

Page 1
Wireless Internet Keyboard &
Optical Mouse
User’s Manual
Model KB990W
Page 2

FCC Statement
This device complies with part 15 of FCC Rules. Operation is subject to the following two conditions: (1) this device may not cause
harmful interference, and (2) this device must accept any interference received, including interference that may cause undesired
operation. This equipment has been tested and found to comply with the limits for a Class B digital device, pursuant to part 15 of
FCC Rules. These limits are designed to provide reasonable protection against harmful interference when the equipment is operated in a
residential installation. This equipment generates, uses, and can radiate radio frequency energy and, if not installed and used in
accordance with the instruction guide, may cause harmful interference to radio communications. However, there is no guarantee that
interference will not occur in a particular installation. If this equipment does cause harmful interference to radio or television reception,
which can be determined by turning the equipment off and on, the user is encouraged to try to correct the interference by one or more
of the following measures:
• Reorient or relocate the receiving antenna.
• Increase the separation between the equipment and the receiver.
• Connect the equipment into an outlet on a circuit different from that to which the receiver is connected.
• Consult a service representative for help.
Properly shielded and grounded cables and connections must be used in order to comply with FCC emission limits. Micro Innovations is
not responsible for any radio or television interference caused by using other than recommended cables and connectors, or by
unauthorized changes or modifications to this equipment. Unauthorized changes or modifications could void the user’s authority to
operate the equipment.
Responsible party:
Micro Innovations Corp.
400 Clearview Ave.
Edison, NJ 08837
Telephone: 1-732-346-9333
Tes ted To Co mply With FC C St and ards
FOR HOME OR OFFICE USE
2 Wireless Internet Keyboard & Optical Mouse
Page 3

Table of Contents
Welcome! . . . . . . . . . . . . . . . . . . . . . . . . . . . . . . . . . . . . . . . . .4
System Requirements. . . . . . . . . . . . . . . . . . . . . . . . . . . . . . . . 4
Features & Benefits . . . . . . . . . . . . . . . . . . . . . . . . . . . . . . . . . . . 4
Keyboard & Mouse Features . . . . . . . . . . . . . . . . . . . . . . .5
Getting Started . . . . . . . . . . . . . . . . . . . . . . . . . . . . . . . . . . . .6
Configuring the Hot Keys & Mouse Buttons . . . . . . . .7
Install the Drivers . . . . . . . . . . . . . . . . . . . . . . . . . . . . . . . . . . . . 7
Configure the Hot Keys . . . . . . . . . . . . . . . . . . . . . . . . . . . . . . . 10
Configure the Mouse Buttons . . . . . . . . . . . . . . . . . . . . . . . . . 14
Modify, Repair, or Remove the Drivers . . . . . . . . . . . . . . . . . . 17
Care & Maintenance . . . . . . . . . . . . . . . . . . . . . . . . . . . . . 18
Troubleshooting. . . . . . . . . . . . . . . . . . . . . . . . . . . . . . . . . 19
Technical Support . . . . . . . . . . . . . . . . . . . . . . . . . . . . . . . . . . . 19
Table of Contents 3
Page 4

Welcome!
Congratulations and thank you for purchasing the
Micro Innovations Wireless Internet Keyboard &
Optical Mouse! The advanced design of your new
keyboard and mouse makes them simple to install
and customize, so you can hit the ground running
and connect to any USB-enabled PC with ease.
Features & Benefits
• Wireless Keyboard & Optical Mouse
• 2.4 GHz RF USB Receiver
• Multimedia & Internet Hot Keys
• Customizable Mouse Buttons
• Slim, Full-Size Keyboard
System Requirements
To use yo u r n e w M icr o I n n o v ations Wireless Internet
Keyboard & Optical Mouse, your system must include
the following:
• IBM
• Windows
or 100% compatible PC
®
2000/XP/Vista™
®
The information included in this manual
will help you get the most out of your
Wireless Internet Keyboard & Optical Mouse
by guiding you through the installation
and customization process, as well as by
offering some tips for using and
maintaining your keyboard and mouse.
• USB Port
• CD-ROM Drive
4 Wireless Internet Keyboard & Optical Mouse
Page 5

Keyboard & Mouse Features
Multimedia & Internet Hot Keys
Wireless RF USB
Connectivity
Side Mouse Buttons
Keyboard & Mouse Features 5
Page 6
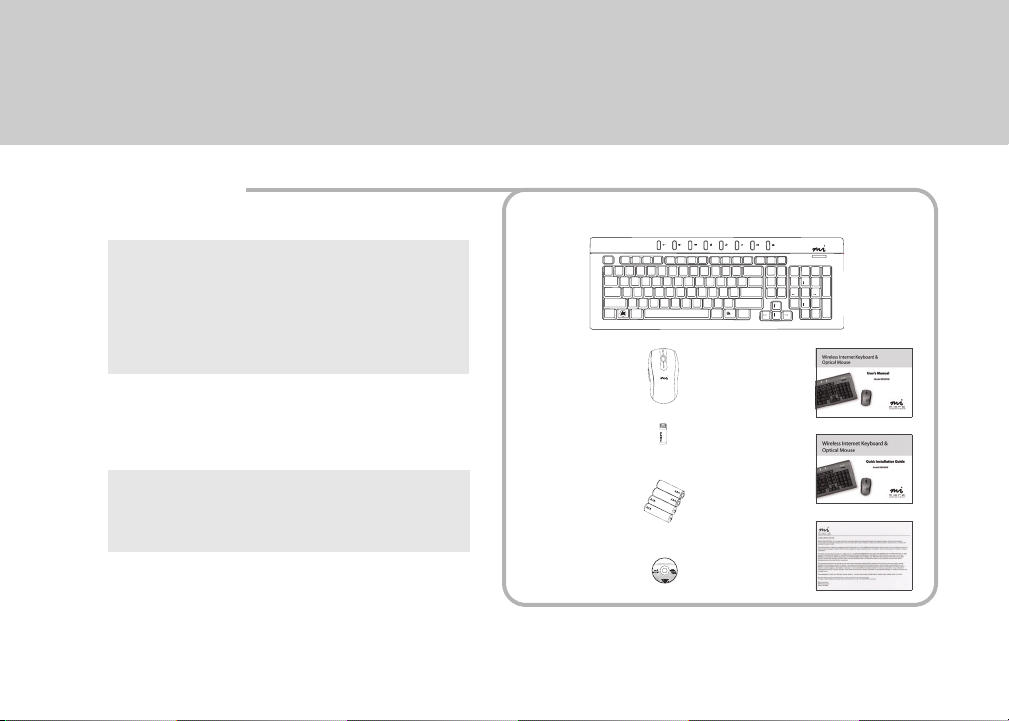
Getting Started
1. Unpack the box.
2. Install batteries in the keyboard and mouse.
Note: Your mouse can run on one or two
batteries. To increase the operating life,
install two batteries.
Note: Remove any existing keyboard or
mouse connections before continuing.
3. Insert the USB receiver into a USB port.
The keyboard and mouse automatically link
to the USB receiver.
Note: Your mouse and keyboard must be
within two meters (6.6 ft.) of the USB
receiver during installation.
4. Begin using your new keyboard and mouse.
6 Wireless Internet Keyboard & Optical Mouse
Wireless Keyboard
Optical Mouse
2.4 GHz RF
USB Receiver
4 AAA
Duracell
Batteries
Installation
CD
®
User’s
Manual
Quick
Installation
Guide
War rant y
Information
Page 7

Configuring the Hot Keys & Mouse Buttons
Install the Drivers
1. Close all open programs, and insert the CD
into your CD/DVD drive.
The Driver Installation dialog displays.
2. Click Install to begin the installation.
The Install Shield Wizard dialog displays and
indicates Preparing to Install.
Then, the Welcome to Setup dialog displays.
3. Click Next.
The Choose Destination Location dialog
displays and indicates the default Destination
Folder.
Configuring the Hot Keys & Mouse Buttons 7
Page 8

4. To select a different location in which
to install the files, click Browse,
select a location, and then click OK.
The Choose Destination Location dialog
re-displays.
5. Click Next.
The Setup Status dialog displays.
Note: When you click Next, the installation
procedure may automatically reboot
your system.
8 Wireless Internet Keyboard & Optical Mouse
Page 9

Once the installation is complete, the Setup Status
System Tray Icons
dialog disappears, and the mouse and keyboard
icons display in the system tray.
KeyboardMouse
Note: Scroll Lock, Caps Lock, and Number
Lock icons display in the system tray
only when you press the
corresponding keys to activate these
Number Lock
Caps Lock
Scroll Lock
The multimedia & Internet hot keys at the top of
the keyboard will now automatically operate.
functions.
Configuring the Hot Keys & Mouse Buttons 9
Page 10

Configure the Hot Keys
The hot keys at the top of your keyboard include
multimedia and Internet keys, which are all
pre-programmed with default settings to
complete an action or launch a program.
You can set the actions of the customizable hot
keys to launch a variety of programs.
Note: The system keys cannot be customized.
System Keys
Media Player Volume
Media Player Play/Pause
System Standby
10 Wireless Internet Keyboard & Optical Mouse
Customizable Hot Keys
Launch Media Player
Open User’s Favorites Folder
Launch E-Mail Program
Launch Internet
Home Page
Page 11

To Set the Customizable Hot Keys
1. Double-click the keyboard icon in the
system tray.
The Key Settings window displays.
2. Click an icon to set the action of the
corresponding key.
The Setup function of the key dialog displays.
Launch Media
Player
Launch Internet
Home Page
Open User’s
Favorites Folde r
Launch E-Mail
Program
Configuring the Hot Keys & Mouse Buttons 11
Page 12

3. To set the action of a key, select the
Choose a function option, and then click
the drop-down list to select an option.
Note: To restore the default system settings,
click Restore to default.
12 Wireless Internet Keyboard & Optical Mouse
Page 13

4. To change the action of a key to run a
program not included in the function list,
select the Select a program to run option,
and then click Browse to navigate to the
desired program.
5. Click OK to accept the changes, or Cancel to
discard the changes and exit the dialog.
Configuring the Hot Keys & Mouse Buttons 13
Page 14

Configure the Mouse Buttons
You can customize the mouse buttons on the
side of your mouse to complete a variety of
actions. You can also change the settings for
the pointers and mouse wheel.
To Customize the Mouse Buttons
1. Double-click the mouse icon in the
system tray.
The Mouse Properties dialog displays.
2. Select a tab to view or change the settings
for the mouse.
14 Wireless Internet Keyboard & Optical Mouse
Config of mouse button Set the commands for the
side mouse buttons.
Pointers Select a scheme for mouse pointers.
Pointer Options Set motion, action,
and visibility options.
Config of the mouse wheel Adjust
the mouse wheel scroll speed and
volume settings.
About Wireless Mouse
Driver View software
copyright information.
Page 15

3. To set the operation of the side mouse
buttons
Config of mouse button tab.
4. Click a drop-down list to select an action for
each button.
Note: To restore the factory default settings, click
n and o, select the
Restore to default.
Configuring the Hot Keys & Mouse Buttons 15
Page 16

5. Double-click the jack-in-the-box to ensure
your double-click speed is set correctly.
The jack-in-the-box pops up.
Note: If the jack-in-the-box does not pop up,
your double-click speed setting is too
fast or too slow.
Slide the Speed of double click arrow
toward Slow or Fast to change the speed
setting.
6. Click Apply to accept the changes and
proceed to another tab, OK to accept the
changes and exit, or Cancel to discard any
changes and exit.
16 Wireless Internet Keyboard & Optical Mouse
Page 17

Modify, Repair, or Remove the Drivers
1. Insert the CD into your CD/DVD drive.
The installation program runs automatically.
The InstallShield Wizard Welcome dialog
displays and then the Micro Innovations Install
dialog displays.
2. Select Install.
The Welcome dialog displays.
3. Select an option:
• Modify — Changes the settings.
• Repair — Reinstalls features.
• Remove — Uninstalls and removes all
currently installed features.
4. Click Next.
The Install Progress dialog displays.
When installation is complete, the
Maintenance Complete dialog displays.
5. Click Finish to exit setup.
Configuring the Hot Keys & Mouse Buttons 17
Page 18

Care & Maintenance
To keep your Micro Innovations keyboard and
mouse looking new and functioning properly:
• Use and store them only in normal temperature
environments.
• Keep them dry; if they get wet, wipe them dry
immediately.
• Handle them carefully; do not drop them.
• Keep them away from dust and dirt, and gently
wipe them with a damp cloth occasionally.
Modifying or tampering with the keyboard’s or
mouse’s internal components can cause a
malfunction and might invalidate the warranty.
18 Wireless Internet Keyboard & Optical Mouse
Page 19

Troubleshooting
Problem Solution
My mouse and/
or keyboard
won’t work.
• Check the USB receiver connection. Try
inserting it into a different USB port.
• Verify the batteries are inserted
correctly.
• Verify the optical sensor on the mouse
is clean.
• Install new batteries.
• Restart your computer.
• Reinstall software drivers.
The cursor does
not move, and/
or the keyboard
does not work.
My computer is
asleep.
• Install new batteries.
• Move the mouse and keyboard to
within 10 meters (33.3 ft.) of the
receiver.
• Reinstall software drivers.
• Move the mouse or press a key on the
keyboard to wake up your system.
Technical Support
For technical assistance with your keyboard and
mouse, visit www.microinv.com, or call toll-free
1-877-550-5534.
Technical Support is available Monday – Friday, from
8:30 am to 7:00 pm E.S.T.
Product Information
For quick reference later, enter information about
your keyboard and mouse below.
Product N ame:
Model Number:
Serial Number:
Place Purchased:
Date Purchased:
Tro ubl esh ooti ng 19
Page 20

© 2008 Micro Innovations Corp., 400 Clearview Avenue,
Edison, NJ 08837 USA
All brand and product names are trademarks or
registered trademarks of their respective companies.
Printed in China
 Loading...