

MicroFridge MFRA-3, refrigerator, AERIS, Whisper XD Instruction Manual
INSTRUCTION
MANUAL
MFRA-3
REFRIGERATOR
ATTENTION
For your protection in the event of theft or loss of
refrigerator, fill in spaces provided below.
Model and Serial Numbers are indicated on the
inside right liner of the refrigerator.
MODEL No. ____________________________
SERIAL No. ____________________________
MicroFridge®, a Product of Intirion Corporation
Microwave Oven and Refrigerator/Freezer Residential Limited Warranty
Intirion is pleased to provide a comprehensive warranty on these products. Intirion takes
pride in its product and manufacturing standards and warrants its products and parts
against defects in materials or workmanship to the original purchaser.
All requests for service should be directed to Customer Service at Intirion by calling
1-800-637-7567. Intirion offers a quick response customer service program. Customer
Service will diagnose the problem and either replace or the original purchaser will carryin the appliance to an authorized service provider for repair, at the discretion of
Intirion.
MicroFridge® warranty services are performed by Intirion authorized service
providers. Intirion expects prompt, courteous and efficient service. Intirion further
expects that all authorized service providers will make every reasonable effort to
enhance the image and reputation of Intirion and its products. Inadequate service or
customer dissatisfaction should be promptly reported to Intirion.
Damage initiated by spark fires caused by using inappropriate material inside the
microwave oven is specifically excluded from this warranty. Intirion assumes no liability
and does not guarantee or warranty any repairs and/or replacement parts not supplied
or performed by an authorized service provider, nor any 50/60 cycle or 60/50 cycle
conversions, damage caused by failure to follow the owner’s manual as to adjustments
and/or maintenance, customer adjustments that are not covered in the instruction
booklet, broken or marred cabinet, misuse, neglect, accident, fire, flood or other acts of
nature.
THIS WARRANTY W ILL BECOME INVALID IF ANY SERIAL NUMBER ON THE
PRODUCT IS ALTERED, REPLACED, DEFACED OR MISSING. THIS WARRANTY IS
FOR INTIRION PRODUCTS PURCHASED AND USED IN THE UNITED STATES
EXCEPT FOR UNITED STATES POSSESSIONS AND/OR DOMINIONS OF THE
UNITED STATES.
This is the entire Intirion warranty and it may not be changed or amended by any
person, agency, distributor, dealer, or company. Intirion assumes no liability and indeed
specifically denies responsibility for any consequential damages beyond the repair or
replacement of the product or its components.
The warranty period begins on the date of sale and proof of that date (evidenced by an
original sales slip or bill of sale) will be necessary to initiate a warranty claim.
MICROFRIDGE®, A PRODUCT OF INTIRION CORPORATION,
10 Walpole Park South, Walpole MA 02081 1-800-637-7567
Subassembly Duration
−
Microwave oven magnetron
2 years
−
Refrigerator/freezer sealed system and compressor
2 years
−
Microwave oven and refrigerator/freezer mechanical components
1 year
Part No. 8336460131805A
SR3655MF Printed in Mexico
by Intirion
Parts and Features
CAUTION:
Do not operate your refrigerator near flammable materials such as gasoline. Do not
use for storage of flammable materials. Your refrigerator must be grounded. Use a
120 volt, 60 Hz outlet. Do not use an extension cord.
UNLESS THE ABOVE GROUNDING METHOD IS FOLLOWED, YOU ARE NOT
PROTECTED AGAINST SEVERE OR LETHAL SHOCK IN THE EVENT OF A
SHORT CIRCUIT OF AN ELECTRICAL COMPONENT OR WIRING OF THE
REFRIGERATOR.
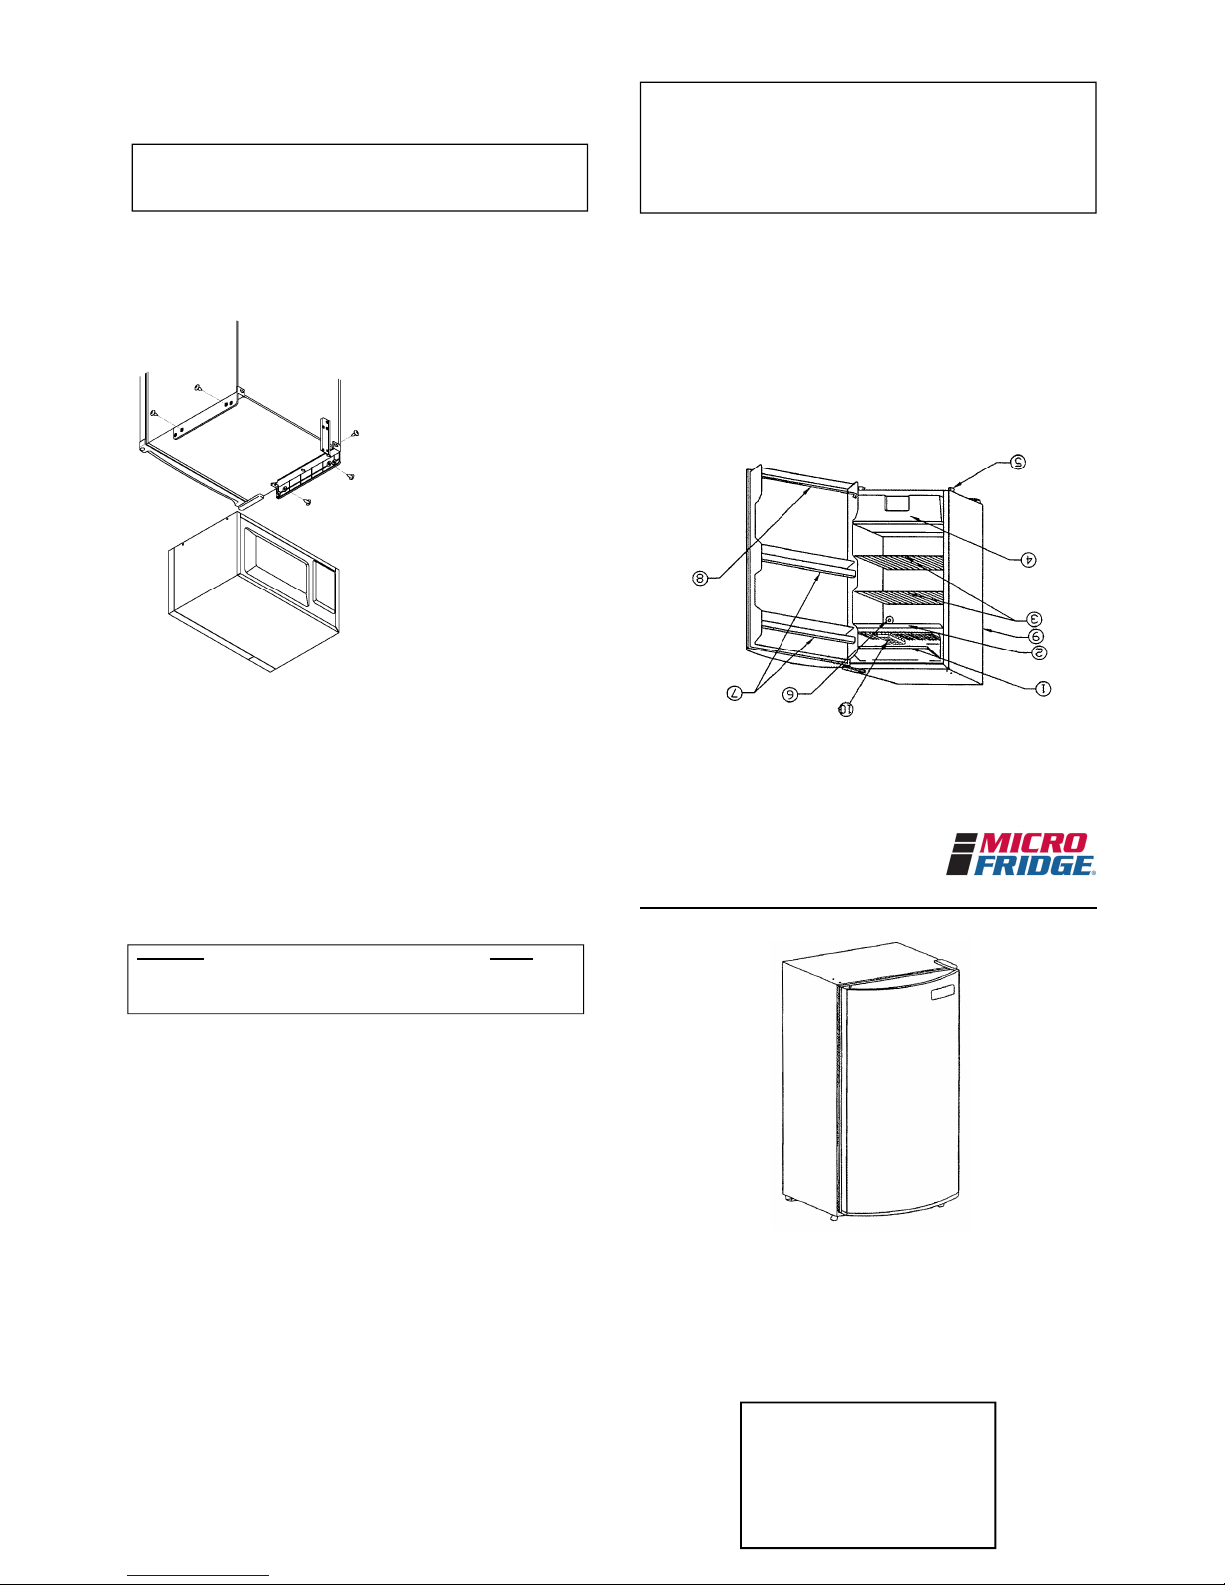
1. Ice Compartment: Use it for making ice cubes and short term storage of frozen
food.
2. Drip Tray
3. Slide-Out Shelves
4. Glass Shelf with Crisper
5. Adjustable Feet
6. Temperature Control Knob
7. Full-Width Door Shelves
8. 2-Liter Bottle Shelf
9. Defrost Timer
10. Ice Cube Tray
MFRA-3
Remove all packing materials and accessories.
Examine the oven for any damage, such as
dents or broken door. Do not install if the oven
is damaged.
1. Place the oven on top of the approved
MicroFridge® refrigerator carefully
lining up screw holes of the refrigerator
sash with microwave holes.
• Do not block the inlet and outlet
openings located at the rear and
bottom of the oven. Blocking the inlet
and/or outlet openings can damage
the oven.
• Do not remove the feet from the
bottom of the oven.
2. Attach the microwave oven to the
refrigerator by screwing in the four (4)
side screws and one (1) rear screw.
• Screws can be found in the attached
bag.
3. Plug your oven and refrigerator into a
standard 120-volt/60Hz household
outlet. Be sure the electrical circuit is
at least fifteen (15) amperes and that
your microwave oven is the only
appliance on the circuit.
NOTE:
If your oven does not operate properly, unplug it from the 120 volt household outlet and then plug
it back in. This unit is not designed for 50 Hz or any circuit other than 120 volt/ 60Hz AC current.
Installation of Microwave Models
MicroFridge®
Assembly Diagram
Model MFRA-3
Changing Door Hinge Location
Refer to the disassembly diagram and
change the door hinges according to
the following steps.
Defrosting
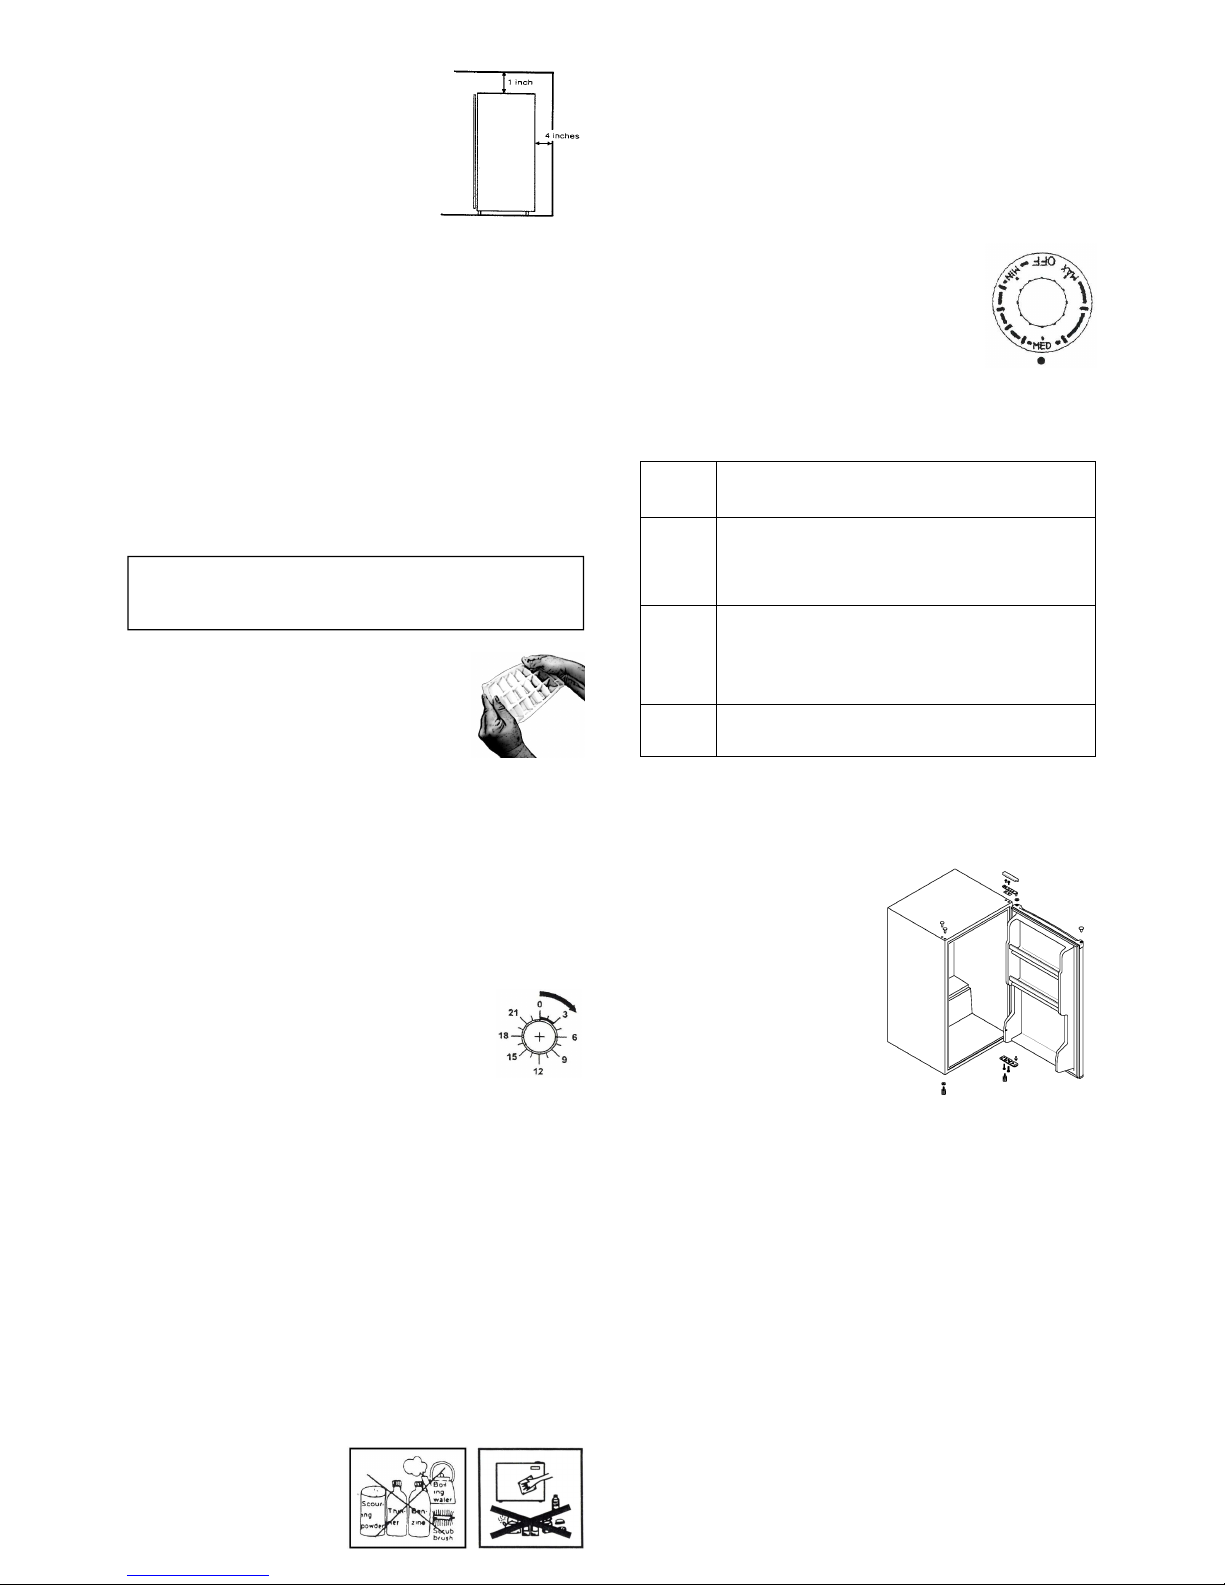
This refrigerator is equipped with an autom atic defrost timer so that no manual
operation is required for defrosting.
The defrost timer is located on the rear wall of the refrigerator. The black
segment of the defrost timer dial (see below) from 0 to 3 covers a 3-hour time
span and represents the normal defrosting period the compressor does not
operate. The defrost timer will continue to operate and will repeat the 3-hour
defrost period once every twenty-four (24) hours as long as the refrigerator is
plugged in. The most practical time for automatic defrosting is between
midnight and 3:00 a.m.
Example
If the refrigerator was started at 9:00 a.m., set the timer shaft
to the number 9 on the timer dial. If it was started at 6:00 p.m.,
set the shaft to number 18.
Defrost starting time may be altered by changing the position
of the timer shaft as desired. For voluntary defrosting, set the timer shaft to 0.
This will start the 3-hour defrosting immediately and after completion the
refrigeration cycle will begin again. However, the defrosting cycle will be
automatically repeated at the same time every twenty-four (24) hours.
While defrosting, the defrost water is drained out of the cabinet into an
evaporating tray on the rear wall of the refrigerator and is evaporated
automatically. To set the timer shaft, use a screwdriver and turn the shaft
CLOCKWISE only.
Cleaning and Maintenance
Your refrigerator does not require any maintenance.
Turn off your refrigerator and remove all food, shelves, trays, etc. Wash the
interior liner with a solution of two tablespoons of baking soda and a quart of
warm water. Then, rinse and wipe it out. Do not use soaps, detergents,
scouring powders, spray cleaners or the like for cleaning the interior liner, as
these may cause odors in the refrigerator compartment.
Wash the ice cube trays, drip tray and shelves in a mild detergent solution and
dry with a soft cloth.
Wipe the exterior surface with a soft cloth dampened with soapy water and dry
it with a soft cloth. Normal appliance spray cleaners may be used for the
exterior only.
Use only mild soap and water to clean the door gasket.
Never use acid, chemical thinners,
gasoline, benzene or the like to
clean any part of the refrigerator.
Boiling water and benzene may
deform or damage the plastic parts.
ATTENTION
If the unit is turned off or unplugged, YOU MUST ALLOW THREE (3) MINUTES
BEFORE RESTARTING OR REPLUGGING THE UNIT. The unit will not start if you
attempt to restart it in less than three (3) minutes.
Where to Place Your MicroFridge®
1. Select a location with a strong, level floor. If the
floor is not quite level, adjust the height of the
front legs accordingly.
2. Allow four inches of space between the
refrigerator’s back and the wall, one inch above
the refrigerator and one inch on the side.
3. Avoid any direct sunlight and heat. Direct
sunlight may affect the enamel coating. Heat
sources nearby will cause higher electricity
consumption.
4. Avoid very moist places. Too much moisture in the air will cause frost to
form very quickly on the evaporator and the refrigerator will have to be
defrosted more frequently.
5. Your refrigerator is equipped with a three-prong plug and is grounded to
eliminate electrical hazards. In order to make it more effective, it must be
plugged into a grounded electrical outlet.
Test Run Your Refrigerator
Before using your refrigerator, clean it and test run it to see if it is operating
properly. If it is not, then check your electrical source. If you cannot locate
the source of the problem, contact your dealer.
1. Set the temperature control knob to the OFF position and then plug the AC
cord into an electrical outlet of 115 volt, 60Hz. The compressor motor
should not run.
2. Set the temperature control knob to the MAX position and let the
refrigerator operate for 20 minutes. The freezer (ice compartment) should
get slightly frosted and the motor should run smoothly with a soft hum.
3. Rotate the temperature control knob counter-clockwise toward the MIN
position. Before the pointer of the temperature control knob reaches the
MIN position, the compressor motor should turn off.
How to Remove Ice Cubes from the Tray
The ice cube tray is flexible. Twist the tray to remove the
ice cubes. If the ice cube tray is frozen hard to the
surface, do not use a knife or other metal instrument to
remove it because this may damage the surface.
Temperature Control
You can control the temperature inside your refrigerator by turning the
temperature control dial. Dialing toward MAX means greater cooling power;
toward MIN mean less cooling power. Set the temperature control dials to MAX
only when the rapid refrigeration/freezing of foodstuffs in your refrigerator is
necessary. Be sure to set it back to MED later on
Important
− Do not operate your refrigerator for more than six hours at a stretch with the
temperature control dial set to MAX. At this setting, the compressor will run
continuously. Consequently, foodstuffs stored in the refrigerator
compartment will be frozen and frost will form on the cooling (evaporator)
unit.
− At the control dial setting of MIN the freezer
compartment temperature will not remain at a
su ffici ently lo w l evel f or fr ozen f oo ds.
Usually the temperature control dial should be set at
the MED position.
Before Calling for Service
We urge you to read the chart below. If the problem is not caused by defective
workmanship or materials, you may be charged for service calls even during
the warranty period. Before calling for service, check these few simple points:
Refrigerator
not operating
•
Is the temperature control dial inside the refrigerator set to OFF?
•
Is the unit unplugged? Be sure!
•
Is the fuse blown or the circuit breaker tripped?
Storage
compartment
too warm
•
Has the door been opened frequently? Is it slightly ajar?
•
Are the shelves overcrowded?
•
Have large amounts of warm food been added recently?
•
Are the coils on the back clogged or blocked?
•
Is the temperature control dial set properly?
Excessive
noise
•
Is the refrigerator level? (Try to rock it.)
•
Are dishes vibrating?
•
Are there objects behind or on top that are shaking?
•
Does any part of the refrigerator touch the back or side wall?
•
When the motor comes on, you may hear popping or cracking sounds as
metals expand or contract.
Moisture
•
Moisture in the storage compartment is normal in humid weather.
•
Is the door opened frequently? Has the door been left ajar?
Does the door fit properly?
1. Remove the hinge cap by twisting it off.
2. Remove the upper hexagonal head screws.
3. Remove the lower hexagonal head screws
and the leg on the hinge side.
4. Remove the other leg.
5. Attach the bottom hinge with the hinge shaft
and the leg symmetrically to the other side
of the cabinet.
6. Attach the other leg.
7. Remove the two cabinet plug buttons and
remount them in the holes from which the
screws were removed in step 2.
8. Remove the door plug button using a
screwdriver and insert it in the opposite side
of the door.
9. Use the screw to attach the upper hinge and the spacer (if there is any). Do not tighten the
screw completely.
The direction in which the door opens has now been changed; however, the following points
should be checked:
a. Make sure the door is on straight.
b. Make sure there is no space between the door gasket and the refrigerator unit itself when
the door is closed.
c. Make sure that the gasket on the hinged side is not caught between the door and the unit
when the door is opened or closed. (If the door is forced closed when the gasket is caught,
the gasket may be damaged).
10. Af ter making sure that the door is installed correctly, tighten all the screws holding the hinges.
 Loading...