

MicroFridge 103MFR, 10.3RMFR, 10.3LMFR Instruction Manual
MicroFridge® with Safe Plug®, a Product of Intirion Corporation
Microwave Oven and Refrigerator/Freezer Residential Limited Warranty
Intirion is pleased to provide a comprehensive warranty on these products. Intirion takes
pride in its product and manufacturing standards and warrants its products and parts
against defects in materials or workmanship to the original purchaser.
All requests for service should be directed to Customer Service at Intirion by calling
1-800-637-7567. Intirion offers a quick response customer service program. Customer
Service will diagnose the problem and either replace or the original purchaser will carryin the appliance to an authorized service provider for repair, at the discretion of
Intirion.
MicroFridge® with Safe Plug® warranty services are performed by Intirion authorized
service providers. Intirion expects prompt, courteous and efficient service. Intirion
further expects that all authorized service providers will make every reasonable effort
to enhance the image and reputation of Intirion and its products. Inadequate service or
customer dissatisfaction should be promptly reported to Intirion.
Damage initiated by spark fires caused by using inappropriate material inside the
microwave oven is specifically excluded from this warranty. Intirion assumes no liability
and does not guarantee or warranty any repairs and/or replacement parts not supplied
or performed by an authorized service provider, nor any 50/60 cycle or 60/50 cycle
conversions, damage caused by failure to follow the owner’s manual as to adjustments
and/or maintenance, customer adjustments that are not covered in the instruction
booklet, broken or marred cabinet, misuse, neglect, accident, fire, flood or other acts of
nature.
THIS WARRANTY W ILL BECOME INVALID IF ANY SERIAL NUMBER ON THE
PRODUCT IS ALTERED, REPLACED, DEFACED OR MISSING. THIS WARRANTY IS
FOR INTIRION PRODUCTS PURCHASED AND USED IN THE UNITED STATES
EXCEPT FOR UNITED STATES POSSESSIONS AND/OR DOMINIONS OF THE
UNITED STATES.
This is the entire Intirion warranty and it may not be changed or amended by any
person, agency, distributor, dealer, or company. Intirion assumes no liability and indeed
specifically denies responsibility for any consequential damages beyond the repair or
replacement of the product or its components.
The warranty period begins on the date of sale and proof of that date (evidenced by an
original sales slip or bill of sale) will be necessary to initiate a warranty claim.
MICROFRIDGE® W ITH SAFE PLUG®, A PRODUCT OF INTIRION CORPORATION,
10 Walpole Park South, Walpole MA 02081 1-800-637-7567
Subassembly Duration
− Microwave oven magnetron
2 years
− Refrigerator/freezer sealed system and compressor
2 years
− Microwave oven and refrigerator/freezer mechanical components
1 year
Part No. 8336460134200
S
R1088MF* Printed in Mexico
INSTRUCTION
MANUAL
10.3RMFR, 10.3LMFR
REFRIGERATOR/FREEZER
What is Safe Plug® Technology?
MicroFridge® combination appliances utilize Safe Plug® technology, a revolutionary,
patent-pending design, to conserve electricity and reduce potential fire hazards that can be caused
by overloaded circuits. This technology, built into the microwave, works by temporarily shutting off
the power to the refrigerator and charging outlets when the microwave is in use. W hen the
microwave is finished, power to the refrigerator and charging outlets resumes. Engineered with
unique one-plug-to-the-wall operation, our combination appliances never draw more than
11-15 amps of current.
MicroFridge® with Safe Plug® uses patent-pending intelligent load monitoring technology to control
the microwave, refrigerator and extra outlets. The two charging outlets are designed to
conveniently re-charge cell phones, digital cameras, laptops or similar low power devices.
ATTENTION
For your protection in the event of theft or loss of
refrigerator, fill in spaces provided below.
Model and Serial Numbers are indicated on the
inside right liner of the refrigerator.
MODEL No. ____________________________
SERIAL No. ____________________________
by Intirion
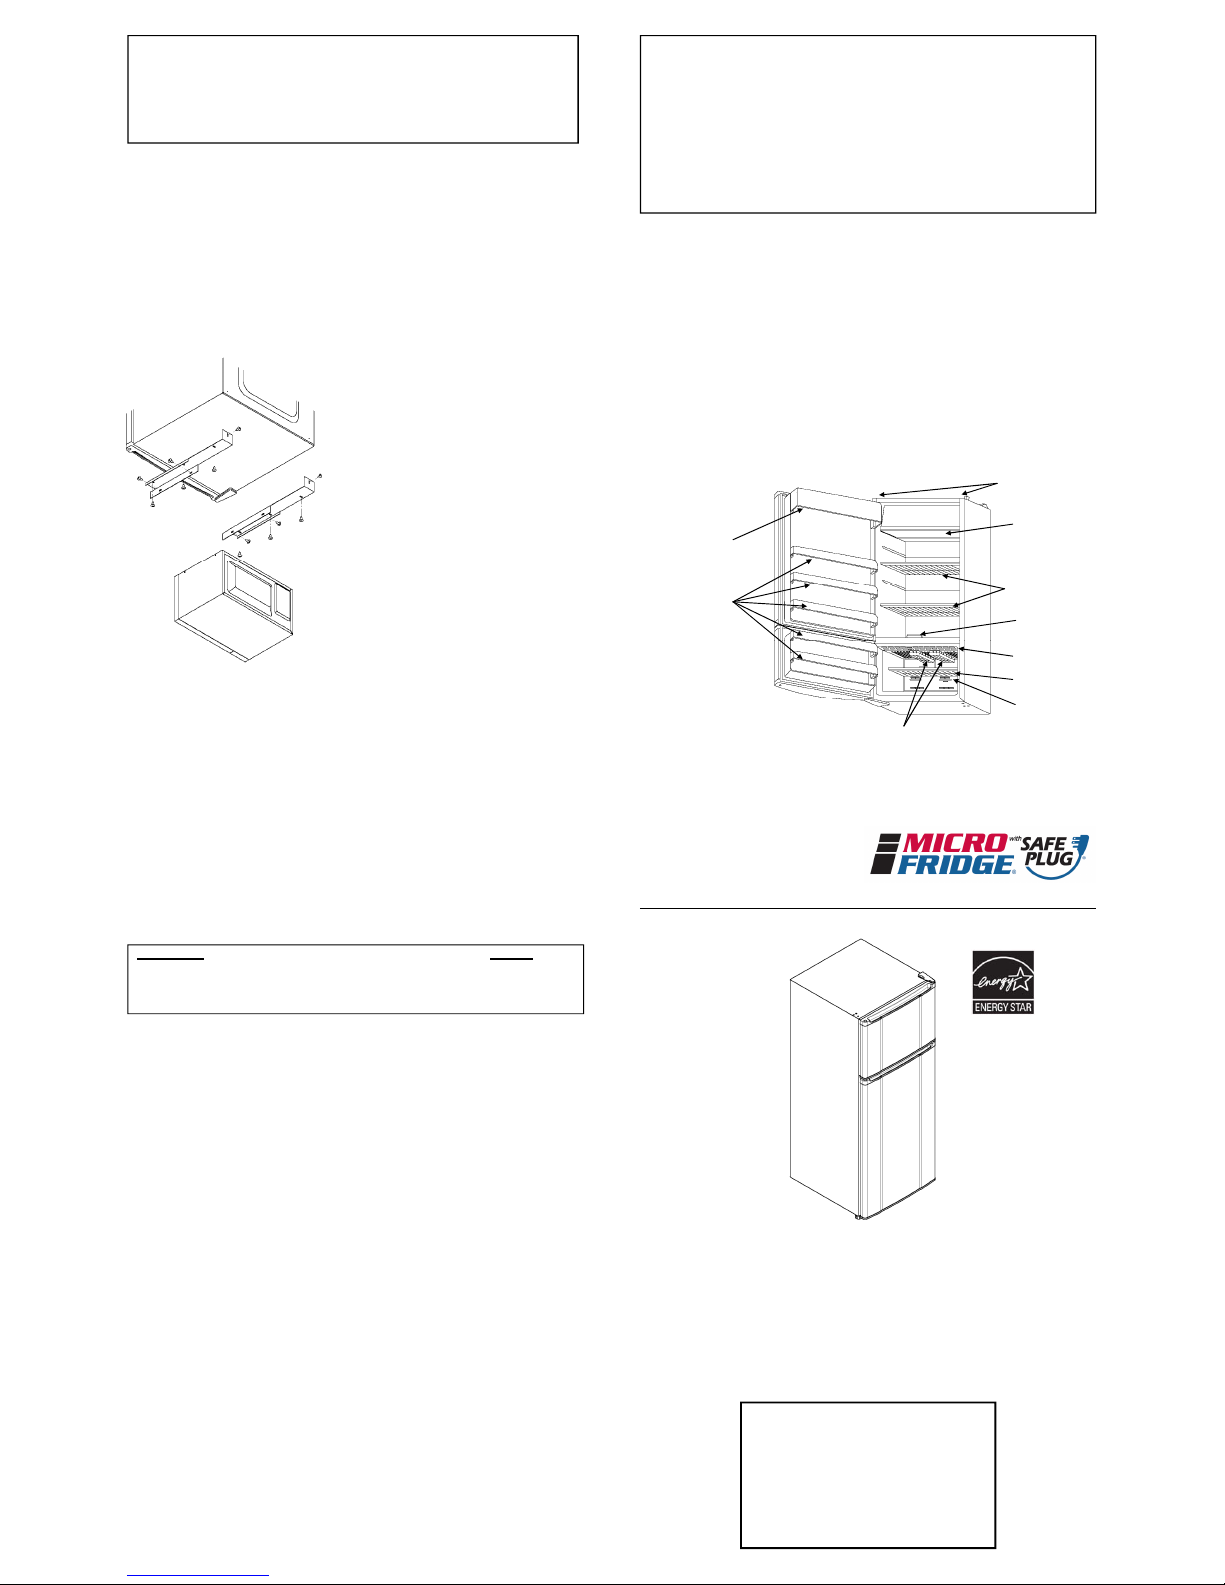
Parts and Features
1. Discharge Outlet for Cold Air: S
ince cold air flows t hrough this outlet into the refrigerator,
be sure to avoid blocking it with stored food.
2. Suction Inlet
3. Temperature Controls
4. Slide-Out Shelves
5. Freezer Shelf
6. Glass Shelf with Crisper
7. Interior Light
8. Interior Light Switch
9. Evaporating Tray: (not shown).
10. Ice Cube Trays
11. Full-Width Door Shelves
12. 2-Liter Door Shelf
13. Adjustable Feet
CAUTION:
Do not operate your refrigerator near flammable ma terials su ch as gasoline. Do not use for storage of
flammable materials. Your refrigerat or must be grounded. Use a 120 volt, 60 Hz outlet. If you are using
this refrigerator as part of a MicroFridge® with Safe Plug® combination appliance, you must use the
120 V/60 Hz outlet located on the back of the Microwave Oven in order to take advantage of patent-
pending Safe Plug® technology to limit electrical draw. Do not use an extens ion cord.
Use a 3-prong plug with the 3-prong grounded outlet on the Microw ave Oven. (This is the only method that
complies with the National Electric Code, local codes and ordinances.)
UNLESS THE ABOVE GROUNDING METHOD IS FOLLOWED, YOU ARE NOT PROTECTED AGAINST
SEVERE OR LETHAL SHOCK IN THE EVENT OF A SHORT CIRCUIT OF AN E LECTRICAL COMPONENT
OR WIRING OF THE REFRIGERATOR.
When you start t his refrigerator from the Microwave Ov en Power Supply: Do NOT plug in while the Microwave
Oven is working. WAIT at least three (3 ) minutes after using the Microwave Oven before plugging in th e
refrigerator because the electricity will be cut off during this period.
10.3RMFR / 10.3LMFR
⑬
⑤
⑥
③⑦⑧
⑩
⑫
⑪
①
②
④
NOTE:
The MicroFridge® with Safe Plug® brand refrigerator and charging outlets will not operate when
the microwave oven is on. This is part of the patent-pending MicroFridge® with Safe Plug®
technology that prevents wiring overload.
If your oven does not operate properly, unplug it from the 120 volt household outlet and then
plug it back in. This unit is not designed for 50 Hz or any circuit other than 120 volt/ 60Hz AC
current.
Installation of Microwave Models
1. Locate the microwave oven. Remove the
packet of twelve (12) screws located
inside the microwave oven. Retain the
screws.
2. Place the right bracket flush with the top right
side of the refrigerator/freezer with its rear lip
facing downward over the back edge of the
refrigerator/freezer, the shorter bend without
holes should face outward.
3. Align the hole in the rear lip of the bracket
with the hole on the back of the refrigerator/
freezer, and attach using the screws from
Step 1.
4. Using the screws from Step 1, attach the
bracket(s) to the top of the refrigerator/freezer
using the three (3) holes located on the
bottom of the bracket. There are no preset
holes in the top of the refrigerator/freezer so
apply pressure when installing the screws.
5. Place the left bracket flush with the top left
side of the refrigerator/freezer with its rear lip
facing downward over the back edge of the
refrigerator/freezer, the shorter bend without
holes should face outward.
6. To finish installing the left bracket please repeat steps 3 and 4.
7. Place the microwave oven on top of the refrigerator/freezer and inside the two upright
sides of the brackets. Line up the two (2) holes on each side of the microwave oven
with those on the brackets, and attach the microwave oven using the screws from
Step 1.
8. Plug the refrigerator/freezer AC cord into the outlet on the back of the microwave
oven.
9. Plug the AC cord from the microwave oven into an appropriate, grounded outlet.
The MicroFridge® with Safe Plug® combination appliance will now operate within eleven
(11) to fifteen (15) amps of current draw.
MicroFridge® with Safe Plug®
Models 10.3RMFR/10.3LMFR
Changing Door Hinge Location
The door of the refrigerator can be hinged on either side so that the direction they open in can be
chosen to suit the place of installation. Refer to the disassembly diagram and change the door
hinges according to the following steps:
1. Remove the hinge cap by twisting it off.
2. Remove the upper hexagonal head screws.
The freezer door can now be removed.
3. Remove the middle hexagonal head screws. The
refrigerator door can now be removed.
4. Remove the right side leg, attach it to the oth er side hole
which is positioned symmetrically.
5. Remove the left side leg, attach it to the other side hole
which was positioned symmetrically.
6. Attach the bottom hinge symmetrically to the other si de of
the cabinet.
7. Remove the upper hinge plug buttons and inse rt them in the
holes from which the screws were removed in Step 2.
8. Remove the middle hinge plastic cover and remount it t o
cover the holes from which the screws were removed in
Step 3.
9. Remove the door plug button from the top of each d oor
using a screwdriver and insert in the hole on the opposite
side of each door.
10. Attach the refrige rator door to the bottom hinge.
11. Rotate the middle hinge 180 degrees. Attach it to the
refrigerator door and secure it with a screw. (Do not
tighten the screw completely.)
12. Attach the upper hinge to the freezer door. Attach the
freezer to the middle hinge and use the screw to attach
the upper hinge. (Do not tighten the screw completely.)
13. The direction in which the doors open has now been
changed; however, the following points should be
checked:
A) Make sure both doors are on straight.
B) Make sure that there is no space between the door
gasket and the refrigerator unit itself when the doors
are closed.
C) Make sure that the gasket on the hinged side is not
caught between the door and the unit when the door
is opened or closed. (If the door is forced closed
when the gasket is caught, the gasket may be
damaged.)
14. After making sure that the doors are installed correctly,
tighten all the screws holding the hinges. If they are not
tightened, the doors may slip out of position or there
may be an opening between the doors and the cabinet.
15. For models with s enior living handles, remove the
screws holding the handle on the door. Remove plastic
pins from the other side of the door and insert them into
the holes where the screws were removed. Re-install
the handle using the same screws that were removed
from the door handles.
Cleaning and Maintenance
Your refrigerator does not require any maintenance.
Turn off your refrigerator and remove all food, shelves, trays, etc. Wash the
interior liner with a solution of two tablespoons of baking soda and a quart of
warm water. Then, rinse and wipe it out. Do not use soaps, detergents,
scouring powders, spray cleaners or the like for cleaning the interior liner.
It may cause odors in the refrigerator compartment.
Wash the ice cube trays, drip tray and shelves in a mild detergent solution and
dry with a soft cloth. Normal appliance spray cleaners may be used for the
exterior only.
Use only mild soap and water to clean the door gasket.
Never use acid, chemical thinners, gasoline, benzene or the like to clean any
part of the refrigerator. Boiling water and benzene may deform or damage the
plastic parts.
Cleaning the Evaporating Tray
Since dust accumulated on the evaporating tray
will decrease the evaporation efficiency, remove
the tray to clean.
The evaporating tray is set on the back of the
refrigerator. To remove tray, remove screws and
pull tray away from the unit. After cleaning make
sure to put the tray securely back in place
otherwise defrosted water may spill or the
evaporation process may be hindered.
Hot-Line
With the refrigerator/freezer in operation, it is possible that the
cabinet will feel warm at the front edges. This does not
indicate trouble. It is attributable to the hot gas line design.
This prevents moisture from accumulating and has nothing to
do with the storage temperature inside.
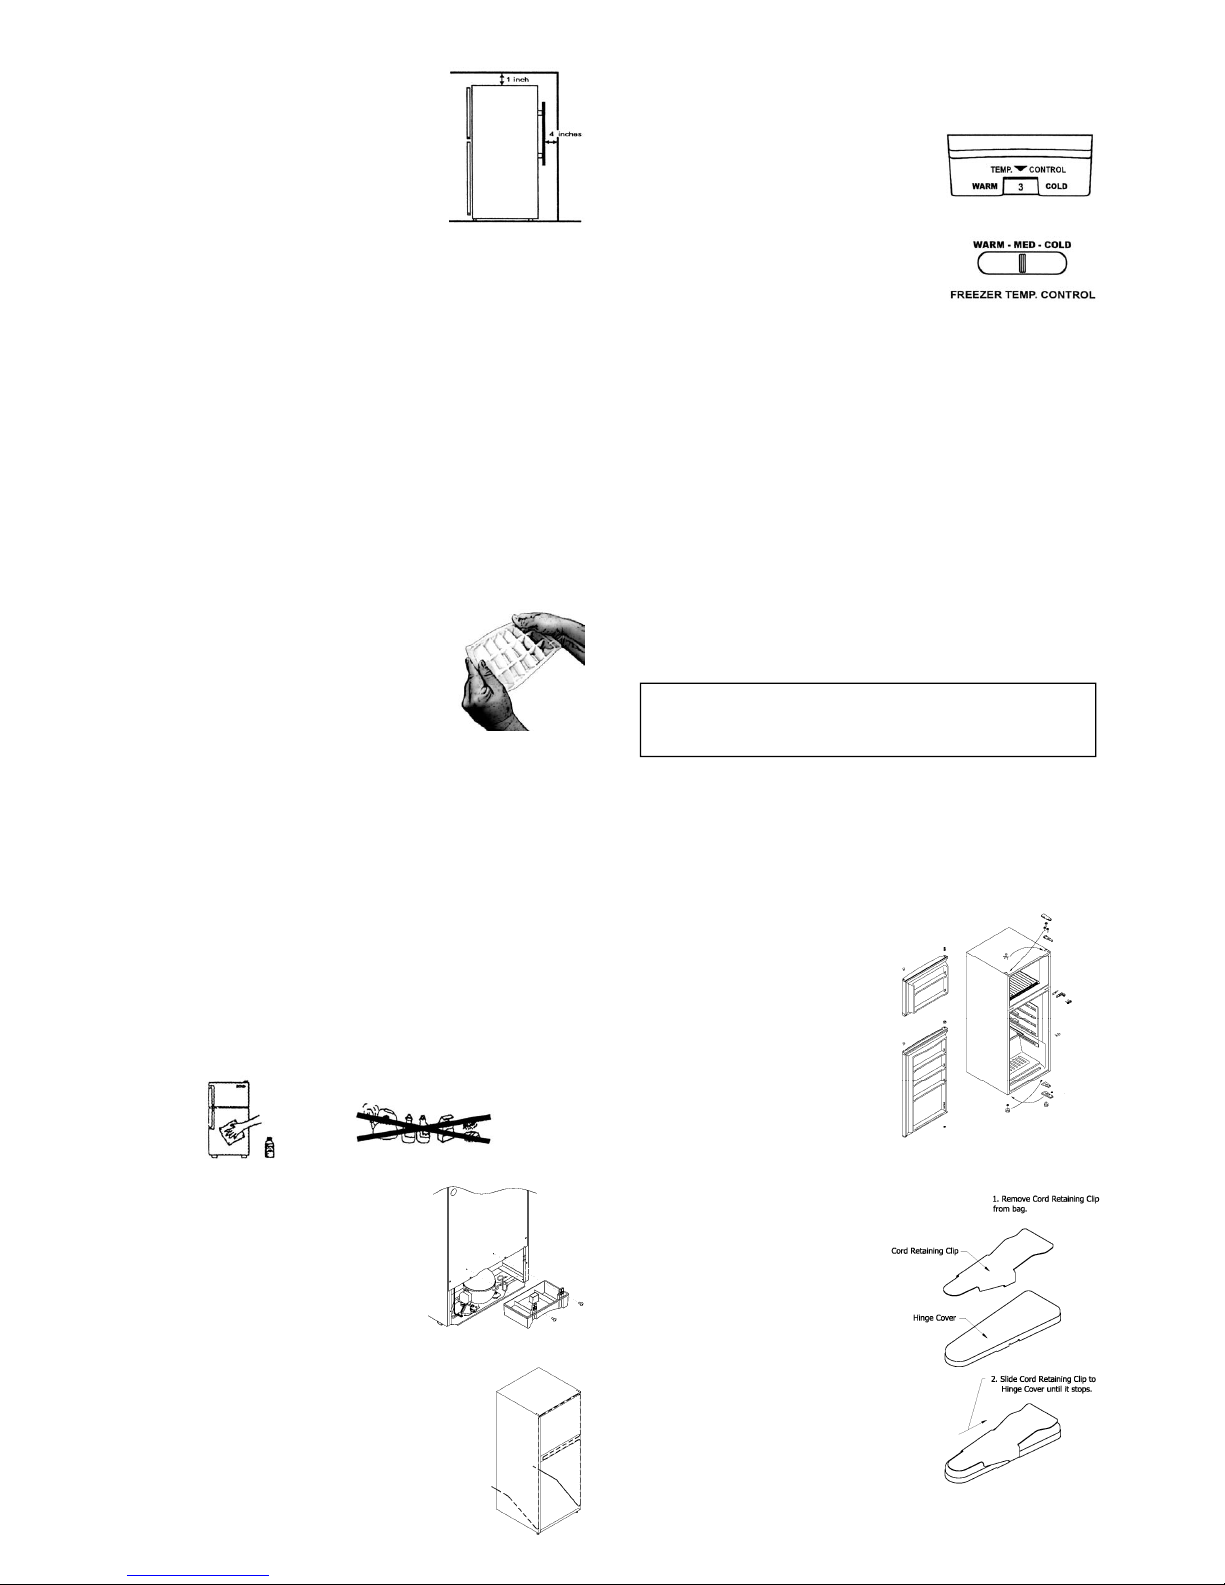
Temperature Control
You can control the temperature inside your refrigerator by turning the
temperature control dial. Higher numbers mean greater cooling power; smaller
numbers mean less cooling power.
Refrigerator
Set the temperature control dial to 3 for optimum
refrigeration effects under normal conditions.
Set the temperature control dial to MAX only when
rapid cooling in your refrigerator is necessary. Be
sure to set it back to 3 later on.
Freezer
For ordinary use, set the temperature control in the
MED position. For rapid freezing of foodstuffs or to
make ice cubes in a hurry, set the knob to the
COLD position. Do not forget to set the
temperature control back to MED once the rapid freezing process has been
completed.
Important
− Do not operate your refrigerator for more than six hours at a stretch with the
temperature control dial set to 5 or MAX. At this setting, the compressor
will run continuously. Consequently, foodstuffs stored in the refrigerator
compartment will be frozen and frost will form on the cooling (evaporator)
unit.
− At the control dial setting of 1, the freezer compartment temperature will not
remain at a sufficiently low level for ice cream and frozen foods.
ATTENTION
If the unit is turned off or unplugged, YOU MUST ALLOW THREE (3) MINUTES
BEFORE RESTARTING OR REPLUGGING THE UNIT. The unit will not start if you
attempt to restart it in less than three (3) minutes.
Where to Place Your MicroFridge® with Safe Plug®
1. Select a location with a strong, level floor. If the floor
is not quite level, adjust the height of the front legs
accordingly.
2. Allow four inches of space between the refrigerator’s
back and the wall, one inch above the refrigerator
and one inch on the side.
3. Avoid any direct sunlight and heat. Direct sunlight
may affect the enamel coating. Heat sources nearby
will cause higher electricity consumption.
4. Avoid very moist places. Too much moisture in the
air will cause frost to form very quickly on the evaporator and the refrigerator
will have to be defrosted more frequently.
5. Your refrigerator is equipped with a three-prong plug and is grounded to
eliminate electrical hazards. In order to make it more effective, it must be
plugged into a grounded electrical outlet.
Test Your Refrigerator
Before using your refrigerator, clean it and test run it to see if it is operating
properly. If it is not, then check your electrical source. If you cannot locate the
source of the problem, contact your dealer.
1. Set the temperature control knob to the OFF position and then plug the AC
cord into an electrical outlet of 115 volt, 60Hz. The compressor motor should
not run.
2. Set the temperature control knob to the MAX position and let the refrigerator
operate for 20 minutes. The freezer should get slightly frosted and the motor
should run smoothly with a soft hum.
3. Rotate the temperature control knob counter-clockwise toward the MIN
position. Before the pointer of the temperature control knob reaches the MIN
position, the compressor motor should turn off.
Sound of Flowing is Noticeable
This sound is caused by the refrigerant flowing into the refrigerating device. It
does not denote a malfunction.
How to Remove Ice cubes from the Tray
The ice cube tray is flexible. Twist the tray to remove
the ice cubes. If the ice cube tray is frozen hard to the
surface, do not use a knife or other metal instrument to
remove it because this may damage the surface.
WARNING:
Do not route high-voltage electrical cords
underneath the hinge clip. Only use the clip
to cover low-voltage electrical cords.
Installing the Hinge Clip
① ② ⑫
⑦
⑧
⑪
③
ⓞ
⑥
④
⑤
⑤
ⓞ
⑨
ⓞ
⑨
ⓞ
 Loading...