

Page 1
MICRO FENCE
The Micro Fence Circle Jig
13160 Saticoy St. N. Hollywood, CA 91605 Phone 1-800-480-6427
Email: [email protected] Website: www.microfence.com
Circle Jig
The
a separate complete tool, (the
INSTRUCTIONS FOR OPERATION:
Circle Jig
The
curves and circles. It will provide telescoping adjustability and measuring capability for circles with
diameters from approximately 6" to 48". It will also function as the adjustable portion of your own
shop-made jig for larger work requirements. We hope it will serve as a catalyst for your thinking as
you dream up and plan your woodworking projects.
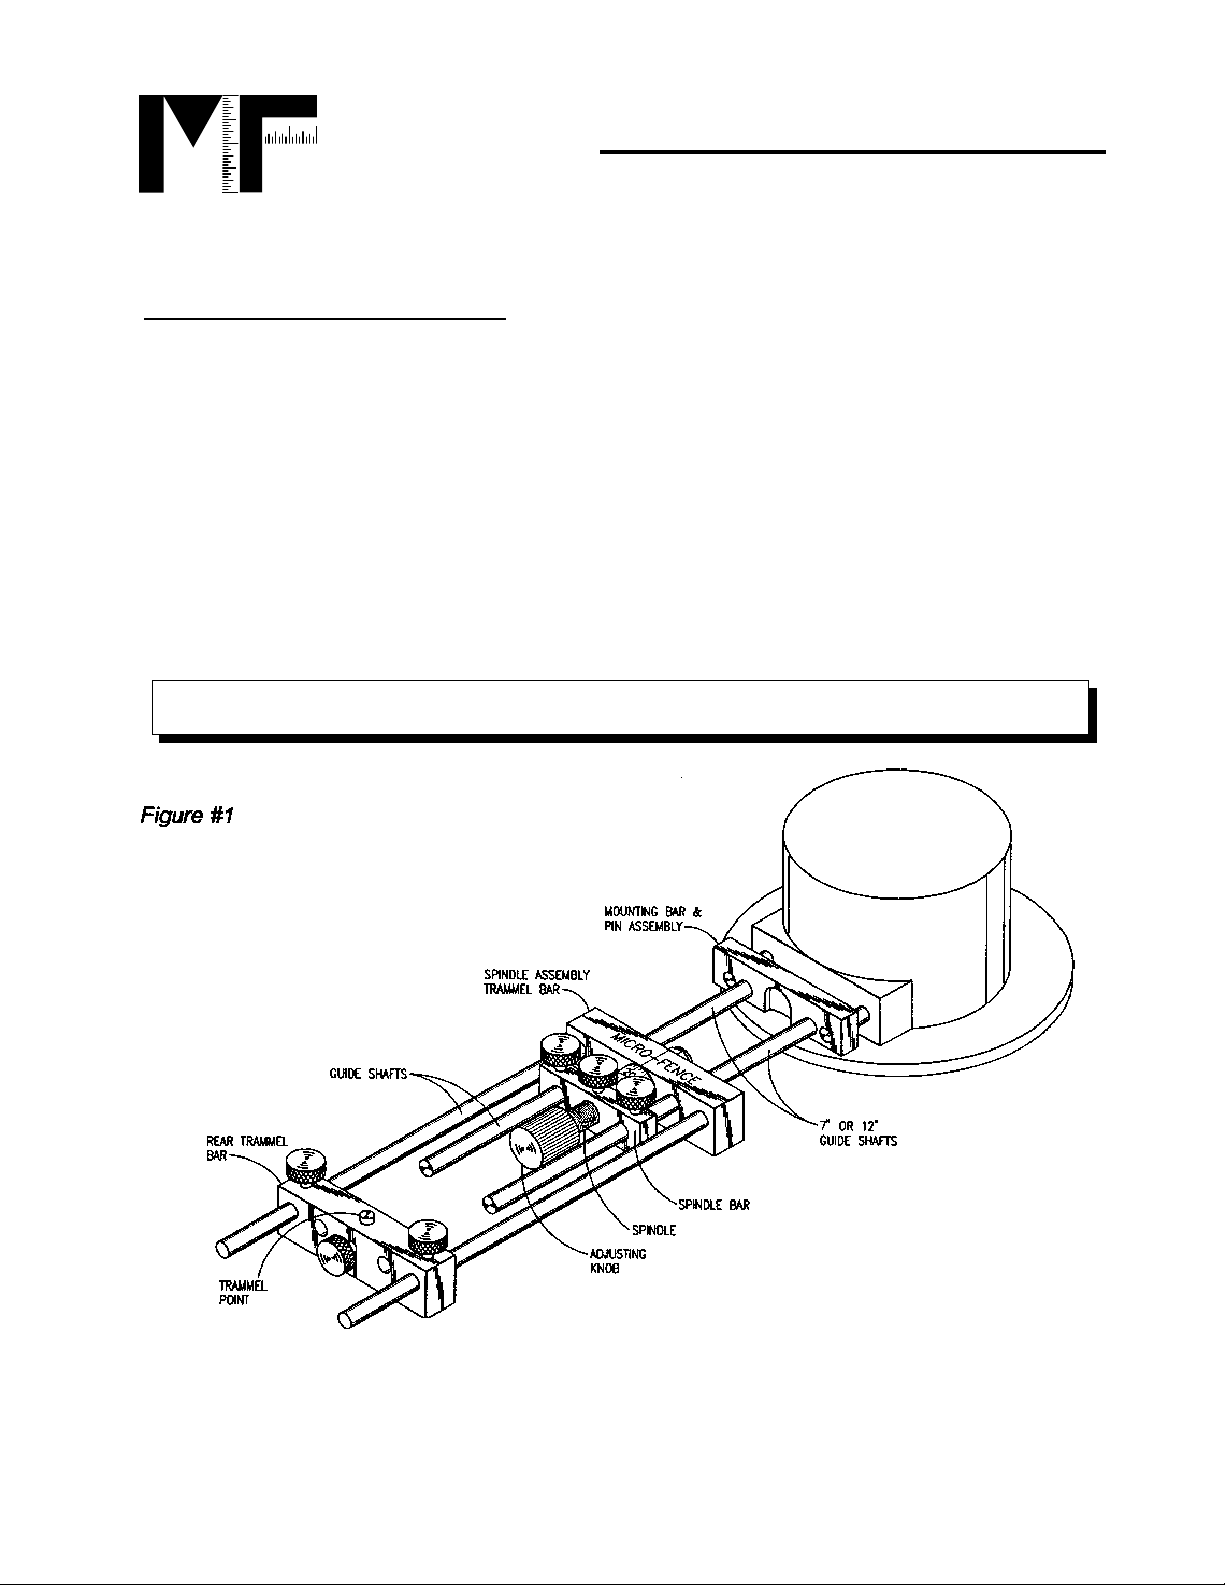
If you already own a Micro Fence Edge Guide, you have the appropriate mounting bar, pins and
guide shafts for the installation of the
body/spindle assembly and replace it with the
the unit will appear as shown in Fig.1.) If you have purchased the
own the entire Micro Fence System, the proper mounting bar, pins and screws will be supplied with
the tool.
Be sure your router is unplugged and switched off before installing this accessory.
is available as an accessory to the Edge-Guide, (the
Circle Jig Complete
was designed to maximize your router's versatility and efficiency in the making of
Circle Jig Attachment
).
. Simply slide off the Micro Fence
Circle Jig Attachment
Circle Jig Attachment),
. (When properly assembled,
Circle Jig Complete
and do not
or as
There are several ways in which your
certain advantages when addressing specific types of work requirements. Your first decision will be
to select the assembly that best serves your needs. Some of the most common tasks are listed in
the following pages.
Circle Jig
Revised 01/30/2002 1
can be assembled. Each configuration offers
Page 2
MICRO FENCE
The Micro Fence Circle Jig
13160 Saticoy St. N. Hollywood, CA 91605 Phone 1-800-480-6427
Email: [email protected] Website: www.microfence.com
Circles Between 12" and 48" Diameter:
for circle cutting. We recommend your circles be initially "blanked out" slightly oversized with either
band or sabre saw, and then trued to perfection with our Circle Jig and your router fitted with a
spiral-fluted straight bit. We realize that this approach may not be the most efficient production
technique, but it will reduce the cutting load for your router and make the entire process a safer and
more manageable experience.
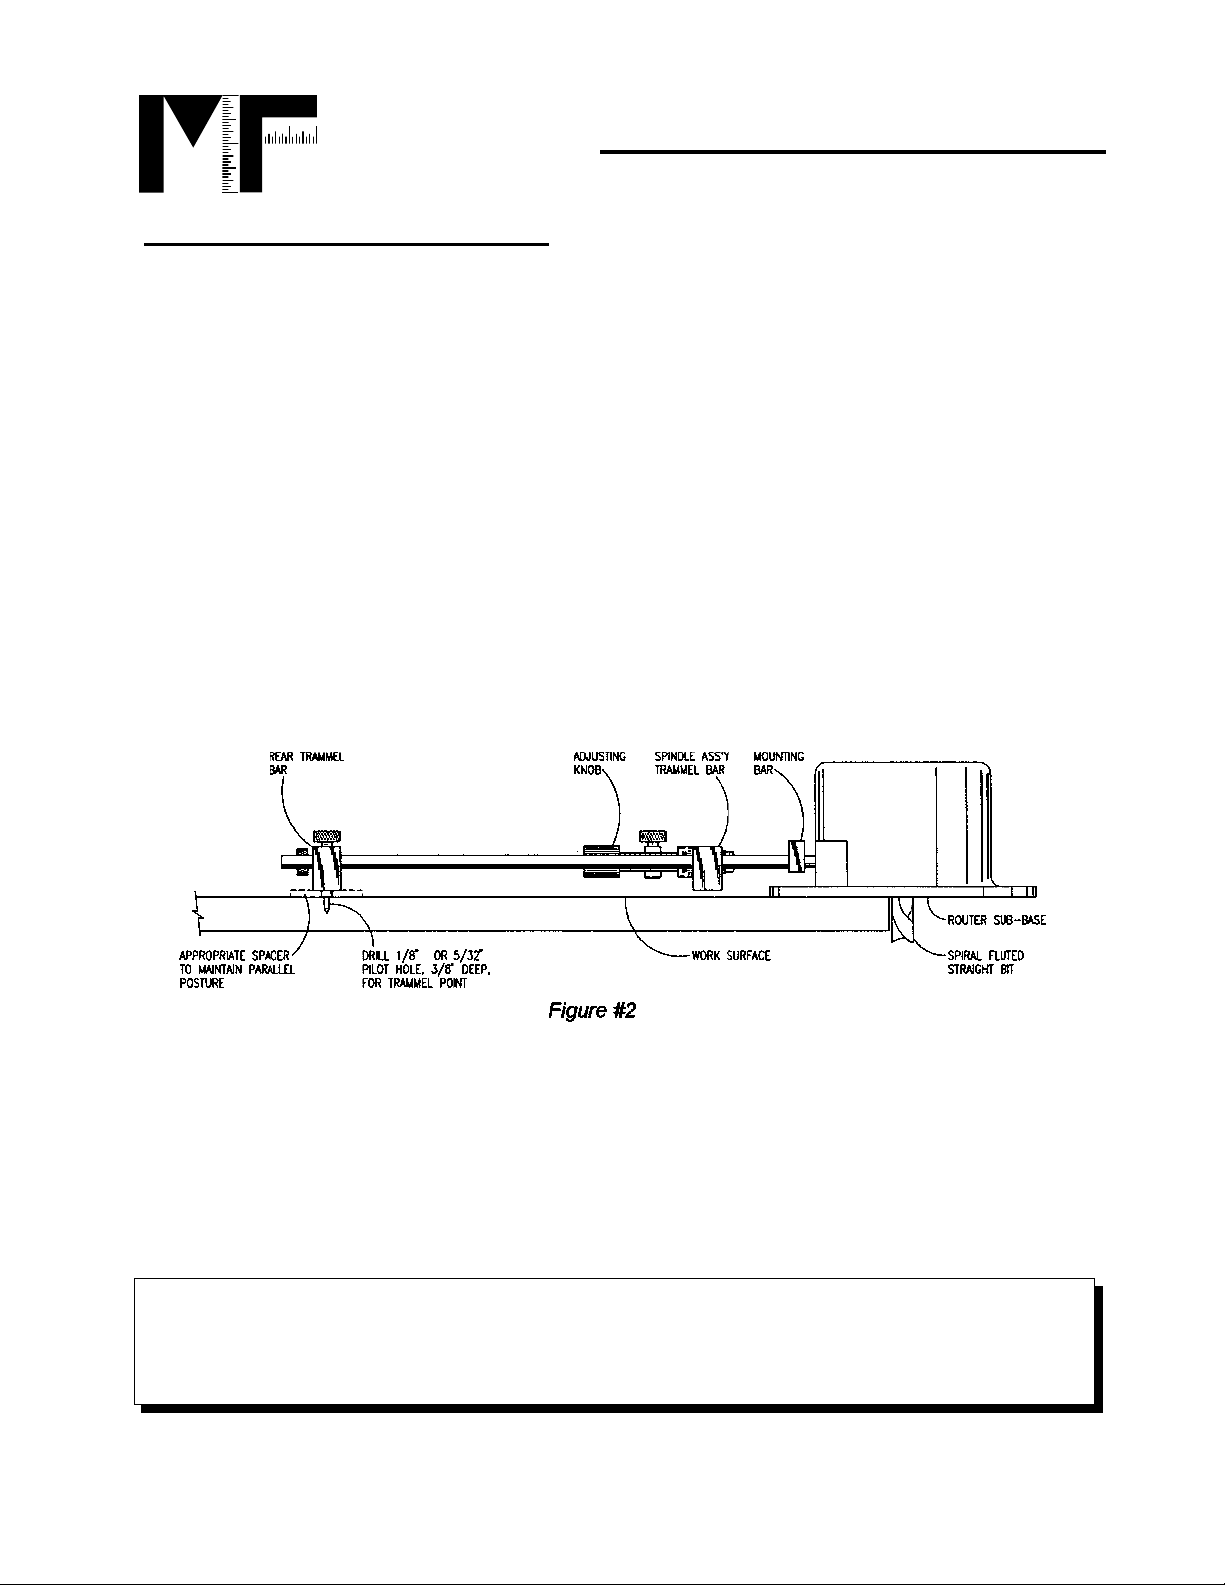
Use a compass or trammel beam for your original layout and then drill a 1/8" or 5/32" pilot hole, Drill
approximately 3/8" deep at the center position to receive the spiked end of the trammel point.
Unless you're working with material less than 1/2' thick, you won't have to drill all the way through
your workpiece.
unmarked)
locking screw slightly loosened. Place the trammel bar, over the pilot hole and gently tap the 5/32"
spike on the end of the trammel point into it. The trammel bar should be adjusted up or down on the
pin to insure that the entire jig is parallel to the work surface. (See Fig. 2). If you wish you may
insert a spacer of appropriate thickness between the work surface and the bottom of the trammel
bar. Be sure, then, to tighten the locking thumbscrew.
(This will allow you to work upside-down and leave the top side of your work
. Position the trammel point in the center hole of the rear trammel bar, leaving the brass
Figure 1 illustrates the assembly used most frequently
Set the initial jig position so that the router bit is slightly clear of the material to be cut. Make a
"power-off" revolution to check all settings and to see that a smooth, uninterrupted motion will be
achieved. The use of a dry lubricant spray on the sub-base of the router may provide improved
motion. Once you are satisfied that all systems are "go", you're ready to make a circle.
Turning the spindle clockwise draws the bit toward the fence; counter-clockwise pushes
it away. Remember that routers rotate clockwise, (when viewed from above). Your feed
should be counter-clockwise to avoid “climb-cutting.” Take it easy. NEVER force your
router beyond it’s load capability.
Revised 01/30/20022
Page 3
MICRO FENCE
g
q
The Micro Fence Circle Jig
13160 Saticoy St. N. Hollywood, CA 91605 Phone 1-800-480-6427
Email: [email protected] Website: www.microfence.com
Be sure to tighten all mounting and adjusting screws firmly. Failure to do so can result in
spoiled work or injury. We encourage you to develop the habit of rechecking tightness
uently during use to insure that the router’s vibration has not caused loosening.
fre
Start the router and gently "dial" into the cut. Turn the Circle Jig's adjusting knob clockwise until you
hear the bit touch the workpiece. When contact has occurred, dial approximately .010" further and
make an initial pass around the work. "Dead" spots or heavier cutting sounds will indicate the
trueness of your circle. We recommend subsequent cuts in roughly .010" increments until you
become familiar with the characteristics of both material and machine. Your circle will be true when
even cutting occurs all the way around the work. Check your diameter with tape measure or
calipers and continue "dialing in" until you achieve the dimension you require.
Note
: Micro Fence's Vacuum Center will allow you to secure your jig to the work surface without
any need for a pilot hole. Call for additional information.
Circles Smaller than 12":
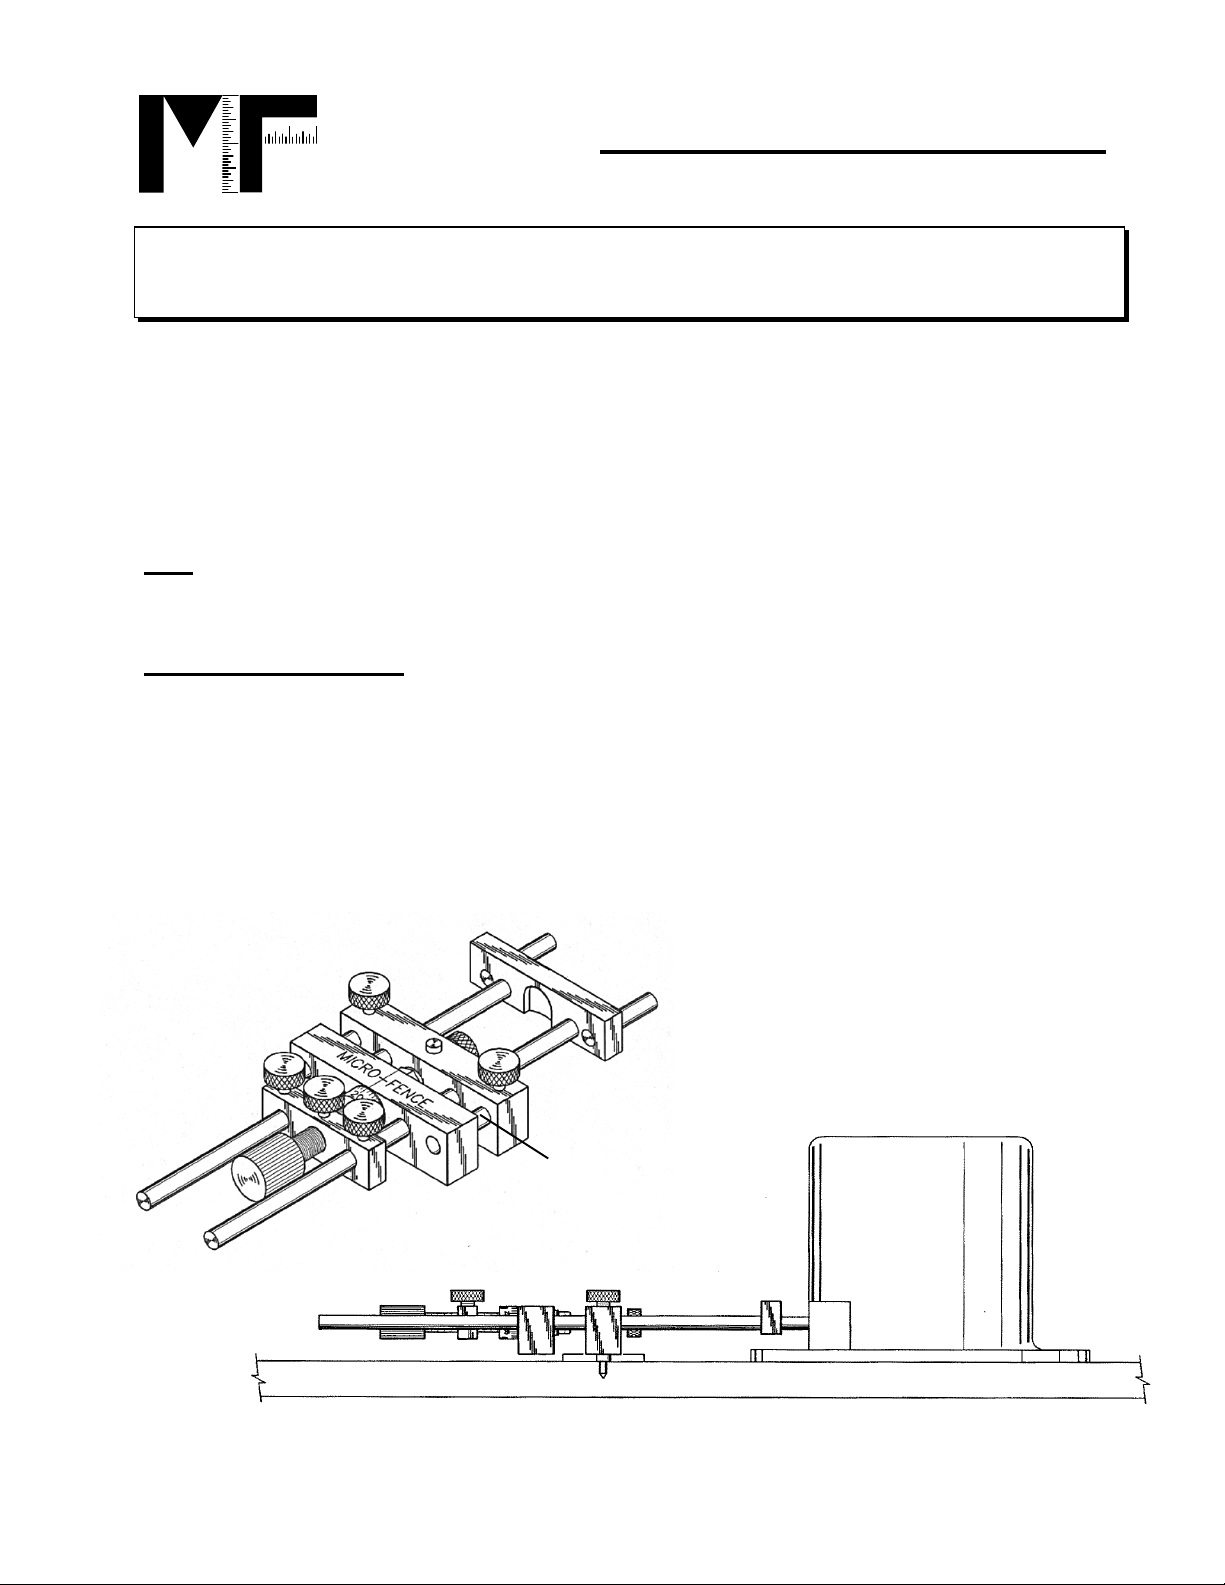
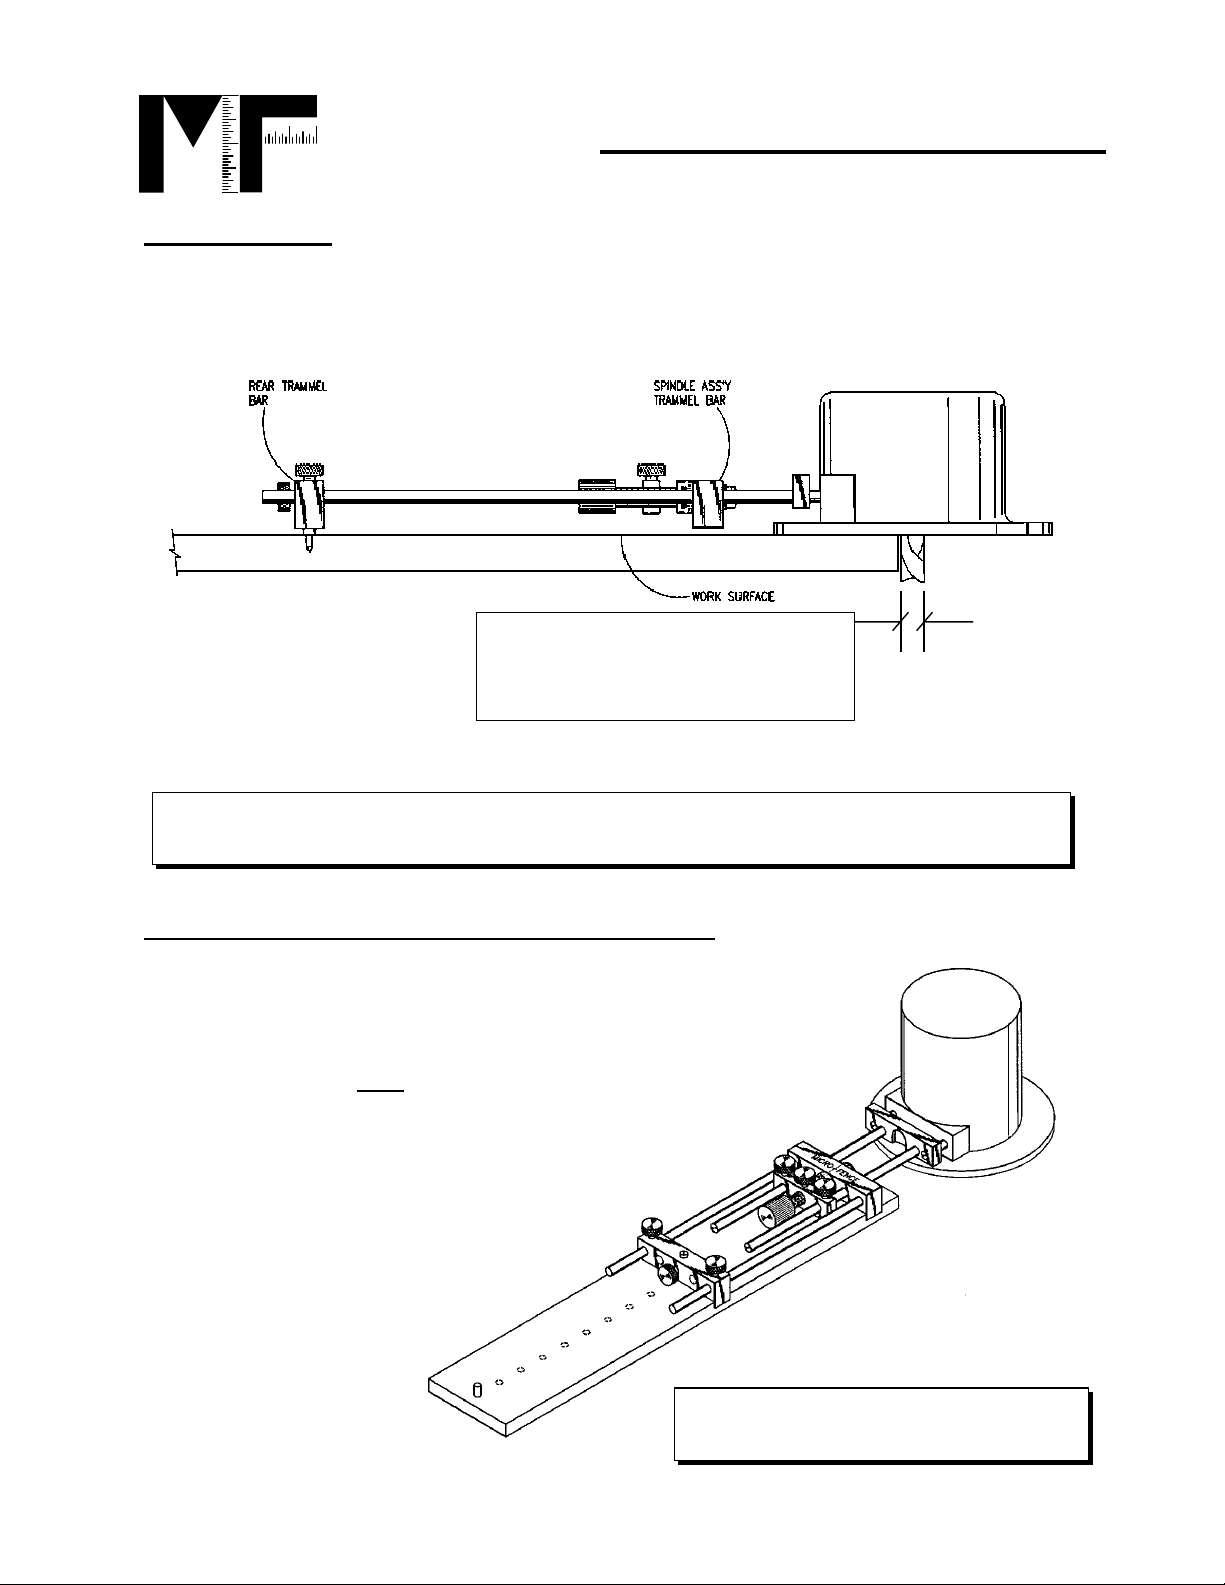
The Micro Fence Circle Jig system offers an assembly option for smaller circles. Figures 3 & 4 show
the rear trammel bar mounted in front of the spindle assembly using the two 5/16” X 1 1/2" pins that
are included in your parts bag. After removing the two 12" guide shafts from the spindle assembly
trammel bar, these pins may be installed in a position pointing toward your router. They will provide
a place to mount the rear trammel bar, and thus utilize the 1/4" trammel pin as your center.
pay particular attention to keep the Circle Jig parallel to your workpiece.
can be adjusted vertically so that its shoulder supports the jig. Optionally, a spacer, (or washer) of
appropriate thickness can be placed between the work and the bottom of the spindle bar.
(See Figure 4).
Figure #3
5/16” x 1½” Pins
The trammel point
ure #4
Fi
Always
Revised 01/30/2002 3
Page 4
MICRO FENCE
g
The Micro Fence Circle Jig
13160 Saticoy St. N. Hollywood, CA 91605 Phone 1-800-480-6427
Email: [email protected] Website: www.microfence.com
Mating Radiuses:
One unique capability that your Micro Fence Circle Jig brings to your shop is
that of being able to create virtually flawless mating circular cuts. Let’s say, for example, that you
use your jig to cut out a perfect circle. If you measure the cutting diameter of the bit you are using,
(use dial calipers to check the kerf of your bit, See Fig. 5 below), you can dial that precise
dimension inboard to produce the set up you’ll need to cut the perfect mating radius.
Fi
Dialing the actual cutting diameter of
your bit toward the center of your circle
will produce the proper set-up to cut a
mating radius.
ure #5
We do not recommend making circles under 6” diameter with the Micro Fence Circle
Jig. This is a potentially dangerous procedure.
Circles Larger than 48" (without Longer Guide Shafts):
Out of the box,
your Circle Jig will make circles up to just over 48", depending on the
diameter of your router's base and, of course, the size of the bit you
are using. If your job requirement is greater than 48", the jig may be
mounted on any length extension you wish to fabricate using
the 6-32 threaded holes that are on the underside of the trammel
bars. Securely fasten
both
rear and spindle assembly bars
to the end of a strip of approximately 1/4" thick material,
(masonite, plastic, plywood or aluminum), that
measures 3 1/2" to 4" in width. You should
utilize all four tapped holes to maximize
rigidity. Use flat-head screws and
countersink them so your jig will
slide smoothly over your work
surface. Drill a hole, or series
of holes for the trammel point
on the centerline of this
Figure #6
extension strip at
whatever position
your job requires.
(See Figures 6 & 7)
24” and 36” Guide Shafts are available
for larger projects.
Revised 01/30/20024
Page 5
MICRO FENCE
The Micro Fence Circle Jig
13160 Saticoy St. N. Hollywood, CA 91605 Phone 1-800-480-6427
Email: [email protected] Website: www.microfence.com
Figure #7
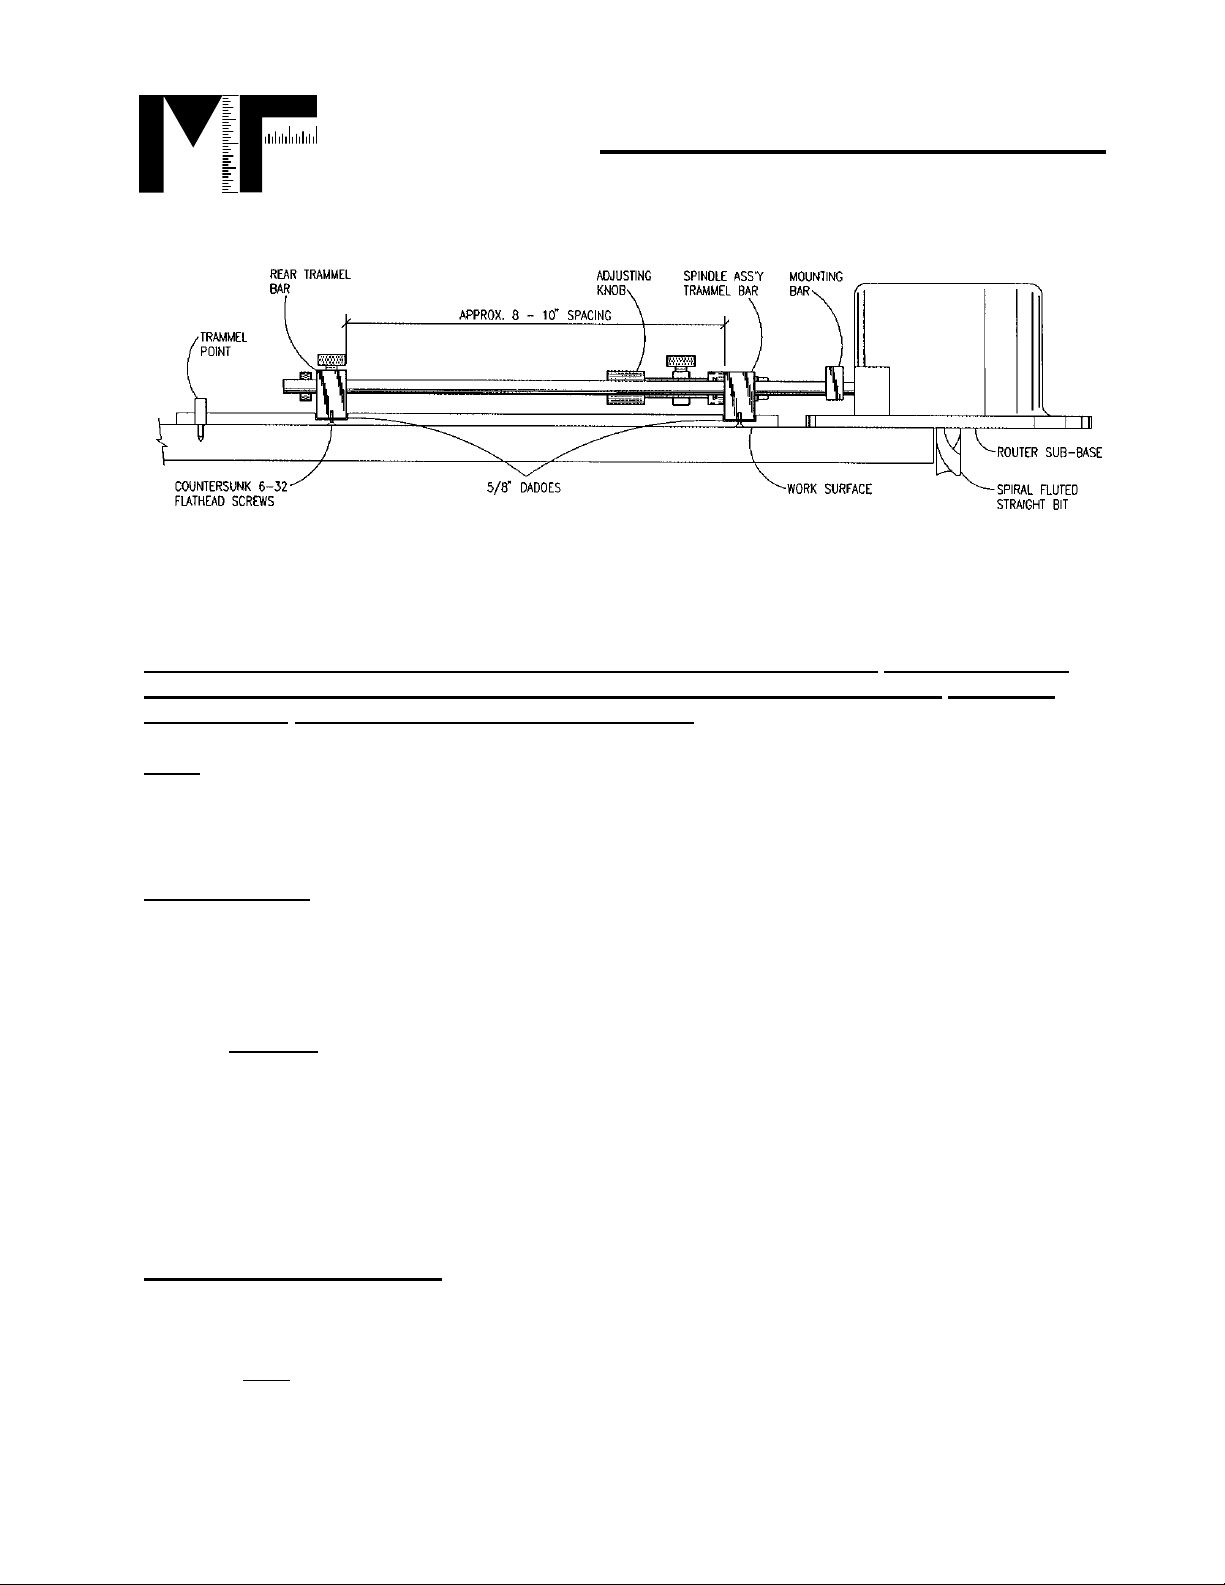
Note: Pay particular attention to keep the entire jig parallel to the work surface. It may be
necessary to dado your extension strip with 5/8" slots in which to mount the circle jig's
trammel bars. We recommend an 8" to 10" spacing.
When cutting larger circles, it may be advisable to enlist the help of another pair of hands to
Note:
keep pressure downward on the centerpoint while you operate the router. This will eliminate the
possibility of the trammel point lifting. A "dry-run" with the router switched off should tell you when
this would be preferable.
Internal Circles:
In operations such as loudspeaker manufacture or circular frame generation, both inboard and
outboard cutting surfaces of the bit are in contact with the material. A starting hole may be drilled to
allow start-ups with the router bit clear of the work.
plunge or fixed-base routers.
material
occurs. We recommend that the cut-out portion be screwed or pinned down to a flat sub-surface,
insuring that your trammel point position will remain secure before, during and after the cut
execution. This practice will allow concentric cuts to be made for final diameter dimensioning or for
rabbeting to accept speaker rims.
There are some varieties of two-sided tape that can be used very effectively for fastening down the
work piece. Micro Fence offers 2” wide rolls that can be ordered from us at 1-800-480-6427.
securely
to avoid movement and possible kick-back scarring when final cut-through
Be sure to clamp or fasten both interior and exterior portions of the
(See Figure 7)
This is a good safety practice with either
.
Shop Tips for Better Circles:
Pausing as you cut may cause burn marks or imperfections. Try constructing a lazy susan and
placing your circle blank on it with a rubber router pad under it. This arrangement will allow you to
rotate the work while holding the router steadily in one position. Continuous motion is more easily
accomplished, cord management becomes less of a problem and fancy footwork is eliminated.
Revised 01/30/2002 5
Page 6
MICRO FENCE
The Micro Fence Circle Jig
13160 Saticoy St. N. Hollywood, CA 91605 Phone 1-800-480-6427
Email: [email protected] Website: www.microfence.com
Using larger diameter router bits when making circles provides greater speed, (SFM), at the cutting
edge of the bit. This, in turn, provides cleaner cuts. We believe that spiral bits offer the smoothest
finish and reduce tearing tendencies.
Stabilizer Bars,
Our
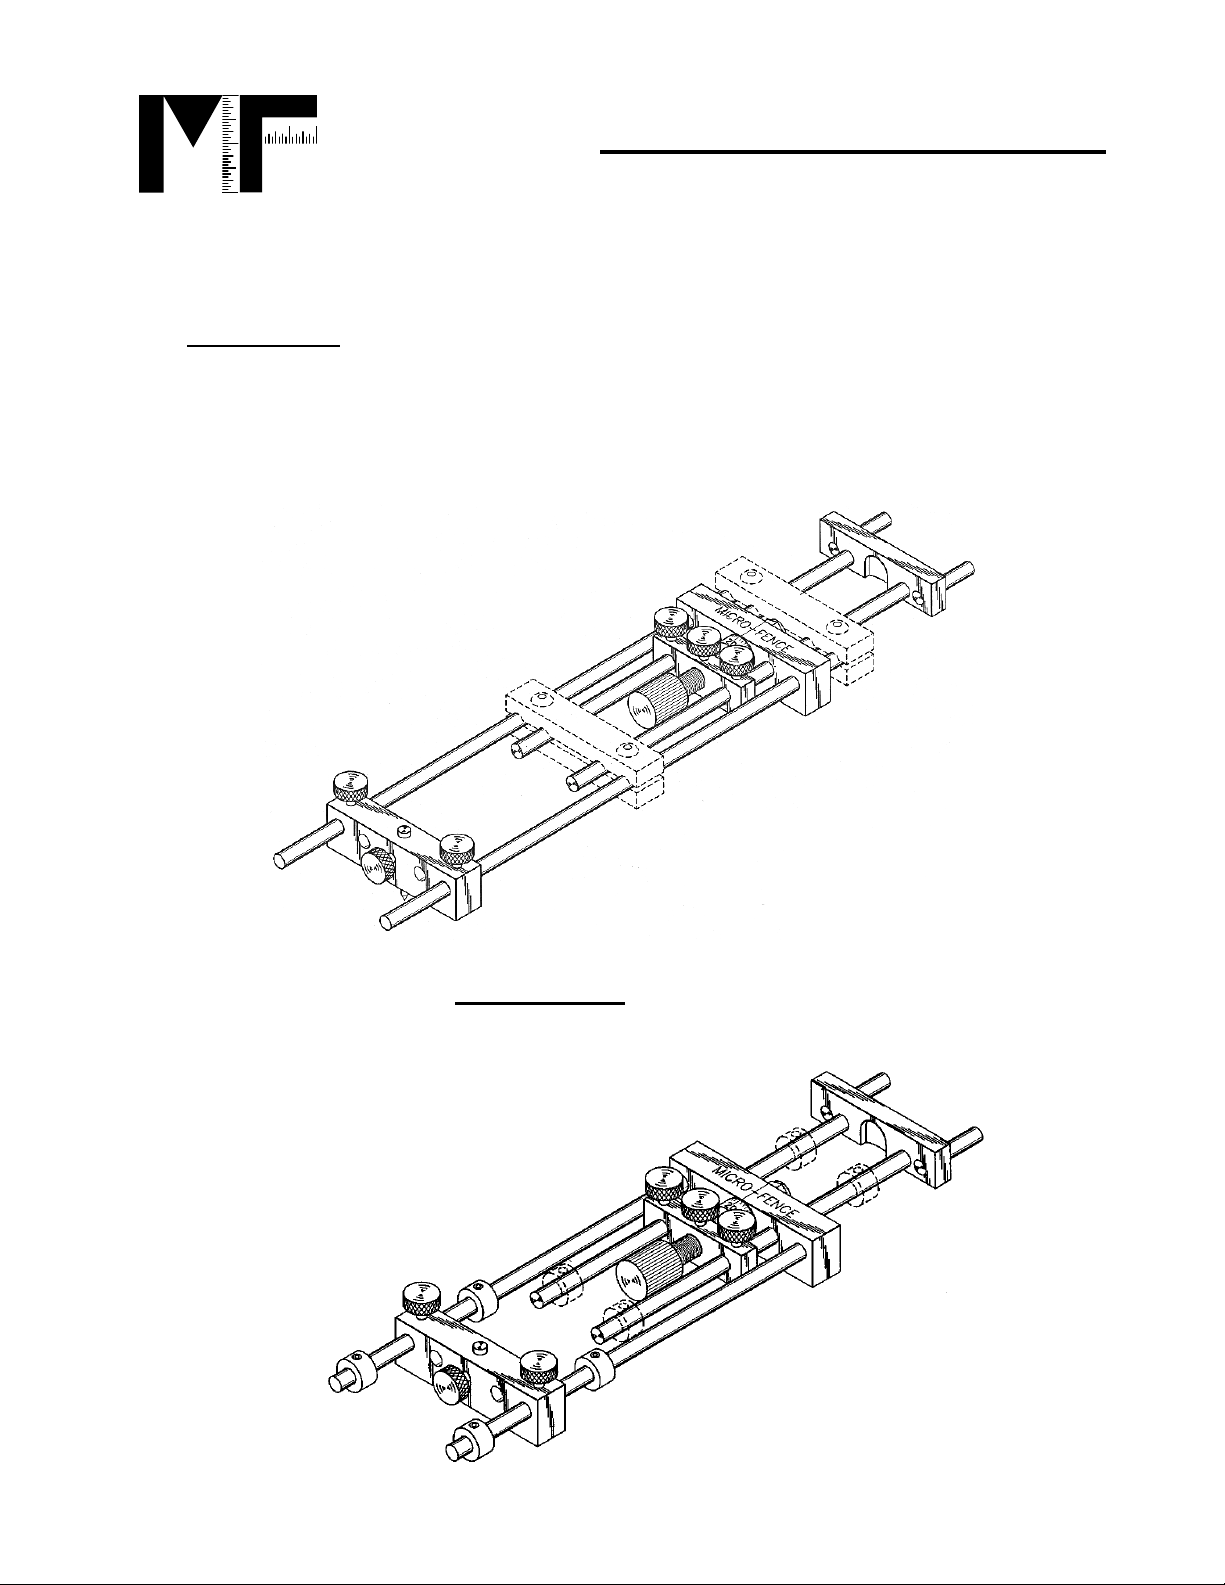
Circle Jig operation, particularly with heavier cut requirements or when using larger routers. (See
Fig. 8). When using the longer guide shafts to full extension, it may be necessary to use two sets of
stabilizer bars. If your intention is to cut circles in a single pass without first "blanking" on band or
sabre saw, these are a virtual necessity for accurate, smooth cutting. They may be positioned in
front of or behind the spindle bar, and simply clamp across all four guide shafts.
Figure #8
when installed across all four guide shafts, provide maximum rigidity for any
Another of our accessories, the
“memorize” cutting positions for ease of repetition. They are fitted with nylon-tipped set screws that
prevent scarring the stainless steel guide shafts. Use the 5/64” allen wrench to loosen and tighten
them.
Figure #9
Stop Collar Sets
Revised 01/30/20026
, (Figure 9 ), can be used to pre-set or
Page 7
MICRO FENCE
The Micro Fence Circle Jig
13160 Saticoy St. N. Hollywood, CA 91605 Phone 1-800-480-6427
Email: [email protected] Website: www.microfence.com
Using Your Circle Jig to Make Parallel Dadoes
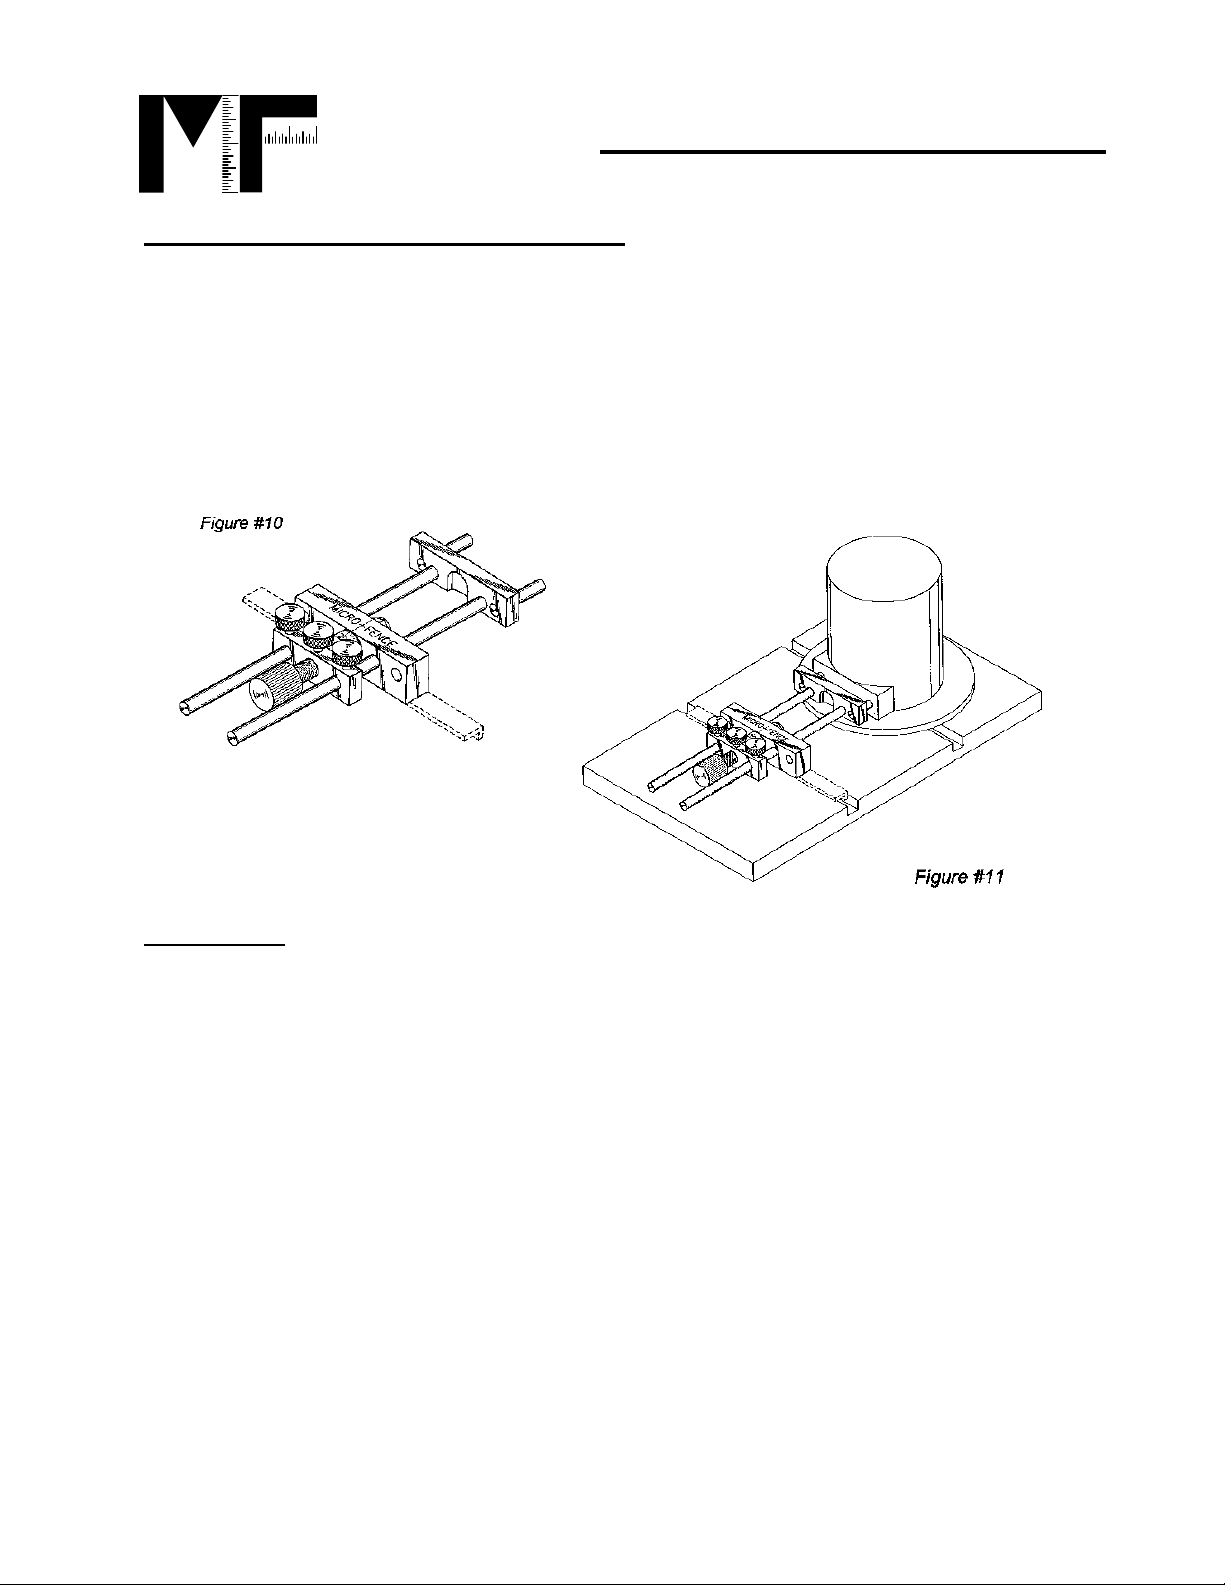
When your work requires referencing from a previous cut, or making parallel dadoes, the Circle Jig
is easily modified to meet the need. Simply install the secondary aluminum fence on the underside
of either trammel bar (See Figures 10 & 11 ). A pair of 6-32 X 1/4” flathead screws is provided with
the unit. You can make and install your own secondary fence to comply with whatever your job
requires. If, for instance, you are making parallel cuts with a 3/8” bit, you may wish to fabricate a
secondary fence, (we recommend hard maple), just slightly smaller than the size that your bit’s
cutting diameter. (This will reduce or eliminate the possibility of the fence “drifting” away from your
reference edge). The drilled and tapped holes are on 2 1/4” centers.
:
Maintenance:
Use the 1/8” black rubber pad, (included in every Micro Fence package), under fingers or pliers to
insure firm seating and to avoid damaging the stainless steel guide shafts or mounting pins during
installation and/or interchanging. Be aware that some pliers have jaws so sharp that they can cut
through the rubber pad. Alternatively, a wood-jaw vise or drill chuck offer methods of tightening and
loosening.
Keep your Micro Fence Circle Jig clean and well lubricated. Frequent dusting with compressed air
or soft brush is highly recommended. A good quality, silicone-free dry lube/cleaner that will not stain
wood, but will help to keep all stainless rods sliding smoothly. We use a product from Dynaglide
called "Woodworking & Tool Dry Lubricant & Cleaner" which can be ordered from us.
Whenever guide shafts are installed, check their alignment to insure that they are parallel to each
other. This can be checked by placing the mounting bar/ guide shaft assembly on any flat surface,
(like a table saw top), and pressing the end of each guide shaft with your finger tip. If there is any
deflection, that is, if either rod is off the table, press it gently in the appropriate direction and
retighten. Recheck on the table top until both rods are touching equally. Keeping the guide shafts
parallel in both directions and well-lubed will give you a smooth-sliding jig.
Revised 01/30/2002 7
Page 8

MICRO FENCE
The Micro Fence Circle Jig
13160 Saticoy St. N. Hollywood, CA 91605 Phone 1-800-480-6427
Email: [email protected] Website: www.microfence.com
Occasional cleaning of the lead-screw thread with a good de-greasing agent will keep it operating
smoothly. At the factory, we apply a single drop of oil in the spindle-locking screw hole for
lubrication. Our preference is a light-weight bicycle oil.
The “feel” of your micro-adjusting spindle mechanism can be altered by increasing or decreasing
the compression of the plated wave washer located under the 7/16” nylock nut. The torque on these
assemblies is preset at Micro Fence to maximize rigidity and minimize deflection potential.
Tightening the nut while holding the adjusting knob will make the spindle harder to turn, loosening
the nut will make it easier. Be careful not to loosen the nut too far. Doing so could have an effect on
the jig’s rigidity under load.
It is normal for the brass locking screws to tarnish. Occasional polishing will restore their original
lustre. This is easily accomplished by holding the screw shaft in a hand-held drill chuck (drill press
or cordless), hand-tightening the chuck, and spinning the screw while touching the head with
Scotch Brite or fine steel wool. Brass was chosen as the material for all our locking screws because
it is softer than the stainless steel guide shafts.
replacing them with steel or other types of screws. This could cause permanent scarring to
your tool
.
If you lose any of these parts, be sure to avoid
See our latest brochure or visit our website at
our products and accessories.
Complete coverage of router techniques and practice is beyond the scope of these instructions, but
this knowledge is essential for safe and accurate work. If you haven’t studied this topic we
recommend reading any of the titles listed below.
Reading Recommendations:
Hylton
Techniques and Jigs Any Woodworker Can Use
Martin’s Press, 1993. ISBN 0-87596-577-6 (hardcover)
Kirby,
distributed by Lyons Press, NY, NY, 1998. ISBN 0-9643999-7-0
Warner
The Taunton Press, Inc., Newtown, CT, 2001. ISBN 1-56158-423-1
Warner
F&W Publications, Inc., Cincinnati, Ohio, 1999. ISBN 1-55870-486-8 (alk. paper)
Warner
Publications, Inc., Cincinnati, OH, 1998. ISBN 1-55870-444-2 (alk. Paper)
, Bill and
Ian –
, Pat –
, Pat –
, Pat –
Matlack,
The Accurate Router, Quick Setups and Simple Jigs,
The Router Book, A Complete Guide to the Router and Its Accessories
Fast, Easy & Accurate Router Jigs
The Router Joinery Handbook
Fred –
Woodworking with the Router, Professional Router
www.microfence.com
, Rodale Books, Emmaus, PA, distributed by St.
, Popular Woodworking Books, an imprint of
, Popular Woodworking Books, an imprint of F&W
for the latest information on
Cambrium Press, Bethel, CT,
,
Warner
F&W Publications, Inc., Cincinnati, OH, 1996. ISBN 1-55870-399-3 (alk. Paper)
, Pat –
Getting the Very Best From Your Router
Micro Fence
The
is protected under Richard Wedler’s US Patent # 5,299,609.
Micro Fence
name and logo are copyrighted and trademarked.
Revised 01/30/20028
, Betterway Books, an imprint of
 Loading...