

Page 1

Instruction Manual
Endolight FOT Xenon
Page 2

Xenon light source
MICRO-EPSILON Eltrotec GmbH
Heinkelstr. 2
73066 Uhingen / Germany
Phone +49 (0) 7161/98872-300
Fax +49 (0) 7161/98872-303
email eltrotec@micro-epsilon.de
www.micro-epsilon.com
Certified according to DIN EN ISO 9001: 2008
Page 3

Contents
1. Safety ........................................................................................................................................ 5
1.1 Symbols Used ................................................................................................................................................. 5
1.2 Warnings .......................................................................................................................................................... 5
1.3 Notes on CE Identification ............................................................................................................................... 7
1.4 Proper Use ....................................................................................................................................................... 8
1.5 Proper Environment ......................................................................................................................................... 8
2. Functional Principle, Technical Data ....................................................................................... 9
2.1 Short Description ............................................................................................................................................. 9
2.2 Advanced Features .......................................................................................................................................... 9
2.3 Technical Data ............................................................................................................................................... 10
3. Delivery ................................................................................................................................... 11
3.1 Unpacking ...................................................................................................................................................... 11
3.2 Storage .......................................................................................................................................................... 11
4. Assembly ................................................................................................................................ 11
5. Operation ................................................................................................................................ 12
5.1 Installation ...................................................................................................................................................... 12
5.2 Commissioning .............................................................................................................................................. 12
5.3 Xenon Lamp ................................................................................................................................................... 15
6. Instruction for Operation ....................................................................................................... 21
6.1 Additional Safety Measures ........................................................................................................................... 21
6.2 Cleaning ......................................................................................................................................................... 21
6.3 Troubleshooting ............................................................................................................................................. 22
5.3.1 Replacing a Lamp ........................................................................................................................ 15
5.3.2 Light Output Stability .................................................................................................................... 18
6.2.1 Housing and Power Supply Unit .................................................................................................. 21
6.2.2 Xenon Lamp and Quartz Glass .................................................................................................... 21
Endolight FOT Xenon
Page 4

7. Accessories ............................................................................................................................ 23
8. Warranty .................................................................................................................................. 24
9. Service, Repair ...................................................................................................................... 24
10. Decommissioning, Disposal ................................................................................................. 25
Endolight FOT Xenon
Page 5

Safety
1. Safety
The handling of the system assumes knowledge of the instruction manual.
1.1 Symbols Used
The following symbols are used in the instruction manual.
WARNING
CAUTION
Indicates a hazardous situation which, if not avoided, may result in death or serious
injuries.
Indicates a hazardous situation which, if not avoided, may result in minor or moderate
injuries.
WARNING
CAUTION
Endolight FOT Xenon
NOTICE
i
Indicates a situation which, if not avoided, may lead to property damage.
Indicates a user action.
Indicates a user tip.
1.2 Warnings
Do not operate the Endolight FOT Xenon light source without a xenon lamp. Disconnect the power supply
before replacing the xenon lamp.
> Death by electric shock
> Danger of injury
Connect the power supply in accordance with the safety regulations for electrical equipment.
> Danger of injury
> Damage to or destruction of the light source
Do not look directly into the light source.
> Danger of injury, damage to the eyes or skin
Page 5
Page 6

Safety
Use the xenon lamp during operation only in the designated FOT Xenon light source.
> Fire hazard, risk of burns, damage to the eyes or skin
> Damage to property
Let the xenon lamp cool off for 10 to 15 minutes before replacing it.
> Risk of burns
NOTICE
Endolight FOT Xenon
The supply voltage must not exceed the specified limits.
> Damage to or destruction of the light source
Keep the light source away from liquids and splashes of water.
> Damage to or destruction of the light source
Install the xenon lamp correctly and ensure that the light source is connected properly.
> Short circuit
Please ensure sufficient ventilation to prevent overheating. Do not cover the light source.
> Damage to or destruction of the light source
The light source must not come into contact with solvent-based cleaning agents (neither lens nor cover).
> Damage to or destruction of the light source
Ensure a distance of about 2 m to computers or other magnetic-field-sensitive devices, or shield the light
source separately.
> Electromagnetic interference (EMI)
Page 6
Page 7

Safety
1.3 Notes on CE Identification
The following applies for the Endolight FOT Xenon light source:
EMC regulation 2004/108/EC and
Low voltage Directive 2006/95/EC
Products which carry the CE mark satisfy the requirements of the EMC regulation 2004/108/EC ‘Electromagnetic Compatibility’ and the European standards (EN) listed therein. The EC declaration of conformity is kept
available according to EC regulation, article 10 by the authorities responsible at
MICRO-EPSILON Eltrotec GmbH
Heinkelstraße 2
D-73066 Uhingen
The light source is designed for use in industry and satisfies the requirements of the standard
- DIN EN 61010-1: 2011-07
The system satisfies the requirements if they comply with the regulations described in the instruction manual
for installation and operation.
Endolight FOT Xenon
Page 7
Page 8

Safety
1.4 Proper Use
- The Endolight FOT Xenon light source is used, using special fiber optic cables and systems for
Endoscopy
Microscopy
Image processing
Measurement
Industrial and technical lighting
Automatization
- The Endolight FOT Xenon light source is not suitable for medical purposes.
- The system may only be operated within the limits specified in the technical data, see Chap. 2.3.
- Use the Endolight FOT Xenon light source in such a way that in case of malfunctions or failure personnel
or machinery are not endangered.
- Take additional precautions for safety and damage prevention for safety-related applications.
1.5 Proper Environment
- Operating temperature: 5 °C to 40 °C (+41 °F to +104 °F)
- Storage temperature: 10 °C to 30 °C (+50 °F to +86 °F)
- Humidity: 15 to 95 %
- Ambient pressure: Atmospheric pressure (700 hpa up to 1060 hpa)
Endolight FOT Xenon
Page 8
Page 9

Functional Principle, Technical Data
2. Functional Principle, Technical Data
2.1 Short Description
The Endolight FOT Xenon light source provides high-quality intense white light with a color temperature of
5000 k, which is similar to daylight. The light source has a very high color rendering index. It is an ideal solution for applications requiring intense white light, such as
- Lighting for endoscopes
- UV/NDT inspections
- Fluorescence
- Microscopes
- Video and optical lighting systems
2.2 Advanced Features
- Internal thermal shutdown
- Double insulated
- Low electrical noise
- Convection cooling
- ACMI Fiber adapter
- Full-off light attenuation through mechanical iris control
- UV/IR filter included
- Shock resistant
- Constant light output
Endolight FOT Xenon
Page 9
Page 10

Functional Principle, Technical Data
2.3 Technical Data
Model Endolight FOT Xenon
Output
Light output 590 Im with glass fiber optic cable with a 4 mm fiber cross section
Fiber diameter max. 5 mm
Average operating life ~ 500 h
Weight
Voltage supply 100 - 240 V, 50 - 60 Hz
Input voltage 12 VDC
Output 12 V / 3.4 A
Light source Xenon
Color temperature xenon lamp
Xenon lamp 24 Watt
Operating life xenon lamp approximately 500 hours
Light intensity Manually adjustable
Fiber optic cable connection ACMI
Dimensions 137 x 90 x 68 mm
Operating temperature
Storage temperature 10 °C to 30 °C (+50 °F to +86 °F)
Low Voltage Directive DIN EN 61010-1: 2011-07
Shock resistant With precisely aligned electrodes instead of a tungsten filament
24 W
Light source
0.5 kg
Power supply unit 0.5 kg
5000 K
5 °C to 40 °C (+41 °F to +104 °F)
1
Endolight FOT Xenon
1) This design improves resistance to shocks and vibrations – ideal lighting for harsh environments.
Page 10
Page 11

Delivery
3. Delivery
3.1 Unpacking
- FOT Xenon light source
- Power supply unit
- Power supply cable
- Xenon lamp
Suitable fiber optic cables are listed in Optional Accessories, see Chap. 7.
Fiber optic cables with synthetic fibers are suitable to only a limited extent.
i
Check for completeness and shipping damage immediately after unpacking.
In case of damage or missing parts, please contact the manufacturer or supplier immediately.
3.2 Storage
- Storage temperature: 10 °C to 30 °C (+50 °F to +86 °F)
- Humidity: 15 to 95 %
4. Assembly
Endolight FOT Xenon
90 (3.54)
42 (1.65)
Fig. 1 Endolight FOT Xenon light source – dimensional drawing
137 (5.39)
119 (4.69)
68 (2.68)
Page 11
Page 12

Operation
CAUTION
Operate the Endolight FOT Xenon
light source only
when the cover is
closed. Position
the device horizontally. The xenon lamp
particles can reach
temperatures of up
to 1000 °C (1832 °F).
Risk of fire, burns,
property damage
5. Operation
5.1 Installation
Please ensure that the light source is placed onto its feet and is positioned horizontally; otherwise thermal
changes may occur, reducing the operating life of the xenon lamp.
The xenon lamp is filled with hot vapor and is subject to gravity, which has a horizontal pull.
The xenon lamp ignites with a series of short (> 1 microsecond) high-voltage pulses of up to 10 kV. This
sounds like a series of mouse clicks. An ionized arc is created between the electrodes.
5.2 Commissioning
Insert the plug of the power cable into the power supply unit, see Fig. 2.
Fig. 2 Power supply unit and power cable
Insert the plug of the power supply unit, into the supply voltage connection, see Fig. 4.
Endolight FOT Xenon
Page 12
Page 13

Operation
CAUTION
Do not look directly
into the light source
and avoid direct
contact with the
light source. Risk of
injuries; damage to
the eyes or skin
Connection of power supply
Fig. 3 Power supply unit plug Fig. 4 Light source rear view
Now connect the power supply to a grounded AC outlet.
The power switch should be in the O position, see Fig. 5
Turn the intensity control for your Endolight FOT Xenon light source to minimum, see Fig. 5.
Endolight FOT Xenon
Intensity control
Fig. 5 Light source front view
Insert the fiber optic cable into the lamp connection, see Fig. 6, see Fig. 7, and connect the other end
with an endoscope, see Fig. 8 or a fiber optic illumination unit.
Power switch
Page 13
Page 14

Operation
NOTICE
Do not turn the Endolight FOT Xenon
light source on and
off in rapid succession. This shortens
the life span of the
xenon lamp considerably.
Endolight FOT Xenon
Fig. 6 Connecting the fiber optic cable to the light
source – not yet connected
Fig. 8 Connecting the fiber optic cable to an endoscope
Set the power switch to I, see Fig. 5.
Use the intensity control of your Endolight FOT Xenon light source to adjust the light intensity, see Fig. 5.
Switch off the light source when it is not needed by pushing the power switch back into the O position.
Let the xenon lamp cool off for 10 to 15 minutes after each use.
Do not start the Endolight FOT Xenon light source straight after switching it off. This will reduce the life of
i
the lamp significantly.
If you cannot start the lamp:
Switch off the supply voltage and wait 10 to 14 seconds before turning the light source back on, see
Chap. 6.3.
Fig. 7 Connecting the fiber optic cable to the light
source – connected
Page 14
Page 15

Operation
5.3 Xenon Lamp
5.3.1 Replacing a Lamp
Switch off the Endolight FOT Xenon light source by pushing the power switch into the 0 position, see
Fig. 5. Disconnect the power cord from the wall socket and remove the power supply unit plug from the
rear of the light source.
Remove the 5 screws from the FOT Endolight Xenon light source with a 2 screwdriver, see Fig. 9.
Screws (5 x)
Fig. 9 Side view with screws
Open the housing cover upwards to have access to the xenon lamp, see Fig. 10.
Open upwards
Endolight FOT Xenon
Housing cover
Fig. 10 Opening the cover
Page 15
Page 16
Operation
CAUTION
Ensure that you follow the instructions
for proper disposal,
see Chap. 10., if
the xenon lamp is
broken. Risk of poisoning, respiratory
distress
CAUTION
Remove the xenon
lamp only after it has
cooled off completely. Risk of burns
Ensure that you dispose of the xenon lamp correctly, if it is broken, see Chap. 10.
i
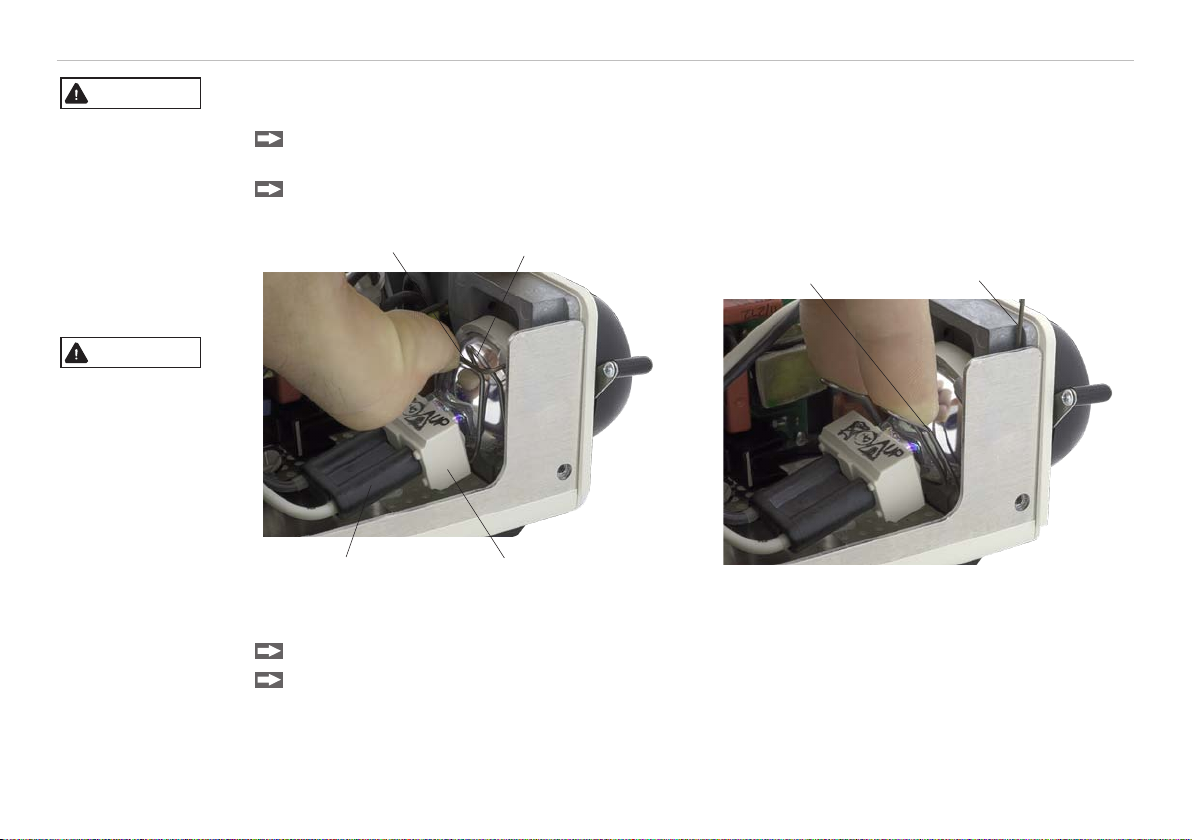
When the xenon lamp has cooled down (10 to 15 minutes after the last operation), pull the clamping
bracket upwards over the lamp spring holder, see Fig. 11.
Now hold the lamp base and simultaneously press down the lamp spring holder, see Fig. 12.
Clamping bracket Lamp spring holder
Clamping bracketLamp spring holder
Lamp baseLamp connector
Fig. 11 Pull up the clamping bracket Fig. 12 Press down the lamp spring holder
At the same time, hold the xenon lamp at its base and gently pull it out (upwards).
Disconnect the lamp connector from the xenon lamp, see Fig. 13, and remove the xenon lamp.
Endolight FOT Xenon
Page 16
Page 17

Operation
NOTICE
Do not touch the
xenon lamp. Only
touch the lamp
socket.
Skin oils from fingerprints or other impurities on the xenon
lamp will decrease
lamp performance
or cause premature
failure of the xenon
lamp.
Fig. 13 Disconnect the lamp connector from the xenon lamp
Dispose of the xenon lamp, see Chap. 10.
Hold the new xenon lamp 1 at its socket, and insert it into the lamp connector (polarity protection).
Make sure that “UP” is facing upwards when you insert the xenon lamp into the socket.
i
Press the lamp socket with the xenon lamp downwards. The xenon lamp is now inside the lamp spring
holder.
Note the clicking sound. The guide pin is now positioned at the bottom of the xenon lamp and engaged in
the lamp holder slot, see Fig. 15.
Push the clamping bracket back over the lamp spring holder.
Remove any fingerprints and lint using a clean cotton swab and alcohol.
Tighten the 5 screws to close the cover.
Reconnect the power supply.
Endolight FOT Xenon
1) Use only original xenon lamps from MICRO-EPSILON Eltrotec, which are available as accessories, see
Chap. 7.
Page 17
Page 18

Operation
CAUTION
Operate the Endolight FOT Xenon
light source only
when the cover is
on. Position the
device horizontally.
The xenon lamp
particles can reach
temperatures of up
to 1000 °C (1832 °F).
Risk of fire, burns,
property damage
Endolight FOT Xenon
Guide pin
Fig. 14 Xenon lamp with guide pin Fig. 15 Lamp slot, view from below
5.3.2 Light Output Stability
Fluctuations in the light output of up to 5 % and occasional gas flares or bright flashes of red or pink light are
normal.
Xenon lamps contain small amounts of metals. These metals are present both in liquid and in solid form and
may show as dark-reddish or reddish-brown spots or as a film on the inner surface when the xenon lamp is
cold. These phenomena are normal and do not affect the operation of the xenon lamp. They disappear once
the xenon lamp has been put into operation.
The discharge between the two closely positioned electrodes, which are sealed in a quartz glass envelope,
generates light through an electric arc. During operation small amounts of metals are heated to a liquid state,
producing the vapor required for the desired light color.
Light generated in such a way is very intense.
Appropriate precautions in relation to light intensity and heat must be taken:
- The Endolight Xenon light source operates at very high temperatures and under extremely high pressure.
Particles can reach up to 1000 °C (1832 °F) and can cause burns, fire or damage to property. Proper installation, cooling and ventilation is required to ensure reliable operation.
Page 18
Page 19

Operation
CAUTION
Do not look directly
into the light source
and avoid direct
contact with the light
source. Risk of injuries; damage to
the eyes or skin
NOTICE
Do not touch the
xenon lamp. Only
touch the lamp
socket.
Skin oils from fingerprints or other impurities on the xenon
lamp will decrease
lamp performance
or cause premature
failure of the xenon
lamp.
- Operate the xenon lamp only in its closed light source housing.
- The UV light from the xenon lamp can cause serious eye damage and skin irritation.
- Always let the xenon lamp cool off for 10 to 15 minutes before replacing it.
- Handle the xenon lamp with caution.
- Do not touch the xenon lamp. Only touch the lamp socket. Skin oils, fingerprints or other impurities on the
xenon lamp will decrease the performance or cause premature failure of the xenon lamp.
- Switching the FOT Xenon light source on and off in rapid succession will shorten its life span.
- Xenon lamps are highly efficient and sensitive to changes in temperature and external influences. Varia-
tions in performance and color may occur.
- After switching the xenon lamp off it should be left to cool for 10 to 15 minutes before turning it back on to
ensure a trouble-free startup. If you do not observe this waiting period, the xenon lamp may not ignite because the pressure within the chamber is too high and no arc between the electrodes can be generated.
- The more stable the mains voltage, the longer the service life of the xenon lamp and the better the quality
of the emitted light.
- Avoid any damage and mechanical disruptions when installing, assembling or replacing the xenon lamp.
- The maximum operating temperature must not be exceeded and good ventilation must be provided at all
times.
- The high quality of the light output is typically retained during the lifetime of the lamp at 75 % or more of its
original value.
- Xenon lamps use high-voltage short-term pulses to initiate operation.
- This model is a DC (direct current) xenon lamp. Ensure proper electrical wiring to prevent damage to the
xenon lamp.
- It takes about 24 seconds to achieve full light output. After the ignition process, the mixture of metals,
halogens and rare earth elements must first heat up to melt the solid components and let them evaporate.
During the warm-up phase instabilities may occur, such as a flickering or blinking of the lamp.
Endolight FOT Xenon
Page 19
Page 20

Operation
Because a variety of factors influence the service life of the xenon lamp, the stated life span is only an average value.
The xenon lamp is considered defective if it does not start or if the light yield has fallen to half its original
value. The operating life of the xenon lamp depends on how often it is started. If the xenon lamp is switched
on and off frequently in rapid succession, the service life is reduced by approximately 50 %.
If the xenon lamp is operated in a continuous mode, its service life improves by up to 30 %.
The following illustrations show the state of the spectral distribution and light intensity of a new xenon lamp,
see Fig. 16
life cycle.
Relative Intensity
, and after 650 hours, see Fig. 17. The performance of the xenon lamp barely changes during its
Relative Intensity
Endolight FOT Xenon
Wave length (nm)
Wave length (nm)
Fig. 16 Spectral output at 0 operating hours Fig. 17 Spectral output at 650 operating hours
Page 20
Page 21

Instruction for Operation
CAUTION
Do not look directly
into the light source
and avoid direct
contact with the
light source. Risk of
injuries; damage to
the eyes or skin
NOTICE
Do not immerse the
device in water.
Do not connect the
device/power supply
cable if it is damp.
The light source
may get damaged or
destroyed
6. Instruction for Operation
6.1 Additional Safety Measures
The xenon lamp produces light across the entire visible spectrum (UV-IR) as well as ultraviolet light. Never
look directly into the light of a xenon lamp. Operate the xenon lamp only when the light source housing is
closed.
> Can irritate the eyes or cause severe damage to the retina.
Please wear appropriate protective glasses!
i
6.2 Cleaning
6.2.1 Housing and Power Supply Unit
Turn off the Endolight FOT Xenon light source and disconnect the power cord from the wall socket and
from the rear of the light source.
Wipe the exterior surfaces using a damp cloth with mild soapy water.
Wipe the power cord using a damp cloth with mild soapy water.
6.2.2 Xenon Lamp and Quartz Glass
Remove any fingerprints using a cotton swab or isopropyl alcohol (rubbing alcohol).
Remove any lint from the xenon lamp.
Endolight FOT Xenon
Page 21
Page 22

Instruction for Operation
CAUTION
6.3 Troubleshooting
There are only few possible causes for a defective xenon lamp, which are all due to extreme thermal and
mechanical conditions within the xenon lamp.
1. The xenon lamp breaks.
One typical failure cause is the xenon lamp breaking (sometimes with an audible pop).
Replace the xenon lamp, see Chap. 5.3.1.
Please ensure that you follow the safety and disposal instructions, see Chap. 10.
> Risk of poisoning, respiratory distress, health hazard
NOTICE
Do not turn the Endolight FOT Xenon
light source on and
off in rapid succession. This shortens
the life of the xenon
lamp considerably.
Endolight FOT Xenon
2. The xenon lamp does not ignite.
Switch off the power supply and wait 10 to 15 seconds before turning the device back on.
Check the voltage supply and the connections between power supply unit and light source / power sup-
ply unit and power supply.
Check that the xenon lamp is positioned correctly.
Try again to switch on the light source.
Do not start the Endolight FOT Xenon light source straight after it was switched off as it may not ignite.
i
Let the xenon lamp cool off for 10 to 15 minutes before starting it again.
Page 22
Page 23

Accessories
7. Accessories
Endolight xenon replacement lamp Order no. 21320903
Fiber optic cable EL 1/4 1800 MEP/S with universal adapter Order no. 20711767
Liquid fiber optic cable EFL 1/4 1800 MEP/S with universal adapter Order no. 20711803
Endolight FOT Xenon
Other fiber optic cables and fiber optic lighting units are available on request.
Page 23
Page 24

Warranty
8. Warranty
All components of the device have been checked and tested for perfect function in the factory. In the unlikely
event that errors should occur despite our thorough quality control, this should be reported immediately to
MICRO-EPSILON Eltrotec.
The warranty period lasts 12 months following the day of shipment. Defective parts, except wear parts, will be
repaired or replaced free of charge within this period if you return the device free of cost to MICRO-EPSILON
Eltrotec. This warranty does not apply to damage resulting from abuse of the equipment and devices, from
forceful handling or installation of the devices or from repair or modifications performed by third parties.
No other claims, except as warranted, are accepted. The terms of the purchasing contract apply in full.
MICRO-EPSILON Eltrotec will specifically not be responsible for eventual consequential damages. MICROEPSILON Eltrotec always strives to supply the customers with the finest and most advanced equipment. Development and refinement is therefore performed continuously and the right to design changes without prior
notice is accordingly reserved. For translations in other languages, the data and statements in the German
language operation manual are to be taken as authoritative.
9. Service, Repair
Endolight FOT Xenon
In the event of a defect on the Endolight FOT Xenon light source or on power supply cable please
send us the effected parts for repair or exchange. In
the case of faults the cause of which is not clearly
identifiable, the whole measuring system must be
sent back to:
MICRO-EPSILON Eltrotec GmbH
Heinkelstraße 2
73066 Uhingen / Germany
Tel: +49 / 7161 / 98872-300
Fax: +49 / 7161 / 98872-303
eltrotec@micro-epsilon.de
www.micro-epsilon.com
Page 24
Page 25

Decommissioning, Disposal
10. Decommissioning, Disposal
The light source is manufactured in accordance with RoHS Directive 2011/65/EU.
The xenon lamp consists largely of quartz glass and it contains a small amount of mercury and inert gas.
Argon and xenon are used as filling gases. In addition, small quantities of other materials are used, but they
do not play a significant role. The electrodes are made of tungsten. They are coated with nickel and molybdenum and fused into the quartz glass.
Disposal must be carried out according to the following steps and in line with local regulation guidelines for
the disposal of hazardous waste:
Mercury may leak when the xenon lamp breaks.
CAUTION
Risk of poisoning,
respiratory distress,
health hazard
Do not breathe in any mercury vapor.
Mercury vapor is toxic and can damage your lungs and nervous system. If mercury leaks out, air the room
thoroughly (for approximately 30 minutes, depending on room size and conditions). A high concentration
of vapors may cause short-term symptoms such as pneumonia, chest pain, shortness of breath, coughing,
gingivitis, salivation and stomatitis. When the substance comes into contact with the skin and/or eyes it can
cause redness and irritation.
Inhalation of quartz may lead to shortness of breath and coughing.
Inhalation of tungsten dust may cause irritation of eyes, nose and throat. The essential trace element molybdenum is no longer processed correctly which can lead to disorders of the stomach/intestinal tract.
Remove the xenon lamp only after it has cooled off completely (10 to 15 minutes).
Remove the broken xenon lamp from the lamp socket.
Remove any remaining mercury using adhesive tape, paper or a syringe.
Place any material that was in contact with mercury into an airtight non-metallic container, and dispose
of it in line with official regulations.
Ensure that these steps are carried out with adequate ventilation, and wear protective goggles and pro-
tective clothing.
Clean the affected areas with a mild soap or detergent and water, and prevent any further contact. Con-
sult a doctor if necessary.
Endolight FOT Xenon
Page 25
Page 26

MICRO-EPSILON Eltrotec GmbH
Heinkelstr. 2 · D-73066 Uhingen, Germany
Phone +49 (0) 7161 / 98872-300 · Fax +49 (0) 7161 / 98872-303
eltrotec@micro-epsilon.de · www.micro-epsilon.de
X9751310-A021123HDR
MICRO-EPSILON Eltrotec
*X9751310-A02*
 Loading...