

Page 1
1
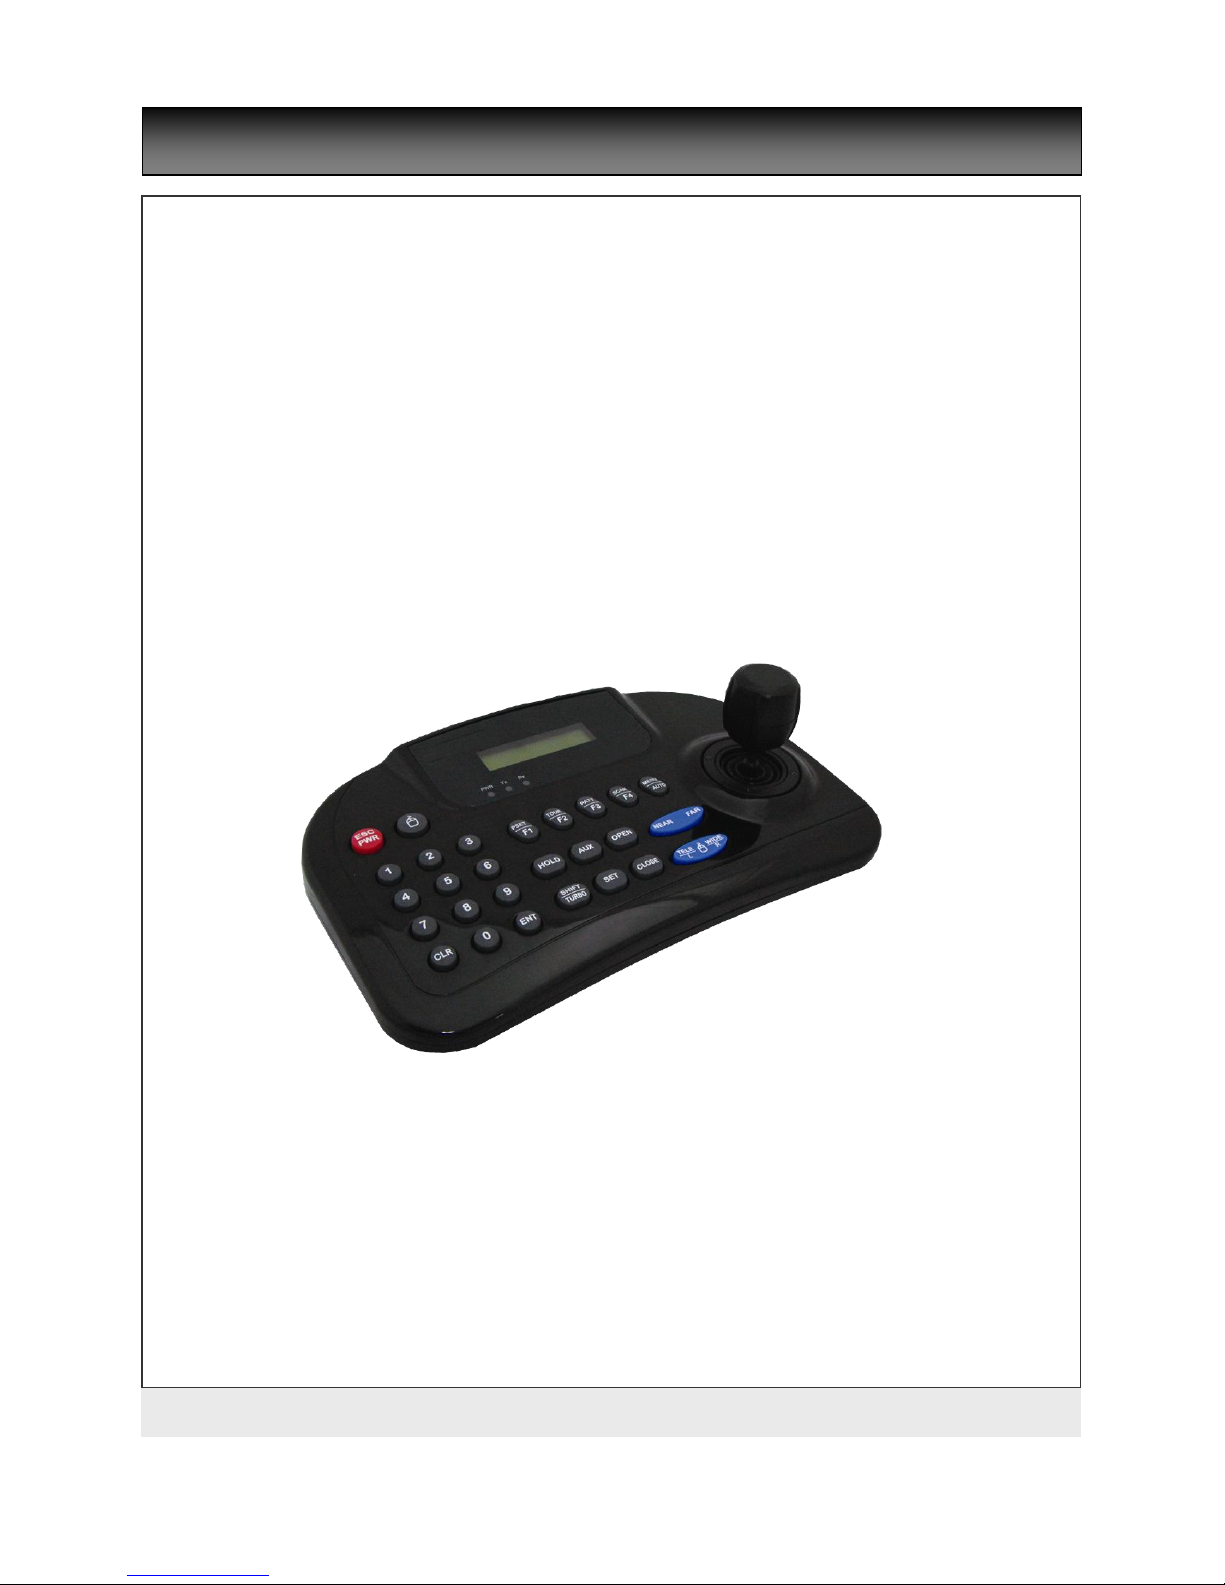
Advanced PTZ Controller
User’s Manual
Chapter 1. Introduction
PTZ Controller
V1.06-n017 This document contains preliminary information and subject to change without notice.
Page 2

2
Chapter 1 Introduction
In This Manual
Overview : This manual covers the operation of the WTX-1200A keyboard.
WTX-1200A keyboard
This remote keyboard is an accessory for PTZ dome camera, etc
It allows the user to control from 1 to 255 camera.
Features
Controls from 1~ 255 cameras.
Multiple protocol supported in each channel
RS485/RS-422 Communication (Tx : 3 port, Trx : 1 port)
Programmable user preferences (preset, tour, group, etc)
Built in 3 Axis proportional joystick
Easy upload programmed data via serial communication port of PC.
Built in 2 lines character LCD.
User password support
Designed for desktop use
Programmable transmission speed for each IP (2.4~57.6kbps)
Note : units should be set to the communication protocol and the same baud rate.
Before installation
This keyboard system must be installed by qualified service and installation personnel.
Perform the following steps to install the keyboard system.
A.Unpack all components.
B.Place the keyboard in a convenient location.
Note : Carefully and completely read the manuals for each piece of equipment before
attempting to installation and connect the equipment.
C. Decide on the configuration method.
D. Use one of the following sections to configure the wiring.
Page 3
3
Chapter 1 Introduction
Hardware Overview
Hardware
Components
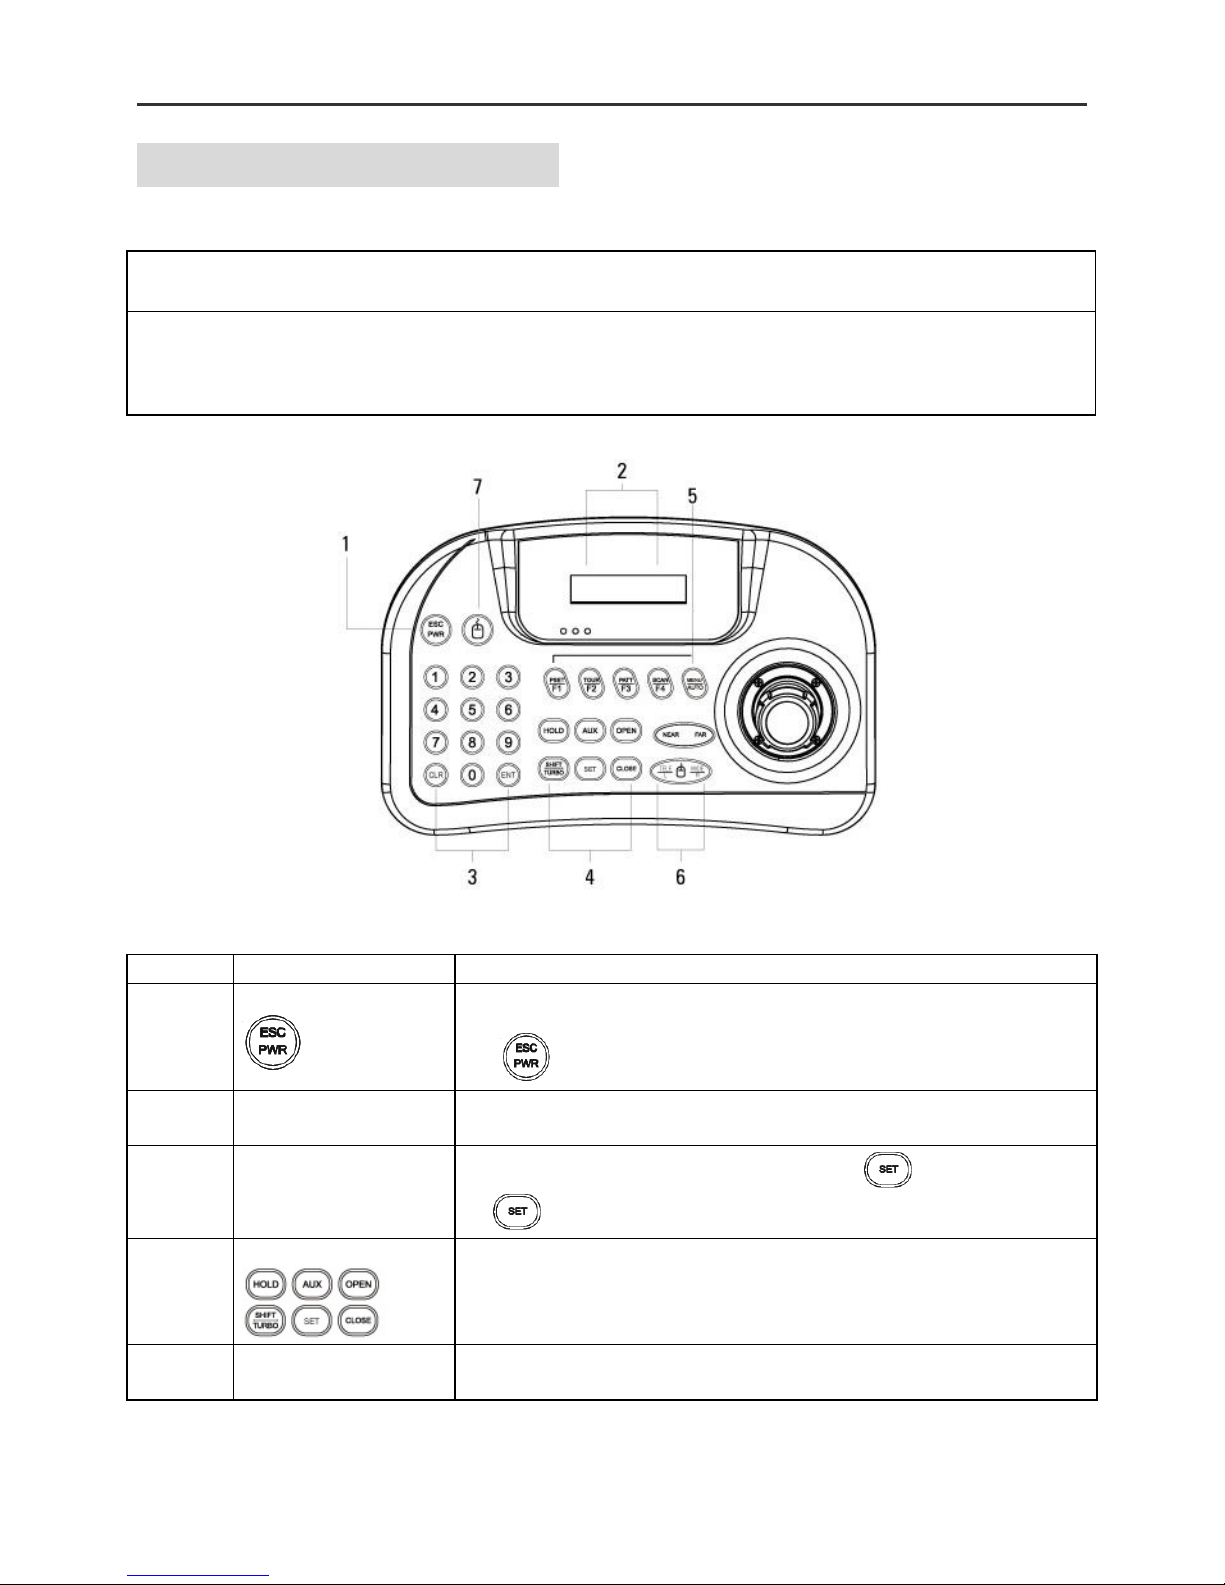
This remote keyboard contains easy to use control keys on the front and
simple input and output connectors on the back.
Control Buttons &
connection
This unit provides the primary operator interface. Most operations are one
or tow button presses. The following Table contains a description for each
buttons on the keyboard and ort of cable connection. Use Figure 1 and
Figure 2 as a reference
Number
Button
Description
1
ESC/ POWER
Pressing the ESC/POWER button enters the power on/off or escape key.
Right description led on(red). Pressing it again exits the Power off. (Push
the button 2-3 seconds) and then Power off)
2
LCD Display
16 x 2 Graphic display
Display Camera ID, Protocol, function status, general status, etc
3
Numbers
Camera ID setting value change, PTZ setup (1+ ) , Main Setup
(2+ )
4
Control Function Keys
Hold : System locking (Unlocking : Input the password 4 digit ****)
SHIFT/TURBO : SHIFT – Key for special function (Customize)/ TURBO-
High Speed
5
Function keys
Page 4
4
Number
Button
Description
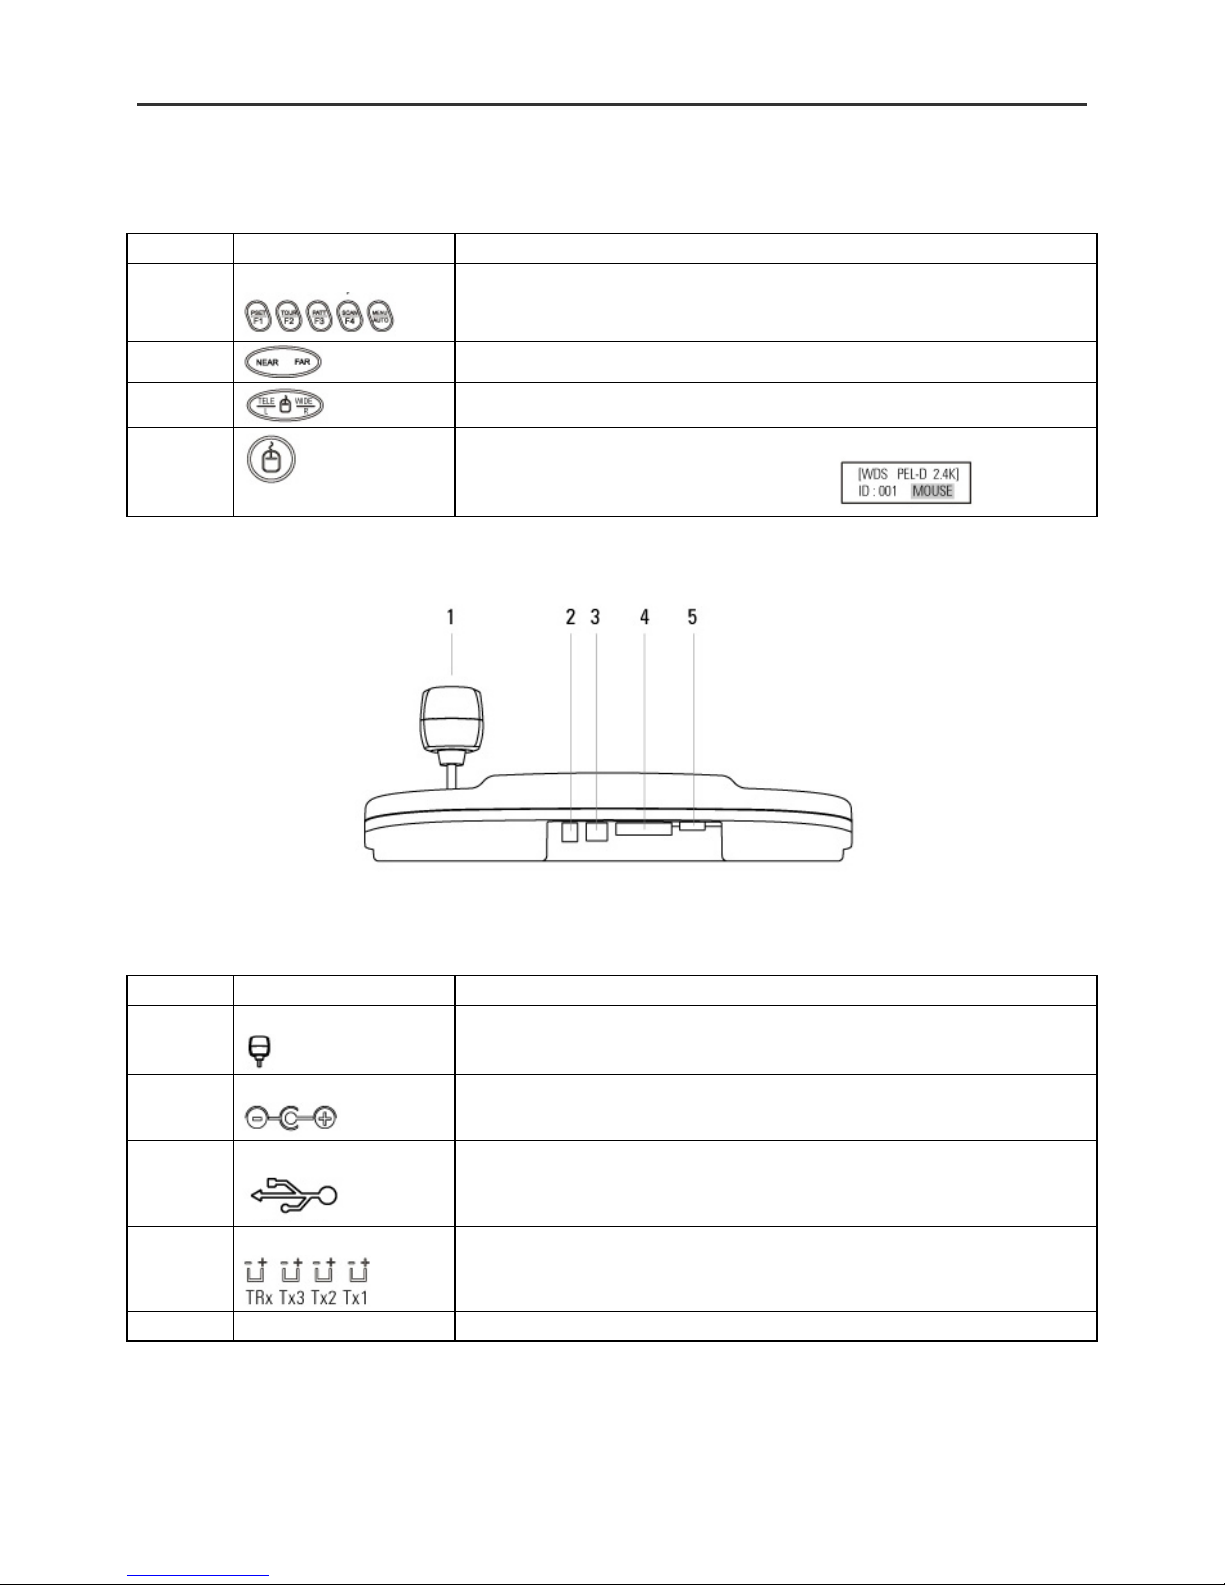
5
Function keys
F1 – MENU/AUTO : Function Keys (Preset, Tour, Pattern, Scan, Auto)
MENU : Used for Camera(Pan/Tilt) Menu adjustment
6 Camera Focus Control
Camera Zoom Control
7 MOUSE ON/OFF (Mouse Function Key 2-3 Seconds push)
Mouse Character Description will be display
Number
Button
Description
1
Joystick
Telemetry Joystick Blt allows precise control of Pan/Tilt/Zoom
2
DC 12V Input
DC 12V Input, 140 mA
3
USB PORT
Universal Serial Bus Port, USB Mouse function
(External Equipment communication port)
4
RS-485
RS-485/RS-422 communications
(Tx/Rx : 3 port, Trx :1 port)
5
Program
Download connector(For Program Update)
Page 5
5
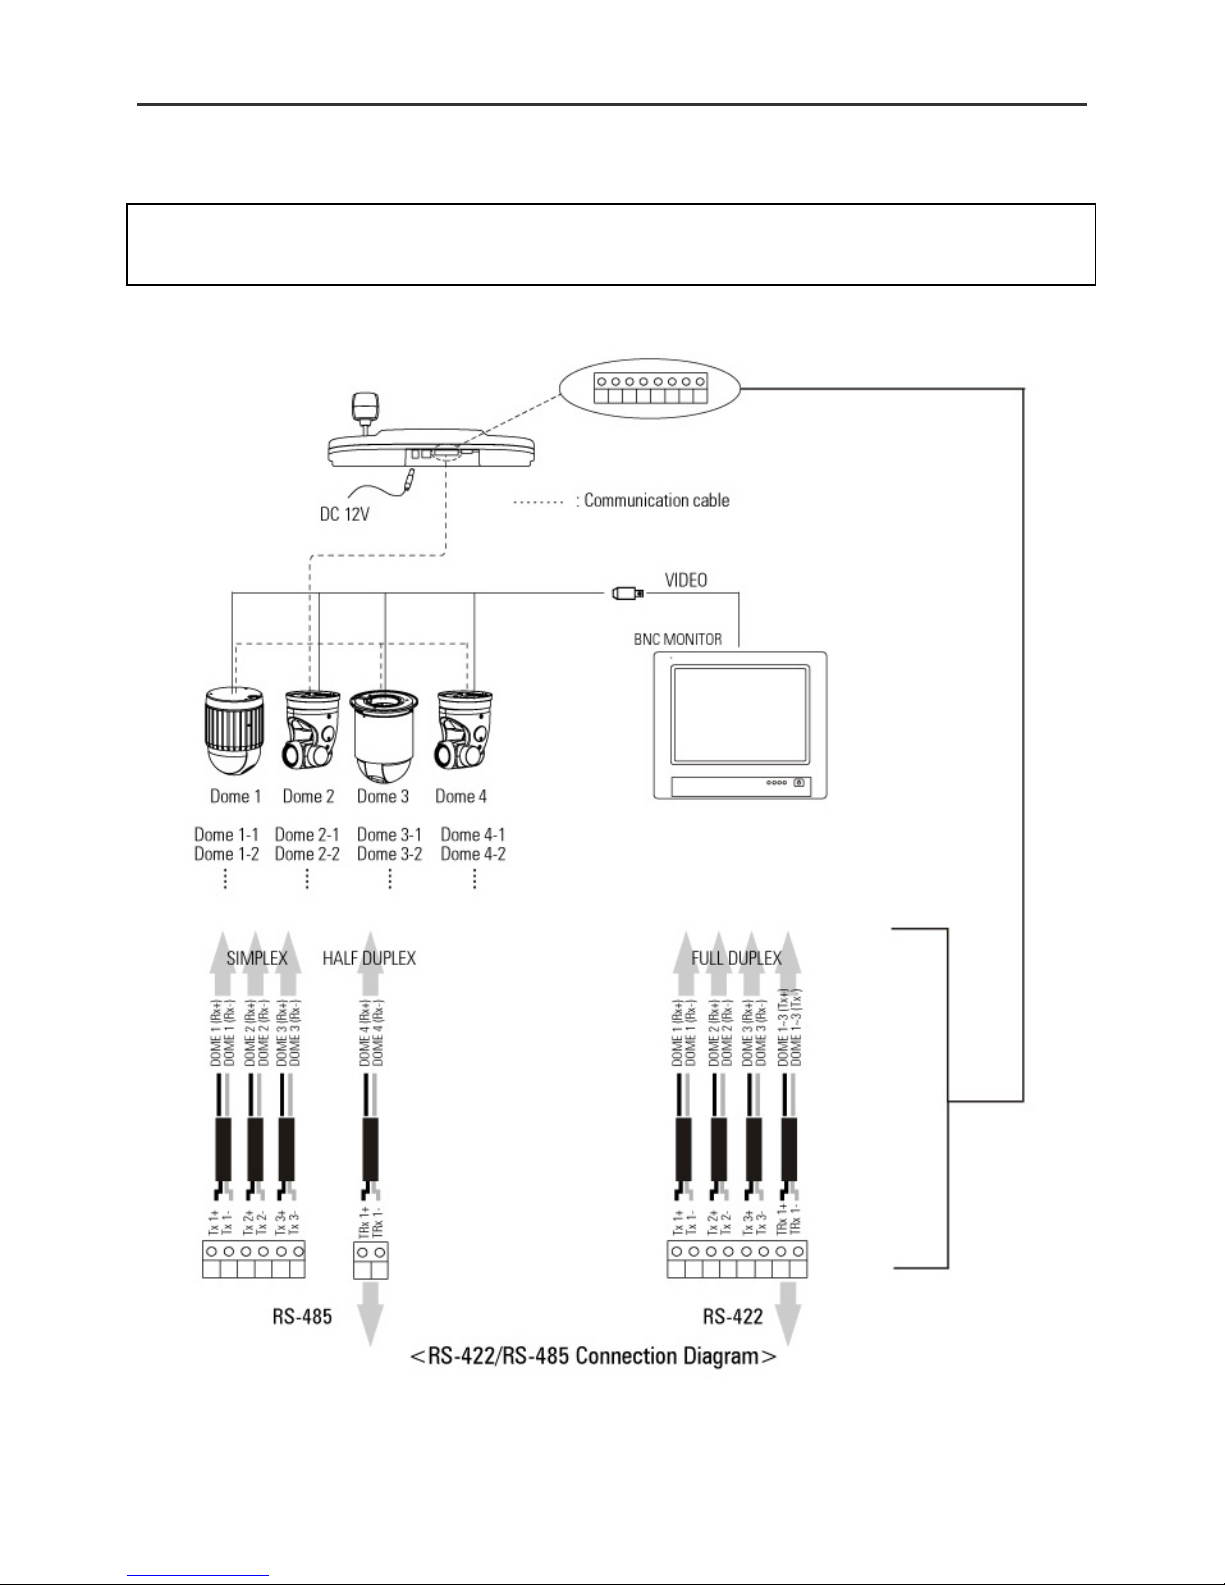
System Configuration and Wiring
Basic
Installation
Use the Keyboard Configuration when only one keyboard is connected to
the controlled units. Connect the RS-485 output port of Remote keyboard to
RS-485 input port of the first controlled unit using the terminal block.
Page 6
6
Chapter 2 System Installation & Typical Applications
System Installation
Keyboard Installation
Before you start the keyboard equipment to your system, make sure the
units to be controlled are completely installed and everything is working
correctly. Before use of this keyboard, you should set the protocol and baud
rate (2.4 ~ 57.6kbps) in the PTZ SETUP mode.
Use the following steps to set the communication protocol and baud rate.
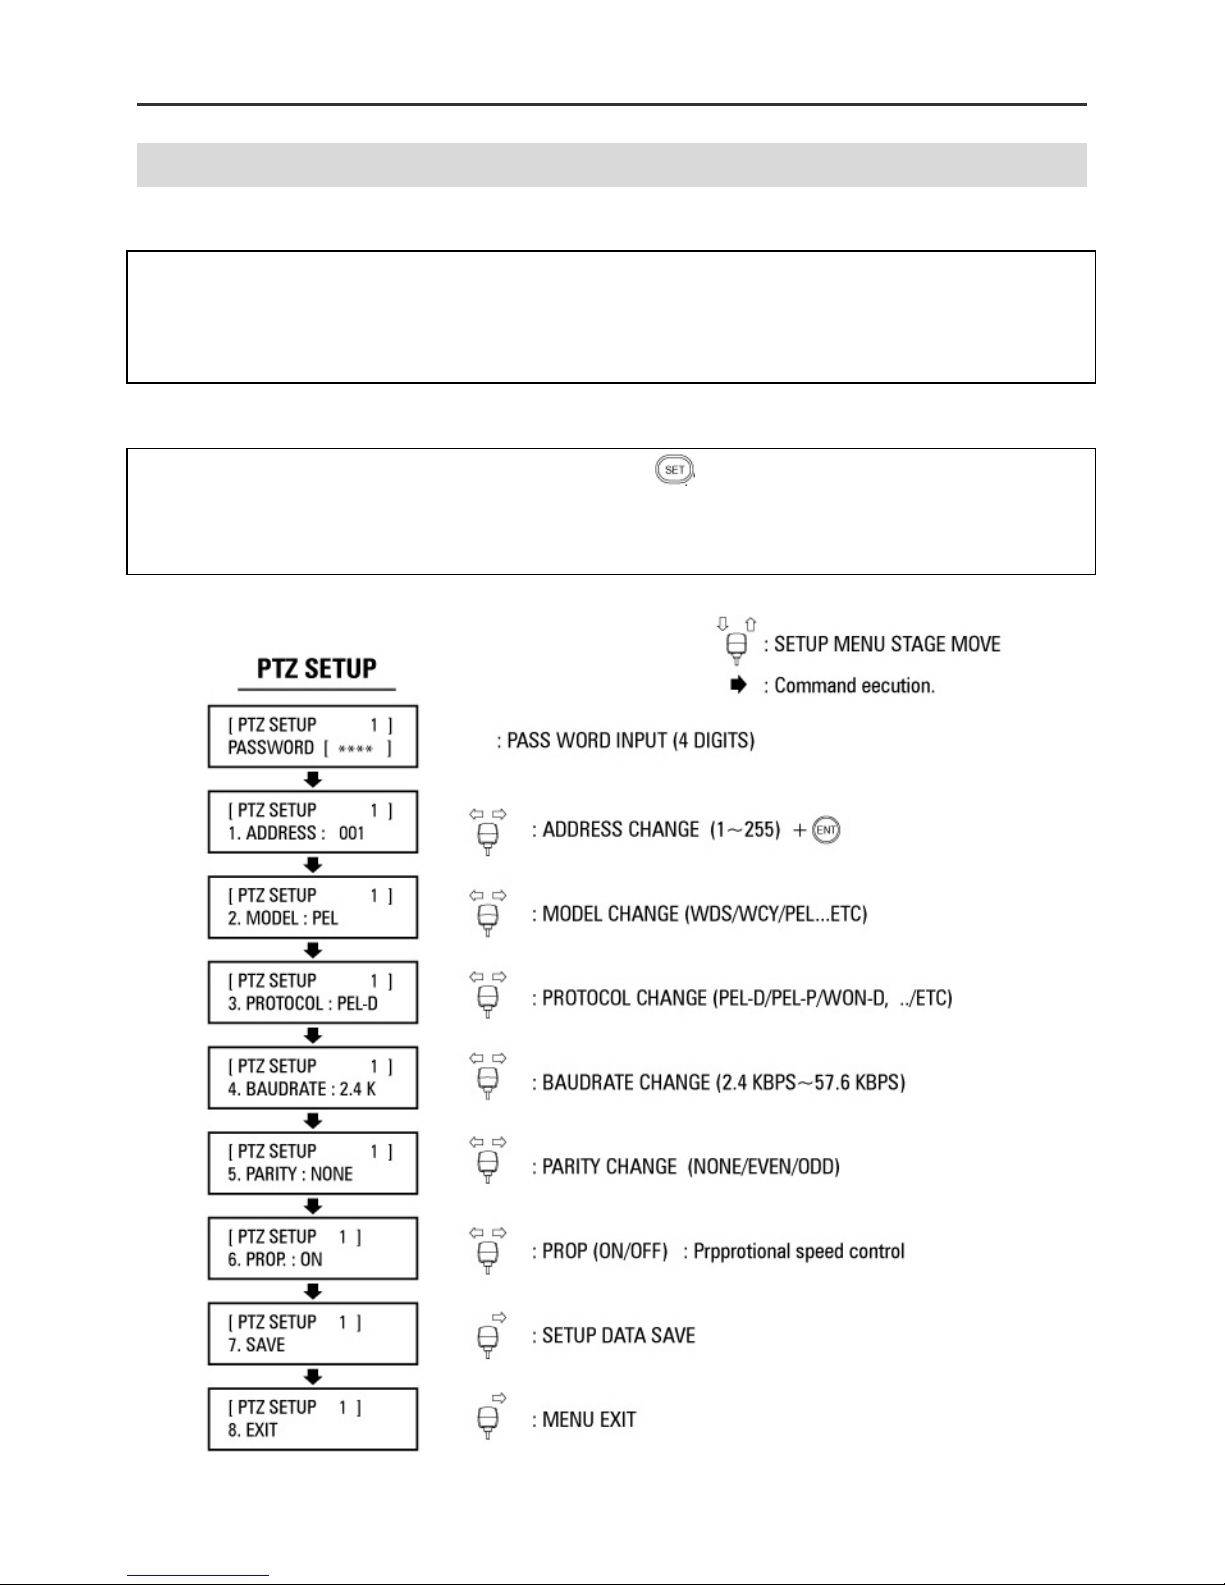
PTZ setup
PTZ setup
PTZ Setup mode, select 1 + , (2~3 seconds)
Setup screen allows you to make change each programmable clause.
Note : The baud rate must be the same between the controlled unit and the
keyboard.
Page 7
7
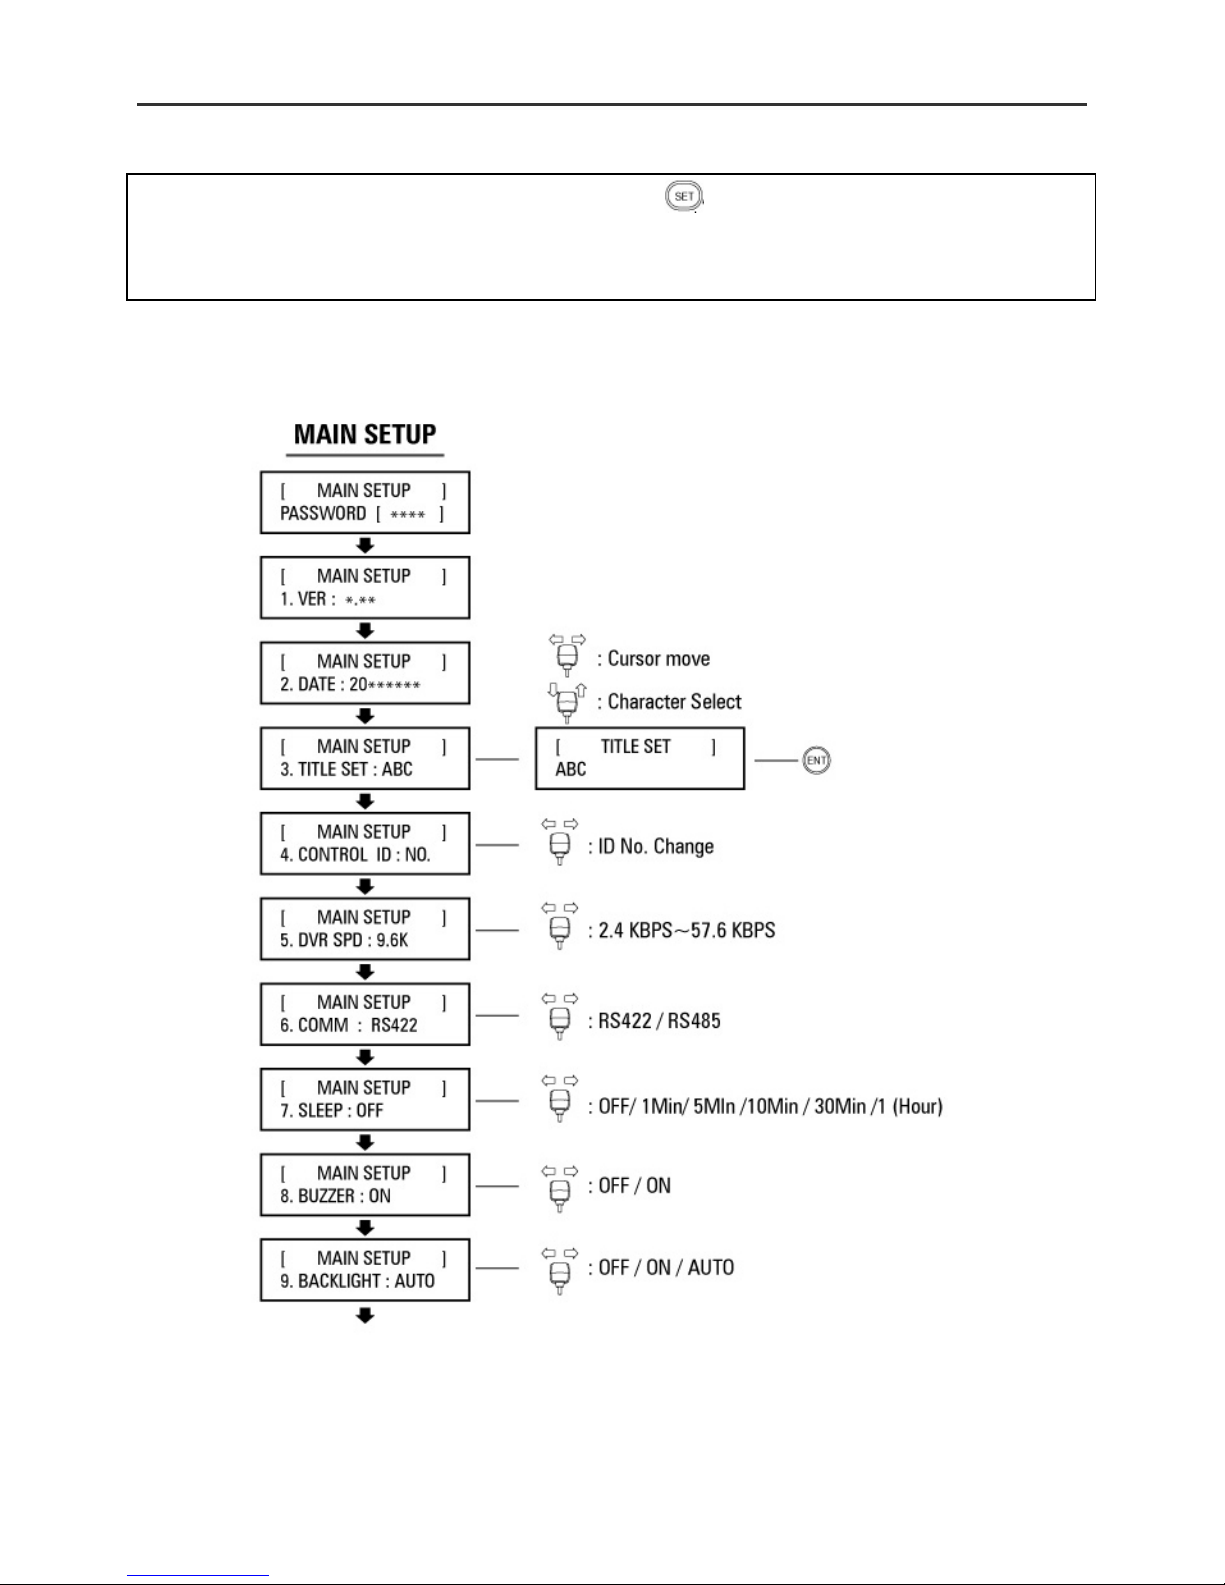
Main Setup
Main Setup
Main Setup mode, Select 2 + , (2~3 seconds)
Setup screen allows you to make change each programmable clause.
Note: The baud rate must be the same between the controlled unit and the
keyboard.
Page 8
8
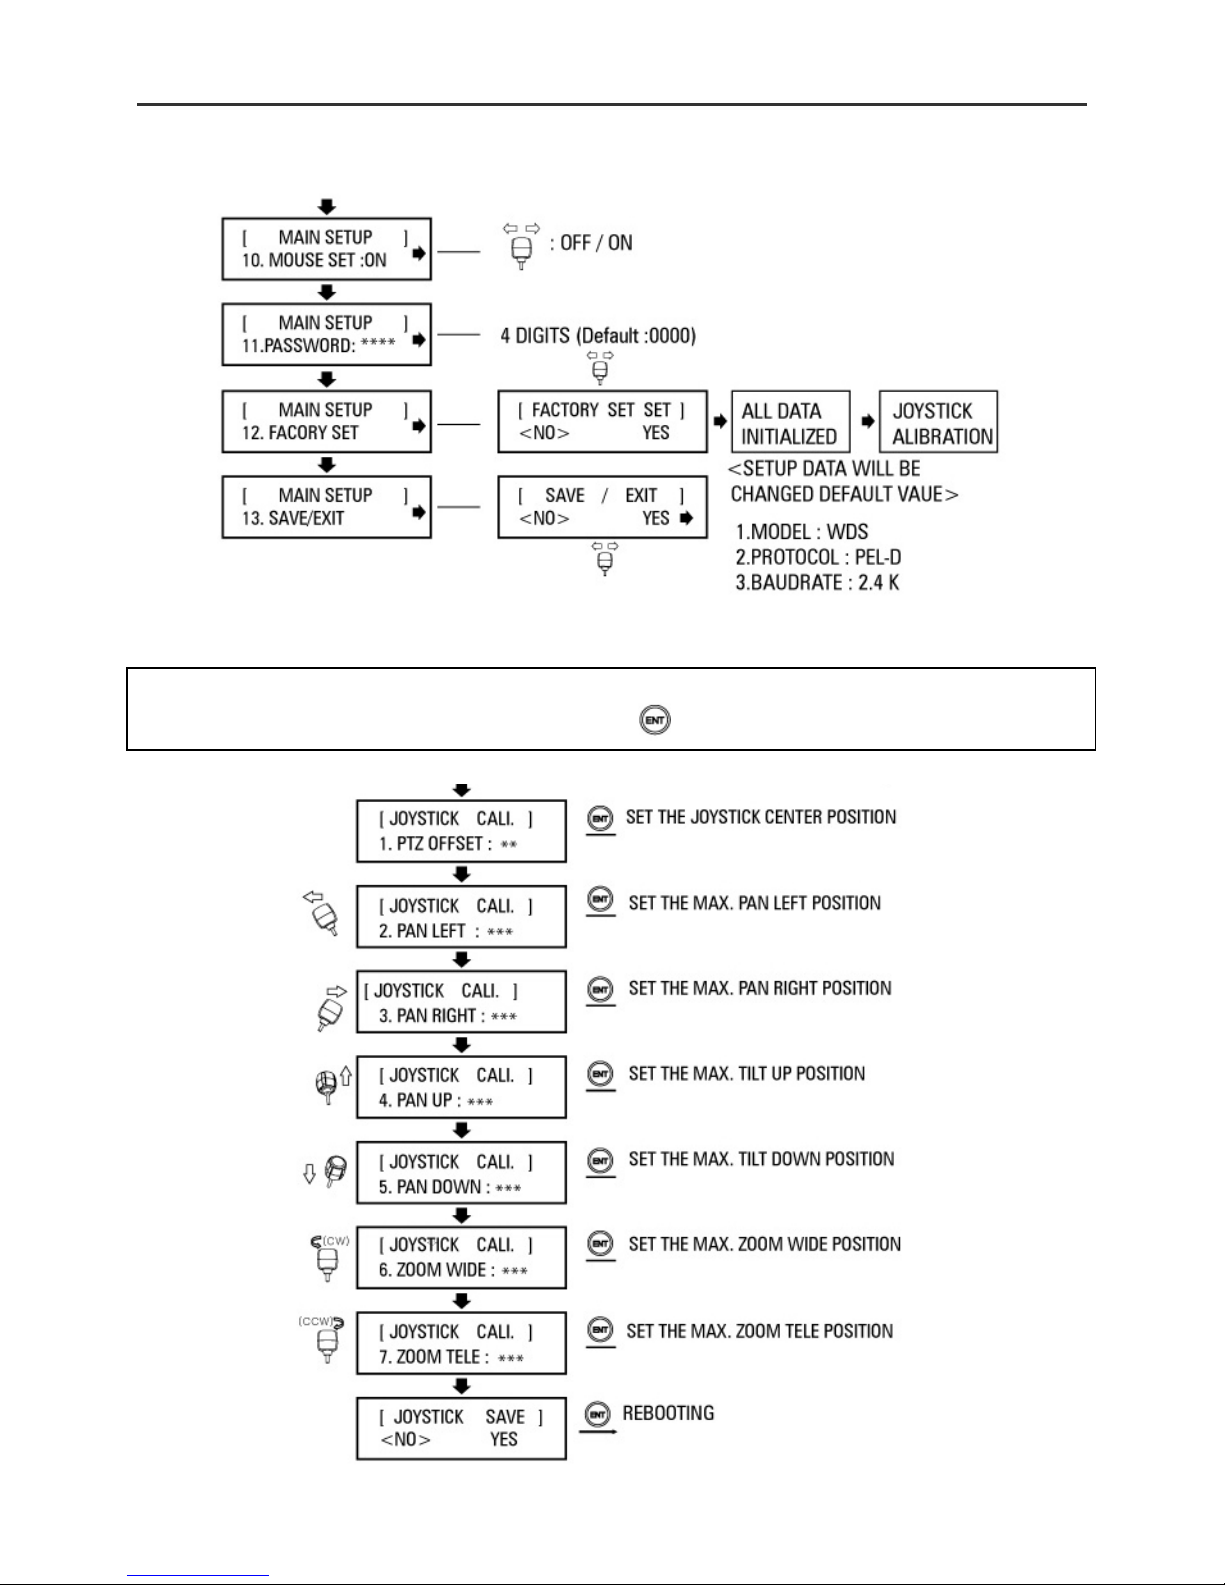
Joystick Calibration
It is for the keyboard to set the Max. movement of joystick.
Calibration method : Joystick move {Position Value} +
Page 9
9
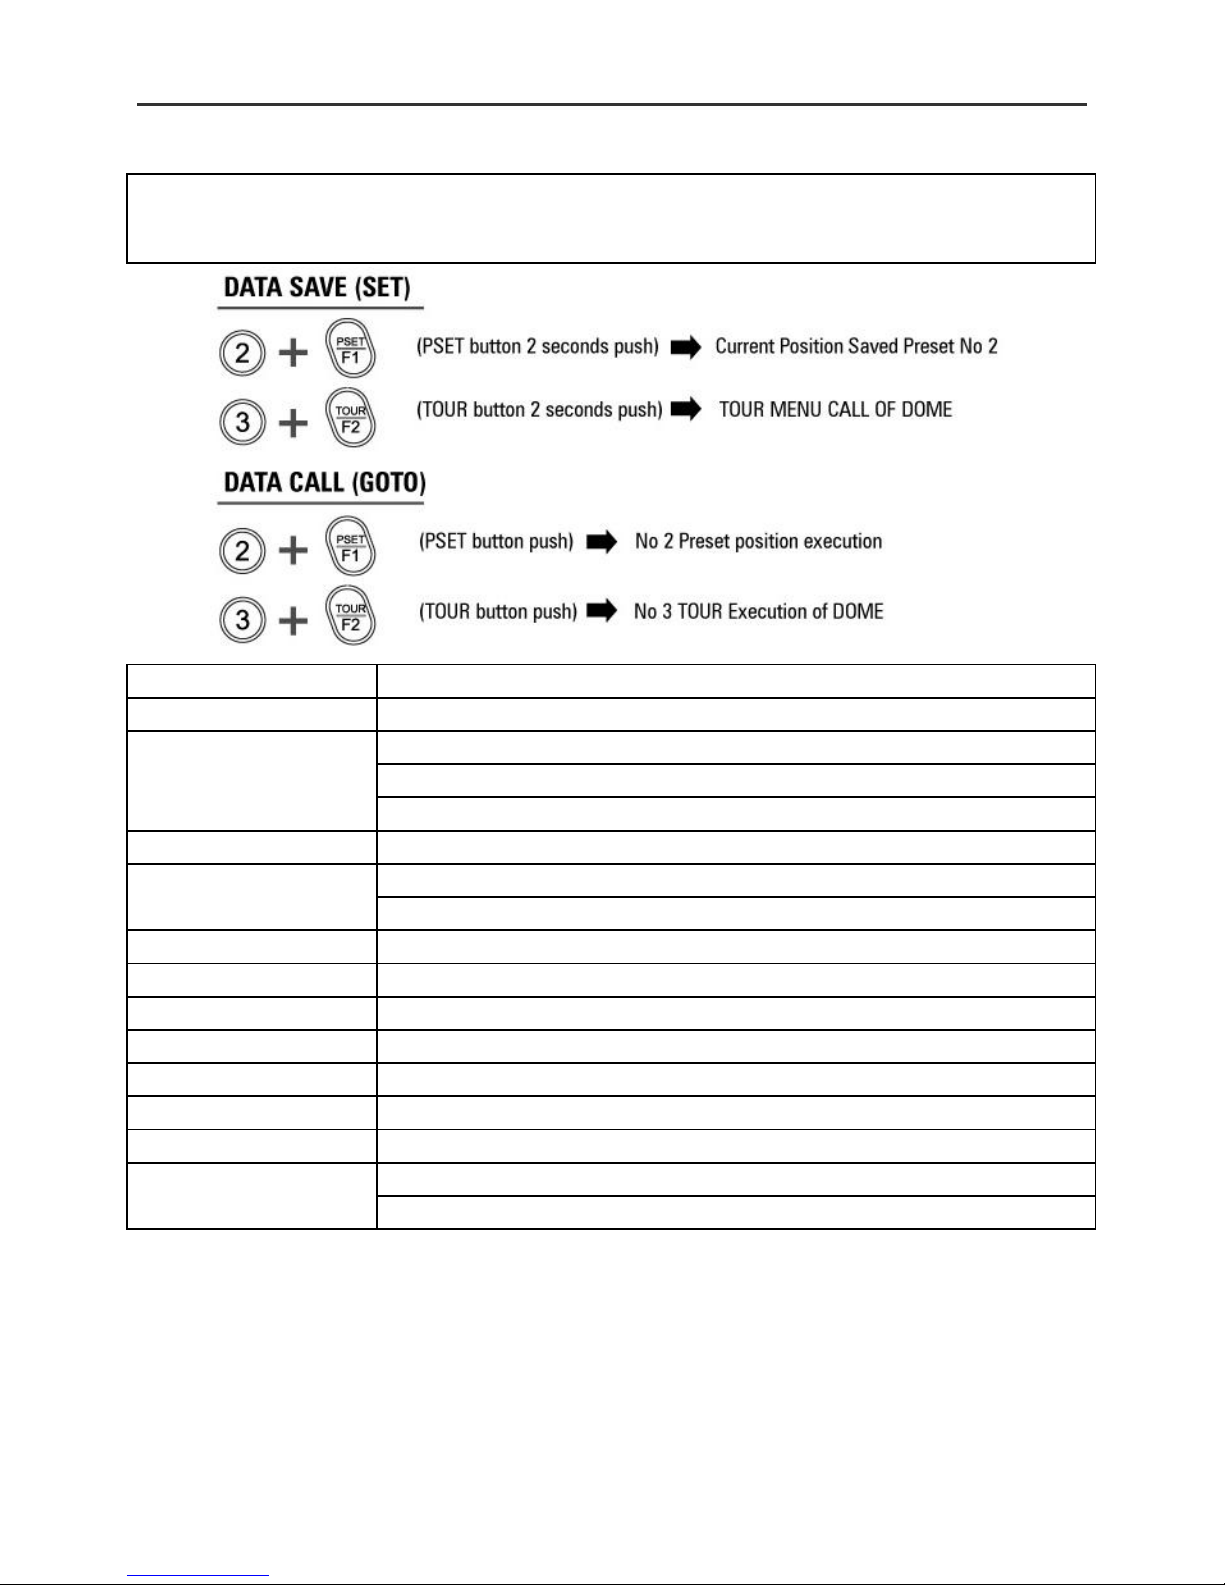
Easy Setting Function {E.S.F}
Easy Setting Function (Number key + Function key)
Number key + PSET/TOUR/PATT/SCAN/E.S.F
Is current postion data(pan, tilt, focus, zoom data) save or call Dome memory
Specifications
Model
WTX – 1200A
Keyboard
Communication
Interface : RS – 485 (Tx 3 port, Trx 1 port) P
An/Tilt operating distance : 4700 ft(1029m) No 24 AWG wire
Protocol : Multiple (Pelco-D, etc), (Baud rate selectable)
Connector Type Data
TERMINAL BLACK (8P)
Keyboard Keypad
Rubber button
Numeric keypad and camera function key
Joystick
Stick 3-axis, variable speed with zoom
Input Voltage
12V DC or 9V batt (battery mode)
Power Consumption
Max. 140mA
LCD Display
Graphic display : 16 * 2 Graphic display
Operation Temperature
0 to 45
Humidity
10% - 70% non-condensing
Dimension & Weight
280(W) x 174(D) x 92(H), Net: 0.7 kg Gross: 1.7 kg
Packing include
WTX – 1200A keyboard, Adaptor
Packing include : Batt 9V, USB cable, Manual, Terminal Block (8p)
 Loading...