

Page 1

INSTRUCTION MANUAL (MDR-AHxxxx Series _Ver. 1.0)
H.264 Video Compression
Analog HD Digital Video Recorder
User Manual
About this user guide
Before installing and using this unit, please read this user guide carefully.
Be sure to keep it handy for later reference.
Page 2
2
Safety Precautions
Explanation of Graphical Symbols
WARNING
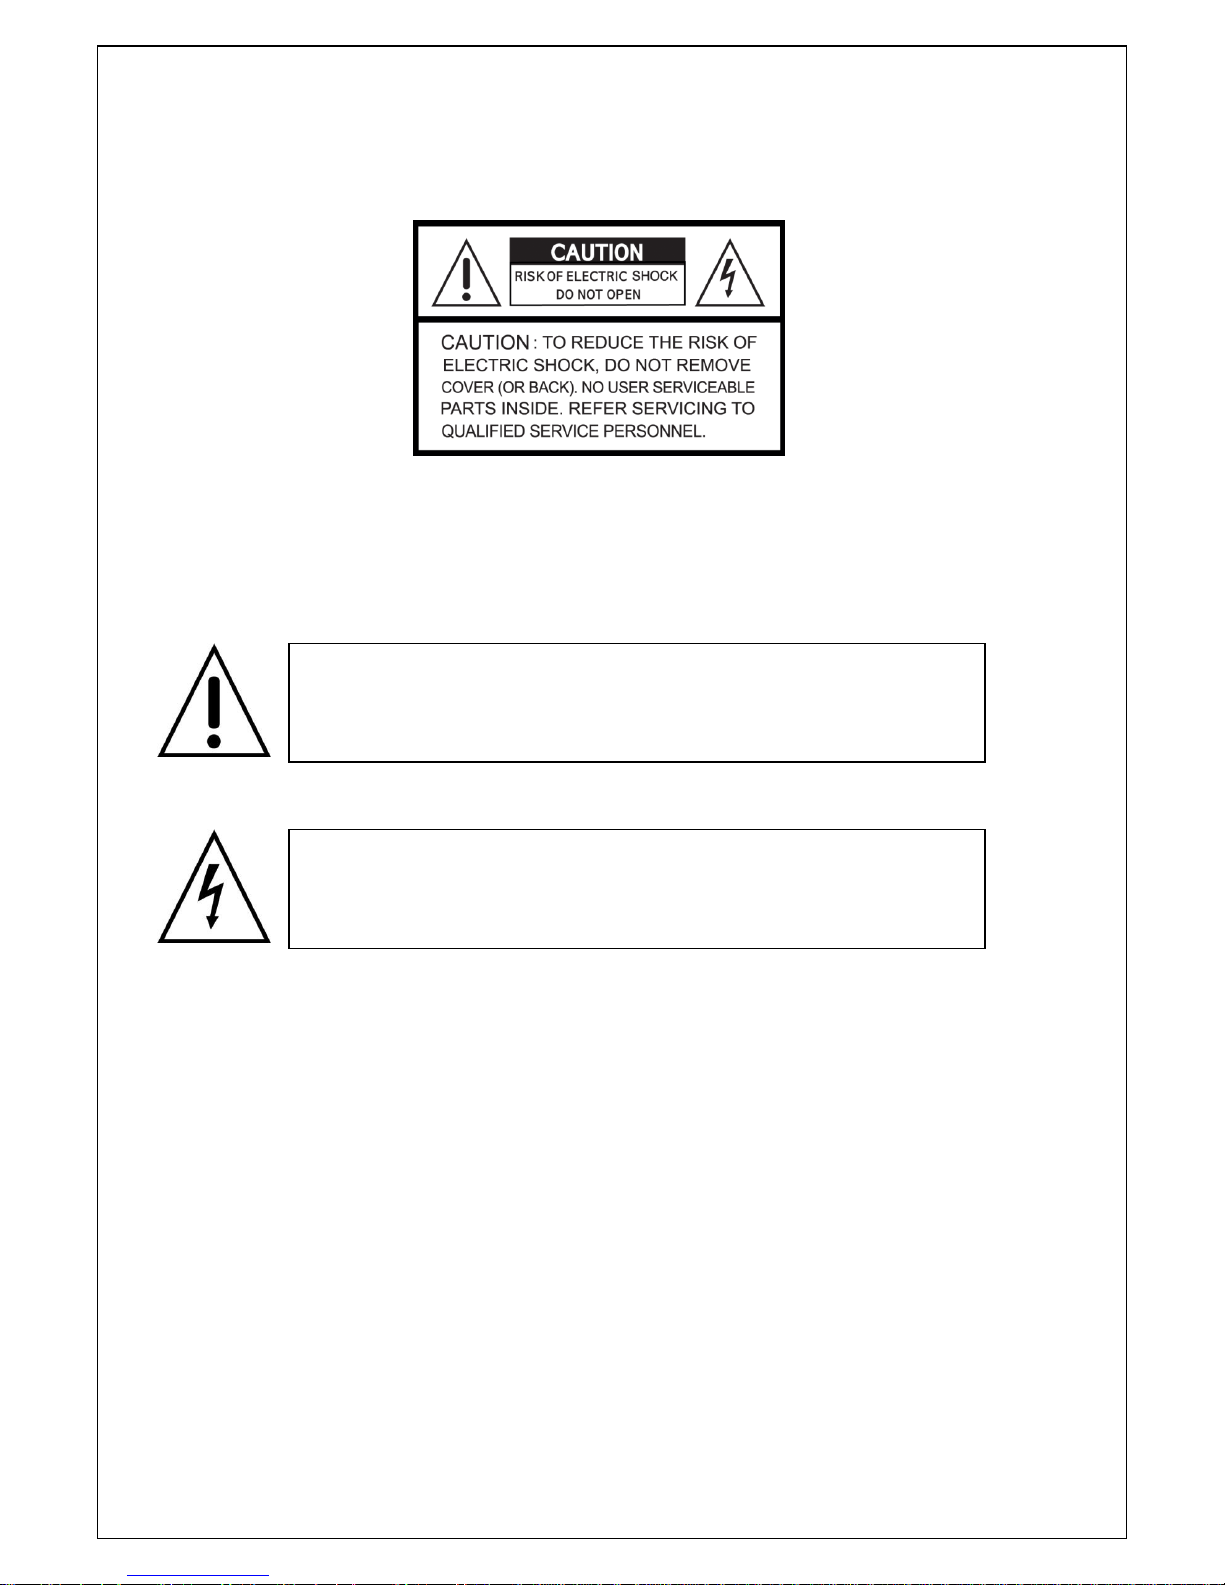
To reduce a risk of fire or electric shock, do not expose this product to rain or moisture.
CAUTION
Changes or modifications not expressly approved by the manufacturer may void the user’s authority to
operate this equipment.
CAUTION
It is danger of explosion if battery is incorrectly replaced.
Replace only with the same or equivalent type recommended by the manufacturer.
Discard used batteries according to the manufacturer’s instructions.
This symbol indicates the presence of important operating and
maintenance (servicing) instructions in the literature accompanying the
product.
This symbol indicates the presence of Uninsulated ”dangerous voltage”
within the product’s enclosure that may be of sufficient magnitude to
constitute a risk of electric shock to persons.
Page 3
3
These precautions must be followed for safety reasons.
Warning
Do not uses if the unit emits smoke, strange sounds are heard, or odor is emitted.
Make sure the power cable is not damaged.
Make sure there is no dust accumulation on the power plug or the outlet.
Disassembly prohibited
Do not place any foreign objects inside the unit.
Do not place a container holding water or other liquids above the unit when it is connected to
power.
Do not allow the unit to get wet.
Do not use during thunder/thunder storms.
Do not place in an unstable position.
Do not expose to shock or vibration.
Do not use this unit in areas where it is exposed to the possibility of explosion.
Caution
Do not pull on the power cable when removing the power plug from the outlet.
Do not touch the power plug with wet hands.
Do not sit on.
Make sure the cables are connected properly.
Do not place heavy objects on connected units.
Never move this unit while the power is turned on.
Remove the power plug from the outlet when the unit is going to remain unused for long periods of
time.
Do not block the cooling fans or air ducts.
Do not expose to extreme temperatures or humidity changes.
Warning
Installation and servicing should be performed only by qualified and experienced personnel.
Turn off the power of the DVR when connecting cameras, audio or sensor cables.
The manufacturer is not responsible for any damage caused by improper use of the product or failure to
follow instructions for the product.
The manufacturer is not responsible for any problems caused by or resulting from the user physically
opening the DVR for examination or attempting to fix the unit. The manufacturer may not be held liable for
any issues with the unit if the warranty seal is removed.
Page 4
4
Product Components
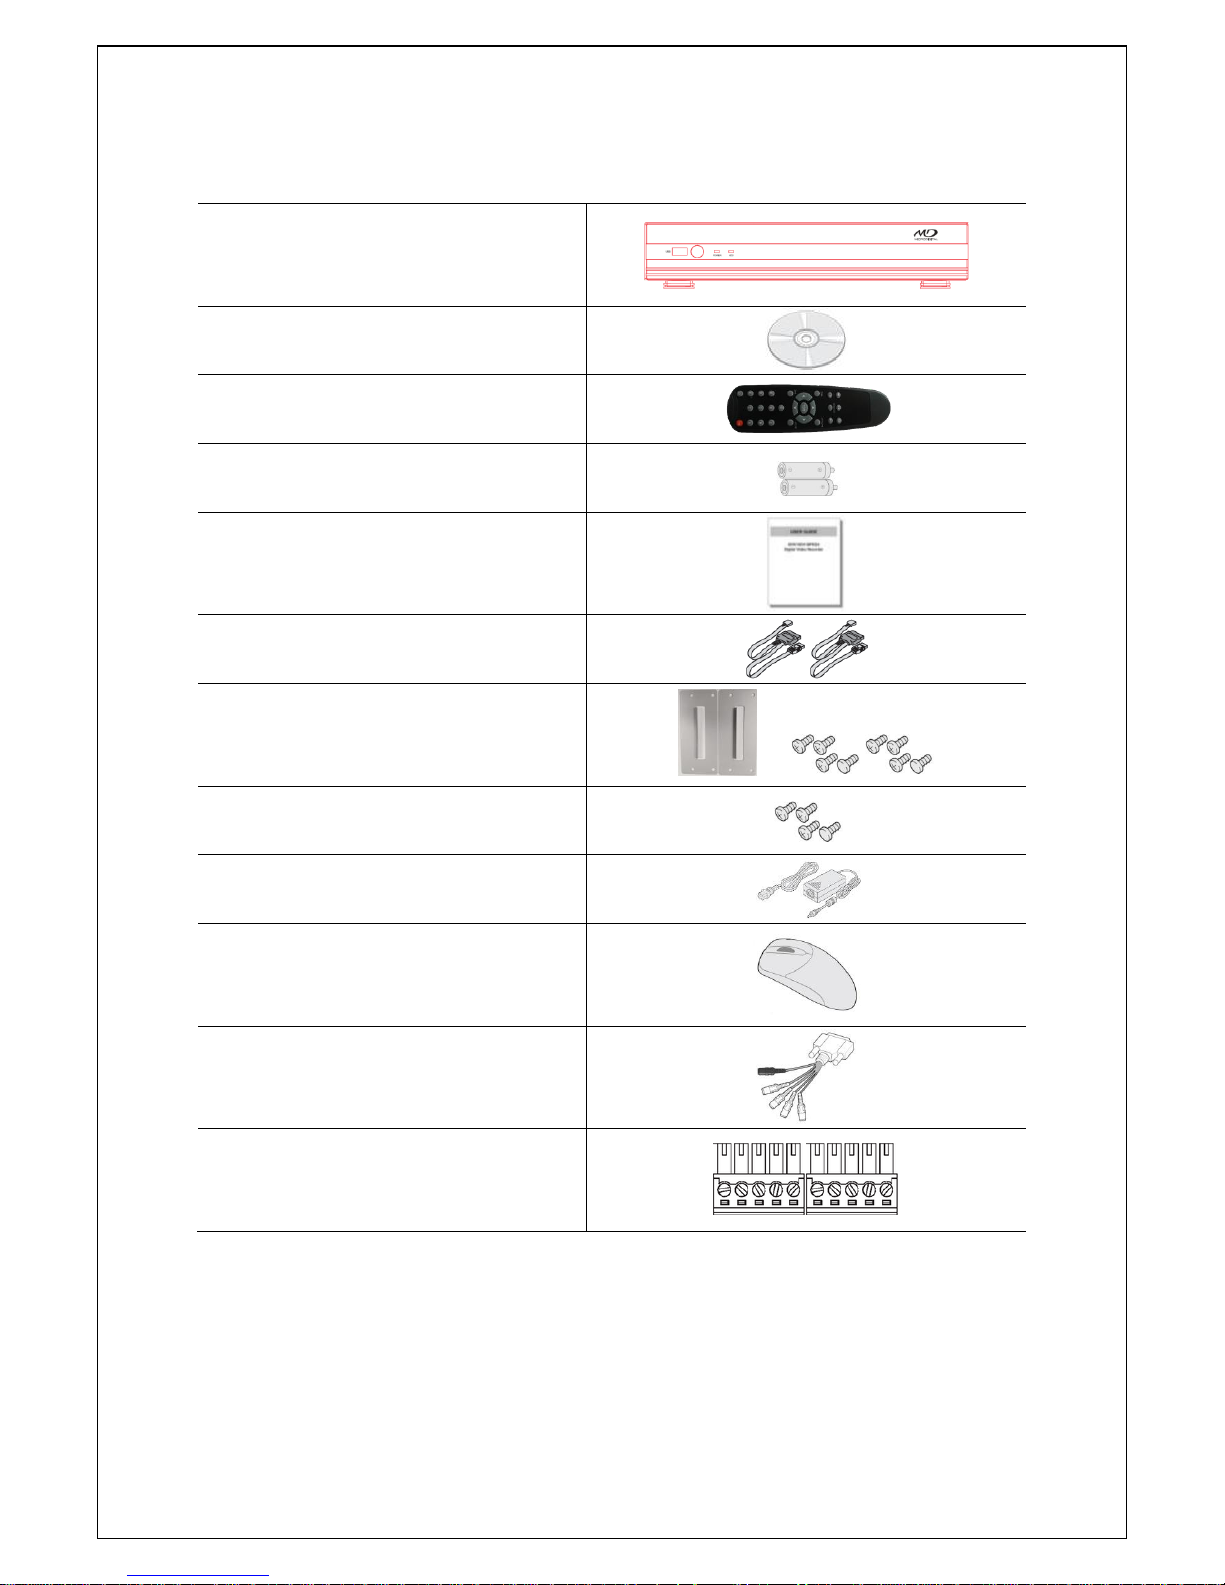
The package contains the main unit and its components as specified below. When you purchase the unit,
Please check to ensure the components specified below are included.
DVR Set (4/8/16ch)
Client Software CD
Remote Control
Battery1.5V (AAA x 2EA)
Quick Guide
HDD data power cable(SATA)
HDD mounting bracket & Screw
/
HDD fixing screw
Adaptor (DC12V 3A or 5A)
& Power Cable
Mouse
Audio cable (16CH only) optional
DIDO Terminal Block(2EA)
Page 5
5
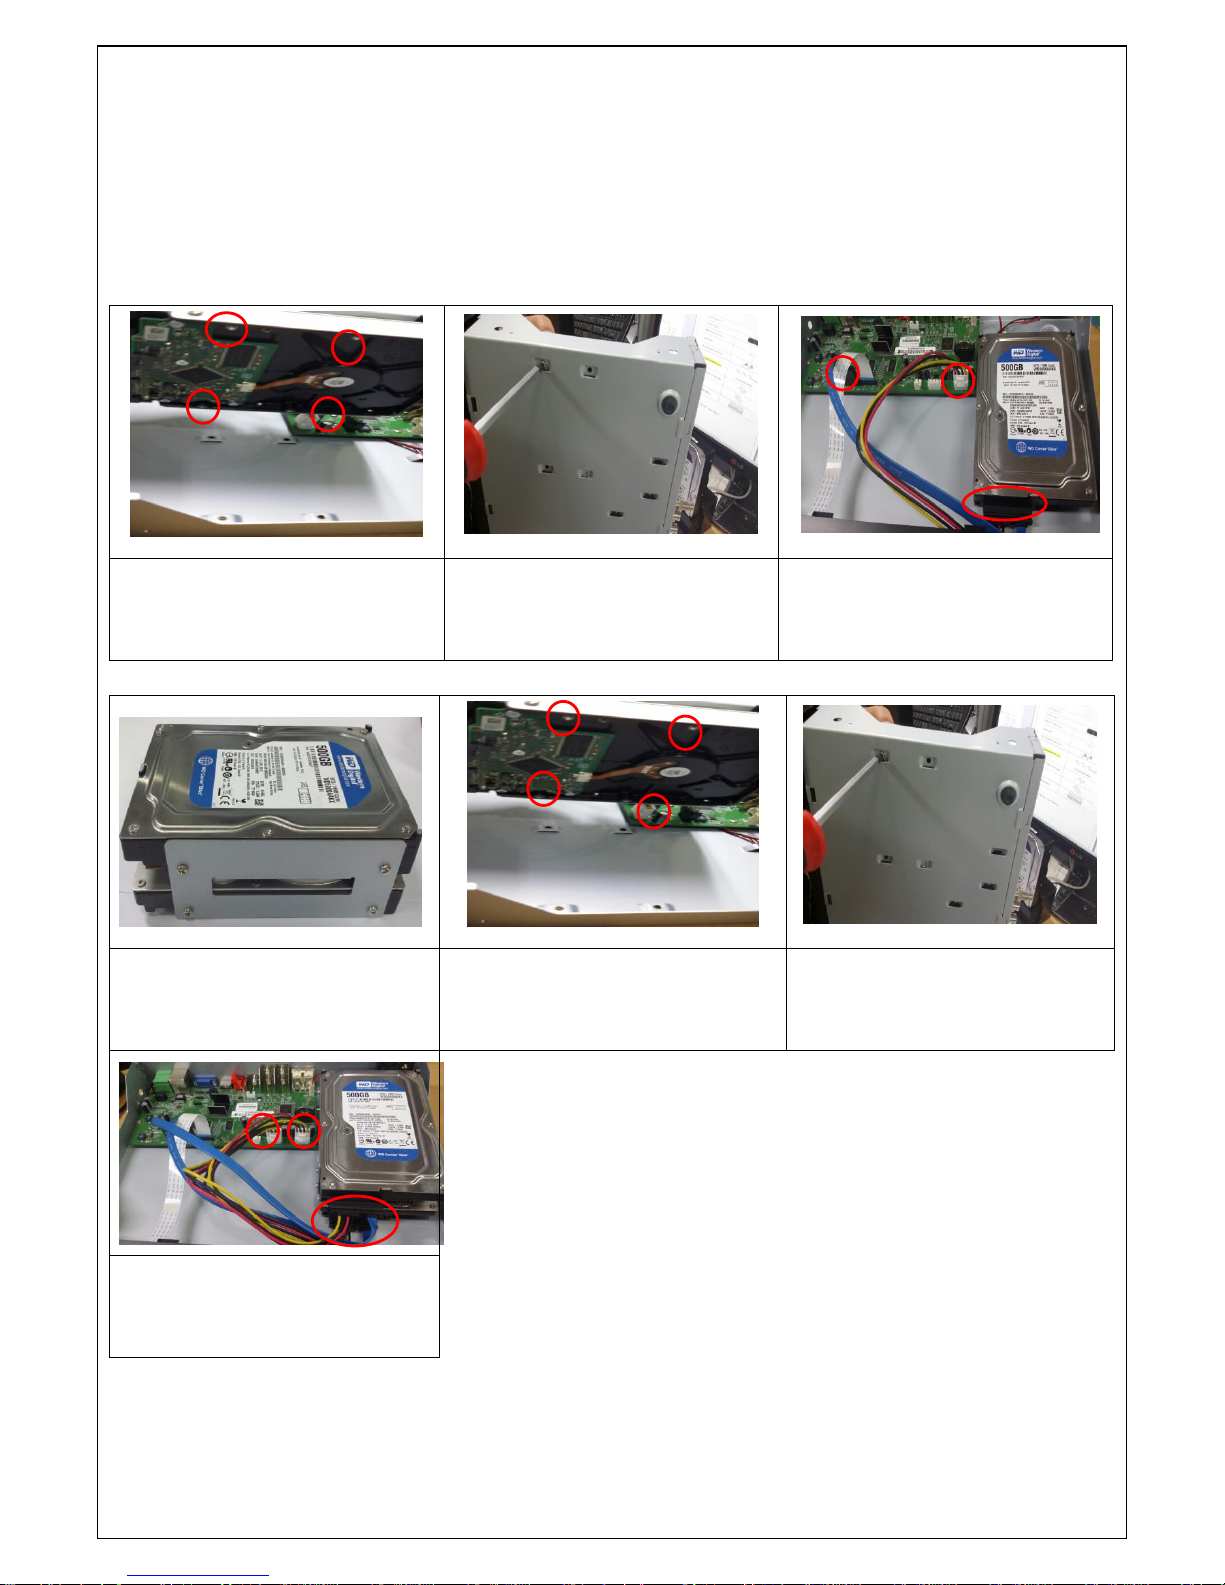
Mounting the HARD DISK (4/8/16ch)
Remove the screws and the top cover
How to mount HDD x 1
1. Mount the HDD into bottom
case as specified above
2. Mount the HDD into bottom
case as specified above
3. Connect the HDD SATA and
HDD power cable as specified
above
How to mount HDD x 2
1. Mount the HDD into the
mounting bracket as specified
above
2. Mount the HDD into bottom case
as specified above
3. Mount the HDD into bottom
case as specified above
4. Connect the HDD SATA and
HDD power cable as specified
above
Page 6
6
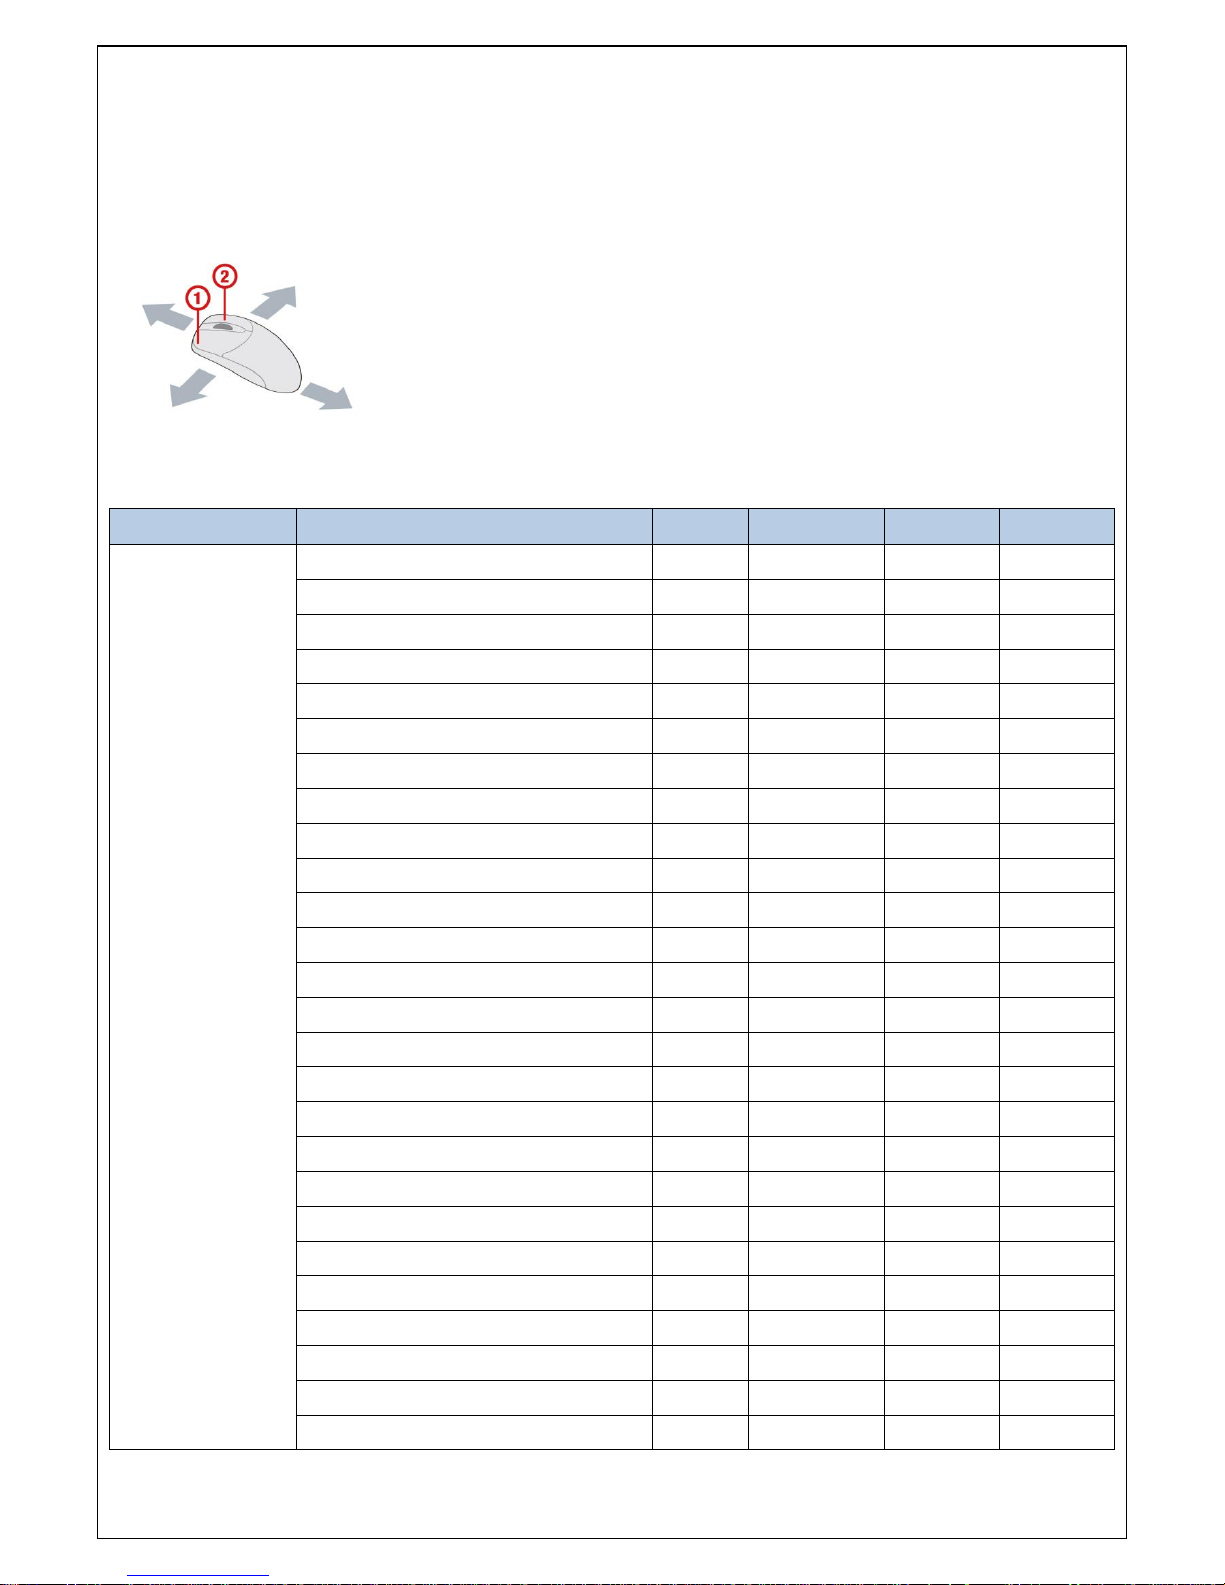
Basic function of the MOUSE
① : Left button: SELECT function
② : Wheel: MOVEMENT function on a drop-down menu
Compatible HDD Models
제조회사
모델명
용량
SATA Type
RPM
BUFFER
Seagate
ST4000VM000-1F3168 [fw: SC25]
4 TB
SATA 3
5900 RPM
64 MB
ST3000VX000-1CU166
3 TB
SATA 3
7200 RPM
64 MB
ST3000VM002-1F316N [fw: SC25]
3 TB
SATA 3
5900 RPM
64 MB
ST3000DM001 [fw: CC43]
3 TB
SATA 3
7200 RPM
64 MB
ST3000DM001 [fw: CC24]
3 TB
SATA 3
7200 RPM
64 MB
ST2000VM003-1CT164 [fw: SC23]
2 TB
SATA 3
5900 RPM
64 MB
ST2000VM003
2 TB
SATA 3
5900 RPM
64 MB
ST2000VM002
2 TB
SATA 2
5900 RPM
64 MB
ST2000VX000-1CU164 [fw: CV22]
2 TB
SATA 3
7200 RPM
64 MB
ST2000DL003
2 TB
SATA 3
5900 RPM
64 MB
ST32000641AS
2 TB
SATA 3
7200 RPM
64 MB
ST2000DM001
2 TB
SATA 3
7200 RPM
64 MB
ST1000VX000
1 TB
SATA 3
7200 RPM
64 MB
ST1000VM002 [fw: SC12]
1 TB
SATA 3
5900 RPM
64 MB
ST1000DM003
1 TB
SATA 3
7200 RPM
64 MB
ST31000524AS
1 TB
SATA 3
7200 RPM
32 MB
ST31000322CS
1 TB
SATA 2
5900 RPM
8 MB
ST31000526SV
1 TB
SATA 3
7200 RPM
32 MB
ST31000524AS
1 TB
SATA 3
7200 RPM
32 MB
ST31000340SV
1 TB
SATA 2
7200 RPM
32 MB
ST31000528AS
1 TB
SATA 2
7200 RPM
32 MB
ST1000VM002-1CT162 [fw: SC23]
1 TB
SATA 3
5900 RPM
64 MB
ST3500312C8
500 GB
SATA 2
5900 RPM
8 MB
ST500DM002
500 GB
SATA 3
7200 RPM
16 MB
ST3500312CS
500 GB
SATA 2
5900 RPM
8 MB
ST3500411SV
500 GB
SATA 3
7200 RPM
16 MB
Page 7
7
ST3500413AS
500 GB
SATA 3
7200 RPM
16 MB
ST3500830SCE
500 GB
SATA 2
7200 RPM
8 MB
ST3500418AS
500 GB
SATA 2
7200 RPM
16 MB
ST3500410AS
500 GB
SATA 2
7200 RPM
16 MB
ST3500312CS [fw: SC13]
500 GB
SATA 2
5900 RPM
8 MB
ST250DM000
250 GB
SATA 3
7200 RPM
16 MB
ST3250312CS
250 GB
SATA 2
5900 RPM
8 MB
ST3250410AS
250 GB
SATA 2
7200 RPM
16 MB
ST3250310SV
250 GB
SATA 2
7200 RPM
8 MB
ST3250318AS
250 GB
SATA 2
7200 RPM
8 MB
ST3160815AS
160 GB
SATA 2
7200 RPM
8 MB
HITACHI
HDS723020BLA642
2 TB
SATA 3
7200 RPM
64 MB
HDS722020ALA330
2 TB
SATA 2
7200 RPM
32 MB
HDS721010DLE630
1 TB
SATA 3
7200 RPM
32 MB
HDS721010KLA330
1 TB
SATA 2
7200 RPM
32 MB
HDT721010SLA360
1 TB
SATA 2
7200 RPM
16 MB
HDS721010CLA332
1 TB
SATA 2
7200 RPM
32 MB
HDS721050DLE630
500 GB
SATA 3
7200 RPM
32 MB
HDS721050CLA362
500 GB
SATA 2
7200 RPM
16 MB
HDP725050GLA360
500 GB
SATA 2
7200 RPM
16 MB
HDS721032CLA362
320 GB
SATA 2
7200 RPM
16 MB
HDS721025CLA382
250 GB
SATA 2
7200 RPM
8 MB
HDT721025SLA380
250 GB
SATA 2
7200 RPM
8 MB
HDP725025GLA380
250 GB
SATA 2
7200 RPM
8 MB
Western Digital
WD40PURX-64GVNY0
/ WD40EURX-64WRWY0
4 TB
SATA 3
64 MB
WD30EURS-63SPKY0
3 TB
SATA 2
5400 RPM
64 MB
WD30EZRX-00MMM
3 TB
SATA 3
5400 RPM
64 MB
WD30EURS-63R8UYO
3 TB
SATA 2
5400 RPM
64 MB
WD30PURX-64P6ZY0
/ WD30EURX-64HYZY0
3 TB
SATA 3
64 MB
WD20PURX-64P6ZY0
/ WD20EURX-64HYZY0
2 TB
SATA 3
64 MB
WD20EURS-63SPKY0
2 TB
SATA 2
5400 RPM
64 MB
WD20EURX-63T0FY0
2 TB
SATA 3
5400 RPM
64 MB
WD20EARS
2 TB
SATA 2
5900 RPM
64 MB
WD20EARX-00PASB0
2 TB
SATA 3
5900 RPM
65 MB
WD20EADS
2 TB
SATA 2
5400 RPM
32 MB
WD20EURS
2 TB
SATA 2
5400 RPM
64 MB
WD10EZEX-00RKKA0
1 TB
SATA 3
7200 RPM
64 MB
Page 8
8
WD10PURX-64D85Y0
/ WD10EURX-64RPPY0
1 TB
SATA 3
64 MB
WD10EURX-63FH1Y0
1 TB
SATA 3
5400 RPM
64 MB
WD10EZRX-00A8LB0
1 TB
SATA 3
5400 RPM
64 MB
WD10EARS-00Y5B1
1 TB
SATA 3
5400 RPM
64 MB
WD10EVDS-63U8B1
1 TB
SATA 3
7200 RPM
32 MB
WD10EALX-229BA1
1 TB
SATA 3
7200 RPM
32 MB
WD10EALX-009BA0
1 TB
SATA 3
7200 RPM
32 MB
WD10EVVS
1 TB
SATA 2
5400 RPM
8 MB
WD10EACS
1 TB
SATA 2
16 MB
WD10EUCX
1 TB
SATA 3
16 MB
WD10EURS-630AB1
1 TB
SATA 2
5900 RPM
64 MB
WD5000AAKX-00ERMA0
500 GB
SATA 3
7200 RPM
16 MB
WD5000AVCS-632DY1
500 GB
SATA 2
5400 RPM
32 MB
WD5000AAKX-221CA1
500 GB
SATA 2
7200 RPM
16 MB
WD5000AAKX-001CA0
500 GB
SATA 3
7200 RPM
16 MB
WD5000AVCS
500 GB
SATA 2
16 MB
WD5000AACS
500 GB
SATA 2
5400 RPM
16 MB
WD2500AVVS-63L2B0
250 GB
SATA 3
WD2500AAKX
250 GB
SATA 3
7200 RPM
16 MB
WD2500AVVS
250 GB
SATA 2
8 MB
WD2500AAKS
250 GB
SATA 2
7200 RPM
16 MB
TOSHIBA
HDS723020BLE640 / DT01ACA200
2 TB
SATA 3
7200 RPM
64 MB
DT01ABA200V
2 TB
SATA 3
5700 RPM
32 MB
NOTICE
The brands and models of all HDD should be the same. If the brands and models of each HDD are different
with others, the DVR may not recognize HDD.
Page 9
9
Specifications
Please note that specifications and unit exterior design are subject to change without notification
MODEL
4CH
8CH
16CH
Description
960H / AHD 2.0 (720p & 1080p) Hybrid DVR
Video
Input
Number of Channels
4
8
16
Camera
720p25/30/50/60, 1080p25/30 or NTSC/PAL
Output
Main Monitor
HDMI and VGA(Max. 1920x1080)
Sub Monitor
CVBS or SPOT
CVBS and SPOT
Audio
Input / Output
4 / 1
Audio Codec
G.711
Alarm
Sensor Input
4
Alarm Output
1
RS-485
1
Recording
Compression
H.264
(Main Profile)
H.264 (High Profile)
1920x1080 Camera Input
1920x1080
15fps/ch
1920x540
15fps/ch
1280x720
15fps/ch
640x360
15fps/ch
1280x720 AHD Camera
Input (PAL/NTSC)
1280x720
25/30fps/ch
640x360
25/30fps/ch
Analog Camera Input
(PAL/NTSC)
960H
25/30fps/ch
D1
25/30fps/ch
CIF
25/30fps/ch
Recording Quality Grade
5 Levels
Recording Mode
Continuous / Motion / Sensor / Schedule / Manual
Pre Recording
Max. 20 Minutes
Post Recording
Max. 60 Seconds
Playback
Search
Date/Time, Event, Archive, Log
Multi-Decoding
1, 4
1, 4, 8
1, 4, 9, 16
Playback Speed
x0.25, x0.5, x2, x4, x8, x16, x32 & x64
Backup
Media
USB drive, External HDD, Network
Format
BMP, AVI, Proprietary Format
Huge Backup
Yes (Max. 24 hours)
Storage
HDD
Capacity of 1 HDD
4TB
Internal HDDs
2 2 2
Page 10

10
e-SATA
None
USB
Front
1
Rear
1
User I/F
Input Method
IR, Mouse, Keyboard Controller
Network
Network Interface
10/100 Base-T
10/100/1000
Base-TX
Dynamic DNS
Yes (Free DDNS)
Dual Encoding for Network
Yes
Features
Digital Zoom
Yes
DLS (Day Light Saving)
Yes
NTP (Network Time Protocol)
Yes
S.M.A.R.T
Yes
Internal Beep
Yes
Multi-Language
Yes
e-mail Notification
Yes
Network
Access
Mobile
iPad / iPhone / Android
Web Viewer
Windows (IE, Chrome, Firefox, Safari)
PC Client
Single / Multi Client and CMS (64 channels)
Remote Setup and Upgrade
Yes
Power
Power Supply Voltage
DC 12V 5A
Temperature
Operation
5°C ~ 40°C
Storage
-10°C ~ 50°C
Humidity
Operation
20% ~ 80% (Non-condensing)
Weight
Unit Weight (Gross weight)
4.1Kgs (6.0Kgs)
Dimension
Unit Dimension (W x H x D)
380mm x 340mm x 72mm
Please note that specifications and unit exterior design are subject to change without notification
Page 11

11
Table of Contents
1. Main Features ............................................................................................................ 14
2. Name, Function and Connection ................................................................................ 15
2-1. Front Panel ................................................................................................................................... 15
2-2. Rear Panel ................................................................................................................................... 15
2-3. Remote control ............................................................................................................................. 16
3. Setting up the DVR ..................................................................................................... 17
3-1. Setup – Main Screen .................................................................................................................... 17
3-1-1. Setup – MENU TREE ................................................................................................................ 18
3-2. Setup – Display Mode .................................................................................................................. 21
3-3. Setup – Recording Mode .............................................................................................................. 22
3-3-1. Recording Schedules ................................................................................................................ 24
3-4. Setup – Device Mode ................................................................................................................... 24
3-4-1 Controller & PTZ Setup .............................................................................................................. 26
3-4-2. Motion Zone Setup .................................................................................................................... 27
3-5. Setup – Storage Mode .................................................................................................................. 28
3-6. Setup – System Mode .................................................................................................................. 29
3-7. Setup – SECURITY Mode ............................................................................................................ 34
3-8. Setup – Network Mode ................................................................................................................. 36
3-8-1. Port, Network Audio Port and Web Port ..................................................................................... 37
3-8-2. Network Types .......................................................................................................................... 38
3-8-2-1. DHCP ..................................................................................................................................... 38
3-8-2-2. STATIC ................................................................................................................................... 38
3-8-3. DDNS ........................................................................................................................................ 38
3-8-4. Network Stream ......................................................................................................................... 39
3-9. Setup - CONFIG Mode ................................................................................................................. 39
4. Live, Search and Playback ......................................................................................... 41
4-1. Live Viewing Screen ..................................................................................................................... 41
4-2. SEARCH Screen .......................................................................................................................... 44
4-2-1. TIME-LINE Search ................................ ................................................................ .................... 44
4-2-2. Event Search ............................................................................................................................. 45
4-2-3. Go To First Time ........................................................................................................................ 46
4-2-4. Go To Last Time ........................................................................................................................ 46
4-2-5. Go To Specific Time ................................................................................................................... 46
4-2-6. Archive Search .......................................................................................................................... 46
4-2-7. Log Search ................................................................................................................................ 47
4-3. Play mode .................................................................................................................................... 48
Page 12

12
4-4. Digital Zoom in Live and Playback Screen ................................ .................................................... 49
5. PTZ Control ................................................................................................................... 50
6. Back up ......................................................................................................................... 51
6-1. Still Image backup onto USB flash Drive....................................................................................... 51
6-2. Video backup onto USB flash Drive ................................................................ .............................. 51
6-3. Transferring still images or video from the ARCHIVE list .............................................................. 52
6-4. Playback of Backup Video ............................................................................................................ 53
7. Upgrading Firmware ...................................................................................................... 54
8. Network access using the Exclusive network viewer, UMS single .................................. 58
8-1. PC requirements .......................................................................................................................... 58
8-2. Installing the network viewer ......................................................................................................... 59
8-3. Live monitoring mode and functions. ............................................................................................ 60
8-4. Bi directional audio ....................................................................................................................... 62
8-5. Remote search mode and functions ................................................................ ............................. 62
8-6. PC System configuration .............................................................................................................. 65
8-7. UMS Client Connection ................................................................................................................ 70
9. Network access using the Exclusive network viewer, UMS Multi ................................... 71
9-1. Overview ...................................................................................................................................... 71
9-2. Minimum PC requirements ........................................................................................................... 71
9-3. Installing the program ................................................................................................................... 72
9-4. Live Window ................................................................................................................................. 73
9-4-1. Main user interface .................................................................................................................... 73
9-4-2. Control buttons .......................................................................................................................... 73
9-5. Search and Playback Window ...................................................................................................... 75
9-5-1. Main user interface .................................................................................................................... 75
9-5-2. Main control panel ..................................................................................................................... 75
9-6. Setup of UMS Multi Client............................................................................................................. 77
9-6-1. General ..................................................................................................................................... 77
9-6-2. Event ......................................................................................................................................... 78
9-6-3. Record ...................................................................................................................................... 79
9-6-4. DISPLAY ................................................................................................................................... 80
9-6-5. Language .................................................................................................................................. 80
9-6-6. About ......................................................................................................................................... 81
9-7. Remote Setup .............................................................................................................................. 81
9-7-1. Display ...................................................................................................................................... 82
9-7-2. Record ...................................................................................................................................... 83
9-7-3. Device ....................................................................................................................................... 84
9-7-4. Storage ...................................................................................................................................... 85
9-7-5. System ...................................................................................................................................... 86
9-7-6. Security ..................................................................................................................................... 88
9-7-7. Network ..................................................................................................................................... 89
Page 13

13
9-7-8. Upgrade .................................................................................................................................... 90
9-7-9. Information ................................................................ ................................................................ 90
9-8. Operation ..................................................................................................................................... 91
9-8-1. Addition, Delete, and modify of DVR sites ................................................................................. 91
9-8-1-1. Addition of sites ...................................................................................................................... 91
9-8-1-2. Delete of sites ........................................................................................................................ 91
9-8-1-3. Modify of sites ........................................................................................................................ 92
9-8-2. Connect and Disconnect ........................................................................................................... 92
9-8-2-1. Connect ................................................................................................................................. 92
9-8-2-2. Disconnect ............................................................................................................................. 93
9-8-3. Still-image capture during Live .................................................................................................. 94
9-8-4. Recording Video on local PC during Live .................................................................................. 95
9-8-5. Local Playback and Remote Playback ....................................................................................... 96
9-8-5-1. Playback of recorded video on local PC ................................................................................. 96
9-8-5-2. Playback of recorded video on remote DVR ........................................................................... 97
9-8-6. AVI Backup during playback ...................................................................................................... 98
10. Network – By an web-browser viewer .......................................................................... 99
APPENDIX: How to connect network................................ ............................................... 102
A. How to set IP address of the DVR and open TCP port of the router? .......................................... 102
B. How to access DVR from Remote PC? ...................................................................................... 103
C. How to access DVR with iPhone? .............................................................................................. 106
D. How to access DVR with Android? ............................................................................................. 110
Page 14
14
1. Main Features
All Video input is detected automatically(Analog / 960H / AHD 720p / AHD 1080p)
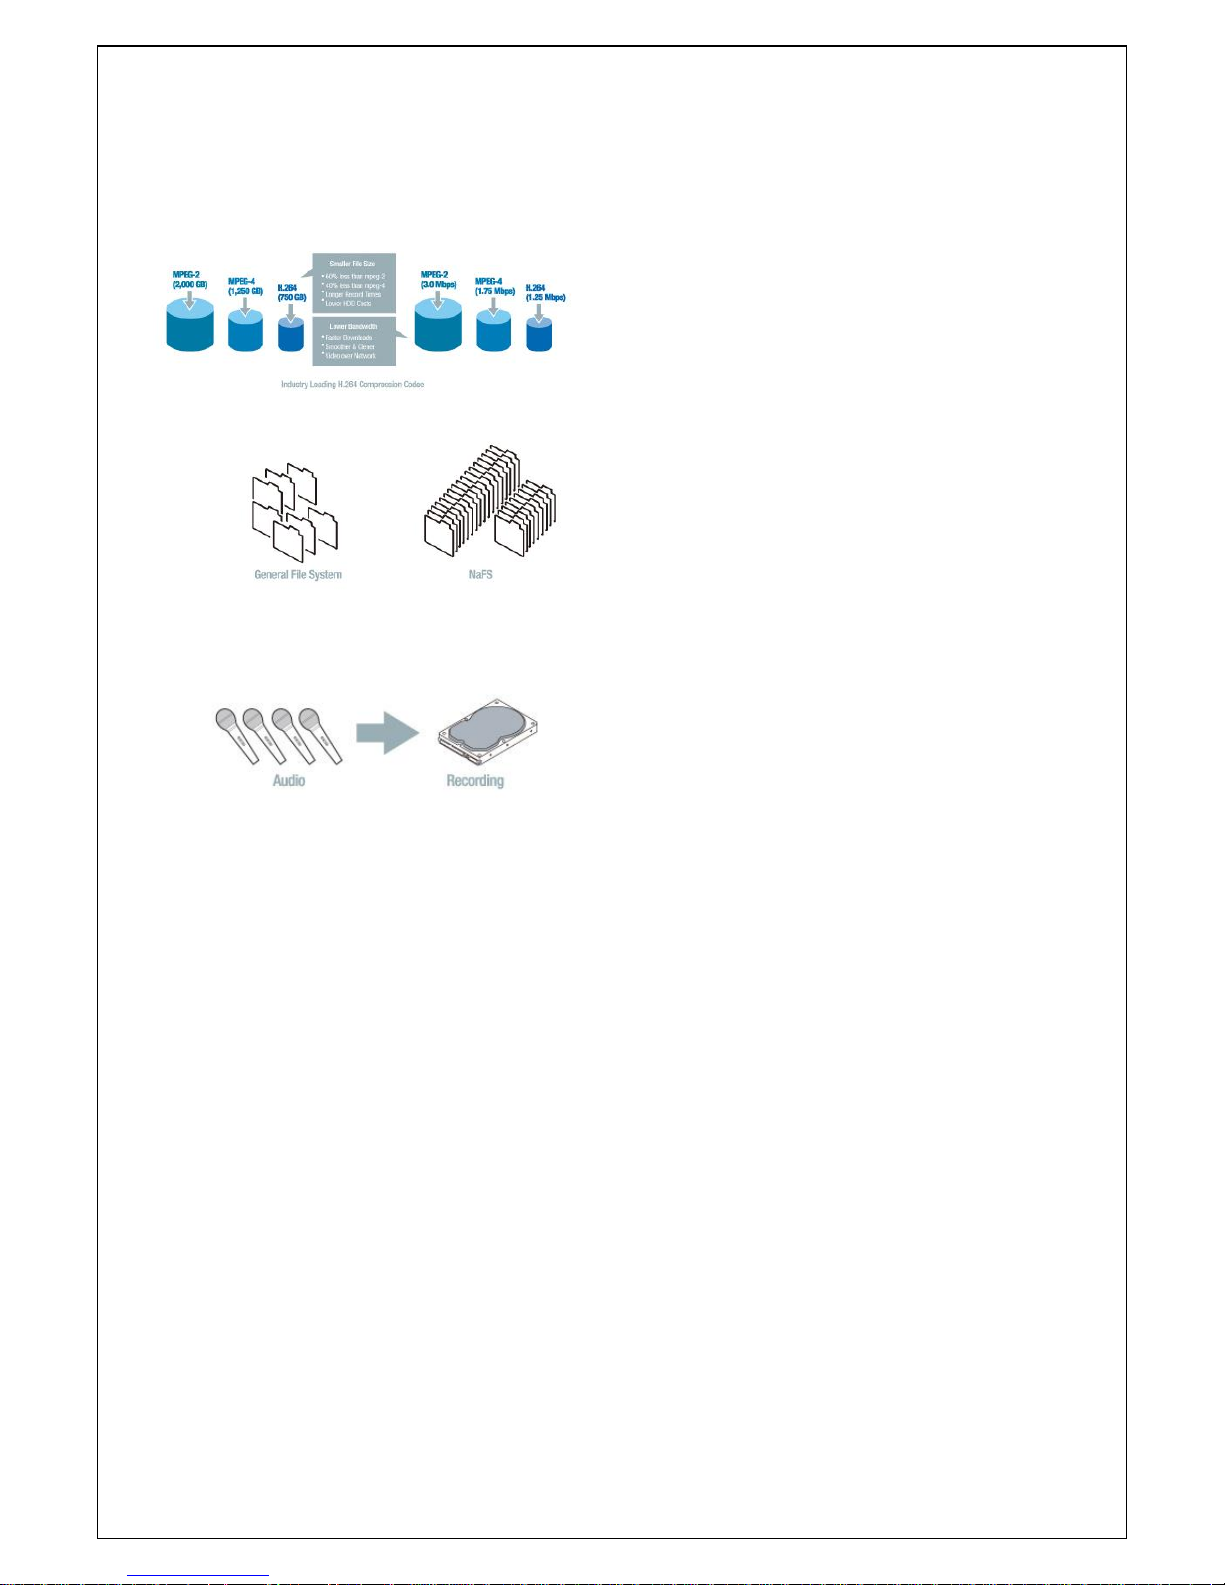
H.264 Video compression
Reliable File system
HDMI & VGA Output
4 channel audio recording
Individual channel operation
Motion detection
Automatic video input and video loss detection
Covert camera operation provides enhanced security
Built-in PTZF camera control
Easy and simple user interface
Easy scheduler
Easy software upgrade
Instant and convenient backup via USB flash drive, network
Exclusive file format backup
AVI backup
Various ways of network access via Network client software, Web-viewer, CMS, UMS(Multi-site
monitoring software) and Mobile Viewer
Page 15
15
2. Name, Function and Connection
2-1. Front Panel
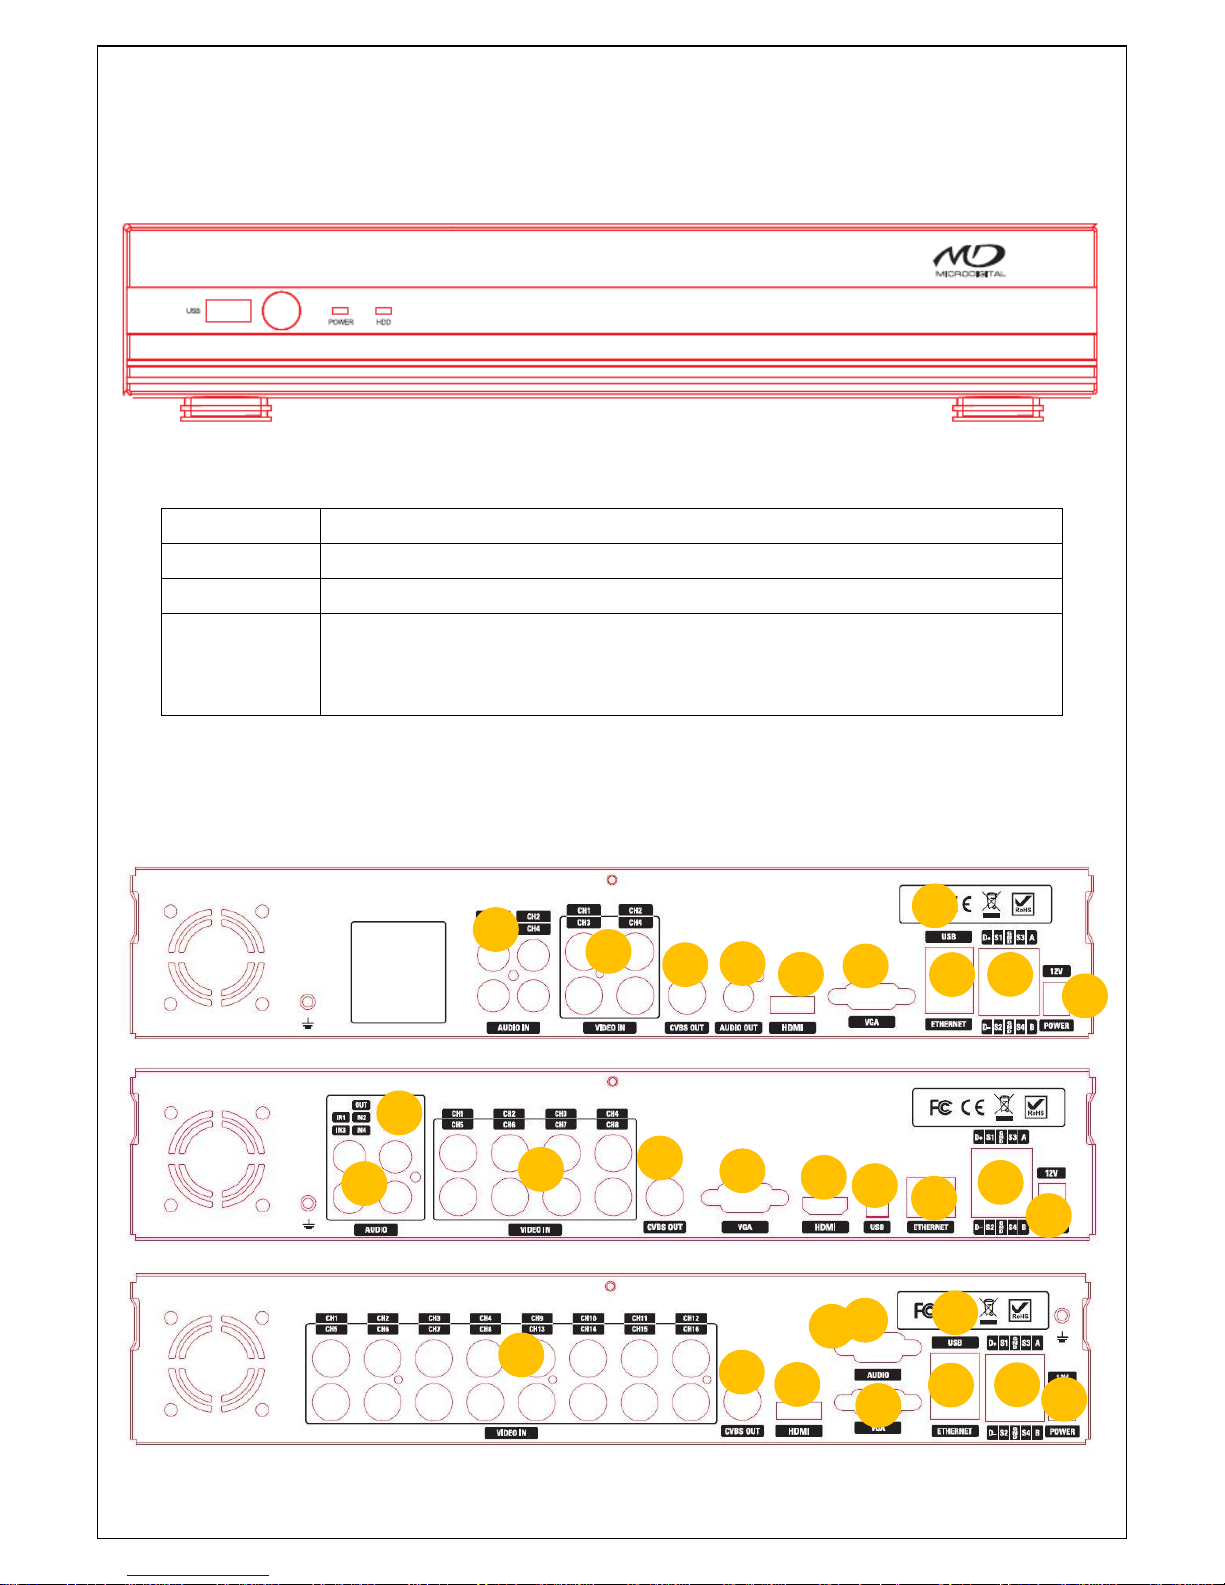
The following information will help you to operate the front panel controls.
4/8/16 CH
Name
Description
POWER
LED light is on when power is applied to the system.
HDD
LED light is on when the system is recording video data.
USB port
There is a USB port located on the left side of the front panel. This
USB port is used to archive footage into a USB storage device. (USB
2.0 connector)
2-2. Rear Panel
1
1
1
2
2 2 3
3
3
4
4 4 5
5 5 6
6
7
7
7
8
8
8
9
9
9
10
6
10
10
Page 16
16
Table 2.2.1. Rear panel connections
NO
Connection
Purpose
1
VIDEO IN
connectors for video input. (960H & Analog HD)
2
AUDIO IN
4 connectors for audio input.
3
AUDIO OUT
1 connector for audio output.
4
HDMI OUT
HDMI connectors for main video output.
5
VGA OUT
Connector for VGA monitor.
6
ETHERNET
RJ-45 Connector for LAN Connection, used for Internet
Connection.
7
USB Port
USB terminal for video export or firmware upgrade
8
SENSOR IN
4 connectors for sensor device connection.
ALARM OUT
1 connector for alarm device connection.
Provides simple On/Off switching by using relay. 0.5A/125V,
1A/30V
RS-485
RS-485 control terminal (+, -)
9
POWER SOCKET
DC 12V Input terminal
10
CVBS OUT
CVBS OUT , SPOT OUT
2-3. Remote control
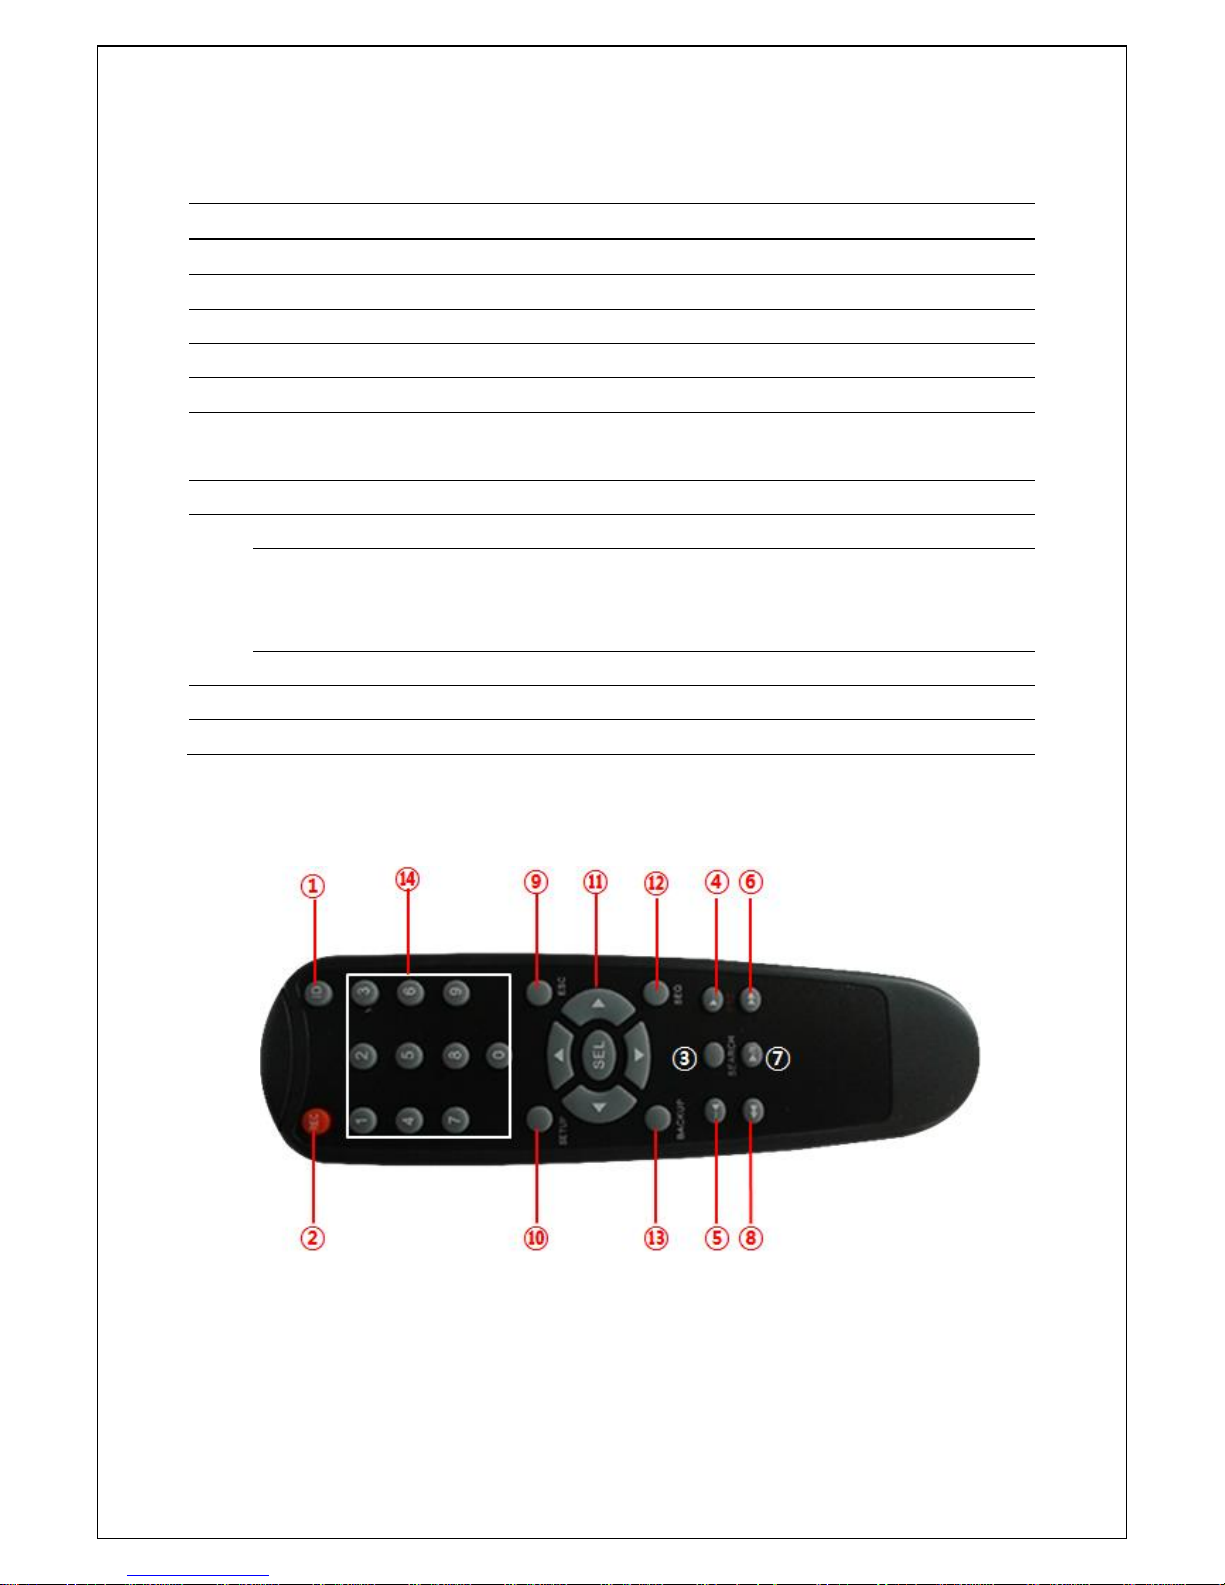
Figure 2.3.1. Remote Controller Button
① ID: To set the remote control ID.
② REC: To start and stop manual recording
③ SEARCH: To go to SEARCH menu.
④ F/ADV:
Page 17
17
During playback – To move the playback position 60 seconds forward .
During Pause – To move the playback position moves 1 frame forward
⑤ F/REW:
During playback – To move the playback position 60 seconds back.
During Pause – To move the playback postion 1 frame back.
⑥ FF: To fast forward the recording.
⑦ PLAY/PAUSE: To play or to pause the recording in playback mode
⑧ REW: To rewind the recording.
⑨ ESC:
During setup – To retun to the preivous menu screen.
During Playback – To exit playback mode
System lock – To lock a system when pressing ESC button for 5 seconds.
System unlock – To unlock a system when pressing ESC button for 5 seconds.
⑩ SETUP: To open the SETUP menu.
⑪ Direction buttons: To move menu items or select a channel.
⑫ SEQ: To start auto sequencing the screen in full screen mode. (Toggle)
⑬ BACKUP: To start a backup operations in live or playback mode
⑭ 0~9: To select channel (1,2,3,..) or to enter a DVR ID number or use as number key.
3. Setting up the DVR
The following sections detail the initial setup of a DVR.
3-1. Setup – Main Screen
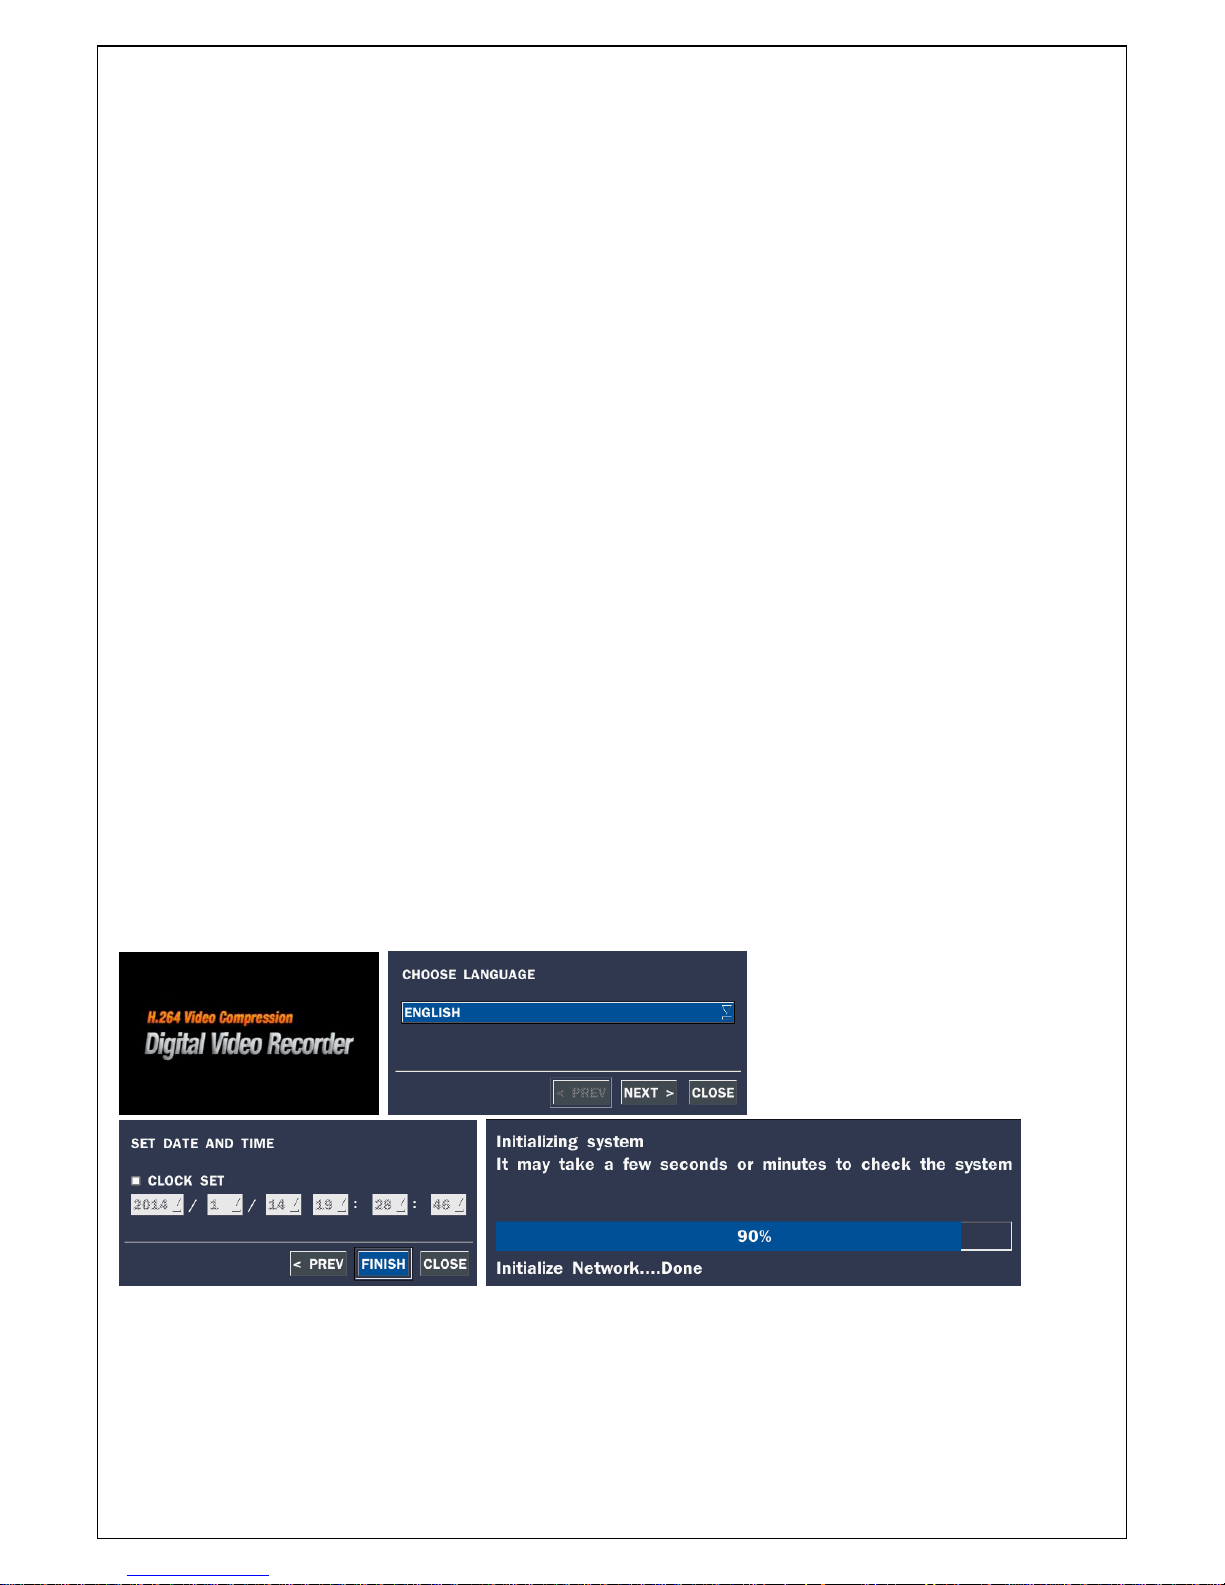
When booting a system at first, the following messages display. After initializing, select a language and set
the time.
Page 18
18
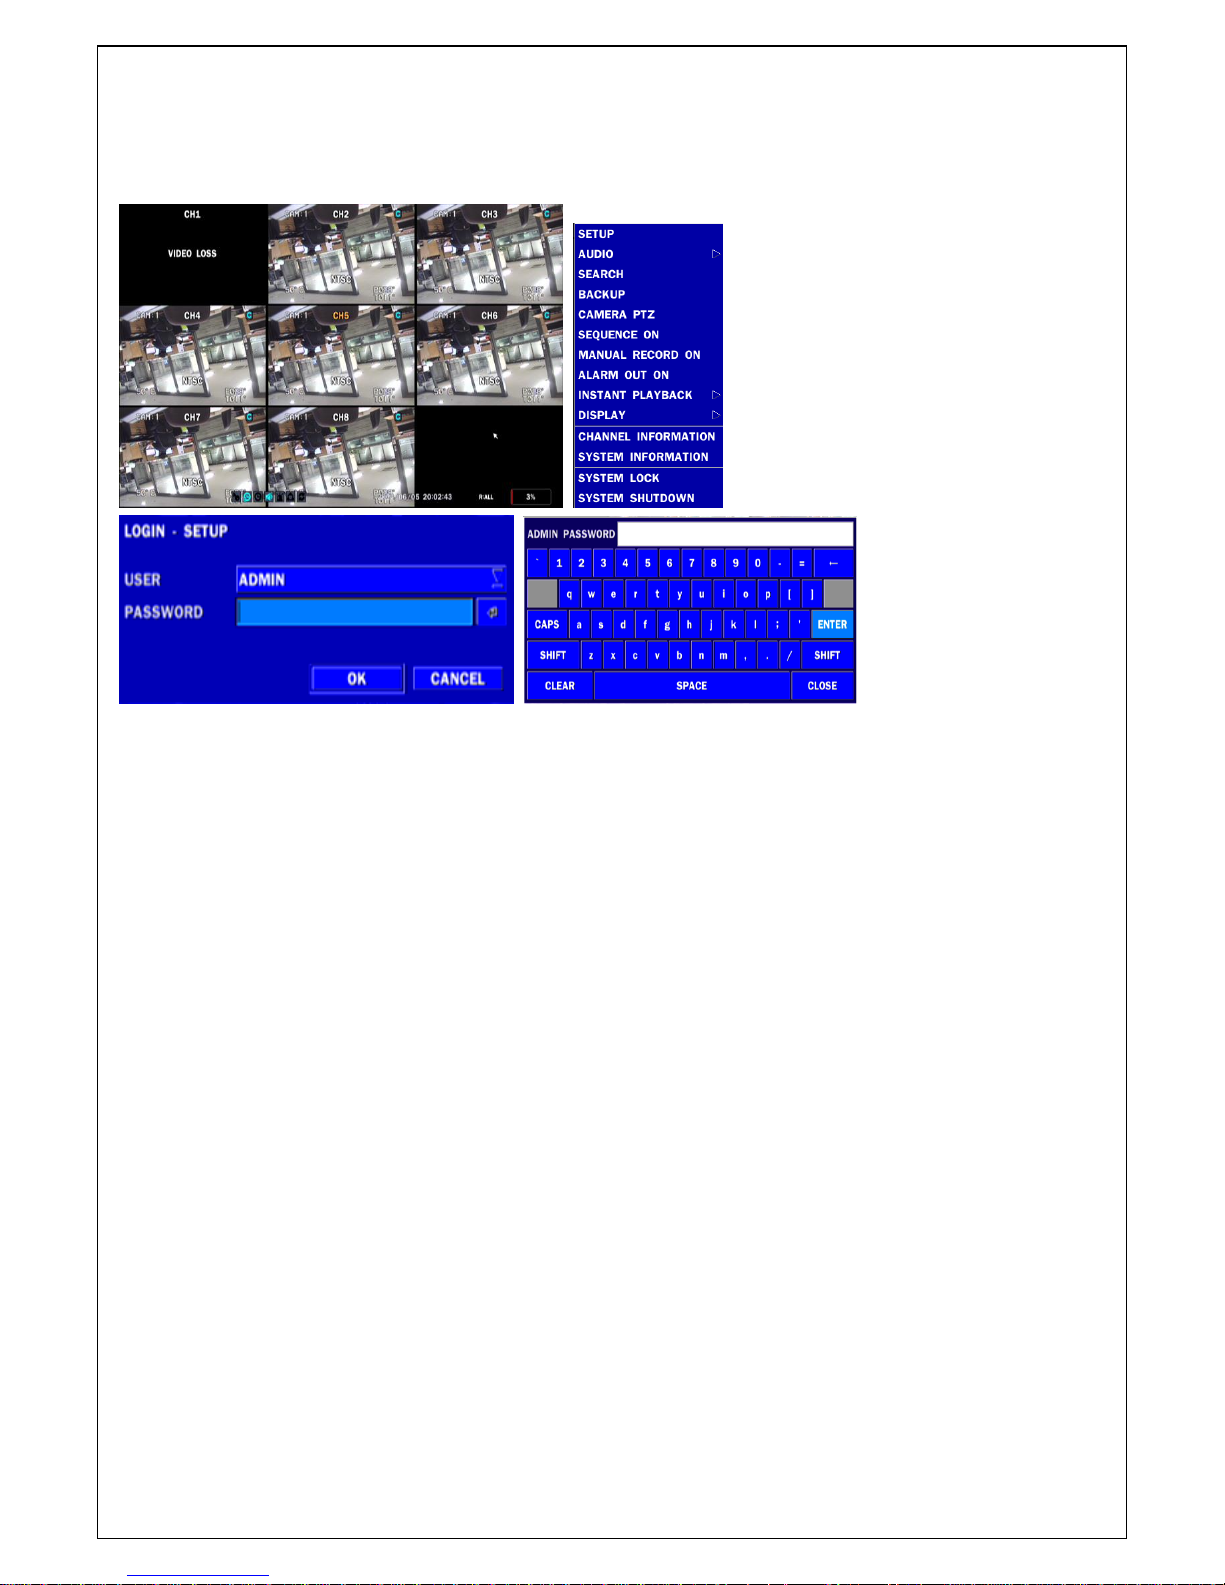
To enter the setup menu, select a right button of the mouse or press the SETUP button on the remote
control.
Table 3.1.1. Setup menu tree
When the DVR prompts the LOG-IN window, enter the PASSWORD using the virtual keyboard, or the front
panel, or the remote control. The factory default password is 1111. It is highly recommended to assign a
new password to protect the system. User can assign a new password in SECURITY setup menu
CONTROL BAR SHOW: Set to hide automatically or display continuously a control bar on the bottom side
in a live mode.
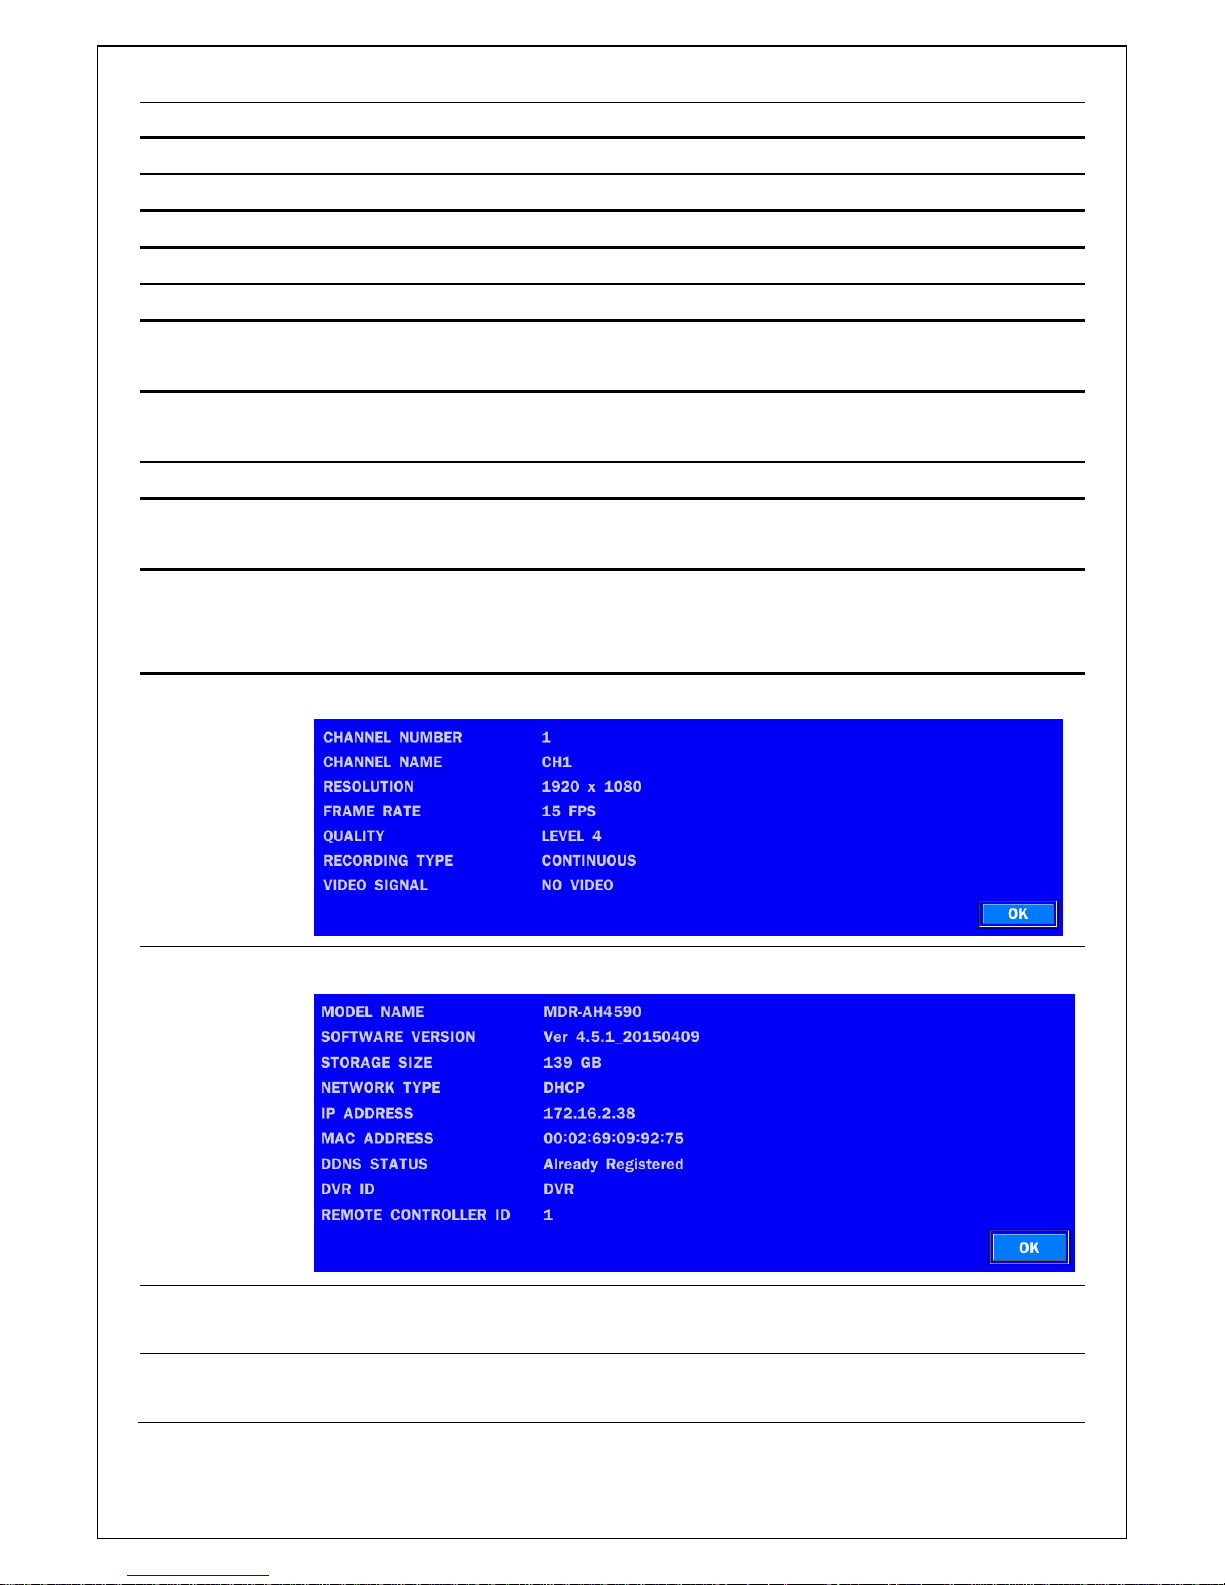
CHANNEL INFORMATION: Display a channel number, channel name, resolution, frame rate, quality and
recording type of each channel.
SYSTEM INFORMATION: Display a software version, storage size, network type, IP address, MAC
address, DDNS status, DVR ID and remote controller ID of the system.
SYSTEM LOCK: To lock the system, user input a password. To unlock the system, please press ESC
button for 5 seconds on a front panel or a remote control. You can also unlock the system when pressing
LOCK icon on the screen using a mouse control. Then, the system will ask a password.
3-1-1. Setup – MENU TREE
DISPLAY
– OSD
– OSD CONTRAST
– SEQUENCE
– SEQUENCE DWELL TIME
– CHANNEL
Page 19

19
- NAME
- COVERT
- BRIGHTNESS
- CONTRAST
- HUE
- SATURATION
– MAIN OUTPUT RESOLUTION
– SUB MONITOR OUTPUT(CVBS/SPOT)
RECORD
– CHANNEL
- RESOLUTION
- FRAME RATE
- QUALITY
- RECORDING
- SENSOR RECORDING
- PRE RECORD
- POST EVENT RECORD
- AUDIO
- SCHEDULE
DEVICE
– ALARM OUT
- ALARM DURATION
– CONTROLLER & PTZ
- CONTROLLER
- SPEED
- ID
- CHANNEL
- CAMERA
- SPEED
- ID
– CHANNEL
- MOTION ZONE
- MOTION SENSITIVITY
– KEY TONE
– REMOTE CONTROLLER ID
– SENSOR
- TYPE
STORAGE
– OVERWRITE
– DISK FORMAT
– DISK INFO
Page 20

20
– RECORDING LIMIT
- RECORDING LIMIT DAYS
SYSTEM
– DVR-ID
– DESCRIPTION
– LANGUAGE
– DATE FORMAT
– SET DATE & TIME
- TIME DISPLAY FORMAT
- TIME ZONE
- DAYLIGHT SAVING
- SET DATE & TIME
– CLIENT ACCESS
– NTP
– SEND EMAIL
– SYSTEM EVENT NOTIFICATION
SECURITY
– USER AUTHENTICATION
– USER NAME
– USER PASSOWRD
– PLAYBACK AUTHORITY
– NETWORK LIVE AUTHORITY
– NETWOR PLAYBACK TIMEOUT
NETWORK
– PORT
– NETWORK AUDIO PORT
– WEB PORT
– NETWORK TYPE (DHCP, STATIC)
- IP
- SUBNET MASK
- GATEWAY
- DNS(PRIMARY)
- DNS(SECONDARY)
– DDNS
- OFF
- DDNS SERVER 1
- DDNS SERVER 2
- DDNS SERVER 3
– NETWORK STREAM
- RESOLUTION
- FRAME RATE
Page 21
21
- QUALITY
– WIRELESS LAN
CONFIG
– SAVE SETUP TO A USB
– LOAD SETUP FROM A USB
– LOAD DEFAULT
– LOAD FACTORY DEFAULT
– SOFTWARE UPGRADE
3-2. Setup – Display Mode
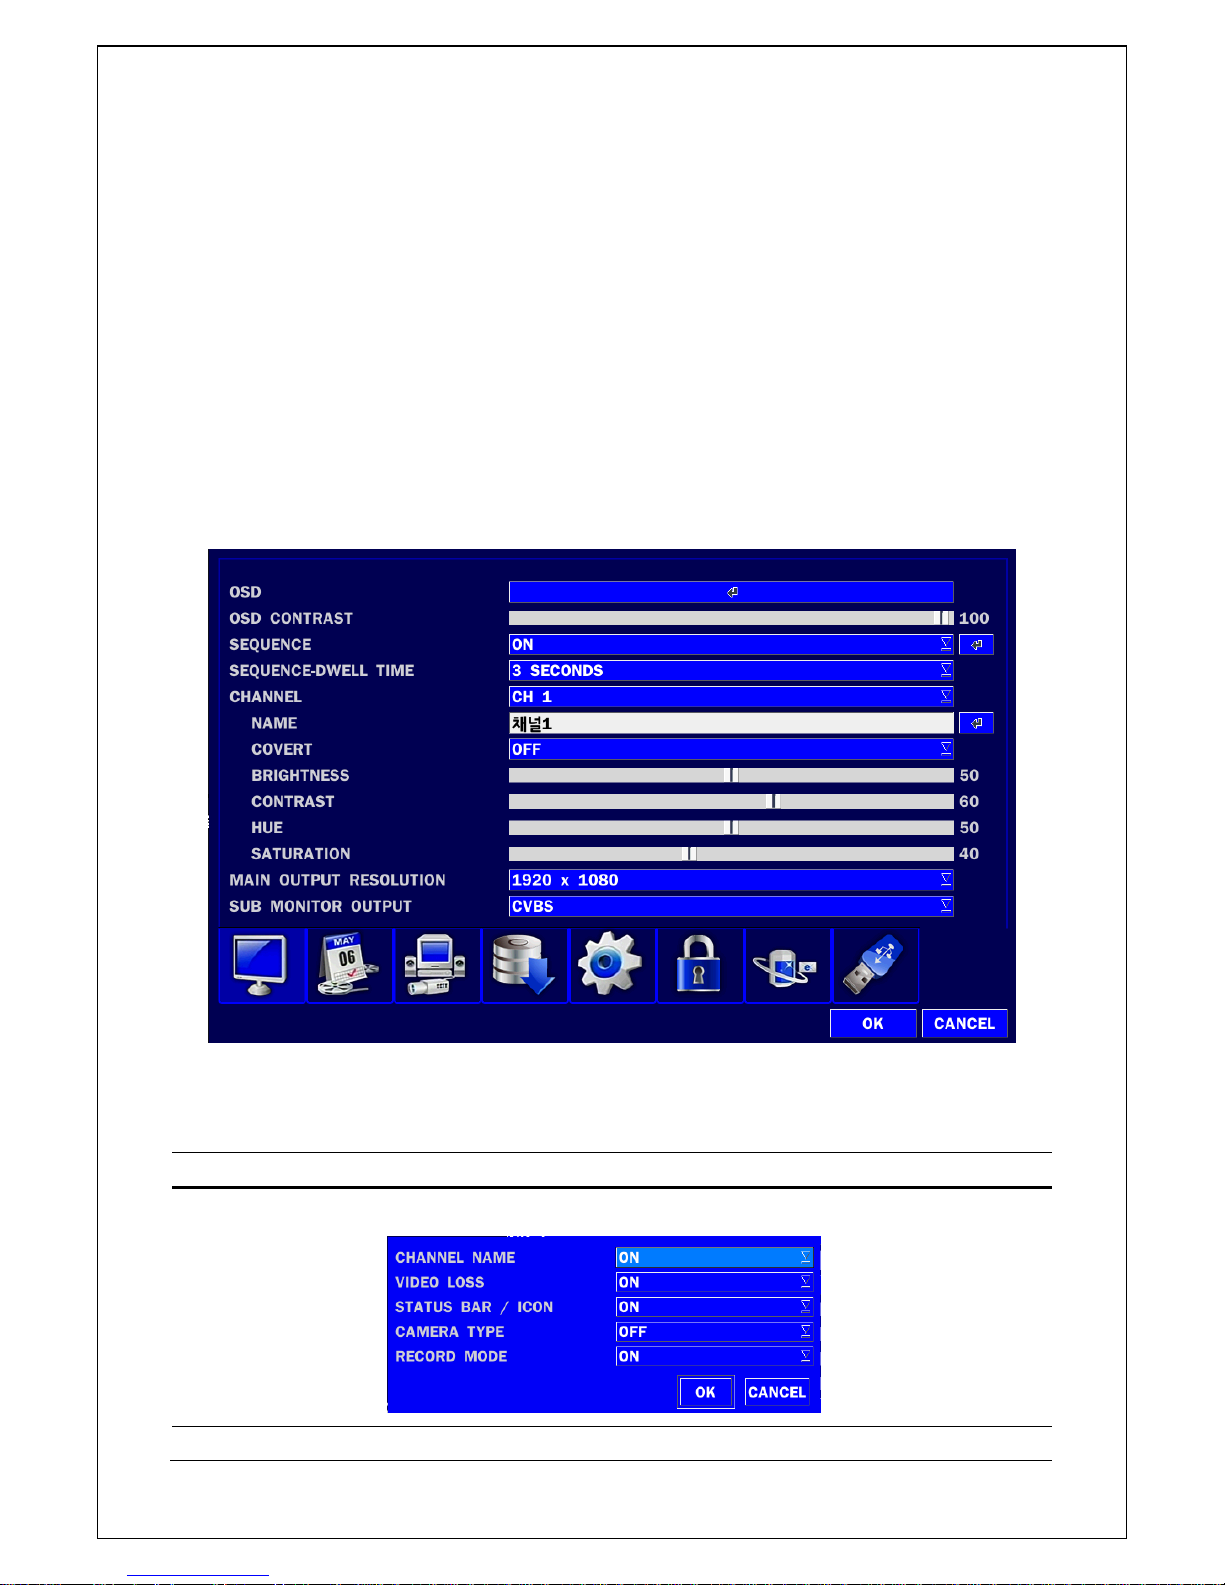
In the SETUP menu, select the DISPLAY tab. Then, the DISPLAY menu is displayed as pictured below.
Navigate through the menu items or change the settings using the mouse or the remote control. To return to
the previous setup menu screen, press the ESC button.
Figure 3.2.1. Display mode setup screen
Table 3.2.1. Menu items in DISPLAY mode setup
Item
Description
OSD
Enable/disable on-screen-display.
OSD CONTRAST
Set the transparency level of the On Screen Display (OSD) (50~100)
Page 22
22
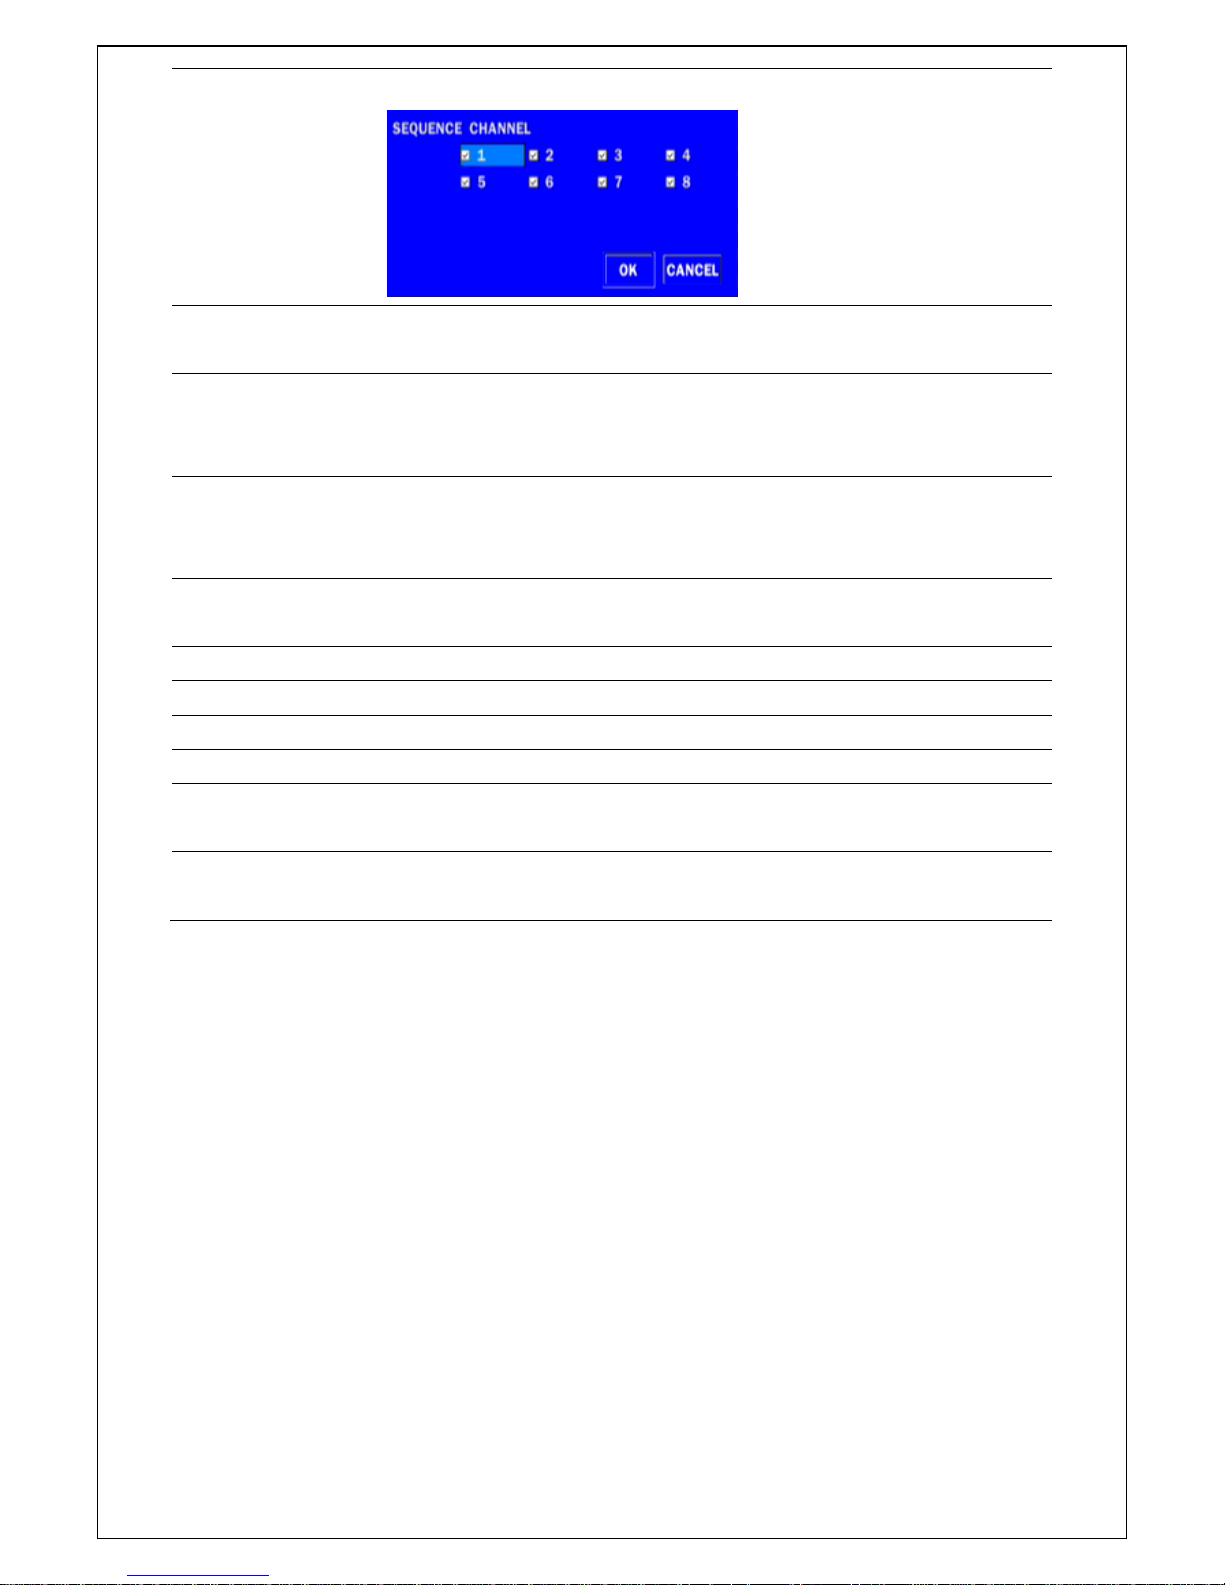
SEQUENCE
Enable/disable sequential display of video in full screen mode.
SEQUENCEDWELL TIME
Set the dwell time of each, single channel display in sequential display
mode (3~60seconds)
CHANNEL
Select a channel to apply the name and covert settings change using
the mouse or the remote control.
Select a channel to apply the following settings using the mouse
NAME
Set the channel name. Press the right square button and set the
channel name and select OK using the mouse.
The name can be made up to 10 characters.
COVERT
Enable/disable display of the specified video channel in live display
mode.
BRIGHTNESS
Change the brightness value of the specified channel. (0~100)
CONTRAST
Change the contrast value of the specified channel. (0~100)
HUE
Change the hue value of the specified channel. (0~100)
SATURATION
Change the saturation value of the specified channel. (0~100)
MAIN OUTPUT
RESOLUTION
Select 1280x720 or 1920x1080.
SUB MONITOR
OUTPUT
CVBS or SPOT output.
3-3. Setup – Recording Mode
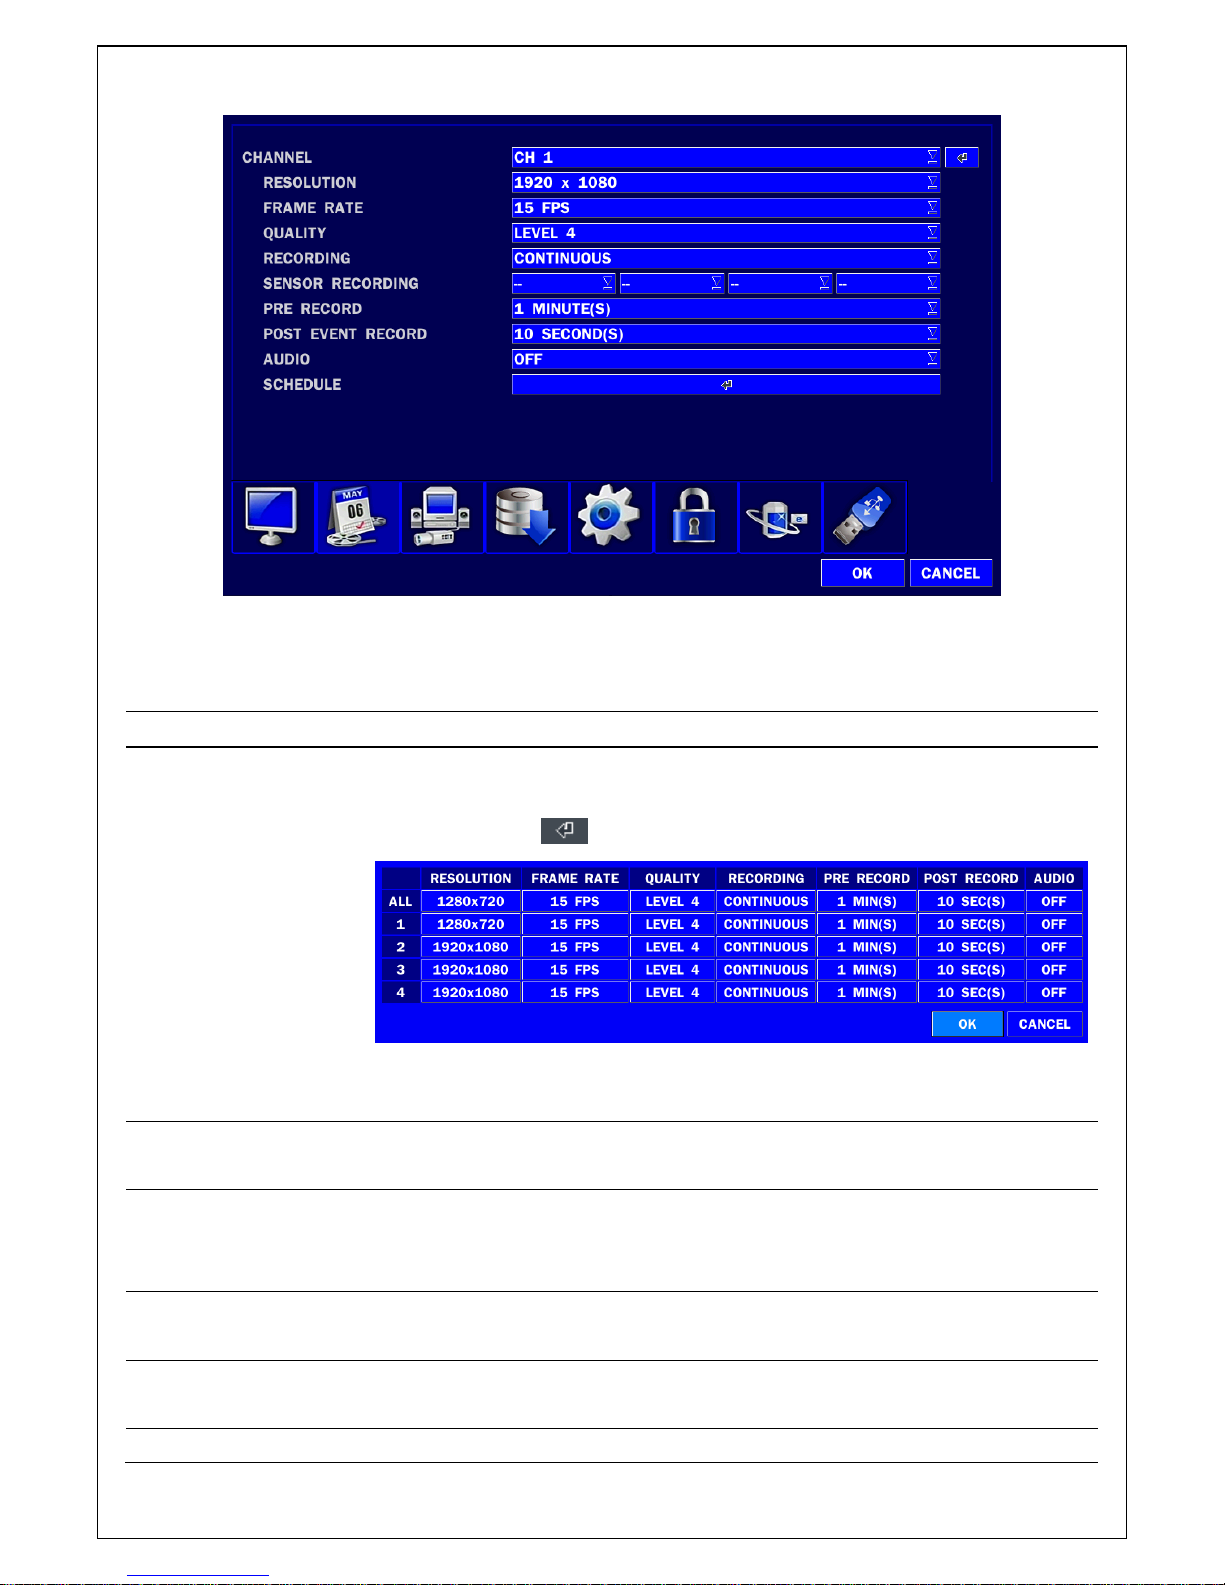
In the SETUP menu, select the RECORD tab. Then, the RECORD menu is displayed as pictured below.
Page 23
23
Navigate through the menu items or change the settings using the mouse or the remote control.
Figure 3.3.1. Recording mode setup screen
Table 3.3.1. Menu items in Recording mode setup
Menu item
Description
CHANNEL
Select a channel for applying the following settings using the mouse or the
remote control. To change the values of all channels, take the following steps.
Select the button to change the values of all channels.
(RESOLUTION, FRAME RATE, QUALITY, RECORDING, PRE RECORD,
POST EVENT RECORD and AUDIO)
RESOLUTION
Select 1920x1080, 1920x540, 1280x720, 640x360 using the mouse or the
remote control.
FRAME RATE
Set the frame rate for the specified channel. The sum of the frame rate values
from each channel cannot exceed the maximum frame rates for a specific
recording resolution.
QUALITY
Select the recording quality for the specified channel. Options are: LEVEL 1
(Low), 2, 3, 4 and 5 (High)
RECORDING
Assign the recording mode for each channel. Options are: Continuous, By
Motion, By Sensor, By Schedule or Disable.
SENSOR
Select the sensor setting for the selected channel.
Page 24
24
RECORDING
PRE RECORD
Enable/disable pre-event recording. Options are: OFF, 15 seconds, 30
seconds, 1 minute, 3 minutes and 20 minutes.
POST EVENT
RECORD
Set the post event recording time duration for the specified channel. (10~60
seconds)
AUDIO
Enable/disable audio recording for the specified channel.
SCHEDULE
Set the recording schedule. Press SEL to go to schedule setup screen.
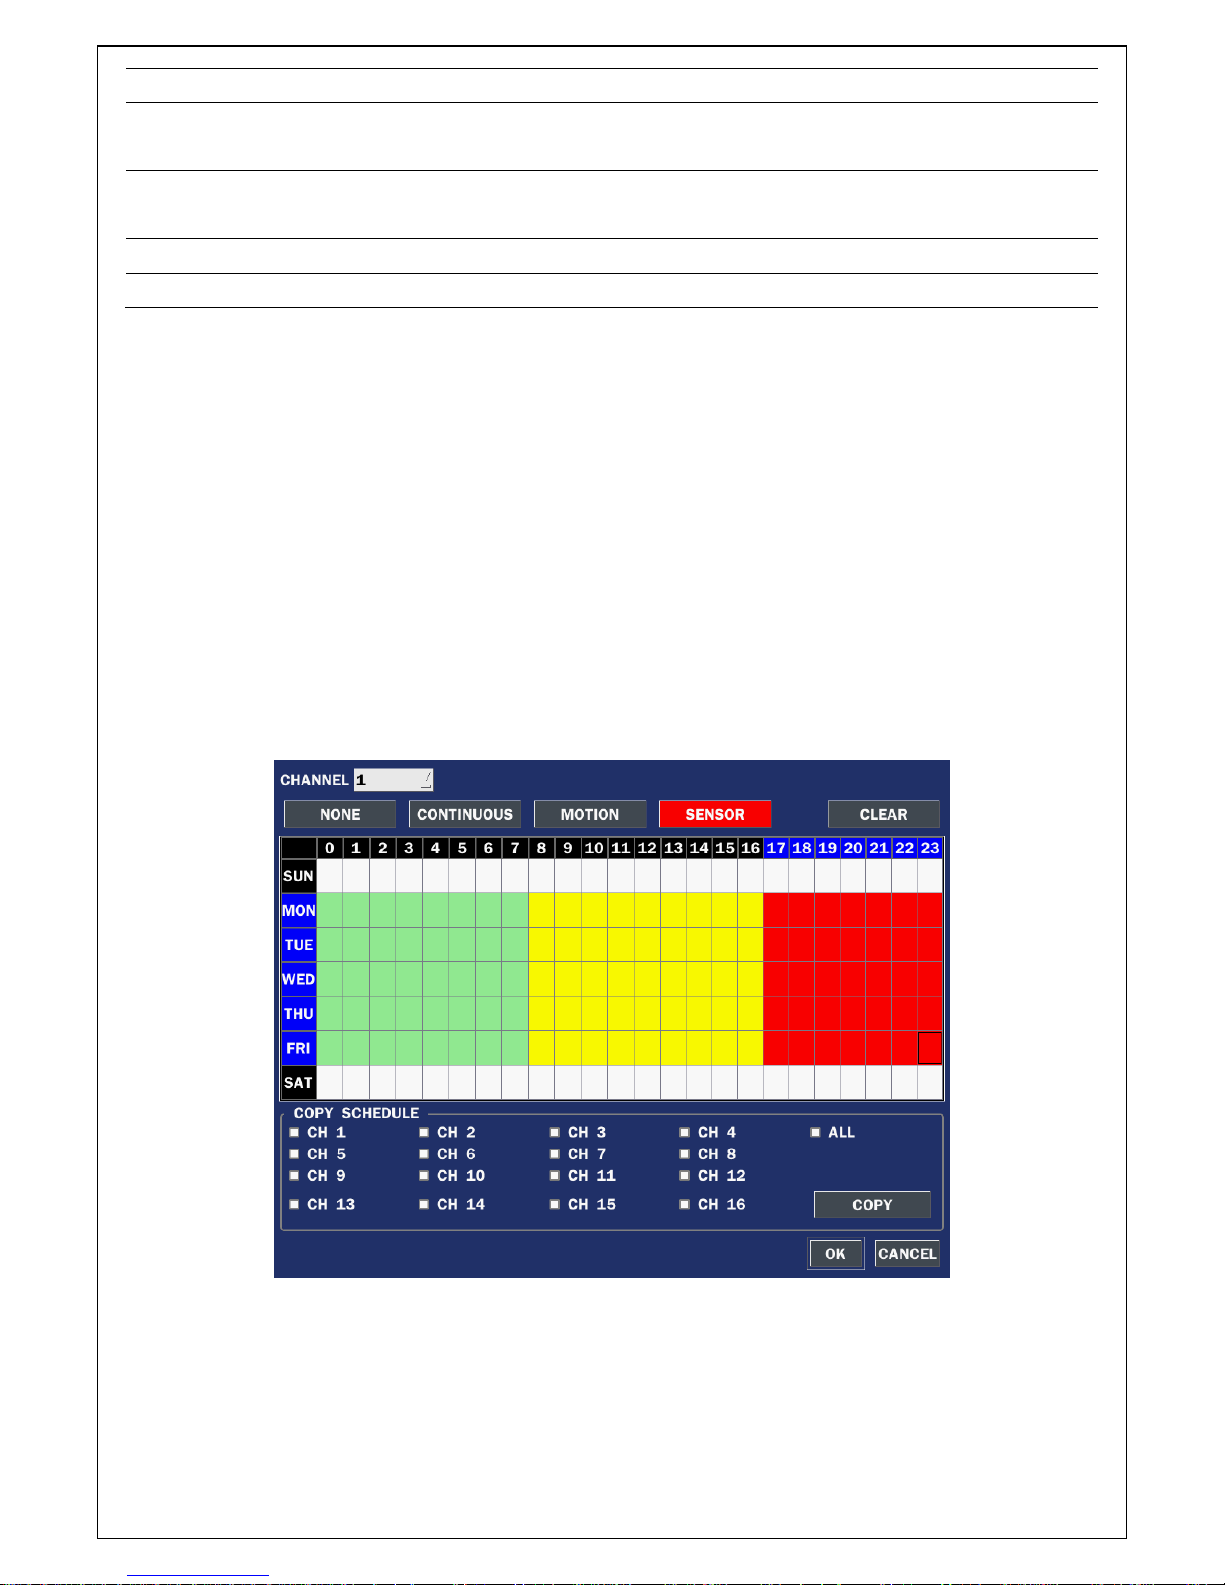
3-3-1. Recording Schedules
To setup a recording schedule, select SCHEDULE in the RECORD menu. Navigate through the menu
items or change the settings using the mouse or the remote control.
[Channel]: Select the specific channel.
[Setup]: Set up using the left button of the mouse to section under the specific day and time. It can set the
all section under the specific day or time at a time when pressing the specific day or time. It is also
possible to set up recording modes of various type using a Continue (green color), Motion (yellow
color) and Sensor button (red color). It can set easy using a drag-and-drop function of a mouse control.
[COPY Schedule]: Set the channel 1 schedule and select the square button of CH2 in COPY SCHEDULE
section using the mouse. And, press the COPY button. Then the CH1 schedule is copied to CH2. To
remove the setting value, press the CLEAR button.
Figure 3.3.1.1. Schedule recording setup screen
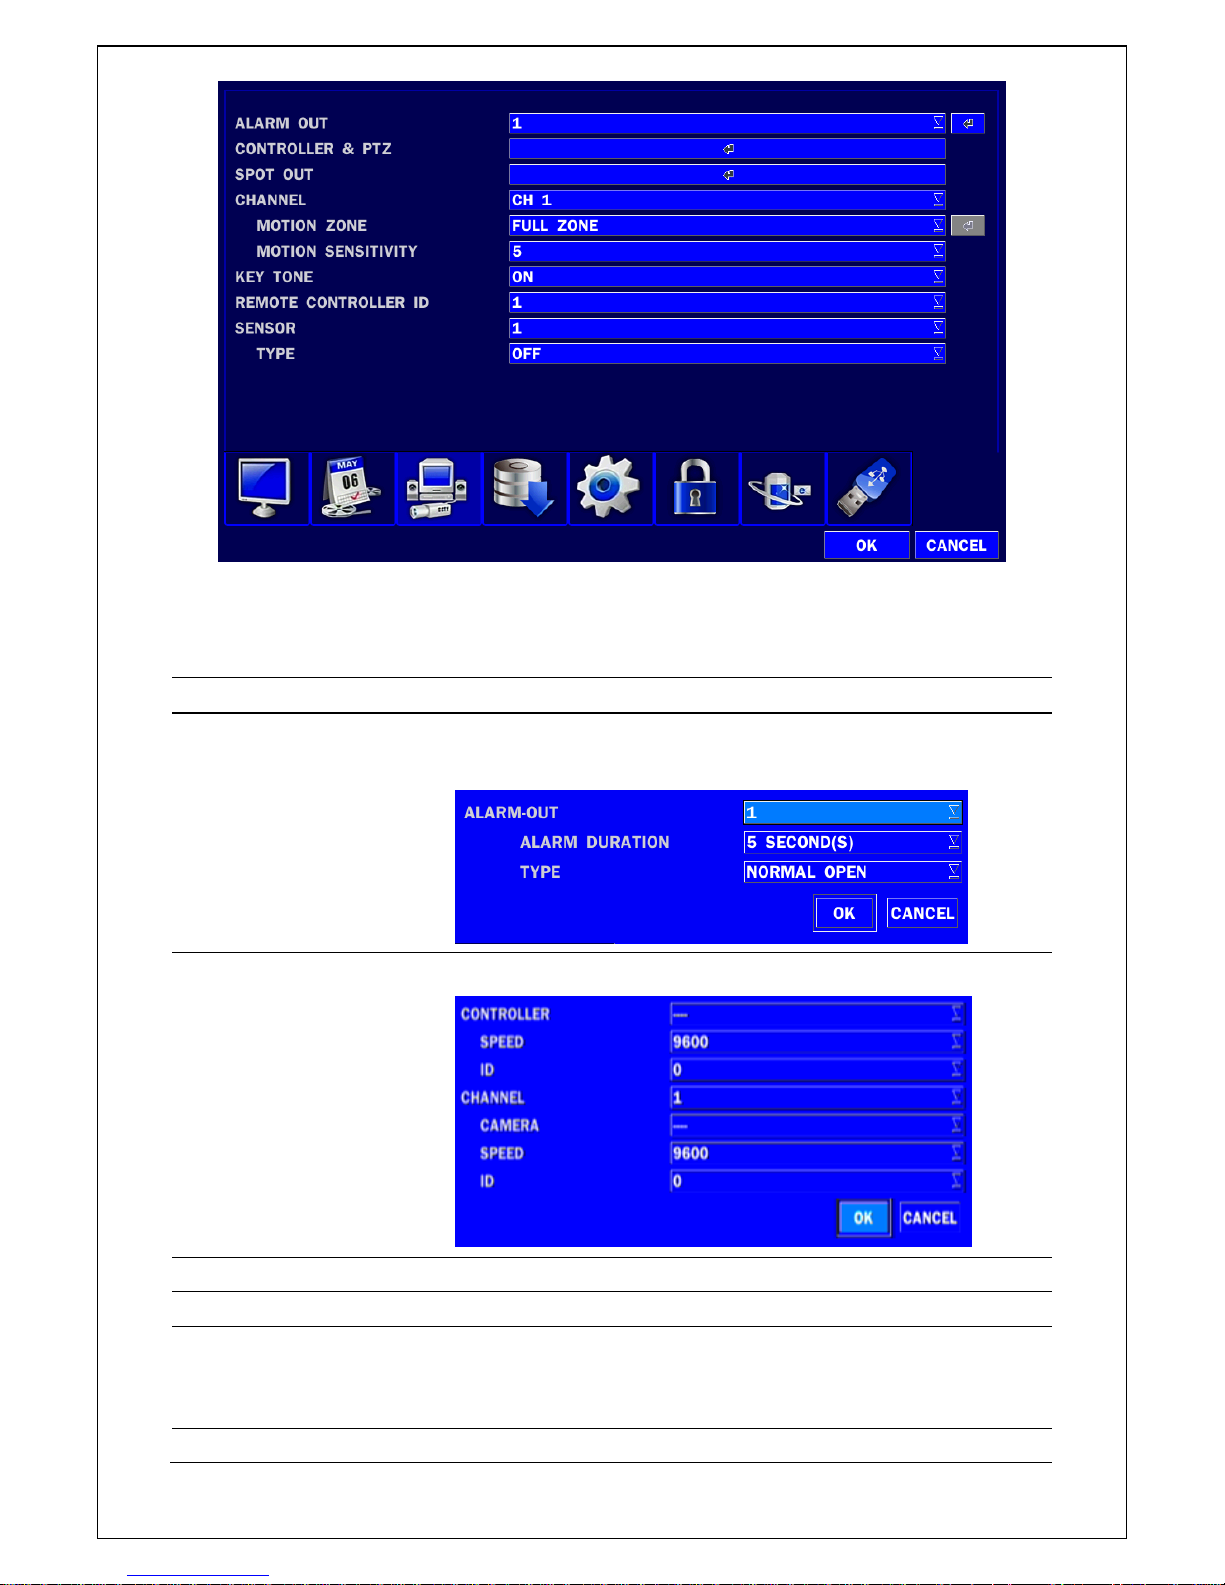
3-4. Setup – Device Mode
In the SETUP menu, select the DEVICE tab. Then, the device menu is displayed as pictured below.
Navigate through the menu items or change the settings using the mouse or the remote control.
Page 25
25
Figure 3.4.1. Device mode setup screen
Table 3.4.1. Menu items in Device Setup screen
Item
Description
ALARM OUT
/ALARM DURATION
Only one Alarm-out is available.
Set alarm dwell time from 5 to 60 seconds or infinite.
CONTROLLER & PTZ
Set the controller and PTZ camera speed, number, type and ID.
CHANNEL
Select specified channel for motion zone setup.
MOTION ZONE
Select either Full Zone or Partial Zone for motion detection.
MOTION SENSITIVITY
Set the motion sensitivity for the selected channel.
Control the motion sensitivity from 1 to 9.
(9 – Highest sensitivity, 1 – Lowest sensitivity)
KEY TONE
Enable/disable key tone from front panel usage.
Page 26
26
REMOTE CONTROL ID
Set the remote control ID.
1. Select ID.
2. Input the remote control ID number.
3. An icon will indicate on the Live Screen if the remote control
ID is synchronized.
The options are from 0 to 99
SENSOR
Select the type of each sensor.
TYPE
Set the type of sensor for the specified channel. Options are:
OFF, N/O (normal open), and N/C (normal closed).
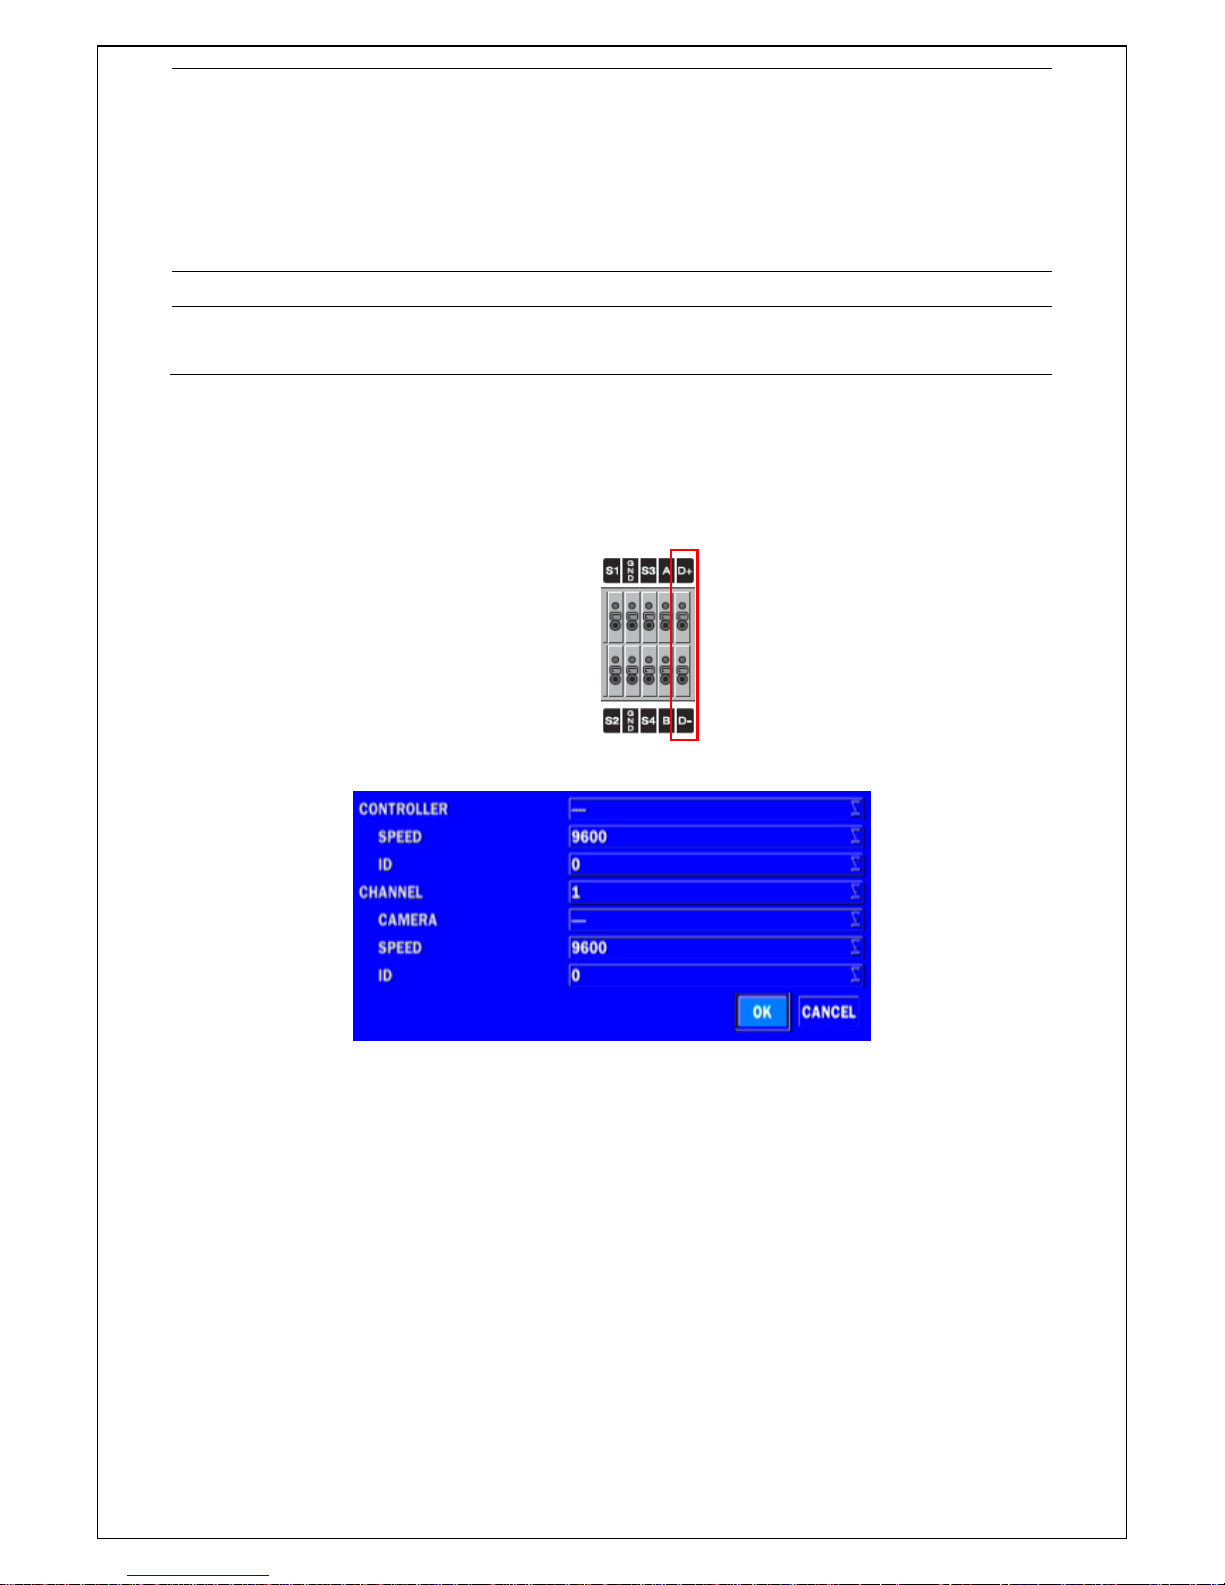
3-4-1 Controller & PTZ Setup
To control the PTZ functions of the camera, connect the PTZ controller to the RS-485 port on the back of
the chassis with CAT5 (or equivalent) cable.
① Connect the RS-485 cables of PTZ camera to the RS-485 port on the rear panel.
② Press the Controller & PTZ menu button. Then PTZ menu screen is displayed.
Figure 3.4.1.1. Controller & PTZ Setup Screen
Note: Connect PTZ cameras that support RS-485 directly to the RS-485 port. If the camera is controlled
through an RS-232C interface, use an RS-232C to RS-485 to RS-232C signal converter.
Use the PTZ setup screen to select the following options for the camera PTZ controller:
- CHANNEL: Channel connected to a PTZ device
- CAMERA: Protocol Type
- SPEED: 19200, 14400, 9600, 4800, 2400 (Baud rate)
- ID: 0-63
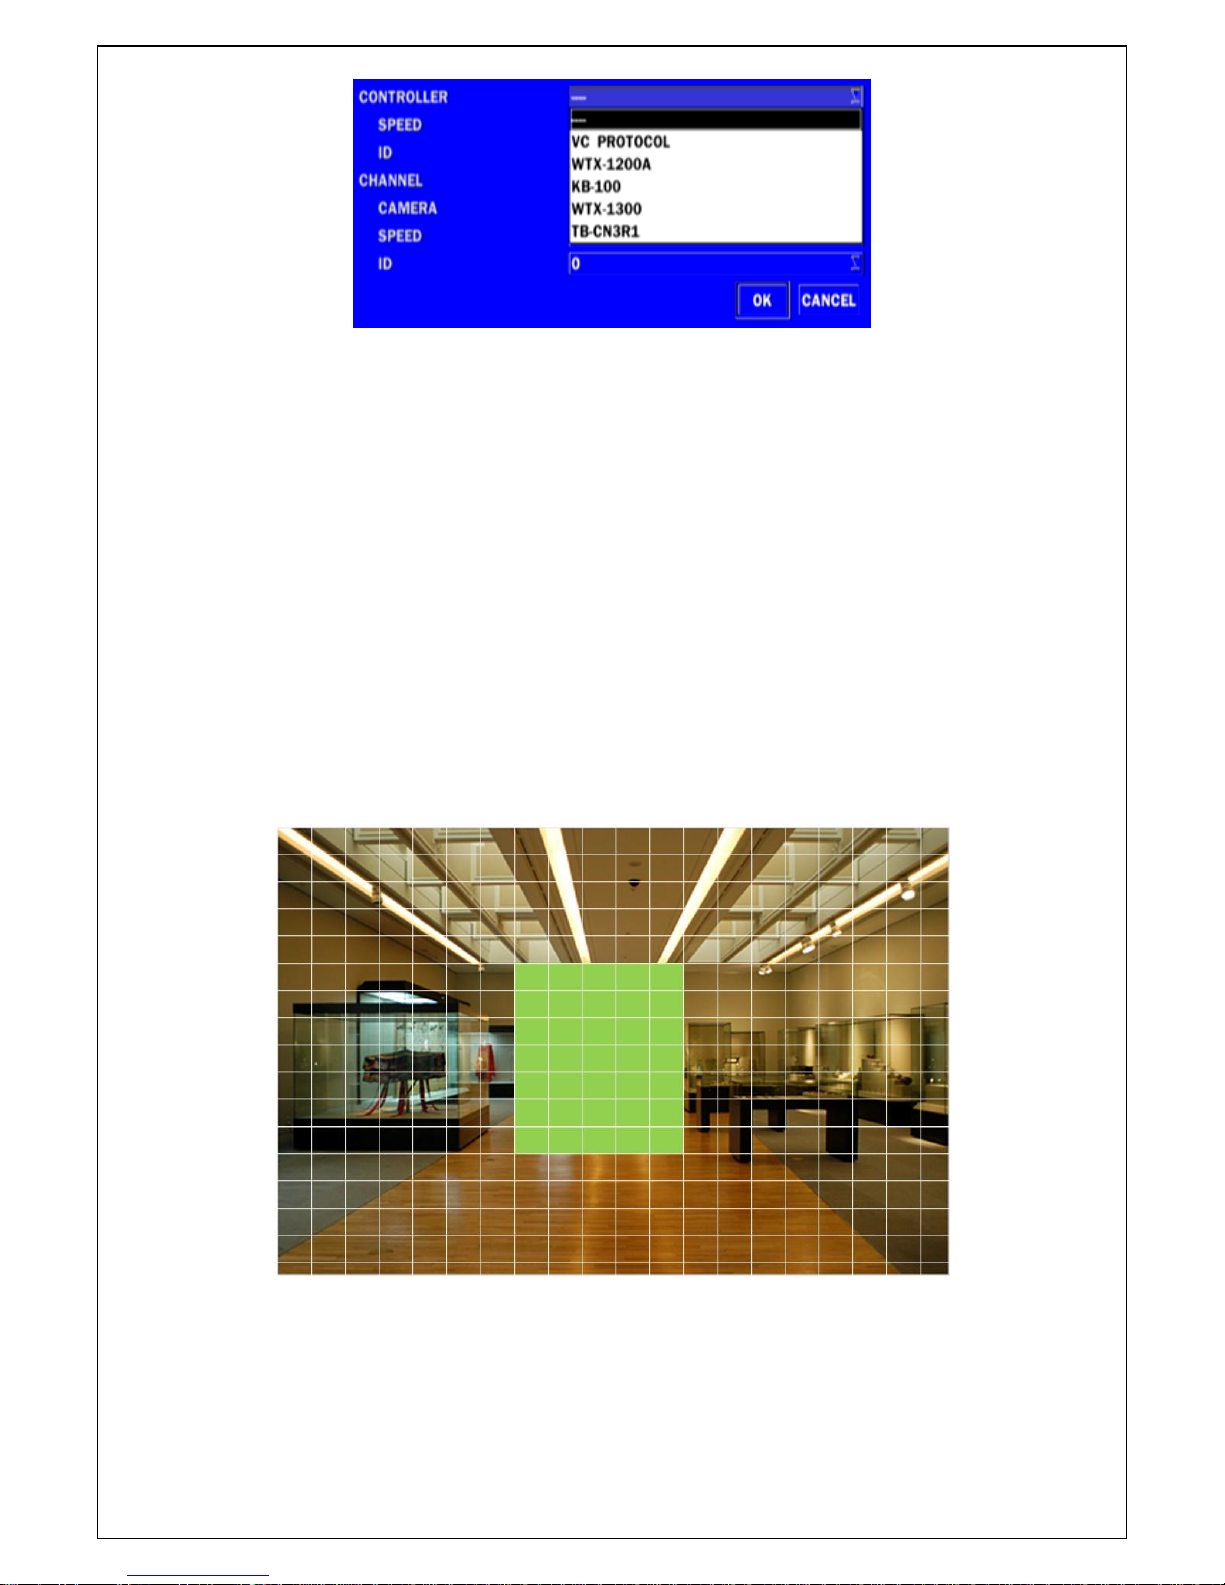
Controller (Keyboard Controller): If a PTZ controller is used, select a controller protocol from Controller
menu. Set SPEED (Baud Rate) and ID number.
Page 27
27
Figure 3.4.1.2. Controller Selection Screen
3-4-2. Motion Zone Setup
Select MOTION ZONE using the mouse or the remote control and select either PARTIAL ZONE or FULL
ZONE using the mouse control. The default value is FULL ZONE.
If FULL ZONE is selected, the motion setting screen is not displayed. Only set the level of sensitivity for
MOTION SENSITIVITY.
FULL ZONE: The motion sensor is active on the whole screen.
PARTIAL ZONE: The motion sensor is active in the set detection frame.
Select the motion detection position using the mouse or the remote control. Then left click on the mouse or
left click and drag the mouse pointer to select or deselect the area. Highlighted area indicates the partial
motion detection zone. Press the ESC button or right click on the mouse to return to the previous menu
Figure 3.4.2.1 Motion Zone selection screen
Page 28
28
3-5. Setup – Storage Mode
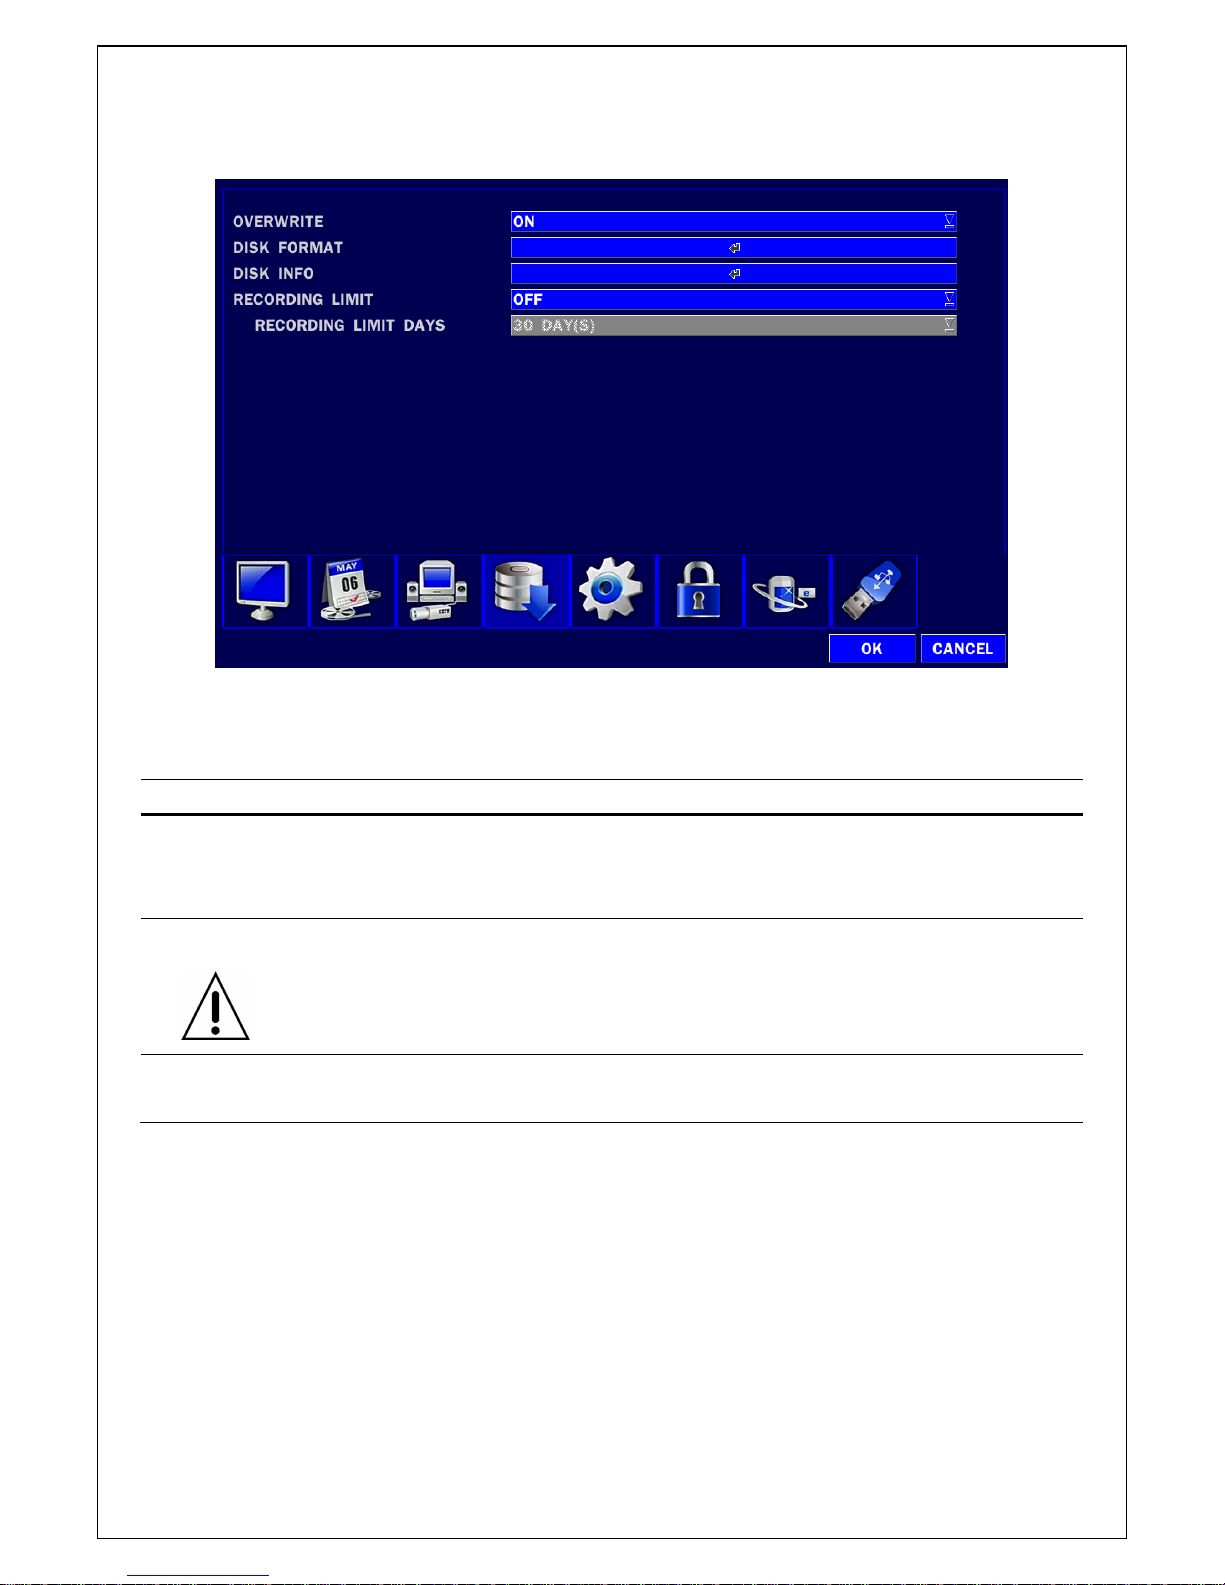
In the SETUP menu, select the STORAGE tab. Then, the STORAGE menu is displayed as pictured below.
Navigate through the menu items or change the settings using the mouse or the remote control.
Figure 3.5.1. STORAGE setup screen
Table 3.5.1. Menu items in STORAGE Setup screen
Item
Description
OVERWRITE
When enabled, the DVR will continue recording and overwrite the oldest
existing recorded data once the hard drive is full. When disabled, recording
will stop once the hard drive is full.
DISK FORMAT
You will have an option of YES or NO for formatting the Hard Drive.
After formatting HDD, the DVR will reboot.
Caution: It is recommended to archive any data that you may need in
the future before formatting the hard drive.
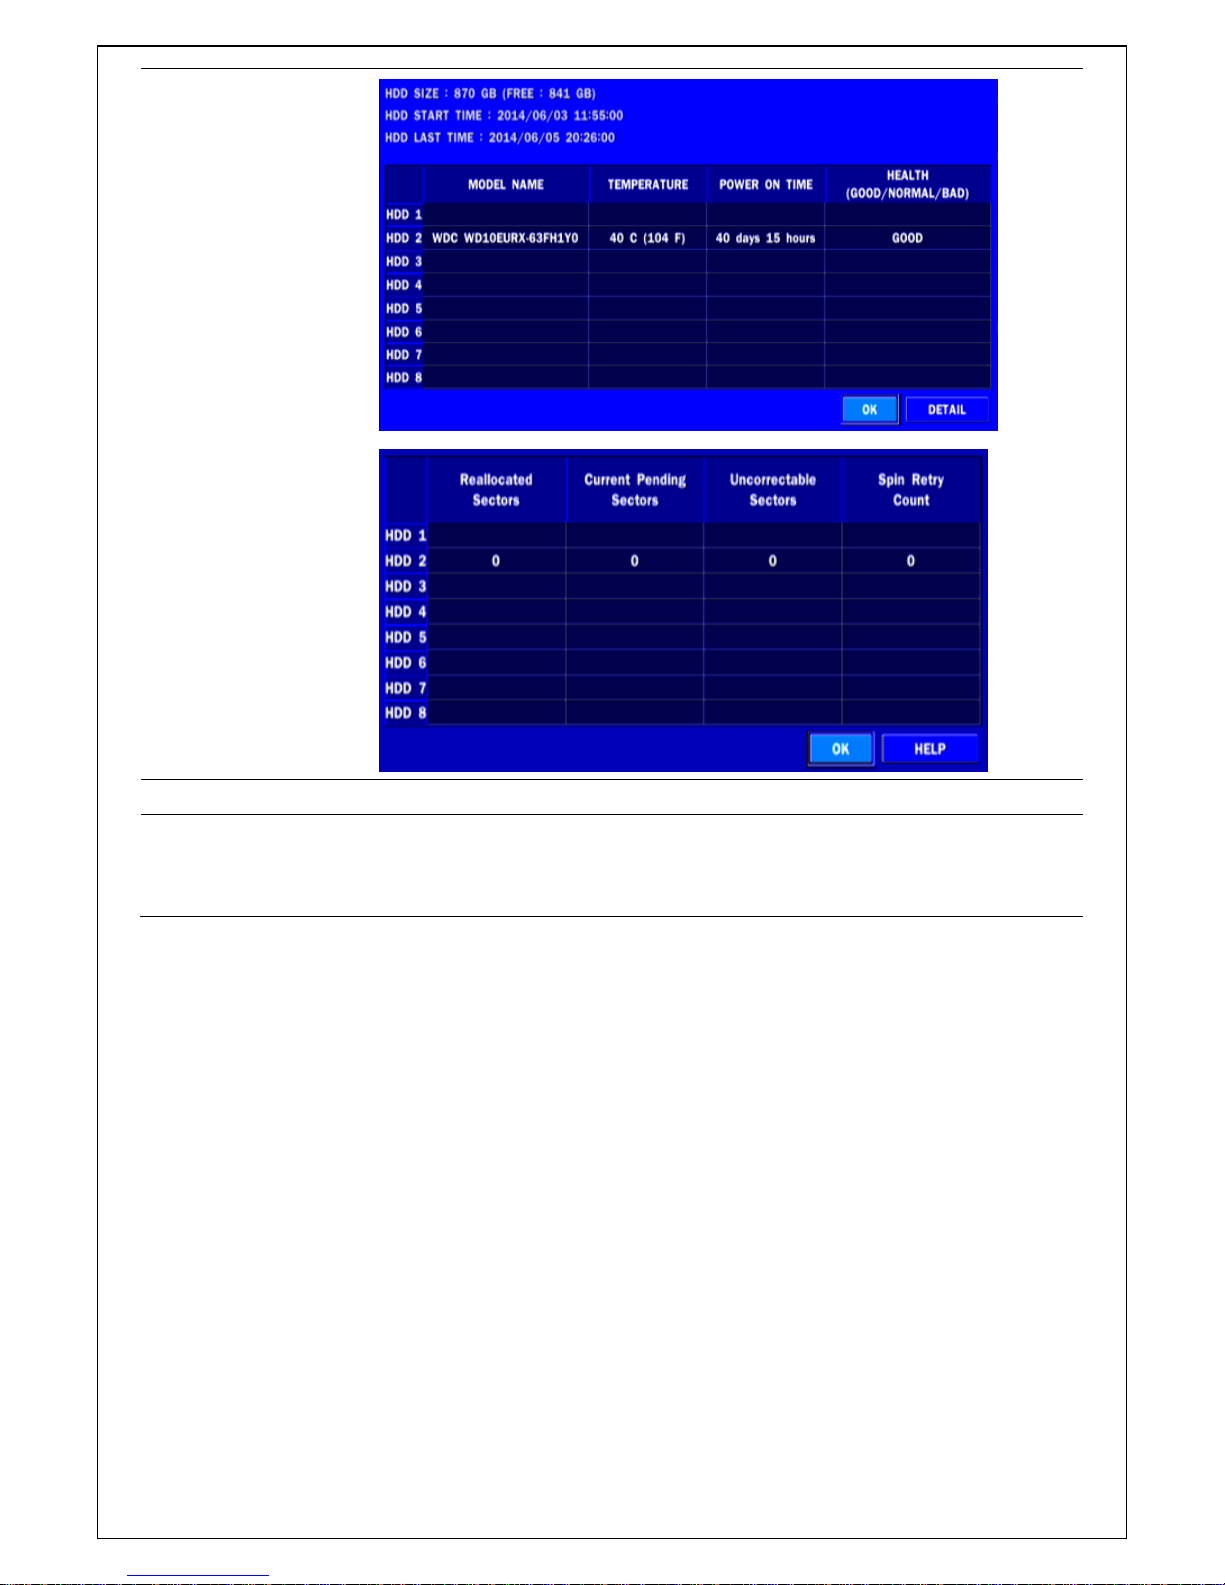
DISK INFO
Hard drive information
Displays the following information;
Page 29
29
RECORDING LIMIT
Enable/disable recording limit.
RECORDING
LIMIT DAYS
Set the recording limit days. (1- 90 days)
If the RECORDING LIMIT DAYS are set to 1, the data will be overwritten
after 24 hours.
3-6. Setup – System Mode
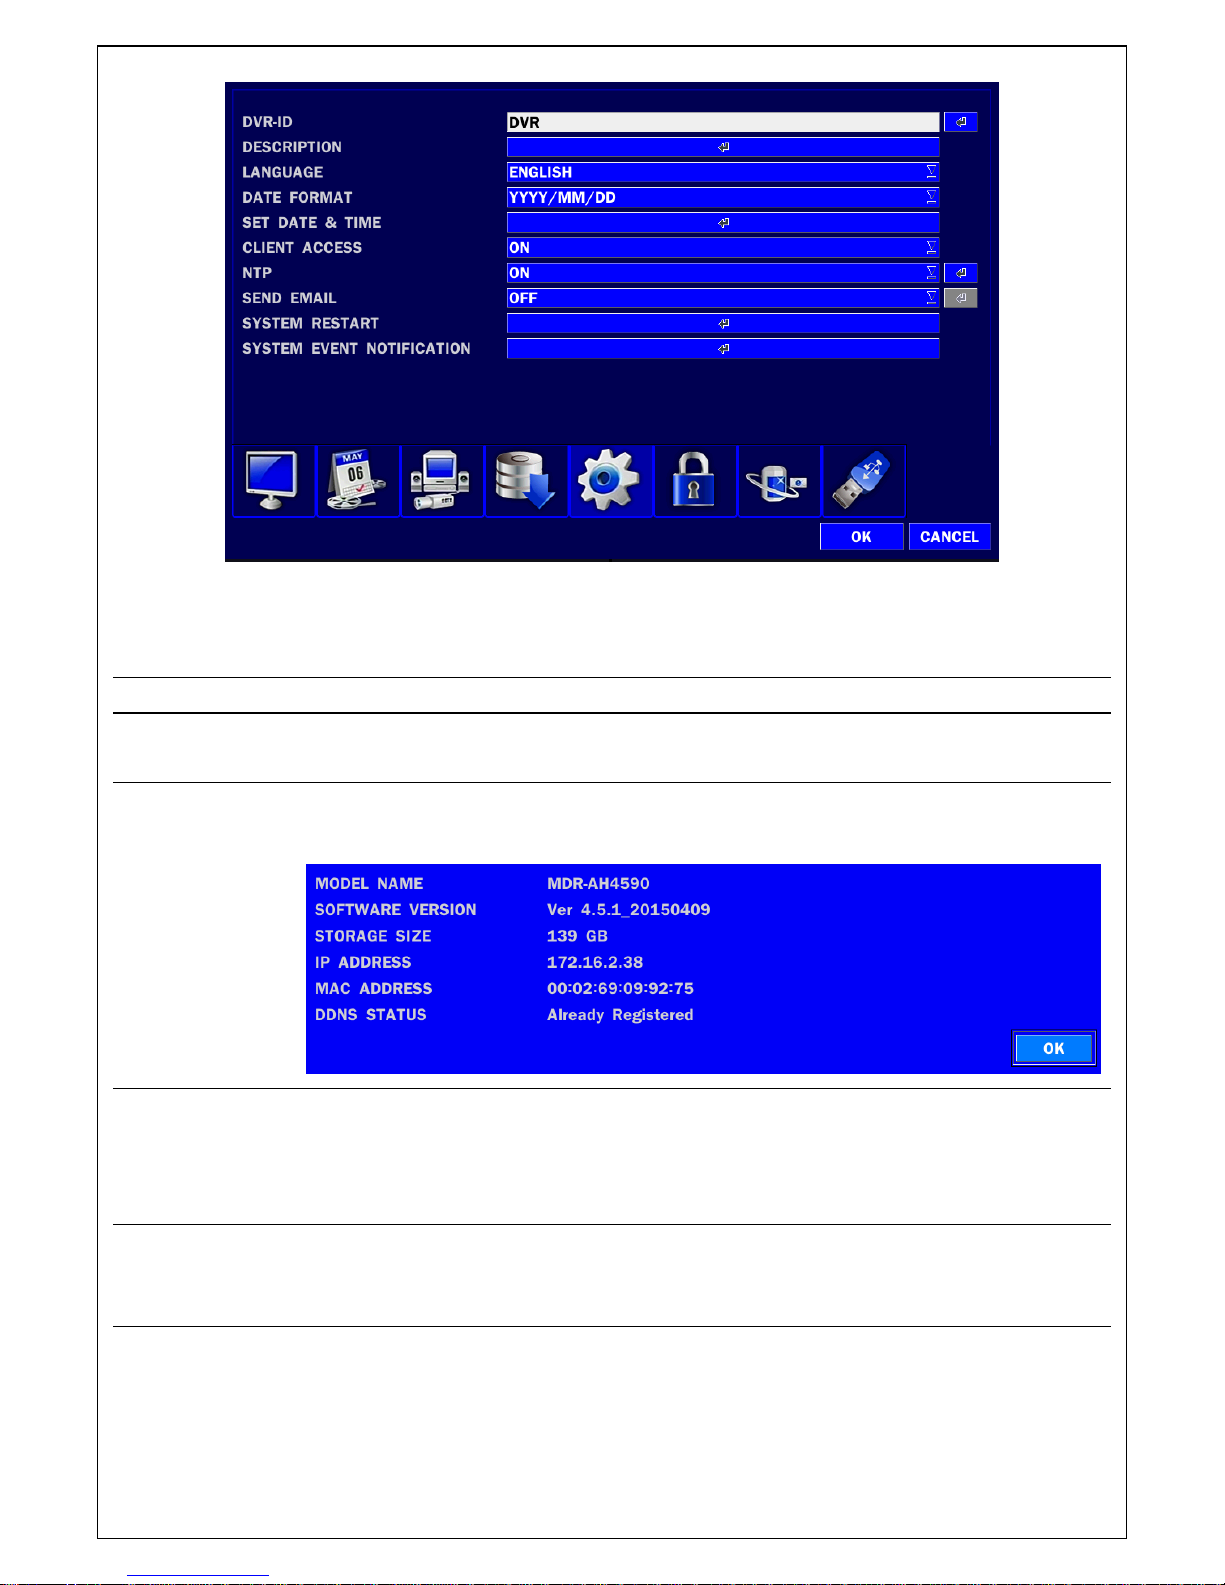
In the SETUP menu, select the SYSTEM tab. Then, the SYSTEM menu is displayed as pictured below.
Navigate through the menu items using the mouse or the remote control and change the value of the menu
Page 30
30
Figure 3.6.1. SYSTEM Setup Screen
Table 3.6.1. Menu items in SYSTEM Setup screen
Item
Description
DVR ID
Name the DVR (e.g. Factory, Library, Store, Location etc)
This is to used to identify the name of each DVR under the same network.
DESCRIPTION
Press the button to view the system information.
(Software Version, Storage Size, IP Address, MAC Address and DDNS Status)
LANGUAGE
Select the display language using the mouse or the remote control. Once a language
is selected, the display language will change. (English, Korean, SP Chinese,
Japanese, Polish, Portuguese, Turkish, Russian, Croatian, Greek, German, Italian,
Spanish, French, Thai, Farsi, Danish, TR Chinese, Finnish, Czech, Dutch and so on)
DATE FORMAT
Select the date display format using the mouse or the remote control. Options are:
(YYYY/MM/DD, MM/DD/YYYY, DD/MM/YYYY, YYYY-MM-DD, MM-DD-YYYY, DD-MMYYYY)
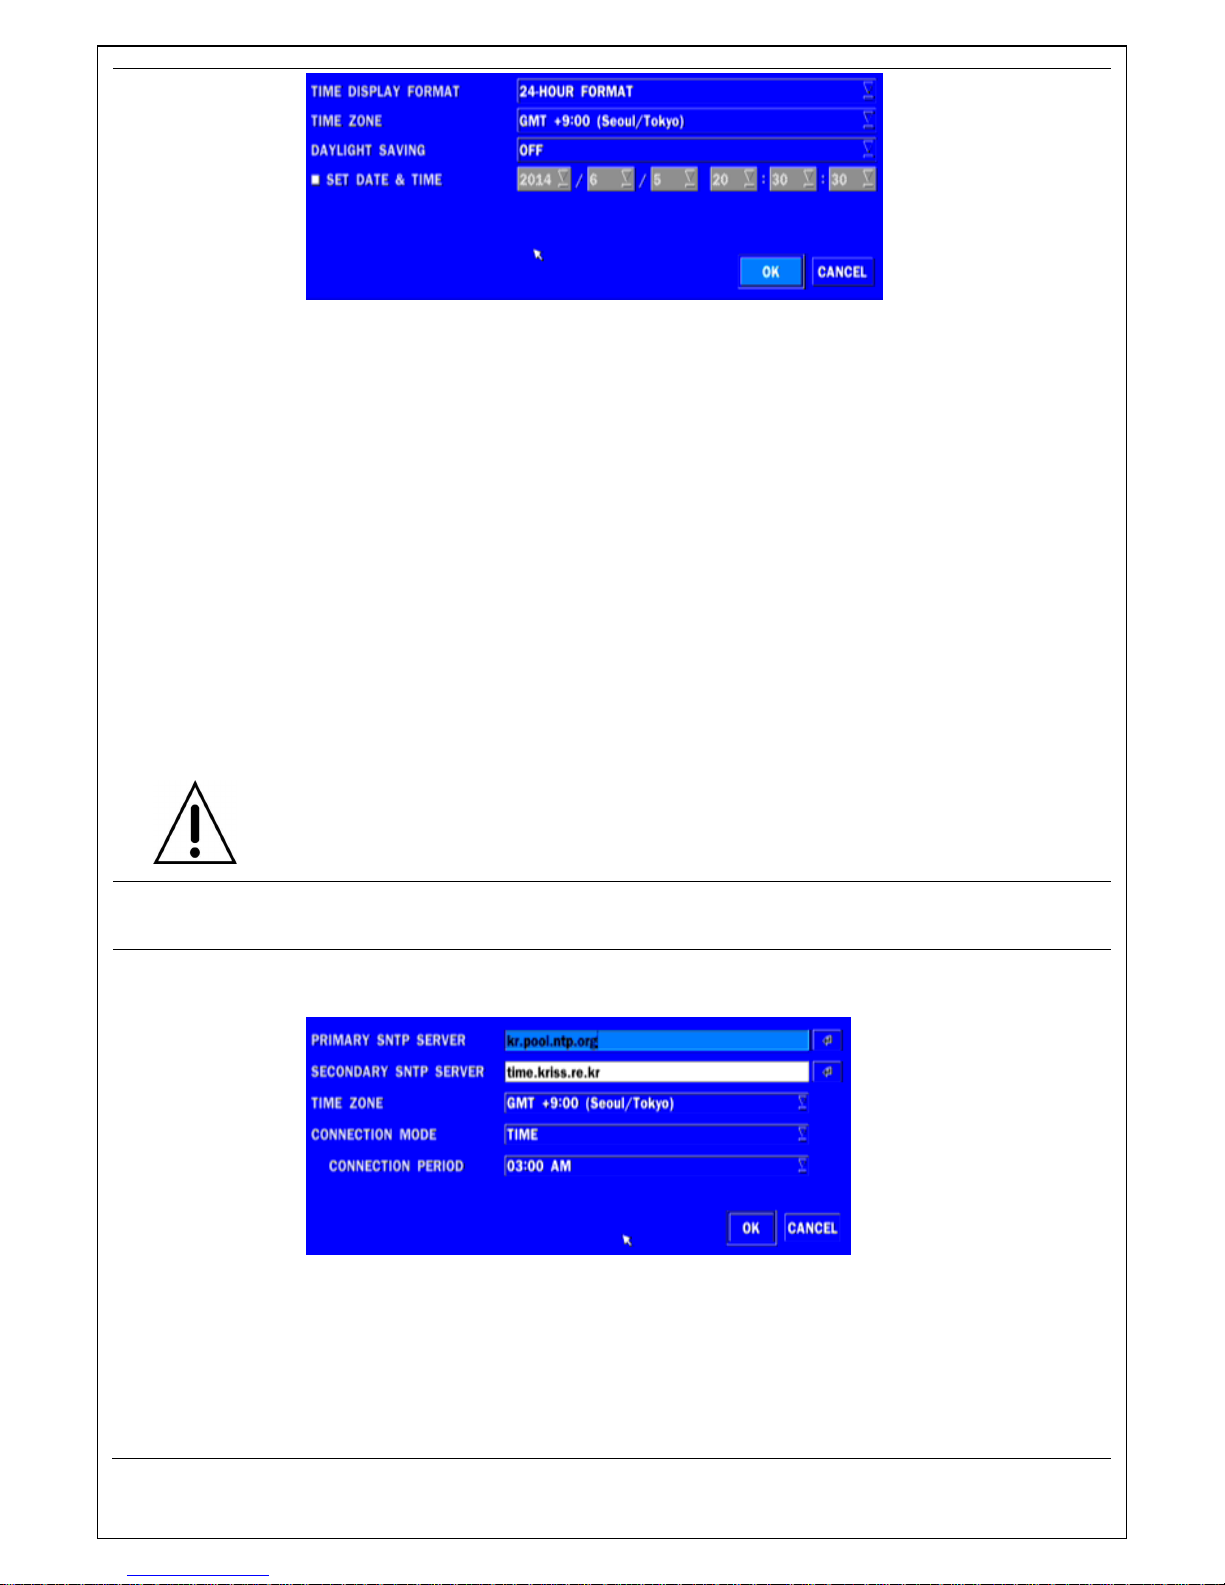
SET
DATE&TIME
Select the display date and time using the mouse or the remote control and press OK
button to set the present date and time.
Page 31
31
DAY LIGHT SAVING
Select DAYLIGHT SAVING using the mouse or the remote control and select the
appropriate daylight saving time zone.
If choosing EU or OTHERS, set the applicable conditions.
The options are: OFF / USA / EU / OTHERS
OFF: Daylight saving is turned off.
USA: Applies the USA daylight saving time.
EU: Applies the EU daylight saving time.
- Select the GMT AREA using the mouse or the remote control.
- Set the time difference with the standard time using the mouse or the button.
OTHERS: If the time zone is neither USA nor EU, set the date and time of the daylight
saving period.
- Select BEGIN or END using the remote and press the SEL button.
Caution
- Do not set the start time to 23:00 for DLS.
- DLS cannot be applied if the date of BEGIN and END is the same.
CLIENT
ACCESS
Enable/Disable remote access through the network.
NTP
NTP (Network Time Protocol) which synchronizes the time of the computer systems
over variable-latency data networks.
PRIMARY SNTP SERVER: Input the address of the primary NTP time-server.
SECONDARY SNTP SERVER: Input the address of the secondary NTP time-server.
TIME ZONE: NTP synchronizes with GMT (Greenwich Mean Time) regardless of
Geography user must set their own time difference.
CONNECTON MODE: Select the NTP time-server connection mode from TIME,
INTERVAL, and ONCE.
Page 32
32
CONNECTION PERIOD
- TIME – Refresh the time at the designated time (e.g. 1AM)
- INTERVAL – Every 1 hour ~ 24 hours
- ONCE – Synchronizes time only once. NTP will not synchronize unless the
Connection Mode is changed.
DVR sends E-MAIL Notification when the NTP server time is faster than the
system time with bellow message.
“NTP server time is faster than the system time.
In this case, NTP server time is ignored to protect the user data.
User must set the time manually.
SYSTEM TIME: Mon Oct 10 13:46:49 2011
SERVER TIME: Mon Oct 10 13:33:12 2011
DVR ID: DVR
IP ADDRESS: 172.16.2.46”
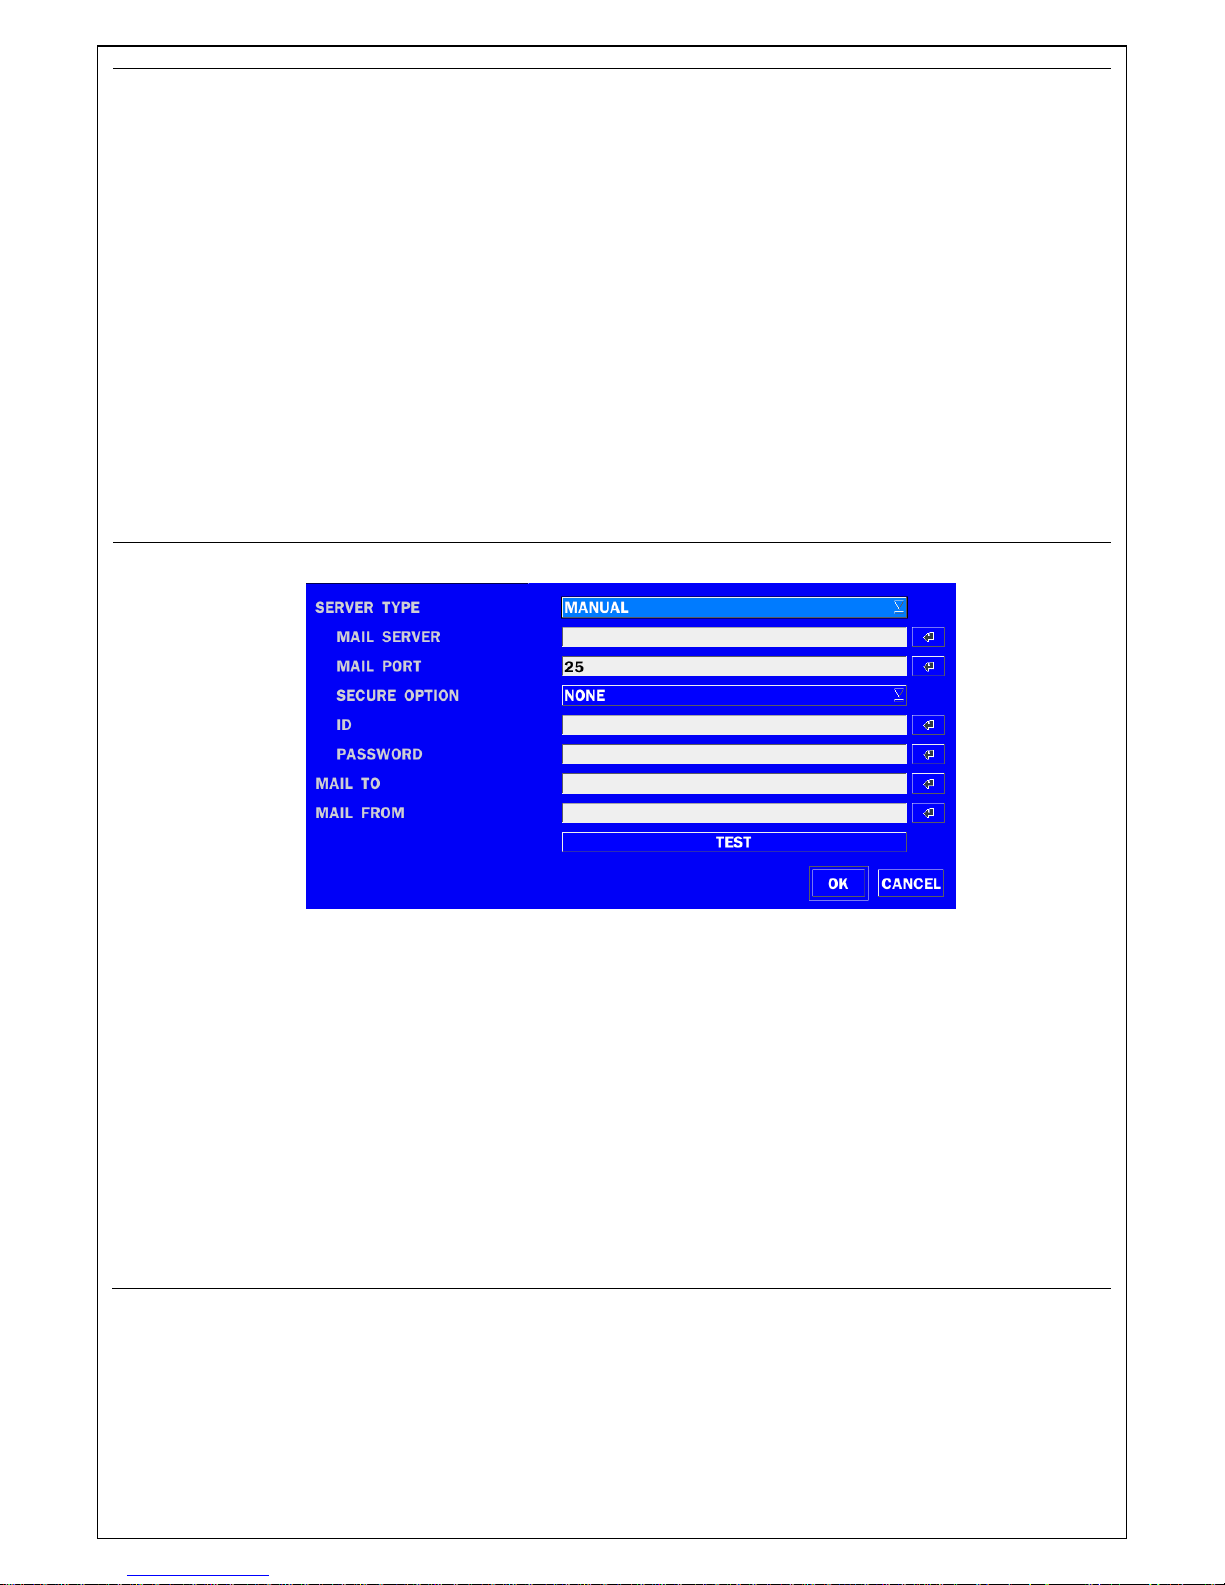
SEND EMAIL
Enable/disable the send e-mail function.(ON/OFF)
SERVER TYPE: Select GMAIL, HOTMAIL, AOL, YAHOO or MANUAL)
MAIL SERVER: Enter the appropriate mail server information.
MAIL PORT: Assign Mail Port number.
SECURE OPTION: Select the secure mail server connection method. (SSL or
TLS)
ID: Enter the appropriate mail server ID.
PASSWORD: Enter the appropriate mail server PASSWORD
MAIL TO: Enter the appropriate email address to enable sending e-mail reports using
a virtual keyboard.
MAIL FROM: To set the email address sent to the destination host.
TEST : E-mail settings sent a test mail to the registered account
Page 33
33
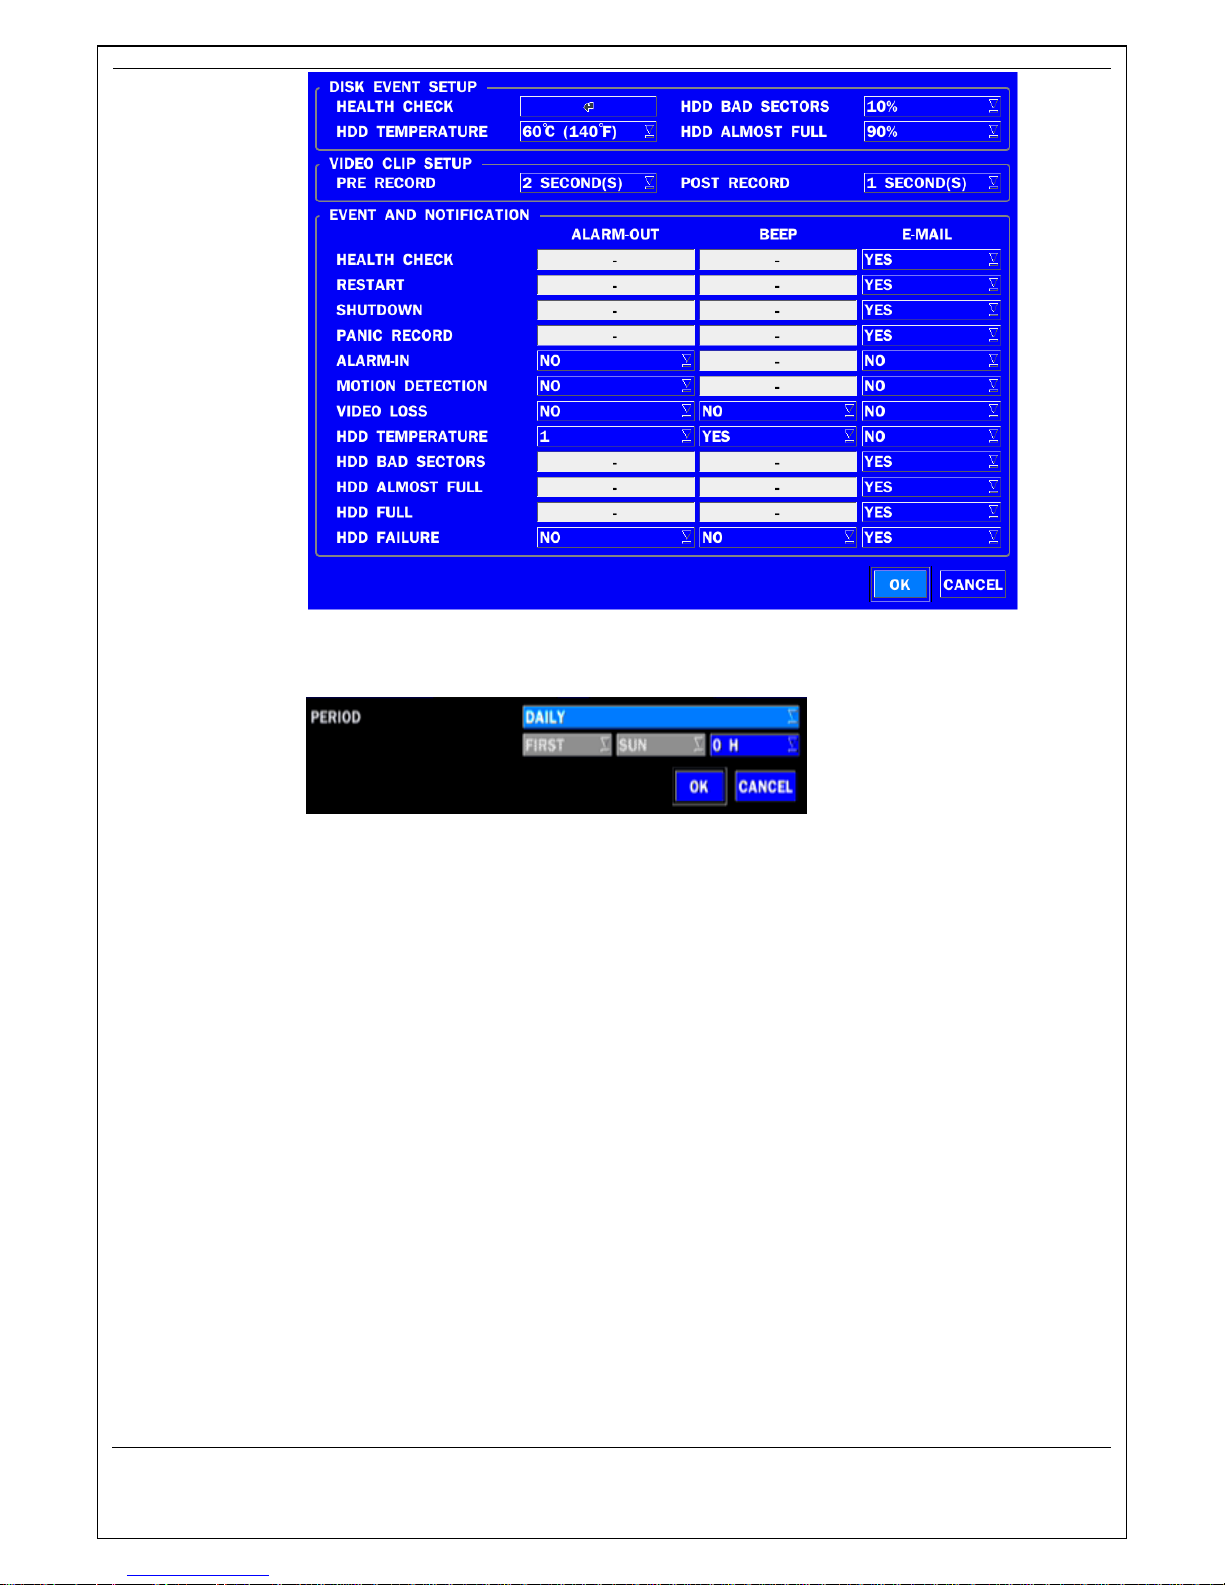
SYSTEM EVENT
NOTIFICATION
HEALTH CHECK – OFF, ON
(Allows the user to set MAIL STATUS periodically) : DAILY or WEELY or MONTHLY
VIDEO CLIP SETUP – Set video recording time for the e-mail appending
Features motion detection or alarm input events only
EVENT AND NOTIFICATION – OFF, ON
(Allows the user to set EVENT NOFICIATION ON or OFF)
HEALTH CHECK / RESTART / SHUTDOWN / PANIC RECORD
- Enable Email Notification in the event a problem occurs with the DVR.
ALARM-IN – Enable Email Notification when the camera detects sensor.
MOTION DETECTION – Enable Email Notification when the camera detects
motion.
NO CONNECTION – Enable Email, Beep and Alarm output Notification when the
camera signal is lost.
HDD TEMPERATURE – Enable Email, Beep and Alarm output Notification when
the HDD temperature.
HDD BAD SECTORS – Enable Email Notification when the HDD has bad Sectors.
HDD ALMOST FULL – Enable Email Notification when the HDD is almost full
HDD FULL – Enable Email Notification when the HDD is full
Page 34
34
HDD FAILURE – Enable Email, Beep and Alarm output Notification when the HDD
fails.
3-7. Setup – SECURITY Mode
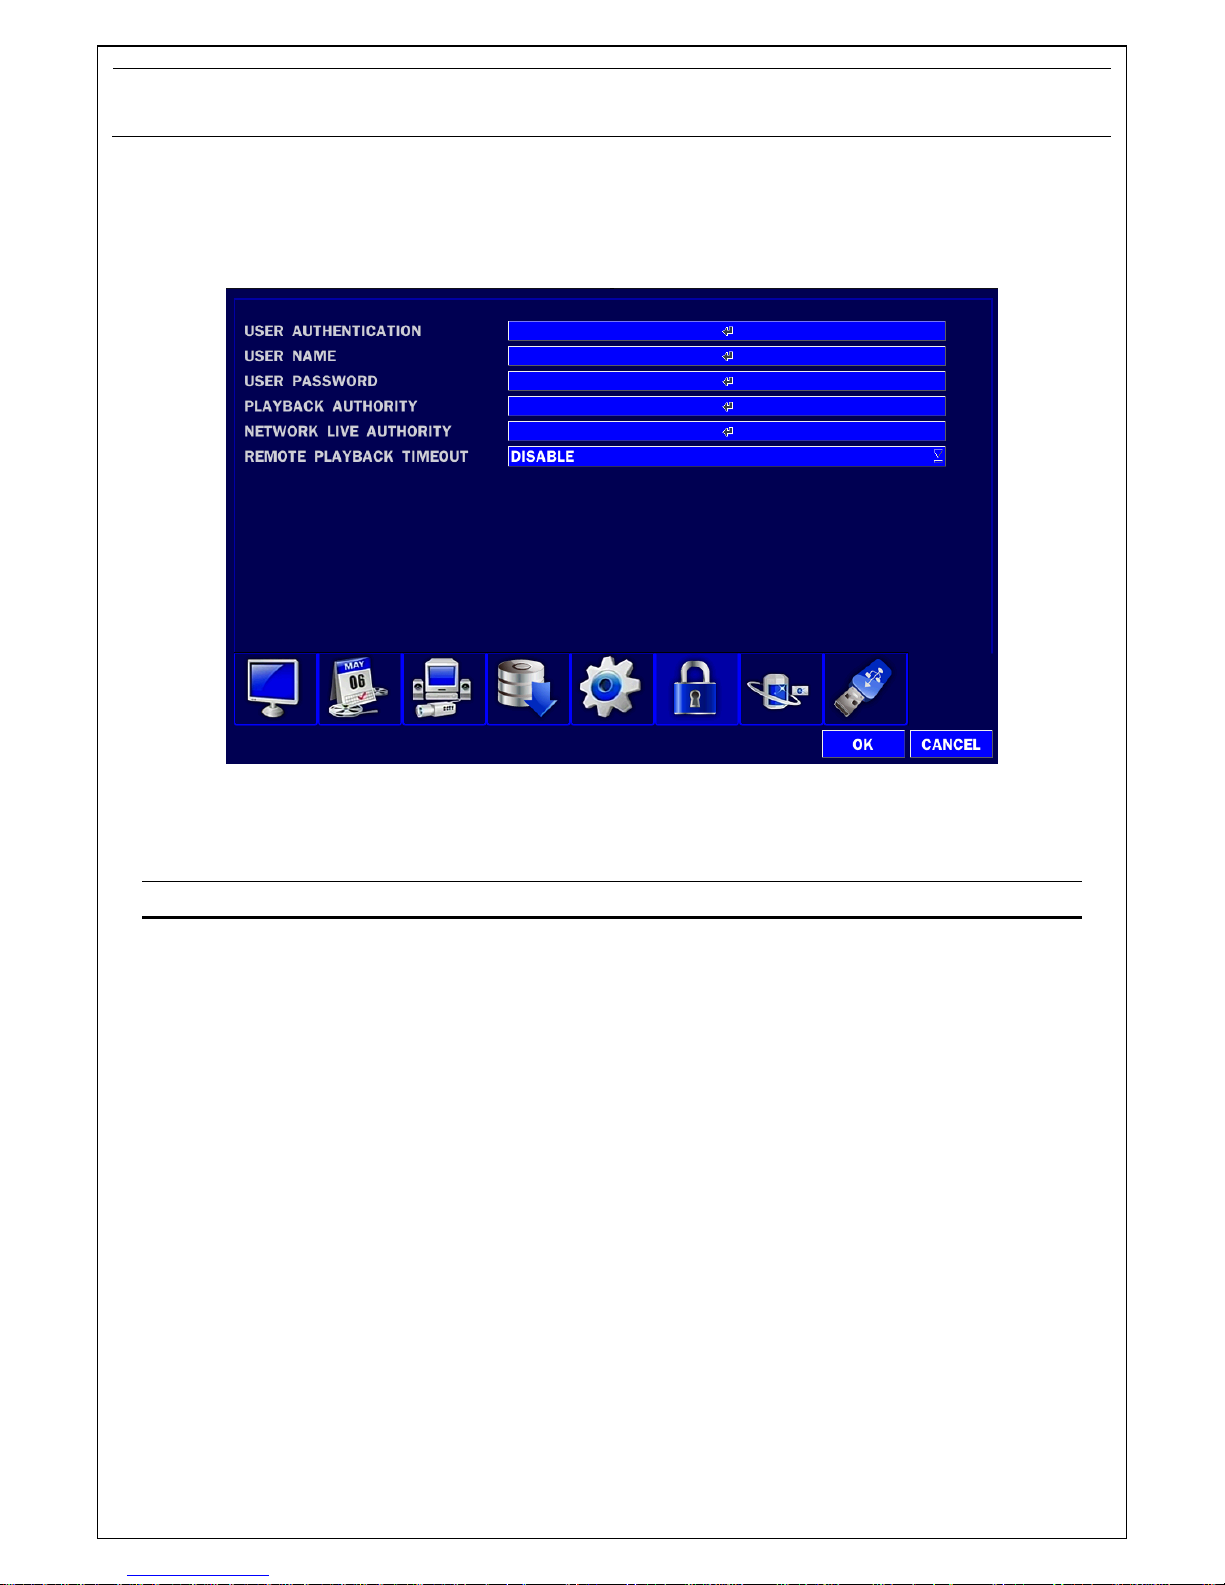
In the SETUP menu, select the SECURITY tab. Then, the SECURITY menu is displayed as pictured below.
Navigate through the menu items or change the settings using the mouse or the remote control.
Figure 3.7.1. SICURITY setup screen
Table 3.7.1. Menu Items in PASSWRORD Setup Screen
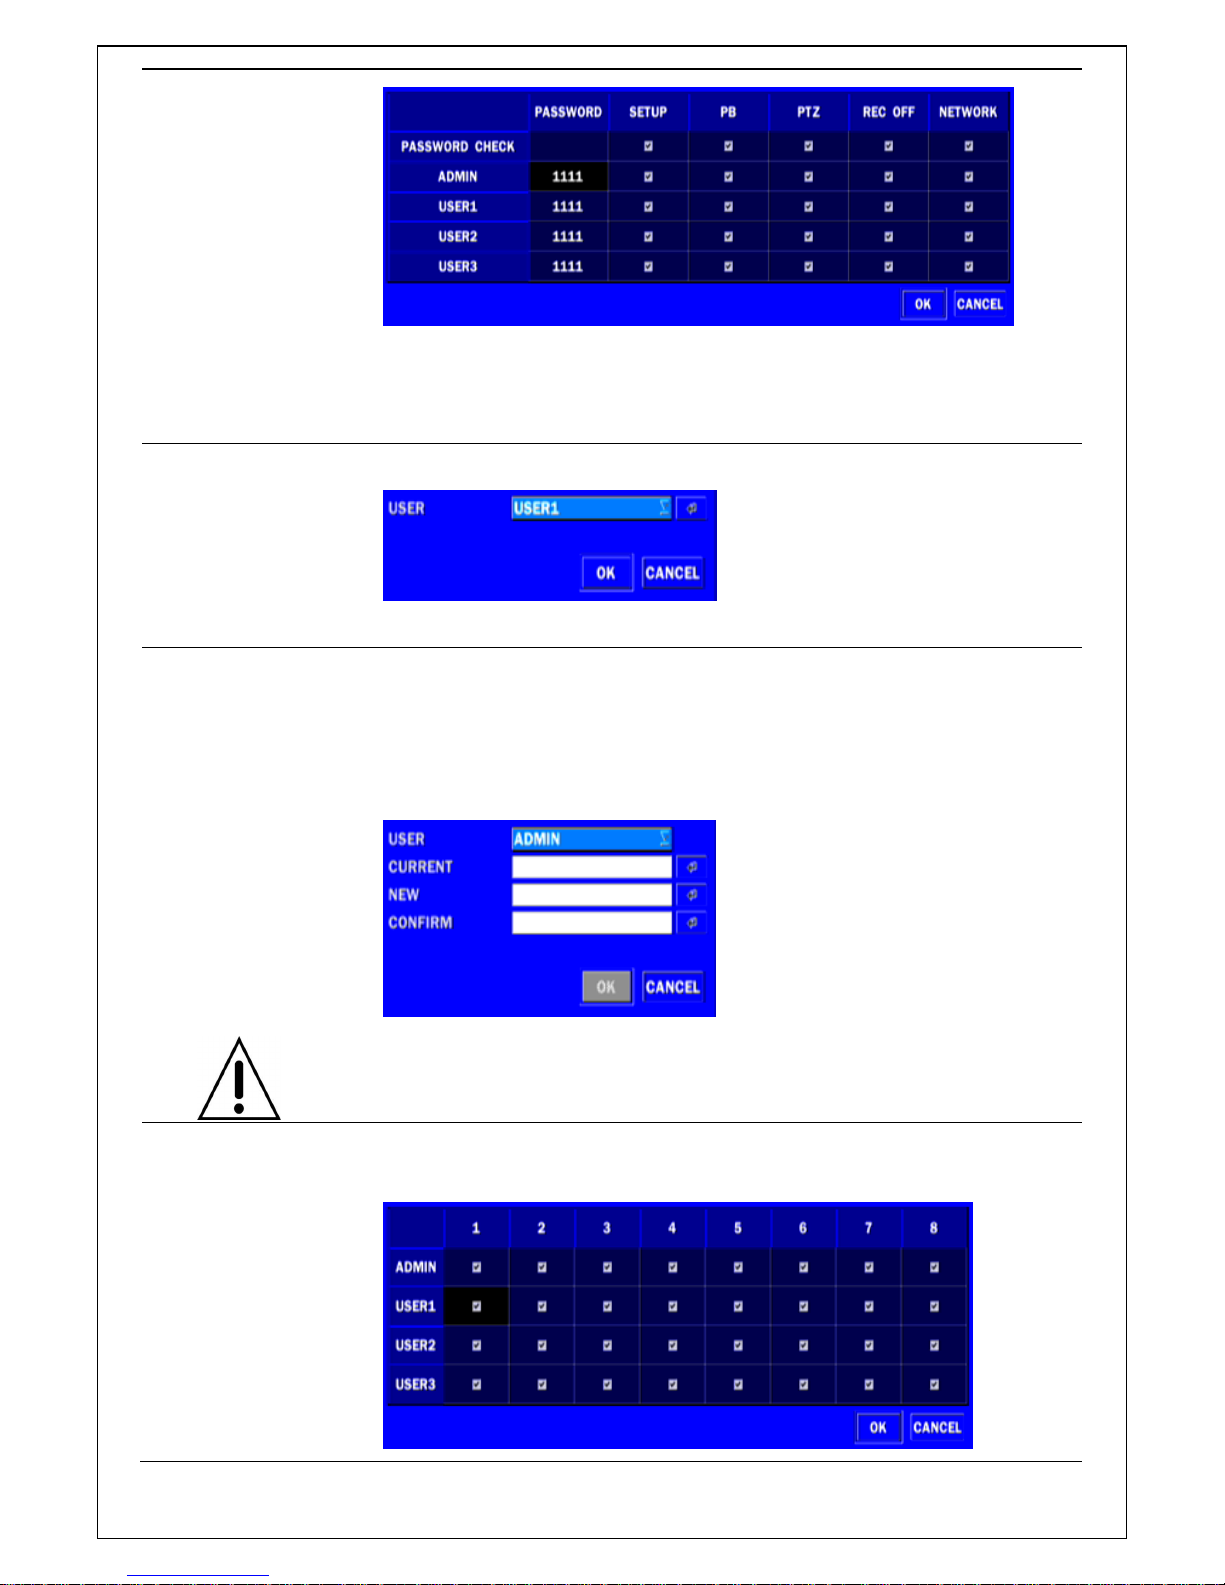
Item
Description
USER
AUTHENTICATION
Only the Admin will have access to the menu.
PASSWORD CHECK: Select the Checkbox to enable the functions or
leave the Checkbox blank to disable the functions.
SETUP: Enable/Disable of access to Setup
PB: Enable/Disable of access to Playback
PTZ: Enable/Disable of access to PTZ Control
REC OFF: Enable/Disable of manual Record
NETWORK: Enable/Disable of access to Network
Selected Checkbox: The DVR will ask for a password when the given
function is selected for all users.
Blank Checkbox: The DVR will not ask for a password when the given
function is selected for all users.
Page 35
35
ADMIN, NETOWRK, USER1, USER2, USER3:
V check: It means the user can access to the function.
Blank: It means the user cannot access to the function.
USER NAME
Change the name of USER1, USER2 and USER3.
Click “ENTER” after naming.
USER PASSWORD
Options are ADMIN, USER1, USER2 and USER3.
Select USER PASSWORD using the mouse or the remote control and
press SEL button. Select user type and enter the current password. And,
enter a new password, enter the same password again to confirm and
select OK. Then the message “PASSWORD CHANGED” is displayed.
The factory default password is 1111.
It is highly recommended to assign a new password to protect the
system.
PLAYBACK
AUTHORITY
Set authority level of playback on each user.
Checked box: authorized to playback. Blank check box: no authority.
Page 36
36
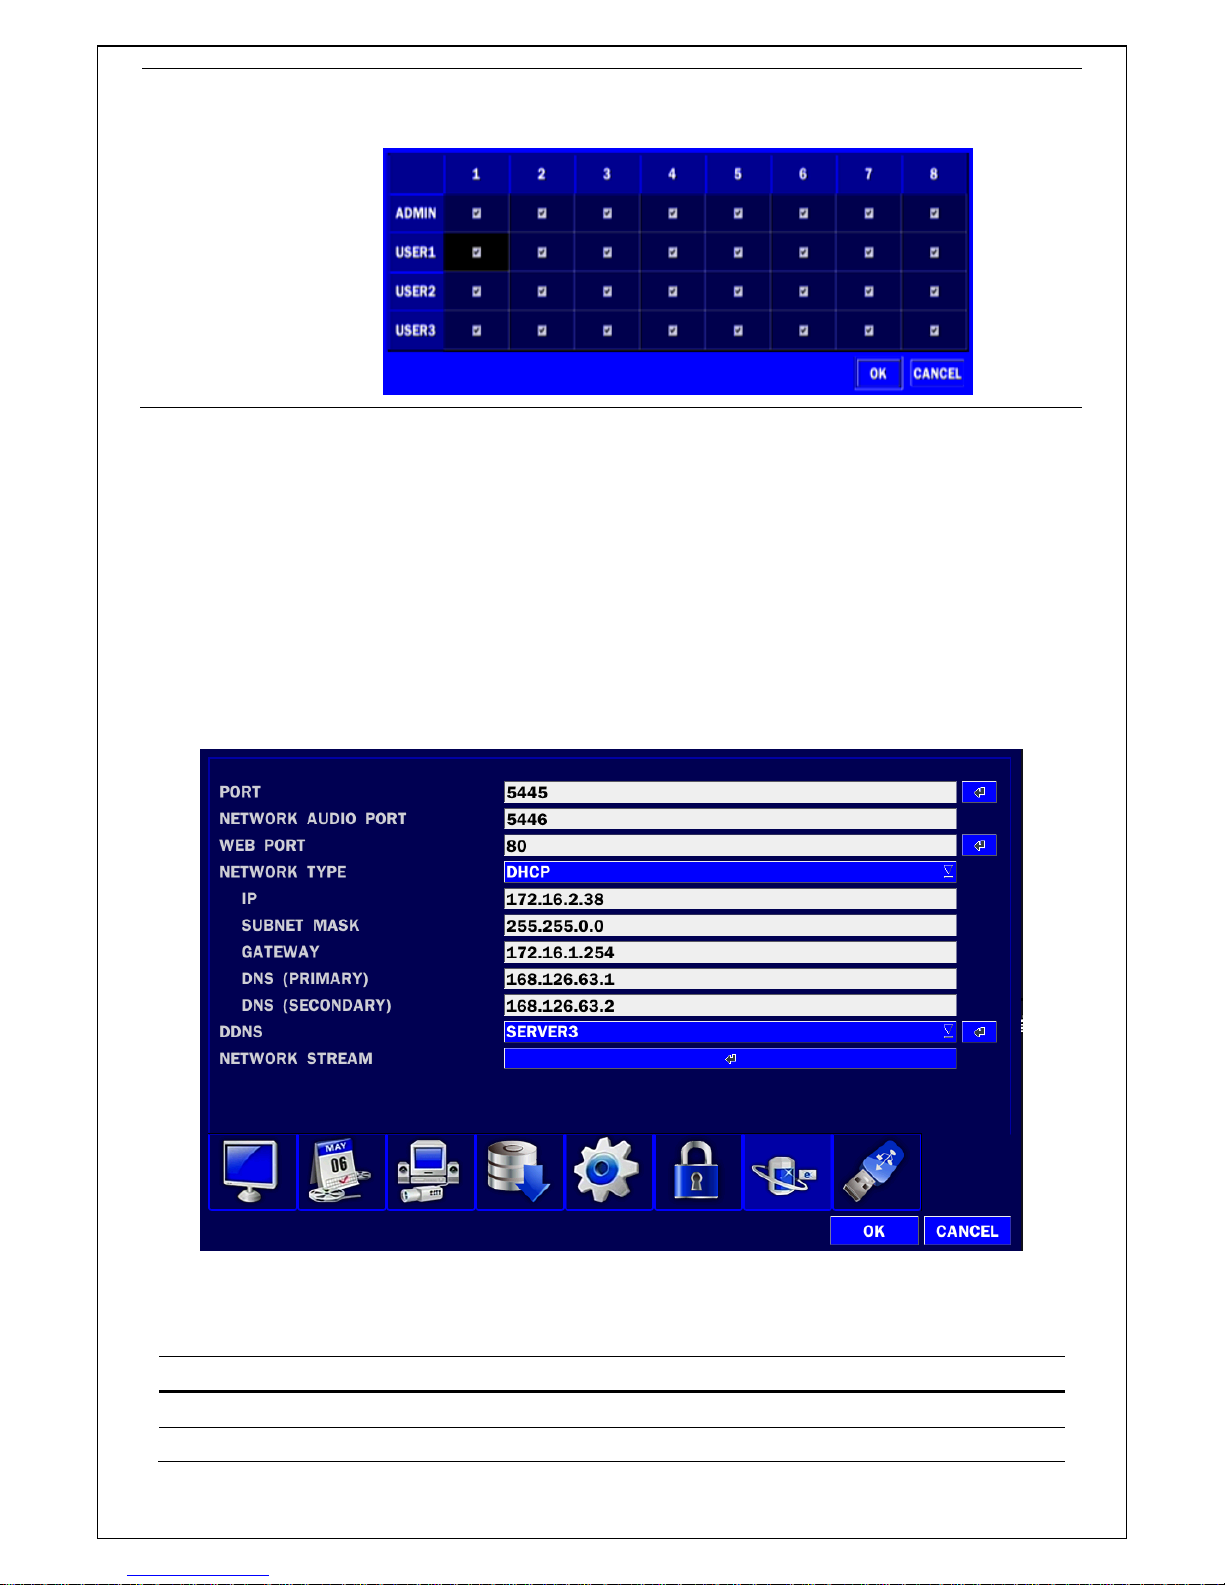
NETWORK LIVE
AUTHORITY
Allows specific users to view selected channels or block the view of
selected channels.
When user set this function, they can see a user login window. Then, user can select one of user types
(ADMIN, USER1, USER2, USER3) using the mouse or the control button (◀ ▲ ▶ ▼) on the remote
control. Then password input screen will be displayed. User can select a password using the mouse or the
control button (◀ ▲ ▶ ▼) on the remote control. The factory default password is 1111. It is highly
recommended to assign a new password to protect the system. User can assign a new password in the
SECURITY setup menu.
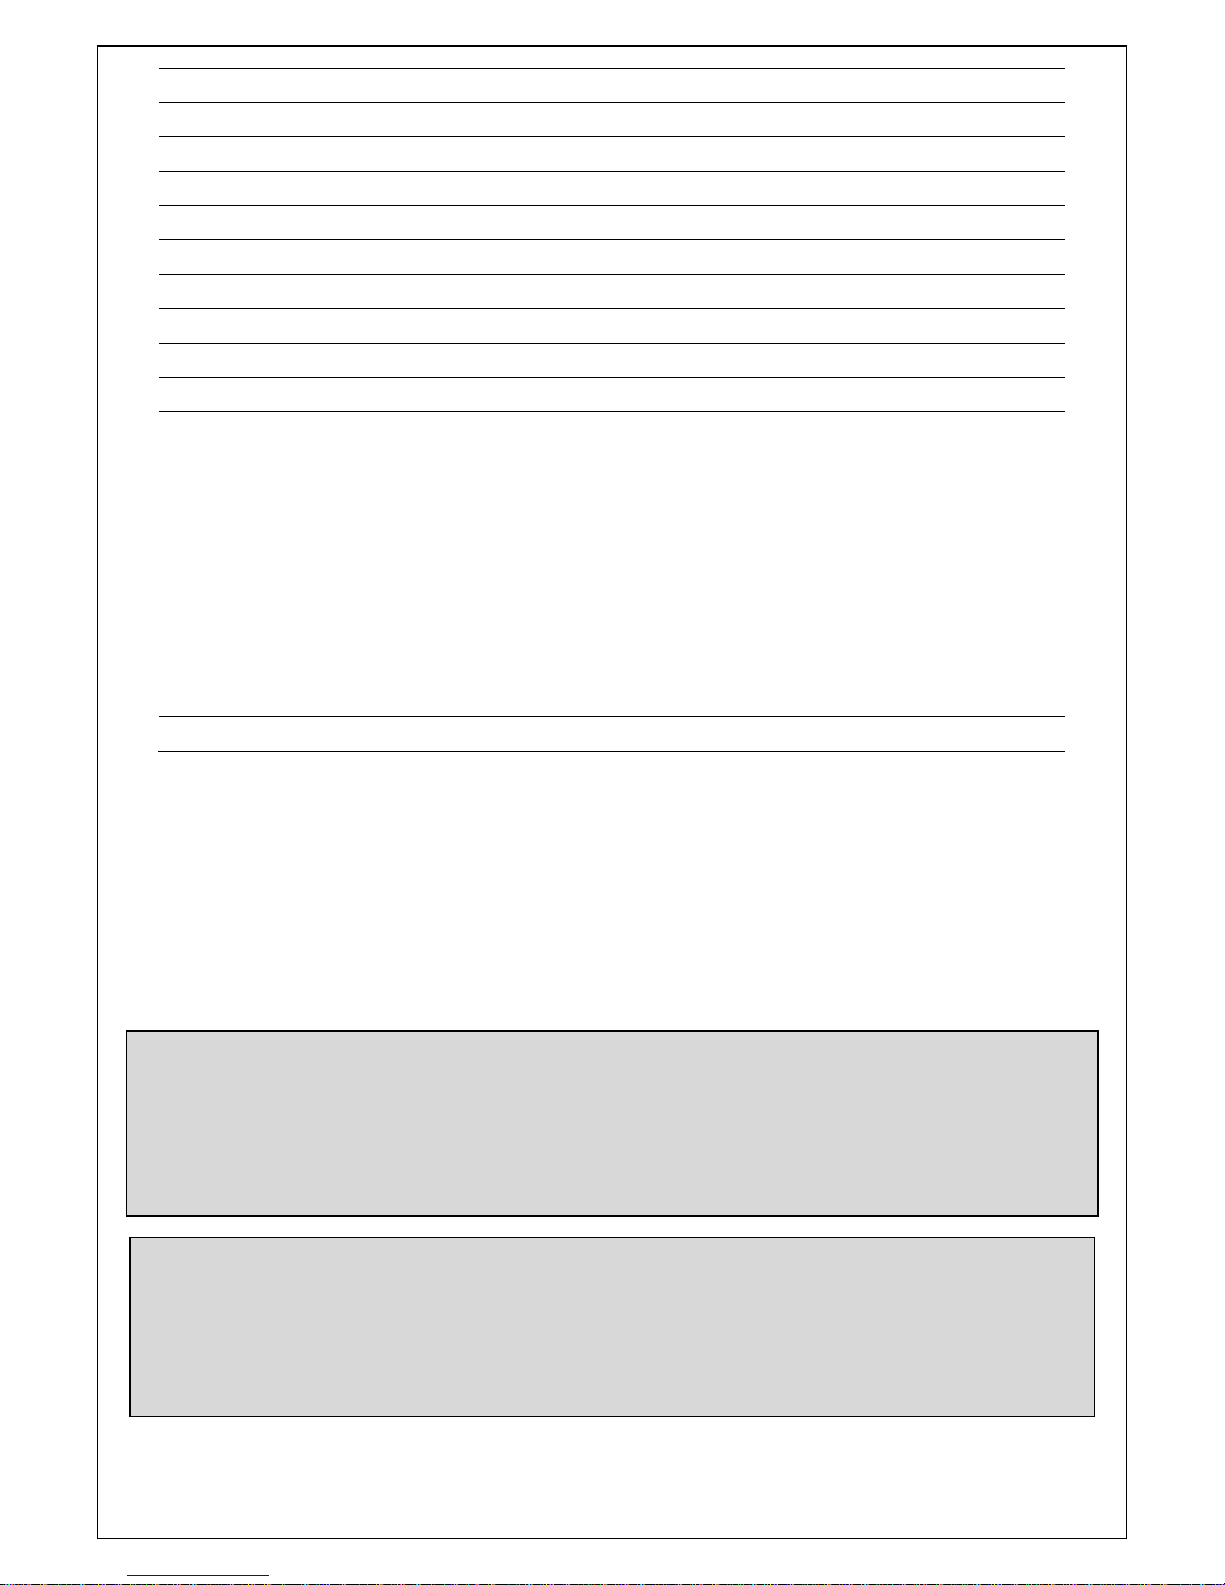
3-8. Setup – Network Mode
Select the NETWORK tab. Then, the network menu is displayed as pictured below. Navigate through the
menu items or change the settings using the mouse or the remote control.
Figure 3.8.1. NETWORK setup screen
Table 3.8.1. Menu items in Network Setup screen
Item
Description
PORT
DVR port. Default is 5445.
NETWORK AUDIO
Set the port for sending audio data via network. Default is 5446 and it
Page 37
37
PORT
has to be the next number of the DVR port. (PORT + 1).
WEB PORT
Enter the port number for connection using web. Default is 80.
NETWORK TYPE
Select a type of network connection.
DHCP
DVR will automatically retrieve an IP address.
STATIC
Network information must be manually configured
IP
Enter IP address that is assigned for the DVR
SUBNET MASK
Enter Subnet Mask that is assigned for the DVR
GATEWAY
Enter Gateway that is assigned for the DVR.
DNS (PRIMARY)
The address for the primary DNS server
DNS (SECONDARY)
The address for the secondary DNS server
DDNS
Dynamic Domain Name System (DDNS) allows a DNS name to be
constantly synchronized with a dynamic IP address. In other words, it
allows using a dynamic IP address to be associated with a static
domain name so others can connect to it by the static name.
Enable/disable using domain name address through DDNS server.
DDNS 1: Select one type among the following three DDNS server.
DDNS 2: Select this type when wants to use other general-purpose
DDNS Server.
DDNS INTERVAL: Set the connection interval (5-60minutes)
NETWORK STREAM
Set the value for network streaming.
3-8-1. Port, Network Audio Port and Web Port
When you connect one or more DVRs to a network through an IP sharing device, each device must have a
unique TCP port number for access to each unit from outside the LAN. Also, the IP sharing device must be
configured for port forwarding so when each port is accessed on the IP sharing device, it will forward to the
appropriate DVR.
Note: This port number is listed next to the Port menu option in the Network Setup screen. If you plan to
access the DVR units only from within the same LAN, the TCP port does not have to be changed.
Web viewer Network access beyond Router
In order to access beyond Router (Firewall), user must open 1 TCP port that is set on NETWORK >
WEB PORT. If this port is not open properly, user can not access DVR using direct Web viewer
(Example: When NETWORK > WEB PORT is set as 80, 80 TCP port of IP address of DVR must be
open.)
Network access beyond a router
In order to access the DVR remotely beyond a router (firewall), the user must open TCP port for
command level, live/storage channels. User need to open port number 5445 and 5445.
If the DVR supports remote setup and upgrade function over the network, user need to open additional
port number 80.
Page 38
38
3-8-2. Network Types
3-8-2-1. DHCP
An IP address is automatically assigned by the DHCP server, which automatically assigns IP address and
other parameters to new devices.
When ADSL or other network being used adopts variable IP method, not fixed IP. This option is used as a
way to automatically get IP address.
3-8-2-2. STATIC
1. For the use of fixed IP.
(See your network administrator if you do not have this information)
2. When DVR is installed in IP sharer that is connected with ADSL, a user can assign fixed IP to DVR from
IP sharer itself using “DMZ” function out of such sharer.
Input IP set in DMZ on “IP” field and Gateway of ADSL modem on “Gateway” field. Similarly, for Subnet
Mask, DNS address, input relevant values in IP sharer.
Table 3.8.2.2. STATIC
Item
Description
IP
The fixed IP address of the DVR unit.
SUBNET MASK
The subnet mask for the LAN
GATEWAY
The IP address of the Gateway
DNS (PRIMARY)
The address for the DNS server
DNS (SECONDARY)
The address for the DNS server
NOTE
Unless DNS is properly set, the DDNS and the e-mail features will not work.
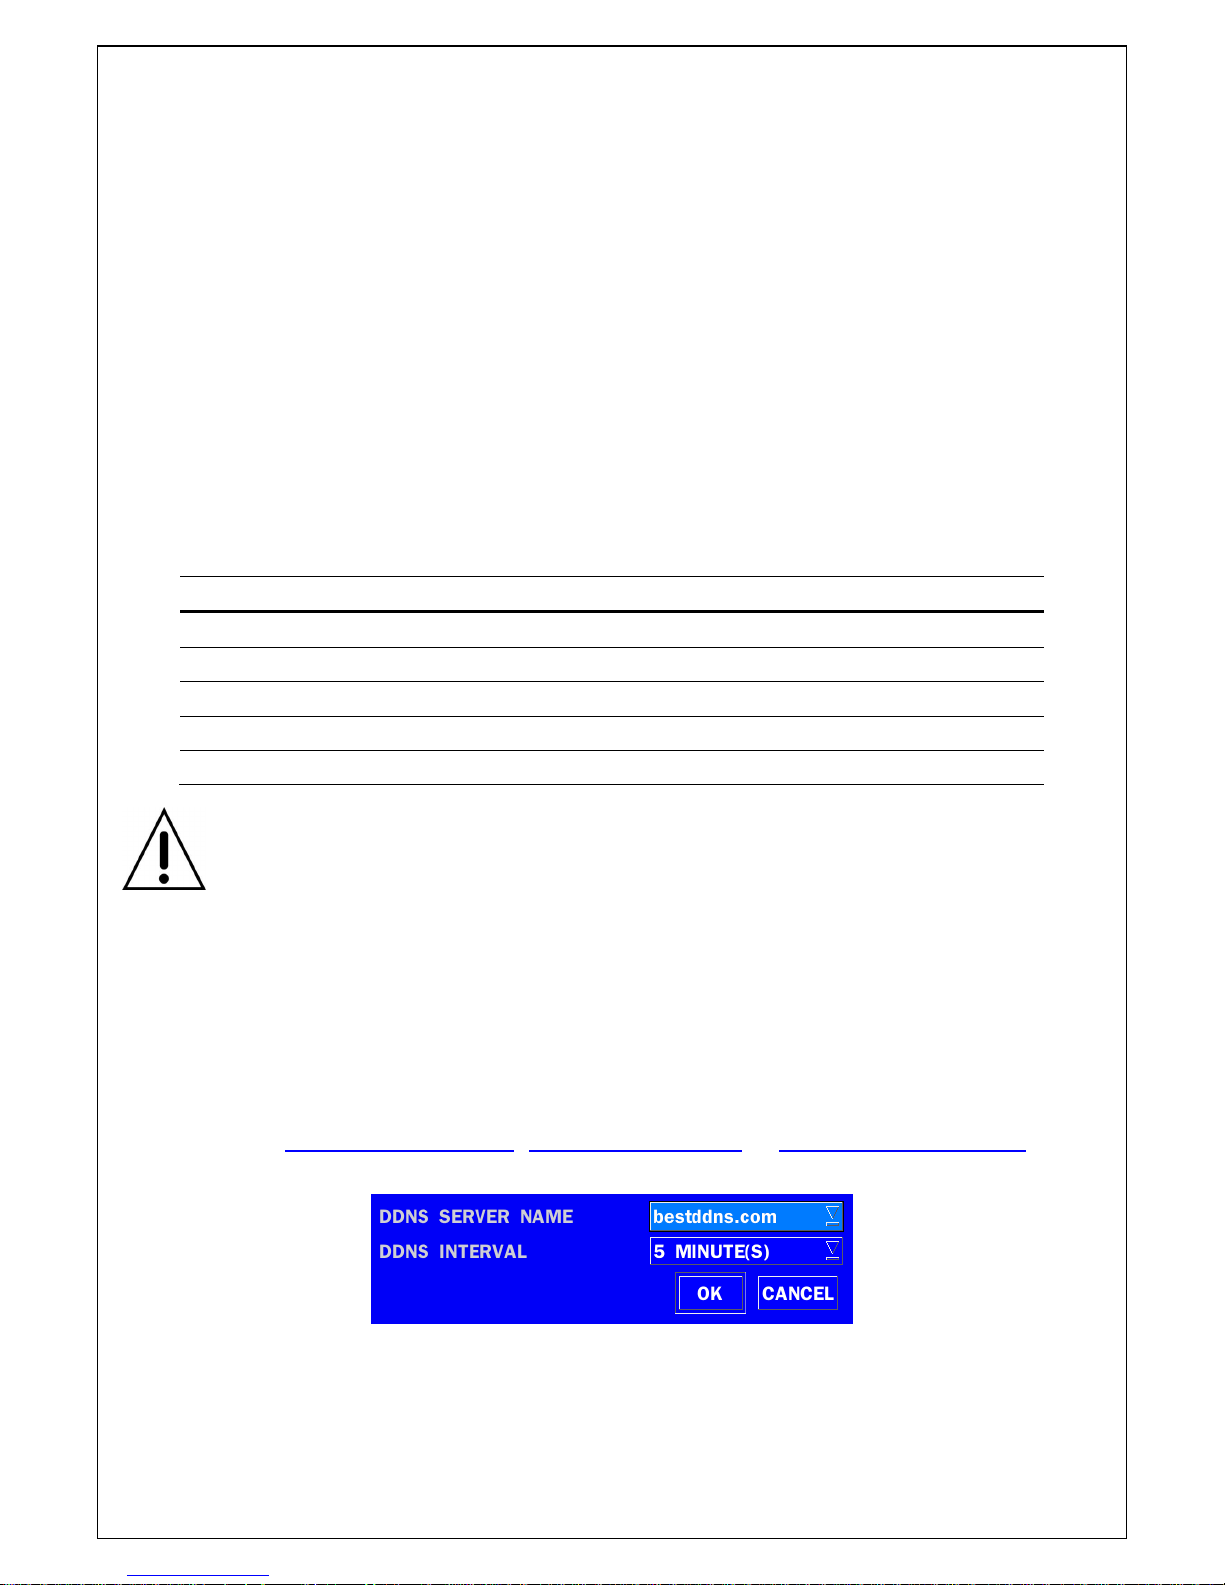
3-8-3. DDNS
User can use the function to connect to a network with a domain name. When it selects a Sever 1, user can
select one type among five DDNS Servers which be supporting for free. (okddns.com for Korea,
ddnscenter.com for USA and bestddns.com for other area including EU and other areas.) The DDNS
interval can be set from 5 to 60 minutes.
To connect to a network with a domain name, user also has to register a MAC address and create a unique
domain name to http://www.bestddns.com, http://www.okddns.com or http://www.ddnscenter.com. Please
refer to Appendix: How to connect network section for the detail of the registration.
Figure 3.8.3.1. Network setup screen – DDNS Server 1
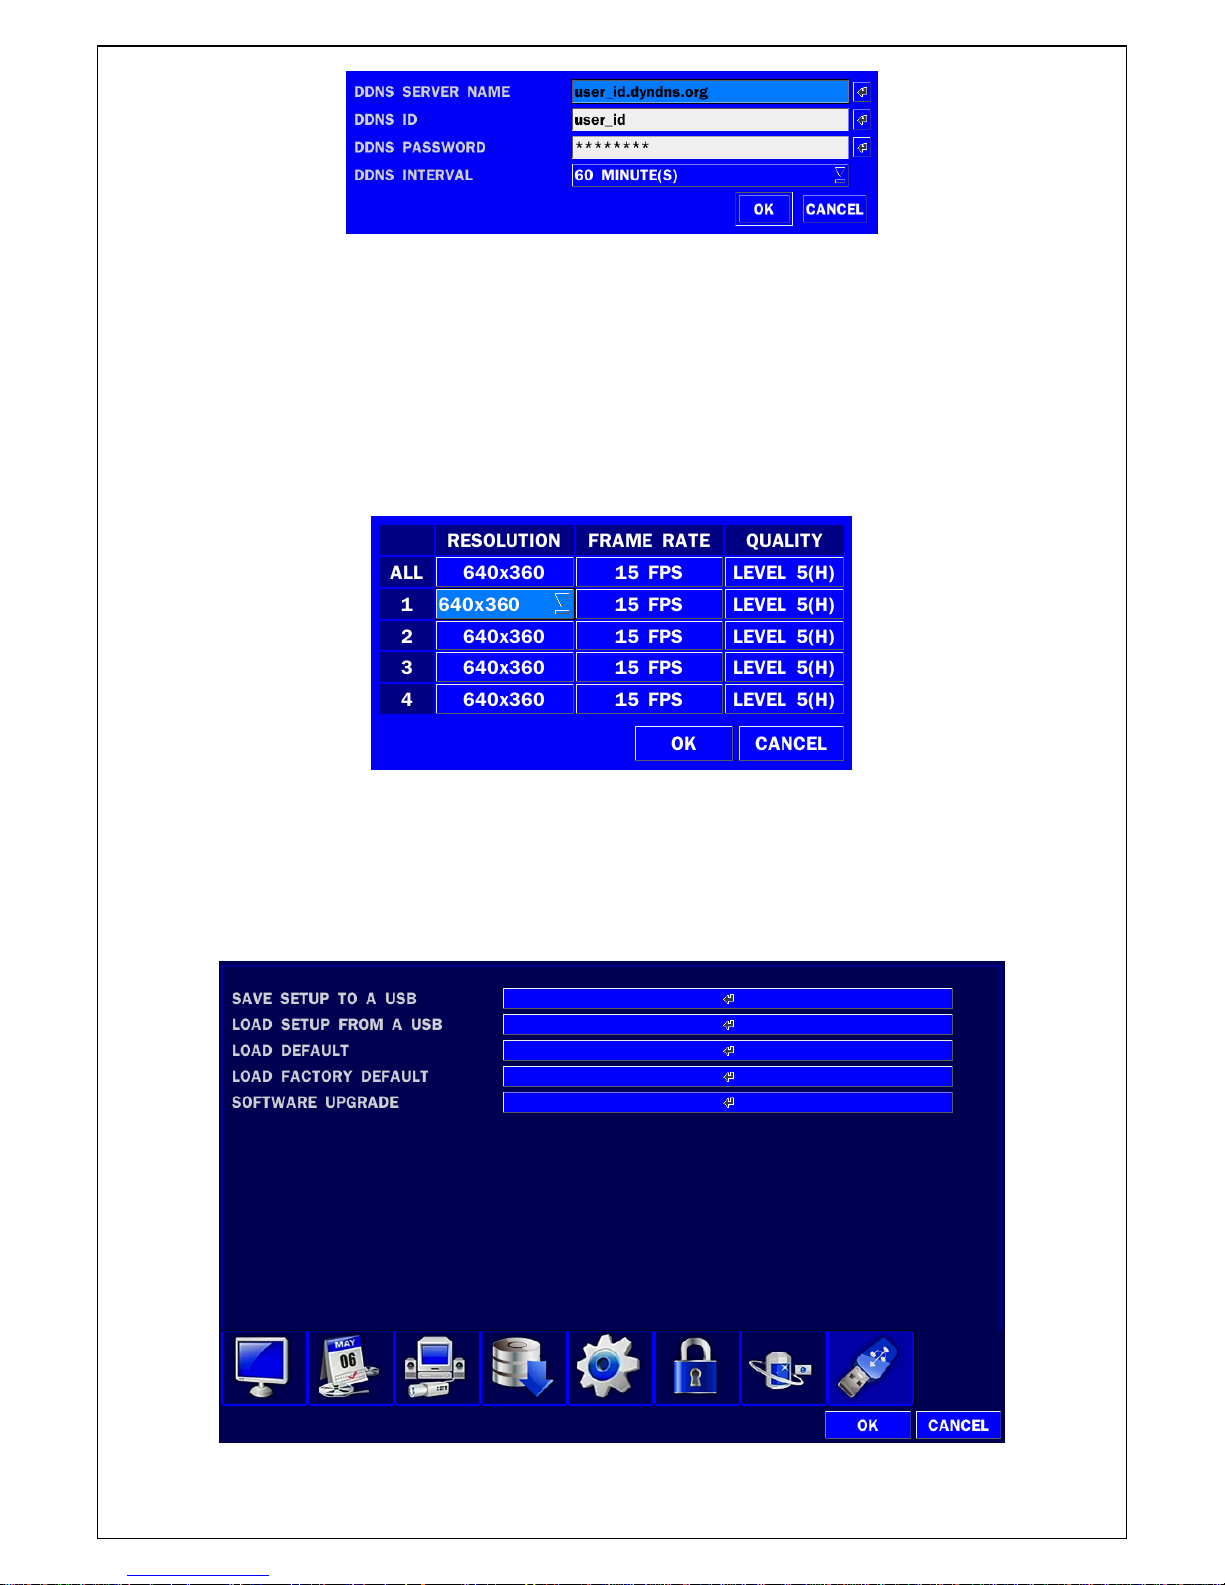
If user wants to use other general-purpose DDNS Server, select a Sever 2. Then, user has to input the
server name, ID and password using a virtual keyboard.
Page 39
39
Figure 3.8.3.2. Network setup screen – DDNS Server 2
3-8-4. Network Stream
User can set the resolution, the frame rate and the quality for a network stream classified by channel. It is
recommended that user should adjust each item to proper level to get the network service smoothly.
The maximum value for the network stream is VGA 15fps per channel but the recording resolution and
frame rate are sending when only one user connects to the one channel mode via network.
Figure 3.8.4. Network setup screen – Network Stream
3-9. Setup - CONFIG Mode
In the SETUP menu, select the CONFIG tab. Then, the configuration menu is displayed as pictured below.
Navigate through the menu items or change the settings using the mouse or the remote control.
Page 40
40
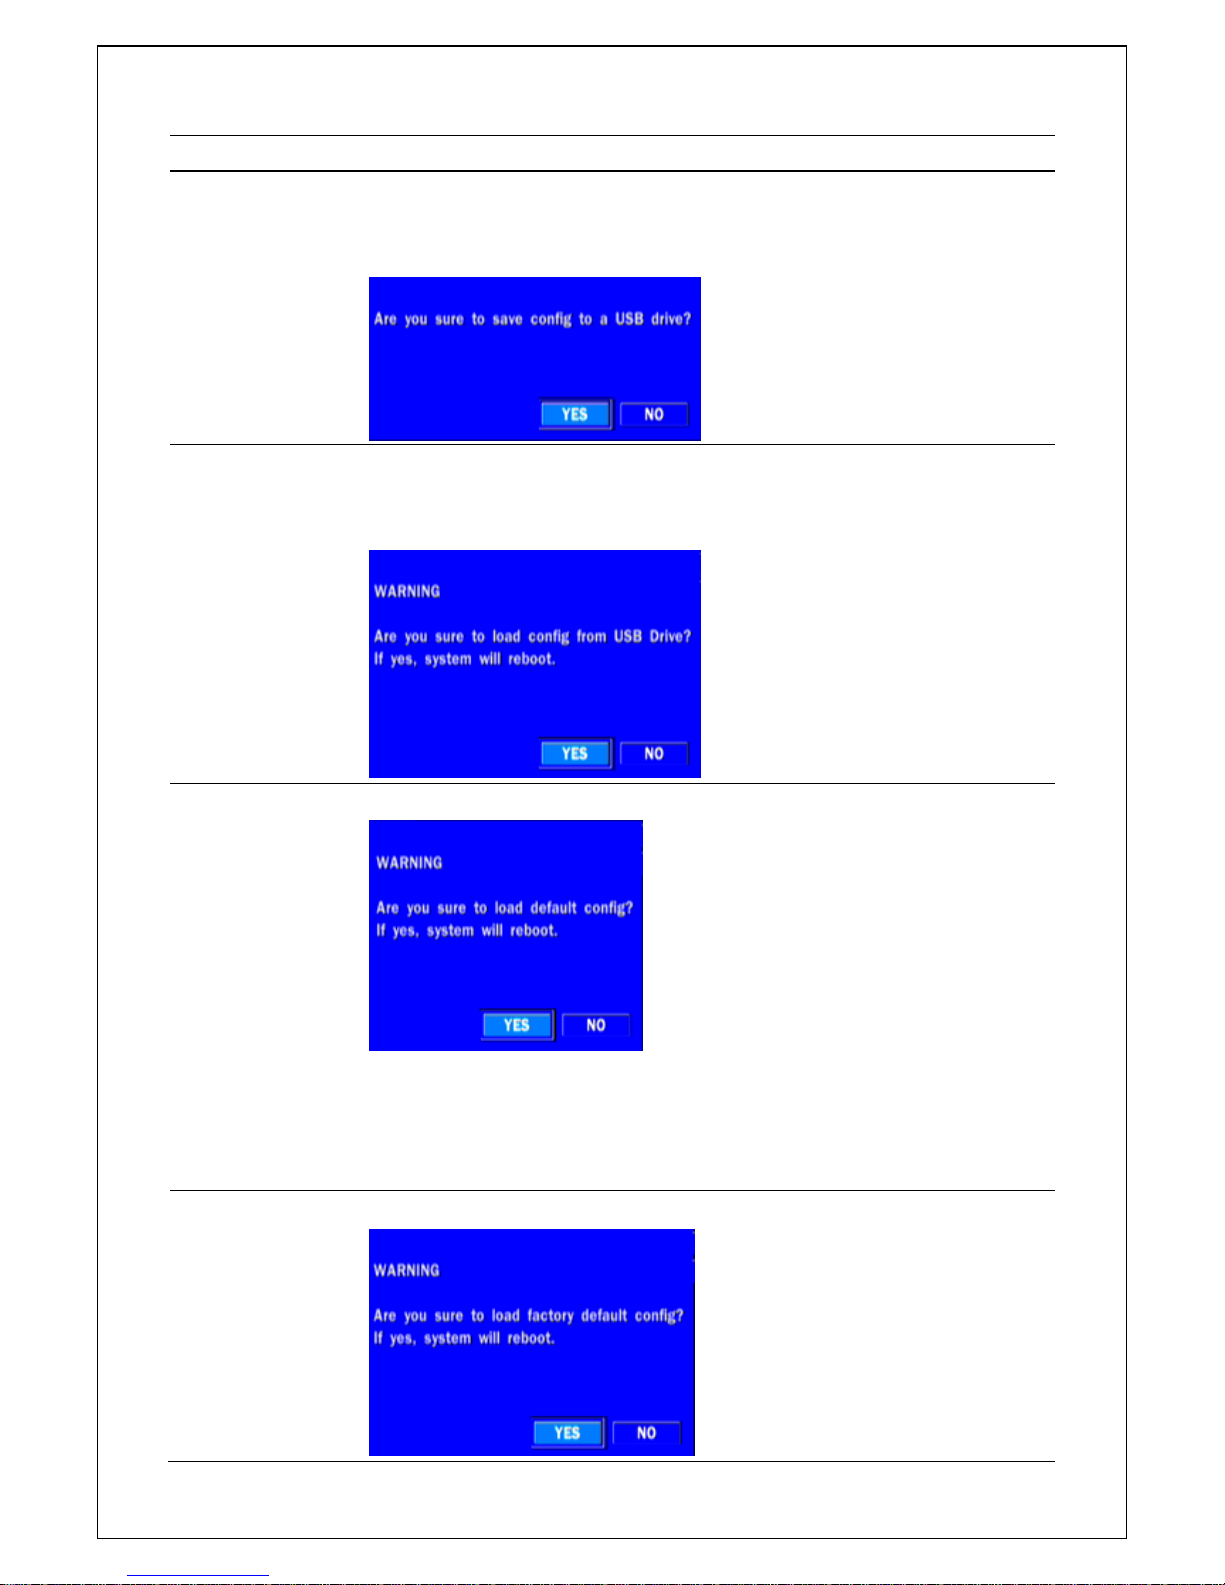
Figure 3.9.1. Config setup screen
Table 3.9.1. Config setup
Item
Description
SAVE SETUP TO
A USB
User can save the current configuration (Setting values) of the DVR to
the USB flash drive. Plug in the USB flash on the front panel and press
the button to start the saving process.
LOAD SETUP
FROM A USB
User can upload the configuration of the DVR to another DVR using the
USB Flash drive. Plug in the USB flash drive on the front panel and press
the button to start the loading process.
LOAD DEFAULT
Press the button to reset the system to the default settings.
The following settings such as Language, DVR ID, Security User
Authentication, Security User P/W, Date format, DLS settings,
Network settings, HDD overwrite, Limit recording, HDD serial
number, and HDD ERROR time will not be included.
LOAD FACTORY
DEFAULT
Press the button to reset the system to the factory default settings.
Page 41
41
SOFTWARE
UPGRADE
Upgrade softeware to the latest version.
After connecting USB flash drive to USB port on the DVR, click SEARCH.
It will automatically find the upgrade file.
Please refer to 7. Upgrading Firmware.
4. Live, Search and Playback
4-1. Live Viewing Screen
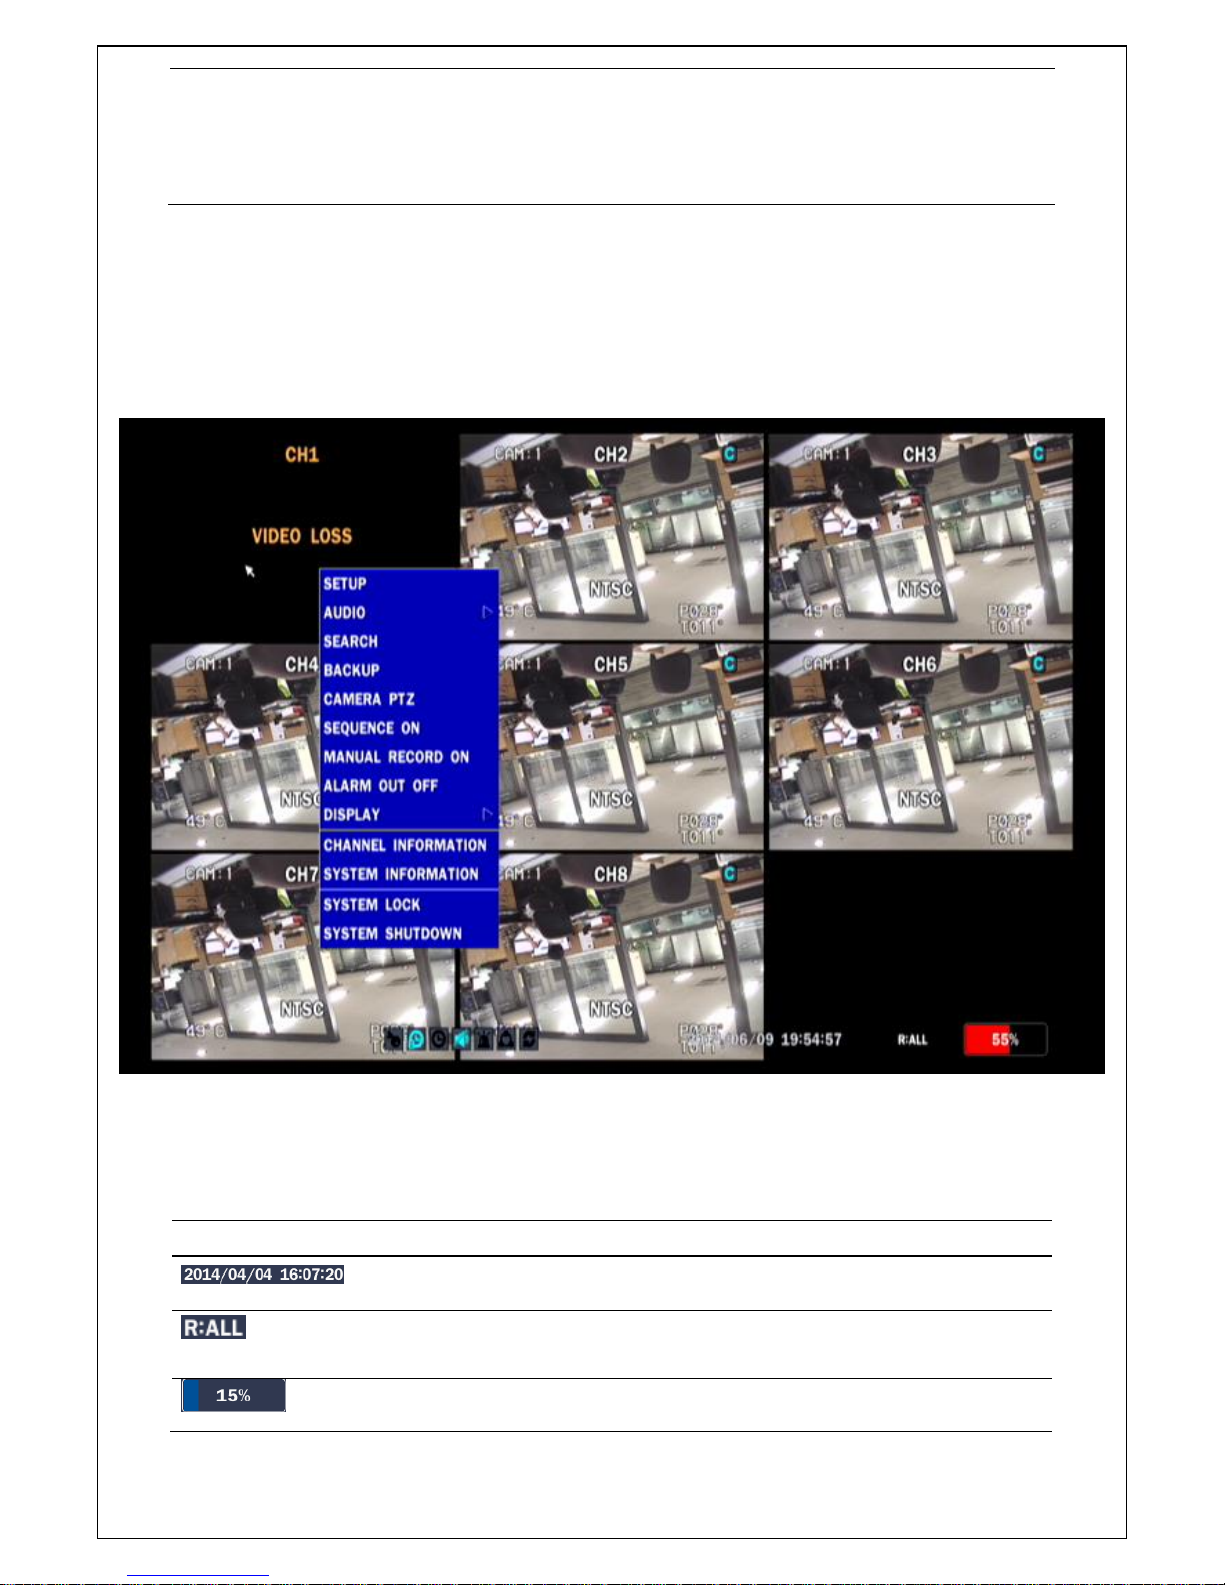
In the Live screen, video inputs from the cameras are displayed as they are configured in the Display Setup
screen. Various on-screen display (OSD) symbols, which indicate the status of the DVR, are described in
Table 4.1.1.
Figure 4.1.1. Live Viewing Screen
The following status bar hides automatically and appears again when putting a mouse pointer to the bar.
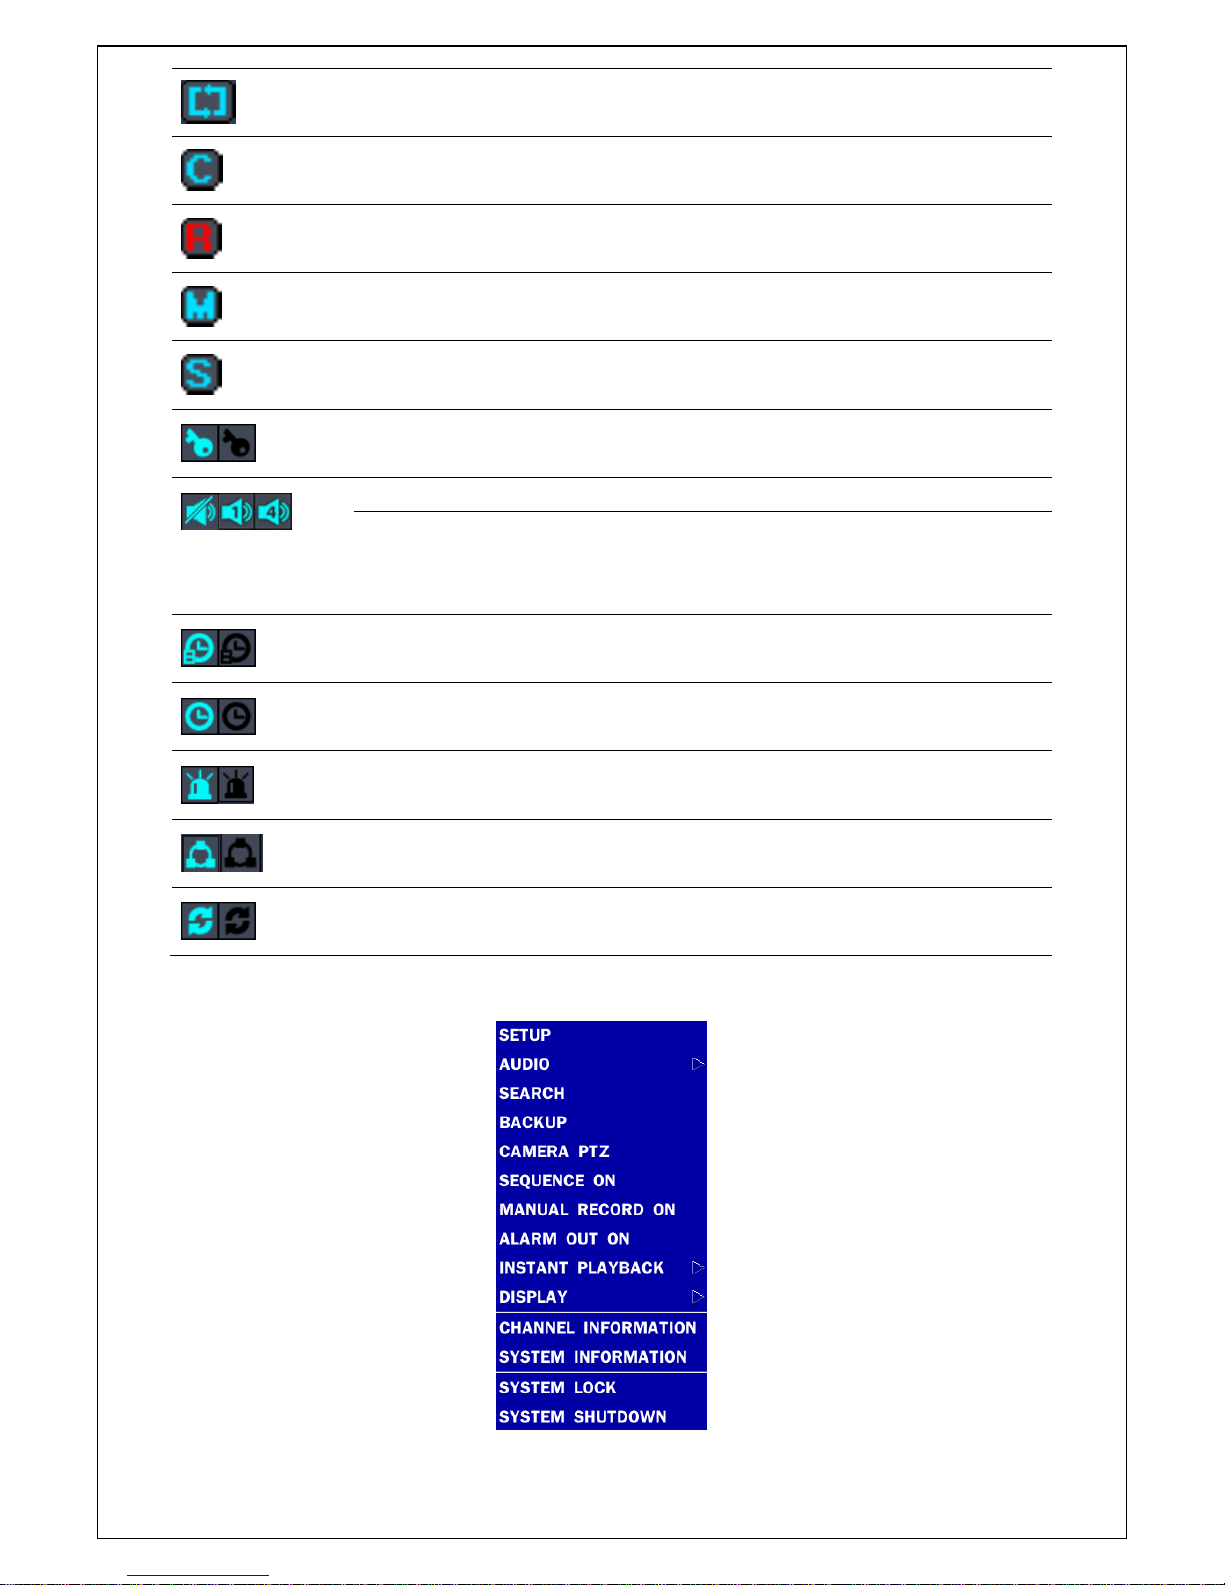
Table 4.1.1. Status Indicator Icons in Live Viewing Screen
Icon
Description
Displays the current date and time.
Remote control ID display. If a remote ID is not set, the message “R: ALL”
is displayed.
Displays the amount of recording on the hard disk from 0-99%.
Page 42
42
Indicates that HDD is recycled.
Continuous recording in progress.
Manual recording in progress. To set the Manual recording mode, press
the Record button on the front panel.
Motion alarm recording in progress.
Sensor recording in progress.
Indicates that the lock is set. To
Audio mute. To set audio mute, press the Audio button on the front panel.
Single audio display. To set audio single for highlighted channel only,
press the Audio button on the front panel.
Indicates that alarm is set. To set the alarm function, press the Alarm
button on the front panel.
Indicates that alarm output is activated.
Event indicator. When there is an event (motion recording, video loss,
HDD fail, S.M.A.R.T), this icon will be highlighted bright.
Indicates that a network client is connected to the DVR.
Indicates that sequencing mode is enabled.
Right click the mouse, and the quick operation window will be displayed as below.
Figure 4.1.2. Quick Operation Window
Page 43
43
Table 4.1.2. Menu Items in Quick Operation Window
Icon
Description
SETUP
Select this option to enter the Setup menu.
AUDIO
Select this option to mute audio on all channels.
SEARCH
Search button. Click this button to enter the search menu.
BACKUP
Capture pictures and store as BMP files
CAMERA PTZ
Pop up the PTZ user interface.
SEQUENCE
ON
Sequence button. Click this button to use a sequence function.
MANUAL
RECORD
Manual Record button. Click this button to enable manual recording.
ALARM OUT
Click this button to enable/disable Alarm outputs
INSTANT
PLAYBACK
Live screen, you can fast search.
(Go Back to 10sec, 20sec, 30sec, 60sec).
CONTROL
BAR
SHOW
Set to hide automatically or display continuously a control bar on the bottom side in
a live mode.
CHANNEL
INFORMATION
Press the button to view the record setting of a selected channel.
SYSTEM
INFORMATION
Press the button to view the system information.
SYSTEM
LOCK
Locks the DVR from unauthorized user access.
SYSTEM
SHUTDOWN
Select this option to shutdown system.
Page 44
44
4-2. SEARCH Screen
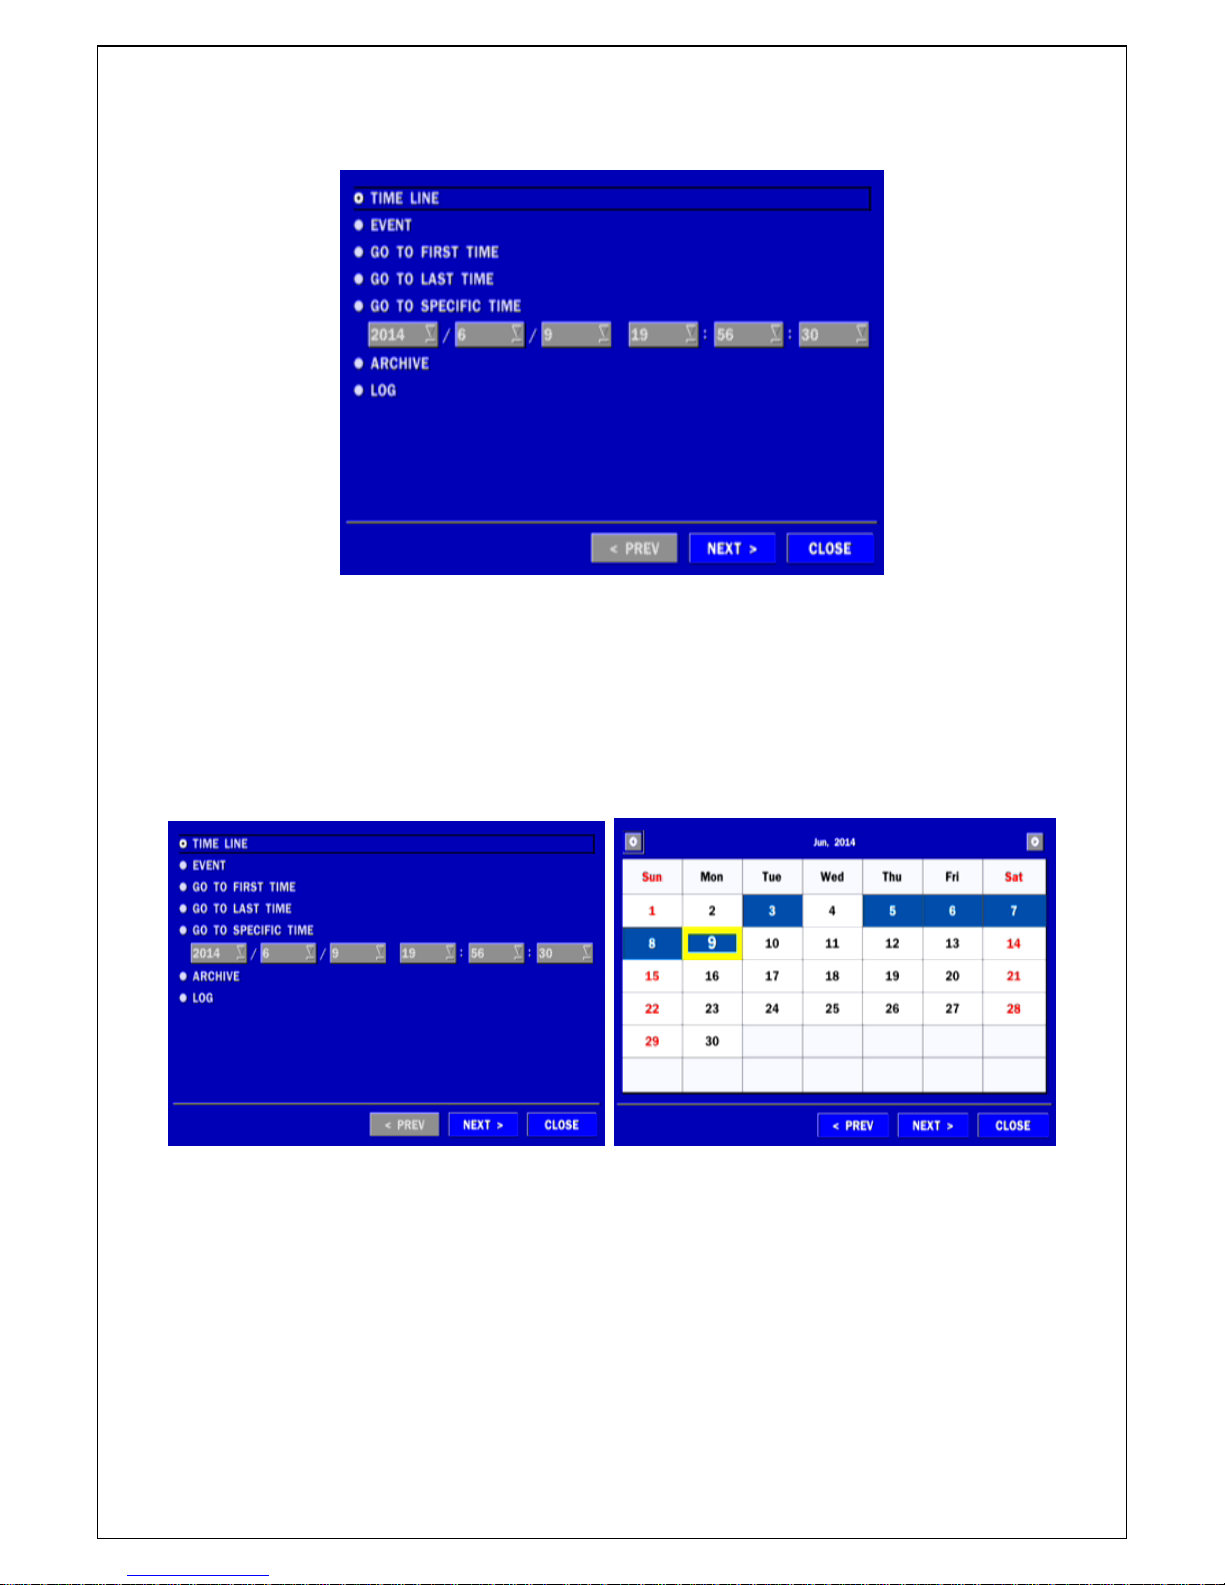
To enter the search screen, select SEARCH menu on the screen using the mouse or press SEARCH icon
on live screen.
Figure 4.2.1. Search Screen
There are 7 ways of search menu such as TIME LINE (Calendar), EVENT, GO TO FIRST TIME, GO TO
LAST TIME, GO TO SPECIFIC TIME, ARCHIVE LIST, and LOG LIST on the screen.
4-2-1. TIME-LINE Search
The TIME-LINE search window is used to find the stored video by using the time line bar.
Page 45
45
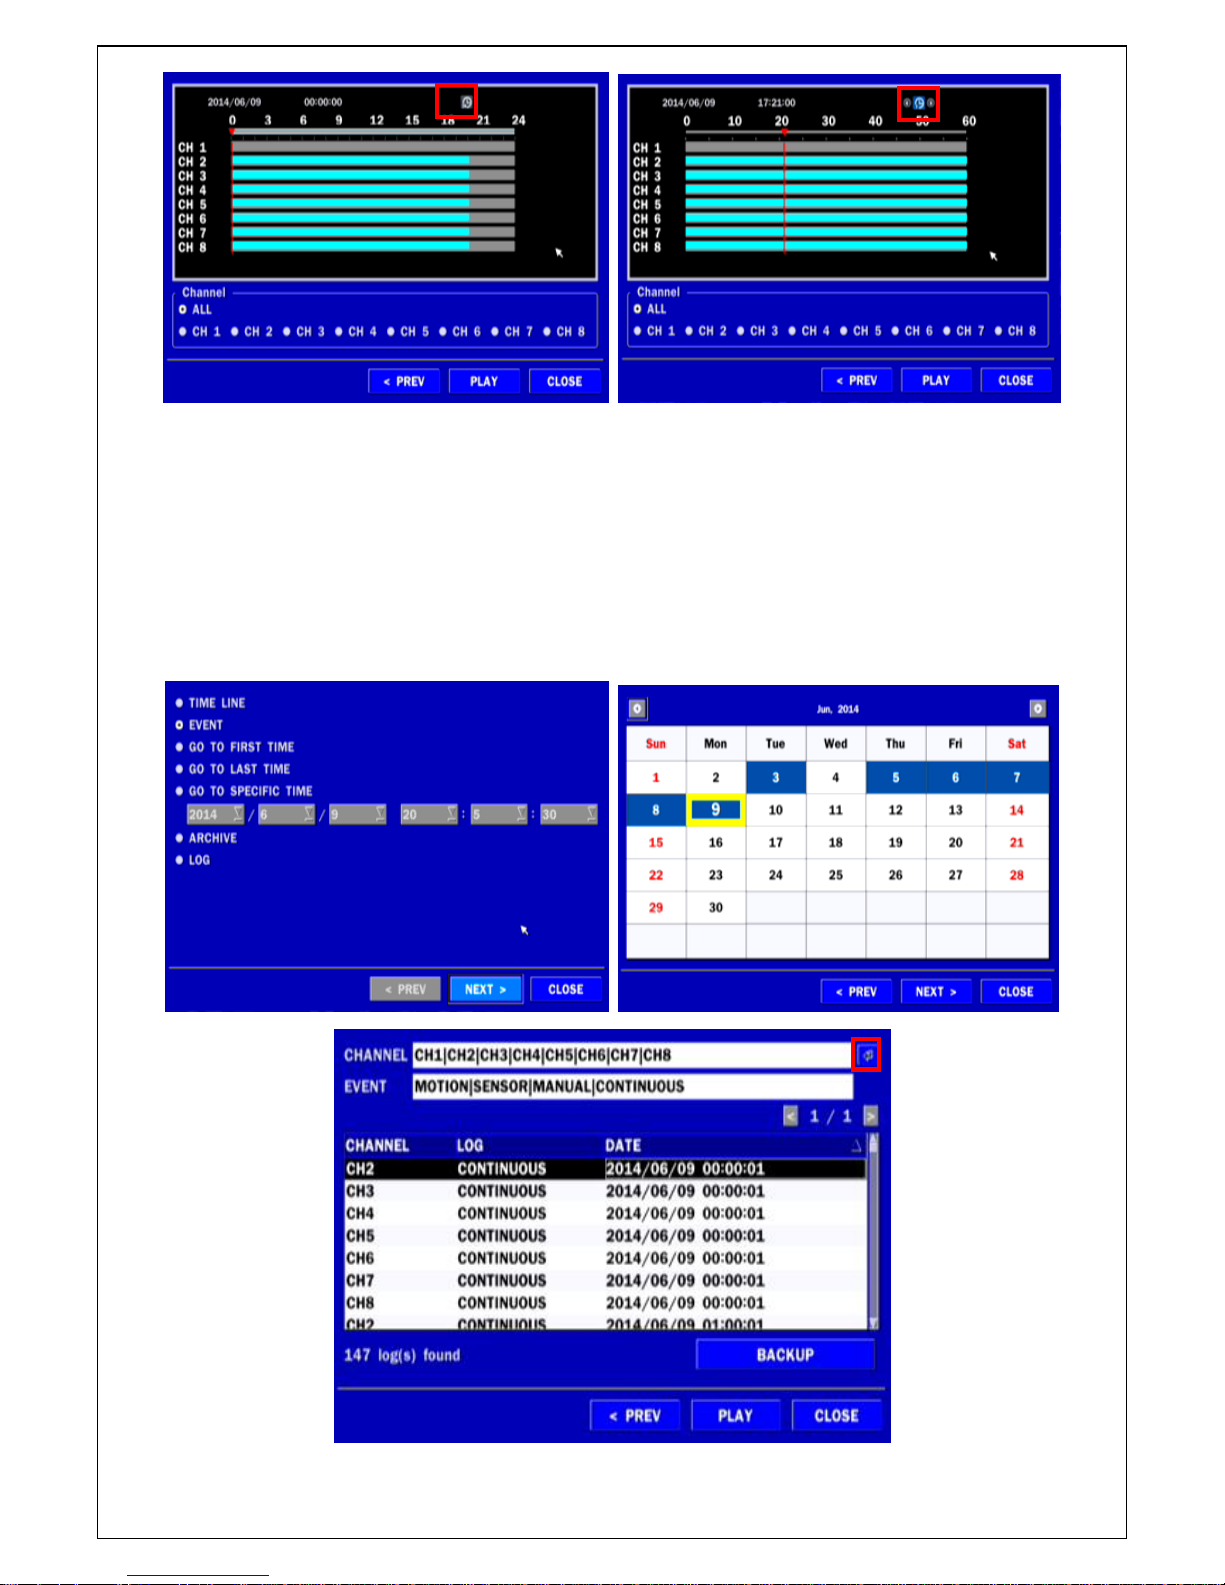
Figure 4.2.2. Time Line Search screen
When it clicks a Timeline menu, user can see a calendar which has recording data. Select a specific date
and time. Use a drag-and-drop function of the mouse control. User can select a specific minutes using a
button in the above red box. Press a PLAY button after setting a specific time. Press the PREV to return to
the SEARCH window.
4-2-2. Event Search
The Event Search window is used to find stored video.
Page 46
46
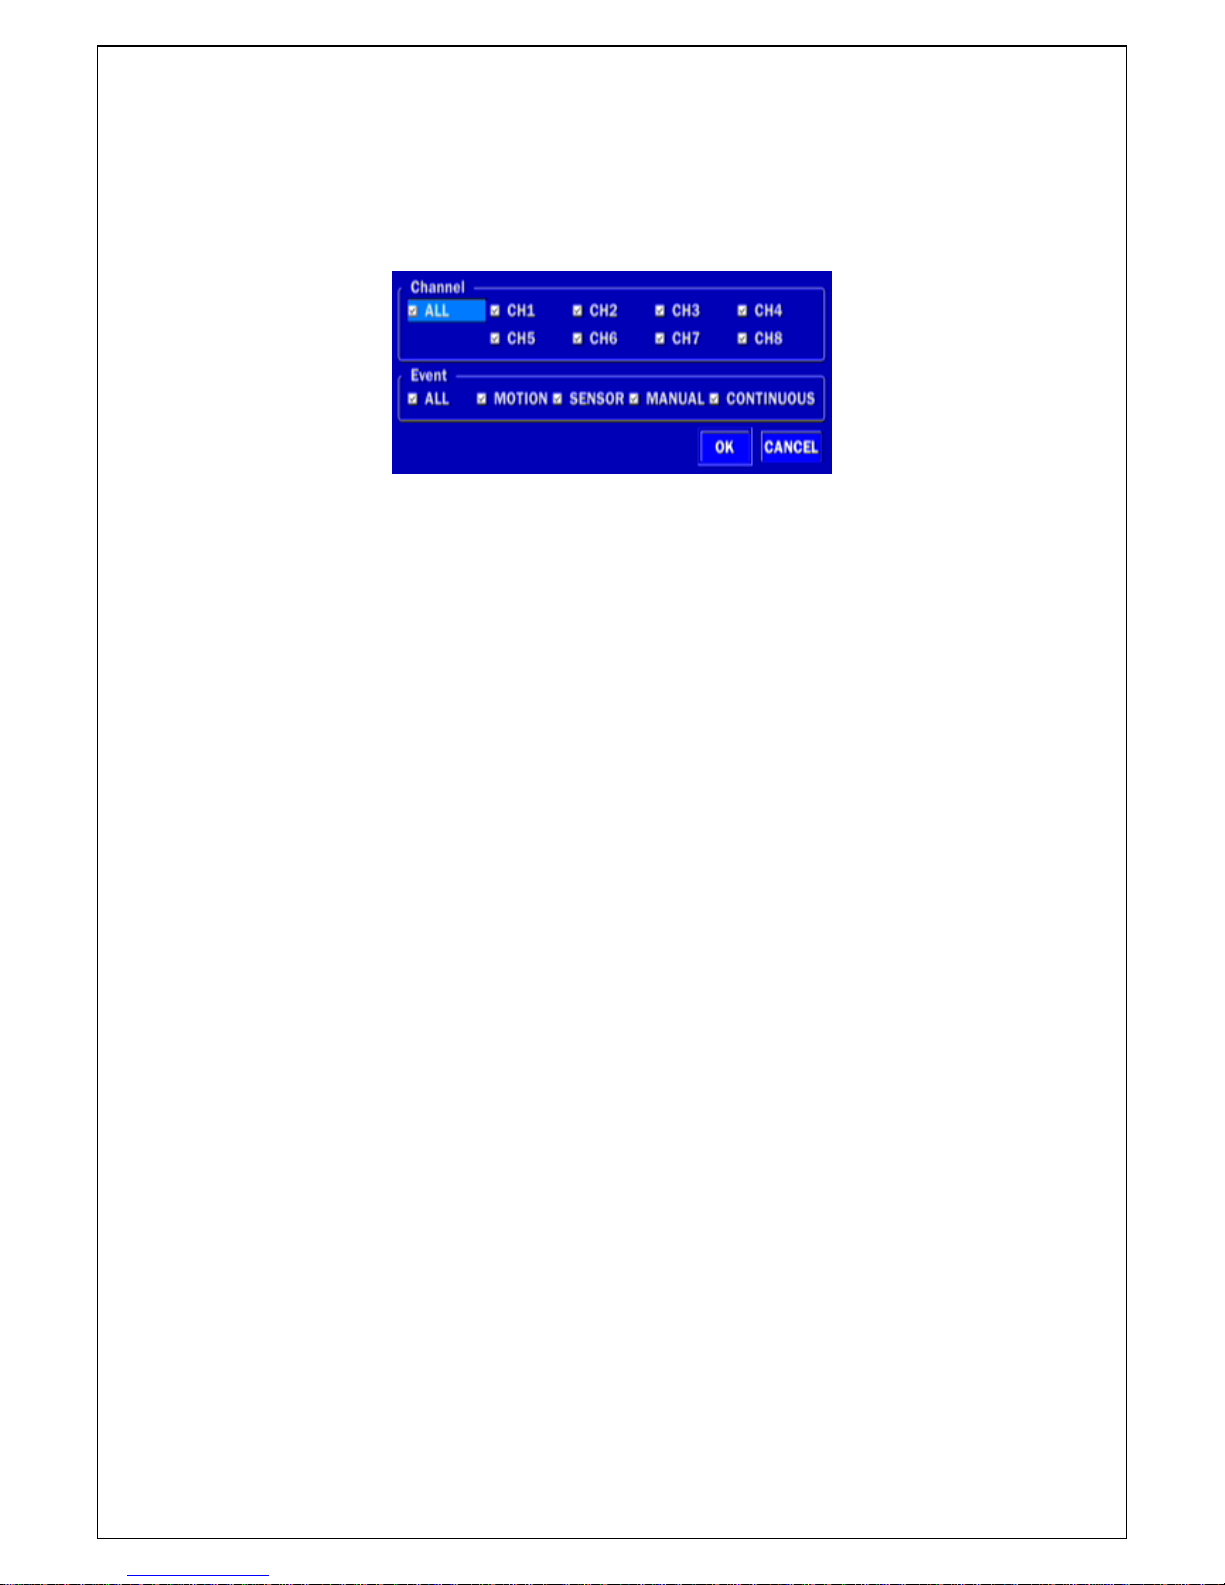
Figure 4.2.3.1. Event Search screen
When the Event menu is selected, the user can see a calendar, which has recorded data. Select a specific
date and the event log will be displayed. Press the PLAY button to playback the data or the SAVE button to
save the data after selecting the specific data. User can find a data of the specific channel and event using
a button in the above red box as following Figure 4.2.3. Press the PREV to return to the SEARCH window.
Figure 4.2.3.2. Event Search screen
4-2-3. Go To First Time
You can access from the oldest recorded data on the DVR hard drive by selecting GO TO FIRST TIME on
the SEARCH window. Press the PREV to return to the SEARCH window.
4-2-4. Go To Last Time
You can access from the last minute recorded data on the DVR hard drive by selecting GO TO LAST TIME
on the SEARCH window. Press the PREV to return to the SEARCH window.
4-2-5. Go To Specific Time
User can search for video data from a specific instance by setting the date and time in the GO TO
SPECIFIC TIME menu. Use the mouse or the remote control to change the date and time value and press
the PLAY button after setting. If there is no video data in the set date and time, No Data Exist message
displays.
4-2-6. Archive Search
The ARCHIVE Search window is used to find previously stored video or images.
Page 47
47
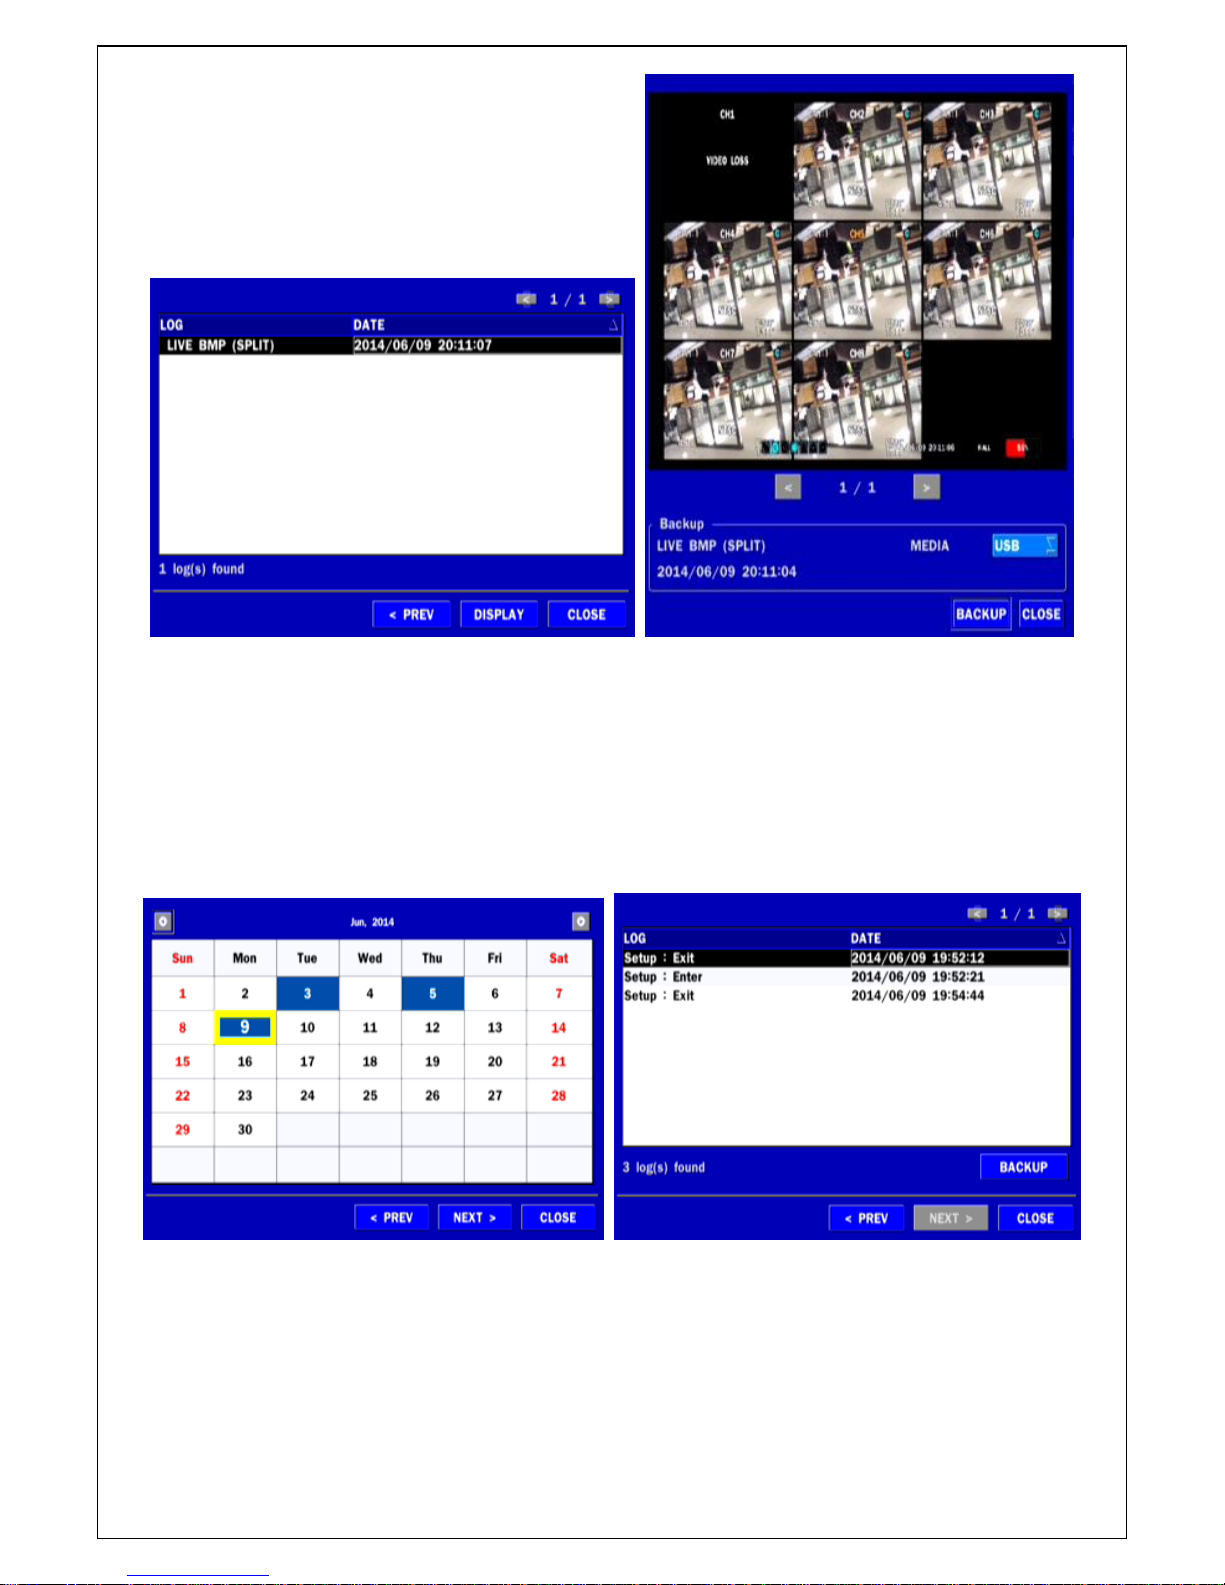
Figure 4.2.6 Archive Search Screen
When it clicks an Archive menu, user can see a calendar which has recording data. Select a specific date
and then user can see all data. When it presses a Display button, the still image or the first frame of the
selected video is opened and user can save the data.
4-2-7. Log Search
You can access the LOG list search screen by selecting LOG on the SEARCH window.
Figure 4.2.7 Log Search Screen
When it clicks a Log menu, user can see a calendar which has recording data. Select a specific date and
press NEXT button. Then user can see all log data. Press SAVE button to save the data and then the data
is saved to text file format.
Page 48
48
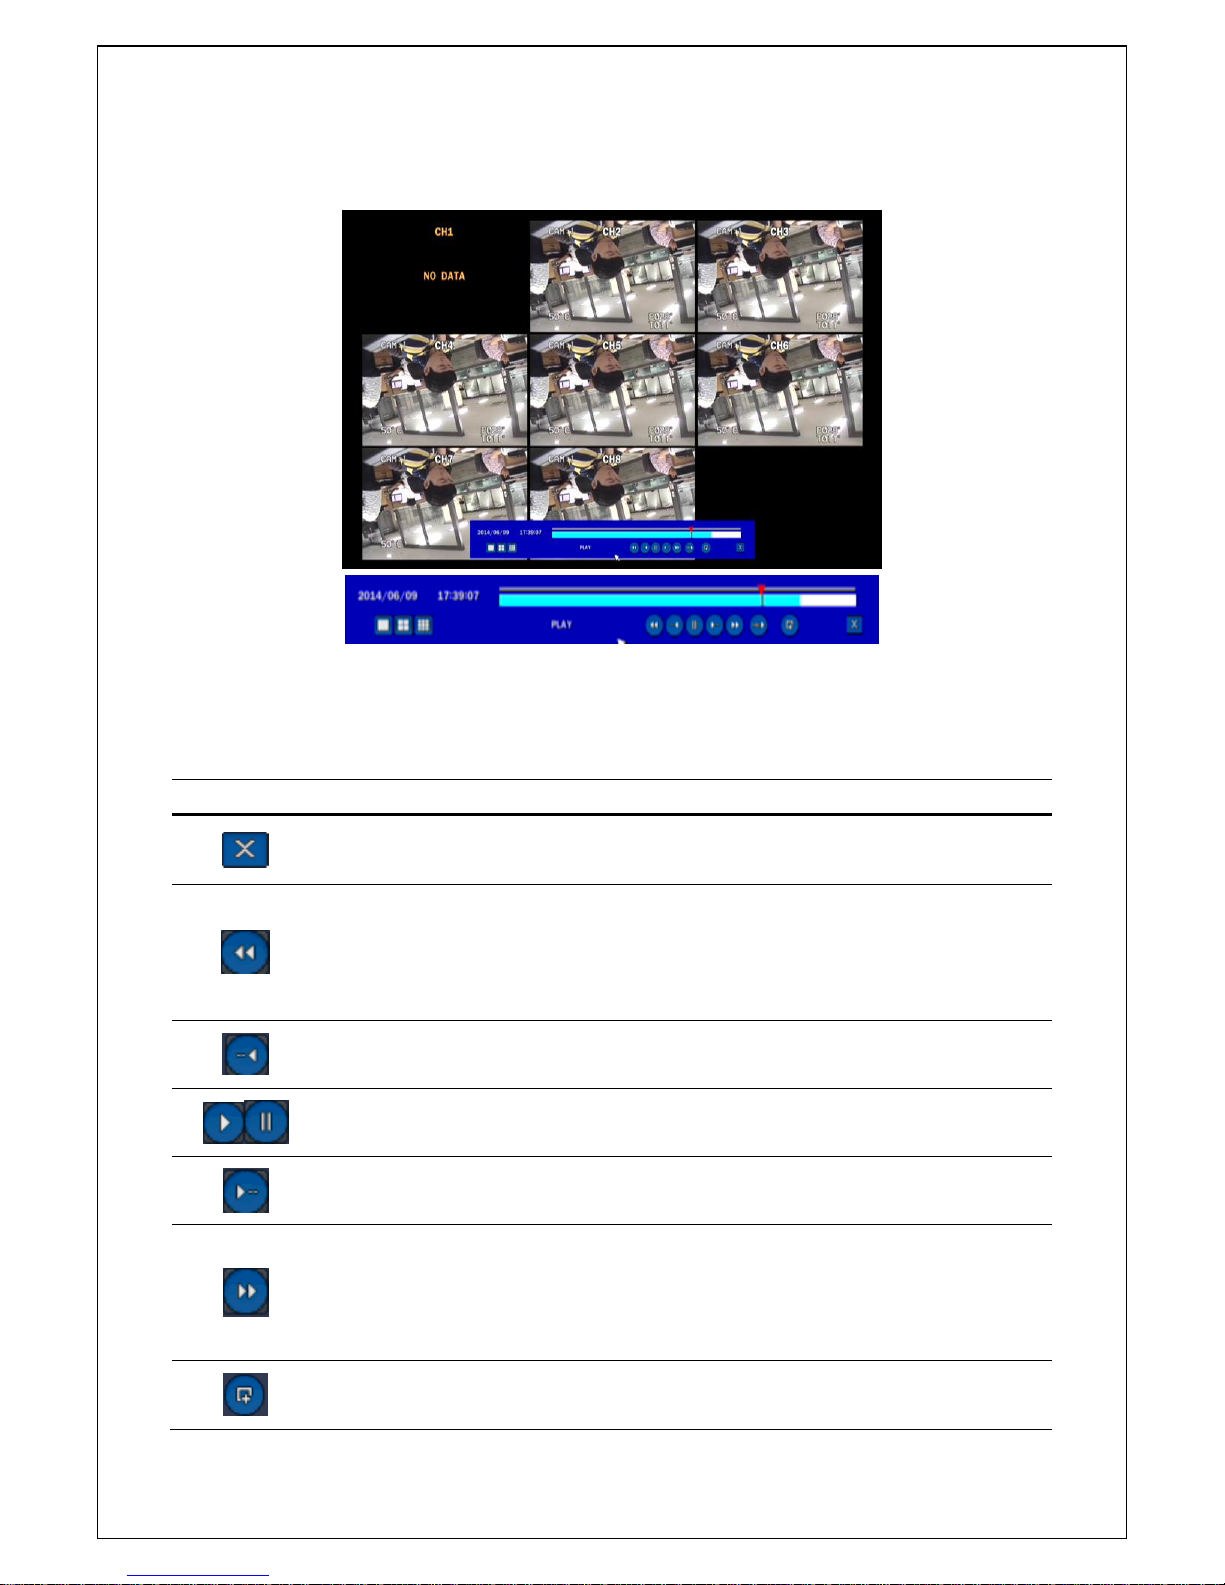
4-3. Play mode
During playback of a recorded event, the mode changes from SEARCH to PLAY. While in PLAY mode, you
may return to the SEARCH screen by pressing the X button on the status bar or the ESC button of a
remote control.
Figure 4.3.1. PLAY Mode Screen
The following status bar hides automatically and appears again if a mouse pointer is positioned to the
bottom of the screen.
Table 4.3.1. Button functions in PLAY Mode
Button
Description
Return to the previous menu screen, search window, or exit from the Menu
2x, 4x, 8x,16x, 32x speeds at 4 split screen
2x, 4x, 8x,16x, 32x at 9 split screen
2x, 4x, 8x, 16x, 32x at 16 split screen
Single Channel backward playback speed 1x, 2x, 4x, 8x, 16x, 32x,
Jump/Step backward. The playback position moves 60 seconds backward.
Press to play or pause recorded video.
Jump/Step forward. Playback position moves 60 seconds forward.
2x, 4x, 8x,16x, 32x speeds at 4 split screen
2x, 4x, 8x,16x, 32x at 9 split screen
2x, 4x, 8x, 16x, 32x at 16 split screen
Single Channel forward playback speed 1x, 2x, 4x, 8x, 16x, 32x
Press to Back up the video.
Page 49
49
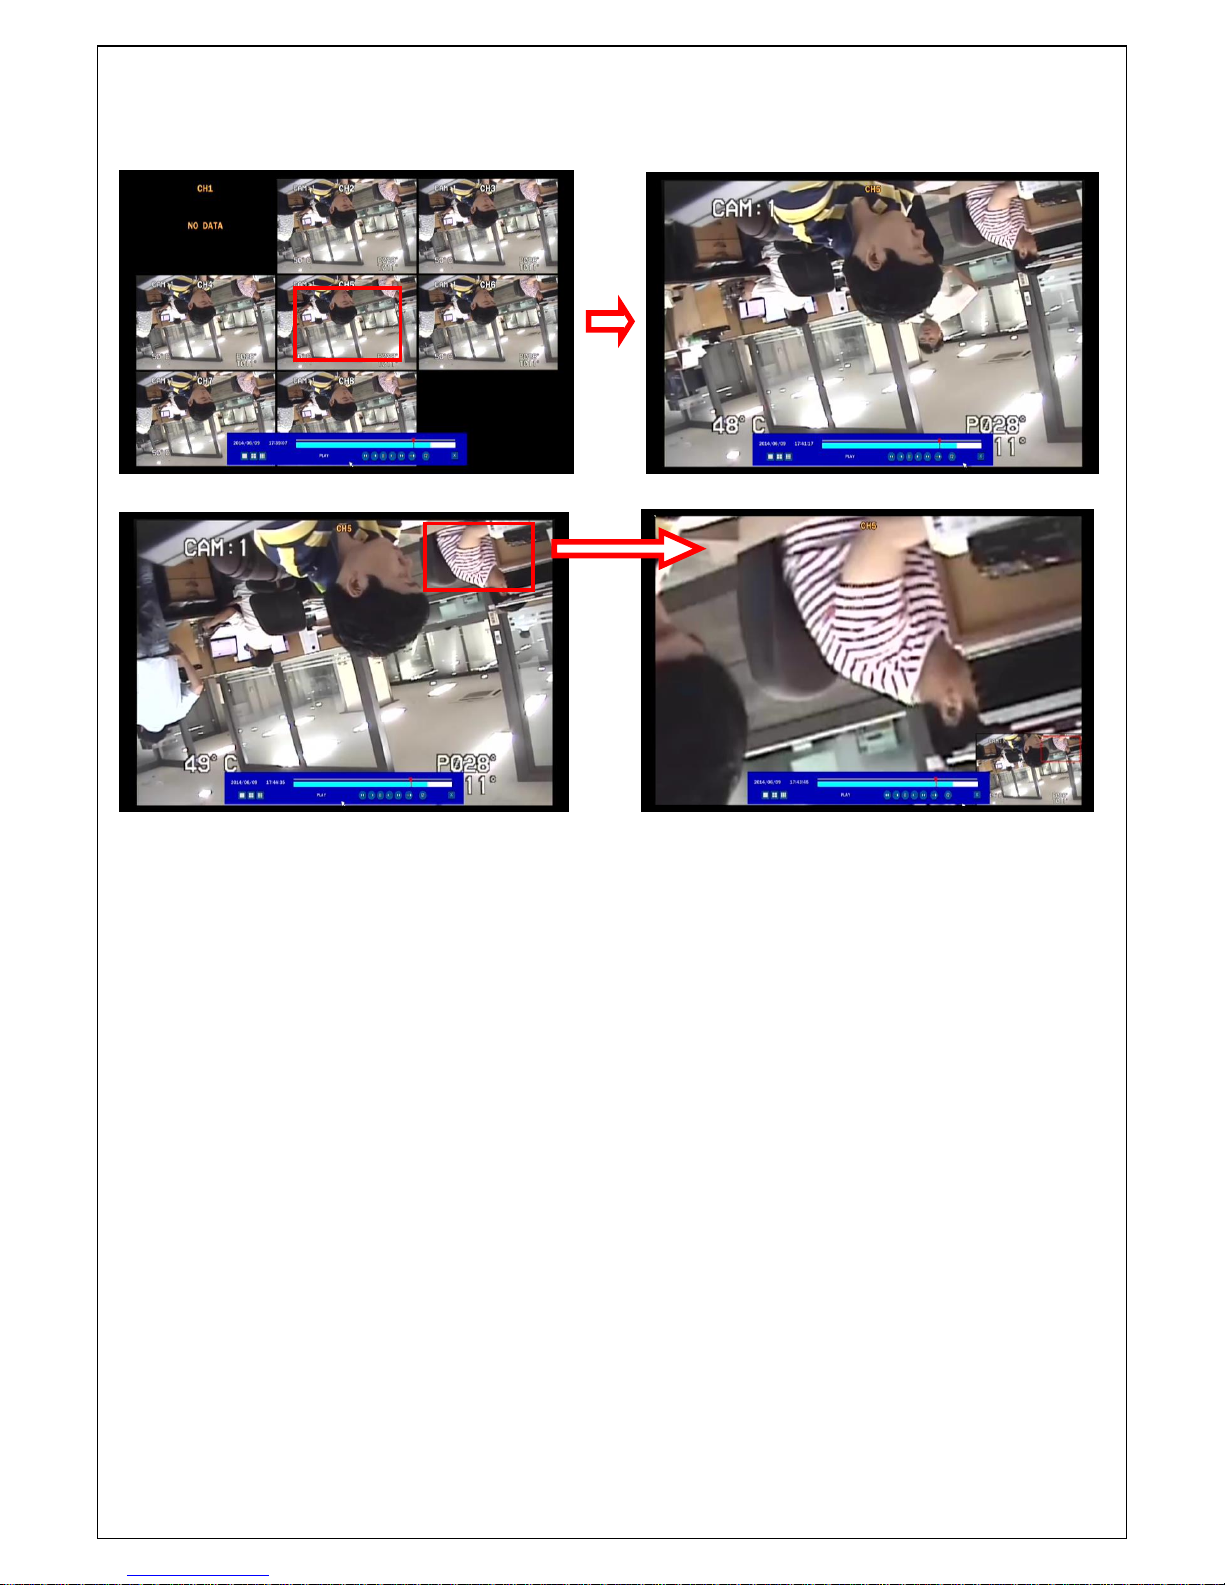
4-4. Digital Zoom in Live and Playback Screen
DVR series supports Digital Zoom feature during live and playback mode.
1. Double click the target channel.
2. Click the left button of the mouse and drag to make rectangular shape.
Page 50
50
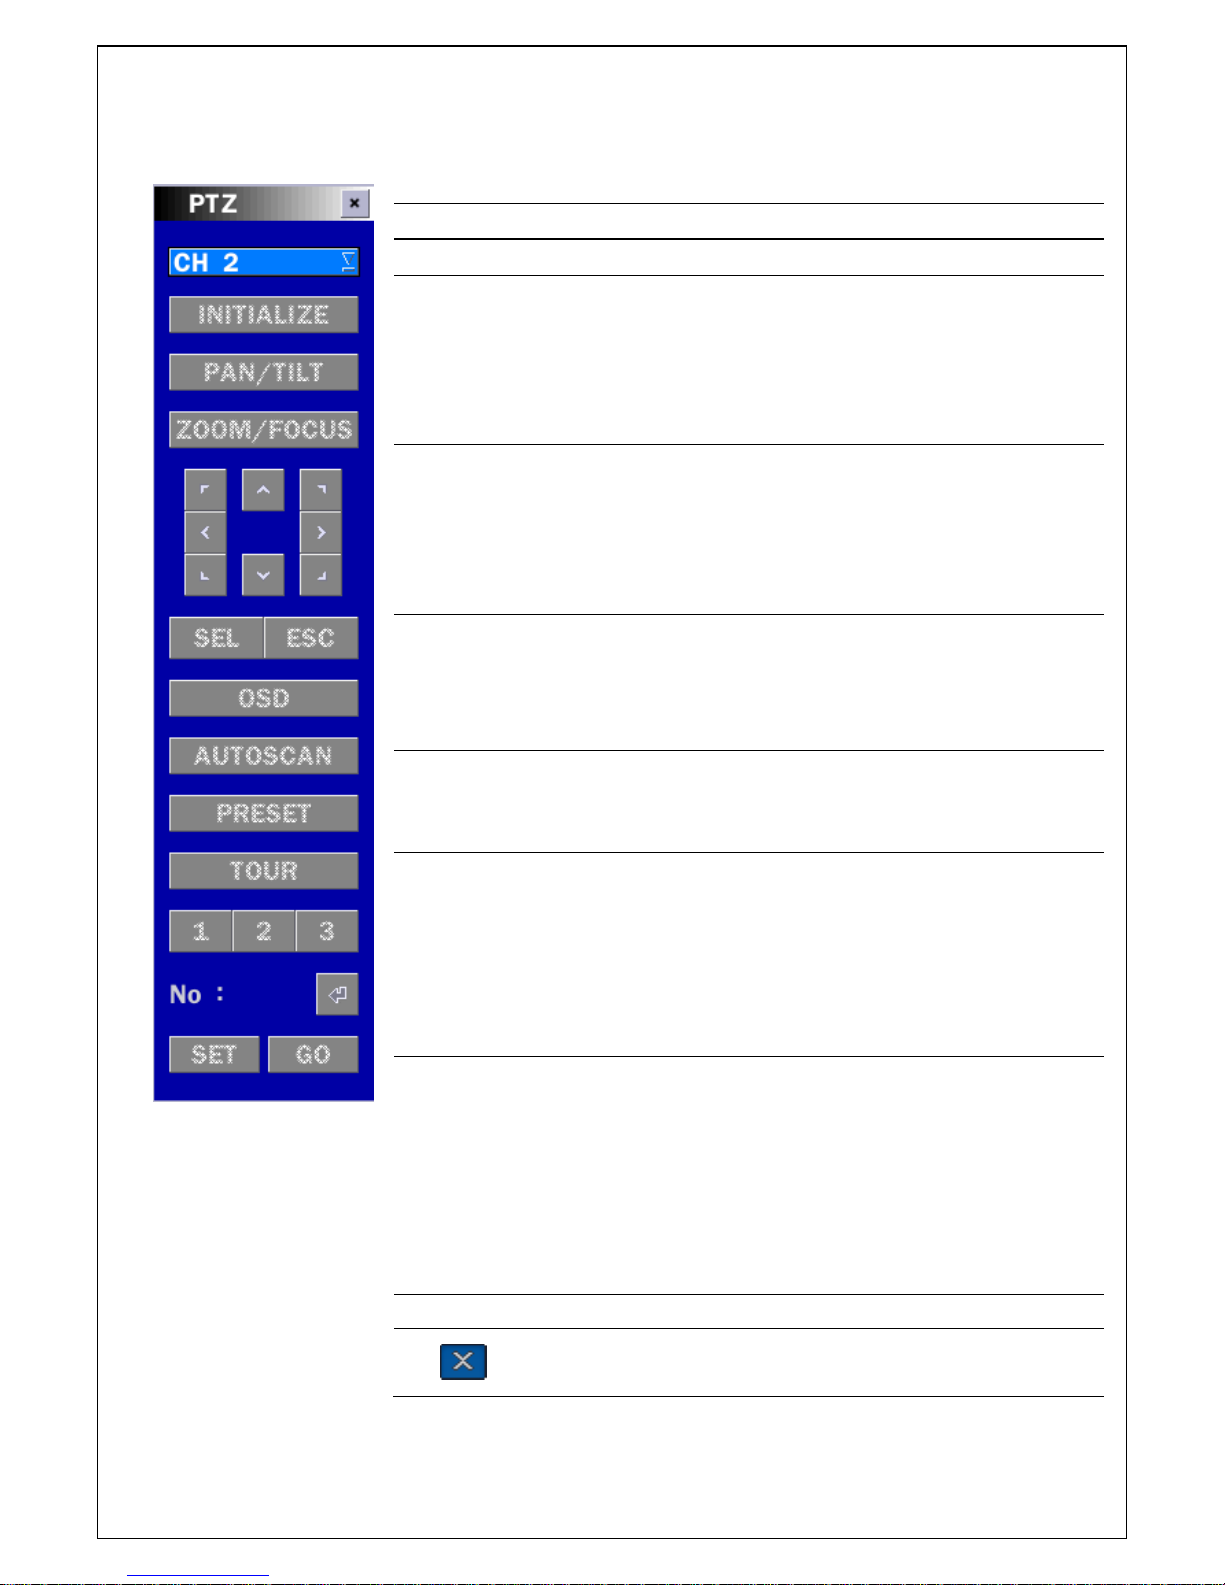
5. PTZ Control
To control the PTZ functions of the camera, select PTZ menu on the screen using the mouse.
Please refer to the table 5.1. for the control.
Table 5.1. Button Functions in PTZ Control
Item
Description
INITIALIZE
Initialize the PTZ settings of the selected camera.
PAN / TILT
Select PAN/TILT using the mouse or the control button (◀
▲ ▶ ▼) and press SEL button on the remote control.
Adjust the Tilt(UP/DOWN) / Pan(LEFT/RIGHT) position
using the mouse or the control button (◀ ▲ ▶ ▼) on the
remote control.
ZOOM /
FOCUS
Select ZOOM/FOCUS using the mouse or the control
button (◀ ▲ ▶ ▼) and press SEL button on the remote
control. Adjust the Zoom (Mouse Wheel Down or Up/Down
button of the remote control)/ Focus (Mouse Wheel Up or
Left/Right button of the remote control) position.
OSD
Select the OSD to enter the menu. Control keys are Right,
Left, UP, Down, Select, Far (REW KEY), and Near (FF
KEY). Press the ESC button to return to the main menu.
Press the PTZ button to escape from the OSD menu.
AUTOSCAN
Press the right key (▶) on the control button to start auto
scan. Press the left key (◀) on the control button to stop
auto scan.
PRESET
Select the PRESET and press the left key (◀) on the
control button. Then, number input window will appear. Set
the number (3 digits) using the number key and press the
SEL to set the preset number for the current position.
Press the right key (▶) on the control button and set the
number (3 digits) to go to the preset number.
TOUR
Select the TOUR and press the right key (▶) on the control
button. Then, number input window will appear. Set the
number (1 digit) using the number key and press SEL to
make the group number work.
Press the left key (◀) on the control button to stop tour.
User can set the preset number in the tour group of the
OSD menu.
NUMBER
Available only on the TOUR and PRESET menu.
Press the ESC button to return to the main menu.
Preset/ Tour/ OSD/ AUTOSCAN function are available on the specific model AP8777 and
PMA-200. (Select it in the NAME of PTZ setup menu)
Page 51
51
6. Back up
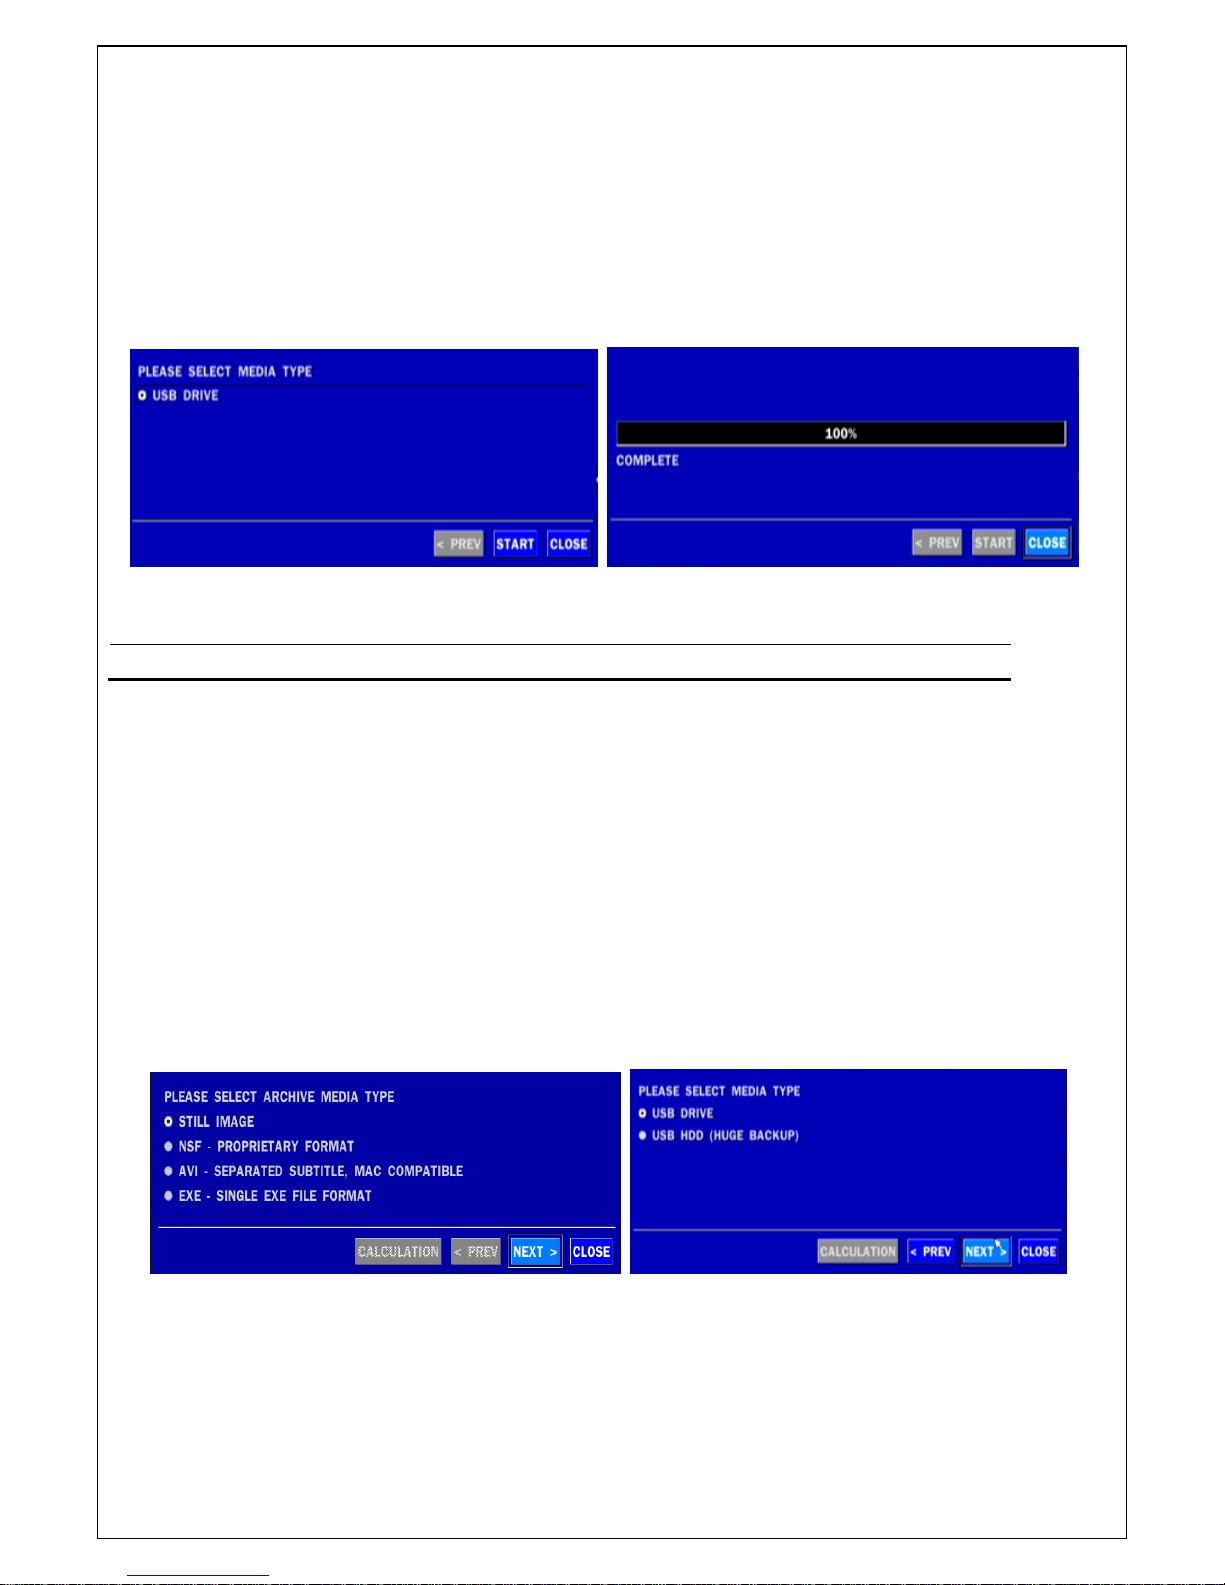
6-1. Still Image backup onto USB flash Drive
Still images can be captured and archived onto the USB flash drive or an USB external hard drive in live
mode or while playing back recorded video. In live mode, press the BACKUP button to launch the archive
function or select BACK UP menu on the screen using the mouse.
1. Select a specific channel which wants to back up on live screen.
2. When you press BACKUP button, the archiving screen will display as Figure 6.1.1.
3. Once you press Backup button, the system will start to archive the data to the selected media.
Figure 6.1.1. Still Image Archiving and Backup Screen
NOTICE For a backup using a USB stick, a format of the USB stick has to be set to FAT32.
6-2. Video backup onto USB flash Drive
Video can be captured and archived onto the USB stick or hard drive while playing back recorded video.
In playback mode, press the BACKUP button to launch the archiving function.
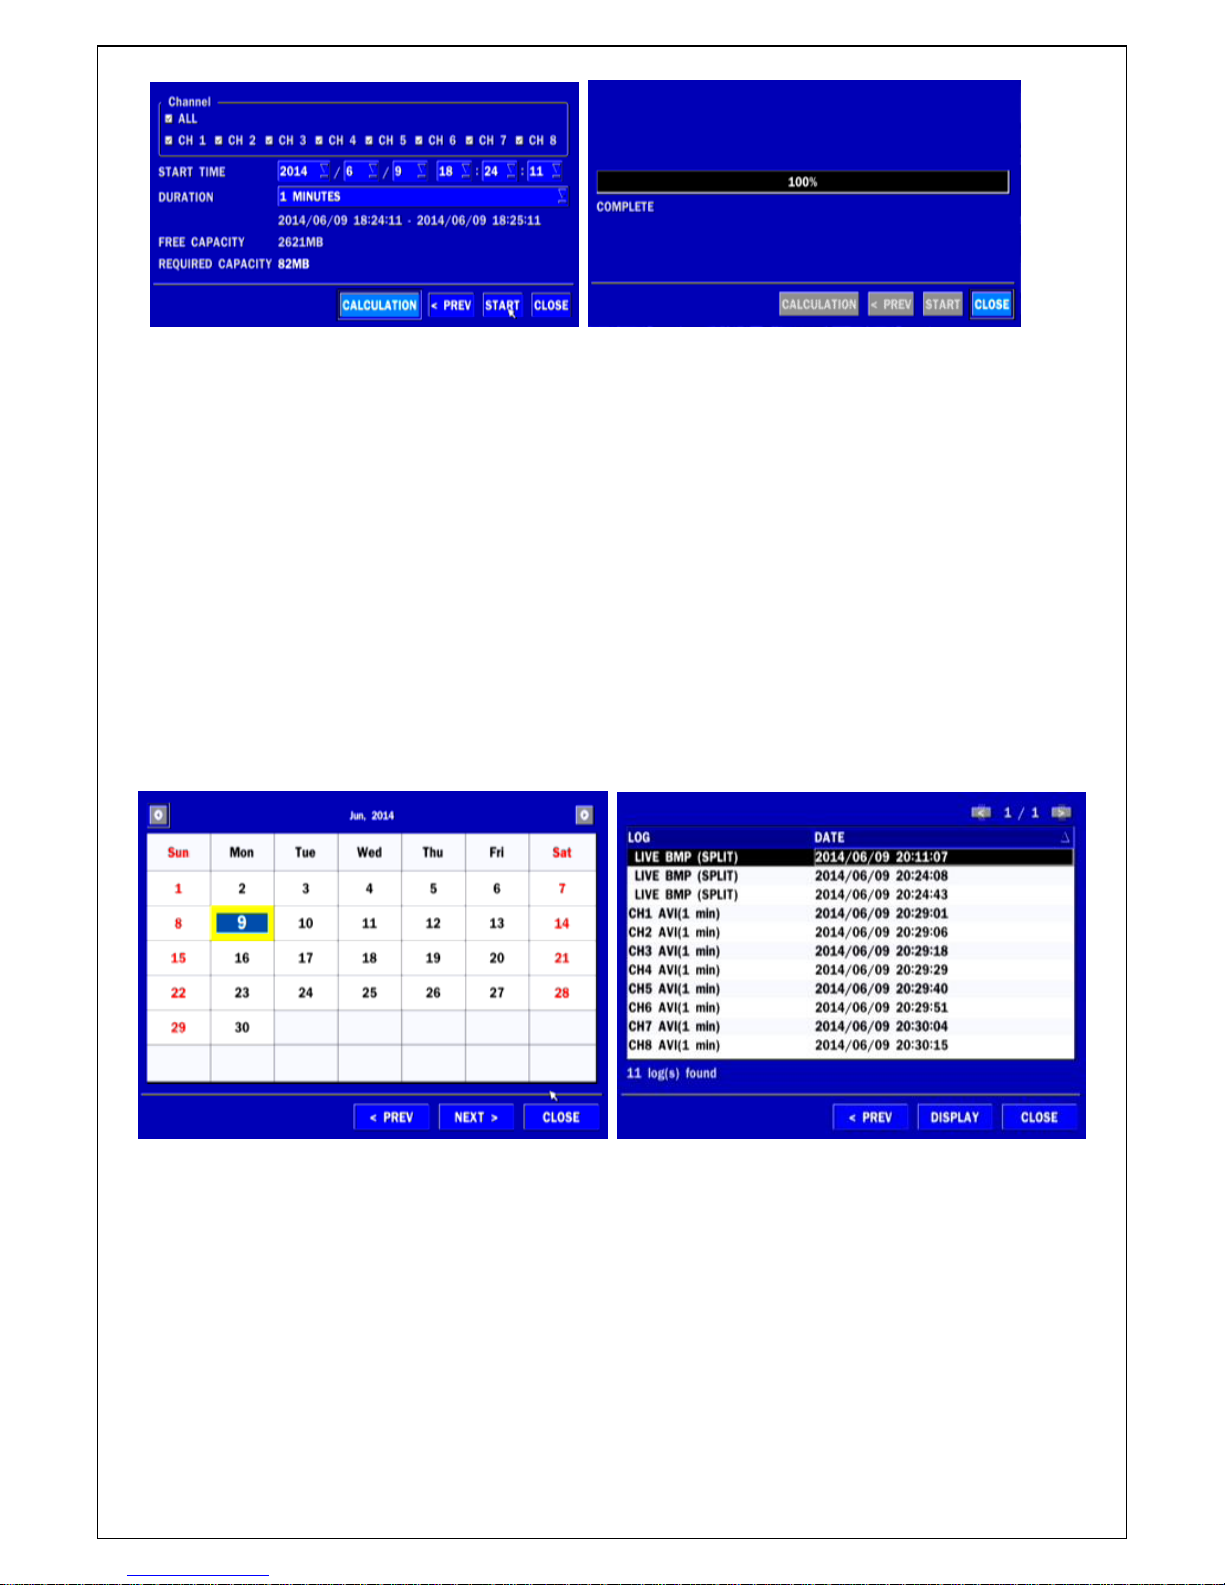
1. When you press BACKUP button, the DVR will ask whether to archive a Still Image or Video clip.
2. If the user selects VIDEO, the DVR will ask for the media. To use the Huge Backup, the external USB
HDD has to be mounted.
3. After selecting the media, the DVR will ask for the channel and the setting of the archiving duration. If
the huge Backup is selected, the duration is from 1 hour to 24 hours.
4. After selecting the channels and setting of the duration, the system will start to archive the data to the
selected media.
Page 52
52
Figure 6.2.1. Video Archiving and Backup Screen
6-3. Transferring still images or video from the ARCHIVE list
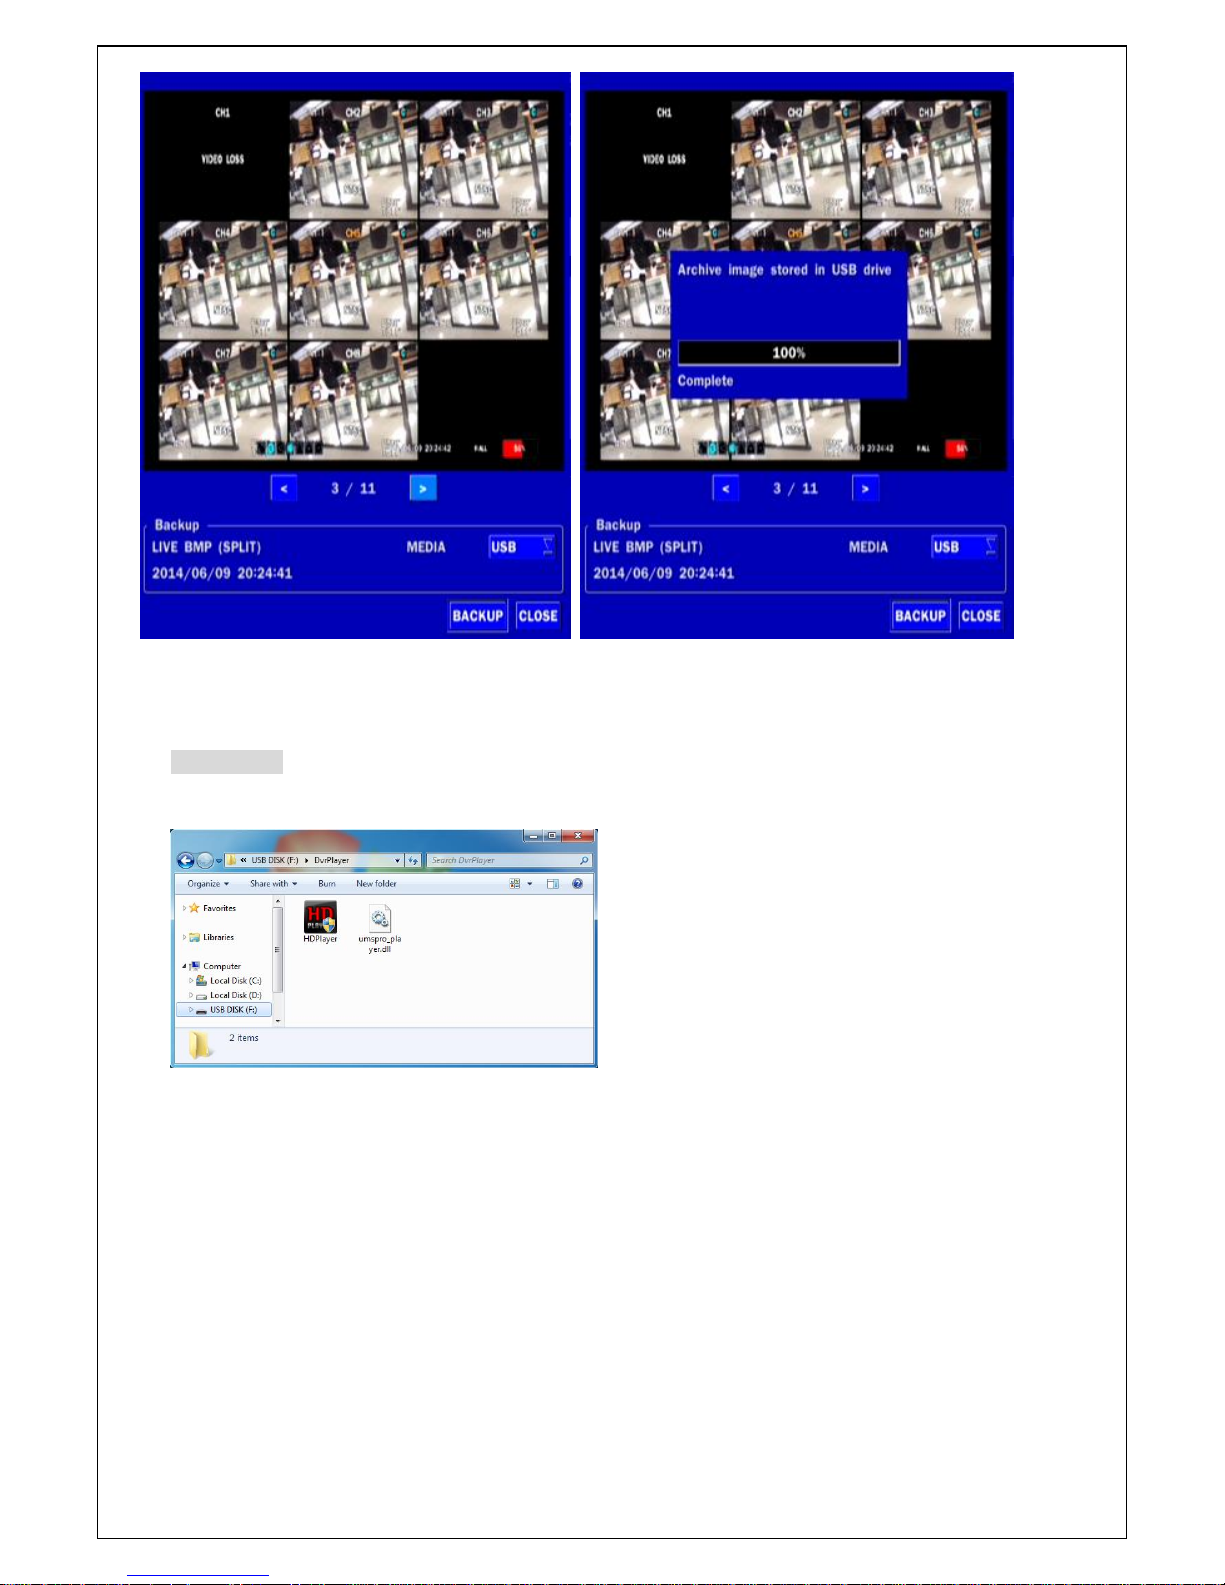
The stored data onto hard drive will be found in the ARCHIVE list in SEARCH window.
User can back up still images or video into the storage device from the ARCHIVE list.
1. Select the date to begin searching and navigate through the days using the mouse or the remote control.
2. Once you have selected the date, press the NEXT button to open the list of stored data.
3. Use the mouse or the remote control to scroll through the archive list.
4. Select a list of stored events in the archive list.
5. Once the desired event has been selected, press the DISPLAY button to view the still image or the first
frame of the selected video.
6. Press the BACKUP button to launch the archiving function in playback mode.
7. Press the CLOSE button to return to the SEARCH window.
Page 53
53
Figure 6.3.1. Archive Search Screen
6-4. Playback of Backup Video
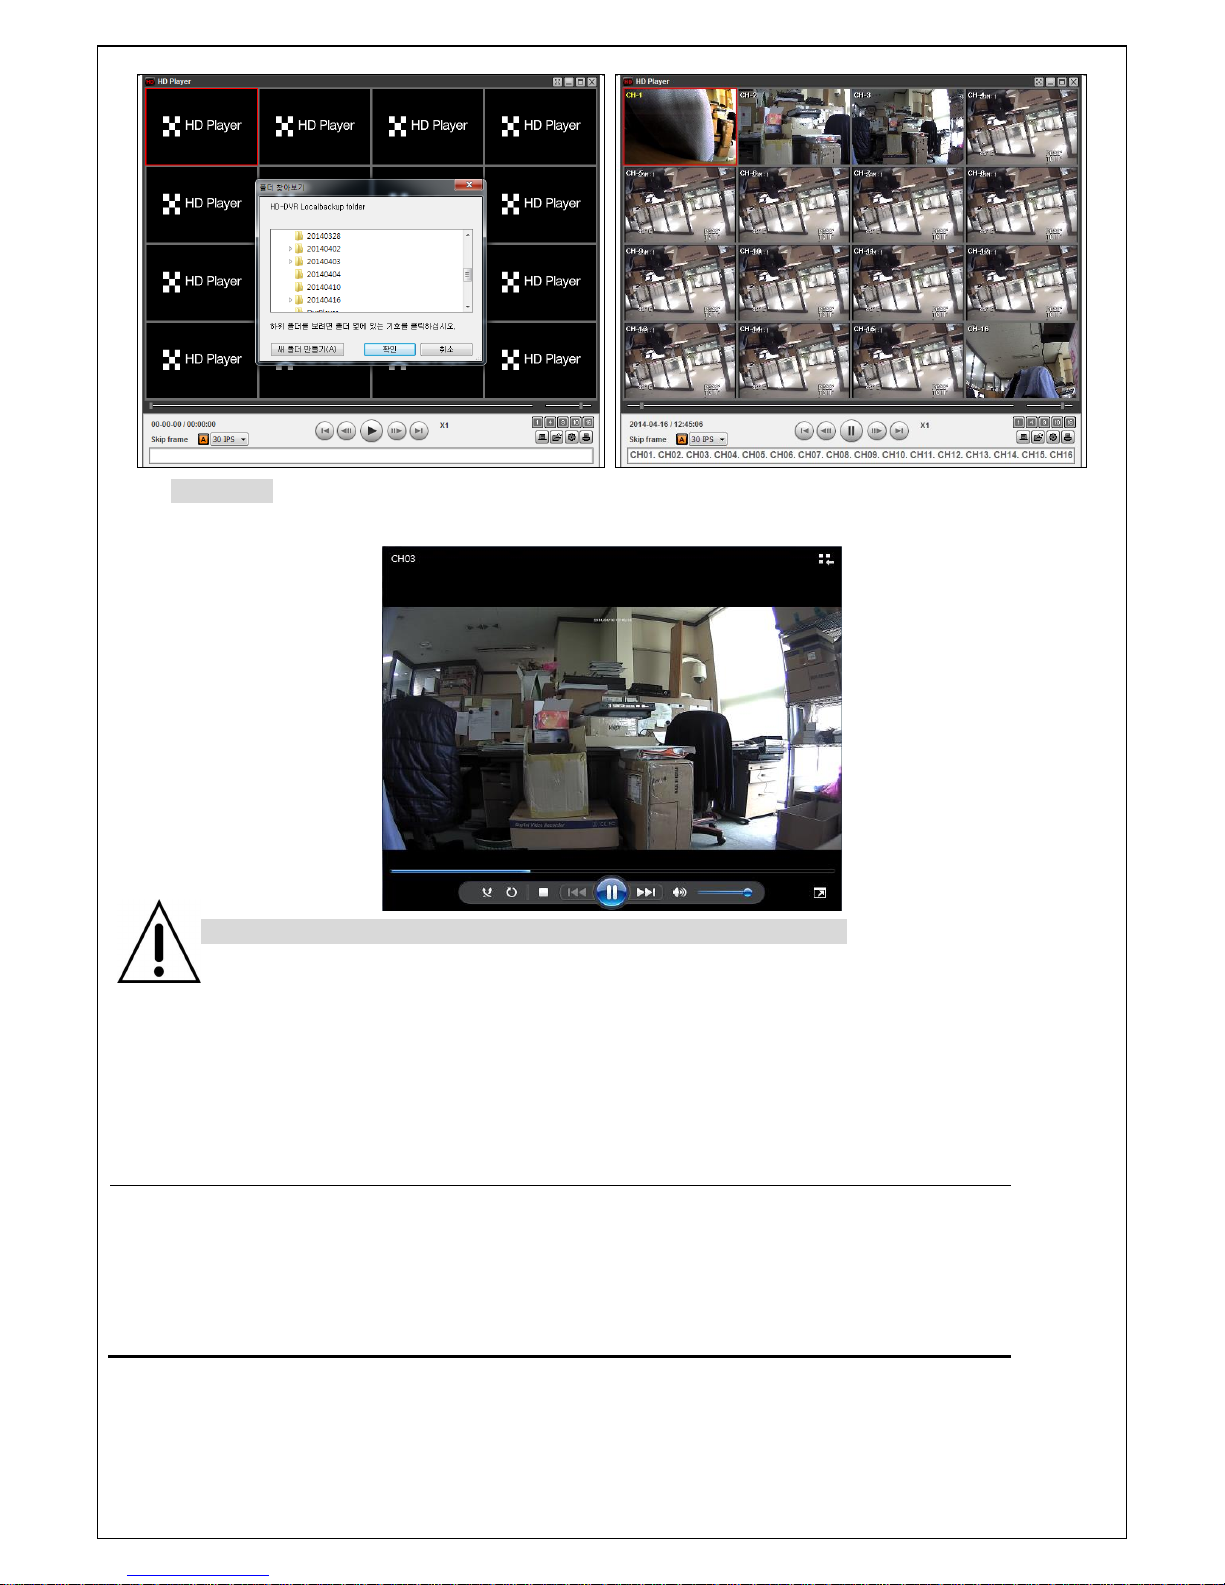
NSF format: NSF format video can be played back by the player (the HD player) that the DVR copies
on USB flash drive with video.
Two folders are copied on USB flash drive
- BACKUP DATA: NSF format video file and INDEX file for a title file of date and time
- HD PLAYER: Exclusive video viewer.
Page 54
54
AVI format: It can be played back by Window Media Player™ or other media player that is compatible
with AVI format video.
Timestamp On AVI. The subtitle is embedded to the video clip file.
The subtitle is embedded to the AVI file.
7. Upgrading Firmware
In order to upgrade, the firmware upgrade file must first be downloaded and copied into the USB memory
drive. Create a new folder in the USB memory drive and name it “upgrade”. Copy the firmware upgrade file
“xxxxxx.bin” into the “upgrade” folder.
NOTICE
A format of the USB Drive has to be set to FAT32.
The folder on the USB memory drive must be named “upgrade”.
After the firmware upgrade file is copied into the USB memory drive, connect the USB memory
drive to the USB port on the front or rear panel and do the followings:
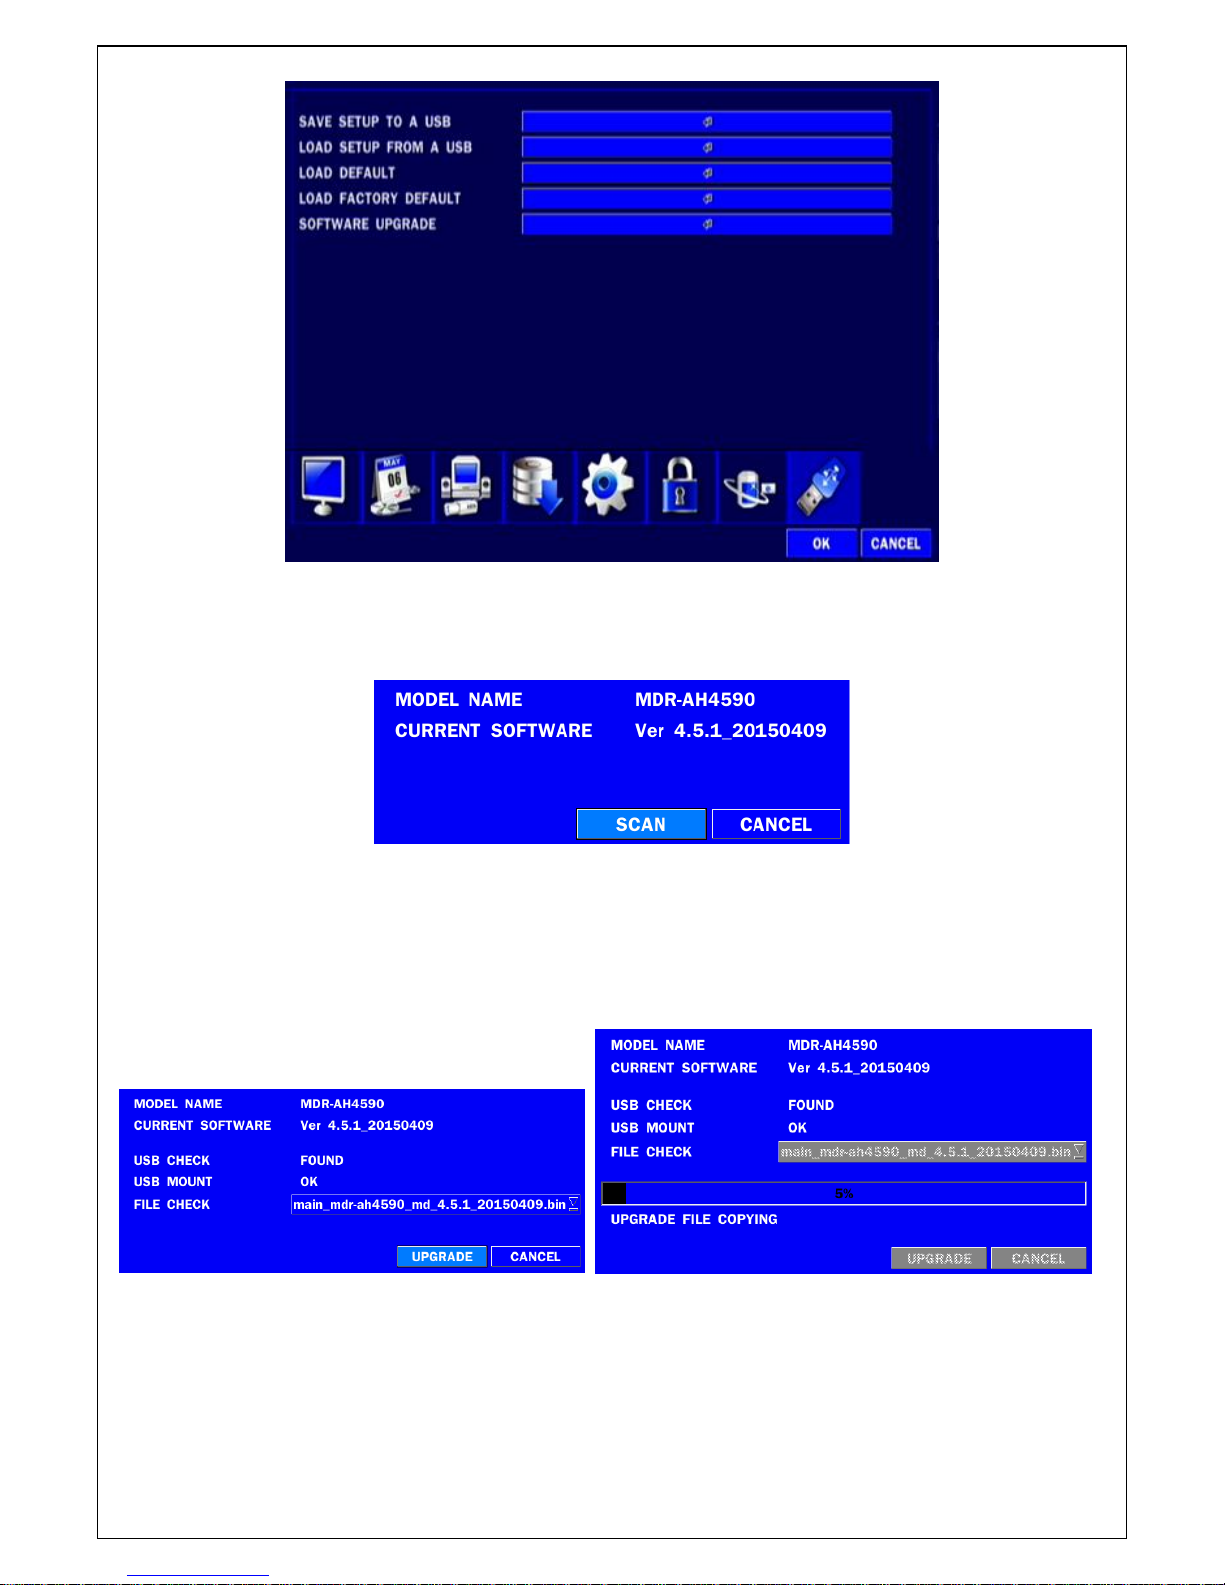
1. Go to CONFIG menu of Setup.
Page 55
55
2. You can see the following message when pressing the software upgrade menu after putting the USB
memory drive on the system.
3. You can see the following message when pressing the scan button. Please check the current firmware
version and the firmware version which you want to upgrade. The system will upgrade automatically when
pressing the upgrade button. After upgrading, the system should be restarted. At that time, the USB
memory drive has to be pulled out on the system.
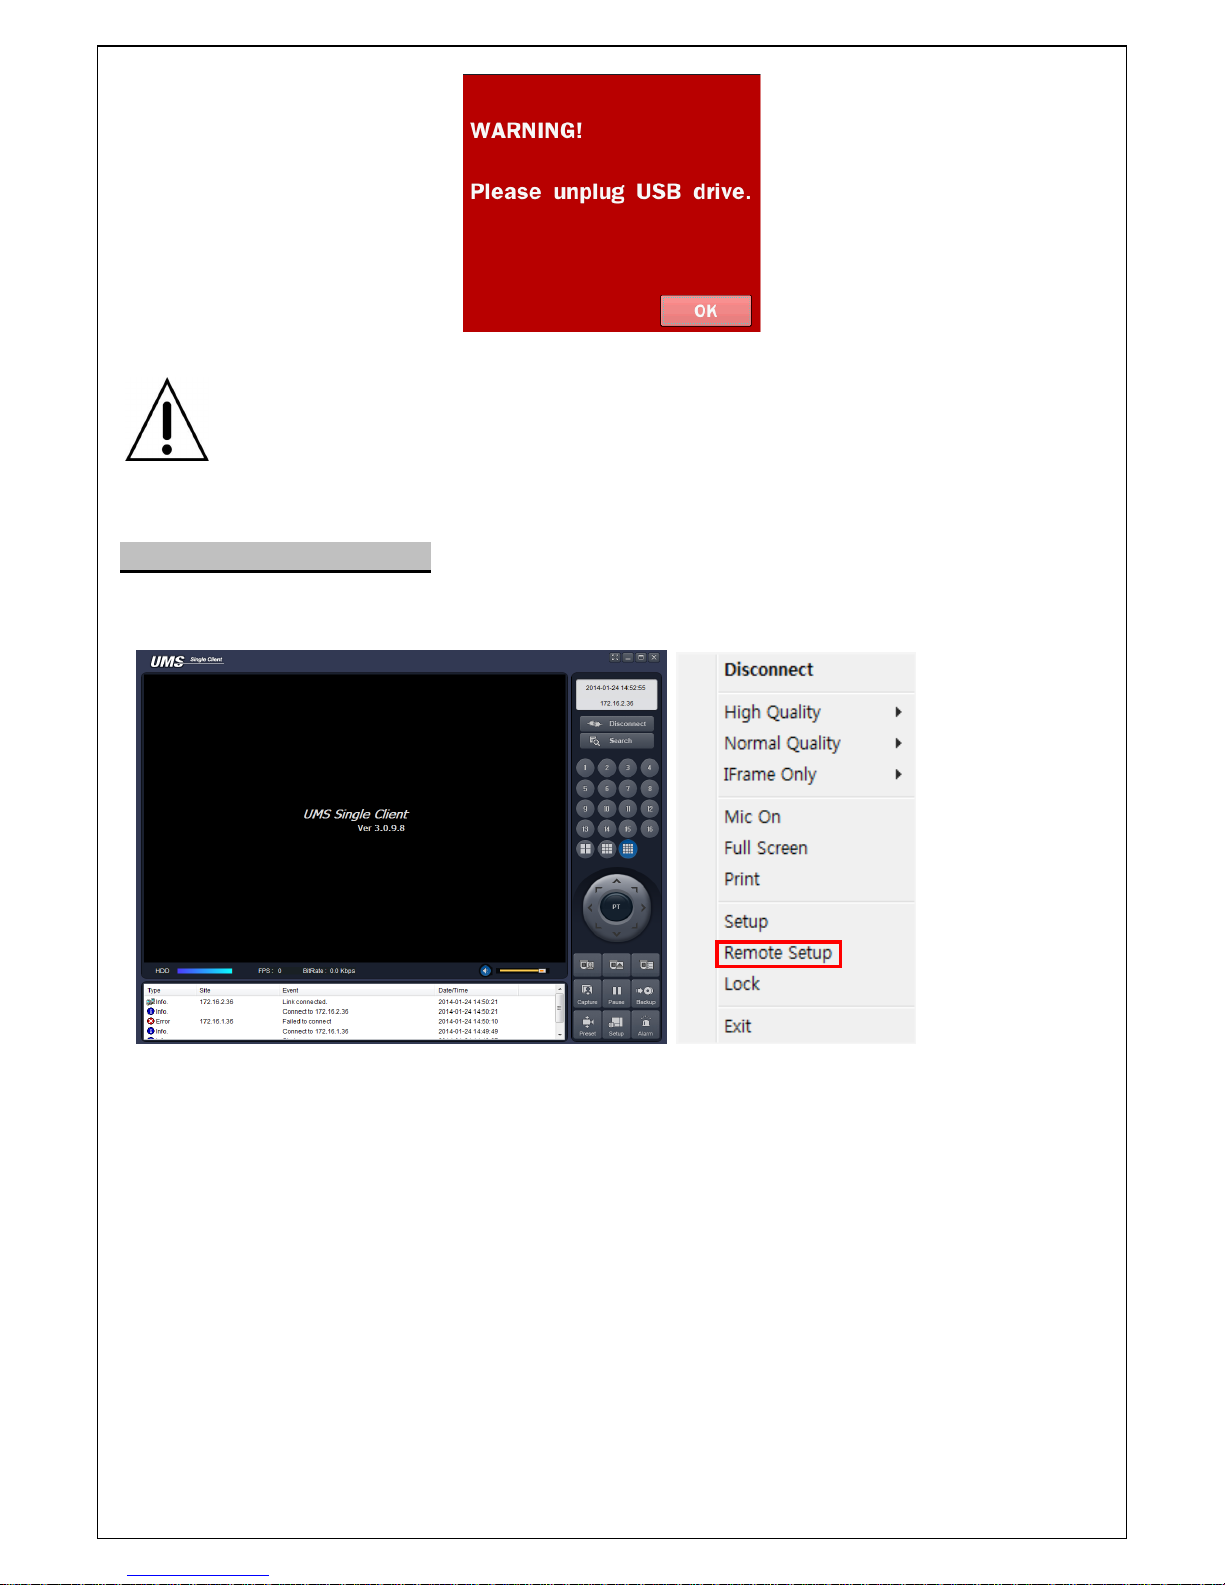
4. You could see the following warning message if you don’t pull out the USB memory drive.
Page 56
56
NOTICE
1. If selecting REBOOT LATER, the upgraded software will not be applied until the system
reboots.
2. If selecting REBOOT NOW when the USB flash drive is plugged, the following message will
pop up. Remove the USB flash drive and select OK.
Remote Firmware Upgrade
User can upgrade the firmware via Network as follows.
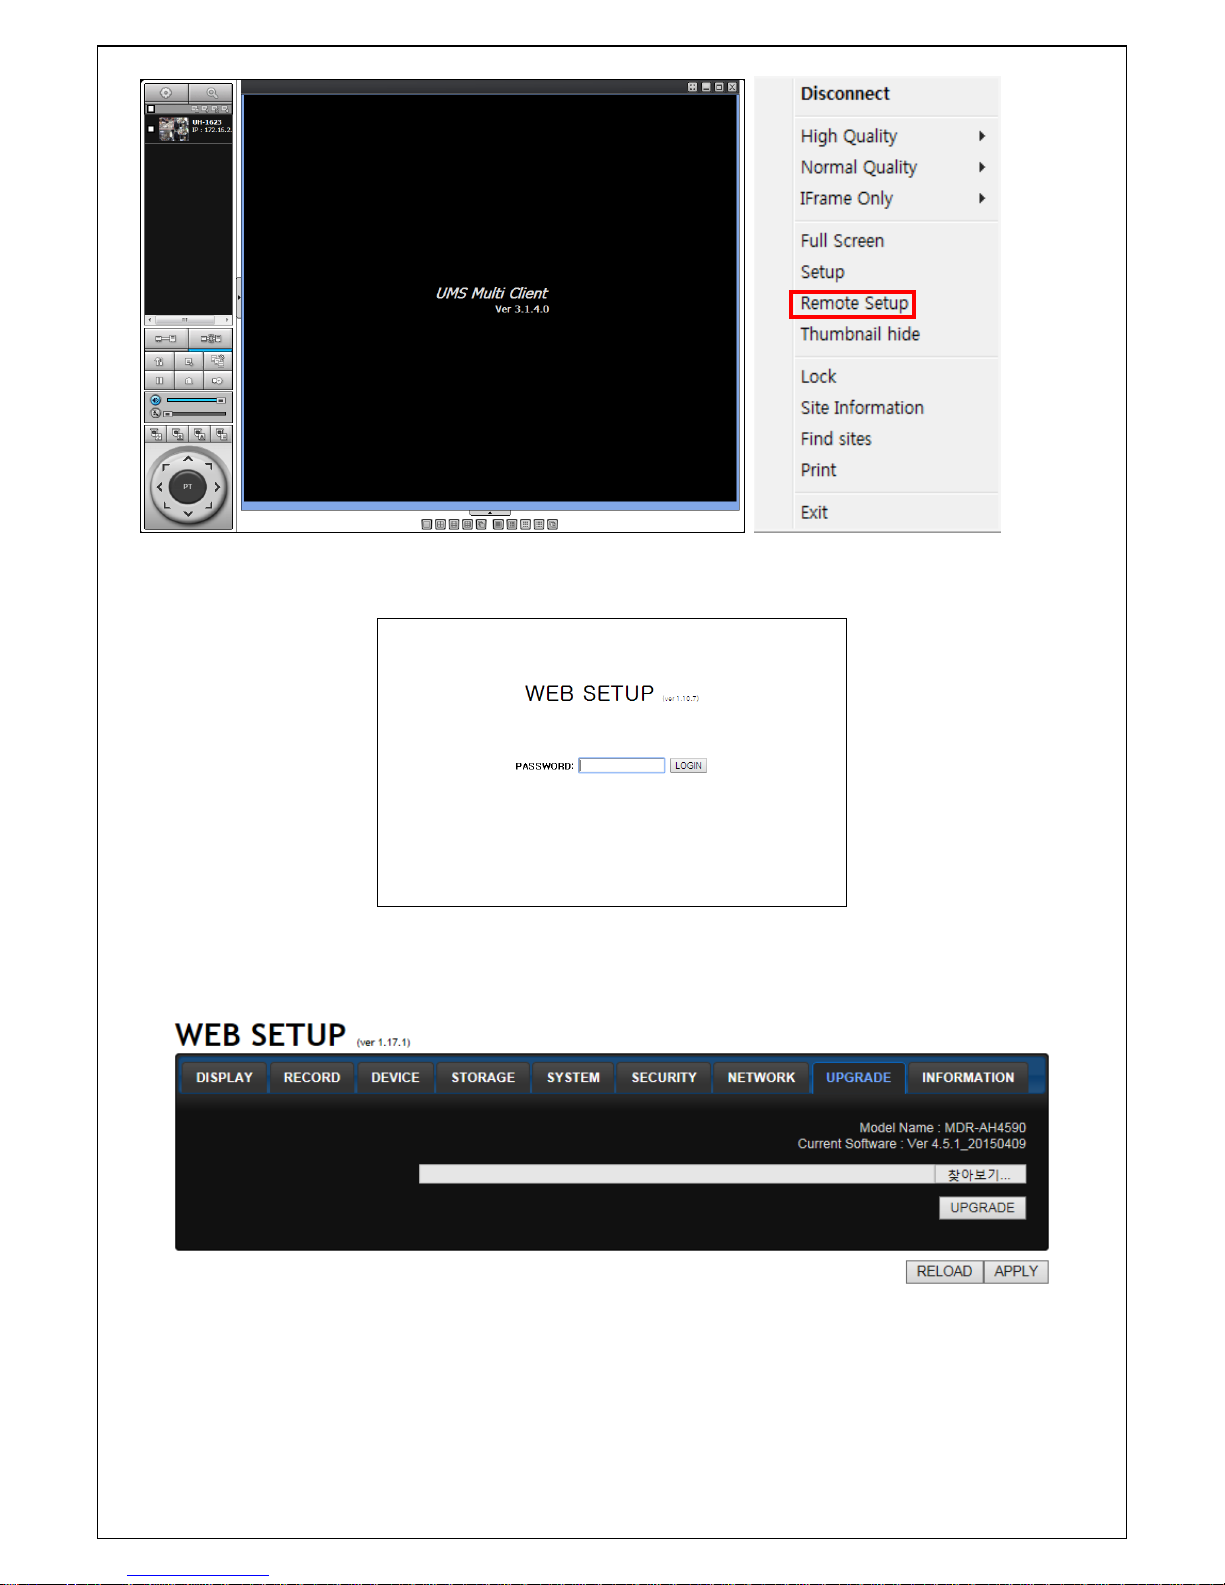
1. Go to the Remote Setup menu on the UMS Single, UMS Multi or Web Viewer.
Page 57
57
2. Press the password for admin. Just admin is possible to connect to the remote setup menu.
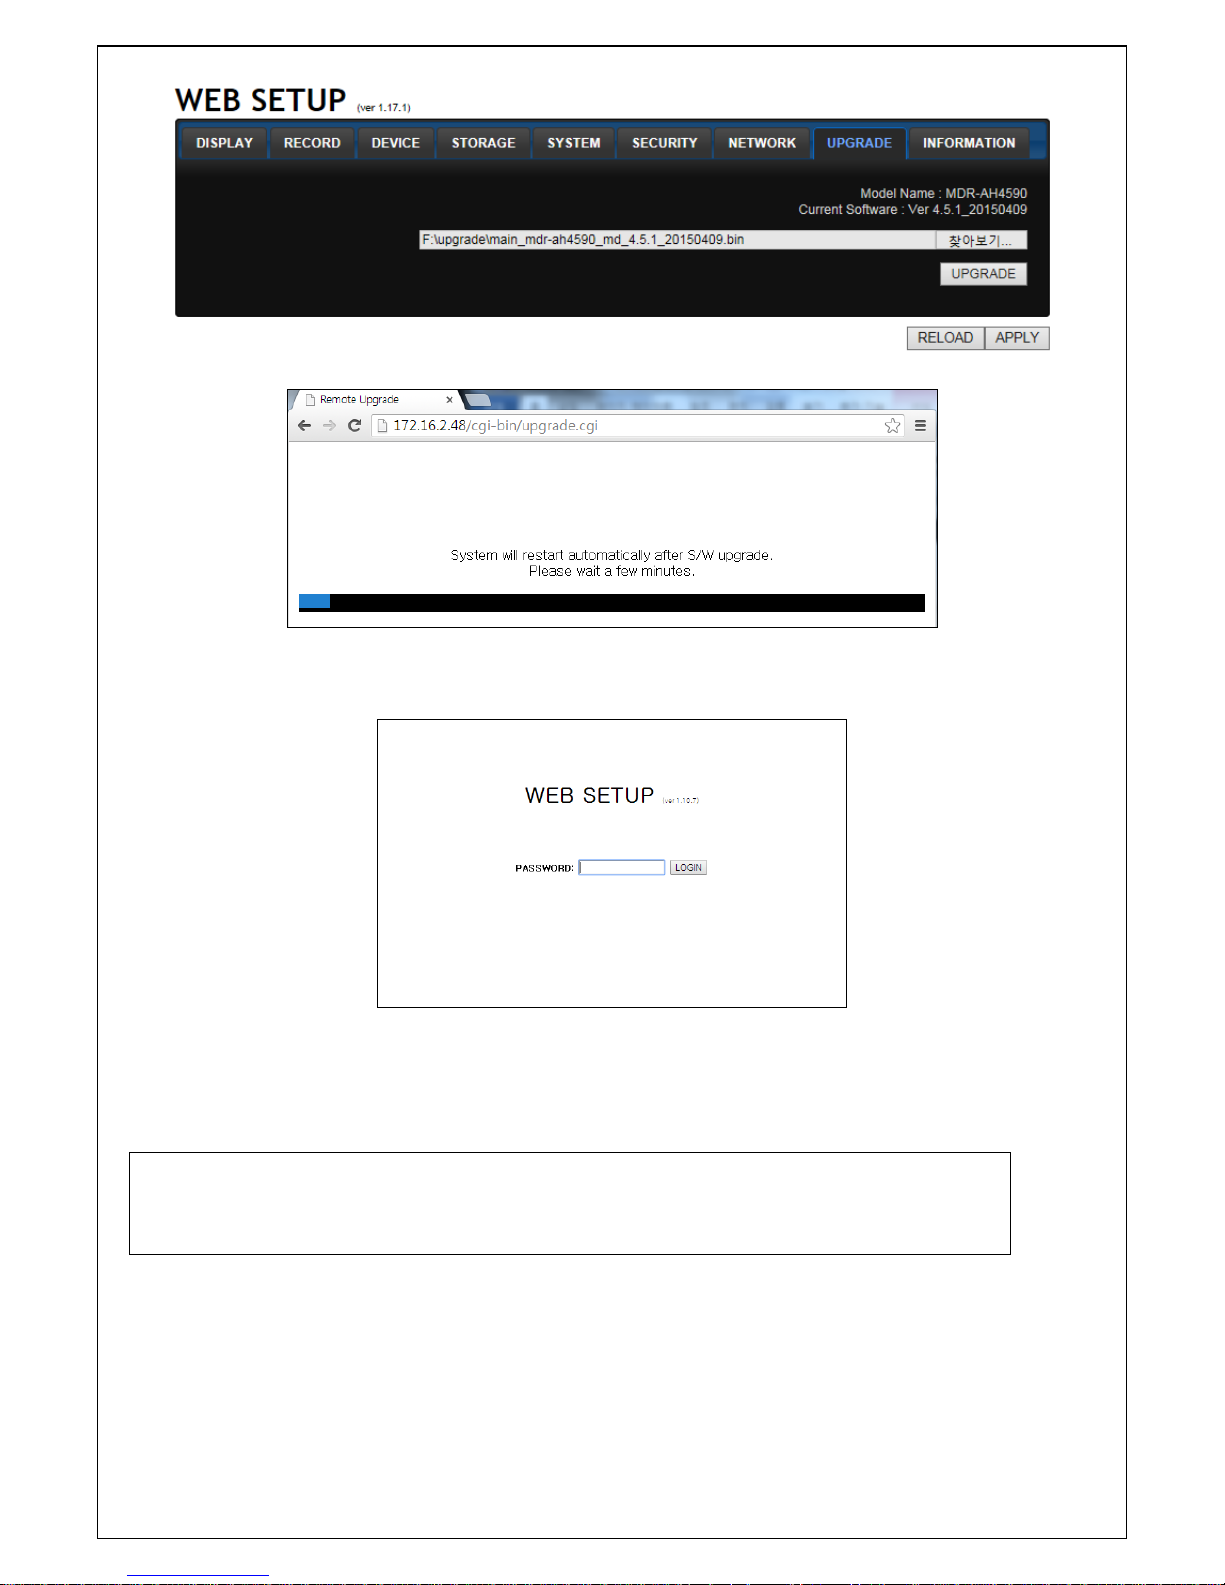
3. Go to the Remote Upgrade menu. Then, you can see the current F/W version as follows. To upgrade a
new F/W, insert the F/W in your PC and press the UPGRADE button.
4. Then, you can see the following progress bar and it would be taken around 150 seconds to upgrade.
Page 58
58
5. When finishing the upgrade, the network streaming would be connected again automatically and you can
see the following screen. Please check the current F/W version if the upgrade is succeeded.
8. Network access using the Exclusive network viewer, UMS single
The DVR provides a live remote monitoring feature. Remote monitoring requires installation of the network
viewer on your PC.
NOTICE
In a high bandwidth network, a maximum of four users can access one DVR simultaneously.
In a low bandwidth network it is recommended that only one user access the DVR at a time.
8-1. PC requirements
CPU: Intel Core i3 1.8Ghz or higher
Memory: 1GB (1GB or higher is recommended.)
VGA memory: 512MB (512MB or higher is recommended.)
Resolution: 1280x720
Page 59
59
O/S: Windows 2000, XP Professional, XP home, Vista, 7(NOTE: Not all versions of Vista and 7 are
supported)
Direct X: DirectX 9.0c or higher
8-2. Installing the network viewer
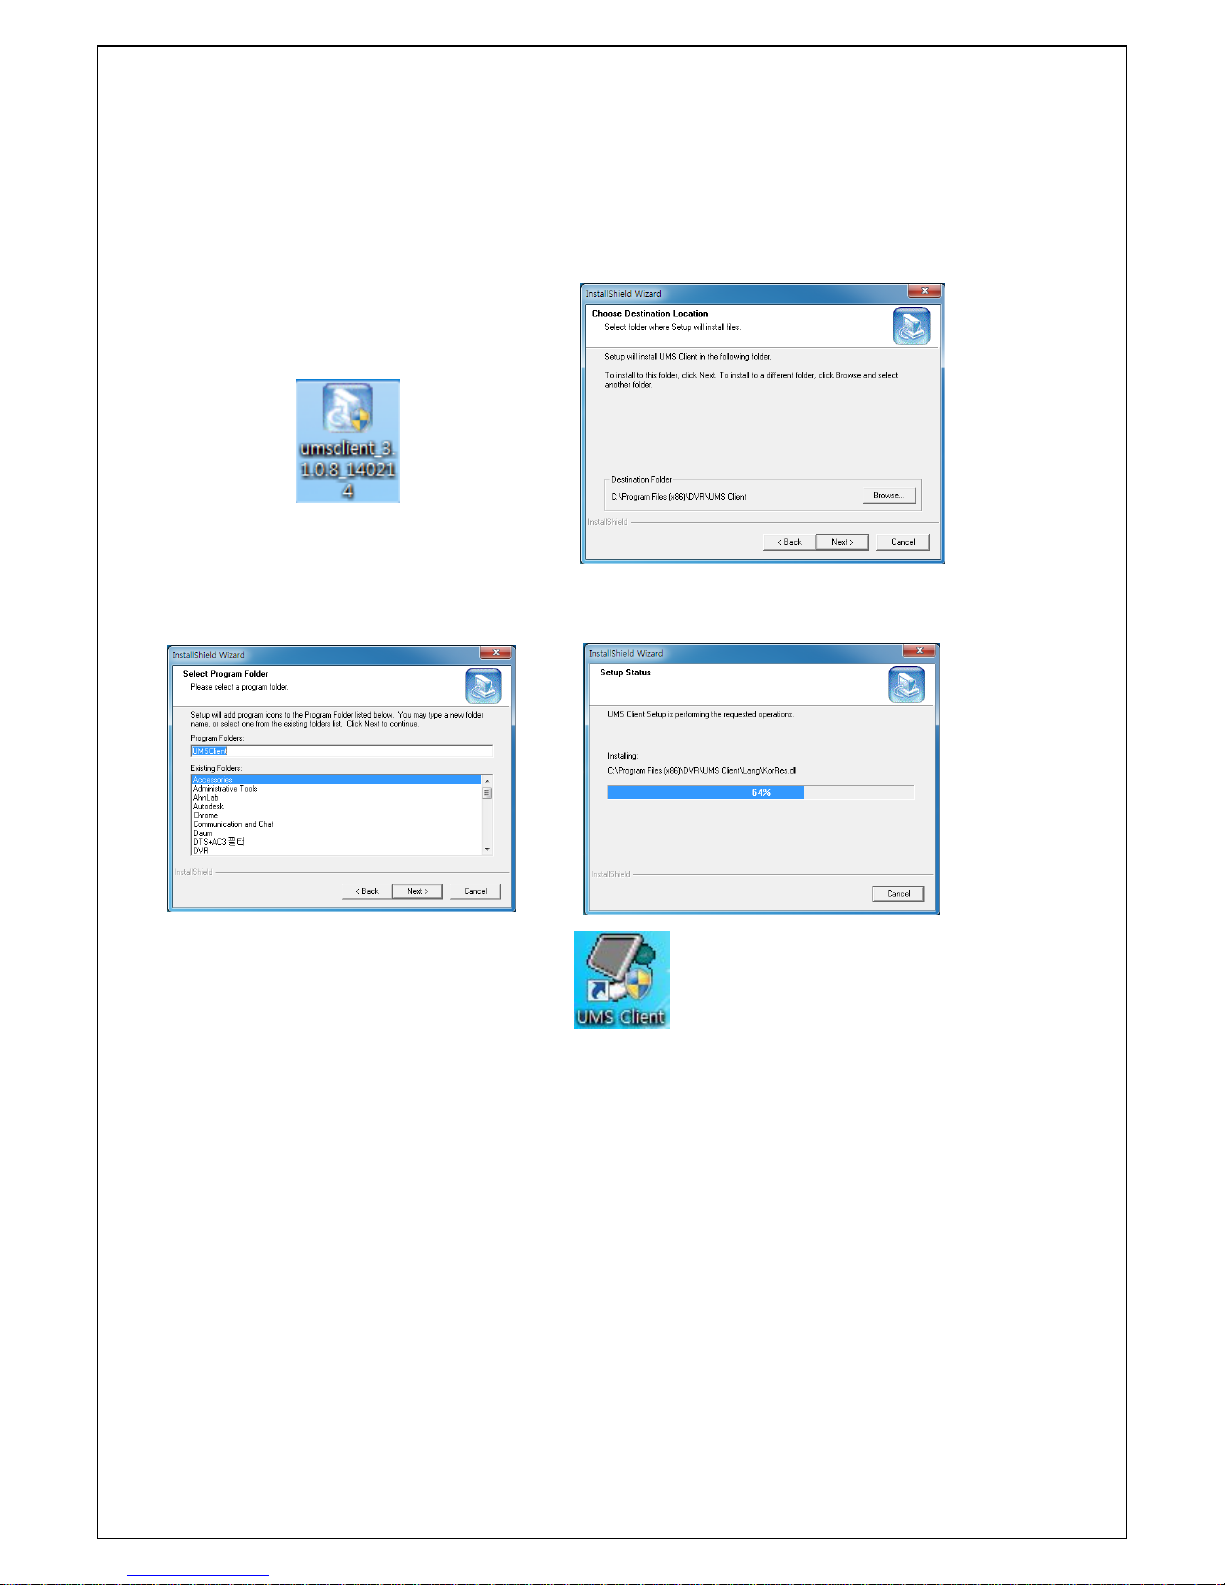
1. Insert the provided CD in the CD drive and double-click “UMSClient(XXXX).exe”
2. Select a destination folder and click
“Next”
4. Select the program folder and click
“Next”.
5. The setup status screen is displayed.
After the installation is completed, “UMS Client” icon is displayed on the desktop.
Page 60
60
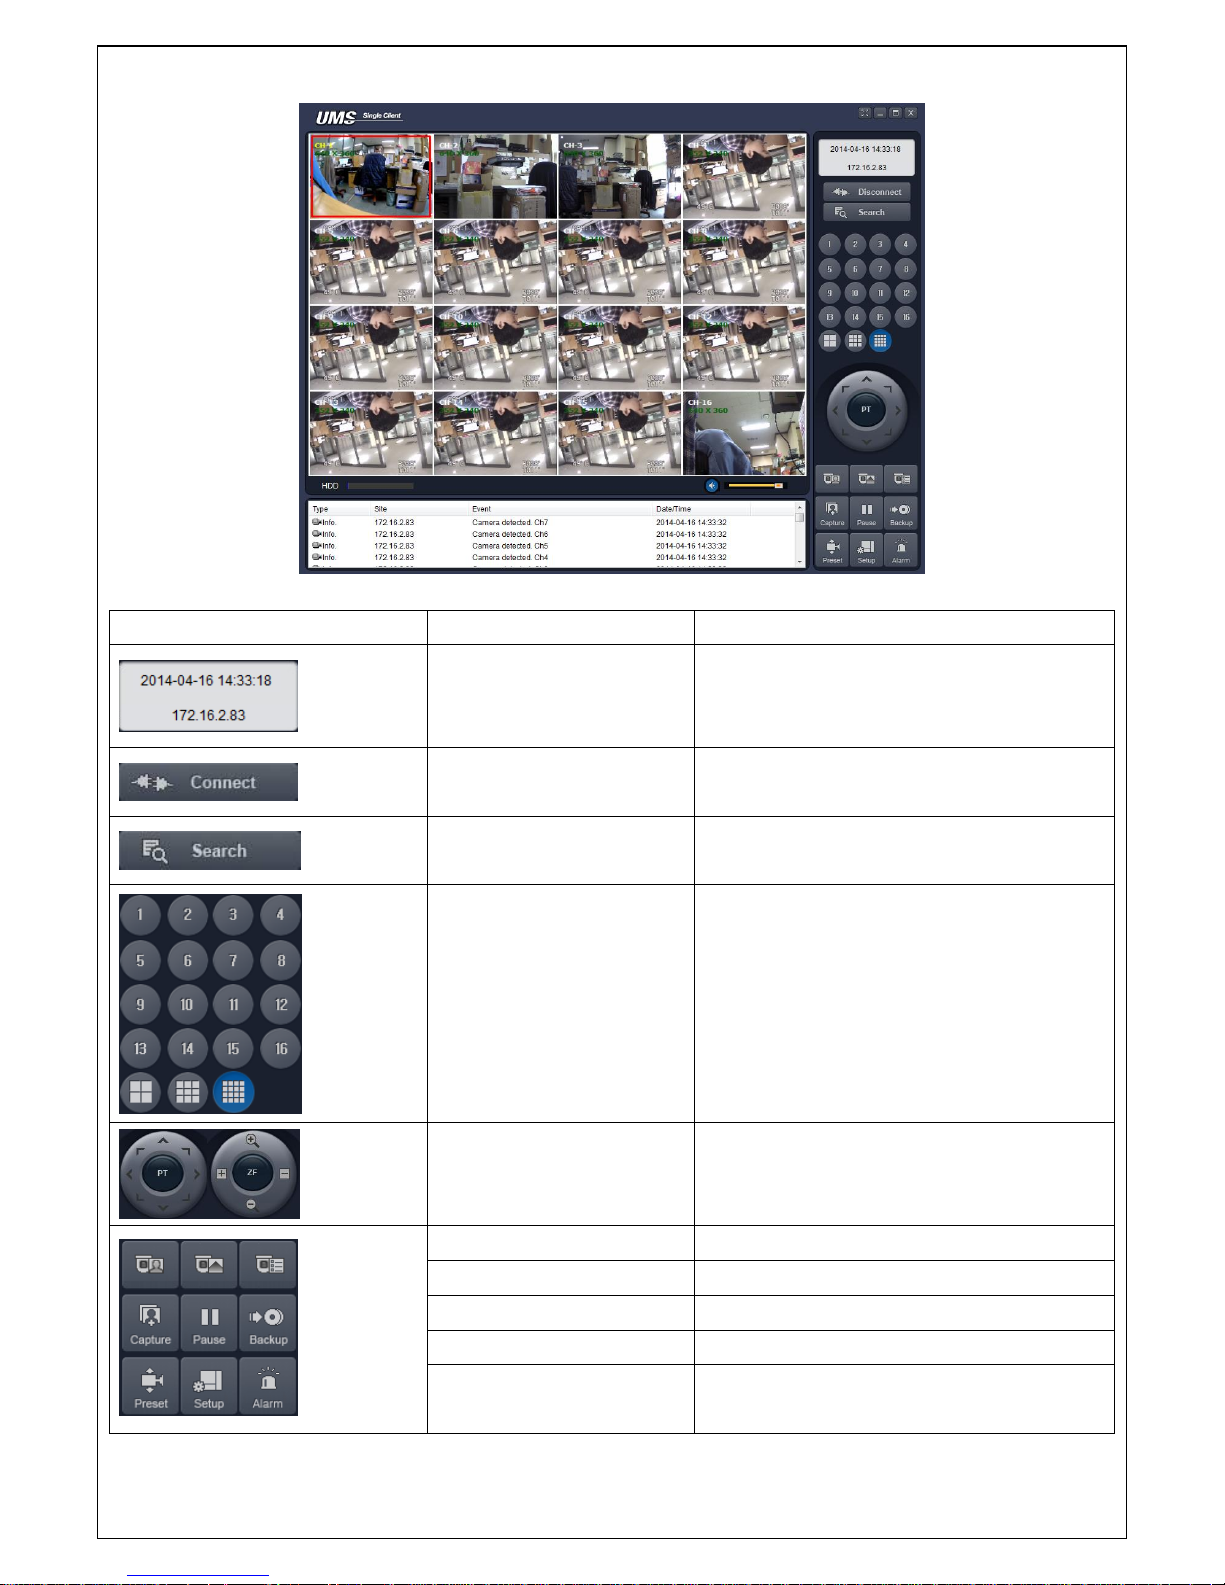
8-3. Live monitoring mode and functions.
Button
Function
Description
DATE & TIME
Displays the current date and time.
CONNECT/DISCONNECT
Connect/disconnect network connection.
SEARCH
Switches the live mode to search mode.
DISPLAY MODE
Select a channel and screen display mode.
PAN/TILT/ZOOM/ FOCUS
Control the PAN / TILT / ZOOM / FOCUS
features on the remote camera.
CAPTURE
Capture a still image from live screen.
PLAY/PAUSE
Play/pause live video.
BACKUP
To start and stop manual recording
PRESET
Select the Preset Number
SETUP
Display the setup screen of the network
viewer
Page 61
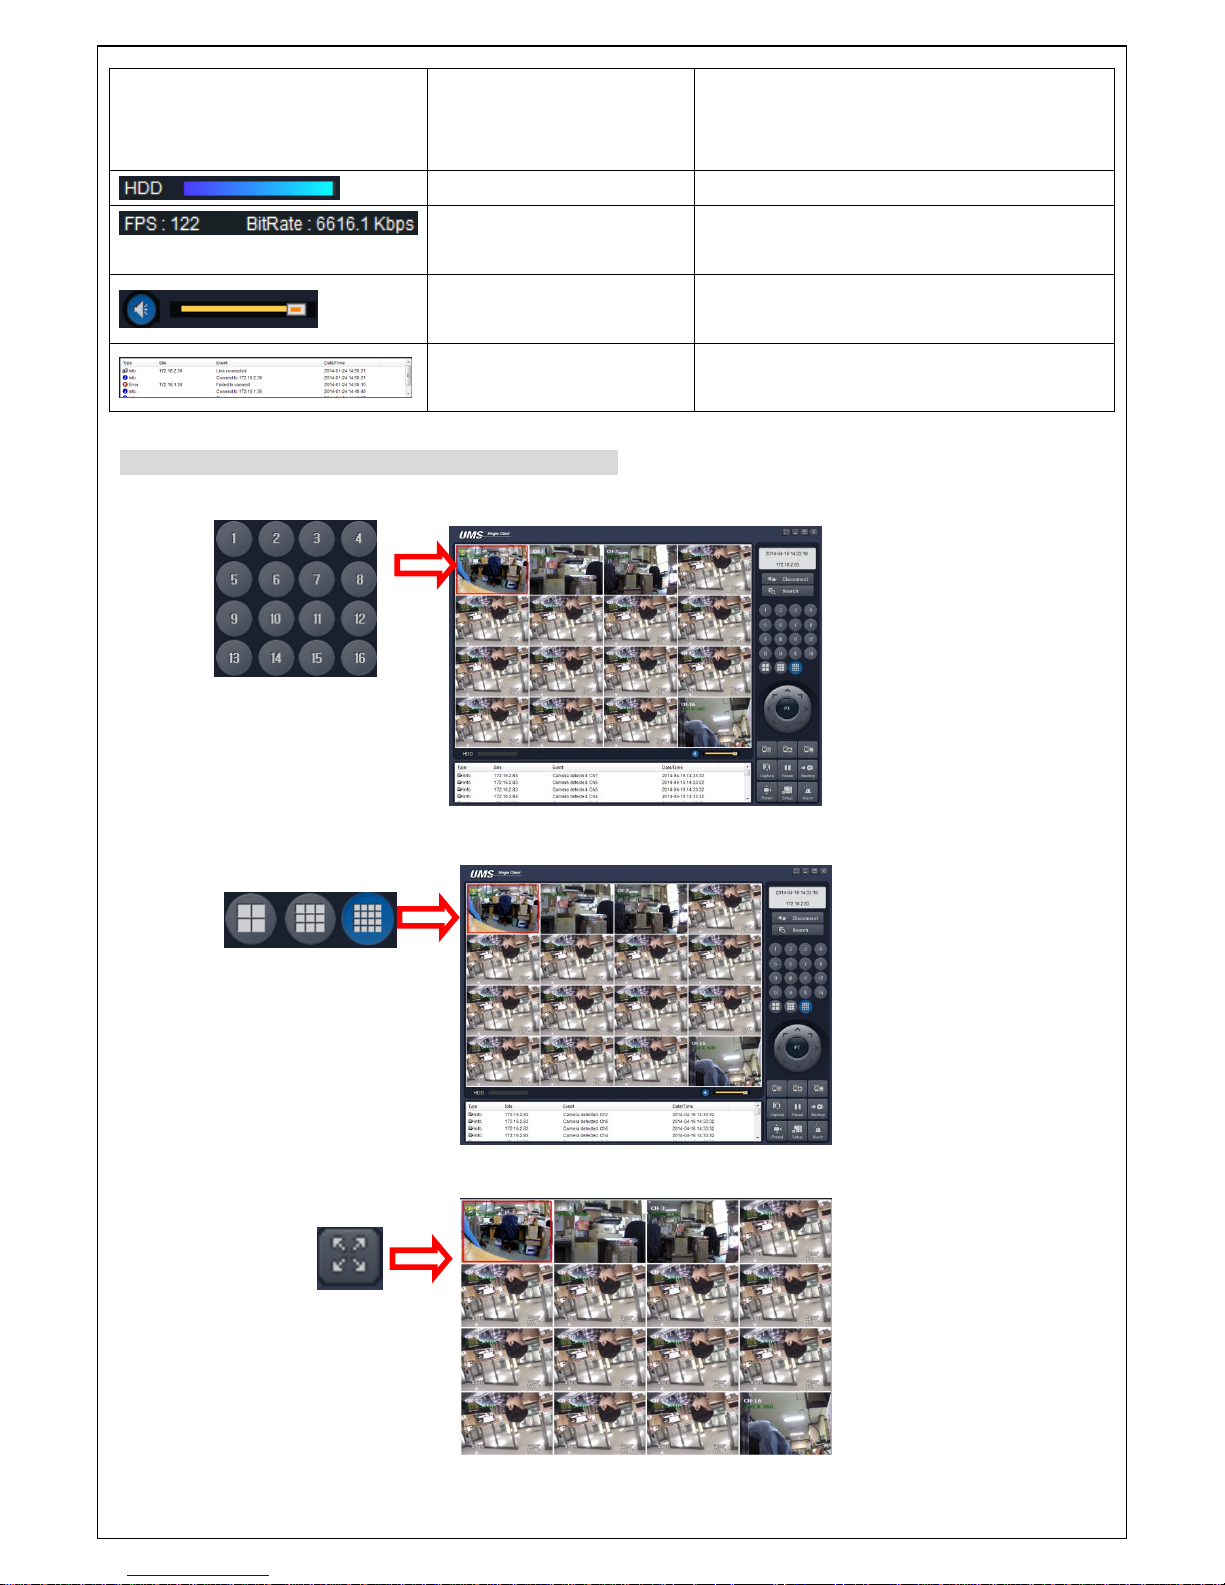
61
ALARM
The ON/OFF button of the alarm output of
the DVR. When an alarm of the DVR is
output, this button becomes Red.
HDD USAGE
DVR HDD storage Indicator.
NETWORK BANDWIDTH
Shows the transferred frames and network
bandwidth.
AUDIO
Adjust the volume. The audio can be
turned on or off by clicking the audio icon.
LOG WINDOW
Display the connection status of DVR
Operations of the display mode of the main screen
Single channel display - Click the one of channel button or double-click the channel screen.
QUAD/-screen display - Click the QUAD button to switch to quad-screen display
Full screen display - Click the maximize button to display only screen and hidden the operation panel.
Page 62
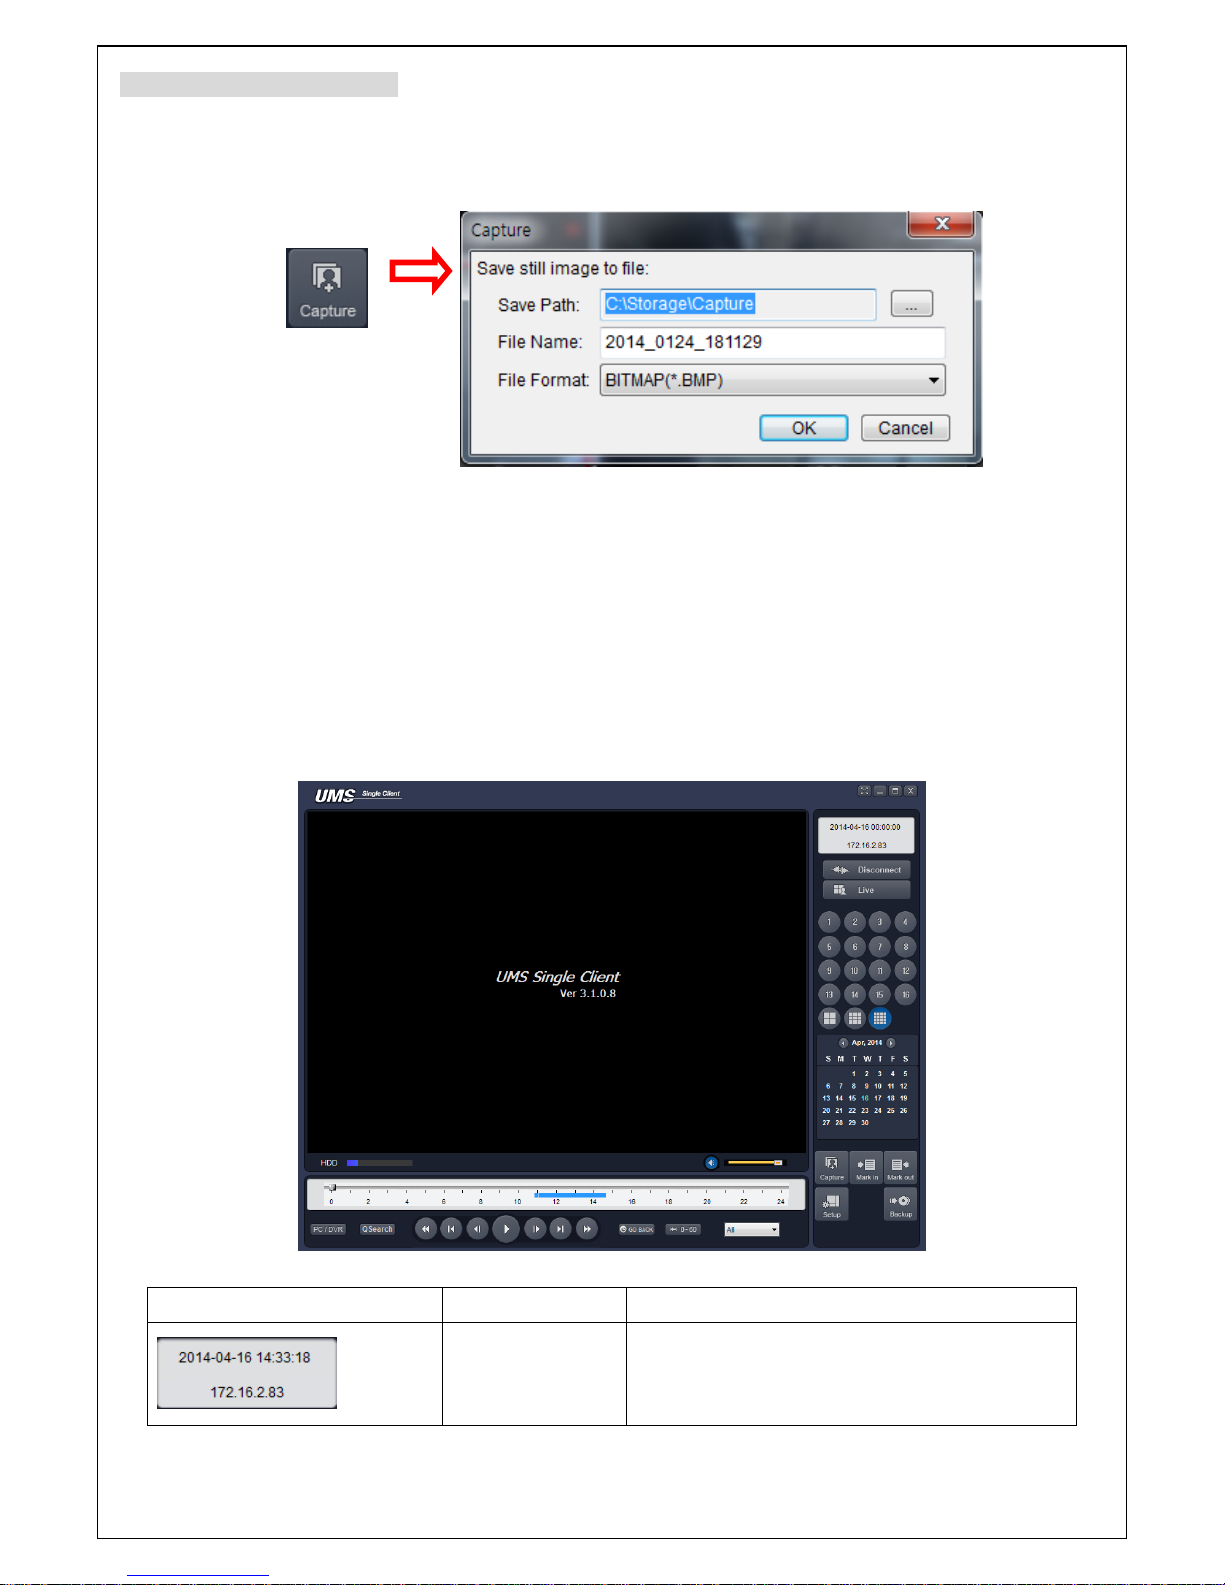
62
Image capture of live screen
Still-image of live screen can be captured and saved as BMP or JPEG file.
1. Click the channel to be captured. Then the channel screen is surrounded with a red line.
2. Click the CAPTURE button. Then the IMAGE CAPTURE dialog is displayed.
3. Set the conditions and click OK button. Then still-image is saved.
8-4. Bi directional audio
The UMS Client allows for bi directional audio between the client and a DVR unit. On the PC, to use bi
directional audio, you will need a sound card of handling a microphone and speakers. On the DVR side,
you will need to connect a microphone to the audio in connection, and a pair of amplified speakers to the
audio out connection.
8-5. Remote search mode and functions
Button
Function
Description
DATE & TIME
Displays the recording time of the data
selected on the time bar at the bottom of the
main user interface.
Page 63
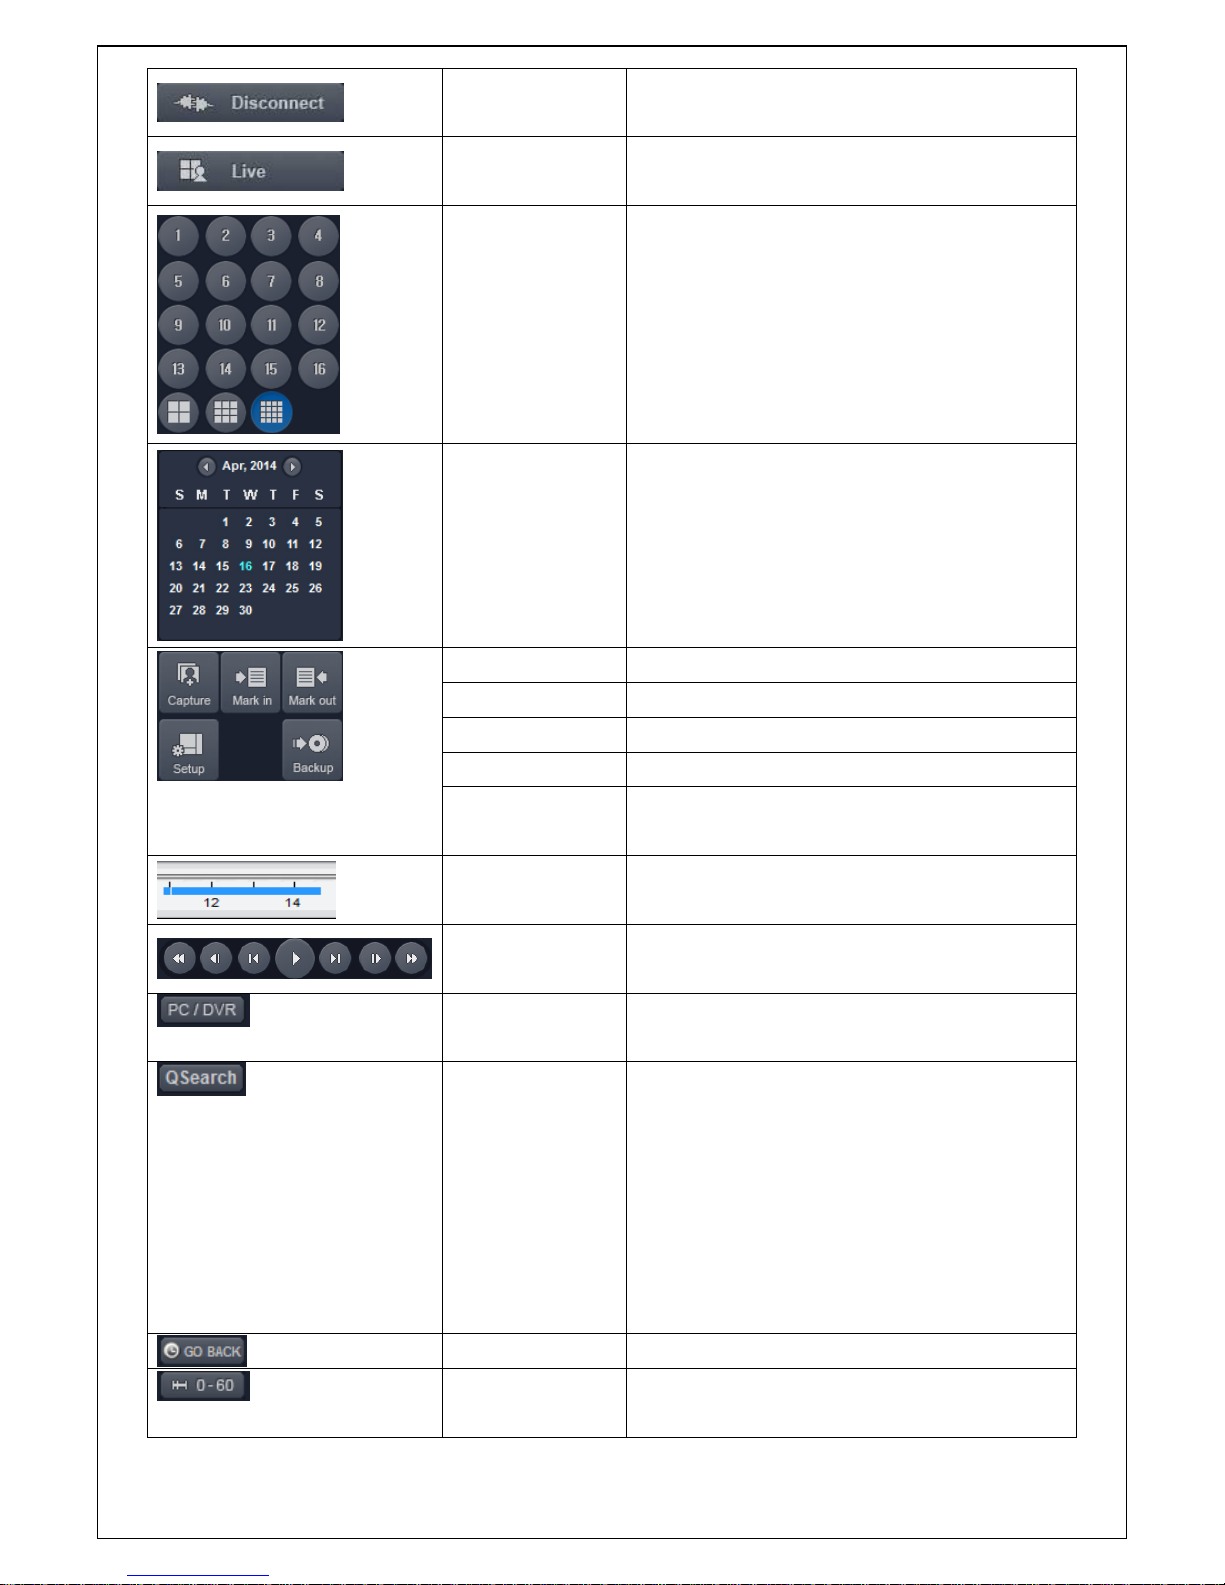
63
DISCONNECT
Disconnect network connection..
LIVE
Switches the search mode to live mode.
DISPLAY MODE
Select a channel and screen display mode.
SEARCH
CALENDAR
The calendar shows dates with recorded video
in a light blue and the selected date in dark
blue.
CAPTURE
Capture a still image from live screen.
MARK IN
Set the start time for video backup.
MARK OUT
Set the ending time for video backup.
SETUP
Display the setup screen of the network viewer
BACKUP
Backup the selected recorded video as AVI
format.
TIMELINE BAR
The timeline shows recorded data in dark blue
on the bar.
PLAYBACK
BUTTON
The playback buttons.
PC/DVR
Select the play button on the remote and local
playback
QSearch
Thumbnail search over the network.
- List the thumbnail 24images from 00:00 to
23:00.
- Select one of 24 images every 150sec for an
hour.
- Then play the tile
* Click the “PREVIOUS” button to go the
previous step.
GO BACK
Time search settings
TIME LINE
To change a timeline scale from 24 hours to 60
minutes.
Page 64
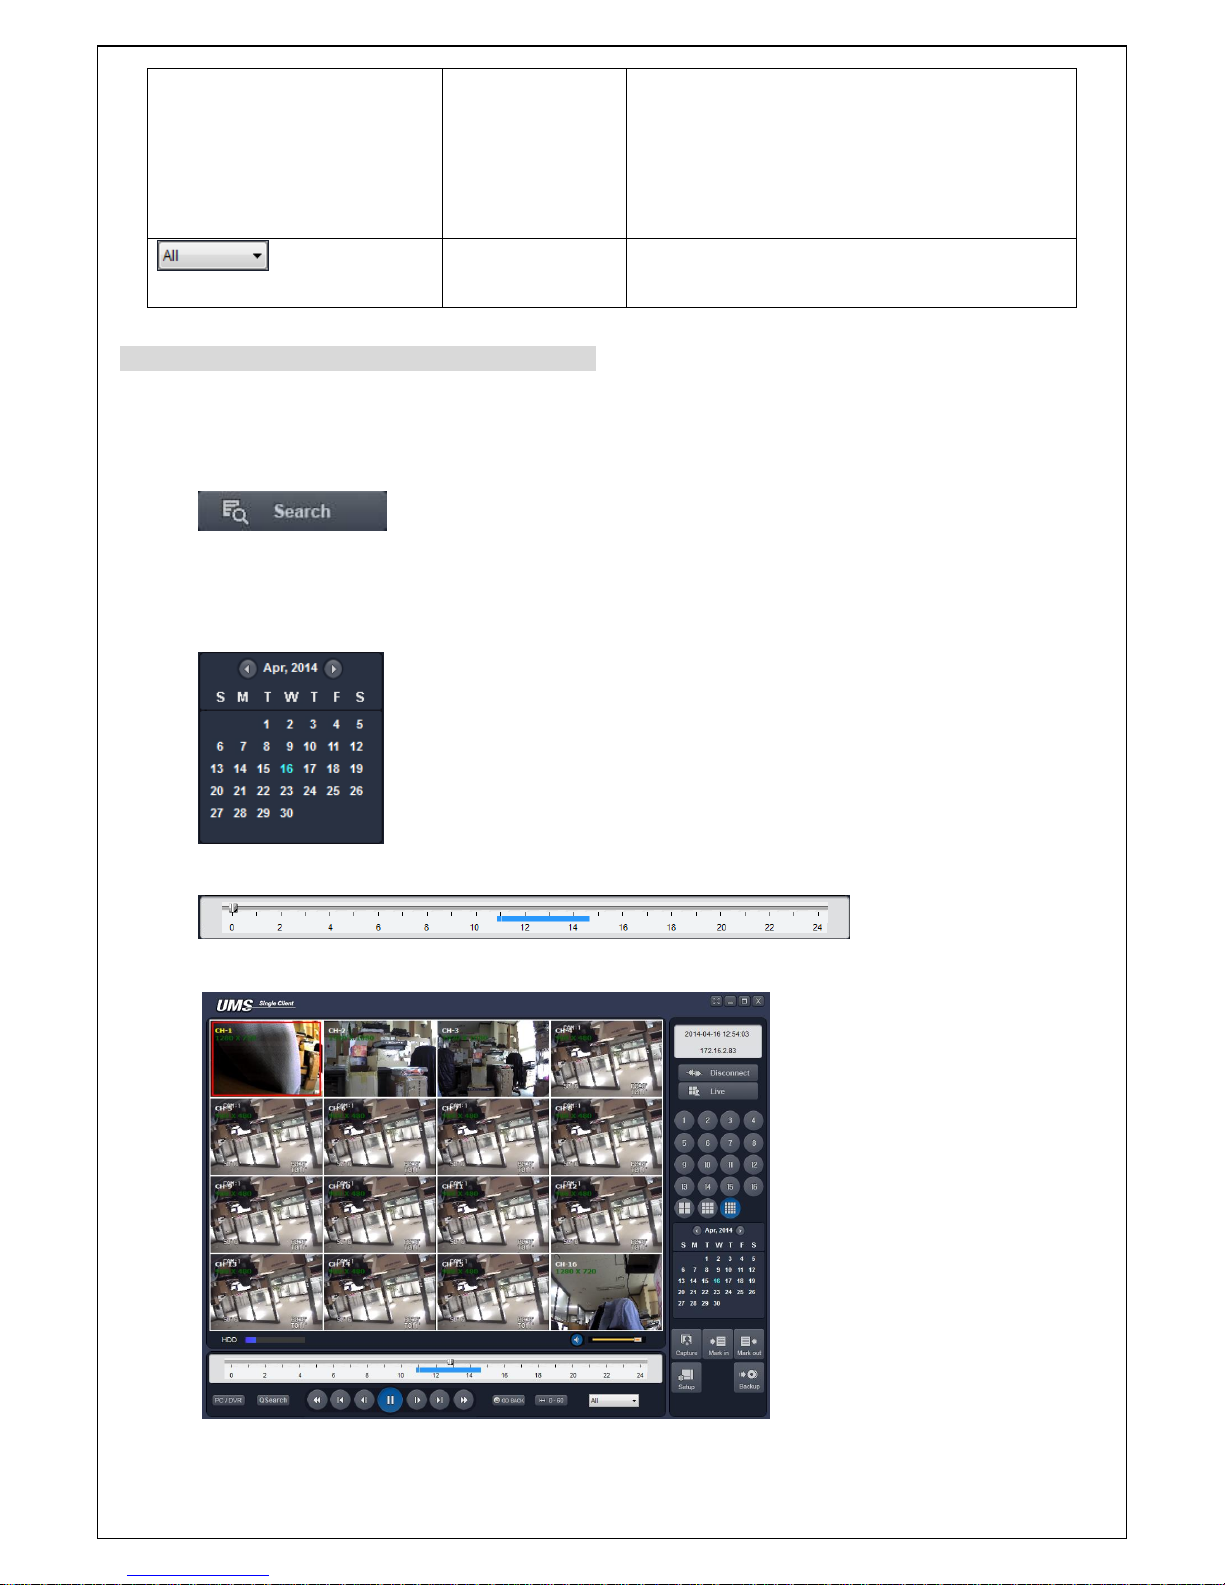
64
The timeline shows recorded data in color on
the bar. You can adjust the timeline scale and
move it to the time you wish to playback. Then
click the play icon to display the recorded
video.
CHANNEL
To display the recorded data of selected
channel or all channels on a time line scale.
Searching and playing video in the remote DVR
Video recorded in the remote DVR or Video recorded on the PC can be searched and played back.
1. Connect the network to the remote DVR and press SEARCH button. Then the mode is changed from
the live mode to the search mode.
Searching the video recorded in the remote DVR: Connect the network to the DVR.
Searching the video recorded in the PC: Do not connect the network to the DVR.
2. Select the date to search the video.
3. Drag the slid on the time scale and drop it between 0 to 24.
4. Press the PLAY button. Then the video recorded in the remote DVR is played back.
Page 65
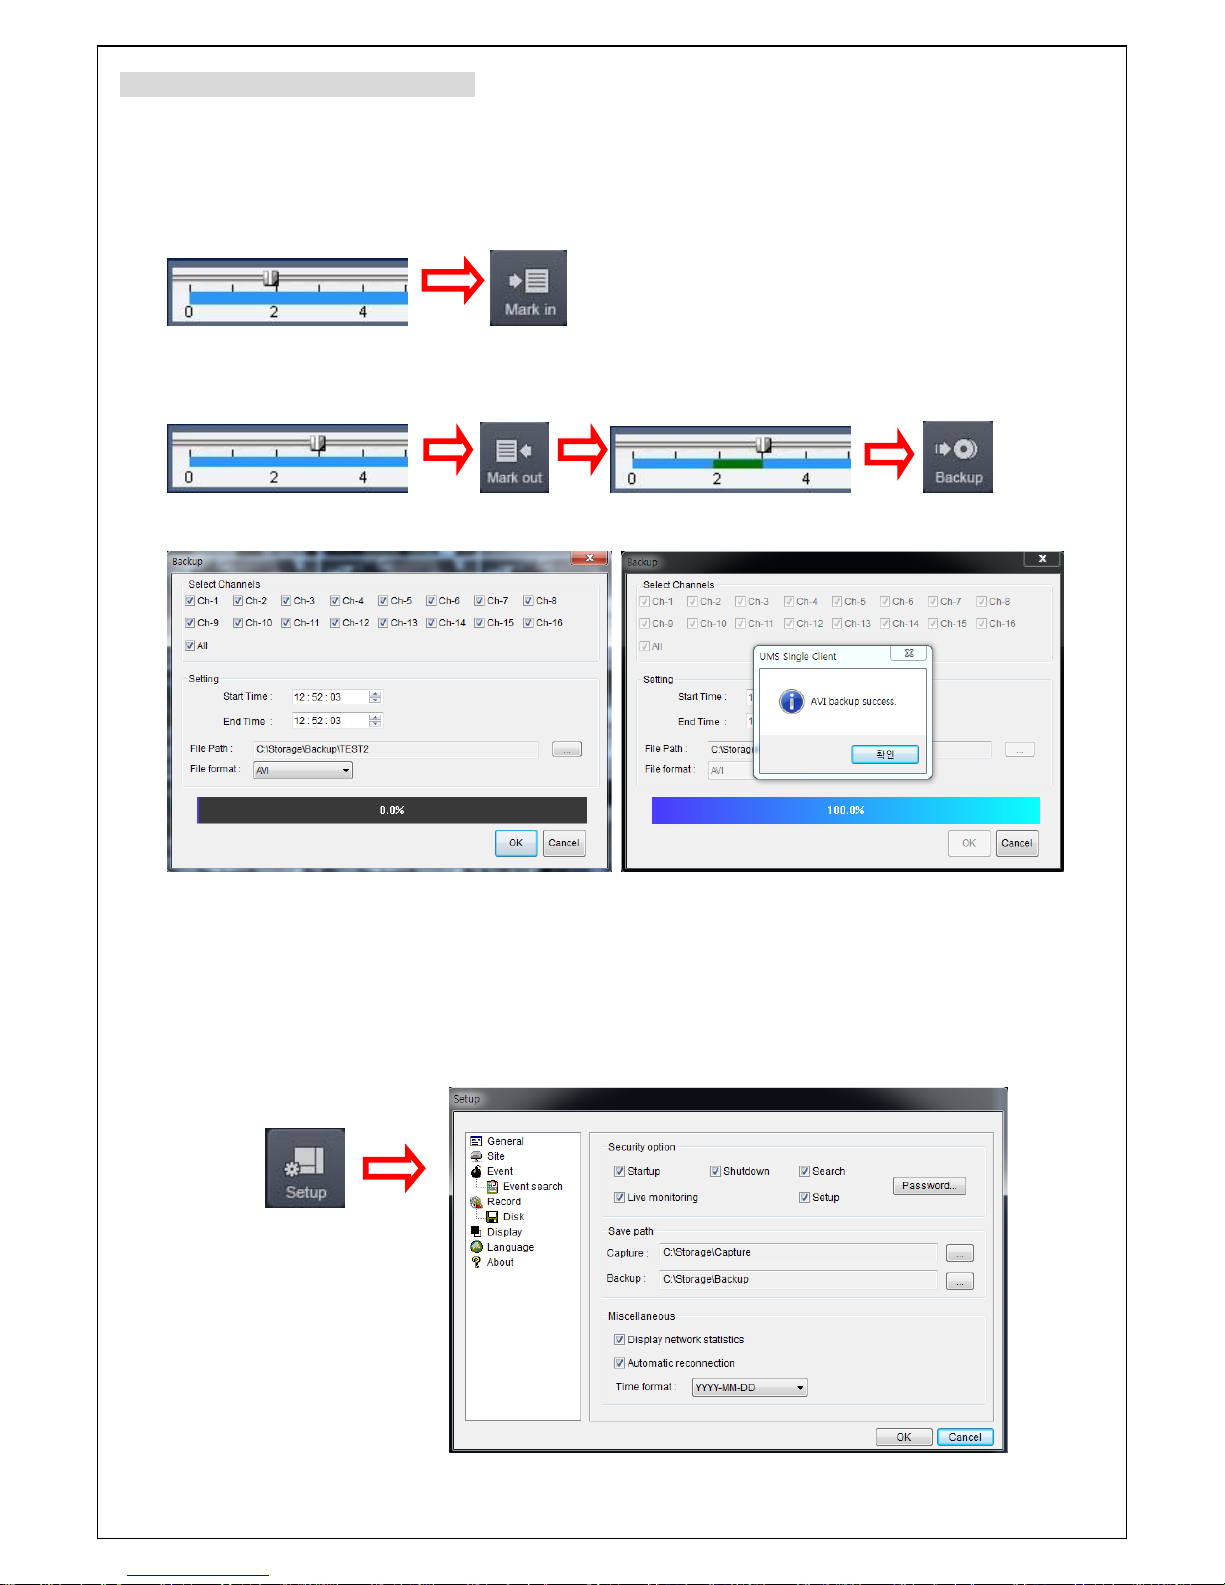
65
Backup of video in the remote DVR
Video recorded in the remote DVR cab be backed up on the PC HDD as AVI format.
1. Connect the network to the remote DVR and play the video recorded in the remote DVR.
2. Drag the slid on the time scale and drop to the start time for video backup and press the MARK IN
button.
3. Drag the slid on the time scale and drop to the end time for video backup and press the MARK OUT
button. Then the marked time is displayed in dark green.
4. AVI Backup dialog is displayed. Click the OK button. Then the marked video is backed up.
Start time / Stop time: Backup time can be changed.
File path: Shows the folder that the backup file is recorded.
Channel: Shows backup channel.
8-6. PC System configuration
Click the SETUP button. Then the Setup dialog is displayed.
Page 66
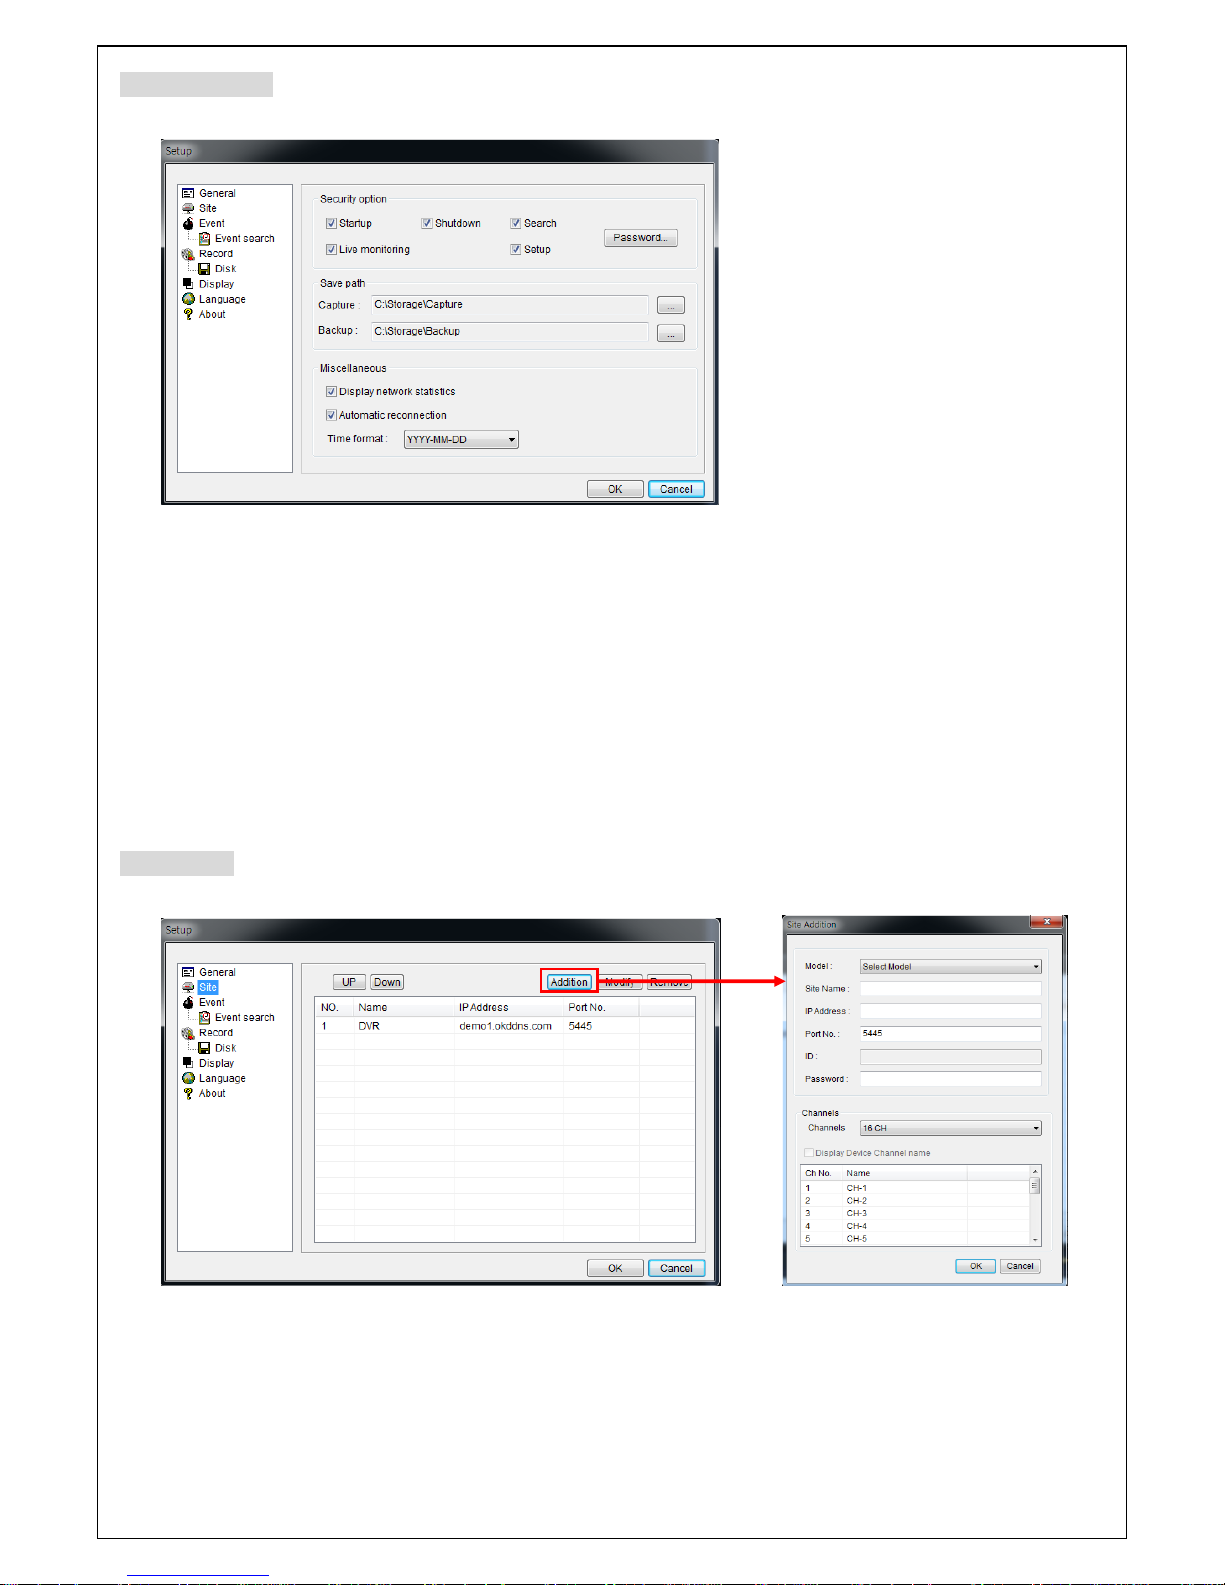
66
Setting General
Set the Security Option, Save Path, and Miscellaneous.
Security Option: Set a password for security options. When you access any of the selected functions,
you will need to enter the password.
Save Path: Specify the location to record for backup and still image capture.
Automatic reconnection: If a user selects this function, the client S/W will automatically try to connect
to the previously connected IP address if the network connection is lost.
Display network statistics: If a user selects this function, the client S/W will display network status,
Bit rate and Frame rate.
Time Format: Change the mode the Client software displays the time.
Setting Site
The remote DVRs can be added, modified, and removed.
Click ADDITION button. And then the following window will be displayed as below.
Site Name: Input a name that properly describes a site.
IP Address: Input IP address (Public IP address of a router that DVR is connected.) or Domain
name
Port Number: Default Port Number is “5445”.
Page 67
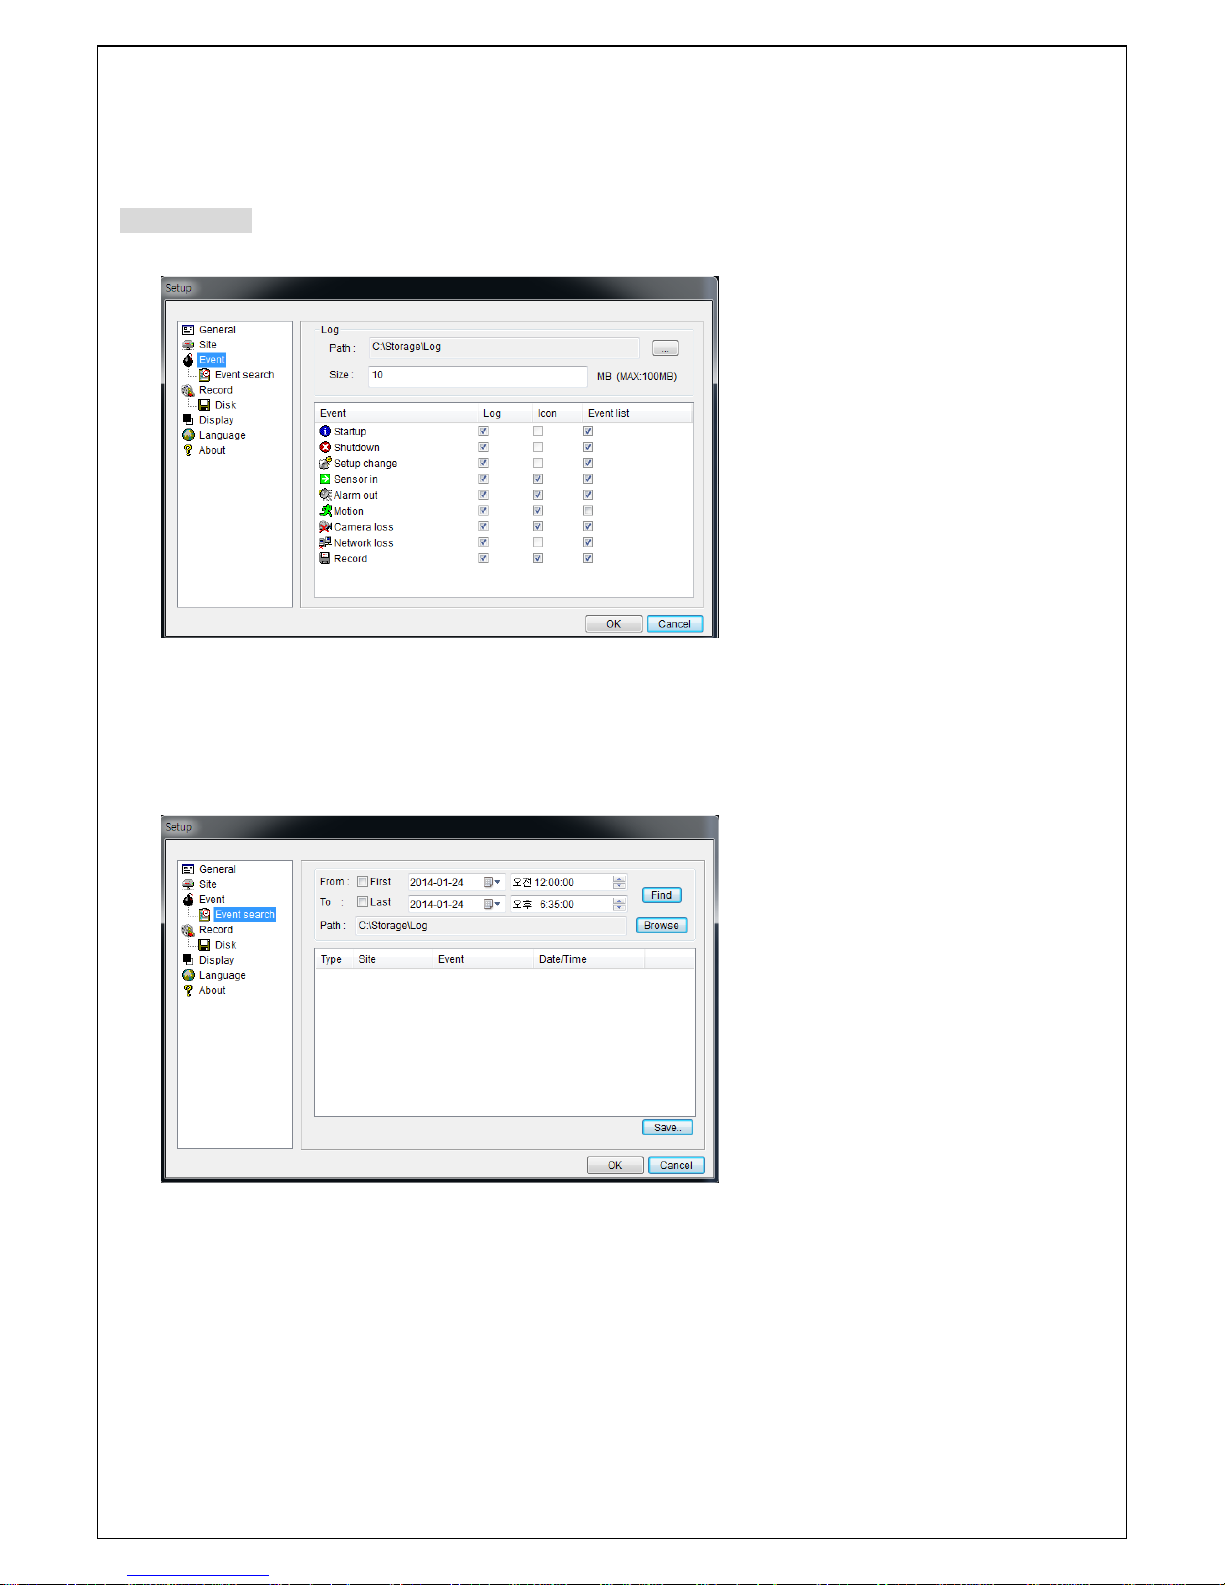
67
ID: Input ID of DVR. Default ID is “admin”.
Password: Input network password of DVR. Default Password is “1111”.
Click OK button. And then the registered site is added on the directory window.
Setting Event
Set the record path and the size of local disk space for the log files.
LOG – Select to save event log into ‘log file’.
ICON – Select to display the event on live video.
EVENT LIST – Select to show the event in the ‘Event List” window of live mode.
Event Search: Event log can be searched from the selected time.
Page 68
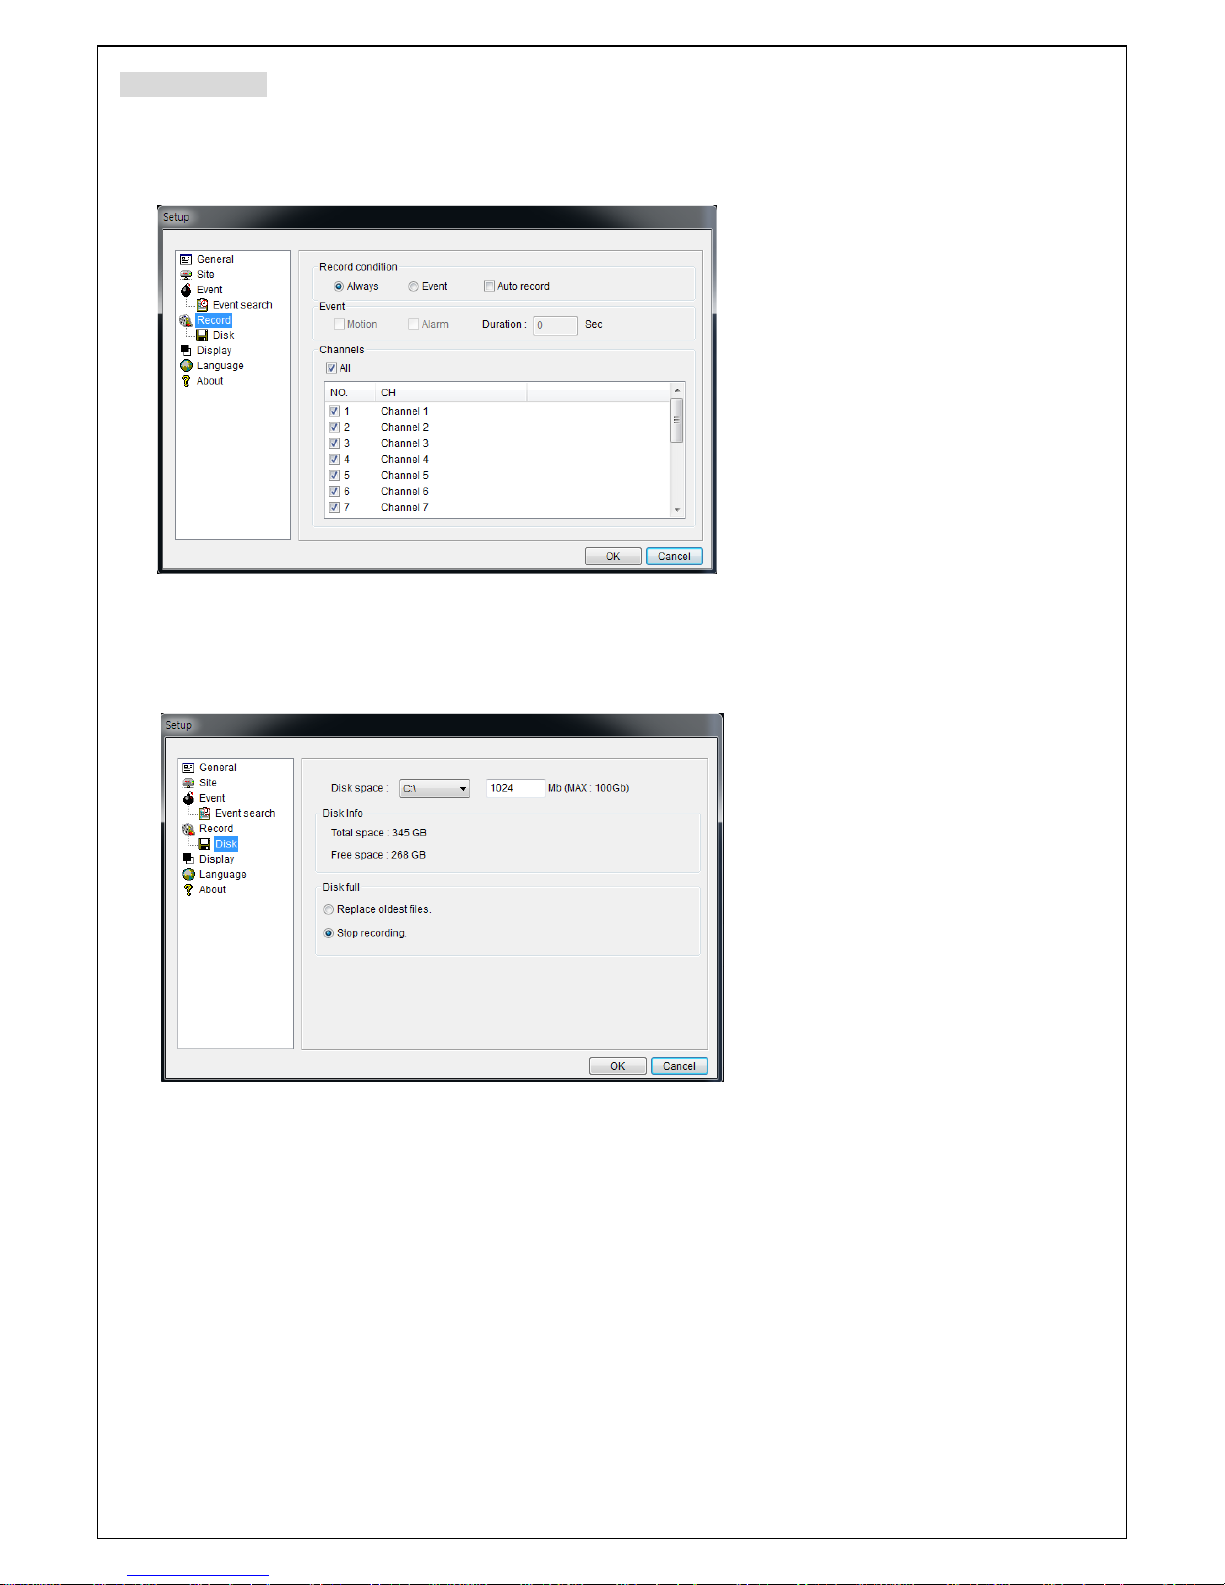
68
Setting Record
Record Setup: You can set the recording conditions as the following; Always, Event, or Auto record. And
you can also select target DVR/DVRs and channel/channels When you set the recording condition to event,
you can set event for motion or alarm with duration.
Record Local Storage Setup: You can select the local disk to record and the amount of disk space you
want to allow the program to use for recording. You can also select the option to overwrite data or stop
recording when the maximum amount of disk space is full.
Page 69
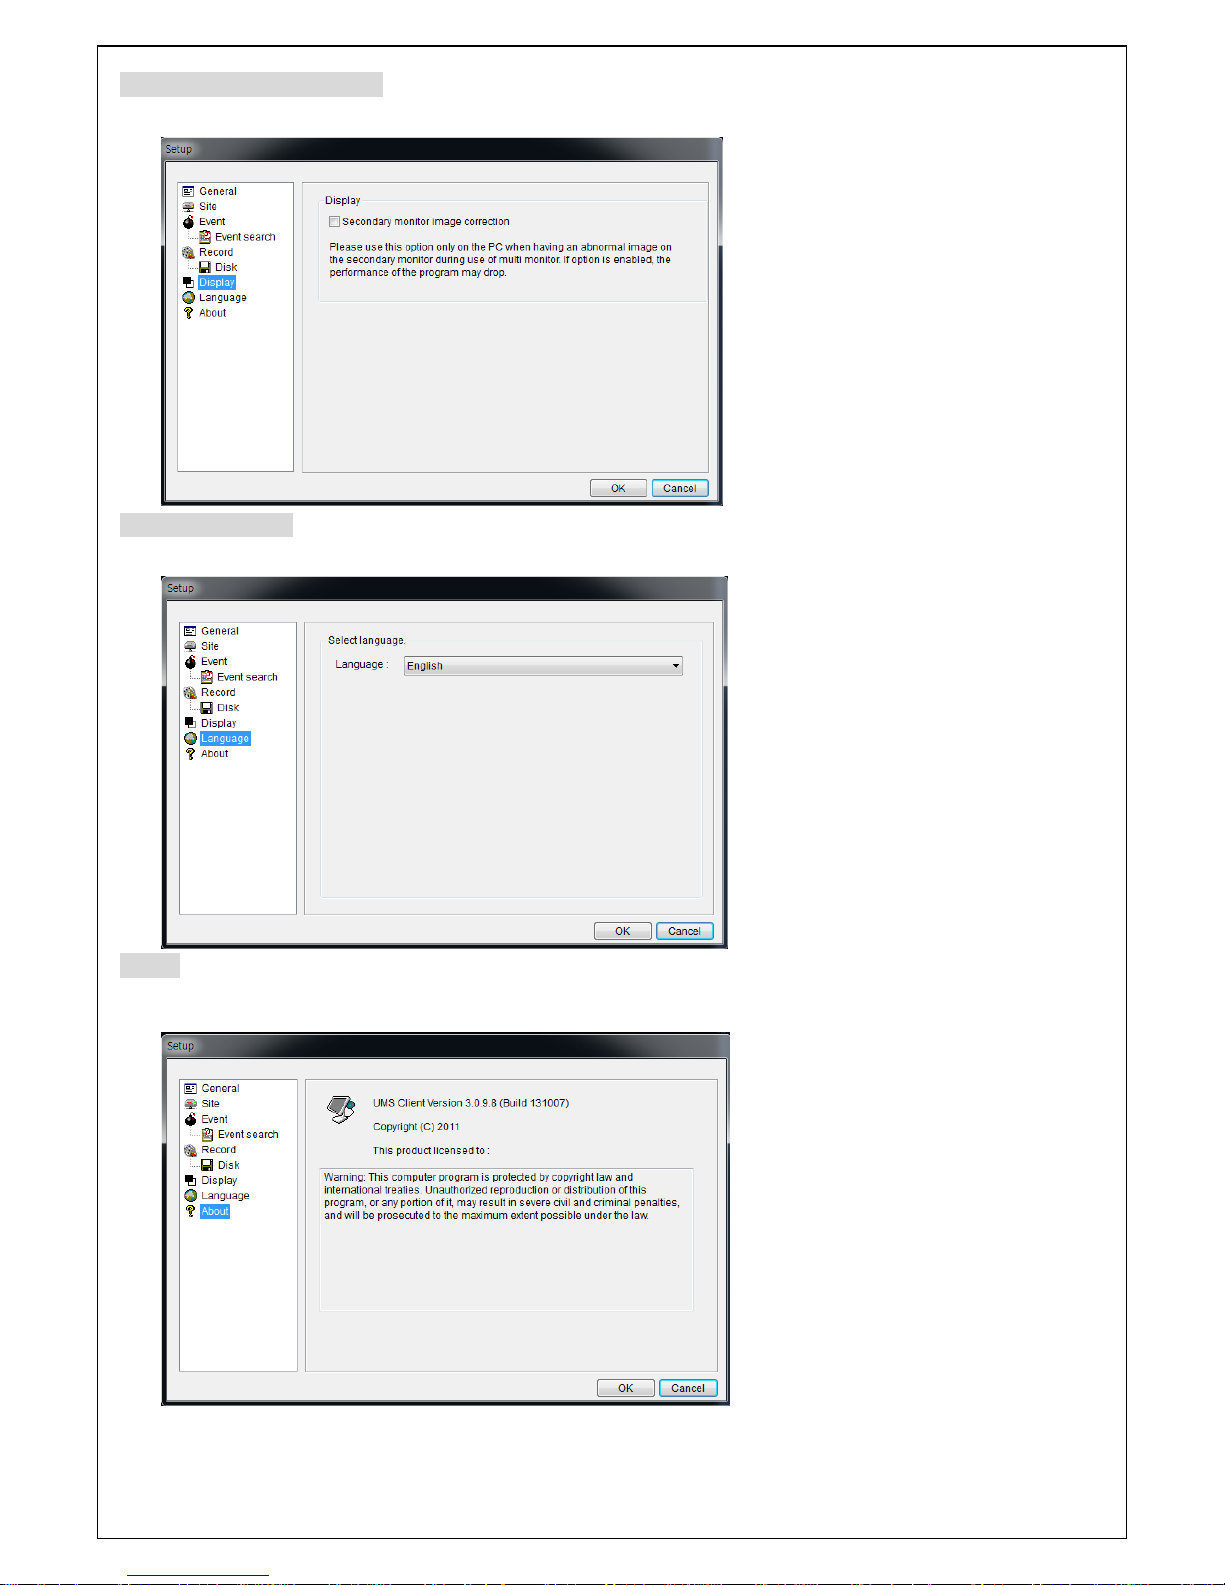
69
Setting Secondary Monitor
Used to calibrate the second monitor image.
Setting Language
English, French and Spanish is selectable.
About
“About” provides network client version information.
Page 70
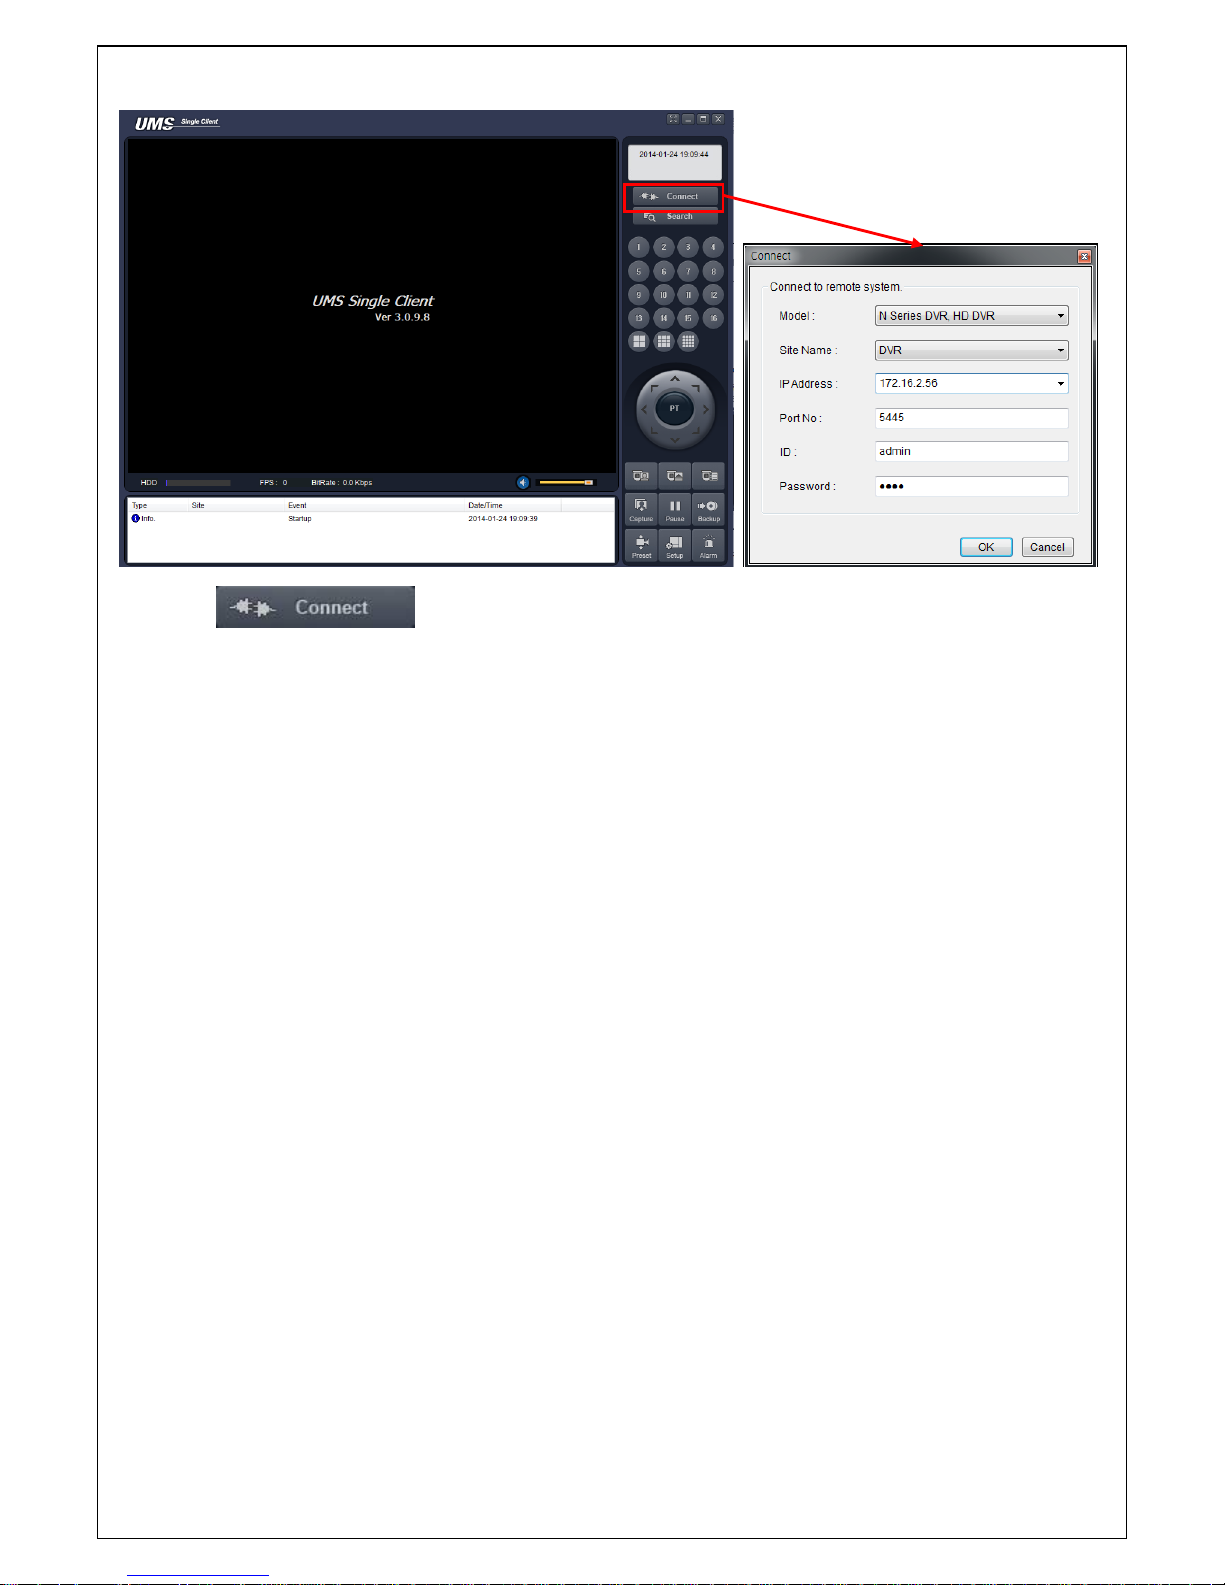
70
8-7. UMS Client Connection
Click CONNECT button to appear on the site registered under the ”OK” button
is pressed, the connection to the site.
If you want to connect directly to an IP address or Domain address to “OK” button
.
Page 71
71
9. Network access using the Exclusive network viewer, UMS Multi
9-1. Overview
The UMS Multi-Client is a multiple site monitoring client software with; video, audio, and alarm signals from
the DVRs over networks. The UMS Multi-Client does not limit the number of DVR units to register.
The program displays to up 256 live videos on one display and even playback videos window on the same
or another display monitor.
On the program, user may control PTZF cameras on the DVRs. By attaching a microphone and speaker
system to devices on site, user may make bi-directional audio communication over the network.
9-2. Minimum PC requirements
Minimum PC Requirements
Recommended PC Requirements
Before installing the program, check the PC specifications. The DVR remote software may not perform
correctly if the PC does not meet the minimum requirements.
CPU
Intel Core i3
1.8Ghz
Memory
2GB DDR2
VGA
512MB
Resolution
1280x720
Disk Space
1GB
OS
Windows 2000, XP Professional, XP Home, Vista, 7 (NOTE: Not all versions of Vista and 7
are supported)
Network
10/100Base T
Others
Direct X 9.0c or Higher
CPU
Intel Core i5
2Ghz or higher.
Memory
4GB DDR3 or higher.
VGA
512MB or higher.
Resolution
1920x1080
Disk Space
1GB
OS
Windows 2000, XP Professional, XP Home, Vista, 7 (NOTE: Not all versions of Vista and 7
are supported)
Network
10/100/1000Base T
Others
Direct X 10 or higher.
Page 72
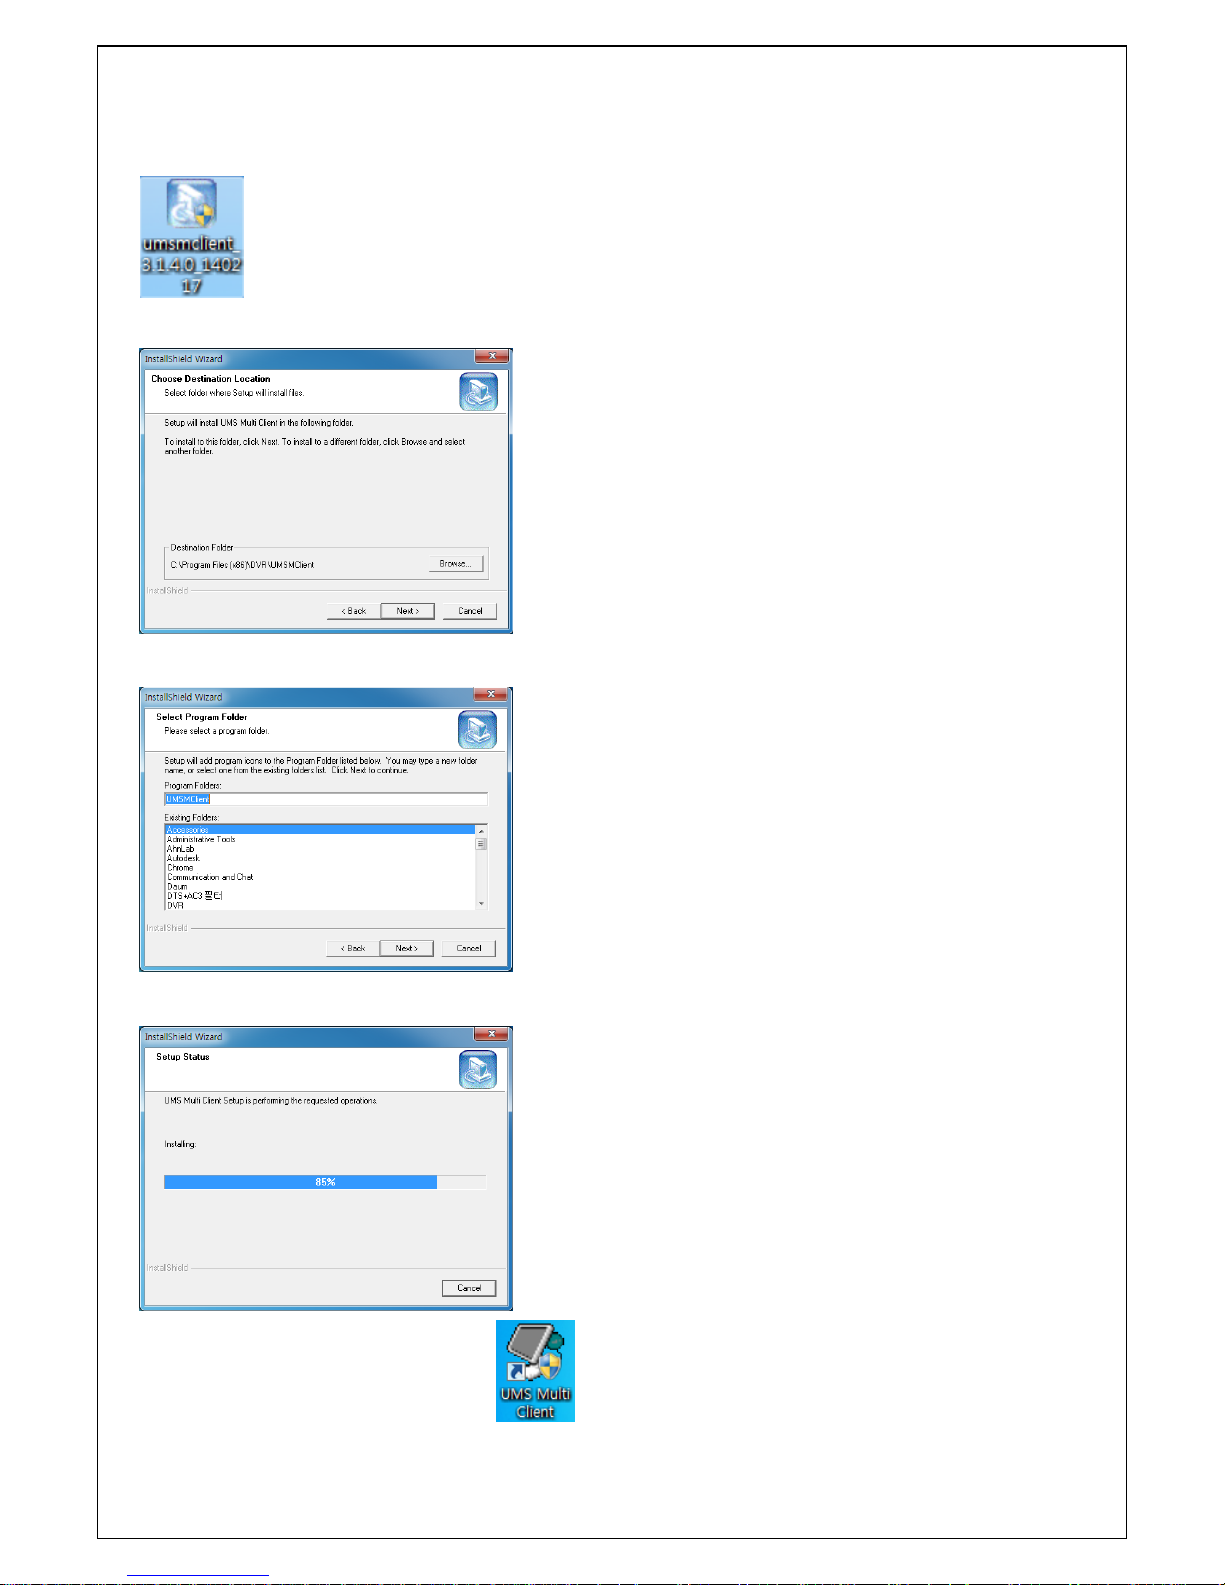
72
9-3. Installing the program
1. Insert the provided CD in the CD drive and double-click “UMSMultiClient (XXXX).exe”
2. Select a destination folder and click “Next”.
3. Select the program folder and click “Next”.
4. The setup status screen is displayed.
5. After the installation is completed, icon displays on the desktop screen.
Page 73
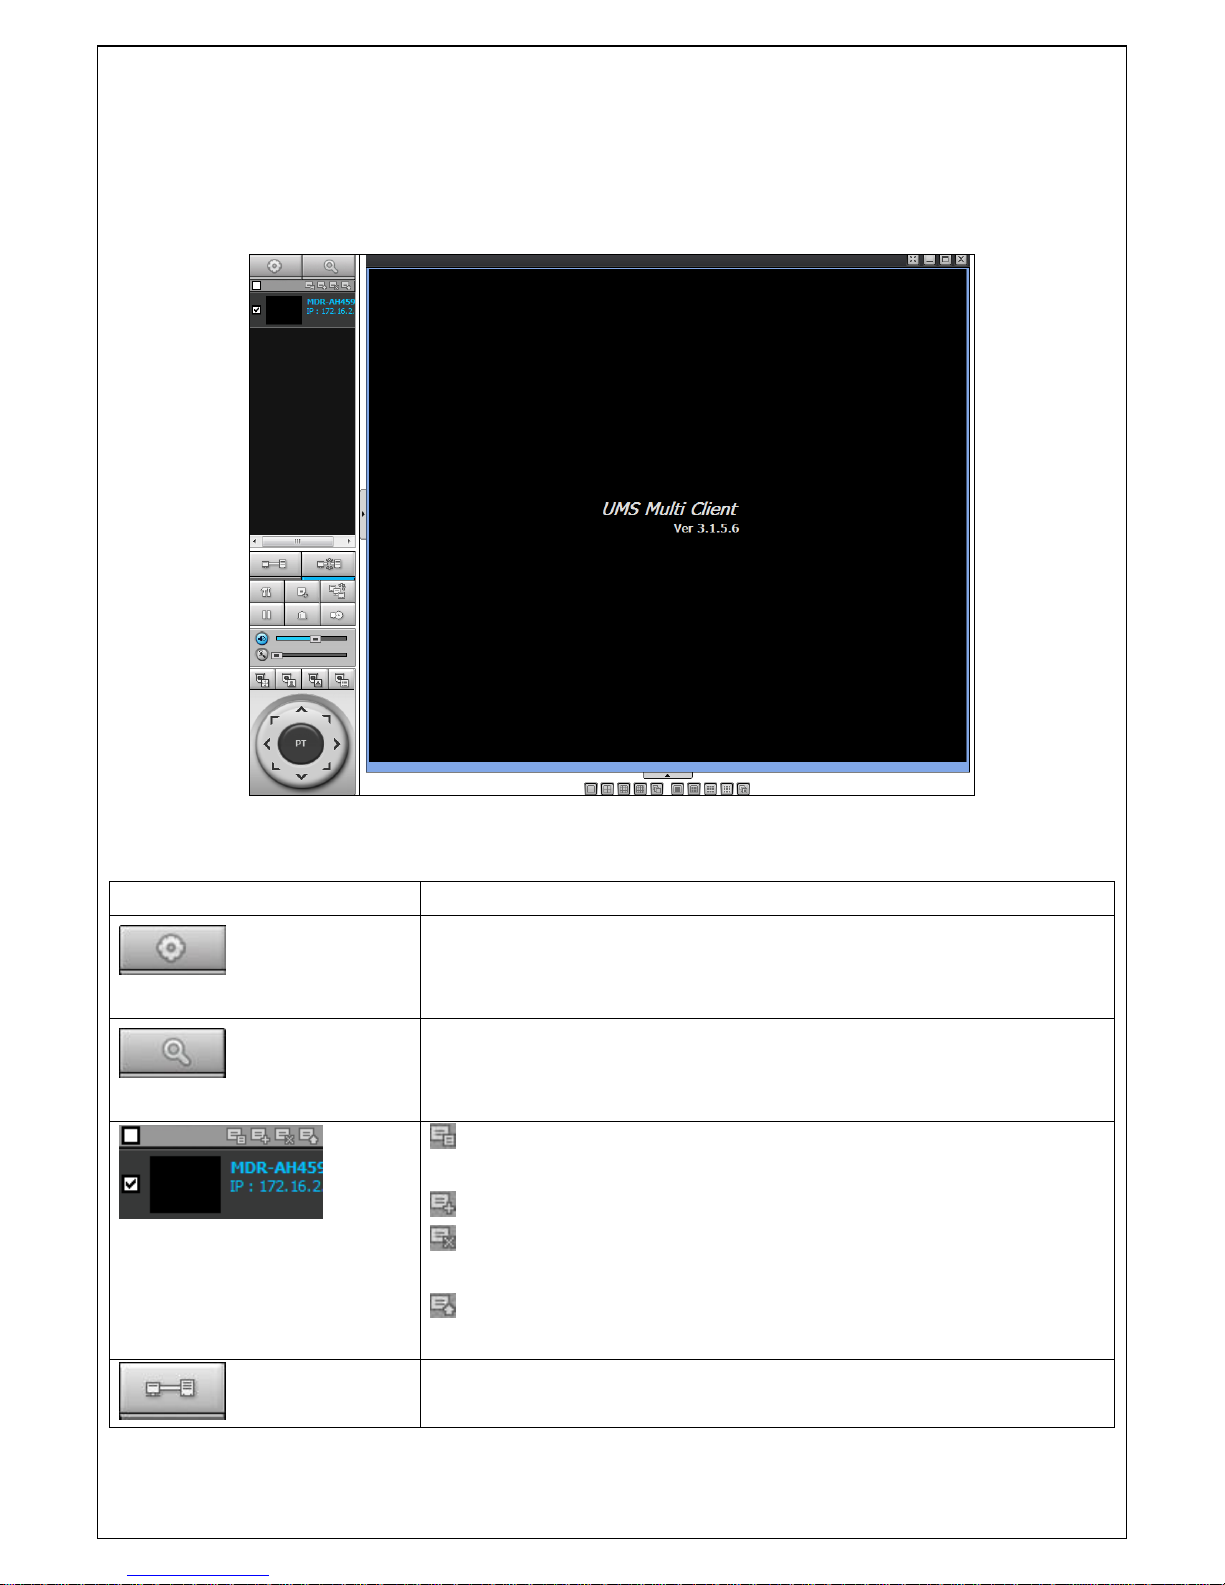
73
9-4. Live Window
When installation is completed, double click the “UMS Multi Client” icon on your desktop to start the
program.
9-4-1. Main user interface
9-4-2. Control buttons
Button
Description
LOCAL PLAYBACK
Click this icon to run a playback window to search and play videos that
are recorded in local PC.
REMOTE PLAYBACK
Click this icon to run a playback window to search and play videos that
are recorded in remote DVR.
SITE MANAGEMENT
THUMBNAIL REFRESH: Click this icon to refresh and renew
thumbnail image of every connected site.
SITE ADDITION: Click this icon to open ‘Site Addition’ window.
SITE DELETE: Click this icon to delete site from the index window,
after disconnect a site.
NET FINDER: Select the site from the index window and click this
icon to modify the information of specific site.
CONNECT
Click this icon to connect the selected site/sites.
Page 74
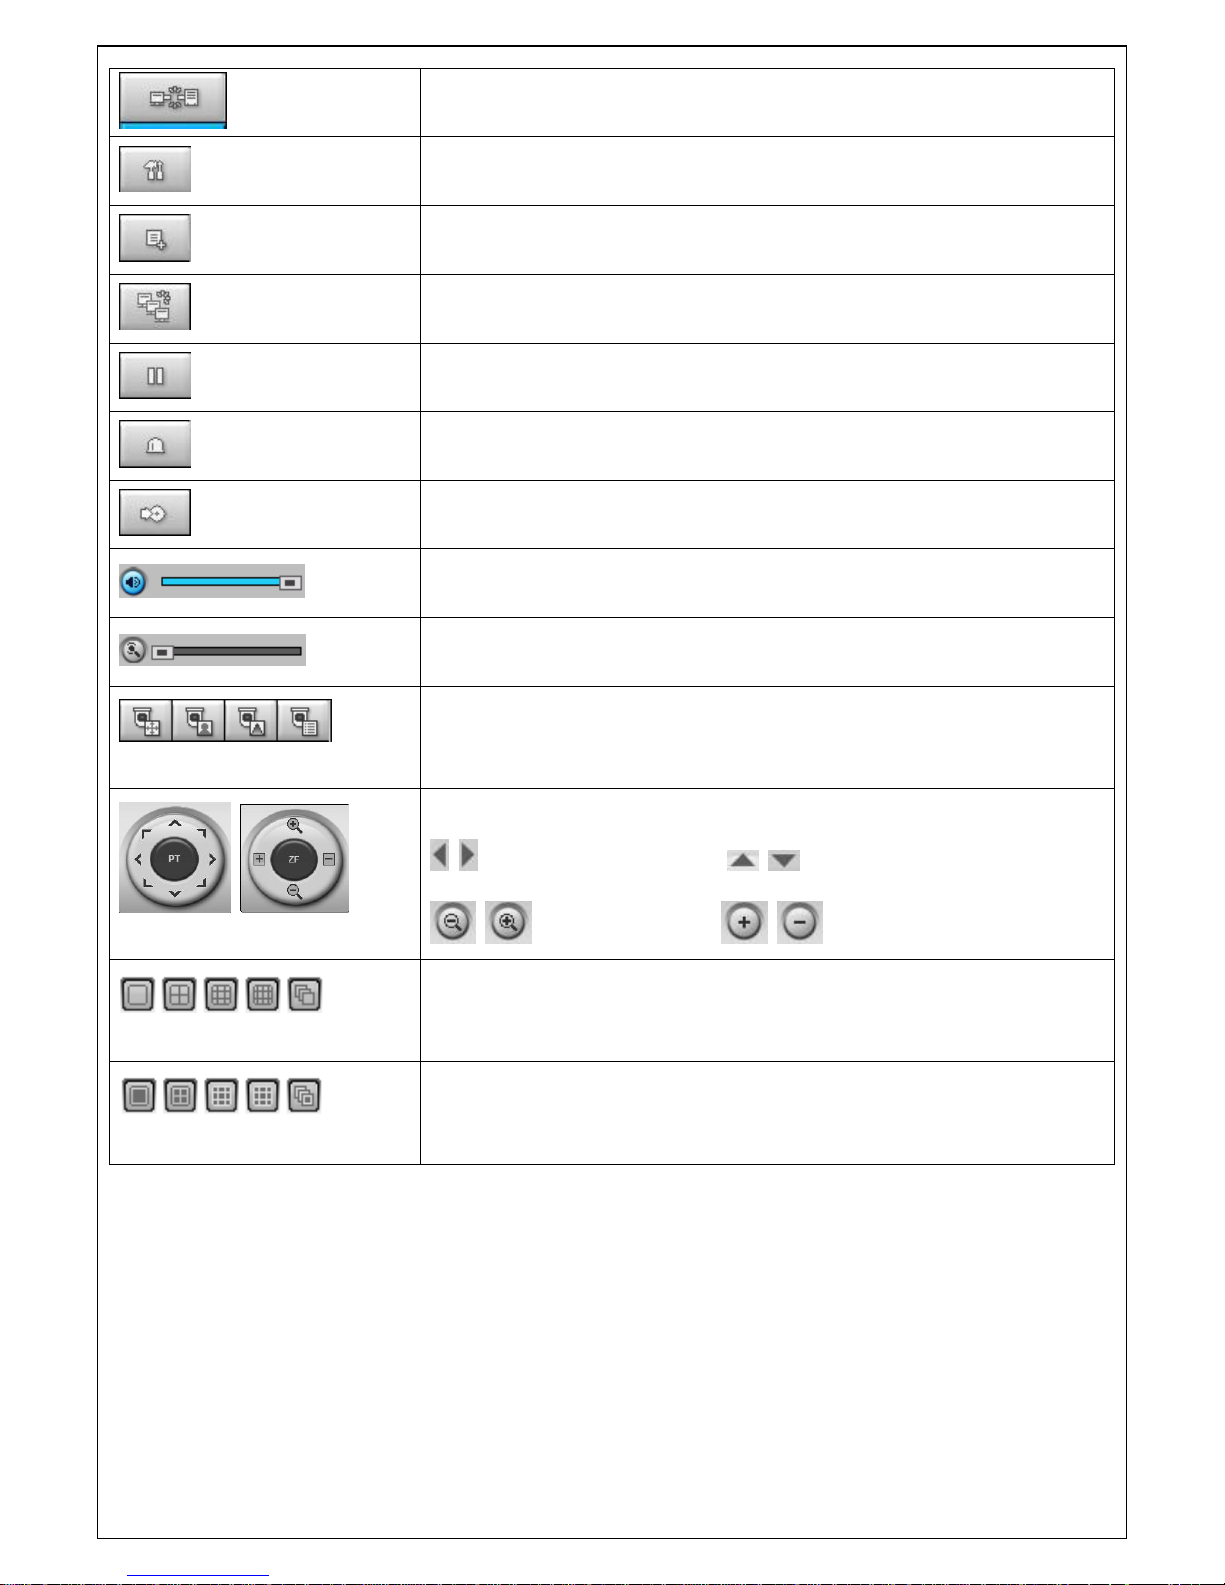
74
DISCONNECT
Click this icon to disconnect the selected site/sites.
SETUP
Click this icon to setup configuration of UMS MULTI CLIENT.
CAPTURE
Click this icon to capture a still image
EVENT LIST
Opens list of events logged by the UMS Multi Client.
PAUSE
Click this icon to play/pause live video.
ALARM ON
Click this icon to turn on/off alarm outputs.
RECORD ON
Enable or disable recording of live video to local disk which has set in
setup menu.
AUDIO
Use the volume control bar to set the audio level.
MIC
Use the micro phone volume control bar to set the micro phone level.
PRESET/TOUR/SCAN/MENU
User can control PRESET/TOUR/SCAN/MENU
User can control PAN/TILT & ZOON/FOCUS.
PAN left /right TILT up/down
ZOOM in/out FOCUS in/out
CHANNEL SPLIT
To select the numbers of display channel/channels (Single, quad, 9
channels, and 16 channels) of highlighted site.
DVR SITE SPLIT
To select the numbers of DVR on main display screen.
Page 75
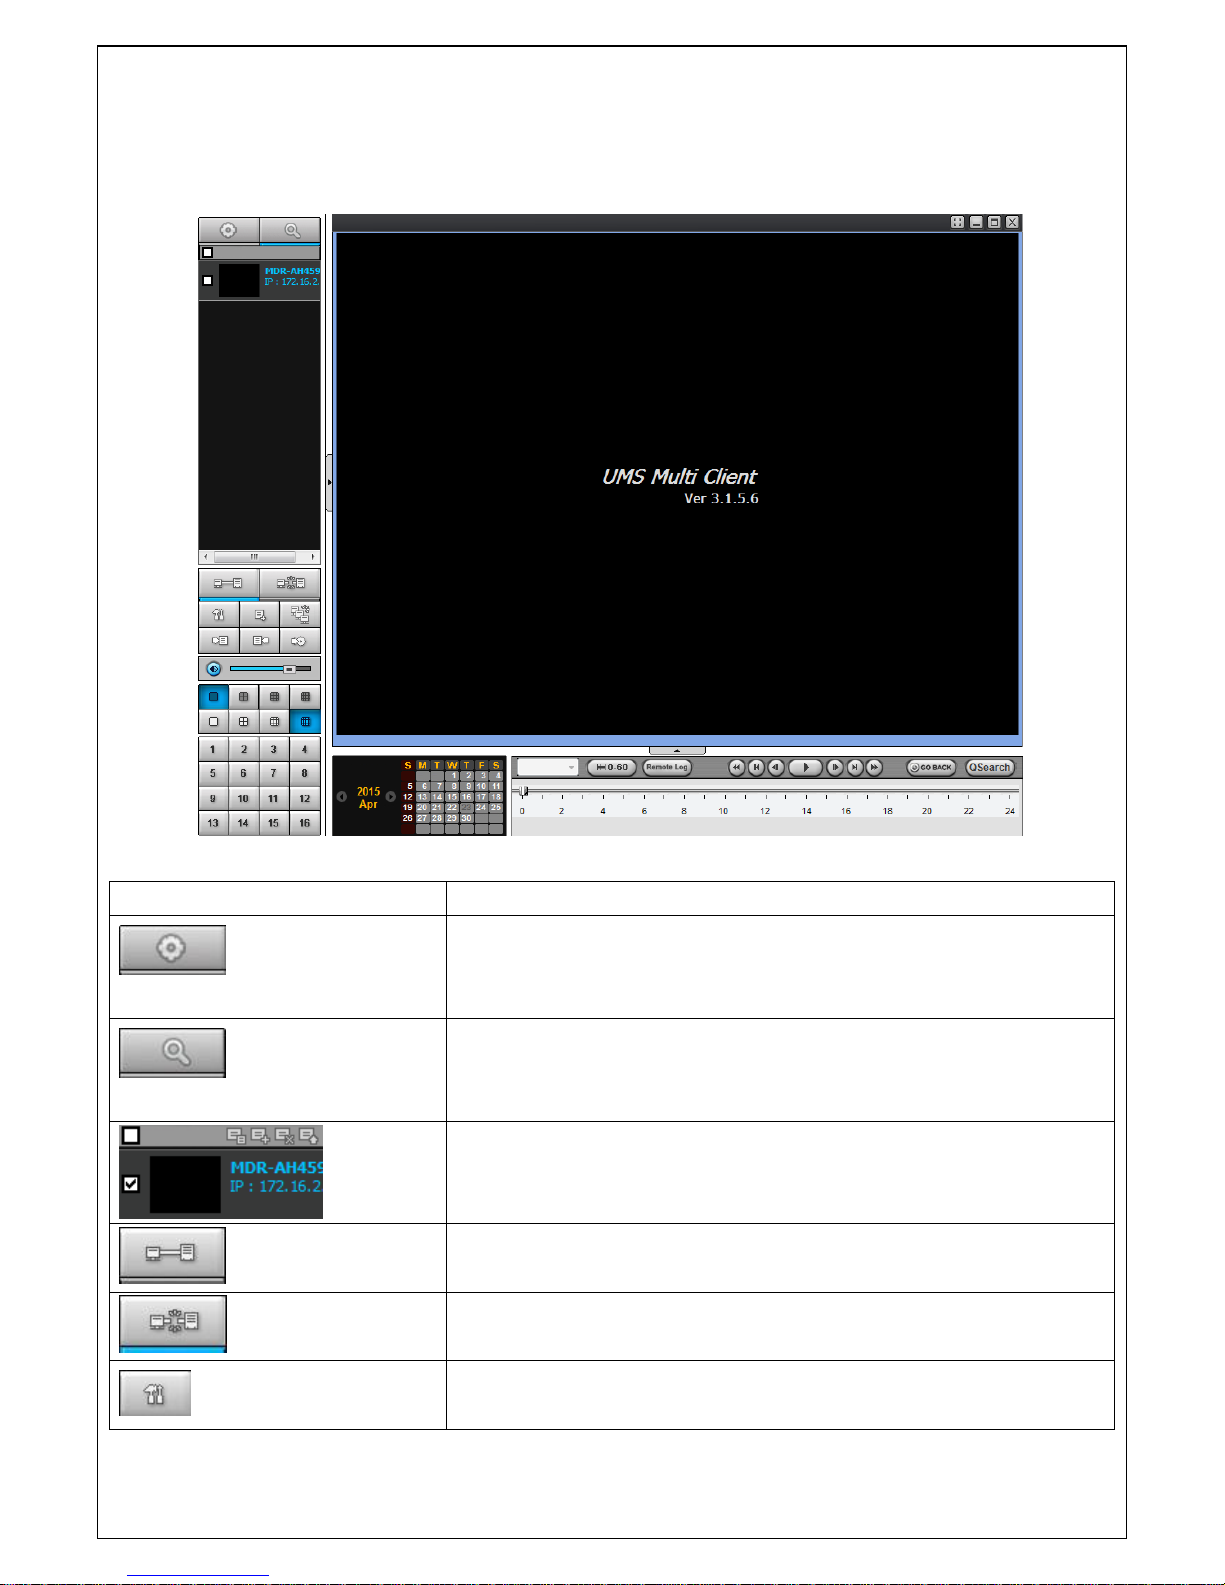
75
9-5. Search and Playback Window
9-5-1. Main user interface
You can access to search window by clicking the search icon (Local Playback / Remote Playback) on the
upper left of Live Window.
9-5-2. Main control panel
Button
Description
LOCAL PLAYBACK
Click this icon to run a playback window to search and play videos that
are recorded in local PC.
REMOTE PLAYBACK
Click this icon to run a playback window to search and play videos that
are recorded in remote DVR.
Directory window shows site/sites that are pre-registered.
CONNECT
Click this icon to connect the selected site/sites.
DISCONNECT
Click this icon to disconnect the selected site/sites.
SETUP
Click this icon to setup configuration of UMS MULTI CLIENT.
Page 76
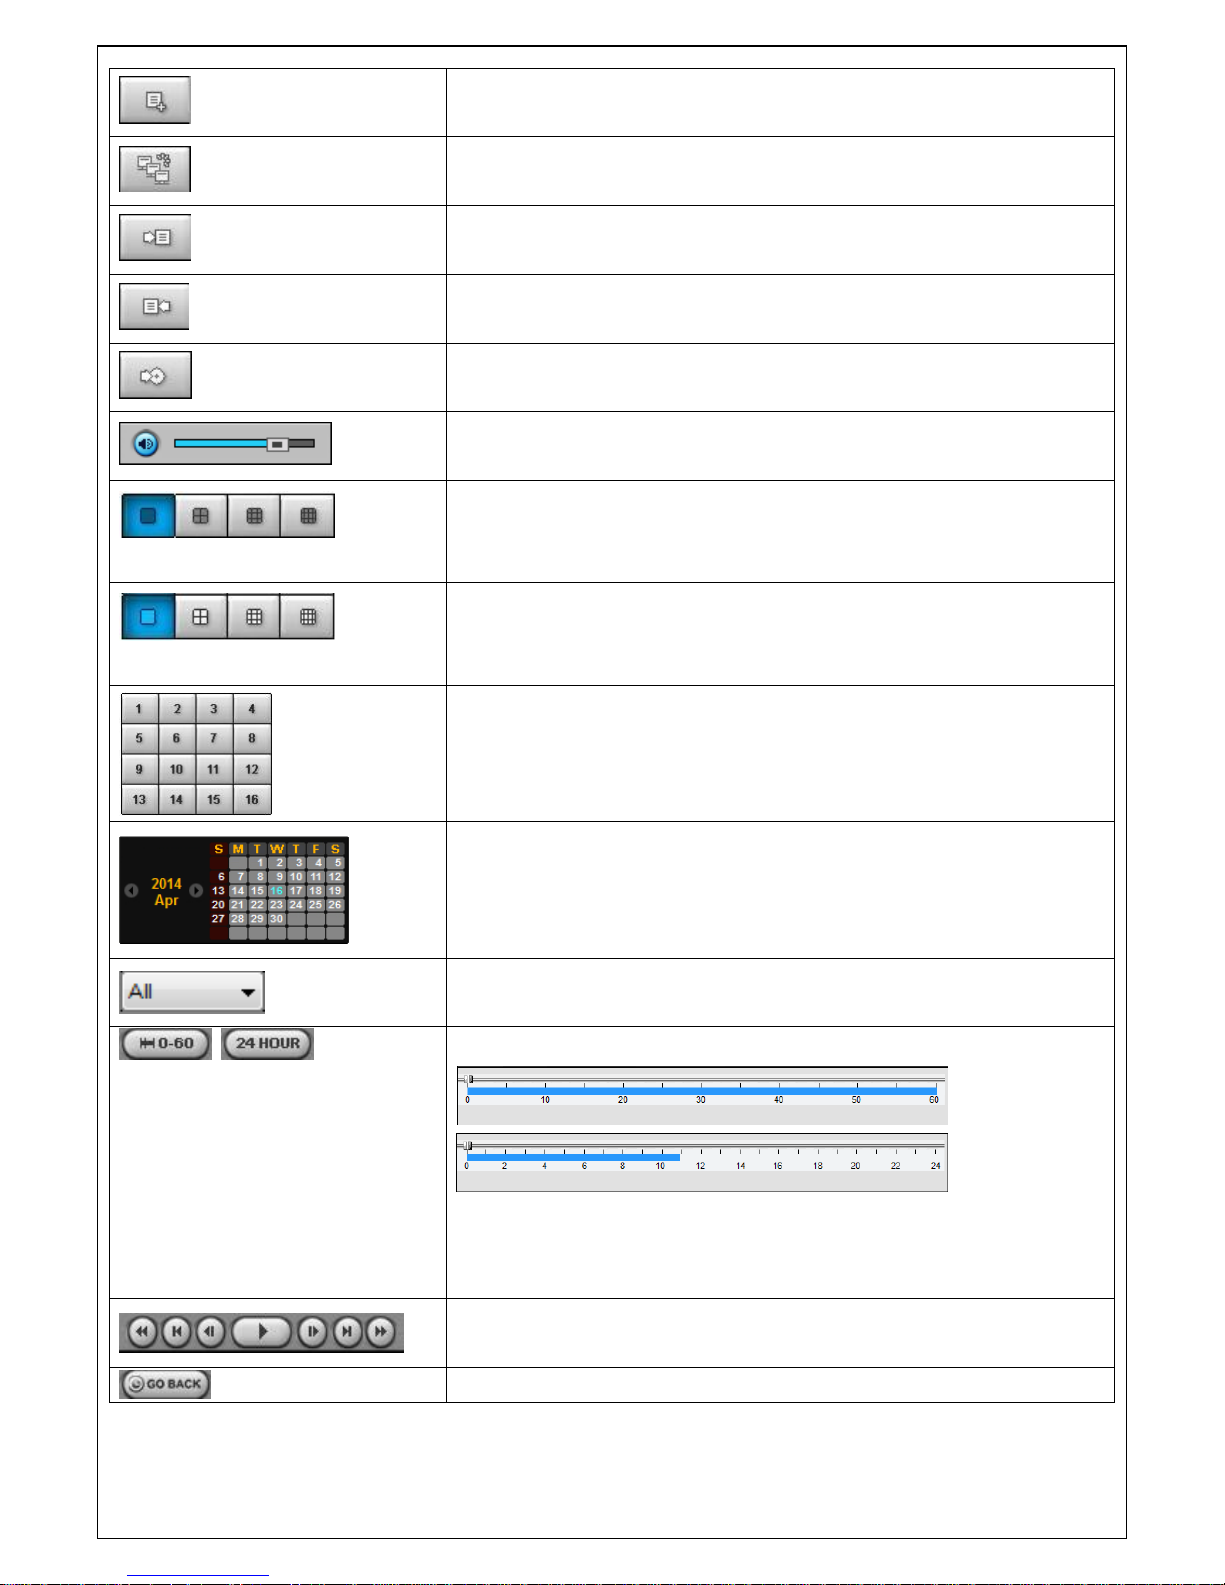
76
CAPTURE
Click this icon to capture a still image.
EVENT LIST
Opens list of events logged by the UMS Multi Client.
MARK IN
Click this icon to set the beginning time for backup of the recorded
video in AVI format.
MARK OUT
Click this icon to set the ending time for backup of the recorded video
in AVI format.
BACKUP
Click this icon to backup the recorded video in AVI format.
AUDIO
Use the volume control bar to set the audio level.
DVR SITE SPLIT
To select the numbers of DVR/DVRs (1 DVR, 4 DVRs, 9 DVRs, 16
DVRs) on main display screen.
CHANNEL SPLIT
To select the numbers of display channel/channels (Single, quad, 9
channels, and 16 channels) of highlighted site.
To select the channel to playback.
The calendar shows dates with recorded video in color.
To display the recorded data of selected channel or all channels on a
time line scale.
To change a timeline scale from 24 hours to 60 minutes.
The timeline shows recorded data in color on the bar. You can adjust
the time line scale and move it to the time you wish to playback. Then
click the play icon to display the recorded video.
Playback buttons.
Time search settings
Page 77
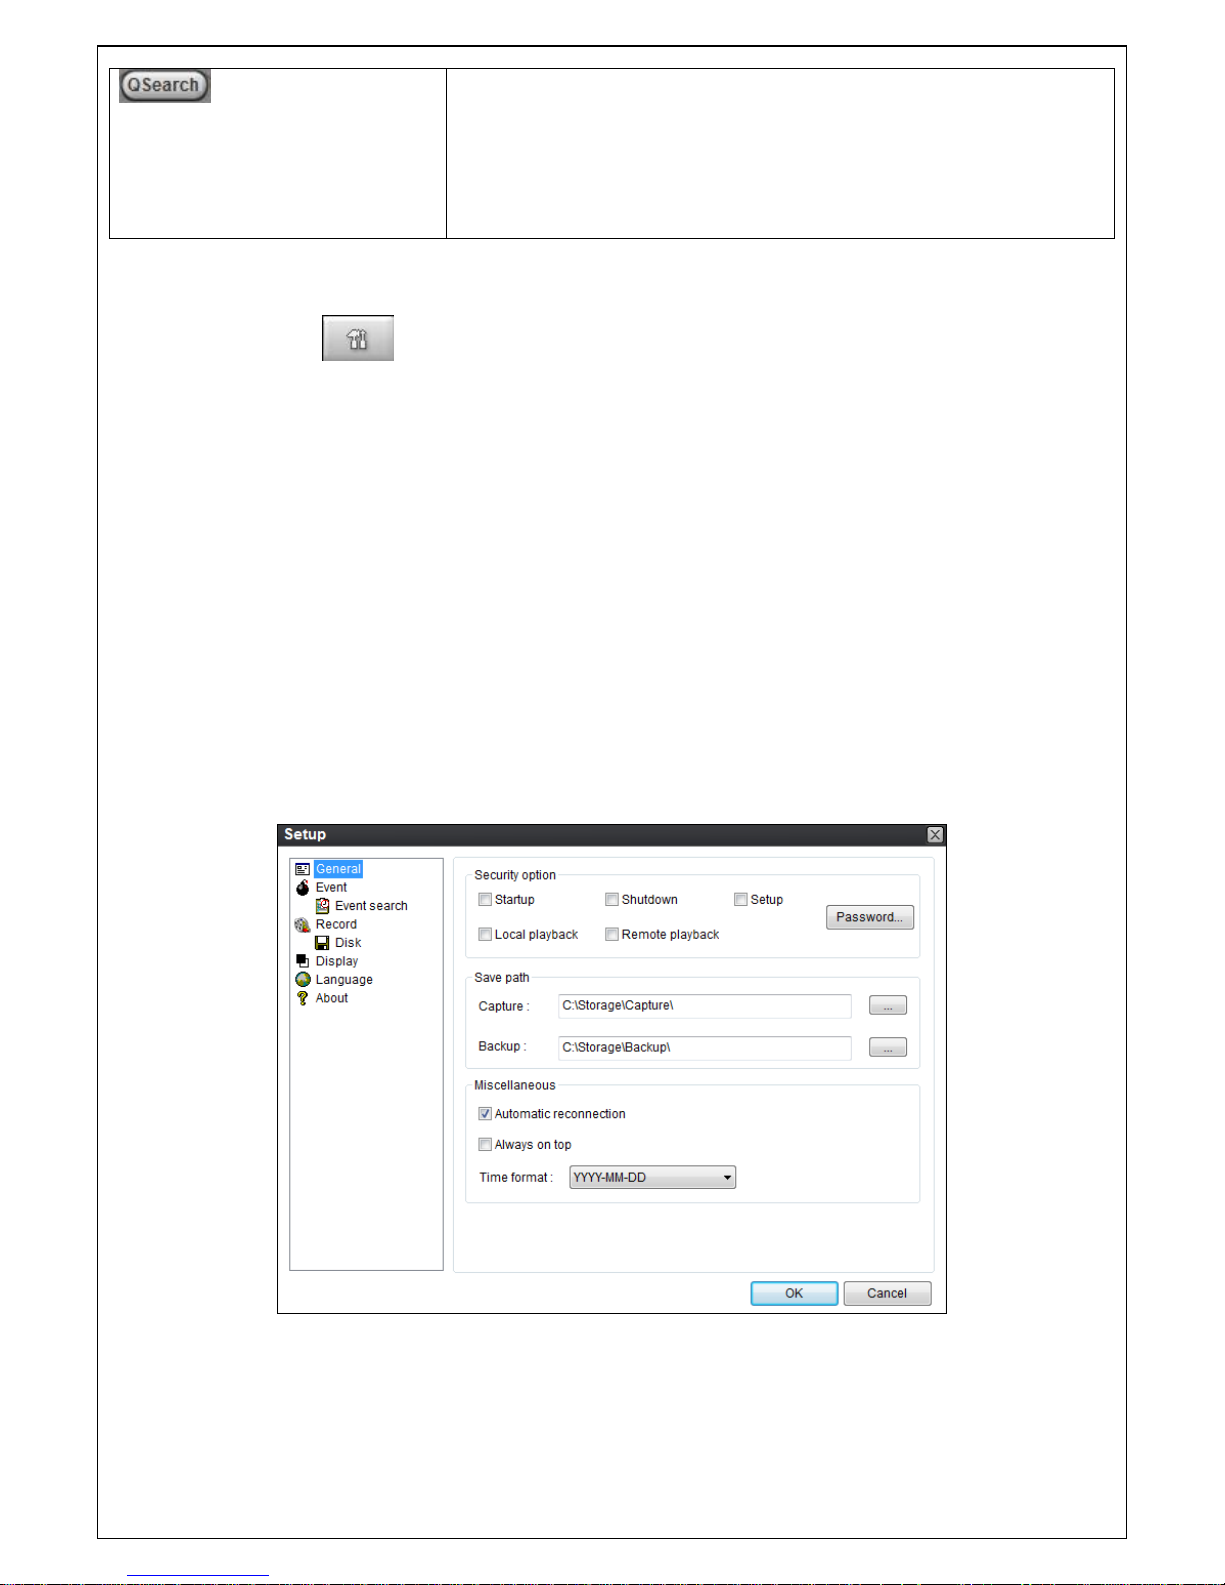
77
Thumbnail search over the network.
- List the thumbnail 24images from 00:00 to 23:00.
- Select one of 24 images every 150sec for an hour.
- Then play the tile
* Click the “PREVIOUS” button to go the previous step.
9-6. Setup of UMS Multi Client
Click the setup icon to setup the configuration of UMS Multi Client software. The Setup window
displayed as below.
9-6-1. General
Security Option: Set a password for security options. Select security options and set a password.
Then when you access any of selected functions, you need to enter the password.
You can also set the save path for capturing and backup.
Save Path: Specify the location to save captured still image for Capture and Backup data.
Miscellaneous
Automatic Reconnection: If enabled, the software will automatically try to reconnect to the last
successful IP address. But, when CLIENT ACCESS is OFF on the DVR, the software will not try to
reconnect even if it is enabled.
Always On Top: If enabled, the software display will be continuously on the top of other windows.
Time Format: Change the way the Client software displays the time.
Page 78
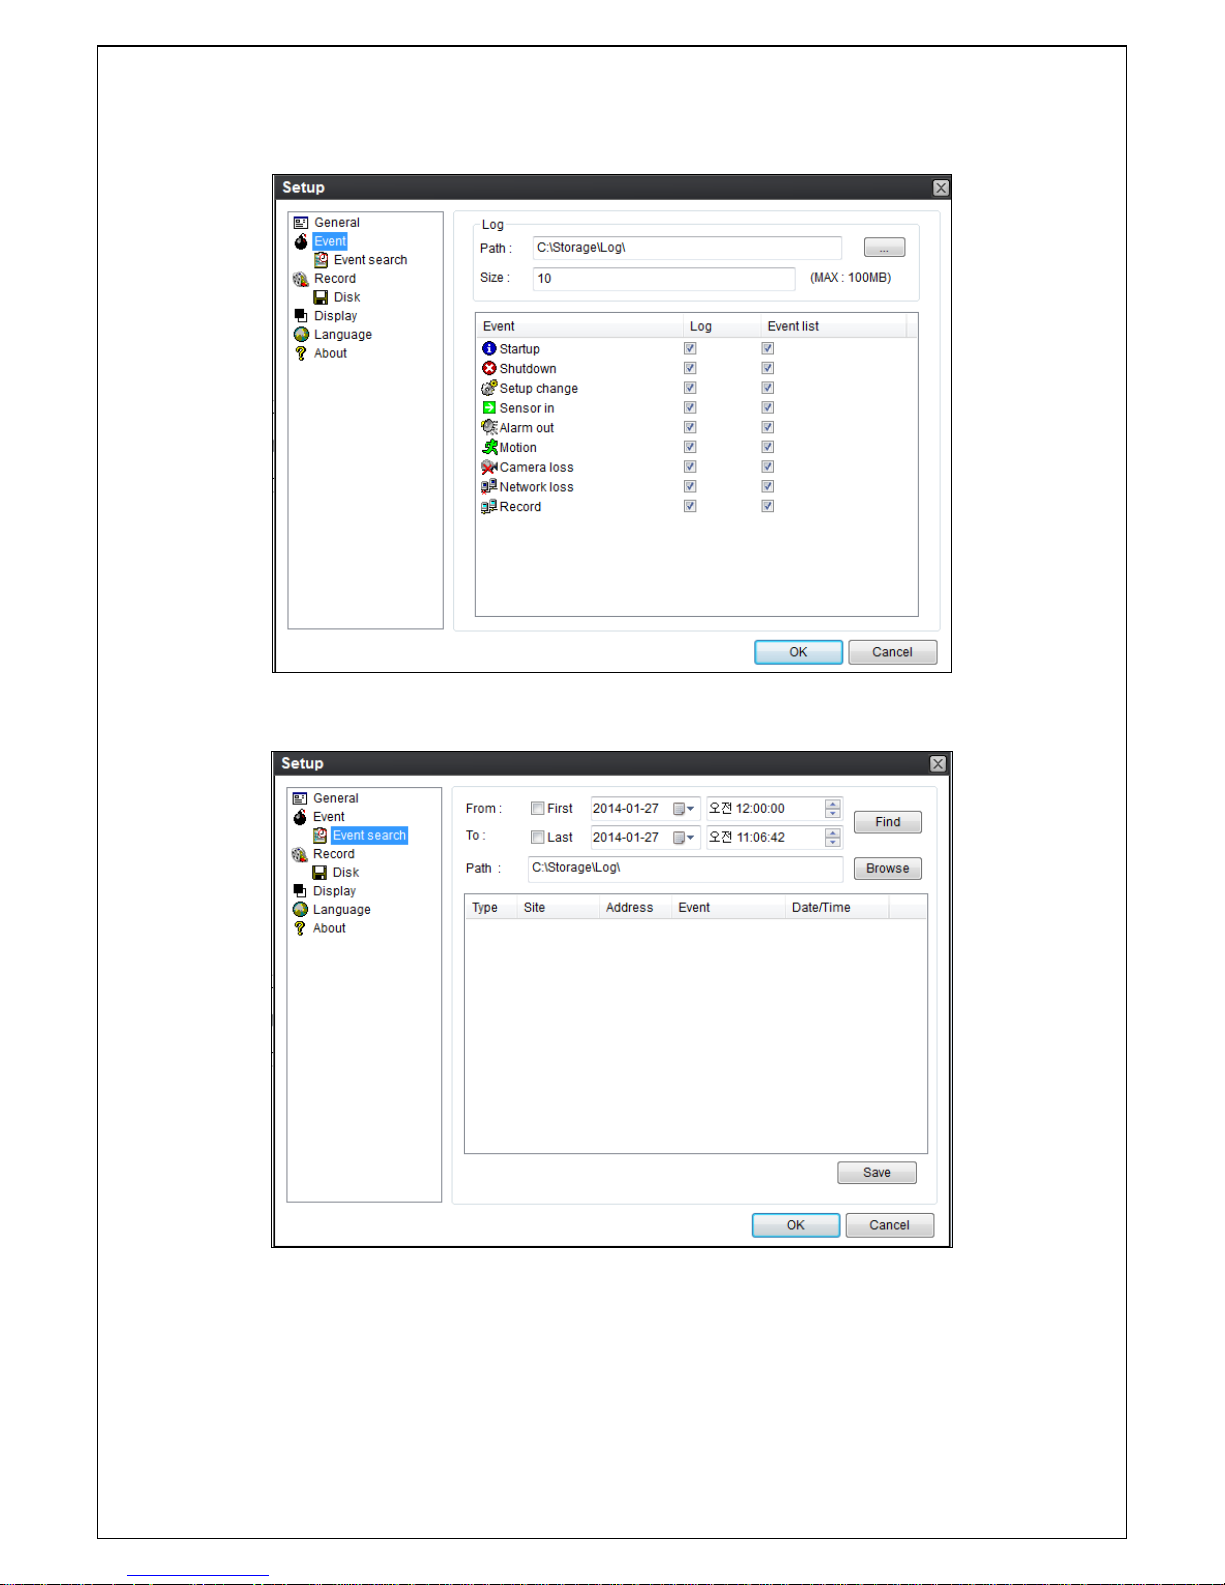
78
9-6-2. Event
Event log can be archived and searched.
Event Log: Specify the location to save event logs and select event to archive.
Event Search: Event log can be searched from the selected time.
Page 79
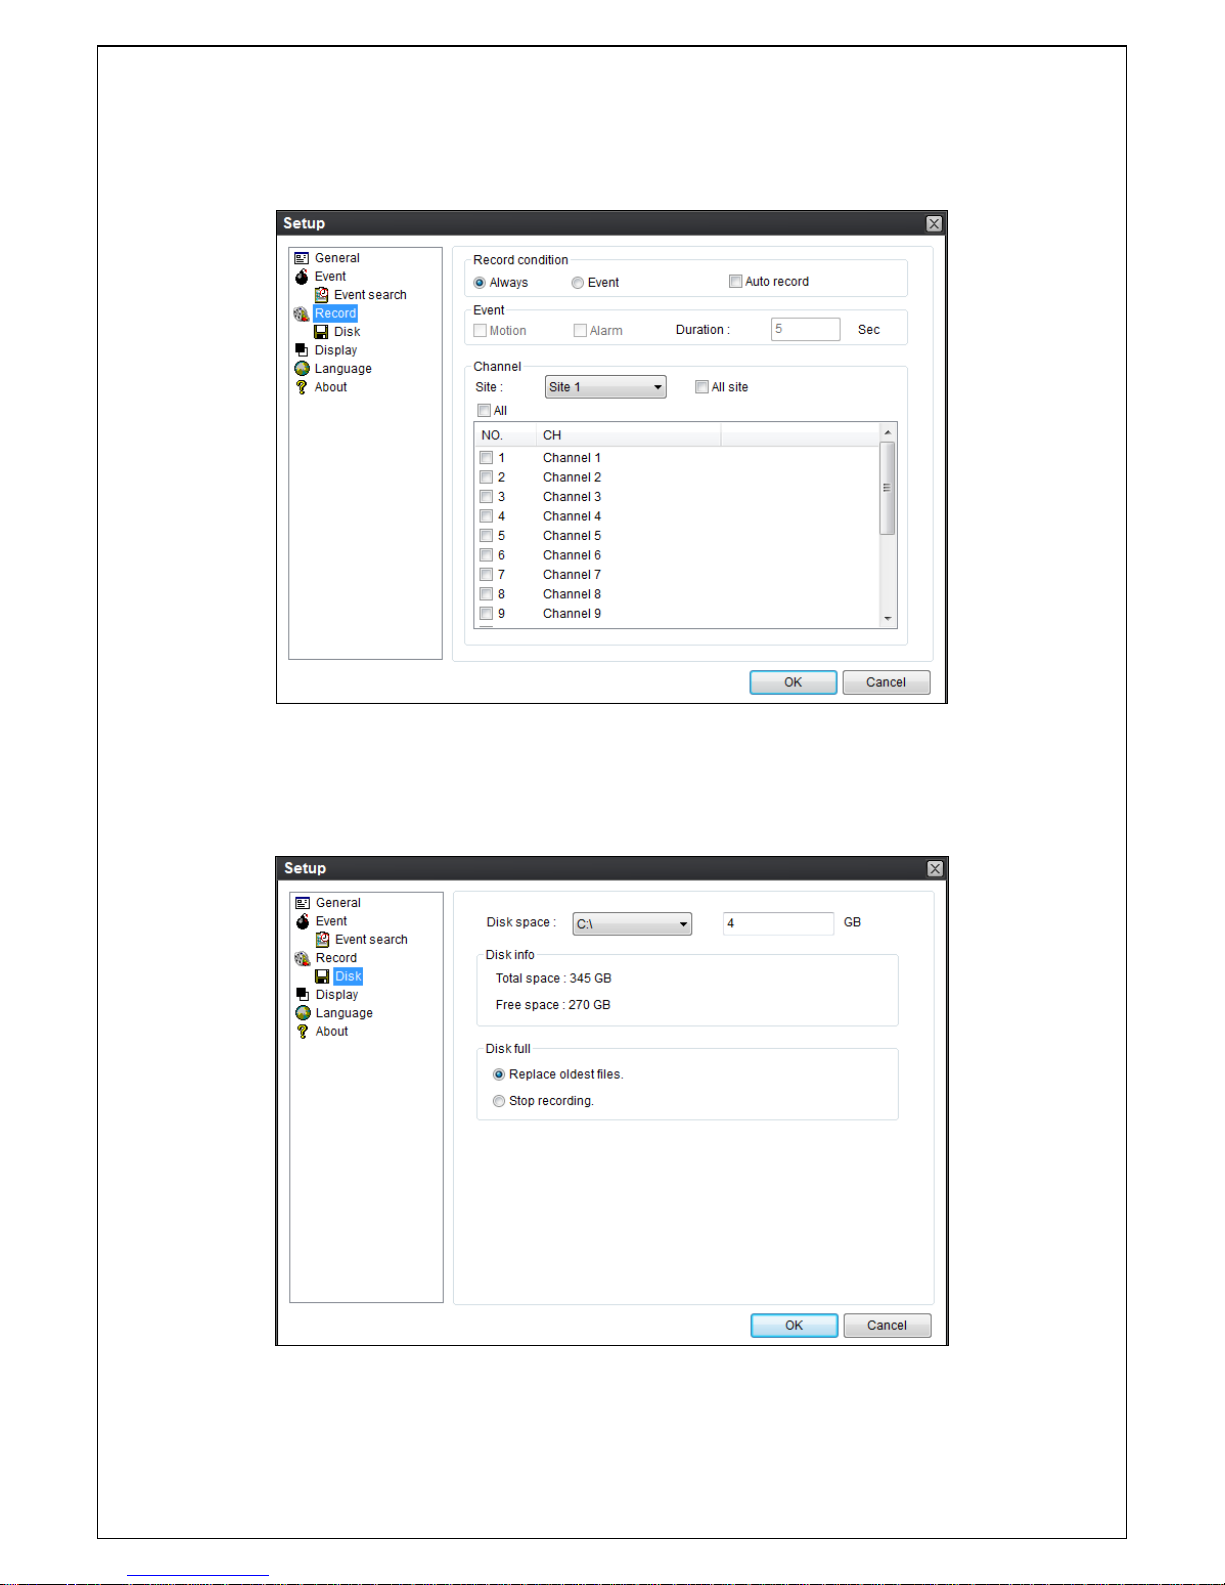
79
9-6-3. Record
Record Setup: You can set the recording conditions as the following; Always, Event, or Auto record. And
you can also select target DVR/DVRs and channel/channels. When you set the recording condition to event,
you can set event for motion or alarm with duration.
Record Local Storage Setup: You can select the local disk to record and the amount of disk space you
want to allow the program to use for recording. You can also select the option to overwrite data or stop
recording when the maximum amount of disk space is full.
Page 80
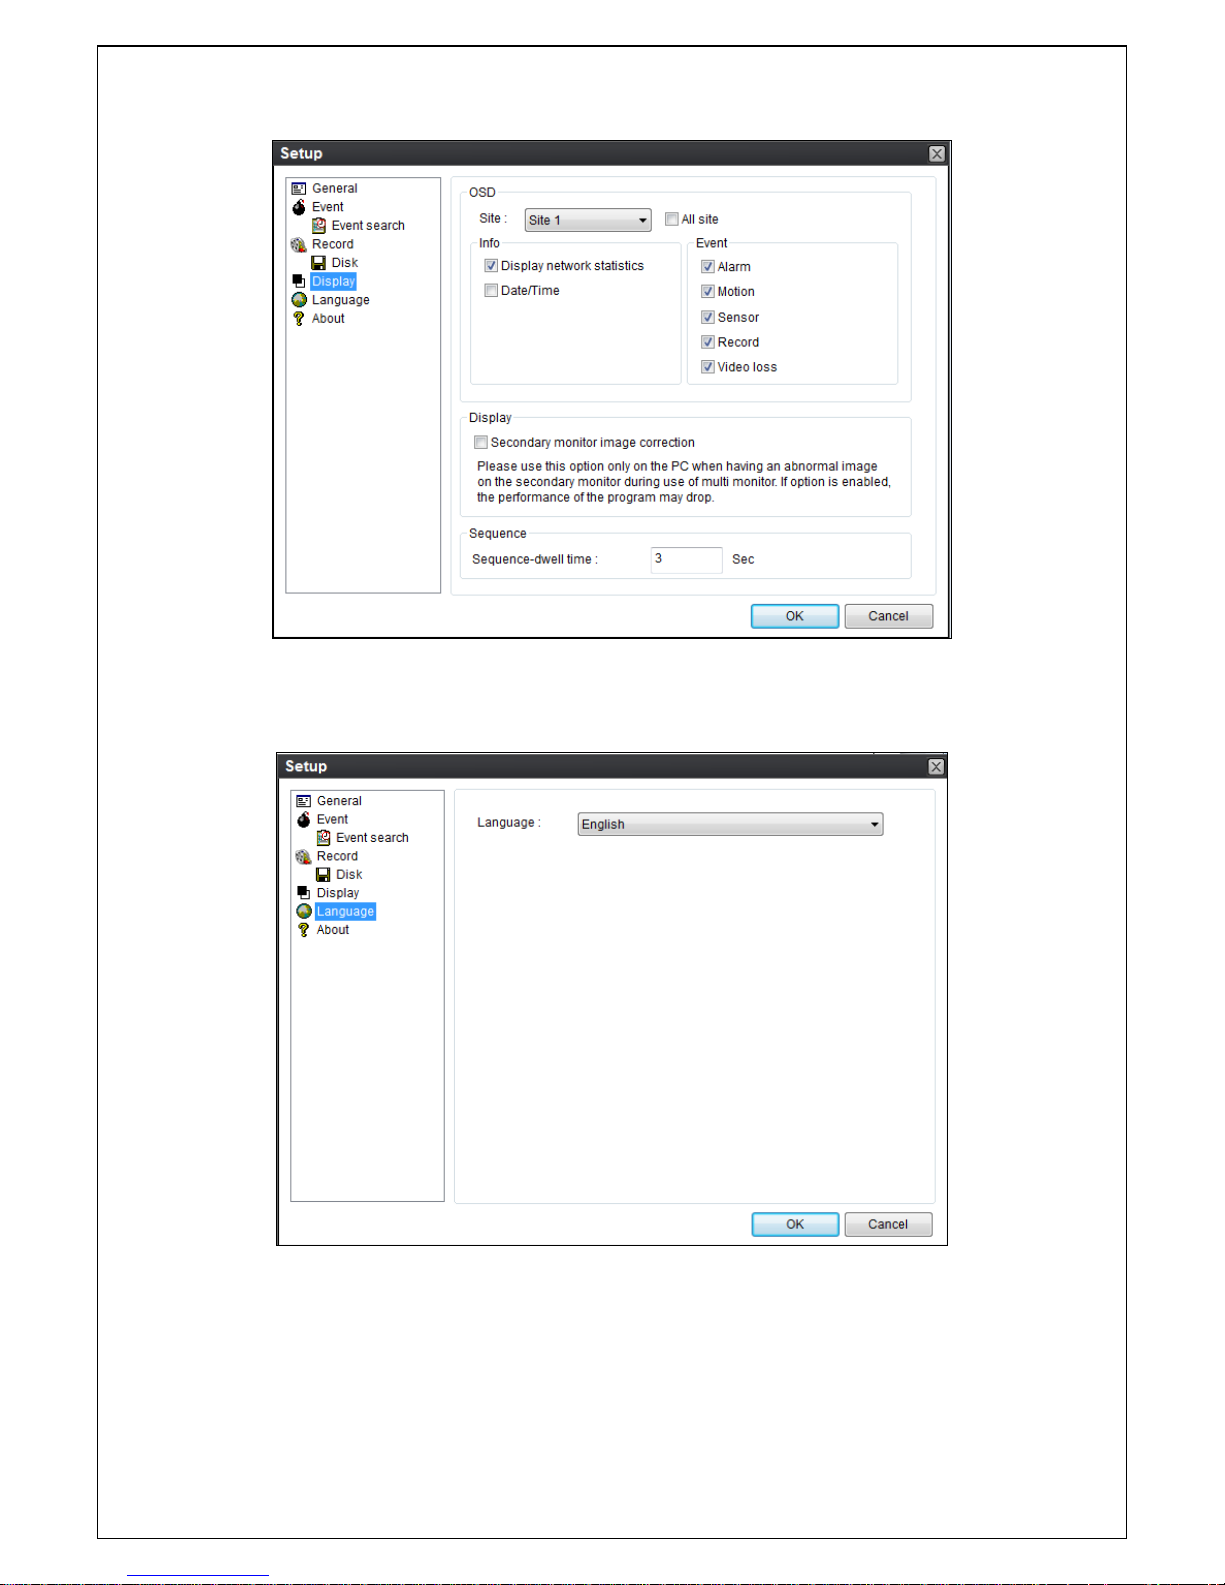
80
9-6-4. DISPLAY
You can select the OSD (On Screen Display) to be displayed.
9-6-5. Language
You can select a language to be display.
Page 81
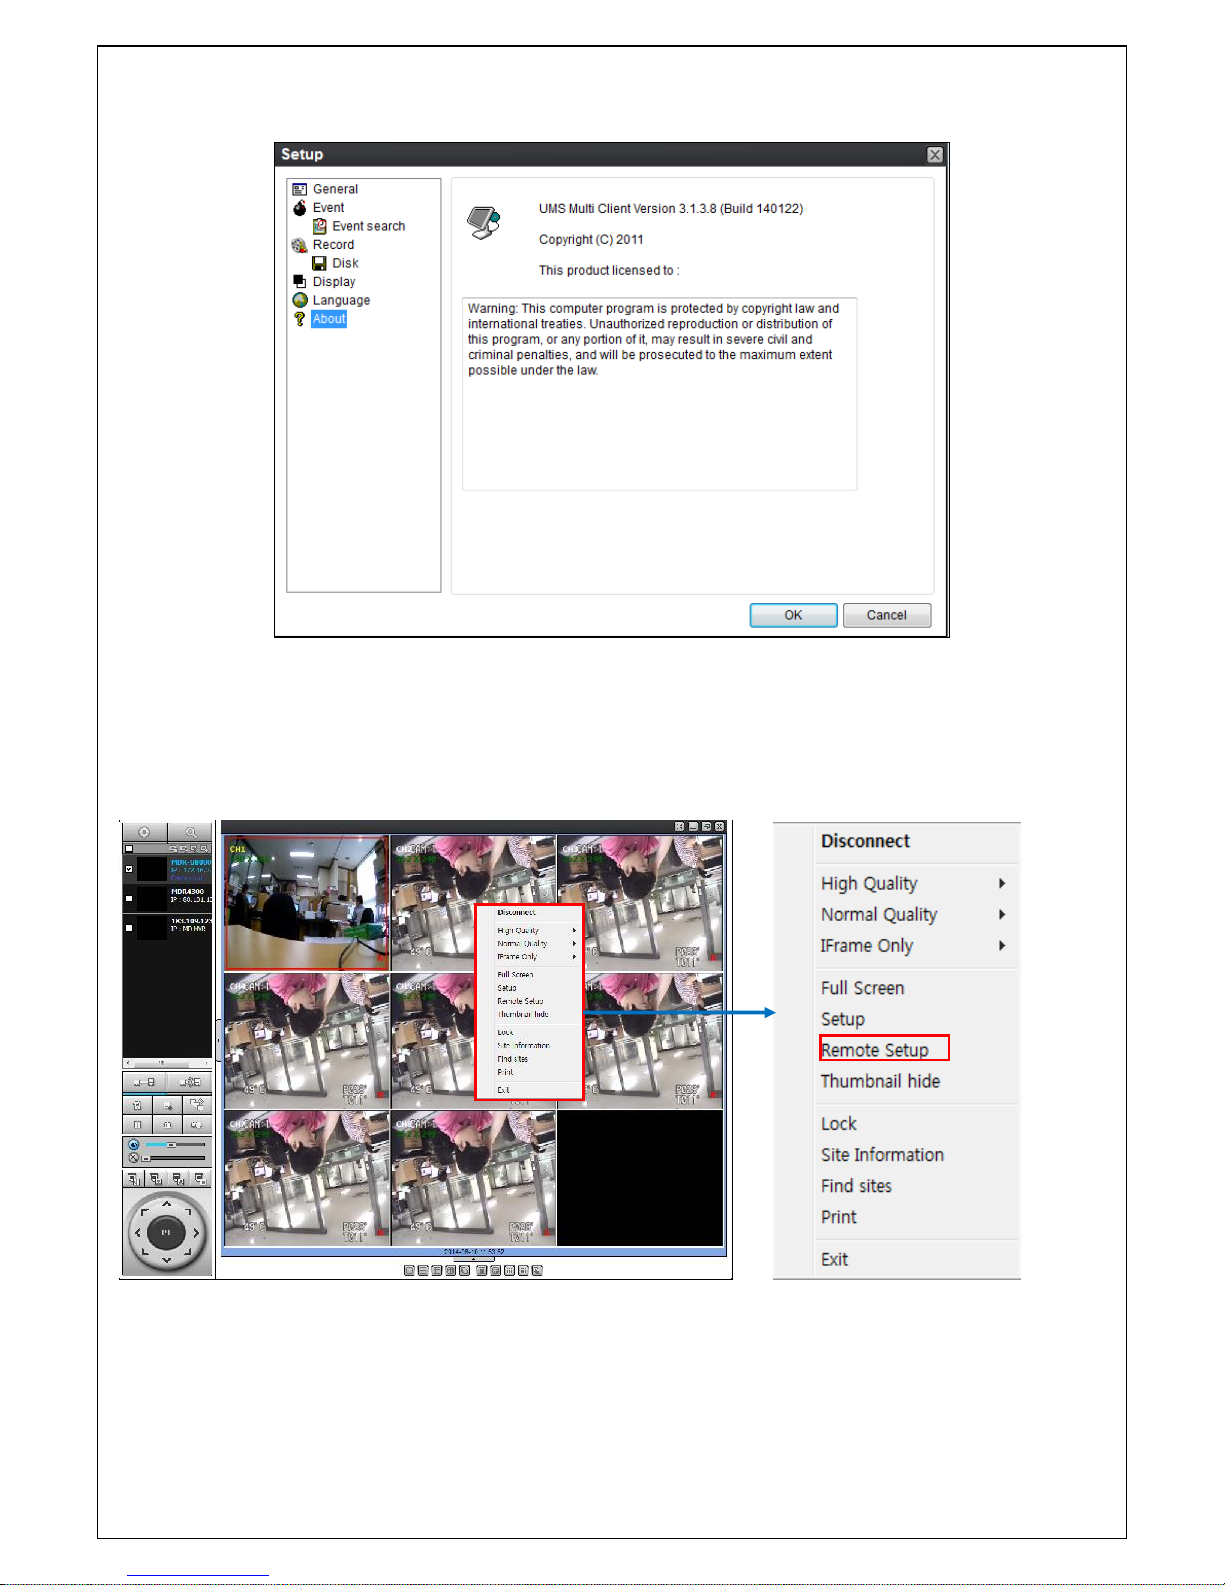
81
9-6-6. About
“About” provides network client version information.
9-7. Remote Setup
The menu settings for the DVR unit can be set over network.
Put the cursor of the mouse on the channel, which is connected to the site and right click on the mouse to
open the submenu. Then the following window is displayed as below. Select the REMOTE SETUP.
Then the setup window is displayed. The specified menu screen is displayed on the upper left of the screen.
Enter the password of the DVR when prompted. (NOTE: The default password is 1111)
Setting is the same as with the DVR menu setting. Refer to the corresponding pages for details on the
setting items.
Page 82
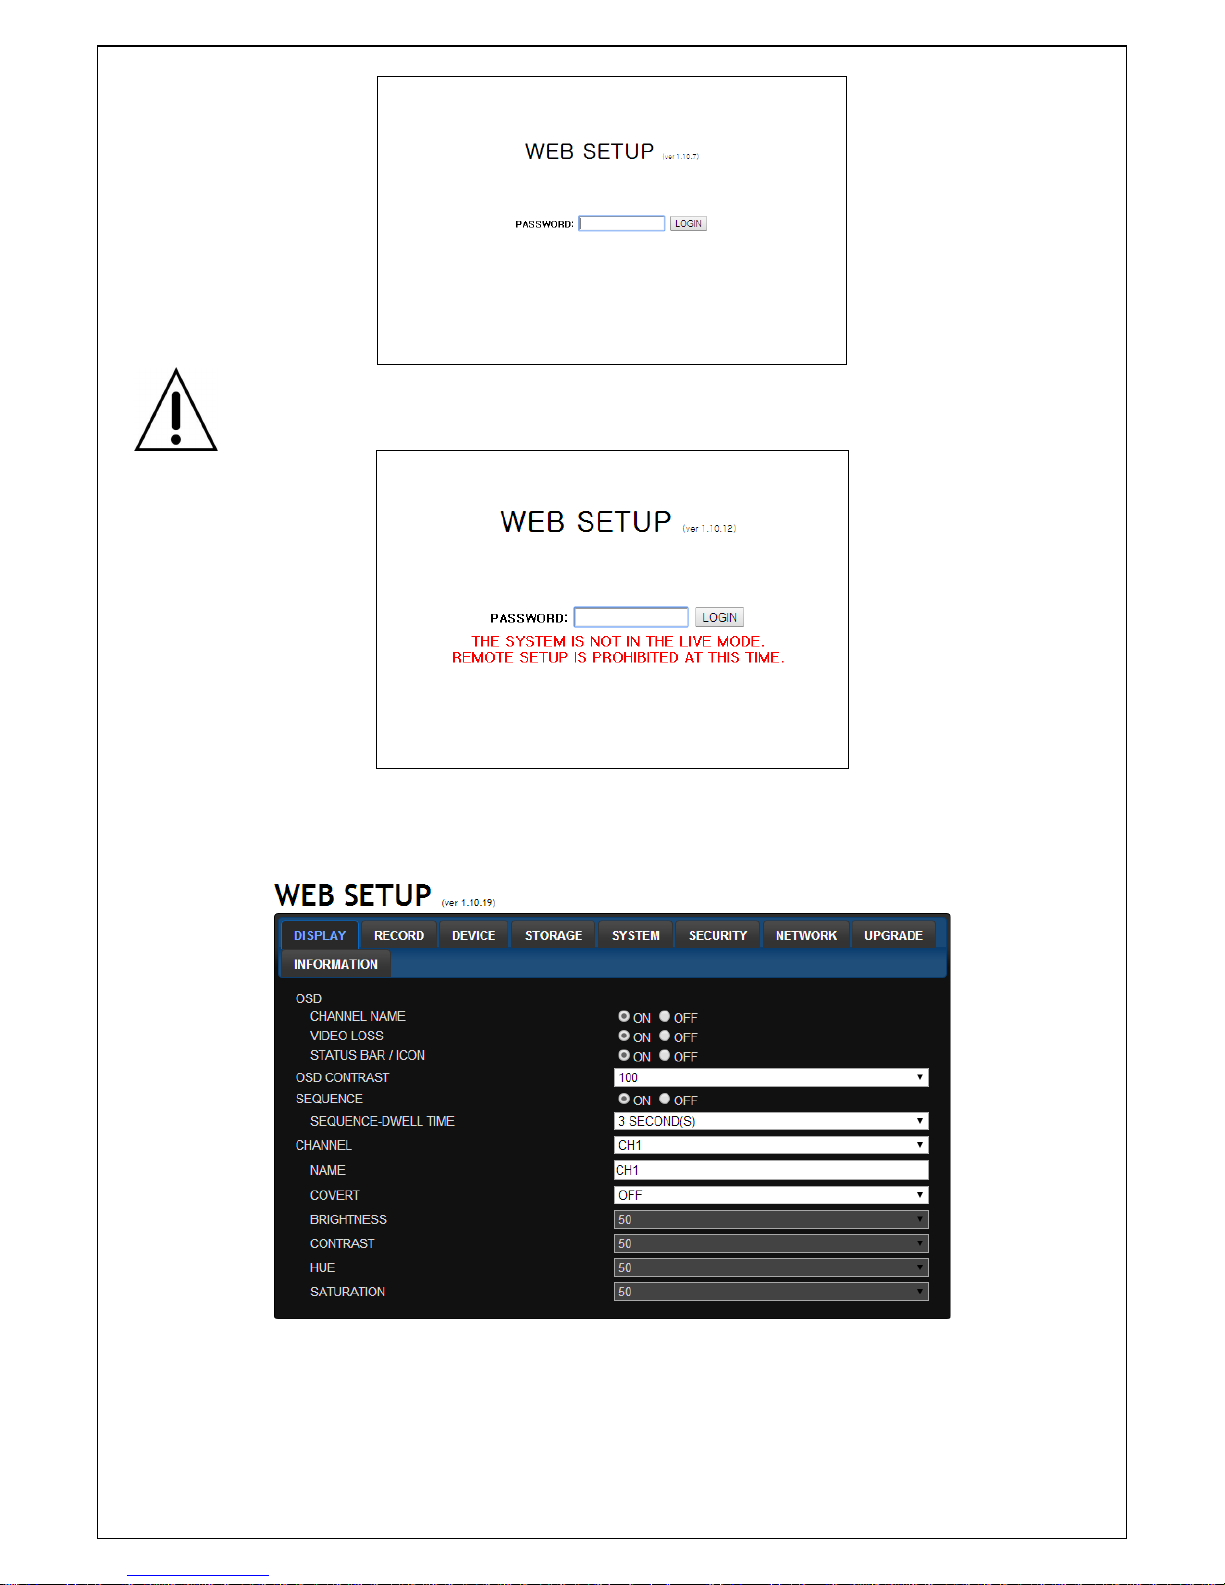
82
NOTICE
Web Setup is prohibited when DVR is in local Setup Menu.
9-7-1. Display
Select the DISPLAY tab to set the DISPLAY conditions.
These settings apply to all channels.
OSD: Sets whether to display or not date and time as well as channel number on the screen.
OSD CONTRAST: Adjust the character contrast on the screen.
MAIN MONITOR SEQUENCE: Setting for automatically switching the displayed video.
Page 83
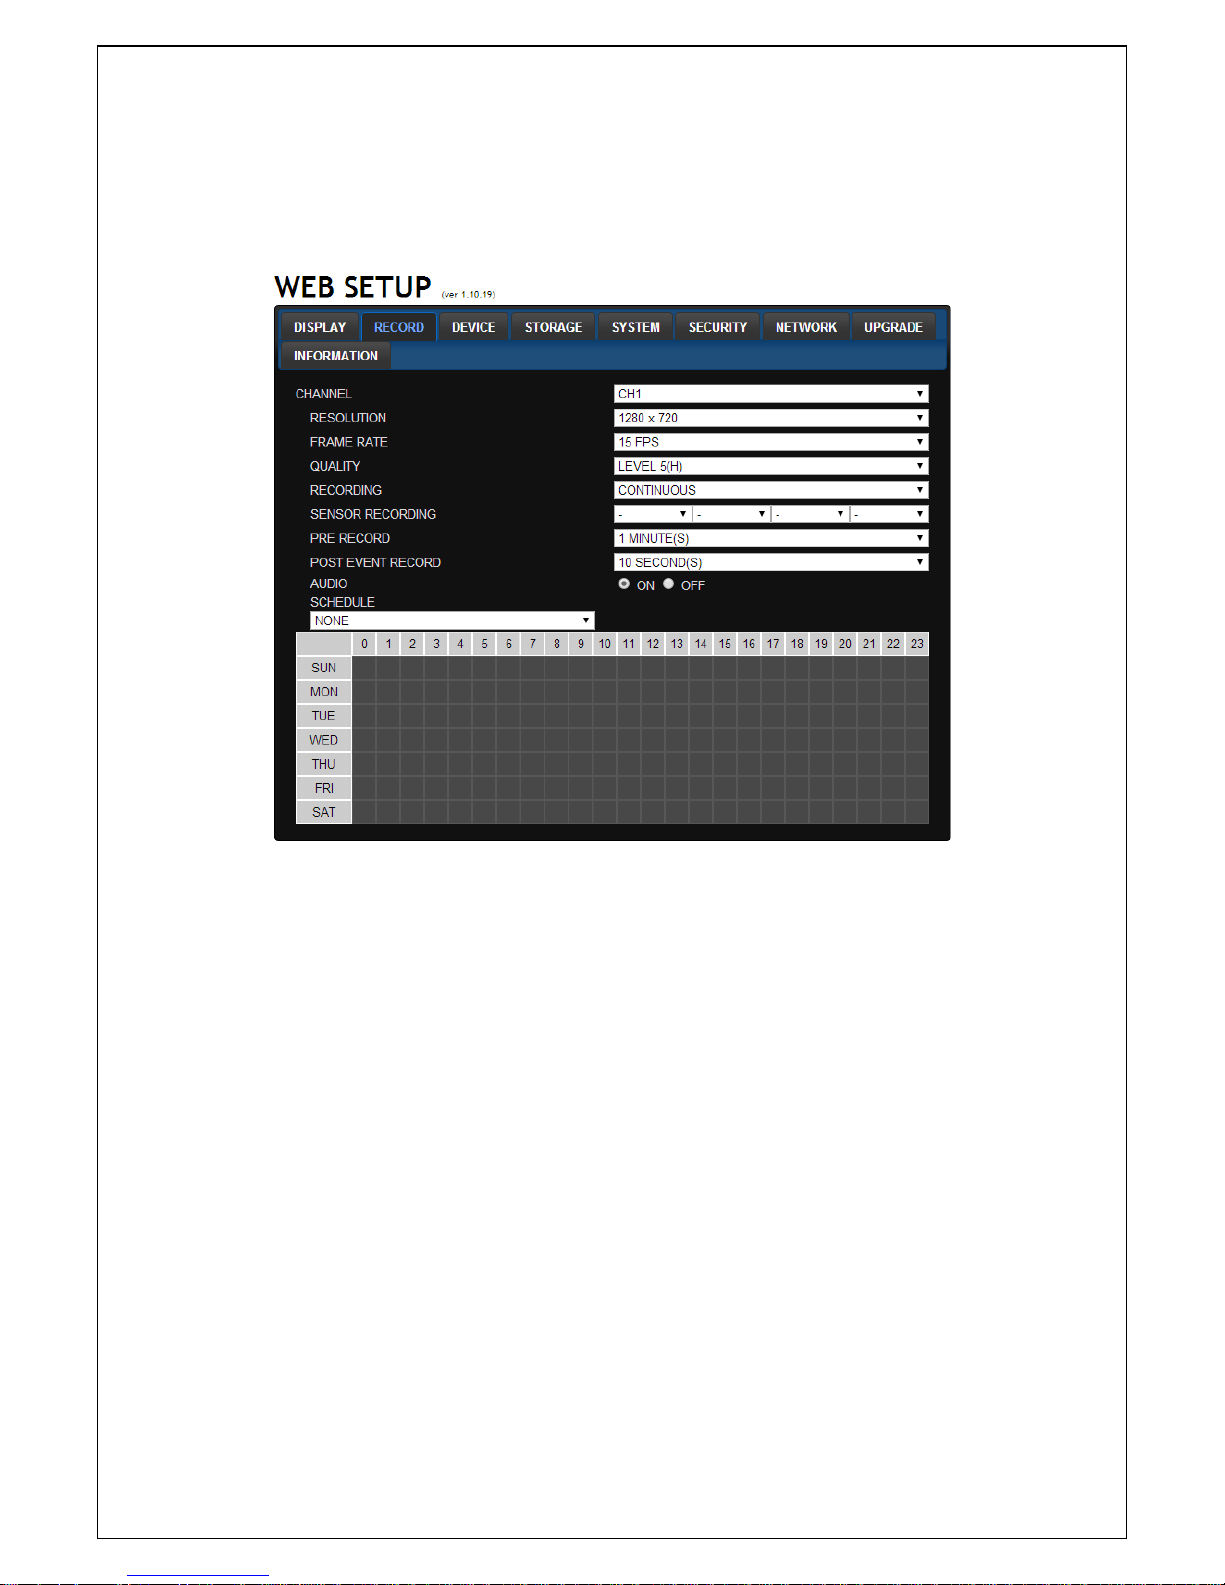
83
SEQUENCE DWELL TIME: Sets the interval for automatically switching the screens.
CHANNEL: Name, Covert, Brightness, Contrast, Hue, Saturation, These settings apply to the
specified channel only.
9-7-2. Record
Select RECORD tab to set the recording conditions.
These settings apply to the specified channel only.
Recording Setup
o RESOLUTION: Sets the resolution for the recordings. The set value applies to an individual
channel.
o FRAME RATE: Sets the recording rate.
o QUALITY: Sets the image quality in 5 levels.
o RECORDING: Sets the recording mode.
o RECORDING MODE: CONTINUOS, SCHEDULE, MOTION, SENSOR
o SENSOR RECORDING: Select the sensor setting for the selected channel.
o PRE RECORD: Sets whether to perform or not pre recording.
o POSE EVENT RECORD: Sets the duration of the event recording.
o AUDIO: Sets whether to perform or not audio recording.
o SECHDULE: Sets the schedule recording.
Page 84
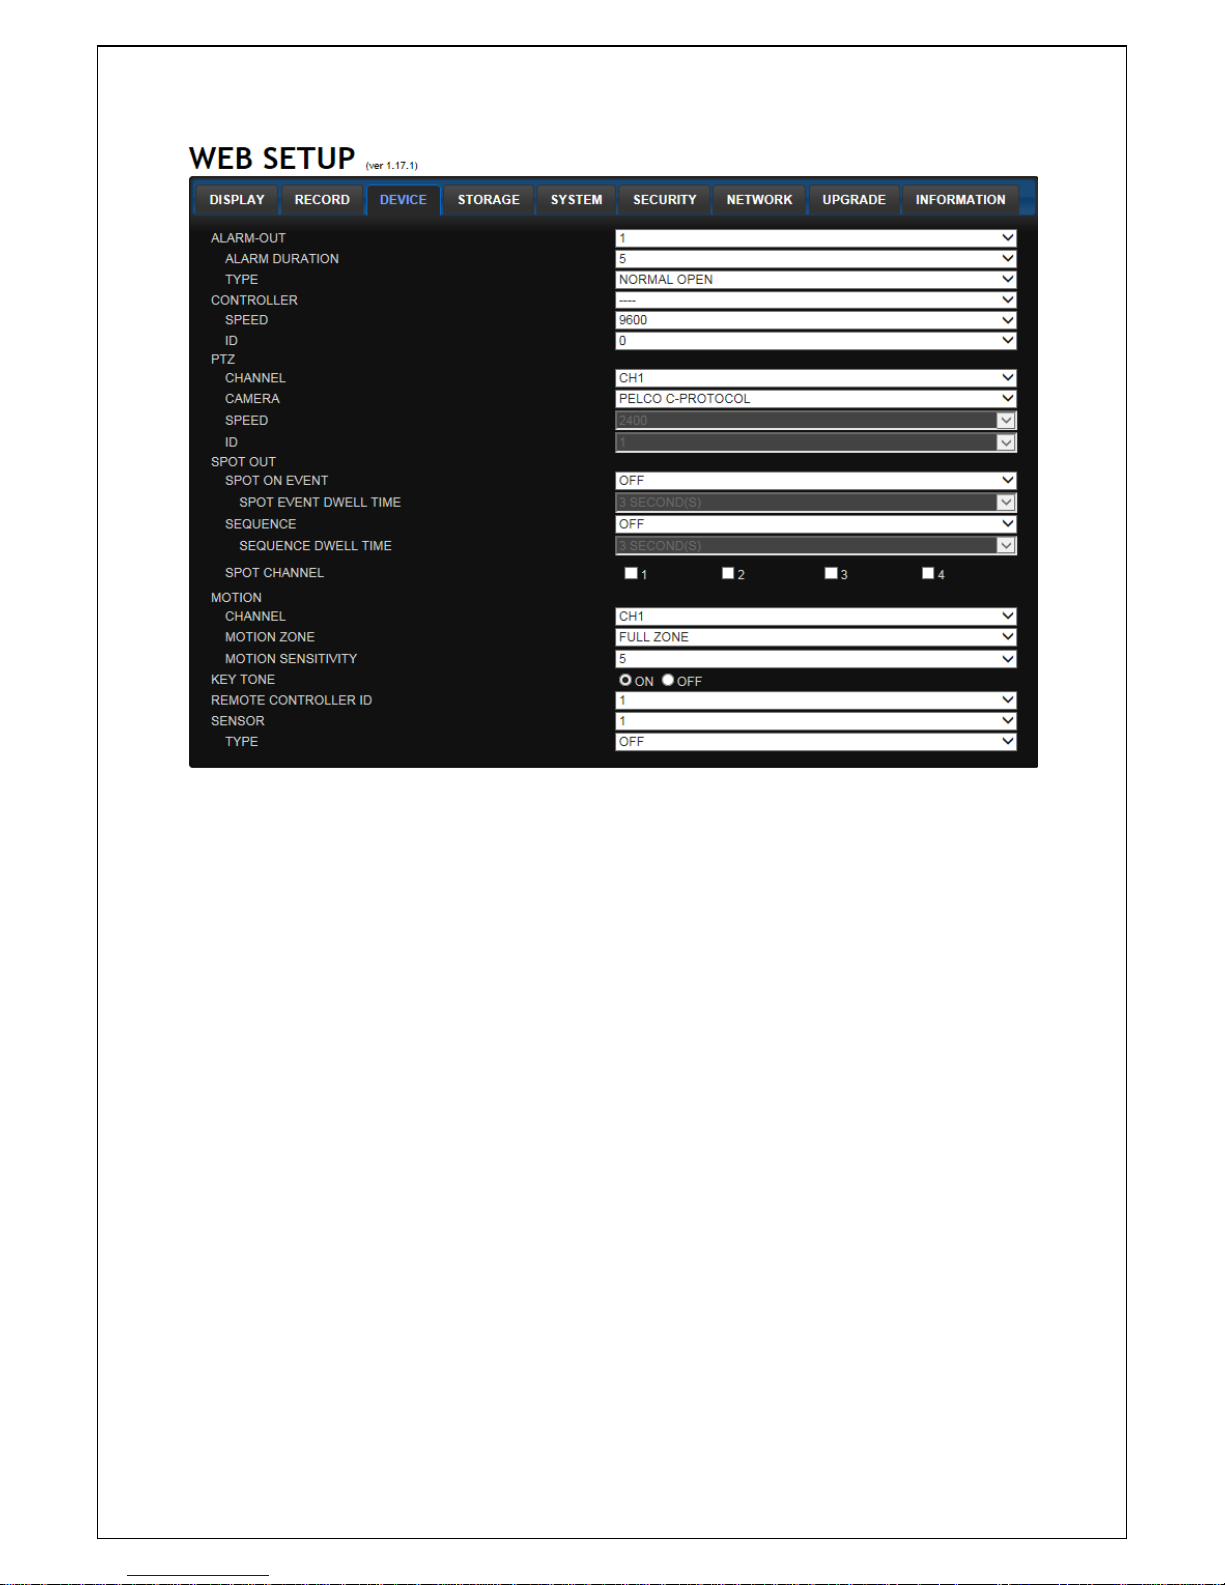
84
9-7-3. Device
Select Device to set Alarm Out, Controller and PTZ, SPOT Out, Motion zone
ALARM OUT: Set the Alarm Output Connector.
o ALARM DURATION: Set alarm dwell time from 5 to 60 seconds or infinite.
CONTROLLER: Set the controller baud rate and ID.
PTZ: Set the PTZ baud rate, protocol, and ID.
SPOT OUT
o SPOT ON EVENT : Spot on/off
o SPOT EVENT DWELL TIME : Set Spot dwell time
o SEQUENCE : Set sequence
o SEQUENCE DWELL TIME : Set sequence dwell time
o SPOT CHANNEL : Select Spot Channel
MOTION: Setup the motion detection area and the sensitivity.
o CHANNEL: Select the channel
o MOTION ZONE: FULL Zone or PARTIAL Zone
o MOTION SENSITIVITY: 1~9 (High sensitivity level)
KEYTONE: Sets On or Off of Key Tone.
REMOTE CONTROLLER ID: Sets an ID number of which remote control to receive commands.
SENSOR: Select the type of sensor.
Page 85
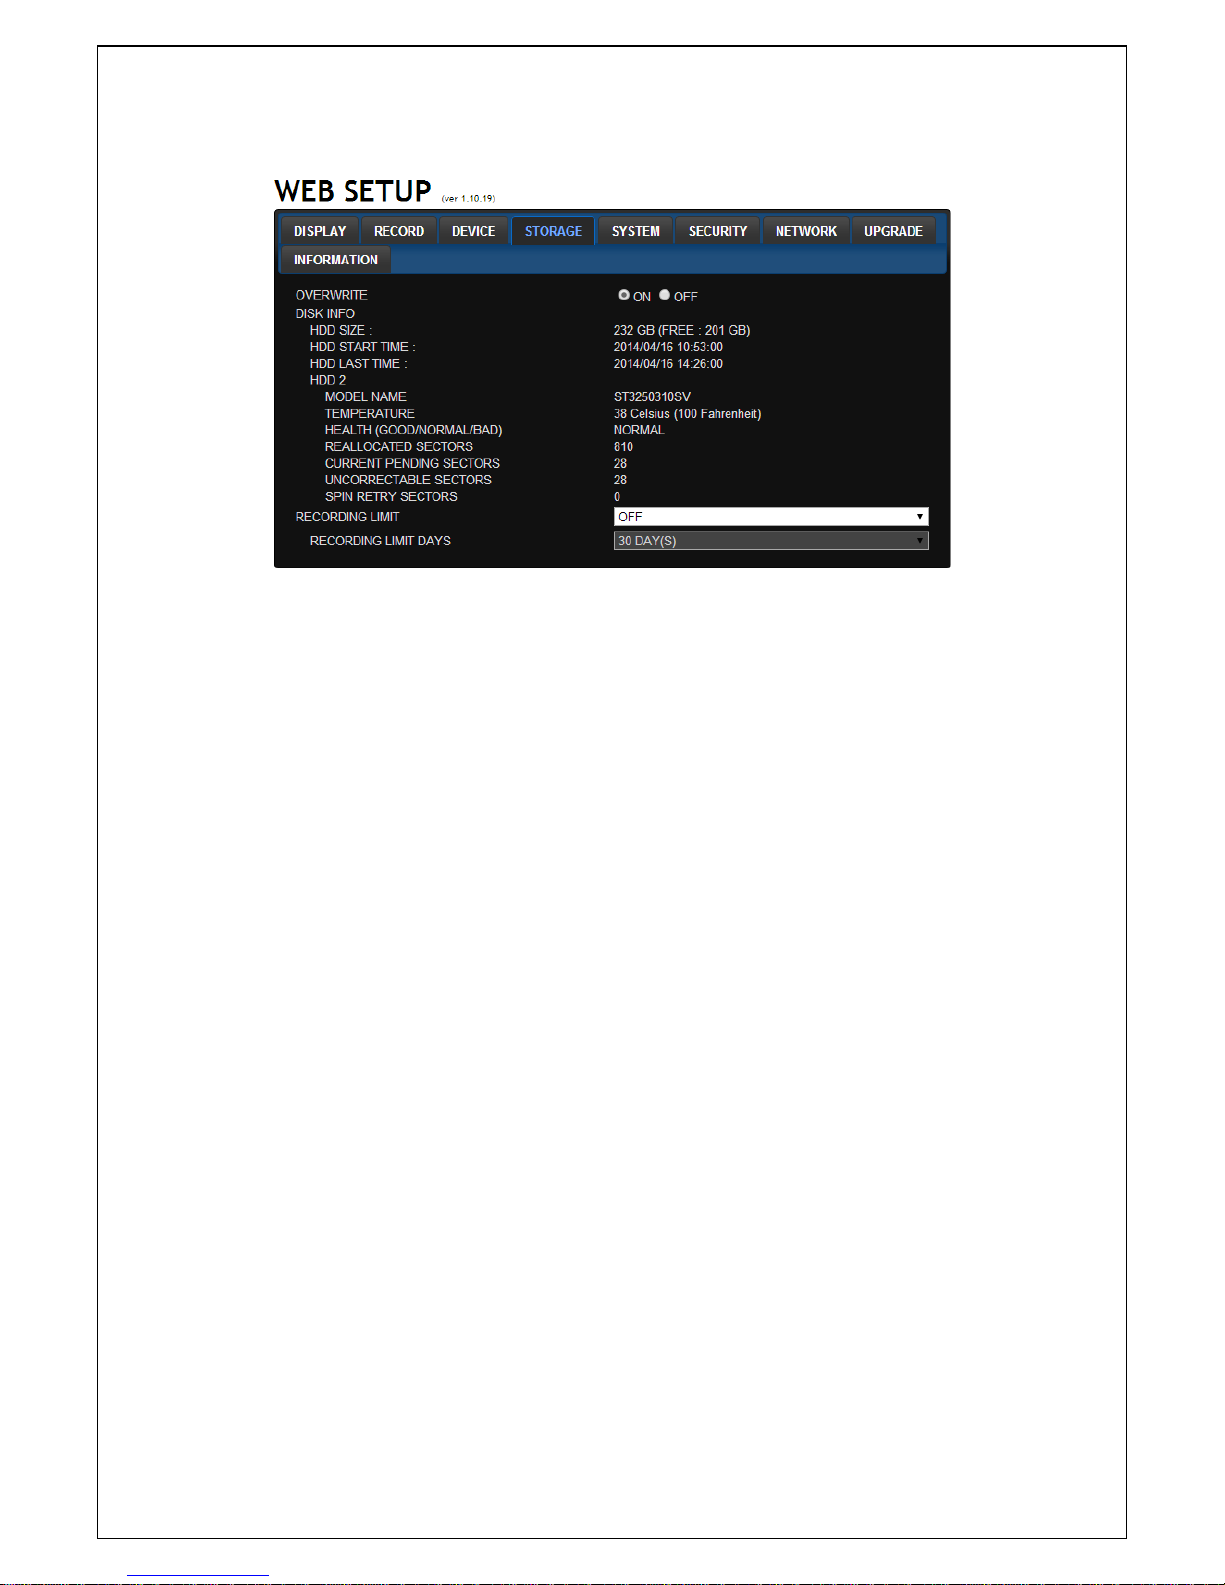
85
9-7-4. Storage
Select Storage to configure continued recording settings by overwriting the hard disk and the storage
period for the recording data.
OVERWRITE: Select on to continue recording by overwriting when the hard disk becomes full.
DISK INFO: Hard drive information.
RECORD LIMIT: Sets whether to limit or not the recording data storage period.
Page 86
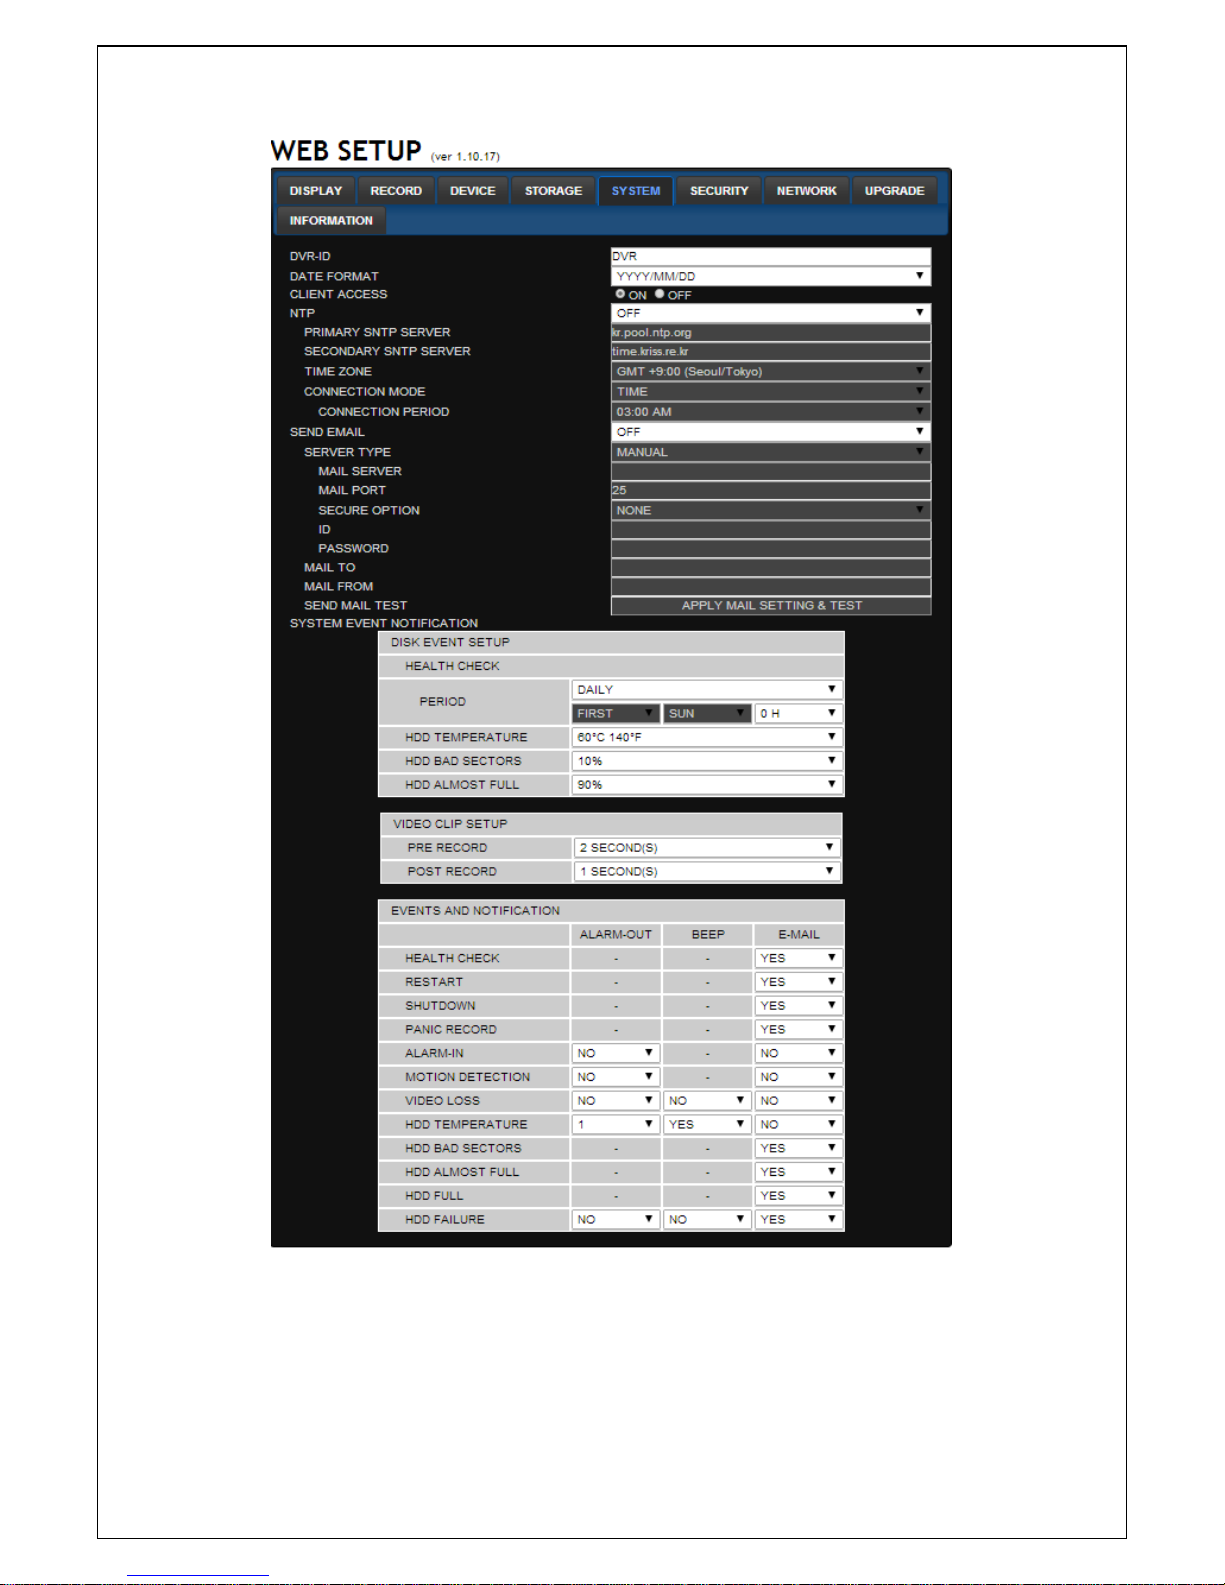
86
9-7-5. System
Select System to set system and time settings.
DATE FORMAT: Select the date display format.
CLIENT ACCCESS: Enable/Disable remote access through network client software.
NTP SETUP: Sets whether to synchronize the time using NTP server or not.
o Primary SNTP Server: Input the NTP primary server address.
o Secondary SNTP Server: Input the NTP secondary server address.
o Time Zone: Select the time zone.
Page 87

87
o Connection Mode: Select the connection mode to NTP time server.
SEND E-Mail SETUP: Sets whether to enable/disable e-mail sending function.
o SEVER TYPE: Select GMAIL, HOTMAIL, AOL, YAHOO or MANUAL)
o MAIL SERVER: Input the SMTP server name as well as the user ID and password.
o MAIL PORT: Mail port setting.
o SEURE OPTION: Select a secure mail server connection. (SSL or TLS)
o ID : Email User ID
o PASSWORD : Email User Password
o MAIL TO: Input the appropriate email address to enable sending e-mail reports
o MAIL FROM (Return Mail Address): Set the source e-mail address to be notified to the
destination.
SEND MAIL TEST : E-mail settings sent a test mail to the registered account
SYSTEM EVENT NOTIFICATION
Allows the user to set EVENT NOFICIATION ON or OFF
o HEALTH CHECK
(Allows the user to set MAIL STATUS periodically) : DAILY or WEELY or MONTHLY
o HDD TEMPERATURE
o HDD BAD SECTOR
o HDD ALMOST FULL
o VIDEO CLIP SETUP: Set video recording time for the e-mail appending
Features motion detection or alarm input events only
o HEALTH CHECK / RESTART / SHUTDOWN / PANIC RECORD
Enable Email Notification in the event a problem occurs with the DVR.
o ALARM-IN : Enable Email Notification when the camera detects sensor
o MOTION DETECTION : Enable Email Notification when the camera detects motion
o VIDEO LOSS: Enable Email Beep and Alarm output Notification when the camera signal is lost.
o HDD TEMPERATURE : Enable Email Beep and Alarm output Notification when the HDD
reaches the maximum temperature
o HDD BAD SECTOR: Enable Email Notification when the HDD has bad sectors.
o HDD ALMOST FULL: Enable Email Notification when the HDD is almost full.
o HDD FULL: Enable Email Notification when the HDD is full.
o HDD FAILURE: Enable Email, Beep and Alarm output Notification when the HDD fails.
Page 88
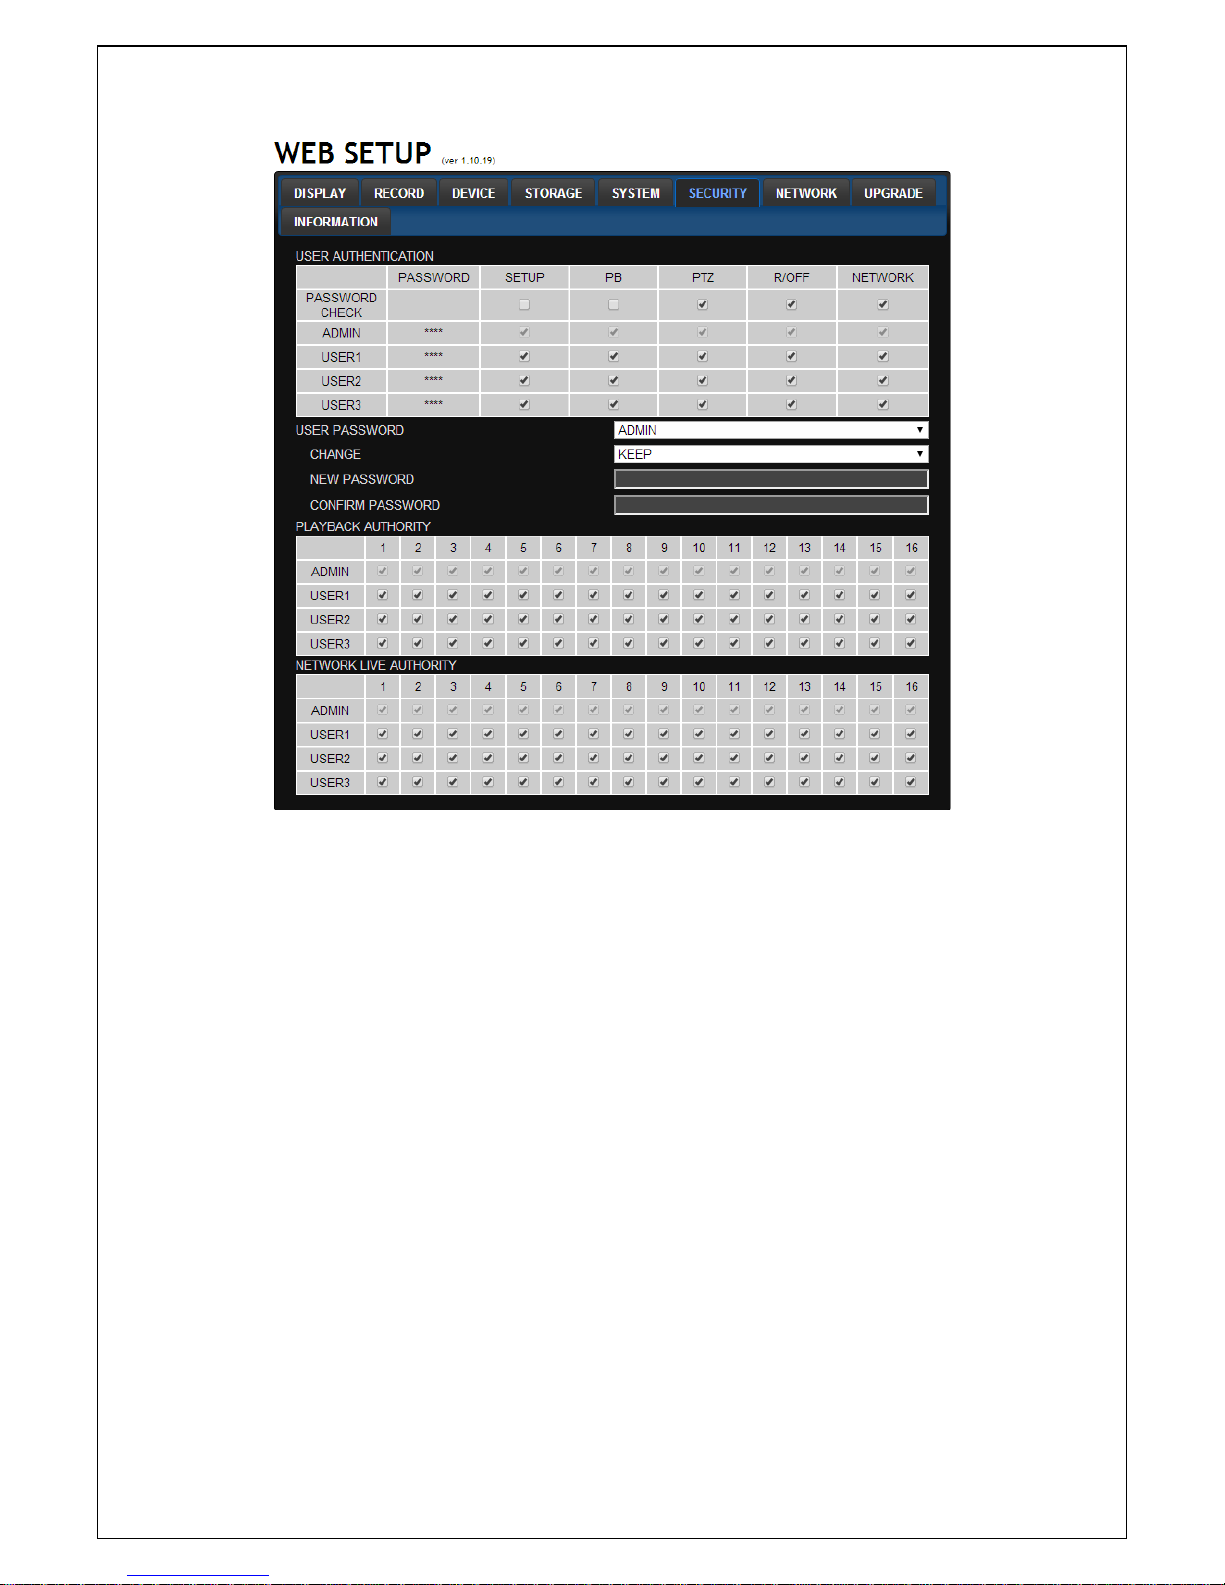
88
9-7-6. Security
Select the Security tab to set the DISPLAY conditions.
USER AUTHORITY: Select which users have access to each function, password check can be
implemented for each function accessed.
USER PASSWORD: Select Username to change Password
o CHANGE: Select whether to KEEP or CHANGE the current password.
o NEW PASSWORD: Input NEW Password if CHANGE was selected.
o CONFIRM PASSWORD: Input NEW Password again to confirm.
PLAYBACK AUTHORITY: User can select which users have access to which channels.
NETWORK LIVE AUTHORITY: Set authority level of Network Live on each user
Page 89
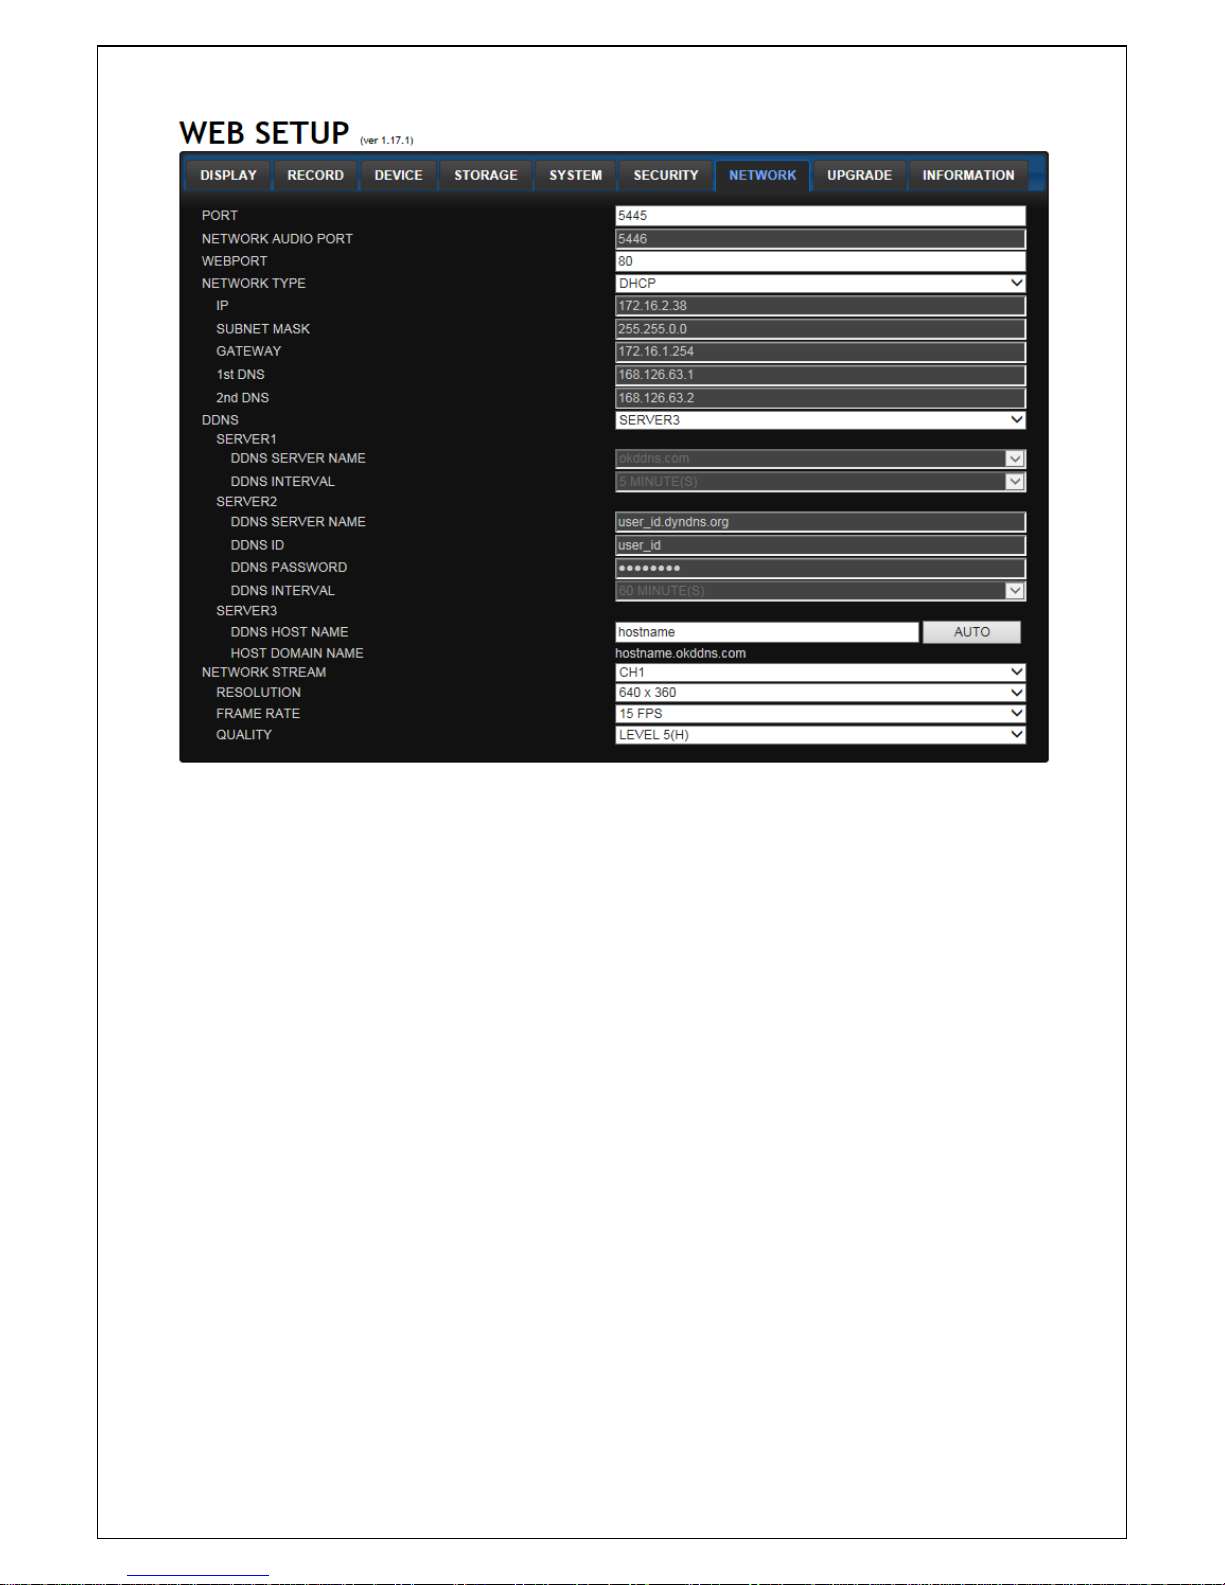
89
9-7-7. Network
PORT: When connecting multiple DVRs to the network, set a unique port number.
NETWORK AUDIO PORT: Display the network audio port (NETWORK PORT + 1).
WEB PORT: Set a web server port number.
NETWORK TYPE ( Cannot be altered remotely )
o STATIC: The address setting mode is manual. Input IP, Gateway, Subnet Mask, and DNS IP.
o DHCP: The address setting mode is automatic.
DDNS: Set whether to use DDNS service or not
o HOST NAME: Allows the user to setup a domain name manually
o SUMBIT/UPDATE: Select ON to submit the settings
NETWORK STREAM: Set the Resolution, Frame Rate, and the Quality.
Page 90
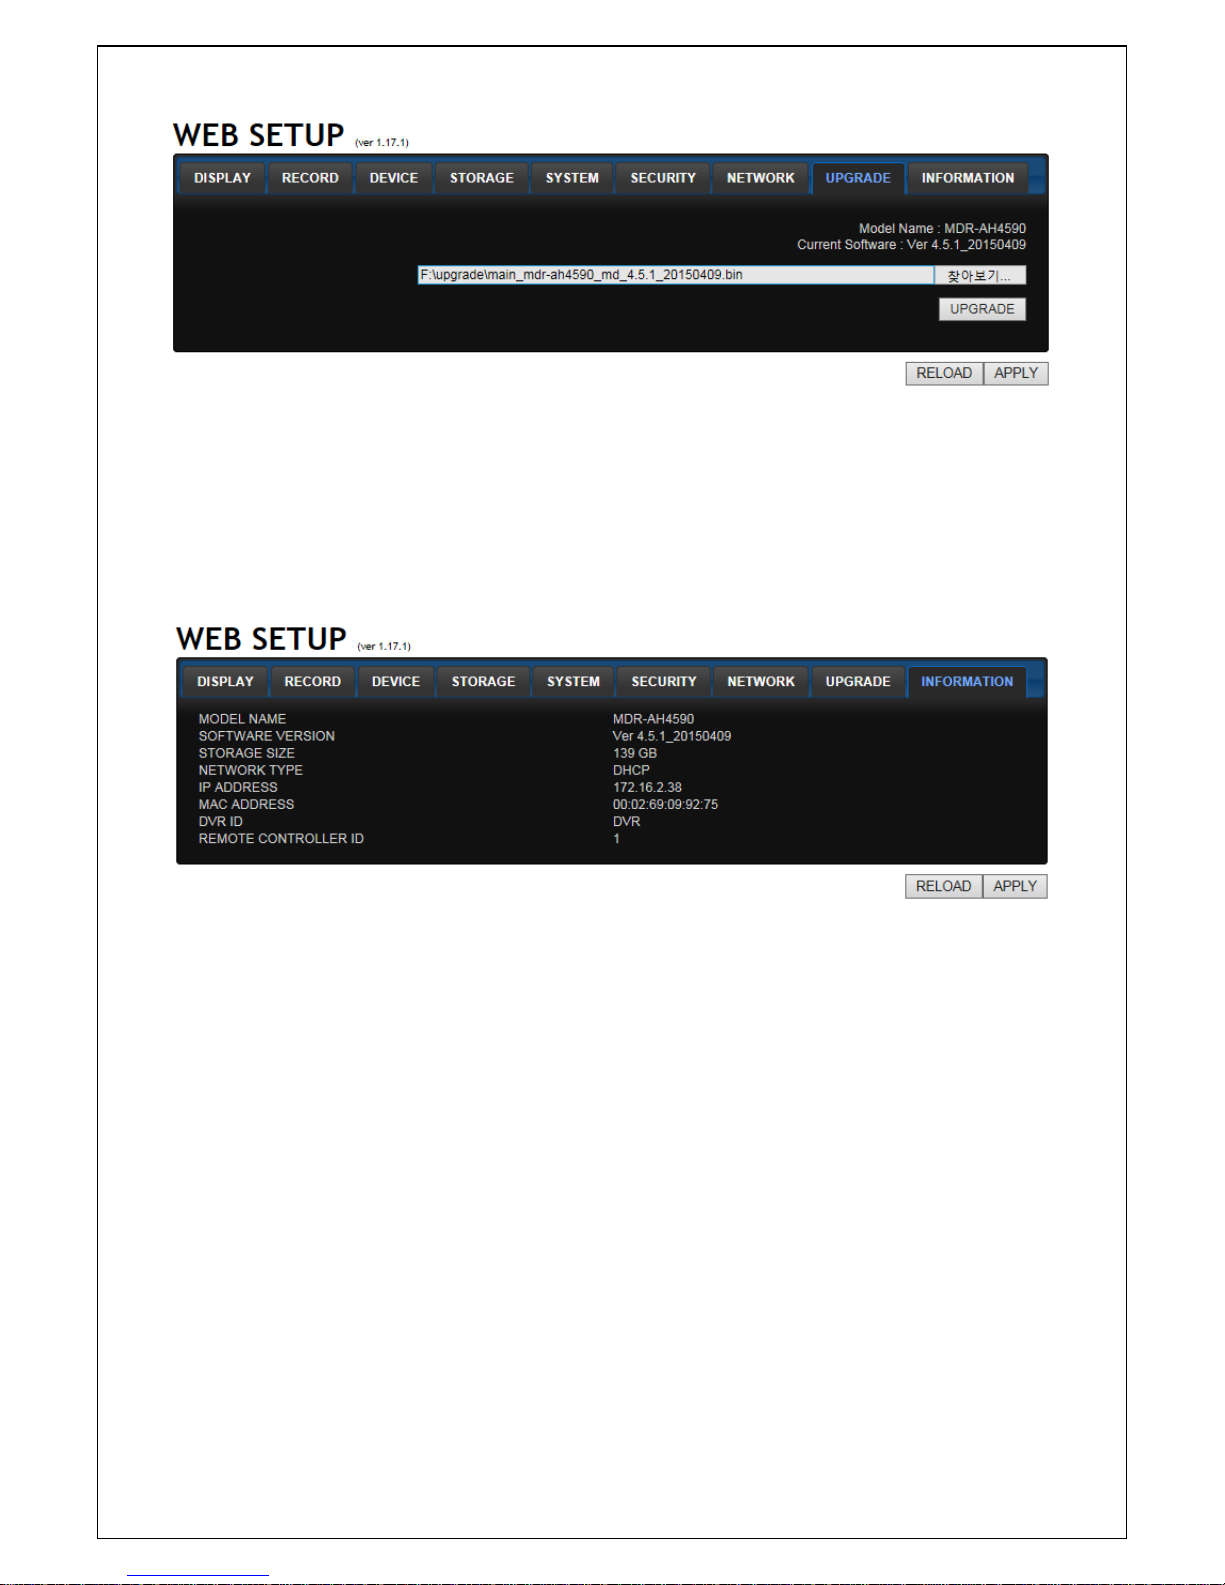
90
9-7-8. Upgrade
Shows the current Firmware version installed on DVR.
Browse: Select BROWSE to locate the firmware file.
Upgrade: Select UPGRADE to upgrade the firmware of the DVR.
Please refer to page 59 for the Remote Upgrade.
9-7-9. Information
Display general information about the DVR.
Page 91
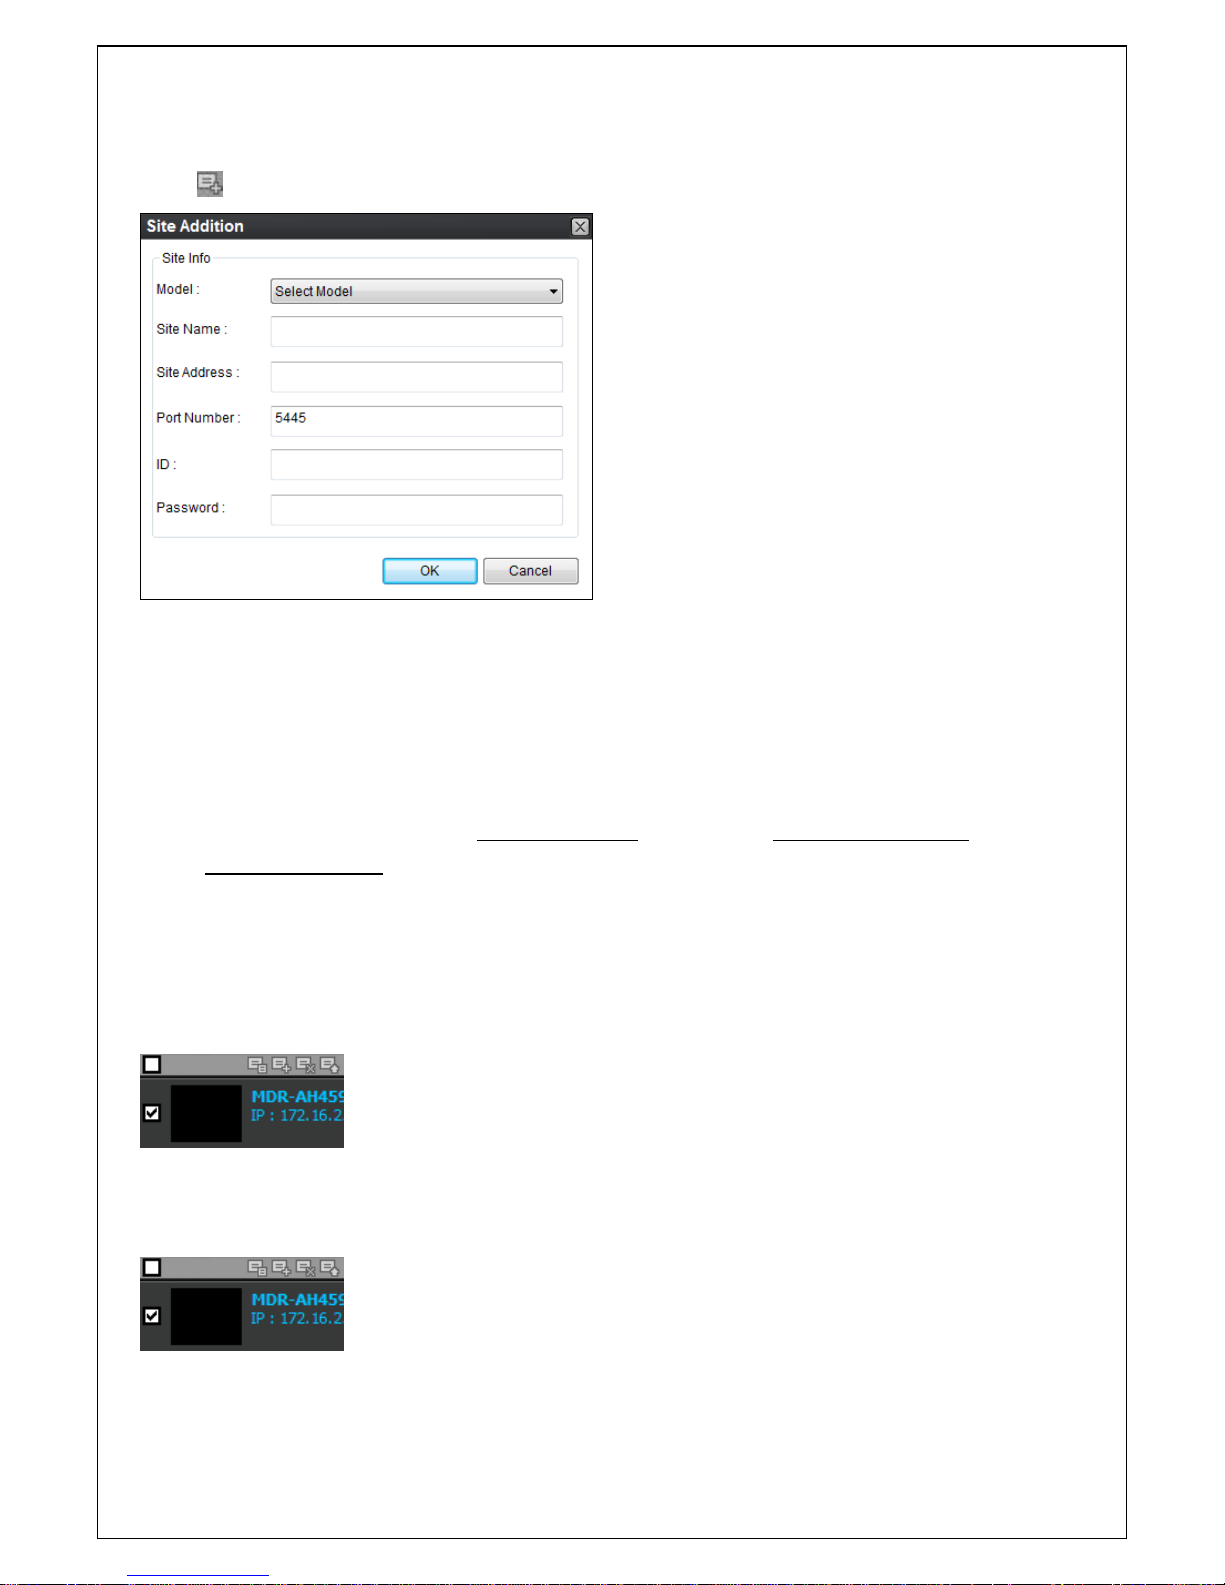
91
9-8. Operation
9-8-1. Addition, Delete, and modify of DVR sites
9-8-1-1. Addition of sites
1. Click SITE ADDITION button. And then the following window will be displayed as below.
o Model: User has to select surely a suitable type.
SDVR series, H series DVR
N series DVR, HD DVR
IP Camera
o Site Name: Input a name that properly describes a site.
o IP Address: Input IP address (Public IP address of a router that DVR is connected.) or Domain
name that is registered at www.okddns.com (for Korea), www.ddnscenter.com (for USA) or
www.bestddns.com (for other area including EU)
o Port Number: Input port number of DVR(Default Port Number is “5445”)
o ID: Input ID of DVR.(Default ID is “admin”)
o Password: Input network password of DVR(Default Password is “1111”)
2. Click OK button. And then the registered site is added on the directory window.
9-8-1-2. Delete of sites
1. Select the site/sites to delete from the directory window.
Page 92
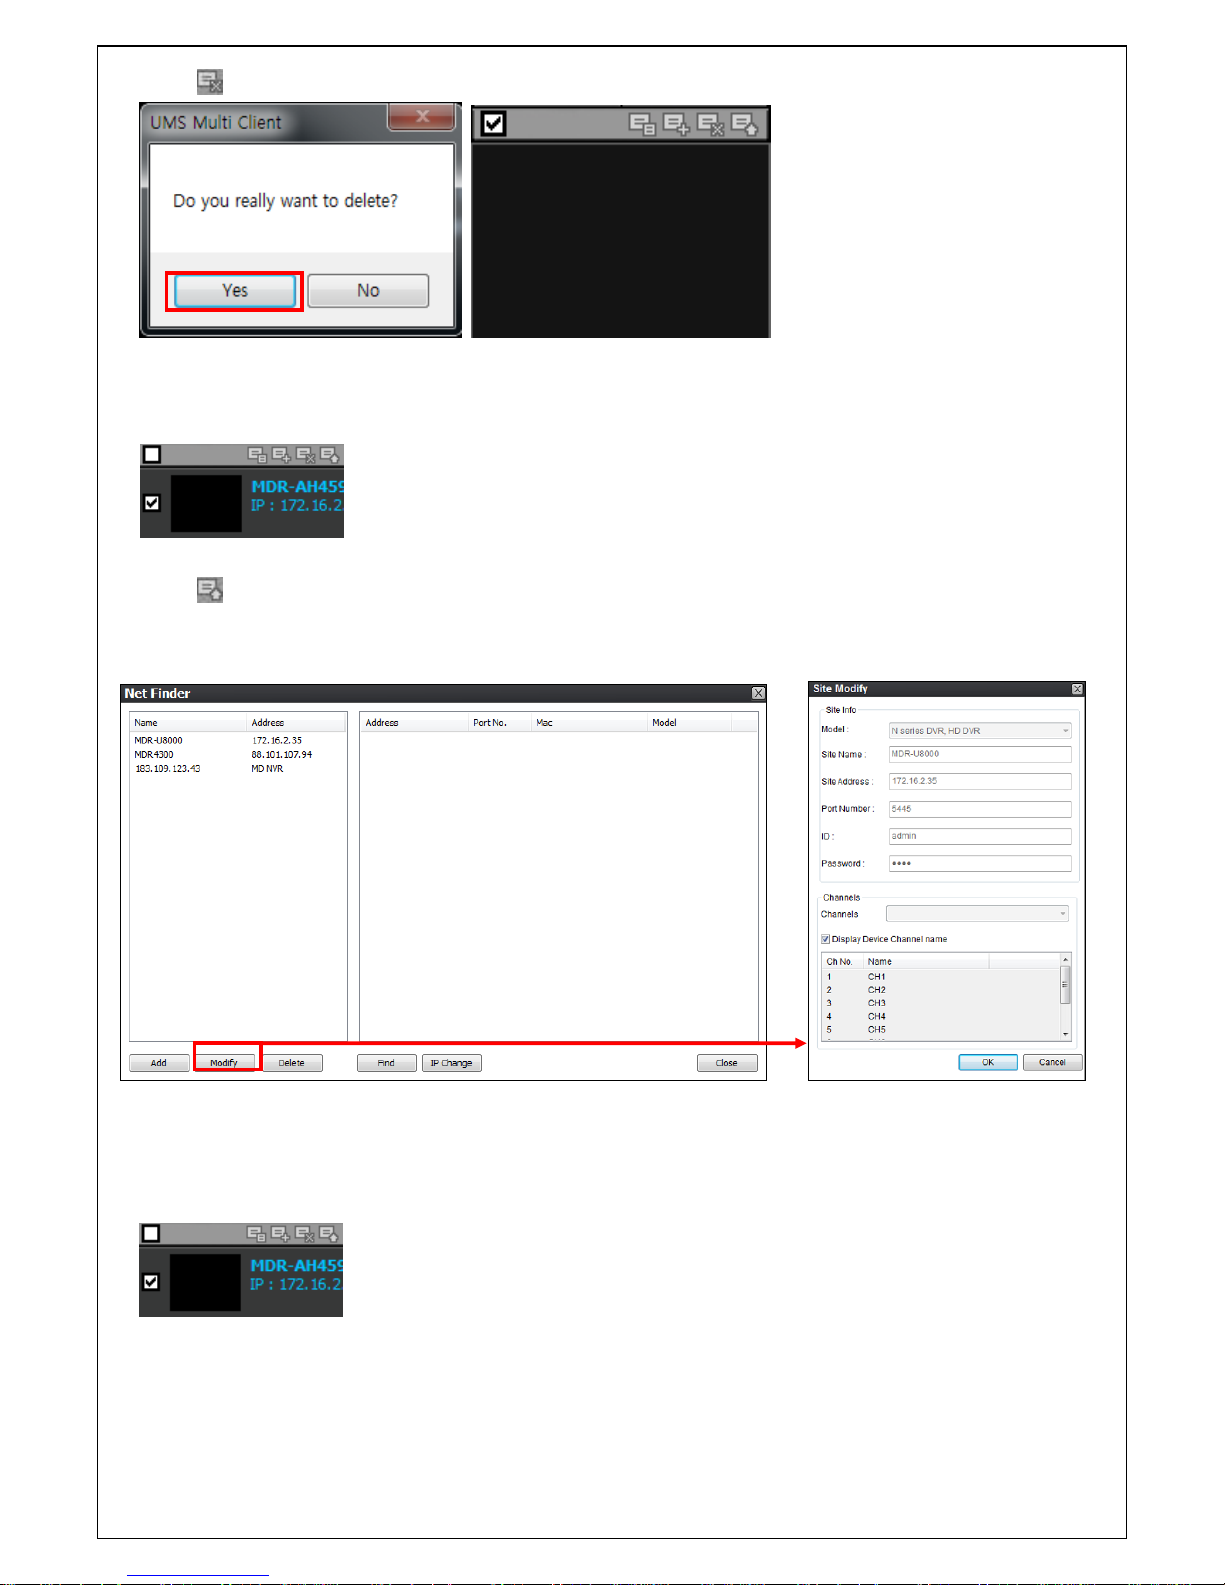
92
2. Click SITE DELETE button. And then the selected site/sites is/are deleted.
9-8-1-3. Modify of sites
1. Select the site/sites to modify from the directory window.
2. Click NET FINDER button. And then the following window displays.
3. Click MODIFY button. And then the modified information is applied.
9-8-2. Connect and Disconnect
9-8-2-1. Connect
1. Select site/sites to connect from the directory window.
Page 93
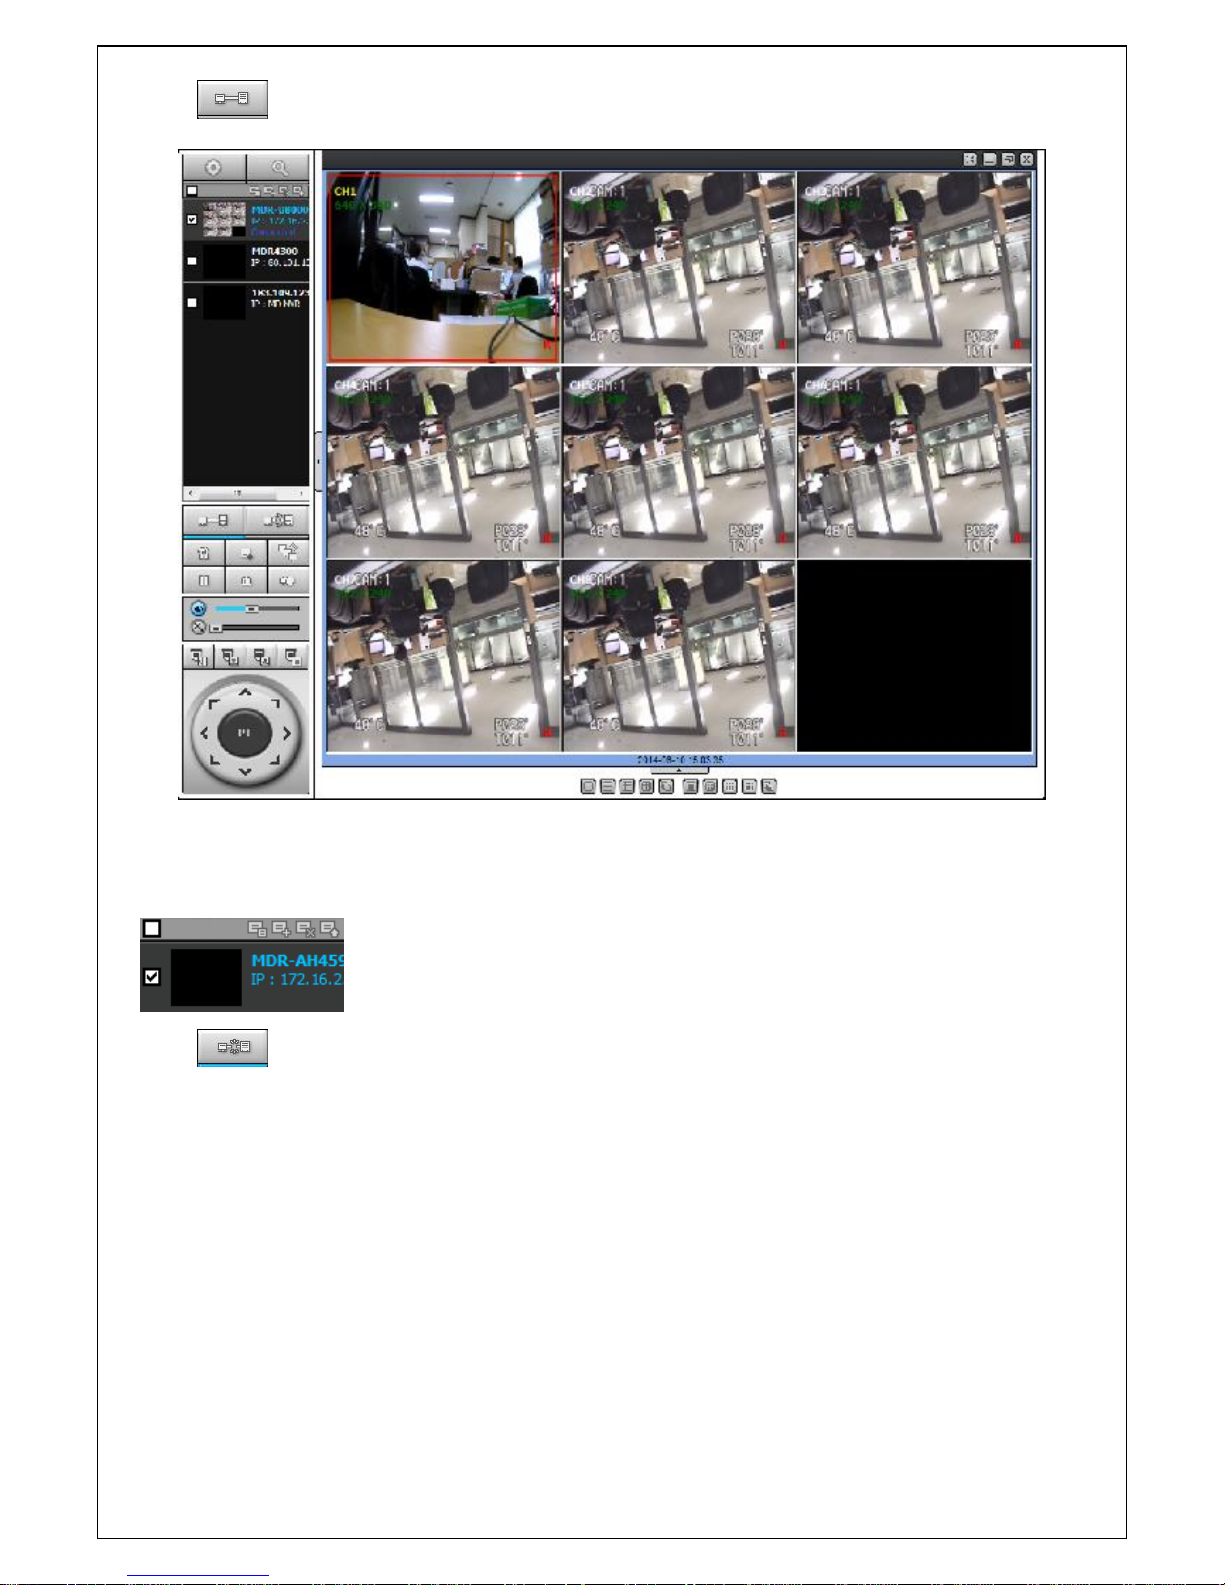
93
2. Click CONNECT button, and then site/sites displays/display as connected.
9-8-2-2. Disconnect
1. Select site/sites to disconnect from the directory window.
2. Click DISCONNECT button, and then selected site/sites disconnected.
Page 94
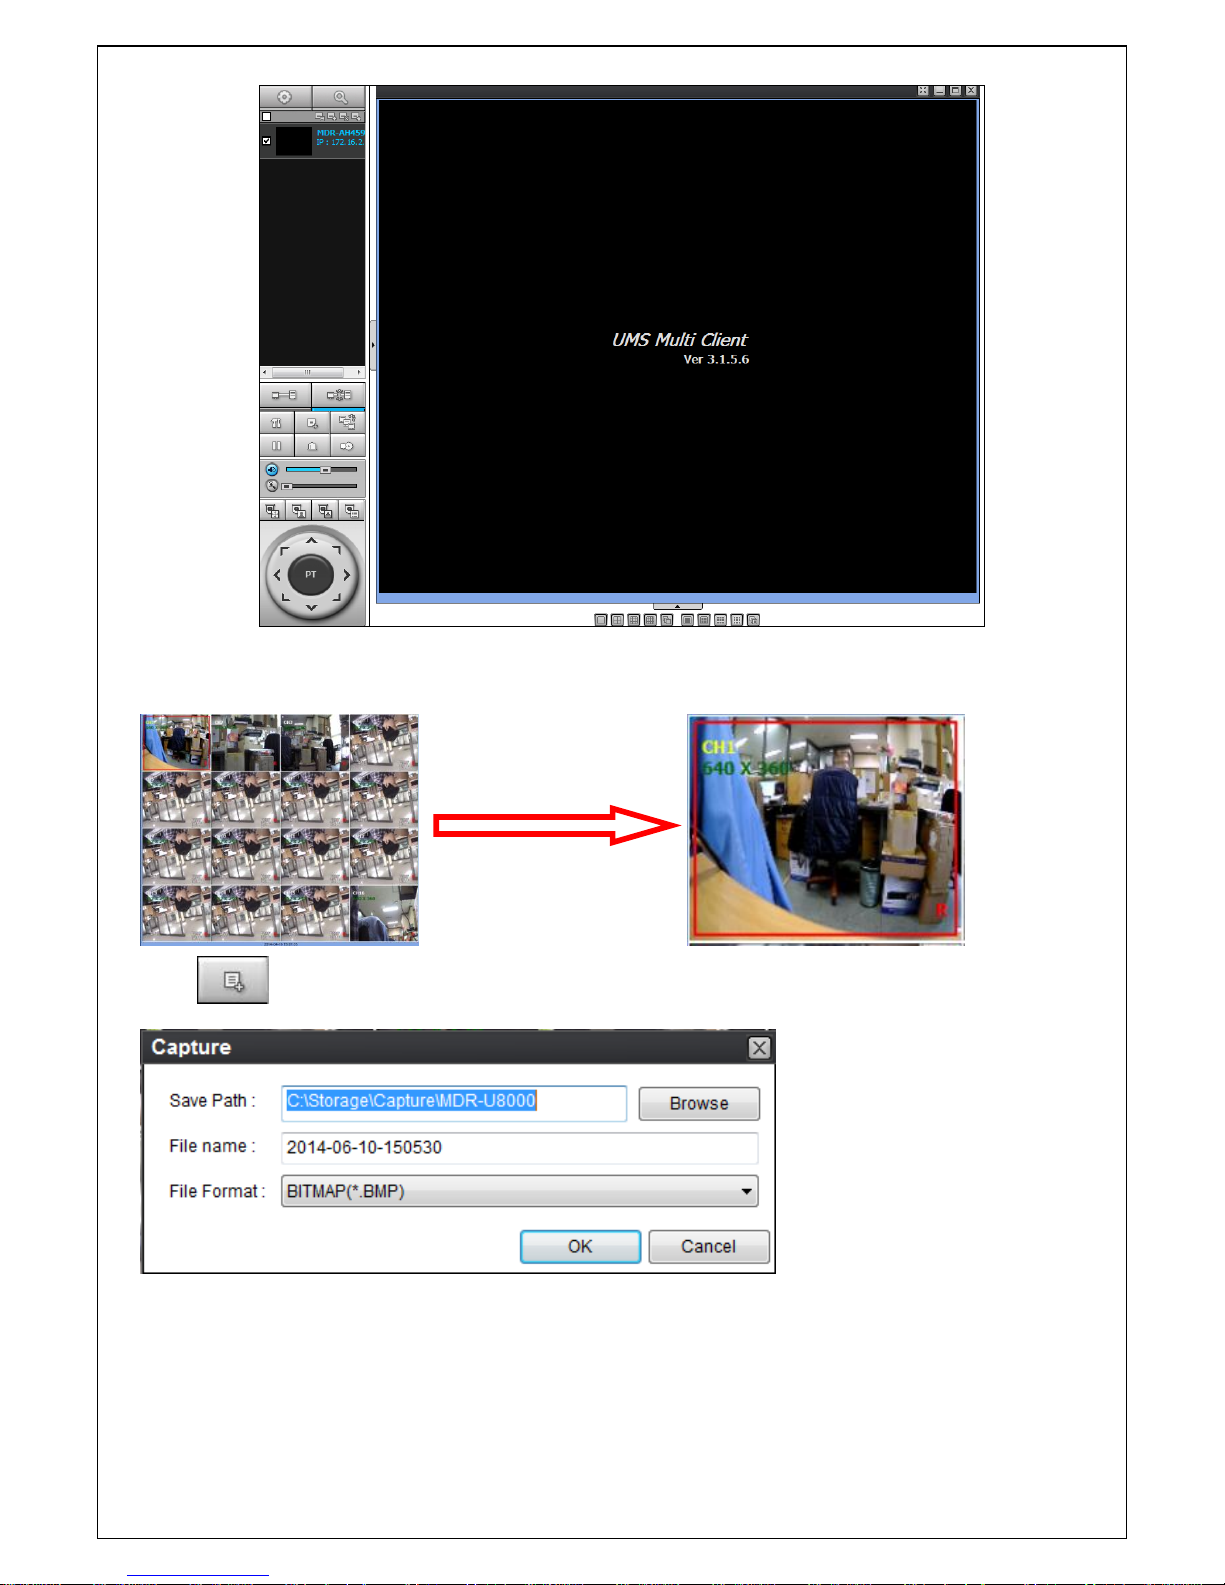
94
9-8-3. Still-image capture during Live
1. Double-click a channel to capture from the display screen. (Otherwise all channels will be captured.).
2. Click CAPTURE button. And then a Capture window displays.
3. Set Save path, File Name, and File Format. And then click OK button.
4. Still image is saved as set in Capture window.
Page 95
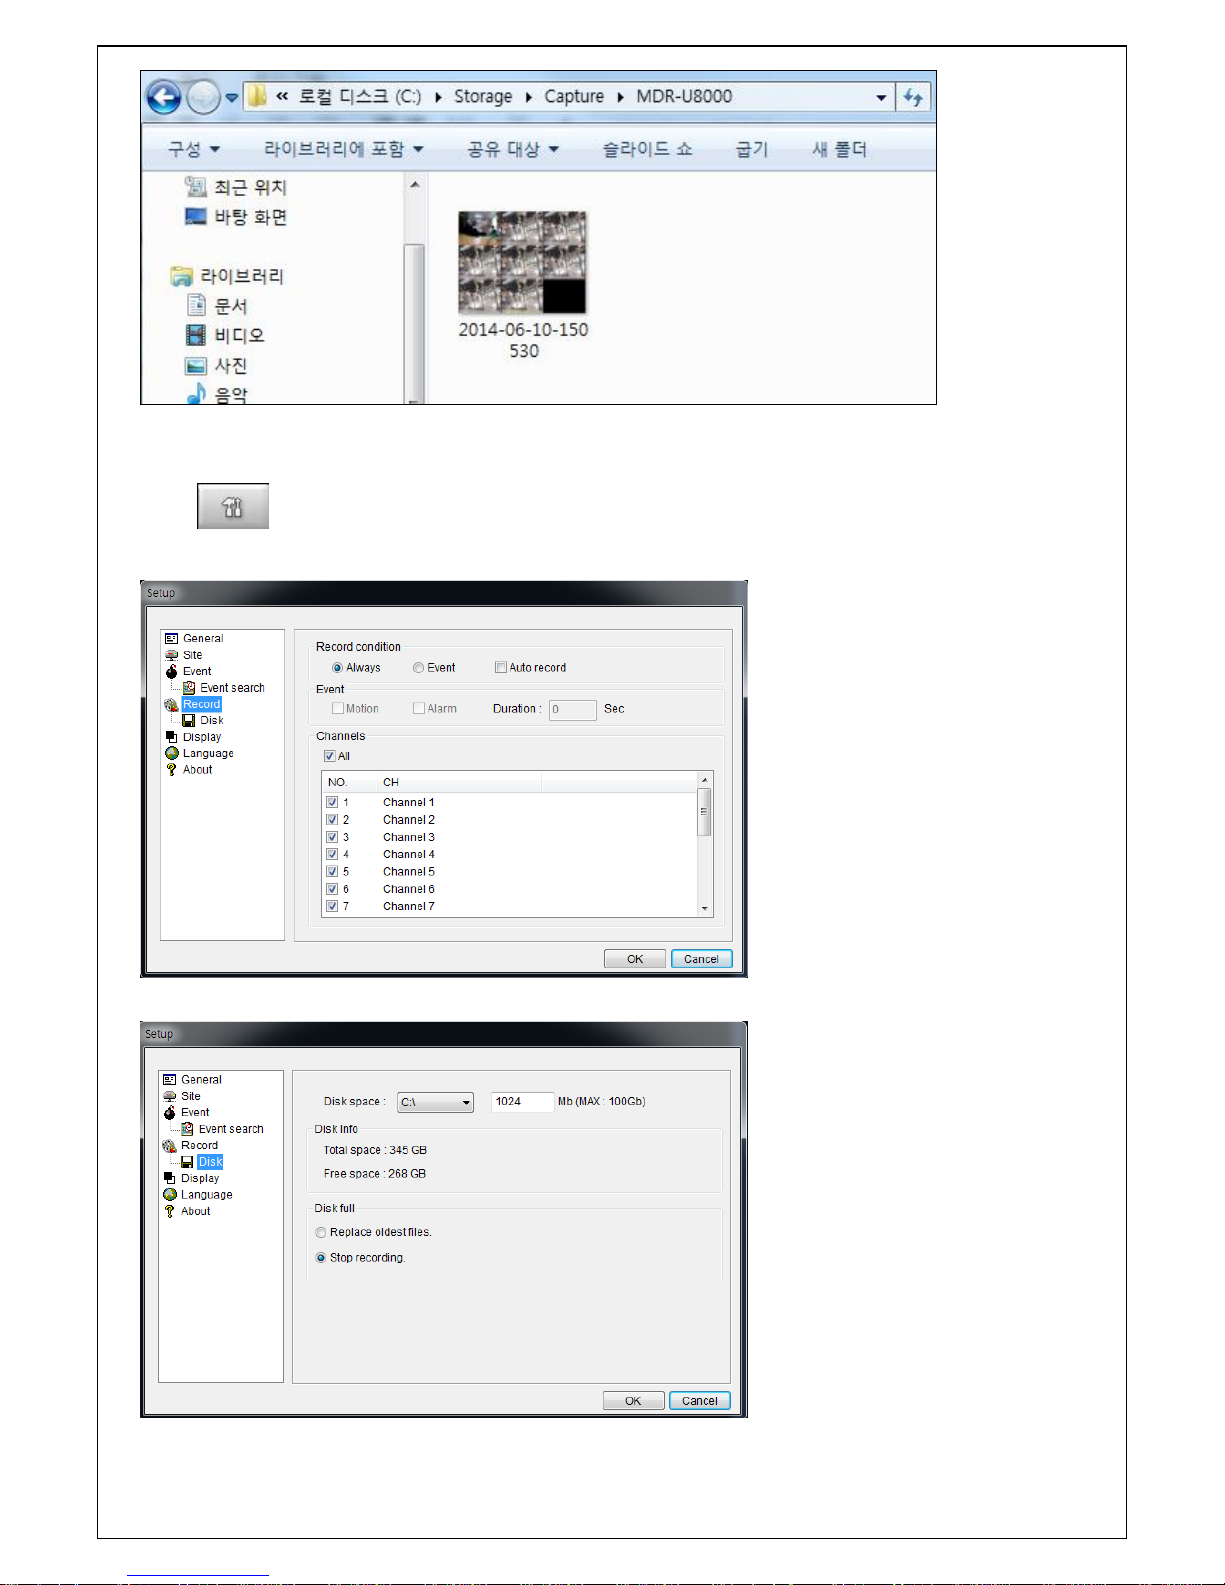
95
9-8-4. Recording Video on local PC during Live
1. Click SETUP button. And then a setup window display.
2. Select Record and set the values.
3. Select Disk and set the values.
Page 96
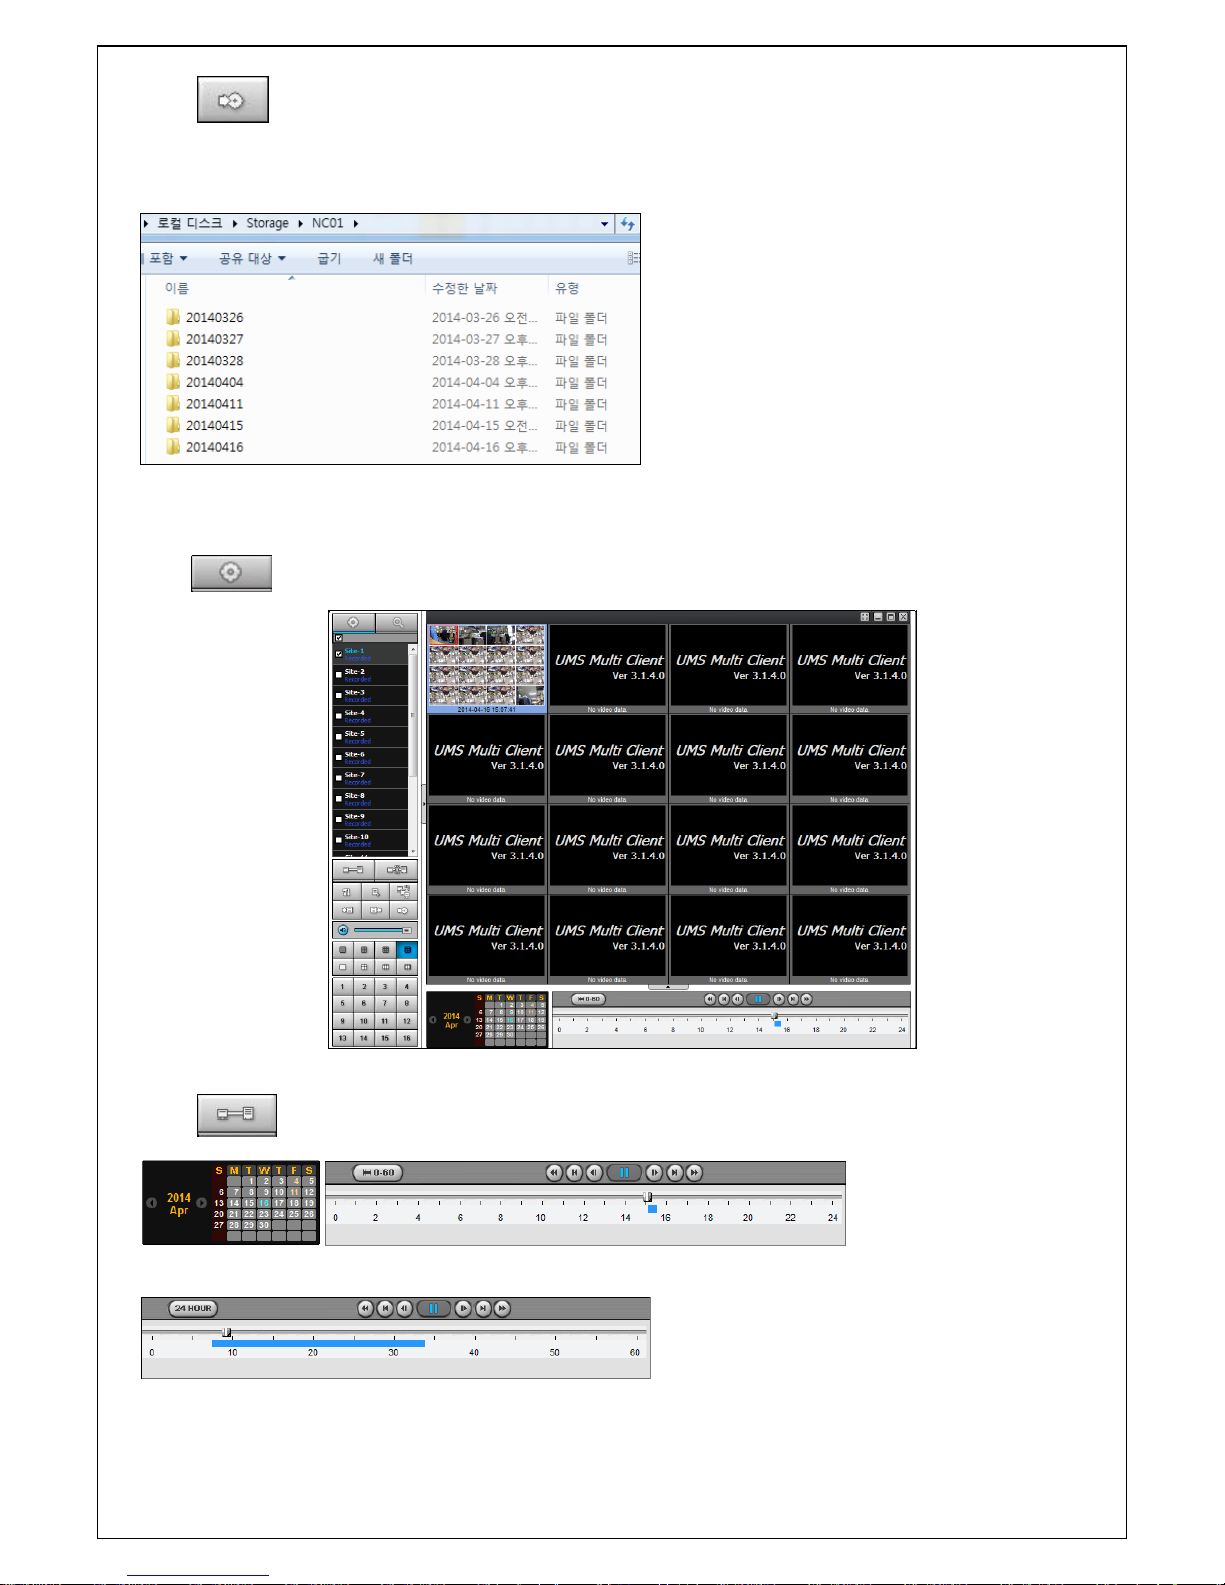
96
4. Click RECORD ON button. And the color of button is changed.
5. Live video data is recorded as set in Record and Disk setup. These video data can be searched and
play-backed with Local Playback.
9-8-5. Local Playback and Remote Playback
9-8-5-1. Playback of recorded video on local PC
1. Click LOCAL PLAYBACK button. And then Playback Window display over Live Window.
2. Select site/sites to connect from the directory window.
3. Click CONNECT button. And then Green bar displays on Search calendar and slide window.
4. Move scroll bar on where there is video data and Play button.
5. Video data that is recorded on local PC will be play-backed.
Page 97
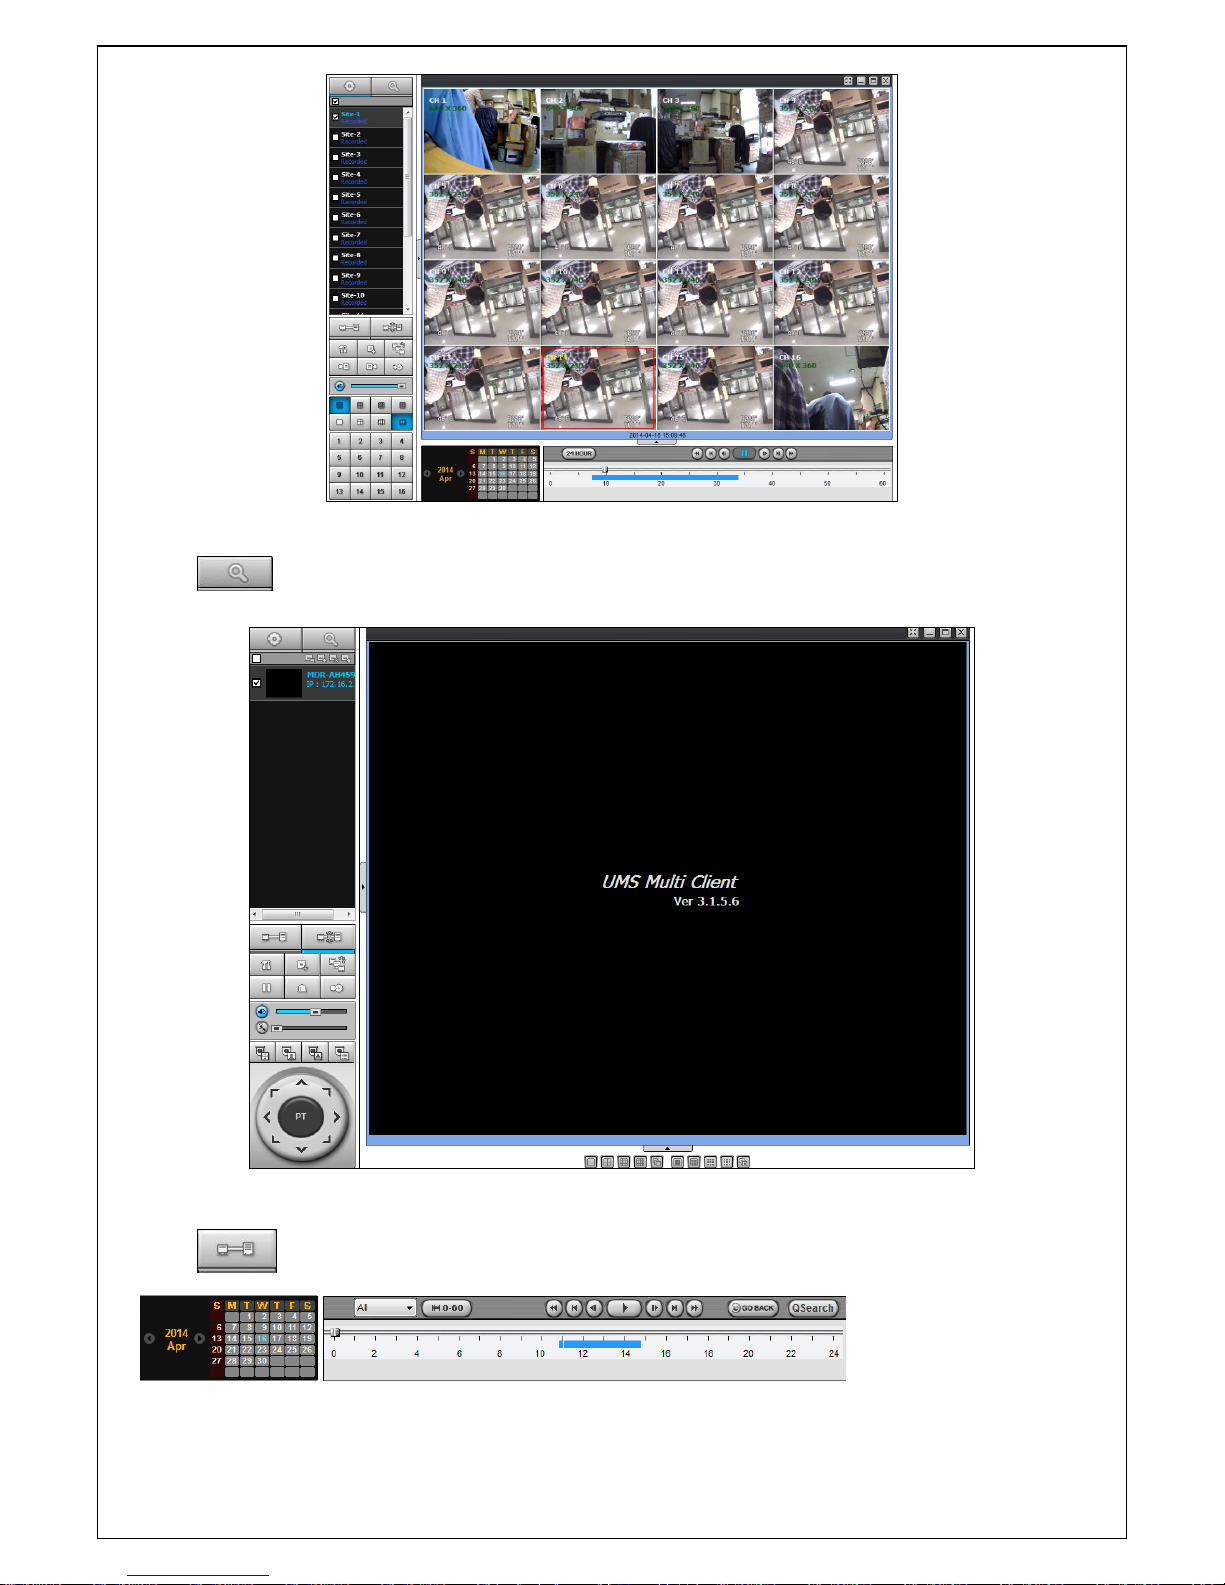
97
9-8-5-2. Playback of recorded video on remote DVR
1. Click REMOTE PLAYBACK button. And then Playback Window display over Live Window.
2. Select site to connect from the directory window.
3. Click CONNECT button. And then Green bar displays on Search calendar and slide window.
4. Move scroll bar on where there is video data and Play button.
Page 98
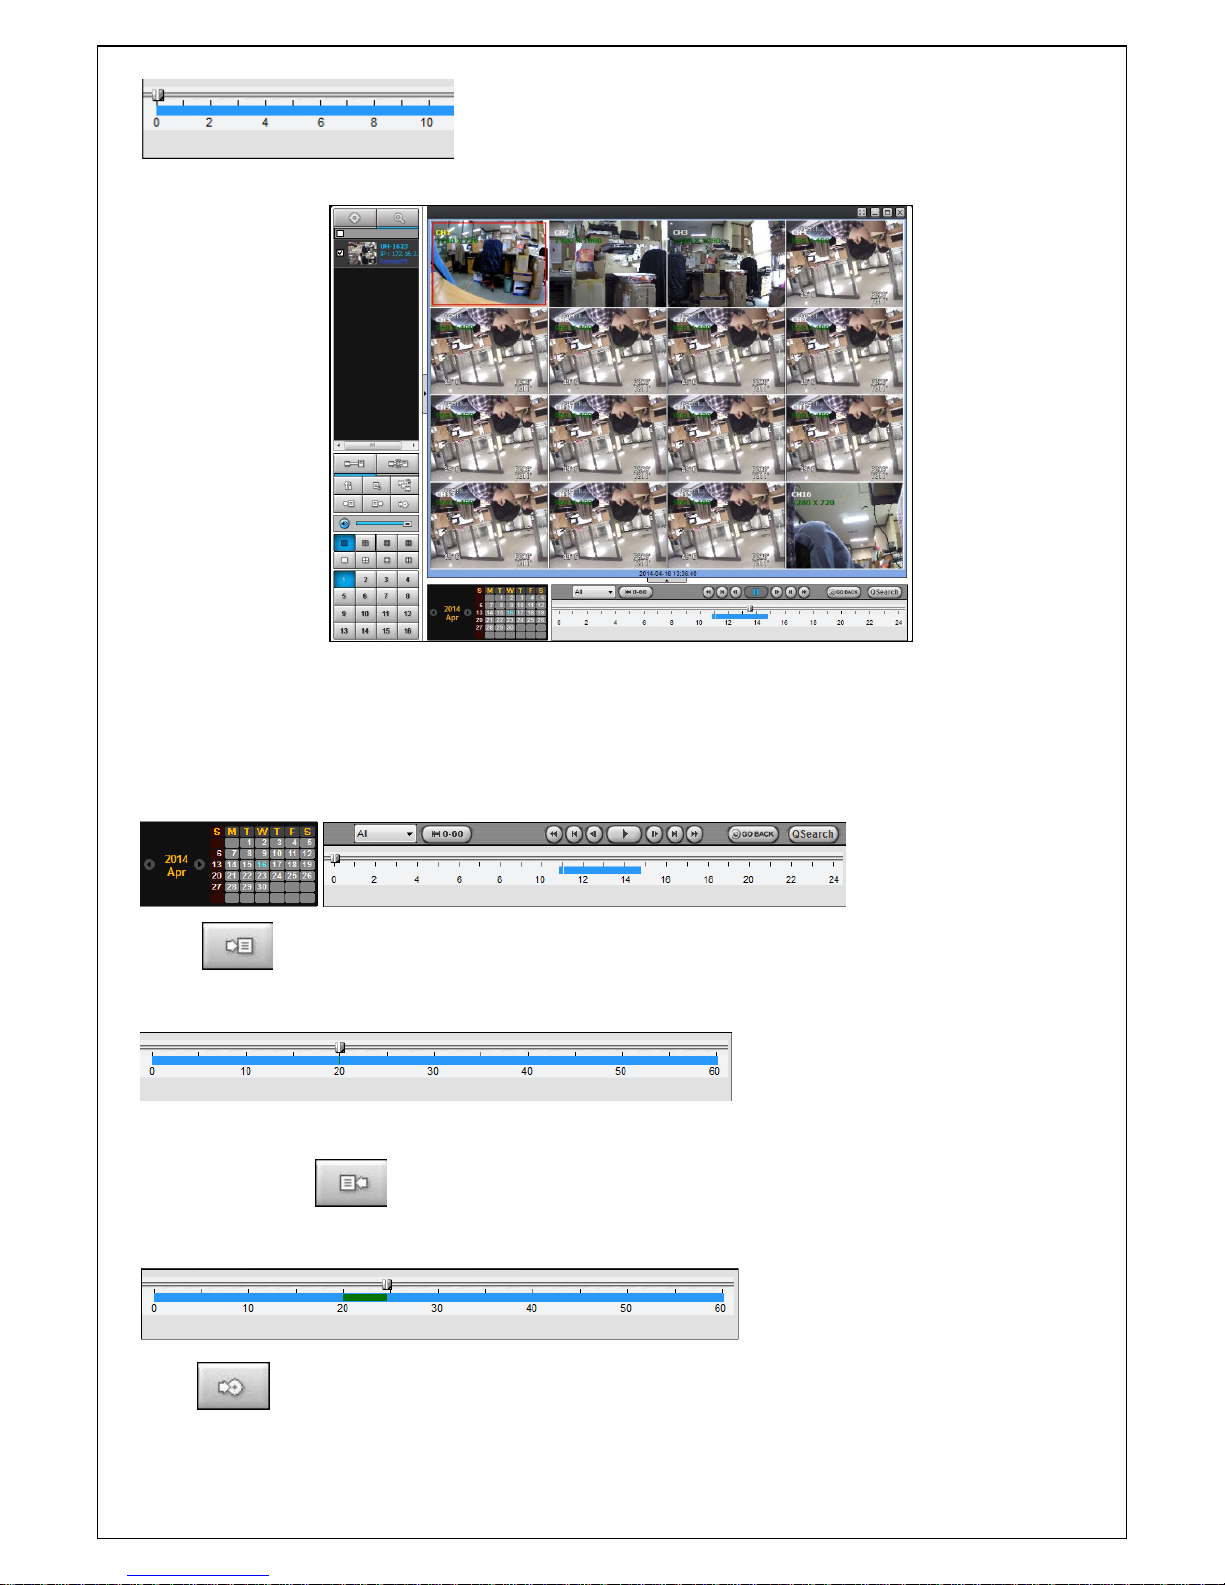
98
5. Video data that is recorded on a remote DVR is play-backed.
9-8-6. AVI Backup during playback
You can back up the recorded videos in AVI format during playback.
1. Double-click the target channel to backup.
2. Select the beginning time by using the search calendar and slide bar.
3. Click MARK IN button, when the scale of the timeline is located on the target time as the
beginning time of backup.
4. Set the ending time on the blue timeline by dragging the scale on the target time as the ending time of
backup and clicking MARK OUT button. Then, color of the timeline between the beginning time
and ending time will be changed into dark Green.
5. Click BACKUP. And then the window appears as below.
6. You can also set the beginning time and ending time on this window. After selecting a channel for backup,
Page 99
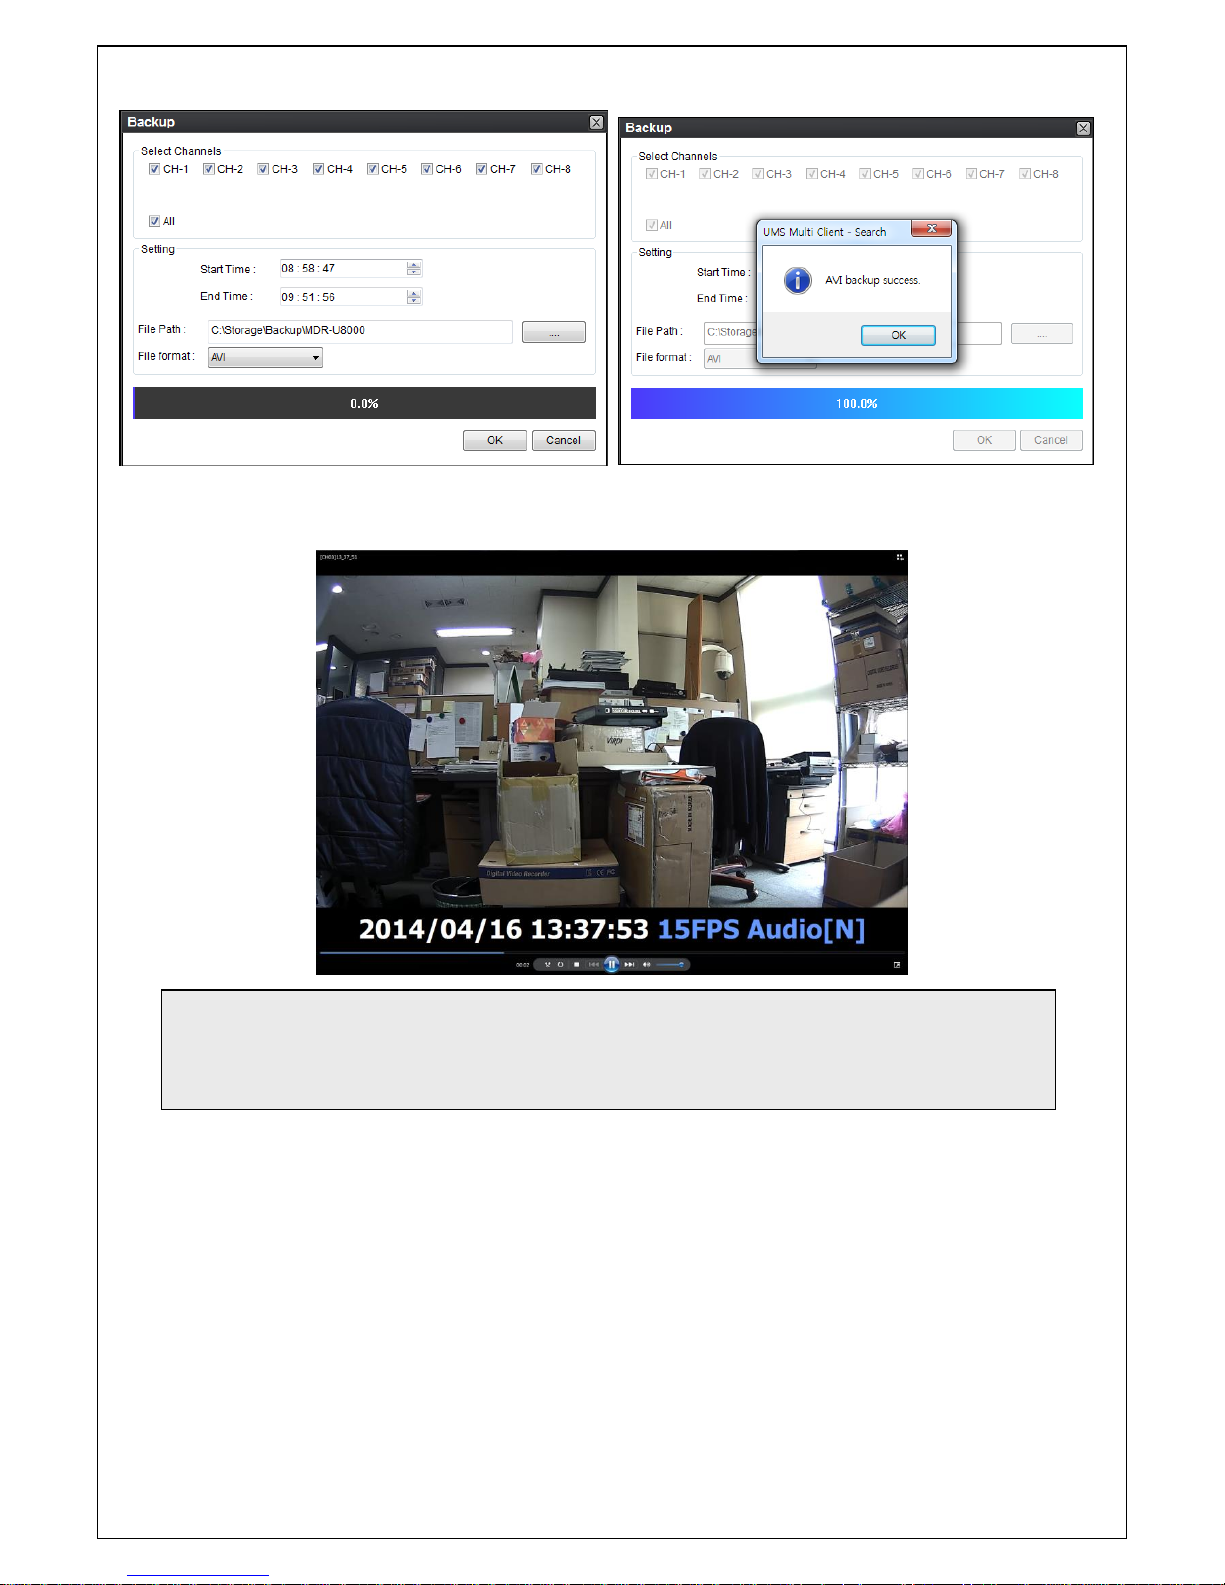
99
click the OK button. The backup will begin.
7. AVI video data is recorded as set in AVI Backup window. AVI format video can be played back by Window
Media Player™ or other media player that is compatible with AVI format video.
10. Network – By an web-browser viewer
The DVR provides a live remote monitoring feature by web-browser viewer. (NOTE: Web-Brower is only
available for Internet Explorer)
1. Check the IP address of the DVR from SETUP>SYSTEM>DESCRIPTION>IP ADDRESS.
Notice
When it does a backup with NSF format, user can do a playback using the DVR player. The
DVR player is installed with the S/W in user’s PC.
Page 100
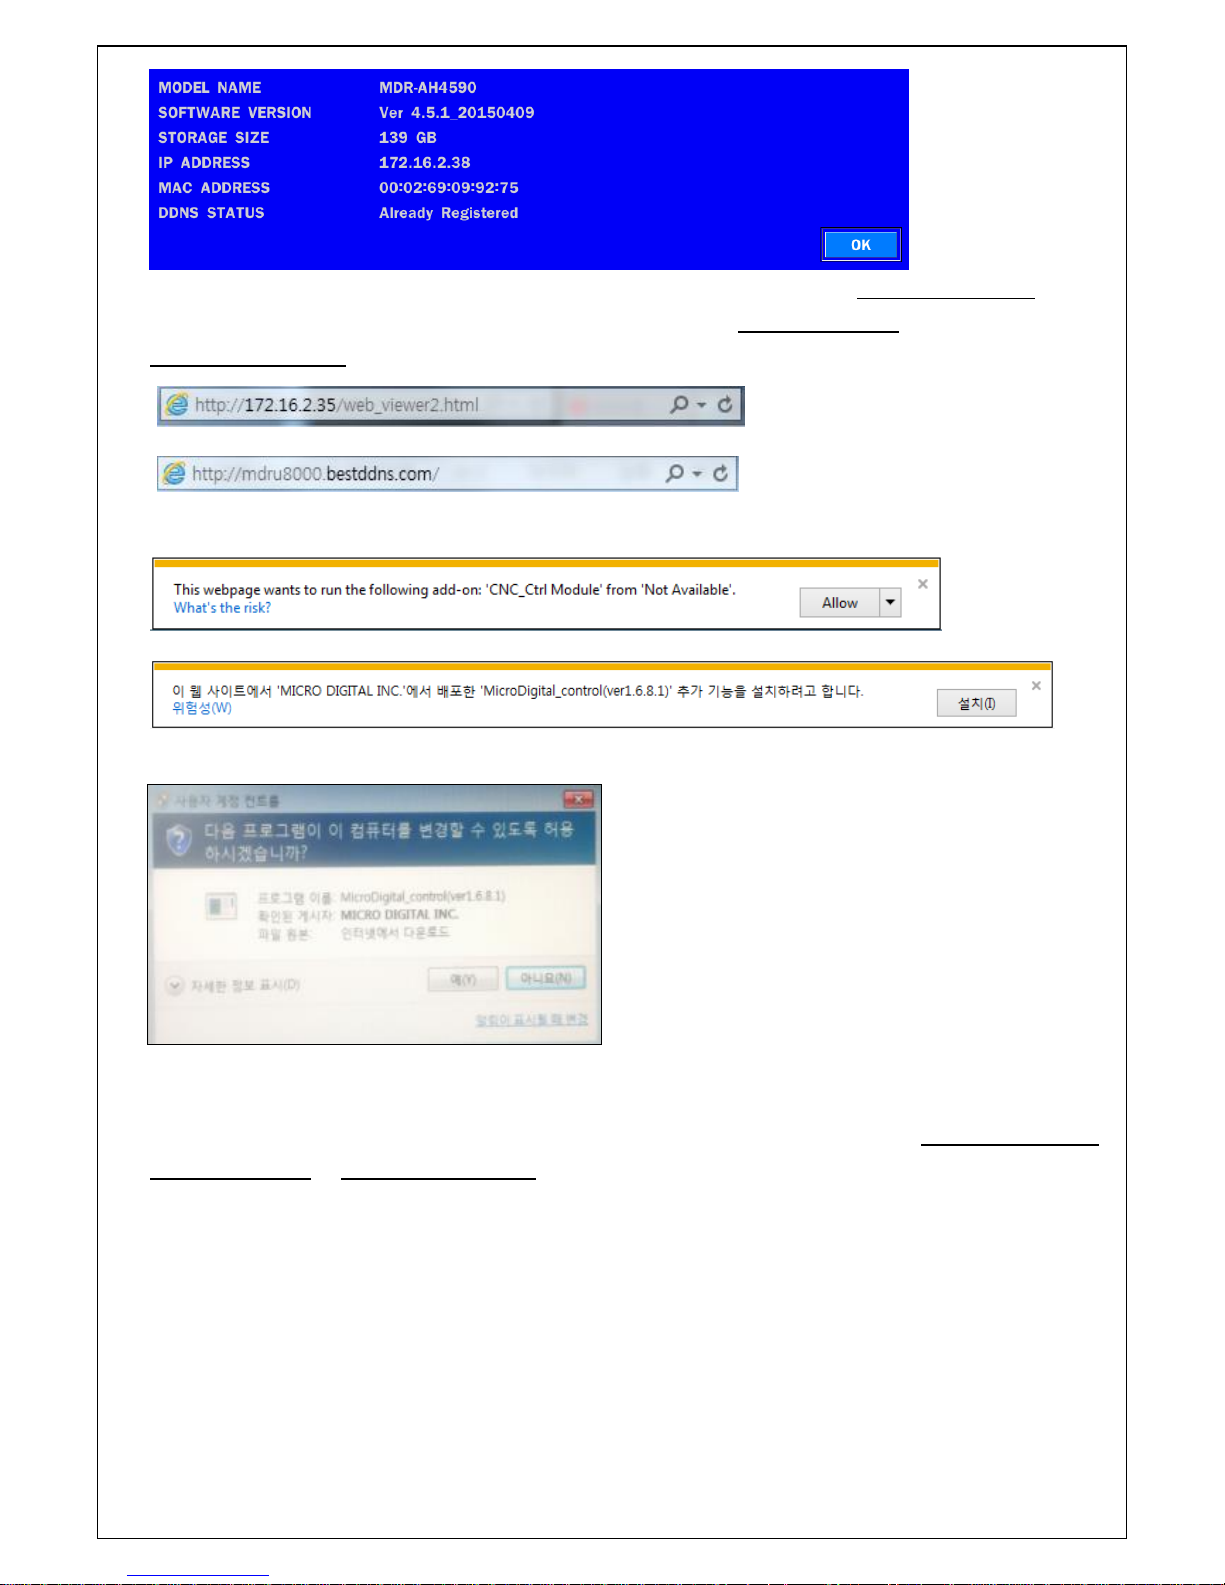
100
2. Input the IP address or Domain name address that you pre-registered on www.bestddns.com on the
address field and press “Go”. Please pre-register on www.okddns.com in Korea and on
www.ddnscenter.com in USA.
3. Click this bar. Then the dialog box is displayed.
4. Click “Install” to download ActiveX control.
5. Web Browser Viewer is displayed as bellow.
6. Click CONNECT button on the Left upper corner of web-viewer. Then “Connect” dialog is displayed.
Enter IP address (or Domain name address that you pre-registered on www.bestddns.com,
www.okddns.com or www.ddnscenter.com, Port number and Password and click “Connect”
 Loading...