

MicroDigial MDR-i016X-n, MDR-i036X-n, MDR-i025X-n, MDR-i064X-n, MDR-i032X-n Reference Manual

MicroDigial NVR
Reference Manual
MicroDigital NVR Reference Manual
by MicroDigital R&D center
Published 2014-02-27
Copyright © 2014 MicroDigital Inc.
This document describes the features and usage of MicroDigital NVR
This document is free to copy, distribute, but is not allowed to alter, transform.

MicroDigital NVR Reference Manual
2
1. Overview .................................................................................................................................................................................................................. 7
Models and System Specification .......................................................................................................................................................... 7
Functions ......................................................................................................................................................................................................... 7
2. Basic Functions .................................................................................................................................................................................................. 10
Live Screen .................................................................................................................................................................................................. 10
Search Screen .............................................................................................................................................................................................. 17
Backup ........................................................................................................................................................................................................... 22
3. Basic Configuration .......................................................................................................................................................................................... 31
Display .......................................................................................................................................................................................................... 31
Camera .......................................................................................................................................................................................................... 36
Audio .............................................................................................................................................................................................................. 41
Record ............................................................................................................................................................................................................ 43
Pan/Tilt/Zoom ............................................................................................................................................................................................. 52
Network ......................................................................................................................................................................................................... 55
User ................................................................................................................................................................................................................. 60
4. Event Configuration ......................................................................................................................................................................................... 64
Motion Detection ....................................................................................................................................................................................... 64
Sensor, Digital Input ................................................................................................................................................................................ 69
Alarm, Digital Output .............................................................................................................................................................................. 72
Pan/Tilt/Zoom Link .................................................................................................................................................................................. 74
Email Link ................................................................................................................................................................................................... 76
SNMP ............................................................................................................................................................................................................ 79
Pop-up ............................................................................................................................................................................................................ 80
Video Contents Analysis (VCA) ......................................................................................................................................................... 82
5. System Configuration ...................................................................................................................................................................................... 85
Disk ................................................................................................................................................................................................................. 85
Network Interface ...................................................................................................................................................................................... 93
Time & Date ................................................................................................................................................................................................ 94
Auto Reboot ................................................................................................................................................................................................ 97
System Log .................................................................................................................................................................................................. 99
Register ....................................................................................................................................................................................................... 101

MicroDigital NVR Reference Manual
3
List of Figures
2.1. Live Screen ....................................................................................................................................................................................................... 10
2.2. Camera Selection Button ............................................................................................................................................................................ 10
2.3. Display Mode Button ................................................................................................................................................................................... 11
2.4. Highlight Selected Camera ........................................................................................................................................................................ 12
2.5. Power Button ................................................................................................................................................................................................... 13
2.6. Search Button .................................................................................................................................................................................................. 13
2.7. Switch Camera Button ................................................................................................................................................................................. 13
2.8. Lock Screen Button ....................................................................................................................................................................................... 13
2.9. System Configuration Button .................................................................................................................................................................... 14
2.10. Logo .................................................................................................................................................................................................................. 14
2.11. Clock area ....................................................................................................................................................................................................... 14
2.12. IP area .............................................................................................................................................................................................................. 14
2.13. Alarm/Preset Panel ..................................................................................................................................................................................... 14
2.14. Dragging Alarm Button ............................................................................................................................................................................ 15
2.15. PTZ button ..................................................................................................................................................................................................... 15
2.16. Camera PTZ / Digital Zoom Buttons ................................................................................................................................................... 15
2.17. Mode Toggle Button .................................................................................................................................................................................. 15
2.18. Camera / Image Move Buttons .............................................................................................................................................................. 15
2.19. Camera Zoom In / Zoom Out / Auto Focus / Focus Far / Focus Near Buttons ................................................................... 16
2.20. Image Zoom In / Zoom Out / Zoom Fit Buttons ............................................................................................................................. 16
2.21. Changed Position of Camera Title ........................................................................................................................................................ 16
2.22. Search Screen ................................................................................................................................................................................................ 17
2.23. Display Mode Button ................................................................................................................................................................................. 17
2.24. Clock Selection ............................................................................................................................................................................................ 18
2.25. Screen with Calendar ................................................................................................................................................................................. 18
2.26. Date Selection ............................................................................................................................................................................................... 18
2.27. Timeline .......................................................................................................................................................................................................... 19
2.28. Daily Information Bar ............................................................................................................................................................................... 19
2.29. Detail Information Bar .............................................................................................................................................................................. 19
2.30. Control Play-back ........................................................................................................................................................................................ 19
2.31. Live Button .................................................................................................................................................................................................... 20
2.32. Backup Button .............................................................................................................................................................................................. 20
2.33. Save Still Image ........................................................................................................................................................................................... 20
2.34. Event Search Button ................................................................................................................................................................................... 21
2.35. Event Search .................................................................................................................................................................................................. 21
2.36. Zoom Button ................................................................................................................................................................................................. 21
2.37. Zoom Control Button ................................................................................................................................................................................. 22
2.38. Select File Catalog to Backup ................................................................................................................................................................ 22
2.39. Add File List Screen 1 ............................................................................................................................................................................... 23
2.40. Add File List Screen 2 ............................................................................................................................................................................... 24
2.41. Add File List Screen 3 ............................................................................................................................................................................... 25
2.42. Modify File List Screen ............................................................................................................................................................................ 25
2.43. Advanced Information for File List Screen ....................................................................................................................................... 26
2.44. Select Backup Device Screen ................................................................................................................................................................. 27
2.45. Backup Progress Screen ............................................................................................................................................................................ 28
2.46. Recording Complete Screen .................................................................................................................................................................... 29
3.1. Display Configuration Window ............................................................................................................................................................... 31
3.2. Supported Languages ................................................................................................................................................................................... 31
3.3. Monitor Setting Screen ................................................................................................................................................................................ 33
3.4. ‘Single / Cloned Monitors’ Selection Screen Resolution ............................................................................................................... 34
3.5. Multiple Monitors Screen ........................................................................................................................................................................... 35
3.6. Changing Monitor Setting Confirmation Dialog ............................................................................................................................... 36
3.7. Camera Configuration .................................................................................................................................................................................. 37
3.8. Network Camera Sources Configuration Screen ............................................................................................................................... 38
3.9. Loss Event Mapping Configuration Screen ......................................................................................................................................... 40
3.10. Camera Signal Recovery Event Mapping Configuration Screen .............................................................................................. 41
3.11. Audio Configuration Screen ................................................................................................................................................................... 41
3.12. Volume Configure Screen ........................................................................................................................................................................ 43
3.13. Record Configuration Screen .................................................................................................................................................................. 44
3.14. Privacy Zone Configuration Screen ..................................................................................................................................................... 45
3.15. Always record cameras Screen .............................................................................................................................................................. 46

MicroDigital NVR Reference Manual
4
3.16. Schedule Configuration Screen .............................................................................................................................................................. 46
3.17. Initial Schedule for Specific Date Screen .......................................................................................................................................... 47
3.18. Calendar .......................................................................................................................................................................................................... 48
3.19. List .................................................................................................................................................................................................................... 48
3.20. Schedule Name ............................................................................................................................................................................................. 48
3.21. Repeat Type ................................................................................................................................................................................................... 48
3.22. Start Date and End Date ............................................................................................................................................................................ 48
3.23. Repeat Term .................................................................................................................................................................................................. 49
3.24. After Clicking Add Button Screen ....................................................................................................................................................... 49
3.25. Selection of End Date from Calendar Screen ................................................................................................................................... 49
3.26. The configuration from February 5th, 2009 to May 15th, 2009 every alternate Thursday Screen .............................. 50
3.27. Removed End Date Configuration Screen ......................................................................................................................................... 50
3.28. Hourly Information Screen ...................................................................................................................................................................... 51
3.29. Pan/Tilt/Zoom Configuration Screen .................................................................................................................................................. 52
3.30. Pan/Tilt/Zoom Protocol List ................................................................................................................................................................... 53
3.31. Network Configuration Screen .............................................................................................................................................................. 55
3.32. Connection List / Filtering Screen ........................................................................................................................................................ 56
3.33. User Configuration Screen ....................................................................................................................................................................... 60
3.34. Default Available Account List ............................................................................................................................................................. 61
3.35. Default Permissions of Administrator ................................................................................................................................................. 61
3.36. Permission Modification for User Account ....................................................................................................................................... 63
4.1. Motion Detection Configuration Screen ............................................................................................................................................... 64
4.2. Motion Area Configuration Screen ......................................................................................................................................................... 65
4.3. Motion Area Configuration with Selected Area Screen ................................................................................................................. 66
4.4. Motion Detection Schedule Configuration Screen ........................................................................................................................... 67
4.5. Event Mapping Configuration Screen ................................................................................................................................................... 68
4.6. Warning Message on Motion Detection Screen ................................................................................................................................. 69
4.7. Sensor Configuration Screen ..................................................................................................................................................................... 69
4.8. Sensor Check Schedule Configuration Screen ................................................................................................................................... 70
4.9. Event Mapping ................................................................................................................................................................................................ 71
4.10. Alarm Configuration Screen ................................................................................................................................................................... 72
4.11. Event Mapping Screen .............................................................................................................................................................................. 73
4.12. Alarm Panel Button in the Main Display ........................................................................................................................................... 74
4.13. Camera Action as Link Number Configuration Screen ................................................................................................................ 74
4.14. Camera Action Configuration Screen .................................................................................................................................................. 76
4.15. Email Link Configuration Screen ......................................................................................................................................................... 76
4.16. Email Link Select Screen ......................................................................................................................................................................... 77
4.17. Email Address Register Screen .............................................................................................................................................................. 78
4.18. Email Message Configuration Screen ................................................................................................................................................. 78
4.19. Email Property Configuration Screen .................................................................................................................................................. 79
4.20. Email Server Configuration Screen ...................................................................................................................................................... 79
4.21. SNMP Configuration Screen .................................................................................................................................................................. 80
4.22. Pop-up Configuration Screen .................................................................................................................................................................. 80
4.23. Event Configuration in Pop-up Rule .................................................................................................................................................... 81
4.24. Device Configuration in Pop-up Rule ................................................................................................................................................. 81
4.25. Camera Configuration in Pop-up Rule ................................................................................................................................................ 82
4.26. VCA Configuration .................................................................................................................................................................................... 83
5.1. Disk Configuration Screen ......................................................................................................................................................................... 85
5.2. USB Device Scanning Screen ................................................................................................................................................................... 86
5.3. Disk Type Selection Screen ....................................................................................................................................................................... 86
5.4. Disks to RAID-1 Selection Screen .......................................................................................................................................................... 87
5.5. Disk Properties Configuration Screen ................................................................................................................................................... 88
5.6. Final Confirmation of Disk Properties Modification Screen ........................................................................................................ 89
5.7. Disk Clear Screen .......................................................................................................................................................................................... 91
5.8. Disk Check Screen ........................................................................................................................................................................................ 91
5.9. Advanced Configuration Screen .............................................................................................................................................................. 92
5.10. Network Interface Configuration Screen ........................................................................................................................................... 93
5.11. Static Address Configuration Screen ................................................................................................................................................... 94
5.12. Traffic Shaping Configuration Screen ................................................................................................................................................ 94
5.13. Time & Date Configuration Screen ...................................................................................................................................................... 94
5.14. Time Zone Area Selection Screen ........................................................................................................................................................ 95
5.15. Time Zone City Selection Screen ......................................................................................................................................................... 96
5.16. Auto Reboot Configuration Screen ...................................................................................................................................................... 98
5.17. Enable Auto Reboot Screen .................................................................................................................................................................... 98
5.18. System Log Configuration Screen ........................................................................................................................................................ 99
5.19. Reset Configuration Confirm Screen ................................................................................................................................................. 100
5.20. Load Configuration from USB Device ............................................................................................................................................. 100

MicroDigital NVR Reference Manual
5
5.21. System Log File Save Screen ............................................................................................................................................................... 101
5.22. Product Register Screen .......................................................................................................................................................................... 101
5.23. Successful Registration Product Screen ........................................................................................................................................... 101
5.24. Failed Registration Product Screen .................................................................................................................................................... 102

MicroDigital NVR Reference Manual
6
List of Examples
5.1. Time Configuration Example 1 ................................................................................................................................................................ 99
5.2. Time Configuration Example 2 : in case interval is zero ............................................................................................................... 99

Overview
7
Chapter 1. Overview
This chapter introduces the basic functions of the MicroDigital NVR system.
Models and System Specification
The number of supported channels on each models and requirements to work MicroDigital NVR system are as follows.
MicroDigital NVR Models
MicroDigital NVR has 5 models like following by the number of channels:
• MDR-i016X-n: 16 channels
• MDR-i025X-n: 25 channels
• MDR-i032X-n: 32 channels
• MDR-i036X-n: 36 channels
• MDR-i064X-n: 64 channels
Supported IP Cameras
Supported IP cameras are following:
• MICRODIGITAL IP camera: All IP camera products/v4.19-34-ds
• ONVIF IP camera: MICRODIGITAL IP camera/ v4.19-34-ds, Samsung SNB-5000, AXIS P3301/v5.20, AXIS
P1354/v5.40.19.1, Merit LILIN IPR414/8EMX, IPR434/8ESX, Bosch NBC-255-P, Lynstan LTN13071/v1.03,
LTN19071/v1.04, iMege B1100E/v1.20, Dahua DM368, KSP HD-300A/S0306H-KP01B02, IDIS MNC322D/v1.0,
TRUEN TCS-2000STR/V1.305R01-T100, TRUEN TCS-300/V1.211R04-T100, Youngkook Electronics
YSD-PN130MH/V02.01.29_ONVIF, Asoni CAM6691FIR/vC1.0.10_As.1, LG LND5100/v1796, CNB
IDC4050IR/XNET.M1-2.20.12.0723, VisionHitech PM2Ti/v1.1.5.5, HIKVISION DS-2CD2012-I/v5.0.0, HUVIRON
SK-ND321/AS65_ALL001_V0.02.01, BestDigital BTN110C/v2.1.0.3
• RTSP IP camera: IP cameras that support RTSP protocol
• UDP Technology IP camera: All IP camera models
• Samsung TechWin IP camera: SNB-3000/v1.42, SNB-3002/v1.00, SNB-5000A/v2.00, SNB-7000/v1.10,
SND-3080CF/v1.41, SND-3080CFN/v1.41, SND-3080CN/v1.41, SNO-5080R/v2.10, SNO-7080R/v1.20,
SNP-5200H/v1.04, SNZ-5200/v1.04
• Samsung Techwin IP camera (old models): SNS-100, SNS-400, SNC-550, SNP-3300/v2.8.0, SNP-3300 NTSC/v2.8.3,
SNP3300A, SNP-1000/v2.4.2, SNP-1000 NTSC/v2.8.4, SNP1000A, SNC570/0x102, SND560
• Panasonic IP camera: BB-HCM580/v3.13, BB-HCM580A/v3.51R00, BB-HCM581/v3.13, BB-HCM581A/v3.51R00
• Sony IP camera: SNC-CH140/v1.11.00, SNC-DH140/v1.61.00, SNC-RH124/v1.73.00
• AXIS IP camera: P3301/v5.20, Q1755/v5.20, P5512/v5.25, P1354/v5.40.19.1, 212 PTZ/v4.49, 210/v4.40.2
• Honeywell (Cellinx): HVS-200(3510)
• DynaColor: W5-BAZH0
• A-MTK: AM2030D/v6.D.2.8988, AM6221/v5.a.2.7317
• KSP IP camera: HD-300A/S0306H-KP01B02
• TRUEN: TCS-2000STR/V1.305R01-T100, TCS-300/V1.211R04-T100
• Asoni IP camera: CAM6691FIR/vC1.0.10_As.1
• LG IP camera: LND5100/v1796
• i-LAX IP camera: I-N354C1/v0.6-4195
• CNB IP camera: IDC4050IR/XNET.M1-2.20.12.0723
• VisionHitech IP camera: PM2Ti/v1.1.5.5
• HIKVISION IP camera: DS-2CD2012-I/v5.0.0
• HUVIRON IP camera: SK-ND321/AS65_ALL001_V0.02.01
• JVC IP camera: VN-H657/SPL2840 1.04.493, VN-V685/v3.05
• BestDigital: BTN110C/v2.1.0.3
Functions
The following functions are based on MicroDigital NVR version.

Overview
8
Display & Interface
• Multilingual input/output interface : Korean, English, Japanese, Spanish, Dimplified Chinese, German, Hungarian,
Portugal, Czech, Italian, Polish, Hebrew, Russian
• Various display mode : 1~100 channels mode and full screen mode
• Camera switching function
• Screen keyboard function
• Motion detection / sensor detection / recording status display per each camera
• Screen lock function
• Pan/Tilt/Zoom control
• Alarm(digital out) button and quick alarm button
Camera/Video
• Brightness / contrast / colorness / hue per each camera
• Camera name display function : configurable properties; camera name, font, size of font, color
• Camera hiding function
• Video loss detection function
Recording
• Support for H.264 / MPEG4 / MJPEG video codec, ADPCM audio codec
• Support for standard video file(AVI) to be played on common player
• Video/audio recording up to 100 channels simultaneously
• Video/audio channel mapping
• Recording with schedule (per week/hour, repeat specific date)
• Recording with event like motion detection and adjust recording time for PRE/POST event
• Adjusting quality of recording (bit rate/key frame interval/frame per second)
Search and playback
• Search for multi channel simultaneously (same display mode with main screen)
• Search by calendar and timeline
• Search for recorded data and event(motion detection) simultaneously
• Support for various replay speed (1,2,4,8,1/4,1/2)
• Frame moving by one second, one minutes forward or backward
• Still image saving to USB (JPEG, PNG, BMP)
• Search for occurred events check on each event
• Back-up by hour and channel, support for various media to back up
Network
• Video/audio streaming on TCP/IP
• Maximum number of client connection and connection port limitation
• Web clients behind firewall
• Support for EDNS
User Management
• Support for multi user and multi role
• Detail permission for each role (view for each camera/streaming control/device control, configure system, search
recording data, control system devices, connect via network)
• Support for user authentication
Events/Handlers
• Linkage capability between every events and handlers
• Event: motion detection for each camera, sensor(digital input), alarm(digital output), disk failure, camera signal loss
• Handler : Recording for each camera, alarm(digital out), warning message and sound generator, send email
• Warning message for each event, configuration for message font, size, color, sound
• Multiple email sending and customizing the content

Overview
9
Motion Detection
• Motion detection for each camera
• Configuration for sensitivity and noise
• Configuration for motion detection area
• Schedule for motion detection
Sensor/Alarm, Digital Input/Output
• Schedule for each sensor check
• Support for alarm of two type (N/C, N/O)
• Programming for each alarm (duration/interval/count)
• Support for alarm test and alarm interface
Disk
• Support for IDE / SCSI / USB / SATA hard disk
• Disk selection to use on recording and disk quota
• Camera mapping for each disk
• Recording on several disk in order and change the order of disk for recording
Pan/Tilt/Zoom Protocol
• Support for way control, ZOOM IN/OUT, PRESET
• Event(motion detection, sensor) linkage to PTZ
Network Interface Card
• Support for DHCP/static address
• Support for traffic shaping
Time
• Configuration for hour/date/time zone
• Local time synchronization to internet time server and time/server/command configuration
• System log confirmation/saving
• Forwarding syslog log message to remote host
• Automatic recognition of hardware change
• Configuration for automatic reboot

Basic Functions
10
Chapter 2. Basic Functions
This chapter describes the basic functions of the MicroDigital NVR system.
Live Screen
The basic functions of NVR are executed in the live screen. Available actions are selecting display mode for the
monitoring cameras, controlling PTZ(Pan/Tilt/Zoom) linked to the selected camera, triggering the alarms(digital outputs),
entering the search mode, executing the system configuration or etc.
Figure 2.1. Live Screen
Camera Selection

Basic Functions
11
Figure 2.2. Camera Selection Button
One way to select the camera is clicking the button of the camera number. The selected button is displayed differently
from the buttons of other cameras. The display area of the camera is switched according to the current display mode
when a camera is selected. If the display area of a camera is clicked directly, the camera will be also selected
automatically.
The selected camera is used for deciding the group of the cameras to be shown in the display mode and controlling
PTZ(Pan/Tilt/Zoom) connected to the camera.
The lamps next to each camera buttons inform the events related the cameras. Different colors of the lamp stand for
different events, for example, the red one indicates the recording event, the yellow one indicates the event like motion
detection.
Display Mode
Figure 2.3. Display Mode Button
The number and the shape of cameras to display in a screen can be selected by clicking these buttons. This function can

Basic Functions
12
be selected by clicking mouse button or pressing keyboard button. The next display mode is selected by pressing Tab key.
The previous display mode is selected by pressing Control+Tab key. The next page in the same screen mode is shown by
pressing PageDown key. The previous page in the same screen mode is show by pressing PageUp key.
• 1x1 Mode (1 Channel)
• This mode shows only the selected camera in the display area. If a mouse button is double-clicked on the display
area of a camera, the camera will be selected and the display mode will be switched to 1x1 mode automatically. If a
mouse button is double-clicked again, the display mode will be returned to the previous mode.
• 2x1 Mode (2 Channels)
• This mode shows 2 channels according to the number of the selected camera.
• 2x2 Mode (4 Channels)
• This mode shows 4 channels according to the number of the selected camera.
• 1+5 Mode (6 Channels)
• This mode shows 6 channels consist of one big display area on the top left corner with small ones.
• 3x3 Mode (9 Channels)
• This mode shows 9 channels according to the number of the selected camera.
• 2+8 Mode (10 Channels)
• This mode shows 10 channels consist of two big display area on the top half with small ones on the bottom.
• 1+12 Mode (13 Channels)
• This mode shows 13 channels consist of one big display area on the top left corner with small ones.
• 4x4 Mode (16 Channels)
• This mode shows all of 16 channels.
• 5x5 Mode (25 Channels)
• This mode shows all of 25 channels.
• 6x6 Mode (36 Channels)
• This mode shows all of 36 channels.
• 7x7 Mode (49 Channels)
• This mode shows all of 49 channels.
• 8x8 Mode (64 Channels)
Full Screen Toggle
Full screen mode is toggled by moving the mouse cursor to the right top corner of the screen or clicking the corner arrow.
The same action is performed with pressing left Windows key.
Highlight Selected Camera
Basic Functions
13
Figure 2.4. Highlight Selected Camera
Translucent background color is added to camera selection buttons when the maximum number of cameras in the selected
display mode is lesser than the one in the system. The selected camera has white color, all the other cameras in the same
group have black color, the rest cameras have grey color. The camera number with camera source is displayed with white
foreground color and the one without camera source or signal is displayed with grey foreground color.
Power
Figure 2.5. Power Button
This button turns off or reboots the system. You can use this function by clicking this button or by pressing Pause key.
Also, user and password must be entered on the confirmation dialog window and the action to execute can be chosen.
The confirmation dialog window can also be seen on clicking the power switch of the system.
Search
Figure 2.6. Search Button
This button starts the search mode where the recorded video or the event can be searched and replayed. You can toggle
the mode betweeen main display and search mode by clicking this button or by pressing Esc key. Detail information is
described in Search Mode.
Switch Camera
Figure 2.7. Switch Camera Button
This button activates and deactivates the camera switching. The switching interval can be configured in Display
Configuration. You can use this function by clicking this button or by pressing F3 key.
Lock Screen
Figure 2.8. Lock Screen Button
This button locks the system not to use it temporarily. You can use this function by clicking this button or by pressing

Basic Functions
14
ScrollLock key. The locked system hides all the channels which are playing. User and password are required to unlock
the system. It can be disabled in Display Configuration.
System Configuration
Figure 2.9. System Configuration Button
This button shows the system configuration menu. Each configuration is described in the related page.
Logo
Figure 2.10. Logo
• The information of the product is displayed. The detail information of each model is described in the section called
“MicroDigital NVR Models”.
• Type of Product
• The type of the installed product is displayed.
Clock
Figure 2.11. Clock area
Date, time information are displayed in this area. To change date and time, see Time & Date Configuration.
IP
Figure 2.12. IP area
Network information is displayed in this area. To change network address, see Network Interface Configuration.
Alarm/Preset Panel
Figure 2.13. Alarm/Preset Panel

Basic Functions
15
This button is used to execute the alarm which is corresponding the number of the button.
Bigger numbers of alarm buttons can be seen by dragging the mouse cursor to the left side on these buttons, smaller ones
can be seen by dragging the mouse cursor to the right side or by scrolling mouse wheel-scroll buton. Interval or counts of
alarm can be configured in Alarm Configuration.
Figure 2.14. Dragging Alarm Button
Preset Button does the same action with alarm button. The selected camera is moved to the position of the preset which
has the corresponding number with the clicked button.
Camera PTZ / Digital Zoom
Figure 2.15. PTZ button
You can move and zoom in / out using Pan / Tilt Zoom control. If you click PTZ button or press F2 key, PTZ control
buttons are shown in the top-left corner on selected camera image.
Figure 2.16. Camera PTZ / Digital Zoom Buttons
• Toggling Mode
•
•
• Figure 2.17. Mode Toggle Button
• Clicking this button toggles the mode between Camera PTZ mode and Digital Zoom mode. If you’re in search screen
or selected camera doesn’t support PTZ protocol, only Digital Zoom mode is used.
• Moving Camera / Image
•
•

Basic Functions
16
• Figure 2.18. Camera / Image Move Buttons
• In Camera PTZ mode, the camera’s Pan / Tilt devices are controlled. In Digital Zoom mode, the viewport area is
moved on the zoomed image. In Digital Zoom mode, you can move the viewport by moving the mouse pointer while a
mouse button is pressed.
• Camera PTZ Mode: Camera Zoom In / Zoom Out / Auto Focus / Focus Far / Focus Near
•
•
• Figure 2.19. Camera Zoom In / Zoom Out / Auto Focus / Focus Far / Focus Near
Buttons
• the camera’s Zoom device is controlled to zoom in / out or set focus to auto / far / near. You can also zoom in / out
with mouse wheel buttons.
• Digital Zoom mode: Image Zoom In / Zoom Out / Zoom Fit
•
•
• Figure 2.20. Image Zoom In / Zoom Out / Zoom Fit Buttons
• Image is scaled with digital image algorithm. You can also zoom in / out with mouse wheel buttons.
Change Camera Title Position
The position of the camera title is changed by pressing F1 key. This position can be configured in Display Configuration.
Figure 2.21. Changed Position of Camera Title

Basic Functions
17
Search Screen
Recorded videos, audios and events can be searched in the search screen. The recorded data can be searched and replayed
by time and date. The still image of the recorded data can be saved. The recorded data can be backed up to various media
such as CD-RW/DVD/USB.
• Note
• Events mean all the information which are managed by the system such as motion detection,
sensor/alarm(digital input/output) and camera signal. The events can be handled by mapping it with
various handler when those occur. Detail information are described in Event Configuration.
Figure 2.22. Search Screen
Display Mode
Figure 2.23. Display Mode Button
The number and the shape of cameras to display can be selected by clicking these buttons. These buttons do the same
action with the ones in the live screen.

Basic Functions
18
Calendar
Figure 2.24. Clock Selection
The calendar is displayed after clicking the clock in the left bottom of the screen.
Figure 2.25. Screen with Calendar
Figure 2.26. Date Selection
The date to search can be selected. The year and the month can be changed by clicking the arrow buttons in the top of the
calendar. If the recorded data exist in the selected year and month, color for the number of the year and the month will be
displayed with a different color.
The color for the date informs the existance of the recorded data and the event data with following 3 colors.
• Gray: Nothing can be selected in the day as here’s no data.
• Red: The only recorded data exists in the day.

Basic Functions
19
• Red with yellow underline: The recorded data and the event data exist in the day.
Timeline
Figure 2.27. Timeline
The information for the recorded data and the event of the selected date and the time is displayed. It has two kind of data.
• Red: The recorded data are contained to a red bar.
• Yellow: The event data are contained to a yellow bar. Any kind of the occured events are displayed. Detail information
is described in event log.
The part where the information are displayed is consists of two main parts.
Daily Information Bar
Figure 2.28. Daily Information Bar
The overall information of a day for the selected data from the calendar is displayed. The enlarged information with
seconds is displayed on the detail information bar.
Detail Information Bar
Figure 2.29. Detail Information Bar
The information for the recorded data and the event of the selected time from the daily information bar is displayed.
Lots of second lines which stands for a second is drawn vertically in the detail information bar. The recorded time is
displayed per a minute below the second lines. The cyan vertical line indicates the current playing position on the search
display.
The data of the desirable position can be played by clicking left mouse button. The cyan vertical line is moved to the
nearest data when the area with no data is clicked. The data which is earlier than the selected data is displayed by
scrolling up mouse wheel button and the data which is later than the selected data is displayed by scrolling down mouse
wheel button.
Control Play-back

Basic Functions
20
Figure 2.30. Control Play-back
Replaying the recorded data is controlled by Play, Stop button. The speed of playing is configured to original(1x) b y
clicking Play button once. The speed will be changed by clicking Play button continuosly in replaying. Supported speeds
are 1x, 2x, 4x, 8x, 1/4x, 1/2x, and it will be changed in this order.
Moving per time and frame can be controlled by buttons of Move Backward 1 second, Move Backward 1 minute, Move
Forward 1 second, Move Forward 1 minute.
These actions are applied to all of the cameras which are shown in the search mode.
Search Exit
Figure 2.31. Live Button
Searching will be quit and the screen will be back to the main display by clicking live button.
Backup
Figure 2.32. Backup Button
This button shows the window of saving still image and Movie Backup button when the selected camera has recorded
videos or the window of backup directly when the camera has not recorded videos.
The selected camera will be saved to still image. File name consist of ‘dvr-camera number-beginning time-ending
time-frame number’ basically, and it can be changed. Extension is attached automatically when file format to save i s
selected. Supported formats are JPEG(JPG), PNG, BMP.
Detail information is described in the section called “Backup”.
Figure 2.33. Save Still Image

Basic Functions
21
Event Search
Figure 2.34. Event Search Button
This button shows or hides the event search window. The event search window describes detail information for the
simple information in the timeline. It displays the information for time, name, device, zone and counter and descripton of
the selected events from the timeline.
Figure 2.35. Event Search
Duration is set by the time which is selected from timeline, and Apply search time is selected automatically. Duration can
be specified directly when the item is not selected. Also, it can be specified by clicking the icon which is in each input
item of date and time. Basically, the event search list for All Cameras and All Events are displayed. Specific event or
camera can be seen by selecting it from the event search window. The result from the search can be sorted by 4 Sort by
method of Time (Descending), Time (Ascending), Event or Camera / Device . The number of currently displayed events
and the number of all of displayed events are displayed above the event search list. The next event list is displayed by
moving down the scroll bar automatically. The items to display VCA information is configured by clicking VCA Display
Setting on the bottom of the window. Detail information is described in Video Contents Analysis (VCA) Configuration.
This window can be closed by clicking the close button on the right bottom of the window.
Choosing the type of event is needed when you want to see specific events only from the event search window.
Zoom Search Screen

Basic Functions
22
Figure 2.36. Zoom Button
This button show control buttons to zoom in or zoom out the current screen. The control buttons are displayed on the top
left of the selected camera. Detail information is described in the section called “Camera PTZ / Digital Zoom”.
Figure 2.37. Zoom Control Button
Backup
This fuction supports backing the recorded data to CD-R/RW, DVD-R/RW, DVD+RW, USB hard disk, USB flash
memory, and the data can be selected by date, time and camera.
Select File Catalog to Backup

Basic Functions
23
Figure 2.38. Select File Catalog to Backup
To back up the recorded data on disk, the file catalog to back up have to be added. The files to back up will be added by
clicking Add... button by date, time and camera. The information for the added file catalog is shown in order, the total
size of all the added files is shown below the check button of the camera. The camera can be selected when an added file
is selected, and it can be modified, removed and described with detail information. After finishing adding file catalog,
clicking Forward button is needed.
Add...

Basic Functions
24
Figure 2.39. Add File List Screen 1
Above picture is the first screen of the step to add files to the list to back up. Clicking Add... button is needed to proceed
to the next.

Basic Functions
25
Figure 2.40. Add File List Screen 2
The start date to back up should be selected on calendar. Then, select the start time from timeline and clicking Set...
button is needed.
Figure 2.41. Add File List Screen 3
The end date should be selected in same order of the start date. Even if the order of the start date(From) and the end
date(To), file lists will be obtained automatically. Then, the selection of the number of the camera to back up is needed.
Clicking OK button is needed to proceed.
Modify...

Basic Functions
26
Figure 2.42. Modify File List Screen
This button modifies the file list which will be back up. Selection target in a similar manner to adding and clicking OK
button are needed.
Advanced...

Basic Functions
27
Figure 2.43. Advanced Information for File List Screen
This button shows detail information of the file list to backup, the paths and the size of the contained file name. The
specific file can be removed from the file list by deselecting it. The deselected files are displayed with red striked line and
it will not be backed up.
Select Backup Device

Basic Functions
28
Figure 2.44. Select Backup Device Screen
The list of available devices for backup is displayed in this area. CD-R/RW, DVD-R/RW, DVD+RW, USB CD-R/RW,
USB hard disk, USB flash memory are supported. If the device is not scanned to the system, it will not be appeared in the
list. Clicking Forward button is needed after selecting device to back up.
Recording

Basic Functions
29
Figure 2.45. Backup Progress Screen
After ready for backup, backup will be begun by clicking Recording button. The button will be disabled when the total
combined size of the files to back up is exceeded the maximum storage size. To change backup configuration, you can
click Cancel button to start configuration again from beginning or Back button to move to the previous page.
• Warning
• If the backup is started once, you must not cancel it before it is finished.
Recording Complete

Basic Functions
30
Figure 2.46. Recording Complete Screen
To record the same file list again after finishing backup successfully, Recording button should be clicked after moving to
the previous page by clicking Back button.

Basic Configuration
31
Chapter 3. Basic Configuration
This chapter describes the configuration for the basic functions of MicroDigital NVR.
Display
The screen and display options can be configured in this section.
Figure 3.1. Display Configuration Window
Language
The language which is used for display messages can be selected, an the program will be restarted to apply this
configuration. Currently supported langauges are English, Korean, Japanese, Spanish, Chinese, German, Hungarian,
Protugal, Czech, Italian, Polish, Hebrew and Russian.

Basic Configuration
32
Figure 3.2. Supported Languages
Camera Information
• Location
• The location of the camera information on the camera video (N/A, Top-Left, Top-Right, Bottom-Left, Bottom-Right)
• Background Color
• The color and transparency of the background of camera information
• Show the title
• Show the camera title.
• Font & Color
• The font name, size and color of the camera title text
• Show network information
• Show the camera’s network information like video / audio bitrates(bits per second), fps(frames per second) and video
resolution.
• Font & Color
• The font name, size and color of the network information text
Camera Switch
• Interval
• You can adjust the interval between camera groups which is switched automatically when ‘Switch’ button is pressed.
Keyboard
• Enable On-Screen Keyboard
• Enable OSK(on-screen keyboard) for typing text entry.
• Enable keyboard actions
• Enable keyboard shortcut actions.
• Enable keyboard search for camera title
• You can select and popup the camera by typing the name of camera and following Enter with keyboard. Only ASCII
characters can be used like alphabet, numeric, etc.

Basic Configuration
33
Performance
• Skip decoding of invisible network camera videos
• Skip decoding of network camera videos which are not visible in current display mode.
• Skip decoding of live network camera videos in search mode
• Skip decoding of live network camera videos which are not visible in search mode.
• Enable captured live video
• Use overlay video of RT1640DH cards in live screen
Screen Layout
• Camera Button Columns
• The number of camera button columns
• Set display mode buttons automatically
• The number of the display mode buttons is automatically calculated when this option is enabled. If it’s disabled, the
number of display mode buttons can be configured with Display Mode Buttons.
• Show panels with overlay mode
• Show camera buttons, clock, etc. over the camera videos.
• Show the corner arrow
• Show the corner arrow indicating the area to switch fullscreen mode.
• Fit video image into the camera area
• Ignore original camera video ratio, and fit video image into the camera area.
• Enable screen lock button
• Enable screen lock button on the live screen.
Animation
• Enable animation effect
• Use animation effect for mode switching, screen toggle, etc.
• Mode Switch Duration
• The duration to switch display modes.
Monitor Setting
This configuration provides monitor settings.

Basic Configuration
34
Figure 3.3. Monitor Setting Screen
• Single / Cloned Monitors
• This item configures the screen resolution of the connected monitors. If two or more monitors are connected, all
resolutions which are supported by each monitor will be appeared. Special * sign appears after the resolution text if the
resolution is supported by all connected monitors. When you select such a resolution, completely same screen is
displayed. If you select a resolution which does not include * sign, the system will display the screen to the nearest
resolution. In this case some monitors which cannot support that resolution will display partial of the screen.
•

Basic Configuration
35
•
• Figure 3.4. ’Single / Cloned Monitors’ Selection Screen Resolution
• Multiple Monitors
• If Two or more monitors are connected to the system then you can select resolutions for each monitors. You can assign
the camera group to each monitors. The camera group is specified with the start camera and the last camera.
•

Basic Configuration
36
•
• Figure 3.5. Multiple Monitors Screen
• Apply
• If you click Apply button, the configuration will be applied and monitor setting window will not closed. The
confirmation dialog will be appeared by modifying configurations.
•
•
• Figure 3.6. Changing Monitor Setting Confirmation Dialog
• After you have changed the setting, and press the Apply button or Ok button, a confirmation dialog is displayed. If you
press the Yes button, the new settings are applied. And if you press the No button, to return to the previous setting. If
you do not press a button within 15 seconds, to return to the previous setting.
• Ok
• If you click Ok button, the configuration will be applied and monitor setting window will closed. The confirmation
dialog will be appeared by modifying configurations. If you click Yes button on the confirmation dialog, the system
will be restarted.
• Note
• ’Multiple Monitors’ option is enabled only when two or more monitors are connected to the system.
• Note
• After openning ‘Monitor Setting’ window if you connect or disconnect a monitor cable, then the system
will find the optimum resolution automatically. If you connect two or more monitors to the system, the
highest resolution which is supported by all connected monitors is setted and same screen will be
displayed.
Camera

Basic Configuration
37
This configuration adjusts functions for camera/video. It can adjust brightness, colorness and can select the source of the
camera.
Figure 3.7. Camera Configuration
Camera Selection
The selection of the camera is needed when the configuration needs to be changed. The configurations of multiple
cameras can be set by clicking check box which is in first column of each row. The changed configurations are applied to
all of the cameras simultaneously when the check box of the first row which contains titles of each column is clicked.
Untouched configuration items are not applied to all of the cameras.
Camera Attributes
Camera attributes are as follows.
• Name
• This item changes the name of the camera. Changing the name of the camera can be done by clicking the co lumn of
name after clicking the row of the camera. This is using on displaying the camera name in the main display or in the
network client. It is also using on the configuration of the camera and the event for recording.
• Network Camera
• A network camera or a capture camera to connect the channel can be selected from the list of registered camera, or the
connected camera can be deselected by clicking this item.
• Brightness
• This item adjusts brightness of the camera.
• Contrast
• This item adjusts contrast of the camera.
• Colorness
• The more its value goes to the left, the more black and white the color turns to, the more it goes to the right, the thicker
colorness is.
• Hue
• The more its value goes to left, the stronger green is, the more it goes to the right, the stronger red is.
• Hidden

Basic Configuration
38
• This item hides the camera video from the main display as the video is not existed. Other functions work correctly such
as the recording, the network transportation and the searching.
• Deinterlace
• Use deinterlace filter.
• VCA (Video Contents Analysis)
• Show the VCA setting window for the camera.
Network Camera Sources
Network camera to be connected with a channel can be registered or removed. Added camera can be selected on Network
Camera item of the camera property.
Figure 3.8. Network Camera Sources Configuration Screen
To add a new network camera, you should enter the name of the network camera to the left input window after clicking
New button. Afterwards, the attributes to be connected to the right network camera should be entered and Check
Connection & Inputs button should be clicked for updating the information of sensor, relay and status.
Scan UPnP / ONVIF IP Camera... The UPnP / ONVIF IP cameras on local network can be scanned from the network and

Basic Configuration
39
added to the list.
The selected network camera will be removed from the list by clicking Delete button.
The order of the added camera in the list can be changed by clicking arrow button besides Delete button.
All of the changed configurations will be applied by clicking Ok button. All of the changed configurations will be
ignored by clicking Cancel button.
• Model
• The model of network camera to be connected should be selected here. The configurable attributes are varied
according to the selected network camera. Supported IP cameras are described in the section called “Supported IP
Cameras”.
• Address
• The address of network camera IP should be entered. All of the path without port number are needed when the model
is a RTSP IP Camera.
• Port
• The port number for network camera to be connected should be entered. If the configuration of network camera is not
changed, the port number is configured with default value according to the model of the network camera.
• RTSP Port
• Set up the RTSP port for network camera. If you use the RTSP port number entered by the user, enable the check box.
Then enter the RTSP port number. If you use the RTSP port number of network camera, disable the check box.
• Audio Port
• Set up the audio port for network camera. If you use the audio port number entered by the user, enable the check box.
Then enter the audio port number. If you use the audio port number of network camera, disable the check box.
• Event Port
• Set up the event port for network camera. If you use the event port number entered by the user, enable the check box.
Then enter the event port number. If you use the event port number of network camera, disable the check box.
• User
• The user id is necessary to access the network camera. Detail information is available in the instruction manual of the
network camera manufacturer.
• Password
• The password is necessary to access the network camera. Detail information is available in the instruction manual of
the network camera manufacturer.
• Use Public Address
• The public IP address is used instead of the private IP address for the camera which is connected through private IP
environment. Enabled option should be selected to use this function. Disabled option should be selected not to use it.
This item is enabled when the type of the network camera is ONVIF IP camera or UDP Technology IP camera.
• Resolution
• The resolution of the network camera video can be selected here. This selection is only available on the supported
model.
• Transport
• Data transportation manner of the RTSP network camera is selected. RTP over RTSP/TCP, RTP over UDP,
RTP/RTSP over HTTP/TCP are currently available. Supported manner from the camera should be selected.
• Profile
• The profile of the network camera video can be selected here. This selection is only available on the supported model.
• Keep Alive
• This item is for keeping alive on RTSP/ONVIF IP camera. Enabled option should be selected to use this function.
Disabled option should be selected not to use it.
• Check Connection & Inputs
• This button updates the information of sensor, relay, status after the first connection with the network camera by
entering model, address, port, user, password, resolution. A new network camera can be registered when this job is
finished successfully.
• Sensor
• The mapping for sensor of the network camera is only available on the supported model.

Basic Configuration
40
• Relay
• The mapping for relay of the network camera is only available on the supported model.
• Status
• The number of the video, the audio connected with the network camera and the use status of the network camera will
be displayed.
Network Camera Auto Mapping
Registered network camera sources are connected to camera in order. Previous camera configuration will be overwritten.
The Number of Cameras
This item specifies the number of displayable cameras. The maximum number of cameras to specify depends on the
models of the system. Detail specification is described in the section called “MicroDigital NVR Models”.
Capture Video Standard / Size
This item specifies standard of video which will be captured to NTSC or PAL and resolution which is supported by
capture card.
• Note
• Capture Video Standard / Size option is enabled only in the system with capture card.
Camera Signal
A status for a camera video input is not entered in a specific time will be detected and recognized as a camera signal loss.
Conversely, status for the camera video input is entered in the status of the camera signal loss will be detected and
recognized as a camera signal recovery.
Loss Event Mapping...
This item configures event to connect when a camera signal loss is detected.

Basic Configuration
41
Figure 3.9. Loss Event Mapping Configuration Screen
Recovery Event Mapping...
This item configures the event to connect the signal when a camera signal loss is detected.
Figure 3.10. Camera Signal Recovery Event Mapping Configuration Screen
Audio
This configuration adjusts the functions for the audio. It enables or disables the audio function and configures for the
audio device.

Basic Configuration
42
Figure 3.11. Audio Configuration Screen
Audio Property
• Name
• This item indicates the name of audio for the connected camera. It is not able to editable while one of camera
configuration is editable.
• Note
• Name option is enabled only in the system with capture card.
• Volume
• This item adjusts the volume of the selected audio. Its value can be from 1 to 100.
• Note
• Volume option is enabled only in the system with capture card.
• Mute
• This item turns on or turns off the volume of the selected audio.
• Note
• Mute option is enabled only in the system with capture card.

Basic Configuration
43
Play audio for selected camera in live screen
This item plays audio of the selected camera in live screen.
Play audio for selected camera in search screen
This item plays audio of the selected camera in search screen.
Broadcast audio to selected camera in live screen
This item broadcasts audio to the selected camera in live screen from NVR mic phone.
Play Volume
The master volume of playing audio can be set to one of value from 1 to 100. Volumes of various part is configurable by
clicking More... button.
Figure 3.12. Volume Configure Screen

Basic Configuration
44
Record
This configuration adjusts the quality of video/audio recording or changes the schedule of the recording. The configured
values are applied to streaming which is transported to network client.
Figure 3.13. Record Configuration Screen
Select Camera
This item selects the camera to apply the changed configuration. The configurations of multiple cameras can be set by
clicking check box which is in first column of each row. The changed configurations are applied to all of the cameras
simultaneously when the check box of the first row which contains titles of each column is clicked. Untouched
configuration items are not applied to all of the cameras.
Record Property
• Resolution
• This item selects a video resolution to use in the recording and streaming.
• Codec
• This item selects a video codec to use in the recording and the streaming. It is selectable between H.264 and MPEG4
codec. H.264 codec has better quality while H.264 consumes more cpu resources on using the same size of the data.
• Frame Rate
• This item decides the number of the frames per one second to use. The bigger its value is, the softer motion is. But the
quality is getting worse proportionally when higher frame is used in the same bit rate.
• Quality
• This item selects a predefined bit rate and a key frame interval. 1 is the best quality and the bigger value is, the worse
quality is. Even the same level of the quality is selected, the real quality can be different on the type of the IP camera,
and selectable ranges of the quality are different.
• Bitrate
• This item decides the quality of the video to record. The quality is specified by bit rate(bits per second). The higher bit
rates are, the bigger needed disk space is. The lower bit rates are, the lower quality of video is. But the quality of the
recording will not be much better above certain level.
• Bit rate should be adjusted with considering the installed place or the quality of the connected IP camera. Noisy and

Basic Configuration
45
dynamic screens need bigger bit rate than other ones to get a similar quality to them at least.
• For reference, the quality of a common video CD is about 1400 Kbps, and the quality of an internet streaming averages
100K ~ 500K.
• Key Frame Interval
• This item decides the interval of key frames which can be replayed with lossless in recording. Key frame needs ten to
hundred times size of other frames. The larger interval of key frame is, the bigger space other frames can use, so the
overall quality will be better. Conversely, the smaller interval is, the less space other frames can use, so the overall
quality will be worse.
• Bigger interval of key frames makes better quality, but the delay time for seeing the next frame will be longer when the
network transmission is delayed or unstable and the program have to wait next frame as some middle frames are lost.
Conversely, smaller interval makes worse quality, but the delay time will be reduced.
• Also bigger interval makes the seek time longer because the playable video can be obtained when the decoding from
the key frame to the desirous of frame is done on searching and playing random position. Conversely, smaller interval
makes the seek time shorter.
• For reference, the key frame is used with the interval of one second for common video, of about five to thirty seconds
for the internet streaming.
• Pre-Event
• This item configures when the recording will be begun before the event in seconds.
• The real start time of the recording can be earlier than the configured one. Because correct MPEG4 video can be
obtained when recording is begun from key frame, but the location of key frame may not be matched exactly. In this
case, recording will be begun from the previous key frame because more recording is better than less one as the
characteristics of the NVR device.
• For reference, the smaller interval of key frames is, the less error occurred.
• Post-Event
• This item configures when the recording will be finished after the event in seconds.
• OSD Location
• This item specifies the content and the location of OSD to display. Content can be of one of name or time. Location
can be one of Top or Bottom. You can select one of pattern like Bottom [name,time].
• OSD Date Format
• This item specifies date format of OSD to display. It is consists of combinations with four digit of year (YYYY), each
two digit of month (MM) and day (DD), and sperators (-, /).
• OSD Color
• This item picks a color of OSD to display.
• Privacy Zone
•

Basic Configuration
46
•
• Figure 3.14. Privacy Zone Configuration Screen
• Sensitive area can be hidden by configuration of privacy zone.
• Note
• Configurations for OSD and privacy zone are enabled only in the system with capture card.
Always record cameras
This item decides whether records camera always regardless of the recording schedule or the event recording. The
recording schedule should be configured and is able to adjust by clicking Schedule... button per hour when it is not
checked.
Figure 3.15. Always record cameras Screen
The recording schedule can be adjusted for each camera. Recording will be done regardless of event recording in hours
applied recording schedule.
Schedule
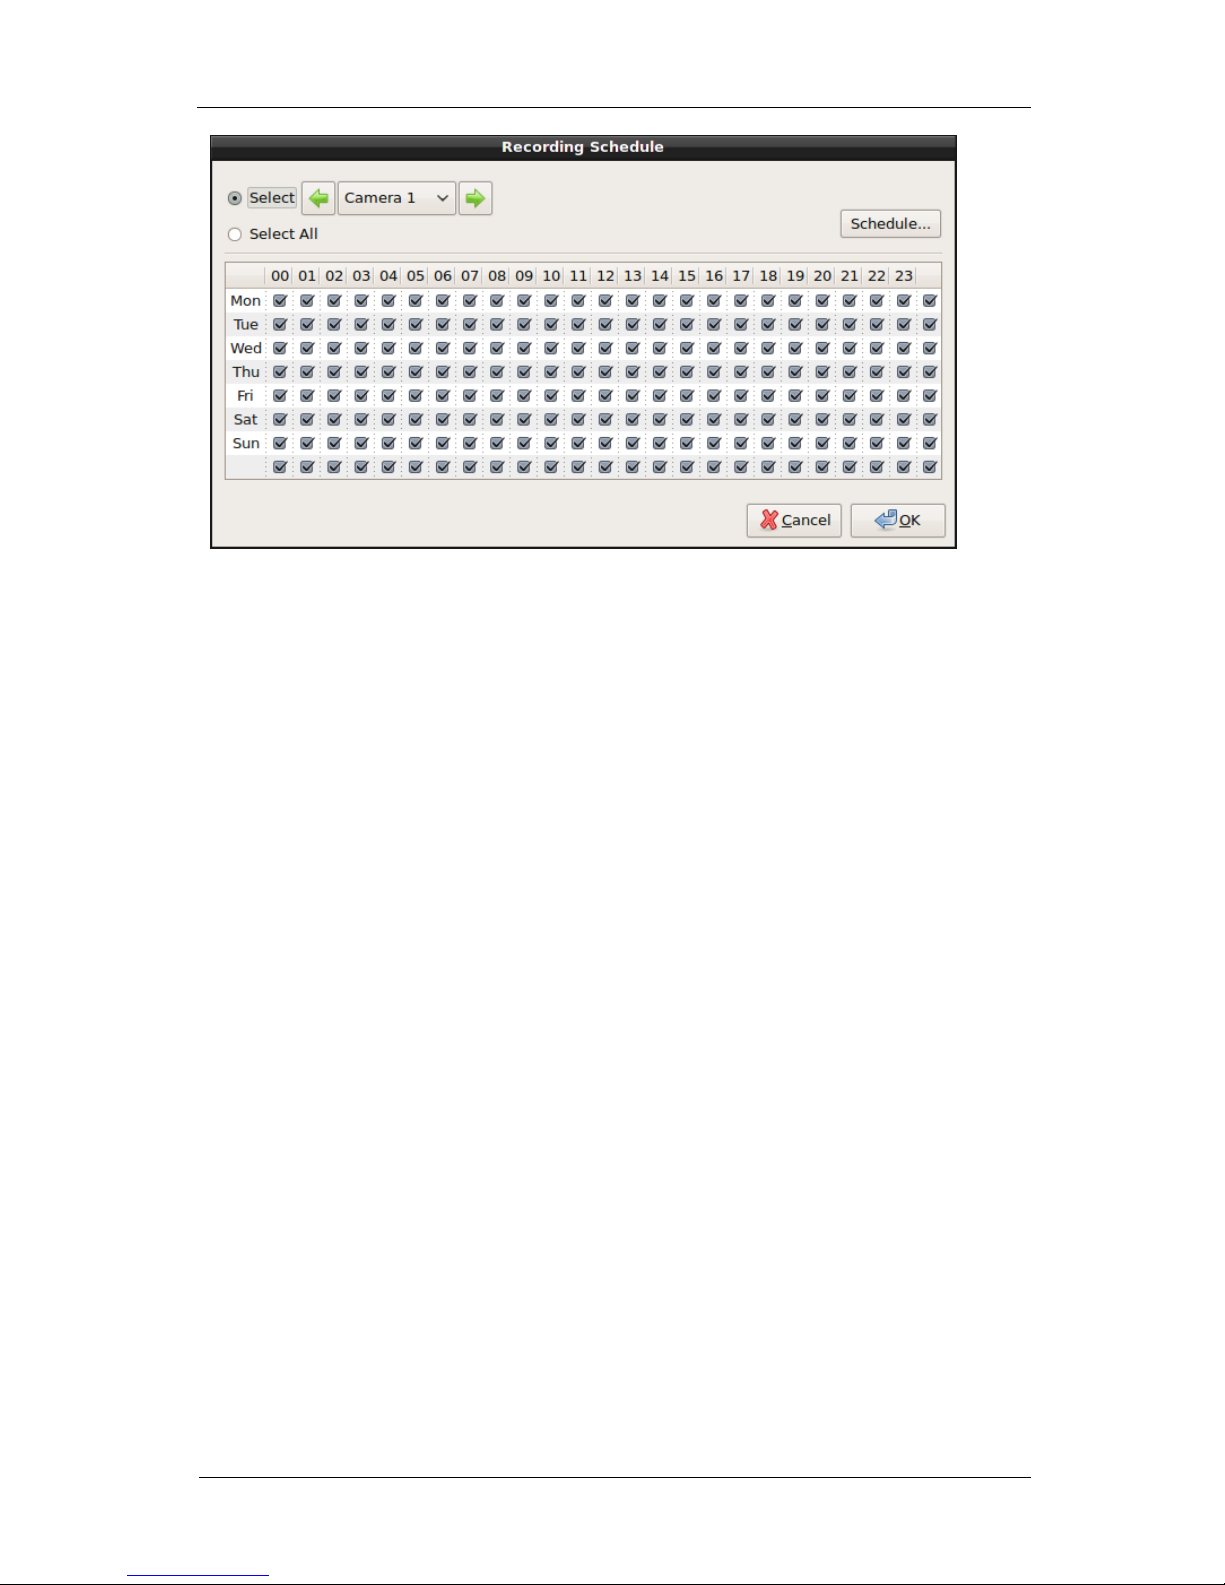
Basic Configuration
47
Figure 3.16. Schedule Configuration Screen
The schedule manages two information. One is about date, the other is about hours. Each row above configuration screen,
is one schedule. A schedule can be added, modified, removed in specified date through this configuration.
One of the created schedule applied to any devices using the schedule. For example, if a schedule applying on 1st of
every month is created, all of the configuration for recording, motion detection, sensor are enabled on 1st of every month.
And not just adding but also removing will applied to other devices using the schedule, so you should be cautious when
you remove a schedule with the use of other device.
User Schedule Configuration on Specific Date
The schedule of the user on specific date can be added. Following example will show how to add schedule for every
alternate Wednesday. The configuration for date can be begun by clicking Schedule... button on the right top of the
window.
Figure 3.17. Initial Schedule for Specific Date Screen

Basic Configuration
48
Followings are description for each part.
• Calendar
•
•
• Figure 3.18. Calendar
• This item selects start date for the schedule. It indicates today basically. The date with schedule is displayed with bold
letters.
• List
•
•
• Figure 3.19. List
• This item shows the list of the schedule on the selected date from calendar. The configuration in the middle section
will be enabled when one schedule from the list is selected. The list for one week providing basically from system is
not shown in this list.
• Name
•
•
• Figure 3.20. Schedule Name
• This item is a name for the schedule. It is the same with one in the list below calendar.
• Repeat Type
•
•
• Figure 3.21. Repeat Type
• This item decides the repeat type of the schedule. The types are one execution, continuous execution to the specific
date and endless execution.
• Start Date and End Date
•
•
• Figure 3.22. Start Date and End Date

Basic Configuration
49
• This item configures start date and end date for selected schedule. It can’t be modified directly. Start date is selected
date from calendar on the top of the window. End date can be enter from calendar by clicking ... button.
• Repeat Term
•
•
• Figure 3.23. Repeat Term
• This item configures repeat term of selected schedule.
• Add
• This item adds a new schedule. The new schedule will be added to the selected date by clicking this button. Desirable
schedule is made of name, type of repeat, start and end date, repeat term after clicking Add button.
• Remove
• This item removes the selected schedule.
You should select the start date of the schedule on Calendar. Clicking Add button on the right top of window is needed to
add a specific date.
Figure 3.24. After Clicking Add Button Screen
The middle section of the configuration window will be enabled after the untitled schedule is added to List below
Calendar. Above screen is for the result of selecting February 5th, 2009 from Calendar and clicking Add button. 3th and
26th day from Calendar are displayed with bold font because those day have the registered schedule already.
You need to change the repeat type to Repeat and select the end date from Calendar by clicking ... button.

Basic Configuration
50
Figure 3.25. Selection of End Date from Calendar Screen
Repeat term can be configured to the specific term. Below screen is the schedule configuration from February 5th, 2009
to May 15th, 2009 every alternate Thursday.
Figure 3.26. The configuration from February 5th, 2009 to May 15th, 2009 every
alternate Thursday Screen
Below screen is the changed configuration to be executed forever.

Basic Configuration
51
Figure 3.27. Removed End Date Configuration Screen
The specific schedule should be selected and Remove button should be clicked when the specific schedule needs to be
deleted. The basic weekly schedule of the system cannot be modified or deleted.
The schedule of the specific date can be changed by selecting the date.
If all of the configuration is done, the configuration can be saved by clicking Ok button. All of the changed configuration
will be discarded by clicking Cancel button.
Hourly Information
Any schedule can be selected or not selected by one hour. The configuration can be applied to all of the devices by
clicking Select All button. It can also be applied to only the selected device through the menu in the left top of the
window.
Figure 3.28. Hourly Information Screen

Basic Configuration
52
The recording schedule can be applied per each camera. The camera will be recorded always regardless of event
recording in the time where the schedule is applied.
Pan/Tilt/Zoom
This configuration adjusts Pan/Tilt/Zoom devices connected to the camera.
Select Camera
This item selects a camera to configure Pan/Tilt/Zoom. The configurations of multiple cameras can be set by clicking
check box which is in first column of each row. The changed configurations are applied to all of the cameras
simultaneously when the check box of the first row which contains titles of each column is clicked. Untouched
configuration items are not applied to all of the cameras.
Figure 3.29. Pan/Tilt/Zoom Configuration Screen
Pan/Tilt/Zoom Property
• Enabled
• This item decides whether Pan/Tilt/Zoom is used for the camera.
• Note

Basic Configuration
53
• This can be toggled only for capure cameras.
• Protocol
• This item indicates Pan/Tilt/Zoom protocol of the camera.
• Supported protocols are following figure.
•

Basic Configuration
54
•

Basic Configuration
55
• Figure 3.30. Pan/Tilt/Zoom Protocol List
• Note
• This can be configured only for capture cameras.
• Target Address
• This item indicates target address to send Pan/Tilt/Zoom command.
• Note
• This can be configured only for capture cameras.
• Speed
• This item indicates speed of the camera when it recieved Pan/Tilt/Zoom command.
• Serial Port
• Pan/Tilt/Zoom command is transmitted through a serial port. The serial port should be selected to transmit the
command.
• Note
• This can be configured only for capture cameras.
Preset for selected camera
This item makes the camera to move to the remembered position or to the user-specified position.
• Move
• This item executes a preset function. The camera will be moved to the remembered position after selecting the preset
number and clicking this button. The preset function is also available at alarm/preset button in the main display.
• Set
• Preset can exist on the camera already and you can specify any preset position as support from the camera. Available
number of the preset is from one to 32 depending on the model. The number of the preset can be changed by using the
button.
• Reset
• This item resets the configuration of the preset to the default.
Network
This configuration provides network settings.

Basic Configuration
56
Figure 3.31. Network Configuration Screen
Network Server
• Connection List / Filtering
• If you click More... button, connected client list and filters are shown.
•

Basic Configuration
57
•
• Figure 3.32. Connection List / Filtering Screen
• If you click Ban button on the connection list, the connection is disconnected immediately and IP address is appended
to ‘Deny’ filters automatically.
• Filtering works with two filter lists, ‘Allow’ and ‘Deny’. If ‘Allow’ is empty. all connection are allowed. If ‘Allow’ is
not empty, however, only matched connections are allowed. If a connection is matched to ‘Deny’ filter list, it is denied
always.
• A filter is composed of ‘user’, ‘address’ and ‘mask’ in the form of ‘user@address/mask’. the ‘user’ stands for NVR
user name, and you can specify multiple users at once using ‘*’ characters, for example, ‘guest*@’ specifies all
accounts whose name starts with ‘guest’. If ‘user@’ part is missing, it is set to ‘*@’, all users, automatically. the
‘mask’ acts as bit-wise AND operator to IP address, for example, subnet ‘192.168.10.’ is specified by filter
‘192.168.10.0/255.255.255.0’ form. If the filter has only address part, the mask is set to ‘255.255.255.255’
automatically.
• Port
• This item configures the port number to receive MPEG4 streaming from the network. server.
• Warning
• Connection will be not available when the client does not specify the port number after changing this
information.
• Max Connections
• This item is a number of the maximum connectible clients. Too many clients which monitors remotely carries a load to
the system, so the system can be disrupted basic function. It is used to limit the connections of the client. The server
refuses the connection when the number of the connections is exceeded this value.
• If the number of the maximum clients is reduced to ten when current one is one thousand and fifty clients are
connected, the current connections are preserved but, no more connections are available.
• Allow clients to control streaming quality
• The client uses the streaming configuration of bit rate, fps and key frame interval from the system basically. But it may
be changed by the network status or other needs.

Basic Configuration
58
• These modifications carry a load to the system totally, so the client is prohibited to change this configuration by default.
This option enables the client to change this configuration in case of need. The account of the client needs a permission
to control the streaming also.
• IP TOS(Type of Service)
• This item is from the third bit to the fifth bit of eight bits which is included in IP packet header, and represents the type
of the query for the requested service.
• LOWDELAY: minimum delay
• RELIABILITY: maximum reliability
• THROUGHPUT: maximum throughput
• LOWCOST: minimum cost
File Sharing
This function is the same function with one of windows, the client can see the recorded data in NVR through the function
when the function is turned on. But the shared files are read-only and cannot be removed or written.
The function cannot be used when the user has not proper permission even if it is turned on.
MJPEG Streaming
This item transmits Motion JPEG video through HTTP protocol.
Function of each item is as follows.
• URL
• This item is a web address to connect to the MJPEG streaming server.
• It can control the specific function with parameter in the format of CGI (Common Gateway Interface).
• user
• This item is the user name to authorize.
• password
• This item is the password to authorize.
• channel
• This item is the channel number to request MJPEG streaming. Its value starts from zero.
• check
• It returns feasibility of the authorization. The authorization will be executed when the value is on.
• snapshot
• This item brings just one JPEG image. It will be executed when the value is on.
• html
• This item returns the result of the request to HTML page. It will be executed when the value is on.
• width
• This item specifies the width of the video in the HTML page.
• height
• This item specifies the height of the video in the HTML page.
• Quality
• This item specifies the quality level of MJPEG video.
• Frame Rate
• This item specifies the transferring frames per second of MJPEG video.
• Resize images for mobile devices
• Video is transmitted with scaled proper size to the mobile device. The default configuration is to transmit the video
without scaling.
Web Client

Basic Configuration
59
You can use the private client to connect to NVR, but it is not installed everywhere. So using web browser is one way to
see the monitoring video from NVR where the private client is not installed.
Internet explorer, the web browser asks downloading ActiveX when the user is connected to NVR through web. The
screen of NVR can be seen on a web page by clicking connection button after downloading ActiveX.
Web client of MJPEG mode will be executed in other browsers, not ActiveX mode.
• Web Browser URL
• This item is an address which should be entered on the address bar of web browser to connect to NVR on the outside.
• Web Port
• This item is a port number to get WWW service. It is 80 usually, the port number can be omitted from address in this
case. But it cannot be omitted when it is not 80.
• The address in Web Browser will be changed after changing the web port configuration.
• Note
• All connections will be permitted in general when the web port have to be changed. But there can exist
special case or the connection from port 80 can be prohibited to limit web service in by ISP. Web
service can be provided by using other port number in this case.
• Forced Web Address
• This item forces the address of the web server. It is used to permit connection when the address of NVR and the
address for the connection are different.
Dynamic DNS
This item enables dynamic DNS function. The client can connect to the NVR server by using the same domain name
when the address of NVR in DHCP is changed.
• Note
• Operation Method of Dynamic DNS
• Dynamic DNS works in following method.
• Operation in NVR : NVR sends the DDNS name and the changed IP address to the DDNS server
whenever the address changes. The DNS server updates its address with the retrieved information.
• Connection from client : The DDNS name will be converted to IP address of the DDNS server when a
client tries to connect to the server. So the client can connect to the NVR server through the DDNS
name regardless of time and place.
• Enable this function
• This item enables or disables dynamic DNS function.
• Update now
• This button is activated when EDNS server is selected. The update request will be sent to the EDNS server with the
current information by clicking the button.
• Domain Name
• This item enters the domain name which is registered in the dynamic DNS server. The client can connect to this device
with the domain name outside. But the host name should contain the domain name which is registered in
www.dyndns.org when www.dyndns.org is selected.
• User
• This item is mandatory when www.dyndns.org is selected. But it cannot be entered when the EDNS server is selected.
It should be the same with the user ID of www.dyndns.org.
• Password
• This item is mandatory when www.dyndns.org is selected. But it cannot be entered when EDNS server is selected. It
should be the same with the password of www.dyndns.org.
• Server
• This item selects the dynamic DNS server. www.dyndns.org and EDNS are supported. Registration is required when
www.dyndns.org is selected. Registration is not required when EDNS is selected.

Basic Configuration
60
• Domain Name Registration to www.dyndns.org
• First, you should access to http://www.dyndns.org or http://dyn.com to make your own account on the server. You
can make the account by selecting Sign In from the right top of the login window.
• You should select My Services from the upper buttons after login. Then, you should select Dynamic DNS Hosts
from left menu. Then, the list of using service will be appeared. You should click Add Host button to proceed. You
should fill the information like Hostname, IP Address and click Add To Cart button. A window of the payment will
be appeared and just click Proceed to checkout button. The list of the service request and simple summary will be
appeared. You should click Activate Services to finish registration when above contents is correct.
• Two hosts are available for free per an account of Dynamic DNS. More hosts are for charge.
Only domain name is required when EDNS is selected. Only registered product can be provided this service.
• User public IP address
• This item is activated when EDNS is selected, in case the MicroDigital NVR device uses private IP address when the
device is connected to NAT(Network Address Translator) device like IP sharing device. It uses public IP, not private
IP for the entered domain name.
• Note
• Connection is not available temporarily when the time (5 minutes) of updating DDNS information and the
time (3 minutes) of recognizing is not matched. Trying again is needed after about ten minutes.
Network Interface
It configures network interface settings like IP address, traffic shaping. Refer to Network Interface Configuration.
User
This item configures the user.
Figure 3.33. User Configuration Screen
User
The user information contains followings.
• Account

Basic Configuration
61
• The name of the account and the simple description is shown in here.
•
•
• Figure 3.34. Default Available Account List
• User
• This item is an unique value for all user, so each user can be distinguished from the system.
• Password
• This item is used to authorize a user and it is saved with one-way encryption which the information cannot be extracted
reversely.
• Password(verify)
• This item is used to verify a spelling of above password phrase. If it is different from above, password will not
changed.
• E-Mail
• This item is used when the user has an authority for email. It only needs the data with email format. It is not mandatory
to run the NVR system.
• Description
• This item is the information of the user and not mandatory.
• Role
• This item selects Role which is described in the next section. A window for modify, add, remove function will be
appeared by clicking More... button.
• Warning
• Administrator account cannot be removed and changed the role. Other information can be changed. The
name ‘admin’ can be changed to other and password, email, description can also be changed.
• Modify/Add/New/Remove
• Modify button is used for the reflection of the changed information, Add button is used for the addition of a new user
with the entered information on the screen. New button readies to enter the information of the new user by clearing all
information on screen. Remove button is used for removing the selected account.
• However, the account of the administrator cannot be removed.
• Enable user authentication (login box)
• Every system start to work from login. In other words, unauthorized user cannot use the system. Even authorized user
has limitary permissions by the role. But most of all users need not login into the system as the characteristic of the
NVR system. So the login window will not appeared in NVR. The login window will be appeared when this option is
used in the opposite case, and the system will work correctly after login.
• Note
• The system regards the user as administrator when this option is disabled. Clicking Lock Screen button
is needed to login as other user.
Role
Role is a set of the configuration of permission. In other words, it is the information for the permission which can be used
by user. User have permissions for the various system configuration like camera and email. But most of all users share
almost same information. So the system resources can be used wasteful when every user have their own permission. For
this reason, the sets of predefined permissions are named. The predefined set is called Role.

Basic Configuration
62
Figure 3.35. Default Permissions of Administrator
• Role
• This item is the selected role.
• Name
• This is the name of the role.
• Use this role as default
• This item selects the default role for a new user.
• Camera Permissions
• This item configures permissions per each camera. ‘Camera 1’ is name of a camera. The last row or column are for all
checkboxs of that row or that column, a checkbox in right bottom is for all checkboxs.
• View
• This item decides permissions for watching the channel data.
• Streaming Control
• This item decides permissions for adjusting the stream per each channel.
• Device Control
• This decides permissions for controlling the device connected to channel like PTZ(Pan/Tilt/Zoom).
• Note
• The role of Administrator can’t be modified or removed.
• System Permissions

Basic Configuration
63
•
•
• Figure 3.36. Permission Modification for User Account
• Configure system
• This item decides permissions for changing the system configuration.
• Search recording data
• This item decides permissions for searching and back-up. The permissions for back-up is available when searching
is available. In other words, this permission is for the past information inspection and back-up.
• Control system devices
• This item decides permissions for control of the system device(poweroff, forced recording...) and digital
input/output.
• Connect via network
• This item decides permissions for connection via the network.
• Access to network file sharing
• This item decides permissions for using windows local file sharing(samba) or not.
• Modify/Add/New/Remove
• Modify reflects the changed information. Add adds the entered input on screen as a new role. New clears all
information on the screen and readies the screen for input of a new information. Remove removes current role, but
can’t modify or remove on Administrator account.

Event Configuration
64
Chapter 4. Event Configuration
This chapter describes the configuration for the event like motion detection, sensor and alarm and links the events to the
handlers.
Motion Detection
Figure 4.1. Motion Detection Configuration Screen
Highlight caputure devices
This button shows only connected configuration of motion detection in current capture card with emphasis.
• Note
• Highlight caputure devices option is enabled only in the system with capture card.
Select Camera

Event Configuration
65
This item selects the camera to apply the changed configuration. The configurations of multiple cameras can be set by
clicking check box which is in first column of each row. The changed configurations are applied to all of the cameras
simultaneously when the check box of the first row which contains titles of each column is clicked. Untouched
configuration items are not applied to all of the cameras.
Motion Detection Property
• Name
• This item indicates the camera name which is configured from Camera Configuration. It is not editable on this section.
• Enabled
• This item decides whether the monitor motion from the all area or the selected area or not. It can be used with
recording, digital output signal, warning message together.
• Sensitivity
• This decides how much difference is occurred to judge the motion detection. For example, if size of width x height of
the camera video is 10 x 10, total number of the points is 100. If the sensitivity is set by 100%, the system judges that
camera has not a motion when any point is not detected. If the sensitivity is set by 90%, the system judges that the
camera has not a motion when less than ten points is detected.
• Note
• The higher sensitivity is, the smaller motion system detects on.
• Noise
• This item decides the level of the ignoring noise from the camera. Much noise can be occurred depending on the status
of the cable connection, then the camera can judge that the motion is detected even camera video is not changed. For
example, if the noise value is 10%, system judges motion detection when the difference between the previous video
and the current video pixel is 10% and more, and the system does not judge motion detection and ignores the
difference when the difference is less than 10%.
• If the color of each coordinate in the current video is Y2 and one of the previous video is Y1, system judges motion
detection when Y2 - Y1 or Y1 - Y2 is bigger than value of noise. In other words, the noise value is a value to ignore to
distinguish normal motion detection and noise. Noise value will be adjusted by the expression of Y2 - Y1 > noise
value.
• Note
• The smaller value of the noise configuration is, the more sensitive detecting the motion will be worked.
But the value should be big when the camera signal is not good.
• Area
• The system can only monitor the motion in the specified partial area when Area button is clicked.
•

Event Configuration
66
•
• Figure 4.2. Motion Area Configuration Screen
• Dragging the mouse button with the desirable area is needed to specify the area to monitor the motion, then the
selected area will be displayed with red color. The system will only monitor the selected red area. Multiple red areas
are selectable.
•

Event Configuration
67
•
• Figure 4.3. Motion Area Configuration with Selected Area Screen
• Clicking Clear is needed to remove the area.
Always detect motion
This item decides the executing schedule for motion detection. The schedule of motion detection can be adjusted per
week by clicking Schedule... button when motion detection is not executed always.

Event Configuration
68
Figure 4.4. Motion Detection Schedule Configuration Screen
The schedule of motion detection can be applied per each camera. Detail information is described in Record Schedule
Configuration.
Event Mapping...
This button connects the function proceeding by the MicroDigital NVR system when the motion is detected. A
configuration window like following will be appeared by clicking Event Mapping... button.
Figure 4.5. Event Mapping Configuration Screen
Vertical axis stands for available camera in system, and horizontal axis stands for feasible functions of system when the
motion is detected.

Event Configuration
69
Figure 4.6. Warning Message on Motion Detection Screen
The configuration will be saved by selecting desirable camera and function and clicking Ok button.
Sensor, Digital Input
Sensor recognizes the outside status into the system. The number of available sensors depends on the model of the
system.

Event Configuration
70
Figure 4.7. Sensor Configuration Screen
Audio Property
• Name
• This item indicates the name of audio for the connected sensor. It is not able to editable while one of camera
configuration is editable.
• Note
• Name option is enabled only in the system with capture card.
• Type
• This item specifies the type of the sensor signal. Selectable values are N/C [0→1] or N/O [1→0].
• Note
• Type option is enabled only in the system with capture card.
Always check signals
This item decides the executing time for checking the sensor. The recording schedule can be adjusted per week by
clicking Schedule... when checking the sensor is not executed always.

Event Configuration
71
Figure 4.8. Sensor Check Schedule Configuration Screen
The sensor checking schedule can be applied per each sensor.
• Note
• Detail information is described in Record Schedule Configuration.
Event Mapping...
This item connects the function proceeding by the MicroDigital NVR system when an input enters into the sensor. The
configuration window like following will be appeared by clicking Event Mapping... button.
Figure 4.9. Event Mapping

Event Configuration
72
The lists for available sensor and the function on the system when the input enters into the sensor are as follows:
•
Recording: the recording of the camera
• Alarm:
activate the alarm device
• Email:
sending email
• SNMP:
sending the SNMP message to the specified SNMP server
• Warning
Message: showing warning message
• Pop-up:
switching to 1x1 mode
• PTZ:
activate PTZ link
The configuration will be saved after selecting the sensor and the function and clicking OK button.
Alarm, Digital Output
Alarm notifies the occurred event from the system to the outside. The number of the alarms depends on the model of the
system.
Figure 4.10. Alarm Configuration Screen

Event Configuration
73
Highlight caputure devices
This button shows only connected alarm in current capture card with emphasis.
• Note
• Highlight caputure devices option is enabled only in the system with capture card.
Alarm Select
This item selects an alarm to change the configuration. The configurations of multiple cameras can be set by clicking
check box which is in first column of each row. The changed configurations are applied to all of the cameras
simultaneously when the check box of the first row which contains titles of each column is clicked. Untouched
configuration items are not applied to all of the cameras.
Alarm Property
The properties of the alarm are as follows.
• Name
• Name distinguishes an alarm from other alarms.
• Type
• Two types of method for sending the alarm signal are supported. The signal is sent when it is changed from zero to one
in first type, the signal is sent when it is changed from one to zero in second type. It should be set depending on
characteristic of the connected alarm device.
• Duration
• It is a duration time for an alarm.
• Interval
• It is a minimal time for generating the next alarm after the previous alarm occurred.
• Count
• It is an additional repetition number for one alarm.
Activate selected alarms
This item is used to test function for generating the alarm signal. It generates the selected alarm signal by clicking
Activate selected alarms button.
Event Mapping...
This button connects function which is proceeding by the MicroDigital NVR system when an input enters into the sensor.
A configuration window like following will be appeared by clicking Event Mapping... button.

Event Configuration
74
Figure 4.11. Event Mapping Screen
• Note
• Event mapping configuration is same with Event Mapping with Sensor.
These alarms can be executed by clicking the alarm panel button in the main display which is corresponding to the
number of a alarm.
Figure 4.12. Alarm Panel Button in the Main Display
Pan/Tilt/Zoom Link
This configuration adjusts Pan/Tilt/Zoom action to be linked when an event occurs. Pan/Tilt/Zoom link is supported up to
the number of the input video signal. The actions on each camera can be configured as the number of Pan/Tilt/Zoom link.

Event Configuration
75
Figure 4.13. Camera Action as Link Number Configuration Screen
Pan/Tilt/Zoom Link Select
This item can be selected by using arrow to move to the previous or the next Pan/Tilt/Zoom link, or directly. The changed
configuration will be applied to all of Pan/Tilt/Zoom link simultaneously when Select All is selected. The unchanged
item is not applied to all ones.
Camera Action Configuration
List of Pan/Tilt/Zoom link action for each camera is as follows.
• none
• pan_left
• pan_right
• tilt_up
• tilt_down
• pantilt_left_up
• pantilt_left_down
• pantilt_right_up
• pantilt_right_down
• focus_far

Event Configuration
76
• focus_near
• zoom_tele
• zoom_wide
• autopan_start
• autopan_stop
• light_on
• light_off
• preset_set
• preset_go
• preset_reset
• user
Figure 4.14. Camera Action Configuration Screen
For example, if the first alarm and the first Pan/Tilt/Zoom link is linked, the PTZ link configuration is same with
Figure 4.14 and the first alarm occurs, then, the first camera will be moved to the position of the 3rd preset, the second
camera will be panned to the left two times, the third camera will be panned to the right two times.
Email Link
This function sends an email which is linked to the specific event. The email link as many as the number of the video
input are supported.

Event Configuration
77
Figure 4.15. Email Link Configuration Screen
Email Link Select
This item selects an email link. It can be selected by using arrow to move to the previous or the next link, or directly.
Changed configuration will be applied to all of the links simultaneously when Select All is selected. Unchanged item is
not applied to all ones.
Figure 4.16. Email Link Select Screen
Address

Event Configuration
78
This item registers the email address to send when the specified event occurs.
Figure 4.17. Email Address Register Screen
To add a new address, you should enter an email address in the input area below the list of the addresses after clicking
New button. Some email with a wrong address format will not be sent. To change the address, you should click the
address from the list and modify it in the input area. Useless addresses can be removed by selecting it in the list and
clicking Delete button.
Message
This item contains a message which will be sent with the email. Subject of the email is needed in Subject input area and
the main content of the email is needed in the next input area.
Figure 4.18. Email Message Configuration Screen
Macro types are following:
• #EVENT#: the name of occurred event
• #DATE#: event occurred time
• #IP#: IP address of NVR
• #ADDRESS#: the email address of the receiver
Above macros are provided from the system configuration. It can be used in the context of the mail.
Property

Event Configuration
79
This item configures the period for the email transmission and the attachment for the image of the occurred event.
Figure 4.19. Email Property Configuration Screen
• Period
• The grabbed events during the period will be sent in an email.
• Attach current image
• The email will be sent with video image together when this item is checked. You need to disable this item when the
video image is not necessary or the email with big size is not available.
Server Configuration
This item configures a mail server to send the email.
Figure 4.20. Email Server Configuration Screen
• Sender
• This item configures the email address of the sender.
• Delivering Type
• Supported delivering method are Direct Send and Mail Server.
• Server Name
• This item is necessary when the email is sent through the mail server. It configures the address of the mail server.
• Port
• This item is necessary when the email is sent through the mail server. It configures the port of the mail server.
• Account
• This item is necessary when the email is sent through the mail server. It configures the account to log in the mail
server.
• Password
• This item is necessary when the email is sent through the mail server. It configures the password of above account.
SNMP
SNMP(Simple Network Management Protocol) is a protocol to manage network. Messages related with events can be
sent to the SNMP management system by using this function. It can be used with linked all of the events.

Event Configuration
80
SNMP Config
It configures the use of SNMP and the SNMP management server.
• Enable this function
• It enables or disables the SNMP function.
• SNMP Server
• Name
• It is IP address or hostname of the SNMP management server. (e.g. 123.45.678.90 or server-name.mynetwork.com)
Figure 4.21. SNMP Configuration Screen
Messages for the event will be sent to the configured SNMP server when each event like signal loss, motion detection is
linked to SNMP and the events is occurred.
Pop-up
Pop-up shows a camera video by 1 x 1 mode when the related event occurs.
Figure 4.22. Pop-up Configuration Screen

Event Configuration
81
Rules
Camera video can be shown by 1 x 1 mode with connected event via rules.
Description for each item of rules are as follows.
• Order: This item means the priority of the rule. A rule of the high priority is executed first when the duplicated
condition exists.
• Event: This item specifies the type of the occurred event which will be checked first. The rule will be not applied when
the type of event is not matched with the occurred event. The rule will be applied regardless of the type of the occurred
event when All Events is selected.
• Device: This item is second condition and specifies devices which has occurred event. The rule will be not applied
when the type of device is not matched with the device of the occurred event. The rule will be applied regardless of the
type of device when All Devices is selected.
• Camera: This item specifies the number of the camera to display in 1 x 1 mode when above conditions are matched
after the event occurred. Camera video will be used which has the same number with camera of the occurred event
when Device No. is selected instead of the number.
Clicking New button is needed to add a rule. Configuration like Event Configuration in Pop-up Rule, Device
Configuration in Pop-up Rule, Camera Configuration in Pop-up Rule is needed when a item is made in the list.
Figure 4.23. Event Configuration in Pop-up Rule

Event Configuration
82
Figure 4.24. Device Configuration in Pop-up Rule
Figure 4.25. Camera Configuration in Pop-up Rule

Event Configuration
83
Video Contents Analysis (VCA)
NVR can render, save and replay the VCA meta data from VCA network cameras. It not also saves and searches VCA
events from the camera, but maps events with various handlers.
• Note
• VCA setting for each network camera can be configured in Camera Configuration.
Figure 4.26. VCA Configuration
Display
You can select VCA information to display on the screen.
• Show zones
• This option shows pre-defined polygonal detection area.
• Show counters
• This option shows a count number of satisfying detection rule.
• Show blobs
• This option shows detected dwells.
• Show objects
• This option shows objects.
• Show objects in multiple colors
• This option shows objects in different colors.
• Show non-alarmed objects

Event Configuration
84
• This option shows non-alarmed objects by any detection rules.
• Show object speed
• This option shows the speed of the moving object.
• Show object height
• This option shows the height of the object.
• Show object area
• This option shows the area of the object in squre meters.
• Show object classifier
• This options shows the classifier of the object.
• Show object wait times
• This option shows the wait time of object in a same place.
• Show object color signature
• This option shows the color signature of the object.
• Show system message
• This option shows system message.
• Tamper detected message
• This option alarms with message when detection environment is tampered.
Event
You can map the VCA events with various handlers. If you click Mapping... button for each camera, event mapping
window is shown.

System Configuration
85
Chapter 5. System Configuration
The chapter describes the configuration for the system management functions like disk, Pan/Tilt/Zoom and network
interface.
Disk
Disk Configuration
This configuration adjusts disk of the system to use.
Figure 5.1. Disk Configuration Screen
• Information of disk
• The information of the disk is displayed on the list is following:
• Order: the priority of the disk
• Type: the type of the disk
• Name: the name of the disk
• Connect: whether the disk is connected and used
• Limit: the limitation of the disk usage
• Capacity: available total space of the disk
• Usage: the ratio of used space of the disk
• From: the oldest recording date of the disk
• To: the latest recording date of the disk
Supported disk types are as follows:
•
SATA / SCSI Disk: The disk is connected to SATA / SCSI controller.
•

System Configuration
86
IDE Disk: The disk is connected to IDE controller.
•
USB Disk: The disk is connected to USB port.
• Disk Addition (Add)
• The disk of IDE and USB cannot be added from this window, only RAID disks can be added.
• The USB device will be shown in the list after connecting it to the USB port physically and the window of scanning
USB devices is disappeared. Afterwards, the device can be used to save the data by using the disk configuration
described on the next description.
•
•
• Figure 5.2. USB Device Scanning Screen
• Clicking add button is needed to add RAID disk.
1. Selecting disk type is needed.
2.

System Configuration
87
3.
4. Figure 5.3. Disk Type Selection Screen
5. Clicking Forward button is needed to proceed.
1. Selecting hard disks is needed to configure RAID-1. Two hard disks are needed at least. Checking Select
checkbox of hard disks to configure RAID-1 and clicking Forward button are needed.
2.

System Configuration
88
3.
4. Figure 5.4. Disks to RAID-1 Selection Screen
1. Disk Properties
2.

System Configuration
89
3.
4. Figure 5.5. Disk Properties Configuration Screen
• Name: This item is used to distinguish disks. It is mandatory and duplicated name are not allowed.
• Connect the disk: This item decides the use of the disk. Data on the disk cannot be searched and saved when the
disk is not selected.
• Capacity Limitation: This item decides the percentage of the disk usage from total spaces of the disk to save data.
100 percent means no limitation.
• Camera Mapping: This item decides cameras to save data. Only the data of the selected camera will be saved on
the disk. The data of any deselected cameras will not saved. The configuration for the camera mapping will be
available when Connect is selected.
Clicking Forward button is needed.
1. Confirm
2.

System Configuration
90
3.
4. Figure 5.6. Final Confirmation of Disk Properties Modification Screen
5. The configured disk will be added to list by clicking ok button.
• Modify
• A disk properties window will be shown by selecting the disk to change the properties and clicking Modify button.
Changing the properties are the same with 3rd and 4th step of the disk addition process regardless of the disk type. The
properties will be changed by clicking Ok button when the configuration is done.
• Note
• The disk configuration is needed again as configured information will be lost when the connected USB
disk is disconnected and reconnected.
• Remove
• A local disk is not removable by user. It will be removed from list when it is removed physically and the changed state
will be recognized in system start.
• USB disk is not removable from the configuration window, but the system will recognize the removal of this when it is
removed physically. However Connect the disk should be deactivated before removing USB disk, if the Connect the
disk is activated, system recognizes it as an error.
• Change Order of Disk Writing
• Order of the disk writing is as follows.
• Priority for order of disk writing
• 1. Disk with available spaces
• 2. Disk with the oldest data
• 3. Disk with upper position on the list

System Configuration
91
The priority of the disk can be changed by clicking Move up button or Move down button.
• Apply Disk Changes
• Clicking Ok button in the disk configuration is needed to apply the performed tasks when some changes like addition,
modification and removal.
• Clicking Cancel button is needed to ignore the preformed tasks. Clicking Cancel button should be careful because all
of the changes will be disappeared.
• Type of Box for Wrong Configuration
• Connection Failure
• It occurs when the disk mount is failed. Checking the physical disk connection is needed.
• Disk Name Collision
• It occurs when the selected disk name exists already. Rename it to other unique name.
• USB Device Recognizing Failure
• It occurs when the device is not recognized even it can be used by the disk. Unplugging and plugging it again can
make it recognizable. Or it may not be the supported device.
• Clear...
•
•
• Figure 5.7. Disk Clear Screen
• Check...
•

System Configuration
92
•
• Figure 5.8. Disk Check Screen
• Advanced...
•
•
• Figure 5.9. Advanced Configuration Screen
• Host ID Configuration
• The host ID of the current system can be changed to prevent a collision with other NVR. It should be used to
distinguish each system on using one more NVR devices with caution.
• Save Status of Removable Disk
• Devices like USB which are easy to remove are not connected to the system by default when the system restarts. But
the devices like large RAID disk which are seldom removed uses the connection configuration with a common disk
to keep the connection immediately on system restarting.
• Disk is Broken Physically

System Configuration
93
• The system blocks a disk saving when the disk is broken physically and shows the damage of the disk by picture. This
status is only shown on the system starting. And any tasks for the disk cannot be done. The disk with this status should
be changed.
Network Interface
The system can be monitored remotely by configuring the interface when the system is connected to the network.
Figure 5.10. Network Interface Configuration Screen
Name
This item is a network interface of the system and displayed in the list depending on the number of the network interface
card. Three interfaces from one to three will be displayed when there’s three network interface card.
Address & DNS
Connection method and address are configured.
• Connection Method
• Each interface has two connection types as follows.
• Automatic (DHCP)
• Network interface configures the system address automatically from the DHCP(Dynamic Host Configuration
Protocol) server connected with NVR via the network.
• Manual (Static)
• The devices on the network are assigned with a static address usually.

System Configuration
94
• The Static address has a advantage to the service while address in the connections of DHCP can be changed. The
static address can be offered from the network administrator to use it. The offered address can be written to Address
section.
The address can be changed by the request from the server, state of line, time, rebooting for it is assigned from upper
server. So, the address in DHCP is not able to modify.
• Address
• The information of this section can only be entered in the static address, the assigned address will be appeared here in
other address mode. IP Address, Subnet Mask, Gateway are mandatory in the static address.
•
•
• Figure 5.11. Static Address Configuration Screen
Traffic Shaping
This item limits the outgoing network traffic. The maximum bandwidth can be limited in Kbps and the current traffic is
seen.
Figure 5.12. Traffic Shaping Configuration Screen
Time & Date
This configuration adjusts time and date.

System Configuration
95
Figure 5.13. Time & Date Configuration Screen
Time & Date
This item displays the date of the current system by format of 24 hours and calendar.
Time Zone indicates the timezone where the current system is located in, it effects to the daylight saving time and the
time synchronization. You need to select area to change timezone.

System Configuration
96
Figure 5.14. Time Zone Area Selection Screen
The first city is selected in an alphabet order when the area is selected above timezone area. This city can be changed into
the preferable city by clicking the city. The window will be disappeared and the time and date information will be applied
by clicking Ok button.

System Configuration
97
Figure 5.15. Time Zone City Selection Screen
Time Server
Time is important in the security device. It is configured with the network time server to get an accurate time. Local time
is tend to slow slightly so the time server is preferred.
Supported time synchronization Protocols are NTP, Unix/Linux, Windows, Custom. NTP method uses network time
protocol(ntpdate, 123 port), Unix/Linux method uses the time synchronization program(rdate, 37 port), Windows
method uses the time synchronization from the windows server(net time, 139/445 port).
Time will be configured with specified server on Server a day by selecting Synchronize clock with internet server. This
process is executed automatically and can be executed instantly by clicking Update now button from the time server.
System policy when time changes
The system will be restarted when time goes backward from the current system’s one. The system will not be restarted
when time goes forward, but the network connection and the recording will be stopped before the change of time and will
be restarted after the change of time.
• Note
• Advancing time occurs few problem to system, turning back time can occur system malfunction. So,
program will be restarted when time is turning back. System will be restarted when Update now button is
clicked with same reason.
• Note
• Overlap of recorded data will be removed when time is turned back to avoid conflicting.
Auto Reboot
Unexpected system stop makes a blank to the system operation when the system is not recovered to normal. This

System Configuration
98
situation is not allowed to the security device. So the system needs to check itself and to get itself back to the operable
state when a problem occurred.
Auto reboot are functions for the system reliability.
Figure 5.16. Auto Reboot Configuration Screen
Auto Reboot
The configuration of the auto reboot is as follows.
Figure 5.17. Enable Auto Reboot Screen
• Reboot Interval
• The next reboot date is decided by add the current date to the reboot interval(days), and the next reboot time is Reboot
Time. The system will be rebooted in the next period when the time is over by disabling Auto Reboot or canceling it.
• The system indicates not the hardware, but the NVR software.
Performance of the system will be deteriorated or the system will not be worked in case the system becomes unstable by
the operating system or the software problem. Increasing these unstableness can raise a critical problem in the security
system. Auto Reboot makes the system reboot after certain amount of time is passed to make up this problem.
• Note
• The time when the administrator exists or the fluctuation of monitoring target is few is suitable to the auto
reboot time.

System Configuration
99
The process of the auto reboot is as follows.
1. The start time of the system will be obtained when the system starts.
1. The auto reboot time is decided by the user configuration. The default value is 7 days.
1. A window inquiring user to reboot will be appeared at the auto reboot time. The window will restart automatically the
system when the reply is not selected within 30 seconds.
• Start time : 2002.4.13 13:03:14
• User reboot interval : 7 days
• Current time : 2002.4.21 16:01:32
• User reboot time : 03:30
• Next reboot time : 4.27(13+14(7*2days) 03:30(user reboot time)
Example 5.1. Time Configuration Example 1
• Start time : 2002.4.13 13:03:14
• User reboot interval : 0 days
• Current time : 2002.4.21 16:01:32
• System will reboot at 13:00 of the next day (4/22 in example) when the time is entered before than the current time,
and will reboot at 18:00 today when the time is entered to 18:00.
Example 5.2. Time Configuration Example 2 : in case interval is zero
System Log
This function shows current status of the system. A problem can be solved with finding wrong point when the system
works abnormally through the system log. The problem can be fixed more precisely by delivering the log of current
status of the system to the device shop.
Figure 5.18. System Log Configuration Screen

System Configuration
100
General Information
This item shows the information of the product.
• Model
• The detail information for each model is described in the section called “MicroDigital NVR Models”.
• System Version
• This item displays the version of the software installed in the product.
• System Key
• This item displays the unique recognized number of the device.
• Use disk serial number as system key
• This item uses disk serial number as a system key.
• Reset Configuration
• This item restores default configuration from the previous one.
•
•
• Figure 5.19. Reset Configuration Confirm Screen
• Load Configuration
• This item changes the system configuration from a file on the usb device connected to the system.
•
•
• Figure 5.20. Load Configuration from USB Device
System Log
This item shows the status of the system and saves the log to the file.
 Loading...