


COPYRIGHT NOTICE
All rights reserved. No part of this publication may be reproduced or transmitted without
the prior permission MICRODIA Ltd.
iRock is a registered trademark of MICRODIA Ltd.
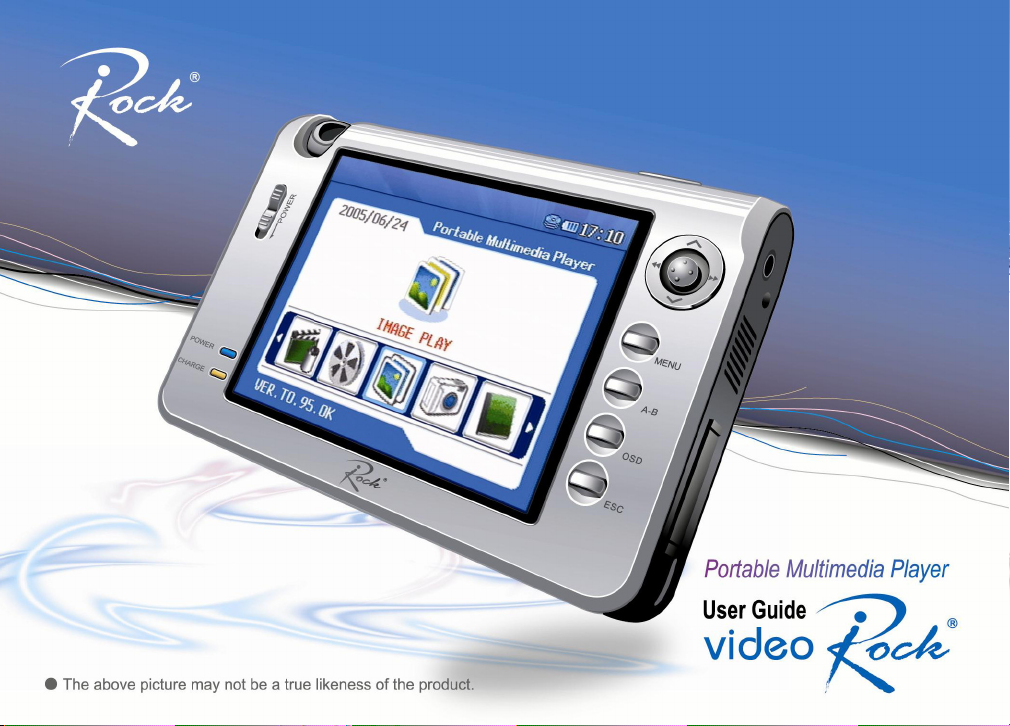
About the Portable Multimedia Player
1.
video iRock is a portable multimedia player with the features to record, play and store
varieties of animation/audio/image files.
2.
video iRock is provided with the encoding function in order to store and play signals
directly received from external audio devices such as voice recorder and CD player and
video devices such as TV through the LINE IN port in digital data format.
3.
video iRock has a built-in camera to take images and animations.
4.
video iRock has a built-in FM radio to record FM signals in MP3 file.
SAFETY CONCERNS
For product safety and correct operation, the following information must be given to the operator/user and
shall be read before the installation and operation.
Conventions
WARNING
Provides instructions that the reader should follow in order to avoid personal injury or fatality.
CAUTION
Provides instructions that you should follow in order to avoid a service failure or damage to
your PMP.
NOTE
Indicates additional information as a reference.
2
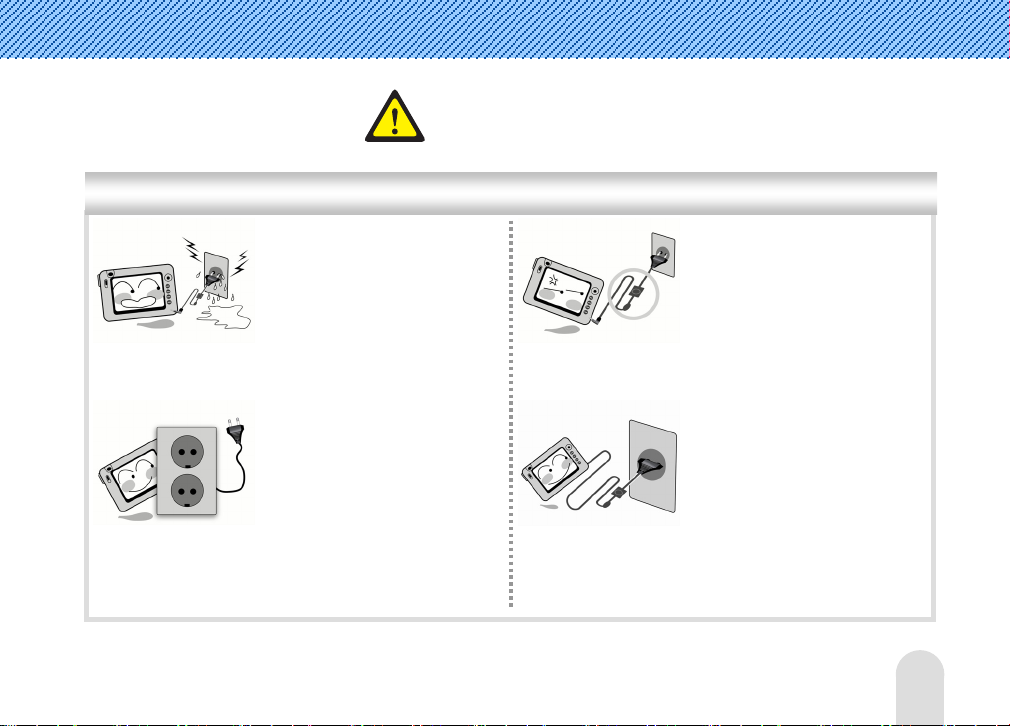
Caution
Precautions associated with power
Do not touch the adaptor
with wet hands.
- This might be a reason of
electric shock.
Make sure to insert the
adaptor into electrical
receptacles with ground
ports.
- This might be a reason of
electric shock.
3
CAUTION
Use only the specified
adaptor.
- Using a different type of
adaptor may damage the
product.
Make sure to insert the
plug tightly.
-This might be a reason of fire.

Precautions when using the product
Do not listen to the
music for a long time
with a large volume.
- This might damage your
hearing ability.
Do not use the head
set/ear phone while
driving or walking.
- This might be a reason of an
accident.
Do not exert impact on
LCD panel and camera
lens.
- This might be a reason of
product trouble.
In case the product is
smoking or deformed by
heat, stop using the
product and contact the
Call Center.
- Using the product continually
may damage the product or
be a reason of fire.
4
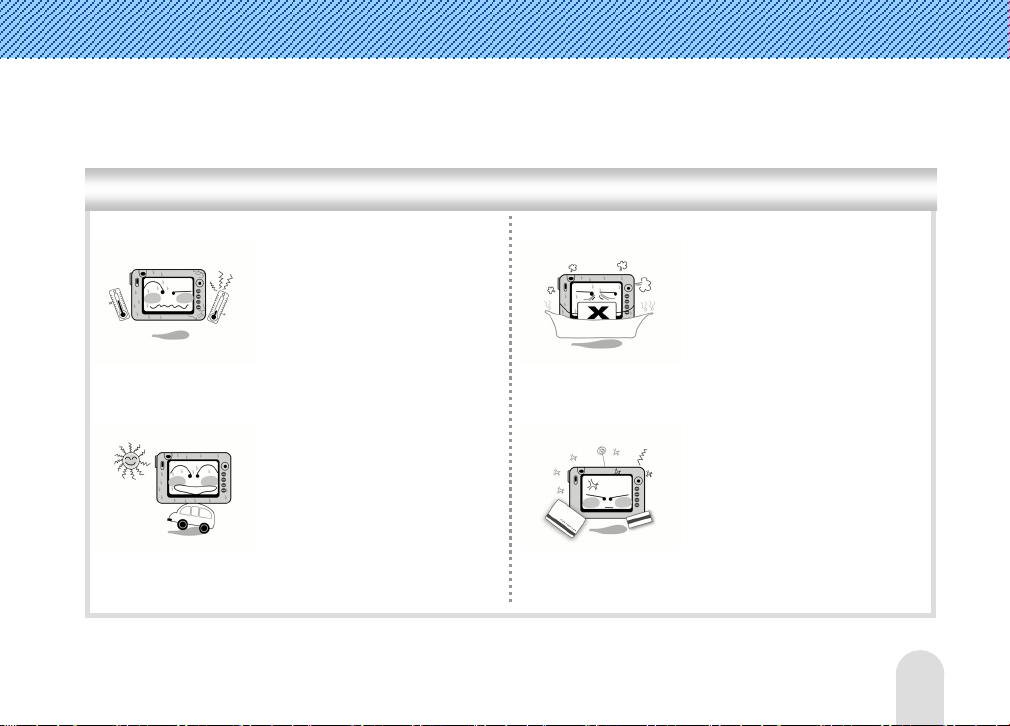
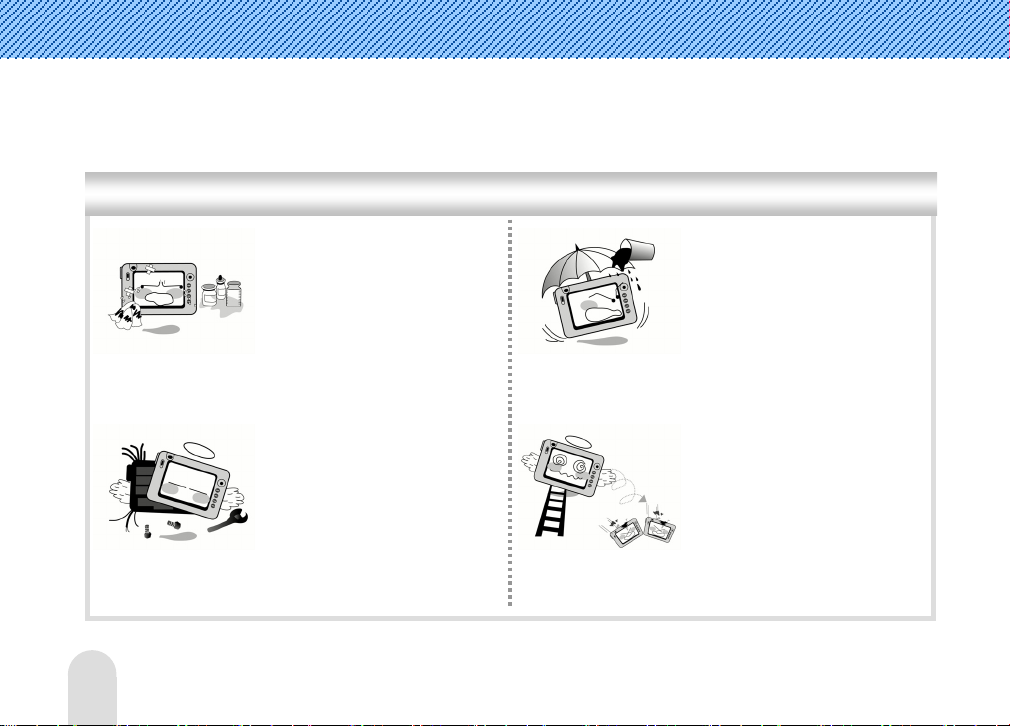
Precautions associated with the product
Do not leave the product
under too hot (over
35°C) or too cold (below
-5°C) environment.
- This might be a reason of
product trouble.
Do not leave the product
under direct sunlight or
in a closed car.
- This might be a reason of
product trouble.
Do not leave the product
in a dusty place,
bathroom and wet place.
- This might be a reason of
product trouble.
Do not place the product
near cash cards, prepaid
cards, etc.
- The magnetic part of cash
card, prepaid cards and others
might be damaged and
become useless.
5
T
Other precautions
Clean the product with
soft and dry cloth and do
not use benzene or
thinner.
- This might be a reason of
Do not repair,
disassemble or revise the
product at random.
- This might be a reason of
product trouble.
product trouble. In such a
case, the company is not
responsible for product trouble.
Take care not to
introduce dirt or fluids
into the product and
camera lens.
- This might be a reason of
product trouble. In such as
case, stop using the product
and contact the Call Center.
ake care not to drop the
product.
- This might damage the
product.
6

TABLE OF CONTENTS
SAFETY CONCERNS 2
Conventions ............................................................................................. 2
Caution..................................................................................................... 3
Introduction 11
Features of the product .......................................................................... 11
Package.................................................................................................. 14
Mechanical Features............................................................................... 15
Battery Charging .................................................................................... 16
Connection ............................................................................................. 17
USB Driver Installation (In case of Windows98) .................................... 22
Automatic Installation ................................................................................. 22
Manual Installation of Windows 98 driver ....................................................... 24
Connecting To a Computer ..................................................................... 30
Isolate from PC ...................................................................................... 32
7

LCD Screen ............................................................................................. 33
Main Menu Screen ...................................................................................... 33
File Search Screen...................................................................................... 35
Video Record/Play Screen ............................................................................ 36
Image Record/Play Screen........................................................................... 38
Audio Record/Play Screen............................................................................ 40
FM Radio Receive/Record Screen .................................................................. 42
Text View/Play Screen..................................................................................... 43
Power On/Off 44
Menu Selection 46
ESC Button Functions 48
Video Functions 49
Play Video .............................................................................................. 49
Record Video .......................................................................................... 56
Image Functions 61
Play Image ............................................................................................. 61
Record Image......................................................................................... 67
8

Audio Functions 72
Play Audio .............................................................................................. 72
Record Audio .......................................................................................... 78
FM Radio Functions 81
Receive FM Radio ................................................................................... 81
Record FM Radio..................................................................................... 86
Text View Functions 89
Text View ............................................................................................... 89
Special Functions (Common to Video/Audio) 96
Bookmark............................................................................................... 96
Favorite.................................................................................................. 99
Section Repeat ..................................................................................... 100
9

Setting Function 102
System Set ........................................................................................... 102
Time Set ............................................................................................... 104
Change Background Image 106
How to use LyricsED 107
Upgrading Firmware 111
Troubleshooting 112
Specifications 115
Warranty 117
10

Introduction
Features of the product
Playing MP3, WMA and AC3 music files
The player can play high quality digital music files (AC3, MP3, WMA).
AVI (XviD), DivX (3.x, 4.x, 5.x), ASF (Recorded file from video iRock), video file
It can play various types of high quality animation files.
Digital camera function
It is equipped with a digital camera of 1.3 Million pixels in order to take images or animations.
Receiving and recording FM
You can receive FM radio broadcasting and record it in MP3 file.
11

Recording voices in high quality MP3 format
The player is provided with microphone to store and play voice signals in high quality MP3 file.
Recording/storing external video or audio input signals in ASF/MP3 files
It stores images of video/audio/TV converted into ASF files or audio signals of CDP/MP3P converted into MP3 f iles.
Editing lyrics (supports lyrics editing program)
You can display lyrics of audio files on the LCD screen through the words editing program.
Providing 3.5” TFT LCD
The player provides 3.5” TFT LCD to display high quality image and animation frames.
Convenient firmware upgrade
The firmware version can be subjected to different from released date to the market. Please download
the latest firmware from iRock website (Refer to the page 111).
12

Utilizing as an external storage device
You can use the player as an external storage device by connecting the player with PC through USB cable.
Fixed bit rate
You can conveniently do voice recording or line in recording depending on circumstances
(Fixed Bit Rate: 128kbps, Sample Rate: 44.1 KHz).
Equipped with lithium polymer battery for charging
You can conveniently charge the battery with the wall outlet power without purchasing a battery
additionally.
Providing animation format conversion program
Even for animations that cannot be directly played on the player, you can play them by converting them
into the file format using the animation format conversion program.
Image viewer/Text viewer
Enjoy the various image files (JPG, GIF, BMP), and text viewer for text file (TXT).
13

V
g
Package
ideo iRock Player
USB Cable
Y Cable
Software
Installation CD
Power Adaptor AV Cable
Stereo Earphone
Cradle
User Guide
conversion CD
Hand Strap
Carryin
Format
Case
14
r
t
t
g
g
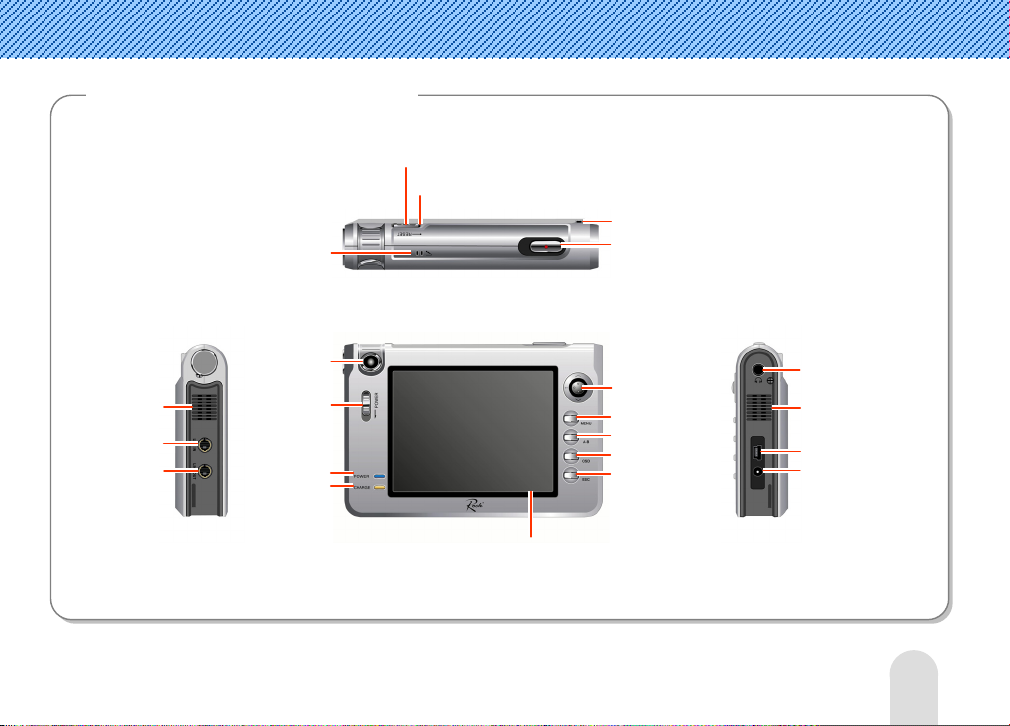
Mechanical Features
Built-in speake
LINE IN Por
LINE OUT Por
Microphone
Camera
Power Button
Power LED
e LED
Char
HOLD Switch
Reset Button
LCD Screen
Hand Strap Hole
REC Button
Jo
Button
Menu Button
Repeat Button
OSD Button
ESC Button
Earphone Port
Built-in speaker
USB Port
Power Adaptor Port
15
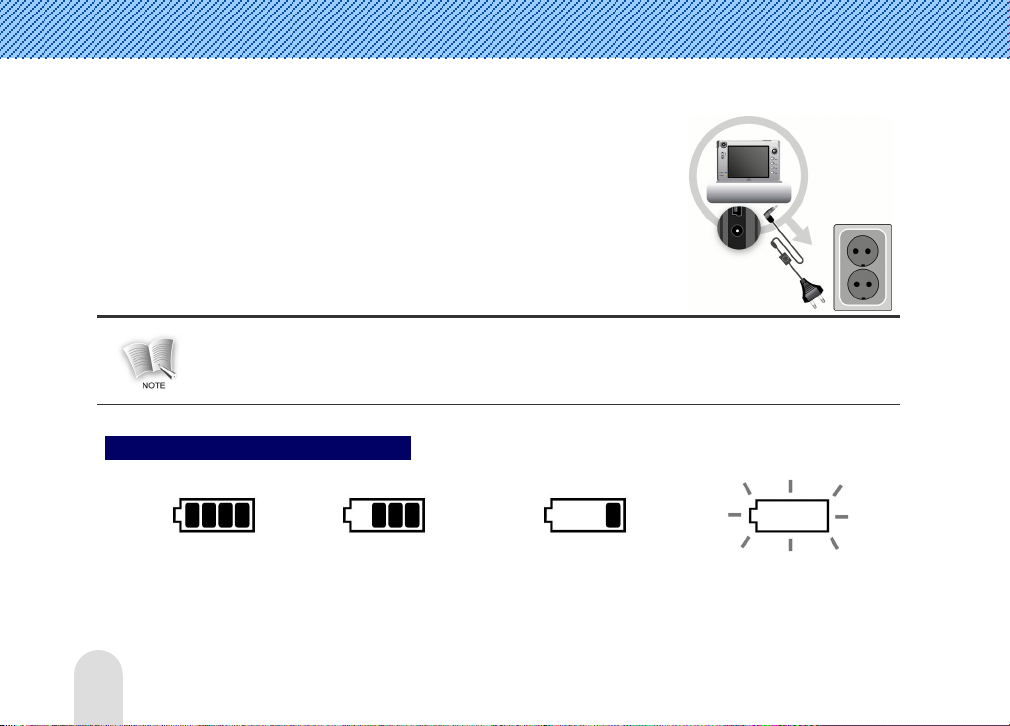
Battery Charging
You can charge the battery by connecting the power adaptor to the
cradle and placing the body on the cradle or by directly connecting
the power adaptor to the adaptor port.
The LED color indicates the charged amount during charging.
(Red-Orange-Green)
The battery will be full chaged from entirely discharged stage roughly 5 hours later.
(Red LED: Under charing, Orange LED: 80% charged, Green LED: Completely charged)
Battery Low Voltage Warning
Full charged A little discharged Nearly discharged Completely discharged
16
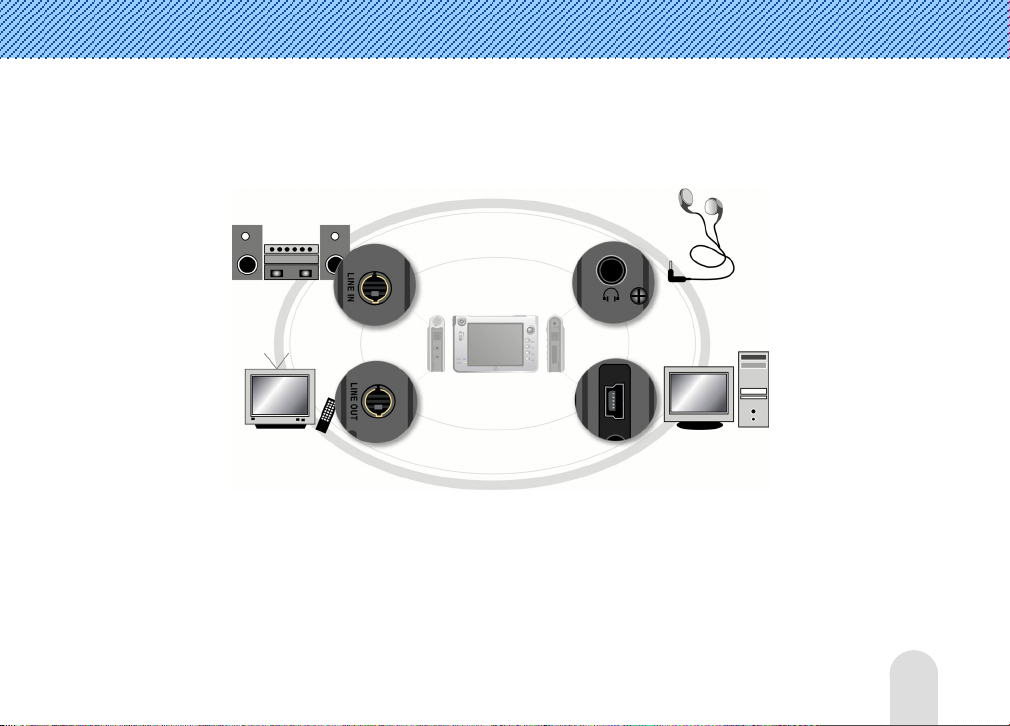
Connection
Audio Connection
Connect the LINE IN port of the player
with the external audio device.
TV Connection
for Playing
Connect the LINE OUT port of the
player with the TV input port using
the AV cable.
TV Connection
for Recording
Connect the LINE IN port of the
player with the TV output port using
the AV cable.
Stereo Earphone Connection
Connect the stereo earphone to the earphone port.
PC Connection
Connect the USB port of the player
with that of PC using the USB
cable.
17
Y
A
V
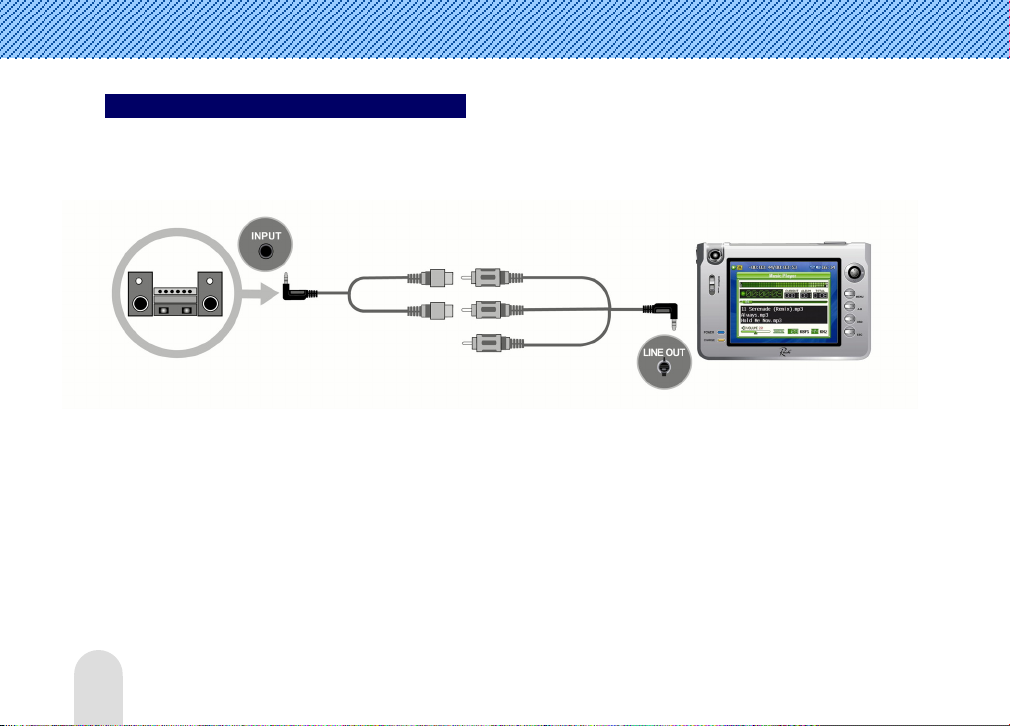
Listening in External Audio devices
Select the [AUDIO PLAY] after connect the player with external audio device by using Y cable and
AV cable.
Cable
Audio (L)
Audio (R)
V Cable
Audio (L)
Audio (R)
ideo
18
V
Y
A
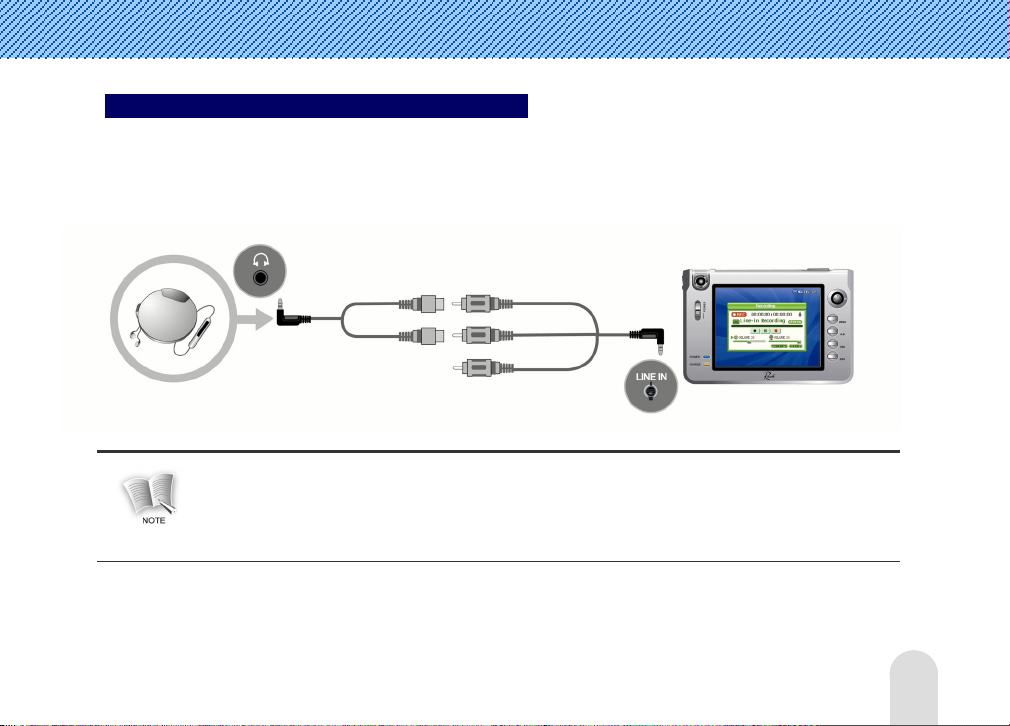
Line In (Recording from External Device)
Select the [AUDIO PLAY] after connect the player with external audio device by using Y cable and
AV cable. It should be set as ‘Line’ for ‘Audio Input’ in ‘Audio Recording Setting’
(Refer to the page 78~80).
Cable
Audio (L)
Audio (R)
Please connect the Y cable to AV cable properly. If one of Y cable is connected with AV cable for
video, the sound will be heard from only one side. In that case, please connect the Y cable,
which can not be heard, to AV cable properly.
V Cable
Audio (L)
Audio (R)
ideo
19
A
V
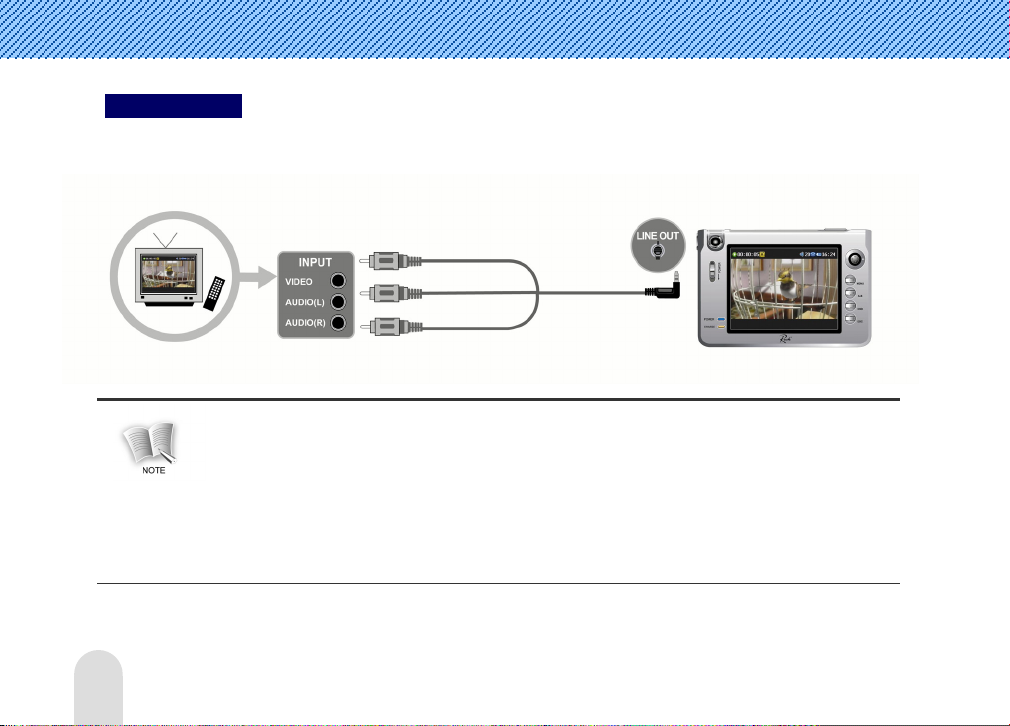
Watching TV
Connect player to TV by connecting AV cable.
- If you want to connect TV to the player and display output of the player on the TV screen,
please set ‘Display Out’ of ‘Display’ to ‘TV’ of ‘SYSTEM SET’ menu on the main menu screen.
In that case, the LCD screen vibrates, ensuring good quality of the TV screen
(This phonomenon is not a player trouble).
- ‘TV Standard’ of ‘Display’ in ‘SYSTEM SET’ menu shold be set properly for user’s local
TV system as NTSC/PAL (Refer to the page 102~103).
V Cable
ideo
Audio (L)
Audio (R)
20
A
V
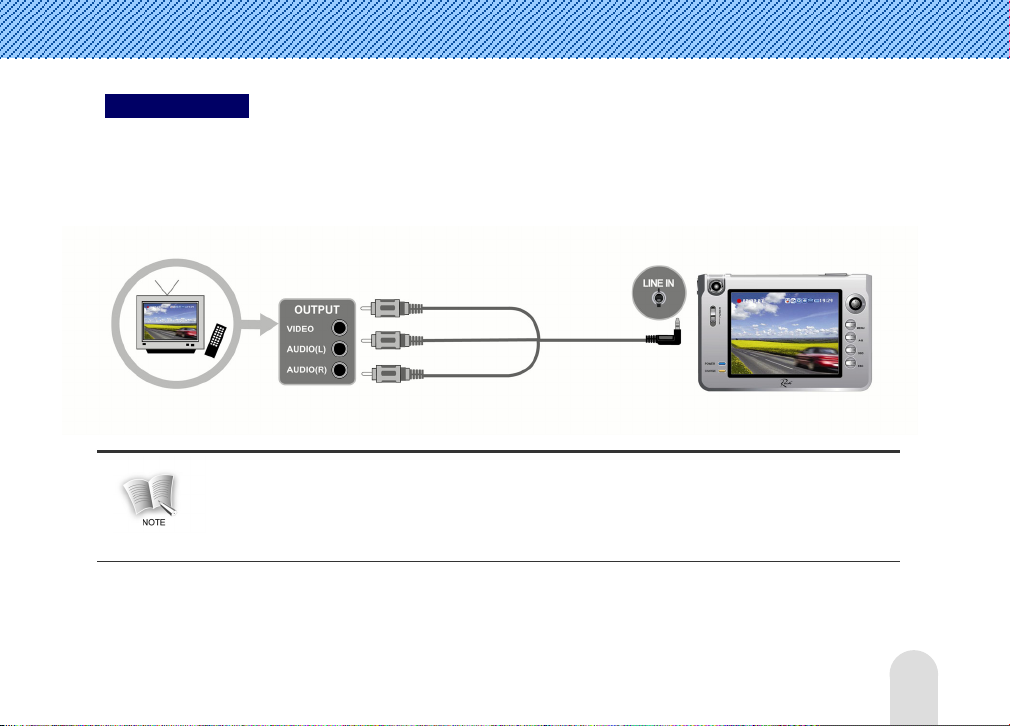
TV Recording
Connect the player to TV by using AV cable, and select [VIDEO RECORD] or [IMAGE RECORD].
It should be set as ‘Line’ for ‘VIDEO INPUT’ of [VIDEO RECORD] or [IMAGE RECORD]
(Refer to the page 56~60 or 67~71).
The color of input/output cable and AV cable are subject to different from manufacturer.
In that case, try to connect the video cable alternately uitil find the video signal, and connect
audio cable.
V Cable
ideo
Audio (L)
Audio (R)
21
USB Driver Installation (In case of Windows98)
You need not install the USB driver under other operating systems, but should install it only
if the PC OS in use is Windows 98/SE.
Automatic Installation
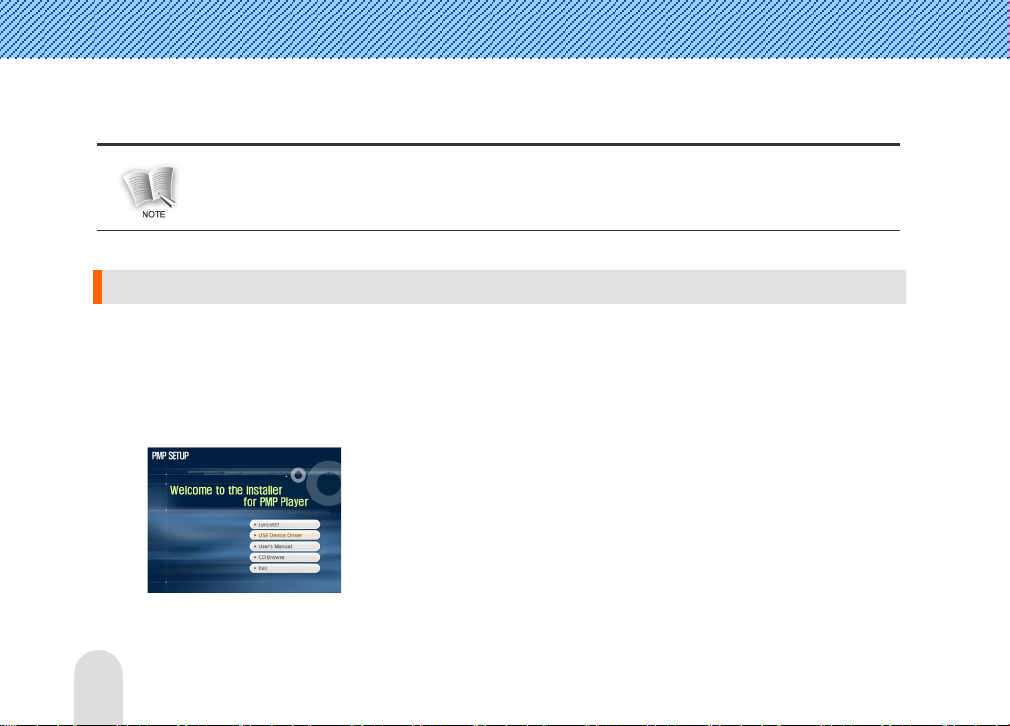
1.
Insert the software install CD provided with the player into the CD-ROM drive of PC.
2.
Select the ‘USB Device Driver’ on the software install screen.
22
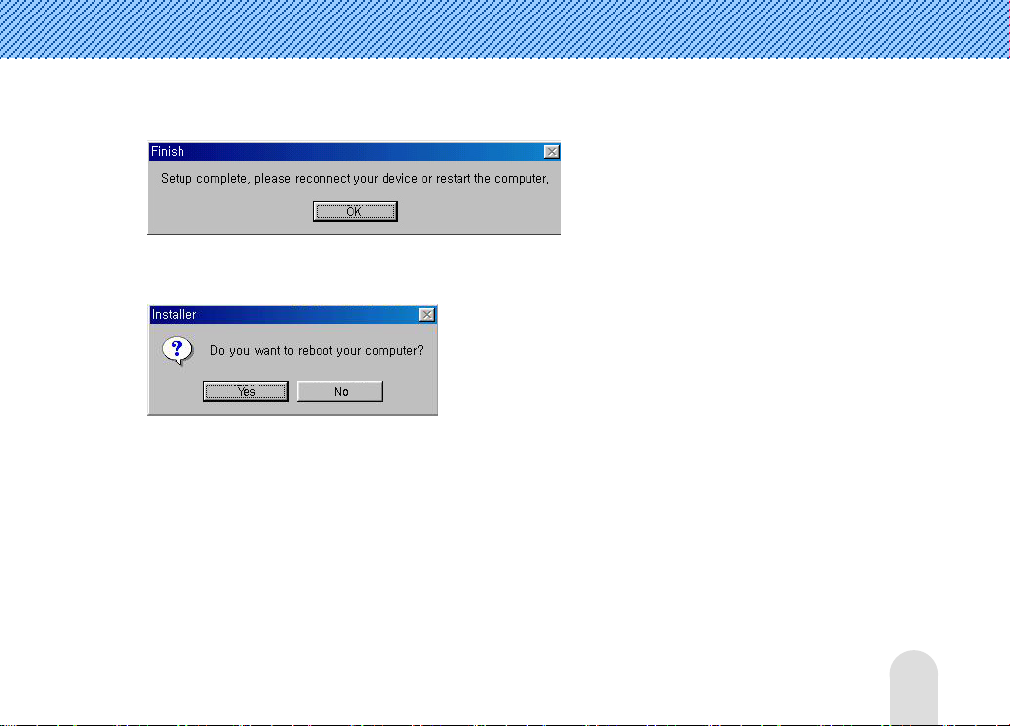
3.
The following message appears when ‘USB Device Driver’ is selected. Click the [OK] button.
4.
Click the [Yes] button and reboot the PC.
23
Manual Installation of Windows 98 driver
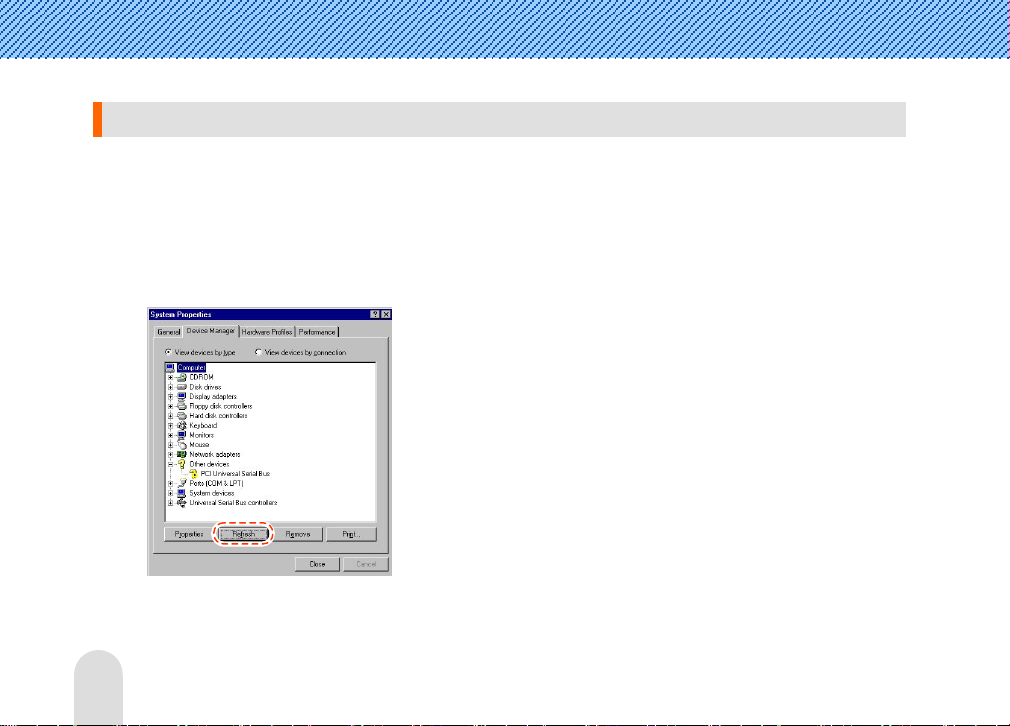
1.
Turn on the player power and connect the video iRock player with PC using the USB cable.
2.
The following is displayed if you select the [Control Panel][System] on the Windows
background window and select the [Device Manager] tab. Click the [Refresh] button.
24
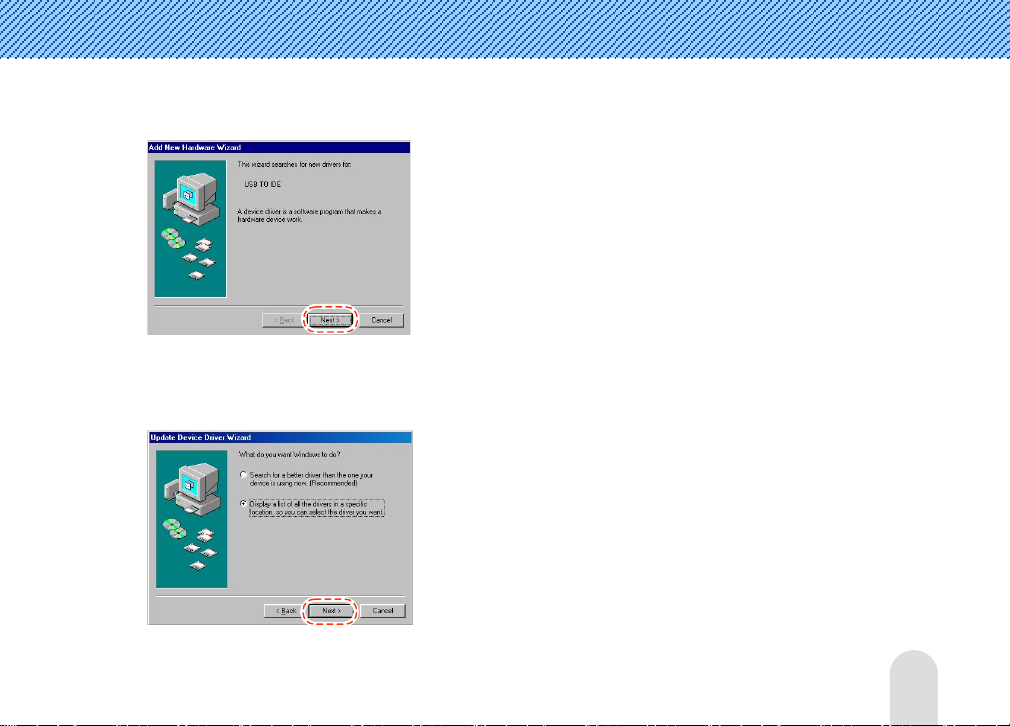
3.
Device driver search appears. Click the [Next>] button.
4.
Select the ‘Display a list of all the drivers in a specific location, so you can select the
driver you want.’ and click the [Next>] button.
25
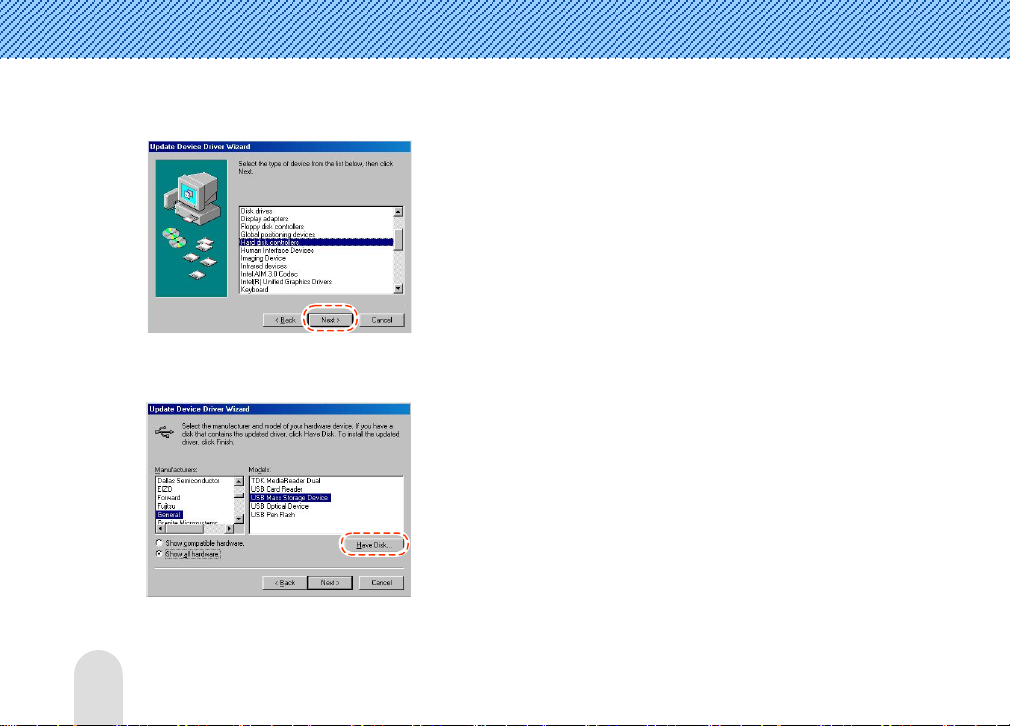
5.
Select the ‘Hard disk controllers’ and click the [Next>] button.
6.
Click the [Have Disk...] button.
26
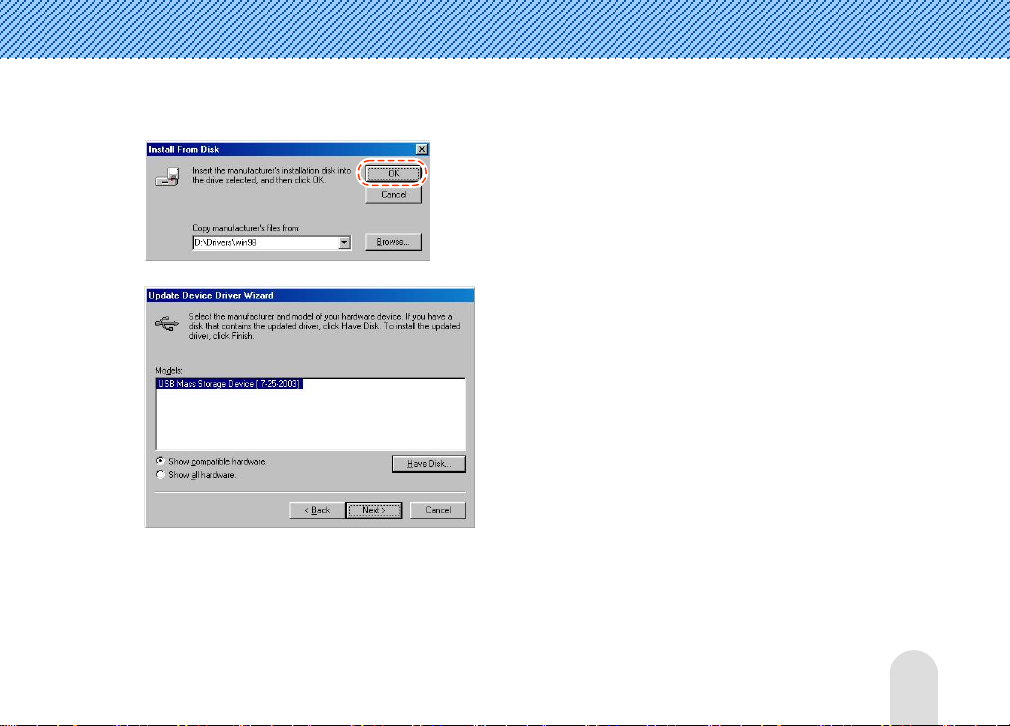
7.
Insert the provided CD into the CD-ROM drive. Select the ‘Win98’ folder and click the [OK] button.
27
8.
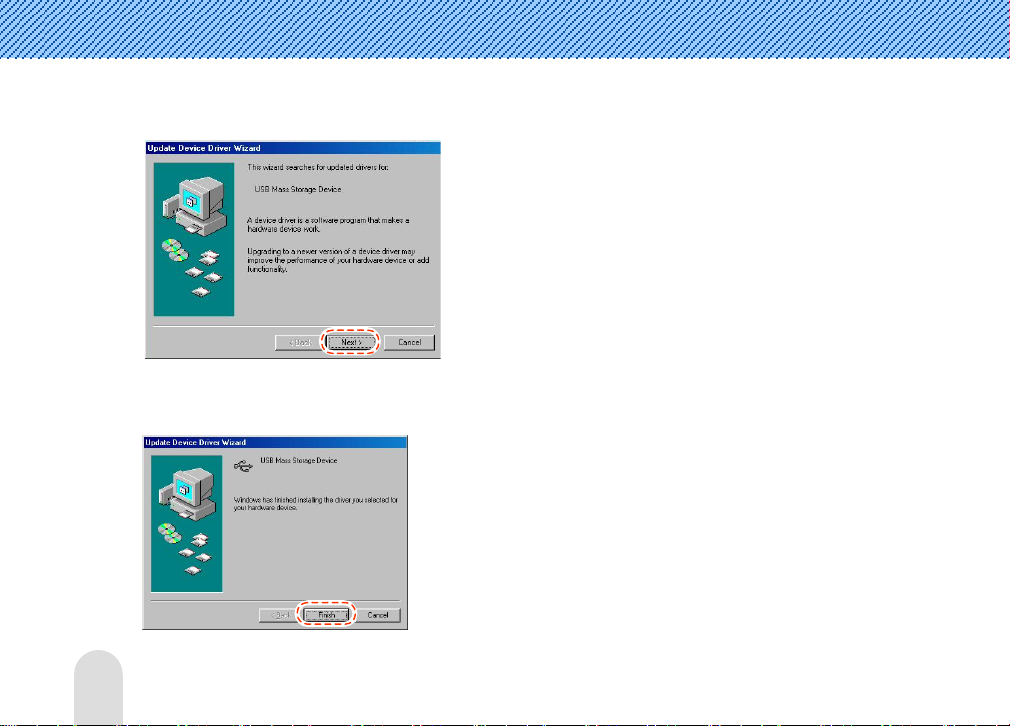
Click the [Next>] button.
9.
When completion screen of USB driver installation is shown, click the [Finish] button.
28

Confirmation of USB driver Installation
1.
The following is displayed if you select the [Control Panel][System] on the Windows
background window and select the [Device Manager] tab.
2.
If you select ‘disk drive’, installed USB driver is displayed.
If USB driver is not reconized with the above method, uninstall the USB driver you installed,
and install USB driver again.
29

Connecting To a Computer
Recommended PC Specifications
Part Specifications
CPU Pentium MMX or above
OS Windows 98SE/ME/2000/XP/Mac/Linux
Hard Disk 50 Mbyte or more hard disk storage available
Other CD-ROM drive, USB port
1.
A new ‘Removable Disk’ will be created in ‘My Computer’ by connect the player with PC by USB cable.
There are five folders of ‘Music’, ‘Movie’, ‘Image’, ‘Data’ and ‘System’.
‘Music’ and ‘Movie’ folders include ‘Bookmark’, ‘Favorite’ and ‘Record’ folders respectively and ‘Image’ folder
includes ‘Record’ folder. You can create new folders in ‘Music’, ‘Movie’, ‘Image’ and ‘Data’ folders.
30

- The player would not work normally if you delete the default folders created under the
‘video iRock’. Therefore, do not delete these folders.
- Please do not format ‘HDD’ if possible, but if you have to format please do ‘FAT32’ format.
- The maximum sub-folder is up to 16 steps.
- ‘MUSIC’, ‘MOVIE’, ‘IMAGE’, ‘DATA’ can save sub-folder up to 400 folders and 4000 files per each
folder. It may not work properly if new folders or files are saved over the maximum quantity.
2.
Select a file to store in the body from the PC and drag or copy it in the corresponding folder of the
‘video iRock’.
You should each copy in the corresponding folder, depending on file types.
- Music folder: audio file
- Movie folder: video file
- Image folder: image file
- Data folder: text file
- System folder: firmware file, background screen file
- Make sure not to disconnect the USB cable during file transmission.
If the USB cable is separated during file transmission, the file may be damaged.
- The order of files appearing in the ‘video iRock’ of Window Explorer does not
concern the play order.
31

Isolate from PC
1.
Select the portable hardware icon from the task bar on the Windows background screen and click on the
right-hand mouse button to select the ‘Safe hardware isolation’.
2.
Select a hardware device to isolate from the PC and click the [Stop] button.
3.
Click the [OK] button to identify the device to stop.
4.
Check the ‘Safe Hardware Isolation’ indication on the task bar and click the [Close] button to finish.
Abnormal isolation of the USB cable from the body might damage the player.
32

g
k
LCD Screen
Main Menu Screen
Loc
(HOLD)
Power Adaptor Connection
HDD Run Status
Battery Char
Current Time
e
Menu
Menu Icon
Press the [OSD] button shortly in the main menu screen, skin color will be changed.
33

Icon Menu Function
34
AUDIO PLAY Play audio (music file).
VIDEO PLAY Play video (animation).
VIDEO RECORD
IMAGE RECORD Record the image signal input from the camera or an external device.
IMAGE PLAY Play images (photo files).
SYSTEM SET Set user environment for the player.
TIME SET Set a time.
FM RADIO Listen to the FM radio or records FM radio signals.
AUDIO RECORD Record the audio signal input from the mic or external device.
TEXT VIEW To read the text file.
Record the moving picture signal input from the camera or an external
device.

File Search Screen
If you select [VIDEO PLAY], [AUDIO PLAY], [IMAGE PLAY] or [TEXT VIEW] menus, the screen
which allows you to select files to play or to search f iles to delete for each menu appears.
Play File
Push the jog button in ∧ or ∨ direction to move to the folder in which the file to be played is included.
Press the jog button to play the file in the selected folder.
Delete File
Push the jog button in ∧ or ∨ direction to move to the folder in which the file to be deleted is included
and press the [A-B] button long. If the ‘delete file conf irmation message’ is displayed, select ‘Yes’
and press the jog button.
List of files in the selected folder
Folder list
File size
35

/
V
Video Record/Play Screen
Video Record Screen
Select the [VIDEO RECORD] menu on the main menu screen. The image screen input from the
camera or external device is displayed on the LCD screen.
Recording
Record Time
Zoom Enable
ideo Size
Camera/LINE IN
Up/Down Reversal
Disable
36

g
V
Video Play Screen
Select the [VIDEO PLAY] menu on the main menu screen.
Playin
Play Time
Play Mode
olume
37

V
Image Record/Play Screen
Image Record Screen
Select the [IMAGE RECORD] menu on the main menu screen. The screen input from the camera or
external device is displayed on the LCD screnn.
Zoom Enable/Disabe
ideo Size
Camera/LINE IN
Up/Down Reversal
38

g
g
Image Play Screen
Select the [IMAGE PLAY] menu on the main menu screen.
Playin
Played Files/Total Files
Play Mode
Ima
e Size
39

A
g
g
g
Audio Record/Play Screen
Audio Record Screen
Select the [AUDIO RECORD] menu on the main menu screen.
Recordin
Recorded File Name
Recordin
Samplin
Bit Rate
Speaker (Earphone)
Volume Setting
Time
Status
Rate
udio Input Volume Setting
40

g
g
g
V
Audio Play Screen
Select the [AUDIO PLAY] menu on the main menu screen.
Playin
Status
Play Mode
Reduced Play Time/
Current Play Time
Play Status/Play Time
Level Meter
File Number/Folder/Total File Count
ressive Bar
Pro
Play File List
Samplin
Rate
Bit Rate
Sound Effect (EQ, Equalizer)
olume
41

g
V
FM Radio Receive/Record Screen
Select the [FM RADIO] menu on the main menu screen.
Playing
Channel Number
Frequency Settin
Receive Mode
olume
42

g
T
g
V
Text View/Play Screen
Select the [TEXT VIEW] menu on the main menu screen.
Playin
Playing File Name
olume
Present Pa
ext
e/Totall Pages
43

Power On/Off
Power On
Power Off
Push the [POWER] button in the arrow direction for about 1~2 sec.
Power is on with the specified screen displayed on the LCD screen and
the main menu screen appears. At this time, the menu selection bar is
located on the menu last executed.
For menu non-operation mode such as play, record and record
(Ex: main menu setting, file searching, waiting status and others),
when no button operation is taken for about 5 minutes, power
automatically goes off to minimize power consumption.
Push the [POWER] button in the arrow direction for about 2 sec.
Power goes off with ‘Power OFF Good Bye’ displayed on the LCD screen.
44

Format for HDD Error
LCD Screen On/Off
It should be format when the player does not work properly
because of ‘HDD’ Error.
It may cause the problem of Hardware due to the ‘HDD’ Error.
Use with caution as formatting results in the loss of all data.
If you need not look at the LCD screen in AUDIO Play, FM Radio
Receive, TV Output Mode, etc., push the [POWER] button
shortly in the arrow direction to make the LCD screen go off.
Shortly push the button again to turn on the LCD screen.
This function is useful for reducing power consumption.
45

Menu Selection
Selecting menu operation mode
Push the jog button in ◀◀ or ▶▶ direction to move to a menu you want. Press the jog button
to select a desired operation mode.
Press the [MENU] button shortly on the operation screen to return to the main menu screen.
46

Menu Selection
If you press the [MENU] button long on each operation screen, the screen which allows you to set
operation mode appears.
Press the [MENU] button shortly on the menu setting screen to return to the operation screen.
47

ESC Button Functions
If you push the jog button in ◀◀ or ▶▶ direction to move to a wanted menu and press the jog button,
wanted play mode is selected.
Press the [ESC] button shortly on the file searching screen or play/record screen, you can return to the
main menu screen.
48

Video Functions
Play Video
1.
2.
Push the jog button in ◀◀ or ▶▶ direction on the main menu
screen to move to the [VIDEO PLAY] menu and press the
jog button.
When the video file search screen is displayed, push the
jog button in ∧ or ∨ direction to move to a file that you want
to play and press the jog button to play the selected file.
You can move between folders or file list of the selected folder by
pushing the jog button in ◀◀ or ▶▶ direction.
If you push the jog button in ∧ or ∨ direction to move to a certain
folder and press the jog button, the files of the selected folder are
displayed.
49

3.
If you push the jog button in ◀◀ or ▶▶ direction during
playing, you can move to the previous file/next file.
You can move to the previous file by pushing it in ◀◀ direction before
5 sec after starting playing and to the beginning of the file being
played by pushing it 5 sec later.
4.
You can search the file being played by pushing the
jog button long in ◀◀ or ▶▶ direction.
5.
You can hide the icons and captions displayed on the screen
by pressing the [OSD] button shortly during playing.
Whenever you press the [OSD] button, the status changes in the
order of ‘Hide iconHide icon/captionShow icon/caption (initial
status)’.
50

6.
If you press the [OSD] button long during playing, you can
see the file information on the screen and then, press the
[OSD] button long again, the file information will be
concealed.
7.
If you want to display the file searching screen during playing
a video file, press the [MENU] button shortly. The video play
screen appears when you press the [MENU] button shortly
again.
The file searching screen is displayed semi-transparently while playing
a video file.
8.
Press the jog button shortly if you want to stop playing the
video file and press it long to finish playing.
The video file searching screen appears when you finish playing the
video file.
51

SYNC Mode Setting
9.
If you want to exit the video play menu and return to the main
menu screen, press the [MENU] button shortly on the video
file searching screen after playing is completed.
1.
The icon “A” will be displayed when this file included sub title,
and the icon “A” will be disappeared after 10 seconds.
When Using The subtitle, the file name of subtitle file should be the
same as you wanted animation movie file’s name and in the same folder
2.
Press the [REC] button for a while to change to the
sync mode what the time for the subtitle is not correct.
The “A+0.0” will be displayed when it is changed to Sync mode.
The displayed number indicate the time by second.
52

3.
To setting the displayed sync time, move the jog button to the
direction of ◀◀ or ▶▶. It will be moved by 0.5 seconds.
4.
Press the [REC] button to finish sync mode.
53

Video Play Setting
1.
If you press the [MENU] button long on the file searching
screen or during playing a video file, the video play setting
screen appears and you can set video play environment.
Set transparency of the setting menu screen from ‘Half Tone’ of the
‘General’ item of ‘SYSTEM SET’ menu on the main menu screen.
2.
Push the jog button in ∧ or ∨ direction to select an item to set
and push it in ◀◀ or ▶▶ direction to set the selected item.
3.
Press the [MENU] button shortly to exit the video play
setting screen.
54

Class Item Description
General
Mode
Power/screen setting (equally applies to video play/audio play/image play/text
The power/screen item on the setting screen of video play, audio play, image play and text
Language Selects a caption language for video play file (English and 34 languages)
Resume Sets playing from the point where the file played last stopped (On/Off)
*It may not work properly by file information.
Full Screen Sets to the displayed screen in full screen (Off/4:3/16:9)
Scope Sets video file play range
- All: Repeatedly plays all video files in the folders under the ‘Movie’ folder
- Dir: Repeatedly plays all video files in the folder which includes the
selected video file
- 1: Repeatedly plays just one video file selected
Repeat Sets repeated playing (On/Off)
Shift Time
(Min)
viwer menu)
viwer menus equally applies to the setting from the ‘SYSTEM SET’ menu on the main menu
screen. See ‘System Set’ of the User Guide for further information on power/screen setting
(Refer to the page 102~103).
Sets a shift time for the file being played (0~10)
55

Record Video
1.
Push the jog button in ◀◀ or ▶▶ direction on the main menu
screen to move to the [VIDEO RECORD] menu and press the
jog button.
2.
If the image screen input to the camera is displayed on the
LCD screen, rotate the camera lens to the object to record to
take a comfortable pause.
3.
You can change up/down reversal by pressing the jog button.
The image on the LCD screeb may be seen reversed depending on
direction of the lens and objects. In that case, you can get normal
image by pressing the jog button.
56

4.
You can produce various screen effects by pushing the
jog button in ◀◀ or ▶▶ direction.
Image effect types:
No Effect, Monochrome, Sepia Blue/Red/Green/Magenta, Negative,
Solarize1/2
5.
Press the [REC] button shortly to start video recording.
6.
It can be zoom out or zoom in by moving the jog button to
∧ or ∨ in QVGA or VGA mode (Zoom function won’t be work in
Line In Mode).
If you select QVGA or VGA mode, the QVGA or VGA mode icon and
the zoom -/+ icon are displayed on the video record screen
(VGA: Enlarging 2X possible, QVGA: Enlarging 4X possible).
You can change QVGA or VGA mode from the ‘Camera Size’ item on
the video record setting menu screen.
57

7.
Press the [REC] button long to finish recording.
Press the [REC] button shortly to stop video recording and
press it again to resume recording.
8.
If you want to exit the video record menu and return to the
main menu screen, press the [MENU] button shortly after
recording is completed.
The recorded file is stored in ‘Record’ folder of ‘Video’ folder.
Recorded file format indicates the record time and date.
- L041212_162030.ASF: Line input animation record file
- C041212_162030.ASF: Camera input animation record file
58

Video Record Setting
1.
If you press the [MENU] button long in record end/wait
mode of the video record menu, the video record setting screen
appears and you can set video record environment.
Set transparency of the setting menu screen from ‘Half Tone’ of the
‘General’ item of ‘SYSTEM SET’ menu on the main menu screen.
2.
Push the jog button in ∧ or ∨ direction to select an item to set
and push it in ◀◀ or ▶▶ direction to set the selected item.
3.
Press the [MENU] button shortly to exit the video record
setting screen.
59

Class Item Description
General
Recording mode depending on image quality
- VGA mode: VGA mode is used to record high quality images. However, is the image is
- QVGA mode: Image quality of QVGA mode is a little lower than that of VGA mode. However,
Video In Selects image input for video recording (Camera/Line)
Flickerless
Camera
Size
Line-in Size Selects image quality of line input (VGA/QVGA)
REC Time
(Min)
recorded with 15 frames/sec, the screen seems to be a little discontiued and a large storage
space is required as the file size of the recorded screen is large.
it can present natural screen actions and requires smaller storage space than VGA mode.
Removes up/down flow of flicker/horizontal line noise
- Auto: Outdoor or normal setting
- 50Hz: Indoor, AC power frequency 50 Hz
- 60Hz: Indoor, AC power frequency 60 Hz
Selects image quality of camera input
(VGA (640×480): 15 frame/sec, QVGA (320×240): 30 frame/sec)
Sets video record time (0~150)
*It will be recorded up to 1GB for consecutive record, and it will be created
new recorded file after stopped automatically if the file capacity is over 1GB.
60

Image Functions
Play Image
1.
2.
Push the jog button in ◀◀ or ▶▶ direction on the main menu
screen to move to the [IMAGE PLAY] menu and press the
jog button.
When the image file searching screen is displayed, push the
jog button in ∧ or ∨ direction to move to a file you want to
play and press the jog button to play the selected file.
You can move between folders or file list of the selected folder by
pushing the jog button in ◀◀ or ▶▶ direction.
If you push the jog button in ∧ or ∨ direction to move to a certain
folder and press the jog button, the files of the selected folder are
displayed.
61

3.
You can zoom a desired part by pressing the [A-B] button
during playing.
Whenever you press the [A-B] button, zoom changes in the order of
‘Normal2x4xNormal’.
You can move the zoom part by pushing the jog button in ∧, ∨,
◀◀, ▶▶ directions.
4.
You can move to the previous image/next image by pushing the
jog button in ◀◀ or ▶▶ direction.
Once the image is enlarged, you cannot move to the previous/next
image.
If a slide time is set, the next image is automatically played after the
specified time.
You can set a slide time on the ‘image play setting’ menu screen.
5.
You can hide the icons displayed on the play screen by pressing
the [OSD] button shortly during playing.
Press once: Hide icons
Press again: Display icons
62

6.
If you press the [OSD] button long during playing, you can
see the file information on the screen and then, press the
[OSD] button long again, the file information will be
concealed.
7.
Press the [MENU] button shortly if you want to display the
file searching screen while playing an image file. The image
play screen is displayed when you press the [MENU] button
shortly again.
The file searching screen is displayed semi-transparently while playing
an image file.
8.
After selecting image during playing image file, press the
[REC] button shortly, it will be setting.
63

9.
If you want to exit the image play menu and return to the main
menu screen, press the [MENU] button shortly on the image
file searching screen after playing is completed.
64

Image Play Setting
1.
If you press the [MENU] button long on the file search
screen or during playing image file, the image play setting
screen appears and you can set image play environment.
Set transparency of the setting menu screen from ‘Half Tone’ of the
‘General’ item of ‘SYSTEM SET’ menu on the main menu screen.
2.
Push the jog button in ∧ or ∨ direction to select an item to set
and push it in ◀◀ or ▶▶ direction to set the selected item.
3.
Press the [MENU] button shortly to exit the image play
setting screen.
65

Class Item Description
General Resume Sets playing from the file played last (On/Off)
66
Mode
Scope Sets image file play range
- All: Repeatedly plays all image files in the folders under the ‘Image’
folder
- Dir: Repeatedly plays all image files in the folder which includes the
selected image file
- 1: Repeatedly plays just one image file selected
Repeat Sets repeated play (On/Off)
Shuffle Sets shuffle play (On/Off)
Effect Selects play slide effect (Normal/LR/RL/TB/BT/Random)
Rotate Sets image file rotation (0˚/90˚/180˚/270˚/Auto)
*Press the [A-B] button long during playing, image will be
rotated as direction of reverse of time direction.
Slide Time (Sec) Selects automatic play side time (0~5)

Record Image
1.
Push the jog button in ◀◀ or ▶▶ direction on the main menu
screen to move to the [IMAGE RECORD] menu and press the
jog button.
2.
If the image screen input to the camera is displayed on the
LCD screen, rotate the camera lens to the object to record to
take a comfortable pause.
3.
You can reverse the screen by pressing the jog button.
The image on the LCD screen may be seen reversed depending on
direction of the lens and objects. In that case, you can get normal
image by pressing the jog button.
67

4.
You can produce various screen effects by pushing the
jog button in ◀◀ or ▶▶ direction.
Recording effect types:
No Effect, Monochrome, Sepia Blue/Red/Green/Magenta, Negative,
Solarize1/2
5.
Press the [REC] button to start image recording.
To record image from an external video device, connect the output of
the external video device to the LINE IN port of the player, and select
‘Line’ for image input. If you press the [REC] button, the player
starts saving the image from the external video device.
68

6.
You can enlarge or reduce the screen size with the zoom
function by pushing the jog button in ∧ or ∨ direction in
QVGA mode (Zoom function won’t be work in Line-In Mode).
If you select QVGA or VGA mode, the QVGA or VGA mode icon and
the zoom -/+ icon are displayed on the image record screen
(VGA: Enlarging 2X possible, QVGA: Enlarging 4X Possible).
You can change QVGA or VGA mode from the ‘Camera Size’ item on
the image record setting menu screen.
The zoom function is not available in SXGA mode.
7.
Press the [MENU] button shortly to exit the image record
menu and return to the main menu screen.
The image record file is created in the ‘Record’ folder of ‘Image’ folder.
Recorded file format indicates the record time and date.
- L041212_162030.JPG: Line input animation record file
- C041212_162030.JPG: Camera input animation record file
69

Image Record Setting
1.
Press the [MENU] button long from the image record menu.
The image record setting screen appears and you can set
image record environment.
Set transparency of the setting menu screen from ‘Half Tone’ of the
‘General’ item of ‘SYSTEM SET’ menu on the main menu screen.
2.
Push the jog button in ∧ or ∨ direction to select an item to set
and push it in ◀◀ or ▶▶ direction to set the selected item.
3.
Press the [MENU] button shortly to exit the image record
setting screen.
70

Class Item Description
General
Video In Selects record image input (Camera/Line)
Flickerless Removes up/down flow of flicker/horizontal line noise
- Auto: Outdoor or normal setting
- 50Hz: Indoor, AC power frequency 50Hz
- 60Hz: Indoor, AC power frequency 60Hz
Camera Size Selects camera input image quality
- SXGA (1280×1024)
- VGA (640×480)
- QVGA (320×240)
Line-in Size Selects line input image quality
- QVGA (320×240)
- VGA (640×480)
Count When recording image, can takes a many of images by one time
click (1~10).
*When recording image, press the [REC] button long.
Interval (sec) When recording image, takes image continuously as adjusted time
interval range (1~5).
71

Audio Functions
Play Audio
1.
2.
Push the jog button in ◀◀ or ▶▶ direction on the main menu
screen to move to the [AUDIO PLAY] menu and press the
jog button.
When the audio file search screen is displayed, push the
jog button in ∧ or ∨ direction to move to a file that you want
to play and press the jog button to play the selected file.
You can move between folders or file list of the selected folder by
pushing the jog button in ◀◀ or ▶▶ direction.
If you push the jog button in ∧ or ∨ direction to move to a certain
folder and press the jog button, the files of the selected folder are
displayed.
72

3.
Pressing the [OSD] button shortly during playing,
you can change the play screen from normal status to
‘Semi-transparentNo display (Display just background screen)
Normal’.
4.
You can change the EQ status by pressing the [OSD] button
long during playing.
You can change the EQ status to
‘NORMAL/ROCK/JAZZ/CLASSIC/POP/U.BASS/U.EQ’.
5.
You can move to the previous song/next song by pushing the
jog button in ◀◀ or ▶▶ direction.
You can move to the previous song by pushing it in ◀◀ direction
before 5 sec after starting playing and to the beginning of the song
being played by pushing it 5 sec later.
73

6.
You can search the file being played by pushing the
jog button long in ◀◀ or ▶▶ direction.
7.
Press the jog button shortly if you want to stop playing the
audio file and press it long to finish playing.
The audio file searching screen appears when you finish playing the
audio file.
8.
If you want to exit the audio play menu, press the
[MENU] button shortly on the audio file searching screen
after playing is complete.
74

Audio Play Setting
1.
If you press the [MENU] button long on the file searching
screen or during playing an audio file, the audio play setting
screen appears and you can set audio play environment.
Set transparency of the setting menu screen from ‘Half Tone’ of the
‘General’ item of ‘SYSTEM SET’ menu on the main menu screen.
2.
Push the jog button in ∧ or ∨ direction to select an item to
set and push it in ◀◀ or ▶▶ direction to set the selected item.
3.
Press the [MENU] button shortly to exit the audio play
setting screen.
75

Class Item Description
Language Selects a voice language for audio play file (English and 34 languages) General
Resume User can play the file which user stopped to see last time (On/Off)
76
Mode
Scope Sets audio file play range
- All: Repeatedly plays all audio files in the folders under the ‘Music’ folder
- Dir: Repeatedly plays all audio files in the folder which includes the selected
audio file
- 1: Repeatedly plays just one audio file selected
Repeat Sets repeated play (On/Off)
Shuffle Sets shuttle play (On/Off)
Id3,Lyric Sets Id3 tag information or words view of the play file
- ID3 Tag: Shows Id3 tag information included in the file instead of file name
- Lyrics: Shows words included in the file
(Shows just the file name if words are not given)
- Normal: Play file name
Shift Time
(Sec)
Sets shift time of the file being played (0~10)

Class Item Description
Sound EQ EQ Sets tone of the audio file output sound being played
(Normal/Rock/Jazz/Classic/Pop/U.B/USER_EQ)
*Press the [OSD] button long to adjust the sound during playing
User EQ 60Hz/250Hz/
1KHz/4KHz/
12KHz
Sets the tone requested by user from low-pitched tone to high-pitched
tone (-12~+12)
77

Record Audio
1.
Push the jog button in ◀◀ or ▶▶ direction on the main menu
screen to move to the [AUDIO RECORD] menu and press
the jog button.
2.
Recording starts when you press the [REC] button.
Change voice input mode from the ‘Audio Input’ item on the audio
record setting menu screen (MIC/Line).
To record audio signal from the external audio devices such as CD
player, connect the Y cable to the output port of the external audio
device and the AV cable to the LINE IN port of the player. The Y cable
and the AV cable should be connected to the matching colors (L/R).
Select ‘Line’ for the audio input mode.
3.
Press the [REC] button shortly to stop recording and
press it again to resume recording.
You can set speaker (earphone) volume and audio input volume only
if the audio input is set to ‘Line’.
78

4.
Press the [REC] button long to finish recording.
The recorded file is stored in the ‘Record’ folder of ‘Music’ folder.
5.
Press the [MENU] button shortly to exit the audio record
menu and return to the main menu screen.
Recorded file format indicates the record time and date.
- L041212_162030.MP3: Line input audio record file
- V041212_162030.MP3: Microphone input audio record file
79

Audio Record Setting
1.
If you press the [MENU] button long in record end/wait
mode of the audio record menu, the audio record setting screen
appears and you can set audio record environment.
Set transparency of the setting menu screen from ‘Half Tone’ of the
‘General’ item of ‘SYSTEM SET’ menu on the main menu screen.
2.
Push the jog button in ∧ or ∨ direction to select an item to set
and push it in ◀◀ or ▶▶ direction to set the selected item.
Audio Input: Voice input selection for audio recording (MIC/Line)
REC Time (Min): Audio record time setting (0~150)
*It will be recorded up to 1GB for consecutive record, and it will be
created new recorded file after stopped automatically if the file
capacity is over 1GB.
3.
Press the [MENU] button shortly to exit the audio record
setting screen.
80

FM Radio Functions
Receive FM Radio
As the earphone plays the role of an FM radio antenna, make sure to connect the earphone to
the earphone port of the body to listen to the FM radio.
1.
Push the jog button in ◀◀ or ▶▶ direction on the main menu
screen to move to the [FM RADIO] menu and press the
jog button.
2.
Push the jog button in ◀◀ or ▶▶ direction to search
a channel you want.
81

3.
Whenever you press the [OSD] button, the status changes in the
Autoscan Memory Searching Mode
If you press the jog button long, audible frequencies are
automatically searched and stored.
It may not work properly by file information.
You can hide the icons displayed on the screen and the receive
screen by pressing the [OSD] button shortly while listening
to the radio.
order of ‘Hide icon/semi-transparent screenHide receive screen
(Display only background screen)Show icon/receive screen
(normal status)’.
82

Autoscan Searching Mode
Manual Searching Mode
If you press the jog button in ◀◀ or ▶▶ direction long,
the frequency automatically increases or decreases to search
available frequency channels (Ex: 89.1MHz91.9MHz).
Frequency searching stops when you press the jog button shortly
during Autoscan searching.
You can directly search audible channels by shortly pressing the
jog button in ◀◀ or ▶▶ direction (Ex: 91.8MHz91.9MHz).
83

Preset Mode
1.
Press the [OSD] button long to change to preset mode.
The ‘preset’ mode on the screen is selected.
2.
Press the jog button in ◀◀ or ▶▶ direction to search preset
channels by increasing channel number
(93.1MHz95.9MHz97.3MHz).
Press the [OSD] button long to release the preset mode.
84

Saving broadcasting channel
Deleting broadcasting channel
1.
Press the [A-B] button shortly while listening to the radio.
2.
Channel number is displayed on the LCD screen and current
frequency being received is stored.
Press the [A-B] button long while receiving a stored
frequency.
The channel number displayed on the LCD screen is cleared and the
stored frequency being received is deleted.
85

Record FM Radio
1.
Recording starts when pressing the [REC] button while
listening to the FM radio.
2.
Press the [REC] button shortly to stop recording temporarily
and press it again to resume recording.
The LCD screen shows the record time during recording. When the
record time exceeds the memory capacity, recording automatically
stops and only the data recorded by allowed record time is stored.
3.
Press the [REC] button long to finish recording.
The record file is stored in the format of ‘R041201_161020.MP3’ in the
‘Record’ folder of ‘Music’ folder.
86

FM Radio Setting
4.
Press the [MENU] button shortly to exit the FM Radio menu
and return to the main menu screen while listening to the
FM radio.
1.
If you press the [MENU] button long from the FM radio
menu, the FM radio setting screen is displayed and you can
listen to the FM radio or set recording environment.
2.
Push the jog button in ∧ or ∨ direction to select an item to set
and push it in ◀◀ or ▶▶ direction to set the selected item.
87

3.
Press the [MENU] button shortly to exit the FM radio setting
screen.
Class Item Description
General
Do not pull out the earphone even when you select the speaker mode.
FM Region
Speaker
REC Time
(Min)
Even you set ouput to the built-in speaker, youshould connect the earphone to the earphone
port of the body as it plays the role an FM radio antenna. Otherwise, there may be troubles
when listening to the FM radio.
Selects FM radio receive region (KOR/USA, Europe, JPN)
*If you change the FM region, you should execute the FM RADIO menu again.
Sets speaker output
- On: Concurrent output to the built-in speaker and the earphone
- Off: Output to the earphone only
Sets FM radio recording time (0~90)
*It will be recorded up to 1GB for consecutive record, and it will be created
new recorded file after stopped automatically if the file capacity is over 1GB.
88

Text View Functions
Text View
1.
Push the jog button in ◀◀ or ▶▶ direction on the main menu
screen to move to the [TEXT VIEW] menu and press the
jog button.
2.
When the text file search screen is displayed, push the
jog button in ∧ or ∨ direction to move to a file that user want
to play and press the jog button to play the selected file.
You can move between folders or file list of the selected folder by
pushing the jog button in ◀◀ or ▶▶ direction.
If you push the jog button in ∧ or ∨ direction to move to a certain
folder and press the jog button, the files of the selected folder are
displayed.
89

3.
User can move to the previous page/next page by pushing the
jog button in ◀◀ or ▶▶ direction.
4.
User can search the file quickly by pushing the jog button
long in ◀◀ or ▶▶ direction.
Time Setting for Automatic Turn the Pages will turn the pages easily.
Set up the Speed for Automatic Turn the Pages at ‘Text View Setting’.
5.
Press the [MENU] button shortly during seeing the text, the
browser screen will be shown. And the browser will be
disappeared when press the [MENU] button shortly again
The browser will be shown as semitransparent during text viewing.
90

6.
Press the jog button for a while to finish the viewing of
present file.
Browser of Text file will be displayed after finished to text viewing.
7.
Press the [MENU] button to return the main menu at the text
file browser after finishing text view function.
The maximum capctity of text file is 4MB.
91

Playing Audio during text view
1.
To playing Audio file, press the [OSD] button shortly during
seeing the text view. And press the [OSD] button shortly
again, playing audio file is stopped.
Push the jog button or direction to adjust volume during playing.
Pressing the [OSD] button during stop status, next music will be
playing.
2.
To pause during playing, you can press the [A-B] button
shortly.
To playing audio file in the text view, audio file should be resistered in the favorite folder
(Refer to the page 99).
92

Receive FM Radio during Text view
1.
Press the [OSD] button long during text view, you can move
FM radio screen,
Select you wanted FM Radio channel (Refer to the page 81~88).
2.
Press the [MENU] button shortly, you can return text view
screen.
3.
Press the [OSD] button long, you can stop finishing FM radio
receive.
93

Text Viewer Setting
1.
Press the [MENU] button for a while at the File Browser,
and the text view setting screen is come out as left picture
The Transparence of menu screen is controlled at ‘SYSTEM SET’ in
Main Menu as below.
2.
Select the specification as you want by moving the jog button
to ∧ or ∨ direction, and set up with selected specification
by using the jog button ◀◀ or ▶▶ direction.
3.
Press the [MENU] button shortly to finish text view setting.
94

Class Item Description
General
Language
Resume
Text H a lf To n e
Auto Page (sec)
Select the language to see the text file (34 Languages)
User can see the page which user stopped to read last time
(On/Off)
Transparence rate setting (0~3)
Set up the speed to turn the pages (0~30 sec)
95

Special Functions(Common to Video/Audio)
Bookmark
If you set a certain position in a file being played, the file is played from the specified point or the specified
position is searched and played, so that you can promptly search a desired position.
Book mark mode on/off
Bookmark mode on:
If you press the [A-B] button long during playing a file,
‘Bookmark Mode On’ message is displayed to show bookmark
mode activated.
Bookmark mode off:
If you press the [A-B] button long again in bookmark mode,
‘Bookmark Mode Off’ message is displayed to show
bookmark mode deactivated.
96

Position setting
Searching during play
If you press the [OSD] button shortly in bookmark mode,
the selected position is marked.
Push the jog button shortly in ◀◀ or ▶▶ direction to move
to the previous/next bookmark position.
97

Searching in the Search screen
Press the jog button in ∧ or ∨ direction in the ‘Bookmark’
folder on the searching screen to move to the bookmarked file.
Press the jog button to play from that position.
Delete Bookmark (This function is permitted only on the searching screen.)
Using the jog button in the ‘Bookmark’ folder on the
searching screen, select the ‘Bookmark’ folder or a specific file
bookmarked in the ‘Bookmark’ folder and press the
[A-B] button long.
Bookmark folder selected: Deletes all files bookmarked.
File in Bookmark folder selected: Deletes only the selected bookmark.
98
 Loading...