

Microdia FlashMover Installation Manual

16-in-1 USB2.0 CARD READER
INSTALLATION GUIDE &
OPERATION MANUAL
INSTALLATION GUIDE
Thank you for purchasing MICRODIA FlashMover® 16-in-1 USB
2.0 Reader. This FlashMover
works with USB enabled Microsoft Windows 98, 98SE, ME,
2000, XP or above and Mac OS 9/X and higher systems. This
installation guide contains all the information you need to
install your FlashMover
®
16-in-1 USB2.0 Card Reader.
®
16-in-1 USB2.0 Card Reader
For Windows Users
To install the FlashMover
®
16-in-1 USB2.0 Card Reader on Windows 98/98SE/2000:
1. Do not plug the card reader into the PC USB port before the installation is completed.
2. Download the driver from www.microdia.com
or insert the Driver CD in the CD-ROM drive.
3. Double click the [Autorun.exe] after downloading or the CD-ROM will auto-run a nd follow [Install W izard] installation
instruction.
4. After installation, reboot your computer.
5. Plug in your card reader into the USB port.
6. There are 4 new removable drives added to your computer.
7. Insert flash memory cards to access files in your cards.
NOTE: Please check MICRODIA
To install the FlashMover
®
16-in-1 USB2.0 Card Reader on Windows ME/XP:
®
website, www.microdia.com, for downloading the latest driver.
1. Plug the card reader into your computer USB port.
2. It is fully Plug-&-Play for Windows ME/XP, no driver installation needed.
3. 4 new removable drives are added to your computer after plug in the card reader.
Insert flash memory cards to access files in your cards.
For Macintosh Users
To install the FlashMover
®
16-in-1 USB2.0 Card Reader on Mac OS 9.X
1. Do not plug the card reader into the USB port before the installation is completed.
2. Download the driver from www.microdia.com
or insert the Driver CD in the CD-ROM drive.
3. Double click [Installer] and follow the [Install Wizard] installation instruction.
4. After installation, plug in your card reader into the USB port.
5. There are 4 new removable drives added to your computer.
6. Insert flash memory cards to access files in your cards.
NOTE:
- Please check MICRODIA
®
website, www.microdia.com, for downloading the latest driver.
- Please go to Mac website to update the latest version of Mac OS.
To install the FlashMover
1. Please go to Mac OS website for upgrading to Mac OS X 10.1.2, then OS X will automatically detects the card reader.
®
16-in-1 USB2.0 Card Reader on Mac OS 10.X and above
Removing your flash memory cards from the FlashMover® 16-in-1 USB2.0 Card Reader
To remove the flash memory cards on Windows system
1. Close any files that are opened and reside on the flash memory cards.
2. You can remove your cards safely after the LED stop blinking
To remove the flash memory card on Mac system
1. The flash memory cards must be [EJECTED] or [UN-MOUNTED] by dragging the card’s disk icon in the trash.
CAUTION: Failure to properly [EJECT] the card before removing the card from the card reader could case data
loss or corruption.
OPERATION MANUAL
This operation manual contains all the information you need to
operate your FlashMover
USING 16-in-1 FlashMover® CARD READER
®
16-in-1 USB2.0 Card Reader.
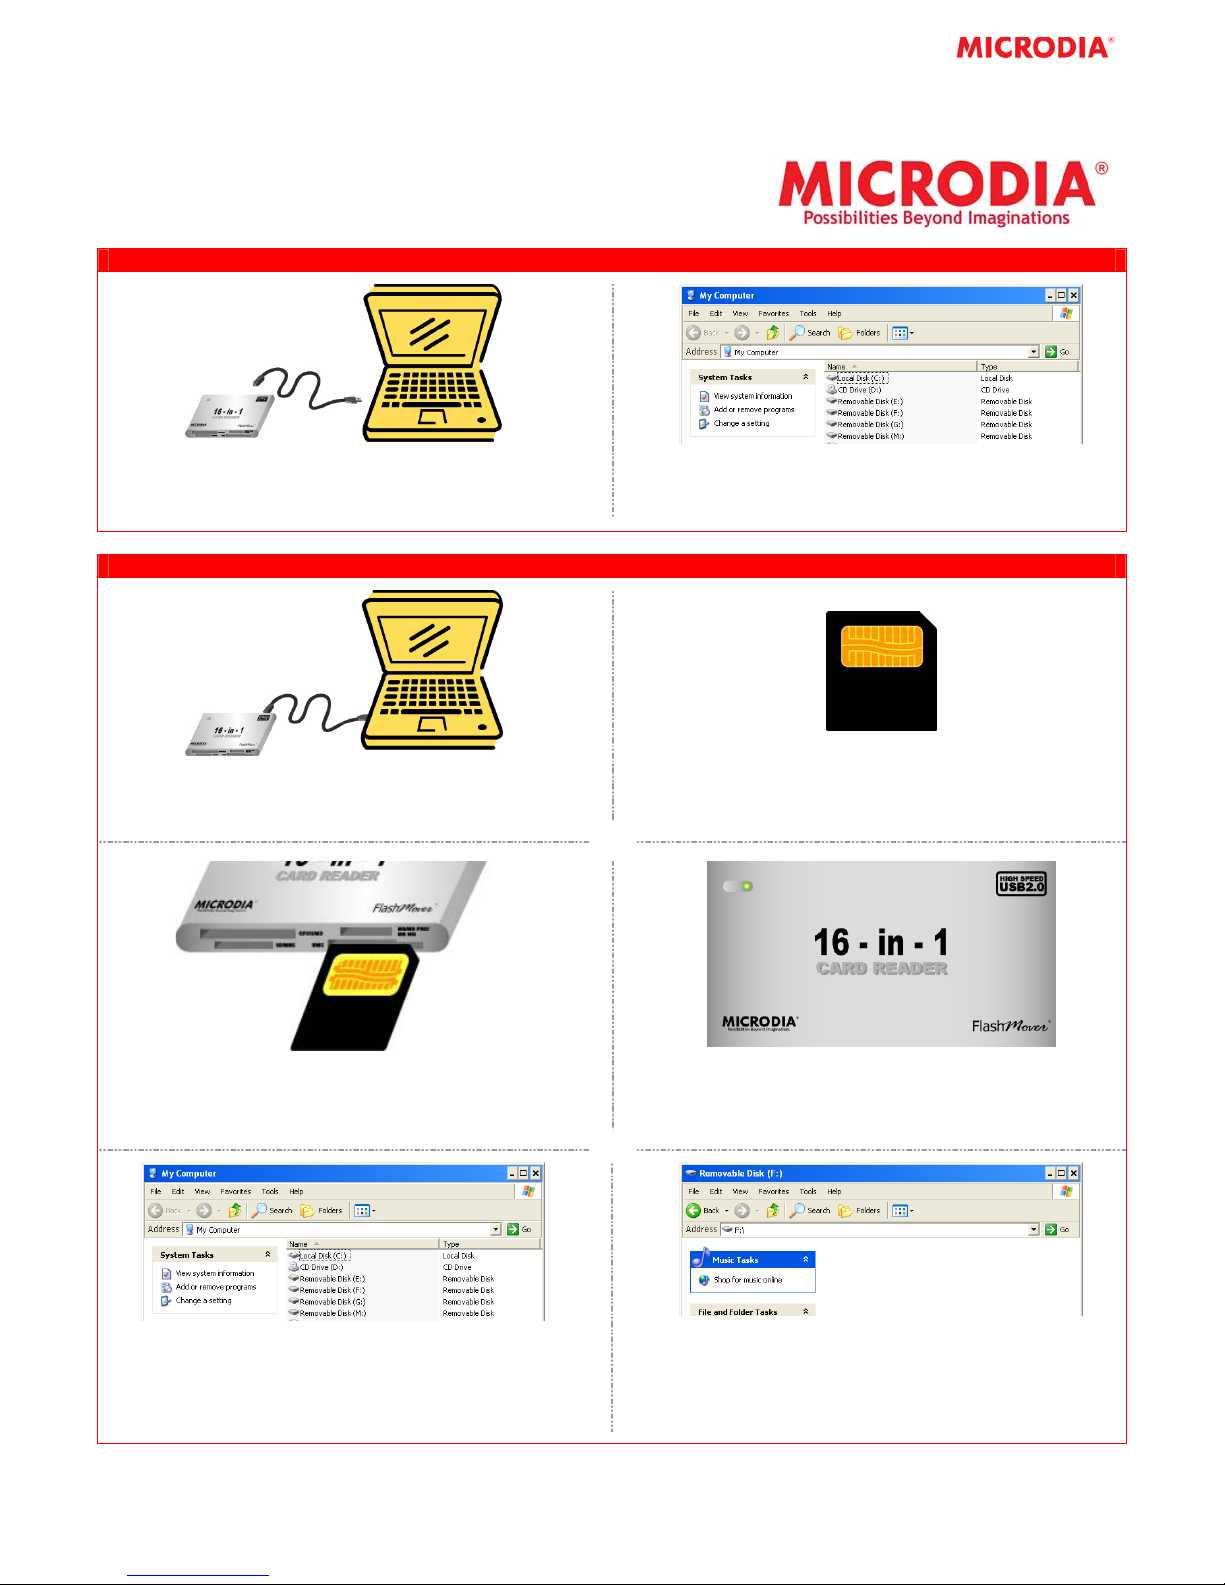
1. Connect 16-in-1 FlashMover Card Reader to the
Computer by USB miniB cable
2. Open My Computer - 4 Removable Disks will be
added. It is now ready for reading/writing
16-in-1 FlashMover® CARD READER FOR SMART MEDIA CARD
1. After connecting the Card Reader to the computer,
you may insert the Smart Media Card
2. Turn the Smart Media Card upside down (e.g. with
the pins of the Smart Media Card facing upward)
Smart Media Pin
3. Insert the Smart Media Card into the slot with pin
facing upward.
5. Open My Computer and double click one of the
Removable Disks such as Removable Disk (F:).
NOTE: The Removable Disk Drive may not be (F:). It is
depended on your computer settings.
4. If the Smart Media Card is inserted correctly, a
LED light on the Card Reader will turn on. If not,
please remove the Card and repeat Steps 3.
6. Removable Disk (F:) will be opened and it is ready
to read/write to the Smart Media Card. Ensure all
operations are completed before removing the
card.
 Loading...