

Page 1

Page 2

Page 3
User’s manual
English
Page 4
444444
44
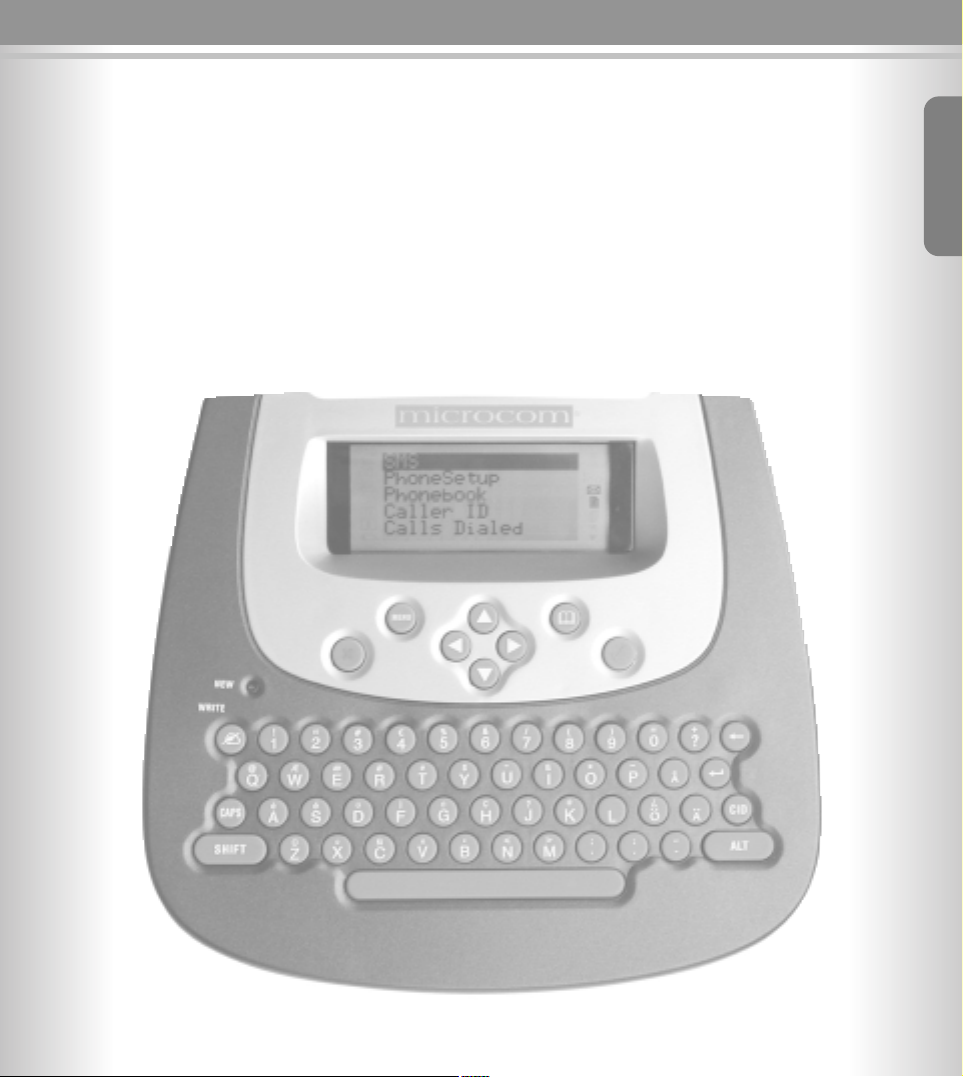
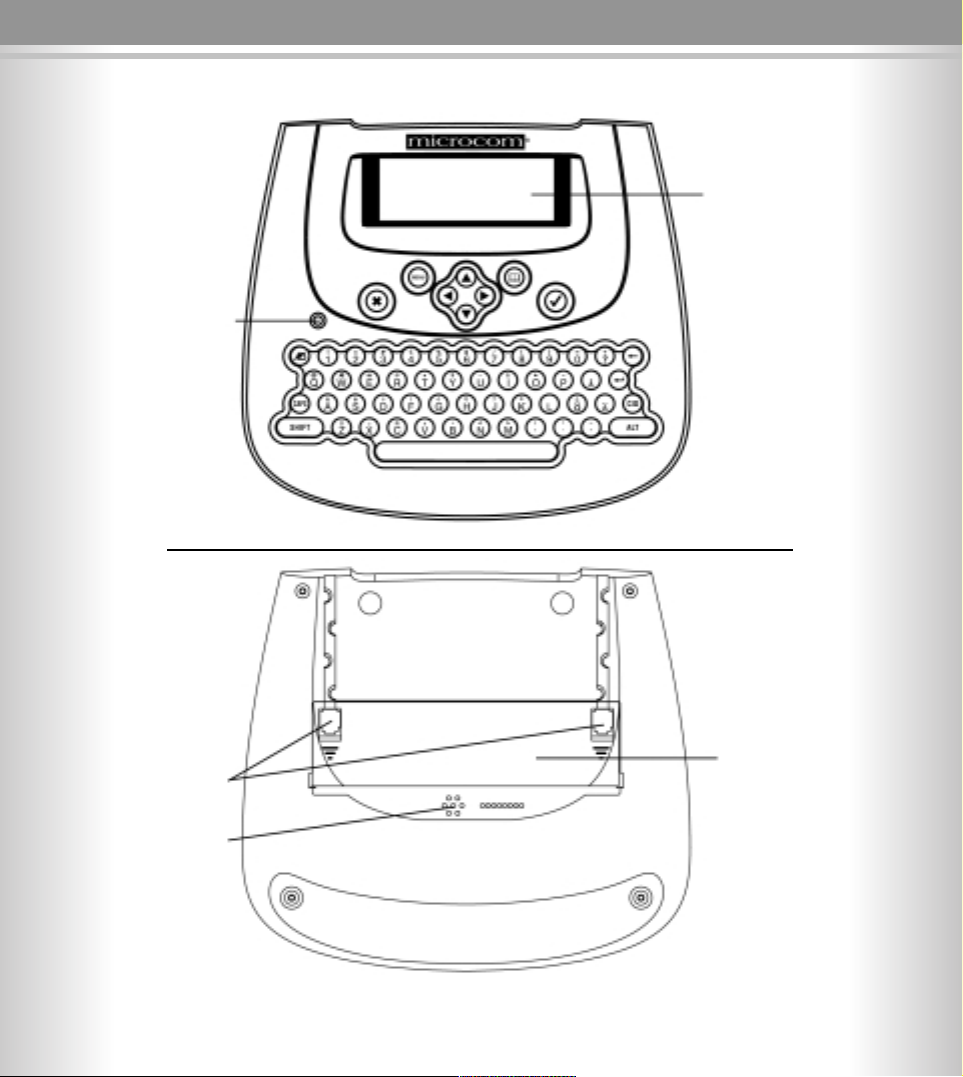
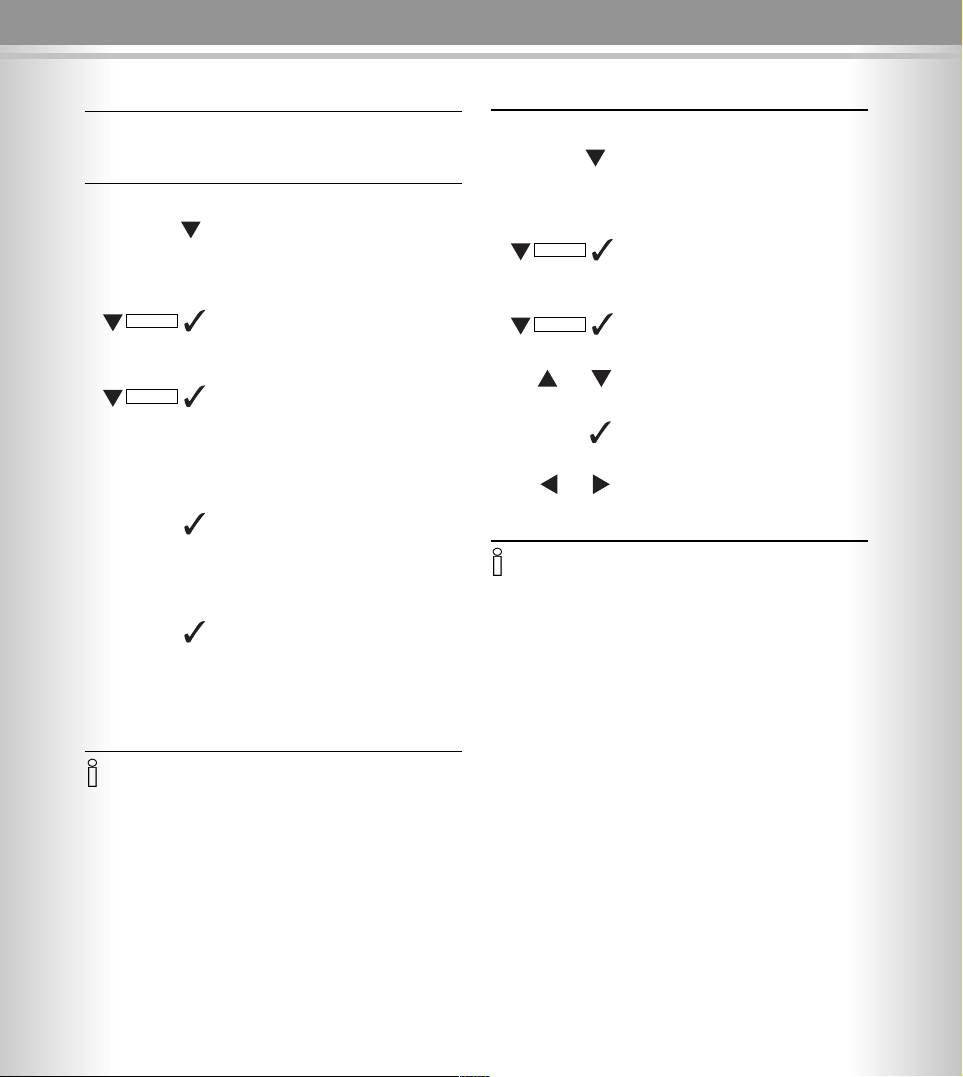
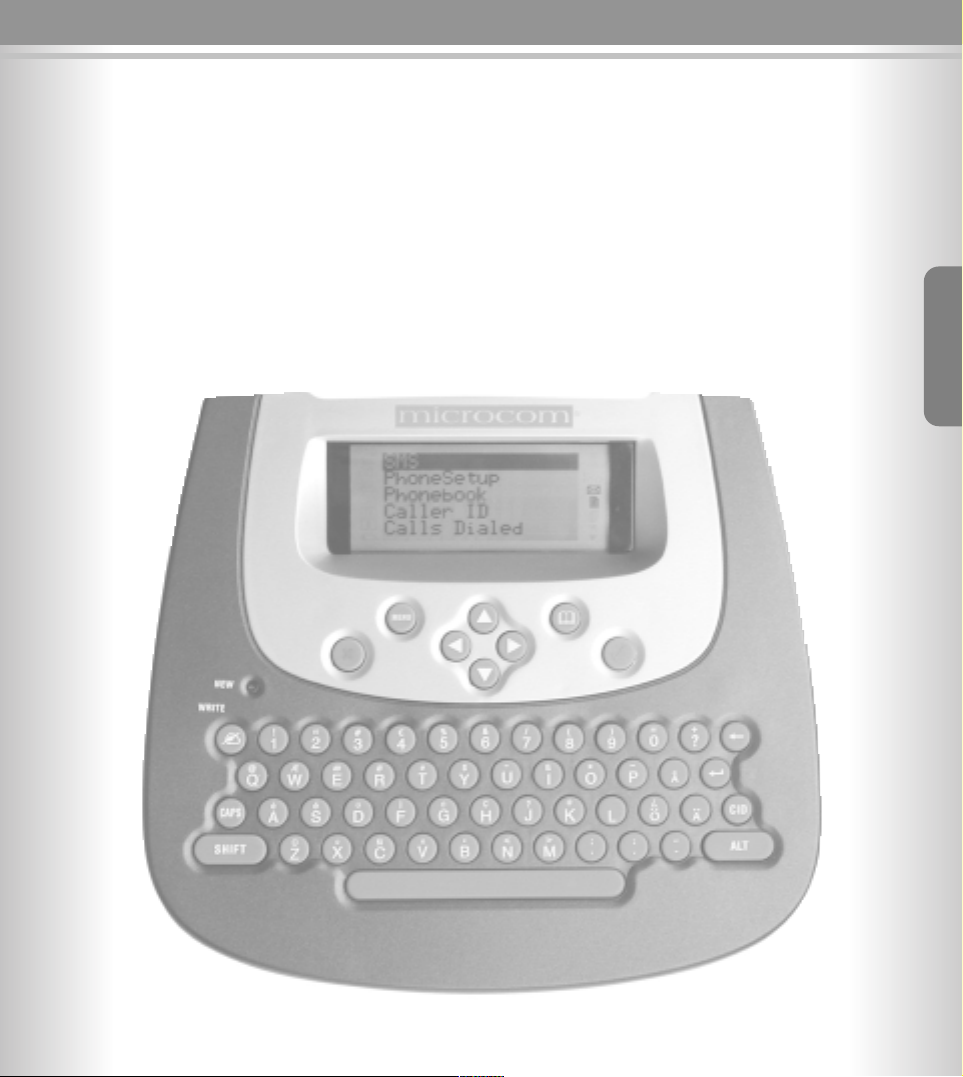
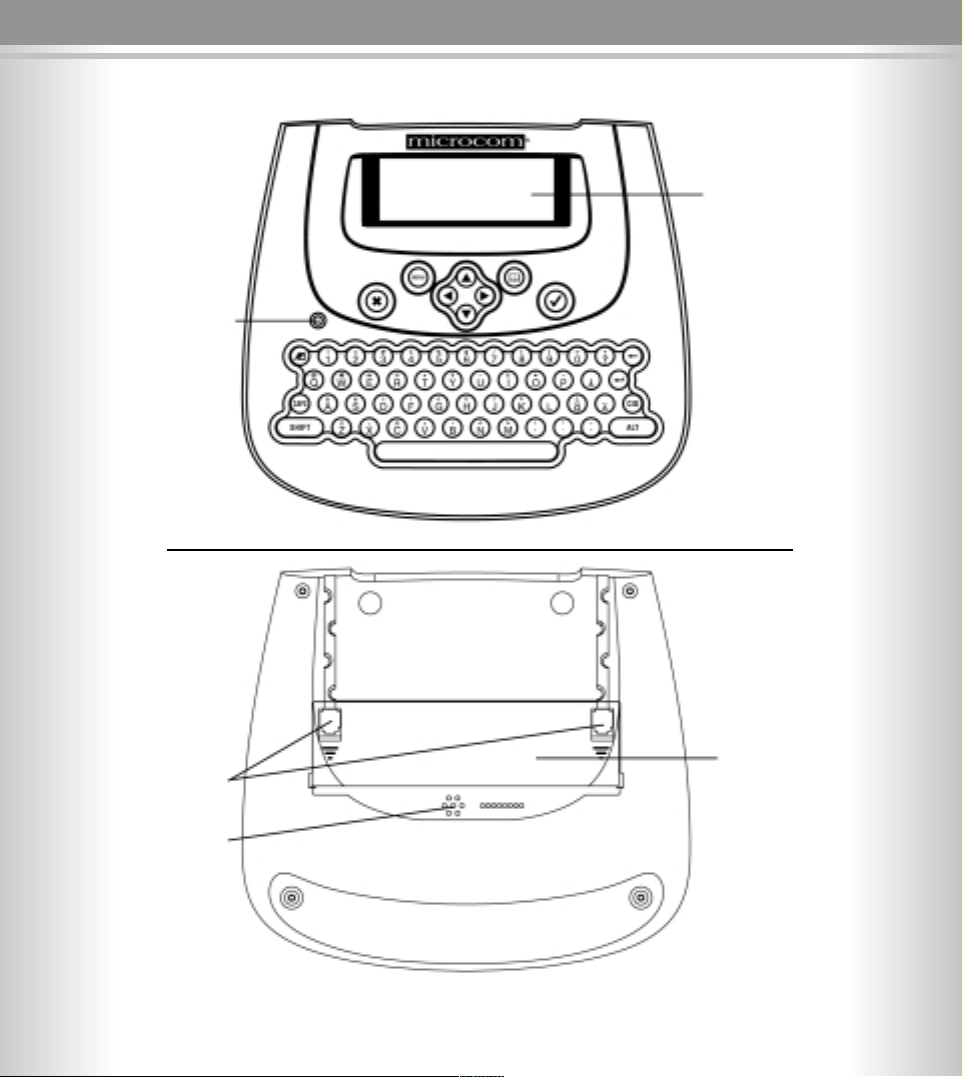
Main Diagram
LCD displey
Battery
compartment
Buzzer
NEW call and
NEW message
indicator
Jack for
line cord
Page 5
555555
55
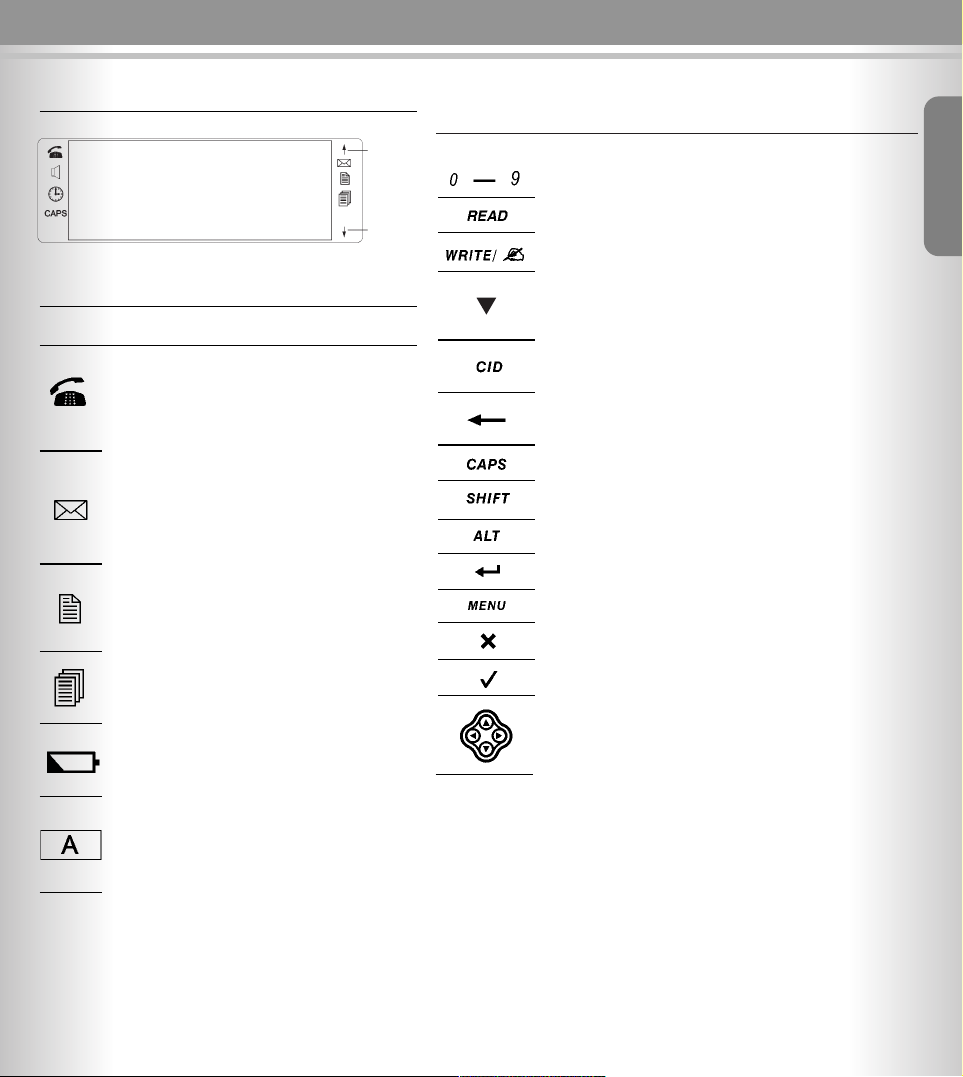
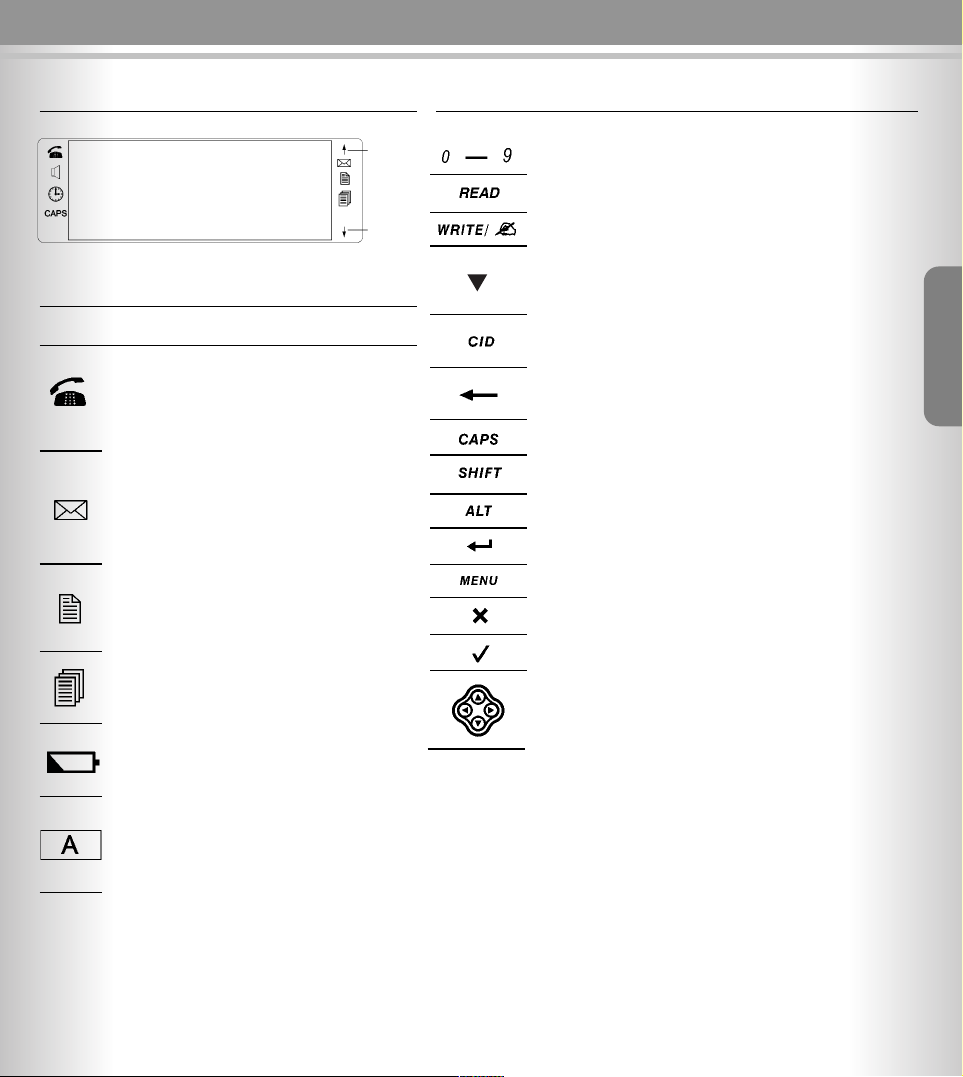
Function Description Functions of control key
Function Description
Description of icon
Icons Description
When in the state of off-hook, this icon will
turn on to indicate that the unit is in use
mode.
When you receive a new SMS message
or voice mail, this icon will be displayed on
the LCD.
If there are new calls in memory, this icon
will turn on. After all the new calls have
been reviewed, the icon will be turned off.
If the call comes repeatedly, this icon will
turn on.
When the battery power is low, this icon will
turn on.
When this icon turns on, it means that the
letter will be entered in upper case.
Functions
Buttons Description
To enter the digits 0~9
To quickly read message
To quickly write messages in Box 0
Phone book function has up to 50 memory locations in
the Phone book memory. For details, please see Phone
book section in this manual.
This unit has up to 90 memory locations in the CID memory. For details, please see Caller identification list
section in this manual.
To delete an entry or a record or all records in the
memory
To switch from lower case to upper case or vice versa
To enter the character up the numeric key
To enter the character up the letter key
To enter down row
To enter the menu list
To cancel
To confirm
To scroll up/down when browsing selections. And
to move the cursor to left/right when editing a record.
To up page
To down
page
Message display area
English
Page 6

66
66
Content
Main Diagram . . . . . . . . . . . . . . . . . . . . . . . . . . . . 4
Function Description . . . . . . . . . . . . . . . . . . . . . . . 5
Information on the display . . . . . . . . . . . . . . . . . . . . . 5
Descriptions of icons . . . . . . . . . . . . . . . . . . . . . . . . . 5
Functions of control key . . . . . . . . . . . . . . . . . . . . . . 5
Safety precaution . . . . . . . . . . . . . . . . . . . . . . . . . 7
Installing the base unit . . . . . . . . . . . . . . . . . . . . 7
Presetting . . . . . . . . . . . . . . . . . . . . . . . . . . . . . . . 9
Country profile . . . . . . . . . . . . . . . . . . . . . . . . . . . . . . 9
Accept all calls (always SMS) . . . . . . . . . . . . . . . . . . 9
Select labguage . . . . . . . . . . . . . . . . . . . . . . . . . . . . . 9
Setting the date and time . . . . . . . . . . . . . . . . . . . . . 9
Setting the LCD contrast . . . . . . . . . . . . . . . . . . . . . 10
Resetting the unit . . . . . . . . . . . . . . . . . . . . . . . . . . 10
Setting the area & LDS code . . . . . . . . . . . . . . . . . . 10
Character map . . . . . . . . . . . . . . . . . . . . . . . . . . . 11
Phonebook . . . . . . . . . . . . . . . . . . . . . . . . . . . . . . 12
Storing the names and numbers . . . . . . . . . . . . . . . 12
Reviewing the names and numbers . . . . . . . . . . . . . 12
Deleting the names and numbers . . . . . . . . . . . . . . 13
Dialling a number from phonebook . . . . . . . . . . . . . 13
Editing the names . . . . . . . . . . . . . . . . . . . . . . . . . . 13
Caller identification list . . . . . . . . . . . . . . . . . . . 14
Reviewing the caller list . . . . . . . . . . . . . . . . . . . . . . 14
Deleting single CID number . . . . . . . . . . . . . . . . . . . 14
Deleting all CID numbers . . . . . . . . . . . . . . . . . . . . . 14
Copying a CID number to phonebook . . . . . . . . . . . 14
Calling back a CID number . . . . . . . . . . . . . . . . . . . 15
Outgoing calls . . . . . . . . . . . . . . . . . . . . . . . . . . . 15
Reviewing and dialling outgoing numbers . . . . . . . . 15
Text message (SMS) . . . . . . . . . . . . . . . . . . . . . . 16
Writing, storing and sending an SMS message . . . . 16
Setting a new code . . . . . . . . . . . . . . . . . . . . . . . . . 17
Clearing a set code number . . . . . . . . . . . . . . . . . . . 17
Inbox list . . . . . . . . . . . . . . . . . . . . . . . . . . . . . . . . . 18
Outbox list . . . . . . . . . . . . . . . . . . . . . . . . . . . . . . . . 19
SMS centre . . . . . . . . . . . . . . . . . . . . . . . . . . . . . . . 19
Main menu . . . . . . . . . . . . . . . . . . . . . . . . . . . . . . 20
Feature list . . . . . . . . . . . . . . . . . . . . . . . . . . . . . . 21
Troubleshooting . . . . . . . . . . . . . . . . . . . . . . . . . . 22
Page 7
77
77
Safety precautions Installing the base unit
Safety precautions
To reduce the risk of fire, electrical shock and injury,
please follow these basic safety precautions before
you use this equipment.
1. Carefully read the instructions in this manual.
2. Read the warnings marked on the unit.
3. When cleaning, unplug the phone. Use a damp cloth.
DO NOT use liquid or aerosol cleaners.
4. DO NOT use this equipment in moist surroundings
5. DO NOT place objects on the line cord that may
cause damage.
6. Avoid spilling any liquids on the unit.
7. Unplug this telephone from the wall outlet and refer
servicing to qualified service.
Preparing the telephone
The package contains the following:
• One base unit
• One line cord
• 4 AA size 1.5V batteries
• One User manual
Installing the base unit
Notes on the installation
The unit is designed for operation in rooms with a temperature range from +5 to +45.
Inserting the batteries
The Phone buddy requires four 1.5V AA size batteries
to activate display.
1. Remove the battery cover from the back of your SMS
phone.
2. Insert four new 1.5V AA size batteries, note +/- polarity marks into the compartment.
3. Replace the cover securely.
BATTERY
NOTE:
1. The battery type is: size AA SUM-4 1.5V
2. Do not dispose the batteries into the fire.
3. Do not dispose the battery in the normal waiste
but use the specified containers or recycling services
to dispose of worn out batteries, to avoid pollution.
Congratulations
or purchasing our high quality product,
please read the manual carefully, in order to benefit from all features and operate the SMS device
properly.
Certifications:
English
Page 8
88
88
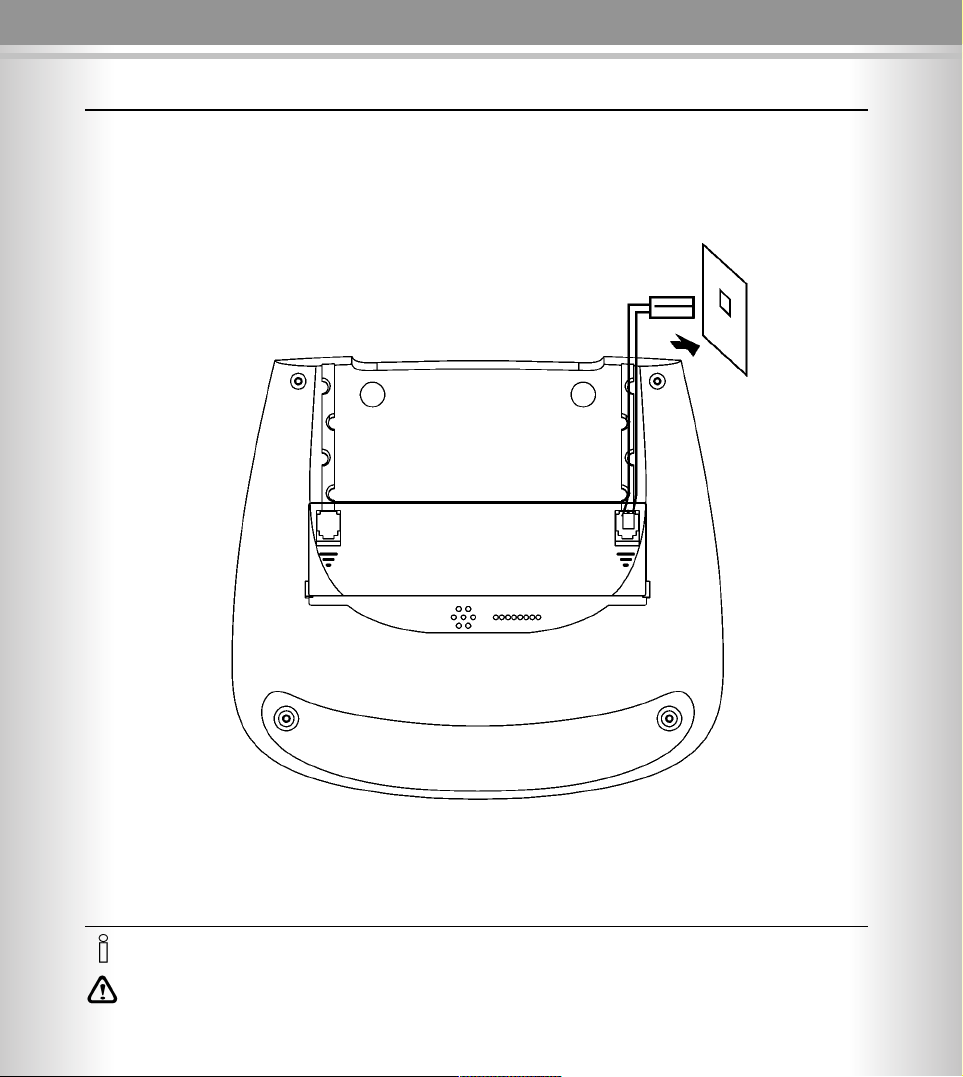
Installing the base unit
Connecting the base unit
Insert one end of the telephone cable into line jack, insert another telephone jack into telephone socket.
• If you buy another cable, ensure that the telephone leads have pin 3-4 assign as AB.
Attention: new telephone cable. Only use the cablesupplied.
Telephone jack with telephone cable
(type varies depending on country)
Page 9
99
99
Presetting
Getting Started
Setting the date and time
In standby mode, the unit can show the date and time,
if your operator supplies time and date information
together with the CLIP information, your unit will
automatically update time and date.
Open the menu
Select the menu item and confirm
The current setting is displayed and
the month digits will flash
Select the Month/Day/Hour/Minute
field
Enter the correct month/day/hour/
minutes (e.g. 12:36 23/08, as shown)
Press to confirm and exit
Country profile
Before you can use the phoneBuddy you need to configure the country settings, by choosing the country where you are using the device, all local services will be configured automatically
Open the menu
Select menu item and confirm
Select country profile item and confirm
List of countries will be displayed
Select the country (for example
Belgium)
Confirm your selection by pressing
button
After confirmation your phoneBuddy is
ready to use.
Accept all calls (always SMS)
This function can be used to make a dedicated SMS line (similar like dedicated FAX line), when activated the
phoneBuddy will pickup all incoming calls without verifying the SMS-C number. This feature is ideal to enable
SMS receiving on lines where CLIP is not present
(i.e PABX).
Open the menu
Select menu item and confirm
Select Accept all calls item and confirm
Select item On/Off
Confirm your selection by pressing
button
• When setting the date and time, you need to enter two digits at
a time e.g. the month August, in the month field you need to enter 8. If not, the entry number is invalid.
• The time is in 24h mode.
If you select this feature, the line where device is connected can
NOT be used for any other purpose then SMS, (all incoming voice
calls will be discarded)
Setup
MENU
MENU
0 - 9
Set Clock
Setup
MENU
Country
profile
English
Select lanugage
Open the menu
Select menu item and confirm
Select menu item and confirm
List of languages of which can be set
will be displayed
Select language (for example English)
Confirm your selection by pressing
button
or
Setup
MENU
Accept all
calls
or
Setup
Language
or
Page 10
111100
00
Presetting Making calls
Setting the area & LDS code
Open the menu
Select the menu item and confirm
Select the menu item and confirm
LCD shows Enter Area Code1
Enter the area code1 number 0~9 (up
to 4 digits)
Press to confirm and enter the area
code2 setting.
LCD shows Enter Area Code2
Enter the area code2 number 0~9 (up
to 4 digits)
Press to confirm and enter the LDS
code setting.
LCD shows Enter Prefix
Enter the LDS code number 0~9 (up
to 2 digits)
Press to confirm and exit.
• If you set the area code number, when dialling the number that
with the set area code number in phonebook or CID list, the number will be dialled out without the area code number.
• If you set the Prefix number, when dialling the long distance
number(more than 7 digits) in phonebook or CID list, the number
will be dialled out with the Prefix number.
• In reviewing state, the Prefix number can not be displayed.
Setup
MENU
Area Code
Setting the LCD contrast
There are 64 levels for you to choose.
Open the menu
Select the menu item and confirm
The current setting is displayed(e.g.
Contrast: 30)
Select the level your desired
Press to confirm and exit
Resetting the unit
After reset the unit, all the settings will be deleted.
Open the menu
Select the menu item and confirm,
LCD shows Reset now?
Press to confirm, and the LCD shows
Formatting. When formatting is
ended the display, will return
to standby mode.
Setup
MENU
Master Reset
Setup
MENU
Contrast
Page 11
111111
11
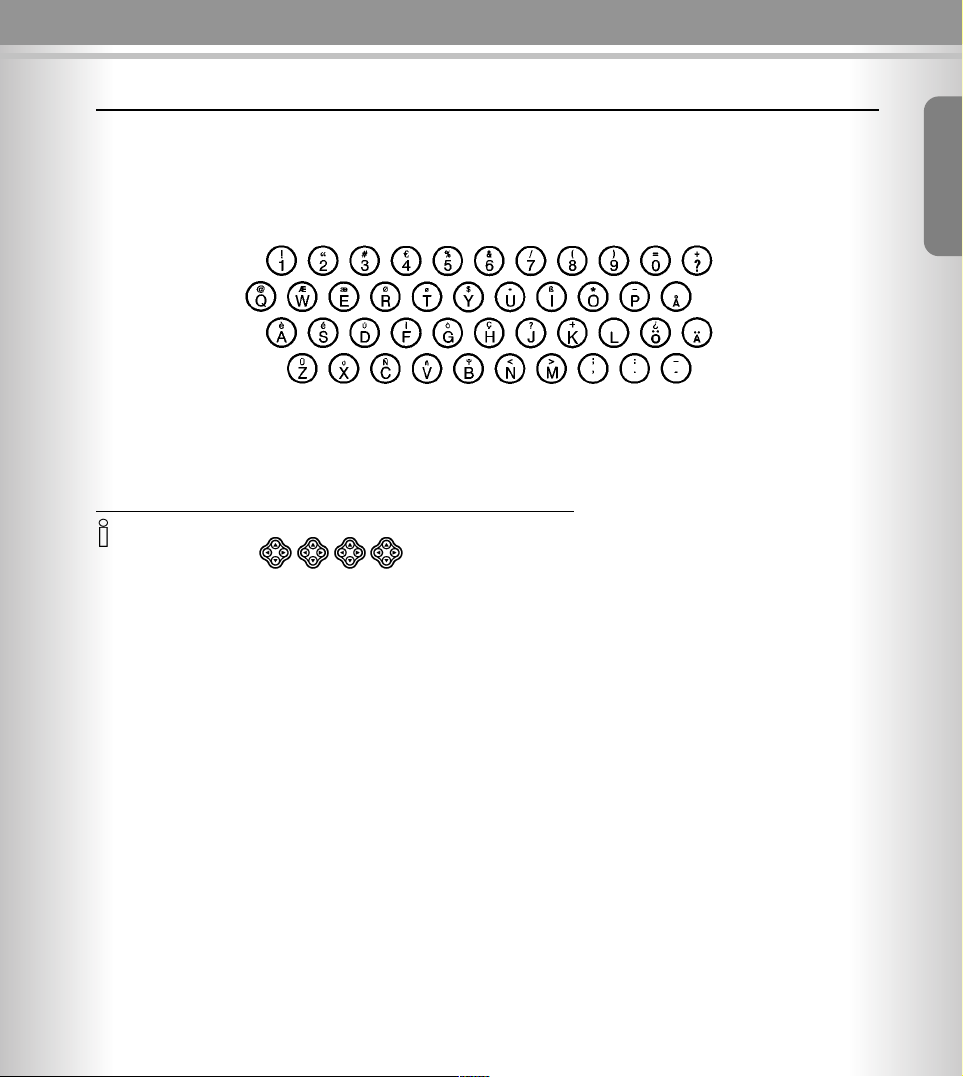
Character map
Character map
• To change a letter from upper case to lower case or vice versa press CAPS.
• Control the cursor with
• The letter to the left of the cursor is deleted with
• Letters are always inserted to the left of the cursor.
➞
English
Page 12
111122
22
Names
Names
The unit can store 50 names and numbers in phonebook.
Storing the names and numbers
Press to confirm
Open the menu
Select the menu item and confirm
display will show the Review and
Add Entry
Select the menu item and confirm
LCD will show the sequence and
Enter Number
Enter the number(e.g.:1236008,as
shown)
Press to confirm and the LCD shows
Enter Name
Enter the name (e.g.:John Smith, as
shown)
Press to confirm and LCD shows
Saved!
• You can store another name and number following above steps
• You can press button to cancel the previous entries
• The entered number is up to 16 digits
• The entered name is up to 16 characters
• If there is no entry in phonebook, display will show Empty
• At the end of the entry, display will show End of List
Reviewing the names and numbers
Press to confirm
Open the menu
Select the menu item and confirm
LCD will show the Review and Add
Entry
Select the menu item and confirm
LCD will show the name list
Scroll to the next or previous call name
Press to review the number and the
entered date and time
Press to scroll the next or previous
number
Names
MENU
0 - 9
Add Entry
or
Names
MENU
Review
or
or
or
Page 13
111133
33
Names
Deleting the names and numbers
When the display shows your desired number
Press to select
Select to delete and the LCD shows
Deleted !, then exit
Dialling a number in phonebook
When the display shows your desired phonebook number
Press to select
Select to delete and the display
shows Pickup handset . .
then in the state of off-hook to dial
out
Editing the names
Press to select
Select the item menu
Enter number will be showed on the
display, confirm and Enter Name
appears.
Enter the new name from keypad
(e.g. John smith, as shown)
Press to confirm and the LCD shows
Saved!, then exit.
Delete
Edit
Dial
English
Page 14
111144
44
Names
Caller Identification list
This unit can store up to 90 incoming calls, with name
and number date an time stamp
• If the memory storage is full, when the next call comes in,
the oldest record will be overwritten - for the New Call Record.
• When you have received New Calls, the NEW messages LED will
flash.
• At the end of the call record list, display will show End of List.
• If there are no calls, display will show No Calls.
Reviewing the caller list
Press to show the CID list
Open the menu
Select the menu item and show the
CID list
Press to review the CID name and
(or) number
Press to review the number, the date
and time
Press to review others number
Deleting single CID number
When get your desired number that shown on the LCD
Press to enter
Press to delete and the LCD shows
Delete !
Deleting all CID numbers
Press to show the CID list
Open the menu
Select the menu item and show the
CID list
Press once and the LCD will show
Del All CID?
Press to delete and the LCD shows
No Calls
Press to cancel
Copying a CID number to phonebook
When get your desired number that shown on the LCD
Press to enter
Press to confirm, LCD shows Enter
Name
Enter the name
Press to confirm, LCD shows Saved!
Caller ID
MENU
CID
or
Caller ID
MENU
➔
CID
or
or
or
Delete
Add name
Page 15

111155
55
Names
Calling back a CID number
Press to show the last CID call list
Open the menu
Select to show the CID list
Press to get your desired
Press twice to enter
Select and the LCD shows Pickup
handset . .
then in the state of off-hook to dial
out
For details, please consult your phone
operator for the availability of this
function.
If the phone can not recognize the information within the caller display
messages properly, it will show
ERROR. This does not mean that your
phone is defective.
Outgoing calls
You can store up to 30 last dialled outgoing calls number
Reviewing and Dialling outgoing numbers
Open the menu
Select the menu and confirm, the
LCD shows the last dialled number
list
Press to get your desired number
that shown on the LCD
Press to enter
Select to dial out the number
Select to add the number to phonebook
Select to delete the number
• The call back function will not dial the phone number properly if
the selected call record is blocked or it is not available.
If the caller has used the option to
prevent his name and number from
being sent (suppressed caller ID, also
CLIR), “Private” will be shown on the
display.
Out of area will display when someone calls from an area where the telephone company is not offering the caller identification services or an area
that is not yet providing name and
number delivery to your area via the
long distance net work.
If you have voice mail service from
your telephone company and a recorded message is left, the display will
show Message Waiting. Icon will
then appear on the right of the display.
The icon will remain until you have
retrieved your voice mail.
PRIVATE
OUT OF AREA
MESAGE
WAITING
ERROR
Call Back
Add name
Caller ID
MENU
MENU
CID
nebo
Calls Dialed
Call Back
Delete
English
Page 16
111166
66
Text message
Text message (SMS)
With this SMS phone you can send and receive text messages (SMS messages). SMS messages can only be received
by device which support this feature (mobile phones, PCs,
other telephones) SMS Short Message Service
Prerequisite:
CID
Caller identification (CID) and station number transmission
must be enabled at your fixed network telephone connection.
Contact your network provider to enable this features for
your telephone connection. Without CLIP enable you will not
be able to receive any SMS message.
SMS center
To send and receive SMSs you need the enter the SMSC
number of the service provider, please contact your operator
to obtain these numbers.
IMPORTANT: without this number the unit will NOT be
able to send or receive any SMS.
Some Fixed SMS center require only one number , other need both sending and receiving number.
Select the menu item and confirm LCD shows Enter Num-
ber, then enter the number
Press and confirm
Select to cancel
Writing, storing and sending an SMS message
Your device has for different SMS boxes they are independent from each other and can be used to enable each memberin the family to receive and send his private SMS,
Each SMS may contain no more than 160 characters.
Each box can store at least 30X160 characters messages or up
to 99 messages, they are not lost in the event of a power off.
The unit will receive messages as long the memory is not full.
Incase of full memory, the unit shows Inbox Full and displays how many messages are stored. You need to free up
space for new messages.
Sending SMS are not automatically stored. If you want to
store an SMS you must do this before sending it.
Open the menu
Select the menu item and confirm
Select the menu item and confirm
Open the input field
Press to quickly write a new
message in Box 0
Press to quickly read a new message
For information on entering letters
and characters, see page 11.
Move the cursor in the
text field
The next characters entered will appear to the left
of the cursor.
Delete characters to the
left of the cursor.
Press to make a space
Press to switch from upper case to lower case or
vice versa
Press and hold it then
press to enter the top
symbol on the button
Press and hold it then
press A~Z and to enter
the top symbol and character on the button
Press to confirm
Store the SMS message in the Outbox to send it later if you like.
Send the SMS immediately and the
unit will ask you to enter the recipients telephone number, Enter
Number
Enter the recipients telephone number
from the directory or dial it manually.
SMS ShortMessageService
We're happy
you got
promot ion.
➞
➞
SMS
MENU
CAPS
SHIFT
ALT
WRITE
READ
Box 0-3
Store
Send
Write Message
or
or
✍
Page 17
111177
77
Text message
Setting the box code
You can use the different SMS boxes in private mode by
defining a pin code number for Box1, Box2 and Box3.
Box0 is for public use.
Setting a new code
Open the menu
Select the menu item and confirm
Select the menu item and confirm
Select the menu item and confirm
Select the menu item and confirm
The LCD shows Enter Code, enter
the code number(0~9)
(up to 4 digits)
• During the sending, the LCD shows SMS Sending...
• If the net is busy, then LCD will show Try Again
• If you press X button while you are sending SMS message, LCD
will show Cancelled.
• If the message was not sent, the unit will return back to standby
mode, and the LCD shows Send Fail.
* Must be supported by your local operator and the device of the
destination owner.
• If the second code number is different to the first one, the LCD
will show Code Error!
• Set the code of Box2 and Box3 same as the steps of Box1.
• If you already set the code, when you want to enter the Box, you
need to enter your code number firstly.
• If you removed the code number, you can enter the box without
it.
• Also you can set a new code number again with the same steps
of Setting a new code number.
Clearing a set code number
Open the menu
Select the menu item and confirm
Select the menu item and confirm
Select the menu item and confirm
Select the menu item and confirm,
the LCD shows Enter Code, then
enter the code number you have set.
Press to confirm, LCD shows Code
Removed !, then exit.
SMS
Box 2
MENU
SMS Setup
Box Code
New Code
SMS
Box 2
MENU
SMS Setup
Box Code
Clear Code
• Press button, use or button to get the desired number from
phonebook, then press button.
• Press button, use or button to get the desired number from
CID list, then press button
Display shows Enter sub address*;
enter sub address of destination, if
you do not know the number, type 0
or press button.
Note: Sub addresses allow you to send your message to
a private SMS box, using 0 or no number automatically
send your message to the public box of the destination
number.
Press to send. When the message
was sent succesfully the unit, shows
Message Sent
CID
Press to confirm, LCD shows
Repeat Entry, enter the same code
number to reconfirm.
Press to confirm, LCD shows
Success !, then exit.
English
Page 18
111188
88
Text message
Inbox list
Reading and deleting received
SMS message
When you get a new message, you will hear a beep tone and the LCD will show icon and the NEW LED will
flash twice at a time to signal until you review it.
Press to quickly read a new message
Select the menu item and confirm
Select the menu item and confirm
Select the menu item and confirm
Select the menu item and open the
inbox list
Scroll to review the numbers from list
Press to read the messages
Press to enter
Press to select
Press to delete
Options while reading
After reading an SMS you can immediately reply to it and
you can access other functions.
Open the menu, then select the option you want.
Reply Can write a new message or edit
this message
Forward Send a text message to someone
else
Call back Make a call to the message sender
Add name Copy the telephone number of the
SMS to the phonebook, also will
indicate to enter name.
Delete Can delete message
• If a new message is receiving, LCD will show SMS receiving.
• If there is no message, LCD will show No Message.
• In the received message, you will see the date and time.
• At the end of the messages you will see -- End --.
• LCD will show the new and total received SMS messages num-
ber: Inbox XX(new)/XX(total), if there is no message will show
Inbox 00/00.
• If the number have been added to phonebook, in the inbox list
will only show the calls name.
SMS
MENU
READ
Box 0
Inbox
Delete
or
or
Page 19
111199
99
Text message
• If there is no message, LCD will show No Message.
• The unit will display the stored SMS message number Outbox
XX, if there is not message the unit will show Outbox 00.
Outbox list
Reading, editing, sending and deleting
stored SMS messages
Press to quickly read a new message
Select the menu item and confirm
Select the menu item and confirm
Select the menu item and confirm
Select the menu item and open the
outbox list
Scroll to the next or previous SMS
Press to read
Select message
Press for deleting message in Outbox
SMS centre
Select the menu item and confirm
Select the menu item and confirm
Select the menu item and confirm
Select the menu item and confirm
Select menu item and enter the
center number of your local operator
and press confirm
Select the menu item and LCD show
Enter number and confirm, LCD
shows Box1 Sub-addr.=0, please
confirm.
Select the menu item and LCD show
Enter number and confirm, LCD
shows Box1 Sub-addr.=0, please
confirm.
SMS
Box 1
MENU
READ
Outbox
or
or
or
SMS
For Sending
MENU
SMS Setup
Center
Number
For Receiving 1
For Receiving 2
English
➞
Page 20
SMS Box0 Write Message
Inbox
Outbox
Box1 Write Message
Inbox
Outbox
Box2 Write Message
Inbox
Outbox
Box3 Write Message
Inbox
Outbox
SMS setup Service Center For Sending
For Receiving
For Receiving
Box Code Box2
Box3
Box4
Setup Contrast
Set Clock
Master Reset
Area Code
Language
Country Profile
Accept all Calls (Always SMS)
Names Review
Add Entry
Caller ID
Calls Dialed
222200
00
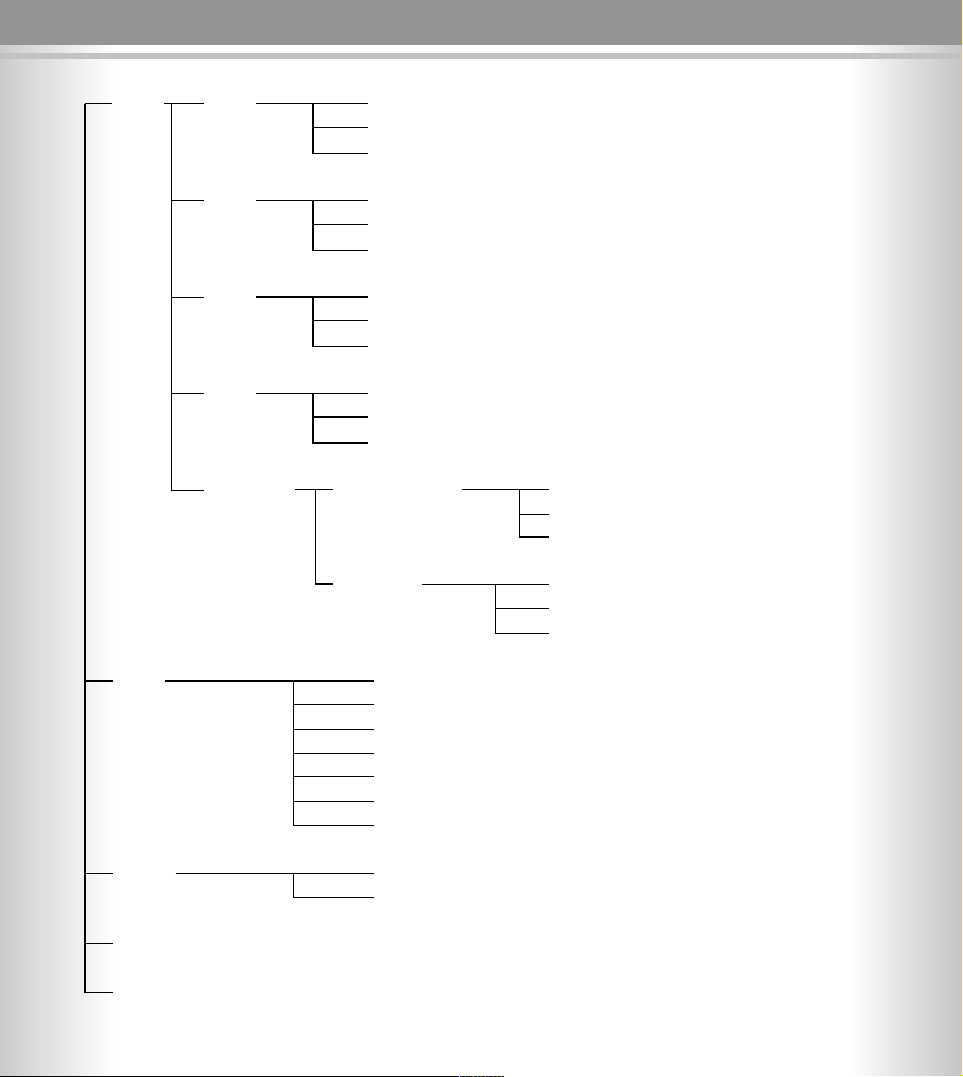
Main menu
Page 21

222211
11
Feature list
FEATURE LIST
●
FSK + DTMF dual system caller ID
●
Stores up 90 incoming calls name, number,
date & time
●
Stores up to 30 outgoing calls number
●
Stores up to 50 names and numbers in phone
book
●
Timer
●
NEW CALL LED indicator
●
Deletes individual or all records
●
LCD display calling and dialling number
●
CALL BACK function
●
Real time clock
●
Message waiting function
●
Out of area/Private
●
LCD contrast adjusting
SMS FEATURES:
●
ETSI protocol 1
●
Send/receive SMS
●
Four SMS boxes can be used for different
people, Box0 for public, Box1-3 can be used in
private.
●
Each boxes can store at least 30x160 characters messages or up to 99 messages. (kept in
memory even powered off)
●
Sending short messages(up to 160 characters)
●
Can select destination number from phonebook or CID memory
●
Inbox messages review/delete/reply/forward
●
Call back to message sender
●
Stores message sender number to phonebook
●
Messages can be sent to SMS or Fax or
Email
●
Message alert
English
Page 22
222222
22
Troubleshooting
If your telephone does not behave the way you want it to, please try first to help yourself with the following tips.
Fault Possible cause Solution
No display Batteries empty Replace the batteries
Can not send The SMS centre Set the SMS centre sending number
any message sending number or verify if the number is correct
has not been set
or was incorrect
Pick a handset, and dial the SMS center
number, by using any handset and listen
for response. If not please inquire for
the correct SMSC number with your operator.
Can not receive The SMS centre Sett the SMS centre receiving number - verify
the message receiving number which number is calling you on the display
is not set or is incorrect of the unit. The SMSC receiving number
needs to match exactly the number you see
in your display
The SMS centre Inquire for the correct SMSC number
receiving number with your operator
not correct
ATTENTION: When you use your device on the analogue ports of a PABX
Make sure the PABX is forwarding the CLIP information to your device. If you do not see any number on the display
this is most likely not the case and your unit can not receive any SMS, in this case you can activate the „accept all
calls“ feature see more page number 9.
If number is properly display, verify if your PABX needs a prefix number to dial out (mostly 0 or 9) . In many cases
you will see that the calling numbers include this prefix. Make sure you include this prefix in the SMSC number
for enabling the SMS receive function of your device.
Page 23
Bedieningsanleitung
Deutsch
Page 24
22224444222244
44
Ansicht des Gerätes
LCD Anzeige
Batteriefach
Lautsprecher
Signallampe
für neuen
Anruf/neue
Kurzmitteilung
Anschluss für
Telefonkabel
Page 25
22225555222255
55
Funktionsbeschreibung Steuerungstastenfunktion
Beschreibung der Displayanzeige
Bedeutung der Symbole
Symbol Bedeutung
Der Hörer ist abgehoben (Telefon in Betrieb)
Empfang einer neuen Kurzmitteilung (SMS)
oder Voice Mail
Neue Anrufe gespeichert. Nachdem alle
neuen Anrufe im Speicher überprüft wurden,
verschwindet das Symbol.
Ein Anruf ist mehrmals angekommen.
Die Batterien sind schwach.
Feststellfunktion Großbuchstaben der
Tastatur- ist aktiviert.
Taste Funktionsbeschreibung
Eingabe der Zahlen 0 – 9
Für schneller Kurzmitteilung lesen
Neue Kurzmitteilung eingeben (im öffentlichen Postfach).
Das Telefonbuch mit den 50 Speicherplätzen aufrufen. Detailinformationen s. Kapitel „Telefonbuch“
Dieses Telefon kann die Rufnummern von 90 ankommenden
Anrufen speichern. Detailinformationen s. Kapitel "Anruferliste".
Eine oder alle Eingaben im Speicher löschen
Aktiviert die Ferstellfunktion für Großbuchstaben.
Eingabe eines Großbuchstabens bzw. Sonderzeichens auf den
Zahlentasten (gleichzeitig mit Buchstaben-/Zahlentaste drücken).
Eingabe eines Sonderbuchstabens bzw. –zeichens auf den
Buchstabentasten (gleichzeitig mit Buchstabentaste drücken).
Absatz einfügen (beim Verfassen von Kurzmitteilungen)
Hauptmenü öffnen bzw. Startbildschirm (Bereitschaftsmodus)
aufrufen.
Abbrechen von Eingaben bzw. Rücksprung auf letzten Bildschirm
Bestätigen von Eingaben bzw. Auswahl von Menüoptionen
Auswahlbalken im Menü nach unten/oben bewegen. Bei
Erstellung einer Mitteilung die Schreibmarke nach links oder rechts
bewegen.
Blättern
rückwärts
Textanzeige
Blättern vorwärts
Deutsch
Page 26

222266
66
Inhalt
Ansicht des Gerätes . . . . . . . . . . . . . . . . . . . . . . 24
Funktionsbeschreibung . . . . . . . . . . . . . . . . . . . . . 25
Beschreibung der Displayanzeige . . . . . . . . . . . . . . . . 25
Bedeutung der Symbole . . . . . . . . . . . . . . . . . . . . . . . 25
Tastenfunktionen . . . . . . . . . . . . . . . . . . . . . . . . . . . . 25
Sicherheitsanweisungen . . . . . . . . . . . . . . . . . . . . 27
Einstellungen . . . . . . . . . . . . . . . . . . . . . . . . . . . . . 29
Länderprofil . . . . . . . . . . . . . . . . . . . . . . . . . . . . . . . . 29
Automatische Rufannahme (spezielle SMS-Leitung) . . 29
Sprache . . . . . . . . . . . . . . . . . . . . . . . . . . . . . . . . . . . 29
Datum und Uhrzeit einstellen . . . . . . . . . . . . . . . . . . . 29
Kontrasteinstellung der LCD-Anzeige . . . . . . . . . . . . . 30
Rücksetzen (Reset) des Gerätes . . . . . . . . . . . . . . . . . 30
Ortsvorwahl und Landesvorwahl (LDS) einstellen. . . . 30
Tastenbelegung . . . . . . . . . . . . . . . . . . . . . . . . . . . 31
Telefonbuch . . . . . . . . . . . . . . . . . . . . . . . . . . . . . . . 32
Namen und Rufnummern speichern . . . . . . . . . . . . . . 32
Anzeigen der-Namen und Rufnummern . . . . . . . . . . . 32
Namen und Rufnummern löschen . . . . . . . . . . . . . . . 33
Wahl einer Nummer aus dem Telefonbuch . . . . . . . . . 33
Ändern von Namen und Rufnummern
im Telefonbuch . . . . . . . . . . . . . . . . . . . . . . . . . . . . . 33
Anruferkennung (CID) . . . . . . . . . . . . . . . . . . . . . . 34
Anzeigen der Anrufer aus der Anruferliste . . . . . . . . . 34
Löschen einzelner Nummern in der Anruferliste . . . . . 34
Löschen aller Nummern der Anruferliste . . . . . . . . . . . 34
Eine Nummer aus der Anruferliste ins Telefonbuch
kopieren . . . . . . . . . . . . . . . . . . . . . . . . . . . . . . . . . . . 34
Eine Nummer aus der Anruferliste anrufen . . . . . . . . . 35
Abgehende Anrufe . . . . . . . . . . . . . . . . . . . . . . . . 35
Anzeige und Rückanruf der letztgewählten
Rufnummern . . . . . . . . . . . . . . . . . . . . . . . . . . . . . . . . 35
Kurzmitteilungen (SMS) . . . . . . . . . . . . . . . . . . . . 36
Schreiben, Speichern und Senden
von Kurzmitteilungen . . . . . . . . . . . . . . . . . . . . . . . . . 36
Speichersperre/PIN-Code für Postfach . . . . . . . . . . . 37
Neuen PIN-Code eingeben . . . . . . . . . . . . . . . . . . . . . 37
PIN-Code löschen . . . . . . . . . . . . . . . . . . . . . . . . . . . 37
Speicher für empfangene Kurzmitteilungen . . . . . . . . 38
Speicher für gesendete Kurzmitteilungen . . . . . . . . . . 39
SMS - Mitteilungszentrale . . . . . . . . . . . . . . . . . . . . . . 39
Hauptmenü . . . . . . . . . . . . . . . . . . . . . . . . . . . . . . . 40
Hauptmerkmale des Gerätes . . . . . . . . . . . . . . . 41
Fehlersuche . . . . . . . . . . . . . . . . . . . . . . . . . . . . . . . 42
Page 27
222277
77
Sicherheitsanweisungen Installation des Gerätes
Sicherheitsanweisungen
Befolgen Sie bitte die nachstehend aufgeführten Hinweise, um das Risiko eines Brandes, eines elektrischen Unfalls und einer Verletzung zu vermeiden.
1. Lesen und befolgen Sie die Anweisungen in diesem
Handbuch.
2. Beachten Sie die Warnschilder auf dem Gerät.
3. Vor Reinigung vom Telefonnetz trennen. Keine flüssigen oder chemischen Reiniger benutzen.
4. Das Gerät nicht in feuchter Umgebung benutzen.
5. Keine Gegenstände auf das Telefonkabel stellen, die
das Kabel beschädigen könnten.
6. Schützen Sie das Gerät vor Flüssigkeiten.
7. Reparaturen dürfen nur von autorisierten Fachleuten
durchgeführt werden. Vor der Reparatur das Telefon
vom Netz trennen.
Die Verpackung enthält folgende Teile:
• phoneBuddy
• Telefonkabel
• 4 x AA (Mignon) Batterien, 1,5 V
• Bedienungsanleitung
Installation des Gerätes
Bemerkung
Das Telefon kann in Räumen mit Temperaturen zwischen
+5 °C bis +45 °C eingesetzt werden.
Einlegen der Batterien
Das Gerät benötigt für den Betrieb vier AA Batterien,
1,5V.
1. Den Deckel des Batteriefachs auf der Rückseite des
Telefons abnehmen.
2. Vier neue AA Batterien, 1,5V einlegen. Polarität beachten.
3. Den Deckel wieder einsetzen.
Batterien:
Zu beachten:
1. Typ: AA SUM-4; Mignon, 1,5V
2. Die Batterien nicht ins Feuer werfen.
3. Die Batterien nach geltenden Umweltschutzbestimmungen entsorgen.
4. Sie können auch wiederaufladbare Batterien (Akkus)
in diesem Gerät benutzen, sofern diese in Typ, Spannung und Kapazität normalen Batterien entsprechen.
Wir gratulieren
zum Kauf dieses Produkts.
Lesen Sie bitte dieses Handbuch sorgfältig. Sie finden darin die Beschreibung aller Hauptmerkmale sowie Hinweise für Benutzung des Gerätes.
Zertifizierung nach:
Deutsch
Page 28

222288
88
Installation des Gerätes
Anschluss des Gerätes
Das Gerät kann an jeden gewöhnlichen analogen Telefonanschluss angeschlossen werden. ISDN-Nutzer scließen das Gerät an
den a/b-Analogwandler Ihrer ISDN-Anlage an.
1. Variante Anschluss als einzelnes Endgerät
Sie möchten das Gerät direkt als einziges Endgerät an einen Telefonanschluss bzw. an den a/b-Analoganschluss einer ISDN-Anlage anschließen: Hierzu verbinden Sie das Gerät mit dem beiliegenden Anschlusskabel, indem Sie ein Ende des Kabels in die Telefonanschlussdose und das andere Ende in die mit LINE gekennzeichnete Anschlussbuchse am Gerät stecken. Verwenden Sie je
nach Typ Ihres Hausanschlusses gegebenenfalls einen TAE-Adapter aus dem Zubehörhandel.
2. Variante Durchschleifen zwischen Netzanschluss und vorhandenem analogen Telefon
Sie möchten das Gerät dem bereits angeschlossenen Telefon vorschalten (Durchschleifen): Hierzu entfernen Sie zunächst das Telefonkabel am Telefon und stecken das nun freie Kabelende in die mit LINE gekennzeichnete Anschlussbuchse des SMS Buddy
Comfort. Nun verbinden Sie mit dem beiliegenden Telefonkabel die mit PHONE gekennzeichnete Anschlussbuchse des SMS Buddy Comfort mit Ihrem Telefon.
Hinweis: Bei sehr alten Telefonapparaten kann es sein, dass das Telefonkabel nicht am Gerät angesteckt werden kann, da das
Kabel direkt mit dem Gerät verbunden ist. In diesem Falle können Sie im Zubehörhandel entsprechende Adapter finden, bitte
lassen Sie sich dort beraten.
• Wenn Sie ein anderes Kabel kaufen, beachten Sie, dass es mit entsprechenden Steckern (Western Norm bzw. RJ11) bestückt ist.
Hinweis: Wir empfehlen das mitgelieferte Kabel zu benutzen.
Telefonanschluss mit Kabel
(Der Typ unterscheidet sich je nach Land)
Page 29
222299
99
Einstellungen
Einstellungen
Sprache einstellen
Nach dem Einlegen der Batterien sollten Sie als erste Deutsch als Bedienersprache einstellen (sofern die Sprache
nicht bereits eingestellt ist).
Menü öffnen.
Den Menüpunkt Einstellungen anwählen und bestätigen.
Den Menüpunkt Language anwählen
und bestätigen.
Mit den Pfeiltasten links/rechts die
Sprache wählen, bis Deutsch in der Anzeige erscheint. Bitte bestätigen Sie die
Eingabe. Alle Meldungen und Menütexte sind nun in deutscher Sprache.
Datum und Uhrzeit einstellen
In der Betriebsart "Bereitschaft" (Startbildschirm) zeigt das
Gerät Datum und Uhrzeit an.
Das Datum und die Uhrzeit sind einzustellen, damit sie richtig angezeigt werden, wenn Sie Kurzmitteilungen oder Anrufe bekommen.
Menü öffnen.
Den Menüpunkt anwählen und bestätigen.
Den Menüpunkt anwählen und bestätigen.
Die bestehende Einstellung wird angezeigt und der Monat blinkt.
Einstellungen
MENU
MENU
Uhr.
Einstellungen
Deutsch
Länderprofil
Bevor Sie den phoneBuddy nutzen können, ist es erforderlich, die Landeseinstellungen vorzunehmen, indem Sie
das Land einstellen, in dem das Gerät genutzt werden soll.
Alle anderen Services werden automatisch eingerichtet.
Öffnen Sie das Menü
Menupunkt wählen und bestätigen
Länderprofil wählen und bestätigen.
Liste der verfügbaren Länder wird
angezeigt.
Land auswählen (z.B. Deutschland)
Bestätigen Sie Ihre Eingabe durch
Drücken des Knopfes
Nach Bestätigung ist Ihr Phone Buddy einsatzbereit.
Automatische Rufannahme
(spezielle SMS-Leitung)
Diese Funktion kann genutzt werden, um alle Nachrichten
anzunehmen, ohne die SMS-C Nummer zu prüfen. Dieses
Merkmal ist geeignet, um SMS zu empfangen, wenn die
CLIP Funktion nicht verfügbar ist. (z.B. bei TK-Anlage).
Öffnen Sie das Menü
Einstellungen wählen und bestätigen
“Automatische Rufannahme” wählen
und bestätigen
On / Off wählen
Bestätigen Sie Ihre Eingabe durch
Drücken des Knopfes
Wenn Sie diese Einstellung wählen, kann das Gerät an der angeschlossenen Leitung für keine anderen Dienste als SMS genutzt
werden. (alle ankommenden Sprachmeldungen werden abgewiesen).
Setup
(
Einstellungen)
MENU
Country
profile
(Länderprofil)
oder
Einstellung
MENU
aut.
Rufannahme
oder
MENU
Sprache
Öffnen Sie das Menü
Menupunkt wählen und bestätigen
Sprache wählen und bestätigen.
Liste der verfügbaren spracher wird
angezeigt.
Sprache auswählen (z.B. Deutsch)
Bestätigen Sie Ihre Eingabe durch
Drücken des Knopfes
Nach Bestätigung ist Ihr Phone Buddy einsatzbereit.
Einstellungen
Sprache
oder
Page 30
333300
00
Einstellungen Anrufe
Ortsvorwahl und Ambtsvorwahl (LDS)
einstellen.
Menü öffnen.
Den Menüpunkt anwählen und bestätigen.
Den Menüpunkt anwählen und bestätigen.
Auf der Anzeige steht Ortsvorwahl 1
Mit den Tasten 0 – 9 (maximal
4 Ziffern) die Ortsvorwahl Nr. 1 eingeben.
Zum Korrigieren oder Löschen
bereits eingetragener Ziffern, die
Löschtaste (Backspace) benutzen.
Die Eingabe bestätigen und zur Eingabe der Ortsvorwahl 2 übergehen.
Auf der Anzeige steht Ortsvorwahl 2
Mit den Tasten 0 – 9 (maximal 4 Ziffern) die Ortsvorwahl Nr. 2 eingeben.
Zum Korrigieren oder Löschen
bereits eingetragener Ziffern, die
Löschtaste (Backspace) benutzen.
Die Eingabe bestätigen und zur Eingabe der Ambtsvorwahl übergehen.
Auf der Anzeige steht nun Ambts-
vorwahl
Mit den Tasten 0 – 9 (maximal 2 Ziffern) die Landwahl (LDS) eingeben.
Zum Korrigieren oder Löschen
bereits eingetragener Ziffern, die
Löschtaste (Backspace) benutzen.
Eingabe bestätigen und das Menü
verlassen.
• Wenn die Ortsvorwahl eingegeben wurde, braucht sie bei Wahl
einer Telefonnummer, die mit der Ortsvorwahl im Telefonbuch
oder in der Anruferliste gespeichert ist, nicht gewählt werden.
• Ambtsvorwahl nummer wahlt automatisch fuer jedem eingegeben nummer Beispiel: ambtsvorwahl = 9 (ISDN anlage) jeden
nummer auch aus tel buch werd 9xxxxxxxx gewahlt.
• Bei Änderung wird die Ambtsvorwahl nicht angezeigt.
Einstellungen
MENU
Ortsvorwahl
Kontrasteinstellung der LCD-Anzeige
Sie können zwischen 64 Kontraststufen wählen.
Menü öffnen.
Den Menüpunkt anwählen und bestätigen.
Den Menüpunkt anwählen und bestätigen.
Die bestehende Einstellung wird angezeigt (z.B. Kontrast: 32).
Wählen Sie den gewünschten Wert.
Eingabe bestätigen und das Menü
verlassen.
Rücksetzen (Reset) des Gerätes
Durch das Rücksetzen des Gerätes werden alle Speicher
gelöscht.
Menü öffnen.
Den Menüpunkt anwählen und bestätigen.
Den Menüpunkt anwählen und bestätigen. Auf der Anzeige steht nun
"Wiederherstellen?"
Nach Bestätigung dieses Befehles
erscheint die Meldung "Formatie-
rung" auf der Anzeige. Nach Beendigung des Formatierens kehrt das Gerät in den Bereitschaftsmodus zurück.
Einstellungen
MENU
Werkseinstellung
Einstellungen
MENU
Kontrast
• Wenn Sie Datum und Uhrzeit einstellen, müssen Sie immer zwei Zahlen, z.B. "08" für August eingeben, sonst ist die Eingabe ungültig.
• Die Uhrzeit ist im 24-Stunden-Format einzugeben.
• Datum und Uhrzeit werden automatisch bei dem ersten ankommenden Anruf eingegeben (FKS Standard).
Eingabefeld für Monat, Tag, Uhr und
Minute anwählen.
Monat, Tag, Uhr und Minuten einstellen.
(z.B. 12:36 23/08)
Eingabe bestätigen und das Menü
verlassen.
0 - 9
Page 31

333311
11
Tastenbelegung
Tastenbelegung
• Für die Umschaltung von Klein- auf Großbuchstaben ist die Taste CAPS zu drücken.
• Die Schreibmarke (Cursor) wird mit den Pfeiltasten gesteuert.
• Mit der Taste wird der Buchstabe links von dem Cursor gelöscht (backspacefunktion).
• Die Buchstaben werden immer links von dem Cursor eingefügt.
➞
Deutsch
Page 32

333322
22
Namen
Telefonbuch
Das Gerät kann 50 Namen und Telefonnummern im Telefonbuch speichern.
Namen und Rufnummern speichern
Taste drücken
Menü öffnen
Den Menüpunkt anwählen und bestätigen.
Auf der Anzeige steht nun Ansicht
und Neuer Eintrag
Den Menüpunkt Neuer Eintrag anwählen und bestätigen.
Auf der Anzeige steht nun und die
Meldung Numm. eingeben
Die Telefonnummer eingeben (z.B.
1236008).
Die Eingabe bestätigen und zur
Eingabe des Namens übergehen.
Auf der Anzeige steht nun Name
eingeben
Den Namen eingeben (z.B. Sven
Schmidt).
Die Eingabe bestätigen, auf der Anzeige steht nun Gespeichert!
• Für die Eingabe weiterer Namen die obigen. Schritte wiederholen
• Die bestehenden Eingaben kann man mit der Löschtaste (Backspace) löschen.
• Jede Telefonnummer darf höchstens 16 Ziffern haben.
• Jeder Name darf höchstens 16 Zeichen haben.
• Wenn das Telefonbuch keinen Eintrag hat, wird die Meldung
Leer angezeigt.
• Beim Blättern im Telefonbuch wird nach dem letzten Eintrag die
Meldung Ende der Liste angezeigt.
• Wenn das Telefonbuch leer ist, wird Meldung Leer angezeigt.
• Am Ende wird die Meldung Ende der Liste angezeigt.
Änzeigen der Namen und Rufnummern
Mit Tastendruck bestätigen.
Menü öffnen.
Den Menüpunkt anwählen und bestätigen.
Auf der Anzeige steht nun die
Meldung Ansicht und Neuer Eintrag.
Den Menüpunkt Ansicht anwählen
und bestätigen.
Auf der Anzeige erscheint nun das
Namensverzeichnis
Wählen Sie mit den Pfeiltasten
oben/unten den Eintrag aus, den Sie
anzeigen möchten und drücken Sie
die Eingabetaste
Der Eintrag wird angezeigt.
Mit den Pfeiltasten links/rechts können Sie nun von Eintrag zu Eintrag
blättern
Namen
MENU
0-9
Neuer Eintrag
nebo
Namen
MENU
Ansicht
oder
oder
oder
Page 33

333333
33
Namen
Namen und Rufnummern löschen
Zuerst die zu löschende Telefonnummer anzeigen.
Mit der Taste das Auswahlmenü
aufrufen. Den Menüpunkt Löschen
anwählen.
Mit der Taste löschen. Nach dem
Löschen des Eintrag wird Gelöscht!
angezeigt.
Wahl einer Nummer
aus dem Telefonbuch
Zuerst die gewünschte Telefonnummer anzeigen.
Mit der Taste das Auswahlmenü
aufrufen. Den Menüpunkt Zurück
anrufen anwählen.
Auf der Anzeige steht Hörer aufhe-
ben.., nach dem Abheben des
Hörers wird die Nummer gewählt.
Hinweis: Diese Funktion funktioniert
nur, wenn ein Telefon an den SMS
Buddy angeschlossen ist.
Ändern von Namen und Rufnummern im
Telefonbuch
Zuerst die gewünschte Telefonnummer anzeigen.
Mit der Taste das Auswahlmenü aufrufen.
Den Menüpunkt Bearbeiten anwählen.
Nummer eingeben steht auf der
Anzeige, bestetigen Sie und Name
eingeben bildet sich an.
Mit der Tastatur die neue Rufnummer
eingeben (z.B. 7483839). Die Eingabe bestätigen. Das Eingabefeld für
den Namen erscheint. Mit der Tastatur den neuen Namen eingeben
(z.B. Steffie Schmidt).
Die Eingabe bestätigen, auf der Anzeige steht nun Gespeichert! Das
Menü verlassen.
Löschen
Bearbeiten
Anrufen
Deutsch
Page 34

333344
44
Namen
Anruferkennung (CID)
Das Gerät kann bis zu 90 Namen u. Nummern von Anrufern einschließlich.-Datum und Uhrzeit in der Anruferliste
speichern.
• Wenn der Speicher voll ist, wird der älteste Eintrag der Anruferliste gelöscht, um Platz für die neuen Informationen zu schafen.
• Wenn ein neuer Anruf kommt, leuchtet die NEW-Leuchtdiode auf.
• Am Ende der Liste wird Ende der Liste angezeigt.
• Wenn kein Anruf eingegangen ist, wird die Meldung Kein Anruf
angezeigt.
Anzeigen der Anrufer
aus der Anruferliste
Durch Drücken der Taste die Anruferliste anzeigen.
Menü öffnen.
Den Menüpunkt anwählen und die
Anruferliste anzeigen.
Mit der Taste den Namen und/oder
die Nummer in der Anruferliste
anwählen.
Mit dieser Taste können Sie die
Details des Anrufs wie Rufnummer
bzw. Name des Anrufers sowie-, das
Datum und die Uhrzeit des Anrufs
anzeigen.
Mit diesen Tasten können Sie in der
Detailansicht zu den anderen
Einträgen der Anruferliste blättern.
Löschen einzelner Nummern
in der Anruferliste
Zuerst die gewünschte Rufnummer in der Detailansicht zur
Anzeige bringen.
Mit Tastendruck das Auswahlmenü
aufrufen.
Den Menüpunkt Löschen anwählen
und mit Eingabetaste bestätigen. Auf
der Anzeige erscheint nun Gelöscht!
Löschen aller Rufnummern
der Anruferliste
Mit Tastendruck die Anruferliste
anzeigen.
Menü öffnen.
Den Menüpunkt anwählen und die Anruferliste anzeigen.
Nach Tastendruck auf die Löschtaste
(Backspace) wird Alle CID lösch.? an-
gezeigt.
Mit dem Tastendruck wird die Liste
gelöscht und auf der Anzeige erscheint Kein Anruf.
Menü verlassen.
Eine Nummer aus der Anruferliste
ins Telefonbuch kopieren
Zuerst die gewünschte Nummer in der Detailansicht zur
Anzeige bringen.
Mit Tastendruck das Auswahlmenü
aufrufen.
Den Menüpunkt In Adressb. hin anwählen und mit der Eingabetaste bestätigen. Auf der Anzeige steht nun die
Meldung Name eingeben.
Den Namen mit der Tastatur eingeben.
Eingabe bestätigen. Auf der Anzeige
erscheint nun die Meldung Gespei-
chert!
Anruflisten
MENU
CID
oder
Anruflisten
MENU
➔
CID
oder
oder
oder
Löschen
Zu namen
Hinzuf.
Page 35

333355
55
Namen
Eine Nummer aus der Anruferliste anrufen
Mit Tastendruck die letzten angekommenen Anrufe anzeigen
Menü öffnen
Mit Tastendruck die Anruferliste anzeigen.
Mit Tastendruck zur gewünschten
Nummer in der Anruferliste gehen.
Zwei Mal die Eingabetaste drücken,
um das Auswahlmenü aufzurufen.
Mit Tastendruck die Funktion Zurück
anrufen anwählen. Auf dem Bildschirm steht nun die Meldung
Hörer aufheben ..
Hinweis: Diese Funktion funktioniert
nur, wenn ein Telefon an den SMS
Buddy angeschlossen ist.
Informationen über die Mailbox-Funktion erhalten Sie von Ihrer Telefongesellschaft bzw. Service-Provider.
Wenn die Information in der MailboxMitteilung für Ihr Telefongerät nicht
verständlich ist, erscheint die Meldung Error auf der Anzeige anstelle
der wahrscheinlich fehlerhaften Mitteilung. Dies bedeutet nicht, dass ein
Fehler in Ihrem Telefon vorliegt.
Abgehende Anrufe
Ihr Telefon kann bis zu 30 Anrufernummern speichern.
Anzeige und Rückruf
der letztgewählten Rufnummern
Menü öffnen.
Menüpunkt Gespräche ab anwählen
und bestätigen. Auf dem Bildschirm
erschienen die letzten gewählten
Rufnummern.
Mit Tastendruck die gewünschte
Nummer auswählen.
Mit Tastendruck das Auswahlmenü
aufrufen
Zum Wählen der angezeigten nummer, den Menüpunkt Zurück anru-
fen anwählen und bestätigen.
Um die angezeigte Rufnummer in
das Telefonbuch zu kopieren, den
Menüpunkt In Adressb. hin anwählen und bestätigen.
Zum Löschen der angezeigten Rufnummer, den Menüpunkt Löschen
anwählen und bestätigen.
• Wenn einzelne Nummern in der Anruferliste gesperrt oder nicht
verfügbar sind, ist diese Funktion nicht möglich.
Wenn ein Anrufer die Anzeige seines
Namens und seiner Rufnummer nicht
freigegeben hat, wird die Meldung
Privat angezeigt.
Die Meldung Out of Area wird bei Anrufen angezeigt, die aus Gebieten
kommen, wo entweder die Telefongesellschaft keine Anruferkennung ermöglicht oder aus Gebieten, wo die
Übergabe der Anruferkennung in Ihr
Gebiet nicht möglich ist.
Wenn Sie eine Mailbox aktiviert haben
und ein Anrufer für Sie eine Mitteilung
hinterlassen hat, wird sie mit der Meldung Nachricht wartet angezeigt.
Das Symbol bleibt in der rechten Ecke
des Bildschirms stehen, bis die Mitteilung empfangen wurde. Ausführliche
PRIVAT
AUßER BEREICH
SMS WARTET
FEHLER
Anrufen
Zu namen
Hinzuf.
Anruflisten
MENU
MENU
CID
oder
Anruflisten
Anrufen
Löschen
Deutsch
Page 36

333366
66
Kurzmitteilungen
Kurzmitteilungen (SMS)
Mit diesem Gerät können Sie auch Kurzmitteilungen (SMS) senden und empfangen. Die Kurzmitteilungen werden von SMS-fähigen Endgeräten (z.B. Mobiltelefone, SMS-Festnetztelefone o.ä.)
als Textmitteilung empfangen. Sie können Kurzmitteilungen auch
an Festnetz-Teilnehmer ohne SMS-fähiges Endgerät senden. In
diesem Falle wird dem Empfänger Ihre Kurzmitteilung automatisch als Sprachmitteilung vorgelesen.
Voraussetzungen:
CID
Die wichtigste Voraussetzung für den Empfang von Kurzmitteilungen im Textformat an Ihrem Festnetz anschluss ist die sogenannte Übertragung der Anruferkennung und der Telefonnummer
(auch CID oder CLIP-Funktion genannt). Bei ISDN-Anschlüssen
ist die CLIP-Funkion bereits automatisch aktiviert. Bei bestimmten Tarifen von analogen Telefonanschlüssen ist die CLIP-Funktion ebenfalls aktiviert.
Sollte die CLIP-Funktion an Ihrem Anschluss noch nicht aktiviert
sein, dann lassen Sie diese Funktion bei Ihrer Telefongesellschaft
freischalten (hierfür können Zusatzgebühren anfallen). Festnetzkunden der Deutschen Telekom können die CLIP-Funktion unter
der Servicenummer 0800-330 10 20 freischalten lassen.
Ohne aktivierte CLIP-Funktion können Sie zwar SMS-Mitteilungen versenden, ankommende SMS werden jedoch nur als
Sprachmitteilung übermittelt, also nicht im typischen SMS-Textformat.
Hinweis: Benutzer von ISDN-Telefonanlagen sollten sicherstellen,
dass die Rufnummernübertragung auch für die integrierten a/bAnalogwandler aktiviert ist. Bei Problemen konsultieren Sie bitte
zuerst die Bedienungsanleitung Ihrer Telefonanlage.
Schreiben, Speichern und Senden von Kurzmitteilungen
Es können vier voneinander unabhängige SMS-Speicher (Postfächer) genutzt werden.
Jede Kurzmitteilung kann bis zu 160 Zeichen umfassen.
In jedem Speicher können maximal 4.800 Zeichen, das entspricht
z.B. 30 Kurzmitteilungen zu je 160 Zeichen und maximal 99 Kurzmitteilungen gespeichert werden. Die gespeicherten Mitteilungen
gehen bei Unterbrechung der Stromversorgung nicht verloren.
Das Gerät kann Kurzmitteilungen empfangen, solange das Postfach nicht voll ist. Wenn das Postfach voll ist, wird die Speicherung weiterer ankommender Mitteilungen abgewiesen. Die Meldung Eingang voll erschein und zeigt an, wieviel Kurzmitteilungen abgespeichert sind.
Die Kurzmitteilungen werden nicht automatisch gespeichert.
Wenn Sie eine wichtige Kurzmitteilung abspeichern wollen, muss
diese vor deren Absendung gespeichert werden.
Menü öffnen.
Den Menüpunkt anwählen und bestätigen.
Den Menüpunkt anwählen und bestätigen
Das Text-Eingabefeld öffnen.
Direktwahltaste zur Eingabe einer neuen Kurzmitteilung im öffentlichen
Postfach (Speicher 0).
Drücken Sie für schneller
Kurzmitteilung lesen
Informationen über die Eingabe einzelner
Buchstaben und Zeichen siehe- Seite 31.
Den Cursor auf die nächste
Position verschieben bzw.
im Textfeld positionieren.
Die eingebenden Zeichen
erscheinen links vom
Cursor.
Zeichen links vom Cursor
löschen.
Mit Tastendruck Leerzeichen eingeben.
Ferstelltaste zur Umschaltung von Klein- und Großschreibung.
Umschaltung Klein- und
Großschreibung bzw. für
die Eingabe vcn Sonderzeichen auf den Zifferntasten
zusammen mit den Buchstabeb- bzw. Zifferntasten
drücken.
Für die Eingabe der Sonderzeichen auf den Buchstabentasten (Zweitbelegung) Zusammen mit den
Buchstabentasten drücken.
Mit Tastendruck die Texteingabe bestätigen.
Die Kurzmitteilung im Postausgang für
spätere Versendung speichern .
Die Kurzmitteilung sofort senden. In
diesem Fall erscheint die Meldung
Numm. eingeben. Geben Sie jetzt die
komplette - also mit Vorwahl - Empfängernummer.
SMS ShortMessageService
Wir gratulieren. Deiner
bestandenen Prüfung.
➞
➞
SMS
MENU
CAPS
SHIFT
ALT
WRITE
READ
Box 1-4
Speichern
Senden
Verfassen
oder
oder
✍
Page 37

333377
77
Kurzmitteilungen
Speichersperre/PIN-Code für Postfach
Sie können ein Postfach (Box 0-3) mit einem PIN-Code
vor fremden Zugriff schützen.
Postfach 1/Box 1 ist für die öffentliche Nutzung vorgesehen
und kann nicht mit einem PIN-Code geschützt werden.
Neuen PIN-Code eingeben
Menu öffnen.
Den Menüpunkt anwählen und
bestätigen.
Den Menüpunkt anwählen und
bestätigen.
Den Menüpunkt anwählen und
bestätigen.
Den Menüpunkt anwählen und
bestätigen.
An dem Bildschirm erscheint die
Meldung Code eingeben. Jetzt die
Codenummer (höchstens vier Ziffern)
mit den Tasten 0 bis 9 eingeben.
• Während des Sendens wird die Meldung SMS senden... angezeigt.
• Die Meldung Wiederholen wird angezeigt, wenn der Telefonan-
schluss des Empfängers besetzt ist.
• Wenn die Taste X während des Sendens gedrückt wird, kommt es
zur Löschung der Kurzmitteilung und die Meldung abgebrochen
wird angezeigt.
• Wenn die Kurzmitteilung nicht versandt wurde, geht das Gerät wieder-, in den Bereitschaftsmodus und auf der Anzeige erscheint die
die Meldung Vers. Erfolgos.
* Muss unterstützt werden durch Ihren örtlichen Telekom und das
gerat auf der Empfänger Seite
• Wenn sich die zweite Codenummer von der ersten unterscheidet,
wird die Meldung Code falsch angezeigt.
• Der PIN-Code für Box 2 und 3 wird in gleicher Weise eingerichtet.
• Wenn ein PIN-Code eingegeben wurde, ist der Zugang zu den
gespeicherten Daten nur nach Eingabe dieses PIN-Codes möglich.
• Nach Löschung des PIN-Codes ist das jeweilige Postfach wieder
frei zugänglich.
• Mit dem gleichen Verfahren kann man nun einen neuen PIN-Code eingeben.
Den eingestellten Code löschen
Menu öffnen.
Den Menüpunkt anwählen und
bestätigen.
Den Menüpunkt anwählen und
bestätigen.
Den Menüpunkt anwählen und
bestätigen.
Den Menüpunkt anwählen und
bestätigen. Auf der Anzeige steht die
Meldung Code eingeben. Die zu
löschende Codenummer eingeben.
Mit Tastendruck bestätigen. Die Meldung Code gelöscht! wird angezeigt. Menü verlassen.
SMS
Box 2
MENU
SMS-
Einstellung
Box Code
Neuer Code
SMS
Box 2
MENU
SMS-
Einstellung
Box Code
Code löschen
• Geben Sie die Empfängernummer
aus dem Telefonbuch oder durch
Direkteingabe ein.
• Die gewünschte Nummer aus dem
Telefonbuch mit Taste und dann
oder anwählen. Die Eingabe mit
Taste bestätigen.
Anzeige zeigt SMS Box Nummer*,
tragen Sie die Nummer ein, wenn Sie
die Zahl nicht wissen, gebe 0 ein
oder bestätigen Sie mit
Notiz: Durch es eingeben von einem SMS box Nummer,
können Sie, die Kurzmitteilung an einem privaten SMS box
schicken, ein 0 oder keine Zahl eingeben wurde die Mitteilung automatisch an dem öfentlichen SMS box schicken.
Die Kurzmitteilung wird jetzz gesendet. Nach dem Versand wird die Meldung SMS Gesendet angezeigt.
Mit Tastendruck bestätigen, auf dem
Bildschrim steht nun die Meldung
Wiedergeben. Denselben Code
noch einmal (als Bestätigung) eingeben.
Mit Tastendruck die Eingabe bestätigen, auf der Anzeige steht nun die
Meldung Gespeichert!. Menü ver-
lassen.
Deutsch
Page 38

333388
88
Kurzmitteilungen
Speicher für empfangene
Kurzmitteilungen (posteingang)
Lesen und Löschen der ankommenden
Kurzmitteilungen
Der Empfang jeder neuen Kurzmitteilung wird mit einem
kurzem Signalton gemeldet. Dann wird das Symbol ne-
ue Kurzmitteilung angezeigt und die Leuchtdiode für
neue Kurzmitteilungen beginnt zu blinken. Die Signallampe blinkt solange, bis Sie die Mitteilung gelesen haben.
Drücken Sie für schneller
Kurzmitteilung lesen
Den Menüpunkt anwählen und
bestätigen.
Den Menüpunkt anwählen und
bestätigen.
Den Menüpunkt anwählen und
bestätigen.
Den Menüpunkt anwählen und den
Posteingang öffnen.
Mit diesen Tasten kann man sich im
Menu nach oben oder nach unten
bewegen.
Mit Tastendruck den Text der Kurzmitteilung anzeigen.
Mit Tastendruck das Auswahlmenü
aufrufen.
Mit Tastendruck die Funktion
Löschen wählen.
Die Kurzmitteilung wird unwiderruflich gelöscht
Leseoptionen
Wenn Sie eine Kurzmitteilung gelesen haben, können Sie
auf diese sofort antworten oder andere Funktionen wählen.
Folgende Möglichkeiten können im
Menü gewählt werden:
Antworten Schreiben einer neuen Kurzmittei-
lung oder die aktuelle Mitteilung
bearbeiten.
Weiterleiten Die aktuelle Kurzmitteilung an eine
andere Person senden.
Anrufen Den Absender der Kurzmitteilung
anrufen.
Zu Namen Die Telefonnummer und den
Hinzuf. Namen des Absenders im Telefon-
buch speichern.
Löschen Kurzmitteilung löschen
• Während des Empfangs einer neuen Kurzmitteilung wird die Mel-
dung SMS-Empfang angezeigt.
• Wenn keine Kurzmitteilungen empfangen wurden, wird die Mel-
dung Keine SMS angezeigt.
• Jede empfangene Kurzmitteilung enthält Datum und Uhrzeit der
Übertragung.
• Am Ende jeder Kurzmitteilung steht die Information – End --.
• Es wird auch die Anzahl der neuen und aller empfangenen
Kurzmitteilungen angezeigt: Postfach Ein. XX (neu)/XX(total).
Wenn keine Kurzmitteilung empfangen wurde, wird die Information Postfach Ein. 00/00 angezeigt.
• Wenn die Telefonnummer des Absenders im Telefonbuch gespeichert ist, erscheint im Speicher für ankommende Kurzmitteilungen der Name des Absenders anstelle der Rufnummer.
SMS
MENU
READ
Box 0
Postfach Ein
Löschen
oder
oder
Page 39

333399
99
Kurzmitteilungen
• Wenn keine Kurzmitteilungen im Speicher sind, wird die Meldung
Keine SMS angezeigt.
• Es wird auch die Anzahl der abgehenden Kurzmitteilungen ange-
zeigt: Postfach Aus. XX. Wenn keine Kurzmitteilung abgegan-
gen ist, wird die Information Postfach Aus. 00 angezeigt.
Speicher für gesendete
Kurzmitteilungen (Postausgang)
Lesen, Bearbeiten, Senden und Löschen
der gespeicherten Kurzmitteilungen
Drücken Sie für schneller
Kurzmitteilung lesen
Den Menüpunkt anwählen und
bestätigen.
Den Menüpunkt anwählen und
bestätigen
Den Menüpunkt anwählen und
bestätigen
Den Menüpunkt anwählen und den
Postausgang anzeigen.
Mit diesen Tasten kann man sich im
Text der Kurzmitteilung nach oben
oder nach unten bewegen.
Mit diesen Tasten kann man zur
nächsten oder vorhergehenden
Kurzmitteilung blättern.
Kurzmitteilung anwählen
Drücken Sie für gesendete
Kurzmitteilung löschen
SMS-Mitteilungszentrale
Um Kurzmitteilungen senden und empfangen zu können,
ist die Telefonnummer des SMS-Zentrums einzugeben.
Den Menüpunkt anwählen und bestätigen.
Den Menüpunkt anwählen und bestätigen.
Den Menüpunkt anwählen und bestätigen.
Den Menüpunkt anwählen und bestätigen.
Den Menüpunkt anwählen, versandt
nummer von SMS zentre eingeben und
bestätigen.
Den Menüpunkt anwählen und
bestätigen.
Auf dem Bildschirm erscheint nun die
Meldung Numm. eingeben. Die Nummer
des SMS Zentrums eingeben. Für Deutschland verwenden Sie bitte die Nummer
0190-01504 des Annyway-SMS-Service
als SMS-Mitteilungszentrale für Versand
und Empfang. Bei Bedarf können Sie noch
eine Empfangsnummer eines alternativen
Serviceproviders eingeben..
Hinweis: Ihr Anschluss darf nicht über eine
Sperre für 0190-Nummern verfügen (z.B.
als Dialerschutz), da ansonsten keine
Verbindung zur SMS-Mitteilungszentrale
aufgebaut werden kann. Wenn möglich definieren Sie eine Ausnahmeregel für die
Nummer der SMS-Mitteilungszentrale.
Der Versand von Kurzmitteilungen wird einzeln abgerechnet und nicht nach Verbindungsdauer. Die aktuell gültigen Tarifinformationen des Annyway-Service finden Sie
im Internet unter http://www.sms-im-festnetz.de. Der Empfang von SMS ist in jedem Falle kostenlos.
Eingabe bestätigen
Menü verlassen.
SMS
Box 1
MENU
➞
READ
Postfach Aus
oder
oder
oder
oder
SMS
Für Versandt
MENU
SMS-
Einstellung
Zentr.-
nummer
Für Empfang-1
Deutsch
Page 40

444400
00
Hauptmenü
SMS Box0 Verfassen
Postfach Ein
Postfach Aus
Box1 Verfassen
Postfach Ein
Postfach Aus
Box2 Verfassen
Postfach Ein
Postfach Aus
Box3 Verfassen
Postfach Ein
Postfach Aus
SMS-Einstellung Zentr.-Nummer Für Versand
Für Empfang-1
Für Empfang-2
Box code Box2
Box3
Box4
Einstellungen Kontrast
Uhr einstellen
Werkseinstellung
Ortsvortwahl
Sprache
Länderprofil
Accept all calls (Always SMS)
Namen Ansicht
Neuer Eintrag
Anruflisten
gewählte Rufnr.
Page 41

444411
11
Hauptmerkmale
Hauptmerkmale:
●
FSK + DTMF Dual System Caller ID
●
Speichert bis zu 90 ankommende Anrufe (Name, Telefonnummer, Datum und Uhrzeit)
●
Speichert bis zu 30 abgehende Anrufe (gewählte Rufnummern)
●
Speichert bis zu 50 Namen und Rufnummern
im Telefonbuch
●
Signallampe NEUER ANRUF
●
Löschen einzelner/aller Einträge der Anruflisten
●
Anzeige der Anrufernummern und der gewählten Rufnummern
●
Funktion
●
Anzeige
●
Anrufumleitung
●
Kontrasteinstellung der LCD-Anzeige
Kurzmitteilungen:
●
ETSI Protokoll 1
●
Senden/Empfangen von Kurzmitteilungen
●
Vier SMS-Speicher für verschiedene Personen
stehen zur Verfügung
●
Box 0 für öffentliche Nutzung, Box 1 bis 3 für
private Nutzung
●
In jedem Speicher können mindestens
30 Kurzmitteilungen je 160 Zeichen oder maximal 99 Kurzmitteilungen gespeichert werden
(Die gespeicherten Daten bleiben auch bei Unterbrechung der Stromversorgung erhalten)
●
Senden von Kurzmitteilungen (bis 160 Zeichen)
●
Wahl der Rufnummern aus dem Telefonbuch
oder aus der Anruferliste
●
Ankommende Kurzmitteilungen: (Ansicht,
Löschen, Antworten, Weiterleiten)
●
Zurückrufen des SMS-Absenders
●
Speichern der Telefonnummer des Absenders
im Telefonbuch
●
Mitteilungen können mit SMS, Fax oder
E-Mail übergeben werden (abhängig vom
SMS-Service-Provider)
●
Signal für ankommende Kurzmitteilungen
Deutsch
Page 42

444422
22
Fehlersuche
Wenn Ihr Gerät nicht richtig funktioniert, versuchen Sie bitte zuerst selbst den Fehler anhand der nachfolgenden Hinweise zu finden und zu beheben.
Fehler Mögliche ist Ursache Fehlerbeseitigung
Keine Anzeige Batterie sind leer Batterie wechseln
Kurzmitteilungen Die Sendenummer des Die Sendenummer des SMSkönnen nicht SMS –Zentrums wurde nicht sending number Zentrums eingeben
gesendet werden eingegeben
Die Rufnummer des Den Hörer abheben und das
SMS-Zentrums wurde nicht SMS-Zentrum wählen, um zu
richtig eingegeben prüfen, ob der Freiton zu hören
ist. Wenn nicht, dann die richtige
Rufnummer eingeben und speichern.
Kurzmitteilungen Die Empfangsnummer des Die Empfangsnummer
können nicht SMS-Zentrums wurde nicht des SMS-Zentrums eingeben.
empfangen eingegeben
werden
Die Empfangsnummer des Die Empfangsnummer des
SMS-Zentrums wurde nicht SMS-Zentrums richtig eingegeben.
richtig eingegeben.
Page 43

UÏivatelsk˘ manuál
âe‰tina
Page 44

444444
44
Vzhled pfiístroje
LCD displej
Pouzdro na baterie
Bzuãák
Indikátor
nov˘ch hovorÛ
a nov˘ch zpráv
Konektor na kabel
pro pfiipojení
k pevné lince
Page 45

444455
55
Popis funkcí Funkce kláves
Údaje na displeji
Vysvûtlení symbolÛ
Symboly Popis
Když je zvednuté sluchátko, objeví se tento
symbol, což znamená, že je přístroj v provozním režimu.
Tento symbol se objeví na LCD displeji, když
obdržíte novou zprávu SMS nebo hlasovou
poštu, a připomene vám, že si máte poštu
přečíst.
Pokud jsou v paměti uložené nové hovory,
objeví se tento symbol. Po přijetí nových hovorů ikona zmizí.
Tento symbol se objeví, pokud se volání
opakuje.
Tento symbol vás upozorňuje, že jsou slabé
baterie.
Když se objeví tento symbol, znamená to,
že do psaného textu bylo vloženo velké písmeno.
Funkãní
tlaãítka Popis
vložit číslice od 0 do 9
rychle přečíst přijatou zprávu
rychle napsat zprávu ve schránce
Funkce adresáře umožňuje uložení 50 údajů do paměti.
Více podrobností najdete v tomto manuálu kapitole
Adresář.
Tato jednotka má paměť pro 90 údajů. Další podrobnosti najdete v kapitole Identifikace volajících.
vymazat text nebo záznam či všechny záznamy v paměti
přejít z malých písmen na velká a obráceně
změna na číslicový režim
změna na písmový režim
posun na další řádku
přechod do menu
zrušit
potvrdit
navigovat nahoru a dolů při prohlížení a pohybovat
kurzorem vpravo/vlevo při editování záznamu.
Pohyb
o stránku
nahoru
Pohyb
o stránku
dolÛ
Displej pro zobrazení zpráv
âe‰tina
Page 46

444466
66
Obsah
Základní popis . . . . . . . . . . . . . . . . . . . . . . . . . . . 44
Popis funkcí . . . . . . . . . . . . . . . . . . . . . . . . . . . . . . . 45
Údaje na displeji . . . . . . . . . . . . . . . . . . . . . . . . . . . 45
Vysvětlení symbolů . . . . . . . . . . . . . . . . . . . . . . . . . 45
Funkce kláves . . . . . . . . . . . . . . . . . . . . . . . . . . . . . 45
Bezpeãnostní pokyny . . . . . . . . . . . . . . . . . . . . . 47
Instalace základnové jednotky . . . . . . . . . . . . 47
Nastavení . . . . . . . . . . . . . . . . . . . . . . . . . . . . . . . 49
Profil země . . . . . . . . . . . . . . . . . . . . . . . . . . . . . . . 49
Příjem všech hovorů (vždy SMS) . . . . . . . . . . . . . . . 49
Vyber jazyk . . . . . . . . . . . . . . . . . . . . . . . . . . . . . . . 49
Nastavení data a času . . . . . . . . . . . . . . . . . . . . . . . 49
Nastavení kontrastu LCD . . . . . . . . . . . . . . . . . . . . . 50
Změna nastavení jednotky . . . . . . . . . . . . . . . . . . . . 50
Nastavení kódu oblasti a předvolby . . . . . . . . . . . . . 50
Klávesnice znakÛ . . . . . . . . . . . . . . . . . . . . . . . . 51
Adresáfi . . . . . . . . . . . . . . . . . . . . . . . . . . . . . . . . . 52
Ukládání jmen a telefonních čísel . . . . . . . . . . . . . . . 52
Přehled jmen a telefonních čísel . . . . . . . . . . . . . . . . 52
Vymazání jmen a telefonních čísel . . . . . . . . . . . . . . 53
Volání na číslo z adresáře . . . . . . . . . . . . . . . . . . . . 53
Editování jmen . . . . . . . . . . . . . . . . . . . . . . . . . . . . . 53
Identifikační seznam volajících (CID) . . . . . . . . . . . . 54
Prohlížení seznamu volajících . . . . . . . . . . . . . . . . . . 54
Vymazání jednotlivých čísel CID . . . . . . . . . . . . . . . . 54
Vymazání všech čísel CID . . . . . . . . . . . . . . . . . . . . 54
Uložení čísel CID do adresáře . . . . . . . . . . . . . . . . . 54
Zpětné volání na číslo CID . . . . . . . . . . . . . . . . . . . . 55
Odchozí hovory . . . . . . . . . . . . . . . . . . . . . . . . . . . . 55
Přehled a vytáčení čísel pro odchozí hovory . . . . . . 55
Textové zprávy (SMS) . . . . . . . . . . . . . . . . . . . . 56
Psaní, uložení a odeslání zprávy SMS . . . . . . . . . . . 56
Nastavení nového číselného kódu . . . . . . . . . . . . . . 57
Odstranění nastaveného číselného kódu . . . . . . . . . 57
Seznam přijatých zpráv . . . . . . . . . . . . . . . . . . . . . . 58
Seznam odeslaných zpráv . . . . . . . . . . . . . . . . . . . . 59
SMS centrum (Středisko zpráv) . . . . . . . . . . . . . . . . 59
Hlavní menu . . . . . . . . . . . . . . . . . . . . . . . . . . . . . 60
Pfiehled vlastností . . . . . . . . . . . . . . . . . . . . . . . 61
Svépomoc pfii závadách . . . . . . . . . . . . . . . . . . . 62
Page 47

444477
77
Bezpeãnostní opatfiení Instalace základny
Bezpeãnostní pokyny
Před použitím přístroje si laskavě přečtěte následující
základní pokyny, aby se snížilo riziko vzniku ohně, elektrického šoku nebo úrazu.
1. Pozorně si přečtěte a dodržujte instrukce uvedené
v manuálu.
2. Řiďte se upozorněními vyznačenými na přístroji.
3. Při čištění komunikátor odpojte. Použijte vlhký hadřík, NEPOUŽÍVEJTE tekuté nebo aerosolové čisticí
prostředky.
3. NEPOUŽÍVEJTE toto zařízení ve vlhkém prostředí.
4. Nepokládejte na šňůru předměty, které by ji mohly
poškodit.
5. Chraňte přístroj před znečištěním jakoukoliv tekutinou.
6. Pokud potřebujete servis, odpojte komunikátor
ze zásuvky ve zdi a obraťte se na kvalifikovanou
servisní službu.
Pfiíprava terminálu
Základní balení obsahuje:
• základnovou jednotku
• telefonní šňůru)
• 4 ks AA baterií 1,5V
• uživatelský manuál
Instalace základnové jednotky
Poznámky:
Základna je určena pro provoz v místnostech s teplotami v rozmezí od +5 do +45°C.
VloÏení baterií
Schránka SMS vyžaduje pro LCD displej čtyři AA baterie 1,5V.
1. Sejměte kryt baterií na zadní straně SMS terminálu.
2. Vložte do pouzdra čtyři nové AA baterie 1,5V a dávejte pozor, aby uložení odpovídalo vyznačené polaritě +/-.
3. Opatrně vraťte kryt na místo.
Baterie
Upozornění:
1. Typ baterie: velikost AASUM-4 1,5V
2. Nevyhazujte baterie do ohně.
3. Nevyhazujte baterie na taková místa, kde by mohly
způsobit znečištění.
Blahopfiejeme
ke koupi našeho vysoce kvalitního výrobku.
Přečtěte si pozorně tento návod, abyste se seznámili se všemi výhodami a vlastnostmi a způsobem používání SMS terminálu.
Homologace:
âe‰tina
Page 48

444488
88
Instalace základny
Pfiipojení základnové jednotky
Zasuňte konec telefonní šňůry do drážky konektoru a vložte další telefonní konektor do telefonní zásuvky.
Upozornění: Používejte pouze dodanou šňůru.
Telefonní ‰ÀÛra s konektorem
(Typ se v rÛzn˘ch zemích li‰í.)
Page 49

444499
99
Základní nastavení
Základní nastavení
Datum a ãas
Přístroj ukazuje datum a hodinu i v pohotovostním režimu, což vám pomůže dodržet sjednané schůzky.
Je třeba nastavit datum a čas, aby bylo možno označit
přijaté zprávy a hovory správnými časovými údaji.
Otevřete menu
Vyberte položku v menu a potvrďte.
Vyberte položku v menu a potvrďte.
Aktuální nastavení se objeví na displeji a pozice měsíce bude blikat.
Vyberte pole Měsíc/Den/Hodina/
Minuta
Zadejte správný měsíc/den/hodinu/minutu. (např. 12:36 23/08)
Stisknutím potvrďte a ukončete.
* Při nastavováni data a času musíte vždy zadat dvě číslice, např.
pro srpen je třeba vložit do pole měsíce 08, jinak je vložené číslo
neplatné.
* Režim času je 24 hodin.
* Jakmile přijmete první hovor, datum a čas se automaticky nasta-
ví. (Standard FSK)
Nastavení
âe‰tina
MENU
0 - 9
Nastavení ãasu
Profil zemû
V této funkci zvolíte vhodné nastavení komunikátoru pro
Váš stát.
Otevřete menu
Vyberte položku v menu a potvrďte
Vyberte položku v menu a potvrďte
Na displeji se objeví seznam zemí,
jejichž profil můžete nastavit
Vyberte danou zemi (např. Česká republika)
Potvrďte volbu tlačítkem
Po potvrzení komunikátor automaticky nastaví všechny nezbytné parametry pro danou zemi.
Pfiíjem v‰ech hovorÛ (vÏdy SMS)
Tato funkce umožňuje příjem SMS zpráv i na linkách,
které nepodporují zobrazení čísla volajícího.
Otevřete menu
Vyberte položku v menu a potvrďte
Vyberte položku v menu a potvrďte
Vyberte položku Zapnuto/Vypnuto
Potvrďte volbu tlačítkem
Jestliže zvolíte tuto funkci, linka, na které je zařízení umístěno, bude schopna přijímat jen sms zpráva, nikoliv příchozí hovory
MENU
Setup
Nastavení
MENU
Country
profile
(profil zemû)
Vyber jazyk
V této funkci zvolíte jazyk
Otevřete menu
Vyberte položku v menu a potvrďte
Vyberte položku v menu a potvrďte
Na displeji se objeví seznam jazyků,
které můžete nastavit
Vyberte jazyk (např. Čeština)
Potvrďte volbu tlačítkem
nebo
Nastavení
MENU
Pfiíjem v‰ech
hov.
nebo
Nastavení
Jazyk
nebo
Page 50

555500
00
Základní nastavení
Nastavení kódu oblasti a pfiedvolby
Otevřete menu.
Vyberte položku z menu a potvrďte.
Vyberte položku z menu a potvrďte.
- Na LCD se znázorní: Vlož kód obl. 1
- Zadejte kód oblasti 1 pomocí číslic
0 - 9 (nejvíce 4 číslice)
Potvrďte volbu tlačítkem a přejděte
na nastavení kódu oblasti 2
- Na LCD se znázorní: Vlož kód obl. 2
- Zadejte kód oblasti 2 pomocí číslic
0 - 9 (nejvíce 4 číslice)
Potvrďte volbu tlačítkem a přejděte
na nastavení předvolby.
- Na LCD se znázorní: Vložte předvolbu
- Zadejte předvolby pomocí číslic
0 - 9 (nejvíce 2 číslice)
Potvrďte volbu tlačítkem a skončete.
• Když nastavíte kód oblasti a budete volit číslo uvedené v adresáři
nebo seznamu CID s tímto kódem, můžete toto číslo vytáčet bez
kódu oblasti.
• Jestliže si nastavíte předvolbu a budete volit číslo uvedené v adresáři nebo seznamu CID, můžete toto číslo vytáčet se zadanou
předvolbou.
• Při kontrole volání se číslo Předvolby neznázorní.
Nastavení
MENU
Kód oblasti
Nastavení kontrastu LCD displeje
Je možno si vybrat ze 64 úrovní.
Otevřete menu.
Vyberte položku z menu a potvrďte.
Vyberte položku z menu a potvrďte.
Objeví se aktuální nastavení (např.
Kontrast: 30)
Zvolte si úroveň podle svého přání.
Zmûna nastavení jednotky
Po znovunastavení jednotky se vymaže veškerá paměť.
Otevřete menu.
Vyberte položku z menu a potvrďte.
Vyberte položku z menu a potvrďte.
Na LCD se objeví nápis: Resetovat?
Potvrďte volbu tlačítkem a na LCD se
znázorní Formátování... Po skončení
se vrátí přístroj do pohotovostního
režimu.
Nastavení
MENU
VymaÏ v‰e
Nastavení
MENU
Kontrast
Page 51

555511
11
Základní nastavení
Klávesnice znakÛ
• Stiskněte klávesu CAPS, pokud chcete přejít z psaní malých písmen an velká a obráceně.
• Kurzor můžete ovládat s použitím.
• Písmeno vlevo od kurzoru lze vymazat s použitím klávesy .
• Písmena se vkládají vždy vlevo od kurzoru.
âe‰tina
➞
Page 52

555522
22
Telefonní seznam
Telefonní seznam
Do adresáře lze uložit 50 jmen a telefonních čísel.
Ukládání jmen a tel. ãísel
Potvrďte volbu tlačítkem
Otevřete menu.
Vyberte položku z menu a potvrďte.
Na LCD se objeví nápis Přehled
a Přidej jméno
Vyberte položku z menu a potvrďte.
LCD znázorní pořadí a objeví se nápis Vložte číslo
Přejděte na číselný režim (např.
1236008)
Potvrďte volbu tlačítkem a přejděte
na nastavení jména.
Na LCD se objeví nápis Vložte jméno
Zadej jméno (např. John Smith)
Potvrďte volbu tlačítkem a na LCD se
objeví nápis Uloženo.
• Podle předešlého postupu můžete uložit další jména a čísla.
• Vložené číslo může nejvíce obsahovat 16 číslic.
• Vložené jméno může nejvíce obsahovat 16 znaků.
• Pokud není v adresáři žádná položka, na LCD se objeví nápis
Prázdný.
• Na konci položek se na LCD objeví nápis Konec seznamu.
ProhlíÏení jmen a ãísel
Potvrďte volbu tlačítkem.
Otevřete menu.
Vyberte položku z menu a potvrďte.
Na LCD se objeví nápis Přehled
a Přidej jméno
Vyberte položku z menu a potvrďte.
LCD znázorní seznam jmen.
Přejděte na další nebo předešlé jméno.
Stiskněte tlačítko a podívejte se na
jméno a vložené datum a hodinu.
Přejděte na další nebo předešlé volané číslo.
Tel. seznam
MENU
0 - 9
Pfiidej jméno
nebo
Tel. seznam
MENU
Pfiehled
nebo
nebo
nebo
Page 53

555533
33
Telefonní seznam
Vymazání jmen a ãísel
Když se na LCD objeví vámi zvolené číslo z adresáře
Stisknutím vyberte.
Vyberte volbu vymazat, na LCD se
objeví nápis
Smazáno!, poté skončete.
Vytáãení ãísla z adresáfie
Když se na LCD objeví vámi zvolené číslo z adresáře
Stisknutím vyberte.
Vyberte volbu vytáčet a na LCD se
objeví nápis
Zvedněte sluchátko..., při zvednutí
sluchátka se pak číslo vytáčí.
Editování jmen a ãísel
Když se na LCD objeví vámi zvolené jméno z adresáře
Stisknutím vyberte.
Vyberte položku z menu
Na displeji se zobrazí Vložte číslo,
potvrďte a objeví se Zadej jméno.
Pomocí klávesnice vložte nové jméno (např. John Smith)
Potvrďte volbu tlačítkem a na LCD se
objeví nápis Uloženo, poté skončete.
âe‰tina
Smazat
Upravit
Volat
Page 54

555544
44
Telefonní seznam
Identifikaãní seznam volajících
Přístroj může uložit až 90 jmen a čísel příchozích hovorů s uvedením dne a hodiny.
• Pokud je paměť plná a přichází nový hovor, nejstarší záznam je
automaticky přepsán novým záznamem.
• Pokud přichází nový hovor či zpráva, na přístroji bliká LED dioda.
• Na konci seznamu zaznamenaných hovorů se na LCD objeví
nápis Konec seznamu.
• Pokud nepřišel žádný hovor, na LCD se objeví nápis Žádné
volání.
ProhlíÏení seznamu volajících
Po stisknutí se znázorní seznam CID.
Otevřete menu
Vyberte položku z menu a znázorní
se seznam CID.
Stisknutím můžete prohlížet jména
a (nebo) čísla volajících.
Stisknutím se znázorní dané číslo
a den a hodina.
Stisknutím můžete prohlížet další
čísla.
Vymazání jednotliv˘ch ãísel CID
Když se znázorní vámi vybrané číslo na LCD
Stisknutím otevřete.
Stisknutím číslo vymažete a na LCD
se objeví nápis
Smazáno!
Vymazání v‰ech ãísel CID
Stisknutím se znázorní seznam
Otevřete menu
Vyberte položku z menu a znázorní
se seznam CID.
Stiskněte jednou a na LCD se objeví
nápis Smazat volání?
Stisknutím proběhne vymazání a na
LCD se objeví nápis Žádné hovory.
Stisknutím mazání zrušíte.
UloÏení ãísel CID do adresáfie
Když se znázorní vámi vybrané číslo na LCD
Stisknutím otevřete.
Stisknutím potvrďte a na LCD se
objeví nápis Vložte jméno.
Vložte jméno.
Stisknutím potvrďte a na LCD se
objeví nápis Uloženo!
Pfiíchozí
hovory
MENU
CID
nebo
Pfiíchozí
hovory
MENU
CID
nebo
nebo
nebo
Vymazat
Pfiidat do
sezn.
➔
Page 55

555555
55
Telefonní seznam
Zpûtné volání na ãíslo CID
Po stisknutí se znázorní seznam CID.
Otevřete menu
Vyberte položku z menu a znázorní
se seznam CID.
Stisknutím můžete vyhledáte požadované číslo.
Stisknutím otevřete.
Vyberte tuto volbu a na LCD se objeví nápis
Zvedněte sluchátko..., při zvednutí
sluchátka se pak číslo vytáčí.
vatele vašich telefonních služeb, zejména co se týče poskytování této
služby.
Pokud telefon nemůže rozeznat informace a nemůže znázornit zprávu volajícího objeví se na displeji CHYBA
místo zprávy, která může chyby obsahovat. To neznamená, že je vada na
vašem telefonu.
Odchozí hovory
Můžete uložit až 30 posledních čísel odchozích hovorů.
ProhlíÏení a vytáãení volan˘ch ãísel
Otevřete menu.
Vyberte menu a potvrďte. Na LCD se
objeví seznam posledních volaných
čísel.
Stiskněte a můžete přejít na vámi vybrané číslo v seznamu znázorněném
na LCD.
Stisknutím vložte.
Vyberte za účelem vytočení čísla.
Vyberte za účelem přidání čísla do
adresáře.
Tímto tlačítkem číslo vymažete.
• Funkce zpětného volání nebude vytáčet telefonní číslo, pokud je
příslušný záznam hovoru zablokován nebo není dostupný.
Pokud si volající vybral volbu, která
zabraňuje volání na jeho jméno a číslo, na displeji se objeví nápis Privátní.
Tento nápis se objeví na displeji, když
někdo volá z oblasti, kde telefonní
společnost nenabízí službu identifikace volajícího nebo z oblasti, odkud se
přes meziměstskou síť ještě neposkytují jména a čísla do vaší oblasti.
Pokud vám telefonní společnost poskytuje službu hlasové pošty a je zanechána zaznamenaná zpráva, LCD
signalizuje příchozí zprávu a vpravo
na displeji se objeví symbol. Tento
symbol tam zůstane až do doby, kdy
vyhledáte hlasovou poštu.
Další informace si zjistěte u poskyto-
PRIVÁTNÍ
MIMO OBLAST
âEKAJÍCÍ
ZPRÁVA
CHYBA
âe‰tina
Volat zpût
Pfiidat do
sezn.
Pfiíchozí
hovory
MENU
MENU
CID
nebo
Odchozí hovory
Volat zpût
Vymazat
Page 56

555566
66
Textové zprávy (SMS)
Textové zprávy (SMS)
S tímto SMS komunikátorem můžete odesílat a přijímat
textové zprávy (SMS zprávy). Textové zprávy mohou být
přijímány pouze zařízením, které podporuje tuto službu
(mobilní telefon, PC, jiný telefon).
Pfiedpoklady:
CID (CLIP)
Funkce identifikace volajícího (CID) a přenos čísla volajícího musí být přístupné ve vaší pevné telefonní síti.
Ujistěte se, že operátor vaší telefonní sítě umožňuje využívání těchto funkcí v rámci telefonního spojení.
Psaní, ukládání a odesílání SMS zpráv
Můžete používat 4 schránky SMS, které jsou na sobě nezávislé.
Jednotlivá zpráva by měla mít nejvíce 160 znaků.
V každé schránce lze uložit 30 zpráv o 160 znacích nebo
nejvíce 99 zpráv, které se neztratí ani při vypnutí přístroje.
Přístroj může přijímat zprávy, pokud není paměť plná, jinak může být nová zpráva odmítnuta. V pohotovostním
režimu se na LCD objeví nápis Plná schránka a údaj, kolik zpráv je uloženo.
Abyste získali místo pro nové zprávy, je třeba vymazat
všechny zprávy, které již nepotřebujete.
SMS zprávy se neukládají automaticky. Pokud si přejete
uložit důležitou zprávu, musíte to udělat před jejím odesláním.
Otevřete menu.
Vyberte položku z menu a potvrďte.
Vyberte položku z menu a potvrďte.
Otevřete vstupní pole.
Stiskněte tlačítko pro rychlé psaní
zprávy ve Schránce 0.
Stiskněte tlačítko pro rychlé čtení
zprávy
Informace o vkládání písmen nebo
znaků najdete na straně 51.
Přejděte kurzorem do textového pole.
Příští vložený znak se objeví vlevo od kurzoru.
Vymazat znaky vlevo od
kurzoru.
Stiskněte pro vytvoření
mezery.
Přejít z malých písmen na
velká a obráceně.
Stiskněte a přidržte, potom stiskněte a 0-9 a můžete vložit vrchní symbol
na tlačítku.
Stiskněte a přidržte, potom stiskněte A-Z a můžete vložit vrchní symbol
a znak na tlačítku.
Potvrďte volbu tlačítkem.
Zprávu SMS můžete takto uložit do
schránky pro odeslání, abyste ji mohli
později popřípadě poslat.
Zprávu okamžitě odešlete a LCD vás
upozorní, abyste vložili telefonní číslo
příjemce, LCD znázorní Vložte číslo.
Vyberte telefonní číslo příjemce z adresáře nebo jej vytočte.
SMS ShortMessageService (=služba krátkých zpráv)
Blahopřejeme
k dosaženému
pokroku
➞
➞
SMS
MENU
CAPS
READ
SHIFT
ALT
PSÁT
Schránka 1-4
UloÏit
Poslat
Napsat zprávu
nebo
nebo
✍
Page 57

555577
77
Textové zprávy (SMS)
Nastavení kódu schránky
Můžete používat schránku pro soukromé účely tak, že
nastavíte číselný kód pro Schránku 1, Schránku 2,
Schránku 3. Schránka 0 je určena pro veřejné použití.
Nastavení nového kódu
Otevřete menu.
Vyberte položku z menu a potvrďte.
Vyberte položku z menu a potvrďte.
Vyberte položku z menu a potvrďte.
Vyberte položku z menu a potvrďte.
Na LCD se znázorní Zadejte kód, zadejte tedy kód pomocí číslic 0 - 9
(nejvíce čtyři číslice)
• Při odesílání se na LCD znázorní Odesílám SMS
• Pokud je síť přetížena, na LCD se objeví nápis Zkus znovu.
• Když stisknete tlačítko X během odesílání zprávy SMS, na LCD
se objeví nápis Zrušeno.
• Pokud nedojde k odeslání zprávy, přístroj se vrátí do pohotovostního režimu a na LCD se objeví nápis Neodesláno.
* Musí podporovat lokální operátor.
• Pokud se druhý zadaný číselný kód liší od prvního, na LCD se
objeví nápis Chybný kód.
• Nastavte kódy pro Schránku 2 a Schránku 3 stejným způsobem
jako u Schránky 1.
• Pokud jste již zadali kód a potom chcete vložit Schránku, musíte
nejprve vložit číselný kód.
• Pokud odstraníte číselný kód, můžete vstoupit do schránky i bez
něj.
• Také můžete nastavit nový číselný kód podle stejného postupu
jako v případě Nastavení nového číselného kódu.
Odstranûní nastaveného ãíseln˘ kódu
Otevřete menu.
Vyberte položku z menu a potvrďte.
Vyberte položku z menu a potvrďte.
Vyberte položku z menu a potvrďte.
Vyberte položku z menu a potvrďte.
Na LCD se objeví nápis
Zadejte kód. Zadejte kód, který jste
měli nastavený.
Potvrďte stlačením, LCD ukáže Kód
odstraněný a vy ukončíte úlohu.
âe‰tina
SMS
Schránka 2
MENU
Nastavení
SMS
Kód
schránky
Nov˘ kód
SMS
Schránka 2
MENU
Nastavení
SMS
Kód
schránky
Zru‰it kód
• Stiskněte tlačítko , použijte tlačítko nebo , abyste přešli na
požadované číslo, a poté stiskněte
tlačítko .
* Displej znázorní Zadej subadresu,
zde můžete zadat subadresu příjemce, pokud příjemce žádnou nemá,
nebo ji nepoužívá jen potvrďte tlačítkem
• Odešlete stisknutím tlačítka , LCD
odeslání potvrdí slovy Zpráva odeslána.
Potvrďte volbu tlačítkem a na displeji LCD se objeví nápis Opakujte zadání. Poté vložte stejný číselný kód,
čímž zadání potvrdíte.
Stisknutím potvrďte a na LCD se objeví nápis Hotovo!, poté skončete.
Page 58

555588
88
Textové zprávy (SMS)
Pfiehled pfiijat˘ch zpráv
âtení a vymazávání pfiijat˘ch zpráv
Když vám přijde nová zpráva, uslyšíte zvukový tón, na
displeji LCD se objeví symbol a indikátor bude
signalizovat dvojitým bliknutím, dokud zprávu neprohlédnete.
Stiskněte tlačítko pro rychlé čtení
zprávy
Vyberte položku menu a potvrďte.
Vyberte položku v menu a potvrďte.
Vyberte položku v menu a potvrďte.
Vyberte položku v menu a potvrďte.
Posouvejte se, abyste si mohli prohlížet čísla z přehledu.
Stiskněte a přečtěte si zprávu.
Stiskněte pro otevření.
Stiskněte pro výběr.
Stiskněte pro vymazání.
Volby pfii ãtení
Po přečtení SMS zprávy na ni můžete okamžitě odpovědět a také máte přístup k dalším funkcím.
Otevřete menu a vyberte si požadované volby.
Odpovědět Můžete napsat novou zprávu nebo
upravit stávající zprávu.
Předat dál Textovou správu můžete zaslat
jinému adresátovi.
Volat zpět Zavoláte osobě, která vám zprávu
poslala.
Přidat do sezn. Telefonní číslo odesílatele zprávy
se zapíše do adresáře a bude také
označeno jménem.
Smazat Zprávu můžete vymazat.
* Při přijetí nové zprávy se na LCD objeví nápis Příchozí SMS.
* Pokud nejsou ve schránce žádné zprávy, na LCD se objeví nápis
Žádné zprávy.
* U přijaté zprávy se znázorní datum a hodina.
* Po skončení zprávy se znázorní Konec.
* LCD ukazuje novou zprávu a celkový počet přijatých zpráv: Přija-
té XX (nová/XX celkem). Pokud ve schránce není žádná zpráva,
na LCD se objeví nápis Přijaté 00.
• Pokud je číslo uloženo do adresáře, ve schránce přijatých zpráv
se objeví pouze jméno volajícího.
SMS
MENU
READ
Schránka 0
Pfiíjaté
Smazat
nebo
nebo
Page 59

555599
99
Textové zprávy (SMS)
* Pokud nejsou ve schránce žádné zprávy, na LCD se objeví nápis
Žádné zprávy.
* LCD ukazuje počet uložených textových zpráv: Odeslané (Archiv)
XX. Pokud nejsou uloženy žádné zprávy, na LCD se objeví nápis
Odeslané (Archiv) 00.
* Lze uložit až dvě čísla pro příjem zpráv, tedy lze přijímat zprávy
z více SMS center různých operátorů. ¨po zadání čísel se objeví
na displeji hláška Schr. 1 sub-ad.=0, potvrďte a nastavení bude
provedeno.
Pfiehled zpráv ve schránce k odeslání
âtení, editování, odesílání a vymazávání
uloÏen˘ch SMS zpráv
Stiskněte tlačítko pro rychlé čtení
zprávy
Vyberte položku menu a potvrďte.
Vyberte položku v menu a potvrďte.
Vyberte položku v menu a potvrďte.
Vyberte položku v menu a potvrďte.
Přejděte na další nebo předchozí
zprávu.
Stiskněte a můžete číst.
Vyberte zprávu
Stiskněte tlačítko pro vymazání
zprávy ve složce Odeslané
SMS centrum
Abyste mohli odesílat a přijímat textové zprávy, musíte
znát telefonní číslo SMS centra vašeho poskytovatele
služeb.
Vyberte položku menu a potvrďte.
Vyberte položku v menu a potvrďte.
Vyberte položku v menu a potvrďte.
Vyberte položku v menu a potvrďte.
Vyberte položku v menu a potvrďte.
Vyberte položku v menu a potvrďte.
Na LCD se objeví nápis Vložte číslo zadejte tedy číslo.
Stiskněte a potvrďte.
Vyberte Zrušit.
âe‰tina
SMS
Schránka 1
MENU
READ
Odchozí
nebo
a
nebo
nebo
SMS
Pro odeslání
MENU
Nastavení
SMS
âíslo centra
Pro pfiíjem
➞
Page 60

SMS Schránka 0 Napsat zprávu
Přijaté
Odeslané (archiv)
Schránka 1 Napsat zprávu
Přijaté
Odeslané (archiv)
Schránka 2 Napsat zprávu
Přijaté
Odeslané (archiv)
Schránka 3 Napsat zprávu
Přijaté
Odeslané (archiv)
Nastav SMS Číslo centra Pro odesílání
Pro příjem 1
Pro příjem 2
Kód schránky Schránka 2
Schránka 3
Schránka 4
Nastavení Kontrast
Nastavení času
Vymaž vše
Kód oblasti
Jazyk
Profil země
Příjem všech hov. (vždy SMS)
Tel. Seznam Přehled
Přidat jméno a číslo
Příchozí hovory
Odchozí hovory
666600
00
Hlavní menu
Page 61

666611
11
Seznam funkcí
P¤EHLED VLASTNOSTÍ
●
Duální systém Caller ID - FSK + DTMF
●
Lze uložit údaje o 90 příchozích hovorech,
včetně jména, čísla, dne a hodiny.
●
Lze uložit až 30 čísel odchozích hovorů.
●
Do adresáře lze uložit až 50 jmen čísel.
●
LED indikátor (LED ukazatel nového hovoru)
●
Lze vymazat jednotlivé nebo všechny záznamy
●
LCD zobrazuje čísla volajících a vytáčení čísla
●
Funkce Volat zpět
●
Hodiny ukazující reálný čas
●
Signalizace příchozí zprávy
●
Oblast mimo dosah/Privátní
●
Úprava kontrastu LCD
Funkce systému SMS:
●
ETSI protokol 1
●
Odeslat/přijmout textové zprávy
●
Lze použít čtyři schránky pro různé adresáty.
Schránka 0 pro veřejnost, schránky 1 - 3 pro
soukromé účely.
●
Do každého schránky lze uložit 30 zpráv se
160 znaky nebo až 99 zpráv. (Data zůstanou
uložena i při vybití baterií)
●
Odesílání krátkých textových zpráv (do 160
znaků)
●
Možnost výběru volaného čísla z adresáře nebo paměti CID
●
Přijaté zprávy - kontrola/vymazání/odpověď/
přesměrování
●
Zpětné volání odesílateli zprávy
●
Uložení čísla odesílatele zprávy do adresáře
●
Zprávy lze odesílat na SMS terminál, e-mail
nebo fax.
●
Upozornění na zprávu
âe‰tina
Page 62

666622
22
¤e‰ení problémÛ
Pokud telefon nefunguje podle vašich představ, pokuste se nejprve sami o nápravu podle následujícího přehledu.
Závada MoÏná pfiíãina ¤e‰ení
Prázdný displej vybité baterie výměna baterií
přerušení přívodu elektřiny obnovení přívodu
Nelze odeslat zprávu není nastaveno číslo zadejte číslo SMS centra pro odesílání
SMS centra pro odesílání
nastavení číslo SMS centra zvedněte sluchátko, zvolte číslo
pro odesílání není správné SMS centra pro odesílání, abyste
zjistili, jestli vyzvání. Pokud ne,
zeptejte se na správné číslo a nastavte ho.
Nelze přijmout zprávu není nastaveno číslo zadejte číslo SMS centra pro přijímání
SMS centra pro přijímání
nastavení číslo SMS centra Zeptejte se na správné číslo a nastavte ho
pro přijímání není správné
Page 63

Felhasználói kézikönyv
Magyar
Page 64

666644
44
Az SMS készülék
LCD kijelzŒ
Elemtartó
CsengŒ
Új hívás/üzenet
jelzŒ
Telefonkábel
dugasz
Page 65

666655
55
A kijelzŒ A funkciógombok
Információk a kijelzŒn
Az ikonok leírása
Ikon Leírás
’Telefon’ Ha felemeli a telefonkagylót, akkor
ez az ikon jelzi, hogy a készülék használatban van.
’Boríték’ Ha új üzenetet kap akkor megjelenik ez az ikon.
’Jegyzet’Ha nem fogadott hívás érkezett akkor ez az ikon jelenik meg. Eltűnik ha az összes nem fogadott hívás át lett tekintve.
’Jegyzettömb’ Ha a hívás egymás után
jön ismételten, akkor ez az ikon jelenik meg.
’Elem’ Ha az elemek kimerülőben vannak,
ez az ikon jelenik meg.
’CAPS’ Írás közben megjelenik ha nagy
betűket használ.
Funkciógomb Leírás
’0-9’ Számbillentyűk. A 0-9 számjegyek beírásához.
Az üzenetek azonnali olvasáda
Új üzenet azonnali írása.
Telefonkönyv azonnali megnyitása.
Híváslista azonnali megnyitása.
Törlés.
Nagy betűről kis betűre váltás.
A számbillentyűk fölötti karakterek megjelenítéséhez.
A betűk fölötti karakterek megjelenítéséhez.
Ugrás a sorban.
A főmenü megnyitása
Egy művelet elhalasztása/megszakítása
Jóváhagyás
Navigálás, szerkesztés, szóköz (jobbra)
Lapozás
felfele
Lapozás
lefele
KijelzŒ az üzenetek megjelenítéséhez
Magyar
Page 66

666666
66
Tartalomjegyzék
FUNKCIÓK . . . . . . . . . . . . . . . . . . . . . . . . . . . . . . . 65
Biztonsági óvintézkedések . . . . . . . . . . . . . . . . 67
Alapbeállítások . . . . . . . . . . . . . . . . . . . . . . . . . . 69
Ország Profil . . . . . . . . . . . . . . . . . . . . . . . . . . . . . . 69
Minden hívást fogad (csak SMS) . . . . . . . . . . . . . . . 69
Nyelv . . . . . . . . . . . . . . . . . . . . . . . . . . . . . . . . . . . . 69
A dátum és idő beállítása . . . . . . . . . . . . . . . . . . . . . 69
Az LCD kontraszt beállítása . . . . . . . . . . . . . . . . . . . 70
A memória törlése . . . . . . . . . . . . . . . . . . . . . . . . . . 70
Hívások kezdeményezése . . . . . . . . . . . . . . . . . 70
Karakterek . . . . . . . . . . . . . . . . . . . . . . . . . . . . . . 71
Telefonkönyv . . . . . . . . . . . . . . . . . . . . . . . . . . . . 72
Nevek és számok tárolása . . . . . . . . . . . . . . . . . . . . 72
Nevek és számok áttekintése . . . . . . . . . . . . . . . . . . 72
Nevek és számok törlése . . . . . . . . . . . . . . . . . . . . . 73
Szám tárcsázása a telefonkönyvből . . . . . . . . . . . . . 73
Nevek módosítása . . . . . . . . . . . . . . . . . . . . . . . . . . 73
Híváslista . . . . . . . . . . . . . . . . . . . . . . . . . . . . . . . 74
A lista áttekintése . . . . . . . . . . . . . . . . . . . . . . . . . . 74
Egyetlen CID szám törlése . . . . . . . . . . . . . . . . . . . . 74
Az összes CID szám törlése . . . . . . . . . . . . . . . . . . . 74
Egy CID szám mentése a telefonkönyvbe . . . . . . . . 74
Egy CID szám visszahívása . . . . . . . . . . . . . . . . . . . 75
KimenŒ hívások . . . . . . . . . . . . . . . . . . . . . . . . . . 75
A kimenő hívások áttekintése és újratárcsázása . . . . 75
Rövid Szöveges Üzenet (SMS) . . . . . . . . . . . . . 76
SMS írása, mentése, küldése . . . . . . . . . . . . . . . . . . 76
Box kód beállítása . . . . . . . . . . . . . . . . . . . . . . . . . . 77
Egy beállított kód törlése . . . . . . . . . . . . . . . . . . . . . 77
Bejövő postafiók . . . . . . . . . . . . . . . . . . . . . . . . . . . 78
Kimenő postafiók . . . . . . . . . . . . . . . . . . . . . . . . . . . 79
SMS központ . . . . . . . . . . . . . . . . . . . . . . . . . . . . . . 79
A FŒmenü . . . . . . . . . . . . . . . . . . . . . . . . . . . . . . . 80
A készülék jellemzŒi . . . . . . . . . . . . . . . . . . . . . 81
Hibaelhárítás . . . . . . . . . . . . . . . . . . . . . . . . . . . . 82
Page 67

666677
77
Óvintézkedések Üzembehelyezés
Biztonsági óvintézkedések
Az áramütés vagy egyéb sérülés elkerülése érdekében,
kérjük kövesse az alábbi óvintézkedéseket.
1. Olvassa végig figyelmesen ezt a kezelési útmutatót.
2. Tartsa be a készüléken található figyelmeztetéseket.
3. A készülék tisztításakor, áramtalanítsa a telefont és
használjon egy enyhén nedves kendőt. NE használjon egyéb folyadékot vagy aerosol tartalmú vegyi
anyagot.
4. NE használja a készüléket nedves környezetben.
5. NE helyezzen el tárgyakat a készülékhez csatlakoztatott telefonkábelen.
6. Kerülje a készülék érintkezését bármilyen folyadékkal.
7. A készülék javítását csak szakember végezheti.
A csomag tartalma
• Készülék
• Telefonkábel
• 4 AA 1,5 V Ceruzaelem
• Kezelési útmutató
ElŒkészítés
Elhelyezés
A készülék optimális működéséhez +5 - +45 C hőmérsékletre van szükség.
Helyezze el a készüléket valamely központi helyiségben
a telefon mellett.
Az elemek elhelyezése
A kijelző megjelenítéséhez 4 db. ceruzaelemre van szükség.
1. Távolítsa el a tok fedelét az sms-készülék hátuljáról.
2. Helyezzen be 4 db. új AA 1,5 V ceruza elemet.
Kérjük ügyeljen a +/- polaritás jelekre a tok belsejében.
3. Helyezze vissza a tok fedelét határozottan.
Üdvözli Önt a phoneBuddy Comfort
Kérem olvassa végig ezt a kezelési útmutatót részletesen, hogy az SMS-készüléket megfelelően
tudja használni.
Magyar
Page 68

666688
88
Üzembehelyezés
A készülék csatlakoztatása
A telefonkábel egyik végét csatlakoztassa a fali telefonaljzathoz, a másikat a készülék ’line’ kimenetéhez.
Csatlakoztassa a telefonja zsinórját a ’phone’ kimenethez.
• Ha új kábelt használ, ügyeljen a bekötésre.
Figyelem: Használja a mellékelt kábelt.
Telefonkábel dugasszal
(a dugasz típusa országonként változó)
Page 69

666699
99
Alapbeállítások
Alapbeállítások
A dátum és idŒ beállítása
Alapállapotban a készülék kijelzi a pontos időt és dátumot.
Azért is fontos a pontos idő beállítása, hogy a hívások és
üzenetek esetén a készülék a megfelelő időpontot tudja
hozzárendelni.
Nyissa meg a főmenüt a ’menu’ gomb
megnyomásával.
Válassza ki a Beállítás menüpontot
segítségével a Beállítások menüt és
nyomja meg a ’zöld pipát’.
Itt válassza ki az ’Óra’ almenüpontot.
Ismét hagyja jóvá a zöld pipával.
Megjelenik az aktuális beállítás.
A nyilak segítségével tud
a Hónap/Nap/Óra/Perc mezők között
váltani.
A szám billentyűk segítségével állítsa
be a pontos dátumot és időt. Pl.:
12:36 23/08
Hagyja jóvá a pipával
Beállítások
MENU
Óra beállítása
Magyar
Ország Profil
Ebben a funkcióban kiválaszthatja a megfelelő ország beállításait.
Nyissa meg a menüt
Válassza ki a Beállítás menüpontot és
hagyja jóvá
Válassza ki az Ország profil menüpontot és hagyja jóvá
A válaszható országok listája megjelenik
Válassza ki az országot (pl.: Magyarország)
Hagyja jóvá a pipa gomb megnyomásával
Jóváhagyás után automatikusan beállítódnak az országra jellemző paraméterek.
A magyarországi gyári beállítások a
matáv fix-sms szolgáltatás üzenetküldő számait tartalmazzák.
Minden hívást fogad (csak SMS)
Ennek a funkciónak a segítségével tud SMS üzeneteket fogadni olyan szolgáltató vonalán, amely nem támogatja a hívószámkijelzést.
Nyissa meg a menüt
Válassza ki a Beállítás menüpontot
Válassza ki a Mindet fogad
menüpontot
Válassza Ki/Be állást
Hagyja jóvá a pipa gomb megnyomásával
Ha beállítja ezt a funkciót, akkor a csatlakoztatott vonal CSAK
SMS-t lesz képes fogadni, a bejövő telefonhívásokat nem!
Setup
(Beállítások)
MENU
Country
profile
(Ország profil)
Nyelv
Nyissa meg a menüt
Válassza ki a Beállítás menüpontot
és hagyja jóvá
Válassza ki a Nyelv menüpontot és
hagyja jóvá
A válaszható országok listája megjelenik
Válassza ki a nyelvet (pl.: Magyar)
Hagyja jóvá a pipa gomb megnyomásával
vagy
Beállítások
MENU
Mindet fogad
vagy
Beállítások
Nyelv
vagy
• A pontos idő és dátum beállításánál egyszerre két számjegyet kell
megadni, tehát pl. az Augusztus hónap beírásához 08-at kell beírni.
• Az idő 24-órás rendszerben kerül kijelzésre.
• A dátum és idő autómatikusan beállítódik amint először fogad egy
hívást a készüléken. (FSK szabvány)
0 - 9
MENU
Page 70

777700
00
Alapbeállítások
ElŒhívó- és körzetszámok
Nyissa meg a menüt.
Válassza ki a telefonbeállítások menüpontot.
Lépjen be a Körzet kód almenübe,
megjelenik a ’Körzet kód 1’ üzenet.
(Írja be a körzet kódját, max. 4 számjegy)
Ezután állítsa be a második körzet
számot.
Megjelenik a ’Közet kód 2’ üzenet.
Írja be, hagyja jóvá, majd lépjen be
az LDS kód (Távolsági hívószám) beállításaihoz.
Megjelenik az ’LDS kód’ üzenet.
Adja meg a kódot (max. 2 számjegy)
majd hagyja jóvá.
• Ha betáplált egy Körzet kódszámot, akkor azt tárcsázásnál nem
kell külön beírni.
• Ha betáplált egy LDS kódszámot, akkor azt tárcsázásnál nem kell
külön beírni.
• Áttekintés módban az LDS számot nem lehet megjeleníteni.
Beállítások
MENU
Körzet szám
Az LCD kontraszt beállítása
64 különböző beálítási szint létezik.
Nyissa meg a menüt, majd a Beállítások-ban a Kontraszt almenü pontot.
A kontraszt jelenlegi beállítása kerül
megjelenítésre. Pl.: Kontraszt 10
A nyilak segítségével válassza ki a kívánt szintet.
Hagyja jóvá a pipával.
A memória törlése
A készülék memóriáit bármikor véglegesen törölheti,
visszaállítva így a gyári beállításokat.
Nyissa meg a menüt.
Válassza a Beaállítások menüt, majd
a ’Fö Visszaállító’ almenü pontot.
A kijelzőn megjelenik a ’Visszaállít’
üzenet.
Hagyja jóvá a zöld pipával.
A kijelzőn megjelenik a ’formatálás’
üzenet. A folyamat végén a készülék
visszaáll alapállapotba.
Beállítások
MENU
Fö Visszaállító
Beállítások
MENU
Kontraszt
Page 71

777711
11
Karakterek
• Szóközt a ’space’ gomb vagy a jobbra nyíl segítségével hagyhat.
• A nagy és kis betűk váltásához használja a ’Caps’ gombot.
• A kurzort a nyilak segítségével irányíthatja.
• A kurzortól balra található karaktereket a ’backspace’ gomb segítségével törölheti.
• A karakterek mindíg a kurzortól balra jelennek meg.
➞
Magyar
Page 72

777722
22
Telefonkönyv
Telefonkönyv
50 név és telefonszám tárolható a telefonkönyvben.
Nevek és számok tárolása
Nyomja meg a ’telefonkönyv’ gombot.
Nyissa meg a menüt. Majd válassza
a ’Telefonkőnyv’ menüpontot, azon
belül pedig a ’Hozzáadás’ almenüt.
Ekkor a kijelzőn megjelenik a ’Tel.
Szám?’ üzenet.
Írja be a számot a billentyűk segítségével, majd hagyja jóvá. (zöld pipa)
Ezután adja meg a számhoz tartozó
nevet.
Jóváhagyás után megjelenik az ’Elmentve’ üzenet.
• A beírt szám és név max. 16 karakter lehet.
• Ha nincs még bejegyzett telefonszám a telefonkönyvben, akkor az
’Üres’ üzenet jelenik meg.
• A bejegyzések végén a ’Lista vége’ üzenet jelenik meg.
Nevek és számok áttekintése
Nyomja meg a ’telefonkönyv’ gombot.
Nyissa meg a menüt. Majd válassza
a ’Telefonkőnyv’ menüpontot, azon
belül pedig az ’Áttekintés’ almenüt.
A nyilak segítségével tud lapozni
a telefonkönyvben.
Nyomja meg a szám megtekintéséhez
A nyilak segítségével tud a számok
között lapozni.
TelefonkŒnyv
MENU
0 - 9
Hozzáadás
vagy
TelefonkŒnyv
MENU
Áttekintés
vagy
vagy
vagy
Page 73

777733
33
Telefonkönyv
Nevek és számok törlése
A telefonkönyvben a törölni kívánt névnél nyomja meg
a ’zöld pipát’.
Válassza a ’Törlés’ menüt.
Hagyja jóvá a zöld pipával.
Megjelenik a ’Törölve’ üzenet.
Szám tárcsázása a telefonkönyvbŒl
Lépjen a tárcsázni kívánt névhez a telefonkönyvben.
Nyomja meg a ’zöld pipát’..
Válassza ki a ’Tárcsáz’ menüt, majd
megjelenik a ’Telefonkagyló’ üzenet.
Ekkor emelje fel a telefonkagylót és
a telefonszám tárcsázásra kerül.
Nevek módosítása
Jelenítse meg a kijelzőn a módosítani kívánt bejegyzést
és nyomja meg a zöld pipát.
Válassza ki a ’Szerkeszt’ menüt.
Nyomjon újra pipát, a név mező
villogni fog.
A szám megadása üzenet megjelenik
a képernyőn, hagyja jóvá és
megjelenik a Név megadása üzenet.
Írja be az új nevet a billentyűk segítségével.
Hagyja jóvá és az ’Elmentve’ üzenet
jelenik meg.
Törlés
Szerkeszt
Telefonkagyló
Magyar
Page 74

777744
44
Telefonkönyv
Hívásinfó (CID)
Ez a készülék max. 90 bejövő hívást tud tárolni, tartalmazva a hívófél nevét, telefonszámát és a hívás dátumát,
idejét.
• Ha a memória egyszer megtelik, akkor új hívás esetén a legrégebbi bejegyzés törlődik, és az új hívás bejegyzésre kerül.
• Ha a készülékre új hívás érkezik és a hívást nem tudja fogadni,
akkor a ’NEW’ felratú kijelző villogni fog, a bejegyzés megtekintéséig.
• A hiváslista legvégét a ’Lista vége’ felirat jelzi.
• Ha nem volt bejövő hívás, akkor a ’Nincs hívás’ felirat jelenik
meg.
A híváslista megtekintése
Nyomja meg a ’CID’ gombot az összes-, és az új-hívások megjelenítéséhez.
Nyomja meg a ’menu’ gombot
Válassza ki a Hívószám (CID) menüpontot és a ’nyilak’ segítségével
áttekintheti a bejövő hívások listáját.
A kívánt bejegyzésnél a ’zöld pipa’
megnyomásával tudja a hívás dátumát és idejét megtekinteni.
Egyetlen hívásinfó törlése
A nyilak segítségével válassza ki a törölni kívánt számot.
Nyomja meg egyszer a ’zöld pipát’,
majd válassza a ’Törlés’ menüt.
Nyomja meg a ’Jóváhagy’ (zöld pipa)
gombot a törléshez.
Megjelenik a ’Törölve’ üzenet
Az összes CID szám törlése
Nyomja meg a ’cid’ gombot az új és
az összes bejövő hívás megjelenítéséhez.
Nyomja meg a ’menu’ gombot
Válassza ki Hívószámok menüpontot
és a ’nyilak’ segítségével áttekintheti
az új illetve az összes bejövő hívást.
Nyomja meg a ’backspace’ gombot
és megjelenik a ’CID törlése?’ üzenet.
Nyomja meg a zöld pipát és a teljes
híváslista törlődik, a kijelzőn a ’Nincs
hívás’ üzenet jelenik meg.
Szakítsa meg a piros kereszttel
Egyetlen hívószám (CID) mentése
a telefonkönyvbe
A számok áttekintése közben,
A nyilak segítségével válassza ki a kívánt számot.
Nyomja meg egyszer a ’pipát’ és válassza ki a ’Mentés?’ funkciót.
Nyomja meg a pipát újra és megjelenik az ’Elmentve’ üzenet.
BejövŒ
hívások
MENU
CID
vagy
BejövŒ
hívások
MENU
CID
vagy
vagy
vagy
Törlés
Név:
➔
Page 75

777755
55
Telefonkönyv
Egy CID szám visszahívása
Nyomja meg a ’cid’ gombot az új és
az összes bejövő hívás megjelenítéséhez.
Nyomja meg a ’menu’ gombot
Válassza ki a Hívószámok (CID) menüpontot és a ’nyilak’ segítségével
válassza ki a tárcsázni kívánt számot.
Nyomja meg a ’zöld pipát’ kétszer
a szám tárcsázásához.
Válassza ki a ’Visszahív’ menüpontot, és a kijelzőn megjelenik a ’Telefonkagyló’ üzenet.
Ha a telefonszám nem tárcsázható,
akkor megjelenik a ’Hiba’ üzenet. Ez
nem jelenti azt, hogy a készülékével
probléma lenne. Ellenőrizze a számot.
KimenŒ Hívások
A 30 utoljára tárcsázott szám tárolható a készülékben.
A tárcsázott számok áttekintése
és újrahívása
Nyomja meg a ’cid’ gombot az utoljára hívott telefonszám megjelenítéséhez.
Nyomja meg a ’menu’ gombot és válassza ki a Kimenő Hívások (Kimenő)
menüpontot.
A ’nyilak’ segítségével válassza ki
a kívánt számot.
Nyomja meg a ’zöld pipát’.
Válassza ki a ’Visszahív’ menüt a telefonszám tárcsázásához.
Válassza ki a ’Mentés’ menüt a telefonkönyvbe való mentéshez.
Válassza a ’Törlés’ menüt a bejegyzés törléséhez.
• Ha az üzenet vagy a hivóféllel kapcsolatos információk nem felismerhető formátumban vannak, akkor a készülék nem fogja
a számot megfelelően tárcsázni.
Ha a hívófél élt a hívószám letiltásának lehetőségével, akkor a ’Privát’
üzenet jelenik meg.
Az ’Ismeretlen’ üzenet jelenik meg
a kijelzőn, ha a hívófél egy olyan más
szolgáltató alá tartozik, amely nem támogatja a hívószám kijelzést.
Ha a szolgáltatójánál elérhető a hangüzenet (voice mail) szolgáltatás, és
egy ilyen üzenetet hagytak a készülékén, akkor az ’Üzenet’ kifejezés és
egy ’boríték’ ikon jelenik meg a kijelző
jobb felén. Az ikon az üzenet megnyitásakor tűnik el.
A szolgáltatás elérhetőségével kapcsolatban lépjen kapcsolatba a szolgáltatójával.
PRIVÁT
ISMERETLEN
ÜZENET
HIBA
Visszahívás
Mentés
BejövŒ
hívások
MENU
MENU
CID
vagy
KimenŒ
hívások
Visszahívás
Törlés
Magyar
Page 76

777766
66
Szöveges Üzenet (SMS)
Rövid Szöveges Üzenet (SMS)
A telefonkészülék segítségével szöveges üzeneteket tud
küldeni illetve fogadni.
SMS üzenetet csak az arra alkalmas készülék tud fogadni (pl.: mobil telefon, PC, SMS telefon)
ElŒfeltétel:
CID
A CID (Caller Identification) – hívószámkijelzés elérhetősége a fixvonalas telefonszolgáltatójánál előfeltétele
a rövid szöveges üzenetek küldésének és fogadásának.
Ellenőrizze a szolgáltatójánál, hogy ezek az alapfeltételek adottak-e a telefonszolgáltatójánál.
SMS üzenetek írása, tárolása és küldése
Négy, egymástól független ’box’ áll rendelkezésre az
üzenetek tárolására és fogadására.
Minden SMS maximum 160 karakter hosszú lehet.
Minden egyes ’box’ 30x160 karakter hosszúságú üzenetet vagy max. 99 üzenetet képes tárolni. Az üzenetek
nem vesznek el áramkimaradás esetén sem.
A készülék egészen addig képes üzeneteket fogadni
amíg a tárolásra alkalmas memória meg nem telik. Ebben az esetben az érkező üzenet elutasításra kerül és
a Memória megtelt (Mem. Tele) üzenet és az üzenetek
száma jelenik meg a kijelzőn. Szükséges az idő közben
feleslegessé váló üzeneteket folyamatosan törölni a memóriából!
Az üzenetek nem kerülnek autómatikusan a memóriába.
Egy fontosabb üzenetet küldés előtt célszerű elmenteni.
Üzenetek írása
Nyomja meg a ’menu’ gombot.
Válassza ki az ’SMS’ menüpontot,
majd nyomja meg a zöld pipát.
Válassza ki a használni kívánt ’box’ot (1-4) és nyissa meg a szerkesztő
felületet...
A legegyszerűbb módon úgy írhat
üzenetet ha megnyomja a ’write’
gombot! (Ebben az esetben a ’Box 0’
van használatban.)
Az üzenetek azonnali olvasásához
A betűk és karakterek megjelenítéséhez lapozzon a „Karakter térkép" fejezethez.
A ’nyilak’ segítségével tud
a már megírt szövegben
navigálni. Az újabb beírt
karakterek a kurzor bal oldalán jelennek meg.
A ’backspace’ gomb segítségével tud törölni
a szövegben. (A kurzortól
balra levő karakterek kerülnek törlésre).
Szóközt a ’space’ segítségével hagyhat vagy egyszerűen nyomja a kurzor
nyilat egyszer jobbra!
Szóköz után a Nagy és kis
kezdőbetűk váltogatásához használja a ’Caps’
gombot.
A ’Shift’ gomb segítségével tudja a betűk fölötti
karaktereket megjeleníteni.
Az ’Alt’ gomb segítségével tudja a számbillentyűk
fölötti speciális karaktereket megjeleníteni.
Ha az üzenet elkészült nyomja meg
a pipát.
Itt el tudja menteni az üzenetet a Kimenő postafiókba (Kimenő) a későbbi küldéshez.
Elküldheti az üzenetet azonnal is. Ekkor megjelenik a ’Telefonszám?’ üzenet.
SMS ShortMessageService
(Rövid Szöveges Üzenet)
➞
SMS
MENU
CAPS
READ
SHIFT
ALT
WRITE
Box 1-4
Tárolás
Küldés
Üzenet írása
vagy
vagy
✍
Page 77

777777
77
Szöveges Üzenet (SMS)
Box kód
Privát használathoz saját kódot rendelhet a 1-hez, 2-es
és 3-ás boxokhoz. A box 0 bárki hozzáférhet.
Új kód beállítása
Nyissa meg a menüt és válassza az
’SMS’ menüpontot. A menüpontokba való belépéshez mindíg nyomjon
’pipát’.
Válassza ki a ’Box kód’ almenüt,
majd válassza ki valamelyik boxot (2-
4).
Az ’Új kód’ menüben tudja beírni
a kívánt kódot. A kijelzőn megjelenik
a ’Kód beírása’ üzenet.
Hagyja jóvá (zöld pipa), majd mégegyszer meg kell ismételnie a kód
megadását. A kijelzőn megjelenik az
’Ismét:’ üzenet.
• Küldés közben az ’SMS küldése’ üzenet jelenik meg.
• Ha a hálózat foglalt, akkor a ’Próbálja újra’ üzenet jelenik meg.
• Ha az üzenet küldése közben megnyomja a ’piros keresztet’ akkor megjelenik a ’Törölve’ üzenet és a küldés megszakításra kerül.
• Ha az üzenet küldése sikertelen volt, a készülék visszaál alapállapotba és a ’Sikertelen’ üzenet jelenik meg a kijelzőn.
* Az alcímzés funkció támogatásáról érdeklődjön helyi telefonszol-
gáltatójánál.
• Ha másodszorra eltérő kódot ad meg, akkor a ’Kód hiba’ üzenet
jelenik meg.
• A Box 2 és 3 kódjait hasonló módon állíthatja be.
• Ha béállított egy kódot, akkor, a boxba való belépéshez előszőr
a kódot kell megadnia.
• Ha a kódot egyszer eltávolította akkor ezentúl kód nélkül léphet
be a boxba.
• Ha új kódot kíván megadni akkor járjon el úgy mint az előző fejezetben.
Egy beállított kód törlése
Nyissa meg a menüt.
Kövesse az alábbi elérési útvonalat:
SMS – Beállítás – Box kód – Box X ,
Ekkor a ’Kód beírása’ üzenet jelenik
meg. Adja meg a kódot és válassza
ki a ’Kód törlése’ opciót, majd nyomjon zöld pipát.
SMS
Box 2
MENU
SMS Beállítás
Box Kód
Új kód
SMS
Box 2
MENU
SMS Beállítás
Box Kód
Kód törlése
Írja be a kívánt telefonszámot vagy
válassza ki a telefonkönyvből:
• Nyomja meg a ’telefonkönyv’ gombot vagy a ’CID’ gombot és válaszsza ki a kívánt számot a nyilak segítségével.
* A kijelzőn megjelenő Alcím? üzenetre
válaszul adja meg a címzett
postafiókjának számát. Ha a nyilvános fiókba szeretné küldeni az üzenetet, csak nyomja meg a gombot.
Nyomja meg a zöld pipát a küldéshez, majd megjelenik az ’Elküldve’
üzenet.
Hagyja jóvá és a sikeres művelet
után megjelenik a ’Siker !’ üzenet
a kijelzőn.
Magyar
Page 78

777788
88
Szöveges Üzenet (SMS)
BejövŒ üzenetek listája
Fogadott SMS üzenetek olvasása
és törlése
Ha SMS üzenete érkezik, egy csengőhangot fog hallani
valamint a ’NEW’ kijelző kettesével villan folyamatosan
és a kijelzőn egy ’boriték’ ikon jelenik meg.
Az üzenetek azonnali olvasásához
Lépjen be a Menübe, majd:
SMS – Box 1 – Bejövő
A nyilak segítségével tud navigálni
a szövegben.
A fel/le gombokkal tud mozogni az
üzenetben.
A jobbra és balra gombokkal tud
a következő ill. előző SMS-ek között
váltani.
Az üzenet olvasása közben nyomja
meg a ’del’ gombot, megjelenik
a ’Törlés?’ felirat.
Hagyja jóvá a zöld pipával.
Opciók olvasás közben
Az SMS olvasása után azonnal választ is küldhet, valamint egyéb funkciókat is elérhet:
Válasz Küldhet új üzenetet, módosíthatja
az adott üzenetet, valamint küldhet gyorsválaszt is (Válasz: Igen,
Válasz: Nem, Hívj fel)
Továbbítás Küldje tovább az üzenetet egy má-
sik címzettnek.
Visszahívás Hivja fel az üzenet küldőjét.
Mentés a Mentse a küldő telefonszámát
telefonkönyvbe a telefonkönyvbe.
Törlés Törölje az adott üzenetet.
• Ha új üzenet érkezik, akkor az ’SMS érkezöben’ üzenet jelenik
meg.
• Ha a Bejövő postafiókban nem található üzenet akkor a ’Nincs
üzen.’ felirat jelenik meg.
• A bérkezett üzenet tartalmazza a küldés idejét és dátumát
• Az üzenet lista végén a ’Vége’ felirat jelenik meg.
• A kijelzőn az új és az összes fogadott üzenet egyaránt megjelenik: Bejövő xx(új)/xx(összes), ha nincs üzenet akkor a Bejövő
00/00 jelenik meg.
• A telefonkönyv az elmentett számhoz tartozó nevet jeleníti meg.
SMS
MENU
READ
Box 1
BejövŒ
Törlés
vagy
vagy
Page 79

777799
99
Szöveges Üzenet (SMS)
• Ha a Kimenő postafiókban nem található üzenet akkor a ’Nincs
üzenet’ felirat jelenik meg.
• A kijelzőn az összes elküldött üzenet megjelenik: Kimenő xx, ha
nincs üzenet akkor a Kimenő 00 jelenik meg.
KimenŒ üzenetek listája
Az elmentett SMS üzenetek olvasása,
szerkesztése, küldése és törlése
Az üzenetek azonnali olvasásához
Lépjen be a Menübe, majd:
SMS – Box 1 – Kimenő
A nyilak segítségével tud navigálni
a listában.
A fel és lefele gombokkal tud mozogni az adott smsben.
A jobbra és balra gombokkal tud
a következő ill. előző sms-ek között
váltani.
Válassza ki a kívánt üzenetet és
nyomja meg a ’del’ gombot,
megjelenik a ’Törlés?’ felirat.
Hagyja jóvá a pipával.
Válassza ki az üzenetet
Nyomja meg a kimenő postafiókban
található üzenet(ek) törléséhez
SMS Központ
Az SMS üzenetek küldéséhez és fogadásához szükség
van a szolgáltató SMS központjának telefonszámára.
Lépjen be a menübe.
SMS – Beállítás – Közp. Szám
Itt beállíthat számot a küldéshez és
fogadáshoz. (Ez a két szám a legtöbb esetben megegyezik)
Megjelenik a ’Tel. Szám?’ üzenet. Írja
be és hagyja jóvá a zöld pipával.
Megjelenik a ’Tel. Szám?’ üzenet. Írja
be és hagyja jóvá a zöld pipával.
Megjelenik a ’Tel. Szám?’ üzenet. Írja
be és hagyja jóvá a zöld pipával.
Hagyja jóvá a pipával.
Szakítsa meg a piros kereszttel.
A megfelelő telefonszámokról a szolgáltatójánál érdeklődhet.
SMS
Box 1
MENU
READ
KimenŒ
vagy
vagy
vagy
vagy
SMS
Küldéshez
MENU
SMS Beállítás
Központ
száma
Fogadáshoz
Fogadáshoz 1
Fogadáshoz 2
Magyar
➞
Page 80

SMS Box0 Üzenet írása
Bejövő
Kimenő
Box1 Üzenet írása
Bejövő
Kimenő
Box2 Üzenet írása
Bejövő
Kimenő
Box3 Üzenet írása
Bejövő
Kimenő
Beállítások Központ száma Küldés
Fogadáshoz 1
Fogadáshoz 2
Box Kód Box2
Box3
Box4
Beállítások Kontraszt
Óra beállítása
Visszaállító
Körzet szám
Nyelv
Ország profil
Minden hívást fogad (csak SMS)
Telefonkönyv Áttekintés
Hozzáadás
Bejövő hívások
Kimenő hívások
888800
00
A fömenü
Page 81

888811
11
Készülékinformáció
Általános jellemzŒk
●
FSK + DTMF duál rendszerű hívoszámkijelzés
●
Max. 90 bejövő hívás tárolása (Név, telefonszám, dátum, idő)
●
Max. 30 kimenő hívás tárolása
●
50 név és telefonszám tárolása
●
Időtartam mérő
●
LED kijelző (Hívás vagy üzenet érkezésekor)
●
Bejegyzések törlése egyesével vagy együttesen
●
LCD kijelző
●
Visszahívás funkció
●
Óra
●
Ismeretlen/Privát számok
●
Üzenet grafikus kijelzése
●
Utolsó szám újrahívása
●
Előhívoszám
●
LCD Kontraszt beállítása
SMS Funkciók
●
ETSI Protokoll 1
●
SMS küldése és fogadása
●
Négy különböző SMS Box, Box 0 – Publikus,
Box 1-3 – Privát
●
Minden box 30x160 karakter vagy max.
99 üzenetet tud tárolni
●
Áramkimaradás védelem
●
SMS üzenetek küldése – max. 160 karakter
●
Címzett telefonszáma elérhető a telefonkönyvből és a CID memóriából is
●
Bejövő üzenetek áttekintése, törlése, válasz
és továbbítás
●
Üzenet küldőjének visszahívása
●
Küldő telefonszám mentése a telefonkönyvbe
●
Email és Fax opciók
●
Üzenetjelzés
Magyar
Page 82

888822
22
Hibaelhárítás
Ha a telefon nem működik rendeltetés szerűen, akkor előszőr próbáljon meg ebből a táblázatból kiindulni.
Hiba Lehetséges Indok Megoldás
A kijelző üres Az elemek lemerültek Cseréljen elemet
Áramkimaradás Vizsgálja meg a biztosítékot
Nem küldhető A küldést szolgáló SMS Adja meg a számot
üzenet szám nem lett megadva
Az SMS központ Tárcsázza a számot, és győződjön meg
szám hibás róla, hogy valós szám. Kérjen segítséget
az SMS központtól.
Nem fogadható A fogadást szolgáló SMS Adja meg a számot
üzenet szám nem lett megadva
Az SMS központ Kérjen segítséget
szám hibás a szolgáltatótól/SMS központtól.
Page 83

Instrukcja u˝ytkownika
Aby skorzystać z zalet Microcom phoneBuddy Comfort niezbędny jest zakup usługi Prezentacji Numeru oferowanej
przez Telekomunikację Polską. Szczegółowe informacje na temat usługi otrzymacie Państwo w Biurach Obsługi
Klientów TP lub pod numerem bezpłatnej infolinii 0-800 100 800.
Polski
Page 84

888844
44
Schemat g∏ówny
wyÊwietlacz
LCD
komora baterii
g∏oÊnik
wskaênik
nowej rozmowy
i nowej wiadomoÊci
wejÊcie
dla przewodu
telefonicznego
Page 85

888855
55
Opis funkcji Klawisze funkcyjne
Obszar wyÊwietlania wiadomoÊci
Opis ikon
ikony opis
Kiedy słuchawka jest podniesiona, ikona
włączy się, co będzie wskazywać, że
urządzenie jest w trybie użycia.
Kiedy otrzymasz nową wiadomość SMS lub
wiadomość na poczcie głosowej, ikona się
włączy, co będzie wskazywać, że w pamięci
urządzenia znajdują się nie przeczytane
wiadomości.
Jeżeli są jakieś nowe rozmowy w pamięci,
ikona włączy się. Po tym jak nowe rozmowy
zostaną przeglądnięte przez użytkownika,
ikona wyłączy się.
Jeżeli rozmowa przychodzi kolejny raz,
ikona się włączy.
Jeżeli poziom energii baterii jest mały, ikona
się włączy.
Jeżeli ikona się włączy, oznacza to, że
użytkownik znajduje się w trybie pisania
dużych liter
Klawisze
funkcyjne Opis
Służy do wpisywania cyfr od 0 do 9
Szybki dostęp do funkcji odcytywania wiadomości
Służy do szybkiego pisania wiadomości SMS
w Skrzynce 0
Spis telefonów – Spis telefonów posiada 50 pozycji
w pamięci. Patrz rozdział Spis telefonów.
Urządzenie posiada możliwość zapisania do
90 numerów przychodzących oraz danych na ich
temat. Patrz rozdział Lista identyfikacyjna dzwoniących.
Służy do skasowania wpisu lub zapełnionej pozycji
w pamięci.
Służy do przełączenia trybu małych liter na duże
i odwrotnie.
Służy do pisania w trybie numerycznych znaków
specjalnych
Służy do pisania w trybie literowych znaków
specjalnych
Przejście do następnego wiersza
Służy do wejścia do menu
Służy do kasowania
Służy do potwierdzania
Służy do poruszania kursorem urządzenia oraz
do wyboru funkcji menu.
przewini´cie
strony
do góry
przewini´cie
strony
do do∏u
Obszar wyÊwietlania wiadomoÊci
Polski
Page 86

888866
66
ZawartoÊç
Schemat g∏ówny . . . . . . . . . . . . . . . . . . . . . . . . 84
Opis funkcji . . . . . . . . . . . . . . . . . . . . . . . . . . . . 85
Informacje pojawiające się na wyświetlaczu . . . . . . . 85
Opis ikon . . . . . . . . . . . . . . . . . . . . . . . . . . . . . . . . . 85
Klawisze funkcyjne . . . . . . . . . . . . . . . . . . . . . . . . . 85
Warunki bezpieczeƒstwa . . . . . . . . . . . . . . . 87
Instalacja jednostki g∏ównej . . . . . . . . . . . . 87
Ustawienia . . . . . . . . . . . . . . . . . . . . . . . . . . . . . 89
Profil kraju . . . . . . . . . . . . . . . . . . . . . . . . . . . . . . . . 89
Akceptuj wszystkie połączenia (zawsze SMS) . . . . . 89
Wybierz język . . . . . . . . . . . . . . . . . . . . . . . . . . . . . 89
Ustawienie daty i czasu . . . . . . . . . . . . . . . . . . . . . . 89
Ustawienie kontrastu wyświetlacza LCD . . . . . . . . . 90
Ustawienia fabryczne jednostki . . . . . . . . . . . . . . . . 90
Ustawienie prefiksu i numeru kierunkowego . . . . . . . 90
Wykaz znaków . . . . . . . . . . . . . . . . . . . . . . . . . 91
Spis telefonów . . . . . . . . . . . . . . . . . . . . . . . . . 92
Przechowywanie nazw i numerów . . . . . . . . . . . . . . 92
Przeglądanie nazw i numerów . . . . . . . . . . . . . . . . . 92
Kasowanie nazw i numerów . . . . . . . . . . . . . . . . . . . 93
Wybieranie numerów ze spisu telefonów . . . . . . . . . 93
Edycja nazw . . . . . . . . . . . . . . . . . . . . . . . . . . . . . . 93
Lista identyfikacyjna dzwoniàcych . . . . . 94
Przeglądanie listy dzwoniących . . . . . . . . . . . . . . . . 94
Kasowanie pojedynczego numeru dzwoniącego . . . 94
Kasowanie wszystkich numerów dzwoniących . . . . . 94
Kopiowanie numeru dzwoniącego
do spisu telefonów . . . . . . . . . . . . . . . . . . . . . . . . . 94
Oddzwanianie na numer dzwoniącego . . . . . . . . . . . 95
Po∏àczenia wychodzàce . . . . . . . . . . . . . . . . . 95
Przewijanie i wybieranie wychodzących
numerów . . . . . . . . . . . . . . . . . . . . . . . . . . . . . . . . . 95
WiadomoÊç tekstowa (SMS) . . . . . . . . . . . . 96
Zapisywanie, przechowywanie i wysyłanie
wiadomości SMS . . . . . . . . . . . . . . . . . . . . . . . . . . . 96
Ustawienie hasła skrzynki . . . . . . . . . . . . . . . . . . . . 97
Ustawienie nowego hasła . . . . . . . . . . . . . . . . . . . . 97
Usuwanie ustawionego hasła . . . . . . . . . . . . . . . . . 97
Skrzynka odebranych wiadomości . . . . . . . . . . . . . . 98
Skrzynka wysłanych wiadomości . . . . . . . . . . . . . . . 99
Centrum Wiadomości . . . . . . . . . . . . . . . . . . . . . . . 99
Menu g∏ówne . . . . . . . . . . . . . . . . . . . . . . . . . . 100
W∏aÊciwoÊci . . . . . . . . . . . . . . . . . . . . . . . . . . . 101
Rozwiàzywanie problemów . . . . . . . . . . . . 102
Page 87

888877
77
Warunki bezpieczeƒstwa Instalacja jednostki
Warunki bezpieczeƒstwa
Aby zniwelować ryzyko pożaru, porażenia elektrycznego
i zranienia, prosimy o zapoznanie się z poniższymi
podstawowymi warunkami bezpieczeństwa.
1. Uważnie czytaj i wykonuj instrukcje zawarte w tym
podręczniku użytkownika.
2. Zwracaj uwagę na ostrzeżenia zawarte na urządzeniu.
3. Przed czyszczeniem urządzenia odłącz urządzenie
od źródeł zasilania. Do czyszczenia użyj wilgotnej
szmatki. Nie używaj środków czyszczących w płynie
ani areozolu.
4. Nie używaj urządzenia w wilgotnych miejscach.
5. Nie umieszczaj takich przedmiotów na kablu
telefonicznym, które mogą spowodować jego
uszkodzenie.
6. Unikaj wylewania płynów na urządzenie.
7. W razie awarii należy odłączyć urządzenie od zasilania
i gniazda linii i skontaktować się z wykwalifikowanym
serwisem.
Przygotowanie urzàdzenia
Pakiet zawiera:
- Jedno urządzenie phoneBuddy Comfort
- Jeden kabel telefoniczny
- 4 baterie 1,5V typu AA
- Jedną instrukcję użytkownika
Instalacja jednostki podstawowej
Uwaga dotyczàca instalacji
Urządzenie zostało zaprojektowane do używania go
w pomieszczeniach o temperaturze od +5 do +45
stopni Celsjusza.
W∏o˝enie baterii
Urządzenie SMS wymaga energii dostarczonej przez cztery baterie 1,5 V typu AA potrzebne do zasilania
wyświetlacza LCD.
1. Zdejmij pokrywę komory baterii znajdującą się z tyłu
telefonu.
2. Włóż do komory baterii cztery nowe baterie 1,5V
typu AA, zgodnie z polaryzacją opisaną wewnątrz
komory baterii.
3. Zamknij dobrze komorę baterii pokrywą komory
baterii.
Gratulujemy
Gratulujemy zakupu naszego produktu.
Prosimy o zapoznanie się z jego instrukcją obsługi w celu pełnego wykorzystania zalet urządzenia
i jego poprawnej eksploatacji.
Homologacja:
Polski
Page 88

888888
88
Instalacja jednostki
Pod∏àczenie podstawowej jednostki urzàdzenia
Włóż końcówkę linii telefonicznej do gniazda linii. Końcówkę drugiego kabla telefonicznego włóż do gniazda
urządzenia, a drugą do telefonu.
Podłączenie kabla linii telefonicznej
• Jeżeli chcesz użyć innego kabla, upewnij się, że kabel ten ma końcówkę typu 3-4.
Uwaga: Zaleca się używanie kabli dostarczonych przez producenta.
Kabel telefoniczny zakoƒczony wejÊciem telefoniczny
(typ koƒcówki dopasowo do wymogów danego kraju)
Page 89

888899
99
Ustawienia
Ustawienia
Ustawienie daty i czasu
W trybie czuwania, jednostka pokazuje datę i czas.
Należy ustawić aktualną datę i czas, by rozmowy
przychodzące i wychodzące miały prawidłowy opis.
Otwórz menu
Wybierz odpowiednią pozycję
z menu i potwierdź
Wybierz odpowiednią pozycję
z menu i potwierdź
Aktualne ustawienie jest wyświetlone
Wybierz pozycję miesiąc/dzień/
godzina/minuta
Wpisz miesiąc/dzień/godzinę/minutę
(np. 12:36 23/08)
Wybierz by potwierdzić
• Kiedy ustawiasz datę i czas, musisz wpisać dwie cyfry np. miesiąc
sierpień wpisz 08. Jeżeli tego nie zrobisz, wpisana data będzie
nieważna.
• Czas podawany jest w trybie dwudziestoczterogodzinnym
• Data i czas wskazywane przez urządzenie, zostaną ustawione
automatycznie, kiedy odbierzesz pierwszą rozmowę (standard
FSK).
Ustawienia
MENU
0 - 9
Ustaw zegar
Polski
Profil kraju
W tym profilu możesz ustawić odpowiednie właściwości
komunikacyjne dla danego kraju.
Otwórz menu
Wybierz odpowiednią pozycję
z menu i potwierdź
Wybierz odpowiednią pozycję
z menu i potwierdź
Lista profili krajów które można
wybrać pojawi się na wyświetlaczu.
Wybierz kraj (np. Polska)
Wybierz by potwierdzić
Po potwierdzeniu wybrania danego kraju, właściwości
komunikacyjne zostaną automatycznie ustawione.
Akceptuj wszystkie po∏àczenia
(zawsze SMS)
Ta funkcja daje możliwość odbierania wiadomości SMS
nawet na linii, która nie posiada udostępnionej usługi
prezentacji numeru dzwoniącego (CLIP).
Otwórz menu
Wybierz odpowiednią pozycję
z menu i potwierdź
Wybierz odpowiednią pozycję
z menu i potwierdź
Wybierz odpowiednią pozycję
Włącz/Wyłącz
Wybierz by potwierdzić
Jeżeli użytkownik wybrał tę usługę, linia do której urządzenie jest
podłączone będzie zdolna do odbioru jedynie wiadomości SMS,
nawet jeżeli linia nie ma udostępnionej usługi CLIP. Tzn. wszystkie
połączenia przychodzące będą zapisywane jako wiadomości SMS.
MENU
Setup
(Ustawienia)
MENU
Country
profile
(Profil kraju)
Wybierz j´zyk
Otwórz menu
Wybierz odpowiednią pozycję
z menu i potwierdź
Wybierz odpowiednią pozycję
z menu i potwierdź
Lista języków które można wybrać
pojawi się na wyświetlaczu.
Wybierz język (np. Polski)
Wybierz by potwierdzić
lub
Ustawienia
MENU
Potw. wsz.
rozm.
lub
Ustawienia
J´zyk
lub
Page 90

999900
00
Ustawienia
Ustawienia prefiksu i numeru
kierunkowego
Otwórz menu
Wybierz odpowiednią pozycję
z menu i potwierdź
Wybierz odpowiednią pozycję
z menu i potwierdź, wyświetlacz
LCD wyświetli „Podaj kierun1"
Wpisz 4 cyfrowy numer kierunkowy1
Wybierz odpowiednią pozycję
z menu i potwierdź, wyświetlacz
LCD wyświetli „Podaj kierun2"
Wpisz 4 cyfrowy numer kierunkowy
2
Wybierz odpowiednią poyzcję
z menu i potwierdź, wyświetlacz
LCD wyświetli „Podaj prefiks“
Wpisz 2 cyfrowy prefiks
• Jeżeli ustawiłeś numer kierunkowy, numer ze spisu telefonów lub
listy numerów dzwoniących, może być wybrany bez numeru kierunkowego.
• Jeżeli ustawiłeś prefiks, to kiedy wybierasz numer
międzymiastowy (powyżej 7 cyfr), numer ten może być
poprzedzony Prefiksem.
• W trybie przeglądania, Prefiks może nie zostać wyświetlony
Ustawienia
MENU
Numer
kierunkowy
Ustawienie kontrastu wyÊwietlacza LCD
Użytkownik ma do wyboru 64 poziomy kontrastu.
Otwórz menu
Wybierz odpowiednią pozycję
z menu i potwierdź
Wybierz odpowiednią pozycję
z menu i potwierdź
Aktualne ustawienie jest
wyświetlone (np. Kontrast:30)
Wybierz odpowiedni dla siebie
kontrast
Wybierz by potwierdzić
Ustawienia fabryczne jednostki
Po zresetowaniu urządzenia, wszystkie pozycje
w pamięci zostaną utracone.
Otwórz menu
Wybierz odpowiednią pozycję
z menu i potwierdź
Wybierz odpowiednią pozycję
z menu i potwierdź, wyświetlacz
LCD wyświetli „Reset?"
Wybierz by potwierdzić,
a wyświetlacz LCD wyświetli
„Format ". Kiedy procedura
zakończy się, urządzenie powróci
do trybu czuwania.
Ustawienia
MENU
G∏owny reset
Ustawienia
MENU
Kontrast
Page 91

999911
11
Wykaz znaków
• By zmienić tryb pisania z małych liter na duże lub odwrotnie, należy nacisnąć klawisz „CAPS"
• Poruszanie kursorem realizują klawisze „strzałek"
• Litera na lewo od kursora, zostaje skasowana po naciśnięciu klawisza
• Litery są zawsze wstawiane po lewej stronie kursora.
➞
Polski
Page 92

999922
22
Spis telefonów
Spis telefonów
Urządzenie może przechowywać do 50 nazw i numerów
telefonów w książce telefonicznej.
Przechowywanie nazw i numerów
Naciśnij by potwierdzić
Otwórz menu
Wybierz odpowiednią pozycję
z menu i potwierdź
Wyświetlacz LCD wyświetli
„Przejrzyj" i „Dodaj Pozycję"
Wybierz odpowiednią pozycję
z menu i potwierdź
Wyświetlacz LCD wyświetli „Wpisz
numer"
Wpisz numer (np. 1236008)
Wybierz by potwierdzić i wejdź
do ustawienia nazwy.
Wyświetlacz wyświetli „Wpisz
nazwę"
Wpisz nazwę (np. Jan Kowalski)
Wybierz by potwierdzić,
a wyświetlacz LCD pokaże
„Zapisane!"
• Możesz przechowywać następne nazwy i numery, tak jak
w powyższych krokach
• Możesz skasować znak podczas wpisywania, korzystając
z klawisza „<-"
• Wpisywany numer może składać się z maksymalnie 16 cyfr,
a nazwa z maksymalnie 16 znaków
• Jeżeli nie ma żadnego wpisu w spisie telefonów, wyświetlacz
wyświetli napis „Pusty"
• Na końcu listy wpisów, pojawi się napis „Koniec listy"
Przeglàdanie nazw i numerów
Naciśnij by potwierdzić
Otwórz menu
Wybierz odpowiednią pozycję
z menu i potwierdź
Wyświetlacz LCD wyświetli „Przejrzyj" i „Dodaj Pozycję"
Wybierz odpowiednią pozycję
z menu i potwierdź
Wyświetlacz LCD wyświetli listę
nazw
Przewiń do następnego
lub poprzedniego wpisu.
Naciśnij by przeglądać numer
i wejść do daty i czasu
Przewiń do następnego
lub poprzedniego wpisu.
Spis. tel.
MENU
0 - 9
Dodaj pozycje
lub
Spis. tel.
MENU
Prezjrzyj
lub
lub
lub
Page 93

999933
33
Spis telefonów
Kasowanie nazw i numerów
Kiedy wyświetlacz LCD wyświetlił odpowiedni numer ze
spisu telefonów
Naciśnij by wybrać
Wybierz by skasować,
a wyświetlacz LCD wyświetli
„Skasowane!"
Wybieranie numerów ze spisu telefonów
Kiedy wyświetlacz LCD wyświetlił odpowiedni numer ze
spisu telefonów
Naciśnij by wybrać
Potwierdź by wybrać, a wyświetlacz
wyświetli „Podnieś słuchawkę",
po podniesieniu słuchawki, numer
zostanie wybrany
Edycja nazw
Kiedy wyświetlacz LCD wyświetlił odpowiedni numer ze
spisu telefonów
Naciśnij by wybrać
Wybierz odpowiednią pozycję
z menu
Na wyświatlaczu pojawi się napis
“Podaj numer”. Po wprowadzeniu
numeru i potwierdzeniu, na
wyświatlaczu pojawi się napis
„Podaj nazwę”
Wpisz nową nazwę (np. Jan
Kowalski)
Naciśnij by potwierdzić,
a wyświetlacz LCD wyświetli
„Zapisane!"
Skasuj
Edytuj
Wybierz
Polski
Page 94

999944
44
Spis telefonów
Lista identyfikacyjna dzwoniàcych
Urządzenie może przechowywać do 90 numerów i nazw
rozmów przychodzących, razem z ich czasem trwania
i datą.
• Jeżeli pamięć jest zapełniona kiedy przychodzi następna rozmowa,
najstarszy zapis zostaje automatycznie usunięty na rzecz nowego.
• Jeżeli masz zarejestrowane nowe rozmowy w Twoim telefonie,
dioda „NEW" będzie migać dopóki nie przejrzysz zarejestrowanych
rozmów.
• Wyświetlacz na końcu listy rekordów rozmów wyświetli „Koniec
listy"
• Jeżeli nie ma żadnych rozmów wyświetlacz wyświetli „Brak
połaczen".
Przeglàdanie listy dzwoniàcych
Naciśnij by wyświetlić listę
dzwoniących
Otwórz menu
Wybierz odpowiednią pozycję
z menu i wyświetl listę dzwoniących
Naciśnij by przejrzeć nazwy
lub numery osób dzwoniących
Naciśnij by przejrzeć numer, datę
i czas
Naciśnij by przejrzeć inne numery
Kasowanie pojedynczego numeru
dzwoniàcego
W trybie przeglądania: Kiedy znajdziesz wybrany numer
i pojawi się on na wyświetlaczu:
Naciśnij by wejść
Naciśnij by skasować a wyświetlacz
wyświetli „Skasowane!"
Kasowanie wszystkich numerów
dzwoniàcych
Naciśnij by zobaczyć liczbę
wszystkich dzwoniących
Otwórz menu
Wybierz odpowiednią pozycję
z menu
Naciśnij raz a wyświetlacz wyświetli
„Skasuj Wszystkie?"
Wybierz by skasować
a wyświetlacz wyświetli „Brak
połaczen"
Wybierz by anulować
Kopiowanie numeru dzwoniàcego
do spisu telefonów
Kiedy wybrałeś numer który chcesz zapisać do spisu
telefonów
Naciśnij by wejść
Naciśnij by potwierdzić,
a wyświetlacz wyświetli „Wpisz
nazwę"
Wpisz nazwę
Naciśnij by potwierdzić, wyświetlacz
wyświetli „Zapisane!"
Po∏
odebrane
MENU
CID
lub
Po∏
odebrane
MENU
CID
lub
lub
lub
Skasuj
Dodaj do
spisu tel.
➔
Page 95

999955
55
Spis telefonów Po∏àczenia wychodzàce
Oddzwanianie na numer dzwoniàcego
Naciśnij by zobaczyć listę
wszystkich dzwoniących
Otwórz menu
Naciśnij by zobaczyć listę
wszystkich dzwoniących
Naciśnij by znaleźć wybrany numer,
który pojawi się na wyświetlaczu
Naciśnij dwa razy by wejść
Wybierz, a wyświetlacz wyświetli
„Podnieś słuchawkę".
Po podniesieniu słuchawki, numer
zostanie wybrany
• Usługa oddzwaniania nie wybierze numeru telefonicznego, jeżeli
wybrany rekord rozmowy jest zablokowany lub niedostępny.
Jeżeli dzwoniący ma zastrzeżony
numer telefonu, na wyświetlaczu
LCD zostanie wyświetlony napis
„Prywatny".
Napis „Poza zasięgiem" zostanie
wyświetlony, jeżeli dzwoniący dzwoni
z obszaru w którym usługa
identyfikacji dzwoniącego nie jest
dostępna.
Jeżeli masz udostępnioną usługę
poczty głosowej przez Twojego
operatora telekomunikacyjnego,
a wiadomość dla Ciebie została
zostawiona, wyświetlacz wyświetli
„Aktywny". Ikona pojawi się po prawej
stronie wyświetlacza LCD. Ikona pozostanie na ekranie dopóki nie odsłuchasz wiadomości głosowej.
PRYWATNY
POZA ZASI¢GIM
AKTYWNY
Oddzwoƒ
Po∏
odebrane
MENU
MENU
CID
lub
Aby upewnić się czy funkcja
jest dostępna, należy skontaktować
się z lokalnym operatorem
telekomunikacyjnym.
Jeżeli telefon nie może rozpoznać
wiadomości, wskaże „Błąd", zamiast
wyświetlić wiadomość zawierającą
błędy. Wskazanie takie wcale nie
znaczy, że telefon jest popsuty.
Po∏àczenia wychodzàce
Możesz przechowywać do 30 ostatnio wybranych
rozmów wychodzących
Przewijanie i wybieranie wychodzàcych
numerów
Otwórz menu
Wybierz menu i potwierdź,
wyświetlacz LCD wyświetli ostatnio
wybierany numer
Naciśnij by wyświetlić żądany numer
na wyświetlaczu
Naciśnij by wejść
Wybierz by wybrać numer
Wybierz by dodać numer do spisu
telefonów
Wybierz by skasować numer
B¸ÑD
Po∏
wychodzàce
Oddzwoƒ
Dodaj do
spisu tel.
Skasuj
Polski
Page 96

999966
66
WiadomoÊç tekstowa (SMS)
WiadomoÊç tekstowa (SMS)
Używając phoneBuddy Comfort możesz wysyłać
i odbierać wiadomości SMS. Odbiorcami Twoich
wiadomości SMS mogą być użytkownicy sieci GSM,
komputery, czy inne telefony stacjonarne.
Warunek wst´pny:
CID
Dostawca usług telekomunikacyjnych musi udostępnić
usługę przesyłania numeru i usługę identyfikacja
dzwoniącego (CID, CLIP)
Zapisywanie, przechowywanie
i wysy∏anie wiadomoÊci SMS
Urządzenie posiada cztery niezależne skrzynki, które są
używane niezależnie.
SMS nie może zawierać więcej niż 160 znaków
Każda skrzynka może zawierać przynajmniej 30
wiadomości po 160 znaków każda lub do 99
wiadomości. Wiadomości nie są tracone po wyłączeniu
zasilania urządzenia.
Urządzenie może otrzymywać wiadomości jeżeli pamięć
nie jest zapełniona. W przeciwnym przypadku
wiadomość przychodząca jest odrzucona, nie przyjęta
do przechowania w pamięci, a wyświetlacz wyświetli
„Skrz.odb.pełna" i liczbę przechowywanych
wiadomości. W takim wypadku, powinieneś skasować
niepotrzebne już wiadomości, by zwolnić miejsce
w pamięci urządzenia, dla nowych wiadomości.
Wiadomości nie są automatycznie przechowywane.
Jeżeli chcesz przechować ważny SMS, musisz to zrobić
przed wysłaniem go.
Otwórz menu
Wybierz odpowiednią pozycję
z menu i potwierdź
Wybierz odpowiednią pozycję
z menu i potwierdź
Otwórz pole wpisu
Naciśnij by szybko napisać
wiadomość do Skrzynki 0
(Informacje na temat wpisywania
wszystkich liter i znaków, znajdziesz
w podroździale Wykaz znaków)
Szybki dostęp do funkcji
odcytywania wiadomości
Przesuń kursor na
następne pole.
Następne wpisane znaki
pojawą się na lewo od
kursora.
Kasowanie wpisanych
znaków odbywwa się na
lewo od kursora.
Naciśnij by wstawić znak
przerwy.
Naciśnij by zmienić
z dużych liter na małe
i vice versa.
Naciśnij i przytrzymaj,
później naciśnij by wpisać
górny symbol naniesiony
na klawiszu.
Naciśnij i przytrzymaj,
później naciśnij A~Z by
wpisać górny symbol
i znak naniesiony na
klawiszu.
Naciśnij by potwierdzić
Przechowaj wiadomość SMS
w archiwum
Wyślij wiadomość SMS natychmiast
a wyświetlacz wyświetli wiadomość
„Wpisz numer"
Wpisz numer odbiorcy wiadomości
korzystając ze spisu telefonów lub
zrób to manualnie
SMS ShortMessageService
(Usługa krótkich wiadomości)
Cieszymy się
z Twojego
awansu
➞
➞
SMS
MENU
CAPS
READ
SHIFT
ALT
WPISZ
Skrzynka 1-4
Zapisz
WyÊ∏ij
Wpisz wiad.
lub
lub
✍
Page 97

999977
77
WiadomoÊç tekstowa (SMS)
Ustawienie has∏a skrzynki
Możesz ustawić hasło skrzynki Skrzynka1, Skrzynka2
i Skrzynka3, aby mieć do niej jedyny dostęp.
Skrzynka0 jest do użytku publicznego.
Ustawienie nowego has∏a
Otwórz menu
Wybierz odpowiednią pozycję
z menu i potwierdź
Wybierz odpowiednią pozycję
z menu i potwierdź
Wybierz odpowiednią pozycję
menu i potwierdź
Wybierz odpowiednią pozycję
z menu i potwierdź
Wyświetlacz LCD wyświetli „Podaj
hasło", podaj hasło(cyfry)
• Podczas wysyłania wyświetlacz wyświetli „wysyłanie SMS"
• Kiedy sieć telefoniczna jest zajęta, wyświetlacz wyświetli „Spr.
pozniej"
• Jeżeli naciśniesz klawisz x podczas wysyłania wiadomości SMS,
wyświetlacz wyświetli „Anulowane"
• Jeżeli wysłanie nie powiedzie się, wyświetlacz wyświetli
„Nieudane", a urządzenie powróci do trybu czuwania.
* Usługa zależna od lokalnego operatora
• Jeżeli drugie hasło jest inne od pierwszego, wyświetlacz wyświetli „Błąd hasła"
• Ustawienie hasła dla Skrzynki2 i Skrzynki3, analogicznie tak jak
w Skrzynce1.
• Jeżeli ustalisz hasło i chcesz wejść do skrzykni, musisz najpierw
wpisać to hasło.
• Jeżeli usuniesz hasło, możesz wejść do skrzynki, bez potrzeby
jego wpisywania
• Możesz ponownie ustawić nowe hasło tak jak w Ustawienie
nowego hasła.
Usuwanie ustawionego has∏a
Otwórz menu
Wybierz odpowiednią pozycję
z menu i potwierdź
Wybierz odpowiednią pozycję
z menu i potwierdź
Wybierz odpowiednią pozycję
z menu i potwierdź
Wybierz odpowiednią pozycję
z menu i potwierdź, wyświetlacz
wyświetli „Podaj hasło", później
wpisz odpowiednie hasło
Naciśnij by potwierdzić, wyświetlacz
wyświetli „Hasło usunięte", później
wyjdź.
SMS
Skrzynka 2
MENU
Ustawienie
SMS
Has∏o
skrzynki
Nowe has∏o
SMS
Skrzynka 2
MENU
Ustawienie
SMS
Has∏o
skrzynki
Usuƒ has∏o
• Naciśnij klawisz , użyj klawisza
lub by wybrać odpowiedni
numer ze spisu telefonów, później
naciśnij klawisz .
• Naciśnij klawisz CID, użyj klawisza
lub by wybrać odpowiedni
numer z listy dzwoniących CID,
później naciśnij klawisz
* Wyświetlacz wyświetli „Wpisz
podadres”, wpisz podadres odbiorcy
a później naciśnij klawisz lub
tylko naciśnij klawisz .
Naciśnij by wysłać. Kiedy wiadomość
została wysłana, wyświetlacz
wyświetli „Wiadomość wysłana"
Naciśnij by potwierdzić, wyświetlacz
pokaże „Powtórz wpis", ponownie
wpisz hasło by potwierdzić
Naciśnij by potwierdzić, wyświetlacz
wyświetli „Sukces"
Polski
Page 98

999988
88
WiadomoÊç tekstowa (SMS)
Skrzynka odebranych wiadomoÊci
Czytanie i usuwanie otrzymanej
wiadomoÊci SMS
Kiedy otrzymasz nową wiadomość, usłyszysz sygnał
dźwiękowy, a wyświetlacz wyświetli ikonę i dioda „New"
zamigocze dwa razy.
Szybki dostęp do funkcji
odcytywania wiadomości
Wybierz odpowiednią pozycję
z menu i potwierdź
Wybierz odpowiednią pozycję
z menu i potwierdź
Wybierz odpowiednią pozycję
z menu i potwierdź
Wybierz odpowiednią pozycję
z menu i otwórz skrzynkę
odebranych wiadomości
Przewiń by przejrzeć numery z listy
Naciśnij by przeczytać wiadomość
Naciśnij by wejść
Naciśnij by wybrać
Naciśnij by skasować
Opcje w czasie czytania
Po przeczytaniu wiadomości SMS, możesz natychmiast
na niego odpowiedzieć lub wejść do innych funkcji.
Otwórz menu i wybierz odpowiednią
pozycję:
Odpowiedz Możesz napisać nową wiadomość
lub edytować tą lub szybko
odpowiedzieć (Odpowiedz Tak/
Odpowiedz Nie/Zadzwoń do mnie)
Wyślij Prześlij tą wiadomość tekstową
do kogoś innego
Oddzwoń Zadzwoń do nadawcy wiadomości
Dodaj do spisu Kopiuj numer telefonu z którego
telefonów wiadomość była wysłana, do spisu
telefonów
• Kiedy nowa wiadomość jest dostarczana, wyświetlacz wyświetli
„Odbieranie SMS"
• Jeżeli nie ma wiadomości, wyświetlacz wyświetli „Brak
wiadomości"
• W otrzymanej wiadomości zobaczysz numer, który ją wysłał oraz
datę i czas jej wysłania
• Na końcu wiadomości zobaczysz napis „Koniec"
• Wyświetlacz wyświetli liczbę nowych i wszystkich otrzymanych
wiadomości SMS: Odbiorcza XX(nowe)/XX(razem).
Jeżeli nie ma żadnych wiadomości pokarze Odbiorcza 00/00.
• Jeżeli numer został wcześniej dodany do spisu telefonów,
zamiast numeru zostanie wyświetlona nazwa
Skasuj Kasuje
wiadomść
SMS
MENU
READ
Skrzynka 1
Odbiorcza
Skasuj
lub
lub
Page 99

999999
99
WiadomoÊç tekstowa (SMS)
• Jeżeli nie ma żadnej wiadomości wyświetlacz wyświetli „Brak
wiadomości"
• Wyświetlacz wyświetli przechowywaną liczbę wiadomości
Nadawcza XX, jeżeli nie ma żadnej wiadomości Nadawcza 00
Skrzynka wys∏anych wiadomoÊci
Czytanie, edycja, wysy∏anie i kasowanie
przechowywanych wiadomoÊci SMS
Szybki dostęp do funkcji
odcytywania wiadomości
Wybierz odpowiednią pozycję
z menu i potwierdź
Wybierz odpowiednią pozycję
z menu i potwierdź
Wybierz odpowiednią pozycję
z menu i potwierdź
Wybierz odpowiednią pozycję
z menu i otwórz skrzynkę wysłanych
wiadomości
Przewiń do następnej lub
poprzedniej wiadomości SMS
Naciśnij by przeczytać
Wybierz wiadomośc
Wciśnij aby skasować
ze skrzynki “Nadawcza”
Centrum wiadomoÊci
By wysyłać i otrzymywać wiadomości SMS musisz
wpisać do urządzenia numer centrum wiadomości SMS
Wybierz odpowiednią pozycję
z menu i potwierdź
Wybierz odpowiednią pozycję
z menu i potwierdź
Wybierz odpowiednią pozycję
z menu i potwierdź
Wybierz odpowiednią pozycję
z menu i potwierdź
Wybierz odpowiednią pozycję
z menu i potwierdź
Wybierz odpowiednią pozycję
z menu i potwierdź
Wyświetlacz wyświetli „Wpisz
numer", później wpisz odpowiedni
numer
Wybierz odpowiednią pozycję
z menu i potwierdź
Wyświetlacz wyświetli „Wpisz
numer", później wpisz odpowiedni
numer
Naciśnij by potwierdzić
Naciśnij by anulować
SMS
Skrzynka 0
MENU
READ
Nadawcza
lub
lub
lub
lub
SMS
Do wys∏ania
MENU
Ustawienie
SMS
Centrum
wiadomoÊci
Do odbioru 1
Do odbioru 2
Polski
➞
Page 100

SMS Skrzynka 0 Wpisz wiadomość
Odbiorcza
Nadawcza
Skrzynka 1 Wpisz wiadomość
Odbiorcza
Nadawcza
Skrzynka 2 Wpisz wiadomość
Odbiorcza
Nadawcza
Skrzynka 3 Wpisz wiadomość
Odbiorcza
Nadawcza
Ustawienie SMS Centr. Wiadomości Do wysłania
Do odbioru 1
Do odbioru 2
Hasło skrzynki Skrzynka 2
Skrzynka 3
Skrzynka 4
Ustawienia Kontrast
Ustaw zegar
Główny reset
Numer kierunkowy
Język
Profil kraju
Potw. wsz. rozm.
Spis. tel. Przejrzyj
Dodaj pozycję
Poł odebrane
Poł wychodzące
1111000000
00
Menu g∏ówne
 Loading...