

Page 1

MODEL 322M
DIRECT THERMAL PRINTER
OPERATOR’S MANUAL
PART NUMBER 880022-0106
Revised: August 18, 2005 CPC
© Copyright 2003 by Microcom Corporation, Lewis Center, Ohio – All rights reserved.
Printed in the United States of America
Page 2

This Page Intentionally Left Blank
Page 3

This Page Intentionally Left Blank
Page 4

Proprietary Statement
This manual contains information proprietary to Microcom Corporation. This information is
intended solely for the use of parties operating and maintaining such equipment described
herein.
Product Enhancements
Microcom Corporation is committed to the continual improvement of performance and
quality in our products. For this reason, specifications are subject to change without notice.
Liability Disclaimer
Microcom Corporation makes every effort to assure that all information and specifications
contained in this manual are accurate; however, mistakes are sometimes made. Microcom
Corporation shall not be liable for any damages resulting in the use or misuse of this
product. The exclusion or limitation involving consequential or incidental damage does not
apply to all states; therefore limitation mentioned above may or may not apply.
FCC Compliance Statement
This equipment has been tested and found to comply with the limits for a Class A digital
device, pursuant to Part 15 of the FCC rules. These limits are designed to provide
reasonable protection against harmful interference when the equipment is operated in a
commercial environment. This equipment generates, uses, and can radiate radio frequency
energy, and if not installed and used in accordance with the instructions contained in this
manual, may cause harmful interference to radio communications.
®
HyperTerminal
Centronics
and HyperAccess® are trademarks of Hilgraeve Inc.
®
a registered trademark of Data Computer Corporation.
is
HP® and LaserJet II® are trademarks of Hewlett-Packard Company.
Arial® is a registered trademark of The Monotype Corporation.
TrueType® is a registered trademark of Apple Computer, Inc.
Microsoft®, Windows®, Windows NT® are registered trademarks of Microsoft Corporation.
®
Instapak
is a registered trademark of Sealed Air Corporation.
Other products and company names mentioned herein may be trademarks of their
respective owners.
Page 5

Table of Contents
Introduction........................................................................................... 9
Chapter 1: Printer Specifications .................................................... 11
1.1 General Specifications................................................................................... 11
1.2 Printing Specifications...................................................................................11
1.3 Media Specifications......................................................................................11
Chapter 2: Features and Options .................................................... 13
2.1 Fonts 13
2.2 Graphics........................................................................................................13
2.3 Bar codes......................................................................................................13
2.4 Special Features...........................................................................................14
2.5 Options..........................................................................................................14
Chapter 3: Getting Started............................................................... 15
3.1 Unpacking and Inspection.............................................................................15
3.2 Connecting the Printer...................................................................................15
3.2.1 Printer Power...........................................................................................16
3.2.2 RS232 Serial Communication Interface...................................................16
3.2.3 Optional Cutter Interface .........................................................................16
3.3 Loading Media...............................................................................................16
3.4 Print Button and Status Indicator Light..........................................................17
3.4.1 Print Button..............................................................................................18
3.4.2 Status Indicator Light...............................................................................18
3.5 Printer Modes................................................................................................19
3.5.1 Idle Mode.................................................................................................19
3.5.2 Halted Mode............................................................................................19
3.5.3 Paused Mode ..........................................................................................19
3.5.4 Diagnostic Mode...................................................................................... 19
3.5.4.1 Entering Diagnostic Mode .................................................................19
3.5.4.2 Statistics Label ..................................................................................20
Chapter 4: Communication..............................................................21
322M Operator’s Manual i
Page 6

4.1 RS-232D Serial............................................................................................. 21
4.1.1 RS-232 Printer Cables............................................................................22
Chapter 5: Designing Labels Using LDS .........................................23
5.1 Control Characters........................................................................................ 23
5.2 LDS Design Exercises..................................................................................23
5.2.1 PC Connection (Serial)...........................................................................23
5.2.2 Format Creation...................................................................................... 24
5.3 Label Design: An Overview .......................................................................... 25
5.4 Label Header................................................................................................ 26
5.4.1 HFM (Number of Fields in Layout).......................................................... 27
5.4.2 LSX (Label Size X) ................................................................................. 28
5.4.3 LSY (Label Size Y) ................................................................................. 28
5.4.4 WEB (Web Size)..................................................................................... 28
5.4.5 GAP (GAP Size) ..................................................................................... 28
5.4.6 DPS (Print Speed) .................................................................................. 28
5.4.7 LCB (Label Control Byte)........................................................................ 29
5.4.7.1 Die-Cut and Blow-Hole Media............................................................29
5.4.7.2 Black Line Media (Transmissive).......................................................29
5.4.7.3 Continuous Media..............................................................................30
5.4.7.4 Black Line Media (Reflective)............................................................30
5.4.8 AGD (Activate Gap Detector).................................................................. 30
5.4.9 SPG (Steps Past Gap)............................................................................ 30
5.4.10 OFX (Offset X Direction)......................................................................... 31
5.4.11 OFY (Offset Y Direction)......................................................................... 31
5.5 Sample Header............................................................................................. 31
5.6 Label Format Fields...................................................................................... 32
5.6.1 TSN (Text String Number)..................................................................... 32
5.6.2 XB (X Beginning Coordinate).................................................................. 32
5.6.3 YB (Y Beginning Coordinate).................................................................. 32
5.6.4 CC (Character Count)............................................................................. 32
5.6.5 TCI (Text Conversion Identifier).............................................................. 33
5.6.6 CGN (Character Generator Number)...................................................... 34
5.6.6.1 Embedded Fonts ...............................................................................34
ii 322M Operator’s Manual
Page 7

5.6.6.2 Downloadable Fonts and Graphics....................................................34
5.6.6.3 Embedded Bar Codes.......................................................................34
5.6.7 FO (Field Orientation)..............................................................................36
5.6.8 FJ (Field Justification).............................................................................36
5.6.9 CMX (Character Multiplier X Direction)....................................................36
5.6.10 CMY (Character Multiplier Y Direction)....................................................37
5.6.11 CS (Character Spacing) ..........................................................................37
5.6.12 TSP (Text Starting Position)....................................................................37
5.6.13 ,,, (Reserved Spaces)............................................................................. 37
5.6.14 AN (Attribute Number).............................................................................37
5.7 Line Draw......................................................................................................37
5.7.1 TSN (Text String Number).......................................................................38
5.7.2 XB (X Beginning Coordinate) ..................................................................38
5.7.3 YB (Y Beginning Coordinate) ..................................................................38
5.7.4 ,, (CONSTANT FIELD)..........................................................................38
5.7.5 TCI (Text Conversion Identifier)..............................................................38
5.7.6 ,,,, (CONSTANT FIELDS).......................................................................38
5.7.7 XS (X Size)..............................................................................................38
5.7.8 YS (Y Size)..............................................................................................38
5.7.9 ,,,,, (CONSTANT FIELDS).......................................................................38
5.7.10 AN (Attribute Number)............................................................................. 39
5.7.11 Line Draw Sample...................................................................................39
5.8 Reverse Video...............................................................................................40
Chapter 6: Printer Commands......................................................... 41
6.1 Special Printer Control Codes.......................................................................41
6.2 Printer Enquires.............................................................................................42
6.3 Sending ^D Printer Commands.....................................................................43
6.3.1 Software DIP Switches and Non-Volatile Commands.............................43
6.3.2 Printing Commands.................................................................................48
6.3.3 Auto-sizing and Valid GAP Commands...................................................49
6.3.4 Serial Number Commands......................................................................50
6.3.5 Saving Format Commands......................................................................52
6.3.6 Dispensing Commands ...........................................................................54
322M Operator’s Manual iii
Page 8

6.3.7 Text String Commands........................................................................... 57
Chapter 7: Downloadable Graphics.................................................59
7.1 Using the Graphic Conversion Utilities .........................................................59
7.1.1 PCX2MIC.exe Program.......................................................................... 59
7.1.2 BMP2MIC.exe Program.......................................................................... 59
7.2 Graphic Image Download Methods............................................................... 60
7.2.1 Compressed Binary Image (^D107)........................................................ 60
7.2.2 Uncompressed Image (^D104)............................................................... 61
7.3 Graphic Image Data Format......................................................................... 62
7.4 Downloadable Graphics Command Summary.............................................. 64
Chapter 8: Downloadable Fonts.......................................................65
8.1 Using the Font Conversion Utilities...............................................................65
8.1.1 SFP2MIC.exe Program........................................................................... 65
8.1.2 TTF2MIC.exe Program........................................................................... 65
8.2 Font Download Methods............................................................................... 66
8.2.1 Compressed Binary Image (^D107)........................................................ 66
8.2.2 Uncompressed Image (^D104)............................................................... 67
8.3 Font Structure...............................................................................................68
8.4 Downloadable Font Command Summary..................................................... 69
Chapter 9: Bar Codes........................................................................71
9.1 Types of Bar Codes...................................................................................... 71
9.1.1 Universal Product Code – Version A (UPC-A), TCI 12........................... 71
9.1.2 Universal Product Code – Version E (UPC-E), TCI 13........................... 71
9.1.3 Universal Product Code (UPC-E, send 6 digits), TCI 14......................... 72
9.1.4 Interleaved 2 of 5 (I2of5), TCI 15............................................................ 72
9.1.5 Code 3 of 9 (Code39), TCI 16................................................................. 73
9.1.6 European Article Numbering System 13 (EAN-13), TCI 20.................... 73
9.1.7 European Article Numbering System 8 (EAN-8), TCI 21........................ 73
9.1.8 Modified Plessey (MSI 1), TCI 24........................................................... 73
9.1.9 Modified Plessey (MSI 2), TCI 25........................................................... 73
9.1.10 Modified Plessey (MSI 3), TCI 26 ........................................................... 73
9.1.11 Postnet (ZIP+4), TCI 36.......................................................................... 74
iv 322M Operator’s Manual
Page 9

9.1.12 Postnet (ZIP+6), TCI 37 ..........................................................................74
9.1.13 MaxiCode, TCI 38....................................................................................74
9.1.14 Code 128 (Automatic Compression), TCI 40...........................................77
9.1.15 Code 128 (Manual Compression), TCI 41...............................................77
9.1.16 Codabar (Rationalized), TCI 42...............................................................78
9.1.17 Code 93, TCI 43...................................................................................... 78
9.1.18 AS-10, TCI 44..........................................................................................78
9.1.19 PDF-417, TCI 46.....................................................................................79
9.1.20 UCC/EAN 128, TCI 50.............................................................................82
9.1.21 UCC/EAN Text Information, TCI 51.........................................................86
9.2 Bar Code Rotation.........................................................................................86
9.3 Bar Code Human Readable Text ..................................................................87
Chapter 10: Printer Maintenance...................................................... 89
10.1 Maintenance Schedule................................................................................89
10.2 Thermal Printer Card...................................................................................90
10.3 Internal Cleaning.........................................................................................92
10.4 Print head Maintenance...............................................................................93
10.5 Cleaning the Drive Roller...............................................................................94
10.6 Exterior Cleaning...........................................................................................94
10.7 Gap Detector Adjustment.............................................................................. 94
Chapter 11: Troubleshooting........................................................... 95
11.1 Troubleshooting Tips.....................................................................................95
Appendix A: Limited Warranty........................................................... 97
Appendix B: RMA Procedure.......................................................... 98
Appendix C: Quick Reference Command Summary........................ 99
Glossary............................................................................................ 107
Index..................................................................................................111
User Notes......................................................................................... 115
322M Operator’s Manual v
Page 10

List of Tables
Table 1 General Specifications.......................................................................... 11
Table 2 Printing Specifications.......................................................................... 11
Table 3 Media Specifications............................................................................. 11
Table 4 Power Adapter Specifications............................................................... 16
Table 5 Print Button Description........................................................................ 18
Table 6 Status Indicator Light Description......................................................... 18
Table 7 RS-232 Cable Configurations............................................................... 21
Table 8 DPS Values.......................................................................................... 29
Table 9 TCI Values............................................................................................ 33
Table 10 CGN – Embedded Fonts...................................................................... 34
Table 11 CGN – Bar Code Symbologies............................................................. 35
Table 12 FO & FJ Character Starting Positions................................................... 36
Table 13 Enquiry Responses.............................................................................. 43
Table 14 UPC-E Zero Reduction Format............................................................ 72
Table 15 MaxiCode Control Code Equivalents.................................................... 76
Table 16 Code128 Special Function Access....................................................... 77
Table 17 PDF-417 Error Correction Level...........................................................80
Table 18 UCC/EAN Application Identifiers .......................................................... 85
Table 19 Human Readable/Extended Bars TCI’s................................................87
Table 20 Recommended Maintenance Schedule................................................ 89
vi 322M Operator’s Manual
Page 11

List of Figures
Figure 1 322M Front Angled View.......................................................................viii
Figure 2 322M Rear Angled View........................................................................viii
Figure 3 Typical Printer Accessories...................................................................15
Figure 4 Connecting the Printer...........................................................................17
Figure 5 Print Button and Status Indicator Light..................................................17
Figure 6 Statistics Label......................................................................................20
Figure 7 HyperTerminal™ Window Example ......................................................24
Figure 8 3x3 Sample Label.................................................................................26
Figure 9 Header Elements ..................................................................................27
Figure 10 Line Draw Sample.................................................................................39
Figure 11 Reverse Video Sample..........................................................................40
Figure 12 ^D58 - File #2 Print Sample ..................................................................54
Figure 13 ^D58 - File#3 Print Sample ...................................................................54
Figure 14 ASCII-HEX Conversions .......................................................................62
Figure 15 Code 128 Subset Switching..................................................................78
Figure 16 PDF-417 Sample Format #1 .................................................................81
Figure 17 PDF-417 Sample Format #2 .................................................................81
Figure 18 Bar Code Rotations...............................................................................87
Figure 19 UPC-A Text/Extended Bars...................................................................88
Figure 20 Unlatching the Print head......................................................................91
Figure 21 Removal of Thermal Card.....................................................................91
Figure 22 Internal Cleaning...................................................................................92
Figure 23 Print head Thermal Elements................................................................93
322M Operator’s Manual vii
Page 12
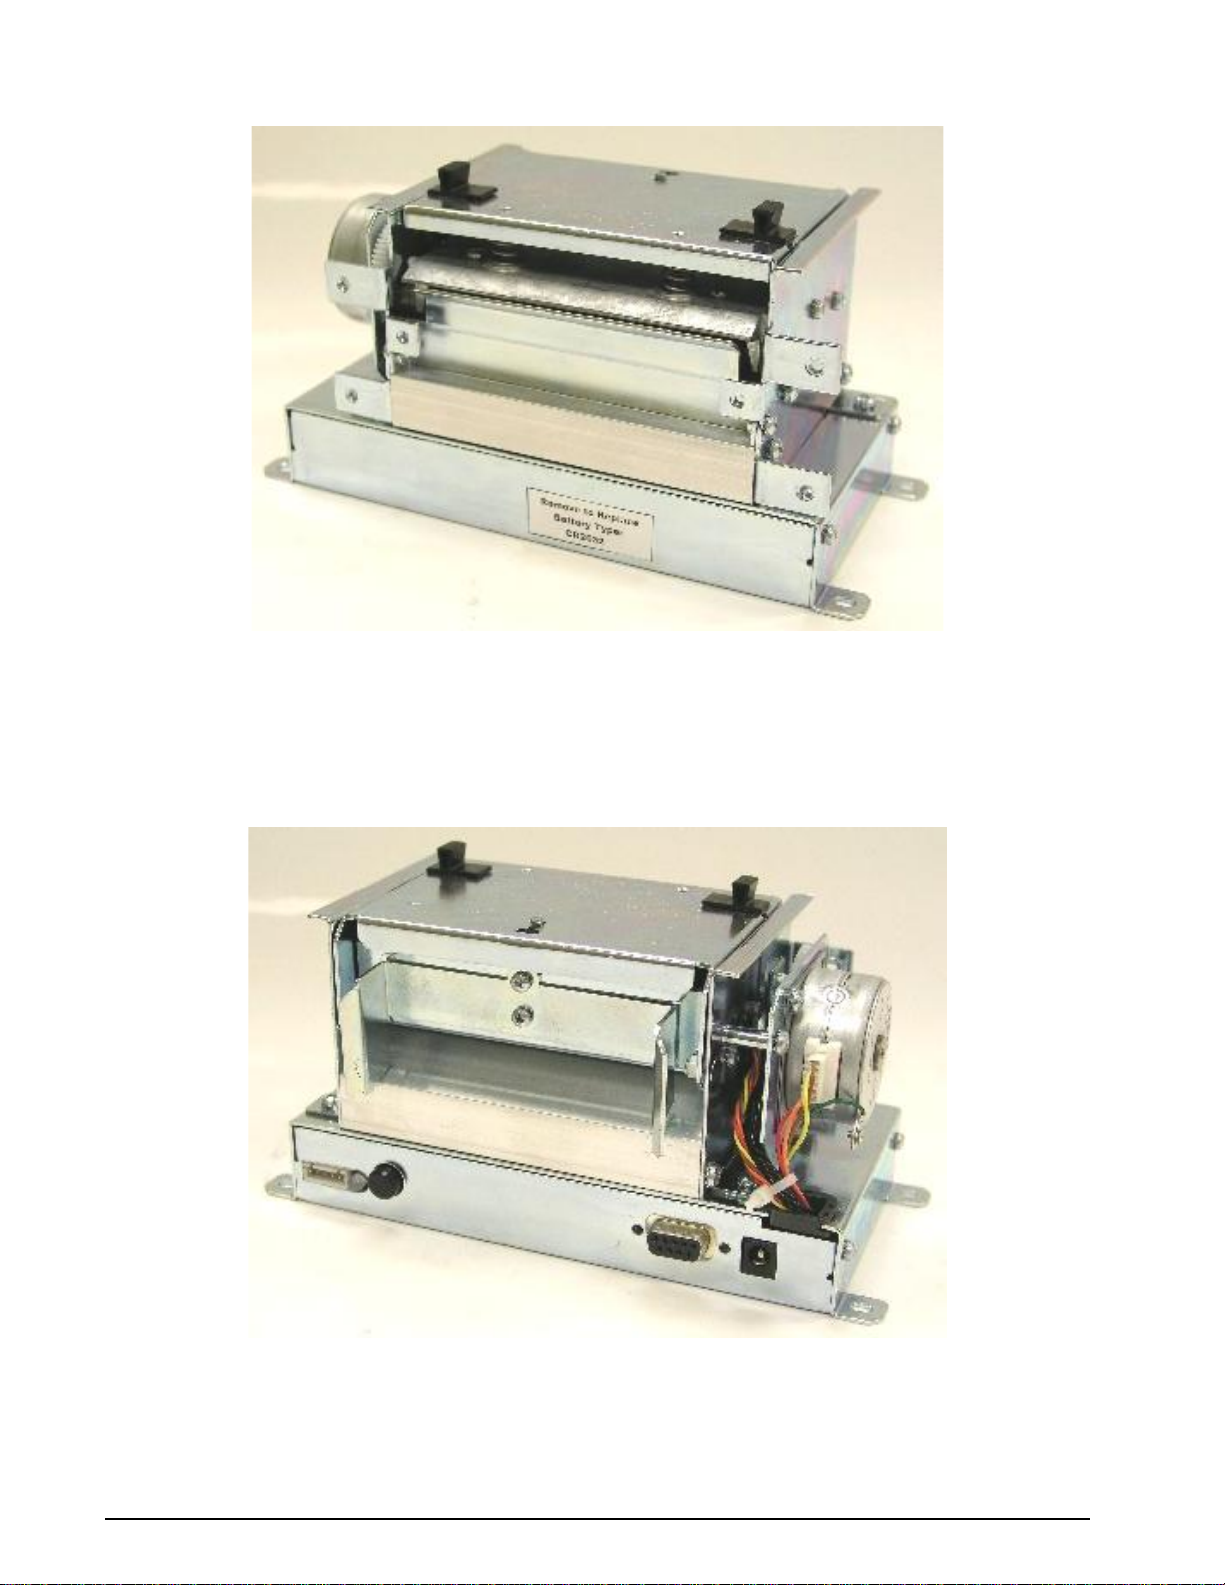
Figure 1 322M Front Angled View
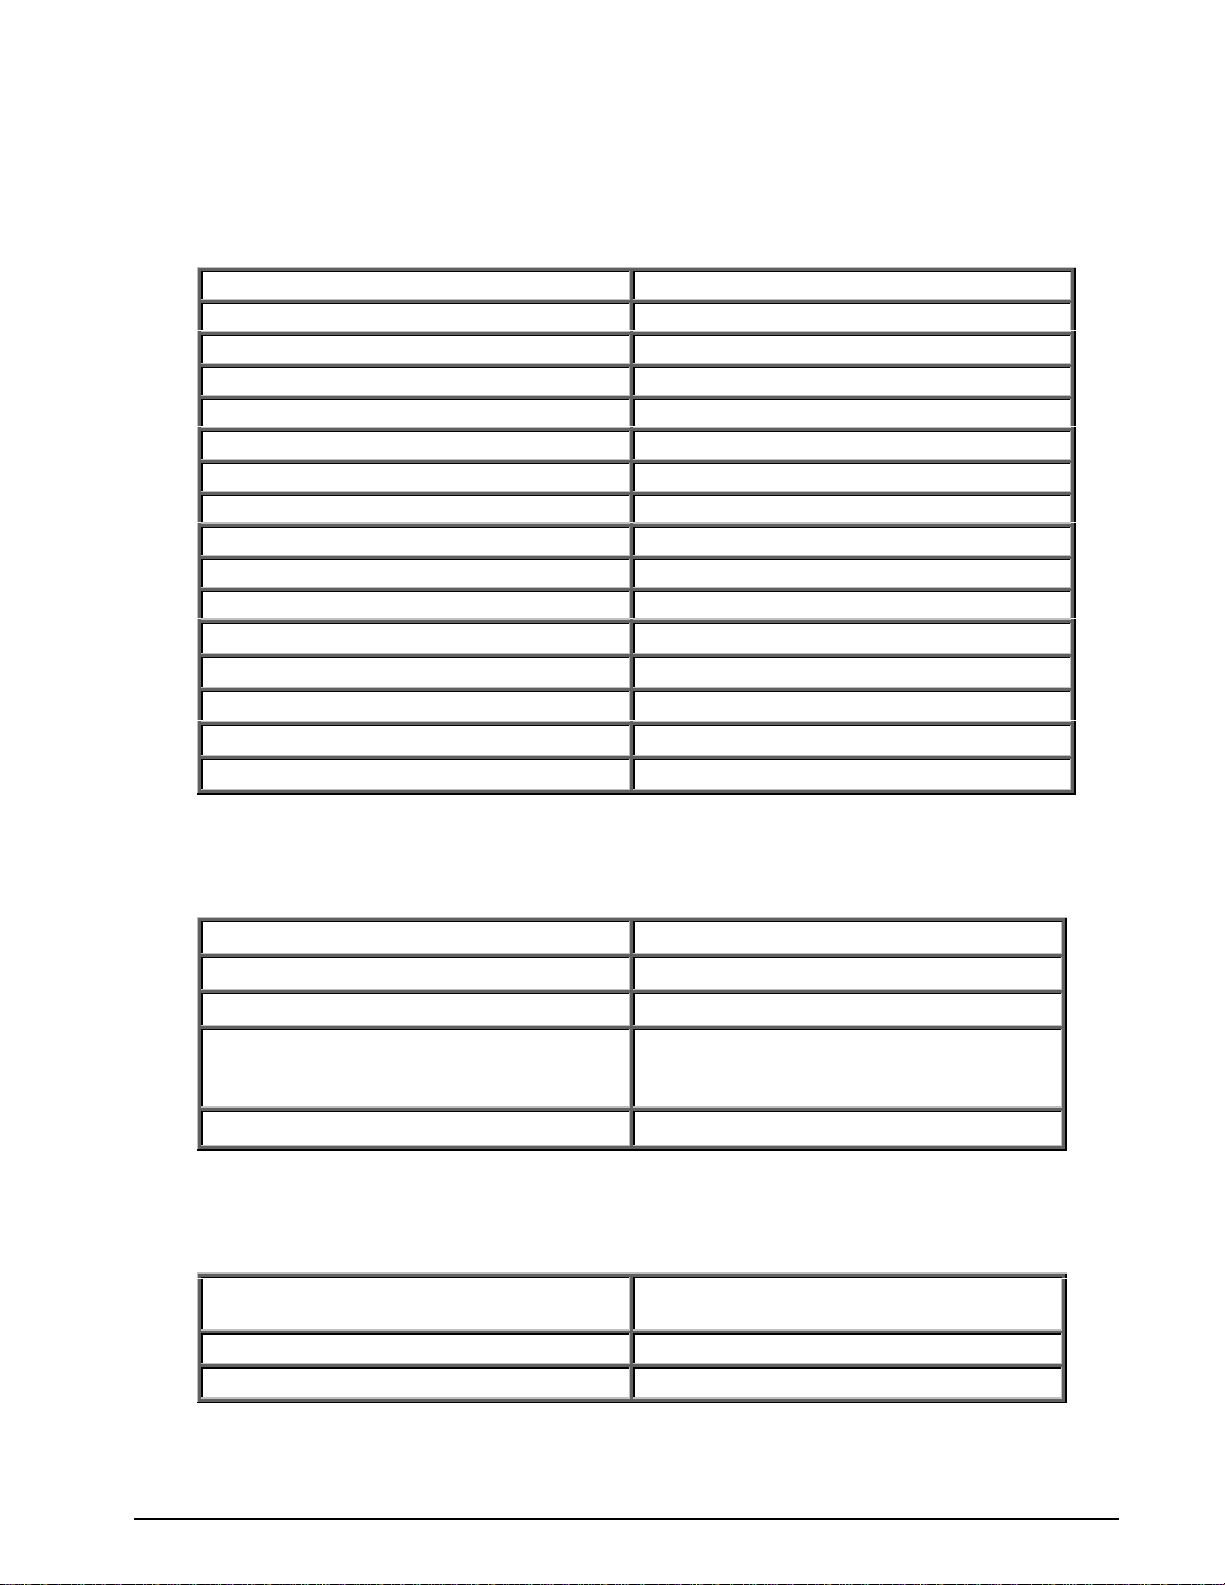
Figure 2 322M Rear Angled View
viii 322M Operator’s Manual
Page 13

Introduction
The Model 322M is a high performance Direct Thermal open frame printer that is
economically sized and priced to fit everyone’s budget. The extensive list of standard
features combined with an easy to operate and maintain design provides continuous and
reliable printing at true high volume throughput. The Model 322M comes equipped with a
high resolution (575 dots, 8-dots/mm) thermal printhead with a print width of 2.83”.
The resident Label Design Software (LDS) is a powerful and easy-to-use control language
that allows the creation of custom label formats. The software is ASCII text based and can
be interfaced to PC’s, mini-computers, main frames and other special purpose machines.
The LDS uses thermal dots as the unit of measure. All commands and parameters, unless
noted otherwise, should be entered using dots. The conversion values for the printer are 8
dots per millimeter, 203 dots per inch or 0.0049” per dot. For example: To enter the width
of a label that is 2” wide, the value entered would be 406 (2” X 203 = 406).
Among many other features, LDS supports downloadable graphics and fonts, serial
numbering, flexible character spacing, reverse video, resident fonts and many of the most
popular bar code symbologies. Bitmapped fonts, bar codes, and graphic images can be
multiplied in size in the X and Y directions while being printed in 0, 90, 180, and 270 degree
rotations. Graphic images and custom designed label formats can also be stored in the
printer’s memory for high-speed access and greater throughput performance.
The Model 322M is capable of printing on most types of labels, pre-print tickets, fax papers,
and tag stocks. The printer is also capable of detecting many registration marks such as:
media that contain die-cut, blow-hole, black-line sense marks and continuous rolled stock as
well. The printer also provides three different cutter types, which include a full guillotine,
full/partial guillotine and rotary cutter. These cutter options provide a means of cutting
media of varying thickness to handle even the most demanding applications.
Many printer applications use the same label format, but change the data on every label.
This is not a problem for the 322M printer. Data may be changed without downloading the
same fixed format or fixed data field, time after time. This, along with the available serial
communication speeds, increases data access time and productivity providing the user with
high performance for a low cost.
®
Contact Microcom Corporation regarding the availability of Windows
WYSIWYG (What You See Is What You Get) software packages that allow quick and easy
on-screen label designing.
drivers and
322M Operator’s Manual 9
Page 14

10 322M Operator’s Manual
Page 15
Chapter 1: Printer Specifications
1.1 General Specifications
Width 7.63” (194mm)
Height 4.0” (102mm)
Depth 3.63” (92mm)
Weight 3.5 lbs. (1.6 kg)
Electrical Universal +24 VDC
Current 3 Amps maximum
Temperature 40° F – 104° F (5° C – 40° C) Operating
Humidity 10% – 85%, non-condensing
SRAM Memory 512K bytes
Flash Memory 512K bytes
Agency Approvals CUL, CE, and complies with FCC Class A.
RS-232D Serial RS-232D, 9 pin D-Sub c onnector (DCE)
Flow Control: XON, XOFF, and CTS
Baud Rates: 110 to 115200
Parity: Odd, Even, and None
Data Bits: 7 or 8
Table 1 General Specifications
1.2 Printing Specifications
Print Type Direct Thermal
Print Resolution 203 DPI (8 dots/mm or 0.0049” per dot)
Maximum Print Speed 6”/sec. (152mm/sec.)
Maximum Print Width
Print Length 50” (1270mm) using standard memory
Table 2 Printing Specifications
1.3 Media Specifications
2.83 inches or 575 dots (72mm)
3.15” or 640 dots (80mm) – When used
with the Heavy Media Printing Option
Media Types
Maximum Media Thickness .006” (.15mm)
Maximum Media Width 3.5” (89mm)
Continuous, die-cut, preprinted and tag
stock either rolled or fanfold.
Table 3 Media Specifications
322M Operator’s Manual 11
Page 16

12 322M Operator’s Manual
Page 17

2.1 Fonts
7 smooth bitmapped alpha-numeric fonts from 6pt to 14pt including OCR-A
and OCR-B.
Converted HP LaserJet™ and/or TrueType® font capability.
All bitmapped fonts expandable in height and width.
Reverse image printing.
Rotated: 0 º, 90 º, 180 º, and 270 º.
Chapter 2: Features and Options
2.2 Graphics
Resident Lines feature.
Storage of fonts, label formats and/or graphics in battery backed memory.
Converted PCX and BMP images.
Rotated: 0 º, 90 º, 180 º, and 270 º.
2.3 Bar codes
One-dimensional: Code 39, Interleaved 2 of 5, Code 128 (A, B, C and Auto),
Code 93, Codabar, Modified Plessey, UPC-A, UPC-E, EAN 8, EAN 13,
UCC/EAN 128, and Postnet.
Two-dimensional: PDF-417 and Maxicode.
Rotated: 0 º, 90 º, 180 º, and 270 º.
Expandable in height and width.
322M Operator’s Manual 13
Page 18

Features and Options Chapter 2
2.4 Special Features
High performance for a Low cost.
Rotating head mechanism for easy print head cleaning.
Adjustable media guides for easy label centering or custom fixed guide
brackets.
Software controlled contrast adjustment.
Detects label gap, blackline, and blowhole using reflective and
transmissive sensors.
Field incrementing, decrementing and serialization.
Downloadable fonts and graphics (with data compression).
Internal statistical counters for inches and labels printed.
Remote printer interrogation.
Automatic detection for optional cutter types
Two types of mounting methods for kiosk installation flexibility.
2.5 Options
3” (76.2 mm) Full or Full/Partial Guillotine cutter available.
3” (76.2 mm) Rotary cutter available.
+24 VDC Universal Power Supply.
User configurable sensor (Input 1).
Label Present Sensor (LPS)
Heavy Media Printing.
Printed Media Presenter (PMP).
Cleaning kit.
14 322M Operator’s Manual
Page 19
Chapter 3: Getting Started
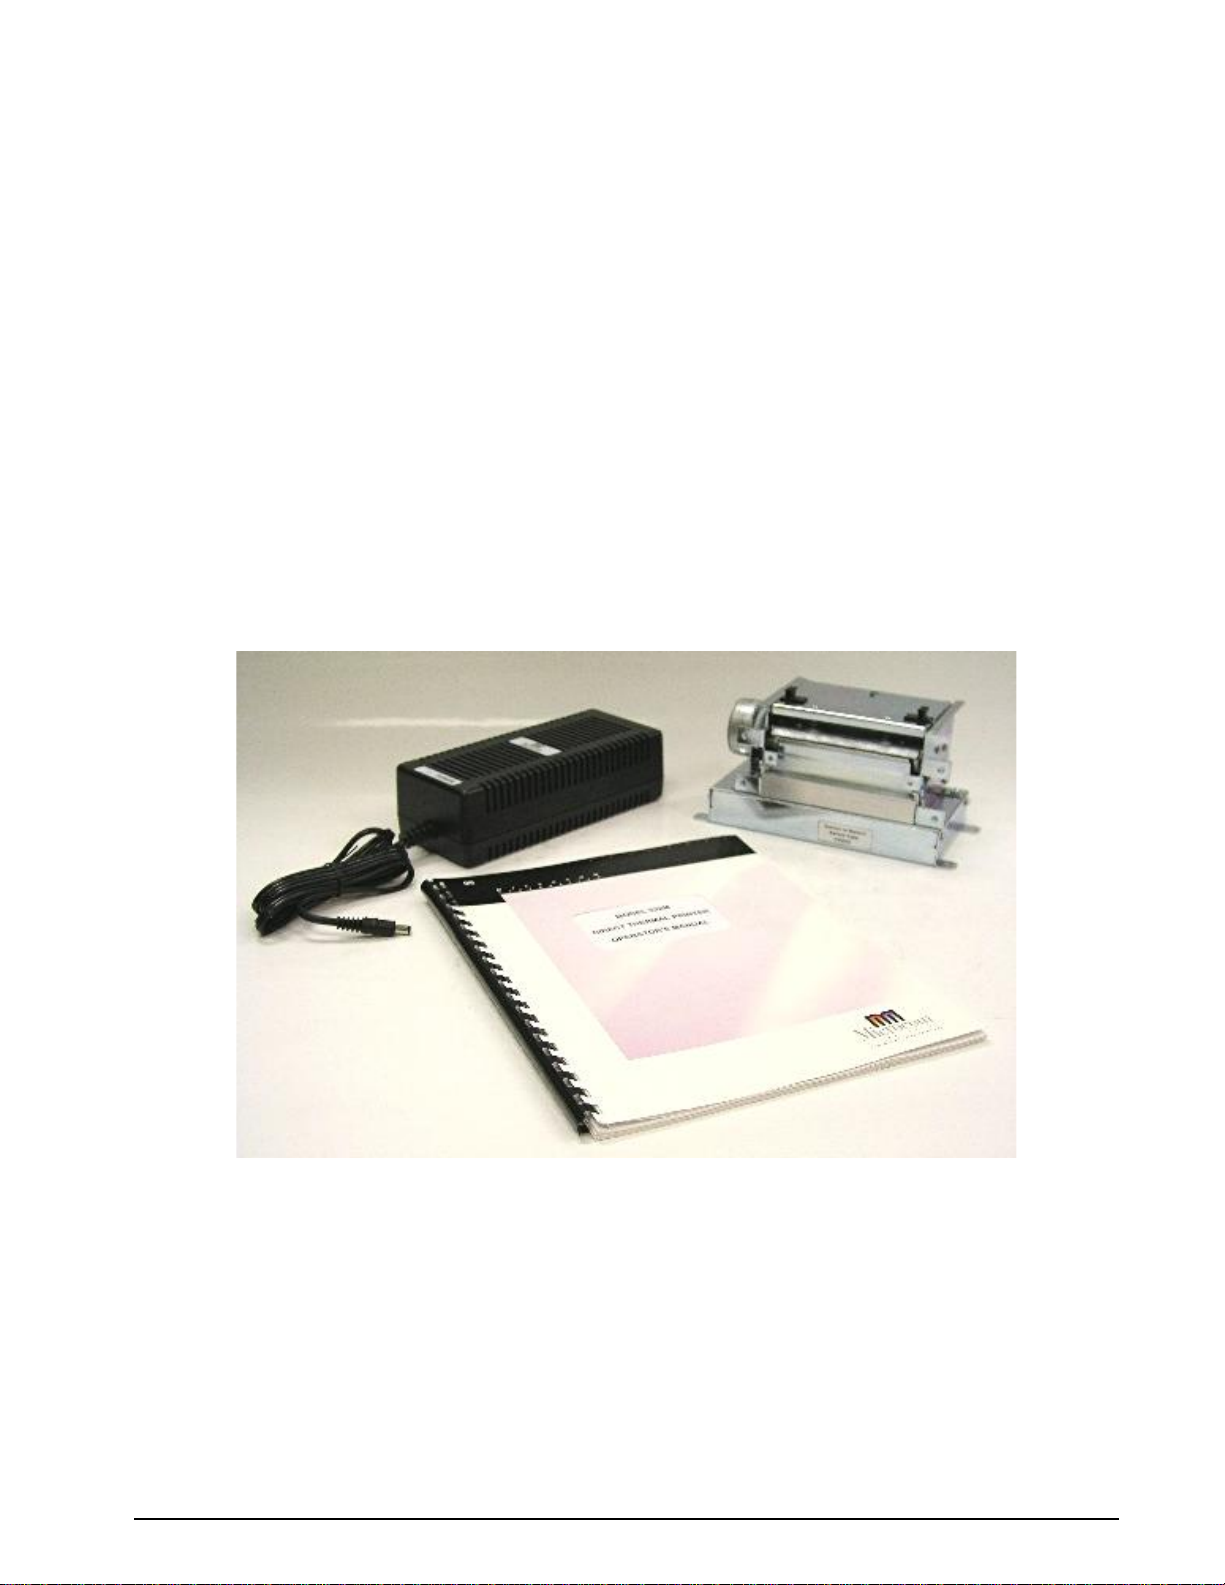
3.1 Unpacking and Inspection
The printer has been packaged to help reduce the damage that may occur during the
shipment of product.
Inspect the shipping container(s) for signs of damage. If damage is evident, contact the
shipping company immediately to file a damage claim.
After the printer is removed from the container(s), verify that all the parts purchased are
present and in good condition (see Figure 3).
The packaging material and shipping container(s) should be kept and used if the printer is to
be shipped. Additional shipping materials can be ordered by contacting the Microcom
Corporation Service Department.
Figure 3 Typical Printer Accessories
3.2 Connecting the Printer
Refer to Figure 4 for proper connections.
322M Operator’s Manual 15
Page 20
Getting Started Chapter 3
3.2.1 Printer Power
Microcom Corporation offers a universal power adapter as an option for the Model 322M.
Any power adapter that conforms to the necessary specifications, listed below, may be
used. The printer requires a universal +24VDC power supply that operates in the 100-240
VAC; 50-60 Hertz range; 2 Amps. The power adapter should operate in an “output foldback
mode” during an overload situation rather than a shutdown and restart attempt; sometimes
referred to as a “Hiccup” mode. Contact your Microcom Corporation representative for any
questions regarding power adapter requirements and/or specifications.
AC Input: 100-240 VAC, 50/60HZ, 2A
DC Output: +24V @ 0.2 ~4.16A +/- 5%
Power Rating: 45 to 60 Watts
Overload Protection: Output Voltage Foldback Mode
Maximum Transient Load:
Printer Power Connector: Standard 2.5mm Barrel Jack
Table 4 Power Adapter Specifications
12 cycles @ 2.1ms rep. rate;
35A, 650µs pulse
Note: Verify that the power adapter jack is plugged into the printer before
plugging the power cord into an electrical outlet.
3.2.2 RS232 Serial Communication Interface
The 322M can be interfaced to PC’s, mini-computers, main frames, and special purpose
machines. This printer offers a standard serial RS-232D port. The factory serial port
configuration is set to 9600 bits per second, no parity, 8 data bits, and 1 stop bit with both
hardware and software flow control hand-shaking enabled. Refer to Chapter 4 for additional
information.
3.2.3 Optional Cutter Interface
The 322M also provides a connector on the rear panel for the optional cutter interface. Use
this connector (see Figure 4) when a cutter is installed on the printer. To prevent damage to
the printer and/or cutter, connect the cutter when the printer power is off.
3.3 Loading Media
The easy to release printhead makes loading media into the Model 322M printer an easy
process. Follow the instructions below to properly load the media.
1. Feed the media into the paper path (see Figure 4), located on the back of the printer,
until you feel resistance.
2. Push and hold the Print Button to feed the media through the printer.
3. Once the media exits the front of the printer, release the button.
16 322M Operator’s Manual
Page 21
Chapter 3 Getting Started
Button
Media
Path
Cutter Option
Connector
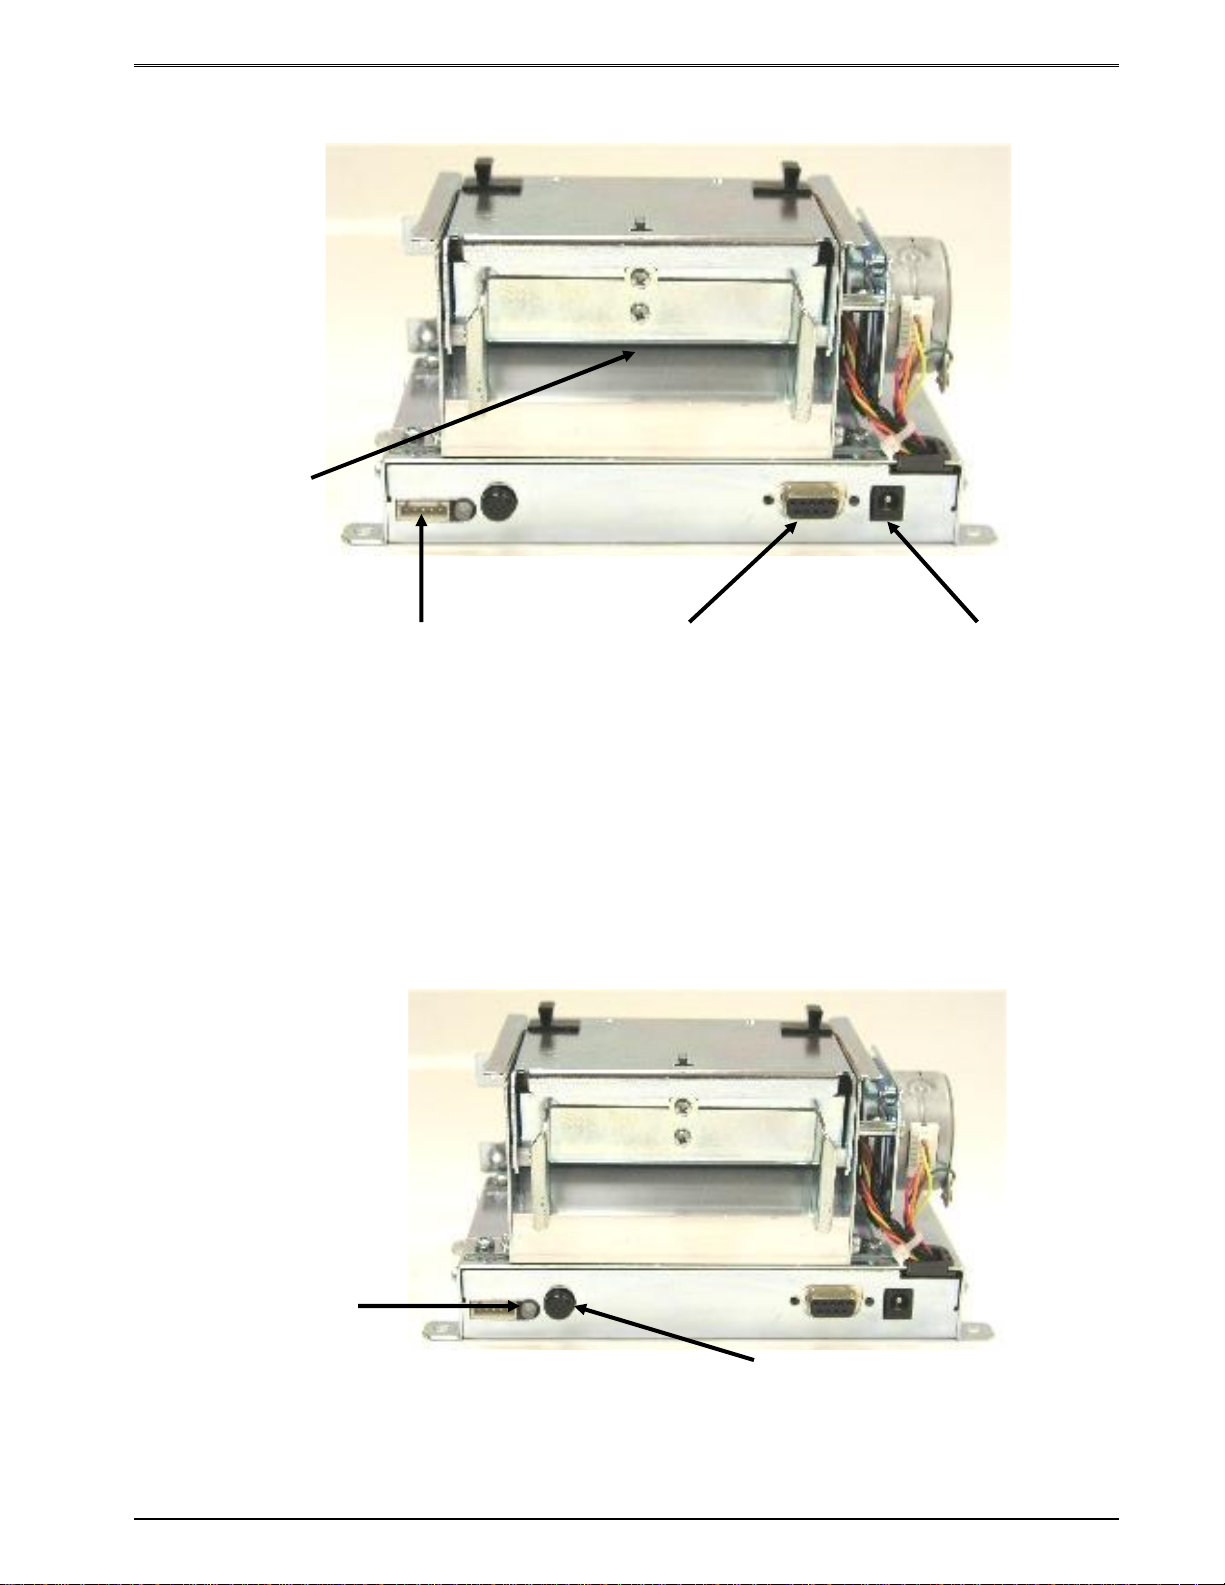
Figure 4 Connecting the Printer
RS-232D
Serial Port
+24VDC
Power Jack
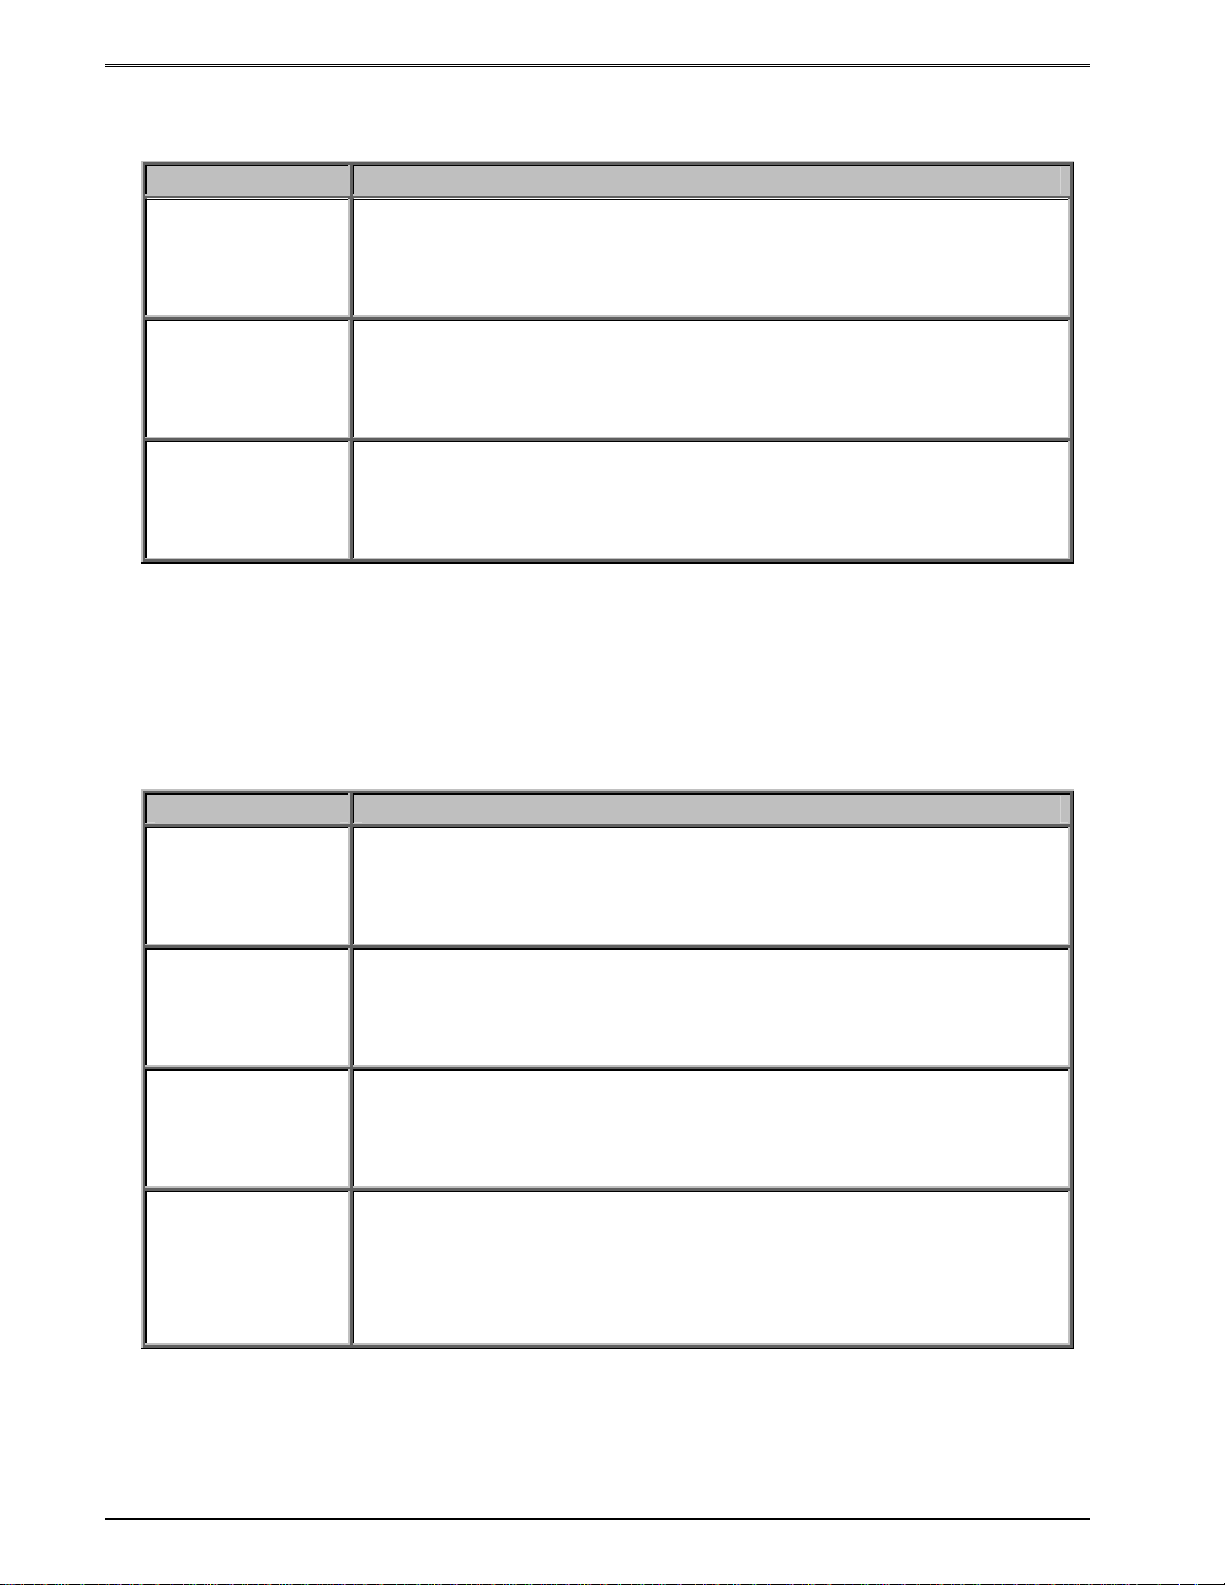
3.4 Print Button and Status Indicator Light
The print button and the status indicator light (see Figure 5) are used to identify and perform
many functions. This section provides a description to familiarize you with the basic function
of the button and light.
Indicator
Light
Print
Figure 5 Print Button and Status Indicator Light
322M Operator’s Manual 17
Page 22
Getting Started Chapter 3
3.4.1 Print Button
Operation Description
Printing a label
Printer Pause
Feeding Labels
Press the print button while the printer is idle or paused will
reprint the last label or after a cold start, a power up label will
print.
Press the print button while the printer is printing will cause the
printer to enter the paused mode.
Note: Press the print button again to continue printing.
Hold the print button down while the printer is idle to feed labels.
The printer will continue feeding labels until the button is
released.
Table 5 Print Button Description
3.4.2 Status Indicator Light
Light Color Description
Solid Green.
Solid Red.
Solid Amber.
Flashing Red.
Indicates that the power is on and the printer is in a ready state.
Indicates an error has occurred. The printer will remain in this
state until the condition is removed. If an unexplained error
persists, contact your Service Representative.
Note: Refer to Chapter 11: Troubleshooting for helpful hints.
Indicates that the printer has been paused, or a tag/tear mode
has been enabled.
LED Flashes Red during a download indicates that the memory
operation was not successful.
Power Spike or low voltage on the AC line. The unit will remain
in this mode until the condition is removed and the printer power
is cycled.
Table 6 Status Indicator Light Description
18 322M Operator’s Manual
Page 23

Chapter 3 Getting Started
3.5 Printer Modes
The printer has four primary modes of operation. The different types of modes have an
impact on how the rear panel print button and indicator lights are treated. This section is
intended to provide the user with an explanation of these different modes.
3.5.1 Idle Mode
Idle Mode is when the printer is not printing and has no pending activity. The indicator light
is green, which indicates that the printer is ready to receive label formats and/or commands.
The Print Button has a couple of different functions while in the Idle Mode. Pressing the
button will reprint the last label or the power-up label if the printer was recently turned on
and no formats were sent to the printer. Pressing and holding the button in, causes the
printer to feed labels until the button is released.
3.5.2 Halted Mode
Halted Mode is when the printer has stopped due to an error condition that needs to be
corrected. The indicator light will be solid red in color when the printer has entered the
Halted Mode. The printer will remain in this mode until the error has been corrected and
then cleared. Once the error has been cleared, the printer will attempt to execute the
previous format and/or commands.
3.5.3 Paused Mode
Paused Mode is when the printer has pending activity and has stopped, but is not in an
error condition. The indicator light is a solid amber color when the printer is in Paused
Mode. The printer enters this mode when the rear panel button is pressed while the printer
is printing. Pressing the button again causes the printer to resume. Another situation that
causes the printer to enter the Paused Mode is when a Dispense command (^D97 and/or
^D98) has been enabled and the label is present. See these commands for additional
information.
3.5.4 Diagnostic Mode
Diagnostic Mode temporarily powers up using factory default parameters while printing out
the printer’s current configuration on what is called the Status Label. This provides useful
information that can be used to help diagnose and troubleshoot problems. The printer will
use the factory default parameters until the printer has been reset using a soft reset or by
cycling power. The printer will then return to the previous configuration that was in use
before entering the Diagnostic Mode.
3.5.4.1 Entering Diagnostic Mode
To enter Diagnostic Mode, press and hold the rear panel button in while turning on the
printer. Release the button after three seconds and the printer will enter Diagnostic Mode
and print the Statistics label and print head test pattern.
322M Operator’s Manual 19
Page 24
Getting Started Chapter 3
3.5.4.2 Statistics Label
The printer prints the statistics label once the printer enters the Diagnostics Mode. When
the statistics label is generated, the printer temporarily powers-up using factory default
parameters. The statistical and configuration information represents the previous setup of
the printer. The printer will return to the previous setup after a power cycle or upon
receiving a soft reset command (^D32).
The Printed Labels field represents the number of labels printed to date and can be reset by
the user. The Printed inches can also be reset by the user while the Total Inches field is set
at the factory and is not user adjustable. The Printed Labels and Printed Inches are reset
using the ^D29 command. Other useful information on the statistics label include the
printer’s serial number, power-on hours, serial parameters, soft switch bank configurations,
firmware revision, and cutter information if installed. Refer to Chapter 6 for additional
information regarding the soft switch bank settings.
PRINTER SERIAL #: 1234567890
PRINTED LABELS: 303
PRINTED INCHES: 1533
TOTAL INCHES: 1571
POWER ON HOURS: 32
CUTTER TYPE: Guillotine
CUTTER ENABLED: NO
CUTTER COUNTS: 303
SWITCH BANK 1: 10001011
SWITCH BANK 2: 01010000
SWITCH BANK 3: 00000010
SWITCH BANK 4: 00000000
SERIAL PARAMETERS: 9600-N-8-1
322 REV 1.00 070000-0100 01/28/03
Figure 6 Statistics Label
20 322M Operator’s Manual
Page 25
Chapter 4: Communication
4.1 RS-232D Serial
The printer provides a 9 pin female D-Sub connector, on the rear panel, for RS-232D serial
communication. The printer is configured as DCE (Data Circuit-terminating Equipment) so a
NULL modem cable is not necessary. A serial data cable is required to use serial
communications, refer to Table 7 below for correct cable configurations.
The factory settings, unless otherwise requested, are set at 9600 baud, 8 data bits, 1 stop
bit and no parity with both hardware and software handshaking enabled. The baud rate is
user selectable from 1200 to 115,200 and uses software XON/XOFF flow control and/or
hardware CTS handshaking.
9 to 9 Pin Cable 9 to 25 Pin Cable
322M
State
DE-9
Pin #
XX 1 DCD DCD 1 HI 1 DCD DCD 8
XX 2 TXD RXD 2 XX 2 TXD RXD 3
XX 3 RXD TXD 3 XX 3 RXD TXD 2
HI 4 DTR DSR 4 HI 4 DTR DSR 20
LO 5 GND GND 5 LO 5 GND GND 7
HI 6 DSR DTR 6 HI 6 DSR DTR 6
DC 7 RTS CTS 7 DC 7 RTS CTS 4
XX 8 CTS RTS 8 XX 8 CTS RTS 5
HI 9 +5V +5V 9 HI 9 +5V -
Signals /
Direction
PC
DE-9
Pin #
State
322M
DE-9
Pin #
Signals /
Directions
PC
DB-25
Pin #
DC = DO NOT CARE XX = INDETERMINATE
Table 7 RS-232 Cable Configurations
If XON/XOFF handshaking is used, the only signals that the printer requires are the RXD,
TXD, and GND signals. If the hardware handshaking is used the CTS and RTS signals are
required. The other signals are offered in the event that the host computer would require
them.
322M Operator’s Manual 21
Page 26
Communication Chapter 4
4.1.1 RS-232 Printer Cables
The printer uses a standard through serial cable, typically referred to as a modem cable,
which may be purchased through Microcom Corporation or a local computer supply
company. A NULL-modem cable is not required because the printer is configured as DCE.
For a 25-pin serial communication port – Use a 25-pin female to 9-pin male cable.
For a 9-pin serial communication port – Use a 9-pin female to 9-pin male cable.
CAUTION: Connection of a serial port to a parallel port may
result in damage to the printer and / or computer.
22 322M Operator’s Manual
Page 27

Chapter 5: Designing Labels Using LDS
Label Design Software (LDS) refers to the control language resident in the printer used to
create labels. All bitmapped fonts, character sets and bar codes are resident in the printer.
Additional fonts and graphic images may be sent from a host and stored in the printer’s
memory.
A label format is produced by a series of 5 steps:
1. Control commands to define printer operation.
2. A format header to define the label height, width, print speed, etc…
3. Field data that defines the placement of text, bar codes, graphics or lines.
4. Actual text data to place in the Field data strings.
5. Control commands to initiate printing.
5.1 Control Characters
Throughout this manual there are references to control characters. In order to print them in
this manual, they have been written using standard characters and icons. Escape
characters are represented by <ESC> and a carriage return is represented by <CR>. It is
important to note that all printer functions, unless otherwise noted, must be followed or
terminated with a carriage return (<CR> or HEX OD).
5.2 LDS Design Exercises
There are many different machines capable of sending information to the printer including
main frames, mini-computers, special purpose computers and PC’s. For the purpose of
simplicity, the design exercises contained in this manual will use one of the easiest methods
by using an IBM compatible PC and a VT-100 terminal emulation software program. This
method of connection will allow two-way, serial communication with the printer.
Items required:
- A computer with at least one unused serial communication port (COM1, COM2…).
- A serial interface cable (see section 4.1.1).
- A VT-100 terminal emulation program such as HyperTerminal™.
- A text editor that does not add formatting characters such as Microsoft® Notepad.
5.2.1 PC Connection (Serial)
The printer ships with serial communication parameters set to 9600 bits per second, no
parity, 8 data bits, and 1 stop bit (9600-N-8-1). This means that for proper communication,
the PC’s communication port will have to be set to these parameters. If a terminal program
is not available, it is possible to send files to the printer using the DOS COPY (for example:
C:\>COPY FILENAME COM1) command. When using DOS, it is a good idea to set the
communications port up using the DOS MODE (for example: C:\>MODE
COM1:9600,n,8,1,p) command before copying the files to the port. Create a text file, enter
“^D3” <CR> (carriage return) and save it as “D3.txt”. Send the file to the printer by either
322M Operator’s Manual 23
Page 28
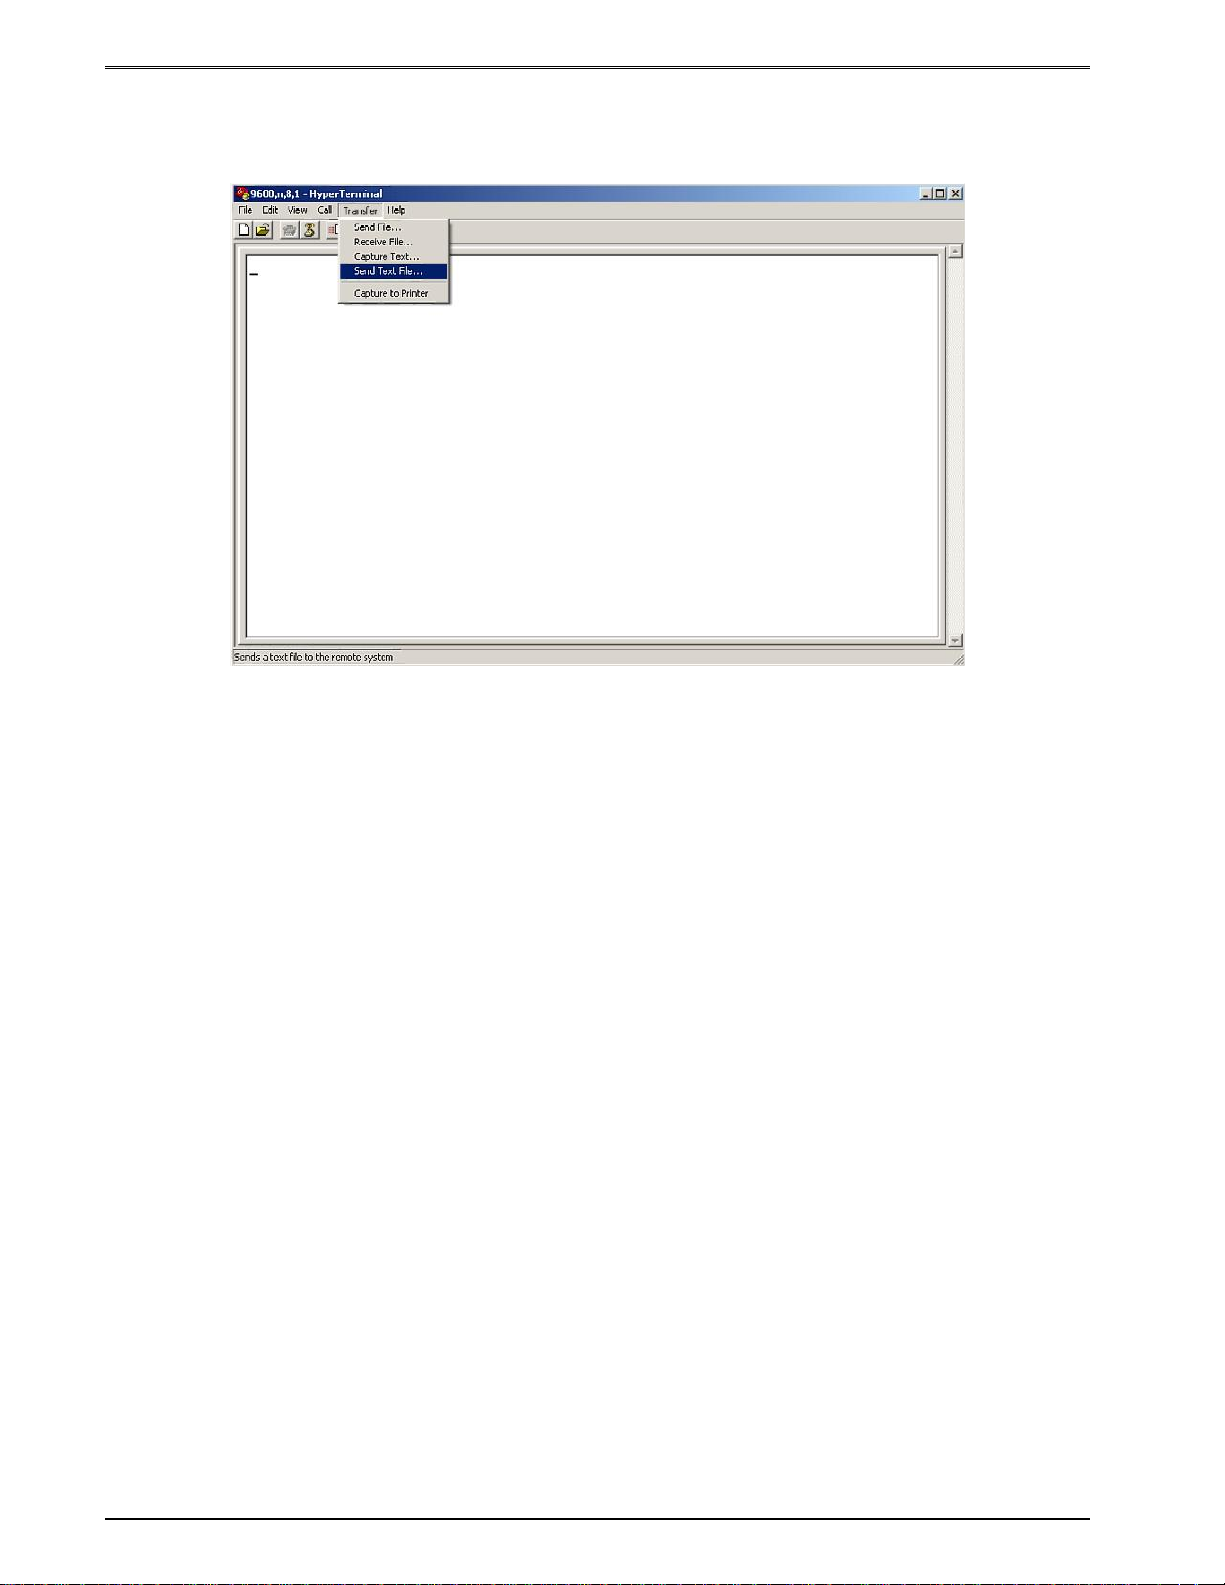
Designing Labels Using LDS Chapter 5
using the DOS COPY (C:\>copy d3.txt com1) command or by using a terminal program (see
Figure 7).
Figure 7 HyperTerminal™ Window Example
5.2.2 Format Creation
Special Control code functions (see section 6.1) and/or label formats may be entered
directly through the keyboard but is not the most efficient method if entering a large amount
of data or numerous commands. Large formats and/or numerous commands should be
entered in an ASCII text editor and then uploaded to the printer. Microsoft® Notepad has is
used for the creation of label designs contained within this manual because it is simple to
use and does not add formatting characters.
The LDS uses thermal dots as the unit of measure. All commands and parameters, unless
noted otherwise, should be entered using dots. The conversion values for the printer are 8
dots per millimeter, 203 dots per inch, or 0.0049” per dot. For example: To enter the width
of a label that is 2” wide, the value entered would be 406 (2” X 203 = 406).
The printer can accept either the one-character control code (“Ctrl + E” (HEX05)) or the two-
character caret (^) plus alpha character (“^E”). In other words, for a PC keyboard, the same
command can be generated either by holding down the “Ctrl” key and pressing the alpha
character or by entering the two characters; the “^” (the character generated when you
press the “Shift” key and the “6”) plus the alpha character. See Chapter 5 for additional
information regarding control codes and printer commands.
There are some special features offered by the printer that assist in label design. For
example, the auto-si ze command (^A2^D39 <CR>) provides most of the header format
information needed to define the different properties of the media being used. The current
state of the printer is accessed through the enquiry command (^D5 <CR>, Ctrl E, or 5
NULL characters (HEX 00) if binary compression has been enabled). The statistical
24 322M Operator’s Manual
Page 29

Chapter 5 Designing Labels Using LDS
information of the printer is made available through the use of the ^A0^D29 <CR> or more
simply ^D29 <CR> command.
The following sections of this chapter are intended to provide the user an overview of the
LDS language. The overview will include information regarding the label format, header
definition, and list the different types of field information available. The combination of these
sections and Chapter 5 should provide the user with the information required for easy format
creation and printing. Once some understanding of these basis concepts are achieved, use
the Quick Reference Guide in Appendix C for expedient label design.
5.3 Label Design: An Overview
A label format consists of a header record and field records, followed by the text data to be
printed. The records describe how the label is to be printed. The header contains
information about the label itself such as label height, width, print speed, etc. The field
records refer to the data section and contain information about positioning coordinates, and
the type of character generation such as text, graphics, bar codes, etc. The number of
fields is limited only by the amount of free memory available.
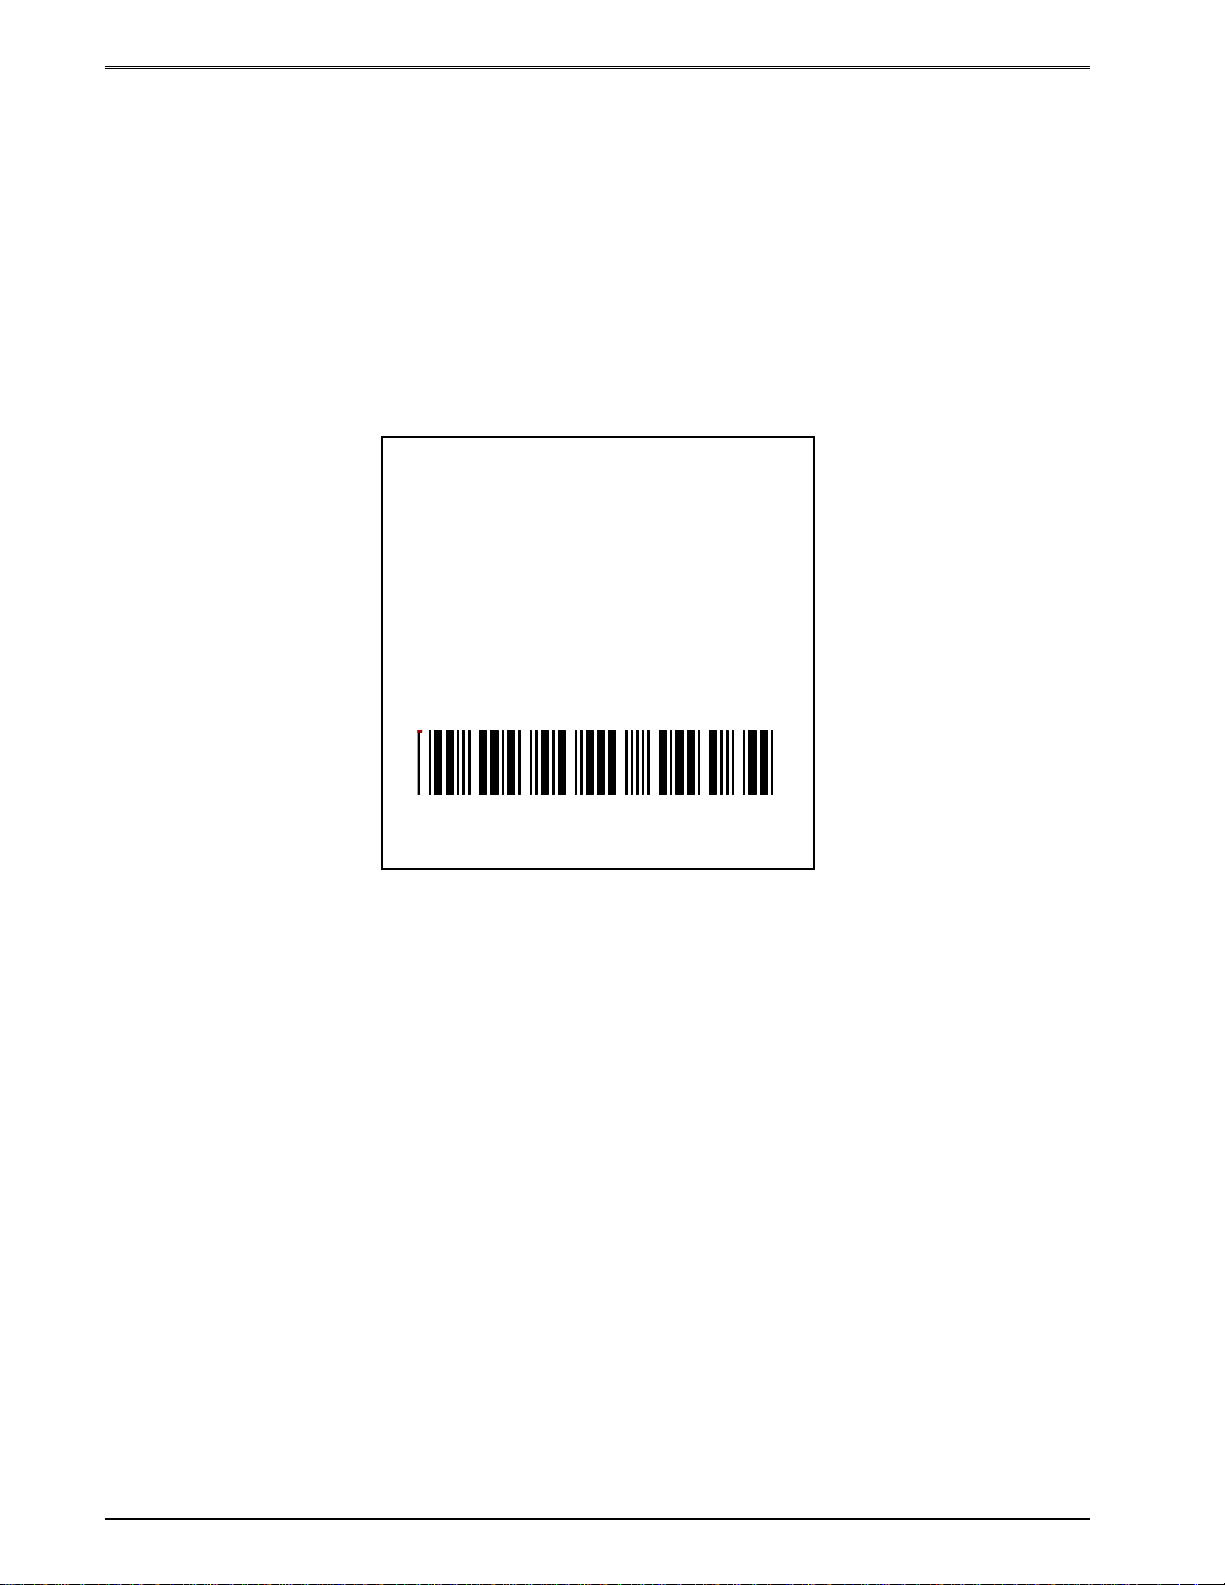
Below is a sample label format. We will refer to this format as we break down the steps and
components to produce the format. Refer to Figure 8 for a printed representation.
^D57 <CR> A label format is coming.
5,575,609,,25,35,0,1,285,0,0 <CR> Header Information.
1,300,500,8,1,5,0,4,2,2,,,,,0 <CR> Field #1 format information.
2,300,400,11,1,5,0,4,2,2,,,,,0 <CR> Field #2 format information.
3,300,300,26,1,5,0,4 <CR> Field #3 format information.
4,300,200,6,1,5,0,4 <CR> Field #4 format information.
4,300,100,6,16,3,,4,3,75 <CR> Field #4 format information.
^D56 <CR> Select RAM format.
^D2 <CR> Text data is coming.
Microcom <CR> Text data string #1.
Corporation <CR> Text data string #2.
Thermal Printing Solutions <CR> Text data string #3.
012345 <CR> Text data string #4.
^D3 <CR> Print label.
The command ^D57<CR> on the first line informs the printer that a format is coming and
causes the printer to enter the format entry mode.
The next line is the header information that sets the label size and other pertinent
information.
The next five lines are layout and configuration for each data field in the format.
The command ^D56<CR> selects the user’s layout or more simply the end of the formatting
information.
The command ^D2<CR> instructs the printer to start accepting data for each of the defined
field’s strings that are entered into the previous format received (between the ^D57 and
322M Operator’s Manual 25
Page 30
Designing Labels Using LDS Chapter 5
^D56 commands). Field #1 defines the placement and configuration for Text Data String
#1; Field #2 defines the placement and configuration for Text Data String #2, etc… The
label is printed from the bottom left corner to the top of the label.
The next three lines are the text data for the associated field format lines.
Text Data String #4 is being accessed twice. The format places the Text “012345” on the
label and then is accessed again placing a Code39 symbol representing “012345” on the
label.
The command ^D3<CR> instructs the printer to print.
The sample label design (Figure 8) is based on a label that is 3” x 3”. You will notice that
the header value that determines the LSX (Label Size X direction) or width is set to “575” (or
2.83”), this is the maximum print head size of the Model 322M printer and should always be
used for the LSX size. The following chapters will go into greater detail about the header
and field format parameters as well as a more in-depth description on their functionality.
Thermal Printing Solutions
Figure 8 3x3 Sample Label
Microcom
Corporation
012345
5.4 Label Header
The label header consists of eleven parameters that control the media layout as well as
printer configuration. A comma (,) delimiter is used to separate the different parameters and
a carriage return is required to terminate the header. If a parameter is left blank, then a
default value will be used. Some parameters, for the Model 322M, are required for proper
operation and should always be included in the script header. These required parameters
are listed in the individual descriptions below.
The value of measurement for many of the header elements is a thermal dot or pixel. The
conversion values for the printer are 8 dots per millimeter, 203 dots per inch, or 0.0049” per
dot. For example: To enter the width of a label that is 2” wide, the value entered would be
26 322M Operator’s Manual
Page 31

Chapter 5 Designing Labels Using LDS
LSX (Always 575)
WEB
GAP
406 (2” X 203 = 406). There is a maximum of 575 dots in the X direction (width), while the Y
direction (height) is virtually unlimited with the standard print head. The auto-size command
(^A2^D39 <CR>) provides most of the header format information needed to define the
different properties of the media being used. This provides a good starting point in
determining the proper values.
Below is a list of the header element mnemonics and their default values:
HFM, LSX, LSY, WEB, GAP, DPS, LCB, AGD, SPG, OFX, OFY
0, 832, 614, 13, 24, 35, 0, 1, 285, 0, 0
Label
Thermal Printing Solutions
This is the
origin; 1, 1
Figure 9 Header Elements
Microcom
Corporation
012345
Die-cut label
backing
LSY
5.4.1 HFM (Number of Fields in Layout)
This parameter is used to specify the number of fields in the layout. If more format fields are
defined than specified in the HFM parameter, they will be ignored and will not print. The
HFM was set to a value of 5 in the format used to create the sample in Figure 8. This
means that a total of five format fields are to be generated. If the HFM was changed to 4,
only the first four format fields would be generated.
322M Operator’s Manual 27
Page 32

Designing Labels Using LDS Chapter 5
5.4.2 LSX (Label Size X)
This parameter is used to specify the width of the label using dots as the unit of measure.
The maximum width of the LSX parameter is the width of the printhead. LDS has been
specifically designed for use with a print head that is 4” in width. The Model 322M printer
has a print head width of 2.83” or 575 dots. For proper print registration the LSX should
always be 575 when using the Model 322M printer.
5.4.3 LSY (Label Size Y)
This parameter is used to specify the height of the label using dots as the unit of measure.
The maximum height is virtually unlimited and is dependant on the memory available in the
printer as well as the intensity of the label design. The sample used to generate Figure 8
has the LSY set to 609 or 3” (609/203 = 3).
5.4.4 WEB (Web Size)
The WEB parameter is the width, measured in dots, of the webbing or backing material that
is found on the left side of the label. This parameter is used to introduce an offset to
accommodate the backing of die-cut media. The Figure 8 sample does not have a value for
the WEB parameter so the default of 13 would be used.
5.4.5 GAP (GAP Size)
This parameter is the height distance, measured in dots, of the registration mark used to
identify the media size. This is the backing material found between die-cut labels, blowhole
sense mark, and/or blackline height. The default value of 24 will be used if a value is not
entered in the GAP parameter. The Figure 8 sample has a value of 25 or 0.123” (25/203 =
0.123).
5.4.6 DPS (Print Speed)
This parameter is used to set the speed the printer will print, referred to as print speed.
Refer to Table 8 for the list of print speeds, DPS values, and inches per second values. The
printer has a default speed of 2 inches per second (IPS) which is a DPS value of 35. To
print at greater speeds, change the DPS value to a lower setting as shown on Table 8.
Generally, better print quality is achieved by printing at lower speeds, however this is also
dependant on the media and contrast settings as well.
Labels per minute can be calculated by the equation below:
IPS x 60 seconds
Labels per Minute =
Label Height
28 322M Operator’s Manual
Page 33

Chapter 5 Designing Labels Using LDS
PRINT SPEED
DPS VALUE
25 76.8 3.0 180
26 74.2 2.9 174
27 71.7 2.8 168
28 69.1 2.7 162
29 66.6 2.6 156
30 64.0 2.5 150
31 61.4 2.4 144
32 58.9 2.3 138
33 56.3 2.2 132
34 53.8 2.1 126
35 51.2 2.0 120
36 48.6 1.9 114
37 46.1 1.8 108
MM PER
SECOND
INCHES PER
SECOND
INCHES PER
MINUTE
38 43.5 1.7 102
39 41.0 1.6 96
40 38.4 1.5 90
Table 8 DPS Values
5.4.7 LCB (Label Control Byte)
This parameter selects the method the printer uses for detecting registration marks on the
different media types. The Model 322M has both upper (transmissive) and lower (reflective)
gap detectors as standard equipment. The following sections discuss the LCB settings for
the different media types.
5.4.7.1 Die-Cut and Blow-Hole Media
A selection of “0” in the LCB parameter instructs the printer to detect the leading edge of the
label or Blow-Hole to identify the start of the next label. This method uses both the upper
and lower sensors for a type of detection referred to as transmissive. When using media
that contains a blow-hole, the software switch 4 (^D24 command) will have to enable “Blow-
hole Sensing” for proper stock out detection.
5.4.7.2 Black Line Media (Transmissive)
The Transmissive Black Line method is used w hen media using a black line for a
registration mark and transmissive detection is desired; a “1” should be entered in the LCB
parameter. This setting will detect the leading edge of the black line by using both upper
322M Operator’s Manual 29
Page 34

Designing Labels Using LDS Chapter 5
and lower sensors. This method may be used, it is however not the preferred method for
detecting media containing a black line. See Black Line Media (Reflective) below.
5.4.7.3 Continuous Media
If the LCB parameter is set to a value of “2”, the printer will not search for a registration
mark. The gap detectors are only used for stock out conditions when set for continuous
media types. The printer will print all fields that contain data and then advance the media by
the amount specified in the SPG parameter of the header when the default AGD of “1” is
entered in the header. This means that fields that are left blank or text data for the
associating format fields are left empty will not print.
For example: Imagine a receipt format that contains 100 lines. If data is provided for the
first 50 lines, the printer will not advance for the remaining 50 lines that have been left blank.
The printer would stop immediately after printing the 50th line and then advance the media
by the amount specified in the SPG header parameter.
When the AGD header parameter is set to “0”, the printer will advance the same amount of
media even when text data fields are left blank. In this case, the advance distance is
determined by adding the SPG parameter and LSY parameter values.
For example: Imagine the same format as mentioned above that has a LSY value of 609
(3” x 203 = 609), an SPG value of 285, and an AGD value of “0” that contains 100 format
lines. If text data is provided for the first 50 lines and the remaining 50 lines are left empty,
then the printer will print the first 50 lines, advance the next 50 lines, advance the remaining
LSY value, and then finally advance the SPG or 285 dots. Regardless of the format fields, if
the LSY is set to 609 and the SPG is set to 285 the printer will advance a total of 881 dots
(609+285=881).
5.4.7.4 Black Line Media (Reflective)
The Reflective Black Line method is used when media using a black line for a registration
mark and reflective detection is desired; a “3” should be entered in the LCB parameter. This
setting will detect the leading edge of the black line by using the lower reflective sensor.
This method is the preferred method for detecting media containing a black line and should
be used when possible.
5.4.8 AGD (Activate Gap Detector)
This parameter sets the number of steps (dots) that the printer will advance with detection of
registration marks or gaps disabled. This value has a default of “1” and is generally used. It
should not be defaulted when the LCB is set to continuous media and the form or label size
is desired to stop after the last printed data (see section 5.3.7.3 Continuous Media).
Another situation where the AGD should not be defaulted is when using media that contains
a heavy concentration of pre-print or gaps that may cause false detection of a registration
mark. If this is the case, the value entered for the AGD parameter should be the distance
from the registration mark to the trailing edge of the pre-print or gap that could cause false
detection.
5.4.9 SPG (Steps Past Gap)
This parameter is used to specify the number of steps (thermal dots) to advance the media
after a registration mark has been detected. This parameter is required to properly position
the next label to the dot row. The proper SPG setting for the Model 322M printer is “285” for
30 322M Operator’s Manual
Page 35

Chapter 5 Designing Labels Using LDS
media that contains an LSY value greater than “285”. For media that has a LSY value less
than “285”, the SPG will need to be calculated.
If the label height is greater than or equal to 285 then the SPG = 285.
If the label height is less than 285, subtract (LSY+GAP) from 285 until the answer is
negative, then add (LSY+GAP) until the result is positive again. Subtract the AGD value
and the result will be the proper SPG value.
5.4.10 OFX (Offset X Direction)
This parameter is used to move or offset all format fields in the X direction without altering
the format fields coordinates themselves.
5.4.11 OFY (Offset Y Direction)
This parameter is used to move or offset all format fields in the Y direction without altering
the format fields coordinates themselves.
5.5 Sample Header
This is the header for the format used to generate the printed sample in Figure 8 followed by
a summary of the header values.
5, 575, 609, ,25 ,35 ,0 ,1 ,285, 0, 0 <CR>
5 = 5 format fields are following the header.
575 = Label width (LSX) of 575 (575 / 203 = 2.83”).
609 = Label height (LSY) of 609 (609 / 203 = 3”).
, , = Default WEB value of 13 will be used.
25 = GAP between labels of 25 (25 / 203 = .123”).
35 = Print speed (DPS) of 35 = 2 inches per second.
0 = LCB of 0 for die-cut labels.
1 = AGD of 1 step.
285 = SPG of 285 for proper placement of the next label.
0 = No X offset.
0 = No Y offset.
<CR> = A carriage return must follow the header.
322M Operator’s Manual 31
Page 36

Designing Labels Using LDS Chapter 5
5.6 Label Format Fields
The Label Format Fields are used to define the characteristics, placement and
representation of the corresponding text data of the individual fields. A format field is
broken down into many different parameters. It is not necessary to enter values for all of the
parameters (default value will be used if a parameter is left blank) but each parameter must
be separated with the comma delimiter (“,”). A carriage return must follow each format field
for proper operation to occur. The values entered must be positive integers for all of the
parameters of the format field.
Below is a list of the format field element mnemonics and their default values:
TSN, XB, YB, CC, TCI, CGN, FO, FJ, CMX, CMY, CS, TSP, , , AN
1, 0, 0, *, 1, **, 0, 0, 1, 1, *, 1, , , 0
* The default value depends on the character generator (CGN) used.
** The default value depends on the text conversion identifier (TCI) used.
5.6.1 TSN (Text String Number)
The parameter determines which line of text data will be used for formatting. This allows for
more than one field to use the same text data. A TSN of “1” accesses the first line of data.
A TSN of “2” accesses the second line of data, and so forth. The text data is the text that
follows the “^D2<CR>” command in the label’s layout. A graphic image field must point to a
text string that contains at least one character. The maximum value for a TSN is 65536.
5.6.2 XB (X Beginning Coordinate)
The X coordinate of the field is measured in thermal dots. The far left edge of the label, as
viewed from the front of the printer, is X coordinate “1”. There is no X coordinate of “0”. The
X coordinates increase in size from the left to right. An XB of 203 would place the field one
inch (203/203 = 1) from the left side of the label.
5.6.3 YB (Y Beginning Coordinate)
The Y coordinate of the field is measured in thermal dots. A YB of 1 would be the bottom
edge of the label as viewed front the front of the printer. The Y coordinates increase in size
from the bottom to the top of the label. A YB of 203 would place the insertion point one inch
from the bottom of the label.
5.6.4 CC (Character Count)
This parameter determines the number of characters that will be used by the format field. If
the number of characters in the selected text string is greater than the quantity specified by
the CC, the remainder of the text string will be ignored. If the text string has less than the
number specified by the CC, then only those characters defined by the text string will be
printed. For example, the text string “character count” should have a CC of “15” including
the space character. This parameter should be set to a value of “1” if the field is a graphic
image.
32 322M Operator’s Manual
Page 37

Chapter 5 Designing Labels Using LDS
5.6.5 TCI (Text Conversion Identifier)
The TCI parameter determines how the text string will be generated. The TCI is used to
select text, bar codes, lines, downloadable font and graphics. The TCI values can be
determined using Table 9 below. For example, a TCI of “1” for the text string data “012345”
would print the text “012345” while a TCI of “15” would produce an I 2 of 5 symbology.
TCI VALUE TCI DESCRIPTION
1 Regular Text (standard embedded fonts)
2 Text Surrounded by Asterisks
3* Text with UPC-A / UPC-E Checksum Digit Added
6 Line Draw
8 Downloadable Fonts and Graphics
12 UPC-A Symbol
13 UPC-E Symbol (Send 11 Digits)
14 UPC-E Symbol (Send 7 Digits)
15 Interleaved 2 of 5 Symbol
16 Code 39 Symbol
17* Text with UPC-E Checksum and Extended Bars Added
20 EAN-13 Symbol
21 EAN-8 Symbol
22* Text with EAN-13 Checksum and Extended Bars Added
23* Text with EAN-8 Checksum and Extended Bars Added
24 MSI 1 Symbol (Modified Plessey)
25 MSI 2 Symbol (Modified Plessey)
26 MSI 3 Symbol (Modified Plessey)
28* Text with MSI Checksum Added – Type 1
29* Text with MSI Checksum Added – Type 2
32* Text with UPC-A Checksum and Extended Bars Added
33* Text with UPC-A with Extended Bars Added
36 Postnet Symbol (Zip+4)
37 Postnet Symbol (Zip+6)
38 MaxiCode Symbol
40 Code 128 Symbol (Automatic Compression)
42 Codabar Symbol
43 Code 93 Symbol
44 AS-10 Symbol
50 UCC/EAN 128 Symbol
51 Text with EAN 128 Information
Table 9 TCI Values
* Refer to Section 9.3
322M Operator’s Manual 33
Page 38

Designing Labels Using LDS Chapter 5
5.6.6 CGN (Character Generator Number)
The CGN parameter is a numeric entry that determines the representation and size of
embedded font and bar codes as well as the memory location of graphic images that have
been selected by the TCI parameter.
5.6.6.1 Embedded Fonts
The Model 322M has seven resident Helvetica style embedded fonts that can be selected
using the CGN when text is selected by the appropriate TCI value.
Embedded Bitmapped Fonts
CGN
VALUE
1 6 Swiss™721 Bold
2 8 Swiss™721 Normal
3 10 Swiss™721 Normal
4 12 Swiss™721 Normal
5 14 Swiss™721 Normal
7 12 OCR-A
8 12 OCR-B
POINT
SIZE
FONT TYPE FONT SAMPLE
6pt ABCDEFGHIJKLMNOPQRSTUVWXYZ1234567890
8pt ABCDEFGHIJKLMNOPQRSTUVWXYZ1234567890
10pt ABCDEFGHIJKLMNOPQRSTUVWXYZ
12pt ABCDEFGHIJKLMNOPQRSTU
14pt ABCDEFGHIJKLMNOPQR
ABCDEFGHIJKLMNOPQRSTUVWXYZ
ABCDEFGHIJKLMNOPQRSTUVW
XYZ
Table 10 CGN – Embedded Fonts
5.6.6.2 Downloadable Fonts and Graphics
When selecting downloadable fonts and graphics using TCI value of “8”, the CGN denotes
the memory slot (1-255) where the font or graphic has been stored. See Chapters 7 and 8
for additional information regarding downloadable fonts and graphics.
For example: If you had stored a graphic into memory slot 1 (see Chapter 7 for additional
information), the proper TCI would be “8” and the CGN value would be “1”.
5.6.6.3 Embedded Bar Codes
Certain bar codes can be printed using various ratios and character spacing options. The
following table (Table 11) illustrates these options. See Chapter 9 for more detailed
information on designing label formats using bar code symbologies. Some bar codes do not
require a CGN value and should be omitted by entering the comma delimiter.
For Example: If a TCI of 40 is selected the CGN will be omitted by entering nothing for the
CGN and surrounding the parameter with the comma delimiter.
1,200,200,10,40,,0,0,100,1
34 322M Operator’s Manual
Page 39

Chapter 5 Designing Labels Using LDS
Bar Code Symbologies
SYMBOL
Code 39
I 2 of 5
UPC / EAN * - 40 % 1 - 0123
UPC Readable * - 40 % 1 - 0123
Code 128 & UCC / EAN 128 *
Codabar
CGN
VALUE
2
3
5
8
2
3
5
- 40 % 1 - 0123
2
3
5
RATIO HEIGHT SPACING FO **
2:1
3:1
5:2
8:3
2:1
3:1
5:2
2:1
3:1
5:2
1
1
1
1
1
1
1
1
1
1
2
2
2
3
-
-
-
-
-
-
0123
0123
0123
0123
0123
0123
0123
0123
0123
0123
Code 93 - 2:1 1 - 0123
AS-10 - 2:1 1 - 0123
2
3
Maxicode (CGN = Mode)
MSI (Modified Plessey) - 1:1 1 - 0123
Table 11 CGN – Bar Code Symbologies
* These Symbologies must use the CMX or CMY multipliers by 2 to produce a 80% ratio.
** The “FO” field represents the available Field Orientation or print rotation. See section
5.6.7.
4
5
6
-
-
-
-
-
-
-
-
-
-
-
-
-
-
-
0123
0123
0123
0123
0123
322M Operator’s Manual 35
Page 40

Designing Labels Using LDS Chapter 5
5.6.7 FO (Field Orientation)
This parameter defines the rotation of the format field on the label. The point of rotation is
determined from the Field Justification parameter.
0 0 degrees (normal rotation)
1 180 degrees (upside-down rotation)
2 90 degrees (left rotation)
3 270 degrees (right rotation)
5.6.8 FJ (Field Justification)
This parameter defines the justification of the format field on the label.
0 Left Justified above the base-line
1 Right Justified above the base-line
2 Left Justified below the base-line
3 Right Justified below the base-line
4 Centered above the base-line
5 Centered below the base-line
Table 12 shows how to obtain the proper character placement or starting positions relative
to the format field’s orientations and justifications.
ROTATION FIELD ORIENTATION and JUSTIFICATION
0 – Left justified above the base-line
1 – Right justified above the base-line
0 & 180 Degrees
90 & 270 Degrees
2 – Left justified below the base-line
3 – Right justified below the base-line
4 – Centered above the base-line
5 – Centered below the base-line
0 – Left justified above the base-line
1 – Right justified above the base-line
2 – Left justified below the base-line
3 – Right justified below the base-line
4 – Centered on the Y axis, right of X coordinate
5 – Centered on the Y axis, left of the X coordinate
Table 12 FO & FJ Character Starting Positions
5.6.9 CMX (Character Multiplier X Direction)
The CMX parameter multiplies each character in the X direction. The valid range is 1 to
65536. For bar codes with a FO of 0 & 180 degree rotation, the CMX would be the
multiplier while the CMY would be the actual height in thermal dots. For bar codes with a
36 322M Operator’s Manual
Page 41

Chapter 5 Designing Labels Using LDS
FO of 90 & 270 degree rotation, the CMX would be the actual height in thermal dots while
the CMY parameter would be the multiplier.
5.6.10 CMY (Character Multiplier Y Direction)
The CMY parameter multiplies each character in the Y direction. The valid range is 1 to
65536. For bar codes with a FO of 90 & 270 degree rotation, the CMY would be the
multiplier while the CMX would be the actual height in thermal dots. For bar codes with a
FO of 0 & 180 degree rotation, the CMY would be the actual height in thermal dots while the
CMX parameter would be the multiplier.
5.6.11 CS (Character Spacing)
This parameter adjusts the spacing between each character. If this parameter is omitted,
then the default for the selected character generator (CGN) is used. The values (0-127) add
dots while (128-255) subtract dots. For example, a value of 4 would insert 4 dots between
the characters while a value of 131 would subtract 4 dots between the characters. Bar
codes have default spacing according to the indicated multiplier. Multiplying a text string will
not multiply the spacing between characters. This element may be used to properly space
the characters to create the desired printed effect.
5.6.12 TSP (Text Starting Position)
This parameter marks the starting position of the character in the text string to be used as
data. This is useful for allowing several fields to use sections of the same text string,
minimizing the amount of data transmitted. For example, for the text string 0123456789, a
TSP of 5 and a CC (Character Count) of 2 would print 45.
5.6.13 ,,, (Reserved Spaces)
These are spaces reserved for future use and nothing should be entered between the
comma delimiters.
5.6.14 AN (Attribute Number)
The AN parameter has four different effects. If set to a value of “0” the character spacing is
proportional. Reverse Text (white on black) is created by setting the AN to a value of “1”
and printing a black box on top of the text using the Line Draw function. (Special Note: The
AN of the line field should also be set to a “1” for proper reverse imaging.) If the AN
parameter is set to a value of “2”, the character spacing will be fixed / non-proportional. A
setting of “3” will print both fixed/non-proportional character spacing and reversed text.
0 Proportional Character Spacing
1 Reverse Video
2 Fixed / Non-proportional Character Spacing
3 Fixed / Non-proportional Character Spacing and Reverse Video
5.7 Line Draw
The Line Draw function uses ten different parameters to generate lines. The first position
may point to any valid text string but it is a good idea to always use “1” to make troubleshooting formats easier. The next positions are the XB and YB or placement coordinates
for the line. The following parameter is always left blank but is still surrounded by the
comma delimiter. The next parameter is a TCI of 6 (Line Draw) followed by three blank or
322M Operator’s Manual 37
Page 42

Designing Labels Using LDS Chapter 5
empty positions. Then the XS and YS parameters are used to specify the x and y size of
the line. Finally there is the AN or Attribute Number position. All fields defaulted must be
separated by the comma delimiter and a carriage return must follow each Line Draw format
field. All values for the Line Draw format line must be entered as positive integers.
The following is a list of the Line Draw field mnemonics and their default values:
TSN, XB, YB, , TCI, , , , XS, YS, , , , , AN
1, 1, 1, , 6, , , , 1, 1, , , , , 0
5.7.1 TSN (Text String Number)
The TSN parameter may point to any valid text string but it is a good idea to always use “1”
to make trouble-shooting formats easier. The text string that the TSN is pointing to must
contain at least one character in order for a line to print properly. A line will not print if the
TSN is pointing to a blank text string.
5.7.2 XB (X Beginning Coordinate)
The X coordinate of the field is measured in thermal dots. The far left edge of the label, as
viewed from the front of the printer, is X coordinate “1”. There is no X coordinate of “0”. The
X coordinates increase in size from the left to right. An XB of 203 would place the field one
inch (203/203 = 1) from the left side of the label.
5.7.3 YB (Y Beginning Coordinate)
The Y coordinate of the field is measured in thermal dots. A YB of 1 would be the bottom or
first edge of the label as viewed front the front of the printer. The Y coordinates increase in
size from the bottom to the top of the label. A YB of 203 would place the insertion point one
inch from the bottom of the label.
5.7.4 ,, (CONSTANT FIELD)
This field is always defaulted (two commas) when printing lines.
5.7.5 TCI (Text Conversion Identifier)
The TCI is always set to a “6” when printing lines.
5.7.6 ,,,, (CONSTANT FIELDS)
The next three fields (four commas) are always defaulted when printing lines.
5.7.7 XS (X Size)
The parameter is used to set the X size of the line. The valid range is 1 to 575.
5.7.8 YS (Y Size)
The parameter is used to set the Y size of the line. The valid range is 1 to 65536.
5.7.9 ,,,,, (CONSTANT FIELDS)
The next four fields (five commas) are always defaulted when printing lines.
38 322M Operator’s Manual
Page 43

Chapter 5 Designing Labels Using LDS
5.7.10 AN (Attribute Number)
The AN parameter has four different effects. If set to a value of “0” the character spacing is
proportional if available. Reverse Text (white on black) is created by setting the AN to a
value of “1” and printing a black box on top of the text using the Line Draw function.
(Special Note: The AN of the line field should also be set to a “1” for proper reverse
imaging.) If the AN parameter is set to a value of “2”, the character spacing will be fixed /
non-proportional. A setting of “3” will print both fixed/non-proportional character spacing
and reversed text.
0 Proportional Character Spacing
1 Reverse Video
2 Fixed / Non-proportional Character Spacing
3 Fixed / Non-proportional Character Spacing and Reverse Video
5.7.11 Line Draw Sample
Enter the following format to produce the sample shown in Figure 10.
^D57 <CR>
2,575,609,,25,35,0,1,285,0,0 <CR>
1,110,482,,6,,,,355,5,,,,,0 <CR>
1,286,127,,6,,,,5,355,,,,,0 <CR>
^D56 <CR>
^D2 <CR>
line <CR>
^D3 <CR>
Figure 10 Line Draw Sample
322M Operator’s Manual 39
Page 44

Designing Labels Using LDS Chapter 5
5.8 Reverse Video
The printer has the ability to produce Reverse Video by printing white text over a user
defined black background. Reverse Video can also be produced by manually placing a
black box on top of an existing image by using the Line Draw feature and setting the
Attribute Number (AN) to a value of “1”. It should be noted that the black background is
fixed and does not automatically adjust with the text. To produce large black backgrounds,
simply increase the line size.
Reverse Text (white on black) is created by setting the AN to a value of “1” and printing a
black box on top of the text using the Line Draw function. (Special Note: The AN of the line
field should also be set to a “1” for proper reverse imaging.) If the AN parameter is set to a
value of “2”, the character spacing will be fixed / non-proportional. A setting of “3” will print
both fixed/non-proportional character spacing and reversed text.
The following is a sample format demonstrating the reverse video function:
^D57
2,575,609,,25,35,0,1,285,0,0
1,125,300,13,1,5,,,,,,,,,1
1,110,285,,6,,,,350,80,,,,,1
^D56
^D2
REVERSE VIDEO
^D3
Figure 11 Reverse Video Sample
REVERSE VIDEO
40 322M Operator’s Manual
Page 45

Chapter 6: Printer Commands
The model 322M printer has a large and versatile collection of control codes to meet the
special needs of labeling applications. Most of the commands use the “^D” control
sequence, however the printer also recognizes a selected number of other control
sequences.
For all commands listed in this manual, the printer will recognize the one character control
code (“Ctrl+D”) or the two-character caret plus alpha character (“^+D+<CR>”) sequence. In
other words, the same command may be generated by either holding the control (Ctrl) key
down and pressing the alpha character or by entering the two characters – the ^ (caret,
generated when the “Shift” key is pressed and then the “6” key) and then the appropriate
alpha key (upper and/or lower case).
To protect against errors, in situations where the two-character caret and alpha sequences
are used exclusively as printer commands, the control character recognition may be
disabled. This is accomplished by either the “^D93” command or through software dip
switch #1 (^D21).
Some mainframe and mini-computers cannot use the ASCII “^” character. In these cases,
substitute the ASCII pipe symbol (“|”) or use the one-character control code representation.
6.1 Special Printer Control Codes
The printer to perform special functions uses the following control characters. All other
control characters will be ignored. Some of these instructions are also accessible through a
“^D” command sequence and will be noted as such.
^A Accumulator Mode: Used to supply the parameters for the ^D commands. These
parameters must be positive integers and are generally decimal numbers but may be
entered as binary if the ASCII B precedes the value or parameter. For example,
“^AB00000001^D21 <CR>” may also be entered as “^A1^D21 <CR>” as well.
^B Text Entry Mode: Instructs the printer to enter printable text entry mode. This
command (or the preferred “^D <CR>”) must be sent before the text string
information. This command is the equivalent of the “^D<CR>” sequence but does not
require the carriage return (^Btext string data). Because the “control B” is shorter it is
easier to use in direct terminal mode. In general it is better to use the ^D2 command
sequence inside a file or program to assist in trouble-shooting the format.
^C Print: Starts the print cycle or batch. This command is the equivalent of the
“^D3<CR>” command sequence but does not require the carriage return. Because
the “control C” is shorter than the ^D3 command sequence it is easier to use in direct
terminal mode. In general the ^D3 sequence is better to use inside a format and/or
program to assist in trouble-shooting the format.
322M Operator’s Manual 41
Page 46

Printer Commands Chapter 6
^D Command Mode: Used to issue commands to the printer. This command is
normally preceded by the ^A sequence. The ^D commands must be terminated with
a carriage return or another command sequence (^A9^D73^D3<CR> is the same as
^A9^D73<CR> and ^D3<CR>).
^E Printer Enquiry: When issued, this command is used to attain the current status or
operational state of the printer. The “^E” does not require a carriage return and is the
equivalent to the “^D5<CR>” command sequence. If Binary Compression is enabled
(default setting) the ^E and ^D5 commands will not function and five NULL characters
(HEX 00) are required to get the printer’s status. See section 6.2 for additional
information regarding the printer enquires.
^M Terminate Text or Data String: This command is the equivalent of the carriage
return character and is used to terminate commands and format lines.
^H DEL: This control code is used to delete the last printable character when
communicating to the printer through a keyboard via a terminal. The ^H is the
equivalent of the “Backspace” key on the keyboard.
^K Print Test Pattern: Used to generate a test pattern which consists of a series of
diagonal lines. The pattern is helpful in determining the condition of the thermal dots
on the print head. The ^K code is the equivalent of the “^D12 <CR>” command
sequence.
^L Form Feed: Used to feed one blank form based on the previous format configuration
parameters. This command is the equivalent of the “^D12 <CR>” command
sequence.
^Q XON: Instructs the printer to send data or resume sending data.
^S XOFF: Instructs the printer to stop sending data.
6.2 Printer Enquires
It is important for the host computer to know the status of the printer as labels are being
produced. This facilitates security in the system and flags electrical, mechanical, and
functional error conditions. Enquires also aid the system designer in adjusting the pace of
the printer with that of the operator.
The printer is capable of returning responses to enquires in three different ways depending
on how the machine is programmed (see software dip switch #1, ^D21 command). The text
equivalent response returns a defining word, giving the current stat of the printer. The “^”
equivalent returns the ASCII “^” response followed by the defining alpha character. The
control code equivalent returns the actual control code.
The printer will send to the host one of the following responses listed in Table 13 in
response to a series of 5 NULL characters or the “Ctrl+E” and/or “^D5<CR>” if binary
compression is disabled (refer to soft switch #3 position 7, ^D23 command).
42 322M Operator’s Manual
Page 47

Chapter 6 Printer Commands
^ALPHA or
TEXT RESPONSE
CONTROL
DEFINITION
CODE
>READY<
>CUTTER ERROR<
>INPUT 1<
>COUNT DONE<
>PRINTER PAUSED<
>PAPER JAM<
>VOLTAGE ERROR<
>DATA ERROR<
>TAKE LABEL<
>NO LABEL FORMAT<
>LOW STOCK<
>RESTARTED<
>UNDER VDD<
>OVER TEMP<
>OVER VDD<
^F
^G
^N
^O
^P
^R
^T
^U
^V
^W
^Y
^Z
^\
^]
^^
Normal Condition
Cutter cannot rotate
Auxiliary Input #1 triggered
Count has finished
Printer is paused
Paper not feeding properly
Voltage is out of operation range
Communication error
Printer is waiting for a label to be taken
A label format has not been loaded
Media supply is low or out
Printer has been reset
Head voltage is low
Print head is too hot
Head voltage is out of operational range
Table 13 Enquiry Responses
6.3 Sending ^D Printer Commands
Unless specified otherwise, these commands are entered by sending the ^Dxx command
where xx is the command number. The ^D commands are terminated by either issuing a
carriage return after the command or by issuing another command and/or control code.
Some commands load data or control numbers and are preceded by the ^Axx command.
The xx specifies the value and/or control number for the associating ^D command. The ^D
commands should precede or follow the actual format layout. They should be placed before
the ^D57 or just before the ^D3 print command.
All commands not listed in section 6.3.1 (Software DIP switches and non-volatile
commands) are not retained when the printer is turned off. These commands will be
required to send to the printer again after a power cycle.
When possible, the following commands are grouped by the intended function and not by
command number. Refer to the Quick Reference Command Summary listed in Appendix C
for a listing of command in numerical order.
6.3.1 Software DIP Switches and Non-Volatile Commands
The following commands are different from the other printer commands in that they are
stored in non-volatile memory and configure the printer upon power up. Once sent to the
printer they are not required to be resent unless changes are desired.
The following commands are loaded on power-up. Although they can be set, they will not
take effect until the printer has been restarted by either a soft reset (^D32 command) or by
cycling power or hard reset. The printer will not use the new settings until this has been
performed.
322M Operator’s Manual 43
Page 48

Printer Commands Chapter 6
^A ^D COMMAND
21 Change SW1: Software DIP Switch #1. The DIP switch commands may use
either the ^A(decimal) or ^AB(binary) value. Since each bit represents a setting for
the printer, the soft switches are always reported in binary.
For example: ^AB10100001^D21<CR> configures serial port #1 for text equivalent
enquiry responses, accept control codes, disables echo, and enables XON/XOFF
flow control.
^AB12345678 (each bit is represented by a numeric position number)
Position:
1,2 Enquiry Response: This determines what the printer will send back in
response to an enquiry command.
00 = Control Codes
10 = Text Equivalent
11 = ^ Equivalent
3 Control Codes: This position is used to set the printer’s handling of
control codes.
1 = Ignore Control Codes
0 = Accept Control Codes
4 Port #1 Parity Selection: Sets the printer port #1 parity for serial
communication.
1 = Odd Parity
0 = Even Parity
5 Port #1 Parity Enable: Sets the printer’s port #1 parity enable for serial
communication.
1 = No Parity
0 = Enable Parity
6 Echo: If this feature is enabled, the printer will echo all received
characters to the serial port.
1 = Enable
0 = Disable
7 Port #1 Data Bits: Sets the printer’s port #1 data bits for serial
communication.
1 = 8 Data Bits
0 = 7 Data Bits
8 XON/XOFF Flow Control: Sets software flow control handshaking.
CTS/RTS hardware handshaking is always enabled.
1 = Enable
0 = Disable
44 322M Operator’s Manual
Page 49

Chapter 6 Printer Commands
^A ^D COMMAND
22 Change SW2: Software DIP Switch #2. The DIP switch commands may use
either the ^A(decimal) or ^AB(binary) value. Since each bit represents a setting for
the printer, the soft switches are always reported in binary.
^AB12345678 (each bit is represented by a numeric position number)
Position:
1 Clear Text Function: If enabled, all variable text strings will be erased
when the ^D<CR> is processed.
1= Enable
0 = Disable
2 >RESTARTED< Response: If the printer has been reset and this
switch has been enabled, the printer will respond with the
>RESTARTED< message for the first enquiry to denote the reset
condition and then >READY< with following enquiries.
1 = Enable
0 = Disable
3 Button Use: If set to a “1”, the printer will disable the button function.
1 = Disable
0 = Enable
4 Print Button: Defines the print button. If set to a “0”, the button can be
used for feeding labels but the print function is disabled.
1 = Enable
0 = Disable
5 Power-up Format Type: Determines whether to use a saved format
file (1) or a ROM format. The printer must have battery backed memory
in order to save format files. The format is selected by switch positions
6, 7, and 8.
1 = Saved Format File
0 = ROM Format File
6,7,8 Power-up Format: These switches are used in conjunction with switch
5 above. They determine which stored format is loaded at power-up.
The printer can be instructed not to load a format at power-up by setting
all three switches to 0. (Please note: The printer will not print unless a
valid format has been loaded. A format may be loaded by using these
switches to automatically load a previously stored format or by simply
sending non-stored format to the printer.)
000 = No Power-up Format
001 = ROM or Saved Format File 1
010 = ROM or Saved Format File 2
011 = ROM or Saved Format File 3
100 = ROM or Saved Format File 4
101 = ROM or Saved Format File 5
322M Operator’s Manual 45
Page 50

Printer Commands Chapter 6
110 = Rom or Saved Format File 6
111 = ROM of Saved Format File 7
^D COMMAND
^A
23 Change SW3: Software DIP Switch #3. The DIP switch commands may use
either the ^A(decimal) or ^AB(binary) value. Since each bit represents a setting for
the printer, the soft switches are always reported in binary.
^AB12345678 (each bit is represented by a numeric position number)
Position:
1 Extended ASCII: If enabled, characters over HEX 7F will be
processed.
1 = Disable
0 = Enable
2 Invert >INPUT 1< Polarity: The >INPUT 1< message is normally
returned when the associated reflective sensor detects a signal. The
polarity of this signal should be inverted when used as a stock level
sensor.
3 Response After Print: If enabled, an enquiry response will be sent
through the serial communications port #1 (COM1) after every print.
1 = Enable
0 = Disable
4 Head Up Switch: Sets the state of the Head Up Switch. Not available
on the Model 322M printer.
1 = Enable
0 = Disable
5 ALWAYS 0
6 ALWAYS 0
7 Binary Compression: If enabled, the printer will accept downloaded
binary compressed font and/or graphic files. Enquiry responses are
generated by sending 5 NULL characters when binary compression is
enabled
1 = Enable
0 = Disable
8 Detect Black Line on Power-up: If enabled, the printer automatically
feeds labels on power-up to determine the proper ^D91 value.
1 = Enable
0 = Disable
46 322M Operator’s Manual
Page 51

Chapter 6 Printer Commands
^A ^D COMMAND
24 Change SW4: Software DIP Switch #4.
^AB12345678 (each bit is represented by a numeric position number)
Position:
5,6,7,8 Code Page Selection: Positions 5 through 8 are used to select from
1 Slashed Zeros: If enabled, the printer will print a slash through the
embedded zero (“0”) characters.
1 = Enable
0 = Disable
2 External Print Request: If enabled, the printer will check Pin 7 of the 9
pin serial connector located at the rear of the printer. If Pin 7 is low, the
printer will begin printing the last loaded label format. Printing will
continue until the signal on Pin 7 goes high.
1 = Enable
0 = Disable
3 Blow-Hole Media: Enable this position when using media that contains
a blow-hole or cut-slot registration mark used to identify the label size.
The Stock Out condition will not function properly if this position is not
enabled and this type of media is being used.
1 = Enable
0 = Disable
4 Auto-size on Power-up: When enabled, the printer automatically sizes
the label to determine the appropriate format header values on powerup. The printer will then use these values on all subsequent label
formats. Refer to the ^D39 command for additional information.
1 = Enable
0 = Disable
the available code pages stored within the printer..
0000 = Not Decoded (Default)
0001 = Danish
0010 = 860
0011 = Spanish
0100 = 850
0101 = German
0110 = 865
0111 = Swiss
1000 = 852
1001 = French
1010 = 863
1011 = Swedish
1100 = 437
1101 = Italian
1110 = English - UK
1111 = English – US
322M Operator’s Manual 47
Page 52

Printer Commands Chapter 6
^A ^D COMMAND
XX 36 Adjust Contrast Base: Used to adjust the contrast base of the printer to
achieve quality print images. The command is stored in non-volatile memory
and skews the entire contrast window (^D35 command). This command has a
^A range of 10 to 200%. Print head life is greatly reduced when using high
contrast settings (150 and greater) so using the lowest possible setting is
highly recommended.
6.3.2 Printing Commands
The following commands initiate printing or define the number of labels to be printed. All of
these commands are terminated by either a carriage return or by issuing another command
or control code.
^D COMMAND
^A
3 Print Command: Informs the printer to print a single label or start printing a
batch of labels. Since commands are processed in the order they are
received, this is typically the last command in the format file.
11 Print Test Pattern: Prints a label with diagonal lines that is used in
determining the condition of the thermal dots of the print head. This command
is equivalent to the “^K” control code.
12 Form Feed: Prints or scrolls a blank form based upon the previous format
definitions. This command is equivalent to the “^L” control code.
70 Clear Commands 73-76: Resets the ^D73 through ^D76 commands to their
default values.
XX 73 Load Copies Count: Instructs the printer to print multiple copies without
incrementing serial numbers. This command can be used in conjunction with
the ^D75 (Load Label Count) to allow duplicate copies to be made within a
batch of labels. For example, the following command string will print a total of
150 labels; three copies of each serial number for the 50 different labels.
(^A3^D73^A50^D75^D3<CR>)
1 74 Infinity Print: Prints a batch of labels until the printer is turned off. This
command is most effective when used in conjunction with the Tag/Tear and
Peel-n-Dispense modes. The “^A1” enables the Infinity Print while a “^A0” will
disable this function.
XX 75 Load Label Count: Instructs the printer to print a batch of labels using the
serial number function if enabled. If the serial number function is disabled, the
^D75 command will print the number of copies (the same label) specified by
the “^Axx” sequence just like the ^D73 command. This command may also be
used in conjunction with the ^D73 command. The batch of labels is printed
once a ^D3 command is executed; therefore the ^D75 command must be
issued before the ^D3 command. The only difference between this command
and the ^D73 is the ability to increment and/or decrement sequential numbers
in a batch.
48 322M Operator’s Manual
Page 53

Chapter 6 Printer Commands
^A ^D COMMAND
XXX 76 Load Delay Time Between Printed Labels: Delays the printing between
labels in a batch. The “^Axxx” specifies the delay time in tenths of a second
with a maximum value of 650. For example, “^A10^D76<CR>” would
introduce a one second delay between printed labels. This command is
typically used in conjunction with the Peel-n-Dispense mode and applicators.
6.3.3 Auto-sizing and Valid GAP Commands
The auto-size command attempts to automatically calculate important format values for the
label header including LSY, GAP, AGD, SPG and the ^D91 value. The printer feeds a
sample of labels through the GAP sensors and takes an average of the values it receives.
The auto-size command uses the appropriate sensors to detect the registration marks set
by the ^D47 command. Before issuing the auto-size command, verify that the ^D47 is set to
the proper setting for the media being used.
When using media that contains a blackline for the registration mark, first execute the
^A1^D47<CR> command sequence before issuing the auto-size command or the results
may be invalid.
When using media that contains a blow-hole, set software switch #4 (^D24 command) for
blow-hole detection and then issue the desired auto-siz e command before issuing the autosize command or the results may be invalid.
.
^D COMMAND
^A
39 Auto-size:
0 Clears the use of auto-size values set by issuing the ^A1^D39<CR>.
1 Uses the values obtained for header variables instead of what is specified in
the format file’s header.
2 Automatically sizes the label and displays to the terminal screen the values for
the format header.
3 Same as ^A2^D39<CR>, but the values will be printed on the media.
5 Diagnostic Mode that steps the motor while displaying the readings from the
GAP detectors to determine the media’s proper ^D91 setting. This is also
referred to as “tick-tick” mode.
^D COMMAND
^A
XX 91 Gap Detection Sensitivity: The proper value is obtained by using the ^D39
auto-size commands. The ^Axx value sets the point (0-255) at which the
printer detects a gap, blow-hole and/or blackline. When the printer is
powered-up or reset, this command defaults to a value of 30 if using the
transmissive sensor and 120 if using the reflective sensor. Although the
default value should work properly with most media types, it is a good idea to
place this command at the beginning of all format files in order to guarantee
that the printer will properly detect your media’s registration mark. If this value
322M Operator’s Manual 49
Page 54

Printer Commands Chapter 6
is not set correctly, the printer may not detect a GAP properly or report an
invalid >LOW STOCK< error. This value can be obtained by issue the ^D39
command as stated above.
6.3.4 Serial Number Commands
The following commands, ^D80 through ^D89, are used for the serial number function
commands of the printer. The printer can increment or decrement any single serial number
on the label by any amount. If the format contains more than one serial number, then all
serial number fields can only increment or decrement by a value of one. Single and Multiple
serial number commands cannot be used on the same format. Please note that the ^D57
command clears most of the serial number commands. Therefore, all serial number
commands should be placed after the ^D56 command or just prior to the ^D3 command.
Refer to section 6.3.2 for additional information regarding the use of the ^D75 command and
the serial number functions.
The following two commands are valid for both single and multiple serial number functions:
^D COMMAND
^A
80 Clears Commands 86, 88, 89.
81 Disable Serial Number Function: This command disables both single and
multiple serial number functions.
The next three commands deal with the single serial number functions:
^D COMMAND
^A
XX 84 Load Text String Number to Increment/Decrement: Instructs the printer
which text string number to increment or decrement. The ^Axx value
determines which of the text strings will be used for incrementing or
decrementing.
XX 85 Load Increment/Decrement Step Value: This is the value that the single
serial number functions is incremented or decremented. The ^Axx is the value
that specifies the step value used to increment or decrement.
X 86 Single Serial Number Status:
0 Disable increment and decrement
1 Enable increment. The serial number will be incremented by the step value
specified by the ^D85 command.
2 Enable decrement. The serial number will be decremented by the step value
specified by the ^D85 command.
The next three commands determine the status of multiple serial numbers:
^D COMMAND
^A
XX 87 Load Field Number to Clear Increment/Decrement: This command is used
to clear the status of one or more fields that are using the serial number
increment/decrement function. Example: A “^A1^D87<CR>” instructs the
50 322M Operator’s Manual
Page 55

Chapter 6 Printer Commands
printer to clear the increment/decrement function of text string number 1 or the
first text string.
^D COMMAND
^A
XX 88 Load Field Number to Increment by 1: The ^Axx specifies which field to
increment by one.
XX 89 Load Field Number to Decrement by 1: The ^Axx specifies which text string
field that will be decremented by one.
A sample format using the single serial number function:
^D57 <CR>
1,575,609,,25,35,0,1,285,0,0 <CR>
1,280,300,2,1,5 <CR>
^D56 <CR>
^A2^D86 <CR>
^A1^D84 <CR>
^A5^D85 <CR>
^A3^D75 <CR>
^D2 <CR>
20 <CR>
^D3 <CR>
This format would enable the decrement function (^A2^D86). Select text string #1 to
decrement (^A1^D84), load the step value of 5 (^A5^D85) and then print three serialized
labels (^A3^D75). The printed result would be “20” for the first label, “15” for the second
label, and “10” for the third or last label.
A sample format using the multiple serial number function:
^D57 <CR>
2,575,609,,25,35,0,1,285,0,0 <CR>
1,280,300,3,1,5 <CR>
2,280,100,3,1,5 <CR>
^D56 <CR>
^A1^D88 <CR>
^A2^D89 <CR>
^A3^D75 <CR>
^D2 <CR>
100 <CR>
200 <CR>
^D3 <CR>
This format would enable the multiple serial number function and select the first text string to
increment by one (^A1^D88), the second field to decrement by one (^A2^D89), and print
322M Operator’s Manual 51
Page 56

Printer Commands Chapter 6
three serialized labels (^A3^D75). The first text string would be printed as “100”, “101”, and
“102” while the second text string is printed as “200”, “199”, and then finally “198”.
6.3.5 Saving Format Commands
The printer can store up to 128 format files into the printer’s RAM. Once stored, these files
can be loaded from memory increasing throughput. With the use of the battery backed
RAM option, the printer will retain these stored formats even after power has been cycled.
The printer can also be configured through software switch #2 (^D22 command) to
automatically process the format once the printer has powered-up. The printer treats the
stored formats as if they were sent through the serial port.
The maximum number of stored files depends on the size of the files and the amount of
memory available. The model 322M provides 512K of RAM, which offers about 448K of
memory available for file storage.
^D COMMAND
^A
XX 54 Send Saved Format to Serial Port: The ^Axx selects the memory slot (1-
128) that is sent to the serial port. This command is typically used at a
terminal to interrogate what formats have been stored in the printer’s memory.
XX 58 Process Saved Format: The ^Axx selects which memory slot (1-128) to
process from the printer’s memory.
XX 59 Save Format File: The ^Axx selects which memory slot (1-128) that the
format is to be saved in the printer’s memory. The format file must be
terminated by an ESC (HEX 1B) character in order to save formats.
100 Clear User RAM: This command will clear all contents of the printer’s RAM
including saved formats, downloadable fonts, and graphics. This command
must be issued before saving format files to an occupied memory slot. It is a
good idea that the ^D100 command is sent before saving the first file into the
printer’s memory to be sure that an existing memory slot is not occupied.
There is currently no way to erase or change individual memory slots.
Before sending the first downloadable font, graphic, or format file the RAM must be initiated
by sending the ^D100 <CR> command. This command will erase all files stored in the
printer’s user memory. Only use this command before sending the first file or when a total
RAM memory clear in desired.
After memory is cleared, formats may be saved into the printer’s memory by using the
^Ax^D59 <CR> command sequence where, “x” is the desired memory slot to save the
format. The format file must be terminated with an ESC (HEX 1B) or “^[“ (left bracket)
character. This instructs the printer that the complete file has been received. Anything
entered between the ^D59 command to the ESC character will be saved into the selected
memory slot.
The saved format may be recalled or processed by entering the ^Ax^D58 <CR> command,
where “x” is the memory slot where the format was saved. Once this command is issued,
the format will be processed as if sent to the serial port.
52 322M Operator’s Manual
Page 57

Chapter 6 Printer Commands
It is important to note that the saved format file function works extremely well with variable
text and greatly improves throughput. Simply configure the format file with the label header,
format field data, fixed text, and terminate the file with the ESC character. The format may
then be accessed by using the ^Ax^D58<CR> command to process the format and then text
may be entered followed by the ^D3 print command.
To list a saved format that has been previously stored in the printer’s memory, use the
^Ax^D54 <CR> command sequence to list the format to the serial port. This is helpful in
determining if a memory slot has been taken and not available.
The sample formats below demonstrate how to use the memory commands. File #1
Initiates memory clear, and then saves a format into slot #1. File #2 recalls the format
stored in slot #1, enters text and then prints. Refer to Figure 11 for the printed
representation of File #2 below.
File #3 shows the format that is saved in File #1 being accessed a second time with different
text string data. Notice that the CC (Character Count) stored in the format of File#1 is set to
the highest number of characters that is allowed to print. The second text string only has a
CC of 6, so only the first 6 characters (Inform) will print on the second line of format File#3,
see Figure 12.
File #1
^D100 <CR>
^A1^D59^D57 <CR>
2,575,609,,25,35,0,1,285,0,0 <CR>
1,300,500,9,1,5,0,4,2,2,,,,,0 <CR>
2,300,400,6,1,5,0,4,2,2,,,,,0 <CR>
^D56 <CR>
^D2 <CR>
Saved <CR>
<CR>
<ESC> Character (HEX 1B or “^[“)
File #2
^A1^D58<CR>
<CR>
Format <CR>
^D3 <CR>
File #3
^A1^D58<CR>
Different<CR>
Information <CR>
^D3 <CR>
322M Operator’s Manual 53
Page 58

Printer Commands Chapter 6
Figure 12 ^D58 - File #2 Print Sample
Different
Figure 13 ^D58 - File#3 Print Sample
Saved
Format
Inform
6.3.6 Dispensing Commands
Dispensing commands are commands that advance the media for cutting, tear off, or
presenting and then retract the media to a home position so that media is not wasted.
These dispense commands include Peel-n-Dispense, Tag/Tear, Cutter commands, and
54 322M Operator’s Manual
Page 59

Chapter 6 Printer Commands
optional media handling commands as well. The following commands define these types of
operations.
^D COMMAND
^A
XX 95 Advance/Retract Distance: This command is used in conjunction with the
tag/tear (^D97), peel-n-dispense (^D98), and cutter (^D99) commands. It is
used to adjust the number of steps the printer will advance the media after
printing has stopped and then retract the same distance so that media is not
wasted. While the maximum value is 64,000 steps, it is not recommended that
the printer advances further than one label size. This may create a paper jam
when the label is retracted back into the printer.
XX 96 Load Advance Delay: The ^Axx specifies the amount time, in milliseconds,
that the printer will delay the repositioning or retraction of the media. For
Example, “^A1000^D96 <CR>” would delay for a period of one second.
X 97 Tag/Tear Operation: This command controls a method of dispensing the
media so that the perforation between labels is positioned on the tear bar or
peel edge. The peel edge assists in tearing the media after printing has
occurred. The distance that the printer advances is defined by the ^D95
command.
0 Disable Tag/Tear operation.
1 Advance after every print. This command is typically used in conjunction with
an optional LPS (Label Present Sensor) installed on the printer. This
command instructs the printer to advance the media by the amount specified
by the ^D95 command to the tear edge. Once the media has been advanced,
the printer will wait for the media to be removed before retraction occurs and
printing continues. This command will assume a ^D95 value of 162 if one is
not specified and uses the optional LPS.
2 Advance after copies count. This command is typically used in conjunction
with an optional LPS (Label Present Sensor) installed on the printer. This
command instructs the printer to advance the media by the amount specified
by the ^D95 command to the tear edge after printing the number of labels
specified by the copies count (^D73) or labels count (^D75) commands. Once
the media has been advanced, the printer will wait for the media to be
removed before retraction occurs and printing continues. This command will
assume a ^D95 value of 162 if one is not specified and uses the optional LPS.
3 Advance when idle. This command does not use the optional LPS. After
printing a label, if no other label is being processed or idle, the command
instructs the printer to advance the media by the amount specified by the ^D95
command. When the printer receives the next print request, it retracts the
media and prints the next label. This command will assume a ^D95 value of
162 if one is not specified and does not use the optional LPS.
322M Operator’s Manual 55
Page 60

Printer Commands Chapter 6
X 98 Peel-N-Dispense: This command is used when the labels are to be peeled
from the backing material, and is typically used in conjunction with an optional
LPS (Label Present Sensor) installed on the printer. This command instructs
the printer to advance the media by the amount specified by the ^D95
command to the tear edge. Once the media is advanced, the printer will wait
for the media to be removed before retraction occurs and printing continues.
This command is very similar to the ^A1^D97 command but will assume a
^D95 value of 83 so that the media is advanced just short of the tear bar. The
proper value for the ^D95 command should allow the label to be peeled from
the backing material and then remain hanging from the peel edge. This
command uses the LPS and Peel-n-Dispense options. The ^A3^D98
command is used in conjunction with the Printed Media Presenter (PMP)
option. The ^A3^D98 mode will allow the cutter to operate in conjunction with
the ^A1^D98 command operation.
0 Disable peel-n-dispense operation.
1 Enable peel-n-dispense operation.
2 Custom Applicator Mode (Peel-n-Dispense without a delay).
3 Enable PMP Mode with LPS sensor.
X 99 Cutter Control: This command controls the enablement of full and/or partial
optional cutters. This command works in conjunction with the ^D102 and
^D103 Cut Interval commands. The ^D95 command is also used with the
^D99 command to adjust the advance distance to the cutter blades and then
retract to the home position (dot row one). The ^D99 command will assume a
default ^D95 value of 155.
0 Disable Cutter operation.
1 Enable Full Cut.
2 Enable Partial Cut.
3 Enable Full and Partial Cut.
XX 102 Full Cut Interval: Instructs the printer when to issue a Full Cut. The default
value is 1. A value of “1” results in a full cut whenever the copies count is
reached, or after each format if a copies count has not been specified. If this
command is set higher than “1” (maximum of 65536), the printer will full cut
when that quantity is reached. This command will not operate if the Cutter
Control (^D99) command is set to full cut.
XX 103 Partial Cut Interval: This command instructs the printer when to issue a
Partial Cut. A partial cut requires the use of a Cutter that is capable of Partial
cuts. Partial Cut is when a thin piece of media, in the center, holds the media
together and the printer waits until the media is removed before printing the
56 322M Operator’s Manual
Page 61

Chapter 6 Printer Commands
next label. The default Partial Cut Interval is set to 1. The printer will issue a
partial cut, if set to a 1, whenever the copies count is reached. If set to a value
greater than 1, the printer will partial cut when that quantity is reached. This
command only functions when the Cutter Control (^D99) command is set to
allow partial cuts.
Please note that a full cut will override a partial cut. The following examples assume that
the ^D99 command has been set to 3. Example #1: If the Full Cut Interval is set to a value
of 5 and the Partial Cut Interval is also set to a value of 5, the printer will issue a Full Cut.
Example #2: If the Full Cut Interval is set to a value of 5 and the Partial Cut Interval is set to
a value of 1, the printer will partial cut after labels 1 through 4 and full cut after label 5.
6.3.7 Text String Commands
These commands offer special functions pertaining to the text strings. Some of the special
functions would include Pre-padded text and auto-print.
^D COMMAND
^A
60 Clears Command ^D61
XX 61 Mark Text Staring Position: The ^Axx specifies which text field to start
entering new data. This is useful for creating variable text fields after a string
of fixed text fields. If set to a value of 2, the first line of new text entered
following the ^D2 will overwrite line two. If two new text strings are entered,
the existing text lines two and three will be overwritten. This command is used
when fixed data is used much like a template and only the variable data is to
change.
62 Pre-padded Text: This command is used to pre-pad text data. Any data
already loaded into a field will be retained if the ^D62 command is sent. The
following is an example of Pre=padded text:
^D57<CR>
3,575,609,,25,35,0,1,285,0,0 <CR>
1,300,500,7,1,5<CR>
2,300,400,7,1,5<CR>
3,300,300,7,1,5<CR>
^D56 <CR>
^D2 <CR>
A<CR>
B<CR>
C<CR>
^D62<CR>
^D2<CR>
line 1<CR>
line 2<CR>
line 3<CR>
^D3<CR>
This format would produce a label with “Aline 1”, “Bline2”, and “Cline 3” printed
on the label.
322M Operator’s Manual 57
Page 62

Printer Commands Chapter 6
X 63 Text Control Mode: Allows the entry of new text without the ^D2 command
and/or clears all previous text when new text is added.
0 Disable modes 1 and 2.
1 Enable Auto-Print mode. If this mode is selected, the printer will accept new
text strings without requiring the ^D2 command. The printer can also autoprint a label when the number of received text strings (carriage returns) equal
the number specified by the ^D64 command. This mode is useful when
interfacing to a scale, bar code wand of other limited host that is capable of
generating and sending carriage return characters.
2 Clear Previous Text Upon Receiving New Data. When one of more characters
of new text is entered, the all-existing text data will be erased. The printer may
be programmed to enter the mode automatically upon power-up by position 1
of software switch #2 (^D22 command).
3 Enable modes 2 and 3.
XX 64 Auto-Print String Count: This command is used in conjunction with the
^A1^D63 auto -print command. The ^Axx specifies the number of text strings
(carriage returns) to accept before issuing the print command. When the
printer is in the auto-print mode, it is not necessary to send the ^D2 command
to enter text or the ^D3 command to initiate printing. The printer will accept
incoming text strings and print the label as soon as the number of strings
equal the amount specified by the ^D64 command.
The following is an example of the ^D61, ^D63, and ^D64 commands:
^A0^D64<CR> (Clears any old settings)
^D57<CR>
6,575,609,,25,35,0,1,285,0,0 <CR>
1,300,300,20,1,4<CR>
2,300,250,20,1,4<CR>
3,300,200,20,1,4<CR>
4,300,150,20,1,4<CR>
5,300,100,20,1,4<CR>
6,300,50,20,1,4<CR>
^D56 <CR>
^D2 <CR>
Protected Field<CR>
Protected Field<CR>
Protected Field<CR>
Variable Field<CR>
Variable Field<CR>
Variable Field<CR>
^A3^D63<CR> (Enables Auto-Print and Clears text)
^A3^D64<CR> (Instructs printer to print after 3 <CR>)
^A3^D61<CR> (Instructs printer to start text entry at line 3
instead of line 1)
58 322M Operator’s Manual
Page 63

Chapter 7: Downloadable Graphics
The printer has 255 memory slots available for storing downloadable fonts and/or graphics.
Existing graphic images may be converted to the proper format for the printer by using
either converter “PCX2MIC.exe” for PCX images or “BMP2MIC.exe” for BMP images. The
graphic image format sections are provided to support developers that wish to create
graphic images within their own applications.
7.1 Using the Graphic Conversion Utilities
The following section details the process required to convert and download graphic images
to the printer. The conversion utilities “PCX2MIC.exe” and “BMP2MIC.exe” may be
downloaded at http://www.microocmcorp.com. These 16 bit DOS utilities convert PCX and
BMP monochrome type graphic images to a format that is suitable for downloading to the
printer.
7.1.1 PCX2MIC.exe Program
1. Run the PCX2MIC program from a DOS prompt.
2. Follow the on screen instructions and note the slot number where the image is saved
(use the model 412 printer).
3. Make sure the destination memory slot is clear. The ^D100 command can be used
to clear the printer’s memory.
4. Download the resulting file (filename N12 (normal rotation) or R12 (rotated)) file to
the printer.
5. Refer to section 6.3.5 for detailed information on printing images.
7.1.2 BMP2MIC.exe Program
1. Run the BMP2MIC program from a DOS prompt.
2. Follow the on screen instructions and note the slot number where the image is saved
(use the model 412 printer).
3. Make sure the destination memory slot is clear. The ^D100 command can be used
to clear the printer’s memory.
4. Download the resulting file (filename N12 (normal rotation) or R12 (rotated)) file to
the printer.
5. Refer to section 6.3.5 for detailed information on printing images.
322M Operator’s Manual 59
Page 64

Downloadable Graphics Chapter 7
7.2 Graphic Image Download Methods
The printer supports both compressed and uncompressed graphic and font downloads. The
compressed (^D107) format shortens the download time by reducing the number of bytes
sent to the printer. Please note that the compressed format is only usable on 8-bit data
connections and will not function on 7-bit data connections. The uncompressed (^D104) is
usable on either 7 or 8-bit connections, is more flexible, and encodes using ASCII-HEX.
This results in a much larger file size. Microcom Corporation recommends the use of the
compressed format when possible.
7.2.1 Compressed Binary Image (^D107)
This command allows graphic images or fonts (fonts must be less than 64KB
uncompressed) to be transmitted in binary, reducing the number of bytes sent to the printer.
Furthermore, this command allows for data compression by converting strings of 0 HEX or
FF HEX to shorter byte-plus-count sequences. These sequences are then expanded to the
original number of bytes inside the printer. This command is only useable on data
connections that support 8-bit data such as a serial port configured for 8 Data Bits and no
parity or a parallel port. This command will not function correctly with a serial port
configured to 7-bit data bits.
The following is the format of the ^D107 command when used with a graphic image file.
^A<Memory Slot Number>^D107<CR>
<Rotation> <Count> <Image Data>
Where:
<Memory Slot Number> is the memory slot location (1-255) where the graphic will be saved
in the printer’s memory. The printer uses the same TCI of “8” to select downloadable fonts
or graphics. Therefore a font and a graphic cannot have the same Slot Number or CGN
number.
<Rotation> is an 8-bit integer, 0 for an upright font and 1 for a 90-degree rotated image.
<Count> is a 32-bit integer, least significant byte first. This is the number of uncompressed
bytes that the image uses, not the number of bytes that will actually be transmitted. Due to
compression, the number of bytes transmitted will normally be less than this number.
<Image Data> is the compressed binary image.
Compressed Algorithm
The binary data that make up the image file is a run-length compressed version of the
image data described in section 7.2. Bytes with a value of 0 HEX of FF HEX are followed
by another byte indicating the number of times that value is repeated.
For example: Suppose the original (uncompressed) image file has a sequence of bytes like:
(All values are listed in Hexadecimal)
“00 01 02 03 04 00 00 00 00 00 00 FF FD FF FF FF FF FF 00 FF”
The encoded result would like this:
60 322M Operator’s Manual
Page 65

Chapter 7 Downloadable Graphics
“00 00 01 02 03 04 00 05 FF 00 FD FF 04 00 00 FF 00”
Result interpretation:
00 - the first byte is 00
00 - count of 0 (the previous 00 byte is not repeated or repeated zero times)
01 - a 01 byte
02 - a 02 byte
03 - a 03 byte
04 - a 04 byte
00 - another 00 byte in the file
05 - the 00 byte is repeated 5 times for a total of 6 “00” bytes (00+05=6 “00” bytes)
FF - a FF byte
00 - count of o (the previous FF byte is not repeated or repeated zero times)
FD - a FD byte
FF - another FF byte
04 - the FF byte is repeated 4 times for a total of 5 “FF” bytes (FF+04 = 5 “FF” bytes)
00 - another 00 byte
00 - repeat count = 0
FF - another FF byte
00 - repeat count = 0
The compression scheme is slightly inefficient for single 00 HEX and FF HEX occurrences
by entering two for each of these occurrences but most image bitmaps include large areas
of either blank space (00 HEX) or black space (FF HEX).
If a string of more than 255 00 HEX or FF HEX occurs, the byte-plus-count sequence may
be repeated as often as necessary to incorporate all occurrences of the byte. For example,
a string of 1132 “FF” HEX bytes in sequence may be encoded as:
“FF FF FF FF FF FF FF FF FF 6B”
The first four pairs of FF HEX each encode 256 bytes of FF HEX (one for the fist FF byte
and 255 copies) totaling 1024 bytes of FF HEX. The next FF HEX byte adds another and
the 6B HEX adds 107 additional copies for a total of 1132 FF HEX bytes.
(4 X 256)+1+107 = 1132
7.2.2 Uncompressed Image (^D104)
This command allows graphic and/or font images (fonts must be less than 64KB
uncompressed) to be transmitted in ASCII-HEX, thereby allowing all data to pass over 7 or
8-bit data connections. This command is useable on data connections that support either 7
or 8-bit data.
The following is the format of the ^D104 command when used for a graphic image file:
^A<Slot Number>^D104<CR>
<Rotation> <Count> <Image Data>
Where:
<Memory Slot Number> is the memory slot location (1-255) where the graphic will be saved
in the printer’s memory. The printer uses the same TCI of “8” to select downloadable fonts
322M Operator’s Manual 61
Page 66

Downloadable Graphics Chapter 7
or graphics. Therefore a font and a graphic cannot have the same Slot Number or CGN
number.
<Rotation> is an 8-bit integer, 0 for an upright font, and 1 for a 90-degree rotated image.
<Count> is a 32-bit integer, least significant byte first. This is the number of bytes that the
image uses.
<Image Data> is the graphic image data that has been converted to ASCII-HEX.
ASCII-HEX Conversion
The ASCII-HEX conversion is performed by “OR’ing” the most significant and least
significant nibbles of every byte with “30” HEX.
For Example: To convert the byte “6C” to ASCII-HEX, simply OR the first and second
nibbles with “30” HEX. This results in the two bytes “36” HEX and “3C” HEX. This
conversion results in a file size that is twice as big as the source, the data can now be
transmitted over a 7-bit data connection.
6 C
36 3C
Figure 14 ASCII-HEX Conversions
6C
7.3 Graphic Image Data Format
The image data consists of a set of data structures and location offsets to those structures.
All data is stored in binary form. Multi-byte values are stored least-significant-byte first.
The method illustrated below allows graphic images to span 64KB memory segments.
When using graphics over 64KB, the printer will determine the number of 64KB slots
required to store the entire graphic and will split the large file into the correct number of
smaller files internally. The printer stores these smaller files sequentially in the slots
following the one specified in the appropriate load or save graphic command. Therefore,
before sending a graphic file that is 64KB or more (uncompressed size), make sure that the
specified font slot has enough following empty slots to store the file properly.
62 322M Operator’s Manual
Page 67

Chapter 7 Downloadable Graphics
Graphics that are stored in multiple slots in this way may still be printed as if they are one
large graphic. In the label format, refer to the first slot (the one specified in the download
command) regardless of how many slots that may be required for large graphics. The
printer will automatically append the additional graphic files seamlessly without additional
user intervention.
(Word is a 16-bit value, Byte is an 8-bit value, and Label is a location within the file)
Label start: the beginning of the file
Word, Word, lookup_table_offset distance in bytes from start to beginning of
lookup_table (4 bytes)
Word tallest_char height of graphic image in dots
Word widest_char Width of graphic image in dots
Byte default_spacing Default spacing, usually 0
Byte byte_width Width of graphic image in bytes
Byte first_char 20 HEX
Byte last_char 20 HEX
Byte default_char 20 HEX
Label lookup_table beginning of lookup table
Word char_offset [last_char-first_char] an array of offsets, one for each character in
font. Each offset is the distance, in bytes,
from the start to the beginning of the
corresponding character’s data structure.
The first word in this array is the offset to the
first character’s data; the last word is the
offset to the last character’s data.
Label first_char_data the beginning of the graphic image data
Word char_height height of this character’s bitmap in dots
Word char_width width of the graphic image in dots
Byte bitmap_data[char_height][byte_width] bitmap of character, 2d array. The most
significant bit of the first byte in each row,
prints as the right most dot of the character,
and the first row is the bottom row when
printed.
322M Operator’s Manual 63
Page 68

Downloadable Graphics Chapter 7
7.4 Downloadable Graphics Command Summary
The following commands refer to the use of downloadable fonts and graphics:
^D COMMAND
^A
100 Clear User RAM: This command clears all downloadable fonts, graphics, and
stored label formats.
101 List Memory Bytes Available: The printer will send the “>” character followed
by the amount of available bytes and then finally a “<” character. (i.e.
>192690<)
XX 104 Load Graphic Images or Fonts into User Memory without Compression:
The ^Axx specifies which memory slot to place the image/font (1-255). This
command should be used with an ASCII-HEX file that contains only printable
characters less then 80 HEX. This command supports graphics over 64KB.
XX 106 Load Graphic Images or Fonts into User Memory without Compression:
This command is intended for legacy support only and Microcom Corporation
recommends either the ^D104 or ^D107 commands. Fonts must be less than
64KB for this command to function.
XX 107 Load Graphic Images or Fonts into User Memory using Binary
Compression: The ^Axx specifies which memory slot to place the image/font
(1-255). This command will greatly reduce the image download time and
should be used whenever possible. This command may only be used with 8bit data connections and will not function on 7-bit data connections.
64 322M Operator’s Manual
Page 69

Chapter 8: Downloadable Fonts
The printer has 255 memory slots available for storing downloadable fonts and/or graphics.
The printer treats downloadable fonts just like the standard bitmapped font mentioned in
Chapter 5. Both LaserJet™ and TrueType® fonts can be converted using the
“SFP2MIC.exe” or “TTF2MIC.exe” software utilities. Note: The “SFP2MIC.exe” program
uses the Portrait or 0 degree source rotation for both normal and rotated fonts.
Downloadable font fields use the same structure as the bit mapped fields with the only
difference being that the TCI must be set to an “8” for downloadable fonts and the CGN
refers to the memory slot location of the downloaded font.
8.1 Using the Font Conversion Utilities
The following section details the process required to convert and download fonts to the
printer. The conversion utilities “SFP2MIC.exe” and “TTF2MIC.exe” may be downloaded at
http://www.microcomcorp.com. These 16 bit DOS utilities convert LaserJet™ SFP or
TrueType® TTF fonts into a format that is suitable for downloading to the printer.
8.1.1 SFP2MIC.exe Program
1. Run the SFP2MIC program from a DOS prompt.
2. Follow the on screen instructions and note the slot number where the image is saved.
The 322M uses the same font structure as the Model 412 printer. Select the Model
412 printer when converting fonts for the 322M printer.
3. Make sure the destination memory slot is clear. The ^D100 command can be used
to clear the printer’s memory.
4. Download the resulting file (filename N12 (normal rotation) or R12 (rotated)) file to
the printer.
5. Refer to section 6.3.5 for detailed information on printing images.
8.1.2 TTF2MIC.exe Program
1. Run the TTF2MIC program from a DOS prompt.
2. Follow the on screen instructions and note the slot number the image is saved. The
322M uses the same font structure as the Model 412 printer. Select the Model 412
printer when converting fonts for the 322M printer.
3. Make sure the destination memory slot is clear. The ^D100 command can be used
to clear the printer’s memory.
4. Download the resulting file (filename N12 (normal rotation) or R12 (rotated)) file to
the printer.
5. Refer to section 6.3.5 for detailed information on printing images.
322M Operator’s Manual 65
Page 70

Downloadable Fonts Chapter 8
8.2 Font Download Methods
The printer supports both compressed and uncompressed graphic and font downloads. The
compressed (^D107) format shortens the download time by reducing the number of bytes
sent to the printer. Please note that the compressed format is only usable on 8-bit data
connections and will not function on 7-bit data connections. The uncompressed (^D104) is
usable on either 7 or 8-bit connections and is more flexible but encodes using ASCII-HEX.
This results in a much larger file size. Microcom Corporation recommends the use of the
compressed format when possible.
8.2.1 Compressed Binary Image (^D107)
This command allows graphic images or fonts (fonts must be less than 64KB
uncompressed) to be transmitted in binary, thereby reducing the number of bytes sent to the
printer. Furthermore, this command allows for data compression by converting strings of 0
HEX or FF HEX to shorter byte-plus-count sequences. These sequences are then
expanded to the original number of bytes inside the printer. This command is only useable
on data connections that support 8-bit data such as a serial port configured for 8 Data Bits
and no parity or a parallel port. This command will not function correctly with a serial port
configured to 7-bit data bits.
The following is the format of the ^D107 command when used with a graphic image file.
^A<Memory Slot Number>^D107<CR>
<Rotation> <Count> <Image Data>
Where:
<Memory Slot Number> is the memory slot location (1-255) where the graphic will be saved
in the printer’s memory. The printer uses the same TCI of “8” to select downloadable fonts
or graphics. Therefore a font and a graphic cannot have the same Slot Number or CGN
number.
<Rotation> is an 8-bit integer, 0 for an upright font and 1 for a 90-degree rotated image.
<Count> is a 32-bit integer, least significant byte first. This is the number of uncompressed
bytes that the image uses, not the number of bytes that will actually be transmitted. Due to
compression, the number of bytes transmitted will normally be less than this number.
<Image Data> is the compressed binary image.
Compressed Algorithm
The binary data that makes up the image file is a run-length compressed version of the
image data described in section 7.2. Bytes with a value of 0 HEX of FF HEX are followed
by another byte indicating the number of times that value is repeated.
For example: Suppose the original (uncompressed) image file has a sequence of bytes like:
(All values are listed in Hexadecimal)
“00 01 02 03 04 00 00 00 00 00 00 FF FD FF FF FF FF FF 00 FF”
66 322M Operator’s Manual
Page 71

Chapter 8 Downloadable Fonts
The encoded result would like this:
“00 00 01 02 03 04 00 05 FF 00 FD FF 04 00 00 FF 00”
Result interpretation:
00 - the first byte is 00
00 - count of 0 (the previous 00 byte is not repeated or repeated zero times)
01 - a 01 byte
02 - a 02 byte
03 - a 03 byte
04 - a 04 byte
00 - another 00 byte in the file
05 - the 00 byte is repeated 5 times for a total of 6 “00” bytes (00+05=6 “00” bytes)
FF - a FF byte
00 - count of o (the previous FF byte is not repeated or repeated zero times)
FD - a FD byte
FF - another FF byte
04 - the FF byte is repeated 4 times for a total of 5 “FF” bytes (FF+04 = 5 “FF” bytes)
00 - another 00 byte
00 - repeat count = 0
FF - another FF byte
00 - repeat count = 0
This compression scheme is slightly inefficient for single 00 HEX and FF HEX occurrences
but most image bitmaps include large areas of either blank space (00 HEX) or black space
(FF HEX).
If a string of more than 255 00 HEX or FF HEX occurs, the byte-plus-count sequence may
be repeated as often as necessary to incorporate all occurrences of the byte. For example,
a string of 1132 “FF” HEX bytes in sequence may be encoded as:
“FF FF FF FF FF FF FF FF FF 6B”
The first four pairs of FF HEX each encode 256 bytes of FF HEX (one for the first FF byte
and 255 copies) totaling 1024 bytes of FF HEX. The next FF HEX byte adds another byte
and the 6B HEX adds 107 additional bytes for a total of 1132 FF HEX bytes.
(4 X 256)+1+107 = 1132
8.2.2 Uncompressed Image (^D104)
This command allows graphic and/or font images (fonts must be less than 64KB
uncompressed) to be transmitted in ASCII-HEX, thereby allowing all data to pass over 7 or
8-bit data connections. This command is useable on data connections that support either 7
or 8-bit data.
The following is the format of the ^D104 command when used for a graphic image file:
^A<Slot Number>^D104<CR>
<Rotation> <Count> <Image Data>
Where:
322M Operator’s Manual 67
Page 72

Downloadable Fonts Chapter 8
<Memory Slot Number> is the memory slot location (1-255) where the graphic will be saved
in the printer’s memory. The printer uses the same TCI of “8” to select downloadable fonts
or graphics. Therefore a font and a graphic cannot have the same Slot Number or CGN
number.
<Rotation> is an 8-bit integer, 0 for an upright font and 1 for a 90-degree rotated image.
<Count> is a 32-bit integer, least significant byte first. This is the number of bytes that the
image uses.
<Image Data> is the graphic image data that has been converted to ASCII-HEX.
ASCII-HEX Conversion
The ASCII-HEX conversion is performed by OR’ing the most significant and least significant
nibbles of every byte with “30” HEX.
For Example: To convert the byte “6C” to ASCII-HEX, simply OR the first and second
nibbles with “30” HEX. This results in the two bytes “36” HEX and “3C” HEX. This
conversion results in a file size that is twice as big as the source but the data can now be
transmitted over a 7-bit data connection. Refer to Figure 13.
8.3 Font Structure
The following font structure is offered to programmer’s who wish to use their own programs
to convert fonts. The font structure consists of a set of data structures and location offsets
to those structures. All data is stored in binary form. Multi-byte values are stored “least
significant byte” first. The printer can store a font of approximately 64KB or less in any one
memory slot location.
(Word is a 16-bit value, Byte is an 8-bit value, and Label is a location within the file)
Label start: the beginning of the file
Word, Word, lookup_table_offset distance in bytes from start to beginning of
lookup_table (4 bytes)
Word tallest_char height of graphic image in dots
Word widest_char Width of graphic image in dots
Byte default_spacing Default spacing, usually 0
Byte byte_width Width of graphic image in bytes
Byte first_char 20 HEX
Byte last_char 20 HEX
Byte default_char 20 HEX
Label lookup_table beginning of lookup table
68 322M Operator’s Manual
Page 73

Chapter 8 Downloadable Fonts
Word char_offset [last_char-first_char] an array of offsets, one for each character in
font. Each offset is the distance, in bytes,
from the start to the beginning of the
corresponding character’s data structure.
The first word in this array is the offset to the
first character’s data; the last word is the
offset to the last character’s data.
Label first_char_data the beginning of the graphic image data
Word char_height height of this character’s bitmap in dots
Word char_width width of the graphic image in dots
Byte bitmap_data[char_height][byte_width] bitmap of character, 2d array. The most
significant bit of the first byte in each row,
prints as the right most dot of the character,
and the first row is the bottom row when
printed.
8.4 Downloadable Font Command Summary
The following commands refer to the use of downloadable fonts and graphics:
^A ^D COMMAND
100 Clear User RAM: This command clears all downloadable fonts, graphics, and
stored label formats.
101 List Memory Bytes Available: The printer will send the “>” character followed
by the amount of available bytes and then finally a “<” character. (i.e.
>192690<)
XX 104 Load Graphic Images or Fonts into User Memory without Compression:
The ^Axx specifies which memory slot to place the image/font (1-255). This
command should be used with an ASCII-HEX file that contains only printable
characters less then 80 HEX. This command supports graphics over 64KB.
XX 106 Load Graphic Images or Fonts into User Memory without Compression:
This command is intended for legacy support only and Microcom Corporation
recommends either the ^D104 or ^D107 commands. Fonts must be less than
64KB for this command to function.
XX 107 Load Graphic Images or Fonts into User Memory using Binary
Compression: The ^Axx specifies which memory slot to place the image/font
(1-255). This command will greatly reduce the image download time and
should be used whenever possible. This command may only be used with 8bit data connections and will not function on 7-bit data connections.
322M Operator’s Manual 69
Page 74

70 322M Operator’s Manual
Page 75

Chapter 9: Bar Codes
The purpose of this chapter is to provide information pertaining to the unique requirements
of the individual symbologies that are resident in the printer. Bar codes are accessed by
selecting the appropriate TCI number.
9.1 Types of Bar Codes
This section provides information regarding the different requirements of the available
resident bar codes. Unless stated otherwise in the descriptions below, the printer will
automatically generate the necessary check digits when required. The following
symbologys are described in numerical order based on the TCI number.
9.1.1 Universal Product Code – Version A (UPC-A), TCI 12
The Uniform Product Code version A or UPC-A symbology is used in the retail industry. It is
capable of encoding numerical characters 0 through 9 and consists of eleven data digits
followed by a check digit that the printer calculates. The first six data digits consist of a
number system digit followed by manufacturer’s identification digits that are assigned by the
Uniform Code Council (UCC). The next five data digits are assigned by the manufacturers
and typically represent product identification. The 12
omitted because the printer will automatically insert the correct value if a checksum is not
included with the data. The printer will accept and print an invalid check digit if an incorrect
check digit is provided. UPC-A bar codes do not use inter-character spacing and therefore
the character spacing (CS) element must be defaulted. The UPC symbology defaults to an
X dimension of 40% or 5.2 mils. To produce a symbology that is within the specification, a
minimum multiplier of 2 should be entered in the appropriate multiplier parameters (CMX or
CMY depending on the field orientation) to produce an 80% or 10.4 mils symbology.
9.1.2 Universal Product Code – Version E (UPC-E), TCI 13
The UPC-E symbology is used in the retail industry and is capable of encoding numerical
characters 0 through 9 and consists of eleven data digits followed by a check digit that the
printer calculates. The first six data digits consist of a number system digit followed by
manufacturer’s identification digits that are assigned by the Uniform Code Council (UCC).
The next five data digits are assigned by the manufacturers and typically represent product
identification. This bar code applies the “zero suppression” compression method to reduce
certain 11 digit UPC-A bar codes to only 6 numeric digits and a conversion type numeric
digit. Certain rules apply for this type of compression method to function properly. These
rules may be obtained from the Uniform Code Counsel (UCC). The digits must be valid
data for the proper bar code to print. Failure to use valid data may result in an incorrect bar
code. The UPC symbology defaults to an X dimension of 40% or 5.2 mils. To produce a
symbology that is within the specification, a minimum multiplier of 2 should be entered in the
appropriate multiplier parameters (CMX or CMY depending on the field orientation) to
produce an 80% or 10.4 mil symbology. When using the TCI 13 (UPC-E), the printer
requires the unconverted 11 digits and the Manufacture’s ID number must begin with “0” for
proper use. UPC-E bar codes do not use inter-character spacing, therefore the character
spacing (CS) element must be defaulted. The chart listed in Table 14 illustrates how the 11
digits are reduced to only 6 using the “zero suppression” compression.
th
digit is the checksum and should be
322M Operator’s Manual 71
Page 76

Bar Codes Chapter 9
SYMBOLOGY DECODED NUMBER
X1 X2 X3 X4 X5 0 NS X1 X2 0 0 0 0 0 X3 X4 X5
X1 X2 X3 X4 X5 1 NS X1 X2 1 0 0 0 0 X3 X4 X5
X1 X2 X3 X4 X5 2 NS X1 X2 2 0 0 0 0 X3 X4 X5
X1 X2 X3 X4 X5 3 NS X1 X2 X3 0 0 0 0 0 X4 X5
X1 X2 X3 X4 X5 4 NS X1 X2 X3 X4 0 0 0 0 0 X5
X1 X2 X3 X4 X5 5 NS X1 X2 X3 X4 X5 0 0 0 0 5
X1 X2 X3 X4 X5 6 NS X1 X2 X3 X4 X5 0 0 0 0 6
X1 X2 X3 X4 X5 7 NS X1 X2 X3 X4 X5 0 0 0 0 7
X1 X2 X3 X4 X5 8 NS X1 X2 X3 X4 X5 0 0 0 0 8
X1 X2 X3 X4 X5 9 NS X1 X2 X3 X4 X5 0 0 0 0 9
Table 14 UPC-E Zero Reduction Format
9.1.3 Universal Product Code (UPC-E, send 6 digits), TCI 14
The UPC-E symbology in used in the retail industry and is capable of encoding numerical
numbers 0 through 9 and consists of six digits followed by a check digit that the printer
calculates. This symbology is the same as the UPC-E (TCI 13) with the only exception
being that only the actual 7 numeric digits are used to produce the bar code. The digits
must be valid data for the proper bar code to print. Failure to use valid data may result in an
incorrect bar code. The UPC symbology defaults to an X dimension of 40% or 5.2 mils. To
produce a symbology that is within the specification, a minimum multiplier of 2 should be
entered in the appropriate multiplier parameters (CMX or CMY depending on the field
orientation) to produce an 80% or 10.4 mils symbology.
9.1.4 Interleaved 2 of 5 (I2of5), TCI 15
The I2of5 is a variable length, paired, numerical symbology that is typically used in the
industrial and distribution industries. The I2of5 is a paired symbology, which means that the
data string being sent must always be an even number amount. If the desired data to be
sent is an odd amount, simply pad the beginning with “0” to achieve an even amount of
digits. This symbology uses 2:1, 3:1, 4:2, 5:2, and 8:3 ratios, which may be selected by the
CGN parameter. The I2of5 symbology actually encodes characters in the spaces as well as
the bars. Therefore, the character spacing (CS) parameter must be defaulted.
72 322M Operator’s Manual
Page 77

Chapter 9 Bar Codes
9.1.5 Code 3 of 9 (Code39), TCI 16
Code 39 is a variable length, alphanumeric symbology that is very popular and is
extensively used in the non-retail, military, manufacturing and medical industries. Code 39
is capable of encoding numerical characters 0 through 9, the English Alphabet (uppercase
only), characters -. *$/+% along with the “space” character. The Code 39 is framed with a
start/stop character represented by the asterisk (“*”) character, which is reserved for this
purpose. This symbology uses 2:1, 3:1, 4:2, 5:2, and 8:3 ratios, which may be selected
using the CGN parameter. Although most specifications require a specific inter-character
spacing, Code39 will allow custom inter-character spacing as long as the maximum does
not exceed the timeout zone of the intended scanning equipment.
9.1.6 European Article Numbering System 13 (EAN-13), TCI 20
The European Article Numbering system (EAN) is a European version of the UPC
symbology that is used in the retail industry. It is also referred to JAN or Japanese Article
Numbering system in Japan. The EAN-13 is a fixed length symbology that encodes up to
13 numeric digits consisting of two country code digits, ten data digits, and one check digit
that the printer will automatically calculate. The EAN symbology defaults to an X dimension
of 40% or 5.2 mils. To produce a symbology that is within the specification, a minimum
multiplier of 2 should be entered in the appropriate multiplier parameters (CMX or CMY
depending on the field orientation) to produce an 80% or 10.4 mils symbology.
9.1.7 European Article Numbering System 8 (EAN-8), TCI 21
The European Article Numbering system (EAN) is a European version of the UPC
symbology that is used in the retail industry. It is also referred to JAN or Japanese Article
Numbering system in Japan. The EAN-8 encodes up to 8 numeric digits consisting of two
country code digits, five data digits, and one check digit that the printer will automatically
calculate. While very similar to the UPC-E symbology, the EAN-8 does not compress the
data digits and is not a condensed version of the EAN-13 symbology. The EAN symbology
defaults to an X dimension of 40% or 5.2 mils. To produce a symbology that is within the
specification, a minimum multiplier of 2 should be entered in the appropriate multiplier
parameters (CMX or CMY depending on the field orientation) to produce an 80% or 10.4
mils symbology.
9.1.8 Modified Plessey (MSI 1), TCI 24
The MSI is a modified version of the Plessey symbology which is a variable length, numeric
only symbology used for retail shelf labeling. When using MSI 1, the user does not have to
provide either check digit; the printer will calculate and insert the check digits automatically.
9.1.9 Modified Plessey (MSI 2), TCI 25
The MSI is a modified version of the Plessey symbology which is a variable length, numeric
only symbology used for retail shelf labeling. When using the MSI 2 bar code, the user
provides one check digit and the printer will calculate the second check digit.
9.1.10 Modified Plessey (MSI 3), TCI 26
The MSI is a modified version of the Plessey symbology which is a variable length, numeric
only symbology used for retail shelf labeling. When using the MSI 3 bar code, the user
provides both check digits.
322M Operator’s Manual 73
Page 78

Bar Codes Chapter 9
9.1.11 Postnet (ZIP+4), TCI 36
Postnet is a numeric only symbology that is commonly used in postal application to sort
mail. The five digit zip or five digit zip plus four digit extension may be used to generate this
Postnet (TCI 36) bar code. Example: 12345 or 12345-1234.
9.1.12 Postnet (ZIP+6), TCI 37
Postnet is a numeric only symbology that is commonly used in postal application to sort
mail. The five digit zip plus six digit extension may be used to generate this Postnet (TCI
37) bar code. Example: 12345-123456.
9.1.13 MaxiCode, TCI 38
MaxiCode is a fixed-size, 2-D matrix symbology that is capable of encoding the entire ASCII
character set (0 to 255) and up to 93 characters per symbology. Modes 2through 6 of the
AIM Internal MaxiCode specification are supported. Modes 0 and 1 are obsolete and are
not supported. The CGN parameter is used to select the desired mode (2-6) of the
symbology.
MaxiCode may encode non-printable characters, and Modes 2 and 3 require certain control
characters for compatibility with transport industry standards. In order to properly specify a
control character in a MaxiCode data string, use the pound symbol (“#”) followed by the two
digits Hexadecimal value of the control code. For example, “#01” specifies “Control-A”
(ASCII SOH) and “#1D” specifies “Control-]” (ASCII GS). Enter “##” in order to include an
actual pound symbol in the data string. Refer to Table 15 for the “#” equivalents that may
be used.
The data string associated with a MaxiCode field shall be formatted according to the Mode
selected (2-6).
Mode 2:
Mode 2 may have either of the following formats:
Format 1
[)>#1e01#dYYPPPPPPPPP#1dCCC#1dSSS#1dA..A#1dB..B#1dC..C#1e#04
Where:
#1e is the ASCII RS character
#1d id the ASCII GS character
#04 is the ASCII EOT character
YY is the two digit numeric year
PPPPPPPPP is the nine digit numeric US Postal Code. if using a 5-digit Postal Code, the
last 4 digits must be 0.
CCC is the three digit numeric Country Code (840 in the US).
SSS is the three digit numeric Class of Service.
74 322M Operator’s Manual
Page 79

Chapter 9 Bar Codes
A..A, B..B, C..C, etc. are variable-length alphanumeric fields separated by #1d. These fields
are optional according to the MaxiCode specification, but may be required by some
applications.
Format 2
PPPPPPPPP#1dCCC#1dSSS#1dA..A#1dB..B#1dC..C#04
The individual fields are the same as previously described in Format 1.
Mode 3:
Mode 3 may have either of the following formats:
Format 1
[)>#1e01#1dYYPPPPPP#1dCCC#1dA..A#1dB..B#1dC..C#1e#04
Format 2
PPPPPP#1dCCC#1dSSS#1dA..A#1dB..B#1dC..C#04
Where:
#1e is the ASCII RS character
#1d is the ASCII GS character
#04 is the ASCII EOT character
YY is the two digit numeric year
PPPPPP is the six character alphanumeric Postal Code.
CCC is the three digit numeric Country Code
SSS is the three digit numeric Class of Service
A..A, B..B, C..C, etc. are variable length alphanumeric field separated by the #1d. These
fields are optional according to the MaxiCode specification, but may be required in certain
application.
Mode 4:
Mode 4 may encode any string of up to 93 characters. Control characters are specified in
Table 15, and occupy only one character in the encoded string.
Mode 5:
Mode 5 may encode any string of up to 77 characters. Control characters are specified in
Table 15, and occupy only one character in the encoded string.
Mode 6:
Mode 6 may encode ant string up to 93 characters. Control characters are specified in
Table 15, and occupy only one character in the encoded string.
322M Operator’s Manual 75
Page 80

Bar Codes Chapter 9
DATA STRING CONTROL CODE ASCII NAME HEX VALUE
#00 Control @ NUL 00
#01 Control A SOH 01
#02 Control B STX 02
#03 Control C ETX 03
#04 Control D EOT 04
#05 Control E ENQ 05
#06 Control F ACK 06
#07 Control G BEL 07
#08 Control H BS 08
#09 Control I HT 09
#0A Control J LF 0A
#0B Control K VT 0B
#0C Control L FF 0C
#0D Control M CR 0D
#0E Control N SO 0E
#0F Control O SI 0F
#10 Control P DLE 10
#11 Control Q DC1 11
#12 Control R DC2 12
#13 Control S DC3 13
#14 Control T DC4 14
#15 Control U NAK 15
#16 Control V SYN 16
#17 Control W ETB 17
#18 Control X CAN 18
#19 Control Y EM 19
#1A Control Z SUB 1A
#1B Control [ ESC 1B
#1C Control \ FS 1C
#1D Control ] GS 1D
#1E Control ^ RS 1E
#1F Control_ US 1F
## n/a # (pound) 23
Table 15 MaxiCode Control Code Equivalents
76 322M Operator’s Manual
Page 81

Chapter 9 Bar Codes
9.1.14 Code 128 (Automatic Comp ression), TCI 40
The Code 128 bar code is a variable length, high density, alphanumeric symbology that is
extensively used worldwide. This bar code uses three subsets (A, B, and C) which allows
for the encoding of the full 128 ASCII character set along with special control codes. This
bar code uses automatic compression. The printer will automatically choose the most
efficient subset and insert the appropriate special function code listed in Table 16. It is
possible to force a subset change by inserting the appropriate code while in automatic
compression, however it is not recommended. Please note that if a subset is forced while
using automatic compression the printer will automatically switch to subset C if 6 or more
numeric characters are contained in the data string. Once the even number of characters
has been processed, the printer will then switch to subset B. This could create problems if a
user sent 6 numeric characters while forcing subset A (“#7123456”). The printer would
automatically switch to subset C and then back to subset B resulting in an undesired bar
code due to the extra function codes. If specific control of the subsets is a requirement,
then the manual compression bar code should be used.
Code SUBSET A SUBSET B SUBSET C
#0 FNC3 FNC3 N/A
#1 FNC2 FNC2 N/A
#2 SHIFT SHIFT N/A
#3 CODE C CODE C N/A
#4 CODE B FNC4 CODE B
#5 FNC4 CODE A CODE A
#6 FNC1 FNC1 FNC1
#7 START N/A N/A
#8 N/A START N/A
#9 N/A N/A START
## # # N/A
Table 16 Code128 Special Function Access
9.1.15 Code 128 (Manual Compression), TCI 41
The Code 128 bar code is a variable length, high density, alphanumeric symbology that is
extensively used worldwide. This bar code uses three subsets (A, B, and C) which allows
for the encoding of the full 128 ASCII character set along with special control codes. This
bar code uses manual compression, which provides full control by manually shifting
between the available subsets using the special function access codes. The codes (#n) are
placed within the data string to access the desired functions listed in the table below. When
using manual compression the printer defaults to subset B if no start code is defined. The
printer will also not attempt to compress the data unless subset C is used. Once in subset
C the user must send the appropriate code (#n) to return to either subset A or B.
322M Operator’s Manual 77
Page 82

Bar Codes Chapter 9
subset C.
switches
Subset A
This subset contains 106 unique characters, which includes numbers 0 through 9, the
English alphabet (uppercase only), punctuation marks, ASCII control codes, and the special
function codes listed in table 6.
Subset B
This subset contains 106 unique characters, which includes numbers 0 through 9, the
English alphabet (both uppercase and lower case), punctuation marks, and the special
function codes listed in table 6. This is the default if a subset is not defined when using
manual compression.
Subset C
This subset contains 106 unique characters, which includes matched pair numbers 00
through 99 and the special function codes listed in table 6. Subset C requires that an even
amount of digits to be sent because the matched pairs are encoded as a single character.
This allows for a greater amount of compression than subsets A and B. If an odd amount of
digits and/or non-numeric characters were sent while using subset C, the resulting bar code
produced would be invalid.
The
printer
defaults to
subset B
ABC#3012345#5abc
The “#3”
code, while
in subset B,
switches to
Figure 15 Code 128 Subset Switching
The “#5”
code,
while in
subset C,
9.1.16 Codabar (Rationalized), TCI 42
Codabar is a variable length linear symbology that is commonly used in libraries, blood
banks, and in the air parcel business. Codabar is capable of encoding the 16 following
characters: 0123456789-$:/. + and the four start/stop characters ABCD. This symbology
uses 2:1, 3:1, 4:2, 5:2, and 8:3 ratios, which may be selected using the CGN parameter.
9.1.17 Code 93, TCI 43
Code 93 is a variable length, alphanumeric symbology that is capable of encoding 48
different characters and through the use of control characters can encode the full 128 ASCII
character set. The 48 characters include the “space”, numerical characters 0 through 9, the
English alphabet (uppercase only), characters $%+-. / along with five special characters
including the start/stop character.
9.1.18 AS-10, TCI 44
The AS-10 symbology is not widely used. It is a variable length and encodes the numeric
values 1234567890.
78 322M Operator’s Manual
Page 83

Chapter 9 Bar Codes
9.1.19 PDF-417, TCI 46
The Portable Data File 417 or PDF-417 is a two-dimensional stacked symbology that is
capable of encoding the entire ASCII character set, 2710 digits, and up to 1108 bytes in a
single bar code. The requirements for generating a PDF-417 symbology are the text data,
placement information, size configuration, rotation, aspect ratio, and Error Correcting Code
or ECC. The character count (CC) parameter only has to be set to one character that will
be used as a placeholder and not printed. The PDF-417 format command (^D77) is used to
load the data as well as formatting instructions for the bar code and is placed on the first line
of the format.
The following format is used to generate a PDF-417 bar code:
^D77<CR>
:Text Data^[
Number_of_Rows<CR>
Number_of_Columns<CR>
Rotation<CR>
ECC_Percent<CR>
ECC_Level<CR>
Aspect_Ratio<CR>
This format is then followed by the placement instructions and text placeholder.
:Text Data^[
This parameter is where the desired data is placed and must be terminated with the “^[“
control code. The text data may include carriage returns and other control codes.
Number_of_Rows<CR>
This parameter specifies the number of rows used for rendering the PDF-417 symbology.
The PDF-417 symbology may have as few as 3 or as many as 90 rows with a default setting
of 90. A carriage return character must be used to terminate this field.
Number_of_Columns<CR>
This parameter specifies the number of columns used for rendering the PDF-417
symbology. The PDF-417 symbology may have 1 to 30 columns with a default setting of 30.
A carriage return character must be used to terminate this field.
Rotation<CR>
This parameter controls the rotation of the rendered PDF-417 symbology in 90-degree
increments. The valid arguments for this parameter would be 0, 90, 180 or 270 with the
default being set to 0. A carriage return character must be used to terminate this field.
ECC_Percent<CR>
The ECC_Percent parameter is used to set the percentage of overall data dedicated to the
Error Correction Control (ECC) of the PDF-417 symbology. This parameter has to be set to
0 if the ECC# method is desired. The default ECC% is set to 0. A carriage return character
must be used to terminate this field.
322M Operator’s Manual 79
Page 84

Bar Codes Chapter 9
ECC_Level<CR>
The ECC_Level parameter is used to set the level of error correction of the PDF-417
symbology with a default value set to 0. This parameter can only be used if the ECC%
parameter is set to 0. Refer to Table 17 for the valid ECC_Level values and their equivalent
correction codewords. A carriage return character must be used to terminate this field.
Aspect_Ratio<CR>
This parameter is used to adjust the aspect ratio of the PDF-417 symbology. The value is
entered in ratio format (height: width) and has a default value of 2:1. A carriage return
character must be used to terminate this field.
ECC#
0 2
1 4
2 8
Number of Error Correction
Codewords
3 16
4 32
5 64
6 128
7 256
8 512
Table 17 PDF-417 Error Correction Level
The follow ing format samples show how to generate a PDF-417 bar code:
80 322M Operator’s Manual
Page 85

Chapter 9 Bar Codes
Sample Format #1:
^D77<CR>
:PDF-417 bar code data^[
3<CR>
30<CR>
0<CR>
0<CR>
0<CR>
2:1<CR>
^D57<CR>
2,575,609,,25,35,0,1,285<CR>
1,190,300,1,46<CR>
2,190,200,11,1,5<CR>
^D56<CR>
^D2<CR>
P<CR>
Text string<CR>
^D3<CR>
Figure 16 PDF-417 Sample Format #1
Sample Format #2:
^D77<CR>
:PDF-417 bar code data<CR>
entered on two separate lines^[
3<CR>
30<CR>
90<CR>
0<CR>
0<CR>
2:1<CR>
^D57<CR>
2,575,609,,25,35,0,1,285<CR>
1,190,300,1,46<CR>
2,190,200,11,1,5<CR>
^D56<CR>
^D2<CR>
placeholder<CR>
Text string<CR>
^D3<CR>
Figure 17 PDF-417 Sample Format #2
Text string
Text string
322M Operator’s Manual 81
Page 86

Bar Codes Chapter 9
9.1.20 UCC/EAN 128, TCI 50
UCC/EAN 128 symbologies are actually code 128 bar codes that have specific data format
guidelines for multiple data subfields. The subfields are identified by application identifiers
that are specified in the “UCC/EAN Application Identifier Standard” available from the
Uniform Code Council, Inc.®.
Data strings can contain one or more substrings appended onto one line. Each substring
can consist of a 2, 3 or 4 digit Application Identifier immediately followed by a data string
meeting the formatting requirements for that specific Application Identifier.
The following table is a list of the supported Application Identifiers and their specific data
format requirements.
Use the legend below when interpreting the data format requirements listed in the table
below:
a alphabetic character
n numeric number
an alphanumeric character
a3 3 alphabetic characters (fixed length)
n3 3 numeric characters (fixed length)
an3 3 alphanumeric characters (fixed length)
a..3 3 alphabetic characters (variable length)
n..3 3 numeric characters (variable length)
an..3 3 alphanumeric characters (variable length)
(*) Indicates only year and month, DD must be filled with “00”
(**) Plus one digit for length indication
(***) Plus one digit for decimal point indication
AI Content Format
00 SCC-18 n2+n18
01 SCC-14 n2+n14
10 Batch or Lot Number n2+an..20
11(*) Production Date (YYMMDD) n2+n6
13(*) Packaging Date (YYMMDD) n2+n6
15(*) Sell By Date (Quality) (YYMMDD) n2+n6
17(*) Expiration Date (Safety) (YYMMDD) n2+n6
20 Product Variant n2+n2
21 Serial Number n2+an..20
22 HIBCC – Quantity, Date, Batch, and Link n2+an..29
23(**) Lot Number (Transitional Use) n3+n..19
240
Additional Product Identification assigned by the
Manufacturer
n3+an..30
82 322M Operator’s Manual
Page 87

Chapter 9 Bar Codes
AI Content Format
250 Secondary Serial Number n3+an..30
30 Quantity n2+n..8
310(***) Net Weight, Kilograms n4+n6
311(***) Length or 1st Dimension, Meters n4+n6
312(***) Width Diameter, or 2nd Dimension, Meters n4+n6
313(***) Depth Thickness, Height or 3rd Dimension, Meters n4+n6
314(***) Area, Square Meters n4+n6
315(***) Volume, Liters n4+n6
316(***) Volume, Cubic Meters n4+n6
320(***) Net Weight, Pounds n4+n6
321(***) Length or 1st Dimension, Inches n4+n6
322(***) Length or 1st Dimension, Feet n4+n6
323(***) Length or 1st Dimension, Yards n4+n6
324(***) Width Diameter, or 2nd Dimension, Inches n4+n6
325(***) Width, Diameter, or 2nd Dimension, Feet n4+n6
326(***) Width, Diameter, or 2nd Dimension, Yards n4+n6
327(***) Depth Thickness, Height or 3rd Dimension, Inches n4+n6
328(***) Depth Thickness, Height or 3rd Dimension, Feet n4+n6
329(***) Depth Thickness, Height or 3rd Dimension, Yards n4+n6
330(***) Gross Weight, Kilograms n4+n6
331(***) Length or 1st Dimension, Meters, Logistics n4+n6
332(***) Width Diameter, or 2nd Dimension, Meters, Logistics n4+n6
333(***)
334(***) Area, Square Meters, Logistics n4+n6
335(***) Gross Volume, Liters n4+n6
336(***) Gross Volume, Cubic Meters n4+n6
Depth Thickness, Height or 3rd Dimension, Meters,
Logistics
n4+n6
340(***) Gross Weight, Pounds n4+n6
341(***) Length or 1st Dimension, Inches, Logistics n4+n6
342(***) Length or 1st Dimension, Feet, Logistics n4+n6
343(***) Length or 1st Dimension, Yards, Logistics n4+n6
344(***) Width Diameter, or 2nd Dimension, Inches, Logistics n4+n6
322M Operator’s Manual 83
Page 88

Bar Codes Chapter 9
AI Content Format
345(***) Width Diameter, or 2nd Dimension, Feet, Logistics n4+n6
346(***) Width Diameter, or 2nd Dimension, Yards, Logistics n4+n6
347(***)
348(***)
349(***)
350(***) Area, Square Inches n4+n6
351(***) Area, Square Feet n4+n6
352(***) Area, Square Yards n4+n6
353(***) Area, Square Inches, Logistics n4+n6
354(***) Area, Square Feet, Logistics n4+n6
355(***) Area, Square Yards, Logistics n4+n6
356(***) Net Weight, Troy Ounce n4+n6
360(***) Volume, Quarts n4+n6
361(***) Volume, Gallons n4+n6
362(***) Gross Volume, Quarts n4+n6
Depth Thickness, Height or 3rd Dimension, Inches,
Logistics
Depth Thickness, Height or 3rd Dimension, Feet,
Logistics
Depth Thickness, Height or 3rd Dimension, Yards,
Logistics
n4+n6
n4+n6
n4+n6
363(***) Gross Volume, Gallons n4+n6
364(***) Volume, Cubic Inches n4+n6
365(***) Volume, Cubic Feet n4+n6
366(***) Volume, Cubic Yards n4+n6
367(***) Gross Volume, Cubic Inches n4+n6
368(***) Gross Volume, Cubic Feet n4+n6
369(***) Gross Volume, Cubic Yards n4+n6
400 Customer’s Purchase Order Number n3+an..30
410 Ship To (Deliver To) Location Code Using EAN-13 n3+n13
411 Bill To (Invoice To) Location Code Using EAN-13 n3+n13
412
414 EAN Location Code for Physical Identification n3+n13
420
421
Purchase From (Location Code of Party from Whom
Goods are Purchased)
Ship To (Deliver To) Postal Code Within a Single
Postal Authority
Ship To (Deliver To) Postal Code with 3 Digit ISO
Country Code Prefix
n3+n13
n3+an..9
n3+n3+an..9
84 322M Operator’s Manual
Page 89

Chapter 9 Bar Codes
AI Content Format
8001
8002
8003
8100
8101
8102
90
91 Intra-Company (Internal) n2+an..30
92 Intra-Company (Internal) n2+an..30
93 Intra-Company (Internal) n2+an..30
94 Intra-Company (Internal) n2+an..30
Roll Products – Width Length, Core Diameter,
Direction, and Splices
Electronic Serial Number for Cellular Mobile
Telephones
UPC/EAN Number and Serial Number of Returnable
Asset
Coupon Extended Code – Number System Character
and Offer
Coupon Extended Code – Number System Character ,
Offer, and End of Offer
Coupon Extended Code – Number System Character
preceded by zero
Mutually Agreed, Between Trading Partners or FACT
Dis
n4+n14
n4+an..20
n4+n14+an..16
n4+n1+n5
n4+n1+n5+n4
n4+n1+n1
n2+an..30
95 Internal-Carriers n2+an..30
96 Internal-Carriers n2+an..30
97 Intra-Company (Internal) n2+an..30
98 Intra-Company (Internal) n2+an..30
99 Internal n2+an..30
Table 18 UCC/EAN Application Identifiers
Each subfield’s format is expressed as the format of the Application Identifier number + the
format of the associated data. Each subfield must adhere to the format specified or else the
printer will be unable to locate following subfields, causing errors generating the bar code.
Any variable length subfield, unless it is the last subfield in the field, must be terminated by
the two characters “#6” (pound+6). These characters are translated as the Code 128
“FNC1” character, which is specified by the UCC/EAN 128 symbologies variable-length field
terminator. The characters “#6” are only used internally and are not printed.
Several Application Identifiers (00, 01, 22, and 8003) specify fields that will have a check
digit as part of their data. A character must be included in the check digit place (although it
need not be the correct check digit). This character is used as a placeholder and will not be
printed. The printer will calculate the correct check digit and replace the character already
there.
322M Operator’s Manual 85
Page 90

Bar Codes Chapter 9
9.1.21 UCC/EAN Text Information, TCI 51
The TCI 51 generates the UCC/EAN information as text. This TCI uses the same criteria for
formatting as the TCI 50 bar code. The CGN selects the desired resident font that will be
used to generate this string. The printer will automatically surround each application
identifier with parentheses and add a space character in front of the data when using a TCI
of 51. Do not use the parentheses or spaces when entering the data for an application
identifier field.
9.2 Bar Code Rotation
When 0 and 180 degree bar codes are X multiplied (CMX), the space between characters is
also multiplied by the printer internally to maintain the correct ratio. When multiplying bar
codes use the default value for the spacing element (SP) in the field format parameters. On
some bar codes that allow spacing to be adjusted, spacing may be increased from the
default and not reduced to a smaller spacing.
When 0 and 180 degree bar codes are Y multiplied (CMY), the result is the actual height of
the bar code in thermal dots. If the Y multiplier (CMY) is not multiplied, a bar code with a
vertical length of one dot would be produced. For example: If a one inch high bar code is
desired, 203 should be inserted for the CMY value.
When 90 and 270 degree, ladder or vertical, bar codes are X multiplied (CMX), the result is
the actual width of the bar code in thermal dots. If the X multiplier (CMX) is not multiplied, a
bar code with a horizontal length of one dot would be produced. For example: If a one inch
wide bar code is desired, 203 should be inserted for the CMX value.
When 90 and 270 degree bar codes are Y multiplied (CMY), the space between characters
is also multiplied by the printer internally to maintain the correct ratio. When multiplying bar
codes use the default value for the spacing element (SP) in the field format parameters. On
some bar codes that allow spacing to be adjusted, spacing may be increased from the
default and not reduced to a smaller spacing.
Rotated Bar Code Program Sample, see Figure 17:
^D57<CR>
5,575,609,,25,35,0,1,285,0,0 <CR>
1,300,500,5,16,2,0,,2,100<CR>
1,300,400,5,16,2,1,,2,100<CR>
1,300,300,5,16,2,2,,100,2<CR>
1,300,300,5,16,2,3,,100,100<CR>
2,288,300,9,1,5,0,4<CR>
^D56 <CR>
^D2 <CR>
12345<CR>
ROTATIONS<CR>
^D3<CR>
86 322M Operator’s Manual
Page 91

Chapter 9 Bar Codes
180
Degrees
270
Degrees
ROTATIONS
Figure 18 Bar Code Rotations
90
Degrees
Degrees
0
9.3 Bar Code Human Readable Text
Certain bar codes require human readable text and/or extended bars to conform to
specifications. This is accomplished by using specially created TCI’s (refer to section 5.6.5
or table 19) which add the human readable text and extended bars. This section will
provide the necessary information to successfully add these items. This should not be
confused with simply making all bar codes human readable. For bar codes that do not
require extended bars, simply access the data that the bar code is using with a second field
that generates a text representation of the data and insert in the desired position.
TCI VALUE TCI DESCRIPTION
3 Text with UPC-A/UPC-E Checksum Digit added.
17 Text with UPC-E Checksum and Extended Bars added
22 Text with EAN-13 Checksum and Extended Bars added
23 Text with EAN-8 Checksum and Extended Bars added
28 Text with MSI 1 Checksum added
29 Text with MSI 2 Checksum added
32 Text with UPC-A Checksum and Extended Bars added
33 Text with UPC-A with Extended Bars added
Table 19 Human Readable/Extended Bars TCI’s
322M Operator’s Manual 87
Page 92

Bar Codes Chapter 9
UPC
-A
UPC
-A
with Checksum added
The Text/Extended Bar TCI’s generate the human readable text and extended bars that are
aligned with the original bar code to create the complete bar code, see Figure 18.
(TCI 12)
(TCI 32)
Text & Extended Bars
Figure 19 UPC-A Text/Extended Bars
The TCI 32 text/extended code shown in Figure 18, is aligned with the TCI 12 code so that
there is no space between the two. This creates one bar code. TCI’s (17, 22, 23, 32, and
33) that add the extended bars should default the CGN parameter or enter a value of “1”.
The fields may then be multiplied using the CMX and CMY parameters to generate the
proper size to match the bar code that the human readable code is intended. The data
used to generate the human readable code should be the same data used to generate the
bar code.
TCI’s (3, 28, and 29) that only add the human readable portion may select any CGN for the
font size and multiply it normally. The main purpose of these codes is to add the
automatically calculated check digit character to the human readable code. The data used
to generate the human readable code should be the same data used to generate the bar
code.
The following is a sample format is used to illustrate the proper use of the human readable
code. This format contains the data used in Figure 18 and will print out two bar codes. The
first bar code is a complete version while the second bar code illustrates the text/extended
code before aligning to the original bar code.
Sample Format:
^D57<CR>
4,575,609,,25,35,0,1,285,0,0<CR>
1,200,418,11,12,,,,2,50<CR>
1,178,400,11,32,,,,2,2<CR>
1,200,150,11,12,,,,2,50<CR>
1,178,125,11,32,,,,2,2<CR>
^D56<CR>
^D2<CR>
01234567890<CR>
^D3<CR>
88 322M Operator’s Manual
Page 93

Chapter 10: Printer Maintenance
10.1 Maintenance Schedule
It is important to note that the optimum print quality and print head life is achieved by
maintaining a clean printer and print head. A Microcom Corporation approved cleaning kit
(part # 040005-0000) is available; contact your sales representative for purchasing
information.
AREA METHOD INTERVAL
Foam tipped swab, cotton tipped
swab, or thermal printer cleaning
Print head
Drive Roller
Peel Edge
Interior Cleaning
Exterior Cleaning
Table 20 Recommended Maintenance Schedule
CAUTION: Microcom Corporation will not be held responsible for
damage caused by any non-approved solvent, cleaning material and/or
method. The use of such non-approved materials and/or methods may
void appropriate expressed or implied warranties.
card dampened with Isopropyl
Alcohol.
See section 10.4
Foam tipped swab, cotton tipped
swab, thermal printer cleaning
card, or lint-free cloth dampened
with Isopropyl Alcohol
See Section 10.5
Foam tipped swab, cotton tipped
swab, thermal printer cleaning
card, or lint-free cloth dampened
with Isopropyl Alcohol
See section 10.3
Compressed air, soft-bristle
brush, and/or lint-free cloth
dampened with Isopropyl Alcohol.
See section 10.3
Lint-free cloth dampened with a
mild, non-abrasive general
purpose cleaner.
See section 10.6
After every roll of
media or every 512
feet of tag stock or
fanfold media.
After every roll of
media or every 512
feet of tag stock or
fanfold media.
As Needed.
As Needed.
As Needed.
322M Operator’s Manual 89
Page 94

Printer Maintenance Chapter 10
10.2 Thermal Printer Card
Decline in print quality, voids or drop out areas in bar codes and/or graphics may indicate
that the print head is dirty and needs to be cleaned. The necessary cleaning materials can
be purchased through Microcom Corporation by contacting your sales representative and
ordering the Cleaning Kit, part # 040005-0000. The print head should be cleaned after every
roll of media or after every 512 feet (3200 tag which is a typical stack of tag or fanfold
media).
A thermal printer card is the quickest and easiest way to clean the print head, drive roller,
and peel edge all at the same time. Follow the steps below for the proper cleaning
procedure.
1. Remove any installed media.
2. Dampen both sides on one end, of the cleaning card with isopropyl alcohol.
3. Push the Head Release Levers towards the center of the printer and insert the card
into the front of the printer between the print head and the drive roller (See Figure
20).
4. Continue inserting the card until you feel resistance; close the head assembly so that
it latches in place.
5. Using both hands, slowly pull the card out of the printer at a 45º down angle (See
Figure 21).
6. Repeat as necessary
7. Reinstall media.
Thermal cleaning cards should not be used more than three times each. Extremely dirty
cards should be disposed of immediately.
CAUTION: Never touch or clean the print head with any abrasive
solvents and/or with any metal or sharp object.
90 322M Operator’s Manual
Page 95

Chapter 10 Printer Maintenance
Figure 20 Unlatching the Print head
Figure 21 Removal of Thermal Card
322M Operator’s Manual 91
Page 96

Printer Maintenance Chapter 10
Print Head
10.3 Internal Cleaning
The overall internal cleaning of the printer is important to help reduce the dust and other
contaminates residing in the printer that may attach to the print head or drive roller and
affect the printer’s performance. Refer to Figure 22 for common areas needing cleaned.
1. Remove any installed media.
2. Turn the printer power OFF.
3. Using the two Head Release Levers (See Figure 20), unlatch and raise the print
head.
4. Basic internal cleaning can be done using a combination of compressed air, softbristle brushes, foam/cotton tipped swabs, and/or lint-free cloths dampened in
alcohol. Use any combination of these materials to remove dust or other
contaminants from the printer. See section 10.4 for the proper print head
maintenance procedure.
5. When finished, close the print head assembly so that it is latched into place and
reinstall media.
6. Turn the printer power ON
Drive Roller
Figure 22 Internal Cleaning
Peel Edge
Thermal
Elements
92 322M Operator’s Manual
Page 97

Chapter 10 Printer Maintenance
10.4 Print head Maintenance
If print quality has not improved after cleaning (using a thermal cleaning card, or if one is not
available) foam or cotton tipped swabs dampened in isopropyl alcohol may be used. Refer
to Figures 20 and 23 and follow the steps below for the proper cleaning procedure.
1. Remove any installed media.
2. Turn the printer power OFF.
3. Using the two Head Release Levers (Figure 20), unlatch and raise the print head.
4. With a foam or cotton tipped swab dampened in isopropyl alcohol, clean the thermal
elements by gently rubbing the swab down the length of the print head. Allow for the
alcohol to evaporate then repeat if necessary. See Figure 23.
5. The Drive Roller, Peel Edge, and other basic internal cleaning may also be
performed at this time. See the appropriate sections for more information.
6. Latch the print head completely and reinstall the media.
7. Turn the power to the printer ON.
Figure 23 Print head Thermal Elements
CAUTION: When performing maintenance inside the printer, always
make sure that the print head is latched completely before installing the
top cover. Failure to do so may result in damage to the print head.
322M Operator’s Manual 93
Page 98

Printer Maintenance Chapter 10
10.5 Cleaning the Drive Roller
Maintaining a clean drive roller not only helps extend the life of the roller but also helps
reduce print quality issues and media slips that may occur due to dust, label adhesive, and
other forms of contamination. The drive roller should be cleaned after every roll of media or
after every 512 feet (3200 tag which is a typical stack of tag or fanfold media). See the
previous section, Thermal Printer Card, for a quick and easy way to clean the drive roller or
follow the steps below.
1. Remove any installed media.
2. Turn the printer power OFF.
3. Using the two Head Release Levers (Figure 20), unlatch and raise the print head.
4. Clean the drive roller with a lint-free cloth dampened in alcohol. Manually rotate the
drive roller by the drive gear located to the left (from the front of the printer) or by
manually rotating the drive roller itself to clean the entire drive roller surface.
5. Print head, Peel Edge, and Internal cleaning may also be performed at this time. See
the appropriate sections for more information.
6. Latch the print head completely and reinstall the media.
7. Turn the printer power ON.
10.6 Exterior Cleaning
Although cleaning the exterior surfaces has no effect on the printer’s performance, it will
help the overall appearance of the printer. The use of any mild, non-abrasive general
purpose cleaner with a lint-free cloth may be used to clean the exterior surfaces. This
cleaning should be performed on an as needed basis.
10.7 Gap Detector Adjustment
The gap detector assembly is centered in the media path at the factory and should work for
almost every type of media. The Gap detectors may be custom configured and placed in a
different position upon request. The printers contain fixed gap detection locations every half
inch to provide flexibility for custom applications.
CAUTION: Isopropyl Alcohol should be used to clean the drive
roller. The use of other cleaning solvents or materials is not
recommended and may degrade the performance of the drive
roller.
94 322M Operator’s Manual
Page 99

Chapter 11: Troubleshooting
11.1 Troubleshooting Tips
The printer fails to turn “ON” and the status indicator light fails to light:
Verify that the power cord is connected to the printer as well as the AC outlet.
Verify that the printer power switch is in the “ON” position.
Verify that the AC outlet is functioning properly.
Contact your Service Representative.
The printer has no serial communication:
Verify that the serial cable is properly connected to the printer and an available serial
port on the host computer.
Verify that the host serial port is functioning properly.
Verify that the printer and the host serial port parameters are set exactly the same.
Contact your Service Representative.
Vertical blank or light lines appear on printed areas:
Clean the print head.
Print head may need replaced.
Contact your Service Representative.
The status indicator light is solid amber in color:
Indicates that the printer has been paused or a tag/tear mode is being used.
Press the print button, light should turn green and resume printing if the printer has
been paused.
Remove the tag, the light should turn green if a tag/tear mode is enabled
Contact your Service Representative.
322M Operator’s Manual 95
Page 100

Troubleshooting Chapter 11
The status indicator light is solid red in color:
The printer has an error and requires service before printing will continue.
Verify that media has been loaded in the printer properly.
Press the print button to attempt to clear the error.
Refer to section 6.2 for information regarding the Enquiry Command to help identify
the error condition.
Cycle power to reset the printer.
The status indicator light is flashing red in color:
Generally due to a power fail error.
Verify that the AC line-voltage is present at the AC outlet.
Cycle power.
During download the status indicator light flashes red in color:
The file contains an illegal operation / command.
The graphic or font is not valid or has errors.
The intended memory slot is already occupied.
Verify that the printer is properly configured for the type of download being sent.
Clear memory and attempt download again.
Verify that the format has been created properly.
96 322M Operator’s Manual
 Loading...