


WhatsMiner M3 Operating Guide
V1.1
Shenzhen MicroBT Electronics Technology Co., Ltd.

Contents
1. Operational safety warning
1.1. Matters needing attention of the miner's wiring
1.1.1. Control board 12V power cable connection precautions
1.1.2. Connection of power control cable
1.1.3. Fan cable connection check
1.1.4. Data cable connection check
1.1.5. Connect the power cable of the hash board
1.1.6. Final check
1.2. Notes for handling of the miner
2. Preparation of miner configuration
2.1. List of miner configuration tools
2.2. Reference network diagram of miner
3. Miner data configuration (configuration on webpage)
4.1. Query the dynamic IP address obtained by the miner
4.1.1. Run the WhatsMinerTools software
4.1.2. Check the IP address of the miner.
4.2. Configure static ip (optional)
4.3. Configure NTP server address and mine pool & miner data.
4.3.1. Modify NTP synchronization server address (optional)
4.3.2. Mine pools & miner configuration.
5. Check the running status of the miner
6. Configure miner in batches, check status, upgrade firmware
.........................................................................................................
............................................................
......................................................................
..................................................................................
................................................................................
........................................................
.............................................................................................................
.......................................................................................
............................................................................................
......................................................................................
..............................................................................
..............................................................
.....................................................................
.......................................................................
.........................................................................................
.....................................................................
.....................................................................................
.....................................
....................................................
........................................
......................................
..................................................
3
3
3
4
4
5
5
6
7
7
7
8
8
8
8
9
10
12
12
13
15
18

1. Operational safety warning
1.1. Matters needing attention of the miner's wiring
WhatsMiner M3's 12V power cable, power control cable, fan cable, data cable must be
properly connected, if the connection error, lead to control board, hash board,
such as burn, the whole machine and board will not belong to the scope of warranty!
1.1.1. Control board 12V power cable connection precautions
When connecting the power cable of the control board, the buckle of the power cable
plug and the socket of the control board must be corresponding. If the power cable
is incorrectly plugged in, it may burn the control board and the signal cable.
The correct connection of the power cable plug and socket:
The incorrect connection of the power cable plug and socket
:

1.1.2. Connection of power control cable
The power control cable is 3pin red and black yellow line, 3 small orientations,
and slot relative insertion:
1.1.3. Fan cable connection check
The fan cable is 4pin blue and yellow red black line, with 4 small orientations,
and the slot is inserted in relative position,and reliable connections。

1.1.4. Data cable connection check
The hash board data cable is connected with the control board, Connect the plug and
socket correctly,and reliable connections.
1.1.5. Connect the power cable of the hash board
When connecting the power cable of the hash board, the buckle of the power cable plug
and the socket of the hash board must be corresponding. If the power cable is
incorrectly plugged in, it may burn the hash board.
The correct connection of the power cable plug and socket:

The incorrect connection of the power cable plug and socket:
X
X
1.1.6. Final check
After all connections are completed, check again to make sure all connections are
correct.
Notes:
(1) The miner before wiring and power up, according to the warning signs on the side
of the miner, shake miner, make sure no heat sink or other devices off, Otherwise, it
will burn the hash board and control board when it is on power. This situation also
does not belong to the warranty scope!
(2) It is necessary to reliably connect the power control cable between the control
board and the power supply, otherwise it may be unable to control the voltage output
of power supply, resulting in low hash rate.
(3) The control board must be reliably connected to the fan cable. If the fan line
is disconnected or the connection is not good, the miner may not be cooled down,
resulting in low hash rate.

1.2. Notes for handling of the miner
The
names
num
use
note
1
computer
1
Configuration miner
2
switch
Mining network data
exchange.
3
DHCP/NTP
Server/router
1
1.Provide dynamic IP
address
2.Provide NTP network
time for the miner
The miner acquires
dynamic IP address
by default of
DHCP.
It is strictly forbidden to carry the power cable, data cable, power control cable
and fan cable as the load-carrying handle of the miner and power supply in the
process of moving and installing the miner. Otherwise, the connection will be
damaged, the cable is loose, and the control board is physically damaged beyond the
endurance. The resulting hardware damage and failure will not belong to the warranty
scope!
2. Preparation of miner configuration
2.1. List of miner configuration tools
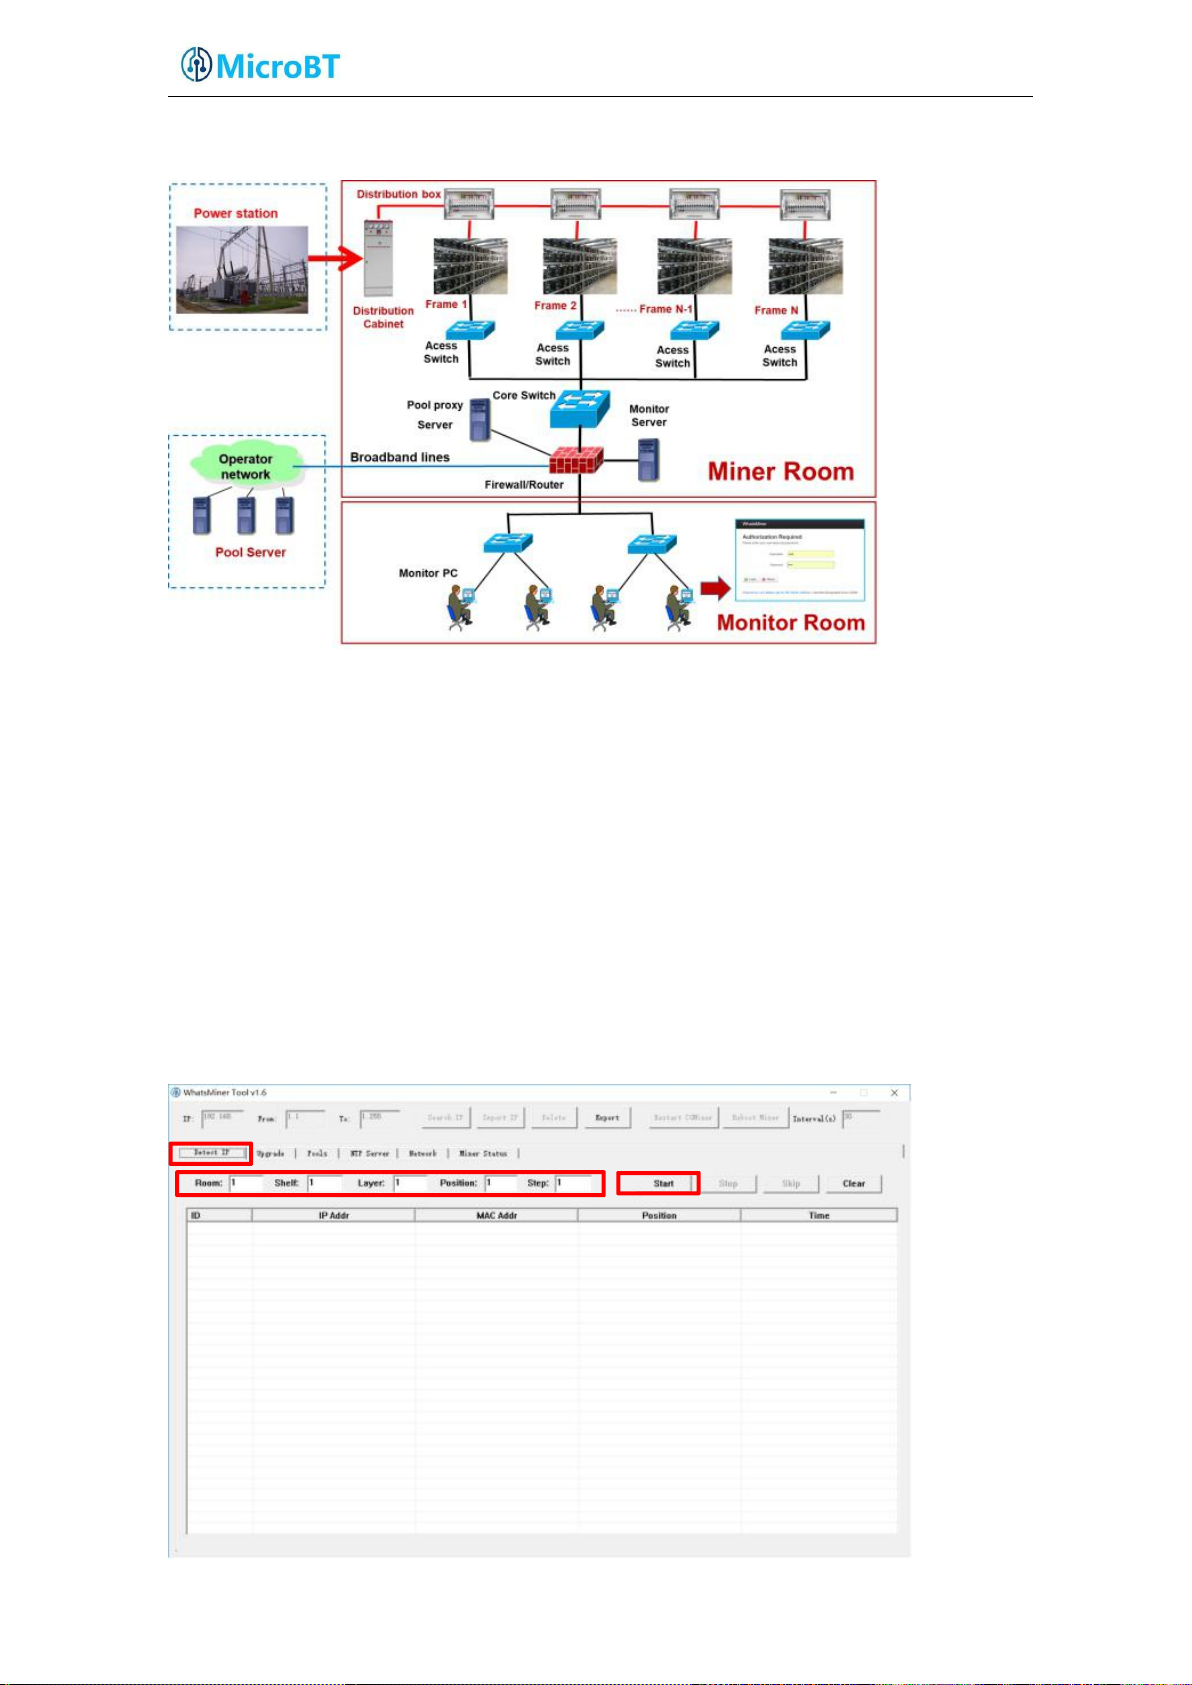
2.2. Reference network diagram of miner
3. Miner data configuration (configuration on
webpage)
4.1. Query the dynamic IP address obtained by the miner
4.1.1. Run the WhatsMinerTools software
First run whatsminertools software on the PC (PC and miner must be in the same
network segment), choose "detect IP" tab in the software, set the miner's room
number, shelf number, layer number and the position of the layer, then click on
"start".
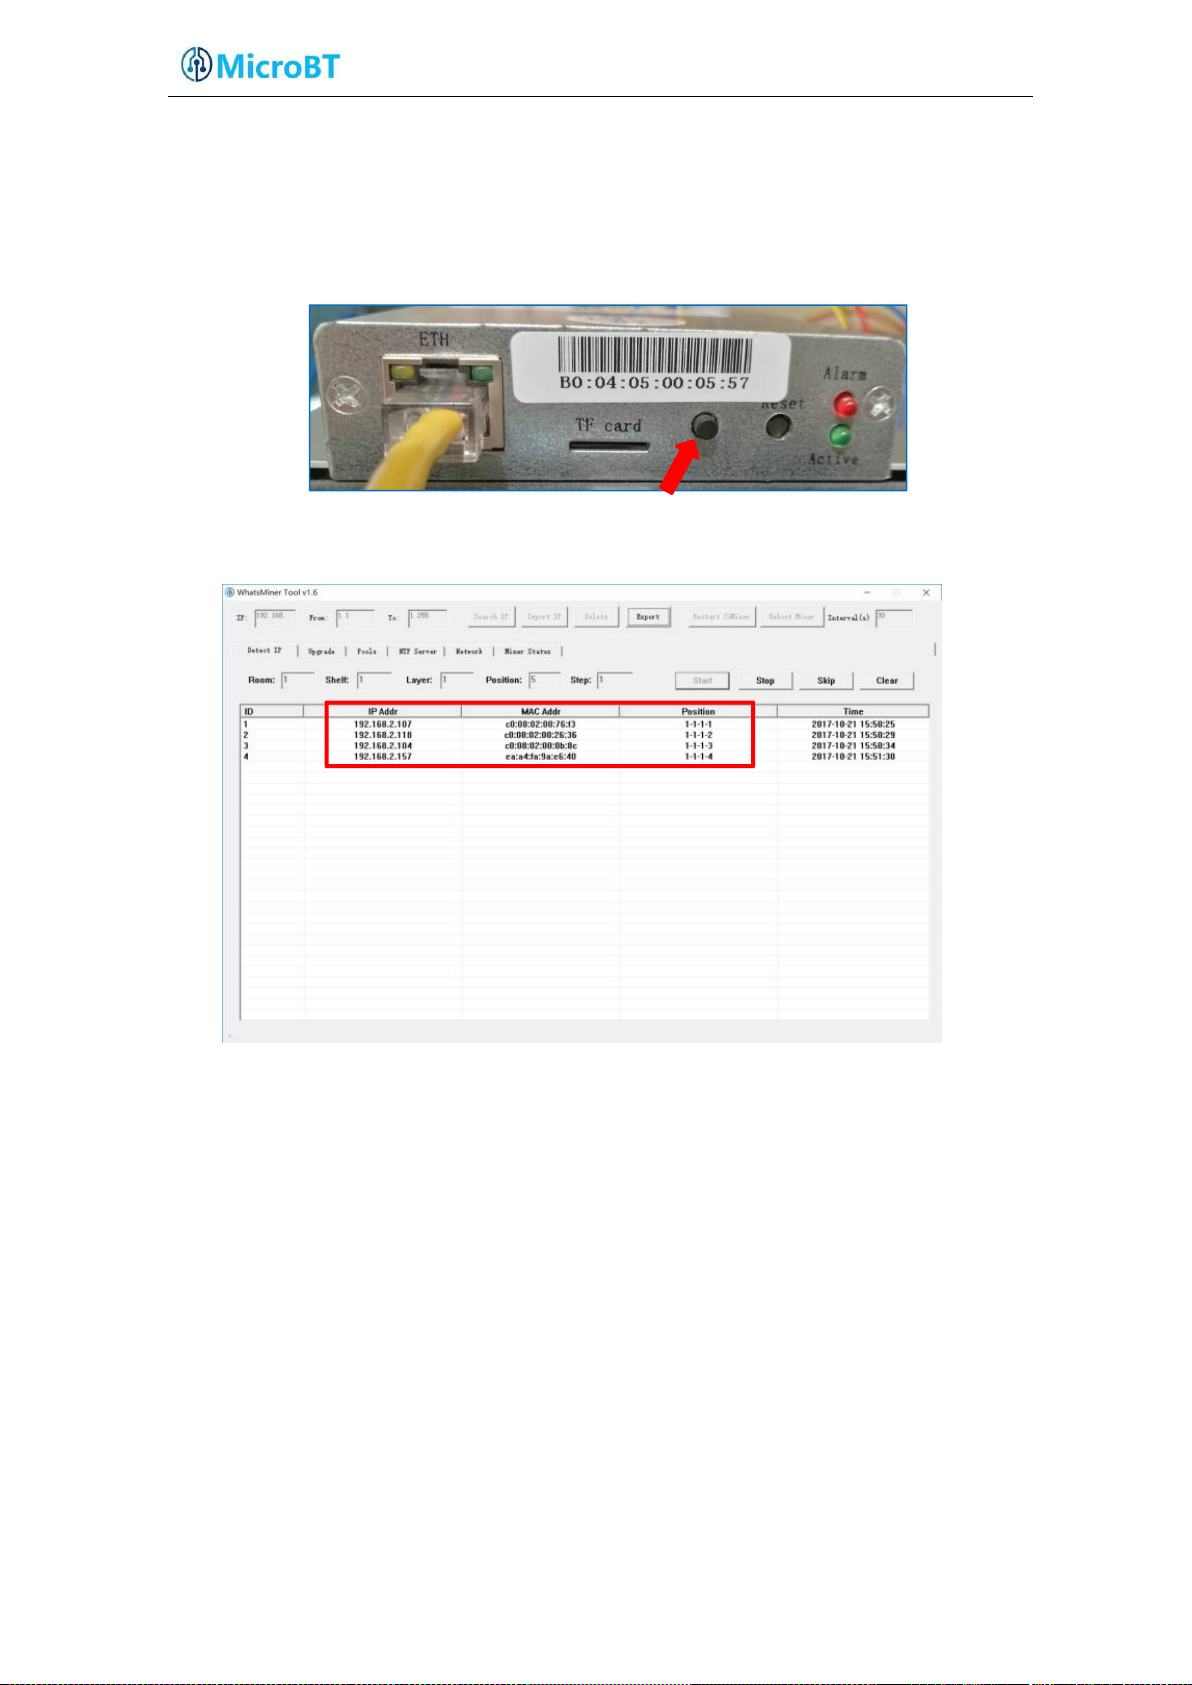
4.1.2. Check the IP address of the miner.
(1) The Miner is powered on after about 30s, the yellow light of the network
port is always on and the green light is flashing under normal circumstances.
Press the IPFOUND button on the panel of the control board (long button) for 5s
or more, The two LEDs on the right side will flash several times to indicate
that the miner has broadcast the IP and MAC addresses to the network.
(2) In whatsMinerTools software to view the miner reported dynamic IP, MAC
address and position.
Notes:
(1) If all the lights on the panel of the control board are not on, please
check the power supply 220V power cable, 12V power cable connection is
reliable, the connection is correct.
(2) If the indicator on the right side of the panel of the control board is
on, but the network port light is off, or the green light does not flash,
please check whether the switch is normal, whether the cable connection is
reliable and the quality of the cable is faulty.
(3) PC running WhatsMinerTools and miner must be in the same network
segment, otherwise it will cause the software not to receive ipfound button
reported IP address and mac address.
(4) If the PC and miner in the same network segment, and the network has
opened the DHCP service, but press the ipfound button, WhatsMinerTools can
not find the miner's ip. Press the reset button on the control board for
more than 5 seconds to restore the factory default configuration, and then
power off the miner and power it on again. Press the ipfound button to
check the miner's ip address after powering on for 30 seconds.
(5) If the PC is running WhatsMinerTools, press the "Start", did not press
ipfound button, but the software automatically found the miner's IP address,
mac address, the reason may be miner's ipfound button stuck panel, to find
the software display mac address corresponding to the miner (control board
panel affixed with mac address bar code), the corresponding miner power off,
and then re-install the control board to ensure that the control board
buttons and lights are exposed in the hole, did not get stuck.
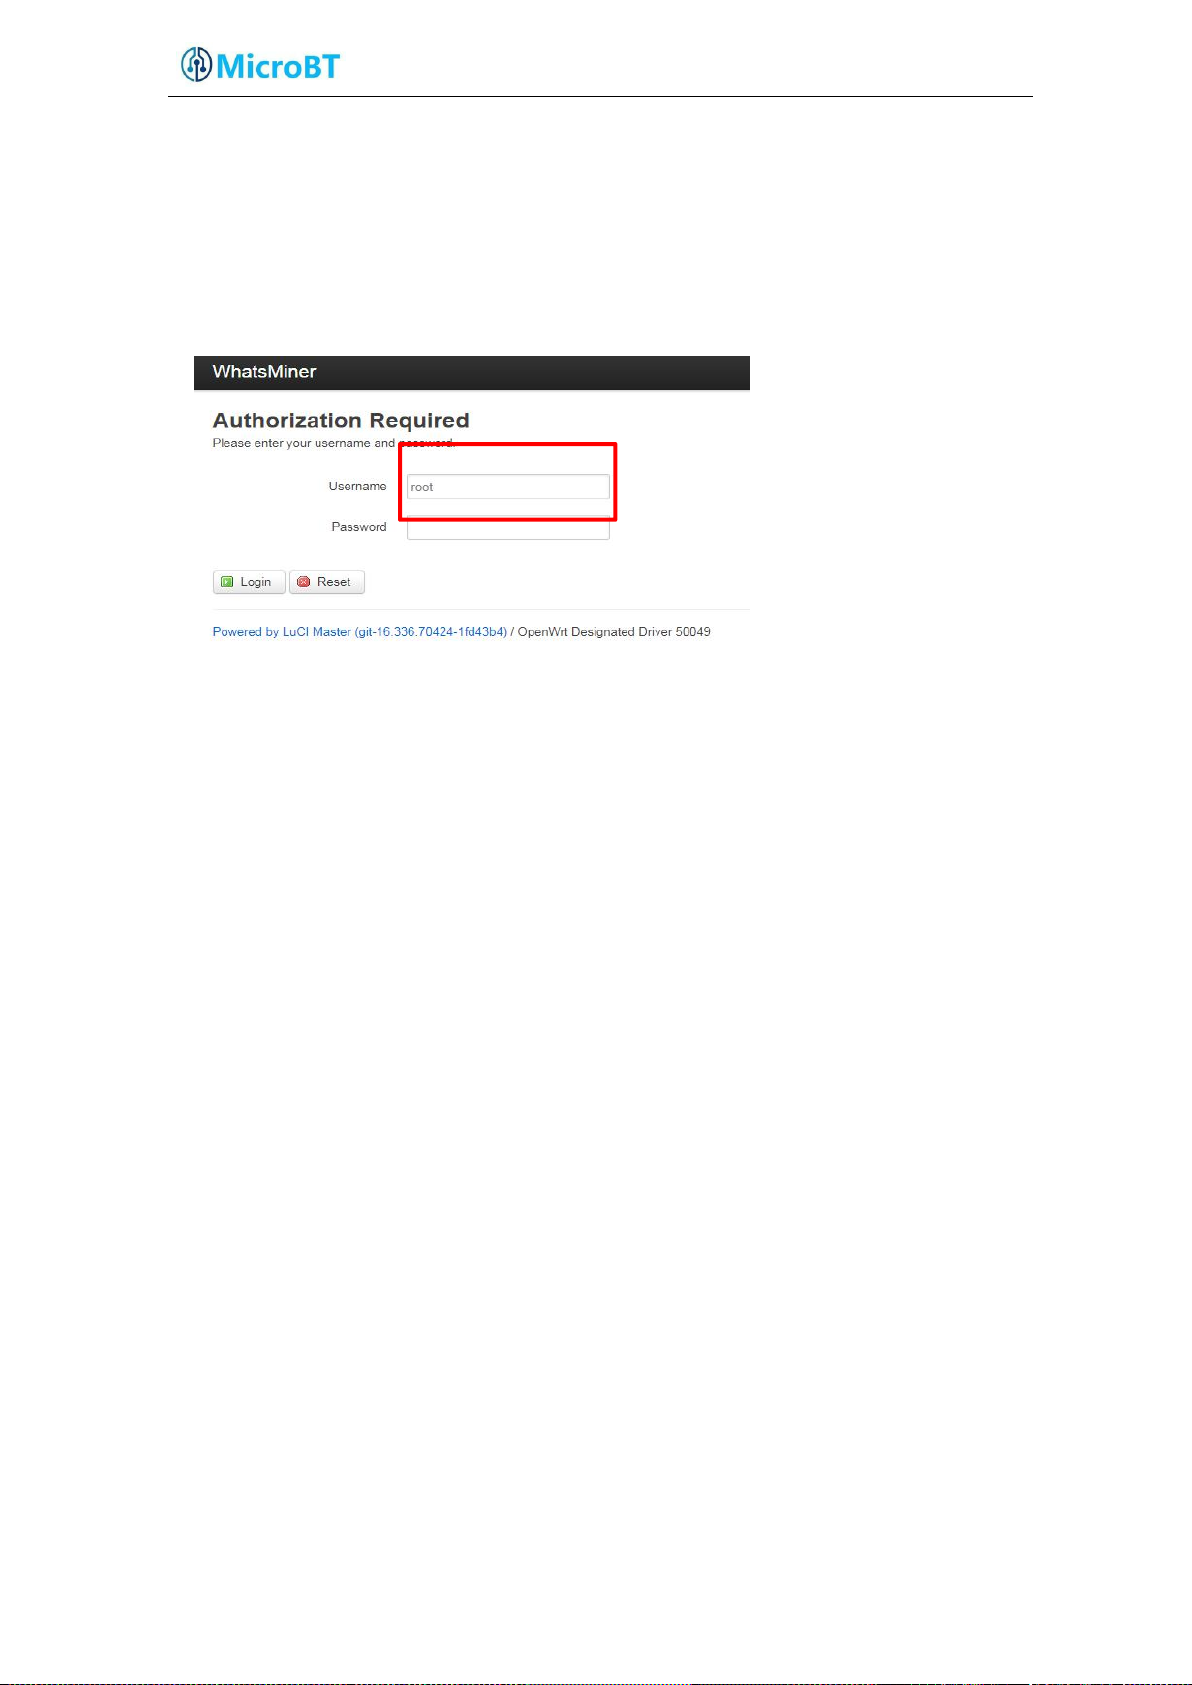
4.2. Configure static ip (optional)
Change the miner's dynamic IP address to a planned static IP address.
(1) Enter the miner's dynamic IP in the browser, and use the root user, the
default password: root, login the miner.

(2) After logging in the miner, select: Configuration-> interfaces, and into the
network interface.
(3) In "Interfaces", click "Edit"
(4) In “Common Configuration”, the protocol chooses "Static address", then
click "Switch protocol".

(5) In the static address configuration interface, modify the IP address, mask,
gateway, broadcast address, and DNS address to the actual planned addresses of
the miner. Click "Save & Apply" in the lower right corner.
Note:
After save &apply, you need to enter the newly set static IP address to log in
the miner.
4.3. Configure NTP server address and mine pool & miner
data.
4.3.1. Modify NTP synchronization server address (optional)
(1) After login, select in the interface: Configuration- > CGMiner Configuration.

(2) In the cgminer configuration interface, miner factory default configuration
(1) The public NTP server in different countries may not be the same. If the
(2) At http://www.pool.ntp.org/zone/@, you can find the public NTP server address
Main pool
Standby pool 1
Standby pool 2
of the four ntp server address, according to the mining farm situation, modify or
add ntp server address for the local ntp server address.
The default NTP server configuration is: -p 3.asia.pool.ntp.org -p
2.cn.pool.ntp.org -p 1.cn.pool.ntp.org -p0.cn.pool.ntp.org.
Each -p is followed by an NTP server domain name or IP address, which can be
modified or added to the NTP Server address pool.
(3) after modifying the NTP server address, click "save & application" in the
lower right corner.
Notes:
miner is running, but it can’t time synchronize with the configured NTP
server, the miner will not work properly. Please check if the address of the
public NTP server in the country is correctly configured.
for your region and country, in the miner configuration to increase your
country's NTP server address.
4.3.2. Mine pools & miner configuration.
(1) After login miner, enter the Cgminer configuration interface.
(2) In the Cgminer configuration interface, modify the address of the mine pool,
the miner's name, and then click "save & apply" on the right corner to save the
modified configuration.

Note:
After the mine pool configuration is modified, the cgminer process must be
restarted or the control board is restarted before the modified configuration
becomes effective.
(3) Restart cgminer to check whether the configuration changes take effect.
In the miner interface, select: Status- > CGMinerStatus to enter the
CGMiner's running state interface.
In the cgminer status interface, click "RestartCGMiner" to restart the
cgminer process.

(4) After the configuration is saved, if cgminer is not restarted, you can reboot
the control board to make the configuration take effect.
In the system interface, click “Reboot”.
`
In the reboot interface, click "Perform reboot" to confirm reboot.
About half a minute after rebooting the miner, the miner system is running,
the browser will automatically jump to the login screen.
5. Check the running status of the miner
After the miner is connected to the network and run, login the miner and check
the running status of the miner.
(1) In the interface of the miner, select: status-> CGMiner Status, and enter
the CGMiner running state interface.
(2) Check the running status of the overall hash rate, front and rear fan
speed, mine pool connection, hash rate of each hash board, temperature of each
hash board, etc.

Notes:
Total hash rate
In/Out fan speed
Hash rate of each hash board
The highest temperature of
each hash board
Effective chips of
each hash board
Mine pool connection status
In fan
Out fan
SM0
SM1
SM2
(1) The order of the fan and hash board in the miner.

(2) When the miner's wiring is correct and the network is normal, after the miner's
power is on, the miner will start to automatically search the frequency. The
frequency search test takes about 15 minutes and the formal mining will be
conducted, this time is normal hash rate. If the search is not over yet, the hash
rate you see will be lower than the normal hash rate.
(3) If the hash board temperature is higher than 85 degrees, the fan speed exceeds
6100 rpm, then the miner will reduce the operating frequency, the hash rate will be
lower than normal. Mine ventilation and cooling must be done measures to ensure
that the air inlet temperature of the miner below 40°
(3) If the fan cable is not reliably connected to the control board, the
corresponding fan speed is 0, which will cause the temperature of the miner to be
over high and the hash board to down-frequency and hash rate to drop
(4) If not detected the temperature of some hash boards, need to power off the
miner, re-plug the power cable and data cable (one side of the control board, one
side of the hash board) corresponding to the hash board, to ensure reliable
connection.
.

6. Configure miner in batches, check status,
upgrade firmware
You can use WhatsMinerTool software batch configuration, status checking,
firmware upgrade, detailed operation, see "WhatsMinerTool Operating Guide"
 Loading...