

Page 1
QD-MultiDrive
Series
User’s Manual
www.microboards.com Version 1.3
Page 2

2
Page 3

Table of Contents
Introduction ................................................................................................................................5
Unpacking your system .............................................................................................................5
Installation..................................................................................................................................5
Basic Instructions.......................................................................................................................5
Buttons and LCD ...................................................................................................................5
Hardware Description............................................................................................................6
Main Menu .................................................................................................................................7
Functions ................................................................................................................................... 8
Copy ...................................................................................................................................... 8
Test........................................................................................................................................8
Test & Copy........................................................................................................................... 8
Verify .....................................................................................................................................9
Compare................................................................................................................................ 9
Prescan .................................................................................................................................9
Disc Info ................................................................................................................................9
Edit Track ............................................................................................................................10
CD to CD Edit .................................................................................................................10
Close Session ................................................................................................................. 11
Setup .......................................................................................................................................12
Language ............................................................................................................................13
CD Burn Speed ................................................................................................................... 13
Read Speed ........................................................................................................................13
Auto Start Drive ...................................................................................................................13
Startup Menu.......................................................................................................................13
Auto Verify...........................................................................................................................13
Auto Compare ..................................................................................................................... 13
Auto Prescan.......................................................................................................................13
Eject Disc ............................................................................................................................13
Burn Mode...........................................................................................................................13
Display Time........................................................................................................................14
Button Sound.......................................................................................................................14
Device Info ..........................................................................................................................14
System Info .........................................................................................................................14
Quick Erase.........................................................................................................................14
Full Erase ............................................................................................................................14
Adv Setup ............................................................................................................................... 15
UnderRun Protect................................................................................................................16
Overburn .............................................................................................................................16
Read Error Skip...................................................................................................................16
Burn-in.................................................................................................................................16
Update Firmware.................................................................................................................16
Compare Firmware..............................................................................................................16
H/W Diagnostic.................................................................................................................
Load Default ........................................................................................................................16
CD+G ..................................................................................................................................17
ISRC & MCN .......................................................................................................................17
USB Option .........................................................................................................................17
CD Text ...............................................................................................................................17
Disc Counter........................................................................................................................ 17
Update Drive F/W................................................................................................................17
Specifications – QD-MultiDrive Series ....................................................................................18
Technical Support.................................................................................................................... 18
Appendix 1 List of Functions ...................................................................................................19
Appendix 2 LCD Messages .....................................................................................................20
Audio Editing: ...................................................................................................................... 20
Firmware Update:................................................................................................................ 20
...16
3
Page 4

4
Page 5
Introduction
The QD-MultiDrive Series includes the QD-123, QD-125, and QD-127. Each is a high speed,
low cost CD Recordable duplication system from Microboards Technology, LLC.
The QD-MultiDrive is perfect for any user requiring easy copying of audio, video, or Data
CDs. Superior technology allows the QD-MultiDrive to ship without a hard drive. LED
indicators provide the user with status of the duplication process, minimizing the number of
faulty discs. Current high speed CD Recordable technology is supported at 52X, which is the
highest in the industry. Applications suited for the QD-2 include Pro Audio, Multimedia,
Government / Education, Software Development, Medical Imaging, and Data Interchange.
Unpacking your system
When unpacking your duplicator, confirm the following items are included:
• QD-MultiDrive duplicator
• Power cable
• Manual
• CD-R disc
If any of these items are missing, please contact Microboards Technology Technical Support.
IMPORTANT: Please keep all the packing for your QD-MultiDrive duplicator. If your
unit ever needs to be sent in for service, it must be returned in the
original packing or the warranty will be voided.
Installation
• Connect the power cable to the QD-MultiDrive duplicator and plug in to a protected
power outlet strip or UPS power supply.
Note for Installation:
1) The socket outlet shall be installed near the equipment and be easily
accessible.
2) Do not block cooling fans.
• Turn on power to the duplicator.
• The system will go through initialization and then display: 1. Copy.
• The system is now ready to use.
Basic Instructions
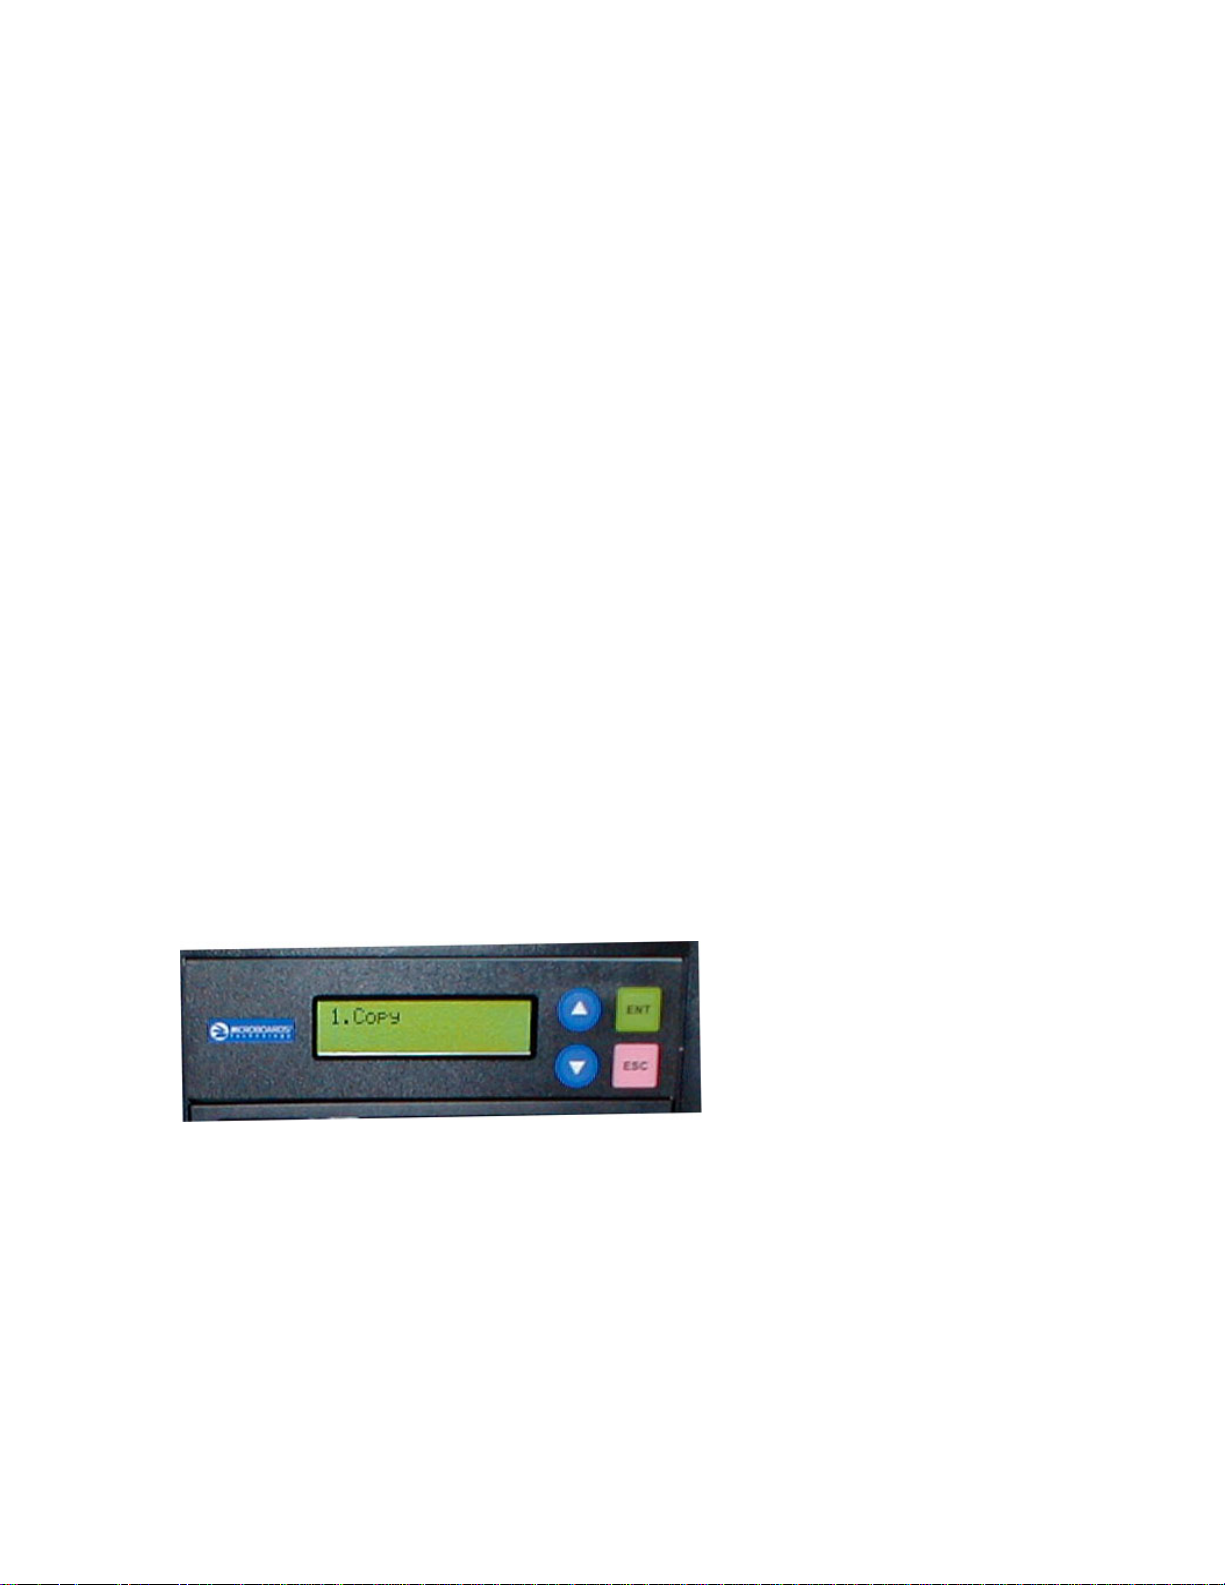
Buttons and LCD
There are four buttons and an LCD on the front panel of the QD-MultiDrive duplicator.
LED display: Shows the menu items and any status messages that may come up during
operation
ENT button: The ENT button, used to start a duplication process or enter into an area in the
menu structure.
ESC button: The ESC button, used to stop an operation or move up the menu structure.
▲ button, used to scroll up in the different menus.
▼ button, used to scroll down in the different menus.
5
Page 6

Hardware Description
p
QD-123
The QD-MultiDrive system consists of a CD reader, 3, 5, or 7 CD recorders (based on model)
and Controller module.
The master discs always go into the TOP CD Reader drive.
The blank CD media will always go into the CD Recorder drives below the Reader.
The power switch and power LED are also located on the front of the QD-MultiDrive
duplicator.
The LCD display will show the different menu selections and also information pertaining to
the recording process. Here is a typical example of what is displayed during the COPY
process:
Displays the function being performed,
such as Copying or Testing, and shows
the record s
eed.
Power LED
Shows the percentage
completed for this action.
Copying – 52x 17%
150.4 MB 01:15
Displays the amount of data left to be
recorded. This number starts at the capacity
of the master and counts down.
Shows the time remaining to
complete this action. This
number also counts down.
Controller Interface
Reader Drive
Recorder Drives
Power Switch
6
Page 7
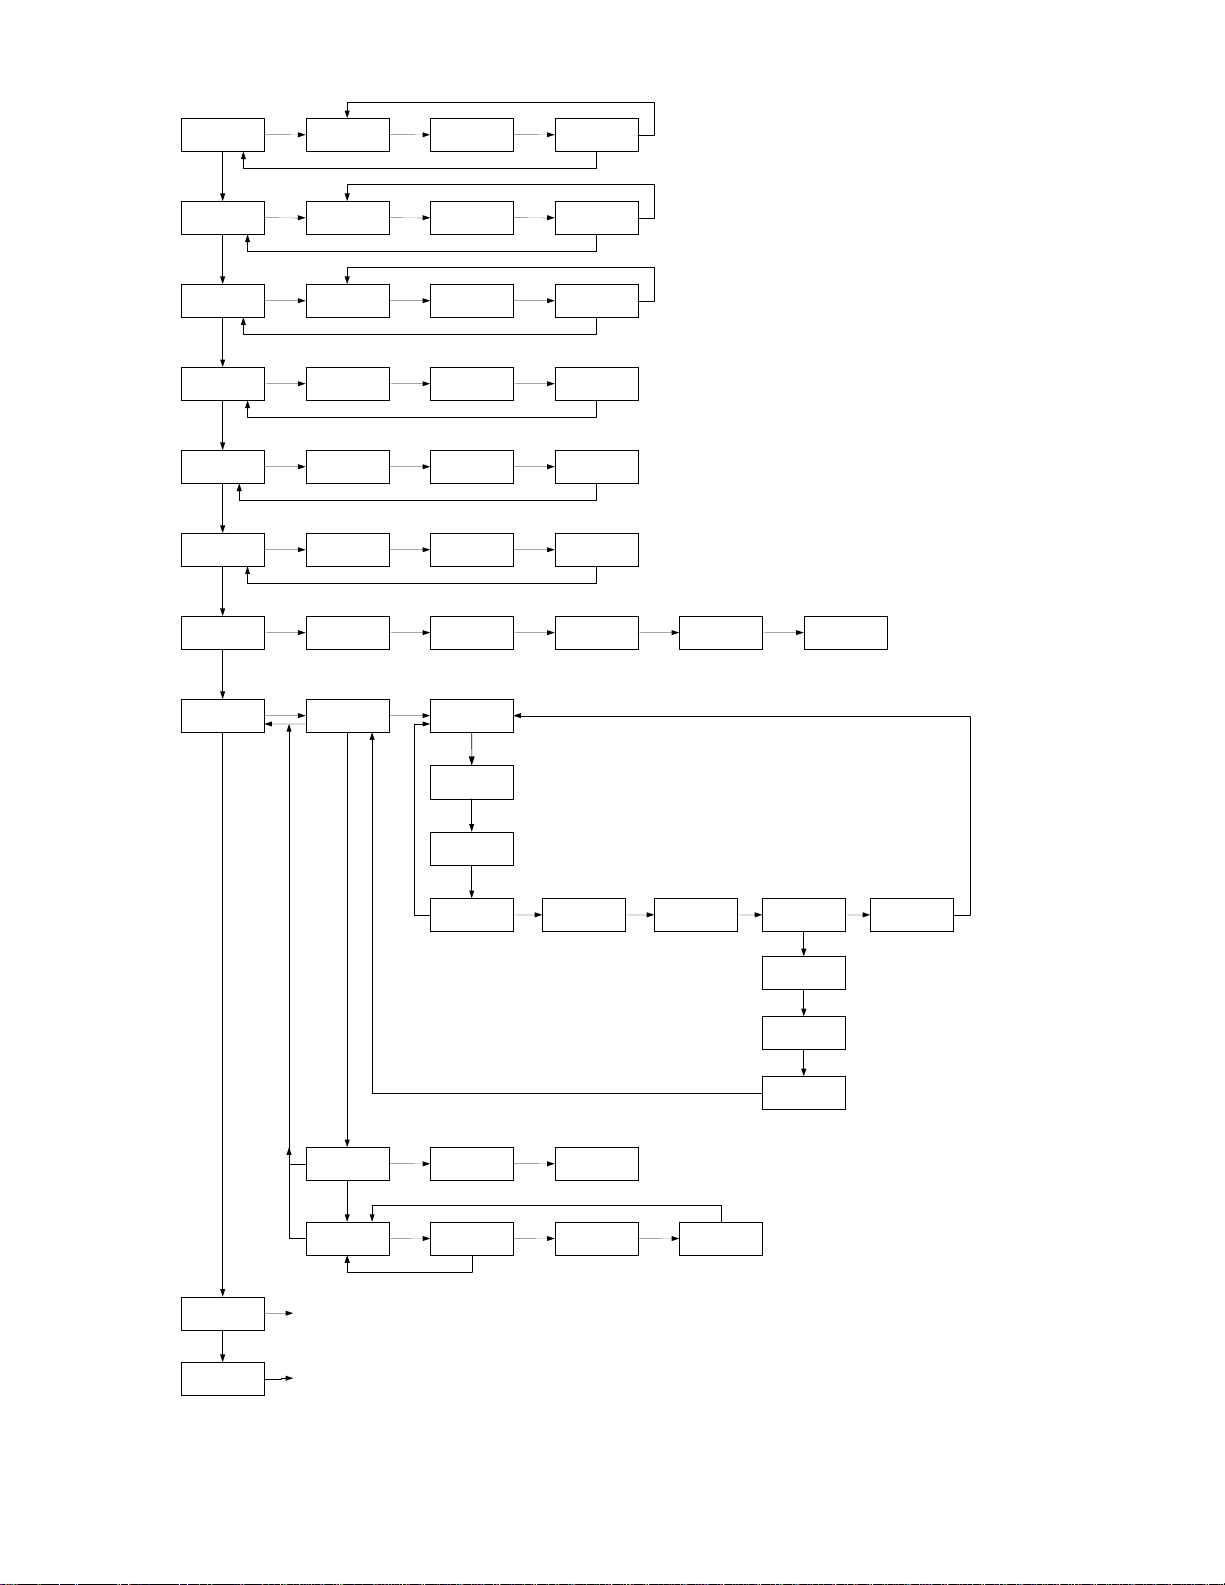
Main Menu
t
A
K
A
tOK
A
K
w
w
A
K
A
r
A
t
r
/
A
r
1 .0 Copy
▼
2.0 Tes
▼
3 .0 Test & Copy
▼
4 . 0 Verify
▼
5 . 0 Compare
▼
6 .0 Prescan
▼
7 . 0 Disc Info
▼
8.0 Edit Track
ESC
ENT
ENT
ENT
ENT
ENT
ENT
ENT
ENT
Source Disc
nalyzing….
Source Disc
nalyzing….
Source Disc
nalyzing….
Preparing…...
Preparing…..
Source Disc
nalyzing….
Source Disc
nalyzing….
8 - 01. Edit Track
CD to CD Edit
ESC
ESC
ESC
ESC
ESC
ESC
Load Next
ENT
Blank Disc
Load Next
ENT
Blank Disc
Load Next
ENT
Blank Disc
Session 01
Track 01 - 01.
Track 01
CDXA 37.1 MB
Copying – 52x 17%
150
.4 MB 01:15
Testing – 52x 17%
150
.4 MB 01:15
Copying – 52x 17%
150
.4 MB 01:15
Copied disc is no
being read .
Copied disc is no
being compared with
the master disc.
Scaning 24 x 15%
620
.4 MB 01:15
▼▼ ▼▼
Total 01 Sessions
Total 01 Tracks.
Select Track:
1
/10 05: 14
ENT or
▼
Select Track:
+10/10 05:14
1.0 Copy
O
: 07
2.0 Tes
: 07
3.0 Copy
O
: 07
4.0 Verify
OK: 07
Compare OK: 7
Fail: 0 Diff: 0
PreScan O
Total: 04:15
Total: 37.0 MB
ENT = Select that track number
= Skip that track numbe
▼
▼
10.
9. Set up
dv Setup
ESC
ESC
Setup Menu
3 seconds
(
See the Adv.
Setup Menu
(
Press and Hold the ESC
button fo
▼
8 - 02. Edit Track
Play Audio Track
▼
8 - 03 . Edit Track
Close Session
See the
page 12 )
page 15 )
▼
Select Track:
End 3 Trk 13:36
ENT
NO
End Edit disc
nd burn? YES
ENT ENT
Select Track:
1
/16 02: 45
Close all Disc’s
Sessions? YES
NO
YES
YESENT
Copying – 52x Edit
3/10 ? 2/3
Playing Track – 1
00:15
02:45
Closing Session
Please wait…...
OK: 01
Close Complete
OK: 7 Fail: 0
ESC
ESC
ESC
Continue edi
Next Disc? NO
NO
Close all disc’s
Session? YES
ENT
Closing Sesion
Please wait…..
Close Complete
OK: 7 Fail: 0
Burn Complete!
NOTE: This feature is not available on all models.
The reader drive must have a headphone jack for
this feature to operate.
YES
Insert Next Maste
7
Page 8

Functions
There are 9 different functions for the QD-MultiDrive duplicator: Copy, Test, Test & Copy,
Verify, Compare, Prescan, Disc Info, Edit Track and Setup. For the Setup options, please
refer to page 12.
These instructions refer to using 7 recorder drives (available only in the QD-127), but the QDMultiDrive will operate using any number of the available recorder drives.
Copy
Please refer to pages 15-17 for CD+G duplication
The Copy function is used to copy our master disc to the blank media, CD-R or
CD-RW. The QD-MultiDrive duplicator will be in Copy mode when it is turned
on. The display will read:
Place your master disc into the CD reader drive.
Place your blank media into the CD Recorder drives.
Press the ENT button on the controller interface.
The data will now be copied to the blank discs.
When the job is completed, the recorded discs will be ejected from the
recorder drives. The display will read:
Copying – 52x 18%
150.4MB 01:15
Test
The Test function is used to simulate copying our master disc to the blank media,
CD-R or CD-RW. To use the Test function, press the ▼ button on the controller
until Test is displayed:
In Test mode, the blank media will remain blank and can be used again.
Place your master disc into the CD reader drive.
Place your blank media into the CD Recorder drives.
Press the ENT button on the controller interface.
The duplicator will now simulate writing to the blank discs.
When the job is completed, the recordable discs will be ejected from the
recorder drives. The display will read:
Testing – 52x 18%
150.4MB 01:15
1. Copy
1.0 Copy
OK: 07
2. Test
2.0 Test
OK: 07
Test & Copy
The Test and Copy function will perform both operations, one after the other. If the Test
portion passes without errors, the system will automatically start the Copy process.
To run the Test and Copy function, press the ▼▲ buttons until the
display reads:
Place your master disc into the CD reader drive.
Place your blank media into the CD Recorder drives.
Press the ENT button on the controller interface.
The duplicator will now simulate writing to the blank discs.
8
Testing – 52x 18%
150.4MB 01:15
3. Test & Copy
Page 9

When this operation completes, the unit will start the Copy
process:
Copying – 52x 18%
150.4MB 01:15
When the job is completed, the recorded discs will be ejected from the
recorder drives. The display will read:
3.0 Copy
OK: 07
Verify
The Verify function will check to see if the recorded disc can be read. This is different from
the Compare function. The Verify function will not compare itself with the master disc. It is
only checking to see if the disc that was recorded can be read back.
To run the Verify function, press the ▼▲ buttons until the display reads:
Place the copied discs into the CD Recorder drives.
Press the ENT button on the controller interface.
The copied discs will now be read. Once completed, the display will show:
4. Verify
4. Verify
OK: 07
Compare
The Compare function is used to compare the master disc with the copied disc. The
Compare function will only work with Data masters. If your master disc has audio or video
(VCD) on it, the Compare function will not work.
To use the Compare function, press the ▼▲ buttons until the display reads:
Place your master disc into the CD reader drive.
5. Compare
Place your copied discs into the CD Recorder drives.
Press the ENT button on the controller interface.
The duplicator will now compare the master and copied discs.
When completed, the display will read:
Press the ▼ button and the following screen will appear:
Compare OK: 7
Fail: 0 Diff: 0
Src:01 CD-RW
Total: 15.2MB
Press the ▼ button again and the following screen will appear,
displaying the status of the first drive:
Press the ▼ button again to check the status of the second
drive, and again for the third.
Tgt: 00 CD-RW
Identical
Prescan
The Prescan function is used to verify the master disc can be read correctly.
To use the Compare function, press the ▼▲ buttons until the display reads:
Place the master disc into the CD reader drive and press ENT.
The prescan starts and the following screen appears:
Once the scanning is complete, the following screen will appear:
Scaning – 24x 15%
620.4MB 02:15
6. Prescan
PreScan OK!
Disc Info
The Disc Info function displays information on the type of master disc placed in the TOP
reader drive.
To use the Disc Info function, press the ▼▲ buttons until the display reads:
9
7. Disc Info
Page 10

Place the master disc into the TOP reader drive. Press the ENT button. The source is
analyzed.
The following screen appears:
The following 4 screens display a variety of information about the master disc. The screens
are reached by pressing the ▼▲ buttons.
Total 01 Sessions
Total 01 Tracks
Total: 04:15
Total: 37.0MB
Session 01
Track 01 - 01
Source Disc
(Analyzing)
Track 01
CDXA 37.0MB
Edit Track
The Edit Track function allows you to select multiple tracks from different master discs and
place them on one Audio CD. The maximum number of tracks that can be written to the CD
is 99. In the Edit Track function, there are three options: CD to CD Edit, Play Audio Track
and Close Session. Play Audio Track will not apply if the drives do not have headphone
jacks on the front drive panels.
Important Note
feature. Please see the Adv. Setup menu on page 15-17 for more details.
CD to CD Edit
To use the CD to CD function, press the ▼▲ buttons until the
display reads:
Press the ENT button. The following screen appears:
1. Place the first master audio CD into the CD reader drive. Place the blank CDs into the
recorder drives. Press the ENT button.
: The CD+G value must be set to OFF in order to use the Track Extraction
8. Edit Track
8-01. Edit Track
CD to CD Edit
The following screen appears:
2. To select a track that you want to burn to the blank disc, press
the ENT button. This will put a + symbol in front of that track:
3. Press the ▼▲ buttons to scroll through the tracks on that CD, selecting the tracks you
wish to record.
4. Once all of your tracks are selected for that master, press
the ▼ button until the display reads:
This screen shows the total number of tracks selected from the master disc and the total time
of those tracks.
5. Press the ENT button. The following screen appears:
Note: Pressing the ▼ button and selecting NO takes you
back to Editing tracks.
6. Press the ENT button to begin recording the selected tracks
to the blank disc. The following screen appears:
Select Track:
1/16 04:53
Select Track:
+ 1/16 04:53
Select Track:
End 1Track 04:53
End Edit Disc
And burn? YES
Copying – 52x Edit
1/16 → 1/1
7. Once the tracks are copied to the blank discs, the following
screen appears:
Burn Complete!
OK: 07
10
Page 11

8. Press the ESC button to take you to this screen:
If you wish to continue to add more audio tracks to the disc in
the recorder drive, press the ▼ button to change the NO to YES.
Then press Enter.
The TOP reader drive will open and ask you to put in the next master disc. Place the new
disc into the drive and close the tray. Go to step 3 and repeat the process.
Once you have completed copying the audio tracks to the Recorder drives, you will need to
close the discs.
9. At this screen, leave the selection as NO and press ENT:
Continue Edit
Next disc? NO
Continue Edit
Next disc? NO
Once ENT is pressed, the following screen appears:
10. Press the ENT button. The following screen appears:
Once the discs are closed, the following screen appears:
Close all disc’s
Sessions? Yes
Closing Session
Please wait….
Close Complete
OK: 07 Fail: 00
Close Session
The Close Session function is used only if you did not close an audio CD, as described in the
Edit Track / CD to CD Edit section. You can use this function to manually close the disc.
To use the Close Session function, press the ▼▲ buttons until the
display reads:
Press the ENT button. The following screen appears:
Press the ▼ button until the display reads:
Make sure your recorded audio CDs are in the Recorder drives.
Press the ENT button. The following screen appears:
Press the ENT button. The following screen appears:
Once the discs are closed, the following screen appears:
8. Edit Track
8-01. Edit Track
CD to CD Edit
8-03. Edit Track
Close Session
Close all disc’s
Sessions? Yes
Closing Session
Please wait….
Close Complete
OK: 07 Fail: 00
11
Page 12

Setup
f
f
f
A
9 .Setup
ENT
ESC
ESC
ESC
ESC
ESC
01
9 -
.
Language
Setup
ENT
Language
English
▲
▼
Idioma
Spanish
▼
9-02. Setup
CD Burn Speed
ENT
CD Burn Speed
Maximum
▲
Available speeds: 48x, 40x, 32x,
▼
▼
9-03. Setup
Read Speed
ENT
Read Speed
Maximum
▲
▼
Read Speed
vailable speeds: 48x,
48x, 40x, 16x, 8x
▼
9-04. Setup
Auto Start Drive
ENT
Auto Start Drive
OFF
▲
▼
Options are Off,
1 and 2
▼
Options are Copy, Test. Test & Copy,
9-05. Setup
Start Up Menu
ENT
Start Up Menu
1.Copy
▲
Verify, Compare, Prescan, Disc Info,
▼
Edit Track, Setup, Adv Setup
▼
9-06. Setup
Auto Verify
ENT
Auto Verify
OFF
▲
▼
Options are ON
or OFF
▼
9-07. Setup
Auto Compare
ENT
Auto Compare
OFF
▲
▼
Options are ON
or OFF
▼
9-08. Setup
Auto Prescan
ENT
Auto Prescan
OFF
▲
▼
Options are ON
or OFF
▼
9-09. Setup
Eject Disc
ENT
Eject Disc
Eject Good Only
Eject Disc
Eject All Discs
▼ ▼
▼
9-10. Setup
Burn Mode DAO TAO –Not Close
ENT
Setup Setup Setup
▼▼
▼
9-11. Setup
Display Time
ENT
Display Time
Of
▲
▼
Options are ON
or Of
▼
9-12. Setup
Button Sound
ENT
Button Sound
ON or Of
▲
▼
Options are ON
▼
9-13. Setup
Device Info
▼
ENT
Press the ▼
button to view
next devices.
00 IDE0 Master
DVD-ROM:
01 IDE1 Master
DVDDUAL: NEC
▼
ENT
ENT
Reader Model and
Firmware
Recorder Model
and Firmware
▲
▼
CD Burn Speed
24x, 20x, 16x, 10x, 4x
Note: Option 2 is not used
in the QD-DVD 123 duplicator
Dil
TURKCE
DVD Read Speed
limited to 16x and 8x.
Eject Disc
Do Not Eject
TAO
9-14. Setup
System Info
ENT ENT
DVD Duplicator
2033S ver: B.123
Fujitsu:29LV1608
2006/06/08 ACARD
▼
YES
▲
▼
Does a quick
erase of the disc
Does a full erase
of the disc
Change interval
before tray closes
ESC
9-15. Setup
Quick Erase
▼
9-16. Setup
Full Erase
▼
9-17. Setup
Auto Close Tray
ENT
All data will be
Lost, Erase? YES
NO
▼
ENT YES
All data will be
Lost, Erase? YES
NO
▼
ENT
Auto Close Tray
Off
▼
9-18. Setup
Quick Compare
ENT
Quick Compare
Off
The Quick Compare feature is not in use.
Setting should remain OFF.
▼
Available Speeds: Auto, Max,
9-19. Setup
Audio Burn Speed
ENT
Audio Burn Speed
Auto
▲
▼
12
48x, 40x, 32x, 24x, 20x, 16x,
12x, 10x, 8x, 6x, 4x
Page 13

Setup Menu
The Setup menu includes many setting the user can select to customize the use of the QDMultiDrive duplicator. Here is a description of the options in the setup menu.
Language
The QD-MultiDrive duplicator has two language options, English and Spanish. English is the
default setting.
CD Burn Speed
The default record speed for the QD-MultiDrive is Maximum (52x). The other record speed
options are: 48x, 40x, 32x, 24x, 16x, 12x, 10x, 8x and 4x.
NOTE: 12x is currently the minimum burn speed. Selecting lower speeds will not
reduce the burn speed below 12x.
Read Speed
The default read speed for the QD-MultiDrive is Maximum (52x). The other read speed
options are:
48x, 40x, 32x, 16x and 8x.
Auto Start Drive
The Auto Start Drive is used to automatically start recording, once the master disc and blank
disc are inserted into the drives.
There are 3 options for this setting, Off, 1 and 2. To use this feature, change the value from
OFF to 1. The 2 setting is not used. Once the value is set to 1, the system will automatically
start recording once a master and blank disc are detected.
Startup Menu
The Startup Menu selection allows you to select the main menu item that appears when the
QD-MultiDrive duplicator starts up. The default setting is 1. Copy. Menu items 1 through 9
can be selected.
Auto Verify
The Auto Verify function can be turned On if you wish to verify every copy you make with the
QD-MultiDrive duplicator. The verify function checks the copied disc, to see if it can be read.
It does not compare the copy with the master disc. The default setting is Off.
Auto Compare
The Auto Compare function can be turned On if you wish to Compare every copy with the
master disc. The Compare function only works with Data master discs. If there is audio or
video on the master disc, the Compare function will not work. The default setting is Off.
Auto Prescan
The Auto Prescan function can be turned On if you with to Prescan every master disc before
recording. The default setting is Off.
Eject Disc
There are 3 options for the Eject Disc setting:
1. Eject good discs only
2. Eject all discs
3. Do not eject discs
The default setting is to eject the good discs only.
Burn Mode
There are 3 options for the Burn Mode setting:
1. DAO (Disc At Once)
2. TAO – Not Close (Track At Once, not closed)
3. TAO (Track At Once, closed)
The default setting is DAO. It is recommended that this setting be used.
13
Page 14

Display Time
The display time function is used to display the total record time, after the recording is
completed. The default setting is Off.
Button Sound
The Button Sound function is used to turn on or off the beep sound a button makes when
pressed. The default setting is On.
Device Info
The Device Info function displays a variety of information about the CD reader and writer,
including model number and firmware revision. Please review the Setup Menu on page 12
for more details.
System Info
The System Info function displays a variety of information about the controller module,
including model number and firmware revision. Please review the Setup Menu on page 12
for more details.
Quick Erase
The Quick Erase function is used to Erase CD-RW media. This option performs the Quick
erase of the disc.
Full Erase
The Full Erase function is used to Erase CD-RW media. This option performs the Full erase
of the disc.
14
Page 15

Adv Setup
A
A
A
A
A
A
A
A
f
f
f
f
A
f
f
f
r
A
f
11. Advanced Setup
ENT
ENT
11 -01
dv Setup
Under Run Protect
▼
ESC
11 -02
Overburn
dv Setup
▼
ESC
11 -03
dv Setup
Read Error Skip
▼
ESC
11 -04
Burn-
dv Setup
In
▼
ESC
11 -05
dv Setup
Update Firmware
▼
ESC
dv Setup
11 -06
Compare Firmware
▼
ESC
11 -07
dv Setup
/W Diagnostics
H
ENT
ENT
ENT
ENT
ENT
ENT
Under Run Protect
ON
Overburn
Of
Read Error Skip
OFF
Burn-In
Erase & Copy
Update F/W A.321
To B.123? YES
NO
Last update F/W
OK!
Runs through
controller diagnostics
▼
▲
▼
▲
▼
▲
▼
YES
Options are ON or
Of
Options are ON or
Of
Options are ON or
Of
Burn-In
Test
Firmware is
updated.
To Be Used by
Service Personnel
ONLY
ESC
ESC
ESC
ESC
ESC
▼
11 -08
dv Setup
Load Default
▼
11 -09
dv Setup
CD+G
▼
11 -10
dv Setup
ISRC & MCN
▼
11 -11
. Adv Setup
USB Option
▼
11-12. Adv Setup
CD-Text
▼
11-13. Adv Setup
Disc Counter
▼
11-14. Adv Setup
Update Drive F/W
ENT
ENTESC
ENTESC
ENT
ENT
ENT
ENT
Load Default
Config? YES
NO
CD+G
OFF
ISRC & MCN
ON
USB Option
On
CD-Text
On
Disc Counte
View
NOT IN USE
YES
▲
▼
▲
▼
▲
▼
▲
▼
ENT
Load Default
!
OK
Options are ON or
Of
Options are ON or
Of
Options are ON or
Of
Options are ON or
Of
View disc
counts
15
Page 16

Advanced Setup Menu
To get to the Advanced Setup Menu, press and hold the ESC button for three seconds.
The Advanced Setup menu includes options for the more advanced user. Normally these
functions are not used in the daily operation of the QD-MultiDrive duplicator. If you have any
questions about using these functions, please contact the Microboards technical support
department.
UnderRun Protect
The UnderRun Protect feature allows the recorder to use Burn Proof during recording. This
setting defaults to ON and should remain on. This feature protects against making “coasters”
or bad discs. Again, this setting should always remain ON.
Overburn
The default setting for this feature is OFF. Overburn can be used with certain CD recorders,
to allow more data to be writing to the disc. This feature is not supported by the QDMultiDrive duplicator.
Read Error Skip
The Read Error Skip feature is used if you wish to ignore read errors during duplication. The
default setting is OFF and it is highly recommended that this setting is not changed. If it is
turned ON, there is the possibility of copying a disc that is not the same as the master.
Burn-in
The Burn-in function is used to test the operation of the QD-MultiDrive duplicator and is for
service purposes only. This function should only be used if directly by Microboards Technical
Support.
Update Firmware
The Update Firmware feature is used to update the controller firmware.
1. To update the firmware: Place the firmware CD into the TOP reader drive.
2. Press the ENT button
3. The display will show:
Update F/W X.12Y
To M.45R YES?
4. Press the ENT button to complete the firmware update.
5. The duplicator will reboot automatically after installing the new firmware.
Compare Firmware
The Compare Firmware function is used to compare the firmware installed on the controller
with the firmware on the CD.
H/W Diagnostic
Hardware Diagnostics runs a number of tests on the controller. Normally this function is used
by service personnel.
Load Default
The Load Default feature will set all the values back to the factory default settings.
16
Page 17

CD+G
The CD+G feature, when set to ON in the Advanced Setup Menu, will allow you to copy a
CD+G Karaoke master disc. The default setting is OFF.
Important Note
feature.
To enable CD+G duplication, perform the following steps:
1. Press and HOLD the ESC button for 3 seconds to enter the Advanced Setup Menu
2. Press the UP or DOWN arrows until the display reads 10-9: Adv Setup CD+G
3. Press ENT to adjust the CD+G setting
4. Use the UP or DOWN arrows to alternate the setting between ON and OFF
5. Press ENT when ON is displayed to enable CD+G duplication
6. Press ESC to exit the Advanced Setup Menu
7. Use the UP or DOWN arrow to return to Copy mode
: The CD+G value must be set to OFF to use the Track Extraction
ISRC & MCN
The ISRC (International Standard Recording Code) & MCN (Media Catalog Number) feature
allows you to copy this information from a CD audio master to the blank disc. The default
setting is OFF.
USB Option
This function is not used in the QD-MultiDrive Series.
CD Text
This feature allows CD-Text content to be copied from master to blank. The default is OFF.
Disc Counter
This feature allows you to view the number of successful and unsuccessful burns. The JC OK
entry is for successful burns for the entire unit; you can also view the individual drive
performance by using the ▼▲ buttons.
Update Drive F/W
This feature is not used by the QD- MultiDrive.
17
Page 18

Specifications – QD-MultiDrive Series
Model Recorders Dimensions, inches (H x W x D) Weight, lbs
QD-123
QD-125
QD-127
• Product Interface ATAPI/ IDE
• Read Speed 52X
• Write Speed 52X
• System Display LED
• Write Method Auto Detect (DAO, TAO )
• Operation Mode COPY, TEST, SCAN,
SAFE
• Data Buffer 1 MB
Supported Formats CD-ROM Mode 1 & 2 CD-DA , CD-ROM/XA Video CD , Game CD Mix Mode,
Multisession , HFS CD Bridge , Photo CD , CD Extra, CD+G (Karaoke)
3 10.5 x 8 x 17 21 lbs
5 17 x 8 x 18 33 lbs
7 17 x 8 x 18 37 lbs
• Firmware Upgrade Via CD-ROM
• AC Input: 115/230 VAC; 8/5 AMPS
MAX; 50-60Hz
• Maximum Operating Temperature: 25
Degrees C.
• Relative Humidity: 30% - 80% non-
condensing
• Recommended Media: Taiyo Yuden
CAUTION: Disconnect AC Power Cord Before Servicing. High Voltages Present with Unit Powered Off and
Line Cord Connected.
Technical Support
For technical questions or support issues, contact Microboards Technology technical support:
United States
PH: 952-556-1639
FAX: 952-556-1628
support@microboards.com
www.microboards.com
PH: +44 (0) 845 230 7800
www.microboards.co.uk
Europe
www.microboards.co.jp
Please have the Model and Serial Number of your QD available when contacting
Technical Support.
Any unauthorized modification to this equipment may result in the revocation by the FCC of the user’s
authority to operate this equipment.
NOTE: This equipment has been tested and found to comply with the limits for a Class B digital device, pursuant to
Part 15 of the FCC Rules. These limits are designed to provide reasonable protection against harmful interference
in a residential installation. This equipment generates, uses, and can radiate radio frequency energy and, if not
installed and used in accordance with the instructions, may cause harmful interference to radio communications.
However, there is no guarantee that interference will not occur in a particular installation. If this equipment does
cause harmful interference to radio or television reception, which can be determined by turning the equipment off
and on, the user is encouraged to try to correct the interference by one or more of the following measures:
• Reorient or relocate the receiving antenna
• Increase the separation between the equipment and antenna
• Connect the equipment into an outlet on a circuit different than that to which the receiver is connected
• Consult the dealer or an experienced radio/TV technician for help
Japan
PH: 03-3561-2266
This product is in conformity with the EMC Directive (89/336/EEC) through compliance with the following European
standards: EN 55022, EN 55024. The CE mark has been affixed in accordance with the CE Marking Directive
93/68/EEC.
Canadian Department of Communications (DOC) Statement
This Class B digital apparatus complies with the Canadian ICES-003 Issue 4:2004. Cet appareil numerique de la classe B est
conforme a la norme NMB-003
du Canade.
18
Page 19

Appendix 1 List of Functions
1 Copy
2 Test
3 Test & Copy
4 Verify
5 Compare
6 Prescan
7 Disc Info
8 Edit Track
8-1 CD to CD Edit
8-2 Play Audio Track
8-3 Close Session
9 Setup
9-1 Language (Default is English)
9-2 CD Burn Speed (Default is Maximum)
9-3 CD Read Speed (Default is Maximum)
9-4 Auto Start Drive (Default is Off)
9-5 Startup Menu (Default is Copy)
9-6 Auto Verify (Default is Off)
9-7 Auto Compare (Default is Off)
9-8 Auto Prescan (Default is Off)
9-9 Eject Disc (Default is Eject Good Only)
9-10 Burn Mode (Default is DAO)
9-11 Display Time (Default is Off)
9-12 Button Sound (Default is On)
9-13 Device Info
9-14 System Info
9-15 Quick Erase
9-16 Full Erase
10 USB Mode
11 Adv Setup
11-1 UnderRun Protect (Default is On)
11-2 Overburn (Default is Off)
11-3 Read Error Skip (Default is Off)
11-4 Burn-in
11-5 Update Firmware
11-6 Compare Firmware
11-7 H/W Diagnostic
11-8 Load Default
11-9 CD+G (Default is Off)
11-10 ISRC & MCN (Default is Off)
11-11 USB Option
11-12 CD TEXT
11-13 Disc Counter
11-14 Update Drive Firmware (NOT IN USE)
19
Page 20

Appendix 2 LCD Messages
Normal Conditions:
Initialize SDRAM......................................................................Initialize the memory of the system.
Detect Drives....................................................Detect what drives are connected with the system.
User Abort!....................................................................................Cancel the job during operation.
Analyzing...................................................................................................Analyze the source disc.
Source Drive Not Ready.............................................................Source drive is not ready to read.
Target Drive Not Ready...............................................................Target drive is not ready to write.
Source Disc Not Ready.......................................................... Source disc is not ready to be read.
Target Disc Not Ready.................................................. Target disc is not ready to be written into.
Erasing disc.................................................................The system is erasing the data on the disc.
Fail to get Drive Info!.................................................... The drive information cannot be obtained.
Fail to get Src Disc Info!................................ The information of source disc cannot be obtained.
Save new config Fail!...................................... The new setting of configuration cannot be saved.
Load Default Config?.....................................................Do you want to load the default settings?
Preparing................................................................................... The system is preparing to record.
Check Target Please Wait ............................................The system is checking the target device.
Audio Disc!!! Can’t compare!................................. The system cannot compare the audio discs.
Identical............................................................................... The comparison results are the same.
Read disc error ..........................................................During comparison the disc cannot be read.
Cannot read TOC..................................................... The system cannot read the contents of disc.
TOC not match.............................................................. The comparison results are not the same.
Target overflow.................................... The target disc hasn’t enough capacity to store new data.
Target Disc Not Empty!!!.................................................................. The target disc still has data.
Press a Key to Eject Good Disc……………….Press any key to eject the good disc after
copying.
Press a Key to Eject Fail Disc........................Press any key to eject the failed disc after copying.
CD-RW does not Support the Func.................................... CD-RW doesn’t support this function.
Hold ESC to exit...................................................... Press ESC for a second to terminate the test.
All data will be lost, erase?...............All data on the disc will be lost. Confirm the erasing of data.
Erase Finished..................................................................... The erasing of data comes to an end.
No Erasable Disc in CD-RW!!...........................The disc on the CD-RW device is not rewritable.
Audio Editing:
Lost selected Tracks?................................................. Abort the selected tracks and delete them.
End edit disc and burn?....................................... Finish the music disc editing and start to copy.
Continue edit next Disc?................................. Ask if you want to continue the music disc editing.
Target Overflow Re-Select.............. The disc capacity is not enough to store the selected tracks.
Close all disc’s session?..................................................... Confirm the closing of disc sessions.
NO AUDIO track in this disc.................................................. The source disc has no audio track.
Insert next disc....................................................................................... Insert the next audio disc.
Sessions were closed already!.............................. The disc sessions have already been closed.
Tgt overflow, del last trk?............... The disc capacity is not enough to store the selected tracks.
Ins empty disc Continue?................... Do you want to insert a blank disc and continue copying?
Firmware Update:
Invalid firmware Disc.................................................... The disc doesn’t contain a valid firmware.
Updating F/W.........................................................................The system is updating the firmware.
Update F/W xxx to yyy?................. Do you want to update the firmware version from xxx to yyy?
Searching F/W ......................................................... The system is searching for a valid firmware.
Check Sum Error!...................................................................... The updated firmware has errors.
Last update F/W OK!........................................................... The firmware is updated successfully.
Last update F/W Fail!.................................................... The firmware is not updated successfully.
Flash ROM fail!................................................................. Data cannot be written into Flash ROM.
7/2008
Page 21

21
 Loading...