

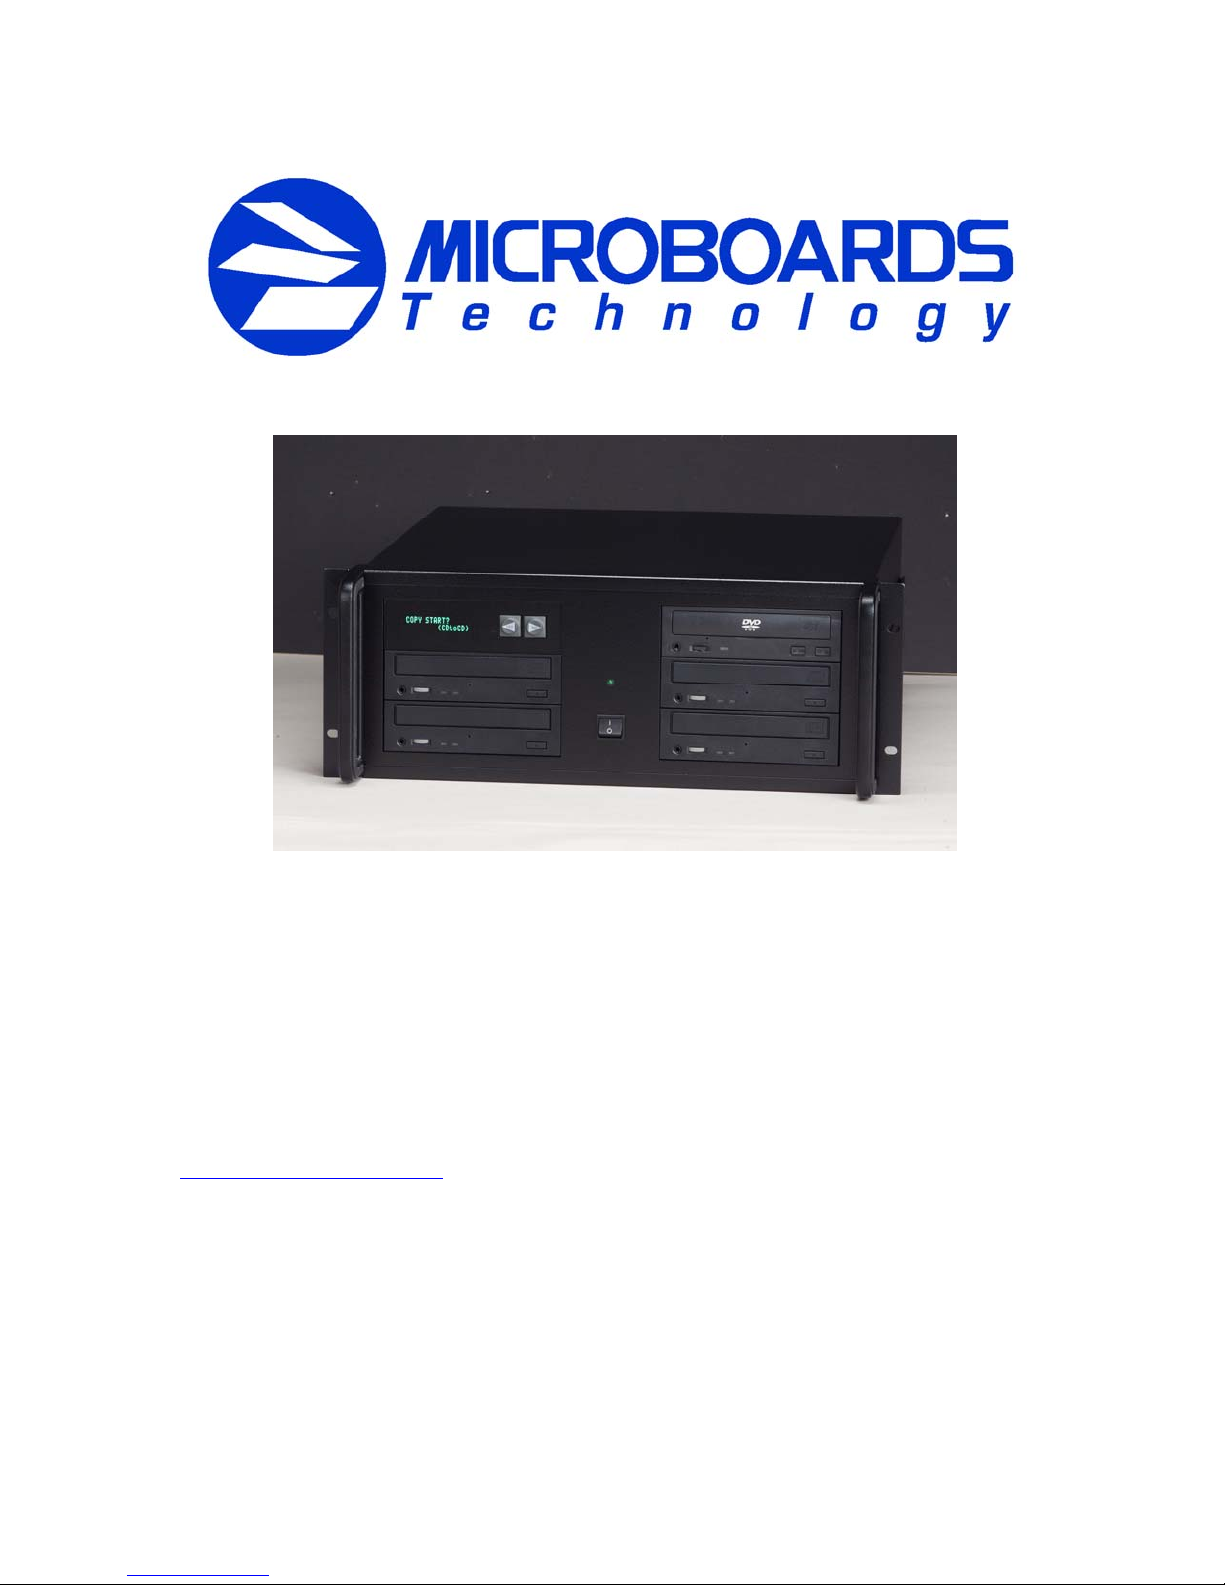
DSR DVD Premium Pro Series
Rack Mount
Users Guide
www.microboards.com Version 1.0

DSR DVD Premium Pro Rack Mount Series MICROBOARDS TECHNOLOGY, LLC
TABLE OF CONTENTS
System Overview................................................................................................................ 3
Unpacking your system....................................................................................................... 3
Installation Requirements ................................................................................................... 4
Menu Overview .................................................................................................................. 5
Setup Menu......................................................................................................................... 7
Copy DVD to DVD ............................................................................................................ 8
Simulation DVD to DVD.................................................................................................... 8
Registering Data to the Hard Drive (HDD)........................................................................ 9
Erasing DVD-+RW media................................................................................................10
Copy Hard Drive (HDD) to DVD..................................................................................... 10
Clearing the Hard Drive (HDD) ....................................................................................... 11
Copy CD to CD................................................................................................................. 13
Simulation CD to CD........................................................................................................ 13
Registering Data to the Hard Drive (HDD)...................................................................... 14
Erasing CD-RW media..................................................................................................... 15
Copy Hard Drive (HDD) to CD........................................................................................15
Clearing the Hard Drive (HDD) ....................................................................................... 16
Track Extraction................................................................................................................ 17
Error status in Track Extraction:................................................................................... 18
Setup Menu....................................................................................................................... 19
Mode Select: ................................................................................................................. 19
Copy DISC TO HD/DISC: ........................................................................................... 19
DVD WR Speed:........................................................................................................... 19
CD WR Speed:.............................................................................................................. 19
ISRC Check: ................................................................................................................. 19
Copy Quantity:.............................................................................................................. 19
Session Mode:............................................................................................................... 20
Drive Inquiry................................................................................................................. 20
F/W Version.................................................................................................................. 20
Error Codes....................................................................................................................... 21
Specifications:...................................................................................................................28
Supported Formats:...........................................................................................................28
Firmware Updates.............................................................................................................28
Contact Information.......................................................................................................... 28
2

DSR DVD Premium Pro Rack Mount Series MICROBOARDS TECHNOLOGY, LLC
System Overview
The DVD market has grown at an incredible pace and Microboards Technology has
developed a duplicator with leading-edge technology to meet the growing market
requirements. The DSR DVD Premium Pro Series is the first stand-alone, multi-drive
DVD-+R/CD-R duplicator employing the use of General Purpose DVD-+R recorders.
Configurations of 1 to 4 recorders are available to meet individual production
requirements. An intuitive, menu driven display and 2-button control interface provide
simple one-touch operation for the novice user while giving access to advanced features
for the professional. The hard drive comes standard with the system and allows for
DVD/CD image archival and CD track extraction for CD audio compilations.
Advanced Features:
• Stand-Alone DVD-R / CD-R duplicator
• One Touch duplication
• Speed selectable (1x to 16x for DVD-+R and 4x to 48x for CD-R)
• Supports writing to DVD-+R/RW, DVD+R DL, CD-R/RW
• Copy and Verify
• Counter feature allows the user to input how many discs need to be
copied and the keeps track of the total discs completed.
• Automatically detects DVD or CD masters
• Simulation mode to ensure recording stability
• Easy-to-read, two-line display for status and error reporting
• Updates easily installed through DVD/CD reader
Unpacking your system
When unpacking your duplicator, confirm the following items are included:
• DSR DVD Rack Mount duplicator
• Power cable
• Quick Start Guide
• Microboards Documentation CD
If any of these items are missing, please contact or Microboards Technology Technical
Support at 952-556-1639.
IMPORTANT: Please keep all the packing for your DSR DVD Rack Mount duplicator. If
your unit ever needs to be sent in for service, it must be returned in the original packing
or the warranty will be voided.
3

DSR DVD Premium Pro Rack Mount Series MICROBOARDS TECHNOLOGY, LLC
Installation Requirements
System Setup
• Connect the power cable to the DSR DVD Rack Mount duplicator and plug in to a protected
power outlet strip or UPS power supply.
• Turn on power to the tower. The system is now ready to use.
Install your DSR DVD Rack Mount duplicator in the following environment:
• On a level and stable surface
• In a well ventilated location
• Temperature and humidity
• Temperature: 5-40°
• Humidity: 20-80%RH (no dew formation)
Do not install it in the following places:
Under direct sunlight (If the machine is exposed to sunlight, the light should be blocked
by a curtain or blind.)
A dusty location
A place where there is a lot of vibration
Near open flame
A place where the temperature and humidity change drastically
Near a heating device such as a heater or furnace
A location where air from an air conditioner blows directly onto the unit
Near a container filled with water such as a vase
In winter during times of low humidity or in a location where static electricity is
generated, use an anti-static-electricity mat or humidifier to prevent static electricity.
Power supply
Use house current as the power source for the unit.
Do not use an outlet near a motor driven appliance (i.e. air conditioner, copying
machine).
Use an outlet with stable power supply voltages.
Do not overload an outlet. Do not use a service outlet from a PCs or other office
machine.
Wire the power cord properly.
Do not touch the power cord with a wet hand.
Be careful not to damage the power cord.
Inspect the power cord periodically.
In the event that the power cord is damaged, replace the power cord.
Be sure to use a tool such as the screwdriver to change the 115/230V Switch.
Do not use your finger.
4
DSR DVD Premium Pro Rack Mount Series MICROBOARDS TECHNOLOGY, LLC
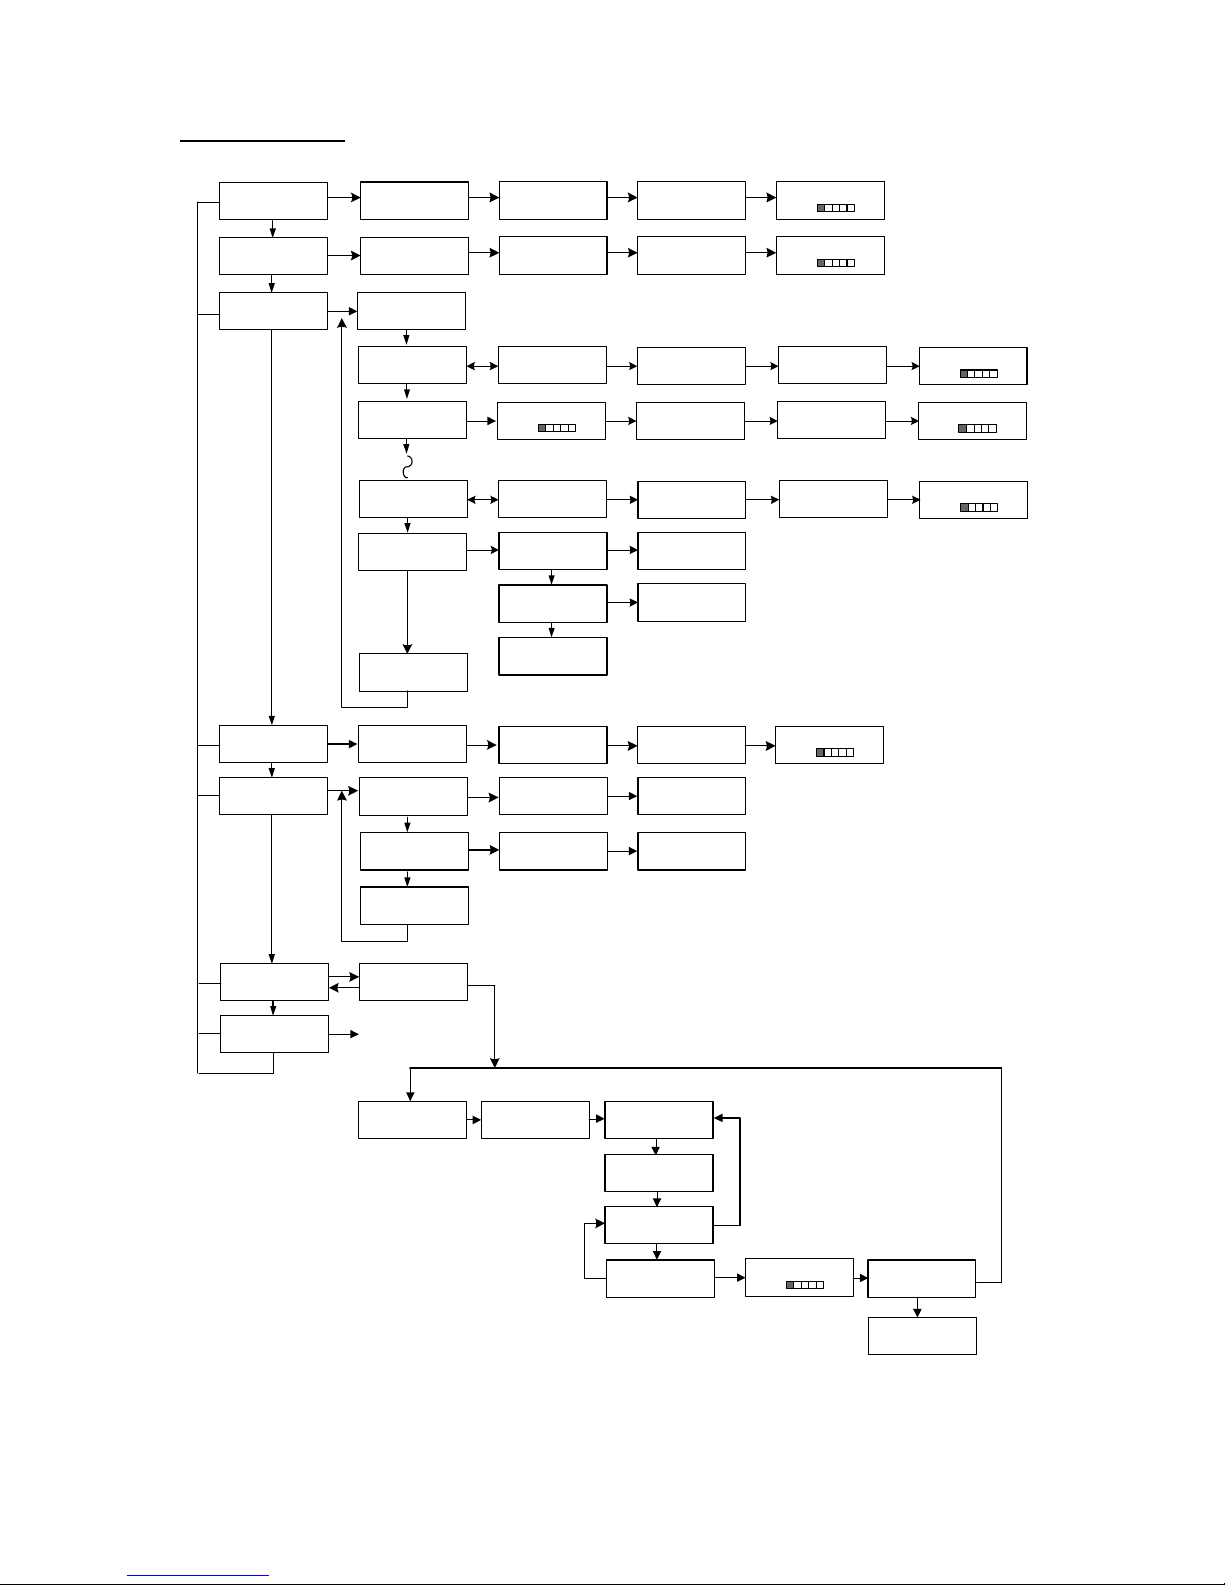
Menu Overview
NO
NO
NO
NO
NO
NO
NO/ESC
YES
INSERT
MASTER DISC
YES
INSERT
MASTER DISC
YES
>READER?
(DISCtoDISC)
NO
>HDD1? CD-DA
(HDDtoDISC)
NO
>HDD2?
(DISCtoHDD/DISC)
NO
>HDD9? CD-DA
(HDDtoDISC)
NO
>MASTER CLEAR?
NO
>EXIT?
NO
YES
INSERT
MASTER DISC
YES
>QUICK ERASE?
NO
>QUICK ERASE?
NO
>EXIT?
NO
YES
EXTRACTION OK?
NO
YES
SETUP MENU
INSERT ANALYZING MASTER
MASTER DISC
>HDD1? 15:26
YES
REGIST 15:26
CD-DA 20%
>HHD9? 15:26
YES
YES
YES
YES
INSERT
TARGET DISC
INSERT
TARGET DISC
(HDDtoDISC)
(HDDtoDISC)
>>HDD1 CLEAR?
NO
>>HDD9 CLEAR?
NO
>>EXIT?
INSERT
TARGET DISC
SURE ? DISC ERASE
SURE ? DISC ERASE
ANALYZING MASTER
ANALYZING MASTER
COPY START?
COPY START?
COPY START?
YES
>HDD1?
YES
>HDD9?
ANALYZING MASTER
YES
Please wait...
YES
Please wait...
EXTRACT THE Trk?
TRK 01/12
EXTRACT THE Trk?
TRK 12/12
END EXTRACTION?
COPY TO HDD OK?
NO
(HDD1toDISC)
(HDD2toDISC)
(HDD9toDISC)
(HDDtoDISC)
(HDDtoDISC)
YES or NO
YES or NO
YES
COPY 15:26
CD-DA 20%
COPY 15:26
CD+G 20%
INSERT
TARGET DISC
INSERT
TARGET DISC
INSERT
TARGET DISC
SIMULATION 15:26
CD-DA 20%
NO = skip track
YES = execute the selected track
NO
YES
REGIST 15:26
CD-DA 20%
COPY 15:26
CD-DA 20%
COPY 15:26
CD-DA 20%
COPY 15:26
CD-DA 20%
NEXT MASTER
NO
COPY START
(HDD1toDISC)
YES
COPY MENU
ESC
ESC
ESC
ESC
COPY START?
(DISCtoDISC)
COPY CD+G START?
(DISCtoDISC)
MASTER SELECT?
(DISCtoDISC)
SIMULATION?
(DISCtoDISC)
DISC ERASE?
(REWRITABLE)
Trk EXTRACTION?
(DISCtoHDD1)
SETUP?
(MODE CHANGE)
5

DSR DVD Premium Pro Rack Mount Series MICROBOARDS TECHNOLOGY, LLC
Important Notes:
* There are 10 hard drive partitions available for storing DVD and/or CD masters.
* The Master Clear? menu item will only appear if information has been stored on the internal
hard drive.
* Track Extraction only applies to CD-DA audio master discs. The Track Extraction feature
copies the audio tracks to HDD1. This cannot be changed to a different hard drive partition.
6
DSR DVD Premium Pro Rack Mount Series MICROBOARDS TECHNOLOGY, LLC
Setup Menu
7
DSR DVD Premium Pro Rack Mount Series MICROBOARDS TECHNOLOGY, LLC
Copy DVD to DVD
1. Place the Master Disc into the Reader drive
2. Place the blank DVD-+R(/W) disc(s) into the Recorder drive(s)
3. The display reads COPY START? (DISC to DISC)
Copy Start?
(DISC to DISC)
4. Press Yes
5. The drive trays will open on any recorder without blank discs installed. If you do
not want to make a copy in those drives, close the tray(s), wait for the drive light
to go out, and then press the YES key to start the copy job.
6. The display will now show the progress of the Copy Job
COPY 4.0GB
DVD 15%
7. The Recorder(s) will eject the DVD recordable discs when the job is complete.
Simulation DVD to DVD
Important: Simulation is not allowed when using DVD+R/RW media.
1. At the COPY START? (DISC to DISC) menu, press the NO key until the display
shows SIMULATION? (DISC to DISC)
Simulation?
(DISC to DISC)
2. Place the Master Disc into the Reader drive
3. Place the blank DVD-R(/W) disc(s) into the Recorder drive(s) and wait 10
seconds for the light(s) on the front of the Recorder(s) to stop blinking.
4. Press Yes
5. The drive trays will open on any recorder without blank discs installed. If you do
not want to make a copy in those drives, close the tray(s), wait for the drive light
to go out, and then press the YES key to start the copy job.
6. The display will now show the progress of the Simulation Copy Job
SIMULATION 4.0GB
DVD 15%
7. The Recorder(s) will eject the DVD-R discs when the job is complete.
Note: The DVD-R media will NOT be recorded to in Simulation Mode.
8
DSR DVD Premium Pro Rack Mount Series MICROBOARDS TECHNOLOGY, LLC
Registering Data to the Hard Drive (HDD)
When registering data to a partition on the internal hard drive, you do have the option
of recording to the blank media as well. In the SETUP menu, go to “Copy DISC to
HD/DISC” and change the setting from OFF to ON. This will allow the data from
the master disc to be copied to the internal hard drive, as well as any blank discs you
have in the recorders. See page 19 for a description of the SETUP menu.
1. At the COPY START? (DISC to DISC) menu, press the NO key until the display
shows MASTER SELECT? (DISC TO DISC)
MASTER SELECT?
(DISC to DISC)
2. Place the Master disc into the Reader drive.
3. Press the Yes key
4. The display will show:
>READER?
(DISC TO DISC)
5. Press the No key
6. The display will now show:
>HDD1?
(DISC TO HDD)
7. If you wish to copy the data to the 1st partition, press the Yes key.
8. If you wish to select another partition, press the NO key.
>HDD2?
(DISC to HDD)
9. By continuing to press the NO key, you will scroll through the different HDD
partitions. Once you are at the partition you wish to use, press the YES key.
10. The display will now show the progress of the data being transferred to the hard
drive:
REGIST 4.0GB
DVD 15%
11. Once the Master disc has been copied to the HDD, the Reader drive will eject the
disc. When you go back into the MASTER SELECT? Menu, and select a
partition with data stored on it, the display will show the type of data (ROM or
Video) and the capacity of that data. Proceed to COPY HDD TO DVD section.
9

DSR DVD Premium Pro Rack Mount Series MICROBOARDS TECHNOLOGY, LLC
Erasing DVD-+RW media
1. At the COPY START? (DISC to DISC) menu, press the NO key until the display
shows DISC ERASE? (REWRITABLE):
DISC ERASE?
(REWRITABLE)
2. Load the Recorder(s) with the DVD-+RW media you wish to erase. You can
erase one disc at a time or fill all the Recorders to erase multiple discs at once.
3. Press the Yes key
4. The next screen asks if you want to perform a Quick Erase.
QUICK ERASE?
If you wish to perform a Full Erase, press the NO key.
FULL ERASE?
Pressing the YES key at either of these selections will show the following screen:
SURE?
5. Press the Yes key if you are sure you want to erase the DVD-+RW disc. If you
do not wish to erase the disc, press the No key and you will go back to the DISC
ERASE screen (step 1).
6. The screen will now show:
DISC ERASE……
7. Once the erasing is complete, the Recorder(s) will eject the disc(s).
Copy Hard Drive (HDD) to DVD
1. Follow the instructions on page 9 to register the Master DVD to the HDD.
2. Press to NO key until the screen displays
Master Select?
3. Press the YES key.
4. The display will show READER.
5. Press the NO key and the display will show HDD1. If this is the hard drive
partition you wish to copy, press the YES key.
6. The screen will display COPY START? (HDD1 to DISC)
10

DSR DVD Premium Pro Rack Mount Series MICROBOARDS TECHNOLOGY, LLC
COPY START?
(HDD1 to DISC)
7. If you wish to select a different hard drive partition, press the NO key in step 5,
unit the display shows the partition you wish to copy.
8. Place the blank DVD-+R disc(s) into the Recorder(s) and wait 10 seconds for the
light(s) on the front of the Recorder(s) to stop blinking.
9. Press the Yes button.
10. The drive trays will open on any recorder without blank discs installed. If you do
not want to make a copy in those drives, close the tray(s), wait for the drive light
to go out, and then press the YES key to start the copy job.
11. The display will now show the progress of the copy job from the HDD to the
Recorder(s):
COPY 4.0GB
DVD 15%
12. After the Copy job is complete, the DVD-+R disc(s) will be ejected from the
Recorder(s).
Clearing the Hard Drive (HDD)
The Master Clear option will not appear if there is no information stored on any of the
hard drive partitions.
1. At the COPY START? (HDD1 to DISC) menu, press the NO key until the display
shows MASTER SELECT? (HDD1 to DISC).
MASTER SELECT?
(HDD1 to DISC)
2. Press the Yes button.
3. The display will show:
>READER?
(DISC TO DISC)
4. Press the No button until you the screen displays MASTER CLEAR? (HDD):
>MASTER CLEAR?
(HDD)
5. Press the Yes button
6. You can now select which hard drive partition to erase. Pressing the NO button
will scroll you though the partition selections.
11

DSR DVD Premium Pro Rack Mount Series MICROBOARDS TECHNOLOGY, LLC
7. Press the Yes button if you are sure you want to clear the HDD.
8. The hard drive will now be cleared and you will be asked if you want to register
another master to the HDD.
>HDD1?
(DISC TO HDD)
9. Press Yes and the Reader drive will eject and you can insert another master to
register to the HDD.
REGIST 4.0GB
DVD 15%
10. Press NO and you can exit this menu.
>EXIT?
12

DSR DVD Premium Pro Rack Mount Series MICROBOARDS TECHNOLOGY, LLC
Copy CD to CD
1. Place the Master Disc into the Reader drive
2. Place the blank CD-R(/W) disc(s) into the Recorder drive(s)
3. The display reads COPY START? (DISC to DISC)
Copy Start?
(DISC to DISC)
4. Press Yes
5. The drive trays will open on any recorder without blank discs installed. If you do
not want to make a copy in those drives, close the tray(s), wait for the drive light
to go out, and then press the YES key to start the copy job.
6. The display will now show the progress of the Copy Job
COPY 15:26
CD-DA 15%
7. The Recorder(s) will eject the CD-R discs when the job is complete.
Simulation CD to CD
1. At the COPY START? (DISC to DISC) menu, press the NO key until the display
shows SIMULATION? (DISC to DISC)
Simulation?
(DISC to DISC)
2. Place the Master Disc into the Reader drive
3. Place the blank CD-R(/W) disc(s) into the Recorder drive(s) and wait 10 seconds
for the light(s) on the front of the Recorder(s) to stop blinking.
4. Press Yes
5. The drive trays will open on any recorder without blank discs installed. If you do
not want to make a copy in those drives, close the tray(s), wait for the drive light
to go out, and then press the YES key to start the copy job.
6. The display will now show the progress of the Copy Job
SIMULATION 15:26
CD-DA 15%
7. The Recorder(s) will eject the CD-R discs when the job is complete.
Note: The CD-R media will NOT be recorded to in Simulation Mode.
13

DSR DVD Premium Pro Rack Mount Series MICROBOARDS TECHNOLOGY, LLC
Registering Data to the Hard Drive (HDD)
When registering data to a partition on the internal hard drive, you do have the option
of recording to the blank media as well. In the SETUP menu, go to “Copy DISC to
HD/DISC” and change the setting from OFF to ON. This will allow the data from
the master disc to be copied to the internal hard drive, as well as any blank discs you
have in the recorders. See page 19 for a description of the SETUP menu.
1. At the COPY START? (DISC to DISC) menu, press the NO key until the display
shows MASTER SELECT? (DISC TO DISC)
MASTER SELECT?
(DISC to DISC)
2. Place the Master CD into the Reader drive.
3. Press the Yes key
4. The display will show:
>READER?
(DISC TO DISC)
5. Press the No key
6. The display will now show:
>HDD1?
(DISC TO HDD)
7. If you wish to copy the data to the 1st partition, press the Yes key.
8. If you wish to select another partition, press the NO key.
>HDD2?
(DISC to HDD)
9. By continuing to press the NO key, you will scroll through the different HDD
partitions. Once you are at the partition you wish to use, press the YES key.
10. The display will now show the progress of the data being transf erred to the hard
drive:
REGIST 15:26
CD-DA 15%
11. Once the Master disc has been copied to the HDD, the Reader drive will eject the
disc. Proceed to COPY HDD TO CD section (page 15).
14

DSR DVD Premium Pro Rack Mount Series MICROBOARDS TECHNOLOGY, LLC
Erasing CD-RW media
1. At the COPY START? (DISC to DISC) menu, press the NO key until the display
shows DISC ERASE? (REWRITABLE):
DISC ERASE?
(REWRITABLE)
2. Load the Recorder(s) with the CD-RW media you wish to erase. You can erase
one disc at a time or fill all the Recorders to erase multiple discs at once.
3. Press the Yes key
4. The next screen asks if you want to perform a Quick Erase.
QUICK ERASE?
If you wish to perform a Full Erase, press the NO key.
FULL ERASE?
Pressing the YES key at either of these selections will show the following screen:
SURE?
5. Press the Yes key if you are sure you want to erase the CD-RW disc. If you do
not wish to erase the disc, press the No key and you will go back to the DISC
ERASE screen (step 1).
6. The screen will now show:
DISC ERASE……
Once the erasing is complete, the Recorder(s) will eject the disc(s).
Copy Hard Drive (HDD) to CD
1. Follow the instructions on page 14 to register the Master CD to the HDD.
2. Press to NO key until the screen displays
Master Select?
3. Press the YES key.
4. The display will show READER.
5. Press the NO key and the display will show HDD1. If this is the hard drive
partition you wish to copy, press the YES key.
6. The screen will display COPY START? (HDD1 to DISC)
COPY START?
(HDD1 to DISC)
15

DSR DVD Premium Pro Rack Mount Series MICROBOARDS TECHNOLOGY, LLC
7. If you wish to select a different hard drive partition, press the NO key in step 5,
unit the display shows the partition you wish to copy.
8. Place the blank CD-R disc(s) into the Recorder(s) and wait 10 seconds for the
light(s) on the front of the Recorder(s) to stop blinking.
9. Press the Yes button.
10. The drive trays will open on any recorder without blank discs installed. If you do
not want to make a copy in those drives, close the tray(s), wait for the drive light
to go out, and then press the YES key to start the copy job.
11. The display will now show the progress of the copy job from the HDD to the
Recorder(s):
COPY 600MB
CDROM 15%
After the Copy job is complete, the CD-R disc(s) will be ejected from the
Recorder(s).
Clearing the Hard Drive (HDD)
The Master Clear option will not appear if there is no information stored on any of the
hard drive partitions.
1. At the COPY START? (HDD1 to DISC) menu, press the NO key until the display
shows MASTER SELECT? (HDD1 to DISC).
MASTER SELECT?
(HDD to DISC)
2. Press the Yes button.
3. The display will show:
>READER?
(DISC TO DISC)
4. Press the No button until you the screen displays MASTER CLEAR? (HDD):
>MASTER CLEAR?
(HDD)
5. Press the Yes button
6. You can now select which hard drive partition to erase. Pressing the NO button
will scroll you though the partition selections.
7. Press the Yes button if you are sure you want to clear the HDD.
8. The hard drive will now be cleared and you will be asked if you want to register
another master to the HDD.
>HDD1?
(DISC TO HDD1)
16

DSR DVD Premium Pro Rack Mount Series MICROBOARDS TECHNOLOGY, LLC
(
R
9. Press Yes and the Reader drive will eject and you can insert another master to
register to the HDD.
REGIST 600MB
CDROM 15%
10. Press NO and you can exit this menu.
>EXIT?
Track Extraction
When extracting tracks to the internal hard drive, the DSR DVD Rack Mount duplicator
always uses the first CD partition. If there is information already stored on CD partition
1, the system will ask if you want to overwrite this information. This partition cannot be
changed from CD partition one.
1. At the COPY START? Menu, press the NO key until the display :
Trk EXTRACTION?
Press the “YES” button.
2. Press “YES” again in the following screen.
EXTRACTION
OK?
If any master data is already registered in HDD, the DSR DVD Rack Mount
duplicator asks you whether you want to overwrite data.
Press “YES” to overwrite, “NO” to cancel.
EXTRACTION
OK?
3. Insert a master audio disc into the reader drive. DSR DVD Standard Pro Series will
analyze the master disc.
INSERT
MASTER DISC
4. After it completes analyzing the master disc, it displays Selected Track Number /
Total Track Number.
EXTRACT THE
Trk?
Press “NO” to skip forward a track.
Press “YES” to select the track you want to extract.
CDtoHDD)
ANALYZING
MASTE
This master data has total 12 tracks.
17

DSR DVD Premium Pro Rack Mount Series MICROBOARDS TECHNOLOGY, LLC
(
5. If you skip forward all tracks, it asks if you want to end extraction for the master data.
EXTRACT THE
Trk? 1/12
END
EXTRACTION?
Press “YES” to finish extraction and register selected tracks in HDD.
Press “NO” to add more tracks from this master data.
6. If you press “YES” in step 5, the DSR DVD Standard Pro Series asks you to register
the extracted tracks in HDD.
COPY TO HDD
OK?
Press “YES” to start registration.
7. After registration completes, the DSR DVD Standard Pro Series asks you if you want
to extract more tracks from other master audio discs.
NEXT MASTER
Press “YES” to extract more tracks from other master audio discs.
Press “NO” to complete extraction.
8. If you press “NO”, the DSR DVD Standard Pro Series moves back to COPY menu
so that you can copy the extracted tracks in HDD to blank CD-R media.
COPY START
HDD to DISC)
Error status in Track Extraction:
In the following situation in TRACK EXTRACTION, the DSR DVD Standard Pro Series
shows an error status on the LCD.
1. When you select a track which is not an audio track:
EXTRACT THE
Trk?
If you try to extract a track which is not CD-DA, the track number does not display
properly, showing “—“. And the “YES” button is invalid even if you press it.
2. When total time of extracted audio tracks is over 80 minutes:
EXTRACT THE
Trk?
If the total time of extracted audio tracks is over 80 minutes, the DSR DVD Standard Pro Series
displays “OVER” and “YES” button is invalid even if you press it.
18

DSR DVD Premium Pro Rack Mount Series MICROBOARDS TECHNOLOGY, LLC
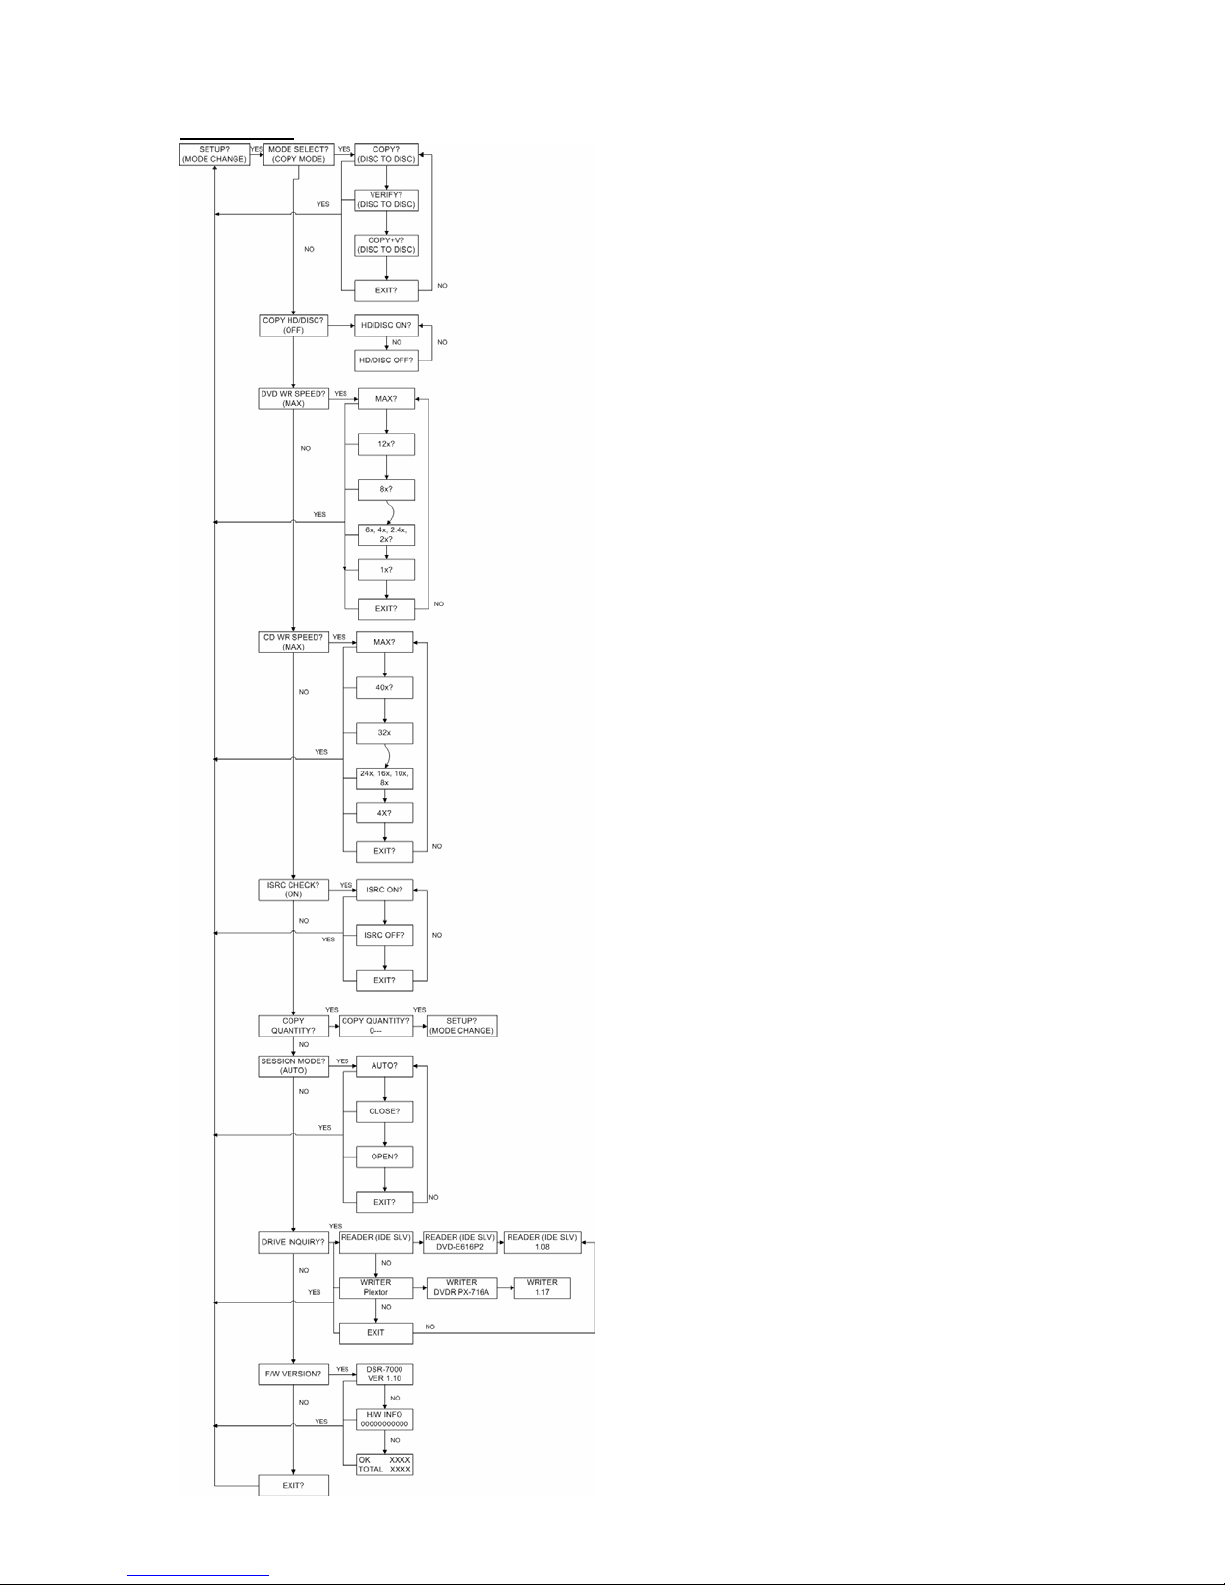
Setup Menu
1. At the COPY START? (DISC to DISC) menu, press the NO key until the display
shows SETUP? (MODE CHANGE)
SETUP?
(MODE CHANGE)
2. Press the Yes button
3. The first setup option is Mode Select, followed by Copy DISC to HD/DISC,
Write Speed, ISRC Check, Copy Quantity, Session Mode, Drive Inquiry,
Firmware Version and Exit.
4. Pressing the No key will allow you to move from menu to menu.
5. Pressing the Yes button will allow you to view or change the configuration of the
system.
6. Please follow the flow chart on page 7 to navigate through the different menus.
Here is a description of each setup menu item:
Mode Select:
COPY - Duplication from master disc to blank disc, or HDD to blank disc if master data
is registered.
VERIFY - It compares a copied disc with the master disc.
COPY+V - Copying in the COPY+VERIFY mode
Copy DISC TO HD/DISC:
Default setting is OFF. When set to ON, this allows you to copy the master disc to a hard
drive partition AND blank discs.
DVD WR Speed:
Available speeds range from 16x down to 1x.
CD WR Speed:
Available speeds range from 48x down to 4x.
ISRC Check:
Default setting is ON. This feature will copy the ISRC codes from the Master audio disc
to the blank discs.
Copy Quantity:
Set up the number of disc you want to copy.
YES: Moves the cursor position to the next place value.
NO: Select the number from 9 to 0 for each place value.
19

DSR DVD Premium Pro Rack Mount Series MICROBOARDS TECHNOLOGY, LLC
Session Mode:
For CD only. Invalid for DVD.
Select either from AUTO, CLOSE, or OPEN.
AUTO: Make the session of copied disc as same as the master.
CLOSE: Close the session of copied disc.
OPEN: Leave the session of copied disc open.
Drive Inquiry
It shows an inquiry of each drive connected. You can check the model & firmware
version of each drive.
F/W Version
It shows DSR DVD Standard Pro Series firmware version and H/W Info that shows the
revision of DSR DVD Standard Pro Series main board.
20

DSR DVD Premium Pro Rack Mount Series MICROBOARDS TECHNOLOGY, LLC
Error Codes
Read
ASC ASCQ Description
00 00 NO ADDITIONAL SENSE INFORMATION
00 06 I/O PROCESS TERMINATED, PLAY OPERATION ABORTED
00 11 AUDIO PLAY OPERATION IN PROGRESS
00 12 AUDIO PLAY OPERATION PAUSE
00 13 AUDIO PLAY OPERATION SUCCESSFULLY COMPLETED
00 14 AUDIO PLAY OPERATION STOPPED DUE TO ERROR
00 15 NO CURRENT AUDIO STATUS TO RETURN
00 17 CLEANINF REQUESTED
01 00 NO INDEX/SECTOR SIGNAL
02 00 NO SEEK COMPLETE
04 00 LOGICAL UNIT NOT READY, CAUSE NOT REPORTABLE
04 01 LOGICAL UNIT IS IN PROCESS OF BECOMING READY
04 02 LOGICAL UNIT NOT READY, INITIALIZING CMD. REQUESTED
04 03 LOGICAL UNIT NOT READY, MANUAL INTERVENTION REQUIRED
04 07 LOGICAL UNIT NOT READY, OPERATION IN PROGRESS
05 00 LOGICAL UNIT DOES NOT RESPOND TO SELECTION
06 00 NO REFERENCE POSITION FOUND (medium may be upside down)
08 00 LOGICAL UNIT COMMUNICATION FAILURE
08 01 LOGICAL UNIT COMUUNICATION TIME-OUT
08 02 LOGICAL UNIT COMMUNICATION PARITY ERROR
08 03 LOGICAL UNIT COMMUNICATION CRC ERROR (ULTRA-DMA/32)
09 00 TRACK FOLLOWING ERROR
09 01 TRACKING SERVO FAILURE
09 02 FOCUS SERVO FAILURE
09 03 SPINDLE SERVO FAILURE
0A 00 ERROR LOG OVERFLOW
0B 00 WARNING
0B 01 WARNING-SPECIFIED TEMPERATURE EXCEEDED
0B 02 WARNING-ENCLOSURE DEGRADED
10 00 ID CRC OR ECC ERROR
11 01 UNRECOVERED READ ERROR
11 02 ERROR TOO LONG TO CORRECT
11 05 L-EC UNCORRECTABLE ERROR
11 06 CIRC UNRECOVERED ERROR
11 0F ERROR READING UPC/EAN NUMBER
11 10 ERROR – LOSS PF STREAMING
12 00 ADDRESS MARK NOT FOUND FOR ID FIELD
13 00 ADDRESS MARK NOT FOUND FOR DATA FIELD
14 01 RECORD NOT FOUND
14 05 RECORD NOT FOUND – RECOMMEND REASSIGNMENT
14 06 RECORD NOT FOUND – DATA AUTO – REALLOCATED
15 00 RANDOM POSITIONING ERROR
15 01 MECHANICAL POSITIONING ERROR
15 02 POSITIONING ERROR DETECTED BY READ OF MEDIUM
17 00 RECOVERED DATA WITH NO EEOR CORRECTION APPLIED
17 01 RECOVERED DATA WITH RETRIES
17 02 RECOVERED DATA WITH POSITIVE HEAD OFFSET
21

DSR DVD Premium Pro Rack Mount Series MICROBOARDS TECHNOLOGY, LLC
17 03 RECOVERED DATA WITH NEGATIVE HEAD OFFSET
17 04 RECOVERED DATA WITH RETIES AND/OR CIRC APPLIED
17 05 RECOVERED DATA USING PREVIOUS SECTOR ID
18 00 RECOVERED DATA WITH ERROR CORRECTION APPLIED
18 01 RECOVERED DATA WITH ERROR CORP. & RETRIES APPLIED
18 03 RECOVERED DATA WITH CIRC
18 04 RECOVERED DATA WITH L-EC
1A 00 PARAMETER LIST LENGTH ERROR
1B 00 SYNCHRONOUS DATA TRANSFER ERROR
1E 00 RECOVE RED ID WITH ECC CORRECTION
20 00 INVALID COMMAND OPERATION CODE
21 00 LOGICAL BLOCK ADDRESS OUT OF RANGE
24 00 INVALID FIELD IN CDB
25 00 LOGICAL UNIT NOT SUPPORTED
26 00 INVALID FIELD IN PARAMETER LIST
26 01 PARAMETER NOT SUPPORTED
26 02 PARAMETER VALUE INVALID
26 03 THRESHOLD PARAMETERS NOT SUPPORTED
26 04 INVALID RELEASE OF ACTIVE PERSISTENT RESERVATION
28 00 NOT READY TO READY CHANGE, MEDIUM MAY HAVE CHANGED
29 00 POWER ON, RESET, OR BUS DEVICE RESET OCCURRED
29 01 POWER ON OCCURRED
29 02 SCSI BUS RESET OCCURRED
29 03 BUS DEVICE RESET FUNCTION OCCURRED
29 04 DEVICE INTERNAL RESET
2A 00 PARAMETERS CHANGED
2A 01 MODE PARAMETERS CHANGED
2A 02 LOG PARAMETERS CHANGED
2A 03 RESERVATIONS PREEMPTED
2B 00 COPY CANNOT EXECUSE SINCE HOST CANNOT DISCONNECT
2C 00 COMMAND SEQUENCE ERROR
2C 05 PERSISTENT PREVENT CONFLICT
2F 00 COMMANDS CLEARED BY ANOTHER INITIATOR
30 00 INCOMPATIBLE MEDIUM INSTALLED
30 01 CANNOT READ MEDIUM - UNKNOWN FORMAT
30 02 CANNOT READ MEDIUM – INCOMPATIBLE FORMAT
30 03 CLEASNING CARTRIDGE INSTALLED
35 00 ENCLOSURE SERVICES FAILURE
35 01 UNSUPPORTED ENCLOSURE FUNCTION
35 02 ENCLOSURE SERVICES UNAVAILABLE
35 03 ENCLOSURE SERVICES TRANSFER FAILURE
35 04 ENCLOSURE SERVICES TRANSFER REFUSED
39 00 SAVING PARAMETERS NOT SUPPORTED
3A 00 MEDIUM NOT PRESENT
3A 01 MEDIUM NOT PRESENT-TRAY CLOSED
3A 02 MEDIUM NOT PRESENT-TRAY OPEN
3B 0F END OF MEDIUM REACHED
3B 11 MEDIUM MAGAZINE NOT ACCESSIBLE
3B 12 MEDIUM MAGAZINE REMOVED
3B 13 MEDIUM MAGAZINE INSERTED
3B 14 MEDIUM MAGAZINE LOCKED
3B 15 MEDIUM MAGAZINE UNLOCKED
22

DSR DVD Premium Pro Rack Mount Series MICROBOARDS TECHNOLOGY, LLC
3B 16 MECHANICAL POSITIONING OR CHANGER ERROR
3D 00 INVALID BITS IN IDENTIFY MESSAGE
3E 00 LOGICAL UNIT HAS NOT SELF-CONFIGURED YET
3E 01 LOGOCAL UNIT FAILURE
3E 02 TIMEOUT ON LOGIC AL UNIT
3F 00 TARGET OPERATING CONDITIONS HAVE CHANGED
3F 01 MICROCODE HAS BEEN CHANGED
3F 02 CHANGED OPERATING DEFINITION
3F 03 INQUIRY DATA HAS CHANGED
40 NN DIAGNOSTIC FAILURE ON COMPONENT NN (80H-FFH)
43 00 MESSAGE ERROR
44 00 INTERNAL TARGET FAILURE
45 00 SELECT OR RESELECT FAILURE
46 00 UNSUCCESSFUL SOFT RESET
47 00 SCSI PARITY ERROR
48 00 INITIATOR DETECTED ERROR MESSAGE RECEIVED
49 00 INVALID MESSAGE ERROR
4A 00 COMMAND PHASE ERROR
4B 00 DATA PHASE ERROR
4C 00 LOGICAL UNIT FAILED SELF-CONFIGURATION
4D NN TAGGED OVERLAPPED COMMANDS (NN=QUEUE TAG)
4E 00 OVAERLAPPED COMMANDS ATTEMPTED
53 00 MEDIA LOAD OR EJECTED FAILED
53 02 MEDIUM REMOVAL PREVENTED
55 00 SYSTEM RESOURCE FAILURE
57 00 UNABLE TO RECOVER TABLE-OF-CONTENTS
5A 00 OPERATOR REQUEST OR STATE CHANGE INPUT
5A 01 OPERATOR MEDIUM REMOVAL REQUEST
5B 00 LOG EXCEPTION
5B 01 THRESHOLD CONDITION MET
5B 02 LOG COUNTER AT MAXIMUM
5B 03 LOG LIST CODES EXHAUSTED
5D 00 FAILURE PREDICTION THRESHOLD EXCEEDED - Predicted Logical
Unit Failure
5D 01 FAILURE PREDICTION THRESHOLD EXCEEDED - Predicted Media
Failure
5D FF FAILURE PREDICTION THRESHOLD EXCEEDED (FALSE)
5E 00 LOW POWE R CONDITION ON
5E 01 IDLE CONDITION ACTIVATED BY TIMER
5E 02 STANDBY CONDITION ACTIVATED BY COMMAND
5E 03 IDLE CONDITION ACTIVATED BY COMMAND
5E 04 STANDBY CONDITION ACTIVATED BY COMMAND
63 00 END OF USER AREA ENCOUNTERED ON THIS TRACK
63 01 PACKET DOES NOT FIT IN AVAILABLE SPACE
64 00 ILLEGAL MODE FOR THIS TRACK
65 00 VOLTAGE FAULT
73 00 CD CONTROL ERROR
80 xx VENDOR SPECIFIC
23

DSR DVD Premium Pro Rack Mount Series MICROBOARDS TECHNOLOGY, LLC
Write
ASC ASCQ Description
00 00 NO ADDITIONAL SENSE INFORMATION
00 06 I/O PROCESS TERMINATED, PLAY OPERATION ABORTED
00 11 AUDIO PLAY OPERATION IN PROGRESS
00 12 AUDIO PLAY OPERATION PAUSED
00 13 AUDIO PLAY OPERATION SUCCESSFULLY
00 14 AUDIO PLAY OPERATION STOPPED DUE TO ERRPOR
00 15 NO CURRENT AUDIO STATUS TO RETURN
02 00 NO SEEK COMPLETE
04 00 LOGICAL UNIT NOT READY, CAUSE NOT REPORTABLE
04 01 LOGICAL UNIT IS IN PROCESS OF BECOMING READY
04 02 LOGICAL UNIT NOT READY, INITIALIZING CMD. REQUIRED
04 03 LOGICAL UNIT NOT READY, MANUAL INTERVENTION REQUIRED
04 04 LOGICAL UNIT NOT READY, FORMAT IN PROGRESS
04 07 LOGICAL UNIT NOT READY, OPERATION IN PROGRESS
04 08 LOGICAL UNIT NOT READY, LONG WRITE IN PROGRESS
05 00 LOGICAL UNIT DOES NOT RESPOND TO SELECTION
06 00 NO REFERENCE POSITION FOUND
08 00 LOGICAL UNIT COMMUNICATION FAILURE
08 01 LOGICAL UNIT COMUUNICATION TIME-OUT
08 02 LOGICAL UNIT COMMUNICATION PARITY ERROR
08 03 LOGICAL UNIT COMMUNICATION CRC ERROR (ULTRA-DMA/32)
09 00 TRACK FOLLOWING ERROR
09 01 TRACKING SERVO FAILURE
09 02 FOCUS SERVO FAILURE
09 03 SPINDLE SERVO FAILURE
0A 00 ERROR LOG OVERFLOW
0B 00 WARNING
0B 01 WARNING-SPECIFIED TEMPERATURE EXCEEDED
0B 02 WARNING-ENCLOSURE DEGRADED
0C 00 WRITE ERROR
0C 02 WRITE ERROR-RECOVERED WITH AUTO REALLOCATION
0C 03 WRITE ERROR-RECOMMEND REASSIGNMENT
0C 07 WRITE ERROR-RECOVERY NEEDED
0C 08 WRITE ERROR-RECOVERY FAILED
0C 09 WRITE ERROR-LOSS OF STREAMING
0C 0A WRITE ERROR-PADDING BLOCKS ADDED
11 00 UNRECOVERED READ ERROR
11 06 CIRC UNRECOVERED ERROR
15 00 RANDOM POSITIONING ERROR
15 01 MECHANICAL POSITIONING ERROR
15 02 POSITIONING ERROR DETECTED BY READ OF MEDIUM
16 00 DATA SYNCHRONIZATION MARK ERROR
16 01 DATA SYNC ERROR-DATA REWRITTEN
16 02 DATA SYNC ERROR-RECOMMEND REWRITE
16 03 DATA SYNC ERROR-DATA ATUO-REALLOCATED
16 04 DATA SYNC ERROR-RECOMMEND REASSIGNMENT
17 00 RECOVERED DATA WITH NO ERROR CORRECTION APPLIED
17 01 RECOVERED DATA WITH RETRIES
17 02 RECOVERED DATA WITH POSITIVE HEAD OFFSET
17 03 RECOVERED DATA WITH NEGATIVE HEAD OFFSET
24

DSR DVD Premium Pro Rack Mount Series MICROBOARDS TECHNOLOGY, LLC
17 04 RECOVERED DATA WITH RETRIES AND/OR CIRC APPLIED
17 05 RECOVERED DATA USING PREVIOUS SECTOR ID
17 06 RECOVERED DATA WITHOUT ECC - DATA AUTO-REALLOCATED
17 07 RECOVERED DATA WITHOUT ECC - RECOMMEND
REASSIGNMENT
17 08 RECOVERED DATA WITHOUT ECC - RECOMMEND REWRITE
17 09 RECOVERED DATA WITHOUT ECC - DATA REWRITTEN
18 00 RECOVERED DATA WITH ERROR CORRECTION APPLIED
18 01 RECOVERED DATA WITH ERROR CORR. & RETRIES APPLIED
18 02 RECOVERED DATA - DATA AUTO-REALLOCATED
18 03 RECOVERED DATA WITH CIRC
18 04 RECOVERED DATA WITH L-EC
18 05 RECOVERED DATA - RECOMMEND REASSIGNMENT
18 06 RECOVERED DATA - RECOMMEND REWRITE
18 07 RECOVERED DATA WITH ECC - DATA REWRITTEN
19 00 DEFECT LIST NOT ERROR
19 01 DEFECT LIST NOT AVAILABLE
19 02 DEFECT LIST ERROR IN PRIMARY LIST
19 03 DEFECT LIST ERROR IN GROWN LIST
1A 00 PARAMETER LIST LENGTH ERROR
1B 00 SYNCHRONOUS DATA TRANSFER ERROR
1C 00 DEFECT LIST NOT FOUND
1C 01 PRIMARY DEFECT LIST NOT FOUND
1C 02 GROWN DEFECT LIST NOT FOUND
1D 00 MISCOMPARE DURING VERIFY OPERATION
20 00 INVALID COMMAND OPERATION CODE
21 00 LOGICAL BLOCK ADDRESS OUT OF RANGE
21 02 INVALID ADDRESS FOR WRITE
24 00 INVALID FIELD IN CDB
25 00 LOGICAL UNIT NOT SUPPORTED
26 00 INVALID FIELD IN PARAMETER LIST
26 01 PARAMETER NOT SUPPORTED
26 02 PARAMETER VALUE INVALID
26 03 THRESHOLD PARAMETERS NOT SUPPORTED
26 04 INVALID RELEASE OF ACTIVE PERSISTENT RESERVATION
27 00 WRITE PROTECTED
27 01 HARDWARE WRITE PROTECTED
27 02 LOGICAL UNIT SOFTWARE WRITE PROTECTED
27 03 ASSOCIATED WRITE PROTECT
27 04 PERSISTENT WRITE PROTECT
27 05 PERSISTENT WRITE PROTECT
27 06 CONDITIONAL WRITE PROTECT
28 00 NOT READY TO READY CHANGE, MEDIUM MAY HAVE CHANGED
29 00 POWER ON, RESET, OR BUS DEVICE RESET OCCURRED
29 01 POWER ON OCCURRED
29 02 SCSI BUS RESET OCCURRED
29 03 BUS DEVICE RESET FUNCTION OCCURRED
29 04 DEVICE INTERNAL RESET
2A 00 PARAMETERS CHANGED
2A 01 MODE PARAMETERS CHANGED
2A 02 LOG PARAMETERS CHANGED
2A 03 RESERVATIONS PREEMPTED
25

DSR DVD Premium Pro Rack Mount Series MICROBOARDS TECHNOLOGY, LLC
2B 00 COPY CANNOT EXECUSE SINCE HOST CANNOT DISCONNECT
2C 00 COMMAND SEQUENCE ERROR
28 00 NOT READY TO READY CHANGE, MEDIUM MAY HAVE CHANGED
29 00 POWER ON, RESET, OR BUS DEVICE RESET OCCURRED
2A 00 PARAMETERS CHANGED
2A 01 MODE PARAMETERS CHANGED
2C 00 COMMAND SEQUENCE ERROR
2C 03 CURRENT PROGRAM AREA IS NOT EMPTY
2C 04 CURRENT PROGRAM AREA IS EMPTY
2C 05 PERSISTENT PREVENT CONFLICT
2E 00 INSUFFICIENT TIME FOR OPERATION
2F 00 COMMANDS CLEARED BY ANOTHER INITIATOR
30 00 INCOMPATIBLE MEDIUM INSTALLED
30 01 CANNOT READ MEDIUM - UNKNOWN FORMAT
30 02 CANNOT READ MEDIUM - INCOMPATIBLE FORMAT
30 05 CANNOT WRITE MEDIUM - INCOMPATIBLE FORMAT
30 06 CANNOT FORMAT MEDIUM - INCOMPATIBLE MEDIUM
30 08 CANNOT WRITE - APPLICATION CODE MISMATCH
30 09 CURRENT SESSION NOT FIXATED FOR APPEND
31 00 MEDIUM FORMAT CORRUPTED
31 01 FORMAT COMMAND FAILED
32 00 NO DEFECT SPARE LOCATION AVAILABLE
32 01 DEFECT LIST UPDATE FAILURE
35 00 ENCLOSURE SERVICES FAILURE
35 01 UNSUPPORTED ENCLOSURE FUNCTION
35 02 ENCLOSURE SERVICES UNAVAILABLE
35 03 ENCLOSURE SERVICES TRANSFER FAILURE
35 04 ENCLOSURE SERVICES TRANSFER REFUSED
37 00 ROUNDED PARAMETER
39 00 SAVING PARAMETERS NOT SUPPORTED
3A 00 MEDIUM NOT PRESENT
3A 01 MEDIUM NOT PRESENT - TRAY CLOSED
3A 02 MEDIUM NOT PRESENT - TRAY OPEN
3D 00 INVALID BITS IN IDENTIFY MESSAGE
3E 00 LOGICAL UNIT HAS NOT SELF-CONFIGURED YET
3E 01 LOGOCAL UNIT FAILURE
3E 02 TIMEOUT ON LOGIC AL UNIT
3F 00 TARGET OP ERATING CONDITIONS HAVE CHANGED
3F 01 MICROCODE HAS BEEN CHANGED
3F 02 CHANGED OPERATING DEFINITION
3F 03 INQUIRY DATA HAS CHANGED
40 NN DIAGNOSTIC FAILURE ON COMPONENT NN (80H-FFH)
43 00 MESSAGE ERROR
44 00 INTERNAL TARGET FAILURE
45 00 SELECT OR RESELECT FAILURE
46 00 UNSUCCESSFUL SOFT RESET
47 00 SCSI PARITY ERROR
48 00 INITIATOR DETECTED ERROR MESSAGE RECEIVED
49 00 INVALID MESSAGE ERROR
4A 00 COMMAND PHASE ERROR
4B 00 DATA PHASE ERROR
4C 00 LOGICAL UNIT FAILED SELF-CONFIGURATION
26

DSR DVD Premium Pro Rack Mount Series MICROBOARDS TECHNOLOGY, LLC
4D NN TAGGED OVERLAPPED COMMANDS (NN=QUEUE TAG)
4E 00 OVAERLAPPED COMMANDS ATTEMPTED
51 00 ERASE FAILURE
51 01 ERASE FAILURE - Incomplete erase operation detected
53 00 MEDIA LOAD OR EJECT FAILED
53 02 MEDIUM REMOVAL PREVENTED
55 00 SYSTEM RESOURCE FAILURE
57 00 UNABLE TO RECOVER TABLE-OF-CONTENTS
5A 00 OPERATOR REQUEST OR STATE CHANGE INPUT
5A 01 OPERATOR MEDIUM REMOVAL REQUEST
5A 02 OPERATOR SELECTED WRITE PROTECT
5A 03 OPERATOR SELECTED WRITE PERMIT
5B 00 LOG EXCEPTION
5B 01 THRESHOLD CONDITION MET
5B 02 LOG COUNTER AT MAXIMUM
5B 03 LOG LIST CODES EXHAUSTED
5D 00 FAILURE PREDICTION THRESHOLD EXCEEDED -
5D 01 FAILURE PREDICTION THRESHOLD EXCEEDED - Predicted Media
Failure
5D 03 FAILURE PREDICTION THRESHOLD EXCEEDED - Predicted Spare
Area Exhaustion
5D FF FAILURE PREDICTION THRESHOLD EXCEEDED (FALSE)
5E 00 LOW POWE R CONDITION ON
5E 01 IDLE CONDITION ACTIVATED BY TIMER
5E 02 STANDBY CONDITION ACTIVATED BY COMMAND
5E 03 IDLE CONDITION ACTIVATED BY COMMAND
5E 04 STANDBY CONDITION ACTIVATED BY COMMAND
63 00 END OF USER AREA ENCOUNTERED ON THIS TRACK
64 00 ILLEGAL MODE FOR THIS TRACK
64 01 INVALID PACKET SIZE
65 00 VOLTAGE FAULT
72 00 SESSION FIXATION ERROR
72 01 SESSION FIXATION ERROR WRITING LEAD-IN
72 02 SESSION FIXATION ERROR WRITING LEAD-OUT
72 03 SESSION FIXATION ERROR - INCOMPATIBLE TRACK IN SESSION
72 04 EMPTY OR PARTIALLY WRITTEN RESERVED TRACK
72 05 NO MORE RZONE RESERVATIONS ARE ALLOWED
73 00 CD CONTROL ERROR
73 01 POWER CALIBRATIOIN AREA ALMOST FULL
73 02 POWER CALIBRATION AREA IS FULL
73 03 POWER CALIBRATION AREA ERROR
73 04 PROGRAM MEMORY AREA UPDATE FAILURE
73 05 PROGRAM MEMORY AREA/RMA IS FULL
73 06 PROGRAM MEMORY AREA/RMA IS (almost) FULL
B6 00 MEDIA LOAD/EJECT MECHANISM FAILED
B9 00 PLAY OPERATION ABORTED
80 FF VENDOR SPECIFIC
27

DSR DVD Premium Pro Rack Mount Series MICROBOARDS TECHNOLOGY, LLC
Specifications:
DVD Recorder Drive: DVD-+R/RW CD-R/RW Recorder
Power Source: 115V/230V 50-60Hz switchable power supply
Weight: 58 pounds
Dimensions: 7.48” (W) x 16.75” (D) x 24.5” (H)
Power supply: 300W
Environment: Temperature: 40°C (104°F) / 5°C (41°F)
Humidity: 20% - 80%
Supported Formats:
Recording format
Applicable media
CD CD-ROM Mode 1, CD-ROM XA Mode 2 (form 1, form 2),
Photo CD, CD-DA (Audio CD), CD-Extra, CD-R, CD-RW
DVD DVD-ROM, DVD-+R, DVD-+RW, DVD-VIDEO
CD 700MB Recording capacity (nominal)
DVD 4.7GB
CD
DVD DVD-+R (4.7GB For General discs), DVD-+RW, DVD+R DL
CD-R, CD-RW
Firmware Updates
Occasionally it may be necessary to load updated firmware on to the DSR DVD Standard
Pro Series duplicator. You will be sent a disc containing the firmware program. Please
follow these steps to load the disc.
• Hold down the YES button and turn on power to the tower.
• The display will read “Please Wait” and the system will beep once.
• Release the YES button.
• The Reader drive will eject and the display will read “Insert Program Disc”.
• Place the firmware disc into the Reader drive and close the tray.
• The display will read “Updating” as the new firmware is being loaded.
• Once the firmware is loaded, the Reader drive will eject the disc.
• Remove the firmware disc from the Reader and close the tray.
• The DSR DVD Standard Pro Series tower will now reboot and be ready for use
with the new firmware program running.
Contact Information
For technical questions or support issues, please contact Microboards Technology
technical support at PH: 952-556-1639, FAX: 952-556-1628, by email at
support@microboards.com
or on the web at http://www.microboards.com.
28
 Loading...