

Page 1

MiCOM P721 & P723
High Impedance Differential Protection
P72x/EN T/C21
Software Version 11.D
Technical Guide
Page 2

Page 3

Technical Guide P72x/EN T/C21
Contents
MiCOM P721/723
Page 1/2
MiCOM P721 & P723
HIGH IMPEDANCE DIFFERENTIAL PROTECTION
TECHNICAL GUIDE
CONTENTS
Safety Section
Introduction
Handling, Installation and Case Dimensions
User Guide
Menu Content Tables
Technical Data
Getting Started
Pxxxx/EN SS/G11
P72x/EN IT/C21
P72x/EN IN/C21
P72x/EN FT/C21
P72x/EN HI/C21
P72x/EN TD/A11
P72x/EN GS/C21
Application
Communication Database
Commissioning and Maintenance Guide
Connection Diagrams
Commissioning Test & Records Sheets
Hardware/Software Version History and Compatibility
P72x/EN AP/C21
P72x/EN CT/A11
P72x/EN CM/C21
P72x/EN CO/A11
P72x/EN RS/A11
P72x/EN VC/C21
Page 4

P72x/EN T/C21 Technical Guide
Contents
Page 2/2
MiCOM P721/P723
BLANK PAGE
Page 5

Pxxx/EN SS/G11
SAFETY SECTION
Page 6

Page 7

Pxxx/EN SS/G11
Safety Section Page 1/8
STANDARD SAFETY STATEMENTS AND EXTERNAL
LABEL INFORMATION FOR SCHNEIDER ELECTRIC
EQUIPMENT
1. INTRODUCTION 3
2. HEALTH AND SAFETY 3
3. SYMBOLS AND EXTERNAL LABELS ON THE EQUIPMENT 4
3.1 Symbols 4
3.2 Labels 4
4. INSTALLING, COMMISSIONING AND SERVICING 4
5. DECOMMISSIONING AND DISPOSAL 7
6. TECHNICAL SPECIFICATIONS FOR SAFETY 8
6.1 Protective fuse rating 8
6.2 Protective Class 8
6.3 Installation Category 8
6.4 Environment 8
Page 8

Pxxx/EN SS/G11
Page 2/8 Safety Section
BLANK PAGE
Page 9

Pxxx/EN SS/G11
Safety Section Page 3/8
1. INTRODUCTION
This guide and the relevant equipment documentation provide full information on safe
handling, commissioning and testing of this equipment. This Safety Guide also includes
descriptions of equipment label markings.
Documentation for equipment ordered from Schneider Electric is despatched separately from
manufactured goods and may not be received at the same time. Therefore this guide is
provided to ensure that printed information which may be present on the equipment is fully
understood by the recipient.
The technical data in this safety guide is typical only, see the technical data section of the
relevant product publication(s) for data specific to a particular equipment.
Before carrying out any work on the equipment the user should be familiar with the
contents of this Safety Guide and the ratings on the equipment’s rating label.
Reference should be made to the external connection diagram before the equipment is
installed, commissioned or serviced.
Language specific, self-adhesive User Interface labels are provided in a bag for some
equipment.
2. HEALTH AND SAFETY
The information in the Safety Section of the equipment documentation is intended to ensure
that equipment is properly installed and handled in order to maintain it in a safe condition.
It is assumed that everyone who will be associated with the equipment will be familiar with
the contents of that Safety Section, or this Safety Guide.
When electrical equipment is in operation, dangerou s voltages will be present in certain parts
of the equipment. Failure to observe warning notices, incorrect use, or improper use may
endanger personnel and equipment and also cause personal injury or physical damage.
Before working in the terminal strip area, the equipment must be isolated.
Proper and safe operation of the equipment depends on appropriate shipping and handling,
proper storage, installation and commissioning, and on careful operation, maintenance and
servicing. For this reason only qualified personnel may work on or operate the equipment.
Qualified personnel are individuals who:
• Are familiar with the installation, commissioning, and operation of the equipment and
of the system to which it is being connected;
• Are able to safely perform switching operations in accordance with accepted safety
engineering practices and are authorised to energize and de-energize equipment and
to isolate, ground, and label it;
• Are trained in the care and use of safety apparatus in accordance with safety
engineering practices;
• Are trained in emergency procedures (first aid).
The equipment documentation gives instructions for its installation, commissioning, and
operation. However, the manual cannot cover all conceivable circumstances or include
detailed information on all topics. In the event of questions or specific problems, do not take
any action without proper authorization. Contact the appropriate Schneider Electric technical
sales office and request the necessary information.
Page 10
Pxxx/EN SS/G11
Page 4/8 Safety Section
3. SYMBOLS AND EXTERNAL LABELS ON THE EQUIPMENT
For safety reasons the following symbols and external labels, which may be used on the
equipment or referred to in the equipment documentation, should be understood before the
equipment is installed or commissioned.
3.1 Symbols
Caution: refer to equipment documentation Caution: risk of electric shock
Protective Conductor (*Earth) terminal
*NOTE: THE TERM EARTH USED THROUGHOUT THIS GUIDE IS THE
3.2 Labels
See Safety Guide (SFTY/4L M/G11) for equipment labelling information.
Functional/Protective Conductor (*Earth)
terminal.
Note: This symbol may also be used for a
Protective Conductor (Earth) Terminal if that
terminal is part of a terminal block or subassembly e.g. power supply.
DIRECT EQUIVALENT OF THE NORTH AMERICAN TERM
GROUND.
4. INSTALLING, COMMISSIONING AND SERVICING
Equipment connections
Personnel undertaking installation, commissioning or servicing work for this
equipment should be aware of the correct working procedures to ensure safety.
The equipment documentation should be consulted before installing,
commissioning, or servicing the equipment.
Terminals exposed during installation, commissioning and maintenance may
present a hazardous voltage unless the equipment is electrically isolated.
The clamping screws of all terminal block connectors, for field wiring, using M4
screws shall be tightened to a nominal torque of 1.3 Nm.
Equipment intended for rack or panel mounting is for use on a flat surface of a
Type 1 enclosure, as defined by Underwriters Laboratories (UL).
Any disassembly of the equipment may expose parts at hazardous voltage, also
electronic parts may be damaged if suitable electrostatic voltage discharge (ESD)
precautions are not taken.
If there is unlocked access to the rear of the equipment, care should be taken by
all personnel to avoid electric shock or energy hazards.
Voltage and current connections shall be made using insulated crimp terminations
to ensure that terminal block insulation requirements are maintained for safety.
Watchdog (self-monitoring) contacts are provided in numerical relays to indicate
the health of the device. Schneider Electric strongly recommends that these
contacts are hardwired into the substation's automation system, for alarm
purposes.
Page 11

Pxxx/EN SS/G11
Safety Section Page 5/8
To ensure that wires are correctly terminated the correct crimp terminal and tool
for the wire size should be used.
The equipment must be connected in accordance with the appropriate connection
diagram.
Protection Class I Equipment
- Before energizing the equipment it must be earthed using the protective
conductor terminal, if provided, or the appropriate termination of the
supply plug in the case of plug connected equipment.
- The protective conductor (earth) connection must not be removed since
the protection against electric shock provided by the equipment would be
lost.
- When the protective (earth) conductor terminal (PCT) is also used to
terminate cable screens, etc., it is essential that the integrity of the
protective (earth) conductor is checked after the addition or removal of
such functional earth connections. For M4 stud PCTs the integrity of the
protective (earth) connections should be ensured by use of a locknut or
similar.
The recommended minimum protective conductor (earth) wire size is 2.5 mm²
(3.3 mm² for North America) unless otherwise stated in the technical data section
of the equipment documentation, or otherwise required by local or country wiring
regulations.
The protective conductor (earth) connection must be low-inductance and as short
as possible.
All connections to the equipment must have a defined potential. Connections that
are pre-wired, but not used, should preferably be grounded when binary inputs
and output relays are isolated. When binary inputs and output relays are
connected to common potential, the pre-wired but unused connections should be
connected to the common potential of the grouped connections.
Before energizing the equipment, the following should be checked:
- Voltage rating/polarity (rating label/equipment documentation),
- CT circuit rating (rating label) and integrity of connections,
- Protective fuse rating,
- Integrity of the protective conductor (earth) connection (where
applicable),
- Voltage and current rating of external wiring, applicable to the application.
Accidental touching of exposed terminals
If working in an area of restricted space, such as a cubicle, where there is a risk of
electric shock due to accidental touching of terminals which do not comply with
IP20 rating, then a suitable protective barrier should be provided.
Equipment use
If the equipment is used in a manner not specified by the manufacturer, the
protection provided by the equipment may be impaired.
Removal of the equipment front panel/cover
Removal of the equipment front panel/cover may expose hazardous live parts,
which must not be touched until the electrical power is removed.
Page 12

Pxxx/EN SS/G11
Page 6/8 Safety Section
UL and CSA/CUL Listed or Recognized equipment
To maintain UL and CSA/CUL Listing/Recognized status for North America the
equipment should be installed using UL or CSA Listed or Recognized parts for
the following items: connection cables, protective fuses/fuseholders or circuit
breakers, insulation crimp terminals and replacement internal battery, as
specified in the equipment documentation.
For external protective fuses a UL or CSA Listed fuse shall be used. The Listed
type shall be a Class J time delay fuse, with a maximum current rating of 15 A
and a minimum d.c. rating of 250 Vd.c., for example type AJT15.
Where UL or CSA Listing of the equipment is not required, a high rupture
capacity (HRC) fuse type with a maximum current rating of 16 Amps and a
minimum d.c. rating of 250 Vd.c. may be used, for example Red Spot type NIT or
TIA.
Equipment operating conditions
The equipment should be operated within the specified electrical and
environmental limits.
Current transformer circuits
Do not open the secondary circuit of a live CT since the high voltage produced
may be lethal to personnel and could damage insulation. Generally, for safety,
the secondary of the line CT must be shorted before opening any connections to
it.
For most equipment with ring-terminal connections, the threaded terminal block
for current transformer termination has automatic CT shorting on removal of the
module. Therefore external shorting of the CTs may not be required, the
equipment documentation should be checked to see if this applies.
For equipment with pin-terminal connections, the threaded terminal block for
current transformer termination does NOT have automatic CT shorting on removal
of the module.
External resistors, including voltage dependent resistors (VDRs)
Where external resistors, including voltage dependent resistors (VDRs), are fitted
to the equipment, these may present a risk of electric shock or burns, if touched.
Battery replacement
Where internal batteries are fitted they should be replaced with the recommended
type and be installed with the correct polarity to avoid possible damage to the
equipment, buildings and persons.
Insulation and dielectric strength testing
Insulation testing may leave capacitors charged up to a hazardous voltage. At the
end of each part of the test, the voltage should be gradually reduced to zero, to
discharge capacitors, before the test leads are disconnected.
Insertion of modules and pcb cards
Modules and PCB cards must not be inserted into or withdrawn from the
equipment whilst it is energized, since this may result in damage.
Insertion and withdrawal of extender cards
Extender cards are available for some equipment. If an extender card is used,
this should not be inserted or withdrawn from the equipment whilst it is energized.
This is to avoid possible shock or damage hazards. Hazardous live voltages may
be accessible on the extender card.
Page 13
Pxxx/EN SS/G11
Safety Section Page 7/8
External test blocks and test plugs
Great care should be taken when using external test blocks and test plugs such
as the MMLG, MMLB and MiCOM P990 types, hazardous voltages may be
accessible when using these. *CT shorting links must be in place before the
insertion or removal of MMLB test plugs, to avoid potentially lethal voltages.
*Note: When a MiCOM P992 Test Plug is inserted into the MiCOM P991 Test
Block, the secondaries of the line CTs are automatically shorted, making
them safe.
Fiber optic communication
Where fiber optic communication devices are fitted, these should not be viewed
directly. Optical power meters should be used to determine the operation or
signal level of the device.
Cleaning
The equipment may be cleaned using a lint free cloth dampened with clean water,
when no connections are energized. Contact fingers of test plugs are normally
protected by petroleum jelly, which should not be removed.
5. DECOMMISSIONING AND DISPOSAL
De-commissioning
The supply input (auxiliary) for the equipment may include capacitors across the
supply or to earth. To avoid electric shock or energy hazards, after completely
isolating the supplies to the equipment (both poles of any dc supply), the
capacitors should be safely discharged via the external terminals prior to
de-commissioning.
Disposal
It is recommended that incineration and disposal to water courses is avoided.
The equipment should be disposed of in a safe manner. Any equipment
containing batteries should have them removed before disposal, taking
precautions to avoid short circuits. Particular regulations within the country of
operation, may apply to the disposal of the equipment.
Page 14

Pxxx/EN SS/G11
Page 8/8 Safety Section
6. TECHNICAL SPECIFICATIONS FOR SAFETY
Unless otherwise stated in the equipment technical manual, the following data is applicable.
6.1 Protective fuse rating
The recommended maximum rating of the external protective fuse for equipments is 16A,
high rupture capacity (HRC) Red Spot type NIT, or TIA, or equivalent. Unless otherwise
stated in equipment technical manual, the following data is applicable. The protective fuse
should be located as close to the unit as possible.
CAUTION - CTs must NOT be fused since open circuiting them may
produce lethal hazardous voltages.
6.2 Protective Class
IEC 60255-27: 2005
EN 60255-27: 2006
6.3 Installation Category
IEC 60255-27: 2005
EN 60255-27: 2006
6.4 Environment
The equipment is intended for indoor installation and use only. If it is required for use in an
outdoor environment then it must be mounted in a specific cabinet or housing which will
enable it to meet the requirements of IEC 60529 with the classification of degree of
protection IP54 (dust and splashing water protected).
Pollution Degree - Pollution Degree 2 Compliance is demonstrated by reference
Altitude - Operation up to 2000m to safety standards.
IEC 60255-27:2005
Class I (unless otherwise specified in the equipment
documentation). This equipment requires a protective
conductor (earth) connection to ensure user safety.
Installation Category III (Overvoltage Category III):
Distribution level, fixed installation.
Equipment in this category is qualification tested at
5 kV peak, 1.2/50 µs, 500 Ω, 0.5 J, between all
supply circuits and earth and also between
independent circuits.
EN 60255-27: 2006
Page 15

Introduction P72x/EN IT/C21
MiCOM P721/P723
INTRODUCTION
Page 16

Page 17

Introduction P72x/EN IT/C21
MiCOM P721/P723 Page 1/10
CONTENTS
1. INTRODUCTION 3
2. HOW TO USE THIS MANUAL 4
3. INTRODUCTION TO THE MiCOM RANGE 5
4. INTRODUCTION TO THE MiCOM P721 & P723 PROTECTIONS 6
5. MAIN FUNCTIONS 7
5.1 Main functions 7
5.2 General functions 7
5.3 Ordering options 9
Page 18

P72x/EN IT/C21 Introduction
Page 2/10 MiCOM P721/P723
BLANK PAGE
Page 19

Introduction P72x/EN IT/C21
MiCOM P721/P723 Page 3/10
1. INTRODUCTION
The differential protections of the MiCOM P72x range are Schneider Electric numerical high
impedance differential protection. MiCOM P721 and P723 have been designed to provide
differential protection and a high impedance differential protection
The differential protection consists to measure the summation of n Current Transformers
(CTs) secondary currents. Without internal fault, this sum is null. If an internal fault occurs,
the protection measures the leak current. If an external fault occurs (with non-saturated CT),
the Kirchhoff's law is conserved and no current is measured.
The high impedance differential protection main application is a CT saturation in a busbar
(when a serious and external fault occurs).
Page 20

P72x/EN IT/C21 Introduction
Page 4/10 MiCOM P721/P723
2. HOW TO USE THIS MANUAL
This manual provides a description of MiCOM P721 and P723 functions and settings. The
goal of this manual is to allow the user to become familiar with the application, installation,
setting and commissioning of these relays.
This manual has the following format:
P72x/EN IT Introduction
The introduction presents the documentation structure and a
brief presentation of the relay, including functions.
P72x/EN IN Handling, installation and case dimensions
This section provides logistics general instructions for handling,
installing and stocking..
P72x/EN FT User Guide
This section provides relay settings with a brief explanation of
each setting and detailed description. It also provides recording
and measurements functions including the configuration of the
event and disturbance recorder and measurement functions.
P72x/EN HI Menu content tables
This section shows the menu structure of the relays, with a
complete list of all of the menu settings.
P72x/EN AP Application Notes
This section includes a description of common power system
applications of the relay, calculation of suitable settings, some
typical worked examples, and how to apply the settings to the
relay.
P72x/EN TD Technical data and curve characteristics
This section provides technical data including setting ranges,
accuracy limits, recommended operating conditions, ratings and
performance data. Compliance with norms and international
standards is quoted where appropriate.
P72x/EN CT Communication database
This section provides an overview regarding the communication
interfaces of the relay. Detailed protocol mappings, semantics,
profiles and interoperability tables are not provided within this
manual. Separate documents are available per protocol,
available for download from our website.
P72x/EN CM Commissioning and Maintenance Guide
Instructions on how to commission the relay, comprising checks
on the calibration and functionality of the relay.
P72x/EN CO Connection diagrams
This section provides the mechanical and electrical description.
External wiring connections to the relay are indicated.
P72x/EN RS Commissioni ng test and records sheets
This section contains checks on the calibration and functionality
of the relay.
P72x/EN VC Hardware/Software version history and compatibility
History of all hardware and software releases for the product.
Page 21

Introduction P72x/EN IT/C21
MiCOM P721/P723 Page 5/10
3. INTRODUCTION TO THE MiCOM RANGE
MiCOM is a comprehensive solution capable of meeting all electricity supply requirements. It
comprises of a range of components, systems and services from Schneider Electric.
Flexibility is central to the MiCOM concept.
MiCOM provides the ability to define an application solution and, through extensive
communication capabilities, to integrate this solution with your power supply control system.
The components within MiCOM are:
• P range protection relays
• C range control products
• M range measurement products for accurate metering and monitoring
• S range versatile PC support and substation control packages
MiCOM products include extensive facilities for recording information on the state and
behaviour of a power system, using disturbance and fault records.
They can also provide measurements of the power system at regular intervals to a control
centre enabling remote monitoring and control to take place.
For up-to-date information on any MiCOM product, refer to the technical publications, which
can be obtained from: Schneider Electric or your local sales office; alternatively visit our web
site.
www.schneider-electric.com
Page 22

P72x/EN IT/C21 Introduction
Page 6/10 MiCOM P721/P723
4. INTRODUCTION TO THE MiCOM P721 & P723 PROTECTIONS
The range of MiCOM protection relays is built on the success of the MIDOS, K and MODN
ranges by incorporating the last changes in digital technology. Relays from the MiCOM P72x
range are fully compatible and use the same modular box concept.
MiCOM P721 and P723 high impedance differential protections provide differential protection
and high impedance differential protection (with P79x high impedance accessory) for
machines, power transformers and busbar installations as well as for other applications
where differential protection is required.
The P721 relay provides simple restricted earth current fault protection. Furthermore, P723
relay is used for 3-phases fault protection.
In addition to its protective functions, each relay offers control and recording features. They
can be fully integrated to a control system so protection, control, data acquisition and
recording of faults, events and disturbances can be made available.
The relays are equipped on the front panel with a liquid crystal display (LCD) with 2 x 16
back-lit alphanumerical characters, a tactile 7 button keypad (to access all settings, clear
alarms and read measurements) and 8 LEDs that indicate the status of MiCOM P721 and
P723 protections.
In addition, the use of the RS485 communication port makes it possible to read, reinitialise
and change the settings of the relays, if required, from a local or remote PC computer loaded
with MiCOM S1 software.
Its flexibility of use, reduced maintenance requirements and ease of integration allow the
MiCOM P72x range to provide an adaptable solution for the problems of the protection of
electric networks.
Page 23
Introduction P72x/EN IT/C21
MiCOM P721/P723 Page 7/10
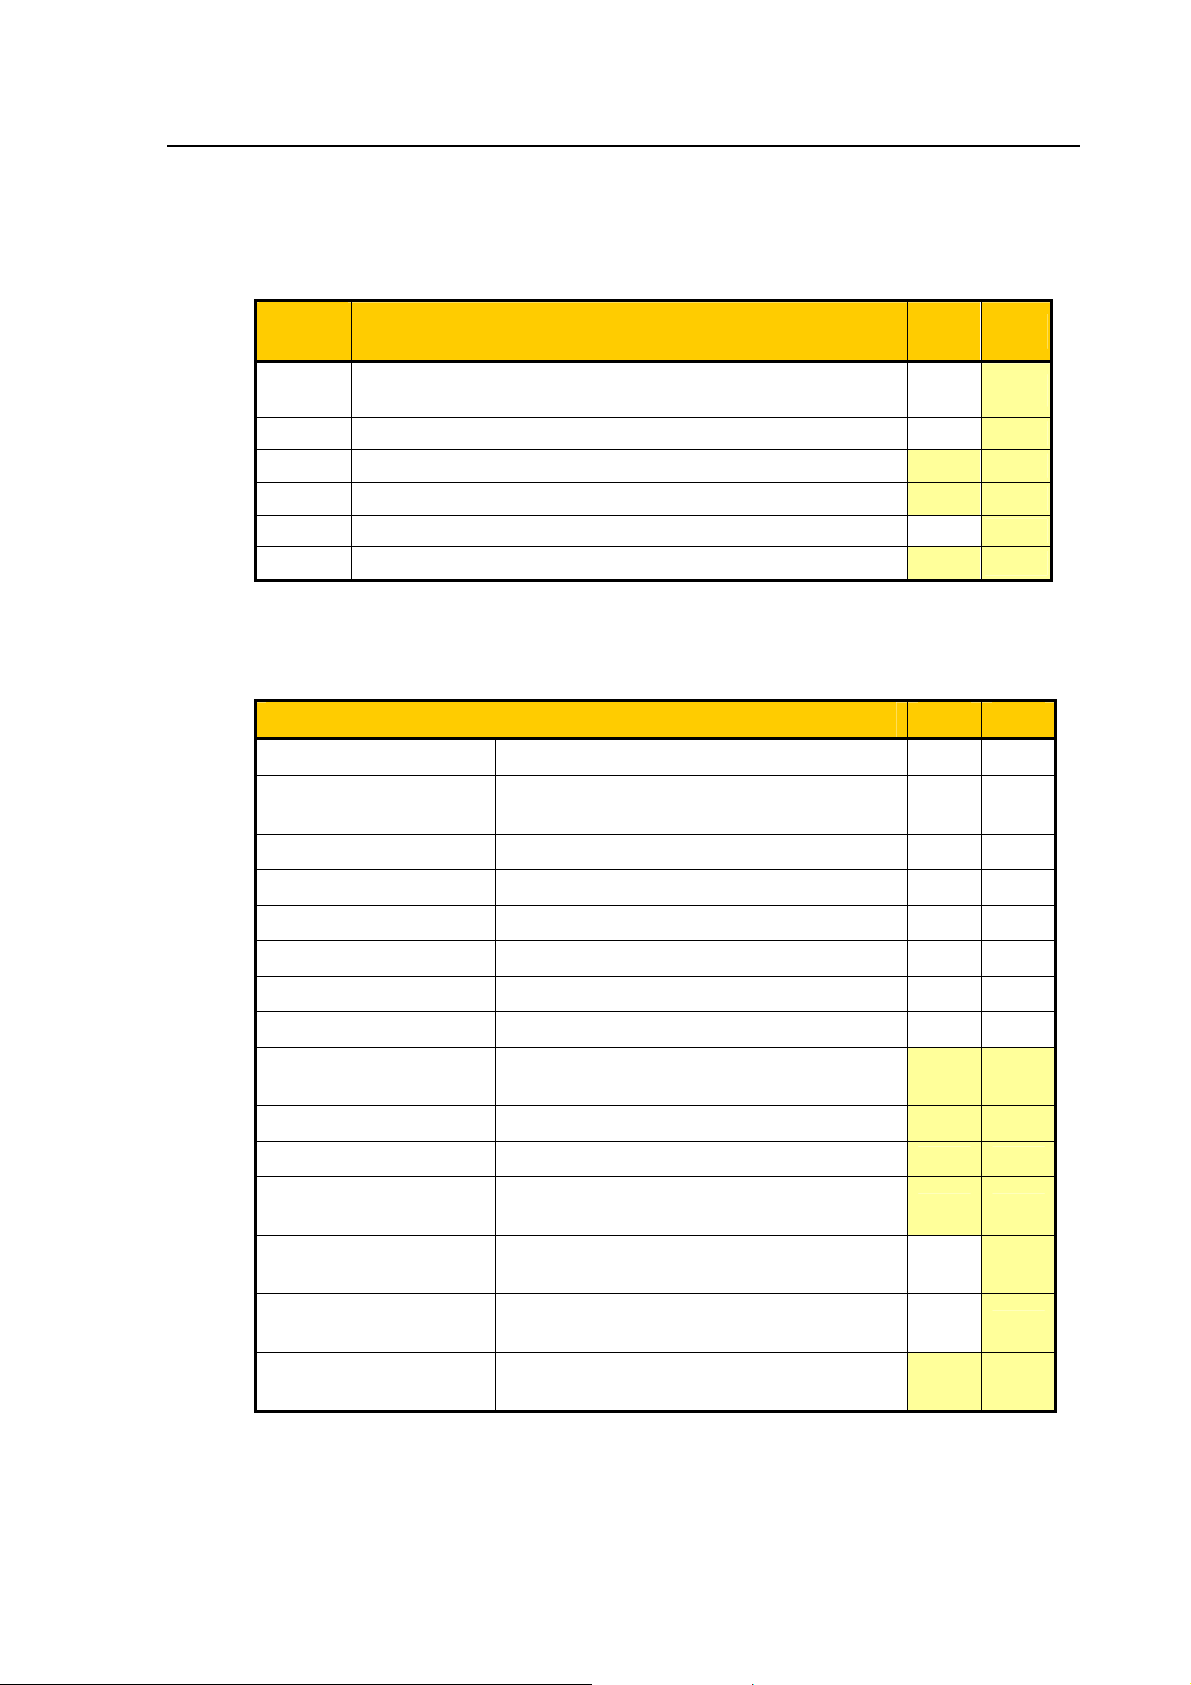
5. MAIN FUNCTIONS
5.1 Main functions
The following table shows the functions available for the different models of the MiCOM
P72x range of relays.
ANSI
CODES
87
95 Phase bus-wire supervision
87N Restricted earth fault protection
95N Earth bus-wire supervision
87CZ Check zone input
50BF Breaker failure detection
5.2 General functions
The following table shows the general features available.
GENERAL FEATURES P721 P723
Number of digital inputs 2 5
Total number of outputs
relays
Events recording 250 250
Fault recording 25 25
FEATURES P721 P723
Phase segregated high impedance current differential
protection
• •
• •
• •
4 8
•
•
•
Disturbance recording 5 5
Instantaneous records 5 5
Setting group 2 2
Auxiliary timers 2 4
Communication IEC60870-5-103, DNP 3.0 & Modbus RTU
(rear and front port)
Settings software MiCOM S1
Logic equation AND, OR and NOT gates (8 equations)
Measurements Neutral supervision / differential currents
(INdiff)
Phase supervision / differential currents
(IAdiff, IBdiff and ICdiff)
Maximum differential currents (ImaxAdiff,
ImaxBdiff, and ImaxCdiff)
Maximum differential neutral currents
(ImaxNdiff
• •
• •
• •
• •
• •
•
•
Page 24

P72x/EN IT/C21 Introduction
Page 8/10 MiCOM P721/P723
Application overview
FIGURE 1: FUNCTIONAL DIAGRAM
Page 25
Introduction P72x/EN IT/C21
MiCOM P721/P723 Page 9/10
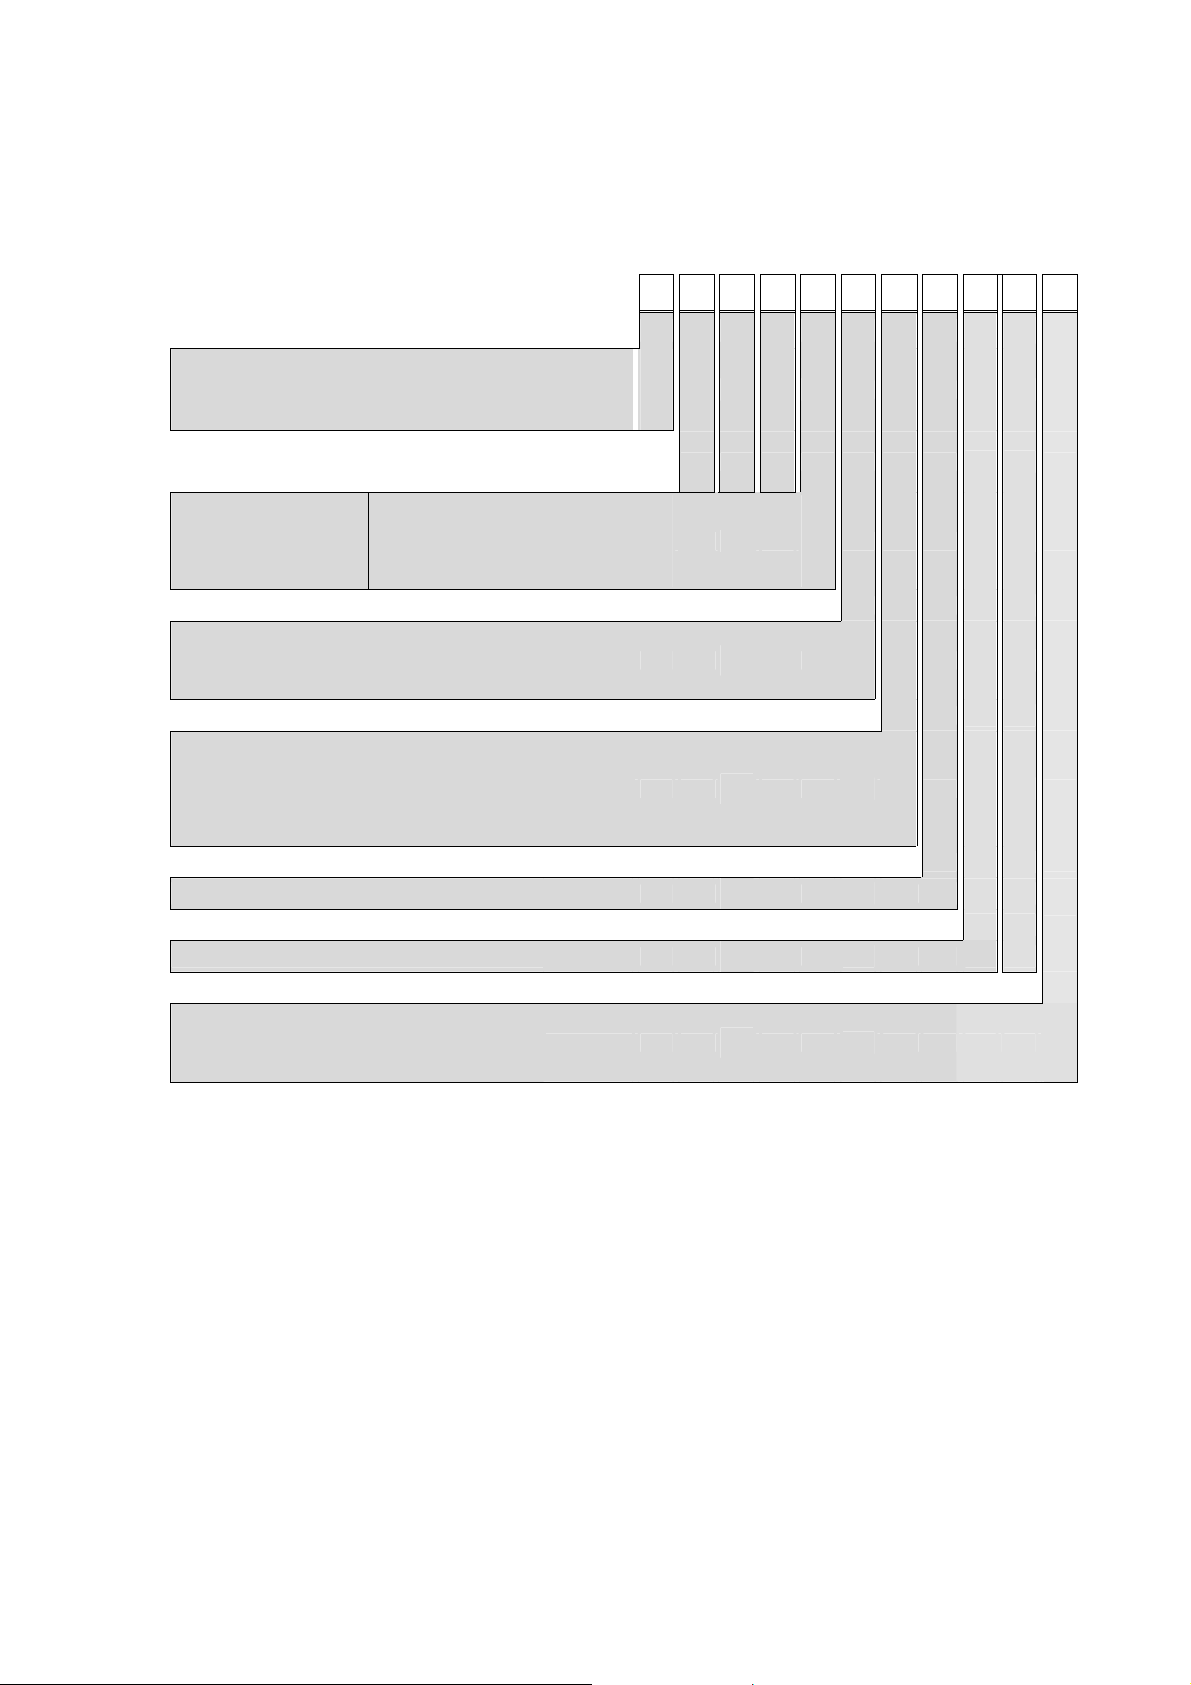
5.3 Ordering options Information Required with Order
Relay Type (differential protection)
Variant
Simple phase high impedance differential
protection
Simple phase or three phase high impedance
protection with binary I/O extension
Auxiliary and digital input voltage
Auxiliary voltage digital input voltage
48-250 Vdc / 48-240 Vac
48-250 Vdc / 48-240 Vac
48-250 Vdc / 48-240 Vac
48-250 Vdc / 48-240 Vac
24-250Vdc / 48-240Vac
Rear port communication interface
Modbus
K-Bus/Courier
IEC 60870-5-103
DNP 3.0
Default HMI language
French
English / American
Spanish
German
Italian
Portuguese
Platform
phase 2 with standard software
Software
Unless specified the latest version will be delivered
Mounting option
None (default)
Pre-fixed HMI (no withdrawability)
Sealed cover
Pre-fixed HMI + Sealed cover
(2)
(2)
(1)
: special application
(2) :
: not available
105-145 Vdc
48-250 Vdc (ENA UK)
110 Vdc –30% / +20%
220 Vdc –30% / +20%
24-250 Vdc / 24 / 240 Vdc
(1)
P72 0 0 0
(1)
(1)
1
3
H
T
V
W
Z
1
2
3
4
0
1
2
3
4
7
2
0
1
2
3
Page 26

P72x/EN IT/C21 Introduction
Page 10/10 MiCOM P721/P723
BLANK PAGE
Page 27

Handling, Installation and Case Dimensions P72x/EN IN/C21 MiCOM P721/P723
HANDLING, INSTALLATION
AND CASE DIMENSIONS
Page 28

Page 29

Handling, Installation and Case Dimensions P72x/EN IN/C21
MiCOM P721/P723 Page 1/10
CONTENTS
1. GENERAL CONSIDERATIONS 3
1.1 Receipt of relays 3
1.2 Electrostatic discharge (ESD) 3
2. HANDLING OF ELECTRONIC EQUIPMENT 4
3. RELAY MOUNTING 5
4. UNPACKING 6
5. STORAGE 7
6. DIMENSIONS 8
6.1 Connection of power terminals, and Signals terminals 8
6.2 Communication port RS485 9
6.3 Earthing 9
7. CASE DIMENSIONS 10
Page 30

P72x/EN IN/C21 Handling, Installation and Case Dimensions
Page 2/10 MiCOM P721/P723
BLANK PAGE
Page 31

Handling, Installation and Case Dimensions P72x/EN IN/C21
MiCOM P721/P723 Page 3/10
1. GENERAL CONSIDERATIONS
BEFORE CARRYING OUT ANY WORK ON THE EQUIPMENT, THE
USER SHOULD BE FAMILIAR WITH THE CONTENTS OF THE SAFETY
GUIDE SFTY/4LM/E11 OR LATER ISSUE, OR THE SAFETY AND
TECHNICAL DATA SECTIONS OF THE TECHNICAL MANUAL AND
ALSO THE RATINGS ON THE EQUIPMENT RATING LABEL.
1.1 Receipt of relays
Protective relays, although generally of robust construction, require careful treatment prior to
installation on site. Upon receipt, relays should be examined immediately to ensure no
damage has been sustained in transit. If damage has been sustained during transit a claim
should be made to the transport contractor and Schneider Electric should be promptly
notified.
Relays that are supplied unmounted and not intended to be installed immediately should be
returned with their protective polythene bags.
1.2 Electrostatic discharge (ESD)
The relays use components that are sensitive to electrostatic discharges.
The electronic circuits are well protected by the metal case and the internal module should
not be withdrawn unnecessarily. When handling the module outside its case, care should be
taken to avoid contact with components and electrical connections. If removed from the case
for storage, the module should be placed in an electrically conducting antistatic bag.
There are no setting adjustments within the module and it is advised that it is not
unnecessarily disassembled. Although the printed circuit boards are plugged together, the
connectors are a manufacturing aid and not intended for frequent dismantling; in fact
considerable effort may be required to separate them. Touching the printed circuit board
should be avoided, since complementary metal oxide semiconductors (CMOS) are used,
which can be damaged by static electricity discharged from the body.
Page 32

P72x/EN IN/C21 Handling, Installation and Case Dimensions
Page 4/10 MiCOM P721/P723
2. HANDLING OF ELECTRONIC EQUIPMENT
A person’s normal movements can easily generate electrostatic potentials of several
thousand volts. Discharge of these voltages into semiconductor devices when handling
electronic circuits can cause serious damage, which often may not be immediately apparent
but the reliability of the circuit will have been reduced.
The electronic circuits are completely safe from electrostatic discharge when housed in the
case. Do not expose them to risk of damage by withdrawing modules unnecessarily.
Each module incorporates the highest practicable protection for its semiconductor devices.
However, if it becomes necessary to withdraw a module, the following precautions should be
taken to preserve the high reliability and long life for which the equipment has been designed
and manufactured.
1. Before removing a module, ensure that you are at the same electrostatic potential as
the equipment by touching the case.
2. Handle the module by its frontplate, frame or edges of the printed circuit board. Avoid
touching the electronic components, printed circuit track or connectors.
3. Do not pass the module to another person without first ensuring you are both at the
same electrostatic potential. Shaking hands achieves equipotential.
4. Place the module on an antistatic surface, or on a conducting surface which is at the
same potential as yourself.
5. Store or transport the module in a conductive bag.
If you are making measurements on the internal electronic circuitry of an equipment in
service, it is preferable that you are earthed to the case with a conductive wrist strap. Wrist
straps should have a resistance to ground between 500kΩ – 10MΩ.
If a wrist strap is not available you should maintain regular contact with the case to prevent a
build-up of static. Instrumentation which may be used for making measurements should be
earthed to the case whenever possible.
More information on safe working procedures for all electronic equipment can be found in
BS5783 and IEC 147-OF. It is strongly recommended that detailed investigations on
electronic circuitry or modification work should be carried out in a special handling area such
as described in the above-mentioned BS and IEC documents.
Page 33

Handling, Installation and Case Dimensions P72x/EN IN/C21
MiCOM P721/P723 Page 5/10
3. RELAY MOUNTING
Relays are dispatched either individually or as part of a panel/rack assembly.
If an MMLG test block is to be included it should be positioned at the right-hand side of the
assembly (viewed from the front). Modules should remain protected by their metal case
during assembly into a panel or rack.
For individually mounted relays an outline diagram is supplied in section 6 of this chapter
showing the panel cut-outs and hole centres.
Page 34

P72x/EN IN/C21 Handling, Installation and Case Dimensions
Page 6/10 MiCOM P721/P723
4. UNPACKING
Care must be taken when unpacking and installing the relays so that none of the parts is
damaged or the settings altered. Relays must only be handled by skilled personnel. The
installation should be clean, dry and reasonably free from dust and excessive vibration. The
site should be well lit to facilitate inspection. Relays that have been removed from their cases
should not be left in situations where they are exposed to dust or damp. This particularly
applies to installations which are being carried out at the same time as construction work.
Page 35

Handling, Installation and Case Dimensions P72x/EN IN/C21
MiCOM P721/P723 Page 7/10
5. STORAGE
If relays are not to be installed immediately upon receipt they should be stored in a place
free from dust and moisture in their original cartons. Where de-humidifier bags have been
included in the packing they should be retained. The action of the de-humidifier crystals will
be impaired if the bag has been exposed to ambient conditions and may be restored by
gently heating the bag for about an hour, prior to replacing it in the carton.
Dust which collects on a carton may, on subsequent unpacking, find its way into the relay; in
damp conditions the carton and packing may become impregnated with moisture and the dehumifier will lose its efficiency.
Storage temperature: –25°C to +70°C.
Page 36

P72x/EN IN/C21 Handling, Installation and Case Dimensions
Page 8/10 MiCOM P721/P723
6. DIMENSIONS
6.1 Connection of power terminals, and Signals terminals
The individual equipment are delivered with sufficient M4 screws to connect the relay via
annular terminals, with a maximum recommended of two annular terminals per contact.
If necessary, Schneider Electric can provide annular terminals to crimp. 5 references exist
according to the section of the wire (see below). Each reference corresponds to a sachet of
100 terminals.
Page 37

Handling, Installation and Case Dimensions P72x/EN IN/C21
MiCOM P721/P723 Page 9/10
To insure the insulation of the terminals and to respect the security and safety instructions,
an isolated sleeve can be used.
We recommend the following cable cross-sections:
− Auxiliary sources Vaux: 1.5 mm²
− Communication Port see paragraph 6.2
− Other circuits 1.0 mm²
Because of the limitations of the annular terminals, the maximum wire cross-section which
can be used for the connector blocks (for current inputs and signals) is of 6mm² by using non
-insulated annular terminals. When only pre- insulated terminals can be used, the maximum
wire cross-section is reduced to 2, 63 mm² per annular terminal. If a more significant wire
cross-section is necessary, two wires can be put in parallel, each one finished by a separate
annular terminal.
All the terminal blocks used for connections, except of the port RS485, must be able to
withstand a nominal voltage of minimum 300V peak value.
We recommend to protect the auxiliary source connection by using a fuse of type NIT or TIA
with a breaking capacity of 16A. For security reasons, do never install fuses in current
transformers circuits. The other circuits must be protected by fuses.
6.2 Communication port RS485
Connections to RS485 is made using annular terminals. It is recommended that a two core
screened cable, is used with a maximum total length of 1000 m or a200nF total cable
capacitance.
Typical specification:
− Each core: 16/0.2 mm copper conductor, PVC insulated.
− Nominal conductor area: 0.5 mm² per core
− Screen: Overall braid, PVC sheathed
− Linear capacitance between conductor and earth: 100pF/m
6.3 Earthing
Each equipment must be connected to a local earth terminal by the intermediary of a M4
earth terminals. We recommend a wire of minimal section of 2.5 mm², with annular terminals
on the side of the equipment. Because of the limitations of the annular terminals, the
possible maximum section is of 6mm² by wire. If a larger section is necessary, one can use
cables connected in parallel, each one ending with an annular terminal separated on the side
of the equipment. One can also use a metal bar.
NOTE: To prevent any electrolytic risk between copper conductor or brass
conductor and the back plate of the equipment, it is necessary to take
precautions to isolate them one from the other. This can be done in
several ways, for example by inserting between the conductor and the
case a plated nickel or insulated ring washer or by using a tin
terminals.
Page 38

P72x/EN IN/C21 Handling, Installation and Case Dimensions
Page 10/10 MiCOM P721/P723
7. CASE DIMENSIONS
MiCOM P721 and P723 relays are available in a 4U metal case for panel or flush mounting.
Weight: 1.7 to 2.1 Kg
External size: Height case 152 mm
front panel 177 mm
Width case 97 mm
front panel 103 mm
Depth case 226 mm
front panel + case 252 mm
P0078ENb
MiCOM P721 AND P723 RELAYS CASE DIMENSIONS
NOTE: The chassis is normally secured in the case by four screws (Self tap
screws 6x1.4), to ensure good seating. The fixing screws should be
fitted in normal service (do not add washers). Do not discard these
screws.
Page 39

User Guide P72x/EN FT/C21
MiCOM P721/P723
USER GUIDE
Page 40

Page 41

User Guide P72x/EN FT/C21
MiCOM P721/P723 Page 1/38
CONTENTS
1. PRESENTATION OF MiCOM P721 AND P723 PROTECTIONS 3
1.1 USER INTERFACE 4
1.1.1 Relay Overview 4
1.1.2 Front panel description 5
1.1.3 LCD display and keypad description 6
1.1.4 LEDs 7
1.1.5 Description of the two areas under the top and bottom flaps 8
1.1.6 The USB/RS232 cable (to power and set the relay) 8
1.2 Menu structure 9
1.3 Password 9
1.3.1 Password protection 9
1.3.2 Password entry 9
1.3.3 Changing the password 10
1.3.4 Change of setting invalidation 10
1.4 Displays of Alarm & Warning Messages 10
1.4.1 Electrical Network Alarms 10
2. MENUS 13
2.1 Default display 13
2.2 Menu contents description 13
2.3 OP PARAMETERS Menu 14
2.4 CONFIGURATION menu 15
2.4.1 Submenu CONFIGURATION 15
2.4.2 Submenus LED 5 to 8 16
2.4.3 Submenu GROUP SELECT 18
2.4.4 Submenu ALARMS 18
2.4.5 Submenu INPUTS 19
2.4.6 Submenu OUTPUT RELAYS 19
2.5 MEASUREMENTS Menu 20
2.5.1 If Earth protection is selected 20
2.5.2 If Phase protection is selected (P723 only) 20
2.6 COMMUNICATION Menu 21
2.7 PROTECTION Menu 22
2.7.1 Earth protection configuration 22
2.7.2 Phase protection configuration 24
2.8 AUTOMAT. CTRL Menu 25
2.8.1 Submenu Trip Commands 25
2.8.2 Submenu Latch of trip output relay by Function 26
2.8.3 Submenu Blocking Logic 1 / 2 27
2.8.4 Outputs Relays submenu 27
Page 42

P72x/EN FT/C21 User Guide
Page 2/38 MiCOM P721/P723
2.8.5 Latch of the auxiliary output relays (RL2 to RL8) 29
2.8.6 Inputs submenu 29
2.8.7 CIRCUIT BREAKER FAILURE submenu 31
2.8.8 Submenu Logic Equations 31
2.9 RECORDS Menu 34
2.9.1 Fault Record submenu 34
2.9.2 INSTANTANEOUS RECORDS submenu 35
2.9.3 DISTURBANCE RECORD submenu 35
3. WIRING 36
3.1 Auxiliary supply 36
3.2 Current measurement inputs 36
3.3 Logic inputs 36
3.4 Output relays 36
3.5 Communication 37
3.5.1 RS485 rear communication port 37
3.5.2 RS232 front communication port 37
Page 43

User Guide P72x/EN FT/C21
MiCOM P721/P723 Page 3/38
1. PRESENTATION OF MiCOM P721 AND P723 PROTECTIONS
MiCOM P721 and P723 are fully numerical relays designed to perform electrical protection
and control functions.
The following section describes the MiCOM P72x range and the main differences between
the different models.
MiCOM relays are powered either from a DC (2 voltage ranges) or an AC auxiliary power
supply.
Using the front panel, the user can easily navigate through the menu and access data,
change settings, read measurements, etc.
Eight LEDs situated in the front panel help the user to quickly know the status of the relay
and the presence of alarms. Alarms that have been detected are stored and can be
displayed on the back-lit LCD.
Any short time voltage interruption (<50ms) is filtered and regulated through the auxiliary
power supply.
Regarding current inputs, MiCOM P721 has one earth current input available for 1A and 5A
rated CTs.
MiCOM P723 has 3 phase and 1 earth current inputs available for 1 and 5 Amps rated CTs.
On each one of these relays, it is possible to combine 1 and 5 Amp curre nt inputs together (ie a mix between 1A for earth fault and 5A for phase connections).
MiCOM P721 and P723 relays continuously measure phase and earth currents and take into
account the true RMS current value up to 10th harmonic (at 50 Hz).
Output relays are freely configurable and can be activated by any of the control or protection
functions available in the relay. Logic inputs can also be assigned to various control
functions.
On their rear terminals MiCOM P721 and P723 have a standard RS485 port available. When
ordering, the user can choose between the following communication protocols: ModBus
RTU, IEC 60870-5-103 or DNP3.0.
Using RS485 communication channel, all stored information (measurements, alarms, and
parameters) can be read and settings can be modified when the chosen protocol allows it.
Reading and modification of this data can be carried out on site with a standard PC loaded
with Schneider Electric setting software.
Thanks to its RS485 based communication, MiCOM P721 and P723 relays can be
connected directly to a digital control system. All the available data can then be gathered by
a substation control system and be processed either locally or remotely.
Page 44

P72x/EN FT/C21 User Guide
Page 4/38 MiCOM P721/P723
1.1 USER INTERFACE
1.1.1 Relay Overview The next figures show the P721 and P723 protections.
The table shows the case size.
Height Depth Width
4U (177mm) 226mm 20 TE
The hinged covers at the top and bottom of the relay are shown closed. Extra physical
protection for the front panel can be provided by an optional transparent front cover; this
allows read only access to the relays settings and data but does not affect the relays IP
rating. When full access to the relay keypad is required to edit the settings, the transparent
cover can be unclipped and removed when the top and bottom hinged covers are open.
Page 45

User Guide P72x/EN FT/C21
MiCOM P721/P723 Page 5/38
1.1.2 Front panel description MiCOM P721 and P723 relay front panel allows the user to easily enter relay settings,
display measured values and alarms and to clearly display the status of the relay.
Top cover
Top cover
Fixed
Fixed
function
function
LED
LED
User
User
programmable
programmable
function LEDs
function LEDs
Keypad
Keypad
Cover (not used)
Cover (not used)
Front comms port
Front comms port
P3602ENg
P3602ENg
FIGURE 1: MiCOM P721 AND P723 FRONT PANEL DESCRIPTION
The front panel of the relay has three separate sections:
1. The LCD display and the keypad,
2. The LEDs
3. The two zones under the upper and lower flaps.
Page 46

P72x/EN FT/C21 User Guide
A
A
Page 6/38 MiCOM P721/P723
1.1.3 LCD display and keypad description The front panel components are shown below. The front panel functionality is identical for
the P721 and P723 relays.
1.1.3.1
1.1.3.2
LCD display
In the front panel, a liquid crystal display (LCD) displays settings, measured values and
alarms. Data is accessed through a menu structure.
The LCD has two lines, with sixteen characters each. A back-light is activated when a key is
pressed and will remain lit for five minutes after the last key press. This allows the user to be
able to read the display in most lighting conditions.
Keypad
The keypad has seven keys divided into two groups:
• Two keys located just under the screen (keys and c).
Keys and c are used to read and acknowledge alarms. To display successive alarms,
press key c. Alarms are displayed in reverse order of their detection (the most recent alarm
first, the oldest alarm last). To acknowledge the alarms, the user can either acknowledge
each alarm using or go to the end of the ALARM menu and acknowledge all the alarms
at the same time.
When navigating through submenus, key is also used to come back to the head line of
the corresponding menu.
NOTE: To acknowledge a relay latched refer to the corresponding submenu
section.
• Four main keys , , , located in the middle of the front panel.
They are used to navigate through the different menus and submenus and to do the setting
of the relay.
The key is used to validate a choice or a value (modification of settings).
Read key
Read key
Arrow keys
Arrow keys
Enter key
Enter key
P3950ENc
P3950ENc
Clear key
Clear key
rrow keys
rrow keys
Page 47

User Guide P72x/EN FT/C21
MiCOM P721/P723 Page 7/38
1.1.4 LEDs The LED labels on the front panel are by default written in English, however the user has
self-adhesive labels available with MiCOM relays on which it is possible to write using a ball
point pen.
The top four LEDs indicate the status of the relay (Trip condition, alarm LED, equipment
failure, auxiliary supply).
The four lower LEDs are freely programmable by the user and can be assigned to display a
threshold crossing for example (available for all models) or to show the status of the logic
inputs.The description of each one of these eight LEDs located in the left side of the front
view is given hereafter (numbered from the top to bottom from 1 to 8):
LED 1
LED 8
LED 1 Colour: RED Label: Trip
LED 1 indicates that the relay has issued a trip order to the cut-off element. This LED
recopies the trip order issued to the Trip logic output. Its normal state is unlit. As soon as a
triggering order is issued, the LED lights up. It is cleared when the associated alarm is
acknowledged either through the front panel, or by a remote command, a digital input, or by
a new fault (CONFIGURATION/Alarms menu).
LED 2 Colour: ORANGE Label: ALARM
LED 2 indicates that the relay has detected an alarm. This alarm can either be a threshold
crossing (instantaneous), or a trip order (time delayed). As soon as an alarm is detected, the
LED starts blinking. After all the alarms have been read, the LED lights up continuously.
After acknowledgement of all the alarms, the LED is extinguished.
NOTE: It is possible to configure the instantaneous alarms to be self reset or
not by choosing Yes or No in the CONFIGURATION/Alarms Menu.
The alarm LED can be reset either through the front panel, or by remote command, by a
digital input, or by a new fault (CONFIGURATION/Alarms menu).
LED 3 Colour: ORANGE Label: Warning
P3951ENa
LED 3 indicates internal alarms of the relay. When the relay detects a « non critical » internal
alarm (typically a communication failure), the LED starts blinking continuously. When the
relay detects a fault that is considered as « critical », the LED lights up continuously. Only
the disappearance of the cause of the fault can clear this LED (repair of the module,
clearance of the Fault).
LED 4 Colour: GREEN Label: Healthy
LED 4 indicates that the relay is powered by an auxiliary source at the nominal range.
LED 5 to 8 Colour: RED Label: Aux.1 to 4.
Page 48

P72x/EN FT/C21 User Guide
Page 8/38 MiCOM P721/P723
These LEDs are user programmable and can be set to display information about
instantaneous and time-delayed thresholds as well as the status of the logic inputs. Under
the CONFIGURATION/LED menu of the relay, the user can select the information he wishes
to associate with each LED. He can affect more than one function to one LED. The LED will
then light up when at least one of the associated information is valid (OR gate). The LED is
cleared when all the associated alarms are acknowledged.
1.1.5 Description of the two areas under the top and bottom flaps
1.1.5.1
Relay Identification
Under the upper flap, a label identifies the relay according to its model number (order
number) and its serial number. This information defines the product in a way that is unique.
In all your requests, please make reference to these two numbers.
Under the model and serial number, you will find information about the level of voltage of the
auxiliary supply and the nominal earth current value.
1.1.5.2
Lower flap
Under the lower flap, a RS232 port is available in all MiCOM relays. It can be used either to
download a new version of the application software version into the relay flash memory or to
download/retrieve settings plugging a laptop loaded with MiCOM S1 setting software.
To withdraw more easily the active part of the MiCOM relay (i-e the chassis) from its case,
open and remove the two flaps, then with a 3mm screwdriver, turn the extractor located
under the upper flap, and pull it out of its case pulling the flaps towards you.
1.1.6 The USB/RS232 cable (to power and set the relay) The USB/RS232 cable is able to perform the following functions:
1. It is able to power the relay from its front port. This allows the user to view or modify
data on the relay even when the auxiliary power supply of the relay has failed or when
the relay is not connected to any power supply. The USB port of the PC supplies the
power necessary to energize the relay. This lasts as long as the battery of the PC can
last.
2. It provides an USB / RS 232 interface between the MiCOM relay and the PC. This
allows the user to be able to change the setting of the relay using a PC with its USB
port.
It eases the use of the relay allowing the retrieval of records and disturbance files for
example when the auxiliary supply has failed or is not available.
The associated driver (supplied with the relay) needs to be installed in the PC. For more
information, refer to MiCOM E2 User Guide.
Page 49

User Guide P72x/EN FT/C21
MiCOM P721/P723 Page 9/38
1.2 Menu structure
The relay’s menu is arranged in a tabular structure. Each setting in the menu is referred to
as a cell, and each cell in the menu may be accessed by reference to a row and column
address. The settings are arranged so that each column contains related settings, for
example all of the disturbance recorder settings are contained within the same column. As
shown in the figure, the top row of each column contains the heading that describes the
settings contained within that column. Movement between the columns of the menu can only
be made at the column heading level. A complete list of all of the menu settings is given in
the Menu Content tables (P72x/EH HI section).
Column header
1.3 Password
Column
data
settings
OP
param
Config.
Measur.
MENU STRUCTURE
Comm.
Protections
Autom. Ctrl
Records
P0106ENb
1.3.1 Password protection A password is required for relay settings, especially when changing the various thresholds,
time delays, communication parameters, allocation of inputs and outputs relays.
The password consists of four capital characters. When leaving factory, the password is set
to AAAA. The user can define his own combination of four characters.
Should the password be lost or forgotten, the modification of the stored parameters is
blocked. It is then necessary to contact the manufacturer or his representative and a standby password specific to the relay may be obtained.
The programming mode is indicated with the letter "P" on the right hand side of the display
on each menu heading. The letter "P" remains present as long as the password is active
(5 minutes if there is no action on the keypad).
1.3.2 Password entry The input of the password is requested as soon as a modification of a parameter is made for
any one of the six/eight menus and the submenus. The user enters each one of the 4
characters and then validates the entire password with .
After 5 seconds, the display returns to the point of the preceding menu.
If no key is pressed inside of 5 minutes, the password is deactivated. A new password
request is associated with any subsequent parameter modification.
Page 50

P72x/EN FT/C21 User Guide
Page 10/38 MiCOM P721/P723
1.3.3 Changing the password To change an active password, go to the OP. PARAMETERS menu and then to the
Password submenu. Enter the current password and validate it. Then press and enter the
new password character by character and validate the new password using .
The message NEW PASSWORD OK is displayed to indicate that the new password has
been accepted.
1.3.4 Change of setting invalidation The procedure to modify a setting is described in the following sections of this manual. If there is a need to get back to the old setting push key before validating the setting
change. The following message will then appear on the LCD for a few seconds and the old
setting will remain unchanged.
UPGRADE
CANCEL
1.4 Displays of Alarm & Warning Messages
Alarm messages are displayed directly on the front panel LCD. They have priority over the
default display presenting measured current values. As soon as the relay detects an alarm
condition (crossing of a threshold for example), the associated message is displayed on the
front panel LCD and the LED Alarm (LED 2) lights up.
We distinguish two types of alarm and warning messages:
- Alarm messages generated by the electrical power network.
- Warning messages caused by hardware or software faults from the relay.
1.4.1 Electrical Network Alarms Any crossing of a threshold (instantaneous or time delay) generates an "electrical network
alarm". The involved threshold is indicated. Regarding the phase thresholds, the phase
designation (A, B or C) is also displayed.
If several alarms are triggered, they are all stored in their order of appearance and presented
on the LCD in reverse order of their detection (the most recent alarm first, the oldest alarm
last). Each alarm message is numbered and the total number of alarm messages is
displayed.
The user can read all the alarm messages pressing c.
The user acknowledges and clears the alarm messages from the LCD pressing .
The user can acknowledge each alarm message one by one or all by going to the end of the
list to acknowledge, and clear, all the alarm messages pressing .
The control of the ALARM LED (LED 2) is directly assigned to the status of the alarm
messages stored in the memory.
If one or several messages are NOT READ and NOT ACKNOWLEDGED, the ALARM LED
(LED 2) flashes.
If all the messages have been READ but NOT ACKNOWLEDGED, the ALARM LED (LED 2)
lights up continuously.
If all the messages have been ACKNOWLEDGED, and cleared, if the cause that generated
the alarm disappears, the ALARM LED (LED 2) is extinguished.
Page 51

User Guide P72x/EN FT/C21
MiCOM P721/P723 Page 11/38
The different electrical system alarms are listed below:
Alarm Signification
[95] SUP + phase fault
Phase bus-wire supervision alarm (phase A, B or C).
indication
[95] tSUP + phase fault
indication
[87] DIFF + phase fault
indication
[87] tDIFF + phase fault
indication
Time delayed phase bus-wire supervision alarm (phase A, B
or C). This alarm acknowledges [95] SUP alarm.
Phase segregated high impedance current differential
protection alarm (phase A, B or C).
Phase segregated high impedance current differential
protection alarm (phase A, B or C). This alarm
acknowledges [87] DIFF alarm.
[95N] SUP Earth bus-wire supervision alarm.
[95N] tSUP Time delayed earth bus-wire supervision alarm. This alarm
acknowledges [95N] SUP alarm.
[87N] DIFF Earth high impedance current differential protection alarm
[87N] tDIFF Time delayed earth high impedance current differential
protection alarm. This alarm acknowledges [87N] DIFF
alarm.
[87CZ] check zone Check zone input. This alarm appears after [95] tSUP.
Buswire shorting Buswire shorting information.
tAux 1 / tAux2 / tAux3 /
tAux4
t AUX1, t AUX2, t AUX 3 and t AUX 4 time-out. These alarms
can be inhibited using CONFIGURATION/ALA RMS menu
tEquation A to H t Equation A, B, C, D, E F,G and H
CB Failure (50BF) Circuit breaker failure indication (the CB does not trip on tBF
time. tBF can be set under the AUTOMAT. CTRL/CIRCUIT
BREAKER Fail menu.
Logical output relays
At least one output relay is latched.
latched
Maintenance Mode
The relay is in maintenance mode.
Relay Hardware or Software Warning Messages
Any software or hardware fault internal to MiCOM relay generates a "hardware/software
alarm" that is stored in memory as a "Hardware Alarm". If several hardware alarms are
detected they are all stored in their order of appearance. The warning messages are
presented on the LCD in reverse order of their detection (the most recent first and the oldest
last). Each warning message is numbered and the total stored is shown.
The user can read all warning messages pressing c, without entering the password.
It is not possible to acknowledge and clear warning messages caused by internal relay
hardware or software failure. This message can only be cleared once the cause of the
hardware or software failure has been removed.
The control of the WARNING LED (LED 3) is directly assigned to the status of the warning
messages stored in the memory.
If the internal hardware or software failure is major (i.e. the relay cannot perform protection
functions), the WARNING LED (LED 3) lights up continuously.
− major fault: Protection and automation functions of the equipment are blocked. In this
condition, the protection relay detects the corresponding fault and activates RL0 Watch
Dog relay (35-36 terminals contact is closed).
For instance: the “DEF. ANA” fault (fault in the analog circuit channel) is considered as a
major fault because the protection functions will not operate correctly.
Page 52

P72x/EN FT/C21 User Guide
Page 12/38 MiCOM P721/P723
− minor fault: Protection and automation functions of the relay operate. A minor fault will not
activate RL0 Watch Dog relay (35-36 terminals contact is closed, 36-37 terminals is
open). This fault causes a LED alarm and is displayed on the LCD panel.
The Watch Dog relay controls the correct operation of the protection and automation
function. This relay fault “RL0 relay” is activated if the following functions or checks are
faulty:
− microprocessor operation,
− power supply check,
− reconstituted internal power supply check,
− heating of a circuit board component monitoring,
− analog channel monitoring (acquisition sampling),
− program execution monitoring,
− communication ports monitoring.
If the internal hardware or software failure is minor (like a communication failure that has no
influence on the protection and automation functions), the WARNING LED (LED 3) will flash.
Possible Hardware or Software alarm messages are:
Major fault:
The protection and automation functions are stopped.
The RL0 watchdog relay is de-energised (35-36 contact clo sed).
<< CALIBRATION ERROR.>>: Calibration zone failure
<< CT ERROR >>: Analog channel failure
<< DEFAULT SETTINGS (*) >>
<< SETTING ERROR (**) >>
(*) DEFAULT SETTINGS: Each time the relay is powered ON it will check its memory
contents to determine whether the settings are set to the factory defaults. If the relay detects
that the default settings are loaded an alarm is raised. The ALARM LED (YELLOW) will light
up and the Watch Dog contact will be activated.
Only one parameter in the relay's menu needs to be changed to suppress these messages
and to reset the watch dog. This alarm is only an indication to the user that the relay has its
default settings applied.
(**) SETTING ERROR: Each time the relay is powered ON it will check the coherence of the
setting data. If the relay detects a problem with the settings, a "HARDWARE" ALARM will
appear on the LCD display followed by "SETTING ERROR" message (when pushing on the
button).. The ALARM LED (YELLOW) will light up and the Watch Dog contact will be
activated. To reset this alarm it is necessary to power ON and OFF the relay. Following this,
the last unsuccessful setting change will then need to be re-applied. If the alarm persists, i.e.
the "SETTING ERROR" alarm is still displayed, please contact Schneider Electric Customer
Care Services for advice and assistance.
Minor fault:
The MiCOM relay is fully operational.
The RL0 watchdog relay is energised (35-36 contact open, 36-37 contact closed).
<< COMM.ERROR >>: Communication failure
<< CLOCK ERROR >>: Time tag failure
<< STATS RESET >>: Statistical data recorded (like CB supervision statistics (Number of CB
opening, etc) have been reset.
Page 53

User Guide P72x/EN FT/C21
MiCOM P721/P723 Page 13/38
2. MENUS
The menu of MiCOM P721 and P723 relays is divided into main menus and submenus. The
available content depends on the model of the relay.
2.1 Default display
By default, the LCD displays the current value measured (selected phase or earth). As soon
as an alarm is detected by the relay, that information is considered as more important and
the alarm message is then displayed instead of the default value.
2.2 Menu contents description
The menu of MiCOM P72x relays is divided into eight main sections. To access these menus
from the default display press . To return to the default display from these menus or sub-
menus press .
DEFAULT
DISPLAY
OP PARAMETERS
CONFIGURATION
MEASUREMENTS
COMMUNICATION
PROTECTION G1
PROTECTION G2
AUTOMAT. CTRL
RECORDS
FIGURE 2: ORGANIZATION OF MiCOM P72X MAIN MENU
NOTE: The content of the menu is presented in the document P72x/EN HI.
This table helps the user to navigate through the different menus and
submenus.
For MiCOM P72x range, while navigating between submenu points,
the user can press the key to go back to the corresponding head
menu.
Using MiCOM S1 Studio, the menu is displayed with a tree structure. A click on the “+” sign
(or a double click on the menu title) opens the corresponding submenu.
The second column displays the corresponding value for each parameter.
Page 54

P72x/EN FT/C21 User Guide
Page 14/38 MiCOM P721/P723
2.3 OP PARAMETERS Menu
On the P72x front panel, press to access the menu OP PARAMETERS from the default
display.
OP PARAMETERS
Password
* * * *
Password
AAAA
Heading of the OP PARAMETERS menu
Press to access the menu content.
Password entry. This password is required when
modifying relay settings and parameters (see §
1.3).
To enter a password, enter it letter by letter using
to go up or down in the alphabet.
After each letter, press to enter the following letter. At
the end, press to validate the password. If the
password is correct, the message « PASSWORD OK »
is displayed on the screen.
NOTE: The password is initially set in factory to AAAA.
WARNING: NO SETTING CHANGES DONE EITHER LOCALLY (THROUGH RS232)
OR REMOTELY (THROUGH RS485) WILL BE ALLOWED DURING THE 5
FIRST MINUTES FOLLOWING A CHANGE OF PASSWORD.
Language
ENGLISH
Indicates the default language used by the device.
Possible choices are English, French, German, Spanish,
Italian and Portuguese languages.
Description
Indicates the type of relay.
Pxxx
Reference
MiCOM
Displays the reference that lists the equipment
associated with the relay.
Software version
Displays the version of the software
XX
Frequency
50 Hz
Active Group
1
Input 54321
Status 10110
Nominal value of the network frequency. Select either 50
or 60Hz.
Displays the active protection and automation group.
This value can be either 1 or 2.
Displays the status of the logic Inputs
Logic Inputs are numbered from 1 to 5 for P723, 1 to 2
for P721.
When the status of one input is:
- state 0: it means that the input is de-energised,
- state 1: it means that the input is energised.
Relay 87654321
Status 01011101
Displays the status of the logic outputs.
Logic Outputs are numbered from 1 to 8 for P723 and 1
to 4 for P721.
When The state of each output is:
- state 0: it means that the output relay is activated,
- state 1: it means that the output relay is not activated.
To activate an unlatching operation, the password is
requested.
NOTE: The Watch-dog output (RL0) is not displayed in
the output status menu.
Date
Displays the date (12/08/09 = 12 August 2009).
12/08/09
Time
Displays the time (13:57:44 = 1:57:44 pm).
13:57:44
Page 55

User Guide P72x/EN FT/C21
MiCOM P721/P723 Page 15/38
Product code
Displays the product code.
P723xxxxxxxxx
Serial number
XXXXXXXX
2.4 CONFIGURATION menu
Under this menu, the different submenus are:
CONFIGUR-
ATION
Connection
Led 8
Output
relays
led 5
Group select
Press to access the CONFIGURATION menu from the default display, then until the
desired submenu header is displayed.
2.4.1 Submenu CONFIGURATION
Displays the serial number
Led 6
Alarms
Led 7
Inputs
2.4.1.1
CONFIGURATION
Heading of the CONFIGURATION menu.
Connection
Protection line select.
EARTH
Heading of the Connection submenu. This submenu is
used to select and configure earth or phase protection,
P723 only.
This menu is used to select the configuration of the
protection (phase or earth supervision).
Protection choices: Earth or Phase.
Input selection
Current
The input selection menu is used to select Voltage unit
instead of Current.
Possible choices: Voltage or Current.
Submenu Configuration with Earth protection selected
E/Gnd Text
N
Choose a label (displayed with the associated values) for
E/Gnd.
Possible choices are N, E, or G.
Stabiliz Resist. N
30 Ω
This stabilizing resistor N (E or G) value is displayed only
if the analogue input mode is the Voltage mode.
It is used to set the resistor value of the P79x resistor
inserted in the outside input circuit of the protection.
Setting choice: 30Ω to 4000Ω, accuracy 0.1Ω.
The value is settable digit by digit, using or keys
to change the value, and or key to modify an other
digit.
E/Gnd CT Primary
1000 A
Choose the rated primary current of the earth CT.
Setting range: from 1 to 9999 – step 1.0000
Page 56

P72x/EN FT/C21 User Guide
Page 16/38 MiCOM P721/P723
E/Gnd CT sec
1 A
Choose the rated secondary current of the earth CT.
Setting value: 1 or 5.
2.4.1.2
Submenu Configuration with Phase selected (P723 only)
Phases Text
L1, L2, L3
Choose a label (displayed with the associated
measurement value) for the 3 phases.
Possible choices are “L1, L2, L3”, “A, B, C” or “R, S, T”.
The values are modified after entering the password.
Stabiliz Resist. L1
30 Ω
This stabilizing resistor L1 (A or R) value is displayed
only if the analogue input mode is the Voltage mode.
It is used to set the resistor value of the P79x resistor
inserted in the outside input circuit of the protection
(phase L1).
Setting choice: 30Ω to 4000Ω, accuracy 0.1Ω.
The value is settable digit by digit, using or keys
to change the value, and or key to modify an other
digit.
Stabiliz Resist. L2
As above for phase L2 (or B or S).
30 Ω
Stabiliz Resist. L3
As above for phase L2 (or C or T).
30 Ω
Line CT Primary
1000 A
Choose the rated primary current of the CT.
Setting range: from 1 to 9999 – step 1.0000
Line CT sec
1 A
2.4.2 Submenus LED 5 to 8 The LED 5 to LED 8 configuration submenu is used to assignate to a LED a protection
function (the LED lights up when the protection function is active).
The following table lists the protection functions that can be assigned to the LEDs (5 to 8) for
each model of relay.
Function P721 P723 Information
[87] Diff
[87N] Diff
[87] tDiff
[87N] tDiff
[87CZ] Check zone
[95] Sup
Choose the rated secondary current of the CT.
Setting value: 1 or 5.
X Phase differential protection threshold
X X Earth differential protection threshold
X Time delayed phase differential protection
threshold
X X Time delayed earth differential protection
threshold
X Check Zone status
X Phase high impedance differential threshold
(buswire supervision)
[95N] Sup
[95] tSup
[95N] tSup
X Earth high impedance differential threshold
(buswire supervision)
X Time delayed phase high impedance differential
threshold (buswire supervision)
X X Time delayed earth high impedance differential
threshold (buswire supervision)
Page 57

User Guide P72x/EN FT/C21
MiCOM P721/P723 Page 17/38
Function P721 P723 Information
[95A] tSupA
[95B] tSupB
[95C] tSupC
Input 1
Input 2
Input 3
Input 4
Input 5
tAux 1
tAux 2
tAux 3
tAux 4
tEqu.A
tEqu.B
tEqu.C
tEqu.D
tEqu.E
tEqu.F
tEqu.G
tEqu.H
X Time delayed phase A (or L1, or R) high
impedance differential threshold (buswire
supervision)
X As above for phase B (or L2 or S)
X As above for phase C (or L3 or T)
X X Copy of the status of the Logic Input n°1
(“automat ctrl/inputs” menu)
X X Copy of the status of the Logic Input n°2
X Copy of the status of the Logic Input n°3
X Copy of the status of the Logic Input n°4
X Copy of the status of the Logic Input n°5
X X Copy of Aux1 Logic Input delayed by Aux1 time
time (Aux1 logic input and aux1 time are set with
“automat ctrl/inputs” menu)
X X Copy of Aux2 Logic Input delayed by Aux2 time
X Copy of Aux3 Logic Input delayed by Aux3 time
X Copy of Aux4 Logic Input delayed by Aux4 time
X X Time delayed logical output of Equation A.
X X Time delayed logical output of Equation B.
X X Time delayed logical output of Equation C.
X X Time delayed logical output of Equation D.
X X Time delayed logical output of Equation E.
X X Time delayed logical output of Equation F.
X X Time delayed logical output of Equation G.
X X Time delayed logical output of Equation H.
NOTES: ⇒ Each parameter can be assigned to one or more LED's.
⇒ One or more parameters (OR logic) can provocate each LED to
light up.
MiCOM S1 Studio setting:
The LED 5 (6, 7 or 8) submenu contains up to 3 lines parameter settings. In the value
column, each line represents a setting value. State “1” means that the corresponding
parameter is associated to the LED.
The corresponding parameters are displayed in the setting panel: from 00 (last digit) up to
1E (first digit).
Page 58

P72x/EN FT/C21 User Guide
Page 18/38 MiCOM P721/P723
P72x Front panel setting:
Press to access the LED 5 CONFIGURATION submenu, then twice (press to access
to others LEDs CONFIGURATION submenus).
Select “Yes” to assignate a LED to a function.
CONFIGURATION
Led 5
Led 5
Function No
2.4.3 Submenu GROUP SELECT The submenu “GROUP SELECT” is used to select the active protection group
CONFIGURATION
Group Select
Change Group
Input = INPUT
Heading LED 5 submenu.
Activate (select choice “Yes” or inhibit (“No”) LED 5
operation when:
- an alarm is exceeded,
- a threshold time delay has elapsed.
Refer to previous tables for protection functions list.
Heading of the “GROUP SELECT” sub-menu.
Setting choice : MENU or INPUT
MENU is used to change settings group via HMI and/or
RS485 port.
If MENU is selected, the following menu is displayed:
Setting Group
1
2.4.4 Submenu ALARMS
CONFIGURATION
Alarms
Inst. Self-reset ?
No
Reset led on
fault ? No
Alarm tAux1
inhib No
Select active setting protection group 1 or 2.
Heading of the Alarms submenu.
Setting choices: Yes or No.
Setting choice Yes: the alarms that are instantaneous
will be self reset when they come back to a normal value
(below the threshold).
Setting choice No: the alarms that are instantaneous will
be need to be acknowledged by the user to be reset.
Yes: the LED associated with an old alarm will be
automatically reset when a new fault occurs. This is
done to avoid a display of numerous alarms that are not
active any more.
No: the appearance of a new fault will not automatically
reset LEDs associated with an old fault.
Yes: auxiliary timer 1 output will not raise an alarm.
Alarm LED stays OFF, no message will be displayed on
the HMI.
No: auxiliary timer 1 will raise an alarm.
Alarm tAux2
As above with timer 2.
inhib No
Page 59

User Guide P72x/EN FT/C21
MiCOM P721/P723 Page 19/38
Alarm tAux3
As above with timer 3 (P723 only)
inhib No
Alarm tAux4
inhib No
Alarm tAux5
inhib No
2.4.5 Submenu INPUTS A digital input can be configured to be activated either on low level or on high level. Low level
(or high level) depends of the application of the digital inputs.
The user has to set under the Menu CONFIGURATION the auxiliary voltage (AC or DC) for
the digital inputs. This setting is necessary because of the time filtering which is different in
DC and AC. The inversion of the logic input in this menu inverts its allocated function status
in the logic inputs allocation (AUTOMAT CTRL/INPUTS menu). For example: if EL 2 logic
input is 1, then tAux1 = 0 when logic input is 1 and tAux1 = 1 when logic input is 0.
CONFIGURATION
Inputs
Inputs 5 4 3 2 1
1 0 1 1 0
As above with timer 4.(P723 only)
As above with timer 5 (P723 only).
Heading of the CONFIGURATION INPUTS submenu.
P721 (2 inputs) and P723 (5 inputs).
This menu is used to assign active high or low
functionality to each logic input.
0 = active low, 1 = active high
Voltage input
DC
2.4.6 Submenu OUTPUT RELAYS
CONFIGURATION
Output Relays
Fail Safe R. 87654321
0000000
Maintenance Mode
No
Relays CMD 8765W4321
000000000
Setting choice: AC or DC power supply for the digital
input. The power supply for any input is the same as the
power supply of the relay.
Heading of the CONFIGURATION RELAYS
MAINTENANCE submenu.
P721 (4 relays), P723 (8 relays).
This menu allows the user to invert each of the output
relay contacts for the de-energised state.
1 = relay activated when driving signal is not active
0 = relay not activated when driving signal is not active
Choose if you want to activate the MAINTENANCE
MODE of the relay. If Yes is selected, output relays are
disconnected from the protection and automation
functions.
P721 (4 relays + watchdog) and P723 (8 relays +
watchdog).
If the MAINTENANCE MODE is activated (set to Yes),
this menu allows the user to activate each one of the
output relay (from RL1 to RL8, W = Watchdog)
1 = relay activated
0 = relay not activated
Page 60

P72x/EN FT/C21 User Guide
Page 20/38 MiCOM P721/P723
2.5 MEASUREMENTS Menu
Under the MEASUREMENTS menu, the user can read the various measurement values.
To access the MEASUREMENTS menu from the default display, press then 2 times.
MEASUREMENTS
Heading of the MEASUREMENTS menu.
2.5.1 If Earth protection is selected
INdiff=
0.00A
Frequency
9.99Hz
Max & Average I
RST = [C]
Displays the average earth differential current value C (True
RMS value):
Displays the network frequency calculated from phase
currents.
Allows the user to clear the maximum (peak) and average
(rolling) memorised values of the current.
Press to clear these values (password required).
Indiff Maximum
0.00A
Displays the maximum earth differential current value (True
RMS value).
2.5.2 If Phase protection is selected (P723 only)
Idiff= 0.00A
0.00A 0.00A
Displays the differential current values for phases A, B and C
(or L1, L2, L3, or R, S, T) (True RMS value) as follows:
Phase A
Phase B Phase C
Frequency
9.99Hz
Max & Average I
RST = [C]
Displays the network frequency calculated from earth
currents
Allows the user to clear the maximum (peak) and average
(rolling) memorised values of the current.
Press to clear these values (password required).
Idiff M 0.00A
0.00A 0.00A
Displays the peak differential current value for phases A, B
and C.
This value is the True RMS maximum value.
Page 61

User Guide P72x/EN FT/C21
MiCOM P721/P723 Page 21/38
2.6 COMMUNICATION Menu
The COMMUNICATION menu content depends on the communication protocol of the relay.
Three protocols are available: MODBUS, IEC 60870-5-103 and DNP3.0.
To access the MEASUREMENTS menu from the default display, press then until the
menu is reached.
WARNING: A MODBUS NETWORK IS LIMITED TO 31 RELAY + 1 RELAY MASTER
ADDRESSES ON THE SAME MODBUS SUB-LAN.
COMMUNICATION
Heading of the COMMUNICATION menu.
Communication ?
Yes
Rear Comm.
Address 1
Activates IEC 60870-5-103 communication via the
RS485 port on the rear terminals of the relay.
This cell sets the unique address for the rear
communication port such that only one relay is accessed
by master station software.
Select from 1 to 255.
Baud Rate
9600 bd
This cell controls the communication speed between
relay and master station.
It is important that both relay and master station are set
at the same speed setting.
Select from: 300, 600, 1200, 2400, 4800, 9600, 19200 or
38400 bd.
Parity
None
Data Bits
8
Stop Bits
1
Spont. Event
Enabl. All
Choose the parity in the IEC data frame.
Select parity: “Even”, “Odd” or “None”.
Choose the number of data bits in the IEC data frame.
Select stop bit: 8 or 7.
Choose the number of stop bits in the IEC data frame.
Select stop bit: 0 or 1.
IEC 60870-5-103 communication only
The events created by the relay have two formats (see
P72x/EN CT chapter):
- public range, using IEC protocol,
- private range, using private number format.
This command activates or deactivates private and
public format transmission of the events to the master
station
Possible choice: Enabl. All – Enabl. IEC. only – Enabl.
none
Command Blocking
No
IEC 60870-5-103 communication only
Allows or blocks remote commands.
Setting choice: Yes – No
Signal Blocking
No
IEC 60870-5-103 communication only
Activates or deactivates signal transmission from relay to
the master station.
Setting choice: Yes – No
Page 62

P72x/EN FT/C21 User Guide
Page 22/38 MiCOM P721/P723
Measure Enabling
Asdu 3.4&9
IEC 60870-5-103 communication only
Selects the measures transmission filtering mode.
ASDU 3.4 option allows communication of earth current
measures (IN) to the master station.
ASDU 9 option allows communication to the master
station of:
- phase current measures (IA, IB and IC),
- frequency measures.
Setting Choice: ASDU 3.4&9 – ASDU 3.4 – ASDU 9 or
none
Front Comm.
Address 29
Date format
Private
2.7 PROTECTION Menu
The protection menu is divided into two groups: PROTECTION G1 for the first setting group
and PROTECTION G2 for the second setting group.
To access the PROTECTION menu from the default display, press then until the menu
is reached.
The different submenus are:
PROTECTION
Earth Protection Phase protection (P723 only)
G1 / G2
[87N] Earth
diff protection
This cell sets the unique address for the relay such that
only one relay is accessed by master station software.
Select an address from 1 to 255 for Modbus front port
communication.
Choose the format of the date, either PRIVATE for
private protocol or IEC protocol for public protocol for the
front port Modbus communication.
PROTECTION
G1 / G2
[95N] earth
bus-wire
supervision
[87] phase diff
protection
[95] phase
bus-wire
supervision
2.7.1 Earth protection configuration
2.7.1.1
Submenu [87N] Earth differential protection
PROTECTION G1
[87N] Earth diff protection
[87N] Earth diff
prot? No
[87N] Threshold
I diff= 1 In
[87N] Threshold
V diff= 200.0V
Heading of the earth differential current protection
submenu (“[87N] Earth diff protection”).
Setting choice: Yes or No
Yes: the [87N] Earth differential current protection is
enabled. The following menus are displayed.
No: the [87N] Earth differential current protection is not
enabled, and no menu is displayed.
This menu is displayed when current input selection is
configured.
It sets the value for the earth current differential
threshold, from 0.01In up to 1In (step 0.01In)
This menu is displayed when voltage input selection is
configured.
it sets the value for the earth voltage differential
threshold, from 0.5V to 200V (step 0.1V)
Page 63

User Guide P72x/EN FT/C21
MiCOM P721/P723 Page 23/38
PROTECTION G1
2.7.1.2
[87N] Flt Timer
t Diff 0s
The fault timer tDiff sets the time delayed earth
differential protection threshold. The setting range is
from 0s to 2s (step 10ms).
[87N] Rst Timer
tReset= 0s
[87N] Measure
Filter Sample
The Reset timer menu sets the reset time, from 0 to
600s (step 10ms)
The measurement filter is used to select sample mode,
fast sample mode or Fourier mode for threshold
detection.
Setting choice: sample mode, fast sample mode or
Fourier mode.
Submenu [95N] Earth bus-wire supervision
PROTECTION G1
[95N] Earth bus-wire
supervision
Heading of the earth high impedance differential current
buswire supervision submenu (“[87N] Earth diff
protection”).
[95N] Earth bus-wire
sup? No
Setting choice: Yes or No
Yes: the [95N] Earth high impedance differential buswire
supervision is enabled. The following menus are
displayed.
No: the [95N] Earth high impedance differential
protection is not enabled, and no menu is displayed.
[95N] Threshold
I Sup= 1 In
[95N] Threshold
V Sup= 200.0V
[95N] Flt Timer
t Sup 0s
[95N] Rst Timer
tReset= 0s
[95N] Measure
Filter Sample
This menu is displayed when current input selection is
configured.
It sets the value for the earth current high impedance
differential threshold, from 0.01In up to 1In (step 0.01In)
This menu is displayed when voltage input selection is
configured.
it sets the value for the earth voltage high impedance
differential threshold, from 0.5V to 200V (step 0.1V)
The fault timer tSup sets the time delay for the earth high
impedance differential threshold. The setting range is
from 0.5s to 3s (step 10ms).
The Reset timer menu sets the reset time, from 0 to
600s (step 10ms)
The measurement filter is used to select sample mode,
fast sample mode or Fourier mode for threshold
detection.
Setting choice: sample, fast sample or Fourier mode.
Page 64

P72x/EN FT/C21 User Guide
Page 24/38 MiCOM P721/P723
2.7.2 Phase protection configuration
2.7.2.1
Submenu [87] Phase differential protection (P723 only)
PROTECTION G1
[87] Phase diff protection
[87] Phase diff
prot? No
Heading of the phase differential current protection
submenu (“[87] Phase diff protection”).
Setting choice: Yes or No
Yes: the [87] Phase differential current protection is
enabled. The following menus are displayed.
No: the [87] Phase differential current protection is not
enabled, and no menu is displayed.
[87] Threshold
I diff= 1 In
This menu is displayed when current input selection is
configured.
It sets the value for the phase current differential
threshold, from 0.02In up to 2In (step 0.01In)
[87] Threshold
V diff= 200.0V
This menu is displayed when voltage input selection is
configured.
it sets the value for the phase voltage differential
threshold, from 1V to 400V (step 0.1V)
[87] Flt Timer
t Diff 0s
The fault timer tDiff sets the time delayed phase
differential protection threshold. The setting range is
from 0s to 2s (step 10ms).
2.7.2.2
[87] Check Zone?
No
Setting choice: Yes or No
Yes: the check zone trip permission (logic input) is
enabled,
No: the check zone is disabled.
[87] Rst Timer
tReset= 0s
[87] Measure
Filter Sample
The Reset timer menu sets the reset time, from 0 to
600s (step 10ms)
The measurement filter is used to select sample mode,
fast sample mode or Fourier mode for threshold
detection.
Setting choice: sample, fast sample or Fourier mode.
Submenu [95] Phase bus-wire supervision (P723 only)
PROTECTION G1
[95] Phase bus-wire
supervision
[95] Phase bus-wire
sup? No
Heading of the phase high impedance differential current
supervision submenu (“[87N] Phase diff protection”).
Setting choice: Yes or No
Yes: the [95] Phase high impedance differential
protection is enabled. The following menus are
displayed.
No: the [95] Phase high impedance differential protection
is not enabled, and no menu is displayed.
[95] Threshold
I Sup= 1 In
[95] Threshold
V Sup= 400.0V
This menu is displayed when current input selection is
configured.
It sets the value for the phase current high impedance
differential threshold, from 0.02In up to 2In (step 0.01In)
This menu is displayed when voltage input selection is
configured.
it sets the value for the phase voltage high impedance
differential threshold, from 1V to 400V (step 0.1V)
Page 65

User Guide P72x/EN FT/C21
MiCOM P721/P723 Page 25/38
PROTECTION G1
[95] Phase bus-wire
supervision
[95] Flt Timer
t Sup 0s
[95] Rst Timer
tReset= 0s
[95] Measure
Filter Sample
2.8 AUTOMAT. CTRL Menu
Under the AUTOMAT. CTRL Menu, the user can program the different automation functions
available in the MiCOM P721 and P723.
The different submenus are:
AUTOMAT.
CTRL
Trip
Commands
Latch
Functions
Heading of the phase high impedance differential current
supervision submenu (“[87N] Phase diff protection”).
The fault timer tSup sets the time delay for the phase
high impedance differential threshold. The setting range
is from 0s to 3s (step 10ms).
The Reset timer menu sets the reset time, from 0 to
600s (step 10ms)
The measurement filter is used to select sample mode,
fast sample mode or Fourier mode for threshold
detection.
Setting choice: sample, fast sample or Fourier mode.
Blocking
logic 1/2
Output
relays
Latch output
Relays
To access the AUTOMAT. CTRL Menu, press then until the menu is reached.
2.8.1 Submenu Trip Commands This submenu makes it possible to assign some or all the selected following thresholds to
the trip output relay.
Function P721 P723 INFORMATION and COMMENTS
Trip [87] tDiff X Time delayed phase differential protection threshold
Trip [87N] tDiff X X Time delayed earth differential protection threshold
Trip tAux 1 X X Time delayed auxiliary input Aux 1.
Trip tAux 2 X X Time delayed auxiliary input Aux 2.
Trip tAux 3 X X Time delayed auxiliary input Aux 3.
Trip tAux 4 X Time delayed auxiliary input Aux 4.
Control Trip X Control Trip function to the trip output relay RL1.
Trip Equ A X X Logical output of Boolean Equation A.
Trip Equ B X X Logical output of Boolean Equation B.
Inputs
Circuit
Breaker Fail
Logic
Equations
Trip Equ C X X Logical output of Boolean Equation C.
Trip Equ D X X Logical output of Boolean Equation D.
Trip Equ E X X Logical output of Boolean Equation E.
Trip Equ F X X Logical output of Boolean Equation F.
Page 66

P72x/EN FT/C21 User Guide
Page 26/38 MiCOM P721/P723
Function P721 P723 INFORMATION and COMMENTS
Trip Equ G X X Logical output of Boolean Equation G.
Trip Equ H X X Logical output of Boolean Equation H.
AUTOMAT. CTRL
Heading of the AUTOMAT.CTRL
Trip Commands
Heading of the Trip ORDER sub-menu.
Function
Yes / No
Setting choice Yes: Assign the corresponding function to
the trip output relay RL1. Then the trip output relay (RL1)
will be activated at the end of the corresponding time
delay.
Setting choice No: the trip output relay (RL1) will not be
activated.
Refer to previous table for protection functions list.
2.8.2 Submenu Latch of trip output relay by Function With this submenu, the user can program the trip output relay associated with one or many
thresholds so that it stays latched after the cause for activating these functions has
disappeared.
Function P721 P723 INFORMATION and COMMENTS
Latch [87N] tDiff X X Time delayed earth differential protection threshold
Latch [87] tDiff X Time delayed phase differential protection threshold
Latch t Aux 1 X X Aux1 delayed by Aux1 time
Latch t Aux 2 X X Aux2 delayed by Aux2 time
Latch t Aux 3 X Aux3 delayed by Aux 3 time
Latch t Aux 4 X Aux4 delayed by Aux 4 time
Latch Control Trip X X Control Trip function to the trip output relay RL1.
Latch tEqu.A X X Time delayed logical output of Equation A.
Latch tEqu.B X X Time delayed logical output of Equation B.
Latch tEqu.C X X Time delayed logical output of Equation C.
Latch tEqu.D X X Time delayed logical output of Equation D.
Latch tEqu.E X X Time delayed logical output of Equation E.
Latch tEqu.F X X Time delayed logical output of Equation F.
Latch tEqu.G X X Time delayed logical output of Equation G.
Latch tEqu.H X X Time delayed logical output of Equation H.
Page 67

User Guide P72x/EN FT/C21
MiCOM P721/P723 Page 27/38
AUTOMAT. CTRL
Heading of the AUTOMAT. CTRL menu.
Latch Functions
Function
Yes
2.8.3 Submenu Blocking Logic 1 / 2 Through the Blocking Logic submenu, the user can block each delayed threshold using a " Start
Block Logic 1 or 2" input (refer to Inputs menu). MiCOM P72x relays have the submenu
Blocking Logic 1 and Blocking Logic 2 available for setting.
It is possible to enable or disable the “blocking” of most protection functions even if a logic
input has been assigned to that function.
Function P721 P723 INFORMATION and COMMENTS
Block [87N] tDiff X X Time delayed earth differential protection threshold
Block [87] tDiff X Time delayed phase differential protection threshold
Heading of the submenu.
Setting choice Yes: Latch the trip output relay associated
with the corresponding protection function. The relay will
be remain latched after the fault has disappeared.
Setting choice No: The trip output relay will be active
when the relevant command is active. The relay will not
be active if the relevant command is reset.
Refer to previous table for protection functions list and
comments.
Block tAux 1 X X Aux1 Logic Input delayed by Aux1 time
Block tAux 2 X X Aux2 Logic Input delayed by Aux2 time
Block tAux 3 X Aux3 Logic Input delayed b y Aux3 time
Block tAux 4 X Aux4 Logic Input delayed b y Aux4 time
AUTOMAT. CTRL
Blocking Logic 1 / 2
Block Function
No
2.8.4 Outputs Relays submenu This submenu makes it possible to assign various alarm and trip thresholds (instantaneous
and/or time delay) to a logic output. Excepted from this option are the Watchdog (RL0) and
the Tripping (RL1) outputs (refer to Trip Commands submenu).
The total number of programmable logic outputs for the three relay models is listed in the
table:
Heading of the Blocking Logic 1 or 2 submenu.
Enables or disables blocking logic of the function on the
level (logic state =1) of logic input “St art Block Lo gic 1 or 2”
Refer to previous table for protection functions list.
Model P721 P723
Output relays 3 7
RL2 relay is a change over relay. The others RL3 to RL8 are normally open relays.
Page 68

P72x/EN FT/C21 User Guide
Page 28/38 MiCOM P721/P723
The following protection functions can be assigned to output relays using this submenu.
Function P721 P723 INFORMATION and COMMENTS
[87N] Diff X X Earth differential protection threshold
[87N] tDiff X X Time delayed earth differential protection threshold
[87] Diff X Phase differential protection threshold
[87] tDiff X Time delayed phase differential protection threshold
[87CZ] ChkZone X Check Zone status
[95N] Sup X X Earth high impedance differential threshold (buswire
supervision)
[95N] tSup X X Time delayed phase high impedance differential threshold
(buswire supervision)
[95] Sup X Phase high impedance differential threshold (buswire
supervision)
[95] tSup X Time delayed phase high impedance differential threshold
(buswire supervision)
Buswire Short X X Buswires is short-circuited (power protection)
[95A] tSup A X Time delayed phase A (or L1, or R) high impedance
differential threshold (buswire supervision)
[95B] tSup B X As above for phase B (or L2 or S)
[95C] tSup C X As above for phase C (or L3 or T)
CB Fail X X Circuit Breaker does not operate.
t Aux 1 X X Aux1 auxiliary input delayed by tAux1 time.
t Aux 2 X X Aux2 auxiliary input delayed by tAux2 time.
t Aux 3 X Aux3 auxiliary input delayed by tAux3 time.
t Aux 4 X Aux4 auxiliary input delayed by tAux4 time.
Active group X X Group 2 is active (setting)
Control trip X X Control Trip function to the trip output relay RL1.
Input1 X X Opto input 1 energized.
Input2 X X Opto input 2 energized.
Input3 X Opto input 3 energized.
Input4 X Opto input 4 energized.
Input5 X Opto input 5 energized.
tEqu. A X X Logic output of Boolean Equation A.
tEqu. B X X Logic output of Boolean Equation B.
tEqu. C X X Logic output of Boolean Equation C.
tEqu D X X Logic output of Boolean Equation D.
tEqu E X X Logic output of Boolean Equation E.
tEqu. F X X Logic output of Boolean Equation F.
tEqu. G X X Logic output of Boolean Equation G.
tEqu. H X X Logic output of Boolean Equation H.
Page 69

User Guide P72x/EN FT/C21
MiCOM P721/P723 Page 29/38
AUTOMAT. CTRL
Output Relays
Heading of the Output Relays submenu.
Function 8765432
1100010
Assigning the corresponding protection function to the
output relays; i.e. to output 3 (RL3)
Setting choice: 1 assigns the output relay; 0 no
assignement
Function 432
Submenu for P721.
010
2.8.5 Latch of the auxiliary output relays (RL2 to RL8) With the following menu the user can set each output relay as latched or not latched. A “0” assigned to an output relay means that the relay is not latched. The output relay will be
active when the relevant command will be active; the relay will not be active when the
relevant command will reset.
A “1” setting assigned to an output relay means that the relay is latched. The output relay will
be active when the relevant command will be active; the relay will remain active, if the
relevant command will reset.
The active latched output relays can be reset by a logic input assigned to this function.
Further, the active latched output relays can be reset from the front panel by pushing .
This action is available if the window status Output Relays in OP. PARAMETERS submenu
is displayed.
The alarm string “Latched Relays” appears on LCD and the yellow LED is lighted.
AUTOMAT. CTRL
Latch Output
Relays
Latch 8765432
Relays 0100100
Latch 432
Relays 000
2.8.6 Inputs submenu This submenu makes it possible to assign a single function or multiple automation functions
to each logic input. The following functions are available for mapping to a logic input:
Label P721 P723 Function
Unlatch X X Unlocks latched output relays
Heading of the Latch Output Relays submenu.
In this example, the output relays set to Latch function
are number 4 and 7 (RL4 & RL7).
Submenu for P721.
Aux 1 X X Assign external information to input Aux1
Aux 2 X X Assign external information to input Aux2
Aux 3 X Assign the input the external information Aux 3
Aux 4 X Assign the input the external information Aux 4
Block Logic 2 X X Blocking logic 2
Start Disturb X X Starting of the disturbance recording function
Page 70

P72x/EN FT/C21 User Guide
Page 30/38 MiCOM P721/P723
Label P721 P723 Function
Start Block
X X Blocking logic 1
Logic 1
Start Block
X X Blocking logic 2
Logic 2
Change
setting
X X Change of setting group (default setting group
1)
Reset Leds X X Reset of the "Trip" & "Alarm" leds
Maint. Mode X X Maintenance Mode ON/OFF change
Local Mode X X Local mode condition (if activated,any remote
command to the output relays is forbidden)
Synchro X X Assign a Time synchronisation input
[87CZ] Chk
X Check Zone
Zone
AUTOMAT.
CTRL
Inputs
Input 1
…
Input 2
P721: 2 inputs
P723: 5 inputs
...
Input 5
2.8.6.1
Aux1 Time
Aux4 Time
Function assignement to a logic input
AUTOMAT. CTRL
Inputs
Heading of the Inputs sub-menu.
Input 1 / 2 /3 /4 / 5
[87N] Diff
Aux1 Time
t Aux1 10s
Aux2 Time
Assigning label [87N] Diff to logic input 1, 2, 3, 4 or 5
See the previous table for input choices.
Displays setting value of timer assigned to logic input
Aux1, from 0ms to 200s (steps of 10ms).
As above for Aux2.
t Aux2 10s
Aux3 Time
t Aux3 10s
P723 only
As above for Aux3.
...
Aux4 Time
t Aux4 10s
P723 only
As above for Aux4.
Page 71

User Guide P72x/EN FT/C21
MiCOM P721/P723 Page 31/38
2.8.7 CIRCUIT BREAKER FAILURE submenu With the CB Fail submenu, circuit breaker failure can be detected and associated
parameters can be set.
AUTOMAT. CTRL
CB Fail
CB Fail ?
Yes
I Diff < =
0.1 In
V Diff < =
5V
CB Fail Time
tBF 40 ms
2.8.8 Submenu Logic Equations
2.8.8.1
Parameters
With the Logic Equations submenu, it is possible to form complex Boolean functions using
NOT, AND and OR operators (indicated from highest to lowest priority). Up to 16 operands
can be used in any single equation. The following logic signals are available for mapping to
an equation:
Heading of the CB Fail submenu.
Selection of the circuit breaker failure function.
If Yes is selected, the following menu is displayed:
If No is selected, the CB Fail function is inactive.
Selection of the undercurrent differential protection
threshold associated to the CB failure detection function,
from 0.01In to 1In (step 0.01In).
P723 with voltage input selection only.
Selection of the undercurrent differential protection
threshold associated to the CB failure detection function,
from 0.5V to 200V (step 100mV).
Selection of the circuit breaker failure time delay from
10ms to 10s (step 10ms).
Function P721 P723 Information
Null
Not Null
[87] Diff
[87N] Diff
[87] tDiff
X X the condition is null (low level)
X X the condition is not null (high level
X Phase differential protection threshold
X X Earth differential protection threshold
X Time delayed phase differential protection
threshold
[87N] tDiff
[87CZ] Check
X X Time delayed earth differential protection threshold
X Check Zone status
zone
[95] Sup
X Phase high impedance differential threshold
(buswire supervision)
[95N] Sup
X Earth high impedance differential threshold
(buswire supervision)
[95] tSup
X Time delayed phase high impedance differential
threshold (buswire supervision)
[95N] tSup
X X Time delayed earth high impedance differential
threshold (buswire supervision)
[95A] tSupA
X Time delayed phase A (or L1, or R) high
impedance differential threshold (buswire
supervision)
[95B] tSupB
X As above for phase B (or L2 or S)
Page 72

P72x/EN FT/C21 User Guide
Page 32/38 MiCOM P721/P723
Function P721 P723 Information
2.8.8.2
[95C] tSupC
Buswire Short
tAux 1
tAux 2
tAux 3
tAux 4
tAux 5
Input 1
Input 2
Input 3
Input 4
Input 5
Group 2
CB Fail
X As above for phase C (or L3 or T)
X Buswires short-circuited
X X Copy of the status of the Logic Input tAux 1
X X Copy of the status of the Logic Input tAux 2
X Copy of the status of the Logic Input tAux 3
X Copy of the status of the Logic Input tAux 4
X Copy of the status of the Logic Input tAux 5
X X Instantaneous digital input 1
X X Instantaneous digital input 2
X Instantaneous digital input 3
X Instantaneous digital input 4
X Instantaneous digital input 5
X X Group 2 is active (setting)
X X Circuit Breaker does not operate
Interface
The Logic equation has the following structure:
− “Equation A.00” to “Equation A.15” views are accessible using and keys,
− Pressing key will open “T Operate” menu.
AUTOMAT.
CTRL
Logic Equations
Equation A
Equation A.00
= Null
Equation A.01
AND Null
T operate
0s
T Reset
0s
Equation A.15
…
AND Null
Page 73

User Guide P72x/EN FT/C21
MiCOM P721/P723 Page 33/38
In order to modify an “Equation A.xx” menu:
− Press key to access to the menu (if necessary, enter password).
Equation A.00
Boolean
− Press to validate or to cancel the setting.
press or key to modify the
corresponding value.
Logic
press or key to access to Boolean
operator or Logic signal
AUTOMAT. CTRL
Logic Equations
Equation A
The following submenu is identical from A.01 to A.15.
Equation A.00
= Null
Equation A.00
= Null
Heading of Equation A submenu.
Boolean function (left lower part of the LED panel): selects
the Boolean function associated to the logic signal.
Presence or not presence of the corresponding logic signal
can selected and combined to the previous equation with an
OR or AND condition.
Setting choices:
- for A.00: “=”, “= Not”
- for A.01 to A.15: “OR”, “OR NOT”, “AND” or “AND NOT”,
Note:
AND operator has priority to OR operator (refer to the
following note)
Logic signal (right lower part): Is used to select the logic
signal corresponding to the Boolean equation. Refer to the
previous table to see the text corresponding to each signal.
Setting Choice: Null and logic signals.
T Operate
0s
T Reset
0s
Example of Equation A settings:
Equation A.00 “= not” “tAux 1” + Equation A.01 “and not” “tAux 2”
means not tAux 1 and not tAux 2.
NOTE: AND operator has priority on OR operator:
− “A or B and C” means “A or (B and C)”.
− To obtain “A and (B or C)”, select “A and B or A and C”.
The time of operation setting is used to set the minimum
time of truth of the selected conditions before validating the
truth of the logic operation.
Setting choice: from 0 to 600s, step 10ms
The reset time sets a minimum time before the logic
operation is not true when at least one condition is not true.
Setting choice: from 0 to 600s, step 10ms
Page 74

P72x/EN FT/C21 User Guide
Page 34/38 MiCOM P721/P723
2.9 RECORDS Menu
Through the RECORDS menu, stored data, events, disturbances and monitoring information
can be displayed and read.
The different submenus are:
RECORDS
Fault
Record
2.9.1 Fault Record submenu The Fault Record submenu makes it possible to read up to twenty five stored fault records.
Information about a fault is recorded when a threshold is crossed.
RECORDS
Fault Record
fault Record
2
fault Time
12:05:23:42
fault Date
12/11/99
Instantaneous records
Disturbance
records
Heading of the trip commands (fault records) submenu.
Selection of the fault record number to be displayed
(select either 1, 2, 3, 4 or 5).
Displays the time when the fault was recorded. The
format of the time is hh:mm:ss.
In this example the fault was recorded at 12:05:23 pm
(and 420ms).
Displays the date when the fault was recorded. The
format of the Date is DD/MM/YY.
In this example, the fault was recorded on November
12th 1999.
Active Set Group
Displays the active setting group (1 or 2).
1
Faulted Phase
Earth
Threshold
[87] tDiff
Fault Magnitude
1200 A
Displays the phase, where a fault occurred, for the
chosen fault record.
Displays the origin of the fault that generated the trip
order.
Displays the magnitude value of the fault: Voltage,
current, earth power. The value is based on the
amplitude at 50 or 60 Hz.
IA Diff R.M.S
1200 A
IB Diff R.M.S
Displays the magnitude value of the phase A current at
the time of the fault.
As above for phase B.
500 A
IC Diff R.M.S
As above for phase C.
480 A
In Diff R.M.S
As above for earth current.
103 A
Page 75

User Guide P72x/EN FT/C21
MiCOM P721/P723 Page 35/38
2.9.2 INSTANTANEOUS RECORDS submenu Through the INSTANANEOUS RECORDS submenu, it is possible to read recorded values
associated with the crossing of a threshold (start information).
RECORDS
Instantaneous
Heading of the Instantaneous records submenu.
Records
Number
5
Hour
13:07:15:53
Select the number of Instantaneous records to be
displayed (maximum 5).
Displays the time when the instantaneous record was
recorded. The format of the time is hh:mm:ss: ms.
In this example the fault was recorded at 1:07:15 pm and
530 ms.
Date
12/11/01
Displays the date when the instantaneous record was
recorded. The format of the Date is DD/MM/YY.
In this example, the fault was recorded on November
12th 2001.
Origin
Displays which threshold has been crossed.
Ie>
Length
57 ms
Trip
No
Displays the period of time during which the threshold
has been exceeded.
Displays if a trip followed the crossing of the threshold or
not.
2.9.3 DISTURBANCE RECORD submenu The Disturb Record submenu makes it possible to set and read up disturbance records.Up to
15 seconds disturbance record(s) duration can be stored (5 x 3s, 3 x 5s, 2 x 7.5s, 4 x 3.75s
or 1 x 15s). The beginning of the record can be adjusted with a selected pre-time.
RECORD
Disturb Record
Heading of the Disturb Record submenu.
Pre-Time
0.2 s
Set the disturbance record pre-time, from 100ms to 3s
(step 100ms). The pre-time adjusts the beginning of the
disturbance record: In this example, the record starts
200ms before the disturbance. Its length is fixed.
Post-Time
0.2 s
Set the disturbance record post-time, from 100 ms to 3s
(step 100ms). The total disturbance recording time is 3
seconds (pre-time + post-time).
Disturb Rec Trig
ON INST.
Select which criteria will start the disturbance record
function. Setting choices are ON INST. (starts recording
on instantaneous thresholds) or ON TRIP (starts
recording after a trip happened).
Page 76

P72x/EN FT/C21 User Guide
Page 36/38 MiCOM P721/P723
3. WIRING
MiCOM P72x range of relays have the same terminal layout for common elements.
3.1 Auxiliary supply
The auxiliary power supply for the MiCOM P721 and P723 relays can be either direct current
with a voltage range of 24-60 VDC, 48-250 VDC,or alternative current with a voltage range
of 48-250 VAC/ 50-60 Hz or 24-250Vdc/24-240Vac. The voltage range (Ua) is specified on
the adhesive paper label under the top hinged cover on the front of the relay.
The auxiliary power supply must be connected only to terminals 33 and 34.
3.2 Current measurement inputs
MiCOM P721 and P723 have 3 phase and 1 earth current inputs available for 1 and 5 Amps
rated CTs. On each one of these relays, it is possible to combine 1 and 5 Amp current inputs
together (i-e a mix between 1A for earth fault and 5A for phase connections) (refer to the
wiring diagram).
NOTE: All phase inputs must have the same rating (1 or 5 Amps).
3.3 Logic inputs
The number of logic inputs depends on the relay model. The relays have programmable
opto-isolated logic inputs, which can be assigned to any available label or function.
Logic inputs for each relay model:
Model P721 P723
Logic outputs 2 5
On the same MiCOM P72x relay, the user can mix different voltage levels as logic inputs are
fully independent (e.g. Uaux = 48-250 Vdc, Input 1= 48 Vdc, Input 2-5= 110 Vdc).
If the user sets the supply of the logic input as AC they are active from 24 to 240Vac.
The automation functions that can be assigned to these logic inputs can be selected from the
AUTOMAT. CTRL Menu.
NOTE: Do not forget to select in the CONFIGURATION/Configuration Inputs
3.4 Output relays
The number of logic outputs depends on the relay model. The relays have configurable logic
outputs, which can be assigned to any available function.
The number of logic outputs available for each relay model is presented in the following
table:
Menu weither the voltage input is "AC" or "DC". .
Model P721 P723
Logic outputs 5 9
The first logic output (RL0) is dedicated to indicate a relay fault (Watchdog, WD) and is not
part of this table.
The normally closed (NC) contact of the Watchdog (RL0) can not be configured. The other
contacts can be configured to be activated on activation of the different functions available in
the relay. A basic output matrix is included in the relay.
Some logic outputs have changeover contacts (RL1 and RL2). The other relays (RL3, to RL
9) are normally open contacts.
The protection and control functions that can be assigned to these output relays can be
selected from the AUTOMAT. CTRL Menu.
Page 77

User Guide P72x/EN FT/C21
MiCOM P721/P723 Page 37/38
3.5 Communication
3.5.1 RS485 rear communication port All MiCOM relays have an RS485 rear communication port. The terminals 29-30-31-32 are dedicated to the RS485 communication port. See wiring
diagrams in chapter P72y/EN CO of the Technical Guide.
3.5.2 RS232 front communication port MiCOM P72x relays provide a RS 232 communication port. This port is dedicated to Setting
software MiCOM S1.
The cable between the relay and the PC is a standard RS 232 shielded-cable.
The relay requires a RS232 cable with a 9-pin male connector.
The RS232 cable has to be wired as indicated below:
RS232 PC PORT
9 pin male connector
1
6
2
7
3
8
4
9
5
MiCOM P721/P723
9 pin female connector
1
6
2
7
3
8
4
9
5
P0073ENb
FIGURE 3: FRONT PANEL PORT COMMUNICATION RS232 CABLE WIRING
A USB/RS232 cable can also be used to communicate to the relay.
Page 78

P72x/EN FT/C21 User Guide
Page 38/38 MiCOM P721/P723
BLANK PAGE
Page 79

Menu Content Tables P72x/EN HI/C21
MiCOM P721/P723
MENU CONTENT TABLES
Page 80

P72x/EN HI/C21
Menu Content Tables
MiCOM P721/P723
BLANK PAGE
Page 81

Menu Content Tables P72x/EN HI/C21
MiCOM P721/P723 Page 1/8
CONTENTS
1. MiCOM P721 – V11.D SOFTWARE 3
2. MiCOM P723 – V11.D SOFTWARE 6
Page 82

P72x/EN HI/C21 Menu Content Tables
Page 2/8 MiCOM P721/P723
BLANK PAGE
Page 83

Menu Content Tables P72x/EN HI/C21
V
MiCOM P721/P723 Page 3/8
1. MiCOM P721 – V11.D SOFTWARE
COMMUNICATIONMEASUREMENTSCONFIGURATION
communication menu
No
Buswire Short.
[87N] tDiff 1
if “protection
line select.”
OP PARAMETERS
Password CONNECTION LED GROUP SELECT ALARMS INPUTS OUTPUT RELAYS INdiff= Communications?
**** 0.00A Yes
Description Input selection LED Yes/No If “MENU” Reset led on fault Voltage input = Maintenance mode Max & Average I Baud Rate
English EARTH MENU No 11111 Safe R. 00000000 99.99 Hz 1
P723 Current [87N] Diff Setting group No DC No RST=[C] 9600 Bd
Language Protection line select. LED 5, 6, 7 or 8 Change group input = Instal self-reset Inputs 54321 Fail 87654321 Frequency Rear Comm. Address
Reference [95N] Sup Inhibition on alarms Relays 8765W4321 Indiff Maximum Parity
CB Fail
tEqu.A
tEqu.C Enabl. All
tEqu.D
tEqu.G
Ω
oltage
if “input
Software version E/Gnd Text Input 1 Alarm tAux1 inhib. Data Bits
selection" =
130
14:15:16 29
11/06/07 Asdu 3,4&9
11.C N Input 2 Alarm tAux2 inhib. 8
Frequency tAux1 Stop Bits
50 Hz tAux2 1
Active Group = Stabiliz. Resist. N tEqu.B Spont, Events (1)
Input 54321 E/Gnd CT Primary tEqu.E Command Blocking (1)
Status 00101 1000 A tEqu.F No
Relay 87654321 E/Gnd CT sec tEqu.H Signal Blocking (1)
Status 00000101 1 A No
Date Measure Enabling (1)
Time Front Comm Address
XXXXXXX (1) IEC 60870-5-103
P723xxxxxxxxx Private
Product code Date Format
Serial Number
=Earth
MiCOM [95N] tSup Yes/No CMD 000000000 0.00A None
Page 84

P72x/EN HI/C21 Menu Content Tables
V
V
A
r
Page 4/8 MiCOM P721/P723
1010101 Relays 000
[87N] Diff
tAux1 [87N] tDiff
[87N] tDiff
Control Trip tAux2 [95N] Sup
0.1 s
[87N] tDiff
tAux1 tEqu. A [95N] tSup
ctive Group
tEqu. A tEqu. D tAux2
Control Trip tEqu. C tAux1
tEqu. D tEqu. G Input 1
tEqu. E
tEqu. F
tEqu. H
tEqu. G tEqu. B
200.0
[95N] Measure Filter tEqu. E tEqu. H Input2
1In 1In
No No
PROTECTION G1 / G2 AUTOM A T. CTRL
[87N] EARTH DIFF [95N] EARTH BUS-WIRE TRIP COMMANDS LATCH FUNCTIONS BLOCKING LOGIC 1/2 OUTPUT RELAYS LATCH OUTPUT
PROTECTION SUPERVISION RELAYS
[87N] Threshold I Diff= [95N] Threshold I Sup= Trip Yes/No tAux2 tAux1 [87N] tDiff
[87N] Earth diff prot? [95N] Earth bus-wire sup? CB Operating Time Latch Yes/no Block 1 / 2 Yes/No Trip 87654321 Latch 432
[87N] Threshold V Diff= 95N] Threshold V Sup= tAux2 tEqu. B CB Fail
3.0 s 3.0 s tEqu. C tEqu. F Control Trip
200.0
[87N] Flt Timer t Diff [95N] Flt Timer t Sup= tEqu. B tEqu. E
[87N] Measure Filte
0s 0s tEqu. D
Sample Sample tEqu. F tEqu. A
[87N] Rst Timer tReset= [95N] Rst Timer tReset= tEqu. H tEqu. C
No No tEqu. G
Page 85

Menu Content Tables P72x/EN HI/C21
A
r
A
A
r
A
A
A
A
A
A
MiCOM P721/P723 Page 5/8
Pre-Time
Post-Time
RECORDS RECORDS
RECORDS
/B/C/D/E/F/G/H 25 5 1.3 s
No
000
000
s above from
ctive Set Group Origin
00/00/00 00/00/00 On Inst
.01 to A.15
Earth 000 ms
[87] tDiff Yes
0s
T Reset Threshold Trip
Ie Diff R.M.S
Fault Magnitude
00:00:00:00 00:00:00:00 2.0 s
ux Times CB Fail Equation Fault Record Numbe
ux 1 Time tAux1 I diff < = Equation A.00 Fault Time Hou
ux 2 Time tAux2 CB Fail Time tBF Fault Date Date Disturb Rec Trig
ux1 0 s 0.1 In (Boolean) (Logic)
ux2
Start Block Logic 2
Change setting Equation A.15
Reset Leds = (operand) 2 [87] tDiff
Maint. Mode
Local mode T Operate Faulted Phase Length
INPUTS CIRCUIT BREAKER FAIL LOGIC EQUATIONS FAULT RECORD INSTANTANEOUS DISTURBANCE
Unlatch
Inputs 1/2
Start Disturb
Start Block Logic 1 0 s 0.1 s
Synchro 0s
Page 86

P72x/EN HI/C21 Menu Content Tables
p
Page 6/8 MiCOM P721/P723
2. MiCOM P723 – V11.D SOFTWARE
COMMUNICATIONMEASUREMENTSCONFIGURATION
if “configuration /
protection line
if “configuration/
protection line
select.” =phase
select.” =Earth
(1) IEC 60870-5-103
communication menu
[87/87N] tDiff (1) 1
[95/95N] tSup (1)
[95B] tSup B Alarm tAux3 inhib.
Input 2
Input 4 0.00A Enabl. All
Input 5
tAux2
tEqu.A
tEqu.D
tEqu.G
(1) depending of protection
Ω
oltage
if “input
if “protection
line select.”
=Earth
OP PARAMETERS
**** Yes
Language Protection line select. LED 5, 6, 7 or 8 Change group input = Instal self-r eset Inputs 54321 Fail 87654321 Idiff= 0.00A Rear Comm. Address
Password CONNECTION LED GROUP SELECT ALARMS INPUTS OUTPUT RELAYS Communications?
English EARTH MENU No 1 1 1 1 1 Safe R. 00000000 0.00A 0.00A 1
Description Input selection LED Yes/No If “MENU” Reset led on fault Voltage input = Maintenance mode Frequency Baud Rate
Reference [87CZ] Check Zone Inhibition on alarms Relays 8765W4321 Max & Average I Parity
P723 Current [87/87N] Diff (1) Setting group No DC No 99.99 Hz 9600 Bd
MiCOM [95/95N] Sup (1) Yes/No CMD 000000000 RST=[ C] None
selection" =
130
Software versio n E/Gnd Text Buswire Short . Alarm tAux1 inh ib. IdiffM= 0.00A Data Bits
11.C N [95A] tSup A Alarm tAux2 inhib. 0.00A 0.00A 8
Frequency [95C] tSup C Alarm tAux4 inhib. Stop Bits
50 Hz Input 1 1
Active Group = Stabi liz. Resist. N Input 3 INdiff= Spont, Events (1)
Input 54321 E/Gnd CT Primary CB Fail Frequency Command Blocking (1)
Status 00101 1000 A tAux1 99.99 Hz No
Relay 87654321 E/Gnd CT sec tAux3 Max & Average I Signal Blocking (1)
hase
if “protection
line select.”
=
if “input
14:15:16 L1, L2, L3 tEqu.F 29
11/06/07 tEqu.C 0.00A Asdu 3,4&9
Status 00000101 1 A tAux4 RST=[C] No
Date tEqu.B Indiff Maximum Measure Enabling (1)
Time Phases Text tEqu.E Front Comm Address
Ω
Ω
Ω
30
oltage
selection" =
XXXXXXX 30
P723xxxxxxxxx Private
Product code tEqu.H Date Format
Serial Number Stabilizing Resistor L1 line configuration
30
Stabilizing Resistor L2
Stabilizing Resistor L3
1A
1000 A
Line CT Primary
Line CT sec
Page 87

Menu Content Tables P72x/EN HI/C21
f
A
A
f
V
V
A
r
A
A
V
V
MiCOM P721/P723 Page 7/8
RELAYS
Relays 0000000
If Configuration/
Protection line
selection =
[87] Phase
AUTOMAT. CTRLPROTECTION G1 / G2
Input3
If Configuration/
Protection line
selection =
[87N] Earth
Trip 87654321 Trip 87654321
[87N] Diff [87] Diff
[87 or 87N] tDiff [87] tDiff
tAux1 [87N] tDiff
tAux3 tAux2
tAux1 tAux4 tAux3
tEqu. D [87N] tDiff [87] tDif
Control Trip tEqu. C
tEqu. C tEqu. F [95N] tSup [95] Sup
tAux2 Control Trip tAux4
tEqu. D tEqu. G Buswire-Short [95] tSup
tEqu.
Active Group tAux2
tEqu. G tAux2 [95A] tSup C
tEqu. H tAux3 CB Fail
Input5 Input2
Input2 Active Group
Input3 Control Trip
tEqu. E tEq u. B
tEqu. C Input5
tEqu. G
tEqu. H
tEqu. F t Equ. C
tEqu. G tEqu. D
if Yes (1)
No No [87 or 87N] tDif
if Yes (1)
[87N] EARTH DIFF [95N] EARTH BUS-WIRE CB Operating Time Latch Yes/no Block 1 / 2 Yes/No Latch 8765432
PROTECTION SUPERVISION 0.1 s
[87N] Earth diff prot? [95N] Earth bus-wire sup? Trip Yes/No tAux2 tAux1
[87N] Threshold I Diff= [95N] Threshold I Sup= tAux3 tEqu.
If Configuration/Protection line selection = [87N] Earth TRIP COMMANDS LATCH FUNCTIONS BLOCKING LOGIC 1/2 OUTPUT RELAYS LATCH OUTPUT
200.0
if Yes (2)
1 In 1 In tAux4 tEqu. B 1010101 1010101
if Yes (2)
3.0 s 3.0 s tEqu. F tA ux 1 [95A] tSup B
200.0
[87N] Threshold V Diff= 95N] Threshold V Sup= tEqu. B tEqu. E [95N] Sup [87CZ] ChkZone
[87N] Flt Timer t Diff [95N] Flt Timer t Sup= tEqu. E tEqu. H CB Fail [95A] tSup
0s 0s No Input1 tAux4
[87N] Measure Filter [95N] Measure Filte
Sample Sample tAux4 tAux1
No [87N] Rst Timer tReset= [95N] Rst Timer tReset= Control Trip tAux3
[87] PHASE DIFF [95] PHASE BUS-WIRE tEqu.
If Configuration/Protection line selection = [87] Phase Input4 Input1
if Yes (1)
No No
if Yes (1)
[87] Phase diff prot? [95] Phase bus-wire sup? tEqu. D tEqu.
PROTECTION SUPERVISION tEqu. B Input4
[87] Threshold I Diff= [95] Threshold I Sup= tEqu. H tEq u. E
400.0
if Yes (2)
1In 1In tEqu. F
if Yes (2)
3.0 s 3.0 s
400.0
[87N] Threshold V Diff= 95N] Threshold V Sup=
Yes / No Sample
[87] Fault Timer tDiff [95] Fault Timer tSup=
[87] Check Zone? [95] Measurement Filter
Sample 0 s
[87] Reset Timer tReset=0sIf "Configuration / Input selection" =
(1): current
(2): voltage
No [87N] Measurement Filter [95] Reset Timer tReset=
Page 88

P72x/EN HI/C21 Menu Content Tables
r
A
r
A
A
V
V
A
AAA
A
A
A
A
A
A
A
A
Page 8/8 MiCOM P721/P723
Pre-Time
Post-Time
00:00:00:00 2.0 s
00/00/00 On Inst
RECORDS RECORDS
RECORDS
[87] tDiff
000
ctive Set Group Origin
Ie Diff R.M.S
s above from
.01 to A.15
/B/C/D/E/F/G/H 25 5 1.3 s
No
If Yes (1) Equation A.00 Fault Time Hou
ux1 I diff < = (Boolean) (Logic) 00:00:00:00
Inputs 1/2/3/4/5 CB Fail Equation Fault Record Numbe
INPUTS CIRCUIT BREAKER FAIL LOGIC EQUATIONS FAULT RECORD INSTANTANEOUS DISTURBANCE
Unlatch
If Yes (2) 00/00/00
ux2 0.1 InAux3 Fault Date Date Disturb Rec TrigAux4
Equation A.15
diff < =
Start Disturb
Maint. Mode 0 s Earth 000 ms
Local mode
Start Block Logic 2 = (operand) 2
Start Block Logic 1 5.0
Change setting CB Fail Time tBF
Reset Leds 0.1 s T Operate Faulted Phase Length
(1): current 000
(2): voltage
0s
0s 000
0s 000
0s 000
ux 1 Time tAux1 If "Configuration / Input selection" = Fault Magnitude
ux 2 Time tAux2 IA Diff R.M.S
ux 3 Time tAux3 IB Diff R.M.S
Synchro T Reset Threshold Trip
[87CZ] Chk Zone 0 s [87] tDiff Yes
ux 4 Time tAux4 IC Diff R.M.S
Page 89

Technical Data P72x/EN TD/A11
MiCOM P721/P723
TECHNICAL DATA
Page 90

Page 91

Technical Data P72x/EN TD/A11
MiCOM P721/P723 Page 1/18
CONTENT
1. RATINGS 3
1.1 Power Supply 3
1.2 Frequency 3
1.3 Current Inputs 3
1.4 Phase and earth current transformers consumption 3
1.4.1 P72x phase CT consumption 3
1.4.2 P72x earth CT consumption 4
1.5 Logic Inputs 4
1.5.1 Supply 4
1.6 Output Relay Characteristic 5
2. INSULATION 5
3. EMC TESTS 6
4. ENVIRONMENT 7
5. EU DIRECTIVE 8
5.1 EMC compliance 8
5.2 Product safety 8
6. DEVIATION OF PROTECTION ELEMENTS 9
7. DEVIATION OF AUTOMATION FUNCTIONS TIMERS 9
8. DEVIATION OF MEASUREMENTS 9
9. PROTECTION SETTING RANGES 10
9.1 [87N] Earth differential protection 10
9.1.1 Protection Setting Ranges 10
9.2 [95N] Earth bus-wire supervision 10
9.2.1 Protection Setting Ranges 10
9.3 [87] Phase differential protection (P723 only) 10
9.3.1 Protection Setting Ranges 10
9.4 [95] Phase bus-wire supervision (P723 only) 11
9.4.1 Protection Setting Ranges 11
Page 92

P72x/EN TD/A11 Technical Data
Page 2/18 MiCOM P721/P723
10. AUTOMATION CONTROL FUNCTIONS 12
10.1 Trip commands 12
10.2 Latch functions 12
10.3 Blocking logic 12
10.4 Output relays 12
10.5 Latch of the auxiliary output relays 12
10.6 Inputs 12
10.6.1 Inputs assignation 12
10.6.2 Auxiliary timers 12
10.7 Circuit Breaker Failure 13
10.7.1 CB Fail Setting Ranges 13
10.8 Logic Equations 13
10.8.1 Timer Setting Ranges 13
10.8.2 Available logical gates 14
10.8.3 Available signals 14
11. RECORDING FUNCTIONS 16
11.1 Fault Record 16
11.2 Instantaneous recorder 16
11.3 Disturbance Records 16
11.3.1 Triggers; Data; Setting Ranges 16
12. COMMUNICATION 17
Page 93

Technical Data P72x/EN TD/A11
MiCOM P721/P723 Page 3/18
1. RATINGS
1.1 Power Supply
Nominal auxiliary voltage Vx 24-60Vdc;
48 -250Vdc/ 48-250 Vac
24-250Vdc/ 24-240Vac
Operating range DC: ± 20% of Vx
AC: – 20%, +10% of Vx
Residual ripple Up to 12%
Stored energy time
Burden Stand by: <3W DC or <8VA AC
1.2 Frequency
Frequency protection functions
Nominal frequency 50/60Hz
1.3 Current Inputs
Phase current inputs 1 and 5A by connection
Earth current inputs 1 and 5A by connection
Operating range Selected at order (Cortec)
Burden Phase Current < 0.025 VA (1A)
Burden Earth Current < 0.08 VA (1A)
Thermal withstand 1s @ 100 x rated current
≥50 ms for interruption of Vx
Max: <6W DC or <14VA AC
nominal frequency ±5Hz
< 0.3 VA (5A)
< 0.42 VA (5A)
2s @ 40 x rated current
continuous @ 4 x rated current
1.4 Phase and earth current transformers consumption
1.4.1 P72x phase CT consumption
phase transformer 5A
phase transformer 5A
RMS voltage (V)
RMS voltage (V)
Current (A)
Current (A)
phase transformer 1A
phase transformer 1A
Page 94

P72x/EN TD/A11 Technical Data
Page 4/18 MiCOM P721/P723
1.4.2 P72x earth CT consumption
earth transform er 5A
earth transform er 5A
RMS voltage (V)
RMS voltage (V)
earth transform er 1A
earth transform er 1A
Current (A)
Current (A)
1.5 Logic Inputs
Logic input type Independent optically insulated
Logic input burden < 10 mAmps per input
Logic input recognition time (DC
inputs)
Logic input recognition time (AC
inputs)
Logic input recognition time (ENA
inputs)
1.5.1 Supply
Ordering
Code
A 24 - 60 Vdc 19,2 – 76 Vdc
T 48 – 250 Vdc
Z
Relay auxiliary power supply Logic Inputs
Nominal
voltage range
Vx
48 – 240 Vac
Special EA (**)
24 – 250 Vdc
24 – 250 Vac
Operating
voltage range
38.4 – 300 Vdc
38.4 – 264 Vac
19,2 – 300 Vdc
19.2 – 264 Vac
< 5ms in a 50Hz system
< 4ms in a 60Hz system
<7ms in a 50Hz system
< 6ms in a 60Hz system
<15ms in a 50Hz system
< 12ms in a 60Hz system
Nominal
Voltage range
24 – 250 Vdc
24 – 240 Vac
24 – 250 Vdc
24 – 240 Vac
24 – 250 Vdc
24 – 240 Vac
Minimal
polarisation
voltage
19,2 Vdc
19,2 Vac
19,2 Vdc
19,2 Vac
19,2 Vdc
19,2 Vac
Maximum
polarisation
current
35 mA
35 mA
35 mA 2.3 mA
Holding
current
after 2 ms
2.3 mA
2.3 mA
Maximum
continuous
withstand
300 Vdc
264 Vac
300 Vdc
264 Vac
300 Vdc
264 Vac
(**) Logic input recognition time for EA approval. Dedicated filtering on 24 samples (15 ms at
50 Hz)
Page 95

Technical Data P72x/EN TD/A11
MiCOM P721/P723 Page 5/18
1.6 Output Relay Characteristic Contact rating
Contact relay Dry contact Ag Ni
Make current Max. 30A and carry for 3s
Carry capacity 5A continuous
Rated Voltage 250Vac
Breaking characteristic
Breaking capacity AC 1500 VA resistive
1500 VA inductive (P.F. = 0.5)
220 Vac, 5A (cos ϕ = 0.6)
Breaking capacity DC 135 Vdc, 0.3A (L/R = 30 ms)
250 Vdc, 50W resistive or
25W inductive (L/R=40ms)
Operation time <7ms
Durability
Loaded contact 10000 operation minimum
Unloaded contact 100000 operation minimum
2. INSULATION
Dielectric withstand IEC 60255-5 : 2000 2 kV common mode
1 kV differential mode
ANSI/IEEE C37.90-1989 1.5 kV rms AC for 1 minute,
(reaffirmed 1994) across normally open contacts.
Impulse voltage IEC 60255-5 : 2000 5 kV common mode
1 kV differential mode
Insulation resistance IEC 60255-5 : 2000 > 1000 MΩ
Page 96

P72x/EN TD/A11 Technical Data
Page 6/18 MiCOM P721/P723
3. EMC TESTS
High Frequency Disturbance
IEC 60255-22-1:1988 2.5kV common mode, Class III
1kV differential mode, Class III
Electrostatic Discharge
EN 61000-4-2: 1995 and IEC 60255-22-2: 1996 8kV contact discharge, Class 4
15kV air discharge, Class 4
Fast Transient
IEC 60255-22-4:2002, Class A 2kV 5kHz, terminal block comms.
4kV 2.5kHz, all circuits excluding comms.
EN 61000-4-4:1995, Level 4 4kV 5kHz, power supply
Surge
EN 61000-4-5:1995 and IEC 60255-22-5:2002 4kV common mode, Level 4
2kV differential mode, Level 4
2kV 5kHz, all circuits excluding power supply.
Conducted Emissions
EN 55022: 1998
Radiated Emissions
EN 55022: 1998
Conducted Immunity
EN 61000-4-6:1996 Level 3, 10V rms @ 1kHz 80% am, 150kHz to 80MHz
Radiated Immunity
EN 61000-4-3:2002
ANSI/IEEE C37.90.2:2004
Radiated immunity from digital telephones
EN 61000-4-3:2002
ANSI Surge Withstand Capability
IEEE/ANSI C37.90.1: 2002
Magnetic Field Immunity
IEC 61000-4-8: 1994
IEC 61000-4-9: 1993
IEC 61000-4-10: 1993
0.15 - 0.5MHz, 79dBµV (quasi peak) 66dBµV (average)
0.5 - 30MHz, 73dBµV (quasi peak) 60dBµV (average).
30 - 230MHz, 40dBµV/m at 10m measurement distance
230 - 1GHz, 47dBµV/m at 10m measurement distance.
Level 3, 10V/m 80MHz to 1GHz @ 1kHz 80% am
35V/m 80MHz to 1GHz @ 1kHz 80% am
35V/m 80MHz to 1GHz @ 100% pulse modulated front
face only.
Level 4, 30V/m 800MHz to 960MHz and 1.4GHz to 2GHz
@ 1kHz 80% am
4kV fast transient and 2.5kV oscillatory applied common
mode and differential mode
Level 5, 100A/m applied continuously, 1000A/m for 3s.
Level 5, 1000A/m.
Level 5, 100A/m at 100kHz and 1MHz.
Page 97

Technical Data P72x/EN TD/A11
MiCOM P721/P723 Page 7/18
4. ENVIRONMENT
Temperature IEC 60068-2-1 : 1993 Storage –25 °C to +70 °C
IEC 60068-2-2: 1993 Operation: –25 °C to + 55 °C
–25°C to 70° (*)
hour duration within any 24 hour period.
Humidity dam heat IEC 60068-2-78:2001 56 days at 93% RH and 40 °C
Enclosure protection IEC 60-529: 2001 Dust IP50 (whole case), Front IP 52,
Back IP 10
Sinusoidal Vibrations IEC 60255-21-1:1998 Response and endurance, class 2
Shocks IEC 60255-21-2:1998 Response and withstand, class 2
(*) The upper limit is permissible for a single 6
Shock withstand & Bump
IEC 60255-21-2:1998 Response and withstand, class 1
Seismic IEC 60255-21-3:1993 Class 2
Corrosive Environments :
Per IEC 60068-2-60: 1995, Part 2, Test Ke, Method (class) 3
Industrial corrosive environment/poor environmental control, mixed gas flow test.
21 days at 75% relative humidity and +30°C
Exposure to elevated concentrations of H²S, NO², Cl² and SO².
Page 98

P72x/EN TD/A11 Technical Data
Page 8/18 MiCOM P721/P723
5. EU DIRECTIVE
5.1 EMC compliance
89/336/EEC
93/31/EEC
Compliance with European Commission EMC Directive.
Generic standards were used to establish conformity:
EN50081-2: 1994
EN60952-2: 1995
5.2 Product safety
Compliance with European Commission Low Voltage Directive. Compliance is demonstrated
by reference to generic safety standards:
2006/95/EC
(replacing 73/23/EEC from 01/2007)
− EN61010-1: 1993/A2: 1995
− EN60950: 1992/A11: 1997
Page 99

Technical Data P72x/EN TD/A11
MiCOM P721/P723 Page 9/18
6. DEVIATION OF PROTECTION ELEMENTS
Element Range Deviation Fault timer Reset timer
Earth differential
protection
I diff (V diff)
Phase differential
protection
I diff (V diff)
Earth bus-wire
supervision
Phase bus-wire
supervision
I Sup (V Sup)
0.01In to 1In
(0.5 to 200V)
0.02 to 2In
(1 to 400V)
0.01 to 1 In
(0.5 to 200V)
0.01 to 1In
(1 to 400V)
± 2%
± 2%
± 2%
± 2%
0s - 2s 0 to 600s
0s – 2s 0 to 600s
0.5s – 3s 0 to 600s
0.5s – 3s 0 to 600s
7. DEVIATION OF AUTOMATION FUNCTIONS TIMERS
CB fail & CB monitoring timers
Auxiliary timers tAUX1, tAUX2, tAUX3, tAUX4
8. DEVIATION OF MEASUREMENTS
Measurement Range Deviation
Phase current 0.02In to 10In
Earth current 0.004In to 2In
±2% 0-10s
±2% 0-200s
Typical ±0.5% at In
Typical ±0.5% at In
Page 100

P72x/EN TD/A11 Technical Data
Page 10/18 MiCOM P721/P723
9. PROTECTION SETTING RANGES
9.1 [87N] Earth differential protection
9.1.1 Protection Setting Ranges
[87N] Earth differential
protection
[87N] Earth differential
protection
[87N] Threshold I diff 0.01In 1In 0.01In
[87N] Threshold V diff 0.5V 200V 0.1V
[87N] Filter timer t Diff 0s 2s 10ms
[87N] Reset timer tReset 0 600s 10ms
Measurement Filter Sample mode / Fast sample mode /
9.2 [95N] Earth bus-wire supervision
9.2.1 Protection Setting Ranges
[95N] Earth bus-wire
supervision
[95N] Earth bus-wire supervision Yes / No
[95N] Threshold I Sup 0.01In 1In 0.01In
Setting Range
Min
Yes / No
Fourier mode
Setting Range
Min
Max
Max
Step
Step
[95N] Threshold V Sup 0.5V 200V 0.1V
[95N] Filter timer t Sup 0.5s 3s 10ms
[95N] Reset timer tReset 0 600s 10ms
Measurement Filter Sample mode / Fast sample mode /
Fourier mode
9.3 [87] Phase differential protection (P723 only)
9.3.1 Protection Setting Ranges
[87] Phase differential
protection
Min
Setting Range
[87] Phase differential protection Yes / No
[87] Threshold I diff 0.02In 2In 0.01In
[87] Threshold V diff 1V 400V 0.1V
[87] Filter timer t Diff 0s 2s 10ms
[87] Check zone? Yes / No
[87] Reset timer tReset 0 600s 10ms
Measurement Filter Sample mode / Fast sample mode /
Fourier mode
Max
Step
 Loading...