

Michelin ViaMichelin Navigation X-930 Owner's Manual

Table of contents
1. INTRODUCTION ............................................................................................................................... 1
2. INSTALLATION ................................................................................................................................. 3
2.1. INSTALLING THE HARDWARE .....................................................................................................................................3
2.2. INSTALLING THE SOFTWARE ......................................................................................................................................3
2.3. ACTIVATING THE GPS ..............................................................................................................................................4
3 GENERAL INTRODUCTION ................................................................................................................ 5
3.1. LEFT-HAND BUTTONS ...............................................................................................................................................5
3.2. RIGHT-HAND BUTTONS.............................................................................................................................................5
3.3. UPPER SECTION BUTTONS .........................................................................................................................................5
3.4. STYLUS ..................................................................................................................................................................5
4. NAVIGATE TO .................................................................................................................................. 7
4.1. ADDRESS................................................................................................................................................................8
4.1.1. Centre on street ........................................................................................................................................... 10
4.1.2. Select House Number................................................................................................................................... 10
4.1.3. Select Street Intersection.............................................................................................................................11
4.2. POI .....................................................................................................................................................................11
4.2.1. Town.............................................................................................................................................................12
4.2.1.1. Name Search ...................................................................................................................................13
4.2.1.2. Criteria Search.................................................................................................................................13
4.2.2. GPS Position or Arrival Point .......................................................................................................................14
4.3. SELECT ON MAP ....................................................................................................................................................15
4.4. MY SAVED ADDRESSES...........................................................................................................................................15
4.4.1. Name Search.................................................................................................................................................16
4.4.2. Search near................................................................................................................................................... 16
4.4.2.1. Town................................................................................................................................................16
4.4.2.2. GPS Position ....................................................................................................................................17
4.4.2.3. Arrival Point .................................................................................................................................... 17
4.5. HISTORY ..............................................................................................................................................................18
4.6. GPS COORDINATES ...............................................................................................................................................18
4.7. NOTES AND TIPS ...................................................................................................................................................19
5. PLAN YOUR JOURNEY ................................................................................................................... 21
5.1. PLAN A ROUTE ......................................................................................................................................................21
5.1.1. Address .........................................................................................................................................................22
5.1.2. POI.................................................................................................................................................................24
5.1.3. Select on map...............................................................................................................................................25
5.1.4. My saved addresses......................................................................................................................................25
5.1.5. History...........................................................................................................................................................26
5.1.6. GPS Coordinates...........................................................................................................................................27
5.2. DISPLAY A MAP.....................................................................................................................................................27
5.2.1. Location marker options..............................................................................................................................28
5.2.1.1. Selecting as departure or destination ...........................................................................................28
5.2.1.2. Add to My saved addresses ............................................................................................................29
5.2.2. Search ...........................................................................................................................................................29
5.2.3. Settings ......................................................................................................................................................... 30
i

5.2.3.1. Change map .................................................................................................................................... 30
5.2.3.2. Display traffic direction/street names............................................................................................30
5.2.3.3. POIs .................................................................................................................................................. 31
5.2.3.4. Display saved addresses..................................................................................................................31
5.2.3.5. Display driving directions ............................................................................................................... 32
5.2.4. Centre ...........................................................................................................................................................32
5.2.5. Navigation .................................................................................................................................................... 33
5.2.5.1. Navigation.......................................................................................................................................33
5.2.5.2. Navigation Demo............................................................................................................................33
5.3. SEARCH FOR A POI................................................................................................................................................33
5.3.1. Town.............................................................................................................................................................34
5.3.1.1. Phone............................................................................................................................................... 35
5.3.1.2. Add to My saved addresses ............................................................................................................35
5.3.1.3. Navigate to...................................................................................................................................... 36
5.3.1.4. Centre on map ................................................................................................................................36
5.3.1.5. Description ......................................................................................................................................36
5.3.2. GPS Position..................................................................................................................................................36
5.3.3. Arrival Point or Departure Point ................................................................................................................. 37
5.4. NOTES AND TIPS ...................................................................................................................................................38
6. SETTINGS........................................................................................................................................ 40
6.1. NAVIGATION ........................................................................................................................................................40
6.1.1. Display ..........................................................................................................................................................41
6.1.1.1. Day mode/Night mode ...................................................................................................................41
6.1.1.2. 2D View/3D View ............................................................................................................................42
6.1.1.3. Navigation display ..........................................................................................................................42
6.1.2. Route ............................................................................................................................................................44
6.1.2.1. Route settings .................................................................................................................................44
6.1.2.2. Speed limits ..................................................................................................................................... 44
6.1.3. Sound............................................................................................................................................................45
6.1.4. Warner.......................................................................................................................................................... 45
6.1.4.1. Speed limit warner..........................................................................................................................46
6.1.4.2. POI Warner......................................................................................................................................46
6.1.4.3. Saved Adresses Warner:..................................................................................................................47
6.1.5. Auto Zoom ON/OFF...................................................................................................................................... 47
6.1.6. GPS................................................................................................................................................................47
6.2. MAP....................................................................................................................................................................48
6.2.1. Change map .................................................................................................................................................49
6.2.2. Display traffic direction/Street names......................................................................................................... 49
6.2.3. POIs ...............................................................................................................................................................50
6.2.4. My saved addresses......................................................................................................................................50
6.3. POI .....................................................................................................................................................................50
6.4. GENERAL .............................................................................................................................................................51
6.4.1. Language......................................................................................................................................................51
6.4.2. Units.............................................................................................................................................................. 52
6.4.3. Power status ................................................................................................................................................. 52
6.4.4. Brightness ..................................................................................................................................................... 52
6.4.5. Time ..............................................................................................................................................................52
6.4.6. About............................................................................................................................................................52
6.5. MY SAVED ADDRESSES...........................................................................................................................................53
6.5.1. Create ...........................................................................................................................................................53
6.5.1.1. Address ............................................................................................................................................ 54
6.5.1.2. POI ...................................................................................................................................................55
6.5.1.3. Select on map.................................................................................................................................. 57
6.5.1.4. History .............................................................................................................................................58
6.5.1.5. GPS Coordinates.............................................................................................................................. 58
6.5.2. Change..........................................................................................................................................................59
6.5.3. Delete ...........................................................................................................................................................60
6.5.3.1. Delete saved address ......................................................................................................................60
ii

6.5.3.2. Delete POI Category .......................................................................................................................60
6.5.4. Rename......................................................................................................................................................... 61
6.6. NOTES AND TIPS ...................................................................................................................................................61
7. INSTALLING THE DVD-ROM........................................................................................................... 63
7.1. CONNECTING VIAMICHELIN NAVIGATION X-930 TO THE PC ......................................................................................63
7.1.1. Connecting ...................................................................................................................................................63
7.1.2. ActiveSync.....................................................................................................................................................63
7.2. INSTALLING THE DVD-ROM...................................................................................................................................63
7.3. POI MANAGER .....................................................................................................................................................66
7.3.1. Transferring “*.asc” or "*.poi" files ........................................................................................................... 66
7.3.1.1. New type of POI..............................................................................................................................67
7.3.1.2. Change type of POI......................................................................................................................... 67
7.3.1.3. Delete type of POI ..........................................................................................................................67
7.4. SD MANAGER ......................................................................................................................................................68
7.5. ADDING A MAP SET ...............................................................................................................................................69
7.6. REPAIR.................................................................................................................................................................70
7.7. UNINSTALLING THE PROGRAMS ...............................................................................................................................71
8. ADDITIONAL INFORMATION ......................................................................................................... 73
8.1. FREE NAVIGATION DISPLAY ....................................................................................................................................73
8.2. DESCRIPTION OF THE NAVIGATION SCREEN ...............................................................................................................73
8.3. “*.ASC” FILES.......................................................................................................................................................74
8.4. CREATING A NEW ICON ..........................................................................................................................................75
9. POIS................................................................................................................................................ 76
9.1. HOW DO YOU NAVIGATE TO A POI? .......................................................................................................................76
9.2. HOW DO I SEARCH FOR A POI?...............................................................................................................................76
9.3. HOW DO I DISPLAY A POI ON THE MAP AND NAVIGATION SCREEN? ............................................................................76
9.4. HOW DO YOU LOOK UP THE DESCRIPTION OF A POI? ................................................................................................76
10. USEFUL INFORMATION ................................................................................................................ 78
10.1 MEMORY CARD CONTENTS ....................................................................................................................................78
10.2. DVD-ROM CONTENTS ........................................................................................................................................78
10.3. WHY AND HOW PERFORM A SOFT OR HARD RESET?.................................................................................................78
10.3.1 Soft reset .....................................................................................................................................................78
10.3.2. Hard reset ................................................................................................................................................... 79
10.4. PRACTICAL INFORMATION ....................................................................................................................................79
10.5. TECHNICAL INFORMATION ....................................................................................................................................80
11. WHAT TO DO IF…........................................................................................................................ 81
12. RIGHTS AND WARRANTIES .......................................................................................................... 83
12.1. END-USER LICENSE AGREEMENT ....................................................................................................................83
12.2. WARRANTY .....................................................................................................................................................84
iii

1
1. Introduction
This manual will help you to get the best out of your ViaMichelin Navigation X-930 device.
The pack you have bought contains:
• 1 ViaMichelin Navigation X-930 with a stylus
• 1 USB cable
• 1 Mount for windshield or dashboard use
• 1 Cigarette lighter cable
• 1 Power adapter
• 1 SD card with country map
• 1 ViaMichelin Navigation DVD-ROM
• 1 Installation diagram
• 1 Quickstart Manual
Before installing your ViaMichelin Navigation X-930 in your car, we recommend that you
first familiarise yourself with the system.
To do this, plug your ViaMichelin Navigation X-930 into a power socket (with the power
adapter supplied) and charge it for four hours when charging for the first time.
You will notice that the indicator light in the top right-hand corner of your ViaMichelin
Navigation X-930 changes colour according to the battery power level:
• Orange indicator light: the ViaMichelin Navigation X-930 is charging.
• Green indicator light: the ViaMichelin Navigation X-930 is fully charged.
The ViaMichelin Navigation X-930 has a battery life of approximately 3 hours depending
on use and the screen brightness maintained.

The device is fitted with a touchscreen, and is designed to be operated with your fingertips
for greater convenience. You can also use the stylus provided (located on the right of your
ViaMichelin Navigation X-930).
The "
Exit" key in the Main Menu is used to switch off the ViaMichelin Navigation X-930.
To turn it on again, just press the on/off button.
Although the ViaMichelin Navigation X-930 is ergonomically designed to be as intuitive as
possible, this manual contains precise instructions, together with tips and advice, for each
of the many functions that the device offers.
2

2. Installation
2.1. Installing the hardware
• Installing on the windscreen: install the car mounting system on the windscreen by
applying pressure to the suction pad and then turning the screw clockwise (reverse the
procedure to remove the windscreen mounting system).
• Installing on the
dashboard: remove the protective film from the plate, position it on a
perfectly smooth and clean surface by pressing evenly over the whole area, then install
the mounting system as described above.
• Mount your ViaMichelin Navigation X-930 on the mounting system by sliding it in as
shown (see the installation diagram provided).
• Start your vehicle.
• Connect the cigarette lighter cable to your ViaMichelin Navigation X-930 (by plugging
the cable into the mini-USB port under the device) then into your vehicle’s cigarette
lighter socket.
2.2. Installing the software
ViaMichelin Navigation is a “Plug & Drive” solution: Simply insert the memory card
provided into the slot on the top of your PND (Personal Navigation Device) then follow the
installation instructions displayed on your screen: rights, choice of the interface language,
voice guidance language, 2D or 3D map display, etc.
ViaMichelin Navigation is now ready to guide you!
Comments:
• Make sure that your SD is not in the “Lock” position, as this may prevent ViaMichelin
Navigation functioning properly (“Lock” position protects the contents of your SD card, but
this also prevents the ViaMichelin programs from saving the information required for the
software to run properly).
• Make sure the X-930 is also not in the "Lock" position. The button on the right of the SD
card slot must be positioned with the "padlock logo" open.
• Do not delete any of the data stored on your ViaMichelin Navigation SD card.
• Do not add any further data to your ViaMichelin Navigation SD card.
• Do not insert your SD card into another PDA or PND: this may damage its contents.
Detailed instructions for installing the DVD-ROM are given in Chapter 7 of this manual.
3
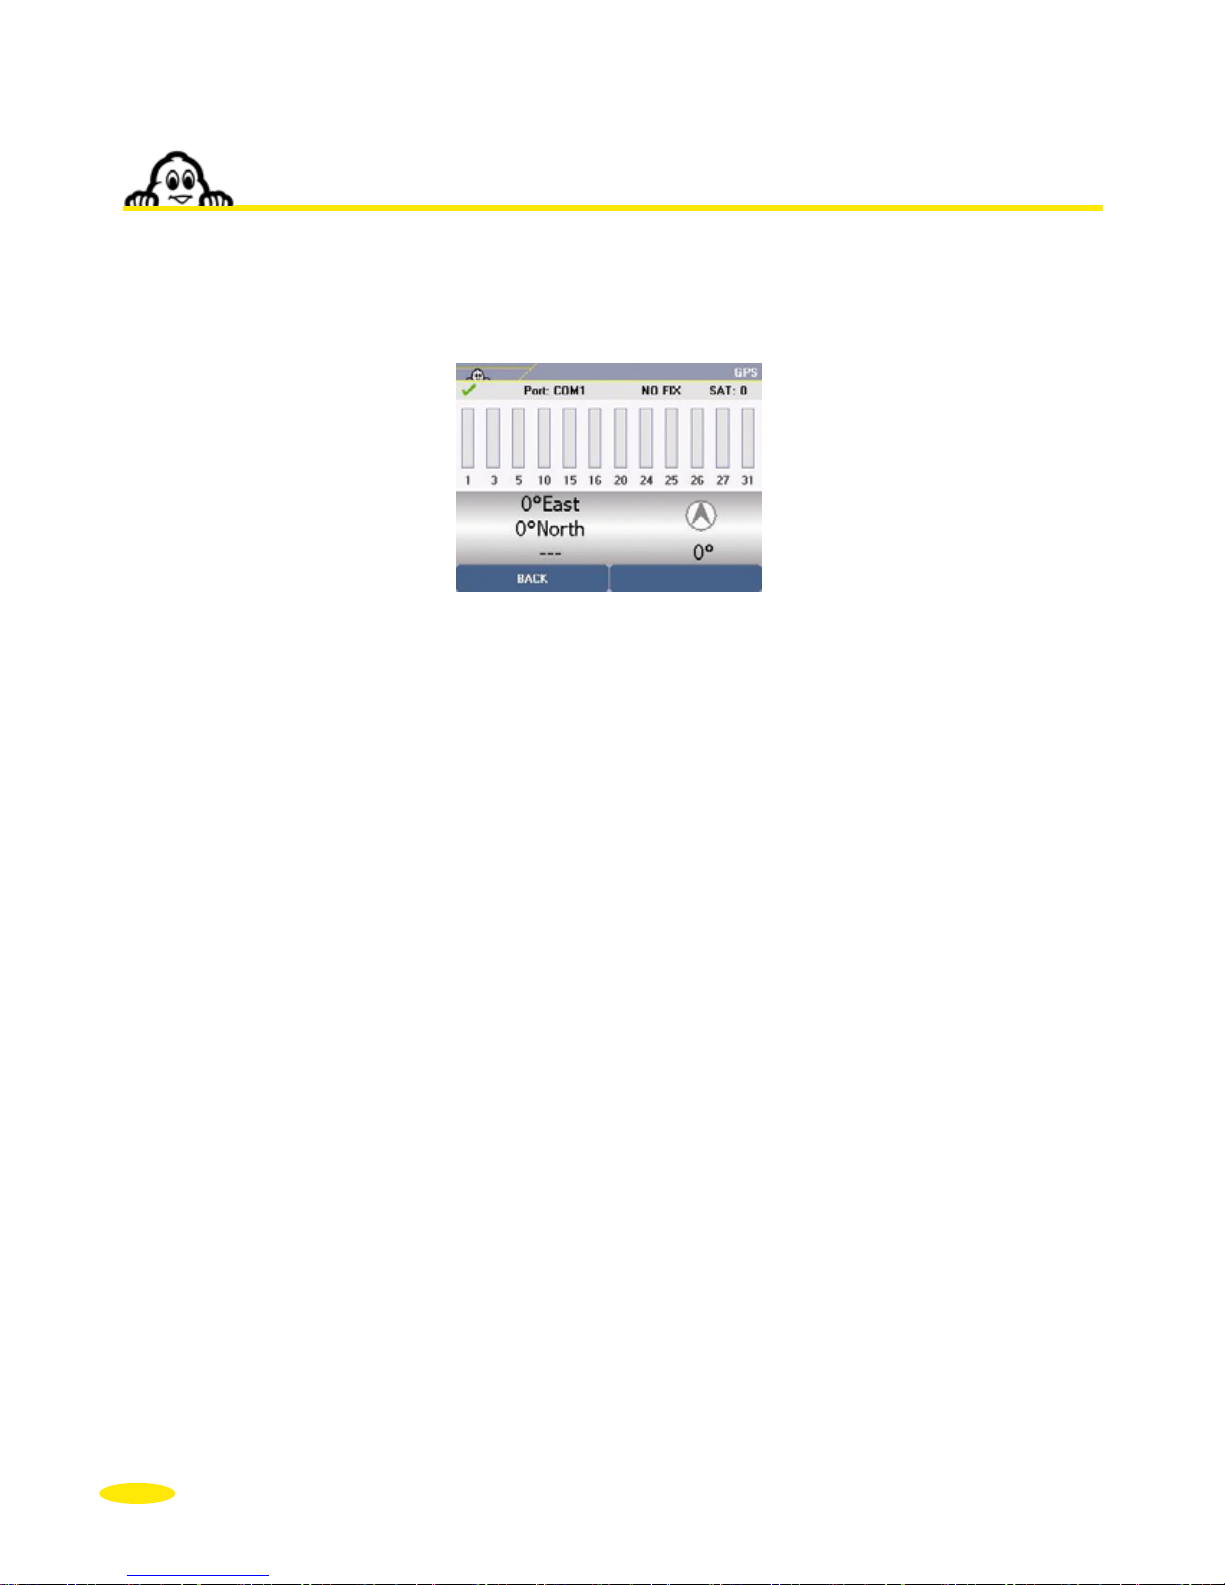
2.3. Activating the GPS
After connecting the ViaMichelin Navigation X-930 and installing the software on the SD
card, press the 3
rd
button from top on the front. This will take you directly to the GPS
settings page:
• The green "V" means that the GPS is on.
• "
NO FIX/FIX: 2D/FIX: 3D" indicates better signal reception, and therefore more accurate
positioning.
• "
SAT" indicates the number of satellites used to calculate your position.
• The vertical bars show the satellites detected:
- Grey: the device is receiving satellite signals but is not yet using them to establish
your position.
- Green: the device is using the satellite signals to calculate your position.
• The numbers under the vertical bars give the satellite number.
• Coordinates: longitude and latitude calculated by the system.
• Direction arrow: shows the direction of travel between 2 position calculations by the GPS.
When using the ViaMichelin Navigation X-930 for the first time, we recommend you do so
in an open space in order to ensure the best possible satellite reception. Activating the GPS
system for the first time can take several minutes, depending on the surroundings and GPS
signal reception.
4
3 General Introduction
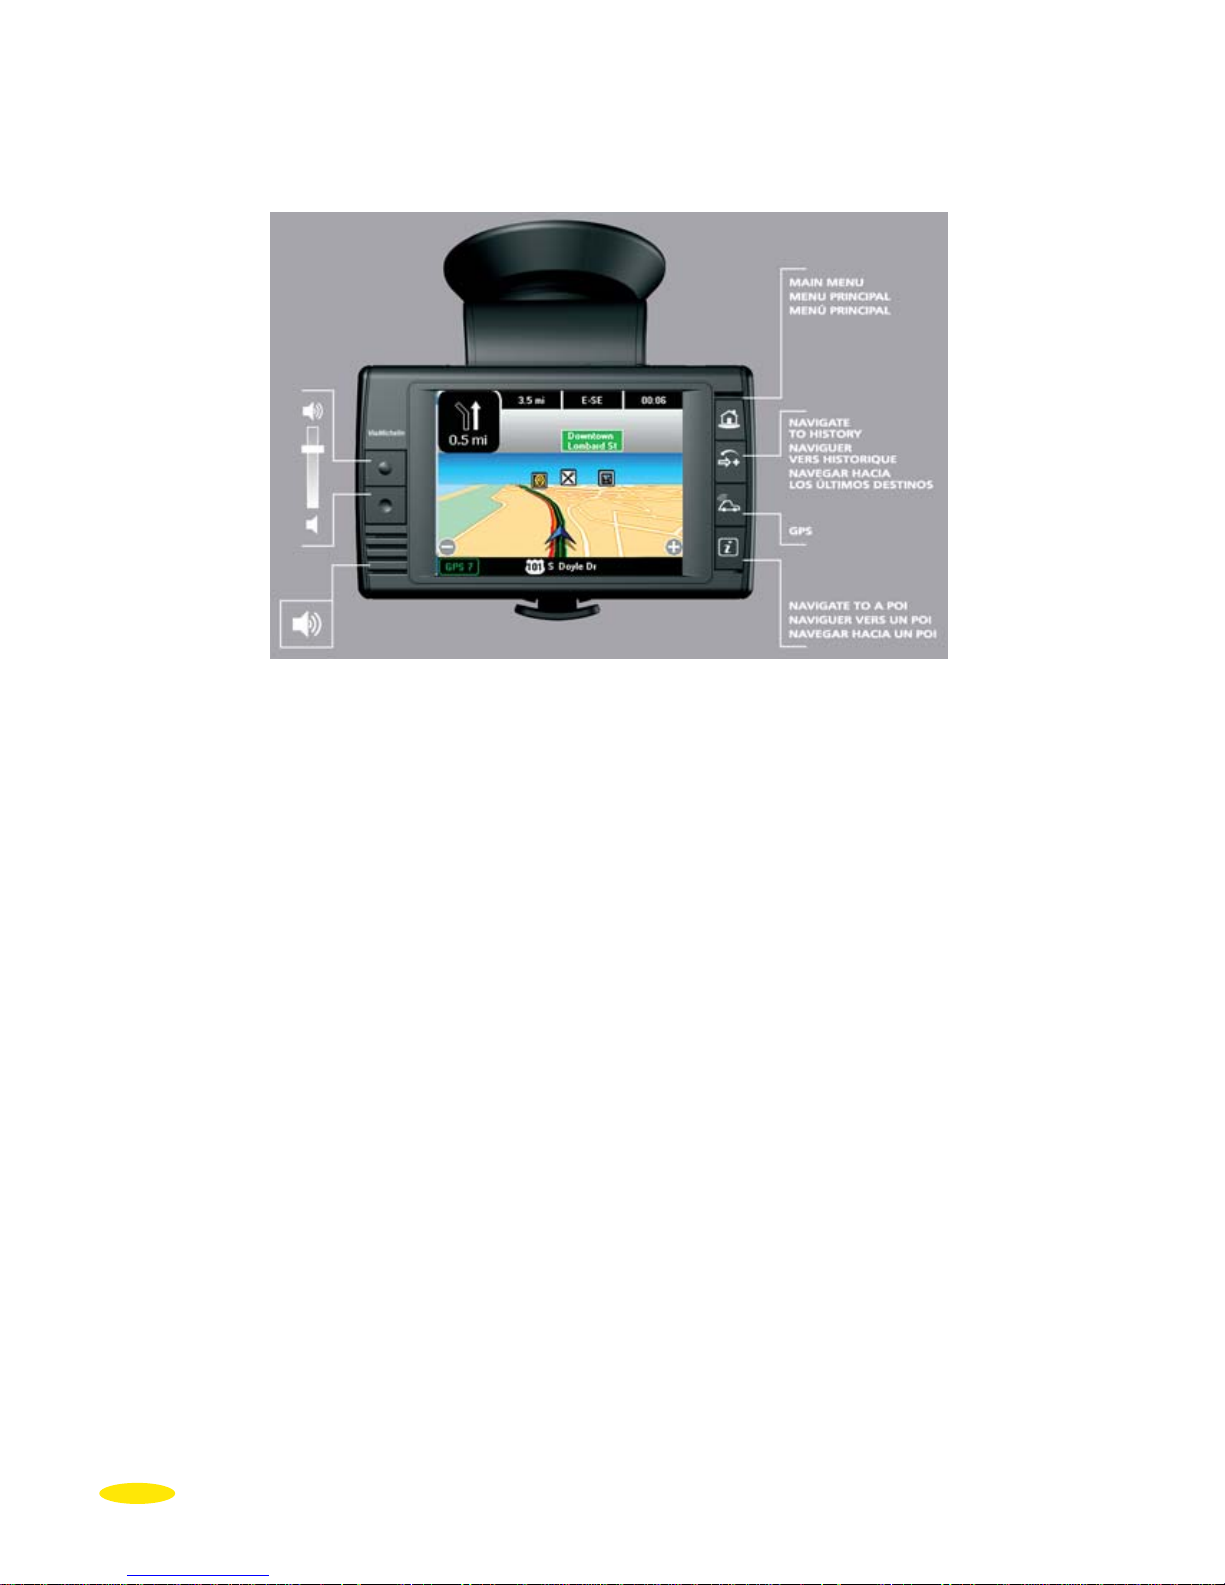
The ViaMichelin Navigation X-930 has several buttons on its front that provide direct
access to certain functions:
3.1. Left-hand buttons
• top button: increases the volume of navigation voice messages.
• bottom button: reduces the volume of navigation voice messages.
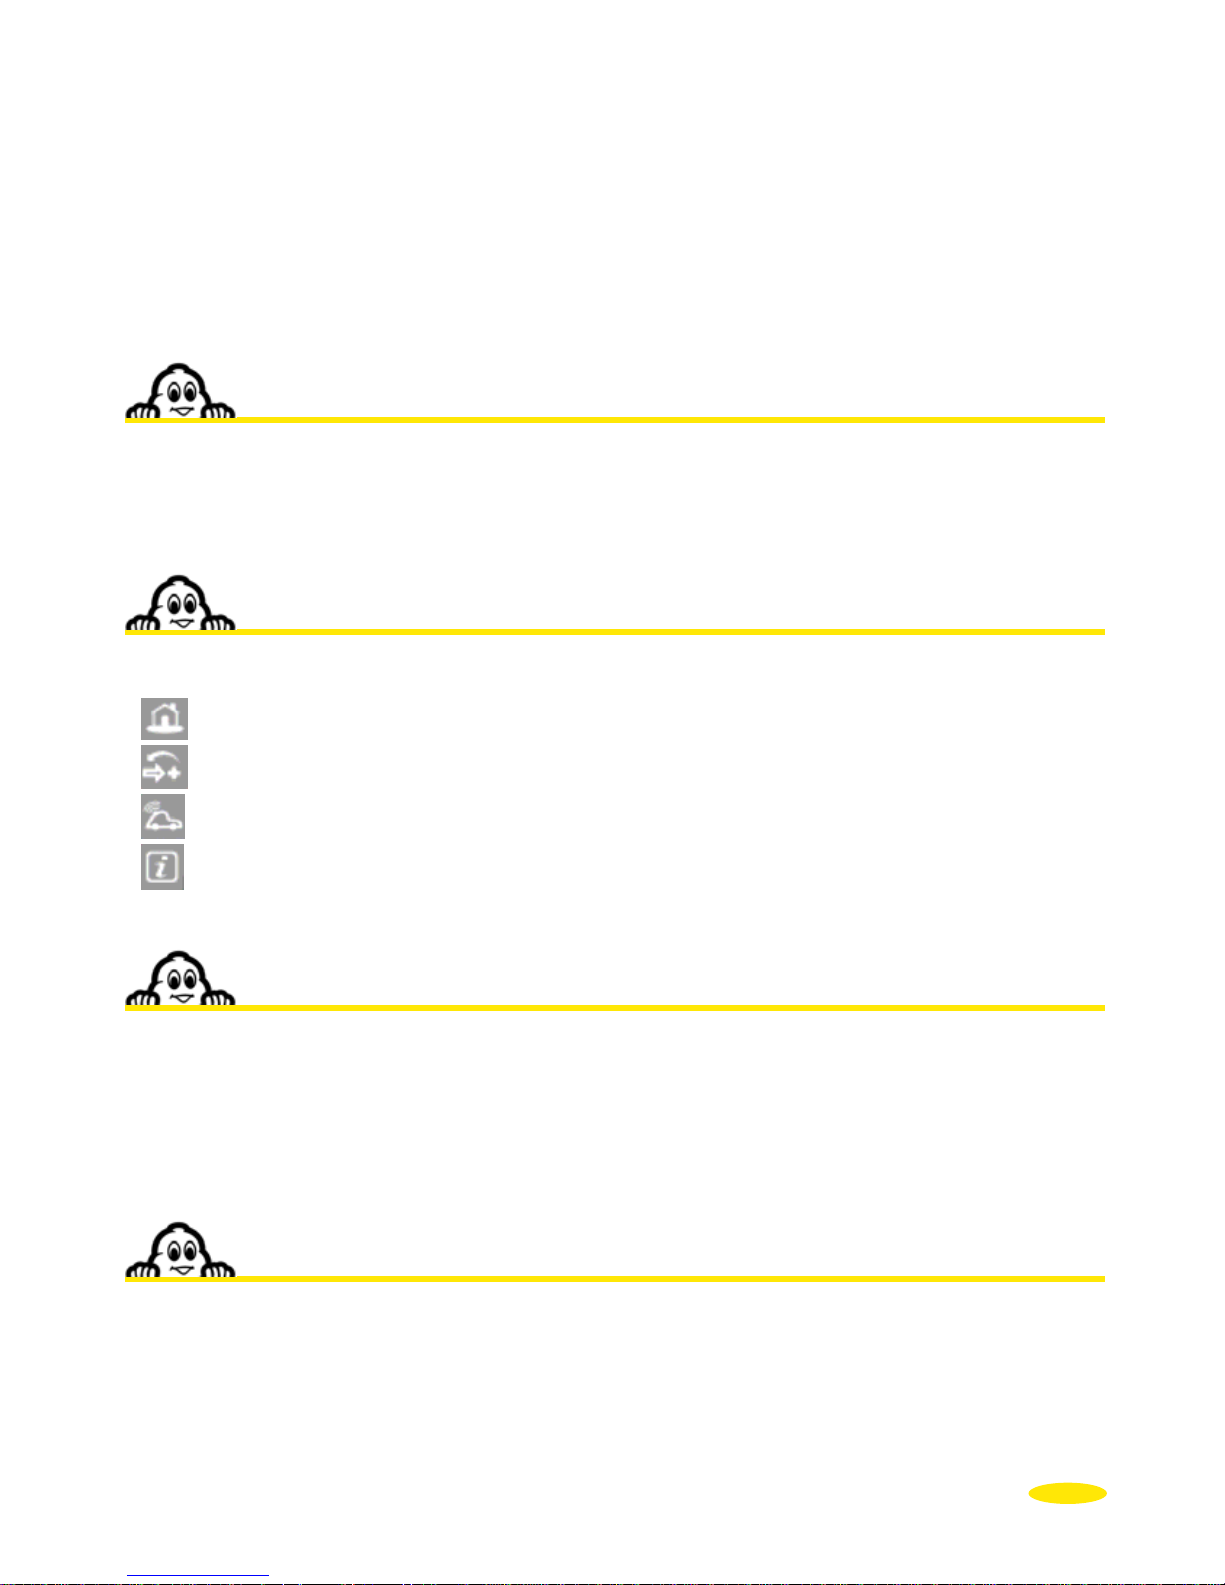
3.2. Right-hand buttons
From the top downwards:
•
: takes you directly to the Main Menu
•
: takes you directly to the History
•
: takes you directly to the GPS screen
•
: takes you directly to Search for POIs
3.3. Upper section buttons
• lock button: used to lock or unlock access to the SD card, to lock the start/stop
button and to enable or disable the ViaMichelin Navigation X-930
touchscreen.
• stop/start button: to switch the device on or off.
3.4. Stylus
Your ViaMichelin Navigation X-930 comes with a stylus. It is stored on the right-hand side
of the device and can be removed by pulling it to the right. You can use it to navigate
5
around the menus and screens on your ViaMichelin Navigation X-930 device or to perform
a “reset” (for more details, refer to paragraph 10.3).
6
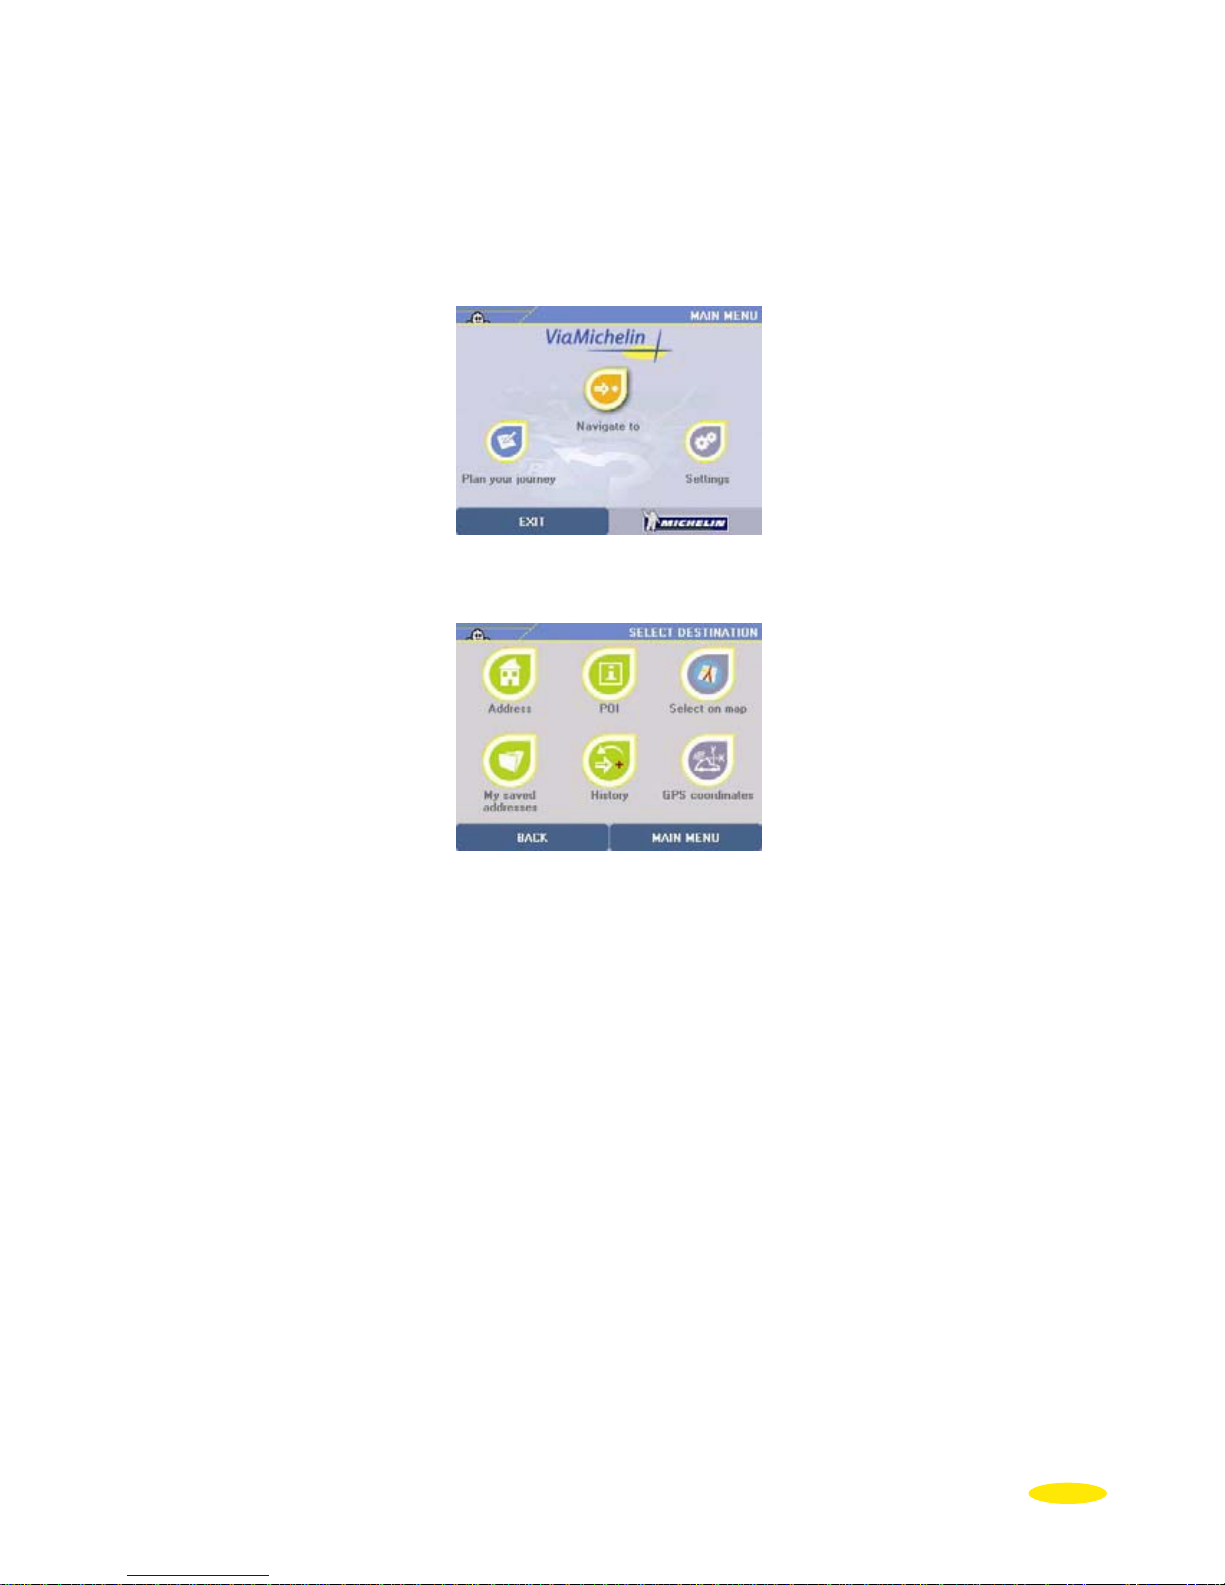
4. Navigate to
• Switch on your ViaMichelin Navigation X-930
• Click on "
Navigate to"
• You can choose your destination by one of 6 search methods:
- to an
Address
- to a POI (Point Of Interest)
- by
Choose a place directly on the map
- in Saved addresses
- in the History of the last 10 journeys made
- by specifying
GPS coordinates
7
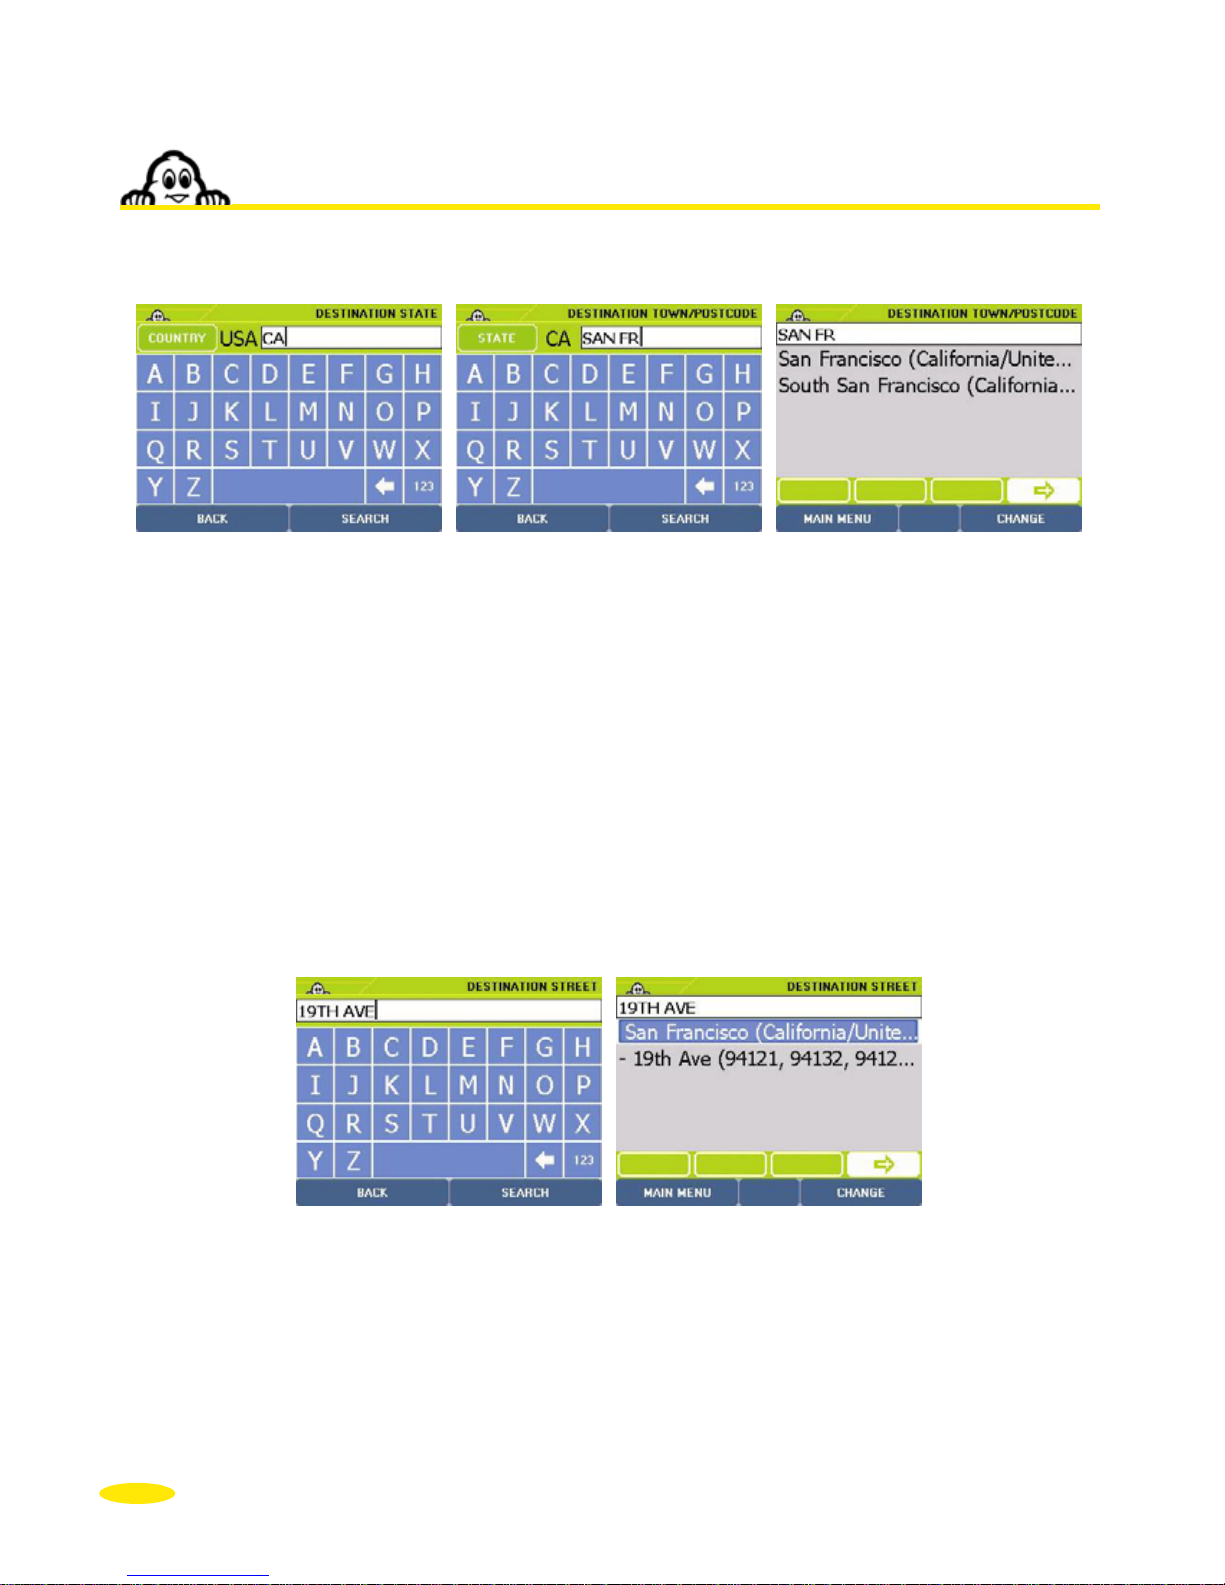
4.1. Address
• Click "Address"
• Enter the name of the destination state by clicking the letters of your choice. You can
enter the complete name of the state, the first letters or the short name.
Example: You can enter TEXAS, TEX or TX.
• If the message "
No address matches your request. Please try a new search" appears,
click
OK and enter a new state name.
For more details, refer to "§ 4.7 - Notes and Tips".
• Click
Search to start a search after entering your search criteria or click Display all to
bring up a list of the states.
• The
Back button returns you to the previous page and the Cancel button stops the
current search.
• If there are several states that meet the criteria you specified, a list of states appears.
Click the direction arrows to view all the states found.
• Click the state you want, or click
Change if you want to modify the search criteria. You
then return to the
Destination State page.
8
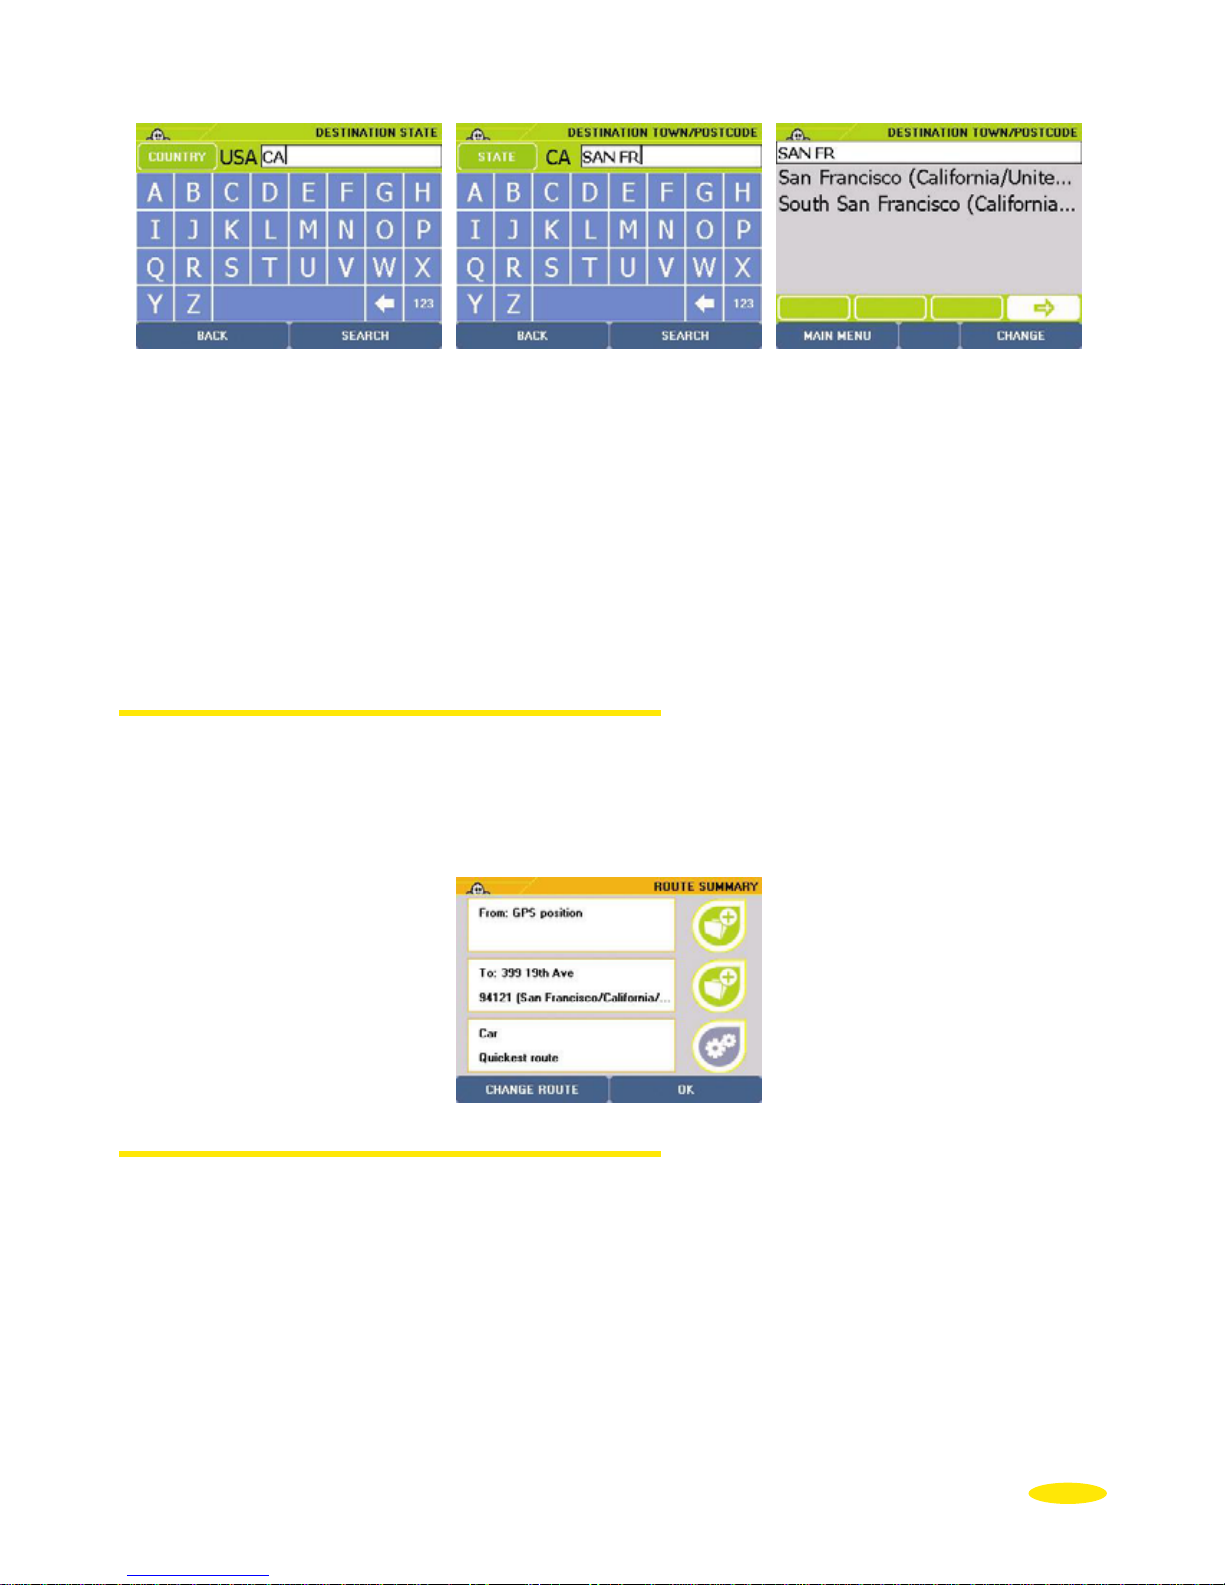
• Enter the name of the
destination town.
• If the message
No POI matches your request. Please try a new search" appears, click
OK and enter a new town name.
• Click on
Search to start a search after entering your search criteria or click on Display all
to bring up a list of the towns.
• The
Back button returns you to the previous page and the Cancel button stops the
current search.
• The
State button (top left) returns you to the Destination State screen where you can
change the search state.
• If there are several towns that meet the criteria you specified, a list of town names
appears. Click the direction arrows to view all the towns found.
• Click the town you want, or click
Change if you want to modify the search criteria. You
then return to the
Destination Town/Postcode page.
• Enter the name of the destination street, without the corresponding street number.
Make sure you use the abbreviations for the types of road: RD for ROAD, ST for STREET,
DR for DRIVE, etc.
• Click
Town Centre if you want to position the arrival point on the geographical centre of
the destination town or click
Back if you want to return to the previous screen.
• Click
Search to start the search.
• If there are several streets that meet the criteria you specified, a list of streets appears.
Click the direction arrows to view all the streets found.
• Click on the street you want, or click
Change if you want to modify the search criteria.
You then return to the
Street screen.
9
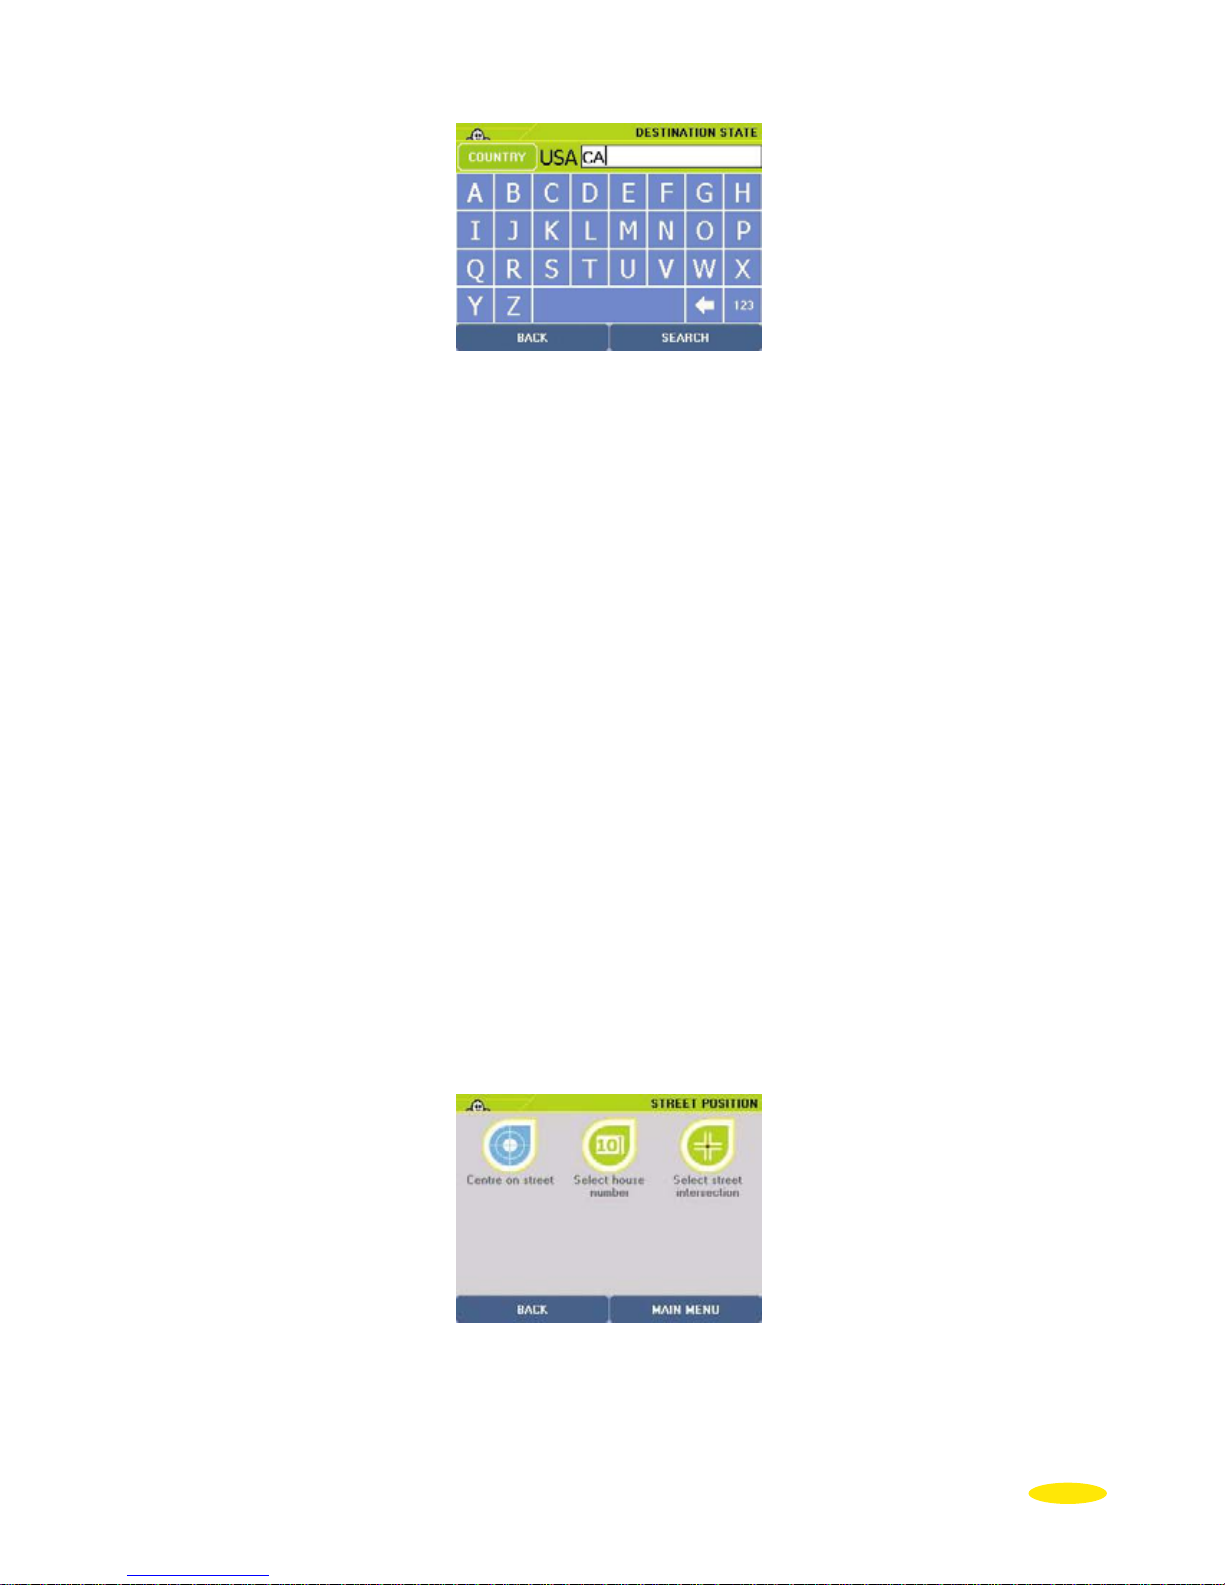
• - Then click on the position you want:
- Centre on street: if you want to position the arrival point in the
geographical centre of the selected street.
- Select House Number: if you want to specify the house number.
- Select street intersection: if you want to position the arrival point at an intersection
with another street.
For subsequent searches:
The state is pre-selected (stored in the memory since your last search) and you
immediately access the Destination Town screen.
If you want to change the state being searched, click the
State button top left and select a
new state.
4.1.1. Centre on street
• You go directly to the "Route Summary" screen.
• Click "
OK" to start calculating the route or "Change Route" if you want to use a different
method to calculate the route.
• The Navigation screen is displayed once the route has been calculated.
• Start driving. The voice guidance system will give you directions to your destination.
For more details, refer to "§4.7 Notes and Tips".
4.1.2. Select House Number
• Click "Select House Number".
• Enter the house number you want or click "
Display all" to bring up a list of known house
numbers in the selected street.
• Click "
Search".
• If the system does not recognise the number entered, a list of known numbers is
displayed. Click on the number closest to the one you want, or click "
Change" if you
10

want to search for a different house number. You then return to the "Select House
Number
" screen.
• If there is no vehicle access to the house number you entered (pedestrian road, private
road, etc.) the message “
No vehicle access to address. We have selected the nearest
road
” is displayed. Click "OK" to position your arrival point automatically as close as
possible to your desired destination point.
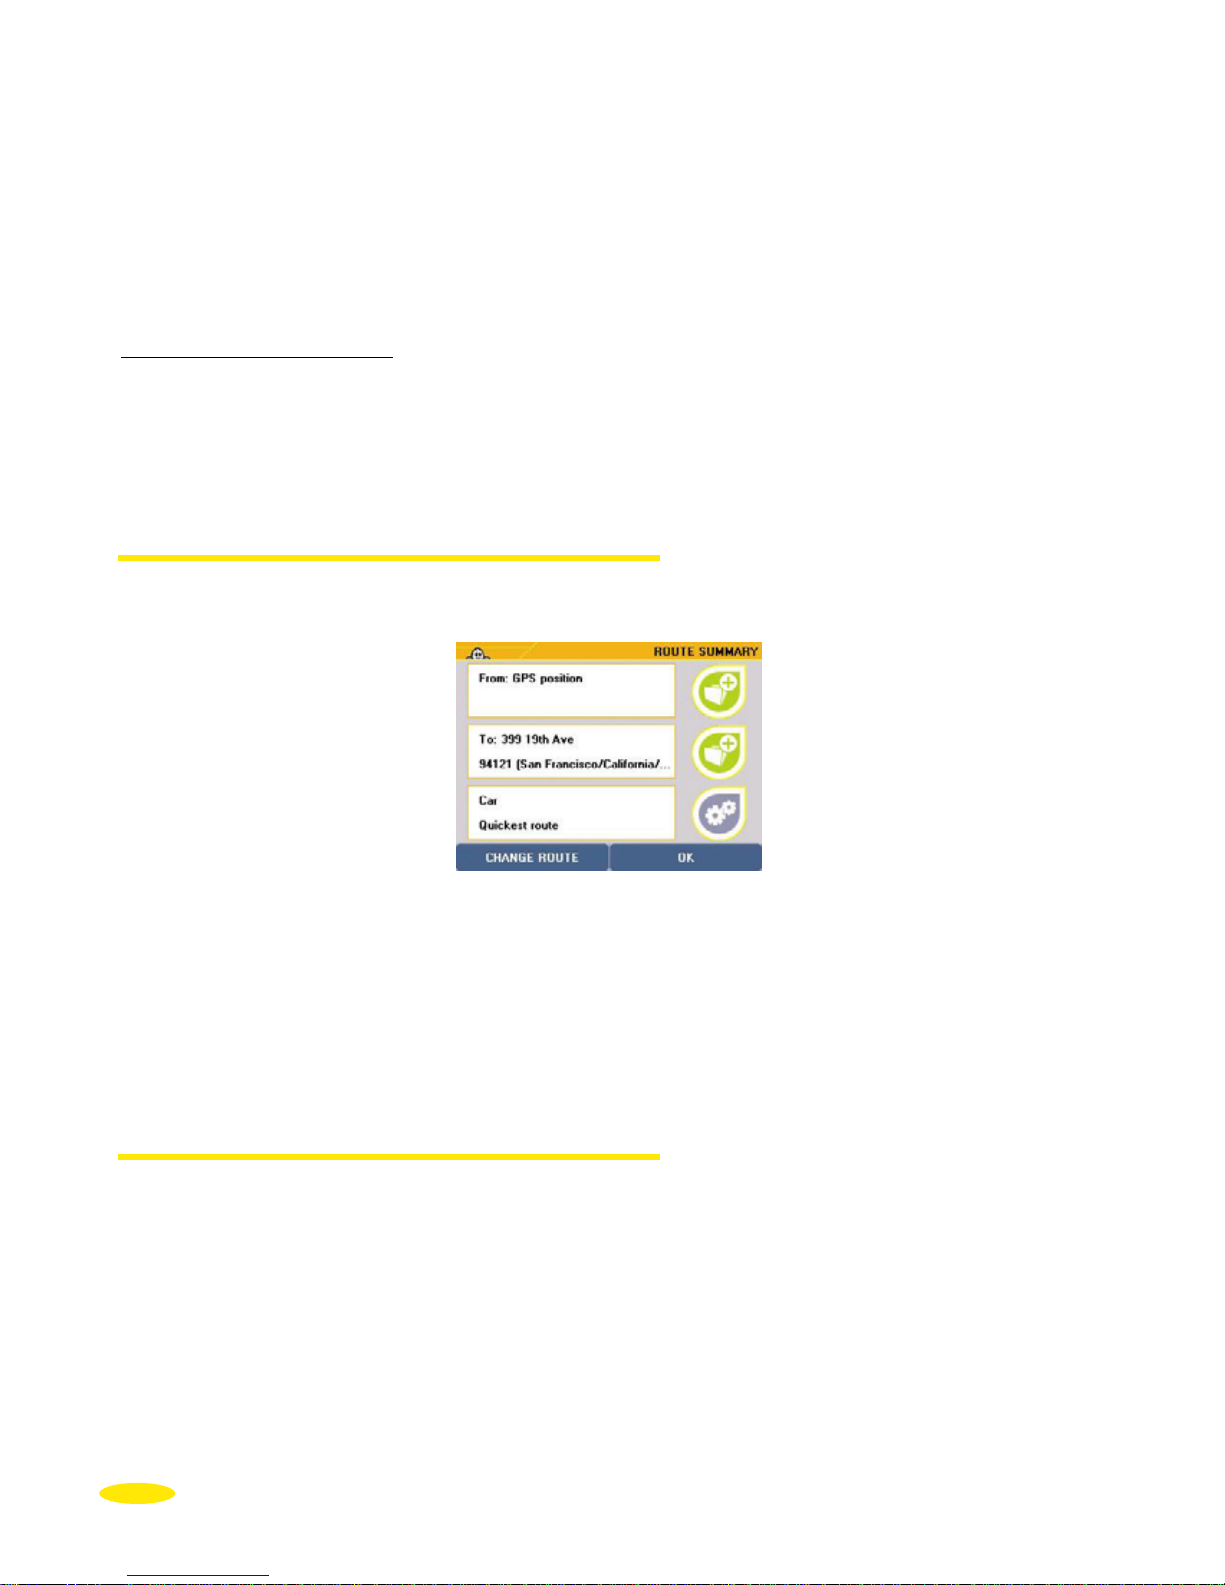
• The next screen provides a summary of the settings used to calculate your route.
• Click "
OK" to start working out the route or "Change Route" if you want to use a
different method of calculation.
• The Navigation screen is displayed once the route has been calculated.
• Start driving. The voice guidance system will give you directions to your destination.
For more details, refer to "§4.7 Notes and Tips".
4.1.3. Select Street Intersection
• Click "Street intersection".
• Enter the name of the street that intersects your destination street or click "
Back" to
return to the previous screen.
• Click "
Search".
If there are several streets that meet your criteria, a list of street names is displayed. Click
the up or down arrows to view all the streets found.
• Click the street you want, or click "
Change" if you want to modify the search criteria. You
then return to the "
Street intersection" screen.
• The next screen gives a summary of your route calculation settings.
• Click "
OK" to start working out the route or "Change Route" if you want to use a
different method of route calculation.
• The Navigation screen is displayed once the route has been calculated.
• Start driving. The voice guidance system will give you directions to your destination.
For more details, refer to "§4.7 Notes and Tips".
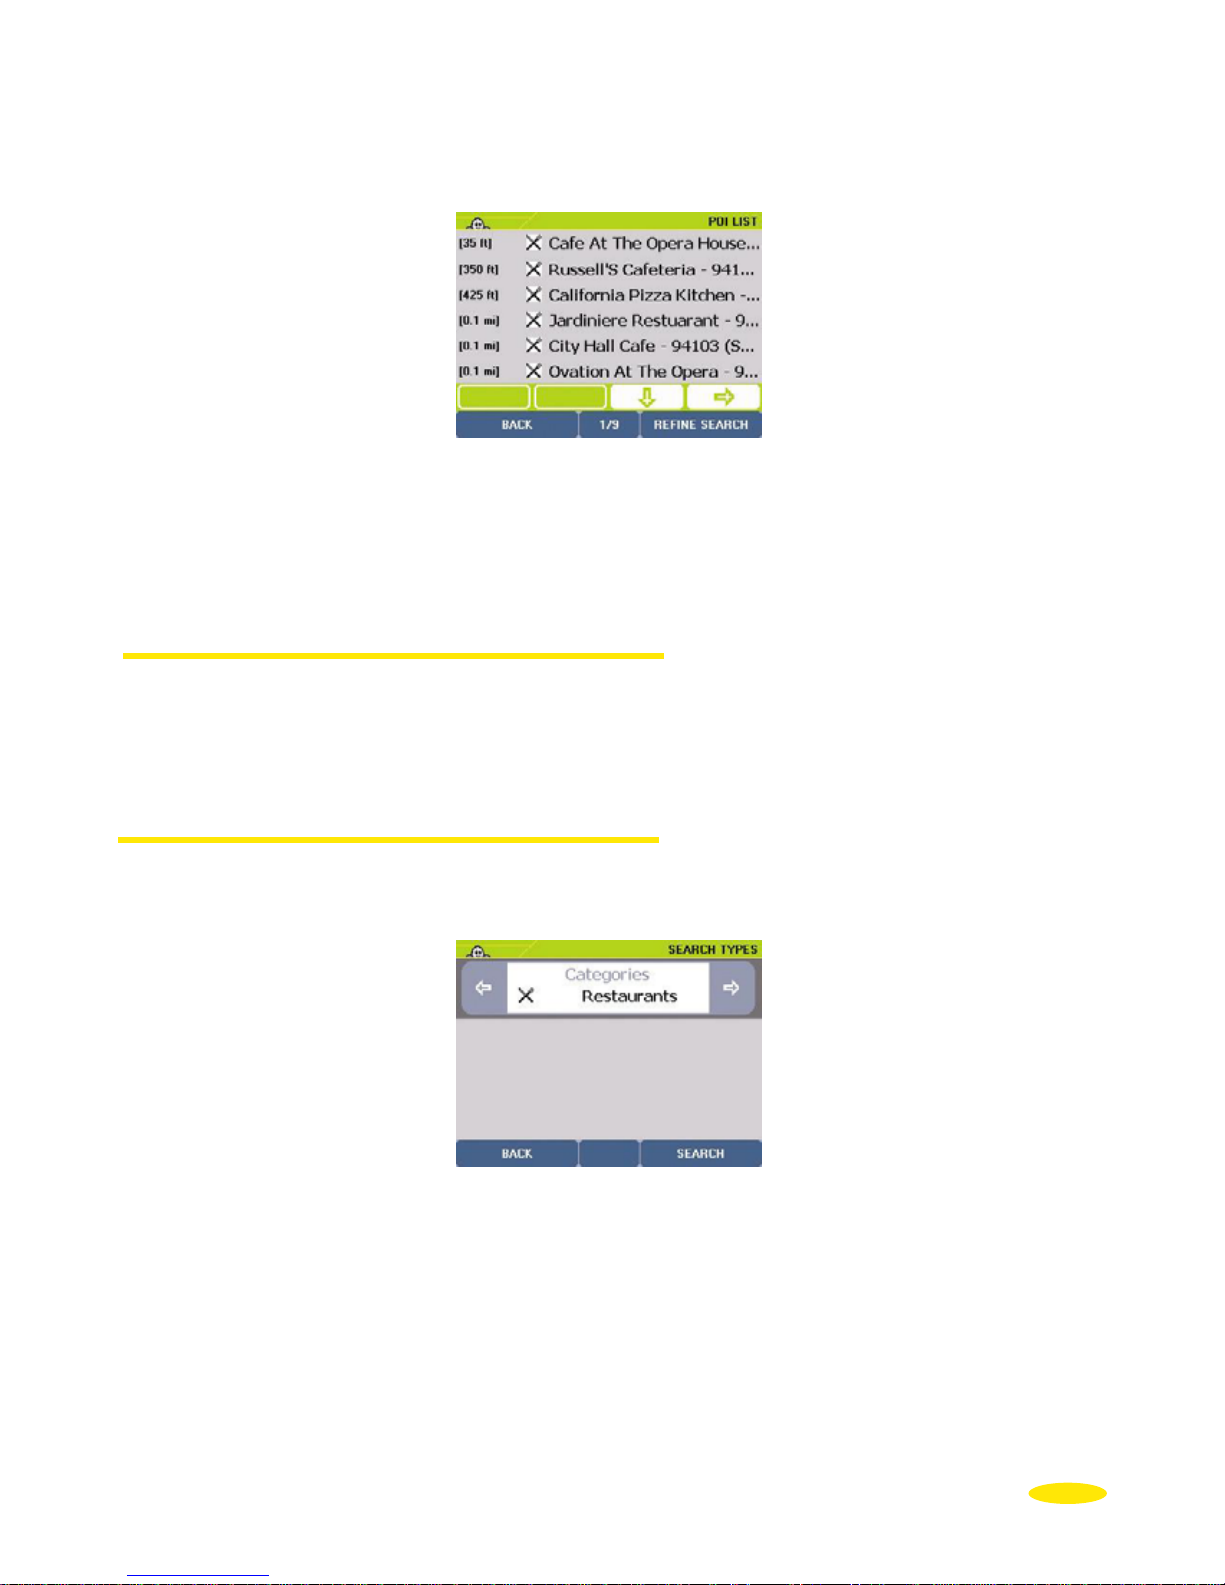
4.2. POI
• Click "POI" (Points Of Interest)
• Click the direction arrows to view all the available categories of POI or "
Back" to return
to the previous screen.
• Click the POI category you want.
For more details, refer to "§4.7 Notes and Tips".
11
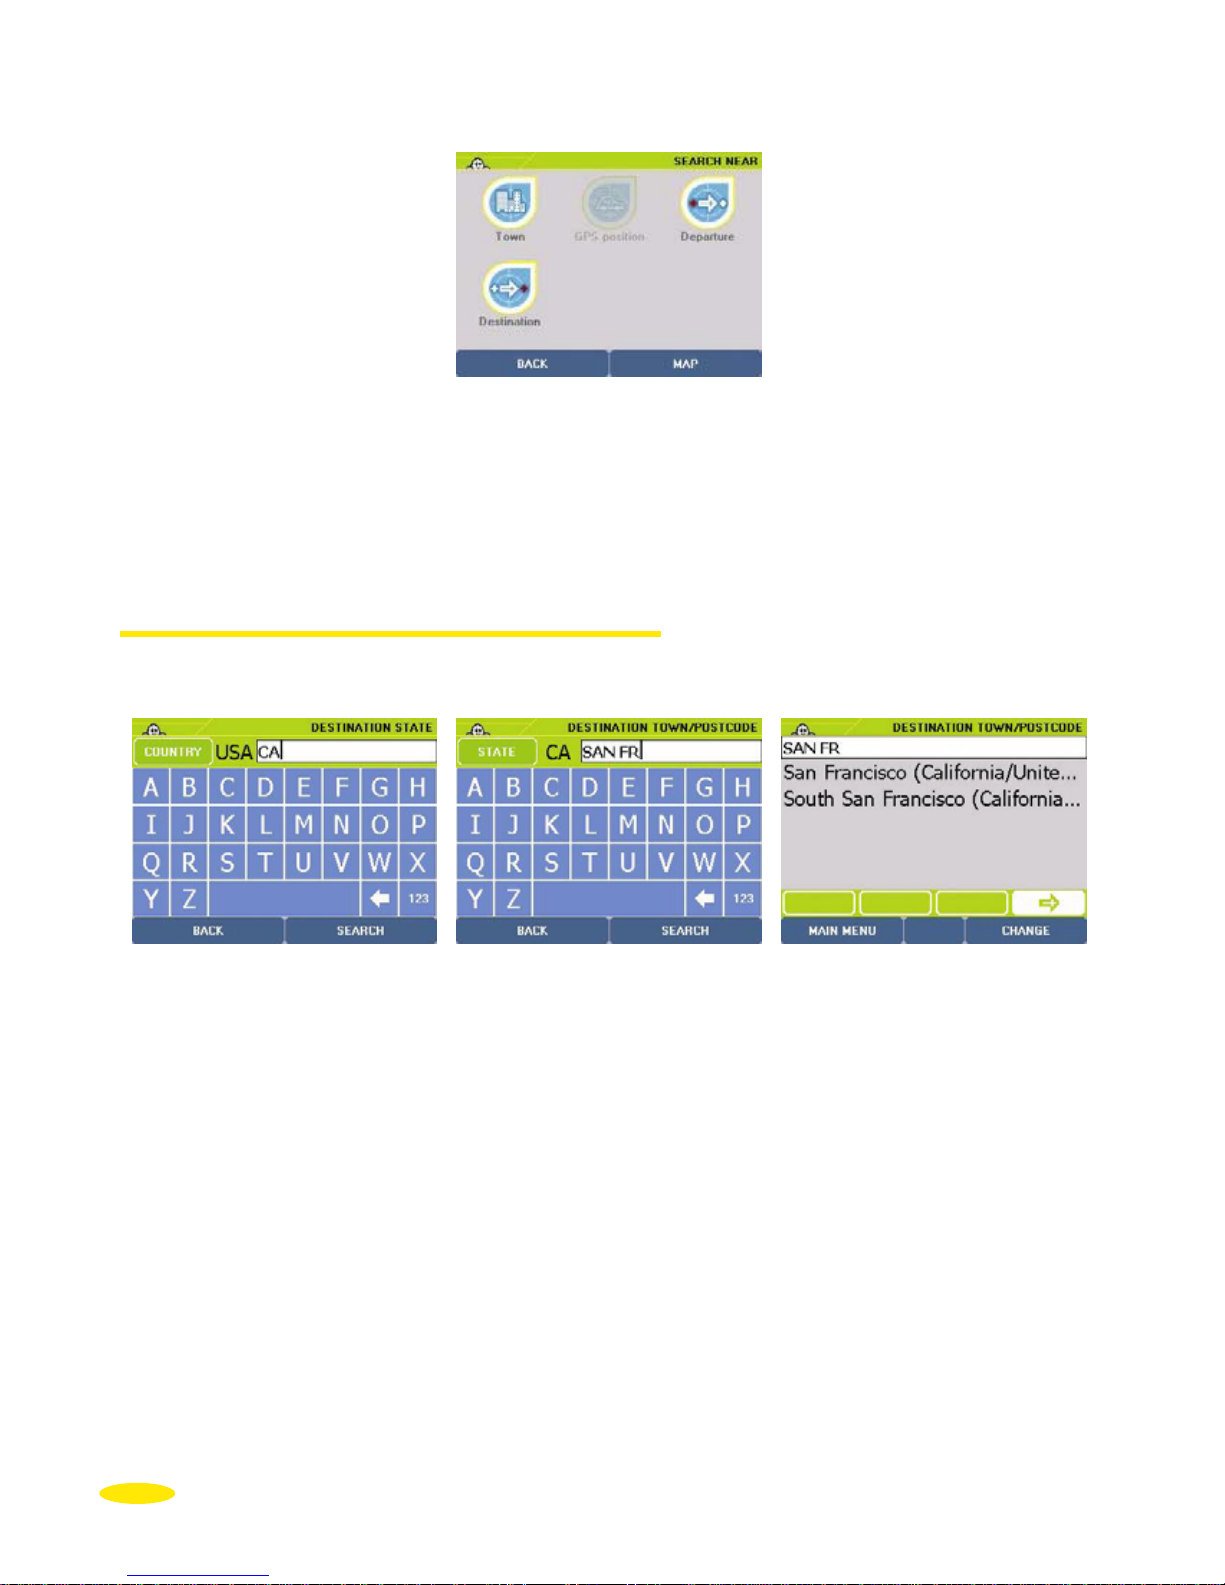
• Then click the place where you want to search:
-
Town: looks for a selected POI in the town you choose.
-
GPS Position: looks for a selected POI near the position given by the GPS.
-
Departure Point: inactive in this method of route planning.
-
Arrival Point: looks for a POI near your arrival point.
4.2.1. Town
• Click "Town".
• Enter the name or postcode of the destination town. If the message “
No address
matches your request. Please try a new search
” appears, click "OK" and enter a new
town name.
• By default, the last state in which you made a search is stored in memory. If you want to
change the state being searched, click the
State button top left and select a new state.
For more details, refer to "§4.7 Notes and Tips".
• Click "
Search" to start searching after entering your search criteria or click "Display all"
to bring up a list of the 50 main towns. The "
Back" button returns you to the previous
page and the "
Cancel" button stops the current search.
• If there are several towns that meet your criteria, a list of town names is displayed. Click
the direction arrows to view all the towns found.
12
• Click the town you want, or click "Change" if you want to modify the search criteria. You
then return to the "
Destination Town/Post code" page.
• Then click the POI you want or "
Refine search" if you want to specify particular search
criteria:
- Name Search
- Criteria Search
4.2.1.1. Name Search
• Click "
Name Search".
• Enter the name of the POI you want or click "
Display all" for a list of the POIs found by
the system.
4.2.1.2. Criteria Search
• Click "
Criteria search".
• Select the criterion you want from the different choices using the right or left arrows and
then click "
Search".
• If the message “
No POI matches your request. Please try a new search” appears, click
"
OK" to return to the choice of criteria.
• You then access the
POI description screen.
13
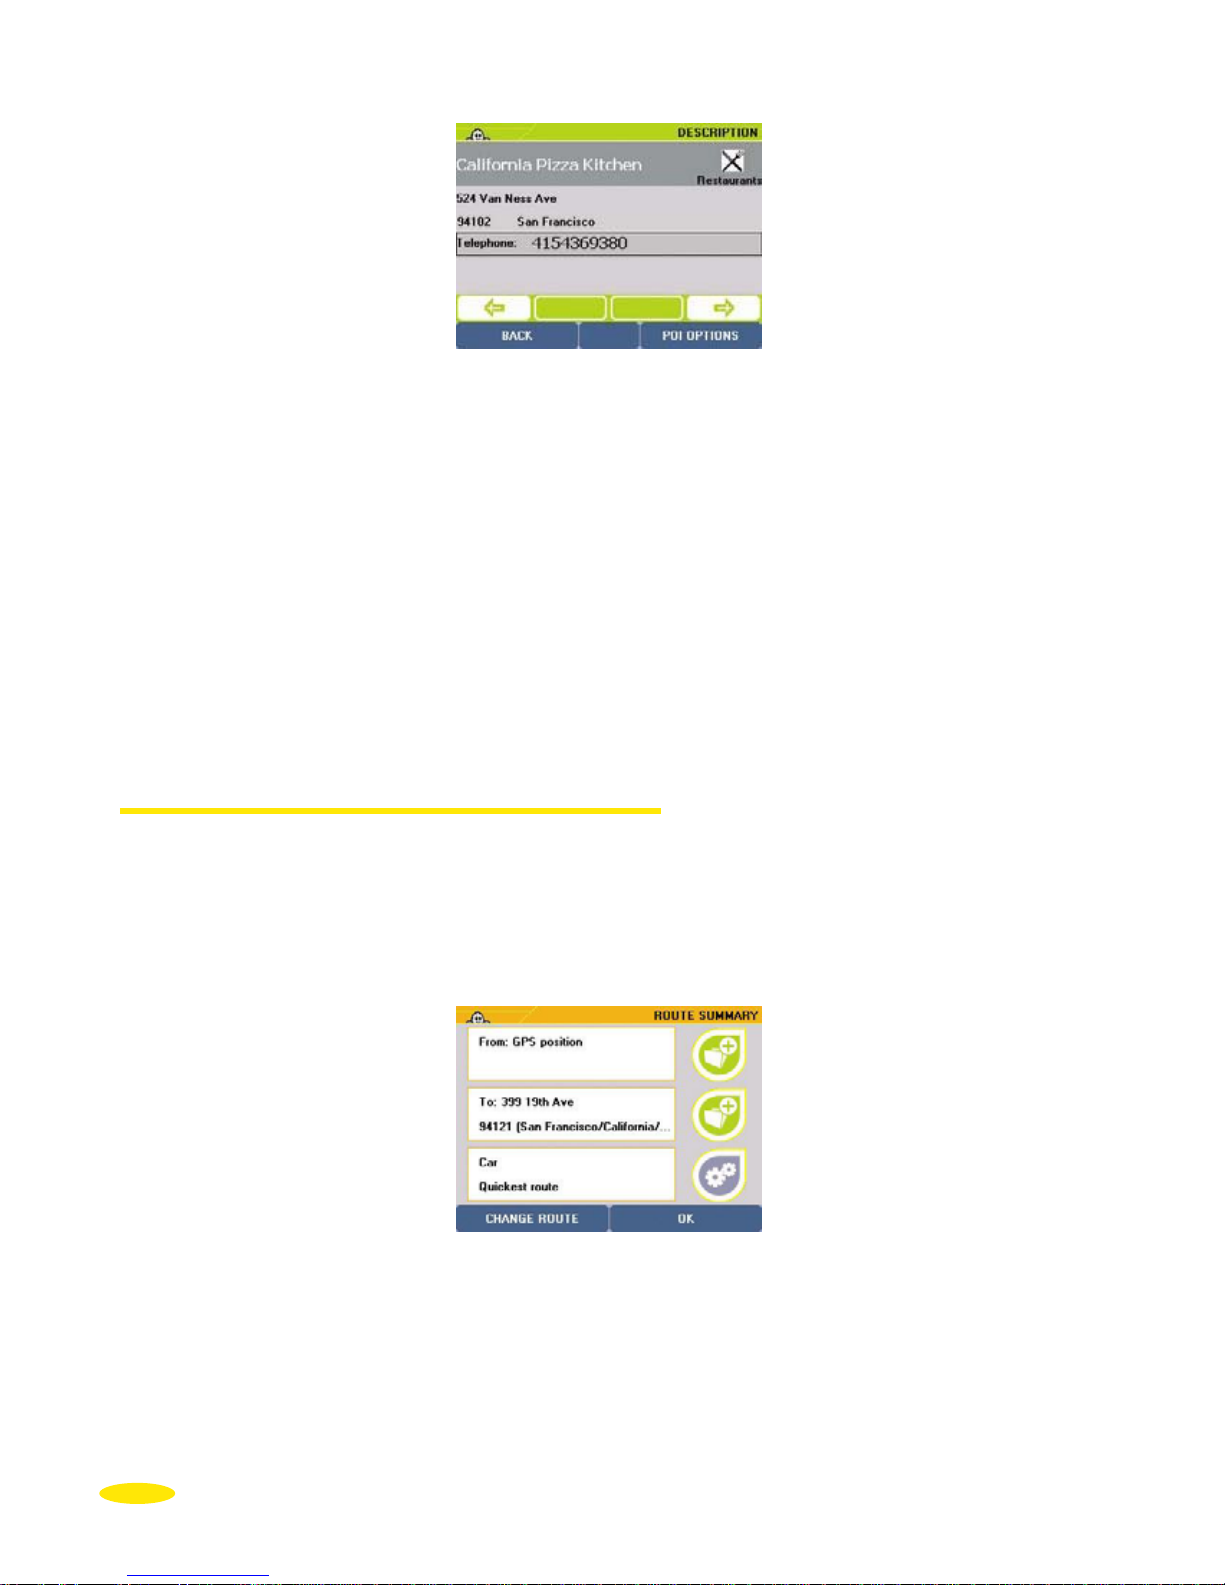
• You can click the direction arrows:
- left: to view the previous POI
- right: to view the next POI
• Click "
OK" to confirm your choice, or "Back" to return to the list of POIs on the previous
screen.
• You then go to the "
Route Summary" screen.
• Click "OK" to start calculating the route or "Change Route" if you want to use a different
method to calculate the route.
• The Navigation screen is displayed once the route has been calculated.
• Start driving. The voice guidance system will give you directions to your destination.
For more details, refer to "§4.7 Notes and Tips".
4.2.2. GPS Position or Arrival Point
• Click "GPS Position" or "Arrival Point".
• Enter the name of the POI you want.
• Click "
Search".
• Then click the POI you want:
• You then go to the "
Route Summary" screen.
• Click "OK" to start calculating the route or "Change Route" if you want to use a different
method to calculate the route.
• The Navigation screen is displayed once the route has been calculated.
• Start driving. The voice guidance system will give you directions to your destination.
For more details, refer to "§4.7 Notes and Tips".
14
4.3. Select on map
• Click "Select on map".
• Zoom in and move the map to position the location marker on the arrival point you want.
For more details, refer to "§4.7 Notes and Tips".
• Click "
Confirm arrival" to accept the position of your arrival point or "Back" to return to
the previous screen.
• You then go to the "
Route Summary" screen.
• Click "
OK" to start calculating the route or "Change Route" if you want to use a different
method to calculate the route.
• The Navigation screen is displayed once the route has been calculated.
• Start driving. The voice guidance system will give you directions to your destination.
For more details, refer to "§4.7 Notes and Tips".
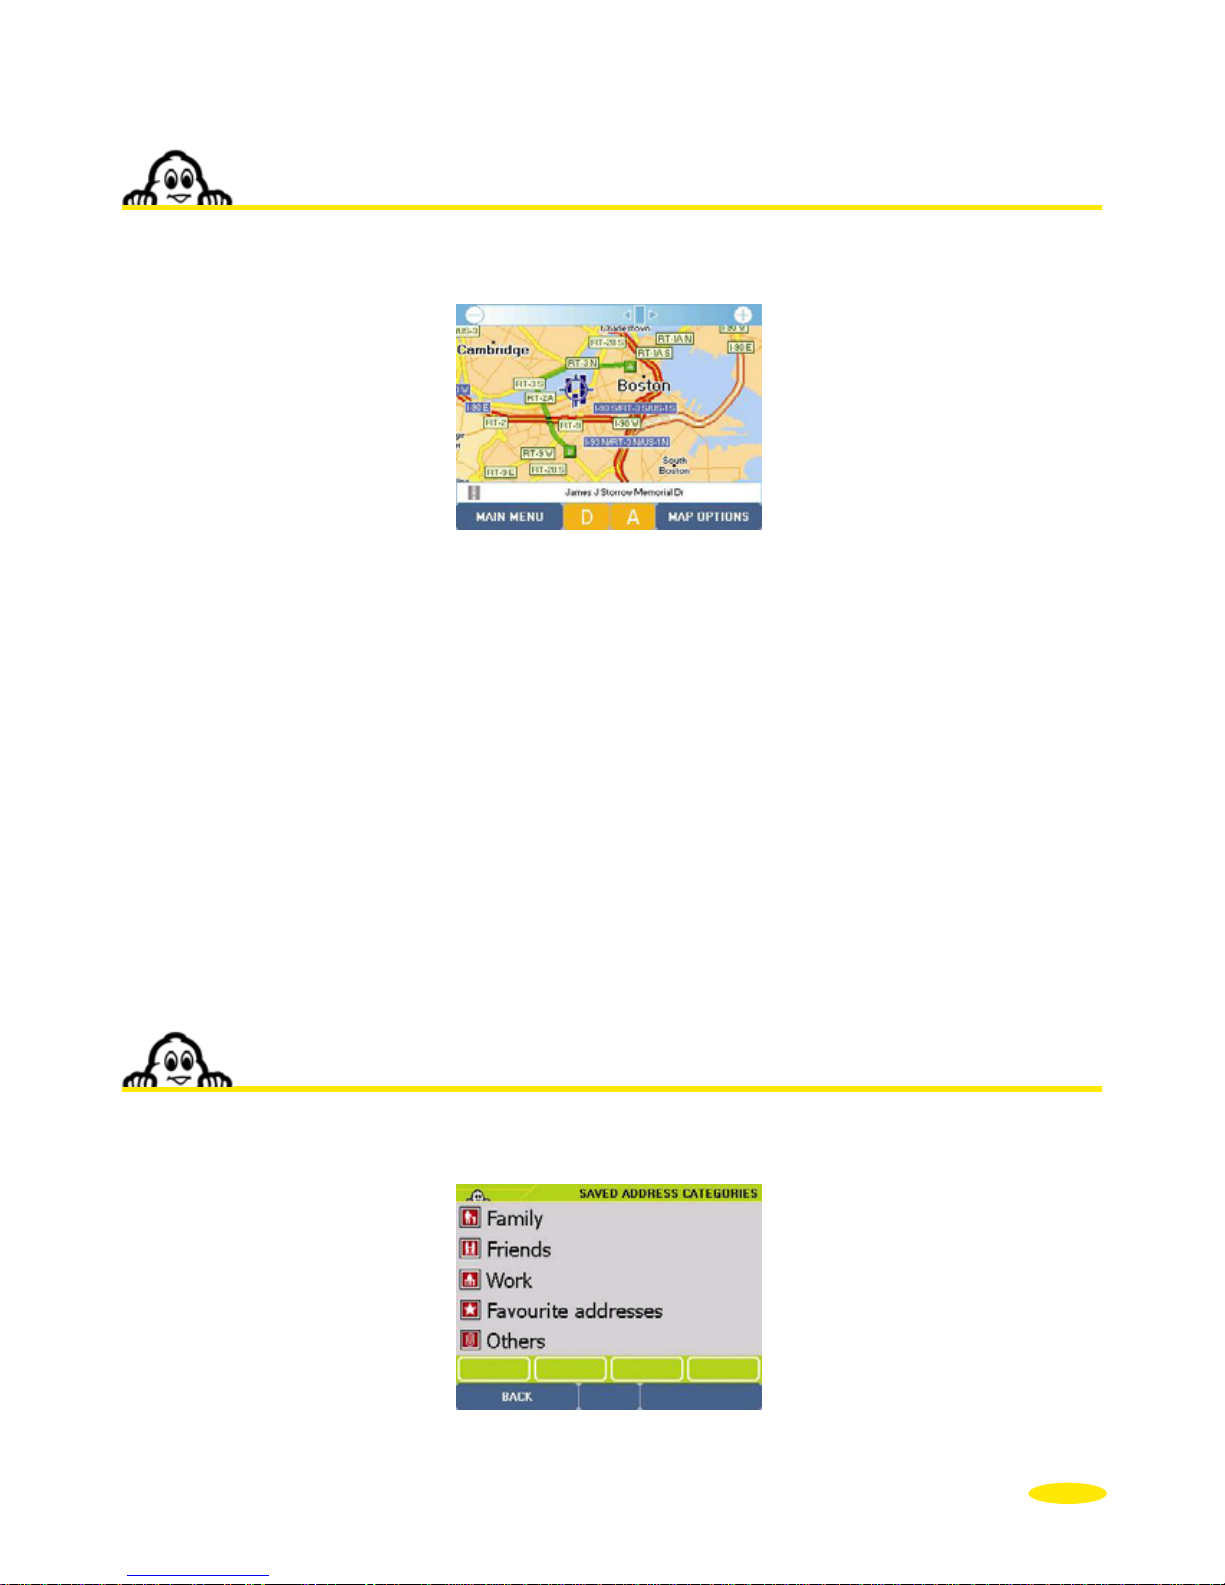
4.4. My saved addresses
• Click "My saved addresses"
15

• Click the category where the saved address you want is located.
• Click the type of search you want to do:
-
Name search to find a saved address from a name.
-
Search near to find a saved address near a place.
4.4.1. Name Search
• Click "Name Search".
• Enter the name of the saved address you want or click "
Display all" for a list of the saved
addresses found by the system. Click "
Back" to return to the previous screen.
• If a list of your saved addresses is displayed, click the direction arrows to view the whole
list. Click the saved address you want.
• You then go to the "
Route Summary" screen.
4.4.2. Search near
• Click "Search near".
• Click the type of search you want:
-
Town: to search for a saved address in the town of your choice.
-
GPS Position: to find a saved address near the position established by the GPS.
-
Departure Point: inactive in this method of route planning.
-
Arrival Point: to select a saved address near your arrival point.
4.4.2.1. Town
• Click "
Town". You go directly to the "Destination Town/Post code" screen.
• By default, the last state in which you made a search is stored in memory. If you want to
change the state being searched, click the
State button top left and select a new state.
16
• Enter the name of your destination town by clicking the relevant letters or postcode or
click "
Display all" to bring up a list of the main towns. Click "Back" to return to the
previous screen.
• Click "
Search".
• If there are several town names that meet your criteria, the system lists them. Click the
direction arrows to view all the town names. Click the town you want or click "
Change"
to return to the town name screen.
• On the list displayed on the screen, click the saved address you want.
• You then go to the "
Route Summary" screen.
4.4.2.2. GPS Position
• Click "
GPS Position".
• The system displays a list of saved addresses located near the position calculated by the GPS.
• Click the saved address you want or click "
Back" to return to the previous screen.
4.4.2.3. Arrival Point
• Click "
Arrival point".
• In the list shown on the screen, click the saved address you want or click "
Back" to return
to the previous screen.
• You then go to the "
Route Summary" screen.
• Click "
OK" to start calculating the route or "Change Route" if you want to use a different
method to calculate the route.
• The Navigation screen is displayed once the route has been calculated.
17
• Start driving. The voice guidance system will give you directions to your destination.
For more details, refer to "§4.7 Notes and Tips".
4.5. History
• Click "History".
• A list of the last 10 destinations is displayed. Click the address you want.
• You then go to the "
Route Summary" screen.
• Click "
OK" to start calculating the route or "Change Route" if you want to use a different
method to calculate the route.
• The Navigation screen is displayed once the route has been calculated.
• Start driving. The voice guidance system will give you directions to your destination.
For more details, refer to "§4.7 Notes and Tips".
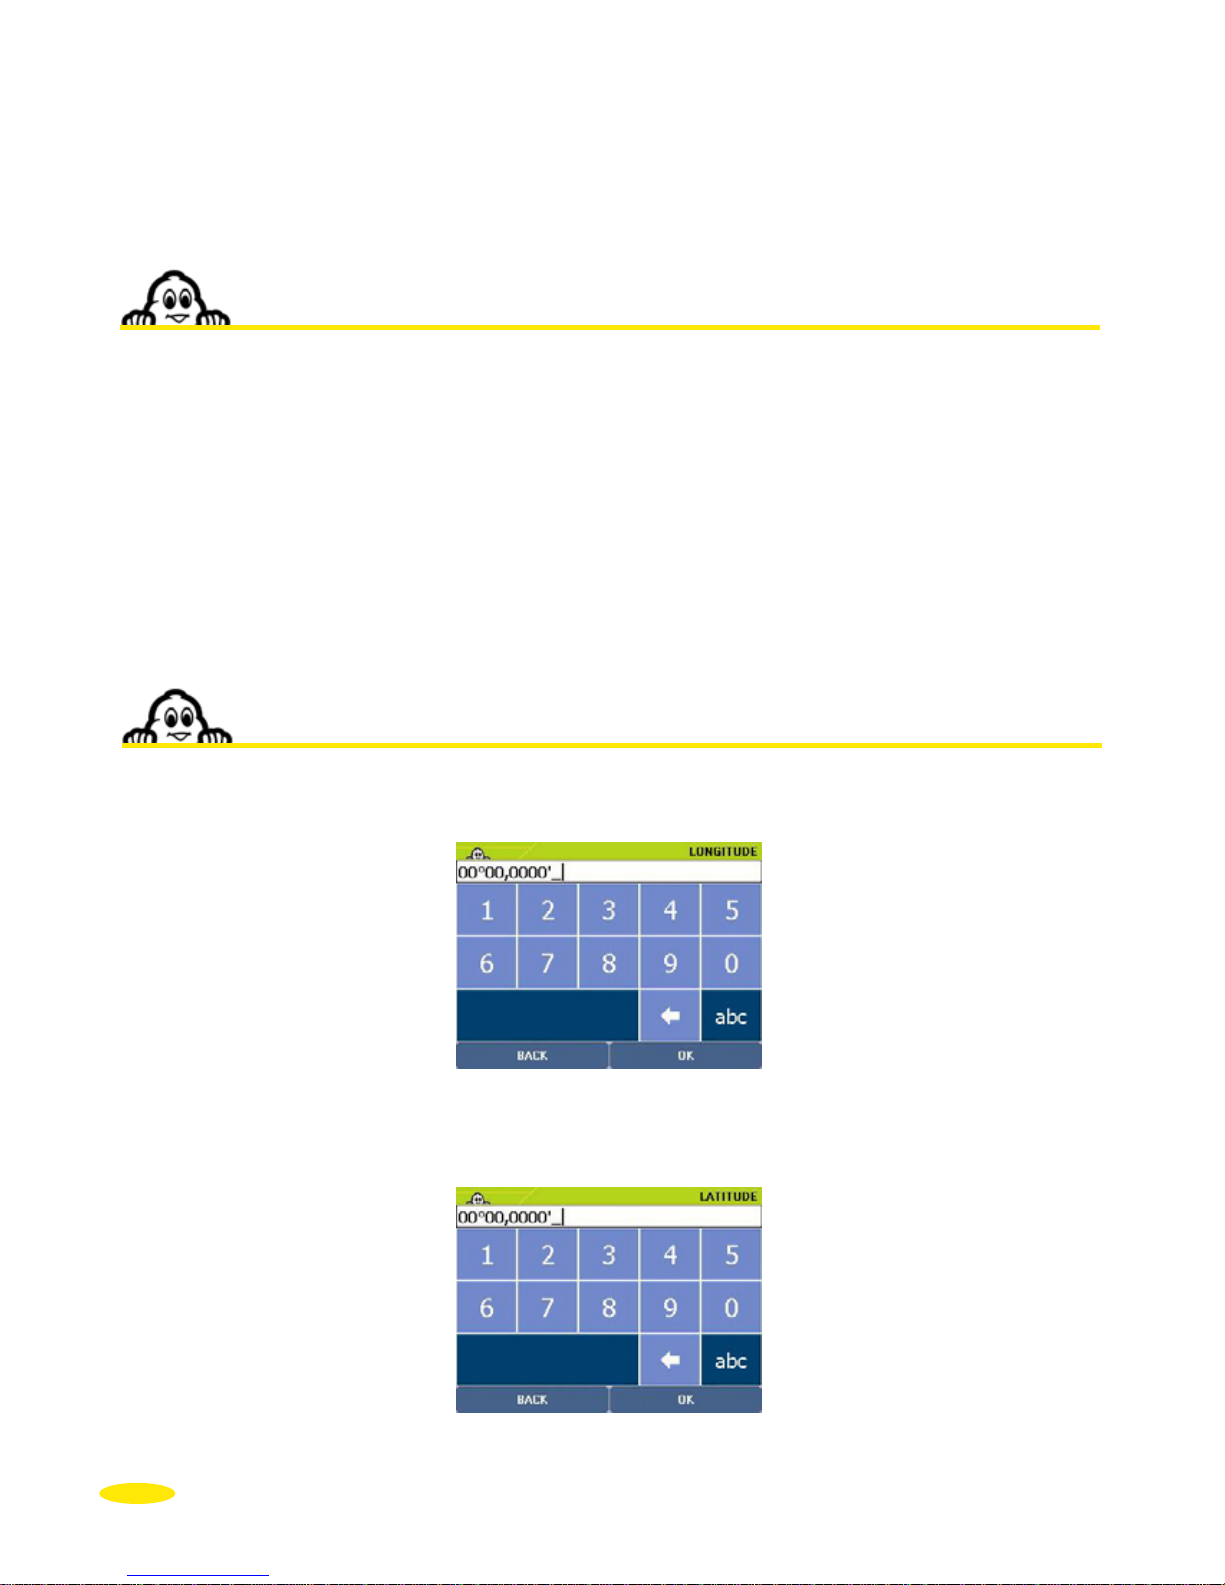
4.6. GPS Coordinates
• Click "GPS coordinates".
• Enter the longitude (E/W) in degrees, minutes and hundredths of minutes, then specify
the direction: East or West, by selecting "
E" or "W" and click on "OK".
18

• Enter the latitude (N/S) in degrees, minutes and hundredths of minutes. Specify the
direction: North or South, by selecting "
N" or "S".
• Click "
OK" to start calculating the route or "Change Route" if you want to use a different
method to calculate the route.
• The Navigation screen is displayed once the route has been calculated.
• Start driving. The voice guidance system will give you directions to your destination.
For more details, refer to "§4.7 Notes and Tips".
4.7. Notes and Tips
This paragraph contains additional information and tips to help you get the best out of
your ViaMichelin Navigation X-930 system:
• To delete a letter, click the left arrow at the bottom right of the screen
• To access the number pad, click the [123] box;
• To return to the alphanumeric keyboard, click the [abc] box.
• To find a town quickly, you can enter a few letters of the town’s name. For example if you
enter "
S FR" the search engine will display "San Francisco (California / United States)",
"
SAN FR" will also display "San Francisco (California / United States)".
• To find a street quickly, you can enter a few letters of the street name you want; for example, if
you enter "
GE WASH", the search engine displays "GEORGE WASHINGTON AVE"
• On the "
Route Summary" screen, you can use the right-hand buttons to save the departure
point and the arrival point and to change the navigation settings.
• During Navigation, only the "
fastest method" of route calculation is used.
• The calculated route is displayed on the map as a green line highlighting the roads taken.
• If you start the search without entering the town name by clicking "
Display all", the system
will list the first 50 towns.
• You can use the direction arrows to view the whole POI list (Points Of Interest).
• If you start the search without entering the POI by clicking "
Display all", the system will list
all the POIs it knows.
• When searching for a POI in a town, the system presents the POIs in descending order of
distance from the town centre.
• When searching for a POI near your arrival point, the system presents the POIs in
descending order of distance from your arrival point.
• Click the (-) and (+) buttons in the bar at the top of the screen to zoom one level out or in
on the map.
• Click in the space on the top bar to zoom several levels in or out on the map.
• Click the cursor in the top bar and move it to the zoom level you want.
19

• Click the screen and move the map in the direction you want, to display the area you are
interested in.
If the coordinates show
must be less than 25km from a road” appears. In this case, click "OK" to return to the
longitude input
• If several saved addresses or POIs are very close together, you will need to zoom in to
separate them.
• The history only contains the last 10 destinations used. It is automatically updated: each
new destination replaces the oldest.
•
20
• a point a long way from a road, the message “The place selected
screen.
In the settings screens, you can click the criterion to bring up a list of available criteria.
Then click the one you want to select.
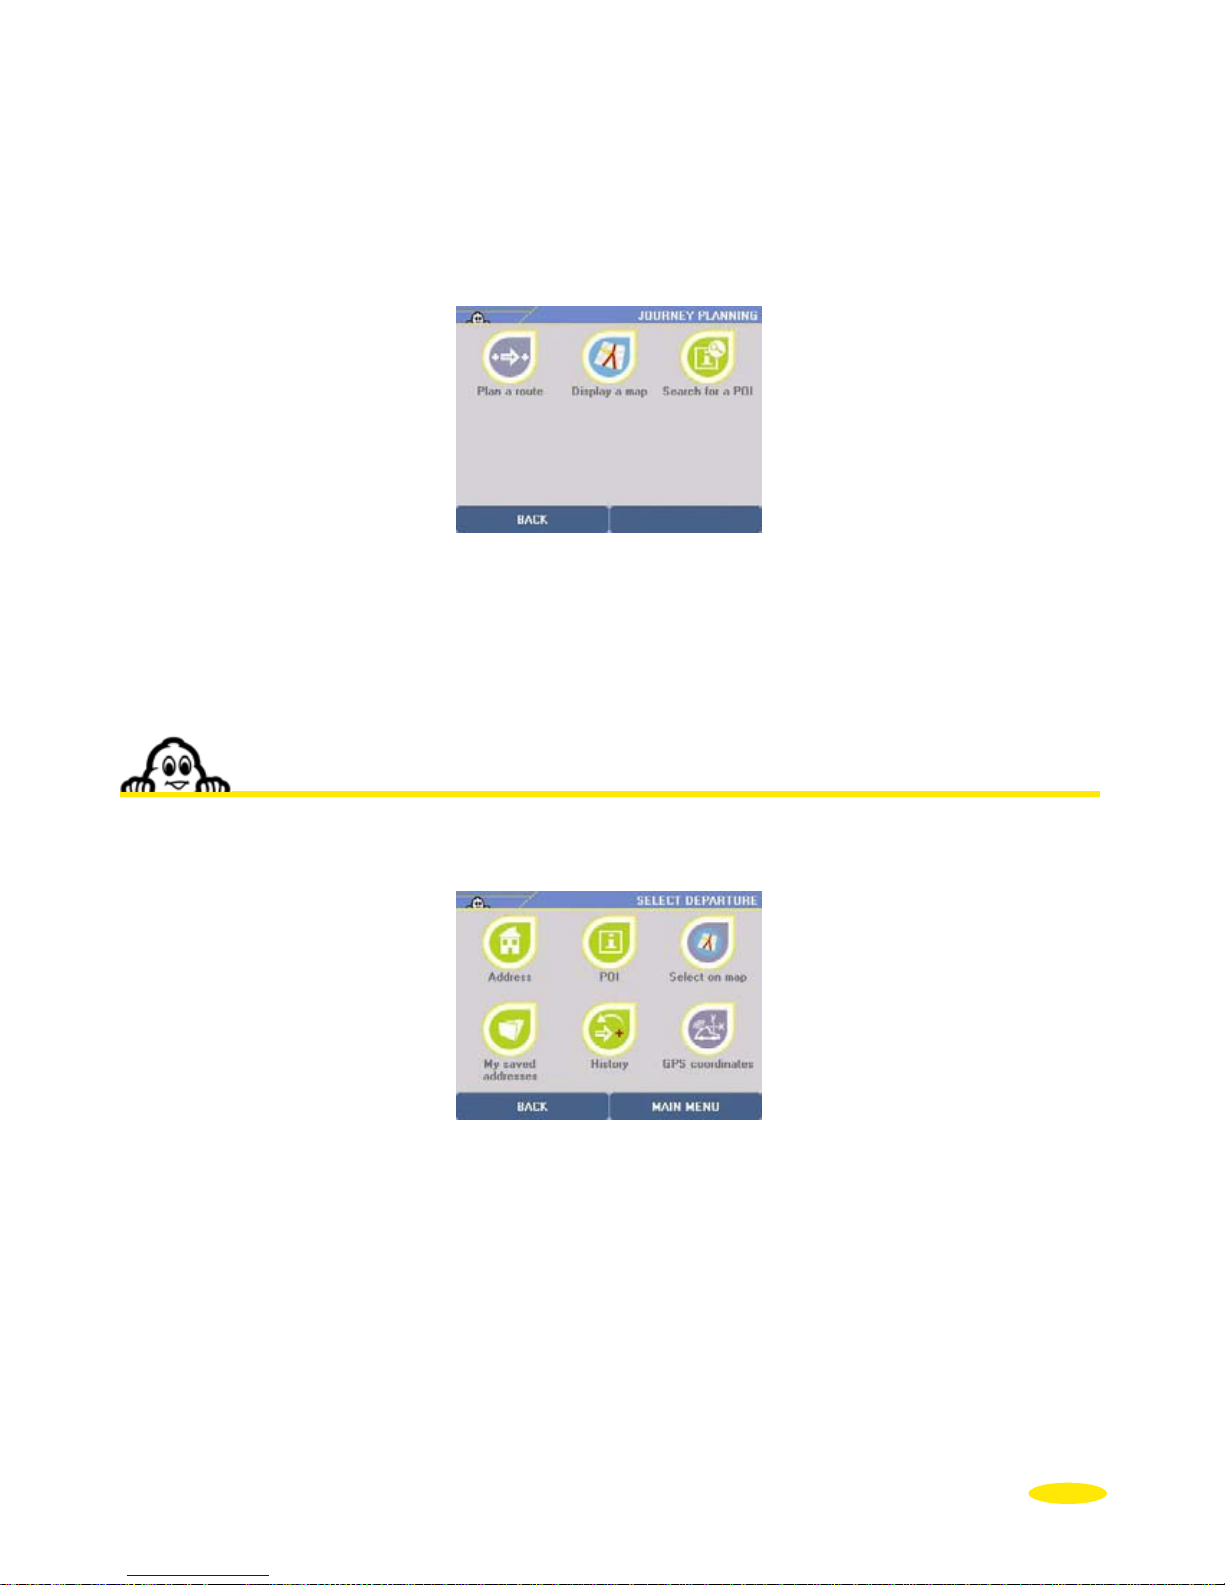
5. Plan your journey
• In the Main Menu, click "Plan your journey".
• You can then plan your journey by one of 3 methods:
-
Plan a route: to specify a departure and arrival point
-
Display a map: to select your departure and arrival points directly on the map
-
Search for a POI: to plan a route to or from a POI
5.1. Plan a route
• Click "Plan a route".
• You then have a choice between 6 types of search to specify your departure point:
- to an
Address
- to a POI (Point Of Interest)
- by
Choose a place directly on the map
- in Saved addresses
- in the History of the last 10 journeys made
- by specifying
GPS coordinates
21
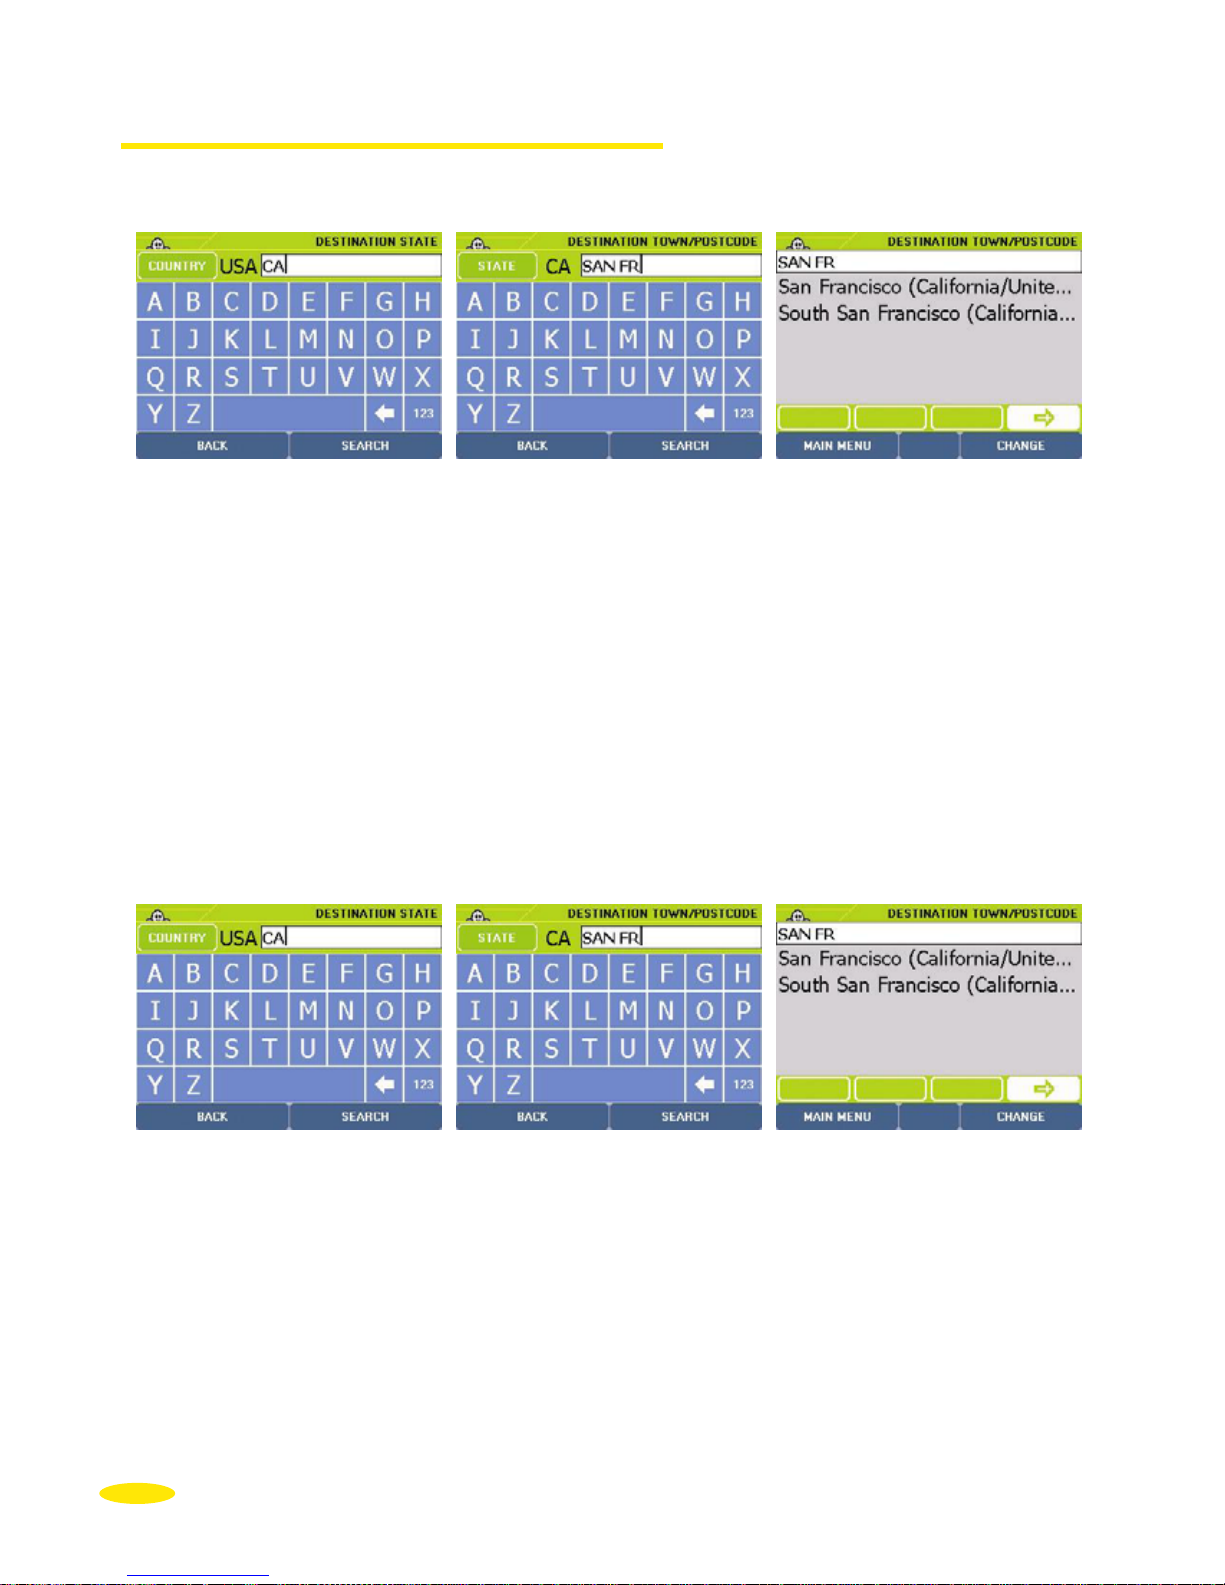
5.1.1. Address
• Click "Address".
• Enter the name of the destination state by clicking the letters of your choice. You can
enter the complete name of the state, the first letters or the short name.
Example: You can enter TEXAS, TEX or TX.
• If the message "
No address matches your request. Please try a new search" appears,
click
OK and enter a new state name.
For more details, refer to "§ 4.7 - Notes and Tips".
• Click
Search to start a search after entering your search criteria or click Display all to
bring up a list of the states.
• The
Back button returns you to the previous page and the Cancel button stops the
current search.
• If there are several states that meet the criteria you specified, a list of states appears.
Click the direction arrows to view all the states found.
• Click the state you want, or click
Change if you want to modify the search criteria. You
then return to the
Destination State page.
22

• Enter the name of the
destination town.
• If the message
No POI matches your request. Please try a new search" appears, click
OK and enter a new town name.
• Click on
Search to start a search after entering your search criteria or click on Display all
to bring up a list of the towns.
The
Back button returns you to the previous page and the Cancel button stops the current
search.
The
State button (top left) returns you to the Destination State screen where you can
change the search state.
• If there are several towns that meet the criteria you specified, a list of town names
appears. Click the direction arrows to view all the towns found.
• Click the town you want, or click
Change if you want to modify the search criteria. You
then return to the
Destination Town/Postcode page.
• Enter the name of the destination street, without the corresponding street number.
Make sure you use the abbreviations for the types of road: RD for ROAD, ST for STREET,
DR for DRIVE, etc.
• Click
Town Centre if you want to position the arrival point on the geographical centre of
the destination town or click
Back if you want to return to the previous screen.
• Click
Search to start the search.
• If there are several streets that meet the criteria you specified, a list of streets appears.
Click the direction arrows to view all the streets found.
• Click on the street you want, or click
Change if you want to modify the search criteria.
You then return to the
Street screen.
• Then click on the position you want:
- Centre on street: if you want to position your arrival point in the
geographical centre of the street (for more information,
refer to §4.1.1.).
- Select House Number: if you want to specify the house number (for more
information, refer to §4.1.2)
- Select street intersection: if you want to position your departure point at an intersection
with another street (for more information, refer to §4.1.3).
23
 Loading...