

Page 1
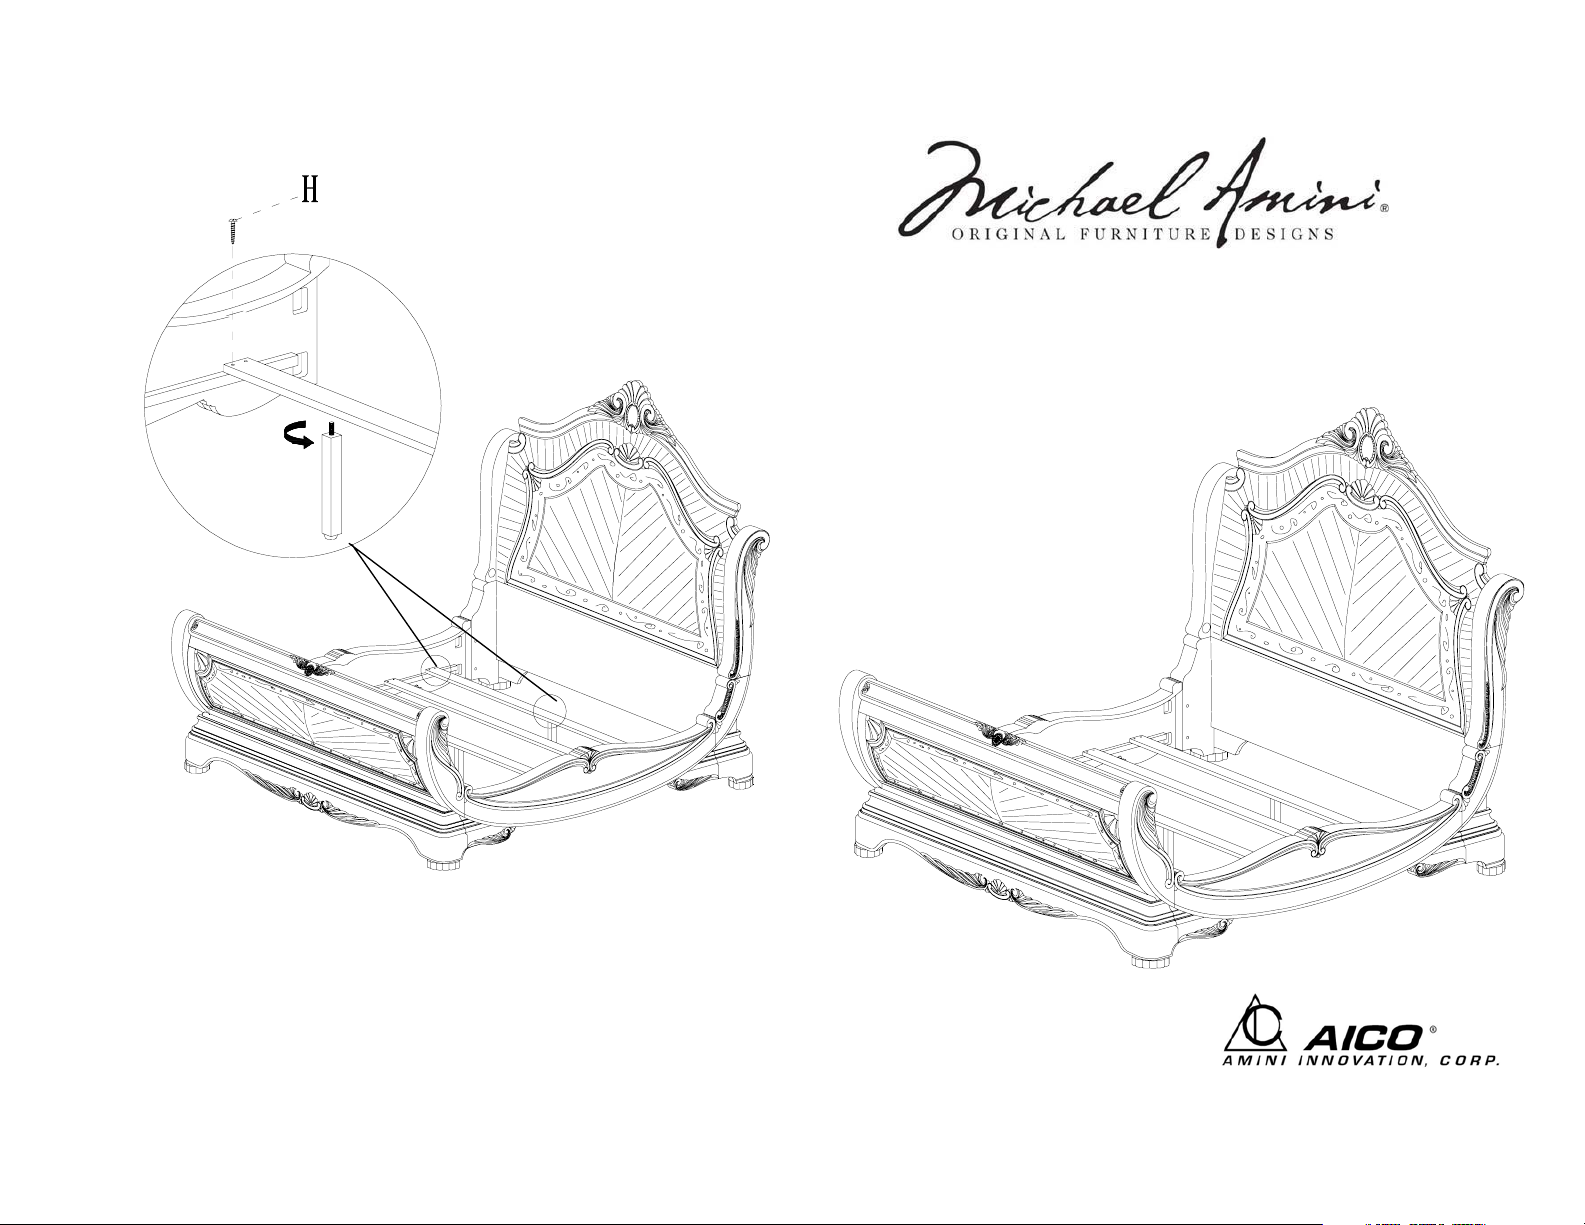
Step2
Figure 2
Queen & King Bed Assembly Instructions
65011NR/021N/031NV/016NR/026N/036NV/018NR/028N/038NV-28
Cortina Colletion
Instructions:
Figure 2
1. Fasten wood support to wood slat by using H (Screw) to rail.
2. Your bed is now ready for your enjoyment .
Congratulations on your purchase.
Rest assured only the finest materials, skilled artisans and modern
engineering were used to carefully construct this exquisite piece.
www.amini.com
Page 2
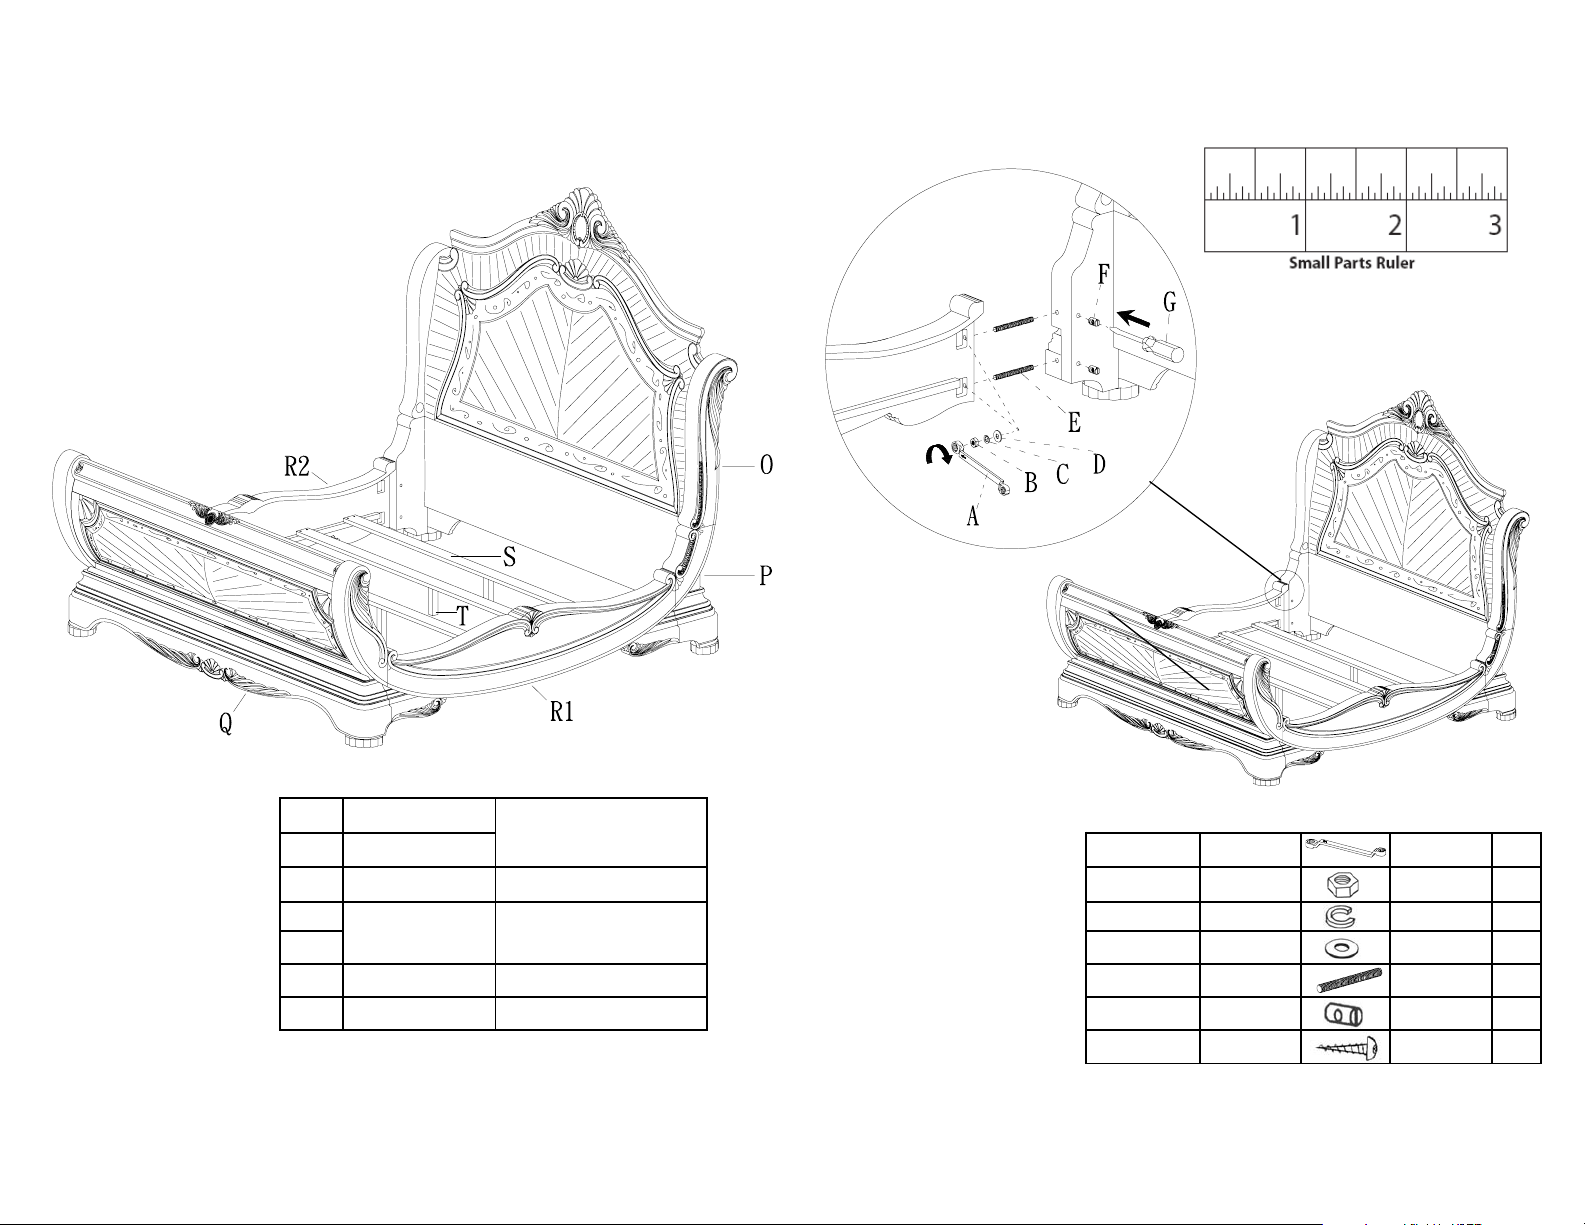
Index Step 1
Figure 1
Bed Parts
O
P
Q B Nut ȥ5/16" 8
R1 C Spring Washer ȥ5/16" 8
R2 D Flat Washer ȥ5/16"*ȥ19*1.5T 8
S E Threaded rod ȥ5/16"*3-1/4" 8
T F Metal dowel ȥ5/16" 8
NOTE:
Headboard Top
Headboard Base
Footboard
Slats Only (5pcs)
Support for Slats w/Leveler Z65000X51-28
Inspect all packing material for small parts, which may have
come loose during shipment.Identify and compare all parts
against the parts list.
65011NR,16NR,18NR-28
65021N,26N,28N-28
Z65000A17-28, Z65036A01-28Rails Only
Z65031,36,38X58-28
Instructions:
Figure 1
1. Insert F (Metal dowel) in to Headboard with G
(Screwdriver). Twist metal dowel with screwdriver so
threaded hole in metal dowel lines up with hole in post
then install E (Threaded rod) into metal dowel and
tighten . Then connect side rails to Headboard using D
(Washer) ,C (Spring washer), B (Nut) with A
(Wrench).
2. Repeat process on Footboard.
Assembly Hardware
A Wrench 12MM 1
H Wood screw 8#*1-1/4" 10
ȥ=Diameter
Page 3
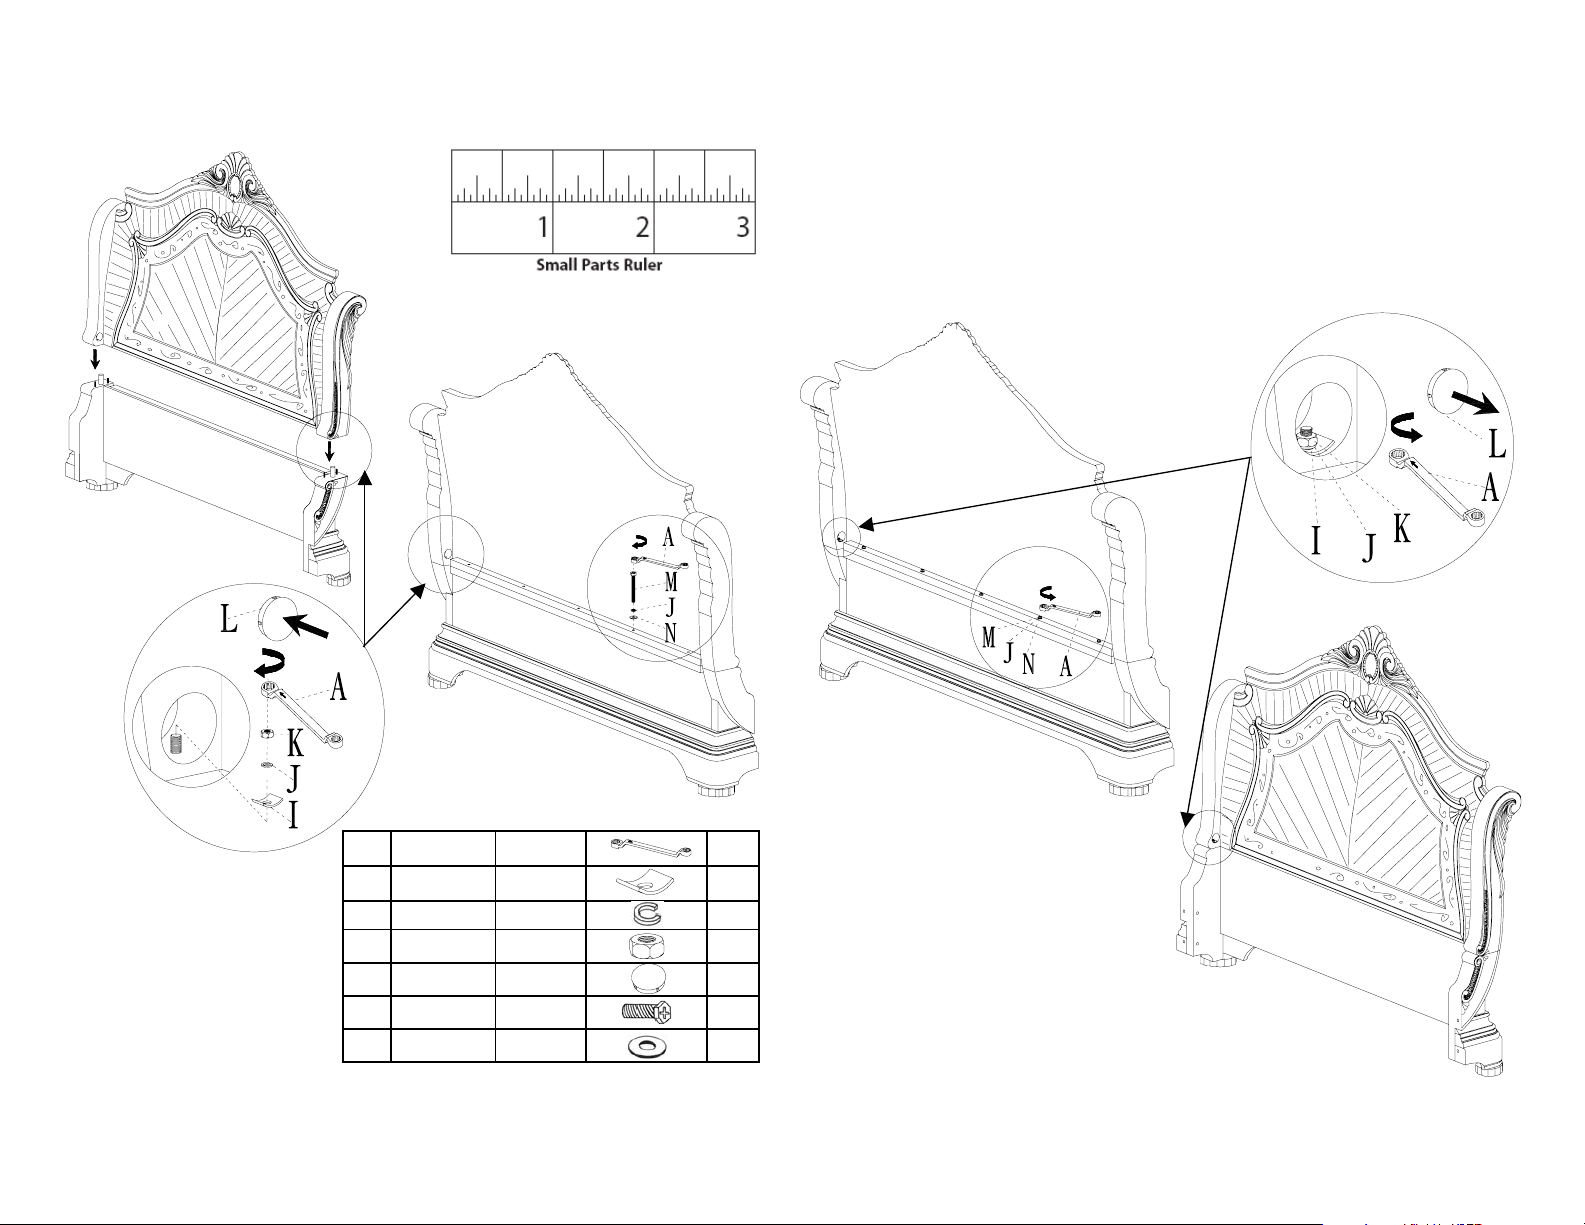
Step 2
2pc Cortina Sleigh Headboard Assembly Instructions
Each new sleigh headboard comes in per-assembled in one box, but you have the option of breaking
down the headboard into two pieces for those tight doors and hallways with following steps.
Warning: The headboard must be properly re-assembled with all the bolts, nuts tightly secured !
Step 1
Figure 1
Figure 4
Figure 2
Figure 3
Instructions:
Figure 3
1. Place O (Headboard Top) onto P (Headboard Base).
2. Secure O to P by using I (Concave Washer)+J
(Spring washer) +K (Nut) with A (Wrench).
3. Cover each Nut hole with L (a cover). L Cover ȥ50*13MM 4
Figure 4
1. Secure O to P by using N (Flat Washer)+J (Spring
washer) +M (Bolt) with A (Wrench) at the back of
Headboard.
A Wrench 12MM 1
I Concave Washer 28*23*7MM 4
J
Spring Washer
K Nut ȥ5/16" 4
M Bolt ȥ5/16"*2-3/4" 5
N Flat Washer
ȥ=Diameter
Assembly Hardware
ȥ5/16" 9
ȥ5/16"*ȥ19*1.5T
Instructions:
Figure 1
1. Take L (The plastic cover) off from where the two
pieces joint together. The plastic cover need some
strength to push it to open.
2. Remove K (Nut), J (Spring washer ) and I (Concave
washer) from the hole with A (Wrench).
Figure 2
1. Remove M (Bolt), J (Spring washer ) and N
5
(Washer) from connect rails at the back of Headboard
Top with A (Wrench).
 Loading...