

Page 1
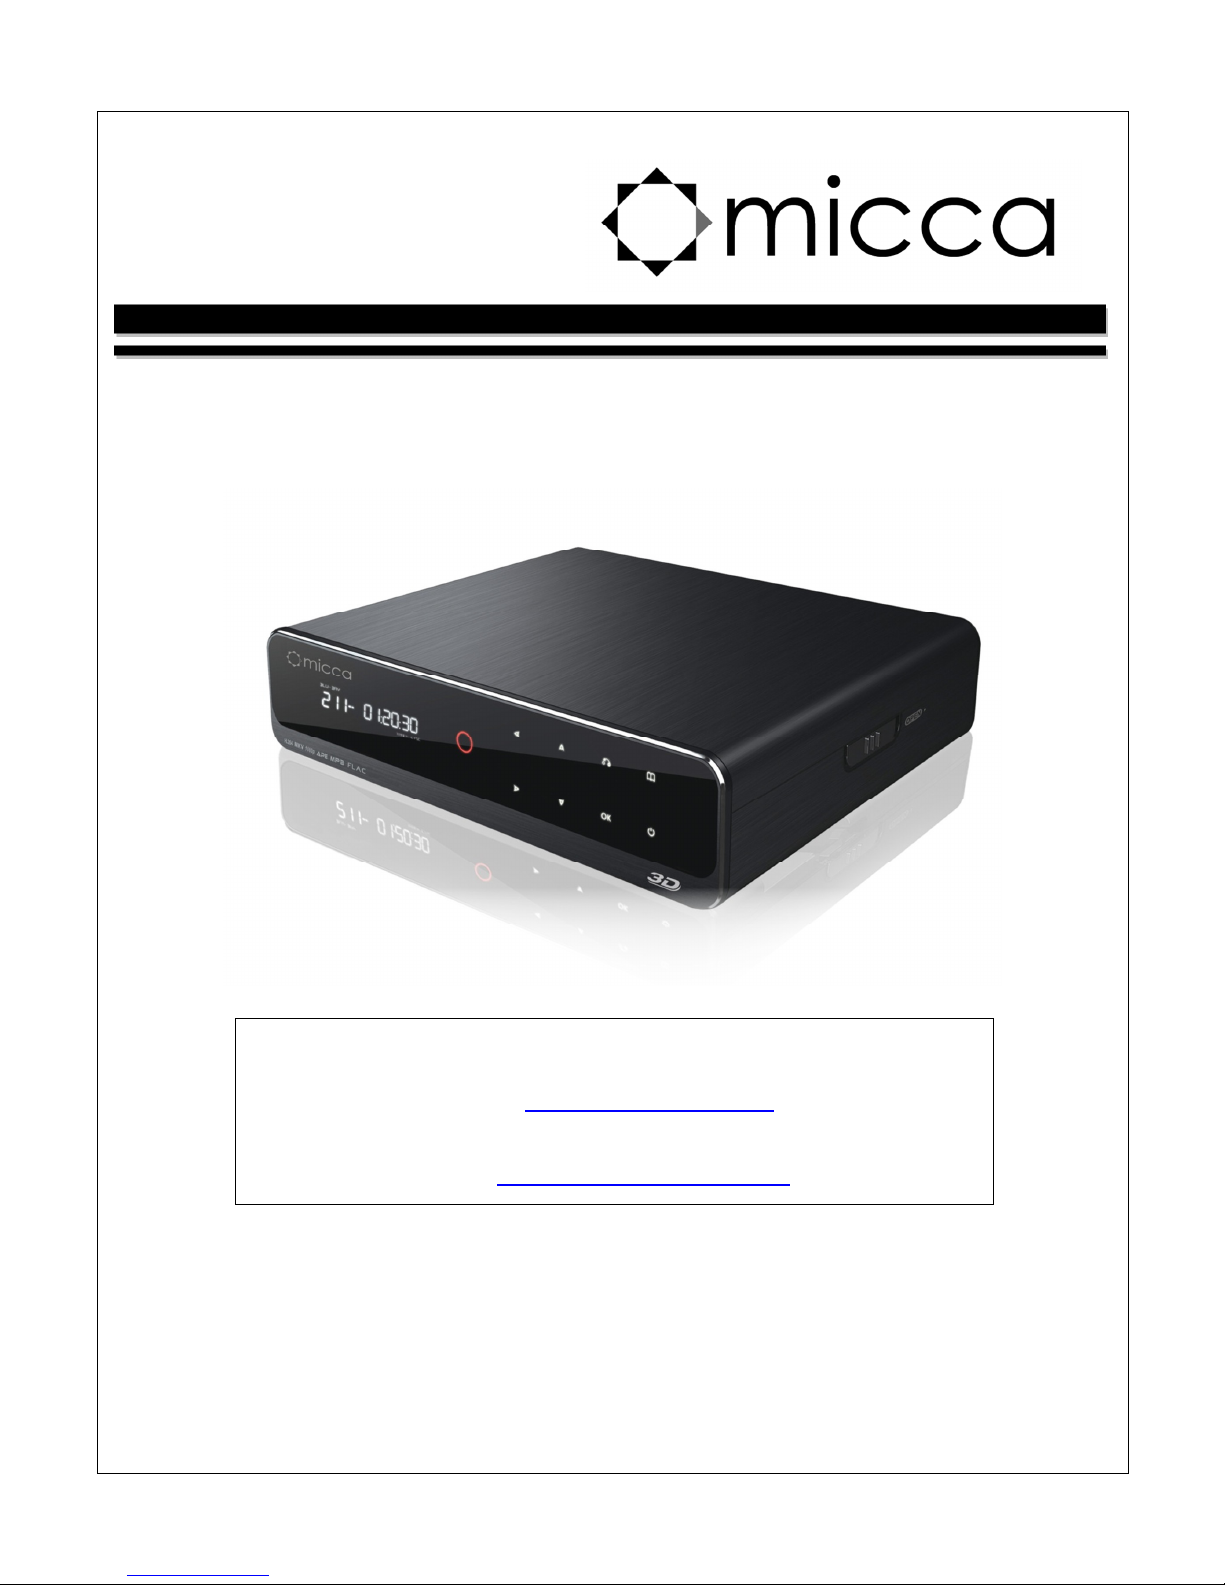
EP950 Digital Media Player
Owner’s Manual
Thank you for purchasing a Micca product. Should you need any
assistance, please contact our technical support before returning the
product to the retailer. Email [email protected]
Product information, firmware updates, and common questions and
answers can be found at: http://content.miccastore.com/
Copyright © 2009-2012 Micca, Ltd. All rights reserved.
This manual may not be reproduced in whole or in part
without permission for any purpose other than personal use.
Page 2

1 Introduction
1.1 Preface
Thank you very much for purchasing this media player. We hope you will enjoy using it as a
great home entertainment device. This player has the following functionality:
1.1.1 A/V Output
HDMI for high-definition video and digital audio
Composite & component video and stereo audio for analog audio-visual connection
S/PDIF coaxial & optical interface for high-fidelity digital audio
Adjustable video output resolution (NTSC, PAL, 480p, 576p, 720p, 1080i, 1080p)
1.1.2 Multimedia Playback
Supports major audio, video and image file formats (1080p HD video decoding)
Video format: AVI, MKV, TS, TP, TRP, M2TS, MPG, MP4, M4V, MOV, VOB, ISO, IFO, DAT,
WMV, ASF, RM, RMVB, FLV
Audio format: MP3, OGG, WMA, WAV, AAC, FLAC
Photo format: JPEG, BMP, GIF, TIF, PNG
Photo slide show with background music
1.1.3 Network Feature
A/V streaming via Ethernet (10M/1000M) & Wi-Fi (802.11b/g/n, optional)
A/V streaming via UPnP Media Server
SAMBA file server for sharing files to other network devices
BitTorrent download (controlled and managed through web browser)
1.1.4 File Copy
Supports copying & moving files among Card, USB, HDD, and Network
1.1.5 USB Support
USB 3.0 device port for connecting to a computer
USB 2.0 HOST ports (2) for connecting USB storage devices
Note: All the information contained in this manual was correct at the time of publication.
However, as our engineers are always updating and improving the product, your device’s
software may have a slightly different appearance or modified functionality than presented in
this manual.
Page 3
1.2 Packing List
Part
Quantity
Player
1
Remote Control
1
AC/DC A
daptor
1
User Manual (printed)
1
Note: The actual contents in the package might be different from the packing list in this manual.
1.3 Precautions
This player’s design has your safety in mind. In order to safely and effectively use this player,
please read the following before usage.
1.3.1 Usage Cautions
Users should not modify this player. If a commercial hard disk drive is being used, the
environmental temperature should be between 40 to 95 degrees Fahrenheit.
1.3.2 Power
The player’s power supply voltage is DC 12V 3A.
When using this player, please connect the supplied AC adapter or AC adapter cable to the
player’s power jack. When placing the adapter cable, make sure it is not damaged or subject to
pressure. To reduce the risk of electric shock, unplug the adapter first before cleaning it. Never
connect the adapter to the player in a humid or dusty area. Do not replace the adapter or cable’s
wire or connector.
1.3.3 Radio Interference
If not properly shielded, almost all electronic devices will get radio interference. Under some
conditions, your player might get interference.
The design of this player has followed the FCC/CE standard, and adheres to the following
rules:
1) This player may not cause harmful interference;
2) This player could accept some interference received including interference that may
cause undesired operation.
1.3.4 Repair
If the player has a problem, you should take it to an appointed repair center and let the
specialists do the repair, never repair the player yourself, you might damage the player or
endanger yourself or your data.
1.3.5 Disposing of the Player
When you dispose of the player, be sure to dispose it appropriately. Some countries may
regulate disposal of electrical device, please consult with your local authority.
Page 4

1.3.6 Hard Disk Cautions
The player uses an internal hard disk for data storage. New hard drives need to be properly
formatted prior to use.
Users should carefully read the Frequently Asked Questions chapter and check our website for
latest information before formatting the hard disk.
Physical impact may damage the hard disk drive. When hard drive errors occur, please use
CHKDSK to scan and fix problems.
All data stored in the player may be lost due to physical impact, electrical shock, power lost,
HDD format etc. Please backup your data.
It is suggested to perform a disk defragment after a long period of usage.
Regularly backup the data in the hard disk so that it can be recovered in the event of data
corruption or loss. Our company takes no responsibility for loss of data stored on the hard
disk.
1.3.7 Additional Precautions
When using this player, please do not let the player come into contact with water or other liquid.
If water is accidentally spilled on the player, please use a dry cloth to absorb the spillage.
Electronic products are fragile. Please be gentle during use; avoid shaking or hitting the player,
and do not press the buttons too hard.
Do not let the player come into contact with water or other liquids.
Do not disassemble, repair or change the design of the player, any damage done will not be
included in the repair policy.
Do not press the buttons of the player too hard.
Avoid hitting the player with hard objects, shaking the player, and stay away from magnetic
fields.
Electrostatic discharge may cause the product to malfunction. When this happens, unplug
the power cable and the product will return to normal operation next time it is powered on.
Page 5
2 Player and Remote Overview
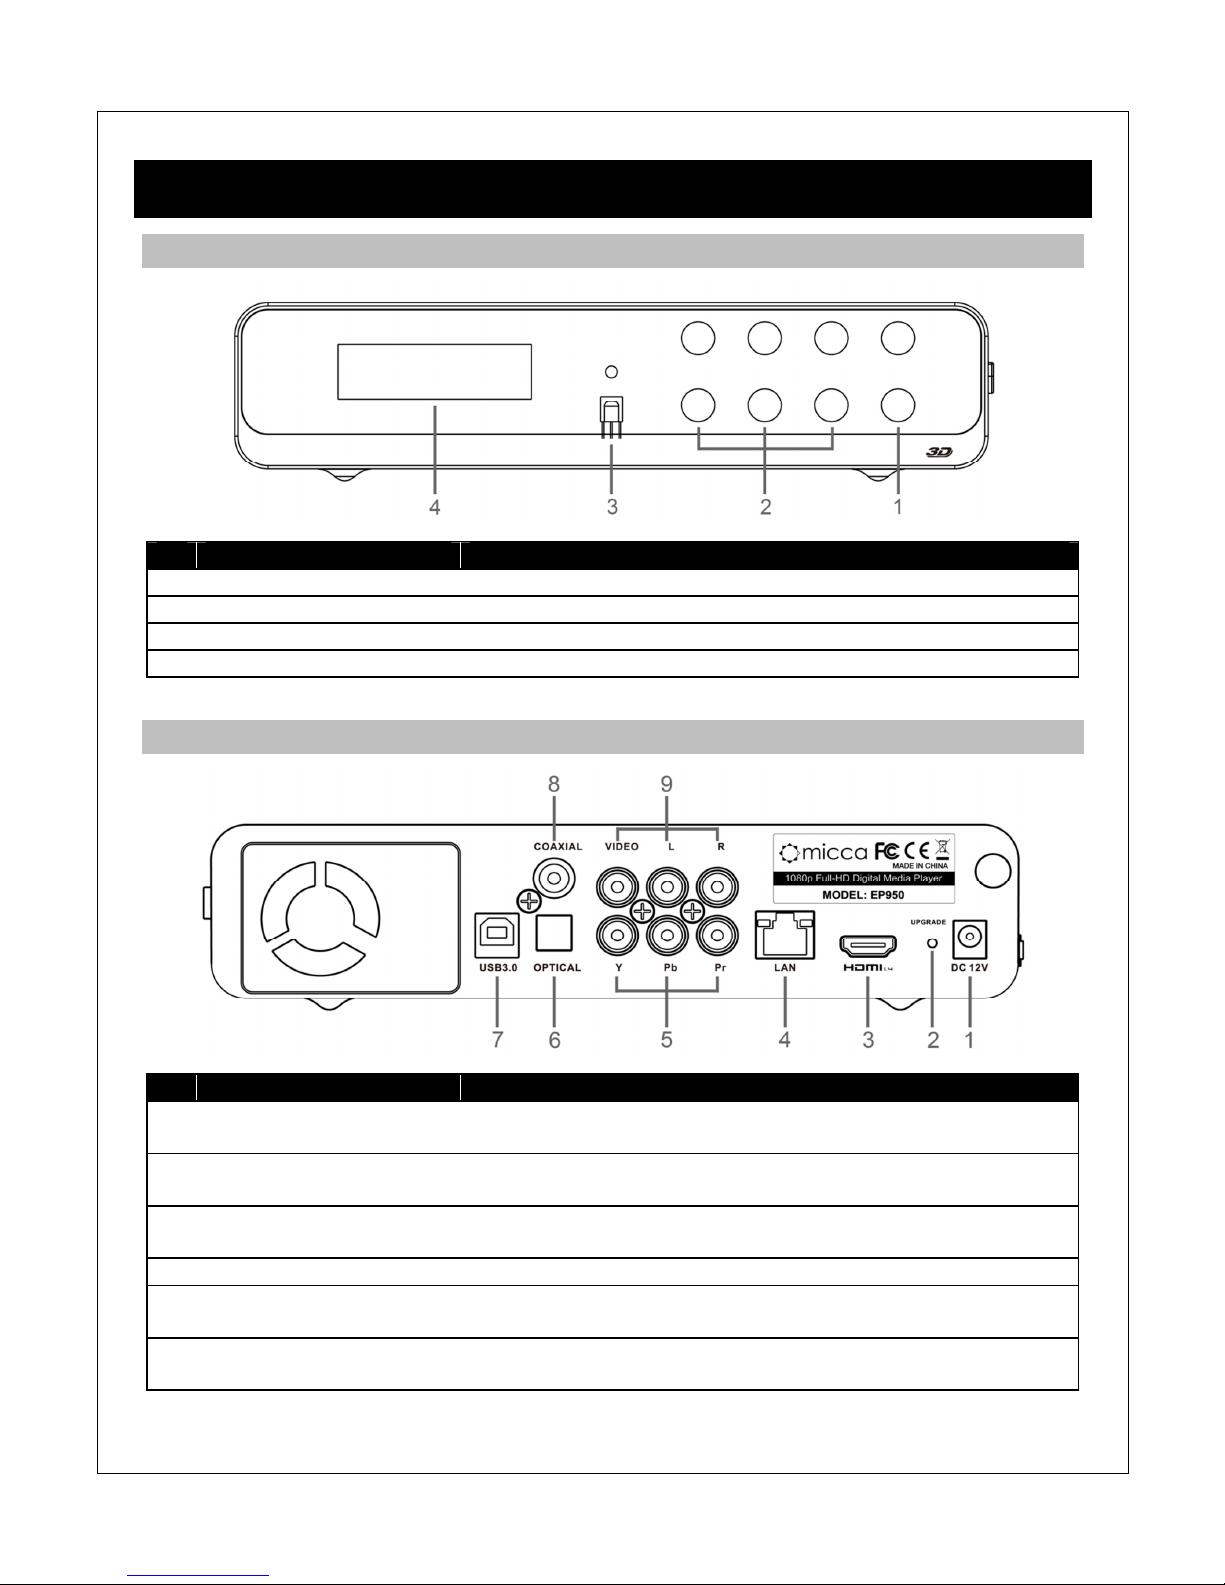
2.1 Front Panel
Name
Description
1 On/
Stand
-
By Button
Turns the player on or places it into stand-by mode
2 Player Control Buttons
For operating the player without the remote control
3 IR Sensor
The sensor for receiving remote control commands
4 VFD
Display
Shows basic player status and current time.
2.2 Rear Panel
Name
Description
1
DC 12V DC power input, 12V. Only use the AC adapter provided with
the player.
2
UPGRADE Pin-hole button for performing firmware update in recovery
mode. See ‘9.6.3 USB Upgrade’ for more information.
3
HDMI Provides digital audio/video to a TV or home theater with
HDMI input.
4
LAN Gigabit Ethernet for Internet or LAN network access.
5
Y/Pb/Pr Component video output to a TV or home theater with
component video input.
6
OPTICAL S/PDIF optical digital audio output to a home theater receiver
with optical audio input.
Page 6
7
USB 3.0 Used to connect the player to a PC and copy media files to or
from the player’s internal hard drive.
8
COAXIAL S/PDIF coaxial digital audio output to a home theater
receiver with coaxial audio input.
9
VIDEO/L/R Composite video and analog Left/Right audio output to a TV
or home theater with analog AV input.
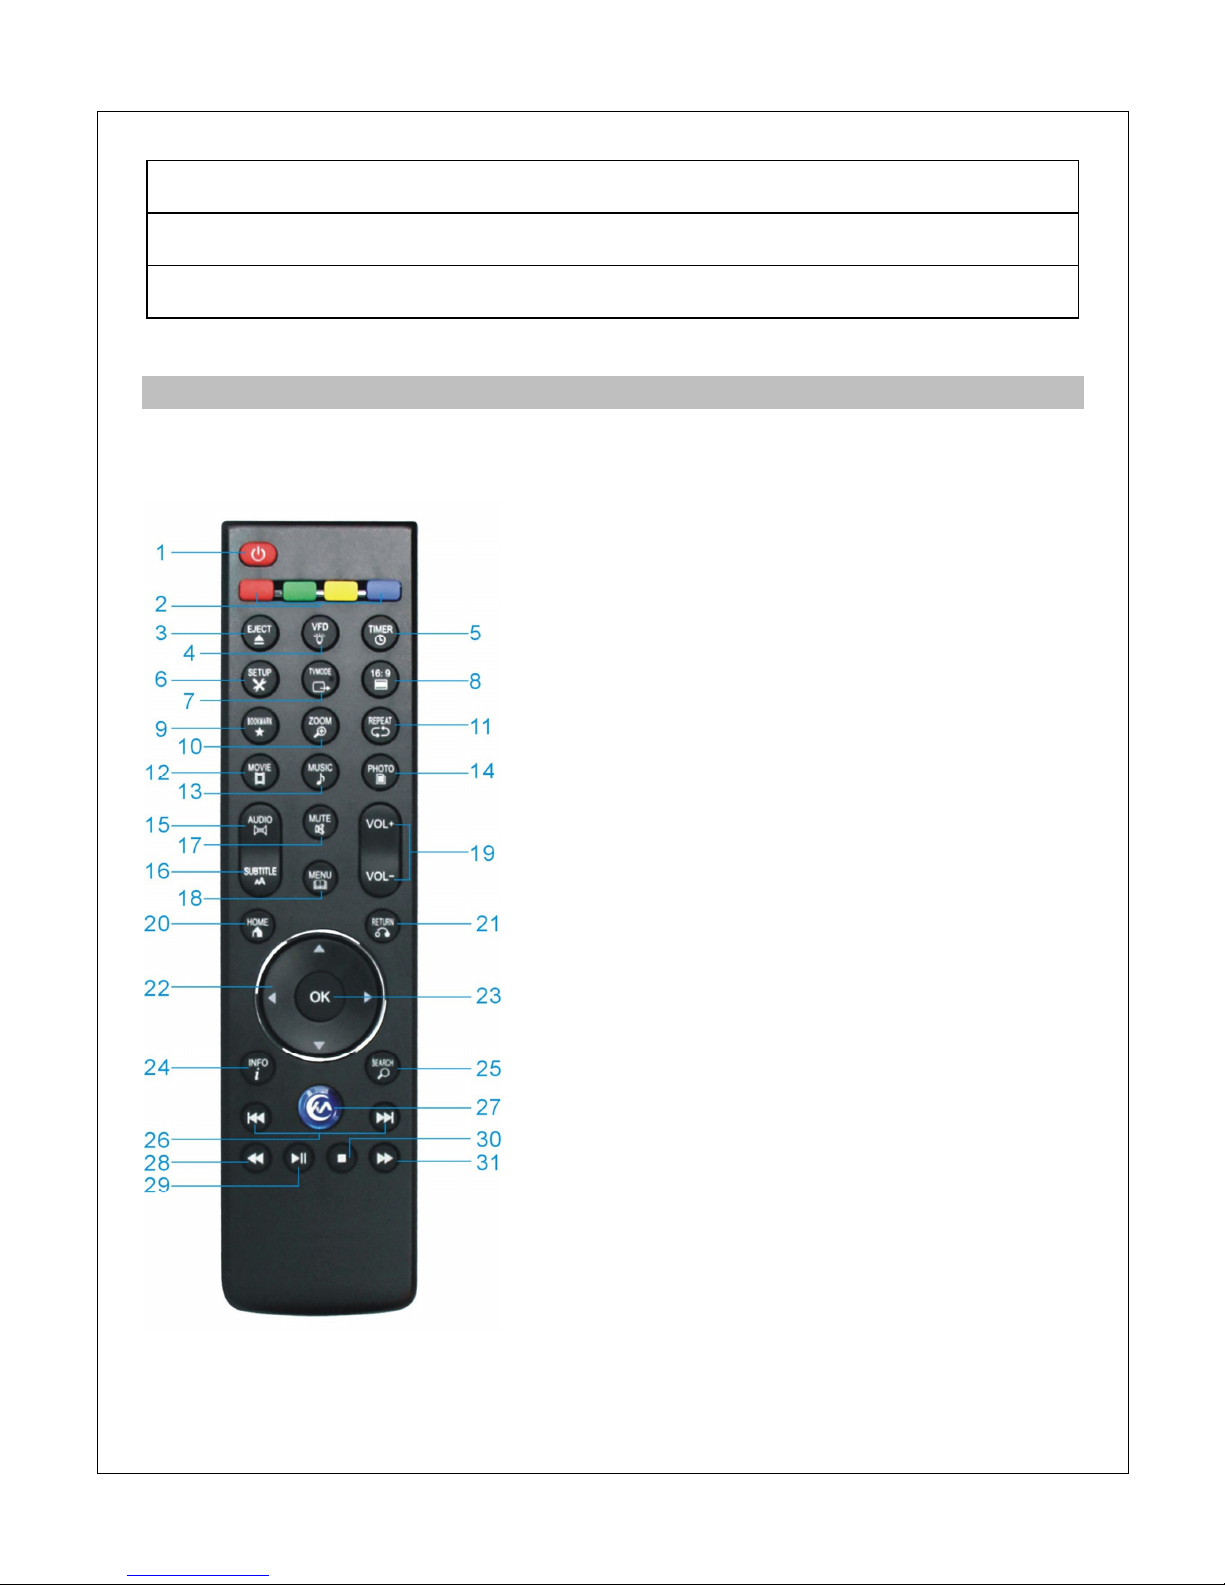
2.3 Remote Control
All player functions can be controlled by using the remote control. See the following for details
on the function of each button.
1. POWER 2. COLOR BUTTONS
3. EJECT 4. VFD
5. TIMER 6. SETUP
7. TV MODE 8. 16:9
9. BOOKMARK 10. ZOOM
11. REPEAT 12. MOVIE
13. MUSIC 14. PHOTO
15. AUDIO 16. SUBTITLE
17. MUTE 18. MENU
19. VOL+/VOL- 20. HOME
21. RETURN 22. DIRECTIONAL KEYS
23. OK/ENTER 24. INFO
25. SEARCH 26. PREV/NEXT
27. IMS 28. REWIND
29. PLAY/PAUSE 30. STOP
31. FAST FORWARD
Page 7

Button
Description
POWER
Press to power on/off the player.
COLOR BUTTONS
Context buttons; Function will be noted when available.
EJECT
Press to stop a storage device for safe removal.
VFD
Turns ON or OFF the VFD light on the front panel.
TIMER
Sets the timer for auto power off. Each press cycles the timer from
15 minutes up to 5 hours.
SETUP
Press to enter the setup menu for changing player settings.
TV MODE
Press to switch between available video output modes: NTSC,
PAL, 480p, 576p, 720p, 1080i/p.
16:9
Switches among 16:9, 16:10, Pan Scan 4:3 , and Letter Box 4:3.
BOOKMARK
Press to add the current playing video to the bookmark list.
At the main menu, press to view the bookmark list. This feature is
only available for media files on attached storage drives.
ZOOM
Press to zoom when viewing photos or playing videos.
Photo zoom levels: 2x, 4x, 8x, 16x.
Video zoom levels: 2x, 3x, 4x, 8x.
REPEAT
Press to set repeat option for the current file.
Videos: Repeat-All, Repeat-Title, Repeat-Off
Photos: Repeat-All, Shuffle Loop, Repeat-Off
Music: Does not function. Use the MENU button to set repeat
MOVIE
Press to jump to the movies media library. The media library must
be already created.
MUSIC
Press to jump to the music media library. The media library must
be already created.
PHOTO
Press to jump to the photos media library. The media library must
be already created.
AUDIO
Press to change audio tracks when playing videos.
SUBTITLE
Press to change the subtitle track when viewing videos. Use the
MENU button to access the full subtitle settings menu.
MUTE
Press to mute audio output; press again to unmute.
MENU
Press to access the settings menu for the current function. Menu
is context sensitive and will be different depending on function.
VOL+/VOL
-
Press to change the output volume. (Hint: Set volume to max and
use the TV or AV receiver to control volume).
HOME
Press to display the main menu icons on the bottom of the screen.
RETURN
Press to return to the previous screen when navigation menus.
Press to exit the current folder when browsing files.
DIRECTIONAL KEYS
Press the arrow buttons to highlight items whenever needed.
OK/ENTER
Press to confirm the highlighted item.
INFO
Press to display information about the currently playing video,
music, or photo.
SEARCH
During video playback, press once to display the time slide bar,
and press again to display the jump-to time entry menu.
In the media library mode, press to show the file search menu.
PREV/NEXT
Press to go to previous/next page in file browser or media library.
Press to go to previous/next chapter during BD/DVD playback.
Press to go to previous/next file during media file playback.
Page 8

IMS
Press to access the Internet Media Service menu.
REWIND
Press to rewind the current playback. Press repeatedly to change
rewind speed.
FAST FORWARD
Press to fast forward the current playback. Press repeatedly to
change fast forward speed.
PLAY/PAUSE
Press to begin or pause playback.
STOP
Press to stop playback.
Page 9

3 Connections
3.1 Basic Connections
3.1.1 Connecting the Power Supply
To connect power to the player:
1) Connect the barrel connector of the AC adapter to the player’s DC IN jack
2) Connect the plug of the AC adapter to the power outlet
3.1.2 Installing an Internal Hard Disk Drive
The player has an internal drive bay for holding a hard disk drive. Media files can be stored on
the internal hard disk drive for playback, avoiding the need for an external storage device during
playback.
Install the hard drive in the by following these steps:
1) Unlock the cover clip on the right side of the player to open the player’s top cover.
2) Slide the SATA connector by pulling it towards the marked “OPEN” position.
3) Place the hard drive in the drive tray with the drive connector facing the player’s SATA
connector.
4) Slide the player’s SATA connector towards the hard drive until the connectors mate
solidly. Do not force the connection to avoid damaging the drive or player.
5) Close the player’s top cover until the cover clip locks in place.
3.1.3 Formatting the Internal Hard Disk Drive
If the hard disk drive installed in the player is brand new, it must be initialized and formatted
before it can be used. This can be done by connecting the drive to a computer prior to installing
it in the player, or by using the player’s built-in format capabilities. Please refer to ‘9.1.10
Format’ for more details on formatting the hard drive using the player.
3.1.4 Connecting to a Computer
The player can be connected to the PC to transfer files to and from the player’s internal hard
disk drive. A common USB 2.0 or 3.0 Type-A to Type-B cable is required (not included).
1) With the player turned off, connect the Type-B end of the USB cable to the USB jack on
the back of the player.
2) Plug the other end of the USB cable to a USB jack on the computer.
3) Turn on the player using the POWER button on the remote control. The player will be
detected by the computer and the player’s hard drive will show up as a USB hard drive
on the computer. It may take 30-60 seconds for the computer to recognize the player and
mount the drive; please be patient while this mounting process is going on.
Page 10
3.1.5 Connecting a USB Storage Device
Storage devices such as USB hard drives or flash drives can be connected to the player for
playback of media files.
1) Plug in the USB device to one of the USB HOST ports on the left side of the player.
2) After about 5-10 seconds, the USB drive will be detected and can be accessed through
the player.
3.1.6 Connecting a Memory Card
SD or SDHC flash memory cards can be connected to the player for playback of media files.
1) Insert the flash memory card into the card reader slot on the left side of the player.
2) After about 5-10 seconds, the flash memory card will be detected and can be accessed
through the player.
3.2 Audio and Video Connections
The player can be connected to a TV/HDTV or home theater system in a variety of methods. For
best results, always use the best method available for connection:
Results
Video
Audio
Requirement
Best
HDMI HDMI TV with HDMI input and home theater
receiver that can decode Audio over HDMI.
Better
HDMI Digital coaxial
or optical
TV with HDMI input and home theater
receiver with Coaxial or Optical input.
Good
Component
(YPbPr)
Digital coaxial
or optical
TV with component input and home theater
receiver with Coaxial or Optical input.
Okay
Composite
Video
Analog L/R TV with composite video and analog audio
inputs.
3.2.1 HDMI Connection
HDMI provides the best possible video and audio connection. Use this connection whenever
possible.
1) Plug one end of the HDMI cable to the player’s HDMI output jack.
2) Plug the other end of the HDMI cable to a HDMI input jack on the TV or home theater
receiver.
3) Please refer to ‘9.3.2 TV System’ for more details on configuring the player’s video
output.
4) Please refer to ‘9.2.2 HDMI Output’ for more details on configuring the player’s HDMI
audio output.
5) Consult the TV or home theater receiver’s manual for configuring its HDMI inputs.
Page 11

3.2.2 Digital Audio Connection
When using a home theater receiver or sound system that lacks HDMI input, the player’s coaxial
or optical digital audio output can be used.
1) Plug one end of the coaxial or Toslink optical cable to the player’s digital audio jack.
2) Plug the other end of the coaxial or Toslink optical cable to the home theater receiver or
sound system’s digital audio input jack.
3) Please refer to ‘9.2.3 SPDIF Output’ for more details on configuring the player’s
coaxial/optical audio output.
4) Consult the receiver or sound system’s manual for configuring its coaxial/optical inputs.
3.2.3 Component Video Connection
When using a TV that does not have HDMI input but has component video, the player’s
component video output can be used.
1) Plug one end of the red/blue/green component video cable to the player’s component
(YPbPr) video jacks.
2) Plug the other end of the red/blue/green component cable to an available component
video input on the TV.
3) Please refer to ‘9.3.2 TV System’ for more details on configuring the player’s video
output.
4) Consult the TV’s manual for configuring its component video inputs.
Note: Component video connection only carries video signal. The audio signal must be
connected separately, such as through digital coaxial/optical or analog L/R audio connection.
3.2.4 Composite Video and Analog Audio Connection
When using a TV that only has composite video input, the player’s composite video and analog
L/R audio output can be used.
1) Plug one end of the red/white/yellow AV cable to the player’s AV jacks.
2) Plug the other end of the red/white/yellow AV cable to an available AV input on the TV.
3) Please refer to ‘9.3.2 TV System’ for more details on configuring the player’s video
output.
4) Consult the TV’s manual for configuring its AV inputs.
3.3 Network Connections
3.3.1 Connecting to a Wired LAN Network
A wired Ethernet connection provides the best results for streaming media content through the
network. Use a wired Ethernet connection whenever it is possible to do so.
Page 12

1) Plug one end of a Cat5/5e/6 Ethernet network cable to the player’s LAN jack.
2) Plug the other end of the Cat5/5e/6 Ethernet network cable to an available port on a LAN
switch, router, or networked wall plate.
The player auto detects LAN network settings in most cases without requiring any additional
configuration. Advanced users can refer to ‘9.4 Network Settings’ for more details on manual
network configuration.
3.3.2 Connecting to a Wireless Network
When a wired network connection is not available, the player can stream A/V content through
the network by using a compatible Wi-Fi USB adapter (sold separately).
1) Power on the player.
2) Plug a compatible Wi-Fi USB adapter to one of the USB HOST ports on the left side of
the player.
3) Refer to ‘9.4 Network Settings’ for more details about WLAN setup.
Note: A/V streaming performance over WLAN is highly dependent on location, distance to
router, the number of floors and walls in the signal path, other 2.4GHz devices in the area, and
other such variables that differ on a case by case basis. It may be difficult to reliably stream HD
quality (720p and 1080p) videos over a WLAN connection even if the signal strength appears to
be strong. Always use a wired Ethernet connection when available.
Page 13
4 First Time Startup
4.1 Power On
After connecting the AC power adapter to the player’s DC IN jack, turn on the player by press
the POWER button on the front of the player or on the remote control. To turn the player off,
press the POWER button on the front of the player or on the remote control again.
4.2 Initial Setup
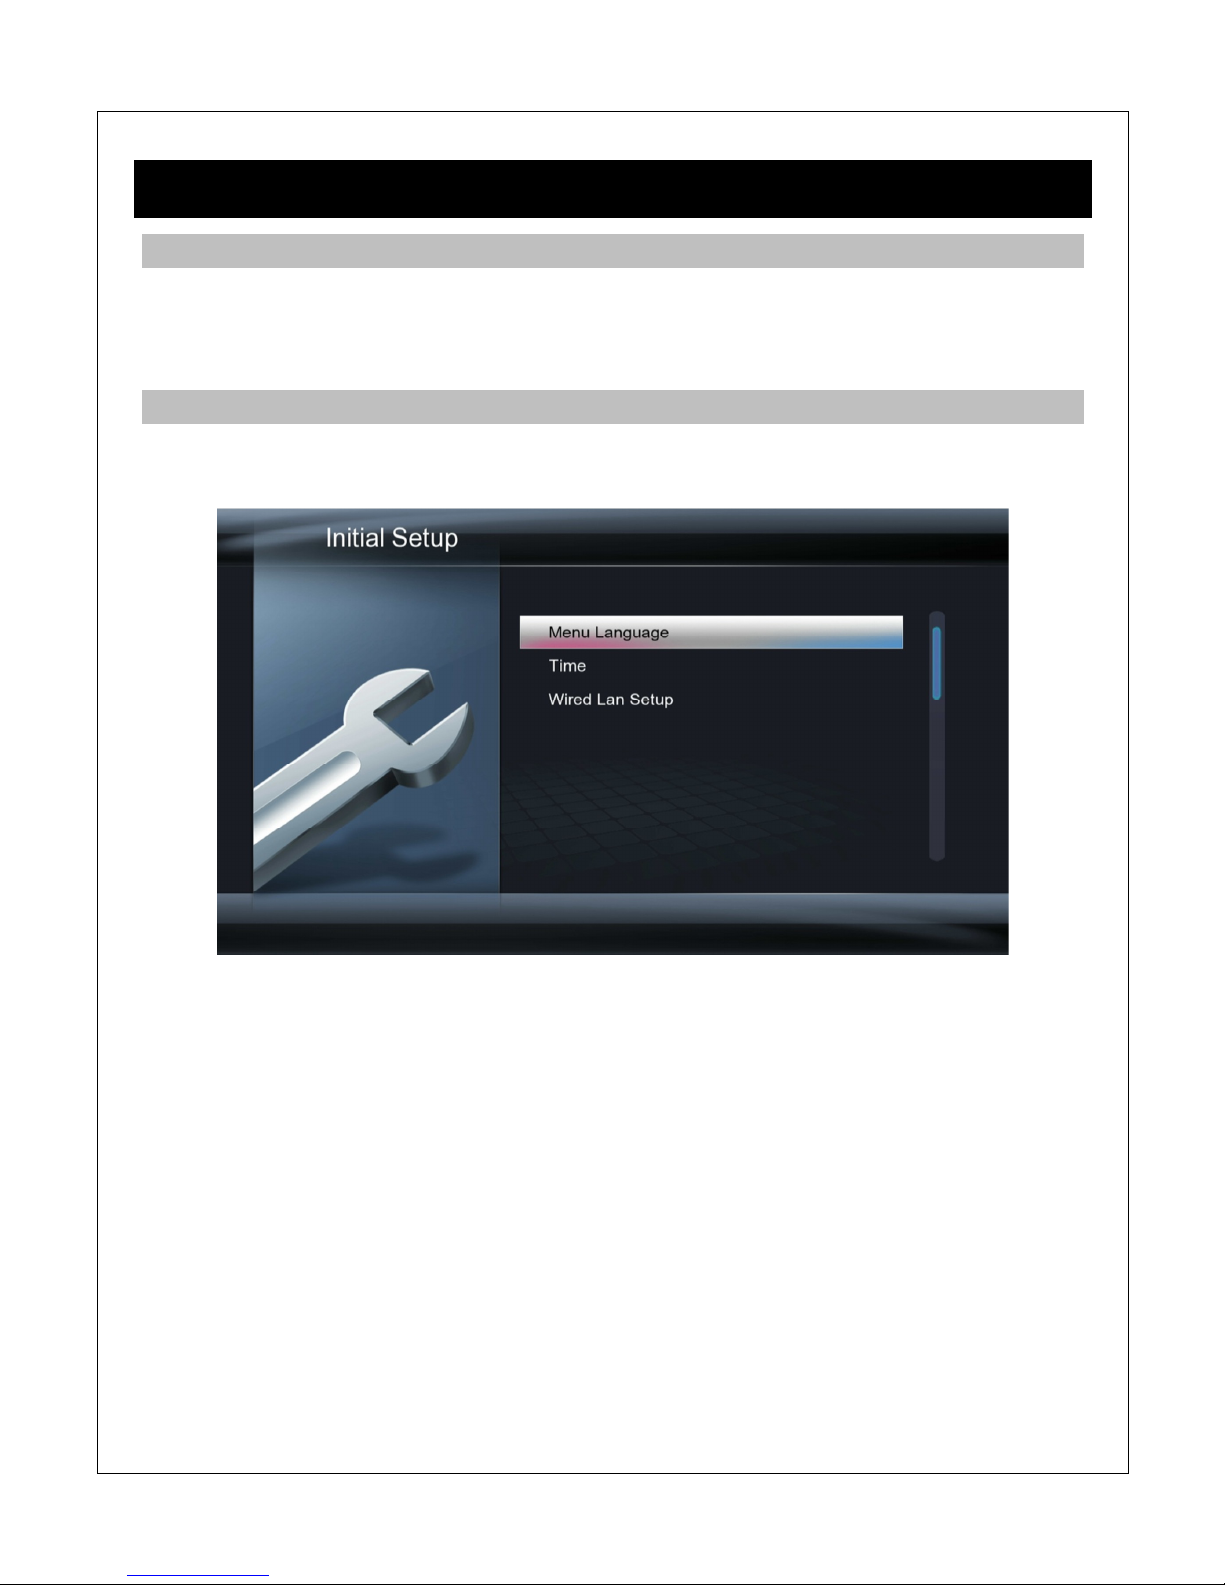
When turning on the player for the first time, it will prompt the user to select the menu language,
time, and wired LAN settings.
4.2.1 Menu Language
Choose the desired language. This is the language that will be used for menus and interface.
4.2.2 Time
Setting the time of the player is optional. To set the time, first select Time Zone relative to GMT.
Next the user is prompted to enter the date and time. If you skip this step, please refer to ‘9.1.3
Time’ for instructions on how to set the player’s time through the Settings menu.
4.2.3 Wired LAN Setup
This step of the initial setup is optional. Refer to ‘9.4 Network Settings’ for more details about
network setup. If the user skips this step during initial setup, the settings can be performed
through the player’s Settings menu. For most cases, the “DHCP IP (Auto)” setting is the correct
setting. Only advanced users should choose the “FIX IP (Manual)” setting.
Page 14
4.3 Main Menu
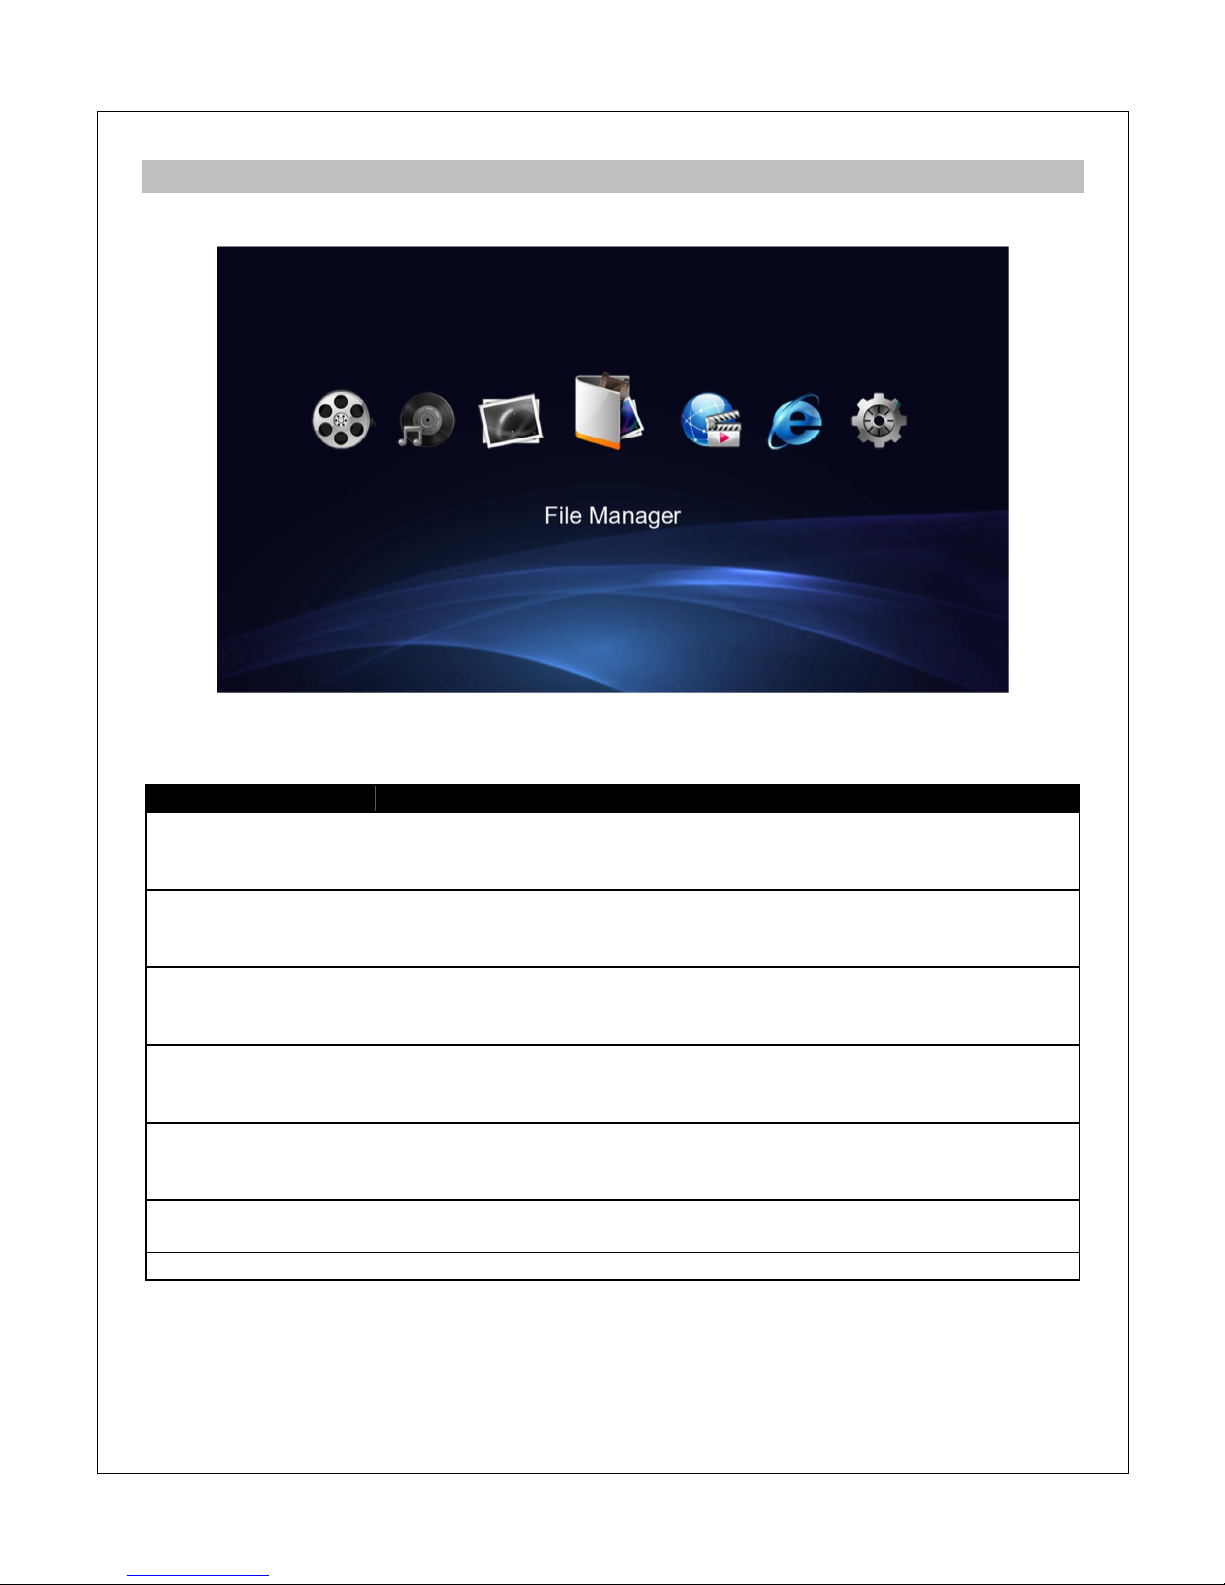
When the initial setup is complete, the player will display the main menu.
The main menu contains a row of menu items that represents functions available for access.
The main menu items have the following functionality:
Menu Item
Description
Movies
Browse and play video files on attached storage devices through the
media library feature. Only available if local storage devices are
present and media library has been created.
Music
Browse and play music files on attached storage devices through the
media library feature. Only available if local storage devices are
present and media library has been created.
Photos
Browse and view photos on attached storage devices through the
media library feature. Only available if local storage devices are
present and media library has been created.
File Manager
Browse and play media files on attached storage devices or through
the network. Media files are be organized in their original folder
structure.
Internet
Apps
Access various Internet video, music, and photo content. Availability of
content may change and is not guaranteed as content providers may
adjust content available at any time without notice.
Web Browser
Perform simple web browsing with a light weight HTML5 compatible
browser.
Setup
Access the setup menu to change player settings.
Page 15
5 File Manager
The file manager is the default method for browse media files on hard drives, USB drives, flash
memory cards, network folder shares, or UPnP servers. Media files will be organized in their
original folder structure. The file manager can also be used to copy/move/rename/delete files.
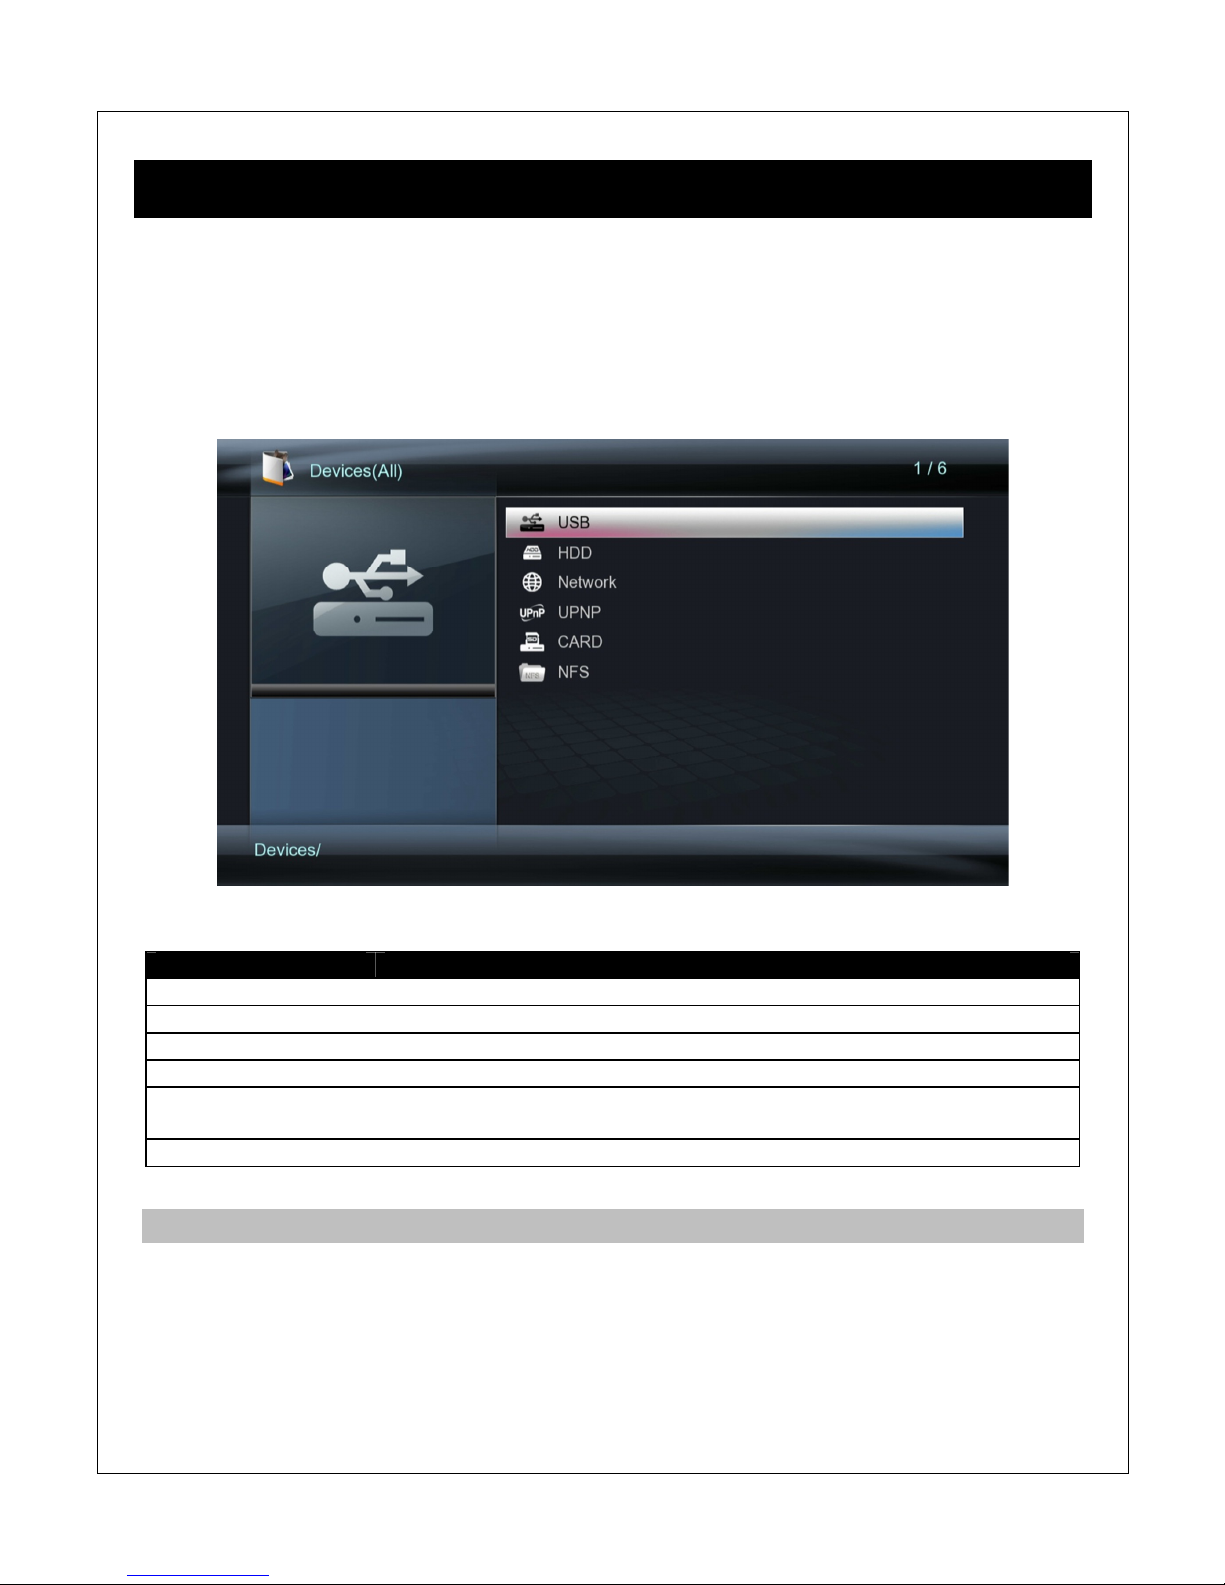
To access the file manager, select the File Manager icon from the main menu and press
OK/ENTER on the remote control. All available storage devices and network connections will be
listed. Select the desired device to browse media files on:
Menu Item
Description
USB
Browse media files on an external USB drive attached to the player.
HDD
Browse media files on the internal hard disk drive.
Network
Browse media files on LAN folder shares.
UPnP
Browse media files on UPnP servers.
CARD
Browse media files on a flash memory card inserted into the player’s
card reader.
NFS
Browse media files on NFS folder shares
5.1 Browsing For Media Files
After selecting a storage device media files will be displayed in the same folder structure as they
are stored. Use the directional LEFT/RIGHT and UP/DOWN buttons on the remote control to
select folders or files and press OK/ENTER to enter a folder. To exit from a folder, press the
RETURN button. To play a media file, highlight it and press the OK/ENTER button.
To make it easier and more intuitive to browse media files, three different media display modes
Page 16
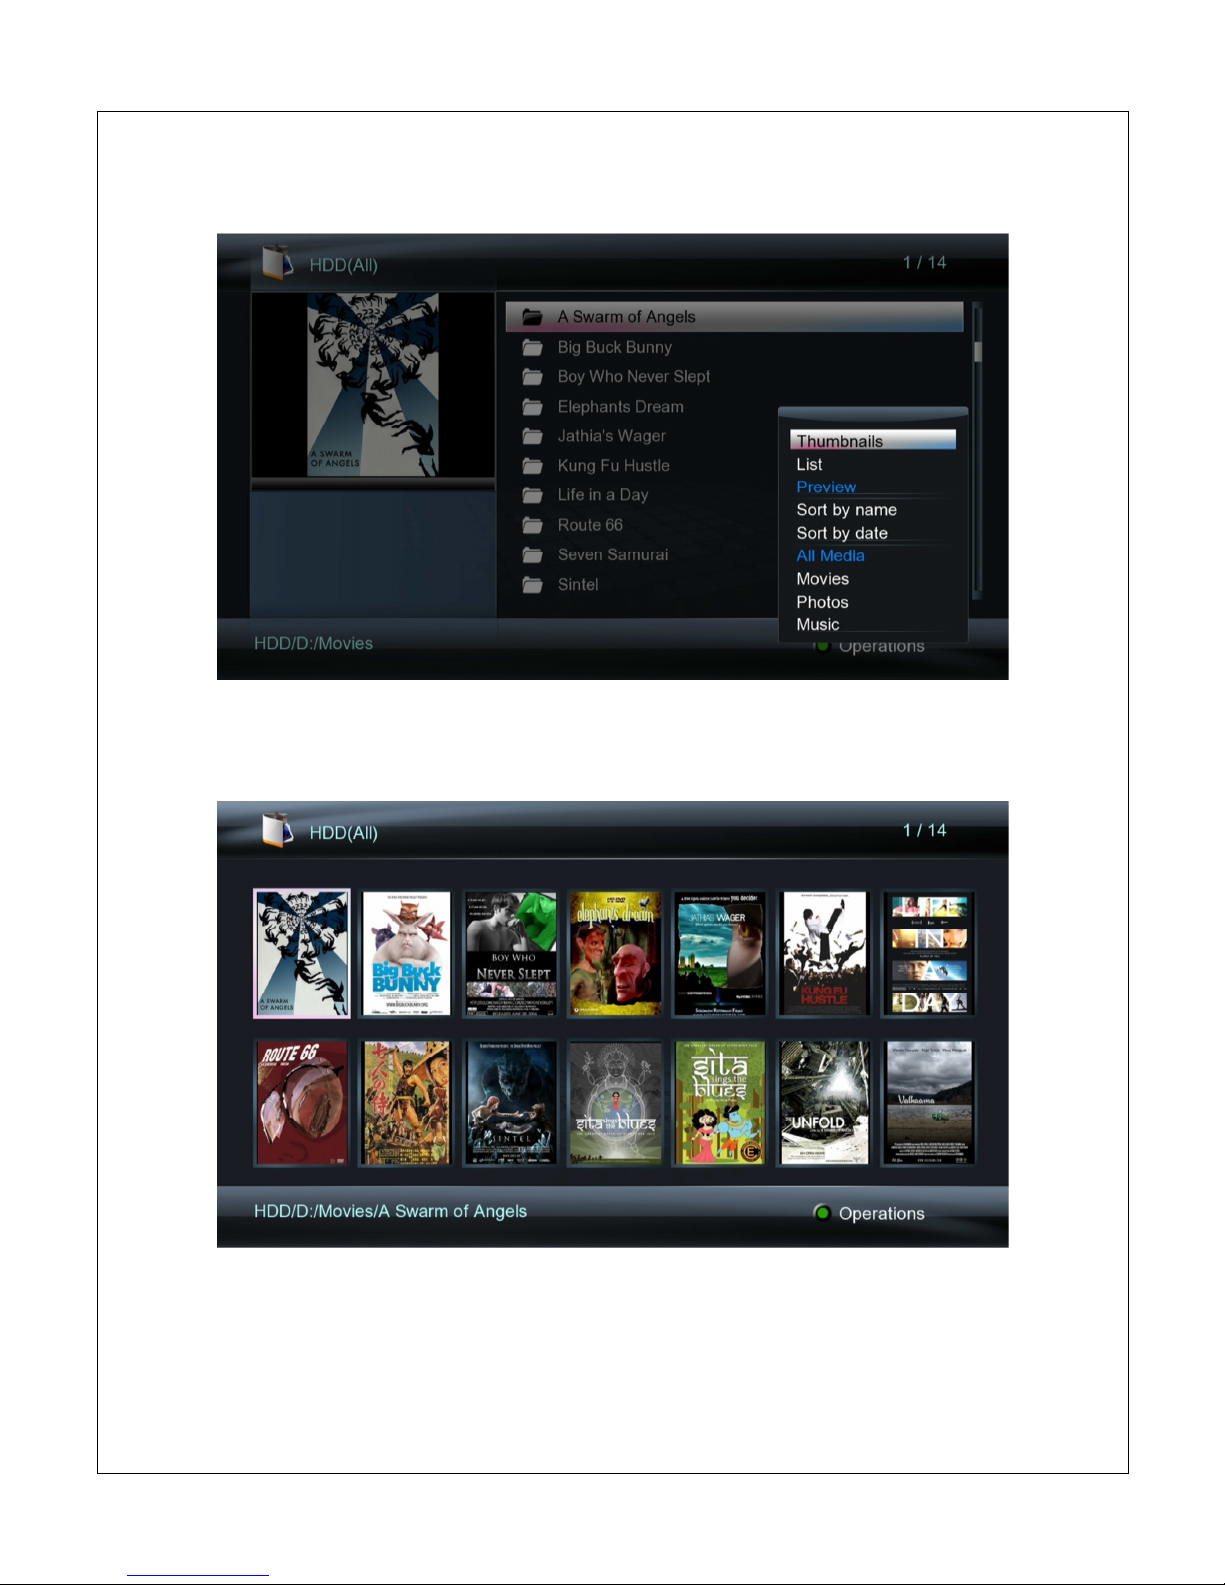
are available: Thumbnail, List, and Preview. To change the display mode, press the MENU
button on the remote to bring up the options menu and select the desired display mode
5.1.1 Thumbnail View
Thumbnail view displays folders and media files as thumbnails on the screen with a partial file
name underneath. This is useful for browsing photos and movies with associated cover art.
5.1.2 List View
The list view displays folder and media files as a simple list with the full file name displayed. This
view loads faster and is suitable for navigating large collections of folders and files.
Page 17
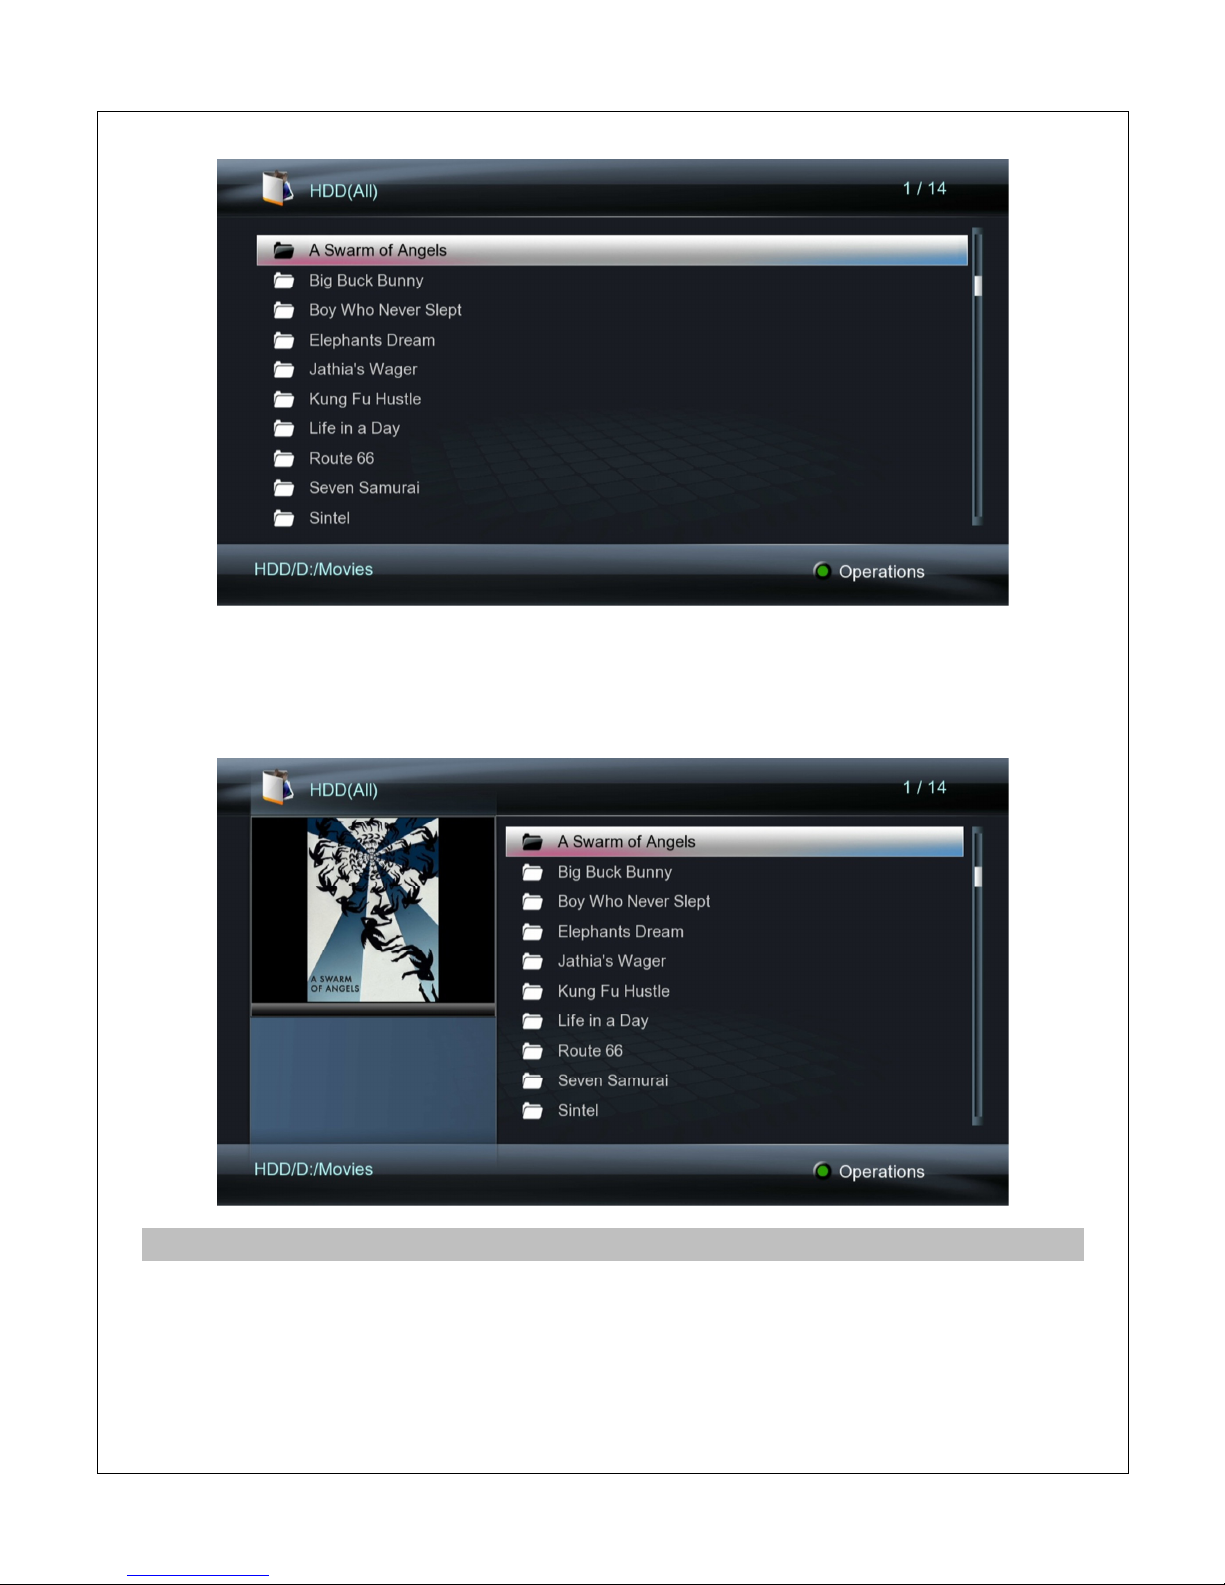
5.1.3 Preview
In preview mode, folders and media files are displayed as a list on the right side of the screen
and a preview window on the left side. When a folder or media file is highlighted in the list, the
preview window displays a thumbnail or video preview.
5.2 Browsing Network Folder Shares
The player has the ability to browse and play media files from folder and file shares on the local
area network, such as Windows PCs, NAS devices, or Linux computers with SAMBA server
enabled. Streaming from Mac OS X 10.7 or later is not supported. Setup and configuration of
folder shares on different computing platforms is beyond the scope of this manual; please refer
to Internet tutorials appropriate for each platform. A Windows 7 folder sharing tutorial is available
Page 18
at the following URL: http://content.miccastore.com/node/230
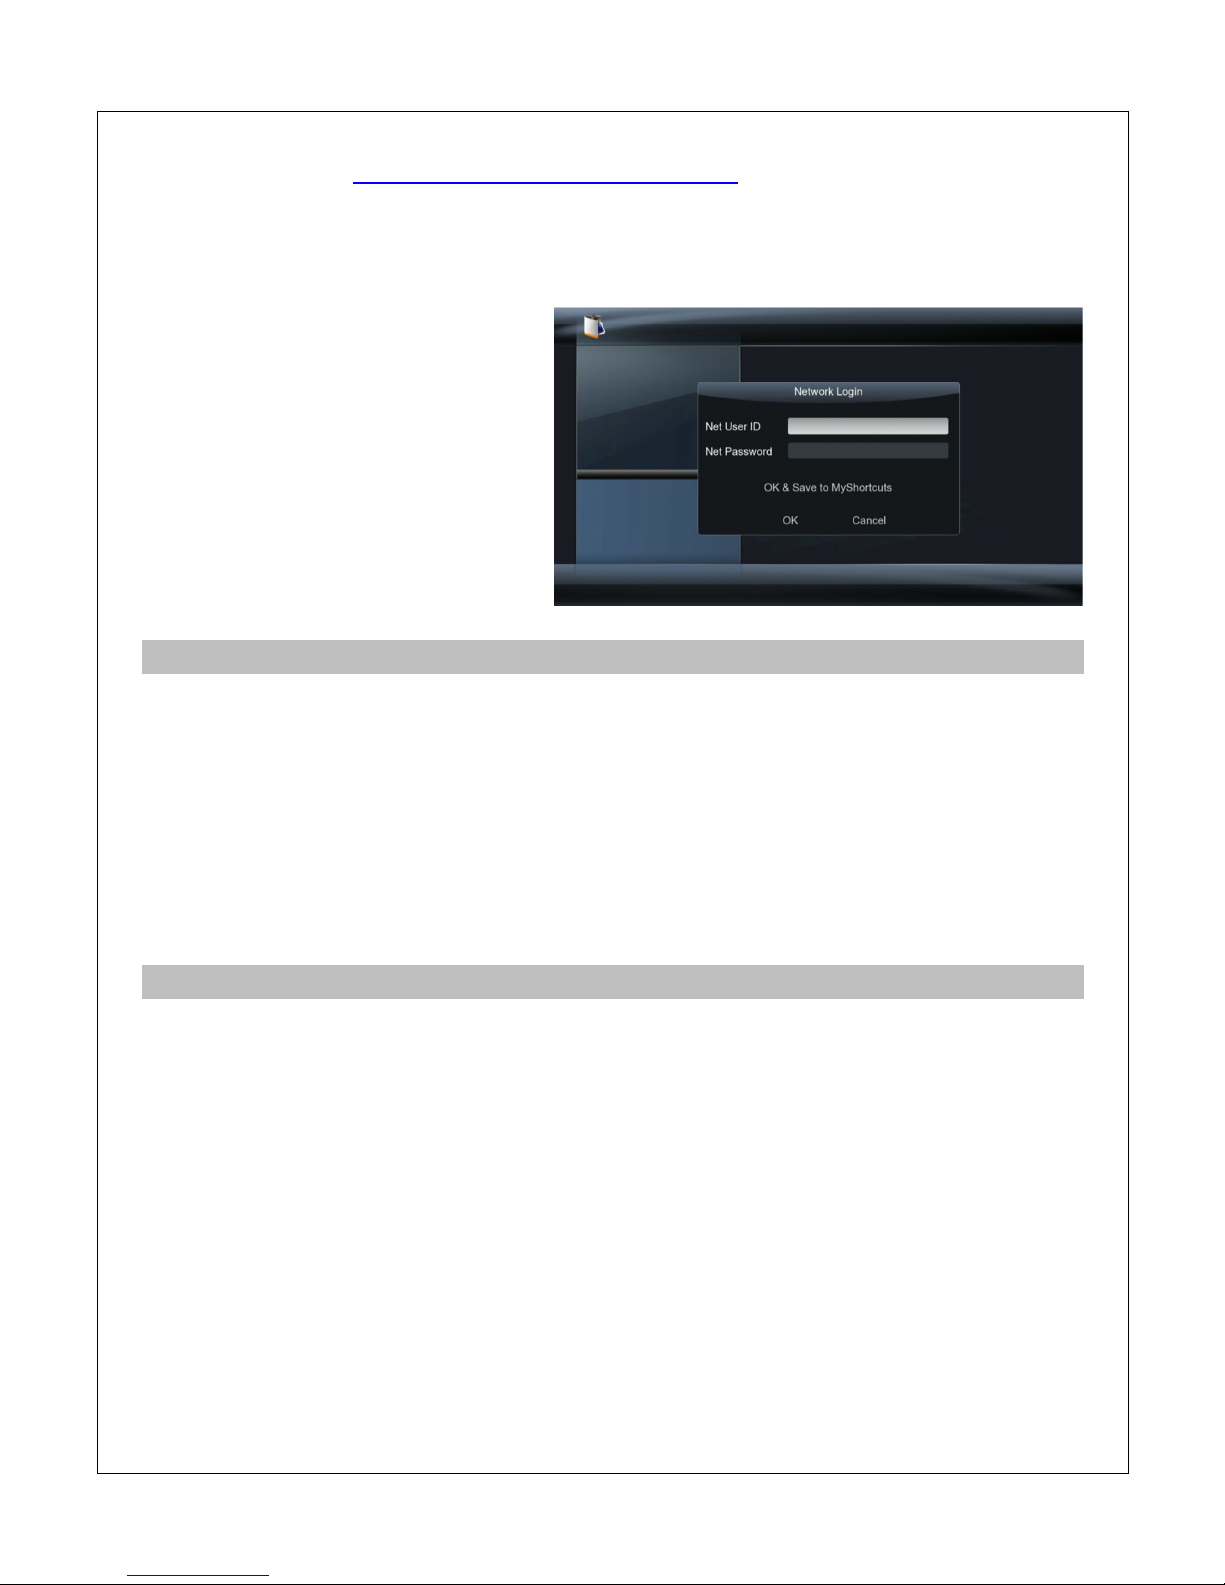
To browse for media files in shared folders on the local area network, elect “Network” from the
file manager device list. On the next screen, select WORKGROUP and a list of available host
names will be shown. Select one of the host names and all available folder shares from that
host will be displayed. If the host
requires a username and password for
accessing a folder share, a login box will
be displayed.
Once the shared folder has been
opened, browsing for media files works
the same as browsing on storage
devices attached to the player. The
same view modes of Thumbnail, List,
and Preview are available.
5.3 Using Network Shortcuts
Some computers or devices do not have a host name or is not a part of the WORKGROUP
network. Shortcuts allow accessing these devices through their IP addresses.
To setup and use network shortcuts, select “Network” from the file manager and select
“My_Shortcuts” on the next screen. Press the RED button on the remote control to bring up the
shortcuts menu and select “Add”. Next enter the username, password, and IP address of the
host. If a username and password is not needed, leave these fields blank. Select “OK” after
entering the above information and the shortcut will be created. Shortcuts can be modified or
deleted by pressing the RED button on the remote to bring up the shortcuts menu.
5.4 Browsing UPnP Servers
The player is able to stream media content from UPnP servers through its network connection.
Most modern operating systems have bundled or free UPnP server software available. Some
popular UPnP server software include Windows Media Player 11, XBMC Media Center
(Linux/Mac/Windows), and MediaTomb (Linux). Setup and configuration of an UPnP server is
beyond the scope of this manual; installation and setup tutorials are available on the Internet for
the aforementioned UPnP server software.
To access UPnP servers, select “Network” from the file manager device list. On the next screen,
select UPnP and a list of available UPnP servers will be shown. Select one of the server names
and all available media categories from the server will be displayed.
Page 19
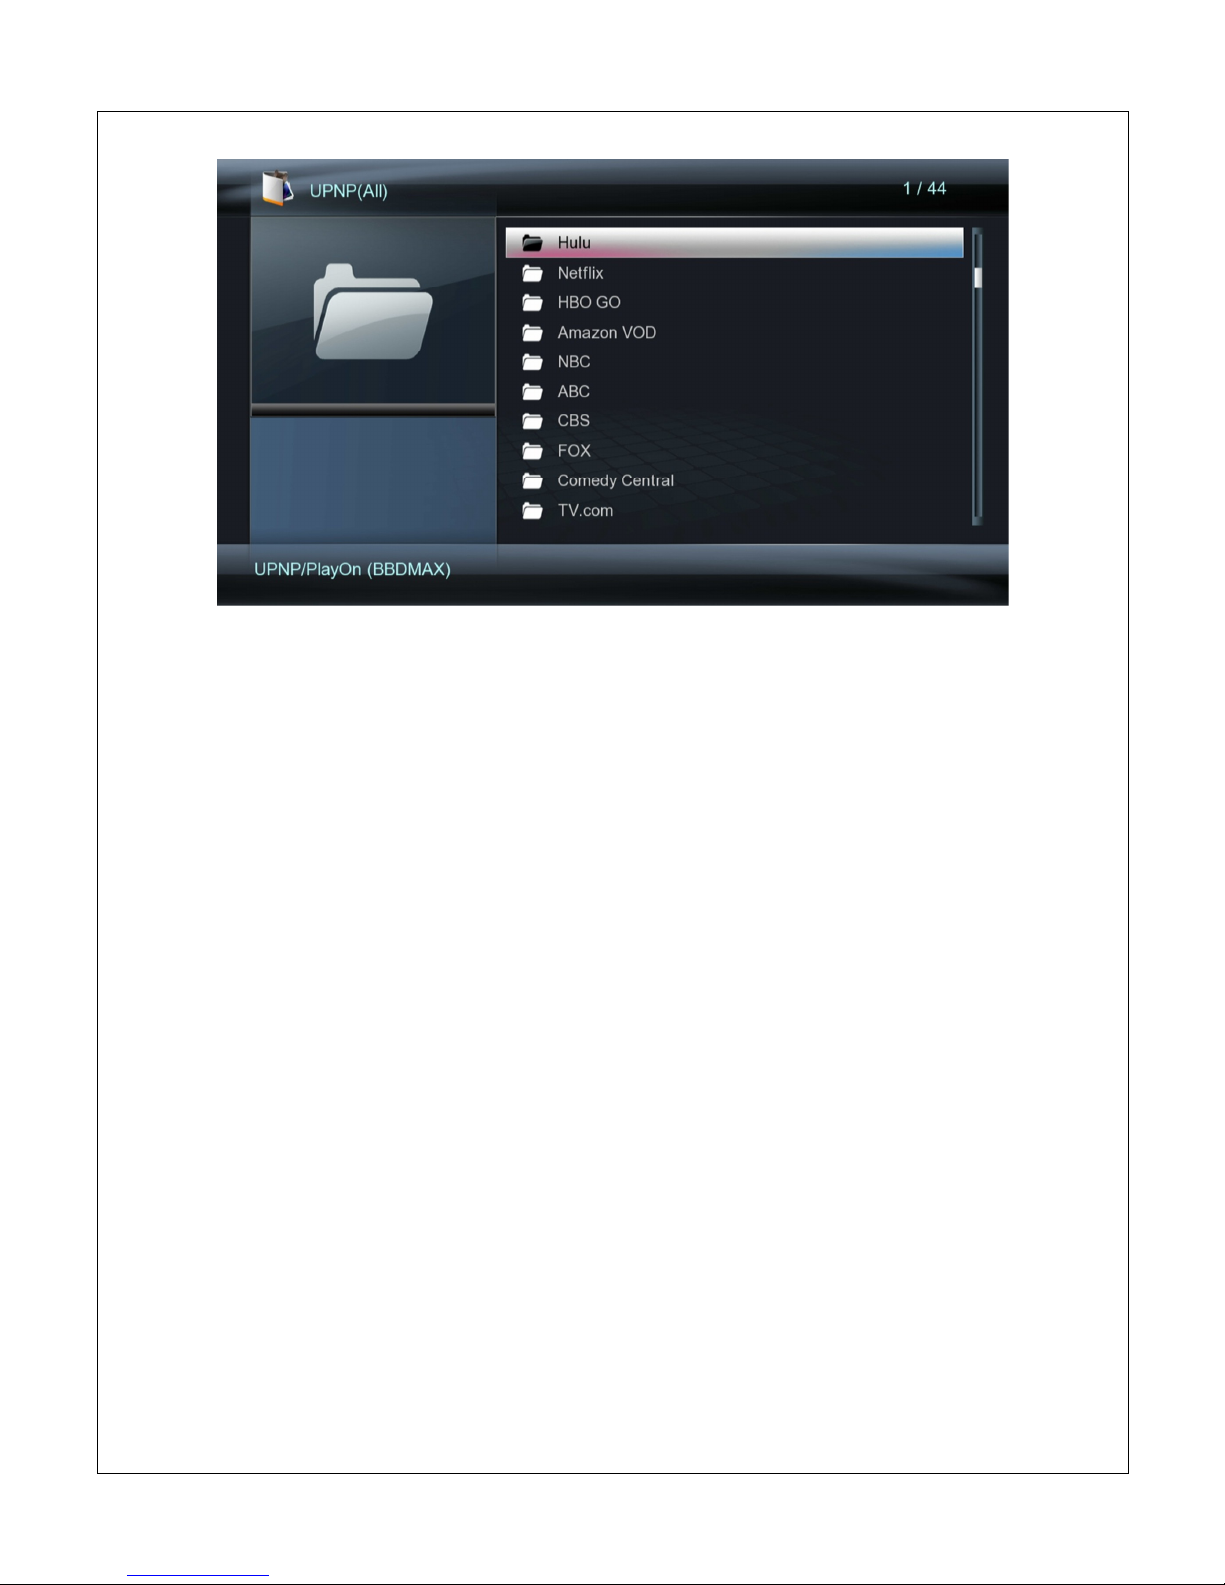
Use the directional LEFT/RIGHT and UP/DOWN buttons on the remote control to select folders
or files and press OK/ENTER to enter a folder. To exit from a folder, press the RETURN button.
To play a media file, highlight it and press the OK/ENTER button.
Because UPnP servers acts as a streaming server and not provide direct access to the
underlying media files, some playback features may not be available depending on the UPnP
server. Examples of features that may not be available include switching of audio tracks and
subtitles, or access to DVD menus. For this reason, it is recommended to stream media files
over a network using file/folder shares instead of UPnP whenever possible.
Page 20
5.5 File Operations, Playlists, Photo Albums
The file manager contains additional functionalities, such as file copying/deleting/renaming, and
creation of playlists and photo albums.
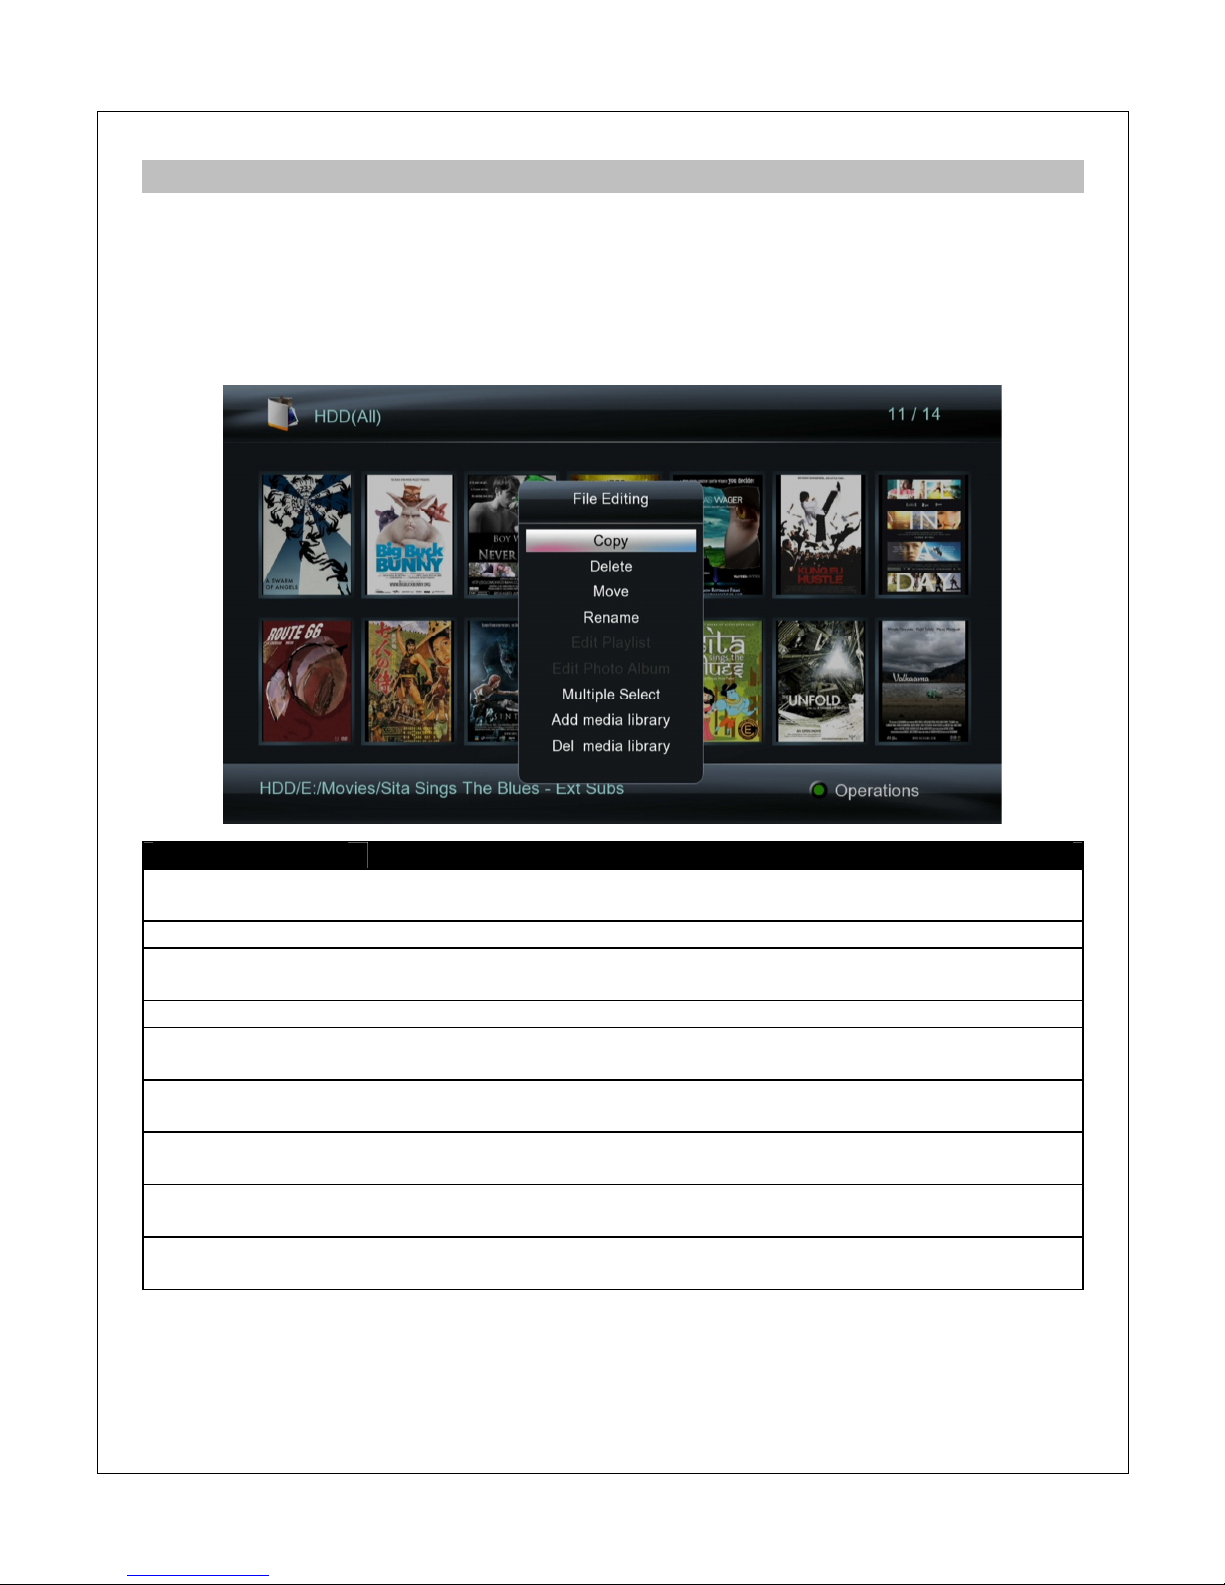
5.5.1 Single File Operations
To access the file operations menu, highlight a file or folder and press the GREEN button on the
remote control.
Setting
Description
Copy
Copy the highlighted file or folder – the user will be prompted to select
the destination location
Delete
Delete the highlighted file or folder
Move
Move the highlighted file or folder – the user will be prompted to select
the destination location
Rename
Rename the highlighted file or folder
Edit Playlist
If the highlighted file is a .M3U playlist file, it can be edited by selecting
this option, such as for deleting or adding songs.
Edit Photo Album
If the highlighted file is a photo album file, it can be edited by selecting
this option, such as for deleting or adding photos.
Multiple Select
Perform copy, delete, move, create playlist, or create photo album on
multiple files or folders.
Add Media Library
Add the currently highlighted file to the media library. This is only
available for files on storage devices attached to the player.
Del Media Library
Delete the currently highlighted file from the media library. This is only
available for files on storage devices attached to the player.
5.5.2 Multi-File Operations
To perform file operations on multiple files, first press the GREEN button on the remote while
highlighting a file or folder in file browser, then select Multiple Select from the file operations
Page 21
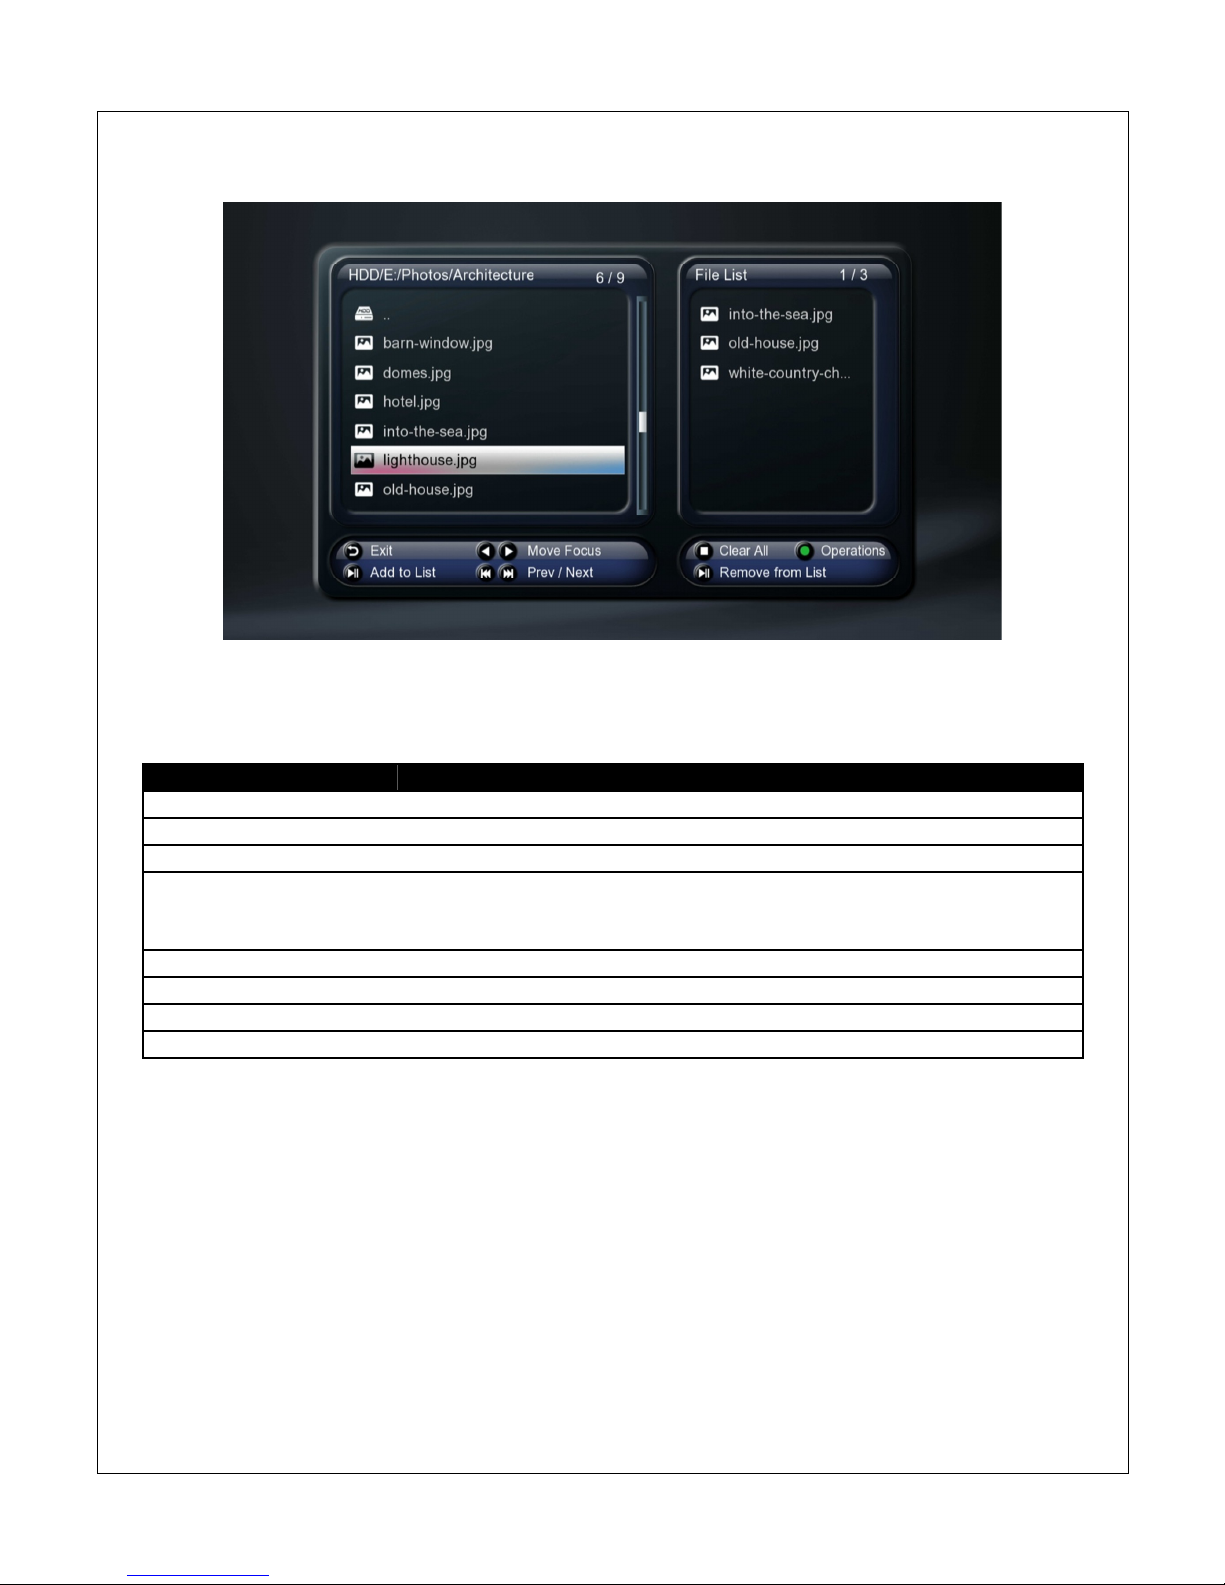
menu. The multi-file operations menu will display:
The multi-file operations menu has two sections, the right section is a file/folder browser box, the
left section shows files and folders that have been selected. While in the multi-file operations
menu, the following remote control commands are available:
Button
De
scription
RETURN
Exit from the multi-file operations menu
UP/DOWN
Move the cursor to highlight files or folders
LEFT/RIGHT
Switch between the left or right boxes of the menu
OK/ENTER
Enter the highlighted folder – to exit from the current folder,
highlight the “..” folder at the top – DO NOT press the RETURN
button.
PREV/NEXT
Go to previous or next page
PLAY/PAUSE
Add or remove the current file or folder from the list
STOP
Clears all files or folders from the file list
GREEN
Display the file operations menu (Please see below)
After adding the desired files or folders to the file list, press the GREEN button on the remote to
initiate multi-file operations.
Page 22
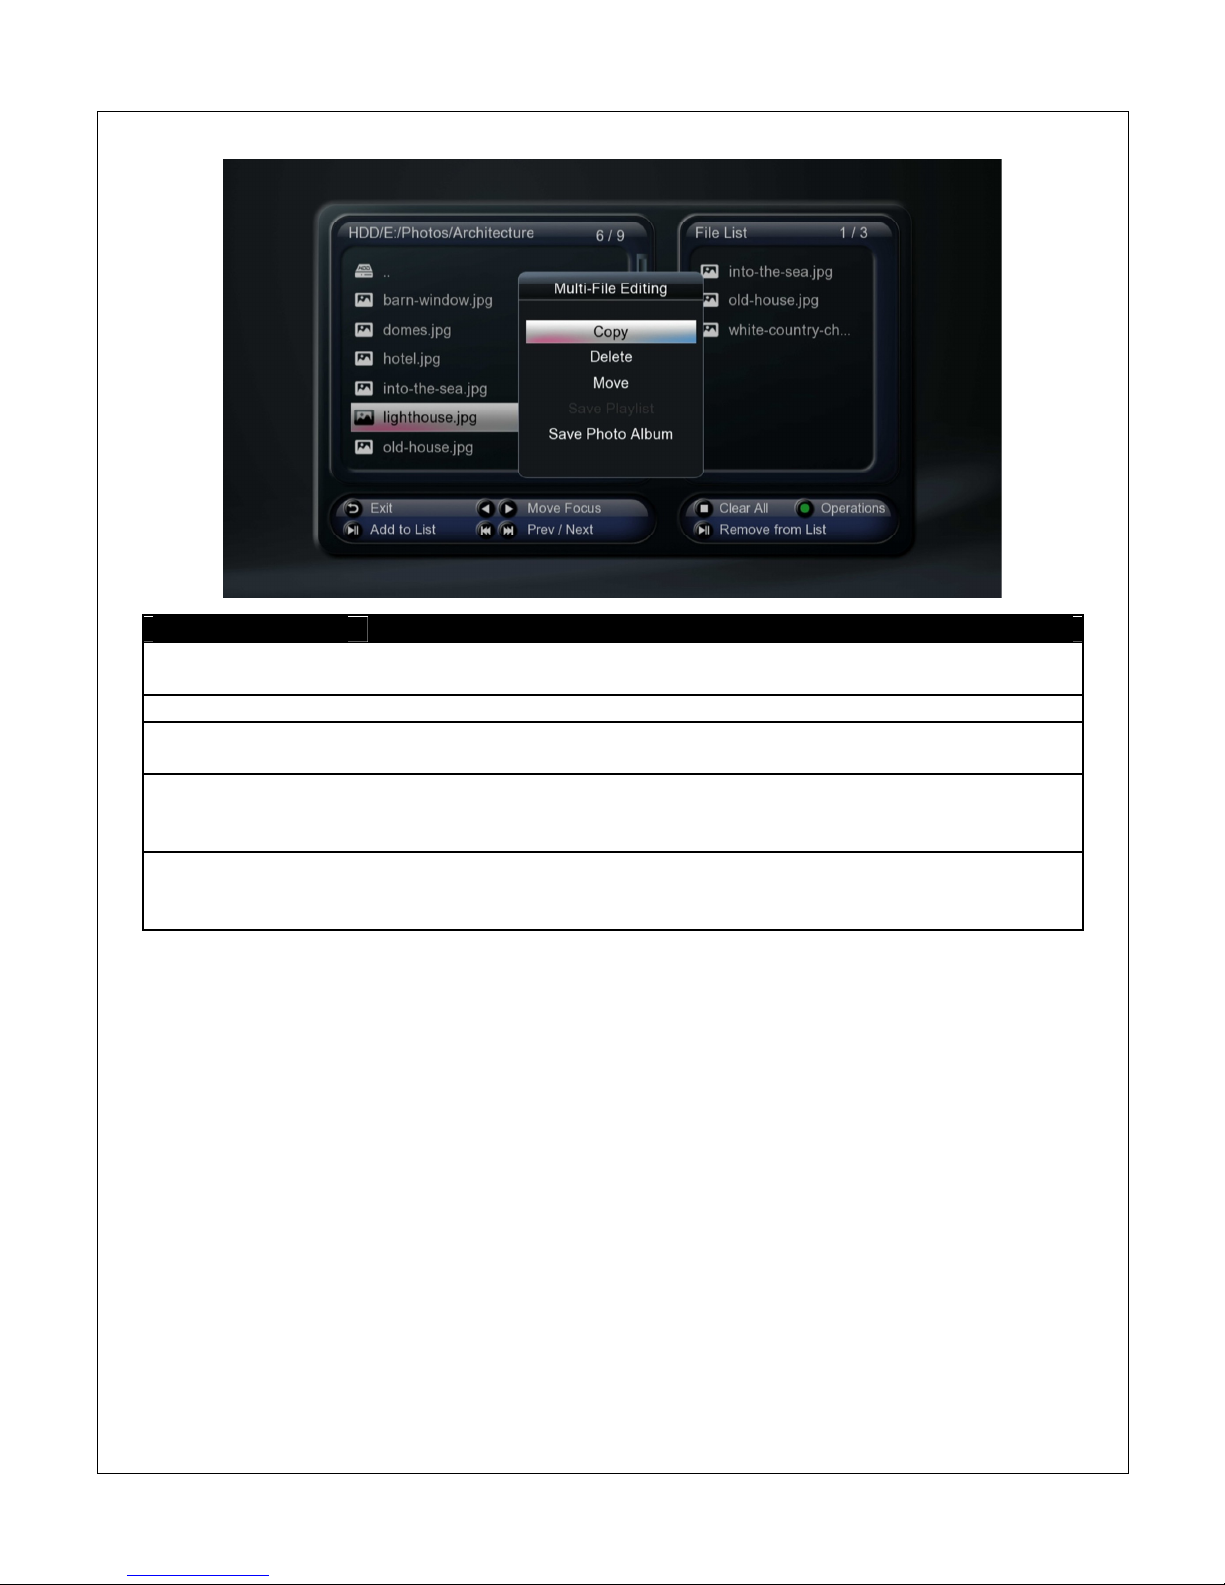
Setting Description
Copy
Copy the list of files or folders – the user will be prompted to select the
destination location
Delete
Delete the list of files or folders
Move
Move the list of files or folders – the user will be prompted to select the
destination location
Save Playlist
If the list of files or folders contains music files, they can be added
together into a new playlist. The user will be prompted to enter a name
for the playlist.
Save Photo Album
If the list of files or folders contains photos, they can be added together
into a new photo album. The user will be prompted to enter a name for
the album.
Page 23
6 Media Library
The player has a media library feature for organizing media files on storage devices attached to
the player. Within the media library, all media files are organized by type (video, music, or
photo), and a search function is available for quickly locating specific files or groups of files,
even when there are tens of thousands of files. The media library feature does not work with
network folder/file shares.
6.1 Media Library – Setup
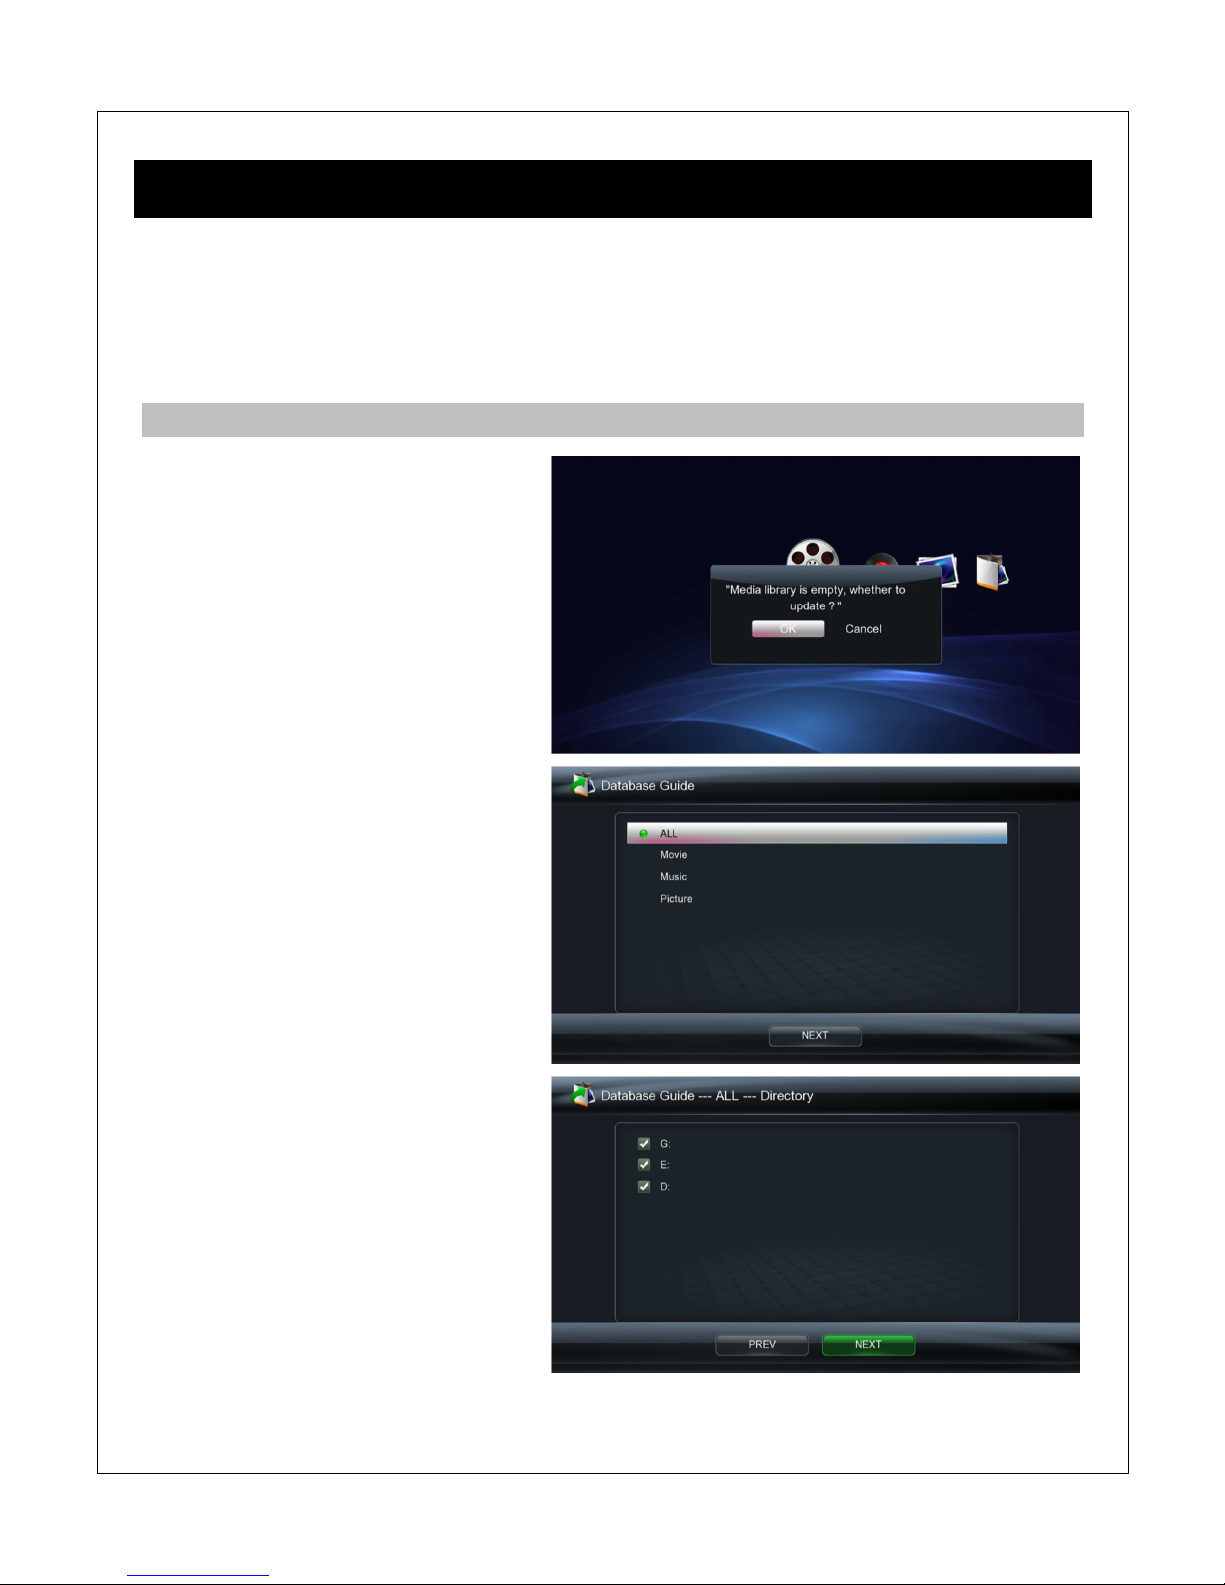
Prior to using the media library, the
player must perform a media scan. The
player must have an internal hard disk
drive containing media files, and/or
attach USB drives with media files.
To begin setting up the media library,
highlight the Movies, Music, or Photos
icon on the main menu and press
OK/ENTER on the remote control. A
message box will pop up indicating that
the media library is empty and asking if
you wish to update it.
Next, you will be asked which type of
media files to include in the media
library. It’s recommended that only
Movie files be placed into the media
library for best performance. If the drive
contains only a small number of music
or photo files, then it is okay to index all
files.
On the next screen, you will be asked
which storage devices to be included in
the media library. The drives are listed
by the drive letter. Deselect the drives
you do not want media files indexed.
For example, you may not wish to index
media files on a SD flash memory card.
On the next screen, you will be asked to
select certain media library optimization features, such as skipping hidden directories. It is
Page 24
recommended that all boxes should be checked.
Next, the player will begin scanning and indexing the media files on the selected storage
devices. When finished, the main menu will be displayed. The media library is now ready for
use. You may now select Movies, Music, or Photos from the main menu to access media files.
6.2 Media Library – Rescanning
Because indexing the media library can be time consuming with a large number of files, the
player does not automatically rescan storage devices for changes. If media files have been
added or deleted, the media library can be updated by performing a re-scan.
To perform a rescan, first access the media library by selecting the Movies, Music, or Photos
icon from the main menu. Then press the GREEN button on the remote control to access the
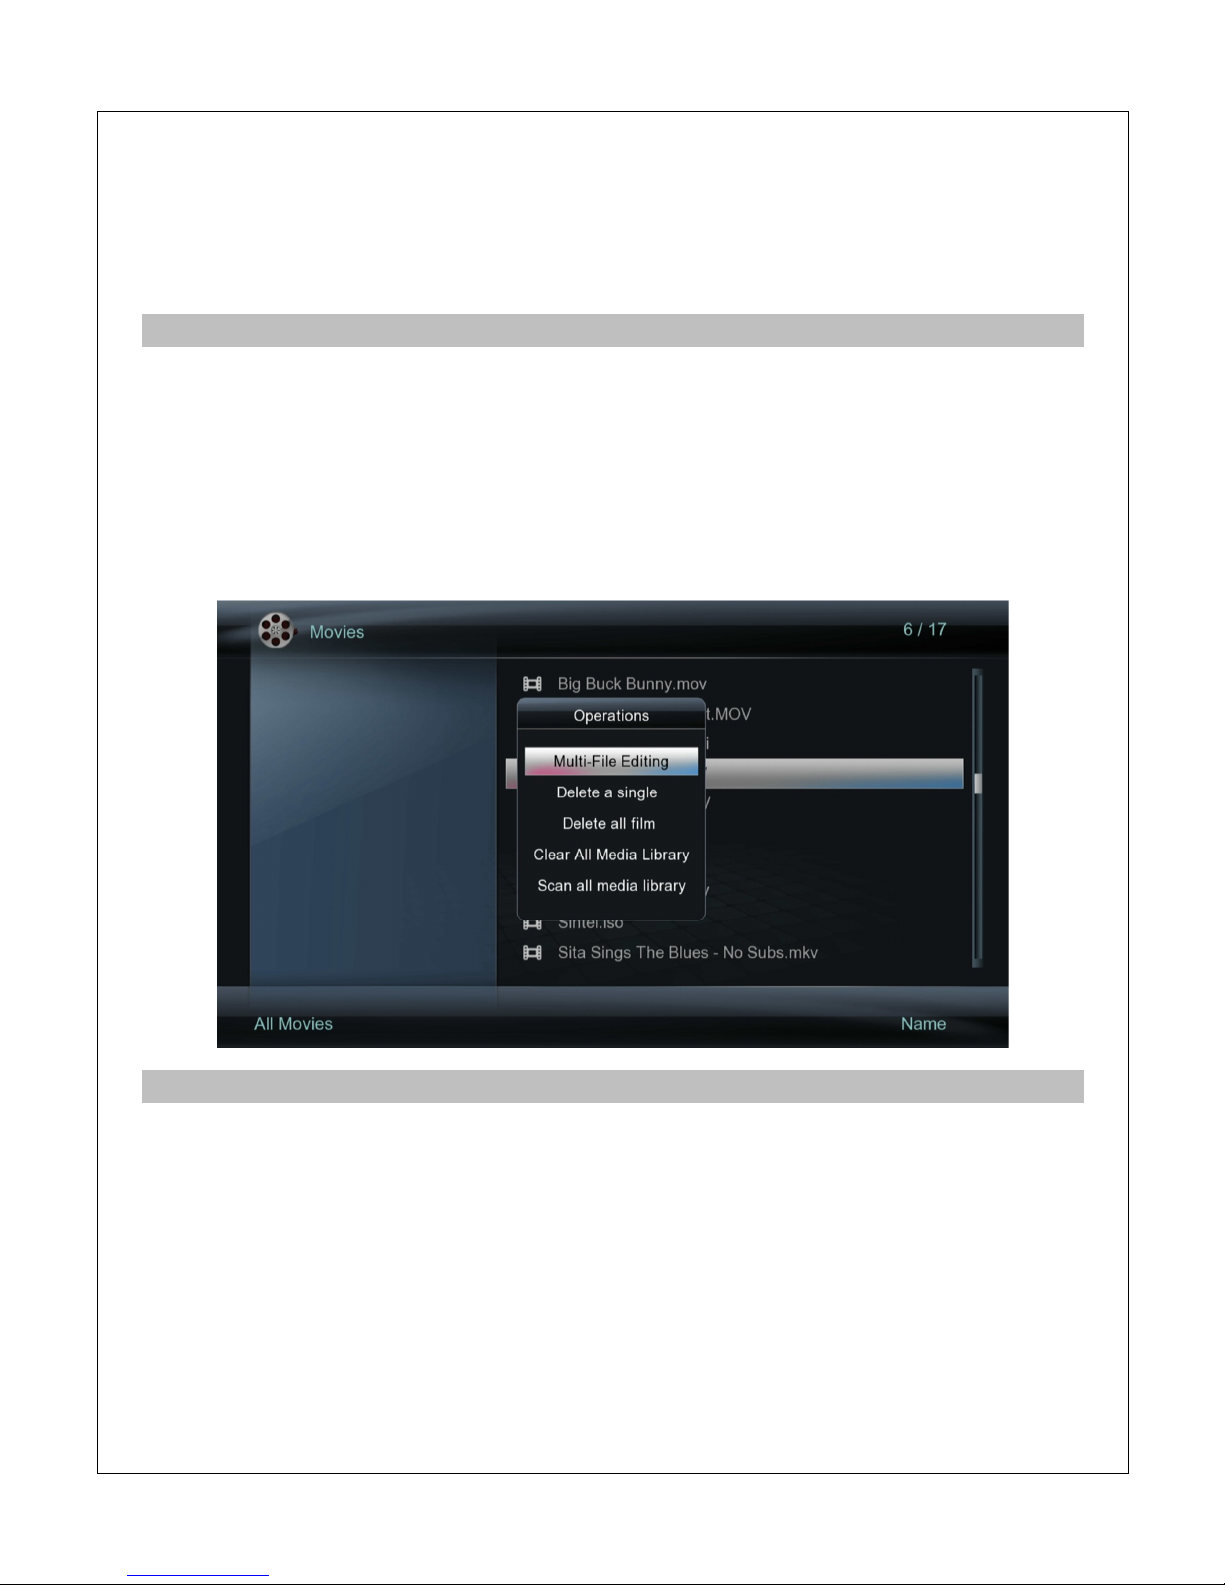
operations menu. Select “Scan all media library” to initiate rescan. The rest of the steps are the
same as creating the media library for the first time.
6.3 Media Library – Clearing
The media library is associated with each storage device that is included in the scan. It is
possible to clear the media library from a storage device so that the media files on the device is
no longer included in the media library.
To clear the media library, remove all storage devices except for the storage device to clear the
media library from. If an internal hard drive is installed, temporarily disengage its SATA
connector to prevent its media library from being cleared. Next, access the media library by
selecting the Movies, Music, or Photos icon from the main menu. Then press the GREEN button
on the remote control to access the operations menu. Select “Clear all media library” to clear the
media library from attached storage devices.
Page 25
6.4 Media Library – Movies
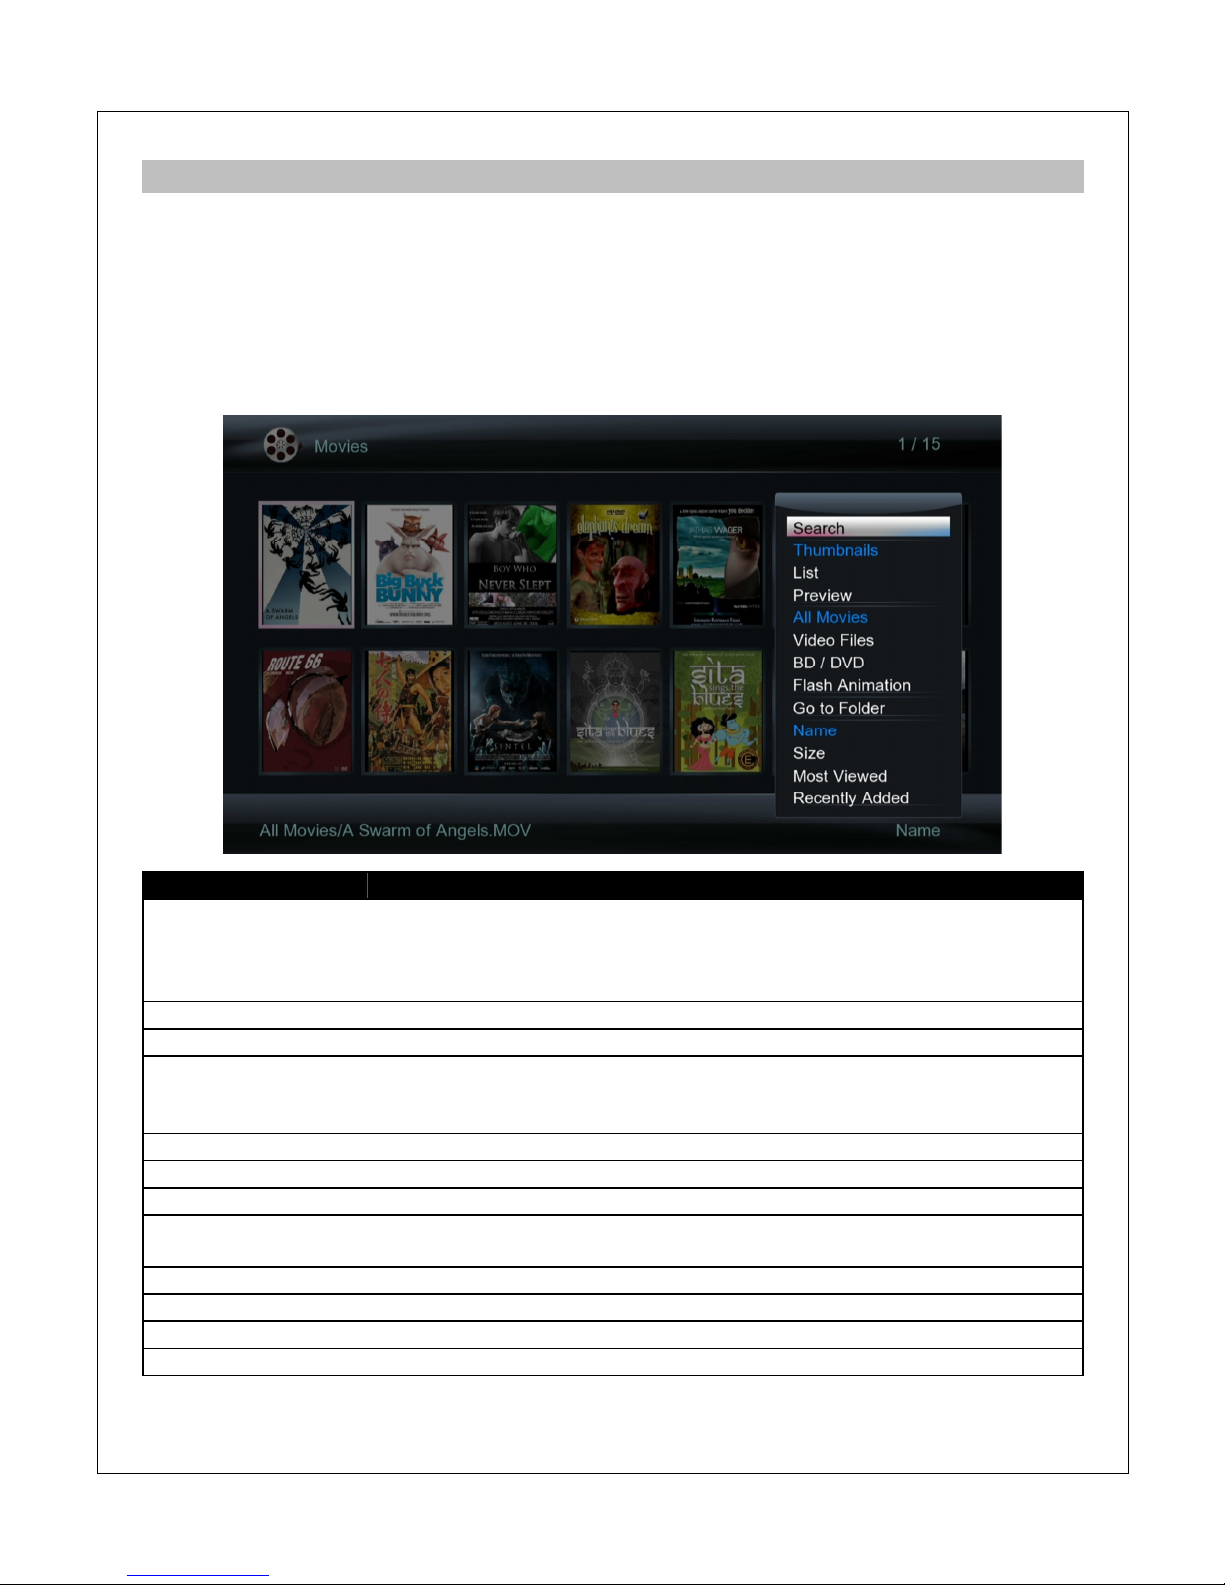
After selecting the Movies icon from the main menu, the media library screen will show all
movies found on attached storage devices. For example, if the internal hard disk drive contains
20 movies and an attached external USB drive contains 10 movies, all 30 movies will be shown
together on the same screen if both drives were selected when setting up the media library.
Press the MENU button on the remote control to bring up the option menu to adjust how movie
files are displayed.
Setting
Description
Search
Search for a movie by name. An on-screen keyboard will be shown.
Enter the first few letters of a movie, select OK, and all matching videos
in the media library will be shown. To see the entire list of movies again,
open the options menu and select All Movies.
Thumbnails
All video files in the media library will be shown as thumbnail icons.
List
All video files in the media library will be shown as a list.
Preview
All video files in the media library will be shown as a list, highlighting a
video will cause the video to begin playing in a small preview box on the
right side of the screen.
All Movies
Show all video files.
BD/ DVD
Show only BD/DVD-type files, such as VOB, IFO, ISO, and VIDEO_TS.
Flash Animation
Show only flash videos.
Go to Folder
Exit from the media library browser and go to the folder of the currently
highlighted video.
Name
Sort videos by name
Size
Sort videos by size
Most Viewed
Sort videos by number of times viewed
Recently Added
Sort videos by date/time added to the media library
Page 26
6.5 Media Library – Music
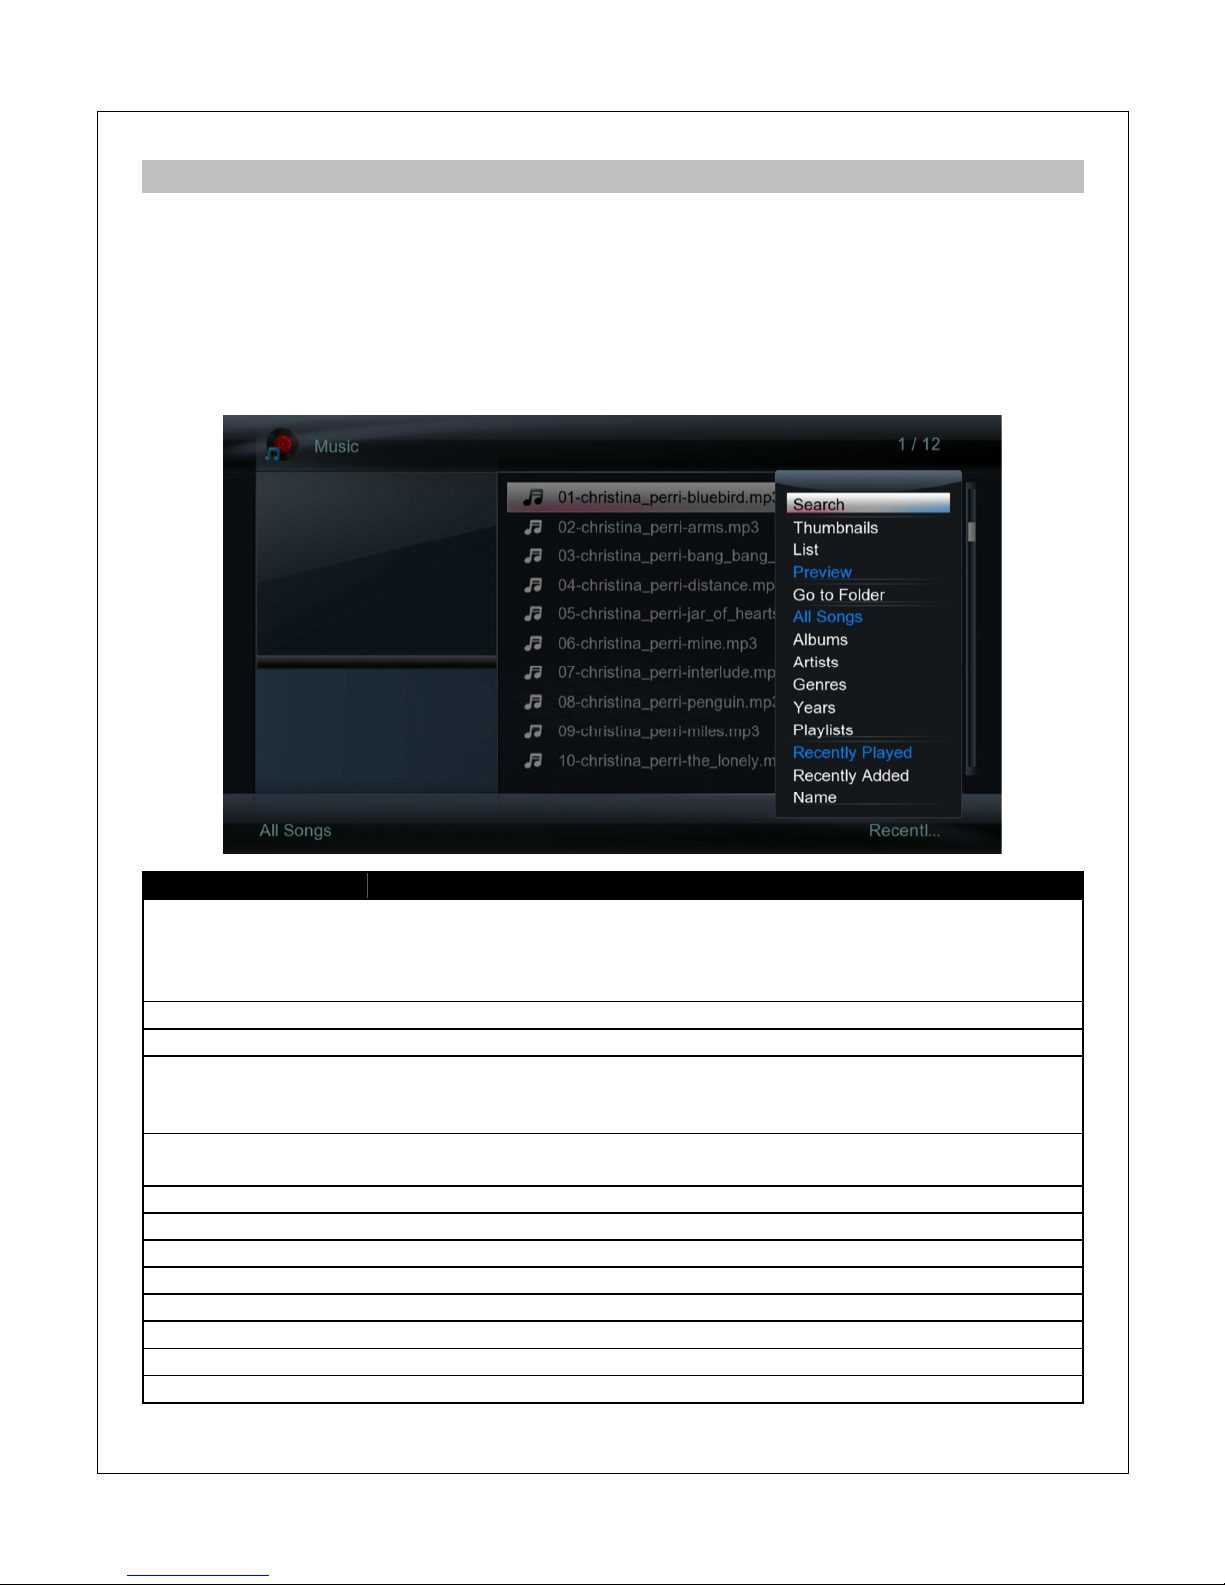
After selecting the Music icon from the main menu, the media library screen will show all music
files found on attached storage devices. For example, if the internal hard disk drive contains 20
music files and an attached external USB drive contains 10 music files, all 30 music files will be
shown together if both drives were selected when setting up the media library.
Press the MENU button on the remote control to bring up the option menu to adjust how music
files are displayed.
Setting
Description
Search
Search for a music file by name. An on-screen keyboard will be shown.
Enter the first few letters of a file, select OK, and all matching music files
in the media library will be shown. To see the entire list of movies again,
open the options menu and select All Songs.
Thumbnails
All music files in the media library will be shown as thumbnail icons.
List
All music files in the media library will be shown as a list.
Preview
All music files in the media library will be shown as a list, highlighting a
music file will cause the file’s info and thumbnail displayed in a preview
box on the right side of the screen.
Go to Folder
Exit from the media library browser and go to the folder of the currently
highlighted music file.
All Songs
Display all songs
Albums
Display by albums; Requires proper ID3 tag with album information.
Artists
Display by artists; Requires proper ID3 tag with artist information.
Genres
Display by genres; Requires proper ID3 tag with genre information.
Years
Display by years; Requires proper ID3 tag with year information.
Playlists
Display by available playlists
Recently Played
Sort music files by recently played
Recently Added
Sort music files by date/time added to the media library
Page 27
N
ame
Sort music files by name
6.6 Media Library – Photos
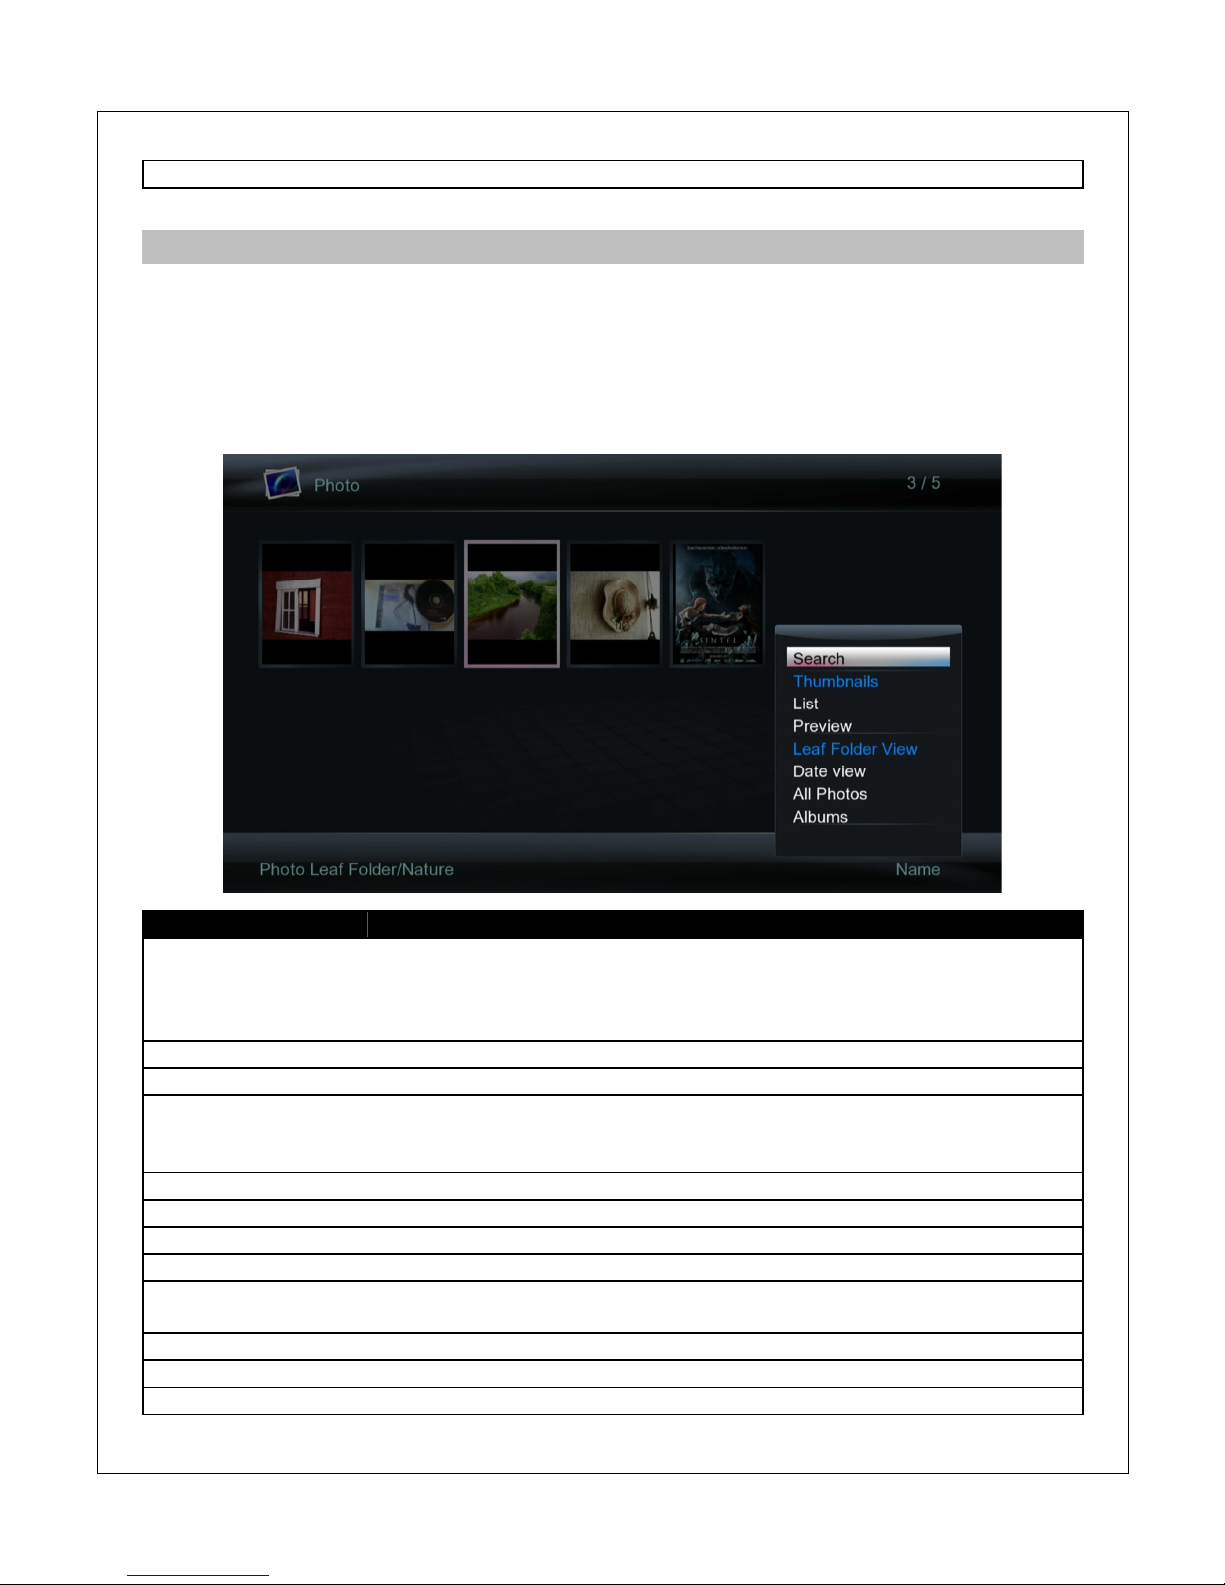
After selecting the Photos icon from the main menu, the media library screen will be shown. By
default, photos will be shown in Leaf Folder View mode, where folders are arranged based on
their folder. Selecting a folder brings up all photos within that folder.
Press the MENU button on the remote control to bring up the option menu to adjust how photo
files are displayed.
Setting
Description
Search
Search for a photo by name. An on-screen keyboard will be shown.
Enter the first few letters of a file, select OK, and all matching photos in
the media library will be shown. To see the entire list of movies again,
open the options menu and select All Photos.
Thumbnails
Photos in the media library will be shown as thumbnail icons.
List
Photos in the media library will be shown as a list.
Preview
Photos in the media library will be shown as a list, highlighting a photo
will cause the file’s info and thumbnail displayed in a preview box on the
right side of the screen.
Leaf Folder View
All photos are organized based on their folder
Date View
All photos are organized based on their date
All Photos
All photos in the media library are shown together on the same screen.
Albums
All photos are organized into stacks based on available albums
Go to Folder
Exit from the media library browser and go to the folder of the currently
highlighted photo.
Name
Sort photos by name
Recently Added
Sort photos by date/time added to the media library
Recently Played
Sort photos files by recently viewed
Page 28
7 Playing Movies, Music, and Viewing Photos
After finding a media file to play using the file manager or media library, a variety of convenient
playback controls are available.
7.1 Playing Movies
7.1.1 Playback Controls
During video playback, the following remote control commands are available:
Button
Description
PLAY/PAUSE
Press to play or pause the current video.
STOP
Press to immediately stop playback.
LEFT & RIGHT
Press to use the time slide bar to quickly go forward or backwards
in a video.
FAST FORWARD
REWIND
Press to fast forward or rewind the current playback. Press
repeatedly to change fast forward or rewind speed. Available
speeds are 1.5x, 2x, 4x, 8x, 16x, and 32x. Some video types may
be limited to 2x. Fast forward speeds beyond 2x are performed by
a combination of forward skips and playback at 2x. Rewinds are
performed as skips and may not occur smoothly.
PREV
/NEXT
Press to go to the previous/next chapter. Double-press to go to the
previous/next video.
MENU
Press to display optional settings when viewing video.
16:9
Switches current playback aspect ratio among 16:9, 16:10, Pan
Scan 4:3 , and Letter Box 4:3.
BOOKMARK
Press to add the current playing video to the bookmark list.
At the main menu, press to view the bookmark list. This feature is
only available for media files on attached storage drives.
ZOOM
Press to zoom when viewing photos or playing videos.
Video zoom levels: 1.1x, 1.2x, 1.3x, 1.4x, 2x, 3x, 4x, 8x.
REPEAT
Press to set repeat option when viewing videos: Repeat-All,
Repeat-Title, Repeat-Off.
AUDIO
Press to change audio tracks for the current video.
SUBTITLE
Press to change the subtitle track when viewing videos. Use the
MENU button to access the full subtitle settings menu.
MUTE
Press to mute audio output; press again to unmute.
VOL+/VOL
-
Press to change the output volume. (Hint: Set volume to max and
use the TV or AV receiver to control volume). Volume does not
have any effect if the player sound output is RAW.
RETURN
Press to stop playback. A message box will ask for confirmation.
Select OK to stop playback, or select CANCEL to continue
playback.
INFO
Press to display information about the currently playing video.
SEARCH
During video playback, press once to display the time slide bar,
and press again to display the jump-to time entry menu.
Page 29
7.1.2 Movies Settings Menu
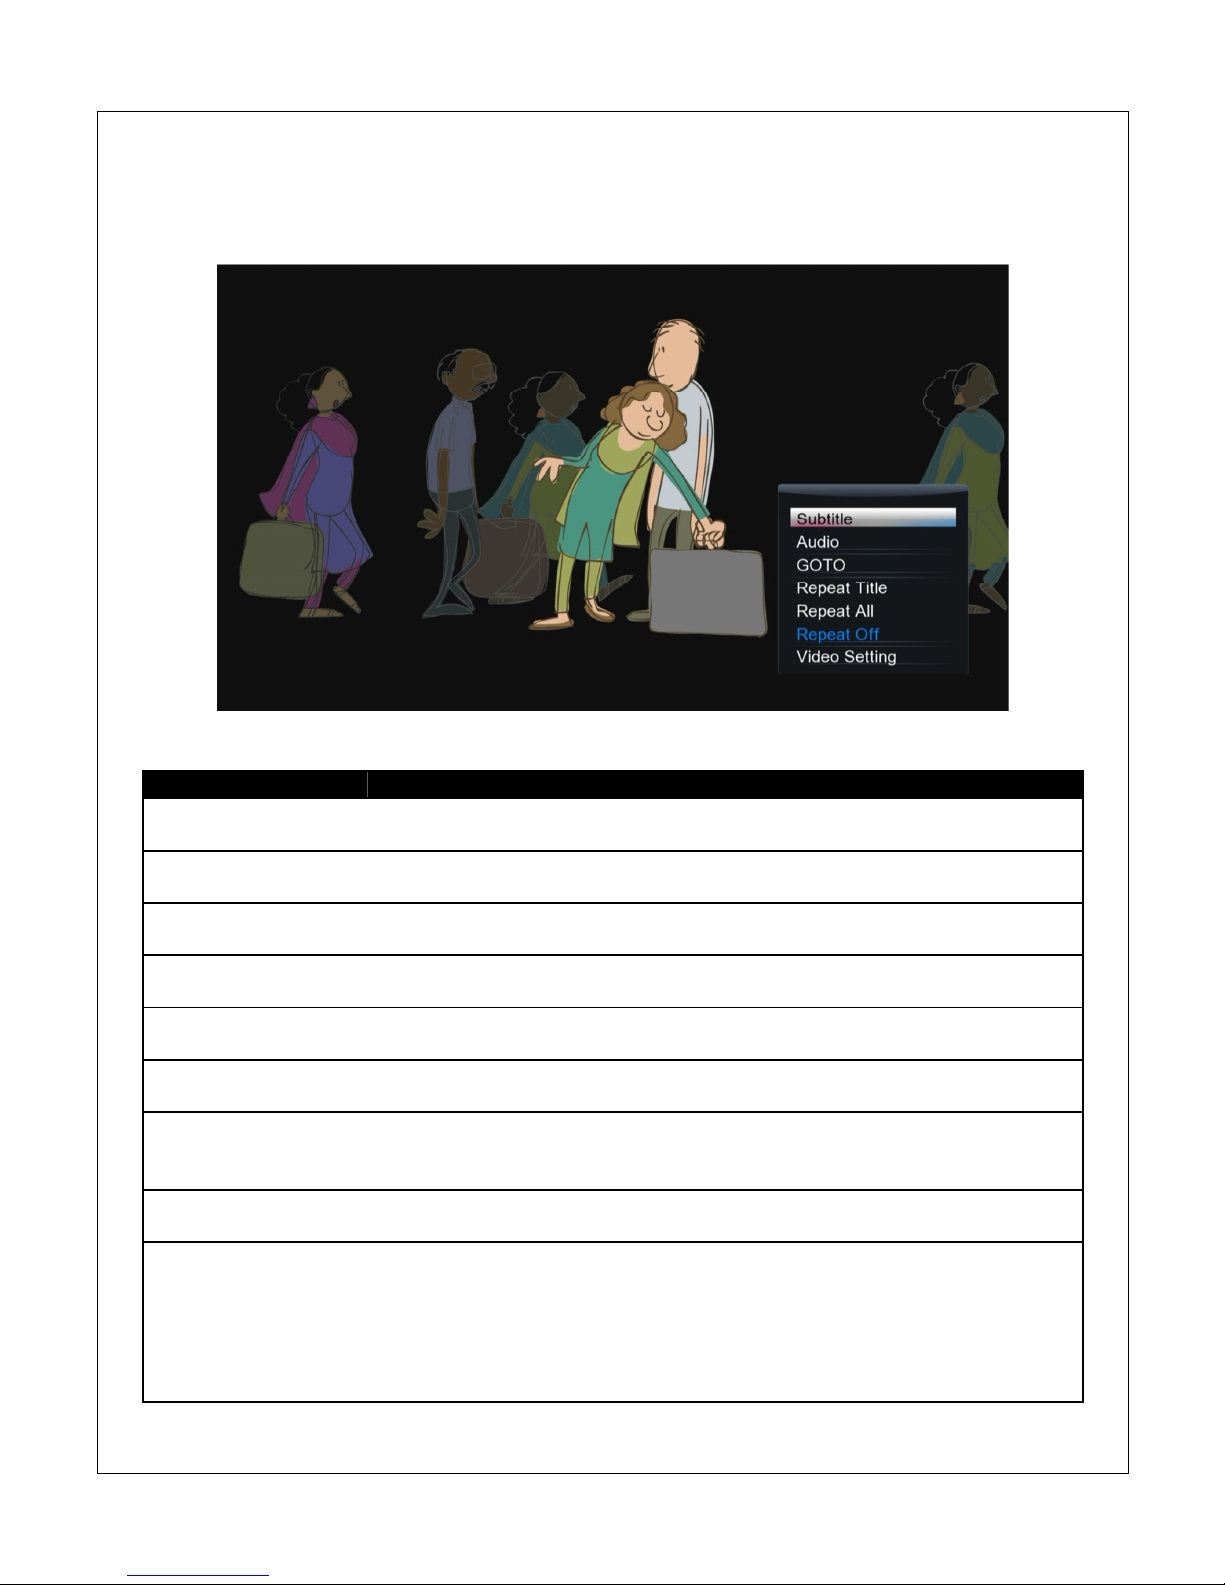
During video playback, additional controls are available through the movie settings menu. To
access the settings menu, press the MENU button while a video is playing.
The available settings have the following functionality:
Setting
Description
BD Navigation
Access the BD navigation menu. This setting is only available when
playing a BD-ISO or BD Folder video.
Subtitle
Access the subtitle settings menu. See ‘7.1.3 Subtitles’ for more
information.
Audio
Display the list of available audio tracks for the current video and select
the desired audio track for playback.
GOTO
Display the jump-to time entry menu. Enter a time mark or title/chapter
to jump to.
Title Menu
Access the DVD title menu. This setting is only available when playing a
DVD-ISO or DVD Folder video.
Root Menu
Access the DVD root menu. This setting is only available when playing a
DVD-ISO or DVD Folder video.
Repeat
Press to set repeat option when viewing videos: Repeat-All, RepeatTitle, Repeat-Off. Not all repeat selections are available when viewing
BD/DVD ISO or Folder videos.
Video Settings
Display and change the player settings for Brightness, Contrast, Hue,
and Saturation.
2
D/3D
These settings are only displayed when a 3D-ready TV or home theater
receiver is detected.
• 2D – playback the current video in 2D mode.
• 3D Simulation – Simulate a 3D playback effect from a 2D video.
• 3D Side By Side – Select if video is a side-by-side 3D video.
• 3D Top Bottom – Select if video is a top-and-bottom 3D video.
Page 30
• Swap L&R – Swap the left and right frames for current 3D video.
• Depth – Adjust the 3D effect depth for 3D Simulated playback.
7.1.3 Subtitles
When subtitles are available for the currently playing video, pressing the SUBTITLE button on
the remote control will cycle through the available subtitle tracks. By default, subtitles will be
displayed when available. To change the default subtitle On/Off behavior, please see ‘9.5.9
Subtitle Default Load’ for more information.
The player supports subtitle tracks embedded in the video file, or external subtitle files. For
external subtitles, the subtitle file should be placed in the same folder as the video and have the
same name as the video. Different language subtitle files can be differentiated in the manner as
illustrated below:
Video file name: sita_sings_the_blues.mkv
English subtitles: sita_sings_the_blues.eng.srt
Spanish subtitles: sita_sings_the_blues.esp.srt
If a video has both embedded and external subtitles, all subtitles will be available together. The
supported sub title formats and features are as follows:
Subtitle
Description
External
SRT, IDX+SUB, SMI, SSA/ASS. Plain text only for all subtitle types.
Internal
DVD (IDX+SUB), BD (PGS), SRT
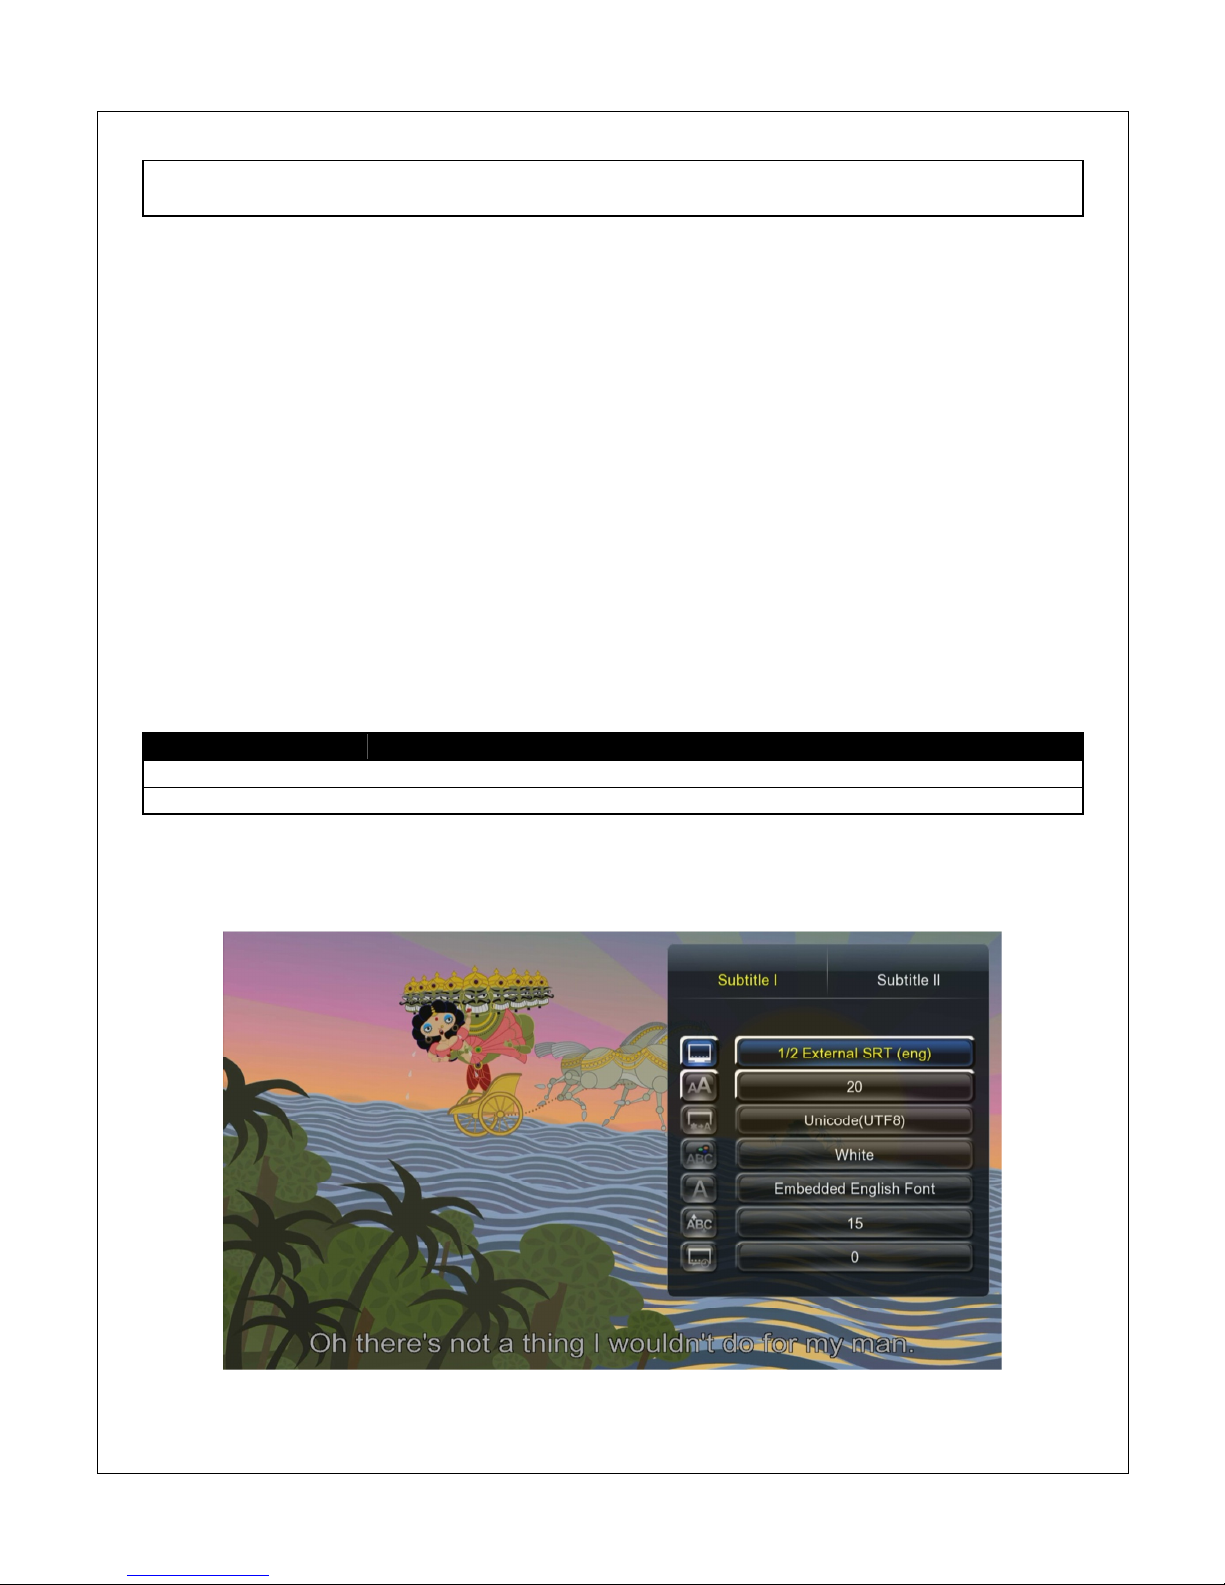
For additional subtitle appearance settings, press the MENU button on the remote control while
a video is playing and select “Subtitle” to access the subtitle settings menu.
The subtitle menu offers the following settings:
Page 31
Setting
Description
Subtitle
I/II
The player can display two different subtitles at the same time. For
example, both the English and Spanish subtitles can be displayed at the
same time. Therefore two subtitle settings menus are available.
Subtitle
Track
Displays a list of available subtitles for the current video. The current
subtitle is highlighted in yellow.
Size
Changes the size of the subtitle text.
Text Encoding
Most subtitles will display correctly with Unicode(UTF8), but if a subtitle
does not display correctly, try one of the other encoding settings.
Color
The color of the subtitle display can be changed for better visibility.
Font
Changes the font for the subtitle text. Please see ‘9.5.8 Subtitle Font
Directory’ for more information.
Offset
Changes how far the subtitle is from the bottom of the screen.
Time Sync
Some subtitles are not perfectly in sync with the video, which happens
mostly with external subtitle files. This setting can be used to adjust the
time sync between the video and the subtitle display.
Subtitle text appearance settings are not available when playing image-based subtitles such as
DVD IDX+SUB and BD PGS.
7.1.4 3D Video Playback
The player supports 3D videos in a variety of formats. The following is a table of the 3D video
types supported:
3D Type
Description
Side by Side
The video has up to 1920x1080 resolution and the left/right frames are
stored on the same frame side by side at half resolution. To play this
type of video in 3D, press the MENU button after the video has started
playing and select “3D Side By Side”.
Top and Bottom
The video has up to 1920x1080 resolution and the left/right frames are
stored on the same frame top and bottom at half resolution. To play this
type of video in 3D, press the MENU button after the video has started
playing and select “3D Top Bottom”.
Frame Packed
The video has the left/right frames packed together in the same stream.
The player automatically detects this type of video and begins playing in
3D mode. It’s important that the BD Navigation is not set to “BD Profile
1.0”, as this will result in 2D playback only. Please see ‘9.5.3 BDMV
Navigation’ for more information.
For BD-ISO and BD Folder videos containing frame packed 3D material, the player sometimes
cannot automatically determining the main 3D feature and instead plays the 2D video stream.
When this happens, choose “BD Lite” as the BDMV Navigation type and try changing the
Playlist to find the correct 3D stream. Please see ‘9.5.3 BDMV Navigation’ for more
information.
Page 32
7.2 Playing Music
During music playback, the following remote control commands are available:
Button
Description
PLAY/PAUSE
Press to begin playback, press again to pause.
STOP
Press to stop playback.
FAST FORWARD
Press to fast forward the current playback. Press repeatedly to
change fast forward speed.
FAST REWIND
Press to fast rewind the current playback. Press repeatedly to
change fast rewind speed.
PREV
Press to go to the previous song.
NEXT
Press to go to the next song.
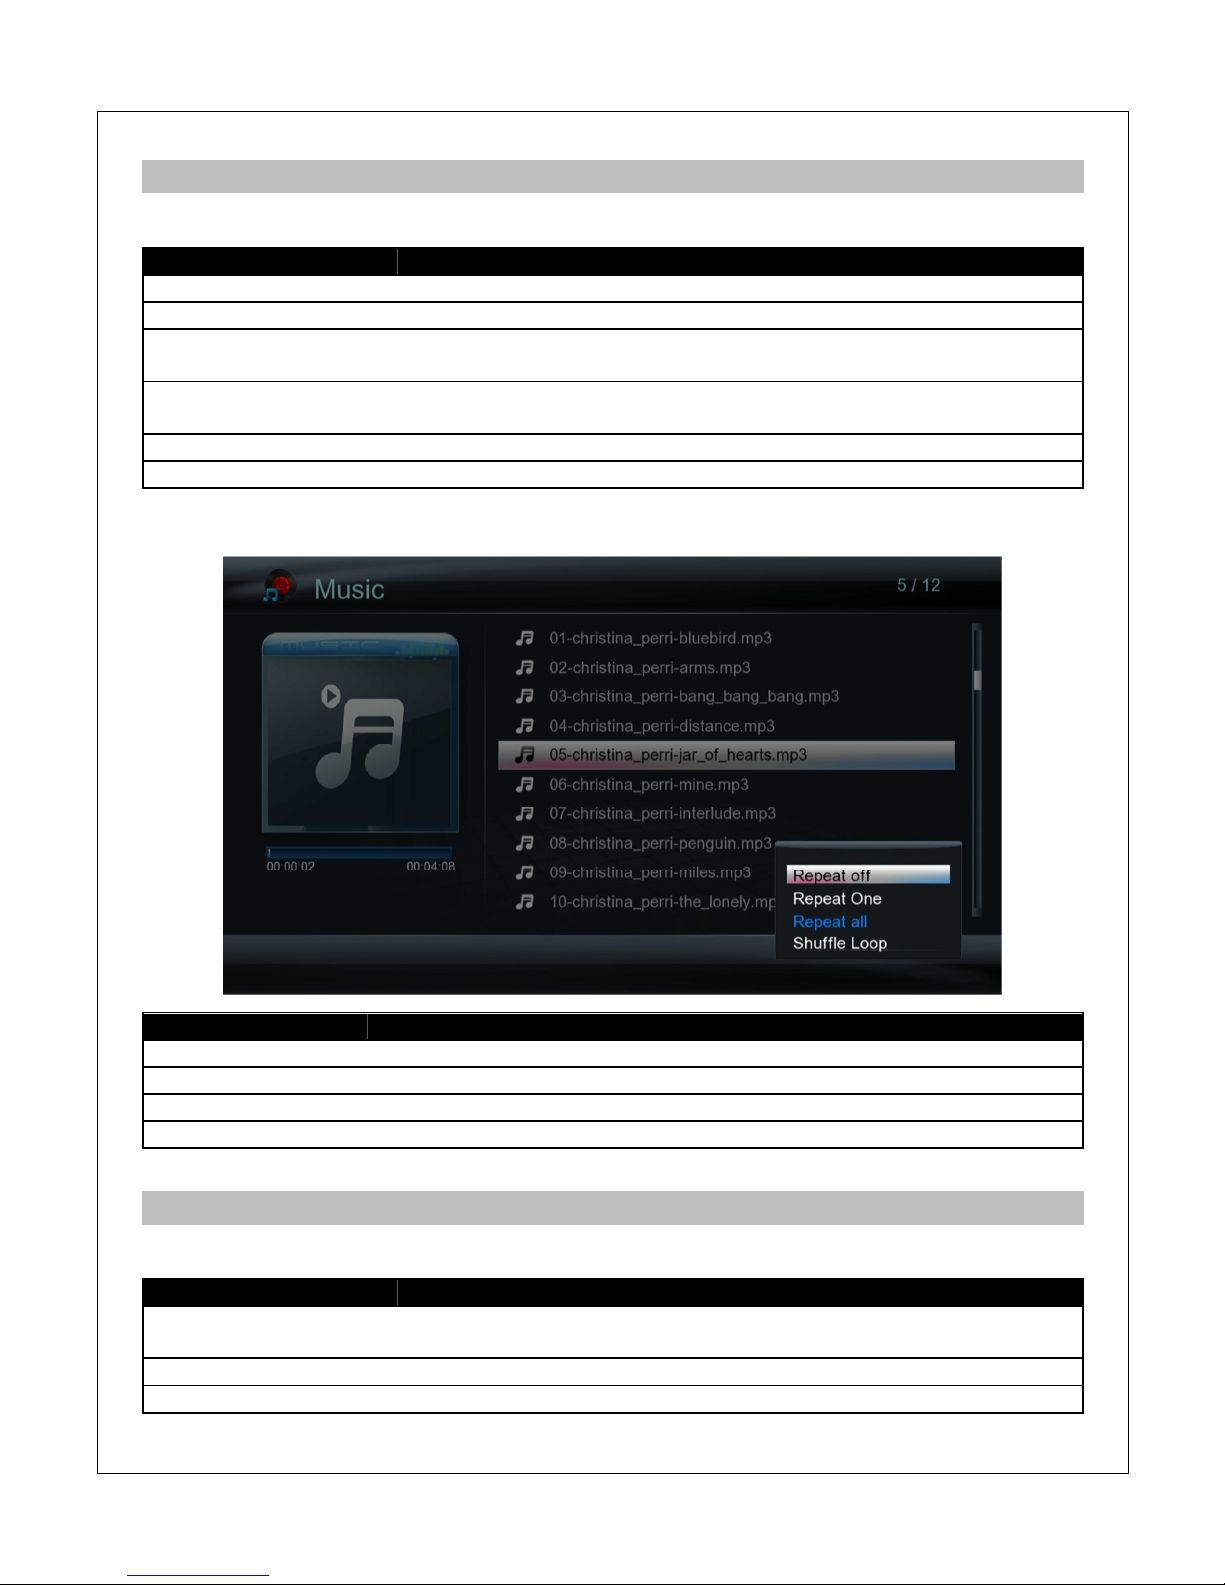
Press the MENU button while playing a song to access repeat/shuffle playback options.
Setting
Description
Repeat Off
Select to turn repeat off
Repeat One
Select to repeat only the current song
Repeat All
Select to repeat all songs in the media library
Shuffle Loop
Select to shuffle play all songs in the media library
7.3 Viewing Photos
While viewing photos, the following remote control commands are available:
Button
Description
PLAY/PAUSE
Press to view photo full screen
If Slide Show Timing is not set to Off, slideshow will start
STOP
Press to stop viewing photo full screen
PREV
Press to go to the previous photo.
Page 33
NEXT
Press to go to the next photo.
ZOOM
When not viewing a slideshow, press to zoom in or out the image.
DISPLAY
Press to display information about the current photo.
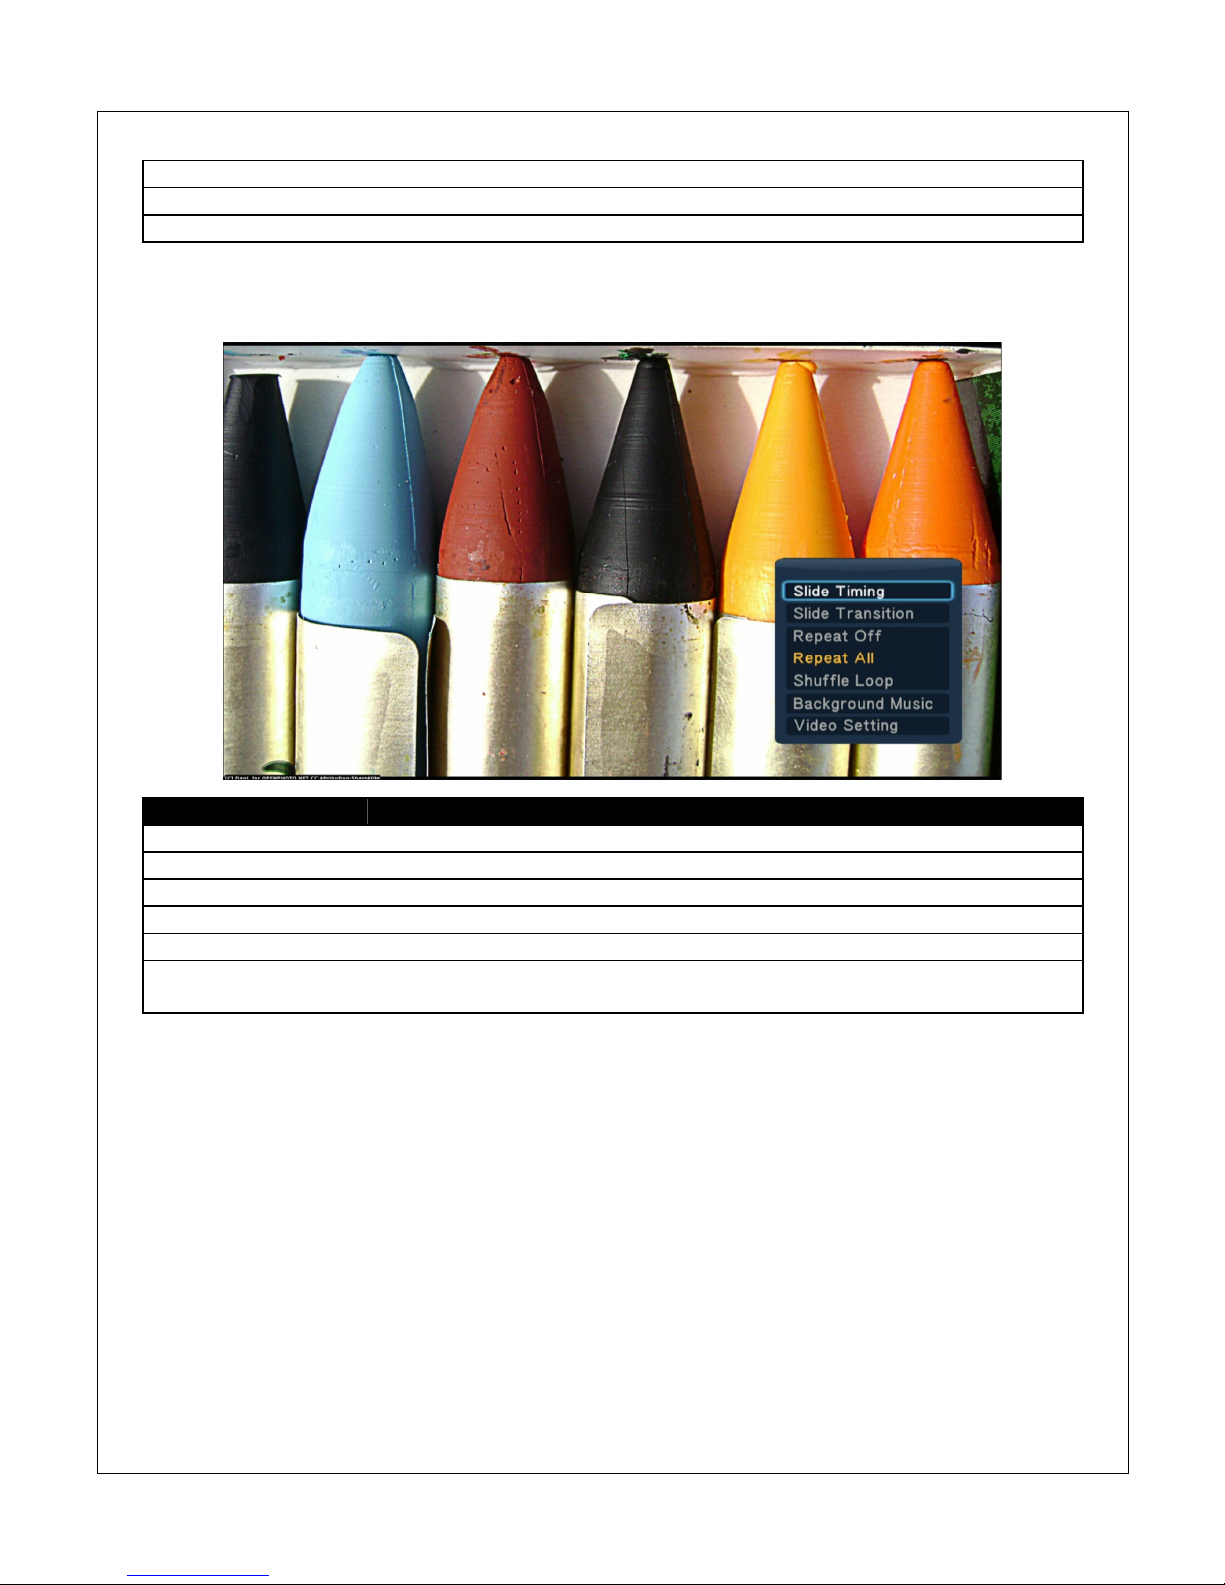
The photo settings menu provides on-screen access to additional photo viewing options. To use
the photo settings menu, press the MENU button while viewing a photo full screen.
Setting
Description
Slide Timing
Sets the time delay between photos in a slideshow
Slide Transition
Sets the transition effect between photos in a slideshow
Repeat Off
Select to set repeat to off
Repeat All
Select to repeat all photos in the media library
Shuffle Loop
Select to shuffle view all photos in the media library
Background
Music
Select to set music for playback as background music during slideshow
Page 34
8 Additional Features
8.1 DLNA Playback
The player functions as a DLNA Digital Media Renderer (DMR) device, allowing media content
to be pushed to it using DLNA Controller devices such as Windows PCs and popular
smartphone/tablet devices running DLNA Controller software. To use this feature, first set a
DLNA device name (see ‘9.1.7 DLNA Device Name’), and then turn on the player’s DLNA DMR
function (see ‘9.1.6 DLNA DMR’). When finished, follow the instructions in the following sections
appropriate for your DLNA Controller device to push media files to the player.
8.1.1 DLNA Controller – Windows 7
To use a Windows 7 computer as a DLNA Controller, the player first has to be recognized by the
computer as a DLNA DMR device using the following directions:
1) Ensure that the player is turned on and is on the same LAN or WiFi network as the
Windows 7 computer. On the Windows 7 computer, open File Explorer and click on the
“Network” item in the left column. A list of detected network devices will be listed on the
right.
2) Find the DLNA Device Name that was configured for the player (“EP950” by default),
right-click on it, and select “Install” from the context menu. The player will now be
installed as a recognized DLNA DMR device.
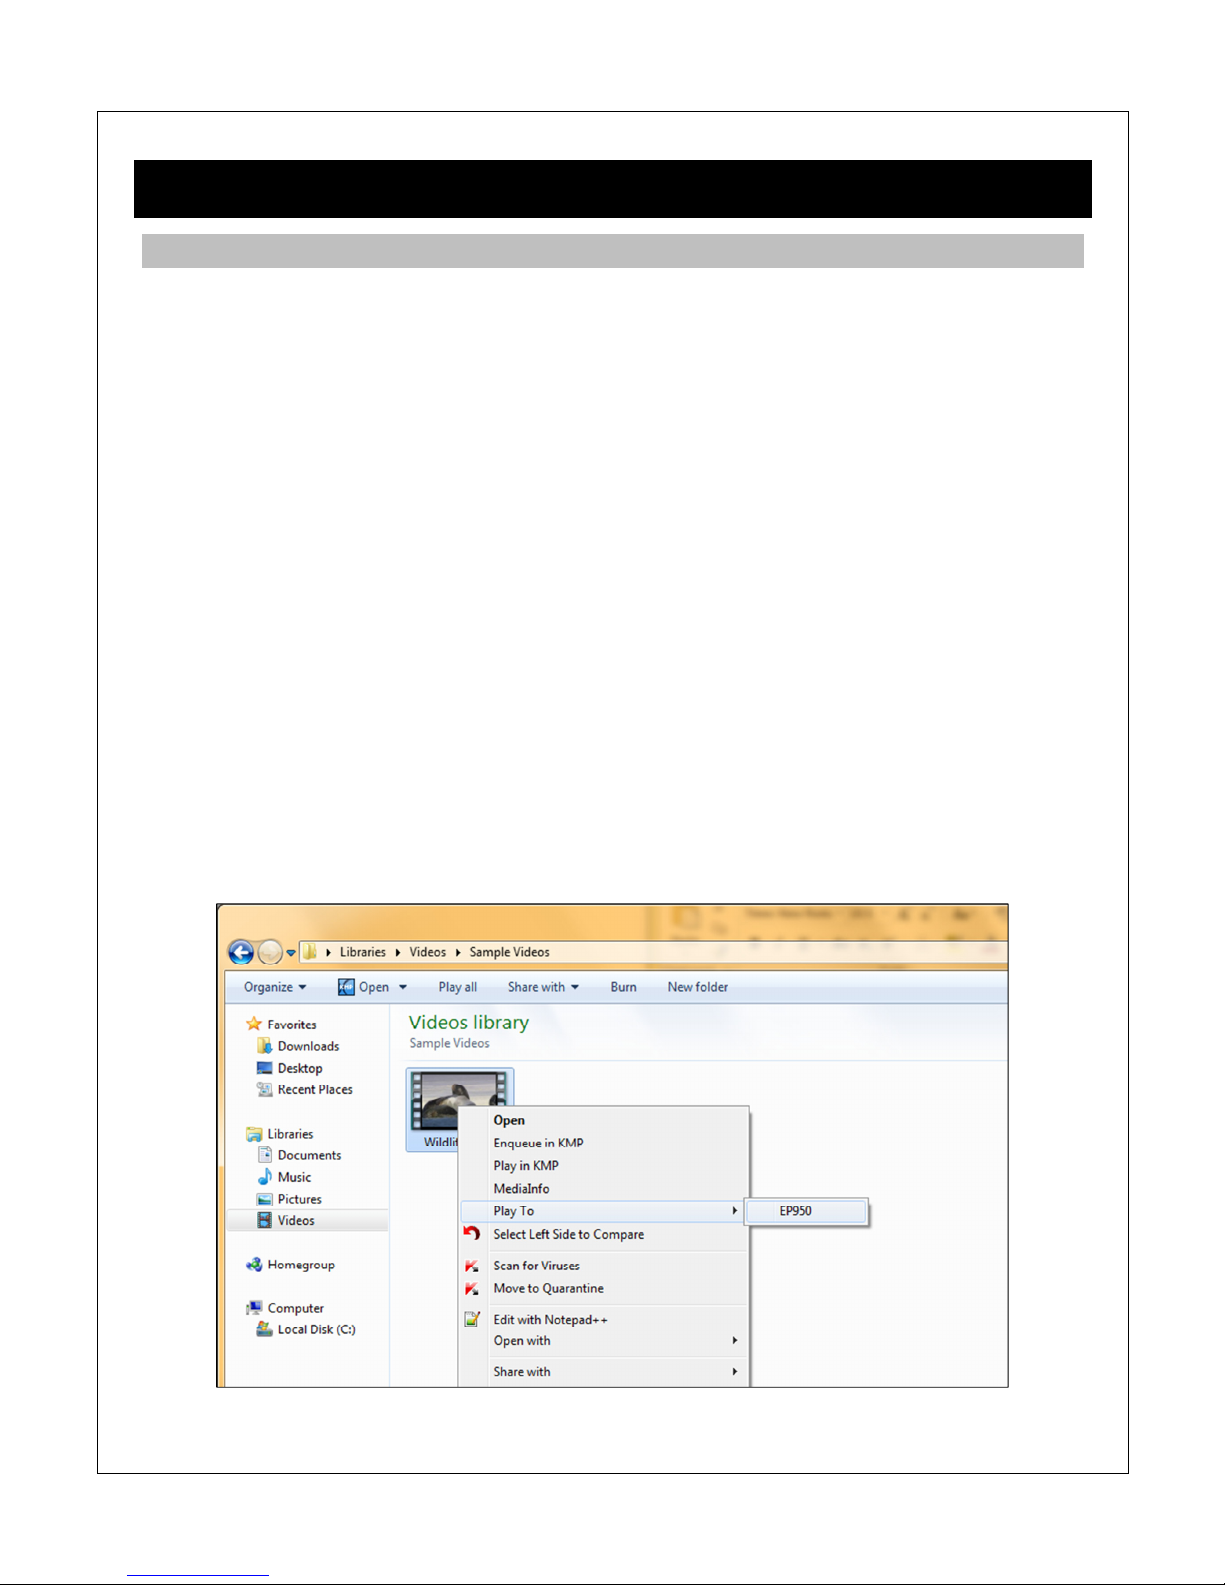
To push a media file to the player, locate the media file using File Explorer, then right click on the
media file and select Play To -> “EP950” (or the DLNA Device Name configured).
Page 35
The selected video will begin playing on the player after a short delay. A DLNA Controller
window will be shown on the Windows 7 computer that can be used to control playback of the
media file.
8.1.2 DLNA Controller – Smartphones and Tablets
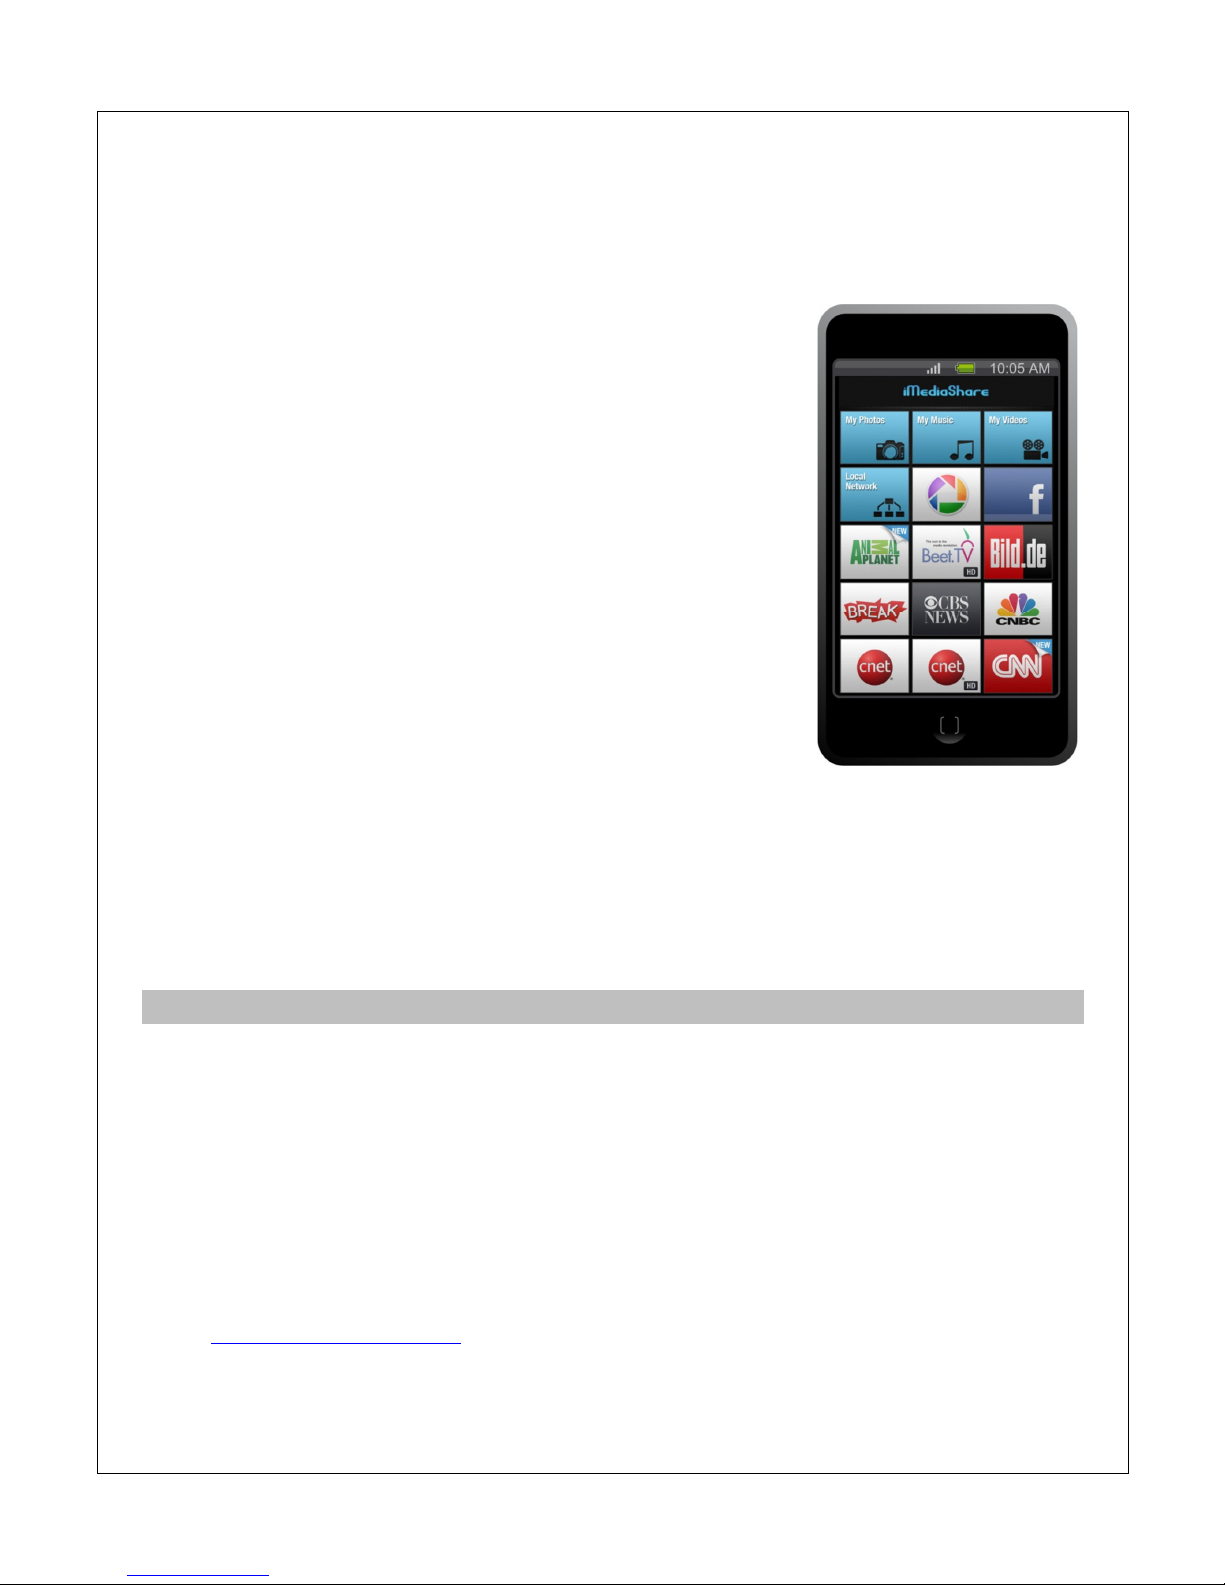
Popular smartphone and tablet platforms including iOS and Android
can function as DLNA Controllers when running an appropriate
app. There are numerous DLNA apps available for both iOS and
Android, the example here uses iMediaShare, which is available for
both platforms free of charge from the respective app
store/markets.
Follow the directions below to push media files to the player using
iMediaShare:
1) Install iMediaShare on the smartphone or tablet device.
2) Make sure that the smartphone or tablet is connected via
WiFi to the same network as the player.
3) Run iMediaShare and browse for media files. The source
can be Internet sites, or local UPnP servers.
4) After selecting a media file to play, iMediaShre lists available
DLNA DMR devices detected, which should include “EP950” (or the DLNA Device Name
configured).
5) Select the player as the playback device.
The selected video will begin playing on the player after a short delay. The user can continue to
browse for other media files to play while the playback of the current media file is on-going.
8.2 BitTorrent Client
The player has a BitTorrent client that can be used for managing BitTorrent file downloads. Due
to the limited general processing power of the player, it is recommended that the BitTorrent
client be used to download 1 file at a time. Follow the instructions below to use the BitTorrent
client:
1) First, turn on the BitTorrent service (see ‘9.4.5 BT Process’).
2) Next, determine the IP address of the player by checking the network information (see
‘9.4.4 Network Info’).
3) To access the BitTorrent client, open a web browser on a computer and set the URL to
http://ip-address-of-player.
4) If the BT/SAMBA security has been turned on, a login prompt will be displayed. Login
with the following credentials:
Page 36
a. User Name: admin
b. Password: 123
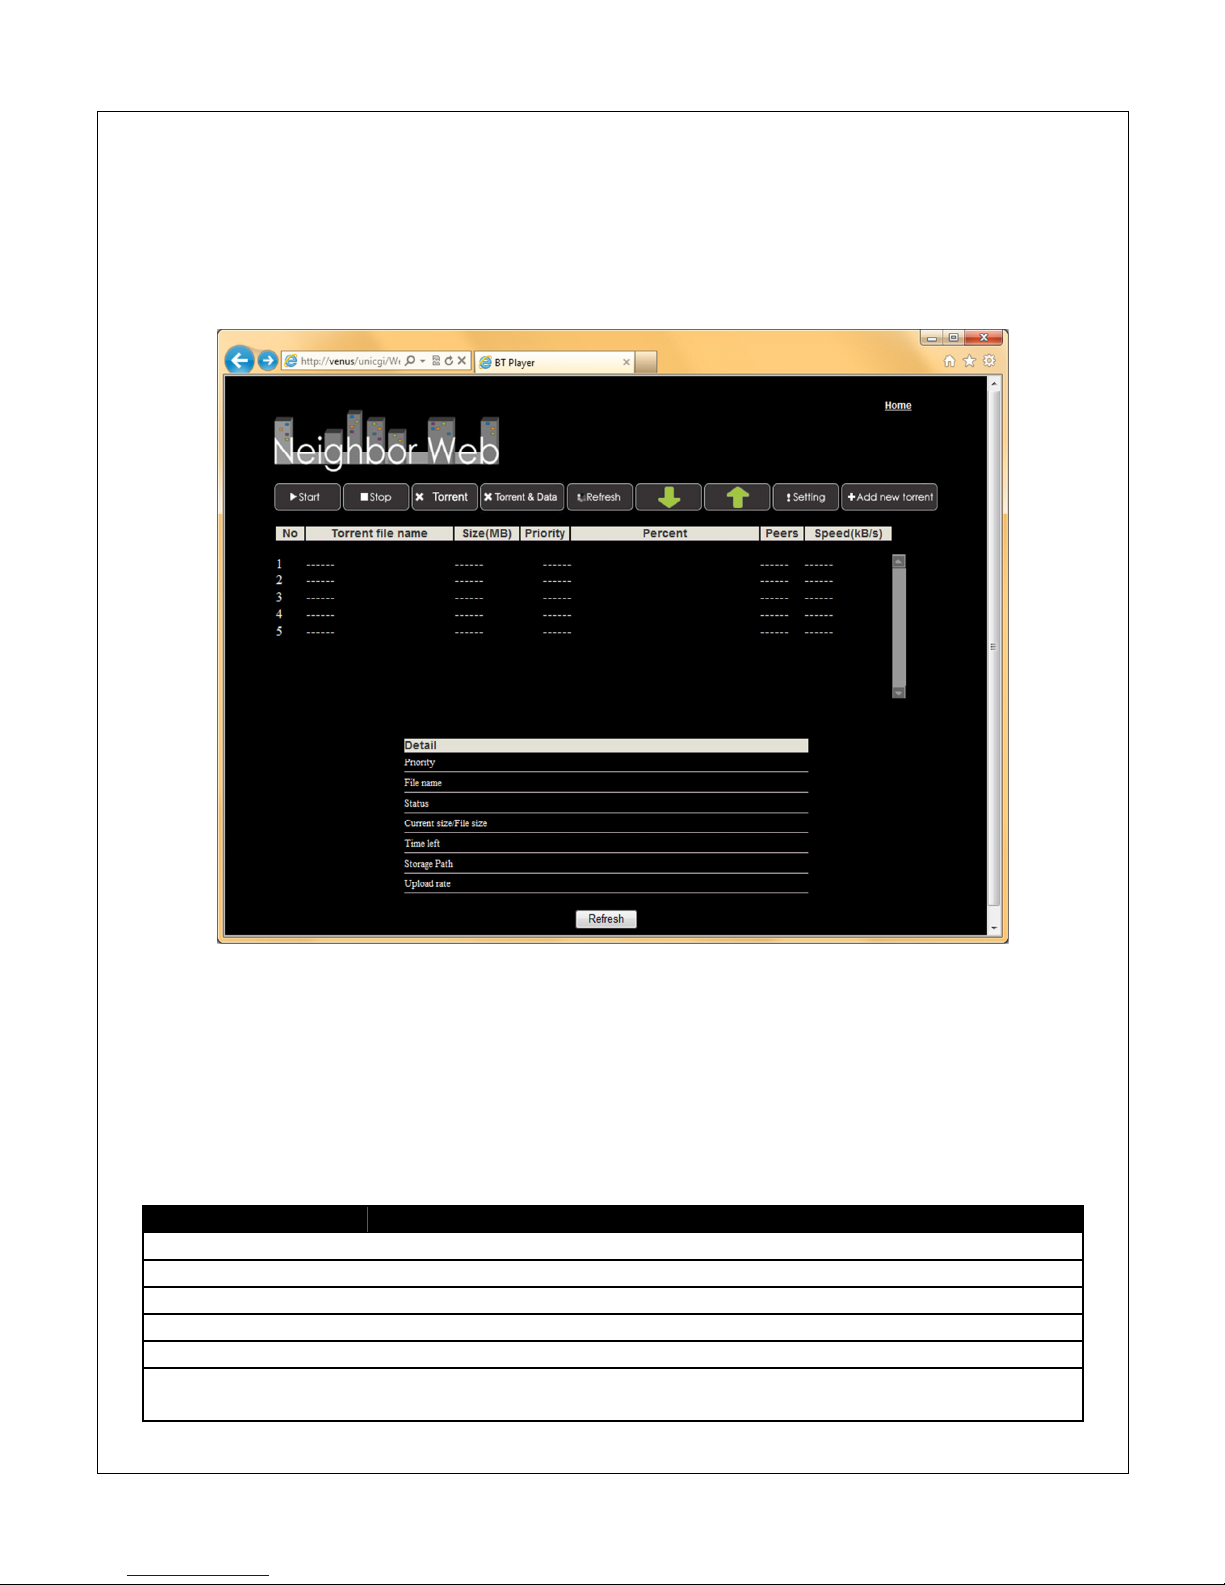
5) Click on the “BitTorrent Download link.
6) The BitTorrent screen will be displayed.
7) Click “Add new torrent” to add a new torrent file for downloading.
8) Click “Browse” and locate the torrent file on the computer.
9) Select the Device/Partition to save the downloaded files to.
10) Click “Yes” to confirm upload and begin downloading the torrent.
The BitTorrent screen contains several controls for managing torrents. Refer to the following
table for their functionality.
Control
Description
Start
Start downloading the currently highlighted torrent
Stop
Stop downloading the currently highlighted torrent
X Torrent
Delete the currently highlighted torrent, keep downloaded data.
X Torrent & Data
Delete the currently highlighted torrent and any downloaded data.
Refresh
Refresh the current page
Up/Down
Move the currently highlighted torrent up or down in the list. Higher
torrent files have higher priority.
Page 37
Setting
Access the BitTorrent client settings menu
Add new torrent
Add a new torrent file for download
The BitTorrent client settings menu provide configurations for how the client functions when
downloading torrents. The available settings are as follows:
Setting
Description
Max download
rate
The maximum download rate in KB/s. Enter 0 for no limit.
Max upload rate
The maximum upload rate in KB/s. Enter 0 for no limit.
If within@
Sets the amount of time of no download activity for a torrent, after which
the torrent will automatically stop and the next torrent will be started.
Seeding time
Sets the amount of time to seed a file after the torrent download is
complete. Enter 0 to disable seeding.
Delete torrent file
automatically
Sets whether the torrent file will be automatically deleted once the
torrent download is complete.
Max simultaneous
downloads
Sets the maximum number of simultaneous torrent downloads. It is
strongly recommended to set this limit to 1.
8.3 Web Browser
The player has a built-in HTML5 web browser capable of performing basic web browsing. To
use the web browser, select the Web Browser icon from the main menu. Once loaded, the web
browser opens http://www.google.com by default.
The web browser can be used with the player’s remote control and a mouse. A keyboard is not
necessary. While browsing a web page, use the UP/DOWN and LEFT/RIGHT buttons on the
remote to scroll the web page.
Page 38
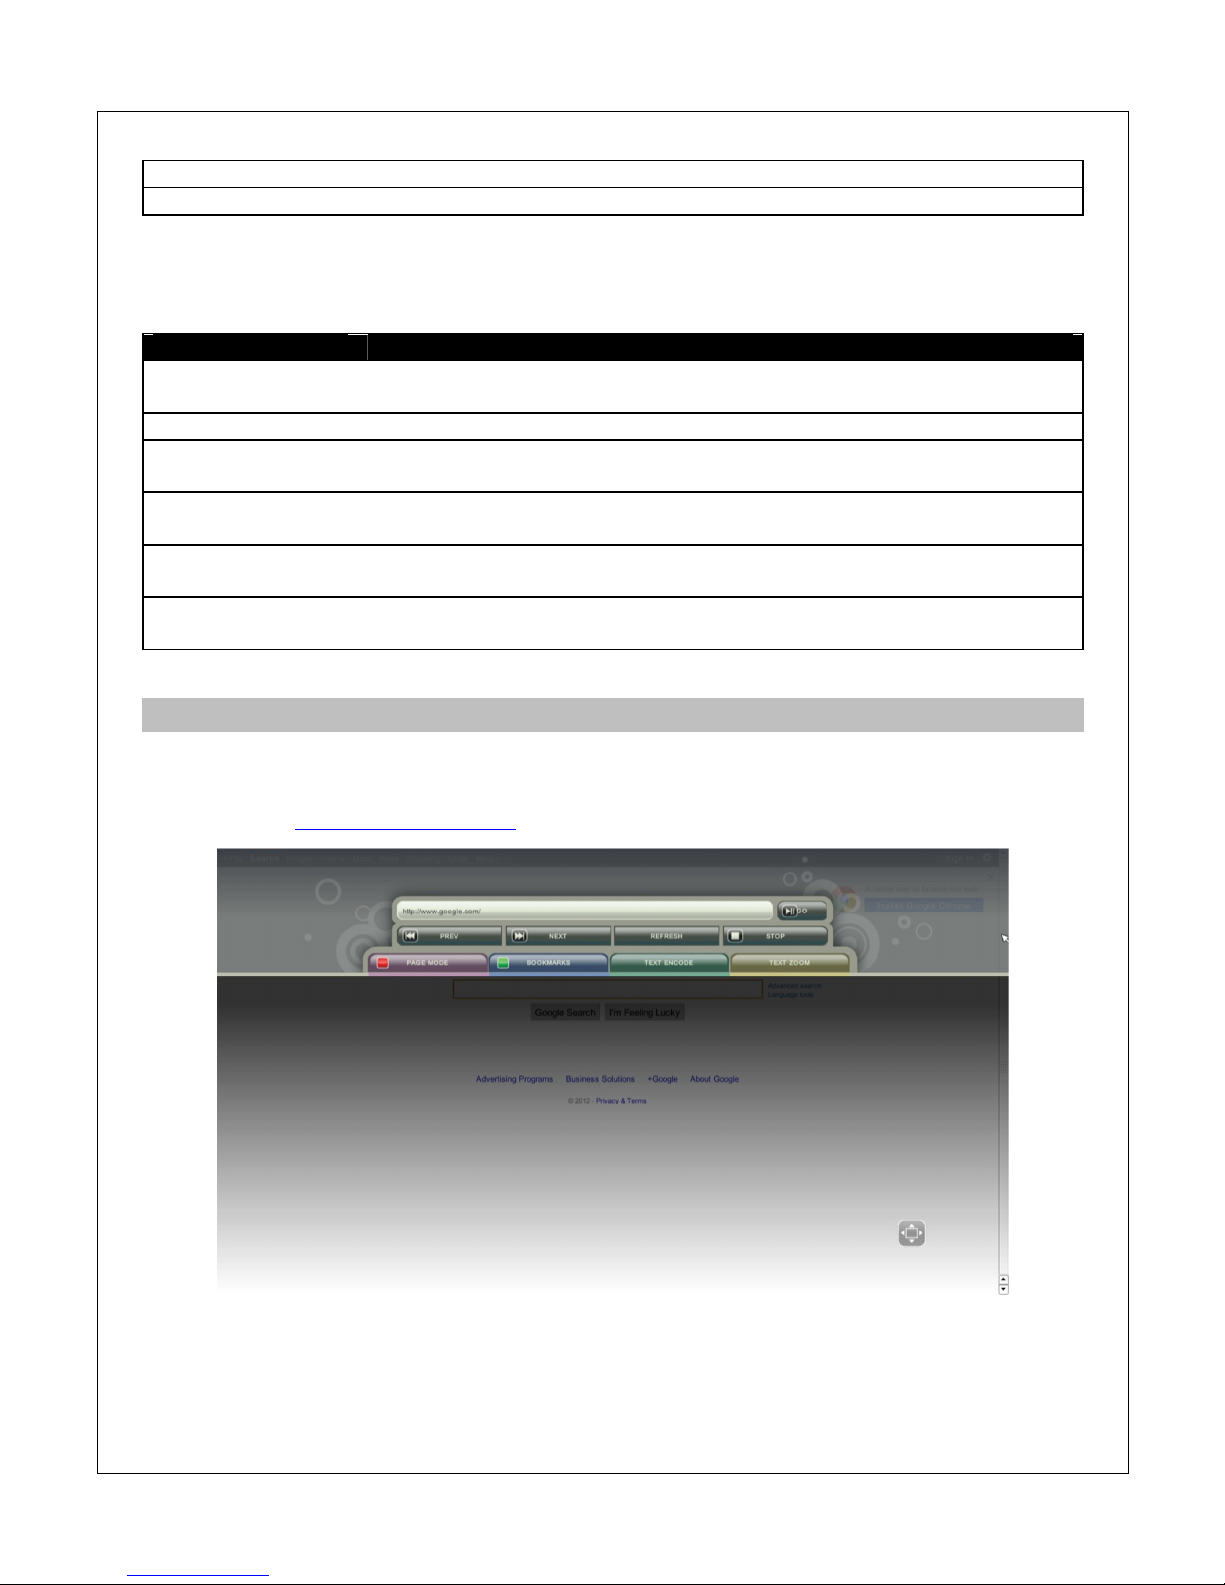
To input text, first click on the text box using the mouse, then press OK/ENTER on the remote
control to bring up the mini on-screen keyboard. Use the remote control to enter characters. If a
USB keyboard is attached to the player, text can be typed in from the keyboard while the mini
on-screen keyboard is displayed. The USB keyboard will not work for entering text when the
mini on-screen keyboard is not displayed.
The web browser’s menu bar can be accessed by pressing the MENU button on the remote
control. The menu bar has the following items:
Item
Description
URL Bar
Used to enter a web page URL to visit. Press
PLAY/PAUSE
on the
remote control or click “GO” with the mouse to submit. When entering
URLs, be sure to entire the entire URL including the “http://” portion.
PREV/NEXT
Go forward/backward in the browsing history. Press
PREV/NEXT
on the
remote control or click “PREV”/”NEXT” with the mouse.
REFRESH
Refresh the current web page.
STOP
Stop loading the current page. Press
STOP
on the remote control or
click “STOP” with the mouse.
PAGE MODE
NAVIGATION
Sets behavior of the
LEFT/RIGHT
/UP/DOWN
buttons on the remote
control. In page mode, the buttons scroll the web page. In navigation
mode, the buttons selects active links on the web page. Press the RED
button on the remote control or click on the button with the mouse to
toggle this setting.
BOOKMARKS
Access the bookmarks list. Press the
GREEN
button on the remote or
click on the button with the mouse to open the bookmark list. Select
“Add Bookmark” to add the current web page to the bookmarks list.
TEXT ENCODE
Setts the text code page for the current web page.
TEXT ZOOM
Sets the text size for the current web page.
The web browser does not support Flash content. Therefore any Flash content on web pages,
such as YouTube, will show a “Missing Plug-In” message.
8.4 Internet Media Content
When the player’s network connection has been setup with access to the Internet, it can stream
and playback various media content from internet media service providers. Media content
available from internet media service providers include:
Videos –YouTube and video podcasts
Music – Internet radios and audio podcasts
Photos – Flickr, Picasa
To access Internet media content, select the Internet Apps icon from the main menu.
Page 39
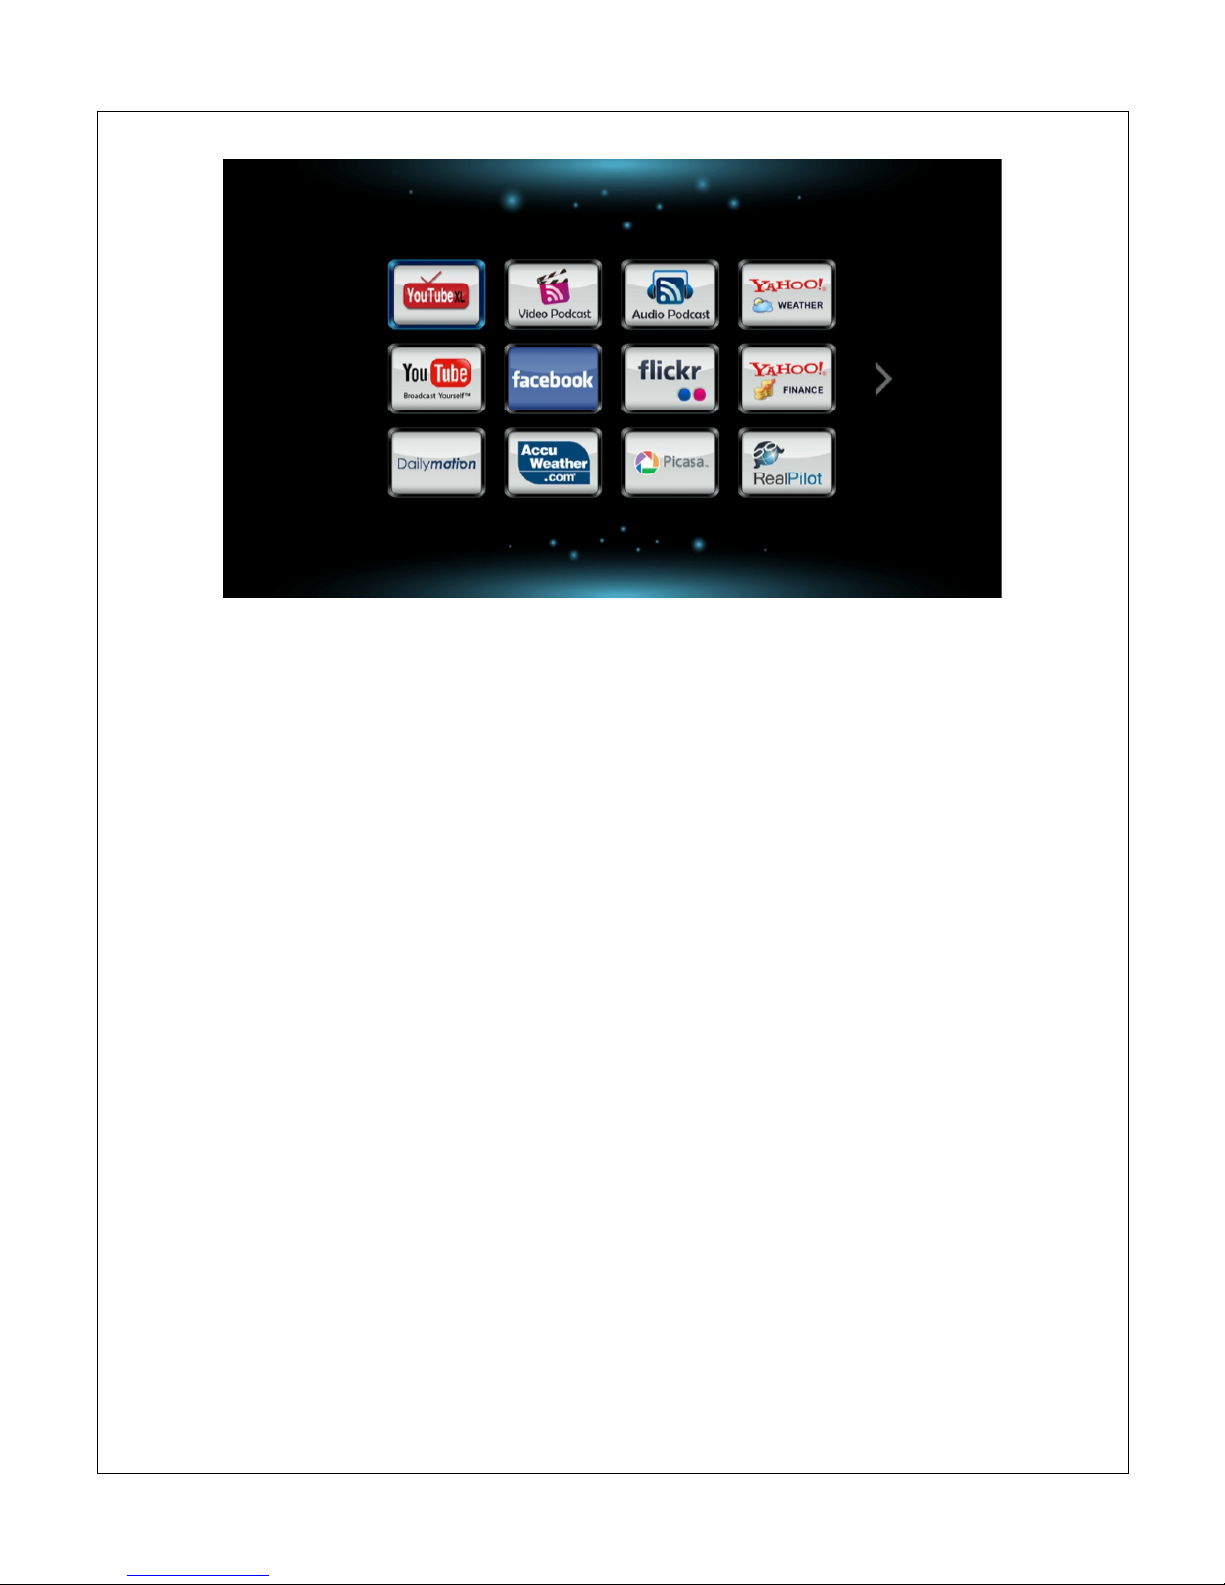
Use the UP/DOWN/LEFT/RIGHT and ENTER buttons on the remote to browse different content
providers.
Note: The availability of Internet media content depends on providers, their policy, state of their
equipment, and their network interface. There are no guarantees that the Internet media content
provider links will play or will continue to play in the future. This part of the player’s capability is
provide as-is without any guarantee.
Page 40
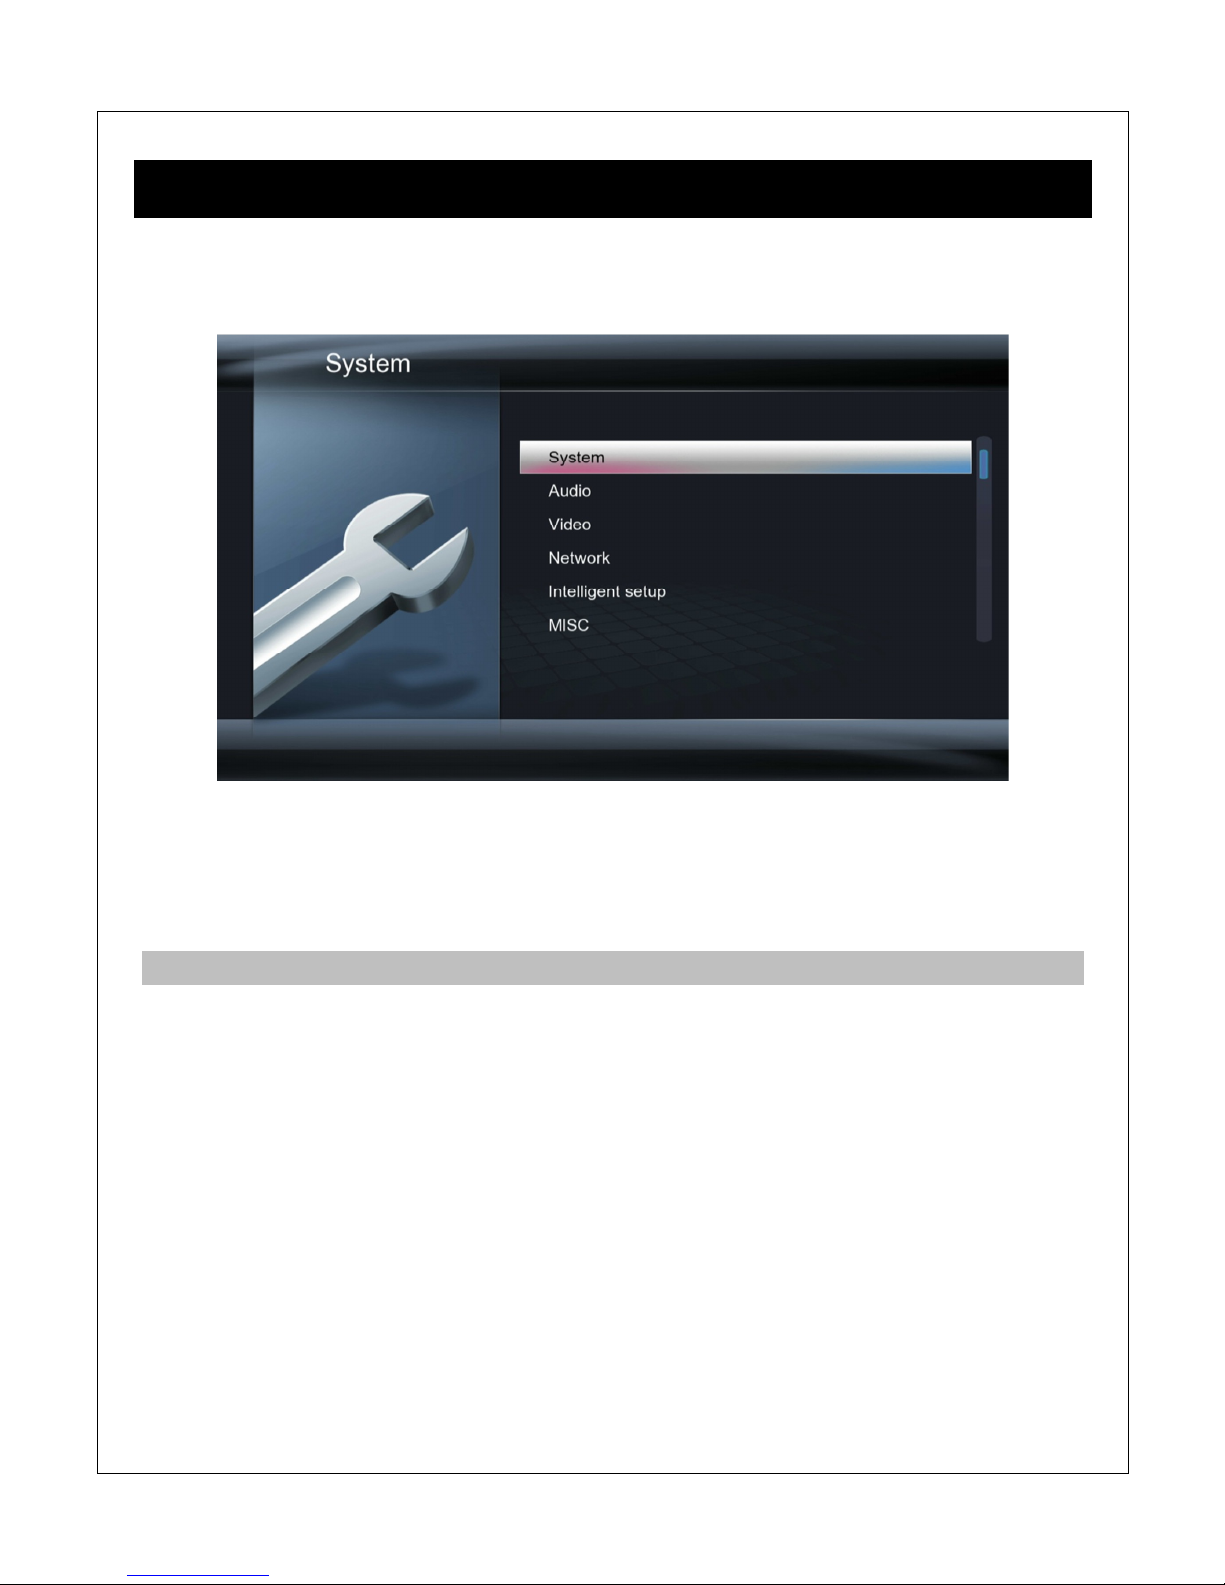
9 Settings
The Setup menu allows users to personalize and configure usage preferences for the player. To
go into the setup menu, select the Setup icon on the main menu, or press the SETUP button on
the remote control.
Use the directional LEFT/RIGHT and UP/DOWN buttons on the remote control to select options
and press OK/ENTER to confirm. To cancel a setting change, press the RETURN button.
IMPORTANT: Settings are not saved until you exit from the Setup menu. If you turn off the
player before exiting the Setup menu, any changes will not be saved.
9.1 System Settings
The system settings menu contains configuration items that determines how the player
generally functions.
9.1.1 Menu Language
The player’s user interface and menu system can be presented in a variety of different language
settings. Note that this setting does not affect the language of audio tracks or subtitles.
Available settings: English, Simplified/Traditional Chinese, Korean, Japanese, Thai, Vietnamese,
Spanish, French, German, Italian, Dutch, Russian, Polish, Turkish, Hebrew, Arabic.
9.1.2 Text Encoding
The player’s user interface text display supports a variety of different text encodings. Most
languages will display correctly with Unicode(UTF8), but if some system text does not display
correctly, try one of the other encoding languages.
Available settings: Unicode (UTF8), Simplified Chinese (GBK), Traditional Chinese (BIG5),
Page 41
Japanese (S-JIS), Korean (EUC-KR), Western, Turkish, Central European, South-East
European, Greek, Cyrillic, Hebrew, Arabic (MS-1256), Thai (MS-874).
9.1.3 Time
This setting configures the time zone, date, and time of the player’s internal clock.
Setting
Description
Manual
Manually set the date and time of the player’s internal clock.
Time Zone
Sets the time zone relative to GMT.
Auto (via NET)
Set the time using time servers on the Internet. Requires an active
Internet connection. Service availability is not guaranteed.
9.1.4 R/RW Auto-Play
When this setting is turned on, the player will automatically play any DVDs detected in an
attached DVD-ROM drive. Note: The player only plays unencrypted DVDs.
9.1.5 Screen Saver
When this setting is turned on, the player will display a screen saver when it has been idle for a
while. This feature is helpful for CRT or Plasma TV users where the display is prone to burn-in
from static images displayed for a long time.
Setting
Description
Timing
Sets the idle time before screen saver is displayed. Available values
include Off, 2 Minutes, 5 Minutes, 10 Minutes.
Options
Changes the screen saver graphics:
• Default: The default moving icon will be displayed.
• Photo Album: Displays a user-created photo album.
9.1.6 DLNA DMR
Configures the DLNA Digital Media Renderer capability of the media player. When enabled, the
player can play media files pushed to it using an DLNA Digital Media Controller devices such as
Windows PCs and popular smartphone platforms running DLNA controller software.
Available settings: On, Off
9.1.7 DLNA Device Name
Configures the DLNA DMR device name for the player. This is required for the player to be
visible on the network as a DLNA DMR device.
9.1.8 MiniKBD Language
Use this setting to select the language for the mini on-screen keyboard. In addition to this setting
here, it is possible to change the language while using the mini on-screen keyboard by pressing
the GREEN remote control button.
Available settings: English, Chinese Zhu Yin, Chinese (Traditional), Chinese (Simplified)
Page 42
9.1.9 Resume Play
This setting configures whether the player will offer to resume playback at the last stop point
when the user plays a video that was partially played previously. When turned on, the player will
prompt the user to resume play back or cancel and start playing from the beginning of the video.
Available settings: On, Off
9.1.10 Safety Poweroff
This setting configures whether the player will use safe power-off mode. Safe power-off mode
terminates all tasks before powering off the player. This takes longer time for the player to power
off, but is recommended for better player stability.
Available settings: On, Off
9.1.11 View Mode
This setting configures the operation mode of the Movies, Music, and Photos icons on the main
menu.
Setting
Description
DB Mode
The player will display media files using the media library feature. Files
in the media library will be displayed in a consolidated and searchable
list. Files not in the media library will not be displayed.
File Mode
The player will display media files using the file manager. Media files will
be organized in their original folder structure. Only matching media file
types are displayed. For example, selecting the Movies icon from the
main menu will display only video files and not music or photo files.
9.1.12 Format
The player can be used to format the internal hard disk drive (if installed) or an externally
connected storage device such as a USB drive. All data on the storage device will be irreversibly
erased when the drive is formatted. If formatting an external drive, make sure that it is the only
drive attached to the player before proceeding. Follow the on-screen prompts to complete
formatting the storage device.
To avoid accidentally erasing files you wish to keep, make sure that you have retained a copy of
all files currently stored on the storage device you are about to format.
Advanced user notes: The player formats the drive using NTFS file system. Drives less than
2TB will have a MBR partition table, and drives larger than 2TB will have a GUID partition table.
In addition to the main partition, the player also creates two smaller partitions. When the drive is
connected to a computer, these two smaller partitions may be reported as unformatted.
It is not necessary to use the player to format the drive. The drive can be formatted with a
computer. Use NTFS file system when formatting the drive for best performance.
9.1.13 Clear All Media Library
Clears the media library database for all attached storage devices. Use this to fix corrupted
Page 43
media library database features. After clearing the database, generate the database again by
following the directions in ‘6.1 Media Library – Setup’.
In rare cases, clearing the media library database is not enough to fix corrupted database
errors. In this case, the database must be manually deleted using a computer. To do so, attach
the storage device to a computer and delete the “.Theatter” folder and “.Part” file from the root
folder of the storage device. For an internal drive installed in the player, attach the player to the
computer by following the directions in ‘3.1.4 Connecting to a Computer’.
9.1.14 Run Android at bootup
This setting configures whether the Android component of the firmware will be loaded when the
player powers up. Since the Android component takes up additional system resources, always
change this settings to Off when not planning to use the Android feature.
Setting
Description
On
The Android component will be enabled. After the player starts up, an
Android icon will be available for selection form the main menu.
Off
The Android component will not be enabled.
9.1.15 Factory Default
Resets settings back to factory default. Certain settings and configurations cannot be reset
through this setting. Perform a firmware update using the recovery method to completely reset
all settings. Please see ‘9.6.3 USB Upgrade’ for more information on performing firmware
updates.
9.2 Audio Settings
The audio settings menu contains configuration items for the player’s audio outputs.
9.2.1 Night Mode
When turned on, night mode compresses the dynamic range of audio output by the player. This
allows the quiet sounds of a movie to be more clearly heard while lowering the volume of loud
sounds so as not to bother other people in the home.
9.2.2 HDMI Output
HDMI Output sets the format of the digital audio carried over the player’s HDMI output.
Setting
Description
Auto
The player will automatically detect the audio formats supported by the
TV or home theater receiver it is connected to. The player will
automatically use either LPCM or RAW as appropriate depending on
source material.
LPCM
Audio is decoded by the player and down-mixed into two channels for
output over HDMI. Use this setting if the TV or home theater receiver
lacks multi-channel audio decoding capabilities.
LPCM Multi
-Ch
The player preserves multi-channel LPCM sound tracks instead of
down-mixing to stereo.
Page 44
RAW
Audio is sent without being decoded by the player. The TV or home
theater receiver must be able to decode the audio, otherwise there will
be no audio playback.
9.2.3 SPDIF Output
SPDIF Output sets the format of the digital audio carried over the player’s SPDIF coaxial or
optical outputs.
Setting
Description
LPCM
Audio is decoded by the player and down-mixed into two channels for
output over coaxial or optical output. Use this setting if the home theater
receiver lacks multi-channel audio decoding capabilities.
RAW
Audio is sent without being decoded by the player. The home theater
receiver must be able to decode the audio, otherwise there will be no
audio playback.
9.2.4 HD Audio Core Output
This setting specifies what the audio output will be when playing a file with 7.1 HD-Audio
formats.
Setting
Description
5.1 Core Only
The player will play the 5.1 core audio track. Select this option if the TV
or home theater does not support 7.1 HD-Audio formats.
HD Audio 7.1
The player will play the 7.1 HD-Audio track. Select this option if the TV
or home theater supports 7.1 HD-Audio formats.
9.2.5 Dolby Output
This setting specifies the audio output format for Dolby audio tracks.
Setting
Description
LPCM
Audio is decoded by the player and down-mixed into two channels. Use
this setting if the TV or home theater receiver lacks multi-channel audio
decoding capabilities.
RAW
Audio is sent without being decoded by the player. The home theater
receiver must be able to decode the audio, otherwise there will be no
audio playback.
9.2.6 DTS Output
This setting specifies the audio output format for DTS audio tracks.
Setting
Des
cription
LPCM
Audio is decoded by the player and down-mixed into two channels. Use
this setting if the TV or home theater receiver lacks multi-channel audio
decoding capabilities.
Page 45
RAW
Audio is sent without being decoded by the player. The home theater
receiver must be able to decode the audio, otherwise there will be no
audio playback.
9.2.7 AAC Output
This setting specifies the audio output format for AAC audio tracks.
Setting
Description
LPCM
Audio is decoded by the player and down-mixed into two channels. Use
this setting if the TV or home theater receiver cannot decode AAC audio.
RAW
Audio is sent without being decoded by the player. The home theater
receiver must be able to decode AAC audio, otherwise there will be no
audio playback.
9.2.8 WMA Pro Output
This setting specifies the audio output format for WMA Pro audio tracks.
Setting
Description
LPCM
Audio is decoded by the player and down-mixed into two channels. Use
this setting if the TV or home theater receiver cannot decode WMA Pro
audio.
RAW
Audio is sent without being decoded by the player. The home theater
receiver must be able to decode WMA Pro audio, otherwise there will be
no audio playback.
9.3 Video Settings
The video settings menu contains configuration items for the player’s video outputs.
9.3.1 Aspect Ratio
Aspect Ratio affects how the player will display content on the TV. It is very important to set the
aspect ratio to match the TV, incorrect setting will result in distorted image output.
Setting
Description
Pan Scan
4:3
Use with 4:3 non-widescreen TVs. Widescreen videos will have the left
and right side cut off, with the center portion of the image filling the 4:3
TV screen.
Letter Box
4:3
Use with 4:3 non-widescreen TVs. Widescreen videos will be displayed
with black bars on the top and bottom of the image.
16:9
Choose this setting if the TV has a 16:9 aspect ratio.
16:10
Choose this setting if the TV has a 16:10 aspect ratio, such as certain
computer monitors.
9.3.2 TV System
The player is able to output video in a wide range of video systems over HDMI or component
video. Consult the TV/HDTV’s manual for which video system it supports. For best results,
Page 46
configure the player’s Video System setting to match the highest quality setting supported by the
TV/HDTV. “HDMI Auto” is recommended when the player is connected to the TV using an HDMI
cable.
Available settings: NTSC / PAL / 480P / 576P / 720P 50HZ / 720P 60HZ / 1080I 50HZ / 1080I
60HZ / 1080P 50HZ / 1080P 60HZ
9.3.3 Video Zoom
This setting applies a slight zoom-out to compensates for the over-scan behavior of certain TV
types. Over-scan is where the image displayed on the TV is a cropped version of the original
with the edges cut off at all four sides.
Setting
Description
Full Pixel (Just
Scan)
Videos are displayed as normal. Use this setting for TVs with 1:1 pixel
mapping. Disable any zoom or over-scan settings in the TV’s settings
menu.
CRT TV (Over
Scan)
Videos are displayed slightly zoomed out. Use this setting only if the TV
applies an over-scan that cannot be turned off, such as many CRT TVs.
9.3.4 Digital Noise Reduction
This setting enables the player’s ability to perform noise reduction processing when playing a
video.
Available settings: Off, Auto
9.3.5 1080P 24Hz
The player supports output of 1080P 24p at native timing without requiring 3:2 pull-down. This
mode provides the best result for when viewing 24p movies.
Setting
Description
On
The player will output 24p video at 24Hz timing.
Off
The player will output all videos with 50/60Hz timing.
9.3.6 Deep Color
This setting configures the color depth of the player’s HDMI video output. Setting the player to a
higher color depth when used with a compatible TV will result in richer colors.
Setting
Description
Auto
Automatically determine the highest color depth supported by the TV.
12-Bit
Always output 12-Bit color depth.
10-Bit
Always output 10-Bit color depth.
Off
Always output 8-Bit color depth.
9.4 Network Settings
The Network settings menu contains configuration items that determines how the player’s
Page 47
network capabilities function.
9.4.1 Wired LAN Setup
If the player is connected to a LAN/Internet with an Ethernet cable, there typically is no need for
making any settings changes as the player will automatically detect and use the network
connection. However, advanced users can use these settings to adjust the player’s network
settings.
Setting
Description
DHCP IP (Auto)
The player will obtain an IP address and connection settings
automatically from an available DHCP server device on the LAN.
FIX IP (Manual)
The user can set the player’s LAN connection settings manually,
including IP address, subnet mask, default gateway, and DNS server IP
address. This setting is for expert user’s only.
9.4.2 Wireless Setup
The player can use a compatible Wi-Fi USB adapter (sold separately) to connect to a WLAN.
USB Wi-Fi adapters using the following chipsets are supported: Realtek RTL8188SU/CUS,
RTL8191SU and RTL8192SU/CU
Note: A/V streaming performance over WLAN is highly dependent on location, distance to
router, the number of floors and walls in the signal path, other 2.4GHz devices in the area, and
other such variables that differ on a case by case basis. It may be difficult to reliably stream HD
quality (720p and 1080p) videos over a WLAN connection even if the signal strength appears to
be strong. Always use a wired Ethernet connection when available.
To configure WLAN settings, follow these steps:
1) Insert a compatible Wi-Fi USB adapter into an empty USB HOST port on the left side of
the player. A green “Wi-Fi Plug-in” message will be displayed briefly by the player.
2) Go to Setup->Network, set Wireless On/Off to “On”.
3) Next, select “Wireless Setup”. The player will display a list of WLAN network SSIDs that it
has detected. If you do not see the SSID you want to connect to, press the SEARCH
button on the remote control to re-scan. Highlight the desired WLAN network SSID and
press OK/ENTER on the remote control.
4) Use the remote to enter the WPA or WEP key phrase using the on-screen keyboard.
Highlight the OK key on the keyboard and press ENTER on the remote control when
finished.
Page 48
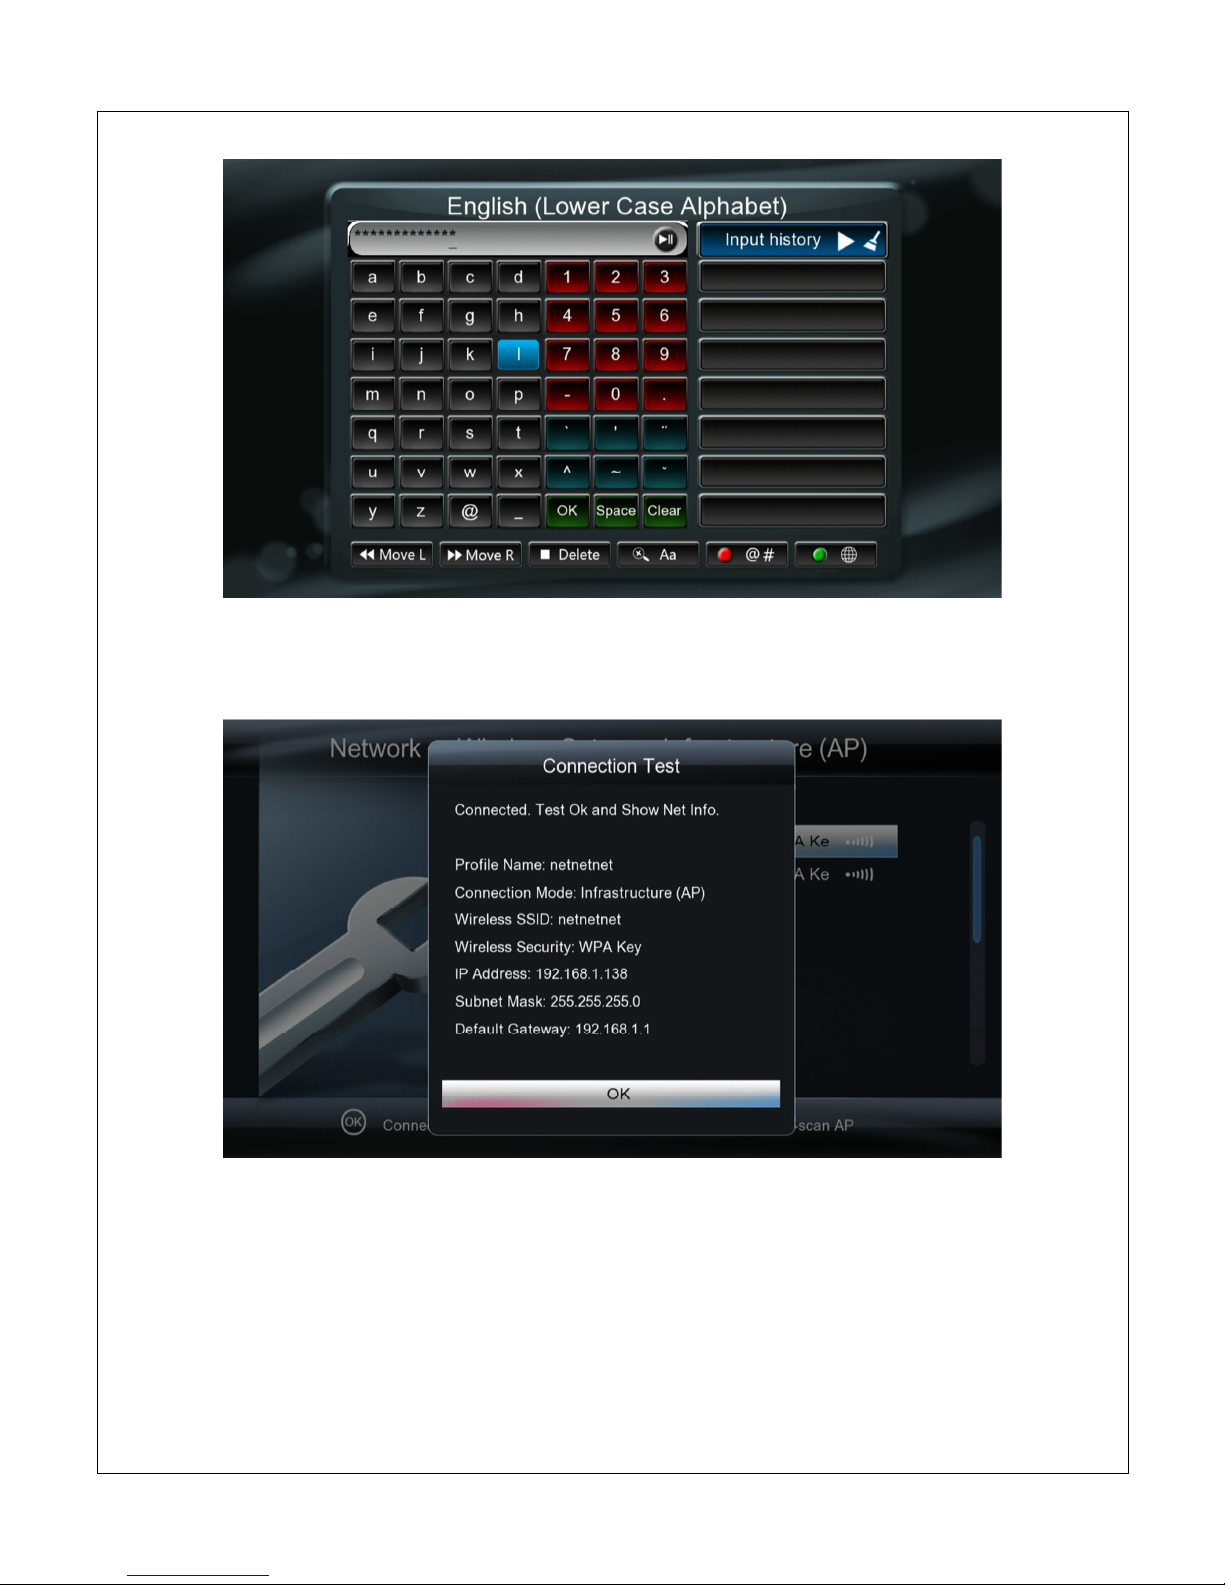
5) If the WPA/WEP key was entered correctly, the player will receive an IP address and
connection settings from the access point router. These settings will be displayed on the
screen; press the OK/ENTER key on the remote control to continue.
6) Once the WLAN setup has been completed successfully, press the RETURN button on
the remote control to go back to the Network Settings screen.
The Wi-Fi settings will be remembered and used each time the player turns on. Up to three
connection settings can be stored although the first one will always be used by default. The
other two setting memory slots are useful if the player will sometimes be used at a different
location.
Page 49
To delete Wi-Fi settings, reset the player to factory default through the System Settings menu.
9.4.3 PPPoE Setup
If the player is connected directly to a PPPoE connection, such as DSL modem, the player can
be configured with the PPPoE user name and password.
Setting
Description
Wired or Wireless
Select which connection should the player attempt to access the PPPoE
network.
User
ID
Enter the PPPoE user name using the remote control and the on-screen
keyboard
Password
Enter the PPPoE password using the remote control and the on-screen
keyboard
9.4.4 Network Info
This setting displays the current wire and wireless network status of the player. If the player has
a valid network connection, the associated IP address will be displayed. Otherwise, the IP
address will be listed as N/A.
9.4.5 BT Process
This setting controls whether the BitTorrent client of the player runs. An internal hard disk drive
must be installed to use this feature. Turn this setting on only when it will be used and turn it off
when finished to reduce processor load. This function is for expert users who are already
familiar with how BitTorrent works. Please refer to ‘8.2 BitTorrent Client’ for more information.
Available settings: On, Off
9.4.6 SAMBA Process
This setting controls whether the SAMBA service of the player runs. When turned on, this player
will be visible on the local area network and all storage devices attached to the player will be
available as shared folders. This is useful for copying/moving/deleting files on the storage
devices, or for using other network media players to play videos stored on this player.
Available settings: On, Off
9.4.7 BT & SAMBA Security
This setting controls whether a username and password will be required to access the BitTorrent
and SAMBA service of the player. The login credentials are:
USERNAME: admin
PASSWORD: 123
Available settings: On, Off
9.5 Intelligent Setup
The intelligent setup menu contains advanced configuration items that can be used to further
Page 50
customize the player’s settings.
9.5.1 Function of navigation key
This setting configures the behavior of the LEFT/RIGHT directional keys on the remote control
during video playback.
Setting
Description
Subtitle
Adjustment
The LEFT/RIGHT buttons on the remote control will change the subtitle
text size.
Search Function
The LEFT/RIGHT buttons on the remote control will bring up the time
slide bar to quickly move to a different spot in the current video.
Skip Playback
The LEFT/RIGHT buttons on the remote control will skip forward or
backward by 30 seconds for each press.
9.5.2 TS Seamless Playback
This setting configures whether TS video files within the same folder will be played back
seamlessly. This is the desired behavior when the TS files are parts of the same video.
Available settings: On, Off
9.5.3 BDMV Navigation
This setting configures the menu behavior when initiating the playback of BD movies that
include menus, such as BD-ISO and BD Folders.
Setting
Description
Direct Play
The BD movie will play without menus. The player will automatically
begin playing the main feature. If the player incorrectly identifies the
main feature, use the BD Lite menu instead.
BD Lite
The player will generate a simple BD navigation menu that allows the
selection of Audio, Subtitle, Chapter, and Playlist. The player will
automatically begin playing the main feature. If the player incorrectly
identifies the main feature, access the BD navigation menu and change
to the next Playlist.
BD 1.0
The player will detect and use BD Profile 1.0 menu. This setting should
only be used if the BD movie contains a Profile 1.0 menu. Otherwise,
choose BD Lite instead.
Ask When Play
Each time a BD-ISO or BD Folder video is played, the player will prompt
the user to select Direct Play, BD Lite, or BD 1.0.
9.5.4 BDMV Folder Auto-Play
When turned on, the player will automatically begin playing a BD Folder when it is selected.
When turned off, the player will navigate into the BD Folder instead.
Available settings: On, Off
9.5.5 BDMV Default Subtitle
This setting configures the default subtitle language for BD-ISO and BD Folder videos.
Available settings: English, Simplified/Traditional Chinese, Korean, Japanese, Thai, Vietnamese,
Page 51

Spanish, French, German, Italian, Dutch, Russian, Polish, Turkish, Hebrew, Arabic.
9.5.6 BDMV Default Audio
This setting configures the default audio track language for BD-ISO and BD Folder videos.
Available settings: English, Simplified/Traditional Chinese, Korean, Japanese, Thai, Vietnamese,
Spanish, French, German, Italian, Dutch, Russian, Polish, Turkish, Hebrew, Arabic.
9.5.7 Subtitle Automation Recognition
When this setting is turned on, the player will automatically detect the text encoding for the
subtitle. When turned off, the player will only use the subtitle text encoding selected by the user.
Available settings: On, Off
9.5.8 Subtitle Font Directory
This setting causes the player to automatically search for TrueType font files in the root directory
of attached storage devices and make the available for selection in the subtitle menu. Once the
font files are loaded, it can be used for text based subtitles such as SRT, SMI and SSA/ASS.
Image based subtitles such as DVD IDX+SUB and BD PGS cannot use font files.
The font files will be available for use with videos on network shared folders. However, the font
files must be on a storage device attached to the player, such as a hard drive, USB drive or
flash memory card.
9.5.9 Subtitle Default Load
This setting specifies whether the player will display subtitles by default each time a video is
played.
Available settings: On, Off
9.5.10 Subtitle Space
This setting specifies the distance between subtitles when using the dual-subtitle feature.
9.5.11 Internal HDD Power Off Threshold
This setting specifies the time of inactivity after which the internal hard disk drive is powered off.
After the hard drive is powered off, it can be powered back on by pressing the GREEN button on
the remote while in the File Manager.
Available settings: 15/30/45/60 Minutes, Never
9.5.12 Key Tone Volume
This setting specifies the volume of key press confirmation tone.
Available settings: Off, 1, 2, 3, 4, 5
9.6 MISC Settings
The MISC settings menu contains items for player information and firmware update.
Page 52
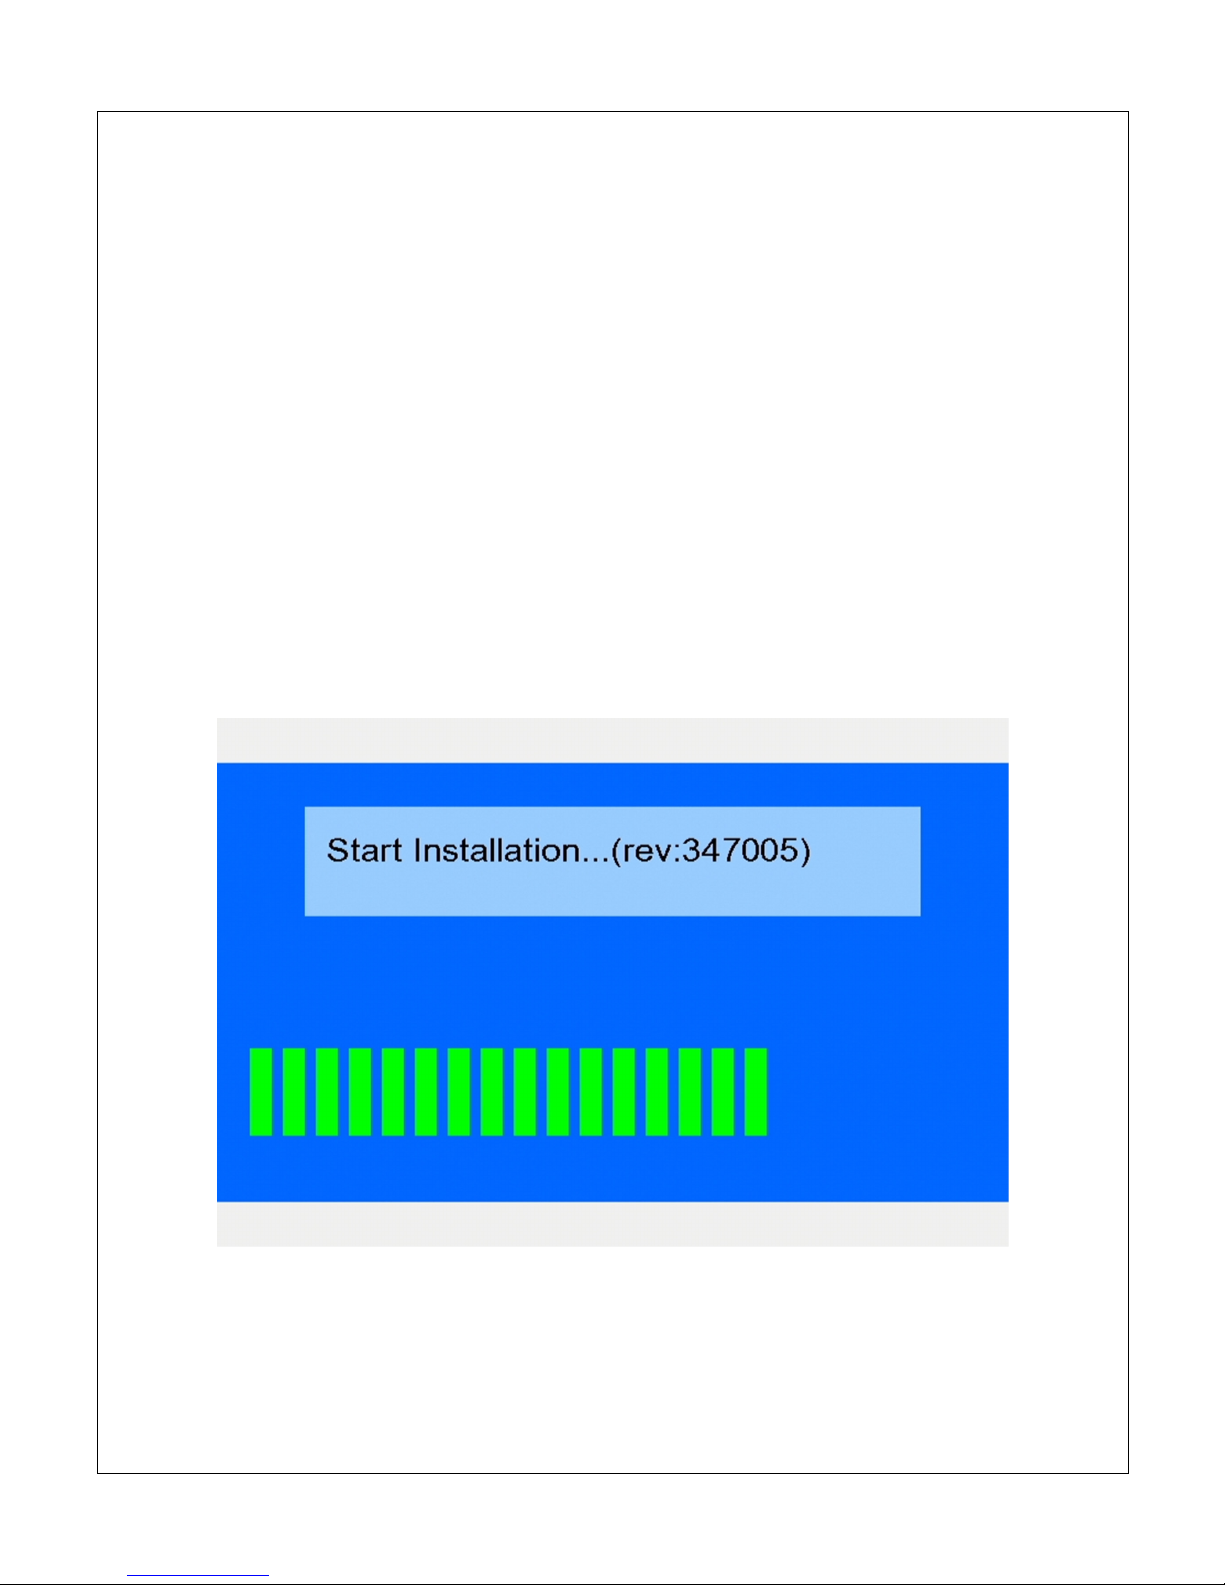
9.6.1 Version Info
This setting displays the current firmware version.
9.6.2 Kernel Info
This setting displays the current firmware kernel version.
9.6.3 USB Upgrade
When new firmware becomes available, the player can be updated with this setting. To update
the firmware, follow these steps:
1) Download the firmware and place the “install.img” file onto the root directory (i.e. not in
any folders) of a USB drive. Do not use a flash memory card.
2) Plug the USB drive into an empty USB HOST jack on the player.
3) With the player turned off, use a paper clip or tooth pick to press and hold the small
pinhole recovery button on the back of the player.
4) While pressing the recovery button, press and release the power button on the front of
the player. Continue to hold the recovery button for 5 more seconds, then release it.
5) The recovery mode will begin upgrading the firmware from the USB drive:
6) Wait for the player to complete the firmware update. Please be patient as it may take
several minutes to complete, during which the screen may be blank or show “no signal”.
Do not interrupt the process or power off the player.
7)
When finished, the player will show the initial setup screen (refer to ‘4.2 Initial Setup’)
Page 53

Information in this manual is believed to be accurate and reliable but Micca Ltd assumes no responsibility for its use nor for any
infringement of patents or other rights of third parties which may result from the use of this manual or the product. Micca
reserves the right to change product specifications at any time without notice.
Micca, EP950, and the Micca logo are trademarks of Micca Ltd. Other trademarks referenced in this manual are the properties
of their respective owners.
© 2012 Micca Ltd. All rights reserved.
 Loading...