

Page 1
- 1 -
AV8
Android Naviceiver for Volkswagen/Seat/Skoda
Page 2

- 2 -
Operation Manual
Content
Content
............................................................................................................................................................................................
2
Foreword
..........................................................................................................................................................................................
2
Instructions
......................................................................................................................................................................................
3
Safety Attention
...............................................................................................................................................................................
3
Copyright Information
.....................................................................................................................................................................
5
Product components graphic
..........................................................................................................................................................
5
Parameter
........................................................................................................................................................................................
7
Packing list
.......................................................................................................................................................................................
7
Wiring Diagram(Volkswagen to GOLF 6 platform )
.........................................................................................................................
9
Wiring Diagram (Volkswagen MQB new cars from GOLF 7 platform)
..........................................................................................
10
Front Panel
.....................................................................................................................................................................................
11
HOME
.............................................................................................................................................................................................
12
Radio
..............................................................................................................................................................................................
13
Bluetooth
.......................................................................................................................................................................................
14
Music
..............................................................................................................................................................................................
16
Video
..............................................................................................................................................................................................
17
AVIN
...............................................................................................................................................................................................
17
File Manage
....................................................................................................................................................................................
18
Car DVR (optional)
.........................................................................................................................................................................
18
Browser
..........................................................................................................................................................................................
21
GPS Navigation
.............................................................................................................................................................................
21
TPMS (optional)
.............................................................................................................................................................................
23
OBDⅡ(optional)
............................................................................................................................................................................
26
DAB+(optional)
...............................................................................................................................................................................
28
Photo
..............................................................................................................................................................................................
34
Steering Wheel Study
....................................................................................................................................................................
34
Easy Connect (Mirror link)
.............................................................................................................................................................
35
Settings
...........................................................................................................................................................................................
35
Maintenance Instruction
...............................................................................................................................................................
41
Trouble-shooting
...........................................................................................................................................................................
41
For further questions, please contact us:
.....................................................................................................................................
42
Foreword
Thank you for choosing car multimedia terminal products produced by M.I.C. GmbH. This products include
GPS, Radio, Bluetooth, Audio & Video, Mirror-Link, Wi-Fi hotspot, 3G Dongle, DVR, TPMS, OBDⅡ, DVR-
T/DVB-T2 & ISDB-T, Rear View auxiliary drive etc. functions.
Page 3

- 3 -
For your convenience, please read the user manual carefully before use this product, in order to fully
understand and master functions and features of products, and keep this user manual for future reference.
Instructions
This user manual as a product guidance only, does not mean hardware and software configuration
description of products, product and accessories may vary by regions. As described product function
contents in this user manual do not match with actual situation, please take actual function as standard.
Remarks: In order to ensure your proper and safety use, please read this user manual carefully before using.
Safety Attention
User please observe the following precautions, In violation of the following causes of product failure or
other personal injury and property damage, the product provider does not assume any liability.
Please install this product correctly, do not block the driver’s view, and do not interfere air bag and other
automotive safety equipment.
You should avoid use this device before enter the explosion area because of implicit factor. Because in these
environments (such as: gas station, inflammable or chemical transport equipment or storage locations,
contain combustible gases or particles in the air), sparks can cause explosion or fire hazard, personal injury
or even death.
This product is used to provide users with drive reference only, please abide by actual traffic rule and actual
traffic conditions.
For your safety, driver shall not operate the system during driving.
If the product malfunction occurred or accessories abnormal, lead to not working properly, please contact
manufacturer or local distributor, please do not disassemble and modification this product.
You are recommended to read all the instructions carefully before installation and have it installed by a
professional dealer of audio devices.
Professional is required to install this product.
This machine is applicable to vehicle power system of 12V(connected with GND ). Do not install machine in
truck or bus with 24V power system, which may cause damage to this product.
Do not watch TV or other video while driving, this may cause car accident
Page 4

- 4 -
Do not replace the power fuse or use inappropriate fuse without the guidance of professional, or else it may
cause damage to this product or trigger fire alarm.
For fear of violating traffic regulation, drivers are for bidden to watch program and operate this product to
avoid traffic accident.
Please use genuine disc rather than non-standard or poor-quality discs,or else it may cause machine failure
or affect d\service life.(Only if the machine supports DVD function)
For consideration of safety and normal operation, please have this product installed by the professional staff
who sells this product to avoid machine damage and accident.
For details, please consult the local professional dealer of auto audio devices.
Do not place this product in damp surroundings or in water to avoid electric shock caused by short circuit
and prevent unnecessary damage and fire hazard.
Do not use the player in strong magnetic environment; GPS, Bluetooth, digital TV will be affected.
Please turn off the player before switching off the ignition switch of your car, since power switch will
consume the car’s battery.
Please turn off or pull out the ignition key before installation, as battery current leakage of short circuit
Maybe caused when the engine is running.
Make sure not to damage any pipe or wire and electronic parts of fuel cell during installation;
otherwise.it may cause fire.
Be careful not to damage any parts of car when digging holes on instrument panel.
Do not use nuts or screws to connect safety devices such as steering connection device,fuel supply or brake s
ystem,as it may cause a fire or accident.
Please be noted car rear view function is only an auxiliary function , The manufacturer will not be
responsible for any accident caused by the driver while driving in reverse.
Tips: For fear of short circuit,please remember to turn off the engine and disconnect ACC from B+before inst
allation.
Installation Location:
Do not install this product in the following positions;
a) In the position where drivers view is blocked.
b) In the position where operations of steering wheel, gear lever and brake pedal may be affected.
Page 5
- 5 -
Notice: Defects caused by abnormal use are not covered by the manufacturer's warranty.
Copyright Information
This product software programs are owned by M.I.C. GmbH. Please do not copy, modify, in any form and
map data transfer software.
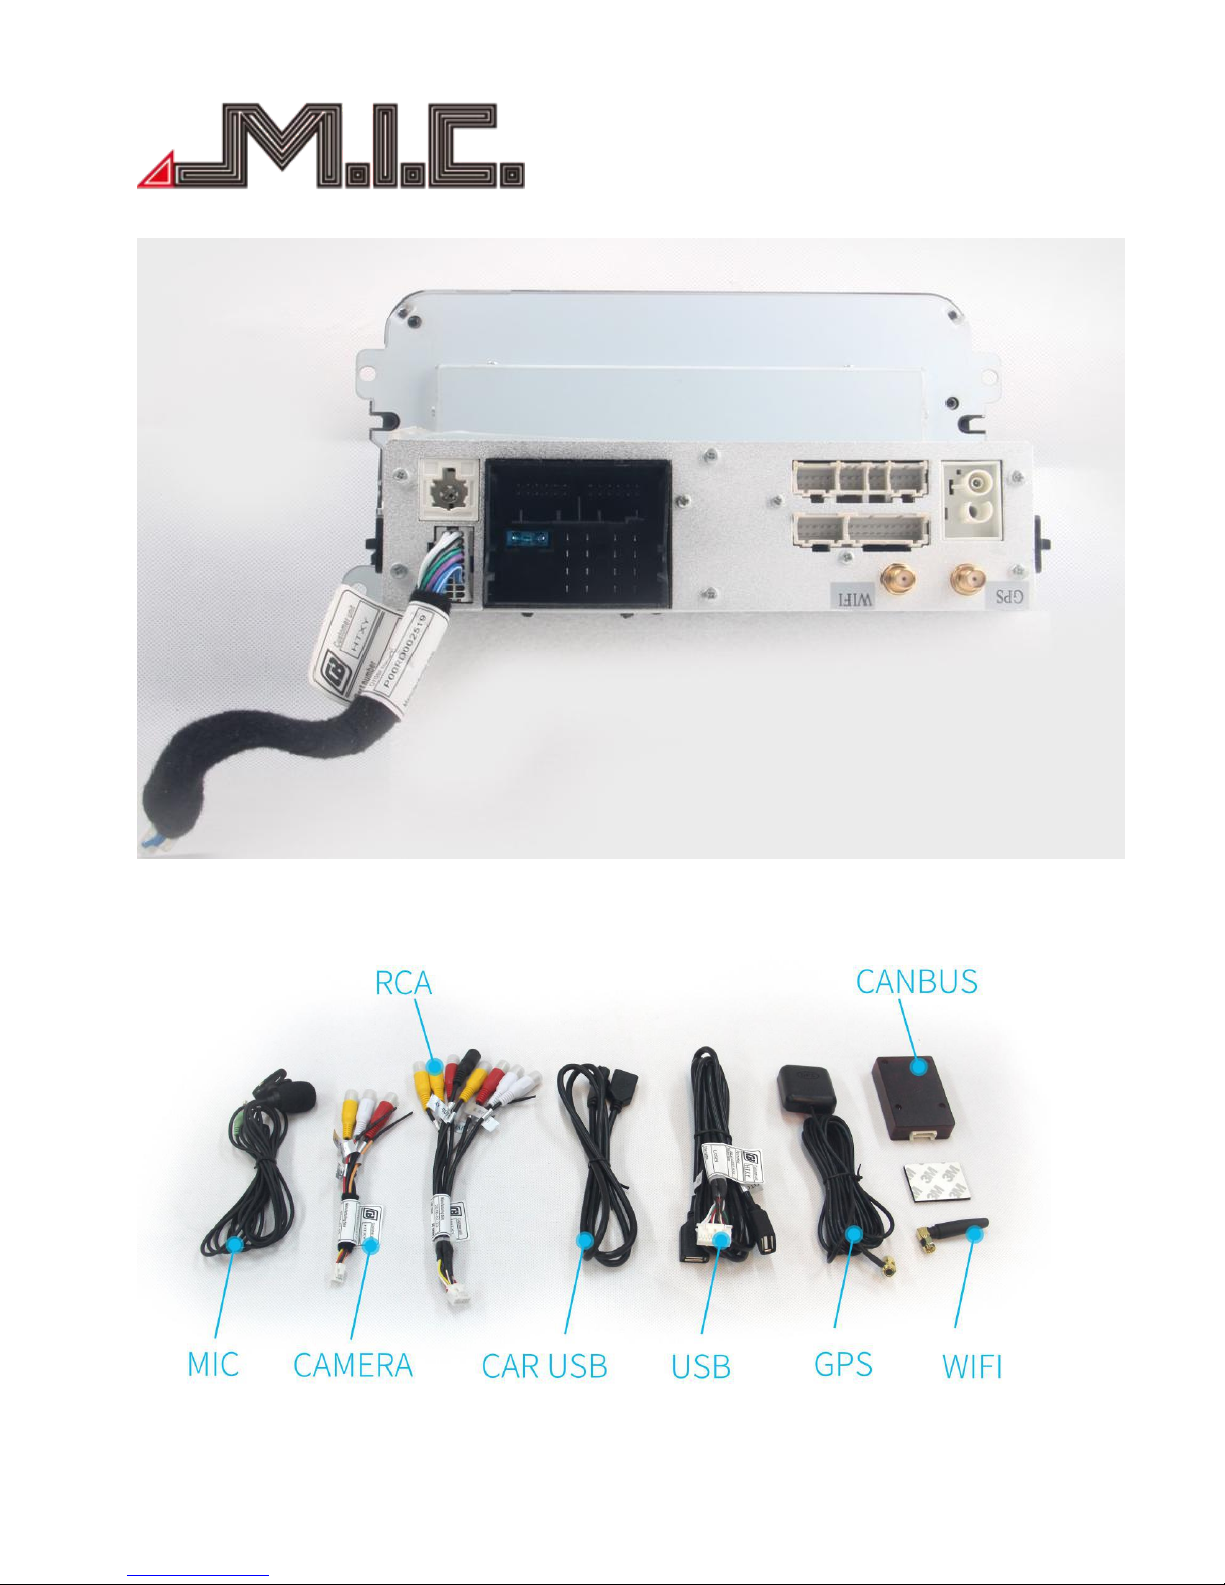
Product components graphic
Note: The following product component diagram for reference only, real product design in kind shall prevail.
VW Universal:
Page 6
- 6 -
Back-panel connection for VW Universal:
Accessories for VW Universal:
Page 7

- 7 -
Parameter
Operating Voltage: 9V-16V DC
Maximum operating current: <11A @14.5V
Standby operating current: 6MA
Operating Temperature: -25℃~+65℃
Storage Temperature: -40℃~+80℃
Relative Humidity: 5%~95%(No frost)
Location mode: GPS
Location accuracy: ≤15M
Positioning precision of speed: ≤0.1M/S
Packing list
● Standard accessories
Standard spec
Quantity
Main unit
1pc
GPS Antenna
1pc
WIFI Antenna
1pc
RCA Cable
1pc
USB Output Cable
1pc
USB Switch Cable
1pc
RCA Reversing Cable
1pc
CAN+Cable
1pc(Low Version Car is
without Canbus)
Page 8

- 8 -
●Optional functions
Optional Accessories
QTY
Universal Camera
1pc
DVR
1pc
DAB
1pc
TPMS
1set
OBDⅡ
1pc
DVB-T/DVB-T2
1set
ISDB-T
1set
Remark: if not order optional accessories, we will not pack into box
Page 9
- 9 -
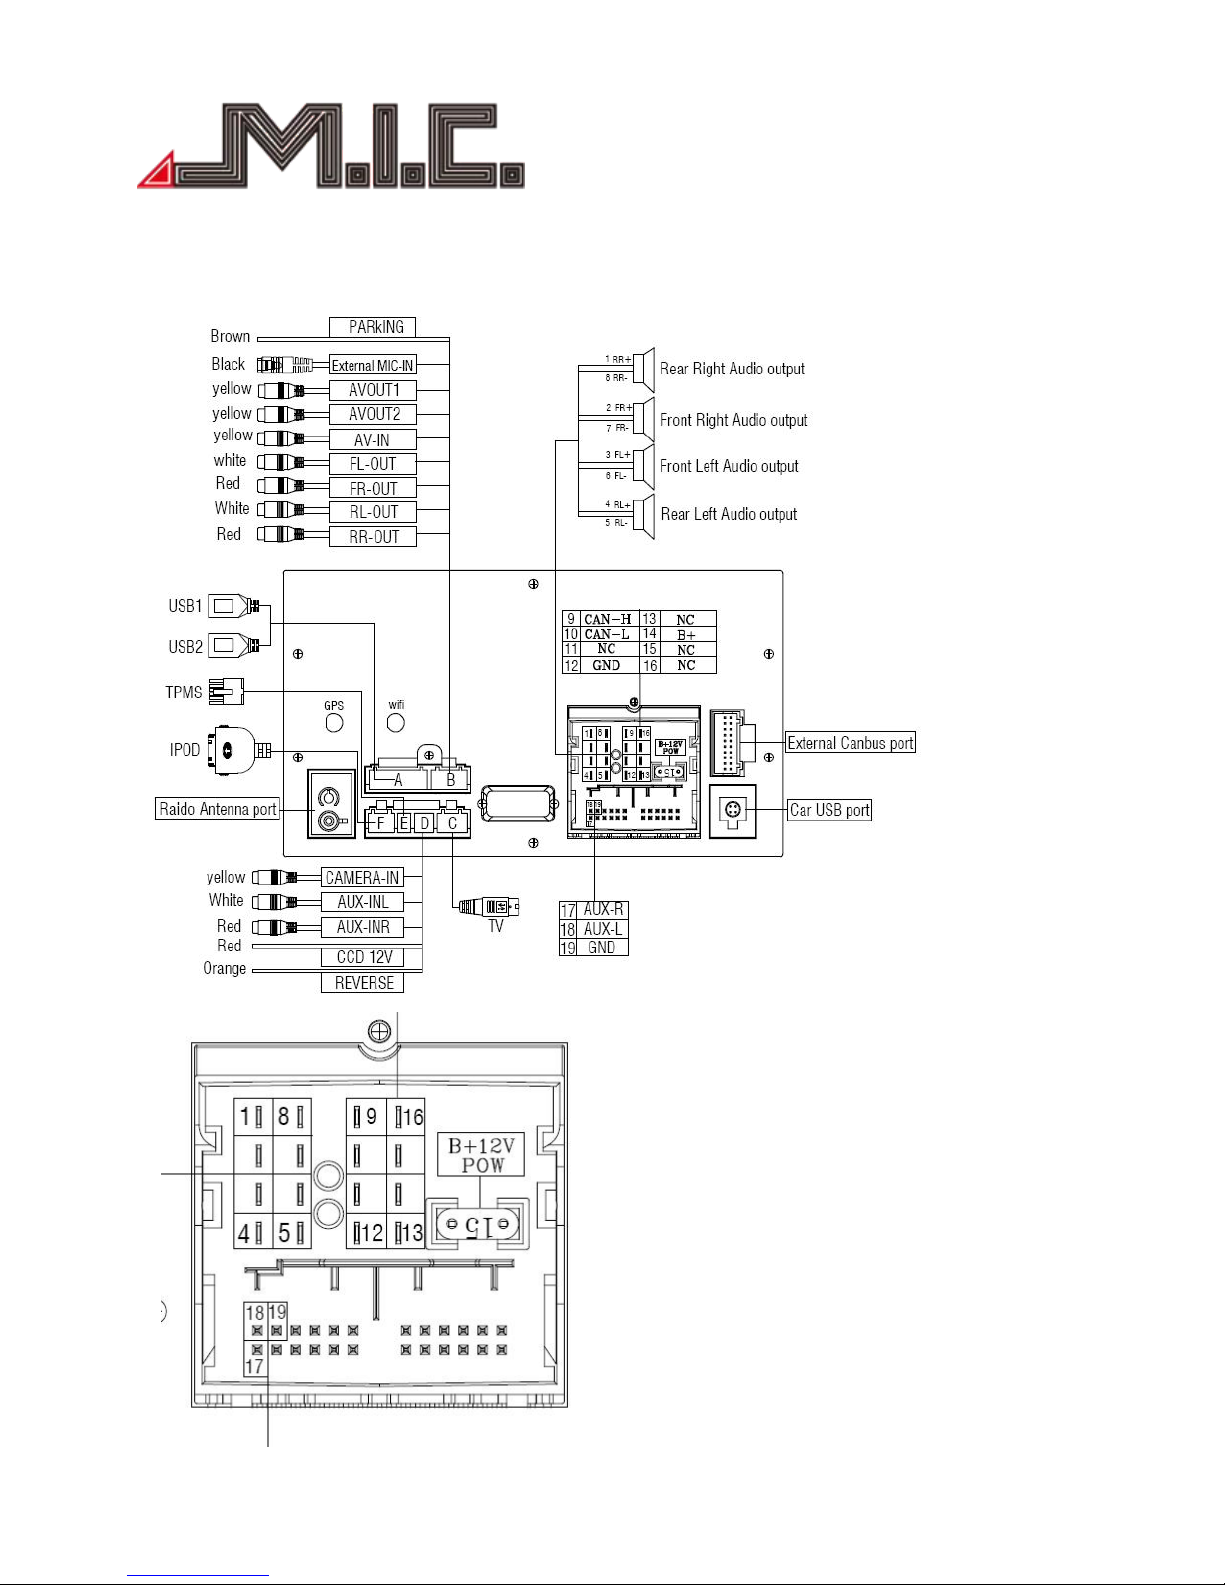
Wiring Diagram(Volkswagen to GOLF 6 platform)
Page 10
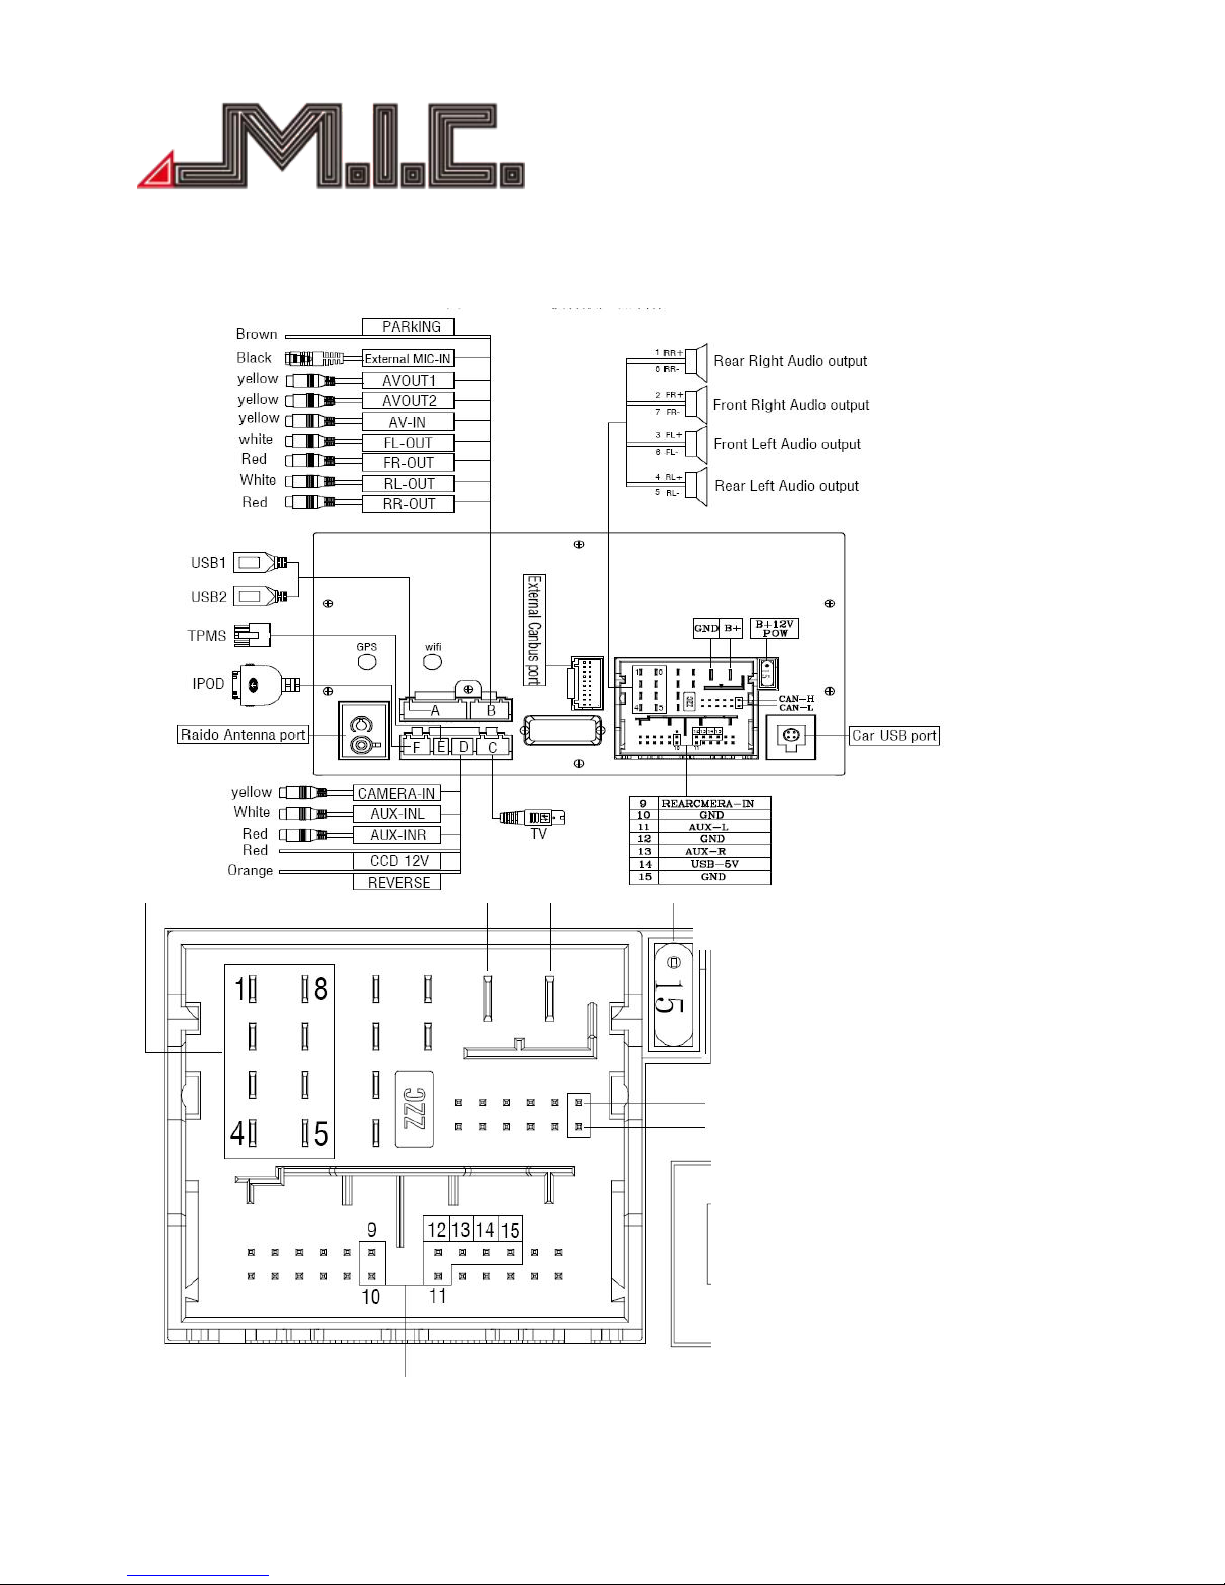
- 10 -
Wiring Diagram (Volkswagen MQB new cars from Golf 7 platform)
Page 11
- 11 -
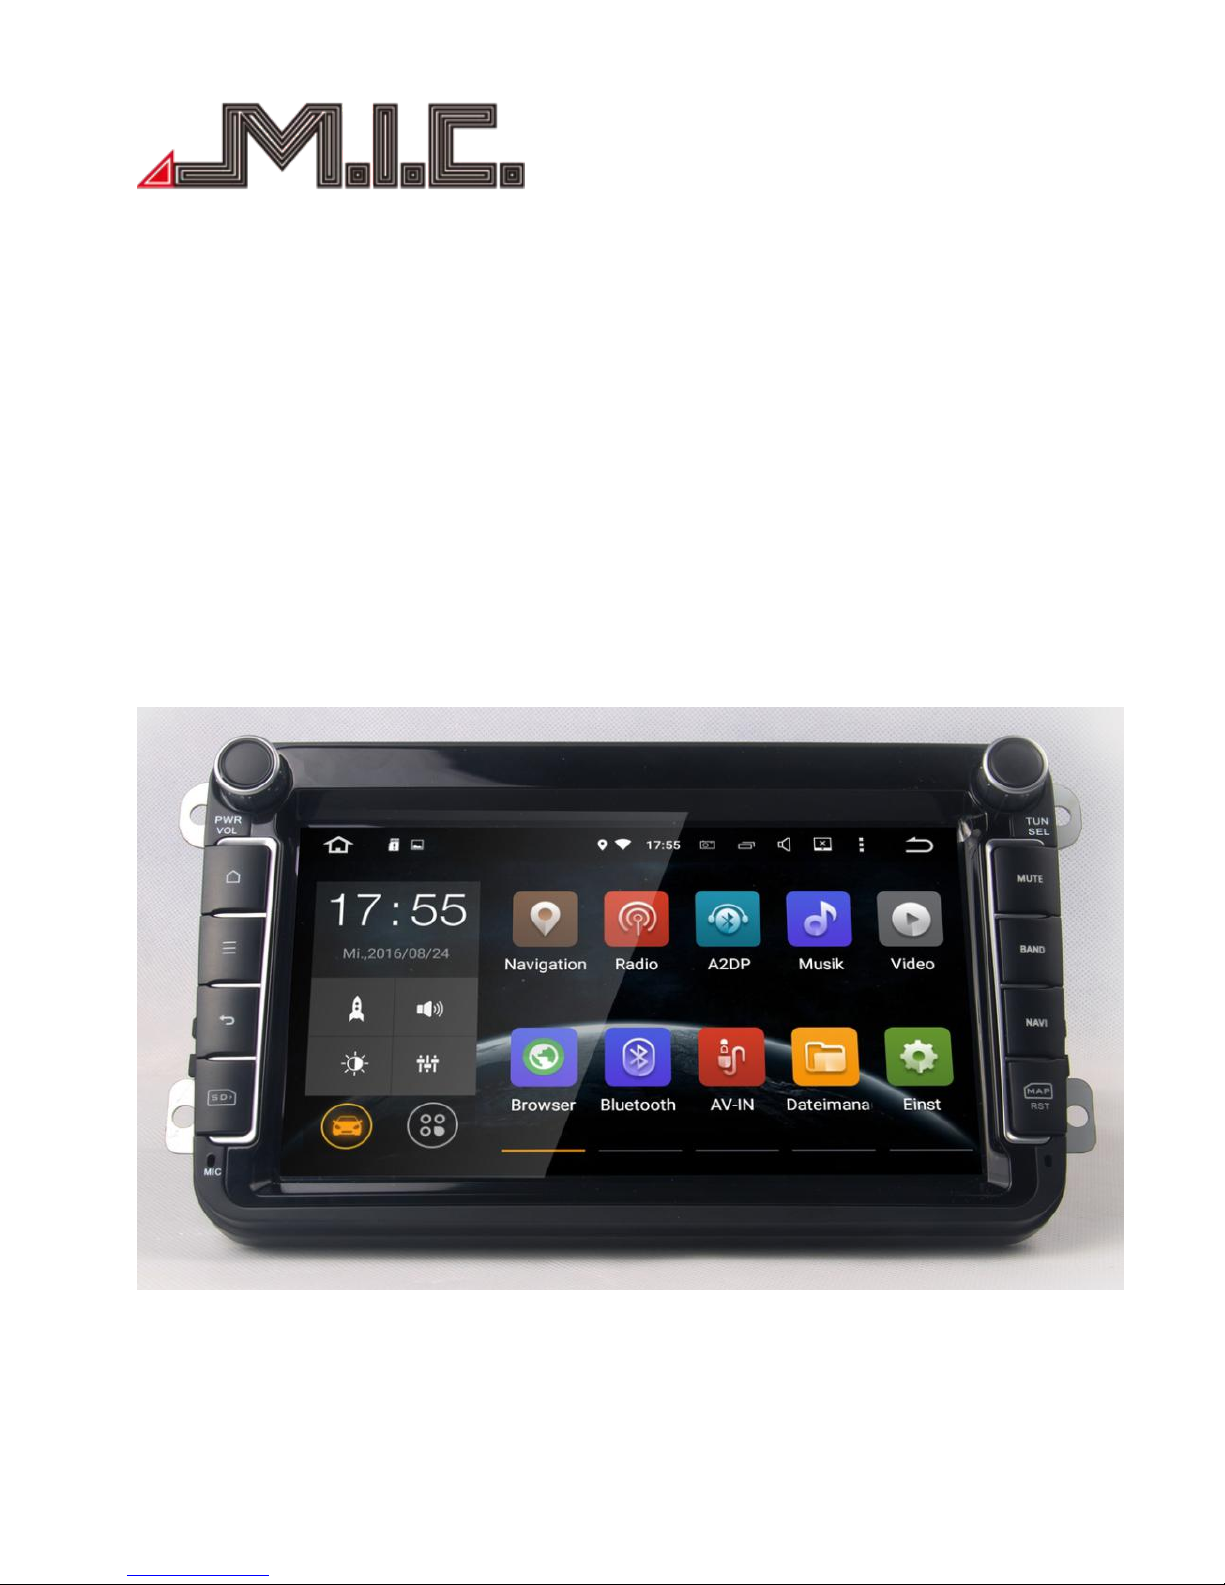
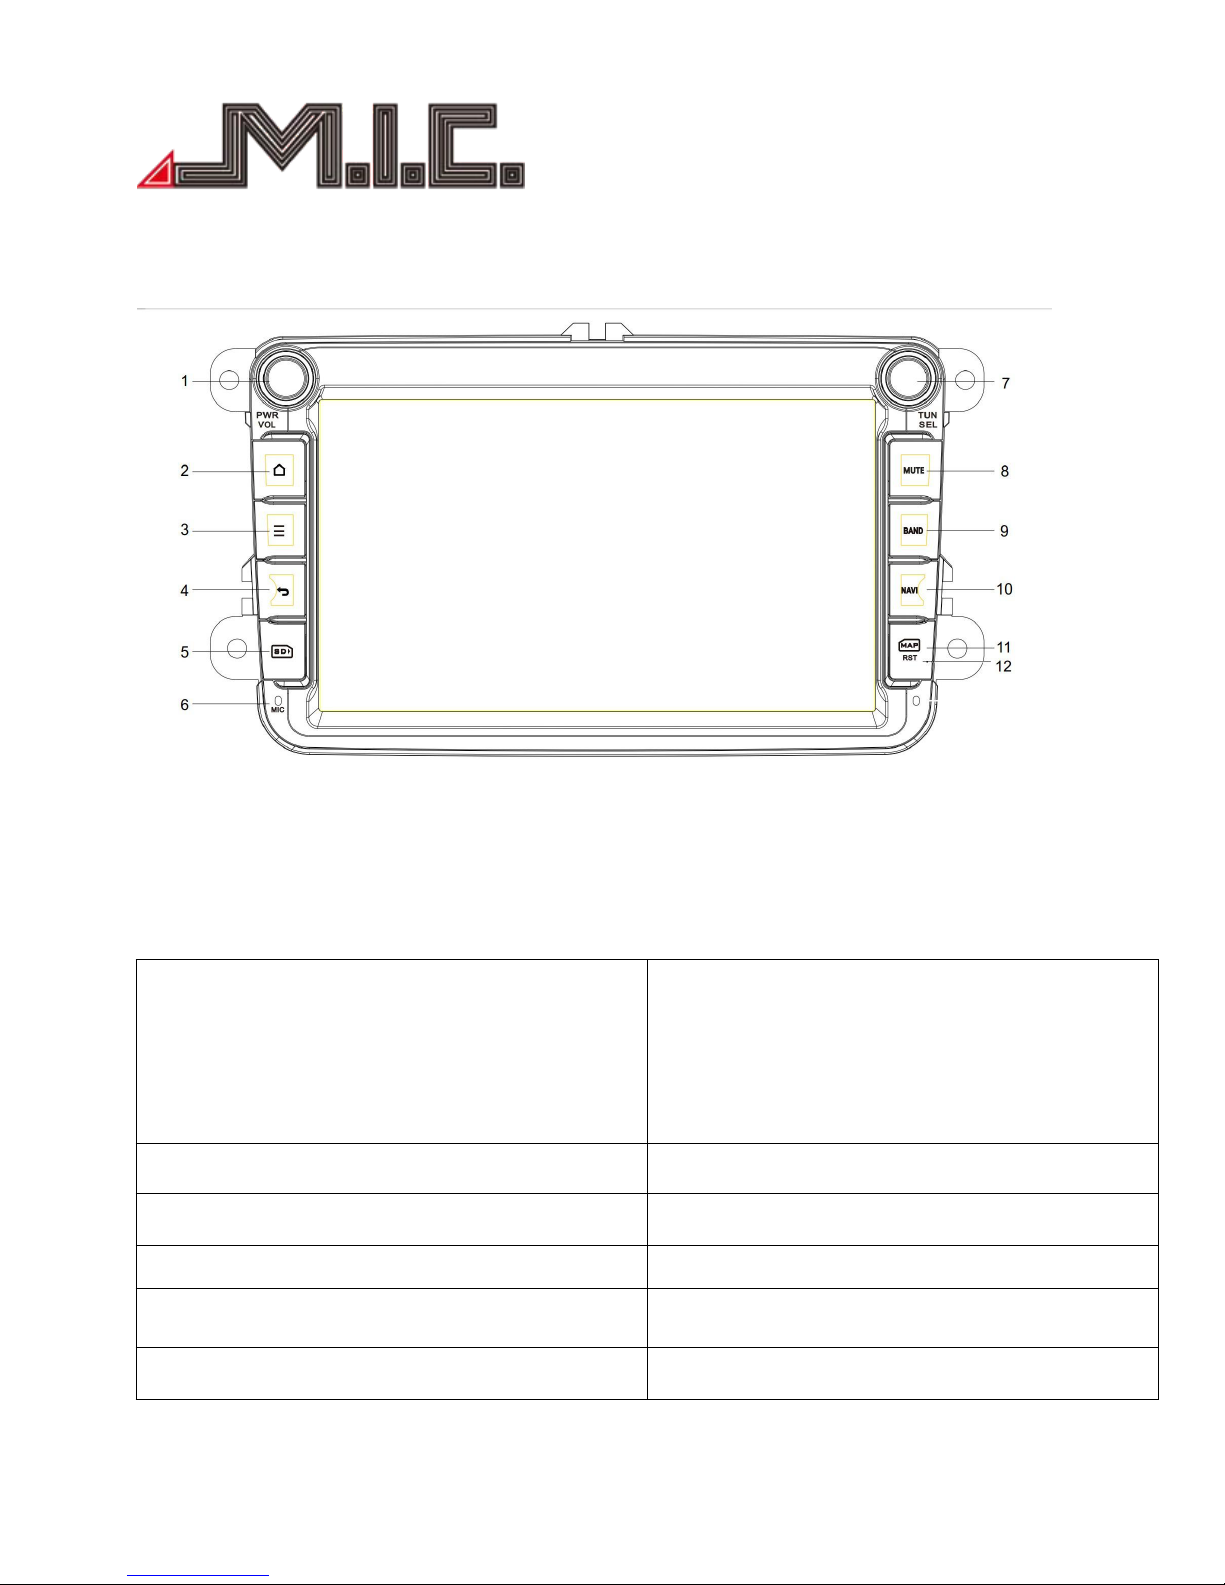
Front Panel(AV8)
1. PWR: Power ON/OFF
VOL: Volume knob(Rotate the knob clockwise to
raise the sound;Instead, shift to decrease the
volume)
7. TUN: Tune(Change channels on the radio)
SEL: ① Select(Rotate the knob clockwise to
select the previous song/video; Instead, shift to
select the next one).
② Play/Pause/EQ: press to play/pause the
song/video; Long press to access EQ setup.
2. Home: press to return the main menu
8. MUTE: set the player to slient mode
3. Attribute: press to check the details
9. BAND: press to access/start radio
4. Back: press to return the last menu
10. NAVI: press to access/start GPS navigation
5. SD: SD card slot
11. MAP: GPS map card slot
6. MIC: Microhpne
12. RST: click to restore the system
Page 12
- 12 -
HOME
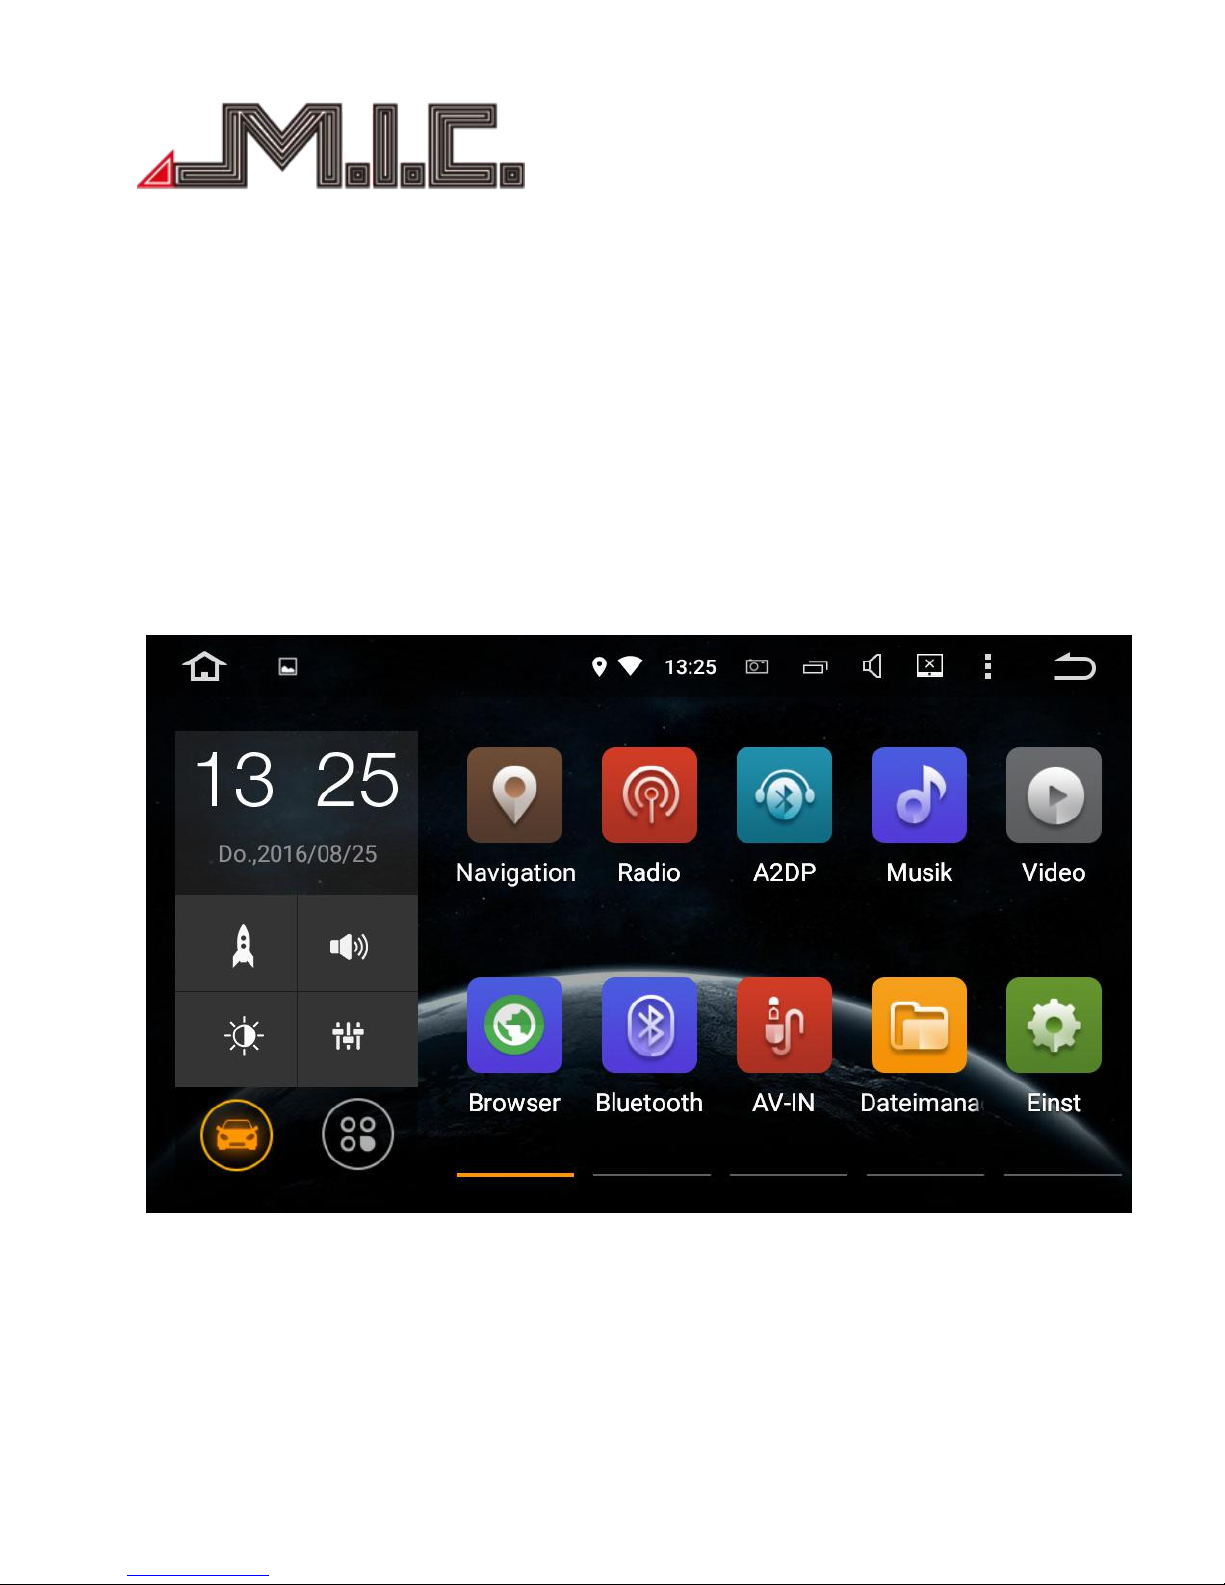
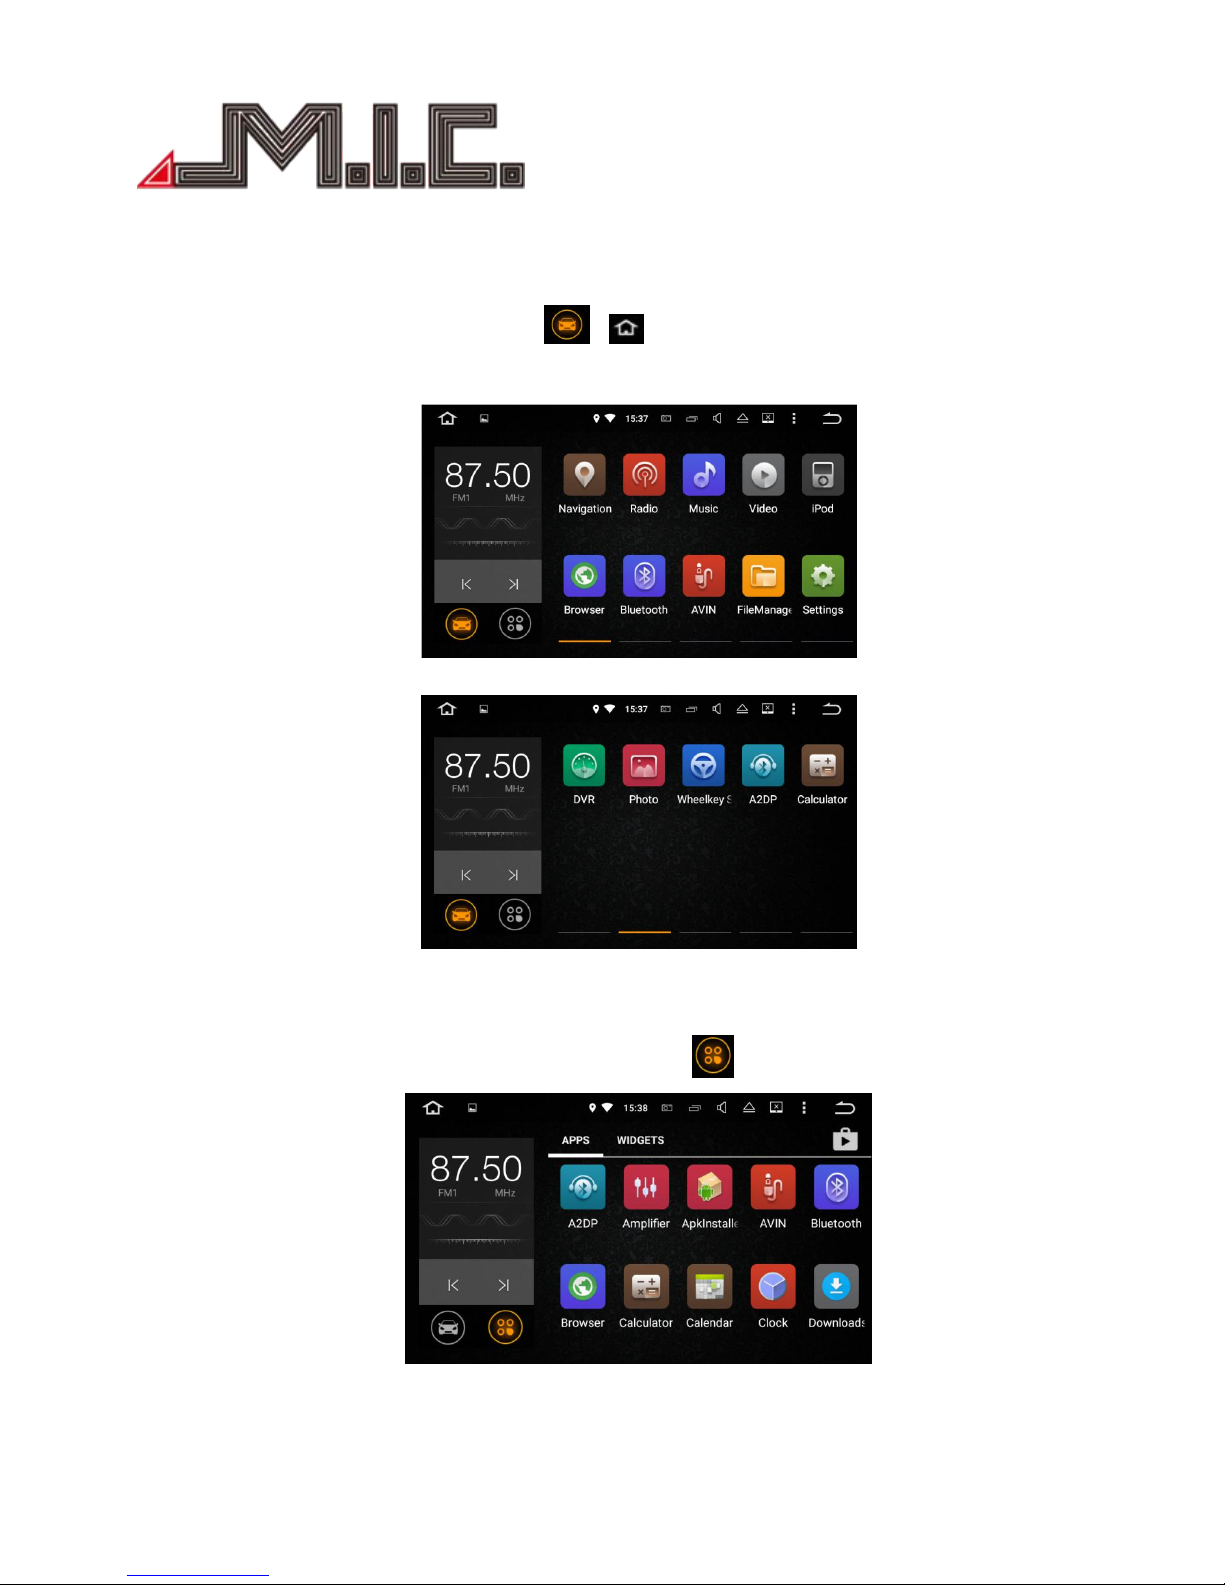
When you turn on the player, it enters into HOME interface firstly.
The interface can be slide left or right; click or to return HOME interface; The APK icons would be
added to or deleted from the HOME interface, as below.
HOME(1)
HOME(2)
This product includes Navigation, Radio, Bluetooth, DVR, 3G, WiFi, Digital TV etc functions. You can click the
function icon to enter relevant function for operation. Click to enter into menu and functions.
MENU(1)
Page 13
- 13 -
MENU(2)
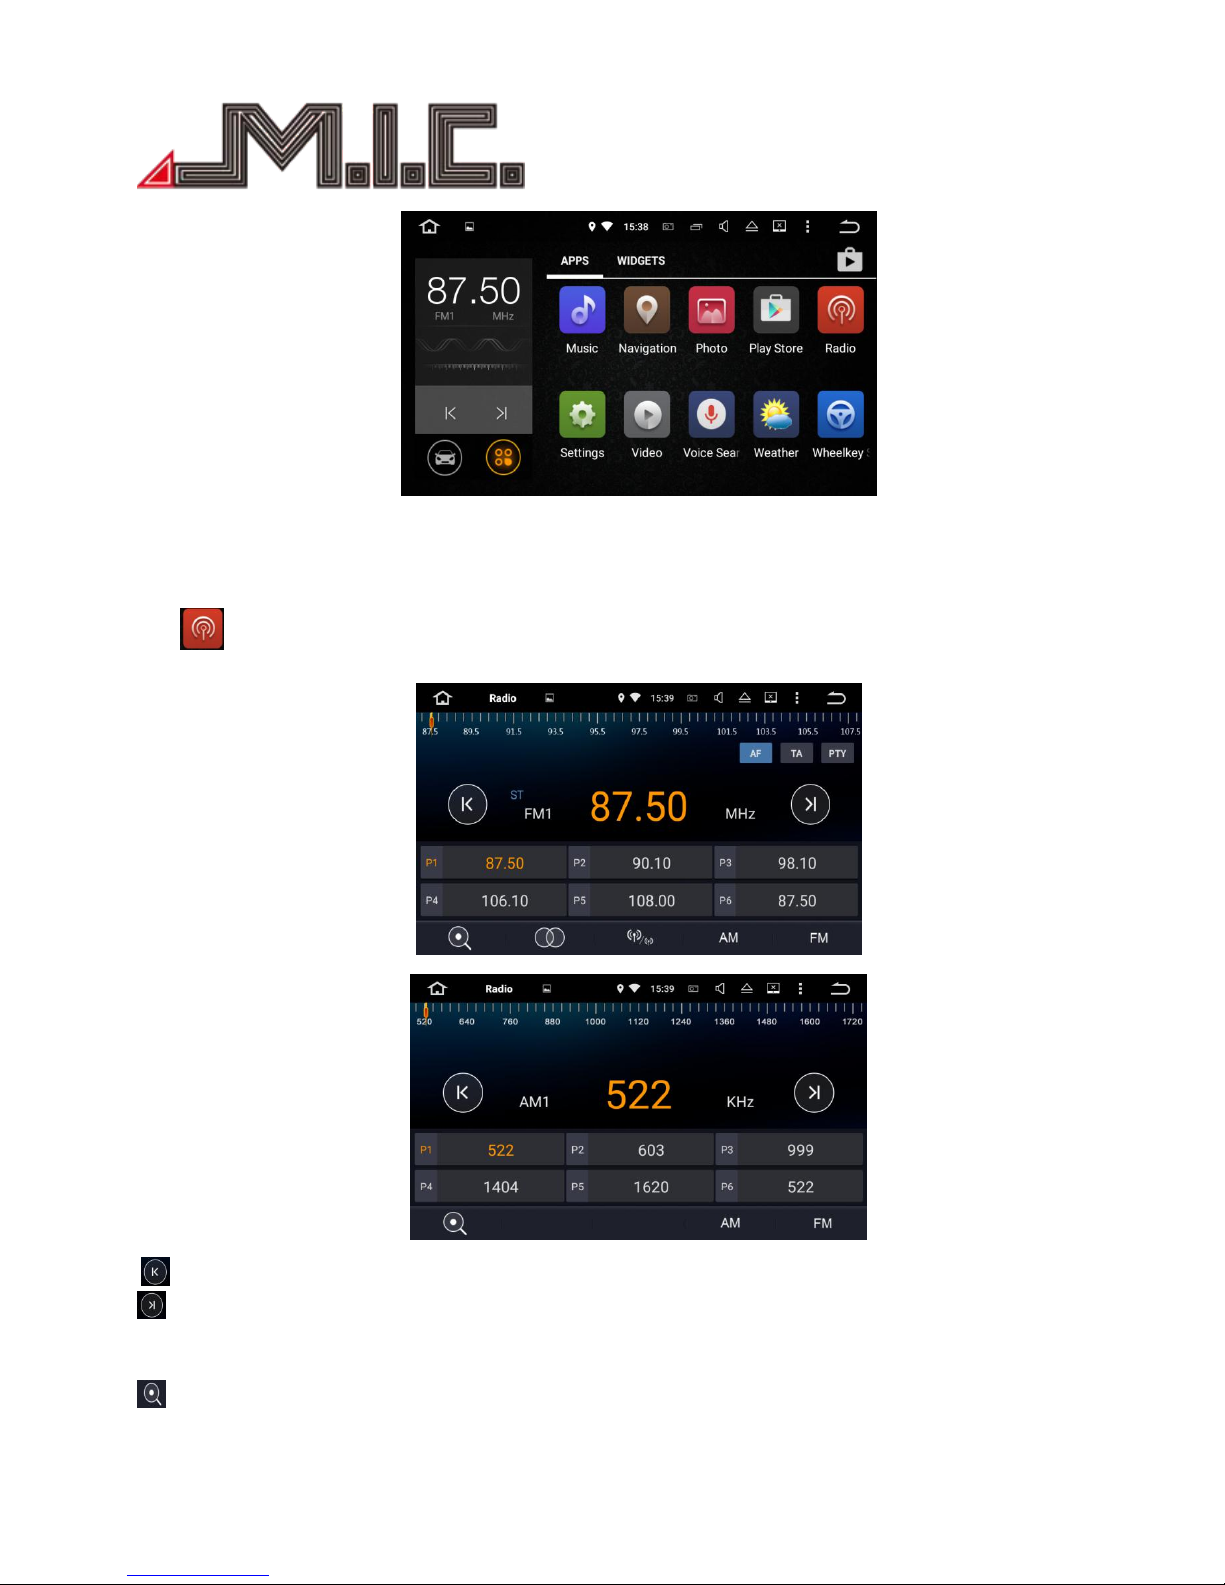
Radio
Click to enter Radio mode, the radio has AM and FM waves ,it can be switched by click the switch
button,as below.
FM
AM
Short press to search forward 0.1m, and long press to previous radio station;
Short press to search backward 0.1m, and long press to next radio station;
(Remarks:for some models, there is TUNER knob on the front panel, you also can rotate it to search
frequency.)
Short press to search for radio stations automatically from low frequency to high frequency; click it
again to stop searching.
Page 14
- 14 -
In FM band, press it to turn on or turn off stereo effect; FM radio signal is stronger at the center of the
city,usually receive in stereo way, however, in the remote area, the radio signal is not stable, usually switch
to mono mode to improve the effect to radio. (Note:when stereo is off, the mono mode is on.)
In FM band, press it to automatically switch between local and remote radio mode, according to the
strength of the radio signal.
Press to choose AM frequency as you like from AM1,AM2; 12 effective radio stations can be saved.
Press to choose FM frequency as you like from P1,P2,P3,P4,P5,P6;18 effective radio stations can be saved.
Bluetooth
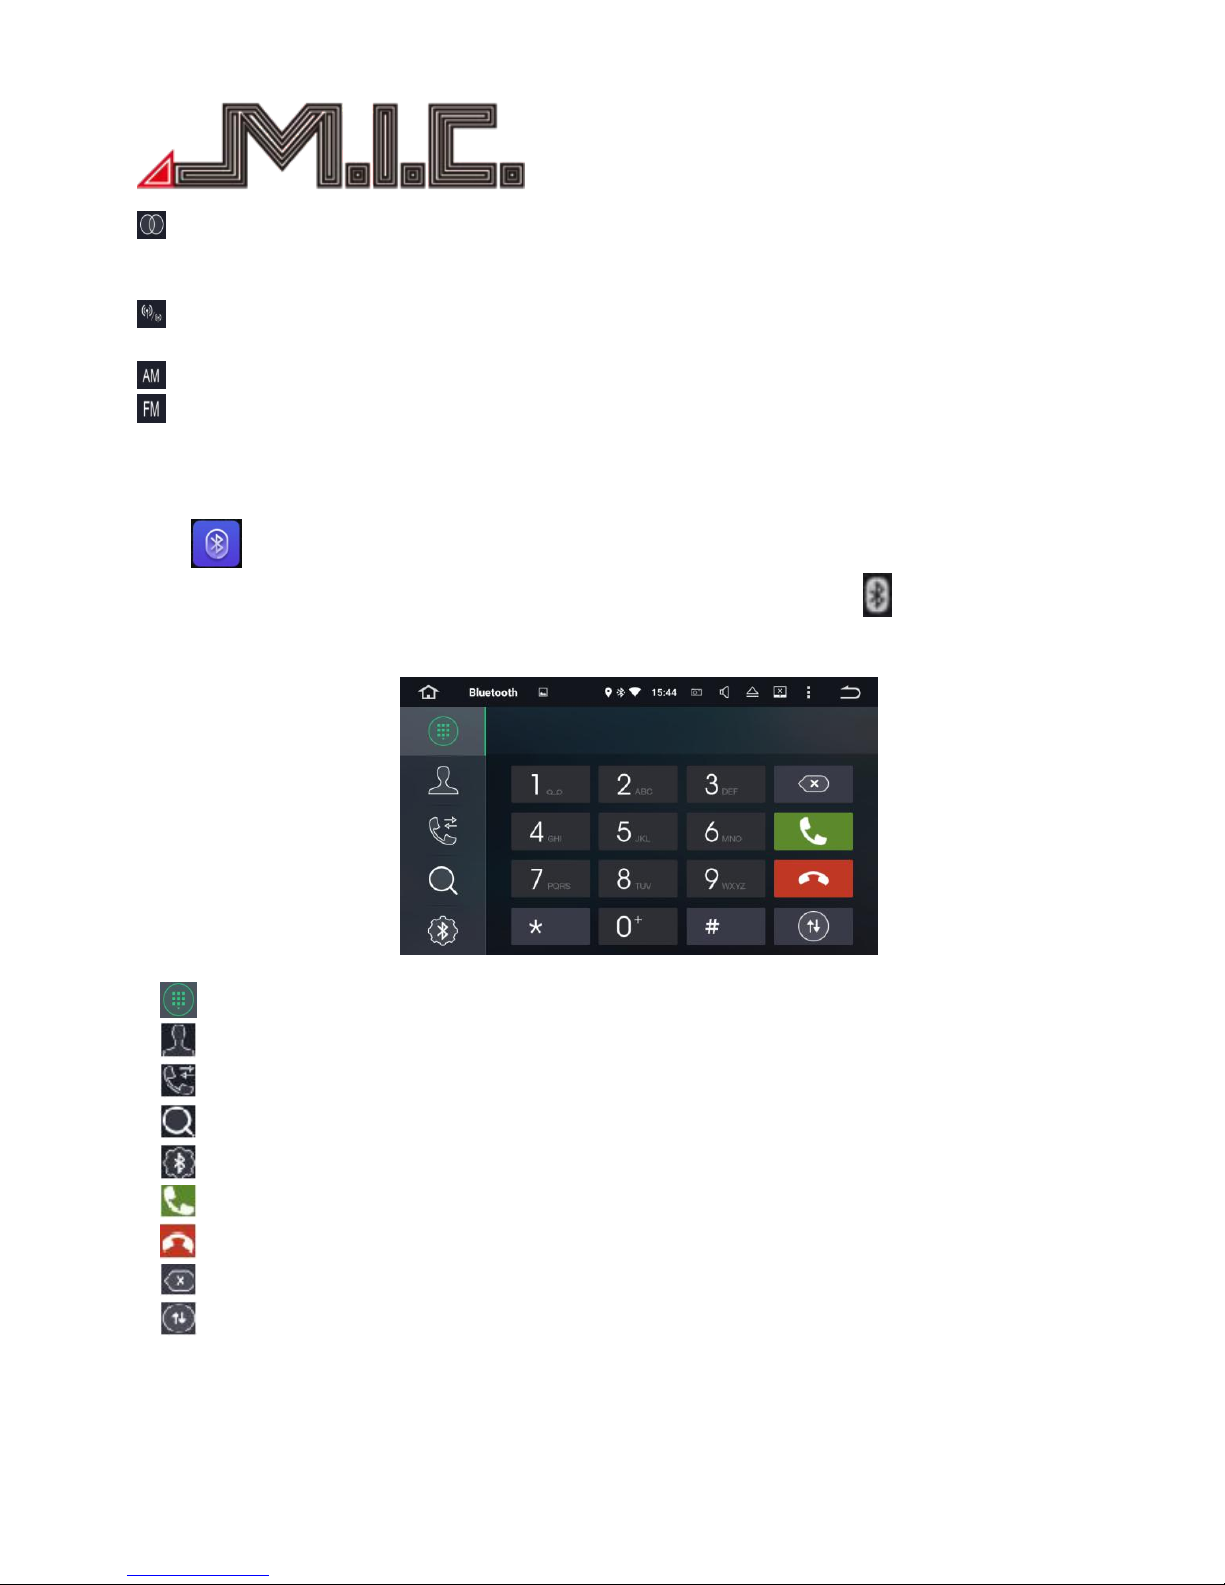
Click to enter Bluetooth mode. When connecting with mobile phone, input the universal
code”0000”and confirm it. After Bluetooth successfully connects with mobile, icon will be displayed on
the top of interface, as below.
Bluetooth Dial-up
Bluetooth dial-up
Bluetooth phone book
Bluetooth call records
Bluetooth pair, click to search Bluetooth match names
Bluetooth setting
Answer/ dial
Hang up
Delect the dial number, long press to delect shortly
Switch, click it to mutually switch the voices between phone and speaker of the player, when
Bluetooth calling
Page 15
- 15 -
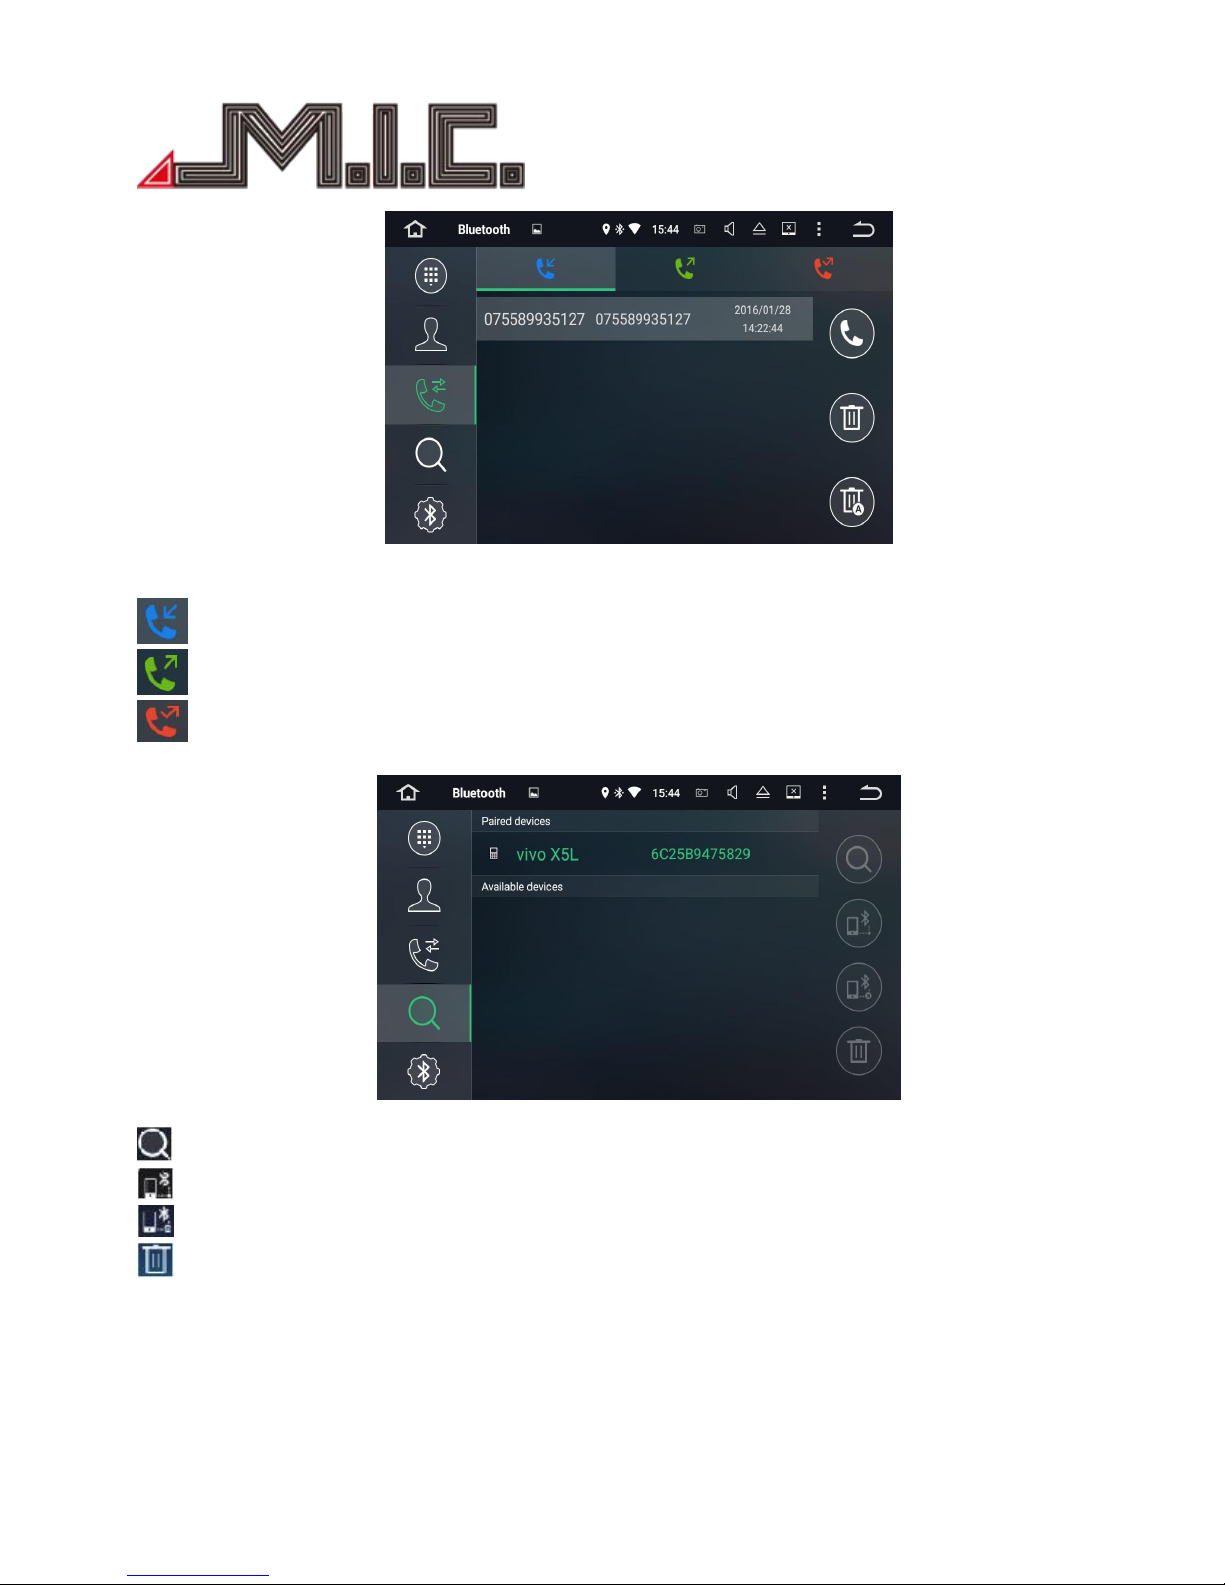
Bluetooth Phone book
call in
call out
missed call
Bluetooth Pair
Search for paired device(mobile) name
Connect with searched paired device(mobile) name
Disconnect selected Bluetooth pairing records
Delete selected Bluetooth pairing records
Page 16
- 16 -
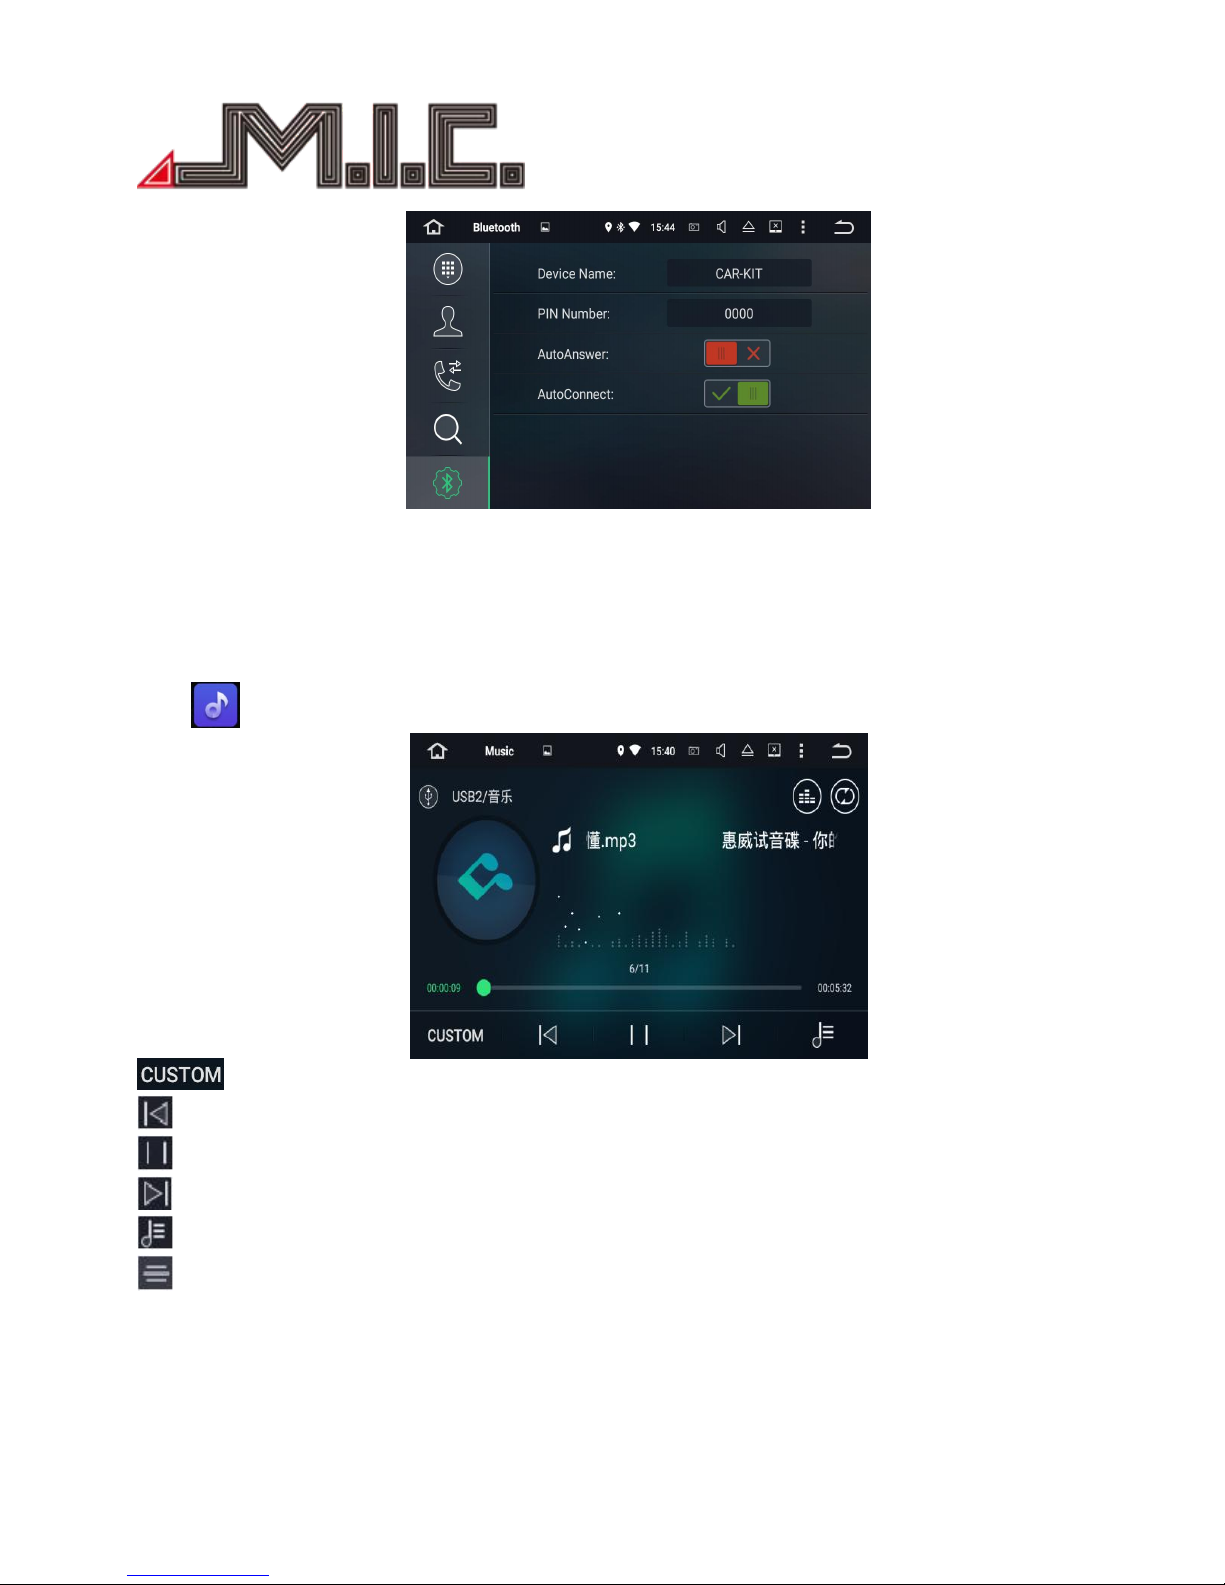
Bluetooth Setting
1) Set up device name of Bluetooth
2) Set up password when connecting Bluetooth
Music
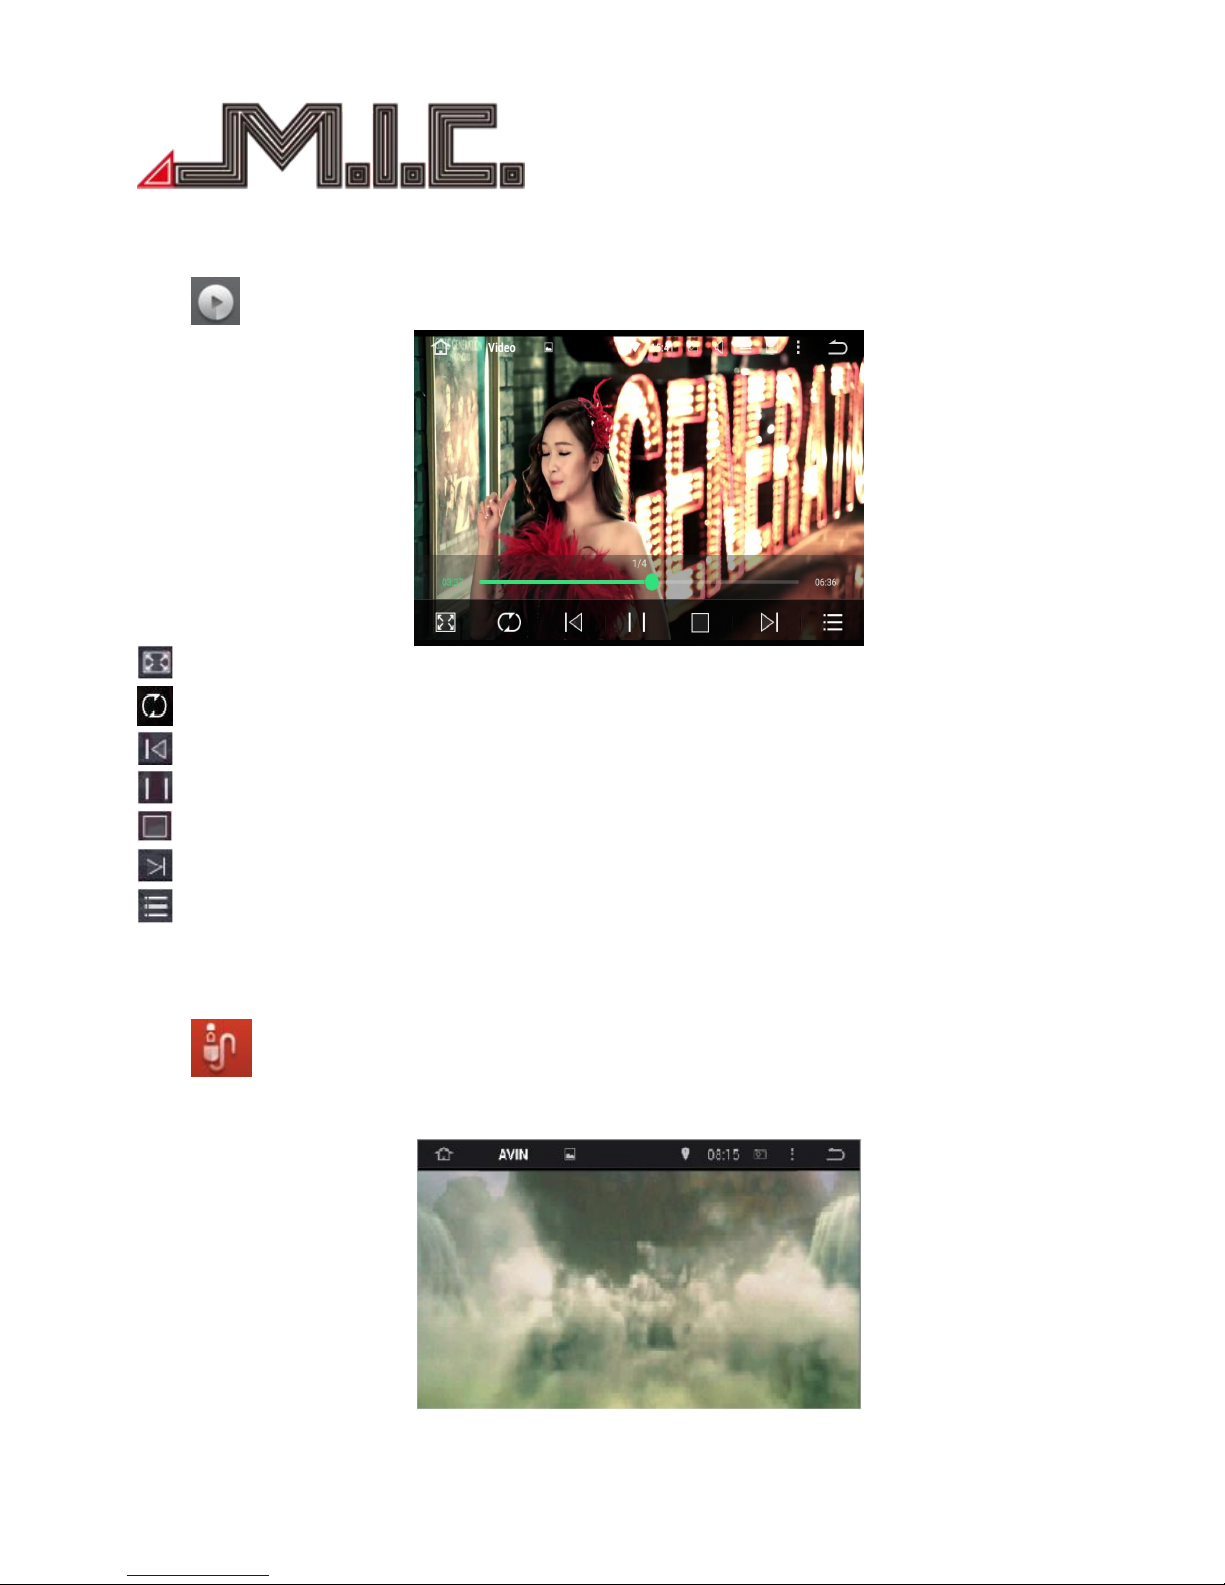
Click to enter music mode, as below; plays audio files from SD card or USB; supports WMA, MP3 etc.
sound mode switch
previous
stop/play
next
playlist
lyrics/Spectrum switch
Page 17
- 17 -
Video
Click to enter video play mode. It can support 1080P video play.
Fullscreen button
Loop playing Mode
Previous chapter
Play/Pause
Stop
Next chapter
Video list
AVIN
Click to enter AV In mode. It supports displaying the video/image from external device, and also
audio output, as below.
Page 18
- 18 -
File Manage
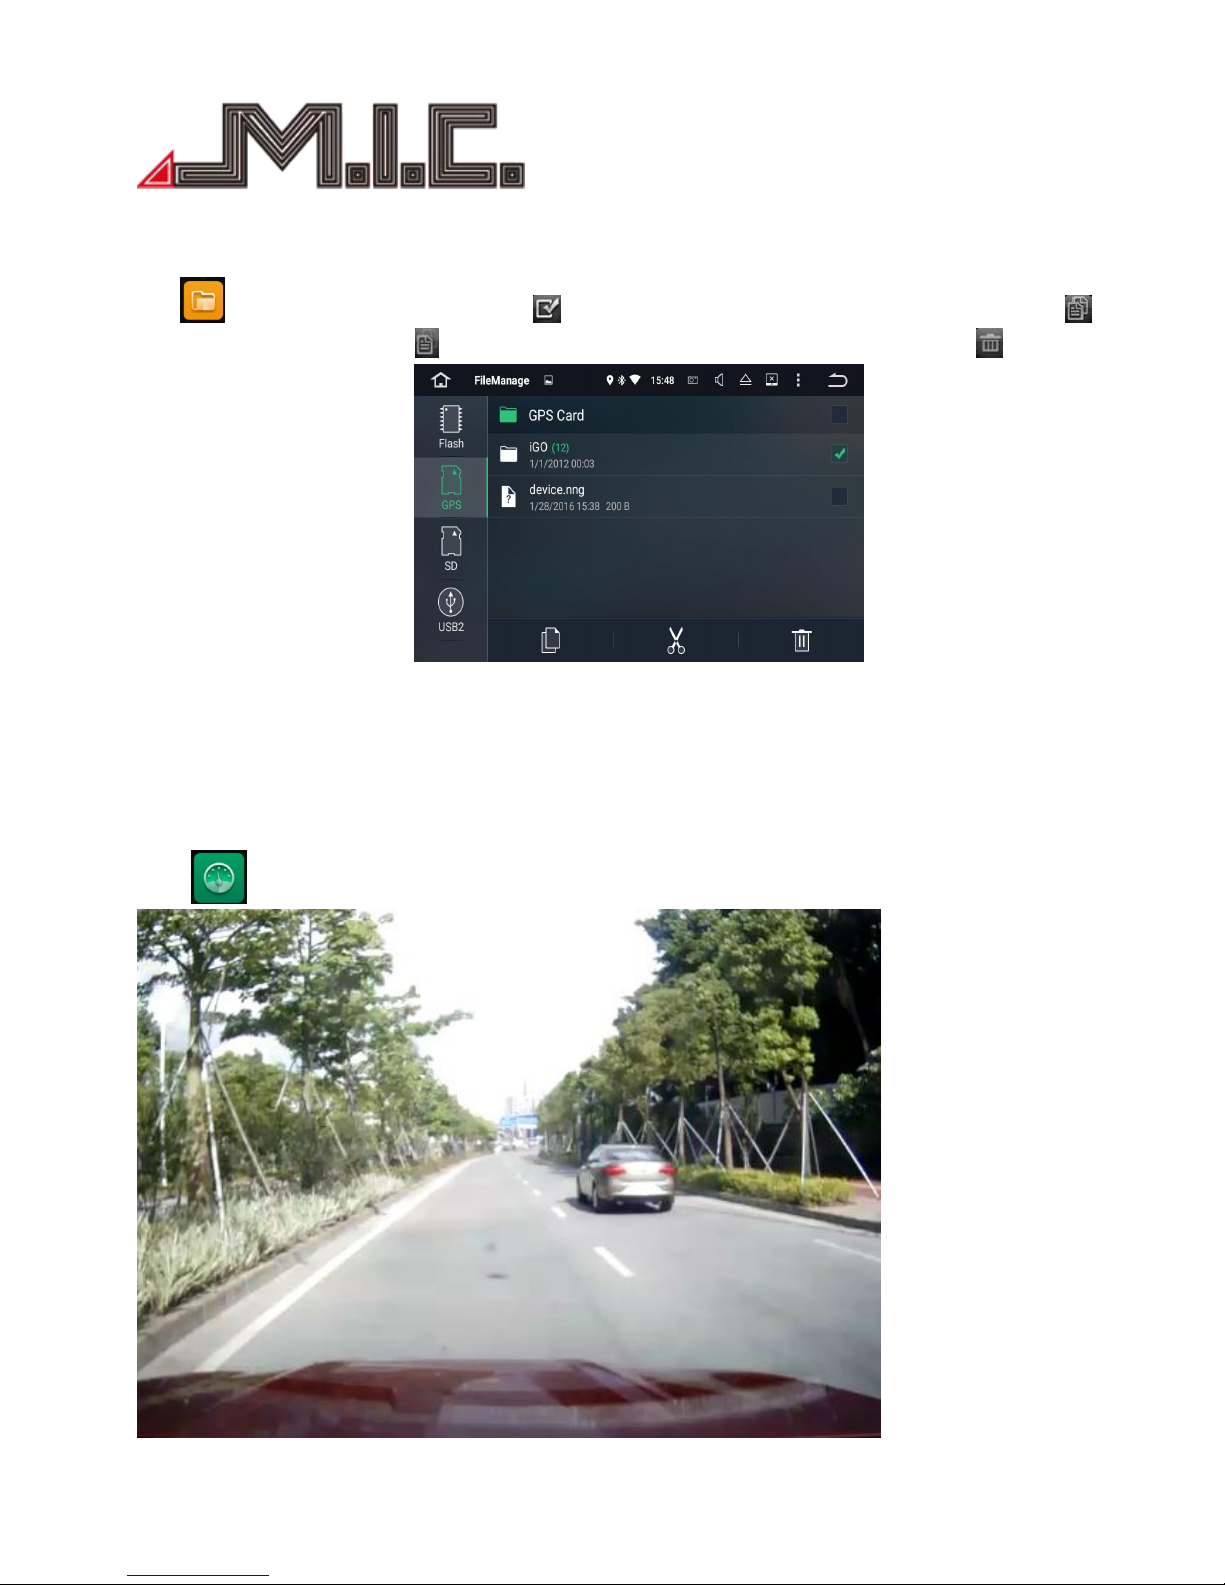
Click to enter File manage mode.Click icon to select the files to remove, select the copy icon to
copy files, and the paste icon to paste; if you don’t need the file, press the delete icon to delete it.
Car DVR (optional)
Click to enter car DVR mode, as below.
Page 19
- 19 -
The video of car DVR are stored in TF card and most files are large, so please use at least 8GB TF card to
record the video for long time automatically.
The product can automatically detect the car DVR when it is connected vis USB interface.
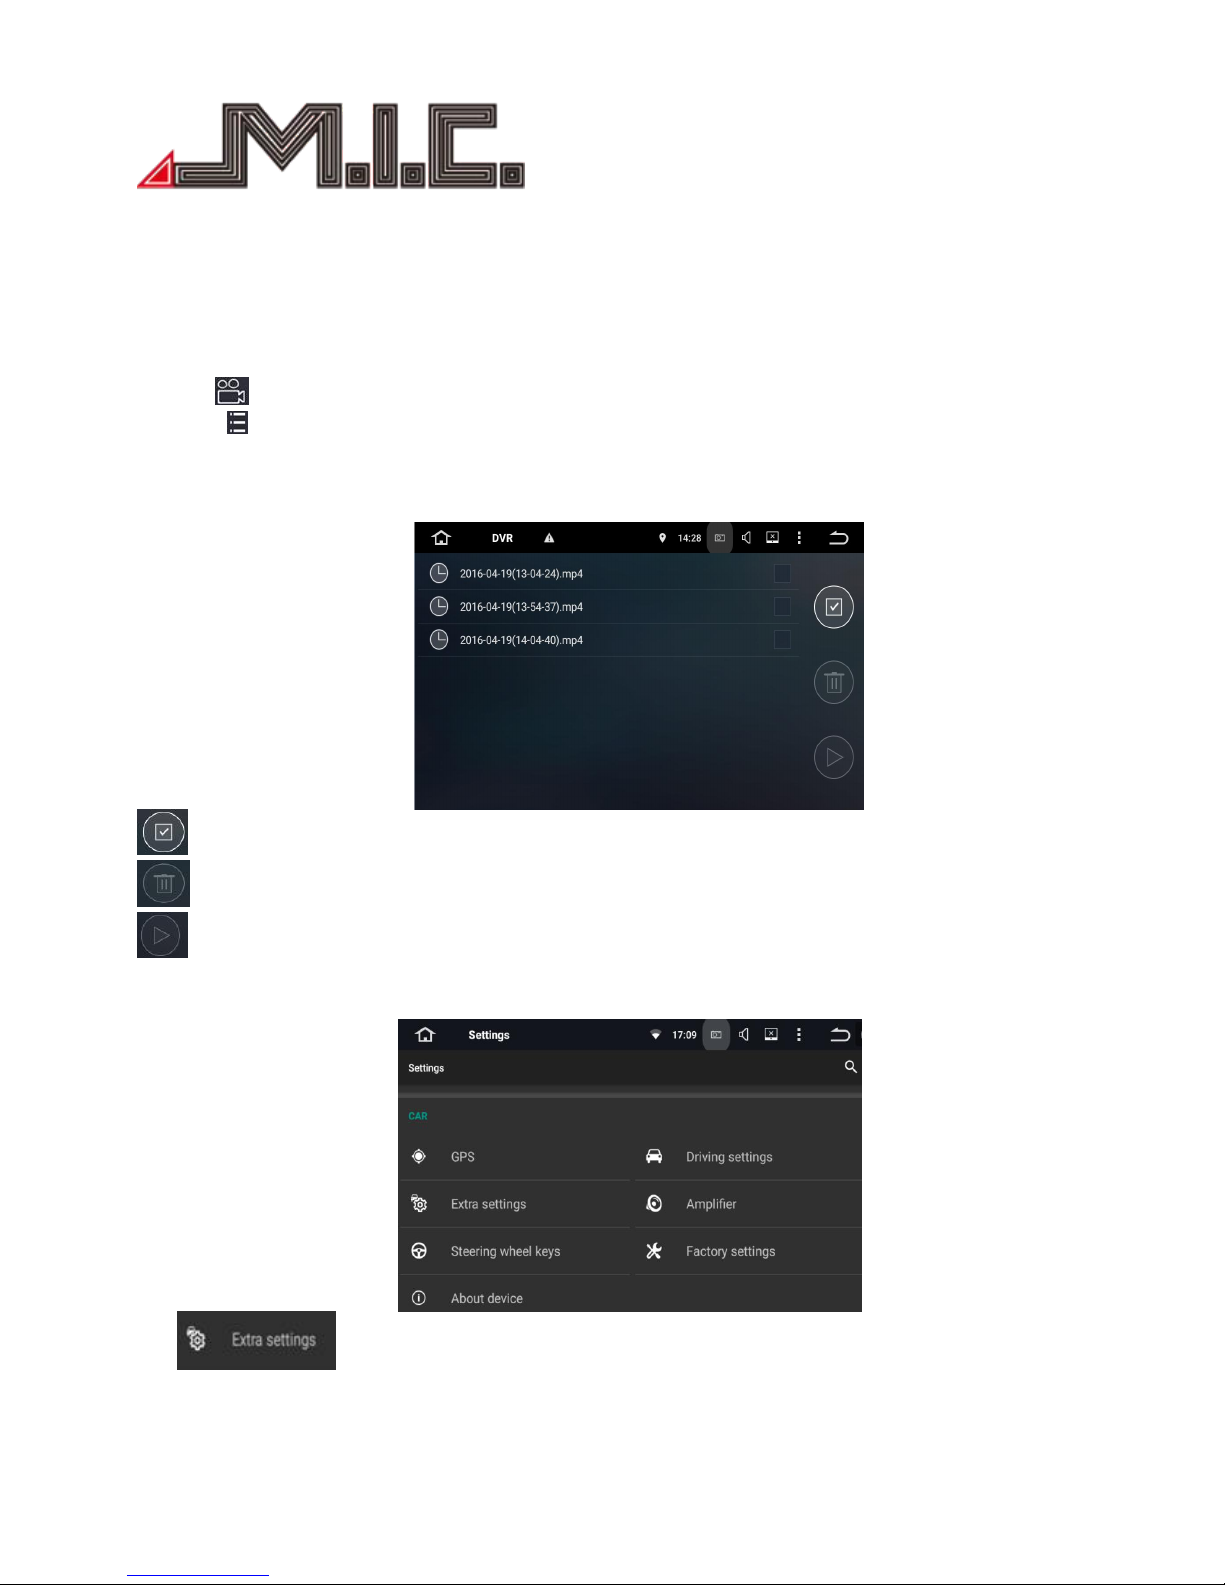
Click the icon to start recording video,the files can be stored automatically after stop recording.
Click the icon to check the recorded video list.
The recorded video list as below.
Select
Delete
Play
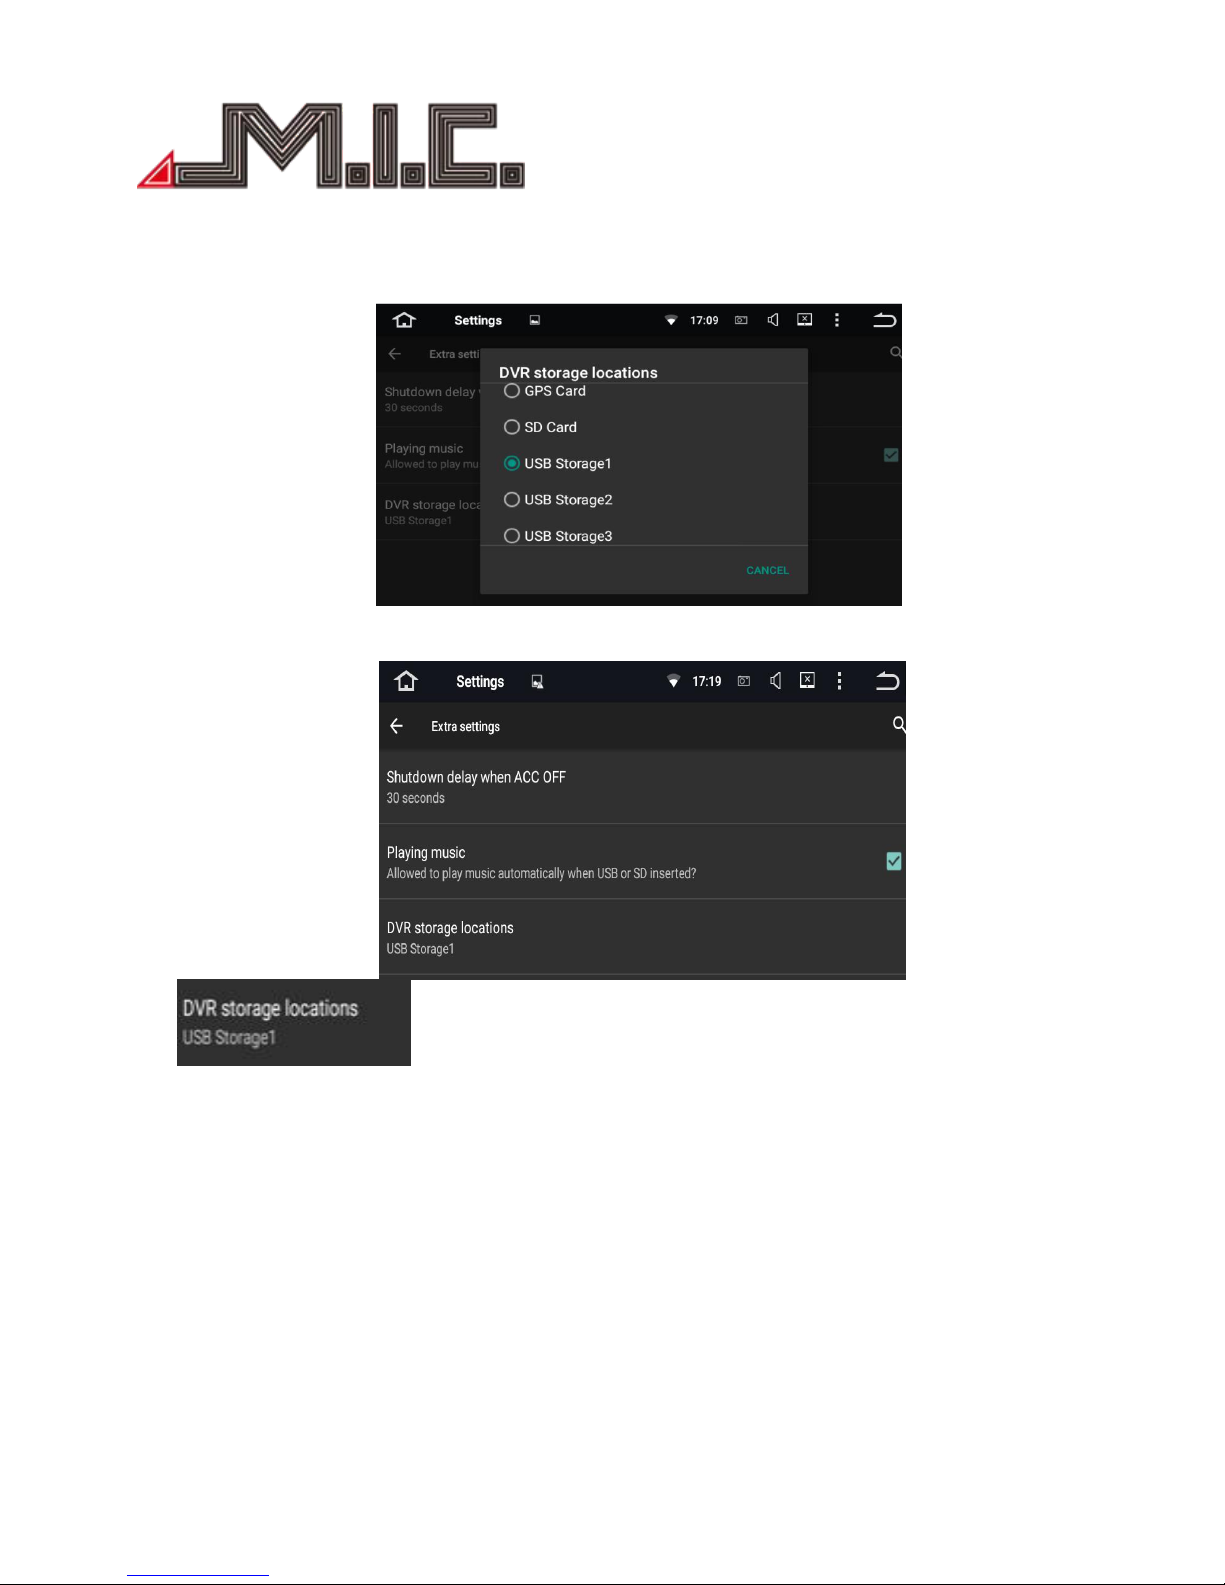
choose the DVR file storage path
click
Page 20
- 20 -
click
Sliding up and down to choose the storage location of device
Page 21
- 21 -
Browser
After you connecting “hard driver”, “SD ”,“USB”,“photos”, “movie”and “Tool”,connect ,then Click“File
Manager”,you will read the content .
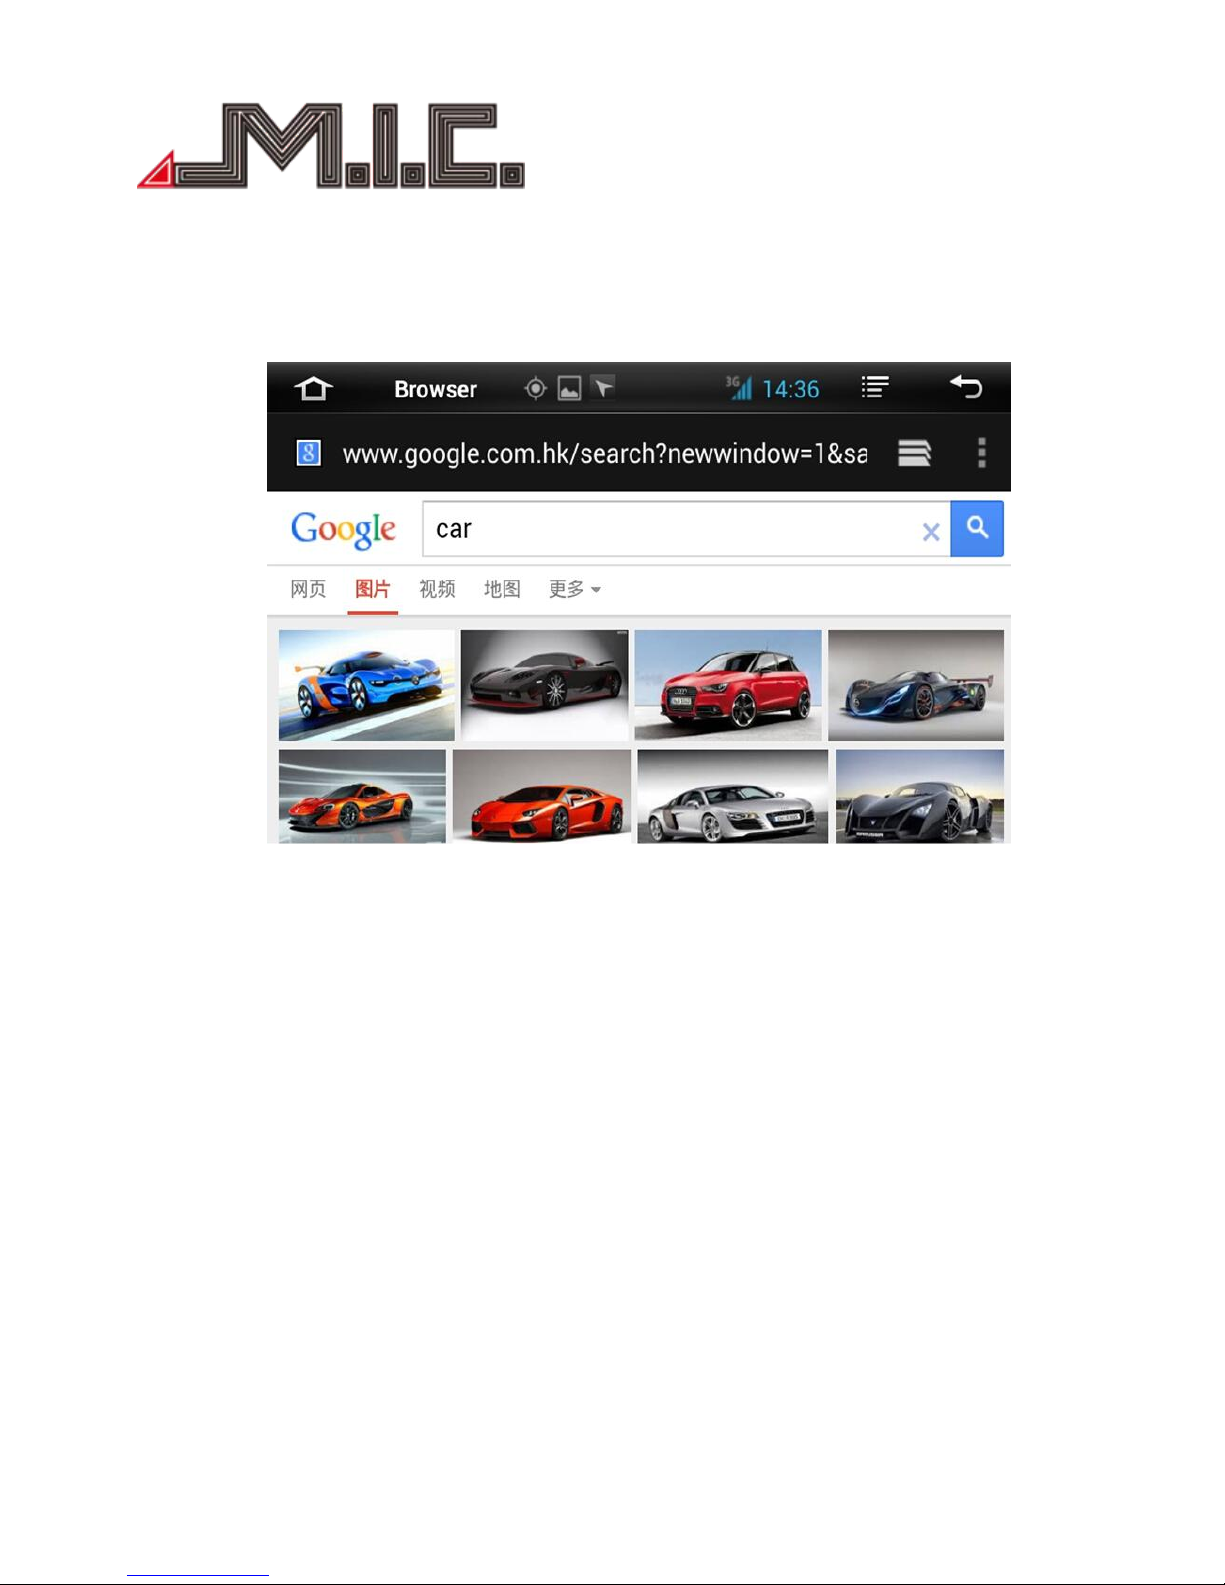
Click“Browser”Open“ Google”inter page,You can enter into different websites ,then web searching,
read news,know the latest events,stock inquiries.
GPS Navigation
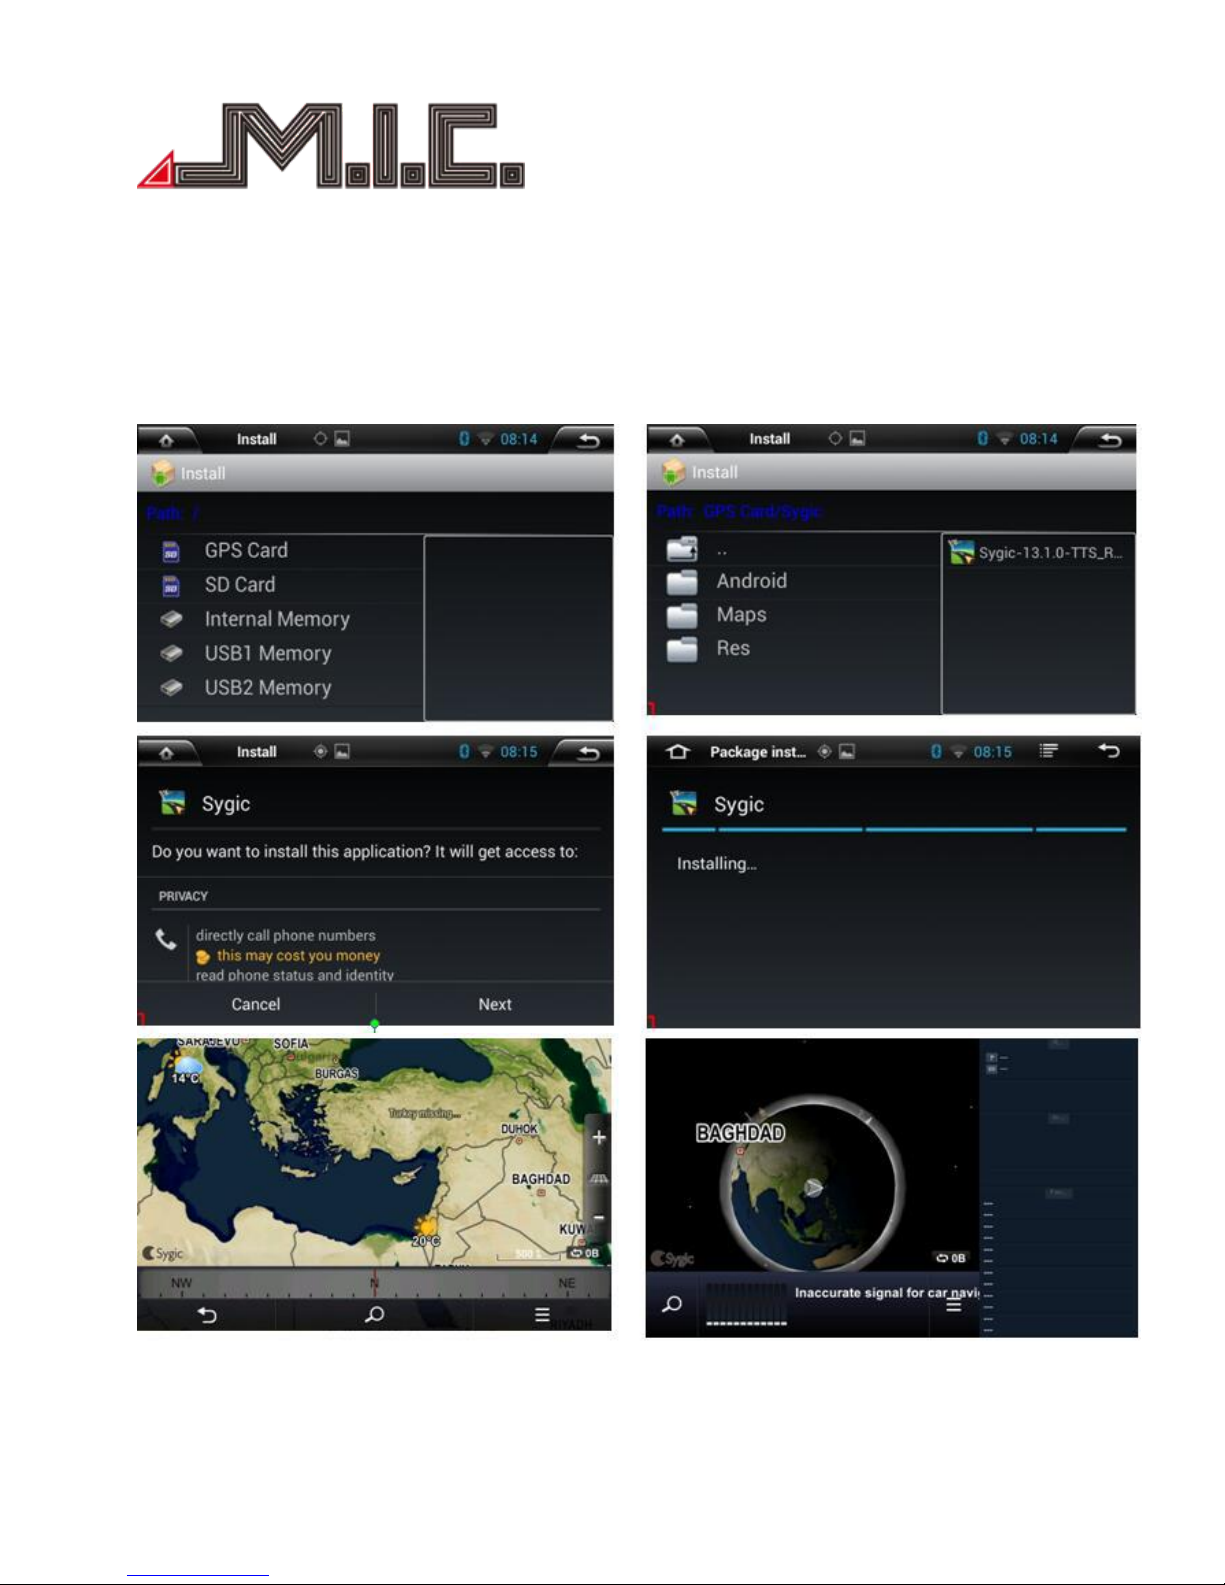
APK File Installation Setting
Select the GPS Card slot path, then click the APK installation files to install the map, as the below picture:
When you need use the navigation, you must click “SD” at first,click“primo_800*480” “IGO” and install
the ”APK” file.
When you install finished map, you can open the map,GPS navigation .
Page 22
- 22 -
Map install (e.g. Sygic)
Page 23
- 23 -
TPMS (optional)
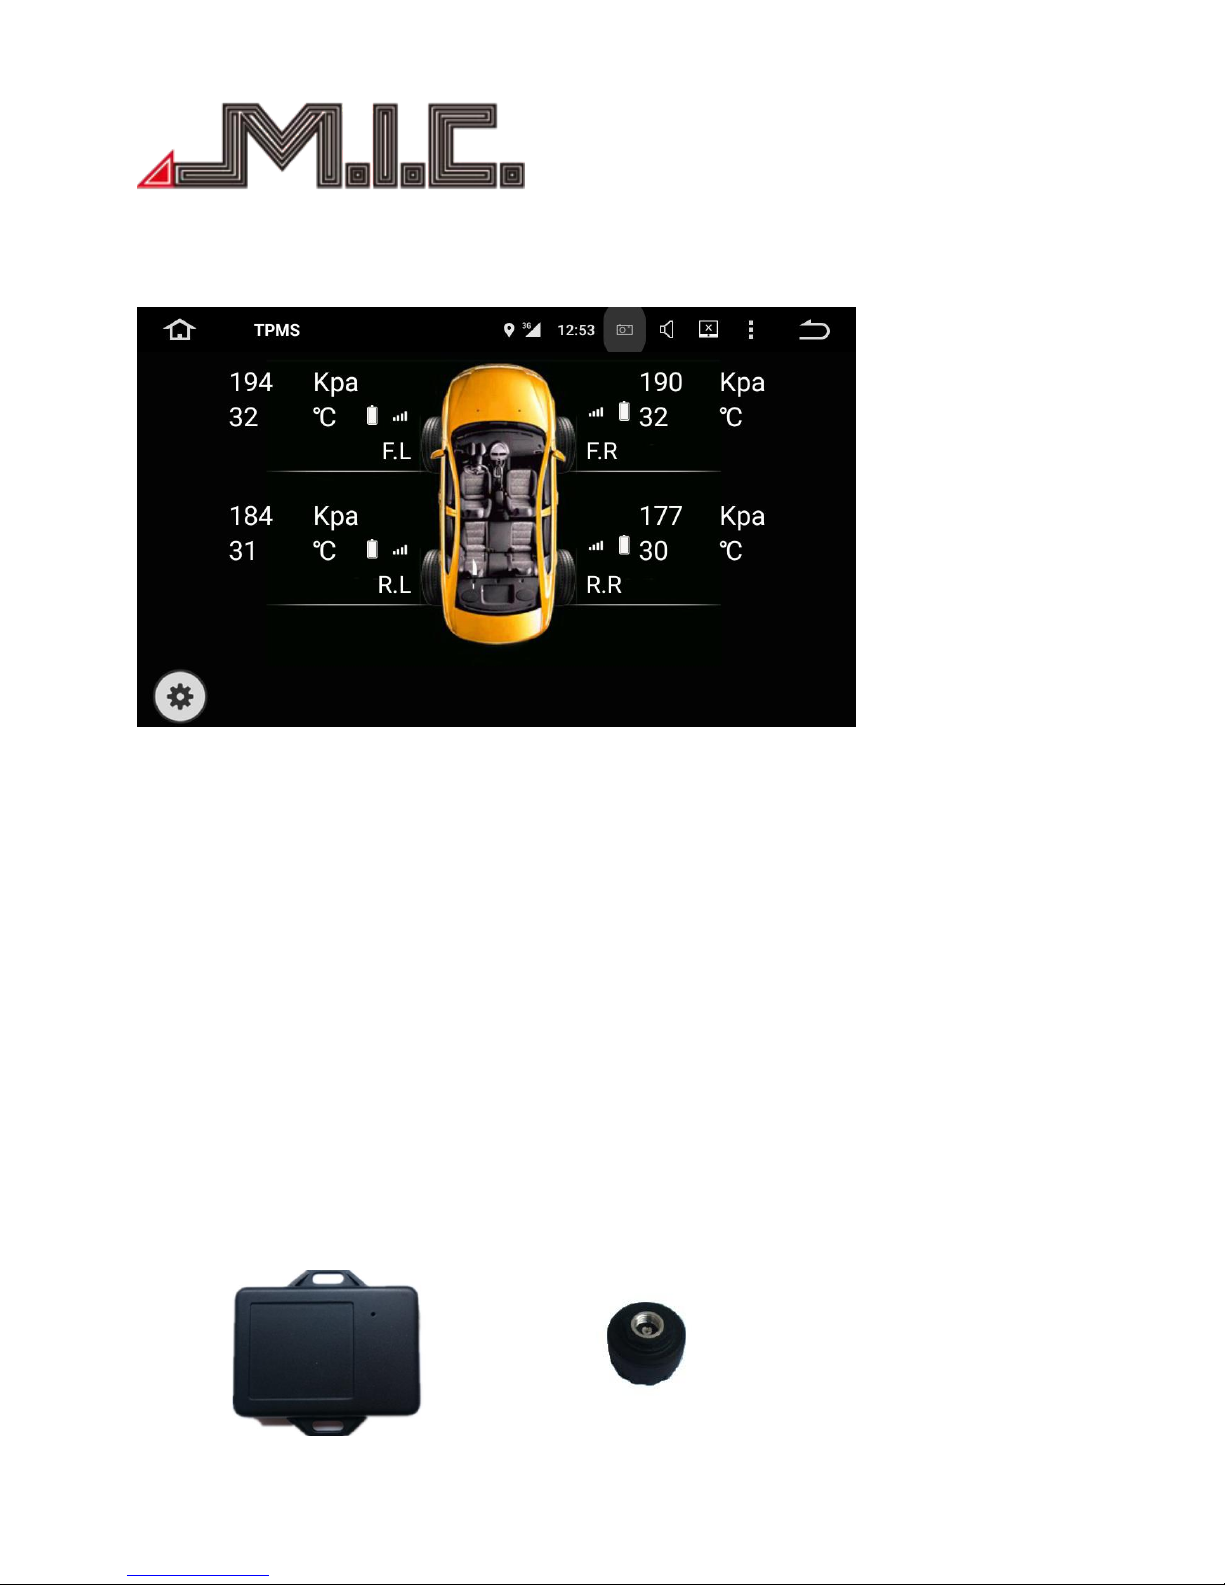
Click “TPMS” icon from Home menu, as below:
1. Brief Introduction
TPMS(Tire Pressure Monitoring System)continually measure air pressure and temperature of the tire as
well as voltage of the sensor batteries, transmits these data to the receiver/DVD for presentation to the
driver. In case of an abnormal value the system activates an alarm in order to warn the driver.
It has the following features:
1. Monitors and displays pressure and temperature of tires in real time.
2. Monitors voltage of sensor batteries.
3. Promptly activates audible and visual alarms: low pressure, high pressure, high temperature,
rapid leak, sensor battery low and no signal from sensor.
4. Displays pressure in kPa, bar, psi.
5. Displays temperature in ℃,℉
6. Allows setting thresholds for low pressure and high pressure alarms.
7. Supports sensor pairing and sensor position swap procedure to facilitate tire rotation.
2. System composition
This system consists of a receiver, TPMS sensors
Receiver External sensor
Page 24
- 24 -
3. Working environment
Receiver
Working temperature : -20℃~+70℃
Storage temperature : -20℃~+80℃
Working voltage: +12V
TPMS sensor:
Working temperature:-20℃~+85℃
Storage temperature: -20℃~+105℃
4. System installation
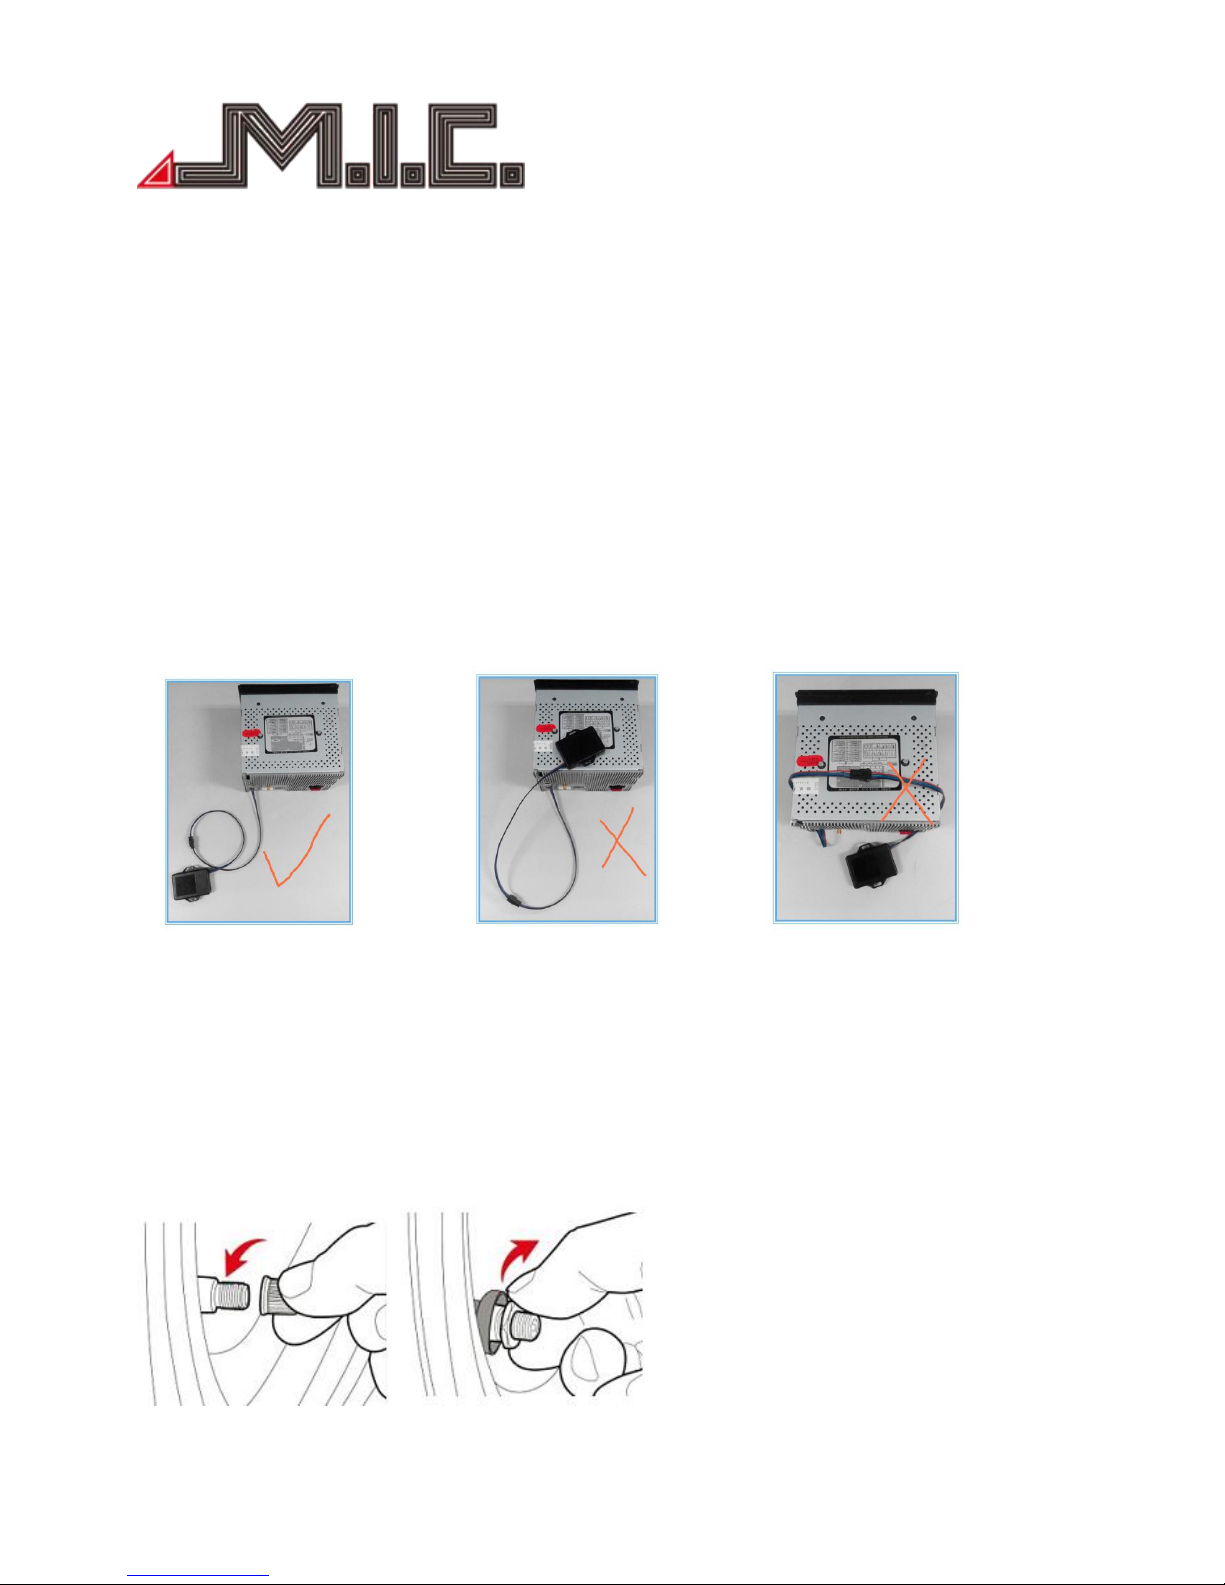
(1)Receiver installation
Correct installation Incorrect installation Incorrect installation
Receiver installation instructions:
Receiver must be 20cm away from large sources of interference such as in-car DVD, navigation, mobile
TV.Data cable and receiver cannot be wound or put on DVD.
(2) External sensor installation
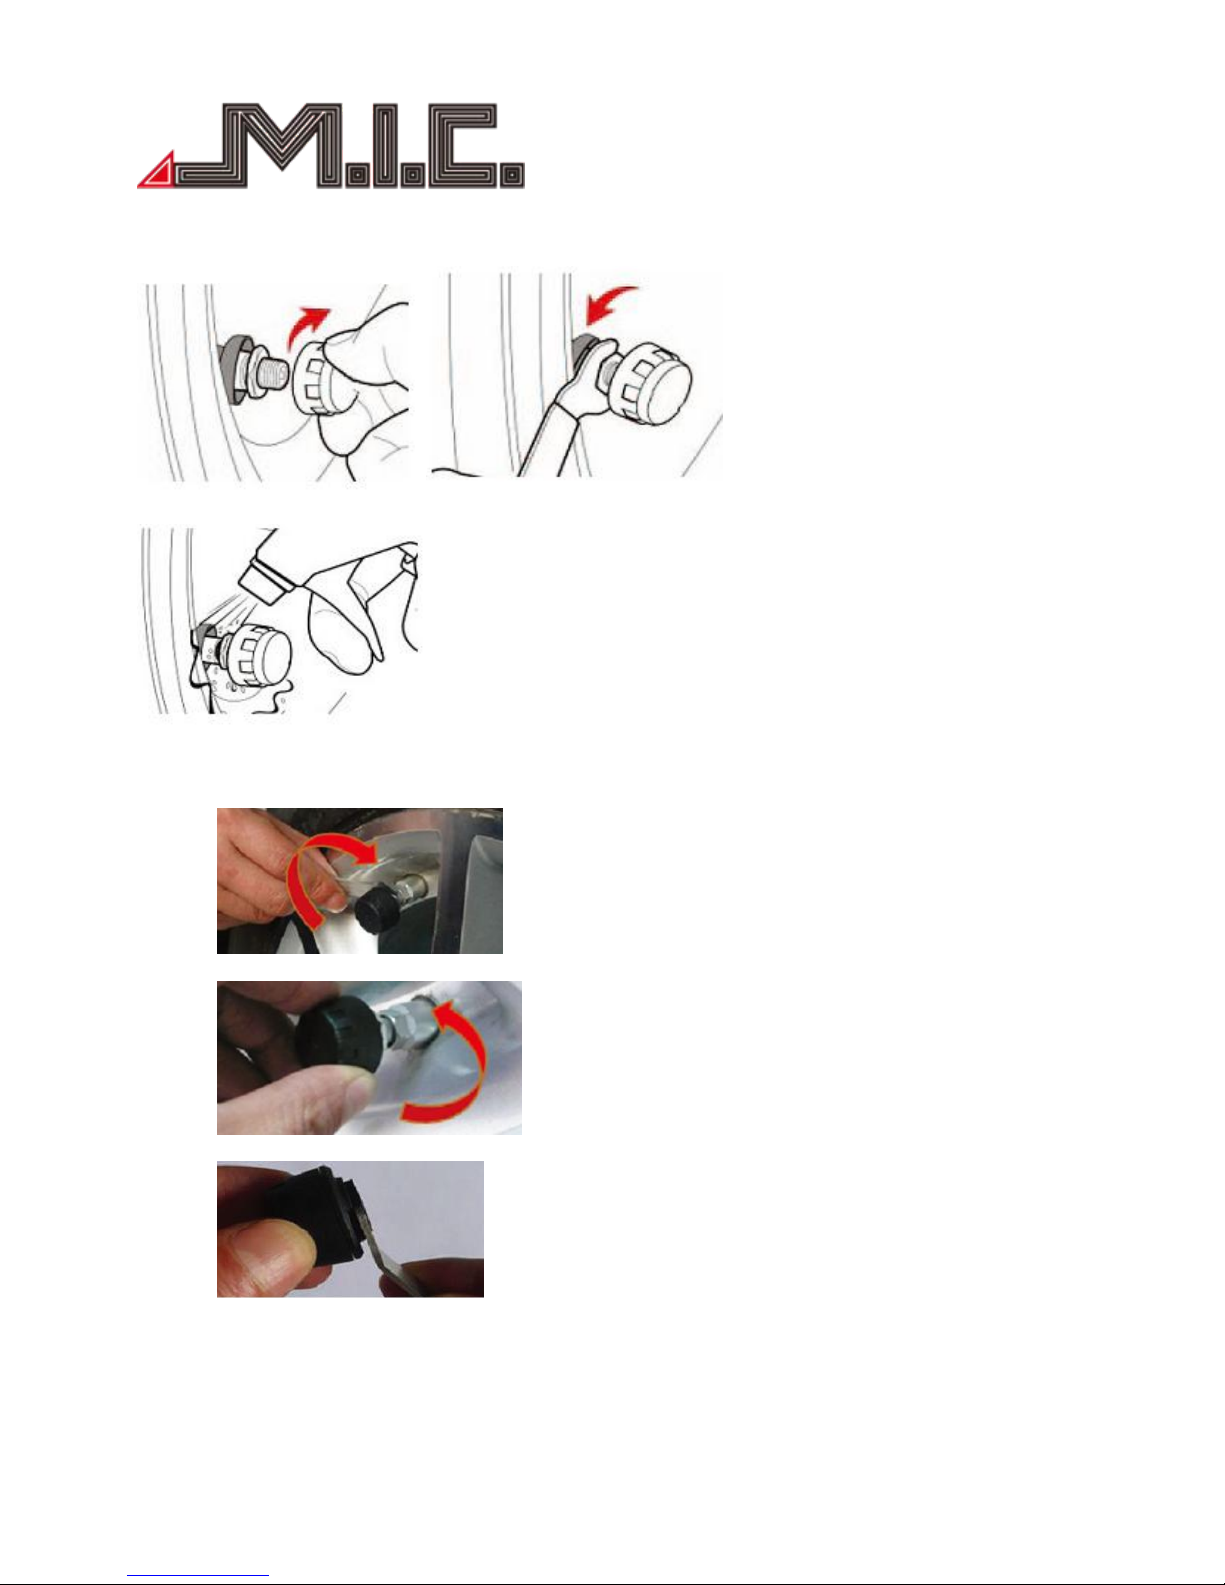
a. Remove tire valve cap b. Screw in hexagon nut
Page 25
- 25 -
c. Screw LR sensor onto LR tire valve stem tightly d. Spin hexagon nut counterclockwise tightly by
supplied spanner
e. Make sure there is no air leak from stem. following the above step to install other sensors
(3) Battery replacement
a. Separate hexagon nut from sensors using supplied spanner.
b. Remove sensor from tire valve
c. Unscrew lid counter clockwise from sensor housing using spanner.
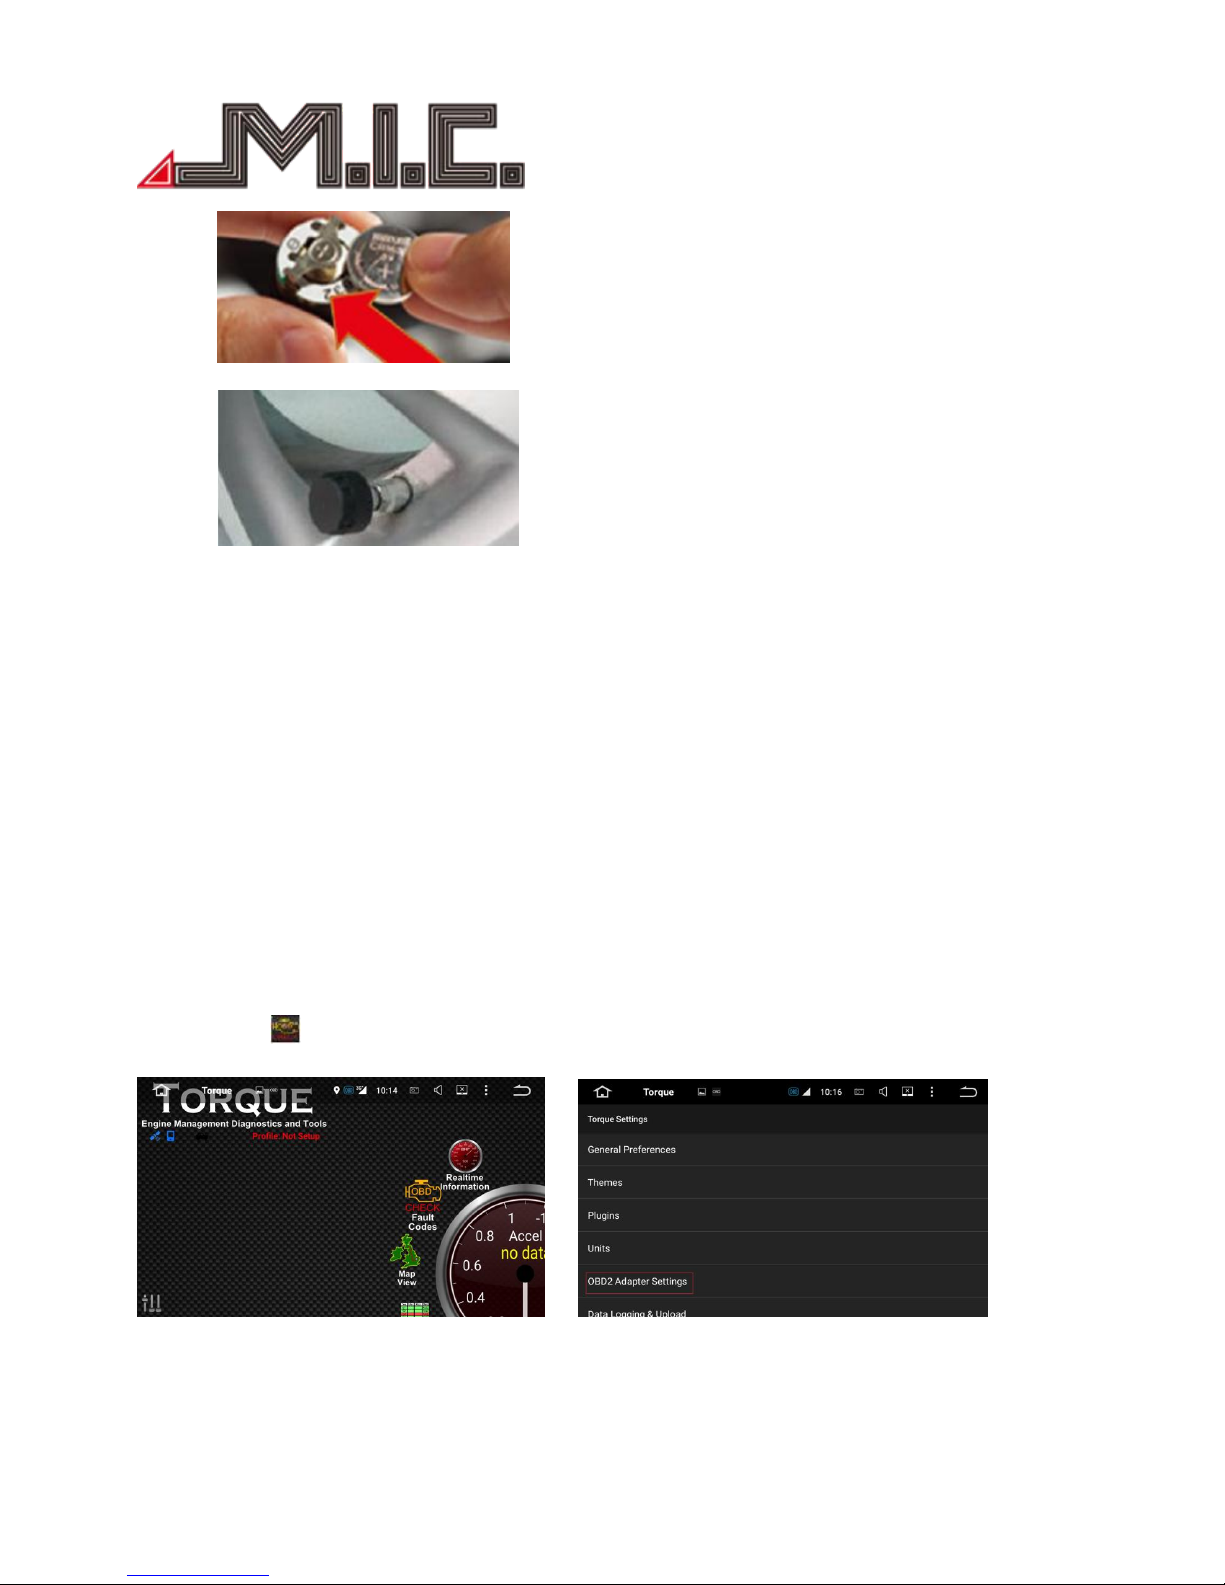
d. Remove old battery and insert a new one(battery positive side is facing up)
Page 26
- 26 -
e. Screw lid tightly onto sensor housing, return sensor onto tire valve and fix with hexagon nut.
OBDⅡ(optional)
OBDⅡis very good tool to monitor car condition. By Torque, it will display car RPM, speed, mile, oil etcs
information, also get the compass, barometer, accelerometer etcs after it is connected to GPS via OBD2
Bluetooth; provide the more and more professional real-time data to the driver, and check the car error and
quality performance.
Besides, Torque also support Google map function, which is a practical tool with the small network flow.
Usage:
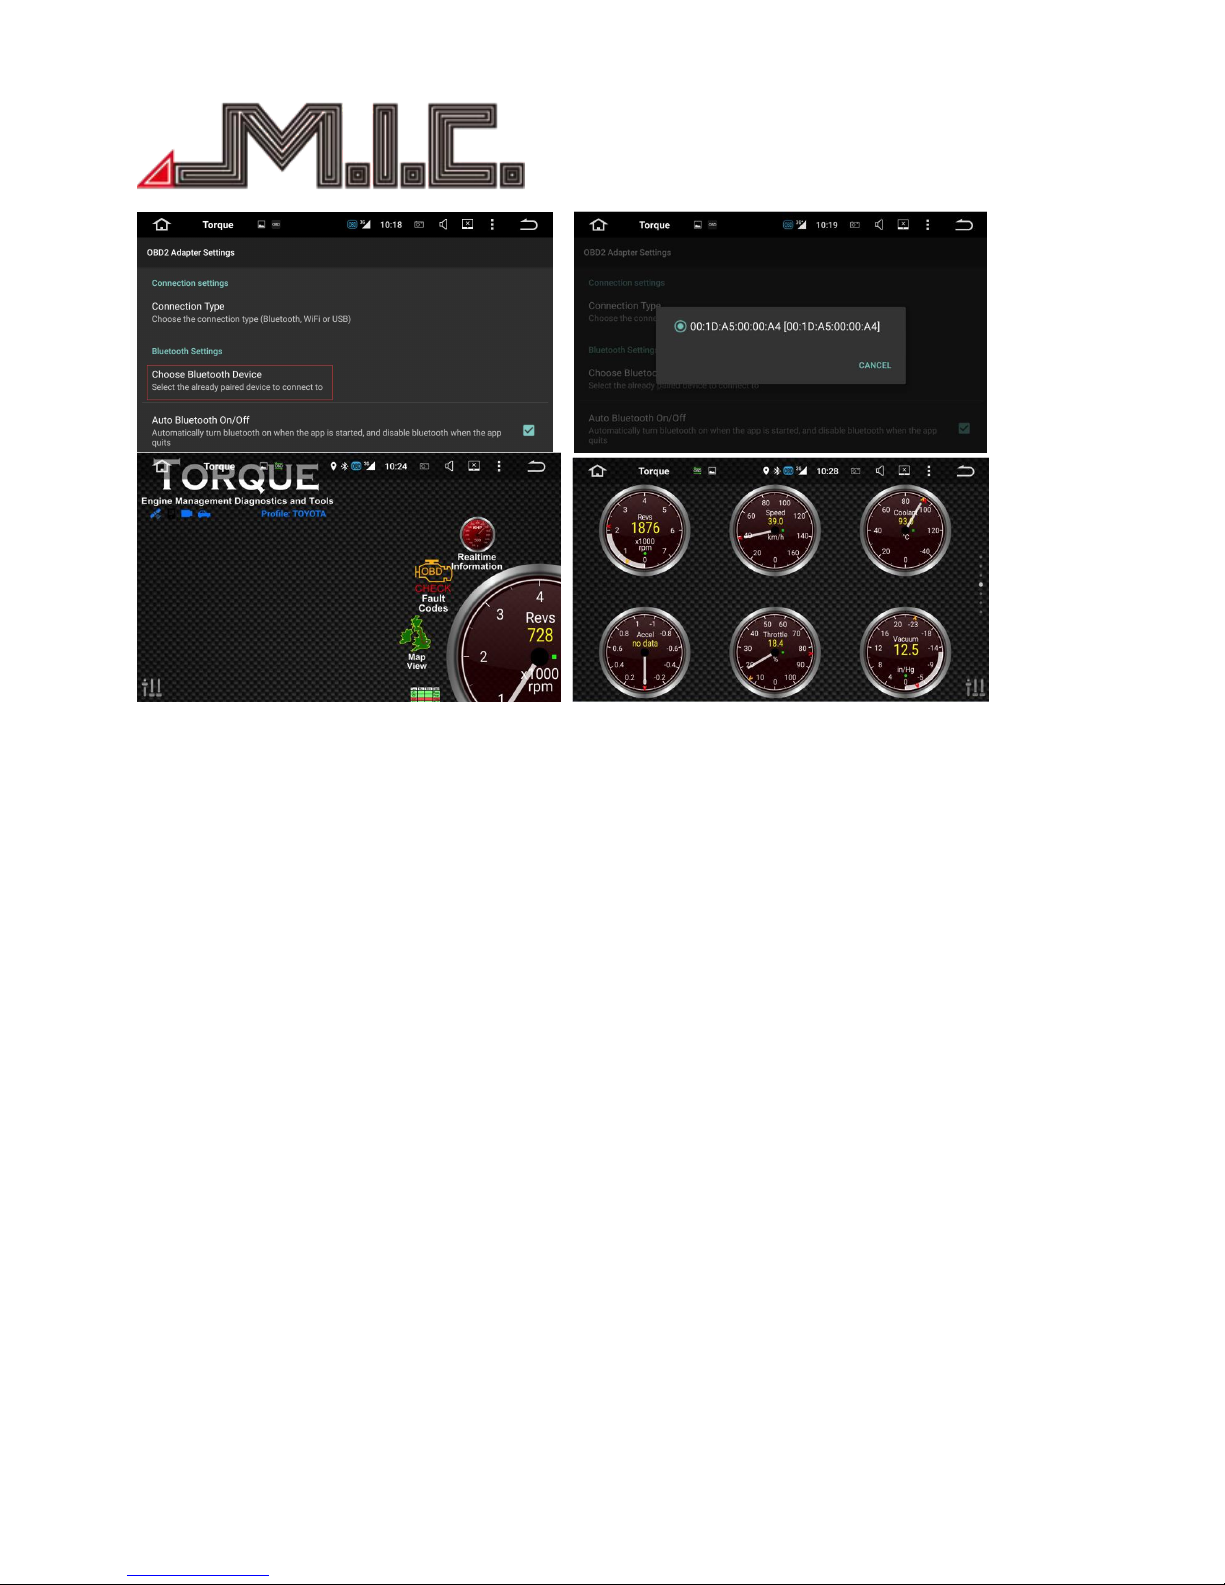
Please insert the detection card to the port of OBD, turn on the Bluetooth of the unit, and connect the
Torque following the steps displayed. The data displayed from the ECU is the most factual and correct, when
Torque is monitoring car status. (Please refer to the OBD user manual for more details.)
Click the icon to access Torque, before connection, please set up the OBD2 adapter setting and choose
Bluetooth device.
Page 27
- 27 -
Tips:
1. ELM327 is a tool to detect the state of engine based on the communication protocol of car PC. It will work
if the protocol is supported, such as, detection of engine system, code reader, code clear, data stream etc;
but, it is unable to provide a comprehensive list of available car models.
2. Not all the cars can read properly oil consumption, because the car models are different, some cars can
not read oil consumption, which is not legitimate reason to exchange or return the unit. Please pay attention
to it.
3. Due to the function is simple and limited, it is not suitable for the professional vehicle maintenance
workshop.
4. OBD cannot be hot unplugged while driving, which may cause the fault of unit.
Page 28
- 28 -
DAB+(optional)
Digital Audio Broadcasting is usually abbreviated to “DAB”; With CD sound quality, it can help you keep track
of real-time traffic information, weather condition, and open-up of elevated ramp etc.
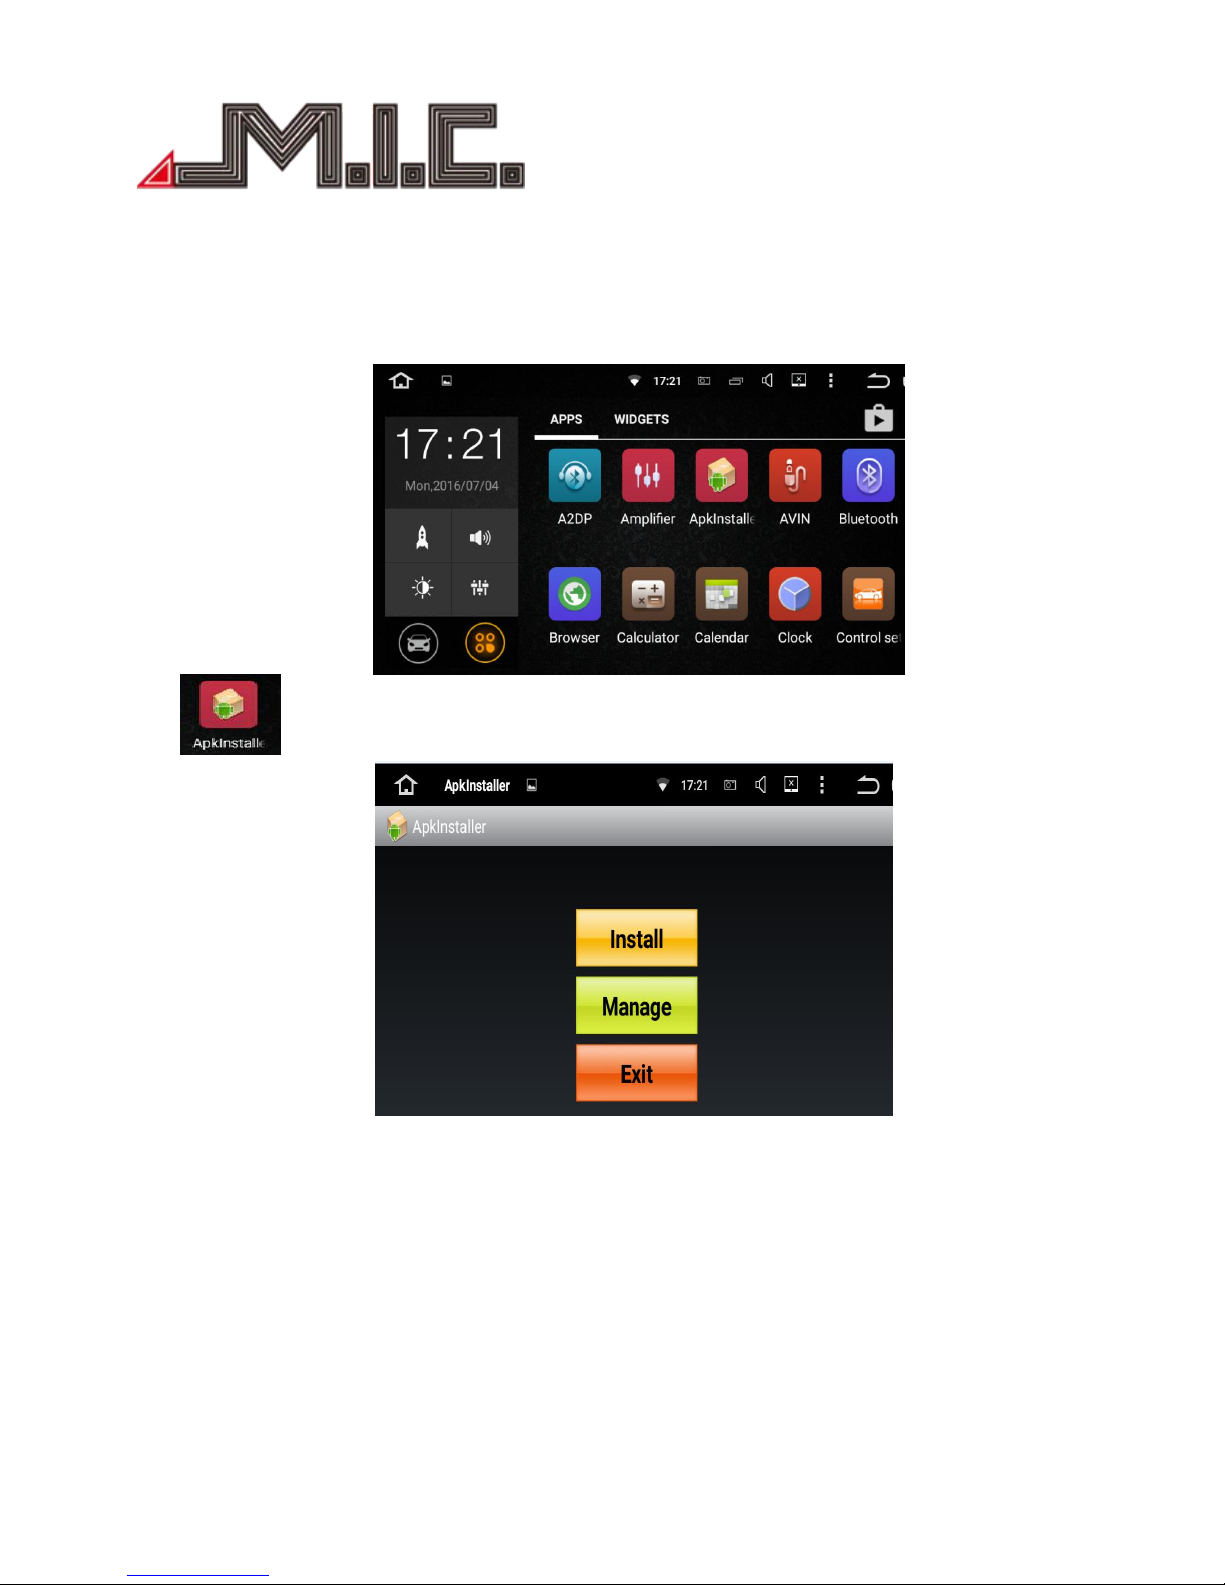
Click
Click install
Page 29
- 29 -
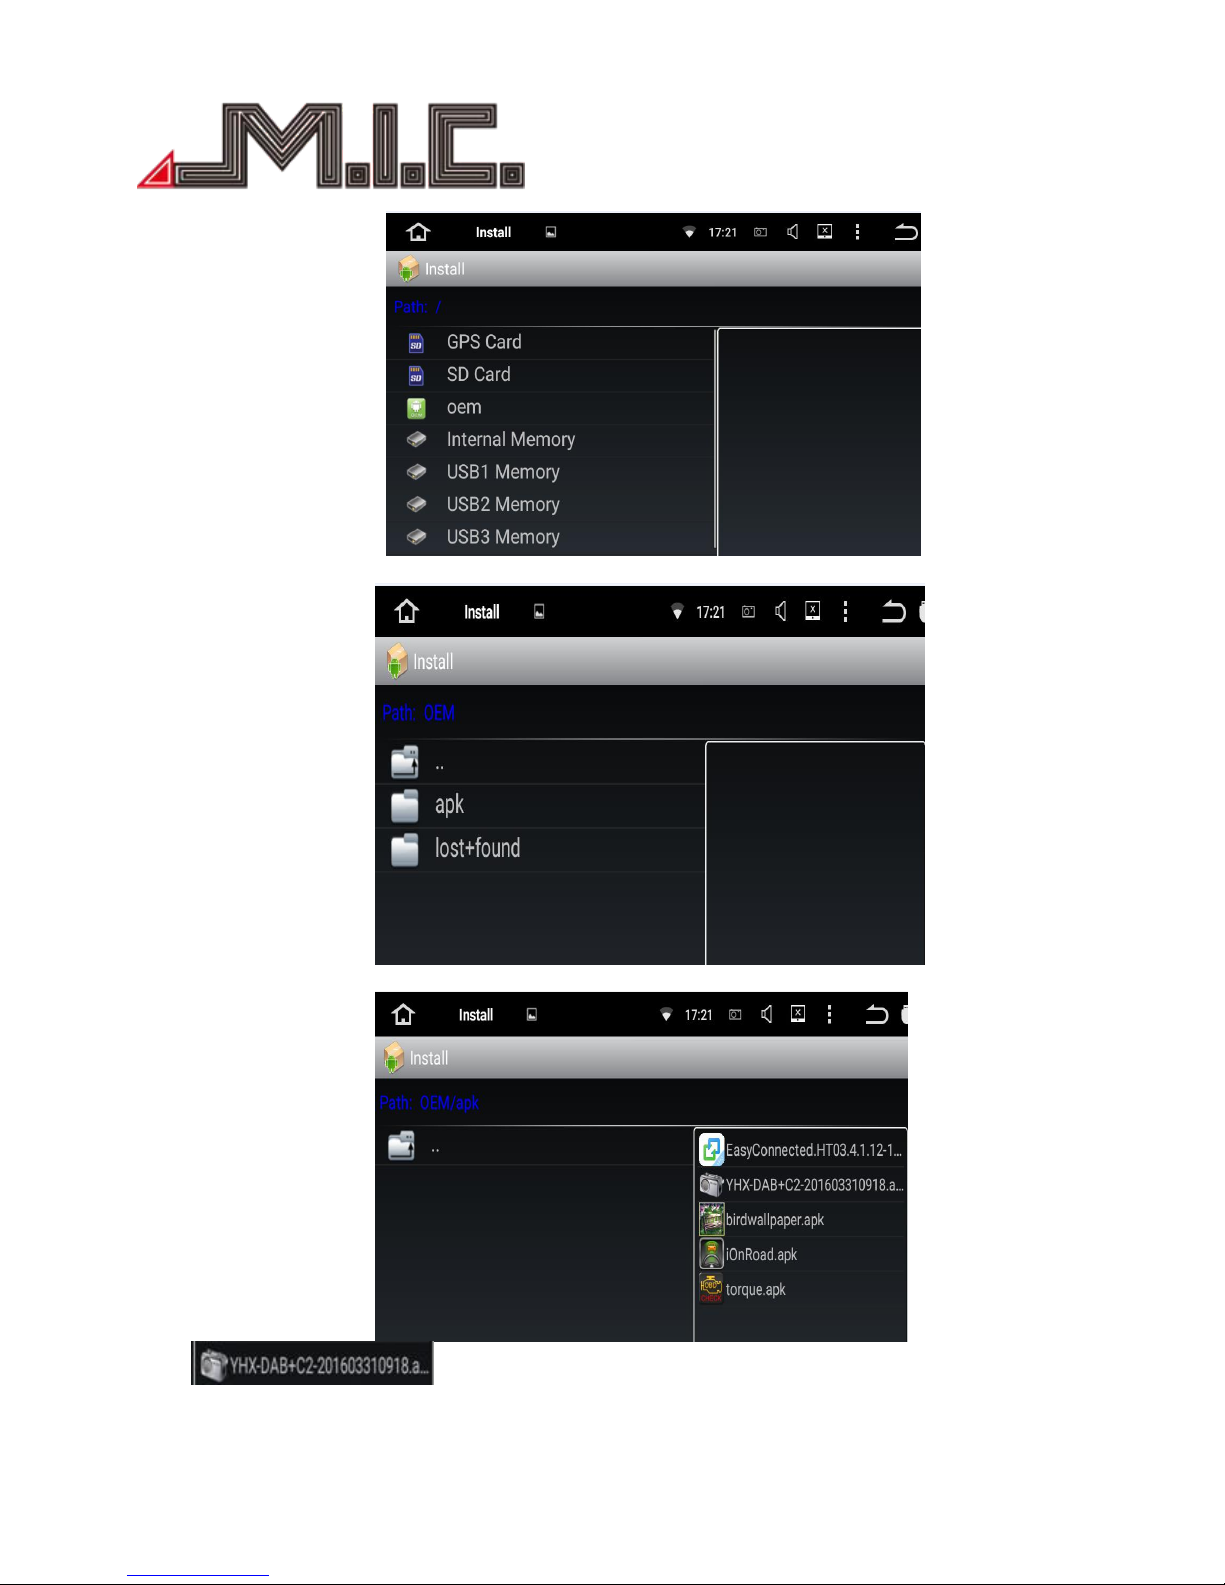
Click oem
Click apk
Click
Page 30
- 30 -
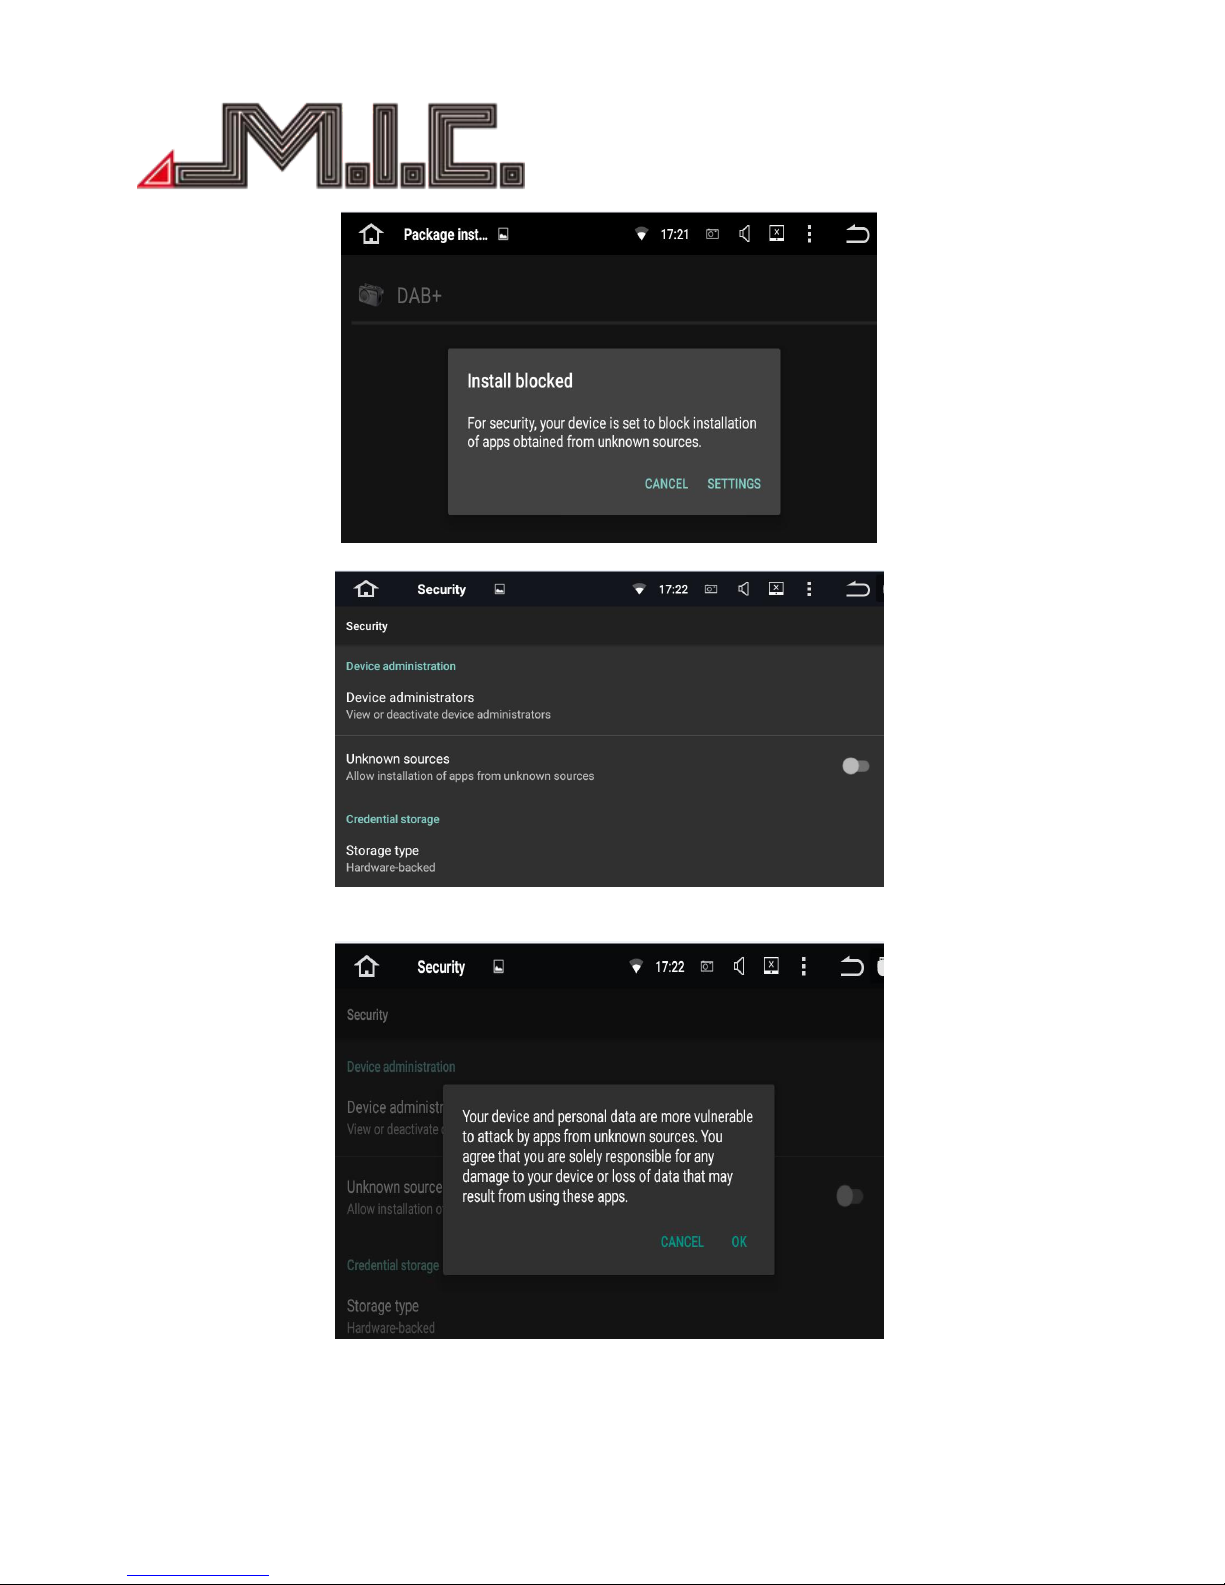
Click SETTINGS
Click Unknown sources - Allow instesllation of appS from unknown sources
Click OK
Page 31
- 31 -
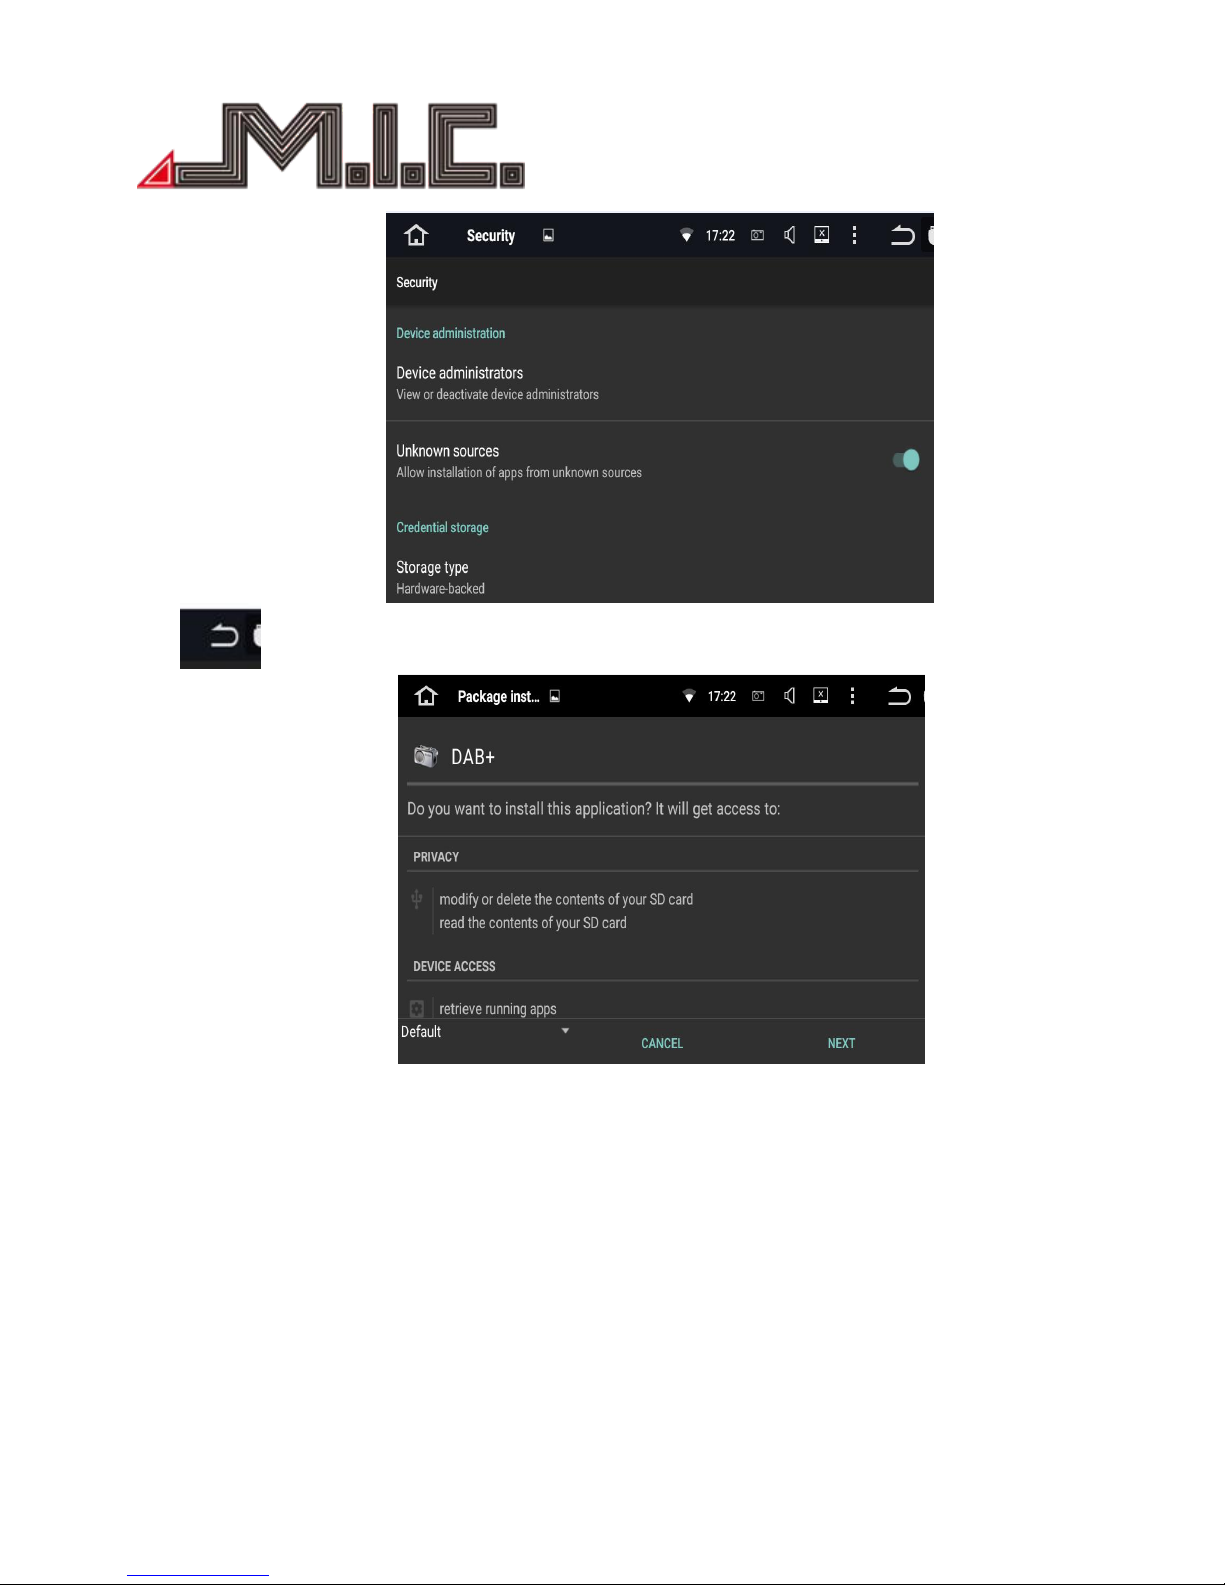
Click
Click NEXT
Page 32
- 32 -
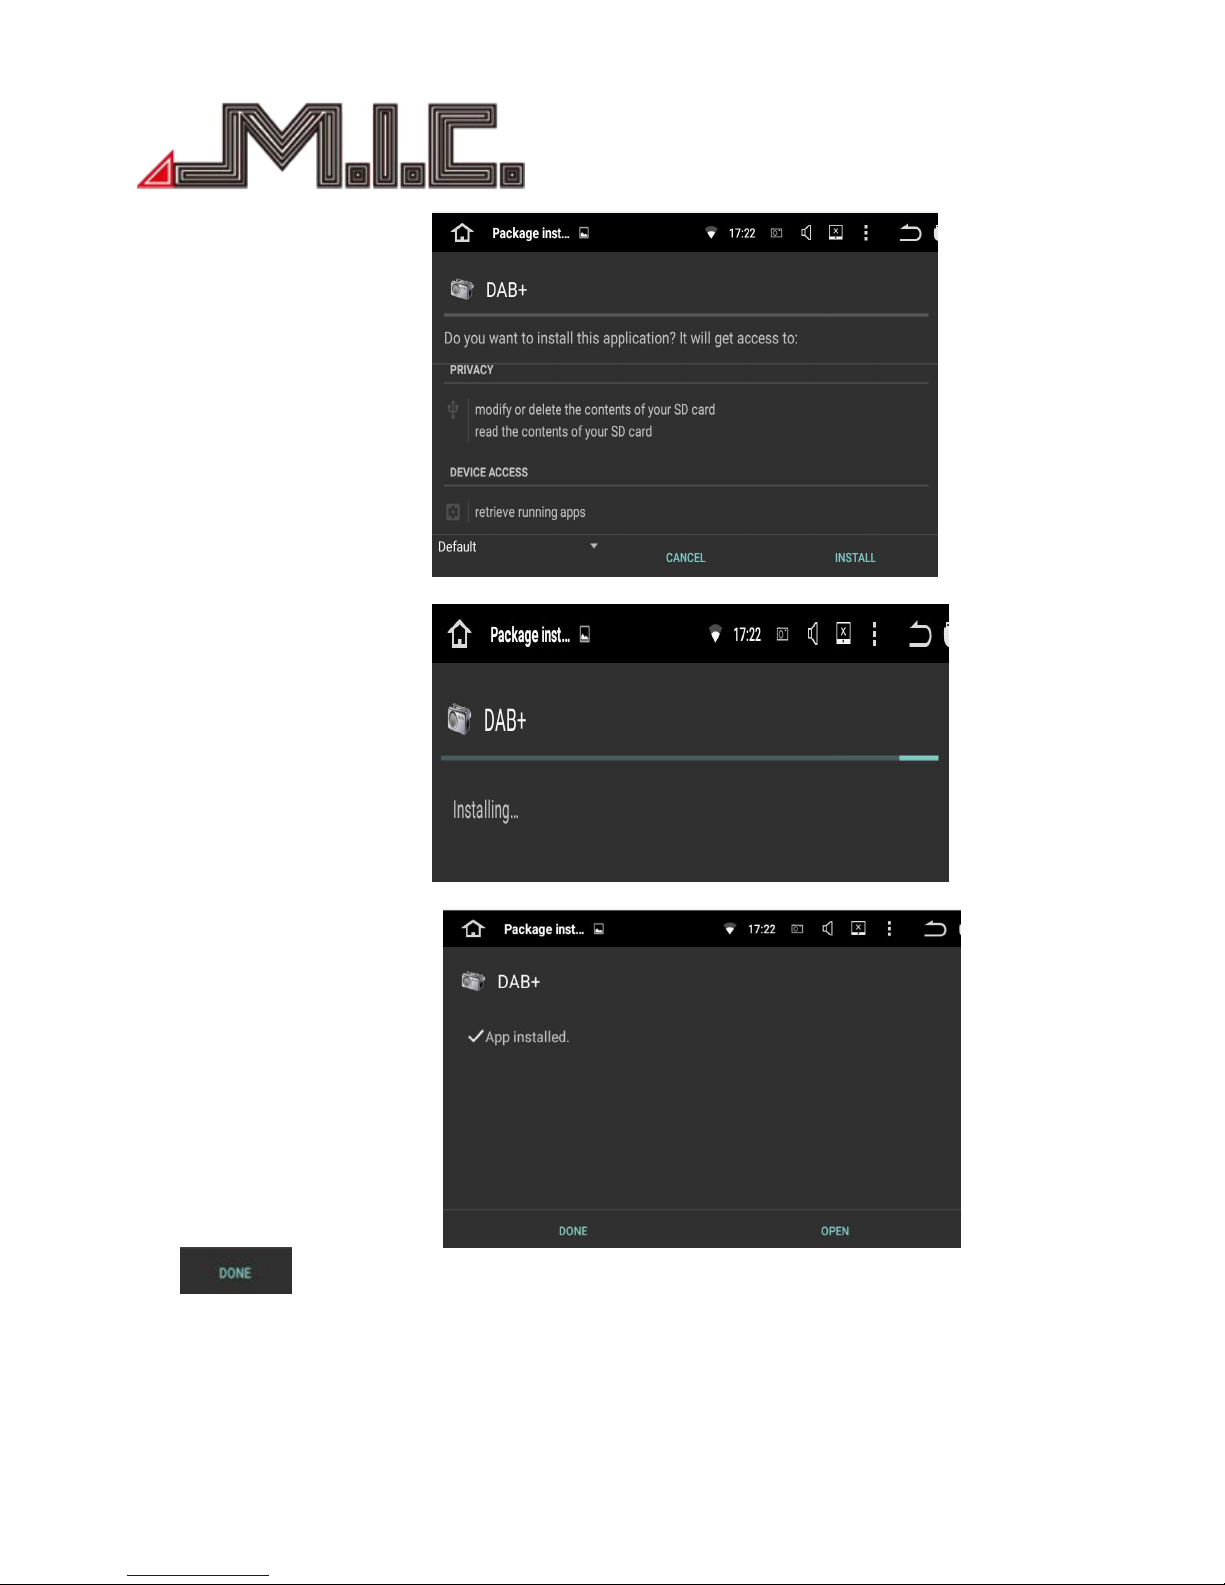
Click Install
Installing
Click
Page 33
- 33 -
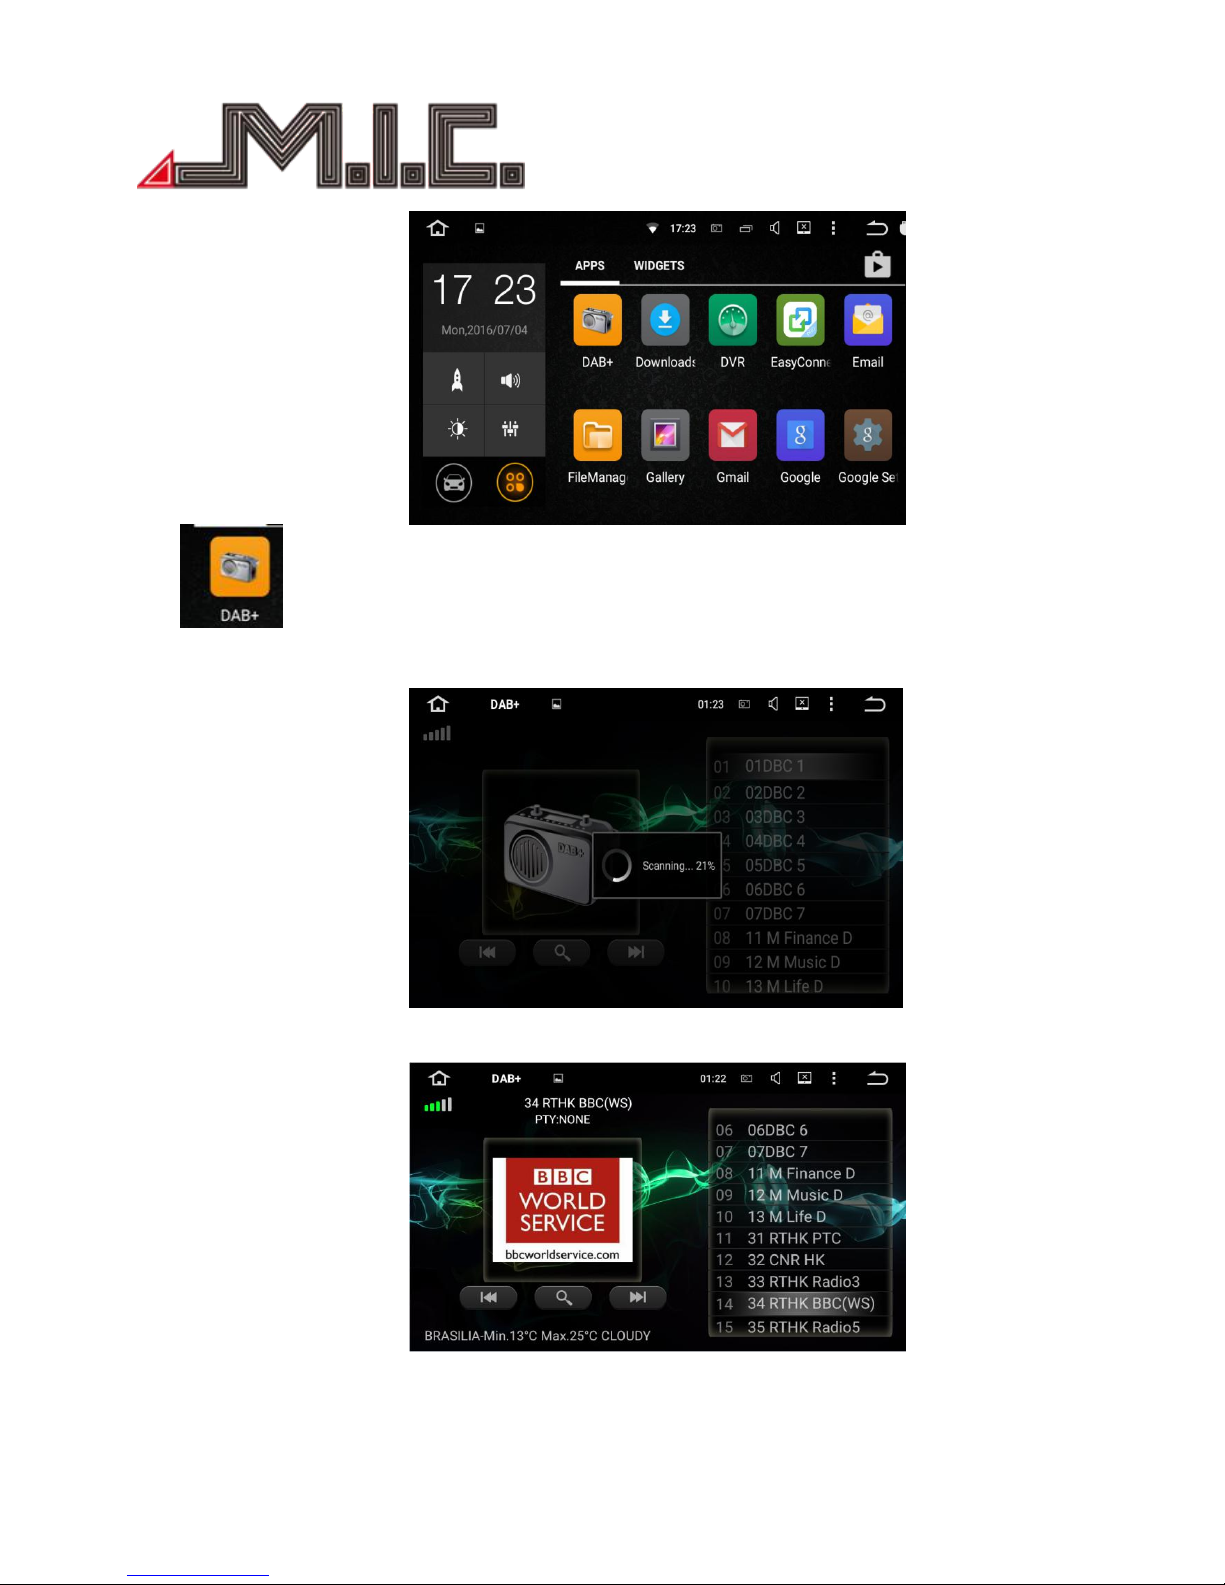
Click
Access DAB mode
Tips: The reception format of DAB varies around the world; maybe DAB abnormally works in your area.
Page 34
- 34 -
Photo
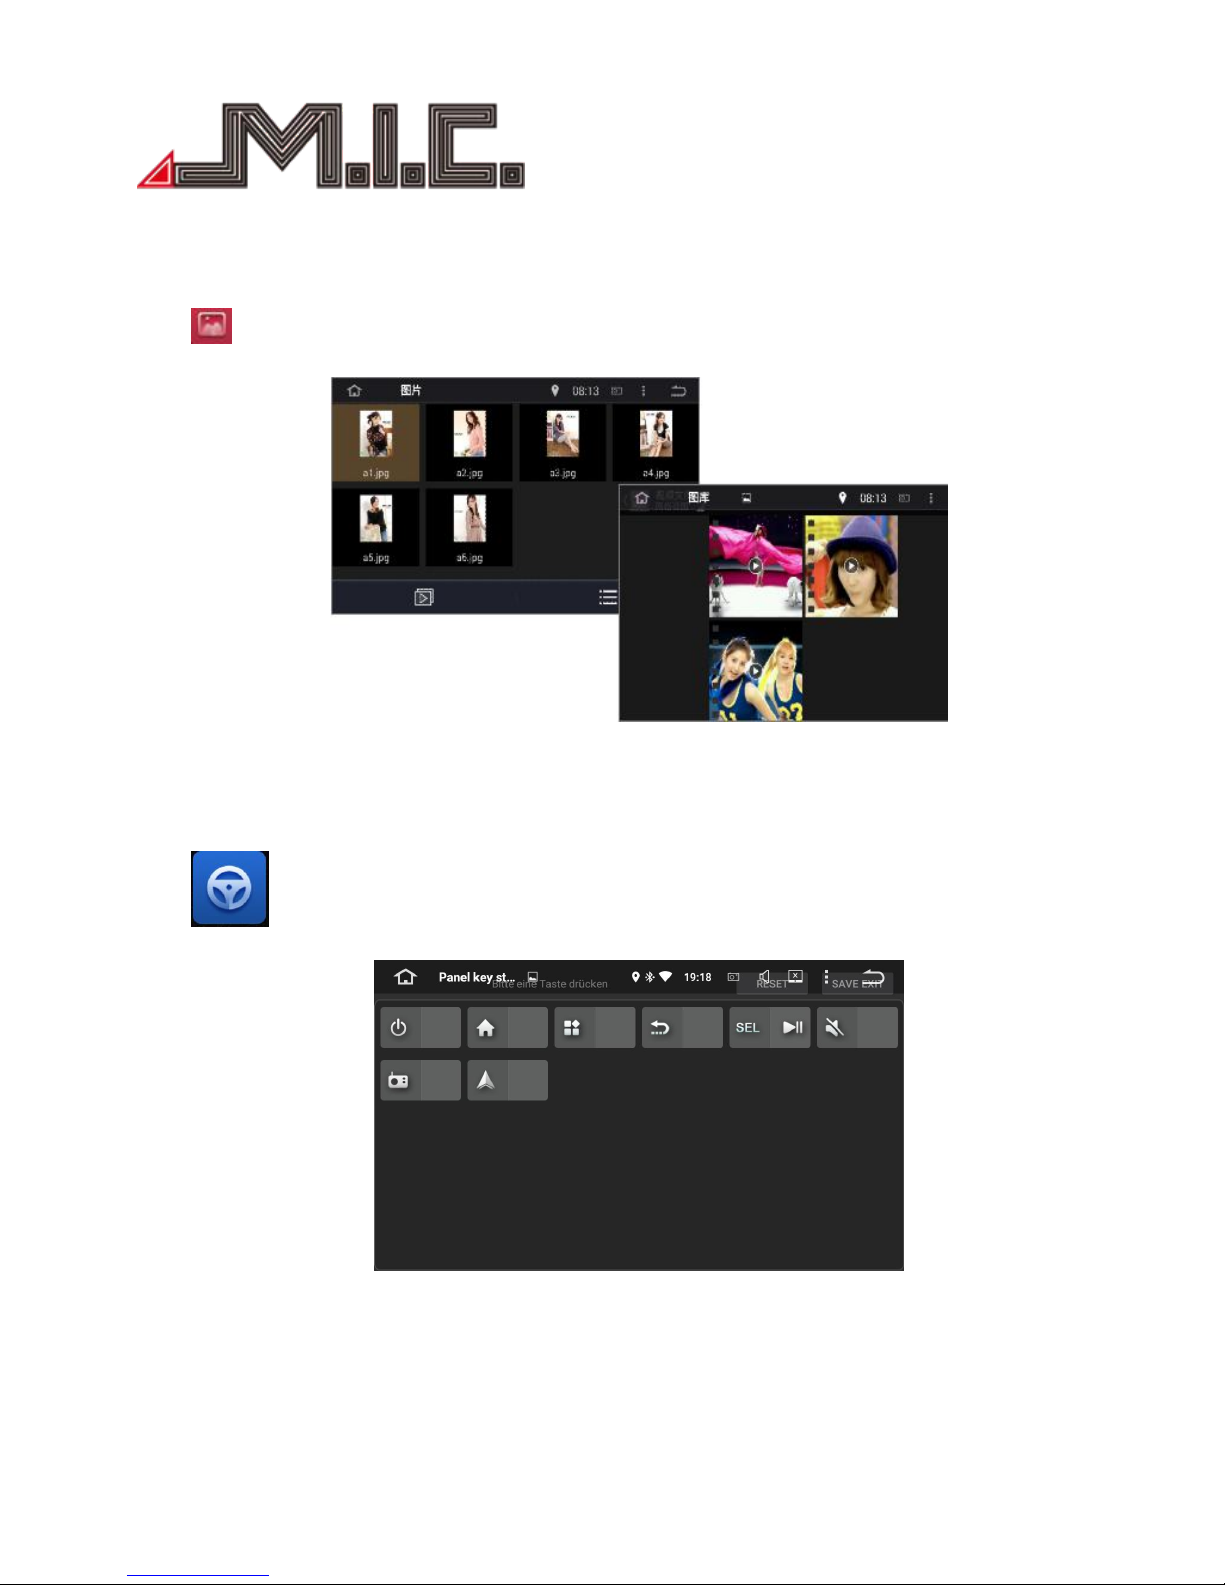
Click to enter photo/gallery mode. Photos are from flash or SD/USB; Gallery can play photos, but also
videos from SD/USB,as below.
Steering Wheel Study
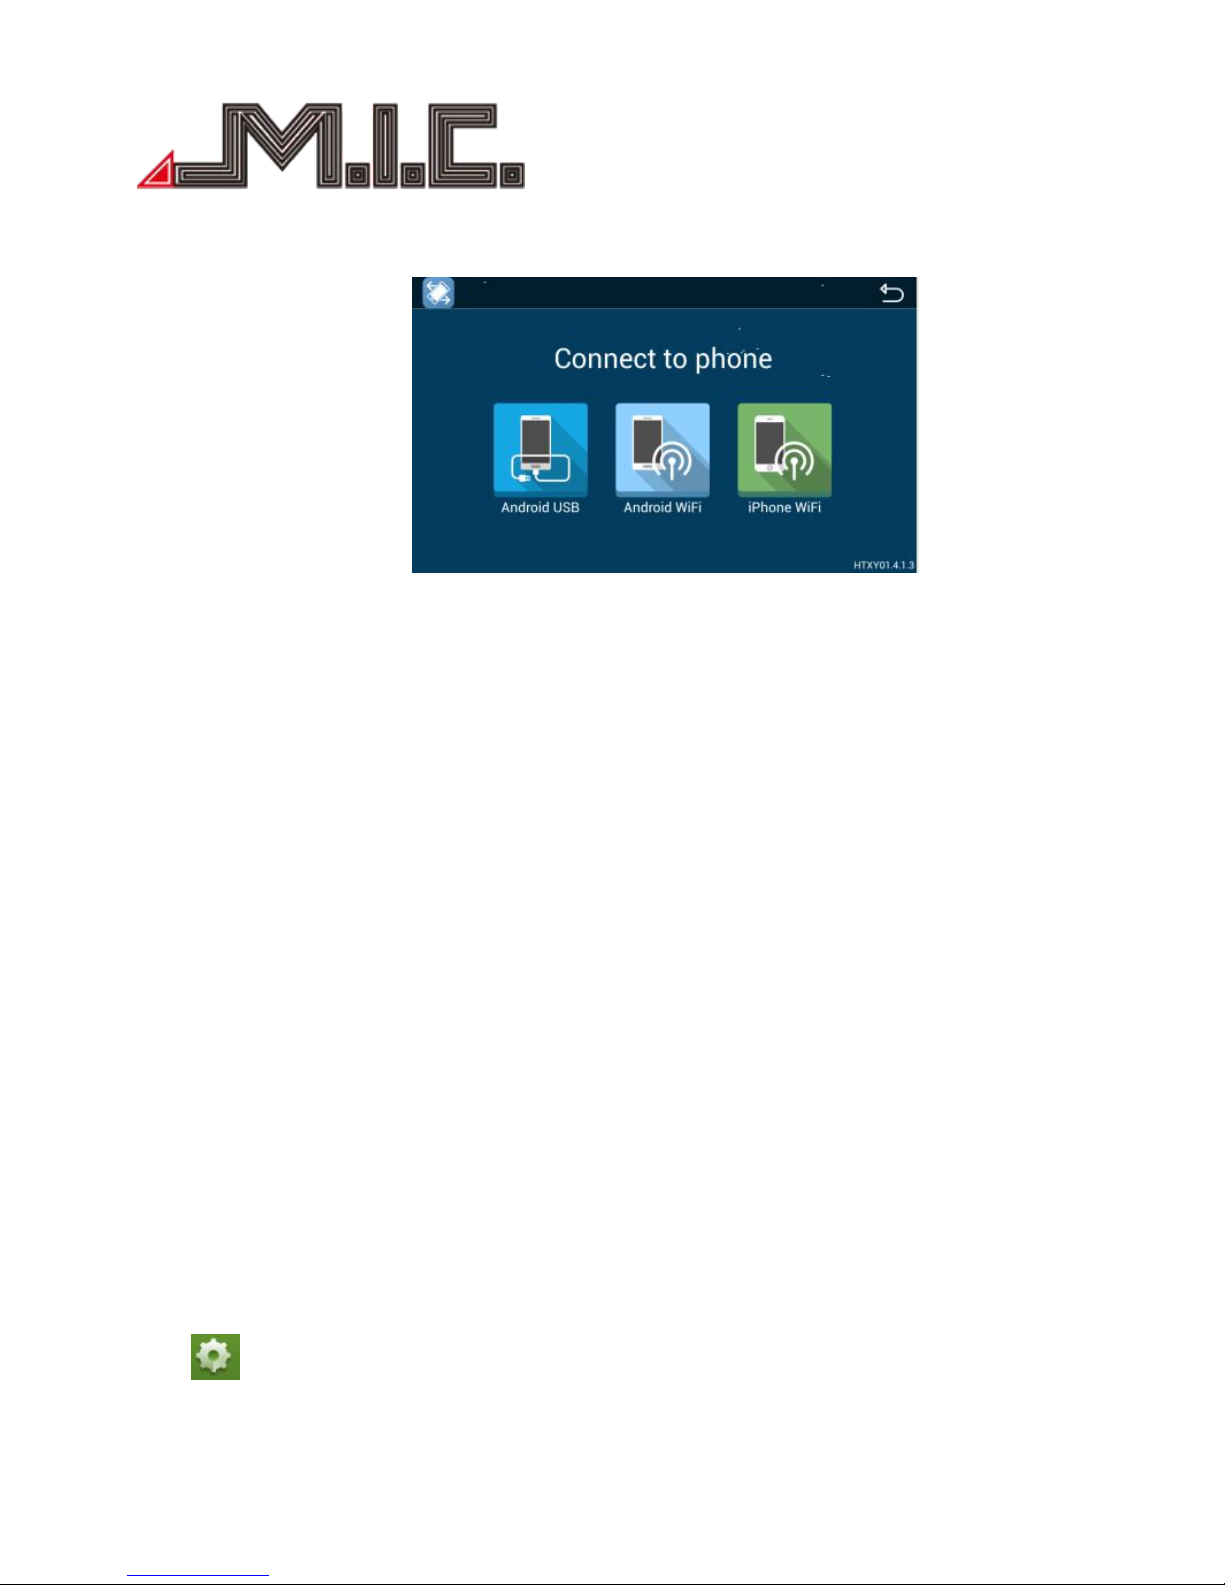
Click to enter Steering wheel study mode, as below. It is appropriate for the original car steering
wheel without canbus control.
Click “RESET”, then long press the key on the steering wheel, and select the corresponding button in the
interface(if the setting is successful, the corresponding buttons of inerface will light up), save the setting
before exit.
Page 35
- 35 -
Easy Connect (Mirror link)
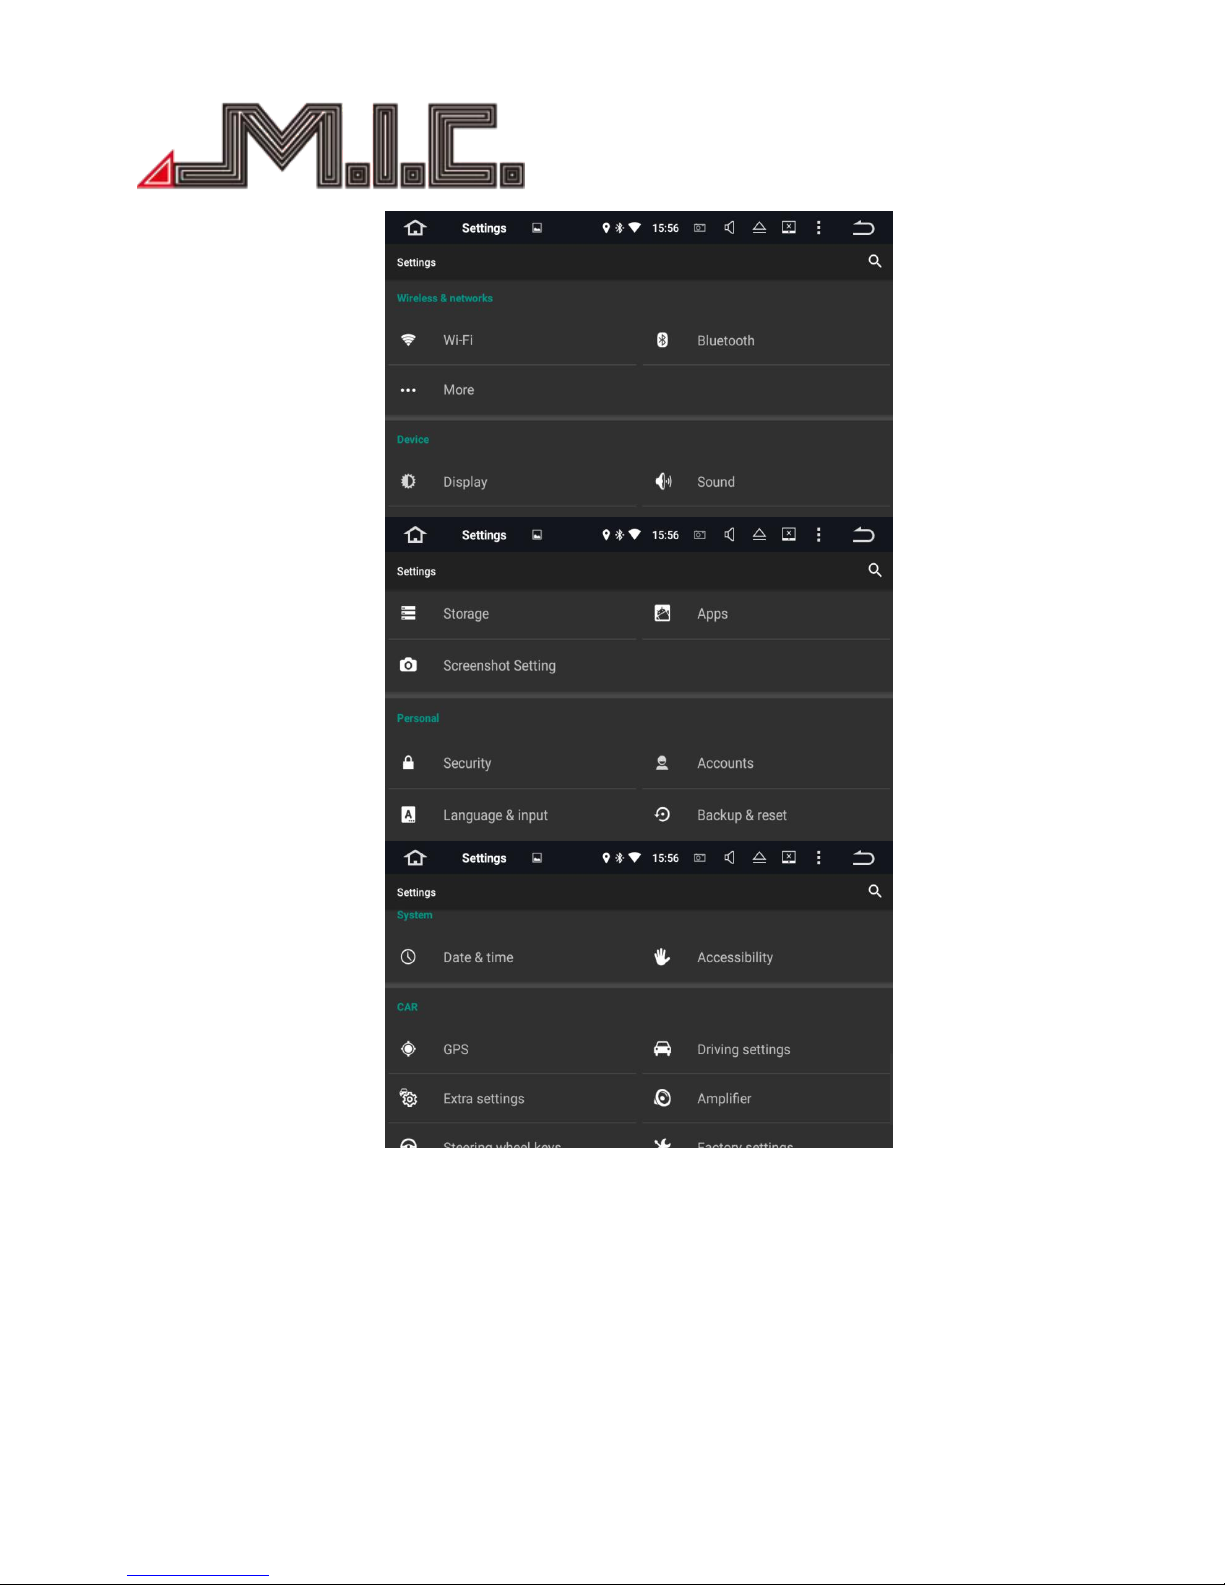
Android USB:
1. Enter mobile settings---open “Developer Option”---turn on USB debugging;
2. Connect mobile to the device by USB cable;
3. Install mobile interconnection service;
4. Please keep mobile unlocked;
5. It will take a long time if mobile first connect;
6. Use USB cable if mobile first connect or reboot;
7. Share the audio and video of mobile to our product screen, and 2-way control;
8. Support horizontal and vertical screen display.
Android WiFi:
1. Open mobile hotspot---select hotspot connection in the list on the left;
2. Connect to the hotsport;
3. Install mobile interconnection service;
4. Share the audio and video of mobile to our product screen, and 2-way control;
5. Support horizontal and vertical screen display.
iPhone WiFi:
1. Open iPhone hotspot---select hotspot connection in the list on the left;
2. Connect to the hotsport;
3. Open iPhone AirPlay and Mirroring function to connect;
4. Share the audio and video of mobile to our product screen;
5. Support horizontal and vertical screen display.
Settings
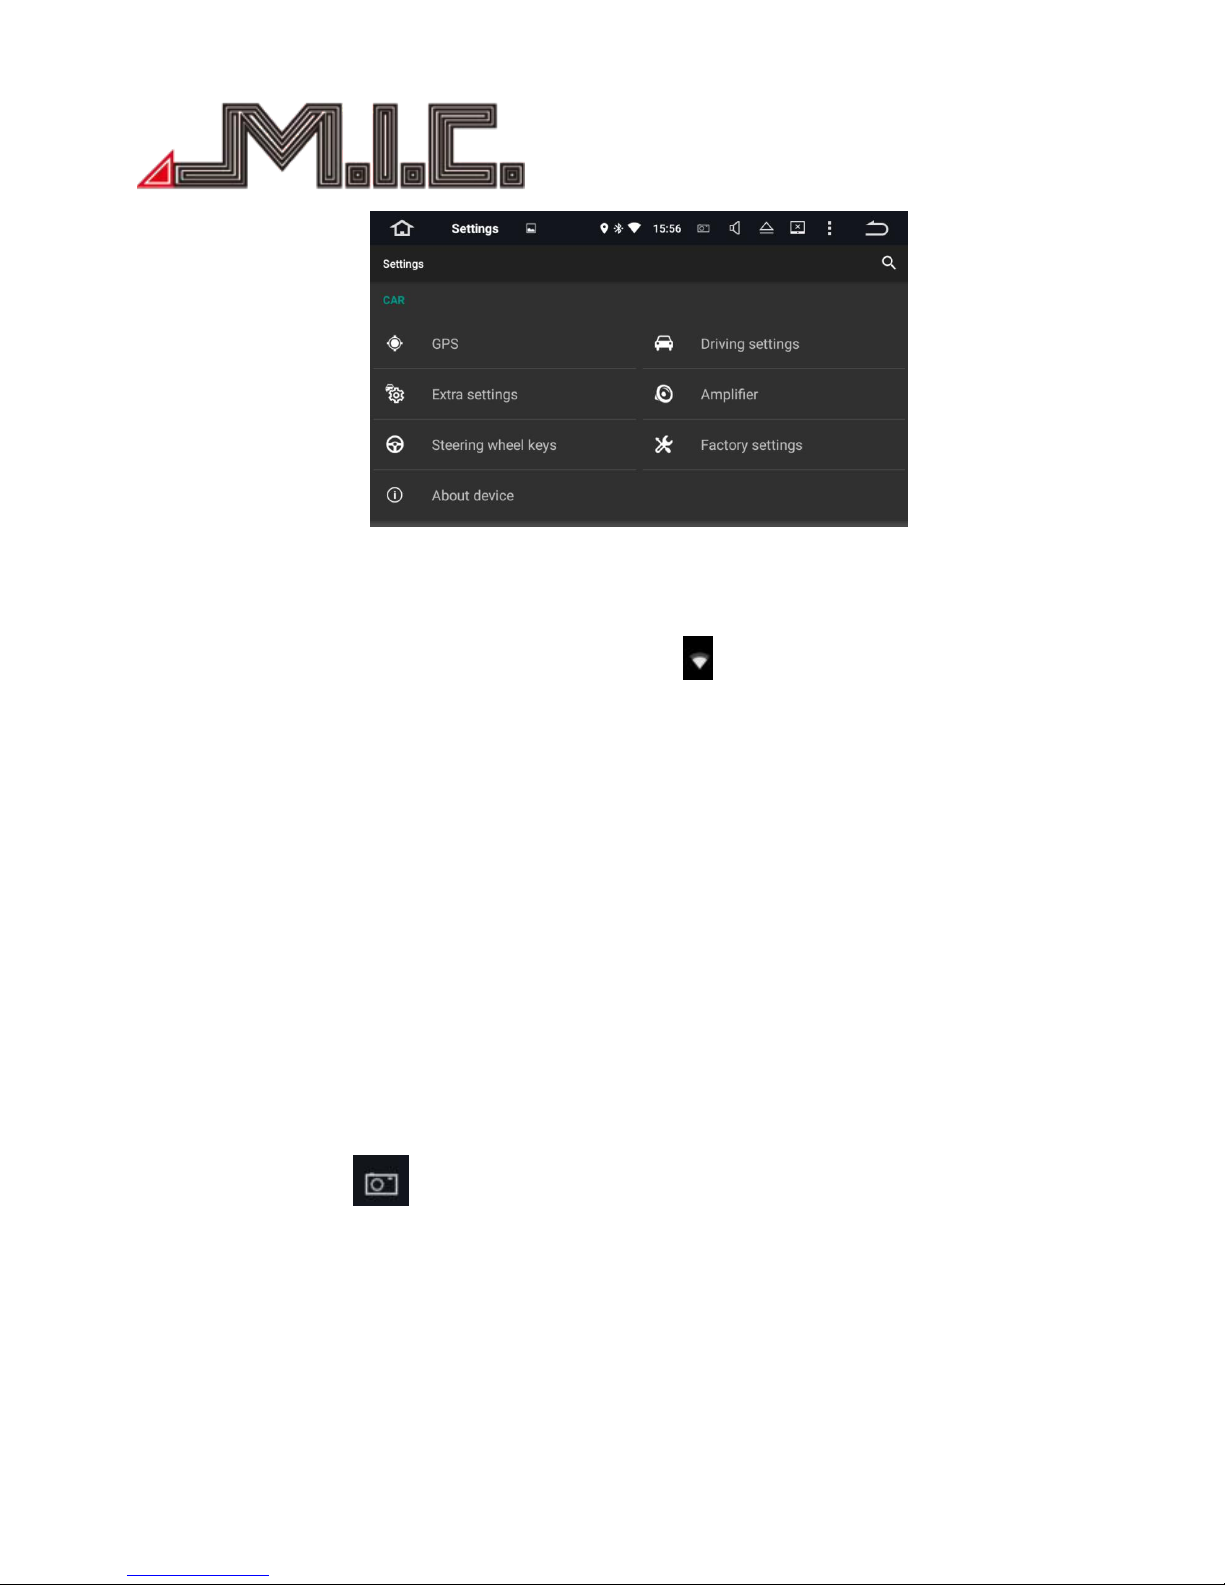
Click to enter System Settings mode, including Wireless & network, Device, Personal, System, and Car
settings, as below:
Page 36
- 36 -
Page 37
- 37 -
1. Wireless & network
WiFi setting:
Input wireless network name and password; the WIFI icon will appears at the top of status bar after the
connection is successful.
3G setting:
Plug the 3G dongle by USB cable, and input VPN information; the 3G icon will appears at the top of status
bar after the connection is successful.
2. Device
Display Setting:
Set up screen brightness, dynamic screen and background
Sound Setting:
Set up the key tone and volume.
Storage Setting:
Check the Internal storage and iNand flash, the details of used and available capacity.
Application Setting:
Check running status, installation and unloading of software
Shortscreen Setting:
Select 10 seconds,15 seconds,30seconds to capture the image of screen and set the storage location, show
the screenshot button at the top of status bar.
3. Personal
Security Setting:
All the Programs to factory reset.
Account Setting:
Register mailbox or set up E-mail, send and receive mails conveniently, check E-mail information easily.
Language and input Setting:
Page 38

- 38 -
The player supports multi-language. You can choose different language and input method as you need.
Backup and Reset:
Backup the installation data, application data, other settings and account information to Google server.If the
system problem happens, you can choose automatic reduction or restore the factory settings.
4. System
Date and Time Setting:
Select and set time and time display formate according to time zone
Accessibility Setting:
Select and set the text-to-speech function,time of touching.shorcut key of auxiliary function
5. Car
GPS Setting:
Select and set GPS navigation and sound mode
Driving Setting:
Select and set if allow to watch video while driving, reversing X-mirror/volume/trajectory display
Extra Setting:
Select and set shutdown delay when ACC off, Playing music when USB/SD inserted, and DVR storage location.
Amplifier Setting:
Select and set or customize sound effect, such as, Standard, Pop, Rock and Roll, Jazz, Class, Soft etc.
Steering Wheel Keys:
Select and set steering wheel keys to learn the corresponding function.
Factory Setting:
Select and set the right models logo, radio area and CanBus for your car.
(Please do not change and set other application information.)
About the Device
Display product information such as: System updates, Version info, Model number, S/N number, CPU,
Memory; Version info includes MCU version, Android version, Kernal Version, and Build number.
* How to update the software
1. Prepare a USB/SD card and format it;
2. Unzip the software folder in your PC, directly copy all of the files to the formatted USB/SD card(root);
3. Connect USB/SD card to the device;
4. Turn on the device;
5. Click “setting-About Device-System updates(select formatting while asking you)
6. The device will automatically upgrade, this process will take about 2 minutes, during the upgradation,
please keep the power is ON;
7. When upgradation is finished, the device will automatically reboot.
P.S: Make sure there is not any extra USB/SD working during the upgradation.
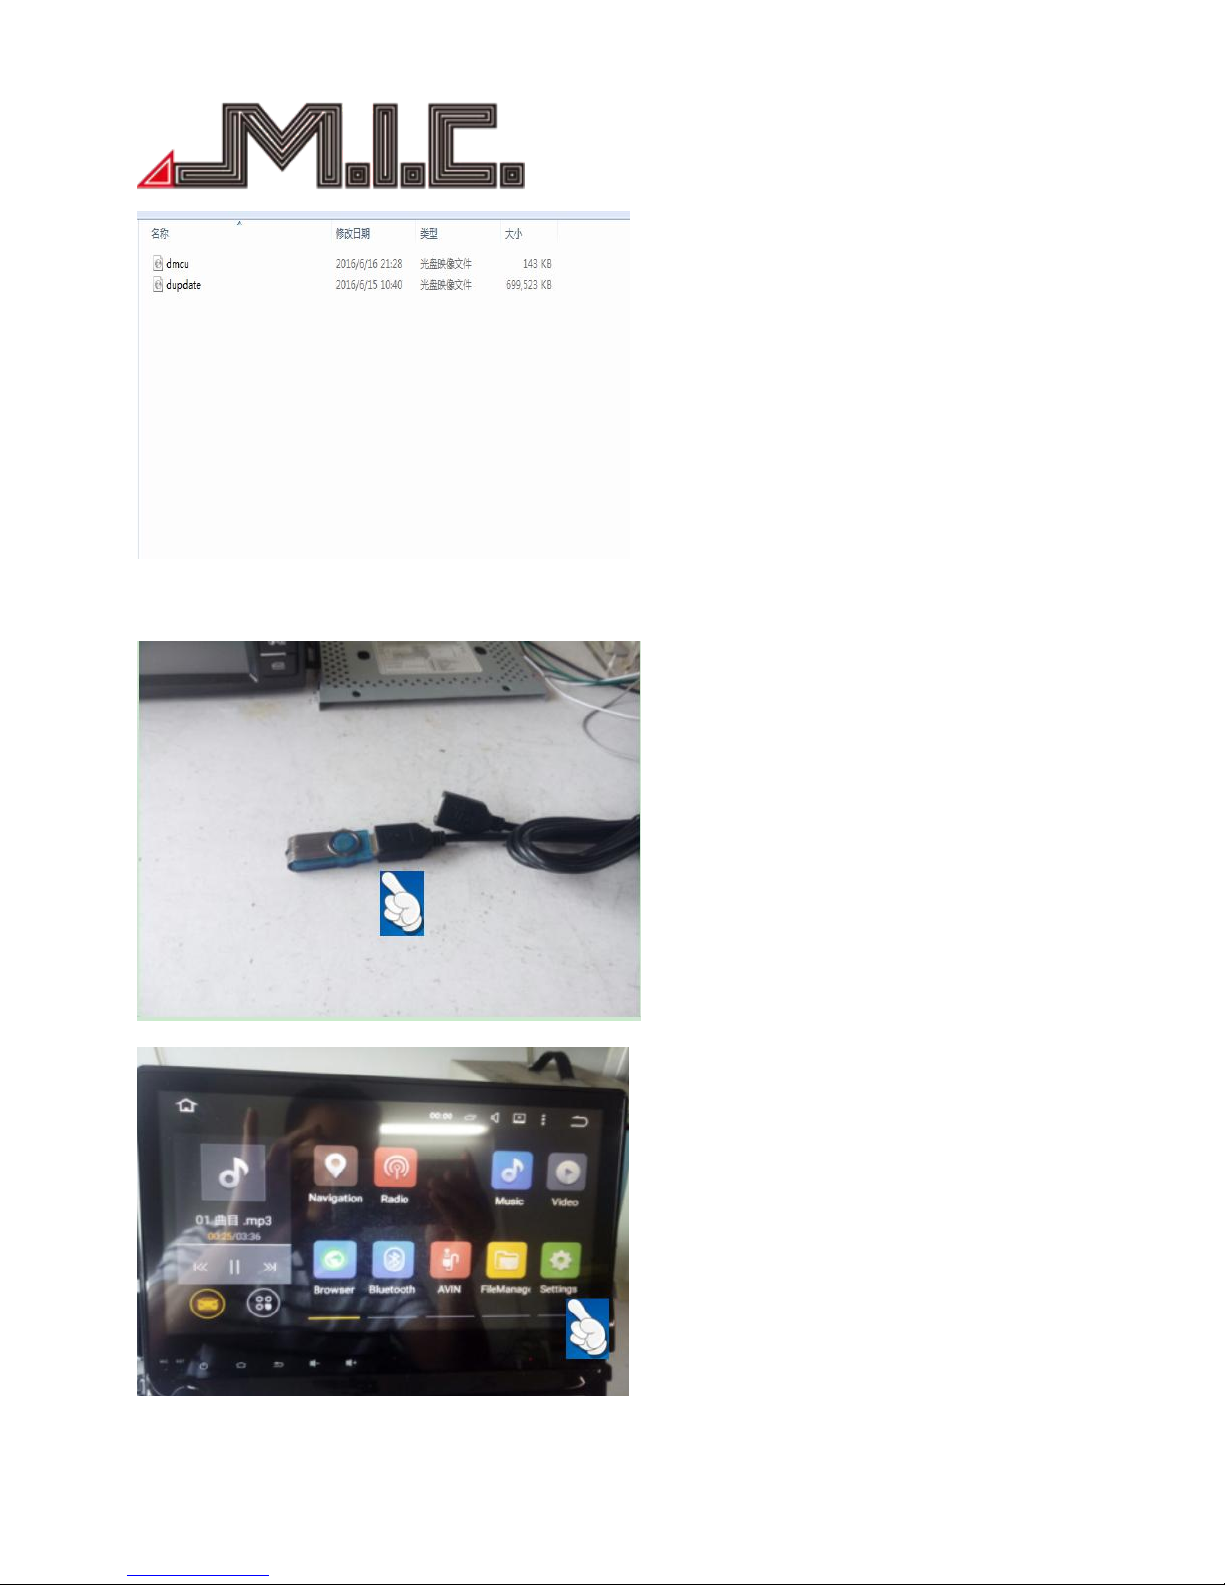
Operation of upgrade
Page 39
- 39 -
1. Copy the two upgrade files to the root directory of the USB flash disk, and the USB flash disk must be in
FAT32 format, other formats will upgrade fail.
2. Plug USB flask disk into USB connector of the DVD player.
3. Boot up the DVD player, into HOME interface, select the Setting.
Page 40
- 40 -
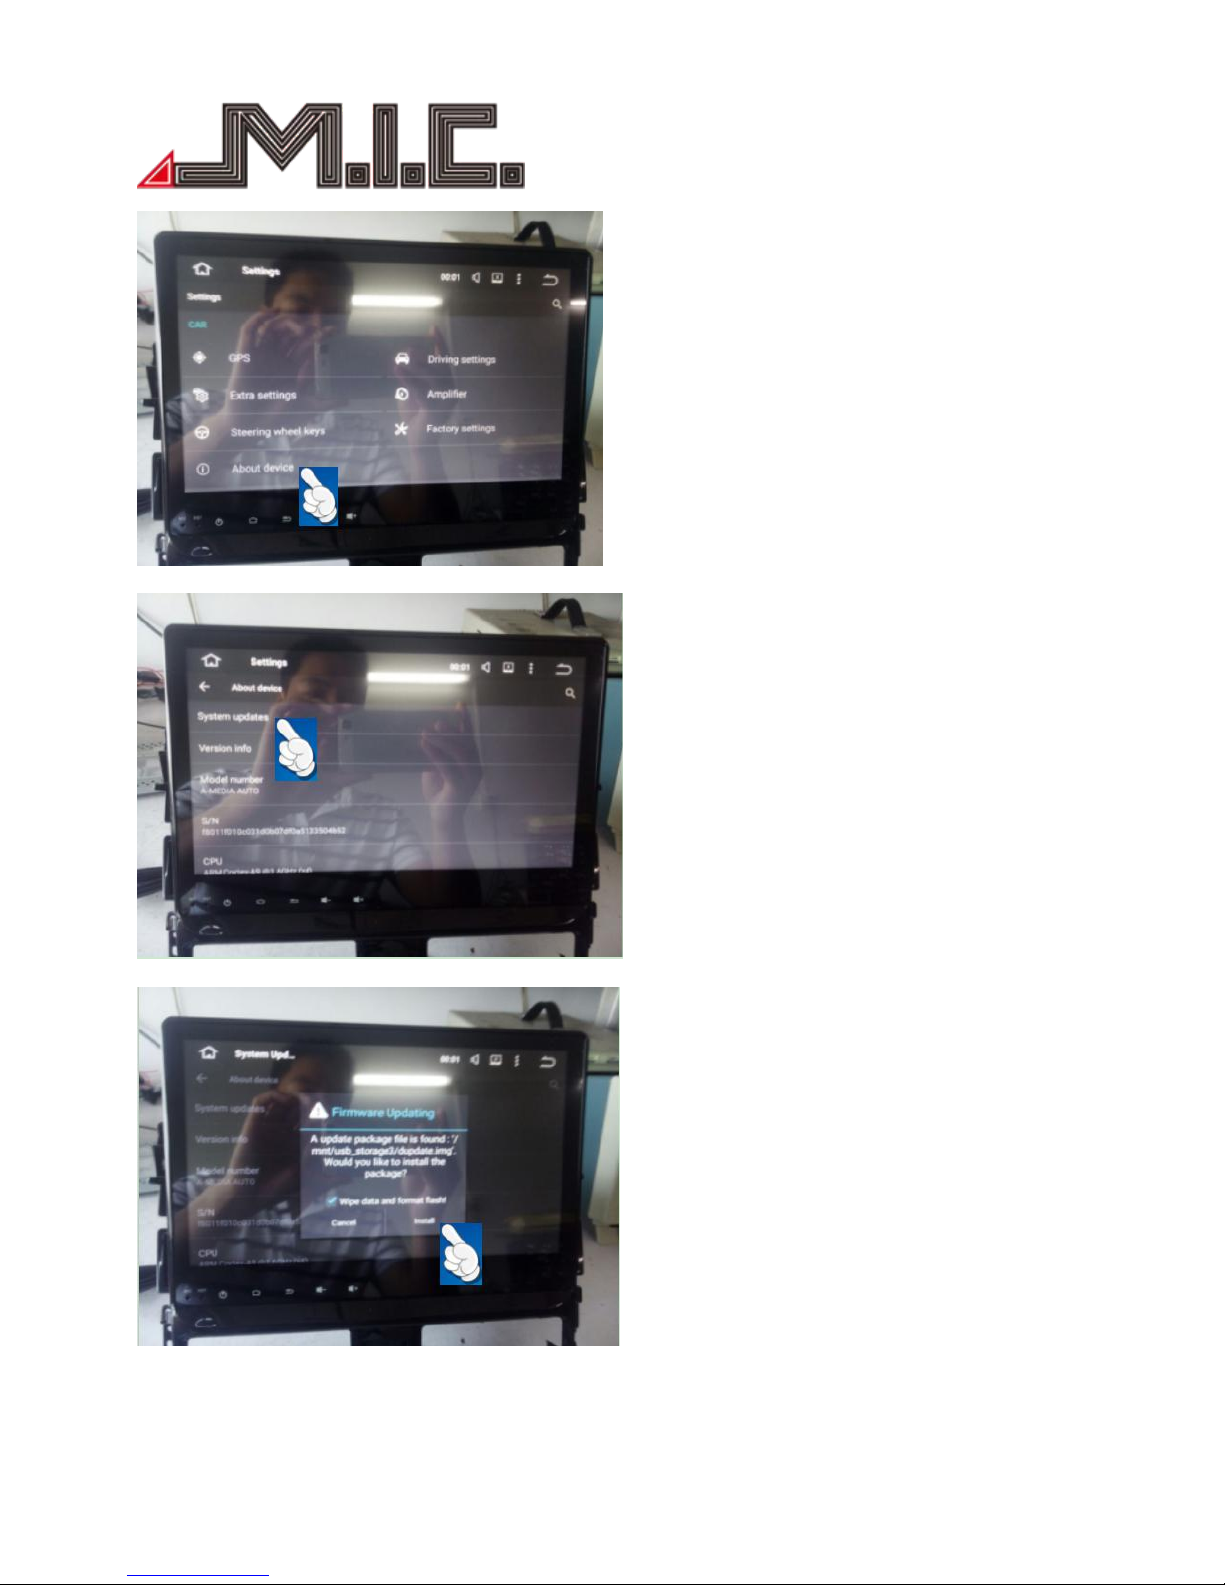
4. Click About device.
5.Click system updates。
6. Clik install
7. Under Upgrading, please do not let it power off, and wait for 10 minutes
8. Upgrade complete, DVD player will Auto power on.
Page 41

- 41 -
Maintenance Instruction
In rainy or very humid environment, steam condensation to water mist on dvd loader will make it failed to
read DVD. Please turn off the DVD player till the inside moisture totally disperse, let it dry then turn on it and
operate.
About LCD
Do not crush LCD panel, as it may cause image distortion or failure. The image may become blurred and LCD
may be damaged.
Precautions on cleaning LCD:
·Wape display screen gently with wet soft cloth.
·Do not use such reagents as gasonline, diluents, detergent or anti-static spraying agent at the market.
·Do not use this product in the temperature lower than -15℃ or higher than 60℃.
·The image may be blurred when parking the car in extreme cold heat place, which is not display fault. After
the temperature in the car restores to be normal, the image will become clear.
·Few “bright spots” may appear on LCD screen, which is acceptable in the aspect of LCD technology.
Trouble-shooting
Before sending the product to maintain, please firstly read the below trouble shooting table and make
simple checking or adjustment to solve the problem according to the instruction.
If the problem of the product could not be solved effectively after following the table and checking, please
contact with professional service center or us.
Problems
Cause
Solution
Fail to turn on the unit; The
unit cannot work.
Vehicle key is not in electric
switch or electric switch is still
off
Insert the vehicle key to turn
on electric switch
Power cable of the unit is
disconnected
Connect power cable
The fuse may be burnt
Replace fuse with the same
rated current
Touch is not smoothly carried
in
Touch screen is not accurate or
slow response
Calibrate the screen
Fail to play the video file
Wrong file format
Support format: WMV, AVI,
RMVB etc…
Wrong file size
Correct file size is
800*480(max),
GPS image cannot display
Not in GPS navigation mode
Click and access the GPS
navigation mode
Page 42

- 42 -
GPS is not working
GPS antenna is disconnected
Connect GPS antenna
Drive in area where GPS
signals are shielded
Drive out to areas where GPS
signals are not shielded
Bluetooth is not working
The mobile did not pair with
the unit at the first time
Pair the mobile with the unit
The Bluetooth between the
mobile and the unit is
incompatible
Change another mobile to
have a try
SD card can read on computer,
but cannot read on the unit.
Because of the compatible
reason of SD brand, not all of
the SD cards can read in this
system.
Replace the right one.
Radio searching doesn't work
well
Vehicle auto antenna is
disconnected
Connect the auto antenna
For further questions, please contact us:
M.I.C. GmbH
Jinghai Chen
Hans-Weigel-Straße 1A
04319 Leipzig
Tel: 034158099135/36
Email: [email protected]
 Loading...