

Page 1
EN / FR
8
7
6
5
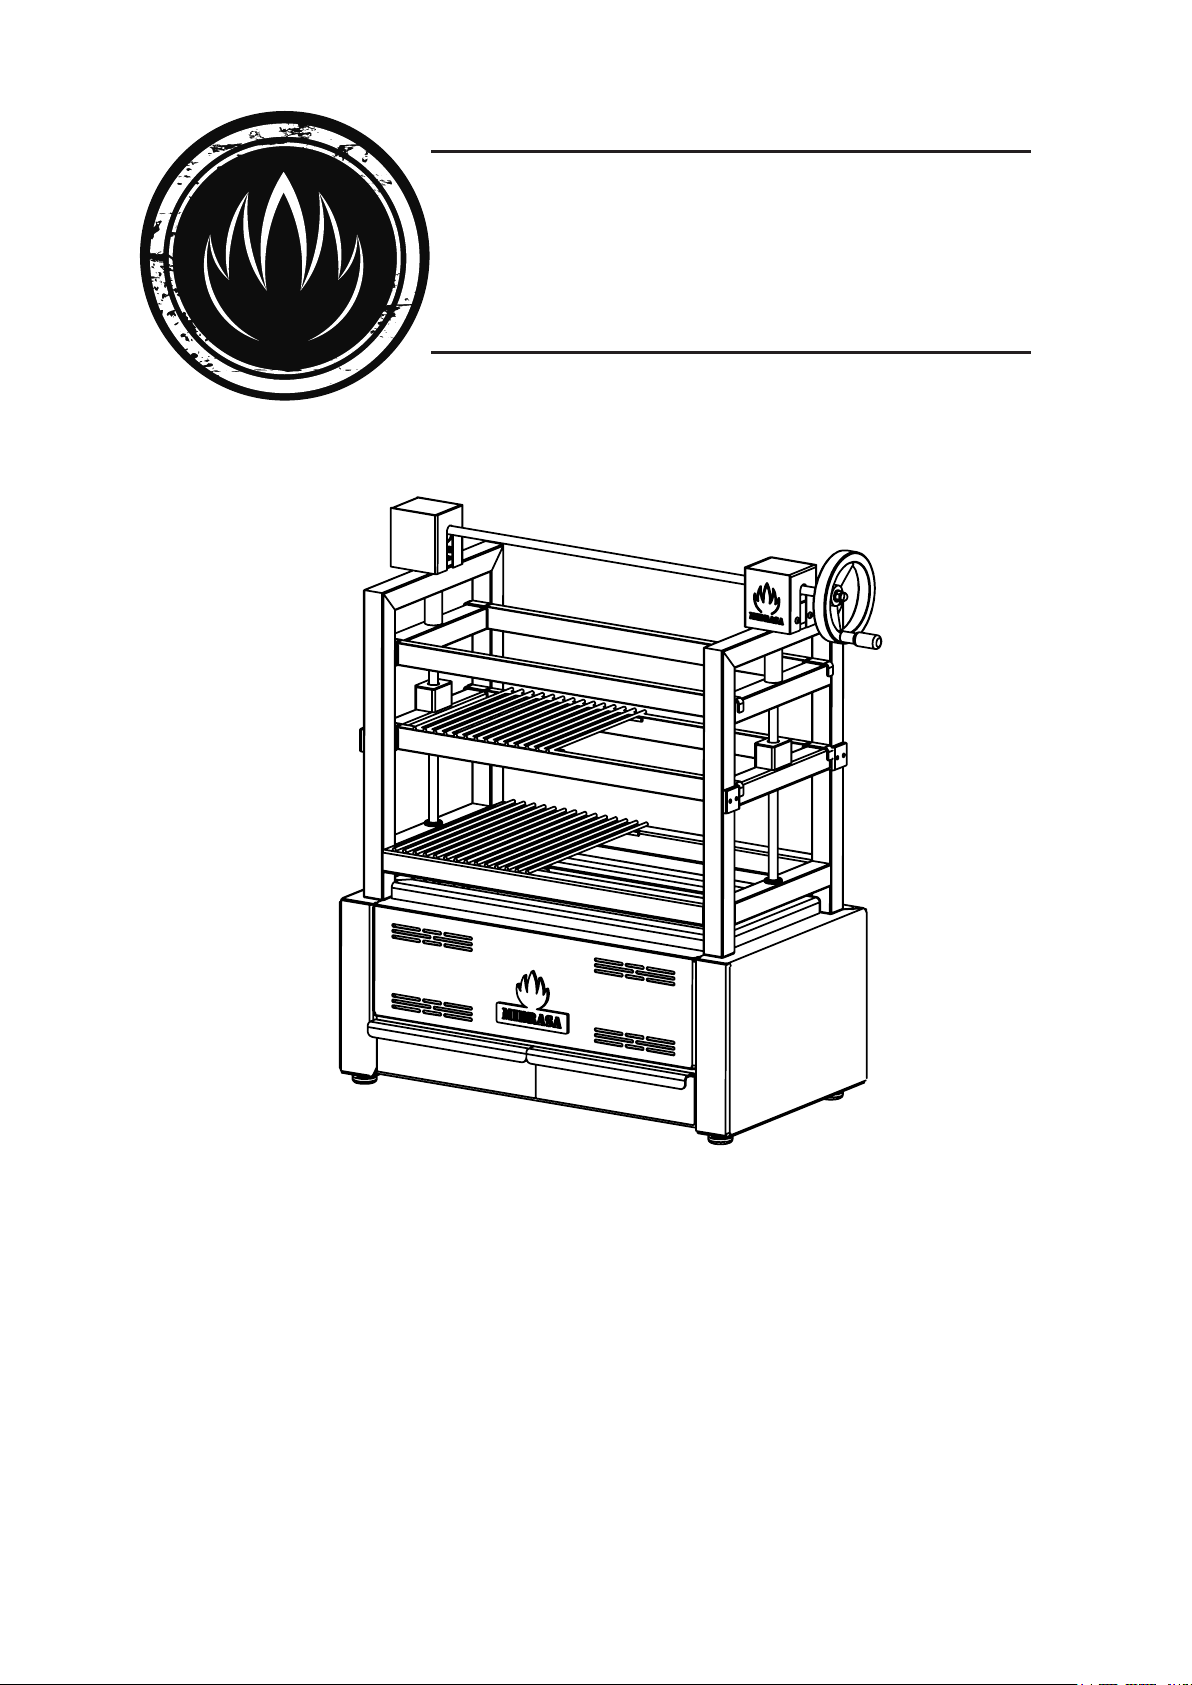
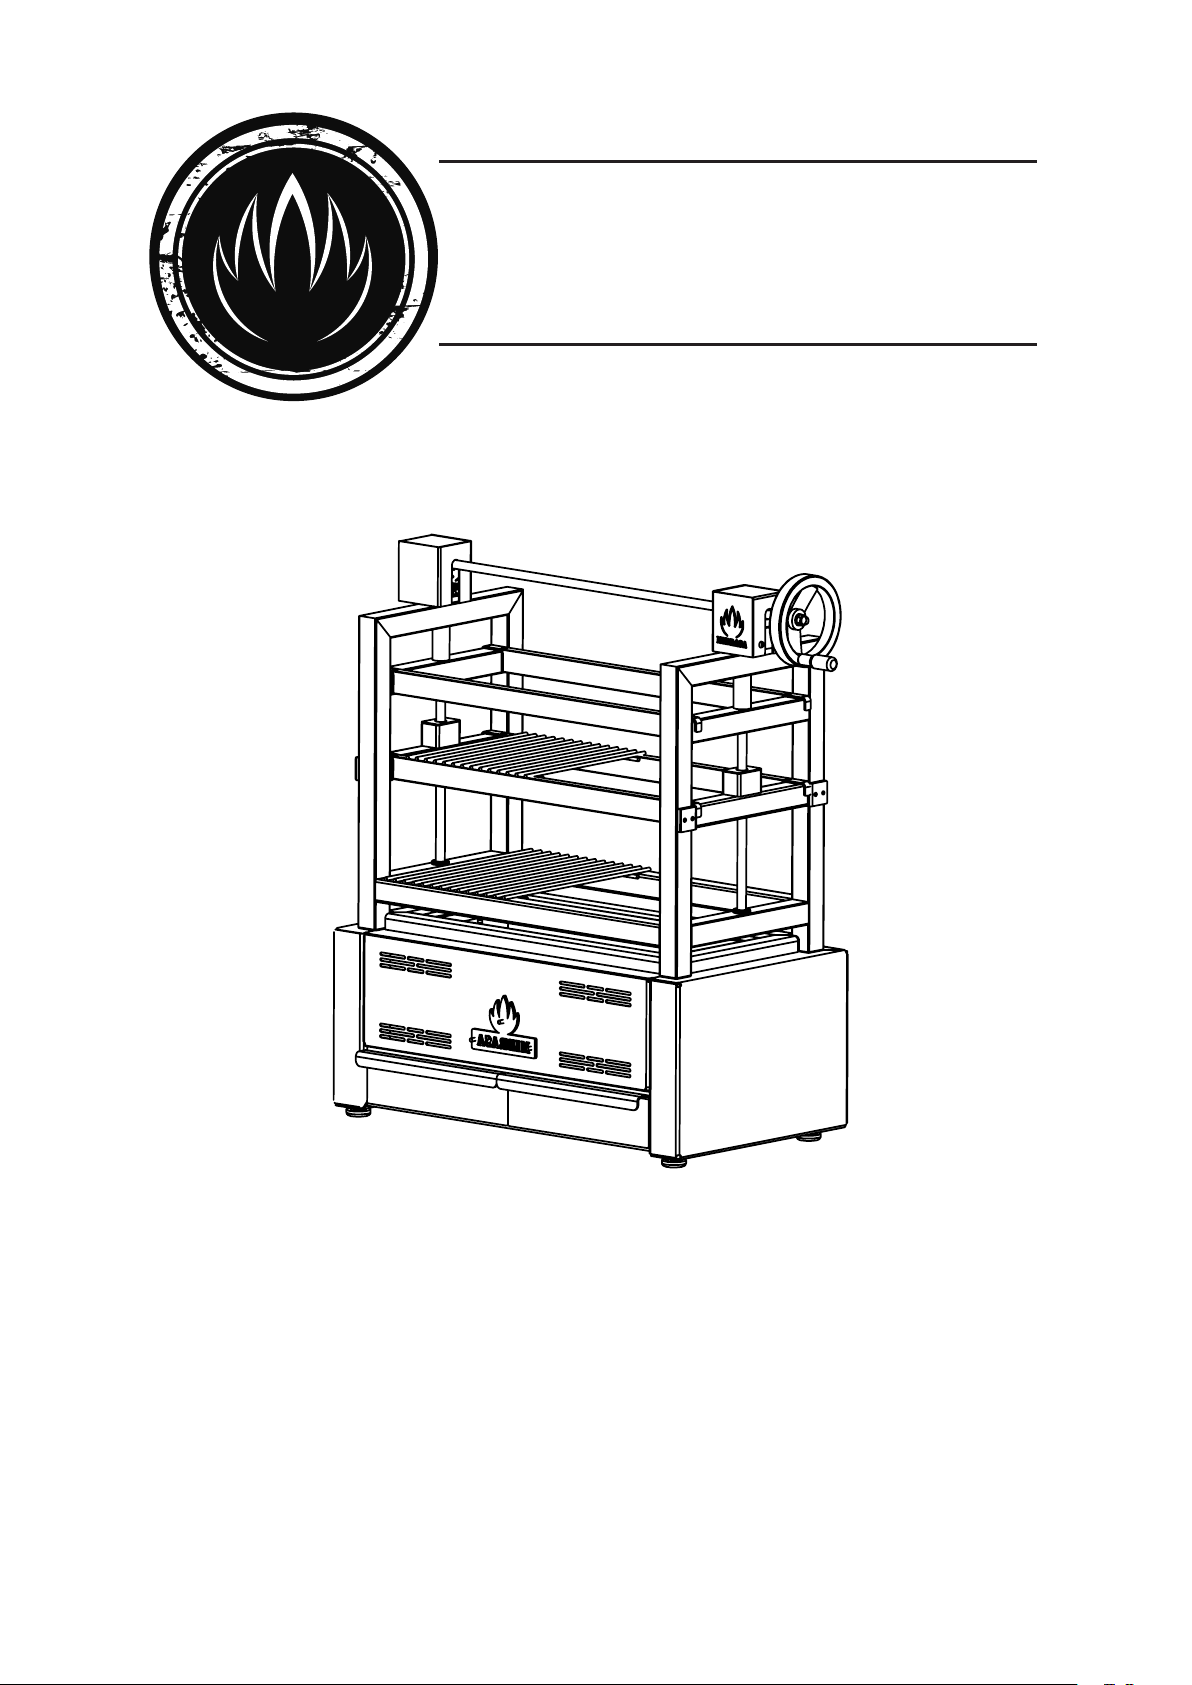
MIBRASA® ROBATAYAKI
USER MANUAL
READ ALL INSTRUCTIONS BEFORE INSTALLING AND USING THE APPLIANCE.
A MAJOR CAUSE OF ROBATAYAKI-RELATED FIRES IS FAILURE TO MAINTAIN REQUIRED
CLEARANCES (AIR SPACES) TO COMBUSTIBLE MATERIALS. IT IS OF UTMOST
IMPORTANCE THAT THIS ROBATAYAKI BE INSTALLED ONLY IN ACCORDANCE WITH
THESE INSTRUCTIONS..
www.mibrasa.com
Feeding the Senses!
Page 2

PLEASE READ THIS ENTIRE MANUAL BEFORE YOU INSTALL THE GRILL. FAILURE TO FOLLOW
INSTRUCTIONS MAY RESULT IN PROPERTY DAMAGE, BODILY INJURY, OR EVEN DEATH.
SAVE THESE INSTRUCTIONS.
Page 3

Contents
1. Introduction 1
2. Mibrasa® Robatayaki dimensions 2
2.1. RM Model
2.2. RM SE Model
3. Parts of the Robatayaki 4
4. Installation instructions 6
4.1. Installation guidelines and safety standards
5. Lighting up 7
6. Robatayaki operation 7
7. Maintenance and safety standards 8
7.1. Daily cleaning
7.2. Special care
7.3. Safety standards
8. General conditions 10
8.1. Warranty
8.2. Returns
8.3. Property Reserve
Page 4
1. Introduction
Originating from the Japanese tea ceremony, which overtime found its way to the north
Japanese shermen utilizing this method to keep food hot while out at sea for long periods.
The evolution of the Robatayaki has brought it into the modern kitchen, where chefs prepare the food and display their showmanship in front of diners allowing them to take part in
the entire cooking experience.
The Mibrasa® Robatayaki is manufactured with steels of the latest technology following the
most rigorous quality controls. Like all Mibrasa® units, they comply to the strict standards
& regulations set by internationally recognised certications of quality.
Our Robatayakis
A multi-tier open charcoal grill equipped with accessories to perform a range of cooking techniques using grills, Teppanyaki hot plates or skewers. Robata grilling lends itself to an array of
foods from meat, sh, seafood and vegetables, imparting light smoky aromas and avours we
seek in grill cooking.
Mibrasa® Robatayaki RM SE (with elevating system), designed and patented by Mibrasa® en-
ables height adjustments between the grill and hot coals to provide the chef with total control
allowing them to cook with more efciency.
1
Page 5
A
E
K
G
L
G H
J
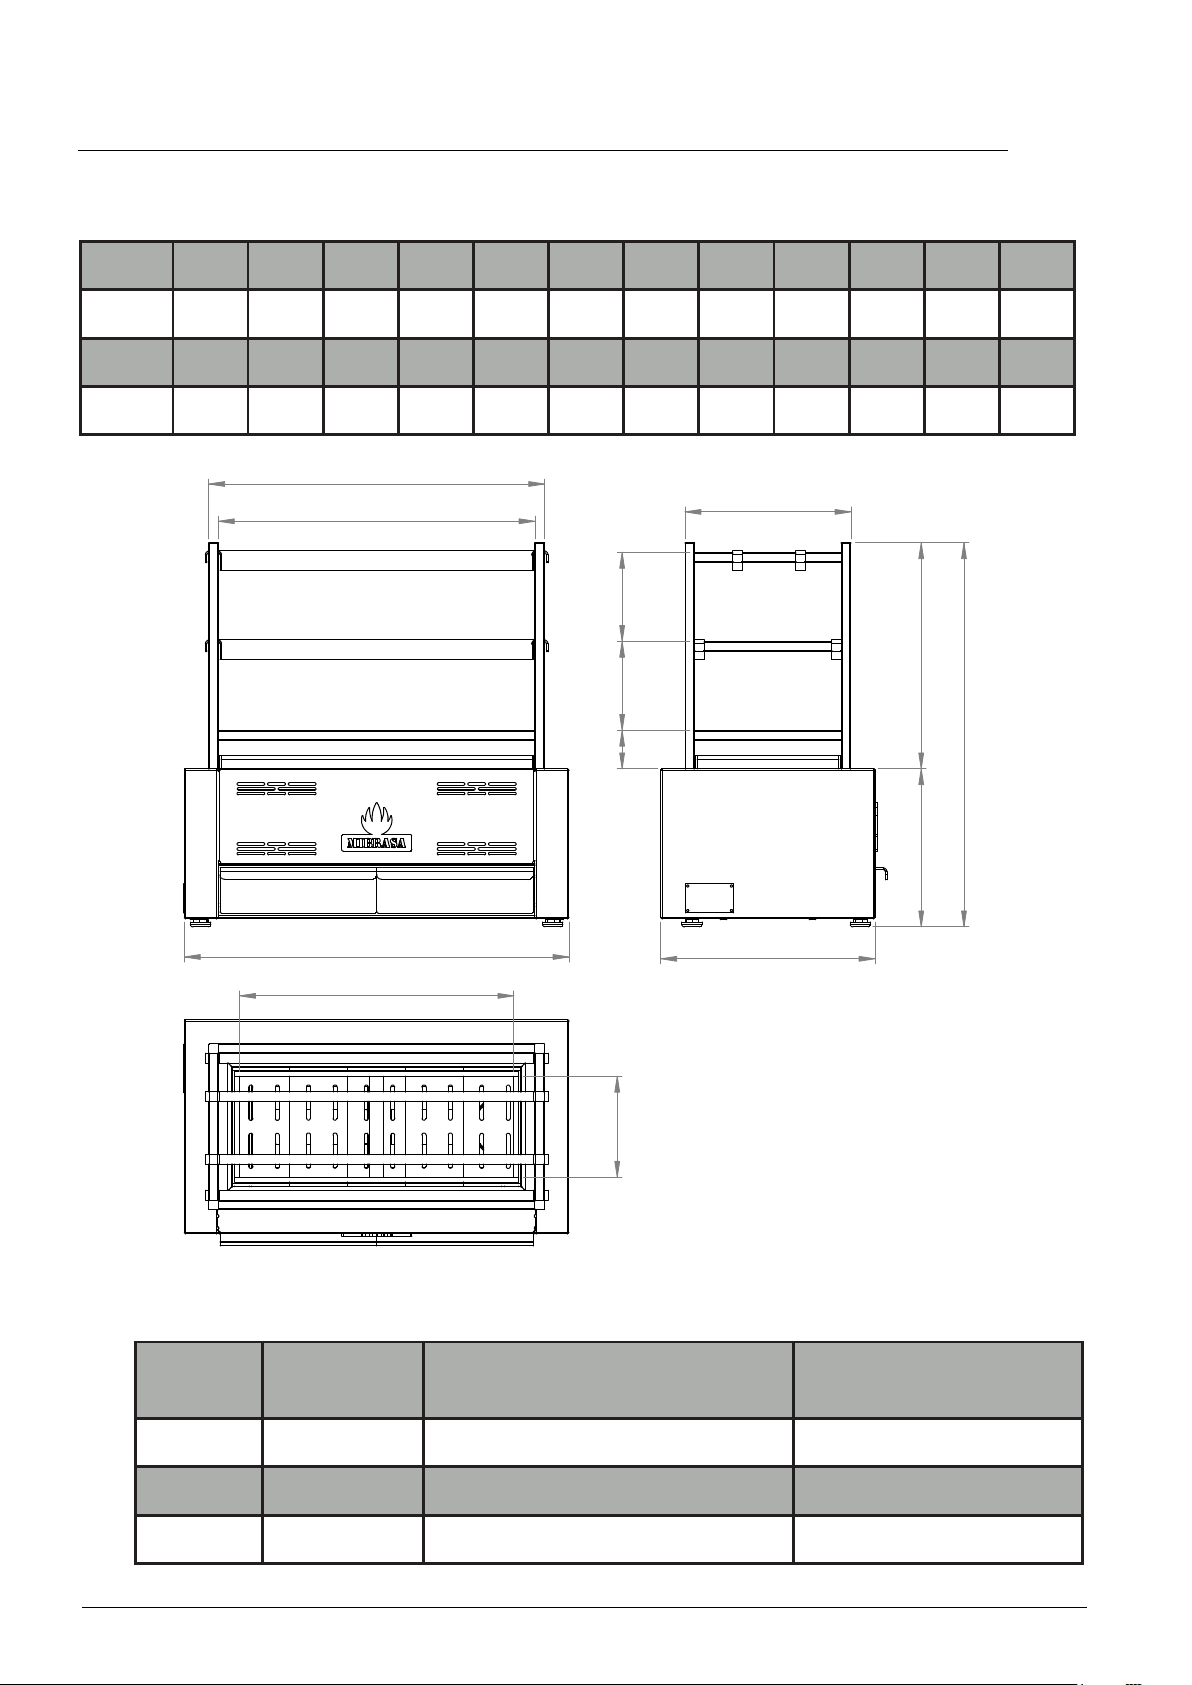
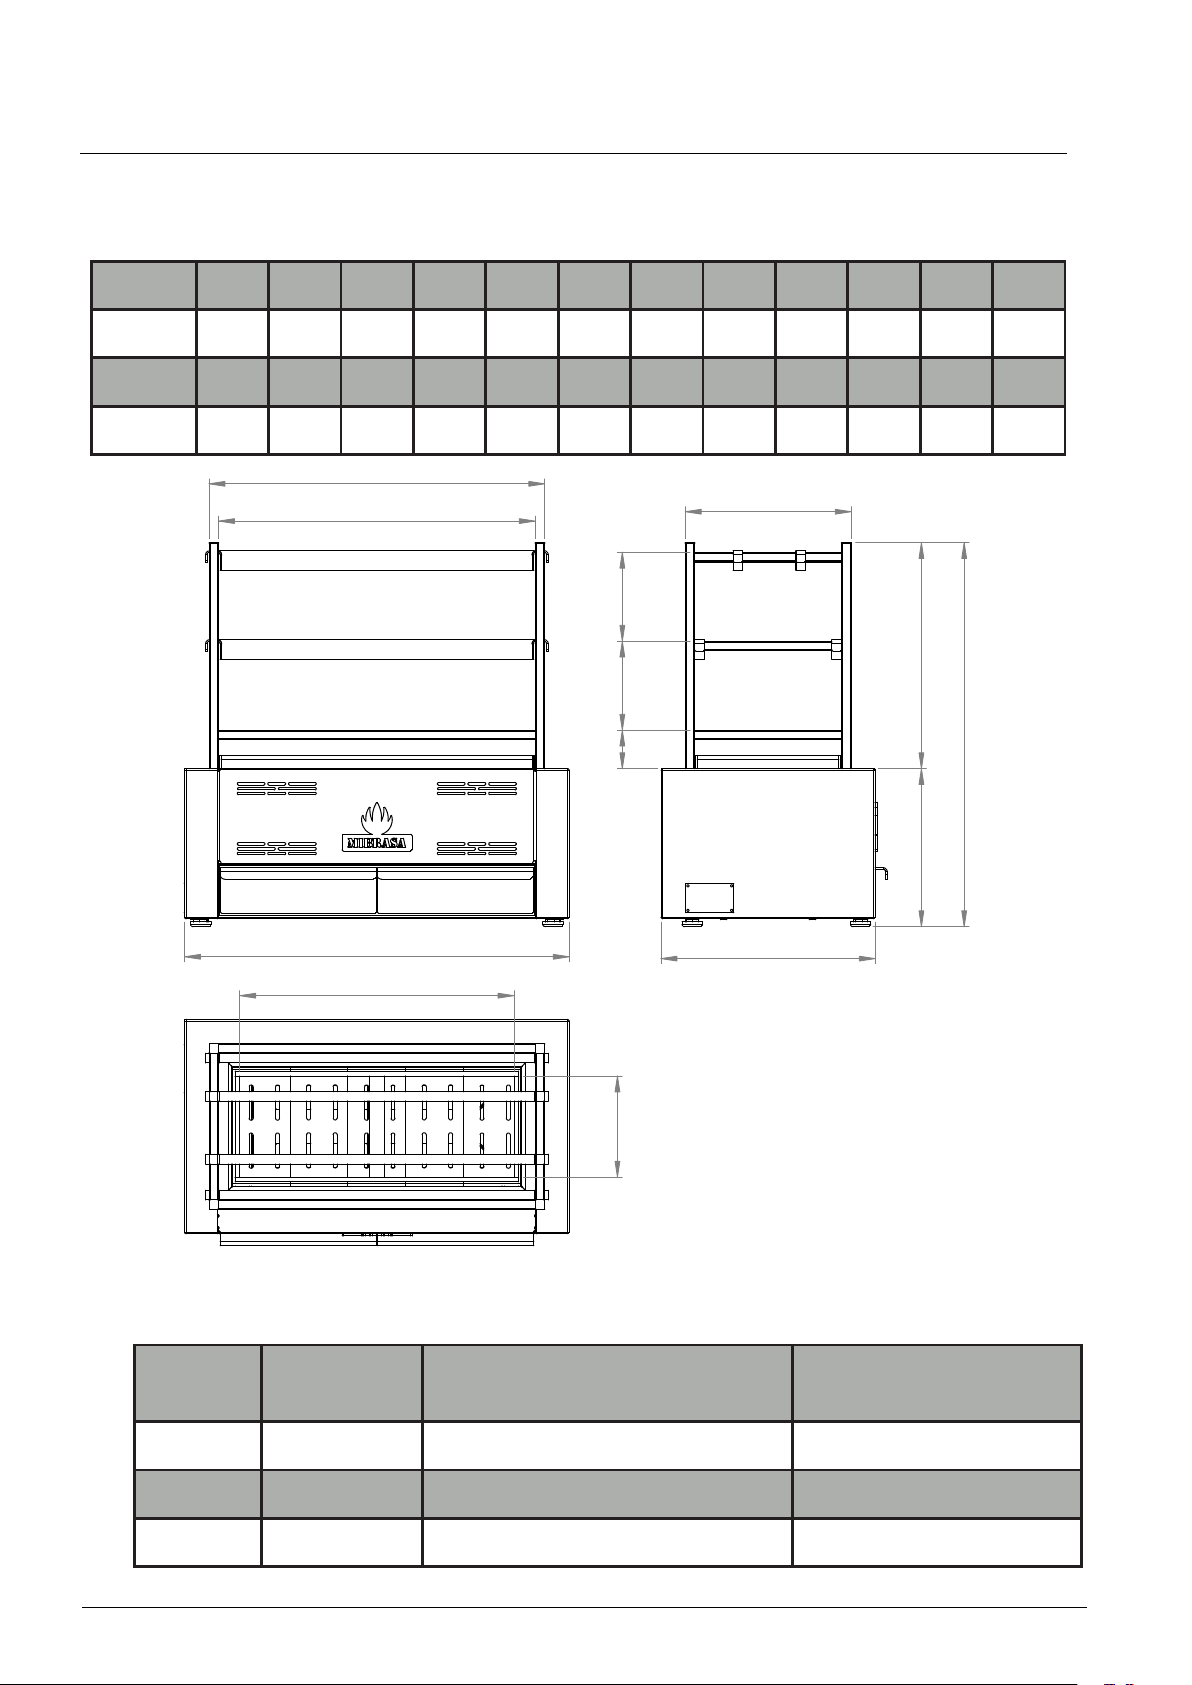
2. Mibrasa® Robatayaki dimensions
2.1 RM Model
Model A B C D E F G H I J K L
RM 60 20.5 18.9 24.4 15.4 8.3 13.6 7.1 3.5 17.5 18.5 13 31.5
RM 80 27.6 26 31.5 22.4 8.3 13.6 7.1 3.5 17.5 18.5 13 31.5
RM 115 41.1 39.6 45.1 36.2 8.3 13.6 7.1 3.5 17.5 18.5 13 31.5
Dimensions in inches
B
C
D
F
I
Ventilation recommendations
Model
RM 60 161 39.37 x 39.37 78.74
RM 80 183 47.24 x 39.37 78.74
RM 115 220 59.06 x 39.37 78.74
Flow rate
(gal/s)
Hood dimensions
(width x depth in inches)
2
Minimum height of hood
from floor (in)
Page 6
E
G
L
I
M
H
K
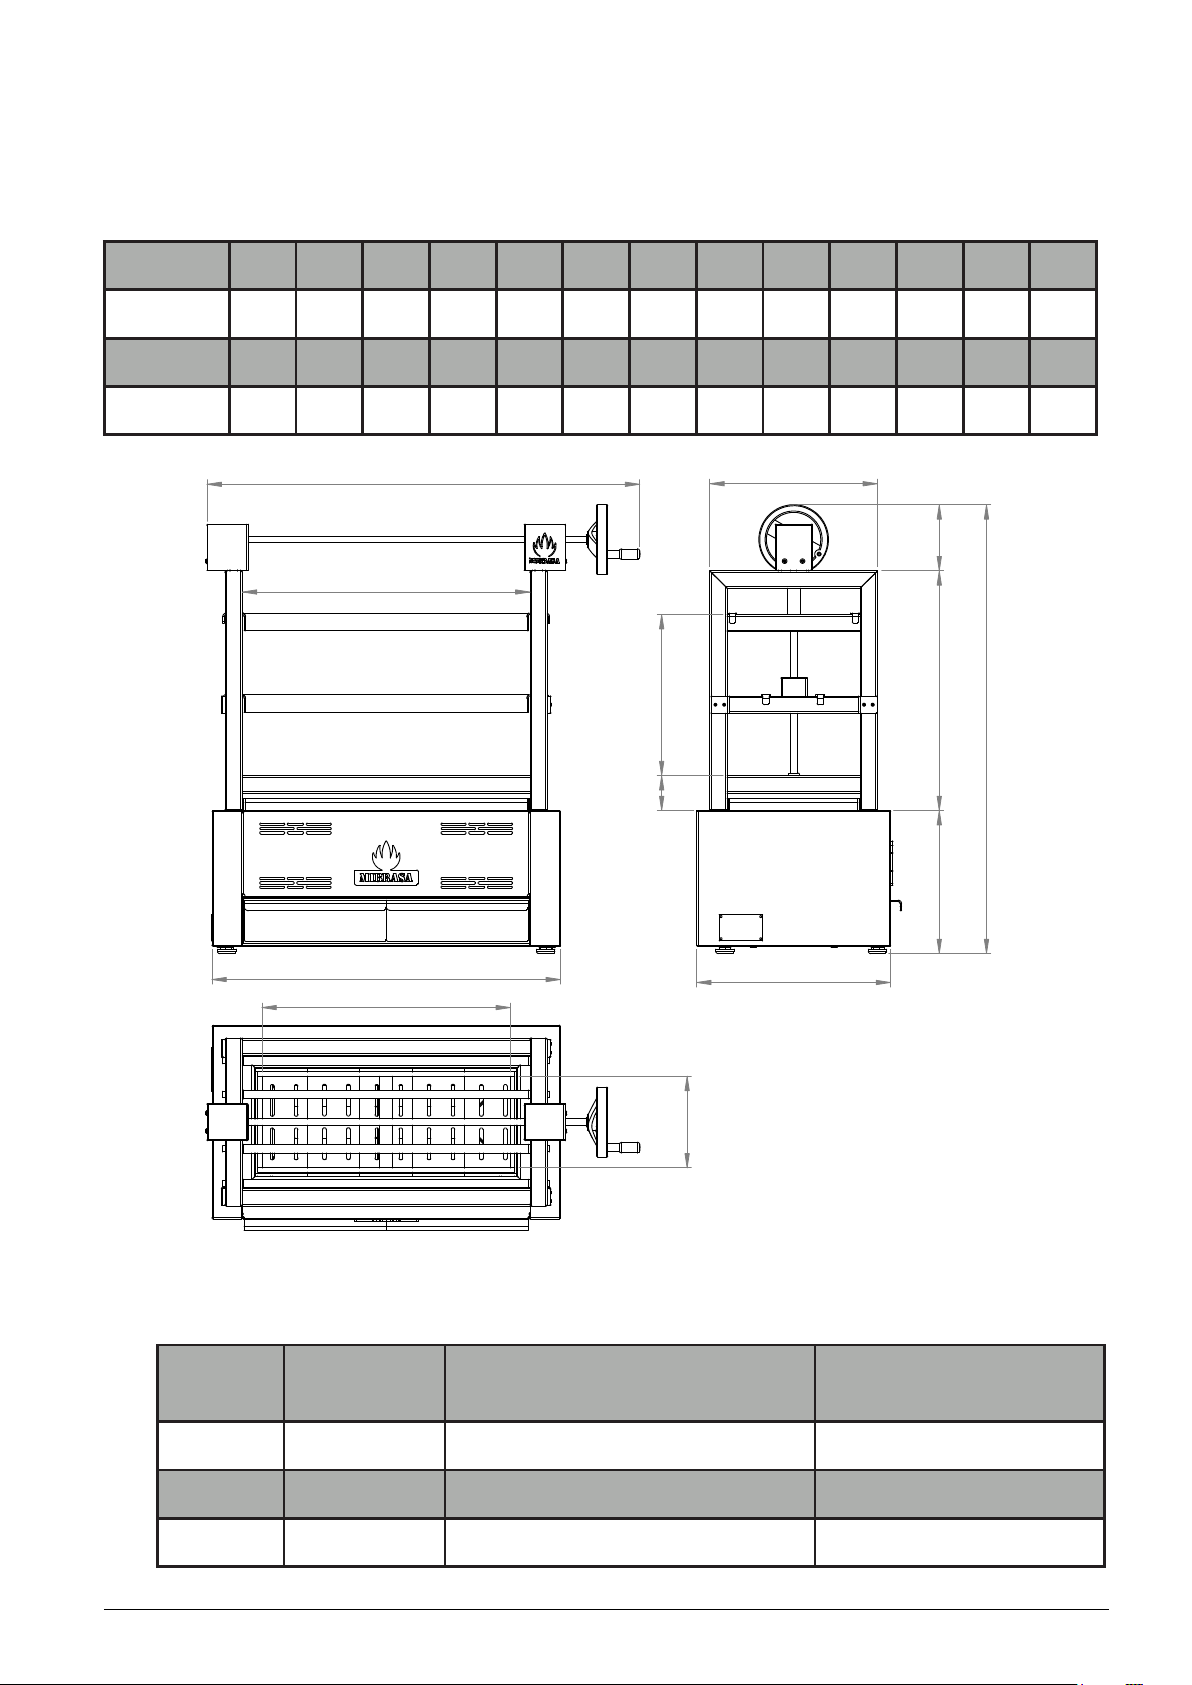
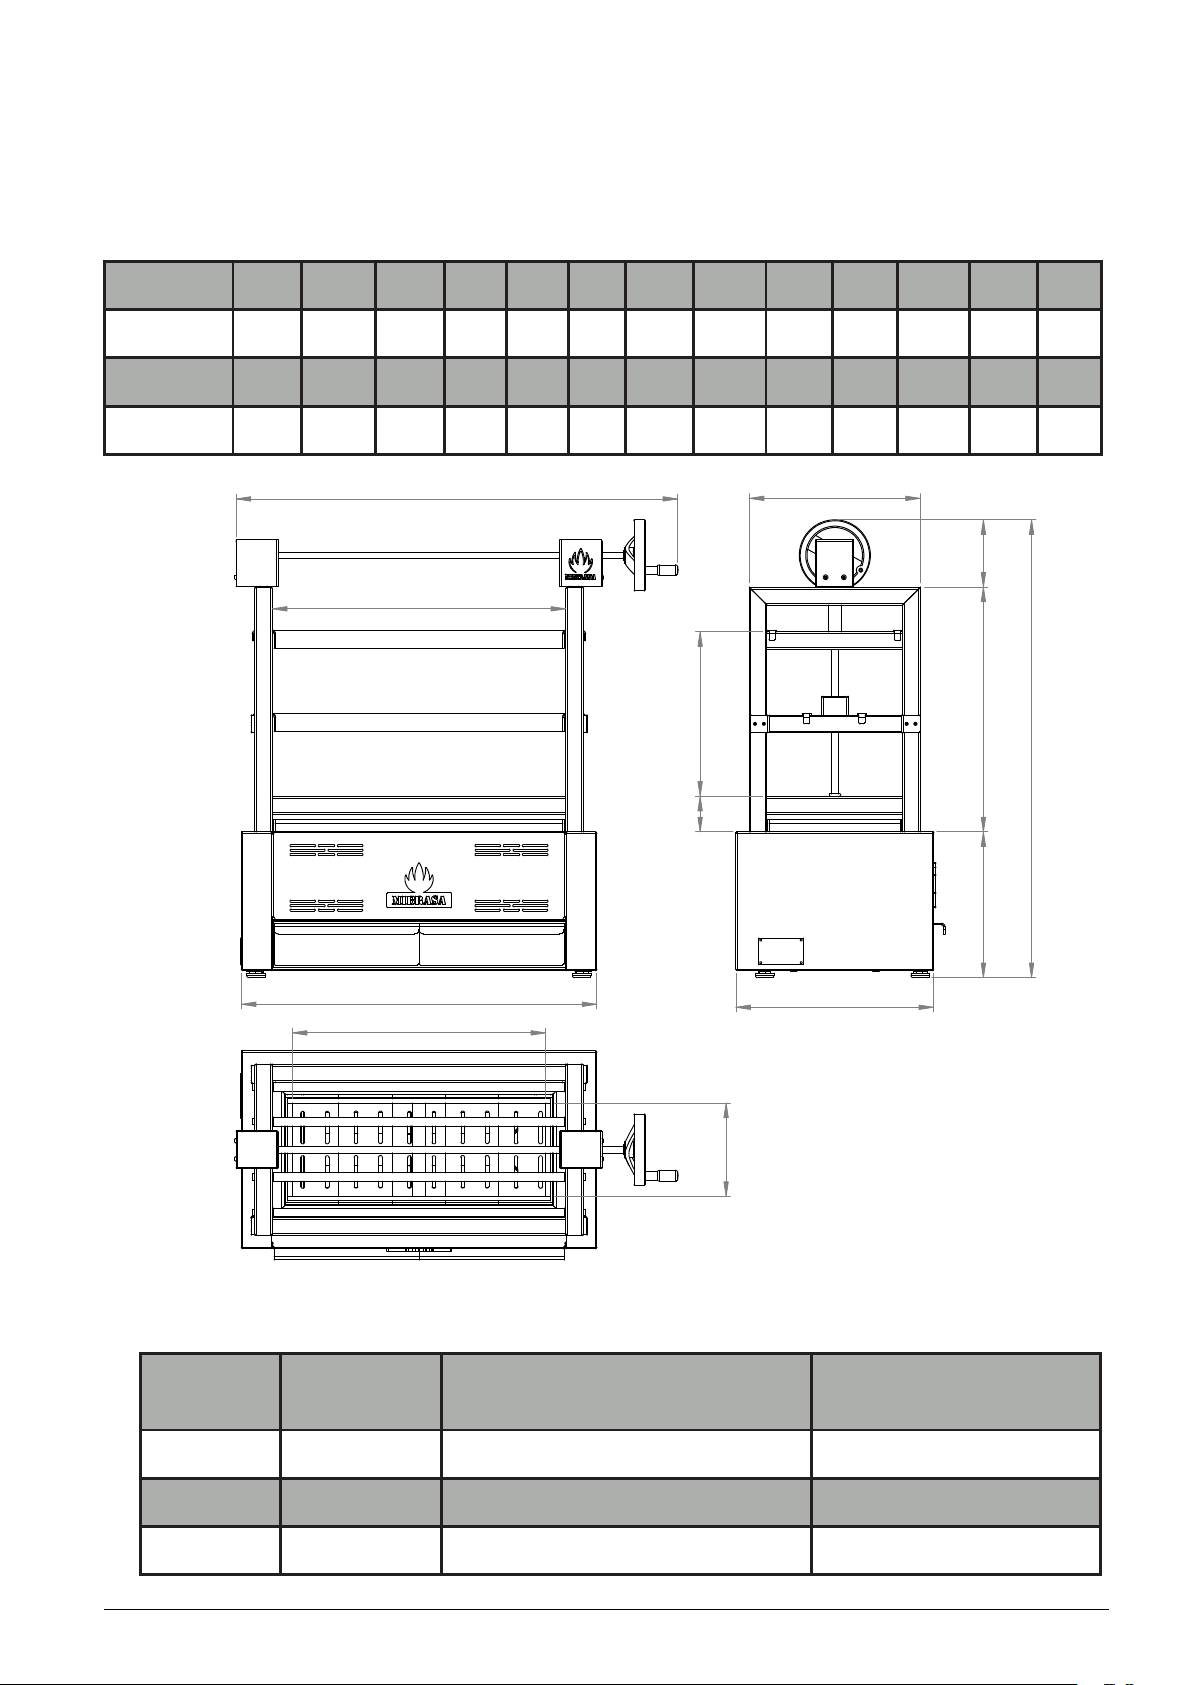
2.2 RM SE Model
Model A B C D E F G H I J K L M
RM SE 60
RM SE 80
RM SE 115
32.3 18.9 24.4 15.4 8.3 15.2 5.9 21.7 13 17.5 40.6 14.2 3.5
39.4 26 31.5 22.4 8.3 15.2 5.9 21.7 13 17.5 40.6 14.2 3.5
53 39.6 45.1 36.2 8.3 15.2 5.9 21.7 13 17.5 40.6 14.2 3.5
Dimensions in inches
B
A
F
C
D
Ventilation recommendations
Model
RM SE 60 161 39.37 x 39.37 78.74
RM SE 80 183 47.24 x 39.37 78.74
RM SE 115 220 59.06 x 39.37 78.74
Flow rate
(gal/s)
Hood dimensions
(width x depth in inches)
J
Minimum height of hood
from floor (in)
3
Page 7
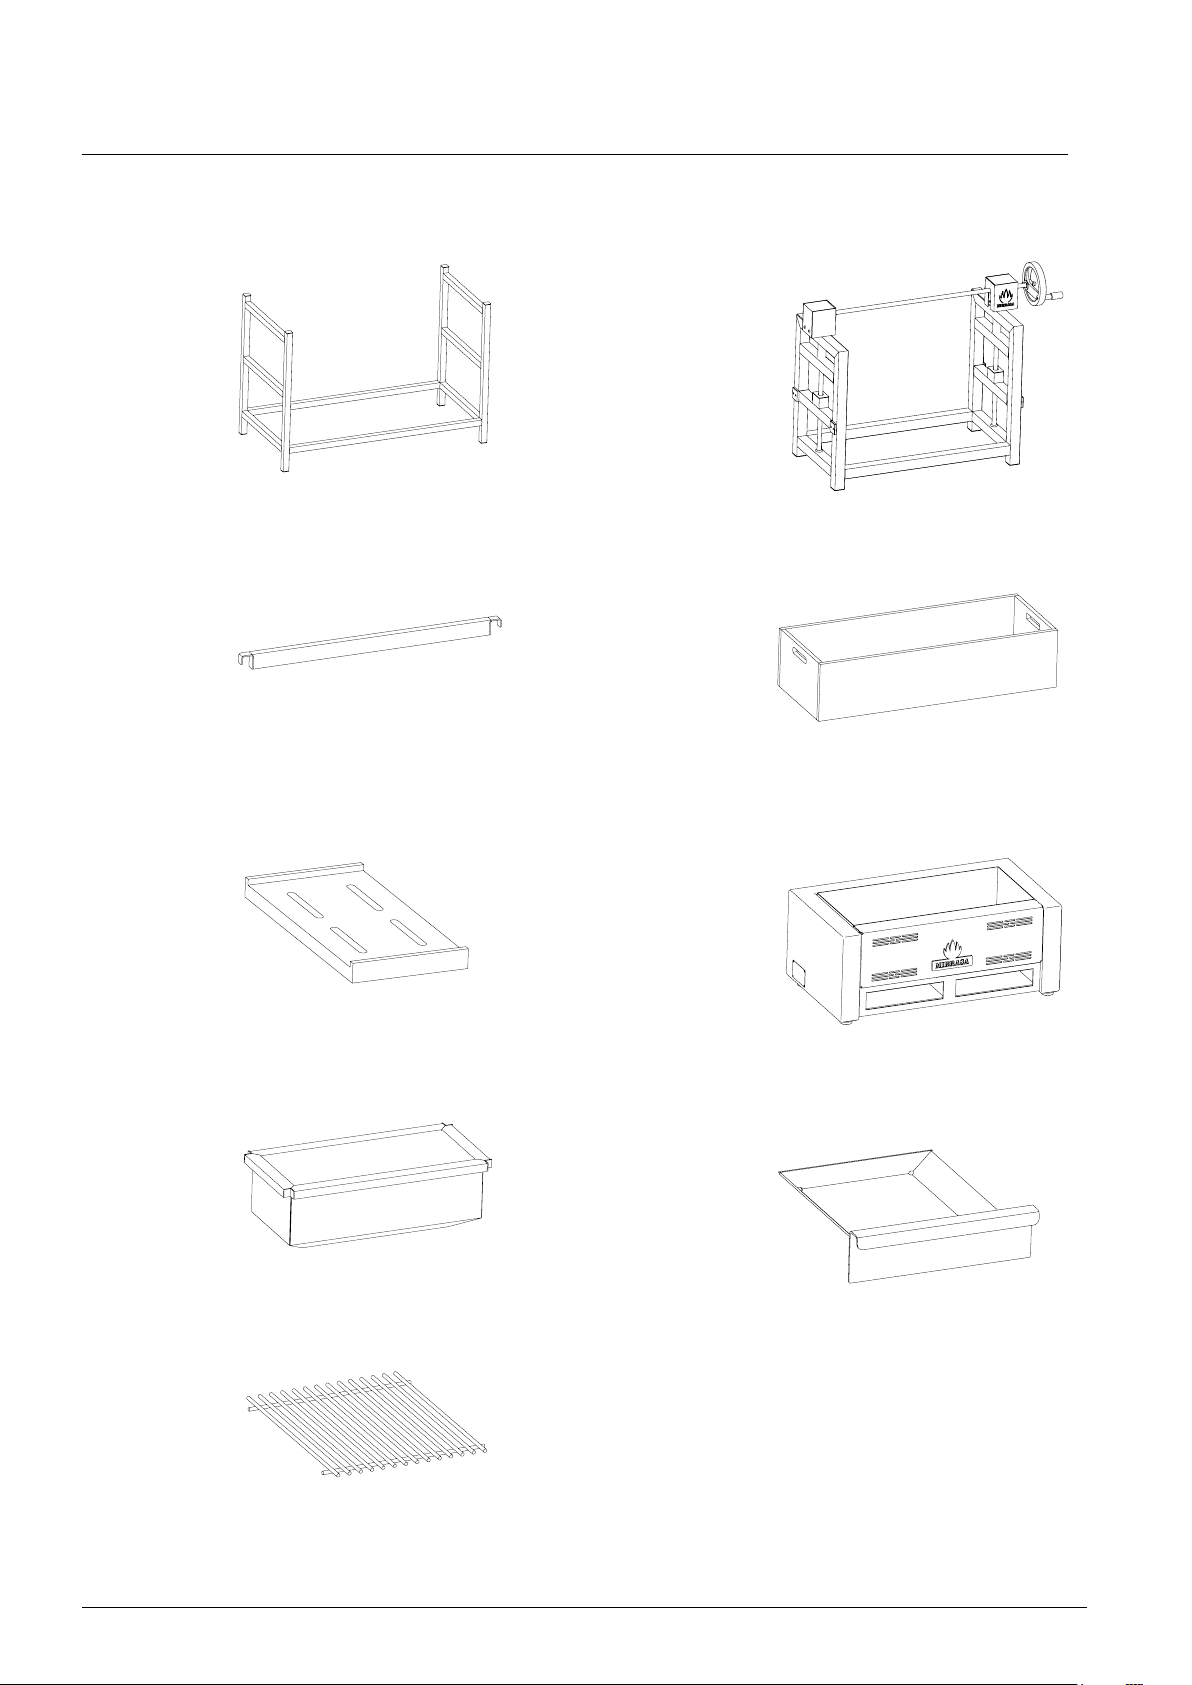
3. Parts of the Mibrasa® Robatayaki
1.a Structure
2. Support bar
4. Charcoal grid
1.b Structure with elevating
system
3. Burning pit
5. Main body
6. Interior body
8. Grill
The Mibrasa® Robatayaki is subject to technical and design changes.
4
7. Ash collector
Page 8
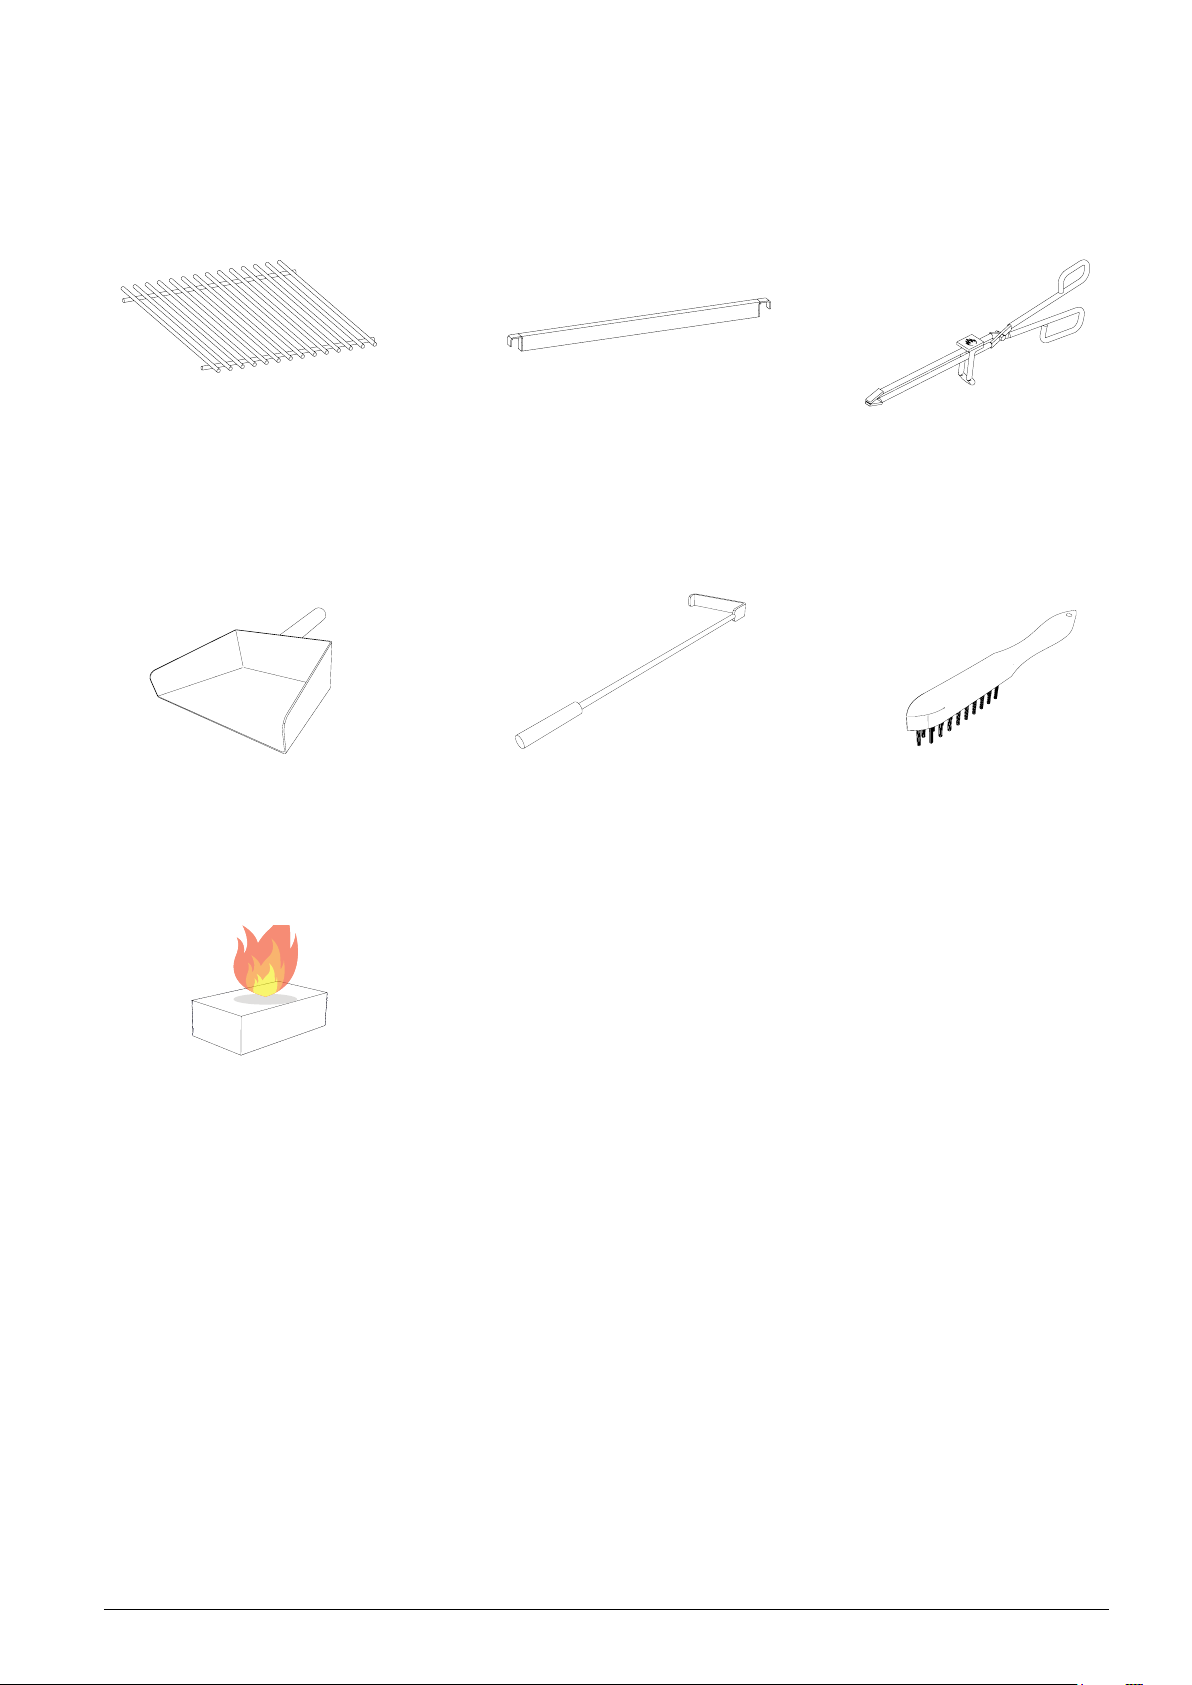
Included accessories:
Top and lower grills*
*The 115 series includes 2 top
grills and 2 lower grills
Ash shovel
Support bars (x4)
Ember poker
Mibrasa® tongs
Grill brush
Mibrasa® Ecofire firelighters
Optional accessories:
• Top mesh grill
• Lower mesh grill
• Support bars (2)
• Flat top Teppanyaki griddle
• Perforated Teppanyaki griddle
• Robatayaki drop-leaf stand
• Lid for end of service
• Stainless steel skewers 11.81 in
• Kitchenware (consult online catalog
at www.mibrasa.com)
• Robatayaki stand
5
Page 9
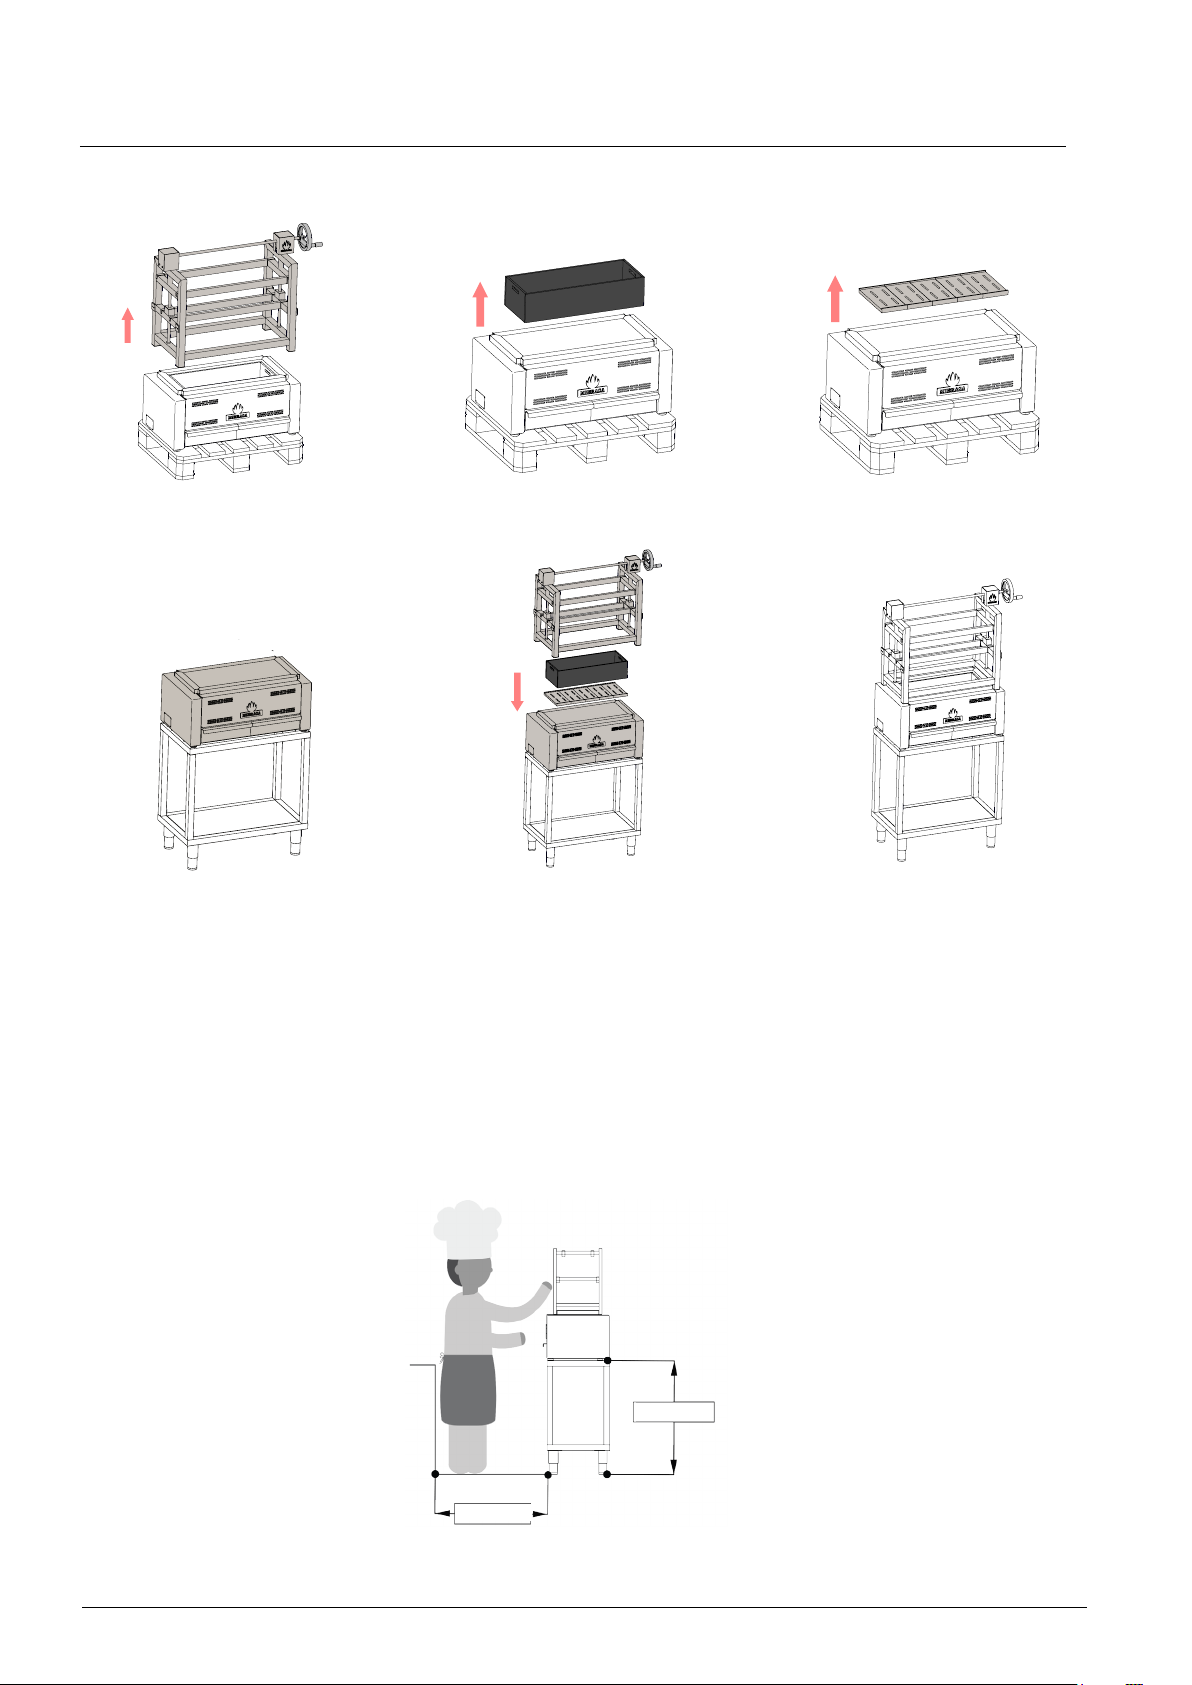
4. Installation instructions
Dismantle the structure
1
4
Place the main body on
top of the stand
2
Take out the burning pit
Replace all the elements
5
3
Remove the charcoal grids
6
Ready to work
4.1 Installation and safety standards
• Clearances to combustible constructions:
Unit to backwalls = 18 in.
Unit to sidewalls = 28 in.
• Workspace for the chef and recommended height of the worktop:
31.5”
27.6”
6
Page 10
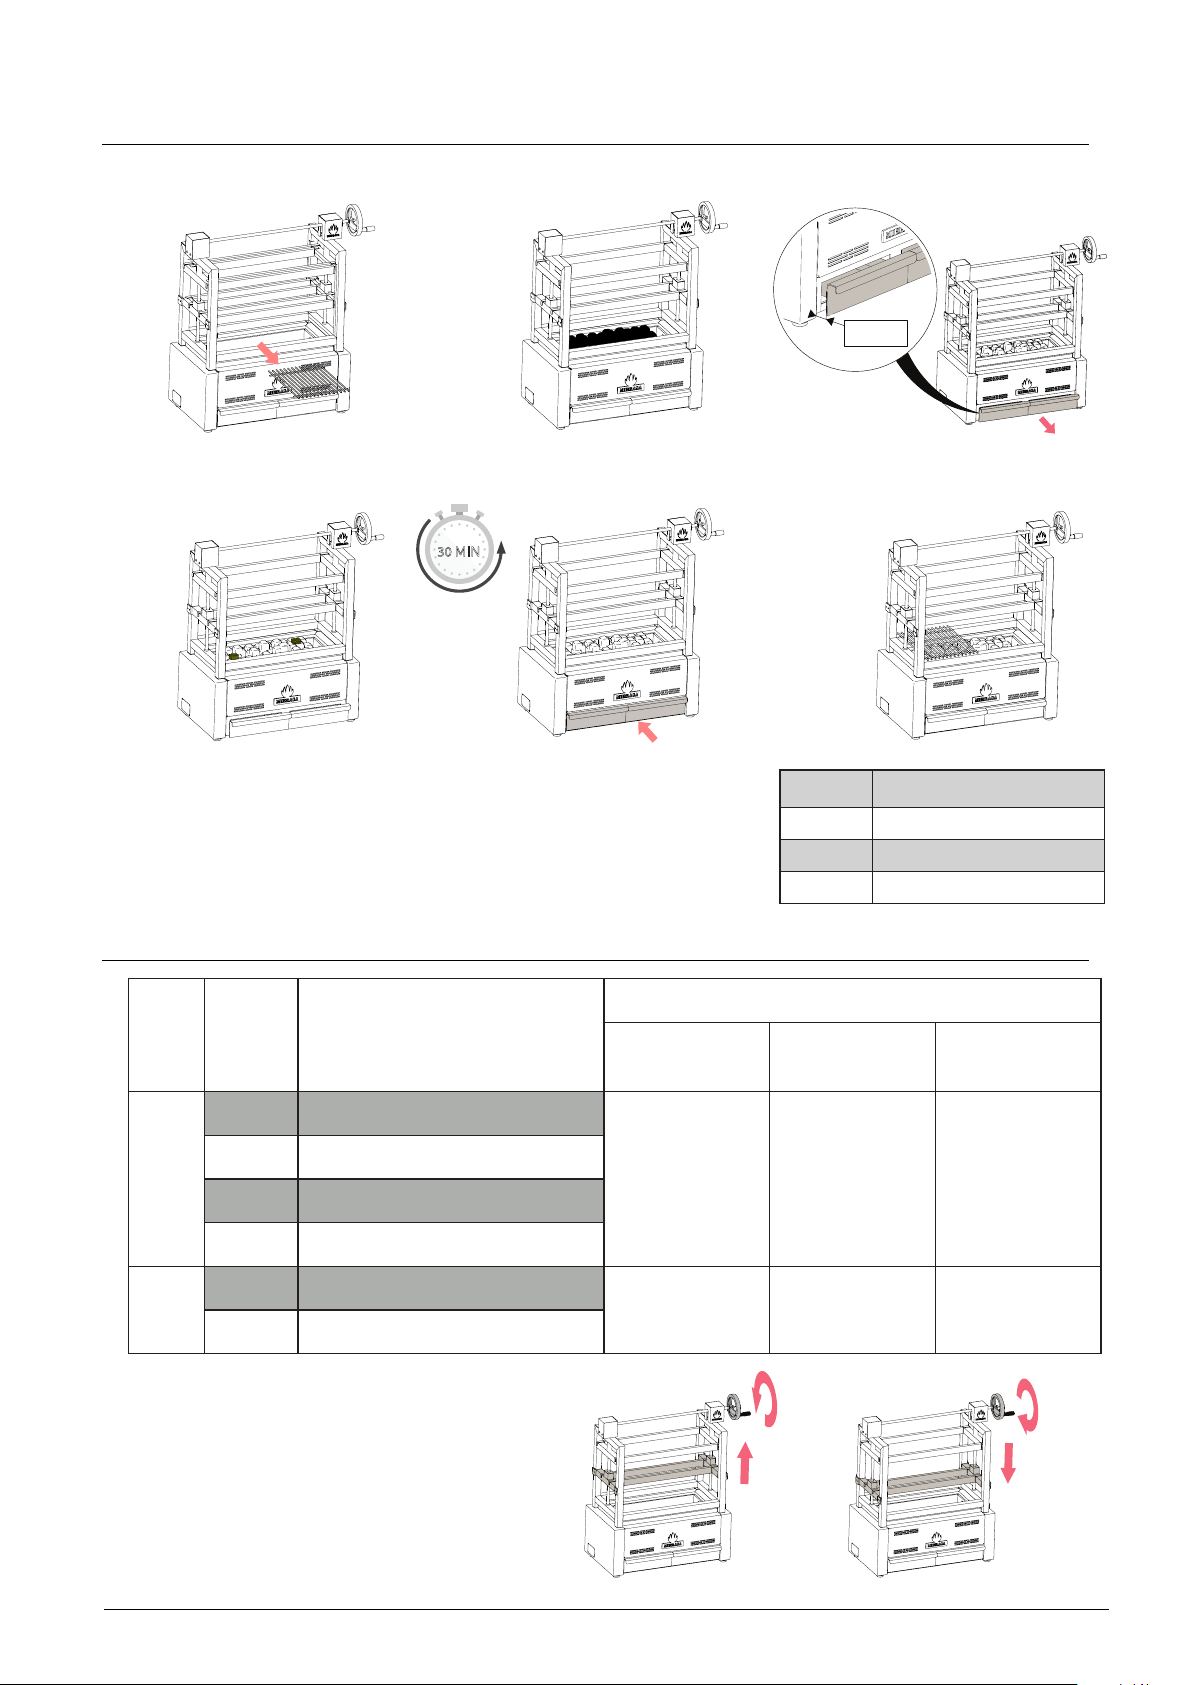
5. Lighting up
1
Remove the grills
4
Place and light the
firelighters
30 MIN
Load the charcoal
2
Close the ash collector
5
Open the ash collector
3
40 mm*
Ready to cook
6
Approximate quantity of charcoal according to Robatayaki
model:
6. Robatayaki Operation
Level Code Description
RLG Lower grill
LGM Lower mesh grill
1
FTTG Flat top Teppanyaki griddle
PTG
RTG Top grill
2 / 3
TGM Top mesh grill
Perforated Teppanyaki griddle
RM 60 /RM
SE 60
1 2 3
1 2 3
Model Initial charcoal load
60 7 lb
80 9 lb
115 15 lb
Max. no. grills level
RM 80 /RM
SE 80
RM 115 /
RM SE 115
Elevation system operation:
7
Page 11

7. Maintenance and safety standards
7.1. Daily cleaning
Do not use chemical products or water to clean the inside of the Robatayaki.
Grills: Clean using the grill brush before and after each use.
Ash collector:
Open the ash collector, use the ash shovel by Mibrasa® to remove the ash and
transfer to a metal container with a tight-tted lid. We recommend completely removing the
ash collector from the Robatayaki once a week to facilitate cleaning. Once the ashes have
completely cooled down they can be disposed of or used as fertilizer.
WARNING Do not dispose the ashes in a ammable-container or heat-deformable container.
7.2. Special care
Exhaust hood: It is very important to keep the exhaust hood lters clean to avoid a build
up of soot, fat and creosote1, which could result in a possible re.
Mibrasa® is not responsible for any damages occurred caused by wrongful use, when the installation instructions have not been followed or wrongful maintenance of the exhaust hood.
1
Creosote – Formation and need for removal. When wood is burned slowly, it produces tar and other organic vapors
that combine with expelled moisture to form creosote. The creosote vapors condense in a relatively cool oven ue
and exhaust hood of a slow burning re. As a result, creosote residue accumulates on the ue lining and exhaust
hood. When ignited, this creosote makes an extremely hot re. The oven ue should be inspected at least twice a
year to determine when creosote buildup has occurred. When creosote has accumulated, it should be removed to
reduce risk of re.
8
Page 12

7.3. Safety standards
WARNINGS
• WARNING Do not pack required air spaces with insulation or other materials.
• Only use charcoal in the Mibrasa® Robatayaki.
• The rst time the Robatayaki is used do not cook food for at least one hour after lighting.
• Proceed with reasonable care when operating a Mibrasa® Robatayaki. Never leave it
unattended when lit.
• CAUTION Do not overload/re. Consult the charcoal loads in the chart in point 5. When
ames spill out, you are over-ring.
• Disposal of ashes – Ashes should be placed in a metal container with a tight-tting lid.
The closed container of ashes should be placed on a non-combustible oor or on the
ground, well away from all combustible materials, pending nal disposal. When the ash-
es are disposed by burial in soil or otherwise locally dispersed, they should be retained
in the closed container until all cinders have thoroughly cooled.
• Do not attempt to pour water over the hot coals.
• Do not clean the Robatayaki when it is in operation or st hot.
• Do not use chemical products to clean the exterior of the Robatayaki when in use or hot.
DANGERS
• When this Robatayaki is not properly installed, a re may result. To reduce the risk of
re, follow the installation instructions.
• Keep children and pets away from the oven and ammable products. Accessible parts
of the Robatayaki may be very hot.
• Never use gasoline, gasoline-type lantern fuel, kerosene, charcoal lighter uid, or
similar liquids to start or ‘freshen up’ a re in this grill. Keep all such liquids well away
from the grill when in use.
• In the case of installing the Robatayaki in an outdoor setting, do not cover it with any
type of protective cover or inammable material when it is in operation or hot.
• Review the restrictions of point 4.1 on minimum distances from combustible materials.
9
Page 13

8. General conditions
8.1. Warranty
• All Mibrasa® Robatayaki have a 2-year warranty against any manufacturing defect.
• The customer will be responsible for the installation, ne-tuning and maintenance of
the goods.
• The warranty is void of:
(I) damage caused by misuse or poor product installation,
(II) where the buyer or third party has started repairs, modications or adjustments
without the prior consent of Mibrasa®,
(III) those defects not immediately notied within the warranty period stated above,
(IV) those defects or damage due to negligence not attributable to Mibrasa®, or an
accident, misuse, improper installation, mishandling or abnormal conditions of
temperature, humidity or dirt,
(VI) that have become damaged through no fault of Mibrasa®.
8.2. Returns
• All goods must be returned in the original condition.
• All returns must be notied in writing, and must be conrmed by our sales department.
• All returns must reach Mibrasa® prepaid. Returned material must enclose the invoice
and delivery note number.
• Returns of goods will only be accepted in its original packaging, unused and in re-sellable
condition. Returned goods that are used, obsolete or worn out will not be considered under
warranty and a credit note will not be issued.
• For all returned goods, there will be a 10% fee of the refund amount to cover deprecia-
tion, demerit and administrative tasks.
8.3. Property Reserve
• Mibrasa® retains title to the goods to the total amount of the price integrity.
• Mibrasa® reserves the right to change their products and prices without notice.
10
Page 14

Page 15

Page 16

Page 17
7
6
5
4
EN / FR
®
ROBATAYAKI MIBRASA
MANUEL D’INSTRUCTIONS
LISEZ ATTENTIVEMENT TOUTES LES INSTRUCTIONS AVANT L’INSTALLATION
ET L’UTILISATION DU MATÉRIEL.
UNE DES PRINCIPALES CAUSES D’INCENDIE PROVOQUÉ PAR LE ROBATAYAKI SE DOIT
AU NON-RESPECT DE LA MAINTENANCE DES ESPACES D’AIR REQUIS POUR TOUT
MATÉRIAU COMBUSTIBLE. IL EST DE LA PLUS HAUTE IMPORTANCE QUE LE
ROBATAYAKI SOIT INSTALLÉ CONFORMÉMENT AUX INSTRUCTIONS DE CE GUIDE.
www.mibrasa.com
Eveillant les Sens!
Page 18

LISEZ ATTENTIVEMENT TOUT LE MANUEL AVANT D’INSTALLER LE FOUR. TOUT MANQUEMENT
DANS LE SUIVI DES INSTRUCTIONS POURRAIT ÊTRE LA CAUSE D’INCENDIE, DE GRAVES
BLESSURES CORPORELLES, VOIR DE DÉCÈS. VEUILLEZ CONVERSER CE DOCUMENT.
Page 19

Index
1. Introduction 1
2. Dimensions du Robatayaki Mibrasa
2.1. Modèle RM
2.2. Modèle RM SE
®
2
3. Parties du Robatayaki 4
4. Instructions d’installation 6
4.1. Indication de montage et normes de sécurité
5. Mise en route 7
6. Fonctionnement 7
7. Normes de maintenance et de sécurité 8
7.1. Nettoyage quotidien
7.2. Soins particuliers
7.3. Normes de sécurité
8. Conditions générales 10
8.1. Garantie
8.2. Retour
8.3. Réserve de propriété
Page 20
1. Introduction
L’origine du Robatayaki vient des anciens pêcheurs du nord du Japon, qui inventèrent cet
appareil pour cuisiner et lutter contre le froid durant leurs longues traversées. Son adaptation à la cuisine moderne fait de lui un élément de cuisson très attractif où le chef cuisine
face aux convives comme un véritable show.
Le Robatayaki Mibrasa® est fabriqué avec des aciers de dernière technologie et suivant des
contrôles rigoureux de qualité, comme tous les équipements Mibrasa® , qui répondent aux
exigences des normes de sécurité internationales.
Nos Robatayaki
Inspirés par l’ancienne technique de cuisine japonaise Robatayaki, souvent abrégée et con-
nue sous le nom de “Robata”, nous avons créé un grill ouvert alimenté au charbon avec
différents niveaux de cuisson et divers accessoires pour élaborer tous types d’aliments
comme la viande, du poisson ou les légumes, cuisinés sous forme de brochettes directe-
ment sur la braise, la grille ou la plaque Teppanyaki.
Le Robatayaki Mibrasa® RM SE incorpore un système d’élévation dessiné et breveté par
Mibrasa® qui permet d’adapter à souhait la distance entre la grille et la braise. Le cuisinier
peut ainsi contrôler la cuisson des aliments avec beaucoup plus d’efcacité.
1
Page 21
2. Dimensions du Robatayaki Mibrasa
A
E
K
G
L
G H
J
®
2.1 Modèle RM
Modèle A B C D E F G H I J K L
RM 60 520 480 620 390 210 345 180 90 445 470 330 800
RM 80 700 660 800 570 210 345 180 90 445 470 330 800
RM 115 1045 1005 1145 920 210 345 180 90 445 470 330 800
B
C
D
F
I
Dimensions en mm
Recommandations de la ventilation
Modèle
RM 60 2200 1000 x 1000 2000
RM 80 2500 1200 x 1000 2000
RM 115 3000 1500 x 1000 2000
Débit
(m3/h)
Mesures hotte centrale
(Largeur x Profondeur en mm)
2
Hauteur min. entre sol et
hotte (mm)
Page 22
E
G
L
I
M
H
K
2.2 Modèle RM SE
Modèle A B C D E F G H I J K L M
RM SE 60 820 480 620 390 210 385 150 550 330 445 1030 360 90
RM SE 80 1000 660 800 570 210 385 150 550 330 445 1030 360 90
RM SE 115 1345 1005 1145 920 210 385 150 550 330 445 1030 360 90
B
C
D
A
F
J
Recommandations de la ventilation
Modèle
RM SE 60 2200 1000 x 1000 2000
RM SE 80 2500 1200 x 1000 2000
RM SE 115 3000 1500 x 1000 2000
Débit
(m3/h)
Mesures hotte centrale
(Largeur x Profondeur en mm)
Hauteur min. entre sol et
3
hotte (mm)
Page 23
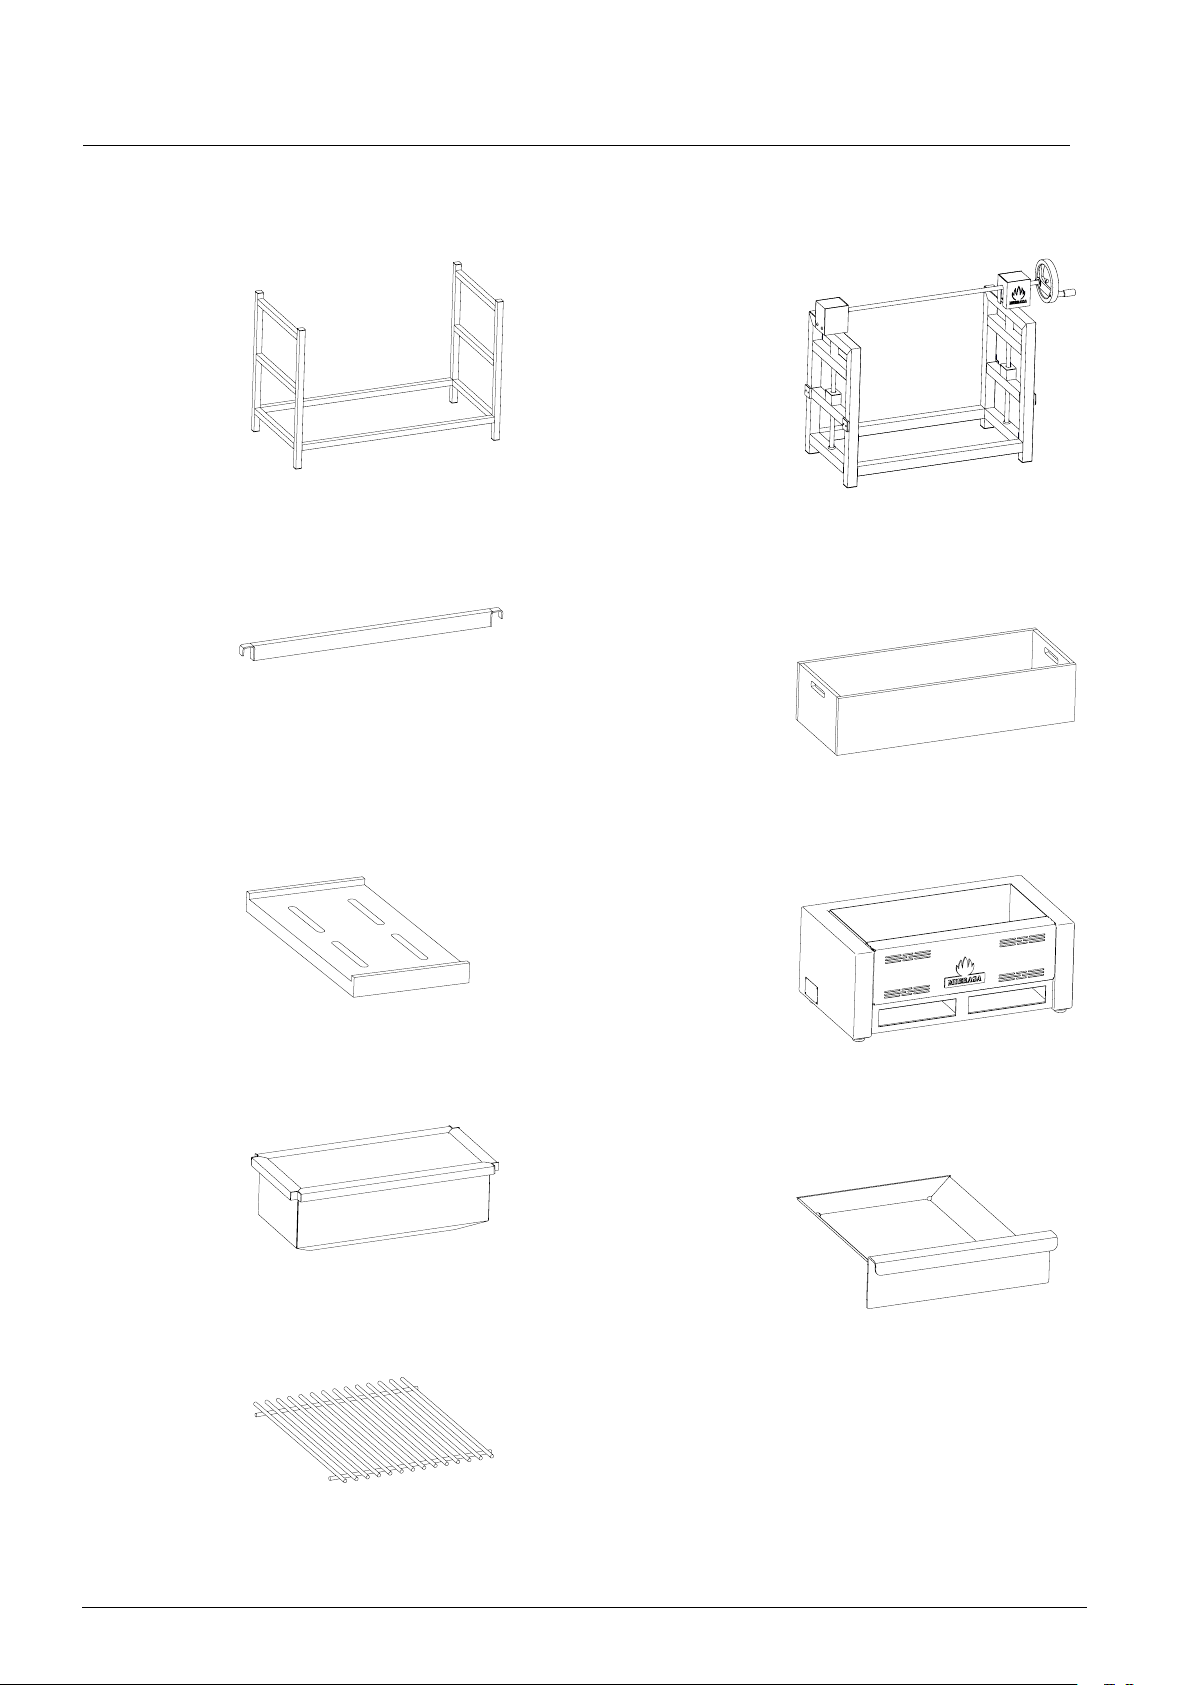
3. Parties du Robatayaki Mibrasa
®
1.a Structure
2. Barre de support
4. Grille en fonte
1.b Structure avec système
d’élévation
3. Brûleur
5. Foyer principal
6. Foyer intérieur
8. Grille
Le Robatayaki Mibrasa peut est sujet à des modifications techniques et de design.
7. Tiroir à cendres
4
Page 24
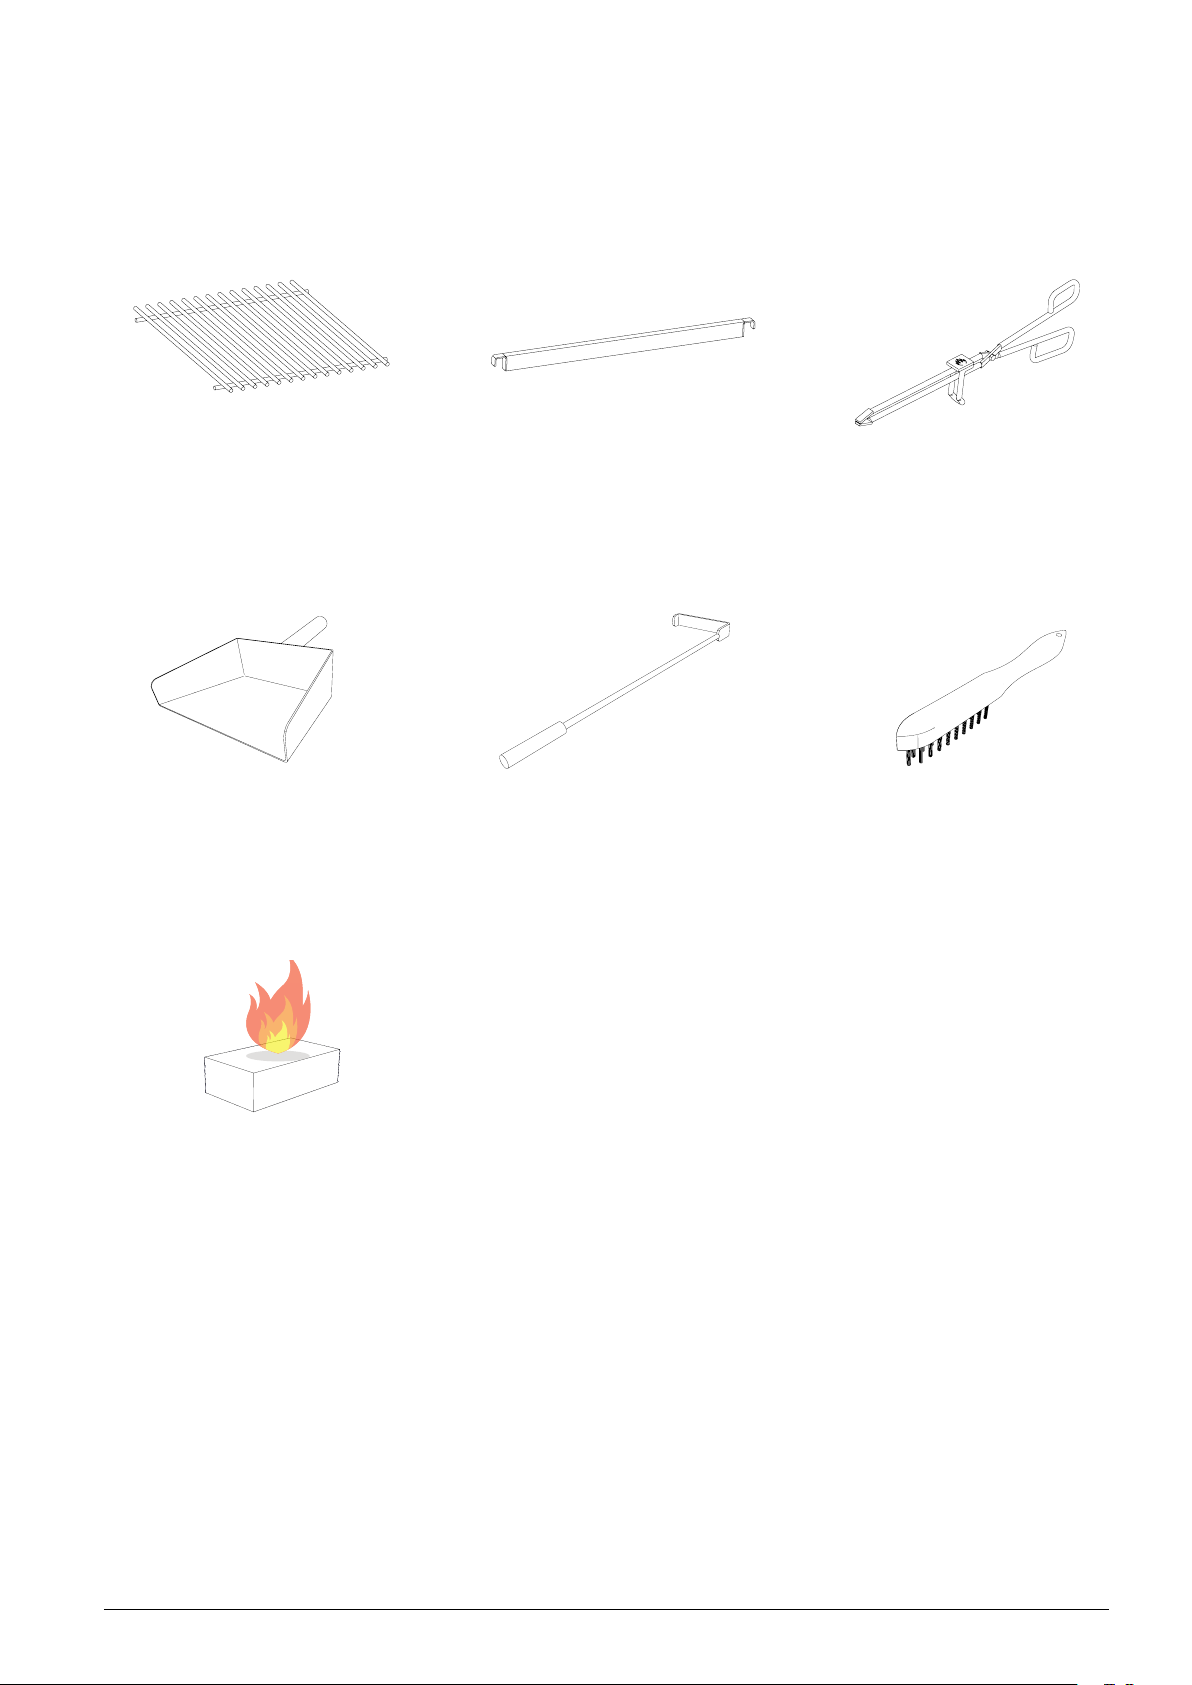
Accessoires inclus:
Grilles supérieure et
inférieure*
*La série 115 inclut 2 grilles supérieures et 2 grilles inférieures
Pelle à cendre
Barres de support (x4)
Tisonnier
Pinces Mibrasa®
Brosse métallique
Tablettes allume-feu Ecofire
Mibrasa
®
Accessoires optionnels:
• Grille à mailles supérieure
• Grille à mailles inférieure
• Barres de support (2)
• Plancha Teppanyaki lisse
• Plancha Teppanyaki perforée
• Table Robatayaki rabattable
• Couvercle pour le fin de service
• Brochettes en inox 30cm & 20cm
• Ustensiles (consulter le catalogue
en ligne sur www.mibrasa.com)
• Table Robatayaki
5
Page 25
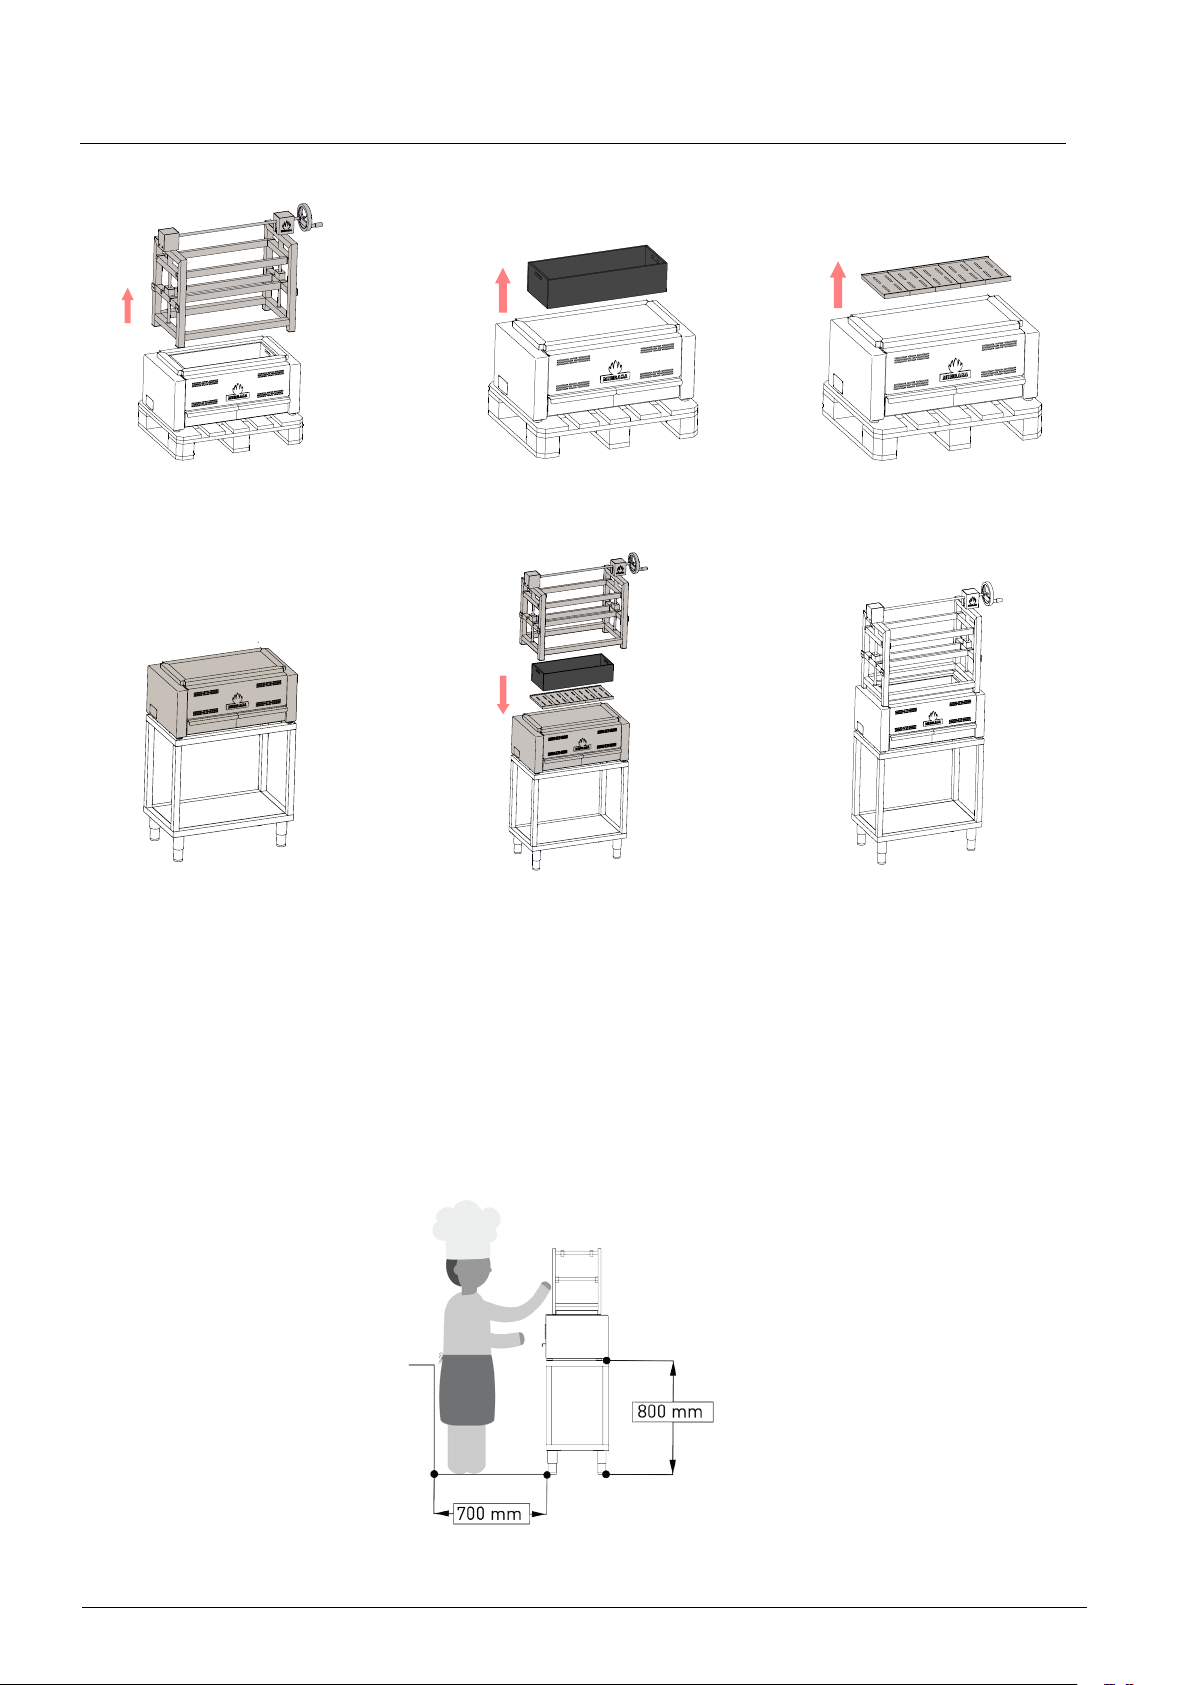
4. Instructions d’installation
1 32
Enlever la structure
Retirer le brûleur
Enlevez les grilles en fonte
Placez le corps principal
sur la table
4.1 Indication de montage et norme de sécurité
• Espace libre requis aux éléments construïts/appareils électrodomestiques:
A murs latéraux = 457mm
A mur arrière = 711 mm
• Espace du travail du chef et hauteur d’installation recommandée:
Repositionner tous les
éléments
Prêt à être utilisé
654
6
Page 26
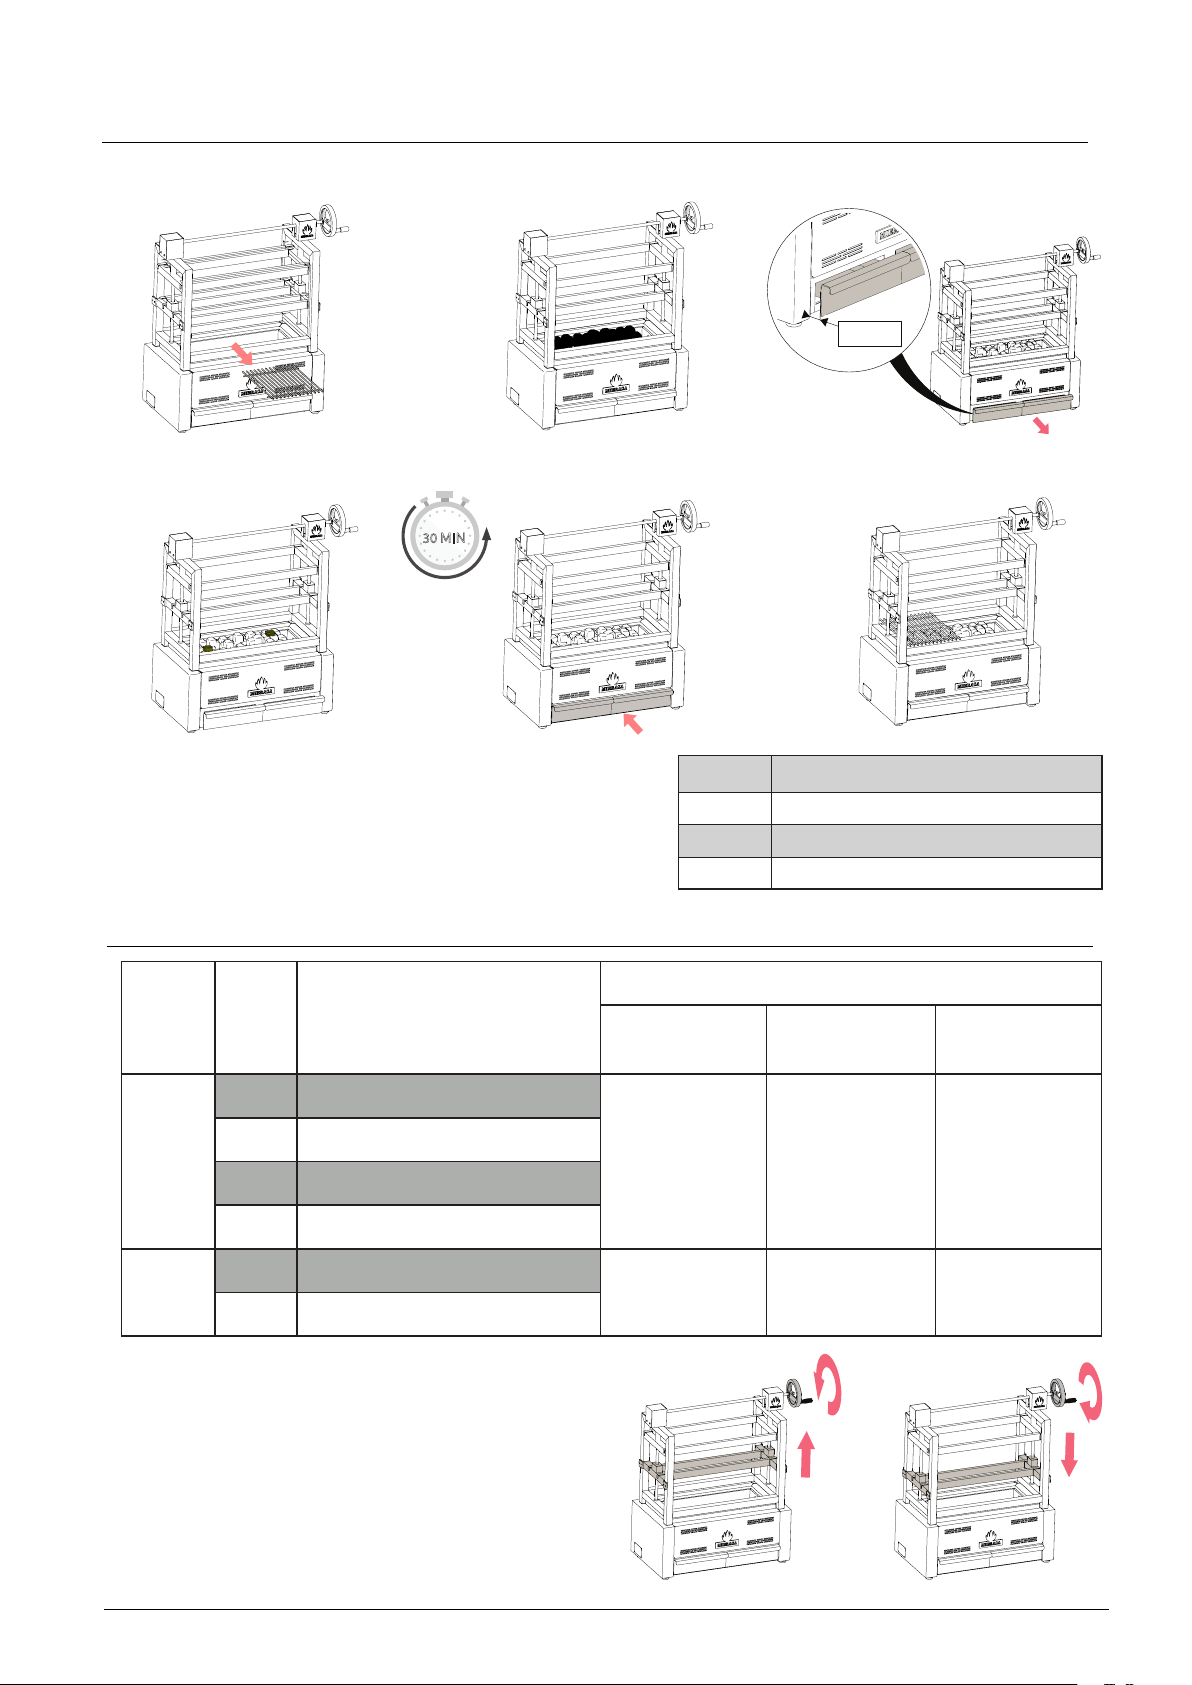
5. Mise en route
1
Enlever les grilles Charger le charbon
4
Placer et allumer les
tablettes allume-feu
30 MIN
2
Fermer le tiroir
5
Ouvrir le tiroir
3
40 mm*
Prêt pour la cuisson
6
Quantité approximative de charbon selon le modèle:
6. Fonctionnement
Niveau Code Description
RLG Grille inférieure
LGM Grille à mailles inférieure
1
FTTG Plancha Teppanyaki lisse
PTG
RTG Grille supérieure
2 / 3
TGM Grille à mailles supérieure
Plancha Teppanyaki perforée
RM 60 /
RM-SE 60
1 2 3
1 2 3
Modèle Charge initiale de charbon
60 3 Kg
80 4 Kg
115 7 Kg
Nombre Max. grilles/niveau
RM 80 / RM-SE
80
RM 115 /
RM SE 115
Fonctionnement du système d’elevation:
7
Page 27

7. Normes de maintenance et de sécurité
7.1. Nettoyage quotidien
Ne pas utiliser de produits chimiques ou de l’eau pour nettoyer l’intérieur du Robatayaki.
Grilles: Nettoyer à l’aide d’une brosse métallique avant et après chaque service.
Tiroir à cendres:
cendres.
Nous recommandons de retirer le tiroir en entier une fois par semaine
dres et la suie qui se trouvent au fond du Robatayaki. Une accumulation des cendres pourrait
entraver et gêner la fermeture complète du tiroir.
Une fois refroidies, les cendres peuvent être utilisées comme engrais.
ATTENTION!
mable ou déformable. Placer les dans un récipient métallique.
7.2. Soins particuliers
Hotte d’extraction: Il est très important de conserver les ltres de la hotte d’extraction
propres pour éviter une accumulation de suie et de graisse, ce qui pourrait conduire à la
propagation d’un éventuel incendie.
Ouvrir le tiroir à cendres et à l’aide d’une pelle métallique, retirer les
et nettoyer les cen-
N’oubliez pas de vider les cendres de charbon dans un récipient non inam-
Mibrasa® ne sera en aucun cas responsable de possibles dommages qui pourraient être
causés par une mauvaise utilisation du Robatayaki et des installations qui ne correspondraient pas aux recommandations données.
8
Page 28

A lire attentivement avant d’utiliser le Robatayaki Mibrasa®.
Ne pas tenir compte des préventions de dangers, avertissements et précautions indiqués
dans ce manuel, pourra occasionner de sérieuses lésions corporelles ou un feu ou une
explosion avec dommages matériels.
7.3. Normes de sécurité
• Utiliser uniquement du charbon végétal dans le Robatayaki Mibrasa®.
• Lors du premier allumage du Robatayaki, attendre au minimum une heure avant la
mise en service.
• Utiliser le Robatayaki Mibrasa® avec vigilance. Il ne doit jamais être laissé sans survei-
llance ou déplacé pendant son fonctionnement.
• PRECAUTION Ne pas surcharger le Robatayaki. Consulter la table de charge du point 5.
• Les cendres doivent être déposées dans un récipient métallique. Ce récipient doit être
placé dans un lieu loin des matériaux combustibles en attendant d’être vidé. Avant de
vider le récipient, les cendres doivent refroidir complètement.
• Ne pas essayer d’éteindre les braises avec de l’eau
.
• Ne pas nettoyer le Robatayaki lorsqu’il est chaud ou en marche.
• Lorsque le Robatayaki est chaud ou en marche, ne pas utiliser des produits chimiques
pour nettoyer l’extérieur.
LES DANGERS
• Une mauvaise installation du Robatayaki peut provoquer un incendie. Suivre les ins-
tructions d’installation recommandées.
• Éloigner les enfants et les animaux domestiques du Robatayaki. Certaines parties
accessibles du Robatayaki peuvent être très chaudes.
• Ne pas utiliser d’alcool, d’essence ou autres liquides similaires pour allumer ou raviver
les braises. Utiliser seulement les pastilles allume-feux Ecore Mibrasa®.
• Si le Robatayaki Mibrasa® est installé à l’extérieur, ne pas le couvrir avec une housse ni
aucun autre produit inammable lorsqu’il est en fonctionnement ou chaud.
• Revoir les restrictions du point 4.1 concernant les distances minimales des matériaux
combustibles.
9
Page 29

8. Conditions générales
8.1. Garantie
• Tous les Robatayaki Mibrasa® sont garantis 2 ans contre tout défaut de fabrication.
• Le client est responsable de l’installation, la mise en service et la maintenance du produit.
• La garantie est annulée en cas de:
(I)
(II) réparations, modications ou réglages effectués par l’acheteur ou tierce
sans l’autorisation préalable de Mibrasa®,
(III) défauts ou dommages non communiqués dans la période de garantie ci-dessus
indiquée,
(IV) dommages dus à une négligence non attribuable à MIBRASA®, accident,
mauvaise utilisation, installation inappropriée, mauvaise manipulation ou con ditions anormales de température, humidité, salissure, corrosion ou toute autre
cause extérieure à Mibrasa®.
dommages causés par un mauvais usage ou mauvaise installation du produit
,
8.2. Retours
• Le matériel retourné doit être en parfaite condition de conservation.
• Tous les retours doivent être notiés par écrit et/ou par fax et doivent être conrmés par
notre service commercial.
• Tous les retours doivent être renvoyés à Mibrasa® aux frais du client et doivent être ac-
compagnés de la facture et du numéro du bon de livraison.
• Les retours seront acceptés à condition que le four soit dans son emballage d’origine,
non utilisé et à l’état neuf. Si le four est utilisé, obsolète ou abimé, il sera détruit sans
aucun remboursement effectué.
• Pour tout retour, une décote de 10 % sera appliquée pour couvrir les frais de gestion.
8.3. Résérve de propriété
• Mibrasa® conserve la propriété des biens vendus jusqu’au paiement effectif de l’in-
tégralité de leur prix.
• Mibrasa® se réserve le droit de modier sans préavis ses produits et ses prix.
10
Page 30

Page 31

Page 32
Feeding the Senses!
8950 SW 74th Ct., Suite 1406
Miami, Florida 33156
(408) 348-7607
www.mibrasa.com
v.1.5
 Loading...