

Page 1
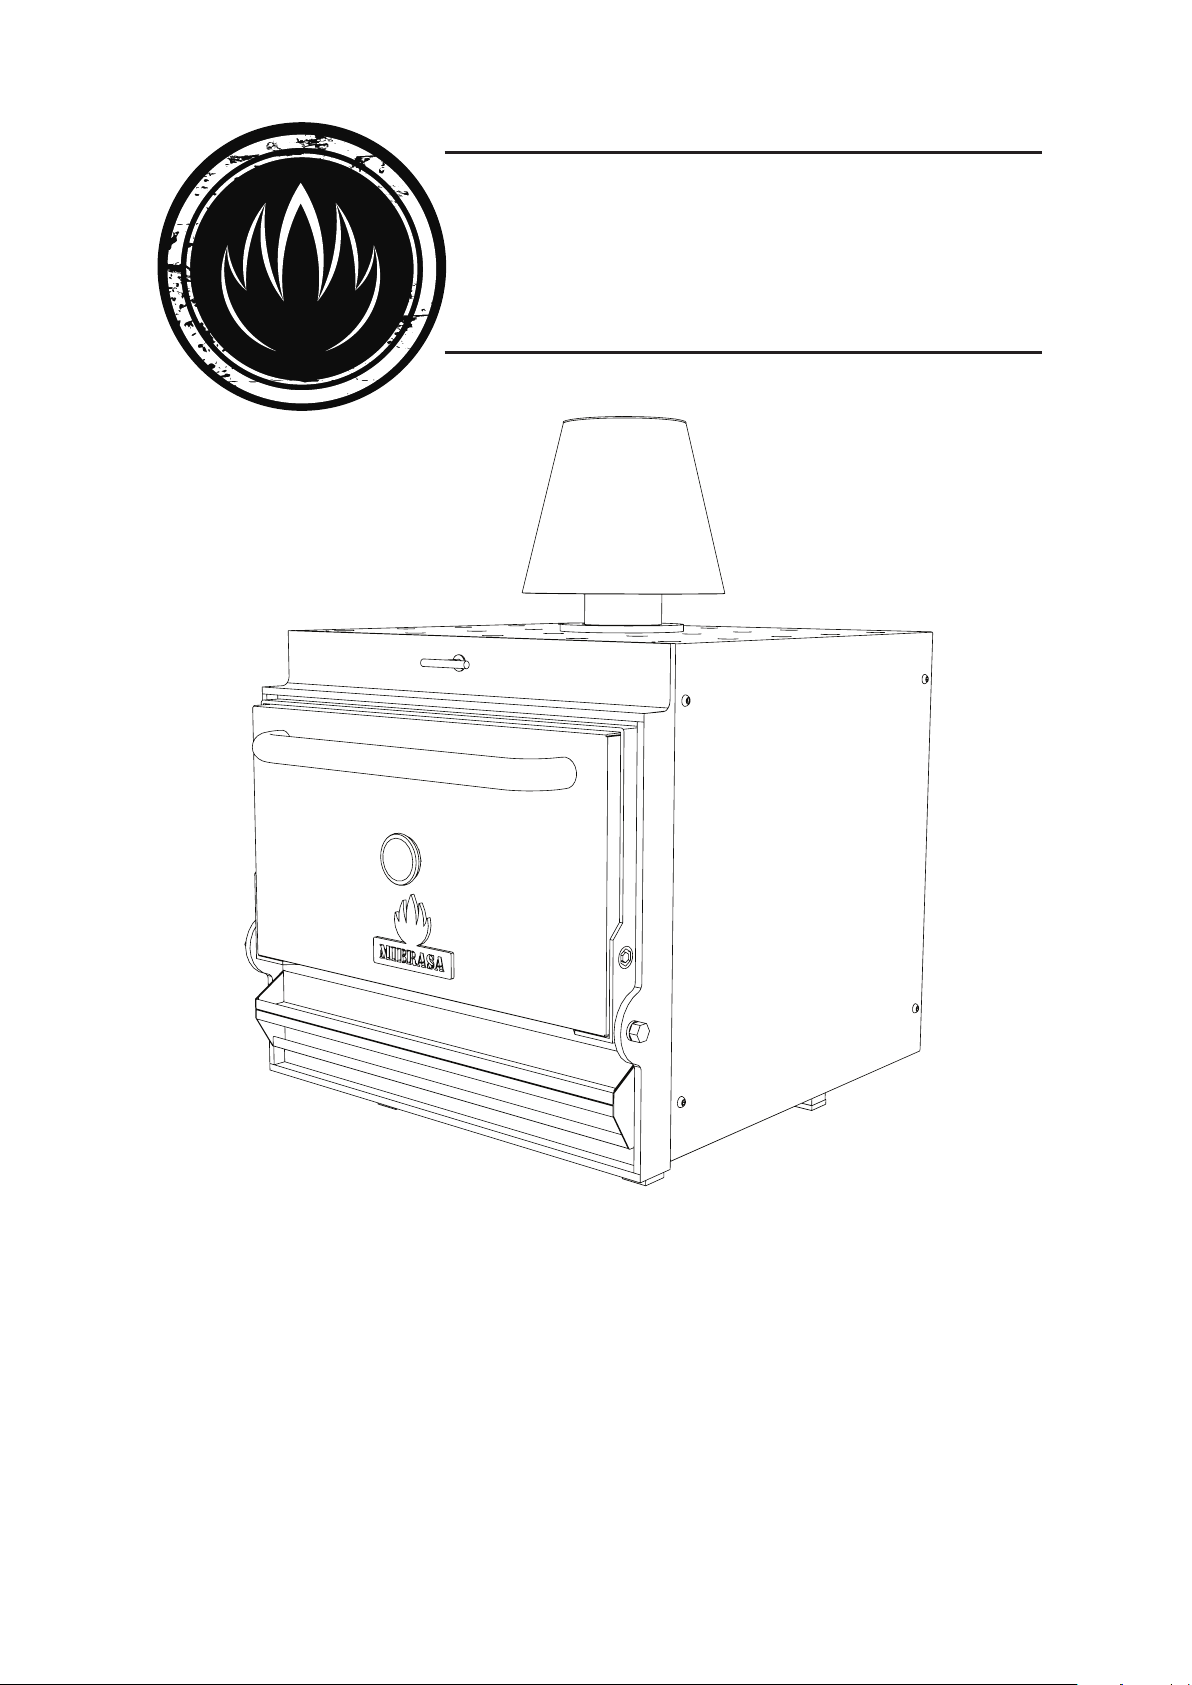
MIBRASA® OVEN
USER MANUAL
Read all instructions before installing and using the appliance.
Save these instructions.
www.mibrasa.com
Feeding the Senses!
Page 2

Page 3
Mibrasa,
the Masters of fire!
We are fascinated by re and invite you to
experience grill cooking for yourselves. Cook
and create in a way that awakens your taste
buds and reminds us of the beauty in simplicity.
Page 4

Page 5

Contents
1. Introduction 1
2. Mibrasa® oven description 3
3. Models 5
4. Installation instructions 8
4.1. Requirements for oven surroundings
4.2. Installation and assembly instructions
4.3. Smoke extraction
5. Instructions of use 16
5.1. Loading the charcoal
5.2. Lighting the charcoal
5.3. Prior to cooking
5.4. Ready to cook
5.5 After service
5.6 Reutilizing charcoal from the previous service
6. Maintenance and safety standards 19
6.1. Daily cleaning
6.2. Weekly cleaning
6.3. Special care
6.4. Safety standards
7. General conditions 21
7.1. Warranty
7.2. Returns
7.3. Property Reserve
Page 6

1. Introduction
Mibrasa® charcoal ovens are robust and solid, an essential piece of equipment for any
kitchen, giving a unique and delicious avor to all your ingredients.
Mibrasa® charcoal ovens comply to the strict standards & regulations set by internationally
recognized certications of quality.
Our ovens
Mibrasa® is a closed grill designed and developed in our workshops. Made from the best
quality steel by expert hands, our grills are designed to satisfy even the most demanding
chefs.
The technical specications allow the user to accurately control the airow through the
oven, regulating the intensity of the heat of the embers to grant a highly efcient way of
cooking while signicantly reducing the consumption of charcoal.
Mibrasa® charcoal ovens allow you to cook all types of foods retaining the natural avors while
bringing out a unique taste.
1
Page 7
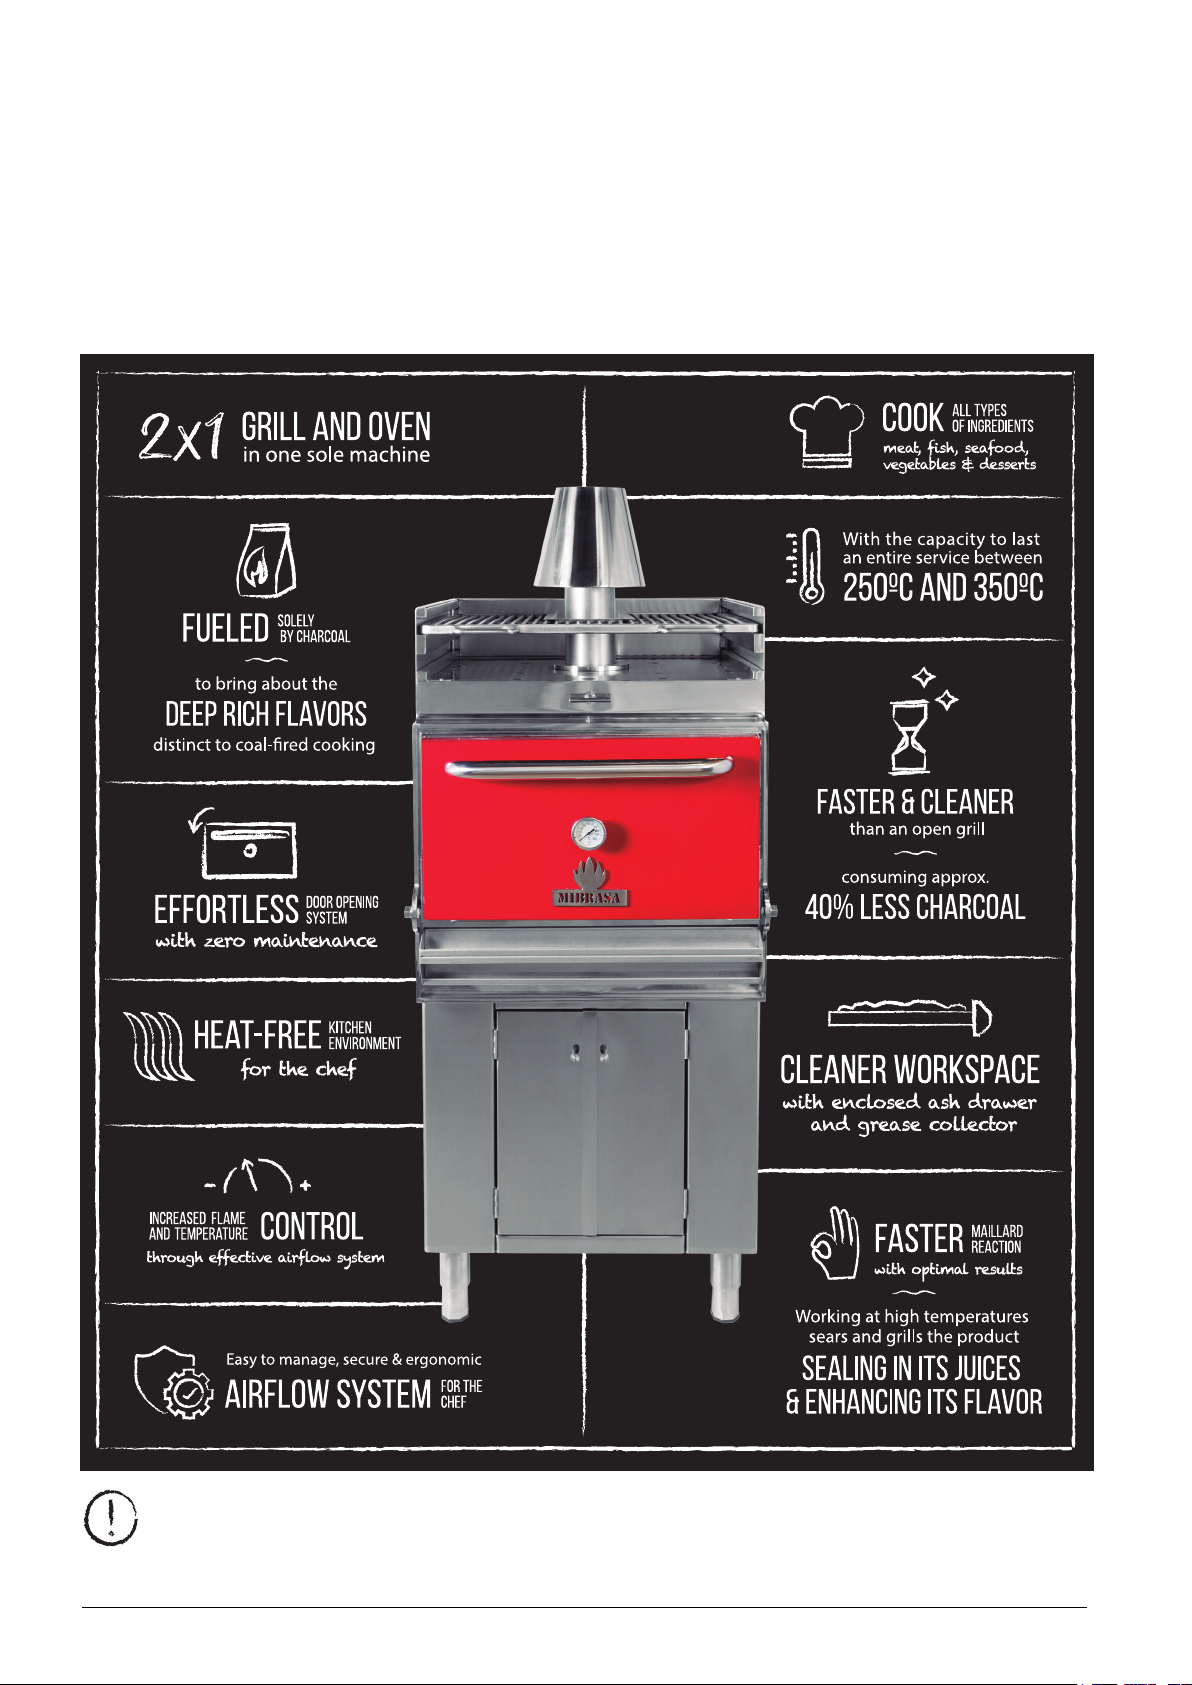
The versatility of Mibrasa® ovens
We have a wide range of models and accessories allowing you to completely personalize your
Mibrasa® oven and adapt it to your needs.
The advantages of Mibrasa® ovens:
The MIBRASA® HMB AB SB has a heating rack with an average temperature of 40ºC, perfect for
bringing the meat to temperature and keeping ingredients warm. It also comes with a natural
heated holding cupboard below with a temperature between 50º and 70ºC.
2
Page 8
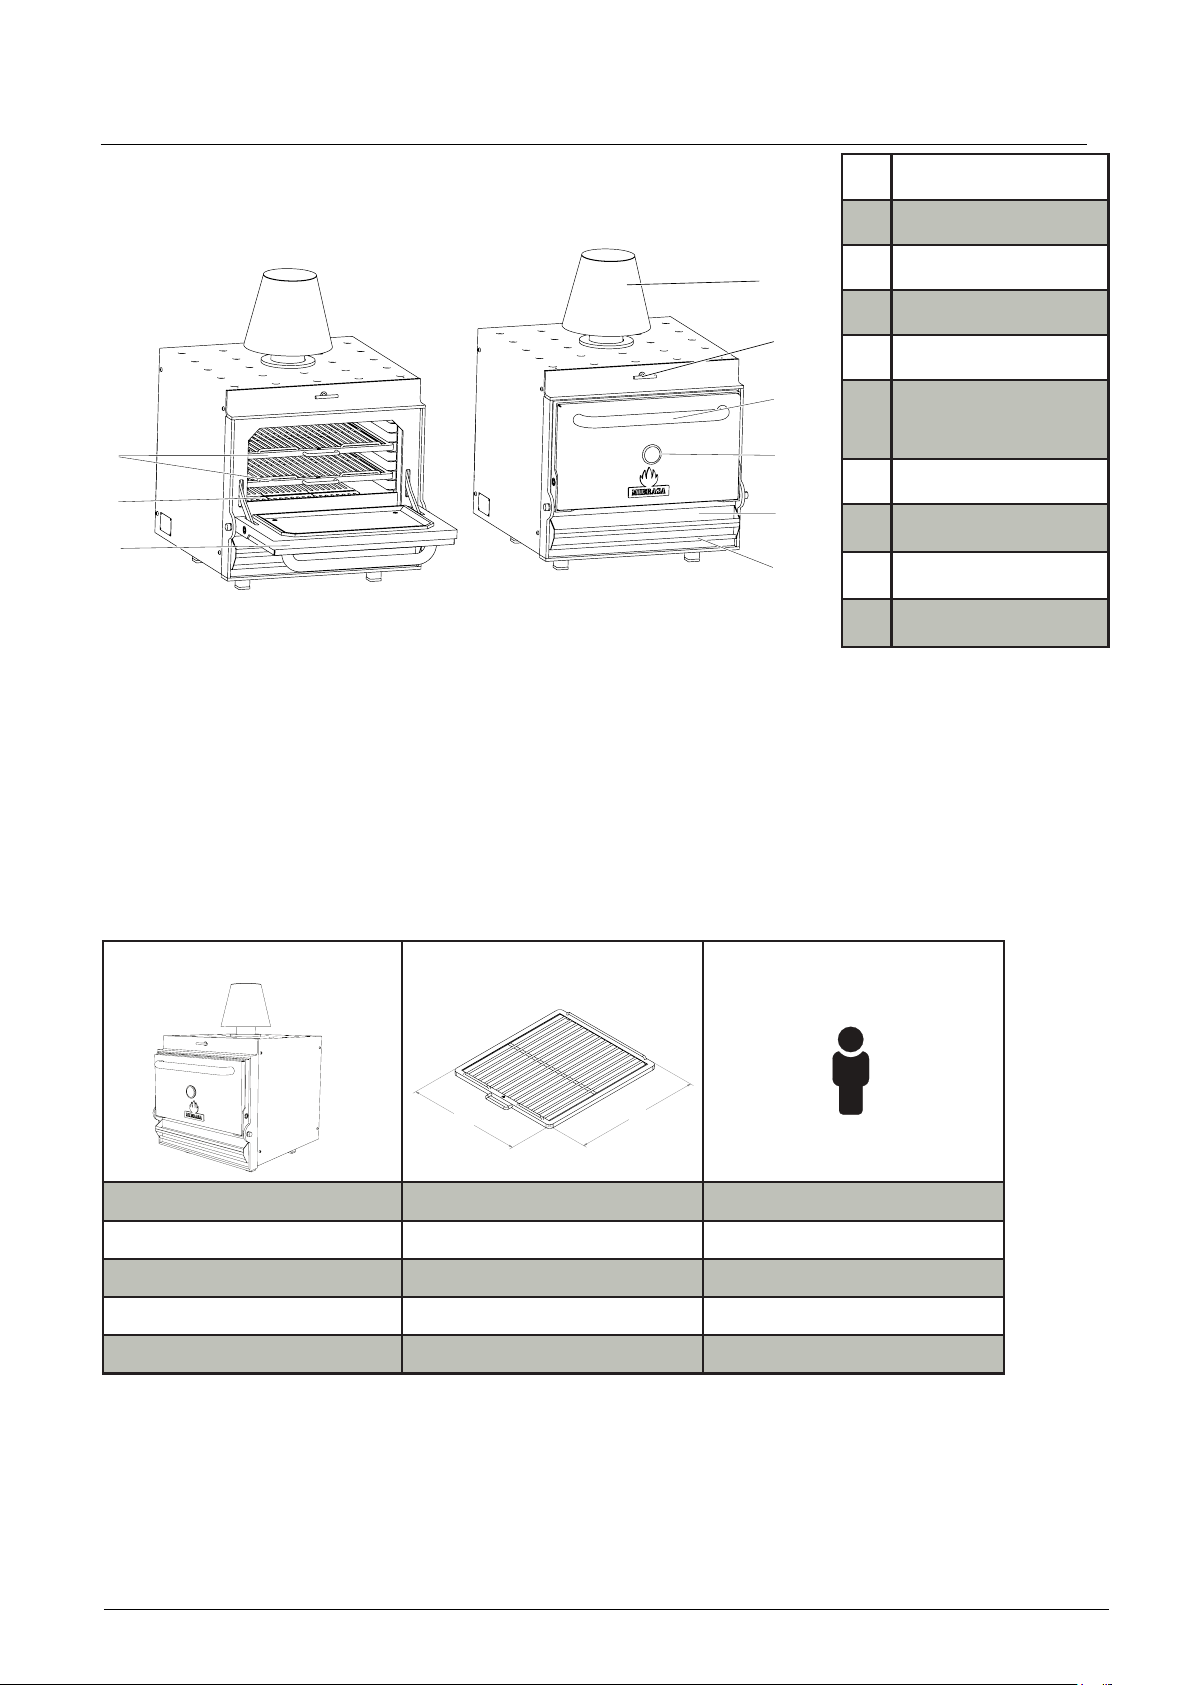
2. Mibrasa® oven description
A Firebreak
B Dissipating filter
A-B
C Upper damper
D Door handle
C
E Thermometer
D
Lower damper /
F
Ash collector
J
E
G Grease collector
I
F
H Door
H
G
I Charcoal grids
J Grills
Note: Regulating the entry of airow is controlled through the opening and closing of the lower damper
whilst the air outlet is controlled using the upper damper.
Grill sizes and approximate diners per service:
Model Grill dimensions (mm) Diners per service
542
W
HMB MINI 540 x 345 35-45
HMB MINI PLUS 540 x 395 45-65
HMB 75 540 x 595 75-95
HMB 110 760 x 595 110-130
HMB 160 760 x 795 160-190
600
D
3
Page 9
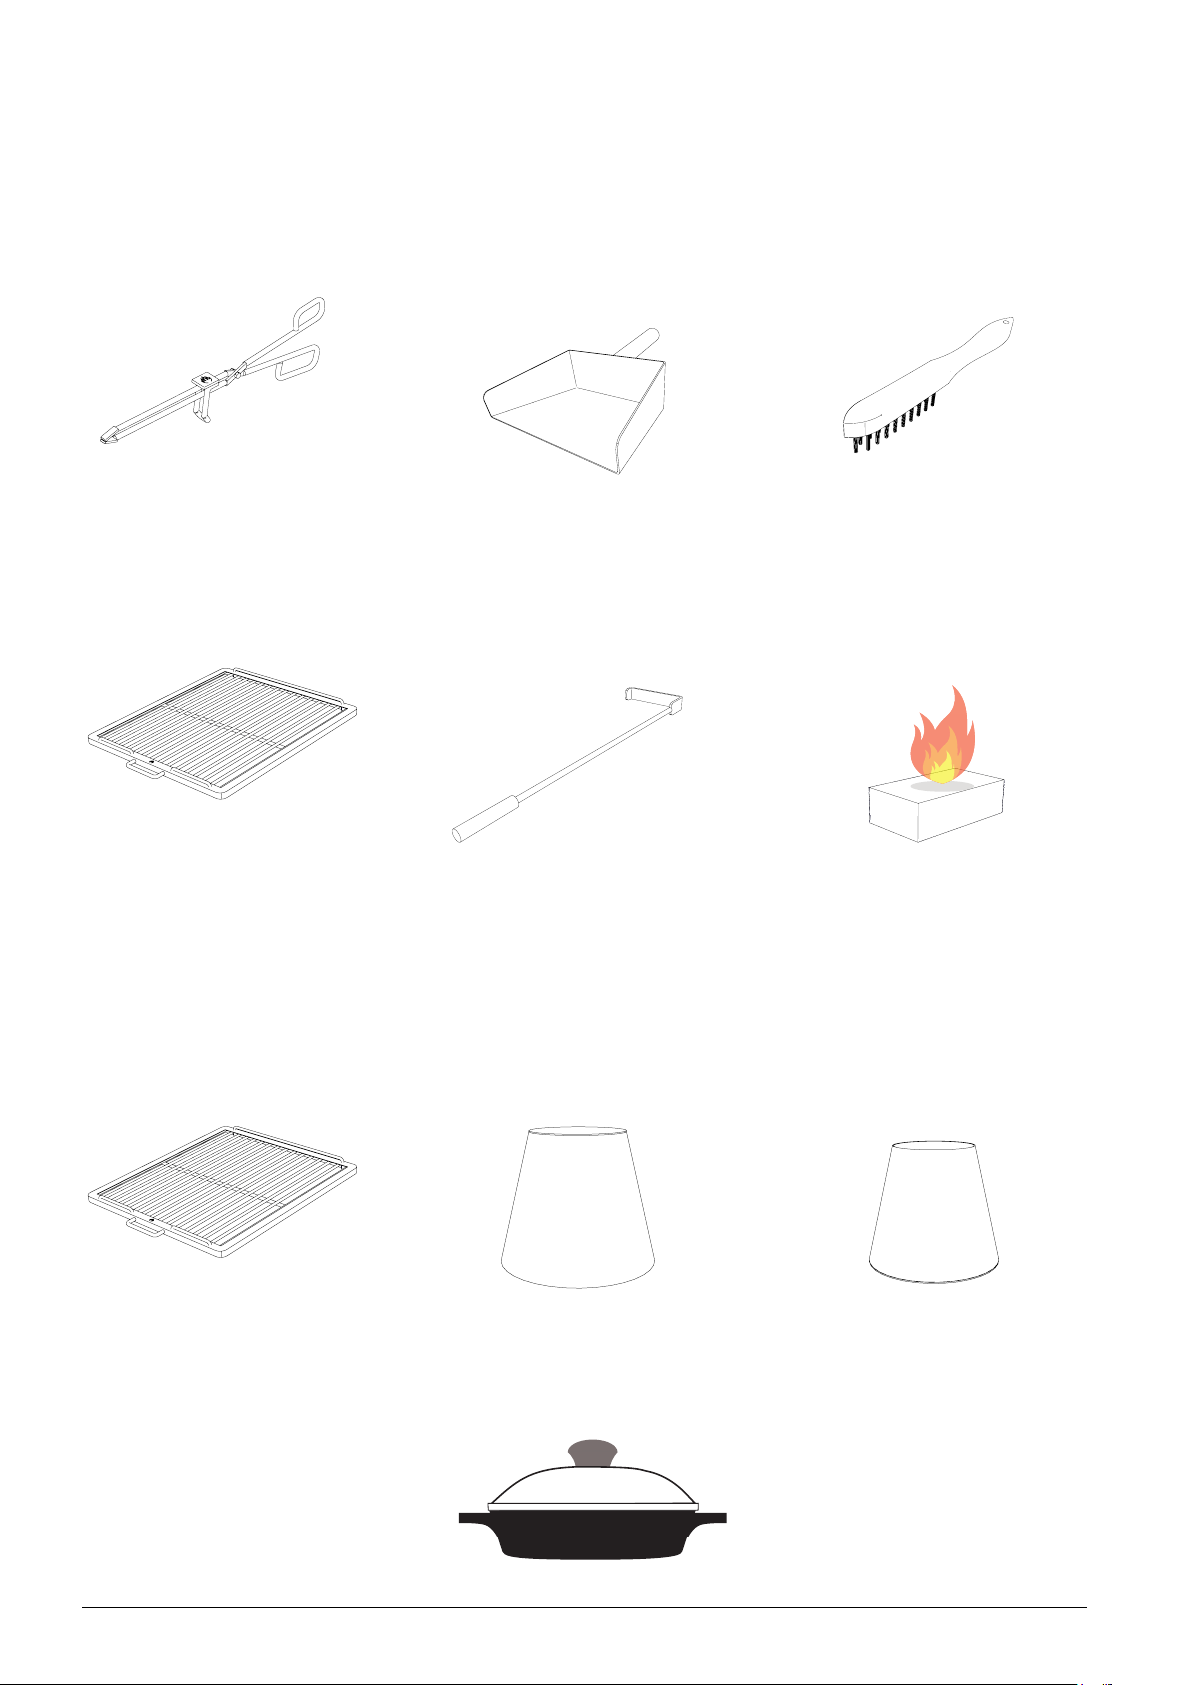
Included accessories:
Mibrasa® tongs Ash shovel Grill brush
Grill
Optional accessories:
Extra grill
Ember poker
Dissipating filter
Mibrasa® Ecofire firelighters
Firebreak
Kitchenware (consult online catalog at www.mibrasa.com)
4
Page 10
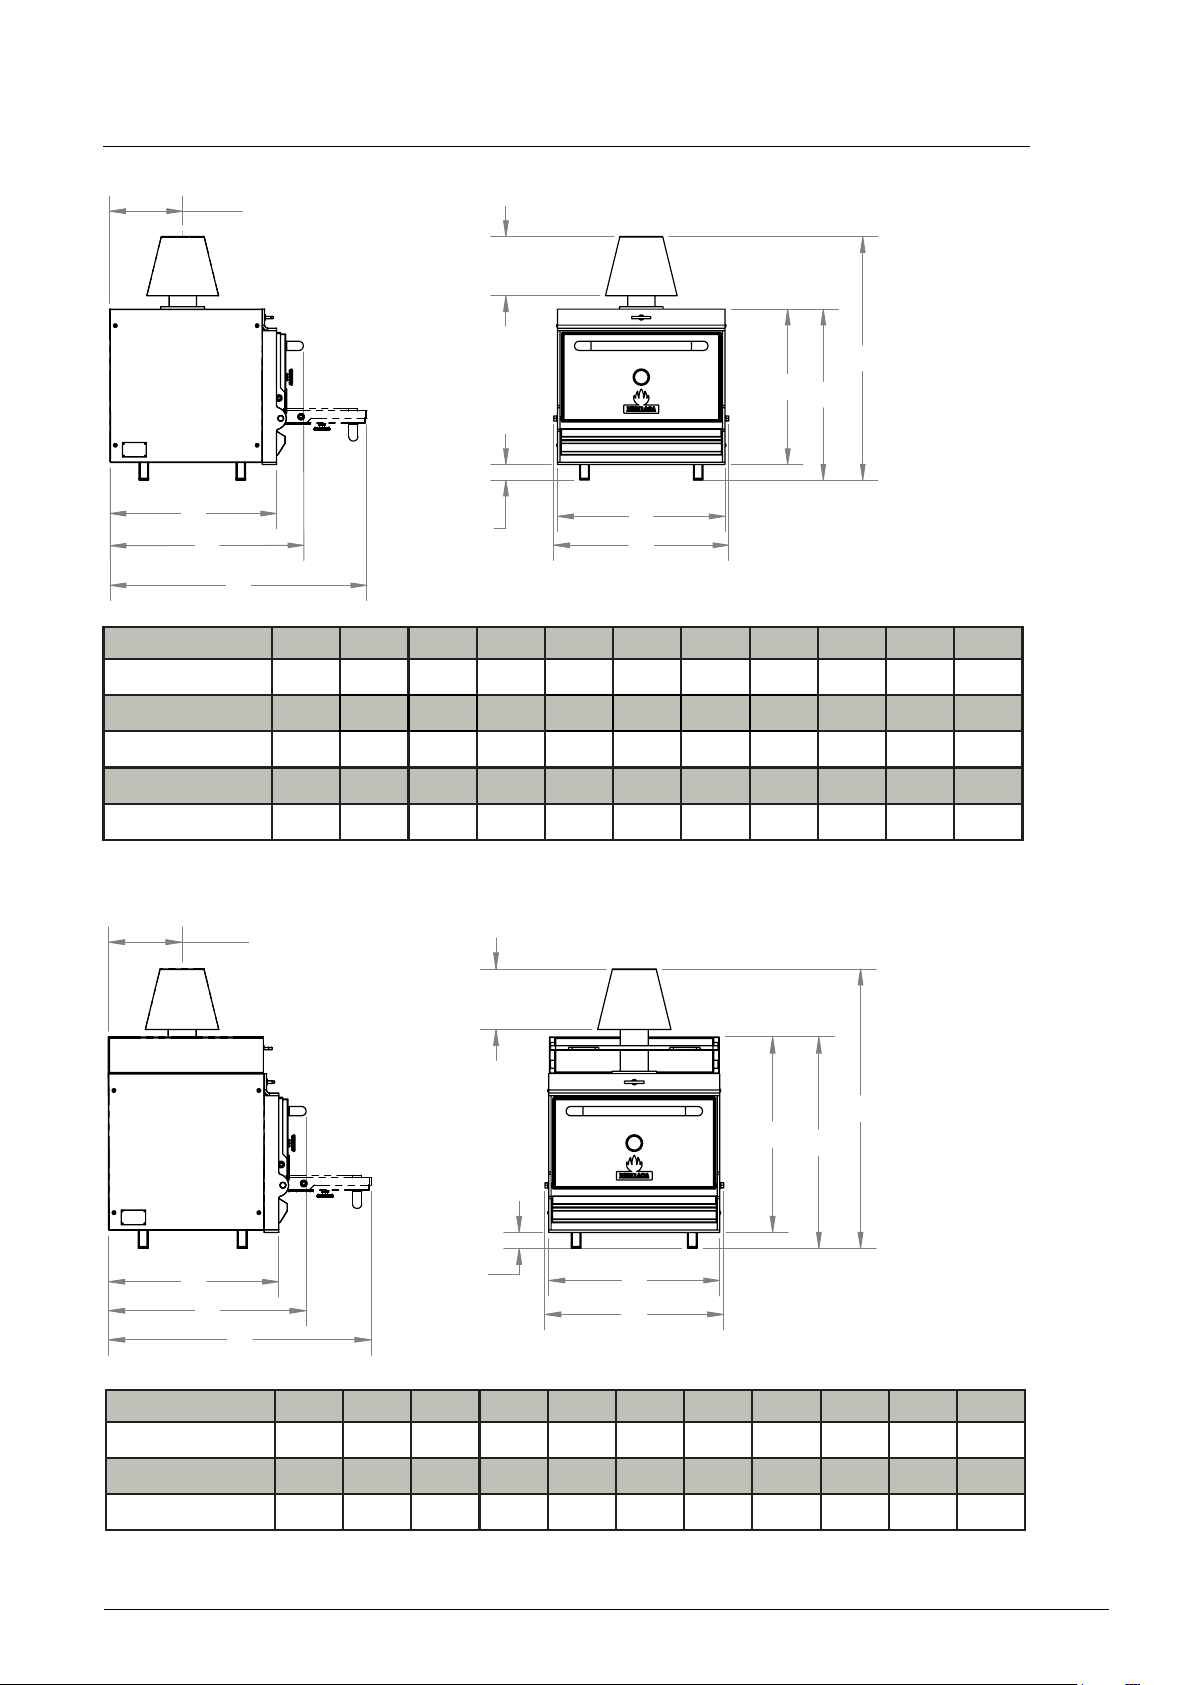
3. Models
HMB Worktop models
A
E
Dimensions in mm
K
I
J
B
C
D
Models A B C D E F G H I J K
HMB MINI 200 490 600 810 250 65 700 735 520 585 895
HMB MINI PLUS 230 510 625 890 250 65 700 735 650 715 1025
HMB 75 300 700 810 1075 250 65 700 735 650 715 1025
HMB 110 300 700 810 1160 250 65 920 955 740 805 1115
HMB 160 350 900 1010 1360 250 65 920 955 740 805 1115
F
G
H
HMB SB Worktop model with heating rack
A
E
K
I
J
B
C
D
Models A B C D E F G H I J K
HMB SB 75 300 700 810 1075 250 65 700 735 800 865 1155
HMB SB 110 300 700 810 1160 250 65 920 955 890 955 1245
HMB SB 160 350 900 1010 1360 250 65 920 955 890 955 1245
F
G
H
5
Page 11
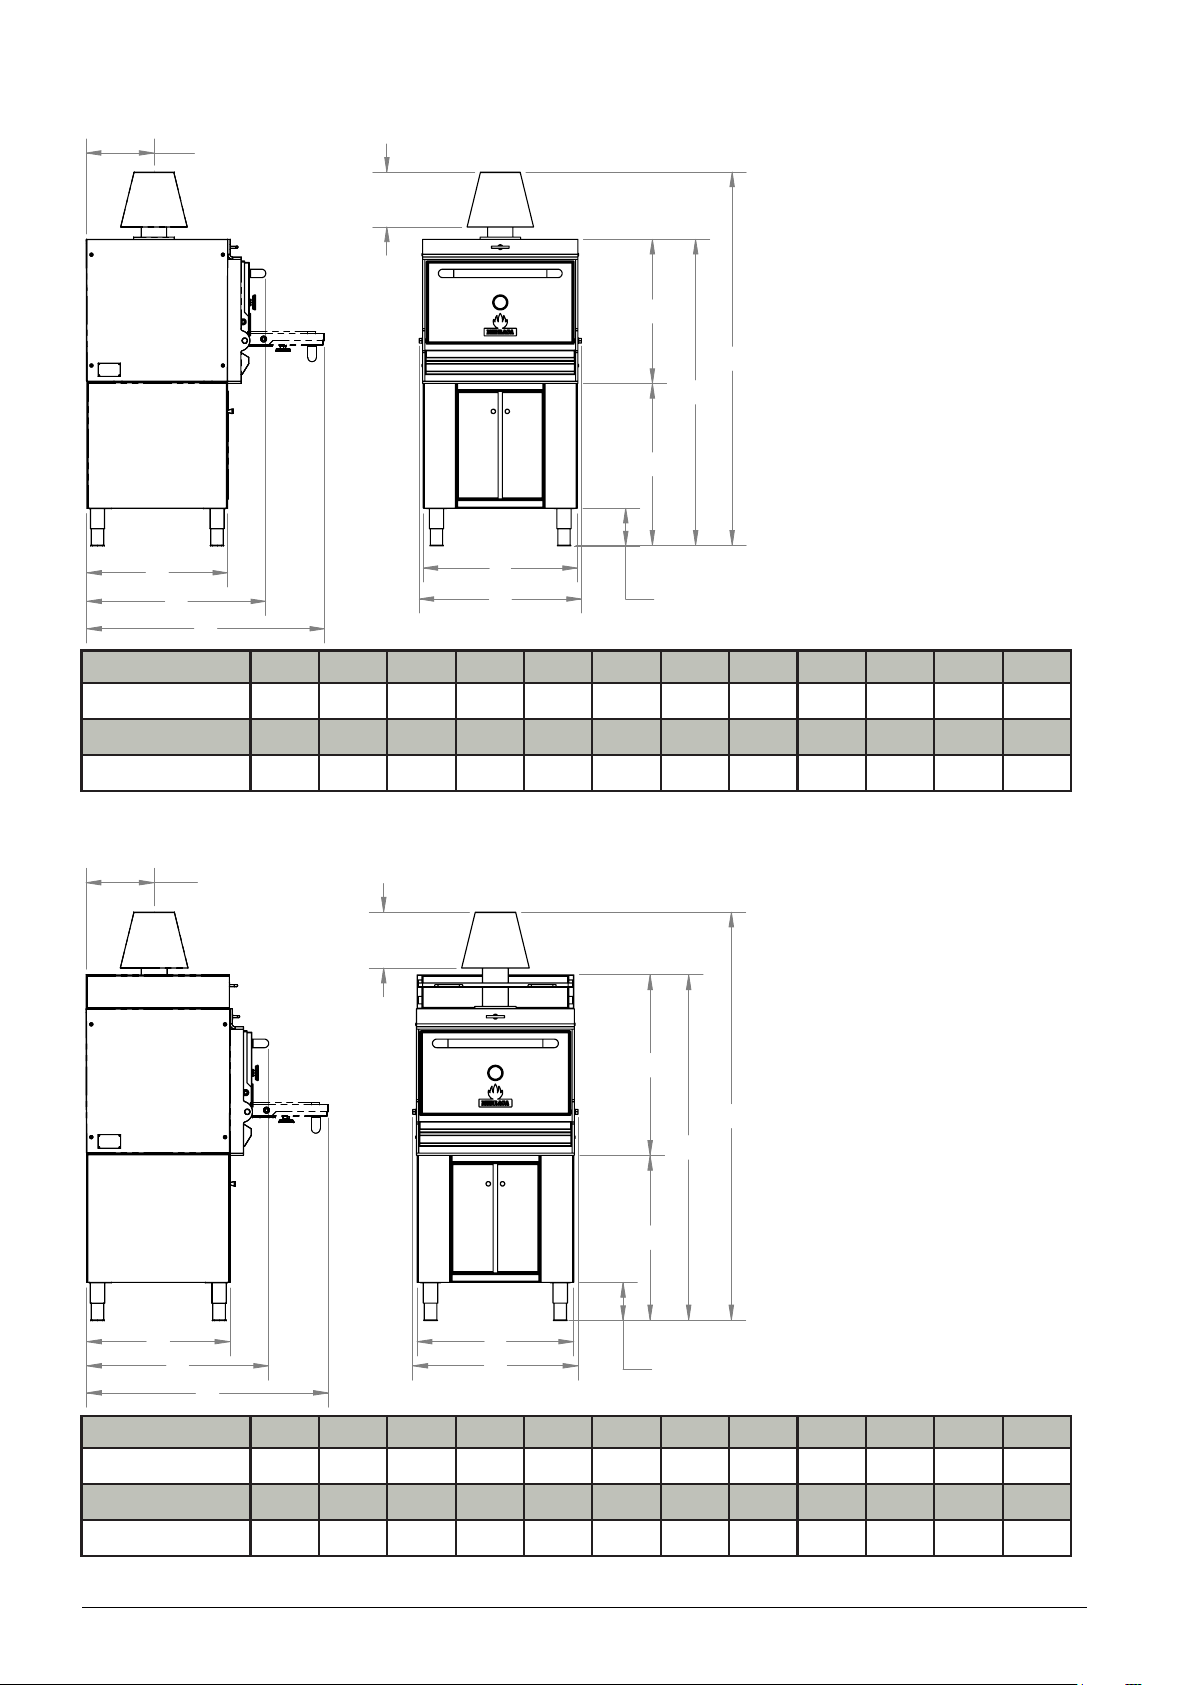
HMB AB with cupboard below
A
E
H
L
K
I
B
C
D
F
G
J
Models A B C D E F G H I J* K L
HMB AB 75 300 635 810 1075 250 695 735 650 740 170 1390 1700
HMB AB 110 300 635 810 1160 250 920 955 740 690 170 1430 1740
HMB AB 160 350 835 1010 1360 250 920 955 740 690 170 1430 1740
* Adjustable leg height: 135-195 mm
HMB AB SB with cupboard below and heating rack
A
E
H
L
K
I
B
C
D
F
G
J
Models A B C D E F G H I J* K L
HMB AB SB 75 300 635 810 1075 250 695 735 800 740 170 1540 1830
HMB AB SB 110 300 635 810 1160 250 920 955 890 690 170 1580 1870
HMB AB SB 160 350 835 1010 1360 250 920 955 890 690 170 1580 1870
* Adjustable leg height: 135-195 mm
6
Page 12
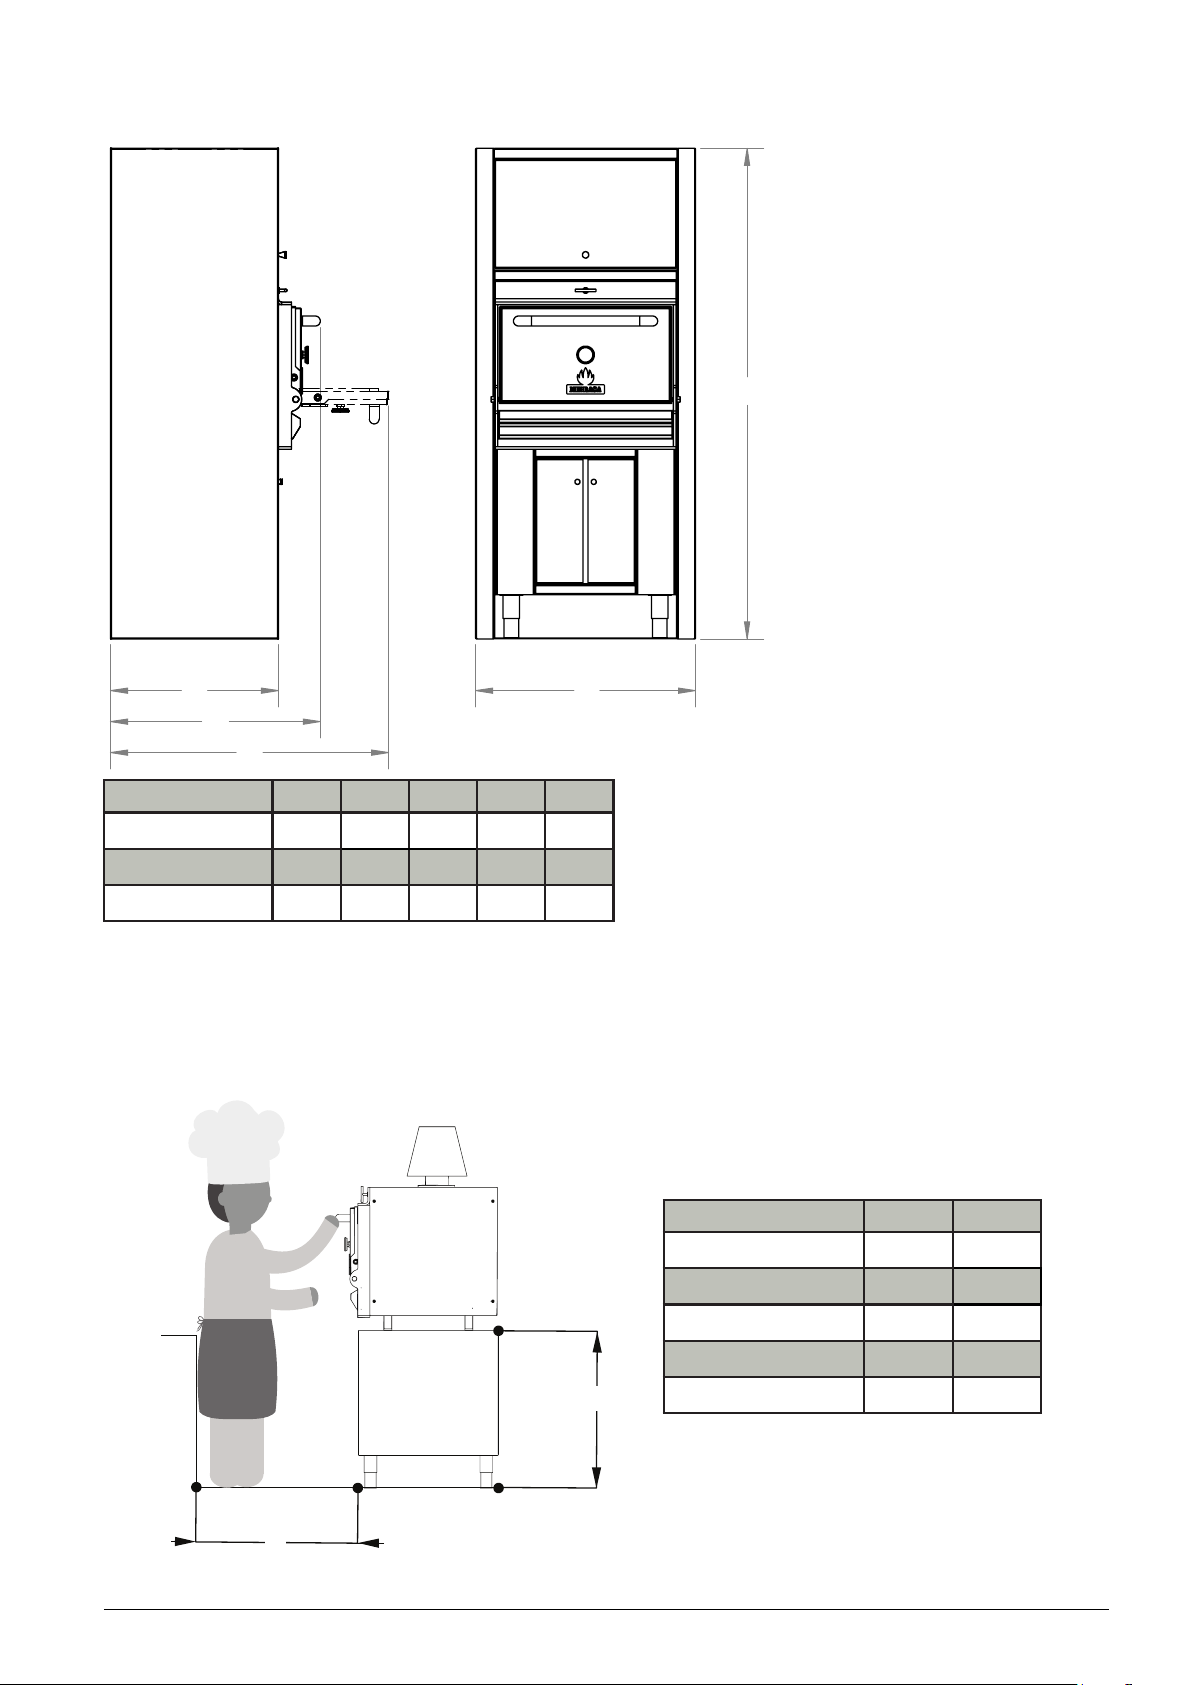
HMB AC with complete cupboard
D
A
E
B
C
Models A B C D E
HMB AC 75 650 815 1080 1900 850
HMB AC 110 650 815 1165 1900 1070
HMB AC 160 850 1015 1365 1900 1070
Measurements are subject to technical changes.
Workspace for the chef and recommended height of the worktop models
Models A B
HMB MINI 1100 800
HMB MINI PLUS 1100 700
HMB 75 1100 700
HMB 110 1100 600
B
HMB 160 1100 600
A
7
Page 13
4. Installation instructions
4.1. Requirements for oven surroundings
The installer should contact the local building or re ofcials concerning any installation
restrictions or need for inspection of the oven installation.
The minimum hearth extension areas to be covered with relationship to the door opening
of the oven for combustible oors should be the following:
a. 762 mm to each side of the door opening
b. 914 mm in front of the door opening
Clearances to combustible construction/other appliances:
a. Unit to backwall = 76 mm
b. Unit to sidewalls = 76 mm
Countertop models should be placed on a reproof material table or stand, preferably
metals: stainless steel, etc. Such support must be strong enough to support the weight of
the oven.
4.2. Installation and assembly instructions
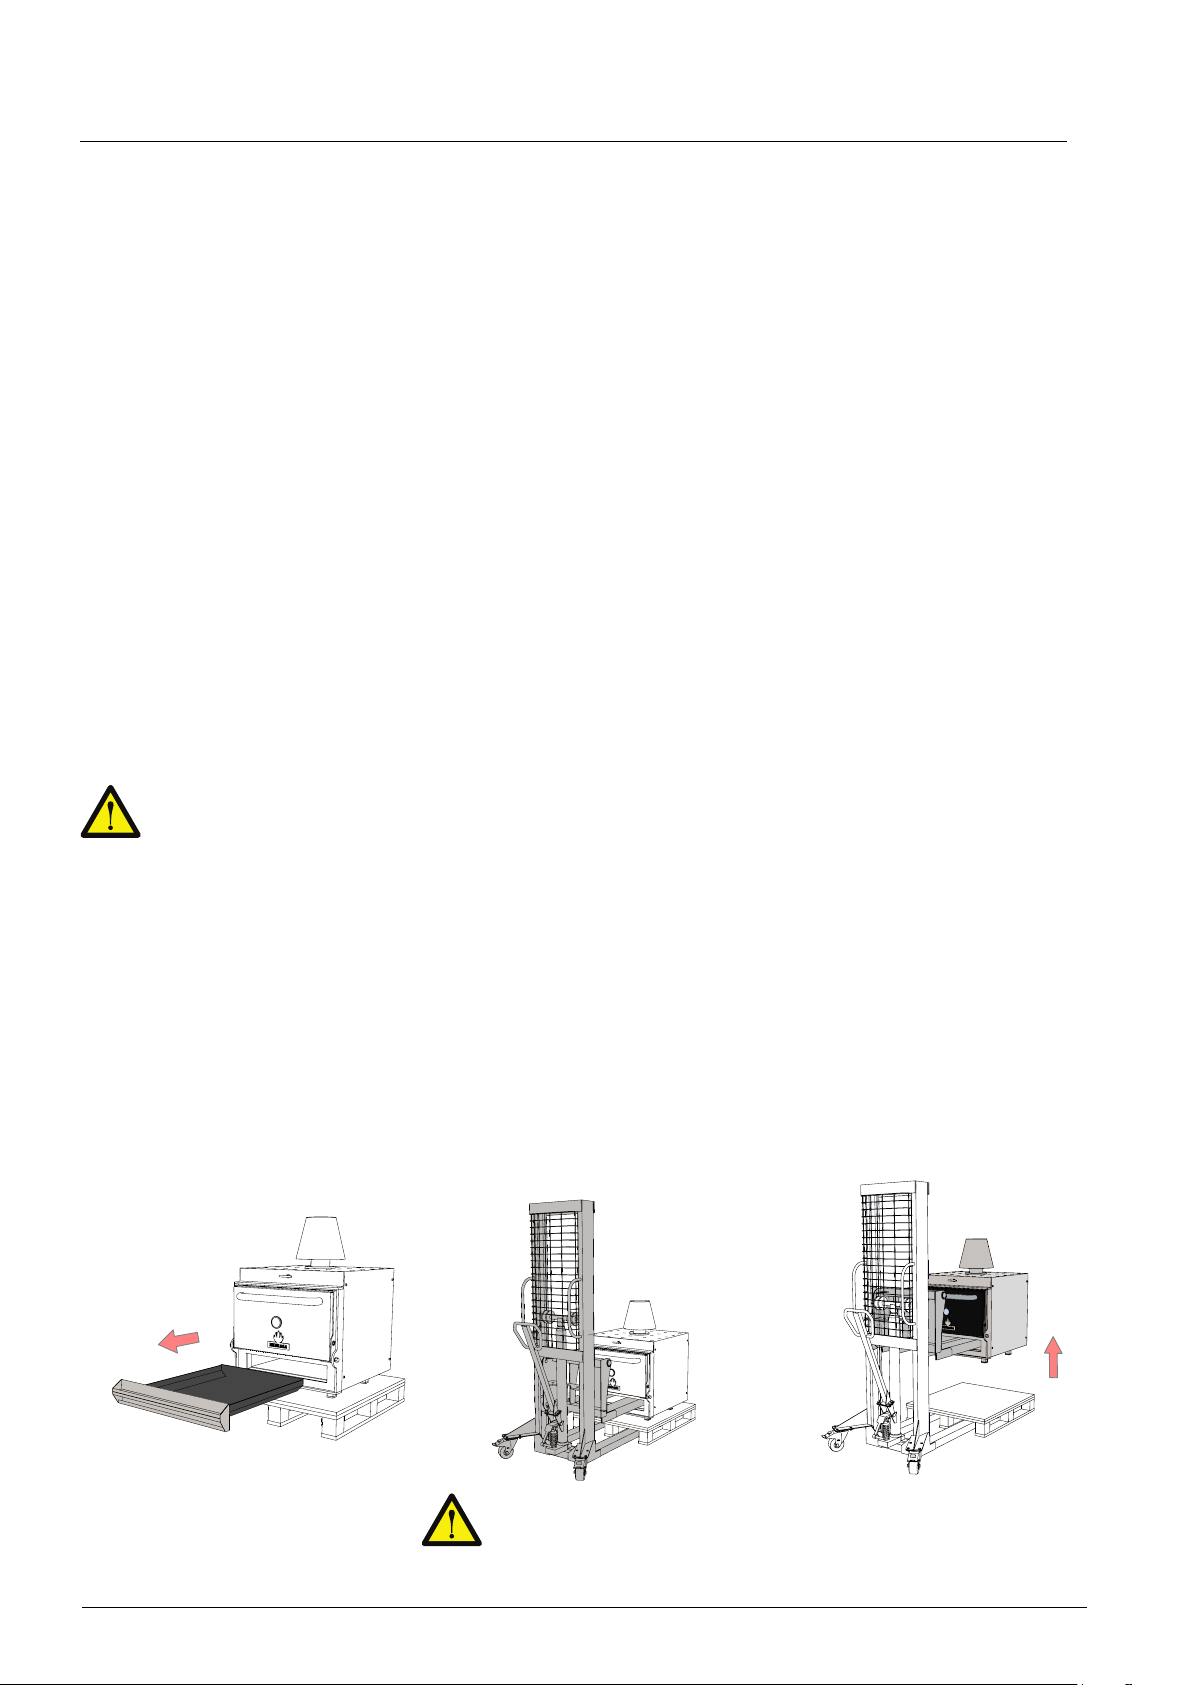
Due to the high weight of the ovens, it is always necessary to use lifting equipment to handle
them safely. If no such equipment is available, there must be an adequate number of personnel in compliance with local safety regulations, to assist with the installation.
Worktop models: - HMB MINI, MINI PLUS, 75, 110, 160
- HMB SB 75, 110, 160
Lifting using a lifting device (recommended)
Remove the ash collector
1
Insert the forks of a lifting de-
2
vice in the ash collector space
Lift the oven
3
Make sure the forks reach
the end of the oven.
8
Page 14
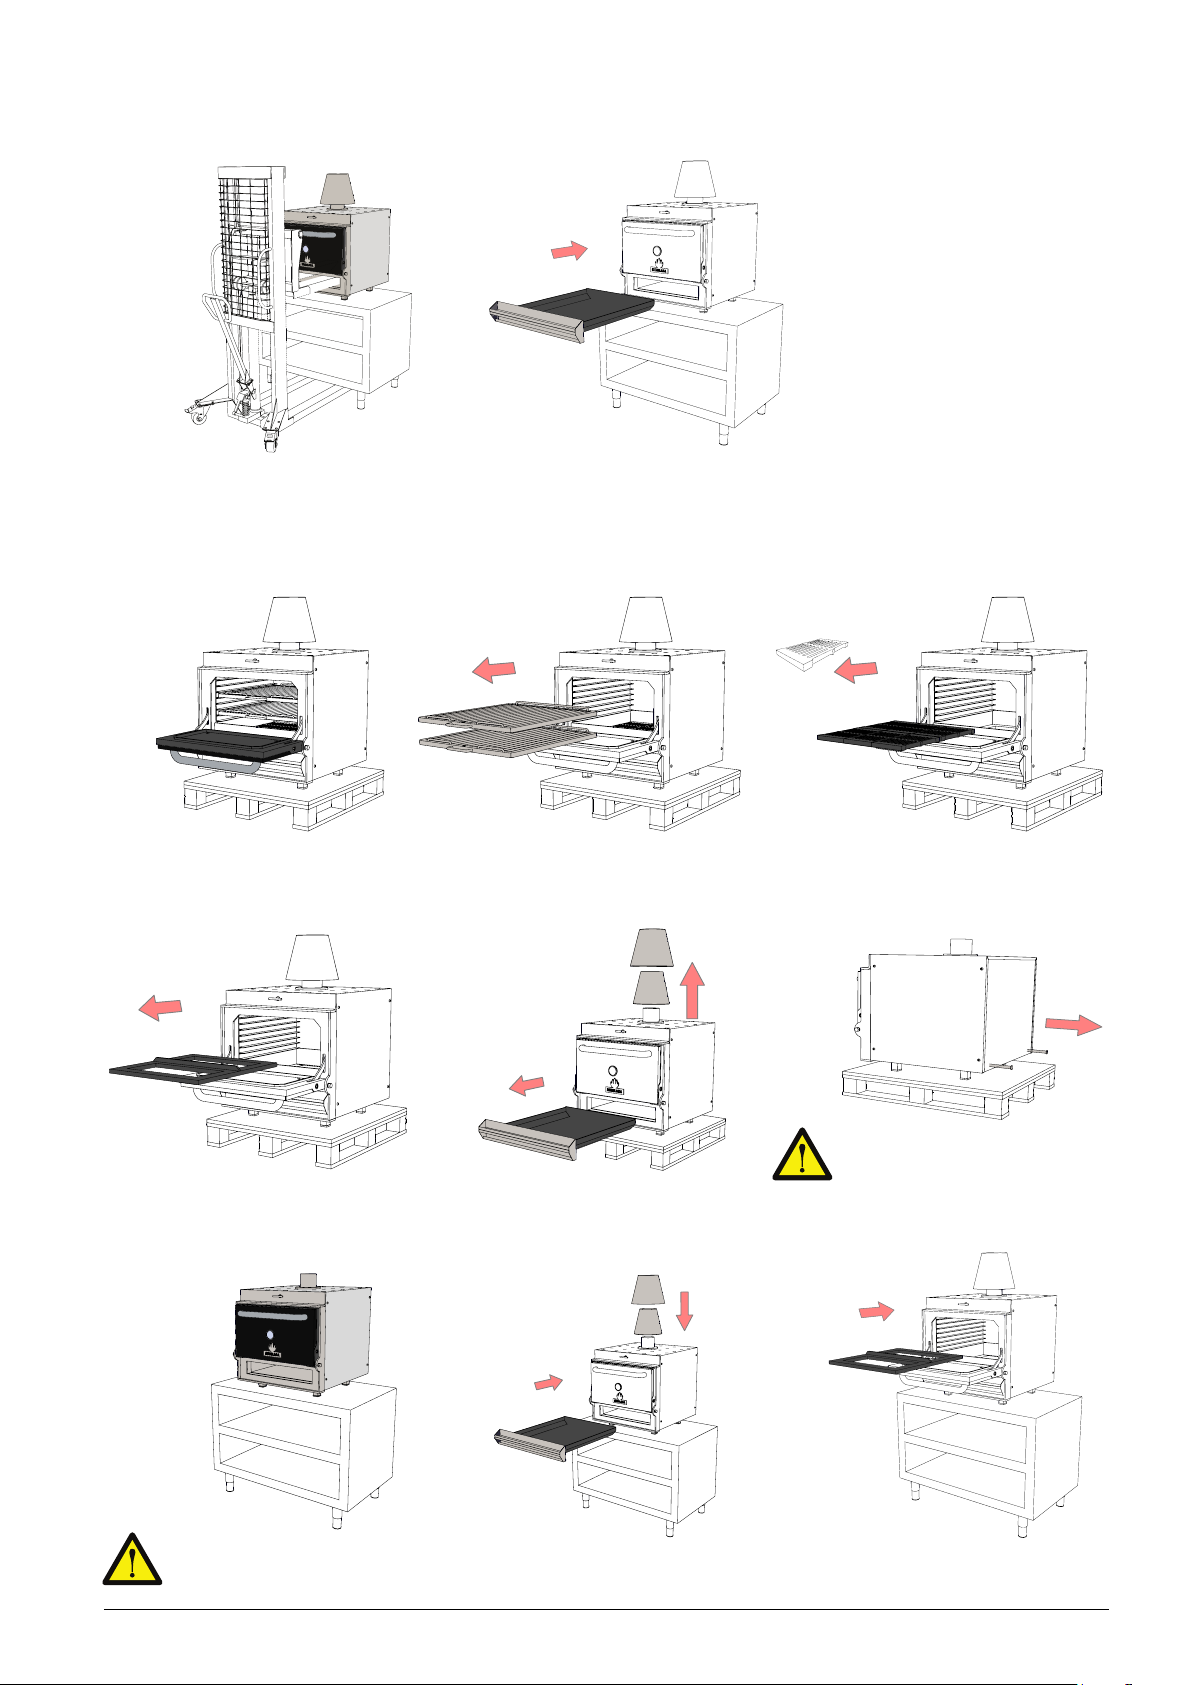
Place the oven on the
4
Place back the ash collector
5
countertop
Lifting by hand (not recommended)
Open the door
1
Remove the charcoal grids
4
support
Remove the grills
2
Remove the ash collector, dis-
5
sipating filter and firebreak
Remove the charcoal grids
3
If lifting by hand use the two
6
pull-out handle bars
Do not lift the oven from the
door handle
Place the oven on the
7
countertop
Majority of the weight is at the
front of the oven
Place back the ash collector,
8
firebreak and dissipating
filter
9
Place back the charcoal grids
9
support
Page 15
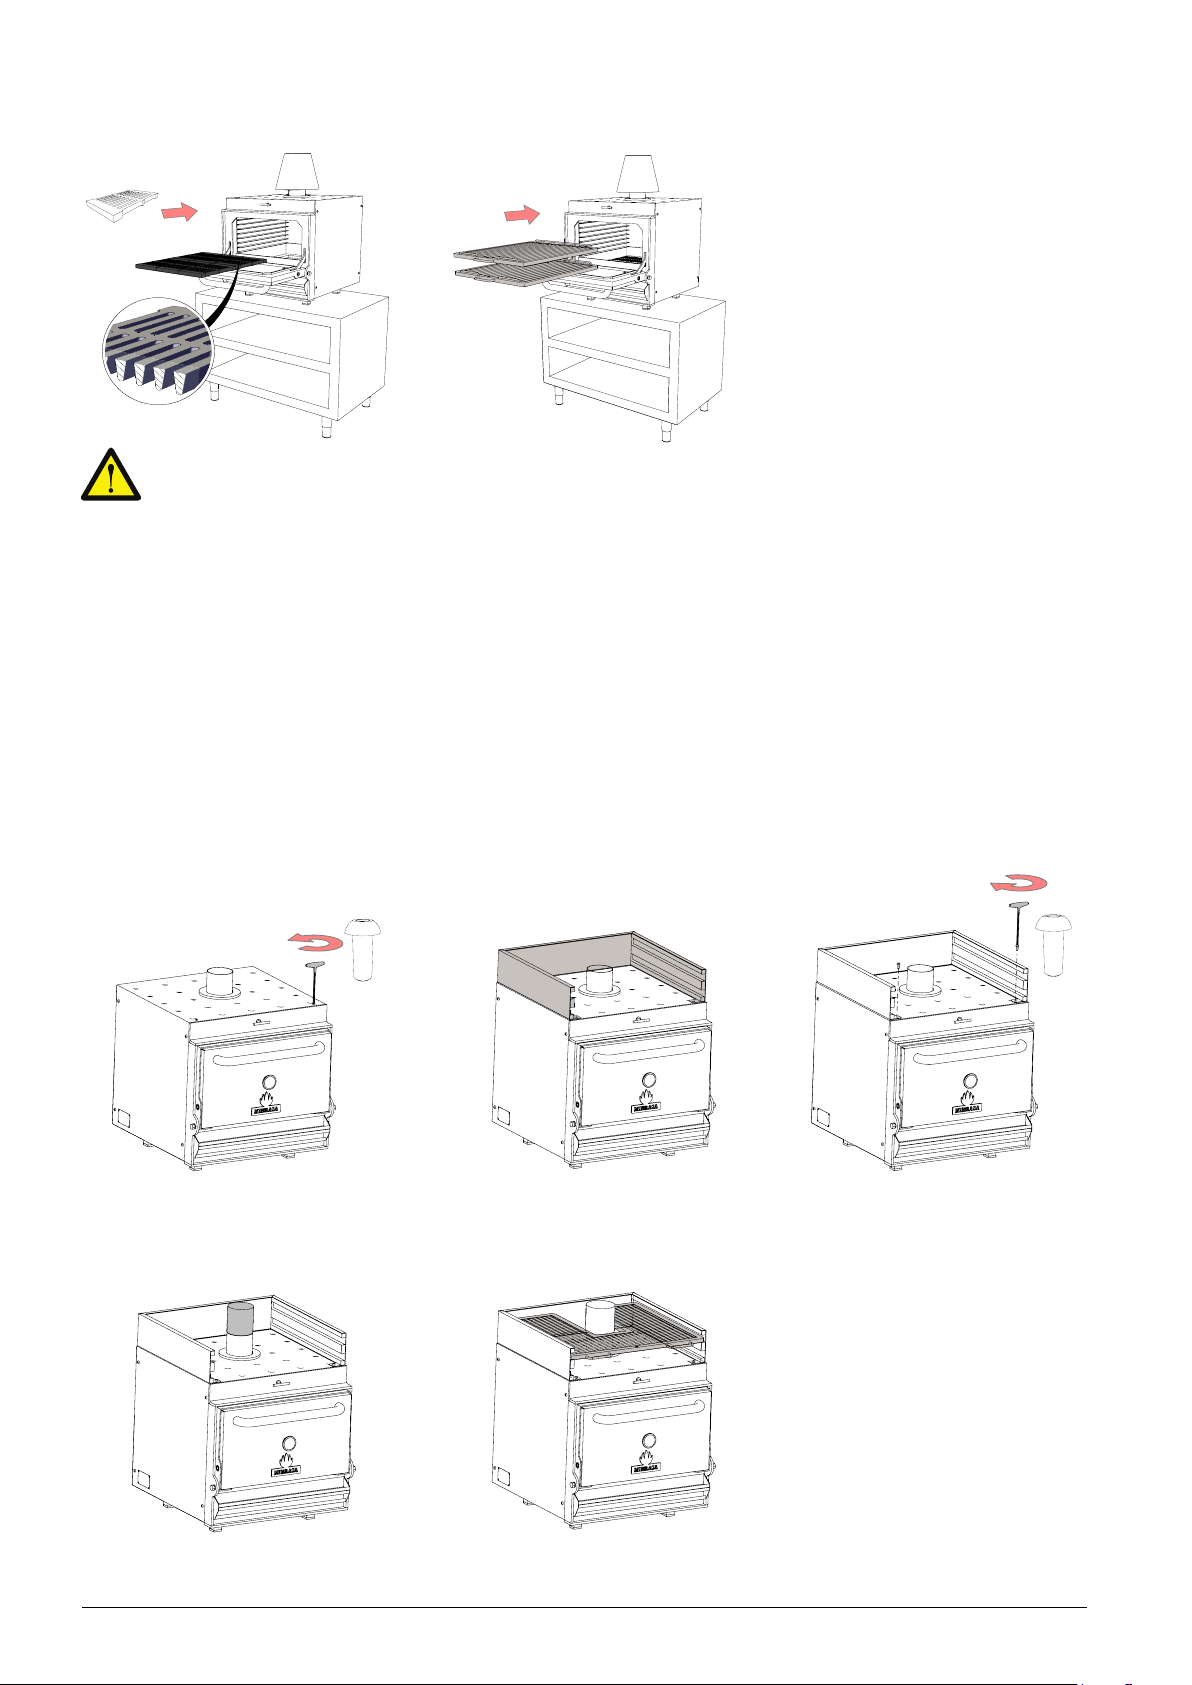
Place back the charcoal
10
grids
Side with narrower slits
facing up
Place back the grills
11
Models with heating rack: - HMB SB 75, 110, 160
- HMB AB SB 75, 110, 160
Unscrew the two screws on
1 3
the roof of the oven
x2
Connect the extension flue
4
Position the heating rack in
2
place
Insert the grill
5
Align the screws with their
holes and screw in tightly
using an allen key 5
x2
10
Page 16
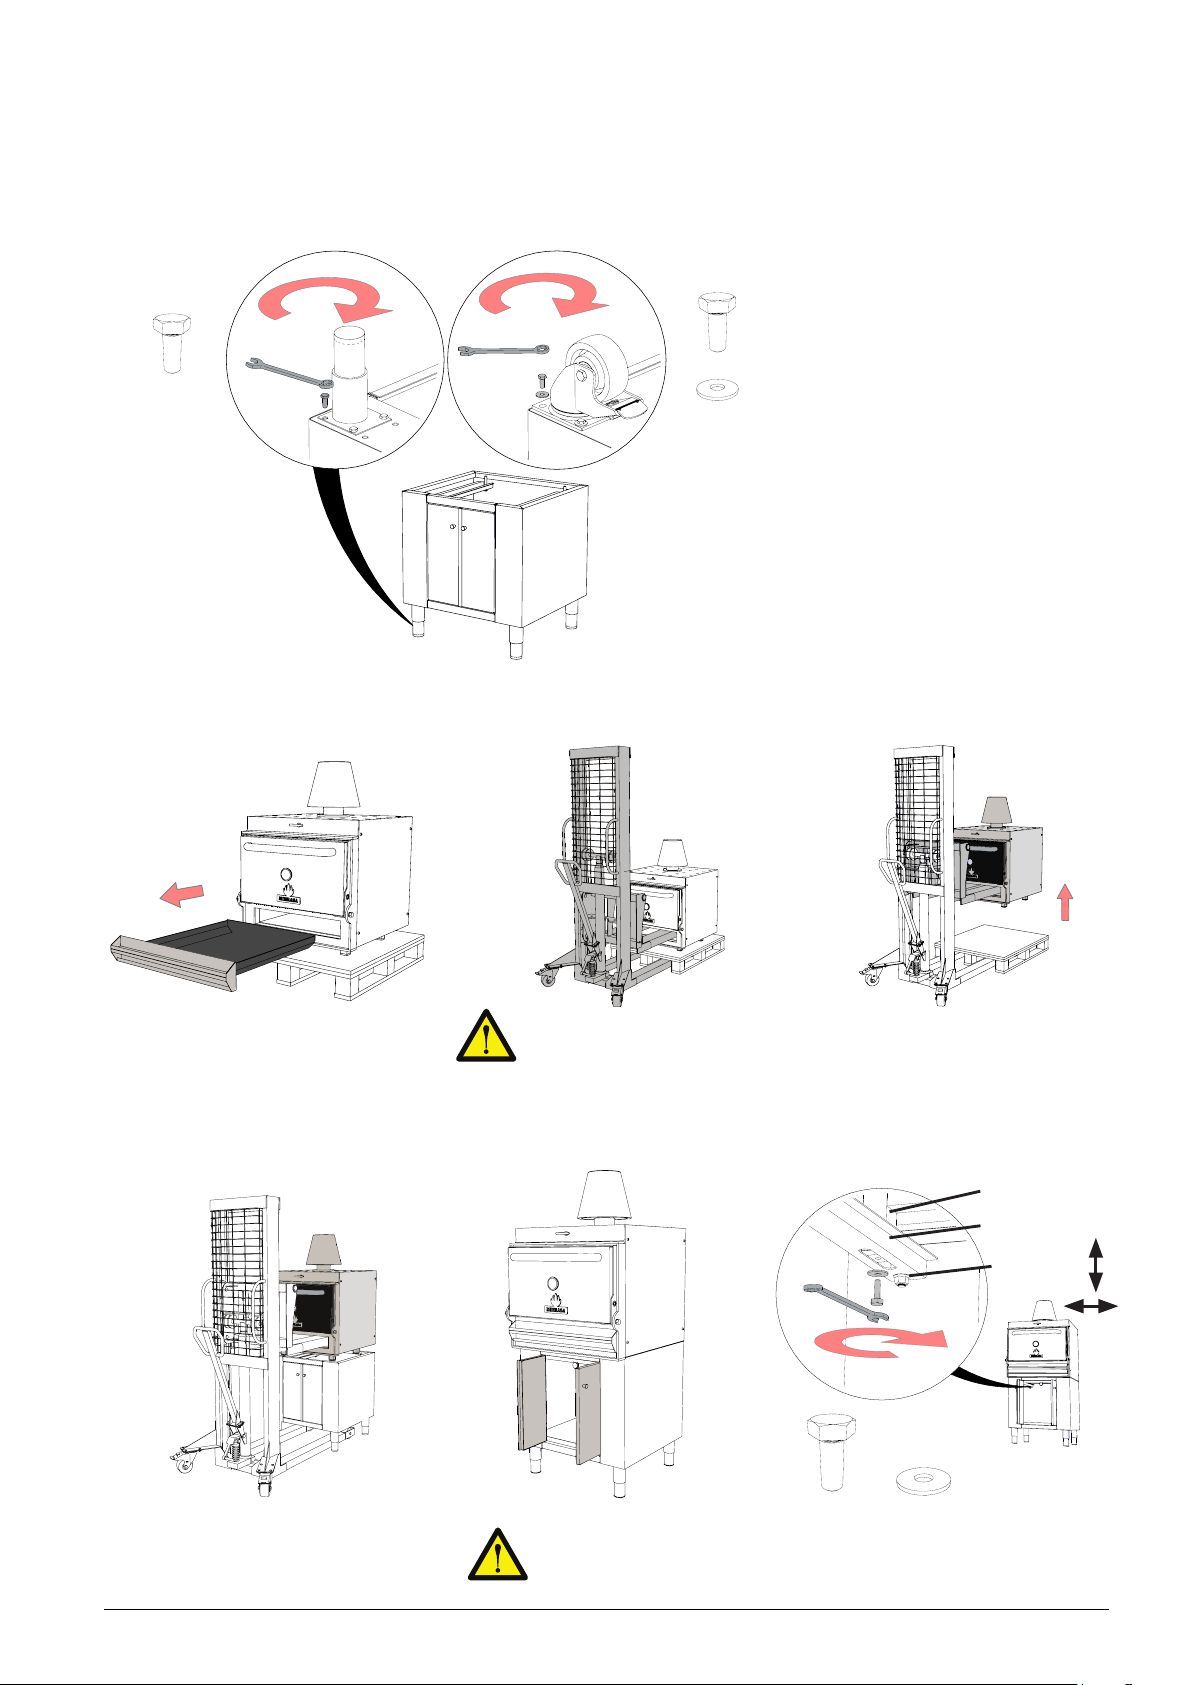
Models with cupboard below: - HMB AB 75, 110, 160
- HMB AB SB 75, 110, 160
- HMB AC 75, 110, 160
Install the legs/wheels of the
1
cupboard
x16
Remove the ash collector
2
Insert the forks of a lifting
3
device in the ash collector
space
x16
x16
Lift the oven
4
Place the oven on the cupboard
5
Make sure the forks reach the
end of the oven.
Assemble the oven with the cupboard
6
a) Open the cupboard doors b) Attach the oven to the cupboard
Oven leg
Omega prole
Adjustable
x4
The open stand is equipped
with the same ttings
x4
11
Page 17
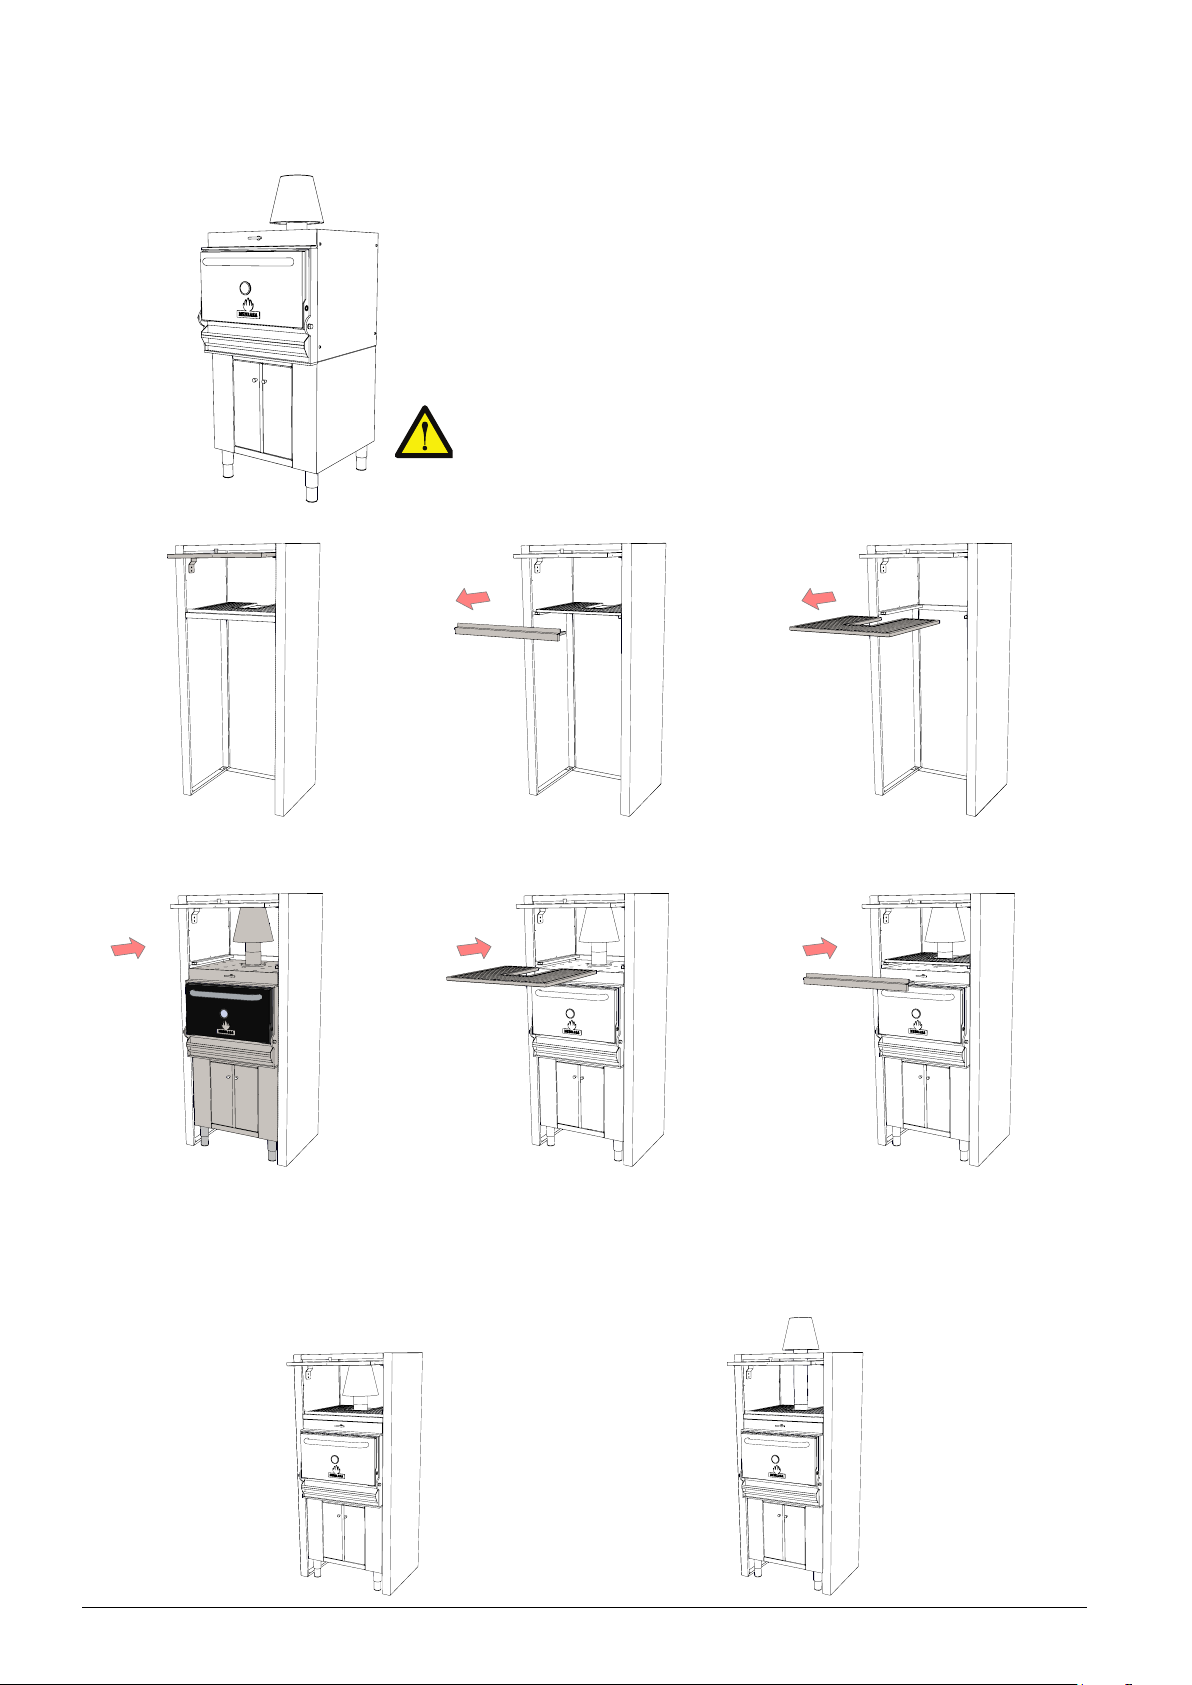
Models with full cupboard: - HMB AC 75, 110, 160
Assemble the oven with cupboard
1
below
Follow the steps for models
with cupboard below
Open the door
2
Place oven with cupboard
5
below in position
Remove the frontal panel
3
Place back the grill
6
Remove the grill
4
Place back the frontal panel
7
An alternative option to provide more working space inside the heating cabinet is to install
the security accessories outside of the cabinet. In order to do this, connect the extended
ue duct to the oven smoke outlet prenetrating the cabinet’s roof. Assemble the rebreak
and dissipating lter over the duct.
Option 1 Option 2
12
Page 18
4.3. Smoke extraction
When the oven is installed in the interior of a closed building an extractor hood of sufcient
dimensions is required.
The extractor hood must have a suitable depth in order to cover the opening of the oven
and stand out laterally by 150 mm on both sides.
The ductwork must be either galvanized steel or stainless steel, uniform and well sealed
throughout. It is important to avoid installing horizontal pipes and must provide frequent
access points to remove the build up of solid/liquid residues and creosote, see point 6.3 on
cleaning and special care.
It is recommended that the ductwork is installed with a vent cap in order to improve the
removal of smoke.
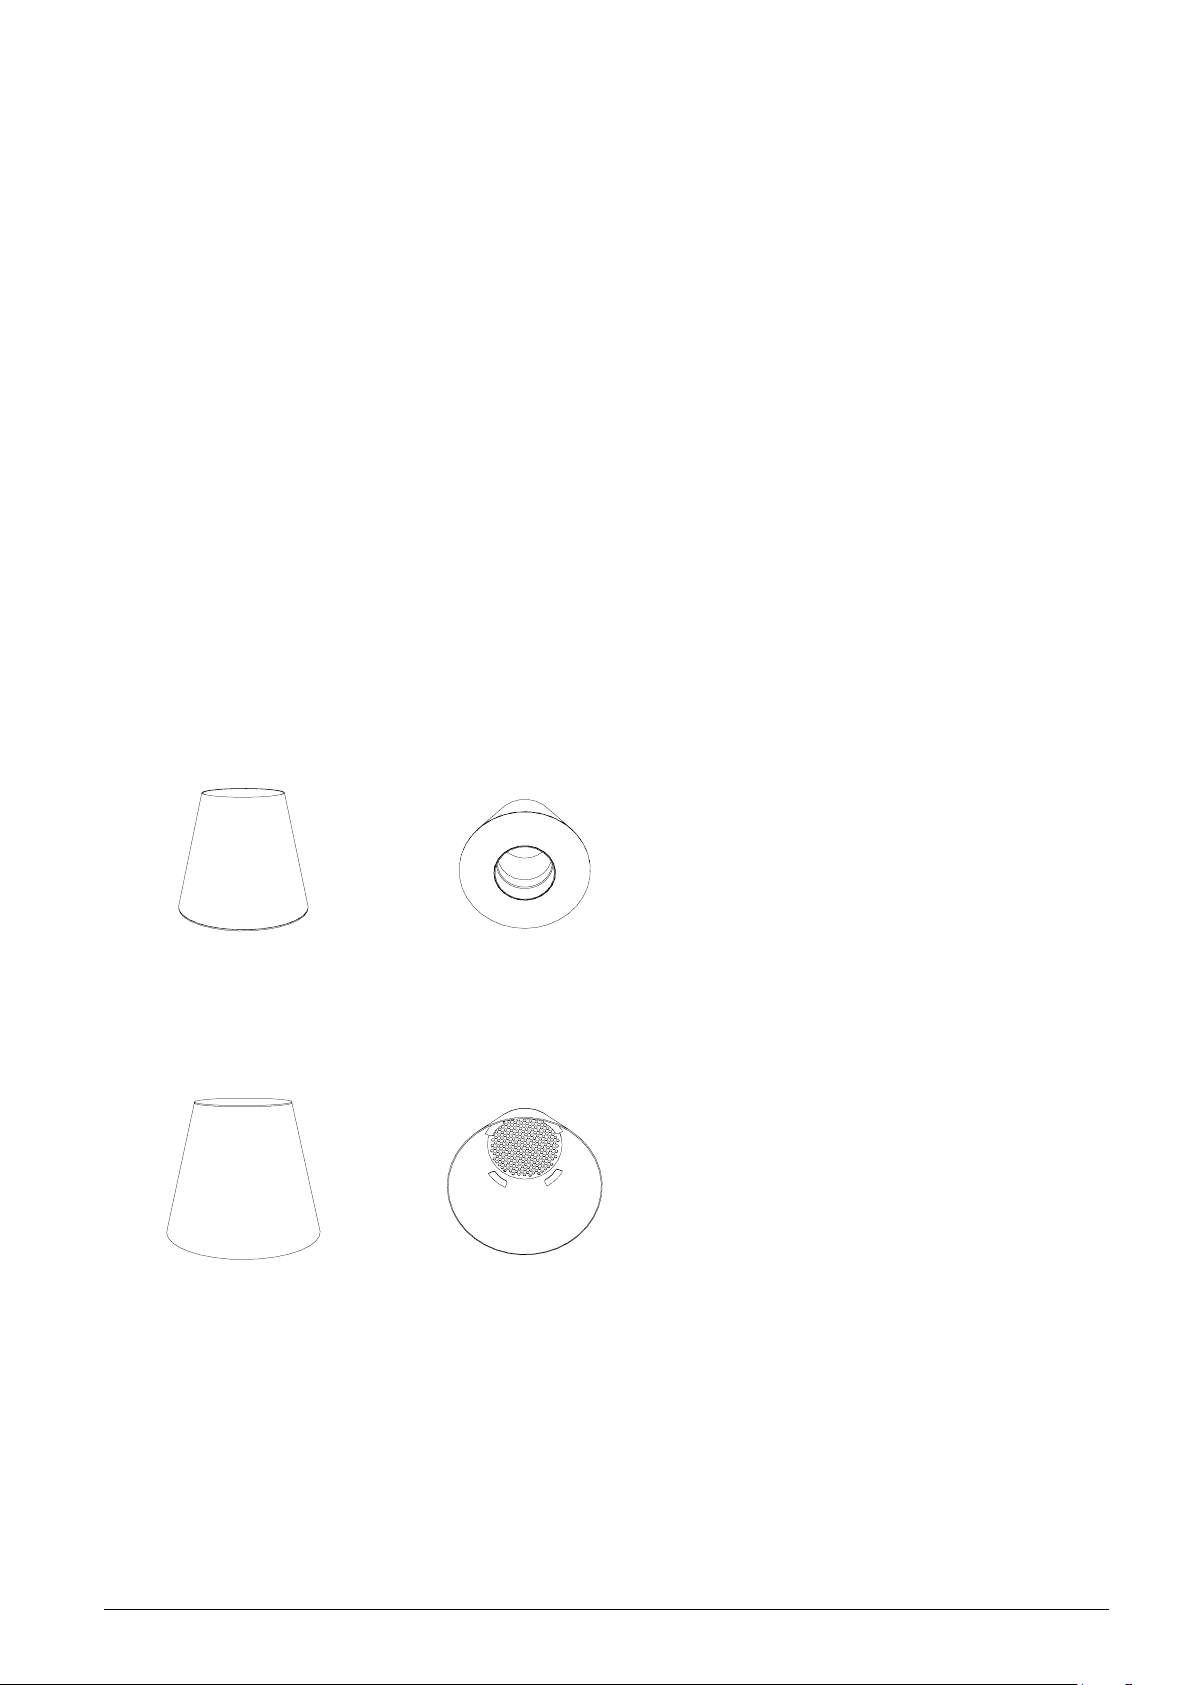
MIBRASA® Protective components
Firebreak: Is installed where the smoke
leaves the oven. Its function is to prevent
ames or sparks from escaping the oven.
Dissipating filter: This is installed over the
rebreak. It lters and spreads the ow of
air, slowing it down and dropping its temperature.
To guarantee the correct operation of the said components, the recommended
charcoal loads mentioned in point 5.1 should be respected.
13
Page 19
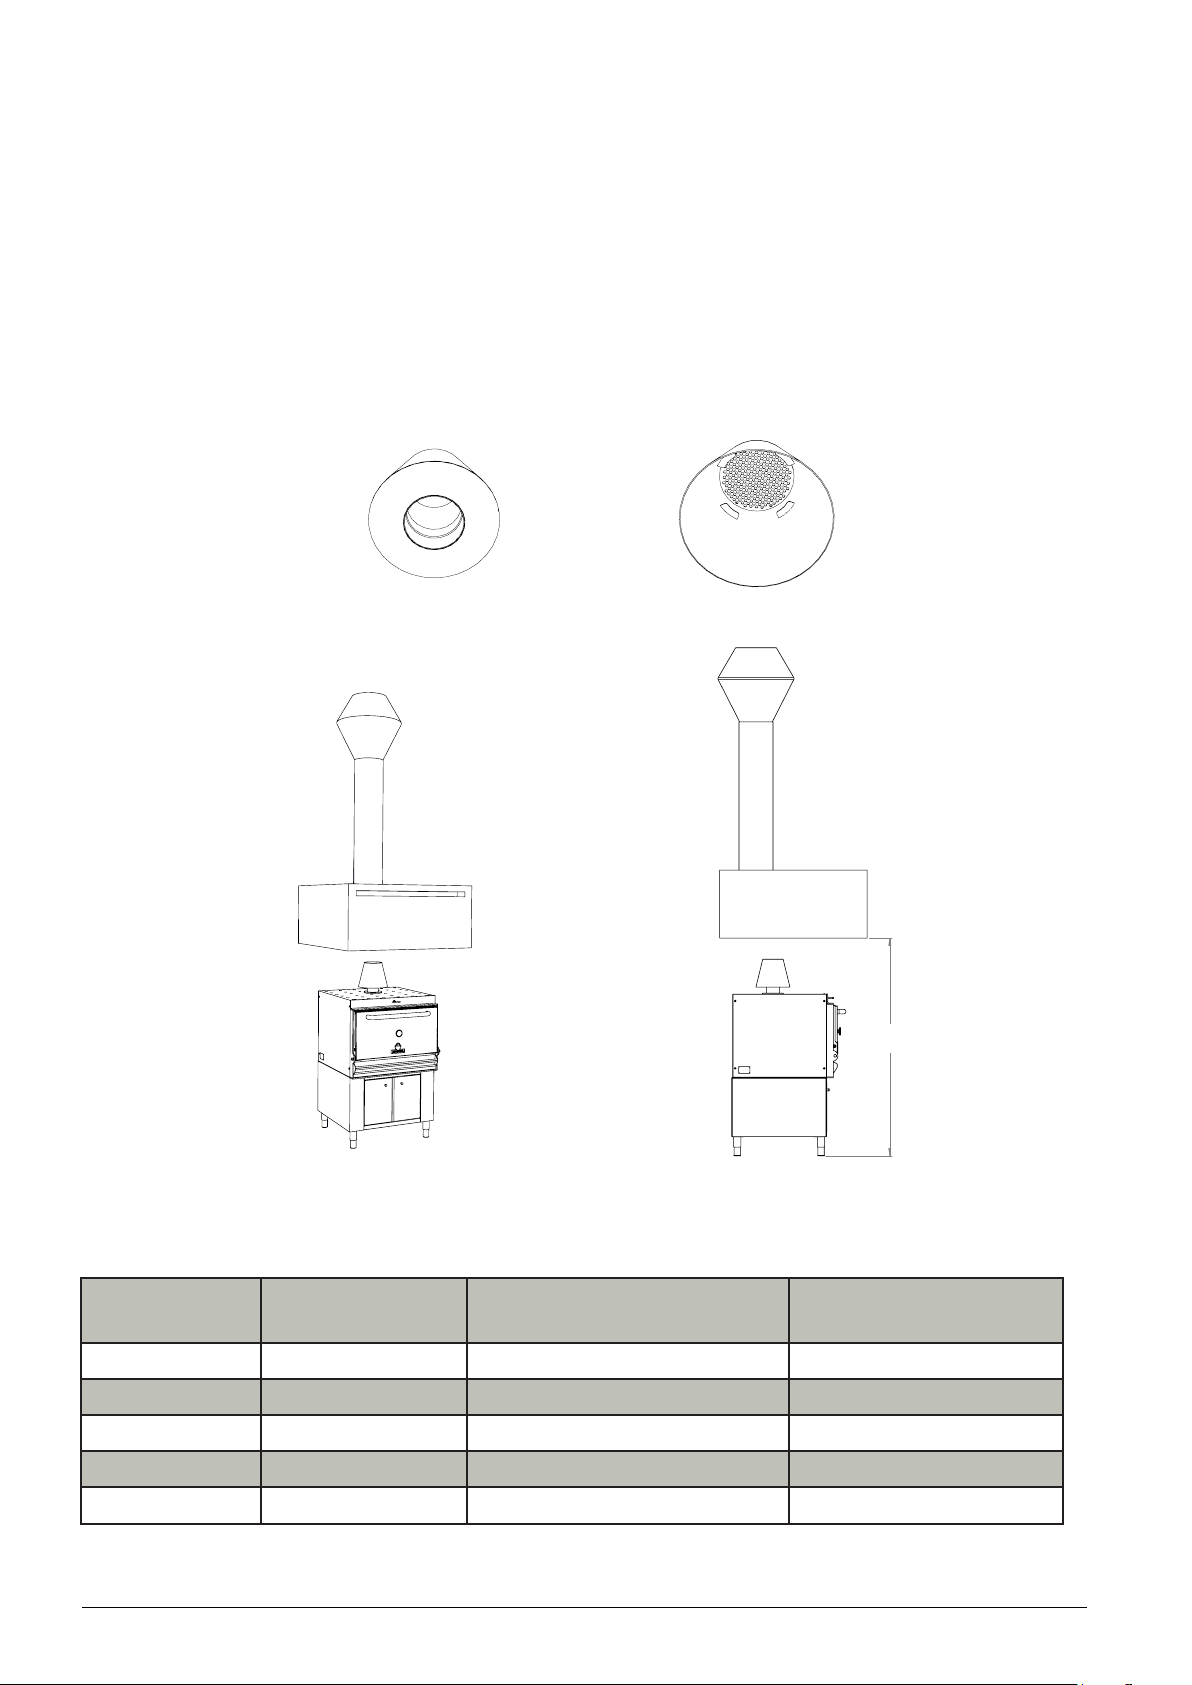
Installation options
1) Oven with independent extraction
This type of installation consists of an exhaust hood, which is independent of the oven.
The ductwork must be either galvanized or stainless steel, 300/350 mm in diameter up to
the highest part of the building. Installation of the rebreak and the dissipating lter are
needed.
+
2000 mm
Table showing exhaust hood measurements and required flow rates:
Models Flow rate (m3/h)
HMB MINI 2500 1000 x 1000 2000
HMB MINI PLUS 2500 1000 x 1000 2000
HMB 75 2800 1300 x 1300 2000
HMB 110 3200 1500 x 1300 2000
HMB 160 3500 1500 x 1500 2000
Minimum hood dimensions
(mm) - (width, depth)
Minimum height from the
floor (mm)
14
Page 20
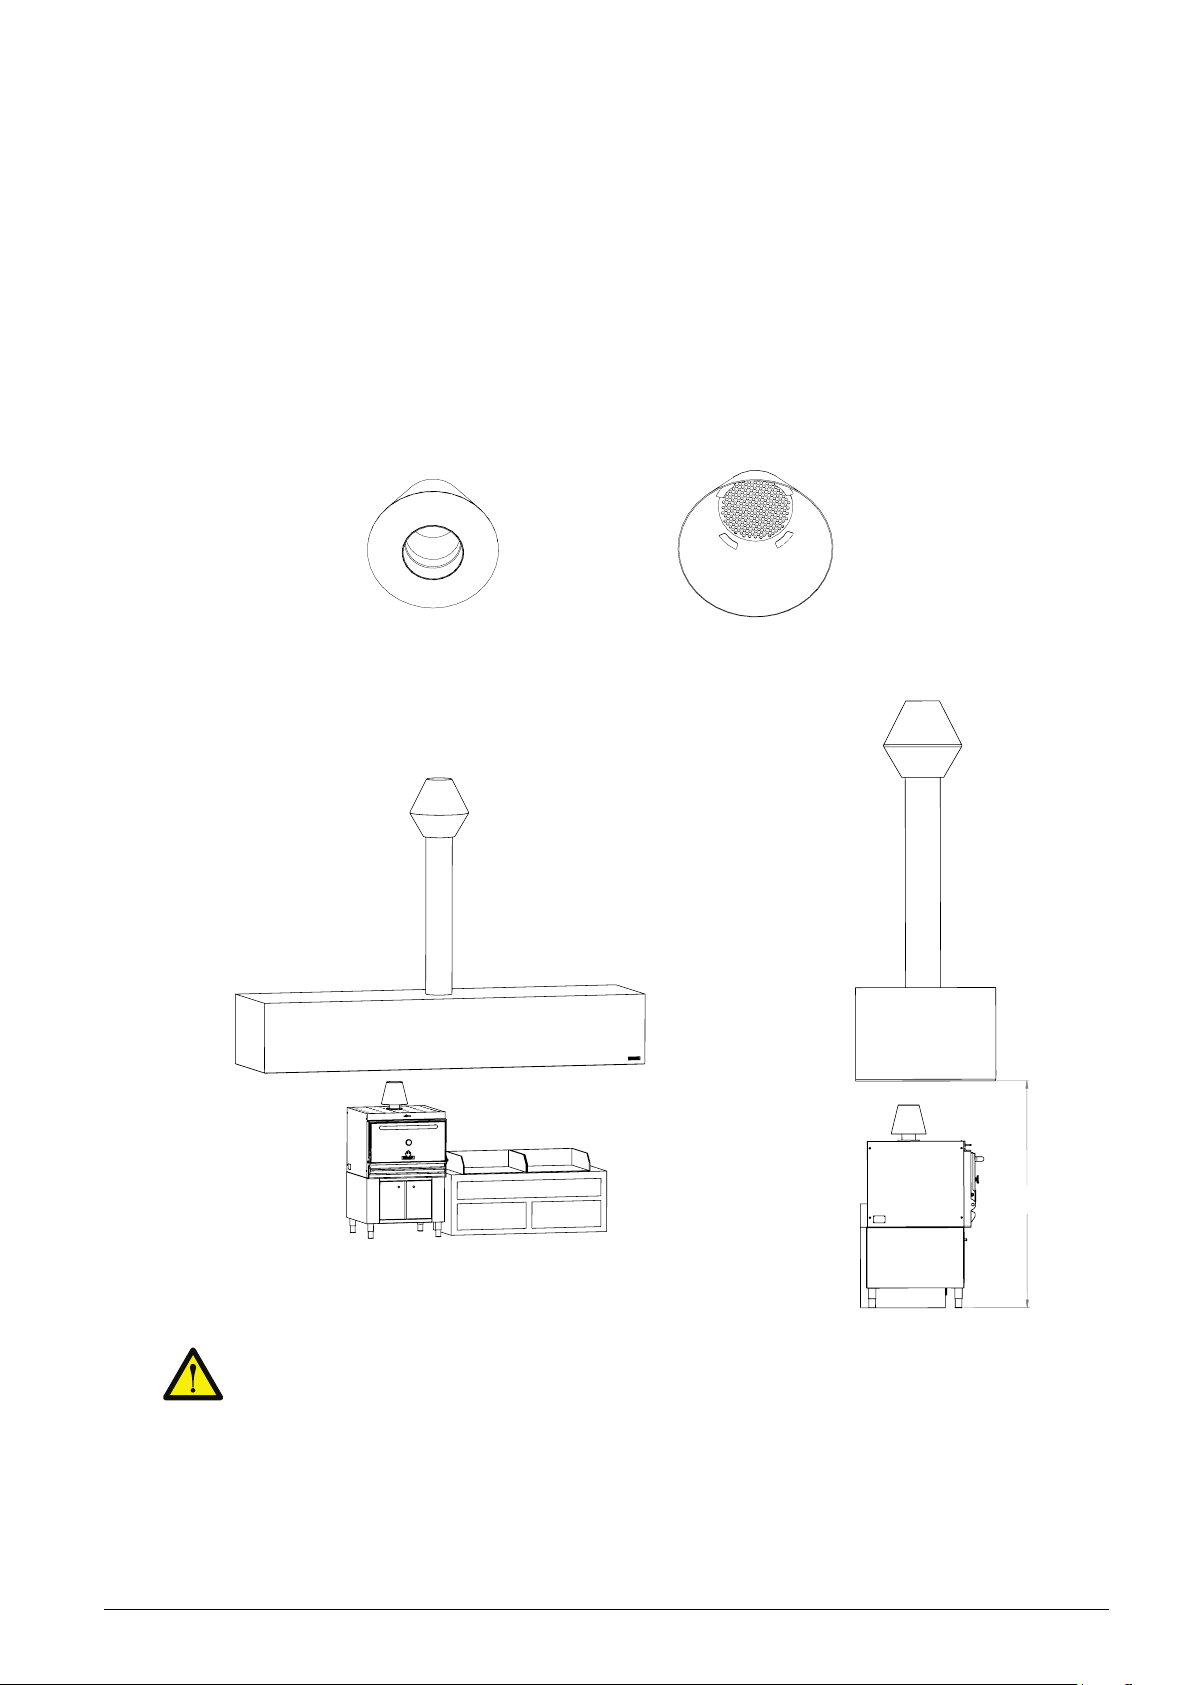
2) Oven installed under exhaust hood with other cooking appliances.
General ventilation ductwork
It is necessary to install the oven with the rebreak and dissipating lter. This will prevent
sparks and ames from escaping the oven. The smoke will be ltered reducing the ow and
cooling its temperature down prior to contact with the ventilation system.
+
Never connect the oven outlet directly with the
exhaust hood
15
2000 mm
Page 21
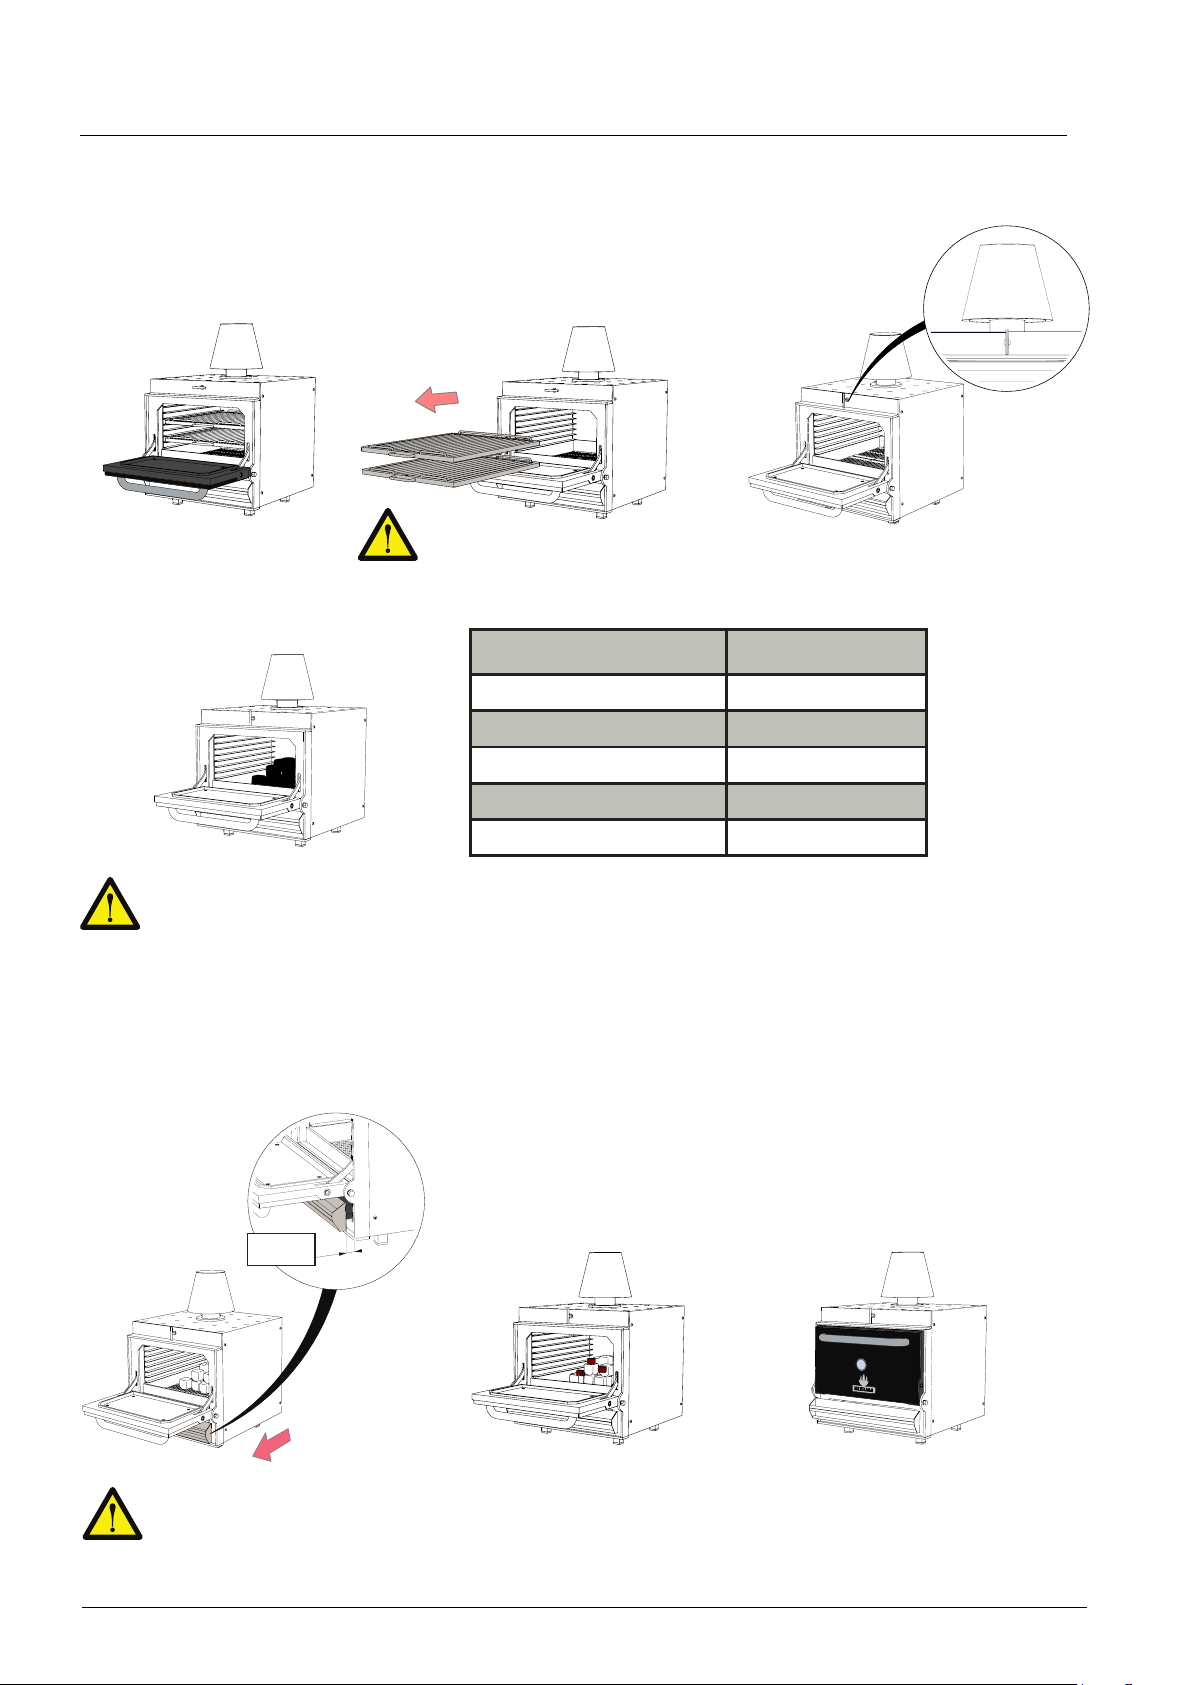
5. Instructions of use
5.1. Loading the charcoal
Open the door
1
Load the Mibrasa® charcoal
4
and make a heap
Remove the grills
2
Important!
Open the upper damper
3
Approximate quantity of charcoal according to Mibrasa® model.
Model Amount
HMB Mini 11 lbs / 5Kg
HMB Mini Plus 14 lbs / 7Kg
HMB 75 22 lbs / 10 Kg
Leave about 150 mm of space
at the back of the oven for air
circulation
5.2. Lighting the charcoal
Open the ash collector/
1
lower damper
50mm
HMB 110 33 lbs / 15 Kg
HMB 160 40 lbs / 18 Kg
Mibrasa® has different types of high quality long burning
charcoal to get the best performance from the oven.
Place and light the Mibrasa®
2
Close the door
3
firelighters
It is compulsory that a member of the kitchen staff is present for the entire lighting up process. During the re- up,
the door must remain closed. This will ensure the most effective light up while minimizing any risk of accidents.
It is very important to respect the maximum charcoal load in every Mibrasa® oven.
16
Page 22
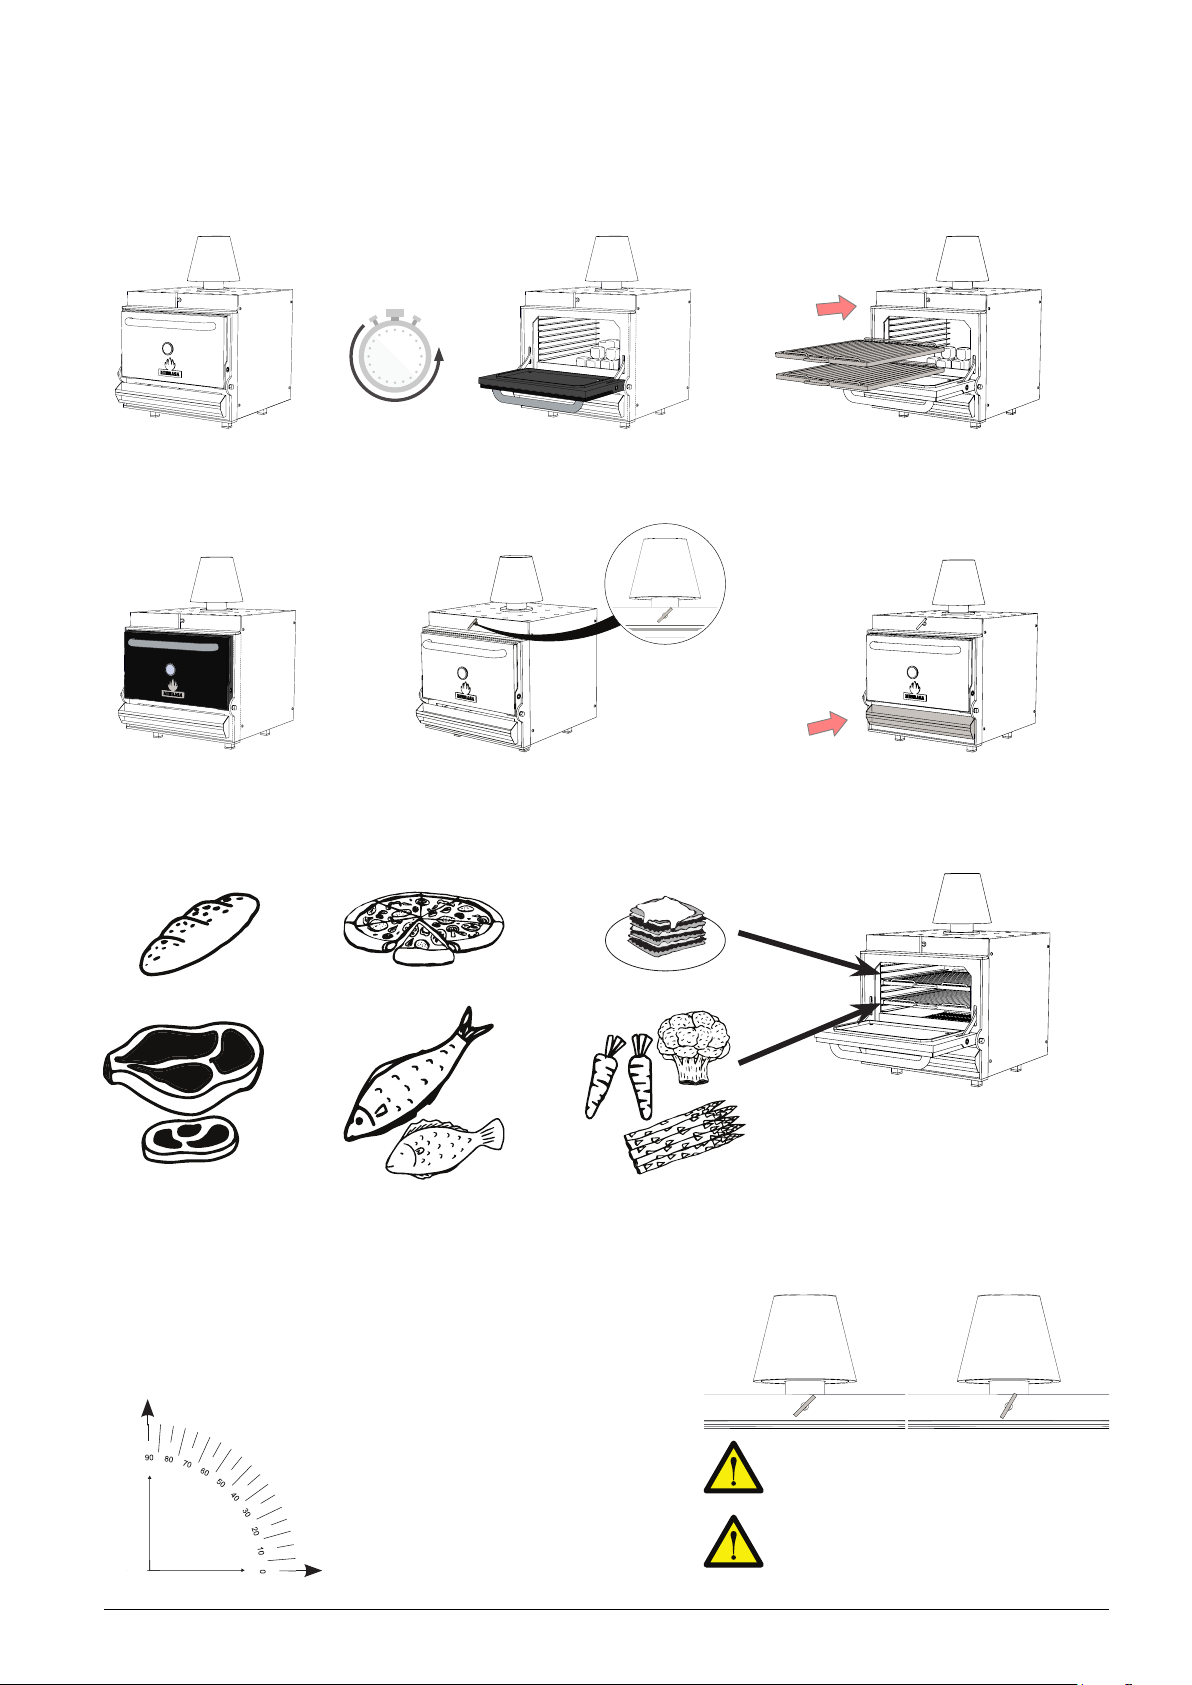
5.3. Prior to cooking
Wait until the charcoal has
1
turned into embers
Close the door
4
40 MIN
Open the door
2
Turn the upper damper
5
to 45º
Place back the grills
3
Close the ash collector/
6
lower damper
5.4. Ready to cook
Turn the upper damper to the desired angle.
The air outlet is controlled by using the upper
damper with the minimum setting at 0º and
the maximum at 90º.
Upper damper open
Recommended upper damper position for
cooking:
45º 60º
Upper damper closed
Remember that the ash collector/
lower damper should remain closed
when cooking.
If the temperature of the oven needs to
be increased quickly, open the lower
damper 2-3 mins max.
17
Page 23
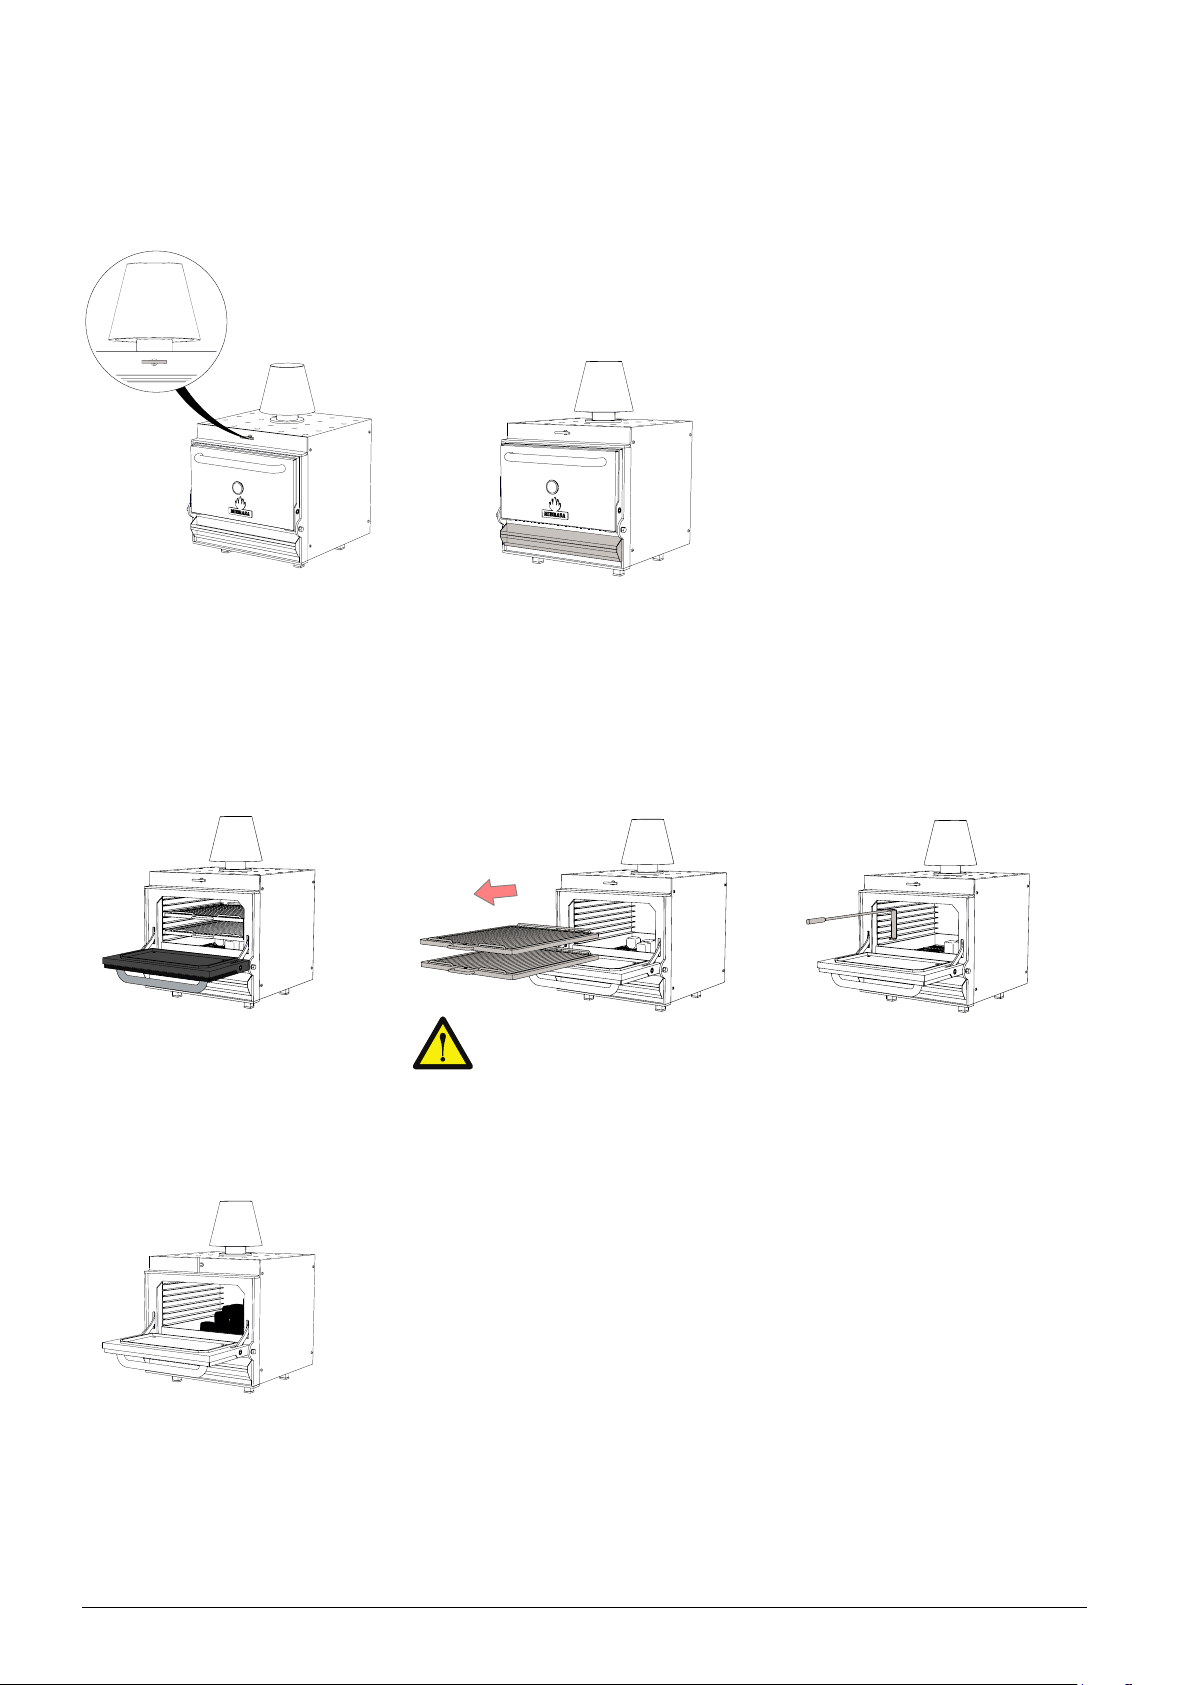
5.5. After service
Close the upper damper
1
Check the ash collector/
2
lower damper is closed
5.6. Reutilizing charcoal from the previous service
Open the door
1
Load the charcoal and
4
follow the steps indicated in
point 5.1
Remove the grills
2
It is necessary to use heatproof gloves when removing
the grills.
Move the charcoal around
3
so the ash falls into the ash
collector
18
Page 24

6. Maintenance and Safety Standards
6.1. Daily cleaning
Do not use chemical products or water to clean the inside of the oven.
Grills: Clean using the grill brush before and after each use.
Ash collector: Open the ash collector, use the ash shovel by Mibrasa® to remove the ash
and transfer to a metal container with a tight-tted lid. If you think it is necessary, you can
remove the ash collector completely from the oven to facilitate cleaning. Once the ashes have
completely cooled down they can be disposed of or used as fertilizer.
WARNING Do not dispose the ashes in a ammable-container or heat-deformable container.
Space between the door and the frame: This should always be kept clean so that it can be
closed properly.
6.2. Weekly cleaning
Dissipating filter: Remove the dissipating lter from the oven. Clean the inside part.
Firebreak:
Remove the rebreak from the oven. Shake gently from side to side to allow the
ash to fall. Never clean with water as the ash will stick to the base and can be difcult to
remove.
Charcoal Grids: Remove the grids and use the grill brush to clean the slits. It is important
for the operation of the oven to keep the slits clear of ash and debris.
Ash collector: Remove the ash collector and clean away any ash and cinders remaining. A
build-up of ash can make closing the ash collector difcult.
6.3. Special care
Exhaust hood and ductwork: It is very important to keep the exhaust hood lters clean as
well as the ducts to avoid a build up of soot and fat, which could result in a possible re.
Follow the weekly cleaning procedures and annual maintenance of the hood, ventilation box
and ue ducts in accordance to the exhaust hood manufacturer’s requirements. Pulverisation
water ltration systems are also accepted to compliment the use of this oven. The ductwork
should be inspected at least twice a year to determine when creosote build up has occured.
When creosote has accumulated, it should be removed to reduce risk of re.
Mibrasa® is not responsible for any damages occurred caused by wrongful use, when the
installation instructions have not been followed or wrongful maintenance of the exhaust hood.
19
Page 25

Please read this entire manual before you install the oven.
Failure to follow instructions may result in property damage, bodily injury, or even death.
6.4. Safety standards
WARNINGS
• Only use charcoal in the Mibrasa® oven.
• The rst time the oven is used do not cook food for at least one hour after lighting.
• Proceed with reasonable care when operating a Mibrasa® oven. Never leave the oven
unattended when lit.
• Wear heatproof gloves while using the oven.
• The door must remain closed during operation. Open only the door when handling food.
• CAUTION Do not overload/re - when ames spill out of the oven, you are over-ring.
• Disposal of ashes – Ashes should be placed in a metal container with a tight-tting
lid. The closed container of ashes should be placed on a non-combustible oor or on
the ground, well away from all combustible materials, pending nal disposal. When the
ashes are disposed by burial in soil or otherwise locally dispersed, they should be
retained in the closed container until all cinders have thoroughly cooled.
• Do not attempt to pour water over the hot coals, only close the upper and lower dampers.
• Do not clean the oven when it is in operation or hot.
• Do not use chemical products to clean the exterior of the oven when in use or still hot
(the interior of the oven is self-cleaning).
• Do not use products not specied for use with this oven.
DANGERS
• When this oven is not properly installed, a re may result. To reduce the risk of re, follow
the installation instructions.
• Keep children and pets away from the oven and ammable products. Accessible parts of
the oven may be very hot.
• Do not fry food in the oven using oil. The temperature is very high and could cause
serious harm or damage.
• Do not use alcohol, oil or other liquids similar to ignite or rekindle hot coals. Use only
Mibrasa® ecore relighters.
• In the case of installing the oven in an outdoor setting, do not cover the Mibrasa® oven
with any type of protective cover or inammable material when it is in operation or hot.
• Read point 4.1 for restrictions on minimum distances from combustible materials.
20
Page 26

7. General conditions
7.1. Warranty
• All Mibrasa® ovens have a 2-year warranty against any manufacturing defect.
• The customer will be responsible for the installation, ne-tuning and maintenance of
the goods.
• The warranty is void of:
(I) damage caused by misuse or poor product installation,
(II) where the buyer or third party has started repairs, modications or adjustments
without the prior consent of Mibrasa®,
(III) those defects not immediately notied within the warranty period stated above,
(IV) those defects or damage due to negligence not attributable to Mibrasa®, or an
accident, misuse, improper installation, mishandling or abnormal conditions of
temperature, humidity or dirt,
(VI) that have become damaged through no fault of Mibrasa®.
7.2. Returns
• All goods must be returned in the original condition.
• All returns must be notied in writing, and must be conrmed by our sales department.
• All returns must reach Mibrasa® prepaid. Returned material must enclose the invoice
and delivery note number.
• Returns of goods will only be accepted in its original packaging, unused and in re-sellable
condition. Returned goods that are used, obsolete or worn out will not be considered under
warranty and a credit note will not be issued.
• For all returned goods, there will be a 10% fee of the refund amount to cover depreciation, demerit and administrative tasks.
7.3. Property Reserve
• Mibrasa® retains title to the goods to the total amount of the price integrity.
• Mibrasa® reserves the right to change their products and prices without notice.
21
Page 27

Page 28
Feeding the Senses!
Factory, head office and showroom:
C/ Joan Rovira i Bastons, 26
17230 Palamós (Girona) Spain
+34 972 601 942
www.mibrasa.com
Version 1.5
 Loading...