

Page 1
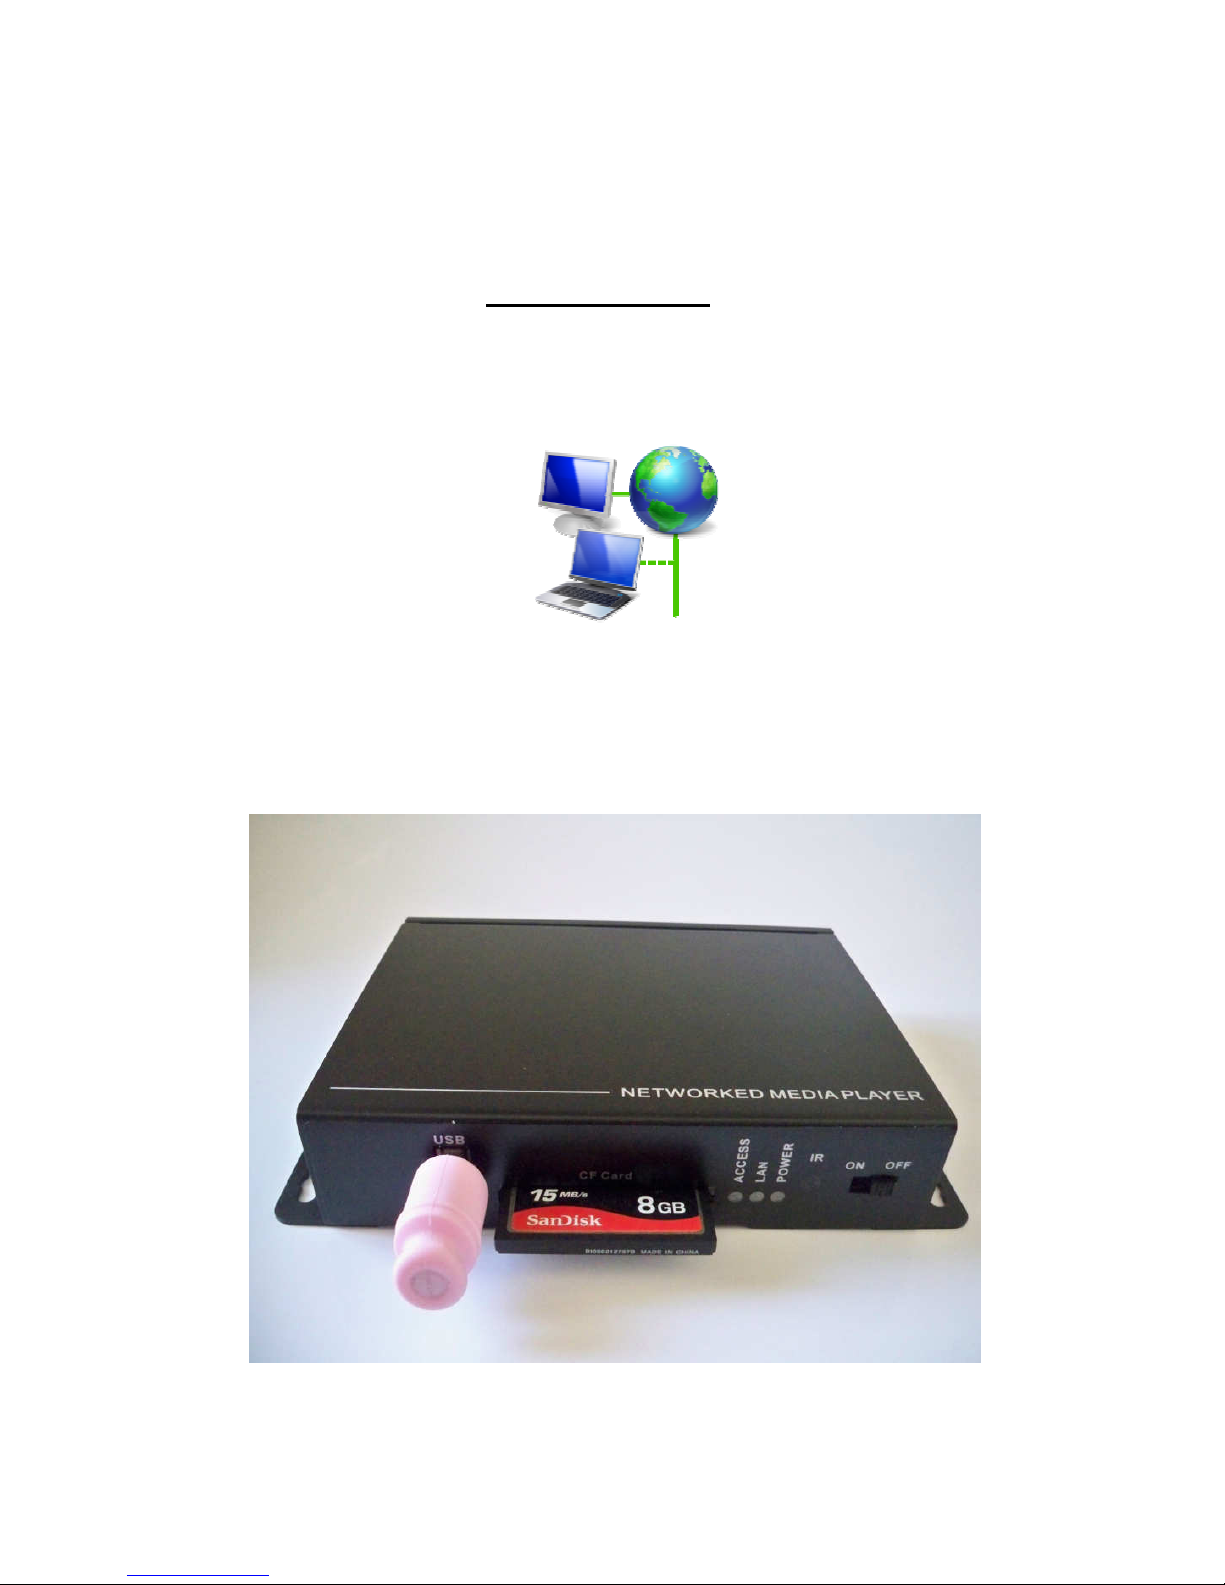
Network Digital Signage Player
NP-50
User Guide
User Guide 1 2/22/2012
Page 2
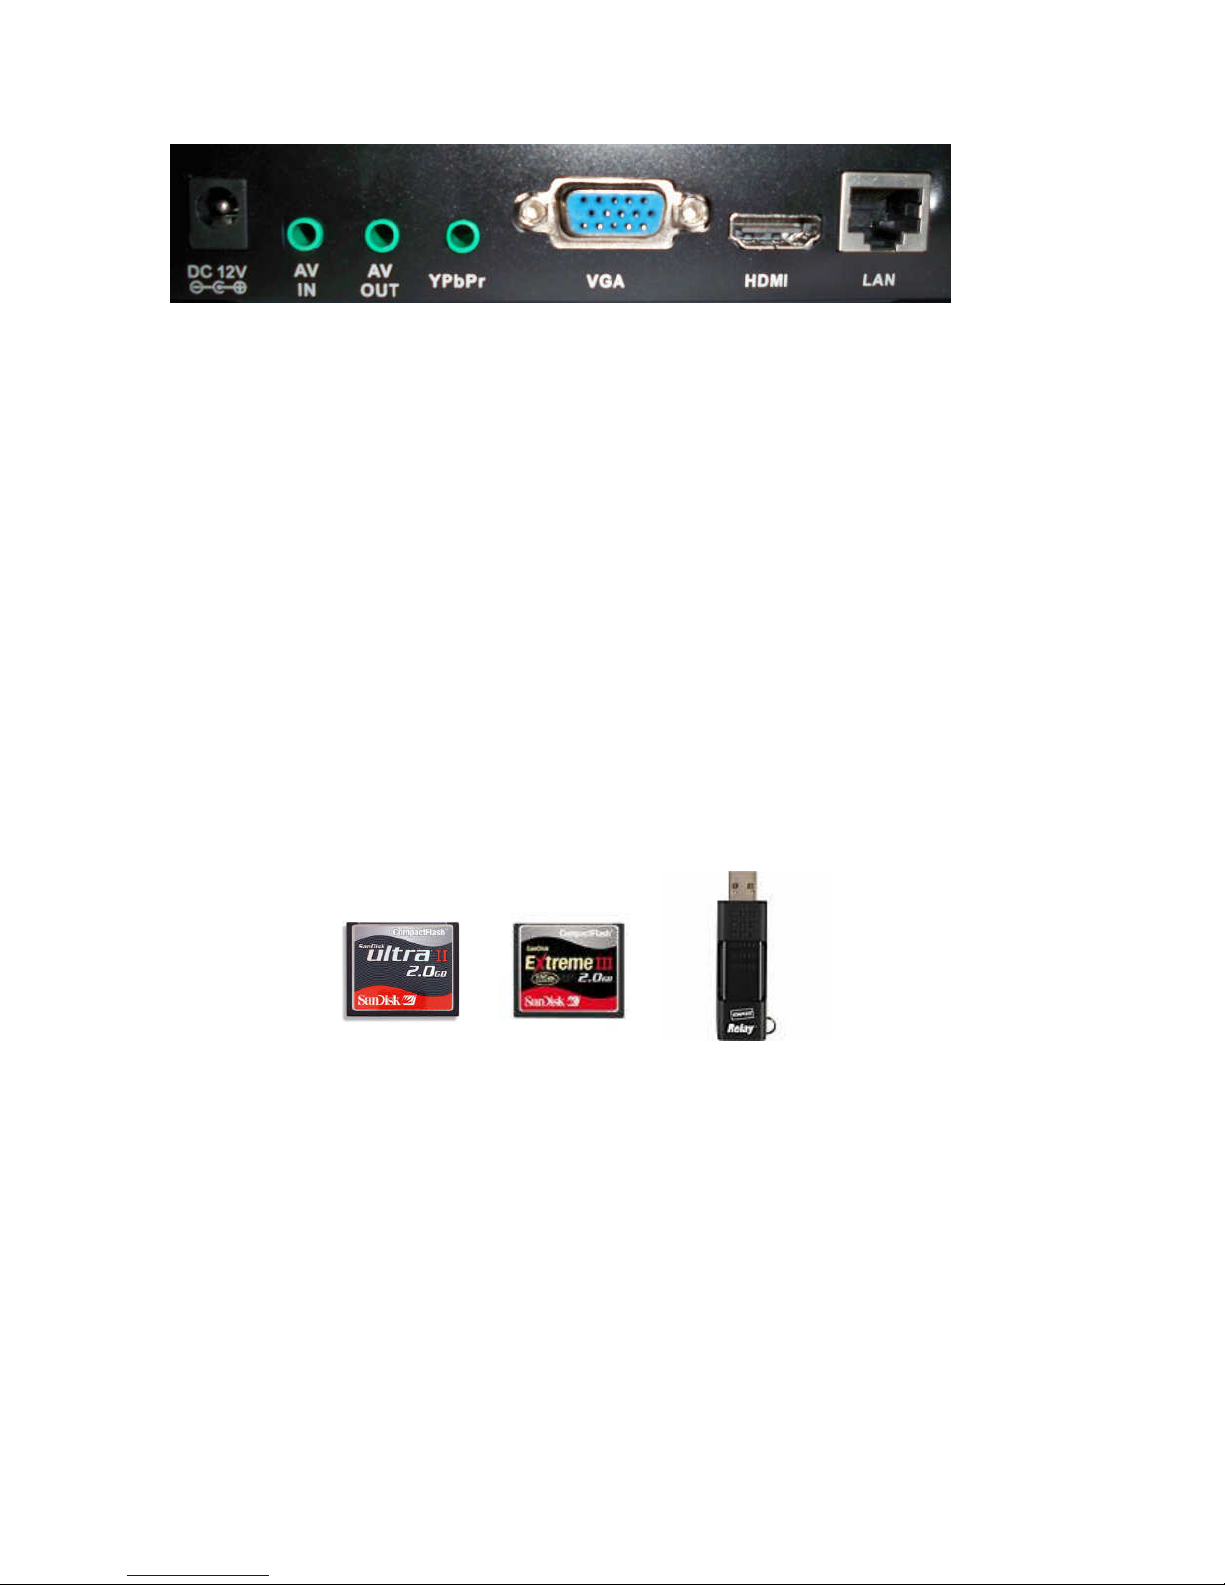
From left to right
A: 12V DC Power Adapter (included)
B: A/V In: Composite video and audio input ( 3-in-1 cable included )
C: A/V Out: Composite video and/or audio output
D: YPbPr: Component Video
E. VGA Video port
F: HDMI: HDMI output (HDMI cable included)
G: Ethernet port: Connect to LAN or Internet network
Storage:
• NP-50 can now playback and download with CF card or USB drive.
• If both CF and USB devices are inserted, CF card will be ignored.
• Insert only one type of media, either USB drive or CF card
• Maximum capacity is up to 32GB for both storage devices
• USB detection will be slower than CF card.
• If your USB and CF card are 4GB or higher or has many files, main menu will show “Loading,..”
then display total capacity Storage (USB) = or Storage(CF) =
•
High speed CF memory card is preferred (like Sandisk Ultra II or Extreme III) for faster download
performance,and select ‘FAT32’ to format CF card for better file structure performance
Board and cables connection
a) Insert CF card into CF card slot or USB drive into USB slot
b) Plug in LAN cable that connects to router
c) Video connection to TV has 3 kinds
i. Connect HDMI cable to LCD TV (HDMI always output and default is 1080p) if your
LCD is 720p then press “Video Mode” key to switch.
ii. Connect YPbPr cable (Red, Green, Blue) to LCD TV (press “Video Mode” key of
remote control if no output)
iii. Connect VGA to LCD TV (press “Video Mode” key of remote control if no output)
d) Connect audio cable (Red and White) to TV’s audio port. (no need this if HDMI output)
e) Plug in 12V AC power adapter (do not use other voltage)
f) Turn on power and wait, screen will show ‘Initializing’ till main menu
User Guide 2 2/22/2012
Page 3
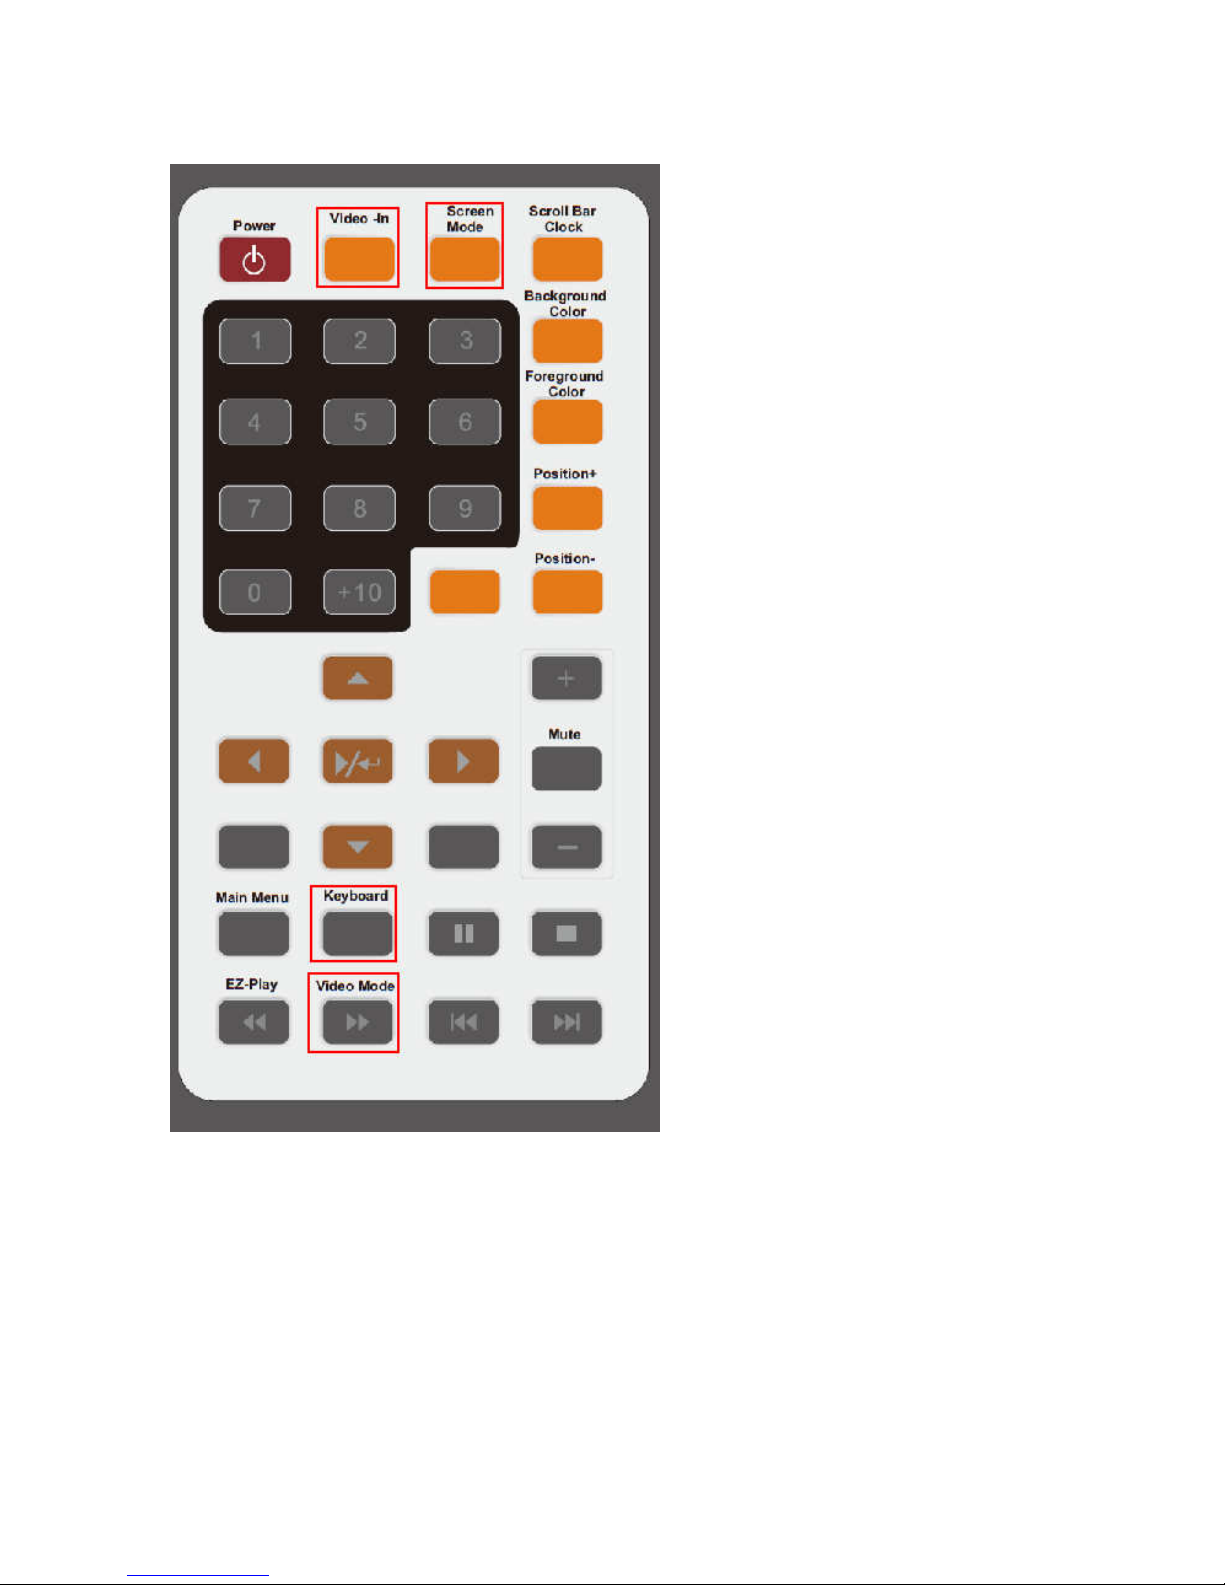
Remote control: special keys
1. Video-In key: Switch either
Video-Input source or CF/USB media file
source on multi-zone screen or full screen
2. Screen Mode key:
Switch entire screen either multi-zone or full
screen
3. Keyboard key:
When Video-In source is used, press it will
pop up color setting menu to adjust
brightness, hue, contrast. Press again to exit.
4. Video Mode key:
Switch either HDMI 1080p (default) or
HDMI 720p.
Also switch eitherVGA or YPbPr.
Note: If no screen after powers up, try to
press this key to switch to right output.
User Guide 3 2/22/2012
Page 4
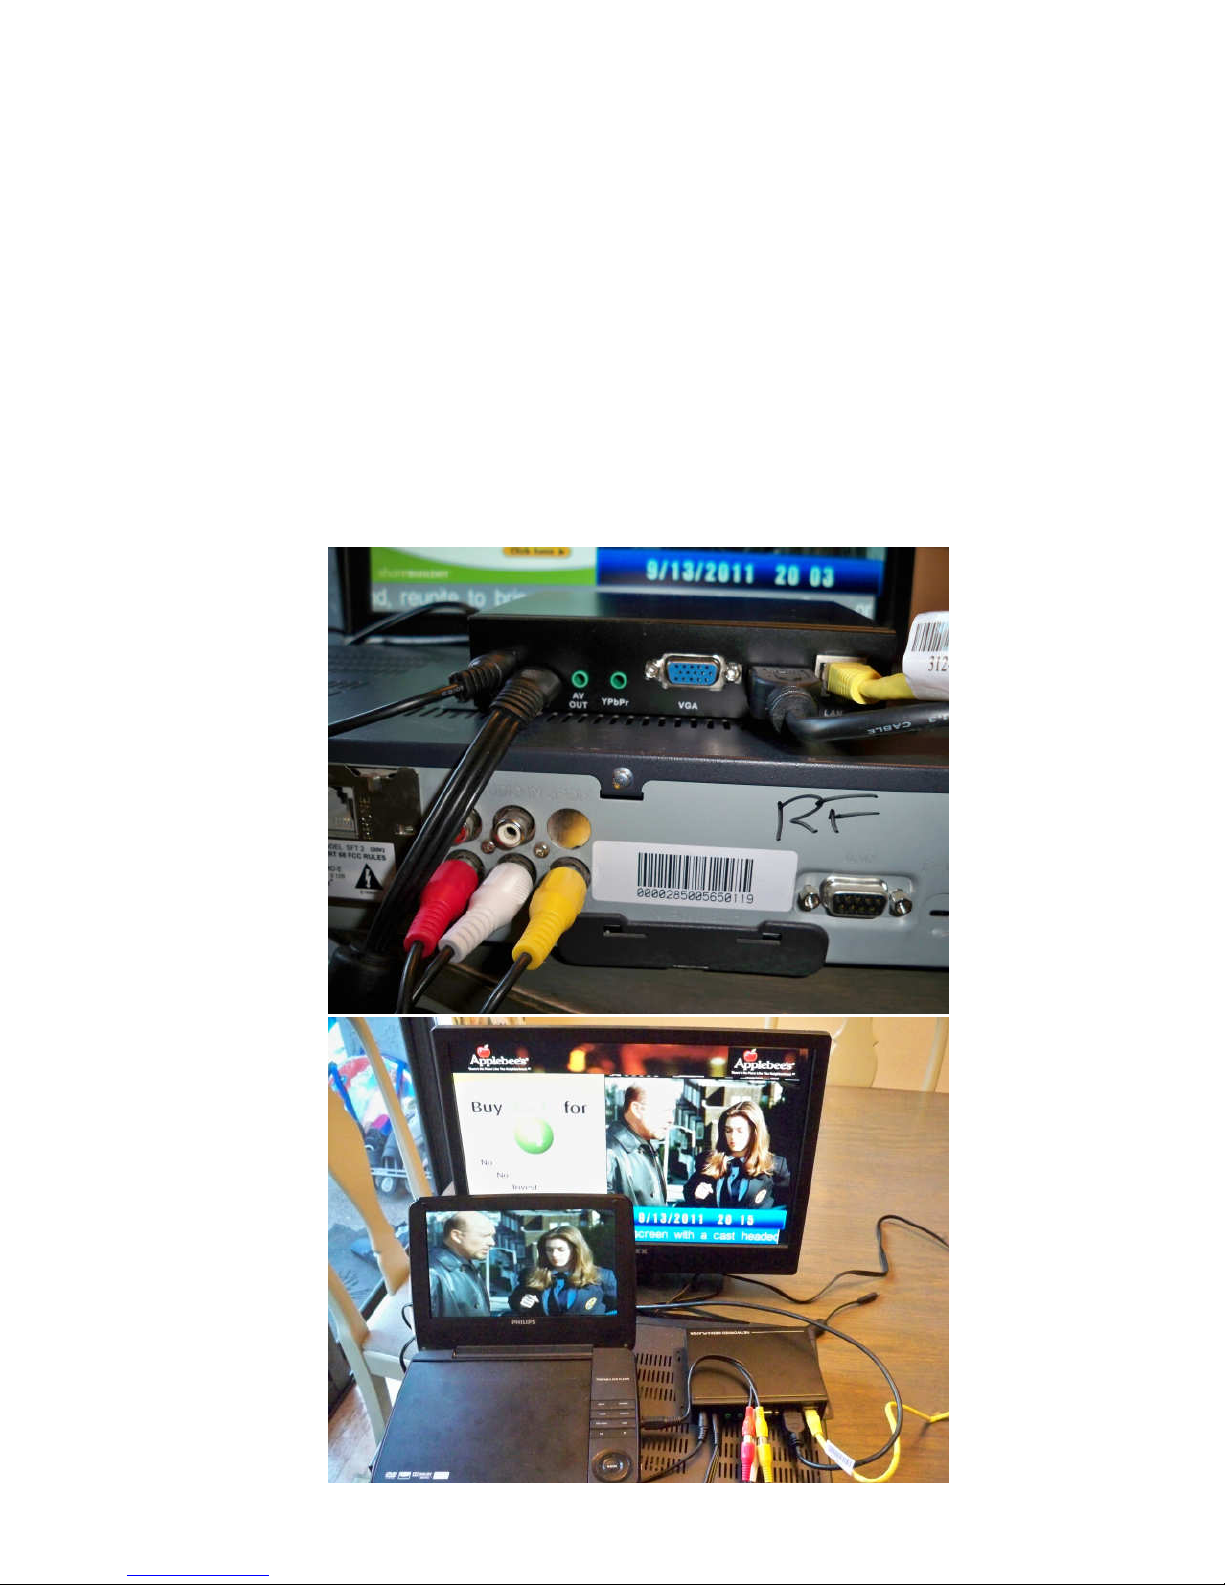
Video Feed Method
NP-50 player has A/V In port that allows video and audio source to feed in from TV Set Top Box
or any composite video output device like DVD player or Camcorder.
Connection:
1. Use 3-in-1 (Yellow/Red/White) cable to connect to TV STB’s A/V out (picture) and plug in
one end to NP-50’s A/V In.
2. During media playback, you can press “Video-In” key to switch back and froth between
media playback and video feed
3. If video color is not clear, please press “Keyboard” key to pop up color setting menu, then
press “RESET” to restore to default values. (NTSC is 50/50/50 and PAL is 62/26/40.) Press
“Keyboard” key again to exit. Note: When color setting menu appears, scrolling text row
will disappear until color menu exits.
User Guide 4 2/22/2012
Page 5
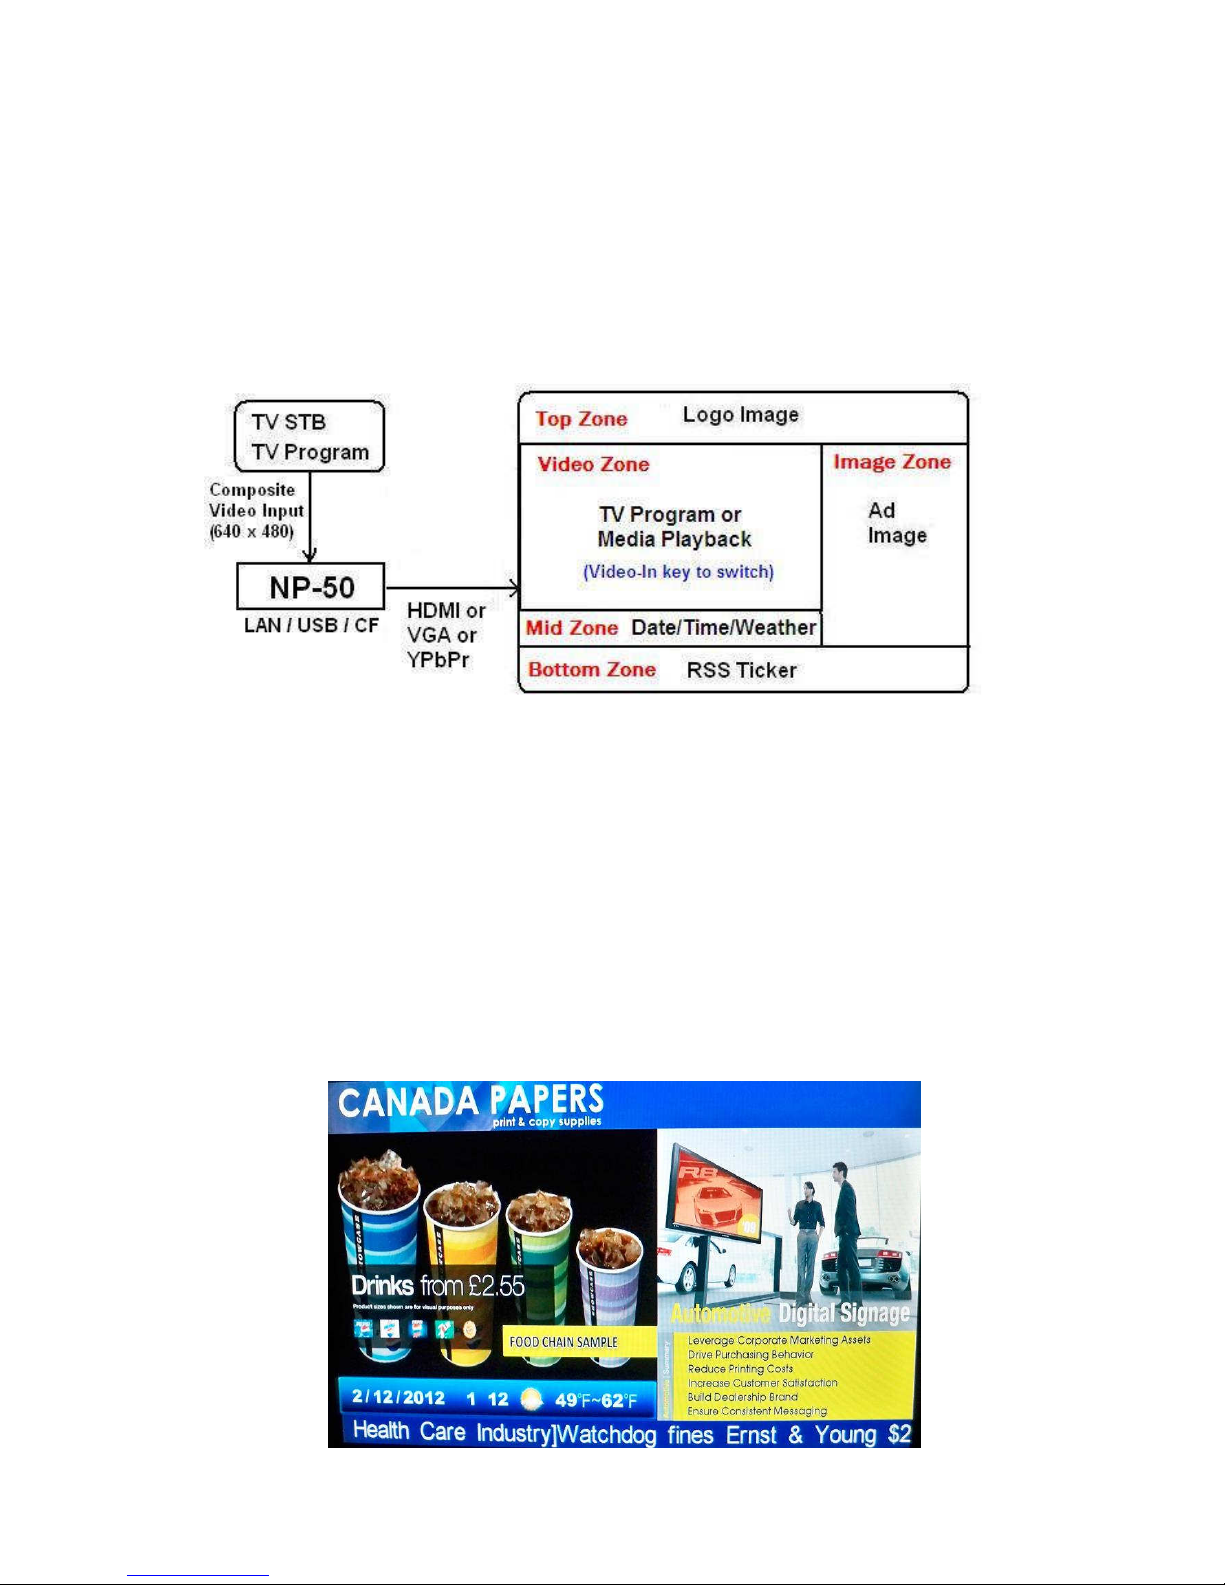
1. Zone resolution: Total area is 1280 x 720 pixels
a. Top Zone: 1280 x 100 pixels
b. Video Zone: 720 x 480 pixels
c. Image Zone: 560 x 560 pixels
d. Mid Zone: 720 x 80 pixels
e. Bottom Zone: 1280 x 60 pixels
System block diagram
• Top zone logo image is never changed, so only need to put one file in the playlist.
• Image Zone YUV files can put as many as possible. It will playback from 1st YUV
file to last YUV file repeatedly on the playlist. Each image YUV file can set duration
time from 10 sec to 60 sec, but no start time and stop time. Video zone and image
zone are two separate playback sequence independently.
• Video Zone files can put as many as possible. Can set duration time and start and
stop time. It will playback from 1st file to last file repeatedly on the playlist.
• Mid zone area is for Date/Time/Weather to display information.
• Bottom zone is for RSS or Instant text message.
Actual multi zone screen
User Guide 5 2/22/2012
Page 6
icat Operation
You can use icat same as before. The additional instructions are stated below.
*Note: If you plan to use full screen only to playback media files only. Go to Step 4.
Step 1. Create image files for the image zone and the top zone.
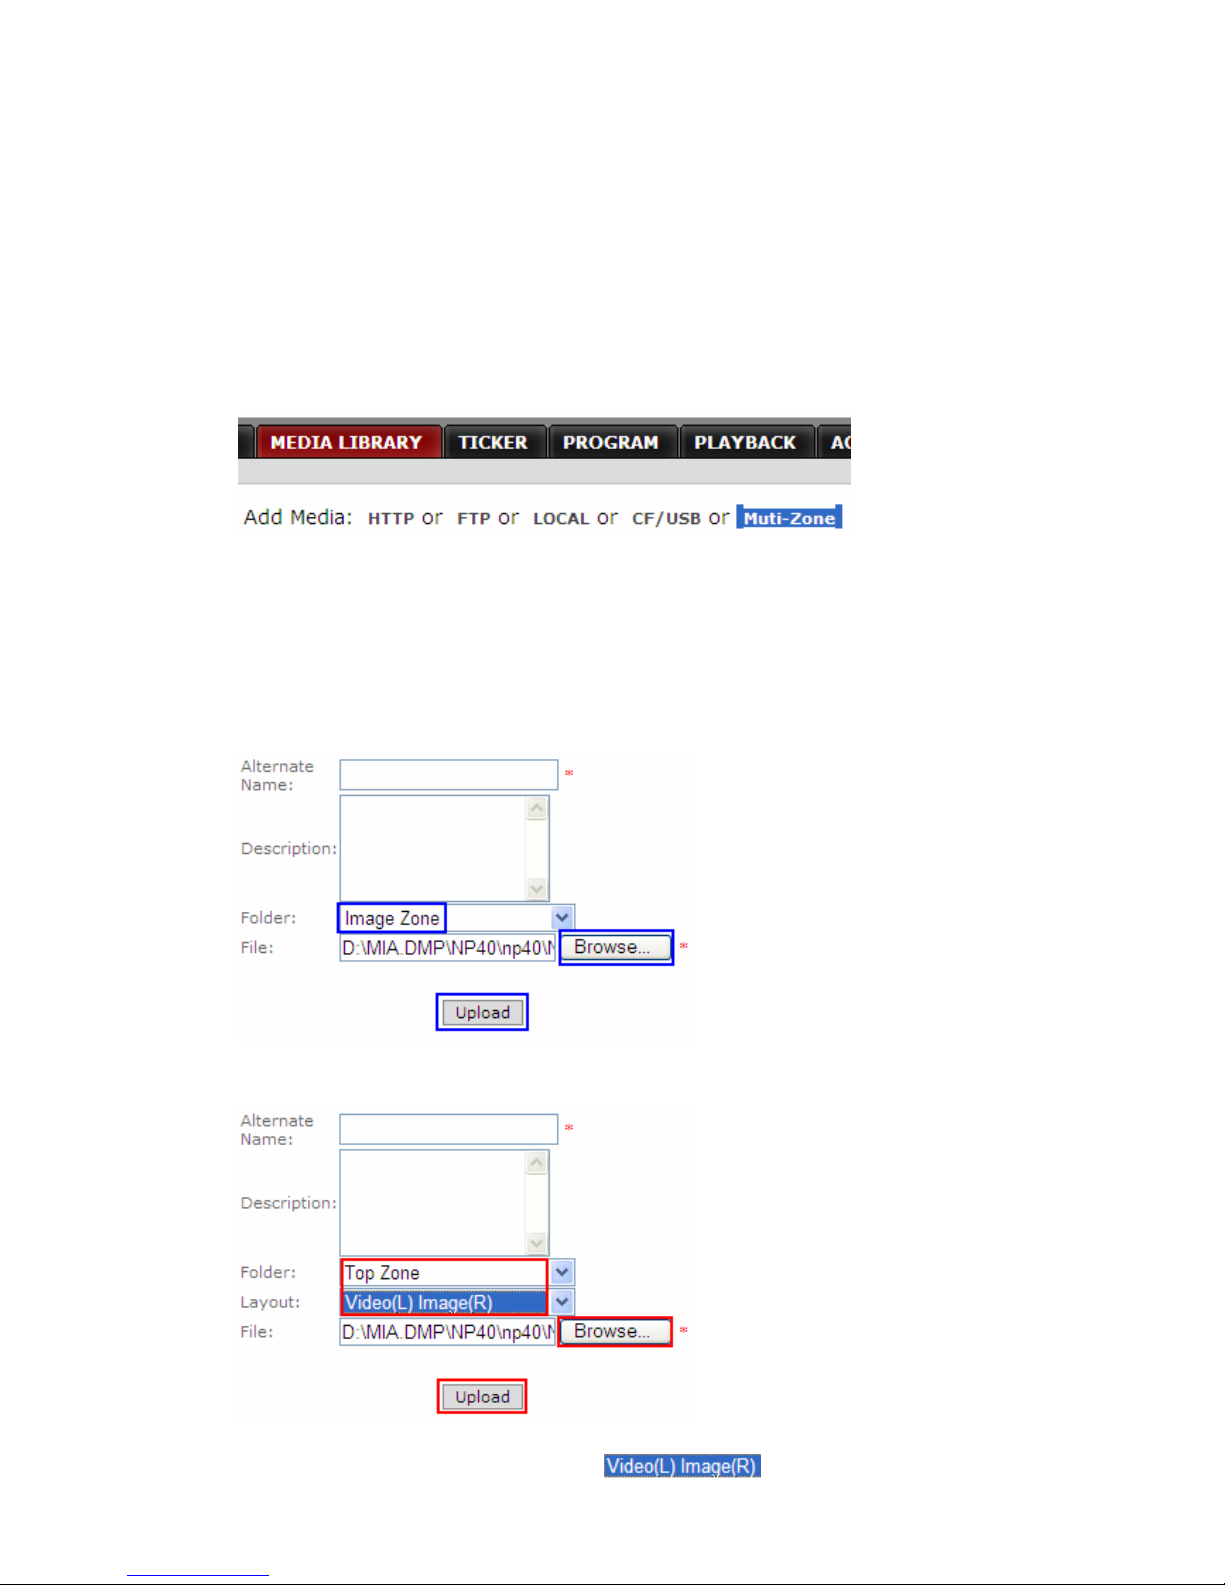
1. Go to Media Library page and click on “Multi-Zone”
2. Top zone resolution is 1280 x 100 and image zone is 560 x 560. Use any photo image editing
software to create your jpg image file and save in your PC disk.
*Note: icat software will do auto-scale if size is not exact 1280x100 and 560x560.
3. If your image data is for Image Zone then select Folder =Image Zone.
4. Browse your jpg image file then click “Upload”. It will be saved under “Image Zone” folder.
5. Continue to upload until all image files are done.
6. If your image data is for Top Zone then select Folder = Top Zone
7. There are two type of layout selection. is Video Zone on the left side and
User Guide 6 2/22/2012
Page 7
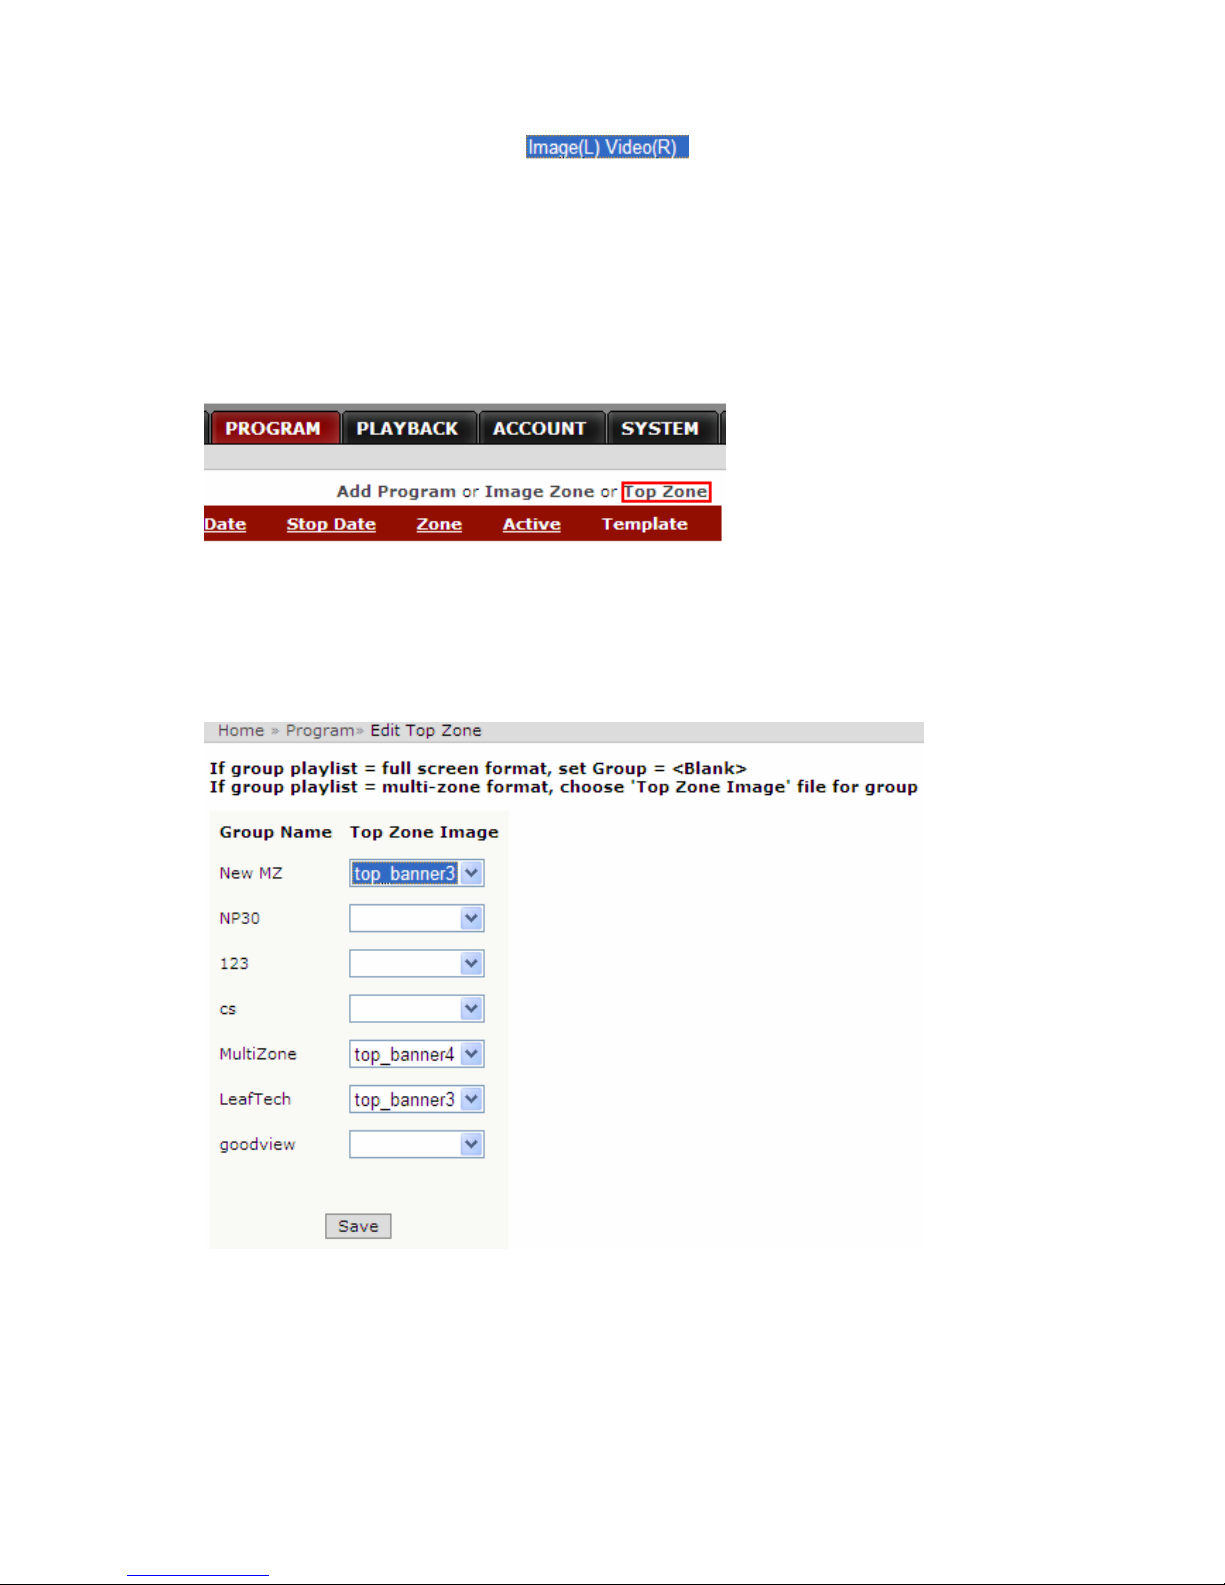
Image Zone on the right side. is Image Zone on the left side and Video
Zone on the right side. Its layout is associated with the Top Zone file.
8. Browse your jpg image file then click “Upload”. It will be saved under “Top Zone” folder.
9. Continue to upload until all image files are done.
Step 2: Add Top Zone image file for each Group
1. Go to Program page and click “Top Zone”
2. All group names will be shown on the left column and drop-down list has all the available
Top Zone image file under “Top Zone” folder.
3. If your group playlist is for multi-zone screen format then select one file and save
4. If your group playlist is for full screen only, you don’t need Top Zone image, select <Blank>
Step 3: Create playlist for Image Zone
1 Go to Program page and click “Image Zone”
User Guide 7 2/22/2012
Page 8
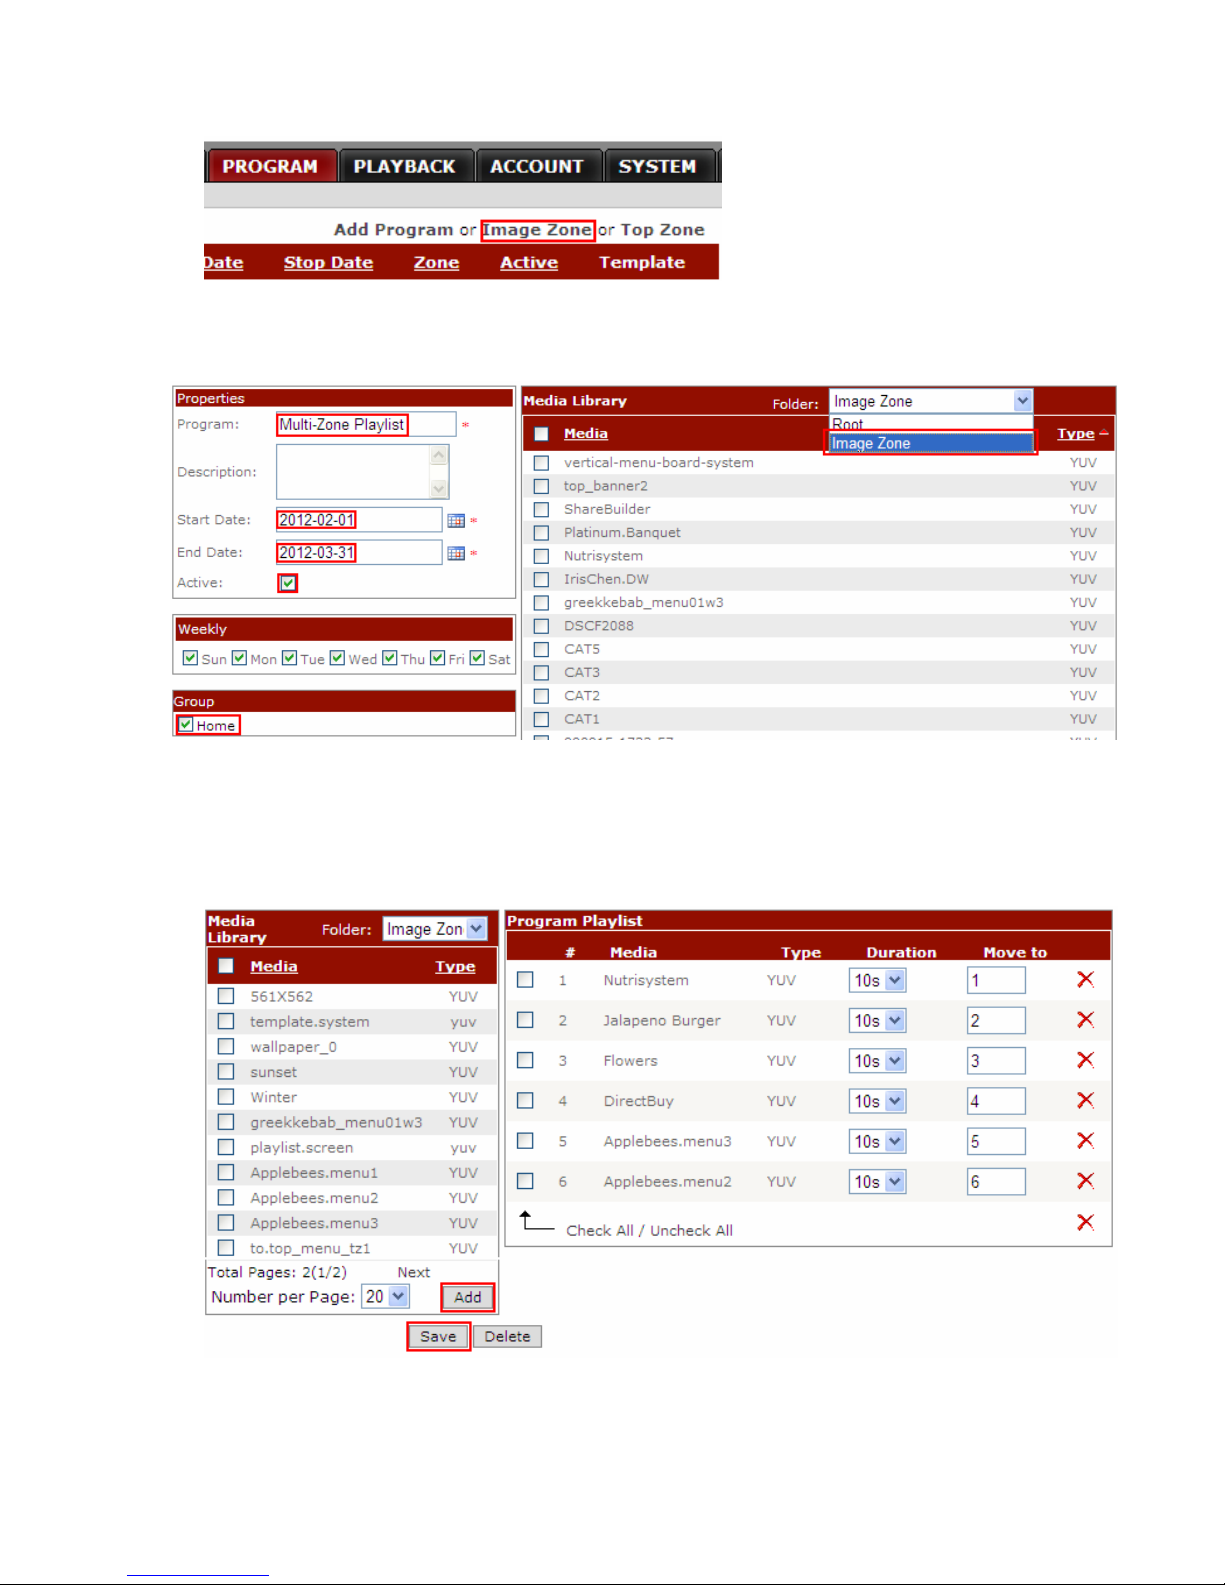
2 Enter data on each field. “*” field must fill with your data. Check Active and any group
name for your players.
3. Go to Folder and select “Image Zone” to display all image files(yuv type)
4. Check your selective image files and click “Add” to playlist area.
5. Click “Save”
Step 4: Create playlist for regular full screen or video zone
1. Go to Program page and click “Add Program”
User Guide 8 2/22/2012
Page 9
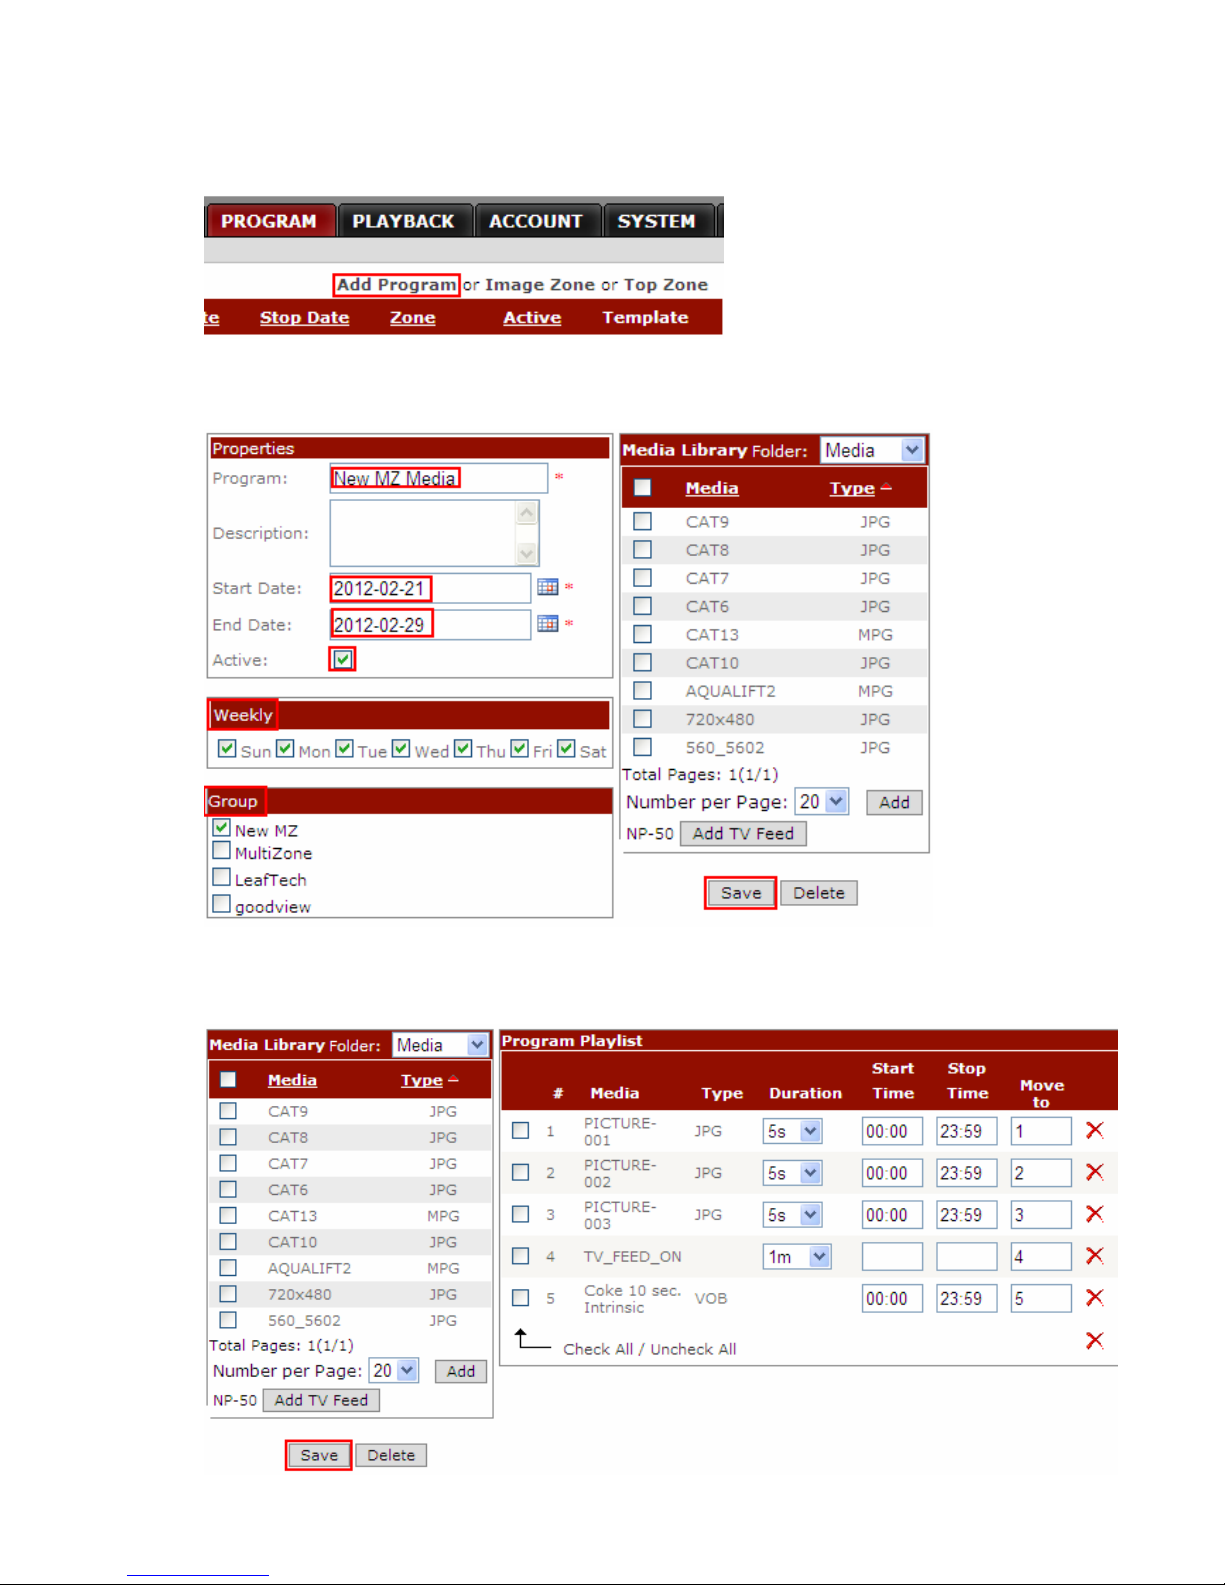
3 Enter data on each field. “*” field must fill with your data. Check Active and any group
name for your players.
4. Go to root or any folder to display all image files from media library.
5. Check your selective image files and click “Add” to playlist area.
6. Click “Save”
User Guide 9 2/22/2012
Page 10
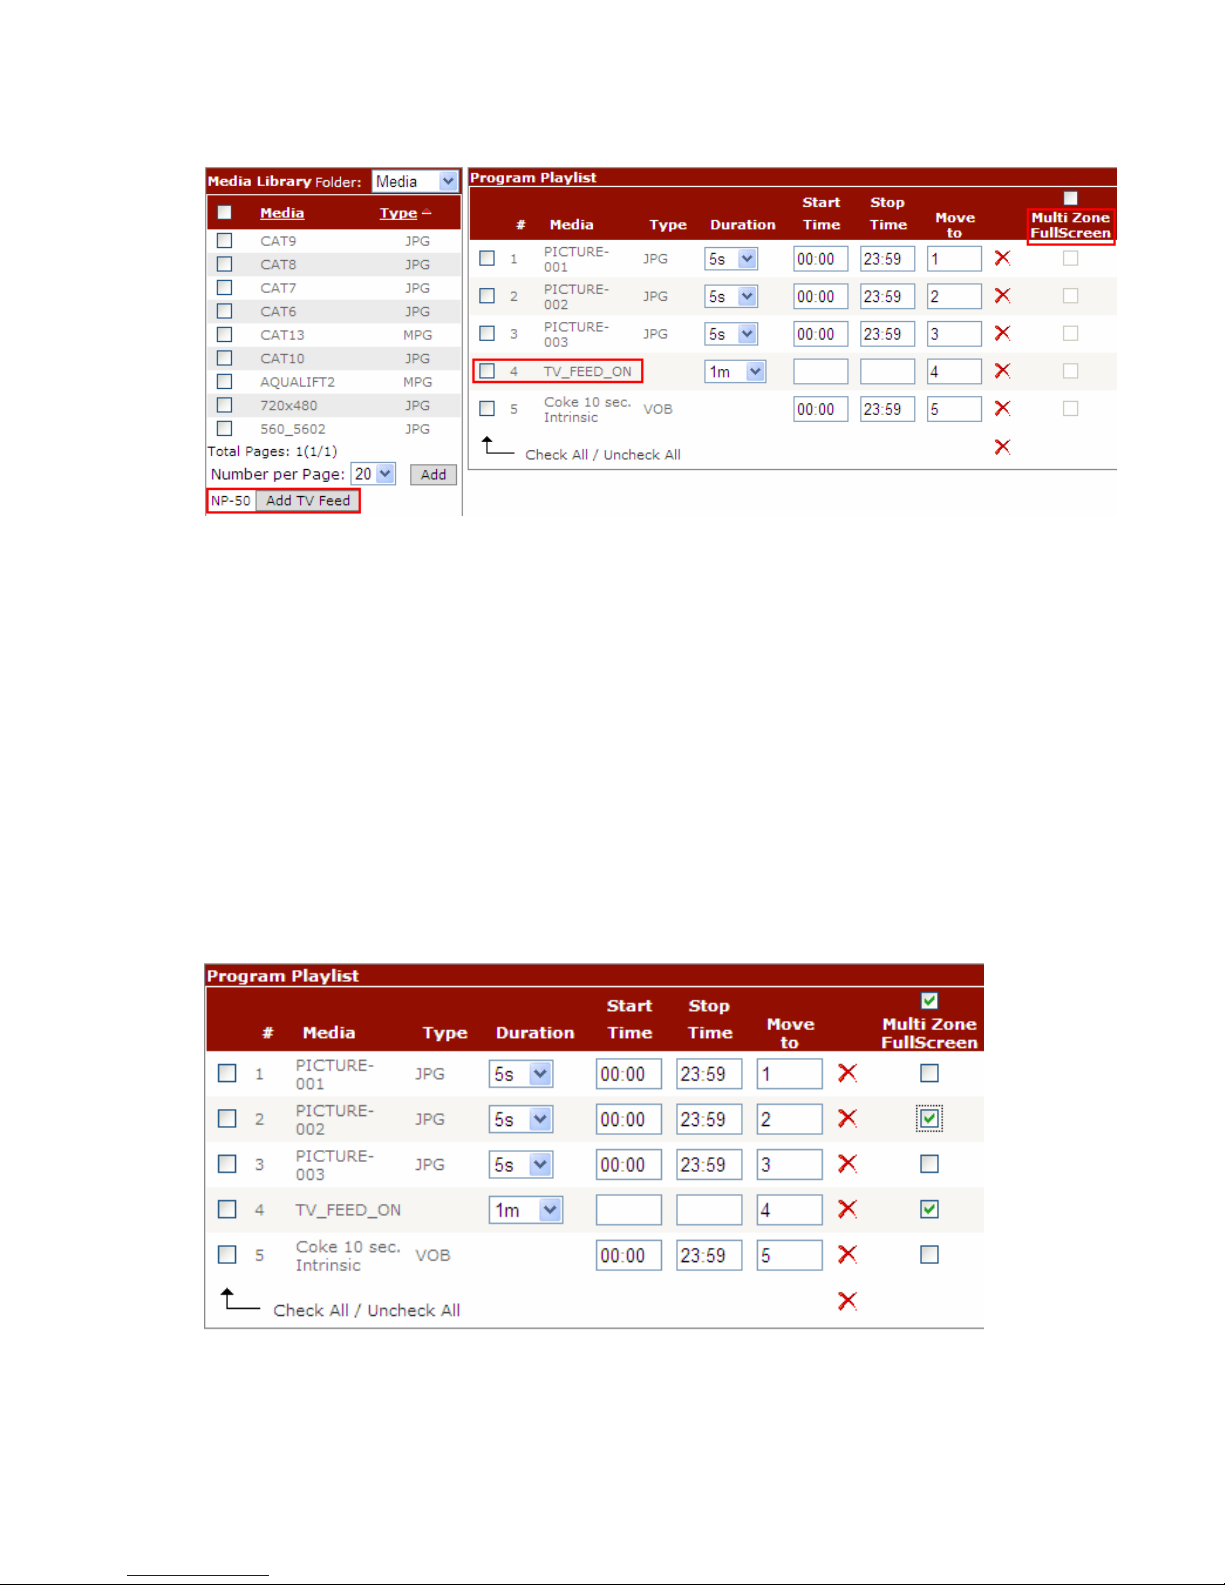
Step 5: Add TV Feed from video input source (NP-50 only)
1. TV Feed Flag: To input external video source into “Video Zone”. Click “Add TV Feed” and
“TV_FEED_ON” will appear on playlist, then select time duration or enter “Start Time
hh:mm” and “Stop Time hh:mm”.
a. Specific time range: ex. 12:00 to 14:00 => switch to TV at 12pm, end at 2pm, then
go to next playlist order
b. No time, only duration: 10m => switch to TV for 10 minutes then go to
next playlist order
2. Full Screen Flag(multi-zone player only): This check allows media file to present in full
screen instead of multi-zone screen. Un-check will switch back to Multi-zone screen.
3. For example below picture: Picture-001.jpg will display on video zone of multi-zone screen,
and Picture-002.jpg will switch to full screen to display. Picture-003.jpg will return to
multi-zone screen. Live TV will go to full screen for 1 minute then ‘Coke 10 sec’ file will
playback on video zone of multi-zone screen and repeat to picture-001.jpg.
Step 6: New feature Weather(NP-50/NP-30 only)
1. In addition to date and time information, NP-50 provides weather information. User needs to
enter player’s city code. There are two places in icat. One is system weather for all players in the
User Guide 10 2/22/2012
Page 11
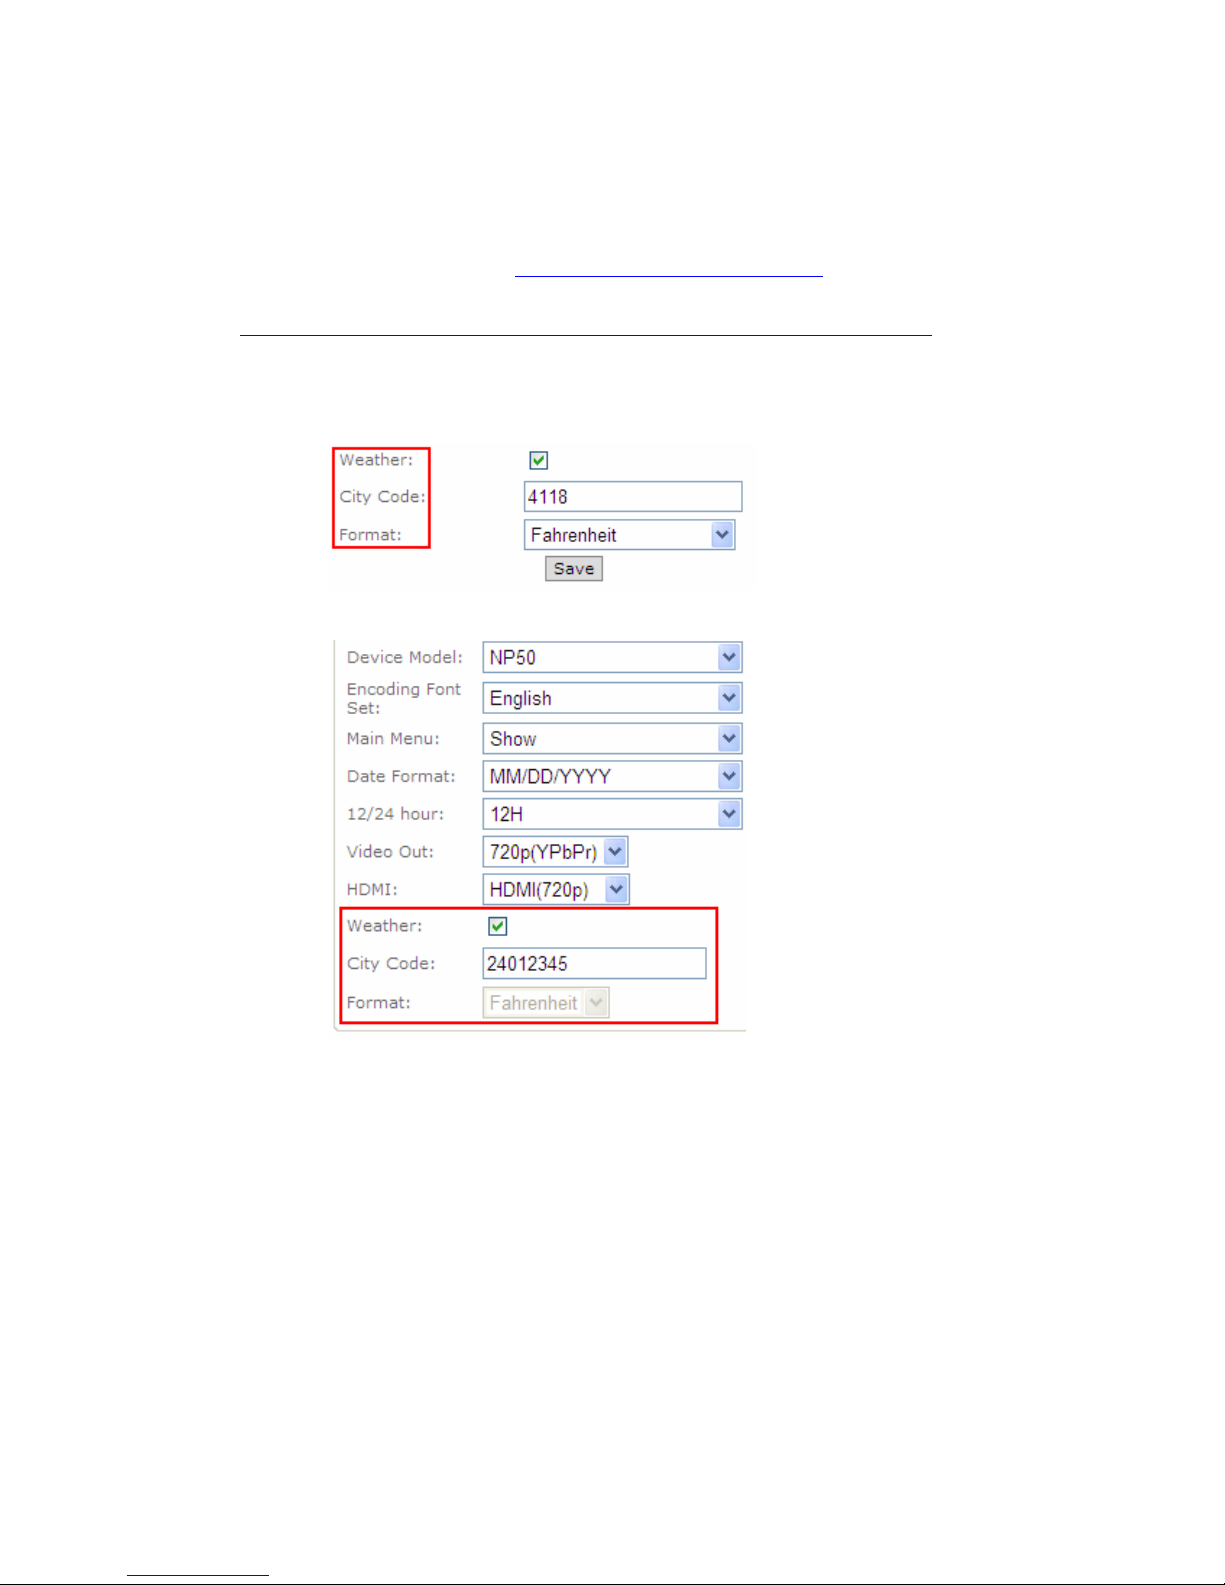
same account. Device weather is for individual player only.
*Note: If system weather is enabled, device weather will be ignored. To control each player’s
weather, disable system weather.
**:To find your City Code, visit http://www.weather.yahoo.com and enter city name. some
digit numbers will appear on the top url address.
ex. http://weather.yahoo.com/united-states/california/los-angeles-2442047/
City Code: 2442047
a. System Weather (under System Page):
b. Device Weather (under Player page->device setup):
User Guide 11 2/22/2012
Page 12
CAT Operation:
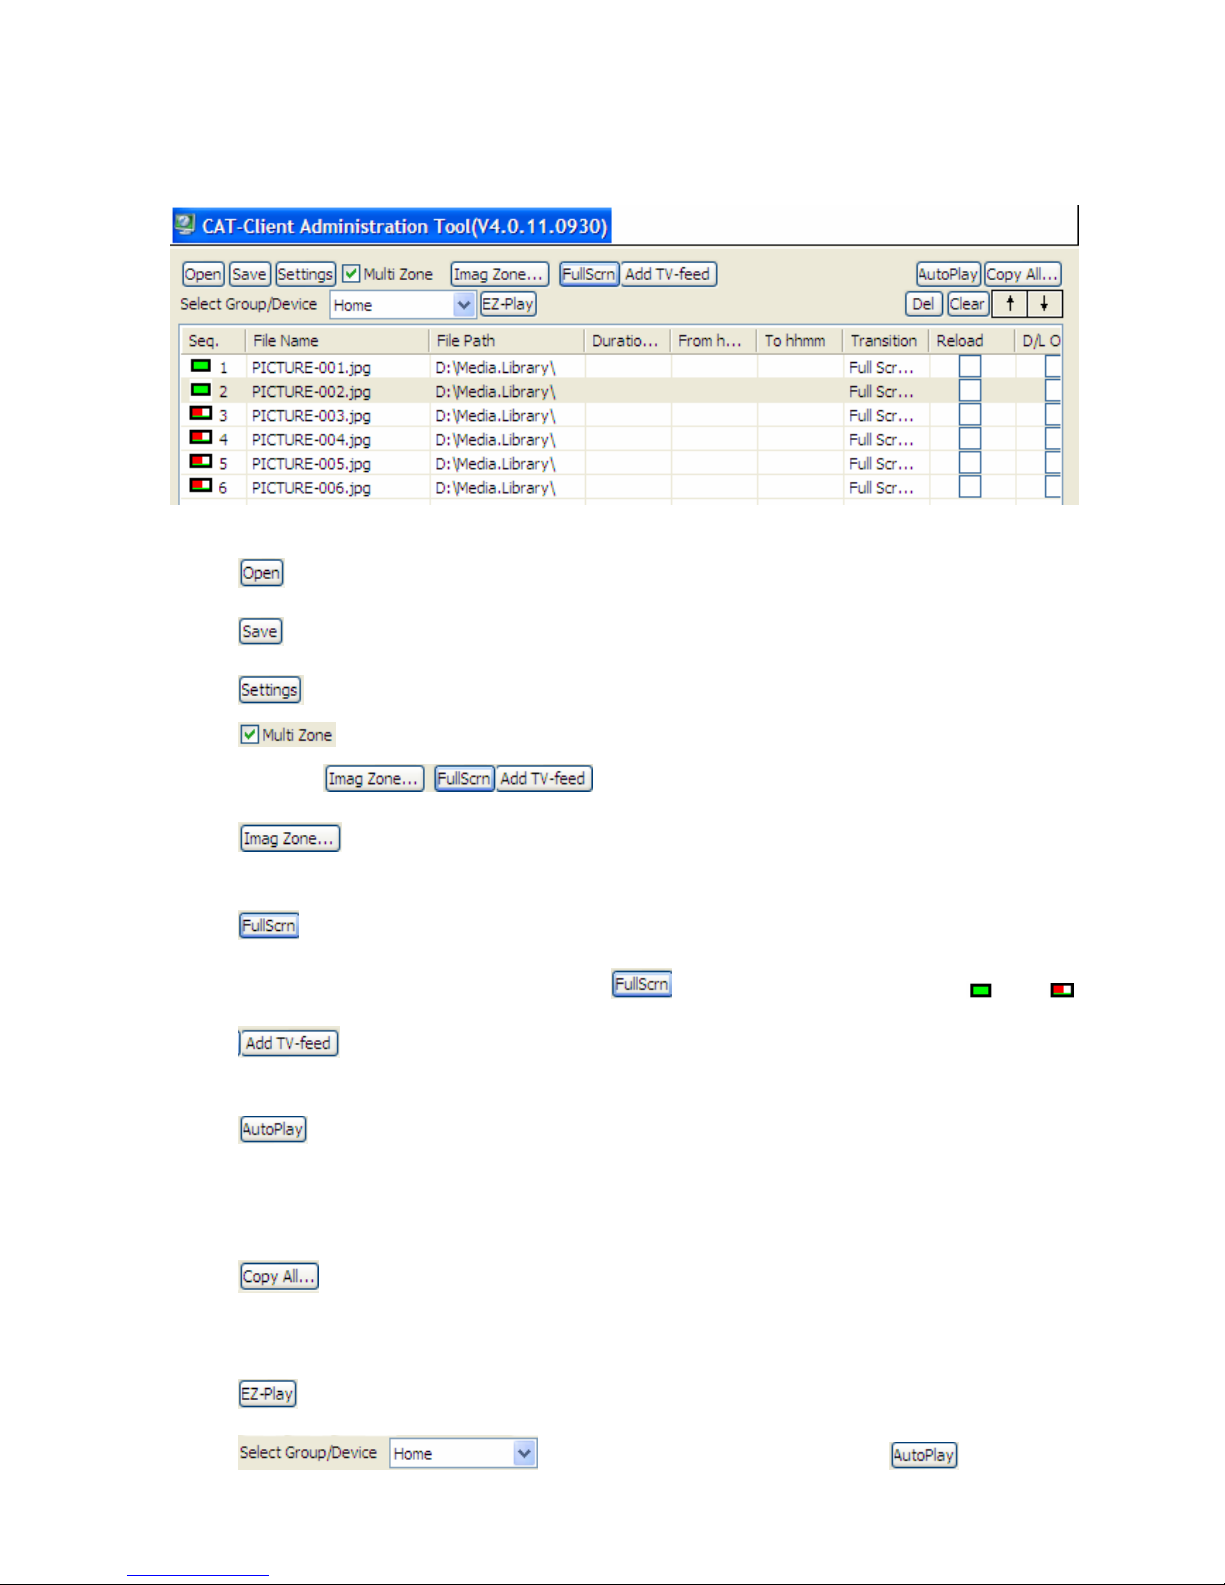
CAT Icon Button definition:
1. Open: open any previous saved playlist file (file extension is .mpl)
2. Save: save current playlist into local disk for future use.
3. Global Settings: there are some options to select to manage playback or device.
4. Multi Zone: Only available on NP-40 and NP-50 models, not NP-25 and NP-30. Once
checked, will grey out for action.
5. : Image Zone: add top zone picture and image zone picture for multi-zone presentation.
Detailed instruction is in the following page.
6. Full Screen: specify any single media file to playback in full screen format. Move mouse to
filename and highlight it and click mouse on to enable it. Left icon will become from
7. Add TV-feed: available on NP-50 only. Allow video-input source to be managed in the
playlist.
8. AutoPlay: user can pre-selected playlist and enable AutoPlay. When player login to CAT, CAT
will do “EZPlay” feature automatically. It means CAT will send out playlist and media file to players.
This feature can be disabled from Group editor. Move mouse to group name and click right button and
select “Edit Group” then uncheck “Enable AutoPlay”.
9. Copy All: User can save current playlist and all its media files from PC to CF or USB drive.
Then insert CF/USB device to player as standalone playback instead of downloading from CAT or icat.
Set player’s operation mode=CF Local mode.
10. EZ-Play: Click this will send current playlist and media files to player according to the
User Guide 12 2/22/2012
. This is manual mode vs. automatic Mode .
Page 13
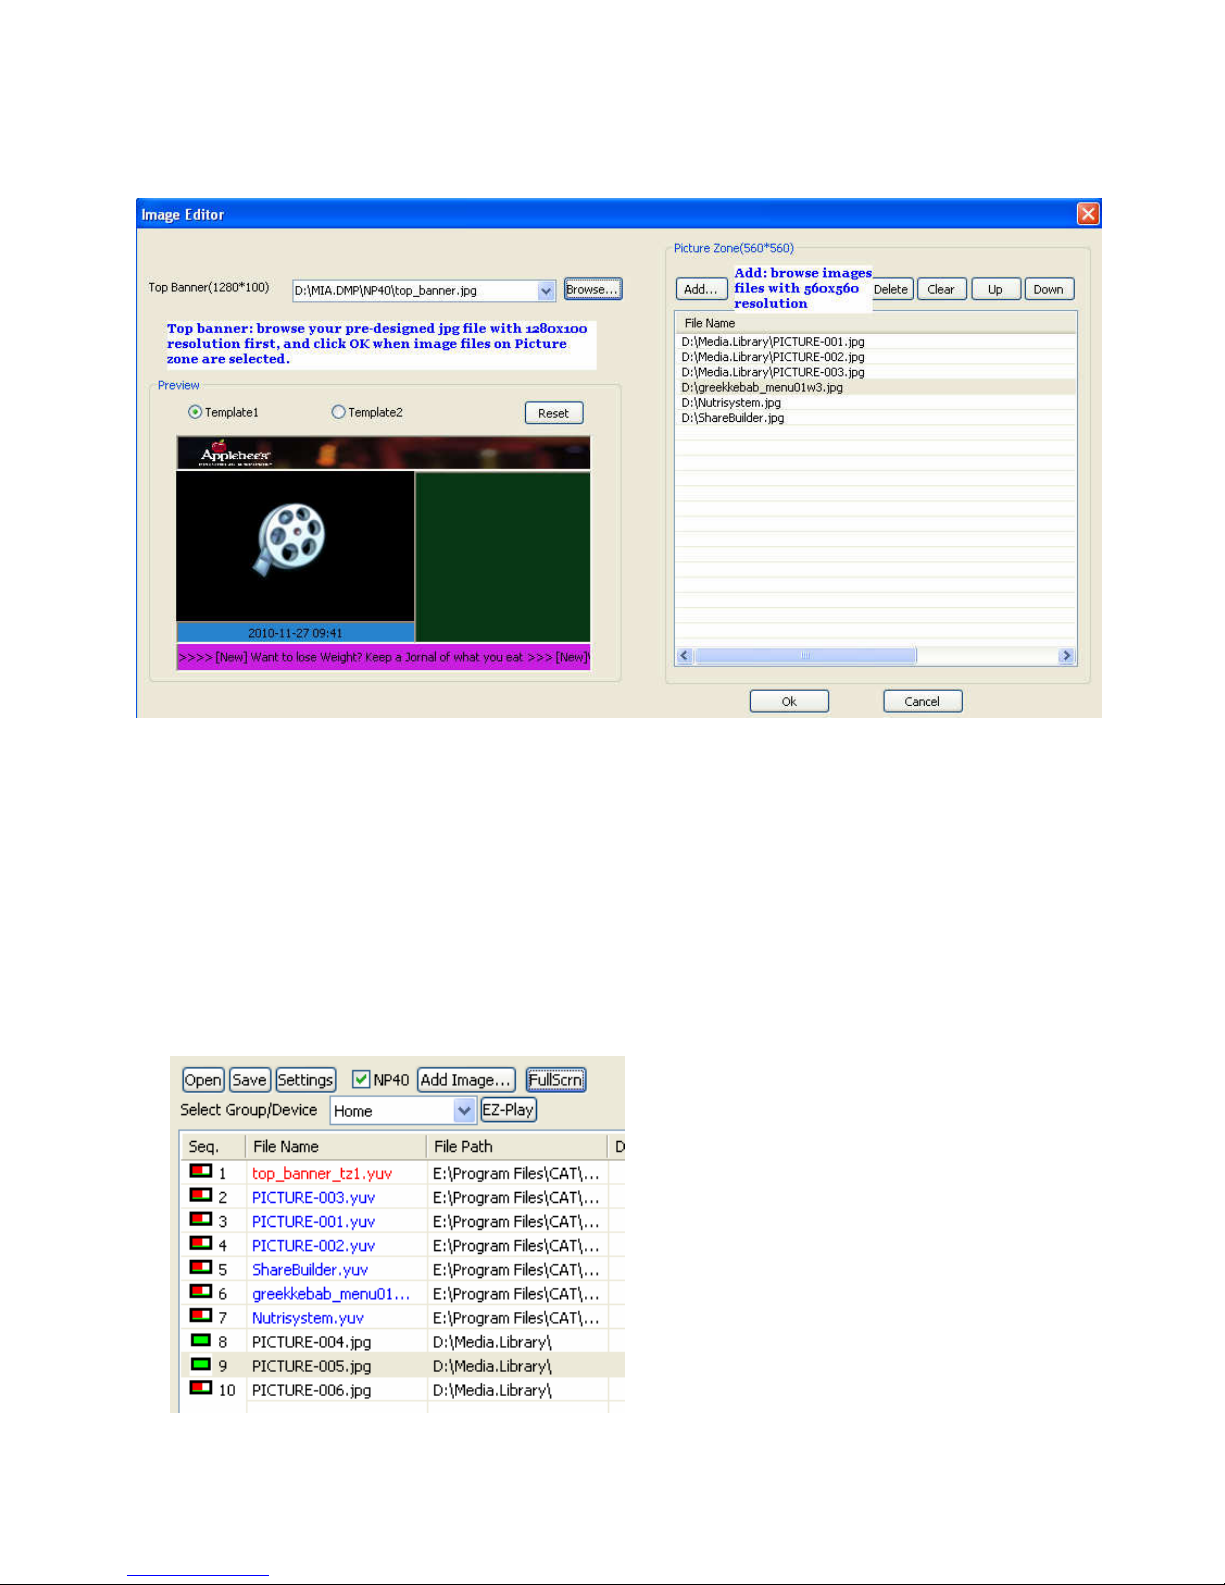
Image Zone Editor
Top banner: Browse to find your pre-designed jpg file with created at 1280x100 resolution which will display as
your top banner image.
Template1 or Template2: define the video zone and image zone layout and can only be set once per playlist.
Add: Add jpg files for image zone. Resolution should be 560x560. If not 560x560, your images will be scaled to
fit.
After the top banner and image files have been selected, click “OK”, this tool will convert the files automatically
to YUV and displayed in the playlist window.
:
Your new playlist for multiple zone is ready, click “EZ-Play” to send content to your NP-30 devices.
User Guide 13 2/22/2012
Page 14
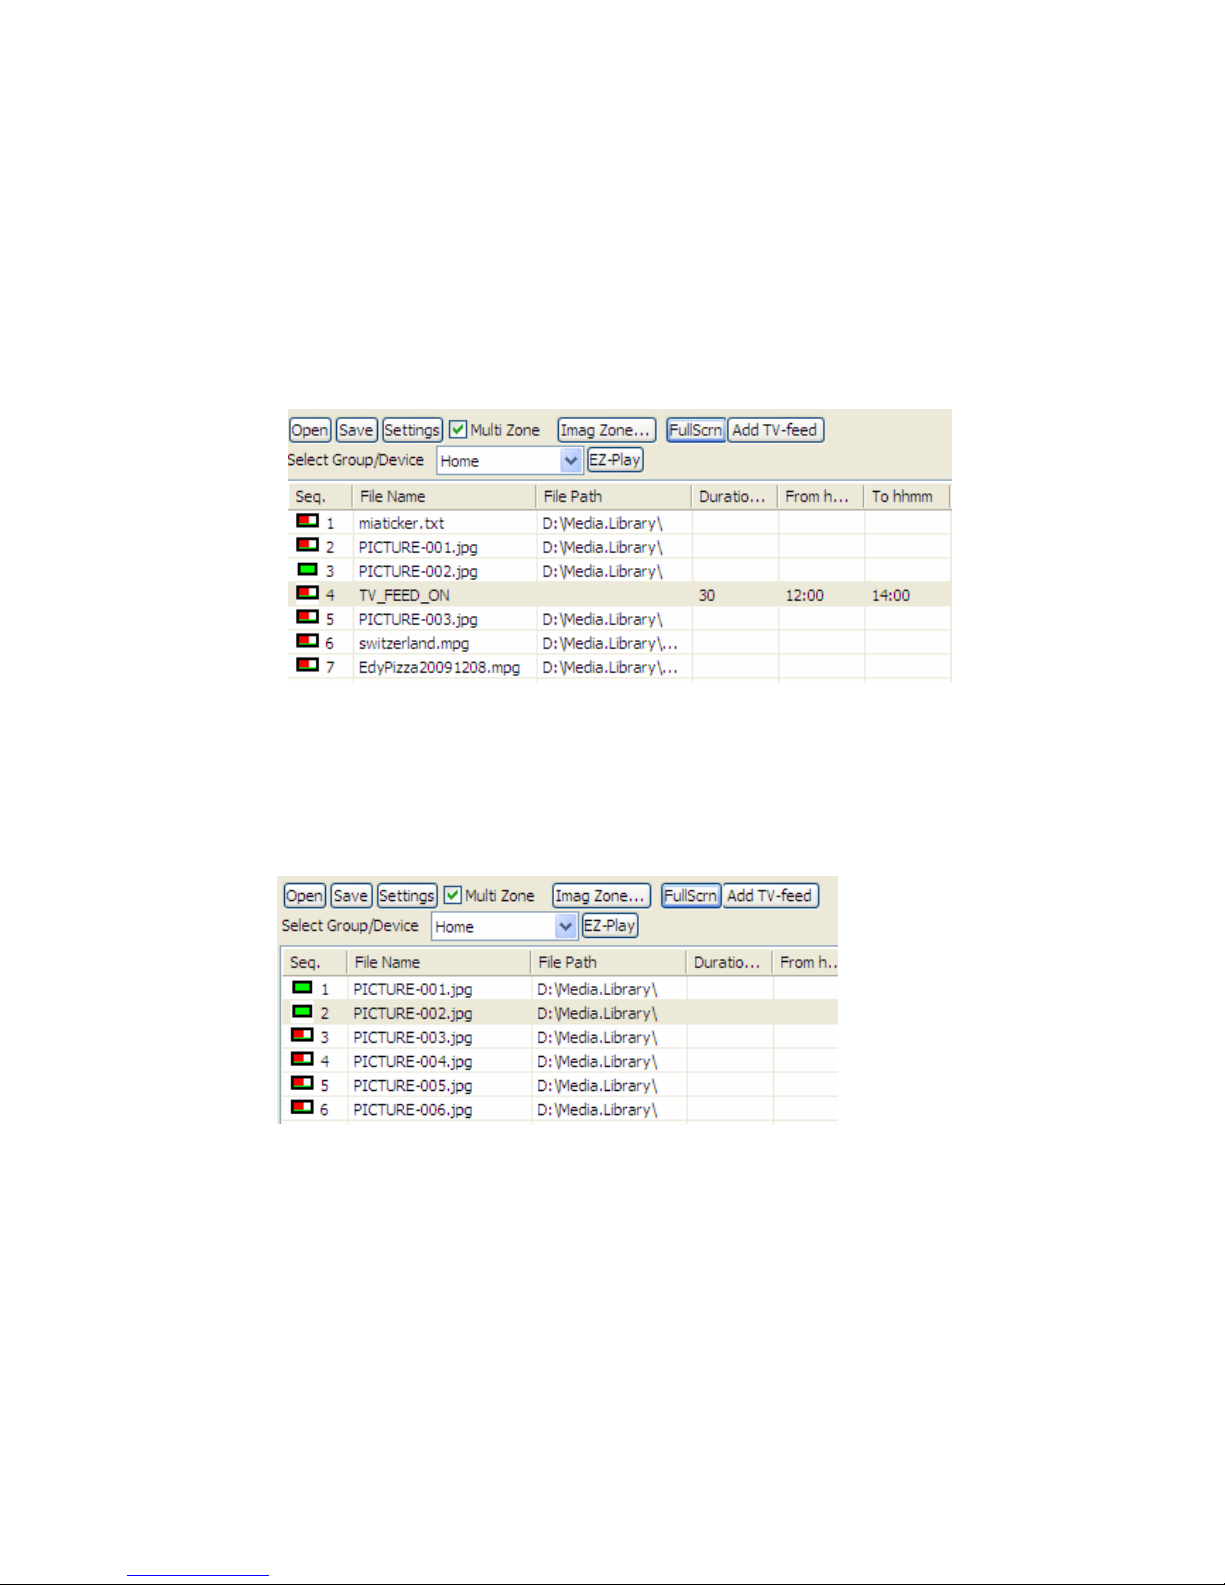
TV Feed and Full Screen:
1. TV Feed: To input external video source into “Video Zone”. Click “Add TV Feed” and
“TV_FEED_ON” will appear on playlist, then select time duration or enter “Start Time hh:mm”
and “Stop Time hh:mm”.
a. Specific time range: ex. 12:00 to 14:00 => switch to TV at 12pm, end at 2pm, then
go to next playlist order
b. No time, only duration: 10m => switch to TV for 10 minutes then go to
next playlist order
2. Full Screen Flag: Let media file to present in full screen instead of multi-zone screen. Move
mouse and click to highlight the file. Then click “Add TV-Feed” button. The left most icon
will change from red dot to solid green. Green color means full screen layout for this file.
Red dot is multi-zone lay-out.
User Guide 14 2/22/2012
Page 15
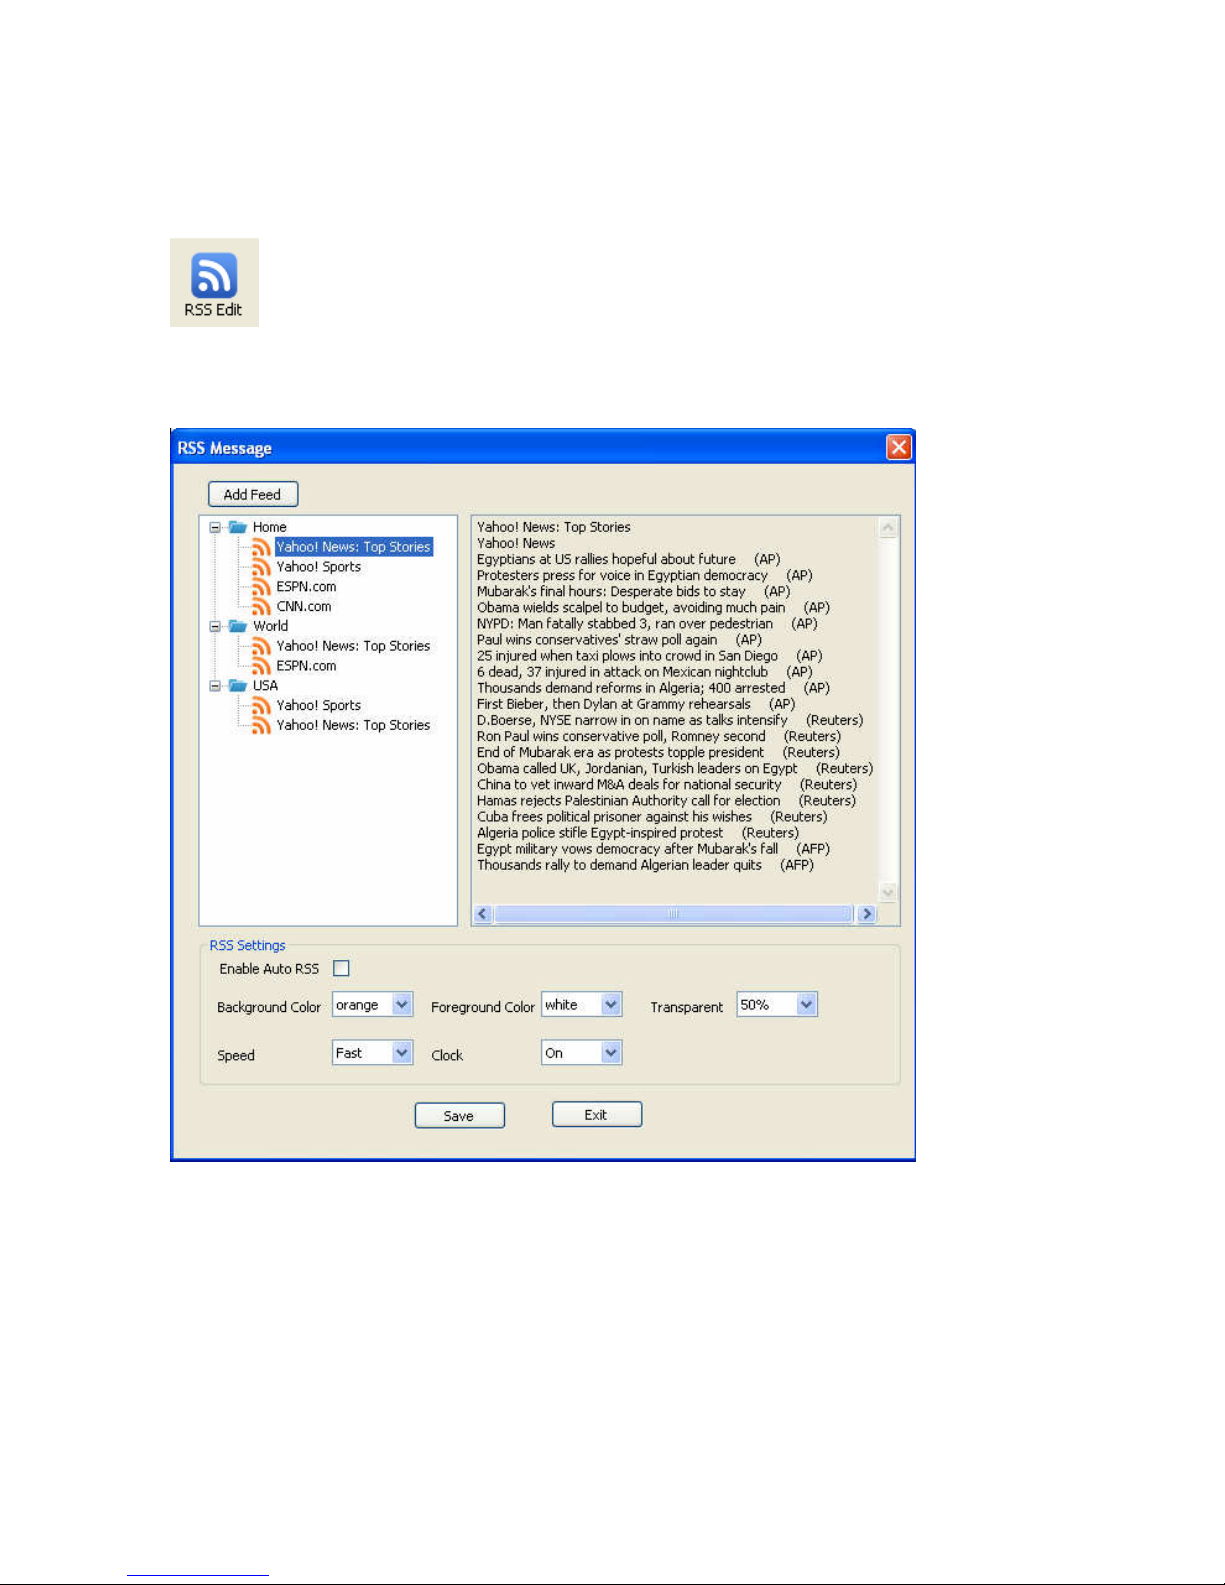
RSS Feature:
1. Add RSS Feeds management to replace previous RSS Advantages software
2. RSS Edit: add or edit RSS url and foreground color, background color ..settings.
When this Icon is clicked, a RSS window will appear.
User Guide 15 2/22/2012
Page 16
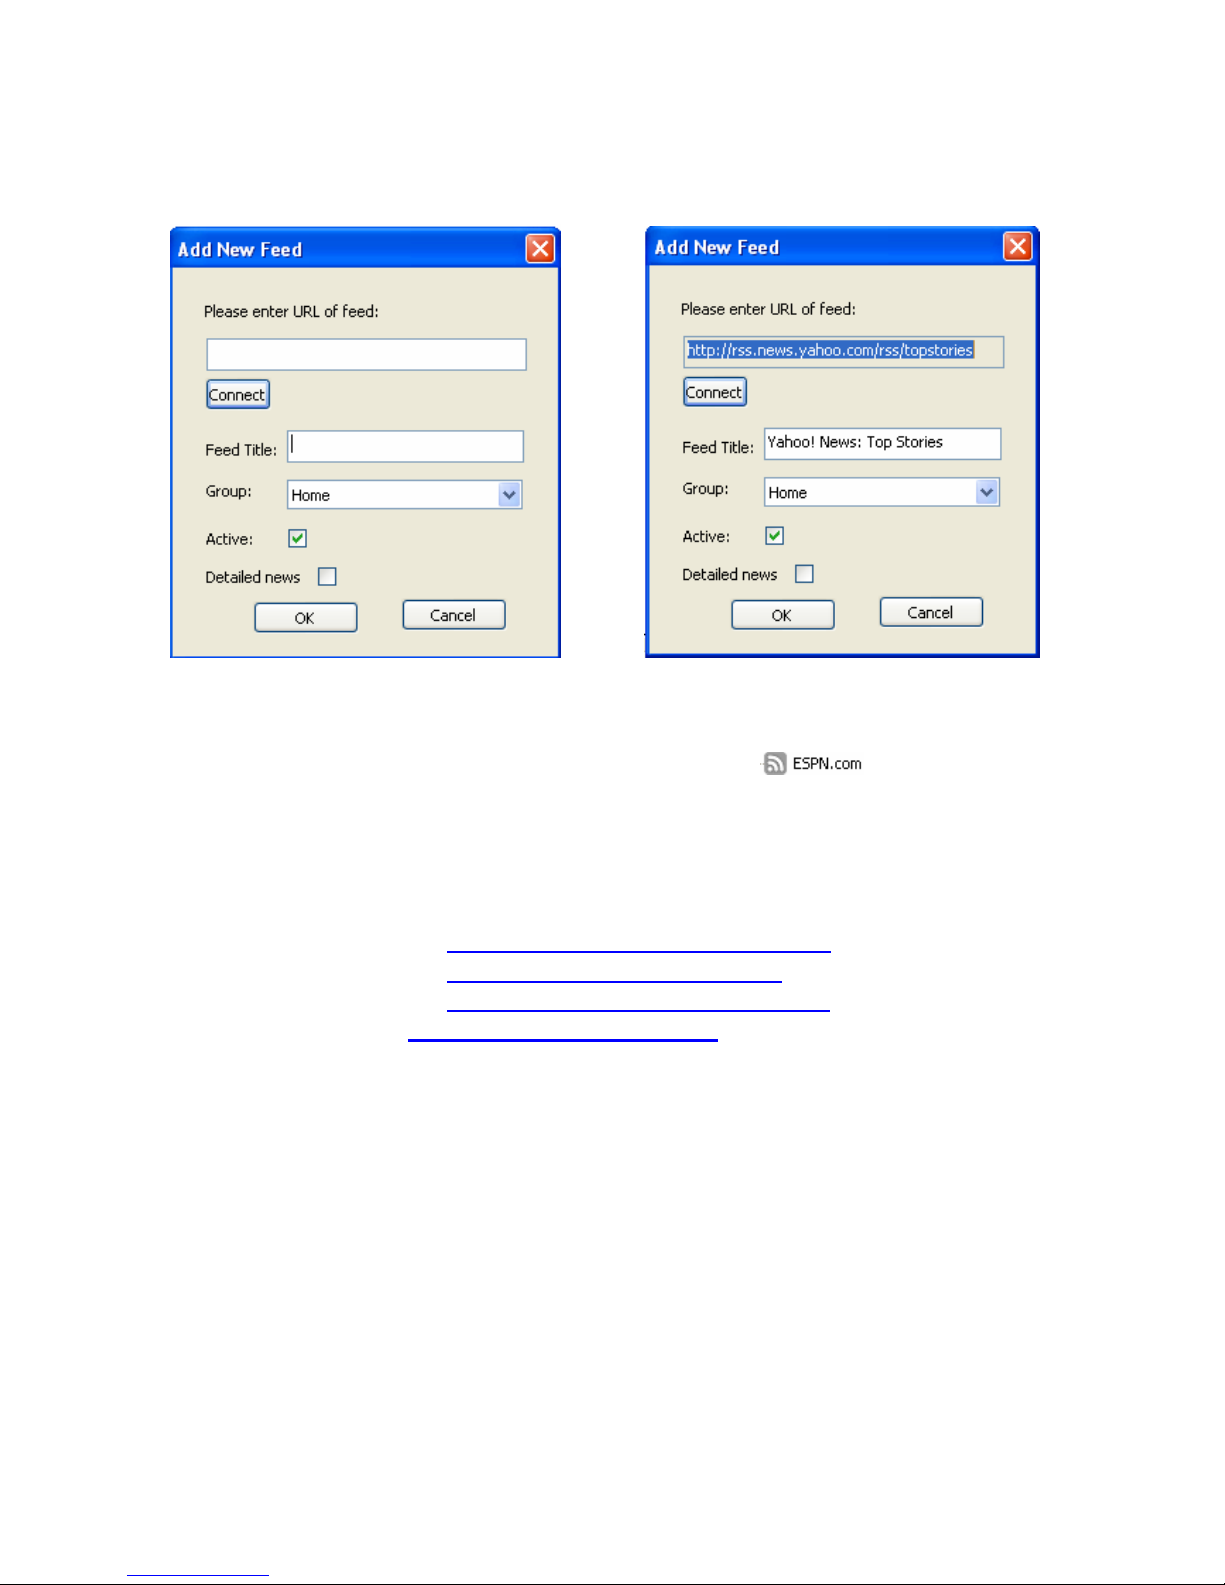
a. click “Add Feed”, a “Add New Feed” RSS window will appear.
Enter your RSS URL link below and click “Connect” to retrieve data.
Make sure your PC is connecting to internet.
=>
- Group: assign RSS to any group on the pull down window
- Active: if checked then current RSS data will be sent under same group. If uncheck, then it
will not be sent and RSS graph will become grey color.
- Detailed news: RSS data has title only or detailed news. If checked, then detailed news will
be shown in the RSS text string.
-
-
b. Some example RSS links:
Yahoo top stories=> http://rss.news.yahoo.com/rss/topstories
Yahoo sports => http://sports.yahoo.com/top/rss.xml
ESPN sports => http://sports.espn.go.com/espn/rss/news
CNN news => http://rss.cnn.com/rss/edition.rss
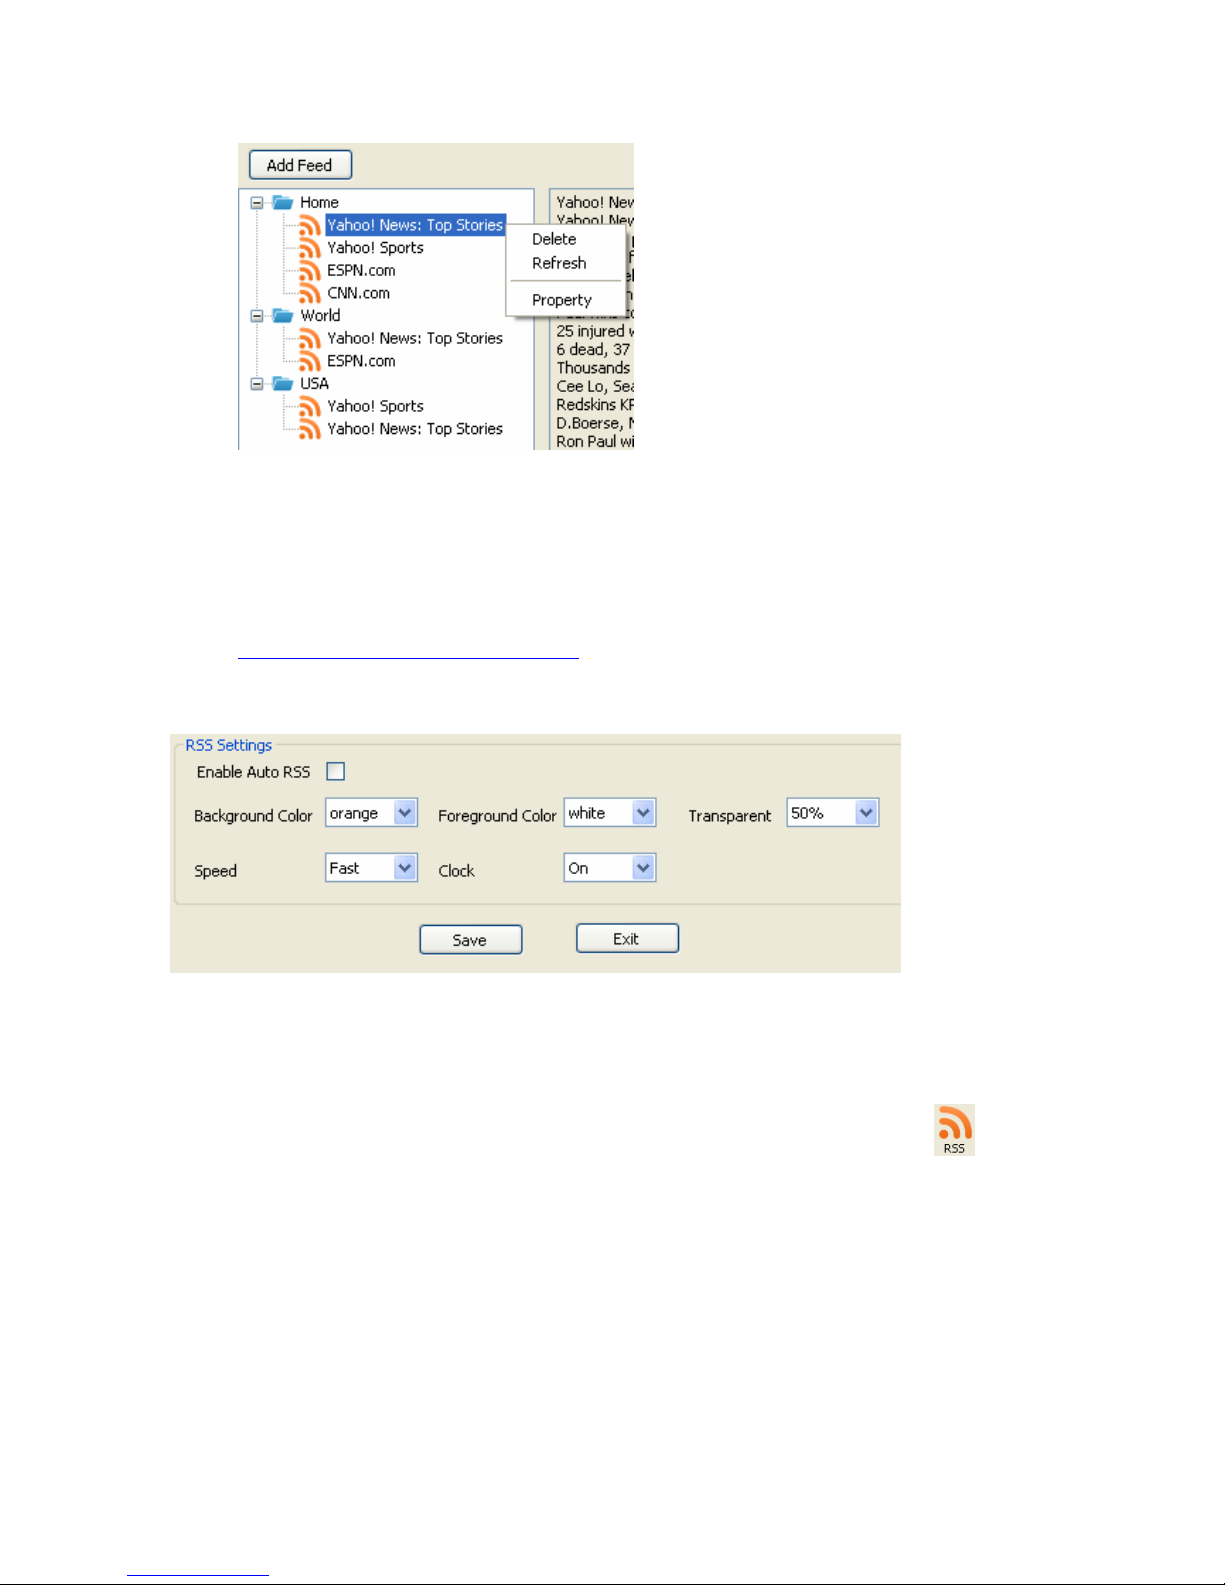
c. When move mouse to any RSS name and click right mouse button, a pop-up window will
appear to display “Delete”, “Refresh” and “Property”.
- Delete is to remove current RSS
- Refresh is to update RSS data on the right window
- Property is to pop up current RSS data for modification.
User Guide 16 2/22/2012
Page 17
d. If user wants to duplicate same RSS to another group, just open current RSS’s property
and use Ctrl-C keys to copy RSS link data and then click “Add Feed” and press Ctrl-V keys
to paste RSS link and then assign to another group name.
e. [Note] If you click “Refresh”, but there is no RSS data (blank) on the right window. Your
MSXML version is too old, please upgrade to MSXML v4.0.
http://support.microsoft.com/kb/324460
RSS Settings:
- Enable Auto RSS: If this box is enabled, then CAT will send RSS text string to players
when player login to CAT. No need to click RSS Icon manually.
- This feature is tied with AutoPlay feature. Autoplay must be enabled as well.
- Background color and others can be selected and saved. When RSS Icon is clicked,
CAT will send RSS text string based on all the RSS link and settings to players.
CAT will update all RSS feeds every 15 minutes automatically or user can click “Refresh”
manually.
- END -
User Guide 17 2/22/2012
 Loading...