

Page 1

97050263
rev. 002
02/2013
Instructions for use
intraoral scanner
ENGLISH (translation from the original in italian)
IT
EN
Page 2

Blank page
Page 3

Indice
Table of Contents
Introduction 5
Conventions used in this manual .......................................................................6
General warnings ...............................................................................................6
Warning for use ..................................................................................................7
Safety and hygiene ............................................................................................8
Maintenance and disposal .................................................................................9
Warranty ...........................................................................................................10
Limited responsibility ........................................................................................10
Standards and classications ..........................................................................10
Package contents and product parts ...............................................................11
Product identication 13
Intraoral Scanner .............................................................................................14
Power supply ...................................................................................................15
Scannersystemcharacteristics 17
Environmental characteristics ..........................................................................18
Scanner characteristics ....................................................................................18
Power supply characteristics ...........................................................................18
Optical characteristics ......................................................................................18
Scanner holder .................................................................................................18
USB ..................................................................................................................19
Personal computer (optional) ...........................................................................19
Cleaninganddisinfection 21
Applying the disposable hygienic protections ..................................................23
Warnings for disposal .......................................................................................24
Preparing for use 25
Using the scanner 29
Troubleshooting 31
Page 4

Blank page
Page 5

INTRAORAL SCANNER - Instructions for use
1
Introduction
• Conventions used in this manual
• General warnings
• Warnings for use
• Safety and hygiene
• Maintenance and disposal
• Warranty
• Limited responsibility
• Standards and classications
• Package contents and product parts
EN
5
Page 6

INTRAORAL SCANNER - Instructions for use
1
The intraoral scanner is a portable medical device capable of three-dimensional scanning of dental arches
generating a digital imprint better than a conventional silicon/alginate/hydrocolloid imprint in terms of marks,
precision and accuracy. Thanks to a sophisticated optical system it allows obtaining a digital imprint of:
- stumps (after preparation), single crowns, 3, 4 or 5-element bridges;
- complete dental arches (for orthodontics);
- abutment from scanning for implant repositioning.
Conventions used in this manual
Throughout this manual the term scanner will be used both to identify the handpiece and the 3D scanning system as a whole (the product), depending on the context. The following abbreviations are also used:
PC: Personal Computer
3D-Progress: technical product name, also referred to as scanner
MHT: Medical High Technologies S.p.A. a socio unico, Verona (VR), Italy – also referred to as the manufacturer
Introduction
USB: Universal Serial Bus (data transfer system from devices to PC)
LAN: Local Area Network (PC)
W-LAN: Wireless LAN
General warnings
- The intraoral scanner (system) and the relative software and drivers are developed and manufactured by
MHT, Verona (IT), hereinafter referred to as the manufacturer.
- These instructions describe how to correctly and safely use the scanner. In order to use the scanner system, you need image acquisition and storage software. For software installation and use refer to the relative manual code 97050264. Please carefully read both manuals before starting to use the scanner.
- The purpose of scanning is to acquire and display digital imprints, similar to what was traditionally done with
resin moulds. This operation does not in any way affect the diagnostic examination, which is assumed to
have been carried out at the time the imprint is acquired, nor the subsequent treatment, such as prosthesis
application, implants or orthodontic treatments which are decided and carried out by the orthodontist.
- No part of this publication may be reproduced, stored in a retrieval system, or transmitted in any form or by
any means, electronic, mechanical, photocopying, recording or otherwise, without the prior permission of
the manufacturer.
- MHT pursues a policy of continual improvement of its products, therefore, some specic instructions and
images contained in this manual may differ from the product purchased. MHT reserves the right to make
any modication to this manual without prior notice.
- The information, technical specications and illustrations contained in this publication are not binding. The
manufacturer reserves the right to make technical modications and improvements without modifying the-
se instructions.
- Warning: in observance of the privacy laws in force in numerous countries, suitably protect sensitive personal data and, moreover, before sending patient images or personal data via computer, informed consent
must be obtained from the patients.
- The original text of this manual is in Italian.
- All the registered trademarks and the product names mentioned are the property of the respective owners.
Please pay particular attention to the sections in the manual where the following symbols appear:
6 EN
Warnings regarding patient or operator safety.
Warnings regarding the risk of damaging the product, and particularly important warnings regarding
the warranty.
Page 7
INTRAORAL SCANNER - Instructions for use
Warnings for use
- Electronic equipment may cause and suffer from interferences when used in proximity of other electromagnetic equipment, in particular mobile phones, personal computers equipped with W-LAN cards, microwave ovens. Avoid keeping the scanner and the PC intended for acquisition and storage of the scans in
proximity of RF sources, such as W-LAN cards, other radio devices, home RF devices, microwave ovens;
the recommended distance is at least 1 metre and at least 2 metres in the case of microwave ovens.
- It is recommended to install an up-to-date rewall and antivirus protection program on the PC and to use it
exclusively for work purposes.
- In the event of malfunctioning of the PC during an intraoral scan (software or operating system crash or PC
failure) the scan in progress will be interrupted and it might be impossible to retrieve it. Previous scans saved to the PC (database) will normally not be lost; nevertheless, if the damage to the PC is serious (mainly
to the hard disk or the operating system in general) the scans saved might not be usable or viewable. It is
advisable to regularly make backups of the scans you have made, keeping the backup of the database (or
databases) on the PC up to date on secure and controlled mediums.
- For installation of the other system components (PC network, personal data storage and management
software), it is advisable to contact specialised technicians.
- The USB connection the scanner uses is not a normal electrical connection, but requires specic USB 2.0
cables (recognisable by the marking USB 2.0 Hi-speed, see “Product identication”). The cable is type “A-
B” (provided).
1
Introduction
The 3D image acquisition system uses a fragile optical system sensitive to impact. Be very careful
not to drop it during use or when housing it in its seat. Should the optical window break, the device becomes
unusable.
The scanner can pick up relatively weak signals, therefore particularly intense electromagnetic
disturbances may interfere with image acquisition. The scanner transmits the acquired images to the PC in
real-time where they are processed and stored. Therefore, in the event of interferences, just restart the scanner to continue the acquisition without any risk to the patient or the operator, the only disadvantage being that
the procedure will be completed with a few seconds’ delay.
- The power supply and the PC generate heat, therefore, they should be used in a relatively ventilated
position (not closed in a cabinet) ; pay particular attention to the support surface; use only hard and clean
surfaces and avoid carpeting, mats, etc.
- Always use the key switch to turn off the scanner when it is not used and remove the key from the power
supply to prevent unauthorised persons from using the instrument.
- Do not turn off the scanner during scanning; if you need to interrupt work, use the buttons on the scanner
handpiece.
- Never disconnect the scanner cable from the power supply without rst turning it off using the key, as you
risk seriously damaging it.
- The warranty does not cover faults caused by tampering, improper use and evident negligence in use of
the product.
EN
7
Page 8
INTRAORAL SCANNER - Instructions for use
1
Safety and hygene
Warning! The scanner is a medical device for digital acquisition of dental imprints. It may
onlybeusedbyqualiedodontologicalstaff.Donotusethesystemforpurposesotherthanacquisition of endoral scans, and do not use it if you do not have the necessary knowledge in the odon-
tologicaleld.
Warning!Inaccordancewiththe60825-1standards,thedeviceisaproductcontaininganin-
frared laser. Infrared radiation is invisible to the human eye and for this reason might be dangerous.
Scrupulously follow the safety instructions below.
Introduction
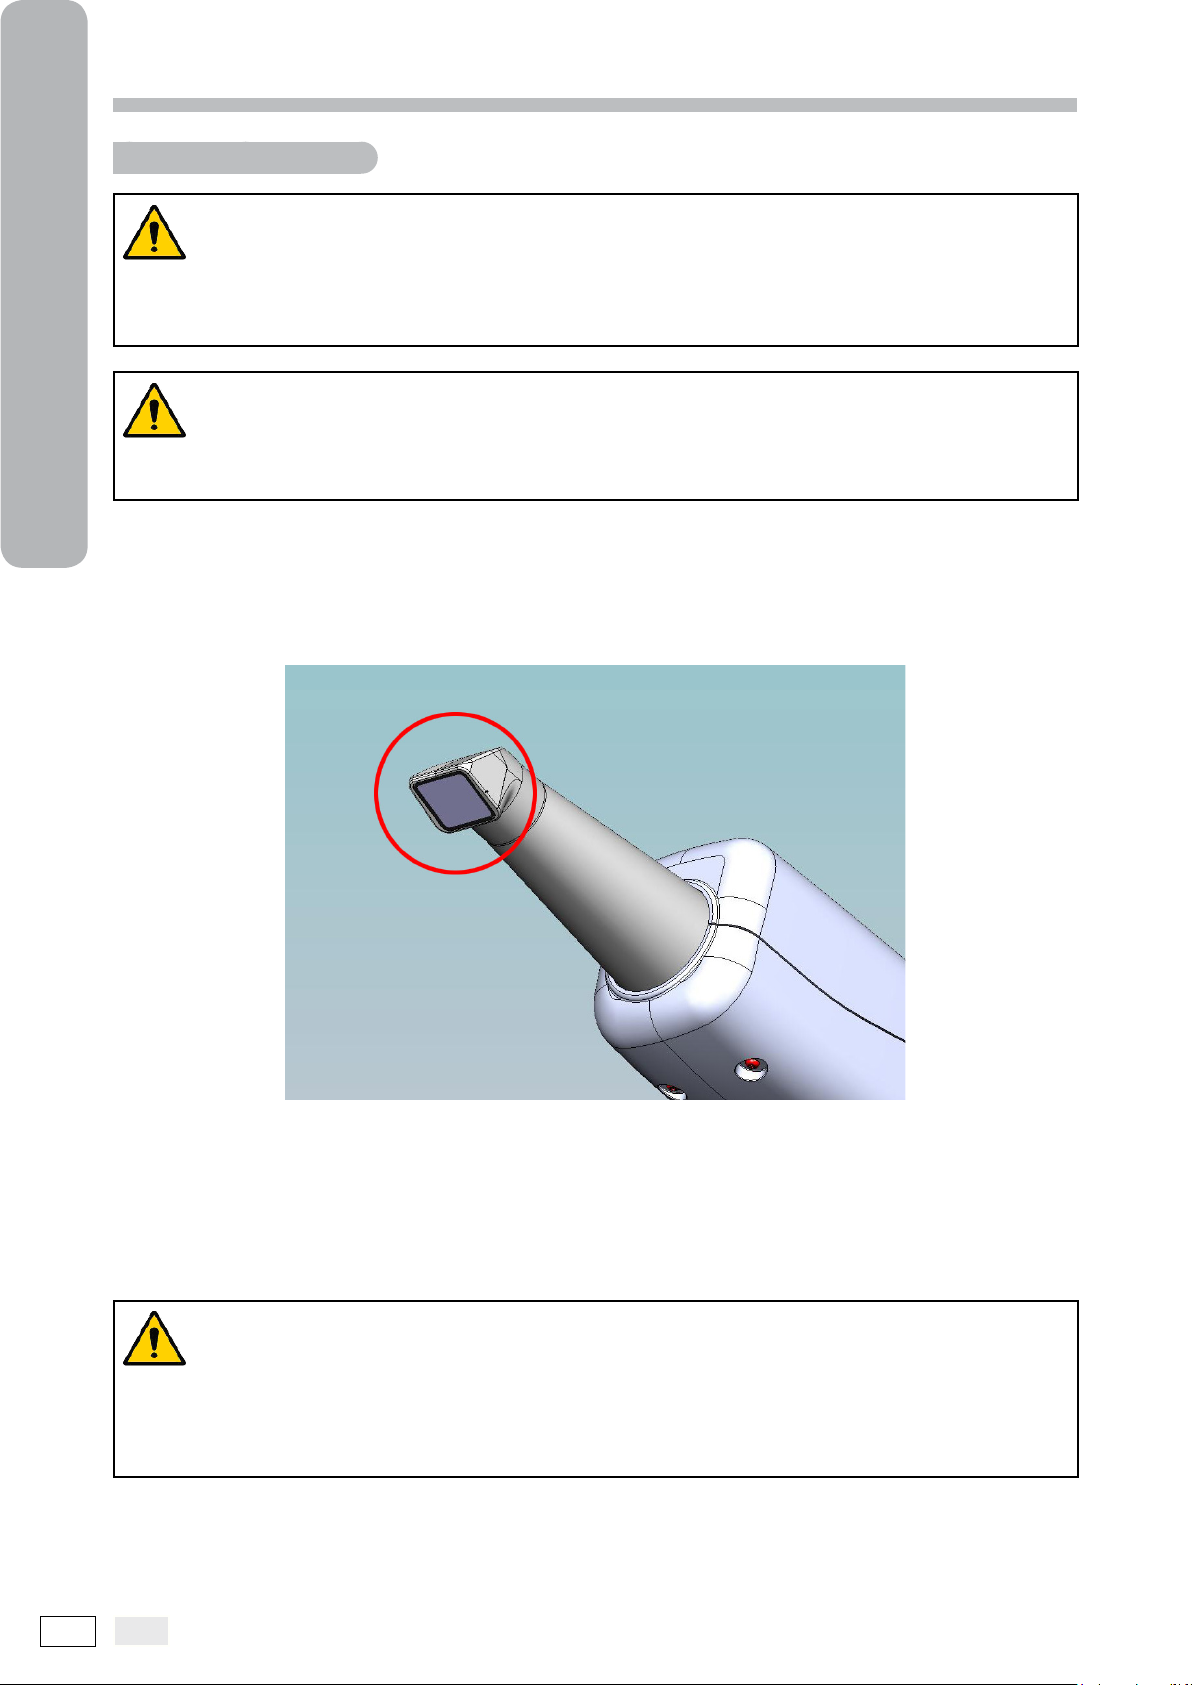
- The instrument does not directly emit a laser beam (even though it contains a laser source). The outer casing of the instrument blocks light radiation emission, except through the acquisition window. This window
is positioned at the front of the instrument circled red in the image below. Radiation is emitted only during
scanning, i.e. from the moment you press the Start/Stop button to the moment when you press it again; this
will be indicated by a yellow LED on the device keypad coming on.
- Always use safety goggles. Safety goggles must be worn by the operator, the assistant and the patient (and
any other person in the room where the instrument is used) throughout acquisition. The goggles must have
an optical density of at least 1, specically for use with infrared sources (808 nm)
- Performing procedures different from those specied in this manual may cause exposure to dangerous
levels of radiation.
- For any reason do not try to open the scanner casing.
In order to prevent transmission of infectious diseases from patient to patient, it is essen-
tialtoalwaysusethedisposableprotectionsprovided.Thedisposableprotectionsareclassiedas
Class IIa medical device and may not be replaced with others in a lower class. For spare disposable
protections, contact the dealer that supplied the scanner. It is also essential to disinfect the product
as described in the section “Cleaning and disinfection”.
- Cover all the components that will come into contact with the hands of the odontological staff with disposable protections, as they might be contaminated by indirect contact with the patient’s mouth. In particular, be
careful how you handle the mouse, keypad, PC and scanner handpiece.
8 EN
Page 9
INTRAORAL SCANNER - Instructions for use
Indice
- Some parts (USB cable, parts of the packaging, power cable) might cause suffocation if ingested or used
improperly. Do not use improperly and keep away from children.
- Not suitable for use in the presence of ammable anaesthetic gas mixed with air, oxygen or nitrous oxide.
- Exclusively use the power supply provided with the device in compliance with the IEC 60601-1 standards.
- Even though the electromagnetic eld irradiated by the instrument is insignicant, it is advisable NOT to use
the product in proximity of life support equipment (e.g. pacemakers or heart stimulators) and hearing aids.
Before using any electronic device in health facilities, always ascertain that it is compatible with the other
equipment present.
- The PC used in connection with the scanner must be in conformity with standards IEC 60601-1, or IEC
60950 with insulation.
1
- Electric system where the device is installed must be in conformity with IEC 60364-7-710 standards.
Warning!Nopartoftheinstrumentrequiresmaintenancebytheuser.Donotattempt
to access the internal parts of the instrument or the power supply for any reason whatsoever. This
may damage the delicate internal parts and expose you to serious risks (dangerous laser radiation
and dangerous electrical voltage) and will make the warranty null and void.
Maintenance and disposal
- If you nd or suspect any system malfunction, or should the casings be open, do not use the scanner on
a patient and return it to the manufacturer or a Technical Service Centre. The device does not contain any
parts that can be repaired by the user. In the event of a malfunction, do not attempt to carry out maintenance operations, but directly contact the manufacturer or his local distributor at the numbers indicated in the
warranty certicate. If you need to return the device to the manufacturer or a Technical Service Centre, di-
sinfect all the outer parts of the device using a specic product (see the section “Cleaning and disinfection”)
and preferably return it in its original packaging.
- At the end of its lifetime, dispose of the device in accordance with the regulations in force. Given that there
is a possibility of cross infections, disinfect all the outer parts of the device before disposal and separate the
materials for differentiated waste collection.
Introduction
- In accordance with Directives 2002/95/EC, 2002/96/EC 2003/108/EC, regarding reduced use of dangerous
substances in electrical and electronic devices as well as waste disposal, do not dispose of the devices in
the household waste but collect them separately. When you purchase a new device of equivalent type, the
device that has come to the end of its lifetime must be returned to the distributor for disposal. As regards
reuse, recycling and other forms of recovery of the above mentioned waste, the manufacturer performs
the functions dened by the individual national legislations. Appropriate differentiated waste collection for
subsequent recycling, treatment and disposal respectful of the environment contributes to preventing possible negative effects on the environment and health and encourages recycling of the materials of which the
device is made up. The crossed-out bin symbol on the device indicates that the product must be collected
separately from other waste at the end of its useful life. Abusive disposal of the product is liable to a ne as
laid down in the individual national legislations.
EN
9
Page 10
1
INTRAORAL SCANNER - Instructions for use
Warranty
The manufacturer guarantees the safety, reliability and performance of the devices. The warranty is conditional
on compliance with the following rules:
- Observance of the conditions stated on the warrantycerticate.
The device must be used exclusively in accordance with the instructions given in this instruction manual.
Installation, repairs, calibration and in general all the operations that require opening the device covers must
be carried out exclusively by technicians authorised by the manufacturer.
Introduction
if failing to observe this clause.
WARNING! The manufacturer declines all responsibility for damage to persons and things
Limited responsability
Under no circumstances will the manufacturer or its suppliers be responsible for direct or indirect damage
(including damage for loss or failed earnings or savings, interruption of the activity, loss of information or data
and other economic losses) to the user or third parties deriving from use or failed use of the software, even if
the manufacturer has been notied of the possibility of such damage.
This limit of responsibility is applicable not only in cases where the software is not used according to the procedures indicated by the manufacturer, but also if the software is used in accordance with the instructions.
Standards and classications
The scanner is an optical system for three-dimensional scanning of dental arches classied in Class I in ac-
cordance with the CEI EN 60601-1 standards and Class IIa in accordance with the Medical Device Directive.
The scanner and its accessories have been designed and constructed in conformity with the following standards:
93/42/EEC and
subsequent amendments
IEC 60601-1 General requirements for safety of electromedical devices. Device
IEC 60601-1-2 Electromedical devices: Electromagnetic compatibility – Require-
IEC 60878 Graphic symbols for electromedical device functions.
UNI CEI EN ISO 14971 Medical devices – Application of risk management to medical devi-
IEC 60825-1 Safety of laser devices – Device classication and safety require-
Medical Device Directive.
designed to operate in the climatic conditions typically found in closed working environments in compliance with this standard.
ments and tests.
ces.
ments.
Class IIa medical device in accordance with Directive 93/42/EEC and subsequent amendments.
Class 1 device with applied part type B in accordance with IEC 60601-1.
Class 3R invisible laser source in accordance with IEC 60825-1.
Neither the scanner (handpiece) nor the power supply are protected against penetration of liquids (IPX0 degree of protection).
Not suitable for use in the presence of ammable anaesthetic gas mixed with air, oxygen or nitrous oxide.
The device is suitable for continuous operation.
In compliance with the European and American regulations for electrical safety and electromagnetic interferences; therefore, it does not generate dangerous electromagnetic interferences and is not disturbed by the
10 EN
Page 11
INTRAORAL SCANNER - Instructions for use
emissions generated during operation of other devices.
Package contents and product parts
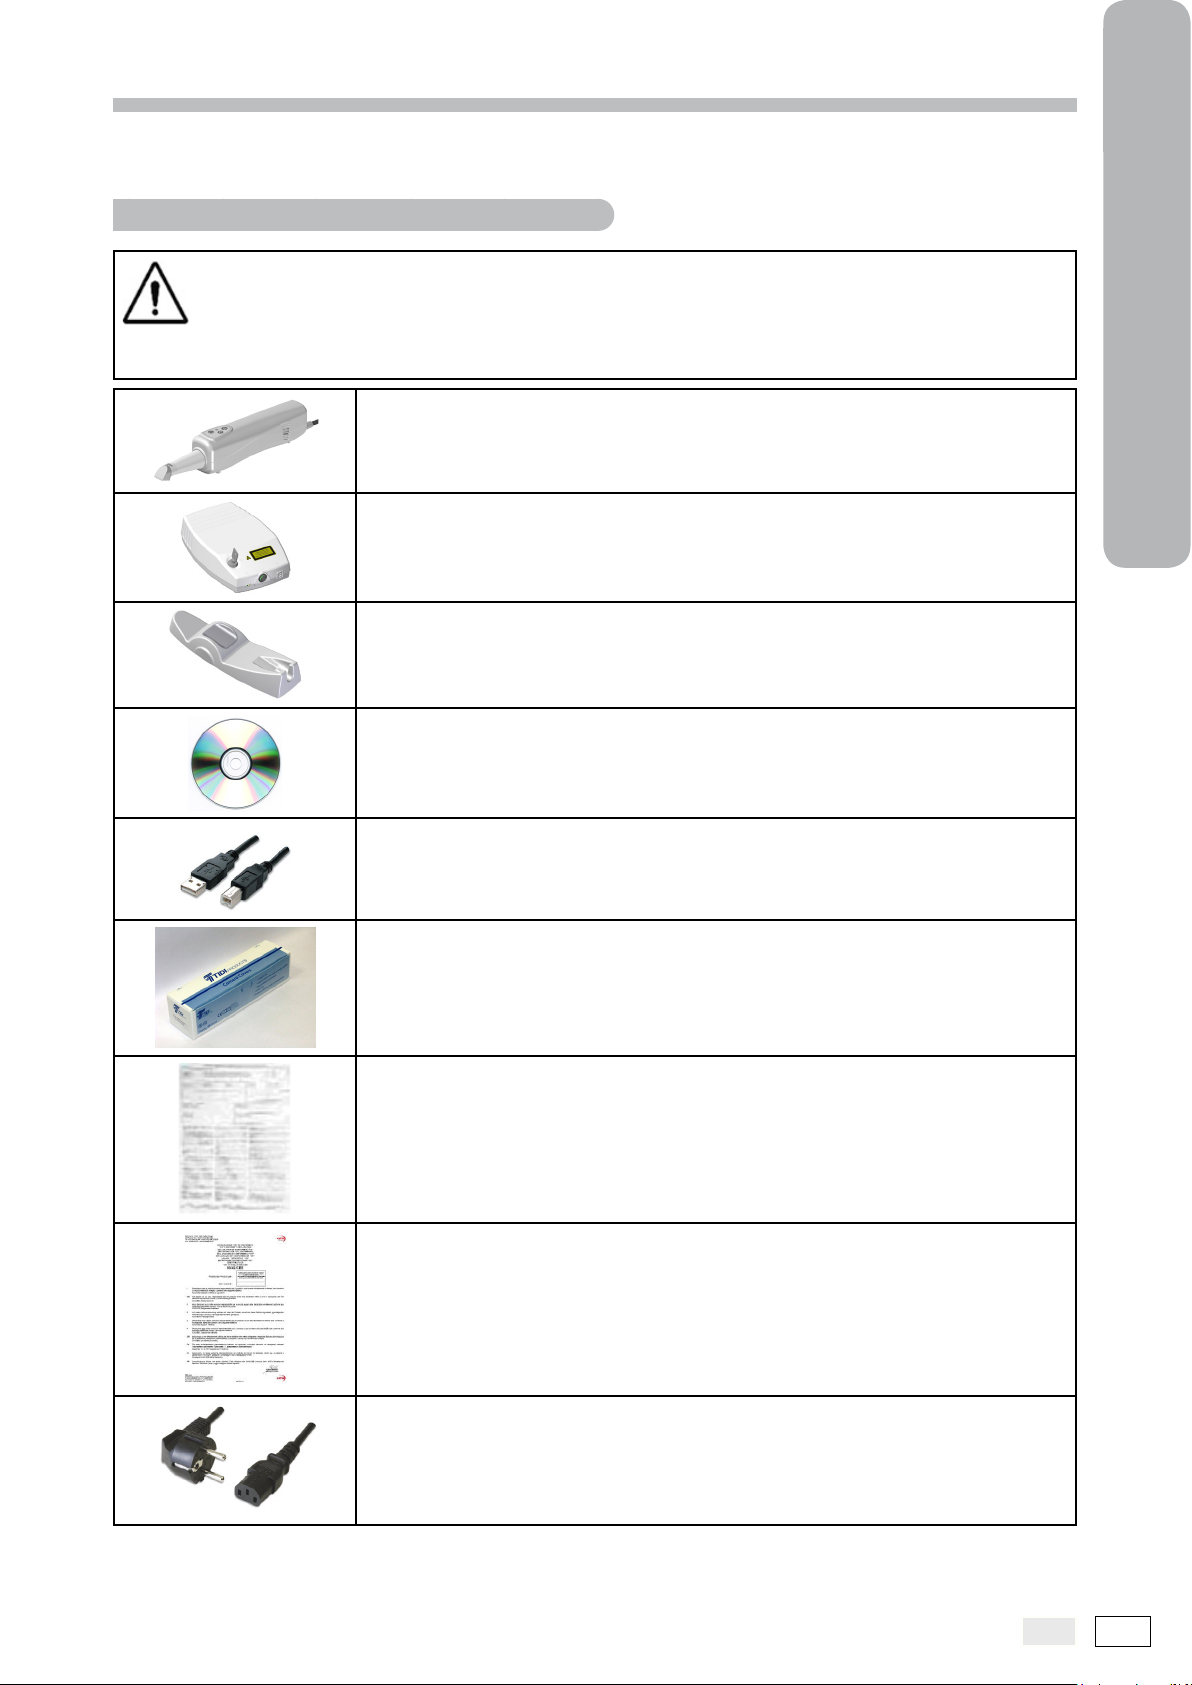
WARNING: The package is made up in stacked layers. Check that you have taken out all the
components before disposing of the packaging.
Intraoral scanner.
Power supply for intraoral scanner.
Scanner holder.
1
Introduction
CD-ROM with software and drivers.
USB 2.0 Hi-Speed® cable.
Package of disposable hygienic protections.
Warranty certicate.
Declaration of conformity.
Mains power cable (according to the destination country).
EN
11
Page 12

INTRAORAL SCANNER - Instructions for use
1
Component parts of the medical device:
- Scanner handpiece;
- Power supply interface;
- Reconstruction software.
Accessories supplied with the product that do not form part of the medical device:
- Power connection cable;
- USB cable;
- An adequate rst supply of disposable hygienic protections;
- A tabletop handpiece holder.
External parts required for the system as a whole that do not are part of the medical device and are
not provided with the product:
- Personal computer.
Introduction
12 EN
Page 13

INTRAORAL SCANNER - Instructions for use
2
Product
identication
• Intraoral scanner
• Power supply
EN
13
Page 14
2
INTRAORAL SCANNER - Instructions for use
Intraoral scanner
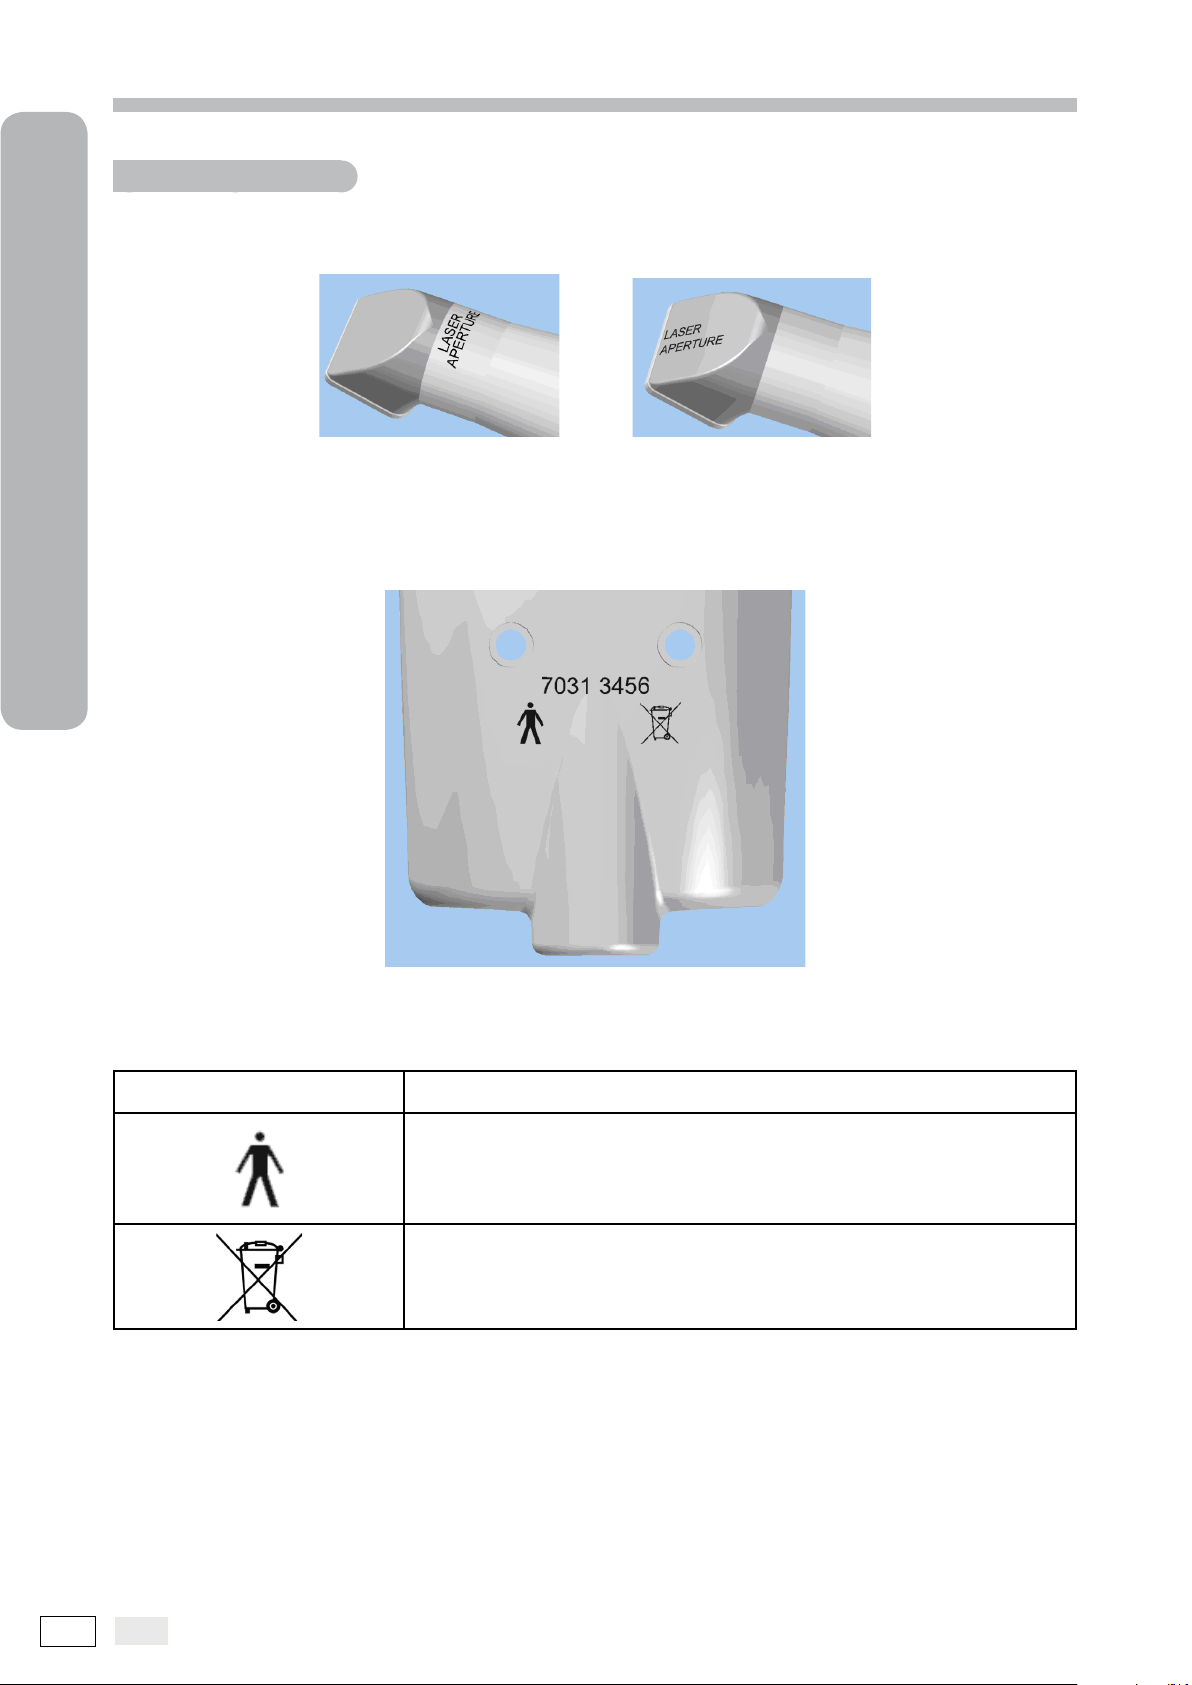
The light radiation (laser) output window is indicated on the front of the handpiece (marking as an alternative).
Identication
The product identication symbols are indicated on the lower part of the scanner:
xxxx xxxx
Product identication serial number.
Symbol: applied part type B.
14 EN
Symbol: dispose of the product in compliance with Directive 2002/96/EC.
Page 15
INTRAORAL SCANNER - Instructions for use
Power supply
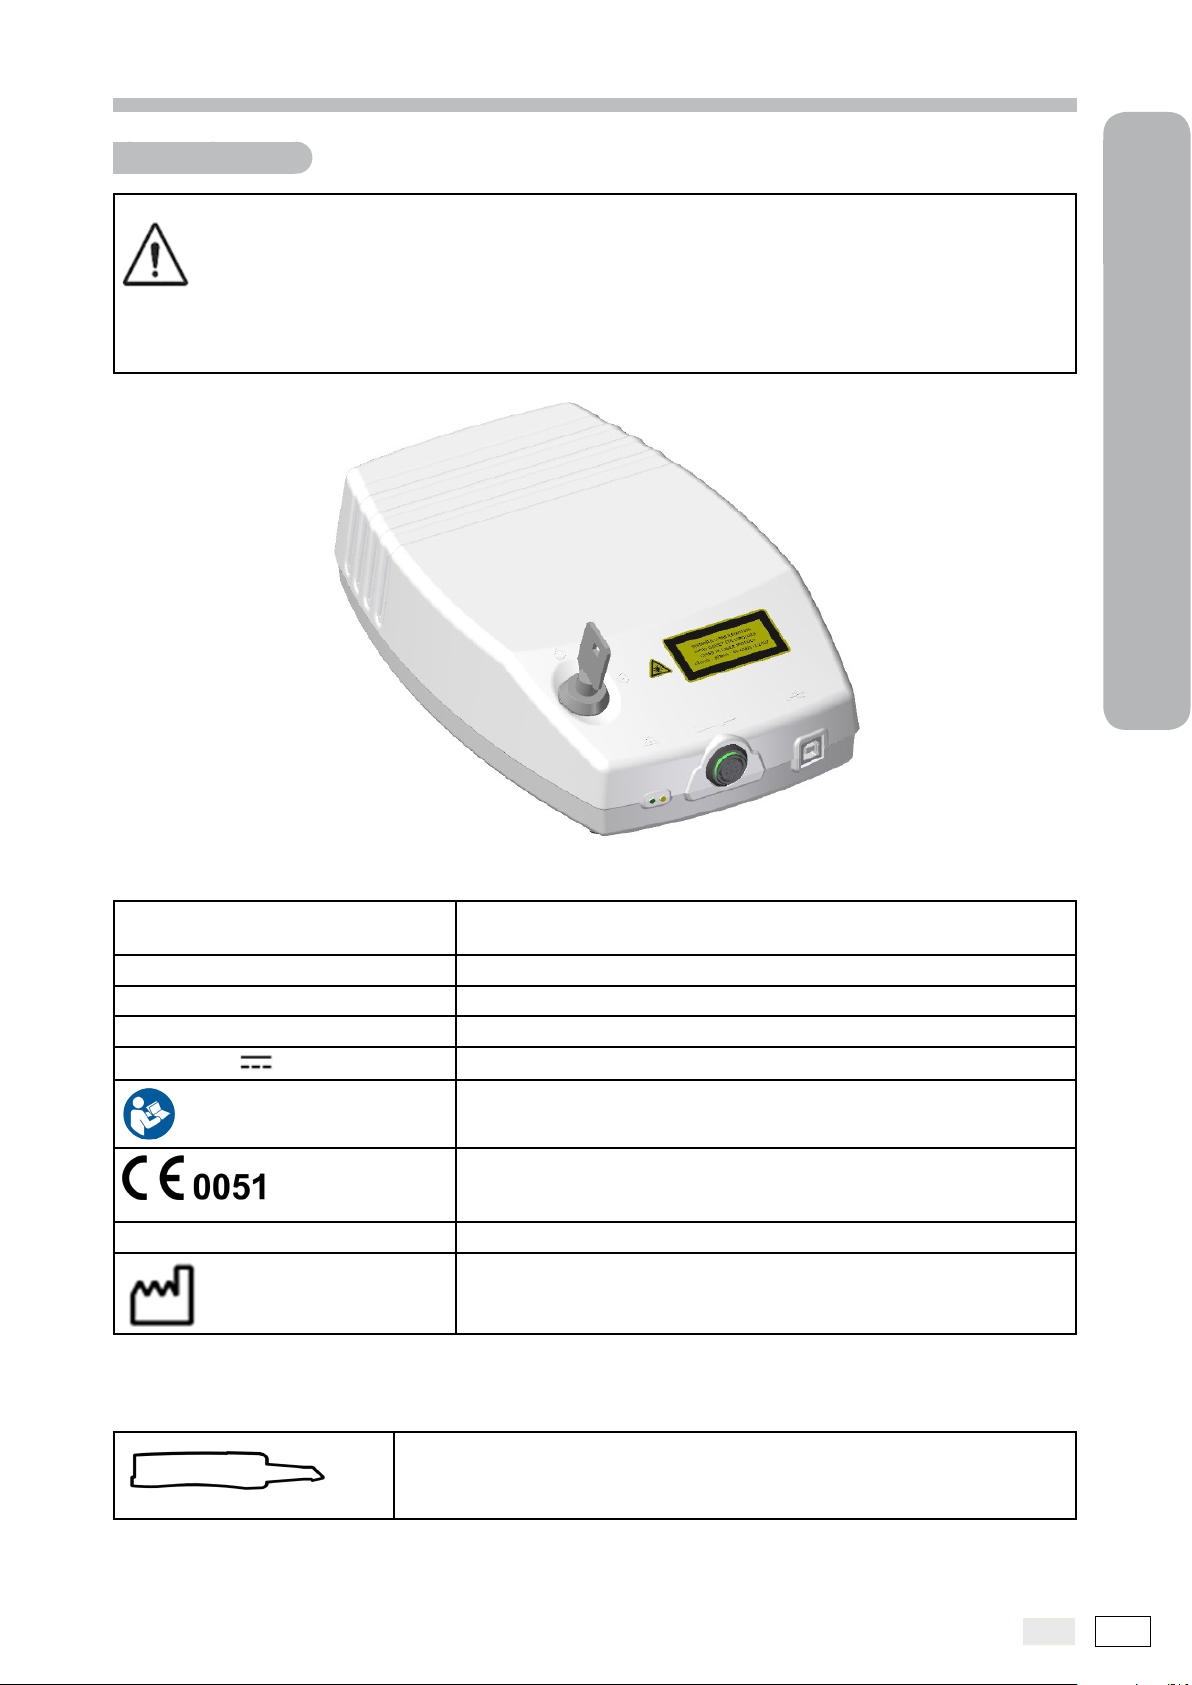
- The power supply is equipped with a key control to prevent unauthorised persons from using the instrument.
- Exclusively use the power supply provided with the product.
2
The product identication symbols are indicated on the lower part of the scanner power supply interface:
MHT SPA a socio unico, Via E. Fermi
22, 37135 Verona - ITALY
3D PROGRESS Industrial product name.
Made in Italy Country of manufacture.
Input: 100-240V 50/60 Hz 1.1-1.8A Operating voltage and frequency and current absorbed.
Output: 12V
SN xxxxxxx Serial number .
8.0 A
Name of the manufacturer and place of manufacture.
Output voltage and current (handpiece power supply).
Warning: read the instruction manual.
Device in compliance with the requirements laid down in Directive
93/42/EEC and subsequent amendments.
Identication
Date of manufacture (month/year).
The following is indicated on the front of the power supply:
Identication of the handpiece connector .
EN
15
Page 16
2
INTRAORAL SCANNER - Instructions for use
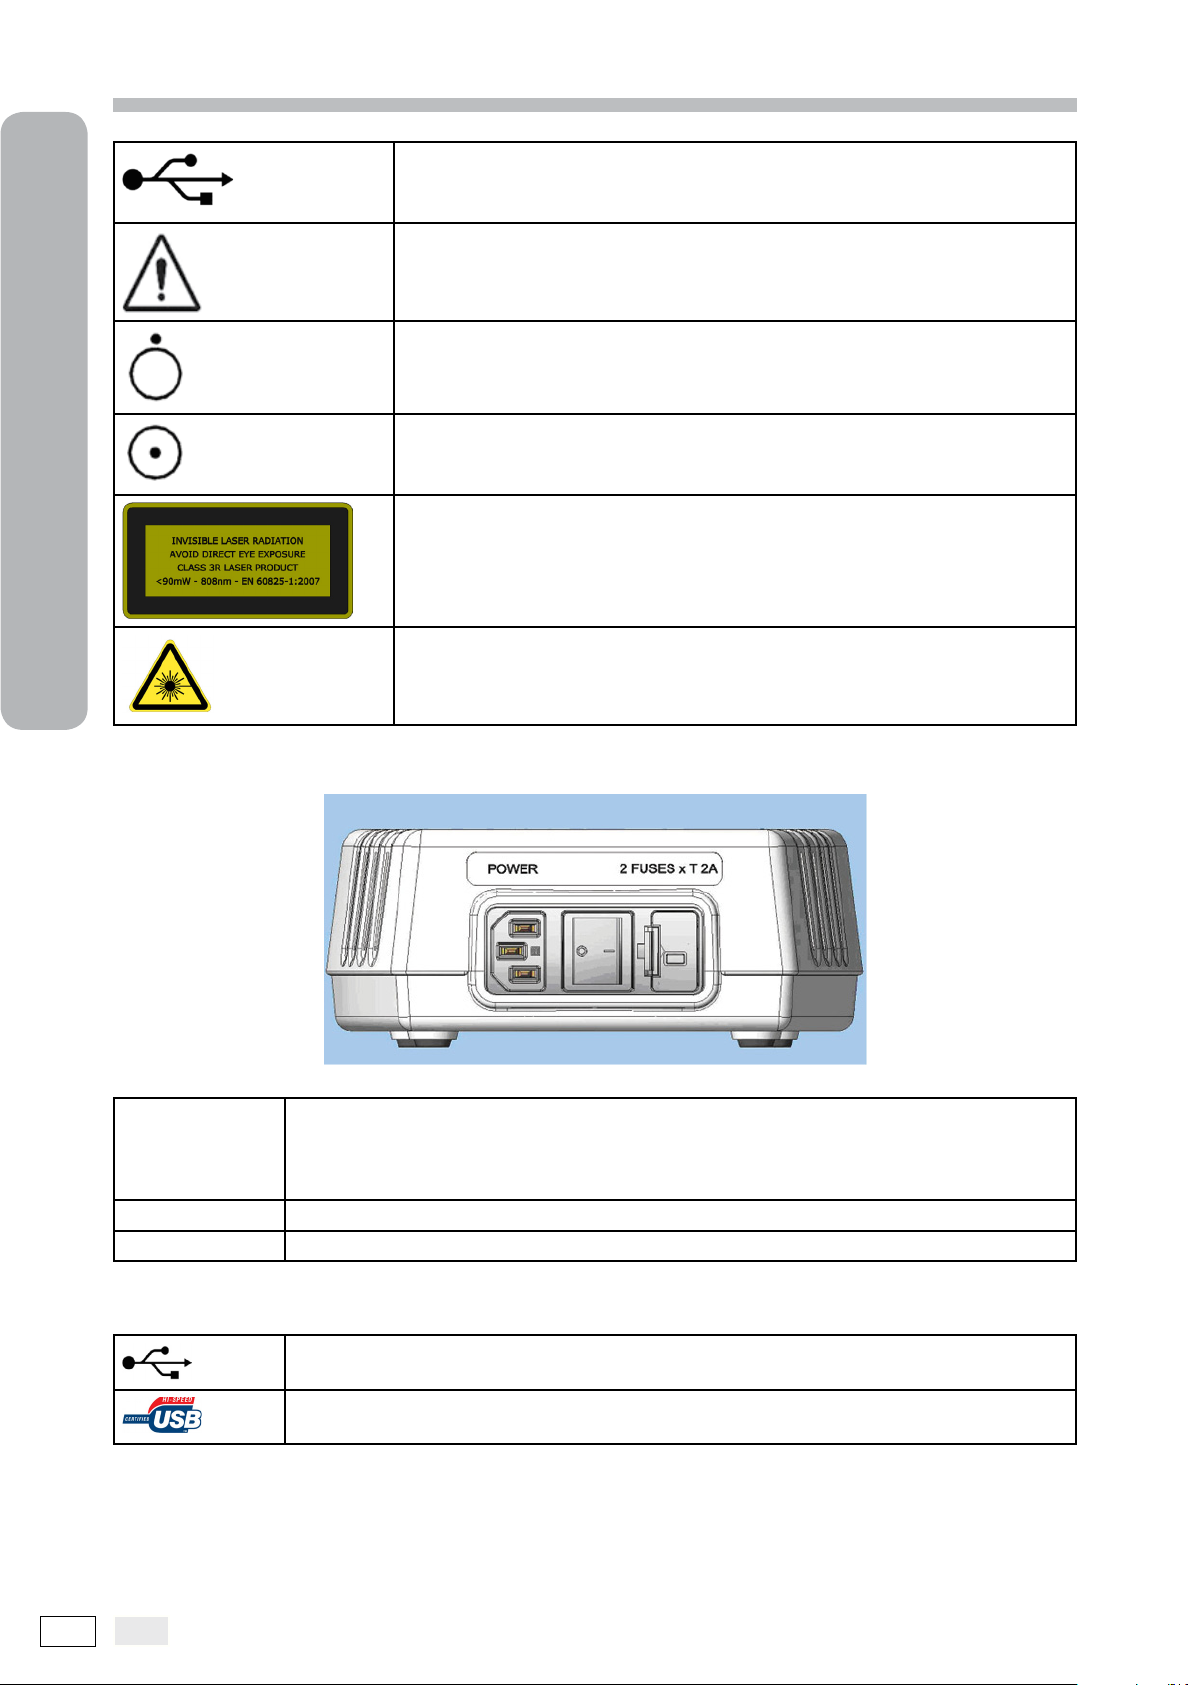
Identication of the connector for the USB cable to be connected to the PC.
Warning: read the instruction manual.
Key switch open.
Key switch closed.
Label with safety indications relating to the radiation emitted by the handpiece in compliance with IEC 60825-1.
Identication
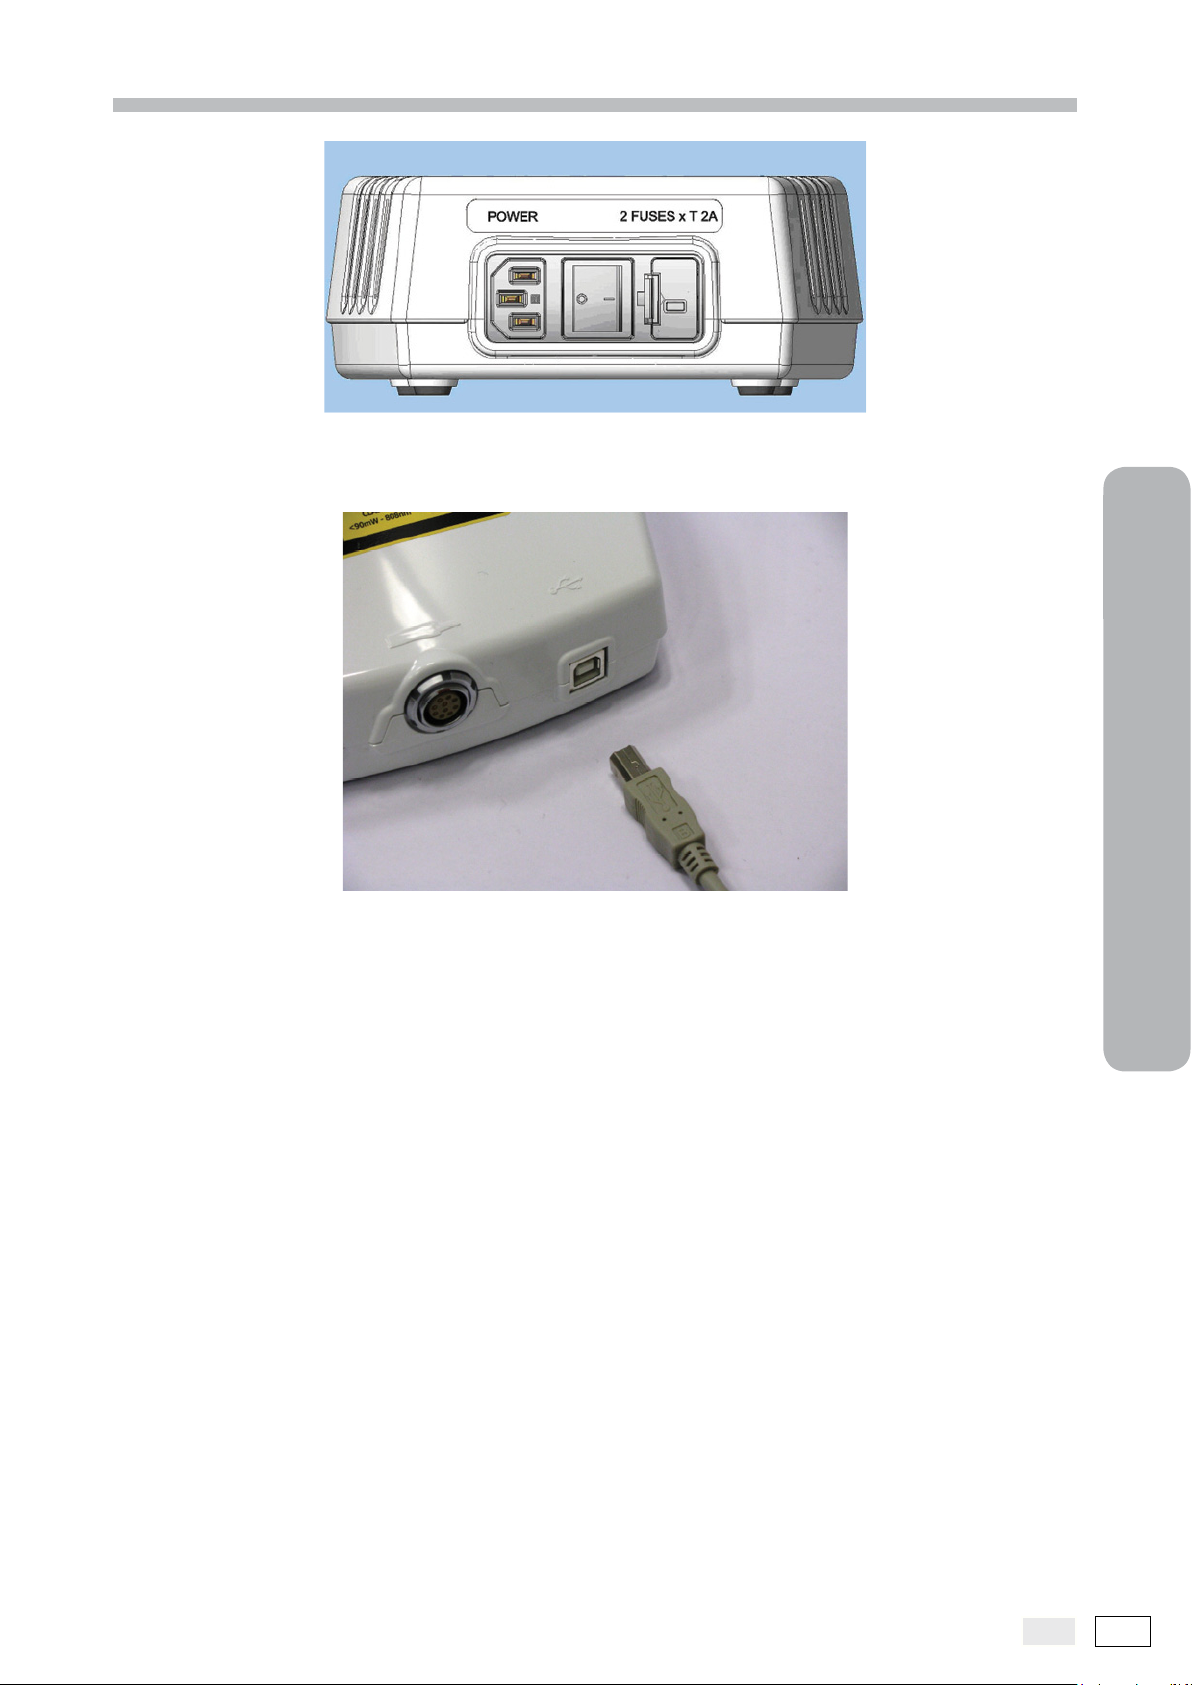
The power connections are found on the rear of the power supply:
Connection for a power cable in compliance with IEC320-C13.
POWER
O I Main power switch.
2 FUSES x T 2A Main fuse identication: if necessary, replace the fuses only with ones of the same type.
For Europe: the cable must be in compliance with IEC 60601-1.
For USA/Canada: the cable must be in compliance with CSA22.2 no.601.1-M90 +
UL60601-1.
”Danger! Laser” label in conformity with IEC 60825-1.
The USB cable is marked with the following symbols:
USB connection.
Cable in compliance with USB 2.0 Hi-Speed standard.
16 EN
Page 17

INTRAORAL SCANNER - Instructions for use
3
Scanner system
characteristics
• Environmental characteristics
• Scanner characteristics
• Power supply characteristics
• Optical characteristics
• Scanner holder
• USB
• Personal computer (optional)
EN
17
Page 18

INTRAORAL SCANNER - Instructions for use
The scanner has been designed to operate in the climatic conditions typically found in closed working environments in compliance with the IEC 60601-1 standards.
Environmental characteristics
Operation:
- temperature +10°C ÷ +35°C;
3
- RH humidity between 20% and 90%;
- Atmospheric pressure 500 ÷ 1060 hPa;
Storage:
- Temperature -10 °C ÷ +50 °C;
- RH humidity between 0% and 100%;
- Atmospheric pressure 500 ÷ 1060 hPa.
Scanner characteristics
- Power supply: by means of the specic power supply provided, 12VDC, max. 8A.
- Dimensions: 295 x 45 x55mm (LxHxW).
- Weight: 720g excluding cable.
- USB: USB 2.0 High Speed.
- Native image: three-dimensional cloud of points.
- Export format: STL le.
- Optical window temperature (anti-misting): 42°C ± 2°C.
- Combined confocal microscopy with Moiré effect recognition.
- SmartPixel sensor.
- Special aspheric lenses.
- Single-frame acquisition time less than 1/10 of a second.
- Typical scanning speed: 14 scans/second.
Characteristics
- Real Time Stitching of the individual frames.
- Resolution (pixel) on the sensor: 144 x 90.
- Pixel size: 50 x 86μm.
- Resolution on the object (XxY): 66μm x 120μm.
- Scanning area (on the object-XxYxZ): 9.6 mm x 10.4 mm x 18 mm.
Power supply characteristics
- Specically for the intraoral scanner, it includes a power supply and USB interface.
- Mains voltage and current: universal power supply, 100-240 VAC, 50/60 Hz, 1.1-1.8 A.
- Output voltage and current: 12VDC -8.0 A
- Power cable type IEC320-C13 with plug according to the destination country.
- Weight: 1200 g.
- USB: USB 2.0 High Speed.
Optical characteristics
- Invisible laser source in accordance with IEC 60825-1: class 3R.
- Power output: < 90mW.
- Emitted radiation wavelength: 808 nm.
- Protective goggles: Minimum optical density (OD) 1.
- Continuous emission during scanning.
- Beam with divergence (semi-angle) of 15°.
Scanner holder
The tabletop holder provided is useful to put the scanner handpiece on when it is not operating. The holder
must be positioned on a stable horizontal surface that guarantees safety against accidental dropping of the
scanner.
18 EN
Page 19

INTRAORAL SCANNER - Instructions for use
USB
- Standard USB cable type “B” - “A”.
- In compliance with the standard: USB 2.0 HIGH SPEED.
- Maximum length (without line amplier hub): 4.5 metres.
Personal computer (optional)
For the minimum requirements of the PC and the relative operating system, refer to the software manual code
97050264.
3
Characteristics
EN
19
Page 20

Blank page
Page 21

INTRAORAL SCANNER - Instructions for use
4
Cleaning and
disinfection
• Applying the disposable hygienic protections
• Warnings for disposal
EN
21
Page 22
4
INTRAORAL SCANNER - Instructions for use
Cleaning is the rst step necessary in any disinfection process.
The physical action of rubbing a surface with detergents and surface-active agents and rinsing with water re-
moves a large number of microorganisms. If a surface is not cleaned rst, the disinfection process cannot be
successful.
When a surface cannot be adequately cleaned, it should be protected with barriers.
WARNING! The container of the electronic interface is not protected against penetration of liquids.
The outer parts of the device must be cleaned and disinfected using a product for hospital use with indications
for HIV, HBV (low-level disinfectant) or tubercolocide (medium-level disinfectant) specically for small surfaces.
For use, follow the manufacturer’s instructions.
The large variety of drugs and chemical products used in dentist’s surgeries may damage the painted surfaces
and the plastic parts. The tests and research conducted have demonstrated that the surfaces cannot be fully
protected against attack of all the products found on the market. The aggressive effects of chemical products
also depend on the time they stay on the surfaces. It is therefore important not to leave the product on the
surfaces of the device for longer than the time indicated by the manufacturer.
Given the aggressiveness of the active ingredients used in disinfectants, it is recommended to use products
that at maximum contain:
- 96% ethanol. Concentration: maximum 30 g for every 100 g of disinfectant;
- Propanol. Concentration: maximum 20 g for every 100 g of disinfectant;
- Combination of ethanol and propanol. Concentration: the combination of the two must be at maximum
40 g for every 100 g of disinfectant.
The manufacturer has performed compatibility tests between the main disinfectants available on the market
and the plastic materials used in the manufacture of its products.
The following products proved to be the least aggressive:
- Incidin Spezial ( Henkel Ecolab );
- Omnizid (Omnident);
- Plastisept ( ALPRO )(non- tubercolocide as not alcohol-based);
- RelyOn Virkosept (DuPont);
- Green & Clean SK ( Metasys )(non-tubercolocide as not alcohol-based).
These tests demonstrated that the above mentioned products can be used, provided that the following warnings are observed:
WARNING!
- Do not use products containing isopropyl alcohol (2-propanol, isopropanol).
Cleaning and disinfection
- Do not use products containing sodium hypochlorite (bleach).
- Do not use products containing phenols.
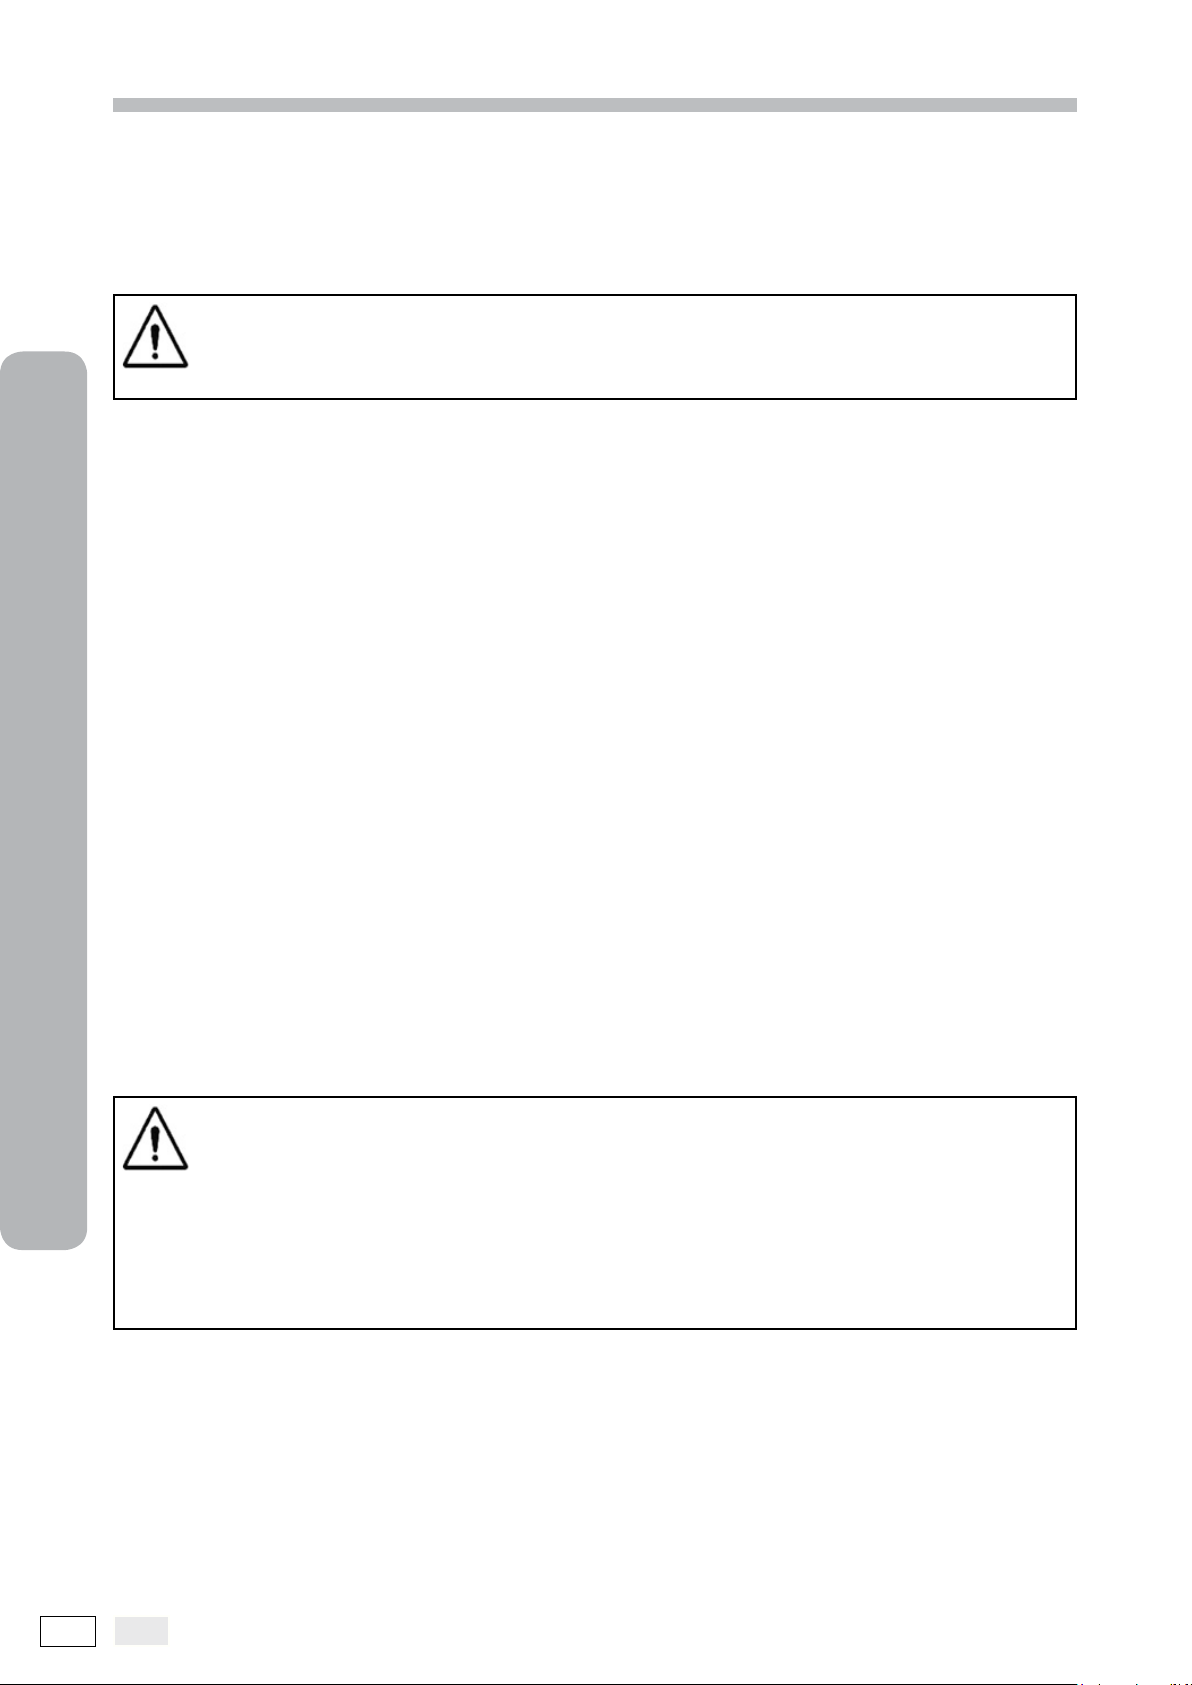
- Do not spray the product directly on the device surfaces.
- Do not mix the above mentioned products with each other or with different liquids.
- Whatever product you use, follow the instructions given by the manufacturer.
Cleaning and disinfection:
For cleaning and disinfection use disposable, soft, non-abrasive paper (do not use recycled paper)
or sterile gauze.
Sponge cloths or any other re-usable materials are not recommended.
Never spray directly onto the surfaces, but moisten a soft cloth and use it to clean the surfaces of the
device.
22 EN
Page 23
WARNING!
INTRAORAL SCANNER - Instructions for use
4
- To clean devices connected to the mains power supply, turn off the devices and disconnect the power
supply before carrying out the cleaning and disinfection operations of the outer parts.
- Everything used for cleaning and disinfection must be thrown away after use. Dispose of the materials in
accordance with the regulations in force.
Applying the disposable hygienic protections
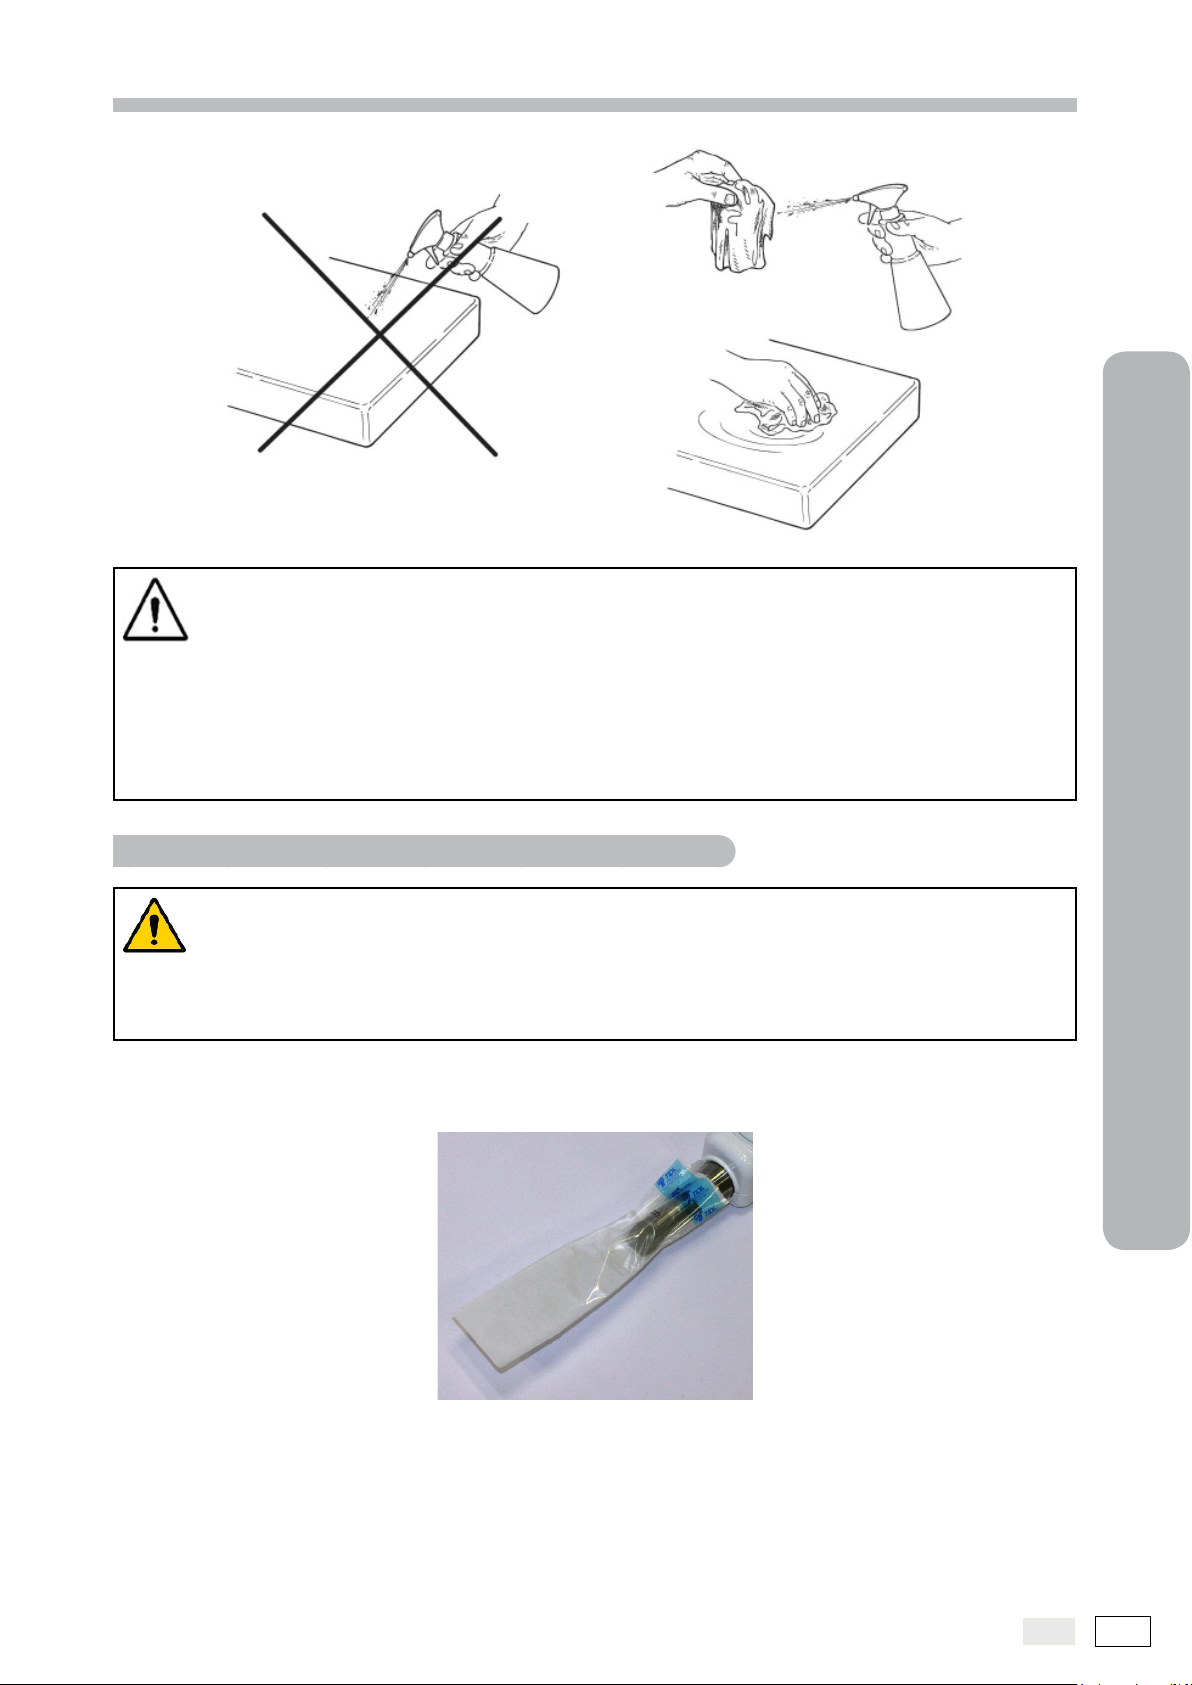
Warning: In order to prevent transmission of infectious diseases from patient to patient, it is
essential to always use the disposable protections provided. The disposable protections are a Class
IIamedicaldeviceandmustbeincompliancewiththeISO10993-1standardsonbiocompatibility.
The disposable protections may not be replaced with others of inferior characteristics.
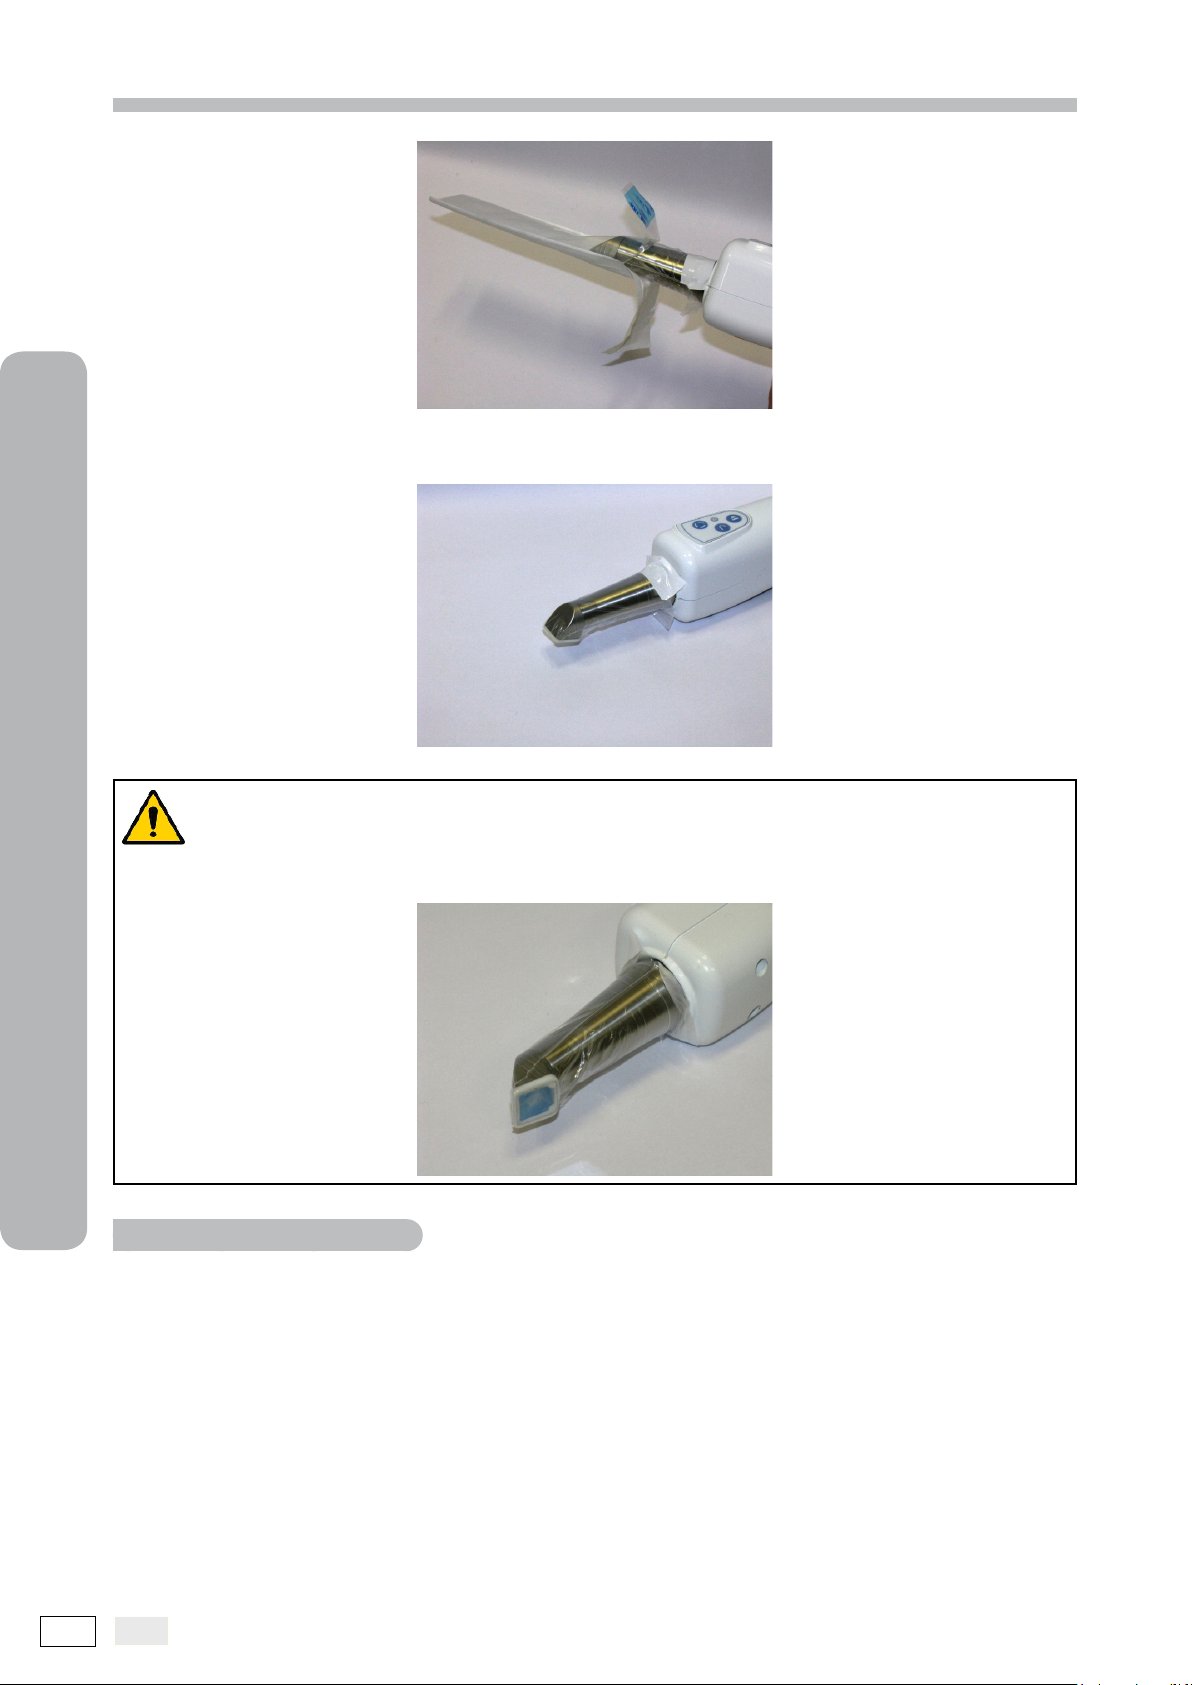
Place a disposable protection complete with its protective peel-off lm on a at surface. Insert the instrument
in the disposable protection and push its tip to the bottom of the protection.
Cleaning and disinfection
Remove the protective peel-off lm.
EN
23
Page 24
INTRAORAL SCANNER - Instructions for use
4
The operation is now complete. When nished discard the disposable protections in “special” waste bins.
Warning: For proper functioning of the device, the protection must perfectly adhere to the
surface of the optical window and may not have any wrinkles.
Cleaning and disinfection
Warnings for disposal
For disposal of intact containers of the disinfectant used, follow the manufacturer’s instructions. Do not dump
the product in the public sewerage and/or waterways.
24 EN
Page 25

INTRAORAL SCANNER - Instructions for use
5
Preparing
for use
EN
25
Page 26
5
INTRAORAL SCANNER - Instructions for use
WARNING! Before using the intraoral scanner for the rst time, you need to install the software
provided and the relative USB drivers. For no reason whatsoever connect the instrument to the PC before
having installed the USB drivers.
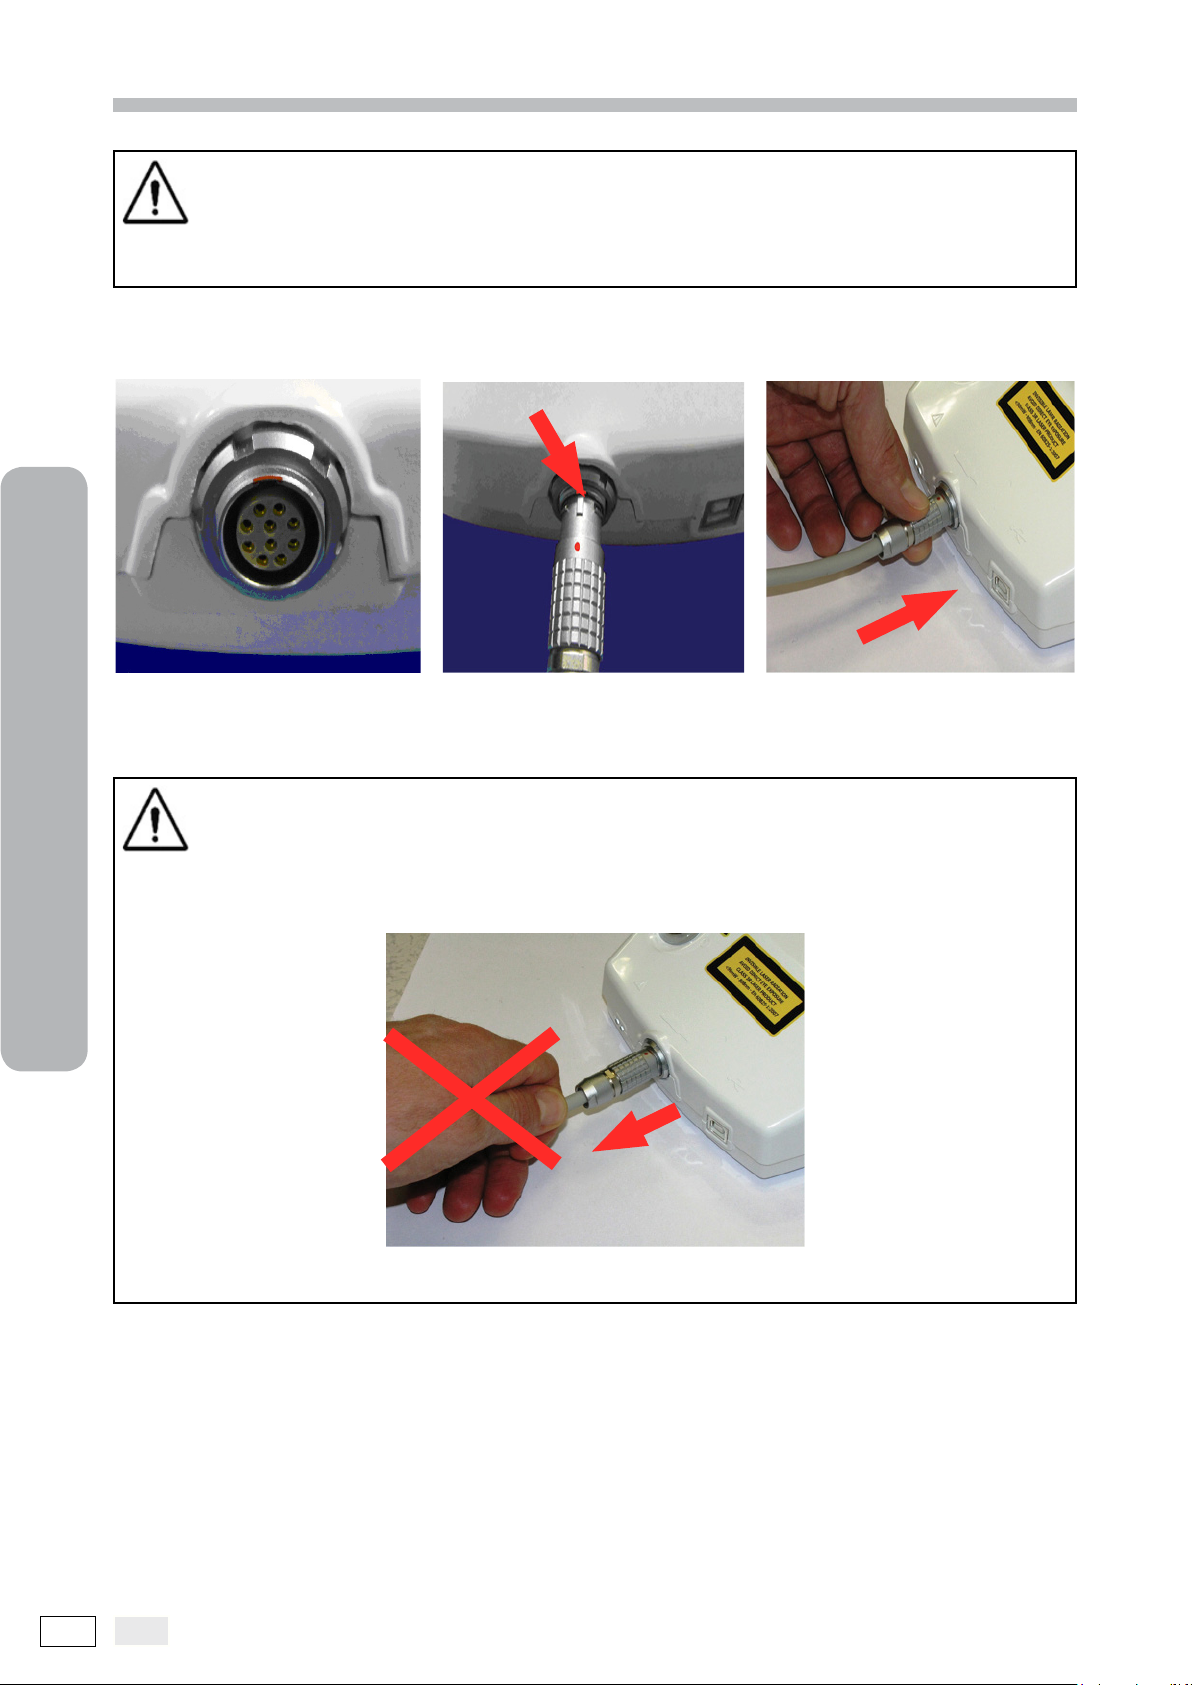
The scanner is equipped with a dual-function cable: power supply and USB transfer. The cable leading from
the instrument must be inserted in the power supply as shown in the photo.
Position the red dot on the male connector (of the handpiece) so that it lines up with the red mark of the female
connector (on the power supply).
WARNING!
Do not connect/disconnect the handpiece connector with the power supply on and do not pull
on the cable as shown in the photo below to disconnect the handpiece:
Preparing
o remove the connector, slightly push the knurled body of the male connector backward to release it from
the female connector.
The power supply must be connected to the mains using the power cable provided (as shown in the photo)
after selecting the cable suited to the power sockets in your surgery.
26 EN
Page 27
INTRAORAL SCANNER - Instructions for use
The power supply also has a USB port: connect the USB cable to the power supply and the PC as shown in
the photo.
5
Preparing
EN
27
Page 28

Blank page
Page 29

INTRAORAL SCANNER - Instructions for use
6
Using the
scanner
EN
29
Page 30
6
INTRAORAL SCANNER - Instructions for use
Use of the scanner is closely tied to the 3D image acquisition software.
1) Check that the power supply is connected to the mains with the dedicated cable and that it is connected to
the USB port of the PC with the USB cable provided;
2) Check that the handpiece cable is properly connected;
3) Turn on the power switch on the rear of the power supply;
4) Insert the key in the front panel of the power supply and turn it clockwise. The key can only be removed
when the switch is open (power supply off);
Key switch open (OFF).
Key switch closed (ON).
5) If everything is working properly, the green LED on the front panel of the power supply should come on and
a few seconds later the blue LED. The green LED indicates that the handpiece is powered. The blue LED
indicates that the USB connection has been established;
6) Put on protective goggles and have everyone in the room (patient, assistant, etc.) put them on;
7) Apply the disposable hygienic protection on the front of the handpiece as described in 4 above;
8) Start the 3D image acquisition software;
9) Only after carrying out the entire initial patient recording and treatment selection procedure, can you start
scanning. The LED on the handpiece keypad will come on green when the device is ready for use. The LED
comes on in different colours with the following meanings:
- Green: handpiece ready;
- Yellow: acquisition in progress (laser active);
- Red: malfunction.
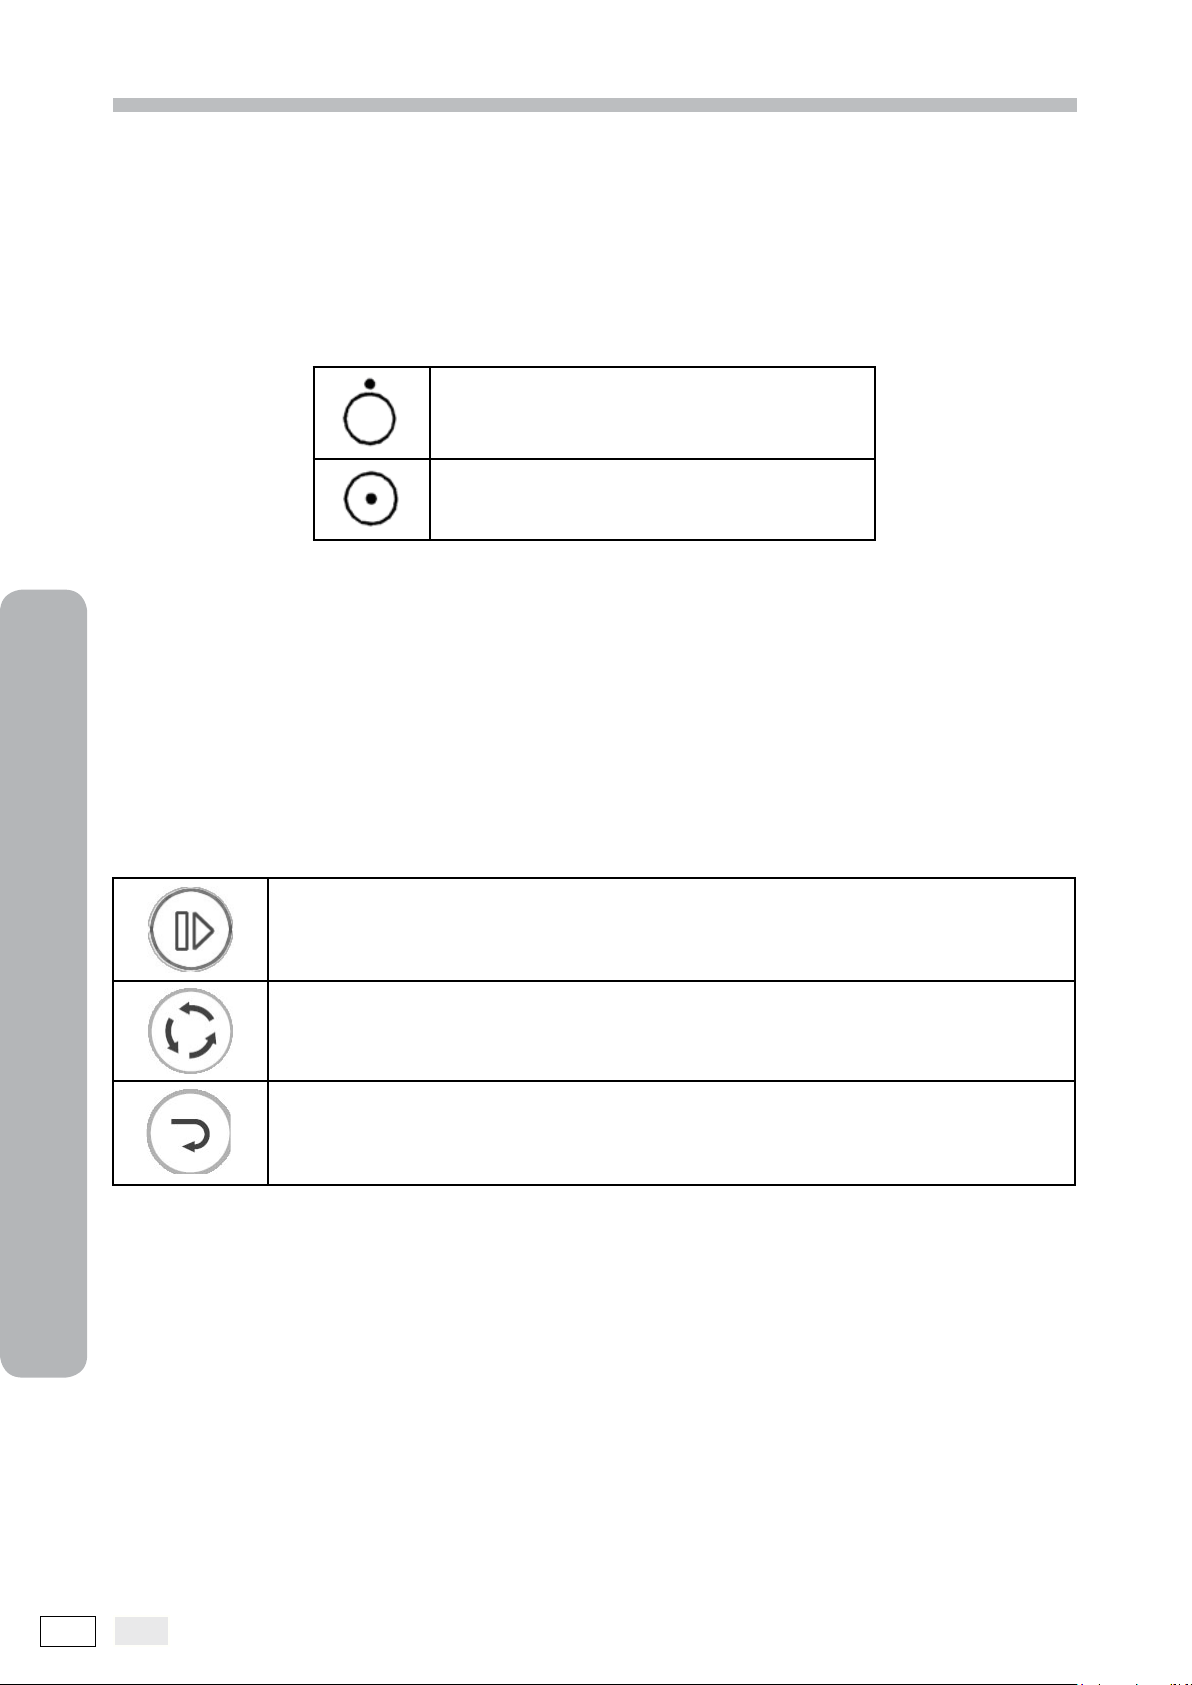
START/STOP key: starts and pauses scanning.
ROTATE key: rotates the image acquired by 180° - functions only when the scanner is in
pause, otherwise it has no effect.
DELETEkey:allows deleting the last image acquired if you notice that you have scanned
undesired elements (e.g. tongue, palate, etc.).
10) Do the scan according to the treatment requirements. During scanning, the LED on the handpiece keypad
turns yellow to indicate laser activation;
11) For the scan acquisition procedures, refer to the software manual provided, code 97050264;
12) Scanning can be interrupted and resumed in succession (also several times) for 3D image acquisition
Using the scanner
requirements and for reasons of patient comfort. The software allows interrupting and resuming acquisition
in a very easy and intuitive way;
13) When you have nished scanning, turn off the key switch and remove the key from the power supply panel;
14) Remove the disposable hygienic protection and dispose of it appropriately.
30 EN
Page 31

INTRAORAL SCANNER - Instructions for use
7
Troubleshooting
EN
31
Page 32
INTRAORAL SCANNER - Instructions for use
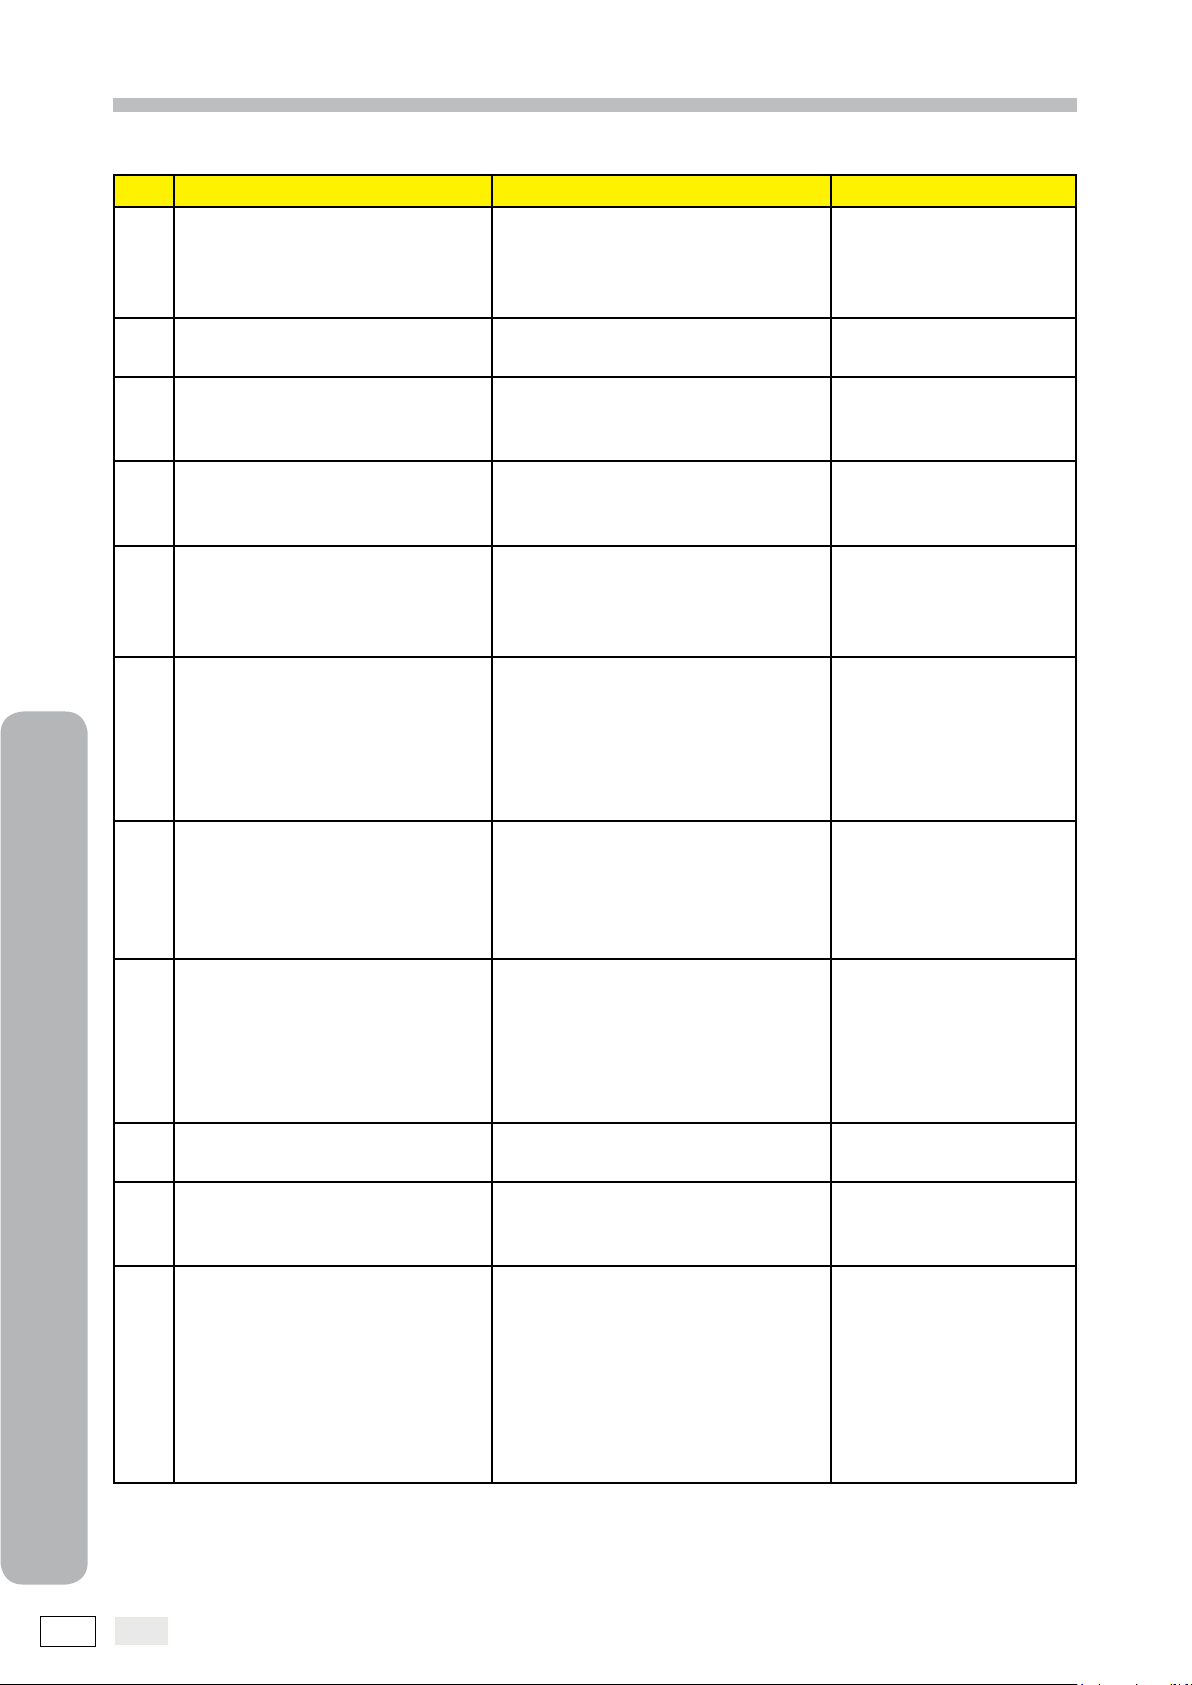
Problem found Possible causes Solutions
Doubt about sensor functioning.
1.
The USB connection does not
2.
seem to be working properly.
The green LED on the power
3.
supply does not come on.
The green LED on the power
4.
supply does not come on.
The green LED on the power
supply does not come on.
5.
The green LED on the power
supply does not come on.
6.
7
The green LED on the power
supply does not come on.
7.
The blue LED on the power
supply does not come on.
8.
The blue LED on the power
9.
supply does not come on.
The blue LED on the power
10.
supply does not come on.
The blue LED on the power
supply does not come on.
11.
Troubleshooting
Dropping, knocking, general
doubt.
Defective cable, USB port on PC
not working.
Power cable not connected. Connect the power ca-
Power switch off. Turn on the power
Key switch off. Insert the key and turn
Fuses burned. Check the fuses in the
After excluding all the causes
above (3-4-5-6), you should assume a power supply fault.
Failed or not working USB connection.
PC off. Turn on the PC.
PC USB port not working. Test the PC USB port,
PC USB port unsuitable (not USB
2.0 Hi-Speed).
Do not use the sensor
on a patient but try 3D
acquisition using an
inanimate object.
Replace the cable,
change USB port.
ble to the power supply
and the wall socket.
switch on the rear of the
power supply.
on the switch on the
front of the power supply.
rear panel next to the
switch; if necessary,
replace the fuses exclusively with ones of the
same ratings.
Do not attempt to open
the power supply. There might be dangerous
voltage. Contact Technical Service.
Check the USB connection between the
the power supply and
the PC; check that the
cable is in good condition.
for example, with a memory key.
The ports of a PC do
not always have the
same technical characteristics. Check that
the USB port of the PC
is a USB 2.0 Hi-Speed;
if necessary, use another USB port.
32 EN
Page 33

INTRAORAL SCANNER - Instructions for use
The blue LED on the power
supply does not come on.
12.
The blue LED on the power
supply does not come on.
13.
The green LED on the scanner
keypad does not come on.
14.
The green LED on the scanner
keypad does not come on.
15.
Starting scanning, the yellow
LED on the scanner keypad
does not come on and the
16.
scan does not appear on the
PC screen.
Starting scanning, the yellow
LED on the scanner keypad
comes on, but the scan on
the PC screen appears faded,
noisy or illegible.
17.
USB cable too long, use of extensions The maximum length of
a USB connection should not
exceed 4.5m.
After excluding all the causes
above (8-9-10-11-12), you should
assume a power supply or scanner fault.
Scanner not ready (no problem). It is normal that at rst
After excluding case 14, you
should assume a malfunction of
the scanner handpiece.
Scanner malfunction. Do not look into the
Optical acquisition problems,
incorrect acquisition distance,
optical window dirty, disposable
hygienic protection dirty or badly
positioned.
Take out the extensions
and use a good quality and not excessively
long cable. For greater
distances use cables
equipped with an am-
plier.
Do not attempt to open
the power supply or the
scanner. There might
be dangerous voltage.
Contact Technical Service.
starting, the LED on
the handpiece keypad
stays off until the software has gone into the
acquisition phase.
Do not attempt to open
the power supply or the
scanner. There might
be dangerous voltage.
Contact Technical Service.
optical window of the
scanner. Danger: there
might be invisible laser
radiation. Contact Technical Service.
Do not look into the
optical window of the
scanner. Danger: there
might be invisible laser
radiation. Interrupt acquisition and check the
optical window. If you
cannot nd anything
evident, contact Technical Service.
7
EN
Troubleshooting
33
Page 34

INTRAORAL SCANNER - Instructions for use
Starting scanning, the yellow
LED on the scanner keypad
comes on and the scan starts
normally, but after a few seconds the scan appears faded,
noisy or illegible.
18.
Scanner malfunction signalling. Scanner malfunction. Do not attempt to open
19.
Optical acquisition problems,
the demisting heater of the optical window might not be working
properly.
Do not look into the
optical window of the
scanner. Danger: there
might be invisible laser
radiation. Without interrupting acquisition,
rest the tip of the scanner on the back of your
hand and check the optical window temperature. It should be quite
hot (approx. 40°C). If it
is cold or if you cannot
nd anything evident,
contact Technical Service.
the power supply or the
scanner. There might
be dangerous voltage.
Contact Technical Service.
7
Troubleshooting
34 EN
Page 35

INDEX
Symbols
3D image 7, 30
3D PROGRESS 15
A
abutment 6
Applying the disposable hygienic protections 3, 21,
23
C
Cleaning 3, 8, 9, 21, 22
D
DELETE key 30
dental arches 6, 10
E
element bridges 6
Environmental characteristics 3, 17, 18
G
General warnings 3, 5, 6
H
handpiece 6, 7, 8, 10, 11, 12, 14, 15, 16, 18, 26, 30,
33
hygienic protections 3, 11, 12, 21, 23
I
intraoral 1, 6, 7, 11, 18, 26
Intraoral 3, 11, 13, 14
23, 24
power supply 7, 9, 10, 15, 16, 18, 23, 26, 27, 30,
32, 33, 34
Power supply 3, 11, 13, 15, 17, 18
R
ROTATE key 30
S
Safety and hygene 8
scanner 1, 6, 7, 8, 9, 10, 11, 15, 18, 26, 30, 33, 34
Scanner 3, 11, 13, 14, 33, 34
Scanner characteristics 3, 17, 18
Scanner holder 3, 11, 17, 18
single crowns 6
software 6, 7, 10, 11, 19, 26, 30, 33
Standards and classications 3, 5, 10
START/STOP key 30
stumps 6
T
Technical Service Centre 9
the manufacturer 6, 9, 10, 15, 22, 24
U
USB 3, 6, 7, 8, 9, 10, 11, 12, 14, 15, 16, 17, 18, 19,
23, 24, 26, 27, 30, 32, 33, 35
W
Warnings for disposal 3, 21, 24
Warnings for use 5, 6
warranty 6, 7, 9, 10
Warranty 3, 5, 10, 11
W-LAN 6, 7, 8, 9, 10, 11, 14, 15, 18, 19, 23, 24
L
LAN 6, 7, 8, 9, 10, 11, 14, 15, 18, 19, 23, 24
laser 8, 9, 10, 14, 18, 30, 33, 34
Laser 16
LED 8, 30, 32, 33, 34
light radiation 8, 14
Limited responsability 10
M
Maintenance and disposal 3, 5, 9
MHT 6, 15, 35, 36
N
O
Optical characteristics 3, 17, 18
P
Package contents and product parts 3, 5, 11
PC 6, 7, 8, 9, 10, 11, 14, 15, 16, 18, 19, 23, 24, 26,
27, 30, 32, 33
Personal Computer 6, 8, 9, 10, 11, 14, 15, 18, 19,
Page 36

No part of this manual shall be copied or transmitted in any form without the prior written permission
of MHT S.p.A a socio unico.
For any further information or technical problems contact the local distributor or the maker directly at:
MHT SPA a socio unico - Registered ofce
Via Milano 12, 37024 Arbizzano di Negrar, Verona - ITALIA
MHT SPA a socio unico - Factory and ofces
Via E. Fermi 22, 37135 Verona - ITALIA
Tel.(+39)0456020842 (+39)0456020843
Fax (+39)0456020196
For information write to: [email protected]
For technical support write to: [email protected]
(Please include your name and the Serial Number of the device)
www.mht.it
www.3dprogress.it
Printed in Italy
 Loading...