

Page 1

RC2
receiver
Installation instructions and warnings
Istruzioni ed avvertenze per l’installazione
Instructions et avertissements pour l’installation
Anweisungen und Hinweise für die Installation
Instrucciones y advertencias para la instalación
Installatievoorschriften en waarschuwingen
IST 161 4858 Rev. 00 del 25-05-2004
Page 2
1 Warnings
GB
• Before proceeding with the installation, make sure the product is
suitable for its intended use. Pay special attention to the data
provided in the "Technical Characteristics” chapter. MHOUSE
disclaims liability for any damage resulting from uses of the product other than those described in this manual.
•Protect the product’s internal components from contact with
water and other polluting substances. Keep it away from heat
sources and do not expose it to open flames. If any of these conditions occur, stop using it immediately and call MHOUSE customer service.
• Disconnect the power supply before proceeding with the installation operations.
• The packaging materials must be disposed of in compliance with
the regulations locally in force.
2 Description and Intended Use of the Product
The RC2 receiver, used in combination with the TX4 transmitters,
is suitable for the remote control of single-phase equipment powered by the mains voltage, with up to 500W power.
The possible commands are On/Off, “Man Present”, Timer 1 and
Timer 2. The receiver operates at a frequency of 433.92 MHz and
can memorize up to 30 “TX4” transmitters.
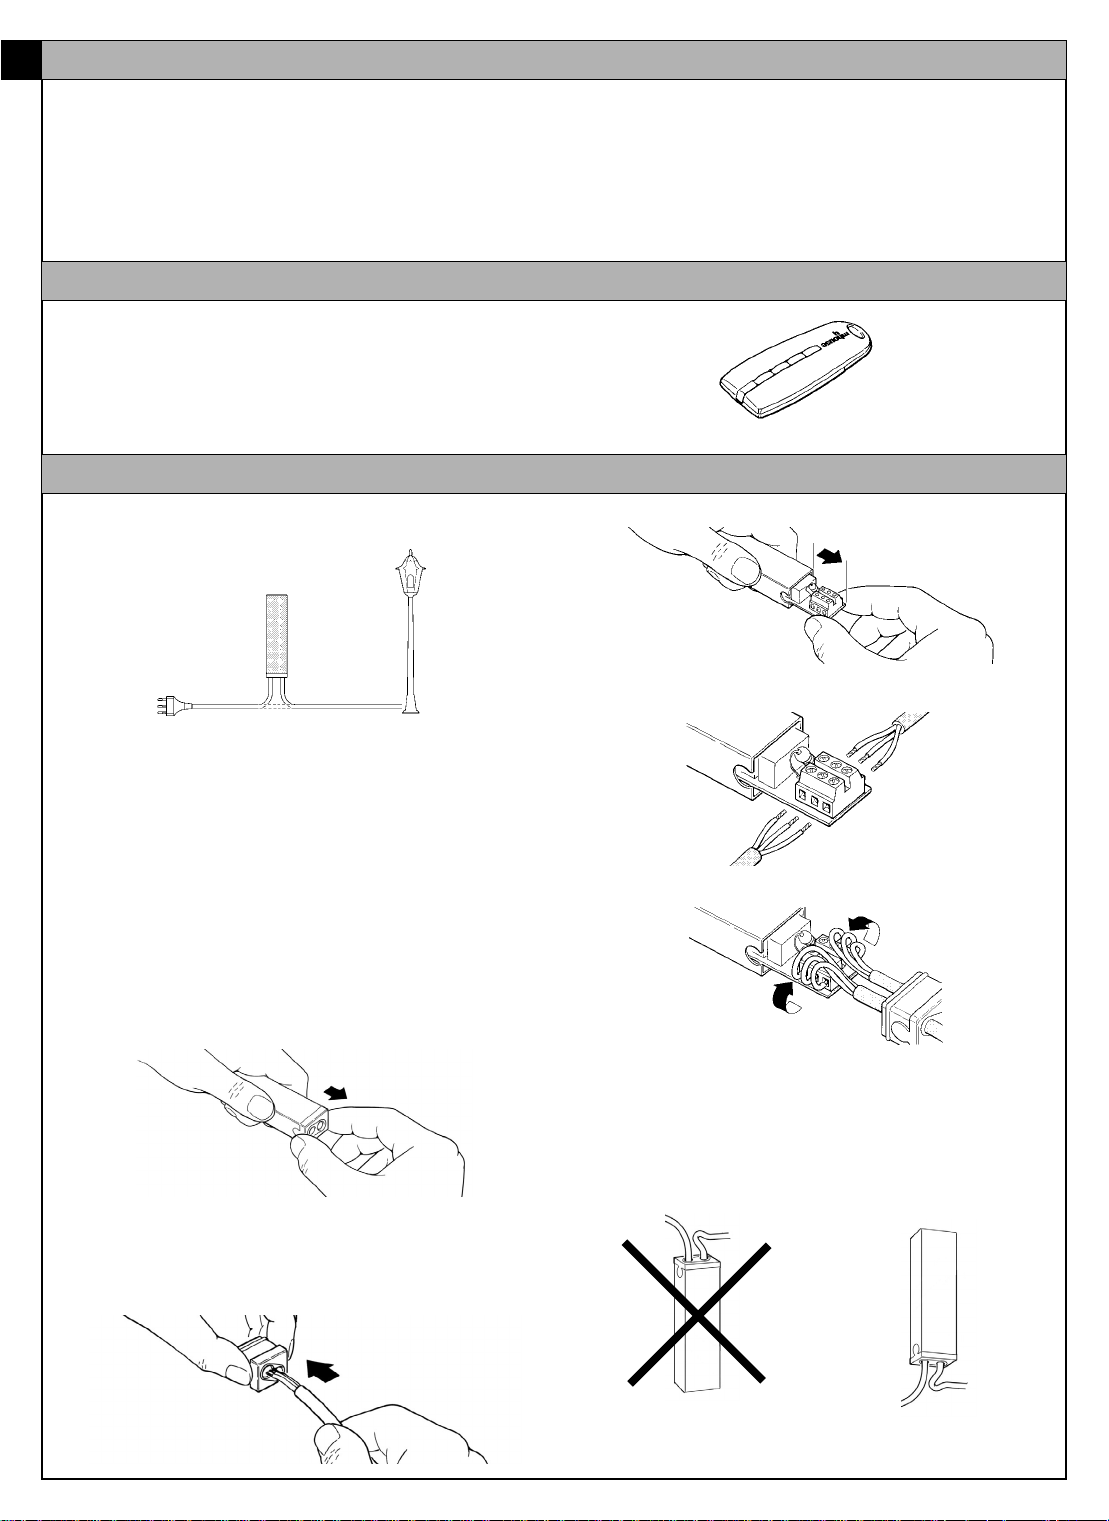
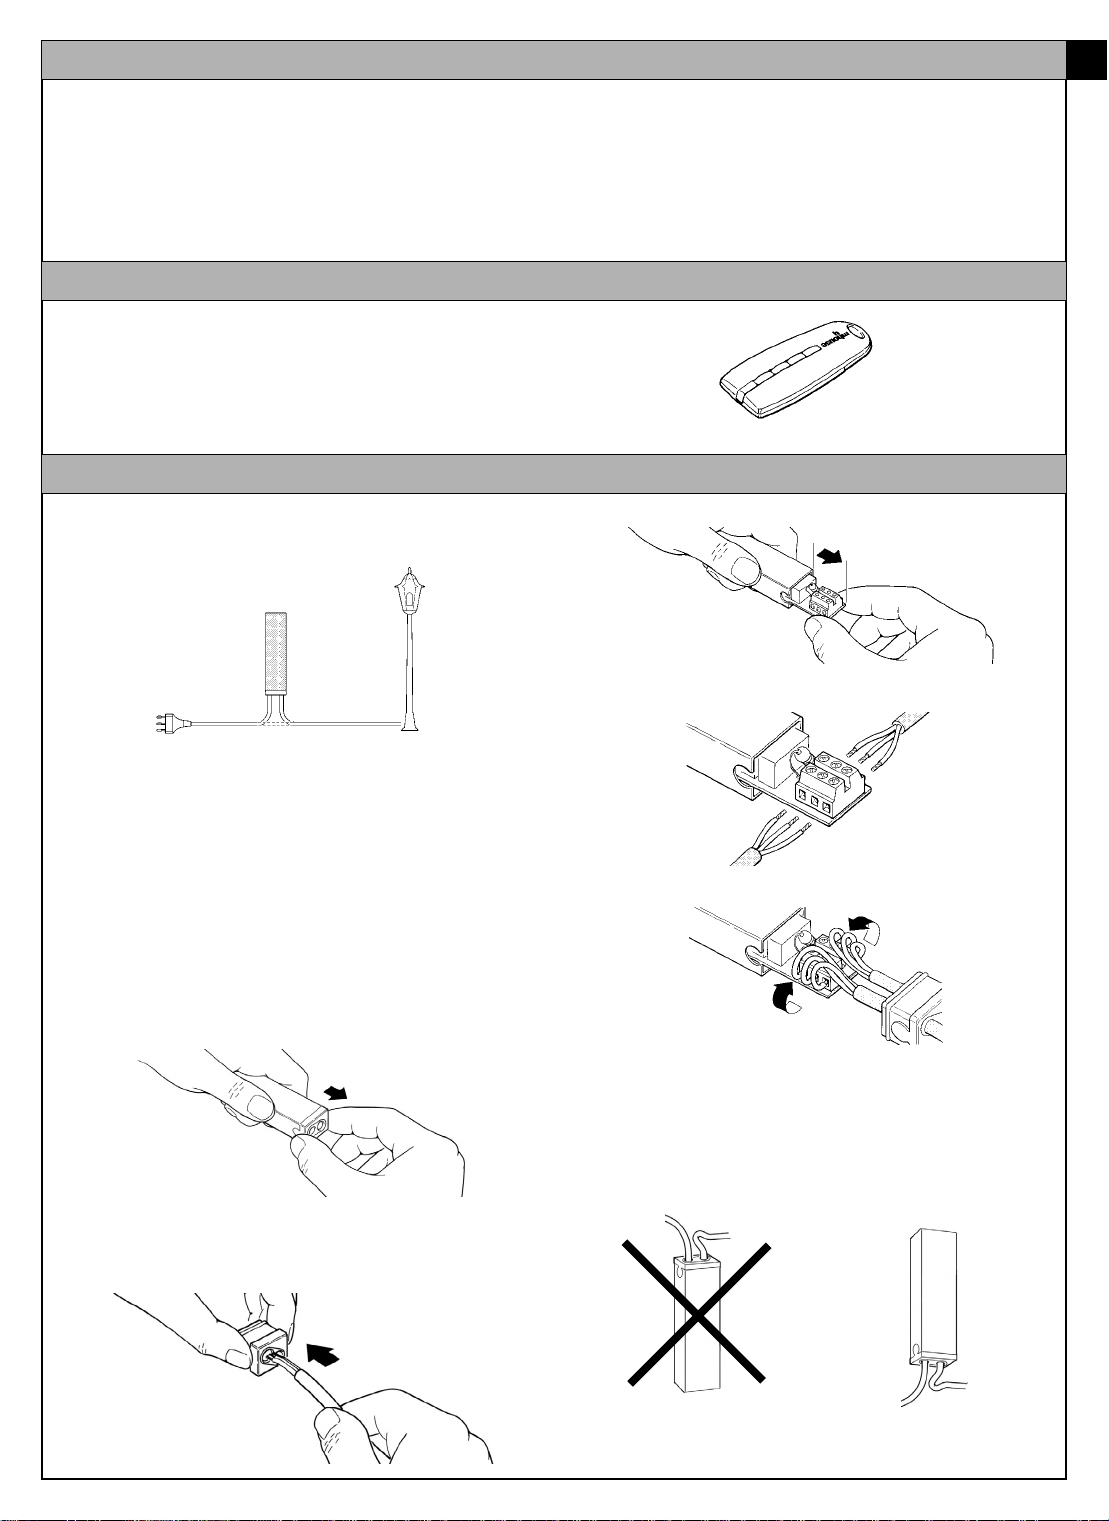
3 Installation
To connect the RC2 receiver, the normal power cable to the equipment to be controlled must be “interrupted”, as shown in figure 1.
Fig. 1
WARNING: Electrical systems must be set up by qualified
and experienced personnel in compliance with current legislation. As the cable clamps do not provide protection
against pulling and the removable cable cap can be separated, the RC2 container must be positioned where it is inaccessible to the general public. Said container does not guarantee protection against access to those parts of the system which are live. If the RC2 receiver is installed outdoors,
keep in mind that the cable holders are waterproof only for
round cables with a diameter of 6.5 to 8.5 mm.
1 Make sure there is no voltage anywhere in the electrical circuits
2 Cut the power cable to the equipment to be controlled
3 Open the RC2 enclosure and remove the “cable holding cap” as
shown in figure 2
Fig. 2
6Pull the board out a few centimetres, as shown in figure 4.
Fig. 4
7 Connect the conductors to the terminals as shown in figure 5.
Fig. 5
8 Fold the conductors as shown in Figure 6.
Fig. 6
7 Push the board back inside the enclosure, making sure that the
stripped sections of cable are not exposed, then slide the “cap”
along the cables until the enclosure is closed tight.
8 The RC2 receiver does not require mounting, it can be positioned
directly in the dedicated compartment. To avoid any risk of water
infiltrations, we recommend positioning it with the cables facing
down. See figure 7
4 Strip the sheath off the two ends of the cable approx. 3 cm, then
strip the single conductors approx. 5 mm.
5 Thread the two cables through the holes in the cable holding
“cap” as shown in figure 3.
Fig. 3
2 RC2
Fig. 7
WARNING: The enclosure must not be perforated for any
reason.
Page 3
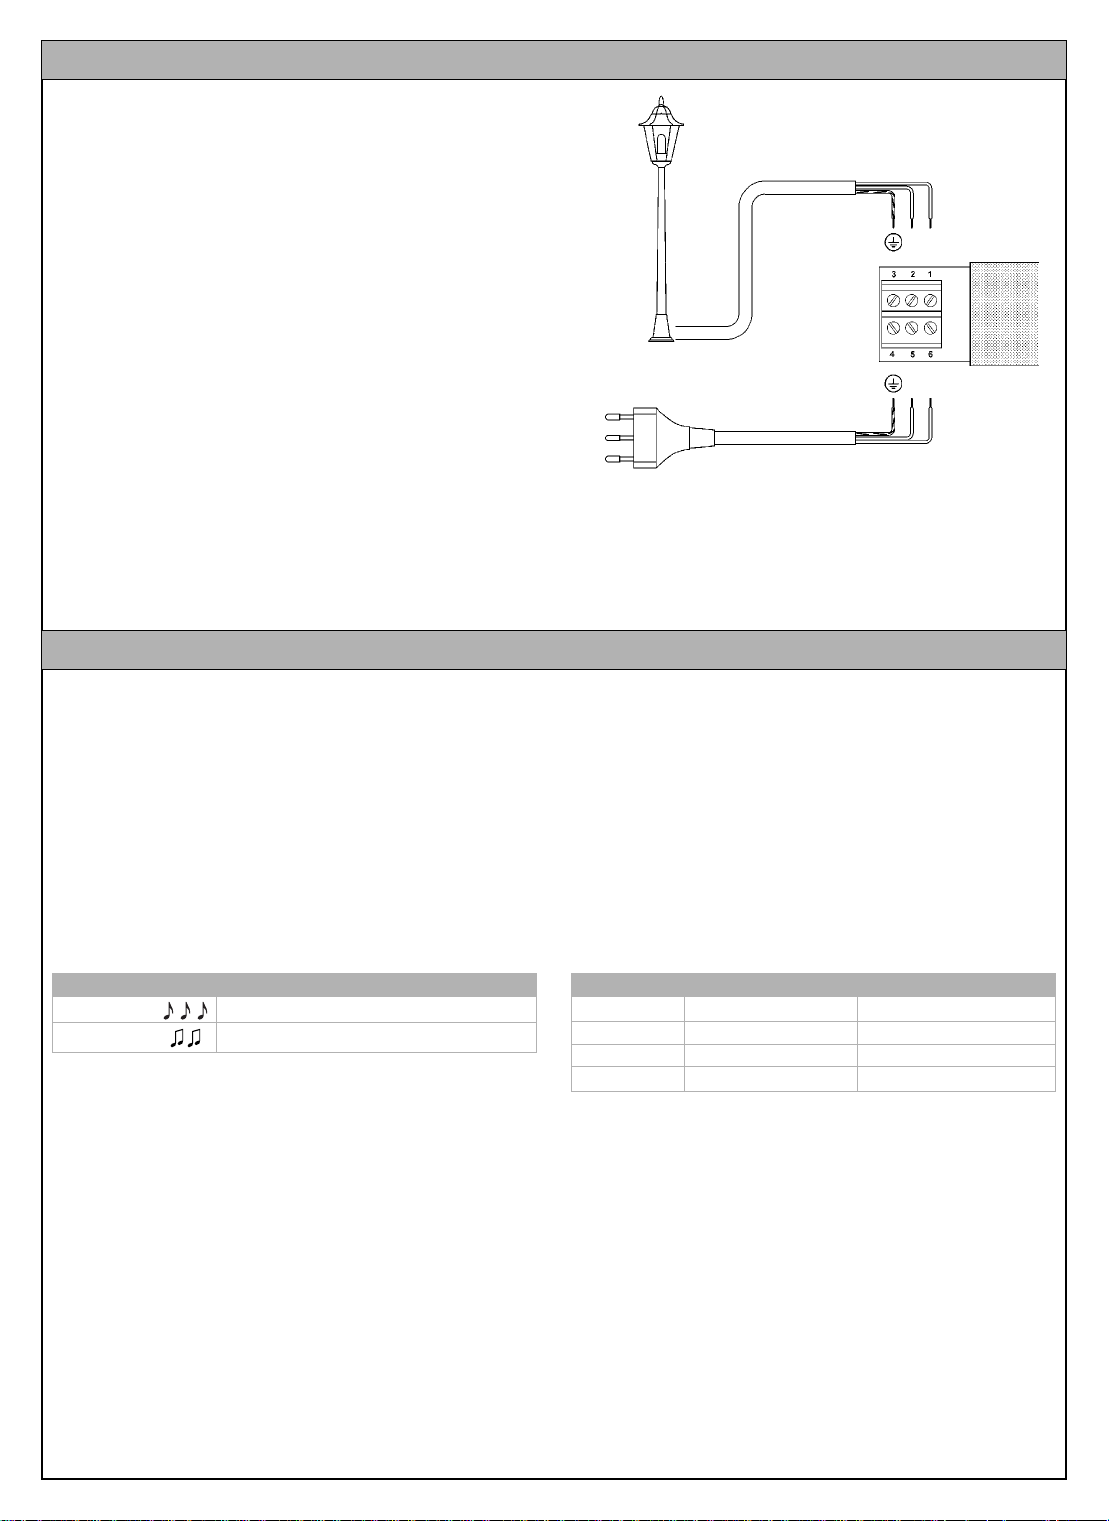
4 Electrical Connections
Power Supply
Use terminals 5-6-7 for the main power supply to the receiver
(ground, phase, neutral), as shown in figure 8 “Electrical Connections”
Connection to the Equipment to Be Controlled
The equipment to be controlled (Max 500W) must be connected to
terminals 1-2; No. 3 is the ground terminal.
WARNING
Terminal 7 (Neutral) is directly connected to terminal 2 of the
equipment to be controlled, which is therefore not completely isolated from the power supply line.
Carefully follow all the connection instructions. If you have any
doubts do NOT make experiments but refer to the relevant technical specifications.
Improper connection may cause serious damage to the
receiver.
Fig. 8
5 Memorizing the transmitters
A memorization procedure must be executed in order to enable the
transmitter to control the receiver.
WARNING:
• All the memorization sequences described in this chapter are
timed, therefore they must be performed within the set time limits.
• All the receivers that are within the range of the transmitter can
be memorized via radio; it is therefore expedient to power only
the receiver involved in the operation.
You can check whether any transmitters have been previously
memorized in the receiver; this is done by counting the number of
beeps emitted when the receiver is switched on.
Checking the memorized transmitters
3 short beeps Vi sono già dei trasmettitori memorizzati
2 long beeps Empty memory (no memorized transmitters)
Two different procedures can be followed to memorize the transmitters:
- Mode I: simplified memorization (the transmitter keys are auto-
matically configured by the RC2 receiver)
- Mode II: advanced memorization (each single transmitter key
can be configured for a specific command)
Mode I (simplified memorization)
In this mode the functions of the transmitter keys are pre-set. The
keys are associated by pairs: keys 1 and 2 can perform the On-
Off commands from an RC2 receiver, whereas keys 3 and 4 can
perform the On-Off commands from a different RC2 receiver, as
shown in the example below.
When the memory is empty (no memorized transmitters) you can
proceed to program the first transmitter in Mode I as shown in table
[A].
WARNING: if you press key 1 or 2, this pair of keys will be mem-
orized, whereas if you press key 3 or 4, this latter pair of keys will
be memorized.
Example of memorization in Mode I
Key 1 On on RC2 n.1
Key 2 Off on RC2 n.1
Key 3 On on RC2 n.2
Key 4 Off on RC2 n.2
RC2 3
Page 4
Table [A] Memorizing the first transmitter in Mode I Example
1 Power the receiver: you will hear two long beeps
2Within 5 seconds, press one of the keys in the desired pair (pair 1-2 or 3-4) on the transmitter
3 Release the key when you hear the first of the 3 beeps confirming the memorization
If the receiver has already memorized one or more transmitters, when it is switched on you will hear 3 short beeps. In this case you will not be
able to proceed as described above, but will have to switch to the memorization mode described in Table [B]
and hold it down
Even if one or more transmitters have already been memorized in Mode I, additional transmitters can be memorized in Mode I, as described
in Table [B]
Table [B] Memorizing additional transmitters in Mode I Example
1Press and hold down one of the keys in the desired pair (1-2 or 3-4) on the new transmitter to
be memorized (New TX) until you hear a beep (after approx. 5 seconds), then release the key New TX
2 Slowly press one of the keys in the desired pair on a previously memorized transmitter (old TX)
Old TX
3 Once again, press and release the key on the new transmitter you pressed according to step 1
New TX
The 3 final beeps signal that the new transmitter has been correctly memorized.
If the memory is full (30 transmitters), 6 beeps will signal that the memory is not capable of memorizing any additional transmitters.
5s
Memorization Mode II (advanced memorization)
In this mode, each of the 4 available commands can be associated to a transmitter key, as shown in Table [C].
Table [C] Commands available for memorization Mode II
N° Command Description
1 On-Off The first command switches on the unit, the next one switches it off, and so on
2 Man Present When the key is pressed the relay contact closes. When the key is released the relay contact opens
3Timer 1
4Timer 2
The contact remains closed for a length of time ranging from 1 sec to 9 hours (programmable as shown in Table [G])
The contact remains closed for a length of time ranging from 1 sec to 9 hours (programmable as shown in Table [G])
In this mode, the memorization procedure is performed separately for each single transmitter key; this means that 2 keys on the same
transmitter can be memorized for two commands to the same receiver, or to command different receivers as illustrated in the example
below:
Example of memorization Mode II
Key 1 On-Off on RC2 no. 1
Key 2 Timer1 on RC2 no. 2
Key 3 Timer2 on RC2 no. 3
Key 4 Man Present on RC2 no. 3
To memorize the transmitters in Mode II, refer to Tables [D] and [E].
Table [D] Memorizing the first transmitter in Mode II Example
1 As soon as the receiver is powered you will hear 2 long beeps
2Within 5 seconds, press the desired key on the transmitter to be memorized and hold it down until all
3Within 3 seconds, press the same key on the transmitter as many times as the number corresponding
4 After approx. 3 seconds you will hear a number of beeps corresponding to the selected command
5Within 2 seconds, press and release the same key to confirm the programming
The 3 final beeps signal that the new transmitter has been correctly memorized. During step 4, if you do not hear the number of beeps corresponding to the desired function, wait 10 seconds before abandoning the procedure, then try again.
Table [E] Memorizing additional transmitters in Mode II Example
1Press and hold down the desired key on the new transmitter (New TX) until you hear a beep
2Within 5 seconds, press and hold down for approx. 5 seconds a previously memorized key on a
3Within 3 seconds, press again the same key on the previously memorized transmitter (old TX) as
4 After approx. 3 seconds you will hear a number of beeps corresponding to the selected command
5Within 2 seconds, press and release the desired key on the new transmitter (new TX) to confirm the
The 3 final beeps signal that the new transmitter has been correctly memorized.
If the memory is full (30 transmitters), 6 beeps will signal that the transmitter cannot be memorized.
3 beeps have sounded, then release the key
to the desired command: 1 = On-Off; 2 = Man Present; 3 = Timer1; 4 = Timer2
(after approx. 5 seconds), then release the key New TX
transmitter (old TX) until you hear 2 short beeps, then release the key.
many times as the number corresponding to the desired command: Old TX
1 = On-Off; 2 = Man Present; 3 = Timer1; 4 = Timer2
programming New TX
X1...X4
X1...X4
5s
5s
X1...X4
X1...X4
4 RC2
Page 5

Memorizing a new transmitter like a previously memorized transmitter
It is possible to memorize a new transmitter so that it operates exactly like a previously memorized one. If the old transmitter was memorized in Mode I, the new one will also operate in Mode I and a single memorization stage will be required. If the key on the old transmitter
was memorized in Mode II, also the key on the new transmitter will be memorized in Mode II and will perform the same function. If you
wish to memorize more than one key you will have to perform a memorization procedure for each key.
Table [F] Memorizing a new transmitter exactly like a previously memorized transmitter Example
1Press the key on the new transmitter (new TX) to be memorized and hold it down for
at least 3 seconds, then release it. New TX
2Press the key on the previously memorized transmitter (old TX) and hold it down for at least 3 seconds,
then release it. Old TX
3Press the key on the new transmitter (new TX) again and hold it down for at least 3 seconds,
then release it. New TX
4Press the key on the previously memorized transmitter (old TX) and hold it down for at least 3 seconds,
then release it. Old TX
The 3 final beeps signal that the new transmitter has been correctly memorized.
If the memory is full (30 transmitters), 6 beeps will signal that the memory is not capable of memorizing any additional transmitters.
3s
3s
3s
3s
Programming the Timers
The RC2 receiver features two independent timers (Timer1 and
Timer2) for automatic relay deactivation after a set time delay.
The deactivation time can be brought forward, compared to the
timer setting, by maintaining the “timer” command active for more
than 3 seconds or by giving an “Off” command.
The factory or default settings for the two timers are 1 minute
(Timer1) and 10 minutes (Timer2) respectively.
Table [G] Programming the Timers Example
1Press and hold down the transmitter key associated with control of the timer you wish to program.
The relay will be activated (On).
2 Hold the key down, after approx. 3 seconds the relay will be deactivated (Off)
3 Hold down the same key for approx. 10 seconds, until the relay is activated again (On).
The time measuring stage starts at this point. Release the key.
4 When the time you wish to set has elapsed, press the key associated with control of the timer.
The relay will be deactivated (Off) and the measured time will be memorized.
3 long beeps will signal that the time has been programmed successfully; the following 1 or 2 short beeps indicate whether timer1 or timer2 has
been programmed.
The time settings can be programmed separately for each of the
two timers, from a minimum of 1 second to a maximum of 9 hours.
Once the timer has been programmed, every command associated with it will activate the relay for the set time interval.
In order to program the timers you need to have a transmitter
memorized for timer control, then follow the steps in the table
below.
“Relay ON”
3s “Relay OFF”
10s “Relay ON”
“Relay OFF”
Clearing the Receiver Memory
There may be cases when the RC2 receiver memory has to be
cleared.
The memory can be cleared using:
- non-memorised transmitters or those which have been memori-
The following items may be erased:
- Transmitters only, proceeding up to step 4
- All the data (transmitters and timers), completing the procedure
up to step 5.
sed for “Timer” commands starting from point A.
- A previously memorized transmitter, starting from step N. 1
Table [H] Clearing the memory Example
AWith the receiver not powered, remove the jumper from the board
➨
B Power the receiver and wait for the initial beeps
1 • With the transmitter in mode I or not memorized:
➨
2 After 1 second, press the same key again and release it precisely during the third beep.
3 After 1 second, press the same key again and release it precisely during the third beep.
➨
4 After 1 second, press the same key again and release it precisely during the third beep.
➨
5 If you wish to completely erase all the data stored in the memory, press the key again within 2 seconds
(after clearing the memory, the jumper must be reinstalled).
Press and hold down key 2 or key 4 on a transmitter previously memorized in mode I until you
hear a beep (after approx. 5 seconds), then release it.
• With the transmitter in mode II (On/Off or timer only):
For On/Off with open relay (Off), press the key to activate it (On), release the key, press it again and
hold it down until you hear a beep (after approx. 5 seconds), then release the key.
For timer with open relay (Off), press the key to activate the relay (On), hold down the key until the
relay is deactivated (Off) and you hear a beep (after approx. 5 seconds), then release the key
and then release it.
After a few seconds, 5 beeps will signal that the memory has been cleared.
?...
5s
5s
RC2 5
Page 6

6 Maintenance and Disposal
The system does not require any special maintenance.
This product is constructed of various types of materials, some of
Warning: certain electronic components may contain polluting
substances; do not pollute the environment.
which can be recycled while others must be disposed of. Make
sure you recycle or dispose of the product in compliance with the
laws and regulations locally in force.
7 Technical Characteristics
R2 is produced by NICE S.p.a. (TV) I, MHOUSE S.r.l. is an affiliate of the Nice S.p.a. group.
Nice S.p.a., in order to improve its products, reserves the right to modify their technical characteristics at any time without prior notice.
In any case, the manufacturer guarantees their functionality and fitness for the intended purposes.
Note: all the technical characteristics refer to a temperature of 20°C.
RC2 Receiver
Type: radio receiver for control of general electrical equipment
Technology adopted: reception and decoding of the radio signals emitted by the transmitters.
Possibility of remote control: with TX4 or TX3 transmitters
Coding: 64 bit rolling code (18 billion billion combinations)
TX4 transmitter memorization capacity: up to 30, if memorized in mode 1
Reception frequency: 433.92 MHz
Receiver sensitivity: better than 0.6µV (with direct coupling)
Range of TX4 transmitters: estimated at 50-100m (this distance may vary in the presence of obstacles or electromagnetic
Power supply: 230Vac (+10-15%) 50Hz
Maximum power output: 500W / 400VA
Absorption when idle: < 0.7W (typical at 230 Vac)
Activation time: approx. 300ms
Deactivation time: approx. 300ms
Maintenance of output status in case of power failure: No
Timer resolution and precision: 1s/±2%
Operating ambient temperature: -10 ÷ 55°C
Use in acid, saline or potentially explosive
atmosphere:
Protection class: IP55 (enclosure undamaged) with round cables having a diameter of 6.5 to 8.5 mm
Dimensions / weight: 98 x 26 x 20 / 45g
Activation of the output relays only in case of correspondence with a previously memorized code,
correctly synchronized with the variability sequence.
disturbances)
No
8 Declaration of conformity
Declaration of conformity according to Directive 1999/5/EC
Number 187/RC2/GB Date: 30/04/2004 Revision: 00
The undersigned Lauro Buoro declares that the following product:
Manufacturer’s name: NICE S.p.a.
Address: Via Pezza Alta 13,
31046 Z.I. Rustignè - ODERZO - ITALY
Model: RC2
meets the essential requirements of Directive R&TTE 1999/5/CE, article 3, for the intended purposes of the product
ODERZO, 30/04/2004
Lauro Buoro
(Managing Director)
6 RC2
Page 7
1 Avvertenze
I
• Prima di iniziare l'installazione verificate se il prodotto è adatto
all'uso, con particolare attenzione ai dati riportati nel capitolo
"Caratteristiche tecniche"; MHOUSE non risponde dei danni
risultanti da un uso del prodotto diverso da quanto previsto nel
presente manuale.
• Le operazioni di installazione devono avvenire senza la presenza
dell'alimentazione elettrica.
• Evitare che le parti interne del prodotto possano venire a contatto con acqua o altre sostanze inquinanti, non tenerlo vicino a forti fonti di calore né esporlo a fiamme; qualora accada, sospendere immediatamente l'uso e rivolgersi al servizio assistenza
MHOUSE.
• Il materiale dell'imballaggio deve essere smaltito nel pieno rispetto della normativa locale.
2 Descrizione del prodotto e destinazione d’uso
Il ricevitore RC2 permette di comandare a distanza tramite gli
appositi trasmettitori TX4, apparecchi monofase alimentati a tensione di rete con potenze fino a 500W.
Sono possibili comandi On/Off, Uomo Presente, Timer 1 e Timer 2.
Il ricevitore opera alla frequenza di 433.92 MHz e può memorizzare fino a 30 trasmettitori della serie e “TX4”.
3 Installazione
Il ricevitore RC2 si deve collegare “interrompendo” il normale cavo
di alimentazione dell’apparecchio da comandare come rappresentato in figura 1.
6 Estrarre di qualche centimetro la scheda come in figura 4.
Fig. 4
Fig. 1
ATTENZIONE: Gli impianti elettrici devono essere eseguiti da
personale esperto e qualificato, nel rispetto delle norme di
legge. Il contenitore di RC2 deve essere posto in luoghi non
accessibili in quanto i passacavo non proteggono dallo strappo dei cavi ed il tappo removibile costituisce elemento separabile e non garantisce la protezione contro l'accesso a parti
in tensione. Se il ricevitore RC2 viene posto in ambienti esterni considerare che i passacavi garantiscono la tenuta all’acqua solo per cavi rotondi e con diametro tra 6,5 e 8,5 mm.
1 Assicurarsi che non sia presente tensione in nessuna parte dei
circuiti elettrici.
2Tagliare il cavo di alimentazione dell’apparecchio da comandare
3 Aprire il contenitore di RC2 togliendo il “tappo passacavi” come
indicato nella figura 2
Fig. 2
4 Sguainare le due parti del cavo di circa 3 cm e poi i singoli con-
duttori di circa 5mm.
5 Passare i due cavi negli appositi fori passacavo del “tappo” come
in figura 3.
7 Collegare i conduttori ai morsetti rispettando lo schema di figura. 5.
Fig. 5
8 Ripiegare i conduttori come in Figura 6.
Fig. 6
9 Spingere la scheda all’interno del contenitore, verificare che la
parte sguainata del cavo sia tutta all’interno, far scorrere il “tappo” sui cavi fino alla completa chiusura del contenitore.
10 Il ricevitore RC2 non necessita di fissaggio e può essere posi-
zionato direttamente nel vano destinatogli; per evitare il rischio
di infiltrazioni d’acqua si consiglia di riporlo con i cavi verso il
basso. Vedi figura 7.
Fig. 3
Fig. 7
ATTENZIONE: Il contenitore non deve essere forato per nessun motivo.
RC2 7
Page 8

4 Collegamenti elettrici
Alimentazione
L’alimentazione principale del ricevitore (terra, fase, neutro) deve
essere eseguita utilizzando i morsetti 5-6-7 come indicato dalla
figura 8 “Collegamenti elettrici”
Collegamento all’apparecchio da comandare
L’apparecchio da comandare (Max 500W) deve essere collegato
tra i morsetti 1-2; mentre il n° 3 è il morsetto di terra.
ATTENZIONE
Il morsetto 7 (Neutro) è collegato direttamente al morsetto 2
dell’apparecchio da comandare che quindi non risulta completamente isolato dalla linea elettrica di alimentazione.
Rispettare scrupolosamente i collegamenti previsti, in caso di dubbio NON tentare invano, ma consultare le apposite schede tecniche di approfondimento.
Un collegamento errato può provocare guasti gravi al ricevitore.
Fig. 8
5 Memorizzazione dei trasmettitori
Affinché un trasmettitore possa comandare il ricevitore, è necessario eseguire una fase di memorizzazione.
ATTENZIONE:
•Tutte le sequenze di memorizzazione descritte in questo capito-
lo sono a tempo, cioè devono essere eseguite entro i limiti di
tempo previsti.
• La memorizzazione via radio può avvenire in tutti I ricevitori che si
trovano nel raggio della portata del trasmettitore; è quindi oppor-
tuno tenere alimentato solo quello interessato all’operazione.
E’ possibile verificare se nel ricevitore vi sono già memorizzati dei
trasmettitori; a questo scopo è sufficiente verificare il numero di bip
acustici emessi al momento dell’accensione del ricevitore.
Verifica dei trasmettitori memorizzati
3 bip brevi Vi sono già dei trasmettitori memorizzati
2 bip lunghi
Vi sono 2 possibili modalità per memorizzare i trasmettitori:
- Modo I: memorizzazione semplificata (i tasti del trasmettitore
sono automaticamente configurati dal ricevitore RC2)
- Modo II: memorizzazione avanzata (ogni singolo tasto del tra-
smettitore può essere configurato per un determinato comando)
Memoria vuota (nessun trasmettitore memorizzato)
Modo I (memorizzazione semplificata)
In questa modalità le funzioni dei tasti del trasmettitore è prefissata. L’associazione dei tasti avviene a coppie: i tasti 1 e 2 posso-
no svolgere i comandi On-Off di un ricevitore RC2, mentre i tasti 3
e 4 possono svolgere i comandi On-Off di un altro ricevitore RC2
come indicato nel seguente esempio.
Quando la memoria è vuota (nessun trasmettitore memorizzato) si
può procedere all’inserimento del primo trasmettitore in Modo I
come indicato in tabella [A].
ATTENZIONE: premendo i tasti 1 o 2 verrà memorizzata questa
coppia di tasti, mentre premendo i tasti 3 o 4 verrà memorizzata
questa seconda coppia di tasti.
Esempio di memorizzazione in Modo I
Tasto 1 On su RC2 n°1
Tasto 2 Off su RC2 n°1
Tasto 3 On suRC2 n°2
Tasto 4 Off suRC2 n°2
8 RC2
Page 9
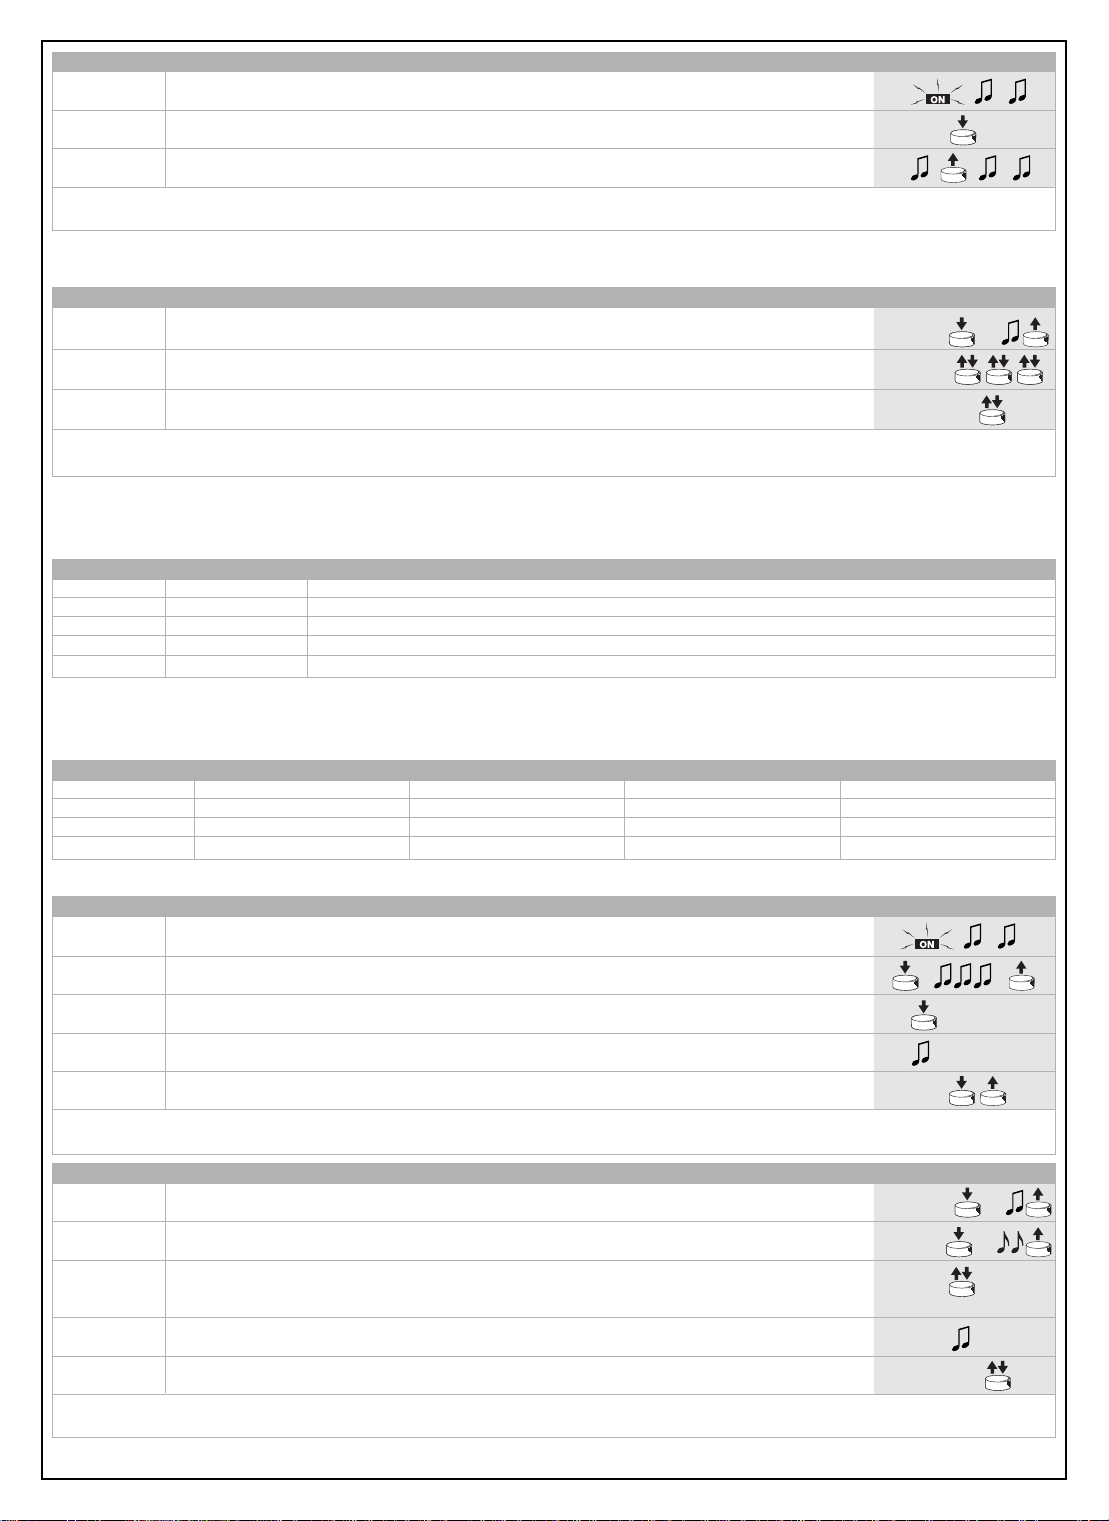
Tabella [A] Memorizzazione del primo trasmettitore in Modo I Esempio
1 Alimentare il ricevitore: si sentiranno 2 bip lunghi (biiip)
2 Entro 5 secondi premere e tener premuto, nel trasmettitore, un tasto della coppia desiderata
(coppia di tasti 1-2 oppure 3-4)
3 Rilasciare il tasto al primo dei 3 bip che confermano la memorizzazione
Se il ricevitore contiene già dei trasmettitori memorizzati, all’accensione si udiranno dei 3 bip brevi e non si potrà procedere come descritto sopra.
In questo caso sarà necessario passare alla modalità di memorizzazione della Tabella [B]
5s
Quando uno o più trasmettitori sono già stati memorizzati in Modo I, è possibile memorizzarne degli altri sempre in Modo I, come indicato in tabella [B]
Tabella [B] Memorizzazione di trasmettitori aggiuntivi in Modo I Esempio
1Tenere premuto un tasto della coppia desiderata (1-2 oppure 3-4) del nuovo trasmettitore da
memorizzare (Nuovo TX) fino a sentire un bip (dopo circa 5 secondi) poi rilasciare
2 Lentamente premere per 3 volte un tasto della coppia desiderata di un trasmettitore già memorizzato
(vecchio TX)
3Premere e rilasciare ancora una volta lo stesso tasto premuto al punto 1 del nuovo trasmettitore
I 3 bip finali segnalano che il nuovo trasmettitore è stato memorizzato correttamente
Se la memoria è piena (30 trasmettitori), 6 Bip indicheranno che la memoria non è in grado di memorizzare altri trasmettitori.
Nuovo TX
Vecchio TX
Nuovo TX
5s
Memorizzazione in Modo II (memorizzazione avanzata)
In questa modalità ad ogni tasto del trasmettitore può essere associato uno dei 4 possibili comandi come indicato in tabella [C].
Tabella [C] Comandi disponibili per memorizzazione in Modo II
N° Comando Descrizione
1 On-Off Il primo comando attiva l’accensione, il successivo attiva lo spegnimento e così via
2 Uomo Presente Con tasto premuto il contatto del relè è chiuso. A tasto rilasciato il contatto del relè è aperto
3Timer 1 Chiusura del contatto per un periodo di tempo che va da 1 sec a 9 ore (programmabile come da tabella [G])
4Timer 2 Chiusura del contatto per un periodo di tempo che va da 1 sec a 9 ore (programmabile come da tabella [G])
In questa procedura la memorizzazione avviene separatamente per singolo tasto del trasmettitore; questo significa che 2 tasti dello stesso trasmettitore possono essere memorizzati per due comandi dello stesso ricevitore oppure per comandare ricevitori diversi come indicato nel seguente esempio:
Esempio di memorizzazione in Modo II
Tasto 1 On-Off su RC2 n°1
Tasto 2 Timer1 su RC2 n°2
Tasto 3 Timer2 su RC2 n°3
Tasto 4 Uomo Presente su RC2 n°3
Per memorizzare i trasmettitori in Modo II fare riferimento alle tabelle [D] e [E].
Tabella [D] Memorizzazione del primo trasmettitore in Modo II Esempio
1 Appena data alimentazione al ricevitore, si sentiranno 2 bip lunghi (biiip)
2 Entro 5 secondi premere e mantenere premuto il tasto desiderato del trasmettitore da memorizzare
3 Entro 3 secondi premere lo stesso tasto del trasmettitore per un numero di volte uguale al comando
4 Dopo circa 3 secondi si udirà un numero di bip uguale al comando scelto
5 Entro 2 secondi premere e rilasciare lo stesso tasto per confermare la programmazione
I 3 bip finali segnalano che il nuovo trasmettitore è stato memorizzato correttamente.
Se al punto 4 non si sente un numero di bip uguale alla funzione desiderata, aspettare 10 secondi per uscire dalla procedura e poi riprovare.
Tabella [E] Memorizzazione di trasmettitori aggiuntivi in Modo II Esempio
1Tenere premuto il tasto desiderato del nuovo trasmettitore (nuovo TX) fino a sentire un bip
2 Entro 5 secondi premere e tenere premuto per circa 5 secondi un tasto già memorizzato di un
3 Entro 3 secondi premere nuovamente lo stesso tasto del trasmettitore già memorizzato (vecchio TX)
4 Dopo circa 3 secondi si udirà un numero di bip uguale al comando scelto
5 Entro 2 secondi premere e rilasciare il tasto desiderato del nuovo trasmettitore (nuovo TX)
I 3 bip finali segnalano che il nuovo trasmettitore è stato memorizzato correttamente
Se la memoria è piena (30 trasmettitori), 6 Bip indicheranno il trasmettitore non può essere memorizzato.
fino alla fine di tutti e 3 i bip; quindi rilasciarlo
desiderato: 1 = On-Off; 2 = Uomo Presente; 3 = Timer1; 4 = Timer2
(dopo circa 5 secondi) e rilasciare
trasmettitore (vecchio TX) fino a sentire 2 bip brevi, quindi rilasciare.
un numero di volte uguale al comando desiderato:
1 = On-Off; 2 = Uomo Presente; 3 = Timer1; 4 = Timer2
per confermare la programmazione Nuovo TX
Nuovo TX
Vecchio TX
Vecchio TX
X1...X4
X1...X4
5s
5s
X1...X4
X1...X4
RC2 9
Page 10

Memorizzazione di un nuovo trasmettitore come un trasmettitore già memorizzato
E’ possibile anche memorizzare un nuovo trasmettitore in modo che funzioni esattamente come un trasmettitore già memorizzato. Se il
trasmettitore già memorizzato è in Modo I, anche il nuovo trasmettitore funzionerà in Modo I e basta una sola fase di memorizzazione. Se
il tasto del trasmettitore già memorizzato è in Modo II anche il tasto del nuovo trasmettitore lo sarà in Modo II ed eseguirà per lo stesso
comando; se si desiderano memorizzare più tasti bisognerà fare una fase di memorizzazione per ogni tasto.
Tabella [F] Memorizzazione di un nuovo trasmettitore esattamente come un trasmettitore già memorizzato Esempio
1Tenere premuto il tasto del nuovo trasmettitore (nuovo TX) da memorizzare per almeno 3 secondi,
poi rilasciare Nuovo TX
2Premere il tasto del trasmettitore già memorizzato (vecchio TX) per almeno 3 secondi, poi rilasciare.
Vecchio TX
3Premere nuovamente il tasto del nuovo trasmettitore (nuovo TX) per almeno 3 secondi e rilasciare.
Nuovo TX
4Premere il tasto del trasmettitore già memorizzato (vecchio TX) per almeno 3 secondi, poi rilasciare.
Vecchio TX
I 3 bip finali segnalano che il nuovo trasmettitore è stato memorizzato correttamente
Se la memoria è piena (30 trasmettitori), 6 Bip indicheranno che la memoria non è in grado di memorizzare altri trasmettitori.
3s
3s
3s
3s
Programmazione del tempo dei Timer
Il ricevitore RC2 dispone di 2 timer indipendenti (Timer1 e Timer2)
per lo spegnimento automatico dei relè, dopo un tempo prefissato
dal comando.
E’ possibile anticipare lo spegnimento, rispetto alla durata prevista
dal timer, tenendo attivo il comando “timer” per più di 3 secondi
oppure inviando un comando di “Off”. I valori di fabbrica, o dopo
una cancellazione della memoria, per i due timer sono rispettiva-
E’ possibile programmare il tempo, separatamente per ognuno dei
due timer, da un minimo di 1 secondo ad un massimo di 9 ore. Una
volta programmato il tempo, ogni comando relativo a quel timer
attiverà il relè per la durata prevista.
Per procedere alla programmazione dei timer è necessario disporre di un trasmettitore memorizzato per il comando del timer, poi
seguire i passi della seguente tabella.
mente di 1 minuto (Timer1) e 10 minuti (Timer2).
Tabella [G] Programmazione tempo dei timer Esempio
1Premere e tenere premuto il tasto del trasmettitore relativo al comando del timer che si desidera
2 Mantenere sempre premuto lo stesso tasto, dopo circa 3 secondi il relè si disattiverà (Off)
3 Mantenere sempre premuto lo stesso tasto per circa 10 secondi fino a quando il relè si attiverà
4 Quando è trascorso il tempo che si desidera programmare premere il tasto relativo al comando del timer.
3 bip lunghi segnaleranno l’avvenuta programmazione del tempo; seguiranno 1 o 2 bip brevi per indicare se la programmazione è relativa al timer1
o al timer2
programmare. Il relè si attiverà (On).
nuovamente (On). Da questo istante inizia la fase di “misura” del tempo. Rilasciare ora il tasto
Il relè si disattiverà (Off) e verrà memorizzato il tempo misurato.
10s “Relè ON”
“Relè ON”
3s “Relè OFF”
“Relè OFF”
Cancellazione della memoria del ricevitore
In alcuni casi può essere necessario cancellare la memoria del ricevitore RC2.
La cancellazione della memoria è possibile con:
- un trasmettitore non memorizzato, o memorizzato per comandi
Possono essere cancellati:
- solo i trasmettitori, terminando al punto 4
- tutti i dati (trasmettitori e timer) completando la procedura fino al
punto 5.
"timer", iniziando dal punto A
- un trasmettitore già memorizzato iniziando dal punto N°1
Tabella [H] Cancellazione della memoria Esempio
➨
AA ricevitore non alimentato togliere il ponticello presente nella scheda
(il ponticello va ripristinato al termine della cancellazione).
B Alimentare il ricevitore ed attendere i bip iniziali
➨
1 • Con trasmettitore in modo I o non memorizzato: tenere premuto il tasto 2 o il tasto 4
2 Dopo 1 secondo ripremere lo stesso tasto e rilasciare esattamente durante il terzo bip.
3 Dopo 1 secondo ripremere lo stesso tasto e rilasciare esattamente durante il terzo bip.
4 Dopo 1 secondo ripremere lo stesso tasto e rilasciare esattamente durante il terzo bip.
➨
5 Se si vogliono cancellare completamente tutti i dati presenti in memoria, entro 2 secondi, premere
➨
di un trasmettitore già memorizzato in modo I fino a sentire un bip (dopo circa 5 secondi) e rilasciare.
• Con trasmettitore in modo II (solo On/Off o timer):
Se On/Off con relè aperto (Off) premere il tasto per attivarlo (On), rilasciare il tasto e ripremerlo
mantenendolo premuto fino a sentire un bip (dopo circa 5 secondi) e rilasciare il tasto.
Se timer con relè aperto (Off) premere il tasto per attivare il relè (On), mantenere il tasto premuto fino
a quando il relè si disattiva (Off) e si sente un bip (dopo circa 5 secondi) e rilasciare il tasto
nuovamente il tasto e poi rilasciarlo
Dopo qualche secondo 5 bip segnalano che la memoria è stata cancellata.
10 RC2
?...
5s
5s
Page 11

6 Manutenzione e Smaltimento
Il sistema non necessita di alcuna manutenzione particolare.
Questo prodotto è costituito da varie tipologie di materiali, alcuni
Attenzione: alcuni componenti elettronici potrebbero contenere
sostanze inquinanti: non disperdeteli nell’ambiente.
possono essere riciclati, altri dovranno essere smaltiti. Informatevi
sui sistemi di riciclaggio o smaltimento del prodotto attenendosi
alle norme di legge vigenti a livello locale.
7 Caratteristiche Tecniche
RC2 è prodotto da NICE S.p.a. (TV) I, MHOUSE S.r.l. è una società del gruppo NICE S.p.a.
Allo scopo di migliorare i prodotti, NICE S.p.a. si riserva il diritto di modificare le caratteristiche tecniche in qualsiasi momento e senza preavviso, garantendo comunque funzionalità e Destinazione d’uso previste.
Nota: tutte le caratteristiche tecniche sono riferite alla temperatura di 20°C.
Ricevitore RC2
Tipologia: Ricevitore radio per il comando di apparecchi elettrici in genere
Tecnologia adottata: Ricezione e decodifica dei segnali radio emessi dai trasmettitori.
Possibilità di telecomando: Con trasmettitori TX4 oppure TX3
Codifica: Rolling code con codice a 64 Bit (18 miliardi di miliardi di combinazioni)
Trasmettitori TX4 memorizzabili: Fino a 30 se memorizzati in modo 1
Frequenza di ricezione: 433.92 MHz
Sensibilità del ricevitore: Migliore di 0,6µV (con accoppiamento diretto)
Portata dei trasmettitori TX4: Stimata in 50-100m (la portata cambia in presenza di ostacoli e di disturbi elettromagnetici)
Alimentazione: 230Vac (+10-15%) 50Hz
Potenza massima uscita: 500W / 400VA
Consumo a riposo: < 0,7W (tipici a 230 Vac)
Tempo attivazione: circa 300ms
Tempo disattivazione: circa 300ms
Mantenimento dello stato dell’uscita No
in caso di mancanza di alimentazione:
Risoluzione e precisione dei timer: 1s/±2%
Temperatura ambientale di funzionamento: -10 ÷ 55°C
Utilizzo in atmosfera acida, salina o No
potenzialmente esplosiva:
Grado di protezione: IP55 (contenitore integro) e con cavi rotondi diametro tra 6,5 e 8,5mm
Dimensioni / peso: 98 x 26 x 20 / 45g
Attivazione dei relè di uscita solo in caso di corrispondenza di un codice precedentemente memorizzato
e correttamente in sincronismo con la sequenza di variabilità
8 Dichiarazione di conformità
Dichiarazione di conformità Secondo la Direttiva 1999/5/CE
Numero 187/RC2/I Data: 30/04/2004 Revisione: 00
Il sottoscritto Lauro Buoro, dichiara che il prodotto:
Nome produttore: NICE S.p.a.
Indirizzo: Via Pezza Alta 13,
31046 Z.I. Rustignè - ODERZO - ITALY
Modello: RC2
E’ conforme ai requisiti essenziali richiesti dall’articolo 3 della direttiva R&TTE 1999/5/CE per l’uso cui il prodotto è destinato
ODERZO, 30/04/2004
Lauro Buoro
(Amministratore Delegato)
RC2 11
Page 12

F
1 Avertissements
•Avant de commencer l'installation vérifiez si le produit est adap-
té à l’emploi, avec une attention particulière pour les données
figurant dans le chapitre "Caractéristiques techniques"; MHOUSE ne répond pas des dommages dérivant d’une utilisation du
produit différente de celle qui est prévue dans le présent manuel.
•Éviter que les parties internes du produit puissent entrer en
contact avec de l’eau ou d’autres substances polluantes, ne pas
le conserver à proximité de sources de chaleur intense et ne pas
l’exposer à des flammes vives; si cela se produit, suspendre
immédiatement l’utilisation et s’adresser au service après-vente
MHOUSE.
•Pour les opérations d’installation, couper l’alimentation électrique.
• Les matériaux de l’emballage doivent être émis au rebut dans le
plein respect des normes locales.
2 Description du produit et application
Le récepteur RC2 permet de commander à distance, à l’aide des
émetteurs TX4, des appareils monophasés alimentés à la tension
de secteur avec des puissances allant jusqu’à 500 W. On peut
avoir des commandes type On/Off, “Homme mort”, Temporisateur
1 et Temporisateur 2. Le récepteur opère à la fréquence de 433,92
MHz et peut mémoriser jusqu’à 30 émetteurs de la série “TX4”.
3 Installation
Le récepteur RC2 doit être connecté en “interrompant” le câble
d’alimentation normal de l’appareil à commander comme l’illustre
la figure 1.
6 Extraire la carte de quelques centimètres comme dans la figure 4.
Fig. 4
Fig. 1
ATTENTION: Les installations électriques doivent être effectuées par du personnel qualifié et dans le respect des normes. Le boîtier de RC2 doit être positionné dans un endroit
non accessible car les passe-câbles ne protègent pas les
câbles contre l’arrachement et le couvercle amovible est un
élément qui se détache et qui ne garantit pas la protection
contre l’accès à des parties sous tension. Si le récepteur est
placé à l’extérieur, il faut tenir compte du fait que les passecâbles garantissent l’étanchéité à l’eau seulement pour les
câbles ronds d’un diamètre compris entre 6,5 et 8,5 mm.
1S’assurer qu’aucune partie des circuits électriques n’est sous tension
2 Couper le câble d’alimentation de l’appareil à commander
3 Ouvrir le boîtier de RC2 en enlevant le “ bouchon passe-câbles”
comme l’indique la figure 2
Fig. 2
4 Dégainer les deux parties du câble sur environ 3 cm puis dénu-
der les différents conducteurs sur environ 5 mm.
5 Passer les deux câbles dans les trous prévus à cet effet sur le
“bouchon” comme dans la figure 3.
7 Connecter les conducteurs aux bornes en respectant le schéma de
la figure. 5.
Fig. 5
8 6. Replier les conducteurs comme dans la Figure 6.
Fig. 6
9 Pousser la carte à l’intérieur du boîtier, vérifier que la partie dégai-
née du câble est complètement à l’intérieur, faire coulisser le “bouchon” sur les câbles jusqu’à la fermeture complète du boîtier
10 Le récepteur RC2 n’a pas besoin de fixation et peut être posi-
tionné directement dans le logement qui lui est destiné; pour
éviter le risque d’infiltrations d’eau, il est conseillé de le positionner avec les câbles vers le bas. Voir figure 7
Fig. 3
12 RC2
Fig. 7
ATTENTION: Le boîtier ne doit être percé sous aucun prétexte.
Page 13

4 Connexions électriques
Alimentation
L’alimentation principale du récepteur (terre, phase, neutre) doit
être effectuée en utilisant les bornes 5-6-7 comme l’indique la figure 8 “Connexions électriques”
Connexion de l’appareil à commander
L’appareil à commander (max. 500 W) doit être raccordé entre les
bornes 1-2, tandis que la n° 3 est la borne de terre.
ATTENTION
La borne 7 (Neutre) est connectée directement à la borne 2
de l’appareil à commander qui ne résulte donc pas complètement isolé de la ligne électrique d’alimentation.
Respecter scrupuleusement les connexions prévues, en cas de
doute NE PAS TENTER en vain, mais consulter les fiches techniques d’approfondissement.
Une connexion erronée peut provoquer des pannes graves
au récepteur.
Fig. 8
5 Mémorisation des émetteurs
Pour qu’un émetteur puisse commander le récepteur, il faut effectuer la procédure de mémorisation.
ATTENTION:
•Toutes les phases de mémorisation décrites dans ce chapitre
sont temporisées, c’est-à-dire qu’elles doivent être effectuées
dans les limites de temps prévues.
• La mémorisation par radio peut se vérifier dans tous les récepteurs qui se trouvent dans le rayon de portée de l’émetteur; il est
donc préférable de ne laisser alimenté que celui qui est concerné par l’opération.
Il est possible de vérifier si des émetteurs sont déjà mémorisés
dans le récepteur: pour cela, il suffit de vérifier le nombre de bips
sonores émis au moment de l’allumage du récepteur.
Vérification des émetteurs mémorisés
3 bips brefs Il y a déjà des émetteurs mémorisés
2 bips longs Mémoire vide (aucun émetteur mémorisé)
Il y a deux manières possibles de mémoriser les émetteurs:
- Mode I: mémorisation simplifiée (les touches de l’émetteur sont
automatiquement configurées par le récepteur RC2)
- Mode II: mémorisation avancée (chaque touche de l’émetteur
peut être configurée pour une commande donnée)
Mode I (mémorisation simplifiée)
Dans ce mode, les fonctions des touches de l’émetteur sont préétablies. L’association des touches s’effectue par paires: les touches 1 et 2 peuvent exécuter les commandes On-Off d’un récepteur RC2, tandis que les touches 3 et 4 peuvent effectuer les commandes On-Off d’un autre récepteur RC2 comme l’indique l’exemple suivant
Quand la mémoire est vide (aucun émetteur mémorisé) on peut
procéder à la mémorisation du premier émetteur en Mode I comme l’indique le tableau [A].
ATTENTION: si l’on presse les touches 1 ou 2 c’est cette paire de
touches qui sera mémorisée, tandis que si l’on presse les touches
3 ou 4, c’est cette deuxième paire de touches qui sera mémorisée.
Exemple de mémorisation en Mode I
Touche 1 On sur RC2 n°1
Touche 2 Off sur RC2 n°1
Touche 3 On sur RC2 n°2
Touche 4 Off sur RC2 n°2
RC2 13
Page 14
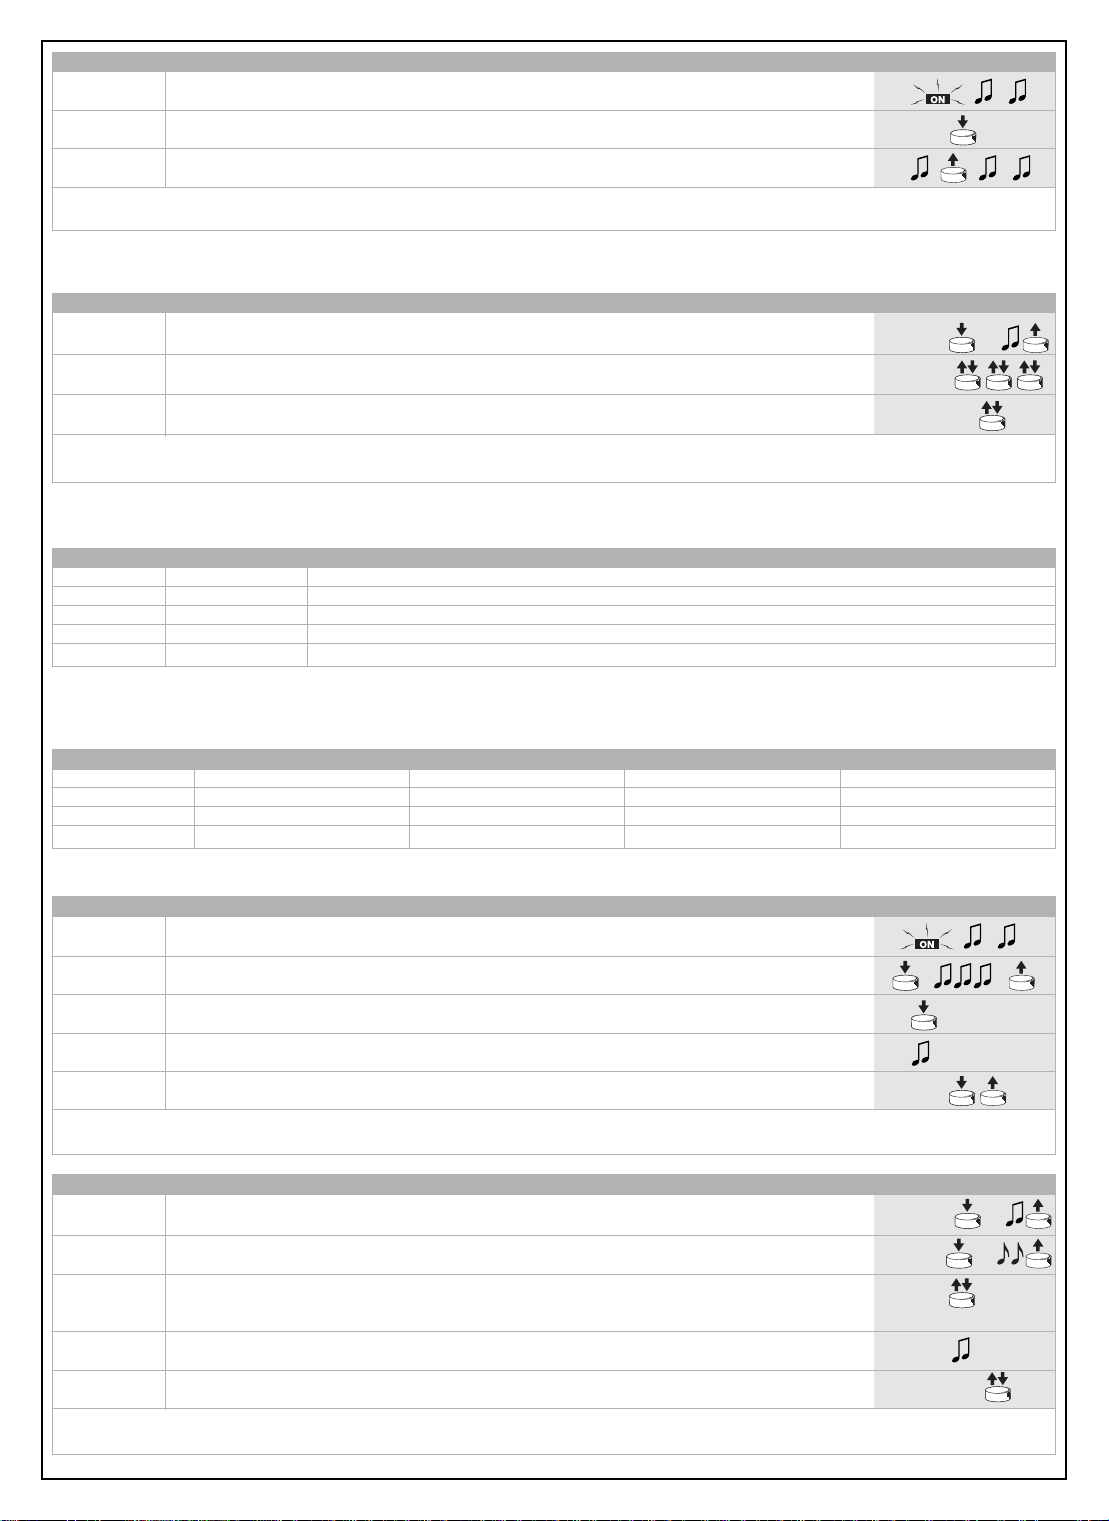
Tableau [A] Mémorisation du premier émetteur en Mode I Exemple
1 Alimenter le récepteur: on entend 2 longs bips (biiip)
2 Dans les 5 secondes qui suivent presser et maintenir enfoncée, sur l’émetteur, une touche de la paire
3 Relâcher la touche au premier des 3 bips qui confirment la mémorisation
Si le récepteur contient déjà des émetteurs mémorisés, à l’allumage on entend 3 bips brefs et il n’est pas possible d’effectuer la procédure cidessus. Dans ce cas , il faudra passer au mode de mémorisation du Tableau [B]
désirée (paire de touches 1-2 ou 3-4)
Quand un ou plusieurs émetteurs ont déjà été mémorisés en Mode I, il est possible d’en mémoriser d’autres toujours en Mode I, comme
l’indique le tableau [B]
Tableau [B] Mémorisation d’émetteurs supplémentaires en Mode I Exemple
1 Maintenir enfoncée une touche de la paire désirée (1-2 ou 3-4) sur le nouvel émetteur à mémoriser
(Nouveau TX) jusqu’à ce que l’on entende un bip (au bout d’environ 5 secondes) puis relâcher la touche
2Presser lentement 3 fois une touche de la paire désirée sur un émetteur déjà mémorisé (ancien TX)
3Presser et relâcher encore une fois la même touche enfoncée au point 1 sur le nouvel émetteur
À la fin, 3 bips signalent que le nouvel émetteur a été mémorisé correctement.
Si la mémoire est pleine (30 émetteurs), 6 bips indiqueront que la mémoire n’est pas en mesure d’accueillir d’autres émetteurs.
Nouveau TX
Ancien TX
Nouveau TX
5s
Mémorisation en Mode II (mémorisation avancée)
Dans ce mode, à chaque touche de l’émetteur on peut associer l’une des 4 commandes possibles, comme l’indique le tableau [C].
Tableau [C] Commandes disponibles pour la mémorisation en Mode II
N° Commande Description
1 On-Off La première commande active l’allumage, la commande successive active l’extinction et ainsi de suite.
2 “Homme mort”
3Temporisateur 1
4Temporisateur 2
Quand la touche est pressée, le contact du relais est fermé. Quand la touche est relâchée, le contact du relais est ouvert.
Fermeture du contact pendant une période de temps qui va d’1 seconde à 9 heures (programmable suivant les indications du tableau [G])
Fermeture du contact pendant une période de temps qui va d’1 seconde à 9 heures (programmable suivant les indications du tableau [G])
Dans cette procédure, la mémorisation s’effectue séparément pour chaque touche de l’émetteur; cela signifie que 2 touches du même
émetteur peuvent être mémorisées pour deux commandes du même récepteur ou pour commander des récepteurs différents comme l’indique l’exemple suivant:
Exemple de mémorisation en Mode II
Touche 1 On-Off sur RC2 n°1
Touche 2 Temporisateur 1 sur RC2 n°2
Touche 3 Temporisateur 2 sur RC2 n°3
Touche 4 “Homme mort” sur RC2 n°3
Pour mémoriser les émetteurs en Mode II se référer aux tableaux [D] et [E].
Tableau [D] Mémorisation du premier émetteur en Mode II Exemple
1 Alimenter le récepteur: on entend 2 longs bips (biiip)
2 Dans les 5 secondes qui suivent, presser et maintenir enfoncée la touche désirée de l’émetteur à
3 Dans les 3 secondes qui suivent, presser la même touche de l’émetteur un nombre de fois égal à la
4 Au bout d’environ 3 secondes on entendra un nombre de bips égal à la commande choisie
5 Dans les 2 secondes qui suivent, presser et relâcher la même touche pour confirmer la programmation
À la fin, 3 bips signalent que le nouvel émetteur a été mémorisé correctement. Si au point 4 on n’entend pas un nombre de bips égal à la fonction
désirée, attendre 10 secondes pour sortir de la procédure puis refaire la procédure.
Ta bleau [E] Mémorisation d’émetteurs supplémentaires en Mode II Exemple
1Maintenir enfoncée la touche désirée du nouvel émetteur (nouveau TX) jusqu’à ce que l’on entende
2
3 Dans les 3 secondes qui suivent, presser de nouveau la même touche de l’émetteur déjà mémorisé
4 Au bout d’environ 3 secondes on entendra un nombre de bips identique à la commande choisie
5 Dans les 2 secondes qui suivent, presser et relâcher la touche désirée sur le nouvel émetteur
À la fin, 3 bips signalent que le nouvel émetteur a été mémorisé correctement.
Si la mémoire est pleine (30 émetteurs), 6 bips indiqueront que la mémoire n’est pas en mesure d’accueillir d’autres émetteurs.
mémoriser jusqu’à la fin des 3 bips; puis la relâcher
commande désirée: 1 = On-Off; 2 = “Homme mort”; 3 = Temporisateur 1; 4 = Temporisateur 2
un bip (au bout d’environ 5 secondes) puis relâcher la touche
Dans les 5 secondes qui suivent, presser et maintenir enfoncée pendant environ 5 secondes une touche
déjà mémorisée d’un émetteur (ancien TX) jusqu’à ce qu’on entende 2 bips brefs, puis relâcher la touche.
(ancien TX) un nombre de fois égal à la commande désirée:
1 = On-Off; 2 = “Homme mort”; 3 = Temporisateur 1; 4 = Temporisateur 2
(nouveau TX) pour confirmer la programmation
Nouveau TX
Ancien TX
Ancien TX
Nouveau TX
X1...X4
X1...X4
5s
5s
X1...X4
X1...X4
14 RC2
Page 15

Mémorisation d’un nouvel émetteur comme un émetteur déjà mémorisé
On peut aussi mémoriser un nouvel émetteur de manière qu’il fonctionne exactement comme un émetteur déjà mémorisé. Si l’émetteur
déjà mémorisé est en Mode I, le nouvel émetteur lui aussi fonctionnera en Mode I et une seule phase de mémorisation suffit. Si la touche
de l’émetteur déjà mémorisé est en Mode II, la touche du nouvel émetteur aussi sera mémorisée en Mode II et actionnera la même commande : si l’on souhaite mémoriser plusieurs touches, il faudra faire une phase de mémorisation pour chaque touche.
Tableau [F] Mémorisation d’un nouvel émetteur exactement comme un émetteur déjà mémorisé Exemple
1Maintenir enfoncée la touche du nouvel émetteur (nouveau TX) à mémoriser pendant au moins 3
2Presser la touche de l’émetteur déjà mémorisé (ancien TX) pendant au moins 3 secondes, puis
3Presser de nouveau la touche du nouvel émetteur (nouveau TX) pendant au moins 3 secondes et
4Presser la touche de l’émetteur déjà mémorisé (ancien TX) pendant au moins 3 secondes, puis
À la fin, 3 bips signalent que le nouvel émetteur a été mémorisé correctement.
Si la mémoire est pleine (30 émetteurs), 6 bips indiqueront que la mémoire n’est pas en mesure d’accueillir d’autres émetteurs.
secondes, puis relâcher la touche
relâcher la touche. Ancien TX
relâcher.
relâcher la touche. Ancien TX
Nouveau TX
Nouveau TX
3s
3s
3s
3s
Programmation du temps des temporisateurs
Le récepteur RC2 dispose de 2 temporisateurs indépendants (Temporisateur 1 et Temporisateur 2) pour l’extinction automatique des relais,
au bout d’un temps préétabli par la commande.
Il est possible d’anticiper l’extinction, par rapport à la durée prévue par
le temporisateur, en maintenant la commande “temporisateur” active
pendant plus de 3 secondes ou bien en envoyant une commande de
“Off”. Les valeurs programmées en usine, ou après l’effacement de la
mémoire, pour les deux temporisateurs sont respectivement d’1
Tableau [G] Programmation du temps des temporisateurs Exemple
1Presser et maintenir enfoncée la touche de l’émetteur relative à la commande du temporisateur que
2 Maintenir toujours la pression sur la même touche, au bout d’environ 3 secondes le relais se
3
4 Quand le temps que l’on souhaite programmer s’est écoulé, presser la touche relative à la commande
3 longs bips signaleront que le temps a été programmé, suivis d’1 ou de 2 bips brefs pour indiquer si la programmation est relative au
temporisateur 1 ou au temporisateur 2
l’on désire programmer. Le relais s’activera (On).
désactivera (Off)
Maintenir toujours la pression sur la même touche pendant environ 10 secondes jusqu’à ce que le relais s’active de
nouveau (On). À partir de ce moment, la phase de “mesure” du temps commence. Relâcher maintenant la touche
du temporisateur. Le relais se désactive (Off) et le temps mesuré est mémorisé.
minute (Temporisateur 1) et de 10 minutes (Temporisateur 2). Il est
possible de programmer le temps de manière séparée pour chacun
des deux temporisateurs, d’un minimum d’1 seconde à un maximum
de 9 heures. Une fois que le temps est programmé, chaque commande relative à ce temporisateur activera le relais pendant la durée prévue. Pour procéder à la programmation des temporisateurs, il faut
disposer d’un émetteur mémorisé pour la commande du temporisateur, puis suivre les phases décrites dans le tableau ci-dessous.
“Relais ON”
3s “Relais OFF”
10s “Relais ON”
“Relais OFF”
Effacement de la mémoire du récepteur
Dans certains cas, il peut être nécessaire d’effacer la mémoire du
récepteur RC2.
L’effacement de la mémoire est possible avec:
- un émetteur non mémorisé ou mémorisé pour des commandes
On peut effacer:
- seulement les émetteurs, en terminant la procédure au point 4
- toutes les données (émetteurs et temporisateurs) en complétant
la procédure jusqu’au point 5.
« temporisateur » en commençant à partir du point A.
- un émetteur déjà mémorisé en commençant à partir du point N°1
Tableau [H] Effacement de la mémoire Exemple
➨
AAvec le récepteur non alimenté, enlever le cavalier présent sur la carte
(il faut le remettre en place à la fin de la procédure d’effacement).
BAlimenter le récepteur et attendre les bips initiaux
➨
1
2 Au bout d’1 seconde, presser de nouveau la même touche et la relâcher exactement durant le
3 Au bout d’une seconde presser de nouveau la même touche et la relâcher exactement durant le
4 Au bout d’une seconde presser de nouveau la même touche et la relâcher exactement durant le
➨
5 Si l’on souhaite effacer complètement toutes les données présentes dans la mémoire, dans les 2
➨
• Avec l’émetteur en mode I ou non mémorisé: Maintenir enfoncée la touche 2 ou la touche 4 d’un émetteur
déjà mémorisé en mode I jusqu’à ce que l’on entende un bip (au bout d’environ 5 secondes) puis relâcher la touche.
• Avec l’émetteur en mode II (seulement On/Off ou temporisateur): Si “On/Off” est avec le relais ouvert (Off)
presser la touche pour l’activer (On), relâcher la touche et la presser de nouveau en la maintenant enfoncée jusqu’à
ce que l’on entende un bip (au bout d’environ 5 secondes). Relâcher ensuite la touche. Si “temporisateur” est avec
le relais ouvert (Off) presser la touche pour l’activer (On), maintenir la touche enfoncée jusqu’à ce que le relais se
désactive (Off) et qu’on entende un bip (au bout d’environ 5 secondes). Relâcher ensuite la touche.
troisième bip.
troisième bip.
troisième bip.
secondes qui suivent, presser de nouveau la touche puis la relâcher.
Au bout de quelques secondes 5 bips signalent que la mémoire a été effacée.
?...
5s
5s
RC2 15
Page 16

6 Maintenance et mise au rebut
Le système n’a besoin d’aucune maintenance particulière.
Ce produit est constitué de différents types de matériaux dont cer-
Attention: certains composants électroniques pourraient contenir
des substances polluantes: ne pas les abandonner dans la nature.
tains peuvent être recyclés, d’autres devront être mis au rebut.
Informez-vous sur les systèmes de recyclage ou de mise au rebut
du produit en respectant les normes locales en vigueur.
7 Caractéristiques techniques
RC2 est produit par NICE S.p.a. (TV) I, MHOUSE S.r.l. est une société du groupe NICE S.p.a.
Dans le but d’améliorer les produits, NICE S.p.a. se réserve le droit d’en modifier à tout moment et sans préavis les caractéristiques techniques, en garantissant dans tous les cas le bon fonctionnement et le type d’utilisation prévus.
N.B. : toutes les caractéristiques techniques se réfèrent à la température de 20°C.
Récepteur RC2
Typologie: Récepteur radio pour la commande d’appareils électriques en général
Technologie adoptée: Réception et décodage des signaux audio émis par les émetteurs.
Possibilité de télécommande: Avec émetteurs TX4 ou TX3
Codage: Rolling code avec code à 64 Bits (18 milliards de milliards de combinaisons)
Émetteurs TX4 mémorisables: Jusqu’à 30 s’ils sont mémorisés en mode 1
Fréquence de réception: 433,92 MHz
Sensibilité du récepteur: Supérieure à 0,6 µV (avec couplage direct)
Portée des émetteurs TX4: Estimée à 50-100 m (la portée change en présence d’obstacles et de parasites électromagnétiques)
Alimentation: 230 Vca (+10-15%) 50 Hz
Puissance maximum en sortie: 500 W / 400 VA
Consommation au repos: < 0,7 W (typiques à 230 Vca)
Temps d’activation: environ 300 ms
Temps de désactivation: environ 300 ms
Maintien de l’état de la sortie en cas de
manque d’alimentation:
Résolution et précision des temporisateurs: 1 s / ±2 %
Température ambiante de fonctionnement: -10 ÷ 55 °C
Utilisation en atmosphère acide, saline ou
potentiellement explosive:
Indice de protection: IP55 (boîtier intact) et avec câbles ronds diamètre compris entre 6,5 et 8,5 mm
Dimensions / poids: 98 x 26 x 20 / 45 g
Activation des relais de sortie seulement en cas de correspondance d’un code précédemment mémorisé
et correctement en synchronisme avec la séquence de variabilité
Non
Non
8 Déclaration de Conformité
Déclaration de conformité selon la Directive 1999/5/CE
Numéro 187/RC2/F Date: 30/04/2004 Révision: 00
Je soussigné Lauro Buoro, déclare que le produit:
Nom producteur: NICE S.p.a.
Adresse: Via Pezza Alta 13,
31046 Z.I. Rustignè - ODERZO - ITALY
Modèle: RC2
Est conforme aux conditions essentielles requise par l’article 3 de la directive R&TTE 1999/5/CE pour l’usage auquel le produit est destiné
ODERZO, 30/04/2004
Lauro Buoro
(Administrateur Délégué)
16 RC2
Page 17

1 Hinweise
D
• Prüfen Sie vor Beginn der Installation, ob das Produkt für seinen
Zweck geeignet ist, insbesondere was die Daten im Kapitel
"Technische Merkmale" betrifft; MHOUSE übernimmt keinerlei
Haftung für Schäden infolge eines Gebrauchs des Produktes, der
anders als in der vorliegenden Anleitung angegeben ist.
•Die Innenteile des Produktes dürfen nicht mit Wasser oder ande-
ren Schadstoffen in Berührung kommen; das Produkt nicht in der
Nähe starker Wärmequellen halten und keinen Flammen aussetzen; sollte dies der Fall sein, das Produkt nicht mehr benutzen
und den MHOUSE Kundendienst zu Rate ziehen.
•Die Installationsarbeiten müssen ohne Vorhandensein der Stromversorgung ausgeführt werden.
• Das Verpackungsmaterial muss unter genauester Einhaltung der
örtlichen Vorschriften entsorgt werden.
2 Beschreibung des Produktes und Einsatz
Mit dem Empfänger RC2 können über dazu vorgesehene Sender
TX4 einphasige, mit Netzspannung gespeiste Geräte mit Leistungen bis 500W gesteuert werden. Es können folgende Befehle
erteilt werden: On/Off, Todmannfunktion, Timer 1 und Timer 2. Der
Empfänger arbeitet auf einer Frequenz von 433.92 MHz und kann
bis zu 30 Sender der Serie “TX4” speichern.
3 Installation
Der Empfänger RC2 muss angeschlossen werden, indem das normale Versorgungskabel des zu steuernden Geräts “unterbrochen”
wird - siehe Abbildung 1.
6Die Karte ein paar Zentimeter herausziehen - siehe Abbildung 4.
Abb. 4
Abb. 1
ACHTUNG: Elektroanlagen müssen von erfahrenem Fachpersonal unter Einhaltung der gesetzlichen Vorschriften ausgeführt
werden. Die Box von RC2 muss an nicht zugänglichen Orten
angebracht werden, da die Kabeldurchführungen die Kabel
nicht vor Wegreißen schützen und der entfernbare Stopfen ein
abtrennbares Element ist und vor Zugang zu unter Spannung
stehenden Teilen nicht schützt. Falls der Empfänger RC2 im
Freien installiert wird, ist zu beachten, dass die Kabeldurchführungen nur für runde Kabel mit Durchmesser zwischen 6,5 und
8,5 mm die Wasserfestigkeit garantieren.
1Sicher stellen, dass in keinem Teil der elektrischen Kreisläufe
Spannung anliegt.
2 Das Versorgungskabel des zu steuernden Geräts durchschneiden.
3 Die Box von RC2 öffnen und den “Stopfen der Kabeldurchfüh-
rung” öffnen, wie auf Abbildung 2 gezeigt.
Abb. 2
4 Die beiden Kabelteile ca. 3 cm, dann die einzelnen Leiter ca. 5
mm abisolieren.
5Die beiden Kabel durch die Bohrungen im “Stopfen der Kabel-
durchführung” führen – siehe Abbildung 3.
7 Die Leiter nach dem Plan in Abbildung. 5. an den Klemmen anschließen.
Abb. 5
8Die Leiter wie in Abbildung 6. biegen.
Abb. 6
9 Die Karte in die Box schieben und prüfen, dass sich das abiso-
lierte Kabelteil ganz in der Box befindet; den “Stopfen” auf die
Kabel gleiten lassen, so dass die Box ganz verschlossen ist.
10 Der Empfänger RC2 bedarf keiner Befestigung und kann direkt
in seinem Abteil untergebracht werden; um Wasserinfiltrationen
zu vermeiden, sollte er mit den Kabeln nach unten angebracht
werden – siehe Abbildung 7.
Abb. 3
Abb. 7
ACHTUNG: Die Box darf nie und aus keinem Grunde gelocht
werden.
RC2 17
Page 18

4 Elektrische Anschlüsse
Versorgung
Die Hauptversorgung des Empfängers (Erde, Phase und Nullleiter)
muss unter Verwendung der Klemmen 5-6-7 ausgeführt werden,
wie in Abb. 8 “Elektrische Anschlüsse” angegeben.
Anschluss am zu steuernden Gerät
Das zu steuernde Gerät (max. 500W) muss zwischen den Klemmen 1-2 angeschlossen werden; Klemme Nr. 3 ist die Erdklemme.
ACHTUNG
Die Klemme Nr. 7 (Nullleiter) ist direkt an Klemme Nr. 2 des
zu steuernden Geräts angeschlossen und daher nicht ganz
von der elektrischen Versorgungsleitung isoliert.
Die Anschlüsse genau wie vorgesehen ausführen; im Zweifelsfall
KEINE Versuche machen, sondern die dazu bestimmten technischen Blätter zu Rate ziehen.
Ein falscher Anschluss kann schwere Defekte am Empfänger verursachen.
Abb. 8
5 Speicherung der Sender
Damit ein Sender den Empfänger steuern kann, ist eine Speicherungsphase notwendig.
ACHTUNG:
• Alle Speichersequenzen müssen innerhalb der vorgesehenen
Zeitgrenzen ausgeführt werden.
• Die Speicherung per Funk kann an allen Empfängern erfolgen,
die sich in der Reichweite des Senders befinden, daher sollte nur
der betreffende Empfänger gespeist sein.
Man kann prüfen, ob der Empfänger bereits gespeicherte Sender
enthält; hierzu genügt es, die Anzahl der vom Empfänger beim Einschalten abgegebenen Bieptöne zu zählen.
Überprüfung der gespeicherten Sender
3 kurze Bieptöne Es sind bereits gespeicherte Sender vorhanden
2 lange Bieptöne Speicher leer (kein Sender gespeichert)
Die Sender können auf zwei Arten gespeichert werden:
- Modus I: vereinfachte Speicherung (die Sendertasten sind auto-
matisch vom Empfänger RC2 konfiguriert)
- Modus II: fortgeschrittene Speicherung (jede einzelne Senderta-
ste kann mit einem bestimmten Steuerbefehl konfiguriert werden)
Modus I (vereinfachte Speicherung)
In diesem Modus sind die Funktionen der Sendertasten vorbestimmt. Die Zuordnung der Tasten erfolgt paarweise: Tasten 1 und
2 können die Befehle On-Off eines Empfängers RC2 ausführen,
wogegen die Tasten 3 und 4 die Befehle On-Off eines anderen Empfängers RC2 ausführen können, wie im nachfolgenden Beispiel:
Wenn der Speicher leer ist (kein Sender gespeichert) kann der erste
Sender wie in Tabelle [A] angegeben im Modus I gespeichert werden.
ACHTUNG: Durch Druck auf Taste 1 oder 2 wird dieses Tastenpaar gespeichert, wogegen durch Druck auf Taste 3 oder 4 dieses
zweite Tastenpaar gespeichert wird.
Beispiel: Speicherung im Modus I
Taste 1 On an RC2 Nr. 1
Taste 2 Off an RC2 Nr. 1
Taste 3 On an RC2 Nr. 2
Taste 4 Off an RC2 Nr. 2
18 RC2
Page 19

Tabelle [A] Speicherung des ersten Senders im Modus I Beispiel
1 Den Empfänger speisen: man wird 2 lange Bieptöne (biiip) hören
2 Innerhalb von 5 Sekunden am Sender auf eine Taste des gewünschten Paars (Tastenpaar 1-2 oder 3-4)
3 Die Taste loslassen, wenn man den ersten der 3 Bieptöne hört, welche die Speicherung bestätigen
Enthält der Empfänger bereits gespeicherte Sender, wird man beim Einschalten 3 kurze Bieptöne (bip) hören; in diesem Fall kann man nicht wie
beschrieben weitermachen, sondern es muss im Modus in Tabelle [B] gespeichert werden.
drücken und diese gedrückt halten
Wenn ein oder mehrere Sender bereits im Modus I gespeichert sind, können andere immer im Modus I wie in Tabelle [B] angegeben gespeichert werden.
Tabelle [B] Speicherung weiterer Sender im Modus I Beispiel
1
2 Langsam drei Mal auf eine Taste des gewünschten Paars eines bereits gespeicherten Alter TX
3 Nochmals auf die in Punkt 1 gedrückte Taste des neuen Senders drücken und loslassen
Am Ende werden 3 Bieptöne melden, dass der neue Sender korrekt gespeichert worden ist.
Ist der Speicher voll (30 Sender), werden 6 Bieptöne melden, dass keine weiteren Sender gespeichert werden können.
Auf eine Taste des gewünschten Paars (Tastenpaar 1-2 oder 3-4) des neuen Senders drücken, der Neuer TX
gespeichert
Senders drücken (Alter TX)
werden soll (Neuer TX), bis man einen Biepton hört (nach ca. 5 Sekunden), dann loslassen
Neuer TX
5s
Speicherung im Modus II (fortgeschrittene Speicherung)
in diesem Modus kann jeder Sendertaste einer der vier möglichen Befehle, angegeben in Tabelle [C] zugeordnet werden.
Tabelle [C] Im Modus II zur Verfügung stehende Befehle
Nr. Befehl Beschreibung
1 On-Off Der erste Befehl aktiviert die Einschaltung, der nächste die Ausschaltung usw.
2Todmann Mit gedrückter Taste ist der Relaiskontakt geschlossen, mit losgelassener Taste ist der Relaiskontakt geöffnet
3Timer 1 Schließung des Kontaktes für eine Zeit von 1 Sek. bis zu 9 Stunden (kann programmiert werden - siehe Tabelle [G])
4Timer 2 Schließung des Kontaktes für eine Zeit von 1 Sek. bis zu 9 Stunden (kann programmiert werden - siehe Tabelle [G])
Bei diesem Verfahren erfolgt die Speicherung gesondert für jede einzelne Sendertaste; das bedeutet, dass 2 Tasten desselben Senders
für zwei Befehle desselben Empfängers oder zum Steuern verschiedener Empfänger gespeichert werden können, wie im folgenden Beispiel angegeben:
Beispiel: Speicherung im Modus II
Taste 1 On-Off an RC2 Nr. 1
Taste 2 Timer1 an RC2 Nr. 2
Taste 3 Timer2 an RC2 Nr. 3
Taste 4 Todmann an RC2 Nr. 3
Für die Speicherung der Sender im Modus II, auf die Tabellen [D] und [E] Bezug nehmen.
Tabelle [D] Speicherung des ersten Senders im Modus II Beispiel
1 Sobald der Empfänger mit Spannung versorgt ist, wird man 2 lange Bieptöne (biiip) hören
2 Innerhalb von 5 Sekunden auf die gewünschte Taste des zu speichernden Senders drücken und diese
3 Innerhalb von 3 Sekunden sooft auf dieselbe Sendertaste drücken, wie die Zahl des gewünschten
4 Nach ca. 3 Sekunden wird man so viele Bieptöne hören, wie die Zahl des gewählten Steuerbefehls ist.
5 Innerhalb von 2 Sekunden erneut auf dieselbe Taste drücken und loslassen, um die Programmierung zu
Am Ende werden 3 Bieptöne melden, dass der neue Sender korrekt gespeichert worden ist. Sollte man an Punkt 4 nicht die Zahl an Bieptönen
hören, die mit der gewünschten Funktion übereinstimmt, 10 Sekunden warten, um das Verfahren zu beenden, dann erneut versuchen.
Tabelle [E] Speicherung weiterer Sender im Modus II Beispiel
1 Auf die gewünschte Taste des neuen Senders drücken (Neuer TX), bis man einen Biepton hört
2 Innerhalb von 5 Sekunden auf eine bereits gespeicherte Sendertaste (Alter TX) drücken und diese ca. 5 Alter TX
3 Innerhalb von 3 Sekunden erneut sooft auf dieselbe Taste des bereits gespeicherten Senders (Alter TX) Alter TX
4 Nach ca. 3 Sekunden wird man so viele Bieptöne hören, wie die Zahl des gewählten Steuerbefehls ist.
5 Innerhalb von 2 Sekunden erneut auf die gewünschte Taste des neuen Senders (Neuer TX) drücken
Am Ende werden 3 Bieptöne melden, dass der neue Sender korrekt gespeichert worden ist.
Ist der Speicher voll (30 Sender), werden 6 Bieptöne melden, dass keine weiteren Sender gespeichert werden können.
bis zum Ende aller 3 Bieptöne gedrückt halten, dann loslassen
Steuerbefehls ist: 1 = On-Off; 2 = Todmann; 3 = Timer1; 4 = Timer2
bestätigen
(nach ca. 5 Sekunden), dann loslassen Neuer TX
Sekunden lang gedrückt halten, bis man zwei kurze Bieptöne hört, dann loslassen.
drücken, wie die Zahl des gewünschten Steuerbefehls ist:
1 = On-Off; 2 = Todmann; 3 = Timer1; 4 = Timer2
und loslassen, um die Programmierung zu bestätigen Neuer TX
X1...X4
X1...X4
5s
5s
X1...X4
X1...X4
RC2 19
Page 20

Speicherung eines neuen Senders als bereits gespeicherter Sender
Ein neuer Sender kann auch so gespeichert werden, dass er genau wie ein bereits gespeicherter Sender funktioniert. Falls der bereits gespeicherte Sender im Modus I gespeichert wurde, wird auch der neue Sender im Modus I funktionieren und es genügt nur eine Speicherphase. Falls
die Taste des bereits gespeicherten Senders im Modus II gespeichert wurde, wird auch die Taste des neuen Senders im Modus II funktionieren
und denselben Befehl ausführen; wenn man mehrere Tasten speichern will, muss für jede Taste eine Speicherphase ausgeführt werden.
Tabelle [F] Speicherung eines neuen Senders als bereits gespeicherter Sender Beispiel
1 Die Taste des neuen, zu speichernden Senders (Neuer TX) mindestens 3 Sekunden gedrückt halten,
dann loslassen Neuer TX
2 Die Taste des bereits gespeicherten Senders (Alter TX) mindestens 3 Sekunden gedrückt halten,
dann loslassen. Alter TX
3Erneut die Taste des neuen, zu speichernden Senders (Neuer TX) mindestens 3 Sekunden gedrückt
halten, dann loslassen. Neuer TX
4 Die Taste des bereits gespeicherten Senders (Alter TX) mindestens 3 Sekunden gedrückt halten,
dann loslassen. Alter TX
Am Ende werden 3 Bieptöne melden, dass der neue Sender korrekt gespeichert worden ist.
Ist der Speicher voll (30 Sender), werden 6 Bieptöne melden, dass keine weiteren Sender gespeichert werden können.
3s
3s
3s
3s
Programmierung der Timerzeit
Der Empfänger RC2 verfügt über 2 unabhängige Timer (Timer1
und Timer2) für das automatische Abschalten der Relais nach einer
vorbestimmten Zeit ab Steuerbefehl. Das Abschalten im Vergleich
zur vom Timer vorgesehenen Dauer kann vorverstellt werden,
indem der Befehl “Timer” länger als 3 Sekunden aktiviert bleibt
oder indem man einen Off-Befehl erteilt. Die werkseitig oder nach
dem Löschen des Speichers eingestellten Werte sind für die bei-
Für jeden Timer kann die Zeit gesondert von mindestens 1 Sekunde bis höchstens 9 Stunden programmiert werden. Nach der Programmierung der Zeit wird jeder Befehl, der sich auf jenen Timer
bezieht, das Relais die vorgesehene Dauer über aktivieren.
Für die Programmierung des Timers ist ein bereits gespeicherter
Sender nötig, um dem Timer den Steuerbefehl zu erteilen; dann
müssen die Schritte in der folgenden Tabelle ausgeführt werden:
den Timer jeweils 1 Minute (Timer1) und 10 Minuten (Timer2).
Tabelle [G] Programmierung der Timerzeit Beispiel
1 Auf die Taste des Senders drücken, mit welcher dem zu programmierenden Timer der Steuerbefehl
erteilt wird und gedrückt halten. Das Relais aktiviert sich (On).
2Immer dieselbe Taste gedrückt halten: nach ca. 3 Sekunden wird sich das Relais deaktivieren (Off)
3Immer dieselbe Taste ca. 10 Sekunden lang gedrückt halten, bis sich das Relais erneut aktiviert
(On). Ab diesem Augenblick beginnt die “Zeitmessung“. Die Taste nun loslassen.
4 Nach Ablauf der Zeit, die man programmieren will, die Taste für den Steuerbefehl des Timers drücken.
Das Relais deaktiviert sich (Off) und die gemessene Zeit wird gespeichert.
3 lange Bieptöne werden die erfolgte Zeitprogrammierung melden, gefolgt von 1 oder 2 kurzen Bieptönen, um anzuzeigen, dass sich die
Programmierung auf Timer1 oder Timer2 bezieht.
“Relais ON”
3s “Relais OFF”
10s “Relais ON”
“Relais OFF”
Löschen des Empfängerspeichers
In einigen Fällen kann das Löschen des Speichers des Empfängers
RC2 notwendig sein.
Das Löschen des Speichers ist möglich mit:
- einem nicht gespeicherten Sender oder einem für “Timer”-Befeh-
Gelöscht werden können:
- nur die Sender, wozu man bei Punkt 4 endet
-alle Daten (Sender und Timer), wozu man das Verfahren bis
Punkt Nr. 5 vervollständigt.
le gespeicherten Sender, wenn man bei Punkt A beginnt.
- einem bereits gespeicherten Sender, angefangen bei Punkt Nr. 1
Tabelle [H] Löschen des Speichers Beispiel
➨
A Mit nicht gespeistem Empfänger die Überbrückung an der Steuerkarte
durchschneiden (die Überbrückung muss nach Beendigung des Löschens
wieder hergestellt werden).
B Den Empfänger mit Strom versorgen und warten, bis man die 2 anfänglichen Bieptöne hört.
➨
1 • Mit in Modus I oder mit nicht gespeichertem Sender: Taste 2 oder Taste 3 eines bereits in Modus I
2 Nach 1 Sekunde erneut auf dieselbe Taste drücken und genau während des dritten Bieptons loslassen.
3 Nach 1 Sekunde erneut auf dieselbe Taste drücken und genau während des dritten Bieptons loslassen.
4 Nach 1 Sekunde erneut auf dieselbe Taste drücken und genau während des dritten Bieptons loslassen.
➨
5Wenn man alle Daten im Speicher vollständig löschen will, innerhalb von 2 Sekunden erneut auf die
➨
gespeicherten Senders drücken, bis man einen Biepton hört (nach ca. 5 Sekunden), dann loslassen.
• Mit in Modus II gespeichertem Sender (nur On/Off oder Timer): Falls On/Off mit geöffnetem
Relais (Off), auf die Taste drücken, um das Relais zu aktivieren (On), die Taste loslassen, erneut drücken
und gedrückt halten, bis man einen Biepton hört (nach ca. 5 Sekunden), dann loslassen. Falls Timer mit
geöffnetem Relais (Off), auf die Taste drücken, um das Relais zu aktivieren (On), die Taste gedrückt halten,
bis sich das Relais deaktiviert (Off) und man einen Biepton hört (nach ca. 5 Sekunden), dann loslassen.
Taste drücken, dann loslassen
Nach ein paar Sekunden werden 5 Bieptöne melden, dass der Speicher gelöscht worden ist.
20 RC2
?...
5s
5s
Page 21

6 Wartung und Entsorgung
Das System bedarf keiner besonderen Wartung.
Dieses Produkt besteht aus verschiedenen Stoffen, von denen eini-
Achtung: einige elektronische Teile könnten umweltschädliche
Stoffe enthalten; nicht in die Umwelt geben.
ge recycled werden können, andere müssen dagegen entsorgt
werden. Informieren Sie sich, wie recycled oder entsorgt werden
kann und halten Sie sich an die örtlich gültigen Vorschriften.
7 Technische Merkmale
RC2 ist von NICE S.p.a. (TV) I hergestellt, MHOUSE S.r.l. ist eine Gesellschaft der NICE S.p.a. Gruppe
Für eine Verbesserung der Produkte behält sich Nice S.p.a. das Recht vor, diese jederzeit und ohne vorherige Benachrichtigung zu ändern,
wobei aber vorgesehene Funktionalitäten und Einsätze garantiert bleiben.
Bitte bemerken: alle technischen Merkmale beziehen sich auf eine Temperatur von 20°C.
Empfänger RC2
Typik: Funkempfänger für die Steuerung von Elektrogeräten allgemein
Angewendete Technologie: Empfang und Decodierung der von den Sendern abgegebenen Funksignale.
Mögliche Fernbedienung: mit Sendern TX4 oder TX3
Codierung: Rolling Code mit 64 Bit Code (18 Billiarden Kombinationen)
Speicherbare Sender TX4: bis zu 30, falls im Modus I gespeichert
Empfangsfrequenz: 433.92 MHz
Empfindlichkeit des Empfängers: besser als 0,6µV (mit Direktkopplung)
Reichweite der Sender TX4: ca. 50-100m (die Reichweite ändert sich bei Vorhandensein von Hindernissen und elektromagnetischen
Versorgung: 230Vac (+10-15%) 50Hz
Max. Ausgangsleistung: 500W / 400VA
Verbrauch in Ruhestellung: < 0,7W (typisch bei 230 Vac)
Aktivierungszeit: ca. 300ms
Deaktivierungszeit: ca. 300ms
Beibehaltung des Status im Ausgang bei Stromausfall:
Auflösung und Präzision der Timer: 1s/±2%
Umgebungs-/Betriebstemperatur: -10 ÷ 55°C
Benutzung in säure- und salzhaltiger oder
explosionsgefährdeter Atmosphäre:
Schutzart: IP55 (unbeschädigte Box) und mit runden Kabeln mit Durchmesser zwischen 6,5 und 8,5mm
Abmessungen / Gewicht: 98 x 26 x 20 / 45g
Aktivierung der Ausgangsrelais nur im Falle von Übereinstimmung eines vorher gespeicherten Codes und
korrekt synchronisiert mit der Variabilitätsfolge
Störungen)
Nein
Nein
8 Konformitätserklärung
Konformitätserklärung gemäß der Richtlinie 1999/5/CE
Nr. 187/RC2/D Datum: 30/04/2004 Revision: 00
Der Unterzeichnete Lauro Buoro erklärt, dass das Produkt:
Herstellername: NICE S.p.a.
Adresse: Via Pezza Alta 13,
31046 Z.I. Rustignè - ODERZO - ITALY
Modell: RC2
mit den wichtigsten Anforderungen des Artikels 3 der Richtlinie R&TTE 1999/5/CE konform ist, was den Einsatzzweck des Produktes betrifft.
ODERZO, 30/04/2004
Lauro Buoro
(Der Geschäftsführer)
RC2 21
Page 22

E
1 Advertencias
• Antes de comenzar la instalación, controle si el producto es ade-
cuado para el uso, verificando especialmente los datos indicados en el capítulo "Características técnicas"; MHOUSE no responde de los daños derivados de un uso inadecuado del producto, diferente de aquel previsto en este manual.
•Evite que las piezas internas del producto puedan tener contac-
to con el agua o con otras substancias contaminantes, no lo
coloque cerca de fuentes de calor intensas ni lo exponga a llamas; si esto sucediera, interrumpa de inmediato el uso y diríjase
al servicio de asistencia MHOUSE.
• La instalación debe llevarse a cabo con la alimentación eléctrica
desconectada.
• Elimine el material de embalaje respetando la normativa local
vigente.
2 Descripción del producto y uso previsto
El receptor RC2 permite accionar a distancia mediante los transmisores TX4 correspondientes, los equipos monofásicos alimentados en tensión de red con potencias de hasta 500W.
Es posible disponer de los mandos On/Off, Hombre muerto, Timer
1 y Timer 2. El receptor funciona con frecuencia 433.92 MHz y
puede memorizar hasta 30 transmisores de la serie “TX4”.
3 Instalación
El receptor RC2 debe conectarse “interrumpiendo” el cable normal
de alimentación del equipo a accionar, tal como muestra la figura 1.
6 Extraiga algunos centímetros la tarjeta, como muestra la figura 4.
Fig. 4
Fig. 1
ATENCIÓN: las instalaciones eléctricas deben ser llevadas a
cabo por personal experto y cualificado, respetando las normas vigentes. La caja del RC2 debe colocarse en un lugar
no accesible puesto que los prensaestopas no evitan que el
cable pueda ser arrancado y el tapón extraíble es un elemento separable que no garantiza la protección contra el
acceso a las piezas bajo tensión. Si el receptor RC2 se instala en exteriores, considere que los prensaestopas garantizan la estanqueidad al agua sólo para los cables redondos
y con diámetro entre 6,5 y 8,5 mm.
1 Asegúrese de que no haya tensión en ninguna parte de los cir-
cuitos eléctricos.
2 Corte el cable de alimentación del equipo a accionar
3 Abra la caja del RC2 quitando el “tapón prensaestopas” tal como
indicado en la figura 2
Fig. 2
4Pele unos 3 cm las dos partes del cable y 5 mm cada uno de los
conductores.
5 Pase los dos cables por los orificios del prensaestopas del
“tapón”, tal como muestra la figura 3.
7 Conecte los conductores a los bornes respetando el esquema de
la figura 5.
Fig. 5
8 Pliegue los conductores tal como muestra la Figura 6.
Fig. 6
9 Empuje la tarjeta dentro de la caja, controle que la parte pela-
da del cable quede en el interior, haga deslizar el “tapón” por
los cables hasta cerrar completamente la caja.
10 El receptor RC2 no precisa ser fijado y puede situarse directa-
mente en el alojamiento correspondiente; para evitar el riesgo
de infiltraciones de agua se aconseja colocarlo con los cables
hacia abajo. Véase figura 7
Fig. 3
22 RC2
Fig. 7
ATENCIÓN: no perfore la caja por ningún motivo.
Page 23

4 Conexiones eléctricas
Alimentación
La alimentación principal del receptor (tierra, fase, neutro) debe
conectarse utilizando los bornes 5-6-7 como representado en la
figura 8 “Conexiones eléctricas”
Conexión del equipo a accionar
El equipo a accionar (Máx 500W) debe conectarse entre los bornes 1-2; mientras el n° 3 es el borne de tierra.
ATENCIÓN
El borne 7 (Neutro) está conectado directamente al borne 2
del equipo a accionar que, por tanto, no queda completamente aislado de la línea eléctrica de alimentación.
Respete escrupulosamente las conexiones previstas, si tuviera
alguna duda NO pruebe inútilmente, sino que consulte las fichas
técnicas.
Una conexión incorrecta puede provocar averías graves en
el receptor.
Fig. 8
5 Memorización de los transmisores
Para que un transmisor pueda accionar un receptor, hay que efectuar la memorización.
ATENCIÓN:
•Las secuencias de memorización descritas en este capítulo son
por tiempo, es decir que deben ejecutarse dentro de los límites
de tiempo previstos.
• La memorización por radio puede efectuarse en todos los recep-
tores que se encuentran dentro del radio de alcance del transmi-
sor; por lo que hay que alimentar solamente aquel que se quiere
memorizar.
Es posible comprobar si hay otros transmisores memorizados en
el receptor; a tal fin basta con controlar la cantidad de tonos de aviso que emite el receptor al encenderlo.
Verificación de los transmisores memorizados
3 tonos de aviso
cortos
2 tonos de aviso
prolongados
Existen 2 modos posibles para memorizar los transmisores:
- Modo I: memorización simplificada (los botones del transmisor
son configurados automáticamente por el receptor RC2)
- Modo II: memorización avanzada (cada botón del transmisor
puede configurarse con un mando determinado)
Hay transmisores memorizados
Memoria vacía (ningún transmisor memorizado)
Modo I (memorización simplificada)
en este modo las funciones de los botones del transmisor son predeterminadas. La asociación de los botones es por pares: los botones 1 y 2 pueden activar los mandos On-Off de un receptor RC2,
mientras que los botones 3 y 4 pueden activar los mandos On-Off
de otro receptor RC2 como muestra el siguiente ejemplo
Cuando la memoria está vacía (ningún transmisor memorizado) se
puede comenzar a memorizar el primer transmisor en Modo I, véase la tabla [A].
ATENCIÓN: al presionar los botones 1 ó 2 se memorizará este par
de botones; presionando los botones 3 ó 4 se memorizará este
segundo par de botones.
Ejemplo de memorización en Modo I
Botón 1 On en RC2 n°1
Botón 2 Off en RC2 n°1
Botón 3 On en RC2 n°2
Botón 4 Off en RC2 n°2
RC2 23
Page 24

Tabla [A] Memorización del primer transmisor en Modo I Ejemplo
1 Alimente el receptor: oirá 2 tonos de aviso largos (biiip)
2 Antes de transcurridos 5 segundos, presione y mantenga apretado, en el transmisor, un botón
3 Suelte el botón cuando oiga el primero de los 3 tonos de aviso que confirman la memorización.
Si el receptor contiene otros transmisores memorizados, al encenderlo oirá 3 tonos de aviso cortos y no podrá proceder como antes indicado.
En tal caso, deberá pasar al modo de memorización indicado en la tabla [B].
del par deseado (par de botones 1-2 ó 3-4)
Cuando han sido memorizados uno o varios transmisores en Modo I, es posible memorizar otros , también en Modo I, tal como muestra
la tabla [B].
Tabla [B] Memorización de otros transmisores en Modo I Ejemplo
1 Mantenga apretado el botón del par deseado (1-2 ó 3-4) del nuevo transmisor a memorizar (Nuevo TX)
hasta oír un tono de aviso (transcurridos uno 5 segundos), después suéltelo Nuevo TX
2 Lentamente presione 3 veces un botón del par deseado de un transmisor memorizado (viejo TX)
Viejo TX
3Presione y suelte de nuevo el botón presionado en el punto 1 del nuevo transmisor
Nuevo TX
Al concluir, 3 tonos de aviso le indicarán que el transmisor nuevo ha sido memorizado correctamente.
Si la memoria está llena (30 transmisores), 6 tonos de aviso indicarán que no pueden memorizarse otros transmisores.
5s
Memorización en Modo II (memorización avanzada)
En este modo puede asociarse a cada botón uno cualesquiera de los 4 mandos posibles, como se indica en la tabla [C].
Tabla [C] Mandos disponibles para memorización en Modo II
N° Mando Descripción
1 On-Off El primer mando activa el encendido, el siguiente activa el apagado y así sucesivamente
2 Hombre muerto
3Timer 1 Cierre del contacto durante un tiempo que va desde 1 s a 9 horas (programable como en la tabla [G])
4Timer 2 Cierre del contacto durante un tiempo que va desde 1 s a 9 horas (programable como en la tabla [G])
Con el botón apretado el contacto del relé está cerrado. Con el botón no apretado el contacto del relé está abierto
En este procedimiento la memorización se efectúa por separado para cada botón del transmisor; lo que significa que 2 botones del mismo transmisor pueden memorizarse para dos mandos del mismo receptor o para accionar unos receptores diferentes, como se indica en
el siguiente ejemplo:
Ejemplo de memorización en Modo II
Botón 1 On-Off en RC2 n°1
Botón 2 Timer1 en RC2 n°2
Botón 3 Timer2 en RC2 n°3
Botón 4 Hombre muertoen RC2 n°3
Para memorizar los transmisores en Modo II véanse las tablas [D] y [E].
Tabla [D] Memorización del primer transmisor en Modo II Ejemplo
1 Al alimentar el receptor oirá 2 tonos de aviso largos (biiip)
2 Antes de transcurridos 5 segundos, presione y mantenga apretado el botón deseado del transmisor
3 Antes de transcurridos 3 segundos, presione el mismo botón del transmisor una cantidad de veces
4Transcurridos unos 3 segundos se oirá una cantidad de tonos de aviso equivalente al mando
5 Antes de 2 segundos presione y suelte el mismo botón para confirmar la programación
Al concluir, 3 tonos de aviso le indicarán que el transmisor nuevo ha sido memorizado correctamente. Si en el punto 4 no se oye una cantidad
de tonos de aviso equivalente a la función deseada, espere unos 10 segundos para salir del procedimiento y vuelva a probar.
Tabla [E] Memorización de otros transmisores en Modo II Ejemplo
1 Mantenga apretado el botón deseado del nuevo transmisor (nuevo TX) hasta oír un tono de aviso
2 Antes de 5 segundos, presione y mantenga apretado durante unos 5 segundos un botón memorizado
3 Antes de 3 segundos, presione nuevamente el mismo botón del transmisor memorizado (viejo TX)
4Transcurridos unos 3 segundos se oirá una cantidad de tonos de aviso equivalente al mando
5 Antes de 2 segundos presione y suelte el botón deseado del nuevo transmisor (nuevo TX) para
Al concluir, 3 tonos de aviso le indicarán que el transmisor nuevo ha sido memorizado correctamente.
Si la memoria está llena (30 transmisores), 6 tonos de aviso indicarán que no puede memorizarse el transmisor.
a memorizar hasta que concluyan los 3 tonos de aviso; entonces, suéltelo
equivalente al mando deseado: 1 = On-Off; 2 = Hombre muerto; 3 = Timer1; 4 = Timer2
seleccionado
(transcurridos unos 5 segundos) y después suéltelo Nuevo TX
de un transmisor (viejo TX) hasta oír 2 tonos de aviso, después suéltelo. Viejo TX
una cantidad de veces equivalente al mando deseado: Viejo TX
1 = On-Off; 2 = Hombre muerto; 3 = Timer1; 4 = Timer2
seleccionado
confirmar la programación Nuevo TX
X1...X4
X1...X4
5s
5s
X1...X4
X1...X4
24 RC2
Page 25

Memorización de un nuevo transmisor exactamente como un transmisor ya memorizado
Ta mbién es posible memorizar un transmisor nuevo para que funcione exactamente como un transmisor memorizado. Si el transmisor
memorizado está en Modo I, también el nuevo transmisor funcionará en Modo I y es suficiente una sola etapa de memorización. Si el
botón del transmisor ya memorizado está en Modo II también el botón del nuevo transmisor se memorizará en Modo II y ejecutará el mismo mando; si se quieren memorizar varios botones habrá que cumplir una etapa de memorización para cada botón.
Tabla [F] Memorización de un nuevo transmisor exactamente como un transmisor ya memorizado Ejemplo
1 Mantenga apretado el botón del nuevo transmisor (nuevo TX) a memorizar durante unos 3 segundos,
después suéltelo Nuevo TX
2Presione el botón del transmisor memorizado (viejo TX) durante unos 3 segundos, después suéltelo
Viejo TX
3Presione nuevamente el botón del nuevo transmisor (nuevo TX) durante al menos 3 segundos y suéltelo.
Nuevo TX
4Presione el botón del transmisor memorizado (viejo TX) durante al menos 3 segundos, después suéltelo.
Viejo TX
Al concluir, 3 tonos de aviso le indicarán que el transmisor nuevo ha sido memorizado correctamente.
Si la memoria está llena (30 transmisores), 6 tonos de aviso indicarán que no pueden memorizarse otros transmisores.
3s
3s
3s
3s
Programación del tiempo de los Timers
El receptor RC2 dispone de 2 timers independientes (Timer1 y
Timer2) para el apagado automático de los relés, después de un
tiempo prefijado desde el mando.
Es posible anticipar el apagado, respecto de la duración prevista
por el timer, manteniendo activo el mando “timer” durante más de
3 segundos o enviando un mando de “Off”. Los valores de fábrica,
o después de borrar la memoria, para los dos timers son 1 minu-
Es posible programar el tiempo, por separado para cada uno de
los dos timers, desde un mínimo de 1 segundo hasta un máximo
de 9 horas. Una vez programado el tiempo, cada mando relativo a
ese timer activará el relé durante el tiempo previsto.
Para proceder a la programación de los timers es necesario disponer de un transmisor memorizado para el mando del timer y seguir
los pasos indicados en la siguiente tabla.
to (Timer1) y 10 minutos (Timer2) respectivamente.
Tabla [G] Programación del tiempo de los timers Ejemplo
1Presione y mantenga apretado el botón del transmisor relativo al mando del timer que quiere programar.
2
3
4 Cuando ha transcurrido el tiempo que quiere programar, presione el botón relativo al mando del timer.
3 tonos de aviso le indicarán que el tiempo ha sido programado; seguirán 1 ó 2 tonos de aviso cortos para indicar si la programación se refiere
al timer1 o al timer2.
El relé se activará (On).
Mantenga presionado siempre el mismo botón, transcurridos unos 3 segundos el relé se desactivará (Off)
Mantenga presionado siempre el mismo botón durante unos 10 segundos hasta que el relé se active
nuevamente (On). Desde ese instante, comienza la etapa de “medición” del tiempo. Ahora suelte el botón
El relé se desactivará (Off) y se memorizará el tiempo medido.
10s “ReléON”
3s “Rel
“Relé ON”
é
OFF”
“ReléOFF”
Borrado de la memoria del receptor
En algunos casos puede ser necesario borrar la memoria del
receptor RC2.
El borrado de la memoria es posible con:
- un transmisor no memorizado, o memorizado para mandos
Pueden borrarse:
- sólo los transmisores, concluyendo en el punto 4
- todos los datos (transmisores y timers) completando el procedimiento hasta el punto 5.
"timer", comenzando desde el punto A
- un transmisor ya memorizado comenzando desde el punto N°1
Tabla [H] Borrado de la memoria Ejemplo
➨
A Con el receptor sin alimentar, quite el conector puente situado en la tarjeta
(el puente se restablece al concluir el borrado)..
B Alimente el receptor y espere los tonos de aviso iniciales
➨
1 • Con el transmisor en modo I o no memorizado: mantenga apretado el botón 2 o el botón 4
2Transcurrido 1 segundo vuelva a presionar el mismo botón y suéltelo exactamente durante el
3Transcurrido 1 segundo vuelva a presionar el mismo botón y suéltelo exactamente durante el
4Transcurrido 1 segundo vuelva a presionar el mismo botón y suéltelo exactamente durante el
➨
5Si quiere borrar completamente todos los datos almacenados en la memoria, antes de 2 segundos,
➨
de un transmisor ya memorizado en modo I hasta oír un tono de aviso (unos 5 segundos) y suéltelo.
• Con el transmisor en modo II (sólo On/Off o timer): Para On/Off con relé abierto (Off) presione el
botón para activarlo (On), suelte el botón y vuelva a presionarlo manteniéndolo apretado hasta oír un
tono de aviso (transcurridos unos 5 segundos) y suelte el botón. Para timer con relé abierto (Off)
presione el botón para activar el relé (On), mantenga el botón apretado hasta que el relé se desactive
(Off) y oiga un tono de aviso (transcurridos unos 5 segundos) y suelte el botón.
tercer tono de aviso.
tercer tono de aviso.
tercer tono de aviso.
presione de nuevo el botón y suéltelo.
Transcurrido unos segundos, 5 tonos de aviso indicarán que se ha borrado la memoria.
?...
5s
5s
RC2 25
Page 26

6 Mantenimiento y Eliminación
El sistema no exige ningún mantenimiento especial.
Este producto está formado de diversos tipos de materiales, algunos de ellos pueden reciclarse, otros deben eliminarse. Infórmese
Atención: algunos componentes electrónicos podrían contener
substancias contaminantes: no los abandone en el medio ambien-
te.
sobre los sistemas de reciclaje o eliminación del producto respetando la normas locales vigentes.
7 Características Técnicas
RC2 es fabricado por NICE S.p.a. (TV) I, MHOUSE S.r.l. es una sociedad del grupo NICE S.p.a.
A fin de mejorar sus productos, NICE S.p.a. se reserva el derecho de modificar las características técnicas en cualquier momento y sin
previo aviso, garantizando siempre la funcionalidad y el uso previstos.
Nota: todas las características técnicas se refieren a una temperatura de 20°C.
Receptor RC2
Tipo: Receptor radio para accionar equipos eléctricos en general
Tecnología adoptada: Recepción y decodificación de las señales radio emitidas por los transmisores.
Posibilidad de telemando: Con transmisores TX4 o TX3
Codificación: Rolling code con código de 64 Bits (18 mil billones de combinaciones)
Transmisores TX4 memorizables: hasta 30 si están memorizados en modo 1
Frecuencia de recepción: 433.92 MHz
Sensibilidad del receptor: mejor que 0,6µV (con acoplamiento directo)
Alcance de los transmisores TX4: estimada en 50-100 m (el alcance cambia si hay obstáculos y perturbaciones electromagnéticas)
Alimentación: 230Vac (+10-15%) 50Hz
Potencia máxima salida: 500W / 400VA
Consumo en reposo: < 0,7W (típicos a 230 Vac)
Tiempo de activación: alrededor de 300ms
Tiempo de desactivación: alrededor de 300ms
Mantenimiento del estado de la salida si falla la
alimentación:
Resolución y precisión de los timers: 1s/±2%
Temperatura ambiente de funcionamiento: -10 ÷ 55°C
Empleo en atmósfera ácida, salobre o con
riesgo de explosión:
Grado de protección: IP55 (caja íntegra) y con cables redondos diámetro entre 6,5 y 8,5 mm
Dimensiones / peso: 98 x 26 x 20 / 45g
Activación de los relés de salida solamente en caso de correspondencia de un código antes memorizado
y correctamente sincronizado con la secuencia de mutabilidad
No
No
8 Declaración de Conformidad
Declaración de conformidad según la Directiva 1999/5/CE
Número 187/RC2/E Fecha: 30/04/2004 Revisión: 00
El suscrito, Lauro Buoro, declara que el producto:
Nombre fabricante: NICE S.p.a.
Dirección: Via Pezza Alta 13,
31046 Z.I. Rustignè - ODERZO - ITALIA
Modelo: RC2
Satisface los requisitos generales de la Directiva exigidos por el artículo 3 de la directiva R&TTE 1999/5/CE para el uso al que está destinado el producto
ODERZO, 30/04/2004
Lauro Buoro
(Administrador Delegado)
26 RC2
Page 27

1 Aanbevelingen
• Controleer voordat u met de installatie begint of het product voor
de toepassing in kwestie geschikt is en let in het bijzonder op de
gegevens die u in het hoofdstuk "Technische gegevens" vindt;
MHOUSE is niet aansprakelijk voor schade die het gevolg is van
het feit dat het product anders gebruikt is dan in deze handleiding voorzien is.
• Zorg ervoor dat het binnenste van dit product niet in contact met
water of andere vervuilende stoffen kan komen: houd de zender
uit de buurt van sterke warmtebronnen en open vuur; mocht dit
toch gebeuren dan dient u onmiddellijk het gebruik van het product te staken en zich tot de klantenservice van MHOUSE te
wenden.
•Tijdens de installatiewerkzaamheden mag er geen elektrische
spanning op het apparaat staan.
•De afvalverwerking van het verpakkingsmateriaal dient volledig
volgens de plaatselijke voorschriften te gebeuren.
2 Beschrijving van het product en gebruiksbestemming
Met de ontvanger RC2 kunt u in combinatie met de speciale zenders TX4, éénfase-apparaten die via de elektriciteitsleiding van
stroom voorzien worden en maximaal een vermogen van 500W
hebben, op afstand aansturen. U hebt dan de beschikking over de
instructies On/Off, Iemand aanwezig, Timer 1 en Timer 2.
De ontvanger werkt op een frequentie van 433,92 MHz en kan
maximaal 30 zenders van de serie “TX4” in het geheugen opslaan.
3 Installatie
NL
De ontvanger RC2 wordt aangesloten door de normale netkabel
van het aan te sturen apparaat te “onderbreken”; kijk hiervoor op
afbeelding 1.
Afb. 1
LET OP: De elektrische installaties en automatiseringen moeten aangelegd worden door ervaren en gekwalificeerd personeel met inachtneming van de wettelijke voorschriften. Het
kastje van de RC2 moet op een ontoegankelijke plaats worden
aangebracht daar de kabeldoorvoer geen bescherming tegen
het uittrekken van de kabels biedt. Bovendien kan de dop ervan
afgehaald worden waardoor er geen bescherming bestaat
tegen het aanraken van onder spanning staande delen. Als de
ontvanger RC2 buiten geplaatst wordt, dient u eraan te denken
dat de kabeldoorvoer alleen waterdicht is voor ronde kabels
met een diameter die tussen de 6,5 en 8,5 mm ligt.
1 Controleer of er nergens op de elektrische circuits spanning staat.
2Snijd de netkabel van het aan te sturen apparaat door.
Open het kastje van RC2 door het “dopje van de doorvoeropeningen
3
voor de kabel” te verwijderen zoals dat op afbeelding 2 is aangegeven.
Afb. 2
4 Strip de twee kabels over een lengte van ongeveer 3 cm en daar-
na de afzonderlijke draden over een lengte van ongeveer 5 mm.
5 Haal de twee kabels door de daarvoor bestemde doorvoerope-
ningen van “het dopje” zoals op afbeelding 3 te zien is.
6 Haal de kaart enkele centimeter naar buiten, zoals dat op afbeel-
ding 4 is aangegeven.
Afb. 4
7 Sluit de draden op de klemmetjes volgens het schema van afbeel-
ding 5 aan.
Afb. 5
8 Buig de kabels om zoals dat op afbeelding 6 te zien is.
Afb. 6
9 Duw de kaart het kastje in, controleer of het gestripte deel van
de kabel helemaal binnen in het kastje zit, verschuif het “dopje” over de kabels totdat het kastje helemaal dicht is
De ontvanger RC2 behoeft niet vastgezet te worden en kan recht-
10
streeks in de voor hem bestemde ruimte geplaatst worden; om het
risico op waterinfiltratie te beperken is het raadzaam deze zo terug
te zetten, dat de kabels naar beneden gericht zijn. Zie afbeelding 7
Afb. 3
Afb. 7
LET OP: Er mogen om geen enkele reden boringen in het
kastje uitgevoerd worden.
RC2 27
Page 28

4 Elektrische aansluitingen
Stroomvoorziening
De hoofdstroomaanvoer van de ontvanger (aarde, fase, nulleider)
moet aangesloten worden door de klemmetjes 5-6-7 te gebruiken
zoals dat op afbeelding 8 “Elektrische aansluitingen” te zien is.
Aansluitingen op het te bedienen apparaat
Het te bedienen apparaat (max. 500W) moet tussen de klemmetjes 1-2 aangesloten worden, terwijl het klemmetje 3 het aardingsklemmetje is.
LET OP
Het klemmetje 7 (Nulleider) wordt rechtstreeks op het klemmetje 2 van het te bedienen apparaat aangesloten dat dus
niet helemaal geïsoleerd is van het elektriciteitsnet.
Houd u nauwgezet aan de aanwijzingen voor de aansluitingen
zoals die voorzien zijn; waag u in geval van twijfel NIET aan experimenten, maar raadpleeg de daarvoor bestemde gespecificeerde
technische bladen.
Een verkeerd uitgevoerde aansluiting kan ernstige schade
of een gevaarlijke situatie veroorzaken.
5 Geheugenopslag van de zenders
Om een zender een ontvanger te laten aansturen dient u eerst de
zender in het geheugen van de ontvanger op te slaan.
LET OP:
•Alle opeenvolgende handelingen met betrekking tot de geheugenopslag zoals dat in dit hoofdstuk beschreven is, zijn tijdgebonden, dat wil zeggen dat zij binnen een bepaalde tijdslimiet uitgevoerd dienen te worden.
• Alle ontvangers welke zich binnen het bereik van de zender
bevinden, kunnen via de radio in het geheugenopgeslagen worden; het is dus van belang dat alleen die zender onder spanning
staat welke in het geheugen moet worden bewaard .
Het is mogelijk te controleren of er al zenders in het geheugen van
de ontvanger opgeslagen zijn; hiervoor behoeft u alleen maar het
aantal geluidssignalen te tellen dat op het moment dat de ontvanger aangezet wordt, te horen is.
Controle of er zenders zijn opgeslagen
3 korte
geluidssignalen
2 lange
geluidssignalen
Er zijn reeds zenders opgeslagen
Geheugen leeg (geen enkele zender opgeslagen)
Afb. 8
Modus I (vereenvoudigde geheugenopslag)
In deze modus zijn de functies van de toetsen van de zender vooraf
bepaald. De koppeling van de toetsen vindt paarsgewijs plaats: de
toetsen 1 en 2 kunnen de instructies On-Off voor een ontvanger RC2
uitvoeren, terwijl de toetsen 3 en 4 de instructies On-Off voor een
andere ontvanger RC2 kunnen uitvoeren zoals u dit op het onderstaande voorbeeld kunt zien.
Wanneer het geheugen leeg is (geen enkele zender in het geheugen opgeslagen) kunt u de eerste zender in Modus I invoeren zoals
dat in tabel [A] is aangegeven.
LET OP: wanneer u op de toetsen 1 of 2 drukt, zal dit stel toetsen
in het geheugen worden opgeslagen, terwijl wanneer u op de toetsen 3 of 4 drukt, dit tweede stel toetsen in het geheugen zal worden opgeslagen.
Voorbeeld van geheugenopslag in Modus I
Toets 1 On op RC2 1
Toets 2 Off op RC2 1
Toets 3 On op RC2 2
Toets 4 Off op RC2 2
Er zijn twee mogelijkheden om de zenders in het geheugen op te
slaan:
- Modus I: vereenvoudigde geheugenopslag (de toetsen van de
zender worden automatisch door de ontvanger RC2 geconfigureerd)
- Modus II: geavanceerde geheugenopslag (elke toets van de
zender kan afzonderlijk voor een bepaalde instructie geconfigureerd worden)
28 RC2
Page 29

Tabel [A] Geheugenopslag van de eerste zender in Modus I Voorbeeld
1 Zet de ontvanger onder spanning: u zult 2 lange geluidssignalen horen
2 Druk binnen 5 seconden op een toets van het gewenste stel toetsen (stel toetsen 1-2 of 3-4) op de
3 Laat de toets bij het eerste van de 3 geluidssignalen die de geheugenopslag bevestigen, los
Als er in de ontvanger reeds zenders zijn opgeslagen, hoort u bij het inschakelen 3 korte geluidssignalen en kunt u niet, zoals hierboven
beschreven is, te werk gaan. In dit geval zult u de andere modus voor geheugenopslag dienen te gebruiken; zie Tabel [B]
zender en houd die ingedrukt
Wanneer er reeds één of meerdere zenders in het geheugen in Modus 1 zijn opgeslagen, kunt u andere ook in Modus 1 in het geheugen
opslaan, zoals u dat op tabel [B] kunt zien.
Tabel [B] Geheugenopslag van verdere zenders in Modus I Voorbeeld
1 Houd een toets van het gewenste stel (1-2 of 3-4) van de nieuwe zender die in het geheugen
opgeslagen moet worden (Nieuwe tx) zo lang ingedrukt totdat u een geluidssignaal (na ongeveer 5 Nieuwe tx
seconden) hoort en laat hem dan los
2Druk 3 maal langzaam op een toets van het gewenste stel van een reeds in het geheugen Oude tx
bewaarde zender (oude tx)
3 Druk nogmaals op dezelfde toets als die van punt 1 van de nieuwe zender en laat die weer los
Nieuwe tx
De 3 geluidssignalen aan het einde geven aan dat de nieuwe zender correct in het geheugen is opgeslagen. Wanneer het geheugen vol is (30
zenders), zullen 6 geluidssignalen aangeven dat er geen andere zenders meer in het geheugen kunnen worden opgeslagen.
5s
Geheugenopslag in Modus II (geavanceerde geheugenopslag) In deze modus kan elke toets op de zender aan één van de 4 beschikbare instructies gekoppeld worden, zoals dat op tabel [C] wordt aangegeven.
Tabel [C] Beschikbare instructies voor geheugenopslag in Modus II
Nr. Instructie Beschrijving
1 On-Off De eerste instructie activeert het inschakelen, de volgende het uitschakelen en zo voorts
2 Iemand aanwezig
3Timer 1
4Timer 2
Wanneer er op de toets gedrukt wordt, is het contact van het relais gesloten. Wanneer de toets niet ingedrukt wordt, is het contact van het relais open.
Sluiting van het contact voor een tijdsduur die tussen de 1 sec en 9 uur ligt (programmeerbaar volgens gegevens van de tabel [G])
Sluiting van het contact voor een tijdsduur die tussen de 1 sec en 9 uur ligt (programmeerbaar volgens gegevens van de tabel [G])
Bij deze procedure vindt de geheugenopslag voor elke afzonderlijke toets van de zender apart plaats; dit betekent dat 2 toetsen van dezelfde zender voor twee instructies van dezelfde ontvanger in het geheugen opgeslagen kunnen worden, of om verschillende ontvangers aan
te sturen, zoals u op onderstaand voorbeeld kunt zien:
Voorbeeld van geheugenopslag in Modus II
Toets 1 On-Off op RC2 nr.1
Toets 2 Timer1 op RC2 nr.2
Toets 3 Timer2 op RC2 nr.3
Toets 4
Iemand aanwezig op RC2 nr.3
Om de zenders in Modus II in het geheugen op te slaan gelieve u de tabellen [D] en [E] te raadplegen.
Tabel [D] Geheugenopslag van de eerste zender in Modus II Voorbeeld
1 Zodra de ontvanger onder spanning komt te staan, zult u 2 lange geluidssignalen horen
2 Druk binnen 5 seconden op de gewenste toets van de in het geheugen te bewaren zender en houd
3 Druk binnen3 seconden op dezelfde toets van de zender en wel zoveel maal als overeenkomt met de
4 Na ongeveer 3 seconden zult u een aantal geluidssignalen horen dat overeenkomt met de gekozen
5 Druk binnen 2 seconden op dezelfde toets en laat hem daarna los om de programmering te
De 3 geluidssignalen aan het einde geven aan dat de nieuwe zender correct in het geheugen is opgeslagen. Als u op punt 4 niet het aantal
geluidssignalen hoort dat overeenkomt met de gewenste functie, wacht u 10 seconden om de procedure te verlaten en opnieuw te proberen
Tabel [E] Geheugenopslag van verdere zenders in Modus II Voorbeeld
1
2 Druk binnen 5 seconden op een toets van een reeds in het geheugen bewaarde zender (oude TX) en
3Druk binnen 3 seconden zoveel maal opnieuw op dezelfde toets van de reeds in het geheugen
4 Na ongeveer 3 seconden zult u een aantal geluidssignalen horen dat overeenkomt met de gekozen
5 Druk binnen 2 seconden op de gewenste toets van de nieuwe zender (nieuwe TX) en laat die dan
De 3 geluidssignalen aan het einde geven aan dat de nieuwe zender correct in het geheugen is opgeslagen.
Wanneer het geheugen vol is (30 zenders), zullen 6 geluidssignalen aangeven dat de zender niet in het geheugen kan worden opgeslagen.
die ingedrukt tot na afloop van alle 3 geluidssignalen; laat hem daarna los
gewenste opdracht: 1 = On-Off; 2 = Iemand aanwezig; 3 = Timer1; 4 = Timer2
opdracht
bevestigen
Houd de gewenste toets van de nieuwe zender die in het geheugen opgeslagen moet worden (Nieuwe TX)
zo lang ingedrukt totdat u een geluidssignaal (na ongeveer 5 seconden)hoort en laat hem dan los Nieuwe tx
houd die ongeveer 5 seconden ingedrukt totdat u 2 korte geluidssignalen zult horen, en laat hem Oude tx
vervolgens los.
opgeslagen zender (oude TX) als overeenkomt met de gewenste opdracht: Oude tx
1 = On-Off; 2 = Iemand aanwezig; 3 = Timer1; 4 = Timer2
opdracht
los om de programmering te bevestigen Nieuwe tx
X1...X4
X1...X4
5s
5s
X1...X4
X1...X4
RC2 29
Page 30

Geheugenopslag van een nieuwe zender gelijk aan een reeds in het geheugen opgeslagen zender
Het is ook mogelijk een nieuwe zender zo in het geheugen op te slaan dat deze net zo werkt als een reeds in het geheugen opgeslagen zender. Als de reeds in
het geheugen opgeslagen zender in Modus I is, zal ook de nieuwe zender in Modus I functioneren, en is één enkele cyclus van geheugenopslag voldoende. Als
de toets van de reeds in het geheugen opgeslagen zender in Modus II is, zal ook de toets van de nieuwe zender dat in Modus II zijn en zal die dezelfde instructie geven; als u meerdere toetsen in het geheugen wenst op te slaan zult u voor elke toets een aparte cyclus van geheugenopslag dienen uit te voeren.
Tabel [F]
1 Houd de toets van de nieuwe zender (nieuwe tx) die in het geheugen opgeslagen moet worden,
2 Druk tenminste 3 seconden op de toets van de reeds in het geheugen opgeslagen zender (oude tx),
3 Druk tenminste 3 seconden opnieuw op de toets van de nieuwe zender (nieuwe tx) en laat hem
4 Druk tenminste 3 seconden op de toets van de reeds in het geheugen opgeslagen zender (oude tx),
De 3 geluidssignalen aan het einde geven aan dat de nieuwe zender correct in het geheugen is opgeslagen.
Wanneer het geheugen vol is (30 zenders), zullen 6 geluidssignalen aangeven dat de zender niet in het geheugen kan worden opgeslagen.
Geheugenopslag van een nieuwe zender precies hetzelfde als een reeds in het geheugen opgeslagen zender
tenminste 3 seconden ingedrukt, laat hem vervolgens los. Nieuwe tx
laat hem daarna los. Oude tx
vervolgens los. Nieuwe tx
laat hem daarna los. Oude tx
Voorbeeld
3s
3s
3s
3s
Programmering van de tijd van de Timers
De ontvanger RC2 beschikt over 2 onafhankelijke timers (Timer1
en Timer2) voor het automatisch uitschakelen van de relais, na een
door de aansturing vooraf ingestelde tijd. U kunt het uitschakelen
ten opzichte van de door de timer voorziene duur vervroegen door
langer dan 3 seconden de instructie “timer” geactiveerd te houden
of door een instructie “Off” te verzenden De fabrieksinstellingen, of
nadat het geheugen gewist is, zijn voor de twee timers respectie-
U kunt voor elke timer apart een tijd instellen, met een minimum
van 1 seconde en een maximum van 9 uur. Wanneer de tijd ingesteld is zal elke instructie waarop die timer betrekking heeft het
relais gedurende de ingestelde tijd activeren.
Om de timer te kunnen programmeren hebt u een zender nodig die
in het geheugen opgeslagen is voor het aansturen van de timer;
daarna volgt u de stappen van onderstaande tabel.
velijk 1 minuut (Timer1) en 10 minuten (Timer2).
Tabel [G] Programmering tijd van de timers Voorbeeld
1 Druk op de toets van de zender die de timer aanstuurt welke u wenst te programmeren, en houd
die ingedrukt. Het relais zal geactiveerd worden (On).
2 Houd diezelfde toets nog steeds ingedrukt en na ongeveer 3 seconden zal het relais gedeactiveerd
worden (Off)
3 Houd diezelfde toets ongeveerd 10 seconden ingedrukt totdat het relais opnieuw geactiveerd wordt
(On). Vanaf dit moment zal de tijd “gemeten” worden. Laat nu de toets los
4Wanneer de tijd verstreken is die u wenst te programmeren, drukt u op de toets die de timer aanstuurt en
zal het relais gedeactiveerd worden (Off) en zal de gemeten tijd in het geheugen opgeslagen worden.
3 Lange geluidssignalen zullen aangeven dat de tijd geprogrammeerd is; er volgens nu 1 of 2 korte geluidssignalen om aan te geven of de
programmering betrekking heeft op timer1 of op timer2
“Relais ON”
3s “Relais OFF”
10s “Relais ON”
“Relais OFF”
Wissen van het geheugen van de ontvanger
In sommige gevallen kan het nodig zijn het geheugen van de ontvanger RC2 te wissen.
U kunt het geheugen wissen door als volgt te werk te gaan:
bij een zender die niet, of voor timerinstructies, in het geheugen is opge-
-
Gewist kunnen worden:
- alleen de zenders, en u stopt dan op punt 4
- alle gegevens (zenders en timer) door de procedure helemaal tot
punt 5 te volgen.
slagen begint u bij punt A
- bij een zender die reeds in het geheugen opgeslagen is begint u bij punt 1
Tabel [H] Wissen van het geheugen Voorbeeld
AA Terwijl de ontvanger niet onder spanning staat verwijdert u het bruggetje
➨
dat op de kaart aanwezig is (dit bruggetje wordt na afloop van het wissen weer
teruggeplaatst).
B Zet de ontvanger onder spanning en wacht op de begin geluidssignalen
1 • Bij een zender in modus I of niet in het geheugen opgeslagen zender: Houd toets 2 of toets 4
➨
2Druk na 1 seconde opnieuw op dezelfde toets en laat hem precies tijdens het derde geluidssignaal los.
3Druk na 1 seconde opnieuw op dezelfde toets en laat hem precies tijdens het derde geluidssignaal los.
➨
4Druk na 1 seconde opnieuw op dezelfde toets en laat hem precies tijdens het derde geluidssignaal los.
➨
5 Als u alle in het geheugen aanwezig gegevens wilt wissen, drukt u binnen 2 seconden opnieuw op de
van een reeds in modus I opgeslagen zender ingedrukt totdat u (na ongeveer 5 seconden) een
geluidssignaal hoort, en laat dan los.
• Bij een zender in modus II (alleen On/Off op timer): Bij On/Off met open relais (Off) drukt u op
de toets om het te activeren (On); laat dan de toets los, druk er opnieuw op en houd hem ingedrukt
totdat u (na ongeveer 5 seconden) een geluidssignaal hoort) en laat dan de toets los. Bij timer met open
relais (Off) drukt u op de toets om het relais (On) te activeren, houd de toets ingedrukt totdat het relais
gedeactiveerd wordt (Off) en u (na ongeveer 5 seconden) een geluidssignaal hoort; laat dan de toets dan los
toets en laat hem dan los
Na enkele seconden zullen 5 geluidssignalen aangeven dat het geheugen is gewist.
30 RC2
?...
5s
5s
Page 31

6 Onderhoud en Afvalverwerking
Het systeem vereist geen enkel bijzonder onderhoud.
Dit product bestaat uit verschillende soorten materiaal, enkele
Let op: sommige elektronische componenten zouden vervuilende
stoffen kunnen bevatten ; laat ze niet in het milieu verdwijnen.
daarvan kunnen hergebruikt worden; voor andere is afvalverwerking vereist. Stel u op de hoogte van de systemen van recycling of
afvalverwerking en houd u daarbij aan de plaatselijk geldende voorschriften.
7 Technische gegevens
RC2 wordt vervaardigd door NICE S.p.a. (TV) I, MHOUSE S.r.l. is een maatschappij van de groep NICE S.p.a.
Teneinde haar producten steeds meer te vervolmaken behoudt NICE S.p.a. zich het recht voor op elk gewenst moment en zonder voorbericht wijzigingen in haar producten aan te brengen, waarbij functionaliteit en gebruiksbestemming echter gehandhaafd blijven.
N.B.: alle technische kenmerken hebben betrekking op een temperatuur van 20°C.
Ontvanger RC2
Typologie: Radio-ontvanger voor het aansturen van elektrische apparaten in het algemeen
Aangewende technologie: Ontvangst en decodering van door zenders uitgezonden radiosignalen.
Mogelijkheid tot afstandsbediening: Met zenders TX4 of TX3
Codering: Rolling code met 64-bits codering (18x 1012 combinaties)
Aantal zenders TX4 dat in het geheugen kan
worden opgeslagen:
Ontvangfrequentie: 433,92 MHz
Gevoeligheid van de ontvanger: beter dan 0,6µV (met directe koppeling)
Bereik van de zenders TX4:
Stroomtoevoer: 230Vac (+10-15%) 50Hz
Maximumvermogen uitgang: 500W / 400VA
Verbruik bij rust: < 0,7W (typisc bij 230 Vac)
Tijd benodigd voor activering: circa 300ms
Tijd benodigd voor deactivering: circa 300ms
Behoud van de status van de uitgang bij stroomuitval:
Resolutie en preceisie van de timers: 1s/±2%
Bedrijfstemperatuur: -10 ÷ 55°C
Gebruik in zure, zoute of potentieel
explosieve atmosfeer:
Beveiligingsklasse: IP55 (kastje intact) en bij ronde kabels met een diameter tussen de 6,5 en 8,5mm
Afmetingen / gewicht: 98 x 26 x 20 / 45g
Activering van relais in uitgang alleen indien een eerder in het geheugen opgeslagen code overeenkomt
met de uitgezonden code dat correct gesynchroniseerd is met de variabele sequentie
maximaal 30 indien in modus 1 in het geheugen opgeslagen 1
geschat op 50-100m (dit bereik kan variëren indien er obstakels en elektromagnetische storingen aanwezig zijn )
Nee
Nee
8 Conformiteitsverklaring
Conformiteitsverklaring volgens de Europese Richtlijn 1999/5/CE
Nummer 187/RC2/NL Datum: 30/04/2004 Herziening: 00
Ondergetekende, Lauro Buoro, verklaart dat het product:
Naam fabrikant: NICE S.p.a.
Adres: Via Pezza Alta 13,
31046 Z.I. Rustignè - ODERZO - ITALY
Model: RC2
conform de essentiële eisen is vervat in artikel 3 van de Europese Richtlijn R&TTE 1999/5/CE voor het gebruik waarvoor het bestemd is.
ODERZO, 30/04/2004
Lauro Buoro
(Gedelegeerd Bestuurder)
RC2 31
Page 32

Mhouse
Via Pezza Alta, 13 - Z.I. Rustignè
31046 Oderzo TV Italia
Tel. +39 0422 20 21 09
Fax +39 0422 85 25 82
info@mhouse.biz
www.mhouse.biz
 Loading...