

Page 1

Mhouse - Alarm System
IS0096A00EN_13-05-2011
Instructions and warnings for installation and operation manual
0682
Page 2

Page 3

1 - Read the general warnings
2 - Place all devices on a table
3 - Ensure full understanding of the specific application of each device
4 - Draw up the layout of the house
5 - Read the advice on setting up the system
6 - On the layout, mark the device positioning points
7 - Divide the system into “Zones” for partial activation
Programming all devices
8 - Open the cover of all devices and remove the batteries
9 - Associate the touchscreen with the control unit
10 - Learn how to ‘navigate’ through the touchscreen
11 - Associate the control unit with the various devices (codes, remote controls, detectors, ...)
12 - Configure the system parameters (date, time, automatic activation, ...)
13 - Provisionally place the devices at the envisaged fixing points
14 - Perform the “Control Unit” and “Dialler” test
Install all devices at the envisaged points
Test operation of the devices
15 - Permanently fix the devices
16 - Test general system operation (“Control Unit” test)
chap. 1
Setting the alarm system
chap. 7.1.1
chap. 7
chap. 7.1
chap. 7.1
chap. 5.4
chap. 5.3
chap. 5.2
chap. 5.1
chap. 4.1
chap. 3.2
chap. 3.1
chap. 3
chap. 2.1
Step by step guide to system set-up
3
Page 4

TECHNICAL GLOSSARY
4
NOTES TO THE MANUAL
• This manual describes how to set up a complete and optimal alarm system, using all devices
belonging to the Mhouse alarm system. Some devices and accessories specified in the manual are optional and may not be present in the kit. For a complete overview of the devices,
request the information from your local retailer.
• This manual is intended as a step-by-step guide
. Therefore, to facilitate work and avoid any
errors, it is important to perform all specified operations in the same order as described.
The control unit manages different types of alarm, depending on different situations. The alarms are:
“Deterrent” alarm This type of alarm is intentionally activated by the user to deter an attempt at intrusion, activating the sirens
and sending the calls (and text messages) to the set numbers.
“Emergency” alarm This type of alarm is intentionally activated by the user to request emergency assistance by phone. This
sends the calls (and text messages) to the set numbers.
“Technical” alarm This type of alarm is activated automatically by the control unit if smoke, flooding or other similar events are
detected.
False alarm False alarm, caused by defect and/or fault of one or more appliances.
“General” alarm This alarm is activated by a detector following an intrusion. This activates the sirens and sends the calls and
text messages to the set numbers.
Improper alarm Alarm caused by incorrect installation, technical restraint of appliances or external cause.
“Tamper” alarm This alarm is generated by an attempt at tampering with a system device (opening of the control unit,
removal of a detector etc.).
Anti-duress Function that enables the user to deactivate the alarm and at the same time activate the calls envisaged for
an "emergency" event. This is obtained by a specific deactivation code.
Detector deactivation If necessary (detector faulty) the device can be deactivated temporarily.
Pre-alarm (control unit status) Alarm that precedes a “General alarm”, caused by detectors for which an alarm signal delay is programmed.
Pre-alarm (siren status) External siren status before actual alarm activation (emission of beeps repeated for approx. 10 seconds).
Alarm delay Interval between transmission of detector and alarm status: programmable for each detector.
Supervised system The control unit monitors the associated radio devices to ensure all are running correctly.
Touchscreen Radio device for programming/control with touchscreen technology.
Dual frequency transmission Radio transmission simultaneously on two separate frequencies. Enhances security in radio communication.
Bidirectional transmission The device that transmits a radio message receives confirmation of reception from the other device.
Zone (A, B, C) Grouping of detectors, which can be activated and deactivated together (e.g. a zone may be represented by
all detectors in the sleeping area or by all magnetic contacts of the windows). Each detector can be programmed to belong to one zone only.
Page 5

1 - SAFETY WARNINGS AND GENERAL PRECAUTIONS
ucts (refer to nominal range values specified in the chapter “Technical
specifications”).
• Ensure that the devices (detectors, control unit etc.) are positioned on
sufficiently solid surfaces.
• Install the products in positions difficult to reach to avoid intentional
damage, remaining in compliance with installation specifications.
• During installation and use of the product, ensure that no foreign bodies
(solids or liquids) penetrate any open devices.
• Do not place system components near to sources of heat to avoid
potential damage.
• Ensure that all tools and materials are available for correct installation;
ensure that they are in good condition and comply with relative safety
standards. Some examples are provided in fig. 1.
1.1 - Safety warnings
• CAUTION! – This manual contains important instructions and
warnings to ensure personal safety. Before starting any work, carefully read all sections of this manual. If in doubt, suspend installation and
request clarifications from the Mhouse Assistance Service.
• CAUTION! – Important instructions: keep this manual in a safe
place for future maintenance and product disposal procedures.
Further information can be found on the web site: www.mhouse.biz.
1.2 - General warnings
• Use of these products for applications other than as specified in this
instruction manual is strictly prohibited.
• Never make modifications to any part of the products, other than as
described in this manual. Unauthorised operations can cause malfunctions; the manufacturer declines all liability for damage caused by
improper product modifications.
• According to the specific application, check whether additional products
are required, such as detectors or warning sirens.
• Before proceeding with installation, check whether there are applicable
local standards regarding the use of acoustic warning devices (sirens)
placed outside buildings.
• To use the touchscreen, simply press the surface lightly with a finger or the
stylus supplied (do not exert pressure). Never use sharp pointed objects
on the screen as these will cause irreparable damage to the display.
• Always replace batteries in observance of the specified polarity.
• Manufacturer liability: the manufacturer declines all liability for faults
deriving from incorrect installation or programming, failure to perform
maintenance and improper use of the devices. Furthermore the manufacturer will not be responsible for incorrect or incomplete operation of
the product or failure to detect intrusion.
• Guarantee (summary of terms): Mhouse guarantees company products against concealed defects for a period of 5 years as of the date of
manufacture (3 years for the touchscreen). The guarantee applies to the
direct purchaser from Mhouse. No guarantee is envisaged for the end
user, who in the event of faults must contact the specific installer or
retailer.
• Exclusions from guarantee: the guarantee does not cover aesthetic
parts, the display, parts subject to normal wear or normal consumables,
such as batteries.
• The product packaging material must be disposed of in full observance
of current local legislation.
1.3 - Installation warnings
• The individual parts are designed according to the following environmental classes (EN 50131-1):
- Class II environment: general indoor use; temperature range –10 +40 °C, average humidity 75% (condensate free);
- Class III environment: protected outdoor use; temperature range –25 +50 °C, average humidity 75% with peaks of 30 days per year between
85 and 95% (condensate free).
• Before proceeding with installation, check the product environmental
class as specified in the chapter “Technical specifications”.
• In the device installation sites, check whether the radio range of the
devices is greater than the physical distance between the various prod-
2 - PRODUCT DESCRIPTION AND INTENDED USE
transmission on 2 separate radio frequencies: 433 MHz and 868 MHz.
Furthermore, communication between the main elements is bidirectional;
for some devices transmission requires reception of a confirmation signal
(e.g. activation of the system via remote control is confirmed by a red led
on the remote control itself).
The touchscreen can also be used for radio control of all Mhouse automations.
The products in this kit are part of the Mhouse alarm system designed for
the protection of residential spaces. Any use other than as described in
this manual is strictly prohibited!
The Mhouse alarm system is not to be considered simply a home burglar
alarm, as it is able to detect a variety of events thanks to special sensors:
intrusion, break-in attempts (impact-vibration sensor), fire risks (smoke
detector) and water leaks (flooding sensor).
The different alarm situations can be indicated locally with audible signals
(indoor or outdoor sirens), with voice messages or remotely via telephone
calls or text messages.
The system offers optimal flexibility and simplicity of installation; it is powered exclusively by batteries and does not require any electrical connection. The various devices interact by radio wave communication. Maximum reliability of communication between the devices is achieved by
5
1
Page 6

6
Touchscreen
The touchscreen is the radio interface that enables programming of the entire alarm system and management of the
intrusion protection system. It implements an icon menu and integrated voice menu to ensure simple and intuitive
use. It is equipped with a transponder badge reader to enable rapid activation and deactivation of the alarm system.
It can also be used to control Mhouse automations such as a gate, shutter, awning etc. As well as the controls on
display, a further 4 buttons are available for direct and immediate control of the automations. There is also a voice
recorder to enable recording and listening of voice messages.
The device is battery powered and automatically turns off after a brief period of inactivity. A special charger base,
desktop or wall-mounted (MATSC1, optional) enables the display to remain on at all times.
The models and accessories available are:
MATS1 Touchscreen with wall-mounted support
MATSC1 Desktop support for touchscreen, with rechargeable batteries and power supply unit
Detectors
The detectors are used to control the environment where they are installed; they control the change in area status, detecting events in the environment and instantly transmitting the relative event to the control unit. For efficient control of the area, they must be positioned at strategic points of the
room, doors, windows, shutters, porches etc. The types of detectors are classified as follows:
- perimeter, for opening of doors, windows, shutters;
- perimeter, using “vertical curtain” technology;
- volumetric, for the detection of human presence inside the area covered by the detector;
- special, for the detection of flooding, smoke, glass breakage etc.
The models available are:
MAD1 Door and window opening detector
MAD2 Infra-red detector with volumetric lens
MAD3 Infra-red detector with vertical curtain lens
MAD4 Volumetric detector of glass breakage
MAD5 Smoke detector
MAD6 Flooding detector
MAD1 MAD2 MAD3 MAD4 MAD5 MAD6
MATS1
Control unit
The control unit is the decision making core of the system and communicates with all associated devices.
The control unit is programmed and managed by means of one or more keypads with a touchscreen interface (mod. MATS1).
The control unit can also be controlled by means of portable remote controls and radio control keypads. It receives alarm
signals from different types of detectors and sends notification signals, inside and outside the environments, with acoustic
devices and deterrent voice messages emitted by the sirens. Thanks to the integrated telephone system, the control unit
can notify users of the alarms and system technical events by sending calls to the telephone numbers set in the phone
book. The model MACU1 is also able to send text messages.
Lastly, the remote management function enables the user to manage the control unit by telephone.
The models available are:
MACU1 Control unit for alarm systems • via radio • battery powered • with PSTN and GSM telephone dialler
MACU2 Control unit for alarm systems • via radio • battery powered • with PSTN telephone dialler
2.1 - Understanding the devices that make up the system
Open the packaging and lay out all the components in the pack on a
table. Before proceeding, read the following sections to understand the
role and main features of each device in the system. These devices represent the complete range of articles needed to set up an optimal alarm
system. Some devices specified in the manual are optional and may not
be present in the kit.
MACU1
MACU2
Page 7

7
3 - LAYOUT OF DEVICES IN THE ENVIRONMENT
a) against the movement of persons or other (MAD2);
b) against glass breakage (MAD4);
c) against the presence of smoke (technical sensor MAD5);
d) against flooding (technical sensor MAD6).
Avoid the installation of volumetric detectors near to possible turbulence
of hot or cold air (fireplace, radiators etc.) and where animals (hot blooded)
are present; if necessary, during installation, reduce sensitivity of the sensor or position it with the directional joint supplied.
03. Mark the position of all fixed devices used to control the alarm
system inside
the environment:
a) touchscreen (MATS1);
b) keypad (MADS1).
The touchscreen can be fixed to the wall, in which case an easily accessible location should be chosen (e.g. near the main door).
As well as the touchscreen, additional radio keypads can be used for daily management of the system (for example to activate and deactivate the
alarm, when accessing via secondary entrances). The keypads can be
wall-mounted or portable if required.
04. Mark the position of other devices used to distribute the acoustic
alarm, in addition to the siren integrated in the control unit:
a) outdoor siren (MASO1);
b) indoor siren (MASI1).
The control unit has a specific built-in siren, but, in the case of isolated
buildings, the installation of at least one outdoor siren is strongly recommended. This should be positioned in a highly visible location (its mere
presence serves as a deterrent) but in a place difficult to access by vandals/burglars. Although the sirens are adequately protected for outdoor
applications, they should be installed in an area protected against direct
rain; the ideal location would be under a protruding roof or on a terrace/balcony. In large or multi-floor buildings, the addition of one or
3.1 - Application limits
• Before proceeding with installation, check the condition of the product,
adequacy of the selected model and suitability of the intended installation environment.
• Ensure that all conditions of use remain within the limits as specified in
chapter 12 - “Technical Specifications”.
• The product may only be integrated with Mhouse devices (not supplied
in the pack.
3.2 - Draw the layout of the devices on a drawing of the
home to be protected
Prepare a drawing of the environments to be protected and then mark the
exact points where the various devices are to be installed. To proceed
with work, read the following sections with reference to the example
shown in fig. 1.
Caution! – This drawing will be of use later to perform the tasks
described in chapters 4 and 7.
01. Mark the position of all detectors used to protect the environ-
ment perimeter
:
a) against opening of doors and windows (MAD1);
b) against intrusion from outside, using infra-red technology (MAD2)
and vertical curtain technology (MAD3).
It is essential to choose the type of detector with care, depending on the
intended use. A detector that is incorrect or positioned in an unsuitable
location may not detect intrusion or cause improper alarms. Each type of
detector has a specific operating principle; therefore refer to the technical
datasheet of each detector as provided in chapter 7.
02. Mark the position of all detectors used to protect the inside
of
the environment:
Sirens
The sirens represent the main deterrent elements of the alarm system, thanks to
the emission of high-power sounds and intimidating voice messages. The siren
scares and dissuades the intruder, while the flashing light (if fitted) enables the area
where the alarm trips to be lit up.
The models available are:
MASI1 Indoor siren via radio • Sound power 114 dB
MASO1 Outdoor bidirectional siren via radio • Dual Band • with built-in flashing
light and voice message board • Sound power 116 dB
MASO1
MASI1
Remote controls and transponder badges
These represent the most practical and simple means of controlling an alarm system, both inside and outside
buildings; they enable total or partial activation and deactivation of the system. Some keys are used to send
emergency signals and automation control signals.
The models available are:
MATX4 Bidirectional radio remote control • 4 keys dedicated to the alarm system
MATX8 Bidirectional radio remote control • 4 keys dedicated to the alarm system and 4 keys for the con-
trol of Mhouse automations
MAB1 Transponder badge
MATX4
MAB1
MATX8
Keypad
The radio keypad enables control of the alarm system with total or partial activation of the zones to be protected.
Thanks to bidirectional communication, it receives information on system status from the control unit (e.g. “zones
activated”, “doors/windows left open” etc.), which is displayed by means of leds and acoustic signals.
The models available are:
MADS1 Bidirectional radio keypad • Dual Band
MADS1
Page 8

8
1
In open spaces (outdoors)
Walls in plasterboard/wood
Walls in brick or concrete
Walls in reinforced concrete or ceilings
Walls in metal
approx. 100 metres
approx. 50 metres, through a maximum of 5 walls
approx. 30 metres, through a maximum of 3 walls
approx. 20 metres, through a maximum of 1 wall or ceiling
not admitted; metal walls constitute virtual total shielding
TABLE 1
MATERIAL ESTIMATED MAXIMUM RANGE
walls and other objects located between the emitting device and the
receiving device (control unit); b) the characteristics of the wall construction materials; c) the presence of electromagnetic sources that create
radio disturbance (for example, radio television equipment).
Therefore all system devices should be installed far from radio television
equipment; also avoid installation of the control unit in alcoves, metal cabinets, on load-bearing columns of the building or on reinforced concrete
walls. There must not be any large metal surfaces or metal grids near the
control unit, including those inside walls.
To sum up, to calculate the maximum admissible distance between
the control unit and a device, in relation to the number of obstacles
and the shielding properties of the relative materials, refer to Table 1.
C and D - To enable use of the telephone system integrated in the control
unit and the relative services available, the control unit should be positioned in an area equipped with the fixed telephone line. Also, if GSM telephone communication is required, the control unit must be positioned in a
location with good coverage of the GSM network.
more indoor sirens (MASI1) is recommended, located in the main
rooms.
05. Mark the position of the control unit, taking into consideration
the following:
• the control unit must be positioned at least 1 m from the ground;
• the distance of the control unit from each detector (point A);
• the number of walls present between the control unit and devices,
and the characteristics of the construction materials (point B);
• the position of the telephone land line (only if the function for alarm
notification by telephone is required) (point C);
• coverage of the GSM telephone network (only if equipped with the
MACU1 control unit, with GSM dialler) (point D).
A - The control unit operates by transmitting and receiving low power
radio signals (within the limits as envisaged by standards). For this reason
the control unit should be positioned at the centre with respect to all other devices. The latter should not be positioned too far from the unit to
avoid failure to receive the relative radio signals.
B - The zone where the control unit is installed must enable adequate
radio signal propagation. Take into account that inside buildings, radio
transmission may be influenced by a number of factors: a) the number of
MAD1
MAD1
MASO1
MATS1
MAD3
MACU1
MACU2
MAD2
MAD2
MAD5
MAD6
Page 9

9
4 - PRELIMINARY PROGRAMMING PROCEDURES (Dividing the alarm area into “zones”)
• zone B = door and window opening detectors (MAD1);
• zone C = indoor volumetric detectors (MAD2).
Benefits: freedom of movement within the home, with perimeter protection
against intrusion from outside (zone C off; zones A and B on).
Example of “block” distribution (fig. 3):
• zone A = garage detectors;
• zone B = ground floor detectors;
• zone C = first floor detectors.
Benefits: during the night, only the ground floor and garage detectors can
be left activated (zone C off, zones A and B on).
As well as these 3 zones, there is a zone defined as “24 hour technical”
in which technical sensors are programmed, such as those for smoke and
flooding.
This group is always active and cannot be deactivated.
4.1 - Dividing the entire environment into “ZONES” for
subsequent total or partial activation of the alarm
system
During programming, the detectors can be grouped into 3 different areas,
called “Zone A, B, C”. During system use, this division enables total or
partial activation of the alarm, with the option of differentiated protection of
the environment.
The logic adopted to assign the detectors to the same group must be evaluated on the basis of the type of building and routine use of the various
areas involved. In any event, all devices can be programmed within a single zone as required (e.g. zone C).
Example of “perimeter” distribution (fig. 2):
• zone A = volumetric proximity sensors on doors and windows, with “cur-
tain” lens (MAD3);
2
zone
C
zone
B
zone
A
3
zone B
zone A
zone C
Page 10

10
5 - STANDARD PROGRAMMING OF THE ALARM SYSTEM
The following sections describe how to program the system for standard
operation.
Before proceeding with programming all devices, the touchscreen
must first be programmed and associated with the control unit (paragraph 5.1).
Note – Place the control unit and various devices without batteries on a
table (to open the battery compartment and personalise the functions of individual devices, refer to the respective datasheets in chapter 7).
5.1 - Associate the touchscreen with the control
unit
To ensure that the touchscreen communicates correctly with the control
unit, the following association procedure must be performed:
01. Define the “administrator” and “user” code (minimum 4, maximum 8 digits) and note them down in the
following table. Important! – The two codes must be different. See paragraph 5.1.1 - “Defining the three types of
code”.
02. On the touchscreen:
a) fig. 4: press at point (1) and push the base (2) upwards.
b) fig. 4: insert the memory board “A” in the relative slot
(do not insert batteries).
03. On the control unit:
a) ensure that no batteries are fitted; remove if necessary.
b) to use the GSM line, insert the SIM CARD in the slot (see fig. 5) be-
fore inserting the batteries. The SIM CARD is not essential for correct
operation of the alarm control unit. The SIM CARD enables the delivery of alarm messages, in voice or text form, if the PSTN telephone
line is not available (or in addition to the PSTN line).
The SIM CARD is not included in the KIT. The alarm system can operate with contract or “pay as you go” SIM CARDS. Before installing the
SIM CARD the PIN CODE must be disabled.
c) insert the batteries; 1 beep confirms activation.
04. On the touchscreen:
a) after the confirmation beep from the control unit, insert the batter-
ies in the touchscreen keypad within one minute.
b) The touchscreen immediately requests entry of the “administrator”
code and “user” code.
05. At this point the control unit and touchscreen are associated after entry
of the codes.
06. Close the touchscreen cover (to install the control unit, see paragraph
7.3.2).
The other system devices can now be programmed; see paragraph 5.2.
Before proceeding, ensure that you are familiar with the various screen
pages and icons available on the touchscreen; see paragraph 5.3.
5.1.1 - Defining the three types of code.
“Administrator” code – This code is a numerical sequence of at least 4
digits and enables access to programming mode with administrator rights.
The administrator is normally the person assigned to program and configure the alarm system; this person is authorised to perform all programming
procedures, including total deletion, but may not activate or deactivate the
alarm.
“User” code – This code is a numerical sequence of at least 4 digits and
enables access to only part of the programming mode. The user is normally
the person who manages routine system operation on a daily basis (for example, consulting the event log, temporarily disabling a detector, etc.). The
user code enables activation and deactivation of the alarm.
“Access” codes – These codes are numerical sequences of 5 digits, which
only enable activation and deactivation of the alarm. Access codes are normally assigned, – one per person, – to all those who may activate or deactivate the alarm. The same code should not be assigned to more than
one person, as it would then be difficult to check who performed which
operation in the event log.
5.2 - Programming the other system devices
After associating the touchscreen with the control unit (paragraph 5.1) and
ensuring a full understanding of the relative functions, the other system devices can be programmed, as described in paragraphs 5.4 and 5.5. Follow each step of the sequence in the specified order.
5.3 - Navigating the touchscreen menus
The touchscreen is fitted with a tactile graphic display; to use, simply touch
the surface with a finger and press lightly; do not exert pressure! Only
when the virtual graphic keypad is used, for more precision, use of the stylus supplied may be necessary.
On activation, the touchscreen shows the main menu with three icons giving access to the respective sub-menus. To navigate the menus and submenus, simply touch the icon on screen. Various screen models and icons
are available for navigation. Before proceeding, familiarise yourself with
these items with reference to fig. 6. and fig. 6a.
5
“A”
Codes
administrator code ..............................................................
user code ..............................................................
4
Page 11

11
MAIN MENU
Key
A - Screen header (read only).
B - Enables updates to the alarm system status bar (I) .
C - Accesses the Settings menu exclusively for the touchscreen.
D - Displays the local time (read only).
E - Displays the date (read only).
F - Accesses the macro-screen for automation management.
G - Accesses the macro-screen for alarm management.
H - Accesses the macro-screen for voice reminders.
I - Displays the status of the alarm and touchscreen.
Screen Auto Off Recharge Link Volume Mov. Firmw.
Reset
Touchscreen settings
To access the parameters menu, touch the icon and then select the icon of the parameter to be modified.
SCREEN Enables adjustment of the display brightness.
Touch the keys or to make adjustments as required. Touch “OK” to confirm.
AUTO OFF Enables entry of the interval before automatic shut-off of the touchscreen.
Note – The item “Never”, means that the touchscreen remains on at all times. This option should only be selected if rechargeable batteries are used and
recharged regularly, for example by means of the accessory MATSC1.
Select the required time. Touch “OK” to confirm.
RECHARGE Allows the user to enable the battery recharging function if rechargeable batteries are used. Caution! – Never attempt to recharge non-rechargeable bat-
teries. This could cause damage to the touchscreen.
Select the required item. Touch “OK” to confirm.
LINK Enables the addition or removal of a link between the touchscreen and an alarm system control unit. For specifications, refer to the system instruction
manual.
VOLUME Enables adjustment of the volume.
Touch the keys or to make adjustments as required. Touch “OK” to confirm.
MOV. Allows the user to enable the movement sensor: if the touchscreen has not been switched off with the ON/OFF key this is activated automatically as soon
as movement is detected.
Select the required item. Touch “OK” to confirm.
FIRMW. Enables display of the touchscreen firmware version.
RESET Enables deletion of all contents of the touchscreen memory. Important! – This function does not delete the parameters stored in the control unit; see para-
graph 5.4 - Alarm system programming.
Select the required item. Touch “OK” to confirm.
6
List of operating icons and status
Specific operating tools Other operating tools
Increase
Decrease
Rec
Stop
Play
Save
Delete
Reminders not read
Battery level
Transponder badge reader ON
New event present in alarm
control unit memory
Alarm ON
Alarm OFF
Zone A activated
Zone B activated
Zone C activated
Status information
Confirm (OK)
Item deselected
Item selected
Back to previous menu
Delete last character entered
On alphabetical keypad, switch from upper case to
lower case and vice versa. On numerical keypad,
switch from numbers to special characters
Changes keypad from
alphabetical to numerical
Back to main menu
Alarm system status request
Horizontal scroll arrow
Vertical scroll arrow
Page 12

LIST OF ITEMS PRESENT IN THE ALARMS MENU
ADMINISTRATOR USER Page
Devices Access codes òòpage 13 (5.4.1)
Remote controls òòpage 13 (5.4.2)
Badges òòpage 13 (5.4.3)
Alarm zone A ò not accessible
Alarm zone B ò not accessible
Alarm zone C ò not accessible
Deterrence ò not accessible page 15 (5.4.10)
Emergency ò not accessible page 15 (5.4.10)
Technical ò not accessible page 14 (5.4.6)
Other devices ò not accessible page 14 (5.4.7)
Touchscreen ò not accessible page 10 (5.1)
Messages Voice messages òòpage 14 (5.4.8)
Text messages òòpage 14 (5.4.8)
Phone book òòpage 15 (5.4.9)
Settings Automatic activation òòpage 16 (5.5)
Exit time òòpage 16 (5.5)
Detector disable òòpage 16 (5.5)
Periodic call òòpage 16 (5.5)
Alarm type ò not accessible page 16 (5.5)
Radio interference ò not accessible page 16 (5.5)
Supervision ò not accessible page 16 (5.5)
User code not accessible ò page 16 (5.5)
Admin. code ò not accessible page 16 (5.5)
Volume òòpage 16 (5.5)
Date and time òòpage 16 (5.5)
Daylight saving time òòpage 16 (5.5)
Line priority ò not accessible page 16 (5.5)
SIM validity òòpage 17 (5.5)
IMEI òòpage 16 (5.5)
Firmware version òòpage 16 (5.5)
Deletion ò not accessible page 16 (5.5)
Events list òòpage 51 (6)
Test Control unit òòpage 18 (7.1.1)
Dialler òòpage 19 (7.1.2)
12
6a
GatesCommands Blinds Lights Set
OnAlarms Off Codes Menu: see detailed list below
NewMessages List
Main subjects
Page 13

13
5.4 - Alarm system programming
Warning – Perform all programming procedures described in
this paragraph in the specified sequence.
Access to the programming menu:
1) in the main menu touch the icon “Alarms”
2) use the arrow icon to scroll through the list and select
“Menu”
3) enter the “ADMINISTRATOR CODE” (set previously)
4) touch “OK” to confirm
5) select the required item according to the instructions below
(e.g. “tools” > “remote controls” ...)
5.4.1 - Programming an access code
This procedure programs the code entered by the user to activate or deactivate the alarm. Up to 20 codes can be programmed. Each must be
personalised with 4 parameters, including the assignment of the zones
(A, B, C) that the code can activate or deactivate.
01. Access the programming menu
02. Touch “Devices”, then “Access codes” and select one of the 20 pro-
grammable codes.
03. Touch “Add” and compile the next screen with the following param-
eters:
• Activation
(enables the user to specify the zones which can be
activated with the code being programmed).
Touch “Activation” and select the zones to associate with the code
being programmed. Touch “OK” to confirm
• Deactivation
(enables the user to specify the zones which can be
deactivated with the code being programmed).
Touch “Deactivation” and select the zones to associate with the code
being programmed. Touch “OK” to confirm
• Anti-duress
(always enables deactivation of the alarm with simultaneous delivery of calls to the numbers set for an “emergency
event”. Use this code only in the event of danger).
Touch “Anti-duress” and select either “Yes” or “No”. Touch “OK” to
confirm
• Name
(enables the association of a code with the relative user
name).
Touch “Name” and enter the user’s name (maximum 9 characters).
Touch “OK” to confirm
04. Touch “OK” to confirm.
05. Enter an access code of 5 digits; then touch “OK” to confirm (the
control unit emits a confirmation beep; 3 beeps indicate that the code
is already used).
Modifying or deleting an existing code
:
01. Touch “Devices”, then “Codes” and select one of the programmed
codes.
02. Touch “View” or “Delete”. Touch “OK” to confirm.
5.4.2 - Programming a remote control
(MATX4, MATX8)
This procedure programs a remote control used by the user to activate
or deactivate the alarm. Up to 20 remote controls can be programmed
and each must be personalised with 4 parameters, including the assignment of the zones (A, B, C) that the remote control can activate or de-
activate.
Programming a remote contro
l:
01. Access the programming menu
02. Touch “Devices”, then “Remote controls” and select one of the 20
programmable remote controls.
03. Touch “Add” and compile the next screen with the following parameters:
• Activation
(enables the user to specify the zones which can be
activated with the remote control being programmed).
Touch “Activation” and select the zones to associate with the remote
control being programmed. Touch “OK” to confirm
• Deactivation
(enables the user to specify the zones which can be
deactivated with the remote control being programmed).
Touch “Deactivation” and select the zones to associate with the remote control being programmed.
• Name
(enables the association of a remote control with the relative
user name).
Touch “Name” and enter the user’s name. Touch “OK” to confirm.
04. Touch “OK” to confirm
05. Touch “OK” again and then, on the remote control, press the keys
“On” and “Off” at the same time. The control unit emits a confirmation beep (3 beeps indicate that the remote control is already present).
06. Lastly, touch “OK” to confirm the parameters entered.
Modifying or deleting an existing remote control
:
01. Touch “Devices”, then “Remote controls” and select one of the programmed remote controls.
02. Touch “View” or “Delete”. Touch “OK” to confirm
5.4.3 - Programming a transponder badge
(MAB1)
The touchscreen has an integrated transponder badge reader. On the
control unit, if at least one proximity/transponder badge has been memorised, this reader is activated as soon as the touchscreen is switched
on; it remains active for a few seconds, after which it can be re-activated by touching the relative symbol; for more details, see paragraph
7.2.5. This procedure programs an electronic badge used by the user
to activate or deactivate the alarm. Up to 32 badges can be programmed and each must be personalised with 3 parameters, including
the assignment of the zones (A, B, C) that the badge can activate or de-
activate.
Programming a badge
:
01. Access the programming menu
02. Touch “Devices”, then “Badges” and select one of the 32 program-
mable badges.
03. Touch “Add” and compile the next screen with the following parameters:
• Activation
(enables the user to specify the zones which can be
activated with the badge being programmed).
Touch “Activation” and select the zones to associate with the badge
being programmed. Touch “OK” to confirm
• Deactivation
(enables the user to specify the zones which can be
deactivated with the badge being programmed).
Touch “Deactivation” and select the zones to associate with the
badge being programmed. Touch “OK” to confirm
• Name
(enables the association of a badge with the relative user
name).
Touch “Name” and enter the user’s name. Touch “OK” to confirm
04. Touch “OK” to confirm
05. Touch “OK” again and then move the badge near the bottom left cor-
ner of the touchscreen, until a confirmation beep is emitted (3 beeps
indicate that the badge is already present).
06. On completion, press “OK” to confirm the parameters entered.
Modifying or deleting an existing badge
:
01. Access the programming menu
02. Touch “Devices”, then “Badges” and select one of the programmed
badges.
03. Touch “View” or “Delete”. Touch “OK” to confirm.
5.4.4 - Programming a keypad
(MADS1)
his procedure associates a keypad with the control unit. This will enable
the user to totally or partially activate/deactivate the alarm, using the various programmed “access codes” on the keypad (do not use the “user
code” or “administrator code”).
01. Insert the batteries (remove the separation tab) on the keypad; a beep
is emitted and all leds flash for 60 seconds.
02. Within 60 seconds, use the touchscreen to immediately activate and
deactivate the alarm using an access code (on deactivation 6 beeps
are emitted to confirm memorisation).
Important – This operation must be performed each time the keypad
batteries are changed
5.4.5 - Programming an intrusion detector
(MAD1, MAD2, MAD3, MAD4)
This procedure enables the association of an intrusion detector (volumetric, magnetic contact, etc.) with the control unit. A single detector can
be programmed by selecting “Add 1 detector” or a pair of detectors, used
together, by selecting “Add 2 detectors”.
Before programming a device:
- decide which group to be assigned (zone A, B, C);
- if necessary, modify the factory settings of the dip-switches on the de-
tector; for each detector, see the corresponding paragraph (7.3.3 - 7.4.3 -
7.5.3).
Caution! – A detector may belong to one zone only, and to move it to
another zone it must be deleted and then reprogrammed in the new
zone.
Page 14

14
Programming a detector:
01. Access the programming menu
02. Touch “Devices”, then touch the zone to be associated with the de-
tector: “Alarm zone A”, B, or C.
03. Select one of the programmable detectors and then touch “Add 1 detector”.
04. Compile the next screen with the following parameters:
• Delay
Touch “Delay” and enter the delay time of alarm delivery by
the detector (0 Sec = immediate alarm). This delay gives the user
time to enter the home and deactivate the alarm without tripping the
detector. Touch “OK” to confirm.
• Name
Touch “Name” and enter the name to assign to the detec-
tor (for example: “kitchen”). Touch “OK” to confirm.
• Voice name
Touch “Voice Name” and enter the name to assign to
the detector (for example: “kitchen”).
05. Touch “OK” to confirm.
06. Touch “OK” again and then insert the battery in the detector. The
control unit emits a confirmation beep (3 beeps indicate that the detector is already present).
Programming 2 combined detectors
:
This function is recommended to reduce possible improper alarms, caused
by infra-red volumetric detectors in specific situations. To activate the function, the two detectors must be in the same room and positioned opposite one another. When the function is active, the control unit only activates
the alarm if it receives a signal from both detectors, within a maximum interval of 30 seconds between one signal and the other.
Caution! - the two detectors must be programmed one after the other.
If one of the detectors is already programmed, delete it first using the
procedure “Modifying or deleting a detector”.
01. Access the programming menu
02. Touch “Devices”, then touch the zone to be associated with the two
detectors: “Alarm zone A”, B, or C.
03. Select one of the programmable detectors and then touch “Add 2 detectors”.
04. Touch “OK” then insert the battery in the first detector (the control
unit emits a confirmation beep; 3 beeps indicate that the detector is
already present).
05. Compile the next screen with the following parameters:
• Name
Touch “Name” and enter the name to assign to the pair of
detectors (for example: “kitchen”). Touch “OK” to confirm.
• Voice name
Touch “Voice Name” and enter the name to assign to
the pair of detectors (for example: “kitchen”).
06. Touch “OK” to confirm.
07. Touch “OK” then insert the battery in the second detector (the con-
trol unit emits a confirmation beep; 3 beeps indicate that the detector is already present).
Modifying or deleting an existing detector
:
01. Touch “Devices”, then touch the zone associated with the detector:
“Alarm zone A”, B, or C.
02. Touch “View” or “Delete”. Touch “OK” to confirm.
5.4.6 - Programming a technical detector
(MAD5, MAD6)
This procedure enables association of the control unit with a technical
detector (for example those for flooding, smoke, etc.). This type of detector must be programmed in the specific “technical” group. This group
is always active.
- MAD5 (smoke detector):
01. Access the programming menu
02. Touch “Devices”, then touch “technical”.
03. Select one of the programmable detectors.
04. Compile the next screen with the following parameters:
• Name
Touch “Name” and enter the name to assign to the detec-
tor (for example: “kitchen smoke”). Touch “OK” to confirm.
• Voice name
Touch “Voice Name” and enter the name to assign to
the detector (for example: “smoke”).
05. Touch “OK” to confirm.
06. Touch “OK” again and then insert the battery in the detector. The
control unit emits a confirmation beep (3 beeps indicate that the detector is already present).
- MAD6 (flood sensor): this must be connected by cable to MAD1; to
program, see paragraph 7.4.4.
5.4.7 - Programming a siren
As well as the siren incorporated in the control unit, additional radio
sirens are available, which if fitted in the system must be associated
with the control unit as follows:
Indoor siren (MASI1):
01. Insert the batteries in the siren.
02. Within 60 seconds, use the touchscreen or remote control to acti-
vate and deactivate the alarm (the siren emits 6 confirmation
beeps).
Important – This operation must be performed each time the siren bat-
teries are changed.
Outdoor siren (MASO1)
01. Access the programming menu
02. On the touchscreen, touch “Devices” and then “Other devices”.
03. Select a device from the list and compile the next screen with the fol-
lowing parameters:
• Name
Touch “Name” and enter the name to assign to the device
(for example: “Siren”). Touch “OK” to confirm.
• Voice name
Touch “Voice Name” and record the name to assign
to the device (for example: “Siren”).
04. Touch “OK” to confirm.
05. Touch “Ok” again and then insert the batteries in the siren (the con-
trol unit emits a confirmation beep).
06. Then fix the siren to the wall, following the instructions in chapter
7.
07. When the cover is closed, the siren emits a beep and starts to flash.
At this point deactivate the alarm immediately via the touchscreen or
remote control.
08. The siren then emits 6 beeps to indicate completion of programming.
5.4.8 - Programming voice and text messages
s
This procedure enables the programming of 6 voice messages and 6 text
messages. For each one:
a) select the event that generates delivery of the voice (or text) message;
b) record the voice message or write the text message (maximum 20
characters).
After completing the initial phase, the message must then be associated
with the telephone numbers present in the phone book (see paragraph
5.4.9).
After this, in the event of an alarm, the control unit will send the set voice
and text messages to the envisaged numbers. The user will then be able
to listen to the recorded message and the name or the device or person
generating the alarm (for example: “Warning: intrusion at seaside house!
... kitchen detector!).
• Note for voice message N° 7.
When the user calls the control unit for remote management, he/she will
hear voice message n° 7
. The control unit uses this message to remind
the user how to interact with it. Therefore record message no. 7 with the
following phrase:
- to check the control unit status, press 0, #
- to deactivate the alarm, press 0, Q, 0, #
- for total alarm activation, press 0, Q, 1, #
- to activate zones A and B: press 0, Q, 2, #.
Programming voice messages
: the text messages are available exclu-
sively via the GSM line
01. Access the programming menu
02. On the touchscreen, touch “Messages” and then “Voice messages”.
03. Select a message to be programmed from the list (for example
“Voice Msg 1) and compile the following parameters:
• Event
Touch “Event” and select the event that generates delivery
of the message (see table 2 for an overview of the events).
Note - If the event “Al. zone” is selected the associated zones must
be specified. Touch “OK” to confirm.
• Voice Msg.
Touch “Voice Msg. ” and record the message for the
selected event (see message examples in table 2).
04. Touch “OK” to confirm.
Programming text messages
01. Access the programming menu
02. On the touchscreen, touch “Messages” and then “Text messages”.
03. Select a message to be programmed from the list (for example “Text
Msg 1) and compile the following parameters:
• Event
Touch “Event” and select the event that generates delivery
of the message (see table 2 for an overview of the events).
Note - If the event “Al. zone” is selected the associated zones must
be specified. Touch “OK” to confirm.
• Text
Touch “Text ” and write the message for the selected event
(see message examples in table 2). Touch “OK” to confirm.
Note - If the event “Al. zone” is selected the associated zones must
be specified.
04. Touch “OK” to confirm.
Page 15

15
5.4.9 - Programming numbers in the phone book
This procedure enables memorisation of the telephone numbers of the
persons receiving the previously set voice and text messages. For each
number it is also possible to specify additional technical type text messages (see table 3). These technical type text messages are already present and do not need to be created.
Memorising a number:
01. Access the programming menu
02. On the touchscreen, touch “Phone book”, select a position (e.g. “Po-
sition 2”) and then touch “Add”.
03. Compile the following fields:
• Name
: name of the user to be called.
• Number: telephone number of the user to be called.
• Voice Msg.: list of voice messages to be sent to this number.
• Text Msg.: list of text messages to be sent to this number.
• Tech. text: select “yes” to enable reception of all technical text
messages (see table 3).
04. Touch “OK” to confirm.
Modifying or deleting an existing number:
01. On the touchscreen, touch “Phone book” and select a name.
02. Touch “View” to modify, or “Delete” to remove.
5.4.10 - Programming keys for emergency or deterrence
requests
This procedure enables programming of keys for emergency or deterrence requests, present on remote controls and keypads.
01. Access the programming menu
02. On the touchscreen, touch “Devices” and then “Deterrence” or
“Emergency”.
03. In the list displayed, touch a line and complete the next screen with
the following parameters:
• Name
Touch “Name” and enter the name to assign to the event
(for example: “emergency”). Touch “OK” to confirm
• Voice name Touch “Voice Name” and record the name to assign
to the event (for example: “grandmother emergency”).
04. Touch “OK” to confirm.
05. Touch “OK” again and then, on the remote control (or keypad) the
icon or ; press and hold the required emergency or deterrence alarm key for 10 seconds (the control unit emits a confirmation beep; 3 beeps indicate that the remote control is already present).
06. Touch “OK” to confirm.
To activate delivery of the emergency or deterrence request voice or
text messages, see paragraphs 5.4.8 and 5.4.9.
5.4.11 - Programming keys for emergency or deterrence
requests
As well as the main touchscreen, a maximum of 3 other keys may be
used for this function.
01. Insert the batteries in the NEW touchscreen
02. Touch and scroll through the list with , then touch
03. In the main menu of the OLD touchscreen, touch the icon
, scroll through the list with the arrow icon and select
Enter the “ADMINISTRATOR CODE and touch “OK” to confirm.
05. Touch “Devices”, and then “Touchscreen” and select one from the
3 available.
06. Touch “Add” and then “OK”.
07. On the NEW touchscreen, touch
08. Touch “OK” to confirm.
Modifying or deleting an existing touchscreen
:
01. Touch “Devices”, then “Touchscreen” and select the touchscreen to
be deleted.
02. Touch “Rename” or “Delete”. Touch “OK” to confirm.
TABLE 2
Event Example of message to record!
NO EVENT
AL. ZONES A,B,C this regards all indoor and outdoor intrusion detectors – example of voice message to record: “Warning: intrusion
alarm at home of Rossi, via Pascoli 10 Rome”.
TAMPER all tamper-proof devices can trip this alarm – example of voice message to record: “Warning: tamper alarm at
home of Rossi, via Pascoli 10 Rome”.
DETERRENCE alarm activated manually by the user via transmitter or keypad – example of voice message to record: “Warning:
danger at home of Rossi, via Pascoli 10 Rome”.
EMERGENCY alarm activated manually by the user via transmitter or keypad – example of voice message to record: “Warning:
emergency request at home of Rossi, via Pascoli 10 Rome”.
TECHNICAL alarm activated by technical sensors (smoke, flooding and other set devices) – example of voice message to
record: “Warning: technical alarm at home of Rossi, via Pascoli 10 Rome”.
BATTERY LOW signal to indicate low battery charge on one of the system devices – example of voice message to record: “Warn-
ing: low battery at home of Rossi, via Pascoli 10 Rome”.
PERIODIC CALL periodic message to confirm correct operation of the telephone dialler – example of voice message to record:
“Telephone dialler operation OK at home of Rossi, via Pascoli 10 Rome”.
TEMPERATURE signal to indicate abnormal temperature (below - 5°C or above 70°C) – example of voice message to record:
“Warning: abnormal temperature at home of Rossi, via Pascoli 10 Rome”.
TABLE 3
Event that causes delivery of text message
1 - control unit battery discharged
2 - detector battery discharged
3 - supervision failure and/or radio disturbance present (check event log)
4 - system armed (message only sent in response to arming via tele-
phone)
5 - system disarmed (message only sent in response to arming via tele-
phone)
6 - no successful call on PSTN line (check for any interruptions on the
fixed telephone line)
7 - periodic message to indicate that the system is running (message sent
after a certain number of programmable hours; see SETTINGS)
8 - SIM expiry warning message (programmed expiry, see SETTINGS
Testo dell’Sms già impostato di fabbrica
LOW BATTERY CONTROL UNIT
LOW BATTERY PERIPHERAL
SUPERVISION FAILURE OR SCANNER
CONTROL UNIT ARMED
CONTROL UNIT DISARMED
NO SUCCESSFUL CALL ON PSTN LINE
PERIODICAL CALL OK
SIM VALIDITY
Page 16

16
5.5 - System settings
This menu enables configuration of some parameters to adapt operation
of the control unit to specific applications.
• Automatic activation
Enables the function for arming the control unit (totally or partially) at a
required and set time. Disarming is manual only.
Caution! – Ensure that the control unit date and time are correct.
01. Access the programming menu
02. On the touchscreen, touch “Settings” and then “Automatic activa-
tion”.
03. On the screen displayed, touch “Enable” and select “Yes”; then
touch “OK” to confirm.
04. Touch “Zones” and specify the zones to be activated; then touch
“OK” to confirm.
05. Touch “Hours” and specify the time of day for automatic alarm activation; then press “OK” to confirm.
06. Touch “Minutes” and specify the minutes; then touch “OK” to confirm.
07. Touch “OK” to confirm.
• Exit time
Enables entry of the time delay between activation and effective operation of the alarm system. The factory setting of this delay is 60 seconds.
The user is recommended to avoid excessively short intervals to avoid
rushed exits.
01. Access the programming menu
02. On the touchscreen, touch “Settings” and then “Exit time”.
03. In the screen displayed, enter the time in seconds (from 0 to 99) and
touch “OK” to confirm.
• Detector disable
If necessary a detector in the system may be temporarily disabled. This
procedure does not delete it, but simply disables use (the alarms sent
from these sensors are not tracked, even in the Events List).
01. Access the programming menu
02. On the touchscreen, touch “Settings” and then “Detector dis-
able”.
03. In the list displayed, touch the detector to be disabled. Touch “OK”
to confirm
• Periodic call
This enables delivery of technical text message n° 7 (see table 3) by the
control unit, at a precise time of day and at a set periodic interval (for example, at 20:30, repeated every 24 hours).
01. Access the programming menu
02. On the touchscreen, touch “Settings” and then “Periodic call”.
03. On the screen displayed, touch “Enable” and select “Yes”; then
touch “OK” to confirm.
04. Touch “Hours” and specify the time of day for text message reception; then touch “OK” to confirm.
05. Touch “Minutes” and specify the minutes; then touch “OK” to confirm.
06. Touch “Frequency” and specify after how many hours to receive
the message since the last time of delivery (for example, “12”, i.e.
after 12 hours; “24”, i.e. after 24 hours, etc.). Touch “OK” to confirm.
Caution! – After programming the frequency of the periodic call, reception of the technical text message must be programmed on the required
telephone numbers (see paragraph 5.4.9).
• Alarm type
This enables association of each zone (A, B, C) with the required
acoustic signal, selectable from a standard siren sound and a deterrent
voice message which can be recorded on the outdoor siren.
In this way, when a detector trips the alarm, the siren emits the programmed sound for the zone where the detector is located.
01. Access the programming menu
02. On the touchscreen, touch “Settings” and then “Alarm type”.
03. In the screen displayed, select a zone and associate the type of
alarm required: “Siren” (traditional siren sound) or “Voice” (personalised voice message recorded on the outdoor siren. To record, see
chapter “Further information”). Touch “OK” to confirm.
• Radio interference
This enables control of radio interference in the surrounding area. The
maximum duration of disturbance must be set, over which the control
unit signals the event by activation of the siren and delivery of technical
text message no. 3.
01. Access the programming menu
02. On the touchscreen, touch “Settings” and then “Radio interference”.
03. On the screen displayed, touch “Enable” and select “Yes”; then
touch “OK” to confirm.
04. Touch “Duration”, enter the time in seconds (from 0 to 99) and touch
“OK” to confirm.
Note – The factory setting is 60 seconds; this should not be reduced.
Caution! – After programming the radio interference, reception of the
technical text message must be programmed on the required telephone
numbers (see paragraph 5.4.9).
• Supervision
This enables a periodic check to ensure correct operation of communication between devices. Absence of a signal on a device, for approx. 3
hours, generates a specific signal on the control unit and delivery of technical text message no. 3.
01. Access the programming menu
02. On the touchscreen, touch “Settings” and then “Supervision”.
03. On the screen displayed, select “Active”. Touch “OK” to confirm.
Caution! – After programming supervision, reception of the technical
text message must be programmed on the required telephone numbers
(see paragraph 5.4.9).
• Administrator code
(item displayed only if programming mode is ac-
cessed with the “administrator” code)
This enables programming of the administrator code.
01. Access the programming menu
02. On the touchscreen, touch “Settings” and then “Admin. code”.
03. In the screen displayed, enter a personal code of at least 4 digits.
Touch “OK” to confirm.
• User code
(item displayed only if programming mode is accessed with
the “user” code)
This enables programming of the user code.
01. Access the programming menu
02. On the touchscreen, touch “Settings” and then “User code”.
03. In the screen displayed, enter a personal code of at least 4 digits.
Touch “OK” to confirm.
• Volume
This enables adjustment of the volume of the beeps emitted by the control unit during total or partial activation and deactivation.
• Date and Time
This enables the user to update the system date and clock; these data
are important as they are used for automatic activation and to record
the times of events.
01. Access the programming menu
02. On the touchscreen, touch “Settings” and then “Date and Time”.
03. In the screen displayed, touch “Year”, “Month”, “Day”, “Hours”, “Min-
utes” and enter the values for each. Touch “OK” to confirm.
• Daylight saving time
This function enables the user to enable/disable automatic changeover
to daylight saving time.
01. Access the programming menu.
02. On the touchscreen, touch “Settings” and then “Daylight saving
time”.
03. In the screen displayed, touch “Yes” to activate automatic management of daylight saving time or “No” to disable. Touch “OK” to confirm.
• Line priority
This enables selection of the priority telephone line for use by the control unit in the event of an alarm.
01. Access the programming menu
02. On the touchscreen, touch “Settings” and then “Line priority”.
03. On the screen displayed, touch “First PSTN” or “First GSM”, to
specify which of the two lines is to be used first for sending alarm notification signals. Touch “OK” to confirm.
• SIM validity
This enables entry of the telephone SIM card expiry and delivery of the
technical text message n° 8 (see table 3) to notify the user of this expiry.
Page 17

17
The touchscreen can also be used as a remote control for different types
of automation in the Mhouse range (gates, doors, awnings, shutters, lights
etc.).
6.1 - Creating commands on the touchscreen
Up to 16 commands can be programmed. Each one must be assigned
a specific name (for example, “open gate 1”) and a category (type) in
which the automation is classified (e.g. “Gates”). Before starting the
procedure, consult the list of commands available for programming
in “Mode II” (in the manual of the automation to be controlled, in the
section dealing with memorising transmitters or remote controls) to
check how many and which commands are required to ensure correct
operation. For example, in the case of a gate, the single command
“Open” may be sufficient as closure is automatic; a control receiver of a
light may need 2 commands: one for ON and one for OFF commands,
while an awning automation may require 3 commands: Open, Stop,
Close.
6.2 - Programming the 4 keys to the side of the
touchscreen
After creating the required commands, 4 immediate keys can be programmed, located to the side of the touchscreen, associating each with the
commands most commonly used.
To create a new command:
01.Turn on the touchscreen and on the main menu, touch the icon
“Commands” ;
02. Scroll to the right through the icons by touching the symbol ;
03. Touch “Set” , followed by “Commands”.
04. On the list displayed, touch “Command 1”, and then “Name”;
enter the name of the command (for example, “open gate”;
“close garage”, etc.); and touch “OK” to confirm.
05. Touch “Type”, then select one of the three types of the automa-
tion to be controlled; then touch “OK” to confirm.
It is possible to leave keys without assigned commands, or to assign the
same command to more than one key.
6.3 - Using the touchscreen to send commands
After creating and memorising all required commands, the automation can
be controlled as described below.
A command can also be sent directly, using the keys to the side of the
touchscreen (only if previously memorised as described in paragraph
6.2).
To program the 4 keys:
01. Turn on the touchscreen and on the main menu, touch the icon
“Commands”;
02. Scroll to the right through the icons by touching the symbol ;
03. Touch “Set” , and then “Immediate keys”.
04. n the list displayed, touch “Key 1” and then select a previously
created with procedure 6.1; touch “OK” to confirm.
05. Repeat point 04 to program any other keys and then touch “OK”
to confirm.
01. Turn on the touchscreen and on the main menu, touch the icon
“Commands”;
02. Touch one of the 3 types assigned to the specific automation to
be controlled.
03. Scroll through the list to find the required command and then
touch or or press and hold to activate radio transmission )the
touchscreen led flashes to confirm transmission).
6 - USING THE TOUCHSCREEN AS A REMOTE CONTROL FOR AUTOMATIONS
01. Access the programming menu.
02. On the touchscreen, touch “Settings” and then “SIM validity”.
03. On the screen displayed, touch “Enable” and select “Yes”; then
touch “OK” to confirm.
04. Touch “Expiry” and enter after how many years the SIM card expires. Touch “OK” to confirm.
• IMEI code
This enables display of the IMEI code of the GSM module on board the
control unit.
01. Access the programming menu
02. On the touchscreen, touch “Settings” followed by “IMEI” to display
the code
• Firmware version
Enables display of the control unit firmware version.
01. Access the programming menu
02. On the touchscreen, touch “Settings” followed by “Firmware ver-
sion” to display the code.
• Deletion
This enables total deletion of the control unit parameters, including the
code of the touchscreen and events log. Caution! – this operation is ir-
reversible and requires reprogramming of the touchscreen on the control unit.
01. Access the programming menu.
02. On the touchscreen, touch “Settings” and then “Deletion”.
03. On the screen displayed, touch “Yes” to delete all parameters of
the control unit or “No” to cancel the operation. Touch “OK” to confirm.
04. 1 beep from the control unit confirms deletion.
key 1
key 3
key 2
key 4
Page 18

This chapter describes installation of all devices belonging to the system.
The work phases are described and grouped into various sections, each
dedicated to a specific device.
7.1 - Checking radio and telephone transmission
before installation
After programming all devices on a table (as described in chapters
5 and 6), temporarily position each device at the various envisaged
points (read chapter 3) and run the “Control unit” test (7.1.1) and
“Dialler” test (7.1.2).
7 - INSTALLATION: the control unit and accessories
18
6.4 - Memorising commands in the automation
receiver
After creating the required commands, memorise each of these in the receiver of the automation to be controlled. To memorise a command, proceed as follows:
01. In the instruction manual of the receiver (or automation) read the op-
erations to be performed for memorising a command in “Mode II”.
Caution! - Do not use the procedure for “Mode I”.
02. Then perform the procedure and when the request is displayed to
touch or press and hold the key of a remote control, touch or press and
hold the command on the touchscreen (blue led lit = transmission in
progress). To send a command, refer to paragraph 6.3.
6.5 - Disabling an existing command
This procedure does not delete a command memorised on the automation;
it simply disables transmission. To delete it permanently, refer to the instruction manual of the automation receiver.
To disable a key to the side of the touchscreen:
01. Turn on the touchscreen and on the main menu, touch the icon
“Commands”;
02. Scroll to the right through the icons by touching the symbol ;
03. Touch “Set” and then “Immediate keys”.
04. In the list displayed, touch the required key followed by ““---- ”;
touch “OK” to confirm.
05. Repeat point 04 for each key to be disabled and then touch
“OK” to confirm.
To disable a command:
01. Turn on the touchscreen and on the main menu, touch the icon
“Commands”;
02. Scroll to the right through the icons by touching the symbol ;
03. Touch “Set” and then “Commands”.
04. In the list displayed, touch the command to be disabled.
05. In the next screen, touch “Type” and the item “----”); ; then touch
“OK” to confirm.
–– “Control Unit” Test (checking radio transmission between detectors and the control unit) ––
On initial installation, run the test with the control unit and detectors positioned provisionally at the envisaged fixing points. This test enables confirmation of whether the control unit can receive the radio signal from the detectors; it also enables a check of the received signal quality.
The test is particularly suitable for systems subject to extreme conditions, with respect to the application limits stated in chapter 3. In these cases a
prior check should be made, before final fixture, to ensure that the radio signal emitted by a detector is able to reach the control unit. The test must
be repeated periodically.
Perform the test as follows:
01. Place the control unit provisionally in the envisaged point.
02. Activate the “Control unit” test function:
03. In the main menu of the touchscreen, touch the icon , scroll through the list with the arrow icon and select
04. Enter the “ADMINISTRATOR or USER CODE” and touch “OK” to confirm.
05. Touch “Test” followed by “Control Unit”.
06. Touch to run the test.
07. Perform the test: from the envisaged point of final installation, transmit a radio signal from each of the various devices.
Example: open the window or pass in front of a volumetric detector (MAD2). The control unit emits a beep to confirm signal reception.
08. The check test results on the touchscreen, touch and check the list of recorded transmissions on display.
For each transmission it is possible to display the name of the detector that transmitted the signal and the signal quality on both transmission frequencies; for example, if the display shows:
ALL CAMERA 1
C1: nnn C2: nnn
this means:
AL = alarm event
ROOM 1 = name of receiver
C1 = 433 MHz radio frequency
C2 = 868 MHz radio frequency
nnn = optimal signal
nn = good signal
n = sufficient signal
= no signal
If there is no signal (n) on one
of the frequencies (C1 or C2) the detector is probably outside the maximum range or there is disturbance on this fre-
quency; in any event a single frequency should still be sufficient to guarantee correct system operation.
However, if both frequencies display nothing, a practical test must be made by arming the control unit and generating the alarm. Technical practices
envisage the test when the signal is weak: in normal conditions the system should continue to be operative.
A detector signal may at times be optimal (nnn) and at other times good (nn): this may depend on random interference or the movement of persons in the area during testing. This often occurs with remote controls as their position with respect to the control unit can easily change.
1
2
Page 19

19
–– 7.1.3 - Final installation of all system devices ––
Proceed with final installation of all devices, as described in the sections below in this chapter, dedicated to each device.
At the end of the test, if results are not satisfactory, move the point where the control unit is to be fixed (or, when possible, the detector fixing point)
and repeat the test.
Notes on control unit testing
- Some detectors transmit the alarm twice; therefore there may be two consecutive signals on the list.
- In normal conditions, after a volumetric detector has detected and transmitted the first alarm, it remains inactive for 3 minutes Therefore, to test these
detectors, ensure that there have been no persons in the area for at least three minutes beforehand. When the detector battery compartment is
opened, the 3-minute block is disabled; therefore to facilitate the procedure, run the test with the battery compartment open.
VERY IMPORTANT - At the end of installation of all devices, repeat this procedure 7.1.1 for a final check and ensure correct operation of
the system in general.
––
7.1.2 - “Dialler” Test (to ensure correct telephone communication of the control unit) ––
This test enables the user to check whether the control unit can make a telephone call, on the land line or mobile network, to a required number. Before proceeding with the test:
a) ensure that the telephone land line is connected to the control unit (fig. 7). Important! – If a broadband line is used, a special filter must be
fitted between the telephone socket and control unit; see figure 7a;
b) insert and enable the SIM card (see chapter 7.3);
c) ensure that all voice and text messages have been programmed (see chapter 5.4.8).
Perform the test as follows:
01. Place the control unit provisionally in the envisaged point.
02. Activate the “Dialler” test function
:
03. In the main menu of the touchscreen, touch the icon , scroll through the list with the arrow icon and select .
04. Enter the “ADMINISTRATOR or USER CODE” and touch “OK” to confirm.
02. Touch “Test” and then “Dialler”.
03. On the numerical keypad displayed, dial the telephone number to receive a voice or text message; then touch “OK” to confirm.
04. In the list displayed, select one of the voice or text messages previously programmed and touch “OK” to confirm.
05. Select the type of line (PSTN or GSM) to be used then touch “OK” to confirm.
06. Wait for message reception. The test can be interrupted by touching “OK”.
If the test fails, the causes may be:
- SIM
card not inserted correctly;
- PIN number not disabled;
- no messages or calls are received = try moving the control unit to a zone with better GSM coverage or change telephone provider;
- no calls are made on the PSTN land line (also broadband) = the cause may be disturbance on the telephone line; in this case to override the call
enter the symbol *before the telephone number (e.g. *0421 987654).
If the call is made correctly, the symbol *must be added to each number entered in the Phone book.
Note - With the insertion of *, the system makes the call on the land line (PSTN), and also automatically sends a security call using the GSM connection ad eseguire la chiamata sulla linea telefonica fissa (PSTN), invia automaticamente anche una chiamata di sicurezza utilizzando il collegamento
GSM.
7
1
2
3
1
2
3
MACU1-MACU2
control unit
wall-mounted
telephone
line
connection
wall-mounted
telephone
line
connection
telephone
telephone
box /
ADSL
modem
modem / computer /
answer phone
(if present)
ADSL
filter
Traditional telephone line Telephone line with broadband
MACU1-MACU2
control unit
7a
Page 20

20
MATS1
7.2 - Touchscreen (MATS1)
7.2.1 - OPERATION (fig. 8)
MATS1 is powered by 2 batteries (the factory supplies non-rechargeable versions). On insertion of the batteries, the touchscreen switches on automatically, ready for immediate use (see paragraph 7.2.2 for initial activation).
It is equipped with an on/off key (fig. 8) and an automatic shut-down function to limit battery consumption; in fact, after a few seconds since the dis-
play was touched the device turns off automatically (the time is settable); to reactivate simply touch the display or pick up the device (it is equipped with
a movement sensor).
As an alternative to the batteries supplied, rechargeable batteries may be used and a battery charger (optional) to be connected to the USB port or the
special desktop/wall-mounted support with built-in charger (MATSC1).
MATS1 is equipped with the following indicator leds:
- Red led = indicates when the battery charge level is low
- Orange led = indicates the charging phase; this is lit when the MATS1 is activated on the MATSC1 support or directly connected to the battery charger
via the USB port.
- Green led = indicates completion of battery charging.
- Blue led = indicates transmission of commands to the control unit and automations.
7.2.2 - INITIAL ACTIVATION AND PROGRAMMING (fig. 9):
When activating the unit for the first time, proceed as follows:
01. Open the cover (fig. 1): press at point 1 and push the base (point 2) upwards;
02. Insert memory board “A” (enclosed with this instruction manual);
03. Before inserting the batteries, carefully read paragraph 5.1 (associating the touchscreen with the control unit - chapter 5).
Caution! – Only insert the batteries when requested, in observance of the specified polarity.
7.2.3 - INSTALLING THE WALL-MOUNTED SUPPORT
01. Mark the fixing points on the wall, drill the holes and insert the plugs supplied, securing the support by means of the screws supplied (fig. 10):
02. Attach the support (fig. 11) and insert the touchscreen.
9
“A”
8
on/off key
microphone
sensor for transponder
Led
4 immediate
keys
stylus
1110
loudspeaker
USB port
Page 21

21
7.2.4 - USING THE TOUCHSCREEN
To understand how to use and navigate the touchscreen menus, refer to chapter 5.
7.2.5 - USING THE INTEGRATED BADGE READER (transponder badge)
The touchscreen has a transponder badge reader that can be set to two modes: “always active” or “temporarily active”. When the reader is active the
icon appears at the bottom left of the display, which can be enabled and disabled as required.
To activate and deactivate the alarm using a previously programmed transponder badge (see paragraph 5.4.3), simply move it close to the symbol on
the touchscreen (fig. 8).
Reader mode “always active”: function available only when MATS1 is connected to the power supply unit and the “automatic shut-down” function
is disabled. To disable the “Automatic shut-down” function: 01. Touch the icon ; 02. Touch the icon and select “Never”; 03. Touch “OK” to
confirm.
Reader mode “temporarily active”: function available when MATS1 is powered by non-rechargeable batteries (standard) or when MATS1 is connected to the power supply unit and the “automatic shut-down” function is enabled.
In this mode the reader is activated each time the touchscreen is reactivated (by touching the display or by means of the on/off key, or by moving it, if
the “movement” option is enabled), or by touching the corresponding icon in the Alarms menu.
To enable the “Movement” function: 01. Touch the icon ; 02. Touch the icon and select “Enabled”; 03. Touch “OK” to confirm.
7.2.6 - USING THE TOUCHSCREEN AS VOICE RECORDER
The touchscreen has a voice recorder function which the user can use to record and listen to messages. This function is accessed directly from the main
menu, by touching the icon “Memo”.
To record a new message:
01. Turn on the touchscreen and on the main menu, touch the icon “Messages” followed by “New”;
02. Assign a name to the new message to be recorded and touch “OK”.
03. In the screen displayed, touch the key to start recording; then at 30-50 cm from the touchscreen, record the message in a clear voice. On com-
pletion, touch to stop the recording.
04. Lastly:
- touch to listen the message again;
- touch to save the message permanently;
- touch
to remove the message and record a new on.
The symbol indicates the presence of new messages on the voice recorder unit.
To listen to a message:
01. Turn on the touchscreen and on the main menu, touch the icon “Messages” followed by “List”;
02. Scroll through the messages in the list and select which one to listen to:
- to listen to the message, touch ;
- touch , to delete the message.
After listening to the new messages, the symbol disappears from the lower section of the screen .
7.2.7 - BATTERY REPLACEMENT (fig. 12)
Only replace the batteries when requested on the touchscreen. Use two AA type 1.5 V batteries.
01. Open the cover and replace the batteries with 2 of the same type, in observance of the specified polarity.
02. Close the cover.
12
MATS1
Page 22

22
7.3 - Control unit (models MACU1 - MACU2)
7.3.1 - SPECIAL WARNINGS
- To ensure correct installation, read chapter 3.
- Before proceeding with installation, associate the touchscreen with the control unit as described in chapter 5 - paragraph 5.1.
7.3.2 - INSTALLATION
01. Open the box (fig. 13);
02. Remove part “a” and keep in a safe place (fig. 14);
03. Remove part “b” (fig. 15);
04. To connect the telephone line, remove part “c” (fig. 16).
05. Mark the 3 fixing points on the wall and the 4th point for part “a” (fig. 17): use the template at the end of the manual with the outline of the con-
trol unit to a scale of 1:1;
06. Drill the wall, insert the plugs supplied and fix (before the control unit) part “a” with the screw supplied (fig. 18). Caution! - This part is fixed to the
hole of part “b”, previously removed.
07. Fix the control unit to the wall using the screws supplied.
08. Connect the telephone cable (fig. 19).
09. On the control unit with GSM module, insert the SIM card (fig. 20).
Note - Ensure that the control unit does not have the batteries inserted. The control unit accepts any type of SIM card provided that it has voice
and text message services. Before inserting it, disable the PIN request using a mobile phone (or configure it using the PIN number 1234).
10. Insert the batteries as shown in fig. 21, in observance of the specified polarity: 1 beep confirms activation;
11. Close the box (fig 22).
To program the control unit, refer to chapter 5.
7.3.3 - CONTROL UNIT BATTERY REPLACEMENT
Only replace the batteries when signalled by the control unit. Use 4 batteries, 1.5 V type D.
01. In the main menu of the touchscreen, touch the icon , scroll through the list with the arrow icon and select
02. Enter the “ADMINISTRATOR or USER CODE” and touch “OK” to confirm.
03. Open the cover (fig. 13) and then the control unit battery compartment (fig. 21) and replace the batteries with 4 of the same type, in observance of
the specified polarity.
04. Close the control unit box (fig 22).
05. Exit programming mode.
13
14
a
15
b
MACU1 - MACU2
Page 23

23
16
1817
c
19
MACU1 - MACU2
Page 24

24
22
21
20
MACU1 - MACU2
Page 25

25
7.4 - Door and window opening detector (MAD1)
7.4.1 - OPERATION
MAD1, detects opening doors and windows (by separation of the magnet from the sensor) and transmits the event to the associated
control unit. It is also possible to connect an additional detector by cable (e.g. a sensor for shutters).
Equipped with LED indicator visible from the outside and 6 dip switches for programming.
Types of alarm signal sent to the control unit:
– Intrusion alarm: alarm signal tripped by opening of the door or window; the led lights up for 1 second to confirm transmission of the event.
– Alarm of second detector (via cable): MAD1 can be programmed so that it transmits 2 differentiated alarms (transmission of 2 different alarm codes:
one for the magnetic contact and one for the second detector connected by cable to MAD1.
– Battery low: the low battery signal is by means of 4 quick flashes of the led and 4 beeps, following opening of a door/window. The event is also trans-
mitted to the control unit and memorised in the “Events list”.
– Supervision: approximately every 40 minutes, MAD1 sends a signal to the control unit to confirm correct operation (operative status).
– Tamper alarm: alarm signal caused by an attempt at tampering (opening of the battery compartment and/or detachment of the device from the fix-
ing surface).
7.4.2 - STANDARD PROGRAMMING
The touchscreen is required for programming; see chapter 5 (paragraph 5.1).
Before proceeding with programming, the factory settings of MAD1 may be modified if required by adjusting the dip switches (fig. 23) as follows:
IMPORTANT! - Before any operation, remove the battery from the detector (fig. 28).
• Open door/window signal
If required (for the alarm activation phase only) the control unit can signal the presence of doors/windows left open, by setting Dip switch 1 to ON.
Note – When this function is enabled (ON) battery lifetime is reduced.
Dip switch 1 set to OFF = No door/window left open signal.
• Intruder function
If an additional intruder protection is required, it can be enabled by setting Dip switch 4 to ON.
Note – This function is not recommended on door/windows subject to vibrations.
Dip switch 4 set to OFF = function disabled.
• Tamper protection disable (anti-detachment)
If required the anti-detachment protection can be disabled (disabling the tamper device on the rear of the detector - fig. 24), by setting Dip switch 5
to ON.
Note – This function is recommended in the event of fixture on irregular surfaces, subject to vibrations or deformations (due to variations in temperature).
Dip switch 5 set to OFF = anti-detachment protection enabled.
At this point, MAD1 can be programmed on the control unit:
01. In the main menu of the touchscreen, touch the icon , scroll through the list with the arrow icon and select
02. 02. Enter the “ADMINISTRATOR CODE and touch “OK” to confirm.
03. Touch “Devices”, then touch the zone: for example “Alarm zone B”.
04. Select one of the programmable detectors and then touch “Add 1 detector”.
05. Compile the next screen with the following parameters:
• Delay
Touch “Delay” and enter the delay time of alarm delivery by the detector (0 Sec = immediate alarm). This delay gives the user time to enter
the home and deactivate the alarm without tripping the detector. Touch “OK” to confirm.
• Name
Touch “Name” and enter the name to assign to the detector (for example: “kitchen”). Touch “OK” to confirm.
• Voice name
Touch “Voice Name” and enter the name to assign to the detector (for example: “kitchen”).
06. Touch “OK” to confirm.
07. Touch “OK” again and then insert the battery in the detector. The control unit emits a confirmation beep (3 beeps indicate that the detector is al-
ready present).
If a second detector is required, connected by cable, see paragraph 7.4.3.
At this point, proceed with installation (paragraph 7.4.4).
7.4.3 - CONNECTING A SECOND DETECTOR (BY CABLE)
Caution! – Before connecting an additional detector by cable, MAD1 must be programmed on the control unit (see paragraph 7.4.2).
– Connecting a detector for shutters
(pulse counter):
01. Remove the battery from the previously programmed MAD1 (fig. 28);
02. Connect the 2 wires of the additional detector to the inputs NC and C (fig. 25).
Note - Maximum wire section = 0.25 mm
03. On MAD1, set Dip switch 3 to ON;
04. Insert the battery again.
If the user wishes to assign different names (and different associated zones) to MAD1 and the second detector by cable, also perform point 05:
05. With the touchscreen, perform the standard programming procedure (paragraph 7.4.2) from point 01 to 07.
At point 07, instead of “INSERTING THE BATTERY IN THE DETECTOR” (already present), move Dip switch 2 to ON.
– Connecting a magnetic contact detector
(NC) or a flooding sensor (NO):
01. Remove the battery from the previously programmed MAD1 (fig. 28);
02. Connect the 2 wires of the additional detector to the inputs NC and C (for the magnetic contact) or NO and C (for the flooding sensor), fig. 27;
Note - Maximum wire section = 0.25 mm
03. On MAD1, set Dip switch 3 to OFF;
04. Insert the battery again.
If the user wishes to assign different names and different associated zones to MAD1 with respect to the second detector by cable, also perform point 05:
05. Using the touchscreen, perform the standard programming procedure (paragraph 7.4.2) from point 01 to 07 and at point 07, instead of “INSERTING
THE BATTERY IN THE DETECTOR” (already present), move Dip switch 2 to ON.
MAD1
Page 26

26
26
7.4.4 - INSTALLATION
Before proceeding with installation, the detector must be programmed on the control unit.
MAD1 comprises a sensor (a - fig. 26), a magnet (b - fig. 26), a cover (c - fig. 26), 2 types of support (d/e - fig. 26) and 2 types of spacer (f/g - fig.
26).
It must be secured to the fixed part of the door/window to be protected, on the opposite side to the hinge, at the point of maximum door/window movement, while the magnet is secured to the mobile section, perfectly aligned with the edge of the detector (fig. 27).
Before securing MAD1 select the type of support (
d/e - fig. 26) to be used for the magnet, from the two types available.
Installation operations:
01. Open the detector box (fig. 24) and remove the battery;
02. Secure the detector and selected support for the magnet: fig. 29a or fig. 29b.
If a spacer is used (f or g- fig. 26) position this before the support. Caution! – The magnet must be perfectly aligned as shown in fig. 27;
03. At this point refit the battery;
04. Perform the operation test by opening and closing the door/window, checking that the alarm signal (led flashing) is transmitted to the control unit;
05. Close the box.
On completion of installation, perform the control unit test (paragraph 7.1.1)
ON
123 456
OFF
23
Dip-switch
24
Tamper
NO
NC
C
25
1
2
3
4
MAD1
MAD6
Page 27

27
7.4.5 - BATTERY REPLACEMENT
Only replace the batteries when signalled by the detector and control unit. Use a 9 V alkaline battery (GP1604A).
01. In the main menu of the touchscreen, touch the icon , scroll through the list with the arrow icon and select
02. Enter the “ADMINISTRATOR or USER CODE” and touch “OK” to confirm.
03. Open the detector cover and replace the battery (fig. 28) with one of the same type, in observance of the specified polarity.
04. Exit the alarms menu by touching the icon at the top right of the display.
29a
29b
27 28
MAD1
Page 28
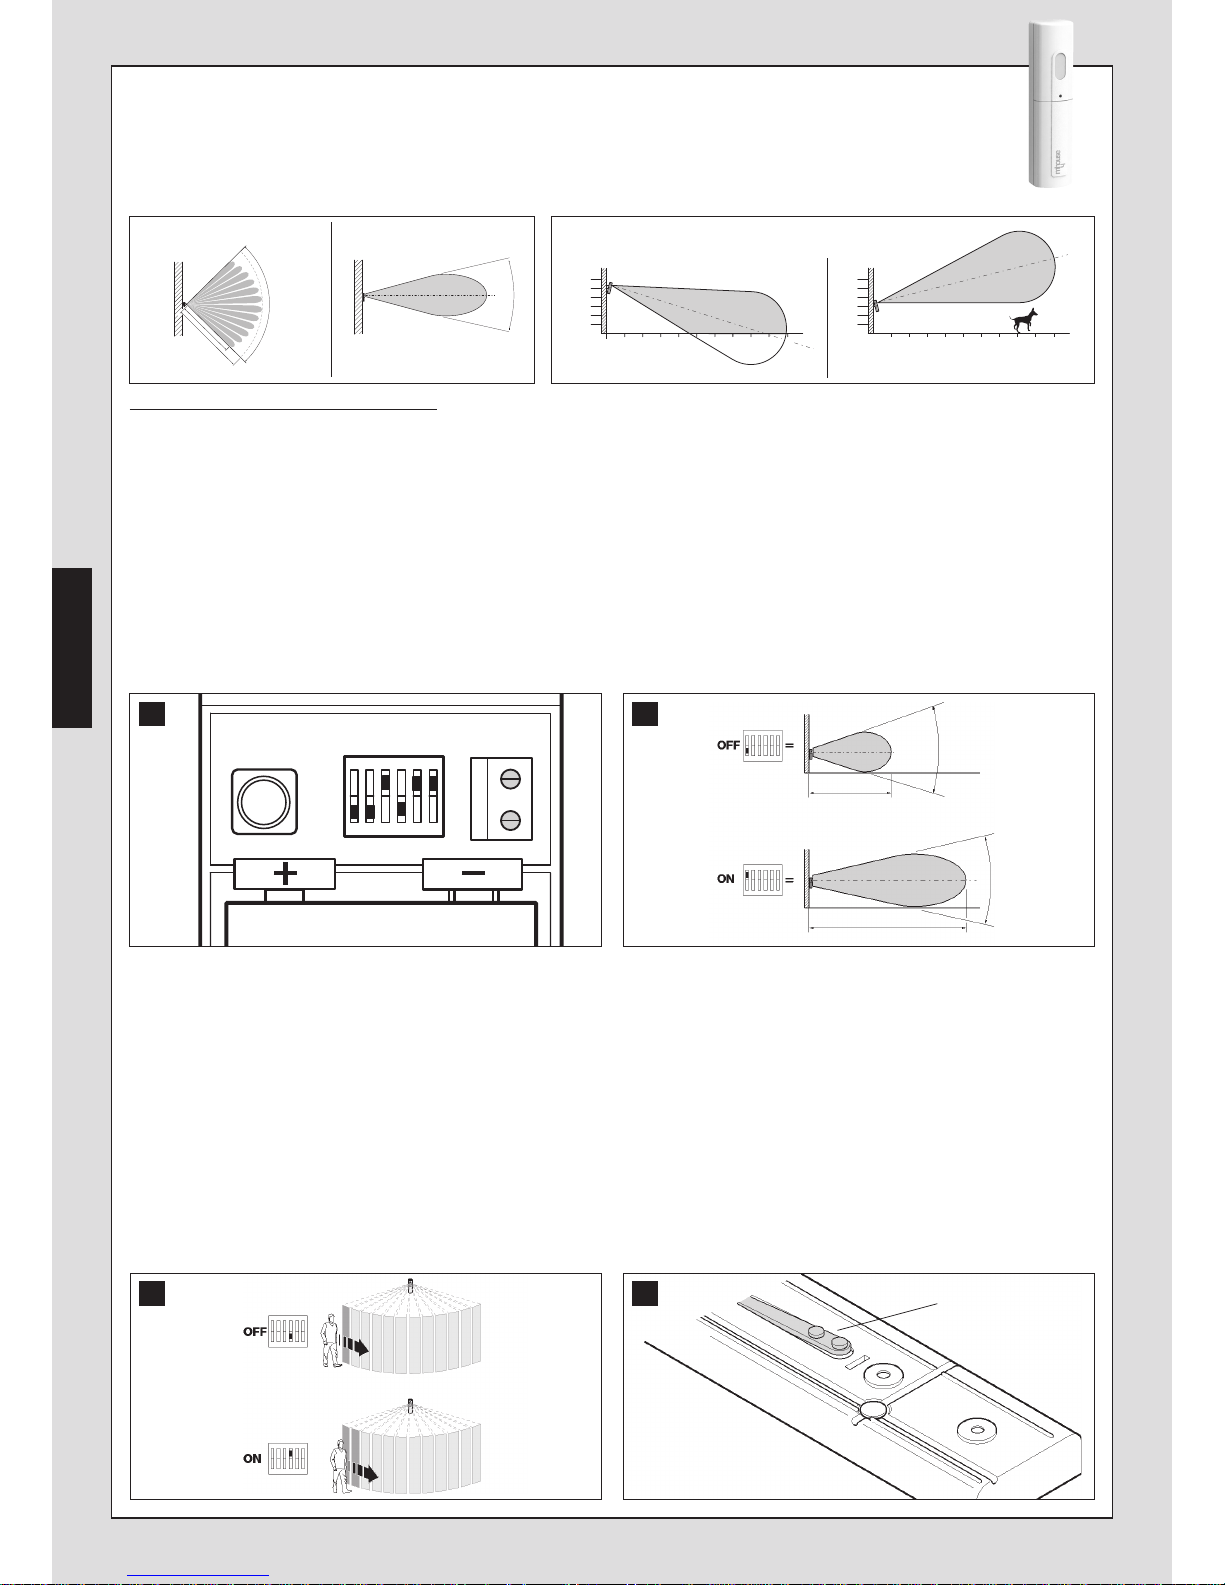
28
7.5 - Infra-red detector with volumetric lens (MAD2)
7.5.1 - OPERATION
MAD2 signals movement of persons in the protected area; thanks to the directional joint the system avoids detecting the movement
of small pets in the protected area. It is also possible to connect an additional detector by cable (e.g. a sensor for shutters) or a magnetic contact.
Equipped with LED indicator visible from the outside and 6 dip switches for programming.
Types of alarm signal sent to the control unit
:
– Intrusion alarm: alarm signal caused by the detection of movement in the protected area. in order not to waste the batteries the detector does not
send out any other signal after the first alarm signal if there is no further movement for at least 2 minutes (except when the battery compartment is
open).
– Alarm of second detector (via cable): MAD2 can be programmed so that it transmits 2 differentiated alarms (transmission of 2 different alarm codes:
one for the magnetic contact and one for the second detector connected by cable to MAD2.
– Battery low: the low battery signal is by means of 4 quick flashes of the led, following detection of movement. The event is also transmitted to the
control unit and memorised in the “Events list”.
– Supervision: approximately every 40 minutes, MAD2 sends a signal to the control unit to confirm correct operation (operative status).
– Tamper alarm: alarm signal caused by an attempt at tampering (opening of the battery compartment and/or detachment of the device from the fix-
ing surface).
7.5.2 - STANDARD PROGRAMMING
The touchscreen is required for programming; see chapter 5 (paragraph 5.1).
Before proceeding with programming, the factory settings of MAD1 may be modified if required by adjusting the dip switches (fig. 30) as follows:
IMPORTANT! - Before any operation, remove the battery from the detector (fig. 35).
• Detector range (fig. 31)
The detector range can be set as follows:
Dip switch 1 set to OFF = 5 m.
Dip switch 1 set to ON = 10 m.
Note – Set the range on the basis of the size of the room to be protected.
• Detector sensitivity (fig. 32)
The detector sensitivity can be set as follows:
Dip switch 4 set to OFF = alarm signal when movement of the intruder is first detected.
Dip switch 4 set to ON = alarm signal when movement of the intruder has been detected twice.
• Tamper protection disable (anti-detachment)
If required the anti-detachment protection can be disabled (disabling the tamper device on the rear of the detector - fig. 33), by setting Dip switch 5
to ON.
Note – This function is recommended in the event of fixture on irregular surfaces, subject to vibrations or deformations (due to variations in temperature).
Dip switch 5 set to OFF = anti-detachment protection enabled.
View of width Vertical view
12 m
10 m
90°
30°
123 456 89 107
2,5
1,5
1
123 456 89 107
0,5
2
2,5
1,5
1
0,5
2
Installation with directional joint
ON
OFF
123 456
30 31
30°
5 m
10 m
30°
Dip-switch
MAD2
32 33
Tamper
Page 29

29
At this point, MAD2 can be programmed on the control unit:
01. In the main menu of the touchscreen, touch the icon , scroll through the list with the arrow icon and select
02. Enter the “ADMINISTRATOR CODE and touch “OK” to confirm.
03. Touch “Devices”, then touch the zone: for example “Alarm zone B”.
04. Select one of the programmable detectors and then touch “Add 1 detector”.
05. Compile the next screen with the following parameters:
• Delay
Touch “Delay” and enter the delay time of alarm delivery by the detector (0 Sec = immediate alarm). This delay gives the user time to enter
the home and deactivate the alarm without tripping the detector. Touch “OK” to confirm
• Name Touch “Name” and enter the name to assign to the detector (for example: “kitchen”). Touch “OK” to confirm
• Voice name Touch “Voice Name” and enter the name to assign to the detector (for example: “kitchen”).
06. Touch “OK” to confirm.
07. Touch “OK” again and then insert the battery in the detector. The control unit emits a confirmation beep (3 beeps indicate that the detector is al-
ready present).
If a second detector is required, connected by cable, see paragraph 7.5.3.
If installing two combined detectors (MAD2), see paragraph 5.4.5.
At this point, proceed with installation (paragraph 7.5.4).
7.5.3 - CONNECTING A SECOND DETECTOR (BY CABLE)
Caution! – Before connecting an additional detector by cable, MAD2 must be programmed on the control unit (see paragraph 7.5.2).
Connection of a magnetic contact detector (NC) or a pulse counter detector for shutters:
01. Remove the battery from the previously programmed MAD2 (fig. 35);
02. Connect the 2 wires of the additional detector to the inputs NC and C (fig. 34)
Note - Maximum wire section = 0.25 mm
03. On MAD2, set Dip switch 3 to OFF for the magnetic contact or to ON for the pulse counter;
04. Insert the battery again.
If the user wishes to assign different names (and different associated zones) to MAD2 and the second detector by cable, also perform point 05:
05. With the touchscreen, perform the standard programming procedure (paragraph 7.5.2) from point 01 to 07.
At point 07, instead of “INSERTING THE BATTERY IN THE DETECTOR” (already present), move Dip switch 2 to ON.
7.5.4 - INSTALLATION
Before proceeding with installation, the detector must be programmed on the control unit.
Installation operations:
01. Open the detector box and remove the battery (fig. 35);
02. Secure MAD2 according to the required type of installation:
• fixture without support: see fig. 36. Note – the detector should be installed at a maximum height of 1.8 m; in the case of heights over 1.8 m (max-
imum 2.5 m), use the directional joint, pointed downwards.
• corner fixture : see fig. 37. Note – The detector should be installed at a maximum height of 1.8 m.
• directional joint installation: see fig. 38. To avoid detection of movement of small pets on ground level, position the directional joint at a height of
1.5 m, pointed upwards.
03. Set up the control unit for learning MAD2, see chapter 5;
04. Refit the battery (fig. 39);
05. Perform the operation test, simulating an intruder with brief movements of the body within the coverage area. Caution! – The test must be per-
formed with the battery box open, otherwise after the first alarm, no others are transmitted until a new normal situation returns (after approx. 3
minutes);
06. Close the box.
NC
C
34
1
2
3
4
MAD2
Page 30

30
7.5.5 - BATTERY REPLACEMENT
Only replace the batteries when signalled by the detector and control unit. Use a 9 V alkaline battery (GP1604A).
01. In the main menu of the touchscreen, touch the icon , scroll through the list with the arrow icon and select
02. Enter the “ADMINISTRATOR or USER CODE” and touch “OK” to confirm.
03. Open the detector cover and replace the battery (fig. 35) with one of the same type, in observance of the specified polarity.
04. Exit the alarms menu by touching the icon at the top right of the display.
38
39
36
37
35
MAD2
Page 31

31
7.6 - Infra-red detector with vertical curtain lens (MAD3)
7.6.1 - OPERATION
MAD3 is a detector used for the protection of door or window perimeters. Thanks to the curtain effect lens, it detects the movement
of persons located inside its operating radius. It is also possible to connect an additional detector by cable (e.g. a sensor for shutters) or a magnetic contact.
Equipped with LED indicator visible from the outside and 6 dip switches for programming.
Types of alarm signal sent to the control unit
:
– Intrusion alarm: alarm signal caused by the detection of movement in the protected area. in order not to waste the batteries the detector does not send
out any other signal after the first alarm signal if there is no further movement for at least 2 minutes (except when the battery compartment is open).
– Alarm of second detector (via cable): MAD3 can be programmed so that it transmits 2 differentiated alarms (transmission of 2 different alarm codes):
one for the magnetic contact and one for the second detector connected by cable to MAD3.
– Battery low: the low battery signal is by means of 4 quick flashes of the led, following detection of movement. The event is also transmitted to the
control unit and memorised in the “Events list”.
– Supervision: approximately every 40 minutes, MAD3 sends a signal to the control unit to confirm correct operation (operative status).
– Tamper alarm: alarm signal caused by an attempt at tampering (opening of the battery compartment and/or detachment of the device from the fix-
ing surface).
7.6.2 - STANDARD PROGRAMMING
The touchscreen is required for programming; see chapter 5 (paragraph 5.1).
Before proceeding with programming, the factory settings of MAD1 may be modified if required by adjusting the dip switches (fig. 40) as follows:
IMPORTANT! - Before any operation, remove the battery from the detector (fig. 44).
• Detector range (fig. 41)
The detector range can be set as follows:
Dip switch 1 set to OFF = 3 m.
Dip switch 1 set to ON = 6 m. Important! – At this distance, the operating radius of MAD3
may also detect movements in the vicinity of the door/window.
• Tamper protection disable (anti-detachment)
If required the anti-detachment protection can be disabled (disabling the tamper device on
the rear of the detector - fig. 42), by setting Dip switch 5 to ON.
Note – This function is recommended in the event of fixture on irregular surfaces, subject to
vibrations or deformations (due to variations in temperature).
Dip switch 5 set to OFF = anti-detachment protection enabled.
At this point, MAD1 can be programmed on the control unit:
01. In the main menu of the touchscreen, touch the icon , scroll through the list with the arrow icon and select
02. Enter the “ADMINISTRATOR CODE and touch “OK” to confirm.
03. Touch “Devices”, then touch the zone: for example “Alarm zone B”.
04. Select one of the programmable detectors and then touch “Add 1 detector”.
05. Compile the next screen with the following parameters:
• Delay
Touch “Delay” and enter the delay time of alarm delivery by the detector (0 Sec = immediate alarm). This delay gives the user time to enter
the home and deactivate the alarm without tripping the detector. Touch “OK” to confirm.
• Name
Touch “Name” and enter the name to assign to the detector (for example: “kitchen”). Touch “OK” to confirm.
• Voice name Touch “Voice Name” and enter the name to assign to the detector (for example: “kitchen”).
06. Touch “OK” to confirm.
07. Touch “OK” again and then insert the battery in the detector. The control unit emits a confirmation beep (3 beeps indicate that the detector is al-
ready present).
m
6
1
0
2
3
4
5
0,500,5
1
0
2
3
4
5
6
m
22,5° 22,5°
Vertical view View of width
ON
OFF
41
6 m
3 m
ON
OFF
123 456
40
Dip-switch
MAD3
42
Tamper
Page 32

32
If a second detector is required, connected by cable, see paragraph 7.6.3.
At this point, proceed with installation (paragraph 7.6.4).
7.6.3 - CONNECTING A SECOND DETECTOR (BY CABLE)
Caution! – Before connecting an additional detector by cable, MAD3 must be programmed on the control unit (see paragraph 7.6.2).
Connection of a magnetic contact detector (NC) or a pulse counter detector for shutters:
01. Remove the battery from the previously programmed MAD3 (fig. 44);
02. Connect the 2 wires of the additional detector to the inputs NC and C (fig. 43)
Note - Maximum wire section = 0.25 mm
03. On MAD3, set Dip switch 4 to OFF; Important! – Set Dip switch 4 to ON if not detector is connected by cable.
04. Then set Dip switch 3 to OFF for the magnetic contact (NC) or to ON for the pulse counter;
05. Insert the battery again.
If the user wishes to assign different names and different associated zones to MAD3 with respect to the second detector by cable, also perform point 06:
06. With the touchscreen, perform the standard programming procedure (paragraph 7.6.2) from point 01 to 07.
At point 07, instead of “INSERTING THE BATTERY IN THE DETECTOR” (already present), move Dip switch 2 to ON.
7.6.4 - INSTALLATION
Before proceeding with installation, the detector must be programmed on the control unit.
Installation operations:
01. Open the detector box and remove the battery (fig. 44);
02. Secure MAD3 (fig. 45);
03. Refit the battery;
04. Perform the operation test by simulating intrusion through the coverage area. Caution! – The test must be performed with the battery box open,
otherwise after the first alarm, no others are transmitted until a new normal situation returns (after approx. 3 minutes);
05. Close the box.
7.6.6 - BATTERY REPLACEMENT
Only replace the batteries when signalled by the detector and control unit. Use a 9 V alkaline battery (GP1604A).
01. In the main menu of the touchscreen, touch the icon , scroll through the list with the arrow icon and select
02. Enter the “ADMINISTRATOR or USER CODE” and touch “OK” to confirm.
03. Open the detector cover and replace the battery (fig. 44) with one of the same type, in observance of the specified polarity.
04. Exit the alarms menu by touching the icon at the top right of the display.
44 45
NC
C
43
1
2
3
4
MAD3
Page 33

33
7.7 - Detector of glass breakage (MAD4)
MAD4 is a detector suitable to detect glass breakage; suitable for normal glass, double glazing or security glazing.
The detector is equipped with a microphone calibrated to recognise the sound of breaking glass. It contains an antitamper device, and a signalling led visible from the exterior.
7.7.1 - OPERATION
It must be used with a great deal of attention because it may also detect sounds similar to the breakage of glass; the sensor should only be activated
when there is no risk of other sounds that may trigger the alarm. Also appliances able to generate sudden pressure surges in rooms (air conditioners,
fans) may generate improper alarms.
Sound-absorbing materials (such as curtains and carpets) may reduce sensitivity of the device.
The device is optimised with factory-setting and may not be modified.
Types of alarm signal sent to the control unit:
– Noise signal (test): by producing a sudden noise in front of the detector (clapping hands or knocking two metal objects together) the led should flash
briefly twice. These noises do not trigger the alarm. Caution! – If the LED does not flash after the noise test the battery may be discharged or the de-
vice may be faulty;
- Alarm status: the breakage of glass (an old bottle can be broken for testing) generates the transmission via radio of the alarm signal and makes the
LED switch on for 4 seconds. The LED flashes for about one minute after the alarm;
– Anti-opening protection: The opening of the casing triggers the “tampering” alarm signal. To avoid this problem, set the control unit to “TEST” mode
before opening the sensor.
- Battery discharged: the low battery signal is transmitted to the control unit a few days in advance. Replace the battery only when the control unit in-
dicates that the detector has a discharged battery. Battery lifetime is reduced if the detector is placed in very noisy areas due to the continuous signalling of noise.
– Supervision: approximately every 40 minutes, MAD4 sends a signal to the control unit to confirm correct operation (operative status).
7.7.2 - PROGRAMMING
The touchscreen is required for programming; see chapter 5 (paragraph 5.1).
01. Remove the battery from the detector (fig. 48).
02. In the main menu of the touchscreen, touch the icon , scroll through the list with the arrow icon and select
03. Enter the “ADMINISTRATOR CODE and touch “OK” to confirm.
04. Touch “Devices”, then touch the zone: for example “Alarm zone C”.
05. Select one of the programmable detectors and then touch “Add 1 detector”.
06. Compile the next screen with the following parameters:
• Delay
Touch “Delay” and enter the delay time of alarm delivery by the detector (0 Sec = immediate alarm). This delay gives the user time to enter
the home and deactivate the alarm without tripping the detector. Touch “OK” to confirm.
• Name Touch “Name” and enter the name to assign to the detector (for example: “kitchen”). Touch “OK” to confirm.
• Voice name Touch “Voice Name” and enter the name to assign to the detector (for example: “kitchen”).
07. Touch “OK” to confirm.
08. Touch “OK” again and then insert the battery in the detector. The control unit emits a confirmation beep (3 beeps indicate that the detector is al-
ready present).
At this point, proceed with installation (paragraph 7.7.3).
7.7.3 - INSTALLATION
Warnings
• To ensure optimal detection, the device must be installed in rooms with an area of 20 to 30 square metres, at a distance of 3 to 6 m from the glass
to be protected and at a height of approx. 2 m (fig. 46)
• Installation is not recommended
: in areas with dimensions of less than 3 x 3 m, in excessively humid environments (bathrooms or kitchens) or in
garages with large metal doors. These situations may generate improper alarms.
Installation operations:
01. Open the box (fig. 47-A) and remove the battery;
02. Secure MAD4 (fig. 47-B-C-D);
04. Refit the battery (fig. 47-E): MAD4 is programmed in self-learning mode and is confirmed by 1 beep emitted by the control unit (3 beeps indicate
that the device is already programmed);
~ 2 m
3 ÷ 6 m
20 ÷ 30 m
2
46
MAD4
Page 34

34
05. Close the box (fig. 47-F);
06. Perform the operation test, by producing a sudden noise in front of the detector (clapping hands or knocking two metal objects together) the led
should flash briefly twice. These noises do not trigger the alarm. Caution! – If the LED does not flash after the noise test the battery may be dis-
charged or the device may be faulty.
7.7.4 - BATTERY REPLACEMENT
Only replace the batteries when signalled by the detector and control unit. Use a 9 V alkaline battery (GP1604A).
01. In the main menu of the touchscreen, touch the icon , scroll through the list with the arrow icon and select
02. Enter the “ADMINISTRATOR or USER CODE” and touch “OK” to confirm.
03. Open the detector cover and replace the battery (fig. 48) with one of the same type, in observance of the specified polarity.
04. Exit the alarms menu by touching the icon at the top right of the display.
47
AB C
DE F
48
MAD4
Page 35

35
7.8 - Fine combustion powder detector (MAD5)
7.8.1 - SPECIAL WARNINGS
Caution! – The detector must not be considered a total protection but simply a support in the protection against combustion risks. The device is not a
fire detector and does not comply with any regulations on fire detection.
• The alarm signal emitted by the detector may not be heard by people with hearing problems or under the effect of alcohol or drugs.
• Do not modify sensitivity of the detector.
• The detector must not be painted or varnished.
• Battery lifetime is reduced in the event of frequent alarm signals.
• The detector may not function correctly if the batteries are discharged.
• To clean the surface of the detector use a soft, slightly damp cloth; do not use products that contain alcohol, benzene, diluents or similar. Do not
dust with feather dusters.
• The device must be replaced after 10 years of use; within 2-3 years if installed in particularly dusty areas.
7.8.2 - OPERATION
MAD5 is a fine combustion powder detector (mist or smoke effect) designed for residential applications. A photodiode detects opacity of the air and
signals the alarm directly on site (by means of a buzzer) and also via radio to the control unit. The detection technology used is of the photo-optical type
and does not emit any type of harmful radiations. It is suitable to control an area of up to 6 x 6 m; it should be installed on the ceiling at the centre of the
area. Smaller rooms that are not square, such as corridors, require the use of more than one detector.
Equipped with led indicator visible from the outside and buzzer for audible signals.
Types of alarm signal
:
– Normal operation (self-diagnostics): led flashes briefly every 45 seconds;
– Alarm status: the concentration of combustion powders in the environment generates transmission of the alarm signal via radio, continuous flashing
of the external led and continuous sounding of the buzzer. The alarm status ends when the situation ends;
– Presence of heavy powders inside the sensor: short acoustic tone every 45 seconds and flashing of the external led not synchronised with the
acoustic tone. This alarm status ends once the powder has been removed (this operation must be carried out by the technical assistance service);
– Battery nearly discharged: short acoustic tone every 45 seconds and flashing of the external led synchronised with the acoustic tone.
Replace the battery only when the control unit indicates that the detector has a discharged battery.
– Supervision: transmission of a signal every 40 minutes (approx.) to indicate that the system is running.
7.8.3 - PROGRAMMING
The touchscreen is required for programming.
01. Remove the battery from the detector (fig. 50).
02. In the main menu of the touchscreen, touch the icon , scroll through the list with the arrow icon and select
03. Enter the “ADMINISTRATOR CODE and touch “OK” to confirm.
04. Touch “Devices”, then touch “Technical”.
04. Select one of the programmable detectors.
05. Compile the next screen with the following parameters:
• Name
Touch “Name” and enter the name to assign to the detector (for example: “kitchen smoke”). Touch “OK” to confirm
• Voice name Touch “Voice Name” and enter the name to assign to the detector (for example: “kitchen smoke”).
06. Touch “OK” to confirm.
07. Touch “OK” then insert the battery in the detector (the control unit emits a confirmation beep; 3 beeps indicate that the detector is already pres-
ent).
At this point, proceed with installation.
7.8.4 - INSTALLATION
Caution! – MAD5 must be installed approximately at the centre of the room to be protected.
01. To install MAD5 see fig. 49;
02. Refit the battery (fig. 49-E): the control unit emits 1 beep to confirm programming. Caution! (4 beeps indicate that MAD5 has already been pro-
grammed);
03. Close the box.
MAD5
49
ACB
D
Page 36

36
7.8.5 - TEST
The detector is equipped with a test button to verify efficient operation of the detector.
Press the button for about 1 second to test the sensor; if it is in good working order the led should flash, the buzzer should emit acoustic tones and the
alarm signal should be transmitted.
To guarantee adequate safety levels, the test should be carried out at least once a month.
7.8.6 - BATTERY REPLACEMENT
Only replace the batteries when signalled by the detector and control unit. Use a 9 V alkaline battery (GP1604A).
01. Open the detector cover and replace the battery (fig. 50) with one of the same type, in observance of the specified polarity.
50
MAD5
EF
Page 37

37
51
AB C
D
F
E
7.9 - Flooding detector (MAD6)
MAD6 comprises 2 electric contacts which must be positioned at approx. 1 mm from the ground. It must be connected
by cable to a compatible detector (e.g. MAD1). In the event of flooding, when the two electric contacts are wet, MAD6 sends
a signal to the connected detector, which transmits it via radio to the control unit.
Caution: the detector connected to MAD6 must be positioned at a height not reached by water.
To obtain optimal detection, the device must be installed vertically on the wall and flush with the ground surface (fig. 51b).
The sensor should be installed in a location most subject to the risk of water leaks, but if the floor is not level, it should be placed at the lowest point of
the room.
7.9.1 - PROGRAMMING
For programming, refer to paragraph 7.9.4 - Connecting a second detector (by cable).
7.9.2 - INSTALLATION
For installation operations, see la fig. 51: using 2 electric wires, connect MAD6 to the input terminals of detector MAD1.
The length of the cable must not exceed 10 m (maximum cable section = 0.25 mm).
MAD6
Page 38

38
7.10 - 4-channel radio transmitter (MATX4)
7.10.1 - OPERATION
MATX4 uses 64 bit rolling code transmission technology. Each key is factory set with a precise function (Table 7) and some of these can be programmed
differently as required. The transmitter is bidirectional, and led L1 (fig. 52) shows the event in progress.
Table 7 (fig. 52)
X = Key (OFF): TOTAL DEACTIVATION
Y = Key (ON): TOTAL ARMING
Z = Key : PARTIAL ACTIVATION OF ZONES A + B
W = Key : DETERRENCE (direct activation of sirens and telephone calls ) / EMERGENCY (silent alarm
with activation of telephone calls)
7.10.2 - STANDARD PROGRAMMING
Before memorising MATX4 on the control unit, check correct operation by pressing any key and ensuring that led L1 lights up (fig. 52).
01. In the main menu of the touchscreen, touch the icon , scroll through the list with the arrow icon and select
02. Enter the “ADMINISTRATOR CODE and touch “OK” to confirm.
03. Touch “Devices”, then “Remote controls” and select one of the 20 programmable remote controls.
04. Touch “Add” and compile the next screen with the following parameters:
• Activation
(enables the user to specify the zones which can be activated with the remote control being programmed).
Touch “Activation” and select the zones to associate with the remote control being programmed. Touch “OK” to confirm
• Deactivation
(enables the user to specify the zones which can be deactivated with the remote control being programmed).
Touch “Deactivation” and select the zones to associate with the remote control being programmed.
• Name
(enables the association of a remote control with the relative user name).
Touch “Name” and enter the user’s name. Touch “OK” to confirm
05. Touch “OK” to confirm.
06. Touch “OK” again and then, on the remote control, press the keys and at the same time. The control unit emits a confirmation beep (3 beeps
indicate that the remote control is already present).
07. Lastly, touch “OK” to confirm the parameters entered.
7.10.3 - SPECIFIC KEY PROGRAMMING
To program the key for the emergency or deterrence request, proceed as follows:
01. In the main menu of the touchscreen, touch the icon , scroll through the list with the arrow icon and select
02. Enter the “ADMINISTRATOR CODE and touch “OK” to confirm.
03. On the touchscreen, touch “Devices” and then “Deterrence” or “Emergency”.
04. In the list displayed, touch a line and complete the next screen with the following parameters:
• Name
Touch “Name” and enter the name to assign to the event (for example: “emergency”). Touch “OK” to confirm
• Voice name Touch “Voice Name” and record the name to assign to the event (for example: “grandmother emergency”).
05. Touch “OK” to confirm.
06. Touch “OK” again and then, on the remote control press and hold the required emergency or deterrence alarm key for 10 seconds (the control
unit emits a confirmation beep; 3 beeps indicate that the remote control is already present).
07. Touch “OK” to confirm.
To program the key for the partial alarm activation (zone B + C) request, proceed as follows:
01. Press and hold keys and at the same time for 10 seconds, the led emits 2 brief orange flashes to confirm changeover of the key function from
alarm to partial activation. The functions can be changed in the other direction simply by repeating the operation. On completion, the led emits 2
short flashes if the key is assigned for partial activation or 3 short flashes if it is assigned as an alarm key.
The partial activation zones of the keys (partial A+B) and (partial B+C) are not modifiable.
Note – Total and partial activation depend on zones A, B, C enabled in the memorisation phase on the touchscreen.
7.10.4 - SIGNALS
The transmitter is bidirectional; after sending the arming or disarming commands, partial or total (phase
in which the orange led is illuminated) it remains on standby for response by the control unit (phase in
which the orange led flashes), after which it displays the results.
- Steady orange led = transmission in progress
- Flashing orange led = awaiting response
- Green led lit for 2 seconds: OFF, system disarmed
- Red led lit for 2 seconds: ON, system armed (total or partial)
- Led off: response not received.
7.10.5 - BATTERY REPLACEMENT
When the battery charge is low, the transmitter range is reduced significantly. When a key is pressed, if
led L1 illuminates and then immediately fades and turns off, this means that the battery is completely
discharged and must be replaced immediately.
Otherwise if led L1 illuminates briefly, this means that the battery charge is low; in this case press and hold
the key for at least half a second to enable the transmitter to attempt delivery of the command. In any
event, if the battery charge is too low to complete a command (and wait for a response) led L1 fades and
the transmitter turns off In these cases, to restore normal operation of the transmitter, replace the old
battery with a new version of the same type (Lithium battery type CR2032), taking care to observe the
specified polarity. To replace the battery, proceed as shown in fig. 53.
52
X
Z
Y
W
L1
53
MATX4
Page 39

39
7.11 - 8-channel radio transmitter (MATX8)
7.11.1 - OPERATION
MATX8 is equipped with 8 keys divided into two groups with different functions: 4 keys (X, Y, Z, W - fig. 54) used for the control of Mhouse alarm systems and 4 keys (1, 2, 3, 4 - fig. 1) used for the control of any automation in the Mhouse range.
The encoding of keys X, Y, Z, W (fig. 54) is compatible with Mhouse alarm systems; each key is factory set with a precise function (see Table 8) but
some keys may be programmed differently as required. The transmitter is bidirectional, and led L1 (fig. 54) shows the event in progress.
Table 8 (fig. 54)
X =
Key
(OFF):
TOTAL DEACTIVATION
Y =
Key
(ON):
TOTAL ARMING
Z =
Key: PARTIAL ACTIVATION OF ZONES A + B
W =
Key: DETERRENCE (direct activation of sirens and telephone calls) / EMERGENCY (silent alarm with
activation of telephone calls
)
7.11.2 - STANDARD PROGRAMMING
Before memorising MATX8 on the control unit, check correct operation by pressing any key and ensuring
that led L1 lights up (fig. 54).
01. In the main menu of the touchscreen, touch the icon , scroll through the list with the arrow icon and select
02. Enter the “ADMINISTRATOR CODE and touch “OK” to confirm.
03. Touch “Devices”, then “Remote controls” and select one of the 20 programmable remote controls.
04. Touch “Add” and compile the next screen with the following parameters:
• Activation
(enables the user to specify the zones which can be activated with the remote control being programmed).
Touch “Activation” and select the zones to associate with the remote control being programmed. Touch “OK” to confirm
• Deactivation (enables the user to specify the zones which can be deactivated with the remote control being programmed).
Touch “Deactivation” and select the zones to associate with the remote control being programmed.
• Name (enables the association of a remote control with the relative user name).
Touch “Name” and enter the user’s name. Touch “OK” to confirm.
05. Touch “OK” to confirm.
06. Touch “OK” again and then, on the remote control, press the keys and at the same time. The control unit emits a confirmation beep (3 beeps
indicate that the remote control is already present).
07. Lastly, touch “OK” to confirm the parameters entered.
7.11.3 - SPECIFIC KEY PROGRAMMING
To program the key for the emergency or deterrence request, proceed as follows:
01. In the main menu of the touchscreen, touch the icon , scroll through the list with the arrow icon and select
02. Enter the “ADMINISTRATOR CODE and touch “OK” to confirm.
03. On the touchscreen, touch “Devices” and then “Deterrence” or “Emergency”.
04. In the list displayed, touch a line and complete the next screen with the following parameters:
• Name
Touch “Name” and enter the name to assign to the event (for example: “emergency”). Touch “OK” to confirm
• Voice name Touch “Voice Name” and record the name to assign to the event (for example: “grandmother emergency”).
05. Touch “OK” to confirm.
06. Touch “OK” again and then, on the remote control press and hold the required emergency or deterrence alarm key for 10 seconds (the control
unit emits a confirmation beep; 3 beeps indicate that the remote control is already present).
07. Touch “OK” to confirm.
To program the key for the partial alarm activation (zone B + C) request, proceed as follows:
01. Press and hold keys and at the same time for 10 seconds, the led emits 2 brief orange flashes to confirm changeover of the key function from
alarm to partial activation. The functions can be changed in the other direction simply by repeating the operation. On completion, the led emits 2
short flashes if the key is assigned for partial activation or 3 short flashes if it is assigned as an alarm key.
The partial activation zones of the keys (partial A+B) and (partial B+C) are not modifiable.
Note – Total and partial activation depend on zones A, B, C enabled in the memorisation phase on the touchscreen.
7.11.4 - MEMORISATION FOR CONTROL OF MHOUSE AUTOMATIONS (keys 1, 2, 3, 4 - fig. 54)
For the memorisation procedure, refer to the instruction manual of the receiver supplied with the automation. These manuals are also available on the
website: www.mhouse.biz
7.11.5 - SIGNALS
The transmitter is bidirectional; after sending the arming or disarming commands, partial or total (phase in which the orange led is illuminated) it remains
on standby for response by the control unit (phase in which the orange led flashes), after which it displays the results.
– Steady orange led = transmission in progress
– Flashing orange led = awaiting response
– Red led = confirmation of system activation
– Green led = confirmation of system deactivation
7.11.6 - BATTERY REPLACEMENT
Replace the old battery with one of the same type (1 lithium battery type CR2032), in observance of the
specified polarity; see fig. 55.
54
X
Z
Y
W
L1
55
MATX8
Page 40

40
7.12 - Indoor siren (MASI1)
7.12.1 - SPECIAL WARNINGS
Install the product in a location difficult to reach, to avoid inadvertent damage, possibly in a location where the sound produced can be propagated to the various other rooms. If necessary, fit additional sirens.
7.12.2 - OPERATION
MASI1 signals intrusion with a powerful acoustic alarm. On each alarm command send by the control unit, it emits an alarm signal lasting approx. 3 minutes; the alarm signal terminates when the control unit is disarmed.
If the siren housing is opened, an alarm signal is activated, lasting approx. 3 minutes.
Acoustic signals
:
• 4 beeps = confirms activation of the control unit
• 1 beep = confirms deactivation of the control unit
• series of beeps for approx. 20 seconds on activation or deactivation of the control unit = batteries discharged
On activation of the battery discharged signal, the batteries must be replaced as soon as possible. Incorrect alarm signals may be generated when batteries are discharged.
7.12.3 - STANDARD PROGRAMMING
The touchscreen is required for programming.
01. Open the box and remove the batteries from the siren (fig. 56-E)
02. Refit the battery, in observance of the specified polarity.
03. Within 60 seconds, use the touchscreen or remote control to activate and deactivate the alarm: the siren emits 6 beeps to confirm programming.
At this point, proceed with installation (paragraph 7.12.4).
7.12.4 - INSTALLATION
For installation, proceed as described in the sequence shown in fig. 56.
If required, the beep volume can be adjusted (not the siren) by turning the potentiometer (fig. 56-F).
7.12.5 - BATTERY REPLACEMENT
Only replace the batteries when signalled by the detector and control unit. Use 3 alkaline batteries, 1.5 V size C.
01. In the main menu of the touchscreen, touch the icon , scroll through the list with the arrow icon and select
02.Enter the “ADMINISTRATOR or USER CODE” and touch “OK” to confirm.
03. Open the siren cover and replace the batteries (fig. 56-E), in observance of the specified polarity.
04. Close the box.
05. Within 60 seconds, use the touchscreen or remote control to activate and deactivate the alarm: the siren emits 6 beeps to confirm programming.
06. Exit the alarms menu by touching the icon at the top right of the display.
56
AB DC
EFG
MASI1
Page 41

41
7.13 - Outdoor siren via radio (MASO1)
7.13.1 - OPERATION
MASO1 signals intrusion with a powerful acoustic alarm. On each alarm command sent by the control unit, it emits an alarm signal lasting approx. 3 minutes; the alarm signal terminates when the control unit is disarmed.
If the siren housing is opened, an alarm signal is activated, lasting approx. 3 minutes. The tamper alarm is also sent to the control unit.
MASO1 receives the various alarm and system status signals from the control unit and displays these with a flashing signal or acoustic
signal.
Signals
:
• 3 beeps and 3 flashes = confirms arming of the control unit
• 1 beep and 1 flash = confirms disarming of the control unit
• series of beeps with lamp lit, for approx. 12 seconds: pre-alarm status
• continuous sound with lamp lit, for approx. 2 seconds; control unit in test/programming phase; opening of the siren box does not trigger tamper alarm.
• rapid series of beeps and flashes for approx. 30 seconds on arming and disarming of the control unit = batteries discharged
On activation of the battery discharged signal, the batteries must be replaced as soon as possible. Incorrect alarm signals may be generated when batteries are discharged.
Thanks to bidirectional communication, it sends the “battery low”, “supervision” and “tamper” signals to the control unit.
It is also equipped with a voice board for the recording of voice messages that can be used to replace acoustic signals (beeps and siren); see paragraph
7.13.4 and chapter 8 - Further details.
7.13.2 - STANDARD PROGRAMMING
The touchscreen is required for programming.
01. Remove the battery from the siren (fig. 57 - phase H-I).
02. In the main menu of the touchscreen, touch the icon , scroll through the list with the arrow icon and select
03. Enter the “ADMINISTRATOR CODE and touch “OK” to confirm.
04. Touch “Devices”, then touch “Other devices”.
05. Select a device from the list and compile the next screen with the following parameters:
• Name
Touch “Name” and enter the name to assign to the device (for example: “Siren”). Touch “OK” to confirm
• Voice name Touch “Voice Name” and record the name to assign to the device (for example: “Siren”).
06. Touch “OK” to confirm.
07. Touch “Ok” again and then insert the batteries in the siren (the control unit emits a beep to confirm siren programming).
To complete programming and then also program the control unit on the siren, proceed with complete installation (paragraph 7.13.3).
7.13.3 - INSTALLATION
Warning- Install the product in a location difficult to reach, to avoid intentional damage, possibly in a location where the sound produced can be propagated efficiently in the required directions. If necessary, fit additional sirens.
For installation, proceed as described in the sequence shown in fig. 57.
01. Open the box (fig. 57-A and B);
02. Remove part “a” and keep in a safe place (fig. 57-C);
03. Remove part “b” (fig. 57-D);
04. Mark the 3 fixing points on the wall and the 4th point for part “a” (fig. 57-E): use the template at the end of the manual with the outline of the
control unit to a scale of 1:1;
05. Drill the wall, insert the plugs supplied and fix (before the siren) part “a” with the screw supplied (fig. 57-F). Caution! - This part is fixed to the
hole of part “b”, previously removed.
06. Secure the siren with the screws supplied (fig. 57- G);
07. Close the box (fig. 57- L and M): the siren emits a beep to confirm box closure. If this does not occur, ensure correct closure of the cover;
08. Immediately afterwards, activate and deactivate the alarm via the touchscreen or remote control; the siren emits 6 beeps and 6 flashes to confirm
programming.
57
ABC D
EF G
a b
MASO1
Page 42

42
7.13.4 - RECORDING VOICE MESSAGES
MASO1 emits the 2 voice messages in two ways; these depend on the type of programming set by the control unit and associated with the siren (see
chapter 8 - Further details):
1) pre-alarm signal
: voice message MSG1 lasting a maximum of 10 seconds and replacing the siren pre-alarm beeps; the high power siren sound then
follows for 3 minutes.
2) voice alarm signal: voice message MSG2 (replacing the siren) lasting a maximum of 20 seconds, repeated continuously for 3 minutes.
To select to a message:
01. Press the key SELECT (fig. 58) one or more times to select the required message (MSG 1 or MSG 2): the relative led flashes (no message is al-
ready recorded) or lights up permanently (message already recorded);
02. Then, within 10 seconds, proceed with one of the following:
• Record a new message (only if led is flashing): press and hold the key REC (fig. 58). Then record the message speaking with a normal voice
at approx. 40-50 cm from the microphone. Release REC at the end of recording (the message will then be played automatically).
• Listen to the selected message (only if led is permanently lit): press the key PLAY (fig. 58).
• Delete a recorded message (only if led is lit): press and hold the key ERASE (fig. 58) until the relative led turns off;
Before closing the housing the volume of the messages can be adjusted as required:
01. Turn the BEEP potentiometer (fig. 59) to modify the volume of the beeps.
02. Turn the MSG potentiometer (fig. 59) to modify the volume of the voice messages.
7.13.5 - BATTERY REPLACEMENT
Only replace the batteries when signalled by the siren and control unit. Use 4 batteries, 1.5 V type D.
01. In the main menu of the touchscreen, touch the icon , scroll through the list with the arrow icon and select
02. Enter the “ADMINISTRATOR or USER CODE” and touch “OK” to confirm.
03. Open the box (fig. 57-A and B) and then the control unit battery compartment (fig. 57-H and I) and replace the batteries with 4 of the same type,
in observance of the specified polarity.
04. Close the box (fig. 57- L and M): the siren emits a beep to confirm box closure. If this does not occur, ensure correct closure of the cover;
05. Exit the alarms menu by touching the icon at the top right of the display.
7.13.7 - LAMP REPLACEMENT
01. In the main menu of the touchscreen, touch the icon , scroll
through the list with the arrow icon and select
02. Enter the “ADMINISTRATOR or USER CODE” and touch “OK” to
confirm.
03. Open the box (fig. 57-A and B) and replace the lamp with one of the
same type (fig. 60);
04. Close the box (fig. 57-L and M).
58 59
60
HIL M
MASO1
Page 43

43
7.14 - Control keypad (MADS1)
7.14.1 - OPERATION
This enables partial or total activation and deactivation of the control unit using one of the ACCESS CODES (5 digits) previously
programmed. IMPORTANT! – On MADS1, the ADMINISTRATOR and USER codes cannot be used.
Maximum transmission security is guaranteed thanks to encrypting using a Rolling Code system. An internal buzzer confirms manoeuvres and emits
audible signals when new events occur and are memorised on the control unit. A battery low signal is also incorporated.
Description of leds and keys
There are 8 indicator leds, 10 numerical keys and 10 function keys (fig. 61):
1 = Leds of zones A, B, C: lit when the zone is enabled
2 = Led : transmission; lit when a radio signal is transmitted
3 = Led : warning - in the case of new events in the control unit memory the
led lights up during deactivation
4 = Led : warning - door open; lit when the control unit is activated and a
door or window has been left open
5 = Led : warning - battery charge low; lit when the control unit is activated
or deactivated to indicate that the battery charge is low and batteries need
to be replaced
6 = Led : lit during standby for confirmation of a control unit command
7 = Keys , and : the key can be used to activate the “Emergency”
or “Deterrence” requests. and special functions
8 = Key : reset key, used to delete a code entered incorrectly
9 = Keys , and : used to select the zones A, B, C to be activated
10 = Key : used to send an activation command to the control unit
11 = Key : used to send a deactivation command to the control unit
12 = Key : used to send a query command to the control unit
Functions available and relative signals
• Control unit activation/deactivation:
- Total arming: enter the personal 5-digit code and after entry of the fifth digit, leds “A - B - C” illuminate, after which press the red key . Entry is
confirmed by the emission of 3 beeps and leds A - B - C remain lit for 30 seconds.
- Partial arming: enter the personal 5-digit code and after entry of the fifth digit, leds (A - B - C) illuminate. Press keys , or of the zones not
to be activated; the relative leds turn off. Now press the red key ;
- Deactivation: enter the personal 5-digit code and after entry of the fifth digit, leds “A - B - C” illuminate, after which press the green key . Deactivation is confirmed by the emission of 1 beep and leds A - B - C remain off.
Note – Deactivation is only total.
Note 1 - Each code used can only activate or deactivate the alarm zones for which it was enabled during the programming phase.
- Deactivation under force (anti-duress): If one or more anti-duress codes have been programmed on the control unit, as an alternative to entry of
the personal 5-digit code, this specific 5-digit code can be entered, which, as well as deactivating the control unit also makes telephone calls to
request assistance as envisaged for this function (see paragraph 5.4.1).
• Code entry errors: if an incorrect code is entered, press the key to reset and enter the correct version.
• Incorrect code: if an incorrect code is used (code not memorised) led [ ] flashes 8 times, and during this interval led [ ] remains lit. After 8 attempts
with an incorrect code, all leds start flashing, and the control unit remains blocked for 30 seconds.
• Control unit status check: press the key to query the control unit; after a brief interval the leds (A, B, C) illuminate according to the zones activat-
ed; if no led turns on, this means that the control unit is deactivated.
7.14.2 - PROGRAMMING
The touchscreen or remote control is required for programming.
• Programming the keypad on the control unit (to use the 5-digit code for activation/deactivation):
01. Open the box and remove the batteries from the keypad (fig. 63).
02. Insert the batteries (remove the separation tab) on the keypad; a beep is emitted and all leds flash for 60 seconds.
03. Within this interval, the control unit must be deactivated (using the touchscreen or remote control); on deactivation, 6 beeps are emitted to confirm
memorisation of the keypad on the control unit.
Note - The volume of the keypad beeps can be adjusted by turning the trimmer as shown in fig. 62 - I.
04. Close the box.
• Programming the key to send “deterrence” or “emergency” alarms:
This procedure enables programming of keys for emergency or deterrence requests, present on the keypad.
01. In the main menu of the touchscreen, touch the icon , scroll through the list with the arrow icon and select
02. Enter the “ADMINISTRATOR CODE and touch “OK” to confirm.
03. On the touchscreen, touch “Devices” and then “Deterrence” or “Emergency”.
04. In the list displayed, touch a line and complete the next screen with the following parameters:
• Name
Touch “Name” and enter the name to assign to the event (for example: “emergency”). Touch “OK” to confirm
• Voice name Touch “Voice Name” and record the name to assign to the event (for example: “grandmother emergency”).
05. Touch “OK” to confirm.
61
12
7
8
9
101112
6435
MADS1
Page 44

44
06. Touch “OK” again and then, on the keypad, press and hold for 10 seconds to generate the emergency or deterrence alarm (the control unit
emits a confirmation beep; 3 beeps indicate that the code is already present).
07. Touch “OK” to confirm.
7.14.3 - WALL-MOUNTED INSTALLATION
Warning - Install the product in an easily accessible location (for example close to the main entrance).
To install the keypad on a wall, proceed as follows:
01. Open the cover (fig. 62-B) and remove the insulation protection (fig. 62-C);
02. Insert the batteries, inobservance of the specified polarity (fig. 62-H): the keypad emits 1 beep and all leds flash for 60 seconds.
During this time, the alarm should be activated
and immediately deactivated using the touchscreen or a transmitter: 6 beeps and shut-down of all
leds confirm programming of the keypad.
7.14.4 - BATTERY REPLACEMENT
Only replace the batteries when signalled by the keypad and control unit. 3 alkaline batteries, 1.5 V size AAA.
01. In the main menu of the touchscreen, touch the icon , scroll through the list with the arrow icon and select
02. Enter the “ADMINISTRATOR or USER CODE” and touch “OK” to confirm.
03. Open the keypad battery compartment (fig. 63) and replace the batteries with 3 of the same type, in observance of the specified polarity.
04. Insert the batteries, inobservance of the specified polarity : the keypad emits 1 beep and all leds flash for 60 seconds.
During this time, the alarm should be deactivated
using the touchscreen or a transmitter: 6 beeps and shut-down of all leds confirm programming
of the keypad.
62
AB C DE
FGHI L
63
MADS1
Page 45

45
9 - PRODUCT MAINTENANCE
cific indicator for this purpose (see chapter 7 for details). This signal is
also sent to the control unit and is displayed on the touchscreen.
Caution! – When batteries are partially discharged, the radio range between devices is reduced and system operation is not guaranteed. Therefore replace batteries to restore full system operation. To replace batteries,
refer to chapter 7 for the instructions related to each alarm system device.
Caution! – Never use new battery models different from the specified version.
In general devices in the Mhouse alarm system do not require special maintenance. In any event, ensure regular cleaning of the product surfaces, and
in particular the sensitive elements of the detectors (sensor areas). These
parts must be dust-free and clean at all times.
Warning – For cleaning the product surfaces, use a slightly damp cloth; use
water only and never detergents or solvents.
An alarm system does not normally signal alarm conditions for extended
periods of time and for this reason correct operation is not always verified.
In any event is is advisable to periodically check efficiency using the special functions of the control unit.
• Perform the device operation test using the function “CONTROL UNIT
TEST” (see paragraph 7.1.1).
• Analyse the “Events list” to locate the source of any malfunctions and to
prevent future problems (the control unit records all events and stores the
last 200 in the memory - see point 6 - User’s guide).
• All system devices powered by batteries have a function that checks bat-
tery charge status and indicates when the charge level is low (in these
cases, residual autonomy is approx. 15-30 days). Each device has a spe-
8.1 - Alarm types
There are different types of alarm:
- Pre-alarm status:
the control unit emits an acoustic signal (beep) or
pre-alarm voice message.
- General alarm
: activation of all sirens for 3 minutes and dialling of all
telephone numbers envisaged for this type of alarm.
- Voice alarm
: in replacement of the siren sound, the siren emits a de-
terrent voice message in the event of an alarm.
- Deterrence alarm: when the system is enabled, this activates all sirens
for 3 minutes and dialling of all telephone numbers envisaged for this
type of alarm; when the system is partially enabled or disabled, this only
activates the sirens.
- Emergency alarm
: dialling of all telephone numbers envisaged for this
type of alarm.
- Technical alarm
: the control unit emits an intermittent audible signal for
15 seconds and dials all telephone numbers envisaged for this type of
alarm.
- Tamper alarm
: with the system enabled, this generates a “general
alarm”; when the system is partially enabled or disabled, this activates an
intermittent audible signal for 3 minutes and dials all telephone numbers
envisaged for this type of alarm.
8.2 - Siren operation
- Indoor sirens: on total or partial activation, these sirens emit 3 beeps
and 1 beep on deactivation. The beep volume can be adjusted through to
level zero.
They are activated for 3 minutes in the event of “general”, “tamper” or “deterrence” alarms.
- Outdoor sirens: on total or partial activation, these sirens emit 3 beeps
and 1 beep on deactivation. The beep volume can be adjusted through to
level zero. The flashing light flashes during siren activation.
They first emit a pre-alarm (series of beeps for 10 seconds) and immediately afterwards the acoustic alarm (3 minutes) in the event of “general”,
“tamper” or “deterrence” alarms. Both the pre-alarm and alarm acoustic
signals can be replaced with two different voice messages which must be
recorded via the microphone on the siren (see fig. 64).
8.2.1 -
Procedure for recording voice messages on the outdoor siren
(MAS01)
2 voice messages can be recorded:
- message 1 = replaces the beep sound during the pre-alarm phase.
(e.g. “”“Caution! Pre-Alarm status)
- message 2 = replaces the siren sound during the general alarm phase.
(e.g. “”“Caution! Alarm in progress)
01. After opening the siren cover (the siren must already be programmed
in the alarm system), using the relative keys proceed as follows:
a) - press SELECT to select the required message (MSG 1 or MSG 2);
the relative led (L1 or L2) flashes ( = MSG not present) or lights up permanently (= MSG present).
b) - listen to the selected message (only if the message is already
present = led lit): press PLAY.
c) - record a new message (MSG 1 or MSG 2): (only if the message
is not already present = led flashing) press and hold REC.
d) - delete a recorded message (MSG 1 or MSG 2): press ERASE
until the relative led turns off (L1 or L2);
02. At this point the voice function volume can be adjusted by means of
the trimmer “MSG”.
03. Close the siren cover.
8.2.2 -
Procedure for activating voice messages on the outdoor siren
(MAS01)
After recording messages on the siren, decide which group of detectors
(zone A, B, C) will activate voice type alarms and which will activate traditional alarms. To activate the messages, proceed as follows.
01. From the main menu press “Alarms”, then “Menu”, “Settings” and
“Alarm type”.
02. In the list displayed, select a zone and associate the type of alarm required. Touch “OK” to confirm.
Example: after activation, all detectors belonging to zone A will generate
a voice type alarm. The remaining detectors (zones B and C) will generate
standard acoustic alarms.
8 - FURTHER DETAILS
64
Page 46

46
10 - TROUBLESHOOTING... (troubleshooting guide)
If a detector repeatedly trips a “tamper” type alarm, check that it is fixed in
place correctly. If necessary, disable the anti-detachment protection (tamper), by setting Dip switch 5 to ON (see the paragraphs on detectors in
chapter 7);
• The “dialler test” does not work:
If the test fails, the causes may be:
- no messages or calls are received = try moving the control unit to a
zone with better GSM coverage or change telephone provider;
- no calls are made on the PSTN land line (also broadband)= the cause
may be disturbance on the telephone line; in this case to override the call
enter the symbol *before the telephone number (e.g. *0421 987654).
Refer also to chapter 7.1.2.
• A detector occasionally generates an improper alarm:
a) - check any warnings in the events list (see point 7 - User’s guide), to
identify which device tripped the alarm;
b) - check whether the batteries are discharged;
c) - ensure that the detector is not dirty or damp.
d) - also, for each type of sensor, perform the following checks:
For door and window opening detectors (MAD1)
- Incomplete door/window closure: if the door or window is not per-
fectly closed, the wind may move it.
- Door/window deformation: check the correct distance between the
sensor and magnet with the door/window closed
- Vibrations: the internal anti-intruder sensor (if active) is sensitive to
strong vibrations
- External contact: the connection to the external contact is sensitive to
high levels of humidity
For infra-red detectors with volumetric lens (MAD2) and with vertical
curtain lens (MAD3)
- Strong currents of hot or cold air: the infra-red sensor is sensitive to
hot moving bodies
- Large insects: for the sensor, a bumblebee of one centimetre would be
like an elephant at a distance of 10 metres
- External contact: the connection to the external contact is sensitive to
high levels of humidity
For detectors of glass breakage (MAD4 )
- Falling objects: can cause noise similar to breaking glass
- Rapid pressure changes: the activation of air conditioners or fans can
generate improper alarms.
For smoke detectors (MAD5)
- Cooking fumes and vapours: place the sensor far from cooking areas
- Dust: avoid positioning the sensor in dusty environments
For flooding detectors (MAD5)
- Condensation or high levels of humidity: high levels of humidity can
produce condensation on the sensor.
- Sensor dirty: dirt increases the risk caused by humidity.
• For all devices in the Mhouse alarm system
Virtually all products are fitted with protection against opening and removal; this system normally acts on the cover and base of the product. Inadequate fixture or incorrect closure of the covers could cause a tamper
alarm signal; this is a rare case for example in the case of temperature
variations.
11 - DISPOSAL
Disposal of batteries
Caution! – The backup batteries and battery packs in the devices
present in this alarm system, also if discharged, contain pollutant substances and therefore must not be disposed of as household waste.
Dispose of according to separate waste collection procedures as envisaged by local current standards
Product disposal
All devices in the alarm system are an integral part of the installation and
must be disposed of as a whole. As in installation, also at the end of product lifetime, the disassembly and scrapping operations must be performed
by qualified personnel.
These products are made of various materials; some may be recycled and
others must be disposed of. Seek information on the recycling and disposal systems envisaged by the local regulations in your area for this product category.
Caution! – Some parts of the products may contain pollutant or hazardous
substances which, if disposed of into the environment, may cause serious
damage to the environment or physical health.
As indicated by the symbol alongside, disposal of this
product in domestic waste is strictly prohibited.
Separate the waste into categories for disposal, according to the methods envisaged by current legislation in your
area, or return the product to the retailer when purchasing a new version.
Caution! – Local legislation may envisage serious fines in the event of abusive disposal of this product.
Page 47

47
Control unit models MACU1 and MACU2
n Power supply: 4 batteries, 1.5 V type D supplied
n Insulation: Class III (safety extra low voltage).
n Absorption: approx. 200 µA on stand-by; maximum 200 mA in alarm status with PSTN operative; maximum 400 mA in alarm status with GSM operative.
n Autonomy: at least 2 years; autonomy estimated with 2 on/off cycles per day, 10 detectors present and 10 alarms per year. Autonomy is reduced in the event of nu-
merous telephone calls.
n Programming: via MATS1 control keypad with portable wireless bidirectional graphic touchscreen with voice guide. The control unit can manage up to 4 MATS1 key-
pads.
n Radio reception-transmission: digital bidirectional communication, in dual band frequency (433 and 868 Mhz) with quartz control; devices pre-encoded in the fac-
tory and managed in self-learning mode.
n Radio range: 100 m in open field free of disturbance or approx. 20 m inside buildings.
n Alarm inputs via radio: up to 50 programmable detectors: immediate, in pairs, or delayed; on 3 activation zones A-B-C or in three 24-hour zones Panic, Emergency,
Technical Alarms.
n Anti-tamper via radio: reception of tamper signal from each detector or siren
n Radio system control: continuous, simultaneous on the 2 operating frequencies and programmable anti-scanner function; reception of supervision and low battery
signals.
n Alarm output via radio: 72 bit coded digital transmissions for alarm system control
n Event log: last 200 events
n Timers: programmable delayed activations. Programmable alarm delay on each detector. Duration of general alarm 3 cycles of 3 minutes each with an interval of 3
minutes.
n Indoor siren: Sound power of 106 db + buzzer with low intensity signal function.
n Acoustic signals: 6 voice messages recordable on 32 Mbit flash memory for approx. 500 s of messages.
n Phone book for telephone calls: up to 10 numbers
n Fixed PSTN telephone connection: Connection with standard RJ11 socket. Automatic adaptation to line characteristics in country of use, according to the selected
language. Compatible with broadband lines.
n GSM telephone connection (*): GSM module, Quad-band, EGSM 850/900/1800/1900 MHz. Output power: - Class 4 (2W) at 850 / 900 MHz - Class 1 (1W) at 1800
/ 1900 MHz Sensitivity: - 107 dBm at 850 / 900 MHz - 106 dBm at 1800 / 1900 MHz.
n Additional functions with GSM: telephone calls also in event of land line mains failure. Delivery of alarm text messages (up to 6) or technical text messages (up to 8)
n Operating temperature: from –10 to +40 °C.
n Dimensions (LxDxH): 211 x 54 x 307 mm.
n Weight: 2 kg, batteries included.
(*) Note – The model MACU2 is not fitted with the GSM module and therefore does not offer the relative GSM functions.
Detector model MAD1
n Type: magnetic contact detector with input for second contact (NC or pulse
count); single or differentiated alarm. Intruder sensor
n Power supply: Alkaline battery 9 V (GP1604A), supplied
n Current absorption: 16 µA on standby - 40 mA in transmission
n Autonomy: approx. 2 years
n Supervision: approx. every 40 minutes
n Display and checks: illumination of led to confirm each alarm. If a led flashes
after an alarm this indicates “battery low”
n Radio transmission: digital communication, in dual band frequency (433 and
868 Mhz) with quartz control; devices pre-encoded in the factory and managed in self-learning mode
n Radio range: 100 m in open field free of disturbance or approx. 20 m inside
buildings.
n Insulation: class III
n Operating temperature: from –10 °C to +40 °C
n Environmental class according to EN 50131-1: II
n Assembly: on the frame of doors or windows
n Dimensions (LxDxH): 33 x 29 x 135 mm
n Weight: 120 g
Detector model MAD2
n Type: infra-red detector with volumetric lens with input for second contact (NC
or pulse count); single or differentiated alarm.
n Power supply: Alkaline battery 9 V (GP1604A), supplied
n Current absorption: 16 µA on standby - 40 mA in transmission
n Autonomy: approx.
2 years
n Supervision: approx. every 40 minutes
n Display and checks: illumination of led to confirm each alarm. If a led flashes
after an alarm this indicates “battery low”
n Radio transmission: digital communication, in dual band frequency (433 and
868 Mhz) with quartz control; devices pre-encoded in the factory and managed in self-learning mode
n Radio range: 100 m in open field free of disturbance or approx. 20 m inside
buildings.
n Insulation: class III
n Operating temperature: from –10 °C to +40 °C
n Environmental class according to EN 50131-1: II
n Assembly: Wall-mounted
n Dimensions (LxDxH): 33 x 28 x 135 mm
n Weight: 130 g
Detector model MAD3
n Type: Infra-red detector with curtain lens and input for second contact (NC or
pulse count); single or differentiated alarm.
n Power supply: Alkaline battery 9 V (GP1604A), supplied
n Current absorption: 16 µA on standby - 40 mA in transmission
n Autonomy: approx.
2 years
n Supervision: approx. every 40 minutes
n Display and checks: illumination of led to confirm each alarm. If a led flashes
after an alarm this indicates “battery low”
n Radio transmission: digital communication, in dual band frequency (433 and
868 Mhz) with quartz control; devices pre-encoded in the factory and managed in self-learning mode
n Radio range: 100 m in open field free of disturbance or approx. 20 m inside
buildings.
n Insulation: class III
n Operating temperature: from –10 °C to +40 °C
n Environmental class according to EN 50131-1: II
n Dimensions (LxDxH): 33 x 31 x 135 mm
n Weight: 120 g
Detector model MAD4
n Type: Detector of glass breakage
n
Power supply: Alkaline battery 9 V (GP1604A), supplied.
n Current absorption: 25 µA on standby, 20 mA in transmission
n Autonomy: approx.
2 years
n Display and checks: operating status test and alarm
n Radio transmission: digital communication, in dual band frequency (433 and
868 Mhz) with quartz control; devices pre-encoded in the factory and managed in self-learning mode
n Insulation: class III
n Radio range: 100 m in open field free of disturbance or approx. 20 m inside
buildings.
n Operating temperature: from –10°C to +40°C
n Environmental class according to EN 50131-1: II
n Dimensions (LxDxH): 108 x 44 x 80 mm
n Weight: 166 g
12 - TECHNICAL SPECIFICATIONS
The kit is produced by Nice S.p.a. (TV) IT, MHOUSE is a company in the group NICE S.p.a.
WARNINGS: • All technical specifications specified herein refer to an ambient temperature of 20°C (± 5°C). • NICE S.p.a reserves the right to apply modifications at any time
as deemed necessary, while maintaining the same functionality and intended use.
Page 48

48
Detector model MAD5
n Type: detector of dense combustion fumes
n Power supply: Alkaline battery 9 V (GP1604A), supplied.
n Current absorption: 15 µA on standby, 25 mA in transmission
n Autonomy: approx. 2 years, with low battery signal
n Supervision: approx. every 40 minutes
n Display and checks: signals via leds
n Protected volume: standard 6 x 6 x 3 m in height; larger or non-square rooms
require more detectors
n Radio transmission: Digital communication, in dual band frequency (433 and
868 Mhz) with quartz control; devices pre-encoded in the factory and managed in self-learning mode
n Insulation: class III
n Radio range: 100 m in open field free of disturbance or approx. 20 m inside
buildings.
n Operating temperature: from –10°C to +40°C
n Environmental class according to EN 50131-1: II
n Assembly: wall-mounted
n Dimensions (∅xA): ø 106 x 60 mm
n Weight: 100 g
Detector model MAD6
n Power supply: not necessary; requires connection to sensor MAD1
n Functions: the alarm signal is generated by a variation in electrical resistances
in the sensor, when contact with water occurs on flooding. Possibility of disabling sensor, for example when cleaning floors
n Dimensions (LxDxH): 35 x 15 x 80 mm
n Weight: 120 g
n Operating temperature: from –10°C to +40°C
Siren model MASO1
n Power supply: 4 batteries, 1.5 V type D supplied
n Average autonomy: 3 years
n Supervision: Approx. every 40 minutes
n Sound power: 116 db at 1 m
n Voice messages: 2 for a total of 30 seconds
n Radio reception: Digital bidirectional communication, on “Dual Band” fre-
quency (433 and 868 MHz)
n Radio range: 100 m in open field free of disturbance or approx. 20 m inside
buildings.
n
Tampering alarm: Transmission of tamper alarm in event of opening of box
and/or detachment from wall and/or violent break-in attempts
n Temperature: –25°C +55°C
n Protection rating: IP 55
n Dimensions: 211 x 66 x 307 mm
n Weight: 2,5 kg
Siren model MASI1
n Type: Indoor siren via radio
n
Power supply: 3 alkaline batteries, 1.5 V size C, supplied.
n Current absorption: 60 µA on standby - 300 mA in alarm status
n Autonomy: approx. 2 years, with 10 alarms per year and two ON-OFF ma-
noeuvres per day
n Sound power: 114 db at 1 m
n Radio reception: digital communication, in dual band frequency (433 and 868
Mhz) with quartz control; devices pre-encoded in the factory and managed in
self-learning mode
n Radio range: 100 m in open field free of disturbance or approx. 20 m inside
buildings.
n Insulation: class III
n Operating temperature: from –10°C to +40°C
n Environmental class according to EN 50131-1: II
n Wall-mounted assembly: vertical / horizontal
n Dimensions (LxDxH): 153 x 37 x 111 mm
n Weight: 700 g
Keypad model MADS1
n Type: bidirectional dual band keypad, for control of alarm system control units
n Power supply: 3 alkaline batteries, 1.5 V size AAA, supplied.
n Absorption: 5 µA on standby - 70 mA in operation
n Autonomy: Approx. 2 years
n Display and checks: 8 function control Leds and buzzer
n Radio transmission: digital communication, in dual band frequency (433 and
868 Mhz) with quartz control; devices pre-encoded in the factory and managed in self-learning mode
n Radio range: 100 m in open field free of disturbance or approx. 20 m inside
buildings.
n Insulation: Class III
n Operating temperature: from –10°C to +40°C
n Environmental class according to EN 50131-1: II
n Assembly: wall-mounted or desktop
n Dimensions (LxDxH): 100 x 23 x 100 mm
n Weight: 200 g
Remote control model MATX4
n Type: 4-key radio transmitter for alarm systems
n Technology adopted: Encoded AM OOK radio modulation
n Radio transmission: digital bidirectional communication, 433 Mhz with quartz
control; devices pre-encoded in the factory and managed in self-learning mode
n Encoding: 64 bit rolling code (18 billion billion combinations)
n Keys: 4
n Radiated power: 1 dBm e.r.p.
n Power supply: 3 V; +20% -40%; with 1 lithium battery type CR2032
n Current absorption: 1 µA on stand by, approx. 25 mA in transmission or re-
ception
n Autonomy: approx. 2 years
n Radio range: 100 m in open field free of disturbance or approx. 20 m inside
buildings(*)
n Housing protection rating: IP 40 (use in the home or protected environments)
n Operating temperature: from –20°C to +55°C
n Dimensions (mm): 38.5 x 13.5 x 50 mm
n Weight: 16 g
(*) Note: All radio controls may be subject to interference which may alter performance. In the
event of such interference, Mhouse cannot provide guarantees as to the effective operating
range of devices.
Remote control model MATX8
n Type: 8-key radio transmitter; 4 keys for alarm system and 4 keys for au-
tomation control
n Technology adopted: Encoded AM OOK radio modulation (433MHz) with
quartz control
n Radio transmission: digital bidirectional communication; devices pre-encoded
in the factory and managed in self-learning mode
n Encoding: “Mhouse Alarm” on keys X, Y, Z, W (fig. 1), 64 bit rolling-code,
“Mhouse Automations” on keys 1, 2, 3, 4 (fig. 1) 72 bit rolling-code
n Keys: 8
n Frequency: 433 MHz
n Radiated power: 1 dBm e.r.p.
n Power supply: 3 V; +20% –40%; with 1 lithium battery type CR2032
n Current absorption: 1 µA on stand by, approx. 25 mA in transmission or reception
n Autonomy: approx. 2 years
n Radio range: 100 m in open field free of disturbance or approx. 20 m inside
buildings(*)
n Housing protection rating: IP 40 (use in the home or protected environments)
n Operating temperature: from –20°C to +55°C
n Dimensions (LxDxH): 38.5 x 13.5 x 93 mm
n Weight: 27 g
(*) Note: All radio controls may be subject to interference which may alter performance. In the
event of such interference, Mhouse cannot provide guarantees as to the effective operating
range of devices.
Touchscreen model MATS1
n Display: graphic, 3.75” (84 x 45 mm) with 240 x128 dots; b/w, backlit
n Input interface: Touchscreen + 4 function keys
n
Power supply: 2 batteries, 1.5V type AA supplied
n Autonomy: on average over 1 year (depending on intensity and type of use)
n Voice guide: 150 pre-recorded phrases (available in main European languages)
n Audio: built-in microphone and loudspeaker
n Voice recorder: 5 messages for a total of 120s (in addition to those on the
control unit)
n Audio output: 0.5W loudspeaker
n Transponder badge reader: for MAB1 type badges
n Automation commands: up to 16 commands
n Luminous signals: 1 blue led, 1 green-red led
n Ports: USB (micro usb) for power supply, battery charging and firmware update
n Radio reception-transmission: digital bidirectional, on 2 channels 433.92 and
434.32 MHz
n Radio range: 100 m in open field free of disturbance or approx. 20 m inside
buildings.
n Operating temperature: from +5°C to +40°C
n Environmental class according to EN 50131-1: I
n Dimensions (LxDxH): 154 x 83 x 20 mm
n Weight: 250 g
Page 49

49
EC declaration of conformity
Declaration in accordance with Directive 1999/5/EC
MACU1, MACU2, MAD1, MAD2, MAD3, MAD4, MAD5, MATX4, MATX8, MADS1, MATS1, MASO1, MASI1 are produced by NICE S.p.a. (TV) I
MHOUSE is a commercial brand name of Nice S.p.a
Note - The contents of this declaration correspond to declarations in the official document deposited at the registered offices of Nice S.p.a. and in particular to the last
revision available before printing this manual. The text herein has been re-edited for editorial purposes.
A copy of the original declaration can be requested from Nice S.p.a. (TV) I.
Number of declaration: 355/MAK Revision: 0 Language: GB
The undersigned, Luigi Paro, in the role of Managing Director, declares under his sole responsibility, that the product:
Manufacturer’s Name: NICE S.p.A.
Address: Via Pezza Alta n° 13, 31046 Rustignè di Oderzo (TV) Italy
Product type: Anti-intruder alarm control unit, battery-powered
Model / Type: MACU1, MACU2
Accessories: MAD1, MAD2, MAD3, MAD4, MAD5, MATX4, MATX8, MADS1, MATS1, MASO1, MASI1
conforms to the essential requirements stated in article 3 of the following EC directive, for the intended use of products:
• Directive 1999/5/EC OF THE EUROPEAN PARLIAMENT AND COUNCIL of 9 March 1999 regarding radio equipment and
telecommunications terminal equipment and the mutual recognition of their conformity according to the following harmonised
standards:
- Health protection (art. 3(1)(a)): EN 50371:2002, only for MACU1 : EN50360:2001+A1:2006
- Electrical safety (art. 3(1)(a)): EN 60950-1:2006
- Electromagnetic compatibility (art. 3(1)(b)): EN 301 489-1 V1.8.1:2008, EN 301 489-3 V1.4.1:2002,
only for MACU1 : EN301489-7 V1.3.1:2005
- Radio spectrum (art. 3(3)): EN 300 220-2 V2.1.2:2007,
only for MACU1 : EN 301511 V9.0.2:2003
only for MATS1 : EN 300330-2 V.1.3.1.:2006
In accordance with the directive 1999/5/EC (appendix V), the product is class 1 and marked:
The product also conforms to the requirements of the following harmonised standards:
EN 50130-4:1995+A1:1998+A2:2003
Oderzo, 24 June 2010
Luigi Paro
(Managing Director)
0682
Page 50

50
–– Alarm management ––
This section describes the general operation of the control unit and system: operation depends on the devices present and type of settings made
during installation.
4 - Activating or deactivating the alarm via a supplementary keypad
• For activation: enter an access code, the press keys A, B, or C to disable any zones not to be activated, after which press key (ON) once.
• For deactivation: enter the access code then press the key (OFF) once.
Note - Each code used can only activate or deactivate the alarm zones for which it was enabled during the programming phase. - Do not use
the ADMINISTRATOR CODE or USER CODE.
Caution! - if an alarm is in progress, the corresponding GSM calls may cause problems with deactivation of the alarm system. In this case move
as close as possible to the control unit to send the deactivation command.
3 - Activating the alarm automatically at a set time
See paragraph 5.5 - Automatic activation.
2 - Activating or deactivating the alarm by a code enabled on the touchscreen
Turn on the terminal; the current alarm status is shown immediately on the status bar.
• For total or partial activation: touch the symbol (ON) and enter the personal ACCESS CODE (or “USER” code); then touch “OK”. To dis-
able activation in specific system zones, touch the relative items and then “OK” to confirm.
The envisaged zones are then activated immediately.
• For deactivation: touch the symbol (OFF) and enter the personal ACCESS CODE (or “USER” code); then touch “OK”.
The zones enabled with this code are then deactivated immediately.
• For deactivation of the alarm under threat (anti-duress): in the event of a threat the alarm can be deactivated with simultaneous dialling
of the telephone numbers envisaged for “emergency” situations, using a specific code programmed with the “Anti-duress” function.
Note - Each code used can only activate or deactivate the alarm zones for which it was enabled during the programming phase
1 - Activating or deactivating the alarm by remote control
• For activation: press the key (ON) (the red led confirms total activation).
• For partial activation (zone A + B): press the key (the red led confirms partial activation).
• For deactivation: press the key (OFF) (the green led confirms total deactivation).
Note - Each remote control used can only activate or deactivate the alarm zones for which it was enabled during the programming phase.
Caution! - if an alarm is in progress, the corresponding GSM calls may cause problems with deactivation of the alarm system. In this case move
as close as possible to the control unit to send the deactivation command.
5 - Managing the alarm system by telephone
Calling the control unit on the PSTN land line (*)
01. Dial the control unit reference telephone number (fixed number)
02. Interrupt the call after the second ring
.
03. Wait 7 seconds and call again: the control unit responds with voice message N° 7(**).
04. After listening to the message, slowly dial the digits of the USER CODE
followed by the symbol #(***).
05. Then slowly enter the digits of the required command (see Table A).
Caution!
(*) It is not possible to call the control unit on the GSM line
(**) Voice message N° 7 must be recorded during programming (see paragraph 5.4.8)
(***) Between pressing one key and the next, wait for the telephone to emit one beep to confirm reception by the control unit
Note - Remote listening
Both when called by the control unit and when the user calls the control unit, during connection on the PSTN fixed line, the user can listen to the environmental
noise captured by the control unit microphone.
To enable this function, press Q on the telephone. Press Q again to stop listening and proceed with sending any commands as required. If no operation is performed, the call is terminated after 60 seconds from ending the remote listening function.
Control unit calling the user automatically
In the event of an alarm, the control unit sends the programmed text messages and makes the calls to all numbers programmed for a specific
event, using the GSM mobile phone line or PSTN land line (for priority see paragraph 5.5).
The first user that answers the call can interrupt the cycle of calls to the subsequent users set in the phone book; to interrupt the calls, listen
to the message and end-of-message beep and then press # on the telephone.
The called user can then interact with the control unit, by entering one of the commands listed in Table A.
USER’S GUIDE
Page 51

Listen to ambient noise (interrupts listening if pressed again)
Query control unit status: 3 beeps = system activated, 1 beep = system deactivated
Total activation: confirmed by 3 beeps
Partial activation (zones A+B only): confirmed by 1 long beep
Disarming and vocal confirmation: 1 beep
Interrupt call cycle
TABELLA A
Q
0 #
0 Q 1 #
0 Q 2 #
0 Q 0 #
#
51
–– Automation control ––
–– Voice recorder ––
The touchscreen has a voice recorder function which the user can use to record and listen to messages. This function is accessed directly from the main
menu, by touching the icon (Memo).
6 - Consulting the events list
The control unit records all events occurred (activation, deactivation, alarms, incoming/outgoing call management etc.), memorising the date,
time, name of the person performing the operation and the device concerned. It is not possible to modify or delete events in the list. The most recent event is shown on the display.
01. Turn on the touchscreen and on the main menu, touch the icon (Alarms);
02. Scroll to the right through the icons by touching the symbol ;
03. Touch the icon (Menu); enter the “ADMINISTRATOR or USER CODE” and touch “OK” to confirm.
04. Touch “Events list” to show the most recent event on display: the first line displays the date and time of the event; the second line displays
the description of the event. Important – The events are shown in abbreviated form; for an explanation of their meanings, refer to examples
in Table B.
10 - Listening to a message
01. Turn on the touchscreen and on the main menu, touch the icon (Messages), then (List).
02. Scroll through the messages in the list and select which one to listen to:
- touch (PLAY) to listen to the message;
- touch (DELETE) to delete the message.
After listening to the new messages, the symbol disappears from the lower section of the screen .
7 - Sending a command by pressing the immediate keys on the touchscreen
This mode is only available if the immediate keys have been associated with commands. Press an immediate key related to the automation to be
controlled (flashing blue led = transmission complete).
8 - Sending a command by touching an icon on display
01. Turn on the touchscreen and on the main menu, touch the icon (Commands);
02. Touch one of the 3 types assigned to the specific automation to be controlled.
03. Scroll through the list to find the required command and then touch or or press and hold to activate radio transmission (the touchscreen led
flashes to confirm transmission).
The touchscreen turns off after a few seconds of inactivity; otherwise touch to return to the previous screen.
9 - Recording a new message
01. Turn on the touchscreen and on the main menu, touch the icon (Messages), then (New);
02. Assign a name to the new message to be recorded and touch “OK”.
03. On the screen displayed, touch (REC) to start recording; then hold the touchscreen in the vicinity of the mouth and record the message in
a normal voice. Touch (STOP) to stop and complete recording.
04. Infine:
- touch (PLAY) to listen the message again;
- touch (SAVE) to save the message permanently;
- touch (DELETE) to remove the message and record a new one.
When the bottom section of the main screen displays the symbol , this means that there are new messages on the voice mail.
Page 52

52
16/05/07 09:32V
M
ARCO OK
(1)(2) (3)(1)
(4) (5)
EXAMPLE 1
16/05/07 18:20
ARM TEL01
(1) (1)
(3)(2)
EXAMPLE 2
on the date 16/05/10, at 9.32 the control unit sent (<) a voice
message ( V ) to Marco. Results were positive.
on the date 16/05/10, at 18.20 the alarm was activated (ARM)
using remote control TEL01
TABLE B
Note On display Meaning
(6) date/time of event
(1) date/time of call
(4) (name) name of call recipient (stored in PHONE BOOK)
ALL alarm
ALL VOC voice alarm
ADMIN access to menu with administrator code
OPEN door/window open
BATT battery low
CANC deletion
BDG Transponder badge
COD access code
DISARM off
IN A (o B o C) partial activation
(7) ARM total activation
C.UNIT INTERF radio disturbance
KO: call failed
NO GSM NETWORK no connection to GSM network
NO PSTN LINE no connection to PSTN telephone line
TAMPER tamper
NO: call failed as no answer
OC call failed as engaged
(5) OK call successful
PROG programming
REMOTE intervention via remote telephone
DET sensor/detector
DET OFF detector disabled
DET ON detector enabled
S SMS text message
SUPERV supervision failure
(8) TEL remote control
TCH touchscreen
USER access to menu with installer code
(3) V voice message
Xxxxx (label) device name (e.g. which activates alarm)
(2) < outgoing call
> incoming call
Page 53

Managing the alarm system by telephone
Calling the control unit on the PSTN land line
01. Dial the control unit reference telephone number (fixed number)
02. Interrupt the call after the second ring
.
03. Wait 7 seconds and call again: the control unit responds with
voice message N° 7.
04. After listening to the message, slowly dial the digits of the USER
CODE followed by the symbol #(*).
05. Then slowly enter the digits of the required command (see Table
overleaf).
(*) Between pressing one key and the next, wait for the telephone to emit one beep
to confirm reception by the control unit
Cut out the coupon and use as a quick guide to manage your system by telephone
Page 54

Listen to ambient noise (interrupts listening if
pressed again)
Query control unit status: 3 beeps = system
activated, 1 beep = system deactivated
Total activation: confirmed by 3 beeps
Partial activation (zones A+B only): confirmed
by 1 long beep
Disarming and vocal confirmation: 1 beep
Interrupt call cycle
TABLE
Q
0 #
0 Q 1 #
0 Q 2 #
0 Q 0 #
#
Page 55

Layout drawing of control unit MACU1/MACU2
to cut out and use for marking wall fixing points
(to scale 1:1)
Page 56

Page 57

Layout drawing of siren MASO1
to cut out and use for marking wall fixing points
(to scale 1:1)
Page 58

Page 59

Page 60

Mhouse is a commercial trademark owned by Nice S.p.a.
Nice S.p.a.
Via Pezza Alta, 13 - Z.I. Rustignè
31046 Oderzo (TV), Italy
Tel. +39 0422 20 21 09
Fax +39 0422 85 25 82
 Loading...