

Page 1
Innominate Security Technologies AG
Rudower Chaussee 13 | 12489 Berlin | Deutschland |
Tel. +49 30 921028-0 | Fax + 49 30 921028-020
www.innominate.com
mGuard smart2 /VPN
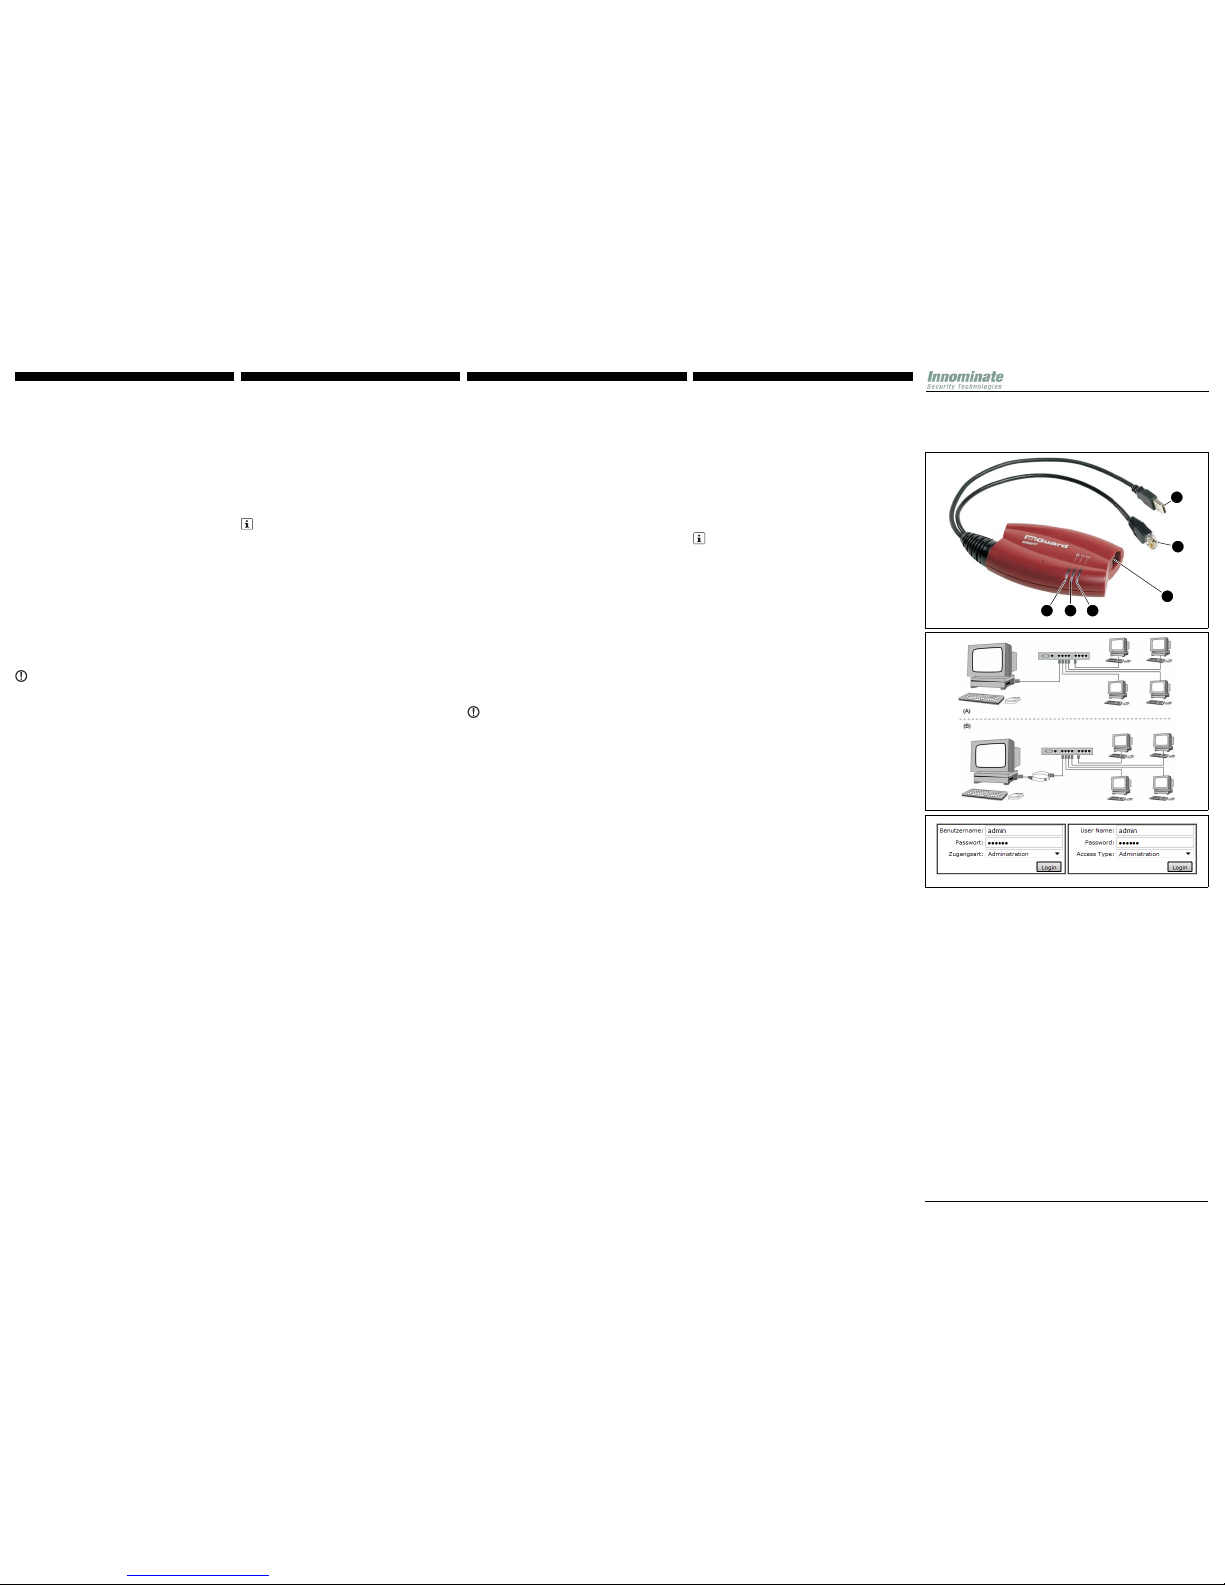
Abb./Fig. 1
Abb./Fig. 2
Abb./Fig. 3
123
4
5
6
DE
Einbauanweisung für den Elektroinstallateur
EN Installation note for electrical personnel
2010-12-01
© INNOMINATE 2010
8135_00
DEUTSCHDEUTSCHENGLISHENGLISH
7. Inbetriebnahme
Der mGuard smart² kann auf drei unterschiedliche Vorgehensweisen in Betrieb
genommen werden:
7.1. Geräte im "Stealth-Modus" in Betrieb nehmen (Standard)
Den mGuard smart² wie folgt in eine bestehende Netzwerkverbindung
zwischenschalten (A)voher / (B) nacher: (Abb.2)
– Verbinden Sie den Ethernet-Stecker (5) des mGuard smart² mit der
entsprechenden Ethernet-Netzwerkkarte des Schützlings bzw. einem validen
Netzwerk-Anschluss des internen Netzwerks.
– Verbinden Sie den USB-Stecker (6) des mGuard smart² direkt mit einer USB-
Buchse des Schützlings oder mit dem optional erhältlichen Netzteil (USBVerteiler sind nicht geeignet).
– Verbinden Sie die Ethernet-Buchse (4) des mGuard smart² mit einem
geeigneten UTP-Kabel (CAT5) mit dem externen Netzwerk/Internet.
– Nach dem Hochfahren des mGuard smart² (ca. 30 Sekunden) und korrektem
Verbinden aller drei Anschlüsse, leuchten die Status-Anzeigen für das interne
und externe Netzwerk (1, 3) grün, die Status-Anzeige für Heartbeat (2) blinkt
grün.
Über einen lokal angeschlossenen Rechner (z.B. der Schützling) mit einem
HTTPS-fähigen Web-Browser (z. B. Mozilla Firefox, Google Chrome, Apple
Safari, Microsoft Internet Explorer) kann der mGuard smart² über das interne
Netzwerk nun sicher konfiguriert werden. Das verwendete HTTPS-Protokoll wird
zur Verschlüsselung und zur Authentifizierung der Kommunikation zwischen dem
mGuard smart² und dem Browser ve rwendet.
Im Browser bitte die folgende Adresse eingeben: https://1.1.1.1/
Die Verbindung zum mGuard smart² wird hergestellt. Der Sicherheitshinweis
wegen eines angeblich ungültigen/nicht vertrauenswürdigen Zertifikats wird
angezeigt. Diese Meldung resultiert aus der Verwendung eines mGuard-eigenen
Zertifikats von Innominate, welches dem Browser noch unbekannt, jedoch zur
Verschlüsselung der Kommunikation zwingend notwendig ist.
Quittieren Sie den Hinweis mit:
´Dieses Zertifikat immer/temporär akzeptieren´ (Firefox), ´Laden dieser Website
fortsetzen´ (Internet Explorer), ´Trotzdem Fortfahren´ (Chrome), bzw. ´Fortfahren´
(Safari).
Die Anmeldemaske des mGuard smart² erscheint. (Abb.3)
Wählen Sie die Zugangsart ´Administration´ und geben Sie bitte zum erstmaligen
Anmelden den folgenden Default-Benutzernamen und -Passwort ein (Groß- /
Kleinschreibung beachten):
Benutzername: admin
Passwort: mGuard
Zugangsart: Administration
Nach erfolgreicher Anmeldung wird die integrierte mGuard Konfigurations- und
Administrations-oberfläche angezeigt. Nun können Sie mit der Konfiguration des
mGuard smart² beginnen.
Eine fehlende Konnektivität des internen oder externen Netzwerks wird
durch die jeweils nicht leuchtende Status-Anzeige (1, 3) gemeldet.
Sollte keine der Status- und Diagnose-Anzeigen leuchten, so fehlt die
korrekte Anschlussspannung am USB-Stecker.
Thank you for putting your trust in the mGuard product range by purchasing the
mGuard smart² from Innominate. mGuard smart² is a compact firewall/router/VPN
device from Innominate Security Technologies AG with low requirements on
industrial hardening for portable and s tatic protection of work places and
environments near the production process.
This package slip contains a brief description for setting up your mGuard smart²
and contains important instructions for startup.
1. Safety no tes
To ensure correct operation and the safety of the environment and of personnel,
the mGuard smart² must be installed, operated, and maintained correctly. Please
use the mGuard smart² for its intended purpose as suited.These can be looked up
in the relevant mGuard manual. The user manual as well as additional pr oduct
information can be found in the download area of the Innominate website at
www.innominate.de or www.innominate.com.
Further technical information can also be found in the module-specific data sheet
and on the Phoenix Contact website at www.download.phoenixcontact.de.
Only connect the RJ45 Ethernet ports and the cable plug of the mGuard smart² to
LAN installations. Some telecommunications connections also use RJ45 sockets
and these may not be connected to the RJ45 connections of the mGuard smart².
2. Technical limit values
The product is intended for use only within the technical limit values specified in the
data sheets.
The following limit values must be observed:
– Do not go below or exceed the ambient temperature range of 0 - +40° C.
– Do not go below or exceed the specified voltage supply range.
– A maximum air humidity of 90 % must not be exceeded an d formation of
condensation must be avoided.
– Th e maximum switching voltag e and the maximum current c arrying capacity
must not be exceeded .
– The maximum input voltage and the maximum output current must not be
exceeded.
Responsibility of the operator
The operator must comply with all current national regulations with respect to
operation, function testing, repairs and maintenance of electronic devices.
Staff qualification
The installation, startup and maintenance of the product may only be performed by
qualified specialist staff. Specialist staff must read and understand this
documentation and comply with instructions.
Safety instructions for transporting
The following instructions must be observed:
- do not subject the product to humidity during transit. Pack the product
accordingly.
- pack the product in such a way that it is protected against shock during transit
e.g., in padded packa ging.
Before installing, check the product for possible damage caused by inappropriate
transport. Transport damage must be recorded in the shipping documents. All
claims for damage must be mad e to the shipping company im mediately and prior
to installation.
3. Safety instructions for the electrical installation
Electrical connection may only be performed according to circuit diagrams by
authorized specialist staff. Observe the instructions on the electrical connection in
order not to adversely effect the degree of electrical protection.
Safe isolation of live circuits is only guaranteed if connected devices fulfill
requirements specified by VDE 0106 T.101 (safe isolation). Additionally isolate or
lay supply lines to live circuits separately.
4. Warranty conditions
The manufacturer is not liable for damages resulting from failure to use for not
intended purpose, failure to observe this documentation, failure to deploy
adequately qualified staff as well as unauthorized modification. The warranty
conditions of the manufacturer expire.
5. Limitations on liability
This brief description is intended to explain the content and processes described
and undergoes regular checking. Because it is not possible to guarantee that the
content and processes are correct in all respects, liability is excluded for all
statements or estimates within. Please also be aware that technical data can be
changed at any time.
6. Overview (F ig.1)
1 Diagnostics/status display - internal network
2 Diagnostics/status display - heartbeat
3 Diagnostics/status display - external network
4 RJ45 socket: network interface for connection to an external network/Internet;
use an UTP cable (CAT 5); the cable is not supplied as standard
5 RJ45 connector: network interface for connection to computers or internal
network to be protected
6 USB connectors for connection to a computer or power supply (not supplied as
standard) for the power supply and serial console
Warning:
This is a Class A item of equipment. This equipment can cause radio
interference in residential areas, and the operator may be required to take
appropriate measures.
7. Installation:
The mGuard smart² can be set up in three different ways:
7.1. Operation in "stealth mode" (default)
Insert the mGuard smart² into an existing network connection as follows (A)before
/ (B) after: (Fig.2)
– Connect the Ethernet connector (5) of the mGuard smart² to the corresponding
Ethernet network card of the device to be protected or a valid network connector
of the internal network.
– Connect the USB connector (6) of the mGuard smart² directly to the USB socket
of the device to be protected or the optional available power supply (USB hubs
are not suitable).
– Connect th e Ethe rnet socke t (4) of the mGuar d sma rt² wi th a s uitab le UTP cabl e
(CAT5) to the external network/Internet.
– After booting the mGuard smart² (approx. 30 seconds) and correct connection
of all three connections, the status displays for the internal and external network
(1, 3) light up green, the status display for the heartbeat (2) flashes green.
The mGuard smart² can now be safely configured via a locally connected
computer in the internal network using a HTTPS-capable we b browser (e.g.,
Mozilla Firefox, Google Chrome, Apple Safari, Microsoft Internet Explorer) . The
HTTPS protocol is used for encryption and authentication of the communication
between the mGuard smart² and the browser.
Enter the following address into the browser: https://1.1.1.1/
A connection to mGuard smart² is established. A security message indicating a
possible invalid/not trusted certificate is displayed. This message results from the
use of an mGuard certificate from Innominate that is not yet known to the browser
but necessary for encryption of the communication.
Confirm this message with:
´Accept this certificate always/temporarily´ (Firefox), ´Continue loading this
website´ (Internet Explorer), ´Continue anyway´ (Chrome), or ´Continue´ (Safari).
The Login form of mGuard smart² is displayed. (Fig.3)
Select ´Administration´ as access type and enter the default user name and
password when using for the first time (case sensitive):
User name: admin
Password: mGuard
Access type: Administration
After successful login, the integrated mGuard configuration and administration
interface is displayed. Now you can begin with the configuration of mGuard smart².
Status displays (1, 3) that do not light up indicate a failure to connect to the
internal or external network.
If the status or diagnostics display do not light up, this is due to incorrect
connection voltage at the USB connector .
Herzlichen Dank für Ihr Vertrauen in die mGuard Produktfamilie durch den Erwerb
des mGuard smart² von Innominate. mGuard smart² ist eine kompakte Firewall/
Router/VPN-Appliance der Innominate Security Techn ologies AG für die portable
und stationäre Absicherung von Arbeitsplätzen und produktionsnahen
Umgebungen mit geringen Anforderun gen an eine industrielle Härtung.
Diese Packungsbeilage beinhaltet die Kurzbeschreibung zur Einrichtung Ihres
mGuard smart² und enthält wichtige Hinweise zur Inbetriebnahme.
1. Sicherheitshinweise
Um den ordnungsgemäßen Betrieb sicherzustellen und die Sicherheit der
Umgebung und von Personen zu gewährleisten, muss der mGuard smart² richtig
installiert, betrieben und gewartet werden. Bitte verwenden Sie den mGuard
smart² ausschließlich auf die dafür vorgesehene Art und für geeignete Zwecke.
Diese können im entsprechenden mGuard Handbuch nachgeschlagen werden.
Das Benutzerhandbuch sowie weitere Produktinformationen finden Sie im
Download-Bereich der Innominate Website unter www.innominate.de bzw.
www.innominate.com.
Weiterführende technische Informationen finden sich auch im modulspezifischen
Datenblatt und der Phoenix Contact Website unter
www.download.phoenixcontact.de.
Schließen Sie die RJ45-Ethernet-Ports und Stecker des mGuard smart² nur an
passende Netzwerk-I nstallationen an. Einig e Fernmeldeanschlüsse verwenden
ebenfalls RJ45-Buchsen; diese dürfen nicht mit den RJ45-Anschlüssen des
mGuard smart² verbunden werden.
2. Technische Grenzwerte
Das Produkt ist ausschließlich für die Verwendung innerhalb der in den
Datenblättern angegebenen technischen Grenzwerte bestimmt.
Folgende Grenzwerte sind einzuhalten:
– Die Umgebungstemperaturgrenzen von 0 - +40° C dürfen nicht unter- bzw.
überschritten werden.
– Der Versorgungsspannungsbereich darf nicht unter- bzw. überschritten werden.
– Die maximale Luftfeuchtigkeit von 90% darf nicht überschritten werden,
Kondensatbildung muss vermieden werden.
– Die maximale Schaltspannung und die maximale Schaltstrombelastung dürfen
nicht überschritten werden.
– Die maximale Eingangsspannung und der maximale Eingangsstrom dürfen
nicht überschritten werden.
Pflichten des Betreibers
Der Betreiber muss grundsätzlich die in seinem Land geltenden nationalen
Vorschriften bezüglich Betrieb, Funktionsprüfung, Reparatur und Wartung von
elektronischen Geräten beachten.
Qualifikation des Personals
Die Installation, Inbetriebnahme und Wartung des Produkts darf nur durch
ausgebildetes Fachpersonal erfolgen. Das Fachpersonal muss diese
Dokumentation gelesen und verstanden haben und die Anweisungen befolgen.
Sicherheitshinweise zum Transport
Die folgenden Hinweise sind zu beachten:
- Das Produkt darf während des Transports keiner Feuchtigkeit ausgesetzt
werden. Das Produkt ist entsprechend zu verpacken.
- Das Produkt bitte so verpacken, dass es vor Erschütterungen beim Transport
geschützt ist, z.B. durch eine luftgepolsterte Verpackung.
Das Produkt ist vor der Installation auf mögliche Beschädigungen überprüfen, die
durch unsachgemäßen Transport entstanden sein könnten. Transportschäden
müssen auf den Frachtpapieren festgehalten werden. Alle
Schadensersatzansprüche sind unverzüglich und vor der Installation gegenüber
dem Spediteur geltend zu machen.
3. Sicherheitshinweise zur elektrischen Installation
Der elektrische Anschluss darf nur von autorisiertem Fachpersonal gemäß den
Elektroplänen vorgenommen werden. Bitte die Hinweise zum elektrischen
Anschluss im Handbuch beachten, ansonsten kann die elektrische Schutzart
beeinträchtigt werden.
Die sichere Trennung von berührungsgefährlichen Stromkreisen ist nur
gewährleistet, wenn die angeschlossenen Geräte die Anforderungen der VDE
0106 T.101 (Sichere Trennung) erfüllen. Für die sichere Trennung die Zuleitungen
getrennt von berührungsgefährlichen Stromkreisen führen oder zusätzlich
isolieren.
4. Gewährleistungs bestimmungen
Eine nicht bestimmungsgemäße Verwendung, ein Nichtbeachten dieser
Dokumentation, der Einsatz von nicht ausreichend qualifiziertem Personal sowie
eigenmächtige Veränderungen schließen die Haftung des Herstellers für daraus
resultierende Schäden aus. Die Gewährleistung des Herstellers erlischt.
5. Haftungsbeschränkung
Diese Kurzbeschreibung soll die hierin beschriebenen Inhalte und Prozesse
wiedergeben und wird regelmäßig überprüft. Da es jedoch nicht möglich ist
sicherzustellen, dass die Inhalte und Prozesse in jeder Hinsicht richtig dargestellt
sind, ist die Haftung für die hierin getroffenen Aussagen oder Einschätzungen
ausgeschlossen. Bitte beachten Sie auch, dass technische Daten jederzeit
geändert werden können.
6. Übersicht (Abb.1)
1 Diagnose/Status-Anzeige - Internes Netz
2 Diagnose/Status-Anzeige - Heartbeat
3 Diagnose/Status-Anzeige - Externes Netz
4 RJ45 Buchse: Netzwerkschnittstelle für den Anschluss an das externe
Netzwerk/Internet; benutzen Sie ein UTP-Kabel (CAT 5); das Kabel ist nicht im
Lieferumfang enthalten
5 RJ45 Stecker: Netzwerkschnittstelle für den Anschluss an den zu schützenden
Rechner bzw. das zu schützende interne Netzwerk (Schützling)
6 USB-Stecker für den Anschluss an einen Rechner oder Netzteil (nicht im
Lieferumfang enthalten) für die Stromversorgung und serielle Konsole
Warnung:
Dies ist eine Einrichtung der Klasse A. Diese Einrichtung kann im
Wohnbereich Funkstörungen verursachen; in diesem Fall kann vom
Betreiber verlangt werden, angemesse ne Maßnahmen durchzuführen.
Page 2
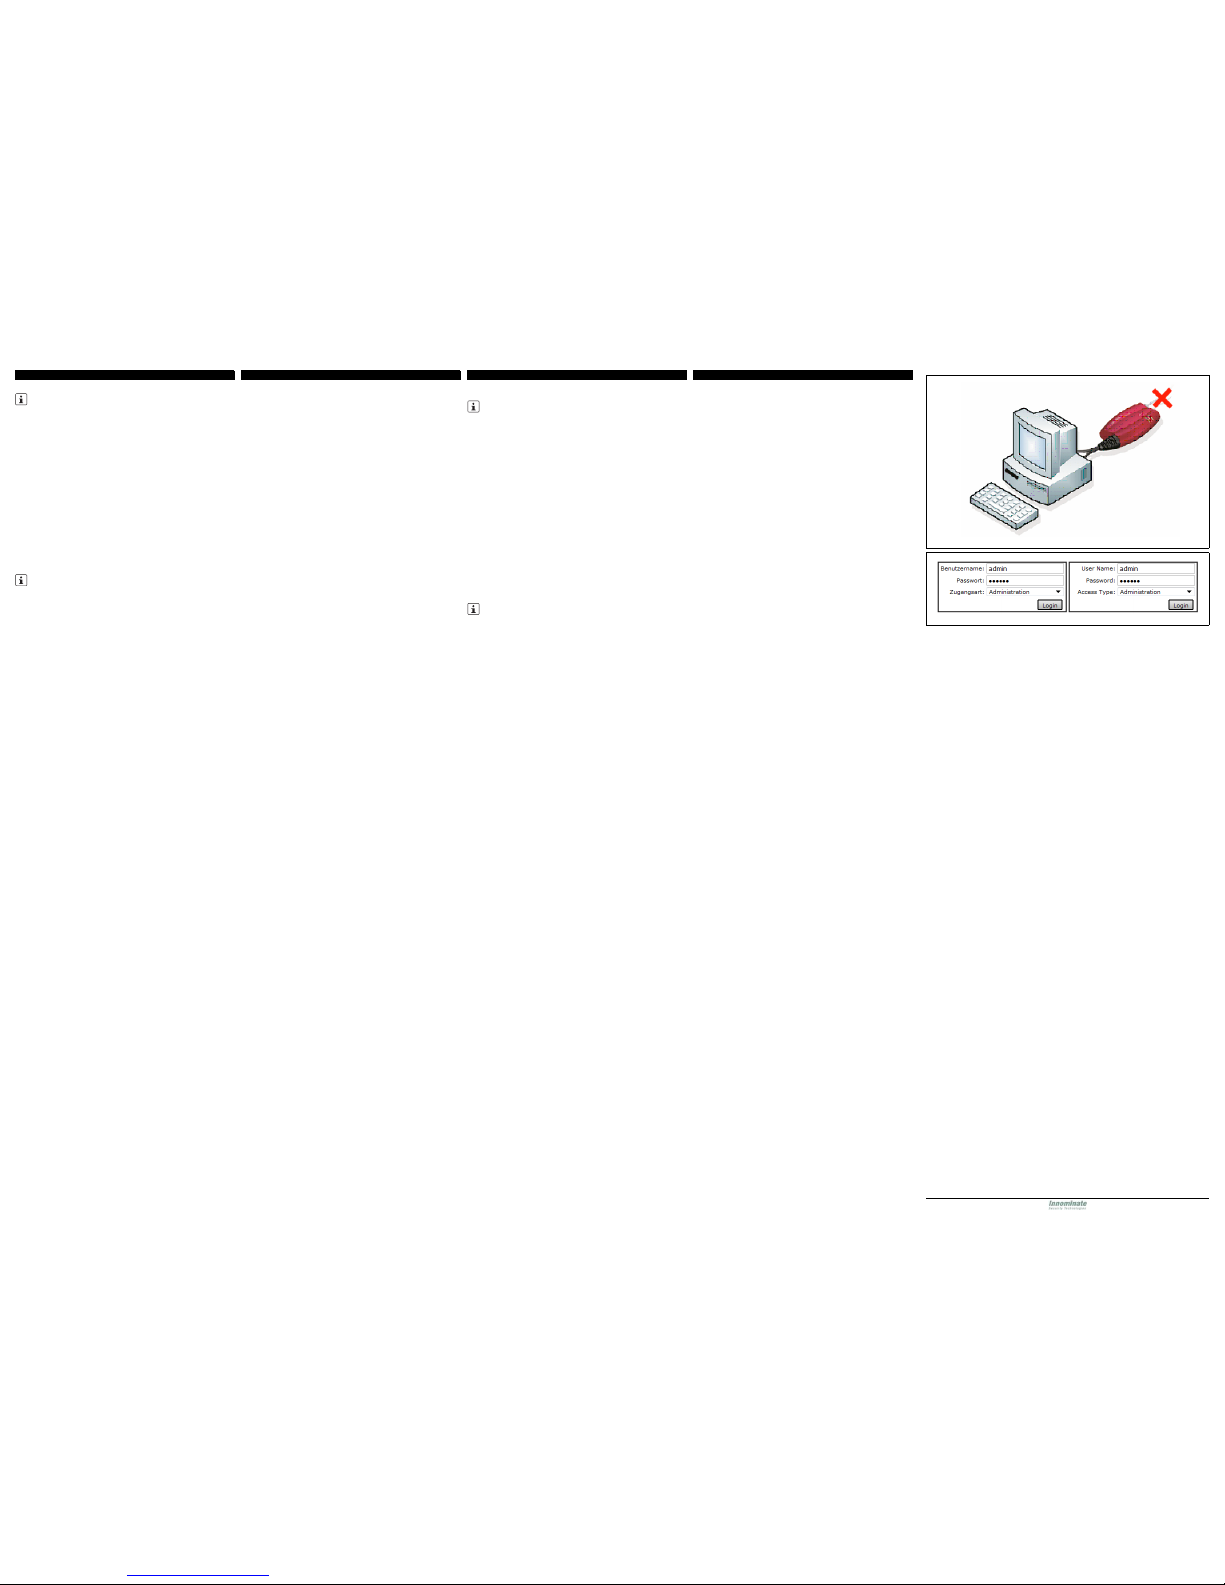
Abb./Fig. 4
Abb./Fig. 5
DEUTSCHDEUTSCHENGLISHENGLISH
Quittieren Sie den Hinweis mit:
´Dieses Zertifikat immer/temporär akzeptieren´ (Firefox), ´Laden dieser Website
fortsetzen´ (Internet Explorer), ´Trotzdem Fortfahren´ (Chrome), bzw. ´Fortfahren´
(Safari).
Die Anmeldemaske des mGuard smart² erscheint
Wählen Sie die Zugangsart ´Administration´ und geben Sie bitte zum erstmaligen
Anmelden den folgenden Default-Benutzernamen und -Passwort ein (Groß- /
Kleinschreibung beachten):
Benutzername: admin
Passwort: mGuard
Zugangsart: Administration
Nach erfolgreicher Anmeldung wird die integrierte mGuard Konfigurations- und
Administrations-oberfläche angezeigt. Nun können Sie mit der Konfiguration des
mGuard smart² beginnen.
8. Fehlerbehebung
Falls keine Verbindung zum mGuard smart² hergestellt werden kann, gehen Sie
bitte wie folgt vor:
– Kontrollieren Sie alle Stecker und Anschlüsse auf korrekten Sitz und Funktion
mit Hilfe der Diagnose- und Status-Anzeigen.
– Ziehen Sie den USB-Stecker des mGuard smart² und verbinden Sie diesen
direkt mit einer anderen USB-Buchse.
– Tauschen Sie das N etzwerkkabel des externen Netzwerks aus.
– Benut zen Sie wenn möglich andere Netzwerkanschlüsse am internen bzw.
externen Netzwerk.
– Deaktivieren Sie für die Dauer de r Konfiguration eine mögliche bestehende
Software-Firewall auf ihrem Rechner.
– Deaktivieren Sie für die Dauer de r Konfiguration eine mögliche bestehende
Antivirus-Software auf ihrem Rechner.
– Benutzen Sie einen anderen Browser und achten Sie auf die zwingende
Verwendung der Syntax ´https//´ statt ´http//´.
– B enutzen Sie zum Konf igurieren vorübergeh end einen anderen Rech ner.
8.1. Nur im "Stealth-Modus"
Bei einem fehlenden oder fehlerhaften Standardgateway des
Konfigurationsrechners kann über die Adresse https://1.1.1.1/ nicht auf den
mGuard smart² zugegriffen werden. In diesem Fall ist das Standardgateway des
Konfigurationsrechners wie folgt zu initialisieren (Beispiel für Microsoft Windows
XP):
Im Dialogfeld „Eigenschaften von Internetprotokoll (TCP/IP)“ der betreffenden
Netzwerkschnittstelle des Konfigurationsrechners die Adresse des
Standardgateways ermitteln oder, falls nicht vorhanden, wie folgt setzen:
IP-Adresse: 192.168.1.10
Subnetzmaske: 255.255.255.0
Standardgateway: 192.168.1.2
Anschließend in der Eingabeaufforderung (Menü: Start, Alle Programme,
Zubehör, Eingabe-au fforderung) folgendes K ommando eingeben (so fern
192.168.1.2 die ermittelte oder festgelegte IP-Adresse des Standardgateways ist):
arp -s 192.168.1.2 00-aa-aa-aa-aa-aa
Über die interne Netzwerkschnittstelle kann jetzt auf den mGuard smart² unter der
Adresse https://1.1.1.1/ zugegriffen werden.
Nach der Konfiguration des mGuard smart² stellen Sie das Standardgateway
wieder zurück. Dazu entweder den Konfigurationsrechner neu starten oder in der
Eingabeaufforderung folgendes Kommando eingeben:
arp -d
Je nachdem, wie Sie den mGuard smart² konfigurieren, müssen Sie
gegebenenfalls anschließend die Netzwerkschnittstelle des lokal
angeschlossenen Rechners bzw. Netzes entsprechend anpassen.
7.2. Operate device via temporary management IP address (Fig. 4)
In this case, the mGuard smart² is accessible using the management IP address
192.168.1.1/24 via both the internal and the external network interface. An address
conflict with the external network interface is not possible as long as a functioning
network is not connected. This management IP address is normally nonpersistent.
However, if the external network interface is connected after booting the mGuard
smart² , the management IP address remains valid and an address conflict with an
existing address in t he external network is possible.
Connect the mGuard smart² as follows:
– Connect the Ethernet connector (5) of the mGuard smart² to the corresponding
Ethernet network card of the configuration computer or a valid network
connector of the internal network.
– Connect the USB connector (6) of the mGuard smart² directly to the USB socket
of the connector or the optional available power supply (USB hubs are not
suitable).
– After booting the mGuard smart² (approx. 30 seconds) and correct connection
of all three connections, the status displays for the internal network (1) lights up
green, the status display for the heartbeat (2) flashes green and the display for
the external network (3) does not light up.
In order to access the mGuard smart² , the configuration computer must be
adapted to the management IP address of the mGuard smart² (example Microsoft
Windows XP):
Set the following in the dialog window "Internet protocol (TCP/IP) attributes" of the
relevant network interface of the configuration computer:
IP address: 192.168.1.10
Subnet mask: 255.255.255.0
Default gateway: 192.168.1.2
The mGuard smart² can now be safely configured via a locally connected
computer using a HTTPS-capable web browser (e.g., Mozilla Firefox, Google
Chrome, Apple Safari, Microsoft Internet Explorer) . The HTTPS protocol is used
for encryption and authentication of the communication between the mGuard
smart² and the browser.
Enter the following address into the web browser: https://192.168.1.1/
A connection to mGuard smart² is established. A security message indicating a
possible invalid/not trusted certificate is displayed. This message results from the
use of an mGuard certificate from Innominate that is not yet known to the browser
but necessary for encryption of the communication.
Confirm this message with:
´Accept this certificate always/temporarily´ (Firefox), ´Continue loading this
website´ (Internet Explorer), ´Continue anyway´ (Chrome), or ´Continue´ (Safari).
The Login form of mGuard smart² is displayed. (Fig.5)
Select ´Administration´ as access type and enter the default user name and
password when using for the first time (case sensitive):
User name: admin
Password: mGuard
Access type: Administration
After successful login, the integrated mGuard configuration and administration
interface is displayed. Now you can begin with the configuration of mGuard smart².
7.3. Startup of the device via BootP
In initial startup mode, the mGuard smart² additionally starts a BootP client in the
internal network interface (5). The BootP-Client is compatible to the BootP servers
´IPassign´ from Phoenix Contact as well as ´DHCPD´ under Linux. An english
version of the software can be downloaded for free at:
http://www.innominate.de >Downloads >Software
http://www.innominate.com >Downloads >Software
http://phoenixcontact.com/automation/32119_30373.htm
If an unconfigured mGuard smart² detects a BootP-Server after booting, the BootP
protocol assigns an IP address, a network submask and an optional default
gateway to the mGuard smart² for the internal network interface. These
parameters are saved in the device which is accessible immediately.
The mGuard smart² can now be safely configured via a locally connected
computer using a HTTPS-capable web browser (e.g., Mozilla Firefox, Google
Chrome, Apple Safari, Microsoft Internet Explorer) . The HTTPS protocol is used
for encryption and authentication of the communication between the mGuard
smart² and the browser.
Enter the address assigned by BootP into the web browser: e.g., https://
192.168.1.1/
A connection to mGuard smart² is established. A security message indicating a
possible invalid/not trusted certificate is displayed. This message results from the
use of an mGuard certificate from Innominate that is not yet known to the browser
but necessary for encryption of the communication.
Confirm this message with:
´Accept this certificate always/temporarily´ (Firefox), ´Continue loading this
website´ (Internet Explorer), ´Continue anyway´ (Chrome), or ´Continue´ (Safari).
The Login form of the mGuard smart² appears (fig. 5).
Select ´Administration´ as access type and enter the default user name and
password when using for the first time (case sensitive):
User name: admin
Password: mGuard
Access type: Administration
After successful login, the integrated mGuard configuration and administration
interface is displayed. Now you can begin with the configuration of mGuard smart².
If the the external mGuard smart² network interface (4) is not connected to
a functioning network in initial startup mode, the address is https://1.1.1.1/
(see "Connect device in ´Stealth-Modus´) is not accessible.
If the status or diagnostics display do not light up, this is due to incorrect
connection voltage at the USB connector .
8. Error correction
If connection to the mGuard smart² cannot be established, proceed as follows:
– With the help of the diagnostics and status indicators, check that all connectors
and connections are securely fixed and function correctly.
– Remove the USB connector of the mGuard smart² and insert it directly into
another USB socket.
– Replace the network cable of the external network.
– If possible, use other network connections of the internal or external network.
– Deactivate a possible existing software firewall on your computer during
configuration.
– Deactivate existing antivirus software on your computer during configuration.
– Use a different browser and make sure you enter ´https//´ instead of ´http//´.
– Temporarily use a different computer for configuration.
8.1. Only in "stealth mode"
In the case of a missing or faulty default gateway of the configuration computer, the
mGuard smart² cannot be accessed via the https://1.1.1.1/ address. In this case,
initialize the default gateway of the configuration computer as follows (example for
Microsoft Windows XP):
Determine the address of the default gateway of the relevant network interface of
the configuration computer un der "Internet protocol (TCP/IP) a ttributes" or if not
possible, set as follows:
IP address: 192.168.1.10
Subnet mask: 255.255.255.0
Default gateway: 192.168.1.2
Subsequently enter the following command under (menu: Start, All Programs,
Accessories, input prompt) (if 192.168.1.2 is the detected or set IP address of the
default gateway):
arp -s 192.168.1.2 00-aa-aa-aa-aa-aa
The mGuard smart² can now be accessed under the address https://1.1.1.1/ via
the internal network interface.
After configuring the mGuard smart², reset the default gateway. Restart the
configuration or enter the following command into the input prompt:
arp -d
Depending on the configuration of the mGuard, it may then be necessary to adapt
the network interface of the locally connected computer or network accordingly.
7.2. Geräte über temporäre Management IP-Adresse in Betrieb nehmen
(Abb. 4)
Der mGuard smart² wird in diesem Fall automatisch über die Management IPAdresse 192.168.1.1/24 sowohl über die interne als auch externe
Netzwerkschnittstelle erreichbar. Ein Adressenkonflikt an der externen
Netzwerkschnittstelle ist nicht möglich, solange diese nicht an ein
funktionierendes Netzwerk angeschlossen wird. Diese Management IP-Adresse
ist normalerweise nicht persistent.
Wird nach dem Hochfahren des mGuard smart² jedoch die externe
Netzwerkschnittstelle nachträglich verbunden, bleibt die Management IP-Adresse
bestehen und ein Adressenkonflikt mit bereits bestehenden Adressen im externen
Netzwerk wäre möglich.
Den mGuard smart² folgendermaßen anschließen:
– Verbinden Sie den Ethernet-Stecker (5) des mGuard smart² mit der
entsprechenden Ethernet-Netzwerkkarte des Konfigurationsrechners bzw.
einem validen Netzwerk-Anschluss des internen Netzwerks.
– Verbind en Sie den USB-Stecker (6) des mGuard smart² direkt mit einer USB-
Buchse des Rechners oder mit dem optional erhältlichen Netzteil (USB-Verteiler
sind nicht geeignet).
– Nach dem Hochfahren des mGuard smart² (ca. 30 Sekunden) und korrektem
Verbinden der beiden Anschlüsse, leuchten die Status-Anzeigen für das interne
Netzwerk (1) grün, die Status-Anzeige fü r Heartbeat (2) blinkt g rün, die Anzeige
für das externe Netzwerk (3) bleibt dunkel.
Um den mGuard smart² erreichen zu können, muss der Konfigurationsrechner an
die Management IP-Adresse des mGuard smart² angepasst werden (Beispiel
Microsoft Windows XP):
Im Dialogfeld „Eigenschaften von Internetprotokoll (TCP/IP)“ der betreffenden
Netzwerkschnittstelle des Konfigurationsrechners die Einstellungen wie folgt
setzen:
IP-Adresse: 192.168.1.10
Subnetzmaske: 255.255.255.0
Standardgateway: 192.168.1.2
Über einen lokal angeschlossenen Rechner (z.B. der Schützling) mit einem
HTTPS-fähigen Web-Browser (z. B. Mozilla Firefox, Google Chrome, Apple
Safari, Microsoft Internet Explorer) kann der mGuard smart² nun sicher konfiguriert
werden. Das verwendete HTTPS-Protokoll w ird zur Verschlüsselung und zur
Authentifizierung der Kommunikation zwischen dem mGuard smart² und dem
Browser verwendet.
Im Web-Browser di e folgende Adresse ei ngeben: https://192.168.1.1/
Die Verbindung zum mGuard smart² wird hergestellt. Der Sicherheitshinweis
wegen eines angeblich ungültigen/nicht vertrauenswürdigen Zertifikats wird
angezeigt. Diese Meldung resultiert aus der Verwendung eines mGuard-eigenen
Zertifikats von Innominate, welches dem Browser noch unbekannt, jedoch zur
Verschlüsselung der Kommunikation zwingend notwendig ist.
Quittieren Sie den Hinweis mit:
´Dieses Zertifikat immer/temporär akzeptieren´ (Firefox), ´Laden dieser Website
fortsetzen´ (Internet Explorer), ´Trotzdem Fortfahren´ (Chrome), bzw. ´Fortfahren´
(Safari).
Die Anmeldemaske des mGuard smart² erscheint. (Abb.5)
Wählen Sie die Zugangsart ´Administration´ und geben Sie bitte zum erstmaligen
Anmelden den folgenden Default-Benutzernamen und -Passwort ein (Groß- /
Kleinschreibung beachten):
Benutzername: admin
Passwort: mGuard
Zugangsart: Administration
Nach erfolgreicher Anmeldung wird die integrierte mGuard Konfigurations- und
Administrations-ob erfläche angezeigt. Nun können Sie mit der Konf iguration des
mGuard smart² beginnen.
7.3. Gerät per BootP in Betrieb nehmen
Der mGuard smart² startet im Erstinbetriebnahme-Modus immer zusätzlich einen
BootP-Client an der internen Netzwerkschnittstelle (5). Der BootP-Client ist
kompatibel zu den BootP-Servern ´IPassign´ von Phoenix Contact sowie
´DHCPD´ unter Linux. Das englische Windows-Programm "IPassign" kann unter
den folgenden Adressen kostenlos heruntergeladen werden:
http://www.innominate.de >Downloads >Software
http://www.innominate.com >Downloads >Software
http://phoenixcontact.com/automation/32119_30373.htm
Erreicht ein nicht kon figurierter mGuard smart² nach dem Hochfahren eine n
BootP-Server, wird über das BootP-Protokoll dem mGuard smart² eine IPAdresse, eine Netzwerk-Maske und optional ein Standard-Gateway an der
internen Netzwerkschnittstelle zugewiesen. Diese Parameter werden persistent
im Gerät gespeichert, welches dann ab sofort darunter erreichbar ist.
Über einen lokal angeschlossenen Rechner (z.B. der Schützling) mit einem
HTTPS-fähigen Web-Browser (z. B. Mozilla Firefox, Google Chrome, Apple
Safari, Microsoft Internet Explorer) kann der mGuard smart² nun sicher konfiguriert
werden. Das verwendete HTTPS-Protokoll w ird zur Verschlüsselung und zur
Authentifizierung der Kommunikation zwischen dem mGuard smart² und dem
Browser verwendet.
Im Web-Browser die per BootP zugewiesene Adresse eingeben: z.B. https://
192.168.1.1/
Die Verbindung zum mGuard smart² wird hergestellt. Der Sicherheitshinweis
wegen eines angeblich ungültigen/nicht vertrauenswürdigen Zertifikats wird
angezeigt. Diese Meldung resultiert aus der Verwendung eines mGuard-eigenen
Zertifikats von Innominate, welches dem Browser noch unbekannt, jedoch zur
Verschlüsselung der Kommunikation zwingend notwendig ist.
Wenn im Erstinbetriebnahme-Modus die externe Netzwerkschnittstelle (4)
des mGuard smart² nicht an ein funktionierendes Netzwerk angeschlossen
wird, so ist das Gerät unter der Adresse https://1.1.1.1/ (siehe „Gerät im
´Stealth-Modus´ anschließen“) nicht erreichbar.
Sollte keine der Status- und Diagnose-Anzeigen leuchten, so fehlt die
korrekte Anschlussspannung am USB-Stecker.
 Loading...