

Page 1

Topaz S3
Inverters
0.5 kVA, 1 kVA,
and 2 kVA
Owner's Manual
Page 2
86-153061-00ii
IMPORTANT SAFETY INSTRUCTION
SA VE THESE INSTRUCTIONS — This manual contains important instructions for all inverters that must be
followed during installation, operation and maintenance of the equipment.
WARNING
Opening enclosures expose hazardous voltages. Always refer service
to qualified personnel only.
ATTENTION
L'ouverture des cabinets expose des tensions dangereuses. Assurezvous toujours que le service ne soit fait que par des personnes qualifiees.
WARNUNG!
Offene Raeume entladen gefaehrliche Stromspannungen. Bitte
wenden sie sich an qualifiziertes Dienstpersonal.
WARNING
To reduce the risk of fire or electric shock, install in a temperature and
humidity controlled indoor area free of conductive contaminants.
ATTENTION
Pour réduire le riske d'inccendie ou d'électrocution, installer dans une
enciente intérieure contrôlée en température et humidité et sans
contaminants conducteurs.
WARNUNG!
Um die Gefahr von Feuer und elektrischem Schock zu reduzieren,
muss das Geraet in einem temperatur - und feuchtigkeitskontrolliertem Raum, frei von leitungsfaehigen Verunreinigungen, installiert
werden..
Page 3
NOTE
This equipment has been tested and found to comply with the limits
for a Class A digital device, pursuant to part 15 of the FCC Rules.
These limits are designed to provide reasonable protection against
harmful interference when the equipment is operated in a commercial
environment. This equipment generates, uses, and can radiate radio
frequency energy and, if not installed and used in accordance with the
instruction manual, may cause harmful interference to radio communications. Operation of this equipment in a residential area is likely to
cause harmful interference in which case the user will be required to
correct the interference at his own expense.
WARNING
As standards, specifications, and designs are subject to change,
please ask for confirmation of the information given in this publication.
ATTENTION
Comme les normes, spécifications et produits peuvent changer,
veuillez demander confirmation des informations contenues dans
cette publication.
WARNUNG!
Normen, Spezifizierung en und Plaene unterliegen Aenderungen. Bitte
beantragen Sie schriftliche Bestaetigung ueber Informationen die in
dieser Herausgabe gemacht wurden.
86-153061-00 iii
Owner’s Manual
Page 4

iv 86-153061-00
Topaz S3 Inverters 0.5 kVA, 1 kVA, & 2 kVA
Page 5

86-153061-00 v
For service call
1-800-523-0142
86-153061-00 B03 3/99
Copyright © 1997 MGE UPS Systems, Inc.
All rights reserved. Printed in U.S.A.
MGE UPS Systems, Inc.
1660 Scenic Avenue
Costa Mesa, CA 92626
(714) 557-1636
Topaz S3 Inverters
0.5KVA, 1 kVA, AND 2kVA
Owner’s Manual
This manual covers these models:
PRODUCTS MODEL RATING
Topaz S3 Inverters 63054 500 VA
63104 1000 V A
63204 2000 V A
Page 6

vi 86-153061-00
Warranty
MGE UPS Systems warranty: warranties to distributors and other commercial customers: MGE UPS Systems warrants
equipment manufactured by MGE UPS Systems to be free from defects in materials and workmanship for a period of one
year from date of installation, but no longer than eighteen months from purchase by end user. No warranty shall extend
more than three years beyond date of manufacture, except for Ultra-Isolator® Noise Suppressors which carry a five-year
warranty. If within such period purchaser discovers such item was not as warranted above and promptly notifies the
company in writing, MGE UPS Systems shall repair or replace the item at the Company's option.
This warranty shall not apply:
(a) to equipment repaired or altered by others than MGE UPS Systems,
(b) to equipment subjected to negligence, accident, or damage by circumstances beyond MGE UPS Systems' control, or
to improper operation, maintenance, or storage, or to other than normal use or service.
With respect to equipment not manufactured by MGE UPS Systems, the warranty obligations of MGE UPS Systems shall
in all respects conform and warranties do not cover reimbursement for labor, transportation, removal, installation, or other
expenses which may be incurred in connection with repair or replacement. Except as may be expressly provided in an
authorized writing by MGE UPS Systems, MGE UPS Systems shall not be subject to any other obligations or liabilities
whatsoever with respect to equipment manufactured by MGE UPS Systems or services rendered by MGE UPS Systems.
Service and Factory Repair - Call 1 - 800 - 523 - 0142
Direct questions about the operation, repair, or servicing of this equipment to MGE UPS Systems Customer Support
Services. Include the part number, assembly number, and serial number of the unit in any correspondence. Should you
require factory service for your equipment, contact MGE UPS Systems Customer Support Services and obtain a Return
Goods Authorization (RGA) prior to shipping your unit. Never ship equipment to MGE UPS Systems without first obtaining
an RGA.
Proprietary Rights Statement
The information in this manual is the property of MGE UPS Systems, and represents a proprietary article in which MGE
UPS Systems, retains any and all patent rights, including exclusive rights of use and/or manufacture and/or sale.
Possession of this information does not convey any permission to reproduce, print, or manufacture the article or articles
shown herein. Such permission may be granted only by specific written authorization, signed by an officer of MGE UPS
Systems.
IBM, ES/9000, and AS/400 are trademarks of International Business Machines Corporation. MGE UPS Systems are
trademarks of MGE UPS Systems. Other trademarks that may be used herein are owned by their respective companies
and are referred to in an editorial fashion only.
Revision History
Topaz S3 Inverters 0.5 kVA, 1 kVA, and 2 kVA Owner's Manual
86-153061-00
Copyright © 1995 MGE UPS Systems. All rights reserved. Printed in U.S.A.
Revision: A02 New Release 5/96
A03 ECN# S3-051 7/98
B03 ECN# ---------- 3/99
Topaz S3 Inverters
0.5 kVA,1 kVA, & 2kVA
Owner’s Manual
Page 7

Section . . . . . . . . . . . . Description Page
Safety Information inside front cover
Service and Factory Repair vi
Warranty vi
Table of Contents vii
How to Use This Manual xi
Section I — Introduction
1.0 . . . . . . . . . . . . . . . Scope 1-1
1.1 . . . . . . . . . . . . . . . General Description 1-2
1.2 . . . . . . . . . . . . . . . Options 1-2
1.3 . . . . . . . . . . . . . . . Specifications 1-2
1.4 . . . . . . . . . . . . . . . Characteristics of Model 1-3
1.5 . . . . . . . . . . . . . . . Electrical Specifications 1-3
1.5.1 Surge Withstand Capability 1-3
1.5.2 DC Input Conducted Emission 1-3
1.5.3 Efficiency 1-3
1.5.4 Harmonic Distor tion 1-4
1.5.5 Line Regulation 1-4
1.5.6 Load Regulation 1-4
1.5.7 Power Factor 1-4
1.5.8 Output Frequency 1-4
1.5.9 Frequency Stability 1-4
1.5.10 Short Circuit Current 1-4
1.5.11 Overload Capability 1-4
1.5.12 Transient Deviation and Recovery 1-4
1.6 . . . . . . . . . . . . . . . Indicators and Controls 1-5
1.6.1 Digital LCD 1-5
1.6.2 Status Indicators (LEDs) 1-8
1.6.2.1 Bypass LED color 1-8
1.6.2.2 Inverter LED color 1-8
1.6.2.3 Lamp Test 1-8
1.6.3 Remote Alarm Indication 1-9
1.6.3.1 Utility Failure 1-10
1.6.3.2 Minor Alarm 1-10
1.6.3.3 Major Alarm 1-10
1.6.4 Front Panel Controls 1-10
1.6.4.1 Input DC Circuit Breaker 1-11
1.6.4.2 Scroll Switch 1-11
1.6.5 Inverter Module Switches
And Controls 1-11
1.6.5.1 Output Voltage Selection 1-14
1.6.5.2 Micro-Processor "DIP"
Switch Settings 1-14
1.7 . . . . . . . . . . . . . . . Mechanical Specifications 1-14
vii
Contents
Page 8

Section Description Page
1.7.1 Dimensions 1-15
1.7.2 Weight 1-15
1.8 . . . . . . . . . . . . . . . Environmental Specifications 1-15
1.8.1 Operating Temperature 1-15
1.8.2 Non-Operating Temperature 1-15
1.8.3 Operating Humidity 1-15
1.8.4 Operating Altitude 1-15
1.8.5 Audible Noise 1-15
1.8.6 Cooling 1-15
Section II — Installation and Operation
2.0 . . . . . . . . . . . . . . . Scope 2-1
2.1 . . . . . . . . . . . . . . . Receiving 2-1
2.2 . . . . . . . . . . . . . . . Handling 2-1
2.3 . . . . . . . . . . . . . . . Storage 2-1
2.4 . . . . . . . . . . . . . . . Prerequisites to Installation 2-1
2.5 . . . . . . . . . . . . . . . Installation 2-1
2.5.1 Location 2-2
2.5.2 Mounting And Wiring Access 2-3
2.5.3 Grounding 2-5
2.5.4 Inverter Connection 2-5
2.5.4.1 Hard Wire Access 2-8
2.5.4.2 Knockout Access 2-8
2.5.4.3 DC Hard Wire Connection 2-8
2.5.4.4 Alarm Hard Wire Connection 2-8
2.5.4.5 AC Hard Wire Connection 2-8
2.5.5 Cooling 2-9
2.6 . . . . . . . . . . . . . . . Inverter Set Up 2-9
2.6.1 Voltage Selection 2-10
2.6.2 Frequency Selection 2-10
2.6.3 Bypass 2-8
2.6.4 On-Line, Off-Line Operation 2-10
2.6.5 Automatic Restart 2-10
2.7 . . . . . . . . . . . . . . . Operation 2-11
Section III — Theory of Operation
3.0 . . . . . . . . . . . . . . . Scope 3-1
3.1 . . . . . . . . . . . . . . . General Description of the Inverter 3-1
3.1.1 Battery Booster 3-3
3.1.1.1 Hysteretic Booster Operation 3-3
3.1.2 Dual Inverters 3-5
3.1.2.1 Average Current Mode 3-6
3.1.2.2 Reference Sine Wave and Control 3-6
3.1.3 Static Transfer Switch and
Maintenance Bypass Relay 3-7
3.1.3.1 On-Line, Off-Line Mode, and
Static Transfer Switch 3-7
viii 86-153061-00
Topaz S3 Inverters 0.5 kVA, 1 kVA, & 2 kVA
Page 9

Section Description Page
3.1.3.1.1 Static Transfer Switch 3-7
3.1.3.1.2 Start Up Sequence 3-8
3.1.3.2 Off-Line Mode 3-8
3.1.4 Digital LCD 3-8
3.1.5 Status Indicators (LEDs) 3-8
3.1.5.1 "Bypass" 3-9
3.1.5.2 "Inverter" 3-9
3.1.6 Power Supply 3-9
3.1.6.1 Supply Description 3-9
3.1.6.2 Supply Operation 3-10
Section IV— Maintenance and Service
4.0 . . . . . . . . . . . . . . . Scope 4-1
4.1 . . . . . . . . . . . . . . . Safety Instructions 4-1
4.2 . . . . . . . . . . . . . . . Preventive Maintenance 4-1
4.3 . . . . . . . . . . . . . . . Replacement Parts 4-2
4.4 . . . . . . . . . . . . . . . Troubleshooting and MGE Ser vicing 4-2
4.4.1 Installation Checks 4-3
4.4.2 Basic Inverter System (-92 Models) 4-4
4.4.3 Inverter With static Transfer Switch
(-94 Models) 4-5
4.4.4 ON-LINE Mode 4-6
4.4.5 OFF-LINE Mode 4-6
4.4.6 Troubleshooting Guide 4-6
Glossary g-1
Illustrations
figure description page
1-1 System Status Readout 1-5
1-1A Line 1 Measurement Readout 1-7
1-1B Line 2 Measurement Readout 1-7
1-1C Line 1 and 2 Measurement Readout 1-8
1-2 Remote Alar m Connection Diagram 1-9
1-3A Inverter Module Configuration
for .5 kVA & 1 kVA 1-12
1-3B Inverter Module Configuration
for 2 kVA 1-13
2-1A Outline and Mounting
for .5 kVA & 1 kVA 2-2
2-1B Outline and Mounting
for .2 kVA 2-3
2-2A Wiring Access and Connection
for .5 kVA & 1 kVA 2-6
2-2B Wiring Access and Connection
for .5 kVA & 1 kVA 2-7
86-153061-00 ix
Owner’s Manual
Page 10

3-1 Inverter Block Diagram 3-2
3-2 Hysteretic Booster Diagram 3-4
3-3 Dual Inverter and Waveform
Diagram 3-5
Tables
Table Description Page
1-1 Characteristics of Inverter 1-3
1-2 LCD Readout Definitions 1-6
2-1 Recommended Input/Output Wiring 2-4
4-1 Installation Checklist 4-3
4-2 Troubleshooting Checklist 4-7
x 86-153061-00
Topaz S3 Inverters 0.5 kVA, 1 kVA, & 2 kVA
Page 11
How T o Use This Manual:
This manual is designed for ease of use and easy location of
information.
To quickly find the meaning of terms used within the text, look
to the Glossary.
The paragraph symbol (¶) indicates numbered paragraphs
that can be quickly found in the Contents on page iii.
This manual uses Noteboxes to convey important
information.
Noteboxes come in four varieties:
NOTE
A NOTE notebox indicates information provided as an operating tip or
an equipment feature.
IMPORTANT
An IMPORTANT notebox
indicates information
provided as an operating
instruction, or as an operating tip.
CAUTION
A CAUTION notebox indicates information provided to protect the user
and service personnel
against possible equipment damage.
WARNING
A WARNING notebox indicates information provided to protect the user
and service personnel
against safety hazards
and/or possible equipment damage.
86-153061-00 xi
Owner’s Manual
Page 12

xii 86-153061-00
Topaz S3 Inverters 0.5 kVA, 1 kVA, & 2 kVA
Page 13
This manual provides technical information required for
installation, operation and maintenance of the Topaz S3
inverters with power ratings of 0.5 kVA, 1.0 kVA, and 2kVA.
Please read this manual before operating the Topaz S3
equipment. Please retain this manual for future reference.
The manual is divided into four sections:
Section I — Introduction
This section introduces the Topaz S3 family of single phase
inverters, including a general description of the system and
its internal components, a description of available options,
and system specifications.
Section II — Installation and Operation
This section presents installation and operating information
for Topaz S3 inverters, including an overview of the system,
its components, and their function; a description of the
indicators and controls and their function; and operational
sequences to be followed for all conditions of normal,
emergency, and maintenance operation.
Section III — Theory of Operation
This section contains the elementary block diagram of the
Inverter Module and Receiver Cabinet and a brief
description of the operation of the electronics of each block.
1.0 Scope
WARNING
An AC output will be present at the output terminals immediately when
AC input is energized even without the inverter module installed in the
receiver cabinet.
ATTENTION
La tension alternative de sortie appara ît dès la mise sous tension de
le'entrée, même si le module onduleur n'est pas installé.
WARNUNG
Die Netzausgangsspannung ist unmittelbar an den
Ausgangsklemmen,sowie der Netzeingang angeschlossen wird-slebst
wenn der Einschub nicht im Gestell ist.
1 — 1Introduction
Introduction
Page 14

Section IV — Maintenance and Service
This section describes maintenance of the Topaz S3 inverter,
including safety instructions, preventive maintenance, and
information about replacement parts, and customer service.
A Glossary in the rear of this manual provides definitions of
terms used within the text.
The sine wave inverter provides stable, distortion-free AC
power from a DC input source, at a selectable output voltage
and frequency, for sensitive equipment which must be
operated in locations where commercial AC power is not
available. With a static switch option, the inverter also forms
a reliable and economical part of uninterruptible power
systems in either on-line or off-line mode. See Section III,
Theory of Operation, for detailed information on inverter
characteristics.
This model is designed for rack mounting in 19 inch, 23 inch,
or 25 inch racks and either flush front panel or center
mountable, depending on the position and location of the
mounting flanges.
Check the model dash number of your unit to make sure it is
the type you need. Standard options are as follows:
Description Product Numbers
500VA & 1kVA 2kVA
Topaz S3 Inverter with Status indicators. 63054-92, 63104-92 63204-92
Topaz S3 Inverter with Status indicators,
Digital LCD, and Static Transfer Switch. 63054-94, 63104-94 63204-94
Receptacles:
(4) NEMA 5-15R 6310-R91 6320-R91
(4) IEC-320 6310-R92 6320-R92
Support Bracket Kit (Recommended when using forward mounted brackets) for 19” Rack unit:
Bracket for 23”/25” rack mount: 6310B-N4 6320B-N4
LCD display meter with static switch
Communication interface
Spare kit (63204-94-SK1)
Specifications subject to revision without notice.
1.3 Specifications
1.2 Options
1.1 General Description
1 — 2 86-153061-00Introduction
S3 Static Inverters 1kVA
Page 15

Table : Characteristics of Inverter
1- 1
Model Output Nominal Input Max. Nominal Output AC Amperes at
Number Power Input Voltage Input DC Selectable Output Voltage of:
Rating Voltage Range Current
(VA/Watts) (Vdc)** (Vdc) Amperes 120V 220V 230V 240V
63204* 2000/1680 -48 42 to 57 60 16.6 8.4 8.4 8.4
63104* 1000/840 -48 40 to 60 30 8.3 4.2 4.2 4.2
63054* 500/420 -48 40 to 60 16 4.2 2.1 2.1 2.1
*Model number is followed by a two-digit dash number :
-92 = Inverter with Status indicators.
-94 = Inverter with Status indicators, Digital LCD, and Static Transfer Switch.
**DC voltage rating is given with respect to earth or chassis ground.
0.5 microsecond, 100 kHz ringing wave with 6000V peak,
with no resulting damage per IEEE587.
Less than 30 dBrnC.
80% minimum (on-line mode).
97% typical (off-line mode).
1.5.3 Efficiency
1.5.2 DC Input
Conducted
Emission
1.5.1 Surge Withstand
Capability
1.5 Electrical
Specifications
1.4 Characteristics
of Model
86-153061-00 1 — 3Introduction
Owner’s Manual
Page 16

Introduction
Does not exceed 3% for all linear and non-linear (computer)
load conditions within the VA/Watt rating.
Inverter output RMS voltage will vary 1% maximum for line
variations between low line and high line at any load between
no load to rated load.
Inverter output RMS voltage will vary 1% maximum for load
variations between no load and full load at nominal line.
2 kVA/1680 Watts, 1 kVA/840 Watts, and .5 kVA/420 Watts
maximum rating available over power factor range of 0.6
leading to 0.6 lagging over rated DC input voltage range.
Crest factor up to 3:1 for non-linear loads within rated
VA/Watt ratings.
50 or 60 Hz, user selectable (see Figure 1-3). When option
-94, Static Transfer Switch is installed and utility AC is
present, the output frequency will be phase locked to within
+/- 6 degrees of the utility frequency. Frequency slew rate
shall be less than one Hz per second. When 60 Hz is
selected, the input frequency must be between 57 to 63 Hz
or when 50 Hz is selected, the input frequency must be
between 47 to 53 Hz or a BYPASS error will be displayed.
Free run frequency stability shall be within +/- 0.02% of the
selected frequency (50Hz or 60Hz).
300% minimum of rated load current for four to five cycles.
Short circuit defined as loads greater than 220% of rated
current.
Continuous overload up to 125% of rated VA/watts at 40º
celsius maximum (120% of rated VA/watts for 2 kVA).
Moderate overload of 125% (120% for 2 kVA) to 150%, 1800
cycles (30 seconds at 60Hz). Severe overload of 150% to
220%, 24 cycles (0.4 seconds at 60Hz).
For a 0 to 100% linear load step change, inverter output
voltage will deviate no more than 20% of rated value, and
shall recover within 1ms.
1.5.12 Transient Deviation
and Recovery
1.5.11 Overload Capability
1.5.10 Short Circuit
Current
1.5.9 Frequency Stability
1.5.8 Output Frequency
1.5.7 Power Factor
1.5.6 Load Regulation
1.5.5 Line Regulation
1.5.4 Harmonic
Distortion
1 — 4 86-153061-00
Topaz S3 Inverters 0.5 kVA, 1 kVA, & 2 kVA
Page 17
See Figure 2-1 on page 2-2 for the location of indicators and
controls.
The LCD displays two lines of twenty characters. Two types
of messages are displayed:system status or measurement.
A system status message is the default at turn-on, after a
system failure or stop sequence.
Each line consists of three columns that identify: 1) power
source, 2) source mode, 3) source status. Power source
definitions are as follows:"INV ." ref ers to the in verter module.
"BYP" refers to the bypass mechanism, either maintenance
bypass relay or static transfer switch.
For definitions of source mode and source status messages,
as well as corresponding LED status indicator colors, refer to
Table 1-2 .
Figure : System Status Readout
1- 1
1.6.1 Digital LCD (Liquid
Crystal Display)
1.6 Indicators and
Controls
86-153061-00 1 — 5Introduction
Owner’s Manual
Upper Scroll Switch
LCD
INV: on normal
BYP: ready normal
Lower Scroll Switch
Column 1
Power
Source
Column 2
Source
Mode
Line 1
Line 2
Column 3
Source
Status
Page 18

Table : LCD Readout Definitions
1- 2
Column 1 Column 2 Column 3 Power Source Mode / Status Definition LED status
Power Source Source
Source Mode Status
SYSTEM SET TO THE ON-LINE Inverter
(INVERTER) MODE. LED
LINE 1 INV: on normal System is on the inverter delivers power to the load. Green
LINE 1 INV: on dc low Input DC voltage is less than 42 volts. Yellow
LINE 1 INV: on dc high Input DC voltage greater than 57 volts. Yellow
LINE 1 INV: on overload Load greater than 125% of rated VA or Watts.** Yellow
120% for 2 kVA
LINE 1 INV: off DC LOW On Bypass. Input DC voltage less than 39.5 volts. Red
LINE 1 INV: off DC HIGH On Bypass. Input DC voltage greater than 60 volts. Red
LINE 1 INV: off DC FAIL On Bypass. Input circuit breaker turned OFF. Red.
LINE 1 INV: off overload On Bypass. Load >125%, see specification. Red
120% for 2 kVA
LINE 1 INV: off software On Bypass. Shut down, micro-processor problem. Red
LINE 2 BYP: ready normal Input AC voltage in tolerance, ready to go to bypass. Blink Green
LINE 2 BYP: ready ac low Input AC voltage less than 85% of nominal. Blink Yellow
LINE 2 BYP: ready AC LOW Input AC voltage less than 71% of nominal. Blink Red
LINE 2 BYP: ready ac high Input AC voltage greater than 110% of nominal. Blink Yellow
LINE 2 BYP: ready AC HIGH Input AC voltage greater than 112% of nominal. Blink Red
LINE 2 BYP: ready AC FAIL Input AC returned, inverter NOT phase locked. Blink Red
LINE 2 BYP: ready ac warn Input AC less than 85%, inverter phase locked. Blink Red
SYSTEM SET TO THE OFF-LINE Bypass LED
(BYPASS) MODE.
LINE 1 INV: ready normal Inverter in stand-by, ready to operate Blink Green
LINE 1 INV: ready dc low Input DC less than 42 volts. Blink Yellow
LINE 1 INV: ready dc high Input DC greater than 57 volts. Blink Yellow
LINE 1 INV: off DC LOW Input DC less than 39.5 volts. Blink Red
LINE 1 INV: off DC HIGH Input DC greater than 60 volts. Blink Red
LINE 2 BYP: static normal Exter nal AC input powering load. Voltage in
tolerance. Green
LINE 2 BYP: ready ac low Input AC voltage less than 85% of nom. On
inverter Yellow
LINE 2 BYP: ready AC LOW Input AC voltage less than 71% of nom.On inverter. Red
LINE 2 BYP: ready ac high Input AC voltage greater than 110% nom. On
inverter. Yellow
LINE 2 BYP: ready AC HIGH Input AC voltage greater than 112% nom.
On inverter.* Red
LINE 2 BYP: maint nor mal Input DC breaker Off, input AC in tolerance. Green
LINE 2 BYP: maint ac low Input DC breaker Off, input AC less than 85% nom. Yellow
LINE 2 BYP: maint AC LOW Input DC breaker Off, input AC less than 72% nom. Red
LINE 2 BYP: maint ac high Input DC breaker Off, input AC greater than
110% nom. Yellow
LINE 2 BYP: maint AC HIGH Input DC breaker Off, input AC greater than
112% nom. Red
LINE 2 BYP: maint ac warn Input DC breaker Off, system recovering from
AC hi/low Yellow
NOTE: In the maintenance bypass mode, the load will be powered from the input AC source,
independent of its voltage level.
* If inverter failure or DC input loss occurs, and AC input voltage is greater than 112% of nominal, the system will shut down
to protect users equipment.
** If overload is not removed, unit will transfer to Bypass, Inverter Ready will be displayed (see specification).
1 — 6 Introduction 86-153061-00
Topaz S3 Inverters 0.5 kVA, 1 kVA, & 2 kVA
Page 19

The LCD can display a total of 10 different measurements, with two measurement values per
line.The following is a list of measurements displayed:
Load Volts (Vrms) %Load (higher of watts/VA)
Utility Volts (Vrms) Frequency (Hz)
DC Input Volts (VDC) DC Input current (Amps)
Load Watts Load Current (Arms)
Inverter internal temperature (deg. C) Inverter frequency (Hz)
To display a measurement, press and hold the UPPER or LOWER scroll switch until the LCD
read-out changes to the desired measurement.
Figure : Line 1 Measurement Readout
1- 1A
Figure : Line 2 Measurement Readout
1- 1B
The same measurements can be displayed on both Line 1
and Line 2 of the LCD, so it is possible to display up to four
different measurements simultaneously.
86-153061-00 1 — 7Introduction
Owner’s Manual
Column 1
Measurement
PRESS
AND HOLD
LOWER
SCROLL
SWITCH
LOAD: 120V 121 %
BYP: ready normal
Column 2
Value
Column 3
Value
INV: on normal
PRESS
AND HOLD
LOWER
SCROLL
SWITCH
DC IN: 51.5V 22.8A
Column 1
Measurement
Column 2
Value
Column 3
Value
Page 20
Figure : Line 1 and 2 Measurement Readout, Status Indicators
1- 1C
Two indicators are provided and identified as "STATUS". One
indicator is labeled "BYPASS", the other "INVERTER". In
normal condition, if the OFF-LINE (bypass) mode has been
selected, the "BYPASS" LED will glow continuously and the
"INVERTER" LED will blink ON and OFF. If the ON-LINE
(inverter) mode has been selected, the "INVERTER" LED will
glow continuously, the "BYPASS" LED will blink. Blink rate is
one second on, one second off.
GREEN -- Utility voltage and frequency within tolerance.
YELLOW -- Warning! Utility voltage or frequency not in
tolerance.
RED -- Alert! Bypass abnormal. Utility voltage or frequency
either too low or too high, can not transfer to bypass.
NOT ILLUMINATED -- Bypass not available.
GREEN -- Inverter ON, no warnings or faults.
YELLOW -- Warning! -- Inverter overload or overload
recovery cycle, thermal warning, or DC warning.
-- Bypass abnormal.
RED -- Alert! Inverter not operating. Stopped for abnormal
Inverter, overload, short circuit, thermal warning, DC
warning, or DC circuit breaker OFF.
At power up or software recovery, an automatic lamp test
sequence will be automatically initiated. Both indicators will
simultaneously go through a RED-YELLOW-GREEN lamp
test sequence.
1.6.2.3 Lamp T est
1.6.2.2 Inverter LED Color
1.6.2.1 Bypass LED Color
1.6.2 Status Indicators
(LEDs)
1 — 8 Introduction 86-153061-00
Topaz S3 Inverters 0.5 kVA, 1 kVA, & 2 kVA
PRESS
AND HOLD
LOWER
SCROLL
SWITCH
LOAD: 120V 121%
DC IN: 51.5V 22.8A
STATUS
BYPASS INVERTER
Page 21

Three alarm relays are provided. 1) UTILITY FAILURE, 2)
MINOR alarm, 3) MAJOR alarm. All relays are identical,
however the UTILITY and MINOR relays are wired as a
SPDT units, whereas the MAJOR alarm relay is a DPDT unit.
Relays are energized under normal operating condition. Deenergizing of the relays results in an ALARM signal as shown
in figure 1-2. Relay contact rating is 2 amperes maximum for
120/240V A C, 25 to 125VDC with a s witched load of 50 Watts.
Connection diagram is clearly labeled on the rear panel for
these alarm relays. See Figure 1-2.
Figure : Remote Alarm Connection Diagram
1- 2
1.6.3 Remote Alarm
Indication
86-153061-00 1 — 9Introduction
Owner’s Manual
Page 22

Alarm if Utility voltage is not within proper limits. Contacts
are:
TB2-1 = NC, TB2-2 - Common, TB2-3 = NO.
A minor alarm will occur for any of the following:
1) inverter output or static transfer switch ov erload or short
circuit.
2) thermal warning or fault.
3) Input DC loss.
4) Static transfer switch failure.
5) 4 transfers to bypass within 4 minutes (on-line mode).
Contacts are: TB2-4 = NC, TB2-5 = Common, TB2-6 = NO.
A major alarm will occur when the load is not powered by the
Inverter or the Utility AC (static transfer switch or
maintenance bypass relay). Two sets of contacts are
provided. Contact set 1 for utility failure alarm: TB2-7 = NC,
TB2-8 = Common, TB2-9 = NO. Contact set 2 for inverter
failure alarm: TB2-10 = NC, TB2-11 = Common, TB2-12 =
N0.
1.6.4 Front Panel
Controls
1.6.3.3 Major Alarm
1.6.3.2 Minor Alarm (Only
Available on Model
With Static Transfer
Switch)
1.6.3.1 Utility Failure (Only
Available on Model
With Static Transfer
Switch)
1 — 10 Introduction 86-153061-00
Topaz S3 Inverters 0.5 kVA, 1 kVA, & 2 kVA
Page 23

A circuit breaker is located on the front panel and identified
as "DC INPUT". Tur ning the breaker to the ON position will
apply the input D.C. voltage to a capacitor bank through a
resistor network to limit the inrush current. After a few
seconds of delay, the DC capacitor bank voltage will be
within a few volts of the input. Then a relay will close and
apply the full battery voltage to the capacitor bank. After
energizing of the relay, the Inverter will be allowed to operate.
Placing the circuit breaker to the OFF position will disable the
Inverter. If the BYPASS option is available, the unit will
transfer to BYPASS, thus the load will be powered from the
Utility power source through the BYPASS switches. The
receiver cabinet contains a maintenance bypass relay to
allow the inverter module to be removed without removing
power from the load provided the BYPASS option is
available.
This is a three position rocker switch and is associated with
the digital LCD. The center position is OFF. Pushing the
UPPER switch will allow scrolling through the various LINE 1
read-outs. Pushing the LOWER switch allows scrolling
through various LINE 2 read-outs in the reverse direction.
When looking at the left hand side of the inverter module,
openings are provided to select the output voltage (120 or
240 VAC) and switches to set up various commands to the
microprocessor. See Figure 1-3A and Figure 1-3B.
1.6.5 Inverter Module
Switches and
Controls
1.6.4.2 Scroll Switch
1.6.4.1 Input DC Circuit
Breaker
86-153061-00 1 — 11Introduction
Owner’s Manual
Page 24

Figure : Inverter Module Configuration for .5kVA and 1kVA
1- 3A
1 — 12 Introduction 86-153061-00
Topaz S3 Inverters 0.5 kVA, 1 kVA, & 2 kVA
Page 25

Figure : Inverter Module Configuration for 2kVA
1- 3B
86-153061-00 1 — 13Introduction
Owner’s Manual
Page 26

Selection of the AC output voltage is accomplished by
moving a connector plug. The printed circuit board has a 10
pin connector (J3) and its mate is a 9 pin plug (P3). Moving
this plug to the left (rear) position selects the 120VAC
position (100, 110, 115, 120 VAC). Moving of the plug to the
right (toward the front panel) connects the inverter to produce
240VAC (200, 220, 230, or 240VAC).
An eight position DIP switch can be seen through the access
hole in the left side of the inverter module. The switches are
labeled "MICRO CONTROL SELECT". The switch functions
are clearly labeled. Switch positions 1 and 2 are reserved
and should be set to the OFF position. Switch position 3 is
ON when no BYPASS option is installed, OFF when the
BYPASS option is installed. Switch position 4 is OFF if AUT O
RESTART is desired, ON if manual restart is desired. Switch
position 5 & 6 select the output voltage of the inverter.
Switches 5 & 6 OFF = 120 or 240 VAC output, 5 ON & 6
OFF = 115 or 230 VAC output, 5 OFF & 6 ON = 110 or 220
VAC output, 5 ON & 6 ON = 100 or 200 VAC. See Figure 1-3.
The inverter assembly consists of an inverter module which
slides into the receiver cabinet. The receiver cabinet consists
of a left and right side "U" channel and a rear housing which
contains EMI filters, Maintenance bypass relay, Alarm relays,
and wire termination points. The inverter module is an easily
removable module which is secured into the receiver cabinet
via two thumb screws. All input and output power and signal
wires go through a single multi-pin connector located on the
rear of the inverter module. See Figures 2-1 and 2-2.
1.7 Mechanical
Specifications
1.6.5.2 Micro-Processor
“DIP” Switch
Settings
WARNING
Modules with "BYPASS" option installed may be damaged when utility
voltage and inver ter output voltage settings are not the same.
ATTENTION
Un module avec l'option "BYPASS" risque d'être endommagé si les
réglages de tension du réseau et de sortie onduleur ne sont pas les
mêmes.
WARNUNG!
Nach Installation des "BYPASS" muss die Spannung dieselbe sein wie
die Inverter Ausgangsspannung, ansonsten Beschaedigung des
Inverter Module.
1.6.5.1 Output Voltage
Selection
1 — 14 Introduction 86-153061-00
Topaz S3 Inverters 0.5 kVA, 1 kVA, & 2 kVA
Page 27

These dimensions include both the receiver cabinet and the
inverter module. Depth is inclusive of the inver ter module
thumb screws.
0.5 kVA, 1 kVA 2 kVA
HEIGHT: 3.50 in (8.9 cm) 5.3 in (13.4 cm)
WIDTH: 17.0 in (43.2 cm) 17.0 in (43.2 cm)
DEPTH: 19.0 in (48.3 cm) 19.0 in (48.3 cm)
0.5 kVA & 1 kVA 2 kVA
Receiver cabinet 8.0 lbs (3.63 Kg) 11 lbs (5 Kg.)
Inverter module 23.0 lbs (10.44 Kg) 31 lbs. (14 Kg.)
Total weight with
mounting brackets 39.0 lbs (17.7 Kg). 51 lbs.(23.18 Kg.)
Continuous overload to 125% of rated VA/Watts @ 50
degrees celsius maximum for 0.5 kVA & 1 kVA, and 120% of
rated VA/Watts @ 40 degrees celsius for 2 kVA. Full output
power/VA and short term (30 seconds) overload to 125%
between -10 to +50 degrees celsius. Derate power/VA
linearly to zero between +50 and +70 degrees celsius.
-40 to +75 degrees celsius. for shipping, but not
recommended for storage. See Section 2.3 for storage
recommendations.
0 to 90% relative, without condensation.
To 10,000 feet above sea level. Derate maximum ambient of
50 degrees celsius by 3 degrees celsius per 1000 ft. at
altitude above 3300 feet (30 degrees celsius maximum at
10,000 feet).
Less than 60 dBA per Type 2, IEC and ANSI SI.4, 1981 when
measured in a 55 dBA environment at a distance of 4 feet
from any surface.
Forced air. Air inlet is located on the front panel. Exhaust is
out the sides of the receiver cabinet. See Figure 2-1.
1.8.6 Cooling
1.8.5 Audible Noise
1.8.4 Operating Altitude
1.8.3 Operating Humidity
1.8.2 Non-Operating
Temperature
1.8.1 Operating
Temperature
1.8 Environmental
Specifications
1.7.2 Weight
1.7.1 Dimensions
86-153061-00 1 — 15Introduction
Owner’s Manual
Page 28

1 — 16 Introduction 86-153061-00
Topaz S3 Inverters 0.5 kVA, 1 kVA, & 2 kVA
Page 29

This section describes the installation of the Topaz S3 0.5
kVA, 1 kVA, & 2 kVA including receiving, handling, storage,
and installation procedures.
Before accepting the shipment from the freight carrier,
inspect the exterior surfaces of all shipping containers or
packaging used, and the equipment, for damage that may
have occurred during transit. If the shipping containers or
equipment show evidence of damage, note the damage on
the receiving document (bill of lading) prior to signing for
receipt of equipment.
Damage claims should be filed directly with the carrier.
Replacements for damaged components should be ordered
through MGE Customer Support Services, @ 1-800-5230142 ext. 476.
No special handling required.
If the equipment is to be stored prior to installation, it should
be stored in a cool, dry, well-ventilated location that is
protected against rain, splashing water , chemical agents, etc.
The equipment should be covered with a tarpaulin or plastic
wrapper to protect it against dust, dirt, paint, or other foreign
materials.
An efficient Topaz S3 installation depends on careful
planning and site preparation. Installation of static inverter
equipment must be handled by skilled technicians and
electricians familiar with the special requirements of highenergy electrical equipment. The installation must comply
with the requirements of the National Electrical Code (NEC,
ANSI/NFPA 70, latest issue) and with local codes and requirements as applicable.
We strongly recommend contacting MGE Customer Support
Services @ 1-800-523-0142 ext. 476 for system start-up.Do
not allow unqualified personnel to handle, install, or operate
the Topaz S3 inverter.
2.5 Installation
2.4 Prerequisites to
Installation
2.3 Storage
2.2 Handling
2.1 Receiving
2.0 Scope
2 — 1Installation and Operation
Installation and Operation
Page 30
The equipment is designed for installation in a protected
environment. Factors to be considered in selecting a
location include ventilation, environmental conditions, and
accessibility. Optimum operation of the unit will be obtained
by careful consideration of its location. Install the unit in a
clean, dry location with an unrestricted air flow surrounding
the equipment. See Figure 2-1A and Figure 2-1B.
Figure : Outline and Mounting for .5kVA & 1kVA
2- 1A
2.5.1 Location
2 — 2 Installation and Operation 86-153061-00
Topaz S3 Inverters 0.5 kVA, 1 kVA, & 2 kVA
Page 31

Figure : Outline and Mounting for 2kVA
2- 1B
The side mounting brackets can be positioned f or either a 19
inch, 23 inch, or 25 inch rack. The Inverter can also be
mounted either flush with the front panel or at the chassis
midpoint. Prior to mounting the Inverter in the rack,
determine the position of all input and output wiring.
NOTE
Input and output conductors must be sized for the maxim um current
as shown in Table 2-1 and otherwise be in compliance with applicable electrical codes. Be sure all connections are fully tightened.
D.C.input terminals can accommodate wire size up to one "0" gauge
wire.
2.5.2 Mounting And
Wiring Access
86-153061-00 2 — 3Installation and Operation
Owner’s Manual
Page 32

Table : Recommended Input/Output Wiring
2- 1
Model DC Input AC Output AC Input
Current Current Current
Max.
Current 63054 16 AMPS 5 AMPS 5 AMPS
Min.Wire
Size (500VA) 12 AWG 14 AWG 14 AWG
Max.
Current 63104 30 AMPS 10 AMPS 10 AMPS
Min.Wire
Size (1kVA) 10 AWG 14 AWG 14 AWG
Max.
Current 63204 60 AMPS 17 AMPS 17 AMPS
Min.Wire
Size (2kVA) 8 AWG 12 AWG 12 AWG
NOTE: Maximum circuit breaker rating for AC input shall be
20 Amperes, Maximum DC input current should be limited
to 50 Amperes. Wire gauge for both AC and DC wiring shall
be selected according to the national electrical code.
WARNING
This product is considered permanently connected equipment and
must have a readily accessible disconnect device incorporated in the
fixed wiring.
ATTENTION
Ce produit est considere comme equipement connecte en permanence
et doit avoir un appareil de deconnexion facilement accessible incorpore dans le cablage fixe.
WARNUNG!
Dieses Produkt ist ein fest zusammengefuegtes Geraet und muss eine
leicht erreichbare Abschaltungsvorrichtung im Leitungsnetz enthalten.
2 — 4 Installation and Operation 86-153061-00
Topaz S3 Inverters 0.5 kVA, 1 kVA, & 2 kVA
Page 33

For safety and proper operation of the unit, including
maximum attenuation of electrical noise, suitable grounding
is required. A separate grounding electrode conductor
should be connected from the ground (GND) terminal to a
nearby grounding electrode, and should be sized per
National Electrical Code Article 250-94. The grounding
electrode should be grounded structural metal, a metal water
pipe, or a suitable ground rod (National Electrical Code,
Article 250-26). The grounding electrode should be as near
as possible to the unit.
After the inverter assembly has been attached to the rack,
remove the Inver ter module from its receiver cabinet using
the two thumb screws and perform the following steps See
Figure 2-2A and Figure 2-2B.
2.5.4 Inverter Connection
2.5.3 Grounding
86-153061-00 2 — 5Installation and Operation
Owner’s Manual
Page 34

Figure : Wiring Access and Connection for .5 kVA & 1 kVA
2- 2A
2 — 6 Installation and Operation 86-153061-00
Topaz S3 Inverters 0.5 kVA, 1 kVA, & 2 kVA
Page 35

Figure : Wiring Access and Connection for 2 kVA
2- 2B
86-153061-00 2 — 7Installation and Operation
Owner’s Manual
Page 36
Remove the cover plate on the rear of the inverter receiver
cabinet to gain access to the wiring compartment.
Route the DC input, AC output, AC input (Static Transfer
Switch option), and alarm signal wires through the selected
knockout holes, using the appropriate conduit bushings . Use
knockout cutters to obtain the proper conduit/bushing sizes.
Be sure that the DC input conductors are connected
POSITIVE to the +DC terminal (40) and the NEGATIVE to
the -DC terminal (41).
Before connecting the AC output wires or AC input wires
(optional), the ALARM wires should be connected to TB2.
Refer to Figure 1-2 for proper wiring. Alarm relays are shown
in their "ALARM", de-energized position. MAJOR alarm (no
power to the load) terminals are TB2-7 to TB2-12. MINOR
alarm (Inverter Stopped) terminals are TB2-4 to TB2-6.
Utility failure (if Static Transfer Switch option is installed)
terminals are TB2-1 to TB2-3.
AC output is on terminal block TB3, marked "AC OUT".
Make sure the white NEUTRAL wire is connected to AC OUT
"N" and the LINE or HOT wire is connected to AC OUT "L".
If a Static Transfer Switch option is installed, connect the
Utility AC input to terminal block TB3, marked "AC IN".
Again make sure the white NEUTRAL wire is connected to
AC IN "N" and the LINE or HOT wire is connected to AC IN
"L" terminal.
2.5.4.5 AC Hard Wire
Connection
2.5.4.4 Alarm Hard Wire
Connection
NOTE
This inverter was designed with the intent that the user will terminate
the positive polarity terminal of the DC source to earth or chassis
ground. For a positive or floating DC input consult MGE
Customer Support Services.
2.5.4.3 DC Hard Wire
Connection
2.5.4.2 Knockout Access
2.5.4.1 Hard Wire Access
2 — 8 Installation and Operation 86-153061-00
Topaz S3 Inverters 0.5 kVA, 1 kVA, & 2 kVA
Page 37

For optimum inverter performance, provide ventilation
clearance from exterior surfaces as follows:
Top and bottom: 0.25 inches [6.3 mm]
Front and sides: 1.50 inches [38.1 mm]
• Verify the inverter module is NOT installed into its
receiver cabinet.
• After the receiver cabinet has been wired, verify that a
separate grounding electrode has been connected to
the chassis "GROUND" lug.
• Turn on the Utility AC and verify the proper AC voltage
exists at ACIN "L" with respect ACIN "N" and chassis
"GROUND".
• Turn on the DC supply to the unit.
• Verify polarity of the DC voltage, positive on "+DC" and
negative on "-DC".
• Turn OFF all AC and DC power to the receiver cabinet.
• The Inver ter module is delivered from the factory set for
120 VAC, 60 Hz , auto-restart, ON LINE (Inverter) mode
operation.
• See Figure 1-3 and perfor m the following steps for a
personalized inverter set up.
2.6 Inverter Set UP
2.5.5 Cooling
WARNING
AC output will be present at the output terminals immediately when AC
input is energized even without the inverter module installed in the
receiver cabinet.
ATTENTION
La tension alternative de sortie appara ît dès la mise sous tension de
le'entrée, même si le module onduleur n'est pas installé.
WARNUNG!
Die Netzausgangsspannung ist unmittelbar an den Ausgangsklemmen,
sowie der Netzeingang angeschlossen wird-slebst wenn der Einschub
nicht im Gestell ist.
86-153061-00 2 — 9Installation and Operation
Owner’s Manual
Page 38

Viewed from the left side of the Inverter module, access
holes can be seen for selecting the AC output voltage via a
120VAC/240VAC hard wired connector plug, and setting of
the MICRO CONTROL "DIP" switches. If low output voltage
is desired (100 to 120VAC) the jumper plug must be in the
120VAC position, toward the rear of the unit. If high voltage
output is desired (200 to 240V AC) then the jumper plug must
be removed and placed in the 240VAC position, side toward
the front panel. Also make sure the MICRO CONTROL
SELECT "DIP" switches 5 and 6 are set to the desired
voltage position. For 120VAC or 240VAC output, switch 5
must be OFF, switch 6 OFF. For 115VAC or 230VAC, switch
5 must be ON, 6 OFF. For 110VAC or 220VAC, s witch 5 must
be OFF, 6 ON. For 100VAC or 200VAC, switch 5 must be
ON, 6 ON.
With the Static Transfer Switch option installed, the
frequency selected must be the same as the utility AC
frequency. If the Utility frequency is 60 Hz and the Inverter is
set for 50 Hz, the microprocessor can not phase lock to the
input, and consequently transfer from Inver ter to Utility for
overload or Inverter shut down can not be accomplished
without causing transients on the output. During star t up of
the Inverter, the load is always powered from the Utility and
upon transfer to the Inver ter, the output voltage will transfer
at some unknown phase. So if 60 Hz operation is desired,
set the MICRO CONTROL SELECT "DIP" switch 7 to OFF
for 60 Hz, ON for 50 Hz.
If the Static Transfer Switch is installed, the MICRO
CONTROL SELECT "DIP" switch 3 must be set to the OFF
position. If the Static Transfer Switch option is not installed,
set this switch to the ON position.
If the Static Transfer Switch option is installed , either the ON
line (output from the Inverter) or OFF line (output from the
Utility power source) mode of operation may be selected. To
select the ON line (Inverter) mode, set MICRO CONTROL
SELECT "DIP" switch 8 to OFF. For OFF line (Utility)
operation, set switch 8 to ON.
Some users do not want the Inverter to automatically restart
upon application of DC power to the unit. Under this
condition, set the MICRO CONTROL SELECT "DIP" switch
4 to ON (manual restart required by turning the DC circuit
breaker OFF and then back to ON). If it is desired that the
Inverter automatically start up upon application of DC, the
MICRO CONTROL SELECT "DIP" switch 4 must be set to
the OFF position.
2.6.5 Automatic Restart
2.6.4 On-Line, Off-Line
Operation
2.6.3 Bypass
2.6.2 Frequency
Selection
2.6.1 Voltage Selection
2 — 10 Installation and Operation 86-153061-00
Topaz S3 Inverters 0.5 kVA, 1 kVA, & 2 kVA
Page 39

When all selections have been made, perfor m the following
steps to operate the inverter:
A) Be sure that all loads are disconnected or turned OFF
and AC input power to models with a Static Transfer
Switch is OFF.
B) Refer to the installation checklist in Table 2-1 (page
4-3)and be sure that all control settings and terminal
block screws are tight.
C) Check again to see that the DC voltage on the inver ter
identification label matches the voltage of your power
source.
D) Set the DC input breaker located on the front panel of
the Inverter module to the OFF position.
E) Install the inverter module into its receiver cabinet and
tighten the two thumb screws.
F) Apply a DC voltage to the DC input terminals.
G) Again, using a voltmeter or polarity tester, verify the
voltage at the DC input terminals, positive on +DC (40)
and negative on -DC (41).
H) Turn ON the DC circuit breaker. Within less than a
second, a relay will energize which should be audible.
Then the "STATUS" indicators will sequence through
their RED, YELLOW, GREEN lamp test sequence. The
alarm relays will also be cycling through various states
as the lamp test is progressing. As the battery booster
starts, a "chirp" sound may emanate from the unit. The
Inverter will start, producing the appropriate
voltage/frequency on the ACOUT terminal block, TB3.
The "STATUS" indicator for the "INVERTER" should be
illuminated Green. Verify the proper output voltage with
a voltmeter at TB3. The "STATUS" indicator "BYPASS"
should be RED, blinking ON and OFF at a 1 second
rate.
I) Turn On the Utility AC and verify the "STATUS" indicator
identified as "BYPASS" turns GREEN and continues to
blink ON and OFF at a 1 second rate, indicating the
Inverter is powering the AC output. If BYPASS indicator
is a steady GREEN color, the "INVERTER" LED should
be GREEN, blinking ON and OFF, indicating that the
Utility is powering the AC output. The mode was
selected in paragraph 2.6.4.
J) Units with the DIGITAL LCD option. Scroll through the
readout menu using the SCROLL push-button and
verify the DC input, AC input if applicable, and AC
output voltages agree with the voltmeter readings
previously taken.
2.7 Operation
86-153061-00 2 — 11
Owner’s Manual
Page 40

K) Tur n the DC circuit breaker on the front panel to the
OFF position. Verify that AC voltage is still on the AC
OUT terminal block TB3.
L) Loosen the thumb screws securing the Inverter module
into its receiver cabinet and remove the module. Verify
Utility voltage is still on the output terminal block, TB3.
M) Turn OFF all the AC and DC input voltages.
N) Reinstall the Inverter module. Inverter is ready for
operation. Connect loads and tur n ON the unit.
WARNING
Module may be damaged if removed with the DC breaker closed.
ATTENTION
Le module risque d'être endommagé s'il est retiré avec le disjoncteur
DC fermé.
WARNUNG!
Entfernung des Moduls mit geschlossenem Gleichstromunterbrecher
koennte zu Schaden fuehren.
2 — 12 86-153061-00
Topaz S3 Inverters 0.5 kVA, 1 kVA, & 2 kVA
Page 41

This section describes the theory of operation of the Topaz
S3 Inverter systems.
The inverter utilizes a "Fly-back" conv erter to boost the input
voltage to two regulated +/- 200 volt outputs. Two identical
inverters are contained in the unit, both inverters controlled
by a single PWM to generate sinusoidal AC outputs . The two
inverters can be connected in parallel to produce 120 VAC
output or connected in series for 240VAC output. This
approach minimizes the size and weight of the magnetics
since both the battery booster and inverter operate at
relatively high frequency, greater than 20 kHz. A modular
approach was taken which allows easy field replacement of
the inverter module without removing power from the load.
Figure 3-1 is a block diagram of the inverter.
3.1 General Description
of the Inverter
3.0 Scope
3 — 1Theory of Operation
Theory of Operation
Page 42
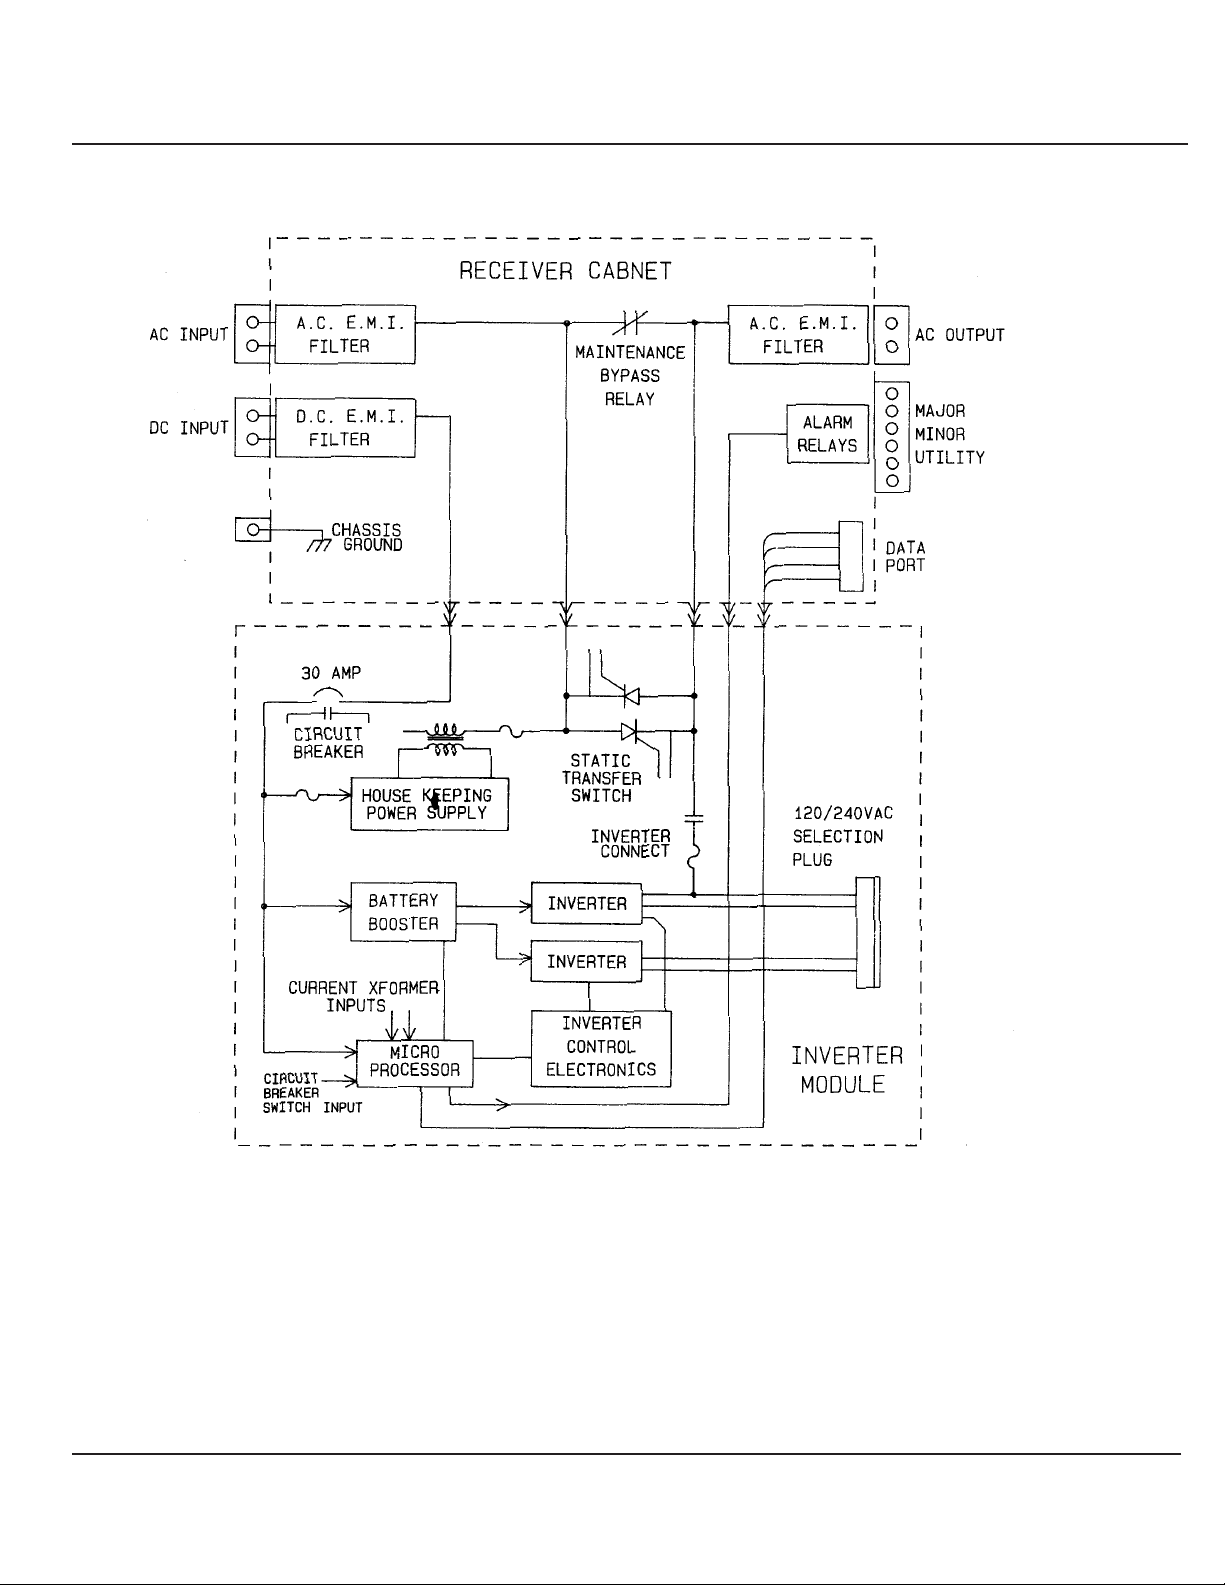
Figure : Inverter Block Diagram
3- 1
3 — 2 Theory of Operation 86-153061-00
S3 Static Inverters 1kVA
Page 43

The battery booster is a "continuous" mode Fly-back
converter which takes the DC input voltage and boost it to
four separate outputs of 200 volts. Two of these outputs are
connected in series to produce -200 VDC and +200 VDC and
used by one of the Inverters. The other two outputs are also
connected in series to produce a second -200 and +200 VDC
to be used by the second Inverter. The booster transformer,
which is actually a coupled inductor, is used to isolate the
primary DC input from the two +/-200 VDC outputs used to
generate the two AC outputs. The total DC bus voltage (+/200 volts) of one inverter is regulated. Feedback is provided
through an analogue optical coupler to control a hysteretic
current mode switch.
Figure 3-2 shows the basic concept of the booster. The
voltage error amplifier (TL431) measures the +/-200 VDC
bus (400 volts total) of one of the Inver ters and provides an
error signal (via an optical coupler) to a comparator. If the +/200 volt bus is lower than normal, the voltage applied to the
positive input of the comparator will become higher, a
demand for more current. A "DC" current transformer
measures the current in the primary and secondaries of the
"coupled inductor". The output of the DC current transformer
is applied to the negative input of the comparator. When the
inductors current has reached the required level, as
measured by the DC current transformer, the comparator
turns OFF, thus turning the Boost switch OFF. Now the
energy stored in the coupled inductor is transferred to the
output energy storage capacitors of the four 200 volt outputs .
Since the turns ratio of the coupled inductor (transformer) is
1:1:1:1:1, all four DC outputs will be at the same voltage. A
resistor placed between the positive input and output of the
comparator controls the hysteresis level. The hysteresis
current is set at 7.5 A. When the measured current falls
below the hysteresis level applied to the positive input of the
comparator, the comparator turns back ON, which turns ON
the boost switch. Now the cycle starts all over again. The
operating frequency of the battery booster is a function of
input and output voltage, ranging between 20 kHz to 35 kHz.
Since the booster switch (parallel FET) turns ON before the
current in the output secondaries of the transformer goes to
zero, the primary current starts at some level set by the
hysteresis level. This is called a "CONTINUOUS" mode
Flyback converter.
3.1.1.1 Hysteretic Booster
Operation
3.1.1 Battery Booster
86-153061-00 3 — 3Theory of Operation
Owner’s Manual
Page 44
Figure : Hystertic Booster Diagram
3- 2
3 — 4 Theory of Operation 86-153061-00
S3 Static Inverters 1kVA
Page 45

As indicated, two identical inverters are used to produce
either 120 or 240VAC depending on parallel or series
connection of their outputs. Each inverter is a conventional
half bridge, that is, only two FET switches are used in each
inverter. See Figure 3-3. The output of each inverter is
applied to a coupled choke. Since the choke acts as a
transformer, the two windings of the choke must have the
same voltage at any given time. Therefore if all four of the
200 VDC capacitors are at the same voltage, the output of
the two inverters must be identical (within 2% of one
another). Note that the FET switches are driven in
synchronization. Control of the inverter is unique in that the
inverter uses what is called "Aver age Current Mode Control".
This is actually a control of the choke current and results in
excellent dynamic response to step loads, overloads, and
short circuits.
Figure : Dual Inverter and Waveform Diagram
3- 3
3.1.2 Dual Inverters
86-153061-00 3 — 5Theory of Operation
Owner’s ManualS3 Static Inverters 1kVA
Page 46

A microprocessor is used in the Inverter system to generate
a reference sine wav e via one of its three PWM outputs . The
PWM signal is filtered to make a clean sine wave. This sine
wave is applied to a voltage error amplifier. The other input
to the voltage error amplifier is the output of one of the
inverters, called the master inverter. The voltage error
amplifier controls the amount of current the inverter supplies
to its output filter capacitor and output load. A second
amplifier (current error amplifier) compares the current
command (voltage error amplifier output) to the choke
current (voltage from another DC current transformer) and
produces an error signal which is applied to a motor control
PWM chip which completes the loop. Operating frequency of
the Inverter is 33kHz, generated by the motor control chips
oscillator.
The microprocessor is used to enable and disable the
battery booster, generate the sine wave reference signal,
enable and disable the Inverter, measure battery
current/voltage, Utility current/voltage/frequency, Output
current/voltage/frequency, provide LCD metering data, and
communicate with other equipment. Selection of the
Inverter’s output voltage and frequency (as set by the DIP
switch) is accessible through the side of the inverter module.
Isolation between DC input electronics and AC output (Line
side) electronics is via high speed optical couplers. If Utility
voltage is present and its frequency is close to the setting on
the DIP switch, then the sine wave reference signal will
become phase locked to the Utility. Frequency slew rate is
less than 1 Hz per second, phase error will be less than 6
degrees. The microprocessor is supplied by power from the
DC input side and the sine wave reference must be provided
to the Inverter, located on the secondary (AC output) side. A
high speed optical coupler is used to get the PWM signal to
the Inverter electronics. This PWM signal is filtered by a two
stage R-C filter and then buffered before it is applied to the
voltage error amplifier. Enable/disable of the Inverter by the
microprocessor is also via this same optical coupler.
Feedback of the input and output AC voltage is
accomplished by using the motor control PWM oscillator
(triangle wave shape, ramping linearly between +4 and -4
volts at 33 kHz rate) to make a PWM signal. This signal is
applied to an optical coupler, buffered, and filtered to
produce an isolated replica of the AC voltages. The
microprocessor has eight analogue inputs, two of which are
used to measure the AC signals. Other inputs to the micro
are: Inverter output current, Utility current (for back feed
protection), battery voltage, battery current, and two heat
sink temperatures.
3.1.2.2 Reference Sine
Wave and Control
3.1.2.1 Average Current
Mode
3 — 6 Theory of Operation 86-153061-00
Topaz S3 Inverters 0.5 kVA, 1 kVA, & 2 kVA
Page 47

This is an optional feature that is described below.
The ON LINE mode is defined as allowing the load to
operate from the Inverter instead of the Utility power. If the
Inverter should fault for some reason (overload, short circuit,
over temperature, DC voltage not within specification, or
Inverter failure) the system will transfer to the "BYPASS"
mode (through the Static Transfer Switch) if the Utility v oltage
is within proper limits. For severe overloads, the
Maintenance Bypass relay located in the receiver cabinet will
be de-energized, shorting out the Static Transfer Switch, thus
preventing damage to the Static Transfer Switch. The
advantage of ON LINE operation is that the AC output is at a
fixed voltage level and frequency and is free of all of the
transients, sags, and brown out conditions that occur on the
Utility power grid.
The Static Transfer Switch is a pair of back to back SCRs
located in the inverter module. The SCRs are tur ned on as
soon as the Utility voltage is present. It is commanded OFF
by the microprocessor. The receiver cabinet also contains a
maintenance bypass relay which is connected in parallel with
the SCRs. The relay needs to be energized to open the
contacts that parallel the SCRs. Energizing of this relay is
also under the control of the microprocessor. Power to the
microprocessor is from the utility and the DC input.
3.1.3.1.1Static Transfer
Switch
3.1.3.1 On-Line, Off-Line
Mode, and Static
Transfer Switch
3.1.3 Static T ransfer
Switch and
Maintenance
Bypass Relay
86-153061-00 3 — 7Theory of Operation
Owner’s Manual
Page 48

When the inverter is enabled (by turning ON the front panel
DC circuit breaker) the microprocessor goes through its start
up sequence, including phase locking the reference sine
wave to the Utility AC input. Then the maintenance bypass
relay is energized, opening its contacts. The inverter is
turned ON to check its functional operation, then turned back
OFF. The Inverter output relay is closed , Inver ter enabled
and the Static Transfer Switch (SCRs) are turned OFF. This
sequence is accomplished without any break (less than 1
millisecond) in output voltage to the load. If a severe
overload should occur, the static transfer switch (SCRs) will
be turned back ON and the Inverter disabled until the
overload is removed. For overloads greater than 150%, the
maintenance bypass relay will be de-energized, effectively
shorting out the SCRs. Other overloads and failure of the
Inverter will also cause transfer to the bypass mode . The DIP
switch accessible through a opening in the side of the
Inverter module must be set to the proper position to achieve
this mode of operation.
This mode allows the load to be powered at all times from the
Utility power source through the Static Transfer Switch.The
maintenance Bypass relay will be energized (contacts open).
When the DC circuit breaker (on the front panel) is turned
ON, the inverter will go through a sequence similar to that
defined above, except the Inverter will not be powering the
load. Transfer to the Inverter will occur only if the Utility
voltage fails to be within specified limits (-20% to +10%). The
STA TUS indicator will b link indicating the inv erter status. The
DIP switch located on the side of the Inverter module must
be set to the proper position to obtain this mode of operation.
Advantage of OFF LINE mode is that the system is more
efficient. Only a small amount of power is required by the
Inverters electronics (less than 30 watts).
The digital LCD has two lines of 20 characters. A "SCROLL"
switch allows scrolling through the display messages which
include as a minimum: Utility voltage and utility frequency
(only with static transfer switch), output voltage , output
current, output frequency, input DC voltage, input DC
current, percent load. All of this data is supplied to the LCD
from the microprocessor.
Two LEDs are on the front panel identified as "ST ATUS". The
left most LED is for "BYPASS" status and the right LED is for
"INVERTER" status.
3.1.5 Status Indicators
(LEDs)
3.1.4 Digital LCD Display
3.1.3.2 Off-Line Mode
3.1.3.1.2 Start Up Sequence
3 — 8 Theory of Operation 86-153061-00
Topaz S3 Inverters 0.5 kVA, 1 kVA, & 2 kVA
Page 49

A blinking LED indicates that the load is powered by the
Inverter, not from the Utility. The "BYPASS" LED will be
illuminated Green if the Utility is within acceptable voltage
and frequency limits as specified by the 50/60 Hz DIP switch
setting. Yellow indicates the Utility is not within proper limits.
Red indicates the utility is out of tolerance, do not transfer to
bypass. Not illuminated indicates that bypass is not
available.
A blinking LED indicates that the load is being powered by
the Utility source and not from the Inverter. Green indicates
the Inverter is ready to power the load. Yellow indicates
Inverter warnings for overload or overload recovery cycle,
thermal DC, and bypass abnormal conditions. Red indicates
the Inverter can not operate properly. LED not illuminated
indicates the inverter is not ON.
An internal power supply is used within the inverter module
which makes several 15 VDC outputs from the -48 VDC
battery input and/or utility AC power through a transformer
and bridge rectifier. The 15 volt outputs are used to power
the AC side electronics ( + & - 15VDC for the control circuits ,
one +15 VDC output to operate the "master" inverters half
bridge driver), and a second +15 VDC output to operate the
"slave" inver ters half bridge driver. Battery side electronics
(hysteretic battery booster and microprocessor) also
requires + & - 15 VDC.
The power supply is a discontinuous mode "Flyback" supply,
that is, the current in the "Flyback" transformer is zero at the
beginning of every switching cycle. The supply was
designed to produce an output power of 20 watts from D.C.
input voltages ranging from 35 VDC to 80 VDC. Control of
this supply is by an industry standard UC3842AN current
mode control PWM chip operating at 100 kHz. The +15 VDC
output on the Battery side (D.C.) is the regulated voltage.
Tight coupling of the transformer ensures that all other
outputs are reasonably close to 15 volts. Within the
UC3842AN integrated circuit, the voltage error amplifier
positive input terminal is set at one half of the chip's
reference (+5.00 volts). So the negative input terminal (VFB)
must also be at +2.50 volts. A 2490 ohm resistor is
connected from the VFB terminal to ground (1.00 mA.) To
obtain +15 VDC, we need 12.5 volts across a resistor at 1.0
mA, or 12,500ohms. A 12400 ohm resistor was used and the
+15 VDC is actually 14.95 volts.
3.1.6.1 Supply Description
3.1.6 Power Supply
3.1.5.2 “Inverter”
3.1.5.1 “Bypass”
86-153061-00 3 — 9Theory of Operation
Owner’s Manual
Page 50

The duty cycle of the UC3842ANs oscillator is set up to be
about 45%. The output of the chip drives the gate of an
IRF840 FET. The "Drain" of the FET is connected to a
"Flyback" transformer (actually a coupled inductor of 50 uHy
primary inductance). At the beginning of the switching cycle,
the FET is turned ON. Current starts to build up linearly in
the primary of this inductor. A resistor located in the
"Source" lead of the FET is used to measure the current in
the primary of the transformer. This signal is applied to the
UC3842ANs current sense port. When this voltage (current
in the transformer's primary) reaches the correct level as
determined by the chip’s voltage error amplifier output, the
FET is turned OFF. Now the energy stored in the "Flyback"
transformer is transferred into the output capacitors.
Remember! Energy (Watt -seconds) times the number of
energy bundles per second is equal to Watts. If the
transformer windings are tightly coupled, all windings should
receive the needed energy to keep all of the outputs at the
same voltage. If the +15 VDC output should become higher
than desired, the voltage error amplifier will start to decrease
its output and thus reduce the amount of energy being
supplied to the output capacitors. If the error amplifier's
output should become less than one volt, no energy will be
stored in the transformers and thus no energy will be
transferred to the output capacitors.
3.1.6.2 Supply Operation
3 — 10 Theory of Operation 86-153061-00
Topaz S3 Inverters 0.5 kVA, 1 kVA, & 2 kVA
Page 51

This section describes maintenance and service of the
Topaz S3 Inverters Systems, including safety instructions,
preventive maintenance, descriptions of replacement parts
kits, and service.
IMPORTANT SAFETY INSTRUCTIONS FOR SERVICING
INVERTER SERVICING SHOULD BE PERFORMED OR
SUPERVISED BY QUALIFIED PERSONNEL ONLY.
The following preventive maintenance routines should be
considered the minimum requirements; your installation and
site may require additional prev entiv e maintenance to assure
optimal performance from your installed Topaz S3 series
Inverter System and associated equipment. We strongly
recommend contracting MGE Customer Support Services
for preventive and remedial maintenance.
The technician or electrician performing preventive
maintenance on the inverter must be familiar with the
indicators, controls, and operation of the inverter, as
described in this manual.
4.2 Preventive
Maintenance
WARNING
DC input power to the inverter is normally from a batter y bank with a
very high short-circuit capacity. Accidental welding and severe burns
can be caused by mistakes while connecting or disconnecting these
conductors.
ATTENTION
L'entrée DC de l'onduleur est normalement alimentée par une batterie
avee un courant de court-circuit élevé. Une erreur lors de la connexion ou deconnexion de ces conducteurs peut causer des soudures
accidentelles et des brûlures sérieuses.
WARNUNG!
Gleichstrom zum Wechselrichter kommt gewoehnlich von der
Batteriebank mit einer sehr hohen Kurzschluss Leistungsfaehigkeit.
Unbeabsichtigtes Schweissen und schwere Verbrennungen koennen
die Folgevon fehlerhafter Verbindung und Trennung sein.
4.1 Safety Instructions
4.0 Scope
4 — 1Maintenance and Ser vice
Maintenance and Service
Page 52

a. Ensure that all equipment is clean and free of loose
dust, dirt, and debris. The exterior of all enclosures
may be cleaned with a mild solution of soap and water,
lightly applied with a lint-free cloth.
b. Inspect the air intake and exhaust openings and clean
as required. Verify that air flows freely through the
equipment. Clean the air intake and exhaust openings
with compressed air or with a soft brush.
c. No further maintenance is required.
Two levels of replacement parts are available for the Topaz
S3 Inverter Systems. The two levels are designated B and
C. The level that you should keep on hand for your
installation will vary depending on the type of maintenance
planned on site, and the configuration of your Topaz S3
Inverter Systems. Having the replacement parts on hand will
prevent any unacceptable delays (due to time involved
obtaining spare parts) during critical periods, such as system
start-up. Any items used during start-up will be replaced by
MGE at no charge. Contact MGE Customer Support
Services for specific recommendations. A description of
each level is provided below:
Level Description
B This level of replacement parts is recommended when
the user can tolerate short-duration UPS downtime to
obtain replacement parts in the event of a major inverter
failure.
C This level of replacement parts is recommended when
the user can tolerate only a minimum of downtime in the
event of a major inverter failure.
Should you encounter a problem in the operation of a Topaz
S3 Inverter Systems and need MGE UPS Systems to
service your product, please take into account the following
recommendations.
To the extent that you feel comfortable with the unit, leave it
in its current state, make a record of the display lights and
messages and call either your local MGE Field Engineer or
MGE's Customer Support Services at 1-800-523-0142 for
assistance. Leaving the unit in its current state will enable
MGE's field engineers to troubleshoot your product and bring
it back on line more easily.
If you are not comfortable with the current status of the unit,
you may want to take the following actions:
4.4 Troubleshooting
and MGE Servicing
4.3 Replacement Parts
4 — 2 Maintenance and Ser vice 86-153061-00
Topaz S3 Inverters 0.5 kVA, 1 kVA, & 2 kVA
Page 53

Many operation problems are due to incorrect installation or
setup. Before turning the unit on, review Section 2 for
instructions pertaining to your particular system. Use the
checklist in Table 4-1 in this review. If the system fails to
operate properly after being turned on, the Table 4-1
checklist should be reverified.
Table: Installation Checklist
4- 1
Installation Item To Be Basic Inver ter System Inverter With Static Transfer
Verified Switch
DC Input Terminals
Voltage
Polarity
AC Input Terminals
Voltage
Connections
AC Output Terminals
Connections
Input Conductor Size
Output Conductor Size
Output V oltage Select
Frequency Select
Bypass Select
On/Off Line
Auto/Manual Start
4.4.1 Installation Checks
86-153061-00 4 — 3Maintenance and Ser vice
Owner’s Manual
Page 54

Before the inverter system can be turned on with the DC
circuit breaker on the front panel, the DC power source must
be energized. Upon turning the DC circuit breaker ON, a
relay will energize and the cooling fan will start to operate
after a short delay of less than one second. The Inverter
STATUS indicator will go through a RED, YELLOW, GREEN
lamp test sequence. The Bypass STATUS indicator will not
be illuminated. After another short delay (less than 2
seconds) a "chirp" sound should be heard from the Inverter
as the Battery Booster circuit starts up. The Inverter status
indicator should turn GREEN indicating power is being
supplied to the output. Using a voltmeter, verify the proper
output voltage at the Receiver Cabinet terminal board,
between ACOUT "L" and "N" terminals. If the Inverter
STATUS indicator is YELLOW, an overload condition exists.
If it is RED, the Inver ter has shut down, either from a severe
overload or Inverter malfunction. If the Inverter STATUS
indicator should be YELLOW or RED, turn the DC circuit
breaker OFF and disconnect the load wires from the ACOUT
terminal block. Turn the DC circuit breaker back ON and
verify the Inverter goes through its normal start-up sequence
(lamp test, battery booster start-up). The Inverter STATUS
indicator should be GREEN. If it is GREEN, a problem
probably exists in the output load. First verify the Inverter's
output voltage by using a voltmeter to check the AC output
voltage on the ACOUT terminal board. Verify that a short
does not exist between the Line and Neutral wires and that
the load does not exceed the rating of the Inverter.
4.4.2 Basic Inverter
System (List 11, -B2
Models)
4 — 4 Maintenance and Ser vice 86-153061-00
Topaz S3 Inverters 0.5 kVA, 1 kVA, & 2 kVA
Page 55

As soon as power is applied to the unit, either from the AC
power source or the DC is applied by closing the DC circuit
breaker, the unit will start up as indicated above for the basic
unit. During the lamp test sequence, both STATUS indicators
will go through the RED, YELLOW, GREEN lamp test
sequence. STATUS indication starts to differ at this point,
depending on the selected mode of operation, ON-LINE or
OFF-LINE.
WARNING
There will be AC on the output immediately when the AC input is energized, even without turning the system ON with the DC circuit breaker.
The digital LCD can display AC voltages, but not current when the DC
circuit breaker is OFF since the Maintenance Bypass relay is closed.
ATTENTION
La tension de sortie AC apparaîtra de's que l'entrée AC sera sous tension, même sans que le systéme soit mis en marche par le dijoncteur
DC. Le panneau de mesures digital peut afficher des tensions AC,
mais pas le courant lorsque le disjoncteur DC est ouvert, vu que le
realy de bypass de maintenance est fermé.
WARNUNG!
Wechselstrom ist automatisch ausgeloest wenn der Wechselstrom
eingeschaltet ist ohne den Gleichstromunterbrecher anzuschalten.
Der digitale LCD kann Gleichstromspannungen anzeigen, jedoch
keinen Strom, wenn der Gleichstromunterbrecher OFF anzeigt, da der
maintenance bypass geschlossen ist.
4.4.3 Inverter With Static
Transfer Switch
(-94 Models)
86-153061-00 4 — 5Maintenance and Ser vice
Owner’s Manual
Page 56

If AC has been applied to the Inverter and is within proper
limits (120VAC or 230VAC, +/- 10% maximum) the Inverter
STATUS indicator should turn YELLOW and then after a
short delay, it will turn GREEN, indicating power is being
supplied to the load. If the Inverter STATUS indicator
remains illuminated either YELLOW or RED, follow the
instructions for the basic Inverter system. The Bypass
STATUS indicator will star t with YELLOW and after a shor t
delay, it will turn GREEN. If the AC input voltage is not within
proper limits, the Bypass STATUS indicator will be YELLOW.
If the utility AC is greatly out of limits, either too high or too
low, the Bypass STATUS indicator will be RED. If it is RED,
the Inverter system will not be allowed to transfer to the
bypass mode in the event of an overload or Inverter failure.
If the Bypass STATUS indicator is RED, the Inverter STATUS
indicator will go from GREEN to YELLOW. This Bypass
STATUS indicator will blink ON for one second, OFF for one
second, indicating the utility AC is not the primary source
powering the load.
In this mode of operation, the Utility AC is being used to
power the load. At start up, the Inverter STATUS indicator
should turn GREEN after going through the lamp test
sequence and power up of the battery booster. This indicator
should blink ON for one second, OFF for one second,
indicating it is not the primary power source for the load. The
Bypass STATUS indicator should be GREEN if the utility AC
is within limits, YELLOW if it is not within proper limits. If the
utility AC is not within the +/- 10 % of the nominal value, the
load will be powered from the Inverter.
If installation, setup, and operation have been rechecked,
use Table 4-2 to relate the symptoms to a probable cause,
and obtain suggestions on how to proceed. It is not possible
to anticipate all symptoms in such a guide, but those listed
are the ones most frequently encountered. Therefore, the
guide can help to quickly isolate most common problems.
Maximum benefit from the guide can be realized if care is
taken to observe all of the information on the front panel to
define complete symptoms. An in-depth knowledge of
installation, setup, and operation in this manual will also
greatly enhance the use of the guide.
4.4.6 Troubleshooting
Guide
4.4.5 OFF-LINE Mode
4.4.4 ON-LINE Mode
4 — 6 Maintenance and Ser vice 86-153061-00
Topaz S3 Inverters 0.5 kVA, 1 kVA, & 2 kVA
Page 57

Table :Troubleshooting Checklist
4- 2
SYMPTOM POSSIBLE CAUSE RECOMMENDED PROCEDURE
No response when DC circuit Polarity reversed on DC Input Check input connections and reverse
breaker is turned ON. connections. If this is the if wrong. Remove the inverter module
Inverter STATUS indicator case, the internal Soft Start from the receiver cabinet. The soft
remains non-illuminated fuse will need to be replaced. start fuse (F1) is located in an opening
on the right hand side of the module. A
spare fuse has been supplied with this
manual. Replace F1 and re-install the
module.
Inverter start up but STATUS Overload. Connect the load directly to the AC
indicator goes to RED after lamp power source and measure the current
test start-up load sequence. and watts.
Incorrect Inverter output voltage Disconnect load. Tur n system ON. Use
or frequency. the meter function on the front panel or
multimeter to check output voltage and
frequency.
Wrong input voltage. Check input source and system
specification. If Inverter was powered
up with the 230 VAC on the input and
the Inverter was set for 120, damage to
the Inverter module is possible. Return
the unit to the depot for repair.
Maintenance Bypass relay Turn off the DC circuit breaker on the
defective. front panel of the inverter module.
Turn off the AC input circuit breaker and
disconnect the AC input wires. Turn on
the DC circuit breaker on the front panel
of the inverter module. If the inverter
STATUS indicator goes to RED, return
inverter module to depot for repair. If
STATUS indicator goes to GREEN,
inverter is OK. Verify that no AC voltage
(less than 5VAC) exist on the AC input
86-153061-00 4 — 7Maintenance and Ser vice
Owner’s Manual
Page 58

SYMPTOM POSSIBLE CAUSE RECOMMENDED PROCEDURE
terminals and that the proper AC output
voltage exist on the AC output ter minal
block. If 100-120 VAC or 200-240 VAC
exist on the AC input terminal block,
Maintenance Bypass relay is defective,
replace AC EMI filter board.
Inverter will not start. DC input voltage is too high or Measure the DC input voltage using
too low. a multimeter. Check specifications.
Inverter starts and stops. Load VA is too high. Measure load current using Utility
Inverter STATUS indicator AC power.
illuminated RED.
Inverter starts and Inverter Load VA is too high. Measure load current using Utility
STATUS indicator is YELLOW. AC power.
Bypass STATUS indicator is Utility AC voltage or frequency Check utility AC voltage with a multi-meter
YELLOW or RED. Not in specified limits. Check frequency to ensure it
agrees with the DIP switch setting in
the inverter module.
After taking these steps, make a record of the display lights
and messages, call your local MGE Field Engineer or call
1-800-523-0142 for assistance.
4 — 8 Maintenance and Ser vice 86-153061-00
Topaz S3 Inverters 0.5 kVA, 1 kVA, & 2 kVA
Page 59

Symbols
¶ Used to reference paragraph headings that are listed in the table
of contents.
/ Used to represent “and/or.”
% Percent; of each hundred.
° F. Degrees Fahrenheit.
° C Degrees Celsius.
@ At.
± Plus or minus.
# Number.
Ø Phase.
Ω Ohms.
2nd Second.
AC or ac Alternating current.
Ambient
air temperature The temperature of the surrounding air, usually defined as 23 degrees C.
Ambient noise The noise level of the environment.
ANSI American National Standards Institute.
Attached load The load attached to the inverter output, such as a computer system
or manufacturing system.
AWG American Wire Gauge, formerly Brown & Sharp gauge.
Breaker Circuit breaker.
BYPASS See "Static Transfer Switch".
BYPASS mode See "off-line mode".
Carrier The company or individual responsible for delivering goods from one area
to another.
g — 1Glossary
Glossary
Page 60

C Common.
CB Circuit breaker.
Conduit A flexible or rigid tube surrounding electrical conductors.
C.S.S. Customer Support Services.
Current rating The maximum current that a piece of electrical equipment is designed
to carry.
dBA Decibels adjusted.
dBrnC Decibels above reference noise.
DC or dc Direct current.
Digital Meter The LCD display on the front panel of the inverter module.
DIP Dual in-line package.
DPDT Double Pole Double Throw.
Earth ground A ground circuit that has contact with the earth.
Electrician Refers to an installation electrician qualified to install heavy-duty
electrical components in accordance with local codes and regulations.
Not necessarily qualified to maintain or repair electrical or electronic
equipment. Compare to technician.
MGE MGE UPS Systems
FET Field Effect Transistor.
FREQ Frequency.
Frequency slew The change in frequency per change in time. Given in terms of Hz per
second (Hz/sec).
GND Ground
Hz Her tz, a measure of frequency; one cycle per second equals one Hertz.
Inverter mode See "on-line mode".
I Current.
IEC International Electrotechnical Commission.
IEEE Institute of Electr ical and Electronic Engineers.
g — 2 Glossary 86-153061-00
Topaz S3 Inverters 0.5 kVA, 1 kVA, & 2 kVA
Page 61

Input branch
circuit The input circuit from the building power panel to the equipment.
Inverter An electrical circuit that generates an AC sinewave output from a DC input.
kVA Kilovolt-Ampere; a measure of apparent power.
L Line.
LCD Liquid-crystal display.
LED Light-emitting diode.
Mains or mains 1 Main AC input source.
Mains 2 Bypass AC input source.
mA Milliampere.
MAX Maximum.
MCM Thousand circular mil; standard wire sizes for multiple stranded conductors
over 4/0 AWG in diameter. M is from the Roman numeral system; it is the
symbol for 1,000.
module Refers to an inverter module.
MOV Metal-oxide varistor.
N Neutral.
NC Normally closed.
NEC National electrical code.
NFPA National fire protection association.
NO.or No. Part number.
NO Normally open.
On-line mode Inverter sources power to the output load. Inverter receives power from the
DC input source.
Off-line mode The output receives power directly from the input utility via a static transfer
switch or maintenance bypass relay.
OSHA Occupational safety and health act.
PWM Pulse width modulator.
86-153061-00 g — 3Glossary
Owner’s Manual
Page 62

SCR Silicon-controlled rectifier.
Shipping damage Any damage done to an article while it is in transit.
SPDT Single Pole Double Throw.
Static Transfer
Switch An electronic or solid state switching mechanism electronically controlled to
pass AC power directly from the utility to an output load.
Technician Refers to an electronic technician qualified to maintain and repair
electronic equipment. Not necessarily qualified to install electrical wiring.
Compare with electrician.
Test connector DB-9 type connector on the rear panel allowing an MGE Customer Suppor t
Services technician to access programmable and diagnostic features of the
system.
VA Volt-amps:Apparent power in volts X amperes.
VAC Volts of alternating current.
VDC Volts of direct current.
Watts Real power - joules/second
g — 4 Glossary 86-153061-00
Topaz S3 Inverters 0.5 kVA, 1 kVA, & 2 kVA
Page 63

Reorder form
1660 Scenic Avenue
Costa Mesa, CA 92626
to order additional copies of this document, or to report any errors,
omissions, or other problems you have experienced.
NAME __________________________________________________________
COMPANY ______________________________________________________
STREET ADDRESS _______________________________________________
CITY __________________ STATE ______________ ZIP _____________
I would like to order _______ (quantity @ $50.00 each) additional copies of the:
Topaz S3 Inverters 0.5 kVA,1 kVA, & 2 kVA
Owner’s Manual
86-153061-00 B03 3/99
I would like to report the following problems with this document:
________________________________________________________________
________________________________________________________________
________________________________________________________________
________________________________________________________________
________________________________________________________________
________________________________________________________________
________________________________________________________________
________________________________________________________________
Use this form
Page 64

Nothing will stop you now
™
1660 Scenic Avenue, Costa Mesa, California 92626 • (714) 557-1636 • www.mgeups.com
 Loading...