

Page 1
FCC Compliance
NOTE: This equipment has been tested and found to comply with the limits for Class B digital device,
pursuant to Part 15 of FCC Rules. These limits are designed to provide reasonable protection against harmful
interference in a residential installation. This equipment generates, uses and can radiate radio frequency
energy and, if not installed and used in accordance with the instructions, may cause harmful interference to
radio communications. However, there is no guarantee that interference will not occur in a particular
installation. If this equipment does cause harmful interference to radio or television reception, which can
be determined by turning the equipment off and on, the user is encouraged to try to correct the interference by one or more of the following measures:
• Reorient or relocate the receiving antenna.
• Increase the separation between the equipment and receiver.
• Connect the equipment into an outlet on a circuit different from that to which the receiver is connected.
• Consult the dealer or an experienced radio/TV technician for help.
This device complies with Part 15 of the FCC Rules. Operation is subject to the following two conditions: (1)
This device may not cause harmful interference, and (2) this device must accept any interference received,
including interference that may cause undesired operation.
Warning: Changes or modifications to this unit not expressly approved by the party responsible for
compliance could void the user‛s authority to operate the equipment.
‘Let‛s care for the environment!‛
The wheelie bin symbol indicates that the product must not be disposed of with other
household waste. Please use designated collection points or recycling facilities when disposing
of the item
Specifications for Camera:
O/S Requirement: For Computer - Microsoft Windows® 98 SE / ME / 2000 / XP
For Mac® - Up to OS 10.2.8
White Balance: Automatic
Exposure Control: Automatic
Image Size: 640 x 480 pixels
Display: Display with TV or computer (TV and Computer are not included)
Interface: USB 1.1 for Computer
Storage: 4MB Built-in memory (including 2 MB for Photo taking, 2 MB for Firmware)
Photo Type: JPG File
Memory: SD Card Slot (Support up to 1GB SD card - Not Included)
NOTE: No LCD screen for Camera.
Ages 6+
355267
ADULT SUPERVISION REQUIRED
INTRODUCTION
Become a movie-maker with your very own Bratz™ Movie Stars Studio! Pose your Bratz™ Movie Stars
Sharidan™ doll (the most pose-able Bratz™ ever!) and snap a picture with the real digital camera! Re-pose
her and snap another picture! When you are done you can play back the pictures on your TV as a movie that
you can watch! You can also print out photos on a computer for your fans!
CONTENTS
• 1 Bratz™ Movie Stars Sharidan™ Doll with Outfit
• 1 Bratz™ Movie Stars Camera
• 1 Adjustable Camera Tripod
• 1 Star Base
• 1 TV Video Cable (RCA)
• 1 USB Cable
• 1 Hair Brush
BEFORE YOU BEGIN
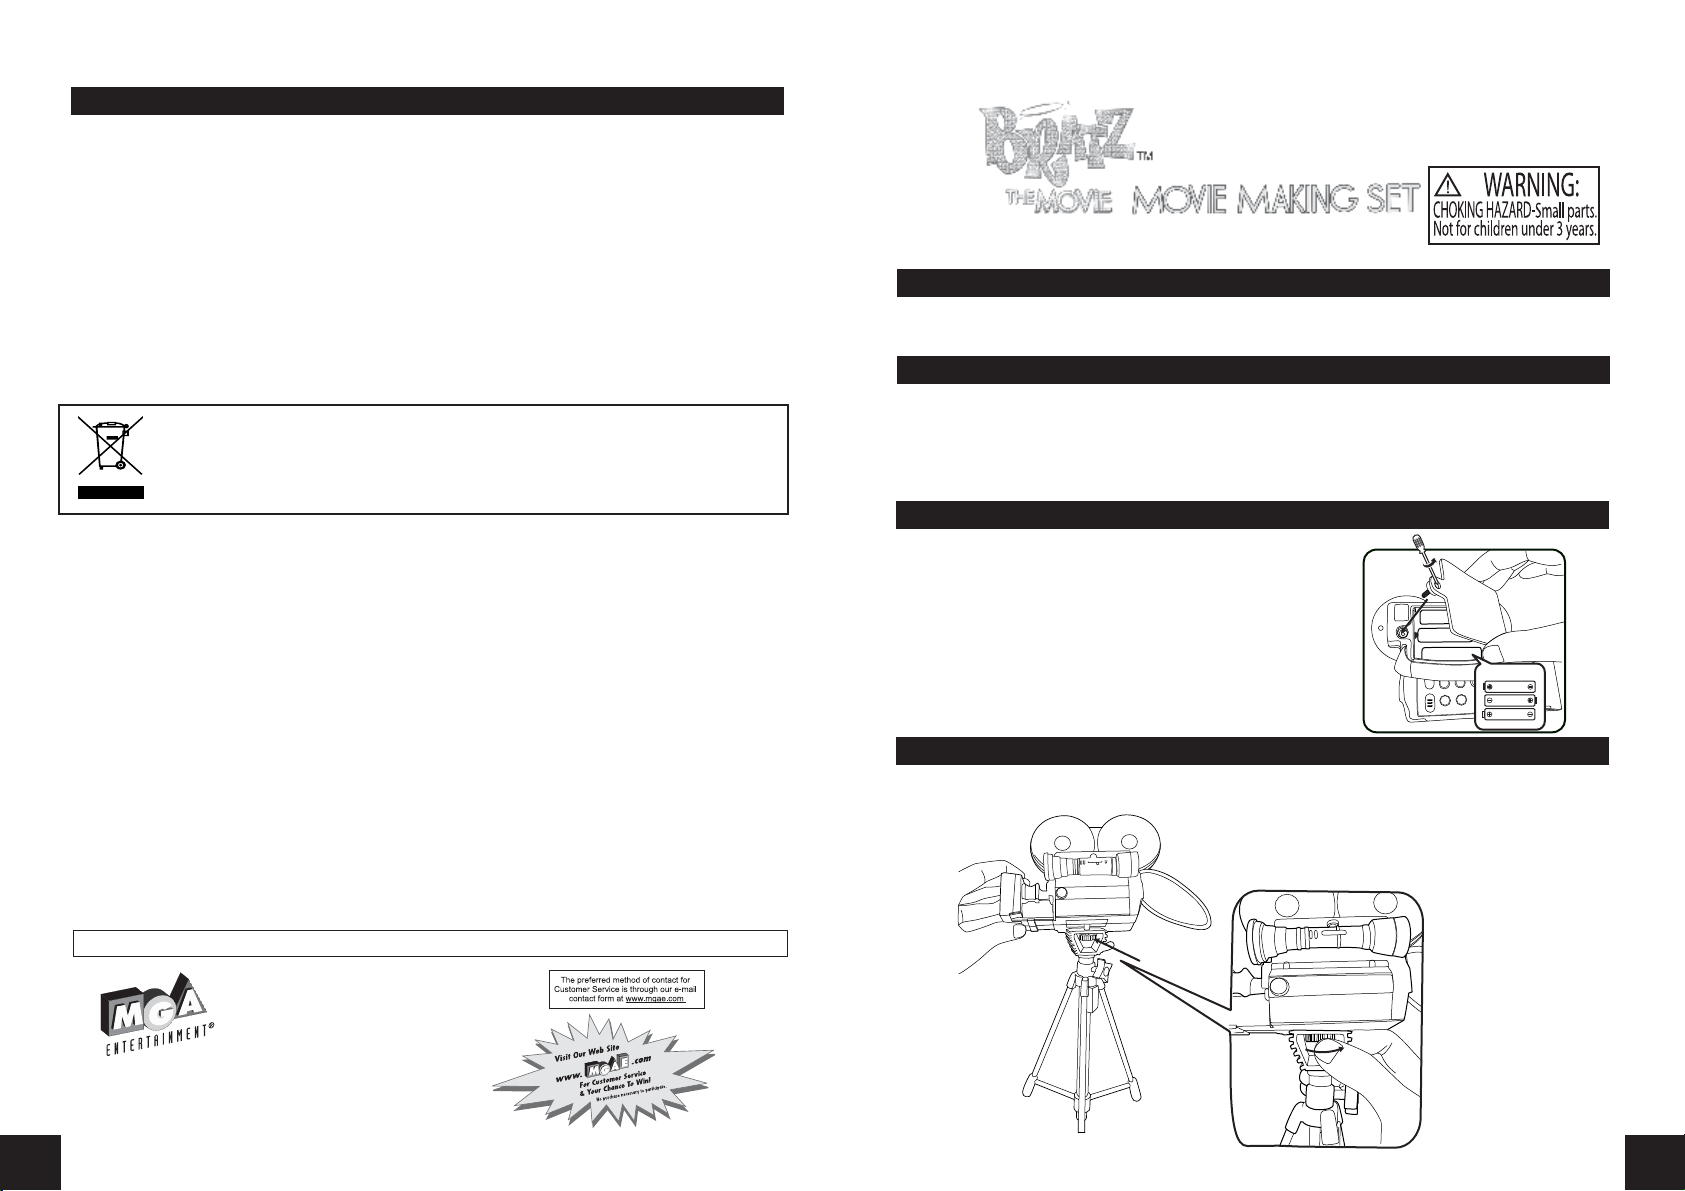
Before you say “Action”, have an adult help you install batteries:
1.Remove the “Shutter Release” button from it‛s holder on the
side of the camera.
2.Using a Phillips screwdriver (not included) remove the screw and
battery compartment cover from the side of the camera.
3.Install three (3) AA alkaline batteries (not included) making
sure the (+) and (-) ends face the proper direction as indicated
inside the battery compartment.
4.Replace the compartment cover and tighten the screw.
ANIMATE
OFF
ON
DELETE
T/
R
A
T
S
AKE UP
W
3 x AA Batteries
1.5V AA/LR06
1.5V AA/LR06
1.5V AA/LR06
QUICK START
Assembly:
1. Place the camera on top of the tripod so that the bolt goes into the camera‛s tripod mount. (See Fig. 1).
NOTE: Windows® is a trademark of Microsoft Corp., registered in the U.S. and other countries.
NOTE: Mac® and Macintosh® is a trademark of Apple Inc., registered in the U.S. and other
countries.
Please keep this manual as it contains important information.
www.bratz.com
TM & © MGA Entertainment, Inc.
BRATZ™, BRATZ PETZ™, LIL‛ BRATZ™,
BRATZ BABYZ™, BRATZ KIDZ™ and all
related logos, names, characters, distinctive
likenesses and slogans, as well as the
packaging and images appearing thereon, are
the exclusive property of MGA.
0507-0
16300 Roscoe Blvd.
Van Nuys, CA 91406 USA
(800) 222-4685
Printed in China
Turn the bolt to right
to secure the mounting.
Fig. 1
18
Page 2
QUICK START (con‛t)
2. Take your Bratz™ Movie stars Sharidan™ doll and place her on the Star
Base. Holes in the bottom of her feet will fit on the pegs of the Star Base.
(See Fig. 2).
3. Place the doll about 14+ inches away from the camera.
CAMERA SETUP AND OPERATION
Fig. 2
Side & Bottom: The Camera is made up of the following parts (Fig. 3):
a. Shutter Release button
b. “ANIMATE/CAPTURE” Switch
c. “ON/OFF”Switch
d. “DELETE” Button
e. “START/WAKE UP” Button
f. “PLAY” Button
g. Previous Image Button ” “
h. Next Image Button ” “
i. Focus knob
g.
Side
b.
c.
d. e.
Back (Fig. 4):
j. Viewfinder
k SD card Slot
l. USB Port
m. Video Out Jack
Back
j.
m.
k. l.
Illustrations may vary from actual contents.
Fig. 4
h.
f.
a.
Bottom
Fig. 3
Slow
3. You can use your Movie Stars camera to animate any of your toys! You can even animate pieces of clay
just like the pros!
4. You do not have to use your Digital Camera strictly for animation. You can use it just like a normal camera
to take pictures of people, pets, landscapes or anything else.
Fast
SAFETY INSTRUCTIONS
• Never insert anything other than an SD card into the camera‛s SD card slot. Doing so may damage both
the camera and the card.
• While the red light on camera is on, press the “START/WAKE UP” button and hold for around 2 seconds
until the red light is off before inserting/removing SD card or connecting/disconnecting the TV video
cable or USB cable, otherwise the camera may be hang or causing data loss stored in built-in memory.
• Make sure that the terminals of the SD card are facing towards the right of the camera.
• Should water or any foreign object ever get into the card slot, immediately turn off the camera and
remove the battery, and then contact your dealer or nearest service provider.
TROUBLESHOOTING
• If the camera “hangs”, reset the camera by the “ON/OFF” switch.
i.
• Turning off the camera by “ON/OFF” switch will cause data loss stored in built-in memory.
• For the best image quality, connect the camera to TV and adjust the focus by watching the TV screen.
• The batteries in the camera are old or improperly installed. Replace old batteries and install them correctly.
• If the camera does not respond, check the cable connection with TV set or computer. Look to see if the
cables are loose or not connected to the proper jack (Refer to the CAMERA SETUP AND OPERATION).
• Computer connections are only for picture storage and individual picture review.
• Capture and Animate function cannot be activated while cable connects to computer.
• The animation or JPG files which are stored in built-in memory of camera cannot be shown or seen while SD
card is inserted into the camera.
NOTE: The camera may malfunction if it is exposed to static electricity. If this happens, reset it by
unplugging and re-plugging the USB Cable into the camera.
SAFE BATTERY USAGE
SAFE BATTERY USAGE
• Use alkaline batteries for best performance and longer life
• Use only the type battery recommended for the unit.
• Batteries should be replaced only by an adult.
• Insert batteries with the correct polarity ( + and – ).
• Do not mix different types of batteries or old and new batteries.
• Do not short-circuit batteries.
• When not used for an extended time, remove batteries to prevent possible leakage and damage to the
unit.
• Do not mix rechargeable and non-rechargeable batteries.
• Rechargeable batteries are to be removed from the toy before charging.
• Rechargeable batteries are to be recharged only under adult supervision.
• Do not recharge non-rechargeable batteries.
• Exhausted batteries are to be removed from the toy.
• Do not dispose of batteries in fire as they may leak or explode.
NOTE: The voltage of a fully-charged, rechargeable battery is often lower than that of a fresh alkaline
battery. Therefore, it is recommended that alkaline batteries be used instead of rechargeable batteries
for best performance and for longest play time.
3
72
Page 3

Movie Playback:
Now we will watch the movie that you have just created:
1. With the camera still on, change the “ANIMATE”/CAPTURE” Switch to “ANIMATE”.
2. The TV screen icons will disappear and a new Frame Counter will appear in the lower left hand corner. This
counter shows the number of total captured images and the current frame that is displayed on screen.
3. Watch the TV screen as the first frame of your animation comes up. If it is not at the first frame. Use
the Previous Image Button “ ” and Next Image Button “ ” (Please refer to Fig. 3) to scroll to the correct
image.
4. Press the “PLAY” button to see your Bratz™ doll raise her arm and wave at you!
5. Press the “PLAY” button continuously to watch the movie over and over.
Deleting Images:
If you ever “mess up” while re-posing your Bratz™ doll, or you capture an image that you don‛t like, you can
easily delete the image. To do so:
1. With the camera in “ANIMATE” mode, use the Previous Image Button “ ” and Next Image Button ” “ to
scroll to the first image you want to delete.
2. Press the “DELETE” Button once. Scroll to the or icon on TV screen and press the “Shutter Release”
button.
3. Repeat Step 2 for any other frames you want to delete.
4. Scroll back to the first frame of your movie and press the “PLAY” Button to watch it without the unwanted
image(s).
5. If you want to delete all of the frames, press the “DELETE” Button twice and confirm deletion with the
“Shutter Release” button.
SAVING IMAGES
If you want to save your images to a computer for printing, emailing to friends or other purposes, have an
adult help you with these steps:
1. Press the “START/WAKE UP” Button on the Camera and hold for about 2 seconds to put it in sleep mode.
2. Disconnect the Camera from the TV Cable.
3. Attach the USB Cable to the back of the camera. (See Fig. 8).
4. Attach the other end of the USB Cable to the USB port of a PC that is running Windows®
98 SE/ME/2000/XP, or a Macintosh® computer that is running up to OS 10.2.8.
PC
a e a e a e
Fig. 8
5. Navigate to the folder on the External Storage device and copy all of the .jpg files to a folder on your PC
or Mac®.
6. Once you have the image files on your computer, you can:
• Print out copies and share them with your friends.
• Email copies of the images to friends and family.
• Use a video editing or “flipbook” program to make a video sequence.
o NOTE: Use a program that is able to import files as “JPEG Sequences”.
Animation Notes:
1. Your Camera plays movies back around 3 to 4 frames per second. This means that around 3 to 4 images
make up one second of movie time. Think about the kinds of actions you want your Bratz™ doll to do and
act them out yourself. Time them and see how many seconds each action takes. This will give you an idea
of the number of images to capture.
2. The more images you capture for an action, the slower the action will look on screen. Take a look at the
images below:
TV Connection and Camera Start:
For best results, you should attach the Camera to a TV with the TV Video Cable (included). This will allow
you to see what the camera sees!
1. Attach the black plug of the TV cable to the Video Out Jack of the Camera. (Fig. 5)
2. Attach the opposite end of the TV cable to the yellow RCA video in Jack on the front or back of your
TV, (the Jack is usually yellow, like the plug of the TV cable) (Fig. 5).
TV
L R
b.
AUDIO
d.
Fig. 5
a.
c.
XXXX
Fig. 6
VIDEO IN
VIDEO OUT
3. Power ON the TV and set the channel to Video Input.
NOTE: The correct Video Input channel name may vary from TV to TV. Some examples are: Aux 1 or 2,
Input 1 or 2, Line 1 or 2. Consult your television manual for the appropriate channel to use.
4. Set the “ANIMATE/CAPTURE” Switch on the side of the
camera to “CAPTURE”.
5. Set the “ON/OFF” switch to “ON”.
6. Press & hold the “START/WAKE UP” button for about 2
seconds; you should hear an audible “chirp”.
7. The Camera Frame (everything that the camera sees through
the lens) will appear on the TV screen.
8. The TV screen also shows the following Icons:
a. “Capture” Mode Icon – This indicates that the camera is set to
Capture Image mode.
b. Battery Power – This icon shows the power level of the
batteries. When they are almost exhausted the icon will turn
red.
c. SD Card Detected – This icon shows that there is an SD Memory
Card in the camera slot.
d. Frames Available – This number shows the number of empty
frames available. Internal camera memory will give you around
40 frames. Adding a 256MB SD Card (not included) will give you
around 5,000 frames.
NOTE: Camera supports SD cards up to 1GB in size.
9. If the Camera Frame is blurry or not clear, adjust the Focus
Knob underneath the camera lens until your subject is clear.
10. The camera is now ready to record your brilliant masterpiece!
NOTE: Make sure that you have sufficient light to see your subject clearly. If it appears too dark on the
TV screen, add more light until the subject is clear.
NOTE: The camera is able to capture images without a TV, but you will not be able to see what the camera
sees as whole captured images cannot be seen through “Viewfinder”. This makes animation much
more difficult!
36
Page 4

Capturing Images:
Your Camera is designed to take a series of still pictures and play them back rapidly in succession, this
process is known as animation. With animation you will be able to make your Bratz™ doll appear to come to
life! Here‛s how:
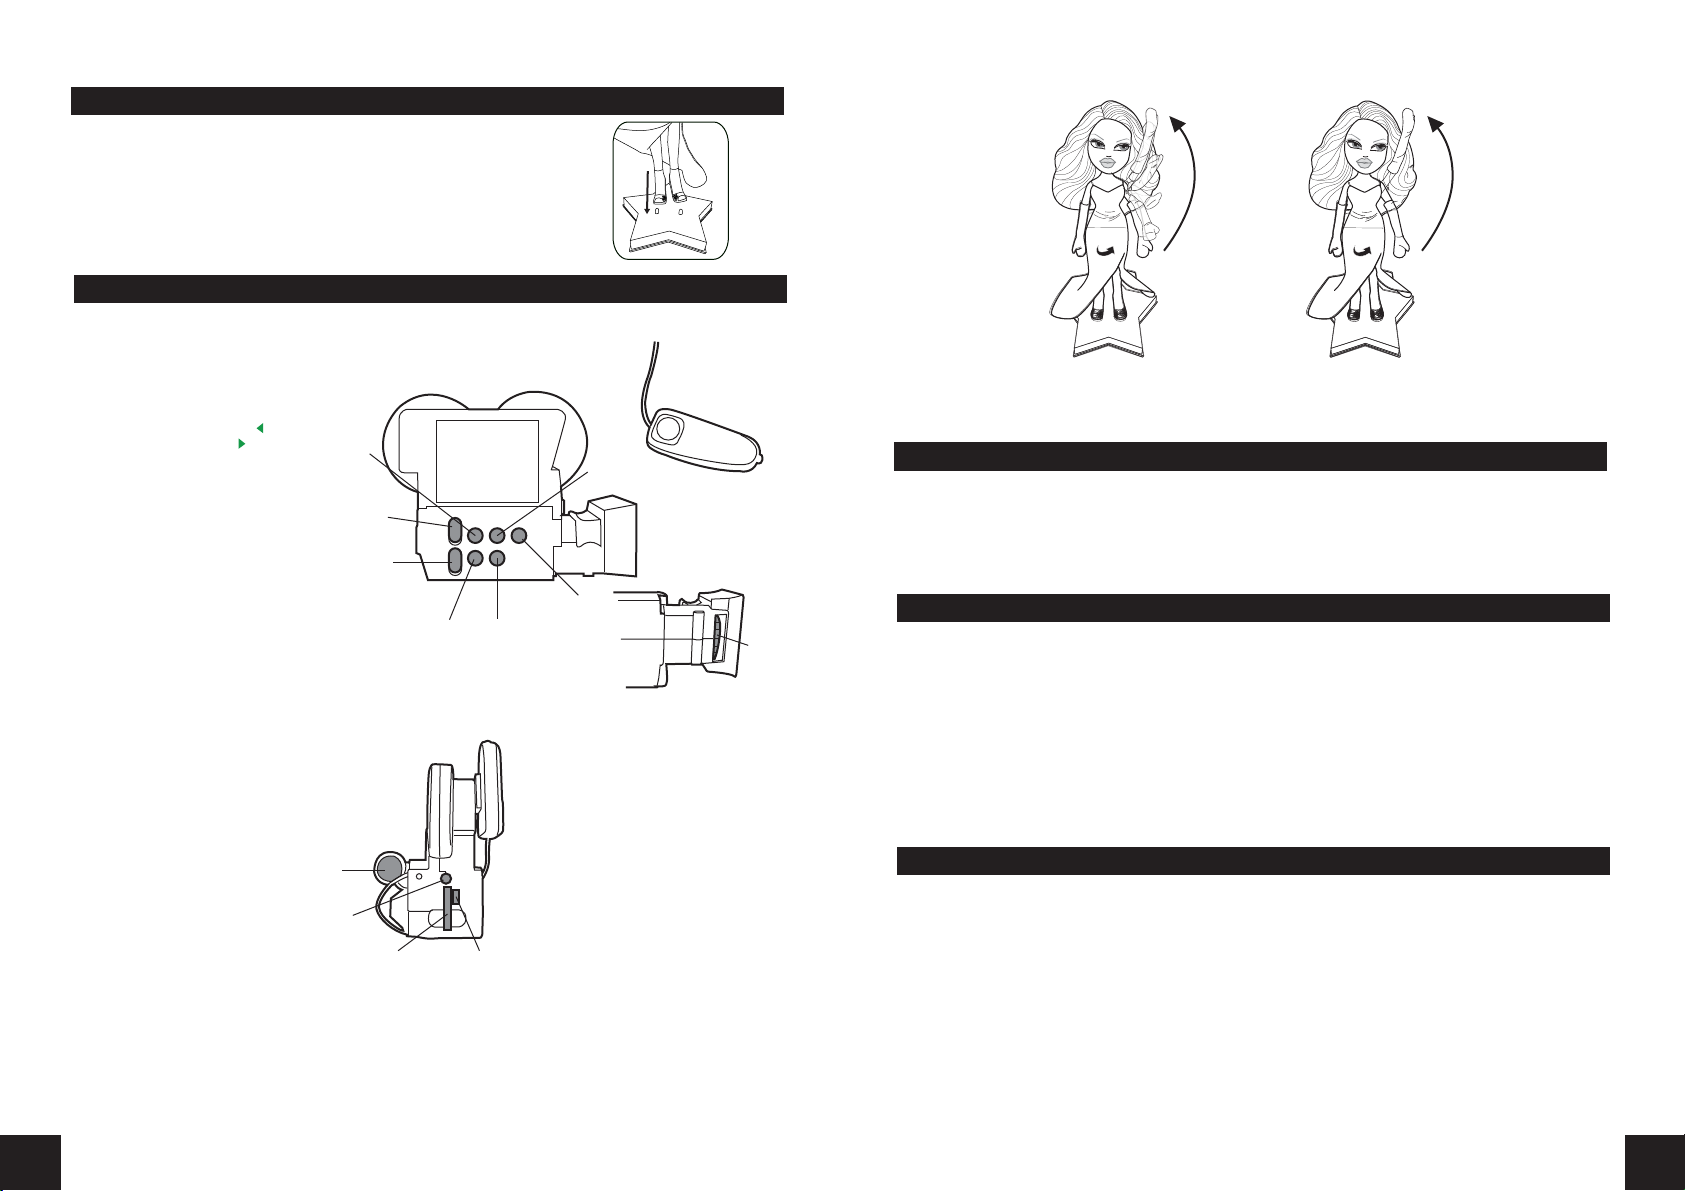
1. Pose your Bratz™ doll in a starting pose.
6. Now, move your doll‛s arm to the left and straighten it out as you go. Then, bring her arm back up into
the first position. Do this six times as shown below.
2. Remove the “Shutter Release” Button from its holder.
3. Press down on the “Shutter Release” Button to take a picture. The Camera will “chirp” to indicate that a
picture was taken. (Note: You can hold the “Shutter Release” Button to take a series of pictures.)
4. Move your doll‛s arm up slightly and take another picture.
5. Repeat Steps 3 and 4 as you take more pictures of your doll. Raise her arm up a little bit each time. Do
this six times.
1.
4.
2.
5.
3.
6.
7. Repeat Step 6 three more times.
8. Now, move your doll‛s arm back the opposite direction. Do this seven times until the arm is in the same
place as the beginning of Step 1.
1.
2. 3.
1.
2. 3.
4.
5.
6.
7.
NOTE: You can remove the camera from the tripod and use the plastic viewfinder to take pictures of your
friends, pets, etc. Before you do this, adjust the Focus Ring left and right until the subject is clear on the
TV screen.
Important Note: DO NOT turn off your camera with the “ON/OFF”
4.
5.
6.
Toggle Switch; otherwise your images will be lost. If you need to turn the camera off for awhile, press the
“Start/Wake up” button.
54
 Loading...