

Page 1

FWP
Getting connected with your device
LEGAL INFORMATION
Copyright © 2019 CARON CORPORATION.
All rights reserved.
We reserve the right to amend the technical parameters of the user manual. We will
improve this user manual and adjust the printing errors in time without notification in
advance.
Page 2

Safety Information Page 2 of 18
Contents
1. Knowing the appearance and key functions of your device ............ 3
1.1. Key functions ....................................................................................... 3
2. Connecting your device ...................................................................... 4
2.1. Configuring your PC ............................................................................. 5
3. Wireless connection ............................................................................ 9
3.1. Normal Connect ..................................................................................... 9
3.2. Web configuration .............................................................................. 10
4. Main feature ........................................................................................ 11
4.1. Main menu ............................................................................................. 11
4.2. Status bar icon ................................................................................... 11
4.3. Main features on phone menu............................................................. 12
4.4. Main features on WEB UI .................................................................... 14
5. Care and maintenance....................................................................... 17
Page 3
1. Knowing the appearance and key functio
ns of your device
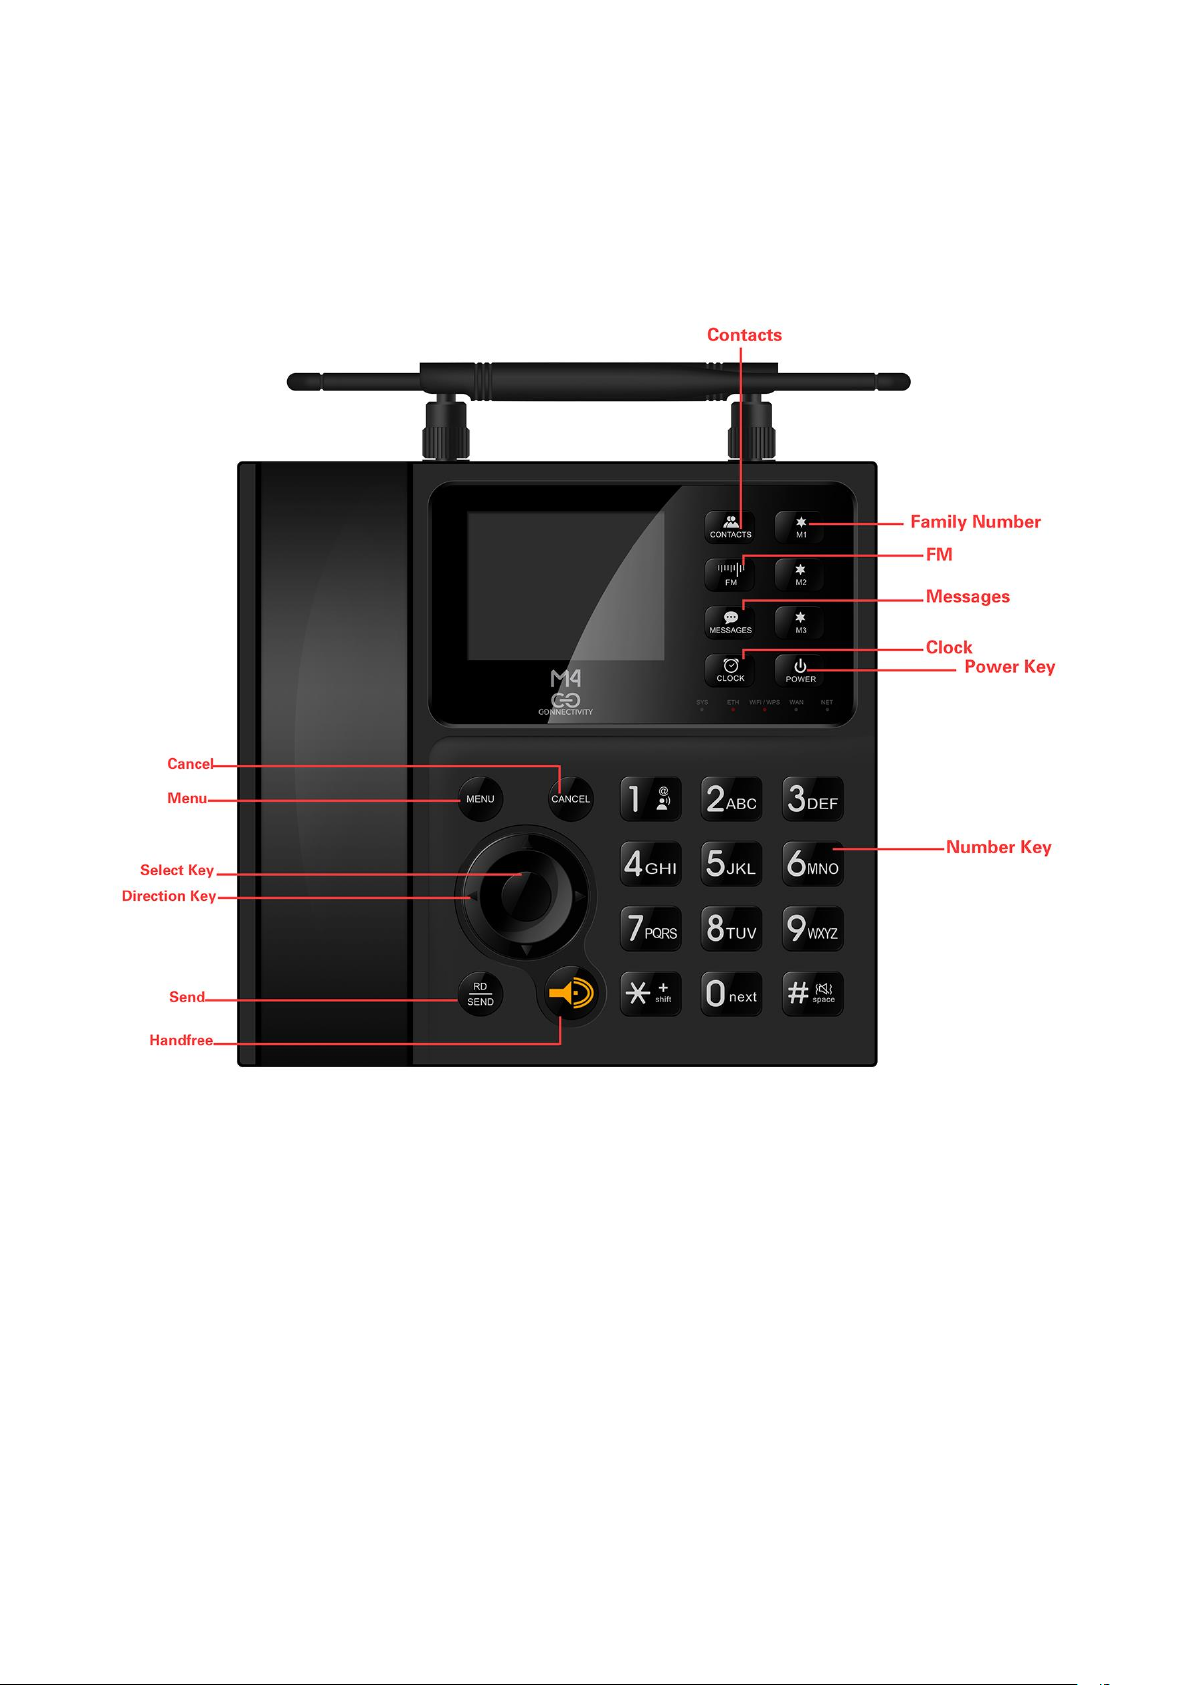
1.1. Key functions
The phone contains the following keys:
On and off key
The power key is located on the right side of the keyboard. Press once to turn
off the screen. If you press and hold the key, the phone will turn off.
Call key
The call key is located on the left side of the keyboard.
Page 4

Safety Information Page 4 of 18
Press once to view the call records.
Navigation keys
The navigation keys are located on the left of the keyboard. Press the
navigation keys to scroll and select Menu items and sub-menus.
Numeric keys
The numeric keys are located 0n the right of the keyboard. Press each number key
to enter the numbers on the dial pad.
Shortcut keys
The shortcut keys are at the right upper of the keyboard. Each shortcut key is a
shortcut to important applications.
2. Connecting your device
To start using your device, connect your device as the following schematic
diagram.
Page 5
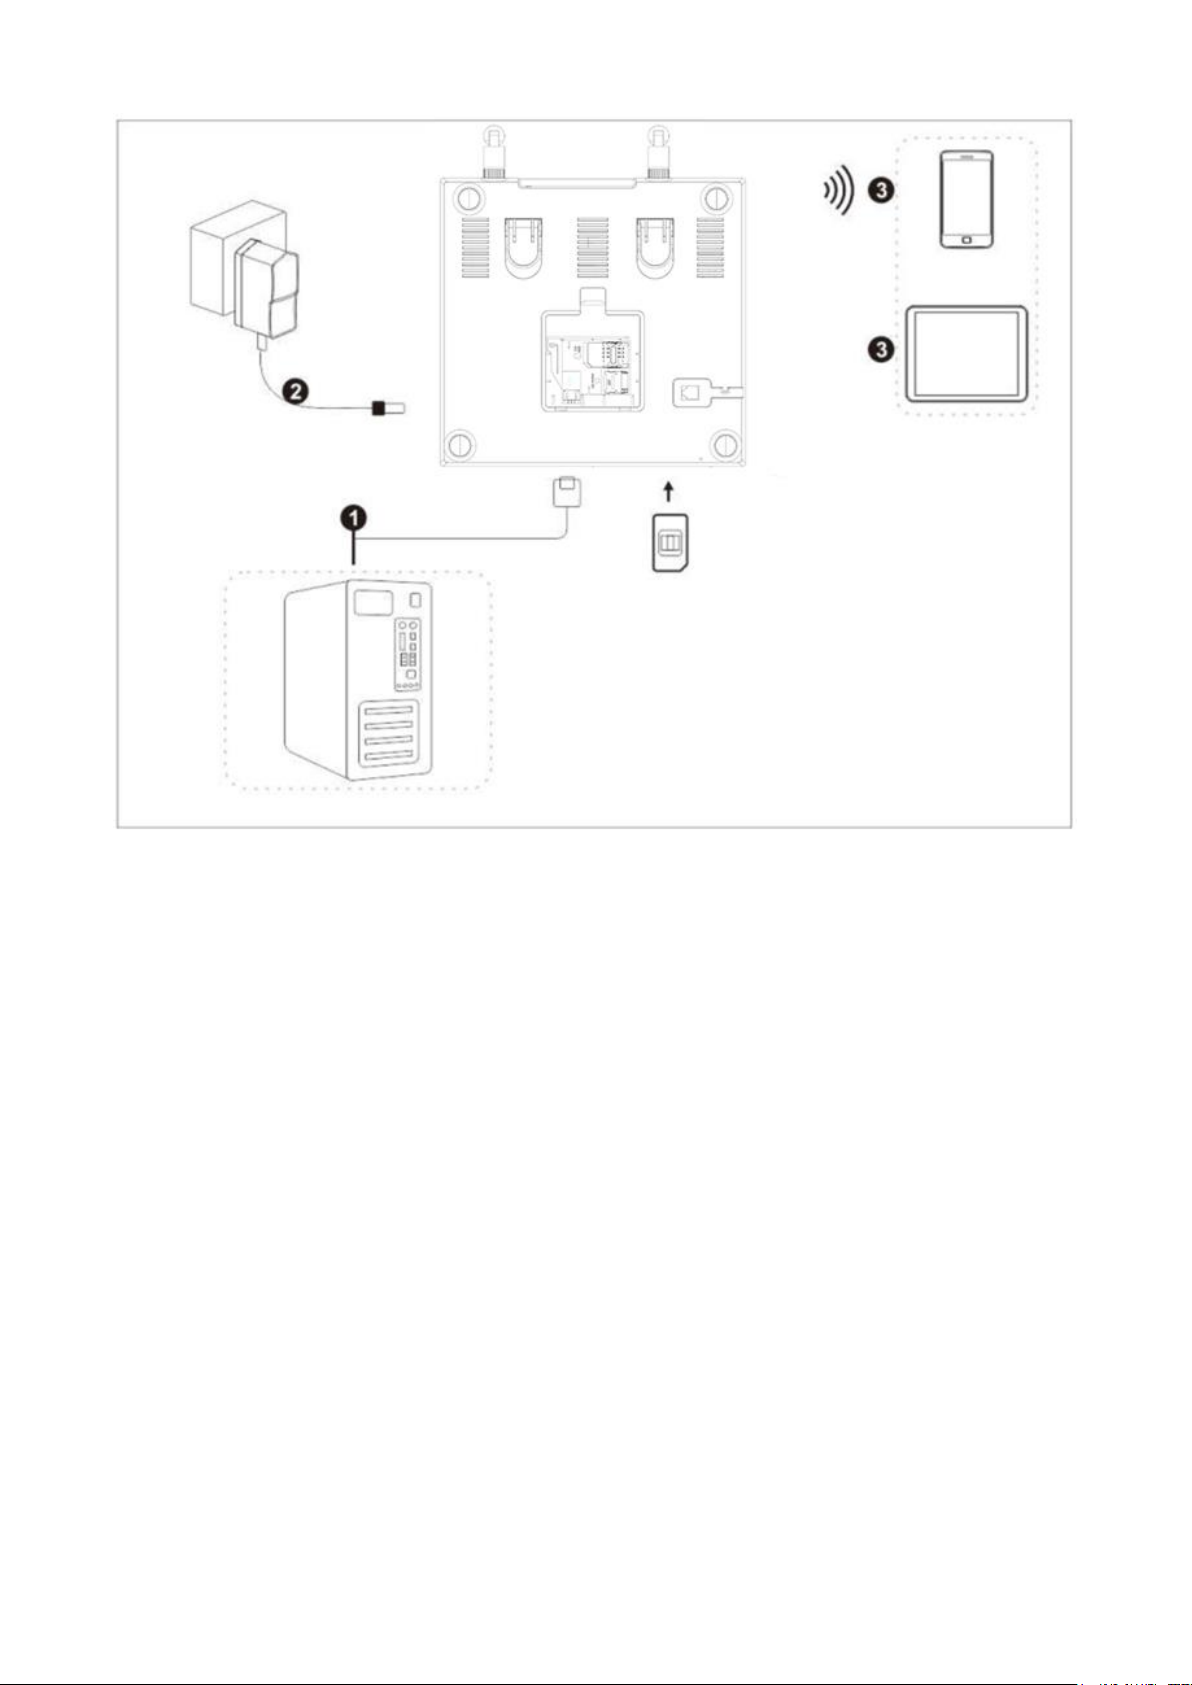
Note:
❶ means computer that should be connected with FWP by network cable.
❷ means DC adaptor.
❸ means wireless devices (e.g. phone, pad, laptop)
Install SIM: push the SIM from SIM slot. After hearing a “click”
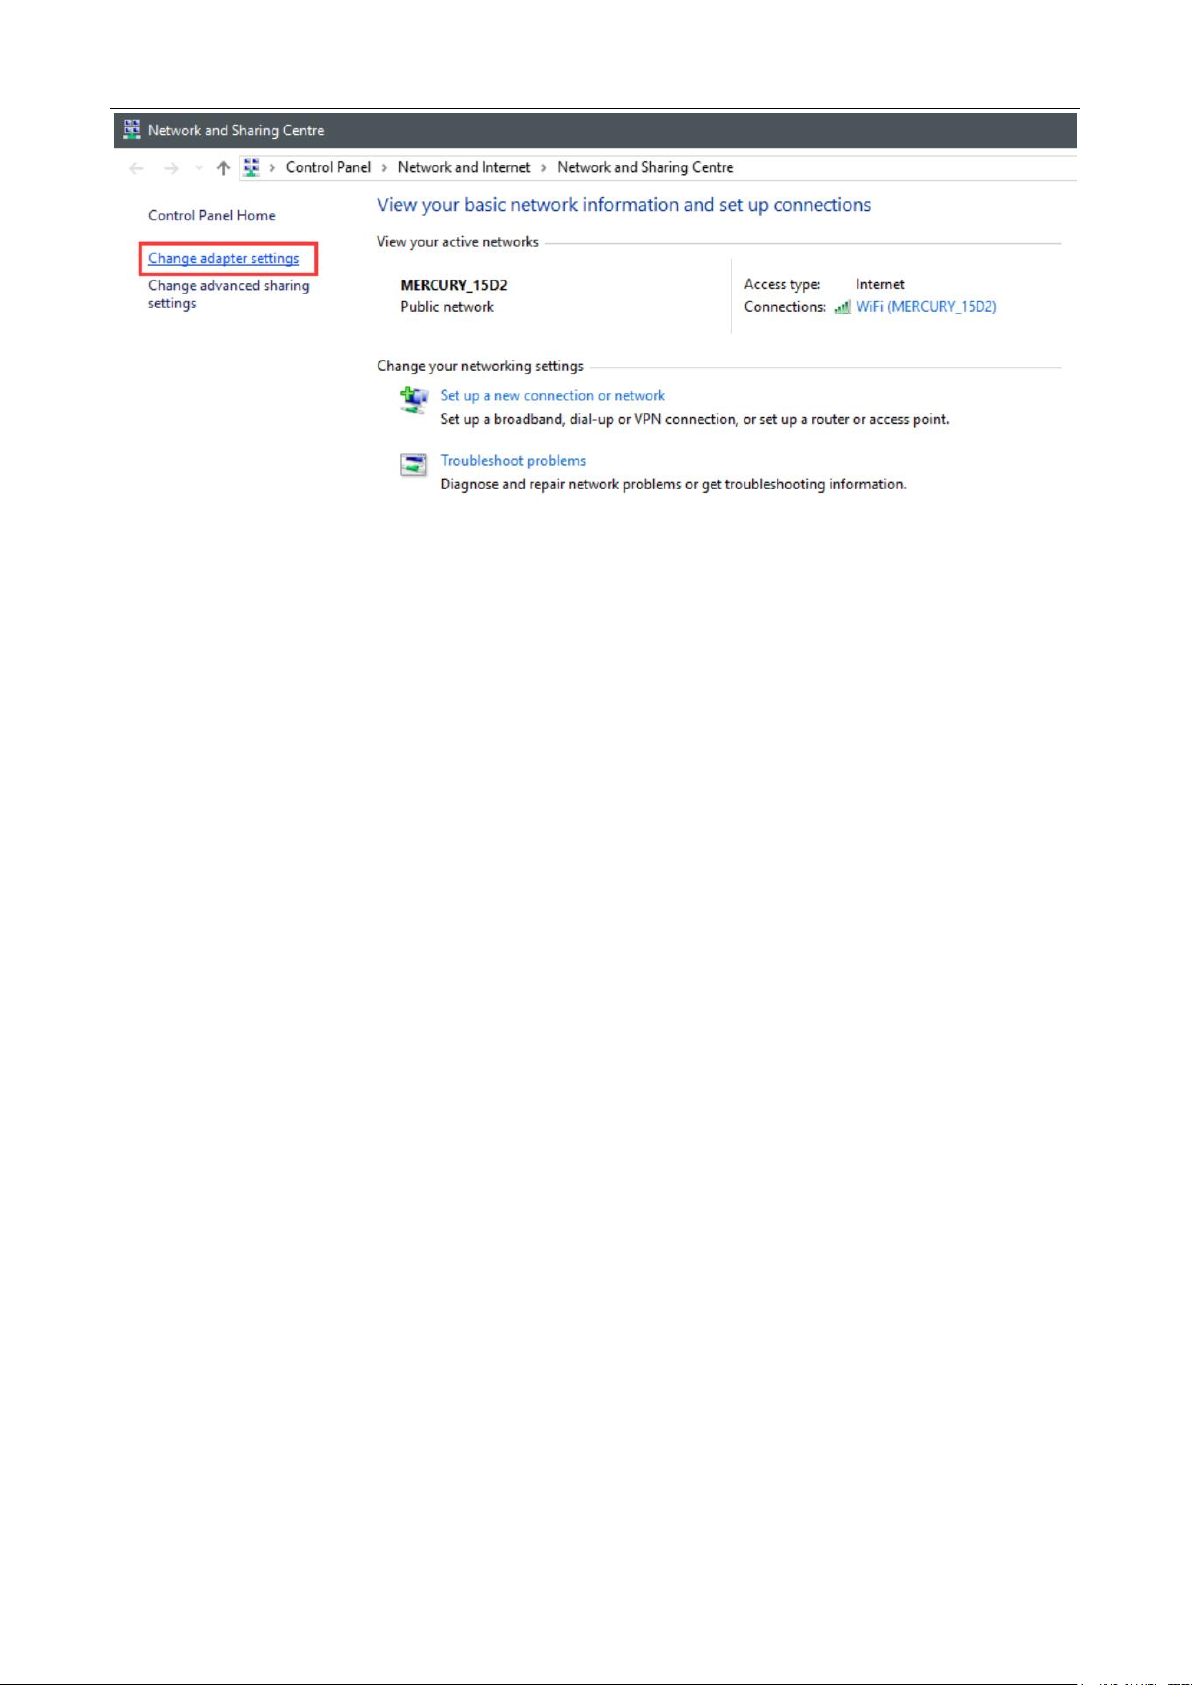
2.1. Configuring your PC
The following steps shows how to configure the Internet protocol in Windows 10
system for WIFI connection.
1.Go to Control Panel and find Network and Internet, and then go into Network
and Sharing Centre. Select Change adapter settings.
Page 6
Safety Information Page 6 of 18
2. Find Wireless Network Connection and right click it, and then click
Properties. In WIFI Properties, double-click Internet Protocol Version
4(TCP/IPv4), or select Internet Protocol Version 4(TCP/IPv4) and then click
Properties.
Page 7

3. Select Obtain an IP address automatically, and Obtain DNS server
address automatically. Click OK to confirm.
Page 8

Safety Information Page 8 of 18
Page 9

3. Wireless connection
3.1. Normal Connect
Select the SSID on computer or mobile phone and click Connect. After inputting
password, the WIFI can be used (default SSID and password can be seen on PWD
sticker).
Page 10

Safety Information Page 10 of 18
3.2. Web configuration
The device supports standard internet cable or WLAN wireless way to connect with
computer or wireless devices. No matter what way to connect, please make sure to
set the mode: obtain IP address as automatically.
Please enter “192.168.1.254” in the IE browser after the computer obtain the
IP address. Then inputting username and password to access WEB UI. Router’s
default username and password can be seen on device sticker. For logging into
the WEB UI, proposed browsers are as follows:
● at least IE 7.0 ● at least Firefox 3.0
● at least Safari 4.0 ● at least Opera 10.0
● at least Chrome 10.0
Page 11

4. Main feature
Call history
Contacts
Message
Settings
Extra Applications
Calendar
Battery Status: Shows the level of battery.
CALL: Appears when one call is in progress.
WIFI Spot: Appears when WIFI is enabled.
SMS: Appears when there is a new unread SMS message.
SIM CARD: Prompt insert a SIM card.
Signal strength: Shows the received signal strength.
FM: Appears when FM is enabled.
Airplane: Appears when Airplane mode is enabled.
4.1. Main menu
Note: The appearance of the icons of the applications may vary when the software
is updated.
4.2. Status bar icon
You will find a series of icons that indicate the status of your phone.
Page 12

Safety Information Page 12 of 18
Alarm clock: Appears when the alarm clock is set.
4.3. Main features on phone menu
1) Voice Call
Make a call to a number in contacts
Press the left selection key to access the Menu and then press the Contacts icon.
Use the navigation keys to select the desired contact. Press the call key to
make a call.
Make a call to a number from the call record
Press the left selection key to access the Menu and then press the Call Log icon,
or press the right selection key on the home screen with a shortcut to Call Logs.
Use the navigation keys to select the desired contact. Press the call key to
make a call.
Answer incoming calls
Press the left selection key or the call key to answer an incoming call, or
press the right selection key or the power key once to reject a call.
Press the power key to hang up a call.
Manage multiple calls
To answer an incoming call in the middle of a conversation, you can press the
call key to answer the new call and keep the first call on hold or you can
combine the two calls.
Note: During the call, use the icons at the bottom of the screen to access the
Contacts, access the keypad, activate the hands-free speaker, mute the
microphone, hold the call on hold or record.
Page 13

2) Contact
The mobile phone can store up to Contacts. The contacts store in the mobile
phone and in the UIM card. After selecting a telephone number in the contacts,
select option to perform the various operations like Edit, New, Write message,
Delete, Delete multiple & more. Search function enables you to find contacts
quickly.
3)Message
You can use Messaging to exchange text messages (SMS) with your friends on their
mobile phones.
4)Settings
Audio Profiles:
In order to use this phone in different scenarios, set personalized ring tones
and phone tone.
1. Need to set the scene mode, press the [OK key] to open the parameter setting
interface.
2. You need to set the type and settings, the setup is complete, save the set
value.
3. When the phone returns profile list, select the profile.
Display Settings:
You can change the settings of wallpaper, brightness, sleep time.
Date & time:
Set the phone to the reference time: time display format date display format.
Language & input:
You can set phone language and input methods.
Page 14

Safety Information Page 14 of 18
More:
You can set airplane mode and mobile network.
Call settings:
Enter dail screen, press Options and select call settings. You can set general
settings, also can set SIM’s call settings.
4.4. Main features on WEB UI
1) Wireless Basic Settings
Log into the WEB UI. Select WLAN1. This page is used to configure the parameters
for wireless LAN clients which may connect to your Access Point.
2) LAN & WAN SETTING
Log into the WEB UI. Select TCP/IP. This page is used to configure the
parameters for local area network which connects to the LAN port of your Access
Point.
Page 15

3) Port Forwarding
Log into the WEB UI. Select Port Forwarding in Firewall Settings menu,
and then set port forwarding.
4) MANAGEMENT
Log into the WEB UI. Select MANAGEMENT. This page shows the current status and
some basic settings of the device.
Page 16

Safety Information Page 16 of 18
Page 17

5. Care and maintenance
Thank you for choosing our device. Should you encounter any problem with the
phone, please contact our dealer or qualified service provider.
Your phone is a finely designed and crafted product. Please use it with care.
The following instructions will help you comply with the terms of the warranty
and enjoy this product for many years:
1. Keep the device and all its parts and accessories out of the reach of
children.
2. Keep the device dry, all kinds of liquid will erode the electronic circuit.
3. Do not use or store the device in a dusty place to avoid damaging the
removable parts.
4. Keep the device away from hot places, high temperature can shorten the life
of electronic device, warp or melt certain plastic and damage batteries.
5. Do not attempt to open or disassemble the device, non-expert handling may
damage it.
6. Do not drop, crush or shake the device to avoid damaging the internal circuit
board.
7. Do not use harsh chemicals, cleaning solvents or strong detergent to clean
the device.
8. Do not paint the device or the paint may obstruct the removable parts and
affect operation.
The above instructions apply to your device, battery, charger and other
accessories. If any of them does not work properly, please send it to a
qualified service provider.
6. Environmental protection
The device and its accessories (if included), such as the power
adapter, headset, and battery should not be disposed of with household
garbage.
This device complies with Part 15 of the FCC Rules. Operation is
subject to the following two conditions: (1)
This device may not cause harmful interference, and (2) This device
must accept any interference received, including interference that may
cause undesired operation.
Any changes or modifications not expressly approved by the party
responsible for compliance could void the user’s authority to operate
the equipment.
This equipment has been tested and found to comply with the limits for
a Class B digital device, pursuant to part 15 of the FCC Rules. These
limits are designed to provide reasonable protection against harmful
Page 18

Safety Information Page 18 of 18
interference in a residential installation. This equipment generates,
uses and can radiate radio frequency energy and, if not installed and
used in accordance with the instructions, may cause harmful
interference to radio communications.
occur in a particular installation. If this equipment does cause
harmful interference to radio or television reception, which can be
determined by turning the equipment off and on, the user is encouraged
to try to correct the interference by one or more of the following
measures:
—Reorient or relocate the receiving antenna.
—Increase the separation between the equipment and receiver.
—Connect the equipment into an outlet on a circuit different from
that to which the receiver is connected.
—Consult the dealer or an experienced radio/TV technician for help.
This equipment complies with FCC radiation exposure limits set forth
for an uncontrolled environment. This transmitter must not be colocated or operating in conjunction with any other antenna or
transmitter.
This equipment should be installed and operated with minimum distance
20cm between the radiator& your body.
 Loading...