

Page 1

MFJ-784 Instruction Manual
Table of Contents
Filter Specifications...................................................................................................................................1
Notch Filters:.................................................................................................................................2
Random Noise Reduction Filter:...........................................................................................2
Signal Processor:........................................................................................................................2
General Features:.......................................................................................................................2
Rear Panel:....................................................................................................................................2
Introduction to DSP...................................................................................................................................3
Connections..................................................................................................................................................4
Input Connections.......................................................................................................................4
Output Connections...................................................................................................................5
Connecting to Receive Audio.................................................................................................6
Power...............................................................................................................................................6
Headphones Out..........................................................................................................................6
Speaker Out...................................................................................................................................6
Filtered Audio Out.......................................................................................................................6
Input Level Adjust........................................................................................................................7
Receive Audio In...........................................................................................................................7
To Radio and To TNC.................................................................................................................7
Front Panel...................................................................................................................................................8
AGC On-Off......................................................................................................................................8
Program..........................................................................................................................................8
Custom Tunable/Pre-Set Filters..........................................................................................8
Filters................................................................................................................................................9
Tunable Filters..............................................................................................................................9
Notch ON - OFF............................................................................................................................9
Notch AUTO - MANUAL............................................................................................................9
Noise Reduction..........................................................................................................................10
Noise Reduction On - Off..........................................................................................................10
Volume .............................................................................................................................................10
Power On - Off...............................................................................................................................10
FILTER IN - FILTER OUT.............................................................................................................11
Filter Description........................................................................................................................................12
LR/HR [1]......................................................................................................................................12
LR/HR [1] (Bandstop)..............................................................................................................12
BP [2]...............................................................................................................................................13
2BP [3]............................................................................................................................................14
CW [4].............................................................................................................................................14
SSB [5].............................................................................................................................................15
RTTY [6]..........................................................................................................................................16
HF PACKET [7].............................................................................................................................16
AMTOR [8].....................................................................................................................................16
PACTOR [9]....................................................................................................................................16
SSTV/ FAX/ WeFAX [10]......................................................................................................17
NOTCH.............................................................................................................................................17
i
Page 2

MFJ-784 Instruction Manual
DSP Operation.............................................................................................................................................18
Initial Operation............................................................................................................................18
CW Operation...............................................................................................................................19
SSB Operation..............................................................................................................................20
Custom Filters.............................................................................................................................................21
Programming a Custom Filter..............................................................................................22
Jumper Settings.........................................................................................................................................24
CW Sidetone Filter Settings...................................................................................................24
DATA Default................................................................................................................................24
In Case of Difficulty....................................................................................................................................26
Technical Assistance................................................................................................................................26
ii
Page 3
MFJ-784 Instruction Manual
MFJ-784
tunable
DSP Filter
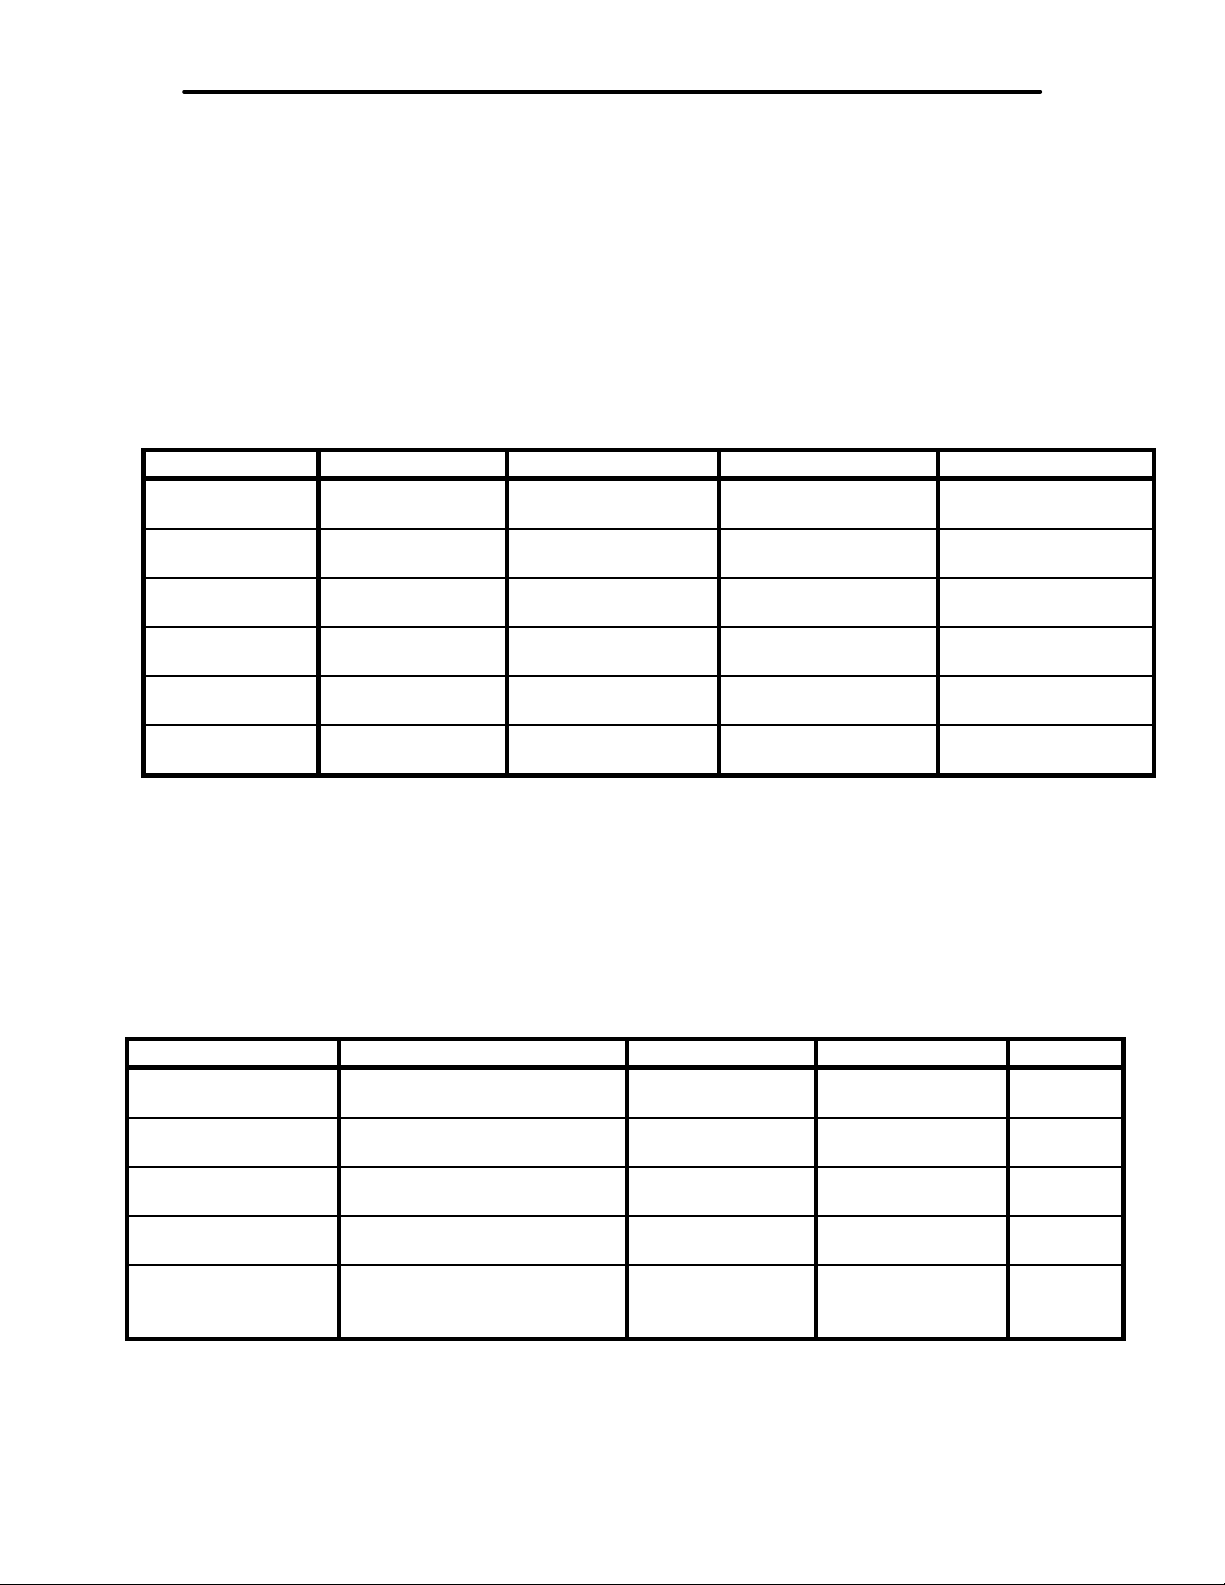
The Filte r Specifications chart lists the parameters for the ten filters available on the
MFJ-784. Definitions for the abbreviations used on the chart are listed below:
LR: Low Reject Cutoff Frequency fc: Center Frequency
HR: High Reject Cutoff Frequency BW: Bandwidth
f1: Center or Notch Frequency #1 FIR: Finite Impulse Response
f2: Center or Notch Frequency #2 IIR: Infinite Impulse Response
Filter Specifications
Tunable Filter Left Control Right Control Attenuation Type
LRHR1 LR: 200-2200 Hz HR:1400-3400 Hz 60 dB @ 74 Hz
outside passband
BP fc: 300-3400 Hz BW: 30-2100 Hz 50 dB @ 60 Hz
outside passband
2BP2 f1: 300-3400 Hz f2: 300-3400 Hz 50 dB @ 60 Hz
outside passband
CW3 fc: 300-1000 Hz BW: 30-700 Hz 50 dB @ 60 Hz
outside passband
SSB4 fc: 600-1700 Hz BW:1000-2500 Hz 60 dB @ 74 Hz
outside passband
Manual Notch f1: 150-3400 Hz f2: 150-3400 Hz 40 dB @ 95 Hz
outside passband
All FIR filters have a 24 mS delay time and have the highest cutoff frequency limited to
3900 Hz.
Notes
1 The LR HR filter becomes a band-stop filter when LR is adjusted higher than HR.
2 The 2BP filter uses the bandwidth setting last used in BP filter but allows
independent variation of the two center frequencies.
3 The CW filter has an optional jumper-programmable sidetone filter, see page 22
4 The SSB filter has its lowest cutoff frequency limited to 175 Hz.
Pre-Set Filter Mark-Space Freq. Bandwidth Attenuation Type
RTTY Jumper Programmable 250 Hz 50 dB @ 60 Hz
outside passband
HF PACKET Jumper Programmable 540 Hz 50 dB @ 60 Hz
outside passband
AMTOR Jumper Programmable 340 Hz 50 dB @ 60 Hz
outside passband
PACTOR Jumper Programmable 440 Hz 50 dB @ 60 Hz
outside passband
SSTV/FAX/WeFAX Dual filter with passbands
fixed @ 1050-1350 Hz and
1450-2350 Hz
300 and 900 Hz 44 dB @ 60 Hz
outside passband
* All pre-set filters have a 24 mS delay time.
* The data filters allow 170 or 200 Hz shift mark-space frequency; see page 24.
FIR linear phase
FIR linear phase
FIR linear phase
FIR linear phase
FIR linear phase
IIR
FIR linear
phase
FIR linear
phase
FIR linear
phase
FIR linear
phase
FIR linear
phase
1
Page 4

MFJ-784 Instruction Manual
Interference Filter Frequency Range Attenuation Type Delay
Multiple Automatic
Notch
Random Noise
Reduction
Entire freq. range of the
received audio
Entire freq. range of
selected bandpass filter
Up to 50 dB, varies with
stability of the heterodyne
Up to 20 dB, varies with the
characteristics of the noise
Adaptive 8 mS max.
Adaptive &
adjustable
8 mS max.
Notch Filters:
Multiple automatic notch attenuates up to 4 tones.
Manual notch attenuates 2 separate tones with the front panel knobs.
Automatic Notch is disabled in the following modes:
CW, RTTY, HF PACKET, AMTOR, PACTOR, SSTV/ FAX/ WeFAX
Random Noise Reduction Filter:
Adaptive and manually adjustable algorithms provide up to 20 dB noise reduction.
Signal Processor:
Signal Processor: Analog Devices ADSP-2105
Clock: 12 MHz
Data Width: 16 bits
General Features:
Direct audio bypass when power switch is in "off" position.
Audio output power is 1.2 w into 6 ohms (MFJ power supply).
Audio frequency response is 250 to 3500 Hz (-3 dB).
Maximum audio input at full sensitivity is 3 volts P-P nominal (190 mW 6 ohms).
Input circuit loading is 10 K ohms nominal.
Rear Panel:
Power: 10-16 Vdc @ .35 amp peak (low "Z " audio load)
Headphones Out: 1/4" stereo (or mono) phone jack
Speaker Out: 3.5 mm mono phone jack
Receive Audio In: RCA phono jack
Input Level Adjust: screwdriver adjustable potentiometer
Filtered Audio Out: RCA phono jack (~1.5 V P-P @ 600 ohms)
To Radio: 5 pin DIN female (filtered audio out, PTT sense, receive audio in).
To TNC: 5-pin DIN female (filtered audio out, PTT sense, receive audio in).
2
Page 5

MFJ-784 Instruction Manual
Introduction to DSP
The MFJ-784
technology. Digital Signal Processing greatly improves signal clarity by reducing or
eliminating noise (QRN) and interference (QRM). DSP technology has existed for many
years but has always been very complicated and expensive. Recent advances in
integrated circuits have greatly increased the processing power and reduced the size
of DSP units. These same advances also lowered the cost of DSP filtering, making
DSP technology affordable for the average amateur or short wave listener.
Almost any microprocessor can perform DSP, but only very fast or special-function
processors perform DSP in
digital signal processor. A digital signal processor is similar to the CPU in a
conventional home computer, but its commands are tailored to the type of instructions
used in signal processing. The use of special DSP commands allows a DSP filter
function to be completed in very few clock cycles (usually one); where a typical home
computer CPU would require a long set of instructions and therefore many clock
cycles to perform the same function. Analog Device's ADSP-2105 16-bit processor is
used in the MFJ-784.
The MFJ-784 DSP Filter converts the analog input signals fro m your receiver to digital
information. This conversion is achieved through the sampling of the signal many
thousands of times per second with an A-to-D converter. The result is a string of
digital "numbers" that represent the amplitude and frequency of the analog input
signal. The ADSP-2105 chip then processes the resulting digital information with
different digital filter algorithms depending on which one the user selects with the front
panel controls. The end result is a digitized signal with undesired signal components
either reduced or removed. The processed digital signal information is converted back
to an audio signal by a digital-to-analog converter and sent to the audio outputs and
speaker.
tunable
DSP Filter uses state-of-the-art Digital Signal Processing (DSP)
real time
. Therefore the heart o f any DSP system is the
3
Page 6

MFJ-784 Instruction Manual
Connections
The illustration below shows the DSP's rear panel connectors.
Power: The power connector con nects the MFJ-784 to a 12 - 16 Vdc, 350 mA (or
larger) power supply.
Headphones Out: This jack connects the MFJ-784 to your station headphones or
speaker. Inserting a plug in this jack disables the SPEAKER OUT jack.
Speaker Out: This jack connect s the MFJ-784 to your sta tion speaker. A connection
made to the HEADPHONES OUT jack disables this jack.
Filtered Audio Out: This jack connects the MFJ-784 to the external audio input jack of
a radio or other accessory. This jack has a fixed level output independent from the
DSP's volume control.
Input Level Adjust: This adjustment varies the sensitivity of all audio inputs.
Receive Audio In: This jack connects the MFJ-784 to the audio output of the radio.
To Radio: This jack supplies connections to the filtered audio output and the receive
audio inputs. In addition, a connection is available for a PTT sense line to
automatically bypass the filter during transmit.
To TNC: This jack supplies connections to the filtered audio output and the receive
audio inputs. In addition, a connection is available for a PTT sense line to
automatically bypass the filter during transmit.
Input Connections
In most cases, the MFJ-784 will be installed between the speaker or headphone audio
output of the receiver and your headphones or speaker. This diagram shows the
typical connections used to attach a radio to the MFJ-784. Only one of the method of
connection may be used.
4
Page 7

Output Connections
MFJ-784 Instruction Manual
5
Page 8

MFJ-784 Instruction Manual
Connecting to Receive Audio
The MFJ-784 Receive Audio In jack connects directly to your receiver's headphones or
speaker jack. A minimum of 2 volts P-P (peak-to-peak) is required for full audio output
when the Input Level Adjust is set for maximum sensitivity.
Audio input peaks that exceed 4 volts P-P will cause distort ion, especially with the AGC
or noise-reduction enabled. This distortion may occur while the audio output control of
the receiver is at a normal gain setting. This distortion may be minimized or eliminated
by adjusting the Input Level Adjust. See the CW and SSB operation sect ions starting
on page 19 to adjust the input level or receiver volume.
Power
The Power conn ect or is l o cat ed o n t he le ft r ear pan el o f t he MFJ- 784. This co n n ect or
accepts the dc input that powers the MFJ-784. The Power connector of the MFJ-784
accepts a 2.1 mm coaxial plug with a positive polarity center conductor. An optional
dc supply, the MFJ-1315, is available from MFJ.
The MFJ-784 requires a filt ered voltage of 12 to 16 Vdc with a negative ground (o r
ground independent) power source. The maximum current demand changes with the
volume level and the impedance of the load. The maximum current demand will be less
than 350 mA at maximum volume but will always be more than 175 mA. If supply
voltage drops below 11 volts the MFJ-784 will enter a power down reset mode and go
"dead".
WARNING: Application of reverse polarity or voltages greater than 18 volts may
permanently damage the MFJ-784.
Headphones Out
The Headphones Out jack can be used to connect the MFJ-784 audio output to
headphones or a speaker. This jack accepts a standard male 1/4 inch stereo or
mono headphone plug. The tip supplies the monaural audio and the ring supplies the
ground. This allo ws the use of either stereo or monaural headphones, or a speaker.
The Speaker Out is disabled when a plug is inserted in the Headphones Out jack.
Speaker Out
The Speaker Out jack accepts a 3.5 mm phone plug. This jack provides the same
audio output as the Headphones Out jack. The "hot" audio signal appears on the tip.
This jack will function with either mono or stereo plugs, but only the tip will supply audio.
This jack is automatically disabled whenever a plug is inserted into the Headphones
Out jack.
Filtered Audio Out
The Filtered Audio Out connector is a standard RCA phono jack. A quality shielded
cable should be used for co n n ecti o ns t o the Filtered Audio Out jack. This jack provides
approximately 1.5 volts P-P into 600 ohm (or higher) impedance loads. The output
voltage of this jack is not affected by DSP volume control knob adjustment. The voltage
level at the Filtered Audio Out jack is dependent on the receiver's audio outpu t level
when the DSP's AGC
operating the voltage will remain nearly constant at 1.5 volts P-P.
is turned "off" or if the DSP is bypassed. When the AGC is
6
Page 9
MFJ-784 Instruction Manual
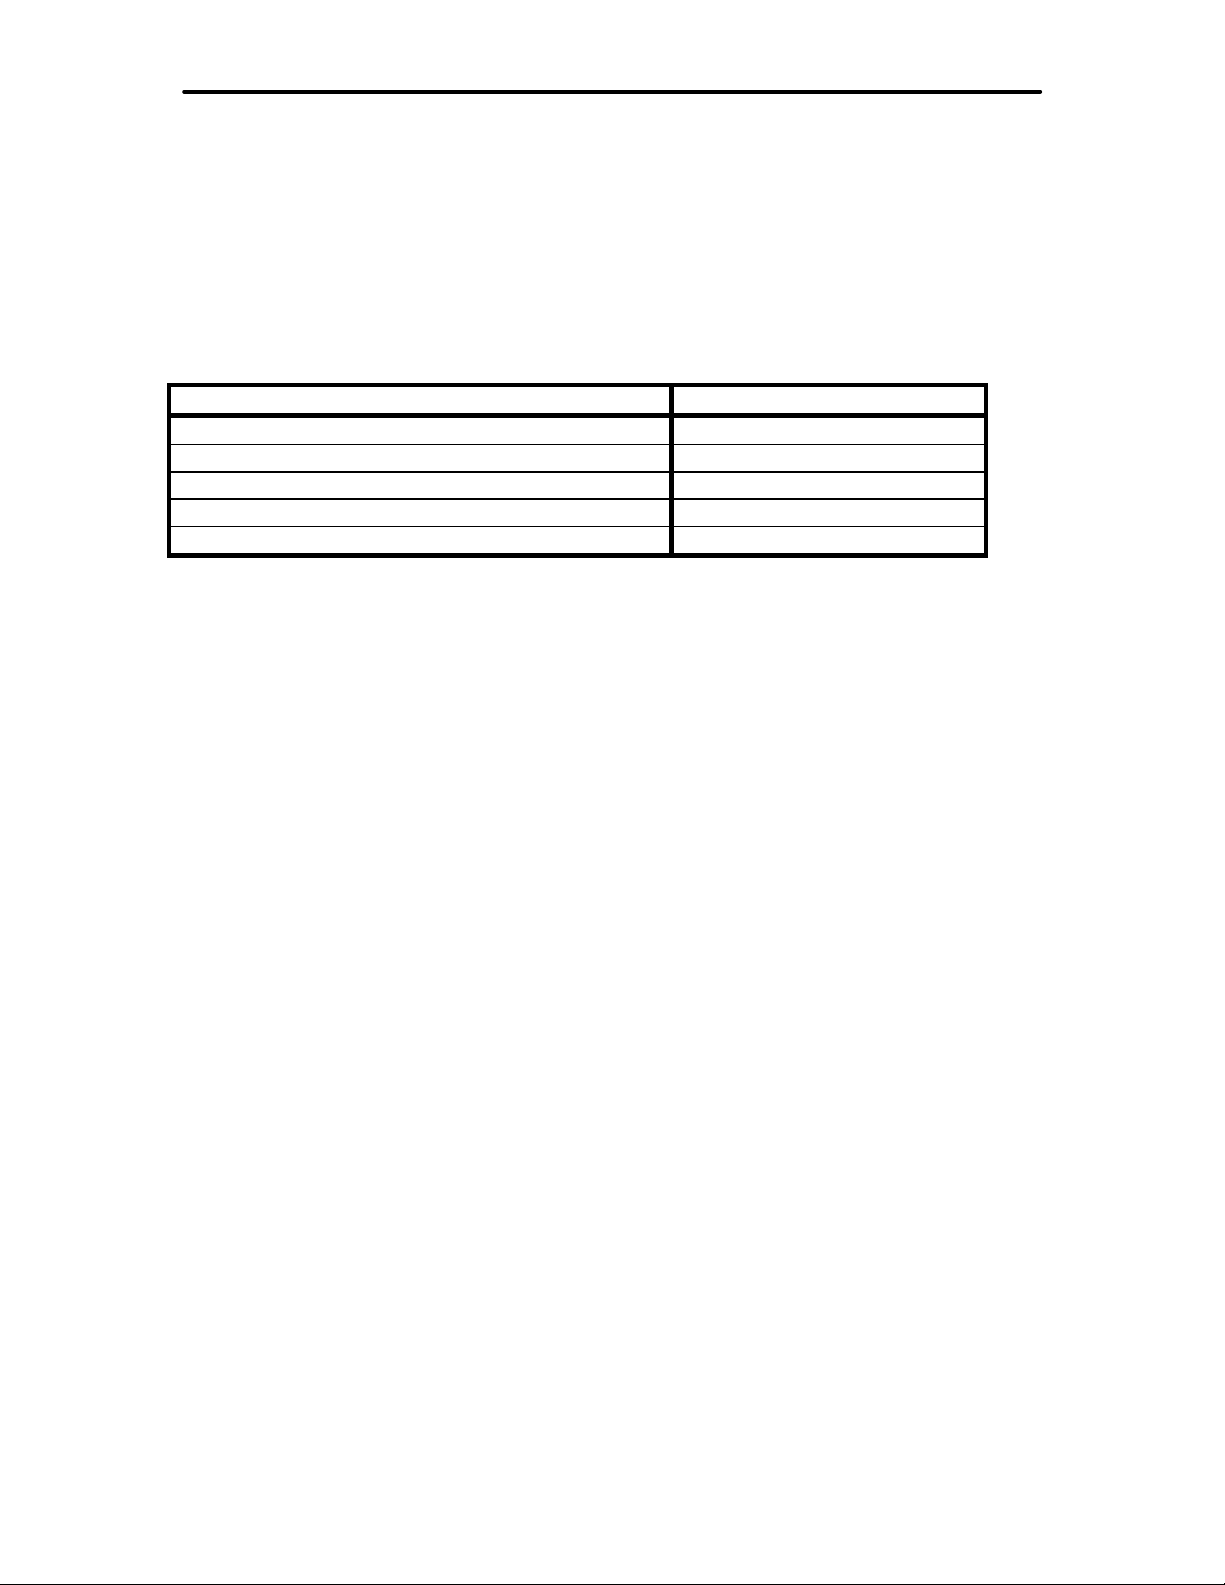
Input Level Adjust
The Input Lev el Adjust controls the sensitivity of the MFJ-784 receive audio and the
audio input pins (pin 4) of t he DIN connectors. Proper adjustment is achieved if the
receiver volume control can be set at the normal setting without overdriving the DSP
(with the AGC
change as the AGC is turned "on" or "off". The chart below describes symptoms that
will appear if the input level is adjusted to an incorrect level. See the CW and SSB
operation sections starting on page 19 to adjust the input level or receiver volume.
turn AGC "off", volume decreases slightly No Adjustment
turn AGC "off", volume decreases significantly Increase
turn AGC "on", volume increases significantly Increase
audio distortion Decrease
cracking or popping on signal peaks Decrease
and/or the noise reduction operat ing). The DSP's volum e should barely
Symptom Line Level Adjustment
Receive Audio In
The Receive Audio In connector is a standard RCA phono jack. A shielded cable
should be used to connect the Receive Audio In connector to the station receiver.
This jack should be driven with a minimum of 2 volts P-P, and no more than 3.5 volts PP unless the setting of the Input Level Adjust is reduced (counterclockwise adjustment
from rear view). This jack has an impedance of approximately 10,000 ohms, and is
normally connected to the receiver's speaker or headphones output.
To Radio and To TNC
The To Radio and To TNC ports are standard ports used by MFJ products. These
ports allow the DSP unit to be connected to MFJ or other brands of TNC without
disturbing the speaker or headphone connections. These ports can be connected to
virtually any radio with one of the pre-assembled MFJ-50xx series cables (available
from MFJ). Each cable in this series is wired for a specific brand of radio.
The To Radio and To TNC ports also provide connections to the PTT line input. All
signal processing functions are bypassed when this line is pulled low. Pulling the PTT
line low allows the transceiver's sidetone and audio monitoring functions to appear at
the DSP output without modification. The PTT line has a blocking diode to prevent
other equipment connected to the PTT line (such as a linear amplifier) from damaging
the DSP. Refer to the CW section starting on page 14 for a description of PTT
configuration.
WARNING: Never connect the PTT line to negative voltages or to positive voltage
sources that exceed 35 volts. If a linear amplifier is connected to the PTT line, a
blocking diode (1N4001 or equivalen t) should be con nected from the linear amplifi er's
control (relay) jack to the PTT line. This dio de prevents the amplifier from loading the
DSP's PTT line when the amplifier is turned "off". The anode of the diode should be
connected to the amplifier and the cathode (banded end) to the PTT line.
7
Page 10

MFJ-784 Instruction Manual
Front Panel
Eight push buttons, 5 knobs and on e LED are present on the front panel of the MFJ784 DSP unit. The following section will help you become familiar with the various
functions of these items. These controls are explained as they appear from left to
right on the panel.
AGC On-Off
This push-button switch controls the automatic gain control (AGC). The AGC will
maintain the same DSP audio output level if the input signal level changes less than 18
dB (0.5 to 3.9 volts P-P).
Note: If the audio-input level from the receiver is too high the audio will distort on voice
peaks. This is especially true when the AGC is being used. If you turn the AGC "off" and
the DSP volume drops greatly the input level is too low. Page 19 describes input level
adjustment.
Program
This non-latching push-button is used in conjunction with the Custom Tunable / Pre-
set FILTERS button. Pushing this momentary contact switch saves the last filter
setting used into the current Filters switch position (1-10).
Refer to page 22 for a thorough description of filter programming.
Custom Tunable/Pre-Set Filters
This push-button switch selects either the 5 tun able filters (LR-HR, BP, 2BP, CW, and
SSB) or the 5 preset filters (RTTY, HF PACKET, AMTOR, PACTOR, SSTV/ FAX/
WeFAX) in the "out" position, or up to 10 custom user-programmed filters (1-10) in
the "in" position.
8
Page 11

MFJ-784 Instruction Manual
Filters
This rotary switch selects any one of the 5 tu nable filters (LR-HR, BP, 2BP, CW, and
SSB) or 5 preset filters (RTTY, HF PACKET, AMTOR, PACTOR, SSTV/ FAX/ WeFAX)
with the Custom Tunable/Pre-Set FILTERS switch in the "out" position, or one of the
10 available user-programmed (custom) filters (1-10) with the Custom Tunable/Pre-
Set FILTERS switch in the "locked" position.
page 13 for detailed information..
See the Filter Description section on
Tunable Filters
The Tunable Filters controls adjust the center frequency and the bandwidth of the
various filters. The following chart lists the adjustment made by each control in the
different filter modes.
Mode Left Control Right Control
LR/HR
BP
2BP
*
CW
SSB
NOTCH
* 2BP Bandwidth is set with the BP bandwidth control
(manual only)
Note: The manual notch function uses the same controls (knobs) as the filters.
Therefore any time the manual notch is being used, the adjustable filters cannot be
changed .
lowest freq. limit highest freq. limit
center freq. bandwidth *
center freq. 1 center freq. 2
center freq. bandwidth
center freq. bandwidth
notch freq. 1 notch freq. 2
Notch ON - OFF
This locking push-button switch enables (in) or disables (out) the notch function. Up to
four frequencies may be notched in the AUTO mode. Two frequencies can be manually
notched in the MANUAL mode. The attenuation of the notch filter can be as great as
50 dB in the automatic mode, and 40 dB in the manual notch mode. The automatic
notch filter is disabled in the following Filters switch po sitions: C W, RTTY, HF PACKE T,
AMTOR, PACTOR, and SSTV/FAX/WeFAX.
Note: If the DSP fails to process properly with the Notch "on" the input level may be
adjusted incorrectly. See page 19 to adjust the input level.
Notch AUTO - MANUAL
The AUTO - MANUAL locking push-button switch selects either the two manual notch
adjustments (out position) or the automatic notch filters (in and locked position). The
Tunable Filters controls are used to adjust the notch frequencies when the AUTO MANUAL switch is in the MANUAL position. The Tunable Filters knobs will vary each
notch frequency from 150 to 3400 Hz. The manual n otch bandwidth is 275 Hz at -3
dB, and 85 Hz at -40 dB. Since the manual notch uses the Tunable Filters controls t o
adjust the notch frequency, the f ilter selected by the Filters switch must be properly
adjusted before engaging the manual notch. The MFJ-784 will "remember" the
Tunable Filters setting at the moment the manual notch is engaged, and the Tunable
Filters controls will adjust the manual notch frequencies.
9
Page 12

MFJ-784 Instruction Manual
Note: The DSP chip remembers the filter knob settings from the moment the notch is
activated until the notch is turned off and the knobs are moved. The instant any filter
knob is moved, the filter will jump to new position of all the knobs. .
In the AUTO (in) position, a multiple automatic notch searches for heterodynes or
steady tones and nulls them. The automatic notch will not function in any of the
following Filters switch positions: CW, RTTY, HF PACKET, AMTOR, PACTOR, and
SSTV/FAX/WeFAX.
NOTE:
The automatic notch will not recognize interference that varies rapidly in
frequency or amplitude. This is because the filter must ignore rapid amplitude and
frequency changes to avoid nulling or distorting voices. If the automatic notch distorts
voice use the manual notch filter. The manual notch causes less distortion of voice
modes.
Noise Reduction
This knob varies the noise reduction level. Maximum noise reduction is available in the
full clockwise position, where random no ise can be attenuat ed up to 20 dB (depending
on the characteristic of the noise). This algorithm uses both adaptive and adjustable
LMS (Least Mean Square) algorithms.
Some echo or ho llowness will be present due to phase delay and t he algoritm's effect
on voices. This is a normal unavo idable chart act eristi c of t his fun cti on . The effects are
less noticeable as the reduction level is decreased.
Noise Reduction On - Off
This push-button switch turns the noise reduction ON (in) or OFF (out). The noise
reduction functions in all filter modes.
Note: If the audio input level from the receiver is too high the audio will distort on audio
peaks. This is especially true when the noise reduction is being used. If the DSP fails to
process properly with noise reduction the input level may be too low. See page 19 to
adjust the input level.
Volume
The Volume knob controls the gain of the internal audio amplifier, and adjusts the audio
output available at the Headphones Out and the Speaker Out jacks. The Volume knob
does not adjust the audio output level at the Filtered Audio Out, To Radio, and To TNC
ports.
Power On - Off
This push-button switch controls the main dc power to the internal DSP electronics.
When the Power switch is in the "off" position, the To Radio port, the To TNC port and
the Receive Audio In co nnectors are connected di rectly to the Headphones Out and
Speaker Out jacks. Also, the audio o utput l ines at the Filtered Audio Out jack and the
To Radio and To TNC ports are "dead."
10
Page 13

MFJ-784 Instruction Manual
FILTER IN - FILTER OUT
This push-button switch either processes the audio (Filter In) or routes the audio
through the DSP electronics without any digital signal processing (Filter Out). Nonprocessed audio is available at all audio outputs when this switch is in the "out"
position. Also the audio output voltage will no longer be a constant 1.5 V P-P because
the internal digital AGC is not operating.
DSP Block Diagram
11
Page 14

MFJ-784 Instruction Manual
Filter Description
The following section describes in detail the filters available in the various Filters switch
positions. All graphs of the following filters show a line at the noise floor of -55 dB. The
response for these digital filters is typically much deeper than -55 dB but circuit noise
will generally mask any response below that point.
LR/HR [1]
Use: Custom Voice, FSK, Wide CW Filter.
Passes medium to wide frequency width.
This position selects an adjustable low reject/high reject filter. The low reject filter (left
knob) removes all signals below a user-selected frequen cy. The low reject filter cutoff
frequency can be varied between 200 Hz and 2200 Hz with the left-hand Tunable
Filters knob. The high reject filter (right knob) removes all signals above the selected
frequency. The high reject limit is adju stable bet ween 1400 and 3400 Hz with the right
hand Tunable Filters knob.
For example: If the low reject filter is adj usted to 900 Hz, and the high reject filter is
adjusted to 2500 Hz, all f requ encies belo w 900 Hz an d above 2500 H z will be reject ed.
In this case, the DSP filter will only pass frequencies from 900 Hz to 2500 Hz.
Typical Low Reject /High Reject Filter Response
Frequency
0 500 1000 1500 2000 2500 3000 3500 4000
0
-10
-20
-30
-40
dB
-50
-60
-70
-80
LR/HR [1] (Bandstop)
Use: Rejecting broad or variable frequency signals between 1400-2200 Hz in all modes.
Removes medium to wide frequency width.
When the low reject Tunable Filters knob is adjusted to a frequency higher than the
high reject Tunable Filters knob, the filter removes all frequencies between the two
filter settings, and passes all frequencies outside the settings of the two filters. This
special filter is called a
the frequency range, and passes everything on either side of the "hole."
band-stop
filter. A bandstop filter makes a "ho le" in the mi ddle of
12
Page 15

MFJ-784 Instruction Manual
For example: If the low reject filter is adjusted to 2200 H z and the high reject filter is
adjusted to 1600 Hz, all frequencies between 1600 Hz and 2200 Hz will be rem oved.
This creates a hole with a 600 Hz bandwidth.
See below for a graph of a band-stop filter.
Typical Bandstop Filter Response
Frequency
0 500 1000 1500 2000 2500 3000 3500 4000
0
-10
-20
-30
dB
-40
-50
-60
-70
BP [2]
Use: Custom Voice, FSK, Custom CW Filter.
Passes narrow to wide frequency width.
This filter is an adjustable bandpass filter. The bandwidth is controlled by the right
Tunable Filters knob. This adjustment is similar to the selectivity control on a receiver.
It can be adjusted from 30 to 2100 H z. The left Tunable Filters knob varies the center
frequency between 300 an d 3400 Hz. This adju stm ent is very m uch li ke the pass ban d
tuning or IF shift control on high quality receivers.
Typical Bandpass Filter Response
Frequency
0 500 1000 1500 2000 2500 3000 3500 4000
0
-10
-20
-30
-40
dB
-50
-60
-70
-80
13
Page 16

MFJ-784 Instruction Manual
2BP [3]
Use: Custom Voice, FSK, Dual Pitch CW Filter.
Passes 2 seperate narrow to wide frequency width.
This position allows the use of two frequency-independent variable bandpass
filters in parallel. The left and right Tunable Filters knobs control the individual
center frequencies of the filters.
Each filter has the same bandwidth. The 2BP position uses the bandwidth
setting from the BP filter. The bandwidth can be adjusted by switching to the
BP position and adjusting the right-hand Tunable Filters Knob (see the BP
section).
Typical Dual Bandpass Filter Response
Frequency
0 500 1000 1500 2000 2500 3000 3500 4000
Example: The Filters knob may be placed in the BP position and the right
Tunable Filters knob adjusted to 200 Hz of bandwidth. When the 2BP filter will
now have two filters available, with the left Tunable Filters knob controlling the
center frequency of a 200 Hz filter and the right Tunable Filters knob
controlling the center frequency of a second 200 Hz filter.
0
-10
-20
-30
-40
-50
-60
-70
-80
dB
CW [4]
Use: CW Filter, Narrow FSK.
Passes "razor sharp" to medium frequency width.
Note: The automatic notch function is disabled when the filter is in the CW
mode.
The CW position of the Filters switch provides an adjustable bandpass filter
that can be varied over the normal frequency range preferred by most CW
enthusiasts. The center frequency (or pitch) is controlled by the left Tunable
Filters knob, and has a frequency range of 300 to 1000 Hz. This Filters knob
functions similarly to the pass band tuning or the IF shift control of a receiver.
14
Page 17

MFJ-784 Instruction Manual
The right Tunable Filters knob adjusts the filter bandwi dth from 30 to 700 Hz.
This knob acts exactly like the selectivity control on a receiver. Note that as the
bandwidth of this filter approaches the on-off rate of the dot and dashes, some
ringing may appear. This is an inherent characteristic of any filter when the
bandwidth approaches the on-off rat e. When this filt er is operated using a very
narrow bandwidth, some ringing or softening is inevitable. To minimize ringing
use the maximum bandwidth possible.
The operator may prefer to listen to a tone that is different than the sidetone of
the transmitter. In this situation, the filter may not pass the sidetone and the
operator may not be able to monitor his sending. There are two methods of
correcting this problem.
The first (preferred) method for passing sidetone is to ground the PTT line (pin
3 on either rear panel DIN connector) during transmission. This procedure will
bypass the DSP and pass any sidetone f requency. Refer to the To Radio and
To TNC section on page 7 for PTT hardware requirements.
The second (less preferred) method for passing sidetone involves activating and
setting a special internal CW sidetone filter. The CW sidetone filter is a totally
separate, jumper programmed, constant frequency filter. This option makes
the DSP function with two separate parallel filters. One filter is the standard
adjustable CW filter and the other is t he fixed frequency (sidetone) filter. This
method has the advantage of not requiring a PTT connection, but the
disadvantage of allowing unwanted signals to f eed through if they happen to be
within 30 Hz of the sidetone frequency. To enable the CW sidetone filter,
internal jumpers must be set to the sidetone frequency of your radio. Refer to
page 24 for a description of jumper settings. The center frequency of the
sidetone filter ranges from 300 to 1000 Hz in 50 Hz increments. The
bandwidth of the sidetone filter is fixed at 50 Hz.
SSB [5]
Use: All Voice modes, FSK, CW Filter.
Passes medium to wide frequency width.
The SSB filter is a bandpass filter with an adjust able center frequency range of
600 Hz to 1700 Hz. The right tuna ble filters knob adju sts the bandwidth fro m
1000 Hz to 2500 Hz. The actual filter response is limited internally to a
minimum of 175 Hz.
While some voice transmissio ns may be understandable with only 1000 H z of
bandwidth if the center frequency is properly adj usted, the majority of stations
will be copied best with the controls nearly centered. The optimum center
frequency and bandwidth setting will be determined by the transmitting
operator's voice, t he transmit ter's respon se, the receiver's respo nse, any no ise
or QRM, and/or the receiving operator's hearing.
The operator may prefer to monitor himself in the transmit mode. The PTT line
available at the TNC and Radio connectors (pin 3), can be grounded by the
transmitter's external control line to cause the DSP to bypass all filters when
15
Page 18

transmitting. This will prevent the DSP from delaying or distorting the
monitored audio.
RTTY [6]
Use: RTTY, FSK.
Passes high frequency tones with narrow frequency width.
The RTTY filter center frequency can be adjusted by moving internal jumpers.
These jumper settings are detailed on page 24. The RTTY filter has a
bandwidth of 250 Hz. This bandwidth offers excellent performance with
standard 170 Hz shift, 45 baud RTTY signals. Under special conditions the
operator may wish to use one of the adjustable bandpass filters.
HF PACKET [7]
Use: Packet, Wide RTTY, FSK.
Passes high frequency tones with medium frequency width.
The HF PACKET filter center frequency can be adjusted by moving internal
jumpers. The jumper settings are detailed on page 24. This filter has a
bandwidth of 540 Hz, and is the optimum filter for a 200 H z shift, 300 baud
signal. Under special conditions the operator may wish to use one of the
adjustable bandpass filters.
MFJ-784 Instruction Manual
AMTOR [8]
Use: AMTOR, Narrow PACTOR, Wide RTTY, FSK..
Passes high frequency tones with narrow frequency width.
The AMTOR filter center f requ ency can be adj ust ed by mo ving in tern al ju mpers.
The jumper settings are detailed on page 24. This filter has a bandwidth of
340 Hz. This is the optimum filter for 200 Hz shift, 100 baud data. Under
special conditions the operator may wish t o u se on e of the adju stable ban dpass
filters.
PACTOR [9]
Use: PACTOR, Narrow Packet, Wide RTTY.
Passes high frequency tones with medium frequency width.
The PACTOR filter center frequency can be adjusted by moving internal
jumpers. The jumper settings are detailed on page 24. This filter has a
bandwidth of 440 Hz. This is the optimum filter for 200 Hz shift, 200 baud
data. Under special conditions the operator may wish to use one of the
adjustable bandpass filters.
16
Page 19

SSTV/ FAX/ WeFAX [10]
Use: Slow Scan, Facimile.
Passes 2 seperate frequency ranges, one narrow and one wide frequency
width.
This filter is a dual bandpass filter that allows two separate frequency groups to
pass through the filter. The first f ilter is pre-set to pass frequencies between
1050 and 1350 Hz. The second filter passes 1450 to 2350 Hz.
NOTCH
Use: Removes unwanted tones or heterodyne
Removes 2 to 4 very narrow frequency ranges, passes all others.
Two frequencies can be notched in the MANUAL mode or four can be notched
in the automatic mode. The attenuation of the notch filter can be as great as
50 dB in the automatic mode, and 40 dB in the manual notch mode. The
automatic notch filter is disabled in the following Filters switch posit ions: CW,
RTTY, HF PACKET, AMTOR, PACTOR, and SSTV/FAX/WeFAX.
The following graph shows the digital response of the manual notch filter.
MFJ-784 Instruction Manual
Typical Notch Filter Response
Frequency
0 500 1000 1500 2000 2500 3000 3500 4000
0
-20
-40
-60
dB
-80
-100
-120
-140
17
Page 20

MFJ-784 Instruction Manual
DSP Operation
Initial Operation
Connect the MFJ-784 as outlined earlier in the section Installations on page 4. Set the
controls as follows to prepare the unit for operation.
AGC: OFF (out)
PROGRAM: N/A
FILTERS: Tunable / Pre-Set (out)
Filters: CW
Tunable Filters: both knobs in center of range
NOTCH: ON/OFF switch to off (out)
NOTCH: AUTO/MANUAL to auto (in)
Noise Reduction: minimum (full counter clockwise)
NOISE REDUCTION: on/off switch to off (out)
Volume: minimum (full counter clockwise)
Power: OFF (out)
Filter In -Bypass: out (bypass)
Warning: Damage or improper operation may occur if the polarity, current or voltage
of the supply is incorrect. See the power supply section on page 6. Never
assume your power supply is correct without checking.
The external power supply should be connected and on. The headphones or speaker
should be connected to the output jack. Be aware that whenever a plug is inserted in
the headphone jack, the speaker jack will be disconnected.
The MFJ-784 should be "powered up" by depressing the POWER OFF/ON button.
During this initial operational phase, the front panel LED will glow
indicates the normal filter modes are select ed. The front panel LED will glow
the custom filters are selected. Press an d release the Filters button if the front panel
LED is green.
This DSP unit provides the unique ability to customize filters for many different
applications. For exam ple, while most other f ilters only provide one pass frequ ency on
CW, this filter is continuously adjustable from 300 to 1000 Hz tones. Instead of
limiting the bandwidth to two or three pre-determined settings, the MFJ-784 allows
the user to adjust the bandwidth continuously between 30 and 700 Hz.
red
. The red glow
green
if
18
Page 21

MFJ-784 Instruction Manual
CW Operation
This operational example demonstrat es how the CW filter operates and helps adjust
the audio from the station's receiver to the proper drive level for the DSP.
A CW station should be tuned in with comfortable levels of pitch and volume. Next,
engage the FILTER IN - FILTER OUT push button, and adjust the Volume control of the
DSP to a comfortable setting. Make sure the Tunable Filters controls are at
midrange.
NOTE:
Always use the DSP's volume control to adjust the volume when the DSP is "on"
unless told otherwise.
1.) Adjust the center frequency (left Tunable Filters knob) to peak the CW signal.
2.) Engage the AGC by pressing and locking the AGC button. Adjust the DSP's volume
control to a comfortable level. Adjust the
audio output is slightly weaker when the AGC is disengaged (out).
receiver's
volume control until the DSP's
Note: If the audio input level from the receiver is too high, the audio may distort on
peaks. This is especially true when the AGC and Noise Reduction are being used.
3.) With AGC "on", switch the DSP's FILTER IN - FILTER OUT button ON(in) and
OFF(out) to confirm that the signal is slightly louder with the DSP engaged. The
signal should have slightly less volume with the DSP bypassed.
4.) If the
normal setting. Adjust the rear panel Input Level Adjust with a small flat-bladed
screwdriver until turning the AGC off only slightly reduces (and ON slightly
increases) the DSP's audio output. This adjustment can be confirmed by
repeatedly engaging and disengaging the DSP (with the DSP's AGC on). The audio
level should barely decrease with the filter bypassed.
5.) Adjust the bandwidth (right Tunable Filters knob) to the desired bandwidth or
selectivity. No te that the desired signal will beco me clearer (less noi se and QRM)
as the selectivity is increased. The frequency contro l may have to be readjusted at
high selectivity if it wasn't centered in step 1.
6.) Place the DSP filter in the FILTER OUT position, and adjust the receiver until a
frequency is found that has several C W signals audible at the same time. When
the DSP filter is placed back in line (FILTER IN), the Tunable Filters knobs can be
adjusted to select one signal at a time. Careful adjustments to the DSP filter's
center frequency (with moderate or high selectivity), may allow the user to find
perfectly readable signals that are undetectable without the filter.
7.) Experiment with the NOISE REDUCTION and the Tunable Filters controls in the
CW mode to become familiar with the function and effects of these controls.
Note: You may have to set a filter or ground PTT to monitor yourself. See page 15.
receiver's
volume control is now set abnormally low, advance it to a more
19
Page 22

MFJ-784 Instruction Manual
SSB Operation
The example in this sect ion demonst rates t he basic SSB filter f unctio ns, and allows f or
further confirmation of the station receiver audio level adjustments. Place the DSP
Filters switch in the SSB mode and turn the AGC and NOISE REDUCTION off. Place
the FILTER IN - FILTER OUT switch in the BYPASS position (out).
Tune in a SSB station with normal pitch and volume. Press and lock the Filter In -
Filter Out button. Adjust the Volume control of the DSP to a comfortable volume
setting.
NOTE:
unless specifically told otherwise.
1.) Adjust the center frequency (left Tunable Filters knob) and the bandwidth (right
2.) Engage the AGC by pressing and locking the AGC button. Adjust the DSP's volume
3.) Turn the DSP's FILTER IN - FILTER OUT button ON (in) and OFF (out) to confirm
4.) If the
NOTE:
audio level on different modes. Set the Audio Level Adjust on the DSP for the most
common mode, and use the receiver's volume knob to properly adjust the level when
switching modes.
5.) You will find that the desi red signal becomes clearer (less n oise and QRM) as the
6.) Place the DSP filter in the BYPASS mode. Adjust the receiver until you find a
7.) Place the filter back in line with the FILTER IN - FILTER OUT push button. Press
NOTE: The automatic notch will not recognize signals that vary rapidly in frequency or
amplitude, because the filter must ignore rapid amplitude and frequency changes to
avoid nulling or distorting voices. If the automatic notch distorts voice use the manual
notch filter. The manual notch causes less distortion of voice modes.
Always use the DSP's volume control to adjust the volume when the DSP is "on"
Tunable Filters knob) to peak the SSB signal for maximum intelligibility.
control to a comfortable level. Adjust the
audio output is only slightly weaker when the AGC is disengaged.
that the signal is just slightly louder with the DSP engaged than it is with the DSP
bypassed.
receiver's
setting. Adjust the rear panel Input Level Adjust with a small flat-bladed
screwdriver until turning the AGC off barely reduces the DSP's audio output. This
adjustment can be confirmed by disengaging the DSP (with the DSP's AGC on).
The audio level should barely decrease with the filter bypassed.
volume control is set abnormally low, advance it to a normal
receiver's
volume control until the DSP's
Some compromise may be required if the receiver does not maintain the same
selectivity is increased and the center frequency is readjusted.
frequency that has CW or other any other tone audible with a SSB signal.
and lock the NOTCH ON and the NOTCH AUTO buttons. The interference shou ld
disappear or be greatly reduced.
20
Page 23

MFJ-784 Instruction Manual
8.) Experiment with different filter adjustments and functions under various
conditions to become familiar with the various controls.
Note: If the audio input level from the receiver is too high the audio may distort on voice
peaks. This is especially true when the AGC and Noise Reduction are being used. If
the audio input level is too low, the automatic notch and the noise reduction may not
function properly.
Note: You have to ground PTT to monitor yourself. See page 15.
Custom Filters
The MFJ-784 can store up to 10 custom filters in non-volatile memory. The custom
filters store all f ront panel settings fro m the "Filters" selection knob on the left, to the
"Noise Reduction" push-button on the right plus internal jumper settings.
The filters stored in memory can not be adjusted. Only the AGC On - Off, Power On Off, Volume, and Filter In - Filter Out functions are adjustable when in the Custom
mode.
Each position of the Filters switch can select a cust om filter for a tota l of 10 filters.
These filters are selected with the "Custom Tunable/Pre-set Filters" push-button. To
program a filter follow the procedure below. It is not necessary to "erase" an old
custom filter. Old filters are erased when a new filter is programmed over them.
The jumper settings for the data modes and internal CW sidetone filter are also stored
in the programmable filters. If you have several different mark-space frequencies that
you will be using, you only have to take the cover off once to set all of the filters. Set the
jumpers to a mark-space frequency and program a filter. Program the next
programmable filter with another mark-space frequency, etc.
21
Page 24

MFJ-784 Instruction Manual
Programming a Custom Filter
A custom filter is stored with the following steps:
1.) Select the filter mode and the control settings that you want to store.
2.) Enter the "custom" mode by pressing and locking the CUSTOM Tunable/PreSet FILTERS button in the CUSTOM position. The power indicator should now turn
green, indicating custom mode, and your new filter will be stored in temporary memory
until it is programmed into a nonvolatile filter setting (1-10).
NOTE:
custom filter until you program the new filter (at step 4).
may not appear to work
custom filter.
When you enter the "Custom" mode, the active filter will be set to the old
because the filter position (1-10) is still set to the old
From step 2-4 your filter
22
Page 25

MFJ-784 Instruction Manual
3.) Turn the Filters knob to the position where the new settings are to be stored.
4.) Press and hold the PROGRAM momentary push button. The power indicator
will light
red
and the DSP will beep within one second. Release the PROGRAM button.
This Filters position [1-10] will now operate with these settings whenever the
CUSTOM mode is selected.
23
Page 26

MFJ-784 Instruction Manual
Jumper Settings
The MFJ-784 has provided the user with the ability to enable and set t he CW sideton e
filter frequency, jumpers 1 through 4, and to change the data mode mark-space
frequencies (RTTY, HF Packet, AMTOR, and PACTOR), jumpers 5 through 7, by
removing the cover and moving a group of plug in jumpers. Jumper eight is not used.
The jumpers are located on the circuit board next to U15. A diagram of the jumper
area is shown below.
More information on jumpers settings may be found on the
CHARTS
on the next page.
CW Sidetone Filter Settings
The CW sidetone filter is a jumper programm able internal consta nt frequency filt er. It
is used to pass sidetone through the DSP unit in the CW mode. Any signal within 30
Hz of the sidetone frequency will also pass through the filter.
This is not the peferred method to pass sidetone, see page 15 for the prefered
method.
The DSP unit is shipped with the CW sidetone filter set to "off". To enable the CW
sidetone filter internal jumpers must be set to the sidetone frequency of your radio.
The center frequency of the sidetone filter ranges from 300 to 1000 Hz in 50 Hz
increments. The bandwidth of t he sidetone filter is fixed at 50 Hz. See the chart on
the next page to set the sidetone filter.
JUMPER SETTINGS
DATA Default
The data modes are set to a default mark-space frequency of 2125-2295 and 21102310 Hz, with shift of 170 or 200 Hz. See the chart on the next page to set the
mark-space frequency and shift to different settings.
NOTE:
circuit board. The JUMPER SETTINGS CHARTS contain more detailed information on
the jumper settings and how each affects the unit's operation.
The chart to the left shows the position of the jumper settings area on the
24
Page 27

MFJ-784 Instruction Manual
25
Page 28

MFJ-784 Instruction Manual
In Case of Difficulty
If you experience low volume, hum only when the DSP volume control is high, or
distortion:
Double check the wiring used to connect the DSP to the receiver's speaker and
headphones jacks. The wiring can be tested by tu rning the DSP "off". When the DSP
power switch is in the "off" position, the audio input jack is connected directly to the
DSP's speaker and headphones jacks. If the DSP is properly connected and the wiring
is good, the volume level and audio quality should be exactly the same as when the
speaker or headphones is plugged directly into the receiver's speaker or headphones
jacks.
If the DSP fails to process properly when using the Automatic Notch or Noise
Reduction, or if the DSP audio is distorted intermittently:
The receiver's volume or the DSP's input level contro l may need to be adjusted. The
DSP's volume should barely change as the AGC is turned "on" or "off". If you turn on
the DSP's AGC and the volume increases significantly, the audio input level needs to be
increased. If the signal cracks or pops on peaks, the audio input level may be too high.
See page 19
If you hear hum at high or low volume:
The power supply you are using may not be filtered properly.
If the DSP won't start or shuts off intermittently:
The power supply may not be within the required 12-16 volt range. If the power supply
drops below 12 volts from poor regulation or a bad connection, the DSP may go into a
power down reset and go "dead". The power LED may flash erratically.
Technical Assistance
If you have any problem with this unit first check the appropriate section of this manual.
If the manual does not reference your problem or your problem is not solved by
reading the manual you may call MFJ t oll-free at 1-800-647-TECH (8324). Outside of
the continental U.S.A. call 601-323-5869. You will be best served if you have your unit,
manual and all information on your station handy so you can answer any questions the
technicians may ask.
You can also send questions by mail to MFJ Enterprises, INC., PO. Box 494, Mississippi
State, MS 39762; by FAX to 601-323-6551 or on Compuserve at
76206.1763@Compuserve.com. Send a complete description of your problem, an
explanation of exactly how you are using your unit and a complete description of your
station.
26
Page 29

MFJ-784 Instruction Manual
FULL 12 MONTH WARRANTY
MFJ Enterprises, Inc. warrants to the original owner of this product, if manufactured by MFJ
Enterprises, Inc. and purchased from an authorized dealer or directly from MFJ Enterprises, Inc.
to be free from defects in material and workmanship for a period of 12 months from date of
purchase provided the following terms of this warranty are satisfied.
1. The purchaser must retain the dated proof-of-purchase (bill of sale, canceled check, credit
card or money order receipt, etc.) describing the product to establish the validity of the
warranty claim and submit the original of machine reproduction or such proof of purchase
to MFJ Enterprises, Inc. at the time of warranty service. MFJ Enterprises, Inc. shall have
the discretion to deny warranty without dated proof-of-purchase. Any evidence of
alteration, erasure, of forgery shall be cause to void any and all warranty terms
2. MFJ Enterprises, Inc. agrees to repair or replace at MFJ's option without charge to the
3. MFJ Enterprises, Inc. will supply replacement parts free of charge for any MFJ product
4. This warranty is NOT void for owners who attempt to repair defective units. Technical
5. This warranty does not apply to kits sold by or manufactured by MFJ Enterprises, Inc.
6. Wired and tested PC board products are covered by this warranty provided only the
7. Under no circumstances is MFJ Enterprises, Inc. liable for consequential damages to
8. Out-of-Warranty Service: MFJ Enterprises, Inc. will repair any out-of-warranty product
9. This warranty is given in lieu of any other warranty expressed or implied.
10. MFJ Enterprises, Inc. reserves the right to make changes or improvements in design or
11. All MFJ products to be serviced in-warranty or out-of-warranty should be addressed to
12. This warranty gives you specific rights, and you may also have other rights which vary
immediately.
original owner any defective product under warrantee provided the product is returned
postage prepaid to MFJ Enterprises, Inc. with a personal check, cashiers check, or money
order for $7.00 covering postage and handling.
under warranty upon request. A dated proof of purchase and a $5.00 personal check,
cashiers check, or money order must be provided to cover postage and handling.
consultation is available by calling (601) 323-5869.
wired and tested PC board product is returned. Wired and tested PC boards installed
in the owner's cabinet or connected to switches, jacks, or cables, etc. sent to MFJ
Enterprises, Inc. will be returned at the owner's expense unrepaired.
person or property by the use of any MFJ products.
provided the unit is shipped prepaid. All repaired units will be shipped COD to the
owner. Repair charges will be added to the COD fee unless other arrangements are made.
manufacture without incurring any obligation to install such changes upon any of the
products previously manufactured.
MFJ Enterprises, Inc., 300 Industrial Park Road, Starkville, Mississippi 39759, USA
and must be accompanied by a letter describing the problem in detail along with a copy of
your dated proof-of-purchase.
from state to state.
27
 Loading...