

Page 1

MFJ-414 Instruction Manual Classroom Morse Code Tutor
Contents
THE BASICS
Introduction................................................................................................................................1
Getting Started: How to Use the Menu System.........................................................................1
Fast Start: Using the MFJ-414 ..................................................................................................3
Using the MFJ-414 As a Standalone Morse Code Trainer..................................................3
Using the MFJ-414 As a Keyer...........................................................................................4
Using the MFJ-414 For Over-the-Air Code Practice..........................................................5
Connecting to a Computer..........................................................................................................7
Connecting to a Printer...............................................................................................................8
Learning Morse Code.................................................................................................................8
THE DETAILS
The Menus: Detailed Descriptions............................................................................................9
Setup Mode.........................................................................................................................9
Keyer Menu......................................................................................................................10
Overall Speed Menu .........................................................................................................11
Farnsworth Menu..............................................................................................................11
Tone Menu........................................................................................................................12
Set Menu...........................................................................................................................12
Beginner Sets.............................................................................................................12
The Combine Menu:...........................................................................................13
The Group Menu:...............................................................................................13
Advanced Sets ...........................................................................................................14
The Random Words Database:........................................................................... 14
Transferring a Random Words Database From the Computer.....................15
Transferring the Random Words Database to the Computer.......................15
Custom Sets...............................................................................................................16
Custom Characters:.............................................................................................16
Custom Words:...................................................................................................17
Memory Sets..............................................................................................................17
Preparing Messages:...........................................................................................18
Uploading and Downloading Messages:.............................................................21
Loading a Memory Bank From the Computer.............................................21
Sending Contents of a Memory Bank to the Computer...............................22
Interactive Menu...............................................................................................................22
New Play Menu.................................................................................................................22
i
Page 2

MFJ-414 Instruction Manual Classroom Morse Code Tutor
Repeat Play Menu.............................................................................................................23
Print Play Menu................................................................................................................23
The Front and Back Panels ......................................................................................................24
APPENDICES
Factory Defaults............................................................................................................... ........26
Self Test...................................................................................................................... .............27
Troubleshooting.......................................................................................................................28
Error Messages.........................................................................................................................29
MFJ Pre-wired Cables and Open End Cables..........................................................................30
Morse Code Character Set .......................................................................................................30
Some CW Abbreviations..........................................................................................................32
Meaning of Q Signals...............................................................................................................33
Menus System Chart ................................................................................................................34
Schematic.................................................................................................................................36
Memory Banks Chart...............................................................................................................38
Technical Assistance................................................................................................................38
ii
Page 3

MFJ-414 Instruction Manual Classroom Morse Code Tutor
The Basics
Introduction
The MFJ-414 Professional Classroom Code Tutor is the most capable and versatile Morse code
training tool on the market. This unit can be used by individuals to practice receiving and sending
code, by instructors to provide practice to their classes, by clubs and other groups to provide onthe-air code practice through all types of radios and repeaters, by Volunteer Examiners in
preparing and administering code examinations, and as a keyer by amateur operators on all bands.
Its strong, high-quality audio, its ability to work with a computer and its printer output port make it
a valuable tool for any training environment. The MFJ-414 can provide:
• Individual or group code practice with random sending of:
Basic, advanced or custom-configured character groups, including:
All characters in the FCC code tests and more
Preprogrammed or custom-configured sets of words
Exam-style sample amateur QSOs
• Printouts of practice sessions, for grading purposes, via its printer port
• Ability to tape-record practice sessions via its audio port
• Practice, demonstrations or examinations for large groups via either its built-in speaker or by
feeding its audio output to a Public Address system
• Custom practice sessions downloaded from a computer, including the ability to generate a
complete FCC code test for a VE session
• Over-the-air code practice via its radio interface for FM, AM or SSB transceivers
• Iambic or semi-automatic keying of CW transcei vers.
In this manual, we'll start by explaining the basics of the MFJ-414, then show how you can quickly
start using it for some of its major functions. In this Fast Start section, we'll concentrate on putting
the unit to work for you immediately. As you'll see, you can start using it in just a few minutes. In
later sections, we'll cover all its capabilities and features in full detail.
Getting Started: How to Use the Menu System
You may set up the MFJ-414 to perform any of its many functions by making the appropriate
selections from its menu system. T his system consists of eleve n main menus, eight of which have
submenus. You make your select ions using the three buttons under the LCD display−Previous,
Next and Select. These buttons do the following:
1
Page 4
MFJ-414 Instruction Manual Classroom Morse Code Tutor
• Previous−Selects the previous main menu, or the previous item in a submenu.
• Next−Selects the next main menu, or the next item in a submenu.
• Select−Enters a submenu to allow changing your choices within that submenu. To do this,
press and release the Select button within one second (as we'll see later, this button does other
things when held down longer than one second).
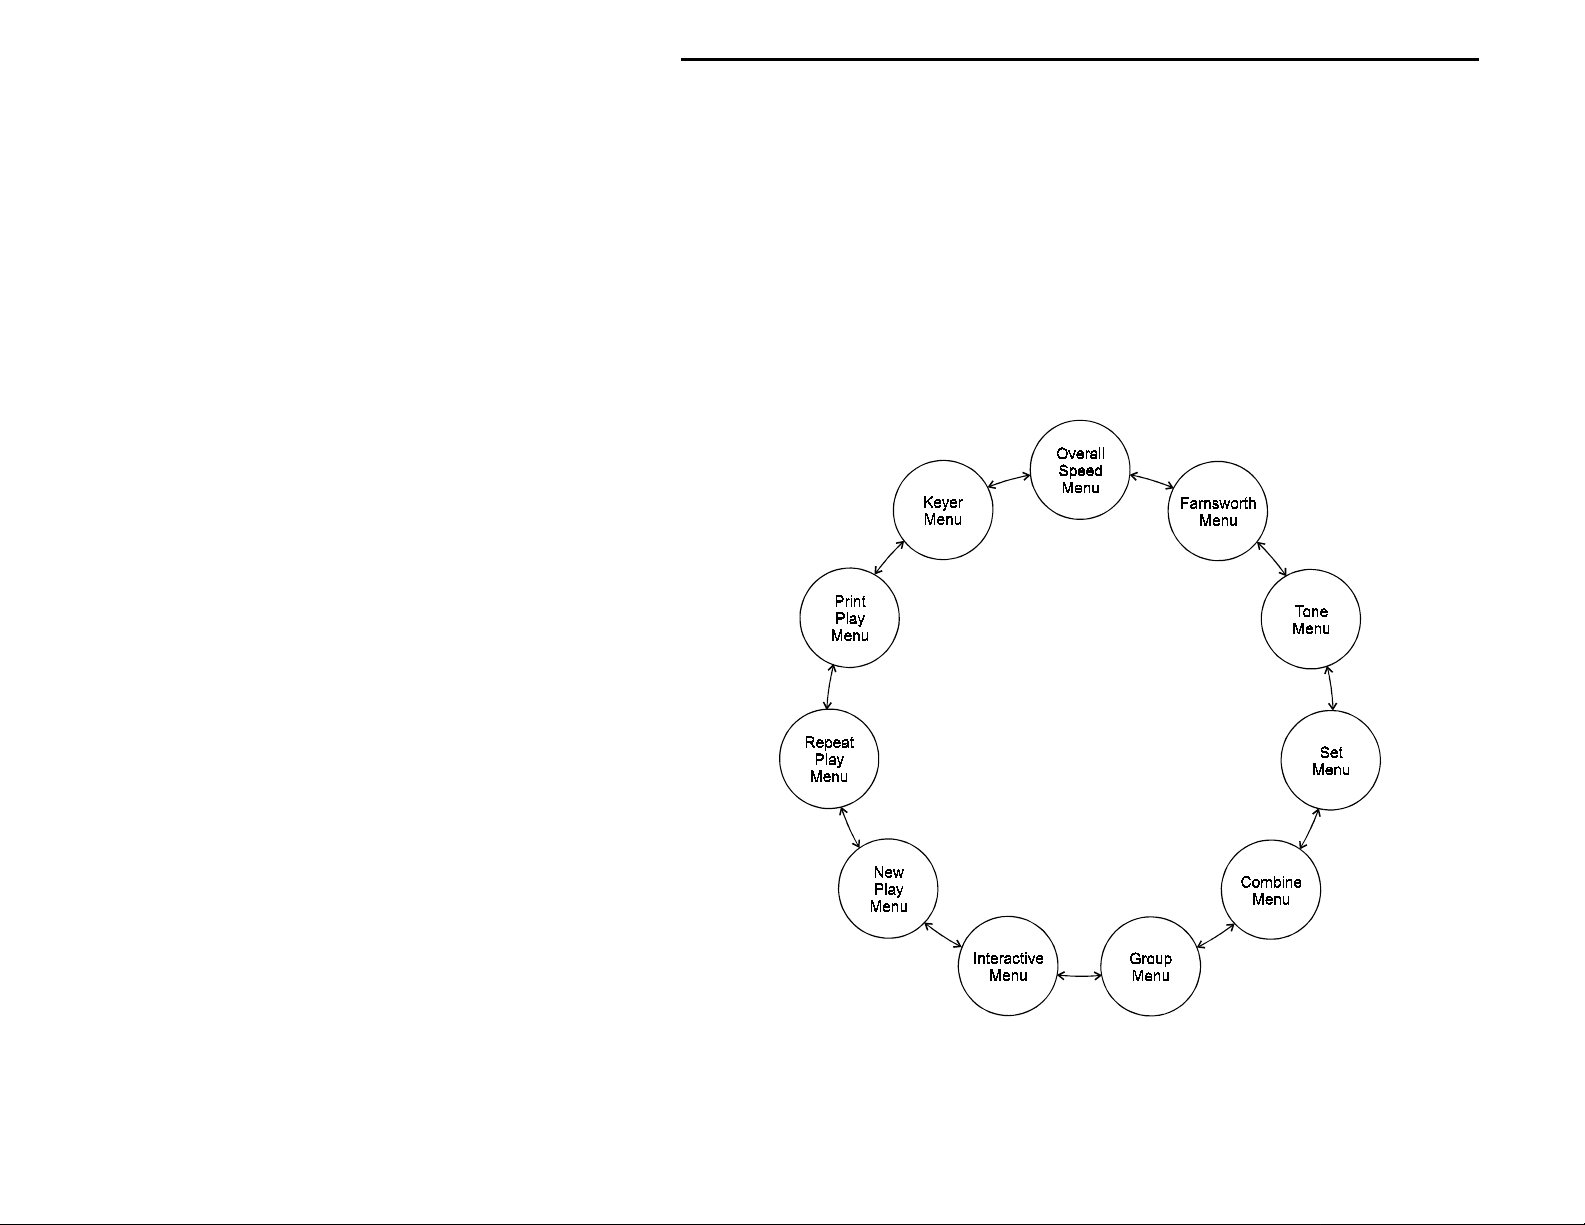
The menus are arranged in a "wrap-around" structure, so that pressing the Next or Previous button
will bring up another menu or submenu item in a sequence. Figure 1 shows the sequence of the
main menus. Notice the availability of the Combine, the Group and the Interactive menus depends
on the selection in the Set menu. When power is turned on, the menu displayed is the one that was
displayed when the unit was last turned off.
Figure 1. MFJ-414 Main Menu System.
To see how the menu system works, consider the following example.
2
Page 5

MFJ-414 Instruction Manual Classroom Morse Code Tutor
EXAMPLE: If the display shows that you are in the Overall Speed menu, pressing the
Next button would put you in the Farnsworth menu and pressing the Previous button
would put you in the Keyer menu. Pressing the Select button would put you in the
Overall Speed submenu. This is indicated by a blinking block at the right side of the
LCD display. While this block appears, you may raise the speed by pressing the Next
button or lower it by pressing the Previous button. Once you have selected the speed you
desire, you may leave the submenu by pressing the Select button again.
Once you have made your choices within the unit's submenus, they will be saved in non-volatile
memory for your next session.
Fast Start: Using the MFJ-414
In the following sections, we'll show how you can quickly set up the MFJ-414 to perform each of
its major functions. To start, power up the unit and press the Next button until you reach the first
menu mentioned, then follow the instructions.
Using the MFJ-414 As a Standalone Morse Code Trainer
• Keyer Menu−Set to "Keyer Off"
• Overall Speed Menu−Enter this submenu by pressing Select and choose your overall sending
speed (using the Next and Previous buttons), then exit the submenu by pressing Select again.
• Farnsworth Menu−Farnsworth spacing means that individual characters are sent faster than the
overall sending speed. For example, many 13-wpm Amateur Radio examinations consist of
characters sent at 18 wpm, but spaced out to reduce the overall sending speed to 13 wpm. To
choose Farnsworth spacing, press Select. The blinking block will appear. Use the Next and
Previous buttons to select the Farnsworth speed you desire. Setting the Farnsworth speed the
same as the overall sending speed will turn Farnsworth spacing off.
• Tone Menu−Press Select to enter this submenu and select the audio tone you desire. If you're
preparing for a code examination, you should know that most exams are given using audio
tones between 700 and 800 Hz, so you may want to stay within that range so it sounds familiar
to you during the exam. Pressing Select again will exit the Tone menu and return you to the
main menu sequence.
• Set Menu−This selects the set of characters (or words or QSOs) that will be randomly sent.
The MFJ-414 offers a wide variety of practice sessions applicable to many different codetraining techniques and to all stages of your code training. The character sets available are:
nine beginner sets, eleven advanced sets, four custom sets you may program yourself, and
sixteen memory sets you may program yourself. As you step through these options, the
contents of the sets are displayed on the LCD.
3
Page 6

MFJ-414 Instruction Manual Classroom Morse Code Tutor
When you have selected the sec ond or higher Beginner Set or the sec ond or higher Custom
Character Set, the Combine menu allows you to combine previous Beginner or Custom
Character sets into a single set for practice purposes.
When you have selected a character set, the Group menu lets you set the number of characters
to be sent in each group.
For complete details of the Set menu, see page 12.
To decide which of these sets to choose, you must first decide how you are going to approach
the task of gaining code proficiency. See the section titled "Learning Morse Code" on page 8
for information about different code-training techniques.
• Interactive Menu−With the Interactive function turned on, the unit will halt after sending one
or more (your choice) words or code groups and wait for you to press the Next button before
sending the next word(s) or group(s). If you want this feature activated, pr ess Select to turn
Interactive on, then Next or Previous to choose how many words or groups the unit should
send before halting. When you have made this selection, press Select again to exit this menu.
• New Play Menu−Press Select to have the unit star t sendi ng cod e. T o p ause the sending, pre ss
Select again (the word
Select button and hold it down for more than one second (the word
"PAUSE"
will appear in the display). To stop the sending, press the
"STOP"
will appear in the
display).
• Repeat Play Menu−If you wish to hear the previous session sent again, press Select.
• Print Play Menu−Pressing Select in this menu also will cause the previous session to be
replayed, and in addition will send the text to a printer. This is particularly useful if you wish
to grade yourself on how accurately you copied.
Using the MFJ-414 As a Keyer
With the MFJ-414, you may send Morse code in all the major ways commonly in use. This
includes both Iambic A and B automatic keyer modes with dual-lever paddles, semi-automatic key
mode using a single-lever paddle, or even with a straight key or mechanical, semi-automatic "bug."
The unit comes with Iambic A selected as the default keyer mode. To change this, you enter the
Setup menu, which is described on page 9.
The Key Input jack accepts a 1/4-inch stereo phono plug. For dual-lever "squeeze" keys, connect
the dot wire to the tip of the plug and the dash wire to the ring. Use two-conductor shielded cable,
or, if two shielded cables are used, connect the shields together. The shield must be connected to
the plug's ground.
To use a straight key or "bug," also use a stereo phono plug; a mono plug will not work. Connect
one wire to the p lug's ring and the othe r to the ground ( the tip is not used ). Yo u then must enable
the Semi-Auto mode and disable the Reverse function (both done from the Setup menu).
4
Page 7

MFJ-414 Instruction Manual Classroom Morse Code Tutor
• Keyer Menu−Press Select to turn the keyer to "on." T he keyer speed and the audio tone will
be the same as those last selected from those menus. However, you can change both (as well
as the PTT hang time for the radio interface) from within the Keyer menu when the keyer is
turned on. To do this, press Select briefly. Three numbers showing, from left to right, speed,
tone and PTT hang time will be displayed on the second line of the display. One of these will
have a set of square brackets around it. Pressing the Select button will move the brackets to
the next parameter, such as from speed to tone. You can change the value within the brackets
by pressing the Next or Previous buttons. To turn the keyer off, press the Select button and
hold it down for more than one second.
PTT hang time indicates the amount of time the PTT line will be active after you have sent
your last charac ter. You may adjust this to your liking for o n-the-air sending.
• Overall Speed Menu−When the keyer is turned "on," it is automatically set to the last speed
selected. Speed can be selected from within the Keyer menu as described above. This menu
has no effect when using a straight key or bug.
• Farnsworth Menu−Not used in this function.
• Tone Menu−When the keyer is turned "on," the tone is automatically set to the last tone
selected. The tone can be selected from within the Keyer menu as described above.
• Set Menu−Not used in this function.
• Combine Menu−Not used in this function.
• Group Menu−Not used in this function.
• Interactive Menu−Not used in this function.
• New Play Menu−Not used in this function.
• Repeat Play Menu−Not used in this function.
• Print Play Menu−Not used in this function.
Display During Keyer Operation: When using the unit in Keyer mode, except when the SemiAuto function is enabled, the code sent is displayed on the front-panel LCD and sent to the Serial
Port. If the Keyer Memory is enabled, the cod e sent with the paddles also is stored in the nonvolatile Keyer Memory. The keyer memory bank has a maximum capacity of 1022 characters. If
more than that are sent, the newest characters will replace the oldest ones−a "circular" memory
arrangement. Invalid code is displayed as a lowercase "x" and is not stored in memory.
Using the MFJ-414 For Over-the-Air Code Practice
The MFJ-414 allows you to send code practice sessions over the air, using all types of transceivers.
The Key Output jack on the rear panel provides keying for solid-state CW transmitters. The Radio
5
Page 8
MFJ-414 Instruction Manual Classroom Morse Code Tutor
Output jack, also on the rear panel, provides PTT switching and audio for sending Morse code as
audio tones thr ough an FM, SSB or AM transmitter. With this function, you may, for example,
send Morse code using FM transceivers on VHF simplex frequencies or over repeaters.
Important Note: With the MFJ-414, you may send Morse code using several different emission
types as defined b y the FCC. The FCC r egulatio ns regard ing emission types ap ply whether you're
sending Morse code or voice signals with that type of emission. Thus, for example, when you
connect this unit to an FM transmitter, you are sending Morse code by FM, not by CW. That
means you must remain within the band limits designated for FM transmissions. In the amateur
six- and two-meter bands, the subbands 50.0 - 50.1 MHz and 144.0 - 144.1 MHz are reserved
exclusively for CW transmissions. If you're sending Morse code as audio tones with an SSB
transmitter on the HF bands, you must remain within the band segments designated for SSB; you
cannot transmit this type of emission in the CW bands.
Also remember to identify your station at least once every 10 minutes during your code practice
transmission.
Hooking Up to the Radio
Connect your radio to the unit, using a cable run from the Radio Output jack on the MFJ-414 to
your radio. MFJ sells cables for most major brands of radios. See the list on page 30 for the
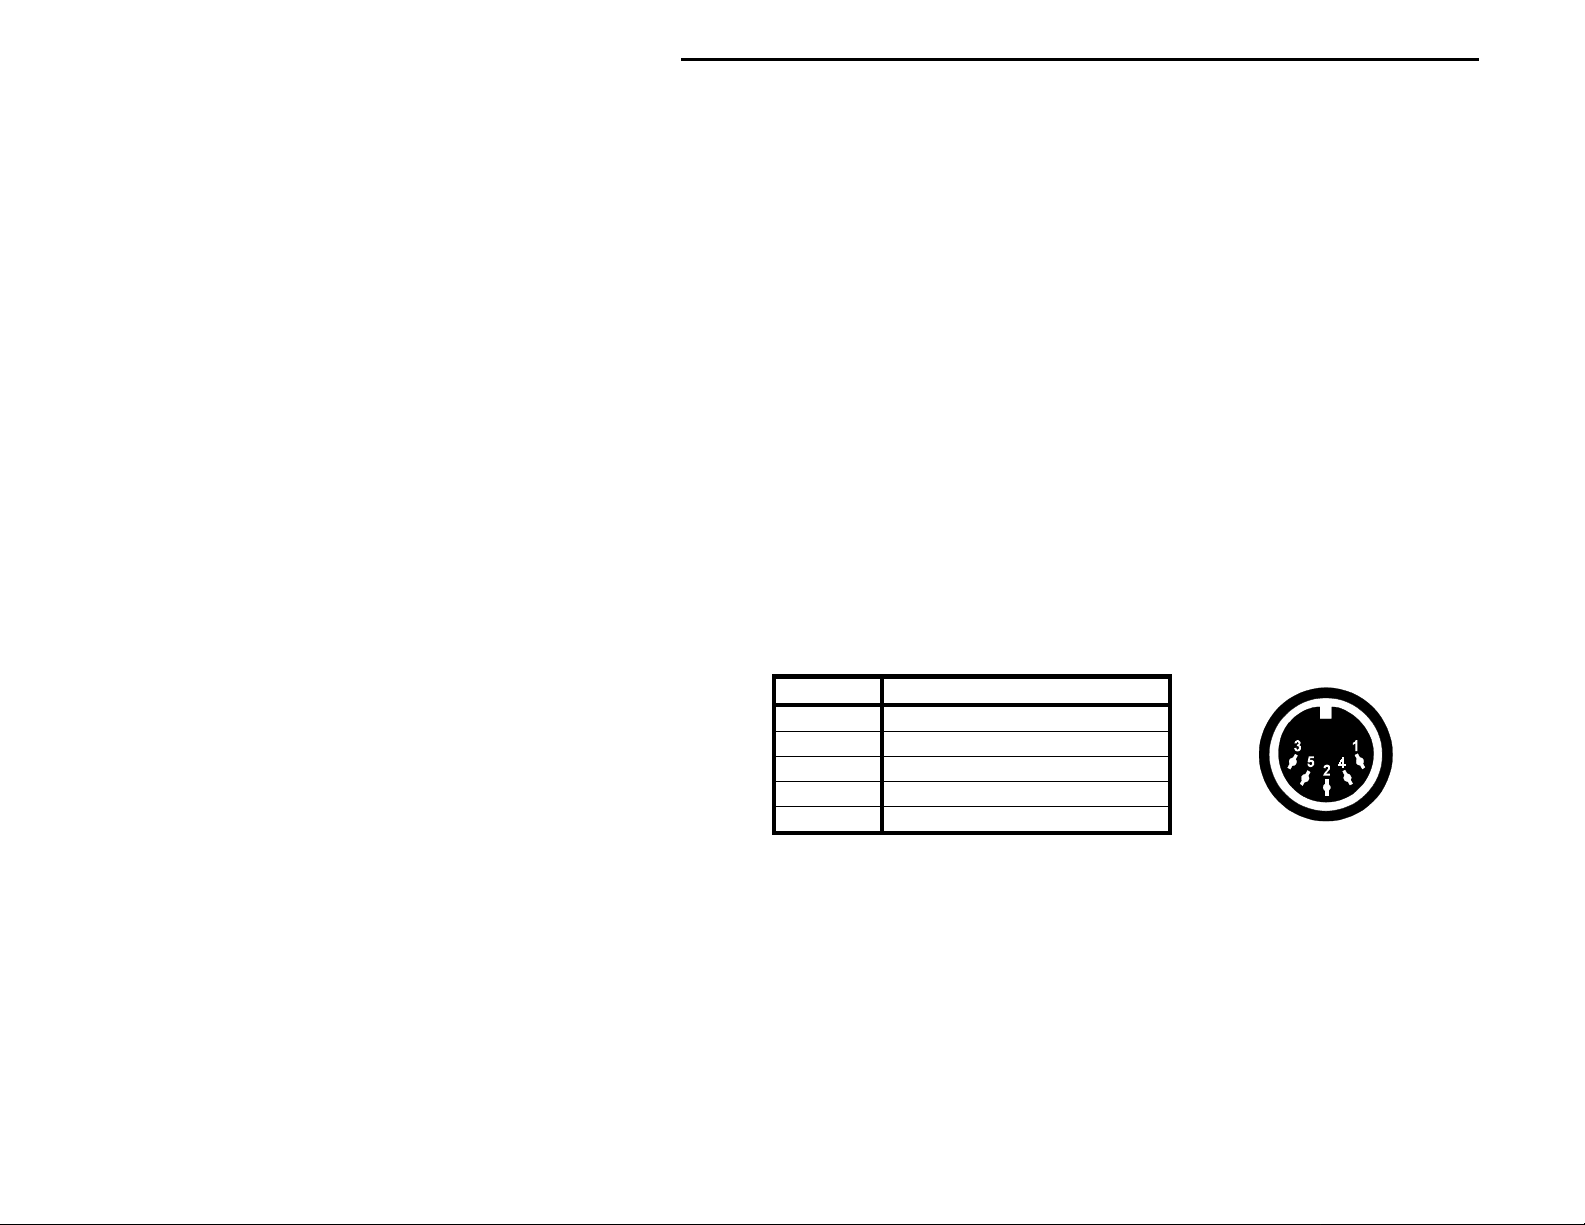
appropriate stock number. If you wish to make your own table, below is a diagram of the standard
5-pin DIN jack on the MFJ-414 and a table showing its connections.
Pin Radio Output Function
1 Transmit Audio
2 Ground
3 PTT
4 No Connection
5 No Connection
• Keyer Menu−If your over-the-air code practice is to be sent using the unit's character sets or
text loaded into its memory, turn the keyer function off. If you're going to send the practice
session yourself with a key or paddle, select the type of keying you want to use, as described
above in the section on using the 414 as a keyer.
• Overall Speed Menu−Select the overall speed at which you wish the practice session to be
sent. If you're sending the se ssion yourself using the keyer function, select the speed just as
you would any other keyer.
6
Page 9

MFJ-414 Instruction Manual Classroom Morse Code Tutor
• Farnsworth Menu−If you're sending from the MFJ-414's character sets or from text you
entered into the unit's memory banks, you may choose a Farnsworth speed for the over-the-air
practice session. If you're sending the code practice yourself using the keyer function, the
Farnsworth mode is temporarily disabled.
• Tone Menu−If you're using the MFJ-414 to key a CW transceiver, the Tone menu is not
applicable. If, however, you're using the MFJ-414 to send Morse code as audio tones over an
FM, AM or SSB transceiver, the Tone menu allows you to choose the audio tone sent.
• Set Menu−Choose a set for transmission unless you're sending the code practice yourself with
the keyer.
• Combine Menu−Not used if you're sending the practice yourself. Otherwise configure
accordingly just as you would if using the unit as a standalone tutor.
• Group Menu−Not used if you're sending the practice yourself. Otherwise choose the number
of characters per group just as you would if using the unit as a standalone tutor.
• Interactive Menu−Not used in this function.
• New Play Menu−Not used if you're sending the practice yourself. Otherwise start a new
session just as you would if using the unit as a standalone tutor.
• Repeat Play Menu−Not used if you're sendi ng the practice yoursel f. If sending a Tutor session
over the air, you can repeat the session if desired.
• Print Play Menu−Not used in this function.
When you begin sending, make sure your radio goes into transmit mode. If it does not, or if it
transmits continuously whether or not the MFJ-414 is sending, you will need to adjust the PTT
Keying Adjust trimpot, accessible from the back panel. Use a small, flathead screwdriver to adjust
this pot so that your radio transmits when the MFJ-414 is sending and does not transmit when the
unit is not sending. You may adjust the level of the transmitted audio with the Line Audio Adjust
trimpot, also on the back panel. Monitor the signal transmitted by your radio or have someone else
do this and adjust for a comfortable audio level.
Connecting to a Computer
You may connect the MFJ-414 to a computer using the unit's serial port, on the back panel. A 9pin-to-9-pin serial cable is provided with the unit. If your computer has a 25-pin serial port, you
can use a 9-pin-to-25-pin adapter.
To use a computer with the MFJ-414, run a terminal program that will upload and download
ASCII files, and configure the terminal program to do so. Set the terminal program for 1200 baud,
8 data bits, no parity and one stop bit. If you see extraneous linefeeds on the computer screen
7
Page 10

MFJ-414 Instruction Manual Classroom Morse Code Tutor
when receiving data from the MFJ-414, you may configure your software to strip out these extra
linefeeds.
During New Play, Repeat Play or Print Play, the characters sent by the MFJ-414 are sent through
the serial port, so you may use your computer to monitor the transmitted copy. You may find this
particularly convenient.
You also may upload and download text files between the MFJ-414 and your computer. For
details on this, see the discussion of the Set Menu starting on page 12.
Connecting to a Printer
The printer port will send your practice session to any Epson compatible printer. This function is
only active during Print Play, which repeats the previous session. The printer must be connected
and turned on before starting Print Play; otherwise you will get an error message saying
FAULT."
press Previous to abort the operation; if you wish a printout, make sure the printer is properly
connected and powered up, then press Select to retry.
This message includes Abort and Retry options. If you selected Print Play by mistake,
"PRINTER
Learning Morse Code
Learning Morse code is a matter of practice, practice and more practice. Whether you're just
starting to learn the characters or working on high-speed "head co pying," you'll succeed through
regular, frequent practice. That is why the MFJ Classroom Morse Code Tutor is the ideal tool for
learning the code. It provides an extremely wide variety of practice sessions, all sent in truly
random fashion and with high-quality audio like that used in examination sessions.
Unlike tapes, which you quickly can memorize and thus defeat the purpose of the practice, the
Classroom Code Tutor sends a new practice session every time to hone your skills. The keyer
functions allow you to practice sending. With speeds from 3 to 60 wpm and sets from a few
characters to the entire character set, then words and QSOs, this unit can take you from no code
skills at all up to the ranks of high-speed CW contesters.
Over the years, many different programs for building code proficiency have been developed, but
the common element to all these programs is regular practice. With the MFJ-414, you may follow
any training program you desire. This unit is extremely versatile and allows you to tailor its
functions to provide the type of code practice you desire. It also allows you to customize your
practice sessions to focus on any particular trouble spots that may arise during your training.
A traditional method of gaining code proficiency has been to learn all the characters, then slowly
build speed. While this succeeds for many people, it proves frustrating for others. A common
complaint is that, at about 10 wpm, students hit a "plateau," where they see no increase in their
8
Page 11

MFJ-414 Instruction Manual Classroom Morse Code Tutor
copying speed for some time. An alternative method, devised by a psychologist in the 1930's,
starts students at full speed, say 15 or 20 wpm, but with only a limited set of characters at the
beginning. T his Koch Method, named after its inventor, showed the fastest training progress o f
any method ever published in the psychological journals.
The MFJ-414's Custom Character sets allow you to use the Koch Method in an easy,
straightforward manner. For full details on the Koch Method, as well as on CW operating and the
history of Morse code, see the book, "Morse Code: Breaking the Barrier" (MFJ-3400), available
from MFJ Enterprises, Inc.
The Details
The Menus
Setup Mode
Entering the Setup mode allows you to change some basic functions of the Tutor and the Keyer.
To enter the Setup mode, first turn off power to the unit, then press and hold both the Previous and
Select buttons while turning power on. When
In the Setup mode, press Previous or Next button to select the previous or next submenu,
respectively, and press the Select button to toggle the options within that submenu.
To exit the Setup mode, press and hold the Select button for one second. If the Keyer Memory
option has be en c hange d,
the change (and erase the content of the last memory bank), or press the Select button to cancel the
change. Release the button after
You choose Setup options from seven submenus. These are:
• On-the-Fly Speed: With this option ON, you may change the sending speed while the Tutor
is sending, as described belo w in the section on the Play menus. In Setup mode, you may turn
this feature OFF to avoid accidentally changing the speed during a session.
• Play Format: This selects the order in which the character is sent to the display and the
speaker. You may choose to have the character sent to the display first, then the speaker, or
vice-versa.
"CHG KEYER MEMORY"
"EXIT"
−−−−
Detailed Descriptions
"ON-THE-FLY SPEED"
will appear. Press the Previous button to confirm
appears to resume with normal operation.
appears, release the buttons.
• Semi-Auto: With the Semi-Auto option OFF, the keyer functions as an iambic keyer, for use
with a dual-lever paddle. As an iambic keyer, the MFJ-414 has dot and dash memories, for
"squeeze keying," and functions just like other iambic keyers, both standalone keyers and
9
Page 12

MFJ-414 Instruction Manual Classroom Morse Code Tutor
those built into radios. With Semi-Auto turned ON, the keyer can be used with a single-lever
key, with dots generated automatically and dashes formed manually by the user. This
emulates the function of a mechanical, semi-automatic "bug." You also may use this unit with
a straight key or a b ug−connect the key or bug to the ground and the dash line. With semiauto turned ON, the MFJ-414 will not display the code sent or record to the keyer memory.
• Iambic: There are two different types of iambic keying, and both are available. The
difference in behavior of these two modes occurs when both paddles are squeezed, then
released. In iambic mode A, the keyer will simply complete the element (dot or dash) in
progress, then stop sending. In iambic mode B, the keyer will complete the element in
progress, then send an additional opposite element. You may choose either mode.
• Reverse: When using paddles, the MFJ-414 normally expects the dot paddle to be connected
to the tip of the plug and the dash paddle to be connected to the plug's ring. If your paddles
are wired in the opposite manner, or you wish to change between right- and left-handed
operators, you may turn Reverse ON to switch the paddle functions. You can also set this
mode by simply pressing the paddle you desire to designate as the dot paddle.
• Keyer Memory: With Keyer Memory turned O N, you change the last memory ba nk (Bank
P) into a keyer memory. If you change the state of this memory, you erase its contents. When
Keyer Memory is turned on, the text you send with the paddles is saved into memory and can
later be played back. This memory has a total capacity of 1022 characters. If more than that
are sent, the newest characters will replace the oldest characters, in a "circular" memory
arrangement. Duri ng sending, invalid cod e is displayed as a l owercase "x" but not store d in
the memory.
Hint: To store an extra word space, send an invalid code and pause for a word space.
When switching from the Keyer mode to Tutor mode (by pressing Select for one second), a 5digit number will appear indicating the number of characters sent (plus two for "[" and "]")
and stored into the keyer memory. If more than 1022 characters were sent,
"FULL"
will be
displayed. In that case, only the last 1022 characters will have been stored.
• Write Protection: Turning this function ON prevents the non-volatile memories, the random
words and memory banks, from being accidentally overwritten. In order to download files
into the MFJ-414 memory, this option must be OFF.
Keyer Menu
10
Page 13

MFJ-414 Instruction Manual Classroom Morse Code Tutor
"KEYER OFF"
When
is displayed, press Select to turn the keyer on. The keyer speed and the audio
tone will be the same as those last selected from those menus. However, you can change both (as
well as the PTT hang time for the radio interface) from within the keyer menu when the keyer is
turned on. To do this, press Select briefly. Three numbers showing, from left to right, speed, tone
and PTT hang time, will be displayed on the second line of the display. One of these will have a
set of square brackets around it. Pressing the Select button will move the brackets to the next
parameter, such as from speed to tone. You can change the value within the brackets by pressing
the Next or Previous buttons. To turn the keyer off, press the Select button and hold it down for
one second.
Overall Speed Menu
This menu allows you to select a keying speed from 3 to 60 words per minute (wpm). By "overall"
speed, we mean the speed at which the words or groups are sent. A "word" is defined as 50 units
of time, and the word "PARIS" is exactly 50 units in length. Therefore, if "PARIS" is sent 13
times in one minute, the sending speed is 13 wpm.
Standard Morse code timing defines a dit as one unit of time and a dah as three units of time.
Within each character, there is one unit between elements (dits and dahs). Three units separate
characters and seven units separate words. Farnsworth spacing (see below) will increase the
amount of time between characters and wo rds.
"OVERALL SPEED"
When
is displayed, press Select to enter the menu, then Next will increase the
overall sending speed and Previous will lower it, both in 1-wpm increments. Once you have
selected your speed, press Select again to exit the menu. Note that setting the overall speed greater
than or equal to the Farnsworth speed will disable Farnsworth spacing.
Speed requirements for U.S. amateur licenses are: 5 wpm for Novice and Technician-Plus; 13
wpm for General and Advanced; and 20 wpm for Amateur Extra Class. Many amateur exams are
administered using Farnsworth spacing. For example, many 5- and 13-wpm exams are
administered by sending 18-wpm characters spaced out to provide the slower overall speed. In
order to provide themselves a "buffer" to overcome possible test-day jitters, many amateurs
practice at a slightly higher speed than that at which they will be tested. Someone trying for the
13-wpm test, then, might practice with 18 or 20 wpm characters spaced out to an overall sending
speed of 15-16 wpm. That way, when test day comes, the exam may sound slow and easy,
boosting your chances of success.
Farnsworth Menu
11
Page 14

MFJ-414 Instruction Manual Classroom Morse Code Tutor
As explained previously, Farnsworth spacing adds more time between characters to slow down the
overall sending speed. The advantage of this is that, by hearing the characters sent at a faster
speed, you learn to recognize each character by its distinctive rhythm, rather than by trying to
"count dits. " This greatly assists you in copying Morse cod e at higher speeds.
To activate Farnsworth spacing, press Select when
"FARNSWO RTH OFF"
is displayed. A black box
will blink on the right-hand side of the display. Press Next to increase the Farnsworth speed, or
Previous to reduce it. The Farnsworth speed, however, must be higher than the overall speed. To
turn Farnsworth off, reduce the Farnsworth speed to the same speed as the overall speed.
Tone Menu
The Tone menu allows you to select the audio frequency sent by the unit. You may select
frequencies from 305 to 1006 Hz. While you can choose an audio frequency that pleases you, you
should be aware that most amateur code exams are given using audio frequencies between 700 and
800 Hz. Also, most CW transceivers use sidetone frequencies in the 700 to 800 Hz range.
To select your audio frequency, press Select when
"TONE"
is displayed. Then, you can use Next to
raise the frequency or Previous to lower it. Press Select again to exit the Tone menu.
The MFJ-414 features smooth, clean audio, with sine wave output, instead of the harsh square
wave audio used by many other code-training machines. Also, the MFJ-414 produces each dit and
dah with a rise and decay time of approximately 5 milliseconds, avoiding the "spikes" that cause
distracting key clicks. The MFJ-414's audio sounds like that of the high-quality tapes frequently
used for exams or that of a good CW transceiver.
Set Menu
The Set menu allows you to select the set of characters (or words or QSOs) from which the MFJ414 will send random practice when playback is started. These are classified as Beginner Sets,
Advanced Sets, Custom Sets and Memory Sets. There are nine Beginner Sets, 11 Advanced Sets,
four Custom Sets, and 16 banks of non-volatile memory for Memory Sets that you may download
into the Tutor from a computer. The Combine feature (detailed below) allows you to combine
Beginner and Custom Character sets for your practice sessions.
Beginner Sets
The nine Beginne r se ts i nclud e let ter s, numeral s, p unc tuat io n marks and p ro si gns (pr oc ed ur al signs
used on the air). When a single Beginner set is selected, each playback will begin with the
characters in that set sent in the sequence listed below three times, separated by a word space.
Then the characters will be sent randomly. The three repetitions at the beginning are designed to
familiarize you with the sound of the characters before random sending begins. This
12
Page 15

MFJ-414 Instruction Manual Classroom Morse Code Tutor
familiarization sequence is not sent when the Combine function is turned on, indicated by a "+"
character on the right-hand side of the display.
The Beginner Sets are:
EISHTMO
•
AWJNDB
•
UVGZKRPX
•
FCLQY
•
12345
•
67890
•
. , ? / + * =
•
; : ' " - _ $
•
( ) & ! % @ # ^
•
letter1
letter2
letter3
letter4
number1
number2
prosign1
prosign2
prosign3
Note: In the above listings, punctuation marks are included in the prosign sets. In addition,
prosigns are represented here by symbols that also appear on the unit's display when the prosigns
are sent. The prosign1 set includes all prosigns included in the characters required for the FCC
Amateur Radio tests. To see which symbols represent the prosigns, refer to the chart on page 30.
The Combine Menu:
When you have selected any Beginner or Custom Character set other than the corresponding first
sets (
EISHTMO
and
CST CHR1
), the Combine menu will be available to you. This feature allows
you to combine Beginner or Custom Character sets into a larger pool of characters from which the
unit will send. By combining sets, previously learned sets are combined with new sets to reinforce
all that you have learned.
When the second or higher Beginner or Custom Character set is selected, Combine will appear in
the main menu sequence. To make your choice, press Select to activate the Combine menu, then
press either Previous or Next to toggle the Combine function on or off. Then press Select again to
leave the Combine menu.
When the Combine function is on, the current character set is combined with all previous Beginner
or Custom Character sets (a "+" character will appear on the right-hand side of the display in the
Set menu). When off, only the current character set is used (no "+" character displayed).
The Group Menu:
13
Page 16

MFJ-414 Instruction Manual Classroom Morse Code Tutor
When sending from character sets, rather than words, callsigns or QSOs, the unit sends the
characters in groups, with word spacing between groups. You may select either random-length
groups or fixed-length groups with lengths up to 8 characters per group. When you have selected a
character set, the Group menu is activated. To change the group type, press Select, then, using the
Next or Previous button, choose either random-length groups or the number of characters for
fixed-length gro ups.
Advanced Sets
The Advanced sets are designed for the later stages of code training, after the student has learned
all the characters. These include letters, numbers, prosigns, and combinations of these, as well as
callsigns, words and sample QSOs−the format of the FCC Amateur Radio tests. Anyone preparing
for an Amateur code exam should practice copying sample QSOs such as those sent by the MFJ-
414. Be sure you copy such details as the stations' callsigns, the operators' names, their QTHs,
rigs, and any other details that could be asked in a multiple-choice or fill-in-the-blanks test
question.
In addition to preparing for tests, Amateurs who already have passed the tests and wish to improve
their code proficiency will find these advanced sets very useful. The sets of callsigns and words
and the sample QSOs are an excellent way to help build the ability to copy at higher speeds and to
copy "in your head." The callsign practice can be useful for contesters who wish to improve their
ability to work CW contests where the speeds can be quite high.
The Advanced Sets are:
LETTERS
•
NUMBERS
•
PROSIGNS
•
LETTERS+NUMBERS
•
LETTERS+PROSIGNS
•
NUMBERS+PROSIGNS
•
FCC CHAR
•
ALL CHAR
•
CALLSIGNS
•
WORDS
•
QSOs
•
†
FCC testing requirement consists the 26 letters, the 10 numerals, and prosign1 set.
All letters
All numbers
All prosigns
All letters and all numbers
All letters and all prosigns
All numbers and all prosigns
The 43 characters required on FCC code tests †
All characters
Randomly-generated USA callsigns
Random words (500 programmable words, 10 char. max. each)
Randomly-generated sample QSOs
The Random Words Database:
14
Page 17

MFJ-414 Instruction Manual Classroom Morse Code Tutor
The random words database is a set of 500 words. When this database is selected for code
practice, the unit will choose randomly from these words for its code transmission. You may
change this set of words by loading a new set from your computer into the Tutor. You may
substitute a completely new set of wo rds or replace only some of the words by editing the existing
database. To edit the database, you may transfer it from the Tutor to your computer, perform the
editing, then transfer the edited database back to the Tutor. The database is stored in non-volatile
memory, so it is preserved even when the power is turned off.
To transfer files to and from the Tutor, use a terminal program that will transfer data in ASCII
format. Configure the program for 1200 baud, 8 data bits, no parity and one stop bit.
To prepare a random words database, use an ASCII text editor on your computer. Valid characters
for the database include all those listed in the chart of page 30, the space and the angle brackets
"<>". The angle brackets are used to build custom prosigns−a custom prosign must begin with
"<", end with ">", and contain at least one non-space character. Examples are <IMI>, <AAA> and
<AS>.
The words in this database may have a maximum of ten characters each. Compound words, such
as "ham radio" and "code tutor" are allowed. Each word or compound word in the database file
must be on a separate line. Leading spaces, blank lines and invalid characters are ignored by the
unit when the file is downloaded. All characters following the first ten valid characters on any line
are also ignored. You may add trailing spaces to insert extra spacing between words.
Transferring a Random Words Database From the Computer
• Go to the Set menu and enter its submenus by pressing Select.
• Go to the Words submenu.
• Press Select and hold it for one second.
• Press Previous to begin receiving.
"TRANSFER"
"RECEIVING"
will appear on the display.
will appear on the display.
• Begin sending the ASCII file from your terminal program. You may stop the transfer at any
time by pressing Select.
• At the end of the transmission, press Select. If you ended your ASCII file of words with a
close square bracket "]", the unit will stop the transfer automatically when the bracket is
received. The unit also will stop the transfer automatically when 500 words have been
received. If your file contains less than 500 words, the unit will replace in its existing
database only the number of words in your file, starting at the beginning of its database. This
will leave the words at the end of the existing database.
• When the transfer is complete, the unit will check the database for errors. If an error is found,
it will display the word number and the word containing the error on the first line and the error
number on the second line. See the list of error messages on page 29.
• Press Select to return to normal operation.
Transferring the Random Words Database to the Computer
• Go to the Set menu and enter its submenus by pressing Select.
• Go to the Words submenu.
15
Page 18

MFJ-414 Instruction Manual Classroom Morse Code Tutor
• Press Select and hold it for one second.
"TRANSFER"
will appear on the display.
• Configure your computer's terminal program to receive ASCII data.
• Press Next to begin sending.
"SENDING"
will appear on the display.
• A progress indicator will appear on line two of the display to indicate the numb er of words
sent. Each block represents 32 words.
• You may stop the transfer at any time by pressing Select.
• After the transfer is complete, the unit returns to normal operation.
Custom Sets
There are three custom character sets (
CST WORD
set (
). The custom character sets can contain up to 16 characters each and the custom
CST CHR1, CST CHR2
and
CST CHR3
) and one custom word
word set may contain up to 10 words. These may be configured with the characters or words you
wish. In addition, the custom character sets may be combined with the Combine function,
described above, to make a single custom set of up to 48 characters.
The custom character sets allow you to use the MFJ-414 to learn Morse code using the Koch
Method. To do this, configure the first custom character set with your first two characters for
Koch practice, and practice using that set. When your copying accuracy reaches 90 percent, add
another character to this custom set. As you again reach 90 percent accuracy with the next
character, add another. By combining the three custom character sets, you can add characters to
your Koch practice sessions until you have learned all the characters required for the FCC exam, at
which point you can switch to copying words and QSOs. For full details on the Koch Method of
code training, see the book "Morse Code: Breaking the Barrier" (MFJ-3400), available from MFJ
Enterprises, Inc.
At any time in your training, you can configure a custom character set to provide extra practice on
characters that prove troublesome.
Custom Characters:
Here is how to configure a custom character set:
• Go to the Set menu and press Select. A blinking cursor will appear.
• Go to any of the three Custom Character submenus by using the Previous or Next button.
• Press and hold the Select button for one second. The blinking cursor will then move to the
second line of the display.
• You may then change the character under the cursor by pressing Previous or Next. The order
of the characters is the 26 letters in alphabetical order, the blank character, the 10 numerals,
then the prosigns in the order they appear in the chart on page 30.
• Press Select to set the character under the cursor and mo ve the cursor to the next character.
• P ress both Previous and Next to erase all remaining characters, including the one under the
cursor.
16
Page 19

MFJ-414 Instruction Manual Classroom Morse Code Tutor
• A character may be erased by changing it to the blank character. You cannot erase the first
character in any set; a set must contain at least one character.
• A character may be repeated to have it sent more often.
• To stop programming and save the custom character set, press Select for one second. The
blinking cursor will disappear. You may now start a practice session using the custom set you
have built.
Custom Words:
To configure the Custom Words set, first read the section above on Custom Characters.
• Go to the Set menu and press Select. A blinking cursor will appear.
• Go to the Custom Words submenu using the Previous or Next button.
• Press and hold the Select button for one second until
[CST WORD]
is replaced by
[WORD XX]
.
• You may select any wo rd in the set by using the Previous or Next button.
• Press Select to modify the word displayed. You then may modify it character by character just
as you would change Custom Characters as described above. To set the word and return to the
word-selection submenu, press Select for one second.
• The first letter in any word cannot be erased. Compound words, such as "ham radio" and
"code tutor," may be used.
• You may include prosigns in the Custom Word set by using "<" and ">" to build the prosigns.
See the chart on page 30 for the character sequence for prosigns. A custom prosign must
begin with "<", end with ">", and contain at least one non-space character. Examples are
<IMI>, <AAA> and <AS>.
• To stop programming and save the current word set, press Select button for one second. The
blinking cursor will disappear and
[WORD XX]
will be replaced by
[CST WORD]
.
Memory Sets
You may compose messages on a computer and load them into the MFJ-414's memory banks. The
unit's memory system is quite flexible and allows up to sixteen messages to be saved. One
message can call another for additional flexibility. Using the memories, you may prepare the text
for a classroom or over-the-air code practice session in advance. Also, a complete set of code tests
for a VE session can be prepared and loaded into the MFJ-414. The memory is non-volatile, so it
is saved even when the unit is turned off and it does not require battery backup to preserve the
recorded messages.
The unit's memory is composed of sixteen individual banks, arranged in a stack structure,
illustrated in the diagram shown below. These memory banks are lab eled A through P. The total
memory available is 16K characters (where 1K = 1024). Each memory bank is nominally 1K.
However, an individual message may fill more than one bank. When this happens, banks are filled
sequentially, moving upward in the d iagr am. I f a message be gins i n Ba nk B or higher ba nks, 1K is
reserved for each of the previous banks.
17
Page 20

MFJ-414 Instruction Manual Classroom Morse Code Tutor
For example, a message begun in Bank C will, if longer than 1K characters, flow into Bank D, then
Bank E, and so on. However, it cannot flow downward into Bank B or Bank A. Because each of
these lower banks has 1K reserved, the message starting in Bank C can be a maximum of 14K
characters.
The first character displayed on
line two in the Memory Set
submenu indicates the status of
that memory bank. If this
character is an open square
bracket "[" (the "beginning-ofmessage" indicator), the displayed
bank is the beginning of the
message; otherwise, it is a portion
of the previous memory bank.
Message playback will always
start at the beginning of a message
no matter which bank of the
message you have selected in the
Set menu.
Bank P can be configured either
as a regular memory bank or as a
Keyer Memory in which text you
send with the paddles is stored. If
Bank P is configured as Keyer
Memory, it is not available for
messages; thus, the total message
memory then available is 15K. Figure 2. MFJ-414 Memory Bank Structure.
Preparing Messages:
To prepare messages, use an ASCII text editor on your comp uter. Valid characters for messages
include all those listed in the chart on page 30, the space, tab and carriage return. In addition,
there are special characters, shown in the table below. Braces "{}" are used to enclose comments,
preferably at the beginning of a message, that will appear when viewing the Set menu but will be
ignored during playback. Any invalid characters in a message will be ignored by the unit when the
file is downloaded.
Special Characters
Character Represents
Square Brackets ( [ ] ) Delimiters for messages in memory bank.
Angle Brackets ( < > ) Delimiters for custom prosigns.
18
Page 21

MFJ-414 Instruction Manual Classroom Morse Code Tutor
Braces ( { } ) Delimiters for comments.
Backslash Character ( \ ) Embedded command.
Pipe Character ( | ) Embedded Call command.
You may control the unit's features during message playback by using embedded commands.
These embedded commands can set sending speed, audio tone, and Farnsworth values, as well as
provide great flexibility by allowing functions such as message looping and one message calling
another. Embedded commands begin with a backslash "\" and must not contain spaces. Upper or
lowercase letters may be used; embedded commands are not case-sensitive.
When a parameter such as Overall Speed or Tone is specified by an embedded command, the
parameter will remain set during playback of that message. When playback of that message is
completed or stopped, the value of the parameter will revert to the value set prior to the message
playback.
The embedded commands are:
\C
#
Call−call the message in memory bank #, where # is a single letter in the range of A to P.
This allows one message to be called from another. When playback of the called message
is finished, playback continues with the rest of the calling message. This command has a
15 level deep stack; that is, a message can call another message, this message then calls
another message which in turn calls another message and so on up to 15 times. One
message must not call itself or any of its calling messages; otherwise, the stack will
overflow. An equivalent short-hand command is to precede # by the pipe character "|"
such as
"|#"
.
\D
Disable−disables on-the-fly speed changing during playback of the file. This is used to
prevent inadvertent speed changes if, for example, the unit is being used to play exam text
during a VE session.
\F
##
Farnsworth−sets the current Farnsworth speed to ## WPM, where ## represents two
digits in the range of 10 to 60. Setting ## to 00 disables the Farnsworth mode (two zeros
must be used here).
\F+
#
Farnsworth Up−increases the Farnsworth speed by # WPM, where # is a single digit in
the range of 0 to 9. Increasing (wraparound) to 00 or less than or equal to the overall
speed will disable the Farnsworth mode.
\F–
#
Farnsworth Down−decreases the Farnsworth speed by # WPM, where # is a single digit in
the range of 0 to 9. Decreasing to 00 or less than or equal to the overall speed will
disable the Farnsworth mode.
19
Page 22

MFJ-414 Instruction Manual Classroom Morse Code Tutor
\G
#
Goto−go to the message in memory bank #, where # is a single letter in the range of A to
P. This all ows you to conti nue your message into anothe r memory bank. T his command
can be used to create loop of multiple messages. Note that any character after
"\G#"
will
not be sent.
\L
Loop−creates a loop of the current message. Note that any character after
sent. For example:
\P
##
Pause−inserts a timed pause of ## seconds into the message, where ## represents two
BEACON AA5CS 5 W \L.
"\L"
will not be
digits in the range o f 00 to 99. W hen setting pa uses under 10 sec onds, lead ing zero must
be used. Pauses greater than 99 seconds are obtained by using consecutive commands
that total the desired value. For example:
TIMEOUT 1 MIN 39 SEC \P99 TIMEOUT 2 MIN \P60\P60
\R
Repeat−repeats playback from the beginning. Note that any character after
TIMEOUT 1 SEC \P01 TIMEOUT 1 MIN \P60
.
"\R"
be sent.
\S
##
Speed−sets the current overall speed to ## WPM, where ## represents two digits in the
range of 03 to 60. When setting speeds under 10 WPM, leading zero must be used.
\S+
#
Speed Up−increases the overall speed by # WPM, where # is a single digit in the range of
0 to 9.
\S–
#
Speed Down−decreases the overall speed by # WPM, where # is a single digit in the
range of 0 to 9.
\T
##
Tone−sets the current sidetone frequency to approximately ##0 Hz, where ## represents
two digits in the range of 30 to 99. Note that this command sets the sidetone to one of the
24 available frequencies (see table below).
Embedded Tone Command "\T##"
will not
## Tone Freq. ## Tone Freq. ## Tone Freq.
30, 31, 32 305 Hz 54, 55, 56 549 Hz 78, 79, 80 793 Hz
33, 34, 35 335 Hz 57, 58, 59 579 Hz 81, 82, 83 823 Hz
36, 37, 38 366 Hz 60, 61, 62 610 Hz 84, 85, 86 854 Hz
39, 40, 41 396 Hz 63, 64, 65 640 Hz 87, 88, 89 884 Hz
42, 43, 44 427 Hz 66, 67, 68 671 Hz 90, 91, 92 915 Hz
45, 46, 47 457 Hz 69, 70, 71 701 Hz 93, 94, 95 945 Hz
48, 49, 50 488 Hz 72, 73, 74 732 Hz 96, 97, 98 976 Hz
51, 52, 53 518 Hz 75, 76, 77 762 Hz 99 1006 Hz
\T+
#
Tone Up−increases the sidetone frequency by # available frequency, where # is a single
digit in the range of 0 to 9.
20
Page 23

MFJ-414 Instruction Manual Classroom Morse Code Tutor
\T–
#
Tone Down−decreases the sidetone frequency by # available frequency, where # is a
single digit in the range of 0 to 9.
Uploading and Downloading messages:
To send messages either from your computer to the MFJ-414 or from the unit to your computer,
you use a terminal program on the computer that is capable of transferring ASCII data. Configure
the terminal software for 1200 baud, 8 data bits, no parity and one stop bit. To perform the
transfer, you prepare either the comp uter or the Tutor to receive the file, then send from the other.
Loading a Memory Bank From the Computer
• Go to the Set menu and enter its submenus by pressing Select.
• Choose the memory bank you wish to load.
• Press the Select button and hold it for one second. The word
"TRANSFER"
will appear on the
display.
• Press the Previous button. The word
"RECEIVING"
will appear. The unit now is ready to
receive data from your comp uter. To stop the process, press Select.
• Begin sending the data from the computer. To stop loading data at any time, press Select.
• When the message transfer is completed, press Select. If the unit runs out of memory, the
transfer will be stopped automatically.
• The MFJ-414 automatically inserts an open square bracket "[" at the beginning of every
message. This is its "beginning-of-message" indicator. When you press Select to end a
transfer, the unit inserts a close square bracket "]" as its "end-of-message" indicator. If you
insert a "]" at the end of your message file, the MFJ-414 will stop the transfer automatically
when the bracket is received.
• Once the transfer is complete, the unit will check the message for errors. These errors include
illegal commands, invalid custom prosigns or a completely empty message. An empty
message can consist of only spaces, tabs and carriage returns, but no other characters. If the
message is empty, the word
second line of the display will indicate the type of error by showing
"EMPTY"
will appear on the display. If there is another error, the
"ERROR #"
. The last
character displayed on first line will be the cause of the error. See the listing on page 29 for
an explanation of the error.
• If there is no error, the unit will display a five-digit number indicating the number of
characters received. This number includes the opening and ending message delimiters ("["
and "]"), plus tabs and carriage returns.
• Press Select to return to normal operation.
One way of speeding data transfer is to configure your terminal program to strip out linefeeds that
follow carriage returns. While computers store a carriage return as two characters−the carriage
return followed by a linefeed−the MFJ-414 stores only the carriage return, then generates the
21
Page 24

MFJ-414 Instruction Manual Classroom Morse Code Tutor
linefeed following it during playback. The additional linefeed thus does not need to be transferred
to the Tutor.
Sending Contents of a Memory Bank to the Computer
• Go to the Set menu and enter its submenus by pressing Select.
• Choose the memory bank you wish to send to the computer.
• Configure your terminal program to receive ASCII data.
• Press Select and hold it for one second.
• Press Next to begin sending.
"SENDING"
"TRANSFER"
will appear on the display.
will appear on the display.
• A progress indicator will appear on the second line of the display to indicate the percentage of
the message that has been sent.
• To stop the transfer at any time, press Select.
• Return to normal operation when the transfer is completed.
Interactive Menu
The Interactive function allows you to have the unit send one or more words, groups of characters
or QSOs, then pause. With the Interactive function turned on, the unit will halt (
"HALT"
appears)
after sending one or more (your choice) words, code groups or QSOs; and wait for you to press the
Next or Select but to n be fo re send ing the next word (s) , gr o up (s) o r Q SO( s). T o r ep ea t the pr evio us
word(s), group(s) or QSO(s), press the Previous button.
If you want this feature activated, press Select to turn Interactive on, then Next or Previous to
choose how many words, group s or QSOs the unit should send befor e halting. When you have
made your selection, press Select again to exit this menu. To turn the Interactive function off,
press Previous to reduce (or Next to increase) the number of words, groups or QSOs. When you
reduce the number below 1 (or increase above 100), Interactive is turned off.
Note: The Interactive menu is not available when you have selected a Memory set.
Important: The word
"HALT"
must appear on the display before pressing either the Previous or
Next button once-and-only-once to send anther set of wo rd(s), group(s) or QSO(s);
otherwise, the overall speed will unintentionally be changed on-the-fly (if it's
enabled).
New Play Menu
Pressing the Select button when
"NEW PLAY"
is displayed will begin a new practice session. From
the set you have selected, the unit will send random practice. All current settings, such as speed,
tone, etc., will be in effect for your practice session. To pause sending, press Select and
"PAUSE"
will appear. To resume sending, press any button. To stop the session, press and hold Select for
one second (
"STOP"
will appear).
22
Page 25

MFJ-414 Instruction Manual Classroom Morse Code Tutor
Repeat Play Menu
Pressing the Select button when
"REPEAT PLAY"
is displayed will repeat the previous practice
session. To pause the session, press Select. To stop the session, press and hold Select for one
second. During playback, the text sent is displayed on the LCD and sent to the serial port in
addition to the audio. The length of a session that can be repeated is unlimited. Repeating a
session allows you to recopy the same code to check your accuracy, perhaps at a slower speed
and/or with interactive mode enabled.
Print Play Menu
Pressing the Select button when
"PRINT PLAY"
is displayed will, like
"REPEAT PLAY,"
repeat the
previous session, but also send it to the printer port. The printer must be on-line before starting
this function; otherwise you will see an error message and be prompted to retry (after placing the
printer on-line) or abort the session. The printing function is useful for checking the accuracy of
your copying or for grading examinations in a VE session.
Note: During New, Repeat or Print Play, while the unit is sending, the speed may by changed
during the sending by pressing Next to increase or Previous to decrease the speed. This
feature is cal led o n-the -fly spe ed cha nging. B y pre ssing N ext or P r evi ous o nc e q uic kly, you
change the speed by 1 wp m. If you hold the button down, the speed continues to change.
After the fifth change, the rate of the speed change will increase. During on-the-fly speed
changes, two numbers will appear on the second line of the display. The first is the overall
speed and the second is the Farnsworth speed (00 if Farnsworth is disabled). If you bring
the overall speed up to the Farnsworth speed, that will turn the Farnsworth function off.
Speed changes take effect after the button is released and the element in progress is
completed. I f you d o not want the o n-the -fly feat ure in e ffec t d ur ing your sessio ns, you may
turn it off from within the Setup menu.
"EMPTY"
If
consists of only spaces, tabs, and/or carriage returns. If
appears during playback of a memory bank, it means the memory bank is empty or
"ERROR12"
appears, the stack is overflow.
In either case, press the Select button to resume with normal operation.
Hint: A short-cut to the last-used Play menu is by pressing a nd holding the Select but ton for one
second from any main menu (no blinking block character).
23
Page 26

MFJ-414 Instruction Manual Classroom Morse Code Tutor
The Front and Back Panels
Figure 3. MFJ-414 Front Panel.
• LCD display: A 2-line by 16-character alphanumeric display.
• Head Phones jack: A 1/4-inch stereo phono jack. This jack accepts both stereo and mono
plugs. When headphones are used, both the internal and external speakers are disabled.
WARNING: To prevent suffering hearing damage when using headphones, turn the
Volume control to minimum before putting on the headphones, then
slowly adjust for a comfortable volume.
The audio level to this jack is attenuated to provide a comfortable volume. If you cannot
obtain sufficie nt audio through this j ack, you may increase the le vel by using jumpers JMP2
and JMP3, which are located next to the jack inside the unit. To raise the audio level for
mono headphones, put a 470 ohms or smaller resistor on JMP2. For stereo headphones, put
another 470 ohms or smaller resistor on JMP3.
WARNING: Do not sho rt j umper JMP3 when using a mono phono plug, or damage to
the unit will result.
• Key Input jack: A 1/4-inch stereo phono jack. When used with paddles, the dot lever should
be connected to the tip of the plug, the dash wire to the ring, and the ground wire to the shield.
• Previous button: Press to disp lay the previous menu or setting.
• Next button: Press to display the next menu or setting.
• Select button: Press to select the current menu or setting.
• PWR LED: Indicates power to the unit is on.
• Volume control: Controls the audio volume to the speakers and headphones.
• Power button: Press to turn power on; press again to turn power off.
24
Page 27

MFJ-414 Instruction Manual Classroom Morse Code Tutor
Figure 4. MFJ-414 Back Panel.
• Power: A 2.1 mm coaxial jack. A 2.1 mm coaxial plug with positive center and negative
sleeve should be used. This unit requires 12 volts DC. An optional power supply, the MFJ1315, is available from MFJ Enterprises, Inc. This unit requires a minimum of 50 mA and a
maximum of 300 mA at maximum volume into an 8-ohm audio load.
WARNING: Do not apply voltages greater than 18 volts to this unit, or permanent
damage to the unit may result.
• Ext. Speaker: A 3.5 mm jack that accepts both stereo and mono plugs. This jack is volume
controlled and can deliver a maximum of approximately 1.2 watts into an 8-ohm load using
the MFJ-1315 power supply. Use of external speaker will disable the internal speaker. An
optional external speaker, the MFJ-281, is available from MFJ Enterprises, Inc.
• Keying Output: An RCA phono jack for keying of solid-state transmitters only (direct
keying). Use a quality shielded cable for connection to this jack. Consult your transmitter's
manual to determine if it uses direct (positive) keying. If it does not, the transmitter will either
not key at all or key continuously.
• Line Audio Adjust: T his is a trimpot that adjusts the level of audio supplied to the Line
Audio Out jack and to the audio line of the Radio Output jack. At midrange, the level
provided is about 2 volts peak-to-peak into a 600-ohm impedance or higher load. The pot is
adjusted with a small, flathead screwdriver.
• Line Audio Out: An RCA phono jack supplying audio for audio amplifiers or tape recorders.
Use a quality shielded cable for connecting to this jack. The line audio level is independent of
the front-panel Volume control.
• PTT Keying Adjust: T his is a small trimpot that adjusts the Push-to-Talk (PTT) line to the
Radio Output jack. Use a small, flathead screwdriver to adjust this pot. This pot should be
adjusted so that the radio goes into transmit mode when the MFJ-414 is sending and returns to
receive mode when it is not.
25
Page 28

MFJ-414 Instruction Manual Classroom Morse Code Tutor
• Radio Output: A standard 5-pin DIN jack providing connections for a PTT line and audio
for sending Morse co de through FM, AM or SSB radios. Use a quality shielded cable for
connecting to this jack. MFJ offers optional pre-wired cables for most major brands of radios.
See the char t o n p age 3 0 for mod el numbe rs. I f you wish to make your own cab le , c o nsult t he
chart and diagram below.
Pin Radio Output Function
1 Transmit Audio
2 Ground
3 PTT
4 No Connection
5 No Connection
• Serial Port: A standard 9-pin serial port for connecting the MFJ-414 to a computer for
ASCII file transfers or monitoring your code practice sessions on the computer screen. A 9pin-to-9-pin serial cable is provided with the unit. If your computer has a 25-pin serial port,
use a 9-pin-to-25-pin adapter.
To communicate with the MFJ-414, use a terminal program on your computer that is capable
of transferring information in ASCII format. Configure the software for 1200 baud, 8 data
bits, no parity and one stop bit.
• Printer Port: A 25-pin printer port for use with any Epson-compatible printer. When using
this feature, turn the printer on and have paper in the printer before starting the Print Play
session.
Appendices
Factory Defaults
The unit is shipped with the following default settings:
OVERALL SPEED = 13 WPM
•
FARNSWORTH OFF
•
TONE = 701 Hz
•
SET [ADVANCED] FCC CHAR
•
COMBINE OFF
•
GROUP = 5-CHAR
•
INTERACTIVE OFF
•
NEW PLAY
•
To reset the MFJ-414 to these defaults, first turn off power to the unit, then press and hold both the
Next and Select buttons while turning power on. When
release the buttons to resume operation.
26
ON-THE-FLY SPEED ON
•
PLAY FORMAT DISPLAY ! AUDIO
•
SEMI-AUTO OFF
•
IAMBIC A
•
REVERSE OFF
•
KEYER MEMORY OFF
•
WRITE PROTECTION OFF
•
PTT HANG TIME = 1.00 SECOND
•
"DEFAULTS RESET"
appears on the display,
Page 29

MFJ-414 Instruction Manual Classroom Morse Code Tutor
Self Test
A self-test routine will check the functions of the MFJ-414. This routine checks the display, the
ports, the front-panel buttons, the paddles, the internal memory and the audio circuitry. During the
self-test, you may stop the test by turning off the unit; however, this should NOT be done during
the memory test or the memory could be corrupted. The self-test can be completed in
approximately 30 seconds.
Connections of the serial and printer ports are not necessary for this test. If testing of the printer
port is desired, make sure the printer is connected, on-line and has paper.
Note: Performing the self-test will reset the unit to its factory default settings.
Here is the self-test procedure:
1. Turn off the power to the Tutor.
2. Press and hold only the Select button while turning the power on.
3. The test begins by displaying a copyright message. This is the test of the display. This
message is also sent to the serial and printer ports. Release the Select button before the
message completes.
4. You will be prompted to press each of the front-panel buttons.
5. You will be prompted to press the dot and dash paddles. This assumes the dot paddle is
connected to the tip of the plug and the dash paddle to the ring of the plug.
6. The unit then tests its non-volatile memory. Notice this step will reset the unit to its factory
default settings.
7. If the unit is okay, a repetitive message
"PASS"
will be displayed and sent as audio. If there is
a problem, a failure message will be displayed and sent.
8. Once you have confirmed that the audio is okay, turn the unit off.
Failure Message Meanings:
DASH FAIL
•
DOT FAIL
•
EEPROM# FAIL
•
MEMORY FAIL
•
NEXT FAIL
•
PREVIOUS FAIL
•
SELECT FAIL
•
Dash paddle (ring of the plug) is shorted or improperly connected.
Dot paddle (tip of the plug) is shorted or improperly connected.
Non-volatile memory circuitry is improperly connected.
Non-volatile memory is bad.
Next button is shorted or improperly connected.
Previous button is shorted or improperly connected.
Select button is shorted or improperly connected.
27
Page 30

MFJ-414 Instruction Manual Classroom Morse Code Tutor
Troubleshooting
Q. Why does the overall speed change after playing a session?
A. When playing with the Interactive mode enabled, the overall speed might have accidentally
changed on-the-fly when either the Previous or the Next button is pressed before
"HALT"
appears. If so, the on-the-fly speed feature can be disabled in the Setup mode.
Q. Why can't I change the speed on-the-fly?
A. This feature is disabled, go to the Setup mode and enable it. If playing a memory bank, this
feature is probably disabled by the embedded Disable command.
Q. Why can't I enable the Farnsworth mode?
A. The overall speed is at its maximum of 60 WPM.
Q. Why do I get extra linefeeds when uploading to the computer?
A. Configure your terminal program to strip the linefeeds from the carriage returns.
Q. "PRINTER FAULT" appears on the display when I start Print Play.
A. It indicates the printer is not switched on, the printer is not in the on-line status, the printer is
out of paper, or the printer cable is not properly connected.
Q. "EMPTY" appears on the display when I start playback.
A. It means the memory bank you selected for practice is empty or consists of only spaces, tab,
and/or carriage returns.
28
Page 31

MFJ-414 Instruction Manual Classroom Morse Code Tutor
Error Messages
The following error messages are produced immediately after
loading a memory bank if there is any error, except the last one
which appears during playback.
ERROR1
Double "<"
Prosign did not terminate with a matching close angle bracket. For example,
"<PROSIGN<".
ERROR2
ERROR3
Leading ">"
Prosign began with a close angle bracket. For example, ">PROSIGN>".
Invalid character within "<" and ">"
Invalid character (space, tab, carriage return, backslash character, or pipe character)
or no character encountered within custom prosign. For examples, "<PRO|SIGN>",
"<PRO\SIGN>", "<PRO SIGN>", and "<>".
ERROR4
Unmatched "<"
An open angle bracket did not have a matching close angle bracket. For example,
"<PROSIGN".
ERROR5
ERROR6
Unmatched "{"
An open brace did not have a matching close brace. For example, "{COMMENT".
Illegal memory bank designator
An illegal character in a memory bank designator. For examples, "\CW" and "|Z".
Valid characters for memory bank designators are "A..P, a..p".
ERROR7
Illegal embedded Speed command
An illegal value for the Speed setting. For examples, "\S99", "\S+A", and "\S-B".
Valid range for speed is 03 to 60; valid range for relative setting is 0 to 9.
ERROR8
Illegal embedded Farnsworth command
An illegal value for the Farnsworth setting. For examples, "\F90" and "\F+A". Valid
range for Farnsworth is 10 to 60 and 00 to disable Farnsworth mode; valid range for
relative setting is 0 to 9.
ERROR9
Illegal embedded Tone command
An illegal value for the Tone setting. For examples, "\T20", "\T+A", and "\T-B" .
Valid range for tone is 30 to 99; valid range for relative setting is 0 to 9.
ERROR10
Illegal embedded Pause command
An illegal value for the Pause setting. For example, "\P+4". Valid range for pause is
00 to 99.
ERROR11
Illegal embedded command
An illegal character in an embedded command. For example, "\Z". Valid characters
for embedded commands are "C", "D", "F", "G", "L", "P", "R", "S", "T", "c", "d",
"f", "g", "l", "p", "r", "s" and "t".
ERROR12
Stack overflow
The 15 level deep stack used by the embedded Call command is overflow during
playback. For example, memory bank A has "|B" and memo ry bank B has "|A".
29
Page 32

MFJ-414 Instruction Manual Classroom Morse Code Tutor
MFJ Pre-wired Cables and Open End Cables
The following MFJ radio-to-TNC cables are pre-wired for most 8-pin rigs and HTs. The open end
cables allow you to make your own cables. For your nearest dealer or to order call toll free 800647-1800.
Pre-wired Radio-to-Tutor Cables
Radio
MFJ Part # Price
*
Alinco1/Standard HTs MFJ-5022 $14.95
Icom2/Yaesu/Radio Shack HTs MFJ-5024 $14.95
Kenwood3 HTs MFJ-5026 $14.95
Yaesu 8-pin MFJ-5080 $14.95
Yaesu4 8-pin modular MFJ-5080M $14.95
Icom5 8-pin MFJ-5084 $14.95
Icom6 8-pin modular MFJ-5084M $14.95
Kenwood/Alinco 8-pin MFJ-5086 $14.95
Kenwood 8-pin modular MFJ-5086M $14.95
Radio Shack 8-pin modular MFJ-5088M $14.95
MFJ-8621 Data Radio 5-pin DIN MFJ-5100 $14.95
Note 1: Does not include DJ-100, 120T, 200, 500.
Note 2: Does not include IC-W2A.
Note 3: Does not include 2500.
Note 4: Does not include FT-50, FT-8000.
Note 5: Does not include 25A, 255A.
Note 6: Does not include IC-100H, IC-2700H.
Open End Cables With Radio Connectors
Open End Cable ... MFJ Part # Price
*
... with 8-pin mic connector MFJ-5082 $9.95
... with 5-pin DIN connector (general purpose) MFJ-5205 $4.95
... with split connectors for Alinco & other hand-helds MFJ-5222 $9.95
... for Icom/Yaesu/Alinco/Radio Shack hand-helds MFJ-5224 $9.95
... for Kenwood hand-helds MFJ-5226 $9.95
... with 8-pin modular mic plug for Yaesu, Kenwood,
Icom, and Radio Shack
*
Prices and specifications subject to change without notice.
MFJ-5268 $9.95
Morse Code Character Set
1
30
Page 33

MFJ-414 Instruction Manual Classroom Morse Code Tutor
A di-dah
B dah-di-di-dit
C dah-di-dah-dit
D dah-di-dit
E dit
F di-di-dah-dit
G dah-dah-dit
H di-di-di-dit
I di-dit
J di-dah-dah-dah
K dah-di-dah
L di-dah-di-dit
M dah-dah
1 di-dah-dah-dah-dah
2 di-di-dah-dah-dah
3 di-di-di-dah-dah
4 di-di-di-di-dah
5 di-di-di-di-dit
Period [.] di-dah-di-dah-di-dah
Comma [,] dah-dah-di-di-dah-dah
Question Ma rk or
Request for Repetition [?] di-di-dah-dah-di-dit
Fraction Bar [/] dah-di-di-dah-dit
End of Message or Cross [+] di-dah-di-dah-dit
End of Work [*] di-di-di-dah-di-dah
Double Dash, Pause or Break [=] dah-di-di-di-dah
Semicolon [;] dah-di-dah-di-dah-dit
Colon [:] dah-dah-dah-di-di-dit
Apostrophe ['] di-dah-dah-dah-dah-dit
Quotation Ma rk ["] di-dah-di-di -dah-dit
Hyphen or Dash [-] dah-di-di-di-di-dah
Underline [_] di-di-dah-dah-di-dah
Dollar Sign [$] di-d i-di-dah-di-di-dah
Left Parenthesis [(] dah-di-dah-dah-dit
Right Parenthesis [)] dah-di-dah-dah-di-dah
Wait [&] di-dah-di-di-dit
Understood [!] di-di-di-dah-dit
Starting Signal [%] dah-di-dah-di-dah
Error [@] di-di-di-di-di-di-di-dit
Paragraph [#] di-dah-di-dah-di-dit
Invitation to Transmit [^] dah-di-dah
1.
FCC test requirement consists the 26 letters, the 10 numerals, the period, the comma, the question mark, AR, SK, BT and DN.
−
N dah-dit
•
−
O dah-dah-dah
•••
−•−
P di-dah-dah-dit
•
−
Q dah-dah-di-dah
••
R di-dah-dit
•
S di-di-dit
••−•
−−
T dah −
•
U di-di-dah
••••
V di-di-di-dah
••
−−−
W di-dah-dah
•
−•−
X dah-di-di-dah
Y dah-di-dah-dah
•−••
−−
Z dah-dah-di-dit
−−−−
6 dah-di-di-di-dit
•
−−−
7 dah-dah-di-di-dit
••
−−
8 dah-dah-dah-di-dit
•••
−
9 dah-dah-dah-dah-dit
••••
0 dah-dah-dah-dah-dah
•••••
−
•−•−•
−−••−−
••−−••
−••−
•
•−•−•
−
•••−•
−
−
•••
−•−•−
•
−−−
•••
−−−−
•
•
•−••−•
−
−
••••
−
••−−•
−
•••−••
−•−−
•
−•−−•−
•−•••
•••−•
−•−•−
••••••••
•−•−••
−•−
K
−
•
−−−
•−−•
−−•−
•−•
•••
−
••
−
•••
−−
•
−••−
−•−−
−−
••
−
••••
−−
•••
−−−
••
−−−−
−−−−−
AAA
MIM
IMI
DN
AR
SK
BT
KR
OS
WG
AF
DU
IQ
SX
KN
KK
AS
SN
KA
HH
AL
•
31
Page 34

MFJ-414 Instruction Manual Classroom Morse Code Tutor
Some CW Abbreviations
73 Best regards NR Number; near
88 Love and kisses NW Now
ABT About OM Old man
AGN Again OP Operator
ANT Antenna R Are; received; roger
BK Back; break RCVR Receiver
CPY Copy RIG Station equipment
CQ Calling any station RITE Right
CUL See you later RST Readability, strength, tone report
CU See you SIGS Signals
DE From SKED Schedule
DEG Degree STN Station
DX Distance; rare station TEMP Temperature
ES And; "&" TKS Thanks
FB Fine business; excellent TNK Thank
FER For TNX Thanks
FREQ Frequency UR Your; you're; you are
GA Good afternoon U You
GE Good evening WL Well; will
GM Good morning WTS Watts
GN Good night WX Weather
HR Hear; here XCVR Transceiver
HW How XMTR Transmitter
K Go ahead XYL Wife ( ex-young-lady)
MSG Message YL Young lady
32
Page 35

MFJ-414 Instruction Manual Classroom Morse Code Tutor
Meaning of Q Signals
QRA The name of my station is
QRL Do not interfere, Frequency busy
QRM Being interfered with
QRN Static
QRO Increase power, High power
QRP Decrease power, Low power
QRQ Send faster
QRR I am ready for automatic operation
QRS Send more slowly
QRT Stop sending
QRU I have nothing for you
QRX I will call again at ..., wait
QRZ Who is calling me, I am
QSB Your signal is fading
QSD Your keying is defe ctive
QSK I can hear you between my signals
QSL I am acknowledging receipt
QSU Reply on this frequency or mode
QSX I am listening to ... on ... kHz
QSY Change frequency, change to xmit on ... kHz
QTH My location (home) is
QTR The correct time is
QTS I will send so my frequency can be measured
QUB Here is the info you requested
QUM The distress traffic has ended
Send a "?" after a Q signal to ask for information or an action.
Example: QRZ: station (call) is .... QRZ?: what is your station (call)?
33
Page 36

MFJ-414 Instruction Manual Classroom Morse Code Tutor
Menus System Chart
Main Menus:
Sub Menus:
OVERALL
OVERALL
OVERALL
OVERALL
OVERALL
FARNSWORTH ON
TONE = 1006 Hz SET [BEGINNER]
SET [ADVANCED]
SET [ADVANCED]
SET [ADVANCED]
SET [ADVANCED]
LETTERS+NUMBERS
SET [ADVANCED]
SET [ADVANCED]
SET [ADVANCED]
SET [CST WORD] FCC CHAR
SET [ADVANCED]
ALL CHAR
Word Menu:
SET [WORD 2]
SET [WORD 3]
SET [WORD 4]
SET [WORD 5]
SET [WORD 6]
SET [WORD 7]
SET [WORD 8]
SET [WORD 9]
SET [WORD 10]
Setup Options:
ON-THE-FLY SPEED
OVERALL
SPEED
OVERALL
SPEED = 3 WPM
SPEED = 4 WPM
SPEED = 5 WPM
SPEED = 6 WPM
SPEED = 7 WPM
• • •
SPEED = 60 WPM
SET [WORD 1]
MFJ
MORSE
CODE
TUTOR
COPYRIGHT
(C)
MFJ
ENTERPRISES
INC.
1997
ON-THE-FLY SPEED PLAY FORMAT SEMI-AUTO
ON
FARNSWORTH TONE SET COMBINE
FARNSWORTH OFF TONE = 305 Hz SET [BEGINNER]
FARNSWORTH ON
SPEED = 10 WPM
FARNSWORTH ON
SPEED = 11 WPM
FARNSWORTH ON
SPEED = 12 WPM
FARNSWORTH ON
SPEED = 13 WPM
FARNSWORTH ON
SPEED = 14 WPM
• • •
SPEED = 60 WPM
SET [ADVANCED]
SET [ADVANCED]
SET [ADVANCED]
SET [CST CHR1]
SET [CST CHR2]
SET [CST CHR3]
SET [CST WORD]
SET [BANK A]
SET [BANK P]
PLAY FORMAT
DISPLAY ! AUDIO
TONE = 335 Hz SET [BEGINNER]
TONE = 366 Hz SET [BEGINNER]
TONE = 396 Hz SET [BEGINNER]
TONE = 427 Hz SET [BEGINNER]
TONE = 457 Hz SET [BEGINNER]
TONE = 488 Hz SET [BEGINNER]
• • •
SEMI-AUTO OFF
EISHTMO
AWJNDB
UVGZKRPX
FCLQY
12345
67890
. , ? / + * =
SET [BEGINNER]
; : ' " - _ $
( ) & ! % @ # ^
LETTERS
NUMBERS
PROSIGNS
LETTERS+PROSIGNS
NUMBERS+PROSIGNS
CALLSIGNS
WORDS
QSOs
MORSE-CODE-TUTOR
CUSTOM
CHARACTERS
MFJ
[ ]
• • •
[ ]
IAMBIC REVERSE
IAMBIC A REVERSE OFF
COMBINE OFF
COMBINE ON
SET [KEYER]
[ ]
Press dit paddle
34
Page 37

MFJ-414 Instruction Manual Classroom Morse Code Tutor
ON-THE-FLY SPEED
GROUP
GROUP = RANDOM INTERACTIVE OFF KEYER OFF
GROUP = 1-CHAR INTERACTIVE ON
GROUP = 2-CHAR INTERACTIVE ON
GROUP = 3-CHAR INTERACTIVE ON
GROUP = 4-CHAR INTERACTIVE ON
GROUP = 5-CHAR INTERACTIVE ON
GROUP = 6-CHAR
GROUP = 7-CHAR INTERACTIVE ON
GROUP = 8-CHAR
INTERACTIVE ON
EVERY 1 QSO
INTERACTIVE ON
EVERY 2 QSOs
KEYER MEMORY
OFF
INTERACTIVE NEW PLAY REPEAT PLAY PRINT PLAY KEYER
EVERY 1 WORD
EVERY 2 WORDS
EVERY 3 WORDS
EVERY 4 WORDS
EVERY 5 WORDS
• • •
EVERY 100 WORDS
or
INTERACTIVE OFF
INTERACTIVE ON
EVERY 3 QSOs
INTERACTIVE ON
EVERY 4 QSOs
INTERACTIVE ON
EVERY 5 QSOs
• • •
INTERACTIVE ON
EVERY 100 QSOs
WRITE PROTECTION
PLAY FORMAT
AUDIO ! DISPLAY
KEYER ON
AUTO A STD
SEMI B REV
SEMI-AUTO ON
IAMBIC B REVERSE ON
Press dit paddle
"
[03] 0305 0.10
[60] 1006 5.00
35
Page 38

MFJ-414 Instruction Manual Classroom Morse Code Tutor
KEYER MEMORY OFF WRITE PROTECTION
KEYER MEMORY ON WRITE PROTECTION
OFF
ON
Schematic
36
Page 39

MFJ-414 Instruction Manual Classroom Morse Code Tutor
37
Page 40

MFJ-414 Instruction Manual Classroom Morse Code Tutor
Memory Banks Chart
Bank Content Comment
A
B
C
D
E
F
G
H
I
J
K
L
M
N
O
P
Technical Assistance
If you have any problem with this unit first check the appropriate section of this manual. If the
manual does no t re ference your p rob lem or your p rob lem is not so lved by re ading the manual you
may call MFJ Technical Service at 601-323-0549 or the MFJ Factory at 601-323-5869. You will
be best hel ped if you ha ve your unit, manua l and all informatio n on your sta tion hand y so you can
answer any questions the technicians may ask.
You can also send questions by mail to MFJ Enterprises, Inc., 300 Industrial Park Road, Starkville,
MS 39759; by FAX to 601-323-6551; or by email to techinfo@mfjenterprises.com. Please include
a complete description of the problem, an explanation of exactly how you are using the unit when
the problem arises, and a complete description of any equipment you are using with this unit, such
as a computer (including applicable software), printer, or radio.
38
 Loading...