

Page 1
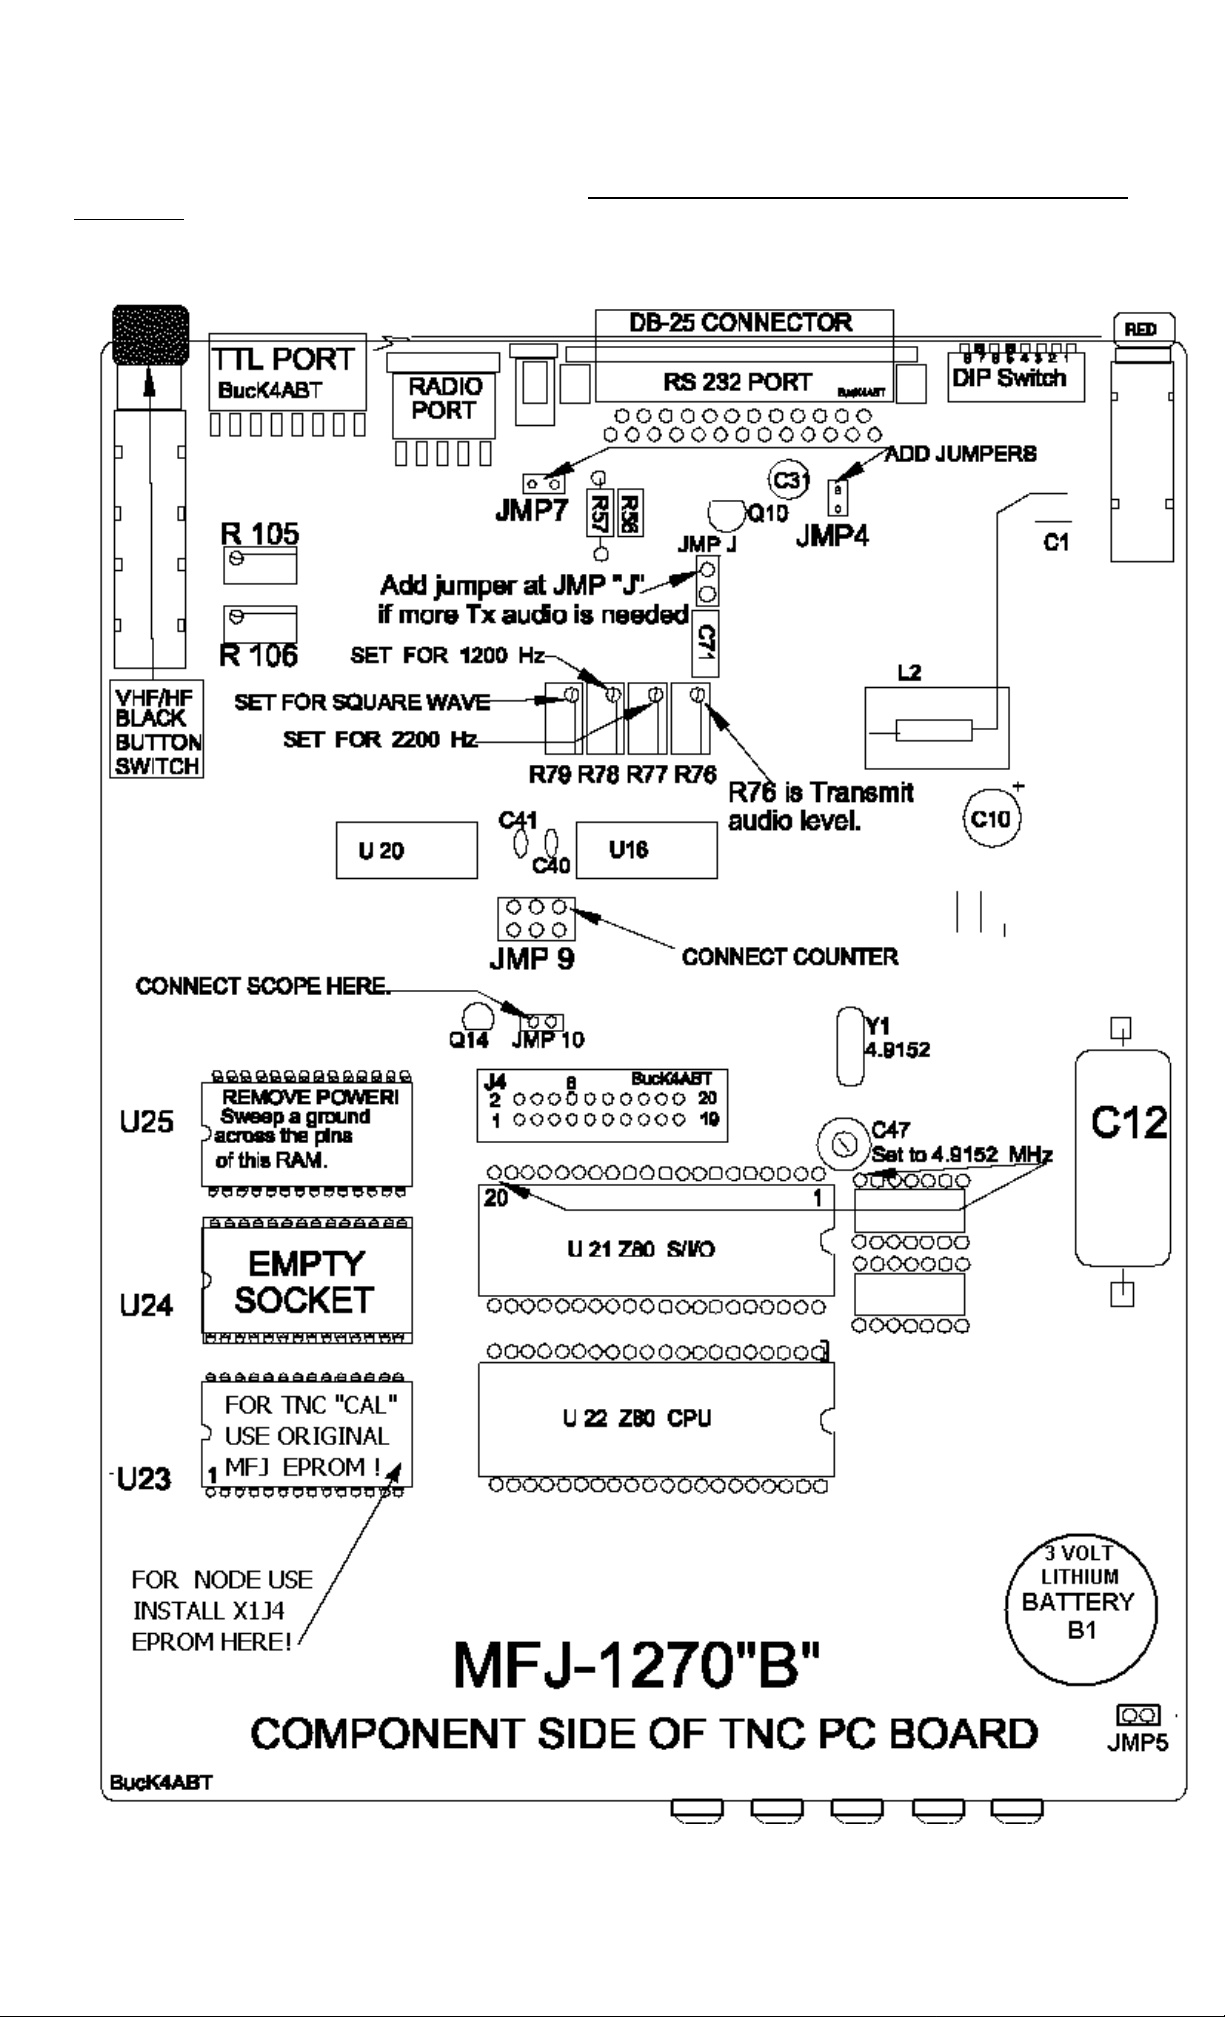
! PacketRadio TNC Alignment TNC2 or MFJ-1270B, & 1274
Alignment of MFJ-1270B, & 1274
WIth several versions of this proceedure going around, and very few of them that covered each step in the correct order, I've opted to submit my
version. This version includes the "PRESS SPACEBAR" to toggle between tones, and PRESS the "D" to advance to the dual-tones..etc.
The TNC shown has the X1J4 Network Node EPROM shown installed, for this alignment however, be sure you use the original TNC EPROM in
the MFJ-1270. In addition, I have identified nearby components so the operator can locate the test point easier.
HavFun Packeting, es 73 de BucK4ABT
1- Power ON. Connect Frequency counter to U21, pin 20 , set C47 to 4.915205
2- Power OFF. Put jumpers on J4 & J7
http://www.packetradio.com/1270algn.htm (1 of 2) [10/29/01 11:16:30 AM]
Page 2

! PacketRadio TNC Alignment TNC2 or MFJ-1270B, & 1274
3- Switch [5] & 6 ON, Brackets [ ] equal "Terminal Speed." (6 = 300 & 7 = 1200 baud radio speed)
(The "DIP" switches on the rear of the tink). DO NOT TURN POWER ON BEFORE SETTING DIP SWITCHES !
4- Power ON
5- At the cmd: prompt, type CAL <Enter>
6- Type K : Note PTT and DCD LEDs should be ON.
7- Connect Counter to JMP9, (NEXT TO C40) near U 16.
8- Set R78 to 1200 Hz. (SEE NOTE) BE SURE HF/VHF Switch is OUT; Press SPACE BAR to toggle 2200 Hz.
NOTE: (In some cases, the TNC may come up in the 2200 Hz mode. In this case, set R77 for 2200 HZ, then SPACE BAR toggle to 1200 Hz mode and
adjust R78 to 1200 Hz.)
9- Set R77 to 2200 Hz.
10- Push HF/VHF (Black Button on rear of TNC) Switch IN
11- Set R106 to 1600 Hz...... After setting R106, toggle to other tone (1800 Hz) with SPACEBAR.
12- Set R105 to 1800 Hz
13- Type D to toggle both tones ON.... two tones.
14- Connect a scope to J10 next to Q14
15- Adjust R79 for squarewave: Be sure top and bottom of pulse are equal.
16- (1274 ONLY) Set R212 for LED under "U" for TUNE (while in dual tones).
17- (1274 ONLY) HF/VHF Switch OUT, check for LED close to "E", If it is not, check step 15 again.
18- #9; REMOVE JUMPERS from JMP-4 and JMP-7
19- Before we install the cover, Check the lithium battery at B1 near JMP5. It is about the size of a 25 cent piece (quarter).
If the voltage is below 3.0 (three) volts, install a new lithium battery of the same type. Replacement lithium batteries of this type are available at most
Radio Shack stores, or directly from MFJ. This battery maintains the parameter settings within the TNC during a power failure.
20- Be sure there is a jumper on both pins of JMP5. Install TNC cover.
21- For VHF operation, make sure the Black VHF/HF switch is in the OUT position.
Buck "[email protected]"
Back to the PacketRadio Networks Home page.
Web Page Design and HTML By
Go To BUX CommCo
G.E. "Buck" Rogers Sr., Communications Consultants
Copyright © 1996--2001
All Rights Reserved
http://www.packetradio.com/1270algn.htm (2 of 2) [10/29/01 11:16:30 AM]
 Loading...