

MFJ MFJ-124 User Manual

Battery Installation
• When the batteries in the MFJ-124 become drained, a low battery symbol will
appear on the LCD display.
• Remove the battery cover (8) and insert two fresh AAA batteries. Be sure to insert
the batteries with the correct polarity as shown inside the battery compartment.
• Replace the battery cover (8) after installing the new batteries.
Initial Start -Up
After inserting new batteries into the MFJ-124, the clock will automatically begin searching
for the radio signal. The LCD display (6) will initially read:
• L:0~5: This indicates the strength of the signal received. Level 5 indicates the
signal strength is OK. Levels 0~4 indicate the signal is weak.
• 00~59: seconds counting.
• OFF: Alarm off mode.
• The receiving tower symbol will begin to blink. This indicates the MFJ-124 has
entered the time signal receiving mode.
If the MFJ-124 has received and locked into the signal, the tower symbol will stop
blinking and remain steady. The LCD display (6) will show the correct time and continue
working. The MFJ-124 will search for the time signal four times a day to auto-adjust the time
and date.
If the MFJ-124 is out of the signal area and cannot receive time signal, the MFJ-124 must
be set manually. Please follow the instructions under Manual Time Setting.
Time Zone Setting
• Hold the SET button (5) for two seconds to enter the set mode. Press the SET
button (5) four times to enter the time zone setting mode. When the LCD display
(6) shows the map flashing, press the ?(2) or ?(4) buttons to select your US time
zone.
• To enter the Daylight Savings Time Set-up, press the MODE button (1) while the
map is still flashing. Press the ?(2) or ?(4) buttons to turn this feature on or off.
• To enter the Hour Offset Set-up, press the MODE button (1) again. Press the ?(2)
or ?(4) buttons to select the offset. The offset can be adjusted between –12 to +12
hours offset.
• To return to the normal clock display mode, press the MODE button (1) or the SET
button (5) once.
Manual Date Setting
• To set the year, month, and date manually, press and hold the SET button (5) for 2
seconds.
• Year will begin to flash on the LCD display (6). Press the ?(2) or ?(4) buttons to
change the year.
• Press the MODE button (1) once and the month will begin to flash. Press the ?(2)
or ?(4) buttons to change the month.
• Press the MODE button (1) again and the date will begin to flash. Press the ?(2) or
?(4) buttons to change the date.
Manual Time Setting
• To set the time manually, press and hold the SET button (5) for 2 seconds.
• When the year begins to flash, press the SET button (5) once. The hour digits will
begin to flash.
• Press the ?(2) or ?(4) buttons to change the hour.
• Press the MODE button (1) once and the minute digits will flash. Press the ?(2) or
?(4) buttons to change the minutes.
• Press the MODE button (1) to return to normal time display.
Alarm Setting
• To set the alarm, press and hold the SET button (5) for 2 seconds.
• When the year begins to flash, press the SET button (5) two times to set ALARM 1.
The U 1 symbol will be displayed and the hour digits will begin to flash.
• Press the ?(2) or ?(4) buttons to change the hour.
• Press the MODE button (1) once and the minute digits will flash. Press the ?(2) or
?(4) buttons to change the minutes.
• Press the MODE button (1) to return to normal time display or press the SET button
(5) again to set ALARM 2. The U 2 symbol will be displayed and the hour digits
will begin to flash.
• Press the ?(2) or ?(4) buttons to change the hour.
• Press the MODE button (1) once and the minute digits will flash. Press the ?(2) or
?(4) buttons to change the minutes.
• Press the MODE button (1) to return to normal time display.
Selecting 1-5 Alarm / 1-7 Alarm
• Press the 1-5/1-7 Alarm button (3) to toggle between the 1-5 or 1-7 alarm.
12/24 Hour Format
• Press and hold down the SNOOZE/LIGHT button (7) for 5 seconds to toggle
between 12 Hour time display and 24 Hour time display.
Backlight
• Press the SNOOZE/LIGHT button (7) once. The LCD display will be illuminated
for 5 seconds.
WARNING
• This clock is designed for consumer use and not a scientific instrument. The success
of time reception is not guaranteed and subject to the condition of the environment
and distance from the signal source.
• This clock is designed for indoor use only.
• Please avoid exposure to high humidity, high temperatures, vibration, shock, and
direct sunlight.
FCC Statement
The MFJ-124 might cause TV or radio interference when operating properly. To
determine whether the MFJ-124 is causing interference, take out the batteries to turn it off. If
the interference goes away, the MFJ-124 is causing the interference. Try to eliminate the
interference by reorienting the MFJ-124 and/or increasing the separation between your
equipment and the MFJ-124. If you cannot eliminate the interference, the FCC requires that
you stop using the clock.
12 MONTH LIMITED WARRANTY
MFJ Enterprises, Inc. Warrants to the orig inal owner of this product, if
manufactured by MFJ Enterprises, Inc. and purchased from an authorized
dealer or directly from MFJ Enterprises, Inc. to be free from defects in
material and workmanship for a period of 12 months from date of purchase
provided the following terms of this warranty are satisfied.
1. The purchaser must retain the dated proof-of-purchase (bill of sale, canceled check, credit card or
money order receipt, etc.) describing the product to establish the validity of the warranty claim and
submit the original or machine reproduction of such proof-of-purchase to MFJ Enterprises, Inc. at
the time of warranty service. MFJ Enterprises, Inc. shall have the discretion to deny warranty
without dated proof-of-purchase. Any evidence of alteration, erasure, or forgery shall be cause to
void any and all warranty terms immediately.
2. MFJ Enterprises, Inc. agrees to repair or replace at MFJ’s option without charge to the original
owner any defective product under warranty, provided the product is returned postage prepaid to
MFJ Enterprises, Inc. with a personal check, cashiers check, or money order for $7.00 covering
postage and handling.
3. MFJ Enterprises, Inc. will supply replacement parts free of charge for any MFJ product under
warranty upon request. A dated proof-of-purchase and a $5.00 personal check, cashiers check, or
money order must be provided to cover postage and handling.
4. This warranty is NOT void for owners who attempt to repair defective units. Technical consultation
is available by callin g (662) 323-5869.
5. This warranty does not apply to kits sold by or manufactured by MFJ Enterprises, Inc.
6. Wired and tested PC board products are covered by this warranty provided only the wired and tested
PC board product is returned. Wired and tested PC boards installed in the owner’s cabinet or
connected to switches, jacks, or cables, etc. sent to MFJ Enterprises, Inc. will be returned at the
owner’s expense un -repaired.
7. Under no circumstances is MFJ Enterprises, Inc. liable for consequential damages to person or
property by the use of any MFJ products.
8. Out-of-warranty Service: MFJ Enterprises, Inc. will repair any out -of-warranty product provided the
unit is shipped prepaid. All repaired units will be shipped COD to the owner. Repair charges will
be added to the COD fee unless other arrangements are made.
9. This warranty is given in lieu of any other warranty expressed or implied.
10. MFJ Enterprises, Inc. reserves the right to make changes or improvements in design or manufacture
without incurring any obligation to install such changes upon any of the products previously
manufactured.
11. All MFJ products to be serviced in -warranty or out-of-warranty should be addressed to MFJ
Enterprises, Inc., 300 Industrial Park Road, Starkville, Mississippi 39759, USA and must be
accompanied by a letter describing the problem in detail along with a copy of your dated proof-ofpurchase.
12. This warranty gives you specific rights, and you may also have other rights, which vary from state to
state.
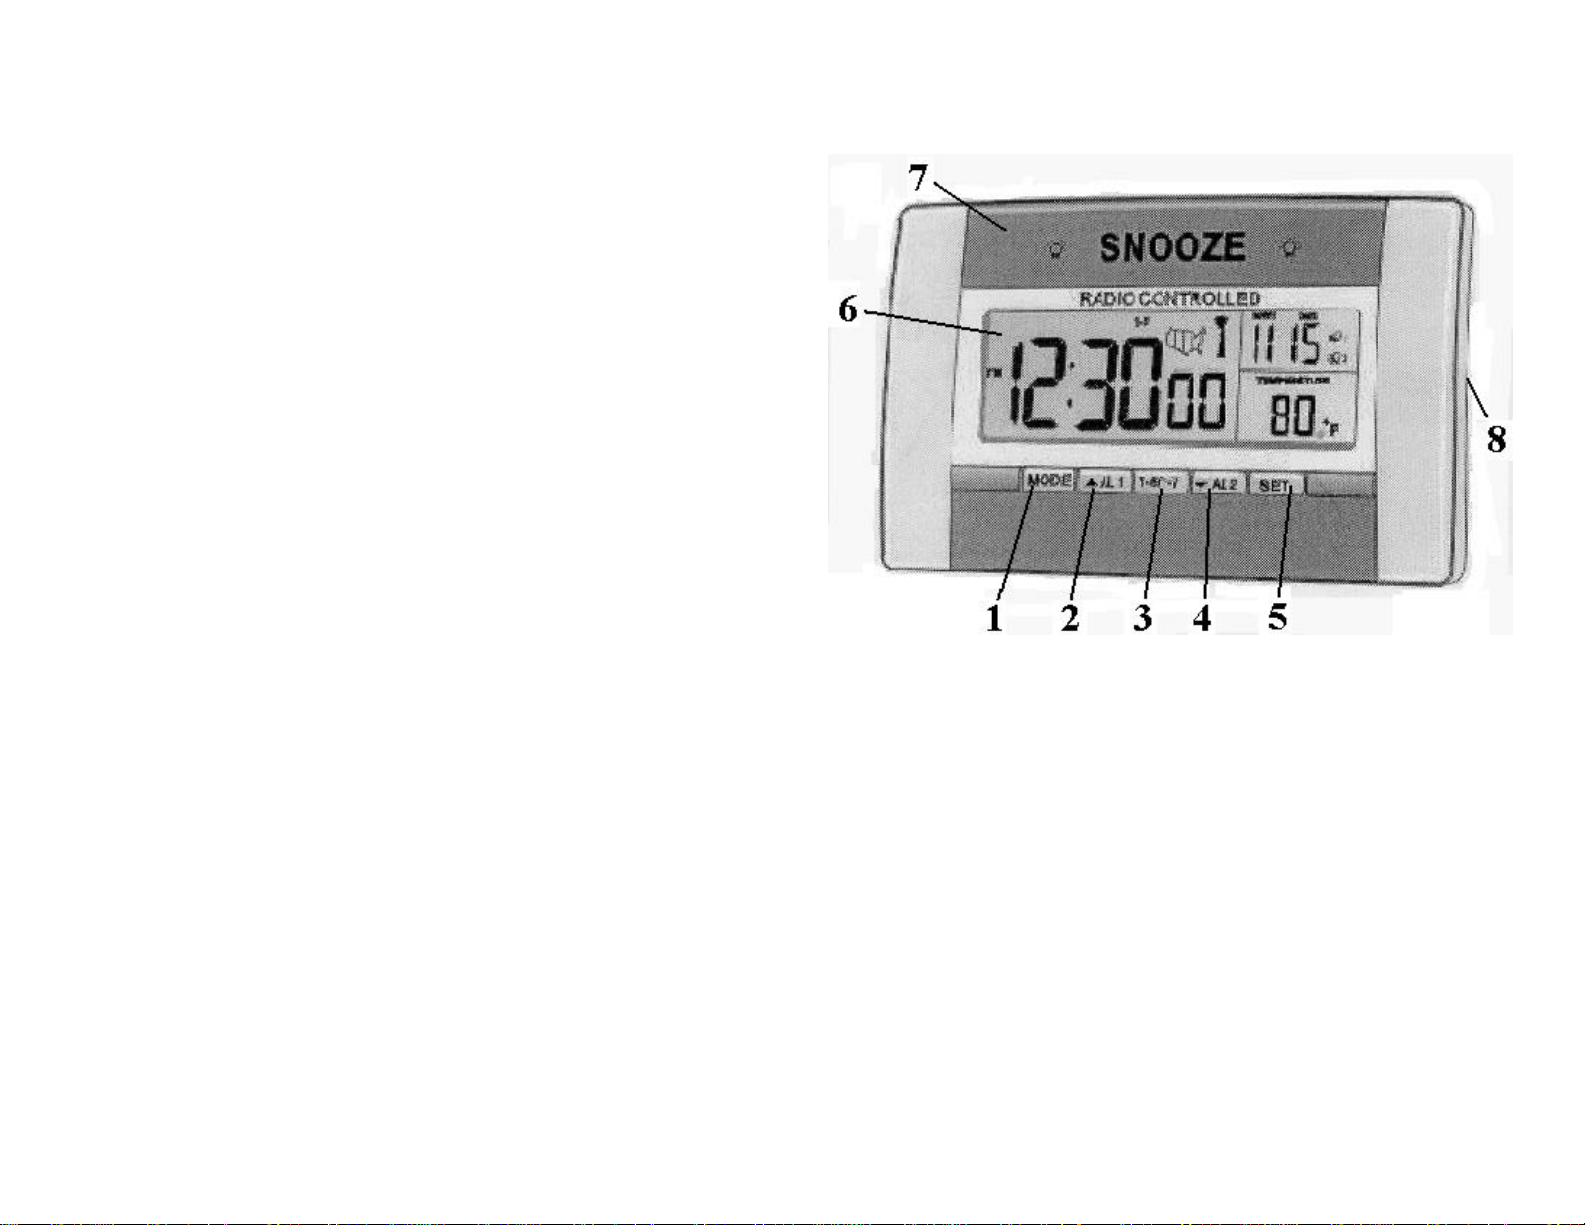
MFJ-124
LCD Atomic Desk Clock
Operating Instructions
CONTROL BUTTONS
1. MODE button
2. ALARM 1 / ? button
3. 1-5/1-7 Alarm button
4. ALARM 2 / ?button
5. SET button
6. LCD Display
7. SNOOZE / BACKLIGHT button
8. BATTERY COVER
FUNCTIONS & SPECIFICATIONS
12 or 24 hour selectable Time Display
Dual Alarm
Snooze
Backlight
Month and Date Display
Thermometer: Range – 14°F to 122°F (±2°F)
Thermometer Sampling Rate – 1 Minute
Receiver set at 60 Hz for WWVB reception.
 Loading...