

Page 1

USB SD 5000 Platform Series
Operating Manual
MF Digital
A Division of Formats Unlimited, Inc
155 Sherwood Avenue
Farmingdale, NY 11735
T: +1 631 249 9393
F: +1 631 249 9273
Authors: Robert Warnock & Patrick McGrath
support@mfdigital.com
www.mfdigital.com/techsupport.html
1
© www.mfdigital.com USB SD Platform 5000 series
Page 2

Content Page
1.0 Introduction Pages 3 - 5
1.1 Feature Overview Page 3
1.2 Hardware Overview Page 4
1.3 Technical Specification Page 5
2.0 Function Pages 6 – 11
2.1 Synchronous Copy Page 6
2.2 Asynchronous Copy Page 7
2.3 Capacity Check Page 8
2.4 USB/SD Information Page 8
2.5 System Information Page 9
2.6 Utilities
2.6.1 Fat 16/32 Formatting Page 9
2.6.2 Measure Speed Page 9
2.6.3 Media Check Page 10
2.7 Erase Functions
2.7.1 Quick Erase Page 10
2.7.2 Full Erase Page 10
2.8 System Update Page 10
2.9 Operational Tips Page 11
3.0 System Settings Functions Pages 11 – 13
3.1 Start Up Menu Page 11
3.2 Copying
3.2.1 Only Data Area Page 11
3.2.2 Whole Media Page 11
3.3 Button Beep Page 11
3.4 Asynchronous Hold Time Page 11
3.5 Ignore Size Page 12
3.6 Asynchronous Copy Mode Page 13
3.7 Language Page 13
3.8 Working Mode Page 13
4.0 Function List Pages 14 – 15
5.0 Help & Support Page 16
2
© www.mfdigital.com USB SD Platform 5000 series
Page 3

1.0 Introduction
1.1 Feature Overview
• 33MB per second transfer speed with each USB/SD channel being
independent from each other.
• High speed comparison function to guarantee successful copies.
• Powerful quality machine that has a Multi-task processing capability, with the
copy, compare, media check and format functions all being independently
operated. Each USB/SD slot has an independent control processing unit so
during operation one can use the buttons to check each USB/SD’s
status and progress.
• Not a PC based system so there is no risk of PC based malware or virus
infection. The SD/USB duplicator is an embedded system and therefore only
copies whatever is on the source. When the system is turned off no residual
memory or file is left in the system.
• Instant system on and off with zero boot time
• Simple one touch copy with real time information displayed on the LCD
screen.
• The flash duplicator supports both Synchronous and Asynchronous copy,
compare, erase, format, media and speed check functions.
• 32 bit CRC checksum.
• Direct source to target duplication with no chance of copying the wrong files.
3
© www.mfdigital.com USB SD Platform 5000 series
Page 4

1.2 Hardware Overview
[Name Plate and LCD Screen]
LCD Screen
Forward
OK, Confirm
[ Flash Slot board ]
USB Master Port
SD Master Port
Two-Colour LED (Red
and Green)
Single Colour LED (Red
and Green)
Single Colour LED (Red
and Green)
Escape
Backward
4
© www.mfdigital.com USB SD Platform 5000 series
Page 5
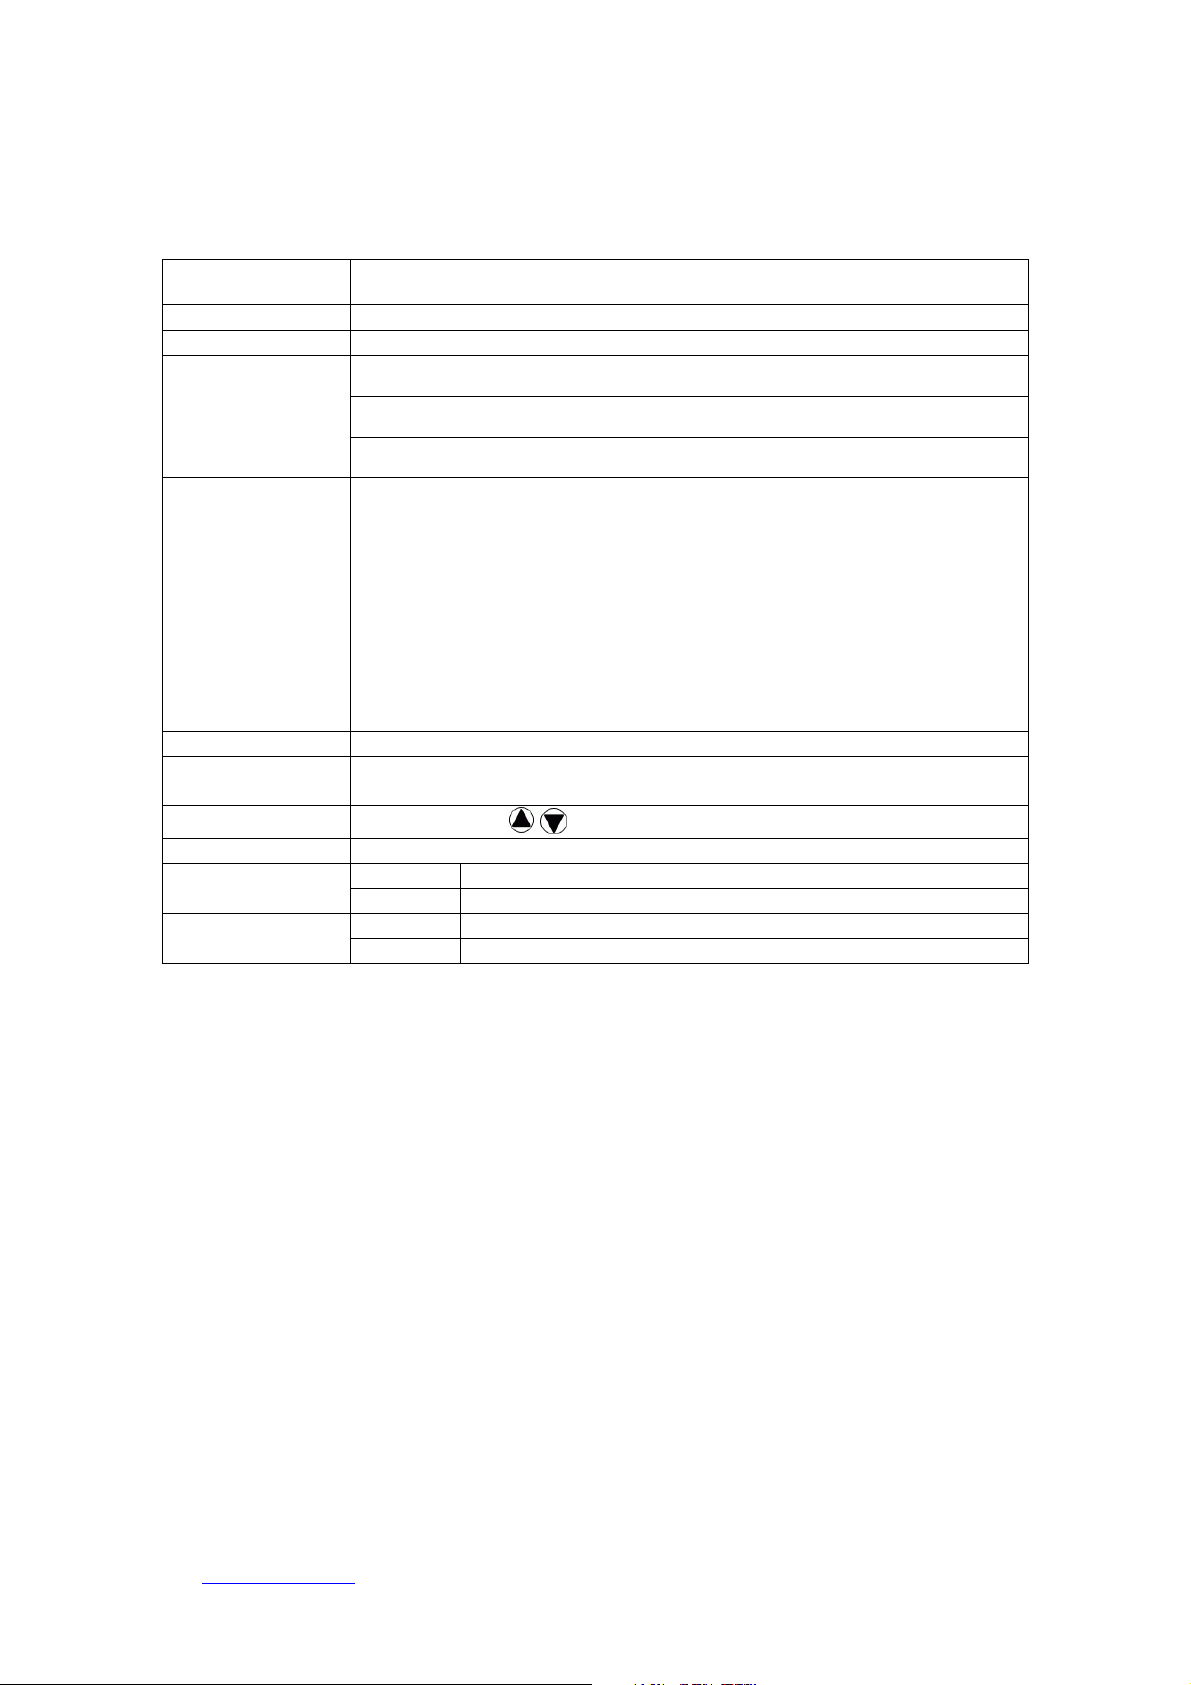
1.3 Technical Specification
Model UB/SD/CF8xx
Target 8/16/24/32~2040 port
Operation Stand Alone
USB1.1, UBS2.0
Supported Media
Features
Display Monochrome LCD display
Power Supply
Control Button
LED LED(Green/Red) on each slot
Humidity
Temperature
*The product specification is for reference only
SD/ SDHC/ Micro SD/ MMC/ MiniSD
Compact Flash TM,
1. Copy, Compare, Copy+Compare Function for Selection
2. Real Asynchronous of Copy, Compare, Check (Speed/ Capacity/
media) and Format
3. Quick FAT16 /32 Format Function
4. Maximum up to 33MB/s bandwidth on each slot channel
5. Support most of common formats such FAT16/32/NTFS/Linux
(Ext2,Ext3).
6. 32 bit CRC checksum
7. Firmware update through USB/SD.
80W~or up (depends on different type of system requirement); support
110V/220V full range power
4 push buttons ( , , OK, Esc)
Working 20%~80%
Storage 5%~95%
Working 00C~75oC
Storage -200C~850C
5
© www.mfdigital.com USB SD Platform 5000 series
Page 6

2.0 Function Overview
The system offers both Asynchronous and Synchronous Copy. Initially the system will
check the content size of the source. If the source content size is less than system’s
buffer memory it will automatically start the asynchronous copy process. If the
source content size is larger than the system’s buffer memory it will automatically
start the synchronous copy process. The purpose of the compare function is to verify
the target data and ensure it is the same as the source data.
2.1 Synchronous Copy
Plug in the source flash card and select either the copy, compare or the
copy/compare function and then press OK.
Plug in the target flash cards. The LCD display will show the number of target flash
plugged into the unit that are ready for copying.
When all the flash cards are plugged in, press OK to start the copying process. Or
when all slots are filled the system will automatically start the copying process
Content size
When the copying has finished the LCD display shows whether the copying has
succeeded or failed. It also shows the quantity that was copied and the time that it
took.
Note:
When the copying process is in operation the green LED lights will flash.
When the copying process has finished the green LED lights will stop
flashing and remain a solid green. If an error occurs the red LED light will
Time Elapsed & % Completed
Content Copied
6
© www.mfdigital.com USB SD Platform 5000 series
Page 7

illuminate.
Quantity Copied
Total size
During the copying process each card slot’s green LED will flash, do not
remove the card while the unit is copying.
When there is a big difference in the target and source cards capacity (e.g.
copying from 1GB to 4GB), an error may occur with the target cards
capacity and format. It is strongly recommended that the capacity of the
target and source cards, are in close range of each other.
2.2 Asynchronous Copy
Plug in the source flash and press OK, and then the system will start to read the
source content and transfer it into system’s buffer. It will then immediately start to
copy, once a target flash card has been plugged in.
During the copying process each card slots green LED light will flash. When copying
has finished, the green LED will stop flashing and remain solidly lit. Then you can
take out the card and put in another new flash card. The Red LED will only be lit
when a copying error has taken place
You can take out cards which have finished copying and plug in replacement flash
cards, and the unit will continue to copy. When the copying has finished the LCD
display shows whether the copying has succeeded or failed. It also shows the
quantity that was copied and the time that it took.
Quantity of flash cards copying
During the asynchronous copy process you can press the buttons to
check each Flash Card’s copying status and progress.
When there is an error (i.e. the Red LED is on) you can also press the
buttons to check each Flash Card’s status.
For example
Amount
::::
Port no. 5
status
Completed
7
© www.mfdigital.com USB SD Platform 5000 series
Page 8

2.3 Capacity check
This function checks the actual capacity of the Flash card.
Plug the SD/USB card into a slot and then select function 4 which is “Capacity
Check”, then press OK. Approximately 3 seconds later the system will display the
exact capacity of the USB/SD card and whether it can be used or not.
The System will use the Green LED to indicate the card is suitable for use and the
Red LED to indicate that the card is not suitable for use. The buttons can be
used to check the progress of the “Capacity Check”.
Note: When the Red LED is lit this indicates an error and you can use the
buttons to check the error information.
(Red Light indicates incorrect size)
(Green Light indicates correct size)
)
This function can support the asynchronous operation so the user can continuously
plug in and pull out USB/SD cards as required; there is no need to push any further
buttons once the process has been started.
2.4 USB/SD information
This display will show the USB/SD flash’s basic information such as flash type,
content size and total capacity.
USB total capacity
File Format
Port Number Being Checked
File content size
8
© www.mfdigital.com USB SD Platform 5000 series
Page 9

2.5 System Information
This feature will show the duplicator system information which includes the controller
model number and the software version.
Controller Model Number
System Firmware
2.6 Utilities
2.6.1 FAT16/32 Formatting
The purpose of this function is to perform FAT flash formatting of the USB/SD Cards.
Plug the USB/SD into the slot and press OK, the system will start the auto detect
capacity function and format according to the card’s capacity.
If USB/ SD format is already FAT16 or FAT32, the format function won’t change
original format.
If USB/ SD format is un-FAT format, i.e. NTFS, Linux or FAT multi-partition. The
system will format according to capacity. When the capacity is above 2GB the system
will format to FAT32 and if the capacity is below 2GB the system will automatically
format to FAT16.
During the formatting process the user
check each Flash Card’s formatting status, progress and information.
The source port (port#1) will not execute any formatting.
2.6.2 Measure Speed
This function will measure the Flash “read” and “write” speed. The speed check
function will not delete any data from the Flash.
Plug the SD/USB into the slot and select the Measure Speed function then press ok
to start the process. The user can also use the buttons to see the exact
“Read” and “Write” speed from each port
can press the
buttons to
9
© www.mfdigital.com USB SD Platform 5000 series
Page 10

2.6.3 Media Check
This function will analyze the media quality. There are two modes which you can set
- Normal and Safe.
The Safe media check will read through the flash and will not damage the content or
formatting of the media. By using the Setup Range function with the Safe function
you can determine whether you want to check a portion or all of the Media. It uses
the buttons to determine how much of the flash is checked, the range can be
set from 1 to 100%. If the user selects 100% the process will take a lot longer.
The Normal media check function will check flash quality by measuring the read and
write speeds for the whole flash. Therefore, this function will delete the flash’s
content and format.
Note: USB/SD data will be erased during normal mode test
Measure Speed and Media check (Safe Mode) won’t damage the data in
the USB/SD Flash, but if the SD/USB has bad media it may cause some
data damage after the check fails.
2.7 Erase Functions
2.7.1 Quick Erase
This function will erase the USB/SD data content but will not erase the flash
FAT16/32 formatting. If the USB/SD format is not FAT16/32, the quick erase will not
start execute. You can use the buttons to check each Flash Card’s status,
progress and information.
2.7.2 Full Erase
This will completely erase the whole flash card, including format and content. This
process will take more time. You can stop the process by pressing the ESC button.
Though the original format and content can no longer be read once the ESC button
is pressed and the USB/SD will need to be reformatted.
2.8 System Update
The purpose of this function is to update the system’s firmware version. Please save
an un-zipped update file to your SD/USB drive; do not put the unzipped files in a
folder. Select function 6.5 which is the System Update and then press OK. The
system will automatically start updating the system and when it is finished turn off
the system for 5 seconds. Then when the unit is powered on again the new firmware
version will have been installed.
10
© www.mfdigital.com USB SD Platform 5000 series
Page 11

2.9 Operational Tips
Do not remove any flash card which is still in the copying process, when a flash card
is copying the green LED light will flash. Removing a card that has a flashing light
may not only damage the flash card but also the system hardware.
Some users may like to use a USB converter to copy different types of flash cards,
such as CF, SD, or Memory stick etc. This is not recommended, since the quality and
reliability of each USB converter on the market is very different, a poor quality USB
converter may cause the damage to the system hardware and the flash card. When
using a converter the resulting copy quality from the Flash card may also be very
poor.
3.0 System Settings Functions
3.1 Start up menu
The user can select which function is shown first when the duplicator is turned on.
3.2 Copying
3.2.1 Only Data Area
This is also called the “quick copy” mode. The system will automatically analyze the
source flash card’s file format and if the data’s file format is recognizable by the
system (FAT16/32, NTFS, Linux, Ext2, Ext3) it will be able to only copy the data and
not the whole Flash. Otherwise if the file format is non-recognizable the system will
copy the whole flash card including the empty space. For example if a 2GB flash card
which has FAT32 file format and has only 50 MB of data inside, the system will only
copy the 50MB of data.
3.2.2 Whole Media
Setup the duplicator in Whole Media function, the system will copy the whole flash
card, including the empty space and format. This function is used when you have a
flash source which has an unknown file format and you don’t want the system to be
confused by such a format. For example a 2GB flash card which is FAT32 file format
and has only 50 MB of data inside, if you setup “Whole Media” the system will copy
whole 2GB of Flash. It will take long time to copy the source.
3.3 Button Beep
Choose whether to hear a beep when a button is pressed.
3.4 Asynchronous Hold time
This is to set the exit time for asynchronous copying. This is to prevent the user from
mistakenly overwriting a source device when they are about to start a new batch and
have forgotten to stop the previous asynchronous copying job. The default setting is
11
© www.mfdigital.com USB SD Platform 5000 series
Page 12

Warning:
for 30 seconds, so when the system detects that all the flash cards have been
removed and no new cards have been inserted after 30 seconds the LCD will display:
Press OK to exit the current Asynchronous copy or press ESC to keep the unit
operating in the current Asynchronous copy.
3.5 Ignore Size
The purpose of this function is to set the flash card tolerance between the source
and target memory capacity.
The default setting is “Don’t Care” and this means there is no limit of tolerance
between the source and target. If you require the source and target flash cards to be
limited to a certain capacity tolerance then you can set the percentage of the
tolerance. For example if your source device has a capacity of 1919MB, that means
the acceptable target devices’ capacity will be limited to between 1976MB to
1861MB.
Note: If the capacity difference between the source and target is larger
than the tolerance setting then when you start to copy Red LED will be lit
to indicate there is an error. You will then see a “Fail” message and you
can press the
currently in the Asynchronous Copying process.
Differences in Source and Target capacity
If Source capacity is smaller than the target, for example 1GB to 2GB:
Example: A. Source B. Target
Note: When there is a big difference in the target and source’s capacity
such as 1GB to 4GB, there is a possibility to cause error to the target’s
capacity and format. It is strongly recommended that the capacity of the
target and source are within a close range.
buttons to check the status of each flash card that is
1GB 2GB
FAT
FAT
Copy OK
become 1GB when it is read on a PC.
You can only restore its real capacity by
re-formatting the device.
.
The 2GB target device will
12
© www.mfdigital.com USB SD Platform 5000 series
Page 13

O --
Copy OK
X
X -- Copy
Fail
If the Source capacity is Greater than the target, for example 2GB to 1GB:
When the source content is within the target flash card’s capacity
A. Source B. Target
2GB 1GB
.
(Data)
succeed as the capacity of the target device is the
same size as the amount of data to be
transferred.
The copying process will
When the source content exceeds the target flash card’s capacity
A. Source B. Target
2GB 1GB
FAT16/32 Data
fail as the capacity of the target device is smaller
than the amount of data to be transferred.
.
The copying process will
3.6 Asynchronous Copy Mode
The function can be enabled by selecting “ON” or disabled by selecting “OFF". If
asynchronous copy is enabled and the source content size is less than the system’s
buffer memory it will automatically start the asynchronous copy process. If the
asynchronous copy is disabled no matter what the content size or which copy
method has been selected the system will only use the synchronous copy mode.
3.7 Language
This function enables the user to choose the language of the system interface.
3.8 Working mode
This function enables the user to choose between the “Turbo mode” and “Normal
mode”. Turbo mode can support high speed Flash with a high speed copy. If using
the “Turbo mode” function please ensure sure the Flash cards support high speed
transfer and are of a good quality. If the Flash card is bad quality there will be errors
in the transfer of data, when using Turbo mode. The factory default System setting is
“Normal Mode”.
13
© www.mfdigital.com USB SD Platform 5000 series
Page 14

4.0 Function List
Function
Description
1. Copy USB/SD/CF flash copy.
2. Compare This option makes bit-by-bit comparison between
3. Copy+Compare This option will make a copy first and then
4. Capacity check Checks the real capacity of the Flash
5. Information 5.1 SD/USB info - This feature will show the
6. Utility 6.1 Format – Use this function to perform FAT
the master source and all other copied flash cards.
compare the copied flash with the source,
immediately after the copy has finished.
USB/SD flash’s information i.e. file format, content
size and capacity.
5.2 System Info -This feature will show system
information for the duplicator i.e. controller model
number and software version.
16/32 formatting of flash cards.
6.2 Measure Speed -This function can measure the
read and write speed of the Flash card. This
function won’t damage the format or content.
6.3 Media check
6.3. Safe mode – Use this function to check the
quality of the flash by reading the flash card. The
safe check will not delete flash content or format.
6.3.2 Normal mode – Use this function to check the
quality (“0”) by reading/writing the flash (“1”). The
normal check will delete the content and format.
6.3.3 Setup Range – Use this function to set up the
area media check will examine. Range can be set
from 1% to 100%
6.4 Quick Erase – Use this function to erase
USB/SD flash content. It will keep the FAT format.
6.5 Full Erase SD/USB – Use this function to
completely erase USB/SD flash data including
format and content.
6.6 System Update - System firmware update via
the SD/USB
14
© www.mfdigital.com USB SD Platform 5000 series
Page 15

7.0 Utility 7.1 Start-up Menu - To select which function is
shown first when the system is first turned on.
7.2 Copy Area
7.2.1 Only Data Area – Use the system to
automatically detect the format (FAT16/32,
NTFS, Linux, Ext2, Ext3) and only copy the
data area.
7.2.2 Whole Media – the system will copy the
whole content of the flash including the empty
space area if the target is not formatted to any
of the following; FAT16/32, NTFS, Linux, Ext2,
Ext3.
7.3 Button Beep - Choose whether to hear a
beep when a button is pressed.
7.4 Asynchronous Hold Time - To set how long
the system will wait to continue or exit the
function of the Asynchronous copying job.
7.5 Ignore Size - To set the tolerance % of the
source and target flash cards. The default
setting is “don’t care”.
7.6 Asynchronous - “On” to enable
Asynchronous copy mode. “OFF” to disable
Asynchronous copy mode.
7.7 Language - Set language of system
interface.
7.8 Working Mode – Use this function to setup
“Turbo mode” or “Normal mode”.
15
© www.mfdigital.com USB SD Platform 5000 series
Page 16

5.0 Help & Support
Contact details:
MF Digital
A Division of Formats Unlimited, Inc
155 Sherwood Avenue
Farmingdale, NY 11735
T: +1 631 249 9393
F: +1 631 249 9273
support@mfdigital.com
www.mfdigital.com/techsupport.html
16
© www.mfdigital.com USB SD Platform 5000 series
 Loading...