

Page 1
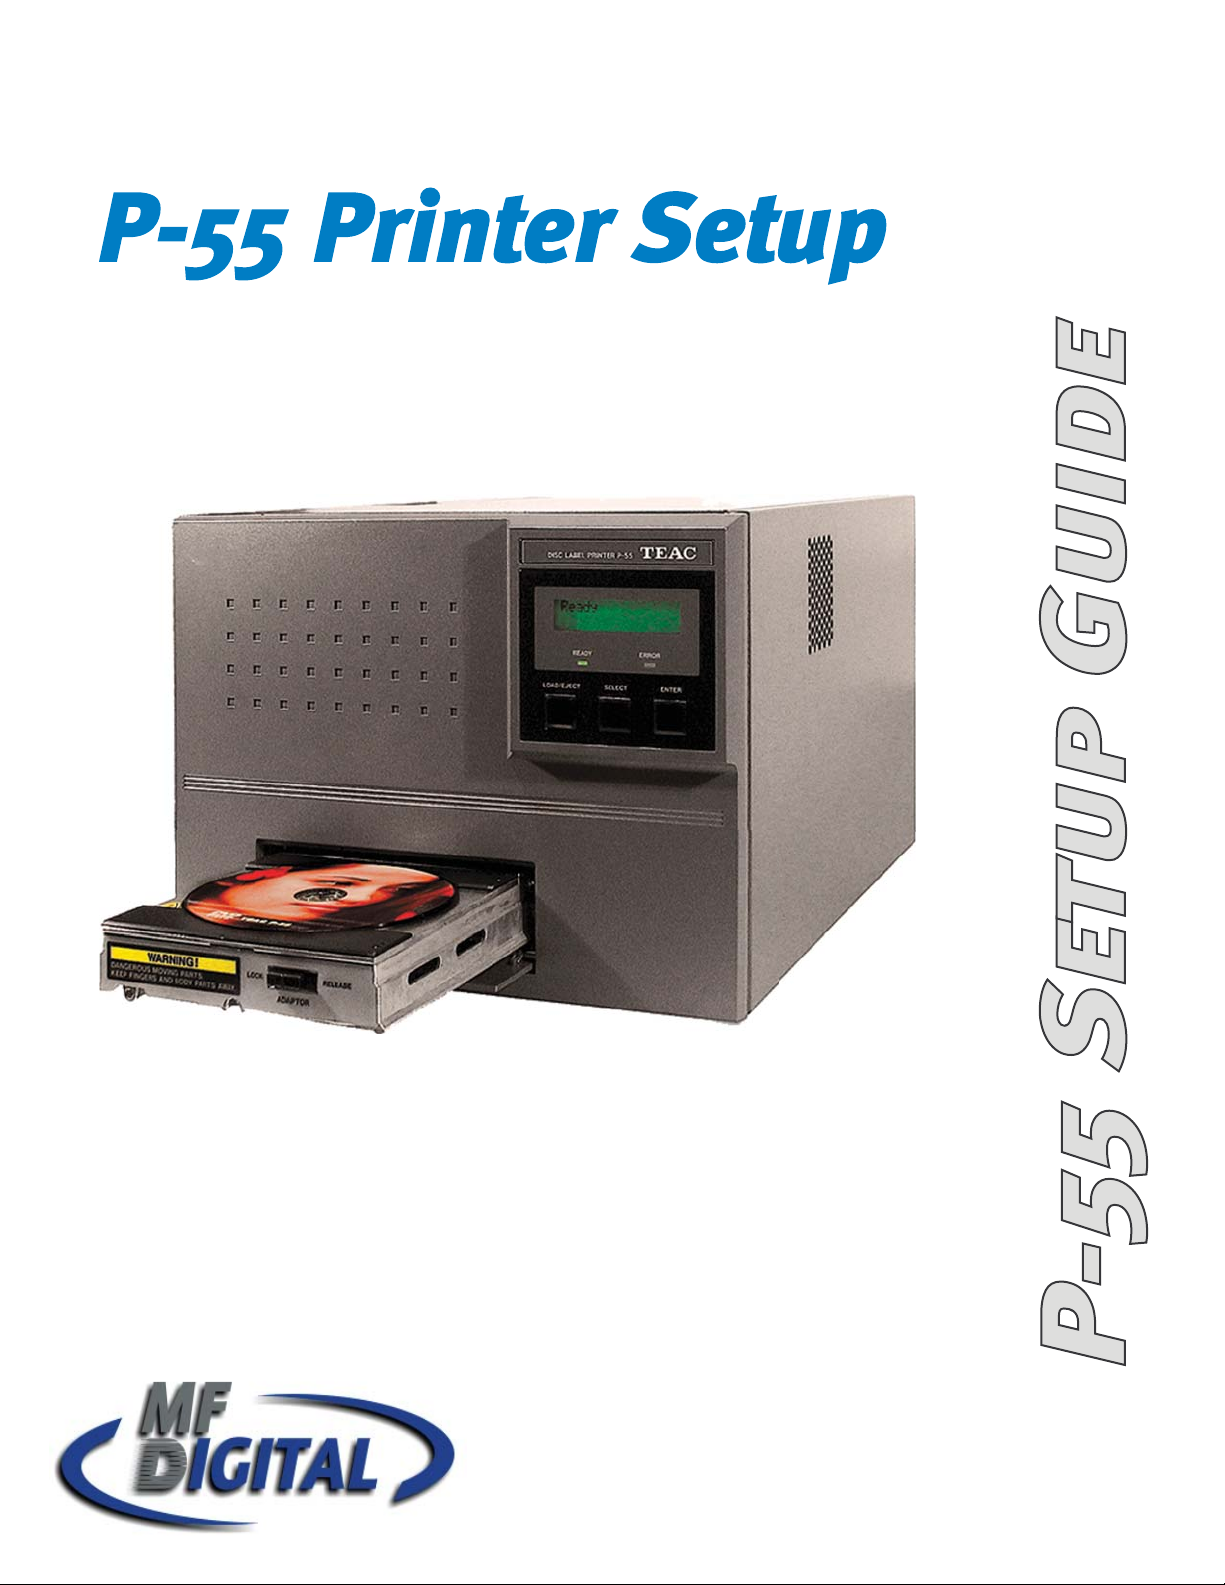
Rev. 6-22-07
Page 2
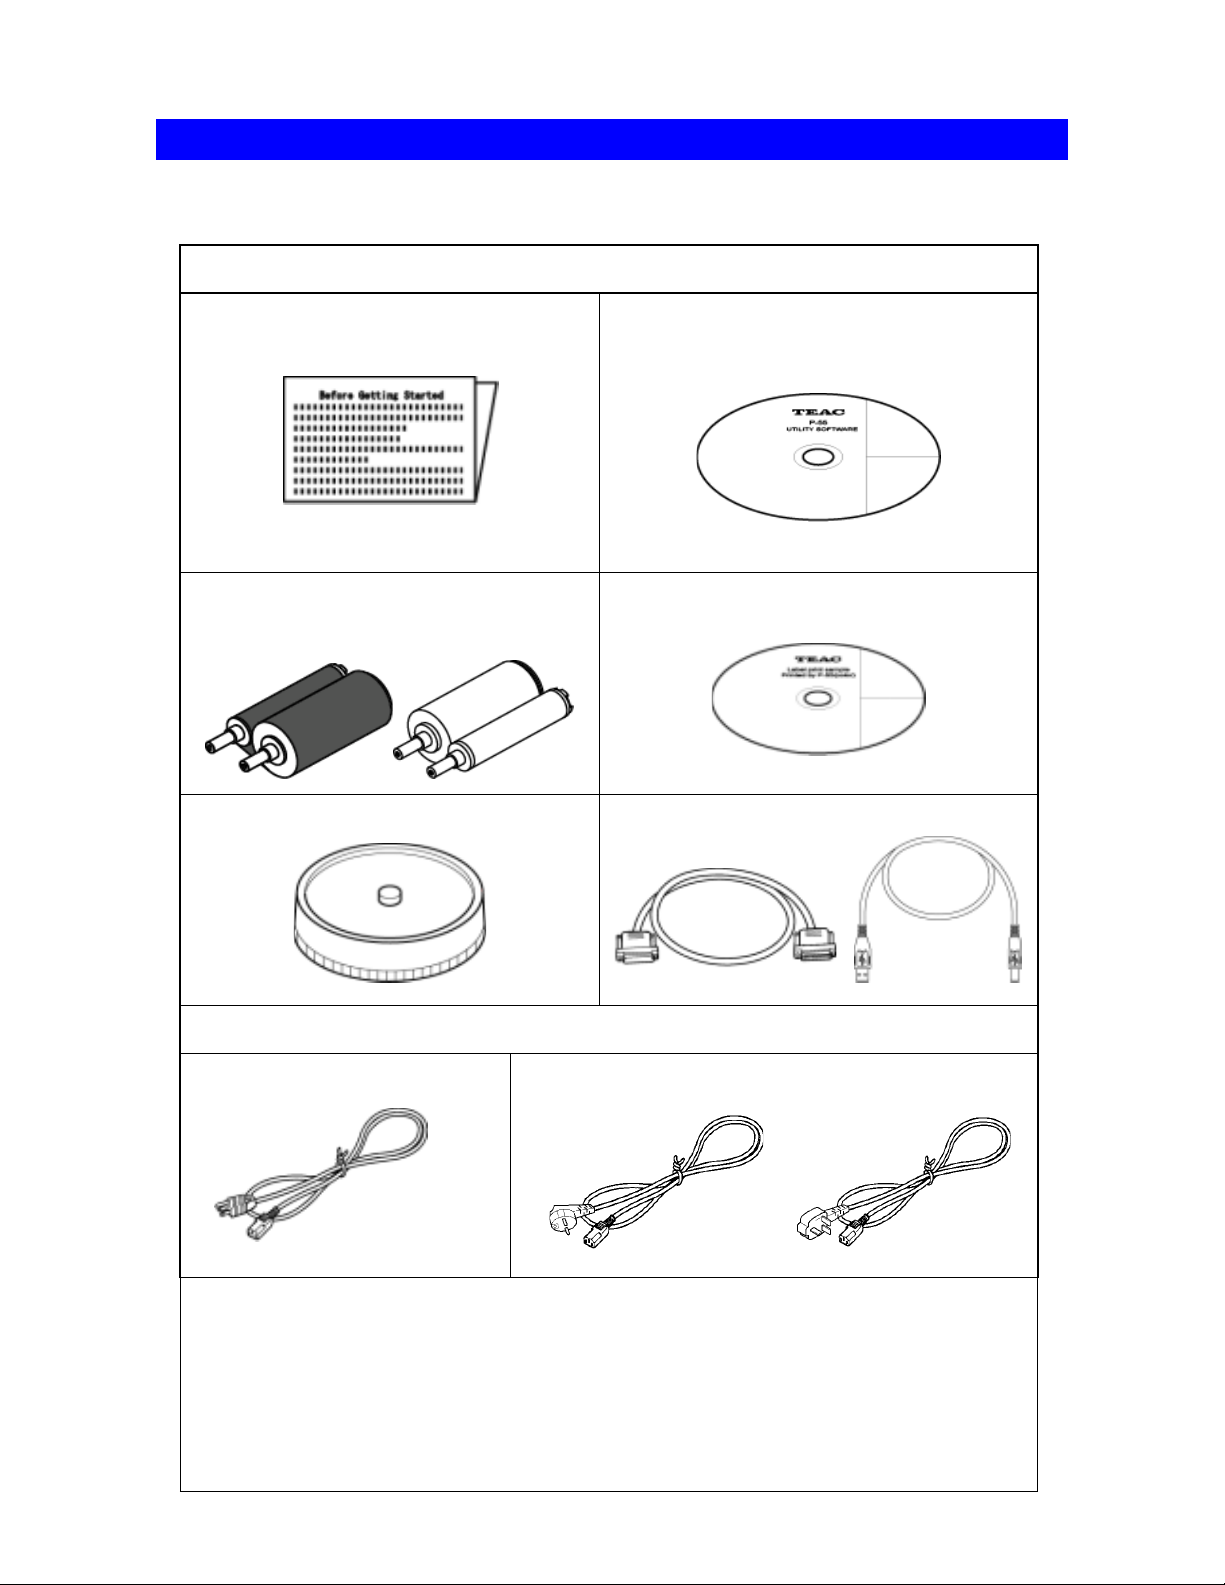
Unpacking and Inspection
The packing-case contains the following items, as well as the P-55 itself. Please make certain that
all the items are present.
Accessories for P-55
"Before Getting Started" x1
Ribbon set x1
(Set of ink ribbon and re-transfer ribbon)
Blank media (CD-R) 10-pack of discs x1 Printer cable x1, USB cable x1
Utility Software CD-ROM x1
(including Operation Manual, Printer
Driver and Disc Label Editor)
Printed by P-55 (PHOTO)
Label print sample printed by P-55
Printed by P-55 (COLOR)
AC power cable
(For U.S.A. and Canada)
(For Europe)
Page 3
Unpacking and Inspection
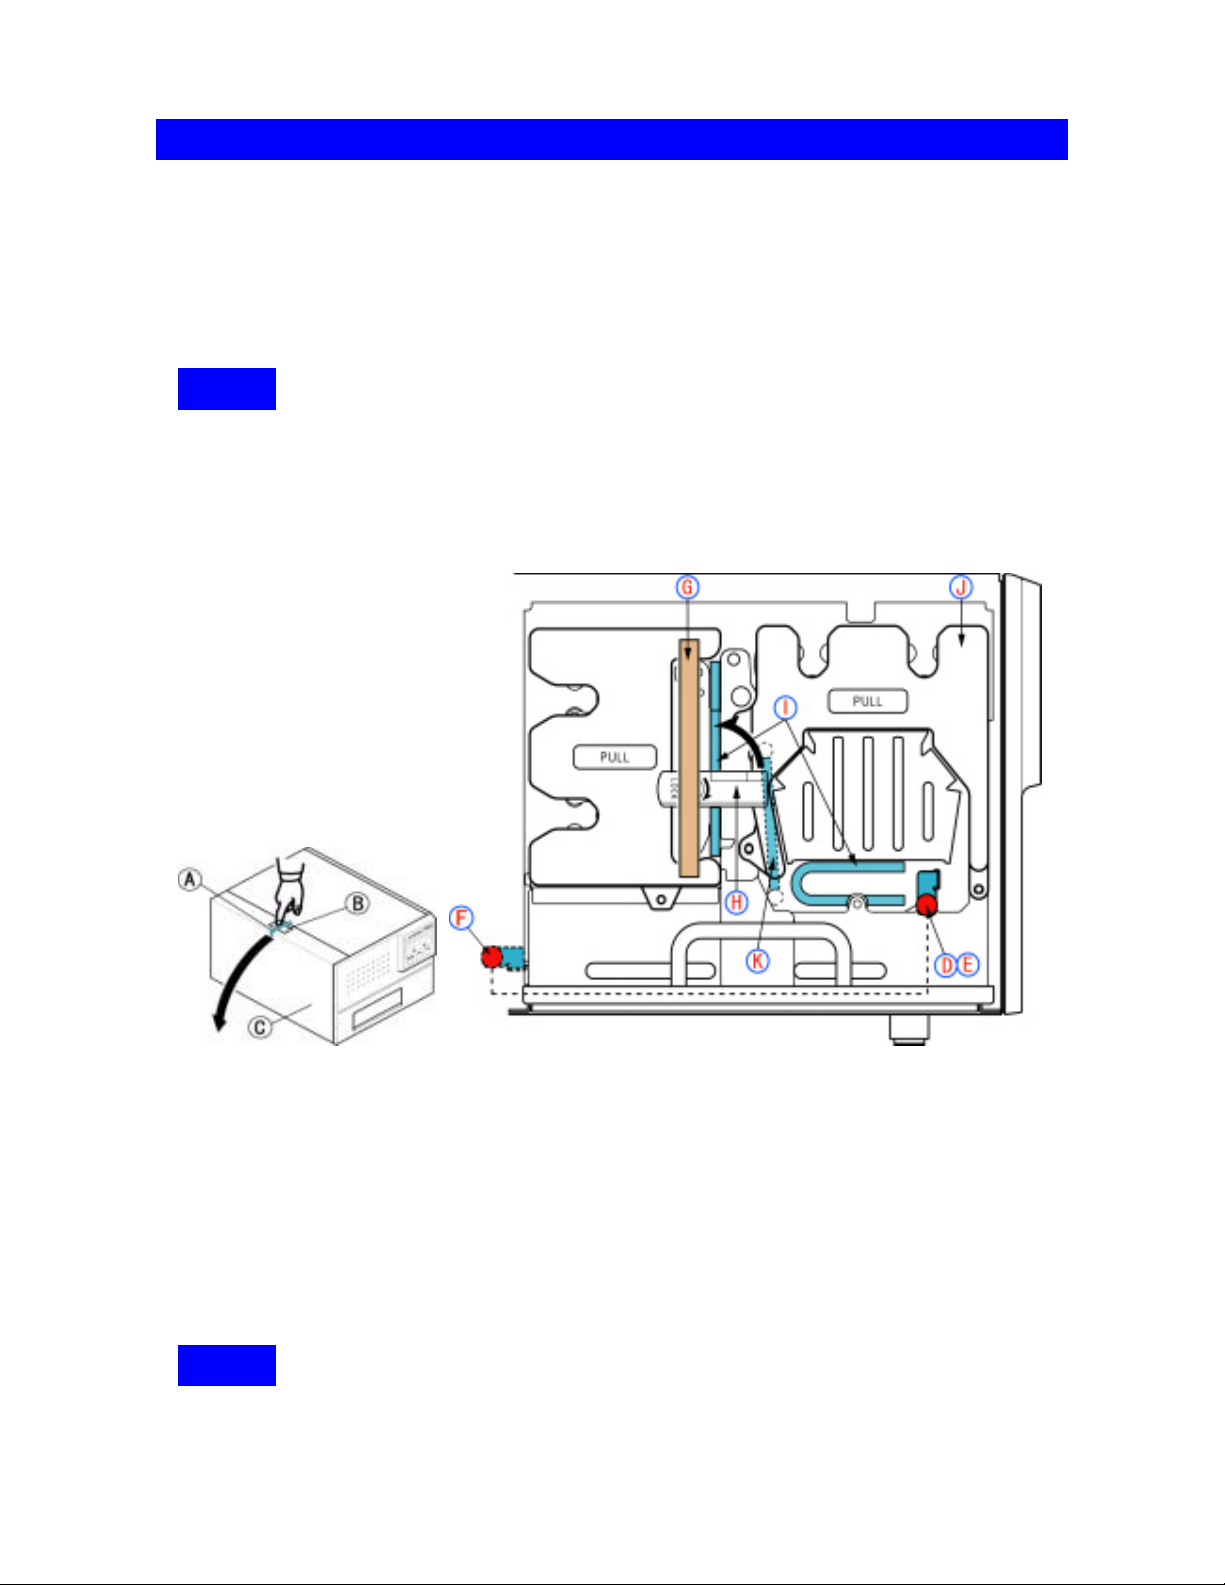
To prevent the product from being damaged in shipment, cushioning materials and xing metal are
used to secure the internal parts to the unit. Make sure all those protection materials are removed
before use. For the future shipment, keep the xing metal and packing (3 types) in the packaging
box along with packing materials.
To prevent the product from being damaged in shipment, install the shipping protection materials in
reverse order to the removal procedure.
The P-55 is a precision machine. Be careful not to drop or subject the unit to severe impact (it
weighs more than 22 kg).
This product internally reaches a high temperature when in use. Before installing the shipping
materials in the unit, leave it turned o for a while (1 hour) to cool it o completely.
Make sure the ink ribbon and transfer ribbon are removed when the shipping protection materials
are installed in the unit. Note
1. Peel o adhesive tape A from the top left of the unit and press unlock button B to open side door
C .
2. Loosen the screw
marked
3. Peel o adhesive tape
cushions
4. Pull out ribbon cartridge
for the moment.
5. Flip down lock lever
Do not t
be da
F to keep it for future use.
I by pulling them toward you.
ry to forcibly close the side door without ipping down the lock lever, or the side door may
maged.
D and pull out the metallic bar E . Insert the removed metallic bar into position
G , ip up lock lever H to unlock the ribbon cartridge and remove two
J , remove cushion K and then put back the ribbon cartridge to its place
H to lock the ribbon cartridge in place and lift up the side door until it locks.
Page 4
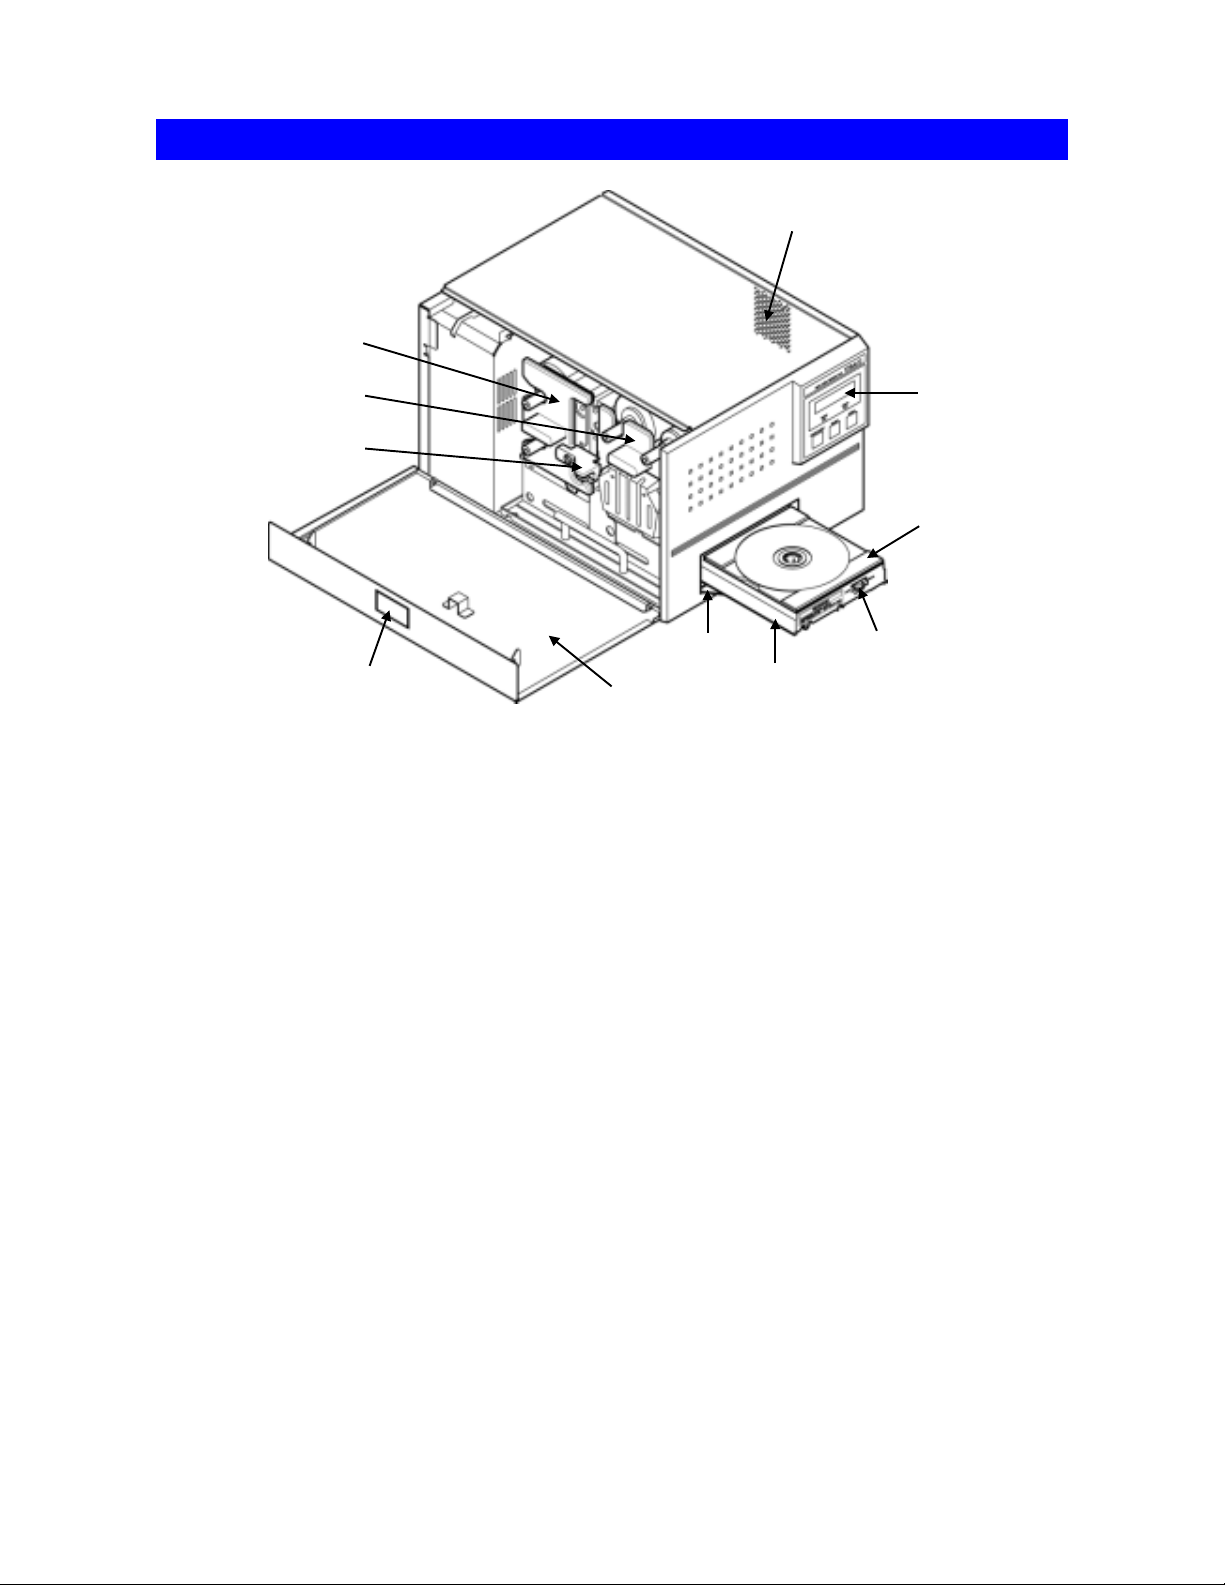
Identifying the Parts
1
4
5
6
7
2
1
Exhaust Fan (on the right side)
This is an air outlet for dropping the temperature inside the unit. Do not let foreign objects get in
through this opening, or the results may be damage to the unit and could hazardous to the
operator. Place the unit in an adequate location.
3
8
2 Side Door Unlocking Button
Pressing this button opens the side door. The side door is locked when the unit is turned on
3 Side Door
You need to open this door when changing ink cartridges.
Keep this door closed when the unit is functioning.
11
10
9
4 Ink Ribbon Cartridge
This is a cartridge for ink ribbon.
(As shipped from the factory, the cartridge does not contain ink ribbon.)
5 Re-transfer Ribbon Cartridge
This is a cartridge for re-transfer ribbon.
(As shipped from the factory, the cartridge does not contain re-transfer ribbon.)
6 Lock Lever
This is for locking the ribbon cartridge in place.
7 Tray Door
The tray slides out. Do not place any objects in front of this door.
8 Tray
9 Tray Adapter Lock Switch
10 Tray Adapter
11 Control Panel
Page 5
Identifying the Parts
15
12
18
12
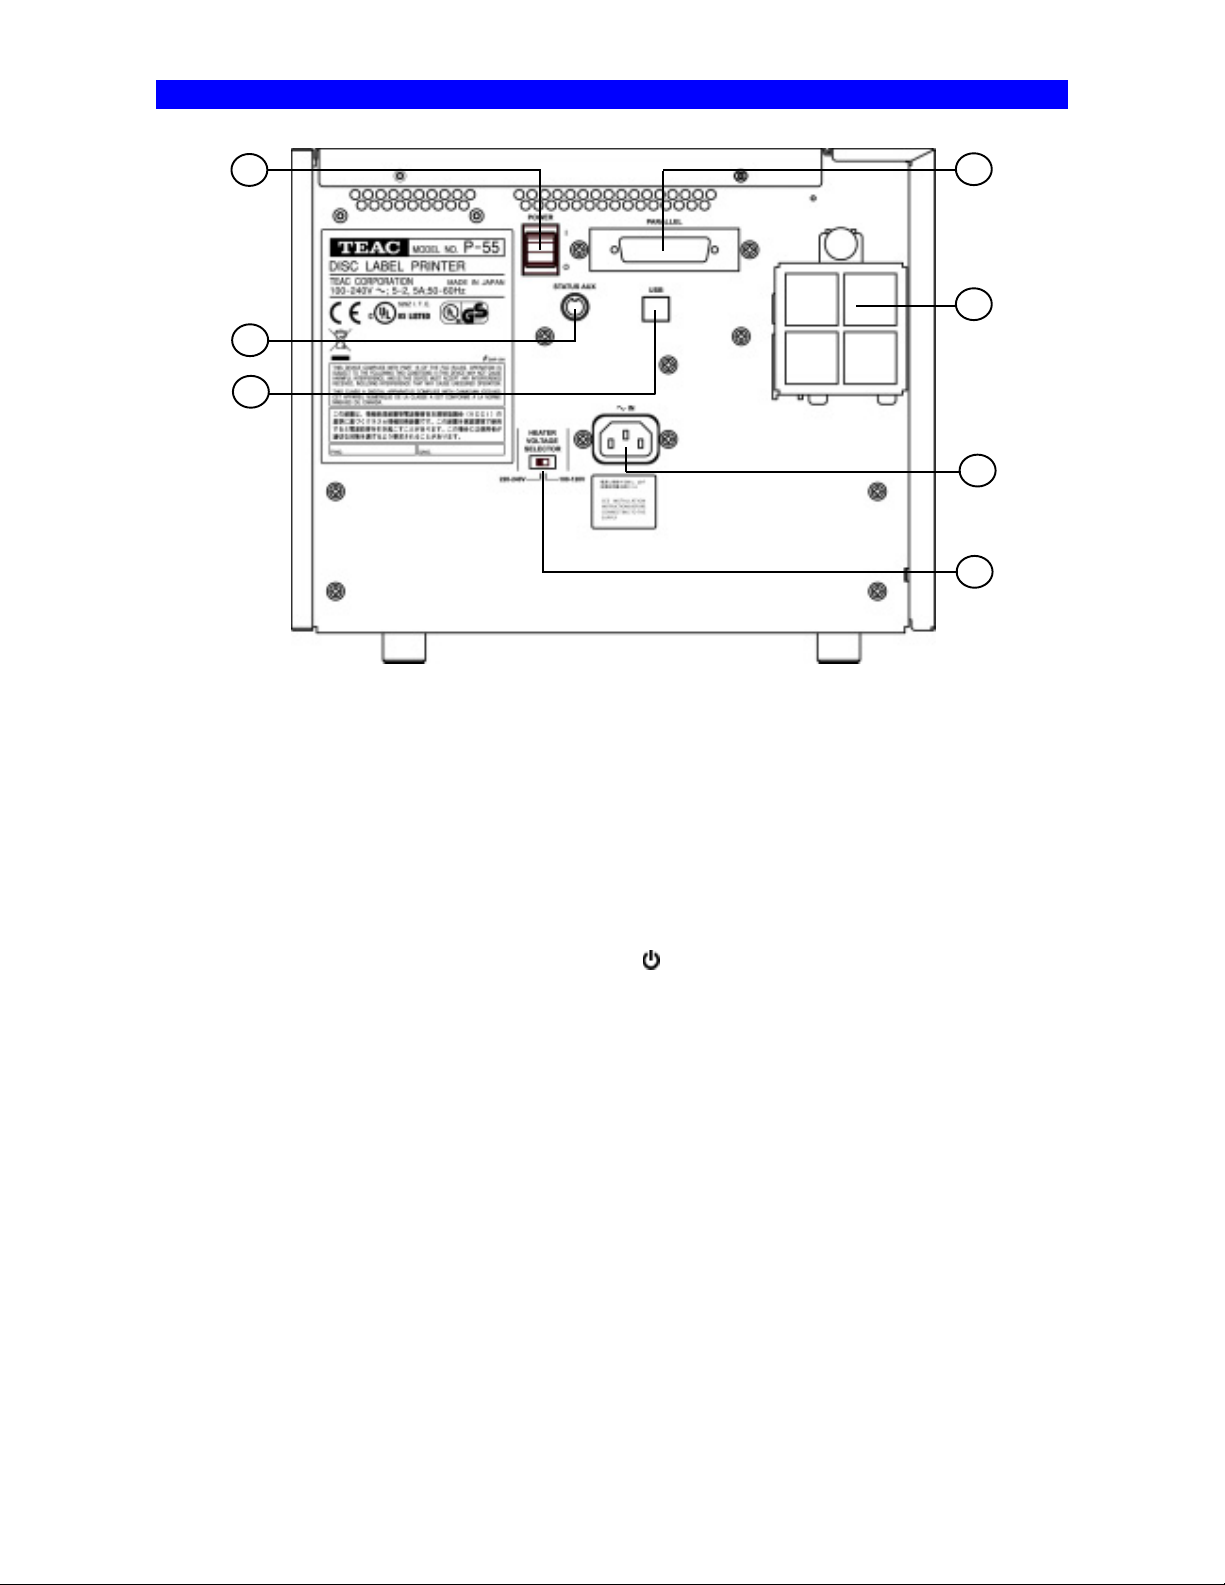
STATUS AUX Connector (optional)
This connector allows connection of the P-55 to an extern al device for the combined use with the robotics system.
*Please contact us before use.
13 Parallel Port Multi-connector
This provides a parallel interface between your PC's printer port and the P-55 over the supplied
printer cable.
14 Intake Fan (with lter)
This opening is for dropping the temperature inside the unit. Obstructing this opening may
result in failures. Place the unit in an adequate location.
13
14
16
17
15 Power Switch
This rocker switch turns power to the unit on and o.
end of the switch, and powers down when pressing “
(The internal cooling fan stops only in about 10-20 minutes after the unit switches into the Standby ode.)
” end.
16 AC Power Input Socket
Plug in here the power cable. (To drop the tem perature inside the unit, the fan continues
to rotate for about 10 to 20 minutes after switching o the power. For this interval of time,
do not unplug the power cable.)
Connections .
17 Heater Voltage Selector Switch
This selects the voltage to supply to the internal heater.
For U.S.A. and Canada
The Heater Voltage Selector Switch is preset to “100-120V” at the factory.
Selecting a wrong voltage may cause the printer to malfunction.
For Europe
The Heater Voltage Selector Switch is preset to “220-240V” at the factory.
Selecting a wrong voltage may cause the printer to malfunction.
18 USB 2.0 Compatible Connector (Hi-Speed support)
Page 6
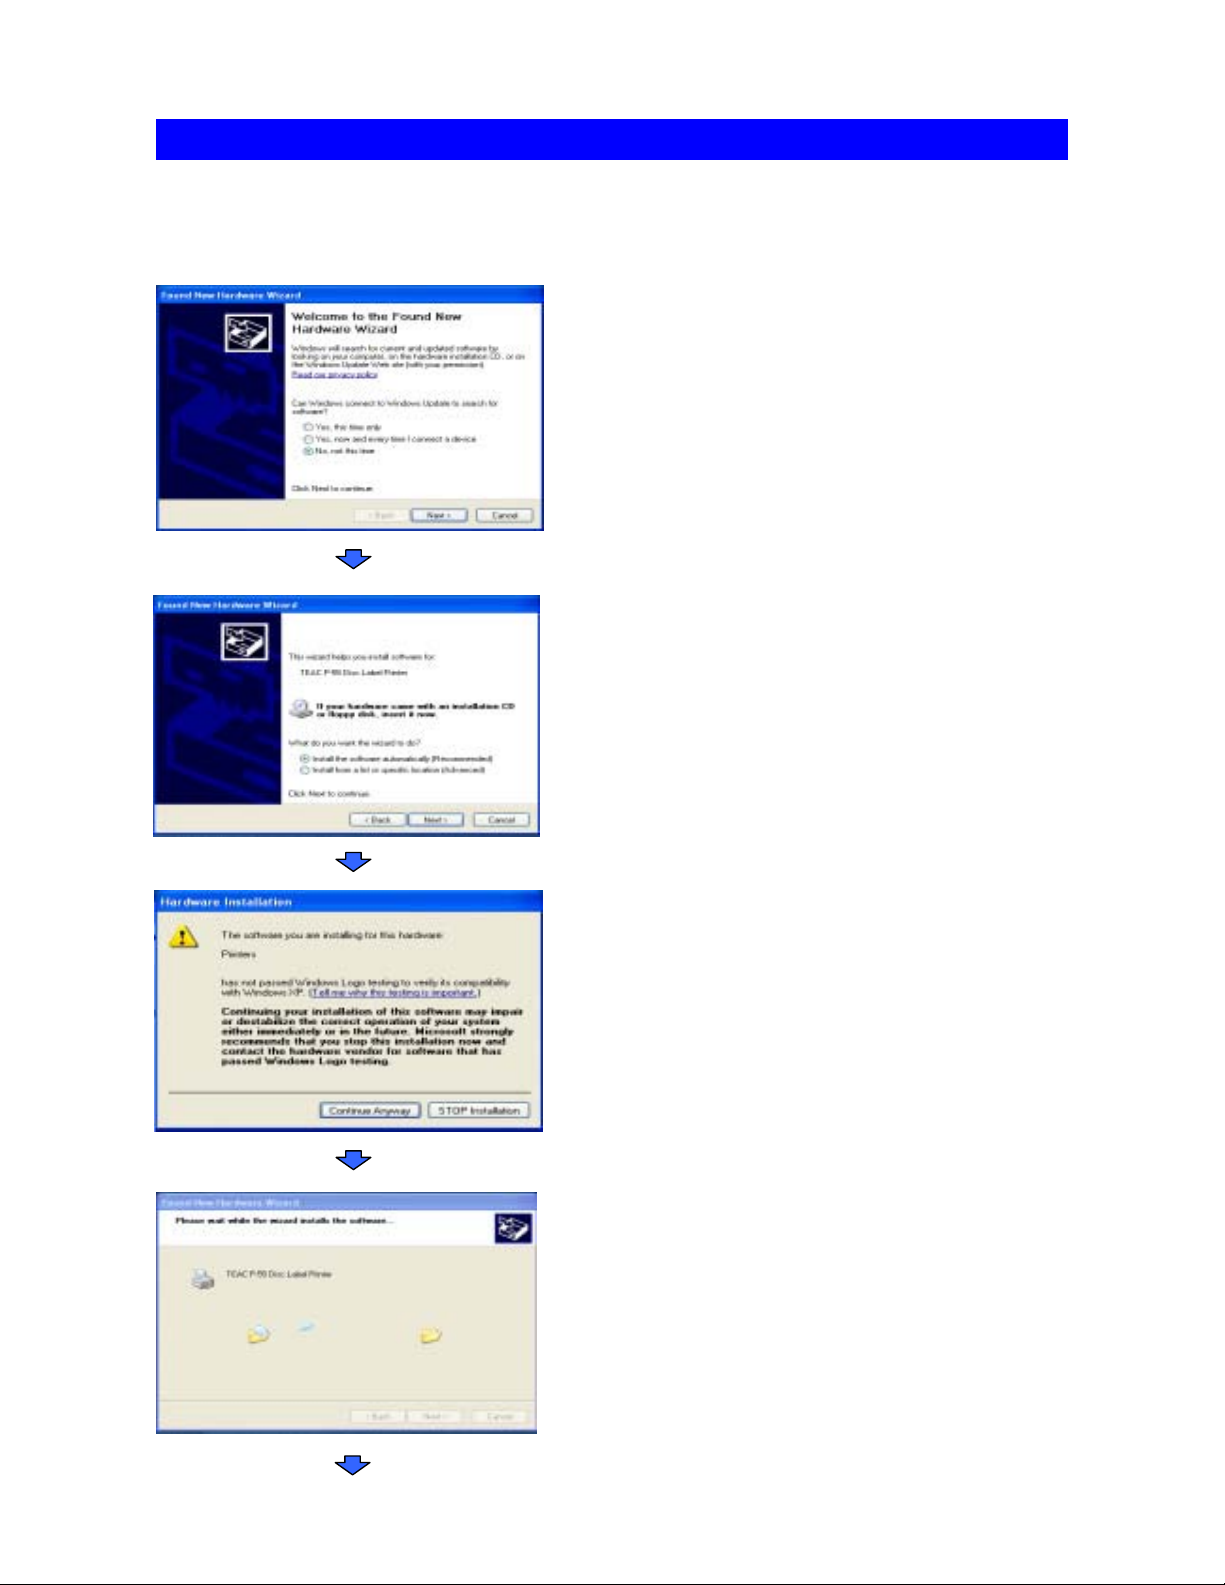
SECTION 10 : Installing the Printer Driver
If both the PC and P-55 are on before installing the driver, turn o the PC rst and then the P-55,
Then, turn on the P-55 rst and then the PC again.
The window Found New Hardware Wizard appears on
the screen.
If you are asked, “Can Windows connect to Windows
update to search for software?” select No, not at this
time and then click Next .
Select Install the software automatically
(Recommended) and click Next .
The window Hardware Installation appears on the
screen. Click Continue Anyway .
The window Please wait while the wizard installs
the software appears on the screen. Wait until the
window appears indicating the wizard is completed.
Page 7

SECTION 10 : Installing the Printer Driver
The message indicates the software has been installed
successfully. Click Finish .
*In Windows, click Start , select Printers and Faxes ,and
make sure the icon representing TEAC P-55 Disc Label
Printer is displayed on the screen.
To restart the computer, in Windows, click Start and
then Shut Down . Select Restart from the pull-down
menu, and click OK .
NOTE
[Printer driver operation modes]
The P-55 printer driver has the two modes.
1. [Standard Mode]
Allows the P-55 to print when the P-55 is online or connected to your Windows computer.
The computer communicates with the P-55 to obtain the info rmation such as ribbon type, remaining ribbon amount and
operation status.
2. [Remote Mode]
Allows the P-55 to create PRN les (*Note1) when the P-55 is oine or not connected to your Windows computer.
You need to specify the ribbon type you want to use in Printing Preferences as the P-55 does not communicate directly
with your PC for the information.
To switch the P-55 printer driver between standard mode and remote mode, execute the application tool setmode.exe. To
locate the tool, double-click the icon for the attached CD-ROM “P-55 UTILITY SOFTWARE” to open. Double-click the
folder “Support” and then “SetMode.”
Page 8

When The P-55 and Duplicator Are Purchased Together
The SureThing Software Is Pre-Installed At The Factory*
*2000 & 9000 Series Only
1. Place CD in Drive. Installation will start automatically.
2. Click “I Accept” to the licensing and warranty information.
Page 9

3. Click “Next” to begin software installation.
4. Click “Next” to add a shortcut to your desktop and start menu.
Page 10

5. Click“Next” to Complete the software installation.
6. When installation is complete, click “Finish” to exit,
and Double Click the Sure Thing icon on your desktop.
Page 11

Important Notes
Note:
The maximum resolution for a .STD file is 600 dpi.
If print image exceeds 600 dpi, a .PRN file must
be used.
Note:
When submitting the PDF file to print, please
make sure the Default printer is the P-55.
(For Example If printing to P55 - P55
must be the default printer)
Any Questions Please Contact
Technical Support
631 249-9393 ext 310
Page 12

Creating an STD file
1. Open SureThing CD Label Software as shown in Fig. 1.
2. Add text and images to your label.
3. Save the STD file that you just created and you are
ready to go!
Page 13

________________________________________________
Note:
For information on creating .PRN files, Please see your
user manual. The user manual is located on the User
Manual CD that came with your MF Digital Duplicator.
________________________________________________
Page 14

2. Loading Ink Ribbon
Loading Ribbons
Ink Ribbon Cartridge
1) Flip up the lock lever that holds the
Ink ribbon cartridge in place.
2) Take out the ink ribbon cartridge by
Pulling it toward you.
3) Take the ink ribbon out from the package
And remove all the pads from the ribbon as
Shown on the left.
*Ribbon specications and appearance
Are subject to
Change for Improvement without notice.
Page 15

Loading Ribbons
4) Place the ink ribbon with the take-up shaft on
the left and the supply shaft on the right, and
their protrusions facing you and their
openings facing away from you.
5) Insert the open end of the take-up shaft into
the hole provided in the cartridge (for ease of
work, we recommend holding the shaft by
inserting your index nger into its open end),
and snap the protrusion at the other end of
the shaft into the cut-o in the cartridge.
6) In a similar way, put the supply shaft into the
ink ribbon cartridge.
7) Turn the take-up shaft clockwise to take up
ribbon slack.
NOTE
If you perform the next step without taking up ribbon slack, there is a chance that the ribbon might
be broken.
8) Mount the ink ribbon cartridge in the P-55
itself.
When mounting the ribbon cartridge, push it
directly and slowly. If you try to force it in
slantwise, there is a chance that the ribbon
might be broken. If the ribbon clogs
somewhere, take out the cartridge, take up
ribbon slack again, and slowly re-insert the
cartridge.
Page 16

Loading Ribbons
3. Loading Re-transfer Ribbon
Re-transfer Ribbon Cartridge
1) Flip up the lock lever that holds the
re-transfer ribbon cartridge in place.
2) Take out the re-transfer ribbon cartridge by
pulling it toward you
3) Take the transfer ribbon out from the package
and remove all the pads from the ribbon as
shown on the left.
*Ribbon specications and appearance are
subject to change for improvement without
notice.
Page 17

Loading Ribbons
4) Place the re-transfer ribbon with the supply
shaft on the left and the take-up shaft on the
right, and their protrusions facing you and their
openings facing away from you.
5) Insert the open end of the take-up shaft into
the hole provided in the cartridge (for ease of
work, we recommend holding the shaft by
inserting your index nger into its open end),
and snap the protrusion at the other end of
the shaft into the cut-o in the cartridge.
6) In a similar way, put the supply shaft into the
re-transfer ribbon cartridge.
7) Turn the take-up shaft clockwise to take up
ribbon slack.
NOTE
If you perform the next step without taking up ribbon slack, there is a chance that the ribbon might
be broken.
8) Mount the re-transfer ribbon cartridge in the
P-55 itself.
When mounting the ribbon cartridge, push it
directly and slowly. If you try to force it in
slantwise, there is a chance that the ribbon
might be broken. If the ribbon clogs
somewhere, take out the cartridge, take up
ribbon slack again, and slowly re-insert the
cartridge.
Page 18

Loading Ribbons
9) Once both the ink ribbon cartridge and the
re-transfer ribbon cartridge have been
mounted, lock them in place by ipping down
the lock lever.
10) After locking the ribbon cartridge in place,
make sure that ribbon slack has been
removed before closing the side door.
NOTE
- The side door is designed so as not to close unless you lock the ribbon cartridges in place with
the lock lever. If you try to forcibly close the side door, there is a chance that the side door might
be damaged.
- Caution in ribbon replacement: It is imperative to take out the cartridge from the P-55. If you try
to force the ribbon replacement with the cartridge mounted, there is a chance that the ribbon or
components involved might be damaged.
- Be sure to change the ink ribbon when it is fully consumed, which yields the error message
"No INK Ribbon" or "No TFR Ribbon". (If you open and close the side door without changing a
fully consumed ribbon, a tape that holds the ribbon shaft and the ribbon itself in place may be
peeled o and thus the ribbon may get stuck in the mechanism, likely causing the printer to go
out of order).
- Avoid dust to store the ribbon installed in the ribbon cartridge.
Page 19

Loading Ribbons
4. Checking the Remaining Ribbon Amount
3 Ink Remain
When the P-55 is Ready as the LCD indicates,
press the SELECT button as many times as
necessary for "Ink Remain" to appear on the LCD,
and then press the ENTER button.
3 TRF 99%
INK 99%
The re-transfer ribbon's remaining amount is
indicated on the upper line and the ink ribbon's
remaining amount on the lower line, expressed as a
percentage.
(The remaining ribbon amount shown on the LCD is not absolute but just a rough "barometer".)
*The P-55 displays the remaining ink level for the ink ribbon as “INK FF%” if no single print
operation is performed after the P-55 is turned on.
Once a print operation is performed, the display changes to a numerical value “INK nn%”
indicating an estimate of the remaining ink in the ribbon.
Page 20

Re-Order Information
P55 Dye Sublimation Re-Transfer Printer Supplies
P55-CRS -- Color Ribbon Set 500 - 1 color (500) & 1 transfer (500)
P55-PRS -- Photo Ribbon Set 500 - 1 photo (500) & 1 transfer (500)
P55-BR -- Black Ribbon 2000 - NO transfer (order 2 P55-TR)
P55-TR -- Transfer Ribbons 1000 - 2 ea.Transfers (500)
P55-CK -- P55 Cleaning Kit
P55-CINK -- Ribbon Rack for Color & Photo Ribbon
P55-CIBK -- Ribbon Rack for Black Ribbon
P55-CTRFR -- Ribbon Rack for Transfer Ribbon
www.mfdigital.com
 Loading...