

Page 1
CD/DVD Inkjet Printer
Guide
2. Power Up
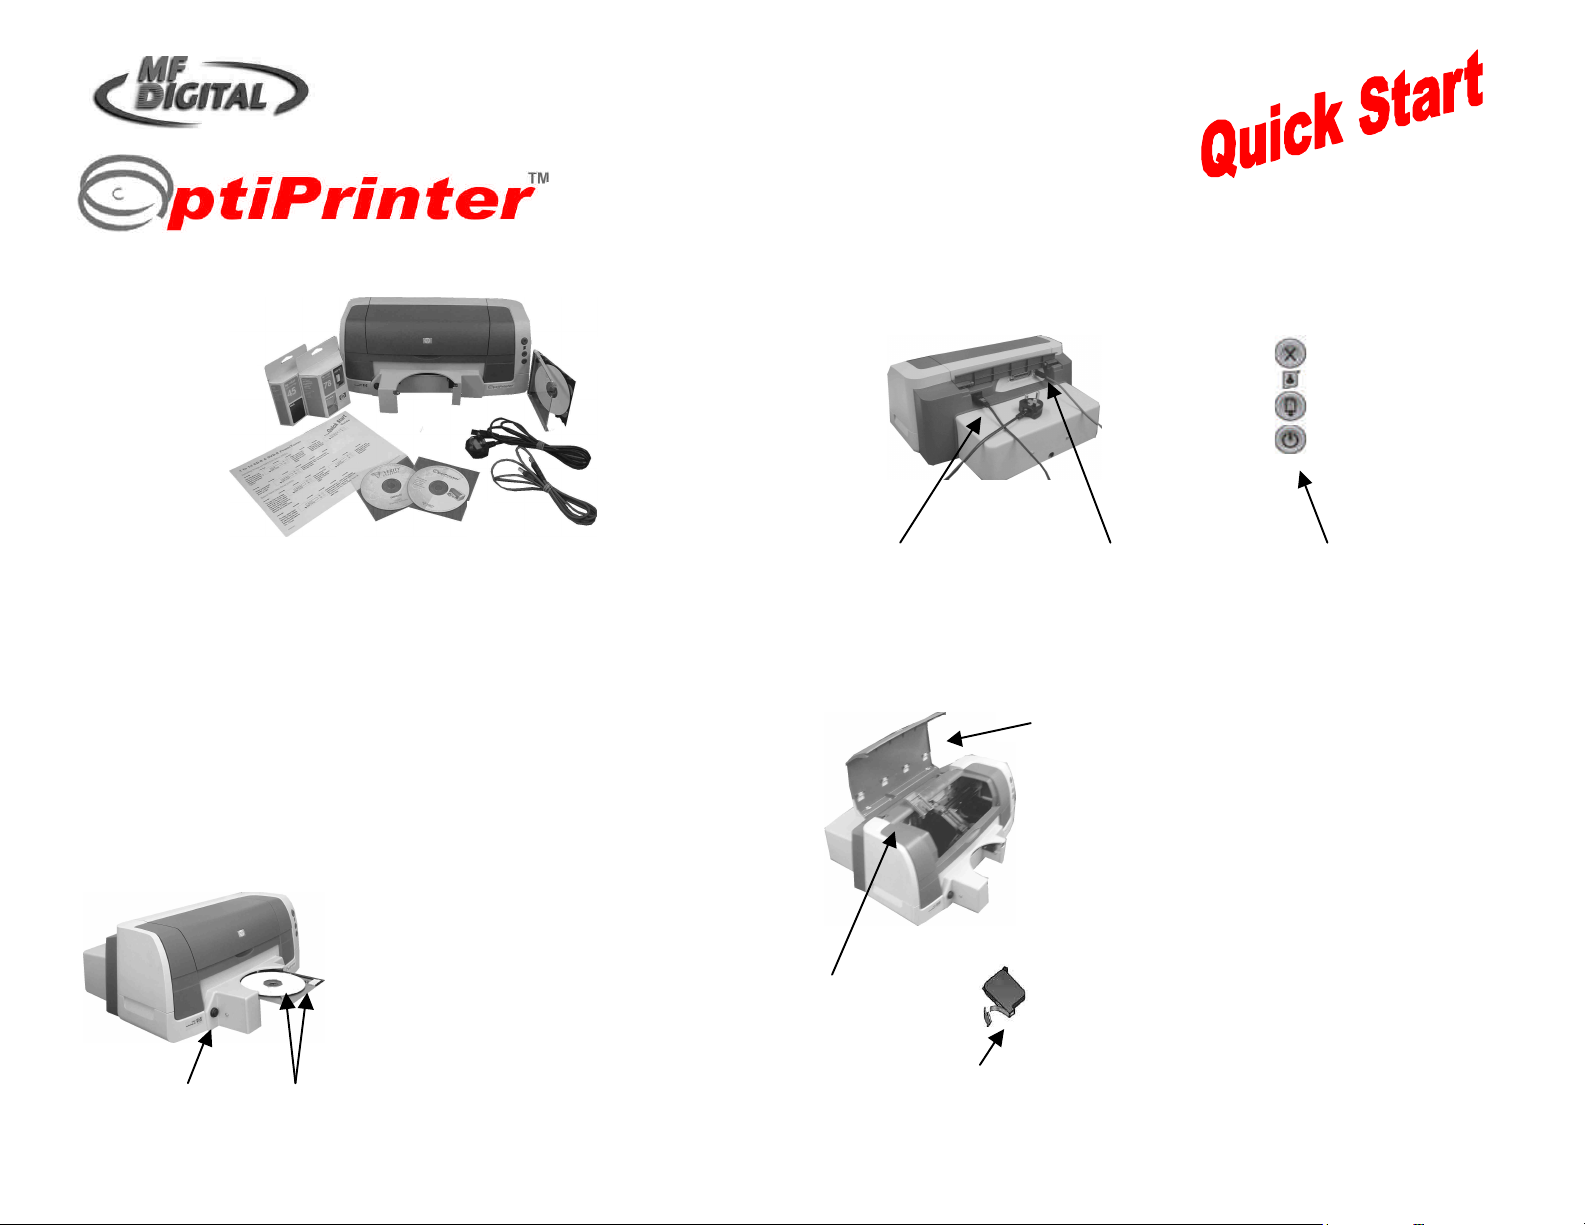
You should find the following packaged with yo
ur printer:
a OptiPrinter
2 Blank CDs
1. Unpack
3. Inserting Ink Cartridges
CD Tray Button
Pins
Press the CD Tray Button and the
again and the tray slides back into
Power Cable
Attach the pow
er cable to the back of the printer and plug into
Open Printer Lid
Remove Plastic Tape
Open the lid of the printer and the
slide to the center
the cradle will not slide to the
middle unless a CD has been loaded into
Raise the 2 cradle latches. Remove the
plastic tape from the print cartridge and
radle.
Remove the tape securing the printer lid then open the lid and
a
f
e
h
g
b
c d
b Power Cable
c USB Cable
d Manual/Driver/
Test Image CD
e
f Black & Color
Cartridge
g Discus Software
h Quick Start Guide
remove the 2 pieces of protective tape on the CD Tray itself.
tray will slide forward to receive a
blank CD. Place a CD onto the
tray, resting the disc against the
two pins at the front of the tray.
Press the CD Tray Button once
the printer.
the power supply.
Press the Power On button located on the front of the printer.
cartridge cradle will
(Note:
the CD tray as described previously).
Raise Cradle
Latch
push the cartridge firmly into the c
Close the latch.
Finally, close the printer lid.
TP 000 023 (1.03) For Windows 2000 & XP only ZZ 004 805
Page 2
Guide
CD/DVD Inkjet Printer
4. Loading Printer Driver
You must load the OptiPrinter printer driver onto your PC before you can print using the OptiPrinter.
5. Loading Discus/QuickTime Software
The
Discus software included with your OptiPrinter allows you to create stunning designs for your discs. Insert the Discus CD into your PC’s
1. Connect the OptiPrinter to your PC using the USB cable (see point 2 on the previous page)
2. Switch on your PC and place the CD which contains the Print Driver into your PC’s CD-ROM drive
3. Your PC should automatically recognize the addition of New Hardware in the form of the M F Digital OptiPrinter and the “Digital
Signature Not Found box” message box will appear. You will be asked if you wish to continue installation, select Yes. (select
Continue Anyway if using Windows XP)
4. You will now be asked to locate the Print Driver. Click on the Browse button and navigate to the ENU_Release folder on the CD in
your PC’s CD-ROM. Click Open and the file “ENU_Release” will appear in the “Copy Files from” window. Click OK and the Print Drive
will begin loading. Once complete, click Finish
5. The OptiPrinter printer driver has been successfully loaded onto your PC
If at any point in the above process you encounter problems, you should load the OptiPrinter print driver via the ADD Printer icon on your
Printer Settings.
CD-ROM drive.
1. Follow Standard Settings
2. At the registration Window, click Next
3. At Select Viewer Associations Window, select Windows File Types, & Internet File Types & Notification of other Applications
4. The QuickTime Launcher & ReadMe window will appear
5. Remove the tick from both the ReadMe File & Launch Quick Time player. Click Close
6. The QuickTime window will appear. Close window
7. The Launcher screen will now appear
8. Click Install to hard disk and on the next screen, select the drive where you wish to load the program (usually your C drive)
9. The Discus program will install. Click OK on the command “Installation is Complete”
10. Discus is now installed on your PC. You will be asked to enter the serial number included at the first run of the Discus software.
TP 000 023 (1.03) For Windows 2000 & XP only ZZ 004 805
Page 3

CD/DVD Inkjet Printer
Guide
Printing a CD
6. Open Discus
Set Outer & Inner
Ensure
X & Y at
With Discus
open, select the CD/DVD label type
7. Run a Test Print
Ensure you have a blank CD loaded into the OptiPrinter’s tray.
•
• Select the Print tab and click the Setup Button (see Fig.1).
• Select M F Digital OptiPrinter from the drop-down list of printers. For paper size,
select A4 (210 x 297mm) and for source select Upper Tray
• Click OK
• Next, click the Select template Button and choose the M F Digital OptiPrinter
• Adjust the position of the red slider buttons to set the Outer Diameter to 119.5mm
and the Inner Diameter to 39.5mm
Ensure that the X & Y Nudge Button dimensions are set at 0mm & 0mm
Diameter
to 0mm
Now click the Test Print button and the Print Properties box appears. Ensure the M F Digital OptiPrinter is selected from the list of printers
(click icon once to highlight it).
• Under the Setup tab, set Print Quality to Normal, and Disk Surface Type to Inkjet Quality/Other Inkjet
• Under the Features tab, remove the tick from the Enable HP Preview
• Under Mask Settings, remove the tick from Enable Masking
• Select Print. A command box appears asking if you are “Ready To Print?”, select OK
A series of circles will print onto the blank CD and should look like Fig. 2 on the next page. However, minor adjustments may be required if the
circles on the test print do not print centrally (as shown in Fig. 3). Adjust the template on the Discus interface by using the X & Y nudge keys to
move the template up, down, left, & right.
Note: Every OptiPrinter is factory set for the correct position, however, CDs can vary in size and it may be necessary to make minor adjustments
using the nudge feature.
TP 000 023 (1.03) For Windows 2000 & XP only ZZ 004 805
Page 4

Guide
CD/DVD Inkjet Printer
8. Adjusting the Template
When you are happy that the template is in the correct position,
9. Printing an Image
Now that the template is in place, you are
tray.
In Discus, select
File
and then
Open
and then navigate to and open
The screen below will appear.
Select the
Print
tab on the Discus interface.
“Ready To Print?” prompt appears, select
The test image should print out as per the
Fig. A
now ready to print the test image,
which has been included on the User
Manual/Driver/Test CD shown below.
Insert this CD into your PC’s CD-ROM.
Place a blank CD into the OptiPrinter’s
r
Project
the file called “TestCD.cdl” located in
your PC’s CD-ROM.
place a blank CD into the CD tray. Select Print and Print again.
Press Print and Print again. When the
OK.
CD image in Fig. A
It may be necessary to reboot your PC at
some point during this Quick Start process.
If at any time you encounter problems with
your OptiPrinter, please refer to the
Operating & Maintenance Manual then
contact your Dealer or the M F Digital
Support Department.
TP 000 023 (1.03) For Windows 2000 & XP only ZZ 004 805
 Loading...