

Page 1

DICOMBurner, version 3
User Manual
Page 2

DICOMBurner: User Manual [DB-UM-3 – Rev B]
Table of Contents
1 ABBREVIATIONS................................................................................................................................................... 5
2 INDICATIONS FOR USE ....................................................................................................................................... 6
3 INTRODUCTION .................................................................................................................................................... 7
4 INTERFACE ARCHITECTURE AND MAIN DIALOG..................................................................................... 8
5 CREATING A CD/DVD OF DICOM FILES ...................................................................................................... 12
5.1 BURN LAST PATIENT .......................................................................................................................................... 13
5.2 BURN ALL NEW IMAGES – ONE CD/DVD PER PATIENT...................................................................................... 13
5.3 BURN LAST STUDY............................................................................................................................................. 14
5.4 BURN NON-BURNT ............................................................................................................................................. 15
5.5 BURN CUSTOM FROM LOCAL STORAGE .............................................................................................................. 16
5.5.1 Study-level search ..................................................................................................................................... 16
5.5.2 Series-level search .................................................................................................................................... 17
5.5.3 Instance-level search ................................................................................................................................ 18
5.5.4 Burn files step ........................................................................................................................................... 19
5.6 BURN CUSTOM FROM DICOM DEVICE............................................................................................................... 20
5.6.1 DICOM Device Selection.......................................................................................................................... 20
5.6.2 Study-level search ..................................................................................................................................... 21
5.6.3 Series-level search .................................................................................................................................... 22
5.6.4 Instance-level search ................................................................................................................................ 23
6 IMPORTING DICOM FILES............................................................................................................................... 24
6.1 IMPORT FROM DISK............................................................................................................................................ 25
6.2 IMPORT FROM DICOM DEVICE.......................................................................................................................... 25
6.2.1 DICOM Device Selection.......................................................................................................................... 25
6.2.2 Study-level search ..................................................................................................................................... 26
6.2.3 Series-level search .................................................................................................................................... 27
6.2.4 Instance-level search ................................................................................................................................ 28
7 EXPORTING DICOM FILES .............................................................................................................................. 29
7.1 EXPORT TO DISK ................................................................................................................................................ 29
7.1.1 Study-level search ..................................................................................................................................... 29
7.1.2 Series-level search .................................................................................................................................... 30
7.1.3 Instance-level search ................................................................................................................................ 31
7.1.4 Export images step.................................................................................................................................... 32
7.2 EXPORT TO DICOM DEVICE.............................................................................................................................. 33
7.2.1 Study-level search ..................................................................................................................................... 33
2
Page 3

DICOMBurner: User Manual [DB-UM-3 – Rev B]
7.2.2 Series-level search .................................................................................................................................... 34
7.2.3 Instance-level search ................................................................................................................................ 35
8 DELETING DICOM FILES.................................................................................................................................. 36
8.1 STUDY-LEVEL SEARCH ...................................................................................................................................... 36
8.2 SERIES-LEVEL SEARCH ...................................................................................................................................... 37
8.3 INSTANCE-LEVEL SEARCH.................................................................................................................................. 38
8.4 DELETE FILES STEP ............................................................................................................................................ 39
9 BACKUP DICOM FILES AND DATABASE...................................................................................................... 40
9.1 BACKUP DATABASE ........................................................................................................................................... 41
9.2 BACKUP A DAY .................................................................................................................................................. 41
9.3 BACKUP A WEEK................................................................................................................................................ 42
9.4 BACKUP A PERIOD ............................................................................................................................................. 43
10 RESTORE DICOM FILES AND DATABASE ............................................................................................... 44
10.1 RESTORE DATABASE.......................................................................................................................................... 45
10.2 RESTORE IMAGES............................................................................................................................................... 45
10.2.1 Study-level search ..................................................................................................................................... 45
10.2.2 Series-level search .................................................................................................................................... 46
10.2.3 Instance-level search ................................................................................................................................ 47
10.2.4 Restore files step ....................................................................................................................................... 48
11 VIEWING INFORMATION ............................................................................................................................. 49
11.1 VIEW LOG DIALOG BOX ..................................................................................................................................... 49
12 DICOMBURNER CONFIGURATION............................................................................................................ 50
12.1 DICOM CONFIGURATION.................................................................................................................................. 50
12.2 DICOM DEVICES CONFIGURATION................................................................................................................... 52
12.3 LOG CONFIGURATION........................................................................................................................................ 53
12.4 FILE STORAGE CONFIGURATION........................................................................................................................ 54
12.5 CD/DVD BURNER CONFIGURATION ................................................................................................................. 56
12.6 LOCAL BURNER CONFIGURATION...................................................................................................................... 57
12.7 RIMAGE UNIT CONFIGURATION......................................................................................................................... 60
12.8 PRIMERA UNIT CONFIGURATION ....................................................................................................................... 66
12.9 MFDIGITAL UNIT CONFIGURATION................................................................................................................... 71
12.10 AUTOMATIC CD/DVD PRODUCTION CONFIGURATION ................................................................................. 76
12.11 AUTOMATIC BACKUP CONFIGURATION......................................................................................................... 78
13 REGISTRATION AND ADMINISTRATION................................................................................................. 80
13.1 REGISTRATION & ADMINISTRATION DIALOG BOX ............................................................................................. 80
3
Page 4

DICOMBurner: User Manual [DB-UM-3 – Rev B]
4
Page 5
DICOMBurner: User Manual [DB-UM-3 – Rev B]
1 Abbreviations
Abbreviation
AE Application Entity
BMP Bitmap
DICOM Digital Imaging and COmmunications in Medicine
DIMSE DICOM Message Service Element
DLL Dynamic Link Library
DPI Dots Per Inch
GUI Graphical User Interface
ICM Integrated Color Management
ID Identifier
JPEG Joint Picture Experts Group
LAN Local Area Network
PC Personal Computer
PDU Protocol Data Unit
PNG Portable Network Graphics
RAM Random Access Memory
SCP Service Class Provider
SCU Service Class User
SOP Service-Object Pair
TCP Transfer Control Protocol
TIFF Tagged Image File Format
UID Unique Identifier
USB Universal Serial Bus
VR Value Representation
Description
5
Page 6

DICOMBurner: User Manual [DB-UM-3 – Rev B]
2 Indications for use
The DICOMBurner software allows receiving and storing DICOM files on a database residing on a
networked PC. In addition DICOMBurner allows burning DICOM files on one or more CDs or DVDs, with an
embedded autorunning viewer. It is intended as a mean to produce digital media containing medical images,
to be provided to patients in substitution of the traditional film hard copies of the exams. Also the produced
media can be used to exchange DICOM files between non-connected PACS or DICOM workstations. The
images stored on the CDs/DVDs can be directly viewed on a normal PC through the embedded autorunning
DICOM Viewer; this software is meant for review of the medical images, and not for diagnosis. Nevertheless,
the DICOM images stored by DICOMBurner provide no quality loss with respect to the original images (no
lossy compression is used by DICOMBurner), hence they can be used as an element for diagnosis once
they are transferred or imported on a PACS diagnostic workstation.
6
Page 7
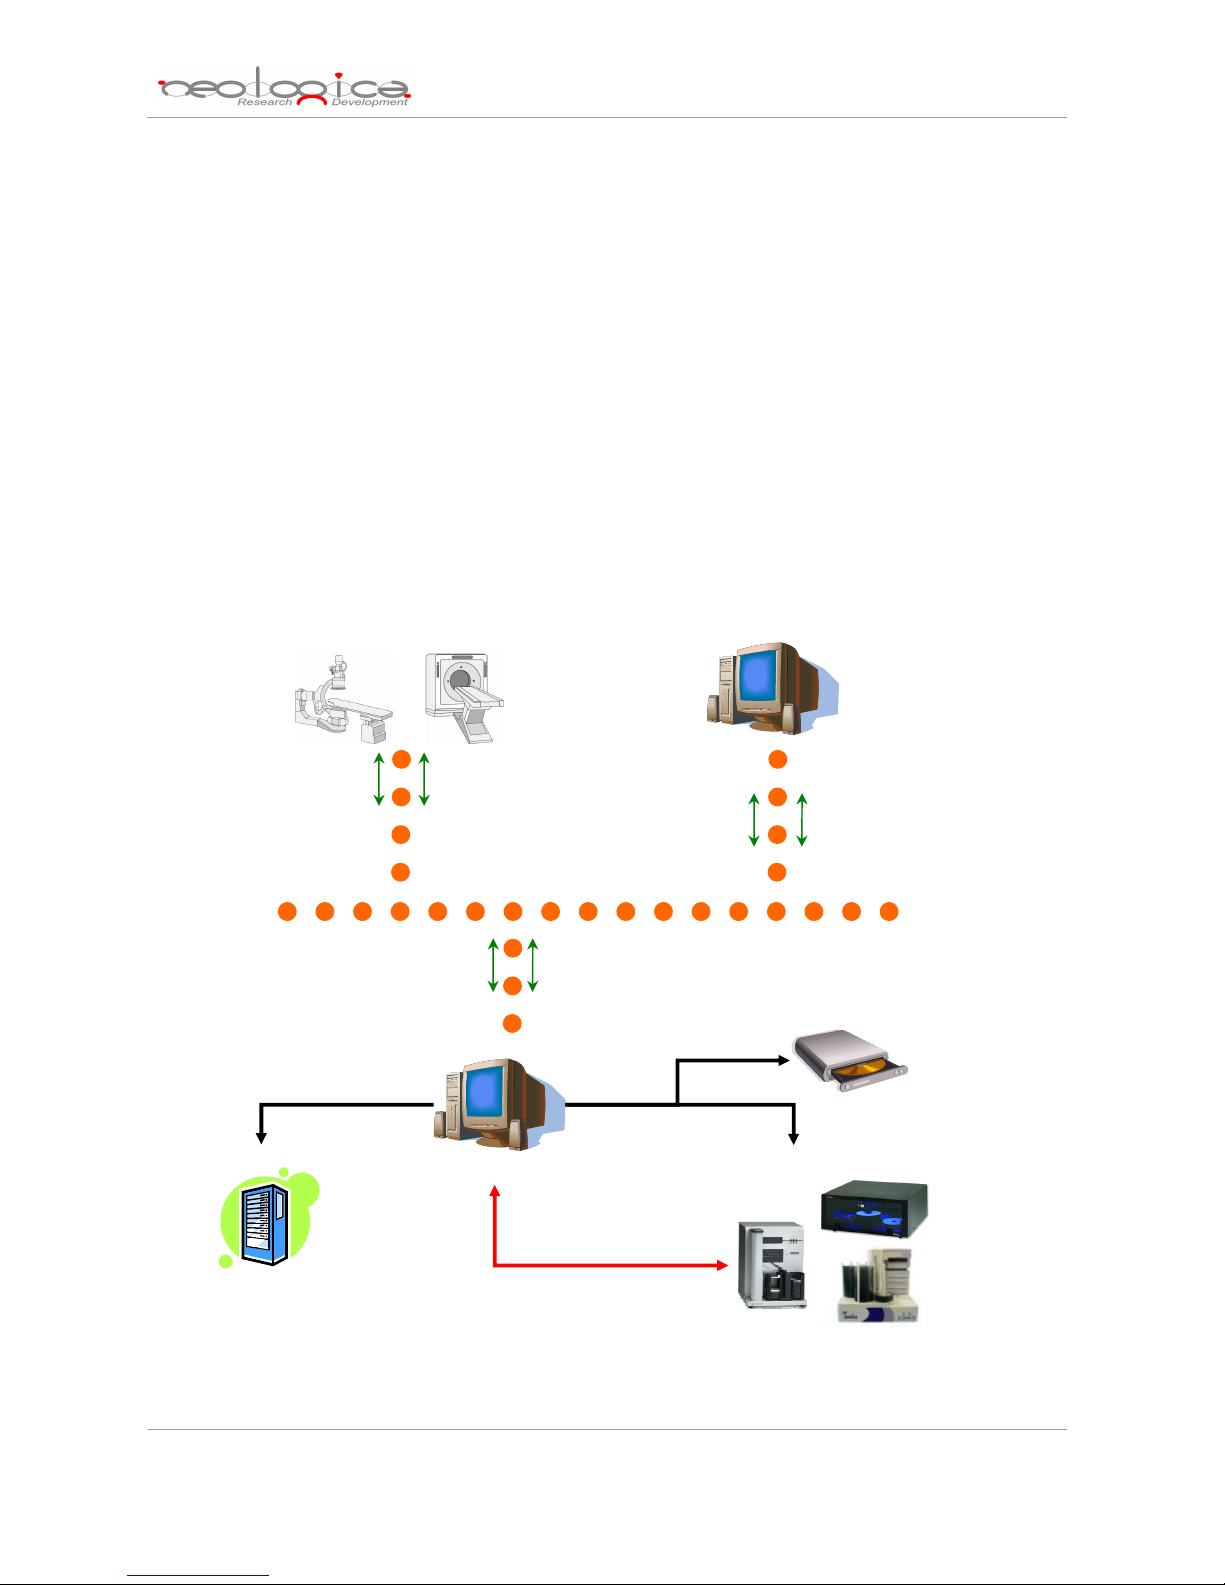
Database
CD/DVD Burner
CD/DVD Production Unit
DICOM Modalities
DICOM Peer
DICOMBurner System
Interaction of the
DICOM
Burner
system with a
DICOM network
DICOMBurner: User Manual [DB-UM-3 – Rev B]
3 Introduction
NeoLogica DICOMBurner is a mini-PACS system that allows a complete interaction with a DICOM
Network. It’s able to import/export DICOM files coming from digital modalities or local disks. It has advanced
CD/DVD production capabilities.
DICOMBurner is an interface between the DICOM world of the digital modalities and a PC local database to
store them. DICOMBurner software runs on a PC based hardware platform equipped with a CD or DVD
burner. In addition it can be equipped with a CD/DVD Production Unit (such as Rimage, MFDigital or Primera)
to automate the CD/DVD burning and to print the CD/DVD surface in order to label it.
DICOMBurner is a Windows-based server application running in background: no user interaction is
necessary to have it working as a DICOM SCP for storage or query/retrieve. Nevertheless, a GUI is provided
in order to adjust configuration parameters and to burn the received DICOM files.
DICOM Store
Archive
DICOM Query/Retrieve
DICOM Store
DICOM Store
DICOM Network
DICOM Query/Retrieve
Backup/Restore Images and
Database
DICOM Query/Retrieve
Burn
7
Page 8
This document will explain the meaning of the available configuration parameters and all the functionalities
available from the DICOMBurner GUI.
DICOMBurner: User Manual [DB-UM-3 – Rev B]
4 Interface architecture and main dialog
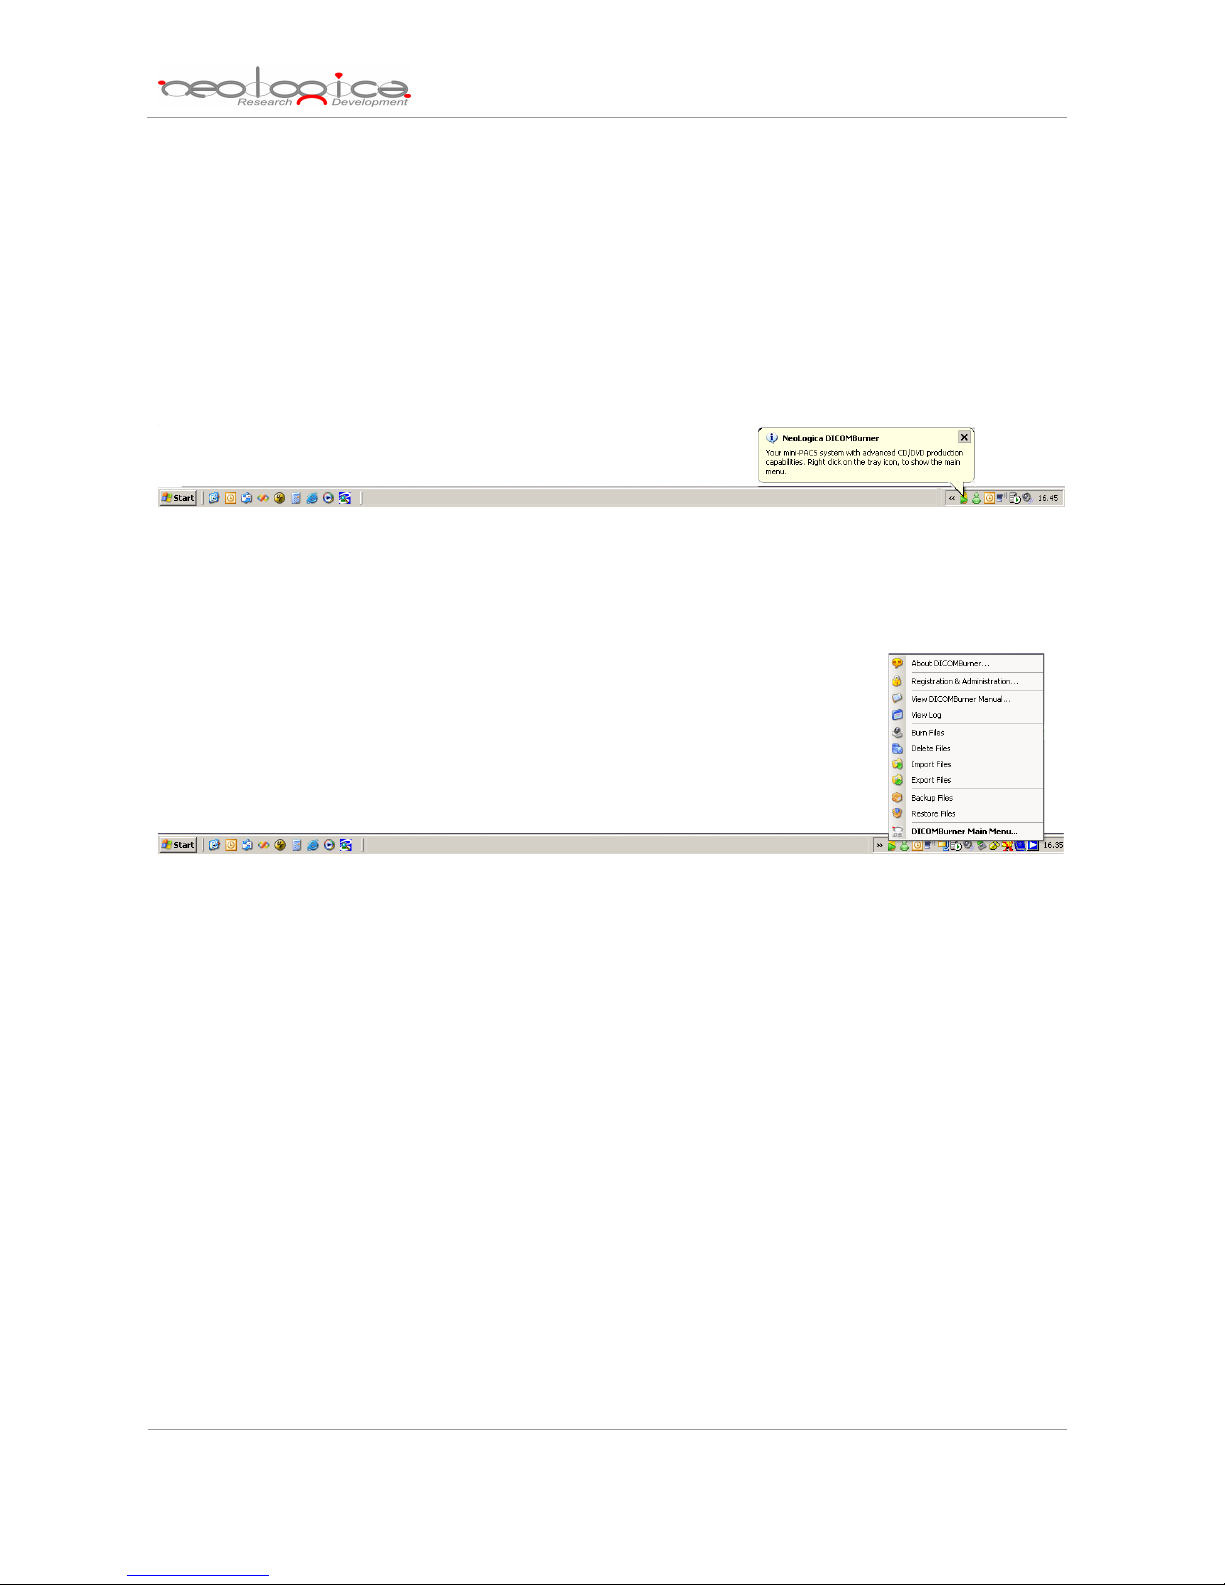
The DICOMBurner application runs in background, with an icon in the system tray area of Windows.
When you start the application, a balloon tooltip for the system tray icon is displayed for some seconds.
DICOMBurner’s icon in the system tray of Windows
By right-clicking on the icon, the DICOMBurner tray menu appears:
DICOMBurner’s main tray menu
By double-clicking on the DICOMBurner tray icon, the main DICOMBurner dialog appears. This dialog box
provides some status information and global statistics about the DICOM associations.
The following picture shows a snapshot of DICOMBurner’s main dialog box.
8
Page 9

DICOMBurner: User Manual [DB-UM-3 – Rev B]
DICOMBurner’s main dialog box
In DICOMBurner’s main dialog box, the following information is provided:
• Store SCP Server:
o Current server status: tells if the connection server is started or stopped. The connection
server must be started if client connections and associations from Storage SCU have to be
accepted. When the connection server is started, it is impossible to modify the DICOMBurner
configuration parameters. In order to access to the configuration features, the server must be
stopped first.
o Listening TCP Port: the TCP Port where DICOMBurner is listening to for incoming connections.
9
Page 10

DICOMBurner: User Manual [DB-UM-3 – Rev B]
• General Statistics:
o Max concurrent associations: the maximum number of concurrent DICOM associations
accepted by DICOMBurner. This value may be changed in the “Settings… DICOM
Configuration” section.
Active: the number of DICOM associations currently active. This value gives an
indication of the current workload.
Available: the number of concurrent DICOM associations that are still available.
o Association requests since startup: the number of DICOM association requests received
since the application startup.
Accepted: the number of accepted DICOM association requests since the application
startup.
Rejected: the number of rejected DICOM association requests since the application
startup. An association request may be rejected, for instance, because the maximum
number of concurrent associations has been reached.
Released: the number of DICOM associations that have been regularly released by
DICOMBurner.
Aborted: the number of aborted DICOM associations since the application startup. An
association may be aborted by both the SCP and the SCU when an abnormal condition
occurs (unexpected PDU, DICOM Upper Layer protocol error, etc.).
o Storage usage: represents the usage of the DICOM files archive.
Used: the size of the used storage expressed in MByte.
Available: the size of the available space for the storage expressed in MByte.
• Task List:
o List: all the tasks that user launched during the server running. It shows the task ID, its starting
time, its name, origination level, status and its progress percentage.
o Task details: the details related to the selected task. Depending on the selected task you can
see some useful information to understand what the task done.
o Delete/Abort buttons: respectively to Delete a completed task and to Abort a running one.
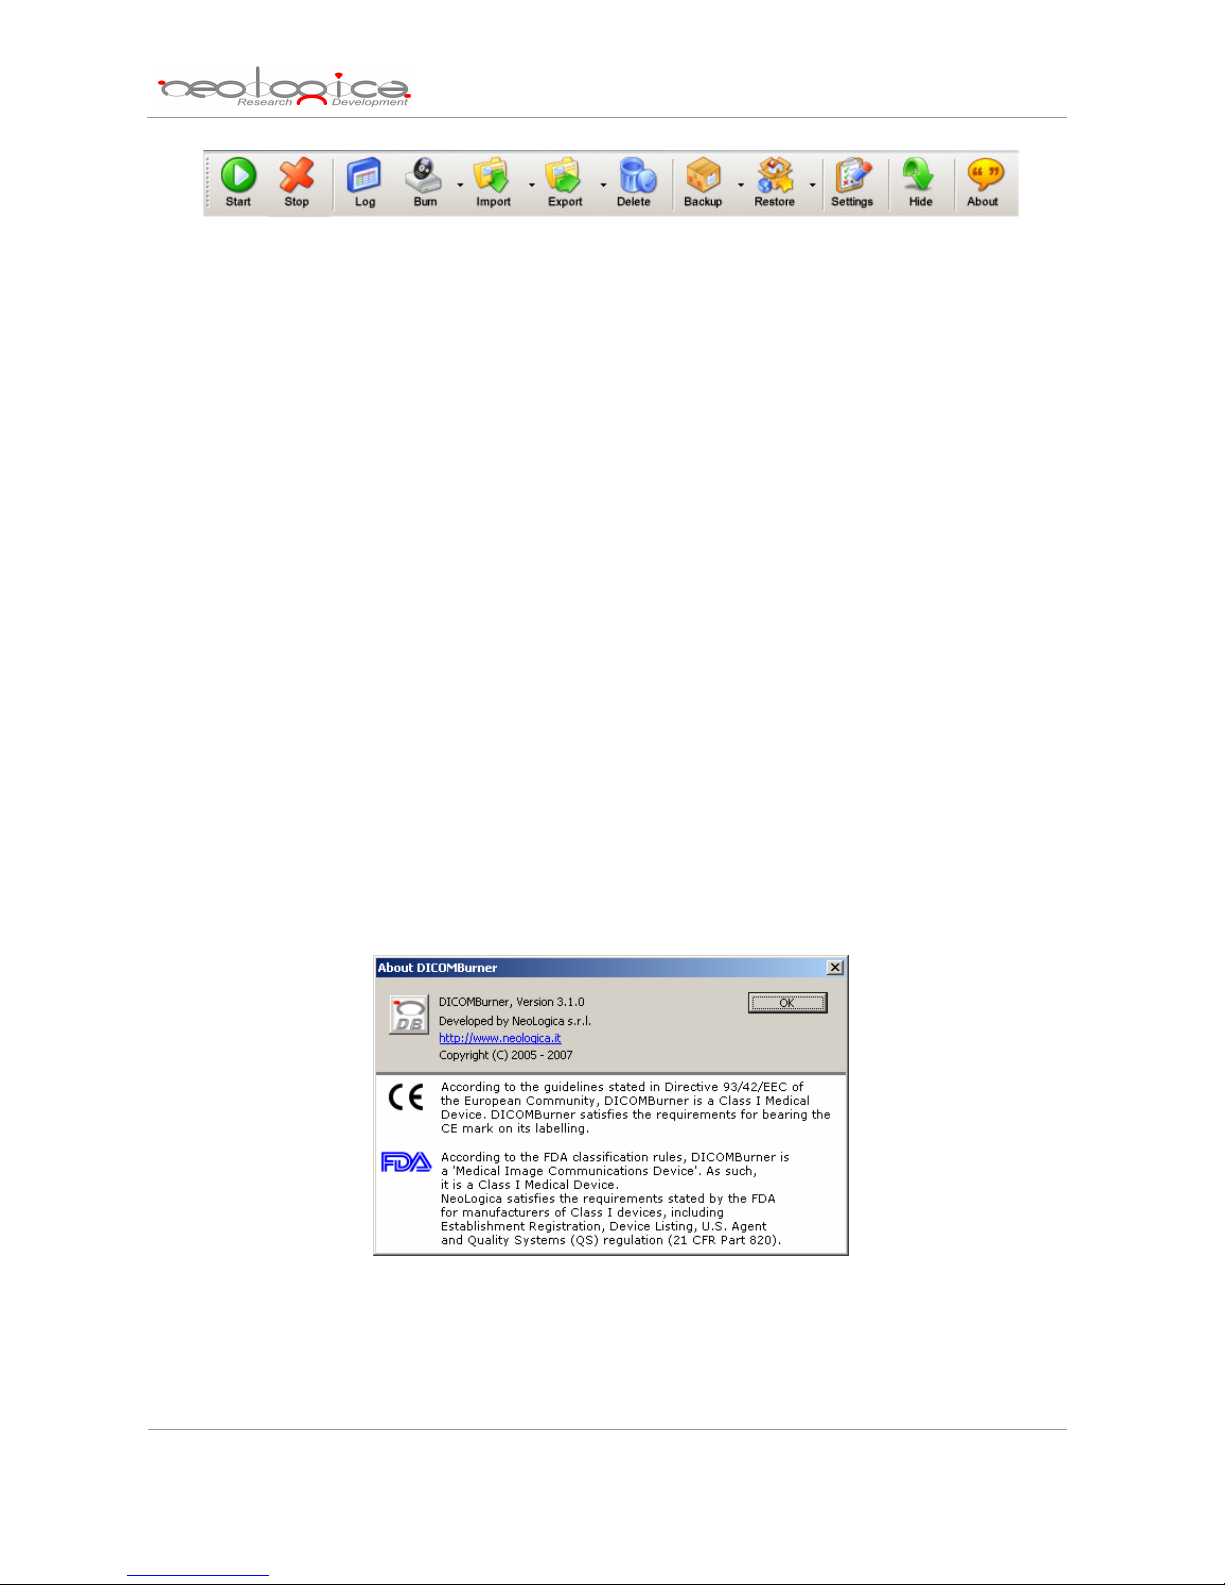
DICOMBurner’s main dialog also provides a toolbar positioned on the top of the client area, which allows
performing all main operations with the program. An overview of each toolbar button is now provided. Each
individual feature will be described in detail in the following sections.
10
Page 11
DICOMBurner: User Manual [DB-UM-3 – Rev B]
• Start: starts DICOMBurner’s connection server. This allows accepting connections and DICOM
association requests from DICOM Storage SCU’s. Once the server is started, the “Settings” button
is disabled.
• Stop: stops DICOMBurner’s connection server. Once the server is stopped, it is no longer possible
to accept connections and association requests from DICOM Storage SCUs. On the other side, the
“Settings” button is re-enabled.
• Log: opens the “View Log” dialog (described later in this document).
• Burn: allows burning received DICOM files onto CDs or DVDs.
• Import: allows importing DICOM files from a local folder or from a DICOM device (DICOM
query/retrieve SCU) to the local database of the DICOMBurner.
• Export: allows exporting DICOM images into a local folder choosing a format among DICOM, BMP,
TIFF, PNG and JPEG. In addition it’s possible to export to a DICOM device (DICOM Store SCU).
• Delete: opens a GUI wizard allowing the selection of files to be deleted from the database.
• Backup: allows the backup of DICOM files or database content.
• Restore: allows the restore of DICOM files or database content (Disaster Recovery).
• Settings: allows entering the DICOMBurner configuration section. This functionality is only enabled
when the connection server is stopped.
• Hide: causes DICOMBurner to be minimized as a system tray icon.
• About: displays information about the current DICOMBurner version. The following picture shows
the “About DICOMBurner” dialog box for version 3.1 of DICOMBurner.
Some of the functionalities available through the buttons located on DICOMBurner’s main toolbar are also
available through the tray menu, by right-clicking on the DICOMBurner tray icon.
The About DICOMBurner dialog box
11
Page 12
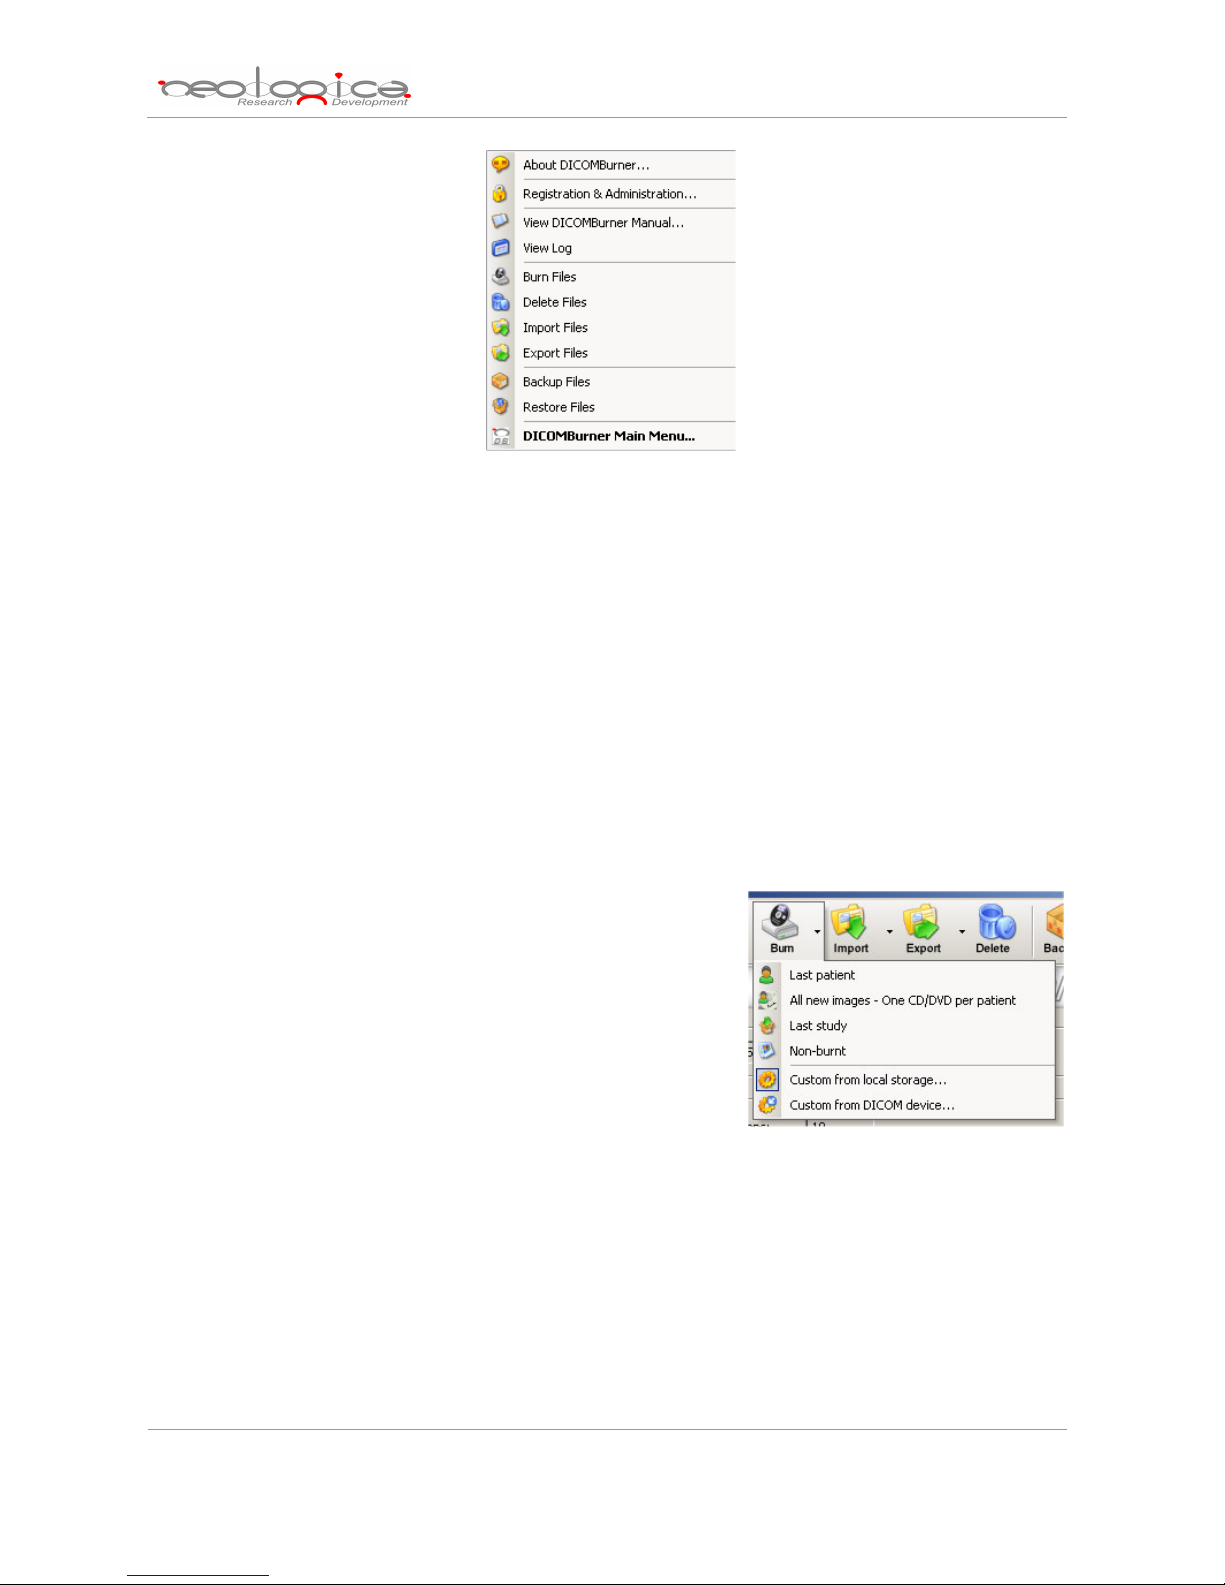
The DICOMBurner tray menu
DICOMBurner: User Manual [DB-UM-3 – Rev B]
5 Creating a CD/DVD of DICOM files
DICOMBurner allows creating DICOM-compliant CDs or DVDs containing DICOM files. The DICOM
files to be stored on CD or DVD can be selected by the user through intuitive wizard-based procedures. The
produced media also contains an autorunning DICOM Viewer which allows viewing the medical images on a
PC. A viewer named LocalEye and developed by NeoLogica is bundled with DICOMBurner, but the user can
select any other he likes.
DICOMBurner provides a quick and easy process to burn the received DICOM files. If you want you can burn
them by just one mouse click. The “Burning” dialog box appears when you press the “Burn” button on the
main toolbar or on the correspondent menu item from the DICOMBurner tray pop-up menu. There exist six
kinds of burning procedures:
1. Burn last patient
2. Burn all new images – One CD/DVD per patient
3. Burn last study
4. Burn non-burnt
5. Burn custom from local storage
6. Burn custom from DICOM device
These six options are accessible by clicking the small down arrow located next to the “Burn” button on the
main toolbar. Once you select one of the available burning options from the pop-up menu, it will become the
default option associated with the “Burn” toolbar button.
Note: if the set of DICOM files to burn exceeds the free size of the media you’ve loaded, then DICOMBurner
spans the DICOM files over two or more CDs/DVDs.
12
Page 13
DICOMBurner: User Manual [DB-UM-3 – Rev B]
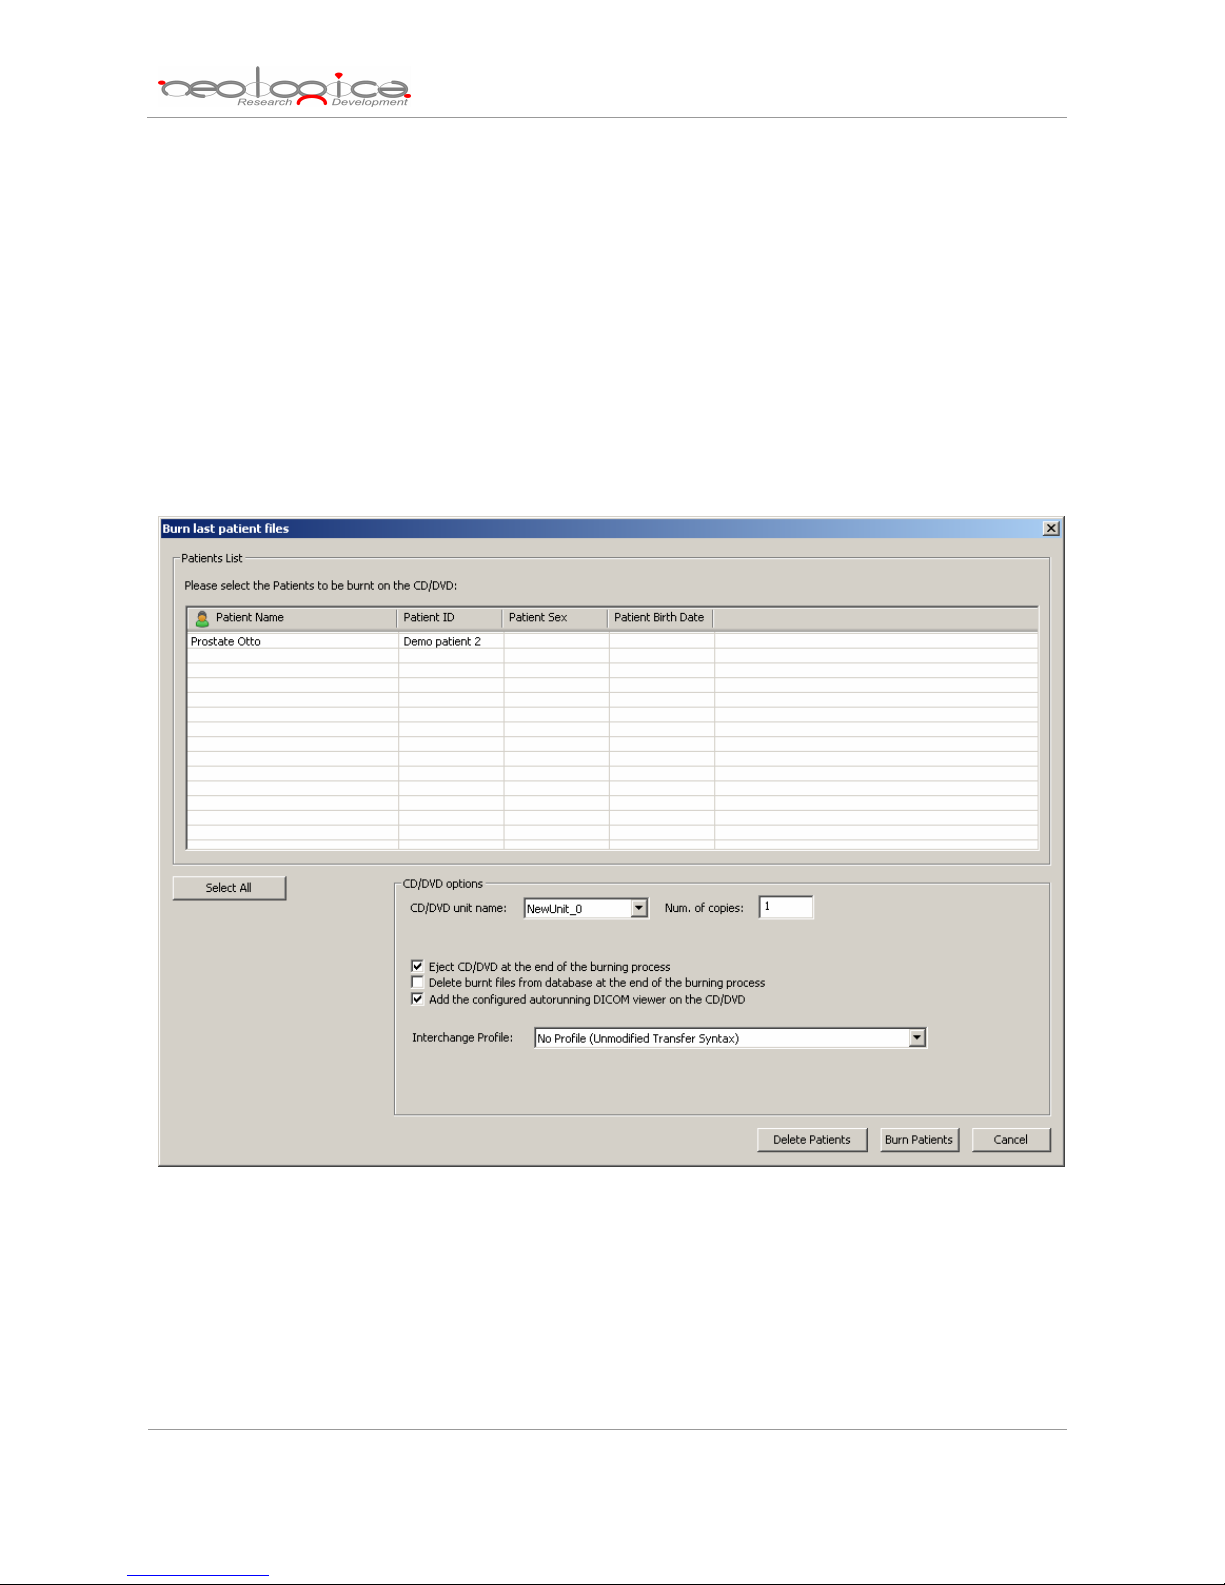
5.1 Burn last patient
By selecting the “Burn last patient” option, you are able to burn all the DICOM files related to the
patient the last received and stored image belongs to (i.e. the “last patient”). DICOMBurner displays a dialog
showing the data related to the last patient. Then you have to select the patient you want to burn and in
addition you can change the CD/DVD options with respect to the default one set by the “CD/DVD Burner
Configuration” tab. Pressing the “Burn Patients” button will start the actual CD or DVD writing procedure.
Otherwise by pressing the “Delete Patients” button you can delete the selected patient and its instances
from the storage and database.
5.2 Burn all new images – One CD/DVD per patient
By selecting the “Burn all new images – One CD/DVD per patient” option, you are able to burn all the
new DICOM files received by DICOMBurner (since last burn), creating one CD/DVD per patient.
DICOMBurner displays a dialog showing the data related to the patients. This dialog may eventually list more
then one patient when several DICOM files belonging to different patients have been received and stored by
13
Page 14
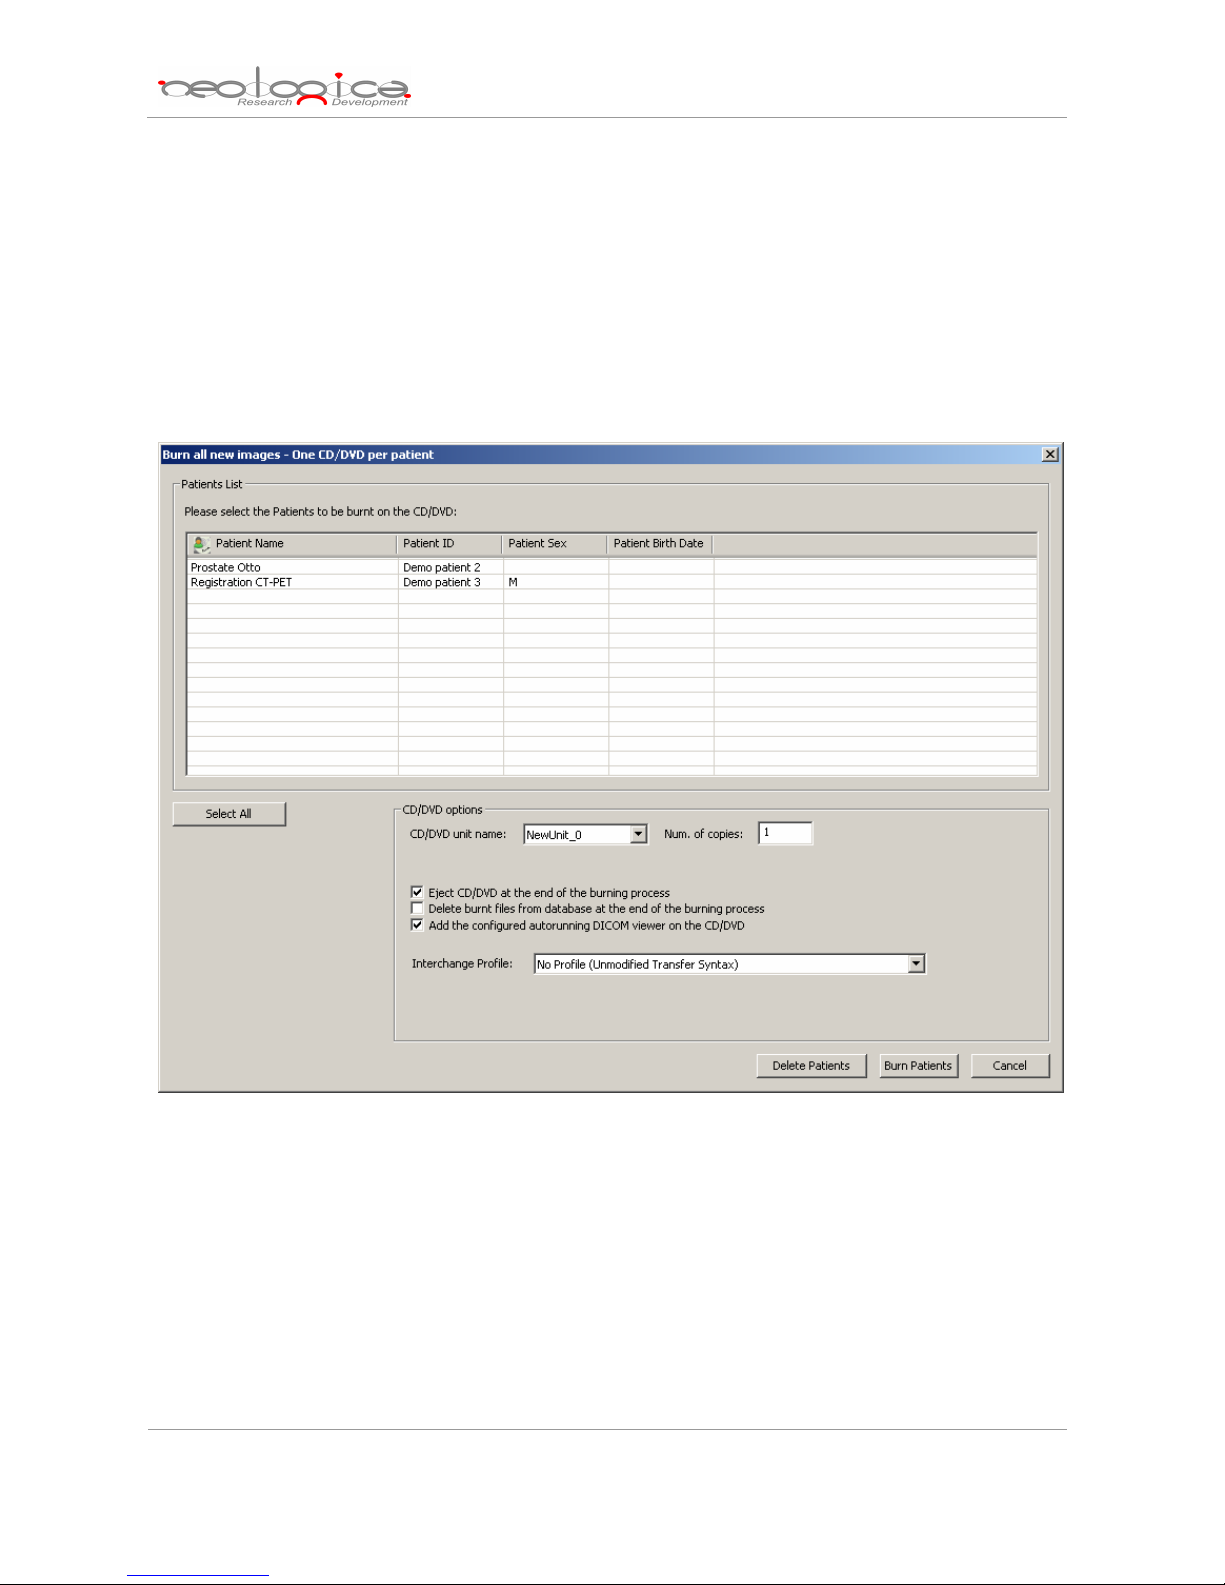
DICOMBurner since last burn operation. Then you can choose the patients you want to burn and in addition
you can change the CD/DVD options with respect to the default one set by the “CD/DVD Burner
Configuration” tab. Pressing the “Burn Patients” button will start the actual CD or DVD writing procedure.
Otherwise by pressing the “Delete Patients” button you can delete the selected patient and its instances
from the storage and database.
If you select a CD/DVD Production Robot by the “CD/DVD unit name” list, you can automatically produce a
CD or DVD per patient by selecting all the listed patients. Otherwise by a local burner, only one single patient
can be burnt.
DICOMBurner: User Manual [DB-UM-3 – Rev B]
5.3 Burn last study
By selecting the “Burn last study” option, you are able to burn all the DICOM files related to the study
the last received and stored image belongs to (i.e. the “last study”). DICOMBurner displays a dialog showing
the data related to the last study. Then you have to select the study you want to burn and in addition you can
change the CD/DVD options with respect to the default one set by the “CD/DVD Burner Configuration” tab.
Pressing the “Burn Studies” button will start the actual CD or DVD writing procedure. Otherwise by pressing
the “Delete Studies” button you can delete the selected study and its instances from the storage and
database.
14
Page 15

DICOMBurner: User Manual [DB-UM-3 – Rev B]
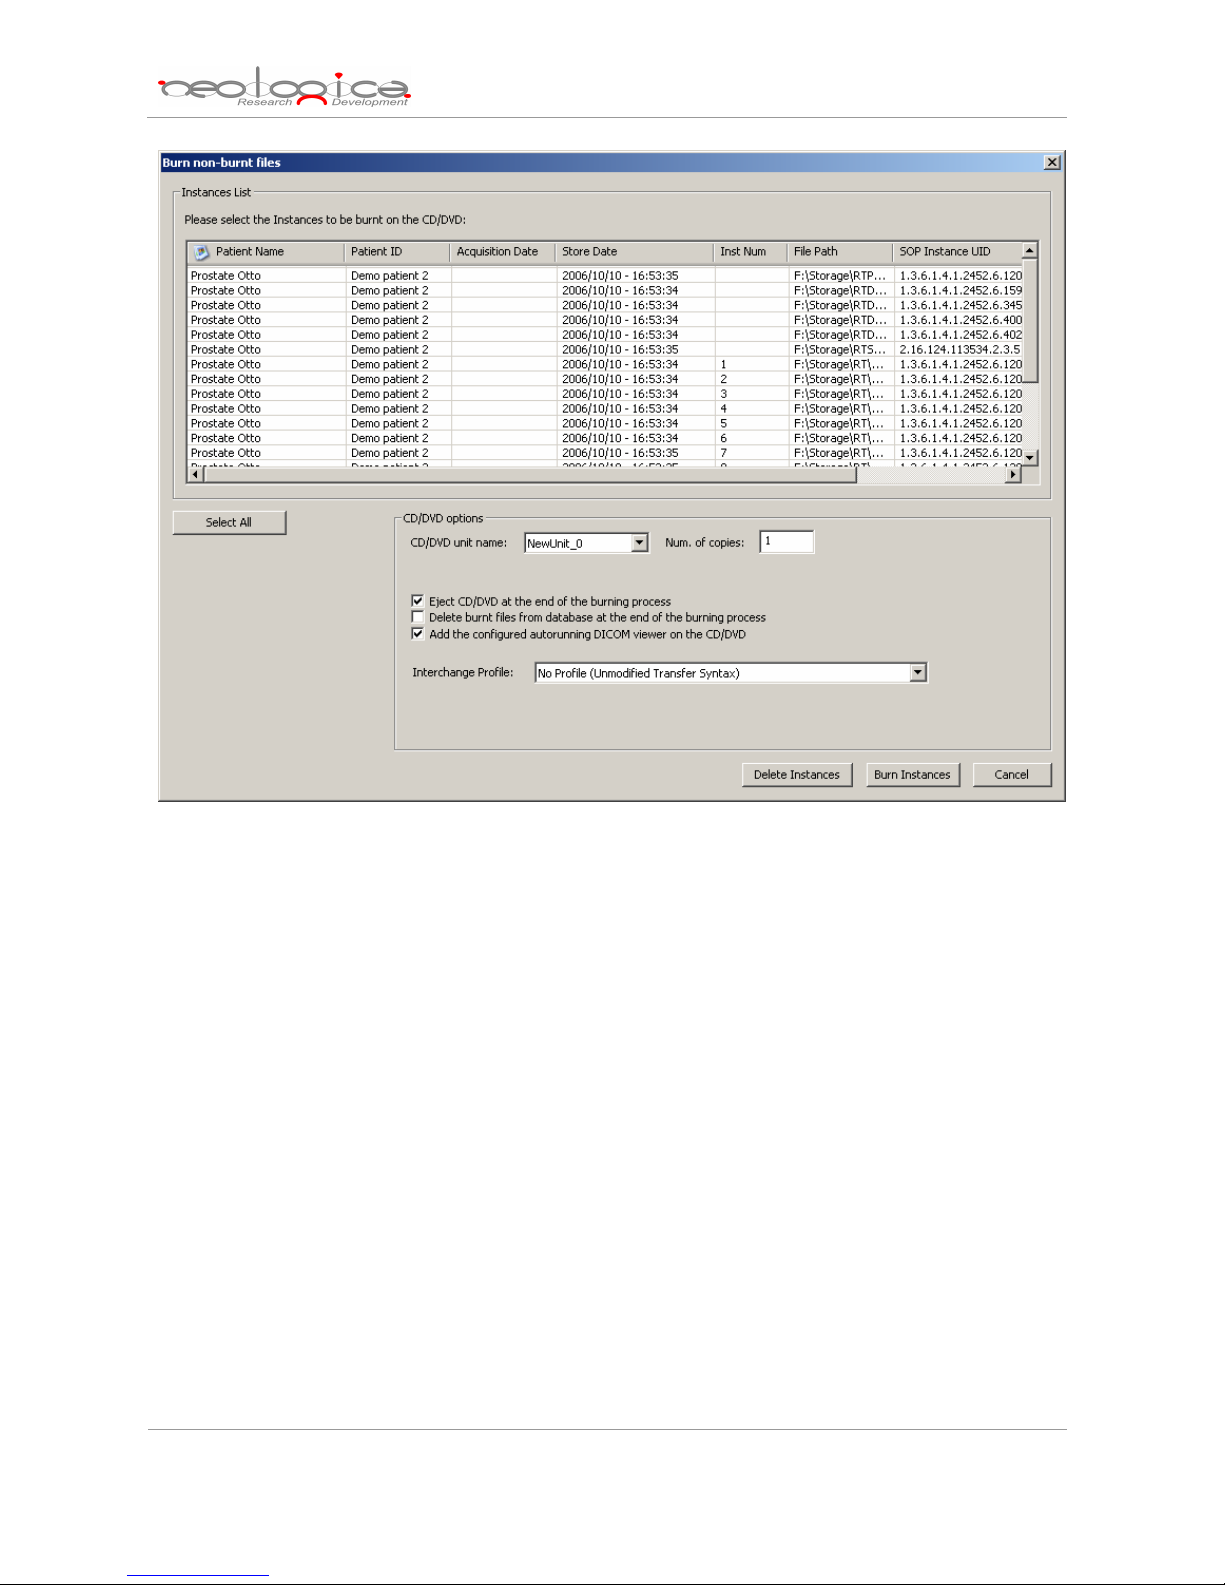
5.4 Burn non-burnt
By selecting the “Burn non-burnt” option, you are able to burn all the DICOM files which have been
received and stored by DICOMBurner, but which haven’t been burnt onto CD or DVD yet. DICOMBurner
displays a dialog box showing the list of non-burnt instances. Then you can choose the DICOM files you
want to burn and in addition you can change the CD/DVD options with respect to the default one set by the
“CD/DVD Burner Configuration” tab. Pressing the “Burn Instances” button will start the actual CD or DVD
writing procedure. Otherwise by pressing the “Delete Instances” button you can delete the selected
instances from the storage and database.
15
Page 16
DICOMBurner: User Manual [DB-UM-3 – Rev B]
5.5 Burn custom from local storage
If you select the “Burn custom from local storage” option, DICOMBurner shows a GUI wizard guiding
you through a hierarchical (Study – Series – Instance) selection of the DICOM files to burn onto CD or DVD.
The DICOM files will be selected by query the local storage.
5.5.1 Study-level search
The study-level step of the wizard procedure allows you to select the studies containing the DICOM
files you want to burn onto CD or DVD. This step includes both the filtering options related to patient and
study levels. The list of studies can be filtered by specifying some filtering options (or search criteria): in
particular, the patient identification filters, the acceptable range of birth dates, the patient sex and the
acceptable range of study dates. By pressing the “Filter” button you obtain the list of studies satisfying the
set conditions. Then you can select all studies you are interested in by using the mouse and multiple file
selection technique. The “Deselect All/Select All” button can simplify this task. The number of studies,
studies size, number of series and number of instances are provided for the selected studies. Finally, you
can proceed to the next step by pressing the “Next>” button. As a shortcut you can start the burning or
16
Page 17

deleting procedure of the selected studies without reaching the last wizard step by pressing the “Burn
Studies” button or “Delete Studies” button respectively. DICOMBurner will execute the burning operation
using the default burning options.
DICOMBurner: User Manual [DB-UM-3 – Rev B]
5.5.2 Series-level search
The series-level step of the wizard procedure allows you to select the series containing the DICOM
files you want to burn onto CD or DVD. The list of series can be filtered by specifying some filtering options
(or search criteria): in particular, you can set the acceptable range of series dates and the producing
modalities. By pressing the “Filter” button you obtain the list of series satisfying the set conditions. Then you
can select all series you are interested in by using the mouse and multiple file selection technique. The
“Deselect All/Select All” button can simplify this task. The number of series, series size and number of
instances are provided for the selected series. Finally, you can proceed to the next step by pressing the
“Next>” button. As a shortcut you can start the burning or deleting procedure of the selected series without
17
Page 18
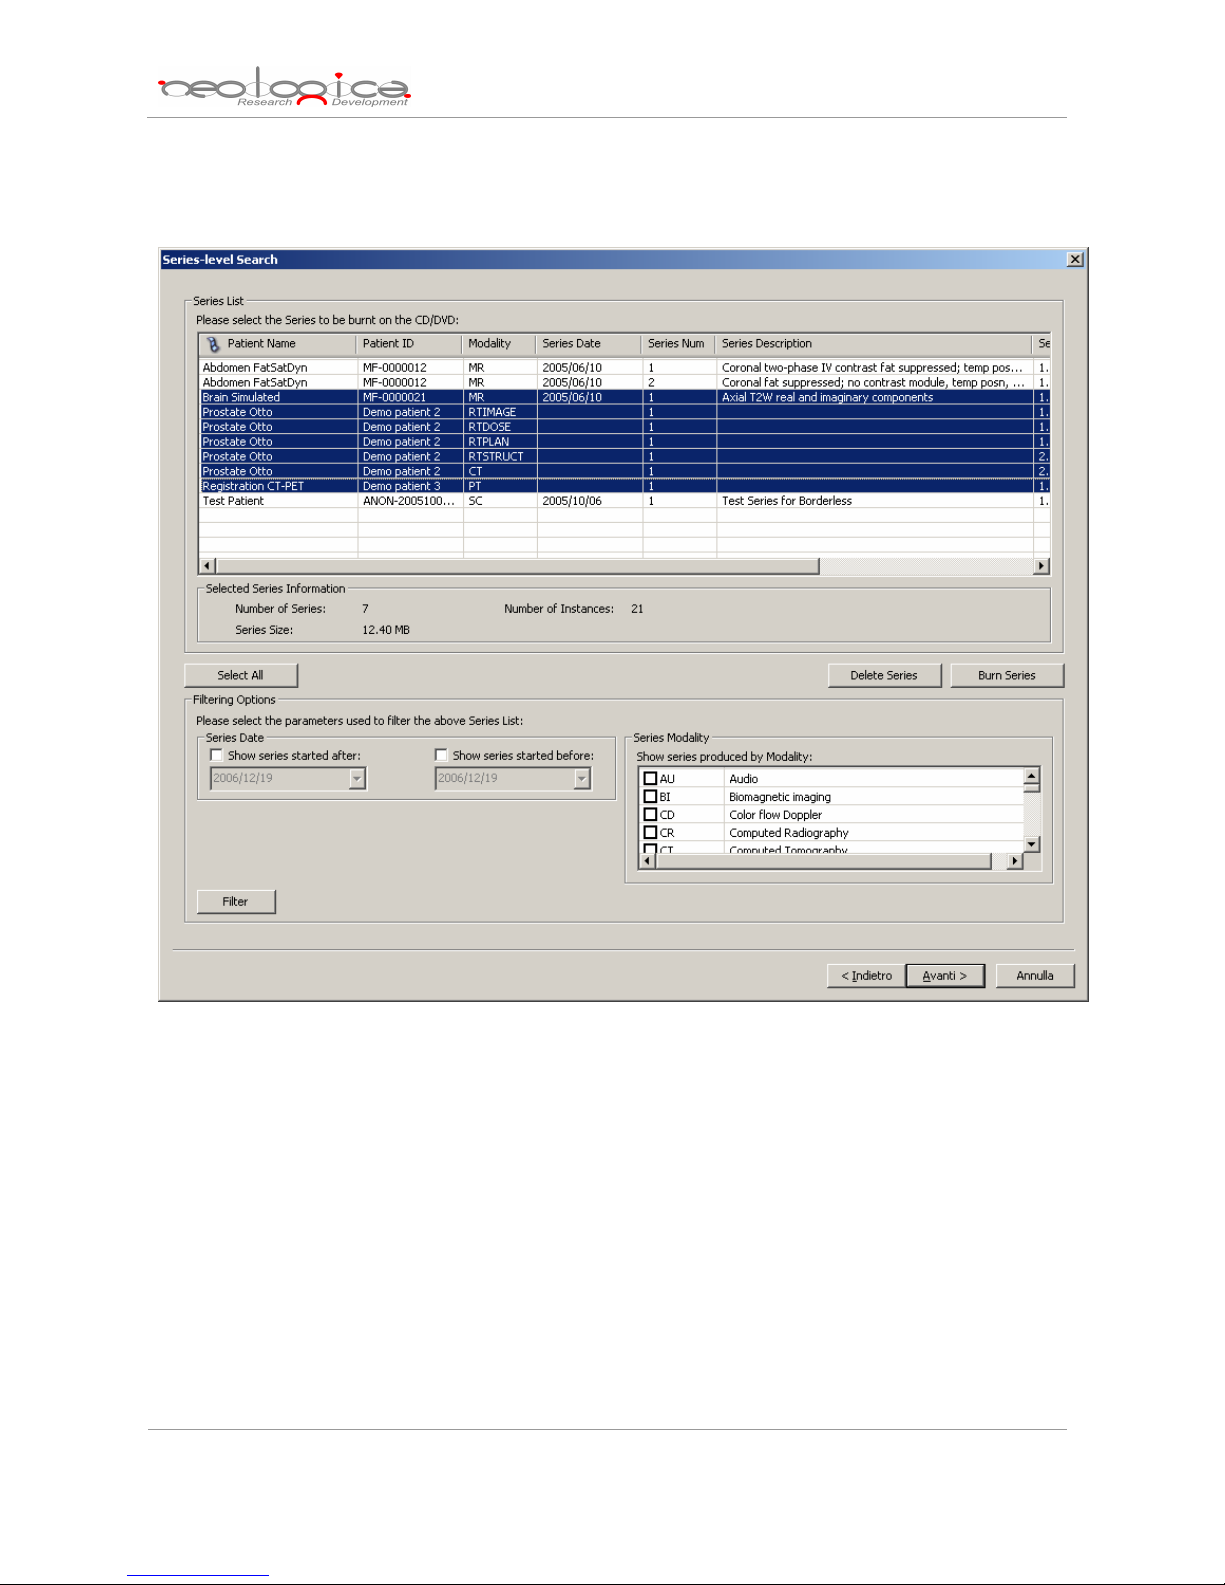
reaching the last wizard step by pressing the “Burn Series” button or “Delete Series” button respectively.
DICOMBurner will execute the burning operation using the default burning options.
DICOMBurner: User Manual [DB-UM-3 – Rev B]
5.5.3 Instance-level search
The instance-level step of the wizard procedure allows you to select the DICOM files/instances you
want to burn onto CD or DVD. The list of instances can be filtered by specifying some filtering options (or
search criteria): in particular, you can set the acceptable range of acquisition dates and the acceptable range
of store dates. By pressing the “Filter” button you obtain the list of instances satisfying the set conditions. At
this level if you select an instance by clicking with the mouse over the corresponding row of the Instance List,
you obtain a preview image of the DICOM file. Then you can select all instances you are interested in by
using the mouse and multiple file selection technique. The “Deselect All/Select All” button can simplify this
task. Finally, you can proceed to the next step by pressing the “Next>” button. As a shortcut you can start
the burning or deleting procedure of the selected instances without reaching the last wizard step by pressing
18
Page 19

the “Burn Instances” button or “Delete Instances” button respectively. DICOMBurner will execute the
burning operation using the default burning options.
DICOMBurner: User Manual [DB-UM-3 – Rev B]
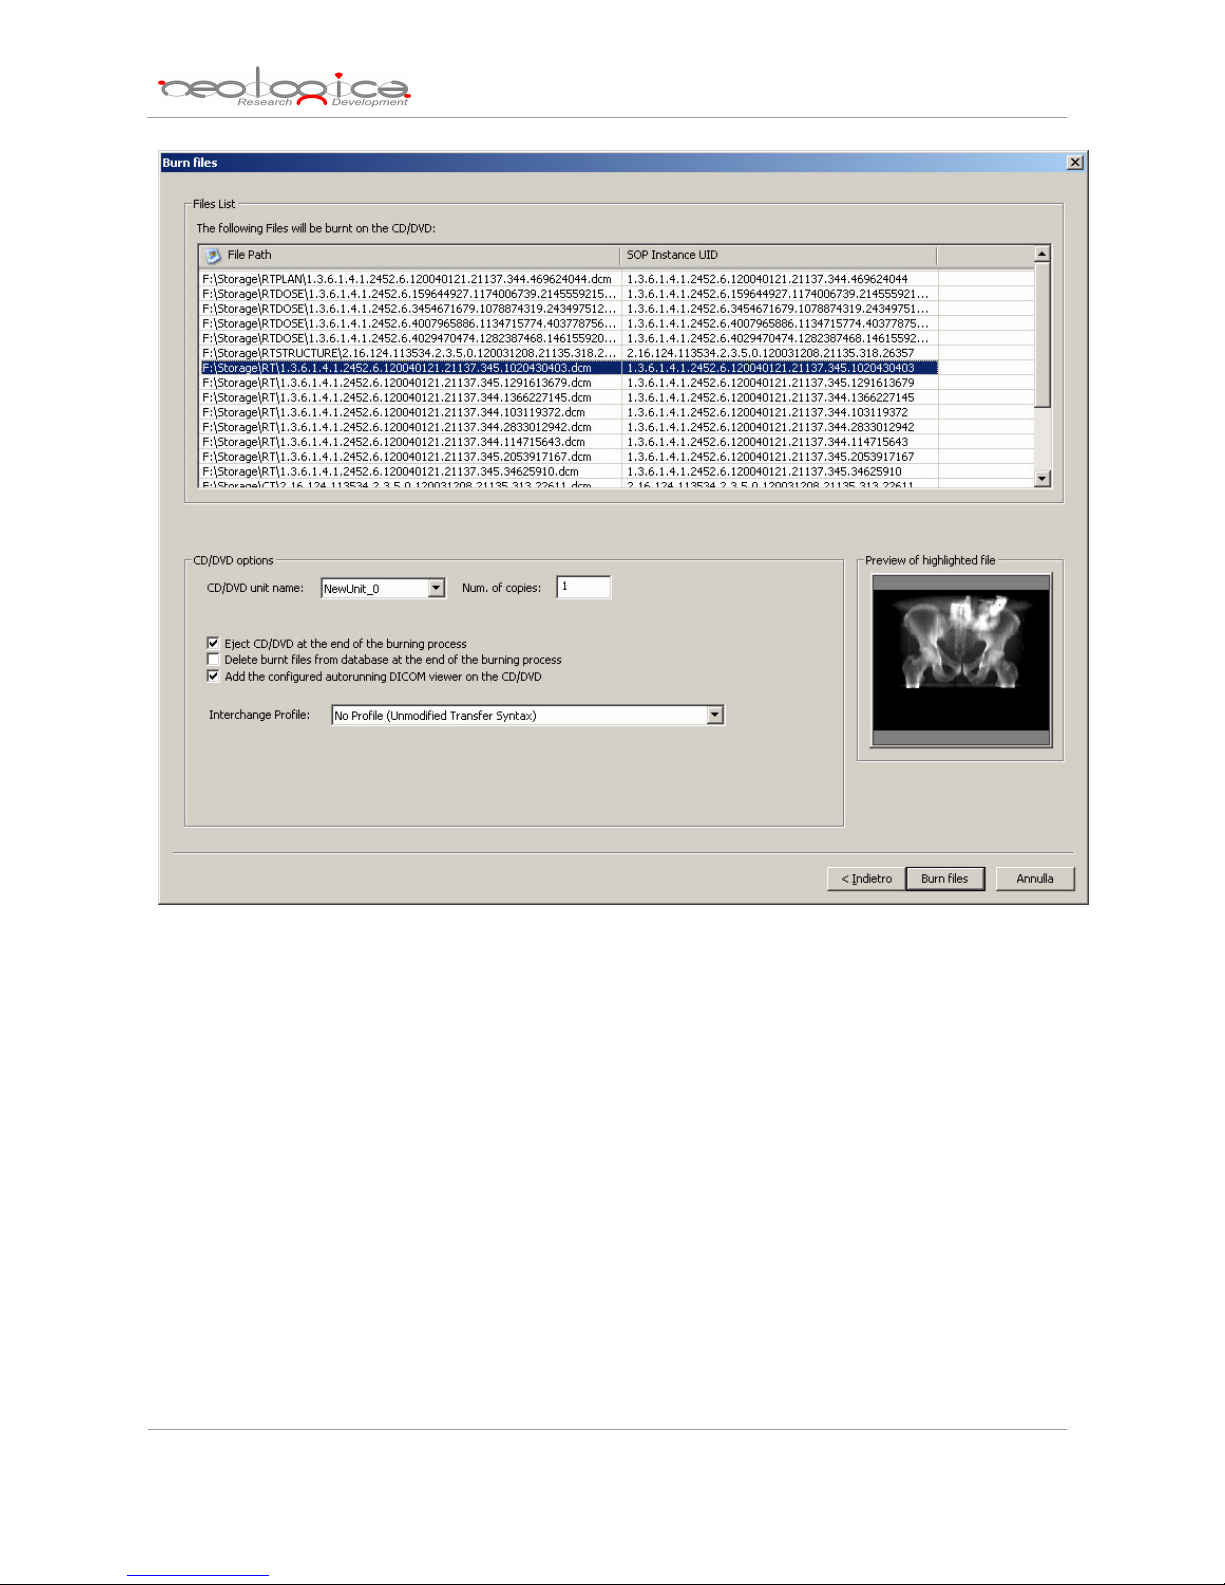
5.5.4 Burn files step
The burn file step is the last one in the wizard procedure: a list of the files that will be burnt on the
CD/DVD is displayed. If you select a file by clicking with the mouse over the corresponding row of the Files
List, you obtain a preview image of the DICOM file. Finally, you can start the burning process by pressing the
“Burn files” button. Also in this case in you can change the CD/DVD options with respect to the default one
set by the “CD/DVD Burner Configuration” tab.
19
Page 20
DICOMBurner: User Manual [DB-UM-3 – Rev B]
5.6 Burn custom from DICOM device
If you select the “Burn custom from DICOM device” option, DICOMBurner shows a GUI wizard
guiding you through a hierarchical (Study – Series – Instance) selection of the DICOM files to burn onto CD
or DVD. The DICOM files will be selected by sending DICOM query commands to a pre-selected DICOM
device.
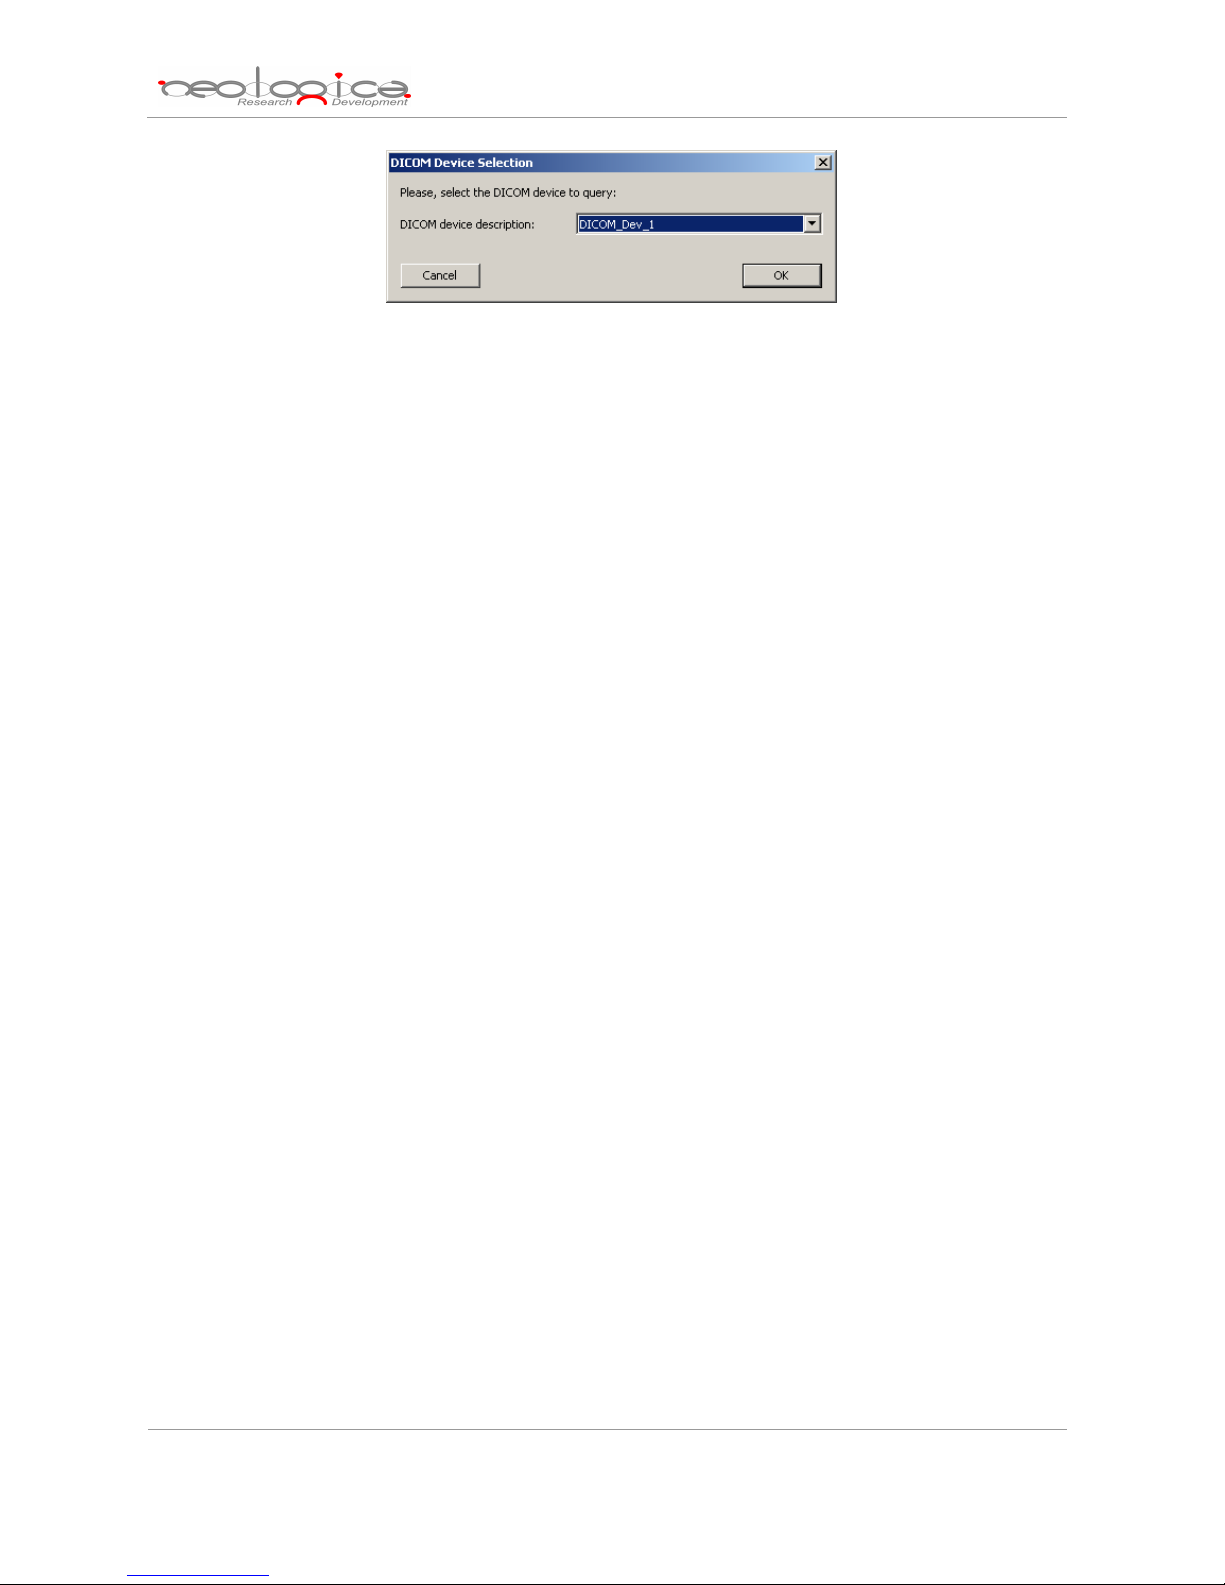
5.6.1 DICOM Device Selection
The following dialog allows you to select the DICOM device to be queried. The DICOM devices have
to be configured by entering the “DICOM Devices Configuration” tab.
20
Page 21
DICOMBurner: User Manual [DB-UM-3 – Rev B]
5.6.2 Study-level search
The study-level step of the wizard procedure allows you to query, select and retrieve the studies
containing the DICOM files you want to burn onto CD or DVD. This step includes both the filtering options
related to patient and study levels. The list of studies can be filtered by specifying some filtering options (or
search criteria): in particular, the patient identification filters, the acceptable range of birth dates, the patient
sex and the acceptable range of study dates. By pressing the “Filter” button you obtain the list of studies
satisfying the set conditions. Then you can select all studies you are interested in by using the mouse and
multiple file selection technique. The “Deselect All/Select All” button can simplify this task. The number of
selected studies is provided. Finally, you can proceed to the next step by pressing the “Next>” button. As a
shortcut you can start the retrieving and burning procedure of the selected studies without reaching the last
wizard step by pressing the “Burn Studies” button. DICOMBurner will execute the burning operation using
the default burning options.
21
Page 22

DICOMBurner: User Manual [DB-UM-3 – Rev B]
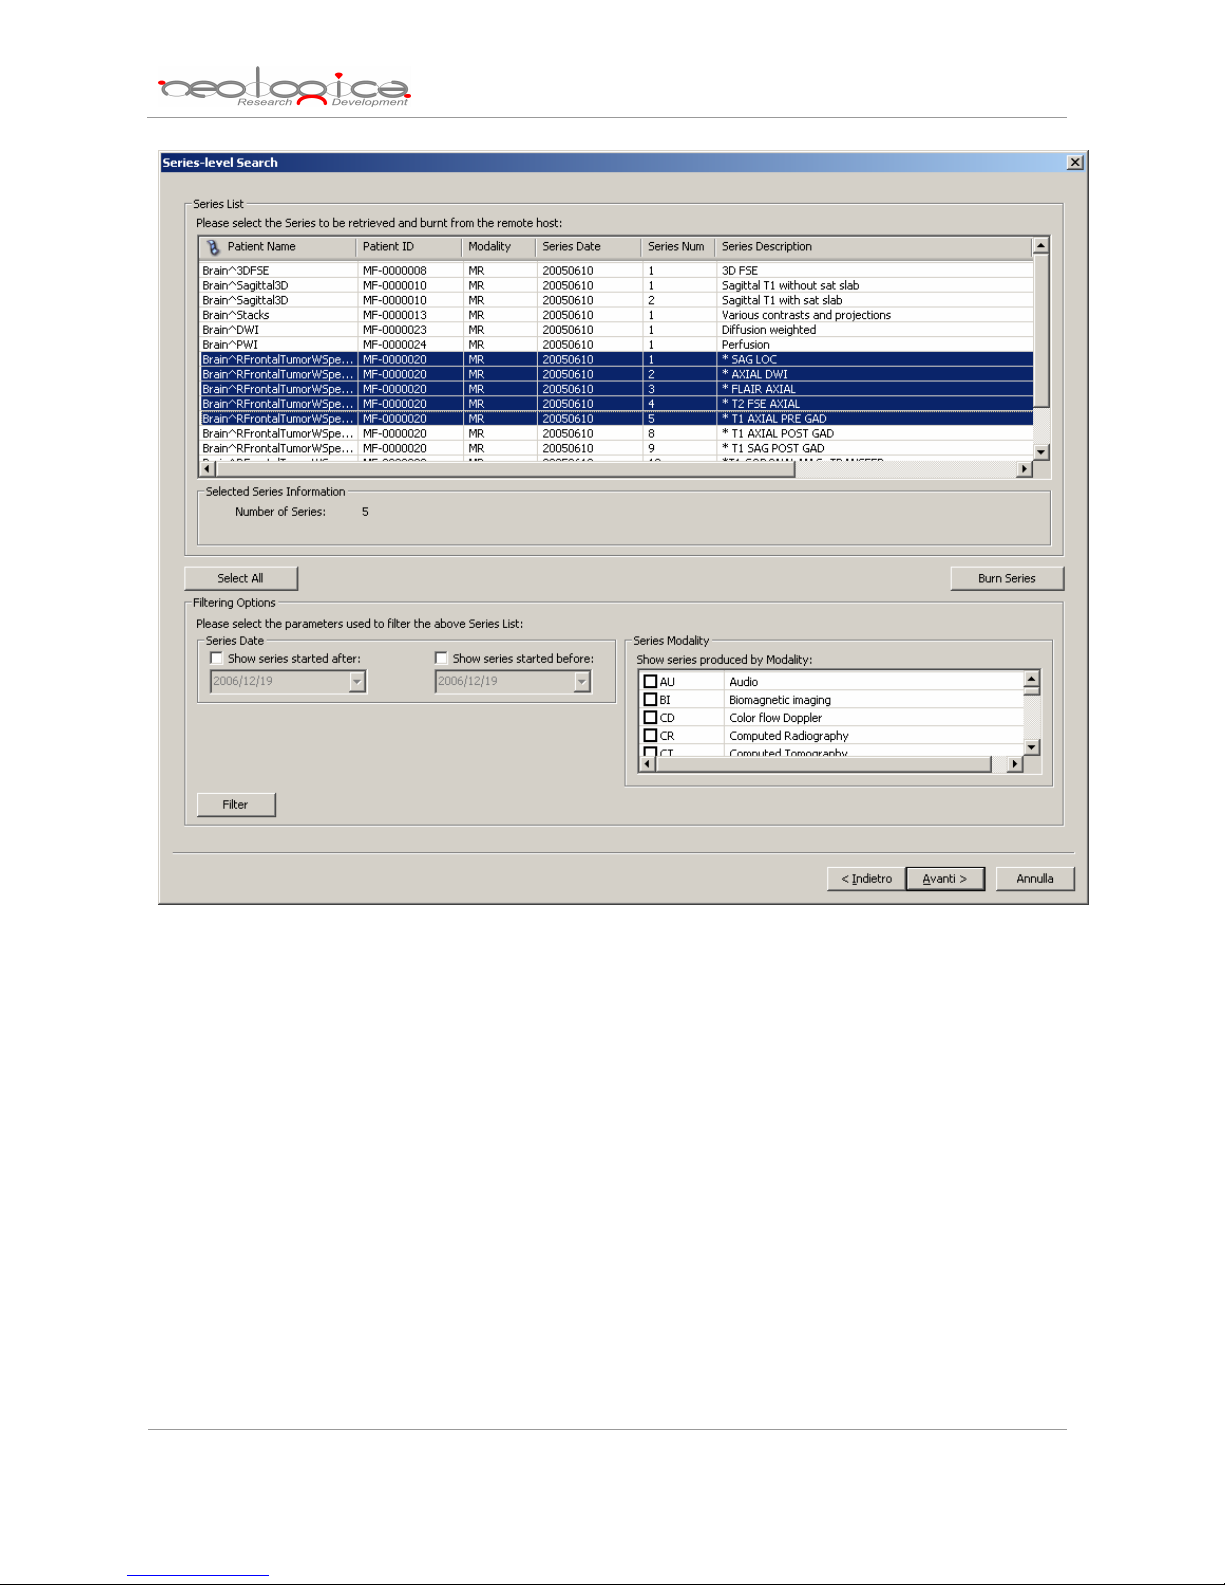
5.6.3 Series-level search
The series-level step of the wizard procedure allows you to query, select and retrieve the series
containing the DICOM files you want to burn onto CD or DVD. The list of series can be filtered by specifying
some filtering options (or search criteria): in particular, you can set the acceptable range of series dates and
the producing modalities. By pressing the “Filter” button you obtain the list of series satisfying the set
conditions. Then you can select all series you are interested in by using the mouse and multiple file selection
technique. The “Deselect All/Select All” button can simplify this task. The number of selected series is
provided. Finally, you can proceed to the next step by pressing the “Next>” button. As a shortcut you can
start the retrieving and burning procedure of the selected series without reaching the last wizard step by
pressing the “Burn Series” button. DICOMBurner will execute the burning operation using the default
burning options.
22
Page 23
DICOMBurner: User Manual [DB-UM-3 – Rev B]
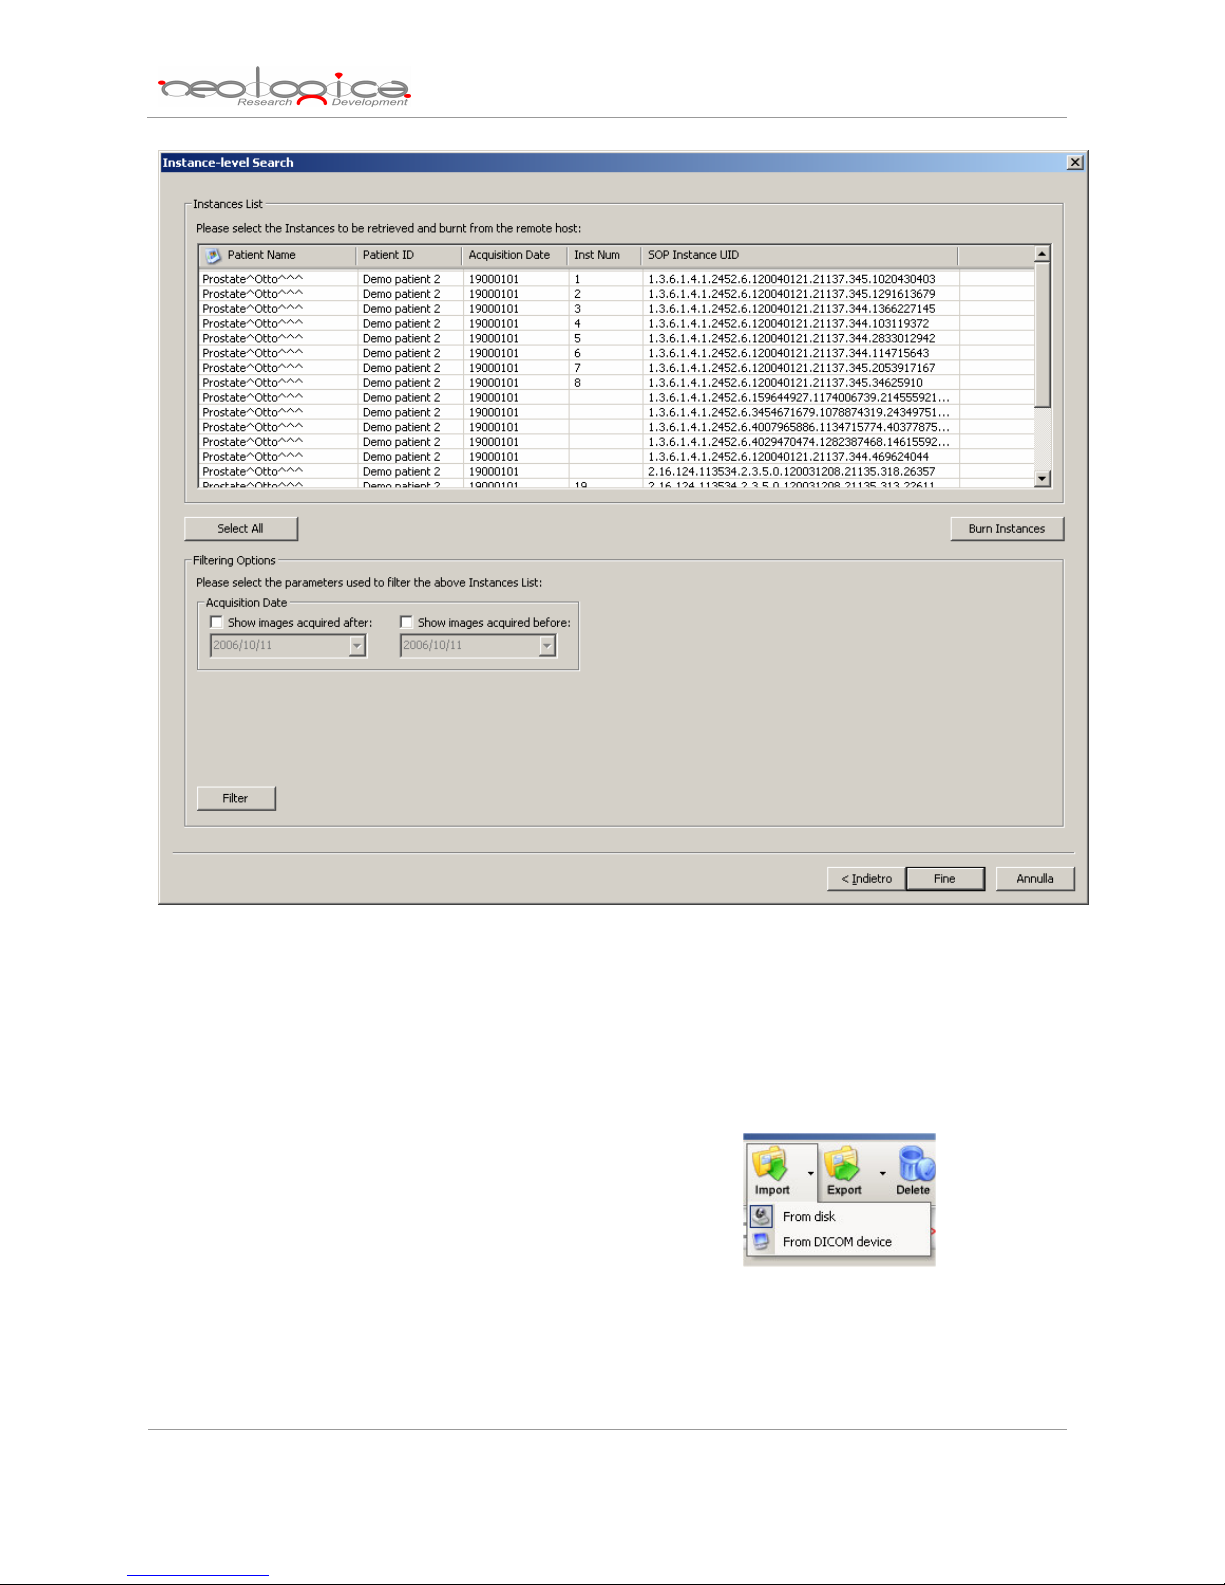
5.6.4 Instance-level search
The instance-level step of the wizard procedure allows you to query, select and retrieve the DICOM
files/instances you want to burn onto CD or DVD. The list of instances can be filtered by specifying some
filtering options (or search criteria): in particular, you can set the acceptable range of acquisition dates and
the acceptable range of store dates. By pressing the “Filter” button you obtain the list of instances satisfying
the set conditions. Then you can select all instances you are interested in by using the mouse and multiple
file selection technique. The “Deselect All/Select All” button can simplify this task. Finally, you can proceed
to the next step by pressing the “Next>” button. You can start the retrieving and burning procedure of the
selected instances by pressing the “Burn Instances” button. DICOMBurner will execute the burning
operation using the default burning options.
23
Page 24
DICOMBurner: User Manual [DB-UM-3 – Rev B]
6 Importing DICOM files
By pressing the “Import” button on the main toolbar or on the correspondent menu item from the
DICOMBurner tray pop-up menu, you can enter the importing feature. There exist two kinds of importing
procedures:
1. Import from disk
2. Import from DICOM device
These two options are accessible by clicking the small down arrow located next to the “Import” button on the
main toolbar. Once you select one of the available importing options from the pop-up menu, it will become
the default option associated with the “Import” toolbar button.
24
Page 25
DICOMBurner: User Manual [DB-UM-3 – Rev B]
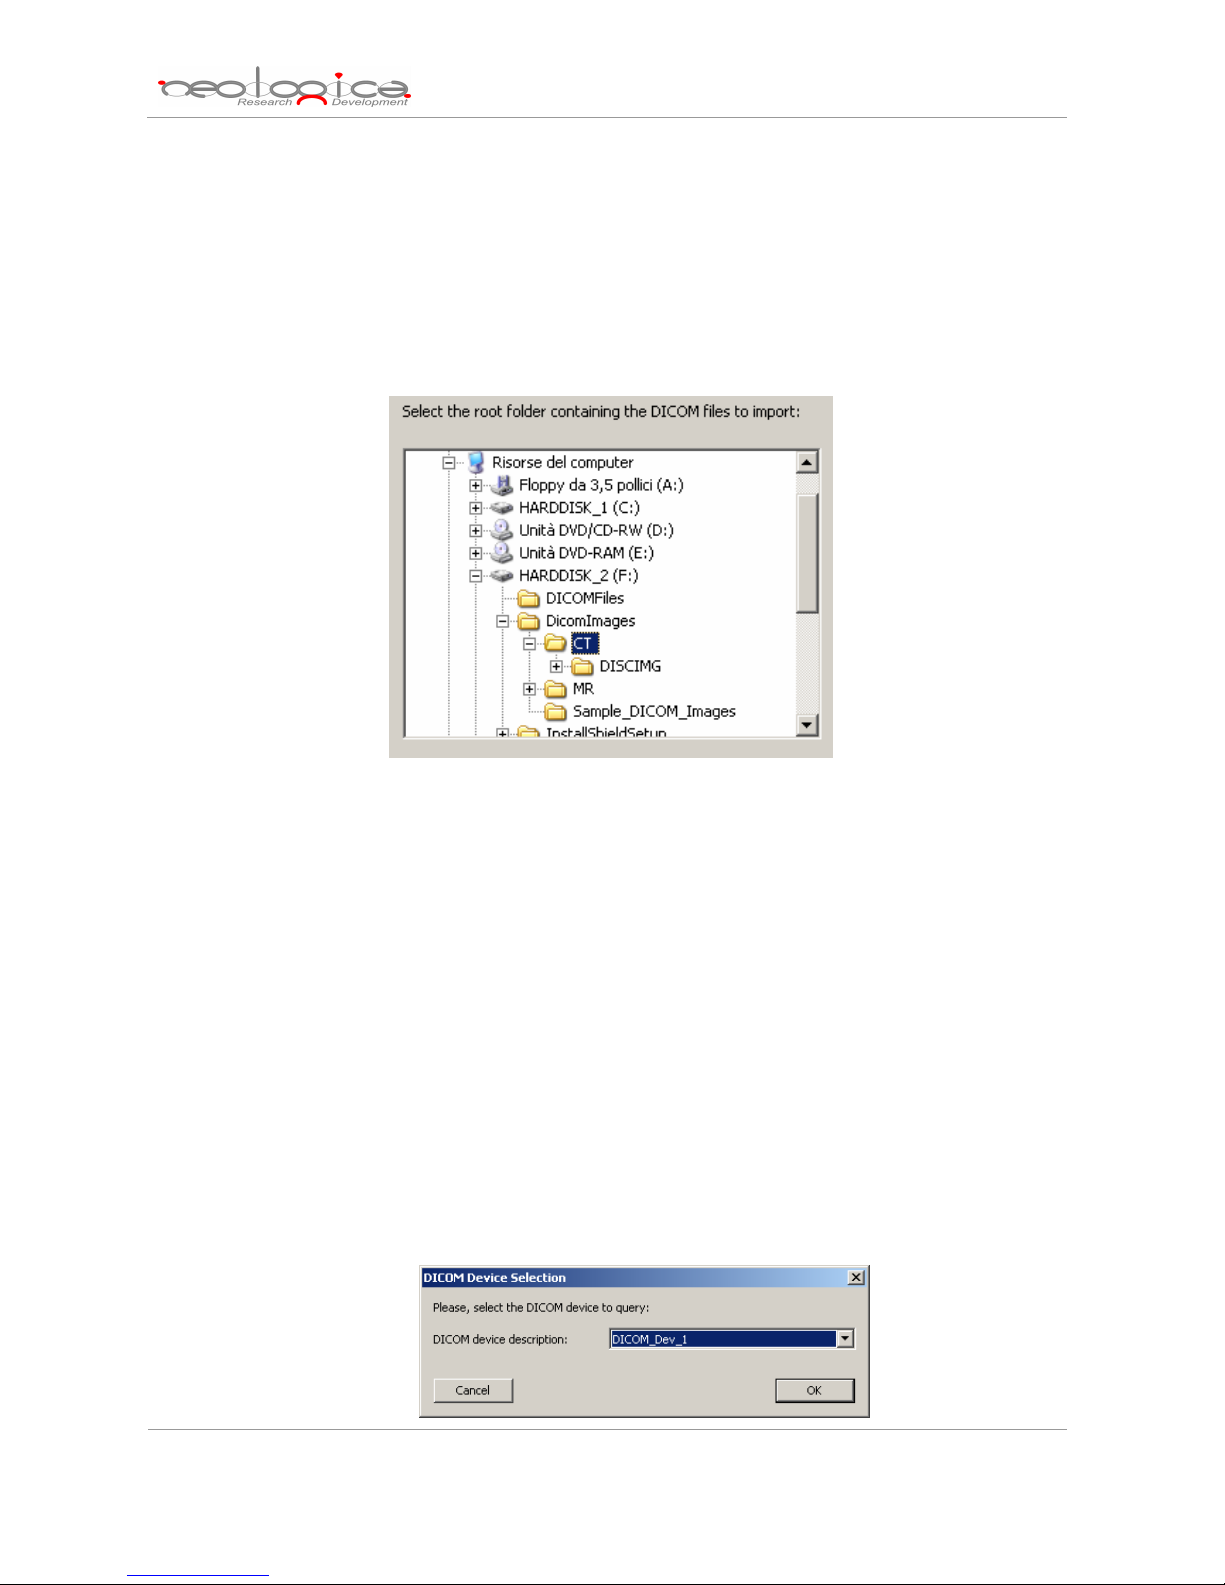
6.1 Import from disk
In addition to being able to receive DICOM files from DICOM peers through the DICOM protocol,
DICOMBurner allows populating its internal database by importing DICOM files from local folders or disks.
The “Browse for folder” dialog box appears when you press the “Import” button on the main toolbar or on
the corresponding menu item from the DICOMBurner tray pop-up menu: through this dialog box, the user
may specify a root folder where to search for valid DICOM instances.
The actual import procedure starts when you press the “OK” button.
6.2 Import from DICOM device
DICOMBurner acts as a DICOM Query/Retrieve SCU allowing populating its internal database by
retrieving DICOM files from a remote DICOM device connected to the DICOM network. When you select the
“Import from DICOM device” functionality DICOMBurner shows a GUI wizard guiding you through a
hierarchical (Study – Series – Instance) selection of the DICOM files to be retrieved.
6.2.1 DICOM Device Selection
The following dialog allows you to select the DICOM device to be queried. The DICOM devices have
to be configured by entering the “DICOM Devices Configuration” tab.
25
Page 26

DICOMBurner: User Manual [DB-UM-3 – Rev B]
6.2.2 Study-level search
The study-level step of the wizard procedure allows you to query, select and retrieve the studies
containing the DICOM files you want to import. This step includes both the filtering options related to patient
and study levels. The list of studies can be filtered by specifying some filtering options (or search criteria): in
particular, the patient identification filters, the acceptable range of birth dates, the patient sex and the
acceptable range of study dates. By pressing the “Filter” button you obtain the list of studies satisfying the
set conditions. Then you can select all studies you are interested in by using the mouse and multiple file
selection technique. The “Deselect All/Select All” button can simplify this task. The number of selected
studies is provided. Finally, you can proceed to the next step by pressing the “Next>” button. As a shortcut
you can start the retrieving procedure of the selected studies without reaching the last wizard step by
pressing the “Retrieve Studies” button.
26
Page 27

DICOMBurner: User Manual [DB-UM-3 – Rev B]
6.2.3 Series-level search
The series-level step of the wizard procedure allows you to query, select and retrieve the series
containing the DICOM files you want to import. The list of series can be filtered by specifying some filtering
options (or search criteria): in particular, you can set the acceptable range of series dates and the producing
modalities. By pressing the “Filter” button you obtain the list of series satisfying the set conditions. Then you
can select all series you are interested in by using the mouse and multiple file selection technique. The
“Deselect All/Select All” button can simplify this task. The number of selected series is provided. Finally,
you can proceed to the next step by pressing the “Next>” button. As a shortcut you can start the retrieving
procedure of the selected series without reaching the last wizard step by pressing the “Retrieve Series”
button.
27
Page 28

DICOMBurner: User Manual [DB-UM-3 – Rev B]
6.2.4 Instance-level search
The instance-level step of the wizard procedure allows you to query, select and retrieve the DICOM
files/instances you want to import. The list of instances can be filtered by specifying some filtering options (or
search criteria): in particular, you can set the acceptable range of acquisition dates and the acceptable range
of store dates. By pressing the “Filter” button you obtain the list of instances satisfying the set conditions.
Then you can select all instances you are interested in by using the mouse and multiple file selection
technique. The “Deselect All/Select All” button can simplify this task. Finally, you can proceed to the next
step by pressing the “Next>” button. You can start the retrieving procedure of the selected instances by
pressing the “Retrieve Instances” button.
28
Page 29

DICOMBurner: User Manual [DB-UM-3 – Rev B]
7 Exporting DICOM files
By pressing the “Export” button on the main toolbar or on the correspondent menu item from the
DICOMBurner tray pop-up menu, you can enter the exporting feature. There exist two kinds of exporting
procedures:
1. Export to disk
2. Export to DICOM device
These two options are accessible by clicking the small down arrow located next to the “Export”
button on the main toolbar. Once you select one of the available exporting options from the pop-up menu, it
will become the default option associated with the “Export” toolbar button.
7.1 Export to disk
DICOMBurner allows exporting DICOM images in full-size format by using a quick and easy process
to select the DICOM images to export. Note that the exporting procedure creates new images into a user
selected folder but the original DICOM files remain on the local storage. When you select the “Export to disk”
functionality DICOMBurner shows a GUI wizard guiding you through a hierarchical (Study – Series –
Instance) selection of the images to be exported.
7.1.1 Study-level search
The study-level step of the wizard procedure allows you to select the studies containing the images
you want to export to a local folder. This step includes both the filtering options related to patient and study
levels. The list of studies can be filtered by specifying some filtering options (or search criteria): in particular,
the patient identification filters, the acceptable range of birth dates, the patient sex and the acceptable range
of study dates. By pressing the “Filter” button you obtain the list of studies satisfying the set conditions. Then
you can select all studies you are interested in by using the mouse and multiple file selection technique. The
“Deselect All/Select All” button can simplify this task. The number of studies, studies size, number of series
and number of instances are provided for the selected studies. Finally, you can proceed to the next step by
pressing the “Next>” button. As a shortcut you can start the exporting procedure of the selected studies
without reaching the last wizard step by pressing the “Export Studies” button.
29
Page 30

DICOMBurner: User Manual [DB-UM-3 – Rev B]
7.1.2 Series-level search
The series-level step of the wizard procedure allows you to select the series containing the images
you want to export to a local folder. The list of series can be filtered by specifying some filtering options (or
search criteria): in particular, you can set the acceptable range of series dates and the producing modalities.
By pressing the “Filter” button you obtain the list of series satisfying the set conditions. Then you can select
all series you are interested in by using the mouse and multiple file selection technique. The “Deselect
All/Select All” button can simplify this task. The number of series, series size and number of instances are
provided for the selected series. Finally, you can proceed to the next step by pressing the “Next>” button. As
a shortcut you can start the exporting procedure of the selected series without reaching the last wizard step
by pressing the “Export Series” button.
30
Page 31

DICOMBurner: User Manual [DB-UM-3 – Rev B]
7.1.3 Instance-level search
The instance-level step of the wizard procedure allows you to select the images/instances you want
to export to a local folder. The list of instances can be filtered by specifying some filtering options (or search
criteria): in particular, you can set the acceptable range of acquisition dates and the acceptable range of
store dates. By pressing the “Filter” button you obtain the list of instances satisfying the set conditions. At
this level if you select an instance by clicking with the mouse over the corresponding row of the Instance List,
you obtain a preview image of the DICOM file. Then you can select all instances you are interested in by
using the mouse and multiple file selection technique. The “Deselect All/Select All” button can simplify this
task. Then you can reach the final step dialog of the exporting procedure by pressing the “Export” button.
31
Page 32

DICOMBurner: User Manual [DB-UM-3 – Rev B]
7.1.4 Export images step
The export images step is the last one in the wizard procedure: a dialog shows all the output image
formats that you can select. For the DICOM format you can check the DICOMDIR generation and select the
Transfer Syntax of the output DICOM files. The JPEG format allows you the output quality selection.
DICOMBurner will create an output image for any format set. For the DICOM format it will generate the
DICOMDIR and will translate the Transfer Syntax you set. To start the exporting process you have to press
the “Export” button.
32
Page 33

DICOMBurner: User Manual [DB-UM-3 – Rev B]
7.2 Export to DICOM device
DICOMBurner acts as a DICOM Store SCU allowing you to send DICOM files to a pre-selected
DICOM device. Note that the sending procedure preserves the original DICOM files remain on the local
storage. When you select the “Export to DICOM device” functionality DICOMBurner shows a GUI wizard
guiding you through a hierarchical (Study – Series – Instance) selection of the DICOM files to be sent.
7.2.1 Study-level search
The study-level step of the wizard procedure allows you to select the studies containing the DICOM
files you want to send to a DICOM device. This step includes both the filtering options related to patient and
study levels. The list of studies can be filtered by specifying some filtering options (or search criteria): in
particular, the patient identification filters, the acceptable range of birth dates, the patient sex and the
acceptable range of study dates. By pressing the “Filter” button you obtain the list of studies satisfying the
set conditions. Then you can select all studies you are interested in by using the mouse and multiple file
selection technique. The “Deselect All/Select All” button can simplify this task. The number of studies,
studies size, number of series and number of instances are provided for the selected studies. Finally, you
can proceed to the next step by pressing the “Next>” button. As a shortcut you can start the sending
procedure of the selected studies without reaching the last wizard step by pressing the “Send Studies”
button.
33
Page 34

DICOMBurner: User Manual [DB-UM-3 – Rev B]
7.2.2 Series-level search
The series-level step of the wizard procedure allows you to select the series containing the DICOM
files you want to send to a DICOM device. The list of series can be filtered by specifying some filtering
options (or search criteria): in particular, you can set the acceptable range of series dates and the producing
modalities. By pressing the “Filter” button you obtain the list of series satisfying the set conditions. Then you
can select all series you are interested in by using the mouse and multiple file selection technique. The
“Deselect All/Select All” button can simplify this task. The number of series, series size and number of
instances are provided for the selected series. Finally, you can proceed to the next step by pressing the
“Next>” button. As a shortcut you can start the sending procedure of the selected series without reaching the
last wizard step by pressing the “Send Series” button.
34
Page 35

DICOMBurner: User Manual [DB-UM-3 – Rev B]
7.2.3 Instance-level search
The instance-level step of the wizard procedure allows you to select the DICOM files/instances you
want to send to a DICOM device. The list of instances can be filtered by specifying some filtering options (or
search criteria): in particular, you can set the acceptable range of acquisition dates and the acceptable range
of store dates. By pressing the “Filter” button you obtain the list of instances satisfying the set conditions. At
this level if you select an instance by clicking with the mouse over the corresponding row of the Instance List,
you obtain a preview image of the DICOM file. Then you can select all instances you are interested in by
using the mouse and multiple file selection technique. The “Deselect All/Select All” button can simplify this
task. You can start the sending procedure of the selected instances by pressing the “Send Instances”
button.
35
Page 36

DICOMBurner: User Manual [DB-UM-3 – Rev B]
8 Deleting DICOM files
In addition to the automatic purging procedure, DICOMBurner allows deleting a portion of the
database content by using a quick and easy process to select the DICOM files to remove. When you press
the “Delete” button on the main toolbar or on the corresponding menu item from the DICOMBurner tray pop-
up menu, DICOMBurner shows a GUI wizard guiding you through a hierarchical (Study – Series – Instance)
selection of the DICOM files to be deleted.
8.1 Study-level search
The study-level step of the wizard procedure allows you to select the studies containing the DICOM
files you want to delete from the local database. This step includes both the filtering options related to patient
and study levels. The list of studies can be filtered by specifying some filtering options (or search criteria): in
particular, the patient identification filters, the acceptable range of birth dates, the patient sex and the
36
Page 37

acceptable range of study dates. By pressing the “Filter” button you obtain the list of studies satisfying the
set conditions. Then you can select all studies you are interested in by using the mouse and multiple file
selection technique. The “Deselect All/Select All” button can simplify this task. The number of studies,
studies size, number of series and number of instances are provided for the selected studies. Finally, you
can proceed to the next step by pressing the “Next>” button. As a shortcut you can start the deleting
procedure of the selected studies without reaching the last wizard step by pressing the “Delete Studies”
button.
DICOMBurner: User Manual [DB-UM-3 – Rev B]
8.2 Series-level search
The series-level step of the wizard procedure allows you to select the series containing the DICOM
files you want to delete from the local database. The list of series can be filtered by specifying some filtering
options (or search criteria): in particular, you can set the acceptable range of series dates and the producing
modalities. By pressing the “Filter” button you obtain the list of series satisfying the set conditions. Then you
37
Page 38

can select all series you are interested in by using the mouse and multiple file selection technique. The
“Deselect All/Select All” button can simplify this task. The number of series, series size and number of
instances are provided for the selected series. Finally, you can proceed to the next step by pressing the
“Next>” button. As a shortcut you can start the deleting procedure of the selected series without reaching the
last wizard step by pressing the “Delete Series” button.
DICOMBurner: User Manual [DB-UM-3 – Rev B]
8.3 Instance-level search
The instance-level step of the wizard procedure allows you to select the DICOM files/instances you
want to delete from the local database. The list of instances can be filtered by specifying some filtering
options (or search criteria): in particular, you can set the acceptable range of acquisition dates, the
acceptable range of store dates and the backup status (backed-up or not) of the instances. By pressing the
“Filter” button you obtain the list of instances satisfying the set conditions. At this level if you select an
instance by clicking with the mouse over the corresponding row of the Instance List, you obtain a preview
38
Page 39

image of the DICOM file. Then you can select all instances you are interested in by using the mouse and
multiple file selection technique. The “Deselect All/Select All” button can simplify this task. Finally, you can
proceed to the next step by pressing the “Next>” button. As a shortcut you can start the deleting procedure
of the selected instances without reaching the last wizard step by pressing the “Delete Instances” button.
DICOMBurner: User Manual [DB-UM-3 – Rev B]
8.4 Delete files step
The delete files step is the last one in the wizard procedure: a list of the files that will be deleted from
the local database is displayed. Finally, you can start the deleting process by pressing the “Delete files”
button.
39
Page 40

DICOMBurner: User Manual [DB-UM-3 – Rev B]
9 Backup DICOM files and database
DICOMBurner allows backing-up the database or creating backup CDs or DVDs containing DICOM
files. The DICOM files to be archived on CD or DVD can be selected by the user. There exist four kinds of
backup procedures:
1. Backup database
2. Backup a day
3. Backup a week
4. Backup a period
40
Page 41

These four options are accessible by clicking the small down arrow located next to the “Backup” button on
the main toolbar. Once you select one of the available backup options from the pop-up menu, it will become
the default option associated with the “Backup” toolbar button.
Note: if the set of DICOM files to burn exceeds the free size of the media you’ve loaded, then DICOMBurner
spans the DICOM files over two or more CDs/DVDs.
DICOMBurner: User Manual [DB-UM-3 – Rev B]
9.1 Backup database
DICOMBurner allows the backup of the database content to prevent loss of data in case of system
crash. Note that this function saves only the database tables entries, not the DICOM files storage. To
completely recover from a system disaster, you need to perform periodically backup of both database and
DICOM files (as explained in the next sections).
To start the database backup procedure you have to select the “Backup database” popup menu option then
it will appear a dialog similar to the following one allowing you to give a name to the database backup file. By
pressing the “Save” button the procedure will start.
9.2 Backup a day
If you select the “Backup a day” popup menu option, it will appear a dialog similar to the following
one. The list of instances can be filtered by specifying some filtering options (or search criteria): in particular,
you can set the store date representing the day you want to backup and the backup status (backed-up or not)
of the instances. By pressing the “Filter” button you obtain the list of instances satisfying the set conditions.
If you select an instance by clicking with the mouse over the corresponding row of the Instance List, you
41
Page 42

obtain a preview image of the DICOM file. Then you can select all instances you are interested in by using
the mouse and multiple file selection technique. The “Deselect All/Select All” button can simplify this task.
Also in this case in you can change the CD/DVD options with respect to the default one set by the “CD/DVD
Burner Configuration” tab. You can start the backup procedure of the selected instances by pressing the
“Backup” button.
DICOMBurner: User Manual [DB-UM-3 – Rev B]
9.3 Backup a week
If you select the “Backup a week” popup menu option, it will appear a dialog similar to the following
one. The list of instances can be filtered by specifying some filtering options (or search criteria): in particular,
you can set the store dates range representing the week you want to backup and the backup status (backed-
up or not) of the instances. By pressing the “Filter” button you obtain the list of instances satisfying the set
conditions. If you select an instance by clicking with the mouse over the corresponding row of the Instance
List, you obtain a preview image of the DICOM file. Then you can select all instances you are interested in
by using the mouse and multiple file selection technique. The “Deselect All/Select All” button can simplify
this task. Also in this case in you can change the CD/DVD options with respect to the default one set by the
42
Page 43

“CD/DVD Burner Configuration” tab. You can start the backup procedure of the selected instances by
pressing the “Backup” button.
DICOMBurner: User Manual [DB-UM-3 – Rev B]
9.4 Backup a period
If you select the “Backup a week” popup menu option, it will appear a dialog similar to the following
one. The list of instances can be filtered by specifying some filtering options (or search criteria): in particular,
you can set the store dates range representing the period you want to backup and the backup status
(backed-up or not) of the instances. By pressing the “Filter” button you obtain the list of instances satisfying
the set conditions. If you select an instance by clicking with the mouse over the corresponding row of the
Instance List, you obtain a preview image of the DICOM file. Then you can select all instances you are
interested in by using the mouse and multiple file selection technique. The “Deselect All/Select All” button
can simplify this task. Also in this case in you can change the CD/DVD options with respect to the default
one set by the “CD/DVD Burner Configuration” tab. You can start the backup procedure of the selected
instances by pressing the “Backup” button.
43
Page 44

DICOMBurner: User Manual [DB-UM-3 – Rev B]
10 Restore DICOM files and database
In case of accidental loss of data DICOMBurner allows restoring DICOM files and database contents,
by using the database backup files and backup CDs or DVDs containing DICOM files. There exist two kinds
of restore procedures:
1. Restore database
2. Restore images
These two options are accessible by clicking the small down arrow located next to the “Restore” button on
the main toolbar. Once you select one of the available restore options from the pop-up menu, it will become
the default option associated with the “Restore” toolbar button.
44
Page 45

DICOMBurner: User Manual [DB-UM-3 – Rev B]
10.1 Restore database
In case of system crashes the entire content of the database can be lost. In this case after you have
reinstalled the system, you can recover the database content by using most recent database backup file
(having the DBK extension). This operation restores the database content and then starts the purging of the
entire content of the DICOM storage setting all instances status to offline. This is to reset the system
preparing it to the restore of the DICOM files. To start the database restoring procedure you have to select
the “Restore database” popup menu option then it will appear a dialog similar to the following one allowing
you to select a database backup file. By pressing the “Open” button the procedure will start.
Important note: this functionality shouldn’t be started if a system disaster doesn’t happen else you can loss
all of the DICOM files stored.
10.2 Restore images
To start the DICOM files restoring procedure you have to select the “Restore images” popup menu
option then DICOMBurner shows a GUI wizard guiding you through a hierarchical (Study – Series – Instance)
selection of the DICOM files to be restored.
10.2.1 Study-level search
The study-level step of the wizard procedure allows you to select the studies containing the DICOM
files you want to restore in the local database. This step includes both the filtering options related to patient
and study levels. The list of studies can be filtered by specifying some filtering options (or search criteria): in
particular, the patient identification filters, the acceptable range of birth dates, the patient sex and the
45
Page 46

acceptable range of study dates. By pressing the “Filter” button you obtain the list of studies satisfying the
set conditions. Then you can select all studies you are interested in by using the mouse and multiple file
selection technique. The “Deselect All/Select All” button can simplify this task. Finally, you can proceed to
the next step by pressing the “Next>” button. As a shortcut you can start the restoring procedure of the
selected studies without reaching the last wizard step by pressing the “Restore Studies” button.
DICOMBurner: User Manual [DB-UM-3 – Rev B]
10.2.2 Series-level search
The series-level step of the wizard procedure allows you to select the series containing the DICOM
files you want to restore in the local database. The list of series can be filtered by specifying some filtering
options (or search criteria): in particular, you can set the acceptable range of series dates and the producing
modalities. By pressing the “Filter” button you obtain the list of series satisfying the set conditions. Then you
can select all series you are interested in by using the mouse and multiple file selection technique. The
“Deselect All/Select All” button can simplify this task. Finally, you can proceed to the next step by pressing
46
Page 47

the “Next>” button. As a shortcut you can start the restoring procedure of the selected series without
reaching the last wizard step by pressing the “Restore Series” button.
DICOMBurner: User Manual [DB-UM-3 – Rev B]
10.2.3 Instance-level search
The instance-level step of the wizard procedure allows you to select the DICOM files/instances you
want to restore in the local database. The list of instances can be filtered by specifying some filtering options
(or search criteria): in particular, you can set the acceptable range of acquisition dates, the acceptable range
of store dates and the backup status (backed-up or not) of the instances. By pressing the “Filter” button you
obtain the list of instances satisfying the set conditions. Then you can select all instances you are interested
in by using the mouse and multiple file selection technique. The “Deselect All/Select All” button can simplify
this task. Finally, you can proceed to the next step by pressing the “Next>” button.
47
Page 48

DICOMBurner: User Manual [DB-UM-3 – Rev B]
10.2.4 Restore files step
The restore files step is the last one in the wizard procedure and a list of alternative restore solutions
is displayed. By clicking a listed restore solution the list of media code identifying the CDs or DVDs that will
be need is displayed. You have to select your favorite restore solution and the CD/DVD unit name to be used
for the CD/DVD automatic loading and reading (the automatic loading isn’t suitable if a local optical reader
has been selected). Finally you can start the restoring process by pressing the “Restore files” button.
48
Page 49

DICOMBurner: User Manual [DB-UM-3 – Rev B]
11 Viewing information
11.1 View Log dialog box
The “View Log” dialog box allows viewing a detailed log of the events occurring inside
DICOMBurner and of the actions performed.
A List control is displayed on the dialog: each row of the list represents a logged event. Each event is defined
by the following information:
• Event ID: a unique number that univocally identifies the event.
• Date: the date when the event occurred.
• Time: the time when the event occurred.
• Event type: tells if the logged event is a “Message”, a “Warning” or an “Error”.
49
Page 50

• Event source: describes the source that originated the logged event or action. Currently defined
sources are:
o DICOM UL: events coming from the DICOM Upper Layer software layer.
o DIMSE: events coming from the DIMSE software layer.
o Database: events or action coming from the database manager.
o Application: events or actions occurring at application level.
• Event description: the actual description of the logged event or action.
The following picture shows a snapshot of the “View Log” dialog box:
DICOMBurner: User Manual [DB-UM-3 – Rev B]
The View Log dialog box
12 DICOMBurner Configuration
In order to enter the DICOMBurner Configuration section, you must stop the connection server (by
pressing the “Stop” button on the main toolbar) and press the “Settings” button on the main toolbar. The
“DICOMBurner Configuration” dialog appears: this dialog is composed of several different tabs, each one
dedicated to a specific configuration section.
12.1 DICOM Configuration
The “DICOM Configuration” tab allows setting several parameters related to the DICOM
associations and communication. A description of each configuration parameter available in this dialog box is
now provided:
• DICOM Association Parameters:
o Server listening port: the TCP port on which the connection server is listening for
incoming connections by DICOM Storage SCU. Default value is 104.
50
Page 51

DICOMBurner: User Manual [DB-UM-3 – Rev B]
o Maximum number of associations: the maximum number of concurrent DICOM
associations accepted by DICOMBurner.
o ARTIM Timer value: the timeout value (in milliseconds) of the ARTIM Timer, used in the
DICOM Upper Layer (see DICOM PS 3.8).
o Maximum received PDU size: the maximum PDU length (in bytes) accepted by
DICOMBurner. This value refers to the maximum length of the variable field of the P-
DATA-TF PDUs that will be sent by the association requestor.
o AE Title: the Application Entity Titles that is currently associated with DICOMBurner.
• SOP Classes Support as SCP: by checking/unchecking a row of the list you are able to
enables/disables support for the related SOP Class.
The following picture shows a snapshot of the “DICOM Configuration” dialog box:
The DICOM Configuration tab
51
Page 52

DICOMBurner: User Manual [DB-UM-3 – Rev B]
12.2 DICOM Devices Configuration
The “DICOM Devices Configuration” tab allows setting some parameters to configure the remote
DICOM devices that DICOMBurner will interact with. The buttons on the dialog allows you to add a new
device configuration, modify or remove an exiting one, verify the connection between DICOMBurner and the
remote device or set a remote device as default for the available DICOM device operations.
By pressing the “Add” or “Modify” button, DICOMBurner shows a dialog similar to the following one. This
dialog allows setting the following device parameters:
• Description: a non-empty and unique text value identifying the device
• AE Title: a non-empty and unique Application Entity Title of the device
• Hostname: the host name or IP address of the DICOM device
• Port: the TCP port on which the DICOM device is listening for incoming connections
• Device type: determine if the device acts as Storage SCP, Query/Retrieve SCP or both
52
Page 53

DICOMBurner: User Manual [DB-UM-3 – Rev B]
12.3 Log Configuration
The “Log Configuration” tab allows setting some parameters related to the production of log by
DICOMBurner. A description of each configuration parameter available in this dialog box is now provided:
• Log Verbosity Configuration:
o Enable log on the “View Log” dialog: enables/disables the log output on the View Log
dialog box. Disabling the log on the “View Log” window may be useful in cases where
DICOMBurner may run unattended for long time periods, since a long log output on the View
Log window may consume a lot of memory. In any case, DICOMBurner periodically performs
an automatic truncation of the log on window.
o Enable Verbose Mode: enables/disables the Verbose Mode. If the Verbose Mode is
enabled, the logged information presents a higher level of detail.
• Debug Mode Configuration:
o Enable Debug Mode: enables/disables the Debug Mode. If the Debug Mode is enabled, a
debug file is produced by DICOMBurner, containing all the main events occurring inside
DICOMBurner and the main performed actions.
o Debug file pathname: allows specifying, through the “Browse…” button, the pathname of
the Debug file.
The following picture shows a snapshot of the “Log Configuration” tab:
53
Page 54

DICOMBurner: User Manual [DB-UM-3 – Rev B]
The Log Configuration tab
12.4 File Storage Configuration
The “File Storage Configuration” tab allows setting some preferences related to the policies used
by DICOMBurner to manage the database where the received DICOM files are stored in. A description of
each configuration parameter available in this dialog box is now provided:
• Storage Purging: DICOMBurner is able to perform periodic checks on the current storage space
and thresholds used by its internal DICOM files database. Based on user-defined rules,
DICOMBurner can automatically delete the oldest files (according to the actual storage date/time)
from database, in order to recover storage space. This deletion activity is known as “Storage
Purging”.
o Enable purge when free disk space falls below a given threshold: if this option is
enabled, the storage database will increase its size until the free disk space falls below the
specified threshold (Minimum Free Disk Space Threshold). At this point, the oldest DICOM
54
Page 55

DICOMBurner: User Manual [DB-UM-3 – Rev B]
files contained in the database (according to the actual storage date) will be deleted until the
free disk space rises above the second specified threshold (Free Disk Space After Purge):
Minimum Free Disk Space Threshold: a value representing the minimum number
of megabytes always granted as free disk space.
Free Disk Space After Purge: a value representing the number of megabyte of free
disk space available after database purging. Note: this value has to be greater than
the Minimum Free Disk Space Threshold.
o Enable purge when DICOM files storage space exceeds a given threshold: if this option
is enabled, the storage database will grow until its size exceeds below the specified
threshold (Maximum File Storage Space Threshold). At this point, the oldest DICOM files
contained in the database (according to the actual storage date) will be deleted until the
storage space falls below the second specified threshold (Storage Space After Purge):
Maximum File Storage Space Threshold: a value representing the maximum
number of megabytes allowed for the database space.
Storage Space After Purge: a value representing the number of megabyte of
database space after its purging. Note: this value has to be less than the Maximum
File Storage Space Threshold.
o Enable purge of DICOM files older than a given age: if this option is enabled, all the
DICOM files older than the set number of days are automatically deleted:
Maximum File Age: a value representing the maximum age (in days) allowed for a
stored DICOM files.
• Storage Location: this section allows setting up the local folder to store where the received
DICOM files will be stored:
o Files Root Folder: indicates the root folder in which DICOMBurner stores the received
DICOM files. The “Browse...” button allows an easy selection of the root folder.
The following picture shows a snapshot of the “File Storage Configuration” tab:
55
Page 56

DICOMBurner: User Manual [DB-UM-3 – Rev B]
The File Storage Configuration tab
12.5 CD/DVD Burner Configuration
The “CD/DVD Burner Configuration” tab allows setting up the burner units that you need to use to
produce CD or DVD containing DICOM files. For any configured unit you can set the default parameters
used during the burning process (for production or backup). The button on the dialog allows you to add a
new burner configuration, modify, remove or duplicate an exiting one or set a burner as default for backup or
production. Note that any configured unit can be associated to the same hardware robot, so you can obtain
many different configurations for a single physical unit.
56
Page 57

DICOMBurner: User Manual [DB-UM-3 – Rev B]
The CD/DVD Burner Configuration tab
By pressing the “Add” or “Modify” button, DICOMBurner shows a GUI wizard allowing you to set all the unit
parameters. DICOMBurner is able to manage local CD/DVD burners and CD/DVD robot producer such as
Rimage, MFDigital and Primera. Since some parameters are specific of a certain kind of burner, we’ll discuss
any single configuration wizard in the following sections.
12.6 Local Burner Configuration
At the first step of the GUI wizard you have to select “Local CD/DVD Writer”. Then you can specify the
following options:
• Unit Type:
o Local CD/DVD Writer: specifies a local burner
o Drive Letter: indicates the drive letter of the local burner
• Unit Identification:
57
Page 58

DICOMBurner: User Manual [DB-UM-3 – Rev B]
o Name: a not-null and unique name that identifies the unit
o Description: an optional description of the unit
o Usage: the destination use (Production or Backup) assigned to the unit (for a local burner
only Production is suitable)
By clicking “Next>” button you reach the second step of the GUI wizard where you can specify the
following options:
• Default CD/DVD Options:
o Number of copies: specifies the number of CD/DVD copies for any burn process.
o Interchange Profile: specifies a Media Storage Application Profile as defined by DICOM PS
3.11.
o Eject CD/DVD at the end of the process: a flag specifying if the media has to be ejected at
the end of the burning process.
o Close CD/DVD at the end of the process: a flag specifying if the media has to be closed
(no more burnable) at the end of the burning process.
o Delete burnt/backed-up files from database at the end of the process: a flag specifying
if the files copied to CD or DVD have to be deleted from the local database at the end of the
burning process.
• Burning Parameters:
o Working directory: specifies a temporary folder where DICOMBurner will copy all the files
to be burnt. At the end of the burning process DICOMBurner removes these files.
58
Page 59

DICOMBurner: User Manual [DB-UM-3 – Rev B]
o Media Type: specifies if the burner has to produce CDs or DVDs.
By clicking “Next>” button you reach the third step of the GUI wizard where you can specify the
following options:
• CD/DVD Image Viewer: DICOMBurner allows putting a DICOM image viewer on every burnt
CD/DVD, so you can specify the location of the executable application file:
o Add an autorunning DICOM viewer on the CD/DVD: a flag specifying if a DICOM Viewer
has to be included into CD/DVD during the burning process.
o LocalEye DICOM Viewer: is a DICOM Viewer developed by NeoLogica and
provided with the DICOMBurner application package. For LocalEye Viewer you can
select the interface language and the target operating system(s) to run the disk on.
o Other DICOM Viewer: this option allows you to select any other viewer you like. The
“Browse...” button allows an easy selection of the pathname. If the viewer is made
of a set of files, you have to check “Include all files contained into the application
folder”.
59
Page 60

By clicking “Finish” button you save the configuration.
DICOMBurner: User Manual [DB-UM-3 – Rev B]
12.7 Rimage Unit Configuration
If you have a Rimage CD/DVD Production Unit and a DICOMBurner license including the Rimage
option then you can configure it for production or backup purposes.
At the first step of the GUI wizard you have to select “Rimage”. Then you can specify the following options:
• Unit Type:
o Rimage: specifies a Rimage robot
• Unit Identification:
o Name: a not-null and unique name that identifies the unit
o Description: an optional description of the unit
o Usage: the destination use (Production or Backup) assigned to the unit
60
Page 61

DICOMBurner: User Manual [DB-UM-3 – Rev B]
By clicking “Next>” button you reach the second step of the GUI wizard where you can specify the
following options:
• Networking: specifies the networking parameters used to connect DICOMBurner to the Rimage
Unit.
o Server Host Name: specifies the name of the server managing the Rimage Unit.
o Server Host Port: specifies the port of the server managing the Rimage Unit.
o Server Password: specifies the password of the server managing the Rimage Unit.
o Email Notification: a checkbox allows you to receive an email notification on the completion
or cancellation of the issued Rimage order.
Email address: specifies the email address to be notified.
61
Page 62

DICOMBurner: User Manual [DB-UM-3 – Rev B]
By clicking “Next>” button you reach the third step of the GUI wizard where you can specify the
following options:
• Default CD/DVD Options:
o Number of copies: specifies the number of CD/DVD copies for any burn process.
o Interchange Profile: specifies a Media Storage Application Profile as defined by DICOM PS
3.11.
o Close CD/DVD at the end of the process: a flag specifying if the media has to be closed
(no more burnable) at the end of the burning process.
o Delete burnt/backed-up files from database at the end of the process: a flag specifying
if the files copied to CD or DVD have to be deleted from the local database at the end of the
burning process.
• Burning Parameters:
o Working directory: specifies a temporary folder where DICOMBurner will copy all the files
to be burnt. At the end of the burning process DICOMBurner removes these files.
o Media Type: specifies if the burner has to produce CDs or DVDs.
62
Page 63

DICOMBurner: User Manual [DB-UM-3 – Rev B]
By clicking “Next>” button you reach the fourth step of the GUI wizard where you can specify the
following options:
• CD/DVD Image Viewer: DICOMBurner allows putting a DICOM image viewer on every burnt
CD/DVD, so you can specify the location of the executable application file:
o Add an autorunning DICOM viewer on the CD/DVD: a flag specifying if a DICOM Viewer
has to be included into CD/DVD during the burning process.
o LocalEye DICOM Viewer: is a DICOM Viewer developed by NeoLogica and
provided with the DICOMBurner application package. For LocalEye Viewer you can
select the interface language and the target operating system(s) to run the disk on.
o Other DICOM Viewer: this option allows you to select any other viewer you like. The
“Browse...” button allows an easy selection of the pathname. If the viewer is made
of a set of files, you have to check “Include all files contained into the application
folder”.
63
Page 64

DICOMBurner: User Manual [DB-UM-3 – Rev B]
Note: if at the first step of the wizard you set Rimage for Backup usage then this step isn’t shown because
the image viewer is useless on a backup CD/DVD.
By clicking “Next>” button you reach the fifth step of the GUI wizard where you can specify the
following options:
o Label Selection: the Rimage Unit allows you to print the CD/DVD surface, so you have to
specify the file pathnames containing the label project.
Label File Name: specifies the pathname of the label project (BTW file).
Field File Name: specifies the pathname of the text file containing the dynamic field
names (a TXT file containing the tab separated placeholders of every text field to be
dynamically replaced by DICOMBurner at running time before printing of the media
surface).
Dynamic Field Associations: allows setting the associations between a label field
and a dynamic field. The “Associate>” and “<Clear” buttons respectively create or
delete an association between a listed and selected “CD Label Field” and a
“Dynamic Field” of the dropdown containing basic DICOM fields and Custom ones.
To set a “Custom DICOM Field” you have to select the “Custom…” item into the
dropdown and then the dialog below appears. It allows you to input the exadecimal
“Group Number” and the “Element Number” of the DICOM element you desire.
64
Page 65

DICOMBurner: User Manual [DB-UM-3 – Rev B]
The Custom DICOM Field Search dialog
Note: if at the first step of the wizard you set Rimage for Backup usage then the label selection step allows
you to select a backup label instead of a production one and the dynamic fields aren’t of DICOM type:
65
Page 66

By clicking “Finish” button you save the configuration.
DICOMBurner: User Manual [DB-UM-3 – Rev B]
12.8 Primera Unit Configuration
If you have a Primera CD/DVD Production Unit and a DICOMBurner license including the Primera
option then you can configure it for production or backup purposes.
At the first step of the GUI wizard you have to select “Primera”. Then you can specify the following options:
• Unit Type:
o Primera: specifies a Primera robot
• Unit Identification:
o Name: a not-null and unique name that identifies the unit
o Description: an optional description of the unit
o Usage: the destination use (Production or Backup) assigned to the unit
66
Page 67

DICOMBurner: User Manual [DB-UM-3 – Rev B]
By clicking “Next>” button you reach the third step of the GUI wizard where you can specify the
following options:
• Default CD/DVD Options:
o Number of copies: specifies the number of CD/DVD copies for any burn process.
o Interchange Profile: specifies a Media Storage Application Profile as defined by DICOM PS
3.11.
o Close CD/DVD at the end of the process: a flag specifying if the media has to be closed
(no more burnable) at the end of the burning process.
o Delete burnt/backed-up files from database at the end of the process: a flag specifying
if the files copied to CD or DVD have to be deleted from the local database at the end of the
burning process.
• Burning Parameters:
o Working directory: specifies a temporary folder where DICOMBurner will copy all the files
to be burnt. At the end of the burning process DICOMBurner removes these files.
o Jobs directory: specifies the folder where DICOMBurner will copy the job file describing the
order to be processed by the “PTBurner” software managing the Primera unit.
o Media Type: specifies if the burner has to produce CDs or DVDs.
67
Page 68

DICOMBurner: User Manual [DB-UM-3 – Rev B]
By clicking “Next>” button you reach the fourth step of the GUI wizard where you can specify the
following options:
• CD/DVD Image Viewer: DICOMBurner allows putting a DICOM image viewer on every burnt
CD/DVD, so you can specify the location of the executable application file:
o Add an autorunning DICOM viewer on the CD/DVD: a flag specifying if a DICOM Viewer
has to be included into CD/DVD during the burning process.
o LocalEye DICOM Viewer: is a DICOM Viewer developed by NeoLogica and
provided with the DICOMBurner application package. For LocalEye Viewer you can
select the interface language and the target operating system(s) to run the disk on.
o Other DICOM Viewer: this option allows you to select any other viewer you like. The
“Browse...” button allows an easy selection of the pathname. If the viewer is made
of a set of files, you have to check “Include all files contained into the application
folder”.
68
Page 69

DICOMBurner: User Manual [DB-UM-3 – Rev B]
Note: if at the first step of the wizard you set Primera for Backup usage then this step isn’t shown because
the image viewer is useless on a backup CD/DVD.
By clicking “Next>” button you reach the fifth step of the GUI wizard where you can specify the
following options:
o Label Selection: the Primera Unit allows you to print the CD/DVD surface, so you have to
specify the file pathnames containing the label project.
Label File Name: specifies the pathname of the label project (STD file).
Field File Name: specifies the pathname of the text file containing the dynamic field
names (a TXT file containing the comma separated placeholders of every text field
to be dynamically replaced by DICOMBurner at running time before printing of the
media surface).
Dynamic Field Associations: allows setting the associations between a label field
and a dynamic field. The “Associate>” and “<Clear” buttons respectively create or
delete an association between a listed and selected “CD Label Field” and a
“Dynamic Field” of the dropdown containing basic DICOM fields and Custom ones.
To set a “Custom DICOM Field” you have to select the “Custom…” item into the
dropdown and then the dialog below appears. It allows you to input the exadecimal
“Group Number” and the “Element Number” of the DICOM element you desire.
69
Page 70

DICOMBurner: User Manual [DB-UM-3 – Rev B]
The Custom DICOM Field Search dialog
Note: if at the first step of the wizard you set Primera for Backup usage then the label selection step allows
you to select a backup label instead of a production one and the dynamic fields aren’t of DICOM type:
70
Page 71

By clicking “Finish” button you save the configuration.
DICOMBurner: User Manual [DB-UM-3 – Rev B]
12.9 MFDigital Unit Configuration
If you have a MFDigital CD/DVD Production Unit and a DICOMBurner license including the MFDigital
option then you can configure it for production or backup purposes.
At the first step of the GUI wizard you have to select “MFDigital”. Then you can specify the following options:
• Unit Type:
o MFDigital: specifies a MFDigital robot
• Unit Identification:
o Name: a not-null and unique name that identifies the unit
o Description: an optional description of the unit
o Usage: the destination use (Production or Backup) assigned to the unit
71
Page 72

DICOMBurner: User Manual [DB-UM-3 – Rev B]
By clicking “Next>” button you reach the second step of the GUI wizard where you can specify the
following options:
• Networking: specifies the networking parameters used to connect DICOMBurner to the MFDigital
Unit.
o Server User Name: specifies the name of the user configured on the MFDigital Unit (the
default is mfdigital).
72
Page 73

DICOMBurner: User Manual [DB-UM-3 – Rev B]
By clicking “Next>” button you reach the third step of the GUI wizard where you can specify the
following options:
• Default CD/DVD Options:
o Number of copies: specifies the number of CD/DVD copies for any burn process.
o Interchange Profile: specifies a Media Storage Application Profile as defined by DICOM PS
3.11.
o Close CD/DVD at the end of the process: a flag specifying if the media has to be closed
(no more burnable) at the end of the burning process.
o Delete burnt/backed-up files from database at the end of the process: a flag specifying
if the files copied to CD or DVD have to be deleted from the local database at the end of the
burning process.
• Burning Parameters:
o Working directory: specifies a temporary folder where DICOMBurner will copy all the files
to be burnt. At the end of the burning process DICOMBurner removes these files.
o Jobs directory: specifies the folder where DICOMBurner will copy the job file describing the
order to be processed by the “Director” software managing the MFDigital unit.
o Media Type: specifies if the burner has to produce CDs or DVDs.
By clicking “Next>” button you reach the fourth step of the GUI wizard where you can specify the
following options:
73
Page 74

DICOMBurner: User Manual [DB-UM-3 – Rev B]
• CD/DVD Image Viewer: DICOMBurner allows putting a DICOM image viewer on every burnt
CD/DVD, so you can specify the location of the executable application file:
o Add an autorunning DICOM viewer on the CD/DVD: a flag specifying if a DICOM Viewer
has to be included into CD/DVD during the burning process.
o LocalEye DICOM Viewer: is a DICOM Viewer developed by NeoLogica and
provided with the DICOMBurner application package. For LocalEye Viewer you can
select the interface language and the target operating system(s) to run the disk on.
o Other DICOM Viewer: this option allows you to select any other viewer you like. The
“Browse...” button allows an easy selection of the pathname. If the viewer is made
of a set of files, you have to check “Include all files contained into the application
folder”.
Note: if at the first step of the wizard you set MFDigital for Backup usage then this step isn’t shown because
the image viewer is useless on a backup CD/DVD.
By clicking “Next>” button you reach the fifth step of the GUI wizard where you can specify the
following options:
o Label Selection: the MFDigital Unit allows you to print the CD/DVD surface, so you have to
specify the file pathnames containing the label project.
Label File Name: specifies the pathname of the label project (a LBL file describing
the object location of every label component including the placeholders, preceded
by an underscore, of every text field to be dynamically replaced by DICOMBurner at
running time before printing of the media surface).
74
Page 75

DICOMBurner: User Manual [DB-UM-3 – Rev B]
Note: if the label project contains images, they have to be put in the same folder of
the LBL file.
Dynamic Field Associations: allows setting the associations between a label field
and a dynamic field. The “Associate>” and “<Clear” buttons respectively create or
delete an association between a listed and selected “CD Label Field” and a
“Dynamic Field” of the dropdown containing basic DICOM fields and Custom ones.
To set a “Custom DICOM Field” you have to select the “Custom…” item into the
dropdown and then the dialog below appears. It allows you to input the exadecimal
“Group Number” and the “Element Number” of the DICOM element you desire.
The Custom DICOM Field Search dialog
Note: if at the first step of the wizard you set MFDigital for Backup usage then the label selection step allows
you to select a backup label instead of a production one and the dynamic fields aren’t of DICOM type:
75
Page 76

By clicking “Finish” button you save the configuration.
DICOMBurner: User Manual [DB-UM-3 – Rev B]
12.10 Automatic CD/DVD Production Configuration
The “Automatic CD/DVD Production Configuration” tab allows setting up the parameters to
manage the automatic burning processes. A description of each configuration parameter available in this
dialog box is now provided:
• Automatic CD/DVD Production Options: to enable this functionality you have to check the
“Enable Automatic CD/DVD Production”.
o Production unit: specifies the unit to be used as default for automatic production.
CD/DVD default unit name: the name of the default unit for automatic production
o Unit selection rules: this section allows setting up some unit selection rules to forward a
production job through a production unit based on the Calling AE Title, Modality and Referring
Physician of the current store request. In order to add a new unit selection rule, the “Add” button
must be pressed: the “Add Unit Selection Rule” dialog appears, which allows specifying the
values of the parameters composing the new unit selection rule:
76
Page 77

DICOMBurner: User Manual [DB-UM-3 – Rev B]
Each Unit Selection Rule is composed of the following parameters:
Calling AE Title: the Calling AE Title of the association. The user may either specify a
specific Calling AE Title, a Calling AE Title present in the DICOMBurner database or
select the “Any” option if this rule should match any Calling AE Title.
Modality: the Modality performing the store request. Even in this case, the “Any” option
and a list of known modalities are provided.
Referring Physician: the Referring Physician for the present exam. Even in this case,
the “Any” option and a list of known Referring Physicians are provided.
Output Unit: the output unit for the current rule. It can be chosen among the available
units.
To modify or remove a selected rule the buttons Modify and Remove are provided. Since the rules
are applied following a top-down order the buttons Move Up and Move Down enable you to move
the rules up and down in the list.
o When/What to burn: specifies when the automatic burn process has to start and what it has to
burn.
Inactivity Timeout: this timeout is expressed in seconds and it is reset every time new
data is received from the SCUs. When it expires the burning process starts.
Burn …: specifies the type of burning process to start after inactivity timeout expiration.
How to split files: specifies how the DICOM files has to be divided into the produced
CD/DVD:
o one CD/DVD per patient
o one CD/DVD per study
o no splitting (a CD/DVD can contains DICOM files belonging to more than one
patient or study)
The following picture shows a snapshot of the “Automatic CD/DVD Production Configuration” tab:
77
Page 78

DICOMBurner: User Manual [DB-UM-3 – Rev B]
The Automatic CD/DVD Production Configuration tab
12.11 Automatic Backup Configuration
The “Automatic Backup Configuration” tab allows setting up the parameters to manage the
automatic backup processes (for DICOM files storage and database content). A description of each
configuration parameter available in this dialog box is now provided:
• Automatic Backup Options: allows to enable/disable and set parameter related to the automatic
backup of DICOM files storage and database.
• DICOM files backup:
o Backup unit: specifies the unit to be used as default for automatic backup of DICOM files.
CD/DVD unit name: the name of the default unit for automatic backup
o When/What to backup: specifies when the automatic backup process has to start and what
it has to backup.
78
Page 79

DICOMBurner: User Manual [DB-UM-3 – Rev B]
Frequency: specifies the frequency of the backup operation selected between
“Week by week” or “Day by day”.
Day: specifies the day of the week in which the backup is launched (available only
for “Week by week” backup)
Time: specifies the time of the day in which the backup is launched
Backup …: specifies which DICOM files has to be backed-up
o All files
o Non backed-up
• Database backup:
o Where/When to backup: specifies where the database backup file has to be stored and
when the process will start.
Destination folder: by pressing the “Browse…” button, a folder dialog appears
allowing the user to specify the folder where the database backup file has to be
stored (we recommend to backup the database on a removable media).
Frequency: specifies the frequency of the backup operation selected between
“Week by week” or “Day by day”.
Day: specifies the day of the week in which the backup is launched (available only
for “Week by week” backup)
Time: specifies the time of the day in which the backup is launched
The following picture shows a snapshot of the “Automatic Backup Configuration” tab:
79
Page 80

DICOMBurner: User Manual [DB-UM-3 – Rev B]
The Automatic Backup Configuration tab
13 Registration and Administration
13.1 Registration & Administration dialog box
The “Registration & Administration” dialog box appears when the DICOMBurner user selects the
“Registration & Administration” menu item from the DICOMBurner tray pop-up menu. It shows the kind of
license activated for the current copy of DICOMBurner.
The following picture shows a snapshot of the “Registration & Administration” dialog box:
80
Page 81

DICOMBurner: User Manual [DB-UM-3 – Rev B]
The Registration & Administration dialog box
Through the “Enter/change registration keys…” button, the user may enter new registration keys for the
current copy of DICOMBurner, or change the current registration keys. This operation is protected by an
administration password. The default administration password for DICOMBurner is “db_2005”.
The administration password may be changed by the user by pressing the “Change admin password…”
button; the “Change administration password” dialog (shown in the following picture) will appear.
81
Page 82

DICOMBurner: User Manual [DB-UM-3 – Rev B]
The DICOMBurner administrator (i.e., a person who knows the DICOMBurner administration password) may
also choose to protect the DICOMBurner configuration section with the administration password: if the
“Request admin password for configuration” option is enabled, then the user will be asked for the
administration password when the “Settings” button of the main toolbar is pressed. This is a kind of
protection against possible “misuses” of the DICOMBurner configuration interface.
82
 Loading...