

Page 1

Director EC Office Publisher with Spectrum2 Printer Installation Guide
Document Revision: 2/21
DIRECTOR EC OFFICE PUBLISHER WITH Spectrum2 PRINTER
INSTALLATION GUIDE
DIRECTOR EC OFFICE PUBLISHER -- PC MINIMUM REQUIREMENTS
• A Pentium® III or compatible personal computer @ 933 MHz or faster with Three (3) Free PCI slots.
• Windows 2000 Professional (service pack 4.0 or higher) or Windows XP (service pack 1.0a or higher)
• 1GB RAM (PC 133 specification - SDRAM or DDRAM)
• 1 Hard Disk Controller Adaptec BRAND Ultra 29160
• 1 18 GB SCSI 15,000rpm Ultra 160 SCSI Hard Drive (formatted NTSF) as follows:
• 1 Basic Partition for System (C:) & 2 5GB NTFS Partitions (D:)(E:) – Temp folder in root on each partition
• 1 Firewire 1394 Card (Supplied by MF DIGITAL)
• 1 Software Identifier Card (Supplied by MF DIGITAL) Computer needs 3.5” power connector for this card
• 1 external COM port (COM1 or COM2) - 2 ports needed if using Prism Plus or Spectrum2
• Network 100/10Mbs on Board
• Video 1024 x 768
• One Parallel Port
THE DIRECTOR EC LOADER MUST BE INSTALLED ON COM PORT 2
THE DIRECTOR EC SOFTWARE MUST BE INSTALLED ON C:\ DRIVE
MF DIGITAL
121 Carolyn Blvd.
Farmingdale, NY 11735
001 631 249 9393
www.mfdigital.com
Page 2
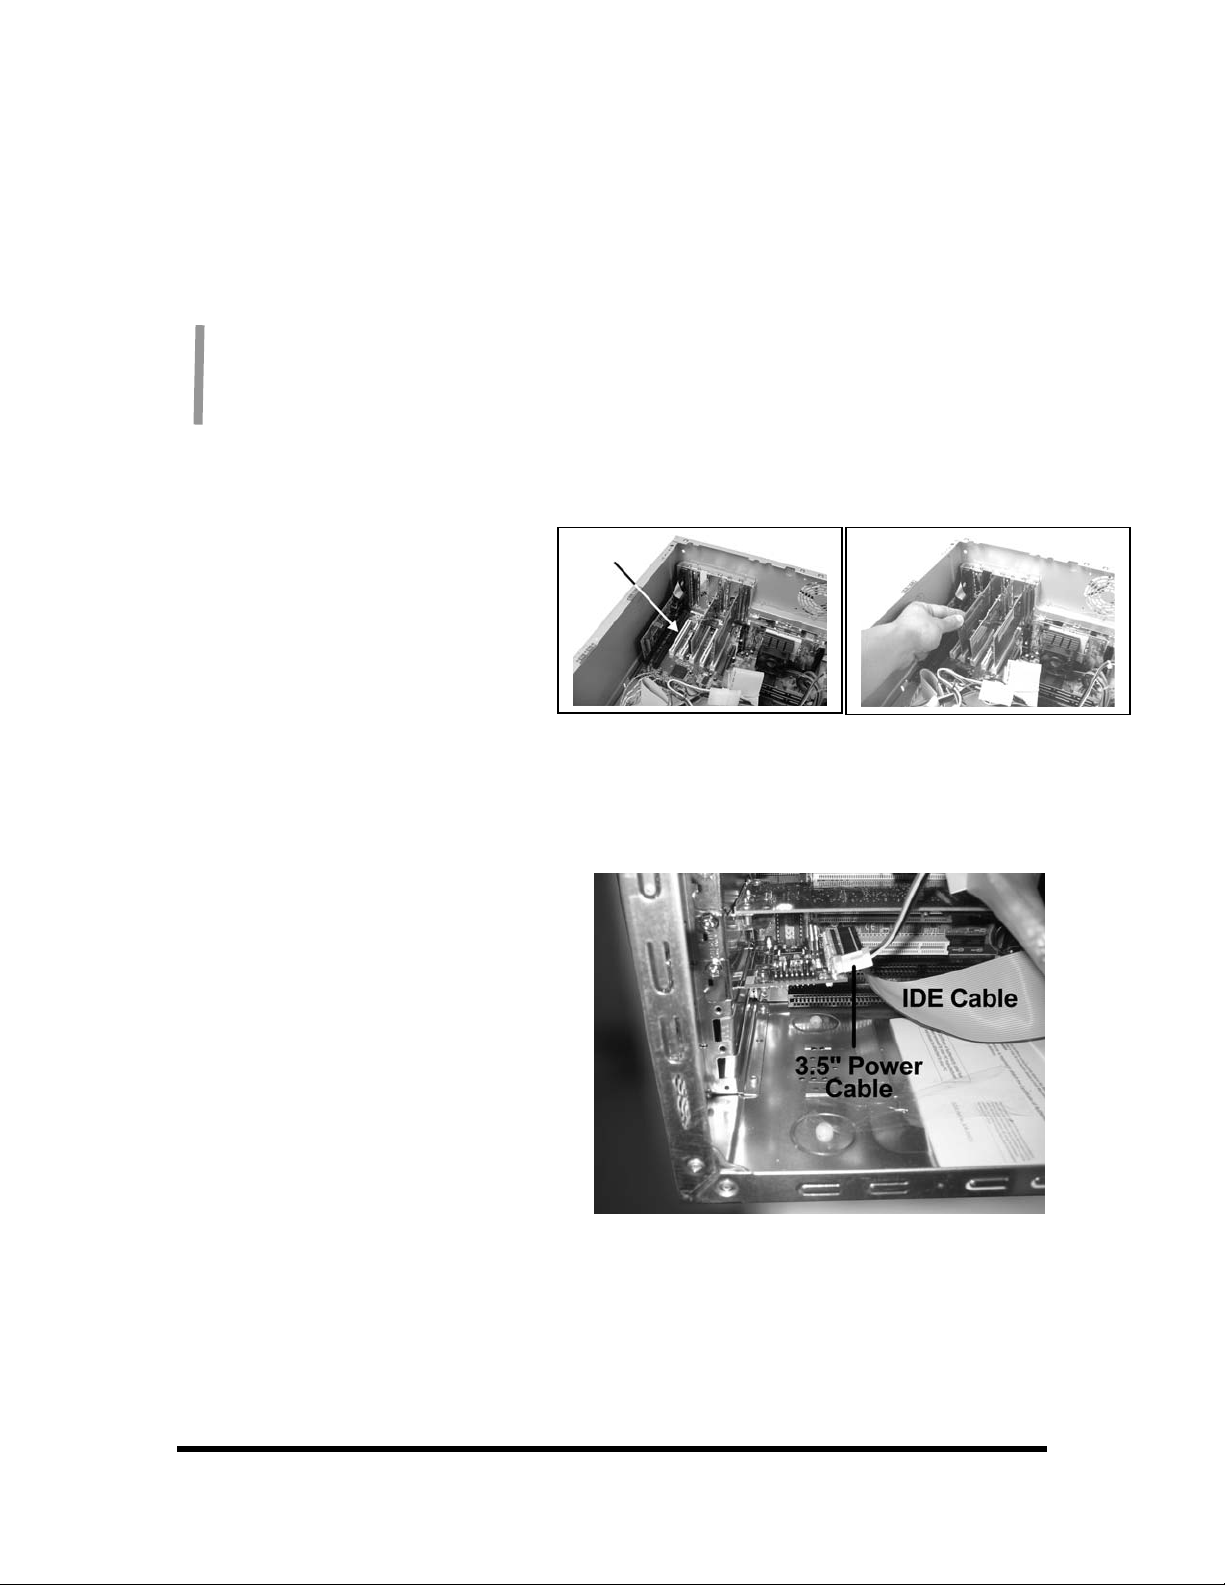
Installing the Firewire Adapter & Software Identifier Cards
Installing the Firewire Card
The DirectorEC Office Publisher requires
one IEEE-1394 card.
1. Shut down the PC.
2. Turn the PC’s power off.
3. Unplug the PC.
4. Remove the PC’s cover as
5. Locate an empty PCI slot, as
6. Install the firewire adapter card (fig. 2).
You should never attempt to service a unit without ensuring proper anti-static protection. The
use of a grounding strap, or other such grounding device, is advised. In addition, the internal
configuration of your computer may be different from the computer pictured below.
indicated in the PC’s manual.
seen in (fig.1).
(fig. 1) (fig. 2)
Installing the Software Identifier Card
a. If your PC is not OFF, perform the
Windows shutdown now.
b. Turn-off powers switch and unplug AC
power from the wall.
c. If the PC’s cover has been re-installed,
remove it now.
d. Locate an Empty slot, Mount the
Software Identifier card in slot as
illustrated (fig. 3).
e. Connect the 3.5” Floppy type power
cable such that the yellow wire is
facing out.
f. Using a 40 Pin EIDE cable, connect the
card to the Secondary IDE Channel on
your PC mother- board.
g. Be sure PIN 1(red wire) if facing
AWAY from the motherboard, and
next to the power connector on
software identifier card (fig. 3).
(fig. 3)
Page 2
Page 3
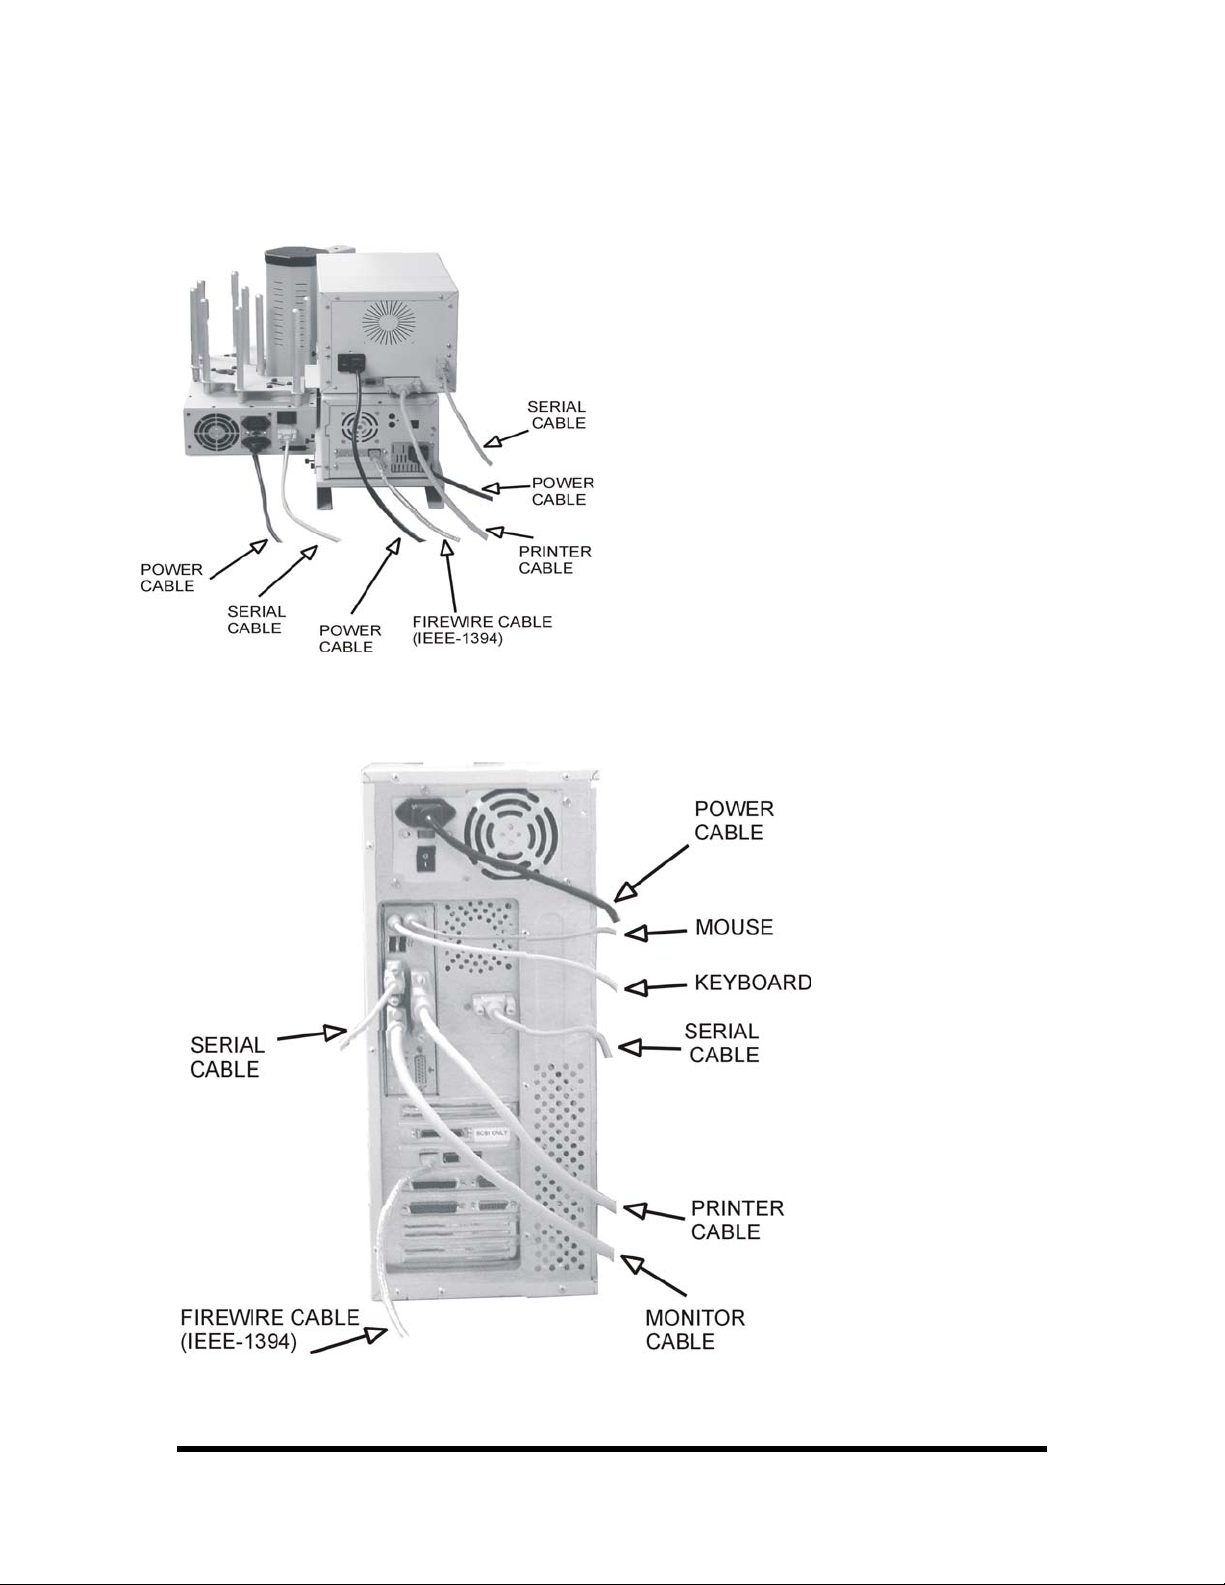
Making the Connection
PC Connection
Page 3
Page 4
N
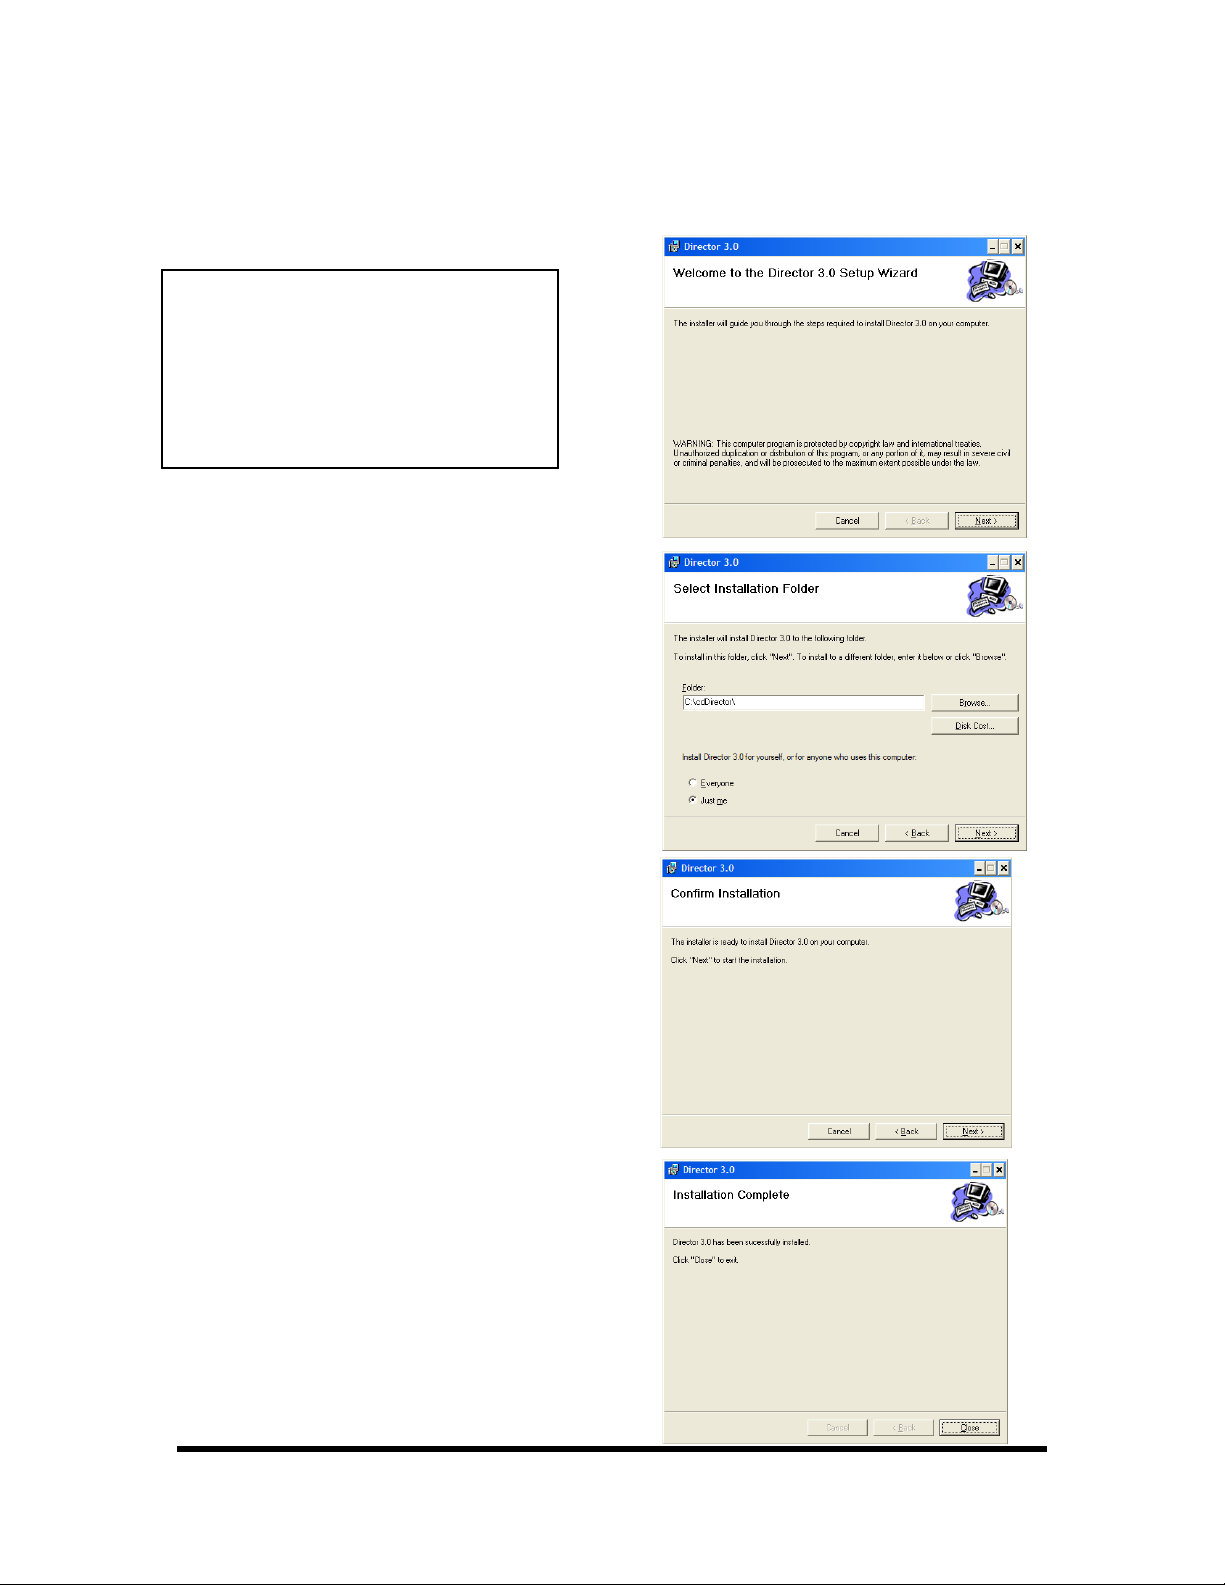
Installing the Director EC Office Publisher Software [1]
ote:
When installing the Director
EC software on Windows XP
you MUST install ODBC
FoxPRo drivers.
See step #2 bellow.
1. Insert the Director EC
Publisher software CD.
2. From the CD ROM drive of
the computer, click
Director 3.0
3. Click Next (fig. 1).
4. You MUST accept default
folder and click Next (fig. 2).
5. Confirm Installation and
click Next (fig. 3).
6. Installation completed click
Close (fig. 4).
(fig. 1)
(fig. 2)
(fig. 3)
(fig. 4)
Page 4
Page 5

N
Installing the Director EC Office Publisher Software [2]
ote:
Windows XP MUST install
ODBC FoxPRo drivers before
running Director 3.0
1. After installation of the
Director EC software go to
“c:\cdDirector\ODBC FoxPro
Driver” folder. (fig. 1)
2. Double click the VFPODBC
file. (fig.2)
3. Congratulations you have
successfully installed
Director EC Office Publisher
software.
(fig. 1)
(fig. 2)
Page 5
Page 6

Selecting system drives for Director EC
1. Open Director EC software.
6. Director EC software might
prompt a message “System
Drives Missing” click OK.
7.
Go to “System Setup” tab
and select system drives “D
and E” (fig. 1)
System Setup tab
(fig. 1)
Page 6
Page 7

Turning OFF Auto RUN on CD-ROM.
1. Go to “Start”.
2. Go to “Run”
3. Type in “regedit” then click
OK (fig.1)
4. Navigate to “Autorun”
registry following the path
“My
Computer\HKEY_LOCAL
_MACHINE\SYSTEM\Cu
rentControlset\Services\Cd
rom” (fig. 2)
5. Set value in “Autorun”
registry to zero if different.
(fig. 1)
Value in Autorun
is set to zero.
(fig. 2)
Page 7
Page 8

Installing the Director EC Publisher Alignment Utility for aligning
the Drive Tower and Printer
1. Insert the Director EC Office
Publisher CD into the CD-ROM
drive of your PC.
2. Click on setup.exe
utility and Click OK (fig. 1).
3. Click Next button to install
complete version (fig. 2).
4. Click Install to start installation
(fig. 3)
of the alignment
(fig. 1)
(fig. 2)
(fig. 3)
Page 8
Page 9

Installing the Director EC Publisher Alignment Utility for aligning
the Drive Tower and printer (cont.)
5. A progress bar will appear (fig. 4).
6. Click Finish to finish installation.
(fig. 5)
(fig. 4)
(fig. 5)
Page 9
Page 10

Installing the Spectrum2 Printer Driver
1. Click Start-> Settings-> Printers
2. Click Add New Printer
3. The “Welcome to the Add Printer
Wizard” window will appear (fig 1).
Click Next.
4. In the “Local or Network Printer”
window, uncheck the “Automatically
detect installed printer” option ,
leaving the “Local printer attached to
computer” option (fig 2) and click
Next..
5. In the “Select a Printer Port” window,
leave the default as LPT1 (fig 3) and
click Next.
6. In the “Install Printer Software”
window, click the “Have Disk” button
(fig 4). You will then be prompted to
“Install from Disk”, click the
“Browse” button (fig 5). Select the
location of the printer driver from
your CD-ROM drive in the PC (fig 6).
fig 1
fig 2
fig 3 fig 4
fig 5
fig 6
Page 10
Page 11

Installing the Spectrum2 Printer Driver (cont.)
7. After specifying the driver for the
Spectrum 2 printer, the printer
“Spectrum2” will appear in the “Add
Printer Window” (fig 7). Click Next to
continue.
8. In the “Name your Printer” window,
leave the printer as the default name, and
select the printer to be the default printer
(fig 8) and click Next.
9. In the “Printer Sharing” window, select
“Do Not Share the Printer” (fig 9) and
click Next.
10. Say No to “Print Test Page” (fig 10)
and click next.
11. The “Completing the Add Printer
Wizard” window will appear (fig 11).
Click Finish. After clicking finish, the
Spectrum 2 printer driver will be installed.
You will be asked to accept that the printer
driver is not digitally signed by Microsoft,
click Continue (fig 12). You have now
successfully installed the printer.
fig 7
fig 8
fig 10
fig 9
fig 11
fig 12
Page 11
Page 12

P
m
P
Adjusting the Spectrum2 Printer Driver Settings
rinting Preferences
To change the printing preferences for the Spectru
2 printer, please do the following:
1. Go to Start-> Settings -> Printers
2. Right-click on the Spectrum 2 printer in
the Printers Folder
3. Go to Printing Preferences
4. For the Scribe Program to use the printer
effectively, please match the settings of
your printer driver to the example on the
right-side of this page.
5. To save settings, click Apply and OK to
exit.
***NOTE: Any changes made to the printer
driver settings, require a NEW PRN file to be
made. If you change one of the settings, be sure
to create a NEW PRN file.***
rinter Spooling
It is important to disable printer spooling on the
Spectrum 2 printer. To do so, please follow the
steps below:
1. Go to Start-> Settings -> Printers
2. Right-click on the Spectrum 2 printer in
the Printers Folder
3. Go to Properties
4. Go to the Advanced Tab
5. For the Scribe Program to use the printer
effectively, please match the settings of
your printer driver to the example on the
right-side of this page.
6. To save settings, Click Apply and OK to
exit.
***NOTE: Any changes made to the printer
driver settings, require a NEW PRN file to be
made. If you change one of the settings, be sure
to create a NEW PRN file.***
Page 12
Page 13

t
r
t
r
r
d
Aligning the Drive Tower
1. From your Start Menu Open the EC Alignmen
Utility (fig. 1). It will be located in the folde
designated when you installed the alignmen
utility. Choose COM Port 2, which the
Director EC Loader is installed. Select all
other printer types and drive bay. Click on
Perform Test.
Follow the instructions by opening the top
2.
CD/DVD drive tray, and Clicking Yes (fig. 2).
The picker arm will hover a disc over the drive
tray, observe the discs position and make the
adjustments to the drive tower (fig. 3).
Click Yes when you are satisfied with you
3.
adjustment (fig. 4).
4. The picker arm will then place the disc onto
the drive tray. Follow the on screen
instructions and click OK (fig. 5).
5. Once you are satisfied with the drive towe
alignment, tighten the thumb-screws locate
on both sides of the drive tower (fig. 6).
(fig. 1)
(fig. 2)
(fig. 3)
(fig. 4)
(fig. 5)
(fig. 6)
Page 13
Page 14

t
r
t
t
r
d
r
y
d
Aligning the Spectrum2 Printer
Alert:
1. From your Start Menu Open the EC Alignmen
2.
3.
4. The picker arm will then place the disc onto
5. Once you are satisfied with the printer tra
Before starting the Alignment Utility,
position the front end of the printer on the
dotted line on the top of the drive bay.
Utility (fig. 1). It will be located in the folde
designated when you installed the alignmen
utility. Choose corresponding COM Por
connected to the Spectrum 2 printer. Select all
other printer types and drive bay. Click on
Perform Test.
Follow the instructions by opening the
Spectrum 2 printer tray, and Clicking Yes
(fig. 2). The picker arm will hover a disc ove
the printer tray, observe the discs position an
make the adjustments to the printer (fig. 3).
Click Yes when you are satisfied with you
adjustment (fig. 4).
the printer tray. Follow the on screen
instructions and click OK (fig. 5).
alignment, tighten the thumb-screws locate
on both sides of the printer.
(fig 1)
(fig 2)
(fig. 3)
(fig. 4)
(fig. 5)
Page 14
 Loading...