

Page 1

CD-5916 Operator’s Guide
Page 2

CD-5916 Operator’s Guide
Document Revision: 060102
Copyright Notice
Copyright ©1996-2002 by MediaFORM, Inc. All rights reserved.
This manual and the accompanying illustrations may not be copied, reproduced,
electronically transmitted, or translated into another language, in whole, or in part,
without the written consent of MediaFORM, Inc.
CD2CD, CD2CD PRO, CD-5400L, CD-5908, CD-5916, CD 3701, CD3703, CD-3706P, cdDIRECTOR, AP-1301i/t, Easi-DAT and Easi-AUDIO
are trademarks of MediaFORM, Inc.
Other trademarks referred to are the property of their respective trademark or
registered trademark holders.
Warranty
MediaFORM, Inc. warrants to the original purchaser that the equipment that you have purchased is free from
defects in materials and workmanship, for a period of time as follows:
Duplicator Electronics & Mechanical Parts 1 year
CD-R/RW Recorders 1 year
This warranty is applicable when the warranty registration has been completed and returned to MediaFORM, Inc.
within a reasonable period of time following the purchase and the warranty is NOT transferable. This warranty
does not apply to malfunctions caused by misuse, negligence, accident, or alteration, nor is MediaFORM, Inc.
responsible for consequential damages related to the use of this equipment.
This warranty is made in lieu of any other warranty expressed or implied.
CD-R/RW Recorder Warranty Policy
Individual CD-R/RW recorder manufacturers are responsible for the products they provide. As a convenience,
MediaFORM, Inc. will honor any service issue related to a defective recorder while under its respective
manufacturer’s warranty providing that the recorder has been purchased from MediaFORM, Inc. either directly
or indirectly. MediaFORM, Inc. assumes no responsibility for products NOT purchased through MediaFORM,
Inc.
Piracy
The copying of audio, video, or software without the permission of the copyright holder is illegal. MediaFORM,
Inc. accepts no responsibility for the copyright use or misuse of this equipment. It is the sole responsibility of the
user to ensure that the legal rights of copyright in duplicating are respected.
MediaFORM, Inc.
400 Eagleview Blvd.
Exton, PA. 19341
Tel.: (610) 458-9200
Fax.: (610) 458-9554
Email: documentation@mediaform.com
www: http://www.mediaform.com
Page 1
Page 3

CD-5916 Operator’s Guide
Document Revision: 060102
Table of Contents
MEDIAFORM, INC....................................................................................................................................................1
ABOUT MEDIAFORM, INC.....................................................................................................................................4
WHAT TO EXPECT FROM YOUR MEDIAFORM CD DUPLICATOR...............................................................................4
ABOUT THIS MANUAL............................................................................................................................................4
GETTING STARTED.................................................................................................................................................5
WHAT’S IN THE BOX..................................................................................................................................................5
PACKING MATERIALS .................................................................................................................................................5
THE BEST PLACE TO PUT THE CD-5916....................................................................................................................6
SAFETY PRECAUTIONS................................................................................................................................................6
LOCATION OF CD-5916 COMPONENTS.......................................................................................................................7
Front View............................................................................................................................................................7
Rear View.............................................................................................................................................................7
LOCATION OF CD-R/RW RECORDER PARTS AND CONTROLS....................................................................................8
LCD Display Screen And Keypad.....................................................................................................................8
MediaFORM SmartDRIVE 16X.........................................................................................................................8
SYSTEM STARTUP ...................................................................................................................................................9
LOADING A DISC ......................................................................................................................................................11
REMOVING A DISC ...................................................................................................................................................11
OPERATION - QUICK START..............................................................................................................................12
MAKING COPIES (CD-TO-CD) ..................................................................................................................................12
COMPARING DISCS (CD-TO-CD) ..............................................................................................................................14
GENERAL OPERATION.........................................................................................................................................16
FUNCTION KEYS .......................................................................................................................................................16
STOPPING THE COPY OR COMPARE PROCESS...........................................................................................................23
CREATING A HARD DISK IMAGE...............................................................................................................................24
Creating A Single Hard Disk Image................................................................................................................24
Creating Multiple Hard Disk Images...............................................................................................................27
COPYING FROM A HARD DISK IMAGE ......................................................................................................................32
Multiple Images Disabled.................................................................................................................................32
Multiple Images Enabled..................................................................................................................................33
COMPARING FROM A HARD DISK IMAGE .................................................................................................................35
Multiple Images Disabled.................................................................................................................................35
Multiple Images Enabled..................................................................................................................................36
COMPARING DISCS (CD-TO-CD TOC) .....................................................................................................................38
SMARTRID AND SMARTSTAMP CODES .................................................................................................................40
Writing SmartRID And SmartSTAMP Codes.................................................................................................40
Reading SmartRID And SmartSTAMP Codes..............................................................................................41
ATIP CODES ............................................................................................................................................................43
Reading ATIP Codes........................................................................................................................................43
VIEWING SCSI DEVICE INFORMATION......................................................................................................................44
COPY PROTECTION ...................................................................................................................................................46
Enabling Copy Protection.................................................................................................................................46
CREATING AUDIO COMPILATION DISCS ....................................................................................................................48
Page 2
Page 4

CD-5916 Operator’s Guide
WORKING WITH CD-REWRITABLE (CD-RW) DISCS ...............................................................................................50
CD-RW Supported Formats ............................................................................................................................50
CD-RW Copying Speed...................................................................................................................................50
Copying From CD-RW Master Discs..............................................................................................................50
CONVERTING FROM TRACK-AT-ONCE TO DISC-AT-ONCE........................................................................................51
SETTING THE INTERNAL CLOCK.....................................................................................................................53
PASSWORD PROTECTION...................................................................................................................................54
SETTING A PASSWORD .............................................................................................................................................54
STARTING UP USING A PASSWORD...........................................................................................................................54
CHANGING OR REMOVING A PASSWORD..................................................................................................................55
SETTING THE MACHINE ID ................................................................................................................................56
FIRMWARE UPDATES...........................................................................................................................................57
CONNECTING THE CD-5916 TO A PC................................................................................................................59
MINIMUM SYSTEM REQUIREMENTS..........................................................................................................................59
SCSI DEVICE SETUP.................................................................................................................................................59
SYSTEM STARTUP.....................................................................................................................................................60
Document Revision: 060102
APPENDIX A: SUPPORTED FORMATS..............................................................................................................61
APPENDIX B: ERROR CODES DISPLAYED ON SCREEN..............................................................................62
Page 3
Page 5

About MediaFORM, Inc.
Thank you for purchasing MediaFORM’s CD-5916 standalone CD
duplicator. MediaFORM manufactures a wide variety of CD duplication
equipment. This includes manual and fully automatic CD duplicators, and
CD printers. We hope you will consider us for all of your duplication needs.
What To Expect From Your MediaFORM CD Duplicator
Your MediaFORM CD-5916 CD duplicator is professionally designed and
manufactured to give you years of trouble free operation. To avoid
accidental damage to your new CD duplicator, please read and understand
this manual thoroughly before operating the unit.
CD-5916 Operator’s Guide
Document Revision: 060102
About This Manual
This manual is written for both novice and experienced users. Please read
through this Operator’s Guide from beginning to end before using the unit.
Once having read the manual, follow along chapter by chapter. This will
provide the necessary understanding of your new CD-5916 CD duplicator.
Page 4
Page 6

Getting Started
Carefully remove the CD-5916 CD duplicator from the shipping container.
Inspect the contents and verify them against the packing slip. Report any
errors in shipping as soon as possible.
What’s In The Box
Your new CD-5916 CD duplicator includes:
• CD-5916 CD duplicator
• Power cord
• Firmware CD
• Operator’s Guide
• MediaFORM Product & Warranty Registration card
CD-5916 Operator’s Guide
Document Revision: 060102
Packing Materials
Please retain the original box and packaging in the event that the unit
requires future servicing. This will help to reduce the possibility of damage
occurring in transit.
Page 5
Page 7

CD-5916 Operator’s Guide
Document Revision: 060102
The Best Place To Put The CD-5916
The best operating location for the CD-5916 CD duplicator is in a climate
controlled area, free of dirt, dust, humidity, excessive heat, and electronic or
electromagnetic interference. Room temperature should be between 65 and
75 degrees Fahrenheit, or between 18 and 23 degrees Celsius. Place the CD5916 on a solid, steady work surface, and allow sufficient room for all
incidental work materials. Provide at least six inches of clearance on all
sides of the unit for ventilation.
Safety Precautions
The system is shipped with a three-prong power connector, and must be
used with a properly grounded AC receptacle. DO NOT try to defeat the
third “ground” prong. All computer peripherals must be properly grounded,
and the CD-5916 is no exception. The use of a power conditioner, such as
an Uninterruptible Power Supply (UPS) or a surge protector, is highly
recommended. The minimum required size is 400VA.
Repairs or alterations should only be attempted by authorized factorytrained technicians. MediaFORM reserves the right to void the warranty if
unauthorized service is performed.
Page 6
Page 8

CD-5916 Operator’s Guide
Location Of CD-5916 Components
Front View
Document Revision: 060102
Rear View
Page 7
Page 9
CD-5916 Operator’s Guide
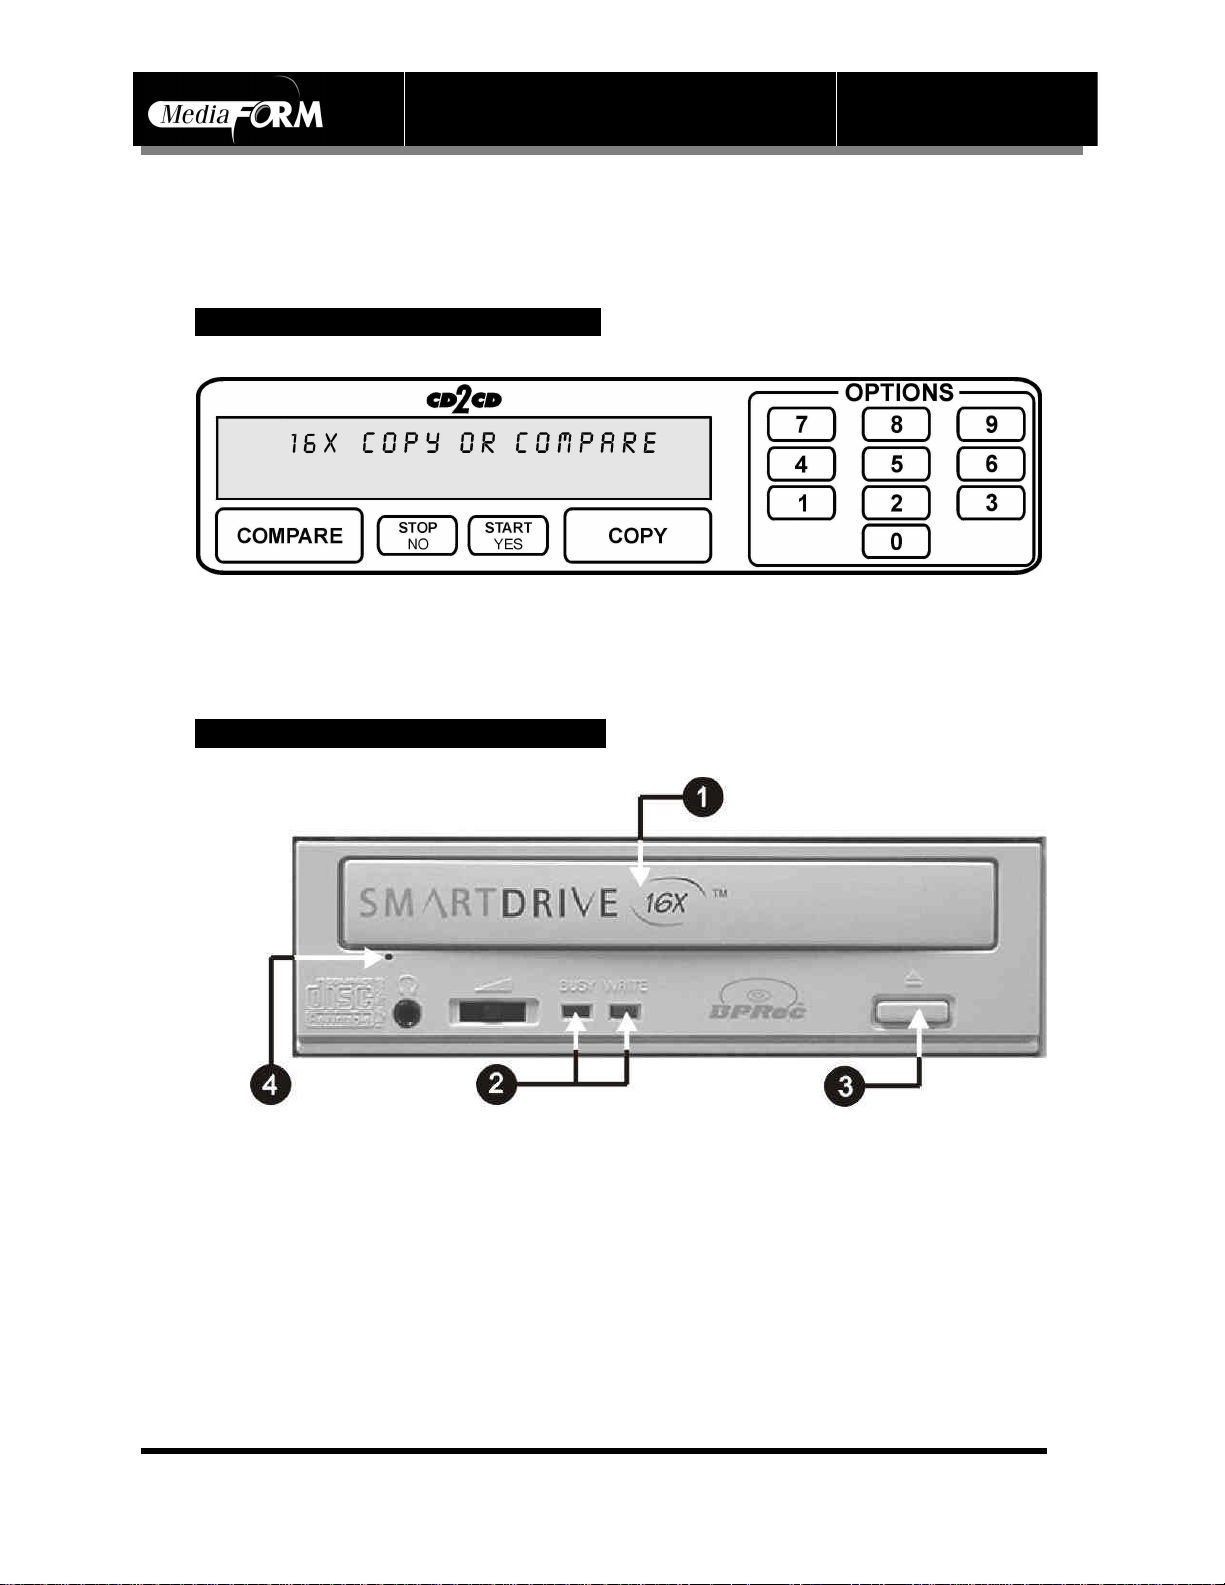
Location Of CD-R/RW Recorder Parts And Controls
LCD Display Screen And Keypad
Document Revision: 060102
MediaFORM SmartDRIVE 16X
Legend
1) Disc tray - Discs are loaded and removed from this tray. Pressing the eject button will open the
tray when the power is switched on to the CD-5916.
2) Read and write status LEDs - These indicators light up when the recorder is reading or writing.
3) Eject button - This button is used to open or close the disc tray.
4) Emergency eject pinhole - In the event that the disc tray will not open by pressing the eject button
insert the tip of a large paper clip into this hole and push.
Page 8
Page 10
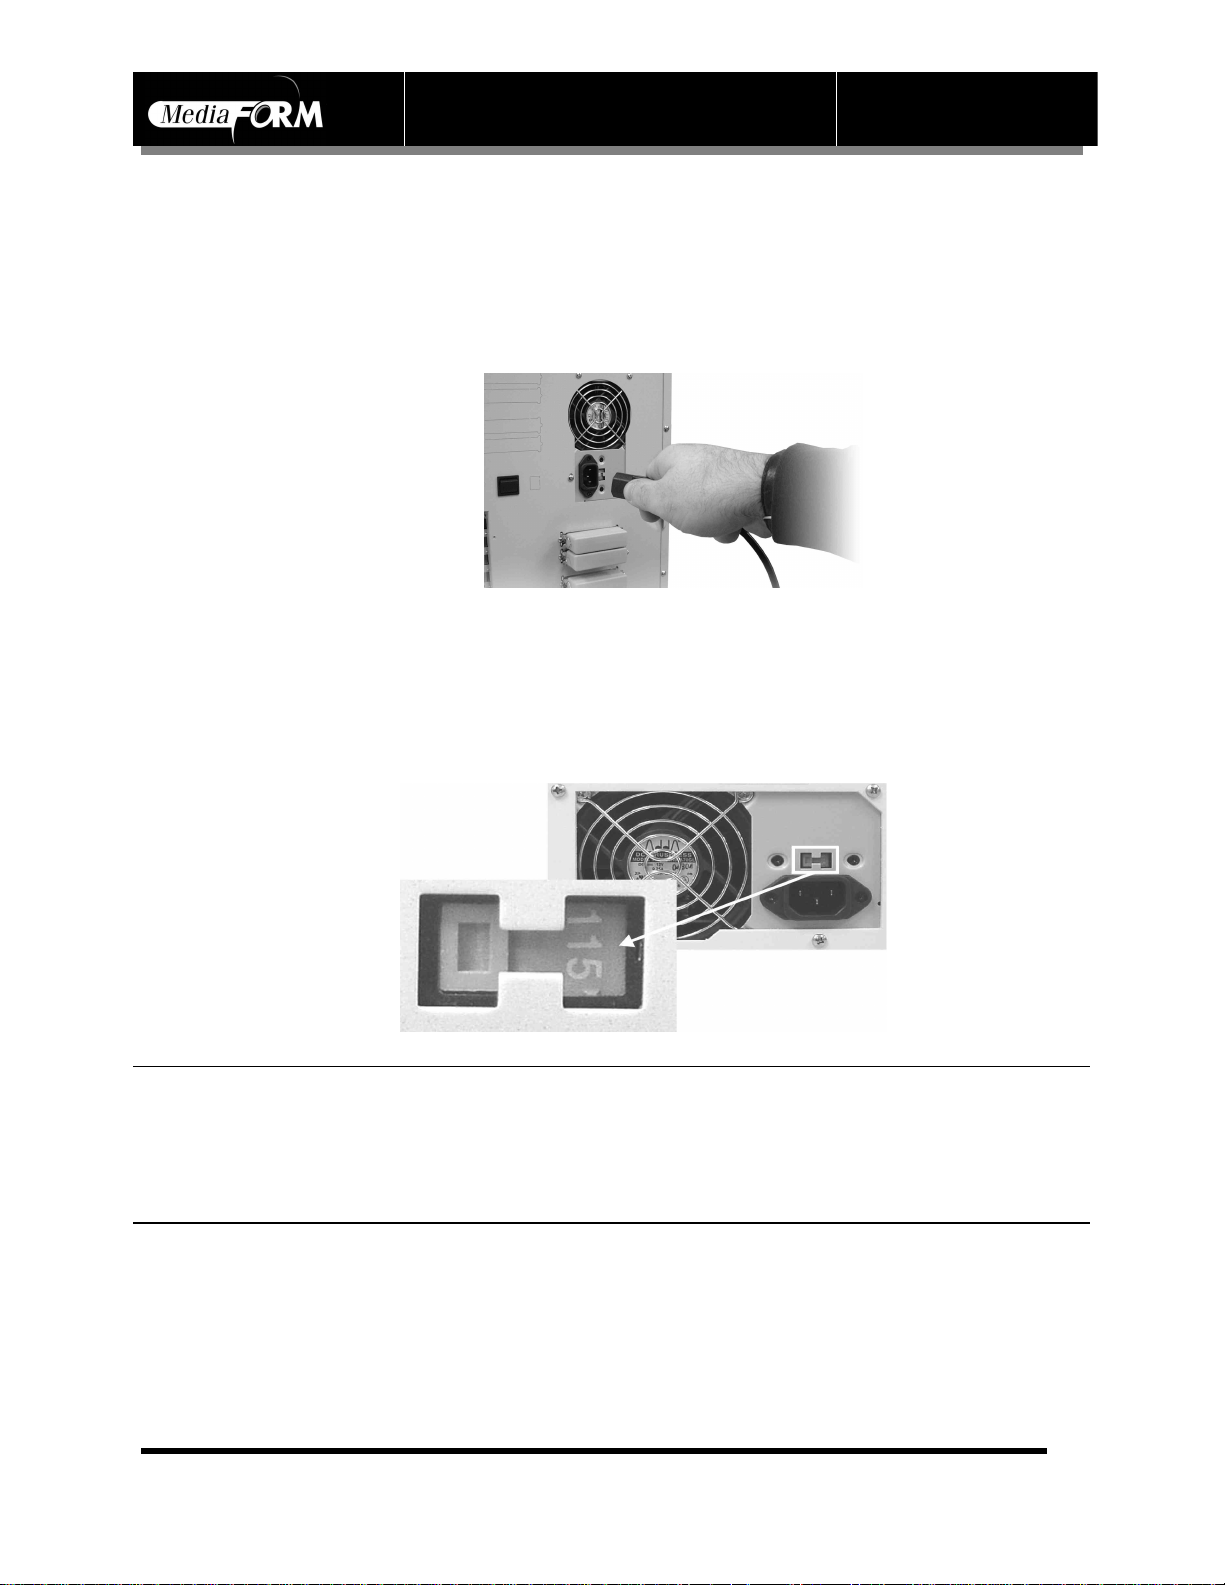
System Startup
Before duplicating can begin, it is necessary to review a few details.
• Plug one end of the supplied power cord into the upper receptacle at the
rear of the unit.
• Next, verify that the voltage selector switch is set correctly. It is located
between the two power receptacles. The CD-5916 supports both 115
VAC and 230 VAC at 50 ~ 60 Hz. Please confirm that the appropriate
voltage (115 VAC for North America) has been selected.
CD-5916 Operator’s Guide
Document Revision: 060102
M
CAUTION
Always use properly grounded receptacles, or severe damage to
your system may result. The use of a surge protector or
Uninterruptible Power Supply (UPS) is highly recommended.
Page 9
Page 11
CD-5916 Operator’s Guide
Document Revision: 060102
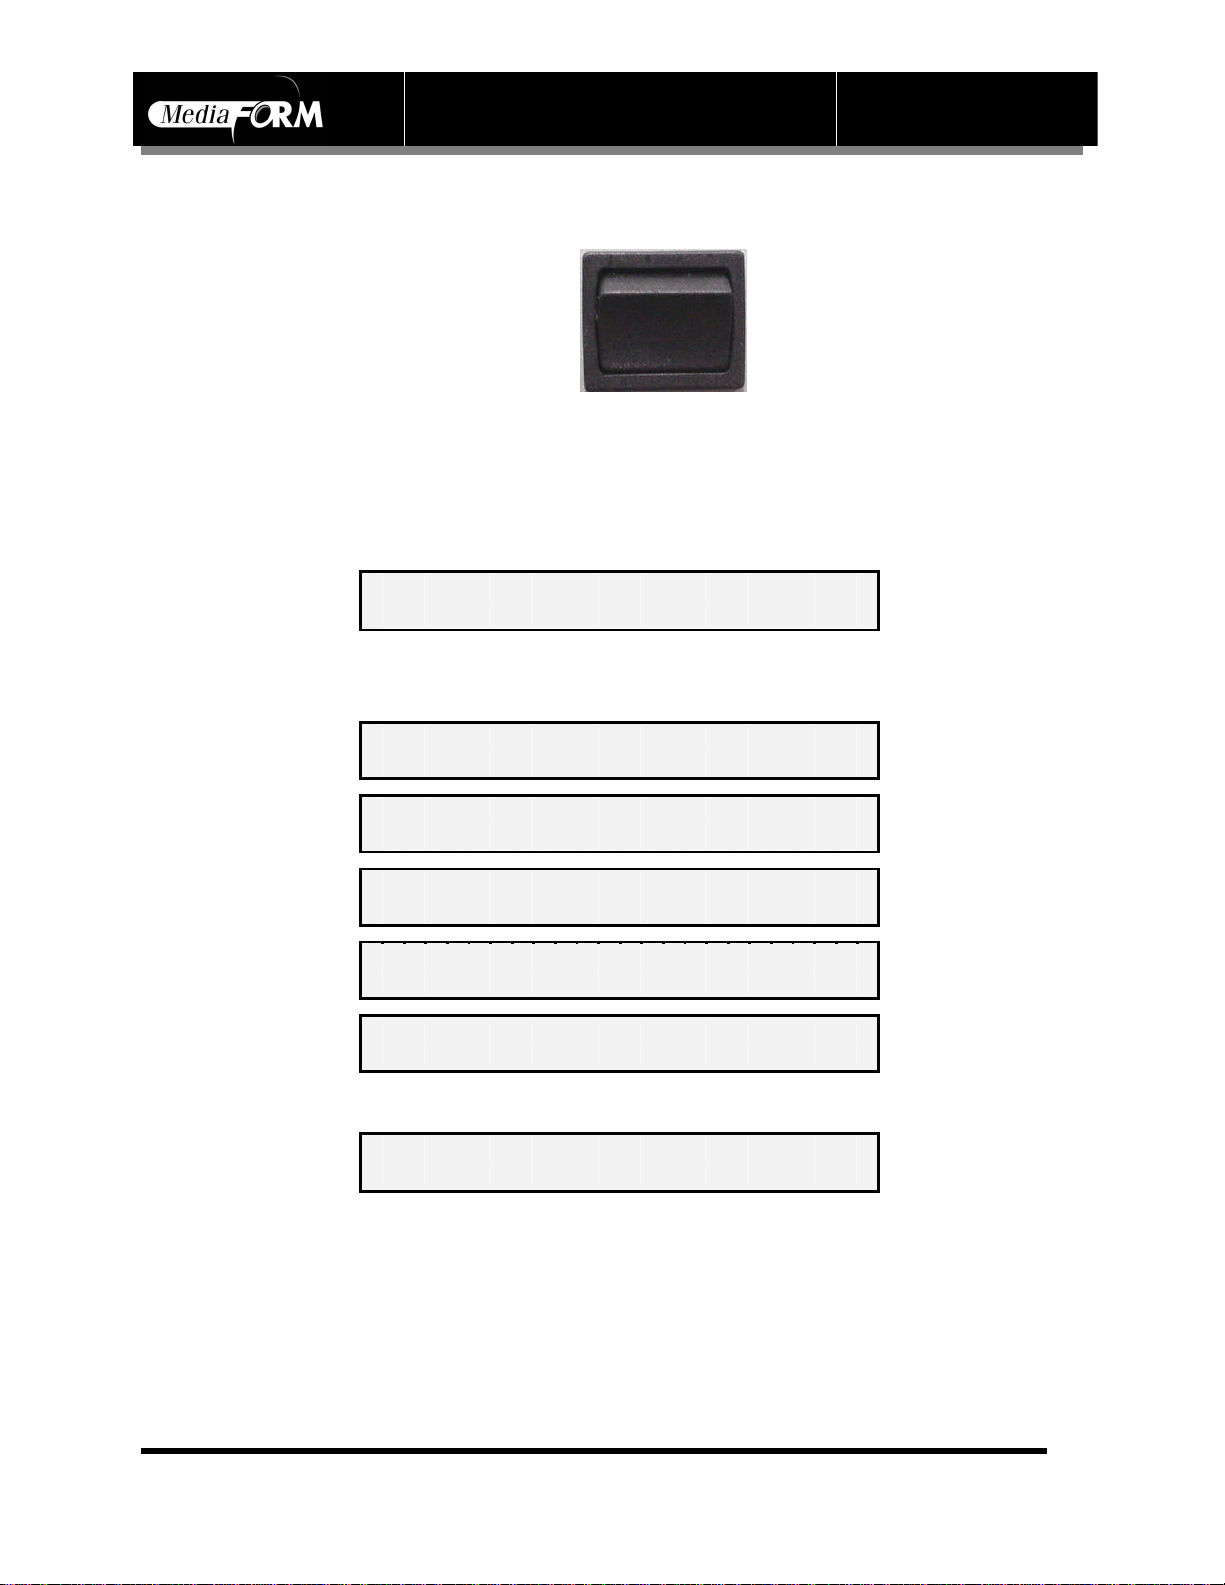
• Make sure you power on the unit using the switch seen below, which is
located on the back of the CD-5916.
• Once the proper voltage setting has been confirmed, it is time to turn on
the unit. The power switch is located at the back of the unit, above the
AC power input. Wait a minute or two while the system starts up. The
screen will now read:
M F I N C .
C D 2 C D P R O A D V A N C E D
After the startup routine is complete a series of self-diagnostics will be
performed. The screen will now read in sequence:
S C A N N I N G H A R D D R I V E
C H E C K I N G S Y S T E M . . . .
S Y S T E M O K
P L E A S E WA I T . . .
S E E K I N G S L A V E U N I T . . .
Once complete the main operating screen is displayed on the screen:
1 6 X C O P Y O R C O M P A R E
Page 10
Page 12
CD-5916 Operator’s Guide
Document Revision: 060102
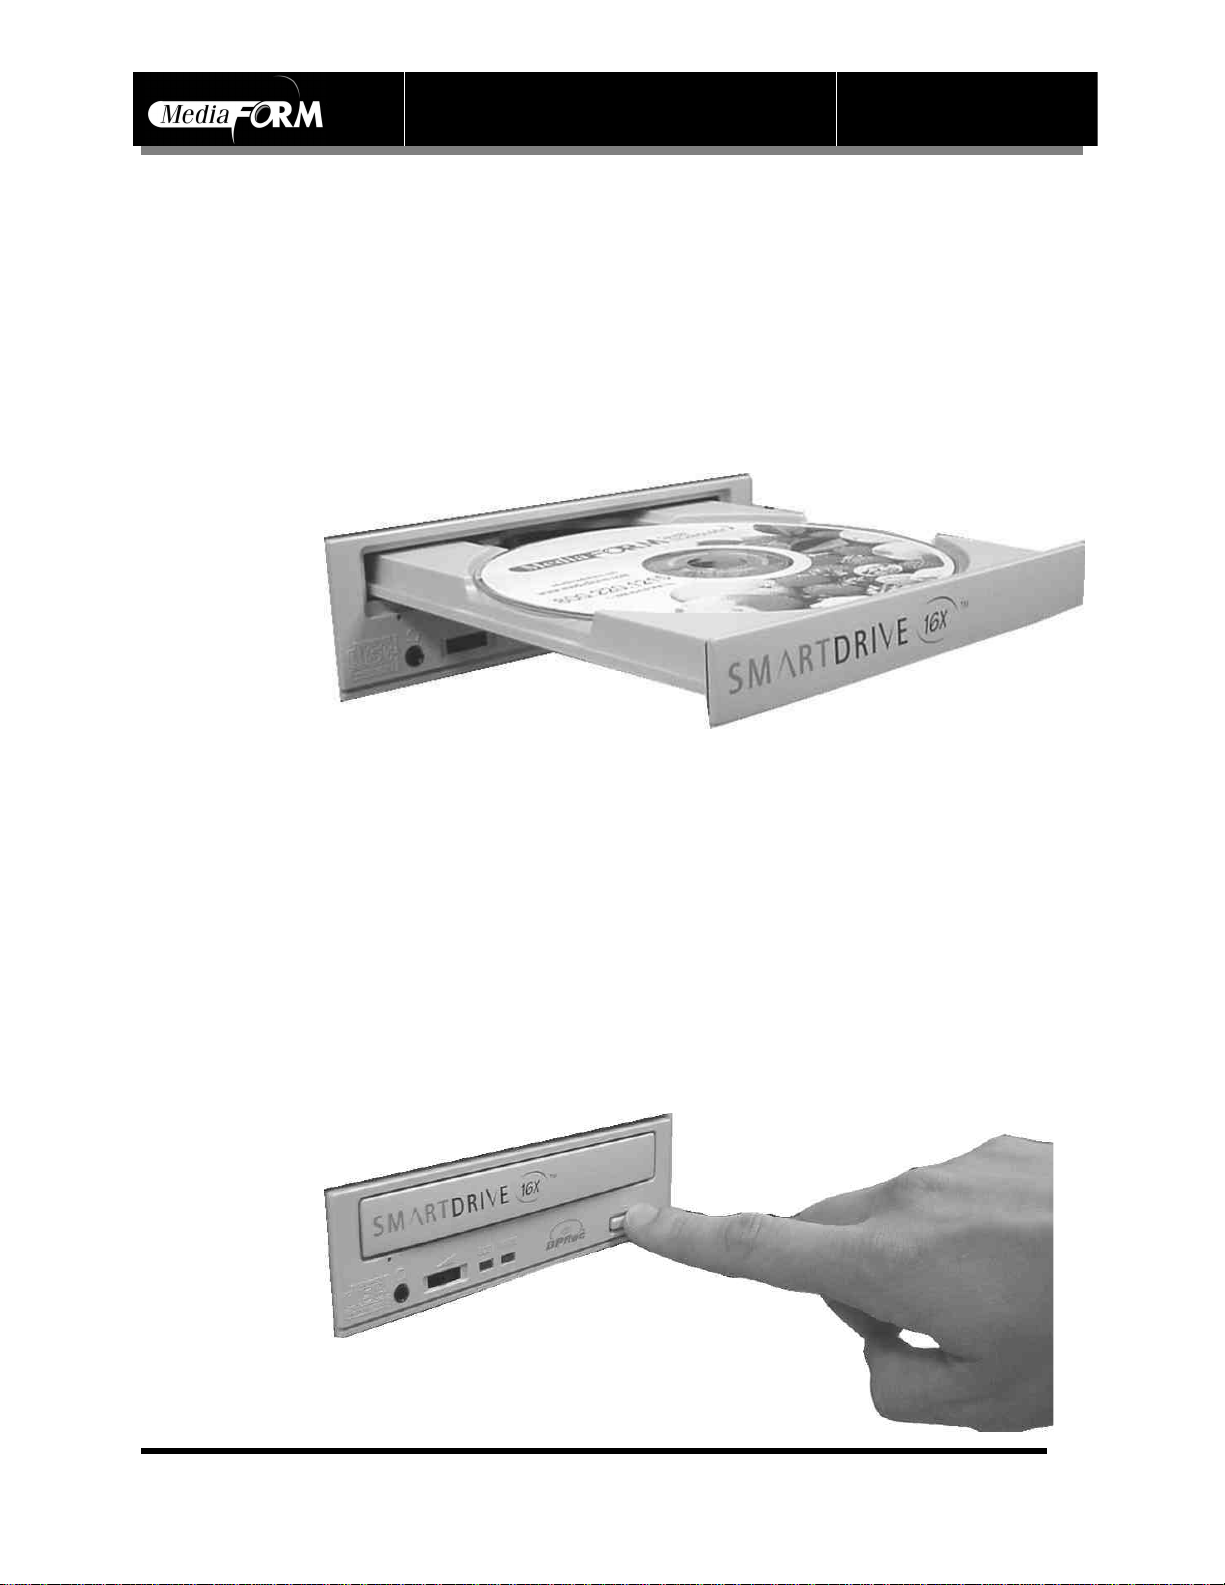
Loading A Disc
• After the CD-5916’s power has been switched on press the eject button
on the front of the recorder to open its disc tray.
• Load by carefully placing the disc (label side up) into the recessed area
of the disc tray, so that the disc lays flat.
• Press the eject button on the front of the recorder to close the disc tray.
Removing A Disc
• While the CD-5916’s power is still switched on, press the eject button
on the front of the recorder to open the disc tray.
• After the disc tray has completely opened, lift the disc by its edges and
carefully remove it.
• Press the eject button on the front of the recorder to close the disc tray.
Page 11
Page 13

WA
CD-5916 Operator’s Guide
Operation - Quick Start
The CD-5916 is a state-of-the-art CD duplicator. It is designed to copy and
verify most standard compact disc formats. This Quick Start section will
guide you through copying and comparing discs using the CD-to-CD
method. More advanced topics, such as copying by making use of the
internal hard disk drive, will be covered later in this guide.
Making Copies (CD-to-CD)
The quickest and simplest way of duplicating one or more discs is to use the
CD-5916’s CD-to-CD copying feature. The steps are as follows:
• From the main operating screen depicted below:
1 6 X C O P Y O R C O M P A R E
• Load your original CD to be copied (master disc) into the top right-hand
side CD-R/RW recorder.
• Load as many blank discs as you may require into the remaining
recorders. Wait for the LED lights on the front of all the recorders to
stop flickering (this may take up to 30 seconds).
• Press the “COPY” key on the keypad. The screen will now read:
F R O M H D ? ( S T A R T ? S T O P )
• Press the “STOP/NO” key. The screen will now read:
T O H D ? ( S T A R T ? S T O P )
• Press the “STOP/NO” key. The screen will now read:
C D - > C D ? ( S T A R T ? S T O P )
• Press the “START/YES” key to begin copying from your master disc (in
the top right-hand side recorder) to the blank discs (in the other
recorders). The master will be analyzed automatically to determine its
format type. The screen will now read in sequence:
I T I N G F O R D R I V E S R E A D Y
Document Revision: 060102
Page 12
Page 14

n n n n
CD-5916 Operator’s Guide
A N A L Y Z I N G F O R M A T
Q U I C K S C A N . . ( T M )
Once the format of the master disc is determined, copying will begin
automatically. Depending on the format type, something like the
following will be displayed on the screen:
M A S T E R S I Z E 2 5 5 M B
S I N G L E T R A C K M O D E 1
Progress will be displayed on the screen during the operation:
C O P Y
R E M A I N I N G T I M E 0 3 : 3 3
n n n n o o o o o o o o
5 0 %
Upon successful completion, the copied disc(s) will be ejected. The
screen will now read:
C O P Y O K , P R E S S S T A R T
• Press the “START/YES” key, and you will be returned to the main
operating screen:
1 6 X C O P Y O R C O M P A R E
Document Revision: 060102
Note: If discs failed to copy properly, the recorder tray drawers stay
closed upon completion. These discs should not be used. To
help you determine the nature of the problem, error messages
can be displayed by pressing the “9” key on the keypad.
Page 13
Page 15
WA
WA
CD-5916 Operator’s Guide
Comparing Discs (CD-to-CD)
To ensure copied discs are identical to the original (master disc) the CD5916 is equipped with powerful verification capabilities. The quickest and
simplest way of comparing a disc or multiple discs against an original CD
(master disc) is to use the CD-5916’s CD-to-CD compare feature.
Note: Due to the nature of the various compact disc formats only
CD-ROM Mode 1, CD-ROM Mode 2, CD-ROM XA Mode 2
Form 1, and audio (CD-DA) discs can be compared.
The steps are as follows:
• From the main operating screen depicted below:
1 6 X C O P Y O R C O M P A R E
• Load the original CD to be compared against (master disc) into the top
right-hand side CD-R/RW recorder.
• Load the discs to be compared into as many of the remaining recorders
as required. Wait for the LED lights on the front of all the recorders to
stop flickering (this can take up to 30 seconds).
• Press the “COMPARE” key on the keypad. The screen will now read:
C D - > C D ? ( S T A R T ? S T O P )
• Press the “START/YES” key to begin comparing the master disc (in the
top right-hand side recorder) against the discs in the other recorders. The
master will be analyzed automatically to determine its format type. The
screen will now read in sequence:
I T I N G F O R D R I V E S R E A D Y
A N A L Y Z I N G F O R M A T
I T I N G F O R D R I V E S R E A D Y
Document Revision: 060102
Page 14
Page 16

n n n n
CD-5916 Operator’s Guide
Once the format is determined the comparison will begin automatically.
Progress will be displayed on the screen during the operation:
C O M P
o o o o o o o o o o o o
2 5 %
Upon successful completion of the comparison, all the discs will be
ejected. The screen will now read:
C O M P O K P R E S S S T A R T
• Press the “START/YES” key, and you will be returned to the main
operating screen:
1 6 X C O P Y O R C O M P A R E
Document Revision: 060102
Note: If discs failed to copy properly, the recorder tray drawers stay
closed upon completion. These discs should not be used. To
help you determine the nature of the problem, error messages
can be displayed by pressing the “9” key on the keypad.
Page 15
Page 17
CD-5916 Operator’s Guide
General Operation
In addition to CD-to-CD copying and comparing the CD-5916 is extremely
versatile and offers many useful and powerful features.
Function Keys
Various uses for the CD-5916 will be explained throughout this Operator’s
Guide. The following section explains the purpose of the function keys.
The numeric keys on the keypad have special functions when the main
operating screen is displayed:
1 6 X C O P Y O R C O M P A R E
Document Revision: 060102
M O D E : C O P Y = 1 , S I M U L A T E = 2
The factory setting for this function is “copy”. When the Recording
Mode of the CD-5916 is set to “copy”, any blank discs loaded into
the recorders will be written to. The “simulate” mode is a diagnostic
tool, useful for testing the readability of a master disc without
actually writing to blank discs loaded into the recorders. It is also
helpful for training purposes and for experimenting with various
system functions.
• Press the “1” key to select “copy” or the “2” key to select “simulate”.
After pressing either key, you will be returned to the main operating
screen.
• Press the “1” key on the keypad. Something similar to the following
will be displayed on the screen in sequence:
• Press the “0” key on the keypad. The screen will now read:
P R O 7 . 0 X X P 0 3 / 0 5 / 0 1
This is the version information of the firmware currently installed on
the CD-5916.
Page 16
Page 18
CD-5916 Operator’s Guide
I M A G E S I Z E 2 5 5 M B
I M A G E I N F O
Document Revision: 060102
If the Multiple Images feature is disabled, the size of the current hard
disk image is displayed.
S I Z E : 2 5 5 M B N U M B E R : 1
I M A G E : 0 N A M E : T E S T
If the Multiple Images feature is enabled, the size, number, and name
of all the hard disk images stored in the CD-5916 are displayed in
sequence.
C R E A T I O N D A T E A N D T I M E
T H U M A R 1 4 1 6 : 1 1 : 5 6 2 0 0 1
This is the date and time which the hard disk image was created. If
the information is inaccurate, adjust the CD-5916’s internal clock
(see page 54).
T O T A L G O O D : 9 9 9 5 B A D : 0
This is the CD-5916’s internal counter, which keeps track of the
number of good and failed copies made by the unit since it was first
activated.
R E C O R D I N G S P E E D 1 6 X
R I D O P T I O N O F F
This display is the CD-5916’s current recording speed setting (8x,
12x, or 16x) as well as the status (on/off) of the SmartRID and
SmartSTAMP feature.
F U L L S C A N O P T I O N
P R E S S Y E S / N O
The factory setting for this function is “disabled”. When “enabled”,
Full Scan performs a full surface test of the master disc to ensure
that it is readable before copying begins. If audio tracks are present
the master disc is additionally checked for low-level (C1 decoder)
errors that could appear as audible noise in the resulting copy. While
the process takes a little longer it is prudent to always use Full Scan.
• Press the “2” key on the keypad. The screen will now read:
Page 17
Page 19

CD-5916 Operator’s Guide
Document Revision: 060102
• Press the “START/YES” key to “enable” or the “STOP/NO” key to
“disable” the Full Scan feature. After pressing either key, the screen
will now read:
V E R I F Y A F T E R O P T I O N
P R E S S Y E S / N O
The factory setting for this function is “disabled”. When “enabled”,
the Verify After feature automatically compares discs to the master
disc or hard disk image after copying is completed. Due to the nature
of the various compact disc formats, only CD-ROM Mode 1, CDROM Mode 2, CD-ROM XA Mode 2 Form 1, and audio (CD-DA)
discs can be compared.
• Press the “START/YES” key to “enable” or the “STOP/NO” key to
“disable” the Verify After feature. After pressing either key, the
screen will now read:
A R C H I V E O P T I O N
P R E S S Y E S / N O
The factory setting for this function is “enabled”. When “enabled”,
the Archive feature allows copies of master discs to be stored on the
CD-5916’s internal hard disk for later recording or comparing (see
page 25). This setting will remain in effect until “disabled”, even
after restarting the CD-5916.
• Press the “START/YES” key to “enable”, or the “STOP/NO” key to
“disable” the Archive feature. After pressing either key, the screen
will now read:
M U L T I P L E I M A G E S
P R E S S Y E S / N O
The factory setting for this function is “disabled”. When “enabled”,
the Multiple Images feature allows up to six images to be stored on
the hard disk drive at one time (see page 24). This setting will remain
in effect until “disabled”, even after restarting the CD-5916.
• Press the “START/YES” key to “enable” or the “STOP/NO” key to
“disable” the Multiple Images feature. After pressing either key, the
screen will now read:
R E C O R D R I D O P T I O N
P R E S S Y E S / N O
The factory setting for this function is “disabled”. When “enabled”,
the Record RID feature will write SmartRID and SmartSTAMP
codes into audio and data discs copied by the CD-5916 (see page 41).
Page 18
Page 20
CD-5916 Operator’s Guide
Document Revision: 060102
• Press the “START/YES” key to “enable” or the “STOP/NO” key to
“disable” the Record RID feature. After pressing either key, the
screen will now read:
C O P Y P R O T E C T O P T I O N
P R E S S Y E S / N O
• The factory setting for this function is “disabled”. When “enabled”,
the Copy Protect feature will write copy protection information into
data discs copied by the CD-5916 (see page 47).
• Press the “START/YES” key to “enable” or the “STOP/NO” key to
“disable” the Copy Protect feature. After pressing either key, you
will be returned to the main operating screen.
I M P O R T F R O M A U D I O I M P O R T
[ C O P Y ] = R E C O R D [ C O M P A R E ] =
This display is the control submenu for the Easi-DAT and EasiAUDIO pro audio import options.
• Press the “3” key on the keypad. The screen will now read:
• Not used.
• Press the “5” key on the keypad. The screen will now read:
I M P O R T T R A C K 0 1 ?
By using the Audio Track Import feature audio compilation discs
can be created one track at a time from one or more master discs (see
page 49).
• Press the “6” key on the keypad. Something similar to the following
will be displayed in sequence:
S C A N N I N G S C S I D E V I C E S
I D : 1 H O S T : 0 C R D - B P 4
R E V : M C 2 1 R I D : 4 7 1 1 F
Page 19
Page 21

CD-5916 Operator’s Guide
I d : 2 h o s t : 0 c r d - b p 4
r e v : M B 2 8 r I d : 4 7 3 8 c
I d : 3 h o s t : 0 c r d - b p 4
r e v : M B 2 8 r I d : 4 7 2 e 7
I d : 4 h o s t : 0 c r d - b p 4
r e v : M B 2 8 r I d : 4 7 1 a 3
I d : 1 h o s t : 1 c r d - b p 4
r e v : M B 2 8 r I d : 4 7 0 c 2
I d : 2 h o s t : 1 c r d - b p 4
r e v : M B 2 8 r I d : 4 7 0 9 b
I d : 3 h o s t : 1 c r d - b p 4
r e v : M B 2 8 r I d : 4 7 0 c e
I d : 4 h o s t : 1 c r d - b p 4
r e v : M B 2 8 r I d : 4 7 0 b d
I d : 1 h o s t : 2 c r d - b p 4
r e v : M B 2 8 r I d : 4 7 0 2 1
I d : 2 h o s t : 2 c r d - b p 4
r e v : M B 2 8 r I d : 4 7 1 6 f
I d : 3 h o s t : 2 c r d - b p 4
r e v : M B 2 8 r I d : 4 6 f f 4
I d : 4 h o s t : 2 c r d - b p 4
r e v : M B 2 8 r I d : 4 7 0 1 2
I d : 1 h o s t : 3 c r d - b p 4
r e v : M B 2 8 r I d : 4 7 6 f e
I d : 2 h o s t : 3 c r d - b p 4
r e v : M B 2 8 r I d : 4 7 7 0 5
I d : 3 h o s t : 3 c r d - b p 4
r e v : M B 2 8 r I d : 4 7 2 0 9
I d : 4 h o s t : 3 c r d - b p 4
r e v : M B 2 8 r I d : 4 7 1 1 d
Document Revision: 060102
This display is the SCSI device information for each of the recorders
installed in the CD-5916. This includes their SCSI channel and host
number, model name, firmware version, and unique SmartRID code.
Page 20
Page 22

CD-5916 Operator’s Guide
Document Revision: 060102
E N T E R A U T H O R I N G M O D E ?
When selected, the Authoring Mode function allows you to
externally connect an Iomega Jaz removable hard disk drive to the
CD-5916 and create a master CD from the files contained on a
DOS/Windows 3.1 or Windows 95/98 formatted cartridge. Press the
“START/YES” key to select the Authoring Mode function. To
advance to the next screen, press the “STOP/NO” key. The screen
will now read:
• Press the “7” key on the keypad. The screen will now read:
R E A D R I D I N F O ?
When selected the Read RID Info function reads the SmartRID or
SmartSTAMP code from a copied disc (see page 41).
• Press the “START/YES” key to select the Read RID Info function.
To advance to the next screen, press the “STOP/NO” key. The screen
will now read:
C O P Y D I S C A T O N C E ? 1 = Y E S
When selected the Copy Disc-at-Once function converts an open
Track-at-Once disc to a finalized Disc-at-Once disc (see page 52).
• Press the “1” key to select the Copy Disc-at-Once function. Press the
“STOP/NO” key, and you will be returned to the main operating
screen.
S E L E C T R E C O R D I N G S P E E D
[ 1 ] = 1 6 x [ 0 ] = 1 2 X [ 8 ] = 8 X
The factory setting for this function is “8x”. When selected the Select
Recording Speed feature allows you to set the copying speed as
determined by the capabilities of the recorders installed in the CD-
5916.
• Press the “1” key to select “16x”, the “0” key for “12x”, or the “8”
key for “8x” recording speed. After pressing any of those keys, the
screen will now read:
• Press the “8” key on the keypad. The screen will now read:
S E L E C T A R C H I V E S P E E D
Page 21
Page 23

CD-5916 Operator’s Guide
[ 0 ] = M A X I M U M [ 4 ] = 4 x
Document Revision: 060102
The factory default setting is “maximum”. When selected, the Set
Archive Speed feature forces the CD-5916 to create a hard disk
image from a master disc at the chosen speed. Using 4x speed can
improve the chances of copying poorer quality master discs.
• Press the “0” key to select “maximum” or the “4” key to select “4x”
archiving speed. After pressing either key, you will be returned to the
main operating screen.
• From the “16x Copy or Compare” screen, press the “9” key on the
keypad.
1 : O K
2 : O K
3 : O K
4 : O K
5 : O K
6 : O K
7 : O K
8 : O K
This displays the status of the last disc copied or compared in each of
the CD-5916’s recorders. If the last operation performed was
successful, the screen will report “OK”. If problems were
encountered, an error message will be displayed (see page 63).
Page 22
Page 24

CD-5916 Operator’s Guide
Stopping The Copy Or Compare Process
If you need to stop either the copy or compare process once they have
begun, the steps are as follows. Please note, a sustained press of at least two
seconds is required, in order to prevent accidental stoppage.
• Press and hold the “STOP/NO” key until the screen reads:
C O P Y S T O P P E D
OR:
C O M P A R E S T O P P E D
• Press the “START/YES” key, and you will be returned to the main
operating screen:
1 6 X C O P Y O R C O M P A R E
CAUTION
Stopping the copying process after the CD-5916 has begun
M
recording will result in partially written CD-R discs, which
cannot be copied to again.
Document Revision: 060102
Page 23
Page 25

CD-5916 Operator’s Guide
Document Revision: 060102
Creating A Hard Disk Image
The CD-5916 comes equipped with an internal hard disk drive, which can
be used to store copies of master discs for later recording or comparing.
Each master is saved as a single image file. Up to six images can be stored
on the hard disk at one time. If blank discs are loaded into any of the
recorders while a hard disk image is being created, copies of the master disc
will also be made at the same time. However, if no blank discs are loaded,
the CD-5916 will simply create the image on the hard disk.
A hard disk image is useful in a number of situations. It is:
1) an efficient way of making many copies of the same master disc. For
example, create a hard disk image while copying the first set of fifteen
discs. Eject the master disc and the first fifteen copies. You will then
load sixteen blank discs and continue copying (sixteen copies are made
from the hard disk image at one time, instead of fifteen, as would be the
case using the CD-to-CD method).
2) a convenient way of copying standard master discs. For example, create
hard disk images for five or six master discs which are needed on a
regular basis, and access them to make copies as required.
3) a more reliable way of copying a poorer quality master disc. For
example, first create a hard disk image of a master disc which is not good
enough for CD-to-CD copying. The hard disk image will then serve as a
more reliable master.
Creating A Single Hard Disk Image
Although the CD-5916’s internal hard disk can store up to six images of
master discs, it is sometimes prudent not to use this Multiple Image feature,
and only allow one image to be created and stored. Using a single image
simplifies the copying process. This reduces the chance that an operator
might make copies of the wrong discs by selecting the incorrect hard disk
image.
To create a single hard disk image, the steps are as follows:
• From the main operating screen depicted below:
1 6 X C O P Y O R C O M P A R E
Page 24
Page 26

CD-5916 Operator’s Guide
• Press the “2” key. The screen will now read:
F U L S C A N O P T I O N
P R E S S Y E S / N O
• Set Full Scan as desired by pressing the “START/YES” key or
“STOP/NO” key (see page 18). The screen will now read:
V E R I F Y A F T E R O P T I O N
P R E S S Y E S / N O
• Set Verify After as desired by pressing the “START/YES” or
“STOP/NO” key (see page 19). The screen will now read:
A R C H I V E O P T I O N
P R E S S Y E S / N O
• Press they “START/YES” key to “enable” the Archive feature. This
setting will remain in effect until “disabled”, even after restarting the
CD-5916. The screen will now read:
M U L T I P L E I M A G E S
P R E S S Y E S / N O
• Press the “STOP/NO” key to “disable” the Multiple Images feature.
This setting will remain in effect, even after restarting the CD-5916. The
screen will now read:
R E C O R D R I D O P T I O N
P R E S S Y E S / N O
• Set Record RID as desired by pressing the “START/YES” or
“STOP/NO” key (see page 20). The screen will now read:
C O P Y P R O T E C T O P T I O N
P R E S S Y E S / N O
• Set Copy Protect as desired by pressing the “START/YES” or
“STOP/NO” key (see page 20). You will be returned to the main
operating screen:
1 6 X C O P Y O R C O M P A R E
• Load the original CD (master disc) into the top right-hand side CD-
R/RW recorder. To also copy while creating the hard disk image, load as
many blank discs as are required into the remaining recorders.
Document Revision: 060102
Page 25
Page 27

WA
n n n n
n n n n
CD-5916 Operator’s Guide
Document Revision: 060102
• Wait for the LED lights on the of all the recorders to stop flickering (this
may take up to 30 seconds). Press the “COPY” key on the keypad. The
screen will now read:
F R O M H D ? ( S T A R T ? S T O P )
• Press the “STOP/NO” key. The screen will now read:
T O H D ? ( S T A R T ? S T O P )
• Press the “START/YES” key to begin creating the hard disk image. The
master will be analyzed automatically to determine its format type. The
screen will now read:
I T I N G F O R D R I V E S R E A D Y
A N A L Y Z I N G F O R M A T . . .
Once the format is determined, hard disk image creation will begin.
Depending on the format type, something similar to the following will
be displayed on the screen:
M A S T E R S I Z E 2 5 5 M B
S I N G L E T R A C K M O D E 1
When working with audio (CD-DA), mixed mode, or CD-Extra discs,
additional screens indicating the presence of sub-indexes and ISRC
codes may also be displayed. Progress will be displayed on the screen
during hard disk image creation:
R E A D
n n o o o o o o o o o o
3 7 %
If discs are also being copied at the same time, the screen will instead
read:
C O P Y
R E M A I N I N G T I M E 0 3 :0 5
n n o o o o o o o o o o
3 7 %
Upon successful completion, the master disc, or any copied discs
will be ejected. The screen will read:
Page 26
Page 28

CD-5916 Operator’s Guide
A R C H I V E O K , P R E S S S T A R T
The master disc is now stored as an image on the hard disk.
Note: If discs failed to copy properly, the recorder tray drawers stay
closed upon completion. These discs should not be used. To
help you determine the nature of the problem, error messages
can be displayed by pressing the “9” key on the keypad.
• Press the “START/YES” key, and you will be returned to the main
operating screen:
1 6 X C O P Y O R C O M P A R E
Document Revision: 060102
Note: When the Multiple Images feature is “disabled” only one
image can be saved on the hard disk. If a new image is created
the old one is overwritten. However, the CD-to-CD copying
method can still be used to make copies of other discs while
leaving the single hard disk image intact.
Creating Multiple Hard Disk Images
The Multiple Images feature allows the CD-5916’s internal hard disk to
store up to six master disc images. The factory setting for this function is
“disabled”. To “enable” it, and create multiple image files, proceed as
follows:
• From the main operating screen depicted below:
1 6 X C O P Y O R C O M P A R E
• Press the “2” key. The screen will now read:
F U L L S C A N O P T I O N
P R E S S Y E S / N O
Page 27
Page 29

CD-5916 Operator’s Guide
• Set Full Scan as desired by pressing the “START/YES” or “STOP/NO”
key (see page 18). The screen will now read:
V E R I F Y A F T E R O P T I O N
P R E S S Y E S / N O
• Set Verify After as desired by pressing the “START/YES” or
“STOP/NO” key (see page 19). The screen will now read:
A R C H I V E O P T I O N
P R E S S Y E S / N O
• Press the “START/YES” key to “enable” the Archive feature. This
setting will remain in effect until “disabled”, even after restarting the
CD-5916. The screen will now read:
M U L T I P L E I M A G E S
P R E S S Y E S / N O
• Press the “START/YES” key to “enable” the Multiple Images feature.
This setting will remain in effect until “disabled”, even after restarting
the CD-5916. The screen will now read:
R E C O R D R I D O P T I O N
P R E S S Y E S / N O
• Set Record RID as desired by pressing the “START/YES” or
“STOP/NO” key (see page 20). The screen will now read:
C O P Y P R O T E C T O P T I O N
P R E S S Y E S / N O
• Set Copy Protect as desired by pressing the “START/YES” or
“STOP/NO” key (see page 20). You will be returned to the main
operating screen:
1 6 X C O P Y O R C O M P A R E
• Load the original CD to be copied (master disc) into the top right-hand
side CD-R/RW recorder. To also copy while creating the hard disk
image, load as many blank discs as are required into the remaining
recorders.
• Wait for the LED lights on the of all the recorders to stop flickering (this
may take up to 30 seconds). Press the “COPY” key on the keypad. The
screen will now read:
Document Revision: 060102
Page 28
Page 30

CD-5916 Operator’s Guide
F R O M H D ? ( S T A R T / S T O P )
Document Revision: 060102
• Press the “STOP/NO” key. The screen will now read:
T O H D ? ( S T A R T / S T O P )
• Press the “START/YES” key. The screen will now read:
N O N E [ S T A R T ] = O K
[ 0 ] = N O N E [ 1 ] = N O N E
The hard disk can now contain up to six images (0, 1, 2, 3, 4 and 5). To
select the number of the image you wish to create, press the
corresponding number key on the keypad. For example, press the “0”
key to select the first image. Notice that after pressing the “0” key, the
name of the first image is displayed in the top left corner of the screen.
By default new images are given the name “NONE”.
• Press the “START/YES” key. The screen will now read:
I M A G E N A M E : N O N E
C H A R - P L A C E E N D C H A R +
• Enter a name for the image file to a maximum of twelve characters
(consisting of A to Z, 0 to 9 and -). This is done by pressing the
“COMPARE”, “STOP/NO”, “START/YES” and “COPY” keys which
correspond to the CHAR-, PLACE, END, and CHAR+ functions
respectively.
Begin by pressing the “COPY” (CHAR+) key to scroll the first
alphanumeric character forward in sequence or press the “COMPARE”
(CHAR-) key to scroll it backward. When the desired alphanumeric
character is reached, press the “STOP/NO” (PLACE) key to advance to
the next character place. Repeat the process until you have finished
entering the image file name.
• Press the “START/YES” (END) key when naming is finished and a
screen similar to the one below will be displayed. In this example, the
name of the image is “TEST”:
I M A G E N A M E : T E S T
[ S T O P ] = N O [ S T A R T ] = Y E S
Page 29
Page 31

WA
n n n n
n n n n
CD-5916 Operator’s Guide
Document Revision: 060102
• If you wish to make changes, press the “STOP/NO” key. If the name is
correct, press the “START/YES” key. The screen will now read:
I T I N G F O R D R I V E S R E A D Y
A N A L Y Z I N G F O R M A T . . .
Once the format is determined, hard disk image creation will begin.
Depending on the format type, something similar to the following will
be displayed on the screen:
M A S T E R S I Z E 2 5 5 M B
S I N G L E T R A C K M O D E 1
When working with audio (CD-DA), mixed mode, or CD-Extra discs,
additional screens indicating the presence of sub-indexes and ISRC
codes may also be displayed. Progress will be displayed during hard disk
image creation:
R E A D
n n o o o o o o o o o o
3 7 %
If discs are also being copied at the same time, the display will instead
read:
C O P Y
R E M A I N I N G T I M E 0 3 :0 5
n n o o o o o o o o o o
3 7 %
Upon successful completion, the master disc or any copied discs will
be ejected. The screen will read:
A R C H I V E O K , P R E S S S T A R T
The master disc is now stored as an image on the hard disk.
• Press the “START/YES” key, and you will be returned to the main
operating screen:
1 6 X C O P Y O R C O M P A R E
Page 30
Page 32

CD-5916 Operator’s Guide
Document Revision: 060102
Note: If discs failed to copy properly, the recorder tray drawers stay
closed upon completion. These discs should not be used. To
help you determine the nature of the problem, error messages
can be displayed by pressing the “9” key on the keypad.
Page 31
Page 33

WA
n n n n
CD-5916 Operator’s Guide
Copying From A Hard Disk Image
After a hard disk image has been created it can be used as the copying
master source. If you have not already created a hard disk image, do so now
as described in the previous section.
Multiple Images Disabled
To make copies from a hard disk image that was previously created with the
Multiple Images feature “disabled” (ie. from a single hard disk image), the
steps are as follows:
• From the main operating screen depicted below:
1 6 X C O P Y O R C O M P A R E
• Load as many blank discs as are required into the CD-R/RW recorders.
Wait for the LED lights on the of all the recorders to stop flickering (this
may take up to 30 seconds).
• Press the “COPY” key on the keypad. The screen will now read:
F R O M H D ? ( S T A R T ? S T O P )
• Press the “START/YES” key to begin copying from the hard disk image
to the blank discs in the recorders. Depending on the format type of the
image, something similar to the following will be displayed on the
screen:
I T I N G F O R D R I V E S R E A D Y
M A S T E R S I Z E 2 5 5 M B
S I N G L E T R A C K M O D E 1
Progress will be displayed on the screen during the operation:
C O P Y
n n n n n n o o o o o o
R E M A I N I N G T I M E 0 3 :0 5
6 2 %
Document Revision: 060102
Upon successful completion, the copied disc(s) will be ejected. The
screen will now read:
Page 32
Page 34

CD-5916 Operator’s Guide
C O P Y O K , P R E S S S T A R T
• Press the “START/YES” key, and you will be returned to the main
operating screen:
1 6 X C O P Y O R C O M P A R E
Note: If discs failed to copy properly, the recorder tray drawers stay
closed upon completion. These discs should not be used. To
help you determine the nature of the problem, error messages
can be displayed by pressing the “9” key on the keypad.
Document Revision: 060102
Multiple Images Enabled
To make copies from hard disk images that were previously created with
the Multiple Images feature “enabled”, the steps are as follows:
• From the main operating screen depicted below:
1 6 X C O P Y O R C O M P A R E
• Load as many blank discs as are required into the recorders. Wait for the
LED lights on the of all the recorders to stop flickering (this may take up
to 30 seconds).
• Press the “COPY” key on the keypad. The screen will now read:
F R O M H D ? ( S T A R T ? S T O P )
• Press the “START/YES” key. The screen will now read:
T E S T [ S T A R T ] = O K
[ 0 ] = T E S T [ 1 ] = N O N E
The name of the currently selected image is displayed in the top left
corner of the screen. Along the bottom line of the display will scroll the
available images identified by their number (0, 1, 2, 3, 4 and 5), and
their name. The CD-5916 defaults to the first image (0) and in this
example the image is named “TEST”. For the purposes of this example,
Page 33
Page 35

WA
n n n n
CD-5916 Operator’s Guide
Document Revision: 060102
press the “0” key to select this image, followed by the “START/YES”
key. The screen will now read:
I M A G E N A M E : T E S T
[ S T O P ] = N O [ S T A R T ] = Y E S
• If you made a mistake and wish to select a different image, press the
“STOP/NO” key. If the selected image is correct, press the
“START/YES” key. Depending upon the format type of the image,
something similar to the following will be displayed on the screen:
I T I N G F O R D R I V E S R E A D Y
M A S T E R S I Z E 2 5 5 M B
S I N G L E T R A C K M O D E 1
Progress will be displayed on the screen during the operation:
C O P Y
R E M A I N I N G T I M E 0 3 : 0 5
n n n n n n o o o o o o
6 2 %
Upon successful completion, the copied disc(s) will be ejected. The
screen will now read:
C O P Y O K , P R E S S S T A R T
• Press the “START/YES” key, and you will be returned to the main
operating screen:
1 6 X C O P Y O R C O M P A R E
Note: If discs failed to copy properly, the recorder tray drawers stay
closed upon completion. These discs should not be used. To
help you determine the nature of the problem, error messages
can be displayed by pressing the “9” key on the keypad.
Page 34
Page 36

WA
CD-5916 Operator’s Guide
Document Revision: 060102
Comparing From A Hard Disk Image
To ensure copied discs are identical to the originals, the CD-5916 is
equipped with powerful verification capabilities. In addition to the CD-toCD compare feature outlined in the Quick Start section of this guide, copied
discs can also be compared against hard disk images to ensure copying
integrity.
Note: Due to the nature of the various compact disc formats only
CD-ROM Mode 1, CD-ROM Mode 2, CD-ROM XA Mode 2
Form 1, and audio (CD-DA) discs can be compared.
Multiple Images Disabled
To compare copied discs to a hard disk image that was previously created
with the Multiple Images feature “disabled” (ie. from a single hard disk
image), the steps are as follows:
• From the main operating screen depicted below:
1 6 X C O P Y O R C O M P A R E
• Load the copied discs to be compared into the CD-R/RW recorders.
Wait for the LED lights on the of all the recorders to stop flickering (this
may take up to 30 seconds).
• Press the “COMPARE” key on the keypad. The screen will now read:
C D - > C D ? ( S T A R T ? S T O P )
• Press the “STOP/NO” key. The screen will now read:
A G A I N S T H D ? ( S T A R T ? S T O P )
• Press the “START/YES” key. The screen will now read:
I T I N G F O R D R I V E S R E A D Y
Progress will be displayed on the screen during the operation:
Page 35
Page 37

n n n n
CD-5916 Operator’s Guide
C O M P
n n n n n n o o o o o o
6 2 %
Upon successful completion, the compared disc(s) will be ejected.
The screen will now read:
C O M P A R E O K , P R E S S S T A R T
• Press the “START/YES” key, and you will be returned to the main
operating screen:
1 6 X C O P Y O R C O M P A R E
Note: If discs failed to copy properly, the recorder tray drawers stay
closed upon completion. These discs should not be used. To
help you determine the nature of the problem, error messages
can be displayed by pressing the “9” key on the keypad.
Document Revision: 060102
Multiple Images Enabled
To compare copied discs to a hard disk image that was previously created
with the Multiple Images feature “enabled”, the steps are as follows:
• From the main operating screen depicted below:
1 6 X C O P Y O R C O M P A R E
• Load the discs to be compared into the CD-R/RW recorders. Wait for
the LED lights on the of all the recorders to stop flickering (this may
take up to 30 seconds).
• Press the “COMPARE” key on the keypad. The screen will now read:
C D - > C D ? ( S T A R T ? S T O P )
• Press the “STOP/NO” key. The screen will now read:
A G A I N S T H D ? ( S T A R T ? S T O P )
• Press the “START/YES” key. The screen will now read:
Page 36
Page 38

WA
n n n n
CD-5916 Operator’s Guide
T E S T [ S T A R T ] = O K
[ 0 ] = T E S T [ 1 ] = N O N E
Document Revision: 060102
The name of the currently selected image is displayed in the top left corner
of the screen. Along the bottom line of the display will scroll the available
images, identified by their number (0, 1, 2, 3, 4 and 5), and their name. The
CD-5916 defaults to the first image (0), and in this example the image is
named “TEST”. For the purposes of this example, press the “0” key to
select this image, followed by the “START/YES” key. The screen will now
read:
I M A G E N A M E : T E S T
[ S T O P ] = N O [ S T A R T ] = Y E S
• If you made a mistake and wish to select a different image, press the
“STOP/NO” key. If the selected image is correct, press the
“START/YES” key. The screen will now read:
I T I N G F O R D R I V E S R E A D Y
Progress will be displayed on the screen during the operation:
C O M P
n n n n n n o o o o o o
6 2 %
Upon successful completion, the compared disc(s) will be ejected.
The screen will now read:
C O M P A R E O K , P R E S S S T A R T
• Press the “START/YES” key, and you will be returned to the main
operating screen:
1 6 X C O P Y O R C O M P A R E
Note: If discs failed to copy properly, the recorder tray drawers stay
closed upon completion. These discs should not be used. To
help you determine the nature of the problem, error messages
can be displayed by pressing the “9” key on the keypad.
Page 37
Page 39

WA
CD-5916 Operator’s Guide
Comparing Discs (CD-to-CD TOC)
In addition to the comprehensive byte-for-byte CD-to-CD and hard disk
image compare features of the CD-5916. Discs can also be quickly
checked against an original CD (master disc) using a CD-to-CD TOC
compare process. This method compares the Table of Contents (TOC)
area of discs only, and is intended as a fast way of identifying that they
are the same. It is not, however, designed to be a complete inspection
process. Use the full compare methods for complete quality assessments.
To compare copied discs against a master disc using the CD-to-CD TOC
method, the steps are as follows:
• From the main operating screen depicted below:
1 6 X C O P Y O R C O M P A R E
• Load the original CD to be compared against (master disc) into the top
right-hand side CD-R/RW recorder.
• Load the discs to be compared against the master disc into as many of
the remaining recorders as are required. Wait for the LED lights on the
of all the recorders to stop flickering (this may take up to 30 seconds).
• Press the “COMPARE” key on the keypad. The screen will now read:
C D - > C D ? ( S T A R T ? S T O P )
• Press the “STOP/NO” key. The screen will now read:
A G A I N S T H D ? ( S T A R T ? S T O P )
• Press the “STOP/NO” key. The screen will now read:
C D - > C D T O C C O M P A R E ?
• Press the “START/YES” key. The screen will now read:
I T I N G F O R D R I V E S R E A D Y
Document Revision: 060102
Page 38
Page 40

WA
CD-5916 Operator’s Guide
A N A L Y Z I N G F O R M A T
I T I N G F O R D R I V E S R E A D Y
Upon successful completion, the compared disc(s) will be ejected.
The screen will now read:
T O C C O M P O K P R E S S S T A R T
• Press the “START/YES” key, and you will be returned to the main
operating screen:
1 6 X C O P Y O R C O M P A R E
Document Revision: 060102
Page 39
Page 41

CD-5916 Operator’s Guide
Document Revision: 060102
SmartRID And SmartSTAMP Codes
The SmartRID and SmartSTAMP codes are unique electronic
fingerprints that can be optionally written into audio and data discs
copied with the CD-5916. These fingerprints allow discs to be traced
back to the specific CD-5916 unit, and even the recorder that copied
them. SmartRID and SmartSTAMP are useful ways of dealing with
unauthorized copying, authenticating discs, and helping to diagnose
copying problems.
SmartSTAMP codes are written outside the specified data area of a data
CD-ROM, so copies will be exactly the same as the original. However,
SmartRID codes written into audio discs may be mistakenly detected by
industrial mastering systems as errors, and therefore should not be used
when creating master discs for mass replication purposes.
Writing SmartRID And SmartSTAMP Codes
To write a SmartRID or SmartSTAMP code into discs copied with the
CD-5916, the steps are as follows:
• From the main operating screen depicted below:
1 6 X C O P Y O R C O M P A R E
• Press the “2” key. The screen will now read:
F U L L S C A N O P T I O N
P R E S S Y E S / N O
• Set Full Scan as desired by pressing the “START/YES” or “STOP/NO”
key (see page 18). The screen will now read:
V E R I F Y A F T E R O P T I O N
P R E S S Y E S / N O
• Set Verify After as desired by pressing the “START/YES” or
“STOP/NO” key (see page 19). The screen will now read:
A R C H I V E O P T I O N
P R E S S Y E S / N O
Page 40
Page 42

CD-5916 Operator’s Guide
• Set Archive as desired by pressing the “START/YES” or “STOP/NO”
key (see page 19). This setting will remain in effect until disabled even
after restarting the CD-5916. The screen will now read:
M U L T I P L E I M A G E S
P R E S S Y E S / N O
• Set Multiple Images as desired by pressing the “START/YES” or
“STOP/NO” key (see page 18). This setting will remain in effect until
“disabled”, even after restarting the CD-5916. The screen will now read:
R E C O R D R I D O P T I O N
P R E S S Y E S / N O
• Press the “START/YES” key to “enable” the Record RID feature. The
screen will now read:
C O P Y P R O T E C T O P T I O N
P R E S S Y E S / N O
• Set Copy Protect as desired by pressing the “START/YES” or
“STOP/NO” key (see page 20). You will be returned to the main
operating screen:
1 6 X C O P Y O R C O M P A R E
• Copy the discs in the usual way and the SmartRID or SmartSTAMP
code will now be written into them.
Document Revision: 060102
Reading SmartRID And SmartSTAMP Codes
To read a SmartRID or SmartSTAMP code from a copied disc, the steps
are as follows:
• From the main operating screen depicted below:
1 6 X C O P Y O R C O M P A R E
• Load the disc that you wish to read the SmartRID or SmartSTAMP
information from, into the top right-hand side CD-R/RW recorder.
• Press the “7” key. The screen will now read:
E N T E R A U T H O R I N G M O D E ?
• Press the “STOP/NO” key. The screen will now read:
Page 41
Page 43

WA
CD-5916 Operator’s Guide
R E A D R I D I N F O ?
Document Revision: 060102
• Press the “START/YES” key. The screen will now read:
R E A D I N G R I D C O D E . . .
I T I N G F O R D R I V E S R E A D Y
If the CD is an audio disc, the SmartRID code of the recorder that
copied it will be displayed on a screen similar to this:
R I D 4 7 1 1 F
P R E S S S T A R T
If the CD is a data disc, its SmartSTAMP information will be displayed
on screen. This includes the SmartRID code of the recorder, and the
machine ID of the CD-5916 that copied the disc. It will also show the
date and time of its copying, on a screen similar to this:
r I d : 4 7 1 1 f m a c h I n e : 0 0 0 0 0 1
d a t e : 0 9 / 1 4 / 0 0 t I m e : 1 5 : 1 7
On the next screen will be displayed the SCSI channel, SCSI ID
number, firmware version of the recorder, and firmware version of the
CD-5916 that copied the disc. The display will look similar to this:
s c s I I d : ( 0 , 1 ) r e v : m c 2 1
c d 2 c d 6 . 0 2 2 7 / 2 5 / 0 0
These details can be matched to a specific recorder by viewing the SCSI
device information.
Page 42
Page 44

WA
CD-5916 Operator’s Guide
ATIP Codes
ATIP stands for “Absolute Time In Pre-Groove”. In firmware 7.0XX and
higher, the ATIP option allows you to determine the manufacturer of the
disc placed in the top drive of the CD-5916. It will also determine the
minutes, seconds, and frames present on the disc. Many generic brand CD’s
will not be recognized.
Reading ATIP Codes
To read an ATIP Code from a disc, the steps are as follows:
• From the main operating screen depicted below:
.
• Place the disc that you wish to read the ATIP information from, into the
• Press the “7” key. The screen will now read:
• Press the “STOP/NO” key. The screen will now read:
• Press the “STOP/NO” key. The screen will now read:
• Press the “START/YES” key. The screen will now read:
• The screen will now display something similar to this.
• Press the “START/YES” key. The screen will now display something
1 6 X C O P Y O R C O M P A R E
top drive of the CD-5916.
E N T E R A U T H O R I N G M O D E
R E A D R I D I N F O ?
R E A D A T I P ?
R E A D I N G A T I P C O D E
I T I N G F O R D R I V E S R E A D Y
A T I P C O D E 9 7 m 2 7 s 5 5 F
P R E S S S T A R T
similar to this.
Document Revision: 060102
Page 43
Page 45

CD-5916 Operator’s Guide
A S S I G N E D F O R M I T S U I
P R E S S S T A R T
• Press the “START/YES” key. You will be returned to the main
operating screen
1 6 X C O P Y O R C O M P A R E
Viewing SCSI Device Information
To view the CD-5916’s SCSI device information, the steps are as follows:
• From the main operating screen depicted below:
1 6 X C O P Y O R C O M P A R E
• Press the “6” key. Something similar to the following will be displayed
on the screen:
S C A N N I N G S C S I D E V I C E S
I d : 1 h o s t : 0 c r d - b p 4
r e v : m b 2 8 r I d : 4 7 1 1 f
I d : 2 h o s t : 0 c r d - b p 4
r e v : m b 2 8 r I d : 4 7 3 8 c
I d : 3 h o s t : 0 c r d - b p 4
r e v : m b 2 8 r I d : 4 7 2 e 7
I d : 4 h o s t : 0 c r d - b p 4
r e v : m b 2 8 r I d : 4 7 1 a 3
I d : 1 h o s t : 1 c r d - b p 4
r e v : m b 2 8 r I d : 4 7 0 c 2
I d : 2 h o s t : 1 c r d - b p 4
r e v : m b 2 8 r I d : 4 7 0 9 b
I d : 3 h o s t : 1 c r d - b p 4
r e v : m b 2 8 r I d : 4 7 0 c e
I d : 4 h o s t : 1 c r d - b p 4
r e v : m b 2 8 r I d : 4 7 0 b d
Page 44
Document Revision: 060102
Page 46

CD-5916 Operator’s Guide
I d : 1 h o s t : 2 c r d - b p 4
r e v : m b 2 8 r I d : 4 7 0 2 1
I d : 2 h o s t : 2 c r d - b p 4
r e v : m b 2 8 r I d : 4 7 1 6 f
I d : 3 h o s t : 2 c r d - b p 4
r e v : m b 2 8 r I d : 4 6 f f 4
I d : 4 h o s t : 2 c r d - b p 4
r e v : m b 2 8 r I d : 4 7 0 1 2
I d : 1 h o s t : 3 c r d - b p 4
r e v : m b 2 8 r I d : 4 7 6 f e
I d : 2 h o s t : 3 c r d - b p 4
r e v : m b 2 8 r I d : 4 7 7 0 5
I d : 3 h o s t : 3 c r d - b p 4
r e v : m b 2 8 r I d : 4 7 2 0 9
I d : 4 h o s t : 3 c r d - b p 4
r e v : m b 2 8 r I d : 4 7 1 1 d
Document Revision: 060102
The SCSI device information is displayed for each of the CD-R/RW
recorders installed in the CD-5916. This includes their SCSI channel
and host number, model name, firmware version, and unique SmartRID
code.
Page 45
Page 47

CD-5916 Operator’s Guide
Document Revision: 060102
Copy Protection
Copy protection is a feature to hinder unauthorized copying that can be
written into data discs (CD-ROM Mode 1 only) duplicated with the CD-
5916. This offers a basic level of defense against casual copying
attempts by inserting and writing invalid blocks at the beginning of a
CD-ROM, in its header section.
The CD-5916’s copy protection function is an elementary tool designed
to frustrate commercial duplication equipment, and consumer software
that copies discs at the block-level. It will not, however, defeat
specialized copying utilities, which are capable of blind reading. In
addition, it will not prevent discs from being re-authored one file at a
time using a CD-R/RW recorder, and a premastering program (such as
Adaptec Easy CD Creator and Toast, CeQuadrat WinOnCD, Ahead
Nero, NTI CD-Maker, and others).
Copy protected discs cannot be duplicated by the CD-5916 and therefore
cannot be used as masters. It is also important to remember that copy
protected discs may also be mistakenly identified by industrial mastering
systems as containing errors, and therefore should not be used as master
discs for mass replication purposes.
Enabling Copy Protection
To write copy protection into discs copied with the CD-5916, the steps
are as follows:
• From the main operating screen depicted below:
1 6 X C O P Y O R C O M P A R E
• Press the “2” key. The screen will now read:
F U L L S C A N O P T I O N
P R E S S Y E S / N O
• Set Full Scan as desired by pressing the “START/YES” or “STOP/NO”
key (see page 18). The screen will now read:
Page 46
Page 48

CD-5916 Operator’s Guide
V E R I F Y A F T E R O P T I O N
P R E S S Y E S / N O
• Set Verify After as desired by pressing the “START/YES” or
“STOP/NO key (see page 19). The screen will now read:
A R C H I V E O P T I O N
P R E S S Y E S / N O
• Set Archive as desired by pressing the “START/YES” key or
“STOP/NO” key (see page 19). This setting will remain in effect until
“disabled”, even after restarting the CD-5916. The screen will now read:
M U L T I P L E I M A G E S
P R E S S Y E S / N O
• Set Multiple Images as desired by pressing the “START/YES” key or
“STOP/NO” key (see page 18). This setting will remain in effect until
“disabled”, even after restarting the CD-5916. The screen will now read:
R E C O R D R I D O P T I O N
P R E S S Y E S / N O
• Set Record RID as desired by pressing the “START/YES” key or
“STOP/NO” key (see page 20). The screen will now read:
C O P Y P R O T E C T O P T I O N
P R E S S Y E S / N O
• Press the “START/YES” key to “enable” the Copy Protect feature. You
will be returned to the main operating screen:
1 6 X C O P Y O R C O M P A R E
• Copy the discs in the usual way, and the copy protection information
will now be written into them.
Document Revision: 060102
Page 47
Page 49

CD-5916 Operator’s Guide
Creating Audio Compilation Discs
In addition to copying entire CDs, audio compilation discs can be created a
track at a time from one or more master discs containing audio (CD-DA,
mixed mode, CD-Extra) using the CD-5916’s audio track import feature.
To create an audio compilation disc, the steps are as follows:
• From the main operating screen depicted below:
1 6 X C O P Y O R C O M P A R E
• Load the master disc that contains the audio track(s) you wish to copy
into the top right-hand side CD-R/RW recorder.
• Load a blank disc into the second recorder from the top right-hand side.
Wait for the LED lights on the of all the recorders to stop flickering (this
may take up to 30 seconds).
Note: Only one audio compilation disc can be created at one time. If
several copies are required, first create the original
compilation disc. You will then copy it in the usual way.
• Press the “5” key. The screen will now read:
I M P O R T T R A C K 0 1 ?
• Select the track from the master disc you wish to copy first by pressing
the corresponding number on the keypad.
• Press the “START/YES” key. The screen will now read:
I M P O R T M O R E F R O M C D ?
• If you wish to copy another track from the same master disc, press the
“START/YES” key. Enter the next track number as before, press the
“START/YES” key, and continue until you have selected the desired
tracks from the same master disc.
• Press the “STOP/NO” key when finished, and a screen similar to the one
below will be displayed. In this example, tracks 1, 4 and 7 have been
selected:
Document Revision: 060102
Page 48
Page 50

# 1
n n n n
CD-5916 Operator’s Guide
I M P O R T T R K
, 4 , 7 ?
• If you wish to make changes, press the “STOP/NO” key. If the
selections are correct, press the “START/YES” key. The screen will
now read:
A N A L Y Z I N G F O R M A T
I M P O R T I N G T R A C K 1
I M P O R T S T A R T O K . . .
Progress will be displayed on the screen during the operation:
C O P Y
I M P O R T I N G T R A C K 1
n n n n o o o o o o o o
5 0 %
This display sequence will continue until all of the audio tracks from
the one master are copied. Upon successful completion, the screen
will now read:
M O R E = 1 , F I N A L I Z E = 9
• If you wish to copy additional tracks from another master CD, eject the
former master disc and load the new master disc. Press the “1” key and
proceed as before. If you have finished, press the “9” key to complete
the disc. The screen will now read:
F I N A L I Z I N G D I S C
D I S C F I N A L I Z E D O K
Upon successful completion, the master and compiled disc will be
ejected. You will be returned to the main operating screen:
1 6 X C O P Y O R C O M P A R E
Document Revision: 060102
Page 49
Page 51

CD-5916 Operator’s Guide
Document Revision: 060102
Working With CD-ReWritable (CD-RW) Discs
In addition to working with CD-Recordable (CD-R) discs, the CD-5916 can
also copy both to and from CD-ReWritable (CD-RW) discs. CD-R discs are
write-once and can be read on any CD audio player, CD-ROM, and
MultiRead DVD-ROM drive. CD-RW discs can be rewritten to as many as
1,000 times and are read using MultiRead CD-ROM (usually 24x and
faster) and DVD-ROM drives.
Note: 10x CD-ReWritable (CD-RW) discs are supported by CD-
5908 systems equipped with SmartDRIVE 16x recorders.
Please note, 2x and 4x CD-Rewritable (CD-RW) discs are not
compatible.
CD-RW Supported Formats
The CD-5916 can copy CD-RW discs written in most logical formats (ISO
9660, audio, etc.) but not those created using the Universal Disk Format
(UDF). CD-RW discs using UDF are produced by packet writing software
(such as Adaptec DirectCD, CeQuadrat PacketCD, Prassi abCD etc.).
Because UDF discs cannot be read by all CD-ROM drives they are not a
good choice for distributing data.
CD-RW Copying Speed
CD-RW copying speed is determined by two factors - the CD-RW writing
speed of the recorders installed in the CD-5916 (10x with SmartDRIVE
16x) and the maximum speed rating of the discs themselves. CD-RW discs
are manufactured with an internal speed code that is checked before
copying begins. The CD-5916, equipped with the SmartDRIVE 16x, will
only accept 10x CD-ReWritable (CD-RW) discs.
Copying From CD-RW Master Discs
Although it is possible to perform CD-to-CD copying using a CD-RW disc
as the master disc, it is advisable to first create a hard disk image (see page
24). This is to work around a limitation in the design of CD-RW discs
which prevents them from being read reliably at high speed.
Page 50
Page 52

CD-5916 Operator’s Guide
Converting From Track-at-Once To Disc-at-Once
Discs produced on the CD-5916 are identical copies to the master discs
from which they were made. This means that, for example, when an
unfinalized Track-at-Once master disc is copied the resulting disc is written
so that it is also an unfinalized Track-at-Once disc. From time to time it
may be necessary, however, to convert open Track-at-Once discs to Disc-atOnce discs.
To copy a master disc so that it is converted from Track-at-Once to Disc-atOnce mode the steps are as follows:
• From the main operating screen depicted below:
1 6 X C O P Y O R C O M P A R E
• Load your original CD to be copied and converted (master disc) into the
top right-hand side CD-R/RW recorder.
• Load as many blank discs as you may require into the remaining
recorders. Wait for the LED lights on the of all the recorders to stop
flickering (this may take up to 30 seconds).
• Press the “7” key. The screen will now read:
E N T E R A U T H O R I N G M O D E ?
• Press the “STOP/NO” key. The screen will now read:
R E A D R I D I N F O ?
• Press the “STOP/NO” key. The screen will now read:
C O P Y D I S C A T O N C E ? 1 = Y E S
• Press the “1” key to begin copying from your master disc (in the top
right-hand side recorder) to the blank discs (in the remaining recorders).
The master disc will be analyzed automatically to determine its format
type. The screen will now read in sequence:
D I S C A T O N C E C O P Y
Document Revision: 060102
Page 51
Page 53

WA
n n n n
CD-5916 Operator’s Guide
I T I N G F O R D R I V E S R E A D Y
A N A L Y Z I N G F O R M A T
Q U I C K S C A N . . . ( T M )
Document Revision: 060102
Once the format of the master disc is determined, copying will begin.
Depending on the format type, something like the following will be
displayed on the screen:
M A S T E R S I Z E 2 5 5 M B
S I N G L E T R A C K M O D E 1
Progress will be displayed on the screen during the operation:
C O P Y
R E M A I N I N G T I M E 0 3 : 3 3
n n n n o o o o o o o o
5 0 %
Upon successful completion the copied disc will be ejected. The
screen will now read:
C O P Y O K , P R E S S S T A R T
• Press the “START/YES” key and you will be returned to the main
operating screen:
1 6 X C O P Y O R C O M P A R E
Note: If any of the recorder tray drawers stay closed upon
completion the discs they contain failed to copy properly and
should not be used. To help you determine the nature of the
problem, error messages can be displayed by pressing the “9”
key on the keypad.
Page 52
Page 54

CD-5916 Operator’s Guide
Setting The Internal Clock
The CD-5916’s internal clock is set at the factory for Eastern Standard
Time (observing daylight savings when applicable).
To set the internal clock the steps are as follows:
• Turn on the power to the CD-5916, and wait for the screen depicted
below:
C H E C K I N G S Y S T E M . . .
• While this is displayed, press and hold the “8” key until the date appears
on the screen:
D A T E I S 0 9 - 1 4 - 0 0 E N T = O K
• Press the “START/YES” key to accept the current date. To change the
date press the “STOP/NO” key, then enter the new date (Month-DayYear) using the number keys on the keypad (the “STOP/NO” key can be
used as a backspace key). Press the “START/YES” key when you are
satisfied with your entry. The time will now be displayed on the screen:
T I M E I S 1 4 : 2 0 : 0 0 E N T = O K
• Press the “START/YES” key to accept the current time. To change the
time, press the “STOP/NO” key, then enter the new time
(Hours:Minutes:Seconds) using the number keys on the keypad (the
“STOP/NO” key can be used as a backspace key). Press the
“START/YES” key when you are satisfied with your entry. The time is
now set and the CD-5916 will continue starting up as usual.
Document Revision: 060102
Page 53
Page 55

W
WO R D
Password Protection
To help prevent unauthorized use of the CD-5916 an optional password
may be established. Once set, the unit will require the password each time it
is turned on or it will not function beyond the initial screen displays.
Setting A Password
The factory setting is “disabled”. To “enable” the password feature the steps
are as follows:
• Turn on the power to the CD-5916 and wait for the screen:
C H E C K I N G S Y S T E M . . .
• While this is displayed, press and hold the “3” key until the password
entry screen is displayed:
N E
P A S S
• Using the number keys on the keypad, enter a six-digit numeric
password. Press the “START/YES” key when satisfied with your
password selection (the “STOP/NO” key can be used as a backspace
key). After the “START/YES” key is pressed a prompt will appear for
you to confirm the password by your entering it a second time.
CD-5916 Operator’s Guide
:
Document Revision: 060102
Starting Up Using A Password
Once a password has been established the CD-5916 will require that it be
entered each time the unit is turned on. To start up the unit when the
password is “enabled”:
• Turn on the power to the CD-5916 and the following screens will be
displayed in sequence:
M F I N C .
C D 2 C D P R O A D V A N C E D
S C A N N I N G H A R D D R I V E . . .
C H E C K I N G S Y S T E M . . . .
Page 54
Page 56

WO R D
WO R D
W
WO R D
WO R D ?
CD-5916 Operator’s Guide
S Y S T E M O K
E N T E R P A S S
Document Revision: 060102
• Using the number keys on the keypad enter the six digit numeric
password that was previously established and press the “START/YES”
key (the “STOP/NO” key can be used as a backspace key). Once the
correct password is entered the CD-5916 will continue starting up as
usual.
Changing Or Removing A Password
C H E C K I N G S Y S T E M . . .
• While this is displayed, press and hold the “3” key until the password
entry screen is displayed:
• Turn on the power to the CD-5916 and wait for the screen:
O L D P A S S
:
• Enter the old password using the number keys and press the
“START/YES” key (the “STOP/NO” key can be used as a backspace
key). The screen will now read:
N E
P A S S
:
• Enter a new password and press the “START/YES” key.
• To disable password protection instead press the “START/YES” key
without entering a new password. The screen will now show:
D I S A B L E P A S S
• Press the “START/YES” key. The password is now disabled. The CD-
5916 will now start up as usual.
Page 55
Page 57

Setting The Machine ID
The Machine Identification number (Machine ID) is a user defined six digit
code that is written into data discs copied using the CD-5916’s
SmartSTAMP feature.
To set the Machine ID the steps are as follows:
• Turn on the power to the CD-5916 and wait for the screen depicted
below:
C H E C K I N G S Y S T E M . . .
• While this is displayed, press and hold the “4” key for five seconds and
release. The screen will now read:
E N T E R I D :
• Using the number keys on the keypad enter a six digit numeric Machine
ID. Press the “START/YES” key when satisfied with your selection (the
“STOP/NO” key can be used as a backspace key). After the
“START/YES” key is pressed the CD-5916 will continue starting up as
usual.
CD-5916 Operator’s Guide
Document Revision: 060102
Page 56
Page 58

WA R E
WA R E
CD-5916 Operator’s Guide
Firmware Updates
From time to time the CD-5916’s internal software or “firmware” may need
updating to add new features or improve existing functions. Firmware is
easily updated by loading a “Firmware Update CD” into the system. The
latest version of firmware will be available for downloading to your
computer from the MediaFORM web site: www.mediaform.com.
Once a firmware image file is downloaded a “Firmware Update CD” can
then be written using a computer, a CD-R/RW recorder and most popular
premastering programs (such as Adaptec Easy CD Creator and Toast,
CeQuadrat WinOnCD, Ahead Nero, NTI CD-Maker, and others). Refer to
your premastering software documentation for details on how to record a
disc from an image file.
After having created a “Firmware Update CD” perform the following steps
to update the CD-5916’s firmware:
• From the main operating screen depicted below:
1 6 X C O P Y O R C O M P A R E
• Load the “Firmware Update CD” into the top right-hand side CD-R/RW
recorder.
• Turn off the power to the CD-5916.
• Press and hold down the “9” key and turn on the power to the CD-5916.
Continue to hold down the “9” key until the screen reads:
L O A D I N F I R M
. . . .
• Release the “9” key. Please be patient as this will take a few moments.
During the update process the screen will read:
F I R M
U P D A T E . . .
Upon successful completion the display will read:
U P D A T E D O N E , R E S T A R T I N G
Page 57
Document Revision: 060102
Page 59

CD-5916 Operator’s Guide
After the CD-5916 restarts and the main operating screen is displayed:
1 6 X C O P Y O R C O M P A R E
• Eject the “Firmware Update” CD from the top right-hand side CD-
R/RW recorder.
Document Revision: 060102
Page 58
Page 60

CD-5916 Operator’s Guide
Connecting The CD-5916 To A PC
If you do not have access to a CD-R/RW recorder the CD-5916 can also be
connected to a PC, for creating original master discs.
Minimum System Requirements
To connect a CD-5916 to a PC, the minimum system requirements are as
follows:
• PC compatible running Windows 95, 98, ME, NT 4.0 or 2000
• 166 MHz Pentium with 32MB RAM
• 800x600 monitor, 256 colors
• CD-R/RW premastering software (Adaptec Easy CD Creator,
CeQuadrat WinOnCD, Ahead Nero, etc.)
• Adaptec AHA-2940 PCI SCSI adapter with EZ-SCSI software
• 1GB of free hard disk drive space
• Short SCSI cable (no longer than 3 feet) with a 50 pin female
Centronics connector on one end
Document Revision: 060102
SCSI Device Setup
• Refer to the documentation that accompanied your SCSI card for
information on how to configure SCSI devices.
• DO NOT use any of the following SCSI ID settings when configuring
the SCSI peripherals on the PC:
DEVICE SCSI ID
CD-5916 internal SCSI card 7
CD-R/RW recorder 1 1
CD-R/RW recorder 2 2
CD-R/RW recorder 3 3
CD-R/RW recorder 4 4
CD-R/RW recorders 5-16 N/A
• Set the PC’s SCSI controller to ID #6.
• Remove the top most terminator from the back of the CD-5916 and
connect the SCSI cable from this port to the PC’s SCSI card.
Page 59
Page 61

CD-5916 Operator’s Guide
System Startup
• Turn on the power to the CD-5916. Wait a minute or two while the
system starts up. The screen will now read:
M F I N C .
C D 2 C D P R O A D V A N C E D
After the startup routine is complete, a series of self-diagnostics will be
performed. The screen will now read in sequence:
S C A N N I N G H A R D D R I V E . . .
C H E C K I N G S Y S T E M . . . .
S Y S T E M O K
P L E A S E WA I T . . .
S E E K I N G S L A V E U N I T . . .
Once complete, the main operating screen is displayed on the screen:
1 6 X C O P Y O R C O M P A R E
• Turn on the power to the PC and the computer will recognize the CD-
5916’s top right-hand side four CD-R/RW recorders as valid SCSI
devices (the remaining twelve recorders will not be recognized). Refer
to the documentation that accompanied your premastering software for
information on how to create CDs.
caution
The CD-5916 cannot be operated in its normal standalone mode when
M
attached to a PC. Do not attempt to execute any commands using the
keypad as this may lockup both the PC and the CD-5916.
Document Revision: 060102
Page 60
Page 62

CD-5916 Operator’s Guide
Document Revision: 060102
Appendix A: Supported Formats
Originally designed for audio use the Compact Disc (CD) evolved quickly and now
employs a wide variety of formats for audio, data and multimedia applications. The
following is a list of the most popular formats currently supported by the CD-5916.
Periodic firmware updates will be made available to deal with new formats as they
appear. To obtain the latest version of firmware contact your MediaFORM reseller or
download the update from the MediaFORM web site: www.mediaform.com.
Many CD formats are international or industry standards but variations on them may
emerge from time to time. Should you encounter a disc (which does not employ a copy
protection scheme) that you cannot copy on your CD-5916 MediaFORM will do its best
to promptly add support for this format. Dealing with custom formats, however, may be
subject to a development charge.
Keeping track of how the various formats relate to each other can be confusing. For
example, the CD-5916 can copy all CD-ROM Mode 1 discs - this includes ISO 9660,
HFS, Hybrid, Rock Ridge and many other types of file systems. As a result the CD-5916
will most likely copy CD formats not listed in the table below. If you require further
assistance please contact MediaFORM’s technical support department at (610) 458-9200
or email: support@mediaform.com.
CD-5916 Supported Formats
ISO 9660 CD-ROM Mode 1 & Mode 2
CD-DA (Compact Disc-Digital Audio) CD-ROM XA Mode 2 Form 1 & Form 2
Hybrid (ISO 9660/HFS) Single session
Hybrid (ISO 9660/HFS/Rock Ridge) Multisession
Mixed Mode Disc-at-Once and Track-at-Once
CD-I Form 1 & Form 2** Rock Ridge
Native O/S’s (NT, DOS, OS/2, UFS,
CD-Extra
HFS, SUN, AS/400, AIX, etc.)
Video CD Romeo
Photo CD Joliet
Picture CD Bootable CD
CD-G* Karaoke CD
*Requires a special hardware configuration and firmware
** Some variations require a special reader
Page 61
Page 63

CD-5916 Operator’s Guide
Appendix B: Error Codes Displayed On Screen
Error Message Diagnosis
Bad Master
Capacity Error
Copy Error
Compare Error
Could Not Analyze Master
Drive Not Ready
• Make sure that the master disc is not
scratched or dirty and that it can be read in a
computer CD-ROM drive or played in a CD
audio player.
• Make sure that the blank media being used
has enough capacity to hold all the
information on the master disc. Remember
that some pressed masters can fit more
information than can a blank CD-R or CD-
RW disc therefore making it impossible to
copy.
• Make sure that the blank and master discs are
not scratched or dirty.
• Make sure that all of the recorders are loaded
with the same brand of blank discs.
• Could also indicate inferior quality blank
discs.
• Make sure that the copies are being compared
to the correct master disc.
• Only CD-ROM Mode 1, CD-ROM Mode 2,
CD-ROM XA Mode 2 Form 1 and audio
(CD-DA) discs can be compared. The CD-to-
CD TOC compare feature can be used for
other formats.
• Make sure that the master disc is not
scratched or dirty and that it can be read in a
computer CD-ROM drive or played in a CD
audio player.
• Make sure recorders are correctly loaded with
blank discs.
• Make sure that all of the read and write status
LEDs on all of the recorders are not
illuminated before pressing the keypad.
Document Revision: 060102
Page 62
Page 64

Drive Not Present
Fatal HD Error
FC Error
Image Not Found
Medium Error
Medium Not Blank
Not a Firmware Disc
OPC Error
Read Fail
CD-5916 Operator’s Guide
Document Revision: 060102
• Make sure that the particular recorder is
properly plugged in the CD-5916.
• The hard drive is corrupt or faulty.
• Try loading new blank discs or exchange the
recorder.
• Reload the image to the hard disk drive.
• Make sure that the master disc is not
scratched or dirty.
• Make sure that all of the recorders are loaded
with the same brand of blank discs.
• Could also indicate inferior quality blank
discs.
• Try loading new blank discs.
• Could also indicate inferior quality blank
discs.
• Make sure that the firmware disc was created
properly.
• Make sure the firmware disc is placed in the
top recorder when trying to install.
• Make sure the blank discs are not scratched
or dirty.
• Could also indicate inferior quality blank
discs.
• Make sure that the master disc is not
scratched or dirty and that it can be read in a
computer CD-ROM drive or played in a CD
audio player.
Page 63
 Loading...