

Page 1

CD-3000 Series
Operator’s Guide
Page 2

CD-3706/P Operator’s Guide
CD-3000 Series Operator’s Guide
Document Revision: 030501.1
Document Revision: 100102
Copyright Notice
Copyright ©1996-2002 by MediaFORM, Inc. All rights reserved.
This manual and the accompanying illustrations may not be copied, reproduced,
electronically transmitted, or tra nslated into another language, in whole, or in par t,
without the written consent of MediaFORM, Inc.
MediaFORM, CD2CD, CD2CD PRO, CD-5400L, CD-5908, CD-5916, CD
3702, CD-3703, CD-3704, CD-3706P, cdDIRECTOR, AP-1001, AP-1301C,
Easi-DAT and Easi-AUDIO are trademarks of MediaFORM, Inc.
Other trademarks referred to are the property of their respective trademark or
registered trademark holders.
CD-R/RW Recorder Warranty Policy
Individual CD-R/RW recorder manufacturers are responsible for the products they provide. As a convenience,
MediaFORM will honor any service issue related to a defective recorder while under its respective
manufacturer’s warranty providing that the recorder has been purchased from MediaFORM either directly or
indirectly. MediaFORM assumes no responsibility for products NOT purchased thro ugh MediaFORM.
Piracy
The copying of audio, video, or software without the permission of the copyright holder is illegal. MediaFORM,
Inc. accepts no responsibility for the copyright use or misuse of this equipment. It is the sole responsibility of the
user to ensure that the legal rights of copyright in duplicating are respected.
Germany office: Home office:
MF Optical, GmbH. MediaFORM, Inc.
Albert-Schweitzer-Ring 23 122 Oscar Way
22045 Hamburg/Germany Chester Springs, PA 19425
Tel: +49 40 668 535 99 Tel: (610) 458-9200
Fax: +49 40 668 535 98 Fax: (610) 458-9554
e-mail: info@mfoptical.de Email: documentation@mediaform.com
www: http://www.mfoptical.de www: http://www.mediaform.com
Page 1
Page 3

CD-3706/P Operator’s Guide
CD-3000 Series Operator’s Guide
Document Revision: 030501.1
Document Revision: 100102
End User License Agreement
• You have acquired a device (“3000 Series CD-R/RW duplicator”) that includes software licensed by MediaFORM from
Microsoft Licensing Inc. or its affiliates (“MS”). Those installed software products of MS origin, as well as associated
media, printed materials, and “online” or electronic documentation (“SOFTWARE”) are protected by international
intellectual property laws and treaties. The SOFTWARE is licensed, not sold. All rights reserved.
• IF YOU DO NOT AGREE TO THIS END USER LICENSE AGREEMENT (“EULA”), DO NOT USE THIS DEVICE OR
COPY THE SOFTWARE. INSTEAD, PROMPTLY CONTACT MEDIAFORM FOR INSTRUCTIONS ON RETURN
OF THE UNUSED DEVICE (S) FOR A REFUND. ANY USE OF THE SOFTWARE, INCLUDING BUT NOT
LIMITED TO USE ON THE DEVICE, WILL CONSTITUTE YOUR AGREEMENT TO THIS EULA (OR
RATIFICATION OF ANY PREVIOUS CONSENT.)
• GRANT OF SOFTWARE LICENSE. This EULA grants you the following license:
⇒ You may use the SOFTWARE only on the DEVICE.
⇒ NOT FAULT TOLERANT. THE SOFTWARE IS NOT FAULT TOLERANT. MEDIAFORM HAS
INDEPENDENTLY DETERMINED HOW TO USE THE SOFTWARE IN THE DEVICE, AND MS HAS
RELIED UPON MEDIAFORM TO CONDUCT SUFFICIENT TESTING TO DETERMINE THAT THE
SOFTWARE IS SUITABLE FOR SUCH USE.
⇒ NO WARRANTIES FOR THE SOFTWARE. THE SOFTWARE is provided “A S IS” and w ith all faults.
THE ENTIRE RISK AS TO SATISFACTORY QUALITY, PERFORMANCE, ACCURACY, AND
EFFORT (INCLUDING LACK OF NEGLIGENCE) IS WITH YOU. ALSO, THERE IS NO WARRANTY
AGAINST INTERFERENCE WITH YOUR ENJOYMENT OF THE SOFTWARE OR AGAINST
INFRINGEMENT. IF YOU HAVE RECEIVED ANY WARRANTIES REGARDING THE DEVICE OR THE
SOFTWARE, THOSE WARRANTIES DO NOT ORIGINATE FROM, AND ARE NOT BINDING ON, MS.
⇒ Note on Java Support. The SOFTWARE may contain support for programs written in Java. Java technology is
not fault tolerant and is not designed, manufactured, or intended for use or resale as online control equipment in
hazardous environments requiring fail-safe performance, such as in the operation of nuclear facilities, aircraft
navigation or communication systems, air traffic control, direct life-support machines, or weapons systems, in
which the failure of Java technology could lead directly to death, personal injury, or severe physical or
environmental damage. Sun Microsystems, Inc. has contractually obligated MS to make this disclaimer.
⇒ No Liability for Certain Damages. EXCEPT AS PROHIBITED BY LAW, MS SHALL HAVE NO
LIABILITY FOR ANY INDIRECT, SPECIAL, CONSEQUENTIAL OR INCIDENTAL DAMAGES
ARISING FROM OR IN CONNECTION WITH THE USE OR PURPOSE. IN NO EVENT SHALL MS
BE LIABLE FOR ANY AMOUNT IN EXCESS OF U.S. TWO-HUNDRED FIFTY DOLLARS (U.S.
$250.00).
⇒ Limitations on Reverse Engineering, De-compilation, and Disassembly. You may not reverse engineer, de-
compile, or disassemble the SOFTWARE, except and only to the extent that such activity is expressly permitted
by applicable law notwithstanding the limitation.
⇒ SOFTWARE TRANSFER ALLOWED BUT WITH RESTRICTIONS. You may permanently transfer rights
under this EULA only as part of a permanent sale or transfer of the Device, and only if the recipient agrees to this
EULA. If the SOFTWARE is an upgrade, any transfer must also include all prior versions of the SOFTWARE.
⇒ EXPORT RESTRICTIONS. You acknowledge that SOFTWARE is of US-origin. You agree to comply with
all applicable international and national laws that apply to the SOFTWARE, including the U.S. Export
Administration Regulations, as well as end-user, end-use and country destination restrictions issued by U.S. and
other governments. For additional information on exporting the SOFTWARE, see
http://www.microsoft.com/exporting/.
Page 2
Page 4

CD-3706/P Operator’s Guide
CD-3000 Series Operator’s Guide
Document Revision: 030501.1
Document Revision: 100102
Table of Contents
ABOUT MEDIAFORM, INC.................................................................................................................................... 4
W
HAT TO EXPECT FROM YOUR MEDIAFORM CD DUPLICATOR.............................................................................. 4
ABOUT THIS MANUAL........................................................................................................................................... 4
GETTING STARTED ................................................................................................................................................ 5
W
HAT’S IN THE BOX ................................................................................................................................................. 5
P
ACKING MATERIALS................................................................................................................................................. 5
T
HE BEST PLACE TO PUT THE CD-3000 ................................................................................................................... 6
S
AFETY PRECAUTIONS............................................................................................................................................... 6
L
OCATION OF CD-3701 COMPONENTS...................................................................................................................... 7
Front View............................................................................................................................................................ 7
Rear View............................................................................................................................................................ 7
L
OCATION OF CD-3702 COMPONENTS...................................................................................................................... 8
Front View............................................................................................................................................................ 8
Rear View............................................................................................................................................................ 8
L
OCATION OF CD-3703 COMPONENTS...................................................................................................................... 9
Front View............................................................................................................................................................ 9
Rear View............................................................................................................................................................ 9
LCD Display Screen And Keypad .................................................................................................................. 10
SmartDRIVE 40X.............................................................................................................................................. 10
R
EMOVING PACKING RESTRAINTS ........................................................................................................................... 11
I
NPUT BIN AND OUTPUT SPINDLE............................................................................................................................ 11
SYSTEM STARTUP................................................................................................................................................. 12
L
OADING A DISC ..................................................................................................................................................... 14
R
EMOVING A DISC................................................................................................................................................... 14
GENERAL OPERATION........................................................................................................................................ 15
F
UNCTION KEYS ...................................................................................................................................................... 15
C
REATING A HARD DISK IMAGE.............................................................................................................................. 21
Creating A Single Hard Disk Image............................................................................................................... 21
Creating Multiple Hard Disk Images .............................................................................................................. 23
E
NABLING VERIFY AFTER........................................................................................................................................ 25
C
OPYING FROM A HARD DISK IMAGE ..................................................................................................................... 26
Multiple Images Disabled ................................................................................................................................26
Multiple Images Enabled................................................................................................................................. 27
C
OMPARING FROM A HARD DISK IMAGE................................................................................................................. 29
Multiple Images Disabled ................................................................................................................................29
Multiple Images Enabled................................................................................................................................. 30
V
IEWING SCSI DEVICE INFORMATION..................................................................................................................... 32
W
ORKING WITH CD-REWRITABLE (CD-RW) DISCS............................................................................................... 33
CD-RW Supported Formats............................................................................................................................ 33
CD-RW Copying Speed................................................................................................................................... 33
SETTING THE INTERNAL CLOCK.................................................................................................................... 34
F
IRMWARE UPDATES ............................................................................................................................................... 35
S
YSTEM STARTUP .................................................................................................................................................... 37
APPENDIX A: SUPPORTED FORMATS............................................................................................................. 38
Page 3
Page 5

CD-3000 Series Operator’s Guide
About MediaFORM, Inc.
Thank you for purchasing MediaFORM’s CD-3000 standalone autoloading
CD duplicator. MediaFORM manufactures a wide variety of CD
duplication equipment. This includes manual and fully automatic CD and
DVD duplicators, and printers. We hope you will consider us for all of your
duplication needs.
What To Expect From Your MediaFORM CD Duplicator
Your MediaFORM CD-3000 CD duplicator is professionally designed and
manufactured to give you years of trouble free operation. To avoid
accidental damage to your new CD duplicator, please read and understand
this manual thoroughly before operating the unit.
CD-3706/P Operator’s Guide
Document Revision: 030501.1
Document Revision: 100102
About This Manual
This manual is written for both novice and experienced users. Please read
through this Operator’s Guide from beginning to end before using the unit.
Once having read the manual, follow along chapter by chapter. This will
provide the necessary understanding of your new CD-3000 CD duplicator.
Page 4
Page 6

Getting Started
Carefully remove the CD-3000 CD duplicator from the shipping container.
Inspect the contents, and verify them against the packing slip. Report any
errors in shipping as soon as possible.
What’s In The Box
Your new CD-3000 CD duplicator includes:
• CD-3000 CD duplicator
• Power cord
• Firmware CD
• Manual CD
• MediaFORM Product & Warranty Registration card
CD-3706/P Operator’s Guide
CD-3000 Series Operator’s Guide
Document Revision: 030501.1
Document Revision: 100102
Packing Materials
Please retain the original box and packaging in the event that the unit
requires future servicing. This will help to reduce the possibility of damage
occurring in transit.
Page 5
Page 7

CD-3706/P Operator’s Guide
CD-3000 Series Operator’s Guide
The Best Place To Put The CD-3000
The best operating location for the CD-3000 CD duplicator is in a climatecontrolled area, free of dirt, dust, humidity, excessive heat, and electronic or
electromagnetic interference. Room temperature should be between 65 and
75 degrees Fahrenheit, or between 18 and 23 degrees Celsius. Place the CD3000 on a solid, steady work surface, and allow sufficient room for all
incidental work materials. Provide at least six inches of clearance on all
sides of the unit for ventilation.
Safety Precautions
The system is shipped with a three-prong power connector, and must be
used with a properly grounded AC receptacle. DO NOT try to defeat the
third “ground” prong. All computer peripherals must be properly grounded,
and the CD-3000 is no exception. The use of a power conditioner, such as
an Uninterruptible Power Supply (UPS) or a surge protector, is highly
recommended. The minimum required size is 500VA.
Document Revision: 030501.1
Document Revision: 100102
Repairs or alterations should only be attempted by authorized, factorytrained technicians. MediaFORM reserves the right to void the warranty if
unauthorized service is performed.
Page 6
Page 8
CD-3706/P Operator’s Guide
CD-3000 Series Operator’s Guide
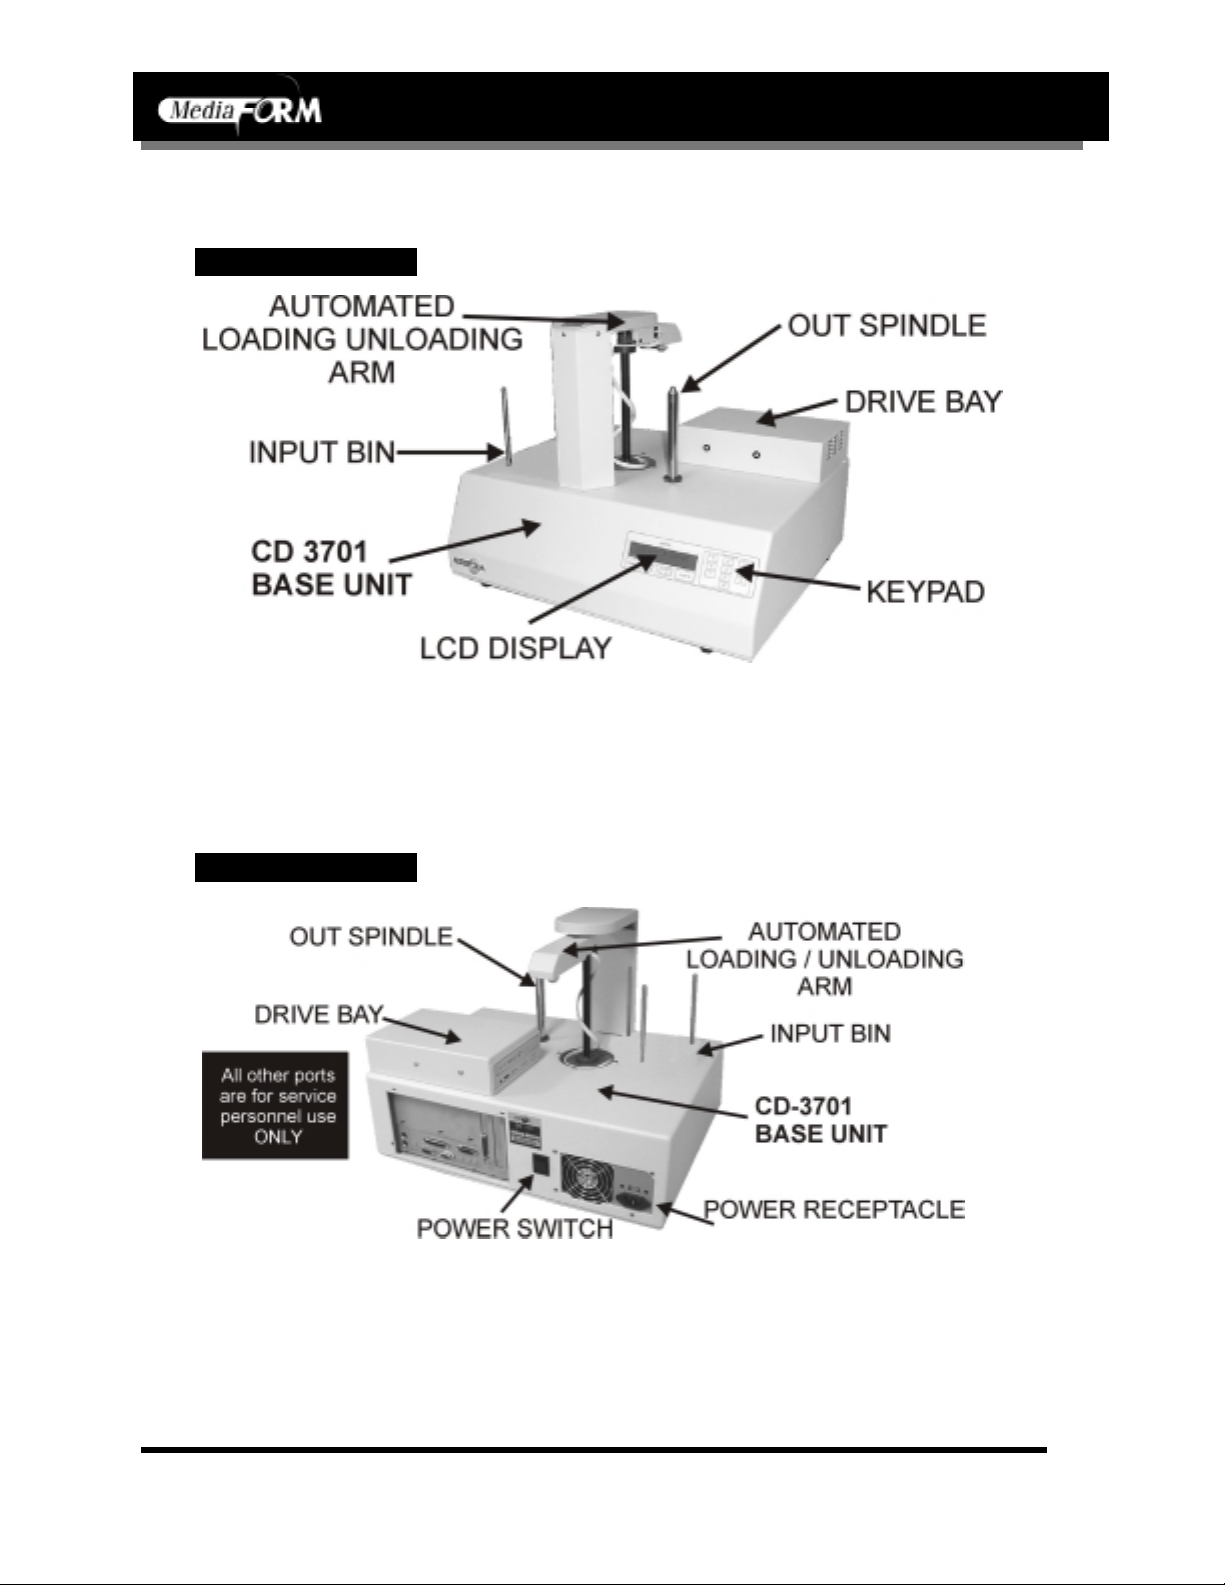
Location Of CD-3701 Components
Front View
Document Revision: 030501.1
Document Revision: 100102
Rear View
Page 7
Page 9
CD-3706/P Operator’s Guide
CD-3000 Series Operator’s Guide
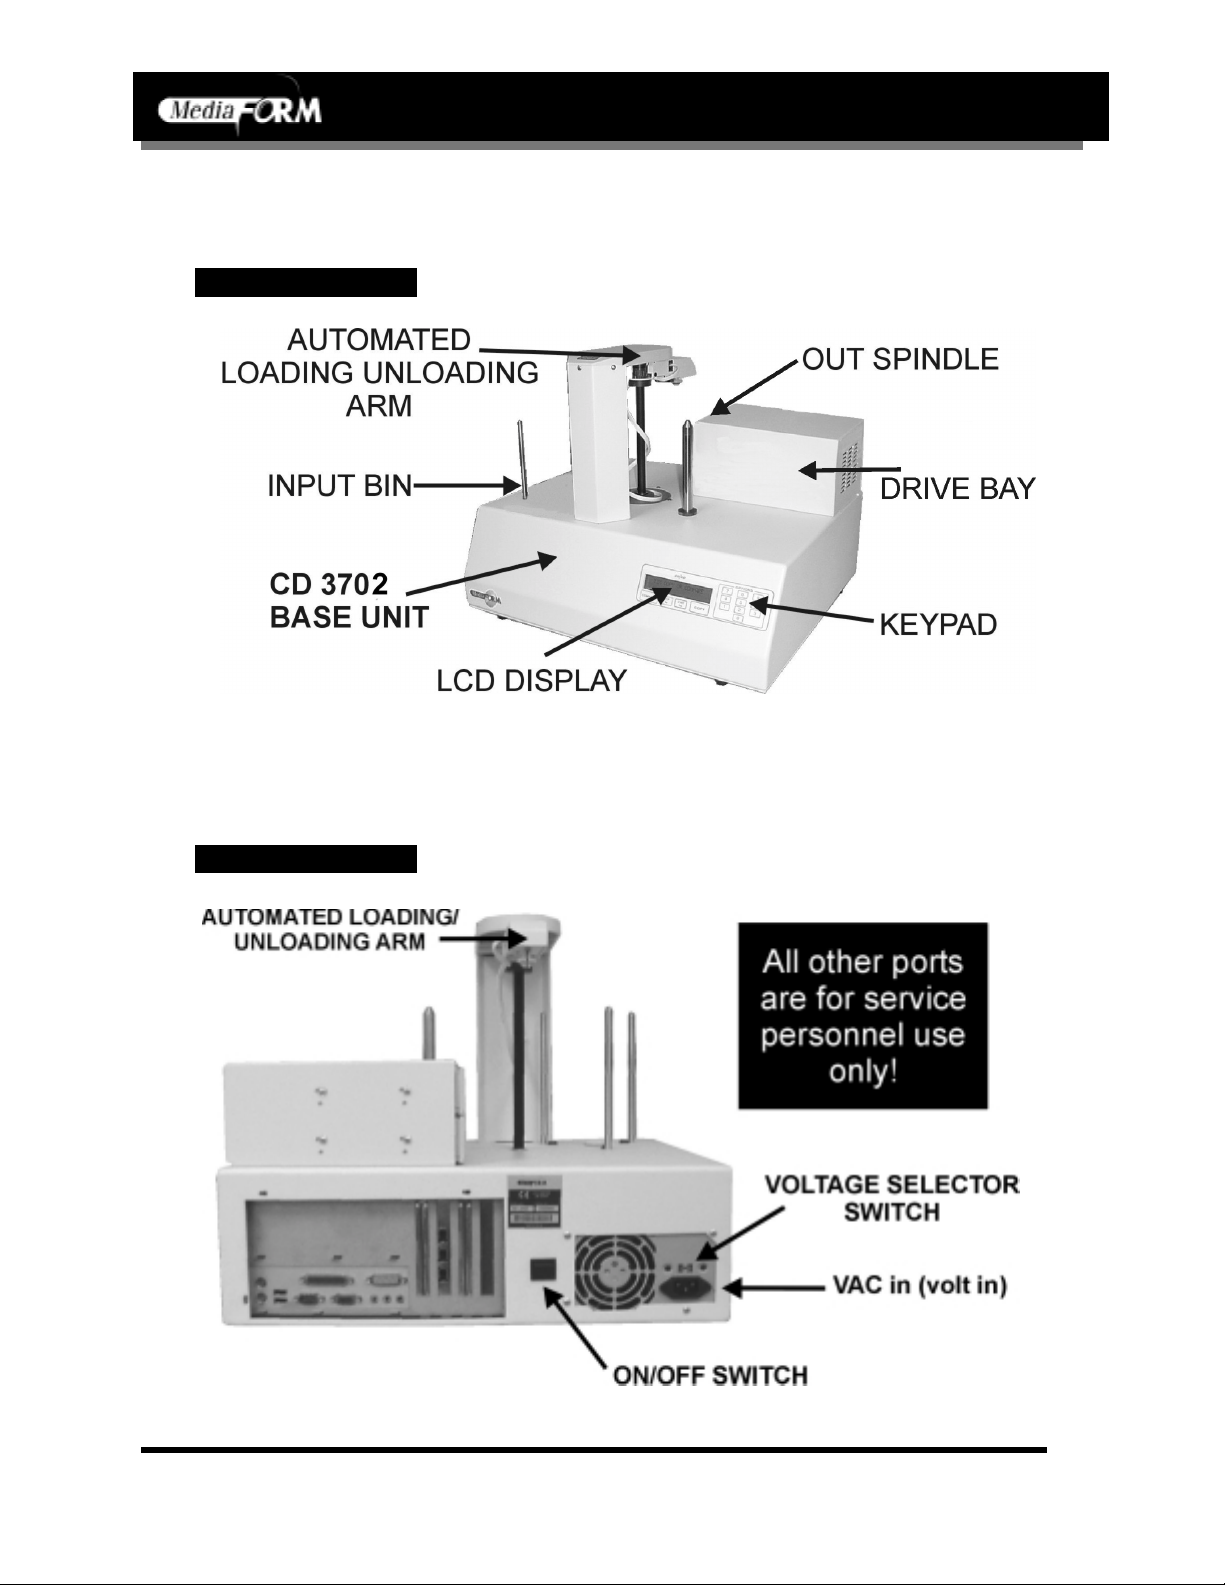
Location Of CD-3702 Components
Front View
Document Revision: 030501.1
Document Revision: 100102
Rear View
Page 8
Page 10
CD-3706/P Operator’s Guide
CD-3000 Series Operator’s Guide
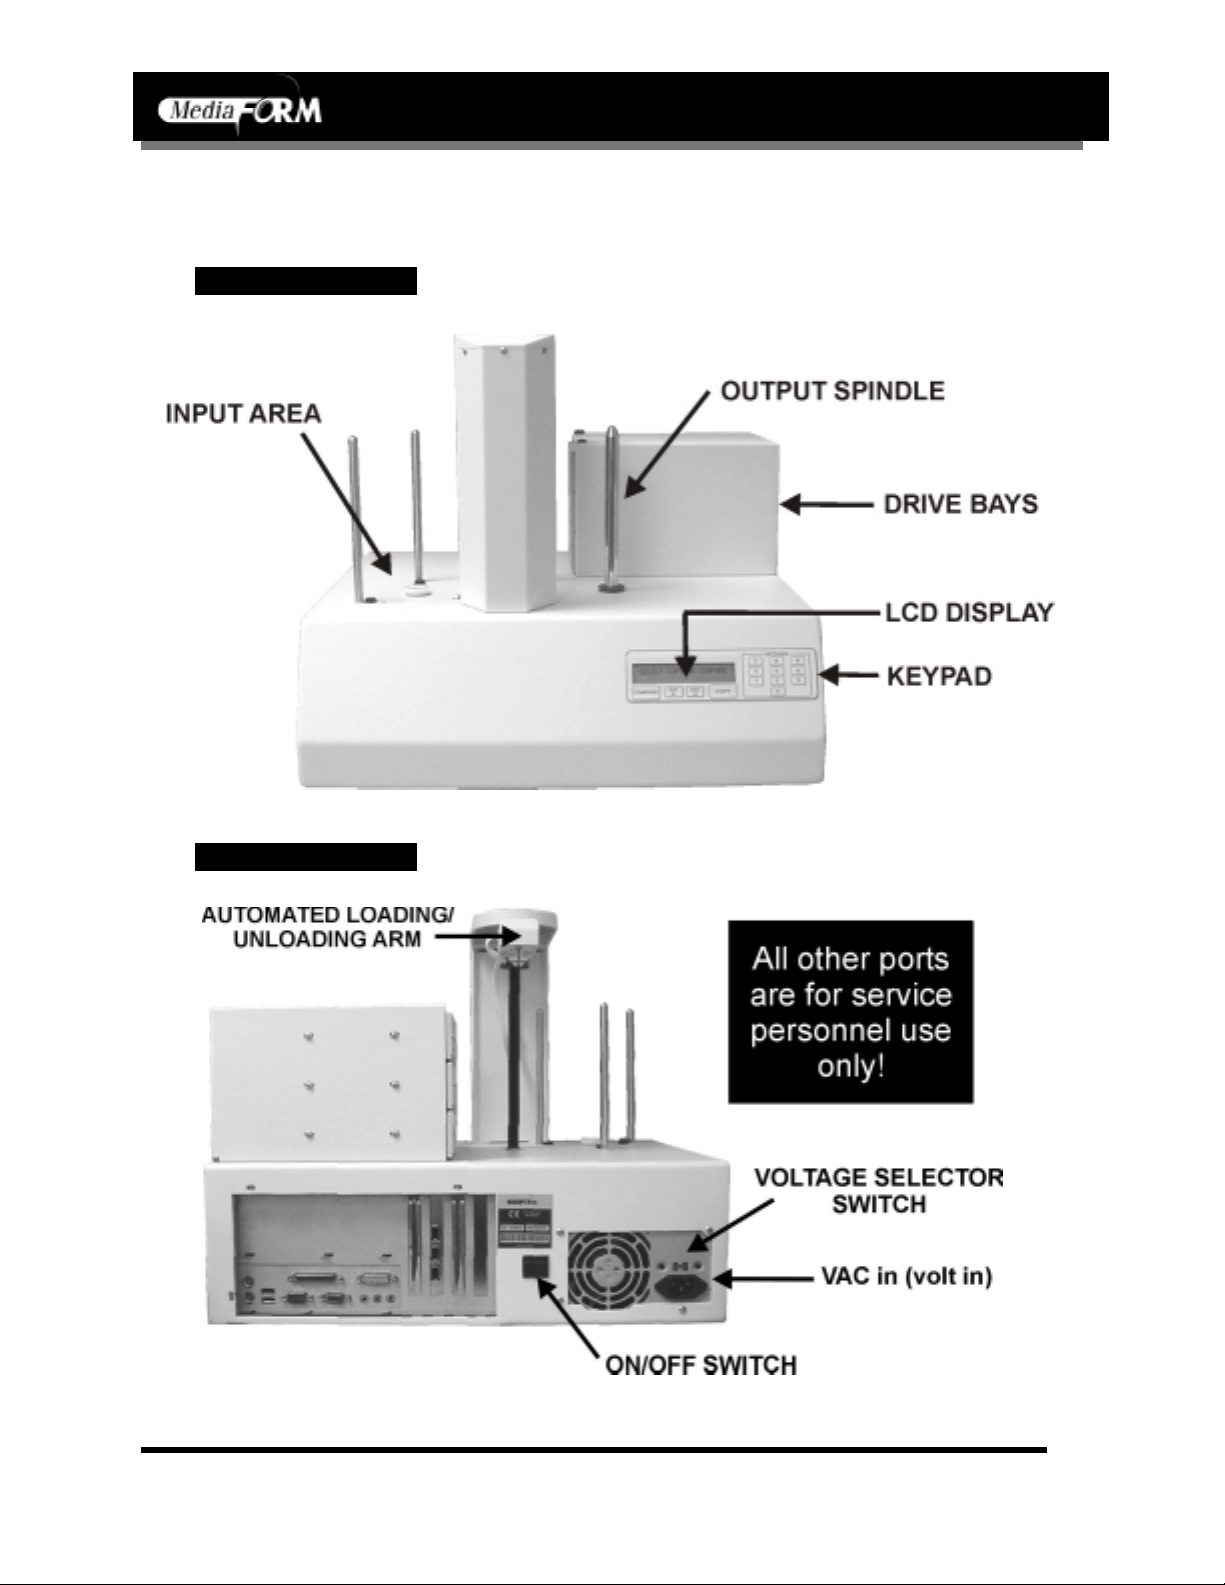
Location Of CD-3703 Components
Front View
Document Revision: 030501.1
Document Revision: 100102
Rear View
Page 9
Page 11
CD-3706/P Operator’s Guide
CD-3000 Series Operator’s Guide
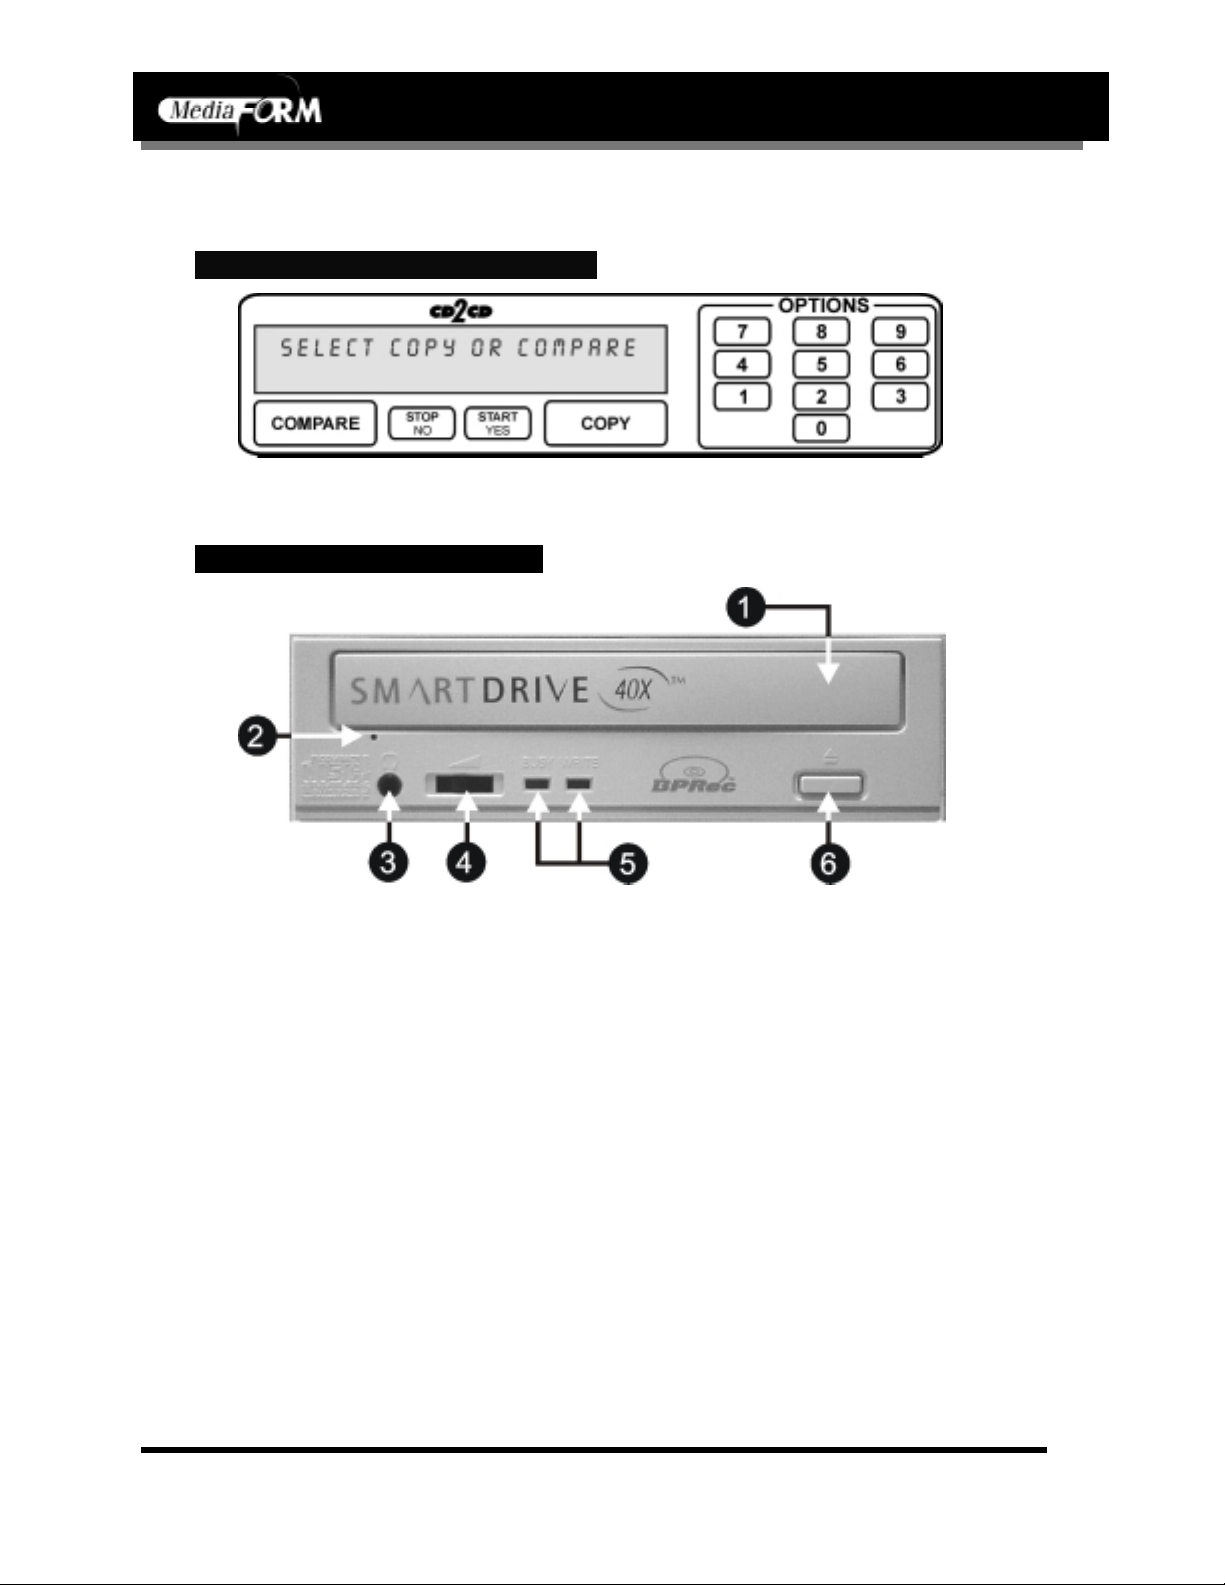
Location Of CD-R/RW Recorder Parts And Controls
LCD Display Screen And Keypad
SmartDRIVE 40X
Legend
1. Disc tray - Discs are loaded and removed from this tray. Pressing the eject
button will open the tray when the power is switched on to the 3000 Series.
2. Emergency eject pinhole - In the event that the disc tray will not open by
pressing the eject button, insert the tip of a large paper clip into this hole and
push.
3. Earphone jack
4. Volume Control
5. Read and write status LEDs - These indicators light up when the recorder is
reading or writing.
6. Eject button - This button is used to open or close the disc tray.
Document Revision: 030501.1
Document Revision: 100102
Page 10
Page 12

CD-3706/P Operator’s Guide
CD-3000 Series Operator’s Guide
Removing Packing Restraints
The CD-3000 ships with a picker arm restraint to reduce the possibility of
damage in transit. This restraint must be removed before operation or
power-on. Gently remove the foam tube from around the transfer arm. Save
the foam tube, as you will need to return it to its place when transporting the
unit in the future.
Input Bin And Output Spindle
The input bin and output spindle serve as the containers to store up to 100
blank and recorded discs.
Document Revision: 030501.1
Document Revision: 100102
Page 11
Page 13

System Startup
Before duplicating can begin it is necessary to review a few details.
• Plug one end of the supplied power cord into the upper receptacle at the
rear of the unit.
• Next, verify that the voltage selector switch is set correctly. It is located
between the two power receptacles. The CD-3000 supports both 115
VAC and 230 VAC at 50 ~ 60 Hz. Please confirm that the appropriate
voltage (115 VAC for North America) has been selected.
CD-3706/P Operator’s Guide
CD-3000 Series Operator’s Guide
Document Revision: 030501.1
Document Revision: 100102
CAUTION
Always use properly grounded receptacles or severe damage to
your system may result. The use of a surge protector or
Uninterruptible Power Supply (UPS) is highly recommended.
Page 12
Page 14

CD-3706/P Operator’s Guide
CD-3000 Series Operator’s Guide
Document Revision: 030501.1
Document Revision: 100102
• Make sure you power on the unit using the switch seen below, which is
located on the back of the CD-3000.
• Once the proper voltage setting has been confirmed, it is time to turn on
the unit. The power switch is located at the back of the unit, next to the
AC power input. Wait a minute or two while the system starts up. The
screen will now read:
MF I N C .
D U P L I C A T I ON MA D E E A S Y
After the startup routine is complete, a series of self-diagnostics will be
performed. The screen will now read in sequence:
I N I T I A L I Z I N G S Y S T E M
Once complete, the unit will display the main operating screen:
S E L E C T C OP Y O R C O MP A R E
Page 13
Page 15

Loading A Disc
• Af ter the CD-3000’s power has been switched on, press the eject button
on the front of the recorder to open its disc tray.
• Load by carefully placing the disc (label side up) into the recessed area
of the disc tray, so that the disc lays flat.
• Press the eject button on the front of the recorder to close the disc tray.
CD-3706/P Operator’s Guide
CD-3000 Series Operator’s Guide
Document Revision: 030501.1
Document Revision: 100102
Removing A Disc
• While the CD-3000’s power is still switched on, press the eject button
on the front of the recorder to open the disc tray.
• Af ter the disc tray has completely opened, lift the disc by its edges and
carefully remove it.
• Press the eject button on the front of the recorder to close the disc tray.
Page 14
Page 16

CD-3706/P Operator’s Guide
CD-3000 Series Operator’s Guide
General Operation
In addition to Relay Mode copying, the 3000 Series is extremely versatile
and offers many useful and powerful features.
Function Keys
Various uses for the 3000 Series will be explained throughout this
Operator’s Guide. The following section explains the purpose of the
function keys.
The numeric keys on the keypad have special functions when the main
operating screen is displayed:
S E L E C T C OP Y O R C O MP A R E
Document Revision: 030501.1
Document Revision: 100102
• Press the “0” key on the keypad. The screen will now read:
M O D E : C O P Y = 1 , S I M U L A T E = 2
The factory setting for this function is “copy”. The “simulate” mode
is a diagnostic tool that is useful for testing the readability of a master
disc, without actually writing to blank discs loaded into the recorder.
It is also helpful for training purposes, and for experimenting with
various system functions.
• Press the “1” key to select “copy” or the “2” key to select “simulate”.
After pressing either key, you will be returned to the main operating
screen.
• Press the “1” key on the keypad. Something similar to the following
will be displayed on the screen in sequence:
A N T S A 1 . 0 0 4 n 0 7 / 3 1 / 0 2
S O F T WA R E R E V ( C A R D 1 B )
This is the version information of the firmware currently installed on
the 3000 Series.
I M A G E S I Z E 2 5 5 MB
T I M E : 1 2 : 1 9 D A T E : 0 7/0 8/0 2
Page 15
Page 17

CD-3706/P Operator’s Guide
CD-3000 Series Operator’s Guide
Document Revision: 030501.1
Document Revision: 100102
The size, creation date and time of all the hard disk images stored in
the 3000 Series are displayed in sequence. If the Multiple Images
feature is “disabled”, the size of the current hard disk image is
displayed.
V E R I F Y A F T E R C O P Y
S Y S T E M O P T I O N S
This displays the Verify After status of the 3000 Series. The Verify
After function will verify a copied disc against the master that it was
burned from immediately after being copied.
M U L T I P L E I MA G E S
S Y S T E M O P T I O N S
This displays the Multiple Images status of the 3000 Series.
I N S T A L L E D ME MO R Y : 1 0 2 0 MB
S Y S T E M O P T I O N S
This displays the installed memory of the 3000 Series.
T O T A L G O O D : B A D :
S Y S T E M O P T I O N S
This is the 3000 Series’ internal counter. It keeps track of the number
of good and failed copies made by the unit since it was first
activated.
Press the “2” key on the keypad. You will see several
functions scroll across the screen. Select a function by pressing the
corresponding number on the keypad. Enable or disable the function by
pressing the “START/YES” or “STOP/NO” key.
0 = V E R I F Y A F T E R C O P Y
S E L E C T OP T I O N
The factory setting for this function is disabled. When enabled, the
Verify After feature automatically compares discs to the master disc or
hard disk image after copying is completed. Due to the nature of the
various compact disc formats, only CD-ROM Mode 1, CD-ROM Mode
2, CD-ROM XA Mode 2 Form 1, and audio (CD-DA) discs can be
compared.
Page 16
Page 18

CD-3706/P Operator’s Guide
CD-3000 Series Operator’s Guide
1 = M U L T I P L E I MA G E S
S E L E C T OP T I O N
Document Revision: 030501.1
Document Revision: 100102
The factory setting for this function is disabled. When enabled, the
Multiple Images feature allows up to four images to be stored on the
hard disk drive at one time. This setting will remain in effect until
disabled, even after restarting the 3000 Series.
2 = C L I C K D E T E C T I O N
S E L E C T OP T I O N
The factory setting for this function is “enabled”. When “disabled”, the
Click Detection feature allows masters with small random errors to be
read to the hard drive. Caution should be taken when disabled, as
masters that would normally be rejected will be allowed to be read-in.
Undesirable results may occur.
3 = C O P Y P R O T E C T I O N
S E L E C T OP T I O N
The factory setting for this function is “disabled”. When “enabled”, the
Copy Protect feature will write copy protection information into data
discs copied by the 3000 Series.
• Not used.
• Press the “4” key on the keypad. The screen will now read:
S T A R T L O A D E R T E S T E R ?
[ S T O P ] = N O [ S T A R T ] = Y E S
When selected, the Loader Test Mode function allows you to manually
control the robotic functions of the system, for troubleshooting and
testing purposes.
[ 0 ] = C [ 1 ] = I [ 2 ] = A [ 3 ] = R
S E L E C T T E S T
• The “0” key recalibrates the picking arm
• The “1” key will load a disc from the input spindle
• The “2” key unloads the disc
• The “3” key rejects the disc
Page 17
Page 19

CD-3706/P Operator’s Guide
CD-3000 Series Operator’s Guide
Document Revision: 030501.1
Document Revision: 100102
• Press the “STOP/NO” key to exit
• Press the “5” key on the keypad. The screen will now read:
S T A R T I MP O R T I N G A U D I O ?
[ S T O P ] = N O [ S T A R T ] = Y E S
• By using the Audio Track Import feature, audio compilation discs
can be created one track at a time from one or more masters.
• Manually place an audio master disc into drive number 1.
• Press the “START/YES” key
• Press the number of the track you wish to import and press the
“START/YES” key. Only one track may be imported at a time. All of
the tracks will create one master image on the hard drive.
• Once you have imported all of the tracks, copy the image you just
created from the hard drive as you normally would.
• Press the “6” key on the keypad. Something similar to the following
will be displayed in sequence:
1 (0 ,0 ) G E N E R I C C R D B P 1 7 0 0
v : m d 0 0 R I D :00 0 9 0 2 0 5 7 0 8 9
This display is the device information for the recorder installed in the
3000 Series. This includes it’s host number, model name, and
firmware version.
• Press the “7” key on the keypad. The screen will now read:
C L E A R H D ?
• Press the “START/YES” key to clear the hard drive.
If the “STOP/NO” key is pressed you will be prompted to set the
“System Time.”
S E T S Y S T E M T I ME ?
• Press the “START/YES” key to set the system time.
If the “STOP/NO” key is pressed you will be prompted to “Read
Watermark.”
Page 18
Page 20

CD-3706/P Operator’s Guide
CD-3000 Series Operator’s Guide
R E A D WA T E R MA R K ?
Document Revision: 030501.1
Document Revision: 100102
The watermark is a unique electronic fingerprint. These fingerprints
allow discs to be traced back to the specific unit and even to the
recorder that wrote them. Watermarks are useful ways of dealing
with unauthorized copying, authenticating discs as well as helping to
diagnose copying problems.
• Press the “START/YES” key to read the watermark..
If the “STOP/NO” key is pressed you will be prompted to “Read
ATIP.”
R E A D A T I P ?
When selected, the ATIP function allows you to determine the
manufacturer of the CD-R placed in drive 1 of the 3000 Series.
• If you pressed the Stop/No key at you will be prompted to “Set the
Drive Order”:
S E T D R I V E OR D E R ?
• Press the “STOP/NO” key if you do not want to reset the drive order.
Press the “START/YES” key and you will then see the following
screen:
O P E N I N G D R I V E S . . .
• All of the drives will open at this time:
T E S T I N G D R I V E S T A T U S
C L O S E D R I V E T R A Y 1
• Close the drive tray of the drive you would like to be drive number
“1”. It can be any one of the drives. You will then see the following
screen:
T E S T I N G D R I V E S T A T U S
D R I V E 1 D E T E C T E D
• Close the remaining drives in the order that you would like them to
read
T E S T I N G D R I V E S T A T U S
C L O S E D R I V E T R A Y 2
Page 19
Page 21

CD-3706/P Operator’s Guide
CD-3000 Series Operator’s Guide
Document Revision: 030501.1
Document Revision: 100102
• Press the “8” key on the keypad. The screen will now read:
S E L E C T R E C O R D I N G S P E E D
[ 0 ] = 1 6 X [ 1 ] = 2 4 X [ 2 ] = 4 0 X
The factory setting for this function is “40x”. When selected the
Select Recording Speed feature allows you to set the copying speed
as determined by the capabilities of the recorders installed in the
3000 Series.
• Press the “0” key to select 16x, or the “1” key for 24X or the “2” key
for 40X. After pressing any of those keys, the screen will now read:
? ? x R E C O R D I N G S P E E D
S E L E C T C O P Y OR C O MP A R E
• Press the “9” key on the keypad. Something similar to the following
will be displayed in sequence:
I D L E
D E V I C E 1 ( 0 , 0 )
This displays the status of the last disc copied or compared in each of
the 3000 Series’ recorders. If the last operation performed was
successful, the screen will report “OK”. If problems were
encountered, an error message will be displayed.
Page 20
Page 22

CD-3706/P Operator’s Guide
CD-3000 Series Operator’s Guide
Creating A Hard Disk Image
The CD-3000 comes equipped with an internal hard disk drive, which can
be used to store copies of master discs for later recording or comparing.
Each master is saved as a single image file. Up to four images can be stored
on the hard disk at one time.
A hard disk image is useful as a convenient way of copying standard master
discs. For example, create hard disk images for three or four master discs
which are needed on a regular basis, and access them to make copies as
required.
Document Revision: 030501.1
Document Revision: 100102
Creating A Single Hard Disk Image
Although the CD-3000’s internal hard disk can store up to f our images of
master discs, it is sometimes prudent not to use this Multiple Image feature
and only allow one image to be created and stored. For example, using a
single image simplifies the copying process. This reduces the chance that an
operator might make copies of the wrong discs by selecting the incorrect
hard disk image.
To create a single hard disk image, the steps are as follows:
• From the main operating screen depicted below:
S E L E C T C OP Y O R C O MP A R E
• Press the “COPY” key. The screen will now read:
F R O M H D ?
• Press the “STOP/NO” key. The screen will now read:
C O P Y T O H D ?
• Press the “START/YES” key. The screen will now read in sequence:
L O A D I N G MA S T E R
G O O D : 0 B A D : 0 O F : 0
Page 21
Page 23

W
CD-3706/P Operator’s Guide
CD-3000 Series Operator’s Guide
A I T I N G F O R D R I V E S R E A D Y
G O O D : 0 B A D : 0 O F : 0
R E A D 7 5 %
G O O D : 0 B A D : 0 O F : 0
M A S T E R A R C H I V E D OK
G O O D : 0 B A D : 0 O F : 0
A R C H I V E O K , P R E S S S T A R T
G O O D : 0 B A D : 0 O F : 0
Document Revision: 030501.1
Document Revision: 100102
The master disc is now stored as an image on the hard disk
Note: If discs failed to copy properly they will be dropped in the
reject area in front of the drive bay. These discs should not be
used. To help you determine the nature of the problem, error
messages can be displayed by pressing the “9” key on the
keypad.
• Press the “START/YES” key, and you will be returned to the main
operating screen:
S E L E C T C OP Y O R C O MP A R E
Note: When the Multiple Images feature is disabled, only one image
can be saved on the hard disk. If a new image is created, the
old one is overwritten.
Page 22
Page 24

CD-3706/P Operator’s Guide
CD-3000 Series Operator’s Guide
Document Revision: 030501.1
Document Revision: 100102
Creating Multiple Hard Disk Images
The Multiple Images feature allows the CD-3000’s internal hard disk to
store up to four master disc images. The factory setting for this function is
“disabled”. To enable it, and create multiple image files, proceed as
follows:
S E L E C T C OP Y O R C O MP A R E
• Press the “2” key. The screen will now read:
• From the main operating screen depicted below:
0 = V E R I F Y A F T E R C O P Y
S E L E C T OP T I O N S
1 = M U L T I P L E I MA G E S
S E L E C T OP T I O N S
2 = C L I C K D E T E C T I O N
S E L E C T OP T I O N S
3 = C O P Y P R O T E C T I O N
S E L E C T OP T I O N S
• Press the “1” key to select multiple images. The screen will now read:
M U L T I P L E I MA G E S MOD E
S E L E C T O P T I O N
• Press the “START/YES” key to enable “Multiple Images”.
M U L T I P L E I MA G E S S E L E C T E D
S E L E C T O P T I O N
• You will then be returned to the main operating screen:
S E L E C T C OP Y O R C O MP A R E
• Press the “COPY” key. The screen will now read:
F R O M H D ?
• Press the “STOP/NO” key. The screen will now read:
C O P Y T O H D ?
Page 23
Page 25

W
CD-3706/P Operator’s Guide
CD-3000 Series Operator’s Guide
Document Revision: 030501.1
Document Revision: 100102
• Press the “START/YES” key. The screen will now read:
I M A G E A = [ 1 ] B = [ 2 ] C = [ 3 ]
S E L E C T I MA G E
• Select the number that will designate the location of your master. The
screen will then read in sequence:
L O A D I N G MA S T E R . . . .
A I T I N G F O R D R I V E R E A D Y
R E A D 7 5 %
G O O D : 0 B A D : 0 O F : 0
M A S T E R A R C H I V E D OK
A R C H I V E O K P R E S S S T A R T
Page 24
Page 26

CD-3706/P Operator’s Guide
CD-3000 Series Operator’s Guide
Document Revision: 030501.1
Document Revision: 100102
Enabling Verify After
• From the main operating screen depicted below:
S E L E C T C OP Y O R C O MP A R E
• Press the “2” key and the screen will now display in sequence:
0 = V E R I F Y A F T E R C O P Y
S E L E C T OP T I O N S
1 = M U L T I P L E I MA G E S
S E L E C T OP T I O N S
• Press the “0” key, and the screen will now read:
V E R I F Y A F T E R C O P Y Y E S / N O
• Press the “START/YES” key to enable, or the “STOP/NO” key to
disable the Verify After option. If you press the “START/YES” key the
screen will read:
V E R I F Y A F T E R C O P Y I S O N
• You will then be returned to the main operating screen.
S E L E C T C OP Y O R C O MP A R E
Page 25
Page 27

CD-3706/P Operator’s Guide
CD-3000 Series Operator’s Guide
Document Revision: 030501.1
Document Revision: 100102
Copying From A Hard Disk Image
After a hard disk image has been created, it can be used as the copying
master source. If you have not already created a hard disk image, do so
now, as described in the previous section.
Multiple Images Disabled
To make copies from a hard disk image that was previously created with the
Multiple Images feature “disabled” (i.e. from a single hard disk image), the
steps are as follows:
• From the main operating screen depicted below:
S E L E C T C OP Y O R C O MP A R E
• Load as many blank discs as are required into the input bin.
• Press the “COPY” key on the keypad. The screen will now read:
F R O M H D ?
• Press the “START/YES” key to begin copying from the hard disk
image, to the blank discs in the recorders. Depending on the format type
of the image, something similar to the following will be displayed on the
screen:
E N T E R QU A N T I T Y :
• Enter the quantity of discs you wish to copy up to 100:
C O P Y I N G. . . .
G O O D : 0 B A D : 0 O F : 0
Progress will be displayed on the screen during the operation:
C O P Y O K , P R E S S S T A R T
G O O D : 0 B A D : 0 O F : 0
• Press the “START/YES” key, and you will be returned to the main
operating screen:
S E L E C T C OP Y O R C O MP A R E
Page 26
Page 28

CD-3706/P Operator’s Guide
CD-3000 Series Operator’s Guide
Note: If discs failed to copy properly they will be dropped in the
reject area in front of the drive bay. These discs should not be
used. To help you determine the nature of the problem, error
messages can be displayed by pressing the “9” key on the
keypad.
Multiple Images Enabled
To make copies from hard disk images that were previously created with
the Multiple Images feature “enabled”, the steps are as follows:
• From the main operating screen depicted below:
S E L E C T C OP Y O R C O MP A R E
• Load as many blank discs as are required into the input bin. Press the
“COPY” key on the keypad. The screen will now read:
F R O M H D ?
• Press the “START/YES” key. The screen will now read:
I M A G E A = [ 1 ] B = [ 2 ] C = [ 3 ]
S E L E C T I MA G E
Along the top line of the display will scroll the available images,
identified by their number (1, 2, 3, and 4). The CD-3000 defaults to the
first image (1). For the purposes of this example, press the “1” key to
select this image, followed by the “START/YES” key. The screen will
now read:
E N T E R QU A N T I T Y :
C O P Y I N G. . . .
G O O D : 0 B A D : 0 OF : 0
Progress will be displayed on the screen during the operation:
C O P Y O K , P R E S S S T A R T
G O O D : 0 B A D : 0 OF : 0
Document Revision: 030501.1
Document Revision: 100102
Page 27
Page 29

CD-3706/P Operator’s Guide
CD-3000 Series Operator’s Guide
Document Revision: 030501.1
Document Revision: 100102
• Press the “START/YES” key, and you will be returned to the main
operating screen:
S E L E C T C OP Y O R C O MP A R E
Note: If discs failed to copy properly they will be dropped in the
reject area in front of the drive bay. These discs should not be
used. To help you determine the nature of the problem, error
messages can be displayed by pressing the “9” key on the
keypad.
Page 28
Page 30

CD-3706/P Operator’s Guide
CD-3000 Series Operator’s Guide
Comparing From A Hard Disk Image
For quality control purposes, the CD-3000 is equipped with powerful
verification capabilities. Copied discs can also be compared against hard
disk images. This feature ensures copying integrity.
Note: Due to the nature of the various compact disc formats, only
CD-ROM Mode 1, CD-ROM Mode 2, CD-ROM XA Mode 2
Form 1, and most CD formats can be compared.
Document Revision: 030501.1
Document Revision: 100102
Multiple Images Disabled
To compare copied discs to a hard disk image that was previously created
with the Multiple Images feature “disabled” (i.e. from a single hard disk
image), the steps are as follows:
• From the main operating screen depicted below:
S E L E C T C OP Y O R C O MP A R E
• Load the copied discs to be compared into the input bin.
• Press the “COMPARE” key on the keypad. The screen will now read:
C O M P A R E A G A I N S T H D ?
• Press the “START/YES” key. The screen will now read:
E N T E R QU A N T I T Y :
Progress will be displayed on the screen during the operation:
C O M P A R I N G . . .
G O O D : 0 B A D : 0 OF : 0
Upon successful completion, the compared disc(s) will be ejected.
The screen will now read:
C O M P A R E OK , P R E S S S T A R T
• Press the “START/YES” key, and you will be returned to the main
operating screen:
Page 29
Page 31

CD-3706/P Operator’s Guide
CD-3000 Series Operator’s Guide
S E L E C T C OP Y O R C O MP A R E
Note: If discs failed to copy properly they will be dropped in the
reject area in front of the drive bay. These discs should not be
used. To help you determine the nature of the problem, error
messages can be displayed by pressing the “9” key on the
keypad.
Multiple Images Enabled
To compare copied discs to a hard disk image that was previously created
with the Multiple Images feature “enabled”, the steps are as follows:
• From the main operating screen depicted below:
S E L E C T C OP Y O R C O MP A R E
• Load the copied discs to be compared into the input bin.
• Press the “COMPARE” key on the keypad. The screen will now read:
C O M P A R E A G A I N S T H D ?
• Press the “START/YES” key. The screen will now read:
I M A G E A = [ 1 ] B = [ 2 ] C = [ 3 ]
S E L E C T I MA G E
• Select the image you would like to compare against by pressing 1, 2, 3,
or 4,
E N T E R QU A N T I T Y :
Progress will be displayed on the screen during the operation:
C O M P A R I N G . . . .
G O O D : 0 B A D : 0 OF : 0
Upon successful completion, the compared disc(s) will be ejected.
The screen will now read:
Document Revision: 030501.1
Document Revision: 100102
Page 30
Page 32

CD-3706/P Operator’s Guide
CD-3000 Series Operator’s Guide
C O M P A R E OK , P R E S S S T A R T
G O O D : 0 B A D : 0 OF : 0
• Press the “START/YES” key, and you will be returned to the main
operating screen:
S E L E C T C OP Y O R C O MP A R E
Note: If discs failed to copy properly they will be dropped in the
reject area in front of the drive bay. These discs should not be
used. To help you determine the nature of the problem, error
messages can be displayed by pressing the “9” key on the
keypad.
Document Revision: 030501.1
Document Revision: 100102
Page 31
Page 33

CD-3706/P Operator’s Guide
CD-3000 Series Operator’s Guide
Viewing SCSI Device Information
To view the CD-3000 SCSI device information, the steps are as follows:
• From the main operating screen depicted below:
S E L E C T C OP Y O R C O MP A R E
• Press the “6” key. Something similar to the following will be displayed
on the screen:
1 ( 1 , 1 ) G E N E R I C C R D - B P 1 7
V : 1 . 5 5 R I D 0 0 0 0 0 0 0 0 0 0
The device information is displayed for each of the CD-R/RW recorders
installed in the CD-3000. This includes their host number, model name,
and firmware version.
Document Revision: 030501.1
Document Revision: 100102
Page 32
Page 34

CD-3706/P Operator’s Guide
CD-3000 Series Operator’s Guide
Document Revision: 030501.1
Document Revision: 100102
Working With CD-ReWritable (CD-RW) Discs
In addition to working with CD-Recordable (CD-R) discs, the CD-3000 can
also copy both to and from CD-ReWritable (CD-RW) discs. CD-R discs are
write-once and can be read on any CD audio player, CD-ROM, and
MultiRead CD-ROM drive. CD-RW discs can be rewritten to as many as
1,000 times, and are read using MultiRead CD-ROM (usually 24x and
faster), and CD-ROM drives.
CD-RW Supported Formats
The CD-3000 can copy CD-RW discs written in most logical formats (ISO
9660, audio, etc.) but not those created using the Universal Disk Format
(UDF). CD-RW discs using UDF are produced by packet writing software
(such as Adaptec DirectCD, CeQuadrat PacketCD, Prassi abCD, etc.).
Because UDF discs cannot be read by all CD-ROM drives, they are not a
good choice for distributing data.
CD-RW Copying Speed
CD-RW copying speed is determined by two factors - the CD-RW writing
speed of the recorders installed in the CD-3000 (8x with Pioneer A03
drives), and the maximum speed rating of the discs themselves. CD-RW
discs are manufactured with an internal speed code, which is checked
before copying begins. The CD-3000, equipped with the SmartDRIVE 40X
drives, will only accept 10x CD-ReWritable (CD-RW) discs.
Page 33
Page 35

CD-3706/P Operator’s Guide
CD-3000 Series Operator’s Guide
Setting The Internal Clock
The CD-3000’s internal clock is set at the factory for Eastern Standard
Time (observing daylight savings when applicable).
To set the internal clock, the steps are as follows:
• Press the “7” key on the keypad. The screen will now read:
C L E A R H D ?
Press the “STOP/NO” and you will be prompted to set the “System
Time.”
S E T S Y S T E M T I ME ?
• Press the “START/YES” key if you would like to set the system
time. The screen will then read:
E N T E R Y E A R :
S E T T I N G S Y S T E M D A T E
• Press the “START/YES” key after each entry.
E N T E R MO N T H :
S E T T I N G S Y S T E M D A T E
E N T E R D A Y :
S E T T I N G S Y S T E M D A T E
E N T E R H O U R :
S E T T I N G S Y S T E M D A T E
E N T E R MI N U T E :
S E T T I N G S Y S T E M D A T E
• You will then be returned to the main operating screen:
S E L E C T C OP Y O R C O MP A R E
Document Revision: 030501.1
Document Revision: 100102
Page 34
Page 36

CD-3706/P Operator’s Guide
CD-3000 Series Operator’s Guide
Document Revision: 030501.1
Document Revision: 100102
Firmware Updates
From time to time the CD-3000’s internal “firmware” may need updating to add new
features or improve existing functions. Firmware is easily updated by loading a
“Firmware Update CD” into the system. The latest version of firmware will be available
for downloading to your computer from the MediaFORM web site: www.mediaform.com
Once a firmware image file is downloaded, a “Firmware Update CD” can then be written
using a computer, a CD-R/RW recorder, and most popular premastering programs (such
as: Adaptec Easy CD Creator and Toast, CeQuadrat WinOnCD, Ahead Nero, NTI CDMaker, and others). Refer to your premastering software documentation for details on
how to record a disc from an image file.
After having created a “Firmware Update CD”, perform the following steps to update the
CD-3000’s firmware:
• From the main operating screen depicted below:
S E L E C T C OP Y O R C O MP A R E
• Load the Firmware Upgrade CD into the top CD-R/RW recorder.
• Turn off the power to the 3000 Series.
• Turn on the power to the 3000 Series.
• The system will startup:
MF I N C .
D U P L I C A T I ON MA D E E A S Y
• You will see the “initializing system” screen:
I N I T I A L I Z I N G S Y S T E M
• You will see the upgrade firmware screen:
U P GR A D E F I R MWA R E
[ S T O P ] = N O [ S T A R T ] = Y E S
U P G R A D I N G F I R MWA R E . . .
• Upon completion, the system will automatically reboot.
• Remove the CD at this time.
• You will then see the following screens:
• Press the “Start/Yes” key to upgrade the firmware.
F I R M WA R E U P G R A D E . . .
P L E A S E WA I T . . .
Page 35
Page 37

CD-3706/P Operator’s Guide
CD-3000 Series Operator’s Guide
F I R M WA R E U P G R A D E O K
• You will then be returned to the main operating screen:
S E L E C T C OP Y O R C O MP A R E
Document Revision: 030501.1
Document Revision: 100102
Page 36
Page 38

CD-3706/P Operator’s Guide
CD-3000 Series Operator’s Guide
System Startup
• Turn on the power to the CD-3000. Wait a minute or two while the
system starts up. The screen will now read:
MF I N C .
D U P L I C A T I ON MA D E E A S Y
Once complete, the main operating screen is displayed on the screen:
S E L E C T C OP Y O R C O MP A R E
• Turn on the power to the PC and the computer will recognize the CD-
3000’s CD-R/RW recorders as valid devices. Refer to the
documentation that accompanied your premastering software for
information on how to create CDs.
CAUTION
The CD-3000 cannot be operated in its normal standalone mode when
attached to a PC. Do not attempt to execute any commands using the
keypad, as this may lockup both the PC and the CD-3000.
Document Revision: 030501.1
Document Revision: 100102
Page 37
Page 39

CD-3706/P Operator’s Guide
CD-3000 Series Operator’s Guide
Document Revision: 030501.1
Document Revision: 100102
Appendix A: Supported Formats
Originally designed for audio use, the Compact Disc (CD) evolved quickly and now
employs a wide variety of formats for audio, data, and multimedia applications. The
following is a list of the most popular formats currently supported by the CD-3000.
Periodic firmware updates will be made available to deal with new formats as they
appear. To obtain the latest version of firmware, contact your MediaFORM reseller or
download the update from the MediaFORM web site: www.mediaform.com
Many CD formats are international or industry standards, but variations on them may
emerge from time to time. Should you encounter a disc (which does not employ a copy
protection scheme) that you cannot copy on your CD-3000, MediaFORM will do its best
to promptly add support for this format. Dealing with custom formats, however, may be
subject to a development charge.
Keeping track of how the various formats relate to each other can be confusing. For
example, the CD-3000 can copy all CD-ROM Mode 1 discs - this includes ISO 9660,
HFS, Hybrid, Rock Ridge and many other types of file systems. As a result, the CD-3000
will most likely copy CD formats not listed in the table below. If you require further
assistance, please contact MediaFORM’s technical support department at (610) 458-9200
or email: support@mediaform.com
CD-3000 Supported Formats CD-R /R W
ISO 9660 CD-ROM Mode 1 & Mode 2
CD-DA (Compact Disc-Digital Audio) CD-ROM XA Mode 2 Form 1 & Form 2
Hybrid (ISO 9660/HFS) Single session
Hybrid (ISO 9660/HFS/Rock Ridge) Multisession
Mixed Mode Disc-at-Once and Track-at-Once
CD-I Form 1 & Form 2** Rock Ridge
Native O/S’s (NT, DOS, OS/2, UFS, HFS
CD-Extra
(Mac O/S), SUN, AS/400, AIX, etc.)
Video CD Romeo
Photo CD Joliet
Picture CD Bootable CD
CD-G* Karaoke CD
Page 38
Page 40

CD-3706/P Operator’s Guide
CD-3000 Series Operator’s Guide
Document Revision: 030501.1
Document Revision: 100102
CD-3000 Supported Formats
CD-ROM Mode 1
CD-ROM XA Mode 2 (form 1, form 2)
Photo CD (single and multi session)
CD-DA
CD-Extra (CD PLUS)
CD-R
CD-RW
*High-Speed CD-RW is not supported to write
Page 39
 Loading...