


FORMULA MIXER
Models F355 • F470 • F585 • F700 • F815 • F1015 • F1215
PB-MIXER-19
Owner / Operator’s Manual
2019 Model Year & Later
10 / 2018
6990633 (1-13) Printed in U.S.A. © Bobcat Company 2013

1.0 IMPORTANT INFORMATION
Model No.
Mixer Serial No.
Trailer Serial No.
Date of Purchase
Dealership
Dealership Phone No.
Mixer Body
Serial Number
Trailer Serial Number
Model Year / Vertical Mixer / Model / Sequence Of Build
VM 0700
201
Vertical Mixer Trailer / Model Year / Sequence Of Build
VMT 19
201
TRAILER (Model F585-F1215)
EXAMPLE: VMT19201
19
MIXER
EXAMPLE: 19VM0700201
The mixer serial number plate is located on the left hand side of the mixing tub. The trailer serial number plate
(Model F585-F1460) is located on the left hand side of the trailer hitch.
Please enter the model, serial number and additional information in the space provided for future reference.
Always use your serial number when requesting information or when ordering parts.
HOW TO READ YOUR SERIAL NUMBER
Meyer Manufacturing Corporation
674 W. Business Cty Rd A
Dorchester, WI 54425
Phone: 1-800-325-9103
Email: sales@meyermfg.com
Website: www.meyermfg.com
Meyer Manufacturing Corporation - 2 -
Fax: 715-654-5513

2.0 PRE-DELIVERY & DELIVERY CHECK LIST
Meyer Manufacturing Corporation
Phone: 715-654-5132 • Toll-Free: 1-800-325-9103 • P.O. Box 405 • Dorchester, WI 54425
PB Mixer Check List
All shields and guards are in place and securely
fastened.
All PTO shields turn freely.
All bolts and other fasteners are secure and tight.
All mechanisms operate trouble free.
All grease fittings have been lubricated, gear
boxes filled to proper levels, and all roller chains
are oiled. See “Lubrication” section of this
manual.
Cross Conveyor Belt or Chain are at proper
tension. See “Adjustments” section in this
manual.
All decals are in place and legible.
All stop/tail/turn lights work properly.
PRE-DELIVERY CHECK LIST
After the New Meyer Mixer has been completely set-up,
check to be certain it is in correct running order before
delivering it to the customer.
The following is a list of points to inspect:
Check off each item as you have made the proper
adjustments and found the item operating
satisfactorily. Any adjustments made, MUST be
according to specifications defined in this manual.
DELIVERY CHECK LIST
The following check list is an important reminder of
valuable information that MUST be passed on to the
customer at the time the unit is delivered.
Check off each item as you explain it to the
customer.
Explain to the customer that pre-delivery check
list was fully completed.
Give customer the Owner & Operator’s Manual.
Instruct to read and completely understand its
contents BEFORE attempting to operate the
mixer.
Explain and review with customer the New Meyer
mixer manufacturer’s warranty.
Show the customer where to find the serial
number on the implement.
Explain and review with the customer “Safety
Precautions” section of this manual.
Explain and review with customer the proper
“Start-up and Operating Procedures” sections of
this manual.
Explain and review with customer the
recommended loading and unloading
procedures.
Demonstrate the start-up and shutdown controls,
proper hydraulic hose storage and tip holder used
to keep system clean from contaminants.
Explain the importance of cross conveyor chain
or belt tension, and the need to watch and tighten
during the break-in period.
Explain that regular lubrication and proper
adjustments are required for continued proper
operation and long life of the mixer. Review with
the customer the “Lubrication” and “Adjustments”
sections of this manual.
Fully complete this “PRE-DELIVERY &
DELIVERY CHECK LIST” with the customer.
This Pre-Delivery & Delivery Check List must be gone through by the Selling Party and the Customer to validate the
Owner’s Registration Form.
Formula Mixer Check List - 3 - www.meyermfg.com
1-800-325-9103

Meyer Manufacturing Corporation
674 W. Business Cty Rd A
Dorchester, WI 54425
Phone: 1-800-325-9103
Fax: 715-654-5513
Email: sales@meyermfg.com
Website: www.meyermfg.com
Meyer Manufacturing Corporation - 4 - Formula Mixer Check List

3.0 INTRODUCTION
IMPORTANT: You are urged to study this manual and follow the instructions carefully. Your efforts will be
repaid in better operation and service as well as a savings in time and repair expense. Failure to read this
manual and understand the machine could lead to serious injury. If you do not understand instructions in
this manual, contact either your dealer or Meyer Manufacturing Corp. at Dorchester, WI 54425.
WARRANTY: At the front of this manual is the Owner’s Registration Form. Be sure your dealer has
completed this form and promptly forwarded a copy to Meyer Manufacturing to validate the
manufacturer’s warranty. The product model and serial number are recorded on this form and on the
inside of the front cover for proper identification of your Meyer equipment by your dealer and the
manufacturer when ordering repair parts. The serial number is stamped in the front left-hand side of the
mixing tub. On F700 model and larger the Trailer has a serial number located on the left hand side of the
hitch.
Congratulations on your purchase of a new Meyer farm equipment product. Undoubtedly you have given
much consideration to your purchase and we’re proud that you have selected Meyer. Pride in craftsmanship,
engineering and customer service have made Meyer products the finest in the farm equipment industry today.
There is no substitute for quality. That is why thousands of people like you have purchased Meyer farm
equipment. They felt it was the best equipment to serve their farming needs, now and in years to come. We
ask that you follow our policy of “safety first”, and we strongly suggest that you read through the Operator’s
& Parts manual before operating your Meyer farm equipment. Meyer Manufacturing Corporation wants to
thank you for not compromising quality. We are determined to offer excellence in customer service as well as
provide you with the very best value for your dollar.
Sincerely,
All Employees of
MEYER MANUFACTURING CORPORATION
When the PTO is referred to, it means power takeoff from the tractor.
The formula mixer may be referred to as mixer, implement, equipment or machine in this manual.
Manufacturer’s Statement: Meyer Manufacturing Corporation reserves the right to make improvements in design, or
changes in specifications at any time, without incurring any obligation to owners of units previously sold. This supersedes
all previous published instructions.
PB-MIXER-19 - 5 - www.meyermfg.com
1-800-325-9103

FEATURES
DESCRIPTION F355 F470 F585 F700 F815 F1015 F1215
Twin Mixing Augers STD STD STD STD STD STD STD
Replaceable Scrapers STD STD STD STD STD STD STD
Hardened Knives STD STD STD STD STD STD STD
Hay Stops STD STD STD STD STD STD STD
Ladder STD STD STD STD STD STD STD
Jack Stand STD STD STD STD STD STD STD
Torque Disconnect PTO’s STD STD STD STD STD STD STD
2-Speed (Electric Shift) N/A N/A STD STD STD STD STD
Straight Drive STD STD N/A N/A N/A N/A N/A
Heavy -Duty Gearboxes STD STD STD STD STD STD STD
Single Axle Trailer STD STD STD STD STD STD STD
OPTIONS
DESCRIPTION F355 F470 F585 F700 F815 F1015 F1215
Tandem Axle Trailer N/A N/A OPT OPT OPT OPT OPT
Side Discharge Door Right/Left OPT OPT OPT OPT OPT OPT OPT
Front Discharge Door OPT OPT OPT OPT OPT OPT OPT
Rear Discharge Door OPT OPT OPT OPT OPT OPT OPT
Front Cross Conveyor OPT OPT OPT OPT OPT OPT OPT
Side Door Conveyor OPT OPT OPT OPT OPT OPT OPT
Viewing Platform N/A OPT OPT OPT OPT OPT OPT
Slide Tray OPT OPT OPT OPT OPT OPT OPT
Safety Chain OPT OPT OPT OPT OPT OPT OPT
Magnets OPT OPT OPT OPT OPT OPT OPT
Hay-Retention Ring OPT OPT OPT OPT OPT OPT OPT
Capacity Belt Extension OPT OPT OPT OPT OPT OPT OPT
Hardened Knives (Additional) OPT OPT OPT OPT OPT OPT OPT
Tank Liner OPT OPT OPT OPT OPT OPT OPT
Baffle Liner OPT OPT OPT OPT OPT OPT OPT
Meyer Manufacturing Corporation - 6 - PB-MIXER-19

TABLE OF CONTENTS
1.0 IMPORTANT INFORMATION . . . . . . . . . . . . . . . . . . . . . . . . . . . . . . . . . . . . . . . . . . . . . . . . . . . 2
2.0 PRE-DELIVERY & DELIVERY CHECK LIST . . . . . . . . . . . . . . . . . . . . . . . . . . . . . . . . . . . . . . . 3
3.0 INTRODUCTION . . . . . . . . . . . . . . . . . . . . . . . . . . . . . . . . . . . . . . . . . . . . . . . . . . . . . . . . . . . . . 5
4.0 MANUFACTURER’S WARRANTY . . . . . . . . . . . . . . . . . . . . . . . . . . . . . . . . . . . . . . . . . . . . . . 11
5.0 SAFETY . . . . . . . . . . . . . . . . . . . . . . . . . . . . . . . . . . . . . . . . . . . . . . . . . . . . . . . . . . . . . . . . . .13
5.1 SAFETY PRECAUTIONS . . . . . . . . . . . . . . . . . . . . . . . . . . . . . . . . . . . . . . . . . . . . . . . .14
5.2 SAFETY SIGNS . . . . . . . . . . . . . . . . . . . . . . . . . . . . . . . . . . . . . . . . . . . . . . . . . . . . . . . .16
5.3 SHUTOFF & LOCKOUT POWER . . . . . . . . . . . . . . . . . . . . . . . . . . . . . . . . . . . . . . . . . .24
5.3.1 Shutoff & Lockout Power Recommendations . . . . . . . . . . . . . . . . . . . . . . . . . . . . . 24
6.0 PRE-OPERATION . . . . . . . . . . . . . . . . . . . . . . . . . . . . . . . . . . . . . . . . . . . . . . . . . . . . . . . . . . . 25
6.1 PRODUCT INSPECTION . . . . . . . . . . . . . . . . . . . . . . . . . . . . . . . . . . . . . . . . . . . . . . . . 25
6.1.1 General Inspection . . . . . . . . . . . . . . . . . . . . . . . . . . . . . . . . . . . . . . . . . . . . . . . . .26
6.1.2 Before Loading The Formula Mixer . . . . . . . . . . . . . . . . . . . . . . . . . . . . . . . . . . . . 26
6.2 LIGHT HOOK-UP . . . . . . . . . . . . . . . . . . . . . . . . . . . . . . . . . . . . . . . . . . . . . . . . . . . . . . .27
6.3 HYDRAULIC HOOK-UP . . . . . . . . . . . . . . . . . . . . . . . . . . . . . . . . . . . . . . . . . . . . . . . . . . 27
6.4 PTO DRIVELINE . . . . . . . . . . . . . . . . . . . . . . . . . . . . . . . . . . . . . . . . . . . . . . . . . . . . . . .28
6.4.1 Drawbar . . . . . . . . . . . . . . . . . . . . . . . . . . . . . . . . . . . . . . . . . . . . . . . . . . . . . . . . .28
6.4.2 Cutout Clutch (F585-F1215 Models) . . . . . . . . . . . . . . . . . . . . . . . . . . . . . . . . . . . 29
6.4.3 Shear Bolt PTO, Primary (F355/F470) . . . . . . . . . . . . . . . . . . . . . . . . . . . . . . . . . . 29
6.5 HITCHING TO TRACTOR . . . . . . . . . . . . . . . . . . . . . . . . . . . . . . . . . . . . . . . . . . . . . . . . 29
6.5.1 Jack Storage . . . . . . . . . . . . . . . . . . . . . . . . . . . . . . . . . . . . . . . . . . . . . . . . . . . . . 30
6.6 START-UP AND SHUT-DOWN . . . . . . . . . . . . . . . . . . . . . . . . . . . . . . . . . . . . . . . . . . . .30
6.6.1 Start-Up . . . . . . . . . . . . . . . . . . . . . . . . . . . . . . . . . . . . . . . . . . . . . . . . . . . . . . . . .31
6.6.2 Shut-Down . . . . . . . . . . . . . . . . . . . . . . . . . . . . . . . . . . . . . . . . . . . . . . . . . . . . . . .31
6.7 TRANSPORTING . . . . . . . . . . . . . . . . . . . . . . . . . . . . . . . . . . . . . . . . . . . . . . . . . . . . . . . 32
6.7.1 Safety Chain . . . . . . . . . . . . . . . . . . . . . . . . . . . . . . . . . . . . . . . . . . . . . . . . . . . . . . 33
6.7.2 Tire / Wheel Torque . . . . . . . . . . . . . . . . . . . . . . . . . . . . . . . . . . . . . . . . . . . . . . . .34
6.7.3 Brake Information . . . . . . . . . . . . . . . . . . . . . . . . . . . . . . . . . . . . . . . . . . . . . . . . . . 34
6.7.4 Tractor Towing Size Requirements . . . . . . . . . . . . . . . . . . . . . . . . . . . . . . . . . . . . 34
6.8 OPTIONAL EQUIPMENT . . . . . . . . . . . . . . . . . . . . . . . . . . . . . . . . . . . . . . . . . . . . . . . . . 35
7.0 OPERATION . . . . . . . . . . . . . . . . . . . . . . . . . . . . . . . . . . . . . . . . . . . . . . . . . . . . . . . . . . . . . . 37
7.1 GENERAL . . . . . . . . . . . . . . . . . . . . . . . . . . . . . . . . . . . . . . . . . . . . . . . . . . . . . . . . . . . . 37
7.1.1 Material . . . . . . . . . . . . . . . . . . . . . . . . . . . . . . . . . . . . . . . . . . . . . . . . . . . . . . . . .37
PB-MIXER-19 - 7 - www.meyermfg.com
1-800-325-9103

7.2 LOADING . . . . . . . . . . . . . . . . . . . . . . . . . . . . . . . . . . . . . . . . . . . . . . . . . . . . . . . . . . . . . 38
7.2.1 Loading Steps . . . . . . . . . . . . . . . . . . . . . . . . . . . . . . . . . . . . . . . . . . . . . . . . . . . .39
7.3 MIXING . . . . . . . . . . . . . . . . . . . . . . . . . . . . . . . . . . . . . . . . . . . . . . . . . . . . . . . . . . . . . . .40
7.4 PLATFORM OPERATION . . . . . . . . . . . . . . . . . . . . . . . . . . . . . . . . . . . . . . . . . . . . . . . . 40
7.5 FOLDING LADDER . . . . . . . . . . . . . . . . . . . . . . . . . . . . . . . . . . . . . . . . . . . . . . . . . . . . .41
7.6 UNLOADING . . . . . . . . . . . . . . . . . . . . . . . . . . . . . . . . . . . . . . . . . . . . . . . . . . . . . . . . . .41
7.7 UNHOOKING THE TRACTOR . . . . . . . . . . . . . . . . . . . . . . . . . . . . . . . . . . . . . . . . . . . . . 42
7.9 HAY STOP ADJUSTMENT . . . . . . . . . . . . . . . . . . . . . . . . . . . . . . . . . . . . . . . . . . . . . . .43
7.9.1 Hay Stop Lock Bolt . . . . . . . . . . . . . . . . . . . . . . . . . . . . . . . . . . . . . . . . . . . . . . . . . 43
7.10 MIXER TROUBLESHOOTING GUIDE . . . . . . . . . . . . . . . . . . . . . . . . . . . . . . . . . . . . .44
8.0 MAINTENANCE . . . . . . . . . . . . . . . . . . . . . . . . . . . . . . . . . . . . . . . . . . . . . . . . . . . . . . . . . . . .45
8.1 LUBRICATION . . . . . . . . . . . . . . . . . . . . . . . . . . . . . . . . . . . . . . . . . . . . . . . . . . . . . . . . .45
8.1.1 Daily or every 8-10 loads: . . . . . . . . . . . . . . . . . . . . . . . . . . . . . . . . . . . . . . . . . . .45
8.1.2 Weekly: . . . . . . . . . . . . . . . . . . . . . . . . . . . . . . . . . . . . . . . . . . . . . . . . . . . . . . . . .46
8.1.3 Monthly: . . . . . . . . . . . . . . . . . . . . . . . . . . . . . . . . . . . . . . . . . . . . . . . . . . . . . . . . .46
8.1.4 Every 40 hours: . . . . . . . . . . . . . . . . . . . . . . . . . . . . . . . . . . . . . . . . . . . . . . . . . . . 48
8.1.5 50 hours: . . . . . . . . . . . . . . . . . . . . . . . . . . . . . . . . . . . . . . . . . . . . . . . . . . . . . . . .48
8.1.6 Semiannually (500 - 600 hours): . . . . . . . . . . . . . . . . . . . . . . . . . . . . . . . . . . . . . . 50
8.1.7 Annually (1500 hours): . . . . . . . . . . . . . . . . . . . . . . . . . . . . . . . . . . . . . . . . . . . . . .51
8.1.8 Every Two Years or When Discolored: . . . . . . . . . . . . . . . . . . . . . . . . . . . . . . . . . 51
8.1.9 Gearbox Oil Change . . . . . . . . . . . . . . . . . . . . . . . . . . . . . . . . . . . . . . . . . . . . . . .52
8.1.9.1 Planetary Gearbox . . . . . . . . . . . . . . . . . . . . . . . . . . . . . . . . . . . . . . . . . . . . . . . 52
8.1.9.2 2-Speed Gearbox . . . . . . . . . . . . . . . . . . . . . . . . . . . . . . . . . . . . . . . . . . . . . . . . 53
8.2 ADJUSTMENTS . . . . . . . . . . . . . . . . . . . . . . . . . . . . . . . . . . . . . . . . . . . . . . . . . . . . . . . .54
8.2.1 Side Discharge Conveyor . . . . . . . . . . . . . . . . . . . . . . . . . . . . . . . . . . . . . . . . . . .54
8.2.2 Tracking . . . . . . . . . . . . . . . . . . . . . . . . . . . . . . . . . . . . . . . . . . . . . . . . . . . . . . . . .54
8.2.3 Front Discharge Conveyor - Chain . . . . . . . . . . . . . . . . . . . . . . . . . . . . . . . . . . . . . 57
8.2.4 Auger Scraper Bar . . . . . . . . . . . . . . . . . . . . . . . . . . . . . . . . . . . . . . . . . . . . . . . . . 57
8.2.5 Auger Timing . . . . . . . . . . . . . . . . . . . . . . . . . . . . . . . . . . . . . . . . . . . . . . . . . . . . . 57
8.2.6 PTO Cutout Clutch Connection . . . . . . . . . . . . . . . . . . . . . . . . . . . . . . . . . . . . . . . 57
8.2.7 Knives . . . . . . . . . . . . . . . . . . . . . . . . . . . . . . . . . . . . . . . . . . . . . . . . . . . . . . . . . .58
8.2.7.1 Knife Removal . . . . . . . . . . . . . . . . . . . . . . . . . . . . . . . . . . . . . . . . . . . . . . . . . . . 58
8.2.7.2 Adding Knives . . . . . . . . . . . . . . . . . . . . . . . . . . . . . . . . . . . . . . . . . . . . . . . . . . . 58
8.2.7.3 Knife Placement . . . . . . . . . . . . . . . . . . . . . . . . . . . . . . . . . . . . . . . . . . . . . . . . . 58
8.2.7.4 Knife Position . . . . . . . . . . . . . . . . . . . . . . . . . . . . . . . . . . . . . . . . . . . . . . . . . . . 58
8.2.7.5 Replacing Damaged or Worn Knives . . . . . . . . . . . . . . . . . . . . . . . . . . . . . . . . . 58
8.3 STORING THE MIXER . . . . . . . . . . . . . . . . . . . . . . . . . . . . . . . . . . . . . . . . . . . . . . . . . .59
8.4 RETURNING THE MIXER TO SERVICE . . . . . . . . . . . . . . . . . . . . . . . . . . . . . . . . . . . . . 59
8.5 REPLACEMENT PARTS . . . . . . . . . . . . . . . . . . . . . . . . . . . . . . . . . . . . . . . . . . . . . . . . .60
8.5.1 Shutoff & Lockout Power Recommendations . . . . . . . . . . . . . . . . . . . . . . . . . . . . . 60
Meyer Manufacturing Corporation - 8 - PB-MIXER-19

9.0 SPECIFICATIONS . . . . . . . . . . . . . . . . . . . . . . . . . . . . . . . . . . . . . . . . . . . . . . . . . . . . . . . . . . 63
9.1 MODELS F355, F470, F585 . . . . . . . . . . . . . . . . . . . . . . . . . . . . . . . . . . . . . . . . . . . . . . . 63
9.2 MODELS F700, F815, F1015 AND F1215 . . . . . . . . . . . . . . . . . . . . . . . . . . . . . . . . . . . . 65
MAINTENANCE RECORD . . . . . . . . . . . . . . . . . . . . . . . . . . . . . . . . . . . . . . . . . . . . . . . . . . . . . . . .67
PB-MIXER-19 - 9 - www.meyermfg.com
1-800-325-9103

Meyer Manufacturing Corporation - 10 - PB-MIXER-19

4.0 MANUFACTURER’S WARRANTY
MEYER FORMULA MIXER
4/2014
I. The “Owner’s Registration Form” must be completed in full and promptly returned to Meyer Mfg. Corp. for
this warranty to become both valid and effective. All warranties on New Meyer Mixers shall apply only
to the
original retail customer from an authorized Meyer Mfg. Corp. dealership.
II. This warranty shall not
apply to any Meyer Mixer which has been subjected to misuse, negligence, alteration,
accident, incorrect
operating procedures, has been used for an application not designed for or pre-authorized
by Meyer in writing, has had the serial numbers altered, or which shall have been repaired with parts other
than those obtained through Meyer Mfg. Corp. Meyer is not responsible for the following: Depreciation or
damage caused by normal wear, lack of reasonable and proper maintenance, failure to follow the operator's
manual recommendations or normal maintenance parts and service. Meyer is not responsible for rental of
replacement equipment during warranty repairs, damage to a power unit (including but not limited to a truck
or tractor), loss of earnings due to equipment down time, or damage to equipment while in transit to or from
the factory or dealer.
III. Meyer Mfg. Corp. warrants New Meyer Mixer to be free from defects in material and workmanship under
recommended use and maintenance service, as stated in the operator’s and parts manuals, as follows:
A. Meyer Mfg. Corp. will repair or replace F.O.B. Dorchester, WI, as Meyer Mfg. Corp. elects, any
part of a new Meyer Mixer which is defective in material or workmanship
:
i. Without charge for either parts or labor during the first (1) year from purchase date to the
original retail customer.
B. In addition to the above basic warranty, Meyer Mfg. Corp. will repair or replace F.O.B.
Dorchester, WI as Meyer Mfg. Corp. elects:
i. Any part of the following which is defective in material or workmanship (not neglect to
recommended use and service) with a “pro-rated” charge for parts only (not labor) during
the stated time period from date of purchase to the original retail customer. 1st year
100%, 2nd year 100%, 3rd year 50%, 4th year 25%, 5th year 10%
a. The Formula Mixer Planetary Gearbox. Meyer Part #'s 119-16-13.4-1,
119-18-13.92-1, 119-21-25.57-1, 119-32-24.8-1.
IV. COMMERCIAL USE: Coverage as in paragraph III.A.i. only, except warranty coverage is for (90) days for parts
and labor to the original commercial retail customer.
V. Repairs eligible for labor warranty must be made by Meyer Mfg. Corp. or an authorized Meyer dealership. The
original retail customer is responsible for any service call and/or transportation of the mixer to the dealership or
the factory for warranty service.
VI. Except as stated above, Meyer Mfg. Corp. shall not be liable for injuries or damages of any kind or nature,
direct, consequential, or contingent, to persons or property. This warranty does not extend to loss of crop or for
any other reasons.
VII. No person is authorized to give any other warranties or to assume any other obligation on Meyer Mfg. Corp.’s.
behalf unless made or assumed in writing by Meyer Mfg. Corp. This warranty is the sole and exclusive warranty
which is applicable in connection with the manufacture and sale of this product and Meyer Mfg. Corp.’s
responsibility is limited accordingly.
Purchased Product Warranty
:
This warranty does not apply to component parts not manufactured by Meyer such as but not limited to wheels, tires,
tubes, PTO shafts, clutches, hydraulic cylinders, scales, tarps, etc.
PB-MIXER-19 - 11 - www.meyermfg.com
1-800-325-9103

Meyer Manufacturing Corporation - 12 - PB-MIXER-19

5.0 SAFETY
This symbol is used to call attention to instructions
concerning personal safety. Be sure to observe and
follow these instructions. Take time to be careful!
The signal word DANGER on the machine and in the manual identifies
a hazardous situation which, if not avoided, WILL
result in death or
serious injury.
The signal word WARNING on the machine and in the manual
indicates a potentially hazardous situation which, if not avoided,
COULD
result in death or serious injury.
The signal word CAUTION on the machine and in the manual
indicates a potentially hazardous situation which, if not avoided, MAY
result in minor or moderate injury. It may also be used to alert against
unsafe practices.
This notice identifies procedures which must be followed to avoid
damage to the machine.
Meyer Mfg. Corp. equipment is manufactured with operator safety in mind. Located on the equipment are various safety
signs to aid in operation and warn of hazardous areas. Pay close attention to all safety signs on the equipment.
Carefully follow the operating and maintenance instructions in this manual and all applicable safety laws. Failure to follow
all safety procedures may result in serious injury or death.
Before attempting to operate this equipment, read and study the following safety information. In addition, make
sure that every individual who operates or works with the equipment, whether family member or employee, is
familiar with these safety precautions.
Meyer Mfg. Corp. provides guards for exposed moving parts for the operator’s protection; however, some areas
cannot be guarded or shielded in order to assure proper operation. The operator’s manual and safety signs on
the equipment itself warn you of hazards and must be read and observed closely!
Danger, Warning, Caution, and instructional decals and plates are placed on the equipment to protect anyone working on
or around this equipment, as well as the components of the equipment. All personnel operating or maintaining this
equipment must familiarize themselves with all Danger, Warning, Caution, and instructional decals and plates.
PB-MIXER-19 - 13 - www.meyermfg.com
1-800-325-9103

5.1 SAFETY PRECAUTIONS
All individuals who will operate this equipment must read
and completely understand this Operator’s And Parts
Manual. Operator must have instructions before operating
the machine. Untrained operators can cause injury or death.
• DO NOT allow anyone to operate, service, inspect or otherwise handle this equipment until all operators have read
and understood all of the instructional materials in this Operator’s And Parts Manual and have been properly trained
in its intended usage.
• For an operator to be qualified, he or she must not use drugs or alcohol which impair alertness or coordination while
working. An operator who is taking prescription drugs must get medical advice to determine if he or she can safely
operate a machine and the equipment.
• Make sure all personnel can READ and UNDERSTAND all safety signs.
• DO NOT allow minors (children) or inexperienced persons to operate this equipment.
• DO NOT operate until all shields and guards are in place and securely fastened.
• DO NOT step up on any part of the equipment that is not designated as a ladder or viewing platform at any time.
• DO NOT adjust, clean or lubricate while the equipment is in motion.
• Inspect when first delivered and regularly thereafter; that all connections and bolts are tight and secure before
operating.
• Know how to stop operation of the equipment before starting it!
• Make certain everyone is clear of the equipment before applying power.
• Keep hands, feet and clothing away from moving parts. Loose or floppy clothing should not be worn by the operator.
• Observe all applicable traffic laws when transporting on public roadways (where legal to do so). Check local laws for
all highway lighting and marking requirements.
• Shut off and lock out power before adjusting, servicing, maintaining or clearing an obstruction from this machine. (See
5.3 SHUTOFF & LOCKOUT POWER on page 24.)
• Always enter curves or drive up or down hills at a low speed and at a gradual steering angle.
• Never allow riders on either tractor / truck or equipment.
• Keep tractor / truck in a lower gear at all times when traveling down steep grades.
• Stay away from overhead power lines. Electrocution can occur without direct contact.
• Use only properly rated undercarriage and tires.
Meyer Manufacturing Corporation - 14 - PB-MIXER-19

Safety Precautions For Tractor Towed Units:
• Do not exceed 20 mph (32 kph). Reduce speed on rough roads and surfaces.
• Always install a SMV emblem on pull-type equipment when transporting on roadways and keep clean and bright.
• Always yield to oncoming traffic in all situations and move to the side of the road so any following traffic may pass.
Safety Precautions For Truck Mounted Units:
• Comply with state and local laws governing highway safety and movement of machinery on roadways.
Safety Precautions For Hydraulic System:
• Check hydraulic tubes, hoses and fittings for damage and leakage. Never use hands to check for leaks. Hydraulic
tubes and hoses must be properly routed and have adequate support and secure clamps. Tighten or replace any parts
that show leakage.
• Always clean fluid spills. Do not use gasoline or diesel fuel for cleaning parts. Use commercial nonflammable solvents.
PB-MIXER-19 - 15 - www.meyermfg.com
1-800-325-9103

5.2 SAFETY SIGNS
Read all safety signs on the equipment and in this manual. Keep all
safety signs clean and replace any damaged or missing safety signs
before operating the equipment. Do Not remove any safety signs.
Safety signs are for operator protection and information.
To prevent serious injury or death:
Read and understand owner’s manual
before using. Review safety precautions
annually.
Observe all applicable traffic laws when
transporting on public roadways (where
legal to do so). Check local laws for all
highway lighting and marking requirements.
Securely attach to towing unit. Use a
high strength appropriately sized hitch
pin with a mechanical retainer and
attach safety chain.
Do not exceed the chassis or tire load
rating. Maximum gross weight is the
lesser of the two.
Do not exceed 20 mph (33 kph).
Slow down for corners and rough terrain.
Do not drink and drive.
No riders allowed when transporting.
Before moving running gear, be sure
required lights and reflectors are
installed and working.
Before maintenance or repair, stop
vehicle, set tractor parking brake,
and remove ignition key.
Place safety stands under frame and
chock wheels before working on tires or
running gear.
Maintain wheel bolts at torque as
recommended in the manual.
If equipped with brakes, maintain proper
adjustment.
46-0800-8 1
CAUTION
FRONT OF MIXER
PART NO. 46-0004-2
6
2
1
4
3
5
7
PART NO. 46-0800-8
1
PART NO. 46-3600-9
2
PART NO. 46-0800-6
3
6
4
PART NO. 46-3600-6
PART NO. 46-0800-7
5
PART NO. 46-3600-2
(Located on trailer frame underneath housing)
7
Meyer Manufacturing Corporation - 16 - PB-MIXER-19

CAUTION
46-0001-62 1
Use Flashing Warning
Lights when transporting
on ALL highways (public
roadways) at ALL times.
EXCEPT
WHEN PROHIBITED BY LAW!
(Check w/local law enforcement)
By all State and Federal laws, implement lights
do not replace the SMV (Slow-Moving Vehicle)
Identification Emblem. All towed agricultural
vehicles must display SMV Emblems when
traveling LESS than 20 mph (32 kph).
FRONT OF MIXER
1
2
3
4
5
PART NO. 46-0001-213
1
PART NO. 46-8500-7
2
3
PART NO. 46-0001-35
PART NO. 46-0001-62
4
5
PART NO. 46-0001-22
PB-MIXER-19 - 17 - www.meyermfg.com
1-800-325-9103

FRONT OF MIXER
1
2
3
PART NO. 46-0001-210
1
PART NO. 46-0001-205
2
PART NO. 46-0001-213
3
Meyer Manufacturing Corporation - 18 - PB-MIXER-19

1
PART NO. 46-0001-211
1
LEFT SIDE OF MIXER
PART NO. 46-0001-212
(Located under mixing tub)
PB-MIXER-19 - 19 - www.meyermfg.com
1-800-325-9103

RIGHT SIDE OF MIXER
1
3
3
2
4
3
PART NO. 46-0001-213
1
PART NO. 46-0001-211
PART NO. 46-0001-212
(Located under mixing tub)
2
PART NO. 46-0001-206
(Both sides on some models)
WARNING
OIL INJECTION HAZARD
RELIEVE PRESSURE BEFORE
SERVICING.
DO NOT CHECK WITH HANDS.
IF INJURED SEEK EMERGENCY
MEDICAL ATTENTION.
46-8500-7 1
PART NO. 46-8500-7
3
4
(Behind Belting - Not Shown)
Meyer Manufacturing Corporation - 20 - PB-MIXER-19

RIGHT SIDE OF MIXER
1
3
2
4
PART NO. 46-0001-205
4
2
PART NO. 46-0001-209
3
1
PART NO. 46-0001-4
PART NO. 46-0001-207
(Located on top of shield) (Located under shield)
PB-MIXER-19 - 21 - www.meyermfg.com
1-800-325-9103

BACK OF MIXER
1
1
2
2
2
1
PART NO. 46-0001-205
PART NO. 46-0001-208
3
SIDE DOOR CONVEYOR (OPTION)
PART NO. 46-0001-213
3
Meyer Manufacturing Corporation - 22 - PB-MIXER-19

LEFT SIDE OF MIXER
1
2
3
2
2
PART NO. 46-0001-209
1
PART NO. 46-0001-206
(Both sides on some models)
PART NO. 46-0001-210
3
PB-MIXER-19 - 23 - www.meyermfg.com
1-800-325-9103

5.3 SHUTOFF & LOCKOUT POWER
It is important that everyone who works on this equipment is properly
trained to help ensure that they are familiar with this procedure and
that they follow the steps outlined above. This manual will remind you
when to Shutoff & Lockout Power.
Any individual that will be adjusting, servicing, maintaining, or clearing an obstruction from this machine needs
to ensure that this machine stays safely “OFF” until the adjustment, service, or maintenance has been
completed, or when the obstruction has been cleared, and that all guards, shields, and covers have been
restored to their original position. The safety of all individuals working on or around this machine, including
family members, are affected. The following procedure will be referred to throughout this manual, so be familiar
with the following steps.
5.3.1 Shutoff & Lockout Power Recommendations
1. Think, Plan and Check
a. Think through the entire procedure and identify all the steps that are required.
b. Plan what personnel will be involved, what needs to be shut down, what guards / shields need to be removed, and
how the equipment will be restarted.
c. Check the machine over to verify all power sources and stored energy have been identified including engines,
hydraulic and pneumatic systems, springs and accumulators, and suspended loads.
2. Communicate - Let everyone involved, including those working on or around this machine, that work is being done
which involves keeping this machine safely “OFF”.
3. Power Sources
a. LOCKOUT - Shut off engines and take the key, or physically lock the start/on switch or control. Disconnect any
power sources which are meant to be disconnected (i.e. electrical, hydraulic, and PTO of pull-type units).
b. TAGOUT - Place a tag on the machine noting the reason for the power source being tagged out and what work is
being done. This is particularly important if the power source is not within your sight and/or will need to be isolated
for a longer period of time.
4. Stored Energy - Neutralize all stored energy from its power source. Ensure that this machine is level, set the parking
brake, and chock the wheels. Disconnect electricity, block moveable parts, release or block spring energy, release
pressure from hydraulic and pneumatic lines, and lower suspended parts to a resting position.
5. Test - Do a complete test and personally double check all of the above steps to verify that all of the power sources are
actually disconnected and locked out.
6. Restore Power - When the work has been completed, follow the same basic procedures, ensuring that all individuals
working on or around this machine are safely clear of the machine before locks and tags are removed and power is
restored.
Meyer Manufacturing Corporation - 24 - PB-MIXER-19

6.1 PRODUCT INSPECTION
DO NOT allow anyone to operate, service, inspect or otherwise
handle this equipment until all operators have read and understand
all of the instructional materials in this Operator’s And Parts Manual
and have been properly trained in its intended usage.
Verify that the equipment is securely fastened to the tractor.
Verify that all electrical / hydraulic connections and bolts / hardware
are tight and securely fastened before operating the equipment.
Always keep all shields and guards in place and securely fastened.
Keep hands, feet and clothing away.
Wear safety glasses to prevent eye injury when any of the following
conditions exist:
• When fluids are under pressure.
• Flying debris or loose material is present.
• Tools are being used.
Failure to heed may result in serious personal injury or death.
Hydraulic fluid escaping under pressure can have sufficient force to
cause injury. Keep all hoses and connections in good serviceable
condition. Failure to heed could result in serious personal injury or
death.
Check that all gear cases and oil bath enclosures contain oil and
that bearings and joints have been greased. (See maintenance
section).
6.0 PRE-OPERATION
PB-MIXER-19 - 25 - www.meyermfg.com
1-800-325-9103

6.1.1 General Inspection
Inspect the mixer, chassis, axles, spindles, tires, hitches & all safety
shielding, safety signs and safety lighting regularly. These parts if
not watched closely, could pose potential injury or death. If any part
is found in need of repair, follow the SHUTOFF & LOCKOUT POWER
recommendations and have qualified personnel repair immediately.
Check to be sure that the gearcases contain oil and that bearing and joints have been greased. See Lubrication section
for more information.
1. Check the mixer for proper assembly, adjustment and lubrication. Check the machine for proper oil supply. If unit is
equipped with a front or side conveyor, oil the apron chains and check to be sure all bolts and set screws are tight.
2. Make sure that all guards and shields are in place, secured and functioning as designed.
3. Check for and remove any foreign objects in the mixing chamber and discharge opening.
4. Check that all hardware is in place and is tight.
5. Watch for any cracks that may have developed in the welds. If found, have qualified personnel repair immediately.
6. Check the hitch for proper location and alignment and clamp load of attaching bolts. If the upper clevis bar becomes
excessively worn, the hitch assembly should be turned over so the unworn hitch bar is on top. Replace if both bars
are worn. Worn or damaged parts, particular bolts should be replaced before failure.
6.1.2 Before Loading The Formula Mixer
Before loading the mixer, check the following items:
1. Check to see that the discharge door is closed.
2. Be sure no one is inside mixer.
3. Test run the mixer.
a. Make sure the mixer is empty, then start the mixer.
b. Run the mixer and front conveyor (or chain and slat) if equipped for at least five minutes at 3/4 of rated PTO RPM.
c. Raise and lower the door several times.
d. Disengage the machine, turn off the tractor engine, and then remove the driveline.
e. Check the drive components to be sure they are not abnormally hot.
Meyer Manufacturing Corporation - 26 - PB-MIXER-19

6.2 LIGHT HOOK-UP
Do not exceed maximum PSI or a motor failure could result.
Hydraulic fluid escaping under pressure can have sufficient force to
cause injury. Keep all hoses and connections in good serviceable
condition. Failure to heed could result in serious personal injury or
death.
NOTE: The lighting system provided is intended for being transported by an agricultural tractor.
Ensure that lights and indicators are clean and in good working order. When attaching to a towing vehicle other than a
tractor always check lighting for proper operation as wiring may vary. Connect to the standardized 7-pin socket located at
the back of the tractor.
Color Function SAE Terminal SAE Connector
Red Ground 1
Not Used 2
Yellow Left Turn & Hazard 3
Not Used 4
Green Right Turn & Hazard 5
Brown Tail Lights 6
Auxiliary Power 7
Viewed From Back
NOTE: The brake wire should only be connected to the #4 terminal if the #4 terminal on the tractor is
confirmed to be a brake light terminal. If the tractor does not have a brake light terminal, cap / seal
off the end of the brake wire of the implement (secure to other wires).
6.3 HYDRAULIC HOOK-UP
Pull Type: Requires 25 GPM @ 3000 PSI.
Call the factory if additional information is needed.
PB-MIXER-19 - 27 - www.meyermfg.com
1-800-325-9103

6.4 PTO DRIVELINE
Shutoff and lockout power before adjusting, servicing, maintaining,
or clearing an obstruction from this machine. Failure to heed may
result in serious personal injury or death.
Do not operate without PTO guard on implement and tractor. Maintain
PTO drive shaft guard tubes in good operating condition. Replace
them if damaged and not turning freely. Failure to heed may result in
serious personal injury or death.
6” - 12”
8” Recommended
14” - 540 RPM, 1 3/8-6
16” - 1000 RPM 1 3/8-21
20” - 1000 RPM 1 3/4-20
15” - 22”
GROUND
The tractor half of the PTO drive shaft assembly must be locked securely to the tractor output shaft and the implement
half of the PTO drive shaft assembly must be locked securely to the mixer drive line.
See your PTO Installation, Service, and Safety Instruction Manual for additional PTO details. Call the factory for a
replacement manual at 1-800-325-9103.
See your ADMA Safety Manual for further safety situations and precautions that you should familiarize yourself and those
that may be operating this equipment. Call the factory for a replacement manual at 1-800-325-9103.
6.4.1 Drawbar
This mixer may be either 540 or 1000 RPM depending on
the model. Do not operate 540 RPM implements at 1000
RPM, or 1000 implements at 540 RPM.
Set your tractor drawbar to conform to the standard
dimensions as shown. An improperly located hitch point
may cause damage to the universal joints of the PTO
drive shaft. This will ensure that the PTO drive shaft will
not be over extended.
Meyer Manufacturing Corporation - 28 - PB-MIXER-19

6.4.2 Cutout Clutch (F585-F1215 Models)
1
Do not allow anyone to stand between the tongue or hitch and the
tractor when backing up to the equipment.
Keep hands, legs and feet from under tongue and hitch until jack is
locked into place.
The clutch is designed to limit the amount of torque transferred to the
machine through the driveline. If excessive torque is developed the clutch
will disengage. A loud ratcheting sound will be heard and the transfer of
power to the machine will be disrupted. This may occur when mixing or
unloading a heavy mix or if an obstruction has lodged within the mixer.
This is to protect the driveline from damage. To re-engage the machine,
simply shut down the PTO and allow the driveline to come to a stop. The
PTO can then be re-engaged to restart the mixer. The cutout clutch will
either re-engage upon shut down of the PTO or just before it comes to a
complete stop.
6.4.3 Shear Bolt PTO, Primary (F355/F470)
The primary driveline on the F355 & F470 has a shear bolt design. When the torque reaches its maximum load, the shear
bolt will shear to protect the system. Replace the 3/8”-16 x 1” grade 5 shear bolt and 3/8-16 locknut to reset the PTO.
6.5 HITCHING TO TRACTOR
Before hitching to the tractor, make sure that there is sufficient ballast on the front axle of the tractor.
Depending on conditions, the ballast weight needs to be adjusted to optimize tractor drive. The front axle load must
never, under any circumstances, be less than 20% of the tractor's unladen weight.
Move to the operator’s position, start the engine and release the parking brake.
Move the tractor in front of the mixer. Slowly move the tractor backwards towards the mixer and align the drawbar with the
implement’s hitch.
NOTE: Lower or raise the mixer jack to properly align the drawbar and hitch.
Fasten the mixer hitch to the tractor drawbar with a properly sized hitch pin with safety retainer. (Reference ANSI/ASABE
AD6489-3 Agricultural vehicles - Mechanical connections between towed and towing vehicles - Part 3: Tractor drawbar.)
Connect the tractor half of the PTO drive shaft assembly. The PTO must be locked securely to the tractor output shaft and
the implement half of the PTO drive shaft assembly must be locked securely to the mixer drive line.
Before operation and after hitching the tractor to the implement, connect the hydraulic hoses (if applicable) and light cord
to the tractor. Place the jack into the storage position. (See 6.5.1 Jack Storage on page 30.)
PB-MIXER-19 - 29 - www.meyermfg.com
1-800-325-9103

6.5.1 Jack Storage
Keep hands, legs and feet from under tongue and hitch until jack is
locked into place.
1
2
DO NOT allow anyone to operate, service, inspect or otherwise handle
this equipment until all operators have read and understand all of the
instructional materials in this Operator’s And Parts Manual and have
been properly trained in its intended usage.
Before operating the equipment, look in all directions and make sure
no bystanders, especially small children are in the work area.
Shutoff and lockout power before adjusting, servicing, maintaining,
or clearing an obstruction from this machine. Failure to heed may
result in serious personal injury or death.
Always keep all shields and guards in place and securely fastened.
Keep hands, feet and clothing away.
After hitching the mixer to the tractor.
Using the handle, raise the jack off the ground and remove the pin.
Move the jack (Item 1) to the storage mount under the left hand
side of the mixing tub. Reinstall the pin (Item 2) to lock the jack into
the transport position.
NOTE: Keeping jack stored in proper position will keep it from
getting damaged during transportation.
6.6 START-UP AND SHUT-DOWN
Meyer Manufacturing Corporation - 30 - PB-MIXER-19

6.6.1 Start-Up
Before Loading The Mixer:
Enter the tractor and start the engine.
Check to see that the discharge door is closed.
Be sure no one is inside the mixer.
Test run the mixer.
a. Make sure the mixer is empty, then start the mixer.
b. Slowly engage the PTO and operate at idle speed.
c. Run the mixer and front conveyor (or chain and slat) if equipped for at least five minutes at 3/4 of rated PTO RPM.
d. Raise and lower the door several times.
e. Disengage the machine, turn off the tractor engine, and then remove driveline.
f. Check the drive components to be sure they are not abnormally hot.
6.6.2 Shut-Down
Disengage the PTO.
Fully lower all doors.
Park the tractor on a flat, level surface.
Engage the parking brake, stop the engine and exit the tractor.
Remove the driveline and all electrical and hydraulic components.
Check drive components to be sure components are not abnormally hot.
PB-MIXER-19 - 31 - www.meyermfg.com
1-800-325-9103

6.7 TRANSPORTING
AVOID SERIOUS INJURY OR DEATH
• Read and understand owner’s manual before using. Review
safety precautions annually.
• Before operating the mixer, look in all directions and make sure
no bystanders, especially small children are in the work area.
• No riders allowed when transporting.
• Do not drink and drive.
• Before moving, be sure required lights and reflectors are
installed and working.
• Before maintenance or repair, stop vehicle, set parking brake,
and remove ignition key.
• Place safety stands under frame and chock wheels before
working on tires or chassis.
• Maintain wheel bolts at torque as recommended in the manual.
• If equipped with brakes, maintain proper adjustment.
Pull-Type Units
• You must observe all applicable traffic laws when transporting
on public roadways. Check local laws for all highway lighting
and marking requirements.
• Use flashing warning lights when transporting on ALL highways
(public roadways) at ALL times (Tractor towed models) EXCEPT
WHEN PROHIBITED BY LAW! (Check w/local law enforcement).
• By all state and federal laws, implement lights do not replace the
SMV (Slow-Moving Vehicle) identification emblem. All towed
agricultural vehicles must display SMV emblems when traveling
LESS than 25 mph (32 kph).
• Check for traffic constantly. Be sure you can see that no one is
attempting to pass you and that all traffic is sufficiently clear
from you before making any turns.
• Securely attach to towing unit. Use a high strength appropriately
sized hitch pin with mechanical retainer and attach safety chain.
• Do not exceed 20 mph (32 kph). Slow down for corners and
rough terrain.
Failure to heed may result in serious personal injury or death.
To Prevent Serious Injury Or Death
• Keep hands and body out of the hitch area when attaching
towing vehicle.
• Keep body clear of crush point between towing vehicle and load.
• Keep hands, legs and feet from under tongue and hitch until jack
is locked into place.
Meyer Manufacturing Corporation - 32 - PB-MIXER-19

NOTE: For Truck Mounted models, an Optional Highway Lighting Package is available to assist in meeting these
To Prevent Serious Injury Or Death
• Shift to lower gear before going down steep grades.
• Avoid traveling on slopes or hills that are unsafe.
• Keep towing vehicle in gear at all times.
• Never exceed a safe travel speed (which may be less than 20
MPH.).
• Check that the braking and lighting systems are in good
condition. Be sure that the tractor has adequate brakes to stop
the loaded mixer.
If you will travel on public roads and it is legal to do so, you must
know all rules governing such operation. This will include lighting
and brake requirements in addition to traffic rules.
A safety chain must be installed to retain the connection between
the tractor (or other towing vehicle) and implement whenever
traveling on public roads in case the hitch connection would
separate.
2
1
If you do not have a safety chain, or a replacement safety chain is
needed, see your local Meyer dealer who will supply you with the
proper chain for your application. Do not operate on public roads
until you are able to travel with the safety chain properly installed.
requirements. See your Meyer Dealer for Details.
6.7.1 Safety Chain
The chain must be of adequate size to hold the weight of the loaded
mixer. See your ag cart or wagon owner / operator’s manual and
parts book, which is also available at www.meyermfg.com.
NOTE: If using a grab hook at the end(s) of the chain to secure
the chain to itself, a hook latch (Item 1) must be installed.
The length of the safety chain is not to be longer than necessary to
turn without interference. If any chain links or attachment hardware
are broken or stretched, repair before using. Store chain so it does
not corrode or become damaged. Do not use this chain for other
implements because the strength and length of the chain may not be
adequate. Identify this chain for use on this particular mixer.
NOTE: Do not use the intermediate support (Item 2) as the attaching point.
PB-MIXER-19 - 33 - www.meyermfg.com
1-800-325-9103

6.7.2 Tire / Wheel Torque
• Clean adjoining surfaces.
• Re-torque wheel nuts after 50-100 miles.
• Check wheel nut torque every 10,000 miles and re-torque as necessary.
MEYER EQUIPMENT WHEEL TORQUE
BOLT / STUD SIZE SOCKET SIZE PRESS FORMED
WHEEL CENTER
BOLT TYPE HEAVY DUTY WHEEL
CENTER
5/8” 15/16” 100 ft. lbs. Bevel Nut 160 ft. lbs.
1-1/16” Flange Nut
3/4” 1-1/8” NA Flange Nut 378 ft. lbs.
1-1/2”
TIRE INFLATION
TIRE SIZE PLY PSI
385 / 65R x 22.5 Recap 100
245 / 70R x 19.5 Recap 100
380 / 60R x 16.5 - 73
6.7.3 Brake Information
Check that the braking and lighting systems are in good condition. Be sure that the tractor has adequate brakes to stop
the mixer.
See your tractor / chassis manual for brake and braking Information.
6.7.4 Tractor Towing Size Requirements
Use the following charts to help calculate the minimum tractor weight when towing without implement brakes. The
minimum tractor weight, up to 20 mph (33 kph) needs to be 2/3’s of the box Gross Weight (GW). Gross Weight is
calculated by the empty weight of the box and undercarriage combined added to the Load Weight. Then take the Gross
Weight and multiply it by 0.667 and you will get the Minimum Required Weight of the Tractor. A tractor with this
recommended weight for your machine is normally adequate for towing the loaded machine under average conditions.
Unit weight will vary depending on door and option selected.
Meyer Manufacturing Corporation - 34 - PB-MIXER-19

Gross Weight
1
MIXER WEIGHT,
EMPTY (LBS)
UNDERCARRAIGE
WEIGHT (LBS)
++=GW
++=
++=
++=
Minimum Required Weight of the Tractor
LOAD (LBS) GROSS WEIGHT (GW)
(LBS)
2/3 GROSS
WEIGHT
MINIMUM TRACTOR
WEIGHT (LBS)
(GW) (LBS)
0.667 x GW = TW
x=
6.8 OPTIONAL EQUIPMENT
Digital Scale Indicator
Refer to scale indicator (Item 1) manufacturer's operator manual for
operation and maintenance.
NOTE:Some scale drift may occur after the scale is turned on
but should level out within 10 to 15 minutes. Temperature
changes may also cause some drifting.
See your Digi-Star manual for additional scale information.
PB-MIXER-19 - 35 - www.meyermfg.com
1-800-325-9103

Meyer Manufacturing Corporation - 36 - PB-MIXER-19

7.0 OPERATION
DO NOT allow anyone to operate, service, inspect or otherwise
handle this mixer until all operators have read and understand all of
the instructional materials in this Operator’s And Parts Manual and
have been properly trained in its intended usage.
Before operating the mixer, look in all directions and make sure no
bystanders, especially small children are in the work area.
Do not climb or step onto the platform or ladder before the parking
brake has been applied.
Turn on level ground. Slow down when turning.
Go up and down slopes, not across them.
Keep the heavy end of the machine uphill.
Do not overload the machine.
Check for adequate traction.
Always operate at the rated PTO speed but DO NOT EXCEED THE
RATED PTO SPEED. If the mixer is operated faster than the rated PTO
speed the strain on the drive train and mixer is greatly increased.
Do not force hay into the auger with loader or any other device.
Be aware of the overall size of the mixer to allow clearance through
doorways.
Never hand feed material into mixer while it is running. Augers may
cut or grab hands, clothing, or material being loaded, causing severe
injury. Always stop the tractor's engine before hand loading
materials.
7.1 GENERAL
The mixer is designed for blending dairy and beef rations. The mixer performance can vary according to the difference in
material, loading sequence, mixing speed and unloading methods. The following guidelines should be understood before
operating the mixer.
A new mixer will need an initial run-in period to polish the augers and mixer sides to achieve correct material movement
inside the mixer. Until the unit is polished inside the user may experience material spillage, dead spots, or increased
horsepower requirements. The load size may need to be reduced until the unit is polished inside.
7.1.1 Material
Some feed materials will need to be processed alone in the mixer before they can be efficiently mixed with other feed
materials.
• Large square or round bales of alfalfa
• Large square or round bales of high moisture content
• Large square or round bales of long mixed grasses, wheat or oat hay and crop residue bales (straw or soybean
stubble)
• Very light and bulky feed material
NOTE: Always remove any twine, net, or plastic wrap from bales before loading into mixer.
PB-MIXER-19 - 37 - www.meyermfg.com
1-800-325-9103

7.2 LOADING
DO NOT ENTER MIXER CHAMBER WHILE MIXER IS RUNNING! Shut
off and lock out power before attempting to clear an obstruction or to
perform work inside the mixing chamber. (See 5.3 SHUTOFF &
LOCKOUT POWER on page 24.)
Be aware of power lines and other overhead obstructions when
loading with a telescopic arm or loader. Failure to obey warnings
could cause serious injury or death.
Comply with the safety instructions stipulated in the User Manuals
for the operation / handling equipment used for loading the mixer.
Shutoff and lockout power before adjusting, servicing, maintaining,
or clearing an obstruction from this machine. Failure to heed may
result in serious personal injury or death.
Do not climb or step onto the platform or ladder before the parking
brake has been applied.
Overloading may cause failure of axles, tires, structural members,
hitches, loss of vehicle control. DO NOT
exceed maximum gross
weight. (See 9.0 SPECIFICATIONS on page 63.)
NOTE: Overloading can have detrimental effects on the integrity of the implement and it’s safe use. Overloading
will void warranty and increase risk to the operator's safety. Always be aware of your gross weight.
MAXIMUM FORMULA MIXER GROSS WEIGHT MATERIAL ESTIMATED WEIGHT
PER CUBIC FOOT
MODEL LBS MATERIAL LBS / CU.FT.
F355 Soybeans 47 lbs.
F470 Cotton Seed (Dry) 20 lbs.
F585 Corn (Shelled) 45 lbs.
F700 Corn Silage 30 lbs.
F815 Haylage 20 lbs.
F1015 Source: SAE D384.2
F1215
NOTE: Maximum Gross Weight is the lesser value between the implement, chassis, or tires.
When loading material into the mixer with an end-loader, dump the material into the center of the mixer.
1. Be sure that mixer is parked on a level surface.
2. The tractor should be straight in line with the mixer.
3. Completely close the mixer discharge door(s).
4. Set hay stops according to the instructions in this manual.
5. Enter the tractor and start the engine.
6. Engage the PTO / hydraulics.
7. Set the tractor engine to operate at approximately 3/4 of rated PTO speed.
8. Load baled hay into the center of the mixer.
Meyer Manufacturing Corporation - 38 - PB-MIXER-19

9. Allow mixer enough time to process the bale before adding other ingredients (4-10 minutes).
When loading from a raised bay or platform, adopt the necessary
measures (safety rails, etc.) to avoid people or equipment from falling
into the machine.
Load all ingredients as quickly as possible. Allow a final mix time of
3-7 minutes, or whenever the load looks consistently mixed.
Never load long stem bales last. They will not be processed or mixed
into the ration and may cause unloading difficulties or spillage.
NOTE: Processing of long stem forages will continue as other materials are added and mixed. Be careful not to
over process these materials before adding other ingredients.
NOTE: Using the mixer two speed shiftable gearbox, roughages can be processed in “Low” or “High” depending
on how fast the bale needs to be processed.
7.2.1 Loading Steps
NOTE: The loading sequence could vary.
The following is an example of a typical loading sequence:
1. Load and process long stemmed materials.
2. Load haylage and corn silage.
3. Load minerals, proteins, and other small quantity ingredients.
4. Load grains, wet and dry commodities, etc.
5. Load all liquid fats, water, other liquids. Always load liquids at the center of the mixing chamber.
PB-MIXER-19 - 39 - www.meyermfg.com
1-800-325-9103

7.3 MIXING
DO NOT ENTER MIXER CHAMBER WHILE MIXER IS RUNNING! Shut
off and lock out power before attempting to clear an obstruction or to
perform work inside the mixing chamber. (See 5.3 SHUTOFF &
LOCKOUT POWER on page 24.)
Always operate at the rated PTO speed but DO NOT EXCEED THE
RATED PTO SPEED. If the mixer is operated faster than the rated PTO
speed the strain on the drive train and mixer is greatly increased.
Do not force hay into the auger with loader or any other device.
VIEWING PLATFORM
Normal mixing speed is 3/4 to full PTO speed. Time available to mix, thoroughness of the mix, and ingredients are all
factors that must be considered when deciding on when and how fast to operate the mixer.
7.4 PLATFORM OPERATION
Park the tractor on a flat, level surface.
Engage the parking brake.
NOTE: Always maintain a three-point contact at all times when
getting on and off the ladder. Use the ladder rails and steps
when climbing the ladder.
Meyer Manufacturing Corporation - 40 - PB-MIXER-19

7.5 FOLDING LADDER
1
2
Shutoff and lockout power before adjusting, servicing, maintaining, or
clearing an obstruction from this machine. Failure to heed may result
in serious personal injury or death.
DO NOT ENTER MIXER CHAMBER WHILE MIXER IS RUNNING! Shut
off and lock out power before attempting to clear an obstruction or to
perform work inside the mixing chamber. (See 5.3 SHUTOFF &
LOCKOUT POWER on page 24.)
To unfold the ladder, release latch (Item 1) and pull ladder fully out (Item
2). To return ladder to storage position, pull ladder out to “unlock” it and
guide the ladder support back up to its original position. Replace latch.
7.6 UNLOADING
NOTE: Unload the mixed ration within a short time of mixing. A fully loaded mixer which is bounced over rough
terrain or allowed to settle will require more horsepower during start-up.
1. Enter the tractor, start the engine, release the parking brake.
2. Move the tractor and mixer to the unloading area.
3. Be sure that mixer is parked on a level surface.
4. The tractor should be straight in line with the mixer.
5. Shift hydraulic sliding base discharge into working position, or lower slide tray / incline extension / chain and slat (if
equipped).
6. Using the two speed shiftable gearbox, shift the gearbox into “Low” to ease the start of a full load for unloading.
7. Engage the PTO.
8. Set the tractor engine to operate at approximately 1/2 of rated PTO speed.
9. Open discharge door slowly to adjust the amount of material to be discharged. Adjust door height or conveyor speed
for desired flow of feed.
10. After the load begins to discharge, increase the tractor RPM to full rated PTO speed to ensure fast and thorough clean
out while driving forward along the discharge path.
NOTE: The mixer PTO MUST be stopped before shifting the 2-speed gearbox to prevent damage to the gearbox.
11. The 2-speed gearbox can be shifted into “HIGH” during the unloading process. Stop the PTO prior to shifting. This will
help remove any feed remaining on the augers and assist in keeping an even feed flow until the mixer is empty.
NOTE: For Truck Mounted Models, do not operate above the rated 1500 RPM engine speed.
12. When finished unloading, reduce engine speed to idle and disengage the PTO / hydraulics.
PB-MIXER-19 - 41 - www.meyermfg.com
1-800-325-9103

13. Move the mixer forward, away from the unloaded material.
If any component fails, shut off all power to the mixer and move the
mixer to a safe work area. Repair or replace damaged components
before proceeding with unloading of the mix.
Keep hands, legs and feet from under tongue and hitch until jack is
locked into place.
14. Close the discharge door.
15. Shift hydraulic sliding base discharge into storage position, or raise slide tray / incline extension / chain and slat (if
equipped).
16. Park the mixer on a flat, level surface.
17. Engage the parking brake, stop the engine and exit the tractor.
18. Disconnect the driveline.
7.7 UNHOOKING THE TRACTOR
1. Park the implement on level ground. Put the tractor controls in neutral, set the parking brake, and turn the engine off
before dismounting.
2. Place wheel chocks in front and in back of the implement wheels on opposite sides to prevent the implement from
rolling after the tractor is unhooked.
3. Remove the hydraulic hose ends from the tractor hydraulic ports and secure the hose ends in the key slot holes on
the front of the mixer to keep them clean.
4. Remove the light cords and any optional equipment connections.
5. Remove the jack from the storage mount and reinstall the jack to the mount. Crank the jack down until the hitch lifts
off the tractor draw bar.
6. Remove the hitch pin.
7. Unhook safety chain from tractor drawbar and intermediate support.
8. Slowly drive the tractor away from the implement.
Meyer Manufacturing Corporation - 42 - PB-MIXER-19

7.9 HAY STOP ADJUSTMENT
Do not adjust the hay stops while the mixer is running. Moving feed
inside the mixer can make the hay stop move suddenly causing
injury to the person making the adjustment.
Never operate the mixer without the hay stop lock bolt installed.
1
2
Hay Stop
Position A
Hay Stop
Position B
Hay Stop
Position C
Hay Stop
Position D
Hay Stop
Position E
7.9.1 Hay Stop Lock Bolt
The hay stop lock bolt (Item 1) prevents the hay stop from rotating
past the intended range of operation. If the hay stop bolt and the
positioning pin (Item 2) are removed, the hay stop could contact the
moving auger and cause damage to the hay stop and auger.
Position Setting Material
A High Light and bulky material (dry grasses)
B Medium High Alfalfa bales and other forages
C Neutral Unrestrained movement of feed
D Medium Low Heavier rations
E Low Aggressive cutting
PB-MIXER-19 - 43 - www.meyermfg.com
1-800-325-9103

7.10 MIXER TROUBLESHOOTING GUIDE
PROBLEM POSSIBLE SOLUTIONS
Forage is cut too short • Reduce the initial processing time.
• Adjust hay stops to a less aggressive or neutral position.
• Reduce total loading time.
• Reduce the mixer RPM to limit aggressiveness in processing.
• Modify the knife type, quantity, setting or placement.
• If the machine is equipped with a 2 speed shiftable gearbox, shift into “Low”.
Spillage is Occurring • Reduce load size.
• Reduce tractor and/or mixer RPM.
• Make sure machine is level.
• The load size may need to be reduced until the unit is polished inside.
• Adjust hay stops to a less aggressive or neutral position.
• Adjust knives to a less aggressive position.
• If spillage still occurs, the optional side extensions or hay retention ring may
need to be installed.
Requiring High Horsepower • Reduce load size.
• Adjust hay stops to a less aggressive or neutral position.
• The load size may need to be reduced until the unit is polished inside.
• Modify the knife type, quantity, setting, or placement.
• If the machine is equipped with a 2 speed shiftable gearbox, shift into “Low”.
Dead Spots • The load size may need to be reduced until the unit is polished inside.
• The auger scraper may need to be adjusted. (See the Adjustments Section.)
Digital Scale Indicator • Refer to scale manufacturer’s operator manual for operation and maintenance.
• Some scale drift may occur after the scale is turned on but should level out
within 10 to 15 minutes.
• Temperature changes may also cause some drifting.
Meyer Manufacturing Corporation - 44 - PB-MIXER-19

8.0 MAINTENANCE
SHUTOFF & LOCKOUT POWER before adjusting, cleaning, lubricating
or servicing the machine. (See 5.3 SHUTOFF & LOCKOUT POWER on
page 24.)
Fluid such as hydraulic fluid, grease, etc. must be disposed of in an
environmentally safe manner. Some regulations require that certain
spills and leaks on the ground must be cleaned in a specific manner.
See local, state and federal regulations for the correct disposal.
1
Front Gearbox
Reservoir
Rear Gearbox
Reservoir
1
2
2-Speed
Gearbox Reservoir
8.1 LUBRICATION
NOTE: When welding do not allow electrical current to flow through bearings, roller chains, or scale weigh bars.
Ground the welder directly to the part being welded. Always disconnect the power cord from scale
indicator before welding.
NOTE: Use a grease type that is composed of a high quality lithium complex or better, unless otherwise stated.
We recommend using a #1 grade in colder temperatures or a #2 grade in warmer temperatures.
NOTE: Over lubrication is a major cause of bearing failures. Please relubricate conservatively when unsure of
bearing requirements.
8.1.1 Daily or every 8-10 loads:
NOTE: See Specifications, Page 53 for proper oil type and capacities.
Check the planetary gearbox oil levels daily to prevent abnormal
component wear. Add new oil to the reservoir tank (Item 1) if the oil
level is not at the oil reservoir mark.
Check for any oil leaks. If leaks occur, correct the source of the
leak.
Check the 2-speed gearbox oil level daily to prevent abnormal
component wear. Add new oil to the reservoir tank (Item 2) if the oil
level is not at the oil reservoir mark.
Check for any oil leaks. If leaks occur, correct the source of the leak.
PB-MIXER-19 - 45 - www.meyermfg.com
1-800-325-9103

8.1.2 Weekly:
1
1
3
2
1
1
Optional Equipment Maintenance (If Equipped)
Clean out under chain return shield (Item 1).
Oil Hubs
• Check the oil level in each wheel hub (Item 1). The oil should be
1/2” high in the sight glass (Item 2). If low, add EP80/90 gear
lube through the pop out rubber plug (Item 3) at the center of the
hub.
8.1.3 Monthly:
Driveline
NOTE: The number of input bearings will vary depending upon your model mixer.
NOTE: Shielding has been removed for illustration purposes only.
Grease all input bearings (Item 1).
Meyer Manufacturing Corporation - 46 - PB-MIXER-19

Optional Equipment Maintenance (If Equipped)
Tandem Inner / Outer Bearings
2
3
3
Front Cross Conveyor - Left Hand Side
Front Cross Conveyor - Right Hand Side
3
3
Grease the tandem inner / outer bearings (Item 2).
Grease the four (4) front cross conveyor bearings (Item 3).
PB-MIXER-19 - 47 - www.meyermfg.com
1-800-325-9103
Side Door Conveyor (If Equipped)
1
1
xxxxxxxxxxxxxxxxSide Door Conveyor Option
Rear Discharge Door
1
Grease the four (4) side door conveyor bearings (Item 1) (both
sides).
8.1.4 Every 40 hours:
Oil Door Pivots (Item 1).
8.1.5 50 hours:
First oil change in the planetaries and 2-speed gearbox. (See page
53).
Meyer Manufacturing Corporation - 48 - PB-MIXER-19

Grease all PTO driveline zerks.
For 118-VM-0001-55, 118-VM-0013-55
For 118-VM-0023-55 and 118-VM-0024-55
For 118-VM-0011-55, 118-VM-0020-55, 118-VM-0025-55, 118-VM-0026-55, and 118-VM-0027-55
Double Universal Joint
3
2
Grease all universal joints (Item 2) and the slide (Item 3).
PB-MIXER-19 - 49 - www.meyermfg.com
1-800-325-9103

8.1.6 Semiannually (500 - 600 hours):
Shading indicates correct amount of grease.
When you lubricate the wheel-end cavity with
approved grease, pack the area of the hub
between the two bearings with grease only up to
the smallest diameter of the bearing cups. Do not
install too much grease in the wheel-end cavity.
Remove excess grease, which can contaminate
the brakes and affect bearing life and braking
Shading indicates correct amount of grease.
performance. Damage to components can result.
Change oil in the 2-speed gearbox.
Grease Packed Hubs
• Use a pressure packer to pack the bearing cones with grease by
forcing grease into the cavities between the rollers and cage
from the large end of the cone. If a pressure packer is not
available, pack the bearings by hand.
• Apply a light coat of grease to the spindle bearing journals.
• Pack the area of the hub between the two bearings with grease up to the smallest diameter of the bearing cups.
Remove excess grease.
• Install and tighten the hub retention hardware. Apply a light coat of approved NLGI 1 or 2 grease to the hubcap interior
and across the face of the outer locknut. This will indicate that NLGI 1 or 2 grease was used, as well as help prevent
corrosion of these parts.
Meyer Manufacturing Corporation - 50 - PB-MIXER-19

8.1.7 Annually (1500 hours):
1
1
Change oil in the planetaries and 2-speed gearbox. (See page 53).
Grease the wheel bearings (Item 1).
8.1.8 Every Two Years or When Discolored:
Oil Hubs
• Drain oil from wheel hubs (Item 1) and refill with EP80/90 oil
every 2 yrs or if oil becomes discolored from water or other
contamination.
PB-MIXER-19 - 51 - www.meyermfg.com
1-800-325-9103

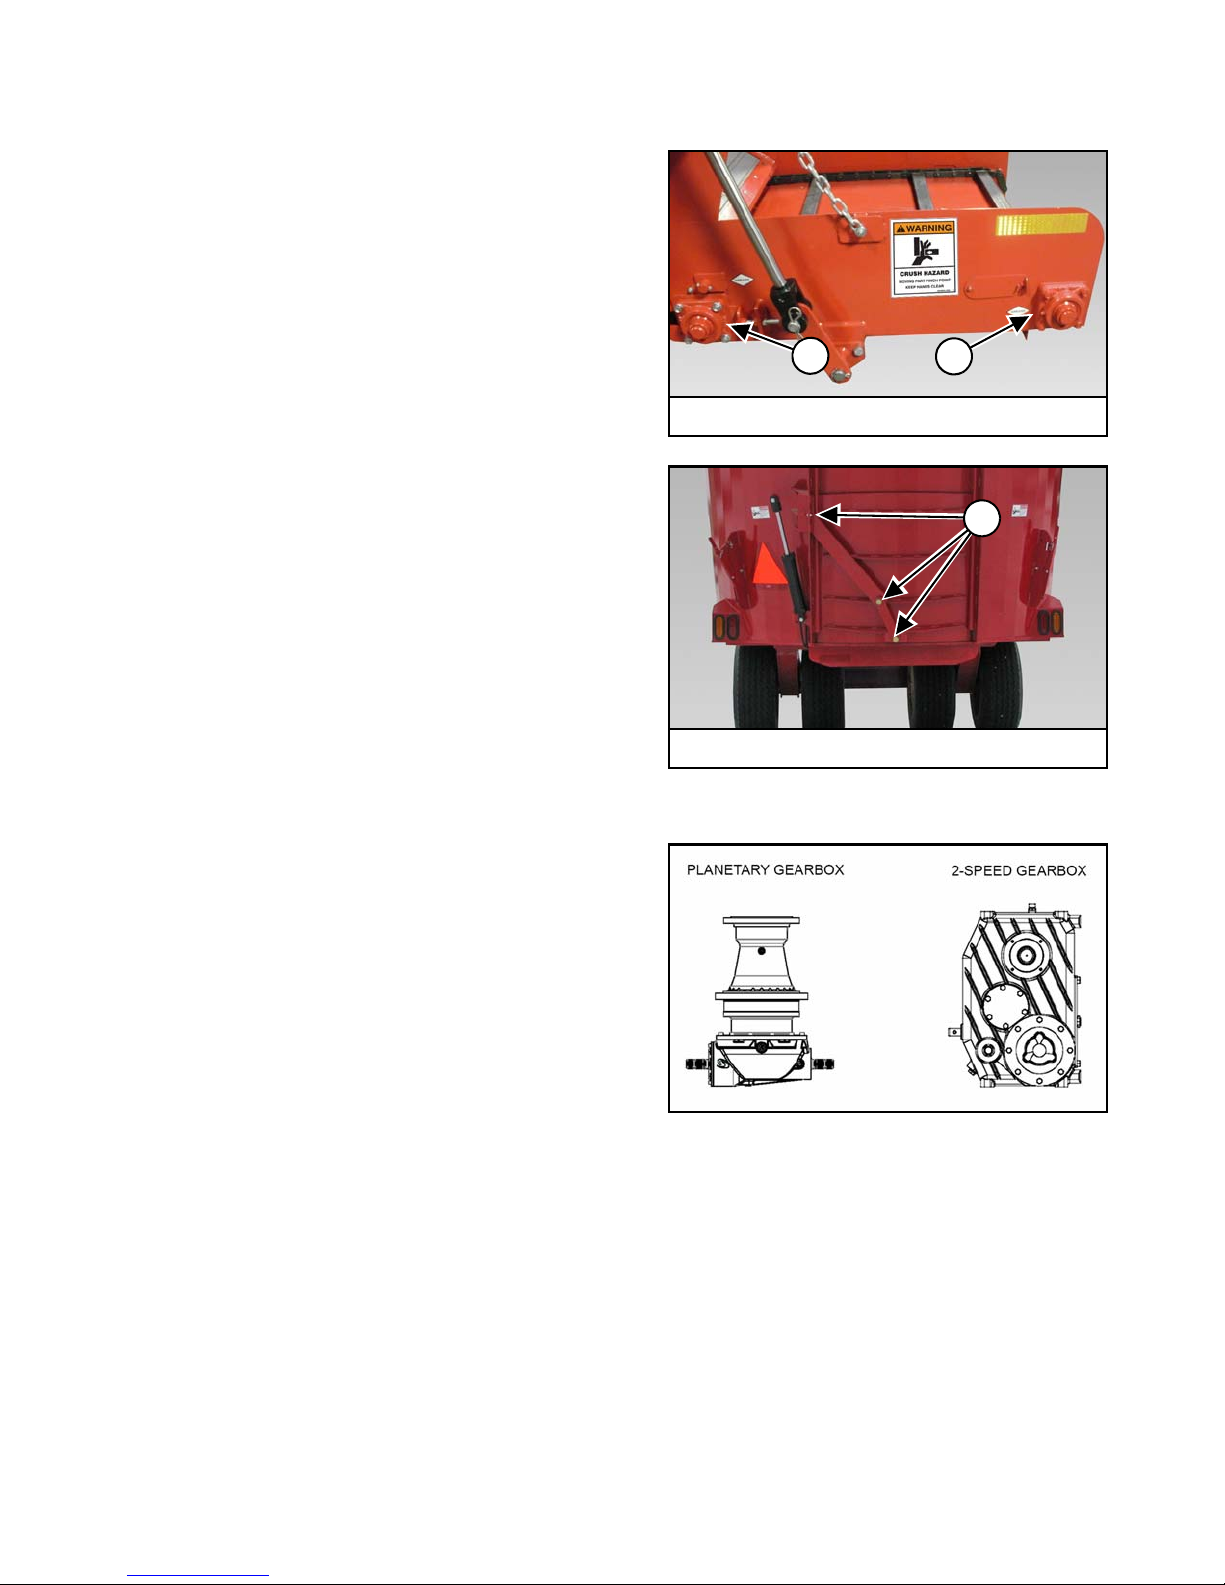
8.1.9 Gearbox Oil Change
SHUTOFF & LOCKOUT POWER before adjusting, cleaning, lubricating
or servicing the machine. (See 5.3 SHUTOFF & LOCKOUT POWER on
page 24.)
Fluid such as hydraulic fluid, grease, etc. must be disposed of in an
environmentally safe manner. Some regulations require that certain
spills and leaks on the ground must be cleaned in a specific manner.
See local, state and federal regulations for the correct disposal.
2
Front Gearbox
Reservoir
Rear Gearbox
Reservoir
3
1
4
5
Planetary For 585 - 1215 Models
Planetary For 355 - 470 Models
NOTE:
• In order to avoid sludge deposits, change the oil while the gear unit is still warm.
• For an effective oil change, the unit should be flushed with a liquid detergent recommended by the lubricant supplier.
• The mixer should be level when changing gearbox oil.
8.1.9.1 Planetary Gearbox
Draining
All Models: Place a container of sufficient capacity under the
gearbox (Item 4).
355 / 470 Models: Drain the planetary by removing the drain plug
(Item 5).
585 / 700 / 815 / 1015 / 1215 Models: Drain the planetary by
loosening the hose clamp and removing the hose.
All Models: Rinse the bottom hose with clean oil to remove any
metal particles or trapped water. Reattach hose, clamp, or drain
plug. After the unit is completely drained, reinstall the drain plug or
hose and hose clamp.
Filling
Filling with an oil pump:
(Call the factory to purchase an oil pump kit, Part #: VA-OP.)
Loosen the hose clamp and detach the lower hose (1) on the
reservoir (Item 2). Unbolt reservoir and lay so the top hose and
reservoir is below the hose used for filling (1).
Connect oil pump to lower hose and fill with oil until the catch basin
fills with approximately 2 quarts of oil. Discard this oil if it is dirty.
Reattach the lower hose (1) with the hose clamp. Bolt the reservoir
back in place. Fill the reservoir to the oil level mark and reinstall the
cap (Item 3).
NOTE: See Planetary Lubrication Specifications on page 53.
Inspect the reservoirs breather, make sure it is not plugged, and
check for leaks.
Meyer Manufacturing Corporation - 52 - PB-MIXER-19

PLANETARY LUBRICATION SPECIFICATIONS
2-Speed Gearbox
Reservoir
Check the gearbox oil levels regularly to prevent abnormal
component wear. Add oil to the reservoir tanks if oil level is not at
the oil level mark.
Model Part Number Description Oil Type Capacity
355 / 470 119-16-13.4-1 1600 Planetary 13.4:1 Synthetic ISO 220 Or Equivalent Approx. 23.5 Quarts
585 / 700 119-18-13.92-1 1800 Planetary 13.92:1 Synthetic ISO 220 Or Equivalent Approx. 14.8 Quarts
815 / 1015 119-21-25.67-1 2100 Planetary 25.57:1 Synthetic ISO 220 Or Equivalent Approx. 18.5 Quarts
1215 119-32-24.8-1 3200 Planetary 24.8:1 Synthetic ISO 220 Or Equivalent Approx. 24.3 Quarts
8.1.9.2 2-Speed Gearbox
Draining
Place a container of sufficient capacity under the gearbox.
Drain the unit by removing the plug from the bottom of the gearbox.
After the unit is completely drained, reinstall the plug.
Filling
Remove filler plug and fill with oil. for proper oil type and capacity.
Replace the filler plug.
2-SPEED GEARBOX LUBRICATION SPECIFICATIONS
Model Part Number Description Oil Type
585 / 700 119-2SP-1.5-2.7-1 1.5:1 / 2.7:1
815 / 1015 119-2SP-1.0-1.5-6 1.0:1 / 1.5:1
1015C / 1215 119-2SP-1.0-1.5-7 1.0:1 / 1.5:1
Synthetic ISO 220 Or
Synthetic ISO 220 Or
Synthetic ISO 220 Or
Equivalent
Equivalent
Equivalent
Capacity
(Including Reservoir Tank)
Approx. 10.5 Quarts
Approx. 10.5 Quarts
Approx. 14 Quarts
PB-MIXER-19 - 53 - www.meyermfg.com
1-800-325-9103

8.2 ADJUSTMENTS
SHUTOFF & LOCKOUT POWER before adjusting, cleaning, lubricating
or servicing the machine. (See 5.3 SHUTOFF & LOCKOUT POWER on
page 24.)
If work must be done inside the mixer put a protective cover over the
auger knives to avoid injury. The hopper and flighting may be
slippery. Use caution when stepping on or standing inside the mixer.
1
2
Side Discharge Conveyor
1
3
2
8.2.1 Side Discharge Conveyor
To adjust tension of the chain, loosen the inner nut (Item 1) and
either tighten or loosen the outer nut (Item 2) as needed. Count the
number of turns you are adjusting so you can adjust the other end.
Once you have proper tension, retighten the inner nut (Item 1) on
both sides.
8.2.2 Tracking
NOTE: The primary discharge side for the two motor flat
conveyor is the side that is used for discharge the most.
Step 1: Loosen the lock nuts (Item 1) holding the four bearings to
the conveyor. Loosen the tightener nuts (Item 2) on all
adjuster locations. Do not loosen the scraper bolts (Item
3).
Step 2: Locate the primary discharge side of the conveyor.
Meyer Manufacturing Corporation - 54 - PB-MIXER-19

Step 3: Set the primary side as follows:
5
4
Use the primary side adjusters to remove at least
half of the belts slack. Measure, as shown below,
until both sides of the drive pulley shaft (Item 4)
are set at exactly the same from the end of the
conveyor frame (Item 5).
Step 4: Once the primary drive pulley is set and square, tighten the lock nuts on both primary drive pulley bearings. Lock
both adjusters on the primary drive pulley.
Step 5: With the primary discharge drive pulley set, move to the other side of the conveyor. Start to evenly tighten the belt
by alternating sides on the non-primary discharge pulley adjusters. Once the belt is tight (Do not over tighten
belt), measure the distance from the non-primary discharge shaft to the end of the conveyor frame, same as
shown in Step 3. Do that for both shaft ends of the non-primary discharge pulley.
Step 6: Take the shortest measurement from either end and set both ends of the non-primary discharge pulley to the
same measurement.
NOTE: If you run out of adjustment on the non-primary side, repeat Step 3 and remove more slack from the belt
using the primary side.
Step 7: With the belt tight and the non-primary discharge pulley square with the conveyor frame, tighten the adjuster bolts
for both non-primary discharge pulley bearings.
PB-MIXER-19 - 55 - www.meyermfg.com
1-800-325-9103

Step 8: Run the mixer conveyor for 2-3 minutes (both directions for front flat conveyors) at full RPM. If you notice the belt
Tighten
Left Side
Front Front
Right Side
Right Side
Rear
Walking Left
Walking Right
Tighten
Left Side
Rear
walking to the left or right while looking at the primary discharge end of the conveyor, stop the conveyor. Check
your measurements to make sure both primary and non-primary discharge pulleys are square with the conveyor
frame. If the conveyor pulleys are square but the belt continues to walk, use the images below to unlock and
tighten the corresponding non-primary discharge pulley bearing adjuster (See Below). Continue to slightly adjust
and run the conveyor until the belt stops walking.
NOTE: If the center v of the belt is completely out of the pulley groove, you may have to loosen both non-primary
pulley adjusters to center the belt. Retighten to your measurement used in Step 6 before adjusting the
conveyor as shown below.
NOTE: Both images are viewed as if the conveyor is a right primary discharge.
Step 9: With the belt conveyor tracking properly, make sure all bearing bolts are tight and adjusters are locked.
Step 10: Watch the conveyor when discharging your feed ration to make sure the belt doesn't slip. If the belt is slipping,
evenly tighten the non-primary discharge side. Run and check belt alignment. Repeat as necessary.
Step 11: Watch the conveyor when discharging your feed ration to make sure the belt doesn't slip. If the belt is slipping,
evenly tighten the non-primary discharge side. Run and check belt alignment. Repeat as necessary.
NOTE: If you run out of adjustment on the non-primary side, repeat Step 3 and remove more slack from the belt
using the primary side.
Meyer Manufacturing Corporation - 56 - PB-MIXER-19

8.2.3 Front Discharge Conveyor - Chain
1
2
1
To adjust tension of the chain, loosen the inner nut (Item 1) and
either tighten or loosen the outer nut (Item 2) as needed. Count the
number of turns you are adjusting so you can adjust the other end.
Once you have proper tension, retighten the inner nut (Item 1) on
both sides.
8.2.4 Auger Scraper Bar
Check the auger scraper monthly for proper clearance with the side
panel. Clearance should not exceed 1/2”. If gap exceeds 1/2”, the
scraper should be adjusted.
8.2.5 Auger Timing
Auger timing is critical. Whenever disconnecting the PTO
connecting the two planetaries, it is critical that the front leading
edge be 225° from the rear leading edge when the rear leading
edge is pointing to the front auger.
8.2.6 PTO Cutout Clutch Connection
The cutout clutch end of the PTO driveline must always be attached
to the implement. The PTO driveline is equipped with a 1-3/4 x 20
spline on the implement half for attaching to the spreader. Remove
the M17-hexagon bolt from the splined hub and slide the PTO onto
the implement splined input shaft. Install the hexagon bolt (Item 1)
through the hub being sure the bolt is falling into the groove on the
splined shaft. Torque tight using a metric size M17 6-point socket
and torque down to 75 ft. lbs. A M17 6-POINT METRIC SOCKET
MUST BE USED AS ROUNDING OF HEXAGON BOLT AND
INACCURACY OF TORQUE SETTINGS COULD OCCUR.
If removal of the M-17 hexagon bolt is necessary, use the same
M-17 6-point socket and loosen bolt 1/2 turn. Insert a 1/4” drift
punch in the hole on the opposite side of the hexagon bolt and tap to loosen the seated portion of the bolt from the
splined hub. Loosen in 1/4 turn increments and tapping to loosen. After bolt seat has been released, remove the bolt. If
bolt is not unseated, damage to the hexagon bolt will occur.
PB-MIXER-19 - 57 - www.meyermfg.com
1-800-325-9103

8.2.7 Knives
Shutoff and lockout power before adjusting, servicing, maintaining,
or clearing an obstruction from this machine. Failure to heed may
result in serious personal injury or death.
If work must be done inside the mixer put a protective cover over the
auger knives to avoid injury. The hopper and flighting may be
slippery. Use caution when stepping on or standing inside the mixer.
Knives are designed and intended for processing and mixing rations that include long stem forages.
NOTE: Some rations may require adding or removing knives, or changing knife position to obtain the desired
result.
8.2.7.1 Knife Removal
Individual knives may be removed from the auger if the ration does not include hay or includes very small amounts of
small square bale hay or tub ground hay. Removing knives will decrease the aggressive cutting action on the stem length
of the ration and may also reduce horsepower requirements.
8.2.7.2 Adding Knives
If the hay in your ration is not being processed enough or fast enough extra knives may be ordered through your dealer.
Adding extra knives will help break down and process materials faster, but may increase the horsepower required to
process and mix.
8.2.7.3 Knife Placement
The placement of knives towards the bottom of the auger will process the forage faster and make the stem length shorter
but may require more horsepower. Placement of knives higher on the auger will assist in breaking up bales faster after
initial loading.
8.2.7.4 Knife Position
“Out” Position
When the knives are in the “out” position they tend to move the long stem hay and lighter bulky materials best in the early
stages of processing and mixing. This setting may result in feed spillage in certain materials. Knives placed in this setting
are very aggressive in processing feed and will also cause an increase in horsepower requirement.
“In” Position
When the knives are in the “in” position they will slow down the long stem hay and lighter bulky materials in the early
stages of processing and mixing. Less spillage will occur due to clearance between the knives. This setting is more
desirable for heavy rations with long run time and where over processing can occur. Knives placed in this position are
less aggressive in processing feed and will reduce the horsepower requirement.
8.2.7.5 Replacing Damaged or Worn Knives
When knives become worn and rounded on the leading edge their efficiency is greatly reduced. This results in longer
processing times and increased horsepower requirements. Refer to your parts manual and contact your Meyer MFG
dealer for replacement part ordering.
Meyer Manufacturing Corporation - 58 - PB-MIXER-19

8.3 STORING THE MIXER
LOCKOUT / TAGOUT the machine / mixer. (See 5.3 SHUTOFF & LOCKOUT POWER on page 24.)
Extended Storage
Sometimes it may be necessary to store your Meyer mixer for an extended period of time. Below is a list of items to
perform before storage.
• Fully empty the material from the mixer. (See 7.6 UNLOADING on page 41.)
• Thoroughly clean the mixer inside and outside.
• Remove all material build-up.
• Lubricate the equipment. (See 8.1 LUBRICATION on page 45.)
• Inspect all mixer components for wear or damage. Repair and replace components as necessary.
• Make appropriate adjustments to equipment. (See 8.2 ADJUSTMENTS on page 54.)
• Place hydraulic hoses and 7-pin connector in the storage brackets (if equipped).
• Inspect the hitch and all welds on the equipment for wear and damage.
• Check for loose hardware, missing guards, or damaged parts.
• Check for damaged or missing safety signs (decals). Replace if necessary.
• Touch up all paint nicks and scratches to prevent rusting.
• Place the equipment in a dry protected shelter.
• Place the equipment flat on the ground.
8.4 RETURNING THE MIXER TO SERVICE
After the Meyer mixer has been in storage, it is necessary to follow a list of items to return the equipment to service.
• Be sure all shields and guards are in place.
• Lubricate the equipment.
• Check tire pressure and that the lug nuts are tight.
• Connect to a tractor and operate equipment; verify all functions operate correctly.
• Check for leaks. Repair as needed.
PB-MIXER-19 - 59 - www.meyermfg.com
1-800-325-9103

8.5 REPLACEMENT PARTS
Before servicing this equipment, ensure that all personnel, including
family members are familiar with the equipment and the safety
hazards that are present, along with the safety practices that should
be observed while working in this equipment.
Inspect the chassis’ axles, o-beams, spindles, tires, hitches & all
safety shielding, safety signs and safety lighting regularly.
Any individual that will be adjusting, servicing, maintaining, or clearing an obstruction from this machine needs
to ensure that this machine stays safely “OFF” until the adjustment, service, or maintenance has been
completed, or when the obstruction has been cleared, and that all guards, shields, and covers have been
restored to their original position. The safety of all individuals working on or around this machine, including
family members, are affected. The following procedure will be referred to throughout this manual, so be familiar
with the following steps.
8.5.1 Shutoff & Lockout Power Recommendations
1. Think, Plan and Check
a. Think through the entire procedure and identify all the steps that are required.
b. Plan what personnel will be involved, what needs to be shut down, what guards / shields need to be removed, and
how the equipment will be restarted.
c. Check the machine over to verify all power sources and stored energy have been identified including engines,
hydraulic and pneumatic systems, springs and accumulators, and suspended loads.
2. Communicate - Let everyone involved, including those working on or around this machine, that work is being done
which involves keeping this machine safely “OFF”.
3. Power Sources
a. LOCKOUT - Shut off engines and take the key, or physically lock the start/on switch or control. Disconnect any
power sources which are meant to be disconnected (i.e. electrical, hydraulic, and PTO of pull-type units).
b. TAGOUT - Place a tag on the machine noting the reason for the power source being tagged out and what work is
being done. This is particularly important if the power source is not within your sight and/or will need to be isolated
for a longer period of time.
4. Stored Energy - Neutralize all stored energy from its power source. Ensure that this machine is level, set the parking
brake, and chock the wheels. Disconnect electricity, block moveable parts, release or block spring energy, release
pressure from hydraulic and pneumatic lines, and lower suspended parts to a resting position.
5. Test - Do a complete test and personally double check all of the above steps to verify that all of the power sources are
actually disconnected and locked out.
6. Restore Power - When the work has been completed, follow the same basic procedures, ensuring that all individuals
working on or around this machine are safely clear of the machine before locks and tags are removed and power is
restored.
Meyer Manufacturing Corporation - 60 - PB-MIXER-19

At times parts on this implement will become worn or damaged. Performing repairs on this implement can pose a risk of
It is important that everyone who works on this equipment is properly
trained to help ensure that they are familiar with this procedure and
that they follow the steps outlined above. This manual will remind you
when to Shutoff & Lockout Power.
Crushing Hazard
Do Not work under suspended or blocked parts.
Call the factory for any additional details you may need to perform
the repair. Some parts may come with instruction sheets to assist in
the repair. Instructions sheets may be provided with your parts order,
otherwise, if available, instruction sheets can be e-mailed or faxed
for you convenience.
injury including death. To reduce risk, the party that will be doing the repair should be very knowledgeable of the
implement and the equipment that they will be using to do the repair.
• Review the repair so that a plan can be put together and the proper equipment can be used to repair this implement
safely and correctly.
• Personal safety equipment may include items such as safety glasses, protective footwear, hearing protection, gloves,
fire retardant clothes, etc.
• The use of hoists and/or supports may be needed to handle heavy components.
• If the implement is being repaired in the field, make sure the parking brake of the tractor is engaged, the implement is
on solid and level ground.
• Welding and torching should be done by properly trained individuals who have proven their skills.
NOTE: Be environmentally friendly and dispose of any waste materials properly. Recycle when appropriate.
PB-MIXER-19 - 61 - www.meyermfg.com
1-800-325-9103

Meyer Manufacturing Corporation - 62 - PB-MIXER-19

9.0 SPECIFICATIONS
9.1 MODELS F355, F470, F585
DIMENSIONS F355 F470 F585
Overall Length - side door / front door 215” / 245” 219” / 249” 270” / 285”
Mixing Chamber Length 212”
Overall Height - Tire Option Used 385 / 65 x 22.5 385 / 65 x 22.5 245 / 70-19.5
Overall Height - Base Machine 84” 98” 97”
Overall Height - Belt Extensions 90” 104” 103”
Overall Height - Hay Retention Ring 90” 104” 103”
Tread Width 98” 98” 87”
Transport Width - front conveyor / side conveyor - w/36” ext. 98” / 110” 98” / 110” 99” / 113”
Max Discharge Reach - Front Cross Conveyor - flat 7” 7” 9”
Max Discharge Reach - Front Cross Conveyor - incline
24”/ 36” / 48” (In Down Position)
Max Discharge Reach - Side Conveyor - 24” / 36” / 48” / 60” /
72” (In Down Position)
Max Discharge Reach - Side Slide Tray 5” 5” 21”
Max Discharge Reach - Side Belt Extension 3” 3” 16”
Max Discharge Height - Front Cross Conveyor - flat 26” 26” 32”
Max Discharge Height - Front Cross Conveyor - incline -24” /
36” / 48” (In Down Position)
Max Discharge Height - Side Conveyor - 24” /36” / 48” / 60” /
72” (In Down Position)
Max Discharge Height - Side Slide Tray 8” 8” 15”
Max Discharge Height - Side Belt Extension 15” 15” 24”
17” / 29” / 40” 17” / 29” / 40” 23” / 34” / 45”
22” / 33”/ 45” / 56”
/ 67”
22” / 33”/ 45” / 56”
/ 67”
35” / 46” / 57” /
68” / 79”
27” / 30” / 33” 27” / 30” /33” 34” / 37”/40”
23” / 27” / 31” /
35” / 39”
23” / 27” / 31” /
35” / 39”
32” / 36” / 40” /
44” / 48”
SPECIFICATIONS F355 F470 F585
Mixing Capacity - no extensions 355 Cu. Ft. 470 Cu. Ft. 585 Cu. Ft.
Mixing Capacity - extensions 400 Cu. Ft. 520 Cu. Ft. 647 Cu. Ft.
Unit Weight - front discharge - lbs (Option Sensitive) N/A N/A N/A
Unit Weight - side discharge - lbs (Option Sensitive) ~9,000 ~9,900 ~13,080
Maximum Net Load - lbs 12,000 15,600 19,410
Auger Qty. 222
Auger Diameter 68” 68” 88”
Auger Speed - standard / high speed 27 / 40 RPM 27 / 40 RPM 27 / 40 RPM
Auger - Upper Flighting Thickness 1/2” 1/2” 5/8”
Auger - Lower Flighting Thickness 5/8” 5/8” 5/8”
Auger - Knives - adjustable - per auger 4 5 5
Planetary Drive straight-drive straight-drive split-drive
PTO Drive 540 RPM 540 RPM 1000 RPM
Drive Protection shear-bolt shear-bolt torque-disconnect
Discharge Door Opening - Front 35” x 40” 42” x 40” 42” x 40”
Discharge Door Opening - Side 35” x 40” 42” x 40” 42” x 40”
1-800-325-9103
PB-MIXER-19 - 63 - www.meyermfg.com

SPECIFICATIONS F355 F470 F585
Discharge Door Opening - Rear 35” x 40” 42” x 40” 42” x 40”
Discharge - Conveyor Width - front/side 30” / 36” 30” / 36” 36” / 42”
Discharge - Front Cross Conveyor Travel - left or right 8” 8” 8”
Tub / Trailer - Floor Thickness 1/2” 1/2” 5/8”
Tub / Trailer - Sidewall Thickness 1/4” 1/4” 1/4”
Tub / Trailer - Trailer or Subframe single-axle single-axle single-axle
Tub / Trailer - Spindle Diameter 2 7/8” 2 7/8” 2 3/4”
Tub / Trailer - Scale System 3-point 3-point 4-point
Tongue Weight - % gross 10% 10% 10%
Tractor Requirement - PTO HP 75 90 110
Meyer Manufacturing Corporation - 64 - PB-MIXER-19

9.2 MODELS F700, F815, F1015 AND F1215
DIMENSIONS F700 F815 F1015 F1215
Overall Length - front door / side door 273” / 288” 296” / 326” 300” / 330” 304” / 334”
Mixing Chamber Length 217” 254” 261” 269”
Overall Height - Tire Option Used 245 / 70-19.5 385 / 65R
x 22.5
385 / 65R
x 22.5
385 / 65R
x 22.5
Overall Height - Base Machine 107” 105” 117” 130”
Overall Height - Belt Extensions 113” 111” 123” 136”
Overall Height - Hay Retention Ring 113” 111” 123” 136”
Tread Width 87” 105” 105” 105”
Transport Width - front conveyor / side conveyor - w/
101” / 115” 116” / 131” 117” / 132” 118” / 133”
36” ext.
Max Discharge Reach - Front Cross Conveyor - flat 9” 9”/0” 9”/0” 9”/0”
Max Discharge Reach - Front Cross Conveyor - incline
23” / 34” / 45” 13” / 25” / 36” 13” / 25” / 36” 13” / 25” / 36”
- 24” / 36” / 48” (In Down Position)
Max Discharge Reach - Side Conveyor - 24” /36” / 48” /
60” / 72” (In Down Position)
35” / 46” / 57” /
68” / 79”
35” / 46” / 57” /
68” / 79”
35” / 46” / 57” /
68” / 79”
35” / 46” / 57” /
68” / 79”
Max Discharge Reach - Side Slide Tray 21” 18” 18” 18”
Max Discharge Reach - Side Belt Extension 16” 15” 15” 15”
Max Discharge Height - Front Cross Conveyor - flat 32” 41” 41” 41”
Max Discharge Height - Front Cross Conveyor - incline
32” / 37”/ 40” 41”/ 44”/ 47” 41”/ 44”/47” 41”/ 44”/ 47”
- 24” / 36” / 48” (In Down Position)
Max Discharge Height - Side Conveyor - 24” / 36” / 48”
/ 60” / 72” (In Down Position)
32” / 36” / 40” /
44” / 48”
41” / 45” / 49” /
54” / 58”
41” / 45” / 49” /
54” / 58”
41” / 45” / 49” /
54” / 58”
Max Discharge Height - Side Slide Tray 15” 25” 25” 25”
Max Discharge Height - Side Belt Extension 24” 32” 32” 32”
SPECIFICATIONS F700 F815 F1015 F1215
Mixing Capacity - no extensions 693 Cu. Ft. 818 Cu. Ft. 1016 Cu. Ft. 1215 Cu. Ft.
Mixing Capacity - extensions 760 Cu. Ft. 910 Cu. Ft. 1112 Cu. Ft. 1315 Cu. Ft.
Unit Weight - front discharge - lbs (Option Sensitive) ~14,660 N/A N/A ~23,620
Unit Weight - side discharge - lbs (Option Sensitive) N/A ~18,100 ~20,800 ~22,660
Maximum Net Load - lbs 22,800 27,300 33,360 39,450
Auger Qty. 2222
Auger Diameter 88” 107” 107” 107”
Auger Speed - standard / high speed 27 / 40 RPM 27 / 40 RPM 27 / 40 RPM 27 / 40 RPM
Auger - Upper Flighting Thickness 5/8” 5/8” 5/8” 5/8” heat
treated
Auger - Lower Flighting Thickness 5/8” 3/4” 3/4” 3/4” heat
treated
Auger Knives - adjustable - per auger 6 6 7 7
Planetary Drive split-drive split-drive split-drive split-drive
PTO Drive 1000 RPM 1000 RPM 1000 RPM 1000 RPM
Drive Protection torque-
disconnect
PB-MIXER-19 - 65 - www.meyermfg.com
torque-
disconnect
torque-
disconnect
torque-
disconnect
1-800-325-9103

SPECIFICATIONS F700 F815 F1015 F1215
Discharge - Door Opening - Front 42” x 40” 46” x 40” 46” x 40” 46” x 40”
Discharge - Door Opening - Side 42” x 40” 42” x 40” 42” x 40” 42” x 40”
Discharge - Door Opening - Rear 42” x 40” 46” x 40” 46” x 40” 46” x 40”
Discharge - Conveyor Width - front/side 36” / 42” 36” / 42” 36” / 42” 36” / 42”
Discharge - Front Cross Conveyor Travel - left or right 8” 8” 8” 8”
Tub / Trailer - Floor Thickness 5/8” 3/4” 3/4” 1”
Tub / Trailer - Sidewall Thickness 1/4” 1/4” 1/4” 1/4”
Tub / Trailer - Trailer or Subframe single-axle single-axle single-axle single-axle
Tub / Trailer - Spindle Diameter 2.75” 3.50” 3.50” 4.50”
Tub / Trailer - Scale System 4-point 4-point 4-point 4-point
Tongue Weight - % gross 10% 10% 10% 10%
Tractor Requirement - PTO HP 110 140 160 200
Meyer Manufacturing Corporation - 66 - PB-MIXER-19

MAINTENANCE RECORD
Manufactured by:
Meyer Manufacturing Corporation
674 W. Business Cty Rd A
Dorchester, WI 54425
Phone: 1-800-325-9103
Fax: 715-654-5513
Email: sales@meyermfg.com
Website: www.meyermfg.com
MODEL NO. ____________________________________ SERIAL NO. ____________________________________
DATE SERVICE PERFORMED DATE SERVICE PERFORMED

Meyer Manufacturing Corporation
674 W. Business Cty Rd A
Dorchester, WI 54425
Phone: 1-800-325-9103
Fax: 715-654-5513
Email: sales@meyermfg.com
Website: www.meyermfg.com
 Loading...