

Meyer 9136T, 9122, 9130, 9124, 9130T User Manual
...
OPERATORS AND PARTS MANUAL NO. 04-01-9100
FOR
9100 SERIES
“BOSS”
REAR UNLOAD FORAGE BOX
TRUCK AND TRAILER
MODELS: 9122 9124
9126 9128
9130 9130T
9136T
08/04
DO NOT OPERATE EQUIPMENT UNTIL THIS MANUAL HAS BEEN READ AND UNDERSTOOD.
MANUFACTURED BY
County Hwy. A West
P.O. Box 405
Dorchester, Wisconsin 54425-0405
Phone 715-654-5132 • FAX 715-654-5513
1-800-325-9103
www.meyermfg.com
E-mail: sales@meyermfg.com

TABLE OF CONTENTS
TABLE OF CONTENTS .....................................................................1
MANUFACTURER’S WARRANTY ............................................................2
INTRODUCTION ..........................................................................3
SAFETY PRECAUTIONS ...................................................................4
PRE-OPERATION .........................................................................7
General ...........................................................................7
Light Hookup .......................................................................7
Air Brake Hookup ...................................................................7
Hydraulic Hookup ...................................................................7
Start Up And Stopping ...............................................................7
TRANSPORTING..........................................................................8
Tractor Towing Size Requirements......................................................8
Material Estimated Weight Per Cubic Foot ................................................8
Rear Unload Operation ...............................................................9
LUBRICATION ...........................................................................12
Daily Lubrication ...................................................................12
End Of Crop Cleanup And Maintenance.................................................12
ADJUSTMENTS..........................................................................13
REPAIR PARTS..........................................................................14
Gearbox & Chain Drive ..............................................................15
Hydraulic Plumb To The Front ........................................................17
Apron............................................................................19
9100 Main Body ...................................................................21
Front Air Hook-Up & ................................................................25
Front Fold Down Extension...........................................................25
Optional Double Door ...............................................................29
Roller Chain Oiler ..................................................................31
Highway Transport Lights ...........................................................32
9100 Optional Grain Kit..............................................................33
Gate Delay Package (#8100 - gate) ....................................................35
Gate Delay Package ................................................................37
MEYER FORAGE BOX “MAINTENANCE RECORD” .............................................38
“SPECIFICATIONS”.......................................................................39
“SPECIFICATIONS”.......................................................................40
9100 Rear Unload --1--

01/01/00
NEW MEYER REAR UNLOAD FORAGE BOX
MANUFACTURER’S WARRANTY
I. The “Product Registration & Inspection Certificate” along with the original billing invoice “Owners Registration Form” must
be completed in full and promptly returned to Meyer Mfg. Corp. for this warranty to become both valid and effective. All war
ranties on New Meyer Forage Boxes shall apply only
dealership.
to the original retail customer from an authorized Meyer Mfg. Corp.
-
II. This warranty shall not
dent, incorrect
Mfg. Corp.
III. Meyer Mfg. Corp. warrants New Meyer Forage Boxes to be free from defects in material and workmanship under recom
mended use and maintenance service, as stated in the Operator’s and Parts Manual," as follows:
A. Meyer Mfg. Corp. will repair or replace F.O.B. Dorchester, WI, as Meyer Mfg. Corp. elects, any part of a new Meyer
B. In addition to the abovebasic warranty, Meyer Mfg. Corp. will repair or replaceF.O. B. Dorchester, WI as Meyer Mfg.
Five (5) Years: The D667XH pintle main apron chain assembly.
operating procedures, or whichshall have been repaired with parts other than those obtained through Meyer
Forage Box which is defective in material or workmanship:
Corp. elects:
apply to any Meyer Forage Box which has been subjected to misuse, negligence, alteration, acci
1. Without charge for either parts or labor during the first (1) year from purchase date to the original retail
customer.
2. Without charge for parts only
tomer.
1. Any part of the following which is defective in material or workmanship (not neglect to recommended
use and service) without charge for parts only
purchase to the original retail customer:
2. Any part of the following which is defective in material or workmanship (not neglect to recommended
use and service) with a “pro-rated” charge for parts only
date of purchase to the original retail customer:
during the second (2) year from purchase date to the original retail cus
(not labor) during the stated time periods from date of
(not labor) during the stated time period from
-
-
-
Ten (10) Years: a. The all welded steel frame box structure.
IV. COMMERCIAL USE: Coverage as in paragraph III A1 ONLY, except warranty coverage is for (90) days for parts and labor
to the original commercial retail customer.
V. Repairs eligible for labor warranty must be made by Meyer Mfg. Corp. or an authorized Meyer dealership. The original retail
customer is responsible for the transportation of the forage box to the dealership for warranty service or for any service call
expenses.
VI. Except as stated above, Meyer Mfg. Corp. shall not be liable for injuries or damages of any kind or nature, direct, conse
quential, or contingent, to persons or property. This warranty does not extend to loss of crop or for any other reasons.
VII. No person is authorizedto give any other warranties or toassume any other obligation on Meyer Mfg.Corp.’s. behalf unless
made or assumed in writingbyMeyer Mfg. Corp. This warranty is the sole and exclusivewarranty which is applicable in con
nection with the manufacture and sale of this product and Meyer Mfg. Corp.’s responsibility is limited accordingly.
Optional Equipment-Tarp, scales etc. warranty-See original equipment warranty.
--2-- 9100 Rear Unload
-
-

INTRODUCTION
Congratulations on your purchase of a new Meyer Rear
Unload Forage Box. Undoubtedly you have given much
consideration to your purchase and we’re proud that you
have selected Meyer. Pride in craftsmanship, engineer
ing and customer service have made Meyer products the
finest in the farm equipment industry today.
The Model 9100 is available as a truck/trailer mounted
unit or mounted to a wagon running gear pulledand pow
ered by a farm tractor. When the PTO is referred to, it
means power takeoff from the truck.
The Model 9100 may be referred to as rear unload box,
forage box, box or rearunload forage box in this manual.
This SAFETY ALERT SYMBOL means ATTEN
TION! BE CAREFUL! YOUR SAFETY IS INVOLVED! It
stresses an attitude of HEADS UP FOR SAFETY. When
you see this symbol, be alert to the possibility of PER
SONAL INJURY and carefully read the message that fol
lows.
WARNING: NEVER OPERATE WITHOUT ALL
COVERS, SHIELDS AND GUARDS IN PLACE. KEEP
HANDS, FEET AND CLOTHING AWAY FROM
MOVING PARTS. SOME COVERS AND GUARDS
HAVE BEEN REMOVED FOR ILLUSTRATIVE PURPOSES ONLY IN THIS MANUAL. FAILURE TO HEED
MAY RESULT IN SERIOUS PERSONAL INJURY OR
DEATH.
Meyer Manufacturing Corporation reserves the right to
make improvements in design, or changes in specifica
tions at any time, without incurring any obligation to own
ers of units previously sold.
-
This supersedes all previous published instructions.
-
IMPORTANT:
At the front of this manual is a Product Registration and
Inspection Certificate. Be sure your dealer has com
pleted this certificate and promptly forwarded a copy to
Meyer Manufacturing to validate the manufacturer’s
warranty. The product model and serial number are re
corded on this certificate and below for proper identifica
tion of your Meyer Forage Box by your dealer and the
manufacturer when ordering repair parts. The serial
number is stamped in the front upright of the left-hand
side.
Model No.___________________________________
Serial No.___________________________________
Date of Purchase_____________________________
-
-
-
-
-
There is no substitute for quality. That is why thousands
of people like you have purchased Meyer farm equip
ment. They felt it was the best equipment to serve their
farming needs, now and in years to come. We ask that
you follow our policy of “safety first,” and we strongly
suggest that you read through the owner’s manual be
fore operating your Meyer farm equipment.
Meyer Manufacturing Corporation wants to thank you for
not compromising quality. We are determined to offer ex
cellence in customer service as well as provide you with
the very best value for your dollar.
Sincerely,
All Employees of
MEYER MANUFACTURING CORPORATION
At the back of this manual is the repair parts section. All
-
replacement parts are to be obtained from or ordered
through your Meyer dealership. When ordering repair
parts, refer to the parts section and give complete infor
mation including quantity, correct part number, detailed
-
description and even Model No. and Serial No. of the for
age box which needs repair parts.
NOTE: All references to right hand (RH) , left hand (LH),
-
front and rear apply to the product as viewed from the
rear of the box.
You are urged to study this manual and follow the in
structions carefully. Your efforts will be repaid in better
operation and service as well as a savings in time and re
pair expense. Failure to read this manual and under
stand the machine could lead to serious injury. If you do
not understand instructions in this manual, contact either
your dealer or Meyer Manufacturing Corp. at
Dorchester, WI 54425.
-
-
-
-
-
9100 Rear Unload --3--

SAFETY PRECAUTIONS
THIS SYMBOL IS USED TO CALL ATTENTION TO INSTRUCTIONS CONCERNING PERSONAL SAFETY.
BE SURE TO OBSERVE AND FOLLOW THESE INSTRUCTIONS. TAKE TIME TO BE CAREFUL!
WARNING: BEFORE ATTEMPTING TO OPERATE THIS FORAGE BOX, READ AND STUDY THE FOL
LOWING SAFETY INFORMATION. IN ADDITION, MAKE SURE THAT EVERY INDIVIDUAL WHO OPERATES
OR WORKS WITH THE FORAGE BOX, WHETHER FAMILY MEMBER OR EMPLOYEE, IS FAMILIAR WITH
THESE SAFETY PRECAUTIONS.
Require anyone who will operate this forage box to read and completely understand this owner’s manual. Give neces
sary instructions.
DO NOT operate, service, inspect or otherwise handle this forage box until all operators have read this Owner’s Man
ual and have been properly trained in its intended usage.
DO NOT allow minors (children) or inexperienced persons to operate this forage box.
DO NOT clean, adjust or lubricate while the forage box is in motion.
Inspect when first delivered and regularly thereafter; that all connections and bolts are tight and secure before operat
ing.
Know how to stop operation of the forage box before starting it!
DO NOT operate until all shields and guards are in place and securely fastened.
Make certain everyone is clear of the forage box before applying power.
Keep hands, feet and clothingaway from moving parts. Loose or floppyclothing should not be worn by theoperator.
Observe all applicable traffic laws when transporting on public roadways (where legal to do so). Check local laws for
all highway lighting and marking requirements.
Tractor Models: Always install a SMV emblem on forage box for transporting on roadways and keep this emblem
clean and bright.
DO NOT step up on any part of the forage box at any time.
Keep the forage box away from power lines. Contact with electric lines may result in serious injury or death by electro
cution!
If the forage box becomes clogged, shut off the power, set park brake, remove keys, keep keys in your possession,
and allow all mechanism to stop. Then, clean or work on the forage box as required.
Always shut off the power, remove keys, keep keys in your possession to prevent accidental startup or unexpected
movement before working on forage box.
Tractor Models: DO NOT tow at speeds in excess of 20 MPH when transporting this forage box. Never exceed a safe
travel speed.
-
-
-
-
-
MEYER MFG. CORP. PROVIDES GUARDS FOR EXPOSED MOVING PARTS FOR THE OPERATOR’S PROTECTION; HOW
EVER, SOME AREAS CANNOT BE GUARDED OR SHIELDED IN ORDER TO ASSURE PROPER OPERATION. THE OPERA
TOR’S MANUAL AND DECALS ON THE FORAGE BOX ITSELF WARN YOU OF DANGERS AND MUST BE READ AND
OBSERVED CLOSELY!
Study the Above Safety Rules
FAILURE TO HEED MAY RESULT IN SERIOUS PERSONAL INJURY OR DEATH.
--4-- 9100 Rear Unload
-
-
SAFETY FIRST
D
E
A
F
C
B
E
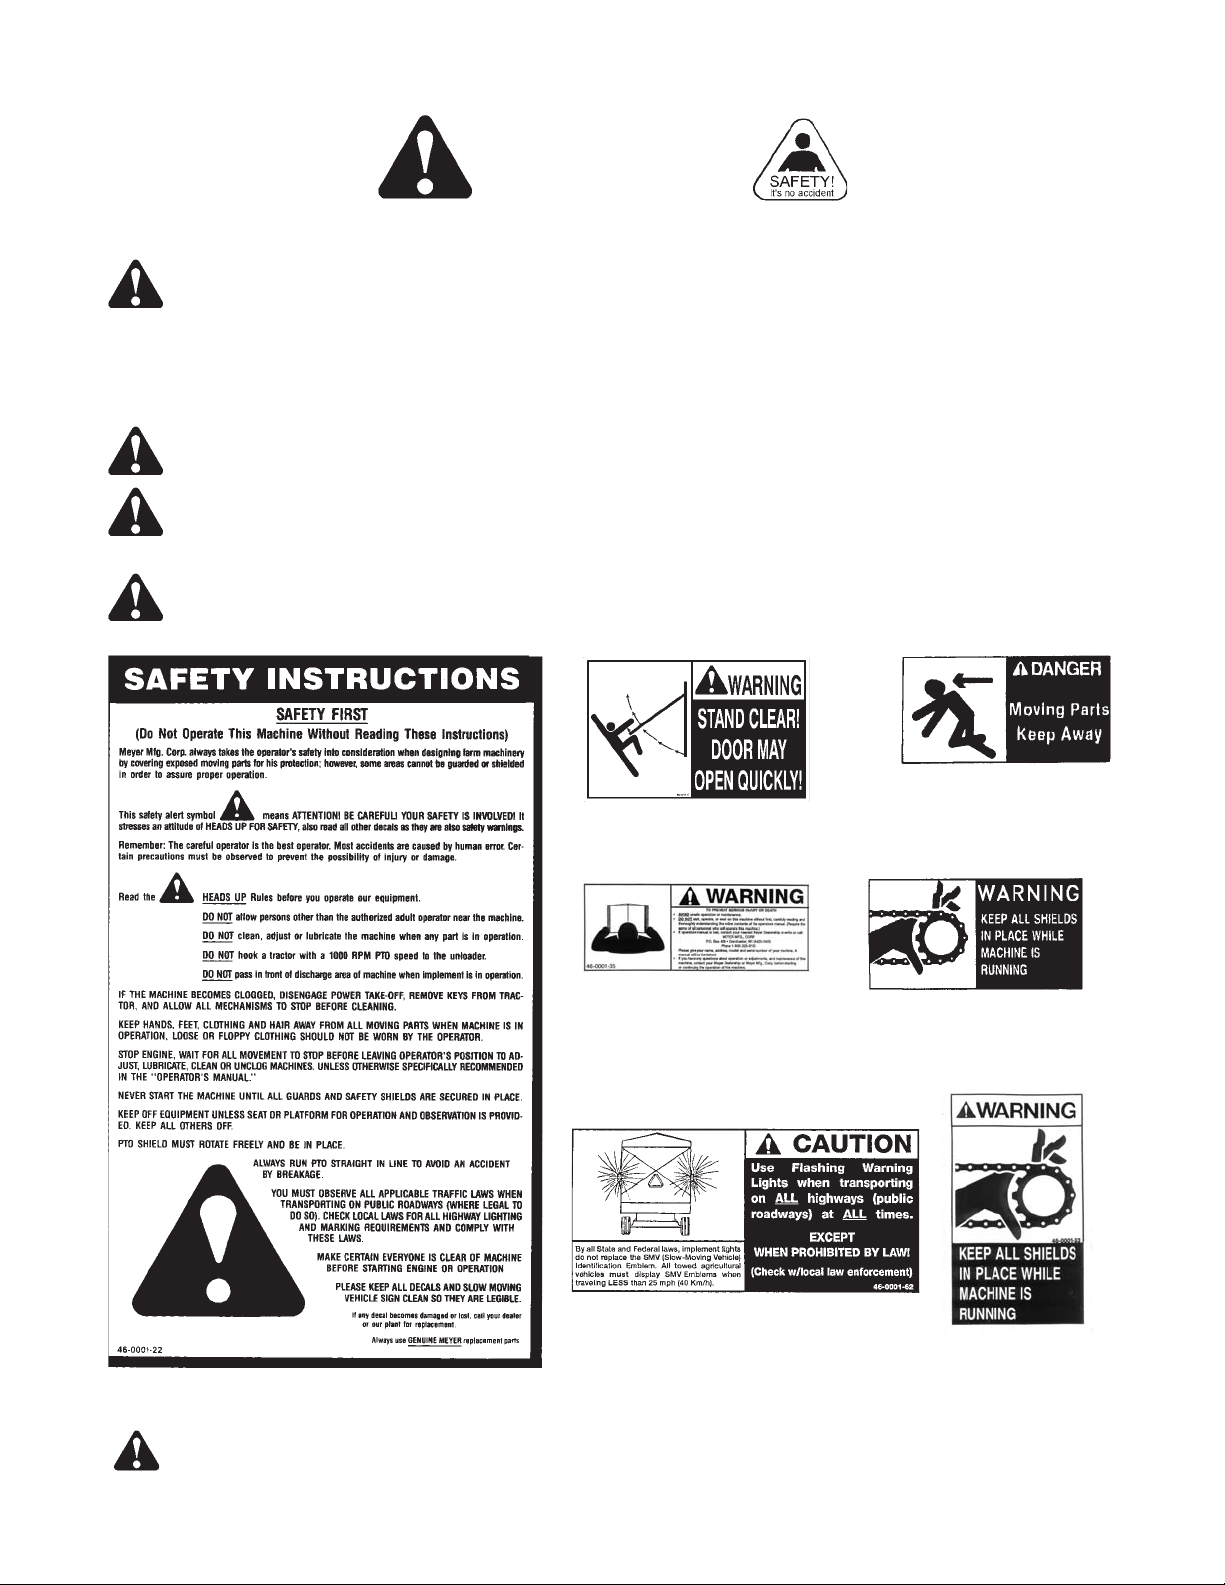
CAUTION: READ ALL DECALS ON THE FORAGE BOX AND IN THIS MANUAL. KEEP THESE DECALS CLEAN AND
REPLACE ANY LOST OR DESTROYED DECALS. BECOME FAMILIAR WITHALL TRUCK OR TRACTOR AND FORAGEBOX
CONTROLS.
9100 Rear Unload --5--
G
SAFETY FIRST
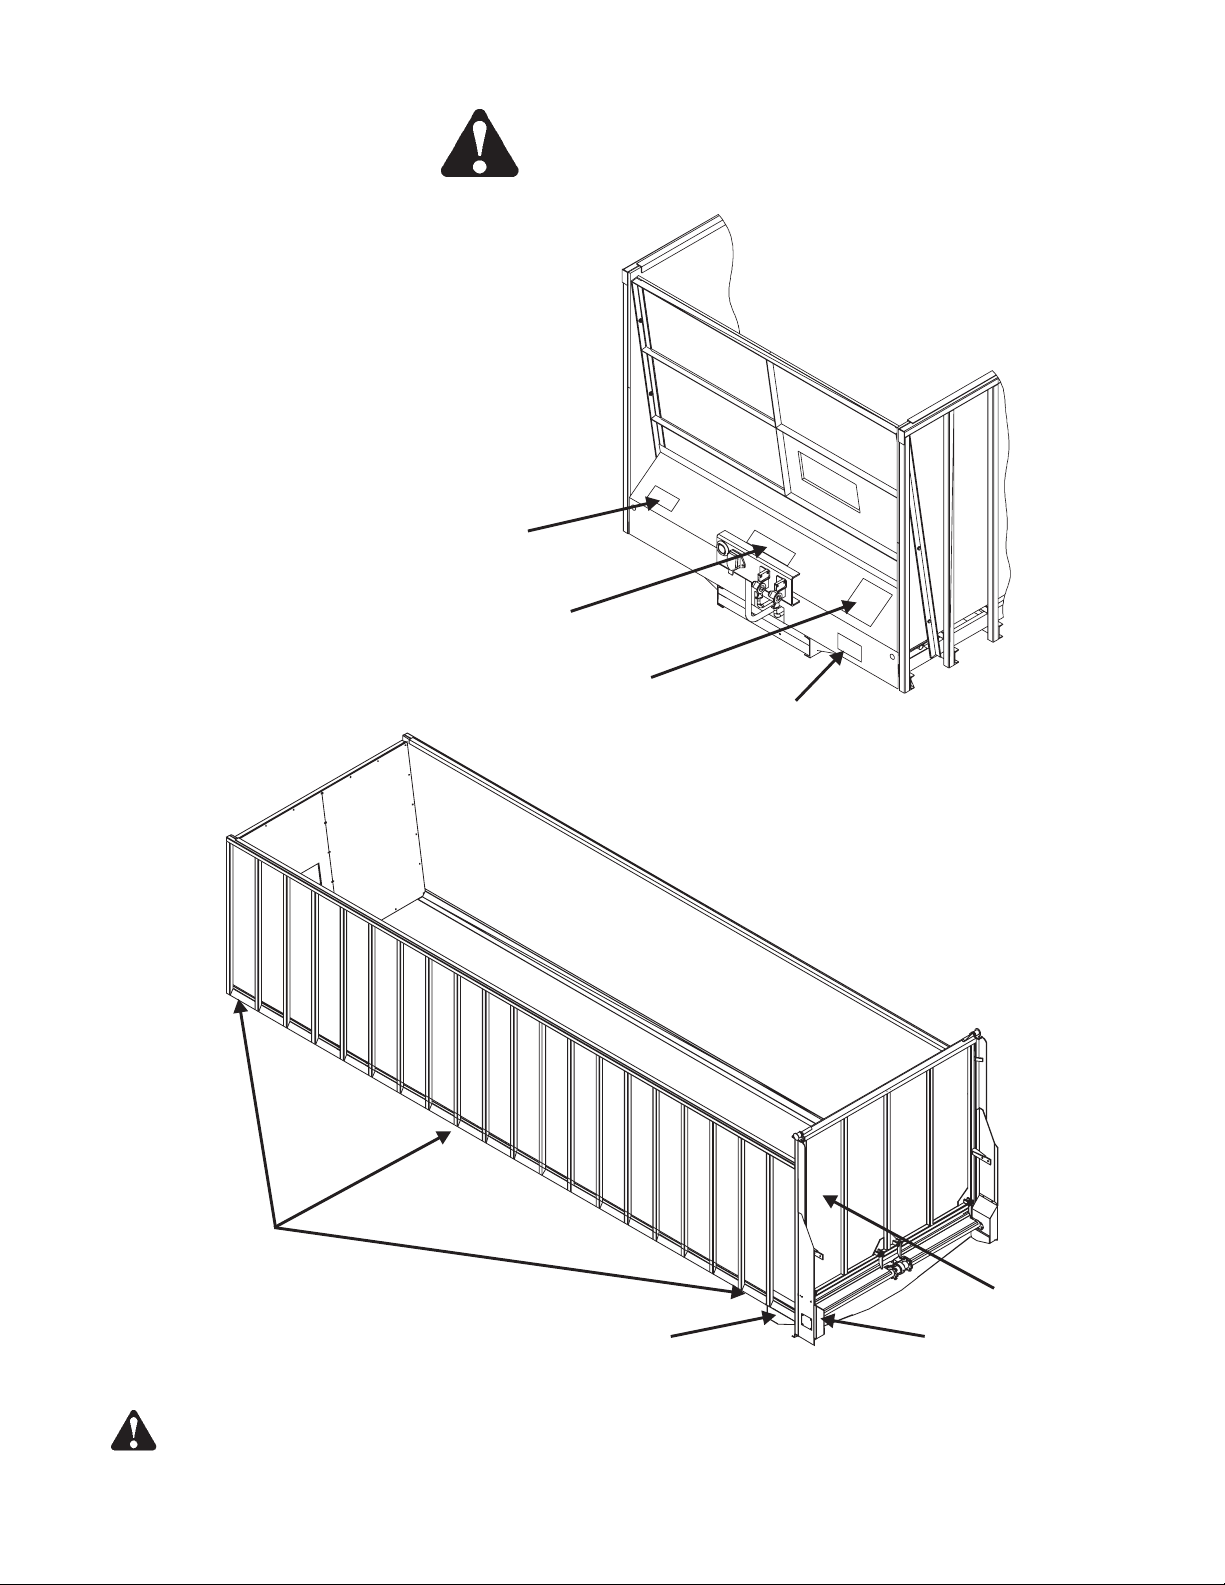
The Meyer Forage Box is manufactured with operator safety in mind. Located on the forage box are various decals to
aid in operation and warn of danger or caution areas. Pay close attention to all decals on the forage box.
DO NOT REMOVE ANY DECALS. IF DECALS ARE LOST, DAMAGED OR IF FORAGE
BOX IS REPAINTED, REPLACE DECALS. REMEMBER: DECALS ARE FOR YOUR PROTEC
TION AND INFORMATION.
A brief definition of signal words that are used in this manual is as follows:
DANGER Indicates an imminently hazardoussituation that, if not avoided, will resultin death or serious injury.
WARNING Indicates a potentially hazardous situation that, if not avoided could result in death or serious injury,
and includes hazards that are exposed when guards are removed.
CAUTION Indicates a potentiallyhazardous situation that, if not avoided mayresult in minor or moderate injury.
-
DECAL A.
PART NO. 46-0001-22
DECAL B.
PART NO. 46-0011-D
DECAL D.
PART NO. 46-0001-35
DECAL F.
PART NO. 46-0001-62
DECAL C.
PART NO. 46-0001-20
DECAL E.
PART NO. 46-0001-4
DECAL G.
PART NO.
46-0001-33
CAUTION: READ ALL DECALS ON THE FORAGE BOX AND IN THIS MANUAL. KEEP THESE DECALS CLEAN
AND REPLACE ANY LOST OR DESTROYED DECALS. BECOME FAMILIAR WITH ALL TRUCK OR TRACTOR AND FOR
AGE BOX CONTROLS.
--6-- 9100 Rear Unload
-
PRE-OPERATION
GENERAL
Whenever adjusting, cleaning, lubricating or otherwise
servicing this forage box, you must shutoff and lockout
power to the box. Because this box can be truck
mounted or powered by a tractor, methods vary. On
truck mounted units, the connection between the PTO
and box is permanently installed and not intended to be
disconnected. On trucks, disengage the PTO drive, turn
off the engine, set the parking brake, remove the ignition
keys and keep them in your possession to prevent any
one else from accidentally applying power to the box un
expectedly. For tractors, disengage the hydraulics, turn
off the engine, set the brakes.
Throughout this manual, when directed to shutoff and
lockout power, be familiar with the previously described
procedures for the type of machine you are operating.
Be sure your forage box is properly mounted to the truck
frame or to the wagon running gear. Consult your dealer
if you have any questions about proper installation. A tie
down kit from the manufacturer and illustrated in the
parts listing of this manual is available for wagon applications.
Hydraulic input to the 9100 forage box requires 35GPM
@ 3000 PSI. If truck mounted, install a relief valve set at
3000 PSI. Engine RPM should be 1500 RPM. Set up hydraulic system on truck mounted units with a 40 gallon
reservoir minimum. Call factory for further information.
Depending on make and model of truck, it may be neces
sary to install a light converter. (Meyer part #56-0028).
Converter allows signallights and brake lightsto operate
according to DOT lighting.
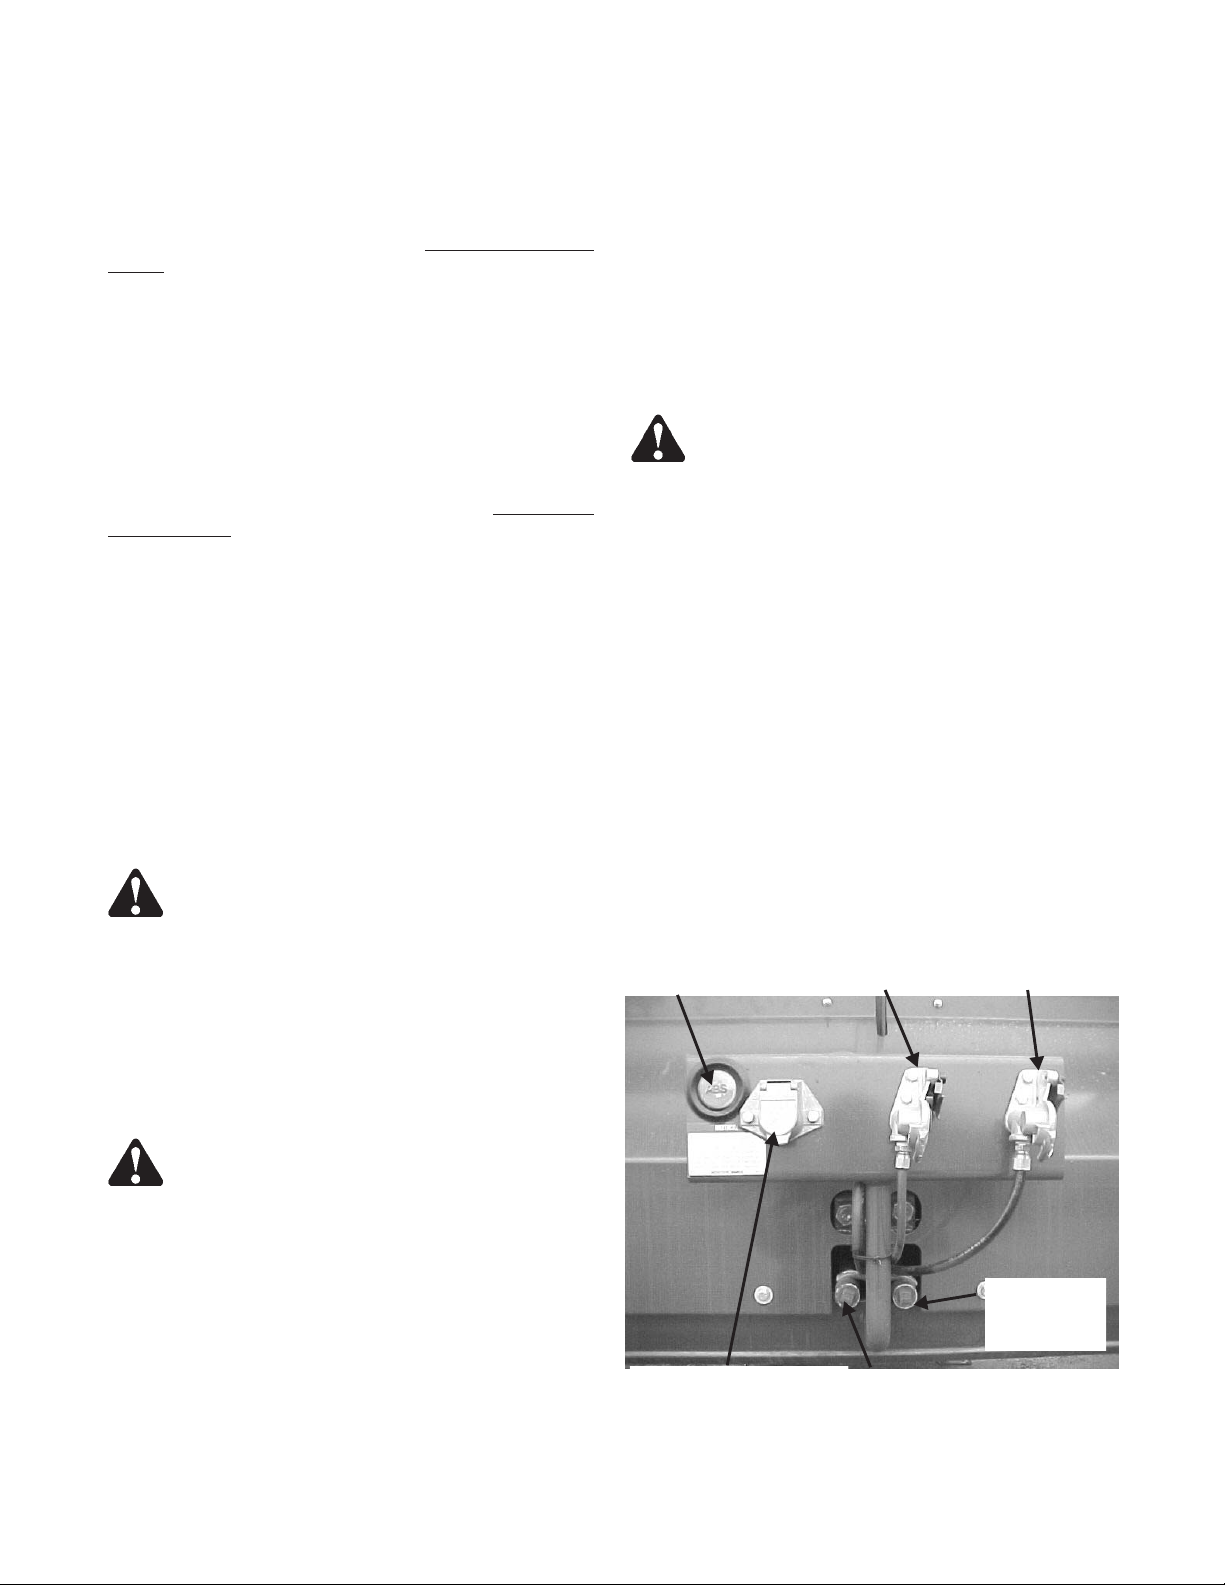
AIR BRAKE HOOKUP
Connect the control line (blue) from your truck air supply to
the blue gladhand on the trailer. Connect the tank supply
line (red) to the red gladhand on the trailer. See figure 1.
-
-
WARNING: IF THE ABS INDICATOR LAMP CO
MES ON AND STAYS ON WHEN YOU APPLY
BRAKES TO A MOVING TRAILER, THE TRAILER
ABS IS NOT WORKING PROPERLY. THE ABS MUST
BE SERVICED AS SOON AS POSSIBLE UPON COM
PLETION OF YOUR TRIP TO ENSURE FULL
ANIT-LOCK BRAKING CAPABILITY
HYDRAULIC HOOKUP
Connect hydraulic lines from the hydraulic power supply
to the pressure and returnlines as illutrated on figure 1.
START UP AND STOPPING
Operation of the forage box with truck begins when the
PTO is engaged to run the hydraulic pump.
-
-
-
WARNING: INSPECT REGULARLY THAT ALL
CONNECTIONS AND BOLTS ARE TIGHT AND SE
CURE BEFORE OPERATING. FAILURE TO HEED MAY
RESULT IN SERIOUS PERSONALINJURY OR DEATH.
Inspect the forage box for proper adjustments as this will
ensure maximum machine performance. See “Adjust
ments” section. Grease and oil the forage box as re
quired. See “Lubrication” section.
WARNING: DO NOT OPERATE UNTIL ALL
SHIELDS AND GUARDS ARE IN PLACE AND SE
CURELY FASTENED. FAILURE TO HEED MAY RE
SULT IN SERIOUS PERSONAL INJURY OR DEATH.
LIGHT HOOKUP
A 7 pin electrical socket is provided to plug the electrical
control plug from your truck or tractor. See figure 1
This will operate signal, tail,clearance and brake lights.
Operation for tractor pulled forage boxes begins when
the tractor hydraulic system is engaged.
-
ABS INDICATOR
LAMP
-
-
-
-
7 PIN ELECTRICAL SOCKET
FIGURE 1. ELECTRICAL LIGHT AND AIR BRAKE
BLUE GLADHAND
HYDRAULIC RETURN LINE
HOOKUP
RED GLADHAND
HYDRAULIC
PRESSURE
LINE
9100 Rear Unload --7--

TRANSPORTING
WARNING: (TRACTOR POWERED) INSTALL
A SMV EMBLEM ON REAR OF FORAGE BOX FOR
TRANSPORTING ON ROADWAYS. KEEP THIS EM
BLEM CLEAN AND BRIGHT. FAILURE TO HEED
MAY RESULT IN SERIOUS PERSONAL INJURY OR
DEATH.
Be sure and observe that the rear discharge door is
latched closed before traveling on roadways.
If you will travel on public roads you must know all rules
governing such operation. This will include lighting and
brake requirements in addition to traffic rules. You may
also be required to install a safety chain device on the
running gear.
TRACTOR TOWING SIZE
REQUIREMENTS
Use the following chart for calculating the minimum tractor weight.
MODEL FORAGE BOX EMPTY
WEIGHT + LOAD = GW
9122 6,300 + _____ = _____ 2/3 of box
9124 6,600 + _____ = _____ 2/3 of box
MINIMUM
TRACTOR
WEIGHT UP
TO 20 MPH
gross weight
gross weight
WARNING: MAKE CERTAIN EVERYONE IS
CLEAR OF EQUIPMENT BEFORE APPLYING
POWER. FAILURE TO HEED MAY RESULT IN SERI
OUS PERSONAL INJURY OR DEATH.
WARNING: (TRACTOR POWERED) DO NOT
TOW
AT SPEEDS IN EXCESS OF 20 MPH. FAILURE
TO HEED MAY RESULT IN SERIOUS PERSONAL IN
JURY OR DEATH.
WARNING: YOU MUST OBSERVE ALL AP
PLICABLE TRAFFIC LAWS WHEN TRANSPORTING
ON PUBLIC ROADWAYS. CHECK LOCAL LAWS
FOR ALL HIGHWAY LIGHTING AND MARKING RE
QUIREMENTS. FAILURE TO HEED MAY RESULT IN
SERIOUS PERSONAL INJURY OR DEATH.
Operating speed is dictated by the terrain over which you
are traveling. Always use caution. Avoid traveling on
slopes or hills that are unsafe.
CAUTION: FOR TRACTOR TOWED USE
FLASHING WARNING LIGHTS WHEN TRANSPORTING ON ALL PUBLIC ROADWAYS, EXCEPT
WHEN PROHIBITED BY LAW.CHECK FOR TRAFFIC
CONSTANTLY. BE SURE YOU CAN SEE THAT NO
ONE IS ATTEMPTING TO PASS YOU AND THAT ALL
TRAFFIC IS SUFFICIENTLY CLEAR FROM YOU BEFORE MAKING ANY TURNS.
-
-
-
-
MATERIAL ESTIMATED WEIGHT
PER CUBIC FOOT
MATERIAL LBS / CU. FT.
SOYBEANS 47 LBS.
COTTON SEED DRY 20 LBS.
CORN (SHELLED) 45 LBS.
CORN SILAGE 30 LBS.
HAYLAGE 20 LBS.
SAWDUST 17 LBS.
SOURCE: ASAE
NOTE: HEAPED LOADS HAVE SIGNIFICANTLY
HIGHER CAPACITIES
--8-- 8100 Rear Unload
REAR UNLOAD OPERATION
Whenever adjusting, cleaning, lubricating or otherwise
servicing this forage box, you must shutoff and lockout
power to the box. Because this box can be truck
mounted or powered by a tractor, methods vary. On
truck mounted units, the connection between the PTO
and box is permanently installed and not intended to be
disconnected. On trucks, disengage the PTO drive, turn
off the engine, set the parking brake, remove the ignition
keys and keep them in your possession to prevent any
one else from accidentally applying power to the box un
expectedly. For tractors, disengage the hydraulics, turn
off the engine and set the brakes.
Throughout this manual, when directed to shutoff and
lockout power, be familiar with the previously described
procedures for the type of machine you are operating.
WARNING: MAKE CERTAIN EVERYONE IS
WELL CLEAR OF EQUIPMENT BEFORE APPLYING
POWER. FAILURE TO HEED MAY RESULT IN SERIOUS PERSONAL INJURY OR DEATH.
Tractor Pulled:
Always park the forage box and unloading tractor in a
straight line. Shift the unloading tractor to “Neutral” or
“Park”. Set the brakes and turn power off.
Make sure all persons are well clear of the forage box
and the unloading area.
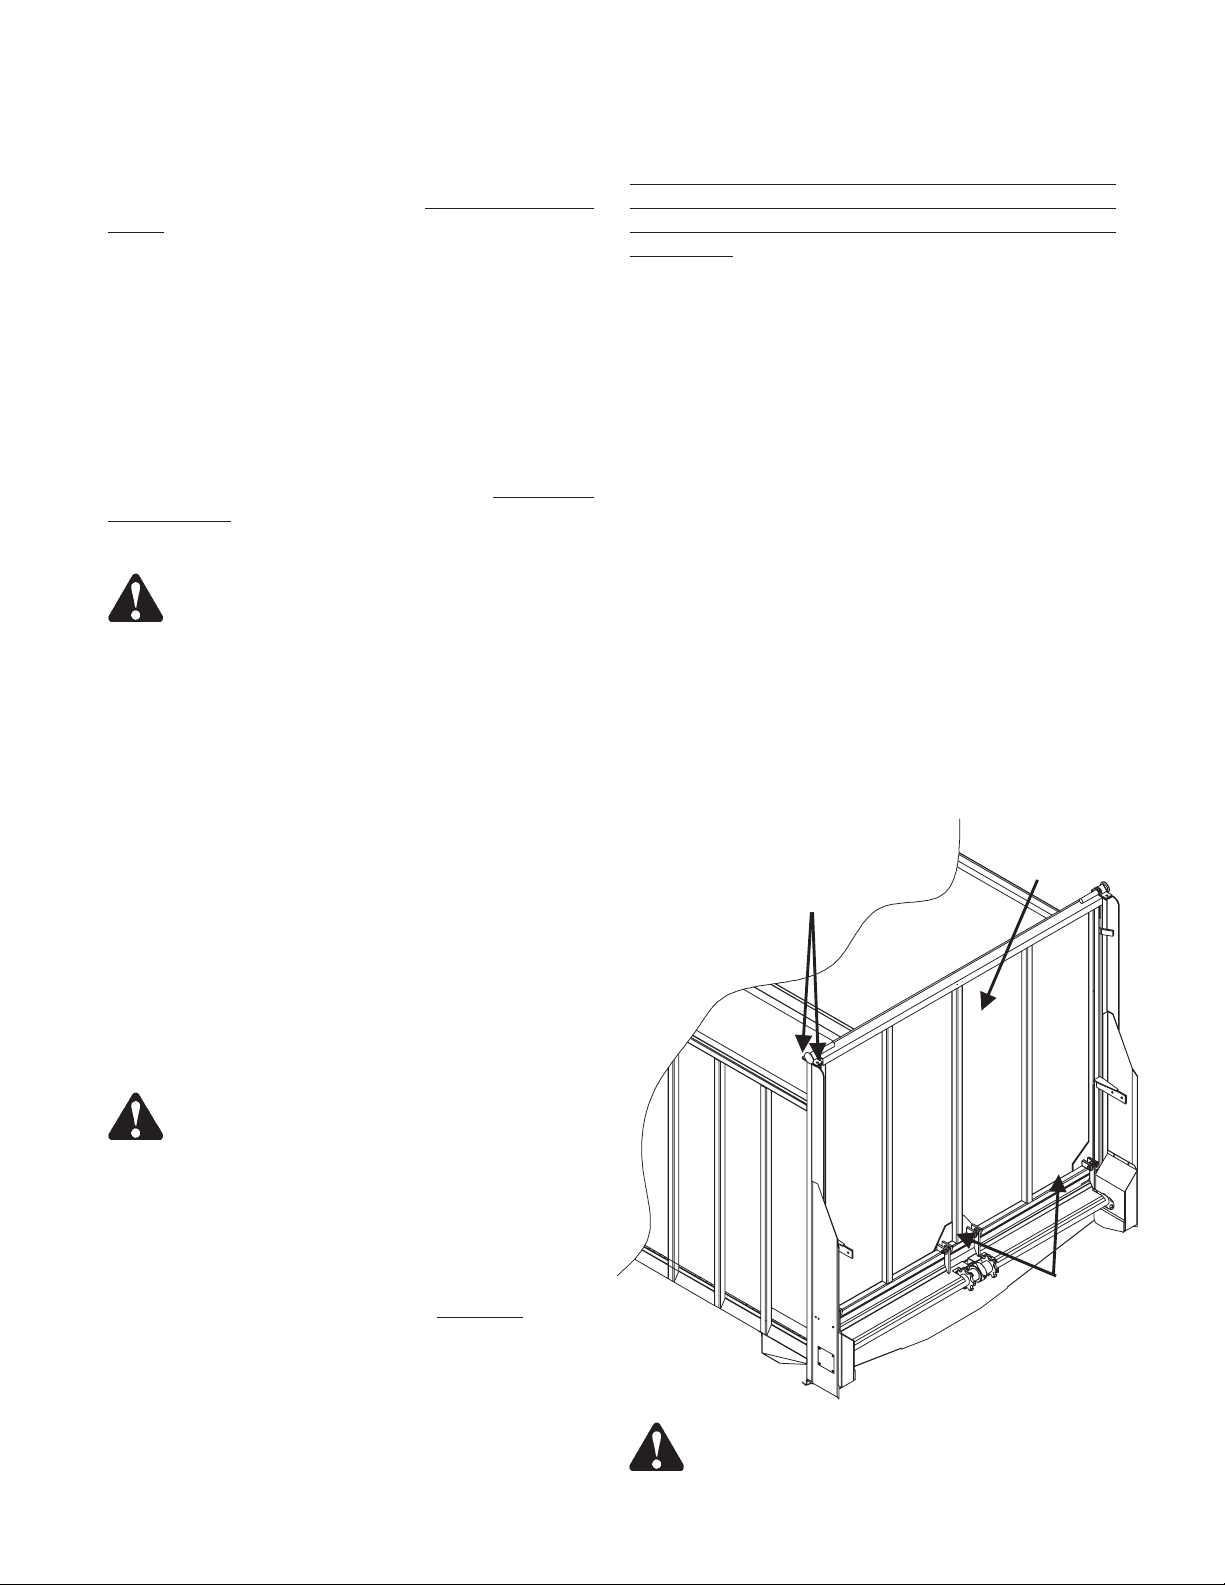
The rear discharge door opens automatically by releas
ing its latches as the main aprons begin to move. The
rear discharge door can spring open with extreme force
when its latches release. See figure 1. Pressure of for
age against the rear door causes it to spring open very
quickly.
Unloading is best observed from the operator’s seat.
Keep moving the forage box forward to prevent silage
from being carried underneath into the main apron chain
return area.
The front of the box has a plexiglass window for conve
nient observation.
-
-
REAR
DISCHARGE
DOOR
HINGE BOLTS
-
-
-
WARNING: THE REAR DISCHARGE DOOR
CAN SPRING OPEN QUICKLY AND WITH EXTREME
FORCE. KEEP ALL PERSONS WELL CLEAR OF THE
FORAGE BOX AND UNLOADING AREA. FAILURE
TO HEED MAY RESULT IN SERIOUS PERSONAL IN
-
JURY OR DEATH.
From the operator’s seat, restart, and SLOWLY
engage
the apron chains to open the rear door. Once the door
opens, regulate the discharge flow with the engine
speed. Do not operate above rated engine speed.
9100 Rear Unload --9--
REAR DOOR
LATCHES
FIGURE 2. REAR OPENING DISCHARGE DOOR
CAUTION - QUICK RELEASE
WARNING: DO NOT STEP UP ON ANY PART OF THE FORAGE BOX AT ANY TIME. FAILURE TO HEED
MAY RESULT IN SERIOUS PERSONAL INJURY OR DEATH.
The unloading process described is to be performed by the operator alone. This will eliminate unexpected “start-ups”
and minimize other hazards that could result by more than one person in control. If the forage box should become
clogged, shut off all power to the forage box and wait for all motion to stop. Shut off and lockout power
. Then clean out
the machine.
When finished unloading reduce engine speed to idle and disengage the truck PTO drive or thetractor hydraulics. Pull
the rear unload box straight ahead to pull the door away from the unloaded pile of forage. When free, gravity will allow
the door to swing shut and the door latches will engage the apron chain links to secure it shut. Observe that this hap
pens properly.
-
WARNING: SHUT OFF AND LOCK OUT POWER
BEFORE CLEANING, ADJUSTING, LUBRICATING OR
SERVICING THIS MACHINE. FAILURE TOHEED MAY RESULT IN SERIOUS PERSONAL INJURYOR DEATH.
Allow box to completely clean out the last load of forage. It is recommended to lube the rear unload box before storage
to exclude moisture from bearings. Apply oil to roller chain drives with gravity oil luber and to the apron chains with a
brush. This is also a good time to inspect all adjustments and check for parts that need repair or replacement. Per
forming these tasks now will guarantee that the box is ready for use at the beginning of the next season.
Never use “live” power to aid in the clean-out of a clogged machine. If any mechanism fails, move the forage box to a
safe work area and then repair the mechanism before proceeding with unloading of the forage. If repairs require removal of forage from inside the forage box, remove the rear discharge door (bolted hinges on top of each side) and
empty the forage manually by hand through the rear opening.
DANGER: NEVER ENTER THE FORAGE BOX FOR ANY REASON WITHOUT FIRST SHUTTING OFF
AND LOCKING OUT POWER. FAILURETO HEED MAY RESULT IN SERIOUS PERSONALINJURY OR DEATH.
Never enter the forage box for any reason if there is any possibility of power being applied to the unit.
-
--10-- 9100 Rear Unload
BOTH SIDES
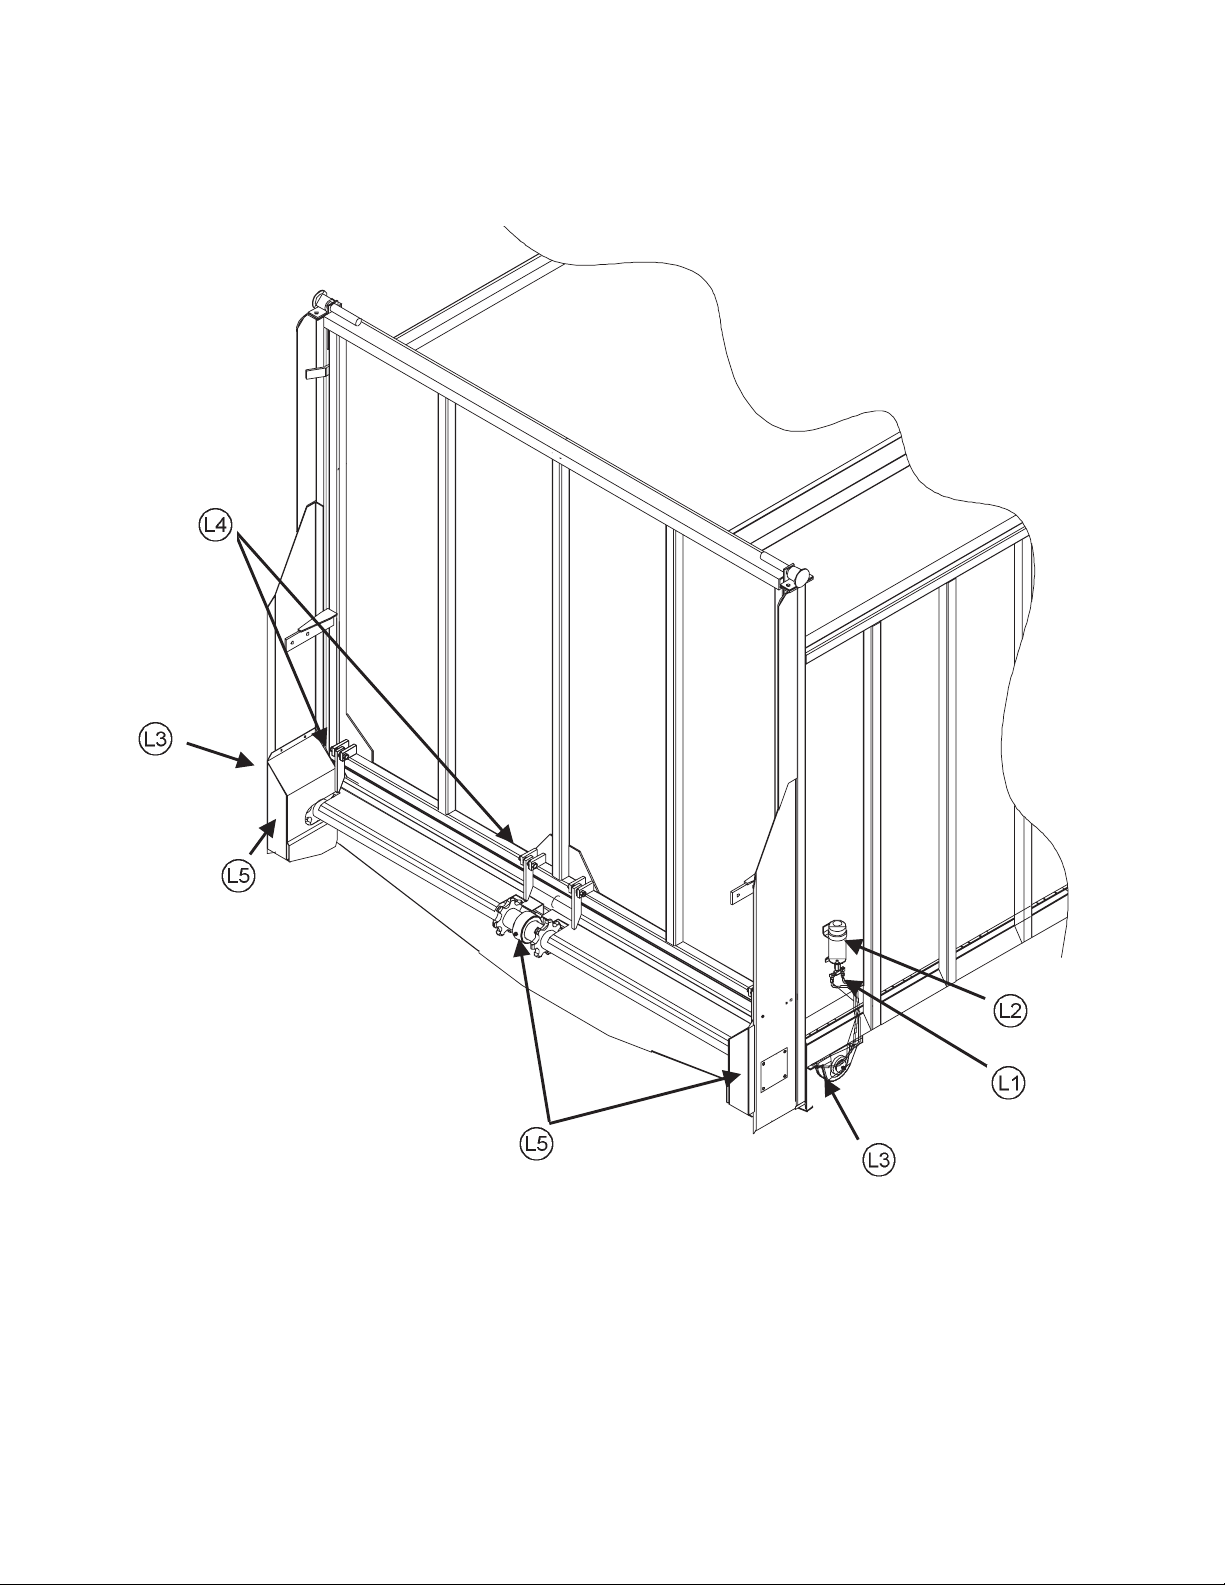
LUBRICATION DIAGRAM
9100 Rear Unload --11--
LUBRICATION
WARNING: SHUT OFF AND LOCK OUT
POWER BEFORE CLEANING, ADJUSTING, LUBRI
CATING OR SERVICING THIS MACHINE. FAILURE
TO HEED MAY RESULT IN SERIOUS PERSONAL IN
JURY OR DEATH.
DAILY LUBRICATION
(every 8-10 loads)
Oil (3) roller chains on apron drive. This is done by
opening the ball valve on the gravity oiler while
unloading, once per day.
WARNING: DO NOT STAND BEHIND UNIT
WHILE PERFORMING THIS OPERATION.
Refill the gravity oiler atthe beginning of each day.
Grease three jackshaft bearings on the rear
driveshaft (each end, one @ center).
-
-
Oil (4) rear gate latch pivot bolts.
Grease (3) main apron shaft bearings.
END OF CROP CLEANUP AND
MAINTENANCE
Allow box to completely clean out last load of forage.
Clean out all forage material from inside the box and on
the outside of the box.
It is recommended to lube the forage box before storage
to exclude moisture from bearings. Apply oil to roller
chain drives with the gravity oil luber and to the main
apron chains with a brush.
It is also a goodtime to inspect all adjustments andcheck
for parts that need repair or replacement. Performing
these tasks now will guarantee that the forage box is
ready for use at the beginning of the next season.
--12-- 8100 Rear Unload

ADJUSTMENTS
WARNING: SHUT OFF AND LOCK OUT POWER BEFORE CLEANING, ADJUSTING, LUBRICATING OR
SERVICING THIS MACHINE. FAILURE TOHEED MAY RESULT IN SERIOUS PERSONAL INJURYOR DEATH.
Correct tension on the apron chains is when the apron chain slat is 1/8” to 1/4” off the return slides (three feet
from the front of the box). To tighten chains, tighten the adjuster bolts at each end of the front sprocket shafts. Each
apron chain has its own sprocket shaft. Tighten the adjuster bolts at each end of the shaft equally.
The roller chain drives are tensioned by automatic spring loaded tension blocks. Periodically tighteners will need to be
adjusted to maintain proper springtension. Springs should be compressed to obtain approximately 5” overalllength.
BOTH SIDES
Front Shields Removed To Illustrate Service Components.
Do Not Remove This Shield To Perform The Service.
ADJUSTMENT DIAGRAM
9100 Rear Unload --13--
 Loading...