

Page 1

MECABLITZ 34 CS-2 digital
Bedienungsanleitung
Mode d’emploi
Handleiding
Operating instructions
Norme per l’uso
Instrucciones del manejo
TV. VIDEO. AUDIO. MECABLITZ
Page 2

2
1. Sicherheitshinweise . . . . . . . . . . . . . . . . . . . . .6
2. Vorbereiten . . . . . . . . . . . . . . . . . . . . . . . . . . . .8
2.1 Stromversorgung . . . . . . . . . . . . . . . . . . . . . . . .8
2.2 Einlegen und Auswechseln der Batterien . . . . . .8
2.3 Montieren / Abnehmen des mecablitz . . . . . . . . .8
2.4 Synchronisation . . . . . . . . . . . . . . . . . . . . . . . . .10
2.5 Ein- und Ausschalten des mecablitz . . . . . . . . . .10
Automatische Geräteabschaltung . . . . . . . . . . . .10
2.6 Wahl der Betriebsart . . . . . . . . . . . . . . . . . . . . . .10
2.7 SLAVE-Funktionsschalter . . . . . . . . . . . . . . . . . .12
3. Automatik-Blitzbetrieb . . . . . . . . . . . . . . . . . . .14
4. Manueller Blitzbetrieb . . . . . . . . . . . . . . . . . . .16
5. Aufhellblitzen bei Tageslicht . . . . . . . . . . . . . .18
5.1 Aufhellblitzen im Automatik-Betrieb . . . . . . . . . .18
6. Blitz-Belichtungskorrektur . . . . . . . . . . . . . . .20
6.1 Blitz-Belichtungskorrektur im A-Blitzbetrieb . . . .20
7. Die Belichtungskontrollanzeige . . . . . . . . . . . .20
8. Ausleuchtung und Vorsatzscheibe . . . . . . . . .22
8.1 Demontage/Montageder Vorsatzscheiben . . . . . .22
9. Drahtloser SLAVE-Betrieb . . . . . . . . . . . . . . . .24
1. mecalux-SLAVE-Funktion . . . . . . . . . . . . . . . .26
2. mecalux-SLAVE-Funktion mit
Messvorblitzunterdrückung . . . . . . . . . . . . . . .28
3. SLAVE-Funktion im drahtlosen
Metz-Remote-System . . . . . . . . . . . . . . . . . . .28
Drahtloser Controller-Blitzbetrieb . . . . . . . . . . . .32
10. Fehler und Abhilfe, Kundendienst . . . . . . . . . .34
11. Technische Daten . . . . . . . . . . . . . . . . . . . . . . .38
Page 3

3
1. Consignes de sécurité . . . . . . . . . . . . . . . . . . .7
2. Préparatifs . . . . . . . . . . . . . . . . . . . . . . . . . . . .9
2.1 Alimentation en courant . . . . . . . . . . . . . . . . . . .9
2.2 Mise en place et remplacement des piles . . . . . .9
2.3 Fixation/démontage du flash . . . . . . . . . . . . . . . .9
2.4 Synchronisation . . . . . . . . . . . . . . . . . . . . . . . . .11
2.5 Mise en marche et coupure du mecablitz . . . . . .11
Coupure automatique du flash . . . . . . . . . . . . . .11
2.6 Sélection du mode au moyen du
sélecteur de mode . . . . . . . . . . . . . . . . . . . . . . .11
2.7 Sélecteur de fonction „SLAVE“ . . . . . . . . . . . . . .13
3. Mode automatique . . . . . . . . . . . . . . . . . . . . . .15
4. Mode manuel du flash . . . . . . . . . . . . . . . . . . .17
5. Fill-in au flash . . . . . . . . . . . . . . . . . . . . . . . . . .19
5.1 Fill-in au flash en mode automatique non TTL . . .19
6. Correction d’exposition . . . . . . . . . . . . . . . . . .21
6.1 Correction d’exposition en mode automatique . .21
7. L’allumage du témoin . . . . . . . . . . . . . . . . . . . .21
8. Couverture et complément . . . . . . . . . . . . . . . .23
8.1 Démontage ou montage du diffuseur
grand-angle/ complément télé . . . . . . . . . . . . . .23
9.
Fonctionnement en mode esclave sans cordon
.25
1. Fonction esclave mecalux . . . . . . . . . . . . . . . .27
2. Fonction esclave mecalux avec inhibition
du pré-éclair de mesure . . . . . . . . . . . . . . . . .29
3. Fonction esclave en mode multiflash
sans cordon Metz Remote . . . . . . . . . . . . . . . .29
Fonctionnement en mode maître sans cordon . .33
10. Erreurs de fonctionnement et
solutions, SAV . . . . . . . . . . . . . . . . . . . . . . . . . .35
11. Caractéristiques techniques . . . . . . . . . . . . . .39
1. Voor uw veiligheid . . . . . . . . . . . . . . . . . . . . . . 7
2. Voorbereiden . . . . . . . . . . . . . . . . . . . . . . . . . . 9
2.1 Voeding . . . . . . . . . . . . . . . . . . . . . . . . . . . . . . . 9
2.2 Inleggen en vervangen van de batterijen . . . . . . 9
2.3 Opzetten en afnemen van de mecablitz . . . . . . . 9
2.4 Synchronisatie . . . . . . . . . . . . . . . . . . . . . . . . . . 11
2.5 In- en uitschakelen van de mecablitz. . . . . . . . . 11
Automatisch uitschakelen. . . . . . . . . . . . . . . . . . 11
2.6 Keuze van de flitsfunctie
met de keuzeschakelaar . . . . . . . . . . . . . . . . . . 11
2.7 SLAVE functieschakelaar . . . . . . . . . . . . . . . . . . 13
3. Automatisch flitsen . . . . . . . . . . . . . . . . . . . . . 15
4. Flitsen met handinstelling . . . . . . . . . . . . . . . . 17
5. Invulflitsen bij daglicht . . . . . . . . . . . . . . . . . . 19
5.1 Invulflitsen bij automatisch flitsen. . . . . . . . . . . . 19
6. Corrigeren van de flitsbelichting . . . . . . . . . . . 21
6.1 Belichtingscorrectie bij automatisch flitsen. . . . . 21
7. Aanduiding van de flitscontrole. . . . . . . . . . . . 21
8. Verlichtingshoek en voorzetvenster . . . . . . . . 23
8.1 Opzetten, c.q. afnemen van de voorzetvensters . 23
9. Draadloos SLAVE-flitsen . . . . . . . . . . . . . . . . . 25
1. mecalux SLAVE-functie: . . . . . . . . . . . . . . . . . 27
2. mecalux SLAVE-functie met onderdrukken
van de meethulpflits . . . . . . . . . . . . . . . . . . . . 29
3. SLAVE-functie in het draadloos
Metz-Remote-systeem . . . . . . . . . . . . . . . . . . 29
Draadloze Controllerflitsfunctie. . . . . . . . . . . . . . 33
10. Fouten, remedie, service . . . . . . . . . . . . . . . . . 35
11. Technische gegevens . . . . . . . . . . . . . . . . . . . . 39
Page 4

4
Vorwort
Avant-propos
Voorwoord
Sehr geehrter Kunde!
Wir freuen uns, dass Sie sich für unseren mecablitz
34 CS–2 digital entschieden haben.
Um Ihnen den Umgang mit dem mecablitz zu erleichtern,
geben wir Ihnen auf den folgenden Seiten eine Anleitung
zur Bedienung des Blitzgerätes, sowie einen kurzen
Überblick über die verschiedenen Einsatzmöglichkeiten.
Lesen Sie bitte diese Bedienungsanleitung genau durch,
auch wenn Ihnen manches auf den ersten Blick nicht so
interessant erscheint. Wir haben zwar bei der Konstruktion
Wert darauf gelegt, die Handhabung des mecablitz möglichst einfach zu gestalten, aber die Kameras auf denen
das Blitzgerät zum Einsatz kommt, bieten doch recht vielfältige Möglichkeiten.
Schlagen Sie bitte auch die Bildseite am Ende der
Bedienungsanleitung auf.
Wir wünschen Ihnen viel Freude mit dem neuen Metz Blitzgerät.
Page 5

5
Cher client,
Nous nous réjouissons que vous ayez opté pour l’achat de
notre mecablitz 34 CS-2 digital.
Afin de vous faciliter l’utilisation du mecablitz, nous vous
proposons aux pages suivantes un mode d’emploi du flash
ainsi qu’un bref aperçu des diverses possibilités d’utilisation.
Veuillez lire attentivement ce mode d’emploi, même si certains passages ne vous paraissent pas très intéressants à
première vue. Lors de la construction du flash, nous avons
certes accordé une grande importance à la facilité d’emploi mais les appareils sur lesquels on l’utilise présentent,
eux aussi, de multiples possibilités.
Tenez également compte des fig. qui se trouvent à la
fin de ce mode d’emploi!
Nous vous souhaitons beaucoup de plaisir avec votre nouveau flash Metz.
Geachte klant!
Wij zijn blij, dat u onze mecablitz 34 CS-2 digital hebt
gekozen.
Om u het gebruiken van deze mecablitz te vergemakkelijken, geven we u op de volgende bladzijden aanwijzingen
voor de omgang met de flitser alsmede een kort overzicht
over de verschillende mogelijkheden die deze flitser u
biedt.
Lees s.v.p. de gebruiksaanwijzing zorgvuldig door, ook al
lijken sommige dingen op het eerste gezicht wellicht minder interessant. We mogen er bij de fabricage dan wel speciaal op hebben gelet de bediening van de flitser zo eenvoudig mogelijk te houden, de camera’s waarmee de flitser
samen moet werken bieden zoveel mogelijkheden.
Sla vooral ook de fotopagina achter in de gebruiksaanwijzing open.
Wij wensen u veel plezier met de nieuwe Metz mecablitz.
Page 6

6
Sicherheitshinweise
Consignes de sécurité
Voor uw veiligheid
1. Sicherheitshinweise
• Das Blitzgerät ist ausschließlich zur Verwendung im fotografischen Bereich vorgesehen und zugelassen.
• Nicht aus sehr kurzer Entfernung direkt in die Augen blitzen! Direktes Blitzen in die Augen von Personen und Tieren kann zu Netzhautschädigungen führen und schwere
Sehstörungen verursachen – bis hin zur Blindheit!
• In Umgebung von entflammbaren Gasen oder Flüssigkeiten (Benzin, Lösungsmittel etc.) darf das Blitzgerät keinesfalls ausgelöst werden. EXPLOSIONSGEFAHR !
• Auto-, Bus-, Fahrrad-, Motorrad-, oder Zugfahrer etc.
niemals während der Fahrt mit einem Blitzgerät fotografieren. Durch die Blendung kann der Fahrer einen Unfall
verursachen !
• Nur die in der Bedienungsanleitung bezeichneten und
zugelassenen Stromquellen verwenden.
• Batterien nicht öffnen oder kurzschließen!
• Batterien keinesfalls hohen Temperaturen wie intensiver
Sonneneinstrahlung, Feuer oder dergleichen aussetzen!
• Verbrauchte Batterien sofort aus dem Gerät entnehmen!
Aus verbrauchten Batterien können Chemikalien austreten (sogenanntes „Auslaufen“) und zur Beschädigung
des Gerätes führen!
• Batterien dürfen nicht geladen werden.
• Das Blitzgerät nicht Tropf- oder Spritzwasser aussetzen!
• Schützen Sie Ihr Blitzgerät vor großer Hitze und hoher
Luftfeuchtigkeit! Bewahren Sie es z.B. nicht im Handschuhfach Ihres Autos auf.
• Nach mehrfachem Blitzen die Vorsatzscheibe nicht
berühren. Verbrennungsgefahr!
• Bei Serienblitzaufnahmen mit voller Lichtleistung und
kurzen Blitzfolgezeiten nach jeweils 20 Blitzen eine Pause von mindestens 3 Minuten einhalten.
• Wenn Sie den Blitz auslösen,darf kein lichtundurchlässiges Material unmittelbar vor- oder direkt auf der Reflektorscheibe (Blitzfenster) sein. Die Reflektorscheibe darf
nicht verschmutzt sein. Es kann sonst wegen des hohen
Energieausstoßes zu Verbrennungen oder Fleckenbildung des Materials bzw. der Reflektorscheibe kommen.
• Blitzgerät nicht zerlegen! HOCHSPANNUNG! Reparaturen
sollten ausschließlich von einem autorisierten Service
ausgeführt werden.
• Anschlußkontakte des Blitzgerätes nicht berühren.
• Wurde das Gehäuse so stark beschädigt, dass Innenteile
freiliegen, darf das Blitzgerät nicht mehr betrieben werden. Batterien entnehmen !
Page 7

7
1. Consignes de sécurité
• L’utilisation du flash est uniquement prévue et autorisée
pour le domaine de la photographie.
• Ne jamais déclencher le flash à proximité des yeux! L’amorçage d’un éclair directement devant les yeux de personnes ou d’animaux peut entraîner une lésion de la rétine et occasionner de graves troubles visuels pouvant
aller jusqu’à l’aveuglement!
• Le flash ne doit en aucun cas être déclenché à proximité
de gaz ou liquides inflammables (essence, dissolvants,
etc.) DANGER D’EXPLOSION!
• Les conducteurs de voiture, bus, bicyclette, moto, train,
etc. ne devront jamais photographier au flash lorsque le
véhicule est en marche. Du fait de l’éblouissement, le
conducteur pourrait causer un accident!
• N’utiliser que les sources de courant décrites dans le
mode d’emploi et autorisées
• Ne jamais ouvrir ou court-circuiter les piles!
• Ne jamais exposer les piles à une très haute température telle qu’un fort rayonnement solaire, un feu ou autre!
• Retirer immédiatement les piles usées de l’appareil! Des
substances chimiques peuvent s’écouler des piles usées
(ce que l’on appelle une «fuite ») et causer des dommages au flash!
• Ne pas recharger les piles.
• Maintenir le flash à l’abri des gouttes d’eau et des éclaboussures!
• Ne pas soumettre le flash à une trop grande chaleur ou à
une trop forte humidité de l’air! Ne pas ranger le flash
dans la boîte à gants de la voiture p. ex.
• En cas d’utilisation répétée du flash, ne pas toucher à la
glace diffusante. Danger de brûlure!
• En cas de séries de photos veiller à faire une pause d’au
moins 3 minutes après 20 éclairs.
• Au moment de déclencher un éclair, il ne doit pas y avoir
de matière opaque directement devant ni sur la glace du
réflecteur (fenêtre du flash) La glace du réflecteur ne doit
pas être souillée. L’énergie de l’éclair peut en effet provoquer des brûlures ou des taches sur la matière opaque
ou sur la glace du réflecteur.
•
Ne pas démonter le flash! HAUTE TENSION! Les réparations ne devront être effectuées que par un agent autorisé.
• Ne pas toucher aux contacts du flash.
• Au cas où le boîtier serait si fortement endommagé que
les éléments intérieurs seraient visibles, ne plus utiliser
le flash. Enlever les piles!
1. Voor uw veiligheid
• De flitser is alleen bedoeld en toegelaten voor gebruik
binnen het fotografische bereik.
• Nooit vanaf korte afstand in iemands ogen flitsen!
Een flits vlak voor de ogen van mens of dier kan tot
beschadiging van het netvlies leiden en zware oogafwijkingen veroorzaken - tot blindheid toe.
• De flitser mag in geen geval worden ontstoken in een
omgeving waarin zich makkelijk ontvlambare gassen of
vloeistoffen (benzine, oplosmiddelen enz.) bevinden.
GEVAAR VOOR EXPLOSIE !
•
Auto- of buschauffeurs, treinbestuurders of motorrijders
nooit tijden het rijden met een flitser fotograferen. Door de
verblinding zou deze een ongeluk kunnen veroorzaken!
• Gebruik alleen de in de gebruiksaanwijzing opgegeven
en toegelaten voedingsbronnen.
• Batterijen, accu’s enz. niet openen of kortsluiten!
• Stel batterijen, accu’s in geen geval bloot aan hoge temperaturen zoals intensieve zonbestraling, vuur o.i.d.!
• Gooi lege batterijen, accu’s enz. niet in vuur!
•
Neem lege batterijen onmiddellijk uit het apparaat! Uit
„lege“ batterijen kunnen chemicali%n lekken (het zogenaamde „uitlopen“) die het apparaat kunnen beschadigen!
• Batterijen alleen verwisselen als het apparaat is uitgeschakeld!
• Batterijen mogen niet worden opgeladen!
•
Stel flitser en oplaadapparaat niet bloot aan drup- of spatwater!
• Bescherm uw flitser tegen grote hitte en hoge luchtvochtigheid! Laat de flitser niet in het handschoenkastje van
de auto liggen!
• Na meerdere flitsen achterelkaar niet aan het lichtvenster komen. Gevaar voor verbranden!
• Wanneer u een flits ontsteekt mag er zich geen ondoorzichtig materiaal direct of vlak bij het lichtvenster bevinden. Het
lichtvenster mag niet vuil zijn. Als u hier niet op let, kan dat
materiaal of het lichtvenster zelf door de hoge energie van
het flitslicht in brand raken of brandvlekken oplopen.
•
Bij flitsseries met vol vermogen wordt het lichtvenster door de
hoge lichtenergie sterk verhit. De mecablitz is tegen oververhitting beschermd doordat hij de oplaadtijden dan verlengt.
• Voer geen elektrische,mechanische of wat voor veranderingen ook, uit.
• Gebruik alleen originele METZ accessoires.
• Haal de flitser niet uit elkaar! HOOGSPANNING! Binnen in
het apparaat bevinden zich geen onderdelen die door
leken kunnen worden gerepareerd.
• Raak de aansluitcontacten van de flitser niet aan.
• Als de flitser eens zo beschadigd zou raken, dat zijn
„ingewanden“ zichtbaar zijn, mag de flitser niet meer
worden gebruikt. Neem de batterijen er uit!
Page 8
8
Vorbereiten
Préparatifs
Voorbereiden
Batterie-Entsorgung
Deutschland: Als Verbraucher sind Sie gesetzlich
verpflichtet, gebrauchte Batterien zurückzugeben.
Diese Zeichen finden Sie auf schadstoffhaltigen
Batterien:
Pb = Batterie enthält Blei
Cd = Batterie enthält Cadmium
Hg = Batterie enthält Quecksilber
Li = Batterie enthält Lithium
2. Vorbereiten
2.1 Stromversorgung
Das Blitzgerät wird mit 2 Lithium Batterien Typ CR2 betrieben werden. Dieser Batterietyp ist viele Jahre fast ohne
Energieverlust lagerfähig und somit für gelegentlichen
Amateurblitzbetrieb sehr geeignet.
Die Batterien sind leer bzw. verbraucht, wenn die Blitzfolgezeit bei Vollblitzen über 60 Sek. ansteigt. Wenn Sie den
mecablitz längere Zeit nicht benutzen, entfernen Sie bitte
die Batterien aus dem Gerät.
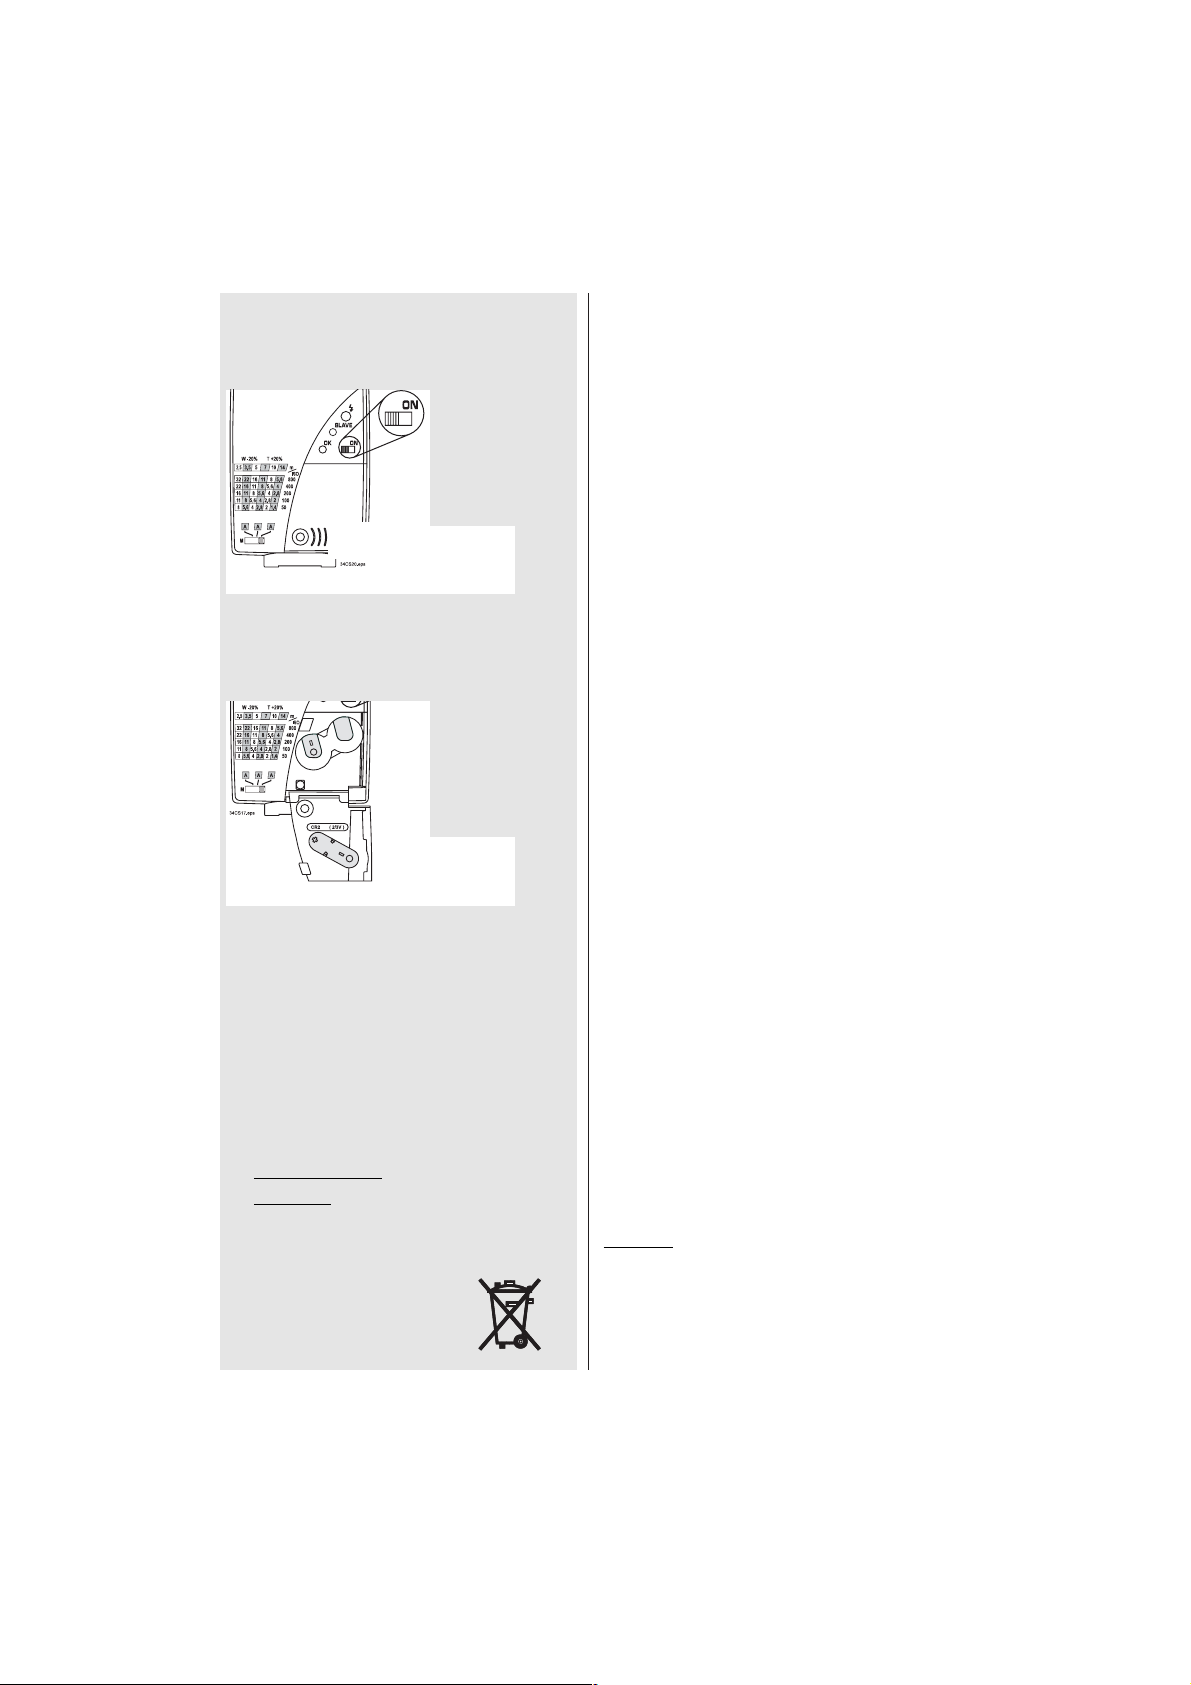
2.2 Einlegen und Auswechseln der Batterien
• Schalten Sie das Blitzgerät mit dem Hauptschalter
aus.
• Drücken Sie den Entriegelungsknopf
(Bild 1), schieben den Batteriefachdeckel nach rechts und klappen
diesen auf (Bild 2).
• Setzen Sie die Batterien entsprechend den angegebenen
Batteriesymbolen ein.
Die beiliegenden Lithium-Batterien sind Verbrauchsmaterialien und unterliegen nicht unseren Garantiebestimmungen.
Nach dem Einlegen der Batterien den Batteriefachdeckel
zuklappen und nach links verschieben, bis Entriegelungsknopf hörbar einrastet.
Achten Sie beim Einsetzen der Batterien darauf, dass + Pol und - Pol wie auf den Symbolen
angezeigt liegen. Vertauschte Pole können zur
Zerstörung des Gerätes führen! Ersetzen Sie
immer beide Batterien durch gleiche Batterien
desselben Herstellertyps mit gleicher
Kapazität !
Verbrauchte Batterien gehören nicht in den
Hausmüll! Geben Sie verbrauchte Batterien bei
den entsprechenden Sammelstellen ab.
2.3 Montieren/ Abnehmen des mecablitz
V
erschiedene Sony-Kameras haben einen
Zubehörschuh, der nicht der DIN-Norm entspricht. Bei Verwendung eines „34 CS-2 digital“
empfehlen wir ausschliesslich die Verwendung
der mitgelieferten Kameraschiene.
Montieren:
• mecablitz mit dem Haupschalter ausschalten.
• Klemmscheibe
gegen das Gehäuse ganz nach oben
drehen.
☞
☞
☛
➭
Bild 1
Fig. 1
Afb. 1
Bild 2
Fig. 2
Afb. 2
Page 9

9
2. Préparatifs
2.1 Alimentation en courant
Le flash ne peut fonctionner qu’avec 2 piles au lithium type
CR2. Ce type de piles peut être stocké pendant des années
sans perte de capacité, ce qui est idéal pour l’utilisation
sporadique du flash.
Les piles sont vides ou usées lorsque le temps de recyclage à pleine puissance dépasse 60 sec. Si vous n’utilisez
pas le mecablitz pendant un certain temps, enlevez les
piles du flash.
2.2 Mise en place et remplacement des piles
• Couper le flash avec l’interrupteur général .
• Presser le bouton de déverrouillage (fig. 1). Repous-
ser le couvercle du compartiment des piles vers la droite
et l’ouvrir en le soulevant (fig. 2).
• Introduire les piles en veillant à respecter les symboles.
Les piles au lithium jointes au flash sont des matériels que
nous utilisons seulement mais ne fabriquons pas et ne
sont pas soumises à nos clauses de garantie.
Après la mise en place des piles, refermer le couvercle du
compartiment des piles et le repousser vers la gauche jusqu’à ce le bouton de déverrouillage produise un déclic.
Lors de la mise en place des piles, veillez à respecter les symboles + et -. L’inversion des pôles peut
causer au flashˇdes dommages irréparables ! Remplacez toujours les deux piles par deux mêmes piles
du même fabricant et de même capacité!
Ne jetez pas les piles usées à la poubelle!
Apportez les piles usées à un point de collecte.
2.3 Fixation/démontage du flash
Différents appareils Sony sont munis d’une
griffe porte-accessoires qui ne correspond pas
aux normes DIN. En cas d’utilisation d’un
appareil " 34 CS-2 digital ", nous recommandons d’utiliser exclusivement la barrette comprise dans la livraison.
Fixation:
• Couper le mecablitz avec l’interrupteur général .
• Tourner le disque de serrage
vers le haut jusqu’en
butée contre le boîtier.
• Engager le mecablitz avec son sabot à fond dans la
barrette, dans le support esclave ou dans la griffe porteaccessoires de l’appareil photo.
☞
☞
2. Voorbereiden
2.1 Voeding
De flitser werkt alleen met 2 lithiumbatterijen, type CR2.
Dit type batterij kan vele jaren zonder zelfontlading worden
opgeslagen en is dus voor het amateur-gebruik van af en
toe een paar flitsen, uitstekend geschikt.
De batterijen zijn leeg, c.q. verbruikt, als de tijd tussen
opeenvolgende flitsen langer wordt dan 60 s. Als u de
mecablitz gedurende langere tijd niet denkt te gebruiken,
neem dan s.v.p. de batterijen uit het apparaat.
2.2 Inleggen en vervangen van de batterijen
• Schakel de flitser uit met de hoofdschakelaar .
• Druk op de ontgrendelingsknop
(afb. 1), schuif het
deksel van het batterijvak naar rechts en klap het op
(afb. 2).
• Leg de batterijen overeenkomstig de aangegeven symbolen in.
De meegeleverde lithiumbatterijen zijn verbruiksmateriaal
en vallen niet onder onze garantiebepalingen.
Na het inleggen van de batterijen het deksel van het batterijvak dichtklappen en naar links schuiven tot de ontgrendelingsknop hoorbaar inklikt.
Let er bij het inzetten van de batterijen op, dat de +
en de - polen liggen zoals door de symbolen wordt
aangegeven. Als ze omgekeerd liggen kan de flitser kapot gaan! Vervang altijd beide batterijen
tegelijk door nieuwe van een zelfde type van
dezelfde fabrikant en met een zelfde capaciteit!
Verbruikte batterijen horen niet bij het huisvuil!
Lever ze in op het adres waar u nieuwe koopt.
2.3 Opzetten en afnemen van de mecablitz
Sommige Sony camera’s hebben een accessoireschoen die niet met de DIN-norm overeenkomt. Bij gebruik van een "34 CS-2 digital"
bevelen wij aan, uitsluitend de meegeleverde
camerabeugel toe te passen.
Opzetten:
• Schakel de mecablitz uit met de hoofdschakelaar
• draai de klemschijf van de flitser geheel naar boven
tegen het flitserhuis;
• Schuif de mecablitz met de aansluitvoet tot de aanslag in de flitsbeugel, in de SLAVE-standaardvoet of in de
flitsschoen van de camera.
• Draai nu de klemschijf geheel tegen de flitsbeugel, de
slave-standaardvoet of het camerahuis zodat de flitser
vastgeklemd wordt.
☞
☞
Page 10
10
Vorbereiten
Préparatifs
Voorbereiden
• Schieben Sie den mecablitz mit dem Anschlußfuß bis
zum Anschlag in die Blitzschiene, den Slave-Standfuß
oder in den Blitzschuh der Kamera.
• Klemmscheibe
gegen die Blitzschiene, den SlaveStandfuß oder das Gehäuse der Kamera ganz nach unten
drehen damit das Blitzgerät festklemmt.
Abnehmen:
• vor dem Abnehmen das Blitzgerät ausschalten.
• Klemmscheibe
gegen das Gehäuse des Blitzgerätes
ganz nach oben drehen und das Blitzgerät von der
Kamera abziehen.
Ein in die Kamera eingebauter Blitz darf nur
dann zusätzlich verwendet werden, wenn er
vollständig in seine Arbeitsposition ausgeklappt werden kann! Ein nicht vollständig ausgeklapptes Kamerablitzgerät kann u.U. beim
Auslösen der Kamera beschädigt werden.
2.4 Synchronisation
Die Synchronverbindung vom Blitzgerät zur Kamera wird
beim Einschieben des Blitzgerätes in den Zubehörschuh
der Kamera automatisch hergestellt.
Bei Kameras ohne Mittenkontakt kann die Synchronverbindung auch mit einem Synchronkabel (36-50 normal
oder 36-52 Spiral, Sonderzubehör) hergestellt werden.
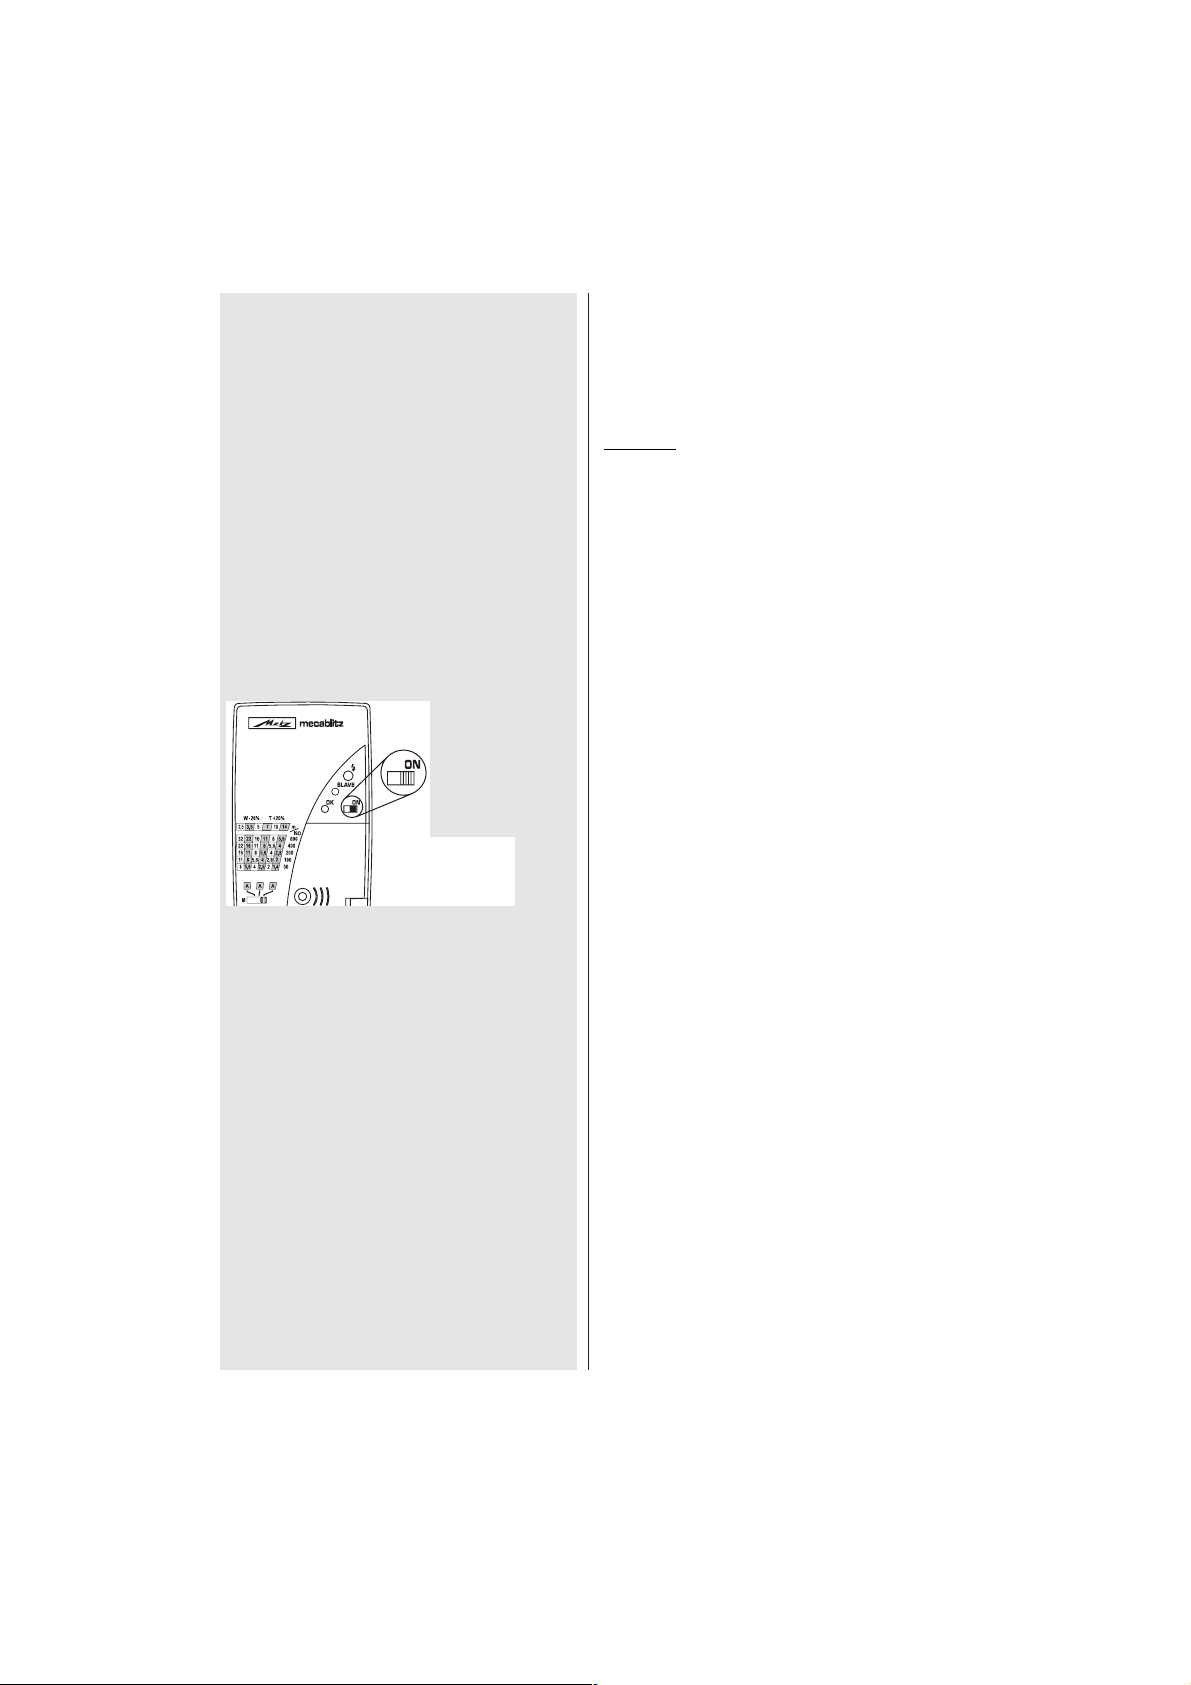
2.5 Ein- und Ausschalten des mecablitz
Zum Einschalten den Hauptschalter in die Position
„ON“ schieben (Bild 3). Wenn die Blitzbereitschaft erreicht
ist, leuchtet die grüne Blitzbereitschaftsanzeige.
Zum Ausschalten den Hauptschalter nach links schieben.
Automatische Geräteabschaltung
Um eine versehentliche Entladung der Batterien zu vermeiden, schaltet das Gerät ca. 8 Minuten -
- nach dem Einschalten,
- nach dem Auslösen eines Blitzes ab,
um Strom zu sparen.
Beachten Sie, dass die automatische Geräteabschaltung auch im SLAVE-Betrieb wirksam ist!
Die grüne Blitzbereitschaftsanzeige
erlischt.
Zum Wiedereinschalten den mecablitz mit dem Hauptschalter
aus- und einschalten.
Wenn Sie den mecablitz nicht betreiben, so
schalten Sie ihn grundsätzlich mit dem Hauptschalter
aus!
☞
☞
☞
Bild 3
Fig. 3
Afb. 3
Page 11

11
• Tourner le disque de serrage pour l’appliquer contre
la barrette, le support esclave ou la griffe porte-accessoires en vue de bloquer le flash.
Démontage:
• Débrancher le flash avant de le démonter.
•
Tourner le disque de serrage vers le haut jusqu’en butée
contre le boîtier et enlever le flash de l’appareil photo.
Pour pouvoir utiliser en supplément un flash
intégré dans l’appareil photo, il faut que ce
flash puisse être entièrement sorti en position
de travail! Un flash intégré qui ne peut pas être
entièrement sorti peut éventuellement être
endommagé au moment du déclenchement de
l’appareil photo.
2.4 Synchronisation
La liaison de synchronisation entre le flash et l’appareil
photo est établie automatiquement lors de la mise en place du flash dans la griffe.
Pour les boîtiers sans contact central, on peut également
l’établir au moyen d’un câble de synchronisation (36-50
normal ou 36-52 spiralé, accessoires en option).
2.5 Mise en marche et coupure du mecablitz
Pour mettre le flash en marche, mettre l’interrupteur
général sur la position «ON » (fig. 3). Lorsque le flash
est prêt à fonctionner,le témoin de recyclage vert s’allume.
Pour couper le mecablitz, repousser l’interrupteur général
vers la gauche sur la position «OFF ».
Coupure automatique du flash
Pour éviter la décharge involontaire des piles, l’appareil
s’éteint au bout d’env. 8 minutes
- après la mise en marche
- après le déclenchement d’un éclairce qui économise du
courant.
Notez que la coupure automatique du flash est
également active dans la fonction ESCLAVE !
Le témoin de recyclage vert du flash s’éteint.
Pour remettre le mecablitz en marche, le brancher et le
débrancher avec l’interrupteur général .
Si vous n’utilisez pas le mecablitz, coupez-le au
moyen de l’interrupteur général !
2.6 Sélection du mode au moyen du sélecteur de
mode
Le sélecteur de mode permet de commuter le mecablitz dans le mode automatique A (3 diaphragmes automa-
☞
☞
☞
Afnemen:
• Vóór het afnemen de flitser uitschakelen.
• d
raai de klemschijf van de flitser geheel naar boven
tegen het flitserhuis en neem de flitser los van de
camera.
Een in de camera ingebouwde flitser mag
alleen worden gebruikt als deze geheel uitgeklapt kan worden! Een niet helemaal uitgeklapte ingebouwde cameraflitser kan onder
bepaalde omstandigheden bij het ontspannen
van de camera beschadigd worden.
2.4 Synchronisatie
De synchroonverbinding tussen camera en flitser vindt, als
de flitser in de flitsschoen van de camera wordt gestoken,
automatisch plaats.
Bij camera’s zonder middencontact kan de synchroonverbinding ook met een flitskabel (36 - 50 normaal of 36 52 gespiraliseerd, accessoires) plaatsvinden.
2.5 In- en uitschakelen van de mecablitz
Voor het inschakelen van de flitser schuift u de hoofdschakelaar in de stand „ON“ (afb.3). Als de flitser opgeladen
is, licht de groene LED als paraatheidsaanduiding op.
Voor het uitschakelen de schakelaar in de „OFF“ stand
schuiven.
Automatisch uitschakelen
Om te voorkomen dat de batterijen per ongeluk leeg lopen
schakelt het apparaat zich ong. 8 min.
- na het inschakelen of
- na het ontsteken van een flits uit, om stroom te besparen.
Let er op, dat de automatische uitschakeling
ook in de SLAVE-functies werkzaam is!
De groene paraatheidsaanduiding dooft.
Om de mecablitz opnieuw in te schakelen, zet u de hoofdschakelaar op uit (OFF) en weer op aan (ON).
Als u de mecablitz niet gebruikt, schakel hem
dan in principe met de hoofdschakelaar uit!
2.6 Keuze van de flitsfunctie met de keuzescha-
kelaar
Met de keuzeschakelaar wordt de mecablitz in de automatisch flitsenfunctie A (u kunt uit 3 werkdiafragma's kiezen) of in de flitsenfunctie met handinstelling M gezet.
De stand van de keuzeschakelaar is in de
SLAVE-functie in het draadloos Metz-Remotesysteem van geen betekenis.
☞
☞
☞
☞
Page 12

Vorbereiten
Préparatifs
Voorbereiden
2.6 Wahl der Betriebsart mit dem Betriebsarten-
schalter
Mit dem Betriebsartenschalter wird der mecablitz in
den Automatik-Blitzbetrieb A (3 Automatikblenden stehen
zur Auswahl) oder den manuellen Betrieb M geschaltet.
Der Schalterstellung des Betriebsartenschalters hat in der SLAVE-Funktion im drahtlosen Metz-Remote-System keine Bedeutung.
2.7 SLAVE-Funktionsschalter
Im normalen Blitzbetrieb wird der mecablitz im Zubehörschuh der Kamera montiert und über den Synchronkontakt im Blitzgerätefuß bzw. über eine Synchronkabelverbindung zur Kamera ausgelöst. Für diesen Betrieb ist der
SLAVE-Funktionsschalter in die Position 0 zu schalten.
Für den Betrieb als SLAVE-Blitzgerät mit drahtloser
Blitzauslösung ist der SLAVE-Funktionsschalter je
nach SLAVE-Betriebsart in die Position 1 bzw. die Position
2 zu schalten. Näheres zu den SLAVE-Betriebsarten siehe
Seite 24.
☞
12
Page 13

tiques ai choix) ou dans le mode manuel M.
La position du sélecteur de mode est sans
importance pour la fonction „esclave“ dans le
mode multiflash sans cordon Metz Remote.
2.7 Sélecteur de fonction „SLAVE“
En utilisation normale, le mecablitz se place dans la griffe
porte-accessoires de l’appareil et est déclenché par le
contact de synchronisation dans le sabot du flash ou par
un cordon de synchronisation qui le relie à l’appareil. Pour
ce mode d’utilisation, le sélecteur SLAVE sera placé sur
la position 0.
Pour l’emploi en flash „esclave“ avec déclenchement sans
cordon, le sélecteur SLAVE sera placé sur la position 1
ou 2 selon le mode „esclave“ voulu. Pour plus de détails
concernant les modes „SLAVE“, voir page 25.
☞
2.7 SLAVE functieschakelaar
In de normale flitsfuncties wordt de mecablitz in de accessoireschoen van de camera gezet en via het synchrooncontact in de voet dan de flitser,c.q. via een flitskabel met
de camera, ontspannen.Voor deze functie moet de SLAVEfunctieschakelaar in de stand 0 worden gezet.
Voor de functie als SLAVE-flitser met draadloze flitsontsteking moet de SLAVE-functieschakelaar afhankelijk van
de SLAVE-functie in stand 1, c.q. in stand 2 worden gezet.
Zie pag. 25 voor details betreffende de SLAVE-functies
13
Page 14
14
Automatik-Blitzbetrieb
Mode automatique
Automatisch flitsen
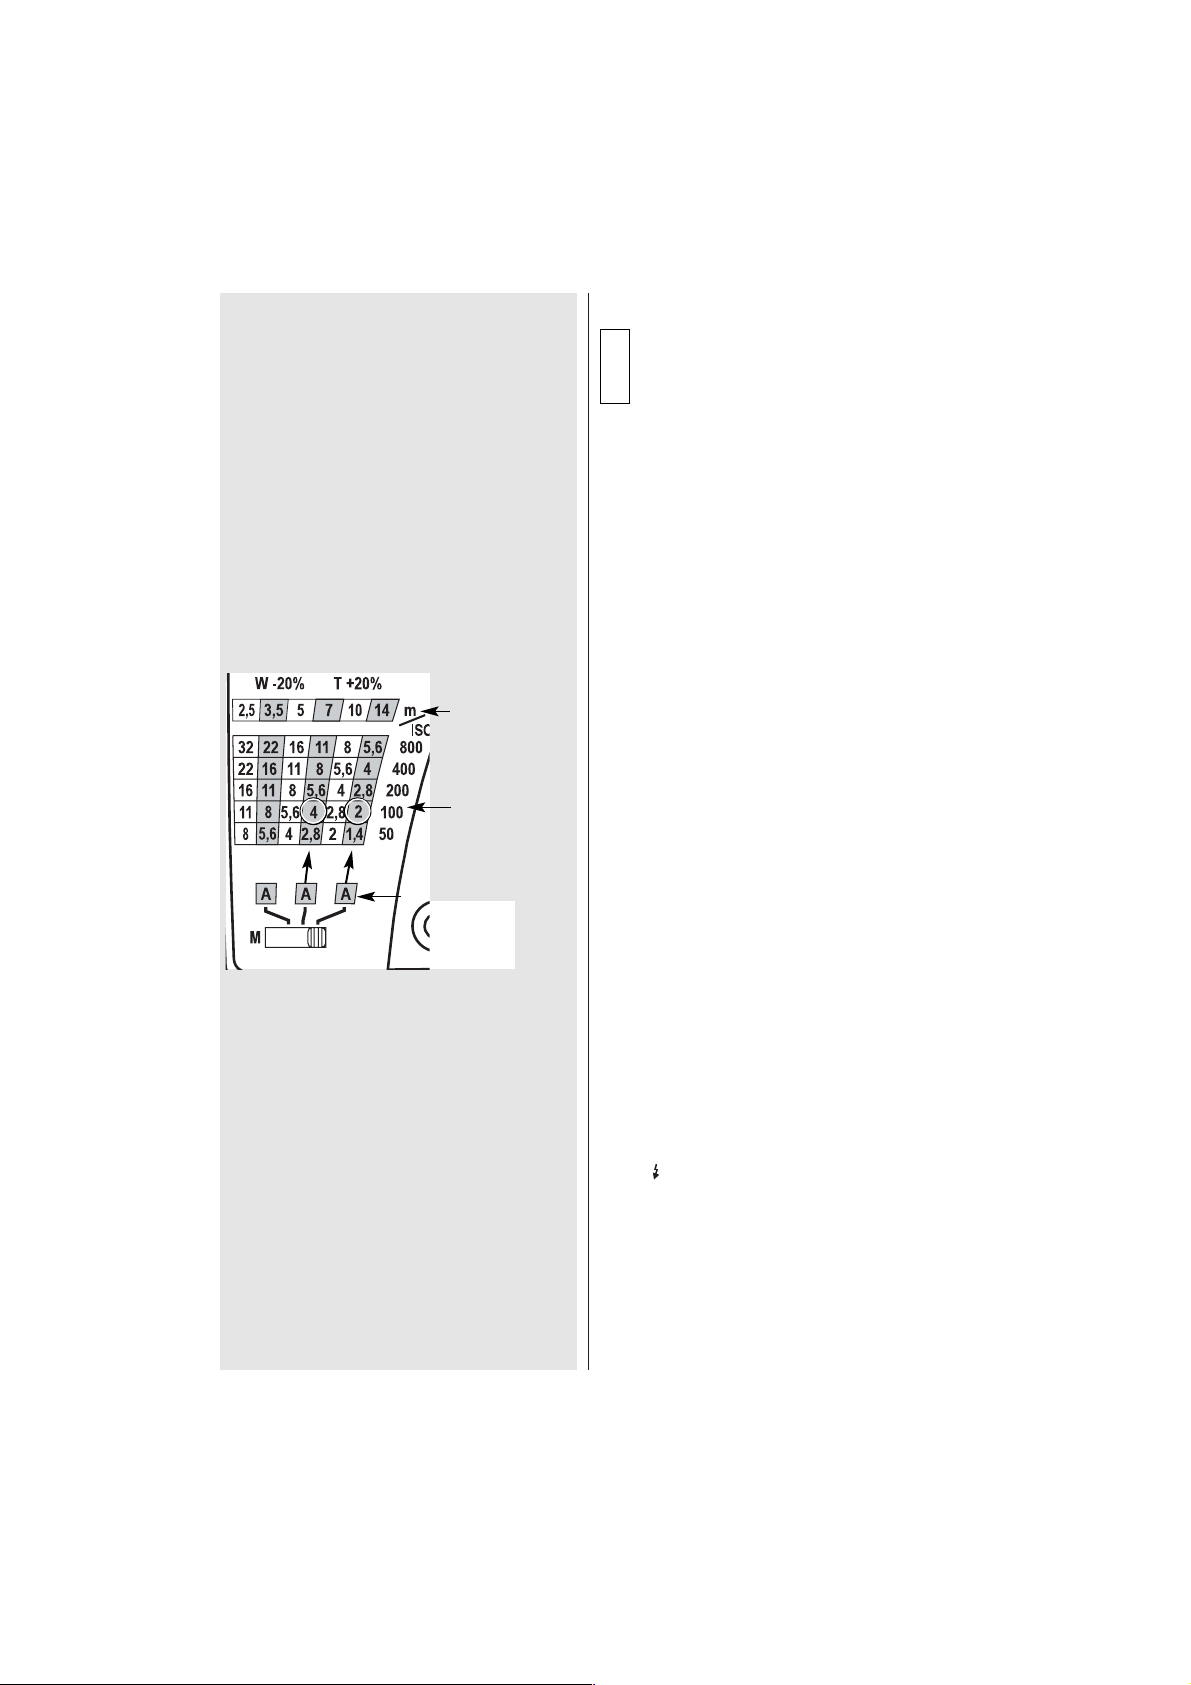
3. Automatik-Blitzbetrieb
Im Automatik-Blitzbetrieb mißt der Foto-Sensor
des Blitzgerätes das vom Objekt reflektierte Licht.
Das Blitzgerät unterbricht die Lichtabstrahlung nach
Erreichen der erforderlichen Lichtmenge.
Dadurch muss bei einer Entfernungsänderung keine neue
Blendenberechnung und Einstellung vorgenommen werden, solange sich das Objekt innerhalb des Automatik–Blitzbereichs befindet.
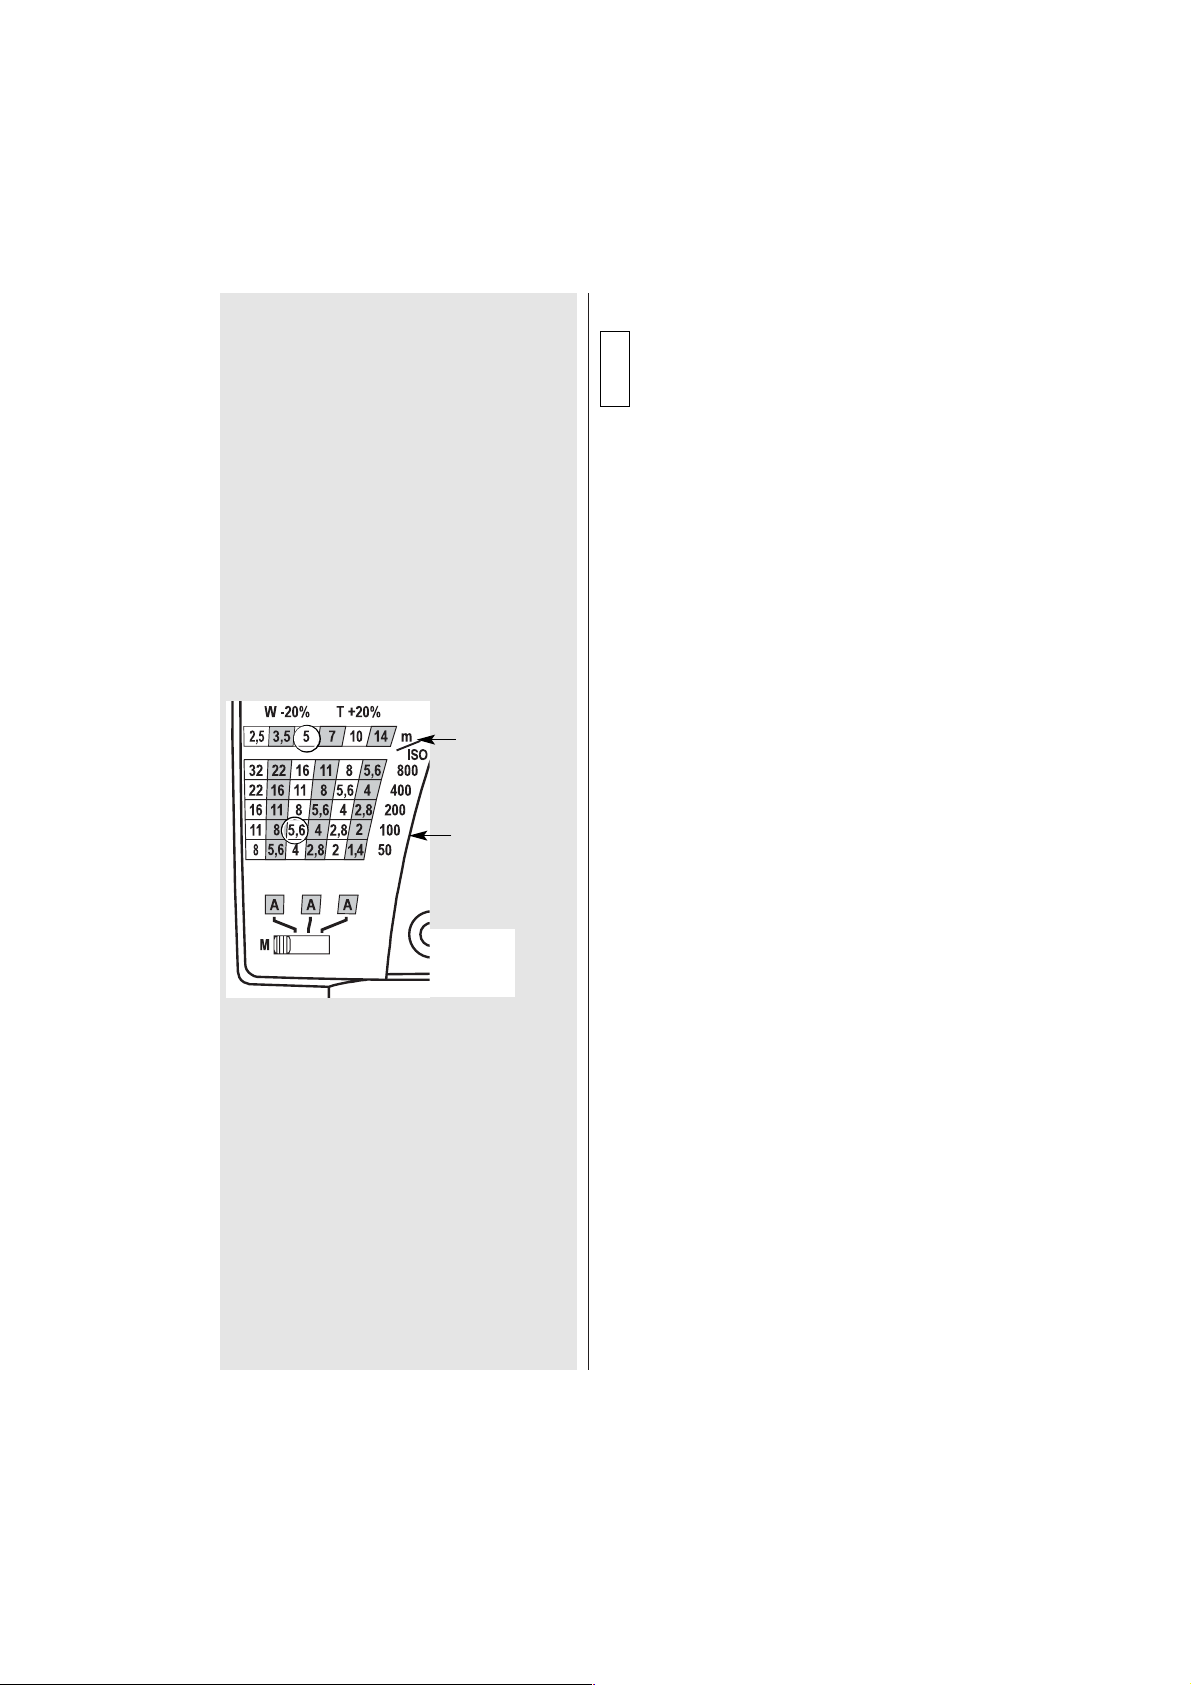
Einstellvorgang für den Automatik-Betrieb (Bild 4):
Beispiel: Objektabstand 5 m
Filmempfindlichkeit ISO 100/21°
Objetivbrennweite z.B. 50mm (Kleinbildformat)
Der mecablitz wird ohne vorgeschwenkte Reflektorvorsatzscheibe betrieben.
Der Beleuchtungsabstand von 5 m erlaubt, bei Beachtung
der max. Reichweite , die Automatikblenden 4 und 2
(siehe Tabelle auf Geräterückwand). Die max. Reichweite
bei der Automatikblende 4 beträgt 7 m, bei Automatikblende 2 beträgt die Reichweite 14 m. Der min. Beleuchtungsabstand beträgt etwa 10% der max. Reichweite.
Das Objekt sollte sich im mittleren Drittel des
Entfernungsbereiches befinden. Damit wird der
Elektronik genügend Spielraum zum Ausgleich
gegeben, wenn es erforderlich ist.
•
Betriebsartenschalter auf die gewünschte Automatikblende stellen.
Mit Rücksicht auf einen kleinstmöglichen Schärfentiefenbereich (bei Portraitaufnahmen erwünscht) empfehlen wir die
Automatikblende 2. Für Gruppenaufnahmen, bei denen viele
Personen hintereinander versetzt sind, empfehlen wir die Automatikblende 4 wegen des größeren Schärfentiefenbereichs.
• Blitzgerät mit dem Hauptschalter einschalten.
•
Den Slave-Funktionsschalter auf die Position 0 stellen.
• gewählte Automatikblende auch am Objektiv der Kamera
einstellen.
• Kamera auf Blitzsynchronzeit oder länger einstellen.
• Blitzbereitschaft abwarten - grüne Blitzbereitschaftsanzeige
leuchtet.
Vorsicht bei Zoomobjektiven !
Diese können bauartbedingt einen Lichtverlust
von bis zu einer Blendenstufe verursachen. Sie
können auch bei unterschiedlichen Brennweiteneinstellungen verschiedene effektive Blendenwerte haben. Dies gegebenenfalls durch
manuelle Korrektur der Blendeneinstellung am
Blitzgerät kompensieren !
☞
☞
Ǻ
Bild 4
Fig. 4
Afb. 4
☛
Page 15
15
3. Mode automatique
En mode automatique non TTL, le senseur incorporé au flash mesure la lumière réfléchie par le sujet
et commande l’interruption de l’éclair dès que la
quantité de lumière est suffisante pour une exposition correcte.
Ceci évite d’avoir à recalculer l’ouverture et à corriger les réglages
à chaque modification de l’éloignement du sujet, tant que ce dernier se situe dans la zone de portée affichée en automatique.
Procédure de réglage du mode automatique (fig. 4)
Exemple : distance flash-sujet 5 m
sensibilité du film 100 ISO / 21°
distance focale par ex. 50 mm (en 24x36)
Le mecablitz est utilisé sans le complément .
Pour une distance flash-sujet de 5 m on peut, en respectant la portée maximale , sélectionner des ouvertures
automatiques de 4 et 2 (voir tableau au dos de l’appareil). La portée maximale est de 7 m avec une ouverture
automatique de 4 et de 14 m avec une ouverture automatique de 2. La distance minimum flash-objet doit correspondre à env. 10 % de la portée maximum.
Le sujet devrait se situer dans le tiers médian
de la zone de portée. L’électronique disposera
ainsi d’une marge d’adaptation suffisante dans
les situations où cela est nécessaire.
•Mettre le sélectionneur
sur l’ouverture automatique
souhaitée.
Pour une profondeur de champ minimum (souhaitable
pour les portraits), nous recommandons une ouverture
automatique de 2. Pour photographier des groupes de
personnes les unes derrière les autres, nous recommandons une ouverture automatique de 4 du fait de la plus
grande profondeur du champ.
• Mettre le flash en marche à l’aide de l’interrupteur
général
.
• Placer le sélecteur de fonction SLAVE sur la position 0
• Régler l’ouverture automatique souhaitée sur l’objectif
de l’appareil photo.
• Régler l’appareil photo sur la vitesse de synchro ou sur
des vitesses d’obturation plus lentes.
• Attendre que le témoin de recyclage vert
s’allume.
Les zooms demandent une attention particulière !
Suivant leur construction, ils peuvent occasionner
une perte de lumière pouvant atteindre une valeur
équivalente à une division du diaphragme. De
plus, l’ouverture réelle peut varier avec la
distance focale. Le cas échéant, il faudra corriger
manuellement l’ouverture sur le flash.
☞
☞
3. Automatisch flitsen
Bij automatisch flitsen meet de fotosensor van de
flitser het door het onderwerp gereflecteerde licht. De
flitser stopt de flits zodra hij voldoende licht heeft
gegeven.
Bij het veranderen van de flitsafstand hoeft daarom het
diafragma niet opnieuw te worden berekend, zolang het
onderwerp zich maar binnen het bereik voor automatisch
flitsen van de flitser bevindt.
Instellen voor automatisch flitsen (afb. 4):
Voorbeeld: onderwerpsafstand 5 m
Filmgevoeligheid ISO 100/21°
Objectiebrandpuntsafstand bijv. 50 mm (kleinbeeld)
De mecablitz wordt zonder voorzetvenster
gebruikt.
De flitsafstand van 5 m maakt het mogelijk, met inachtneming van de max. flitsreikwijdte 4 en 2 als werkdiafragma’s te gebruiken (zie de tabel aan de achterzijde van
de flitser). De flits reikt bij diafragma 4 tot max. 7m en bij
diafragma 2 tot max. 14 m. De minimale flitsafstand
bedraagt ongeveer 10% van de maximale reikwijdte.
Het onderwerp moet zich ongeveer in het middelste derde deel van het afstandsbereik
bevinden. Daarmee krijgt de elektronica voldoende speelruimte om zich bij te stellen indien dat nodig is.
• De functieschakelaar
op het gewenste werkdiafrag-
ma zetten.
Met het oog op een zo klein mogelijk scherptediepte
(vooral wenselijk bij portretopnamen) bevelen wij daarvoor diafragma 2 aan. Voor groepsopnamen waarbij veel
personen achterelkaar zijn opgesteld, diafragma 4
wegens het grotere scherptedieptebereik.
• Schakel de flitser in met de hoofdschakelaar
;
• Zet de SLAVE-functieschakelaar in de stand 0!
• stel het gekozen diafragma ook op de camera in;
•
stel op de camera de flitssynchronisatietijd in of een langere;
• even afwachten tot de flitser is opgeladen - de groene
paraatheidsaanduiding
licht op.
Voorzichtig bij zoomobjectieven!
Deze kunnen, afhankelijk van hun bouw, een
verlies aan licht van een hele diafragmastop
veroorzaken. Ze kunnen ook bij verschillende
brandpuntsafstanden een verschillende effectieve diafragmawaarde hebben. Dit eventueel
met de hand corrigeren door de diafragmainstelling op de flitser te veranderen!
☞
☞
Ǻ
Ǻ
Page 16
16
Manueller Blitzbetrieb
Mode manuel du flash
Flitsen met handinstelling
4. Manueller Blitzbetrieb
In der manuellen Betriebsart wird vom Blitzgerät
immer die volle Energie abgestrahlt. Die Anpassung
an die Aufnahmesituation kann durch die Blendeneinstellung an der Kamera durchgeführt werden.
Einstellvorgang für den manuellen Blitzbetrieb (Bild 5):
Beispiel: Objektabstand 5 m
Filmempfindlichkeit ISO 100/21°
Objetivbrennweite z.B. 50mm (Kleinbildformat)
Der mecablitz wird ohne vorgeschwenkte Reflektorvorsatzscheibe betrieben.
Der Beleuchtungsabstand von 5 m erfordert im manuellen Betrieb die Blende 5,6.
• Betriebsartenschalter
auf M stellen.
• Den Slave-Funktionsschalter auf die Position 0 stellen.
• Blitzgerät mit dem Hauptschalter
einschalten.
• entsprechende Blende am Objektiv einstellen und Kamera auf Blitzsynchronzeit oder länger einstellen.
Die Kamerablende kann auch mit der folgenden
Formel ermittelt werden:
Leitzahl
Blende = ——————
Objektabstand
Die Leitzahl kann aus der Tabelle des Kapitels
„Technische Daten“ für die verwendbaren Filmempfindlichkeiten entnommen werden.
Ǻ
Bild 5
Fig. 5
Afb. 5
☛
Page 17

17
4. Mode manuel du flash
Dans le mode manuel, le flash émet toujours sa pleine
puissance. L’adaptation à la situation s’opère en agissant
sur l’ouverture du diaphragme sur l’appareil.
Procédure de réglage pour le mode manuel (fig.
5):
Exemple : distance flash-sujet 5 m
sensibilité du film 100 ISO / 21°
distance focale par ex. 50 mm (en 24x36)
Le mecablitz est utilisé sans le complé-
ment .
Pour une distance flash-sujet de 5 m, l’ouverture du
diaphragme doit être de 5,6 en mode manuel.
• Positionner le sélecteur
sur M.
• Placer le sélecteur de fonction SLAVE sur la position 0
• Mettre le flash en marche à l’aide de l’interrupteur
général
.
• Régler l’ouverture adéquate sur l’objectif et régler l’appareil photo sur la vitesse de synchro ou sur des vitesses
d’obturation plus lentes.
L’ouverture du diaphragme de l’appareil photo peut être
calculée avec la formule suivante:
Nombre-guide
Ouverture = ———————
Distance au sujet
Pour trouver le nombre-guide correspondant aux films de
sensibilités diverses, se référer au tableau du chapitre
«caractéristiques techniques ».
4. Flitsen met handinstelling
Bij het flitsen met handinstelling wordt door de flitser
altijd alle energie uitgestraald. Aanpassing aan de
opnamesituatie moet door instelling van het diafragma aan de camera plaatsvinden.
Het instellen voor flitsen met handinstelling (afb. 5):
Voorbeeld: onderwerpsafstand 5 m
Filmgevoeligheid ISO 100/21°
Objectiebrandpuntsafstand bijv. 50 mm (kleinbeeld)
De mecablitz wordt zonder voorzetvenster
gebruikt.
De flitsafstand van 5 m vereist bij handinstelling
diafragmawaarde 5,6.
• Zet de functieschakelaar
van de flitser op M;
• Zet de SLAVE-functieschakelaar in de stand 0!
• schakel de flitser in met de hoofdschakelaar
;
• stel het diafragma op de camera in en zet de camera op
de flitssynchronisatietijd.
Het diafragma op de camera kan ook met de volgende formule worden bepaald:
richtgetal
diafragmawaarde = ——————————-
afstand tot het onderwerp
Het richtgetal voor de te gebruiken films vindt u in de tabel
van het hoofdstuk „Technische gegevens“.
Ǻ
Ǻ
Page 18
18
Aufhellblitzen bei Tageslicht
Fill-in au flash
Invulflitsen bij daglicht
5. Aufhellblitzen bei Tageslicht
Der mecablitz kann auch zum Aufhellblitzen bei Tageslicht
verwendet werden, um Schatten zu beseitigen und eine
ausgeglichene Belichtung auch bei Gegenlichtaufnahmen
zu erreichen.
5.1 Aufhellblitzen im Automatik-Betrieb
Ermitteln Sie mit der Kamera oder einem Belichtungsmesser die notwendige Blende und die Verschlusszeit für eine
normale Belichtung.
Dabei ist darauf zu achten, dass die Kameraverschlusszeit
gleich oder länger als die kürzeste Blitzsynchronzeit
(kameratypenabhängig) ist.
Beispiel: Ermittelte Blende = 8
Ermittelte Kameraverschlusszeit = 1/60 Sek.
Blitzsynchronzeit der Kamera z. B. 1/100 Sek.
(siehe Kamera-Anleitung)
Die beiden ermittelten Werte für Blende und Verschlusszeit
können an der Kamera eingestellt werden, da die Kameraverschlusszeit länger ist als die Blitzsynchronzeit der
Kamera.
Um eine abgestufte Aufhellung zu erreichen, um z. B. den
Charakter der Schatten zu erhalten, empfiehlt sich, die am
Blitzgerät eingestellte Automatikblende um eine Stufe
niedriger zu wählen als die an der Kamera eingestellte
Blendenzahl. Im Beispiel wurde die Kamerablende 8 eingestellt. Wir empfehlen Ihnen, die Blende am Blitzgerät auf
5,6 einzustellen.
Tip:
Steht am Blitzgerät die Automatik-Blende 5,6 aufgrund der
eingestellten Filmempfindlichkeit nicht zur Verfügung, so
kann man sich wie folgt helfen:
Wählen Sie am mecablitz die Automatik-Blende 8 und stellen an der Kamera eine Verschlusszeit von 1/30 Sek. bei
Kamerablende 11 ein.
Wenn Sie am mecablitz die Automatik-Blende 4 wählen,so
ergibt sich im Beispiel eine Kameraverschlusszeit von
1/125 Sek. bei Kamerablende 5,6. Die Blitzsynchronzeit
der Kamera von 1/100 Sek. würde dabei unterschritten
werden.
Achten Sie darauf, dass die Gegenlichtquelle
nicht direkt auf den Fotosensor des Blitzgerätes scheint, die Elektronik des Sensors wird
dadurch getäuscht.
☞
Page 19

19
5. Fill-in au flash
Le mecablitz peut aussi être utilisé en flash d’appoint pour
la technique du « fill-in », c’est-à-dire pour délivrer en plein
jour un éclair d’appoint pour déboucher les ombres et
obtenir un éclairage plus équilibré dans les contre-jours.
5.1 Fill-in au flash en mode automatique non TTL
Déterminez à l’aide de l’appareil photo ou d’un posomètre
l’ouverture et la vitesse requises pour une exposition normale.
Veillez à ce que cette vitesse ne soit pas supérieure à la
vitesse de synchro-flash (elle varie d’un appareil à l’autre).
Exemple: ouverture et vitesse déterminée par la mesure:
f/8; 1/60e. Vitesse de synchro-flash de l’appareil
p.ex. 1/100e (voir notice de l’appareil)
Les valeurs d’ouverture et de vitesse ainsi déterminées
peuvent être réglées sur l’appareil puisque la vitesse reste
en-deça de la vitesse de synchronisation de l’appareil.
Pour obtenir un éclairage d’appoint réduit, par exemple
pour conserver le caractère des ombres, il est recommendé de régler sur le flash un diaphragme automatique fermé
d’une division par rapport à l’ouverture réglée sur l’appareil. Dans notre exemple (8 sur l’appareil), on règlera
donc le flash sur 5,6.
Conseil:
Si, du fait de la sensibilité du film réglée sur l’appareil, on
ne peut pas utiliser une ouverture automatique de 5,6 sur
le flash, on peut procéder de la manière suivanteˇ:
Sélectionner sur le mecablitz l’ouverture automatique 8 et
régler l’appareil photo sur une vitesse d’obturation de 1/30
sec. et une ouverture de 11.
Si vous choisissiez sur le mecablitz une ouverture automatique de 4, vous auriez pour l’exemple ci-dessus une vitesse d’obturation de 1/125 sec. pour une ouverture de 5,6.
On serait alors en deçà de la vitesse de synchronisation de
l’appareil qui est de 1/100 sec.
Veillez à ce que la source de lumière en contre-jour ne rayonne pas directement sur le senseur du flash, pour ne pas fausser la mesure.
☞
5. Invulflitsen bij daglicht
De mecablitz kan ook worden gebruikt om bij daglicht in te
flitsen. Inflitsen is een techniek om zware schaduwen te
vermijden en om ook bij tegenlichtopnamen een goede,
uitgebalanceerde belichting te krijgen.
5.1 Invulflitsen bij automatisch flitsen
Bepaal met de camera of met een losse belichtingsmeter
de benodigde combinatie van diafragma en belichtingstijd
voor een normale belichting.
Let er daarbij op, dat de belichtingstijd net zo lang is als, of
langer dan de kortste flitssynchronisatietijd (hangt van het
type camera af).
Voorbeeld: berekend diafragma = 8;
belichtingstijd = 1/60s.
Flitssynchronisatietijd bijv. 1/100 s. (zie de
gebruiksaanwijzing van de camera).
Beide berekende waarden voor diafragma en belichtingstijd kunnen op de camera worden ingesteld, omdat de
belichtingstijd langer is dan de flitssynchronisatietijd van
de camera.
Om een uitgewogen invulling van de schaduwen te verkrijgen, om bijv. hun karakter te behouden wordt aanbevolen de op de flitser ingestelde diafragmawaarde een stop
lager te kiezen dan die welke op de camera is ingesteld.
Heeft u op de camera bijv. 8 ingesteld, stel de diafragmawaarde op de flitser dan in op 5,6.
Tip:
Staat 5,6 als werkdiafragma niet op de flitser ter beschikking vanwege de ingestelde filmgevoeligheid, dan kunt u
als volgt te werk gaan:
kies op de mecablitz werkdiafragma 8 en stel op de camera een belichtingstijd van 1/30 s bij diafragma 11 in.
Zou u op de mecablitz werkdiafragma 4 kiezen, dan zou in
het voorbeeld de belichtingstijd 1/125 s. moeten worden bij
diafragma 5,6. De flitssynchronisatietijd van de voorbeeldcamera is echter 1/100 s. en dat is langer dan 1/125 s.
Let er op, dat de bron van het tegenlicht niet
rechtstreeks op de fotosensor van de flitser
valt, de elektronica van de sensor zou daardoor
in verwarring worden gebracht.
☞
Page 20
20
Blitz-Belichtungskorrektur
Correction d’exposition
Corrigeren van de flitsbelichting
Die Belichtungskontrollanzeige
L’allumage du témoin
Aanduiding van de flitscontrole
6. Blitz-Belichtungskorrektur
Die Belichtungsautomatiken sind auf einen Reflexionsgrad
des Aufnahmeobjektes von 25 % (durchschnittlicher Reflexionsgrad von Blitzmotiven) eingestellt. Ein dunkler Hintergrund, der viel Licht absorbiert, und ein heller Hintergrund,
der stark reflektiert (z .B. Gegenlichtaufnahmen), können
zu Über- bzw. Unterbelichtung des Aufnahmeobjektes
führen.
6.1 Belichtungskorrektur im Automatik–Blitzbetrieb
Um den oben genannten Effekt zu kompensieren, kann die
Belichtung durch Öffnen und Schließen der Kamerablende
korrigiert werden. Bei einem überwiegend hellen Hintergrund unterbricht der Foto-Sensor
des Blitzgerätes die
Lichtabstrahlung zu früh, und das eigentlich zu fotografierende Objekt wird zu dunkel. Bei einem dunklen Hintergrund wird die Lichtabstrahlung zu spät unterbrochen, und
das Objekt wird zu hell.
heller Hintergrund:
Kamerablende um 1/2 bis 1 Wert öffnen
(z. B. von 5,6 auf 4)
dunkler Hintergrund:
Kamerablende um 1/2 bis 1 Wert schließen
(z. B. von 8 auf 11)
7. Die Belichtungskontrollanzeige
Die Belichtungskontrollanzeige leuchtet nur auf, wenn
die Aufnahme im Automatik-Blitzbetrieb richtig belichtet
wurde.
Der Probeblitz wird mit der Handauslösetaste
aus-
gelöst. Bleibt die Belichtungskontrollanzeige
nach dem
Probeblitz dunkel, müssen Sie die nächstkleinere Blendenzahl einstellen oder die Entfernung zur Reflexfläche bzw.
zum Objekt verkleinern und den Probeblitz wiederholen.
Der so ermittelte Blendenwert ist auch an der Kamera einzustellen.
Halten Sie beim Probeblitz Kamera und Blitzgerät wie bei der späteren Aufnahme.
Im drahtlosen Metz-Remote-Betrieb erfolgt am
Slave-Blitzgerät keine Belichtungskontrollanzeige. Für die Belichtungskontrolle ist nur die
Anzeige am Controller relevant.
☞
Bild 6
Fig. 6
Afb. 6
☛
Page 21

21
6. Correction d’exposition
L’automatisme d’exposition est calibré pour une réflectance de 25% (réflectance moyenne des sujets pris au
flash).
Un fond sombre qui absorbe beaucoup de lumière et un
fond clair très réfléchissant peuvent se traduire respectivement par une sous-exposition ou une surexposition.
6.1 Correction d’exposition en mode automatique
On rattrapera l’erreur d’exposition mentionnée ci-dessus
en ouvrant ou en fermant le diaphragme sur l’objectif. Pour
un fond très clair, le senseur interrompt l’éclair trop tôt
et le sujet est sous-exposé. Dans le cas contraire (fond
sombre), l’éclair est coupé trop tard, ce qui entraîne une
surexposition du sujet.
fond clair:
ouvrir le diaphragme de 2 à 1 division
(p.ex. de 5,6 à 4)
fond sombre:
fermer le diaphragme de 2 à 1 division
(p.ex. de 8 à 11)
7. L’allumage du témoin
L’allumage du témoin signale en mode automatique
non TTL que le film a été correctement exposé.
Déclencher un éclair de test au moyen du bouton d’essay
. Si le témoin de bonne exposition ne s’allume pas, il
faudra sélectionner une plus grande ouverture du diaphragme ou rapprocher le flash de la surface réfléchissante ou du sujet et effectuer un nouvel essai.
La valeur d’ouverture ainsi déterminée sera ensuite reportée sur le boîtier.
Orientez le boîtier et le flash comme plus tard
lors de la prise de vue.
En mode multiflash sans cordon Metz Remote,
le témoin de bonne exposition du flash esclave
n’a pas de fonction. Seule l’indication du
témoin sur le flash maître (contrôleur) est valable.
☞
6. Corrigeren van de flitsbelichting
De belichtingsautomatieken zijn berekend op een reflectie
van 25% van het op een onderwerp vallende hoeveelheid
licht (gemiddelde reflectiegraad van te flitsen onderwerpen). Een donkere achtergrond die veel licht absorbeert en een lichte achtergrond die sterk reflecteert (bijv.
bij tegenlichtopnamen), kunnen tot over- resp. onderbelichting voeren van het onderwerp zelf.
6.1 Belichtingscorrectie bij automatisch flitsen
Om bovengenoemd effect te compenseren, kan de
belichting door verder openen of verder sluiten van het
diafragma van de camera worden gecorrigeerd. Bij een
overwegend lichte achtergrond onderbreekt de fotosensor
van de flitser de uitstraling van het licht te vroeg en het
eigenlijk te fotograferen onderwerp wordt te donker weergegeven. Bij een donkere achtergrond wordt die uitstraling
van licht te laat onderbroken en wordt het onderwerp te
licht weergegeven.
Lichte achtergrond:
cameradiafragma 1/2 tot 1 stop verder
openen (bijv. van 5,6 naar 4);
donkere achtergrond:
cameradiafragma 1/2 tot 1 stop verder
sluiten (bijv. van 8 naar 11).
7. Aanduiding van de flitscontrole
De flitscontrole licht alleen op als bij automatisch flitsen
de opname correct werd (of wordt) belicht.
Een proefflits wordt met de ontspanknop voor handbediening
ontstoken. Blijft de flitscontrole na de proefflits
donker, dan moet u een lager diafragmagetal instellen of
de afstand tot het te fotograferen onderwerp of tot het
reflecterende vlak verkleinen en de proefflits
herhalen.
Een langs deze weg bepaalde diafragmawaarde moet ook
op de camera worden ingesteld.
Richt camera en flitser bij de proefflits en de
eigenlijke opname op dezelfde wijze.
Bij de draadloze Metz-Remote-functie verschijnt er op de slave-flitser geen aanduiding van
belichtingscontrole. Voor de belichtingscontrole is alleen de aanduiding op de controllerflitser van betekenis.
☞
Page 22
22
Ausleuchtung und Vorsatzscheibe
Eclairage et compléments grand-angle/télé
Verlichtingshoek en voorzetvenster
8. Ausleuchtung und Vorsatzscheibe
Der mecablitz leuchtet ohne Vorsatzscheibe vor dem Blitzreflektor normale Kleinbildaufnahmen (24x36mm) mit
Objektivbrennweiten ab 35mm oder größer vollständig
aus.
Durch Vorschwenken der Weitwinkelvorsatzscheibe (Kennzeichen W) vor den Blitzreflektor werden Aufnahmen
mit Objektivbrennweiten von 24mm und größer ausgeleuchtet.
Durch Vorschwenken der Televorsatzscheibe (Kennzeichen
T) vor den Blitzreflektor werden Aufnahmen mit Objektivbrennweiten von 85mm und größer ausgeleuchtet.
Wird der mecablitz ...
- auf der Kamera (im Zubehör- bzw.Blitzschuh) oder
- mit der Blitzschiene 34-36 unmittelbar neben der Kamera betrieben,
so sollte bei der Wahl der Vorsatzscheibe die Brennweite des Kameraobjektives berücksichtigt werden. Damit
wird eine optimale Ausleuchtung der Aufnahme bei gleichzeitiger maximaler Reichweite des Blitzlichtes erreicht.
Beachten Sie dabei, dass sich die Reichweite
des Blitzlichtes durch den Einsatz der Weitwinkelvorsatzscheibe verringert (ca. -20%) bzw.
durch die Televorsatzscheibe erhöht (ca.+20%)
Siehe hierzu auch die Tabelle für die maximale
Beleuchtungsentfernung (Seite 38)!
Bei Digitalkameras beachten Sie bitte die auf
das Kleinbildformat umgerechneten Objektivbrennweiten (siehe Kamerabedienungsanleitung)!
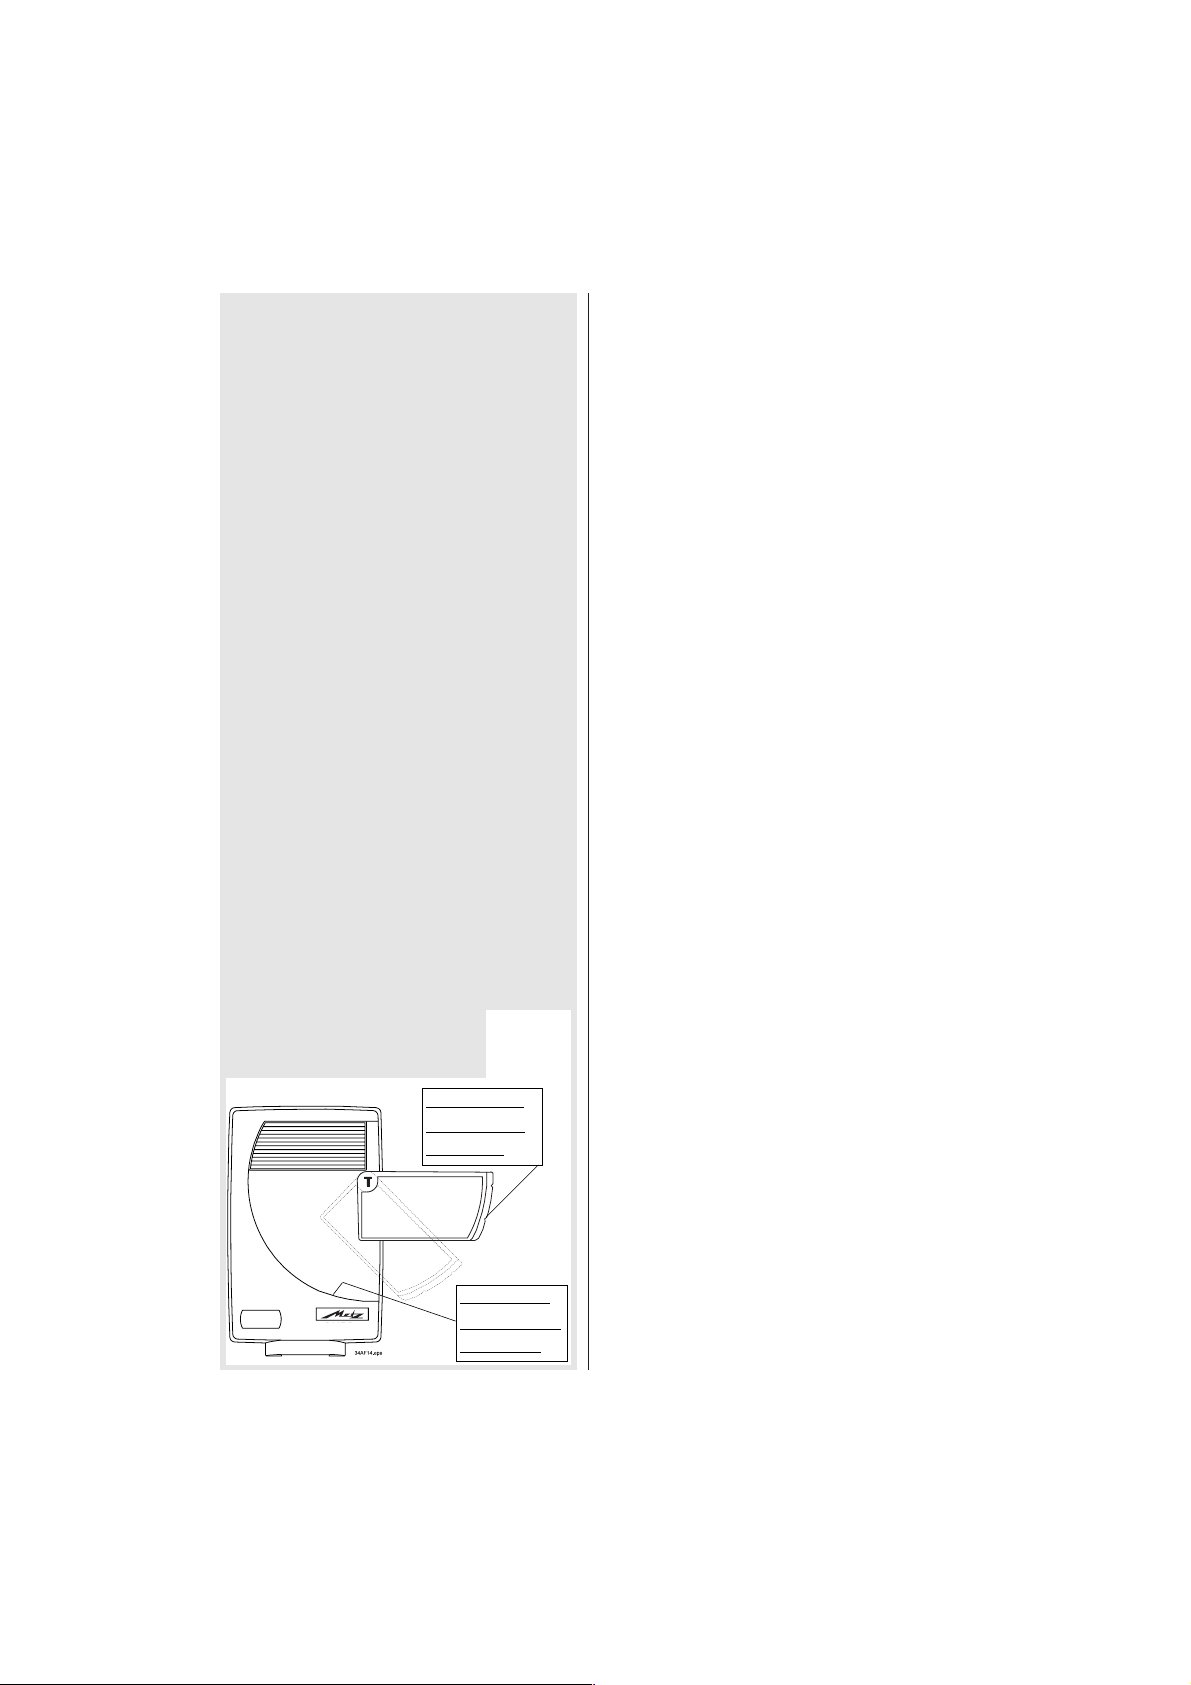
8.1 Demontage / Montage der Vorsatzscheiben
Zur Demontage die Vorsatzscheibe über die Haltefedern
herausdrehen (siehe Bild 7) und die Vorsatzscheibe abziehen.
Die Vorsatzscheibe
im ausgeschwenkten Zustand (siehe Bild) in den Bajonettverschluss einsetzen. Vorsatzscheibe im Uhrzeigersinn drehen und die Führungsleiste in den
Gehäusespalt einführen.
☞
Führungsleiste
rail de guidage
geleiderand
Gehäusespalt
fente du boîtier
geleidegleuf
Bild 7
Fig. 7
Afb. 7
Page 23

23
8. Couverture et complément
Sans le complément devant le réflecteur, le mecablitz a
une couverture équivalente à une focale de 35 mm pour le
format 24x36.
En plaçant le diffuseur grand angle (repère W) devant le
réflecteur, la couverture de l’éclair descend jusqu’à la
focale de 24 mm.
Avec le complément télé (repère T) placé devant le
réflecteur,l’éclair à une couverture équivalente à une focale de 85 mm.
Si le mecablitz est monté
- sur la griffe porte-accessoires de l’appareil ou
- sur la barrette 34-36 directement à côté de l’appareil,
il est conseillé de choisir le complément W ou T en fon-
ction de la distance focale de l’objectif de l’appareil photo.
On obtient ainsi un éclairage optimal de la scène et en
même temps la portée maximale de l’éclair dans la situation considérée.
Notez que le diffuseur grand angle a pour effet
de réduire la portée de l’éclair (env. - 20 %) et
que le complément télé l’accroît (env. + 20 %).
Voir à ce sujet le tableau des portées maximales (page 38).
Si vous avez un appareil numérique, notez
qu’ici les distances focales sont données pour
le format 24x36 (voir le mode d’emploi de votre
appareil).
8.1 Démontage ou montage du diffuseur grandangle/ complément télé
Pour démonter le diffuseur ou le complément télé, le tourner pour le dégager des ressorts de retenue (voir fig.7) et
le sortir.
Faire pivoter le diffuseur grand-angle ou le complément
télé (voir fig.7) et l’insérer dans le joint à baïonnette.
Tourner le diffuseur ou le complément télé dans le sens
des aiguilles d’une montre et introduire le rail de guidage
dans la fente du boîtier.
☞
8. Verlichtingshoek en voorzetvenster
De mecablitz heeft zonder voorzetvenster voor de flitsreflector een verlichtingshoek voor normale kleinbeeldopnamen (24 x 36 mm) die overeenkomt met brandpuntsafstanden van 35 mm en langer.
Door het voordraaien van het groothoekvoorzetvenster
(kenmerk W) voor de reflector worden opnamen met
brandpuntsafstanden van 24 mm en langer uitgelicht.
Door het voordraaien van het televoorzetvenster (kenmerk
T) voor de reflector worden opnemen met brandpuntsafstanden van 85 mm en langer uitgelicht.
Wordt de mecablitz ...
- Op de camera (in de accessoire-, c.q. flitsschoen of
- Met de "flitsbeugel 34-36" direct naast de camera
gebruikt,
Dan met bij de keuze van het voorzetvenster de brandpuntsafstand van het objectief op de camera in acht worden genomen. Daardoor wordt een optimale uitlichting van
de opname bij tegelijkertijd maximale reikwijdte van het
flitslicht verkregen.
Let er daarbij op, dat de reikwijdte van de flitser
door de inzet van het groothooekvoorzetvenster
kleiner wordt (ong. 20%) en door het televoorzetvenster wordt vergroot (ong. 20%). Zie hiervoor ook de tabel voor de maximale flitsafstanden (pag. 38)! Let bij digitale camera's op de
naar kleinbeeldformaat omgerekende brandpuntsafstanden (zie gebruiksaanwijzing van de
camera)!
8.1 Opzetten, c.q. afnemen van de voorzetven-
sters
Voor het afnemen het voorzetvenster over de vasthoudveren uitdraaien (zie afb.7) en het venster afnemen
.
Het voorzetvenster in uitgezwaaide stand (zie afb.7) in
de bajonetvatting zetten. De voorzetvenster in de richting
van de wijzers van een klok draaien en de geleiderand in de
geleidegleuf steken.
☞
Page 24

24
Drahtloser SLAVE-Betrieb
Fonctionnement en mode esclave sans cordon
Draadloos SLAVE-flitsen
9. Drahtloser SLAVE-Betrieb
Der SLAVE-Betrieb dient zur drahtlosen, verzögerungsfreien Fernauslösung von einem oder mehreren zusätzlichen SLAVE-Blitzgeräten. Der Vorteil für den
Fotogra-
fen:
- beweglicher Einsatz mehrerer Blitzgeräte.
- keine Synchronkabelverbindung zur Kamera.
- plastische Ausleuchtung.
Das Auslösen des SLAVE-Blitzgerätes erfolgt durch den
Lichtimpuls des steuernden Blitzgerätes (Controller) auf
der Kamera, bzw.den eingebauten Kamerablitz.
Beim Einsatz des mecablitz als SLAVE-Blitzgerät darf am Controller bzw. an der Kamera
keine Rote-Augen-Vorblitzfunktion aktiviert
sein! Der SLAVE-Betrieb des mecablitz in Kombination mit Stroboskop-Blitzbetrieb, Kurzzeitsynchronisation (FP- bzw. HSS-Blitzbetrieb),
Canon A-TTL und E-TTL, Minolta-ADI oder
Nikon-3D-Blitzbetrieb ist systembedingt nicht
möglich! Gegebenenfalls sind diese Blitzbetriebsarten an der Kamera bzw. am SCA-Adapter des Controllers oder am Controller-Blitzgerät zu deaktivieren (siehe die entsprechende
Geräte-Bedienungsanleitung).
Mittenkontakt und seitliche Massekontakte im
Anschlußfuß dürfen nicht kurzgeschlossen
werden.
Beim Betätigen des Kameraauslösers wird das
SLAVE–Blitzgerät zusammen mit dem Controller ausgelöst. Zum Zeitpunkt der Aufnahme müssen Controller
und SLAVE-Blitzgerät blitzbereit sein (Blitzbereitschaftsanzeige der Blitzgeräte leuchtet).
Für eine zuverlässige Funktion muss sichergestellt sein,
dass der SLAVE-Sensor im mecablitz ausreichend Licht
vom Controller empfängt! Bei Fehlfunktion muss eventuell
die Position des SLAVE-Blitzgerätes so geändert werden,
dass der SLAVE-Sensor mehr Licht erhält.
Für den SLAVE-Betrieb wird der mecablitz auf dem mitgelieferten Ständer oder zusammen mit der Kamera auf die
Blitzschiene 34-36 montiert.
Der mecablitz wird mit dem Ständer an der gewünschten
Position aufgestellt bzw.auf einem Stativ montiert. Im Normalfall zeigt der Reflektor des SLAVE-Blitzgerätes in Richtung des Aufnahmeobjektes.
Unser Tipp:
Im entfesselten Betrieb (der mecablitz wird als SLAVE in
einigem Abstand von der Kamera betrieben) sollte für eine
möglichst breite Ausleuchtung des Aufnahmeobjektes die
☞
Ǻ
Page 25

25
9. Fonctionnement en mode esclave sans
cordon
Le mode esclave permet la télécommande sans
retardement de plusieurs flashs esclaves
(SLAVE) ou à servocommande. L’avantage pour le
photographe:
- Emploi flexible de plusieurs flashs
- Pas de liaison par câble de synchronisation avec
l’appareil photo
- Eclairage plastique
Le déclenchement du flash esclave s’effectue par l’impulsion de lumière émise par le flash maître (controller) placé
sur l’appareil ou intégré.
Si le mecablitz est utilisé comme flash esclave,
la fonction de pré-éclairs anti-yeux rouges ne
doit pas être activée sur le flash maître ou sur
l’appareil photo. L’utilisation conjointe du
mecablitz en mode esclave avec la fonction
stroboscope, avec la synchronisation en vitesse rapide (flash FP ou HSS) ou avec les modes
Canon A-TTL et E-TTL, Minolta ADI ou Nikon 3D
n’est pas possible de par le système. Le cas
échéant, il faudra désactiver ces modes de
fonctionnement sur l’appareil, sur l’adaptateur
SCA du flash maître ou sur le flash maître luimême (voir le mode d’emploi des appareils).
Le contact central et les contacts de masse sur
le côté dans le sabot ne doivent pas être
court-circuités.
L’actionnement du déclencheur de l’appareil a pour effet
de déclencher le flash esclave en même temps que le flash
maître. Au moment de la prise de vue,le flash esclave et le
flash maître doivent être recyclés (le témoin de disponibilité doit être allumé).
Pour un fonctionnement fiable, il faut s’assurer que le senseur du mecablitz esclave sera bien frappé par la lumière
du flash maître. En cas de mauvais fonctionnement, il faut
éventuellement changer l’orientation du flash esclave de
manière que son senseur reçoive davantage de lumière.
Pour le mode esclave, le mecablitz est monté sur le support fourni ou est monté conjointement avec l’appareil
photo sur la barrette 34-36.
Le mecablitz sur le support est posé à l’endroit voulu ou
est monté sur un trépied. En cas normal, le réflecteur du
flash esclave est dirigé vers le sujet.
Conseil :
Lorsque le flash est utilisé en extension (le mecablitz
☞
9. Draadloos SLAVE-flitsen
De SLAVE-functie dient om een of meerdere SLAVEof Servoflitsers zonder vertraging vanaf een afstand
te laten ontsteken. Voordeel voor de fotograaf:
- mobiele inzet van meerdere flitsers;
- geen flitskabelverbinding met de camera;
- plastische verlichting van het onderwerp.
De SLAVE-flitser wordt ontstoken door de lichtimpuls van
de hoofdflitser (Controller) op de camera, c.q. diens ingebouwde flitser.
Bij de inzet van de mecablitz als SLAVE-flitser
mag op de Controller, c.q. op de camera geen
anti rode ogen voorflits worden ontstoken! De
SLAVE-functie van de mecablitz in combinatie
met de stroboscoopfunctie, de flitsen met korte
belichtingstijden (de zogenoemde FP-, c.q. HSSflitsfuncties), de Canon A-TTL en E-TTL, Minolta
ADI of de Nikon 3D flitsfuncties zijn met dit
systeem niet mogelijk! Eventueel moeten deze
flitsfuncties op de camera, c.q. aan de SCAadapter van de Controller of op de Controllerflitser zelf, worden uitgezet (zie de gebruiksaanwijzing van de betreffende apparaten).
Het middencontact in de aansluitvoet mag
niet worden kortgesloten met de massacontacten aan de zijkant.
Bij het bedienen van de ontspanknop op de camera wordt
de SLAVE-flitser tegelijk met de Controllerflitser ontstoken
Op het moment van de opname moeten de Controllerflitser
en de SLAVE-flitser beide flitsparaat zijn. (Zie de aanduidingen van flitsparaatheid.)
Voor een betrouwbaar functioneren moet u zich ervan
overtuigen, dat de SLAVE-sensor in de mecablitz voldoende licht vanuit de Controllerflitser kan ontvangen! Als
een en ander niet goed functioneert moet de stand van de
SLAVE-flitser zo worden veranderd, dat de SLAVE-sensor
meer licht ontvangt.
Voor de SLAVE-functie moet de mecablitz op de meegeleverde standaard of samen met de camera op de "flitsbeugel 34-36" worden gezet.
De mecablitz wordt met de standaard op de gewenste
plaats neergezet, c.q. op een statief gemonteerd. Normaal
gesproken staat de reflector van de SLAVE-flitser daarbij in
de richting van het onderwerp.
Onze tip:
Bij losstaand gebruik (de mecablitz wordt als SLAVE op
enige afstand van de camera bediend) kunt u voor een zo
breed mogelijke uitlichting van het onderwerp zorgen door
☞
Ǻ
Ǻ
Page 26

Drahtloser SLAVE-Betrieb
Fonctionnement en mode esclave sans cordon
Draadloos SLAVE-flitsen
Weitwinkelvorsatzscheibe W vor den Blitzreflektor
geschwenkt sein.
Es stehen drei SLAVE-Funktionsarten zur Verfügung:
Die Wahl der SLAVE-Funktionsart erfolgt am mecablitz
durch den SLAVE-Funktionsschalter .
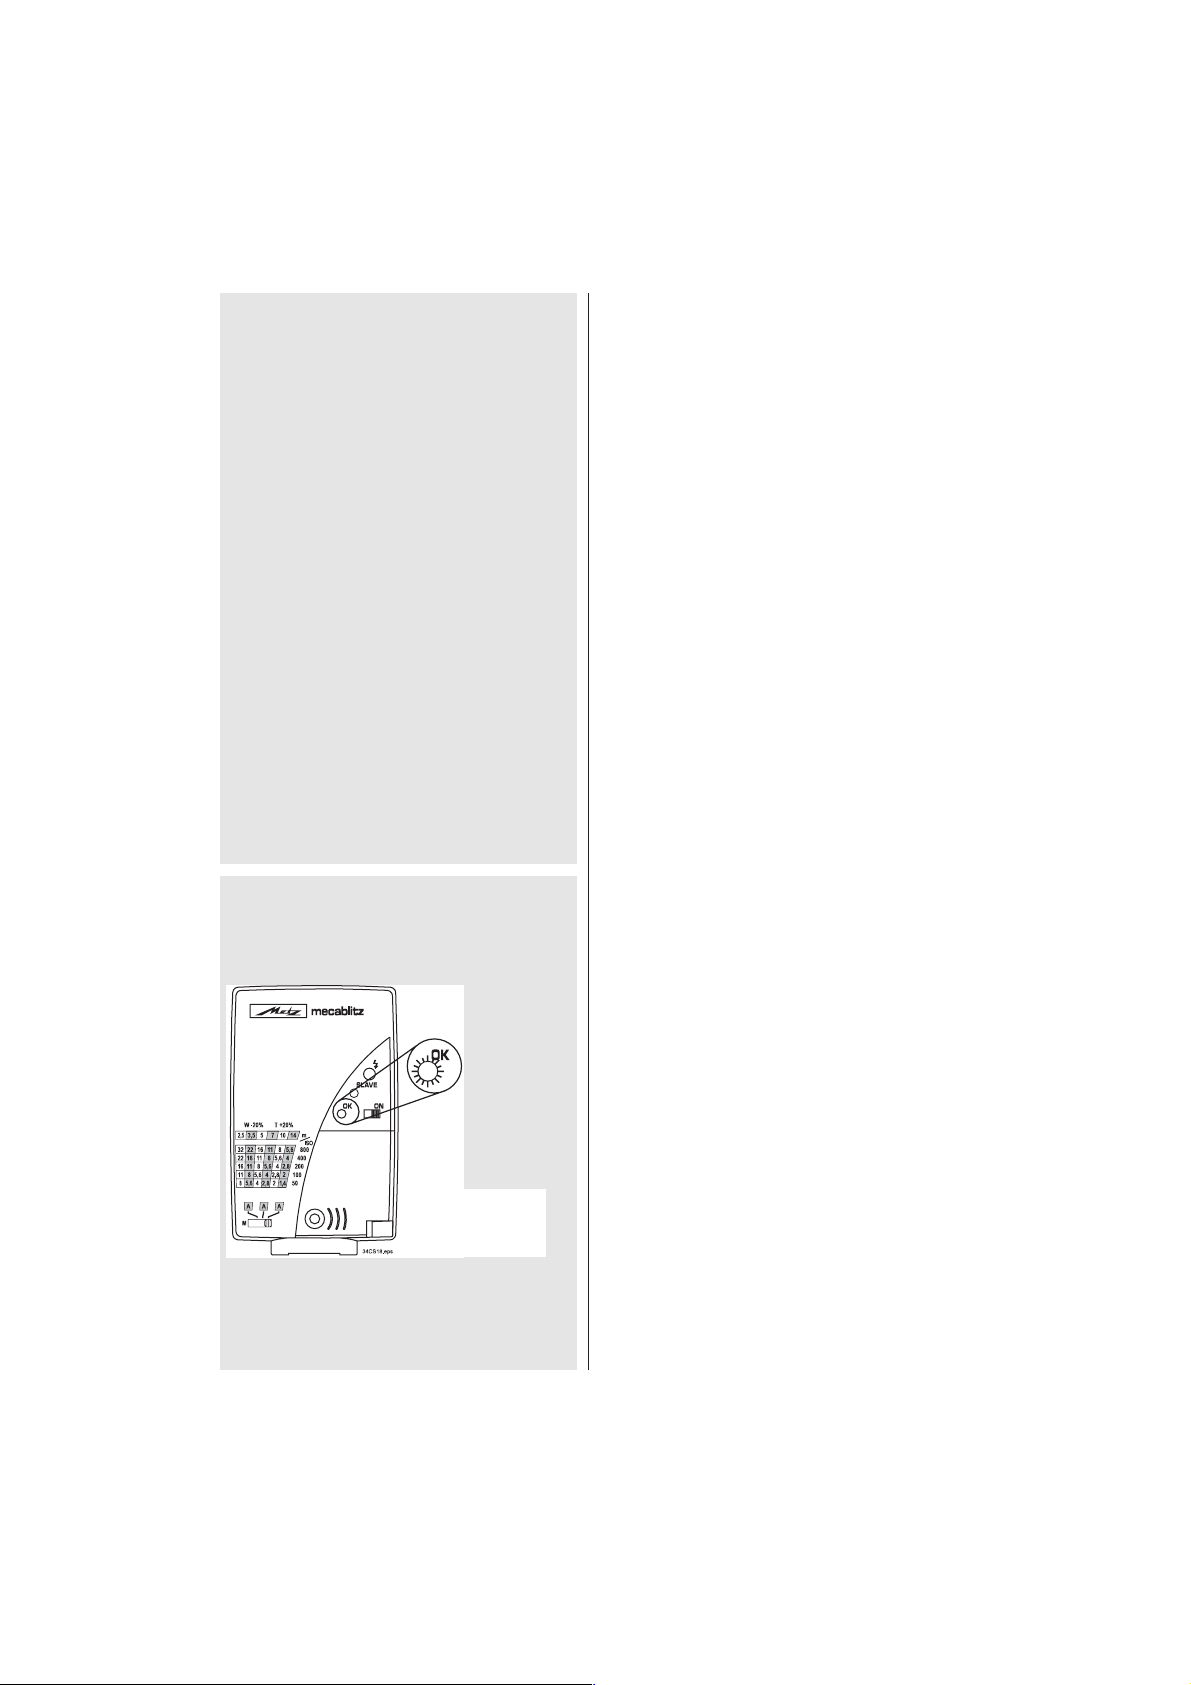
1. mecalux-SLAVE-Funktion:
Diese SLAVE-Betriebsart ist für alle Kameras ohne
Messvorblitz geeignet. Bei Kameras mit Messvorblitz
muss dieser an der Kamera ausgeschaltet werden.
Man kann jedes beliebige Blitzgerät (einschließlich
eines kamerainternen Blitzgerätes) als Controller verwenden. Das SLAVE-Blitzgerät wird zeitgleich mit
dem Controller ausgelöst. Die Lichtregelung erfolgt
am SLAVE-Blitzgerät gemäß der Schalterstellung des
Betriebsartenschalters (Automatik-Blitzbetrieb A
oder manueller Blitzbetrieb M).
Aktivierung des mecalux-SLAVE-Betriebes:
• Das SLAVE-Blitzgerät wie beschrieben montieren und
aufstellen.
• Das SLAVE-Blitzgerät mit dem Hauptschalter einschalten.
• Den SLAVE-Funktionsschalter in Position 1 schalten
(siehe Bild 8). Die SLAVE-Anzeige am mecablitz
leuchtet stetig (siehe Bild 9).
• Mit dem Betriebsartenschalter am SLAVE-Blitzgerät
Automatikbetrieb A oder manuellen Betrieb M wählen.
• Controller an der Kamera aktivieren. Kamera auf Blitzsynchronzeit oder eine längere Verschlusszeit einstellen.
Blitzgeräte von anderen Fotografen, die im selben Aktionsradius des mecablitz (SLAVE-Funktionsschalter in Position 1) arbeiten, können
den mecablitz unbeabsichtigt auslösen.
Für den Automatik-Blitzbetrieb A den Betriebsartenschalter
auf eine der drei Automatikblenden A einstellen. Die
Automatikblende sollte der am Objektiv bzw. der an der
Kamera eingestellten Blende entsprechen. Beachten Sie
dabei die Filmempfindlichkeit ISO des in die Kamera eingelegten Filmes bzw.bei Digitalkameras die Filmempfindlichkeitsangabe (siehe Kamerabedienungsanleitung). Wählen
Sie bei (Zoom-)Kompaktkameras ohne Einstellmöglichkeiten für die Blende die größte Blendenöffnung (entspricht
der kleinsten Blendenzahl; siehe Kamerabedienungsanleitung) für die Blendeneinstellung am mecablitz! Im Automatikbetrieb regelt der Fotosensor des mecablitz die Blitzlichtabgabe.
Für den manuellen Blitzbetrieb M den Betriebsartenschalter
auf M stellen.Der mecablitz gibt nach Ansteuerung einen
☞
26
Bild 8 / Fig. 8 / Afb. 8
Bild 9
Fig. 9
Afb. 9
Ǻ
34CS2-1
Page 27

esclave est placé à une certaine distance de l’appareil
photo), il est conseillé de placer le diffuseur grand angle W
devant le réflecteur pour obtenir une bonne couverture
du sujet par l’éclair.
On dispose de trois modes de fonctionnement esclave :
Le choix du mode esclave s’effectue au moyen du sélec-
teur de fonction SLAVE .
1. Fonction esclave mecalux
Ce mode esclave convient pour tous les appareils
photos sans pré-éclair de mesure. Dans le cas des
appareils émettant un pré-éclair de mesure, celui-ci
doit être désactivé sur l’appareil. On peut utiliser
n’importe quel flash (y compris le flash intégré) comme flash maître. Le flash esclave est déclenché en
même temps que le flash maître. Le dosage de la
lumière s’effectue au niveau du flash esclave en fonction de la position du sélecteur de mode (mode
automatique A ou manuel M).
Activation du mode esclave mecalux :
• Monter et installer le flash esclave comme décrit plus
haut.
• Allumer le flash esclave au moyen de l’interrupteur .
• Placer le sélecteur de fonction SLAVE sur la position 1
(voir figure 8). Le témoin SLAVE sur le mecablitz est
allumé en feu fixe (voir figure 9).
• Avec le sélecteur sur le flash esclave, sélectionner le
mode automatique A ou le mode manuel M.
•
Allumer le flash maître lié à l’appareil. Régler sur l’appareil
la vitesse de synchro flash ou une vitesse plus lente.
Les flashes d’autres photographes travaillant
dans le rayon d’action du mecablitz (sélecteur de
fonction SLAVE sur la position 1) peuvent provoquer un déclenchement intempestif du mecablitz.
En mode automatique A, positionner le sélecteur de mode
sur l’un des trois diaphragmes automatiques A. Le diaphragme sélectionné devrait correspondre à l’ouverture
sélectionnée sur l’appareil photo ou sur l’objectif. Tenez
compte de la sensibilité du film en place dans l’appareil ou
de la sensibilité sélectionnée sur les appareils numériques
(voir mode d’emploi de l’appareil). Dans le cas des compacts (zoom) sans possibilité de réglage du diaphragme,
sélectionner sur le mecablitz la plus grande ouverture (correspond à l’indice de diaphragme le plus petit, voir le mode
d’emploi de l’appareil). En mode automatique, le senseur
du mecablitz dose la quantité de lumière.
Pour le mode manuel M, placer le sélecteur de mode
sur M. Lorsqu’il est déclenché, le mecablitz émet un éclair
☞
het groothoekvoorzetvewnster W voor de reflector te
draaien.
Er zijn drie verschillende SLAVE-functies mogelijk:
De keuze van de SLAVE-functie vindt op de mecablitz
plaats met behulp van de SLAVE-functieschakelaar. .
1. mecalux SLAVE-functie:
Deze SLAVE-functie is voor alle camera's zonder
meethulpflits geschikt. Bij camera's met meethulpflits moet deze op de camera worden uitgeschakeld.
U kunt elke willekeurige flitser (inclusief een in de
camera ingebouwde flitser) als Controller gebruiken.
De SLAVE-flitser wordt tegelijkertijd met de Controller
ontstoken. De regeling van het licht vindt op de SLAVE-flitser overeenkomstig de stand van de functieschakelaar plaats (automatisch-flitsenfunctie A of
flitsen met handinstelling M).
Activeren van de mecalux SLAVE-functie:
• De SLAVE flitser als beschreven monteren en opstellen.
•
De SLAVE-flitser met de hoofdschakelaar inschakelen.
• De SLAVE-functieschakelaar in stand 1 schakelen
(zie afbeelding 8). De SLAVE-aanduiding op de mecablitz licht constant op (zie afbeelding 9).
• Met de functieschakelaar op de SLAVE-flitser de automatisch-flitsenfunctie A of de met de hand in te stellen
functie M kiezen.
• Schakel de Controller op de camera in. Stel de camera in
op de flitssynchronisatie- of een langere belichtingstijd.
Flitsers van andere fotografen die binnen dezelfde
actieradius van de mecablitz (met de SLAVE-functieschakelaar in stand 1) werken, zullen de mecablitz per ongeluk laten meeflitsen.
Voor de automatisch-flitsenfunctie A de functieschakelaar
op een van de drie werkdiafragma's instellen. Het
werkdiafragma moet overeenkomen met de op het objectief of de camera ingestelde waarde. Let daarbij op de
Filmgevoeligheid ISO van de in de camera ingelegde film,
c.q. bij digitale camera's de opgave van de filmgevoeligheid (zie de gebruiksaanwijzing van de camera).
Kies bij een (zoom-)compactcamera zonder instelmogelijkheden voor het diafragma de grootste diafragmaopening
(komt overeen met het laagste diafragmagetal; zie de
gebruiksaanwijzing van de camera) voor de instelling van
het diafragmagetal op de mecablitz! Bij de automatische
functie regelt de flitssensor van de mecablitz de hoeveelheid af te geven licht.
Zet voor het met de hand instellen (M) de functieschake-
☞
27
Ǻ
Ǻ
Page 28

Drahtloser SLAVE-Betrieb
Fonctionnement en mode esclave sans cordon
Draadloos SLAVE-flitsen
ungeregelten Blitz mit voller Lichtleistung ab. Im Wesentlichen gilt für den Abstand zwischen Blitzgerät und Aufnahmeobjekt sowie die einzustellende Kamerablende das gleiche wie für den manuellen Blitzbetrieb (siehe Seite 16).
2. mecalux-SLAVE-Funktion mit MessvorblitzUnterdrückung
Diese SLAVE-Betriebsart ist speziell für Digitalkameras mit Messvorblitz-Funktion geeignet: Verschiedene Digitalkameras lösen einen Sekundenbruchteil vor
der eigentlichen Blitzlichtaufnahme einen Messvorblitz aus. Damit der mecablitz nicht bereits zeitgleich
mit diesem Messvorblitz ausgelöst wird, erfolgt in der
Position 2 des SLAVE-Funktionsschalters die Auslösung des mecablitz erst zum Zeitpunkt des Hauptblitzes, der die Aufnahme belichtet.Die Lichtregelung
erfolgt am SLAVE-Blitzgerät gemäß der Schalterstellung des Betriebsartenschalters (Automatik-Blitz-
betrieb A oder manueller Blitzbetrieb M; näheres siehe „mecalux-SLAVE-Funktion“).
Aktivierung des mecalux-SLAVE-Betriebes mit Messvorblitz-Unterdrückung:
• Das SLAVE-Blitzgerät wie beschrieben montieren und
aufstellen.
• Das SLAVE-Blitzgerät mit dem Hauptschalter ein-
schalten.
• Den SLAVE-Funktionsschalter in Position 2 schalten
(siehe Bild 10). Die SLAVE-Anzeige am mecablitz
leuchtet und wird etwa im Sekundenabstand von zwei
kurzen Pausen (SLAVE-Anzeige 2 verlischt kurzzeitig
zweimal) unterbrochen.
• Mit dem Betriebsartenschalter am SLAVE-Blitzgerät
Automatikbetrieb A oder manuellen Betrieb M wählen.
• Controller an der Kamera aktivieren. Kamera auf Blitz-
synchronzeit oder eine längere Verschlusszeit einstellen.
Das SLAVE-Blitzgerät reagiert nur auf Lichtimpulse
vom Controller innerhalb eines bestimmten Zeitraumes (Sekundenbruchteil). Dadurch ist der mecablitz in dieser Betriebsart weitgehend störungssicher gegen das Blitzlicht anderer Fotografen die
nicht mit Messvorblitz-Technik arbeiten.
3. SLAVE-Funktion im drahtlosen Metz-Remote-
System
Diese SLAVE-Betriebsart ist ausschließlich für das
drahtlose Metz-Remote-System geeignet. Das Controllerblitzgerät auf der Kamera muss das drahtlose
Metz-Remote-System unterstützen (nur mecablitz 40
MZ-..., 50 MZ-5, 54 MZ-3, 70 MZ-...) und in die ent-
☞
28
Ǻ
Bild 10 / Fig. 10 / Afb. 10
Ǻ
34CS2-2
Page 29
à pleine puissance. Pour l’essentiel,ce qui a été dit dans le
mode automatique pour la distance entre flash et sujet et
pour l’ouverture de diaphragme à régler s’applique aussi
au mode manuel (voir page 17).
2. Fonction esclave mecalux avec inhibition du
pré-éclair de mesure
Ce mode esclave convient particulièrement aux
appareils numériques avec pré-éclair de mesure. En
effet, certains appareils numériques émettent quelques fractions de seconde avec la prise de vue au
flash un pré-éclair de mesure. La position 2 du sélecteur de fonction SLAVE a pour effet d’éviter le
déclenchement du mecablitz par ce pré-éclair et de
ne le déclencher qu’avec l’éclair principal. Le dosage
de la lumière s’effectue sur le flash esclave en fonction de la position du sélecteur de mode (mode
automatique A ou mode manuel M ; pour plus de
détails voir „Fonction esclave mecalux“).
Activation du mode esclave mecalux avec inhibition du
pré-éclair de mesure :
• Monter et installer le flash esclave comme décrit plus
haut.
• Allumer le flash esclave au moyen de l’interrupteur .
• Placer le sélecteur de fonction SLAVE sur la position 2
(voir figure 10). Le témoin SLAVE sur le mecablitz
s’allume et se ré-éteint brièvement deux fois de suite
toutes les secondes.
• Avec le sélecteur sur le flash esclave, sélectionner le
mode automatique A ou le mode manuel M.
•
Allumer le flash maître lié à l’appareil. Régler sur l’appareil
la vitesse de synchro flash ou une vitesse plus lente.
Le flash esclave ne réagit qu’aux impulsions de
lumière du flash maître qu’à l’intérieur d’une certaine fenêtre de temps (fraction de seconde). De
ce fait, dans ce mode de fonctionnement, le
mecablitz est largement insensible aux éclairs
des flashes d’autres photographes qui n’utilisent
pas la technique du pré-éclair de mesure.
3. Fonction esclave en mode multiflash sans cordon Metz Remote
Ce mode esclave convient exclusivement au mode
multiflash sans cordon Metz Remote. Le flash maître
sur l’appareil doit supporter le contrôle multiflash
sans cordon Metz Remote (uniquement mecablitz 40
MZ-..., 50 MZ-5, 54 MZ-3, 70 MZ-...) et se trouver
dans ce mode de fonctionnement (voir le mode d’emploi du flash maître). Le dosage de la lumière est
☞
laar op M. De mecablitz geeft bij het ontsteken een
niet-geregelde flits met vol vermogen af. In principe geldt
voor de afstand tussen flitser en onderwerp en het op de
camera in te stellen diafragma hetzelfde als voor flitsen
met handinstelling (zie pag. 17).
2. mecalux SLAVE-functie met onderdrukken van
de meethulpflits
Deze SLAVE-functie is speciaal bedoeld voor digitale
camera's met meethulpflitsfunctie: sommige digitale
camera's vuren een onderdeel van een seconde vóór
de eigenlijke flitsopname een meetflits af. Om nu de
mecablitz niet reeds tegelijk met die meetflits te ontsteken, vindt in stand 2 van de SLAVE-functieschakelaar het ontsteken pas plaats op het moment van
de hoofdflits die de opname belicht. De regeling van
het licht vindt op de SLAVE-flitser plaats, overeenkomstig de stand van de functieschakelaar (auto-
matisch-flitsenfunctie A of flitsen met handinstelling
M; zie voor details de "mecalux-SLAVE-functie").
Inschakelen van de mecalux SLAVE-functie met
onderdrukken van de meethulpflits:
• De SLAVE flitser als beschreven monteren en opstellen.
•
De SLAVE-flitser met de hoofdschakelaar inschakelen.
•
De SLAVE-functieschakelaar in stand 2 schakelen (zie
afbeelding 10). De SLAVE-aanduiding op de mecablitz
licht op en wordt met tussenpozen van ongeveer een
seconde door twee korte pauzes (de SLAVE-aanduiding 2
verdwijnt twee keer voor korte tijd) onderbroken.
• Met de functieschakelaar op de SLAVE-flitser de
automatisch-flitsenfunctie A of de met de hand in te stellen functie M kiezen.
• Schakel de Controller op de camera in. Stel de camera in
op de flitssynchronisatie- of een langere belichtingstijd.
De SLAVE-flitser reageert alleen op de door de
Controller binnen een bepaalde tijd (onderdeel
van een seconde) afgegeven lichtimpulsen.
Daardoor is de mecablitz in deze functie voor
een groot deel storingvrij tegen het flitslicht
van andere fotografen beschermd die niet met
een hulpmeetflits werken.
3. SLAVE-functie in het draadloos Metz-Remote-
systeem
Deze SLAVE-functie is uitsluitend voor het draadloos
Metz-Remote-systeem geschikt. De Controllerflitser op
de camera moet het draadloos Metz-Remote-systeem
ondersteunen (alleen met mecablitz 40 MZ- .., 50 MZ5, 54 MZ-3 en 70 MZ- ..) en in de overeenkomstige
☞
29
Ǻ
Ǻ
Ǻ
Ǻ
Page 30

Drahtloser SLAVE-Betrieb
Fonctionnement en mode esclave sans cordon
Draadloos SLAVE-flitsen
sprechende Betriebsart geschaltet werden (siehe die
Bedienungsanleitung des Controllers). Die Lichtsteuerung erfolgt durch die Kamera (Metz-TTLRemote-System) oder durch einen Fotosensor im
Controller (Metz-Automatik-Remote-System). Die
Schalterstellung des Betriebsartenschalters am
mecablitz ist unerheblich.
Aktivierung des SLAVE-Betriebes im drahtlosen MetzRemote-System:
• Das SLAVE-Blitzgerät wie beschrieben montieren und
aufstellen.
• Das SLAVE-Blitzgerät mit dem Hauptschalter ausschalten.
• Handauslöser drücken und gedrückt halten.
• Den mecablitz mit dem Hauptschalter einschalten.
• Handauslöser loslassen.
• Den SLAVE-Funktionsschalter in Position 2 schalten
(siehe Bild 10). Die SLAVE-Anzeige am mecablitz
blinkt (siehe Bild 11); Aus- und Ein-Intervall sind etwa
gleich lang.
• Controller an der Kamera aktivieren. Kamera auf Blitzsynchronzeit oder eine längere Verschlusszeit einstellen.
Nach dem Ausschalten des mecablitz mit dem
Hauptschalter bzw. nach einer automatischen
Geräteabschaltung muss der SLAVE-Betrieb im
drahtlosen Metz-Remote-System erst wieder
erneut aktiviert werden (siehe oben)!
Beachten Sie, dass der mecablitz als SLAVE im
drahtlosen Metz-Remote-System nur die Controller-Adresse 1 unterstützt! Der Betrieb des
mecablitz als Controller im drahtlosen MetzRemote-System ist nicht möglich!
Testen Sie den drahtlosen Metz-Remote-Betrieb vor
der eigentlichen Aufnahme:
• Positionieren Sie den mecablitz (SLAVE) wie für die Aufnahme gewünscht.
• Halten Sie die Kamera mit dem Controller-Blitzgerät wie
bei der späteren Aufnahme.
• Warten Sie bis das Controller-Blitzgerät und der (die)
SLAVE(S) blitzbereit sind (Blitzbereitschaftsanzeige der
einzelnen Blitzgeräte leuchtet).
• Am mecablitz auf der Kamera (Controller) die Handauslösetaste drücken und einen Probeblitz auslösen.
• Der mecablitz 34 CS-2 digital (SLAVE) antwortet mit einem
zeitverzögerten Blitz und zeigt damit an, dass er betriebsbereit ist. Werden mehrere SLAVES gleichzeitig betrieben,
☞
☞
30
Bild 11
Fig. 11
Afb. 11
Ǻ
Page 31

assuré par l’appareil photo (contrôle TTL Metz Remote) ou par un senseur sur le flash maître (contrôle
Automatique Metz Remote). La position du sélecteur
de mode sur le mecablitz est indifférente.
Activation du mode multiflash sans cordon Metz
Remote :
• Monter et installer le flash esclave comme décrit plus
haut.
• Couper le flash esclave au moyen de l’interrupteur .
• Maintenir enfoncé le bouton d’essai .
• Allumer le flash esclave au moyen de l’interrupteur .
• Relâcher le bouton d’essai .
• Placer le sélecteur de fonction SLAVE sur la position 2
(voir figure 10). Le témoin SLAVE sur le mecablitz clignote (voir figure 11) avec des périodes „allumé“ et
„éteint“ sensiblement égales.
•
Allumer le flash maître lié à l’appareil. Régler sur l’appareil
la vitesse de synchro flash ou une vitesse plus lente.
Après la coupure du mecablitz avec l’interrupteur ou après une coupure automatique, il
faut reprendre depuis le début l’activation du
mode esclave avec contrôle sans cordon Metz
Remote (voir ci-dessus !).
Notez qu’en mode esclave avec contrôle sans cordon Metz Remote, le mecablitz ne supporte que
l’adresse de flash maître 1 ! Le mecablitz ne peut
pas être utilisé comme flash maître dans une configuration multiflash sans cordon Metz Remote.
Testez le contrôle Metz Remote sans cordon avant de
prendre la photo :
• Orientez le mecablitz (esclave) comme pour la prise de
vue.
• Tenez l’appareil portant le flash maître comme pour la
prise de vue.
• Attendez que les témoins de disponibilité s’allument sur
le flash esclave et sur le flash maître.
• Appuyez sur le bouton d’essai du flash maître pour
déclencher un éclair de test.
• Le mecablitz 34 CS-2 digital (esclave) répond à retardement par un éclair, signalant ainsi qu’il est prêt. Si on utilise une configuration avec plusieurs flashes esclaves,
tous les flashes esclaves répondent en même temps.
• Si un flash esclave ne déclenche pas d’éclair en retour,
c’est que son senseur n’a pas été frappé par l’impulsion
lumineuse de déclenchement. Orientez ce flash esclave
de manière que son senseur puisse recevoir l’impulsion
☞
☞
flitsfunctie worden gezet (zie de gebruiksaanwijzing
van de Controller). De sturing van de hoeveelheid flitslicht geschiedt door de camera (Metz-TTL-Remotesysteem). De stand van de functieschakelaar op de
mecablitz is hierbij van geen belang.
Activeren van de SLAVE-functie in het draadloos MetzRemote-systeem:
• De SLAVE flitser als beschreven monteren en opstellen.
•
De SLAVE-flitser met de hoofdschakelaar uitschakelen.
• Druk op de handontspanknop en houd die ingedrukt.
• Druk op de handontspanknop en houd die ingedrukt.
• De mecablitz met hoofdschakelaar
inschakelen.
• Laat de handontspanknop los.
• Met de functieschakelaar op de SLAVE-flitser de automatisch-flitsenfunctie A (zie pag. 4) of de met de hand in
te stellen functie M kiezen. Om de mecablitz als Controller-fitser in te stellen zijn geen extra-instellingen nodig.
• Controllerflitser op de camera aanzetten. Stel op de
camera de flitssynchronisatietijd of een langere tijd in.
Na het uitschakelen van de mecablitz met de
hoofdschakelaar
, c.q. na een evt. automatische uitschakeling moet de SLAVE-functie in
het Metz Rermote-systeem weer opnieuw
geactiveerd worden (zie boven).
Let er op, dat de mecablitz als SLAVE in het draadloos Metz-Remote-systeem alleen Controlleradres 1 ondersteunt! Het is niet mogelijk de
mecablitz als Controller in het draadloos MetzRemote-systeem in te zetten!
Test vóór de eigenlijke opname het draadloos MetzRemote-systeem:
• Plaats de mecablitz (SLAVE) zoals dat voor de opname
wenselijk is.
• Houd de camera met de Controllerflitser als bij de eigenlijke opname.
• Wacht tot de Controllerflitser en de SLAVE(S) gereed zijn
om te flitsen (op elke flitser licht de aanduiding van flitsparaatheid op).
• Druk bij de mecablitz op de camera (Controllerflitser) op
de handontspanknop en ontsteek een proefflits.
• De macablitz 34 CS-2 digital (SLAVE) antwoordt met een
in tijd vertraagde flits en geeft daarmee aan, dat hij gereed is. Als u meerdere SLAVES tegelijkertijd gebruikt, antwoorden alle SLAVES gelijktijdig.
• Geeft een van de SLAVES geen in tijd vertraagde flits af,
dan heeft de sensor van die flitser geen lichtimpuls ont-
☞
☞
31
Ǻ
Ǻ
Page 32

Drahtloser SLAVE-Betrieb
Fonctionnement en mode esclave sans cordon
Draadloos SLAVE-flitsen
so erfolgt die Quittierung aller SLAVES gleichzeitig.
• Gibt ein SLAVE keinen zeitverzögerten Blitz ab, so hat der
Sensor des SLAVE keinen Lichtimpuls empfangen. Drehen Sie den SLAVE so, dass der Sensor einen Lichtimpuls empfangen kann und wiederholen Sie den Test.
Große Umgebungshelligkeit oder / und große
Blendenöffnung am Kameraobjektiv können
dazu führen, dass bei der anschließenden Aufnahme der Lichtimpuls nicht vollständig vom
SLAVE empfangen wird, weil die Elektronik die
Lichtabgabe vorher unterbricht. In diesem Fall
das Kameraobjektiv abblenden oder einen Neutral-Grau-Filter vor dem Objektiv anbringen.
Um den mecablitz von der „SLAVE-Funktion im drahtlosen
Metz-Remote-System“ in die „mecalux-Funktion mit Messvorblitz-Unterdrückung“ zu schalten (SLAVE-Funktionsschalter jeweils in Position 2), genügt es den mecablitz mit
dem Hauptschalter kurzzeitig aus- und wieder einzuschalten. In der Position1 des SLAVE-Funktionsschalters
arbeitet der mecablitz stets mit „mecalux-SLAVE-Funktion“.
Das SLAVE-Blitzgerät reagiert nur auf den Lichtimpuls vom Controller. Blitzgeräte anderer
Fotografen im selben Aktionsradius können
den SLAVE nicht auslösen.
Im drahtlosen Metz-Remote-Betrieb erfolgt am
Slave-Blitzgerät keine Belichtungskontrollanzeige. Für die Belichtungskontrolle ist nur die
Anzeige am Controller relevant.
Drahtloser Controller-Blitzbetrieb
Im Controller-Blitzbetrieb steuert das Blitzlicht des
mecablitz drahtlos die Auslösung eines oder mehrerer SLAVE-Blitzgeräte. Der Controller wird im
Zubehör- bzw. Blitzschuh der Kamera oder auf der
Kameraschiene montiert oder über ein Synchronkabel mit dem Synchronkontakt (X-Kontakt) der Kamera
verbunden (siehe 2.4 Synchronisation). Der mecablitz
34 CS-2 digital unterstützt als Controller nur die
mecalux-SLAVE-Funkion: SLAVE-Funktionsschalter
des mecablitz 34 CS-2 digital auf bzw. an der Kamera in Position 0.
Der SLAVE-Funktionsschalter des SlaveBlitzgerätes auf die Position 1 stellen!
Der mecablitz wird entweder in der Automatik-Blitzbetriebsart A oder der manuellen Betriebsart M betrieben. Für den
Einsatz als Controller-Blitzgerät sind keine zusätzlichen Einstellungen erforderlich.
☞
☞
☞
☞
32
Ǻ
Page 33

lumineuse, et répétez le test.
Dans le cas d’une forte lumière ambiante ou / et
d’une grande ouverture de diaphragme sur
l’objectif de l’appareil photo, il peut arriver
qu’au moment de la prise vue le flash esclave
ne reçoive pas la pleine impulsion lumineuse en
raison de la coupure prématurée de l’éclair
principal. Pour remédier à cette situation, fermer le diaphragme sur l’objectif ou placer un
filtre gris neutre devant l’objectif.
Pour commuter le mecablitz de la „fonction esclave en mode
multiflash sans cordon Metz Remote“ dans la „fonction
esclave mecalux avec inhibition du pré-éclair de mesure“ (le
sélecteur de fonction SLAVE étant dans les deux cas sur la
position 2), il suffit d’éteindre passagèrement le mecablitz au
moyen de l’interrupteur puis de le rallumer. Sur la position 1 du sélecteur de fonction SLAVE , le mecablitz fonctionne toujours avec la „fonction esclave mecalux“.
Le flash esclave ne réagit qu’à l’impulsion lumineuse du flash maître. Les flashes des autres photographes se trouvant dans le même rayon d’action ne peuvent pas déclencher le flash esclave.
En mode multiflash sans cordon Metz Remote,
le témoin de bonne exposition du flash esclave
n’a pas de fonction. Seule l’indication du
témoin sur le flash maître est valable.
Fonctionnement en mode maître sans cordon
En mode maître dans une configuration multiflash,
l’éclair du mecablitz commande à distance (sans cordon) le déclenchement d’un ou plusieurs flashes esclaves. Le flash maître est monté sur la griffe porte-accessoires de l’appareil photo ou sur la barrette ou est relié
par un câble de synchronisation au contact de synchronisation (contact X) de l’appareil (voir 2.4 Synchronisation). Le mecablitz 34 CS-2 digital en tant que flash maître ne supporte que la fonction esclave mecalux : le
sélecteur de fonction SLAVE du mecablitz 34 CS-2 lié à
l’appareil photo doit être positionné sur 0.
Placer le sélecteur de fonction SLAVE du
flash esclave sur la position 1.
Le mecablitz est utilisé soit en mode automatique A ou en
mode manuel M. L’utilisation en flash maître ne requiert
pas d’autres réglages.
☞
☞
☞
☞
vangen. Draai hem dan zo, dat de sensor een lichtimpuls kan ontvangen en herhaal de test.
Een zeer heldere omgeving en/of een grote
diafragmaopening op de camera kunnen ertoe
leiden, dat bij de aansluitende opname de lichtimpuls niet geheel door de SLAVE wordt ontvangen omdat de elektronica de lichtafgifte te
vroeg onderbreekt. In dit geval moet u het
cameraobjectief verder diafragmeren of een
neutraal grijsfilter voor het objectief plaatsen.
Om de mecablitz voor de SLAVE-functie in het draadloos
Metz-Remote-systeem in de functie "mecalux-functie met
onderdrukking van de meethulpflits" te schakelen (functieschakelaar van de SLAVE dan in stand 2), is het voldoende de mecablitz heel even met de hoofdschakelaar uit
en meteen weer aan te zetten. Met de functieschakelaar
van de SL:AVE In stand 1 werkt de mecablitz altijd in de
"mecalux-SLAVE-functie".
De SLAVE-flitser reageert alleen op de lichtimpuls van de Controllerflitser, flitsen van andere
fotografen binnen dezelfde actieradius kunnen
de SLAVE-flits niet ontsteken.
In het draadloos Metz-Remote-systeem verschijnt er op de SLAVE-flitser geen aanduiding
van de belichtingscontrole. Voor controle op de
belichting is alleen de aanduiding op de Controllerflitser relevant.
Draadloze Controllerflitsfunctie
In de Controllerflitsfunctie stuurt de flits van de mecablitz draadloos het ontsteken van een of meerdere
SLAVE-flitsers aan. De Controllerflitser wordt in de
accessoireschoen van de camera of op de flitsbeugel
gemonteerd of via een flitskabel met het flitscontact (Xcontact) van de camera verbonden.(zie 2.4 Synchronisatie). De mecablitz 34 CS-2 digital ondersteunt als
Controllerflitser alleen de mecalux-SLAVE-functie: functieaschakelaar van de SLAVE mecablitz 34 CS-digital
op, c.q. aan de camera in stand 0.
Zet de functieschakelaar van de SLAVE-flitser in stand 1!
De mecablitz werkt in de automatisch-flitsenfunctie A of in
of de met de hand in te stellen functie M. Voor het gebruik
als Controllerflitser zijn geen extra instellingen nodig.
☞
☞
☞
☞
33
Ǻ
Ǻ
Page 34

34
Fehler und Abhilfe, Kundendienst
Erreurs de fonctionnement et solutions, SAV
Fouten, remedie, service
10. Fehler und Abhilfe, Kundendienst
Entfernen Sie Schmutz und Staub mit einem weichen,
trockenen Tuch. Verwenden Sie keine Reinigungsmittel –
die Kunststoffteile könnten beschädigt werden.
Formieren des Blitz-Kondensators
Aus technischen Gründen ist es notwendig, den mecablitz
in vierteljährlichem Abstand für ca. 10 Minuten einzuschalten und ein paar Blitze abzugeben (Der im mecablitz eingebaute Kondensator verändert sich physikalisch, wenn
das Gerät längere Zeit nicht eingeschaltet wird).
Die Batterien müssen dabei mindestens so viel Energie
liefern, dass die Blitzbereitschaftsanzeige spätestens
1 Minute nach dem Einschalten aufleuchtet.
Vor Inanspruchnahme des Kundendienstes sollten Sie
zunächst die folgenden Hinweise beachten:
Wenn der mecablitz auf einer Kamera montiert
ist und kein Blitzlicht abgibt:
• sind die Batterien richtig eingelegt ?
• sind die Batterien leer ?
• hat das Blitzgerät automatisch abgeschaltet ?
• besteht der Synchronkontakt zur Kamera ?
• Ist der SLAVE-Funktionsschalter auf „0“ eingestellt ?
• steckt ein Synchronkabel in der Synchronbuchse des
mecablitz, dann ist der Mittenkontakt deaktiviert !
Wenn der mecablitz als SLAVE- Blitzgerät eingesetzt ist und kein Blitzlicht abgibt:
• sind die Batterien richtig eingelegt ?
• sind die Batterien leer ?
• hat sich das Blitzgerät automatisch in den Stand-by
Modus geschaltet ?
• empfängt der Sensor für den drahtlosen Blitzbetrieb
einen Lichtimpuls ? Event. Aufstellort verändern oder
Kamera abblenden oder Umgebungshelligkeit mindern.
• ist der SLAVE-Funktionsschalter richtig eingestellt ?
- (Digital-)Kamera ohne
Messvorblitz-Technik:
SLAVE-Funktionschalter in Position 1.
- Digitalkamera mit
Messvorblitz-Technik:
SLAVE-Funktionschalter in Position 2.
• Bei der SLAVE-Funktion im drahtlosen Metz-RemoteSystem muss beim Controller-Blitzgerät die Adresse 1
eingestellt sein!
Page 35

35
10. Erreurs de fonctionnement et
solutions, SAV
Nettoyer le flash à l’aide d’un torchon doux et sec. Ne pas
utiliser de produits de nettoyage qui pourraient endommager les éléments en plastique.
Formation du condensateur du flash
Pour des raisons techniques, il est nécessaire de mettre le
mecablitz en marche pendant 10 minutes env. à intervalles
de trois mois à peu près pour qu’il produise quelques éclairs
(le condensateur intégré dans le mecablitz subit des changements physiques lorsque l’appareil n’est pas utilisé pendant
longtemps). La charge des piles doit être suffisante pour que
le témoin de recyclage du flash s’allume au plus tard 1 minute après la mise en marche du flash.
Avant de faire appel au service après-vente, veuillez tenir
compte des indications suivantes:
Lorsque le mecablitz est installé sur un appareil
photo mais ne produit pas d’éclair:
• les piles ont-elles été mises correctement ?
• les piles sont-elles vides ?
• le flash s’est-il débranché automatiquement ?
•
y-a-t-il un contact de synchronisation avec l’appareil photo ?
• le sélecteur de fonction SLAVE l est-il positionné sur 0?
• si un câble de synchronisation est connecté sur la prise
du mecablitz, le contact central est désactivé !
Lorsque le mecablitz est utilisé comme flash esclave ou à servocommande et ne produit pas d’éclair:
• les piles ont-elles été mises correctement ?
• les piles sont-elles vides ?
• le flash s’est-il débranché automatiquement ?
• le senseur pour le fonctionnement sans cordon reçoit-il
une impulsion lumineuse ? Changer éventuellement de
place, réduire l’ouverture de l’appareil photo ou diminuer
l’intensité lumineuse.
• Est-ce que le sélecteur de fonction SLAVE est cor-
rectement réglé ?
- Appareil (numérique) sans
pré-éclair de mesure >>>
sélecteur de fonction SLAVE sur position 1.
- Appareil (numérique) avec pré-éclair de mesure >>>
sélecteur de fonction SLAVE sur position 2.
• Dans le cas de la fonction esclave en mode multiflash
sans cordon Metz Remote, il faut que l’adresse 1 soit
réglée sur le flash maître.
10. Fouten, remedie, service
Verwijder vuil en stof met een zachte, droge doek. Gebruik
geen reinigingsmiddelen - deze zouden de kunststofdelen
aan kunnen tasten.
Formeren van de flitscondensator
Om technische redenen is het noodzakelijk, de mecablitz
elk kwartaal gedurende 10 minuten in te schakelen en een
paar flitsen te ontsteken (de in de mecablitz ingebouwde
condensator verandert natuurkundig als het apparaat langere tijd niet wordt ingeschakeld). De batterijen moeten
daarbij minstens zoveel energie leveren, dat de flitser op
zijn laatst binnen 1 minuut aanduidt, paraat te zijn.
Voordat u de service aanspreekt, kunt u zelf de volgende
controles uitvoeren:
Als de mecablitz op een camera zit en geen flits
ontsteekt:
• Zijn de batterijen correct ingelegd ?
• Zijn de batterijen leeg ?
• Is de flitser misschien automatisch uitgeschakeld ?
• Is er wel elektrisch contact tussen camera en flitser ?
• Staat de keuzeschakelaar SLAVE op „0“ ?
• Zit er een flitskabel in de flitsaansluiting van de mecablitz, dan is het middencontact niet actief !
Als de mecablitz als SLAVE-flitser is ingezet, en
geen flits afgeeft:
• Zijn de batterijen correct ingelegd ?
• Zijn de batterijen leeg ?
• Is de flitser misschien automatisch uitgeschakeld ?
• Ontvangt de sensor voor het draadloze flitsen wel een
lichtimpuls ? Eventueel de plaats van opstelling veranderen, de camera verder diafragmeren of de helderheid van
de omgeving verlagen.
•
Is de keuzeschakelaar van de SLAVE correct ingesteld ?
- (Digitale) camera zonder hulpmeetflitstechniek: >>>
SLAVE-functieschakelaar in stand 1.
- (Digitale) camera met hulpmeetflitstechniek: >>>
SLAVE-functieschakelaar in stand 2.
• Bij de SLAVE-functie in het draadloos Metz-Remotesysteem moet op de Controller Adres 1 ingesteld zijn. !
Page 36

36
Fehler und Abhilfe, Kundendienst
Erreurs de fonctionnement et solutions, SAV
Fouten, remedie, service
Beim Einsatz des mecablitz als SLAVE mit einer
Digitalkamera werden alle Aufnahmen unabhängig von der Stellung des Betriebsartenschalters
zu dunkel belichtet:
• Digitalkamera arbeitet wahrscheinlich mit Messvorblitz-Technik - SLAVE-Funktionsschalter in Position 2
schalten.
Wenn der mecablitz trotz aller angegebenen Hinweise immer noch nicht funktioniert, dann:
• mecablitz mit dem Hauptschalter ausschalten, kurze
Zeit warten und wieder einschalten.
Sollte der mecablitz trotz aller angegebenen Hinweise
immer noch nicht funktionieren, dann wenden Sie sich an
einen autorisierten Metz-Fachhändler.
Page 37

37
Lorsque le mecablitz est utilisé en esclave en
liaison avec un appareil numérique, toutes les
prises de vue sont sous-exposées indépendamment de la position du sélecteur de mode :
• L’appareil numérique fonctionne probablement avec un
pré-éclair de mesure >>> placer alors le sélecteur de
fonction SLAVE sur la position 2.
Si le mecablitz ne fonctionne toujours pas :
• Débrancher le flash à l’aide de l’interrupteur général ,
attendre un peu et le remettre en marche.
Si le mecablitz ne fonctionne toujours pas après tout cela,
s’adresser à un revendeur Metz agréé.
Bij het inzetten van de mecablitz als SLAVE met
een digitale camera worden alle opnamen onafhankelijk van de stand van de functieschakelaar
te krap belicht:
• De digitale camera werkt waarschijnlijk met hulpmeetflitstechniek >>> SLAVE-functieschakelaar in stand
2 zetten.
Als de mecablitz ondanks de hierboven opgevoerde aanwijzingen niet functioneert, dan :
• Flitser uitschakelen met de hoofdschakelaar , enige
tijd wachten en weer inschakelen.
Zou de mecablitz ondanks alle hierboven opgevoerde controles nog steeds niet werken, ga er dan mee naar een
geautoriseerde Metz-fotohandelaar.
Page 38
38
Technische Daten
Caractéristiques techniques
Technische gegevens
11. Technische Daten
Leitzahl bei ISO 100/21°:
34 (mit Tele-Vorsatz)
28 (ohne Vorsatz)
20 (mit Weitwinkelvorsatz)
Ausleuchtung
für Kleinbild ab 35 mm Brennweite, mit
Weitwinkelvorsatz ab 24 mm, mit Televorsatz ab 85 mm
Brennweite.
F
arbtemperatur: ca. 5600° K
Synchronisa
tion: Niederspannungs-IGBT-Zündung
Blitzleuchtzeit:
1/250 s ...1/45000 s
Blitzfolgezeit bei
Vollblitze ca.6 s
Ausleuchtung:
rechteckig
ohne Scheibe horizontal ca. 56°,vertikal ca. 40°
mit W-Scheibe horizontal ca. 75°, vertikal ca. 55°
mit T-Scheibe horizontal ca. 25°, vertikal ca. 18°
Gewicht:
ca. 160 g
Maße
(BxHxT): 61 mm x 111 mm x 35 mm
Auslieferungsumfang:
Blitzgerät, Vorsatzscheiben (W=Weitwinkel / T=Tele),
Ständer,Blitzschiene, Bedienungsanleitung, 2 Batterien
CR 2.
1,4
W N T W N T W N T W N T W N T W N T W N T W N T
8
11
16
22
32
45
10
14
20
28
40
56
12
17
24
34
48
67
5,5
8
11
16
22
32
7
10
14
20
28
40
8,5
12
17
24
34
48
4
5,5
8
11
16
22
5
7
10
14
20
28
6
8,5
12
17
24
34
2,8
4
5,5
8
11
16
3,5
5
7
10
14
20
4,2
6
8,5
12
17
24
2
2,8
4
5,5
8
11
2,5
3,5
5
7
10
14
3
4,2
6
8,5
12
17
1,4
2
2,8
4
5,5
8
1,8
2,5
3,5
5
7
10
2,1
3
4,2
6
8,5
12
1
1,4
2
2,8
4
5,5
1,2
1,8
2,5
3,5
5
7
1,4
2,1
3
4,2
6
8,5
0,7
1
1,4
2
2,8
4
0,9
1,2
1,8
2,5
3,5
5
1
1,4
2,1
3
4,2
6
ISO
25/15°
50/18°
100/21°
200/24°
400/27°
800/30°
2 2,8 4 5,6 8 11 16
max. Entfernung in m • Distance max. en m • Max. afstand in m
Tabelle für max. Beleuchtungsentfernung / Tableau des distances max. flash-sujet /
Tabel voor de max. flitsafstand
W = Weitwinkelvorsatzscheibe W vor den Blitzreflektor geschwenkt
N = Normalbetrieb; Blitzreflektor ohne Vorsatzscheibe
T = Televorsatzscheibe T vor den Blitzreflektor geschwenkt
W = diffuseur grand angle W placé devant le réflecteur du flash
N = utilisation normale, sans complément optique devant le réflecteur
T = complément télé T placé devant le réflecteur du flash
W = groothoekvoorzetvenster W voor de reflector gedraaid
N = normale functie; flitser zonder voorzetvenster
T = televoorzetvenster T voor de reflector gedraaid
Page 39
39
11. Caractéristiques techniques
Nombre-guide
pour ISO 100/21°:
34 (avec complément télé)
28 (sans complément)
20 (avec diffuseur grand-angle)
Ec
lairage pour petit format à partir d’une distance focale
de 35 mm, avec diffuseur grand-angle à partir de 24mm,
avec complément télé à partir d’une distance focale de
85mm.
T
empérature de couleur: env. 5600° K
Synchronisa
tion: amorçage à basse tension IGBT
Durée de l’éc
lair: 1/250 s... 1/45000 s
T
emps de recyclage à pleine puissance: env. 6 sec.
Ec
lairage: rectangulaire
Sans complément, horizontal env. 56 °, vertical env. 40°
Avec diffuseur W, horizontal env. 75 °, vertical env. 55°
Avec complément T, horizontal env. 25 °, vertical env. 18°
P
oids: env. 160 g
Dimensions (larg. x haut.x prof.): 61 mm x 111 mm x 35 mm
Contenu:
Flash, diffuseur/complément (W = grand-angle, T = télé),
support, barrette, mode d’emploi,2 piles CR 2.
11. Technische gegevens
Richtgetal bij ISO 100/21°:
34 (met televoorzetvenster)
28 (zonder voorzetvenster)
20 (m. groothoekvoorzetvenster)
V
erlichtingshoek voor kleinbeeld met objectieven vanaf
f = 35 mm brandpuntsafstand, met groothoekvoorzetvenster vanaf f = 24 mm, met televoorzetvenster
vanaf f = 85 mm brandpuntsafstand.
Kleurtempera
tuur: ong. 5600° K
Synchronisa
tie: laagspannings IGBT-ontsteking
Flitsduur:
1/250 ... 1/45000 s.
Flitsvolgtijd bij flitsen
met volle energie: ong. 6 s.
V
erlichtingsvlak: rechthoekig
Zonder voorzetvenster horizontaal ong. 56°, verticaal ong. 40°,
Met W-voorzetvenster horizontaal ong.75°, verticaal ong. 55°,
Met T-voorzetvenster horizontaal ong. 25°, verticaal ong. 18°.
Gewicht: ong. 160 g
Ma
ten: (B x H x D) 61 mm x 111 mm x 35 mm
De levering bestaa
t uit:
Flitser,voorzetvensters (W=groothoek / T=tele),
standaard, flitsbeugel, gebruiksaanwijzing,2 batterijen CR 2.
Page 40

40
Contents
Indice
Indice
1. Safety instructions . . . . . . . . . . . . . . . . . . . .44
2. Preparations . . . . . . . . . . . . . . . . . . . . . . . . .46
2.1 Power supply . . . . . . . . . . . . . . . . . . . . . . . .46
2.2 Replacing the batteries . . . . . . . . . . . . . . . . .46
2.3 Mounting/Removing the mecablitz . . . . . . . .46
2.4 Synchronisation . . . . . . . . . . . . . . . . . . . . . .48
2.5 Switching the flash unit on and off . . . . . . . .48
2.6 Selecting the operating mode with the mode
selector . . . . . . . . . . . . . . . . . . . . . . . . . . . .48
2.7 SLAVE function switch . . . . . . . . . . . . . . . . .50
3. Automatic flash mode . . . . . . . . . . . . . . . . .52
4. Manual flash mode . . . . . . . . . . . . . . . . . . . .54
5. Fill-in flash with dayligh . . . . . . . . . . . . . . . .56
5.1 Fill-in flash in auto mode . . . . . . . . . . . . . . . .56
6. Flash exposure correction . . . . . . . . . . . . . .58
6.1 Exposure corrections in auto mode . . . . . . . .58
7. Exposure verification . . . . . . . . . . . . . . . . . .58
8. Lighting and diffuser . . . . . . . . . . . . . . . . . .60
8.1 Mounting/removing the attachments . . . . . . .60
9. Cordless SLAVE operation . . . . . . . . . . . . . .62
1. mecalux-SLAVE function . . . . . . . . . . . . . . . .64
2. mecalux-SLAVE function with
preflash suppression . . . . . . . . . . . . . . . . . .66
3.
SLAVE function with cordless Metz remote system
. .66
Cordless controller flash operation . . . . . . . . . . . . . .70
10. Troubleshooting hints - After-sales service . . . .72
11. Technical data . . . . . . . . . . . . . . . . . . . . . . . . . . .76
Page 41

41
1. Avvertenze di sicurezza . . . . . . . . . . . . . . . . . . . .45
2. Preparazione . . . . . . . . . . . . . . . . . . . . . . . . . . . . .47
2.1 Alimentazione . . . . . . . . . . . . . . . . . . . . . . . . . . . .47
2.2 Sostituzione delle batterie . . . . . . . . . . . . . . . . . . .47
2.3 Montaggio/Smontaggio del mecablitz . . . . . . . . . .47
2.4 Sincronizzazione . . . . . . . . . . . . . . . . . . . . . . . . . .49
2.5 Accensione e spegnimento del lampeggiatore . . . .49
2.6 Selezione del Modo con il selettore del
modo di funzionamento . . . . . . . . . . . . . . . . . . . . .49
2.7 Selettore di funzionamento SLAVE . . . . . . . . . . . . .51
3. Modo flash Auto . . . . . . . . . . . . . . . . . . . . . . . . . .53
4. Modo flash Manuale . . . . . . . . . . . . . . . . . . . . . . .55
5. Flash di schiarita alla luce diurna . . . . . . . . . . . .57
5.1 Lampo di schiarita in modo Auto . . . . . . . . . . . . . .57
6. Correzione dell’esposizione flash . . . . . . . . . . . . .59
6.1 Compensazione dell’esposizione in flash Auto . . . .59
7. Indicazione di corretta esposizione . . . . . . . . . . .59
8. Illuminazione e diffusore . . . . . . . . . . . . . . . . . . .61
8.1 Montaggio/smontaggio dei diffusori . . . . . . . . . . . .61
9. Controllo SLAVE senza cavi . . . . . . . . . . . . . . . . . . .63
1. Funzione mecalux SLAVE: . . . . . . . . . . . . . . . . . . .65
2. Funzione mecalux SLAVE con soppressione
del prelampo di misurazione . . . . . . . . . . . . . . . .67
3. Funzione SLAVE nel Controllo Metz a
distanza senza cavi . . . . . . . . . . . . . . . . . . . . . . .67
Modo flash Controller senza cavi . . . . . . . . . . . . . . .71
10. Soluzione di problemi, servizio assistenza . . . .73
11. Dati tecnici . . . . . . . . . . . . . . . . . . . . . . . . . . . . .77
1. Indicaciones de seguridad . . . . . . . . . . . . . .45
2. Preparación . . . . . . . . . . . . . . . . . . . . . . . . . .47
2.1 Alimentación . . . . . . . . . . . . . . . . . . . . . . . . .47
2.2 Cambio de las fuentes de energía . . . . . . . . .47
2.3 Montaje/Desmontaje del mecablitz . . . . . . . .47
2.4 Sincronización . . . . . . . . . . . . . . . . . . . . . . .49
2.5 Conectar y desconectar el flash . . . . . . . . . .49
2.6 Selección del tipo de funcionamiento
con el selector . . . . . . . . . . . . . . . . . . . . . . .49
2.7 Interruptor de función SLAVE . . . . . . . . . . . . .51
3. Funcionamiento Automático . . . . . . . . . . . .53
4. Funcionamiento manual . . . . . . . . . . . . . . . .55
5. Destellos de aclaración en luz diurna . . . . .57
5.1 Destellos de aclaración en el funcionamiento
automático . . . . . . . . . . . . . . . . . . . . . . . . . .57
6. Corrección de exposición . . . . . . . . . . . . . . .59
6.1 Corrección de la exposición en
el funcionamiento automático . . . . . . . . . . . .59
7. Indicación de control de exposición . . . . . .59
8. Iluminación y difusor . . . . . . . . . . . . . . . . . .61
8.1 Montaje y desmontaje de los difusores . . . . .61
9. Funcionamiento esclavo sin cable . . . . . . . .63
1. Función mecalux-SLAVE: . . . . . . . . . . . . . . .65
2. Función mecalux SLAVE con supresión
del predestello de medición . . . . . . . . . . . . .67
3. Función mecalux SLAVE con el sistema
sin cables Metz-Remote . . . . . . . . . . . . . . . . . . . .67
Funcionamiento del flash controlador sin cables . . . . . .71
10. Fallos y Soluciones, Servicio al Cliente . . . . . . . . .73
11. Datos Técnicos . . . . . . . . . . . . . . . . . . . . . . . . . .77
Page 42

42
Foreword
Premessa
Prólogo
Foreword
Congratulations on purchasing our mecablitz 34 CS-2 digital and thank you for the confidence in Metz products.
The following pages give useful instructions for proper
operation of the mecablitz and a survey of all its sophisticated functions.
Please read these operating instructions carefully, even if
they do not appear to be very interesting at first sight. Although our designers have attached great importance to
making the operation of the mecablitz as simple as possible, the cameras on which the flash unit will eventually be
mounted often offer a great diversity of capabilities.
Please fold open the illustrated page at the end of these
instructions.
We wish you great pleasure and success with your new
Metz flash unit.
Page 43

43
Gentile Cliente!
Ci congratuliamo con Lei per l’acquisto del nostr
mecablitz 34 CS-2 digital.
Le informazioni che troverà nelle pagine seguenti di questo
manuale hanno lo scopo di facilitarLe l’uso del lampeggiatore e anche di offrirLe una breve panoramica delle diverse possibilità d’impiego.
Legga pertanto con attenzione e fino in fondo questo
manuale di istruzioni, anche se a prima vista alcuni paragrafi non le sembreranno particolarmente interessanti. E’
vero che noi abbiamo tentato durante la progettazione di
rendere l’apparecchio relativamente facile da usare, ma le
fotocamere con cui il lampeggiatore viene impiegato offrono una vasta serie di possibilità.
Non dimenticate di sfogliate anche l’ultima pagina del
manuale, nella quale è riportata la figura!
Le auguriamo buon divertimento con il suo nuovo lampeggiatore Metz.
Estimado Cliente!
Nos alegramos, que se haya decidido por nuestro
mecablitz 34 CS-2 digital.
Para facilitarle a Vd.el manejo del mecablitz, encontrará en
las siguientes páginas instrucciones para el manejo del
flash, así como una vista general de las distintas aplicaciones.
Lea con detenimiento estas instrucciones, aunque haya
temas que a simple vista no parezcan interesantes. Hemos
procurado que el manejo sea lo más simple posible, pero
las cámaras de sistema en las que se puede utilizar el
flash, sin embargo ofrecen múltiples posibilidades.
Por favor vea también el dibujo al final de las instrucciones.
Esperamos que disfrute con el nuevo flash Metz.
Page 44

44
Safety instructions
Avvertenze di sicurezza
Indicaciones de seguridad
1. Safety instructions
• The flashgun is intended and approved only for photographical use.
• NEVER fire a flash from a very short distance directly into
the eyes of persons or animals! This can cause damage
to the retina and may even lead to blindness!
• NEVER trigger a flash in the vicinity of flammable gases
or liquids (petrol, solvents, etc.), since this may cause
EXPLOSIONS!
• NEVER shoot flash pictures of car or bus drivers, cyclists
or motorcyclists, or train drivers while the vehicle is
moving! This may dazzle the person concerned and
result in an accident.
• Only use the approved power sources specified in these
operating instructions.
• NEVER attempt to open or short-circuit batteries.
• NEVER expose dry or rechargeable batteries to excessive
temperatures such as intensive sunlight or a fire!
• Remove exhausted batteries immediately from the flashgun! Such batteries may leak, releasing chemicals which
can damage the flash unit.
• NEVER attempt to recharge dry batteries!
• Do not expose the flashgun and charger to dripping or
splashing water.
• Do not expose the flashgun to high temperatures and
humidity! Do not keep it in the glove compartment of
your car!
• Do not touch the diffuser after firing several flashes at
short intervals. Danger of burns!
• When taking flash shots at full light output observe an
interval of at least 3 minutes after 20 flashes.
• Never place material that is impervious to light in front
of, or directly on the reflector. The reflector must be perfectly clean when a flash is fired. If this is not observed,
the high energy of the flash light may cause burning or
bleaching of the material or may damage the reflector!
• NEVER dismantle the flashgun! DANGER: HIGH VOLTAGE!
Repairs must only be completed by an authorised repair
service.
• Do not touch the contacts of the flashgun.
• The flash unit must not be used if the case has been so
badly damaged that internal components are exposed.
Remove the batteries!
Page 45

45
1. Avvertenze di sicurezza
• Il lampeggiatore deve essere utilizzato esclusivamente
nel settore fotografico.
• Non scattare flash direttamente negli occhi ad una
distanza particolarmente ridotta! Il lampo diretto negli
occhi di persone e animali può provocare danni alla retina e gravi danni alla vista fino alla cecità!
• Non scattare il flash in prossimità di gas o liquidi
infiammabili (benzina, solventi ecc.). PERICOLO DI
ESPLOSIONE!
• Non fotografare mai con il lampeggiatore il conducente
di un’auto, di un autobus, di una bicicletta, di un motorino o di un treno ecc. durante la guida. A causa dell’abbagliamento il guidatore potrebbe provocare un incidente!
• Utilizzare esclusivamente le fonti di energia descritte e
ammesse nelle istruzioni d’uso.
• Non aprire né mettere in cortocircuito le batterie!
• Non esporre le batterie ad alte temperature, ad esempio
ai raggi diretti del sole, al fuoco, o a simili!
• Togliere le batterie scariche immediatamente dal lampeggiatore! Dalle batterie scariche possono fuoriuscire
delle sostanze chimiche (i cosiddetti „acidi“ delle pile)
che danneggiano il lampeggiatore!
• Le batterie non devono essere ricaricate.
• Non esporre il lampeggiatore a gocce e spruzzi d’acqua!
• Proteggere il lampeggiatore dalle alte temperature e
dall’elevata umidità dell’aria! Non conservare il lampeggiatore nel vano portaoggetti dell’auto.
• Non toccare il diffusore dopo aver scattato diversi flash.
Pericolo di ustione!
• Nel riprese al flash di serie fare una pausa di almeno 3
minuti dopo 20 flash.
• Prima di scattare un flash, accertatevi che non vi sia del
materiale impermeabile alla luce davanti alla parabola o
direttamente a contatto con il riflettore (finestrella del
flash). Il riflettore non deve essere sporco. In caso contrario l’elevata energia del lampo potrebbe incendiarle i
materiali o danneggiare il riflettore.
• Non smontare il lampeggiatore! ALTA TENSIONE! Le riparazioni dovrebbero essere effettuate esclusivamente da
personale esperto e autorizzato.
•
Non toccare i contatti di collegamento del lampeggiatore.
• Se il corpo è stato danneggiato al punto tale che le parti
interne sono scoperte, il lampeggiatore non può essere
più utilizzato. Togliere le batterie!
1. Indicaciones de seguridad
• Solo está permitido y previsto utilizar el flash en el sector
fotográfico.
• No dispare el flash desde una distancia muy corta a los
ojos! Un disparo de flash directo a los ojos de personas o
animales, puede producir defectos en la retina y causar
graves deterioros a la vista - hasta una total ceguera.
• En ambientes de gases inflamables o líquidos (gasolina,
disolventes etc.) no debe disparar el flash. PELIGRO DE
EXPLOSIÓN!
• Nunca fotografíe con flash a los conductores de coches,
autobuses, bicicletas, motos o trenes mientras conducen. Por el destello, el conductor puede provocar un
accidente!
• Solamente utilizar las fuentes de energía permitidas e
indicadas en el manual de instrucciones.
• No abrir las pilas o poner en cortocircuito!
• No exponga pilas a temperaturas altas como la luz del
sol, fuego o similares!
• Extraer siempre las pilas gastadas de su compartimento!
• ¡Las pilas gastadas despiden un líquido que puede deteriorar el aparato!
• Las pilas no se deben cargar.
• No exponga el flash a salpicaduras de agua!
• Proteja su flash de gran calor y mucha humedad! No lo
guarde p. ejemplo en la guantera de su coche.
• Después de varios destellos no toque el difusor. Peligro
de quemadura!
• En tomas de destellos en serie a plena potencia de luz en
el funcionamiento con pilas de litio hay que tener en
cuenta que después de 20 destellos hay que hacer una
pausa de aprox. 3 min.
• No debe colocar ningún material opaco directamente
delante o sobre el cristal reflector (ventana del flash) al
disparar el flash. El cristal del reflector debe estar siempre limpio. En caso contrario, la alta energía del destello
podría producir quemaduras del material o del cristal del
reflector.
• ¡No desmontar el flash! ALTA TENSIÓN! Las reparaciones
solo deben ser efectuadas por servicios técnicos autorizados.
• No tocar los contactos de conexión del flash.
• Si la carcasa quedó tan dañada, que quedan piezas interiores sueltas, no debe utilizar el flash. Sacar las pilas!
Page 46

Preparations
Preparazione
Preparación
46
2. Preparations
2.1 Power supply
The flash unit should only be powered by 2 CR2 lithium
batteries. This type of battery can be stored for many years
with virtually no loss of power, thus making it ideal for
occasional use.
The batteries are exhausted if the recycling time at full
light output exceeds 60 seconds. Remove the batteries
from the mecablitz if it is not going to be used for an extended period.
2.2 Replacing the batteries
• Turn off the flashgun by its main switch .
• Press the unlocking button
(fig. 1), slide the battery
compartment cover to the right and fold open (fig. 2).
• Insert the batteries as indicated by the symbols in the
battery compartment.
The supplied lithium batteries are consumables and not
subject to our guarantee conditions.
After the batteries have been loaded, fold down the battery
compartment cover and push back to the left until it becomes audibly engaged.
When loading the batteries ensure that their +
and - poles are aligned with the symbols.
Transposed poles can destroy the flash unit!
Always exchange both batteries, replacing
them with identical batteries of the same capacity from the same manufacturer! Do not dispose of spent batteries in the domestic waste bin.
Spent batteries should be handed in to an
appropriate collecting point.
2.3 Mounting/Removing the mecablitz
Various Sony cameras have an accessory shoe
that does not comply to DIN standards. If a
"34 CS-2 digital" is used in conjunction with
such a Sony camera we recommend to always
utilize the supplied camera bracket.
Mounting:
• Turn off the mecablitz by its main switch .
• Turn the clamping disk
upward against the housing of
the flash unit.
• Slide the mecablitz foot all the way into the flash
bracket, the SLAVE stand or the camera’s accessory
shoe.
☞
☞
Fig. 1
Fig. 1
Grab. 1
Fig. 2
Fig. 2
Grab. 2
☛
➭
Page 47

47
2. Preparazione
2.1 Alimentazione
Il lampeggiatore può essere alimentato solo con 2 batterie
al Litio del tipo CR2. Le batterie di questo tipo possono
essere conservate per anni con una perdita minima di
energia, e sono quindi particolarmente adatte per l’uso
occasionale.
Le batterie sono scariche o esaurite, quando l’intervallo di
ricarica supera i 60 sec. a carica piena. Se non intendete
usare il mecablitz per un lungo periodo, rimuovere le batterie dall’apparecchio.
2.2 Sostituzione delle batterie
• Spegnete il lampeggiatore con l’interruttore principale .
• Premete il tasto di sblocco
(Fig.1), spingete il coperchio
del vano batteria verso destra e apritelo (Fig.2).
• Inserite le batterie conformemente alle indicazioni dei
disegni.
Le batterie al litio in dotazione sono materiali di consumo e
non sono coperte dalla nostra garanzia.
Dopo aver inserito le batterie nell’apposito vano, chiudete il
coperchio spingendolo verso sinistra fino a quando non
sentirete lo scatto di aggancio.
Inserendo le batterie fate attenzione che il polo
positivo (+) e quello negativo (-) siano disposti
come indicato nei disegni. L’inversione dei poli
può danneggiare l’apparecchio! Sostitute sempre tutte e 2 le batterie con batterie della stessa
marca e con lo stesso stato di carica! Non gettate le batterie esaurite nel contenitore per i rifiuti domestici! Contribuite alla protezione
dell’ambiente facendo uso degli appositi contenitori per la raccolta differenziata.
2.3 Montaggio/Smontaggio del mecablitz
Alcune camere Sony sono dotate di slitta
accessori non corrispondente alla norma DIN.
Utilizzando una "34 CS-2 digital", vi raccomandiamo l’impiego esclusivo della staffa della
camera compresa in dotazione.
Montaggio:
• Spegnete il mecablitz con l’interruttore principale .
• Girate la rotellina di blocco
contro il corpo completa-
mente verso l’alto.
• Spingete il mecablitz con la base di attacco fino
all’arresto nella staffa del flash, nella base dello Slave o
nella slitta accessori della fotocamera.
☞
☞
2. Preparación
2.1 Alimentación
Este flash solo funciona con 2 pilas de litio tipo CR 2. Este
tipo de pila se puede almacenar durante años casi sin pérdida de capacidad y por ello es adecuado sobre todo para
aficionados.
Las pilas están vacías o bien gastadas, si la secuencia de
destellos completos sobrepasa los 60 seg. o en el test de
pila la indicación de pila ya no se ilumina. Si durante algún
tiempo no se utiliza el mecablitz, conviene sacar las pilas
del aparato.
2.2 Cambio de las fuentes de energía
•
Desconecte el flash con el interruptor principal .
•
Presione sobre el botón de desbloqueo , aparte la tapa
del compartimento de pilas hacia la derecha y abra la
tapa. (vea grabado 2).
•
Introduzca las pilas según los símbolos señalados.
Las pilas de litio adjuntas no están cubiertas por la
garantía del flash.
Después de introducir las pilas cerrar la tapa del compartimento y mover hacia la izquierda, hasta escuchar que el
botón de bloqueo vuelve a su posición.
Al introducir las pilas tenga en cuenta la polaridad correcta, como muestran los símbolos.
Polos cambiados pueden llegar a destruir el
aparato! Cambie siempre las 2 pilas. Introduzca
solo pilas del mismo fabricante y con el mismo
estado de carga. ¡No tire pilas gastadas a la
basura! Colabore con el medio ambiente y entregue las pilas gastadas en los lugares correspondientes.
2.3 Montaje/Desmontaje del mecablitz
Algunas cámaras Sony van dotadas de una
zapata para accesorios que no corresponde a
las normas DIN. En caso de usar un
"34 CS-2 digital", recomendamos utilizar
exclusivamente la regleta de cámara incluída
en el suministro.
Montaje:
• Desconectar el mecablitz con el interruptor principal
.
• Gire la tuerca ribeteada
totalmente hacia arriba hacia
la carcasa.
• Introduzca el mecablitz con el pie de conexión hasta
el tope en la regleta portaflash, o en el pie soporte del
esclavo o en la zapata para flash de la cámara.
☞
☞
Page 48

48
Preparations
Preparazione
Voorbereiden
• Turn the clamping disk against the flash bracket, the
SLAVE stand or the camera body to securely clamp the
flash unit.
Remo
ving:
• Turn off the flash unit before removing it.
• Turn the clamping disk
upwards against the housing
of the flash unit and then remove the flash unit from the
camera.
A flash unit incorporated in a camera must only
be used additionally if it is completely folded
out into its working position. An incompletely
folded out camera flash can be damaged when
the shutter is tripped.
2.4 Synchronisation
Synchronisation between flash unit and camera is automatically established when the mecablitz is inserted in the
camera’s accessory shoe.
A synch cable (36-50 normal, or 36-52 coiled, optional
extra) can be used for synchronisation if the camera does
not have a hot shoe.
2.5 Switching the flash unit on and off
To turn on the flash unit, push the main switch to „ON“ (fig.
3). The green lamp lights up to indicate flash readiness.
To turn off the flash unit, push the main switch leftwards to
the „OFF“ position.
Automatic switch-off
To avoid inadvertent battery discharge the flash unit is
automatically switched off approx. 8 minutes after:
- it was switched on,
- the last flash was fired,thereby saving power.
Please note that automatic switch-off is effective also in SLAVE mode!
The green flash-ready light is extinguished.
To switch on the mecablitz, first turn off the main switch
and then on again.
If the mecablitz is not being used, always turn it
off by its main switch.
2.6 Selecting the operating mode with the mode
selector :
Use the operating mode selector to set the mecablitz
to auto mode A (a choice of 3 auto working apertures is
available) or to manual mode M (see page...)
☞
☞
☞
Preparations
Preparazione
Preparación
Fig.3
Fig. 3
Grab. 3
Page 49

49
• Girate la rotellina di blocco contro la staffa del flash,
la base dello slave o il corpo della camera in modo che il
lampeggiatore sia ben serrato.
Smontaggio:
• Spegnete il lampeggiatore prima di smontarlo.
• Girate la rotellina di blocco
contro il corpo del lampeggiatore completamente verso l’alto e togliere il lampeggiatore dalla camera.
Il flash incorporato nella camera può essere
utilizzato in aggiunta solo se può essere estratto completamente nella sua posizione di lavoro.
Il flash della fotocamera non estratto completamente può essere danneggiato al momento dello scatto.
2.4 Sincronizzazione
La sincronizzazione del lampeggiatore con la fotocamera
avviene automaticamente inserendo il lampeggiatore nella
slitta accessori della fotocamera.
Nelle fotocamere senza contatto centrale la sincronizzazione avviene anche con l’apposito cavo (36-50 normale o
36-52 a spirale, accessori speciali).
2.5 Accensione e spegnimento del lampeggiatore
Per l’accensione posizionare l’interruttore principale su
„ON“ (Fig. 3).Non appena l’apparecchio è pronto, si illuminerà la spia di carica verde.
Per lo spegnimento posizionate l’interruttore principale su
„OFF“ a sinistra.
Spegnimento automatico dell’apparecchio
Per evitare di scaricare inavvertitamente le batterie e per
risparmiare corrente l’apparecchio si disattiva circa 8 minuti:
- dopo l’accensione
- dopo l’emissione di un lampo.
Tenete presente che lo spegnimento automatico del lampeggiatore è attivo anche nel Modo
SLAVE!
La spia di carica verde si spegne. Per riattivare il mecablitz spostate l’interruttore principale nella posizione di
accensione e spegnimento.
Servirsi dell’interruttore principale per spegnere l’apparecchio, quando non lo si vuole utilizzare per lungo tempo.
2.6 Selezione del Modo con il selettore del modo
di funzionamento :
Con il selettore del modo di funzionamento si può commutare il mecablitz sul Modo flash Auto A (sono disponibili
☞
☞
☞
• Gire la tuerca ribeteada hacia la regleta portaflash, o
el pie soporte del esclavo o la carcasa de la cámara, para
que el flash quede bien sujeto.
Desmontaje:
• Antes de extraer el flash hay que desconectarlo.
• Gire la tuerca ribeteada
totalmente hacia arriba hacia
la carcasa del flash y quitar el flash de la cámara.
El flash incorporado de la cámara solo debe utilizarse simultáneamente si se puede extraer
totalmente para su funcionamiento, en caso
contrario puede ser dañado al disparar la
cámara.
2.4 Sincronización
La conexión de sincro del flash a la cámara se produce
automáticamente al introducir el flash en la zapata de la
cámara.
En las cámaras sin contacto central también puede haber
conexión de sincro con el cable sincro (36-50 normal o 3652 espiral, accesorios especiales).
2.5 Conectar y desconectar el flash
Para conectar coloque el interruptor principal en posición
"ON" (Grabado 3). Cuando el flash alcance la disposición
de disparo se iluminará un piloto verde.
Para desconectar coloque el interruptor principal en posición "OFF" hacia la izquierda.
Desconexión automática del aparato
Para evitar una descarga involuntaria de las pilas,
- después de conectarlo
- después de efectuar un destello
el flash se desconecta aprox. a los 8 minutos, para ahorrar
energía.
¡Tenga Vd en cuenta que la desconexión
automática del aparato también es eficaz en
modo esclavo!
El piloto verde de disposición de disparo se apaga. Para
volver a conectarlo encienda y apague el mecablitz con el
interruptor principal .
Por principio, cuándo no utilice el mecablitz ¡desconéctelo mediante el interruptor principal!
2.6 Selección del tipo de funcionamiento con el
selector :
Mediante el interruptor de tipo de funcionamiento se
conmuta el mecablitz a modo automático A (se dispone de
3 diafragmas automáticos) o a funcionamiento manual M
☞
☞
☞
Page 50

50
Preparations
Preparazione
Preparación
The position of the operating mode selector
is of no significance for the SLAVE function in
the cordless Metz remote system.
2.7 SLAVE function switch :
For normal flash photography, the mecablitz is mounted in
the camera’s accessory shoe and triggered by way of the
synch contact in the flash unit’s foot or a synch cable
connected to the camera. For this mode set the SLAVE function switch to position 0 (see fig.).
For operation as a SLAVE flash unit with cordless flash triggering, the SLAVE function switch must be set to position 1 or 2, depending upon the desired SLAVE mode. For
more details about the SLAVE modes see page 62.
☞
Page 51

51
3 aperture di diaframma automatiche) o sul Modo flash
Manuale M (vedi pagina....).
La posizione del selettore del modo di funzionamento è irrilevante nel Modo SLAVE nel
Controllo Metz a distanza senza cavi.
2.7 Selettore di funzionamento SLAVE :
Nel funzionamento normale il mecablitz viene montato nella slitta accessori della camera e attivato tramite contatto
sincronizzato nella base del lampeggiatore o tramite un
collegamento di cavi sincronizzato con la camera. Per il
funzionamento normale il selettore di funzionamento SLAVE deve essere portato sulla posizione 0 (vedi figura).
Per il funzionamento come lampeggiatore SLAVE con attivazione senza cavi del flash il selettore di funzionamento
SLAVE deve essere portato sulla posizione 1 o 2 a
seconda del Modo di funzionamento SLAVE. Per maggiori
informazioni sui Modo di funzionamento SLAVE vedi pagina 63.
☞
(véase página....).
En la función esclavo, la posición del selector
de tipo de funcionamiento , con el sistema
sin cables Metz-Remote, no tiene ninguna relevancia.
2.7 Interruptor de función SLAVE :
Para el funcionamiento normal del flash, el mecablitz se
monta en la zapata para accesorios de la cámara y se
dispara a través del contacto síncrono en la zapata del
flash o mediante una unión por cable síncrono a la cámara. Para este modo de funcionamiento, el interruptor de
función esclavo , debe conmutarse a la posición 0,(véase figura).
Para el funcionamiento como flash esclavo con disparo sin
cables del flash, conmute el interruptor de función SLAVE
en la posición 1 o en la posición 2, según el tipo de funcionamiento esclavo. Para más detalles, sobre los tipos de
funcionamiento esclavo, vea la página.63.
☞
Page 52

52
Automatic flash mode
Modo flash Auto
Funcionamiento Automático
3. Automatic flash mode
In the auto flash mode, the flash unit’s sensor
measures the light reflected from the subject. The
flash is cut off as soon as sufficient light has been
emitted for correct exposure.
This eliminates the need to recalculate and readjust the
aperture each time the shooting distance is changed, provided that the subject remains within the indicated auto
flash range.
Setting procedure for automatic mode (fig. 4):
Example: Flash-to-subject distance 5 m
Film speed ISO 100/21°
Focal length, e.g. 50mm (35mm format)
The mecablitz is used without a W or T attachment in place.
Taking into account the maximum effective range , a
flash-to-subject distance of 5m (see table at the back of
the unit) permits the use of the auto-working apertures f/4
or f/2. The maximum range with an auto-working aperture of f/4 is 7 m, and with f/2 up to 14 m. The minimum
lighting distance is approx. 10% of the maximum effective
range.
The subject should be in the middle third of the
distance range. This gives the electronics sufficient leeway for compensation should this prove to be necessary.
• Set the operating mode selector
to the required auto-
working aperture.
For the shortest-possible depth-of-field (as is required in
portraiture) the use of an auto-working aperture of f/2 is
recommended. For group shots with a number of people
standing behind each other, set an auto-working aperture
of f/4 to extend the depth-of-field.
• Turn on the flash unit with the main switch
.
• Switch the SLAVE function selector to position 0!.
• Set the camera to flash synch speed or a slower speed.
• Await flash readiness which is indicated by the green
flash-ready light
.
Caution with zoom lenses!
Due to their design they can cause a loss of
light in the order of up to one f-stop. Furthermore, the effective aperture can also vary,
depending upon the adjusted focal length. This
can be compensated by correcting the aperture on the flashgun manually!
☞
☞
Ǻ
Fig. 4
Fig. 4
Grab. 4
☛
Page 53

53
3. Modo flash Auto
Nel modo flash Auto (automatismo „a computer“), il
lampeggiatore misura la luce riflessa dal soggetto
tramite il sensore incorporato nel flash e interrompe il lampo non appena l’emissione risulta sufficiente per l’esposizione.
Grazie a questa caratteristica, non è più necessario ripetere il calcolo del diaframma ad ogni variazione della distanza finché il soggetto si trova all’interno del campo di lavoro
indicato.
Procedura di regolazione per il modo Auto (Fig. 4):
Esempio: Distanza soggetto 5 m
Sensibilità pellicola ISO 100/21°
Distanza focale obiettivo ad es. 50 mm (riprese
formato piccolo)
Il mecablitz viene azionato senza il diffusore
parabola preorientato .
Rispettando il limite massimo della portatala distanza
dal soggetto di 5 m consente i diaframmi 4 e 2 (vedi
tabella sul retro dell’apparecchio). Il limite massimo della
portata con il diaframma 4 è di 7 m, con il diaframma 2
f
ino a 14 m. La distanza minima flash è di circa il 10% della
portata massima.
E’ preferibile che il soggetto si trovi nel settore
centrale del campo delle distanze, offrendo così
ai circuiti elettronici la possibilità di operare le
compensazioni eventualmente necessarie.
• Regolate il selettore del modo di funzionamento
sul
diaframma desiderato.
Desiderando un campo di profondità minimo (preferibile
per i ritratti) vi consigliamo l’utilizzazione del diaframma 2.
Per riprese di gruppo con molte persone disposte in posizione sfalsata una dietro l’altra, vi consigliamo l’utilizzo del
diaframma 4 per una maggiore profondità di campo.
•
Accendete il lampeggiatore con l’interruttore principale .
• Portate il selettore di funzionamento SLAVE in posizione 0!
• Regolate la fotocamera sul tempo sincro o su tempi più
lunghi.
• Attendete che il flash sia pronto la spia verde
si
accende.
Gli obiettivi zoom richiendo qualche attenzione
nell’impiego con il flash!
Al variare della lunghezza focale, possono
infatti variare la loro luminosità anche di un
intero diaframma. E`possibile ovviare a questo
problema correggendo manualmente il
diaframma sull’obiettivo.
☞
☞
3. Funcionamiento Automático
En el funcionamiento automático el sensor del flash
mide la luz reflejada por el objeto. El flash corta la
radiación del destello al llegar a la dosis de luz precisa.
Por ello no hay necesidad de realizar nuevos cálculos de
diafragmas y ajustes en cada variación de la distancia,
mientras el objeto se encuentre dentro de la gama de
distancias de automatismo de flash indicada.
Procedimiento de ajuste para el funcionamiento automático (Grabado 4):
Ejemplo: Distancia flash- sujeto 5 m
Sensibilidad de la película ISO 100 / 21º
Distancia focal del objetivo, por ej. 50 mm (
formato pequeño)
El mecablitz se utiliza sin el difusor del reflector
desplegado.
La distancia de iluminación de 5 m permite, teniendo en
cuenta el alcance máximo , los diafragmas automáticos
4 y 2 (véase la tabla en la parte posterior del aparato). El
alcance máximo en el diafragma automático 4 es de 7 m,
con diafragma automático 2 hasta 14 m. La distancia de iluminación mínima es aprox. un 10% del alcance máximo.
El objeto debería encontrarse en el tercio central de la gama de distancias. Con ello se da a la
electrónica suficiente juego para compensaciones si fueran precisas.
• Ajustar el selector del tipo de funcionamiento
al
diafragma automático deseado.
Teniendo en cuenta un área lo más reducida posible de
máxima nitidez (importante en tomas de retratos) le
recomendamos el diafragma automático 2. Para tomas
de grupos, le recomendamos el diafragma automático 4
por el área más amplia posible de máxima nitidez.
• Conectar el flash con el interruptor principal
.
• ¡Conmute el interruptor de función esclavo a la posi-
ción 0!
• Ajustar la cámara a la velocidad de sincronización de
flash o más lenta.
• Esperar la disposición de disparo - se ilumina la indica-
ción de disposición de disparo verde
.
¡Atención con objetivos zoom!
Estos pueden causar una pérdida de luz de
hasta un escalón de diafragma debido a su
construcción. Incluso en diferentes ajustes de
distancia focal pueden tener diferentes valores
de diafragmas efectivos. ¡ Esto ha de compensarse eventualmente con una corrección
manual del diafragma en el flash!
☞
☞
Ǻ
Ǻ
Page 54

54
Manual flash mode
Modo flash Manuale
Funcionamiento manual
4. Manual flash mode
Manual flash mode is always associated with full
light output. Consequently, the aperture setting on the
camera must be used for adaptation to the prevailing
lighting conditions.
Setting procedure for manual flash mode (fig. 5):
Example: Flash-to-subject distance 5 m
Film speed ISO 100/21°
Focal length, e.g. 50mm (35mm format)
The mecablitz is used without a W or T attachment in place.
A flash-to-subject distance of 5 m in manual mode
requires an aperture of f/5.6.
• Set the operating mode selector
at M.
• Switch the SLAVE function selector to position 0!.
• Turn on the flash unit with the main switch
.
• Select the corresponding aperture on the lens and set
the camera to flash synch speed or a slower speed.
The aperture to be set on the camera can also be calculated by the following formula:
Guide number
Aperture = ———————
Subject distance
The guide number for the film speed used is indicated in
the corresponding table of the „Technical Data“ section.
Ǻ
Fig. 5
Fig. 5
Grab. 5
☛
Page 55

55
4. Modo flash Manuale
Nel Modo flash Manuale il lampo viene sempre
emesso a piena potenza. Per ottenere l’esposizione
corretta è quindi necessario modificare l’impostazione del diaframma sulla fotocamera in relazione alla
ripresa da fare.
Impostazione per il Modo flash Manuale (Fig. 5):
Esempio: Distanza soggetto 5 m
Sensibilità pellicola ISO 100/21°
Distanza focale obiettivo ad es. 50 mm (riprese
formato piccolo)
Il mecablitz viene azionato senza il diffusore
parabola preorientato .
La distanza flash di 5 m richiede nel Modo flash
Manuale l’apertura di diaframma 5,6.
• Regolate il selettore del modo di funzionamento
su M.
•
Accendete il lampeggiatore con l’interruttore principale .
•
Impostate l’apertura del diaframma sull’obiettivo e regolate la fotocamera sul tempo sincro o su tempi più lunghi.
L’apertura del diaframma della fotocamera si può calcolare
anche con la seguente formula:
numero guida
diaframma: ————————
distanza dal soggetto
Il numero guida per le sensibilità film utilizzabili si può rilevare dalla tabella del capitolo „Dati tecnici“.
4. Funcionamiento manual
En este tipo de funcionamiento el flash radia toda su
potencia. La adaptación a la situación de toma puede
realizarse a través del ajuste del diafragma en la
cámara.
Procedimiento de ajuste para el funcionamiento
manual (Grabado 5)
Ejemplo: Distancia flash- sujeto 5 m
Sensibilidad de la película ISO 100 / 21º
Distancia focal del objetivo, por ej. 50 mm (
formato pequeño)
El mecablitz se utiliza sin el difusor del reflector
desplegado.
Con la distancia de iluminación de 5 m, es necesario en
el funcionamiento manual un diafragma de 5,6.
• Ajustar el selector de tipo de funcionamiento
a M.
• Conectar el flash con el interruptor principal
.
• Ajustar el diafragma correspondiente en el objetivo y
ajustar la velocidad de sincronización de flash o más
lenta en la cámara.
El diafragma de la cámara se puede obtener también
mediante la siguiente fórmula:
Número Guía
Diafragma = ————————
Distancia al objeto
El número-guía se puede comprobar con ayuda de la tabla
en el capítulo "Datos Técnicos" según las sensibilidades
deseadas.
Ǻ
Ǻ
Page 56
56
5. Fill-in flash with dayligh
The mecablitz can also be used for fill-in flash in daylight
to soften harsh shadows and lower the contrast, thereby
producing a more balanced exposure when shooting
against the light.
5.1 Fill-in flash in auto mode
Use the camera, or a hand-held exposure meter, to establish the required aperture and shutter speed for a normal
exposure.
Ensure that the camera’s shutter speed either equals, or is
slower than, the fastest flash synch speed (varies with different camera models).
Example: Established aperture = f/8; established shutter
speed = 1/60th sec. Flash synch speed of the
camera e.g. 1/100th sec. (see operating
instructions for your camera)
The two established values for aperture and shutter speed
can be set on the camera because the camera’s shutter
speed is slower than the camera’s flash synch speed.
To maintain a balanced range of highlights, for instance in
order to retain the character of the shadows, it is advisable to select the automatic aperture on the flashgun one
setting lower than the aperture adjusted on the camera. In
our example f/8 was set on the camera. Consequently, we
recommend an aperture of f/5.6 to be set on the flashgun.
Tip:
If the auto-working aperture f/5.6 is not available on the
flash unit because of the adjusted film speed, then the problem can be overcome in the following manner:
Select an auto-working aperture of f/8 on the mecablitz
and set a shutter speed of 1/30th sec. and f/11 on the
camera.
If an auto-working aperture of f/4 were to be set on the
mecablitz, then a camera aperture of f/5.6 would result in
a shutter speed of 1/125th sec. This would fall short of the
camera’s flash synch speed of 1/100th sec.
When shooting into the light ensure that the
backlight does not shine directly onto the sensor as this will confuse the flashgun’s electronics.
☞
Fill-in flash with dayligh
Flash di schiarita alla luce diurna
Destellos de aclaración en luz diurna
Page 57

57
5. Flash di schiarita alla luce diurna
Il mecablitz può essere impiegato anche in luce diurna per
schiarire le ombre (fill-in flash) o per ottenere un’esposizione più equilibrata nel controluce.
5.1 Lampo di schiarita in modo Auto
Con l’esposimetro della fotocamera o con uno esterno,
rilevate tempo e diaframma richiesti per un’esposizione
normale.
Basatevi su un tempo di posa uguale o più lento del tempo
sincro-flash della vostra fotocamera.
Esempio: diaframma calcolato = f/8; tempo di posa calco-
lato = 1/60 sec. Tempo sincro-flash della fotocamera = 1/100 sec. (ved. manuale istruzioni della
fotocamera)
I due valori rilevati per il diaframma e il tempo possono
essere selezionati sulla fotocamera, in quanto il tempo calcolato è più lungo di quello massimo di sincronizzazione
consentito dalla fotocamera.
Per ottenere una schiarita corretta tale, ad esempio, da
conservare la tridimensionalità delle ombre, à consigliabile
regolare sul flash un diaframma più aperto di un valore rispetto a quello selezionato sulla fotocamera. Nell’esempio
sopra il diaframma impostato sulla fotocamera è f/8, quello da selezionare sul flash è f/5,6.
Consiglio utile:
Se il lampeggiatore non può disporre in Modo Auto del
diaframma 5,6 a causa della sensibilità film impostata, si
può procedere come segue:
Selezionate sul mecablitz in Modo Auto il diaframma 8 e
impostate sulla fotocamera un tempo di posa di 1/30 sec.
con apertura di diaframma 11.
Se sul mecablitz selezionaste in Modo Auto il diaframma 4,
nel caso dato si dovrebbe impostare sulla fotocamera un
tempo di posa di 1/125 sec. con un diaframma 5,6,
raggiungendo così un tempo inferiore a quello sincro-flash
di 1/100 sec.
Nelle riprese in controluce assicuratevi che la
sorgente di luce non colpisca direttamente il
sensore dell’unità di controllo. In caso contrario la misurazione della riflessione del lampo
potrebbe risultare falsata.
☞
5. Destellos de aclaración en luz diurna
Se puede utilizar el mecablitz también para destellos de
aclaración en luz diurna para eliminar sombras y poder
conseguir exposiciones equilibradas en contraluces.
5.1 Destellos de aclaración en el funcionamiento
automático
Determine con la cámara o un fotómetro los necesarios
diafragmas y velocidad para una exposición normal. Ha de
tenerse en cuenta que la velocidad del obturador de la
cámara tiene que ser igual o más lenta que la velocidad
más corta de sincronización (depende del tipo de cámara).
Ejemplo: Diafragma encontrado = 8; velocidad encontra-
da = 1/60 de seg. Velocidad de sincronización de
la cámara p.e. 1/100 de seg. (vea las instrucciones de la cámara)
Los dos valores encontrados de diafragma y velocidad
pueden ajustarse en la cámara puesto que la velocidad del
obturador es más lenta que la de sincronización de la
cámara.
Para conseguir una aclaración escalonada, p.e. para conservar el carácter de sombra, es recomendable rebajar el
diafragma automático ajustado en el flash en un escalón
con relación al diafragma ajustado en la cámara. En el
ejemplo el diafragma era el 8, en el flash sería recomendable el 5,6.
Consejo:
Si en el flash no se encuentra disponible el diafragma
automático de 5,6 por la sensibilidad de película ajustada,
entonces proceda de la siguiente forma:
Elija en el mecablitz el diafragma automático 8 y ajuste en
la cámara una velocidad de obturación de 1/30 de seg. con
diafragma 11.
Si elige en el mecablitz un diafragma automático 4, entonces obtendría una velocidad de obturación de 1/125 de
seg. con diafragma 5,6. La velocidad de sincronización de
la cámara de 1/100 de seg. se vería acortada.
Observe que la fuente de contraluz no caiga
directamente sobre el sensor del flash. Esto
confundiría la electrónica del flash.
☞
Page 58

58
Flash exposure correction
Correzione dell’esposizione flash
Corrección de exposición
Exposure verification
Indicazione di corretta esposizione
Indicación de control de exposición
6. Flash exposure correction
Automatic exposure systems are based on a reflection factor of 25%, this being the average degree of reflection for
subjects shot with flash. A dark background that absorbs a
lot of light, or a bright background that bounces off a great
deal of light (e.g. backlit scenes), can result in overexposure or underexposure of the subject, as the case may be.
6.1 Exposure corrections in auto mode
To compensate the above described effect, exposure can
be corrected by opening or stopping down the camera’s
aperture. If the background is mainly bright, the flashgun’s
sensor will cut off the flash too soon with the result that
the subject will be underexposed. With a dark background
the flash is cut off too late so that the subject looks too
light.
Bright background:
open the camera’s aperture 2 to 1 f-stop
(e.g. from f/5.6 to f/4)
Dark background:
Close the camera’s aperture 2 to 1 f-stop
(e.g. from f/8 to f/11)
7. Exposure verification
The exposure o.k. indicator lights up only when the picture will be, or was, correctly exposed in the auto mode.
Trigger a test flash with the manual firing button (fig. 8).
If the exposure o.k. indicator remains dark after the test
flash was fired, then set the next smaller f-number or diminish the distance to the reflection surface or subject, and
repeat the test flash.
The f-stop established in this manner must also be set on
the camera.
To trigger a test flash, hold the camera and the
flashgun in the same manner as for the actual
shot. There is no exposure verification on the
SLAVE unit in the cordless Metz remote mode.
Only the indication on the controller (master) is
relevant for correct exposure confirmation.
☞
Fig. 6
Fig. 6
Grab. 6
☛
Page 59

59
6. Correzione dell’esposizione flash
I sistemi di esposizione automatica sono regolati per un
fattore di riflessione pari al 25%, il fattore medio di riflessione per i soggetti ripresi con il flash. Uno sfondo scuro,
che assorbe molta luce, o uno chiaro che invece la riflette
(ad esempio riprese in controluce), possono provocare rispettivamente una sovraesposizione o una sottoesposizione
del soggetto principale.
6.1 Compensazione dell’esposizione in flash Auto
Per correggere l’effetto descritto sopra, è possibile apportare una compensazione dell’esposizione selezionando
sulla fotocamera un diaframma più aperto o più chiuso. Se
lo sfondo è prevalentemente chairo, il sensore dell’unità di
controllo interrompe il lampo troppo presto,provocando
una sottoesposizione del soggetto. Se lo sfondo è scuro, il
lampo viene interrotto in ritardo e di conseguenza il soggetto risulterà eccessivamente illuminato.
Sfondo chiaro:
Aprite il diaframma da 2 a 1 valore
(ad es. Da f/5,6 a f/4)
Sfondo scuro:
Chiudete il diaframma da 2 a 1 valore
(ad es. Da f/8 a f/11)
7. Indicazione di corretta esposizione
L’indicazione di corretta esposizione si accende soltanto quando nel modo di funzionamento Auto il lampo
emesso è/è stato sufficiente per una corretta esposizione.
Il lampo di prova viene emesso premendo il pulsante di
scatto . Se dopo il lampo di prova la spia g non si accende, aprite il diaframma di un valore, oppure riducete la
distanza tra flash e superficie riflettente o soggetto, quindi
ripetete il lampo di prova.
La apertura di diaframma rilevata con questa procedura
deve essere impostata anche sulla fotocamera.
Durante l’emissione del lampo di prova tenete
la torcia flash e l’unità di controllo con il sensore orientato come se scattaste effettivamente la fotografia. l Controllo Metz a distanza
senza cavi non viene indicato sul lampeggiatore Slave il controllo dell’esposizione. Per il controllo dell’esposizione è rilevante solo l’indicazione sul Controller.
☞
6. Corrección de exposición
Los automatismos de exposición se basan en un grado de
reflexión del objeto de un 25 % (grado de promedio de
reflexión de tomas con flash). Un fondo oscuro, que absorbe mucha luz y un fondo claro que refleja fuertemente (p.e.
contraluces), pueden producir sobreexposiciones o faltas
de luz del objeto.
6.1 Corrección de la exposición en el funcio-
namiento automático
Para compensar el efecto arriba mencionado, la exposición
puede corregirse abriendo o cerrando el diafragma de la
cámara. Con un fondo muy claro el sensor del flash cor-
ta la radiación de luz demasiado pronto y el objeto principal a fotografiar queda a oscuras. Con un fondo oscuro se
interrumpe la radiación de luz demasiado tarde y el objeto
resulta demasiado claro.
Fondo claro:
Abrir el diafragma1/2 a 1 valor
(p.e. de 5,6 a 4)
Fondo oscuro:
Cerrar el diafragma 1/2 a 1 valor
(p.e. de 8 a 11)
7. Indicación de control de exposición
La indicación de control de exposición se enciende solo
cuando la toma es o fue expuesta correctamente en el funcionamiento automático.
El destello de prueba se efectúa con la tecla de disparo
manual . Si la indicación de control de exposición g no
se enciende después del destello de prueba, debe ajustar
el siguiente diafragma más abierto o reducir la distancia a
la superficie de reflexión o al objeto y repetir un destello de
prueba.
El diafragma encontrado de esta forma debe ajustarse
también en la cámara.
Dirija la cámara y el flash como en la toma
posterior. Con el funcionamiento Metz-Remote
sin cables, en el flash esclavo no se produce
ninguna indicación de control de la exposición.
Para la vigilancia de la exposición sólo es relevante la indicación en el controlador.
☞
Page 60

60
8. Lighting and diffuser
If there is no attachment in front of the reflector,the mecablitz provides full lighting coverage for normal 24x36mm
shots with lenses of 35 mm focal length and longer.
If a wide-angle diffuser (identified by W) is used in front
of the reflector the flash will cover the image angle of a
24mm lens.
When positioning the telephoto attachment (identified
by T) in front of the reflector the mecablitz will fully illuminate shots taken with a telephoto lens of 85 mm focal
length and longer.
If the mecablitz is mounted ...
- on the camera (by the accessory shoe), or
- by way of the „34-36 flash bracket“ next to the camera,
then it will be necessary to consider the focal length of the
camera’s lens when selecting the W or T attachment (8) in
order to optimise the illumination and simultaneously
maximise the effective range of the flash light.
Please note that the effective range of the flash
light is diminished by using a wide-angle diffuser (by approx. -20%), and increased with a
telephoto attachment (by approx. +20%). See
also the table for maximum illumination
distances (page 78)!
For digital cameras take into account that the
focal lengths are given for the 35mm format
(see the operating instructions for the individual camera)!
8.1 Mounting/removing the attachments
To remove turn the attachment out of the retaining springs
(see fig.7) and withdraw.
Insert the wide-angle diffuser
or telephoto attachment
in a swivelled out state (see fig.7) in the bayonet mount.
Turn the attachment clockwise to insert in the guide strip
in the housing gap.
☞
Lighting and diffuser
Illuminazione e diffusori
Iluminación y Difusor
guiding strip
guida
través de la guía
housing gap
fessura del corpo
carcasa del flash
Fig. 7
Fig. 7
Grab. 7
Page 61

61
8. Illuminazione e diffusore
Il mecablitz illumina perfettamente riprese normali di piccolo formato (24x36mm) con obiettivi a partire da 35 mm
di focale o più grandi senza il diffusore davanti alla parabola. Preorientando il diffusore grandangolare (contrassegno
W) davanti alla parabola si possono illuminare anche
riprese con obiettivi da 24 mm di focale o più grandi.
Preorientando il diffusore tele (contrassegno T) davanti
alla parabola si possono illuminare riprese con obiettivi da
85 mm e più grandi.
Se il mecablitz viene azionato
- sulla camera (sulla slitta accessori) oppure
- con la „staffa flash 34-36“ direttamente accanto alla
camera,
si dovrebbe tenere conto, per la scelta del diffusore (8),
della focale dell’obiettivo della camera. In tal modo si può
ottenere un’illuminazione ottimale della ripresa e la tempo
stesso la massimo portata della luce flash.
Tenete presente che la portata della luce flash
si riduce con un diffusore grandangolare di circa il 20% ( ca. - 20%) mentre con un diffusore
tele aumenta di circa il 20 % (ca. + 20%). Vedi
al proposito anche la tabella per la massima
distanza di illuminazione (pagina 78)!
Per le camere digitali tenete presente i valori di
focale degli obiettivi convertiti per riprese di
piccolo formato (vedi istruzioni per l’uso della
camera)!
8.1 Montaggio/smontaggio dei diffusori
Per smontare il diffusore, giratelo verso l’esterno sopra la
molla di fermo (vedi figura 7) e sfilatelo.
Inserite il diffusore
in posizione aperta laterale (vedi
figura 7) nell’attacco a baionetta. Ruotate il diffusore in
senso orario e inserite la guida nell’apposita fessura del
corpo del lampeggiatore.
☞
8. Iluminación y difusor
El mecablitz ilumina totalmente, sin difusor delante del
reflector del flash, fotografías normales de pequeño formato (24 x 36 mm) con objetivos de distancias focales a partir de 35 mm o más.
Colocando el difusor gran angular (código W) delante
del reflector del flash, se iluminan fotografías con objetivos
de distancias focales de 24 mm o más.
Colocando el difusor Tele (código T) delante del reflector del flash, se iluminan fotografías con objetivos de
distancias focales de 85 mm o más.
Si el mecablitz se activa...
- sobre la cámara (en la zapata de accesorios o del flash) o
bien,
- con la „regleta portaflash 34-36“ inmediatamente al lado
de la cámara,
cuándo se selecciona el difusor (8), se ha de tener en
cuenta la distancia focal del objetivo de la cámara. Con
ello, se consigue una óptima iluminación de las tomas y
simultáneamente el máximo alcance del destello.
Tenga aquí en cuenta que el alcance del
destello se reduce (aprox. - 20%) si se utiliza el
difusor gran angular o se incrementa (aprox. +
20 %) al usar el difusor Tele. ¡Véase aquí también la tabla para la máxima distancia de iluminación (pág. 78)!
¡Con cámaras digitales, rogamos tenga en
cuenta la conversión de las distancias focales
al formato pequeño (ver las instrucciones de
manejo de la cámara)!
8.1 Montaje y desmontaje de los difusores
Para desmontar el difusor hay que girarlo sobre los
muelles de sujeción (vea grabado 7) y tirar del difusor.
Coloque el difusor
extraído sobre la bayoneta (véase
grabado 7). Gire el difusor en el sentido de las agujas del
reloj e introdúzcalo a través de la guía en la carcasa del
flash.
☞
Page 62

62
9. Cordless SLAVE operation
The SLAVE mode permits cordless, delay-free remote
triggering of several additional SLAVE or servo flash
units. Advantages for the photographer:
- Mobile use of several flash units.
- No synch cable connection with the camera.
- Modelling illumination.
The SLAVE flash unit is triggered by a light pulse emitted
by the master flash unit (controller) mounted on the camera or by the camera’s built-in flash.
The red-eye reduction preflash function must
not be activated on the controller or camera
when the mecablitz is used as a SLAVE! SLAVE
mode of the mecablitz is not possible in combination with the stroboscopic function, highspeed synchronisation (FP or HSS), Canon ATTL and E-TTL, Minolta-ADI or Nikon 3D flash
mode! If necessary these modes have to be
deactivated on the camera, the SCA adapter of
the controller or on the controller (see corresponding operating instructions).
The hot shoe and the earthing contacts on the
side of the mounting foot must not be
short-circuited.
The SLAVE flash unit and the controller are both triggered
when the camera’s shutter release is pressed. Both the
controller and the SLAVE flash unit must be ready for firing
when the picture is shot (illuminated flash-ready signal on
the flash unit).
To ensure reliable operation the sensor of the SLAVE mecablitz must receive sufficient light from the controller! In the
event of malfunction it may be necessary to change the position of the SLAVE so that its sensor receives more light.
The mecablitz must be mounted on the supplied stand or
combined with the camera on the „34-36 flash bracket“
for SLAVE mode. The mecablitz with stand is set up in the
required position or mounted on a tripod. Normally, the
reflector of the SLAVE flash unit will be directed towards
the subject.
Our tip:
For off-camera operation (the mecablitz is operated as a
SLAVE at a distance from the camera), the wide-angle diffuser W (8) should be positioned in front of the reflector to
achieve the widest possible illumination of the subject.
The following three SLAVE functions are available:
The required SLAVE function is set on the mecablitz with
the SLAVE function selector .
☞
Cordless SLAVE operation
Controllo SLAVE senza cavi
Funcionamiento esclavo sin cable
Ǻ
Page 63

63
9. Controllo SLAVE senza cavi
La modalità SLAVE serve per l’attivazione a distanza
sincronizzata di lampeggiatori aggiuntivi SLAVE o
servo-lampo. Qui di seguito i vantaggi per il fotografo:
- Impiego mobile di più lampeggiatori.
- Nessun collegamento cavo sincro alla fotocamera.
- Illuminazione plastica.
L’attivazione del lampeggiatore SLAVE avviene tramite
impulso luminoso inviato dal lampeggiatore di comando
(Controller) disposto sulla camera oppure tramite il flash
incorporato nella camera.
Impiegando il mecablitz come lampeggiatore
SLAVE, sul Controller o sulla camera non deve
essere attivata la funzione prelampo contro l’effetto occhi rossi! Il Modo SLAVE del mecablitz
non è disponibile per motivi legati al sistema
stesso in combinazione con il Modo Stroboskop,
la sincronizzazione di breve durata (Modo FP o
HSS), Canon A-TTL e E-TTL, Minolta-ADI o
Nikon-3D! Questi Modi devono essere eventualmente disattivati sulla camera o sull’adattatore
SCA del Controller o sul lampeggiatore di
comando Controller (vedi le rispettive istruzioni
per l’uso dei diversi apparecchi).
Il contatto sincro e i contatti di massa nella
base di attacco non devono essere cortocircuitati.
Azionando il pulsante di scatto della camera si effettua
l’attivazione sincronizzata del lampeggiatore SLAVE e del
Controller.Al momento della ripresa il Controller e il lampeggiatore SLAVE devono essere carichi, ossia pronti per il
flash (la spia di carica flash dei lampeggiatori si accende).
Per un funzionamento corretto è necessario assicurarsi
che il fotosensore del lampeggiatore SLAVE nel mecablitz riceva sufficiente luce dal Controller.
In caso di funzionamento sbagliato bisogna eventualmente
modificare la posizione del lampeggiatore SLAVE in modo
tale che il fotosensore riceva più luce.
Per il Modo SLAVE il mecablitz viene montato sul cavalletto in dotazione o insieme alla camera sulla „staffa flash
34-36“.
Il mecablitz viene montato sul cavalletto nella posizione
desiderata o su un treppiede. Normalmente la parabola del
lampeggiatore SLAVE è indirizzata verso il soggetto da
riprendere.
Il nostro consiglio:
Nel Modo asservito (il mecablitz viene azionato come SLAVE
ad una certa distanza dalla camera) si consiglia di utilizzare il
☞
9. Funcionamiento esclavo sin cable
El funcionamiento esclavo sirve para disparar a
distancia sin cable y sin retardo varios flashes esclavos adicionales. La ventaja para el fotógrafo es:
- colocación más flexible de varios flashes.
-
no depender de cables de sincronización a la cámara.
- iluminación más plástica.
El disparo del flash esclavo se produce por un impulso luminoso del flash que controla (controlador) sobre la cámara o el
flash incorporado en la cámara.
Al aplicar el mecablitz como flash esclavo, ¡en el
controlador o en la cámara no debe estar activada ninguna función predestello contra ojos
rojos! ¡La función SLAVE del mecablitz no es
posible, dependiendo del sistema, en combinación con el funcionamiento estroboscópico del
flash, la sincronización de corta duración (funcionamiento del flash FP o HSS), Canon A-TTL y
E-TTL, Minolta -ADI o el funcionamiento del flash
Nikon-3D!. Caso dado, hay que desactivar estos
modos de funcionamiento en la cámara o en el
adaptador SCA del controlador o en el flash controlador, (véanse las correspondientes instrucciones de servicio del aparato).
El contacto central y los contactos laterales a
masa del pie de conexión , no deben estar
en cortocircuito.
Al accionarse el disparador de la cámara, se dispara el
flash esclavo, juntamente con el controlador. En el instante
de la toma, el controlador y el flash esclavo deben estar en
disposición de disparo (el indicador de disponibilidad de
los flashes luce).
¡Para que el funcionamiento esté asegurado deberá comprobar que el sensor esclavo , en el mecablitz,recibe luz
suficiente del controlador! Cuando hay fallos de función, se
debe modificar eventualmente la posición del flash esclavo, de tal forma que el sensor esclavo reciba más luz.
Para el funcionamiento esclavo, el mecablitz se monta sobre
el soporte suministrado o juntamente con la cámara sobre
la
„regleta
portaflash 34-36“.
El mecablitz se coloca con el soporte en la posición que se
desee, o se monta sobre un trípode. En caso normal, el
reflector del flash esclavo está orientado hacia el sujeto de
la toma.
Nuestro consejo:
En funcionamiento encadenado (el mecablitz se acciona
como esclavo, a cierta distancia de la cámara), el difusor
☞
Ǻ
Ǻ
Page 64

64
Cordless SLAVE operation
Controllo SLAVE senza cavi
Funcionamiento esclavo sin cable
1. mecalux-SLAVE function:
This SLAVE mode is suitable for all cameras that do
not feature a measuring preflash. On cameras with
preflash, the preflash function must be switched off.
Any flash unit (including the camera’s built-in flash)
can be used as a controller.The SLAVE is triggered at
the same time as the controller. Light control is performed by the SLAVE and depends on the setting of
the operating mode selector (auto mode A or
manual mode M).
Activating the mecalux-SLAVE mode:
• Mount and set up the SLAVE unit in the described manner.
• Turn on the SLAVE unit with the main switch .
• Set the SLAVE function selector in Position 1 (see fig.
8). The SLAVE indicator on the mecablitz will become
continuously illuminated (see fig. 9).
• Select auto mode A or manual mode M with the operating mode selector on the SLAVE unit.
• Activate the controller on the camera. Set flash synch
speed or a slower shutter speed on the camera.
NOTE: Flash units of other photographers working within the action radius of the mecablitz
(SLAVE function selector in position 1) can
inadvertently trigger the mecablitz.
Set the operating mode selector to one of the three auto
working apertures A for autoflash mode A. The auto working aperture should match the aperture set on the lens or
camera. Take into account the speed of the film (ISO) loaded in the camera or the film speed rating for digital cameras (see camera’s operating instructions). For compact
(zoom) cameras without aperture setting facilities select
the widest aperture on the mecablitz (equalling the smallest aperture number; see operating instructions for the
given camera)! The sensor controls the light output of
the mecablitz when in auto mode.
Set the operating mode selector to M for manual flash
mode M. When activated the mecablitz will fire a flash at
full light output. With regard to the distance of the flash unit
to the subject and the camera aperture to be set, the same
applies as for the auto mode (see page 54).
☞
Ǻ
Fig. 8 / Fig.8 / Grab. 8
Fig. 9
Fig. 8
Grab. 8
34CS2-1
Page 65
65
diffusore grandangolare W davanti alla parabola per assicurare un’illuminazione quanto più omogenea dell’oggetto.
Si possono scegliere tre Modalità SLAVE:
La selezione del Modo SLAVE avviene con il selettore di
funzionamento SLAVE sul mecablitz.
1. Funzione mecalux SLAVE:
Questo Modo SLAVE è adatto per tutte le camere senza prelampo di misurazione. Nelle camere con prelampo di misurazione, questo deve essere disattivato.
Si può utilizzare qualsiasi lampeggiatore (incluso un
lampeggiatore integrato nella camera) come Controller.L’attivazione del lampeggiatore SLAVE è sincronizzata a quella del Controller.La regolazione della luce
avviene sul lampeggiatore SLAVE in base alla posizione del selettore del modo di funzionamento
(Modo flash Auto A o Modo flash Manuale M).
Attivazione del Modo mecalux-SLAVE:
• Montate il lampeggiatore SLAVE come descritto.
• Accendete il lampeggiatore SLAVE con l’interruttore
principale .
• Mettete in posizione 1 il selettore di funzionamento SLAVE (vedi fig. 8). La spia SLAVE sul mecablitz rimane accesa (vedi fig. 9).
• Con il selettore del modo di funzionamento sul lampeggiatore SLAVE selezionate il Modo Auto A o il Modo
Manuale M.
• Attivate il Controller sulla camera. Impostate sulla camera il tempo sincro o un tempo di posa più lungo.
I lampeggiatori di altri fotografi che abbiano lo
stesso raggio di azione del mecablitz (selettore
di funzionamento SLAVE in Posizione 1) possono inavvertitamente attivarlo.
Per il Modo flash Auto A impostate il selettore del modo di
funzionamento su uno dei tre valori di diaframma A. Il
valore di diaframma A dovrebbe corrispondere a quello
dell’obiettivo o a quello impostato sulla camera. Fate attenzione alla sensibilità ISO della pellicola inserita nella camera
o, nelle camere digitali, ai dati relativi alla sensibilità della
pellicola (vedi istruzioni per l’uso della camera). Nelle camere compatte (zoom) senza possibilità di regolazione del
diaframma selezionate l’apertura di diaframma maggiore
(corrisponde al più piccolo numero di apertura del diaframma; vedi istruzioni per l’uso della camera) per impostare il
valore di diaframma sul mecablitz! Nel Modo Auto il fotosensore del mecablitz regola l’intensità della luce emessa.
Per il Modo flash Manuale M mettete il selettore del modo di
funzionamento sulla posizione M. Il mecablitz emette
☞
gran angular W (8) debe estar colocado delante del reflector del flash, para conseguir una iluminación lo más amplia
posible del sujeto.
Se dispone de tres tipos de funcionamiento esclavo:
La selección del tipo de funcionamiento esclavo se realiza en
el mecablitz, mediante el interruptor de función esclavo
1. Función mecalux-SLAVE:
Este modo de funcionamiento esclavo está indicado
para todas las cámaras sin predestello de medición.
En cámaras con predestello de medición se ha de
desconectar éste en la cámara. Se puede emplear
como controlador cualquier flash que se desee
(incluso los internos de las cámaras). El flash esclavo
se dispara simultáneamente con el controlador. La
regulación de la luz se efectúa en el flash esclavo,
según la posición del interruptor de tipo de funcionamiento : modo automático A, o modo manual M.
Activación del funcionamiento mecalux SLAVE:
• Monte y coloque el flash esclavo como se describe.
• Conecte el flash esclavo con el interruptor principal .
• Coloque el interruptor de función esclavo en la posición 1 (ver figura 8). La indicación SLAVE en el mecablitz luce permanentemente, (ver figura 9).
• Mediante el interruptor de tipo de funcionamiento en
el flash esclavo, seleccione el modo automático A o el
modo manual M.
• Active el controlador en la cámara.Ajuste la cámara a la
velocidad de sincronización o a una más lenta.
Los flashes de otros fotógrafos que operen en el
mismo radio de acción que el mecablitz (interruptor de función esclavo, en posición 1),
podrían disparar involuntariamente el mecablitz.
Para el modo de funcionamiento automático A, coloque el
interruptor selector de modo en uno de los tres diafragmas automáticos A. La abertura automática deberá corresponder a la abertura de diafragma ajustada en el objetivo
o en la cámara. Tenga Vd. aquí también en cuenta la sensibilidad ISO de la película cargada en la cámara, o la indicación de la sensibilidad del film en las cámaras digitales
(ver las instrucciones de manejo de la cámara). ¡Con
cámaras (zoom) compactas sin posibilidades de ajuste
para el diafragma, seleccione Vd. la mayor abertura (que
corresponde a la más pequeña graduación del diafragma:
vea las instrucciones de servicio de la cámara) para el ajuste del diafragma en el mecablitz!. Con funcionamiento
automático, el sensor fotoeléctrico del mecablitz regula
la emisión de luz del flash.
☞
Ǻ
Ǻ
Page 66

66
Cordless SLAVE operation
Controllo SLAVE senza cavi
Funcionamiento esclavo sin cable
2. mecalux-SLAVE function with preflash suppression:
This SLAVE mode is especially suitable for digital
cameras with a measuring preflash function: Various
digital camera models fire a measuring preflash fractions of a second before the actual shot. To ensure
that the mecablitz is not triggered as a result of this
preflash, the SLAVE function selector must be set
to position 2 so that the mecablitz will only be triggered by the main flash. Light control is performed on
the SLAVE flash unit depending on the setting of the
operating mode selector (auto mode A or manual
mode M; for details see „mecalux-SLAVE function“).
Activating the mecalux-SLAVE mode with preflash
suppression:
• Mount and set up the SLAVE unit in the described man-
ner.
• Turn on the SLAVE unit with the main switch .
• Set the SLAVE function selector in Position 2 (see fig.
10). The SLAVE indicator on the mecablitz will light up
and at one second intervals it will be interrupted by two
brief pauses (SLAVE indicator 2 is briefly turned off twice).
• Select auto mode A or manual mode M with the opera-
ting mode selector on the SLAVE unit.
• Activate the controller mounted on the camera. Set flash
synch speed or a slower shutter speed on the camera.
NOTE: The SLAVE unit only reacts to light pulses from the controlling master within a specific period (fractions of a second). This makes
the mecablitz almost insensible to flashes from
other photographers who are not working with
the measuring preflash method.
3. SLAVE function with cordless Metz remote
system
This SLAVE mode is exclusively intended for the cordless Metz remote system. The controlling master
flash unit on the camera must support the cordless
Metz remote system (only mecablitz 40 MZ-.., 50
MZ-5, 54 MZ-3, 70 MZ-..) and be set to the corresponding operating mode (see the operating instructions for the given controller). The light output is controlled by the camera (Metz TTL remote system) or by
a sensor integrated in the controller (Metz automatic
remote system). The position of the operating mode
selector on the mecablitz is irrelevant.
☞
Ǻ
Ǻ
Fig 10 / Fig. 10 / Grab.10
34CS2-2
Page 67
67
dopo il comando un lampo incontrollato a piena potenza. Per
la distanza tra il lampeggiatore e il soggetto e per l’impostazione di diaframma della fotocamera valgono gli stessi principi descritti per il Modo flash Auto (vedi pagina 55).
2. Funzione mecalux SLAVE con soppressione del
prelampo di misurazione
Questo Modo SLAVE è adatto in particolare per le
camere digitali con funzione di prelampo di misurazione. Diverse camere digitali attivano un prelampo di
misurazione alcune frazioni di secondo prima che venga effettuata la vera e propria ripresa con il lampo principale. Affinché non venga effettuata un’attivazione
sincronizzata del mecablitz con il prelampo di misurazione, mettendo il selettore di funzionamento SLAVE
nella posizione 2 il mecablitz viene attivato solo con il
lampo principale. La regolazione della luce avviene sul
lampeggiatore SLAVE in base alla posizione del selettore del modo di funzionamento (Modo flash Auto A o
Modo flash Manuale M; per maggiori informazioni al
proposito vedi „Funzione mecalux-SLAVE“).
Attivazione del Modo mecalux SLAVE con soppressione del prelampo di misurazione:
• Montate il lampeggiatore SLAVE come descritto.
• Accendete il lampeggiatore SLAVE con l’interruttore
principale .
• Mettete il selettore di funzionamento SLAVE in posi-
zione 2 (vedi fig. 10). La spia SLAVE sul mecablitz si
accende e viene interrotta da due brevi pause a pochi
secondi di distanza l’una dall’altra (la spia SLAVE 2 si
spegne brevemente due volte).
• Selezionate con il selettore del modo di funzionamento
sul lampeggiatore SLAVE il Modo flash Auto A o il
Modo flash Manuale M.
• Attivate il Controller sulla camera. Impostate sulla came-
ra il tempo-sincro o un tempo di posa più lungo.
IL lampeggiatore SLAVE reagisce soltanto agli
impulsi luminosi del Controller entro un determinato lasso di tempo (frazioni di secondo). In
tal modo il mecablitz può operare in questa
modalità senza essere disturbato dalla luce
flash di altri fotografi che non lavorano con la
tecnica del prelampo di misurazione.
3. Funzione SLAVE nel Controllo Metz a distanza
senza cavi
Questo Modo SLAVE è adatto esclusivamente per il
Controllo Metz a distanza senza cavi. Il lampeggiatore Controller sulla camera deve supportare il Control-
☞
Para el funcionamiento manual M, colocar el interruptor de tipo
de funcionamiento en M. Tras la excitación, el mecablitz
emite una luz no regulada, a plena potencia. Básicamente,
para la distancia entre el flash y el sujeto de la toma, así como
para el diafragma a ajustar en la cámara, sirve lo mismo que
para el funcionamiento automático del flash (ver página 55).
2. Función mecalux SLAVE con supresión del predestello de medición
Este modo de funcionamiento esclavo está especialmente indicado para las cámaras digitales con predestello de medición. Existen diversas cámaras digitales que disparan un predestello de medición, una
fracción de segundo antes de la propia toma con
flash. Para que el mecablitz no dispare también
simultáneamente con ese predestello, en la posición
2 del interruptor de función esclavo se realiza el
disparo del mecablitz únicamente en el instante del
destello principal, que ilumina la toma. La regulación
de la luz se lleva a cabo en el flash esclavo, según la
posición del interruptor de tipo de funcionamiento
: modo automático A,o modo manual M; para más
detalles, ver „Función mecalux SLAVE“.
Activación del funcionamiento mecalux SLAVE, con
supresión del predestello de medición:
• Monte y coloque el flash esclavo como se describe.
• Conecte el flash esclavo con el interruptor principal .
• Coloque el interruptor de función esclavo en la posi-
ción 2 (ver figura 10). La indicación SLAVE en el
mecablitz luce y se interrumpe por dos breves pausas de
aproximadamente unos intervalos de segundo (la indicación esclavo 2 se apaga brevemente dos veces)
• Mediante el interruptor de tipo de funcionamiento en
el flash esclavo, seleccione el modo automático A o el
modo manual M.
• Active el controlador en la cámara.Ajuste la cámara a la
velocidad de sincronización o a una más lenta.
El flash esclavo reacciona solamente con
impulsos de luz del controlador, dentro de un
determinado periodo de tiempo (fracción de
segundo). Con ello, el mecablitz en este modo
de funcionamiento está protegido contra el
destello producido por otros fotógrafos que no
operan con la técnica del predestello.
3. Función mecalux SLAVE con el sistema sin
cables Metz-Remote
Este modo de funcionamiento esclavo está exclusivamente indicado para el sistema sin cables Metz-Remo-
☞
Ǻ
Ǻ
Ǻ
Ǻ
Page 68

68
Cordless SLAVE operation
Controllo SLAVE senza cavi
Funcionamiento esclavo sin cable
Activation of the SLAVE mode with the cordless Metz
remote system:
• Mount and set up the SLAVE unit in the described manner.
• Turn off the SLAVE unit with the main switch .
• Press the manual firing button and keep depressed.
• Turn on the mecablitz with the main switch .
• Release the manual firing button .
• Set the SLAVE function selector in Position 2 (see fig.
10). The SLAVE indicator on the mecablitz will start
flashing (see fig. 11); the on/off intervals are approximately the same.
• Activate the controller (master) on the camera. Set the
flash synch speed or a slower shutter speed on the
camera.
SLAVE operation with the cordless Metz remote
system must be reactivated after the mecablitz
has been switched off with the main switch
or after automatic switch-off (see above)!
NOTE: The mecablitz as a SLAVE in the cordless Metz remote system only supports the
controller address 1! Operation of the mecablitz as a controller in the cordless Metz remote system is not possible!
Testing the cordless Metz remote function before
shooting:
• Set up the mecablitz (SLAVE) in the position required for
picture shooting.
• Point the camera with the controller (master) in the same
direction as for the subsequent shot.
• Wait until the controller and the SLAVE(s) are ready for
firing (flash ready indicator on the individual flash units is
lit).
• Press the manual firing button on the camera-mounted
mecablitz controller and fire a test flash.
• The mecablitz 34 CS-2 digital (SLAVE) responds with a
delayed flash, thereby indicating operating readiness. If
several SLAVES are simultaneously used, then all of
them will respond simultaneously.
• If a SLAVE does not fire a delayed flash then this indicates that its sensor did not receive a light pulse. Should
this be the case turn the SLAVE until its sensor can
receive the light pulse, and repeat the test.
Bright ambient light and/or a wide aperture
setting on the camera lens may cause the electronic circuit to cut off the power prematurely
☞
☞
Fig. 11
Fig. 11
Grab. 11
Page 69

69
lo Metz a distanza senza cavi (solo mecablitz 40 MZ.., 50 MZ-5, 54 MZ-3, 70 MZ-..) ed essere impostato
nel Modo corrispondente (vedi istruzioni per l’uso del
Controller). Il controllo della luce viene effettuato dalla camera (Controllo Metz a distanza TTL) o da un
fotosensore nel Controller (Controllo Metz a distanza
Auto). La posizione del selettore del modo di funzionamento sul mecablitz è irrilevante.
Attivazione del Modo SLAVE nel Controllo Metz a
distanza senza cavi:
• Montate il lampeggiatore SLAVE come descritto.
• Accendete il lampeggiatore SLAVE con l’interruttore
principale.
• Premete il pulsante test e tenetelo premuto.
• Accendete il mecablitz con l’interruttore principale .
• Rilasciate il pulsante test .
• Mettete il selettore di funzionamento SLAVE in posizione 2 (vedi fig. 10). La spia SLAVE sul mecablitz
lampeggia (vedi fig. 11). L’intervallo ON e OFF ha la stessa durata.
• Attivate il Controller sulla camera. Impostate sulla camera il tempo-sincro o un tempo di posa più lungo.
Dopo lo spegnimento del mecablitz con l’interruttore principale o dopo uno spegnimento
automatico dell’apparecchio, il Modo SLAVE nel
Controllo Metz a distanza senza cavi deve essere
riattivato di nuovo (vedi sopra)!
Tenete presente che il mecablitz come SLAVE nel
Controllo Metz a distanza senza cavi supporta
solo l’ingresso 1 del Controller! Il funzionamento
del mecablitz come Controller nel Controllo Metz
a distanza senza cavi non è possibile!
Sperimentate il Controllo Metz a distanza senza cavi
prima di effettuare la ripresa:
• Mettete il mecablitz (SLAVE) nella posizione desiderata
per effettuare la ripresa.
• Tenete la camera con il lampeggiatore Controller nella
posizione adeguata per la ripresa.
• Aspettate che il lampeggiatore Controller e il(i) lampeggiatore(i) SLAVE(S) siano carichi (le spie di carica flash
dei singoli lampeggiatori si accendono).
• Premete il pulsante test sul mecablitz montato sulla
camera (Controller) e scattate un flash di prova.
• Il mecablitz 34 CS-2 digital (SLAVE) risponde con un
lampo ritardato. Ciò significa che è pronto per l’uso. Se
vengono attivati diversi SLAVE contemporaneamente, gli
SLAVE rispondono tutti sincronicamente.
☞
te. El flash controlador en la cámara debe soportar el
sistema sin cables Metz-Remote (sólo mecablitz 40
MZ-..., 50 MZ-5, 54 MZ-3,70 MZ-...) y estar conmutado al correspondiente modo de funcionamiento, (vea
las instrucciones de servicio del controlador). El control
de la luz se realiza a través de la cámara (Metz-TTLRemote-System) o mediante un sensor fotoeléctrico en
el controlador (Metz-Automatik-Remote-System). La
posición del interruptor de modo de funcionamiento
en el mecablitz carece de importancia.
Activación del funcionamiento mecalux SLAVE, con el
sistema sin cables Metz-Remote:
• Monte y coloque el flash esclavo como se describe.
•
Desconecte el flash esclavo con el interruptor principal .
• Pulse y mantenga pulsado el disparador manual .
• Conecte el mecablitz con el interruptor principal .
• Deje suelto el disparador manual .
• Coloque el interruptor de función esclavo en la posición 2 (vea figura 10). La indicación SLAVE en el
mecablitz parpadea (vea figura 11): los intervalos de parpadeo son aproximadamente de igual duración
• Active el controlador en la cámara.Ajuste la cámara a la
velocidad de sincronización o una más lenta.
Después de la desconexión del mecablitz con el
interruptor principal o tras una desconexión
automática del aparato, ¡se ha de reactivar de
nuevo el funcionamiento esclavo en el sistema
sin cables Metz-Remote (ver arriba)!
¡Tenga en cuenta que el mecablitz, como esclavo, en el sistema sin cables Metz-Remote, solo
soporta la dirección 1 del controlador!. ¡El funcionamiento del mecablitz como esclavo en el
sistema sin cables Metz-Remote no es posible!
Compruebe el funcionamiento sin cables Metz-Remote, antes de la propia toma
• Posicione Vd. el mecablitz (esclavo) como desee para la
toma.
• Mantenga la cámara con el flash controlador como para
la toma posterior.
• Espere hasta que el flash controlador y el /o los esclavos
estén en posición de disparo (el indicador de disposición
de cada flash luce).
• Pulse el disparador manual en el mecablitz sobre la
cámara (controlador) y hacer un disparo de prueba.
• El mecablitz 34 CS-2 digital (esclavo) reacciona con un
destello retardado, indicando con ello que está preparado para el uso. Si se activan a la vez varios esclavos, la
☞
Ǻ
Ǻ
Page 70

Cordless SLAVE operation
Controllo SLAVE senza cavi
Funcionamiento esclavo sin cable
70
so that the SLAVE does not receive a complete
light pulse. In such an event close down the
aperture on the camera or mount a neutral
density filter in front of the lens.
It is quite sufficient to briefly switch the mecablitz off and
on again with the main switch to leave the „SLAVE
mode with the cordless Metz remote system“ for the
„mecalux SLAVE mode with preflash suppression“ (SLAVE
function selector in position 2). „ In position 1 of the SLAVE
function selector , the mecablitz always operates with
the „mecalux SLAVE mode.
The SLAVE only reacts to a light pulse from the
controlling „master“-. Flash units of other photographers within the same working radius
will not trigger the SLAVE.
When in cordless Metz remote mode there is
no exposure verification on the SLAVE. Only the
indication on the controller (master) is relevant
for correct exposure confirmation!
Cordless controller flash operation
In the cordless controller flash mode, the flashlight of
the mecablitz telecontrols the triggering of one or
more SLAVES.The controlling master flash is inserted
in the camera’s accessory shoe, or mounted on a
camera bracket, or is linked with the camera’s synch
contact (X contact) with a synchronising cable (see
page 48: Synchronisation).When used as a „master“,
the mecablitz 34 CS-2 digital only supports the
mecalux SLAVE function: the SLAVE function selector
of the mecablitz 34 CS-2 digital mounted on the
camera must be set to position 0.
Switch the SLAVE function selector of the
SLAVE unit to position 1!
The mecablitz is used either in the auto flash mode A or in
the manual flash mode M. No additional settings are required to use the mecablitz as a master flash unit (controller).
☞
☞
Ǻ
Page 71

71
• Se uno SLAVE non emette un lampo ritardato, significa
che il sensore di questo SLAVE non ha ricevuto l’impulso
luminoso. Ruotate lo SLAVE in modo tale che il sensore
possa ricevere l’impulso luminoso e ripetete il test.
Se la luminosità ambiente e/o l’apertura del
diaframma sull’obiettivo della fotocamera sono
troppo grandi, lo SlAVE potrebbe non ricevere
completamente l’impulso luminoso nella ripresa successiva, poiché la centralina elettronica
interrompe prima l’emissione luminosa. Riducete in questo caso l’apertura del diaframma
sull’obiettivo della fotocamera o applicate
davanti all’obiettivo un filtro neutrale grigio.
Per commutare il mecablitz dalla „Funzione SLAVE nel Controllo Metz a distanza senza cavi“ alla „Funzione mecalux
con sopppressione del prelampo di misurazione“ (selettore
di funzionamento SLAVE rispettivamente in posizione 2), non
dovete fare altro che spegnere e poco dopo riaccendere il
mecablitz con l’interruttore principale . Nella posizione 1
del selettore di funzionamento SLAVE il mecablitz funziona sempre nella „Funzione mecalux-SLAVE“.
Il lampeggiatore SLAVE reagisce solo all’impulso luminoso del Controller. I lampeggiatori di
altri fotografi che abbiano lo stesso raggio di
azione non possono attivare lo SLAVE.
Nel Controllo Metz a distanza senza cavi sul
lampeggiatore SLAVE non viene indicato il controllo dell’esposizione. Per il controllo dell’esposizione è rilevante solo la spia sul Controller.
Modo flash Controller senza cavi
Nel Modo flash Controller la luce lampo del mecablitz
controlla senza cavi l’attivazione di uno o più apparecchi SLAVE. Il Controller viene montato sulla slitta
accessori della camera o sulla staffa della camera
oppure collegato tramite cavo sincro con il contatto
sincro (contatto X) della camera (vedi pagina 49: sincronizzazione). Il mecablitz 34 CS-2 digital supporta
come Controller solo la funzione mecalux-SLAVE:
selettore di funzionamento SLAVE del mecablitz 34
CS-2 digital sulla camera in posizione 0.
Mettete il selettore di funzionamento SLAVE
del lampeggiatore SLAVE in posizione 1!
Il mecablitz funzionerà nel Modo flash Auto A o nel Modo
flash Manuale M. Per l’impiego come lampeggiatore Controller non sono necessarie altre impostazioni.
☞
☞
☞
☞
respuesta de todos ellos es simultánea.
•
En el caso de que un esclavo no emita un destello retardado, significa que su sensor no ha recibido ningún impulso
luminoso. Gire el esclavo, de manera que el sensor
pueda recibir un impulso luminoso y repita Vd. la prueba
Una gran luminosidad ambiente y/o una gran
abertura del diafragma en el objetivo de la cámara, pueden ocasionar que en la toma consecutiva,
el esclavo no reciba plenamente el impulso luminoso, dado que la electrónica ha interrumpido
previamente la emisión de luz. En ese caso,
diafragme Vd. el objetivo de la cámara, o coloque
un filtro neutro - gris delante del objetivo.
Para conmutar el mecablitz de la „función esclavo en el
sistema sin cables Metz-Remote“ a la „función mecalux
con supresión del predestello de medición“, (en cada caso,
el interruptor de función esclavo en la posición 2), es suficiente desconectar y volver a conectar brevemente el
mecablitz con el interruptor principal . En la posición 1
del interruptor de función esclavo , el mecablitz opera
siempre con la „función mecalux esclavo“.
El flash esclavo reacciona solamente ante el
impulso luminoso del controlador. Los flashes
de otros fotógrafos en el mismo radio de
acción no pueden disparar al esclavo
En el funcionamiento sin cables Metz-Remote,
no se produce en el flash esclavo ninguna indicación de control de la exposición. Para el control de la exposición sólo es relevante la indicación en el controlador.
Funcionamiento del flash controlador sin cables
En el funcionamiento del flash controlador, la luz de
destello del mecablitz activa, sin cables, el disparo de
uno o de varios flashes esclavos. El controlador se
monta en la zapata para flash o accesorios, o regleta
de la cámara o bien, se une a través de un cable síncrono con el contacto de sincronización (contacto X)
de la cámara (vea la página 49: Sincronización). El
mecablitz 34 CS-2 digital soporta como controlador
solamente la función mecalux esclavo: el interruptor
de función esclavo del mecablitz 34 CS-2 digital, en o
de la cámara en posición 0
¡Coloque el interruptor de función SLAVE ,
del flash esclavo, en la posición 1!
El mecablitz opera en el modo de funcionamiento
automático A o en el modo manual M. Para su aplicación
como flash controlador,no es necesario ningún ajuste adicional.
☞
☞
☞
☞
Ǻ
Ǻ
Page 72

72
Troubleshooting hints - After-sales service
Soluzione di problemi, servizio assistenza
Fallos y Soluciones, Servicio al Cliente
10. Troubleshooting hints - After-sales
service
Remove dirt and dust with a soft dry cloth. Never use
detergents as these may damage the plastic parts of the
flashgun!
Forming the flash capacitor
For technical reasons it is necessary to switch on the
mecablitz for approx. 10 minutes every three months and
to fire a few flashes (the capacitor of the mecablitz changes physically if the flash unit is not switched on for an
extended period).
The batteries must supply sufficient power for flash readiness to be indicated at the latest within 1 minute after
the mecablitz was switched on.
Before contacting the After-sales service please check the
following points:
The mecablitz 34 CS-2 is mounted on a camera
but does not fire a flash:
• Have the batteries been correctly loaded?
• Are the batteries exhausted?
• Has the flash unit automatically switched itself off?
• Is there synch contact with the camera?
• Has the SLAVE function selector l been set at „0“?
• The hot shoe is deactivated when a synch cable is
plugged into the synch socket!
When the mecablitz 34 CS-2 is used as a SLAVE
or servo flash unit and does not fire a flash:
• Have the batteries been correctly loaded?
• Are the batteries exhausted?
• Has the flash unit automatically switched itself off?
• Is the sensor for cordless flash operation receiving a light
pulse? Change the location of the flash unit, stop down
the aperture on the camera lens or diminish the surrounding brightness.
• Has the SLAVE function selector been correctly set?
- (Digital) camera without measuring preflash: >>> SLAVE function selector in position 1.
- Digital camera with measuring preflash: >>> SLAVE
function selector in position 2.
• Address 1 must be set on the master for the SLAVE function in the cordless Metz remote system!
Page 73

73
10. Soluzione di problemi, servizio assistenza
Rimuovete polvere e sporcizia con un panno morbido e
asciutto. Non utilizzate prodotti detergenti in quanto potrebbero danneggiare le parti in plastica.
Formatura del condensatore
Per motivi di ordine tecnico è necessario attivare il mecablitz ogni tre mesi lasciandolo acceso per 10 minuti e scattare un paio di flash (il condensatore incorporato nel mecablitz tende a deformarsi se l’apparecchio non viene
utilizzato per un lungo periodo).
Le batterie devono poter fornire un’energia sufficiente a far
accendere la spia di carica entro un minuto dall’accensione del mecablitz.
Prima di rivolgervi al servizio assistenza, vi preghiamo di osservare le seguenti avvertenze:
Se il mecablitz 34 CS-2 è montato su una fotocamera e non emette alcun lampo:
• Le batterie sono state inserite in modo corretto?
• Le batterie sono scariche?
• Il lampeggiatore si è spento automaticamente?
• La fotocamera è sincronizzata?
• L’interruttore di funzionamento SLAVE l è impostato sullo
„0“?
• Se il cavo sincro è infilato nella presa sincro del meca-
blitz, il contatto centrale è disattivato!
Se il mecablitz 34 CS-2 è impiegato come apparecchio SLAVE o servo-lampo e non viene emesso alcun lampo:
• Le batterie sono state inserite in modo corretto?
• Le batterie sono scariche?
• Il lampeggiatore si è spento automaticamente?
• Riceve il sensore per il controllo flash a distanza l’impul-
so luminoso? Cambiare eventualmente il luogo della
ripresa, chiudere il diaframma o ridurre la luminosità
ambiente.
• Il selettore di funzionamento SLAVE è impostato cor-
rettamente?
- Camera (digitale) senza tecnica del prelampo di misurazione: >>>> selettore di funzionamento SLAVE
in posizione 1
- Camera digitale con tecnica del prelampo di misurazione:>>> selettore di funzionamento SLAVE in
posizione 2.
• Nella funzione SLAVE con Controllo Metz a distanza
10. Fallos y Soluciones, Servicio al Cliente
Quite la suciedad o polvo con un pañuelo suave y seco. No
utilice detergentes que pudieran deteriorar la carcasa de
plástico.
Formar el condensador de destello
Por motivos técnicos es necesario conectar el flash en
intervalos de 3 meses, durante unos 10 minutos y disparar
unos destellos. (El condensador de destello incorporado en
el mecablitz se deforma físicamente, si el aparato no es
conectado durante períodos largos).
Las pilas han de tener la suficiente capacidad, para que la
indicación de disposición de disparo se encienda lo más
tarde un minuto después de la conexión.
Antes de contactar con el Servicio al Cliente debería
tener en cuenta lo siguiente:
Si el mecablitz 34 CS-2 está montado sobre una
cámara pero no da destellos:
• ¿Se han introducido bien las pilas?
• ¿Están vacías las pilas?
• ¿Se ha desconectado automáticamente el flash?
• ¿Hay contacto de sincronización con la cámara?
• ¿Está ajustado el interruptor esclavo
a "0"?
• ¡Si en la conexión de sincro del mecablitz hay un cable
sincro introducido, entonces el contacto central se desactiva!
Si el mecablitz 34 CS-2 se utiliza como flash
esclavo y no da destellos:
• ¿Se han introducido bien las pilas?
• ¿Están vacías las pilas?
• ¿Se ha desconectado automáticamente el flash?
• ¿El sensor para el funcionamiento de flash sin cable ha
recibido un impulso de luz? Cambiar la colocación del
flash o reducir la luz ambiente.
• ¿Es correcta la posición del interruptor de funcionamiento esclavo ?
- Cámara (digital) sin técnica de predestello de medición:
>>> interruptor de función esclavo en posición 1.
- Cámara digital con técnica de predestello de medición:
>>> interruptor de función esclavo en posición 2.
• ¡Con la función esclavo en el sistema sin cables MetzRemote, en el flash controlador debe estar ajustada la
posición 1!
Page 74

74
When the mecablitz is used as a SLAVE unit in
conjunction with a digital camera, all pictures
will be underexposed, irrespective of the setting
of the operating mode selector :
• The digital camera probably operates with measuring
preflash >>> set the SLAVE function selector to position 2.
If the mecablitz still does not function in spite of
all these checks, then:
• Turn off the flash unit by its main switch , wait for a
while, and then turn on again.
Should the mecablitz still not operate properly then consult
an authorised Metz dealer.
Troubleshooting hints - After-sales service
Soluzione di problemi, servizio assistenza
Fallos y Soluciones, Servicio al Cliente
Page 75

75
senza cavi deve essere impostato l’ingresso 1 sul Controller!
Impiegando il mecablitz come SLAVE con una
camera digitale tutte le riprese risultano sottoesposte indipendentemente dalla posizione del
selettore del modo di funzionamento :
La camera digitale funziona probabilmente con la tecnica
del prelampo di misurazione >>>mettete il selettore di
funzionamento SLAVE in posizione 2.
Se il mecablitz non dovesse funzionare
nonostante siano state osservate tutte queste
avvertenze, effettuare allora le seguenti operazioni:
• Spegnete il lampeggiatore con l’interruttore principale
, attendete per un attimo e riaccendetelo.
Se nonostante ciò il mecablitz non dovesse ancora funzionare, rivolgetevi ad un rivenditore Metz autorizzato.
Cuando se aplica el mecablitz como esclavo con
una cámara digital, todas las tomas tienen una
exposición demasiado oscura, con independencia de la posición del interruptor de modo de funcionamiento :
• La cámara digital trabaja probablemente con la técnica
de predestello de medición: >>> conmute el interruptor
de función esclavo a la posición 2.
Si con estas indicaciones el mecablitz sigue sin
funcionar haga lo siguiente:
• Desconectar el flash con el interruptor principal c, esperar un tiempo y volver a conectar.
Si aun así sigue teniendo problemas con su flash, entonces
acuda a su proveedor Metz autorizado.
Page 76
76
Technical data
Dati tecnici
Datos Técnicos
11. Technical data
Guide number at ISO 100/21°:
34 (with telephoto attachment)
28 (without attachment)
20 (with wide-angle diffuser)
Illumina
tion for 24 x 36 mm shots with lenses of 35 mm
focal length and longer; with wide-angle diffuser as of 24
mm focal length; with telephoto attachment as of 85 mm
focal length.
Colour tempera
ture: approx. 5600 °K
Synchronisa
tion: Low-voltage IGBT ignition
Flash dura
tion: 1/250 s ... 1/45,000 s
Rec
ycling time with full light output: approx. 6 s
Illumina
tion coverage: rectangular
Without attachment: horizontal approx. 56°, vertical
approx. 40°
With W diffuser: horizontal approx. 75°, vertical approx.
55°
With T attachment: horizontal approx. 25°, vertical approx.
18°
W
eight: approx. 160 g
Dimensions
(w/h/d): 61 x 111 x 35 mm
Supplied
:
Flash unit, attachments (W = wide-angle; T = telephoto),
stand, flash bracket, operating instructions, 2 CR2-type
batteries
Page 77

77
11. Dati tecnici
Numero guida a ISO 100/21°:
34 (con diffusore tele)
28 (senza diffusore)
20 (con diffusore grandangolare)
Illuminazione
per formati ridotti a partire da 35 mm di
focale, con diffusore grandangolare a partire da 24 mm di
focale, con diffusore tele a partire da 85 mm di focale.
T
emperatura colore: ca. 5.600 ° K
Sincronizzazione:
scarica a basso voltaggio IGBT
Dura
ta del lampo: 1/250 s ....1/45.000 s
Inter
vallo di ricarica
a piena carica ca. 6 s
Illuminazione:
rettangolare
senza diffusore orizzontale ca. 56°, verticale ca.40°
con diffusore W orizzontale ca. 75°,verticale ca. 55 °
con diffusore T orizzontale ca. 25°,verticale ca. 18°
P
eso: ca. 160 g
Dimensioni:
(L x A x P) 61 mm x 111 mm x 35 mm
In dotazione:
lampeggiatore, diffusori (W= grandangolare/T = Tele),
cavalletto, staffa, istruzioni per l’uso, 2 batterie CR2.
11. Datos Técnicos
Nº-Guía con ISO 100/21º:
34 (con difusor Tele)
28 (sin difusor)
20 (con difusor gran angular)
Iluminación
para paso universal desde 35 mm, con difusor
gran angular desde 24 mm, con difusor Tele desde 85 mm
de distancia focal.
T
emperatura de color: aprox. 5600 º K
Sincronización:
Ignición - IGBT - de bajo voltaje
Duración de destello:
1/250 Seg. ... 1/45000 Seg.
Secuencia de destellos
con plena potencia de luz: aprox. 6 seg.
Iluminación:
rectangular
Sin difusor horizontal aprox. 56º, vertical aprox. 40º
con difusor (W) horizontal aprox. 75º, vertical aprox. 55º
con difusor (T) horizontal aprox. 25º, vertical aprox. 18º
P
eso: aprox. 160 grs.
Dimensiones:
61 mm x 111 mm x 35 mm
V
olumen de suministro:
Flash, Difusores (W-Gran angular/T=Tele), Soporte, regleta, Instrucciones, 2 pilas CR 2.
Page 78

78
1,4
W N T W N T W N T W N T W N T W N T W N T W N T
8
11
16
22
32
45
10
14
20
28
40
56
12
17
24
34
48
67
5,5
8
11
16
22
32
7
10
14
20
28
40
8,5
12
17
24
34
48
4
5,5
8
11
16
22
5
7
10
14
20
28
6
8,5
12
17
24
34
2,8
4
5,5
8
11
16
3,5
5
7
10
14
20
4,2
6
8,5
12
17
24
2
2,8
4
5,5
8
11
2,5
3,5
5
7
10
14
3
4,2
6
8,5
12
17
1,4
2
2,8
4
5,5
8
1,8
2,5
3,5
5
7
10
2,1
3
4,2
6
8,5
12
1
1,4
2
2,8
4
5,5
1,2
1,8
2,5
3,5
5
7
1,4
2,1
3
4,2
6
8,5
0,7
1
1,4
2
2,8
4
0,9
1,2
1,8
2,5
3,5
5
1
1,4
2,1
3
4,2
6
ISO
25/15°
50/18°
100/21°
200/24°
400/27°
800/30°
2 2,8 4 5,6 8 11 16
max. Entfernung in m • Distance max. en m • Max. afstand in m
Table of maximum illumination distances / Tabella per le portate massime di illuminazione /
Tabla para distancias máximas de iluminación
W = Wide-angle diffuser W positioned in front of the reflector
N =Normal mode; reflector without attachment
T =Telephoto attachment T positioned in front of the reflector
W = orientamento diffusore grandangolare W davanti alla parabola
N =funzionamento normale; parabola flash senza diffusore
T =orientamento diffusore tele T davanti alla parabola
W = difusor gran angular W girado delante del reflector del flash
N =funcionamiento normal; reflector del flash sin difusor
T =difusor Tele T girado delante del reflector del flash
Page 79

79
Blitzbereitschaftsanzeige/
Handauslöser
Disponibilité du flash/
Boutond’essai
Flitsparaataanduiding/
handbediening
Flash-ready-indication/
manual firing botton
Spia di carica/Pulsante test
Indicador de disposición/
Disparador manual
Belichtungskontrollanzeige
Exposition o.k.
Belichting o.k-aanduiding
Exposure o.k.
Esposizione o.k.
Indicación de exposición
Entriegelungsknopf
Bouton de déverrouillage
Ontgrendelknop
Unlocking catch
Tasto di sblocco
Botón de desbloqueo
Betriebsartenschalter
Sélecteur de mode
Functieschakelaar
Operating mode selector
Selettore del modo di funcionamento
Selector del tipo de funcionamiento
SLAVE-Anzeige
SLAVE-disponibilité
SLAVE-aanduiding
SLAVE-indication
SLAVE-indicazione
SLAVE-indicador
Hauptschalter
Interrupteur
Hoofdschakelaar
Main switch
Interruttore principale
Interruptor principal
Vorsatzscheibe W / T
Complément W/T
Voorzetvenster W / T
Attachment W/T
Diffusore W/T
Difusor W / T
Foto-Sensor
Senseur
Fotosensor
Sensor
Sensore Foto
Sensor
SLAVE-Funktionsschalter
Sélecteur de fonction SLAVE
Keuzeschakelaar SLAVE
SLAVE function selector
Selettore di funzionamento SLAVE
Interruptor p. funcionamiento esclavo
Sensor für drahtlosen Blitzbetrieb
Cellule pour le mode flash sans fil
Sensor voor draadloos flitsen
Sensor for cordless flash control
Sensore per il contr.flash distanza
Sensor para el funcionamiento sin cable
Klemm-Scheibe
Disque de blocage
Klemschijf
Clamping plate
Rotellina di blocco
Tuerca ribeteada
Anschlußfuß
Sabot de raccordement
Voet
Mounting foot
Base di attacco
Pie de conexión
Synchronbuchse
Prise de synchronisation
Aansluiting flitskabel
Synch socket
Presa sincro
Conexión de sincro
Page 80

701 47 0004.A3
Ķĸń ķƴį
Unterhaltungselektronik Fotoelektronik Kunststofftechnik Industrieelektronik
Metz - Werke GmbH & Co KG • Postfach 1267 • D-90506 Zirndorf • info@metz.de • www.metz.de
Metz. Immer erster Klasse.
TV. VIDEO. AUDIO. MECABLITZ
 Loading...