

Page 1

Precision Balances and Comparators
User Manual
XPR
Page 2

Page 3
This User Manual is a brief instruction that provides information to handle with the first steps of the
9
0.1 mg
1
2
3
8
10
4
5 mg / 10 mg
55
2
6
7
9
10
8
1
instrument in a safe and efficient manner. Personnel must have carefully read and understood this
manual before performing any tasks.
For full information, always consult and download the Reference Manual (RM).
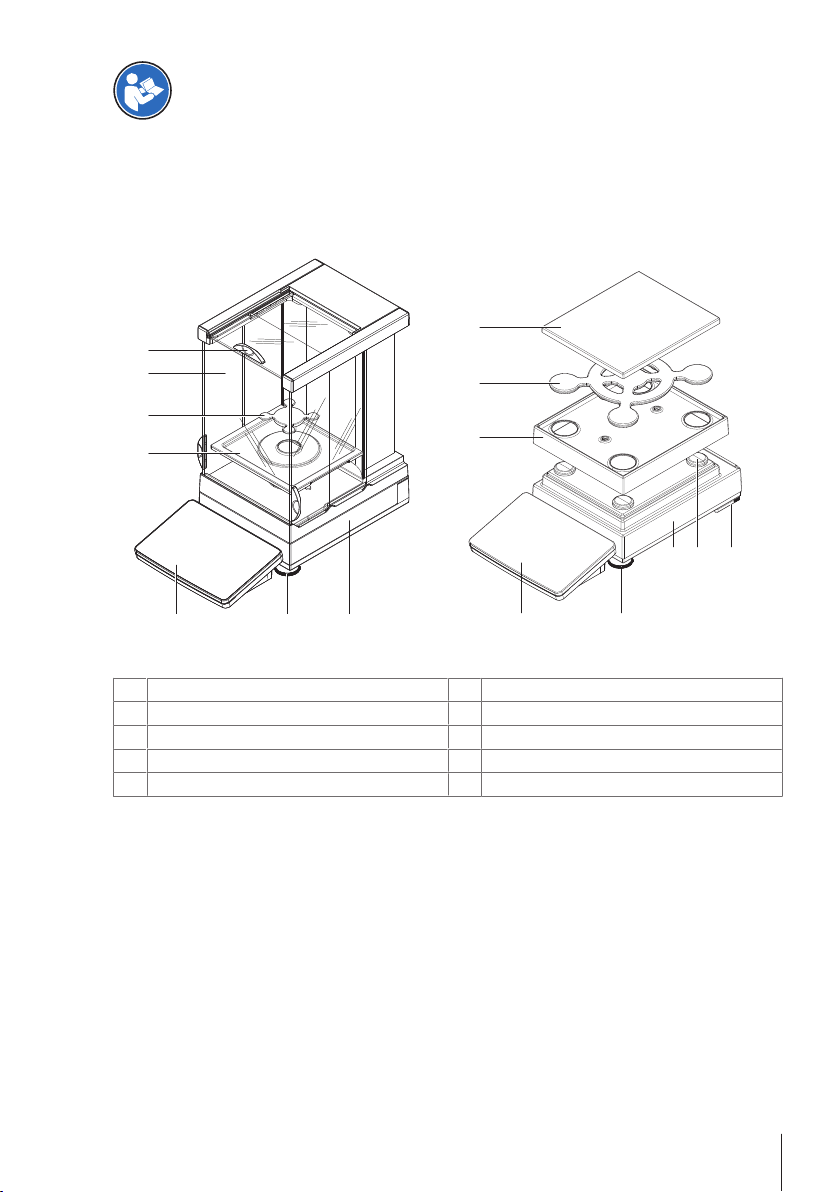
Overview balances with S weighing platform
u www.mt.com/XPR-precision-RM
Legend balances with S weighing platform
DripTray
1
SmartPan weighing pan
2
Pro Draft Shield
3
Pro Draft Shield door handler
4
Weighing pan with protective cover
5
Safety foot
6
Weighing pan support cap
7
Weighing platform with protective cover
8
Leveling foot
9
Terminal with protective cover
10
Overview balances with S weighing platform 3Precision Balances and Comparators
Page 4
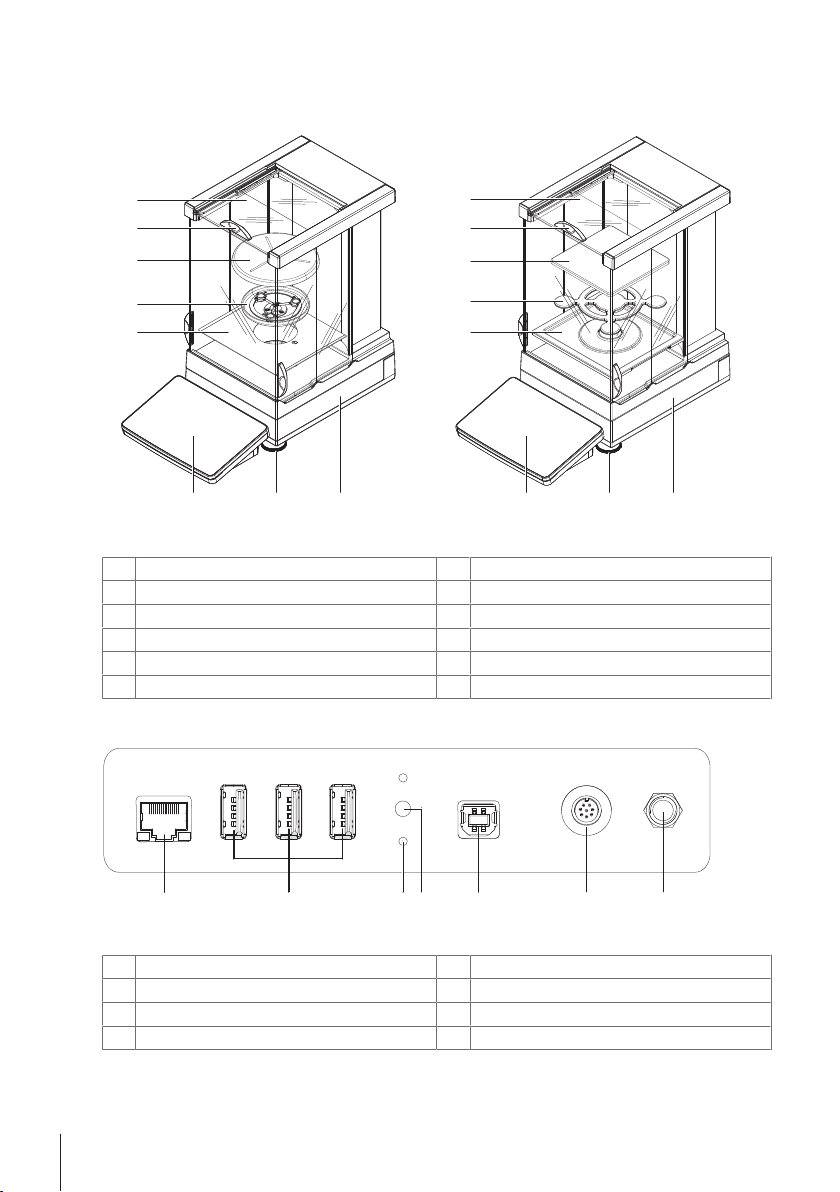
Overview comparators with S weighing platform
10
0.1 mg / 1 mg
1
3
8
9
11
2
4
8
6
7
10 9
11
5
7
11
2
3
6 7
5
4
Legend comparators with S weighing platform
Bottom plate
1
DripTray
2
LevelMatic weighing pan holder
3
SmartPan weighing pan
4
LevelMatic weighing pan
5
Weighing pan
6
Pro Draft Shield door handler
7
Pro Draft Shield
8
Weighing platform with protective cover
9
Leveling foot
10
Terminal with protective cover
11
Overview comparators with S weighing platform4 Precision Balances and Comparators
Overview interface board S weighing platform
Legend interface board S weighing platform
Ethernet port
1
USB device ports
2
Fixations for optional terminal stand
3
Service seal
4
5
6
7
USB host port
Socket for terminal connection cable
Socket for AC/DC adapter
Page 5

Overview balances with L weighing platform
10 mg
0.1 g / 1 g
7
1
2
3
6
8
1
4
5
9789
Legend balances with L weighing platform
Weighing pan support cap
1
Adapter plate
2
Draft shield element
3
SmartPan weighing pan
4
Weighing pan with protective cover
5
Weighing pan
6
Weighing platform
7
Leveling foot
8
Terminal with protective cover
9
Overview balances with L weighing platform 5Precision Balances and Comparators
Page 6

Overview comparators with L weighing platform
1 mg / 5 mg / 10 mg
8
9
1
4
8
9
7
2
7
3
5
6
11 22 4
5
6
3
Legend comparators with L weighing platform
Adapter plate with LevelMatic base plate
1
Weighing pan support cap
2
Draft shield element
3
Weighing pan
4
LevelMatic weighing pan holder
5
LevelMatic weighing pan
6
Weighing platform
7
Leveling foot
8
Terminal with protective cover
9
Overview interface board L weighing platform
Legend interface board L weighing platform
Overview comparators with L weighing platform6 Precision Balances and Comparators
Socket for AC/DC adapter
1
Socket for terminal connection cable
2
Service seal
3
USB host port
4
USB device ports
5
Ethernet port
6
Page 7
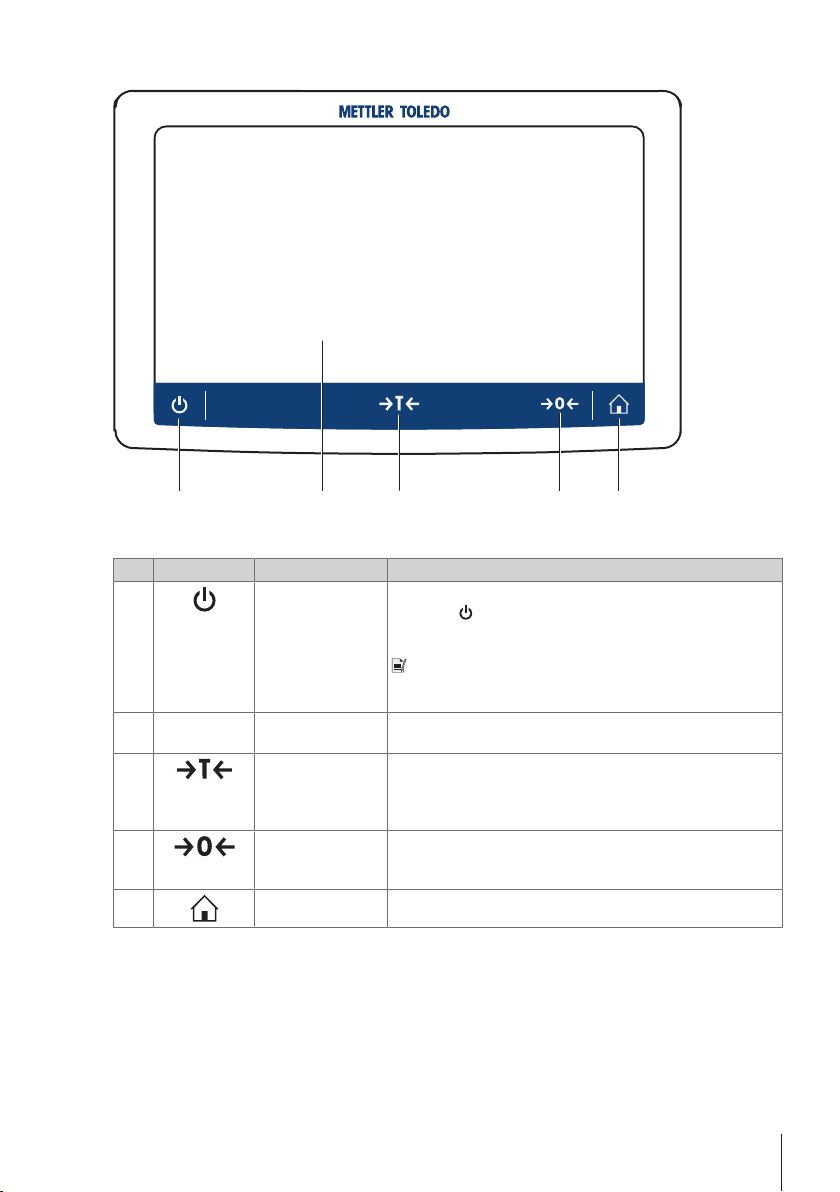
Overview terminal
11
22 33
44
55
Legend terminal
No. Key Name Explanation
1
2
3
4
5
ON/OFF Switches the balance on/off.
- 7 inch capacitive TFT
touchscreen
Tare Tares the balance.
Zero Zeroes the balance.
Home To return from any menu level to the home screen.
By tapping
goes into standby mode. To switch the balance completely off, it
must be unplugged from the power supply.
Note
Do not disconnect the balance from the power supply unless the
balance is not used for an extended period of time.
The touchscreen shows information about the current weighing
process.
This function is used when the weighing process involves
containers. After taring the balance, the screen shows Net which
indicates that all displayed weights are net.
The balance must always be zeroed before starting the weighing
process. After zeroing, the balance sets a new zero point.
, the balance is not completely switched off but
Overview terminal 7Precision Balances and Comparators
Page 8

1 Safety Information
Two documents named "User Manual" and "Reference Manual" are available for this instrument.
• The User Manual is printed and delivered with the instrument.
• The electronic Reference Manual contains a full description of the instrument and its use.
• Keep both documents for future reference.
• Include both documents if you transfer the instrument to other parties.
Only use the instrument according to the User Manual and the Reference Manual. If you do not use the
instrument according to these documents or if the instrument is modified, the safety of the instrument may be
impaired and Mettler-Toledo GmbH assumes no liability.
Finding more information
For full information, always consult and download the Reference Manual (RM).
u www.mt.com/XPR-precision-RM
Search for software downloads u www.mt.com/labweighing-software-download
u www.mt.com/library
1.1 Definition of signal warning symbols
Safety notes are marked with signal words and warning symbols. These show safety issues and warnings.
Ignoring the safety notes may lead to personal injury, damage to the instrument, malfunctions and false results.
General hazard Electrical shock
WARNING
CAUTION
NOTICE
A hazardous situation with medium risk, possibly resulting in death or severe injury if not
avoided.
A hazardous situation with low risk, resulting in minor or moderate injury if not avoided.
A hazardous situation with low risk, resulting in damage to the instrument, other material
damage, malfunctions and erroneous results, or loss of data.
Personal protective equipment
Chemical resistant safety gloves are intended to protect hands against aggressive
chemicals.
The protective goggles protect the eyes from flying parts and liquid splashes.
1.2 Product specific safety notes
Intended use
This instrument is intended to be used by trained staff. The instrument is intended for weighing purposes. Any
other type of use and operation beyond the limits of technical specifications without written consent from MettlerToledo GmbH is considered as not intended.
Safety Information8 Precision Balances and Comparators
Page 9

Intended use also includes compliance with all the instruction in this User Manual and the Reference Manual
(RM).
Responsibilities of the instrument owner
The instrument owner is the person holding the legal title to the instrument and who uses the instrument or
authorizes any person to use it, or the person who is deemed by law to be the operator of the instrument. The
instrument owner is responsible for the safety of all users of the instrument and third parties.
METTLER TOLEDO assumes that the instrument owner trains users to safely use the instrument in their workplace
and deal with potential hazards. METTLER TOLEDO assumes that the instrument owner provides the necessary
protective gear.
Trained personnel
Persons performing weighing processes must fulfill the following basic knowledge requirements regarding the
handling of METTLER TOLEDO instruments and associated software:
• Are able to complete the tasks entrusted to them and independently detect and avoid any possible dangers.
• Have expertise and experience as well as their familiarity with all applicable regulations.
• Able to prove that they have undergone training.
1.2.1 Safety notes
WARNING
Risk of death or serious injury due to electric shock
Contact with parts that carry a live current can lead to death or injury.
1 Only use the approved METTLER TOLEDO power supply cable and AC/DC adapter with a
current-limited SELV output.
2 Connect the power cable to a grounded power outlet, ensure correct polarity.
3 Keep all electrical cables and connections away from liquids and moisture.
4 Check the cables and power plug for damage and replace damaged cables and power plugs.
1.2.2 Accessories and spare parts
NOTICE
Damage in due to the wrong parts are used
Through the use of the wrong or defective parts, dangers for personnel can occur and damage,
malfunction or total instrument failure can occur.
1 Use only original parts supplied or approved by the manufacturer.
2 Always contact the manufacturer if there are questions.
Only purchase parts from Mettler-Toledo GmbH. A listing of all parts can be found in the Reference Manual (RM).
Safety Information 9Precision Balances and Comparators
Page 10
2 Basic Navigation
2.1 Main sections at a glance
The method work screen is the central navigation point where all the menus and settings can be reached (the
picture shows the method work screen of the method General Weighing). The sections Balance menu, Methods
and Protocol can be opened by tapping the drawers along the method work screen.
2.2 Method work screen
The method work screen is the basic screen that appears when working with the balance. Depending on the
method, the method work screen can slightly differ, but the basic elements appear for all methods.
No. Name Explanation
User name Shows the name of the current user.
1
Level indicator Indicates if the balance is leveled.
2
Basic Navigation10 Precision Balances and Comparators
Page 11

No. Name Explanation
Weighing value field Shows the current weighing value.
3
Info weight Shows the current weighing value in another unit.
4
5 Drawer Protocol
6 Sample status OK
7 Sample status Not
OK
8 Button Add to
protocol
Weighing action field This field contains actions referring to the current task.
9
Method information
10
area
Weighing-in aid Defines a target weight with upper und lower tolerances.
11
Weighing value area In this area the result of the current weighing process is shown.
12
13 Method name
In this section the weighing results are being shown.
The weighing result was within the defined tolerances.
The weighing result was out of the defined tolerances.
Adds the result to the protocol.
Depending on the selected method the button can have different functions.
Contains information about sample IDs, method IDs or task IDs.
Shows the name of the current method.
2.3 Opening a section/function
A menu item or a function can be selected or activated by tapping it.
2.4 Scrolling
If a list of available options or results is longer than the size of the screen, a scroll bar appears on the right side
of the list. Place the finger on the list and move the finger up and down to scroll through the list.
Basic Navigation 11Precision Balances and Comparators
Page 12

3 Installation and Putting into Operation
Disclaimer for comparators
In this document, the term "balance" is used to describe both balances and comparators.
Comparators are characterized by their higher resolution compared to balances and are mainly used for differential weighing application, such as the calibration of standard weights. Beside standard balance tests,
comparators have also been tested with differential repeatability (ABA repeatability) during production.
This information is valid for models of the line/s:
XPR2004SC XPR26003LC
XPR5004SC XPR32003LD5C
XPR2003SC XPR64003LD5C
XPR5003SC XPR64002LC
XPR10003SC
Finding more information
For full information, always consult and download the Reference Manual (RM).
u www.mt.com/XPR-precision-RM
u www.mt.com/library
WARNING
Risk of death or serious injury due to electric shock
The instrument must be disconnected from the power supply before performing all setup and
assembly work.
3.1 Unpacking the balance
Open the balance packaging and check for transportation damage or missing parts. Please inform a METTLER
TOLEDO representative in the event of missing or defective parts.
We recommend retaining the original box with its packaging elements. The packaging elements are designed to
protect the balance. Use the packaging elements and the original box to store and transport the balance.
3.2 Scope of delivery
NOTICE
Risk of damage to the instrument due to the use of unsuitable parts!
Using unsuitable parts with the instrument can damage the instrument or cause it to malfunction.
− Only use parts from METTLER TOLEDO that are intended to be used with your instrument.
3.2.1 Balances with S weighing platform
Components 0.1mg
with Pro
Shield
Weighing platform with protective cover
Terminal with protective cover
Terminal support
Installation and Putting into Operation12 Precision Balances and Comparators
Draft
1mg
with Pro
Draft
Shield
1 mg
without
Pro
Draft
Shield
5mg /
10 mg
0.1g
Page 13

Components 0.1mg
with Pro
Shield
Terminal connection cable (pre-assembled)
Pro Draft Shield – – –
Weighing pan 127 x 127 mm – – – –
Weighing pan 172 × 205mm – – – –
Weighing pan 193 × 223mm – – – –
SmartPan weighing pan –
Weighing pan support – – – –
DripTray –
Ring seal – – – –
Weighing hook for below-the-balance weighing
AC/DC adapter
Power cable (country-specific)
User Manual
Production certificate
CE declaration of conformity
Draft
1mg
with Pro
Draft
Shield
1 mg
without
Pro
Draft
Shield
3.2.2 Comparators with S weighing platform
Components 0.1mg 1mg
Weighing platform with protective cover
Terminal with protective cover
Terminal support
Terminal connection cable (pre-assembled)
Pro Draft Shield (not for XPR10003SC)
Draft shield XP W12 (only for XPR10003SC) –
SmartPan weighing pan
LevelMatic weighing pan Ø 130 mm (not for XPR2003SC)
Bottom plate
Ring seal –
Weighing hook for below-the-balance weighing
AC/DC adapter
Power cable (country-specific)
User Manual
Mass calibration software MC Link
Production certificate
5mg /
10 mg
0.1g
Installation and Putting into Operation 13Precision Balances and Comparators
Page 14

Components 0.1mg 1mg
CE declaration of conformity
3.2.3 Balances with L weighing platform
Components 10mg 0.1g / 1g
Weighing platform
Terminal with protective cover
Terminal support
Terminal connection cable
Draft shield element –
Weighing pan 172 × 205mm –
Weighing pan 280 × 360mm –
SmartPan weighing pan –
Power cable (country-specific)
User Manual
Production certificate
CE declaration of conformity
3.2.4 Comparators with L weighing platform
Components 1mg 5 mg 10mg
Weighing platform
Terminal with protective cover
Terminal support
Terminal connection cable
Draft shield element XP W64 (only for XPR26003LC and
XPR64003LD5C)
Weighing pan 280 × 360mm (not for XPR64003LD5C and
XPR64002LC)
LevelMatic weighing pan Ø 220 mm with draft shield
element and weighing pan holder (not for XPR32003LD5C)
Weighing pan Ø 220 mm with draft shield cover (only for
XPR64002LC)
Power cable (country-specific)
Transport case (only for XPR64002LC) – –
User Manual
Mass calibration software MC Link
Production certificate
CE declaration of conformity
–
– –
–
–
3.3 Selecting the location
A balance is a sensitive precision instrument. The location where it is placed will have a profound effect on the
accuracy of the weighing results.
Installation and Putting into Operation14 Precision Balances and Comparators
Page 15

• Choose a solid table that is as horizontal as possible. Choose
11
2
3 4
the table according to the maximum capacity of the balance.
• The balance must only be used indoors and up to a maximum
altitude of 4,000m above sea level.
• Before switching on the balance, wait until all parts are at
room temperature (+10 °C to +30°C).
The humidity must be between 10% and 80% noncondensing.
• The power plug must be accessible.
• Vibration-free location
• No direct sunlight
• No excessive temperature fluctuations
• No strong drafts
3.4 Assembling balances with S weighing platform
3.4.1 Attaching the terminal to the weighing platform
The terminal is usually placed in front of the weighing platform on the terminal support. The terminal can also be
placed individually, e.g. beside the weighing platform or it can be fixed on an additional terminal stand.
NOTICE
Damage to the balance
The weighing platform and the terminal are not safely fixed by the terminal support and may fall off
when carrying.
− Remove the terminal from the weighing platform and place it on the weighing pan when
carrying the balance.
1 Place the weighing platform on a flat surface.
2 Position the terminal support (1) in front of the weighing
platform. The plug of the pre-mounted terminal connection
cable (2) must lie between the terminal support (1) and
the weighing platform.
3 Push the terminal support towards the weighing platform.
The far end of the terminal support (3) must be pushed
into the lock element (4) at the bottom of the weighing
platform.
4 Use the terminal connection cable to connect the terminal
with the weighing platform.
Installation and Putting into Operation 15Precision Balances and Comparators
Page 16

5 Place the terminal on top of the terminal support.
1
2
43
5
6 Push the terminal towards the weighing platform until the
terminal locks into the terminal support.
ð The terminal is mounted and connected to the weighing
platform.
3.4.2 Balances 0.1 mg with Pro Draft Shield and SmartPan weighing pan
Note
The 0.1 mg balances with Pro Draft Shield are equipped with a ring seal. The aim of the ring seal is to isolate the
weighing chamber from draft and must always be correctly installed at the bottom of the Pro Draft Shield.
1 Turn the Pro Draft Shield carefully sideways into horizontal
position.
2 Push the ring seal (2) through the opening (1) on the
bottom of the Pro Draft Shield.
3 Fix the ring seal in the opening of the Pro Draft Shield. The
ring seal (3) must be properly fixed into the opening. The
upper edge (4) of the ring seal must lay all around the
bottom of the Pro Draft Shield.
4 Turn the Pro Draft Shield carefully back into vertical
position.
5 Open the Pro Draft Shield with the door handlers on both
sides.
6 Hold the Pro Draft Shield on the top bars (5) on both sides
and place it on top of the weighing platform.
Installation and Putting into Operation16 Precision Balances and Comparators
Page 17

6
7
7 Place the DripTray (6) into the Pro Draft Shield.
1
2
3
4
8 Place the SmartPan weighing pan (7) into the Pro Draft
Shield on top of the DripTray (6).
3.4.3 Balances 1 mg with Pro Draft Shield
1 Open both side doors of the Pro Draft Shield.
2 Hold the Pro Draft Shield on the top bars (1) on both sides.
3 Place the Pro Draft Shield on top of the weighing platform.
4 Place the DripTray (2) into the Pro Draft Shield.
5 Place the SmartPan weighing pan (3) into the Pro Draft
Shield on top of the DripTray (2).
6 The weighing pan (4) is optional and can be placed into
the Pro Draft Shield on top of the SmartPan weighing pan
(3).
Installation and Putting into Operation 17Precision Balances and Comparators
Page 18

3.4.4 Comparators 0.1 mg and 1 mg with LevelMatic weighing pan
1
2
3
4
11
22
1 Open both side doors of the Pro Draft Shield.
2 Lift the Pro Draft Shield by holding on the top bars (1) on
both sides.
3 Place the Pro Draft Shield on top of the weighing platform.
4 Place the bottom plate (2) into the Pro Draft Shield.
5 Place the LevelMatic holder (3) into the Pro Draft Shield on
top of the bottom plate (2).
6 Place the LevelMatic weighing pan (4) into the Pro Draft
Shield on top of the LevelMatic weighing pan holder (3).
3.4.5 Balances 1 mg with SmartPan weighing pan
1 Place the DripTray (1) on top of the weighing platform.
2 Place the SmartPan weighing pan (2) on top of the
DripTray (1).
3 The weighing pan can be placed on top of the SmartPan
weighing pan if needed.
Installation and Putting into Operation18 Precision Balances and Comparators
Page 19

3.4.6 Balances 5 mg / 10 mg with SmartPan weighing pan
11
22
33
4
2
3
11
1 Place the weighing pan support caps (1) on top of the
weighing platform.
2 Place the DripTray (2) on top of the weighing platform.
3 Place the SmartPan weighing pan (3) on top of the 4
weighing pan support caps (1).
4 Place the weighing pan with the protective cover (4) on top
of the SmartPan weighing pan (3).
3.4.7 Balances 0.1 g
1 Place the 4 pan support caps (1) on top of the weighing
platform.
2 Place the weighing pan support (2) on top of the 4
weighing pan support caps (1).
3 Place the weighing pan with the protective cover (3) on top
of the weighing pan support (2).
Installation and Putting into Operation 19Precision Balances and Comparators
Page 20

3.5 Assembling balances with L weighing platform
1
2
3
2
11
3.5.1 Attaching the terminal to the weighing platform
The terminal can be attached to the long side or to the short side of the L weighing platform.
1 Turn the weighing platform upside down.
2 Dismantle the screws (1) on the long side or the screws
(2) on the short side of the weighing platform.
3 Connect the terminal to the weighing platform with the
terminal connection cable.
4 Attach the terminal support to the long side or to the short
side of the weighing platform. Fix the terminal support with
the screws from the weighing platform.
5 Insert the terminal connection cable (3) into the cable
channel.
Note
When inserting the terminal connection cable into the cable channel, the terminal connection cable must be
inserted simultaneously from both directions. The terminal connection cable must not have any play between the
plug and the cable channel (see picture).
6 Turn the weighing platform.
3.5.2 Balances 0.1 g and 1 g
1 Place the weighing pan support caps (1) on top of the
weighing platform.
2 Place the weighing pan (2) on top of the weighing pan
support caps (1).
Installation and Putting into Operation20 Precision Balances and Comparators
Page 21

3.5.3 Balances 10 mg with SmartPan weighing pan
2
3
11
4
5
1
1 Place the adapter plate (1) on top of the weighing
platform.
2 Place the weighing pan support caps (2) on top of the
adapter plate.
3 Place the draft shield element (3) on top of the adapter
plate (1).
4 Place the SmartPan weighing pan (4) on top of the
weighing pan support caps (2).
5 Place the weighing pan (5) on top of the SmartPan
weighing pan (4) if needed.
3.5.4 Removing the transport arrestments (only for comparators)
Note
Before installing the weighing pan, the transport arrestments on top of the weighing platform must be removed.
Keep the transport arrestments for transporting the comparator.
1 Remove the transport arrestments (1) at the top of the
weighing platform.
2 Close the openings with the enclosed plastic covers.
Installation and Putting into Operation 21Precision Balances and Comparators
Page 22

3.5.5 Comparators 1 mg / 5 mg with LevelMatic weighing pan
2
11
3
4
1 Place the adapter plate with the LevelMatic base plate (1)
on top of the weighing platform.
2 Place the draft shield element (2) on top of the adapter
plate (1).
3 Place the LevelMatic weighing pan holder (3) on top of the
LevelMatic base plate (1).
4 Place the LevelMatic weighing pan (4) on top of the
LevelMatic weighing pan holder (3).
3.6 Connecting the balance to the mains
WARNING
Danger of death or serious injury due to electric shock.
Contact with parts that contain a live current can lead to injury and death.
1 To connect the balance, only use the supplied three-core power cable with equipment
grounding conductor.
2 Only use a three-pin power socket with earthing contact.
3 Only use standardized extension cable with equipment grounding conductor.
4 Do not disconnect the equipment grounding conductor.
NOTICE
Damage to the balance due to short circuit!
Damage to the insulation on the AC/DC adapter can result in a short circuit and damage the
balance.
The balance is supplied with an AC/DC adapter and a country-specific power cable. The AC/DC adapter is
suitable for use with the following voltage range:
100 – 240 VAC, 50/60Hz.
Connect the balance to the mains as follows:
1 Check whether your local power supply falls within the range of the delivered AC/DC adapter. If this is not the
Installation and Putting into Operation22 Precision Balances and Comparators
1 Only use the original AC/DC adapter supplied with your balance.
2 Route the cable so that it cannot be damaged by external influences.
3 Make sure that the power plug is always accessible.
Note
case, under no circumstances connect the AC/DC adapter to the power supply, but contact a METTLER
TOLEDO representative.
Page 23

11
22
2 Connect the AC/DC adapter (2) to the AC/DC socket (1).
3 Use the power cable to connect the AC/DC adapter to the
mains.
ð The balance performs a self-test after connection to the
power supply and is then ready to use.
3.7 Setting up the Balance
3.7.1 Switching on the balance
When the balance is connected to the mains it starts automatically.
EULA (End User License Agreement)
When the balance is switched on for the first time, the EULA (End User License Agreement) appears on the
screen. Read the conditions, tap I accept the terms in the license agreement. and tap
Note
Before the balance can be used, it must warm up first. The warm-up time is at least 30 minutes after connecting
the balance to the power supply. When the balance was switched on from standby-mode, the balance is ready
for operation immediately.
3.7.2 Leveling the balance
When the balance is switched on for the first time or when it is switched on after the location of the balance has
been changed, the message Balance is out of level appears. By tapping
Follow the instructions on the screen to level the balance.
Navigation:
Note
A leveled balance and a stable installation are prerequisites for accurate weighing results.
3.7.3 Performing a simple weighing
When the balance is switched on for the first time, the method work screen of the method General Weighing
opens (the method work screen is described in more detail in the section Method work screen).
3.7.3.1 Zeroing
1 Clear the weighing pan.
2 Close the weighing chamber if the balance has a draft shield.
3 Tap
ð The balance is zeroed.
3.7.3.2 Taring
If a weighing container is used, the balance must be tared.
1 Clear the weighing pan.
2 Close the weighing chamber if a draft shield is being used.
3 Tap
4 Open the weighing chamber if a draft shield is being used.
5 Place the container on the weighing pan.
6 Close the weighing chamber if a draft shield is being used.
Balance menu > Leveling aid
to zero the balance.
to zero the balance.
OK.
the function Leveling aid opens.
Installation and Putting into Operation 23Precision Balances and Comparators
Page 24

7 Tap to tare the balance.
ð The balance is tared.
3.7.3.3 Performing General Weighing
1 Place the weight on top of the weighing pan and wait until the weight value is stable.
2 Tap
ð The weighing process was successfull. The weight value has been transferred to the section Protocol.
Add to protocol.
3.7.4 Setting the balance to standby mode
The balance can be set to standby mode by holding
3.7.5 Switching off the balance
To completely switch off the balance it must be disconnected from the mains. By holding
only into standby mode.
Note
When the balance was completely switched off for some time, it must be warmed up for at least 30 minutes
before it can be used.
. The standby mode can be finished by holding again.
the balance goes
Installation and Putting into Operation24 Precision Balances and Comparators
Page 25

4 Maintenance
4.1 Cleaning
We recommend periodically cleaning the draft shield, the weighing platform, and the terminal. For cleaning the
weighing chamber use the brush supplied with it. The maintenance interval depends on your standard operating
procedure (SOP). The balance is made of high-quality, resistant materials and can therefore be cleaned with a
commercially available, mild cleaning agent.
WARNING
Danger of death or serious injury due to electric shock!
Contact with parts that contain a live current can lead to injury and death. If the device cannot be
shut down in an emergency situation, people can be injured or the device can be damaged.
1 Disconnect the device from the power supply prior to cleaning and maintenance.
2 Only use METTLER TOLEDO power cables, if these need to be replaced.
3 Make sure that no liquid enters the device or AC/DC adapter.
4 Do not open the device or AC/DC adapter. These do not contain any user-serviceable parts.
NOTICE
Damage of the balance due to the use of inappropriate cleaning agents!
− On no account use cleaning agents which contain solvents or abrasive ingredients, as this can
result in damage to the terminal overlay.
Note
Please contact your METTLER TOLEDO dealer for details of the available service options. Regular servicing by an
authorized service engineer ensures constant accuracy for years to come and prolongs the life of your balance.
4.2 Disposal
In conformance with the European Directive 2012/19/EU on Waste Electrical and Electronic
Equipment (WEEE) this device may not be disposed of in domestic waste. This also applies to
countries outside the EU, per their specific requirements.
Please dispose of this product in accordance with local regulations at the collecting point
specified for electrical and electronic equipment. If you have any questions, please contact the
responsible authority or the distributor from which you purchased this device. Should this
device be passed on to other parties (for private or professional use), the content of this
regulation must also be related.
Thank you for your contribution to environmental protection.
Maintenance 25Precision Balances and Comparators
Page 26

5 Technical Data
FCC Rules
This device complies with Industry Canada licence-exempt RSS standard(s) and part 15 of the FCC Rules.
Operation is subject to the following two conditions: (1) this device may not cause interference, and (2) this
device must accept any interference, including interference that may cause undesired operation of the device.
Changes or modifications not expressly approved by the party responsible for compliance could void the user's
authority to operate the equipment.
This equipment has been tested and found to comply with the limits for a Class A digital device, pursuant to part
15 of the FCC Rules. These limits are designed to provide reasonable protection against harmful interference
when the equipment is operated in a commercial environment. This equipment generates, uses, and can radiate
radio frequency energy and, if not installed and used in accordance with the instruction manual, may cause
harmful interference to radio communications. Operation of this equipment in a residential area is likely to cause
harmful interference in which case the user will be required to correct the interference at his own expense.
Technical Data26 Precision Balances and Comparators
Page 27

5.1 Balances with S weighing platform
Power supply
AC adapter: Primary: 100 – 240VAC, 50/60 Hz
Secondary: 12VDC ±3%, min. 2.5A, max. 6.0 A (with
electronic overload protection)
Cable for AC adapter: 3-core, with country-specific plug
Balance power consumption: 12 VDC ±3%, 2.25 A, maximum ripple: 80 mVpp
Polarity:
Protection and standards
Overvoltage category: II
Degree of pollution: 2
Protection: Protected against dust and water
Standards for safety and EMC: See Declaration of Conformity
Range of application: For use in closed interior rooms only
Environmental conditions
Height above mean sea level: Up to 4000m
Ambient temperature: 5–40°C
Relative air humidity: Max. 80% up to 31°C, linearly decreasing to 50% at 40°C,
Warm-up time:
Environmental conditions Comparators
Height above mean sea level: Up to 4000m
Ambient temperature: 10 – 30 °C ±0.5°C / 12 h
Relative air humidity: 40% – 70% ±5%/4h
Maximum air speed: 0.15 m/sec
Warm-up time: At least 60 minutes after connecting the comparator to the power
Materials
Weighing platform: Die-cast aluminum, lacquered, plastic and chrome steel
Terminal: Die-cast zinc, chromed and plastics
Weighing pan: Chrome-nickel steel X2CrNiMo-17-12-2
SmartPan weighing pan with drip
tray:
LevelMatic weighing pan
(Comparators only):
Draft shield: Aluminum, plastic, chrome steel and glass
with a current limited SELV (Safety Extra Low Voltage)
output
noncondensing
At least 30 minutes after connecting the balance to the power
supply; when switched on from standby-mode, the balance is
ready for operation immediately
supply. When switched on from standby-mode, the comparator is
ready for operation immediately.
Die-cast zinc, chromed
Chrome steel, plastic
Technical Data 27Precision Balances and Comparators
Page 28

5.2 Balances with L weighing platform
Power supply
AC adapter: Primary: 100 – 240VAC, 50/60 Hz
Secondary: 12VDC ±3%, min. 2.5A, max. 6.0 A (with
electronic overload protection)
Cable for AC adapter: 3-core, with country-specific plug
Balance power consumption: 12 VDC ±3%, 2.25 A, maximum ripple: 80 mVpp
Polarity:
Protection and standards
Overvoltage category: II
Degree of pollution: 2
Protection: Protected against dust and water
Standards for safety and EMC: See Declaration of Conformity
Range of application: For use in closed interior rooms only
Environmental conditions
Height above mean sea level: Up to 4000m
Ambient temperature: 5–40°C
Relative air humidity: Max. 80% up to 31°C, linearly decreasing to 50% at 40°C,
Warm-up time:
Environmental conditions Comparators
Height above mean sea level: Up to 4000m
Ambient temperature: 10 – 30 °C ±0.5°C / 12 h
Relative air humidity: 40% – 70% ±5%/4h
Maximum air speed: 0.15 m/sec
Warm-up time: At least 60 minutes after connecting the comparator to the power
Materials
Weighing platform: Sheet aluminum, die cast, laquered, plastic and chrome steel
Terminal: Die-cast zinc, chromed and plastics
Weighing pan: Chrome-nickel steel X5CrNi18-10
SmartPan weighing pan: Die-cast zinc, chromed
LevelMatic weighing pan
(Comparators only):
Draft shield: Plastic, chrome-nickel steel, aluminium and glass
Draft shield element: Chrome steel X2CrNiMo-17-13-2
with a current limited SELV (Safety Extra Low Voltage)
output
noncondensing
At least 30 minutes after connecting the balance to the power
supply; when switched on from standby-mode, the balance is
ready for operation immediately
supply. When switched on from standby-mode, the comparator is
ready for operation immediately.
Chrome-nickel steel and aluminium
Technical Data28 Precision Balances and Comparators
Page 29

Page 30

Page 31

Page 32

Mettler-Toledo GmbH
30357071
Im Langacher 44
8606 Greifensee, Switzerland
www.mt.com/contact
Subject to technical changes.
© Mettler-Toledo GmbH 08/2018
30357071Ben
www.mt.com/xpr-precision
For more information
 Loading...