

Page 1
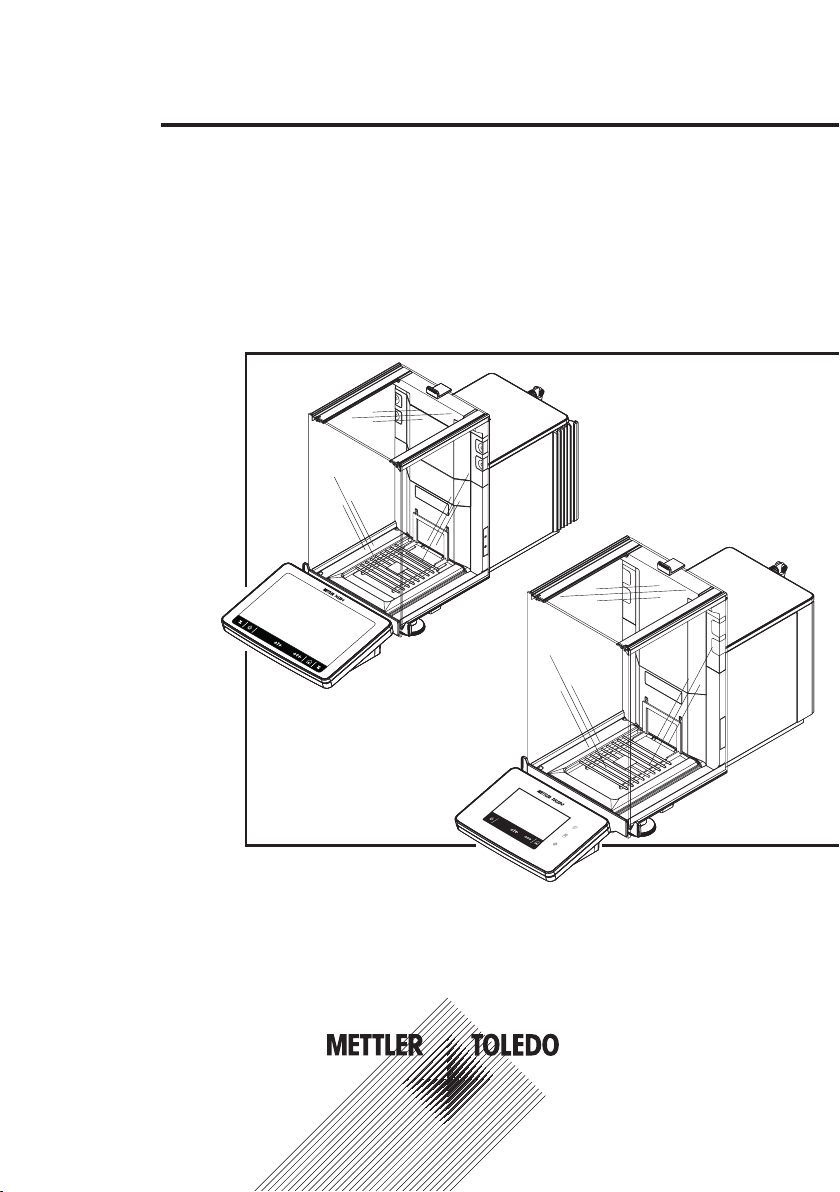
Analytical Balances and Comparators
User Manual
XPR / XSR
Page 2

Page 3

This User Manual is a brief instruction that provides information to handle with the first steps of the
instrument in a safe and efficient manner. Personnel must have carefully read and understood this
manual before performing any tasks.
For full information, always consult and download the Reference Manual (RM).
u www.mt.com/XPR-analytical-RM
u www.mt.com/XSR-analytical-RM
3Analytical Balances and Comparators
Page 4
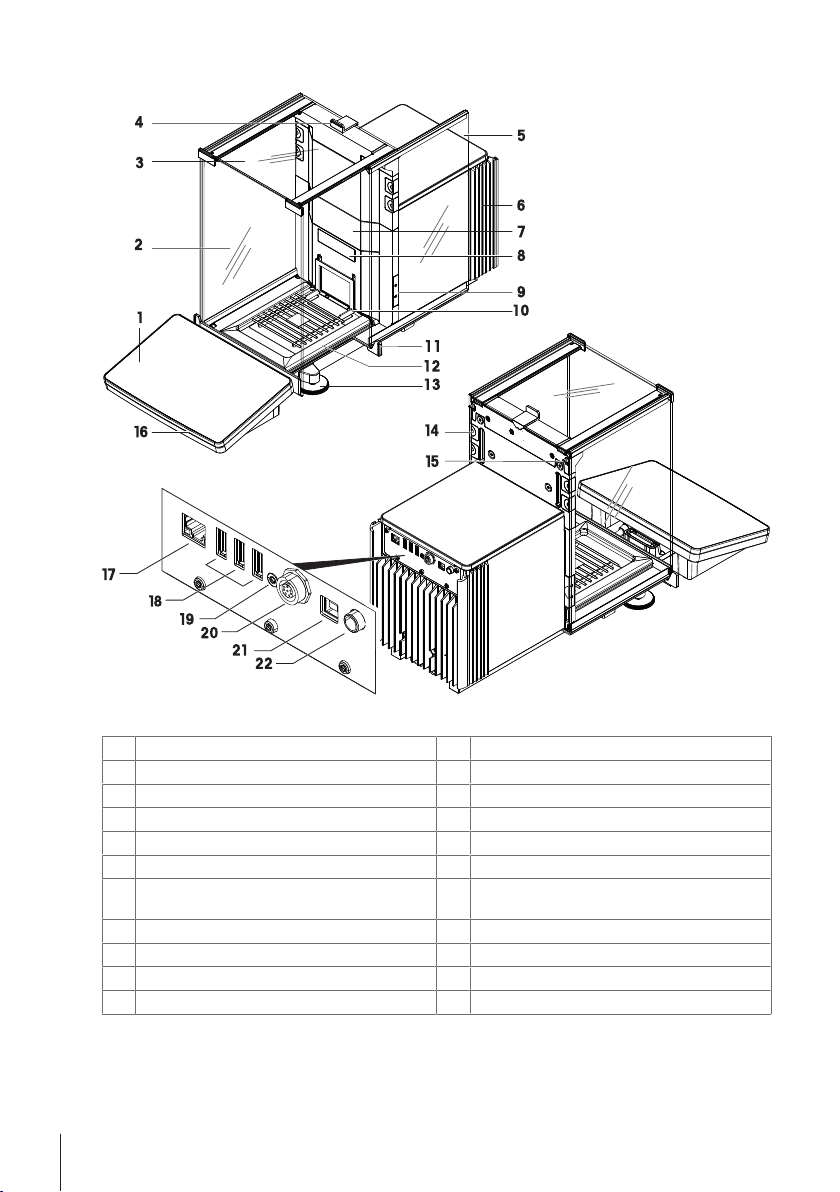
Product Overview
Legend XPR Analytical Balances
Terminal
1
Front panel draft shield
2
Top door draft shield
3
Handle for top door
4
Side door draft shield (right/left)
5
Cooling unit
6
Slot for the installation of an internal module e.g.
7
Ionizer module
Balance type designation plate
8
Optical sensor SmartSens
9
Weighing pan
10
Door handle
11
4 Analytical Balances and Comparators
Drip tray
12
Leveling feet
13
Removable clips
14
Side door release lever
15
Status light
16
Ethernet port
17
USB host port
18
Service seal
19
Socket for terminal connection cable
20
USB device ports
21
Socket for power adapter
22
Page 5
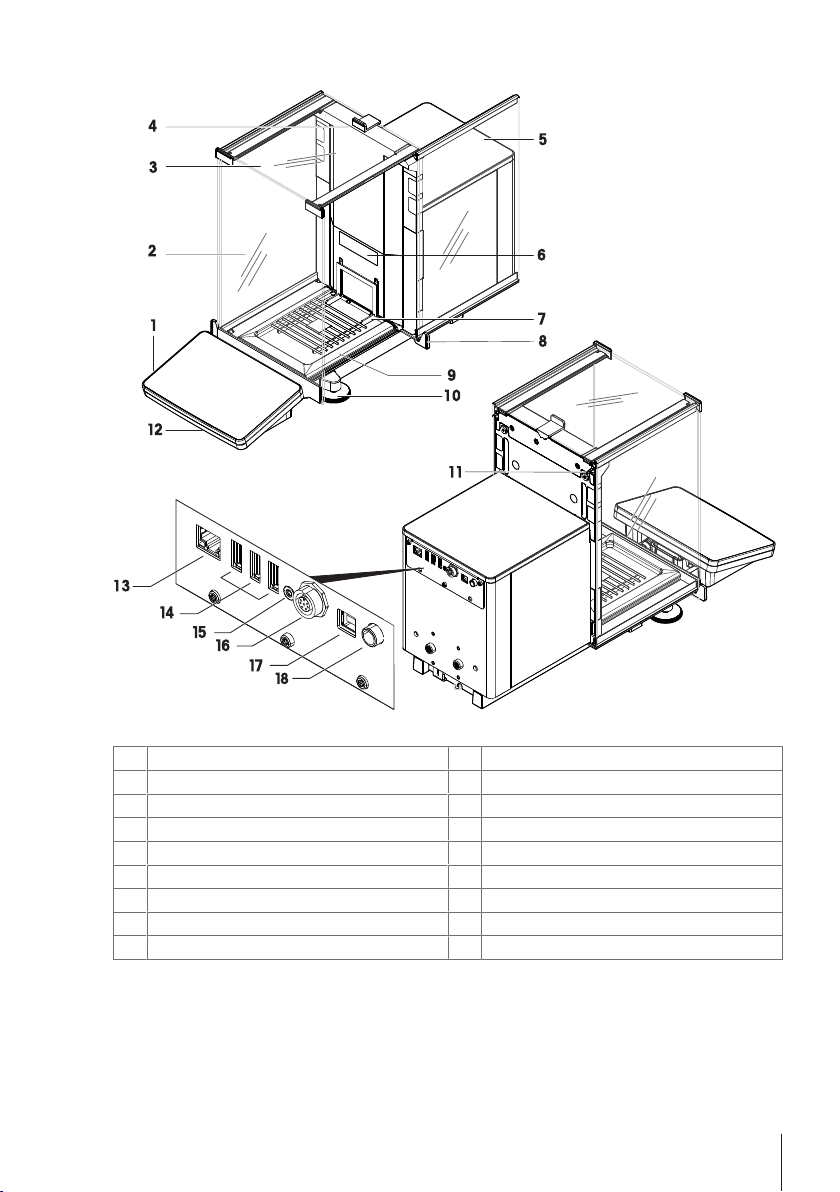
Product Overview
Legend XSR Analytical Balances
Terminal
1
Front panel draft shield
2
Top door draft shield
3
Handle for top door
4
Side door draft shield (right/left)
5
Balance type designation plate
6
Weighing pan
7
Door handle
8
Drip tray
9
Leveling feet
10
Side door release lever
11
Status light
12
Ethernet port
13
USB device ports
14
Service seal
15
Socket for terminal connection cable
16
USB host port
17
Socket for power adapter
18
5Analytical Balances and Comparators
Page 6
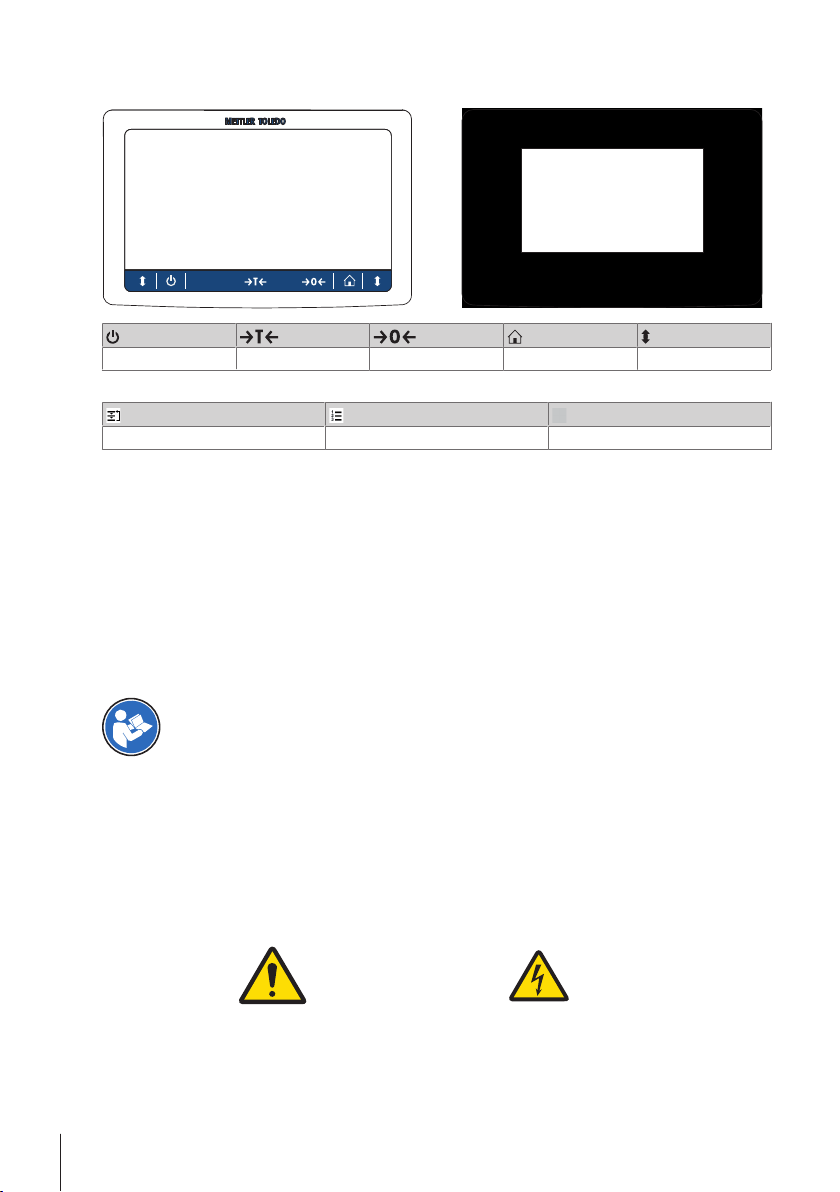
Terminal Overview
XPR XSR
ON/OFF Tare Zero Home Door open
Only for XSR-Terminal
Methods Protocol Balance menu
1 Safety Informations
Two documents named "User Manual" and "Reference Manual" are available for this instrument.
• The User Manual is printed and delivered with the instrument.
• The electronic Reference Manual contains a full description of the instrument and its use.
• Keep both documents for future reference.
• Include both documents if you transfer the instrument to other parties.
Only use the instrument according to the User Manual and the Reference Manual. If you do not use the
instrument according to these documents or if the instrument is modified, the safety of the instrument may be
impaired and Mettler-Toledo GmbH assumes no liability.
1.1 Further applicable documents
This User Manual is a brief instruction that provides information to handle with the first steps of the
instrument in a safe and efficient manner. Personnel must have carefully read and understood this
manual before performing any tasks.
For full information, always consult and download the Reference Manual (RM).
u www.mt.com/XPR-analytical-RM
u www.mt.com/XSR-analytical-RM
Search for software downloads u www.mt.com/labweighing-software-download
1.2 Definition of signal warning symbols
Safety notes are marked with signal words and warning symbols. These show safety issues and warnings.
Ignoring the safety notes may lead to personal injury, damage to the instrument, malfunctions and false results.
General hazard Electrical shock
WARNING
CAUTION
6 Analytical Balances and Comparators
A hazardous situation with medium risk, possibly resulting in death or severe injury if not
avoided.
A hazardous situation with low risk, resulting in minor or moderate injury if not avoided.
Page 7
NOTICE
A hazardous situation with low risk, resulting in damage to the instrument, other material
damage, malfunctions and erroneous results, or loss of data.
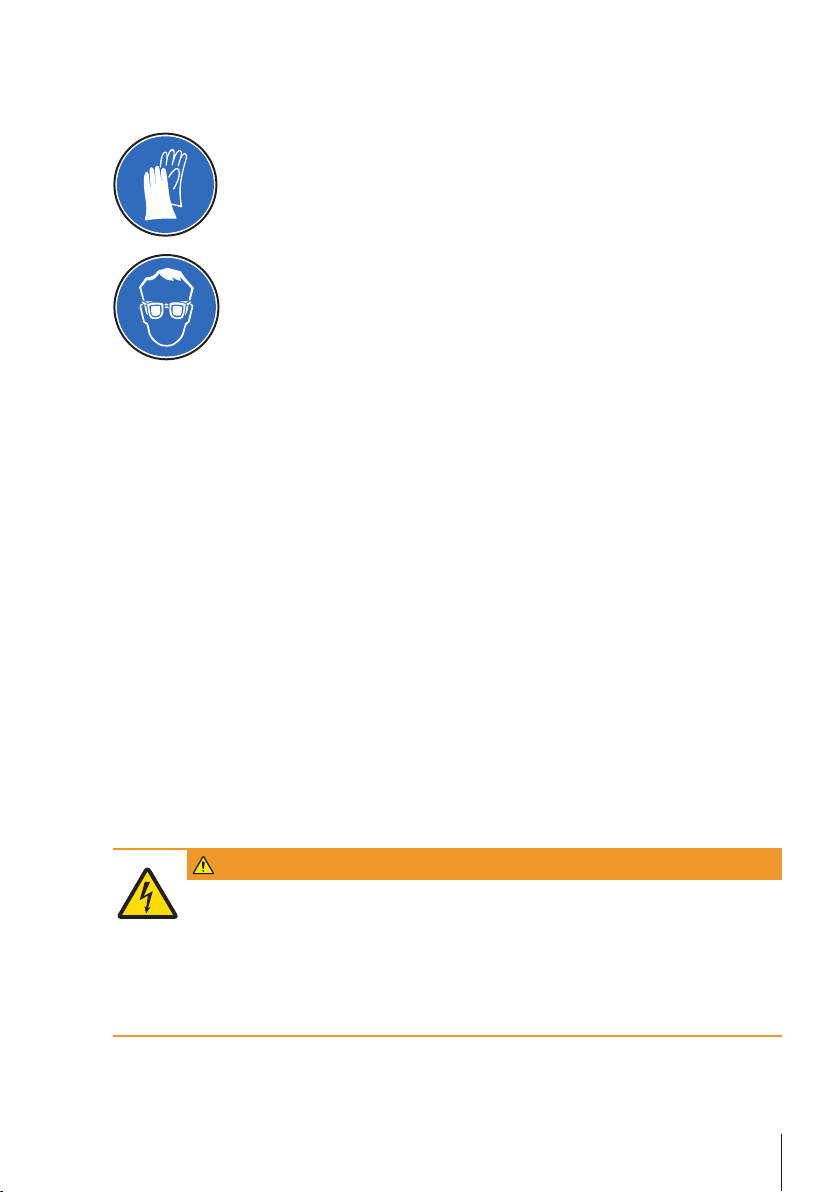
Personal protective equipment
Chemical resistant safety gloves are intended to protect hands against aggressive
chemicals.
The protective goggles protect the eyes from flying parts and liquid splashes.
1.3 Product specific safety notes
Intended use
This instrument is intended to be used by trained staff. The instrument is intended for weighing purposes. Any
other type of use and operation beyond the limits of technical specifications without written consent from MettlerToledo GmbH is considered as not intended.
Intended use also includes compliance with all the instruction in this User Manual and the Reference Manual
(RM).
Responsibilities of the instrument owner
The instrument owner is the person holding the legal title to the instrument and who uses the instrument or
authorizes any person to use it, or the person who is deemed by law to be the operator of the instrument. The
instrument owner is responsible for the safety of all users of the instrument and third parties.
METTLER TOLEDO assumes that the instrument owner trains users to safely use the instrument in their workplace
and deal with potential hazards. METTLER TOLEDO assumes that the instrument owner provides the necessary
protective gear.
Trained personnel
Persons performing weighing processes must fulfill the following basic knowledge requirements regarding the
handling of METTLER TOLEDO instruments and associated software:
• Are able to complete the tasks entrusted to them and independently detect and avoid any possible dangers.
• Have expertise and experience as well as their familiarity with all applicable regulations.
• Able to prove that they have undergone training.
1.3.1 Safety notes
WARNING
Risk of death or serious injury due to electric shock
Contact with parts that carry a live current can lead to death or injury.
1 Only use the approved METTLER TOLEDO power supply cable and AC/DC adapter with a
current-limited SELV output.
2 Connect the power cable to a grounded power outlet, ensure correct polarity.
3 Keep all electrical cables and connections away from liquids and moisture.
4 Check the cables and power plug for damage and replace damaged cables and power plugs.
7Analytical Balances and Comparators
Page 8
1.3.2 Accessories and spare parts
NOTICE
Risk of damage in due to the wrong parts are used.
Through the use of the wrong or defective parts, dangers for personnel can occur and damage,
malfunction or total instrument failure can occur.
1 Use only original parts supplied or approved by the manufacturer.
2 Always contact the manufacturer if there are questions.
Only purchase parts from Mettler-Toledo GmbH. A listing of all parts can be found in the Reference Manual (RM).
8 Analytical Balances and Comparators
Page 9
2 Installation and Putting into Operation
2.1 Scope of delivery
The delivery contains the following components:
Balance Documentation
• Weighing unit
• Draft shield
• Drip tray and weighing pan
• Terminal with terminal holder and terminal connection cable
• AC/DC adapter with country-specific power cable
• MC Link Software (only Comparators)
Table set Accessories
• 1 pair of tweezers
• 2 spatulas
• 1 brush
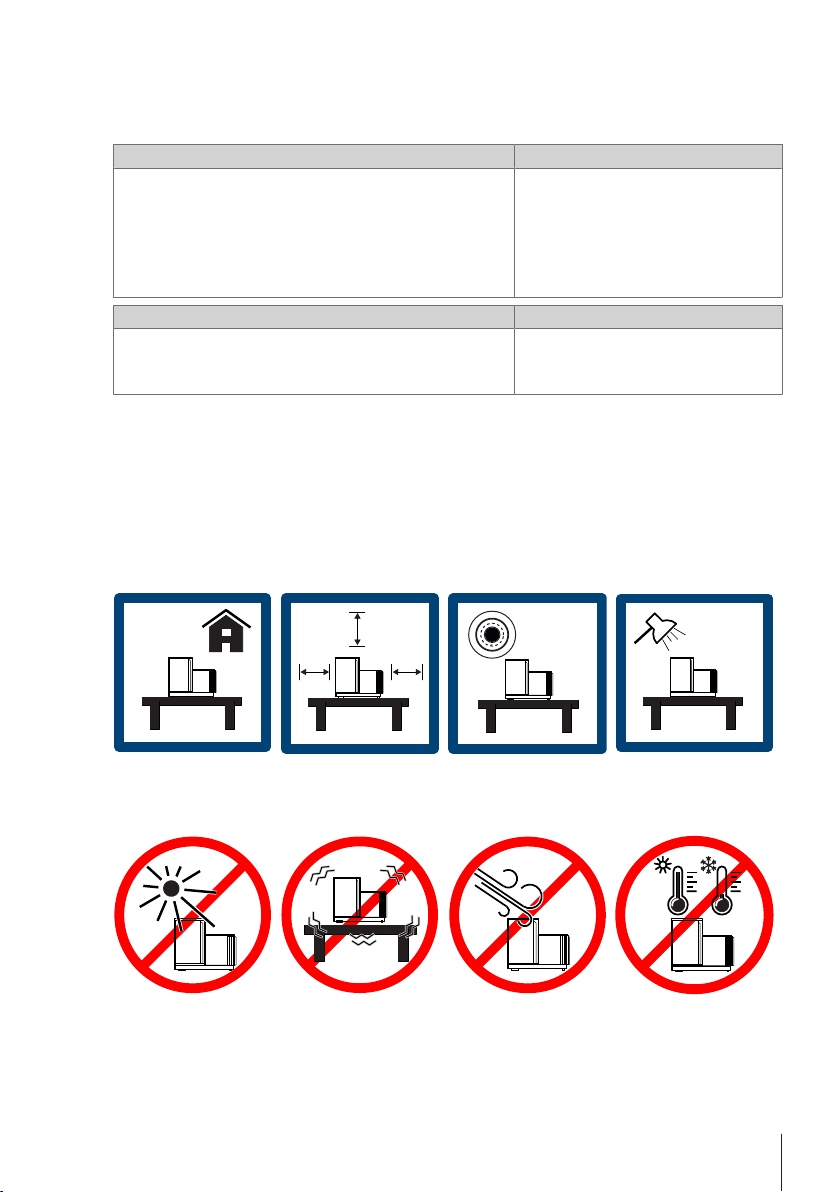
2.2 Selecting the location
A balance is a sensitive precision instrument. The location where it is placed will have a profound effect on the
accuracy of the weighing results.
Requirements of the location
Ensure there is:
• User Manual
• Production certificate
• CE declaration of conformity
• 1 ErgoClip basket
• 2 SmartPrep
• indoor on stable table • with sufficient distance
• in level • adequately lit
(> 15 cm)
Avoid:
• direct sunlight • vibrations • strong drafts • temperature fluctu-
ations
2.3 Unpacking the balance
Check the package, the packaging elements and the delivered components for damages. If any components are
damaged, please contact your METTLER TOLEDO service representative.
9Analytical Balances and Comparators
Page 10
Note
Depending on the balance model, the components may look different. The procedures are always the same.
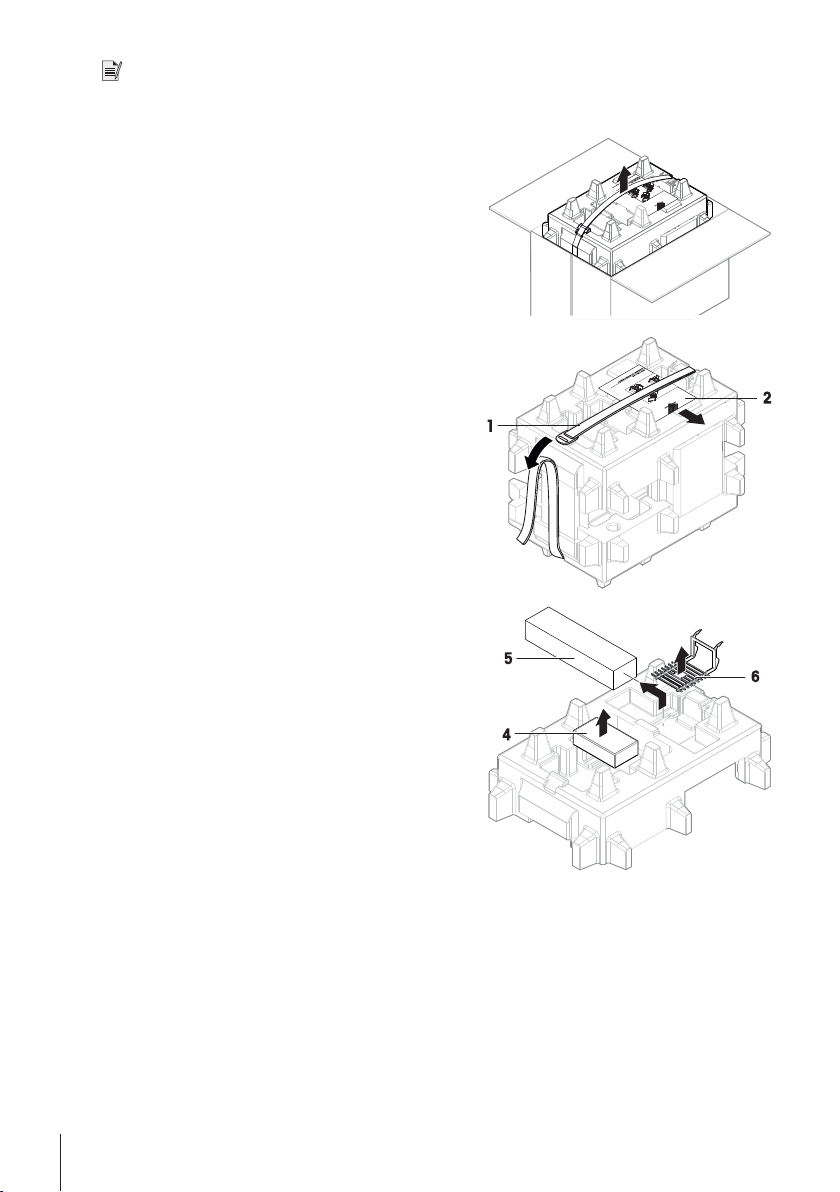
1 Open the box and lift the package out.
2 Open the lifting strap (1) and remove the user manual (2).
3 Remove the upper part of the package and remove the set
with the AC adapter with power cable (4), the box of
several accessories (5) and the weighing pan (6).
10 Analytical Balances and Comparators
Page 11

4 Carefully remove the terminal (7) an the table set (8).
5 Carefully remove the package set with the draft shield
doors and the display holder (9).
6 Carefully remove the weighing unit (10) from the bottom
packaging.
7 Remove any protective sheets.
8 Store all parts of packaging in a save place for future use.
ð The weighing unit is ready for assembling.
Note
Immediately inform a Mettler-Toledo GmbH representative in the event of complaints, damaged parts or missing
accessories.
11Analytical Balances and Comparators
Page 12

2.4 Installation
2.4.1 Attaching the terminal
The following procedure describes the assembling of the terminal.
NOTICE
Risk of damage due to careless handling.
Careless proceeding can damage the connection cable.
− Do not kink or twist the cable!
1 Insert the slides of the display holder (1) into the front of
the weighing unit (2).
2 Insert the angle plug (3) into the socket of the weighing
unit (4). Consider the pin assignment.
3 Carefully tilt the Weighing unit 90° leftwards.
4 Lead the cable (5) through the cable channel to the display
holder (6) and tilt the weighing unit upwards again.
5 Place the terminal (7) onto the display holder.
6 Insert the cable (8) into the socket. Consider the pin
assignment.
ð The terminal is ready.
12 Analytical Balances and Comparators
Page 13

2.4.2 Assembling the balance
CAUTION
Risk of injury due to breaking glass.
Careless handling with the glass components can lead to breakage off glass and damage
cuttings.
− Always proceed focused and with care.
Note
Depending on the balance model, the components may look different. The procedures are always the same.
1 Insert the drip tray (1).
2 Carefully mount the weighing pan (2) onto the hooks (3).
3 Place the side doors (4) into the grooves of the door slides
(5) and tilt them up until the engage. Consider the marks
on the frames below (L = left / R = right).
4 Tilt the side panels (4) towards the weighing platform until
they engage with the door lever (6).
13Analytical Balances and Comparators
Page 14

5 Insert the front panel (7) into the grooves (8) and tilt them
up until it engage.
6 Fit the top door (9) into the slides (10) and push it in.
ð The balance is assembled and ready to put into operation.
2.5 Putting into operation
2.5.1 Connecting the balance
WARNING
Risk of death or serious injury due to electric shock
Contact with parts that carry a live current can lead to death or injury.
1 Only use the approved METTLER TOLEDO power supply cable and AC/DC adapter with a
current-limited SELV output.
2 Connect the power cable to a grounded power outlet, ensure correct polarity.
3 Keep all electrical cables and connections away from liquids and moisture.
4 Check the cables and power plug for damage and replace damaged cables and power plugs.
The balance is supplied with a universal AC/DC adapter or an AC/DC adapter with a country-specific power
cable.
• Insert the power cable in a grounded power outlet that is easily accessible.
• Install the cables so that they cannot be damaged or interfere with operation.
14 Analytical Balances and Comparators
Page 15

1 Connect the AC/DC adapter (1) to the socket.
2 Connect the power plug to the power outlet.
2.5.2 Switching on the balance
EULA (End User License Agreement)
When the balance is switched on for the first time, the EULA appears on the screen. Read the conditions and tap I
accept the terms in the license agreement. and tap
OK. If you agree, than tap OK.
Warming up
Before the balance give reliable results, it must warm up first. This takes at least 120 minutes after connecting
the balance. When the balance is switched on from standby it is ready immediately.
Note
Do not use a multiple switched socket outlet.
The balance has warmed up.
§
− Press
When the balance is switched on for the first time, home screen will appear. However, it will always start with the
screen of the application last used before switching it off.
.
ð The home screen will appear.
2.5.3 Leveling the balance
Exact horizontal and stable positioning are essential for repeatable and accurate weighing results.
If the message Balance is out of level appears. Tap
screen to level the balance.
Find the leveling aid also in the menu:
Navigation:
− Turn both leveling feets (1) until the point is in the center of
the level indicator
Balance menu > Leveling aid
. The Leveling aid opens. Follow the instructions on the
2.5.4 Internal adjustment
1 Tap
More on the main Screen.
15Analytical Balances and Comparators
Page 16

2 Tap Start.
ð Internal adjustment is being executed.
ð When the adjustment has been completed, an overview of the adjustment results appears.
3 Tap
4 Tap
Print if you want to print the results
Finish adjustment.
The balance is now ready to use.
For full information, always consult and download the Reference Manual (RM).
2.6 Transport, packaging and storage
2.6.1 Transporting the balance over short distances
1 Switch off the balance and unplug all interface cables.
2 Hold the weighing platform with both hands and carry the
balance in horizontal position to the target location.
Consider the requirements of the location.
If you want the balance put into operation proceed as the
following:
1 Connect in reverse order.
2 Level the balance.
3 Perform an internal adjustment.
See also
2 Selecting the location}Page9
2 Leveling the balance}Page15
2 Internal adjustment}Page15
2.6.2 Transporting the balance over long distances
For transporting the balance over long distances, always using the original packaging.
u www.mt.com/XPR-analytical-RM
u www.mt.com/XSR-analytical-RM
See also
2 Unpacking the balance}Page9
2 Installation}Page12
2.6.3 Packaging and storage
Package
Store all parts of packaging in a safe place. The elements of the original packaging are developed specifically for
the balance and its components and ensure maximum protection during transportation or storage.
Storage
Only store the balance under the following conditions:
• Indoor and in the original packaging
• according to the environmental condition, see chapter "Technical data"
• When storing for longer than 6 months, the rechargeable battery may become empty (only Date and Time get
lost).
16 Analytical Balances and Comparators
Page 17

See also
XPR XSR
2 General technical data}Page26
3 Operation
3.1 Operating elements
Key Designation Description
ON/OFF Switches the balance in standby.
To switch the balance completely off, it must be unplugged from
the power supply.
Tare Tares the balance.
Zero Zeros the balance.
Home To return from any menu level to the home screen.
Door open Opens the weighing chamber door to the left or to the right (default
Only for XSR-Terminal
Methods Opens the menu Methods.
Protocol Opens the menu Protocol.
Balance menu Opens the Balance menu.
This is used when the weighing process involves containers. After
taring the balance, the screen shows Net which indicates that all
displayed weights are net.
The balance must always be zeroed before starting a weighing
process. After zeroing, the balance sets a new zero point.
value).
17Analytical Balances and Comparators
Page 18

3.2 Main section at a glance
The home screen General Weighing (1) is the central navigation point where all the menus and settings can be
found. The Balance menu (2), Methods (3) and Protocol (4) opens when tapping the drawers along the home
screen (XPR) or the symbols on the Terminal (XSR).
Main section XPR
Main section XSR
3.3 Surface navigation of the touch screen
The surface navigation of the touch screen works like a common touch screens.
For selecting or activation an icon or a function
− Tap it.
For scrolling a screen or a scroll bar
− Move it up/down.
For using a drawer
− Drag it.
3.4 Perform a simple weighing
For full information, always consult and download the Reference Manual (RM).
u www.mt.com/XPR-analytical-RM
u www.mt.com/XSR-analytical-RM
18 Analytical Balances and Comparators
Page 19

4 Maintenance
To guarantee the functionality of the balance and the accuracy of the weighing results, a number of maintenance
actions must be performed by the user.
4.1 Maintenance table
Maintenance action Recommended interval Remarks
Performing an internal
adjustment
Performing routine tests
(eccentricity test, repeatability test, sensitivity test).
METTLER TOLEDO
recommends to perform at
least a sensitivity test.
Cleaning Depending on the degree of pollution or your
4.2 Performing routine tests
There are several routine tests. Depending on your internal regulations, specific routine test must be performed by
the user.
Mettler-Toledo GmbH recommend to perform a sensitivity test after cleaning and reassembling the balance or
after updating the software.
Mettler Toledo can help you to define the routine tests to be performed based on your process requirements.
Please contact your local METTLER TOLEDO representative for additional information.
For full information, always consult and download the Reference Manual (RM).
• Daily
• After cleaning
• After leveling
• After changing the location
• After cleaning
• After a software update
internal regulations (SOP), clean the instrument:
• After every use
• After change of sample
see chapter "Internal
adjustment"
see below
see chapter "Cleaning the
balance"
4.3 Cleaning
4.3.1 Disassembling for cleaning
CAUTION
Risk of injury due to breaking glass.
Careless handling with the glass components can lead to breakage off glass and damage
cuttings.
− Always proceed focused and with care.
1 Press to set the balance into stand-by mode.
u www.mt.com/XPR-analytical-RM
u www.mt.com/XSR-analytical-RM
19Analytical Balances and Comparators
Page 20

2 Pull the top panel (1) from the slides of the side doors.
Shortly before the top panel dropped out you can feel a
slightly resistance. Just keep pulling a little bit tighter.
3 Hold the side doors (2) and push down the lever (3) to
release them.
ð The side doors are unlocked.
4 Carefully remove both side doors (2).
5 Tilt the front panel (4) to the front and remove it.
20 Analytical Balances and Comparators
Page 21

6 Carefully lift the weighing pan (5) to unhook it and pull it
out.
7 Remove the drip tray (6).
8 Unplug and remove the terminal from the weighing
platform.
ð The balance is disassembled and ready for cleaning.
4.3.2 Cleaning the balance
For full information, always consult and download the Reference Manual (RM).
WARNING
Risk of death or serious injury due to electric shock
Contact with parts carrying a live current can lead to injury and death.
1 Disconnect the instrument from the power supply prior to cleaning and maintenance.
2 Prevent liquid from entering the instrument, terminal or AC/DC adapter.
u www.mt.com/XPR-analytical-RM
u www.mt.com/XSR-analytical-RM
NOTICE
Risk of damage due to improper cleaning.
Improper cleaning can damage the load cell or other essential parts.
1 Do not use any cleaning agents other than the ones specified in the Reference Manual or
Cleaning Guide.
2 Do not spray or pour liquids on the balance. Always use a moistened lint-free cloth or a tissue.
3 Always wipe out from inside to outside of the balance.
Protective equipment:
• Gloves
• Goggles
The following procedures describes the cleaning of the weighing panel and all components.
Around the balance
− Remove any dirt or dust around the balance and avoid further contaminations.
Cleaning the weighing unit
1 Use a lint-free cloth moistened with a mild cleaning agent to clean the surface of the balance.
2 Remove powder or dust at first with a disposable tissue.
21Analytical Balances and Comparators
Page 22

3 Remove sticky substances with a damp lint-free cloth and a mild solvent (e. g. isopropanol or ethanol 70
%).
Cleaning all removable parts
− Clean all removed part with a damp cloth or a tissue and a mild cleaning agent or clean it in a dishwasher
up to 80 °C.
Note
Useful details to avoid soiling are described in the Mettler-Toledo GmbH SOP for Cleaning a Balance.
4.3.3 Commissioning after cleaning
1 Reassemble the balance.
2 Check the functionality of the draft shield.
3 Check if the terminal is connected to the balance.
4 Press
5 Check the level status, level the balance if necessary.
6 Perform an internal adjustment.
7 Perform a routine test due to the internal regulations of your company. METTLER TOLEDO recommends to
8 Press
ð The balance has been commissioned and is ready to use.
See also
2 Internal adjustment}Page15
2 Leveling the balance}Page15
to switch on the balance.
perform a sensitivity test after cleaning the balance, see Reference Manual (RM).
to zero the balance.
22 Analytical Balances and Comparators
Page 23

5 Troubleshooting
Possible causes for faults and fault correction tasks are described in the following chapter. If there are faults that
cannot be corrected through the instructions below, contact the Mettler-Toledo GmbH.
NOTICE
Risk of damage due to improperly performed troubleshooting.
Improperly performed troubleshooting operations may result in damage of the instrument or false
weighing results.
1 Only proceed how described in the fault table.
2 Observe the following before putting into operation:
ð Make sure that all troubleshooting operations have been performed and completed
following the instructions and information provided in this User Manual.
ð Ensure that all components have been properly cleaned and the balance is leveled.
5.1 Error message table
Error message Possible cause Diagnostic Remedy
Balance reset
failure
The system has
no valid date
and time set
Weight cannot
be determine
5.2 Error sympthom table
Error
sympthom
The display is
dark.
The keys on the
display do not
work.
Communication failure – Restart the balance.
Low battery – Connecting to the main and let charge
Data signal problems of
electronics.
Bad connection between
terminal an weighing unit.
Possible cause Diagnostic Remedy
The instrument is on
standby.
No Power –
The terminal is not
connected to the
instrument.
The wrong "AC-adapter" is
connected.
The "AC-adapter" is
defective.
The "Terminal cable" is
defective.
The terminal is not
connected.
– Unplug and re-plug the power cable.
1. Check cables for
damages
2. Check cable pins for
damage.
– Switch on the instrument.
Check the connection. Connect the terminal cable to the
Check it with the help of
the Reference Manual
(Accessories).
The LED on the AC-adapter
does not light.
The cable is kink, twisted
or the pins are twisted or
broken.
Check the connection. Connect the terminal cable to the
the battery for 2 - 3 days.
Replace cables.
Connect the power cable. See chapter
"Connecting to the main"
instrument.
Use the correct AC-adapter.
Replace the AC-adapter.
Replace the terminal cable. See
chapter "Attaching the terminal"
instrument. See chapter "Attaching the
terminal"
23Analytical Balances and Comparators
Page 24

Error
sympthom
The value on
the display is
unstable.
• Increasing
and
decreasing
value
The value on
the display is
drifting.
• The value
drifts into
plus or
minus
The display
shows
overload/
underload.
Draft shield
front panel is
not exactly at
90° to the
weighing
platform
Draft shield
side doors are
not exactly
closed.
Possible cause Diagnostic Remedy
Disturbing vibrations on
the working desk (e.g.
building vibrations, foot
traffic)
Draft due to untight draft
shield and /or open
window.
The weighing sample is
electrostatically charged.
Place beaker with water an
the weighing bench.
Vibrations cause ripples on
the water surface.
Check the draft shield for
gaps.
Check if the weighing
result is stable when using
a test weight.
Protect weighing location against
vibrations (e. g. with absorber).
Find a different weighing location.
Close the window.
Fix the draft shield.
Increase the air humidity in the
weighing chamber.
Use a Ionizer, see "Accessories" in the
Reference Manual (RM).
The location is not suitable
for weighing.
– Check and observe the requirements
for the location. See chapter
"Selecting the location"
Something is touching the
weighing pan.
The weighing sample
absorbs moisture or
evaporates moisture.
The weighing sample is
electrostatically charged.
Check for touching parts or
dirts.
Check if the weighing
result is stable when using
a test weight.
Check if the weighing
result is stable when using
a test weight.
Remove touching parts or clean the
balance.
Cover the test weight.
Increase the air humidity in the
weighing chamber.
Use a Ionizer. See chapter "Accessories" in the Reference Manual (RM).
The weighing sample is
warmer or colder than the
air in the weighing
chamber.
Balance is not yet warmed
up.
Check if the weighing
result is stable when using
Bring the sample to room
temperature.
an acclimatized test
weight.
– Warm up the balance. Observe the
warming up time. See chapter
"Selecting the location"
The wrong weighing pan is
installed.
Slightly lift or press
weighing pan > the weight
Install the proper weighing pan.
display appears.
No weighing pan is
– Install the weighing pan.
installed.
Incorrect zero point at
power on.
The balance is not
adjusted.
Draft shield front panel is
not exactly adjusted.
Draft shield side doors are
not exactly adjusted.
– Disconnect and reconncet the power
cable after some seconds.
The standard adjustment is
lost.
Draft shield front panel
have to adjusted.
Draft shield side doors
have to exactly adjusted.
Perform a internal adjustment. See
chapter "Internal adjustment".
Contact METTLER TOLEDO represen-
tative to adjust the front panel.
Contact METTLER TOLEDO represen-
tative to adjust the side doors.
24 Analytical Balances and Comparators
Page 25

5.3 Putting into operation after correction of fault
After correcting the fault, perform the following steps to put the balance into operation:
• Ensure that the balance is completely reassemble and cleaned.
• Reconnect the balance to the mains.
See also
2 Connecting the balance }Page14
25Analytical Balances and Comparators
Page 26

6 Technical data
6.1 General technical data
Power supply
AC/DC adapter: Primary: 100 - 240 V~, 50/60 Hz
Secondary: 12 V DC, 2.5 A, LPS (with electronic overload
protection)
Cable for AC adapter: 3-core, with country-specific plug
Balance power consumption: 12 V DC, 2.25 A
Polarity:
Protection and standards
Overvoltage category: II
Degree of pollution: 2
Protection: Protected against dust and water
Standards for safety and EMC: See Declaration of Conformity
Range of application: For use in closed interior rooms only
The limit values applies when the balance is used within the following environmental conditions:
Environmental conditions
Height above mean sea level: Up to 5000m
Ambient temperature: +5 – +40°C
Temperature change, max. < 5°C / h
Relative air humidity: Max. 70% up to 31°C, linearly decreasing to 30% at 40°C,
Warm-up time:
The balance can withstand the following environmental conditions. However, the specifications of the balance
may be outside the limit values:
Ambient temperature: 5 – 40 °C
Relative air humidity: 20 - 80%, non-condensing
Storage temperature (balance
switched off and in packaging):
Relative air humidity (balance
switched off and in packaging):
Materials
Housing: Die-cast aluminum, plastic, chrome steel and glass
Terminal: Die-cast zinc, chromed and plastics
SmartGrid: Chrome-Nickel-Molybdenum steel X2CrNiMo17
with a current SELV (Safety Extra Low Voltage) output
non-condensing
At least 120 minutes after connecting the balance to the power
supply; when switched on from standby, the balance is ready for
operation immediately
-25°C – 70°C
10 – 90%, non-condensing
6.2 Dimensions
All dimensions in mm
The dimensions refer to the following models:
26 Analytical Balances and Comparators
Page 27

XPR Analytical Balance
336
20
505
150
194
292
195
154
79
237
73
32
329
237
292
126
482
160
73
114
79
195
XSR Analytical Balance
27Analytical Balances and Comparators
Page 28

7 Information on Standards
FCC Rules
This device complies with Industry Canada licence-exempt RSS standard(s) and part 15 of the FCC Rules.
Operation is subject to the following two conditions: (1) this device may not cause interference, and (2) this
device must accept any interference, including interference that may cause undesired operation of the device.
Changes or modifications not expressly approved by the party responsible for compliance could void the user's
authority to operate the equipment.
This equipment has been tested and found to comply with the limits for a Class A digital device, pursuant to part
15 of the FCC Rules. These limits are designed to provide reasonable protection against harmful interference
when the equipment is operated in a commercial environment. This equipment generates, uses, and can radiate
radio frequency energy and, if not installed and used in accordance with the instruction manual, may cause
harmful interference to radio communications. Operation of this equipment in a residential area is likely to cause
harmful interference in which case the user will be required to correct the interference at his own expense.
8 Disposal
In conformance with the European Directive 2012/19/EU on Waste Electrical and Electronic
Equipment (WEEE) this device may not be disposed of in domestic waste. This also applies to
countries outside the EU, per their specific requirements.
Please dispose of this product in accordance with local regulations at the collecting point specified for electrical
and electronic equipment. If you have any questions, please contact the responsible authority or the distributor
from which you purchased this device. Should this device be passed on to other parties, the content of this
regulation must also be related.
28 Analytical Balances and Comparators
Page 29

Page 30

Page 31

Page 32

Mettler-Toledo GmbH
30419872
Im Langacher 44
8606 Greifensee, Switzerland
www.mt.com/contact
Subject to technical changes.
© Mettler-Toledo GmbH 08/2018
30419872Aen
www.mt.com/excellence-analytical
For more information
 Loading...