

Page 1

Analytical Balances and Comparators
Reference Manual
XPR
Page 2

Page 3

Table of Contents
1 Introduction 5
2 Safety Information 6
2.1 Definition of signal warning symbols.............................................................................. 6
2.2 Product specific safety notes ......................................................................................... 6
3 Overview and Functions 8
3.1 Function description..................................................................................................... 8
3.2 Balance overview......................................................................................................... 9
3.3 Component description................................................................................................. 10
3.4 Type plate................................................................................................................... 13
3.5 Terminal Overview ....................................................................................................... 14
3.6 User Interface .............................................................................................................. 15
4 Installation and Putting into Operation 16
4.1 Scope of delivery ......................................................................................................... 16
4.2 Selecting the location ................................................................................................... 16
4.3 Unpacking the balance................................................................................................. 16
4.4 Installation.................................................................................................................. 19
4.5 Putting into operation ................................................................................................... 22
4.6 Transporting the balance .............................................................................................. 24
4.7 Installing devices......................................................................................................... 24
2.2.1 Safety notes.................................................................................................. 7
2.2.2 Accessories and spare parts........................................................................... 7
3.3.1 Standard components.................................................................................... 10
3.6.1 Main sections at a glance .............................................................................. 15
4.4.1 Attaching the terminal .................................................................................... 19
4.4.2 Assembling the balance................................................................................. 20
4.5.1 Connecting the balance to the mains............................................................... 22
4.5.2 Switching on the balance ............................................................................... 22
4.5.3 Login........................................................................................................... 23
4.5.4 Leveling the balance...................................................................................... 23
4.5.5 Performing an internal adjustment................................................................... 23
4.6.1 Transporting the balance over short distanes.................................................... 24
4.6.2 Transporting the balance over long distances ................................................... 24
4.6.3 Packaging and storage.................................................................................. 24
4.7.1 Connecting a printer via USB .......................................................................... 24
4.7.1.1 Connecting a printer via bluetooth ............................................................. 25
4.7.2 Connecting USB devices ................................................................................ 26
5 Operating 28
5.1 User Interface .............................................................................................................. 28
5.1.1 Main screen "General weighing" ..................................................................... 28
5.1.2 Work screen "Balance menu" ......................................................................... 29
5.1.3 Work screen "Methods".................................................................................. 29
5.1.4 Work screen "Protocol" .................................................................................. 30
5.1.5 Surface navigation of the touchscreen.............................................................. 31
5.1.6 Input dialog.................................................................................................. 31
5.1.6.1 Entering characters and numbers.............................................................. 31
5.1.6.2 Changing date and time........................................................................... 32
5.1.7 System status icons ...................................................................................... 32
5.1.8 Weighing status icons ................................................................................... 32
5.2 Performing a simple weighing....................................................................................... 33
5.2.1 Opening/closing the draft shield doors............................................................. 33
5.2.2 Taring the balance ........................................................................................ 33
Table of Contents 1Analytical Balances and Comparators
Page 4

5.2.3 Zeroing the balance....................................................................................... 33
5.2.4 Inserting a weighing object............................................................................. 34
5.2.5 Performing the weighing ................................................................................ 34
5.2.6 Completing a weighing .................................................................................. 34
5.3 Balance Menu ............................................................................................................. 35
5.3.1 Leveling aid.................................................................................................. 35
5.3.2 History......................................................................................................... 35
5.3.2.1 Changes ................................................................................................ 36
5.3.3 Balance info................................................................................................. 37
5.3.4 User management......................................................................................... 37
5.3.4.1 Activating the user management ............................................................... 37
5.3.4.2 Logging in.............................................................................................. 37
5.3.4.3 Logging out............................................................................................ 37
5.3.4.4 Managing users and user groups.............................................................. 37
5.3.4.5 Inactivating the user management............................................................. 41
5.3.4.6 Service request for resetting password or balance ....................................... 41
5.3.5 Settings........................................................................................................ 42
5.3.6 Maintenance................................................................................................. 53
5.3.6.1 Import / export data................................................................................. 53
5.3.6.2 Formatting RFID tag................................................................................. 54
5.3.6.3 Updating the software .............................................................................. 55
5.3.6.4 Resetting................................................................................................ 55
5.3.6.5 Service................................................................................................... 55
5.3.7 Exit / Block the balance ................................................................................. 55
5.3.7.1 Logout / unblocking the balance ............................................................... 56
5.3.7.2 Creating an unblocking password ............................................................. 56
5.3.7.3 Blocking / unblocking the balance............................................................. 56
5.3.7.4 Logout ................................................................................................... 57
6 Software description 58
6.1 Weighing Methods....................................................................................................... 58
6.1.1 Introduction.................................................................................................. 58
6.1.2 Methods Overview......................................................................................... 58
6.1.3 Method General weighing............................................................................... 59
6.1.3.1 Method description.................................................................................. 59
6.1.3.2 Creating a new method for general weighing .............................................. 59
6.1.3.3 Method settings....................................................................................... 60
6.1.3.4 Performing a General Weighing ................................................................ 70
6.1.3.5 Cloning a method ................................................................................... 71
6.1.3.6 Deleting a method................................................................................... 71
6.1.4 Method Interval weighing ............................................................................... 72
6.1.4.1 Method description.................................................................................. 72
6.1.4.2 Creating a new method for interval weighing .............................................. 72
6.1.4.3 Method settings....................................................................................... 72
6.1.4.4 Performing a Interval Weighing................................................................. 75
6.1.4.5 Cloning a method ................................................................................... 75
6.1.4.6 Deleting a Method ................................................................................... 76
6.1.5 Method Piece counting .................................................................................. 77
6.1.5.1 Method description.................................................................................. 77
6.1.5.2 Creating a new method for piece counting.................................................. 77
6.1.5.3 Method settings....................................................................................... 77
6.1.5.4 Performing a Piece Counting .................................................................... 85
6.1.5.5 Cloning a method ................................................................................... 86
6.1.5.6 Deleting a method................................................................................... 86
6.1.6 Method Simple formulation............................................................................. 87
6.1.6.1 Method description.................................................................................. 87
6.1.6.2 Creating a new method for simple formulation............................................ 87
6.1.6.3 Method settings....................................................................................... 88
Table of Contents2 Analytical Balances and Comparators
Page 5

6.1.6.4 Performing a simple formulation ............................................................... 96
6.1.6.5 Cloning a method ................................................................................... 97
6.1.6.6 Deleting a method................................................................................... 97
6.1.7 Method Titration ............................................................................................ 97
6.1.7.1 Method description.................................................................................. 97
6.1.7.2 Creating a new method for Titration ........................................................... 97
6.1.7.3 Method settings....................................................................................... 98
6.1.7.4 Cloning a method ................................................................................... 106
6.1.7.5 Deleting a method................................................................................... 106
6.1.8 Method Density determination......................................................................... 107
6.1.8.1 Method description.................................................................................. 107
6.1.8.2 Creating a method density determination.................................................... 107
6.1.8.3 Method setting ........................................................................................ 108
6.1.8.4 Performing a density determination ........................................................... 113
6.1.8.5 Cloning a method ................................................................................... 114
6.1.8.6 Deleting a method................................................................................... 114
6.1.9 Using method templates ................................................................................ 115
6.1.9.1 Define a template .................................................................................... 115
6.1.9.2 Define a template in the method defining process........................................ 115
6.1.9.3 Define templates in a current task.............................................................. 115
6.1.9.4 Work with templates................................................................................ 116
6.2 Tasks ......................................................................................................................... 116
6.2.1 Deleting a task.............................................................................................. 116
6.3 Tests .......................................................................................................................... 116
6.3.1 Overview routine tests.................................................................................... 116
6.3.1.1 Eccentricity test ....................................................................................... 116
6.3.1.2 Repeatability test..................................................................................... 117
6.3.1.3 Sensitivity tests ....................................................................................... 117
6.3.2 Creating an own new test............................................................................... 117
6.3.3 Test parameter settings .................................................................................. 118
6.3.3.1 Eccentricity test ....................................................................................... 118
6.3.3.2 Repeatability test..................................................................................... 120
6.3.3.3 Sensitivity test......................................................................................... 123
6.3.4 Defining a test weight .................................................................................... 126
6.3.5 Performing a test........................................................................................... 126
6.3.5.1 Performing an eccentricity test .................................................................. 127
6.3.5.2 Performing a repeatability test................................................................... 129
6.3.5.3 Performing a sensitivity test...................................................................... 131
6.3.6 Deleting a test............................................................................................... 133
6.3.7 Printing a test ............................................................................................... 133
6.3.8 Editing a test ................................................................................................ 133
6.3.9 See the test history ........................................................................................ 133
6.4 Adjustments ................................................................................................................ 133
6.4.1 Internal adjustment........................................................................................ 134
6.4.1.1 Editing an internal adjustment................................................................... 134
6.4.1.2 Performing an internal adjustment............................................................. 135
6.4.2 External adjustment....................................................................................... 135
6.4.2.1 Editing an external adjustment.................................................................. 135
6.4.2.2 Perform an external adjustment................................................................. 136
6.4.3 See adjustment history................................................................................... 136
7 Maintenance 137
7.1 Maintenance table........................................................................................................ 137
7.2 Performing routine tests................................................................................................ 137
7.3 Performing an internal adjustment ................................................................................. 137
7.4 Cleaning..................................................................................................................... 137
7.4.1 Disassembling for cleaning ............................................................................ 137
7.4.2 Cleaning agents............................................................................................ 139
Table of Contents 3Analytical Balances and Comparators
Page 6

7.4.3 Cleaning the balance..................................................................................... 140
7.4.4 Commissioning after cleaning ........................................................................ 140
7.5 Updating the software................................................................................................... 141
7.5.1 Update the software....................................................................................... 141
7.5.2 Commissioning after software update .............................................................. 141
8 Troubleshooting 142
8.1 Error messages ........................................................................................................... 142
8.2 Error symptoms........................................................................................................... 142
8.3 Putting into operation after correcting a fault.................................................................... 144
9 Technical Data 145
9.1 General technical data.................................................................................................. 145
9.2 Model specific technical data ........................................................................................ 146
9.3 Dimensions XPR.......................................................................................................... 150
10 Information on standards 151
11 Disposal 152
12 Accessories and Spare Parts 153
12.1 Accessories................................................................................................................. 153
12.2 Spare parts ................................................................................................................. 159
12.2.1 Weighing chamber ....................................................................................... 159
12.2.2 Packaging all models.................................................................................... 160
Index 161
Table of Contents4 Analytical Balances and Comparators
Page 7

1 Introduction
Disclaimer for comparators
In this document, the term "balance" is used to describe both balances and comparators.
Comparators are characterized by their higher resolution compared to balances and are mainly used for differ-
ential weighing application, such as the calibration of standard weights. Beside standard balance tests,
comparators have also been tested with differential repeatability (ABA repeatability) during production.
Thank you for choosing a METTLER TOLEDO balance. The balance combines high performance with ease of
use.
Finding more information
Search for software downloads u www.mt.com/labweighing-software-download
Software version
This Reference Manual refers to the originally installed > software version V 2.0.201.
Search for documents
u www.mt.com/library
For further questions, please contact your authorized METTLER TOLEDO dealer or service representative.
u www.mt.com/contact
Conventions and symbols
Refers to an external document.
Key and/or button designations and display texts are shown in graphic or bold text (e.g.
Note
For useful information about the product.
Elements of instructions
Prerequisites
§
1 Steps
2 ...
ð Intermediate results
ð Results
, Edit).
Introduction 5Analytical Balances and Comparators
Page 8
2 Safety Information
Two documents named "User Manual" and "Reference Manual" are available for this instrument.
• The User Manual is printed and delivered with the instrument.
• The electronic Reference Manual contains a full description of the instrument and its use.
• Keep both documents for future reference.
• Include both documents if you transfer the instrument to other parties.
Only use the instrument according to the User Manual and the Reference Manual. If you do not use the
instrument according to these documents or if the instrument is modified, the safety of the instrument may be
impaired and Mettler-Toledo GmbH assumes no liability.
2.1 Definition of signal warning symbols
Safety notes are marked with signal words and warning symbols. These show safety issues and warnings.
Ignoring the safety notes may lead to personal injury, damage to the instrument, malfunctions and false results.
General hazard Electrical shock
WARNING
CAUTION
NOTICE
A hazardous situation with medium risk, possibly resulting in death or severe injury if
not avoided.
A hazardous situation with low risk, resulting in minor or moderate injury if not avoided.
A hazardous situation with low risk, resulting in damage to the instrument, other
material damage, malfunctions and erroneous results, or loss of data.
Personal protective equipment
Chemical resistant safety gloves are intended to protect hands against aggressive
chemicals.
The protective goggles protect the eyes from flying parts and liquid splashes.
2.2 Product specific safety notes
Responsibilities of the instrument owner
The instrument owner is the person holding the legal title to the instrument and who uses the instrument or
authorizes any person to use it, or the person who is deemed by law to be the operator of the instrument. The
instrument owner is responsible for the safety of all users of the instrument and third parties.
METTLER TOLEDO assumes that the instrument owner trains users to safely use the instrument in their
workplace and deal with potential hazards. METTLER TOLEDO assumes that the instrument owner provides the
necessary protective gear.
Intended use
This instrument is intended to be used by trained staff. The instrument is intended for weighing purposes. Any
other type of use and operation beyond the limits of technical specifications without written consent from
Mettler-Toledo GmbH is considered as not intended.
Intended use also includes compliance with all the instruction in this User Manual and the Reference Manual
(RM).
Safety Information6 Analytical Balances and Comparators
Page 9
Trained personnel
Persons performing weighing processes must fulfill the following basic knowledge requirements regarding the
handling of METTLER TOLEDO instruments and associated software:
• Are able to complete the tasks entrusted to them and independently detect and avoid any possible dangers.
• Have expertise and experience as well as their familiarity with all applicable regulations.
• Able to prove that they have undergone training.
2.2.1 Safety notes
WARNING
Death or serious injury due to electric shock
Contact with parts that carry a live current can lead to death or injury.
1 Only use the approved METTLER TOLEDO power supply cable and AC/DC adapter with a
current-limited SELV output.
2 Connect the power cable to a grounded power outlet, ensure correct polarity.
3 Keep all electrical cables and connections away from liquids and moisture.
4 Check the cables and power plug for damage and replace damaged cables and power
plugs.
2.2.2 Accessories and spare parts
NOTICE
Damage or malfunction due to the use of wrong parts
Through the use of the wrong or defective parts, dangers for personnel can occur and
damage, malfunction or total instrument failure can occur.
− Use only original parts supplied or approved by the manufacturer.
Safety Information 7Analytical Balances and Comparators
Page 10

3 Overview and Functions
3.1 Function description
The XPR line comprises a range of balances that differ from each other due to their weighing range and
resolution. The balances of the XPR analytical line combine a large number of weighing and adjustment possibilities with a simple operation handling.
The following features are common to all models of the XPR analytical line:
• Fully automatic adjustment using internal weights.
• Built-in level sensor and leveling aid for fast and easy leveling.
• Seven inch capacitive color TFT-touchscreen.
• Various methods that can be defined individually.
• Various routine tests that can be defined individually.
• Functions to manage user groups and user rights.
• Functions to collect data such as settings that have been changed or objects that have been deleted/added.
• Motor driven side doors and also top door.
• Easily removable draft shield elements.
• In-built SmartSens optical sensors for touchless door operation.
• Integrated StaticDetect functionality for the detection of electrostatic charges inside the draft shield
Overview and Functions8 Analytical Balances and Comparators
Page 11
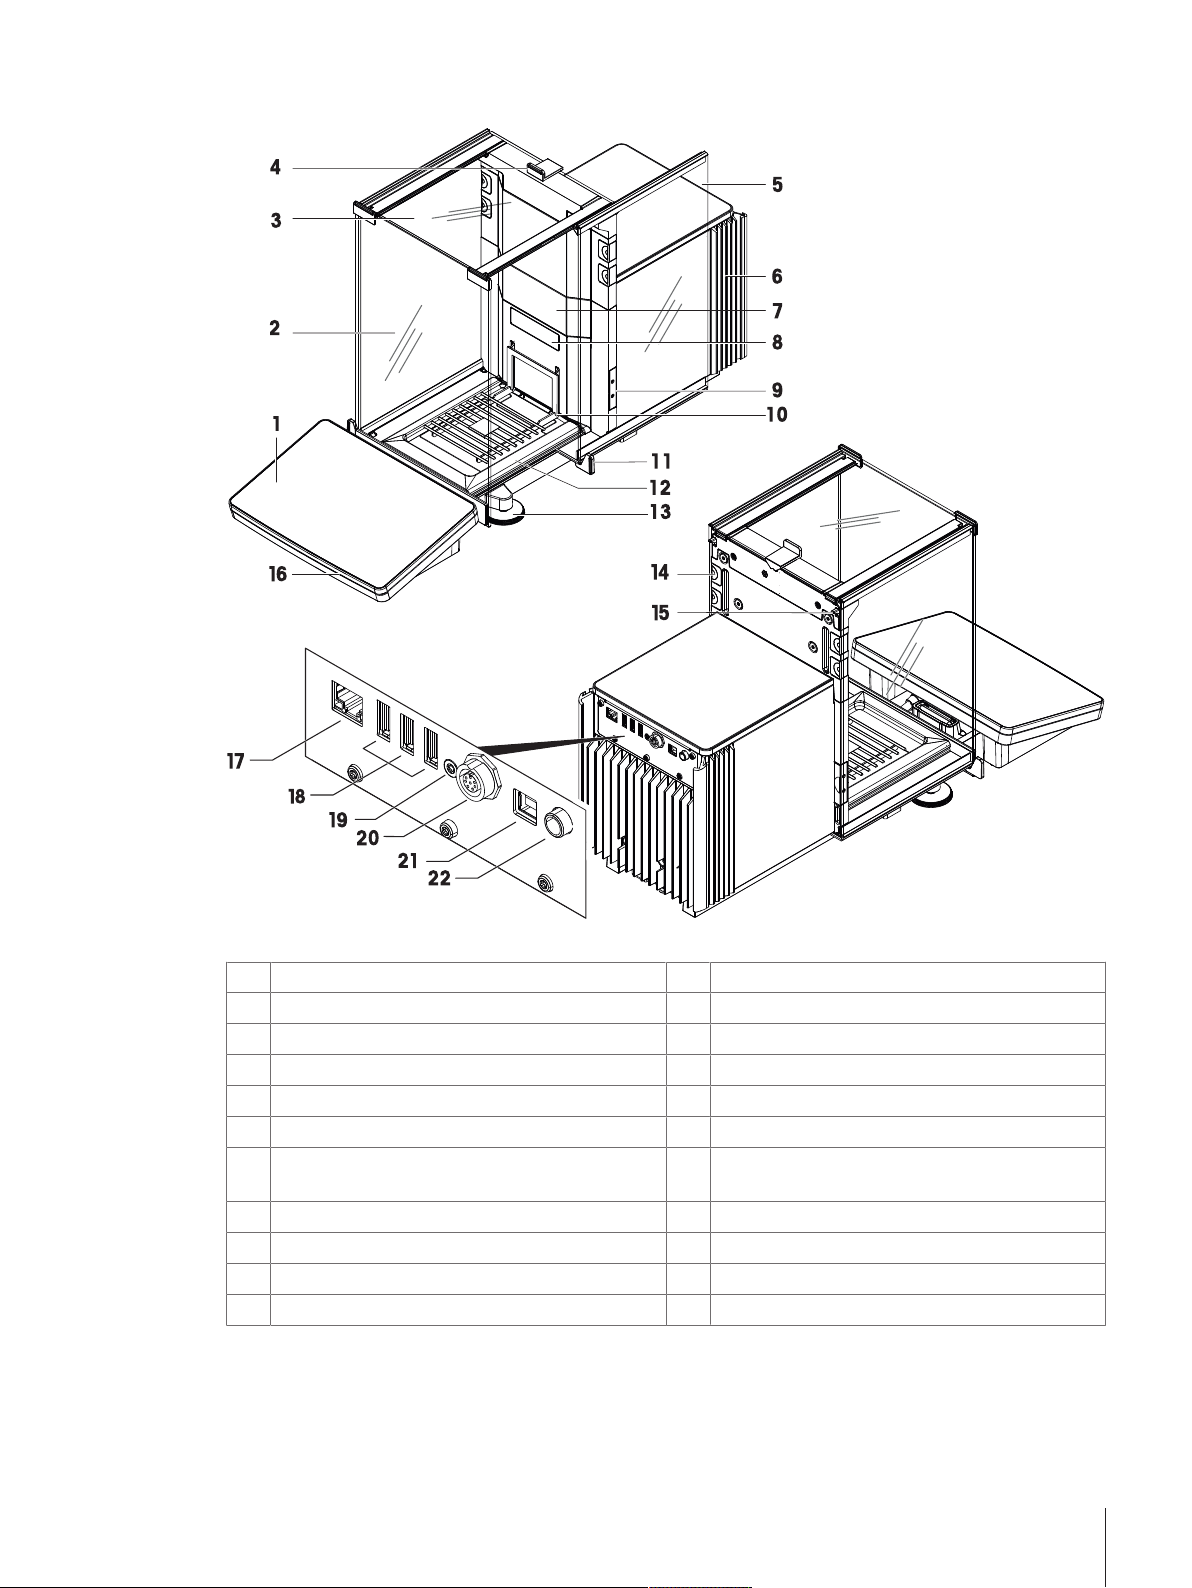
3.2 Balance overview
Legend XPR Analytical Balances
Terminal
1
Front panel draft shield
2
Top door draft shield
3
Handle for top door
4
Side door draft shield (right/left)
5
Cooling unit
6
Slot for the installation of an internal module e.g.
7
Ionizer module
Balance type designation plate
8
Optical sensor SmartSens
9
Weighing pan
10
Door handle
11
Drip tray
12
Leveling feet
13
Removable clips
14
Side door release lever
15
Status light
16
Ethernet port
17
USB host port
18
Service seal
19
Socket for terminal connection cable
20
USB device ports
21
Socket for power adapter
22
Overview and Functions 9Analytical Balances and Comparators
Page 12
3.3 Component description
3.3.1 Standard components
Draft shield
Weighing pan
The draft shield is a housing device that protects the
weighing area against environmental impacts like
drafts or moisture. The side doors and the top door
can be opened manually or automatically with a
touchless sensor.
The weighing pan is the load receptor that serves
directly to accommodate the weighing item.
Drip tray
The drip tray is positioned below the weighing pan on
the weighing chamber base plate. The primary
purpose of a drip tray is that of a dirt trap to ensure
quick cleaning of the balance. Furthermore static
detection drip pan detects static charges..
Overview and Functions10 Analytical Balances and Comparators
Page 13
Removable clips
Door handle
The removable clips help to insert cables or
measurement devices like sensors or an Ionizer into
the weighing chamber without opening the doors of
the draft shield.
The door handles are mounted on the door slides and
are used to open the side and top doors of the draft
shield manually.
Leveling feet
The balance stands on two height-adjustable feet.
These feet are used to level the balance.
Overview and Functions 11Analytical Balances and Comparators
Page 14
Terminal
Module cover
The 7-inch balance terminal has a touch sensitive
display. Further, on the front side of the terminal is a
status light LED strip that indicate the current status of
the balance.
The module cover is a removable cover that covers a
plug in slot. The latter can be used to connect various
accessories like an Ionizer.
Optical sensors
The optical sensors SmartSens are located on the
weighing unit behind the doors and provide a
touchless door handling. When the optical sensors
are activated, the doors can be opened without
touching them by moving the hand over the sensor.
Overview and Functions12 Analytical Balances and Comparators
Page 15
Side door release lever
The side door release lever is located on the back side
of the partition panel and locks/unlocks the draft
shield side door.
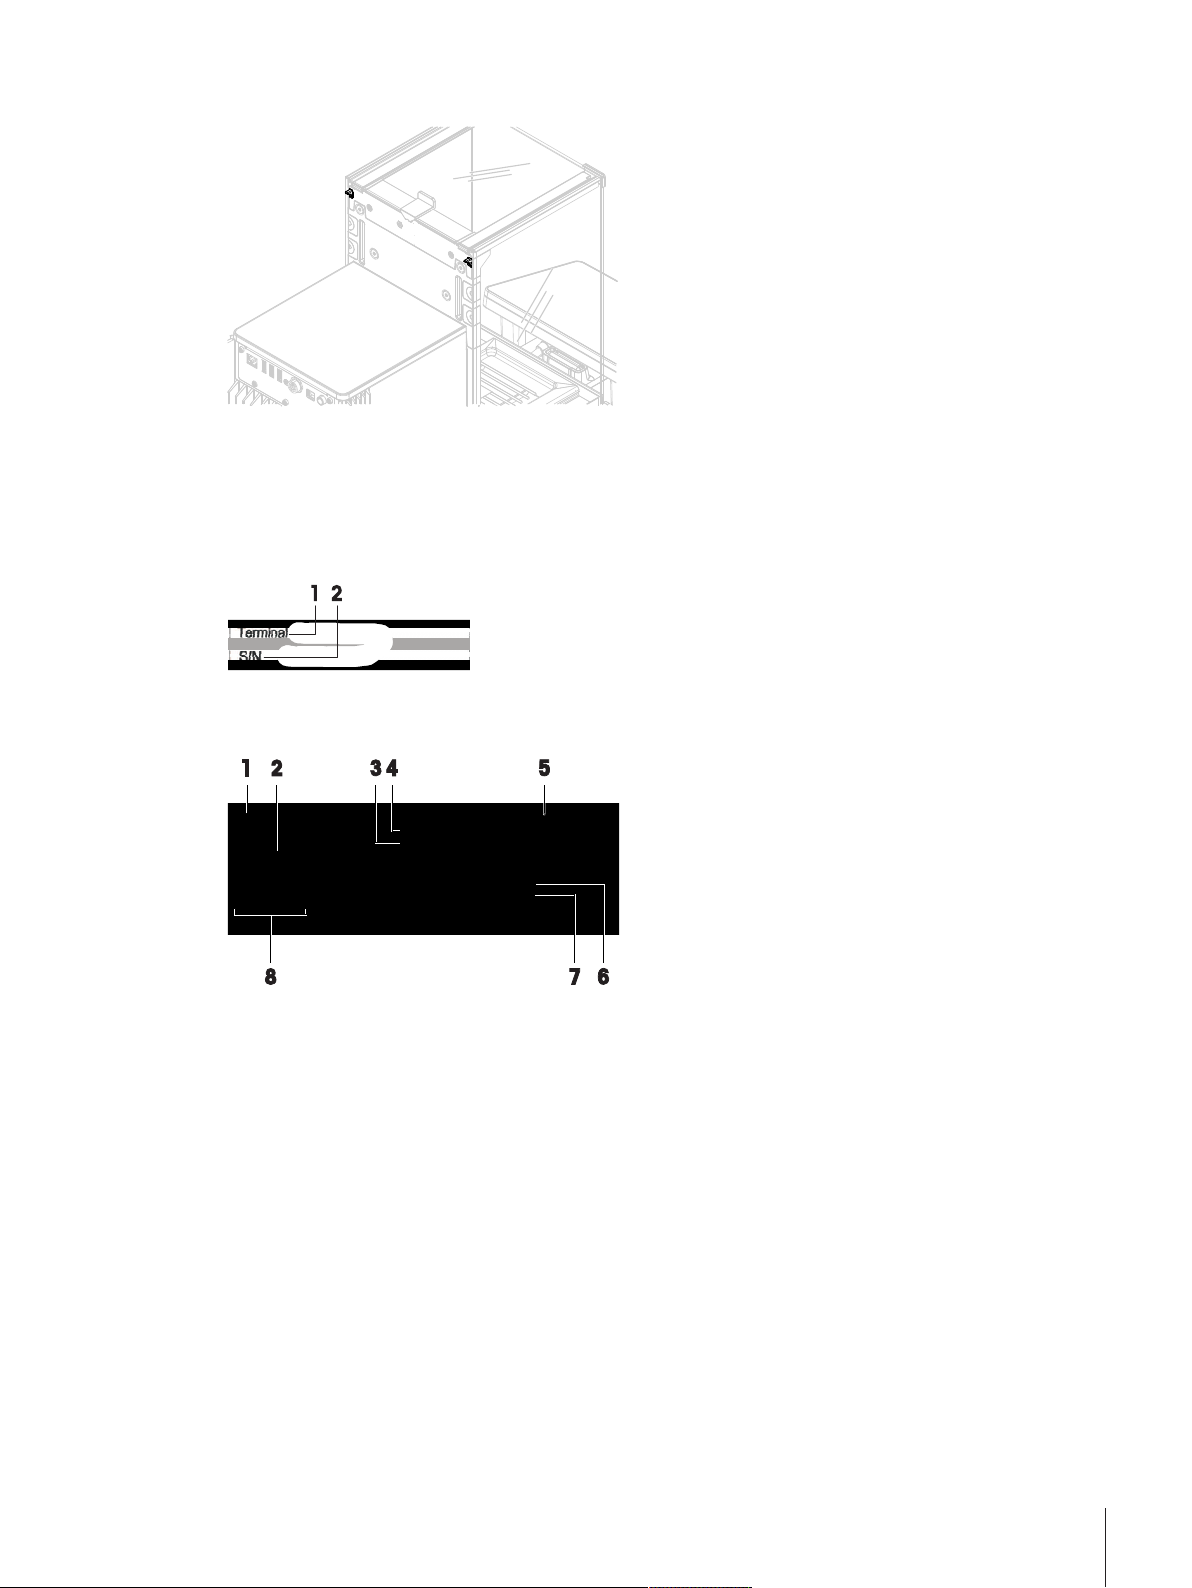
3.4 Type plate
The information on the type plate helps to identify the balance and terminal.
Terminal type plate
The terminal type plate is located on the terminal and contains the following information:
1. Terminal type
2. Terminal serial number
Weighing unit type plate
The balance type plate is located on the side of the weighing unit and contains the following information:
1. Designation of balance model
2. Year of manufacture
3. Readability
4. Maximum capacity
5. Manufacturer
6. Balance type
7. Serial number
8. Power supply
Overview and Functions 13Analytical Balances and Comparators
Page 16
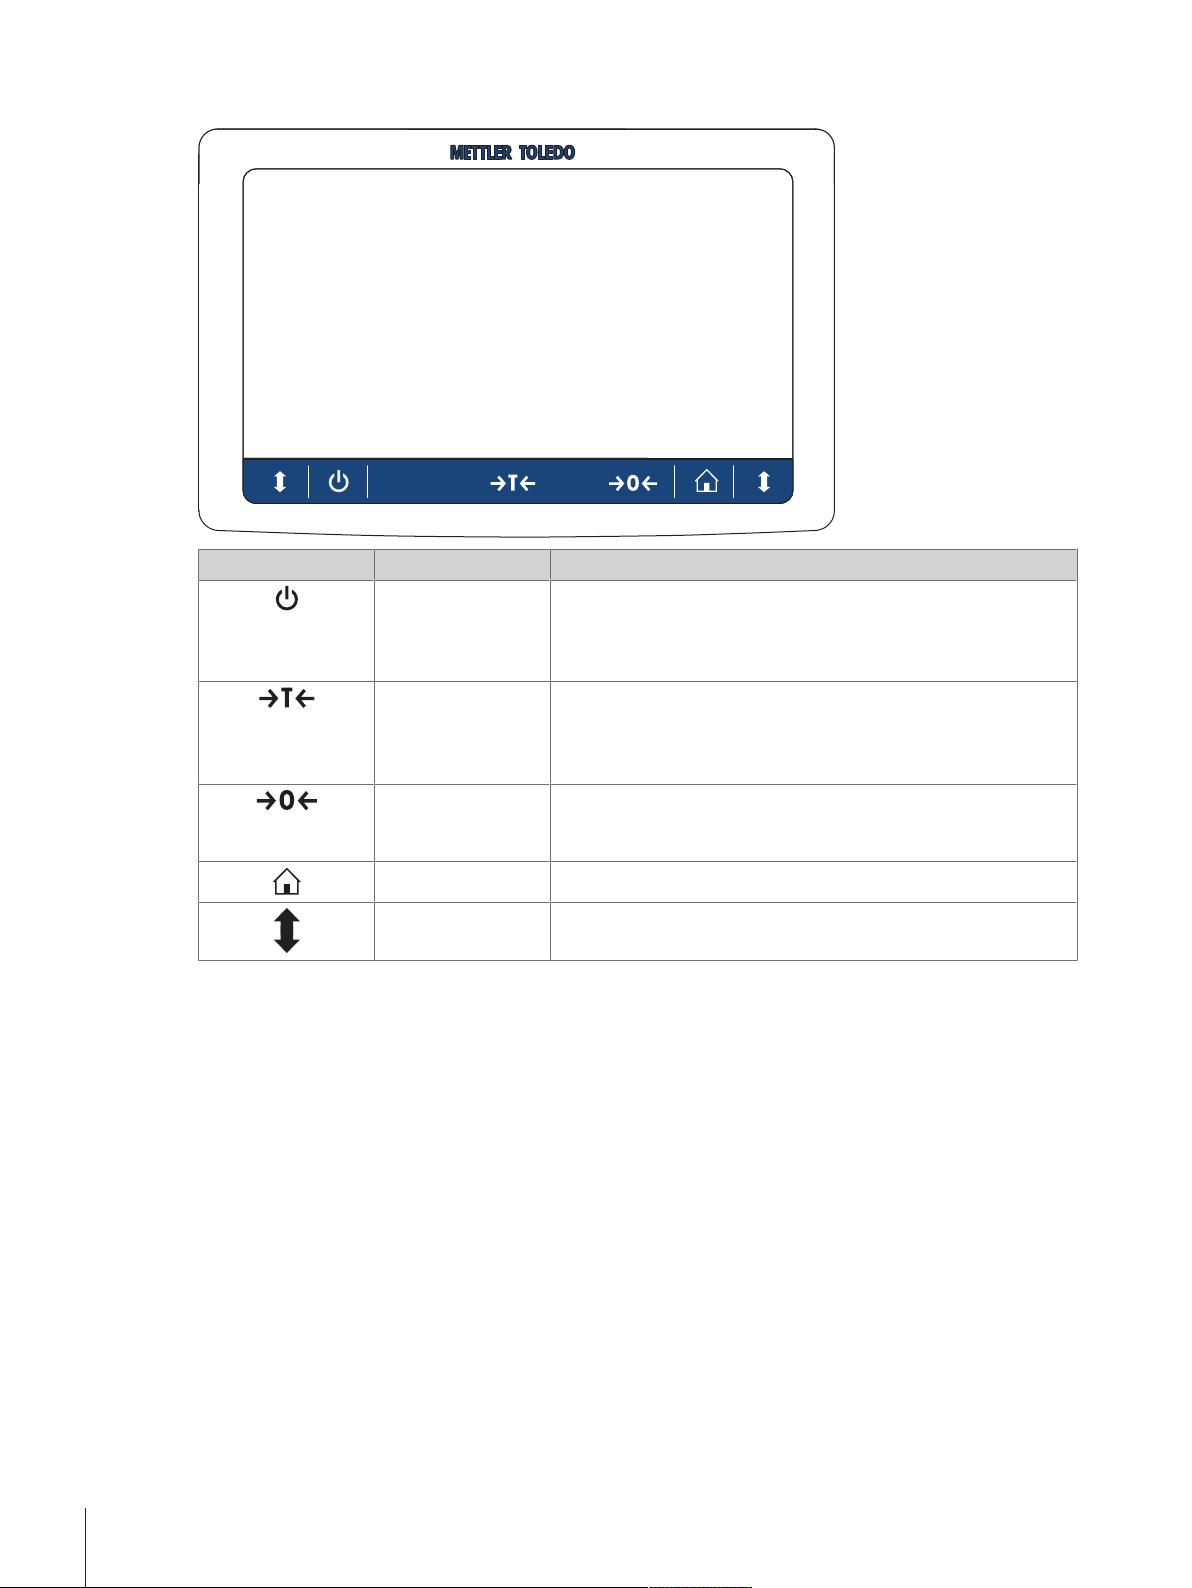
3.5 Terminal Overview
Key Designation Explanation
ON/OFF Switches the balance in standby mode.
To switch the balance completely off, it must be unplugged from
the power supply.
Tare Tares the balance.
This is used when the weighing process involves containers. After
taring the balance, the screen shows Net, which indicates that all
displayed weights are net.
Zero Zeros the balance.
The balance must always be zeroed before starting a weighing
process. After zeroing, the balance sets a new zero point.
Home To return from any menu level to the main weighing screen.
Door open Opens the weighing chamber door to the left or to the right
(default value).
Overview and Functions14 Analytical Balances and Comparators
Page 17
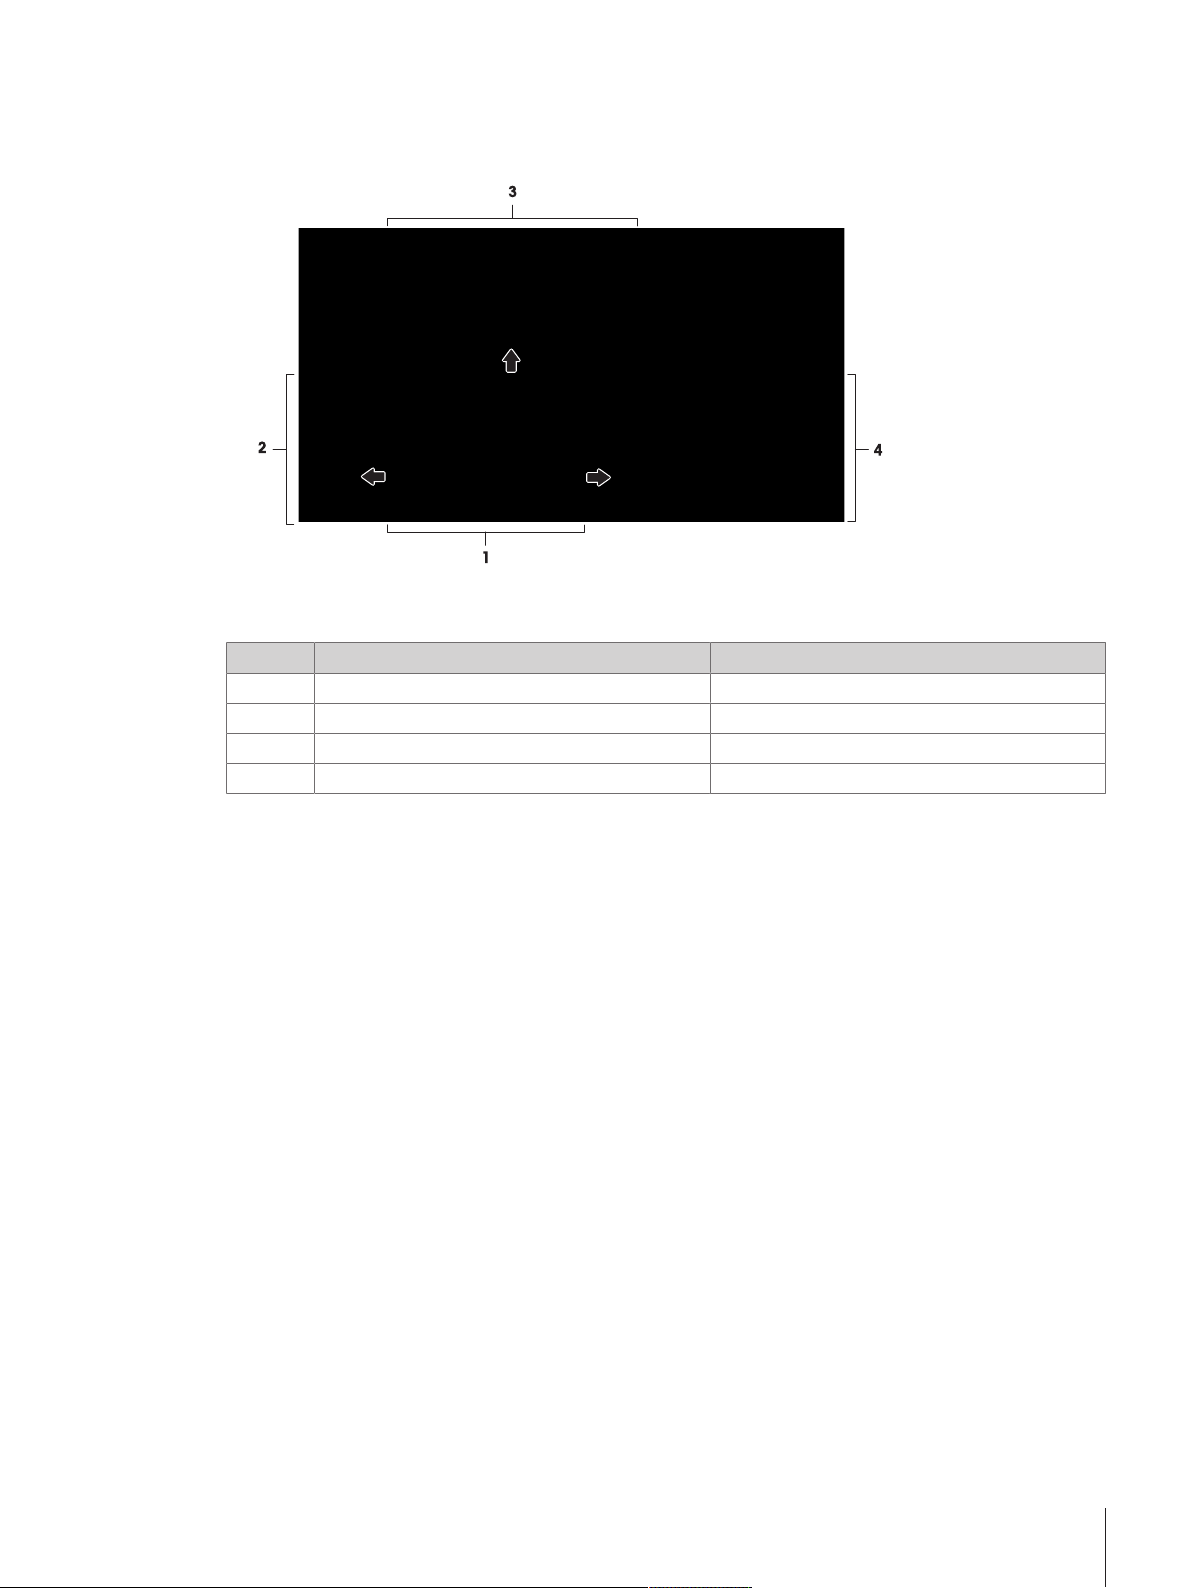
3.6 User Interface
3.6.1 Main sections at a glance
The user interface is divided in a main weighing screen and working screen where all the menus and setting
can be found.
No. Screen More information
1 Main weighing screen [Main screen "General weighing"}Page28]
2 Working screen Balance menu [Work screen "Balance menu"}Page29]
3 Working screen Methods [Work screen "Methods"}Page29]
4 Working screen Protocol [Work screen "Protocol"}Page30]
Overview and Functions 15Analytical Balances and Comparators
Page 18
4 Installation and Putting into Operation
4.1 Scope of delivery
The delivery contains the following components:
Balance Documentation
• Weighing unit
• Draft shield
• Drip tray and weighing pan
• Terminal with terminal holder and terminal connection cable
• AC/DC adapter with country-specific power cable
• MC Link Software (only Comparators)
Table set Accessories
• 1 pair of tweezers
• 2 spatulas
• 1 brush
4.2 Selecting the location
A balance is a sensitive precision instrument. The location where it is placed will have a profound effect on the
accuracy of the weighing results.
• User Manual
• Production certificate
• CE declaration of conformity
• 1 ErgoClip basket
• 2 SmartPrep
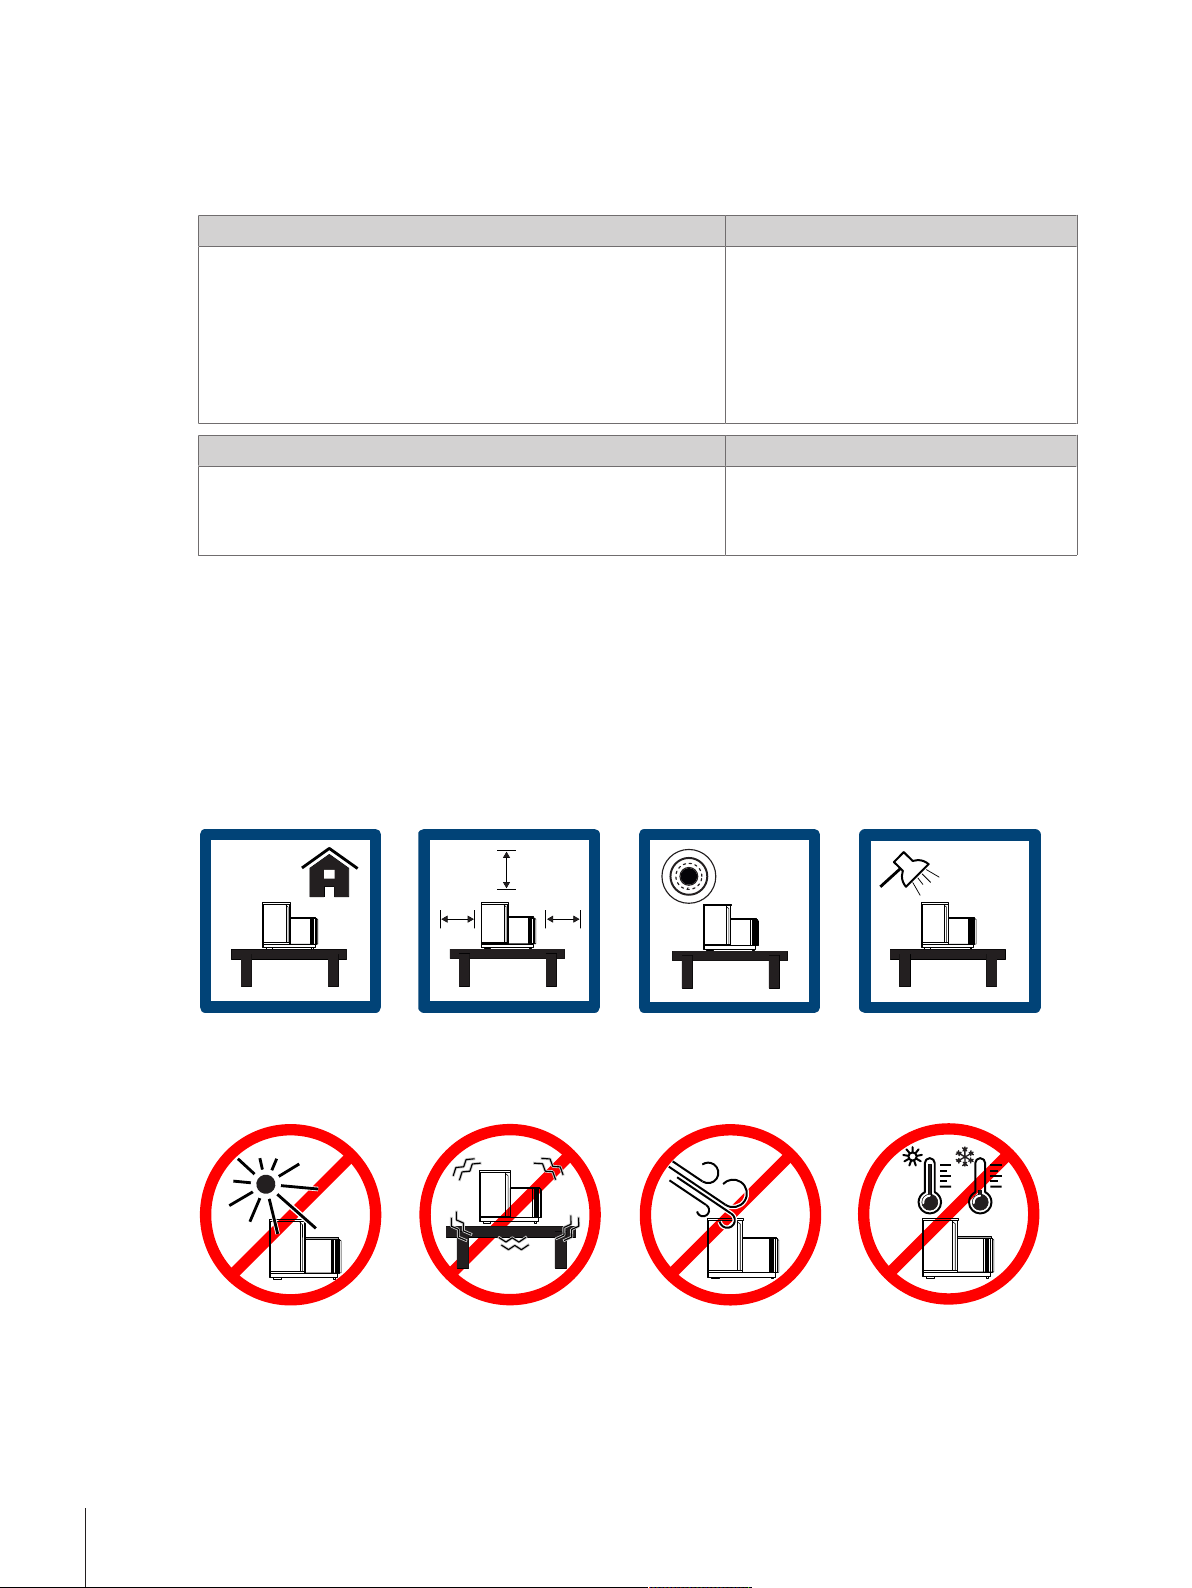
Requirements of the location
Ensure there is:
• indoor on stable table • with sufficient distance
• in level • adequately lit
(> 15 cm)
Avoid:
• direct sunlight • vibrations • strong drafts • temperature fluctu-
ations
4.3 Unpacking the balance
Check the package, the packaging elements and the delivered components for damages. If any components
are damaged, please contact your METTLER TOLEDO service representative.
Installation and Putting into Operation16 Analytical Balances and Comparators
Page 19
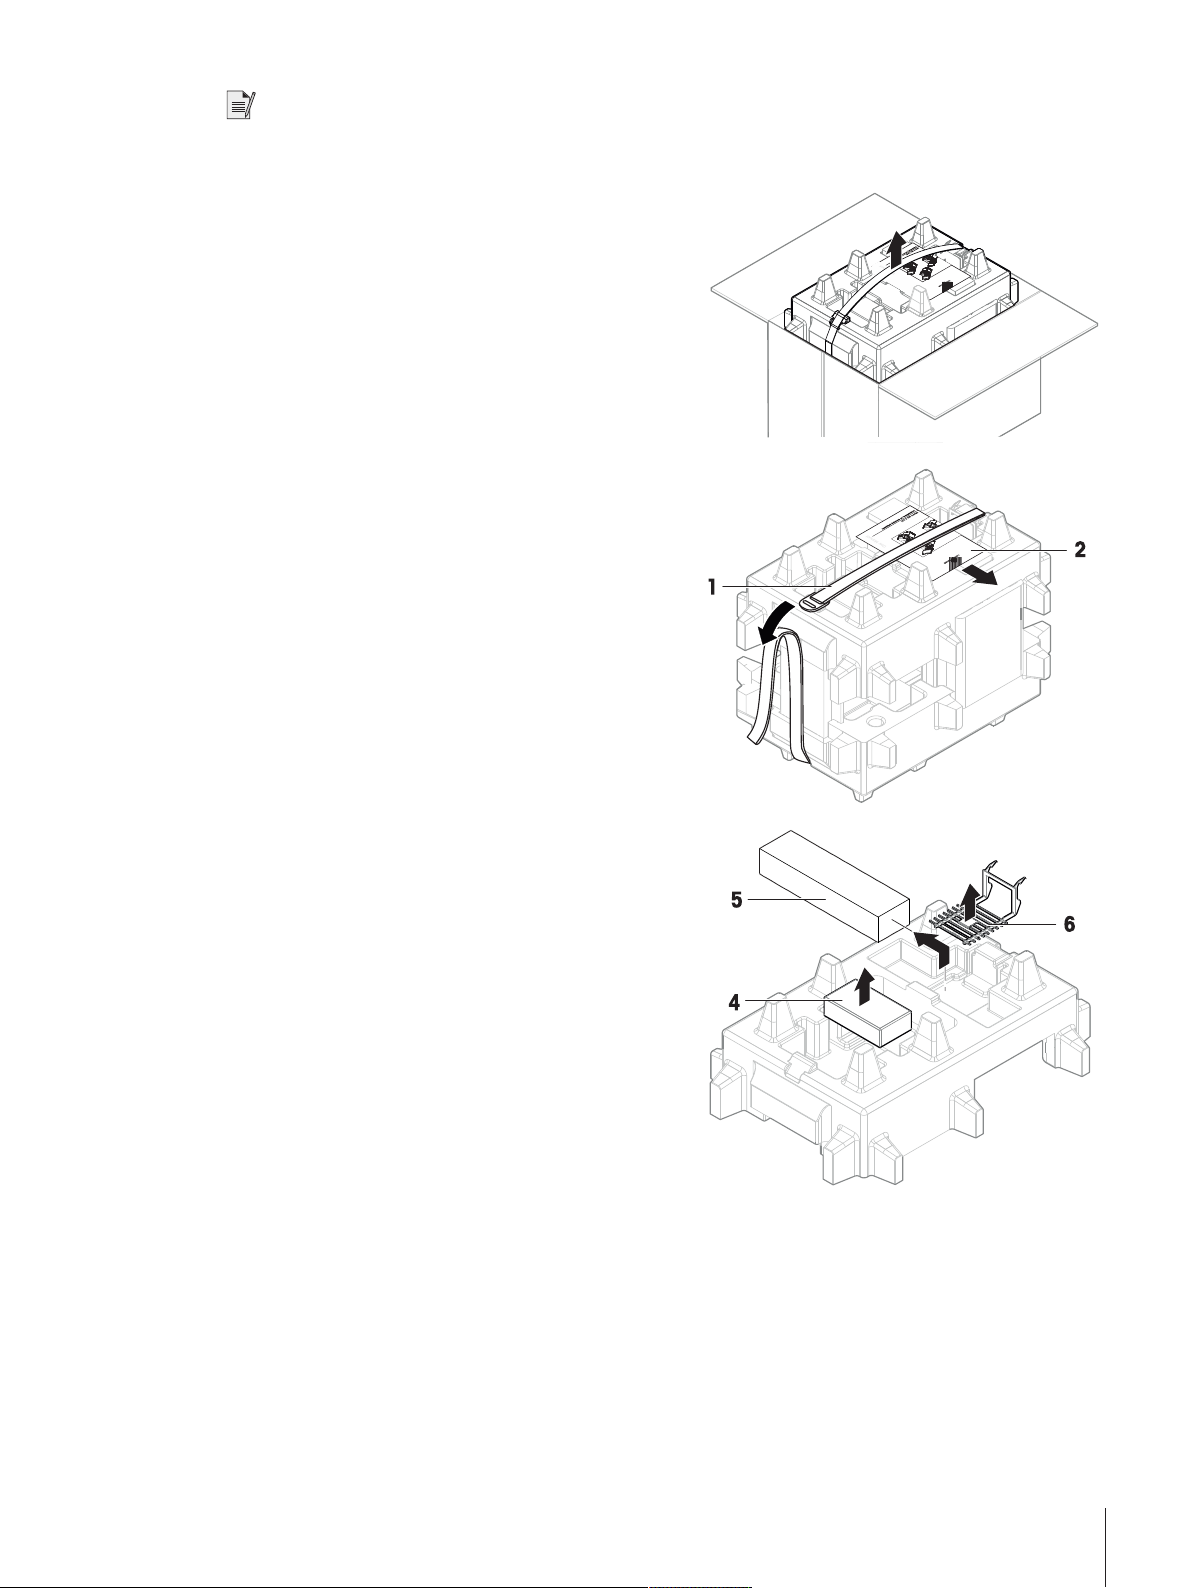
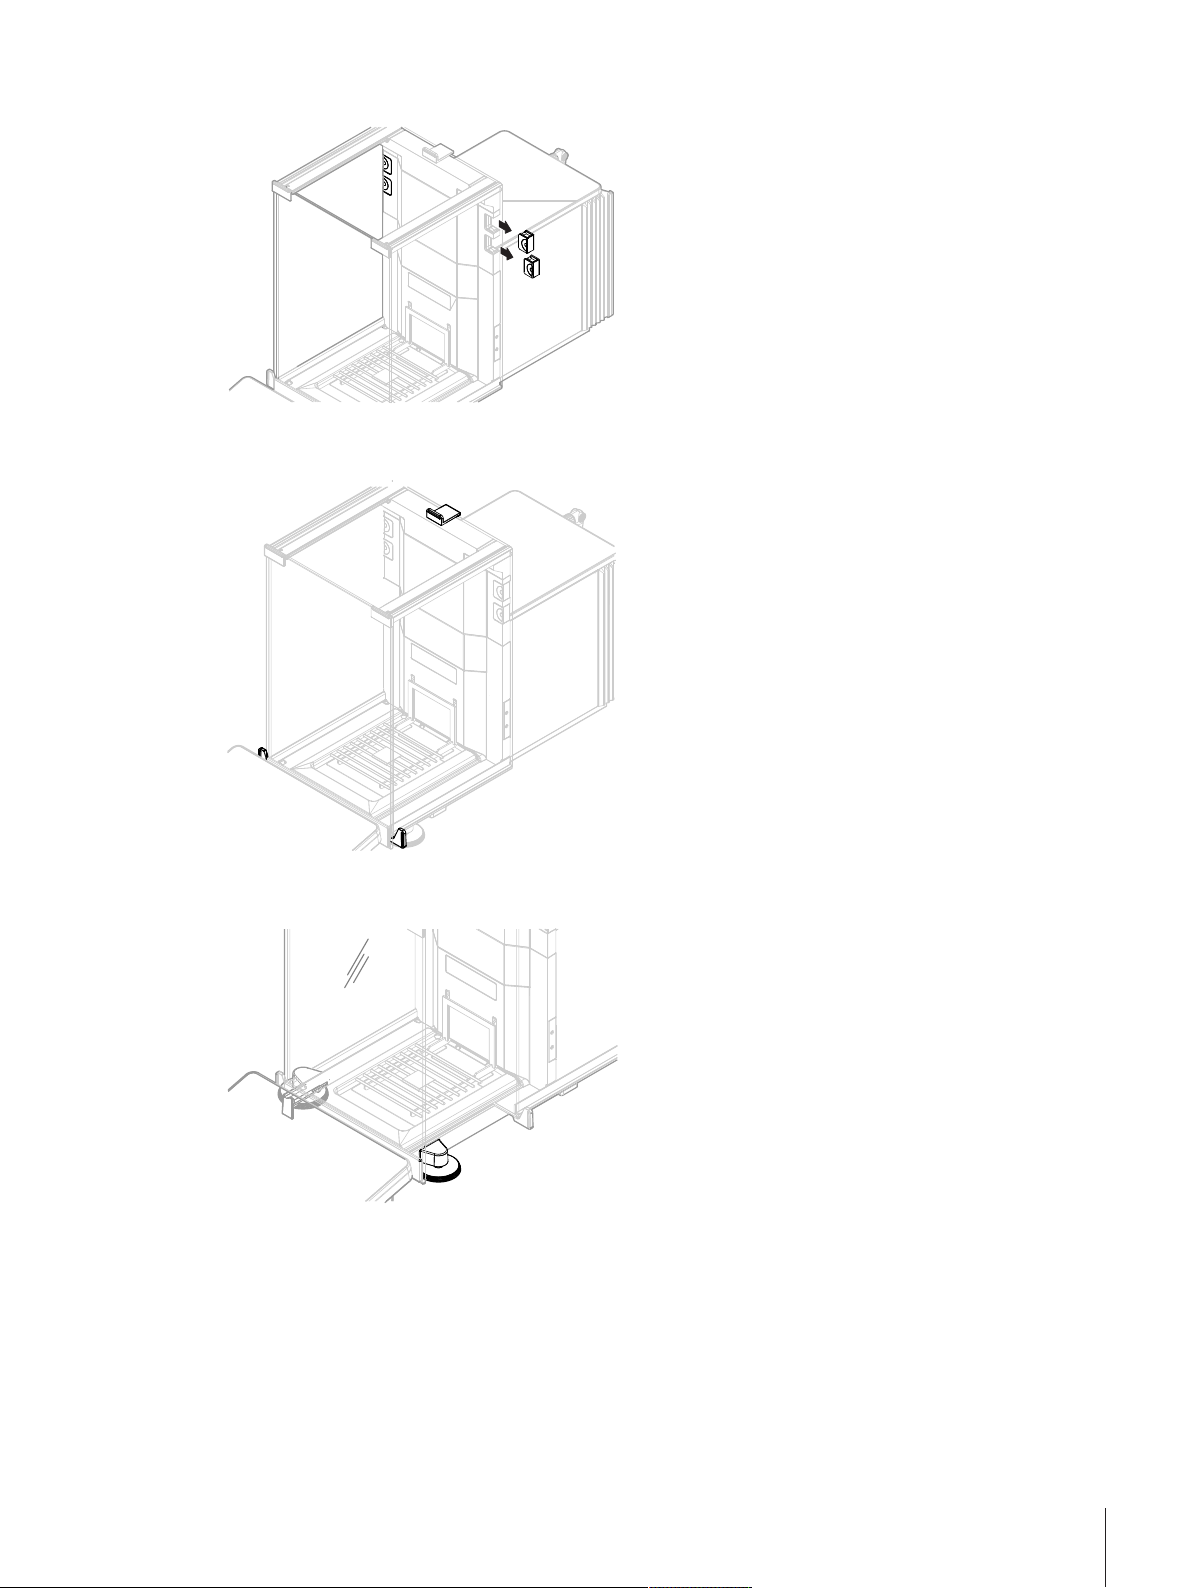
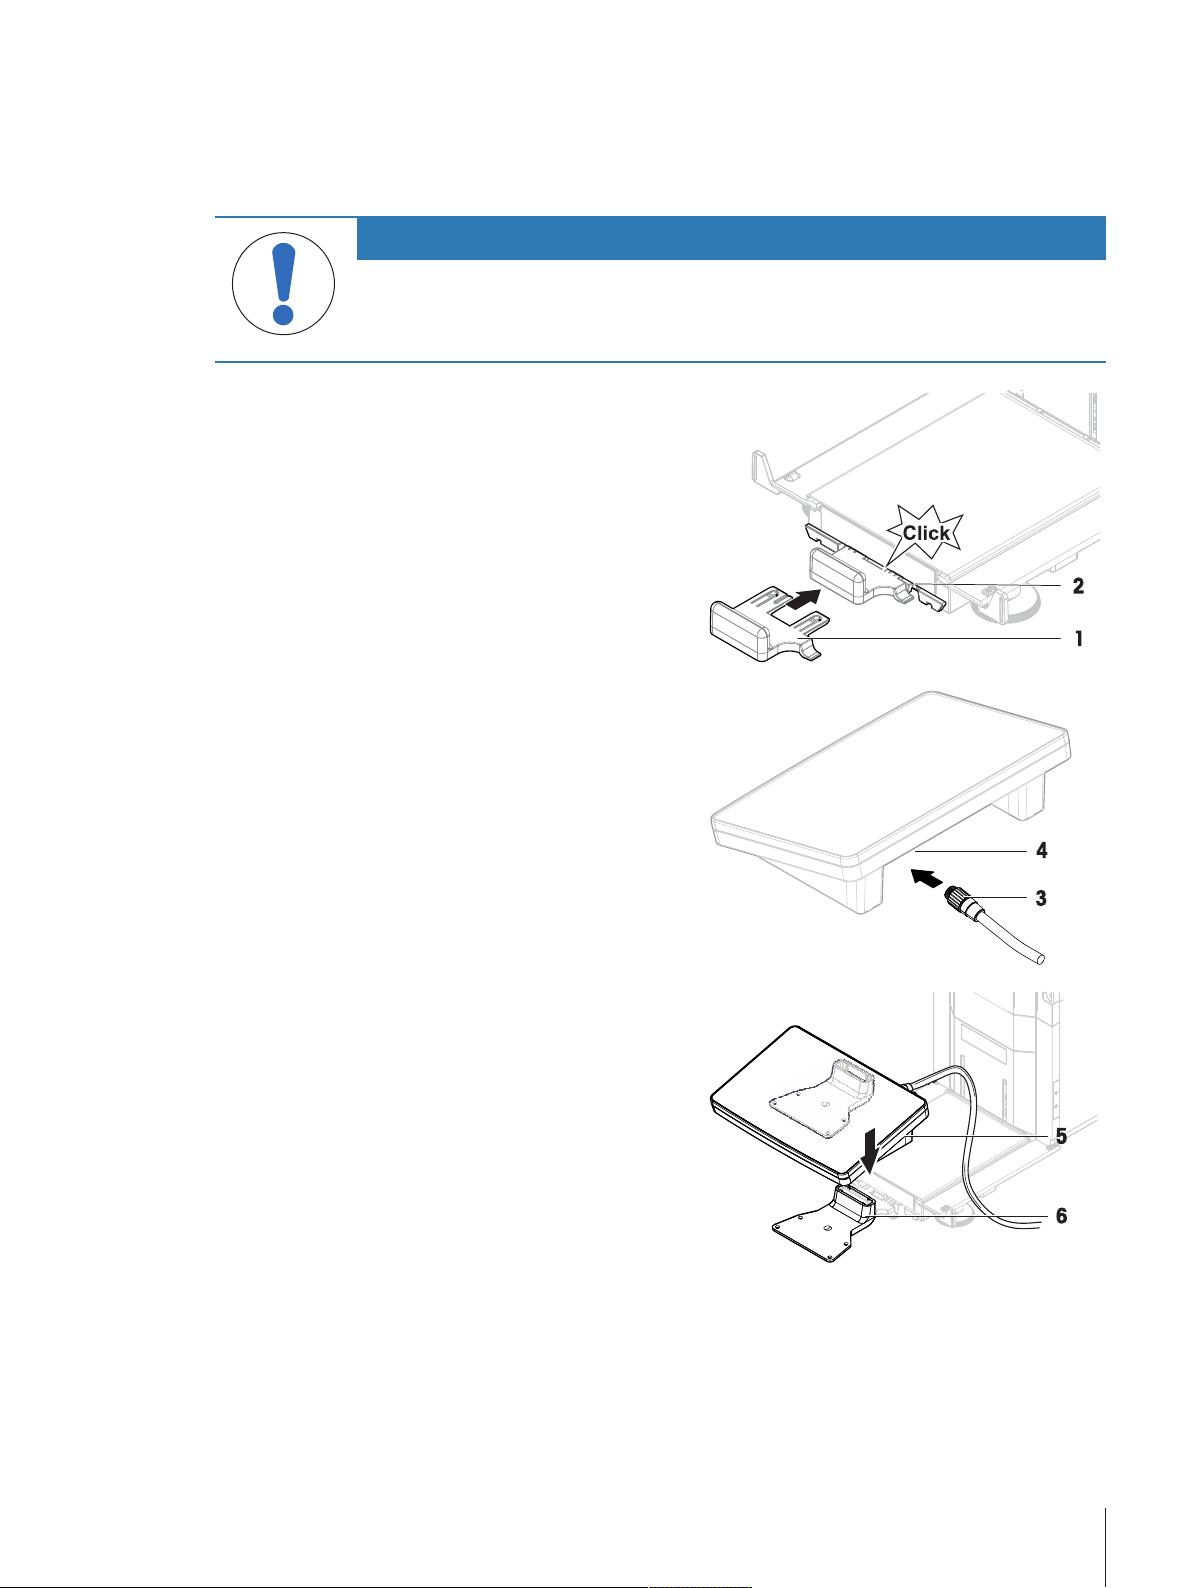
Note
Depending on the balance model, the components may look different. The procedure is always the same.
1 Open the box and lift the package out.
2 Open the lifting strap (1) and remove the user manual
(2).
3 Remove the upper part of the package and remove the
set with the AC adapter with power cable (4), the box
of several accessories (5) and the weighing pan (6).
Installation and Putting into Operation 17Analytical Balances and Comparators
Page 20
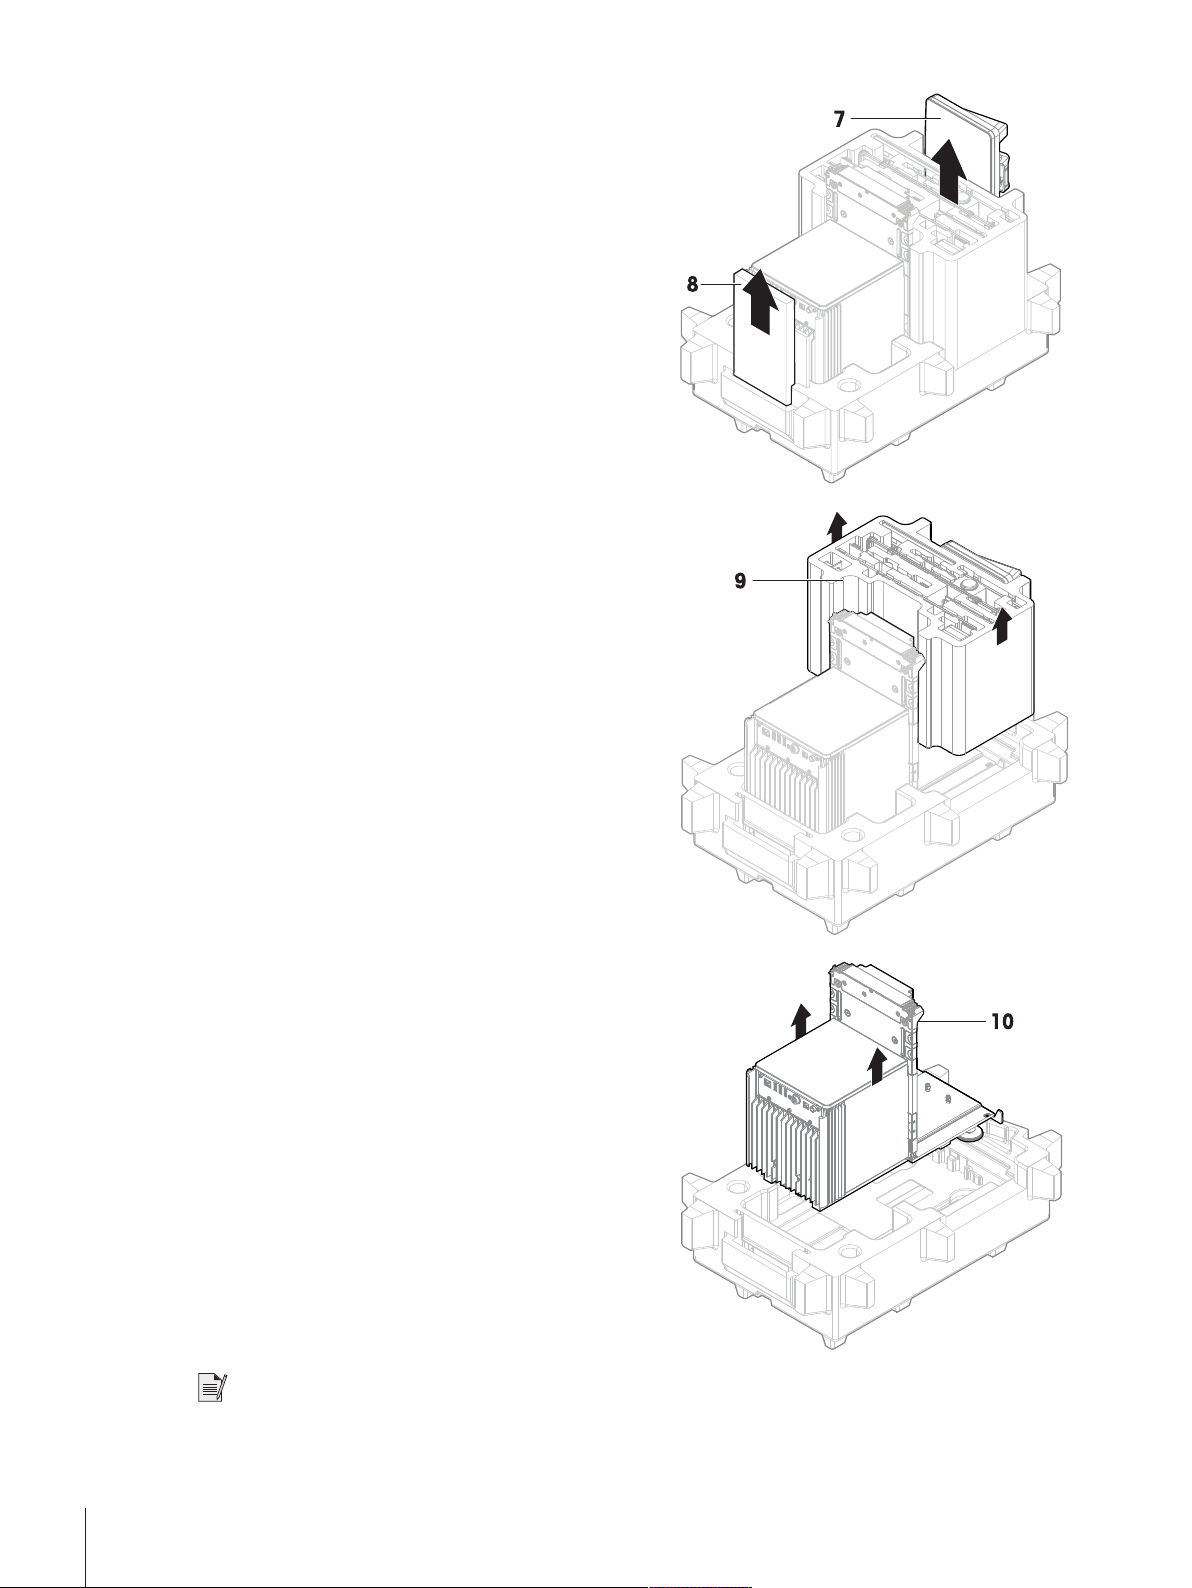
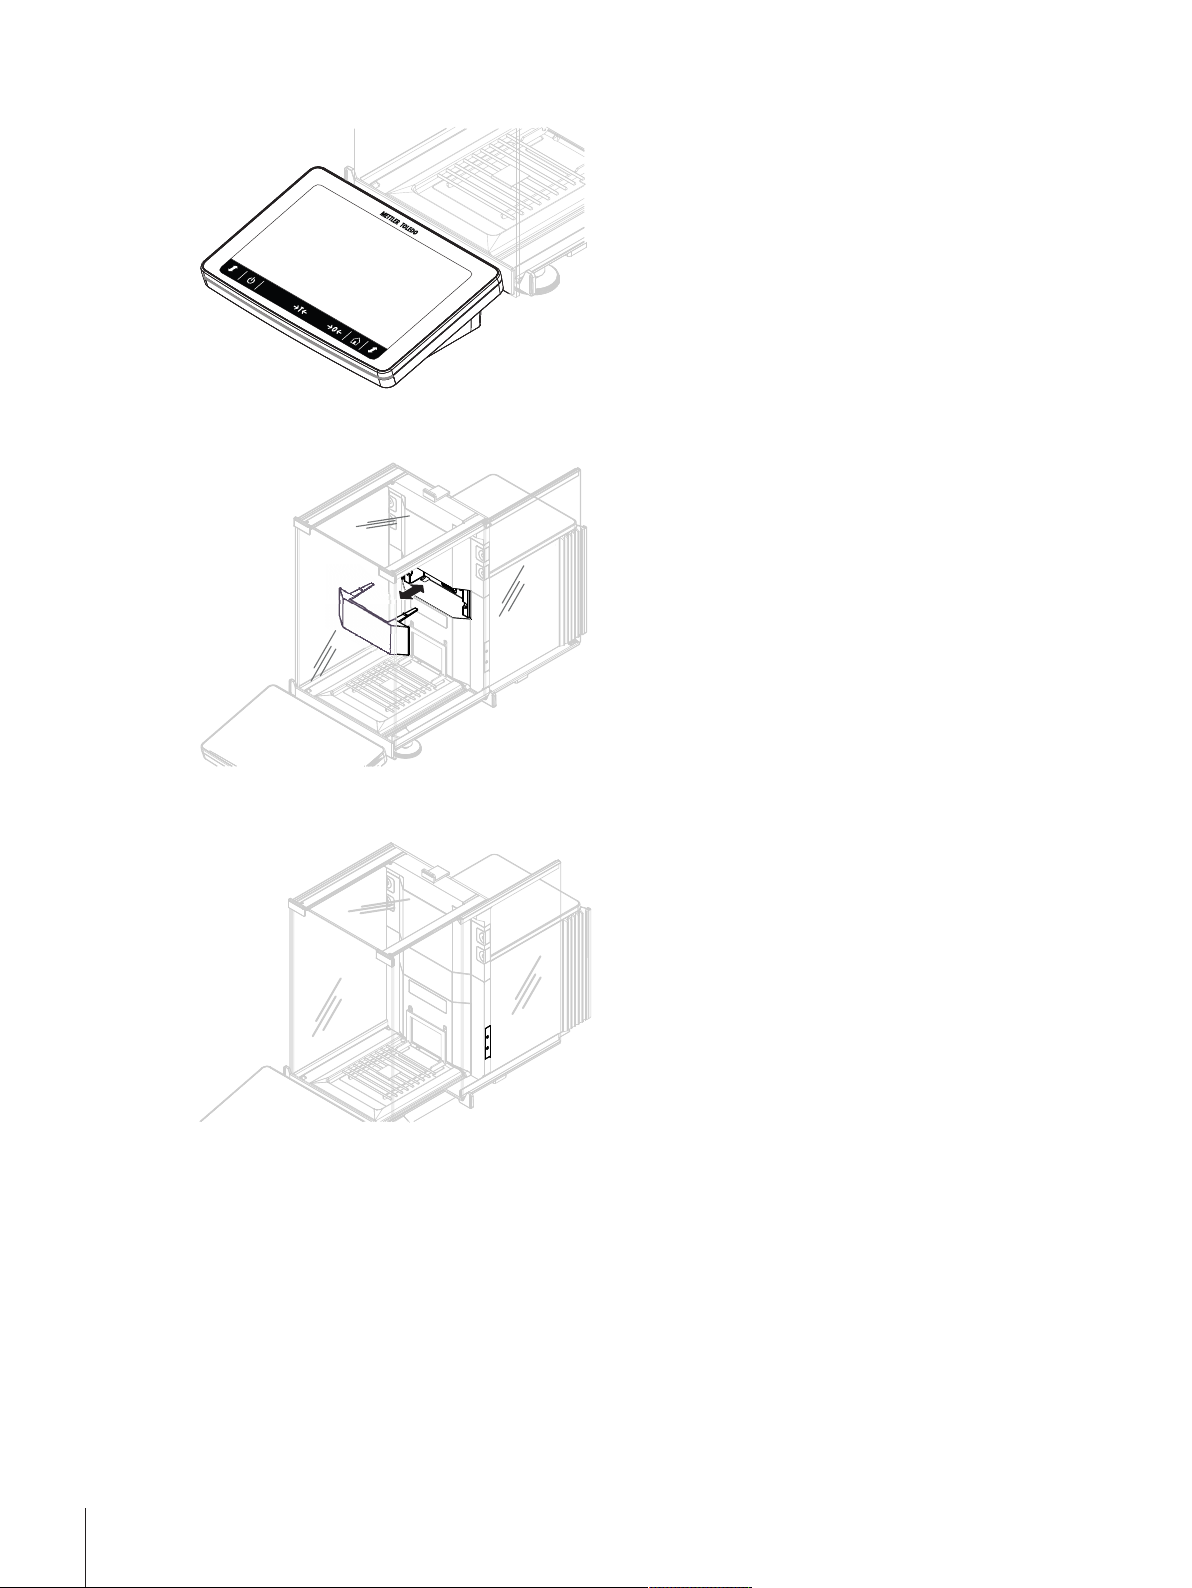
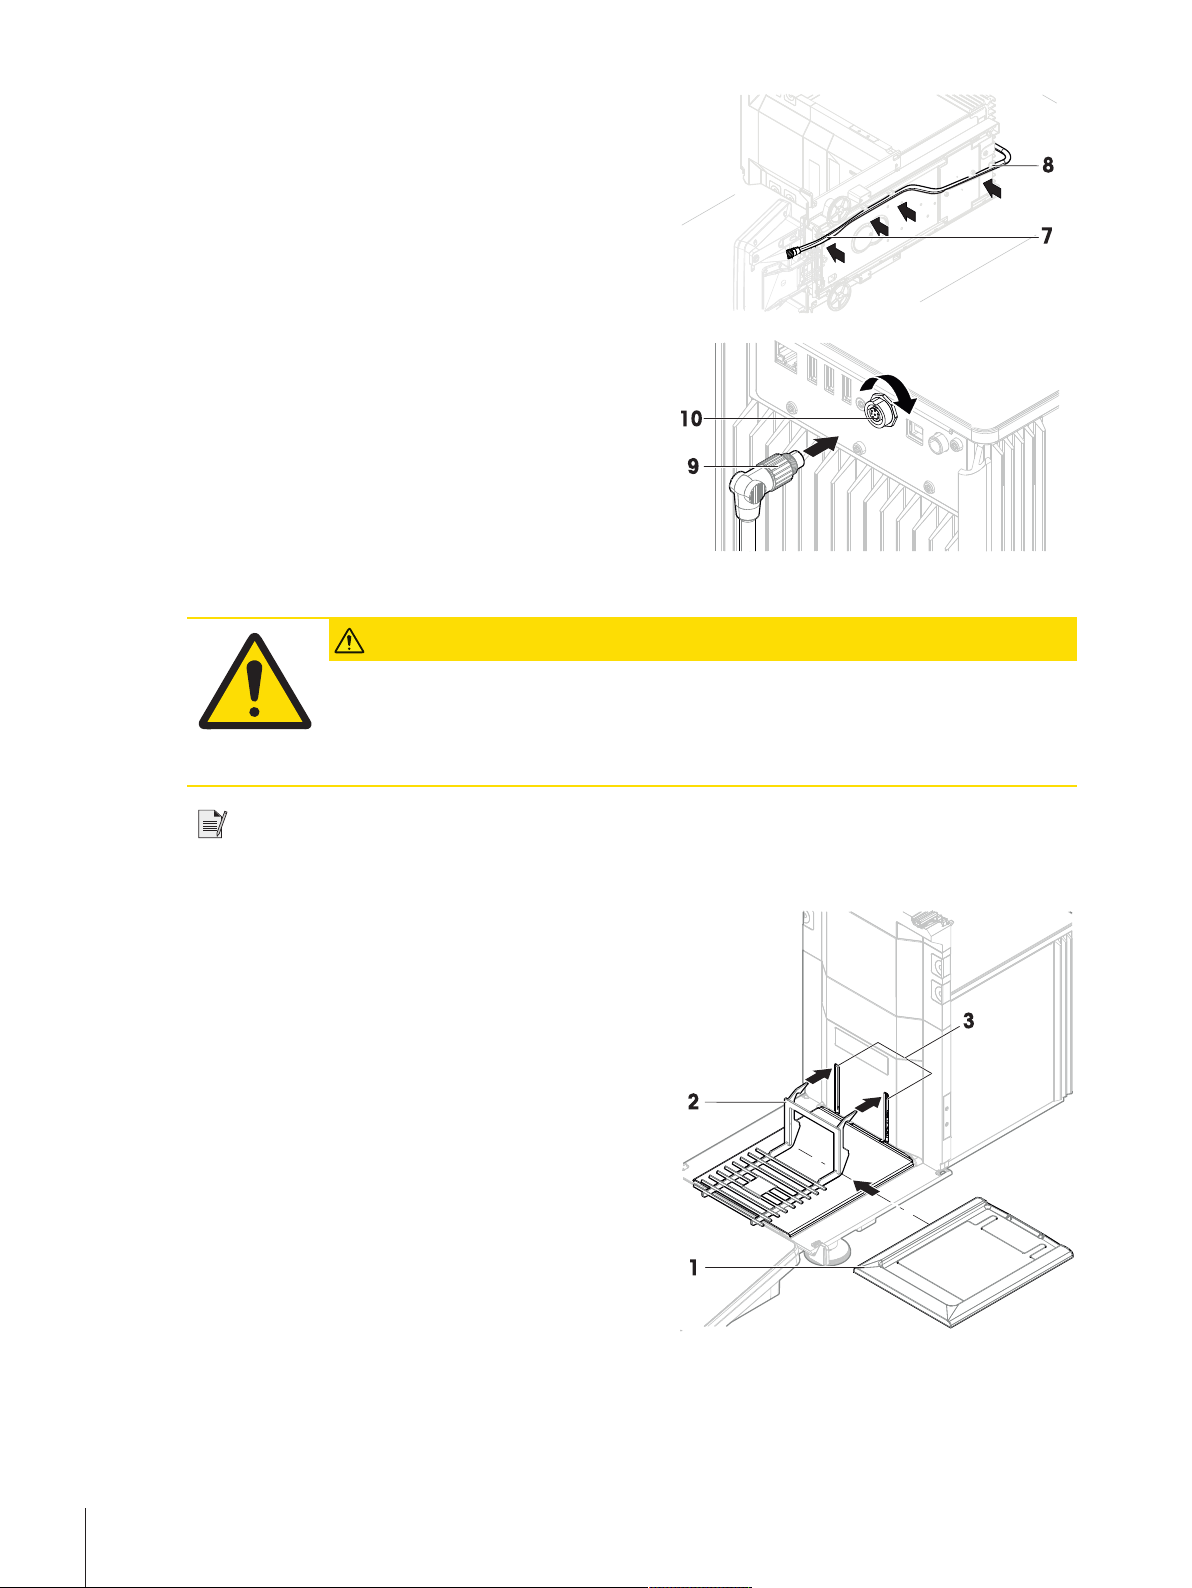
4 Carefully remove the terminal (7) and the table set (8).
5 Carefully remove the package set with the draft shield
doors and the display holder (9).
6 Carefully remove the weighing unit (10) from the
bottom packaging.
7 Remove any protective sheets.
8 Store all parts of packaging in a save place for future
use.
ð The weighing unit is ready for assembling.
Note
Immediately inform a Mettler-Toledo GmbH representative in the event of complaints, damaged parts or missing
accessories.
Installation and Putting into Operation18 Analytical Balances and Comparators
Page 21
4.4 Installation
4.4.1 Attaching the terminal
The following procedure describes the assembling of the terminal.
NOTICE
Damage due to careless handling.
Careless proceeding can damage the connection cable.
− Do not kink or twist the cable.
1 Insert the slides of the display holder (1) into the front
of the weighing unit (2).
2 Connect the terminal cable (3) with the terminal (4).
Consider the pin assignment.
3 Place the terminal (5) onto the display holder (6).
4 Carefully tilt the balance to the left side.
Installation and Putting into Operation 19Analytical Balances and Comparators
Page 22
5 Lead the cable (7) through the cable channel (8).
6 Carefully put the balance back on its feet.
7 Insert the terminal cable (9) into the socket of the
balance (10). Consider the pin assignment.
ð The terminal is ready.
4.4.2 Assembling the balance
CAUTION
Injury due to breaking glass.
Careless handling of the glass components can lead to breakage of glass and damage
cuttings.
− Always proceed with focus and care.
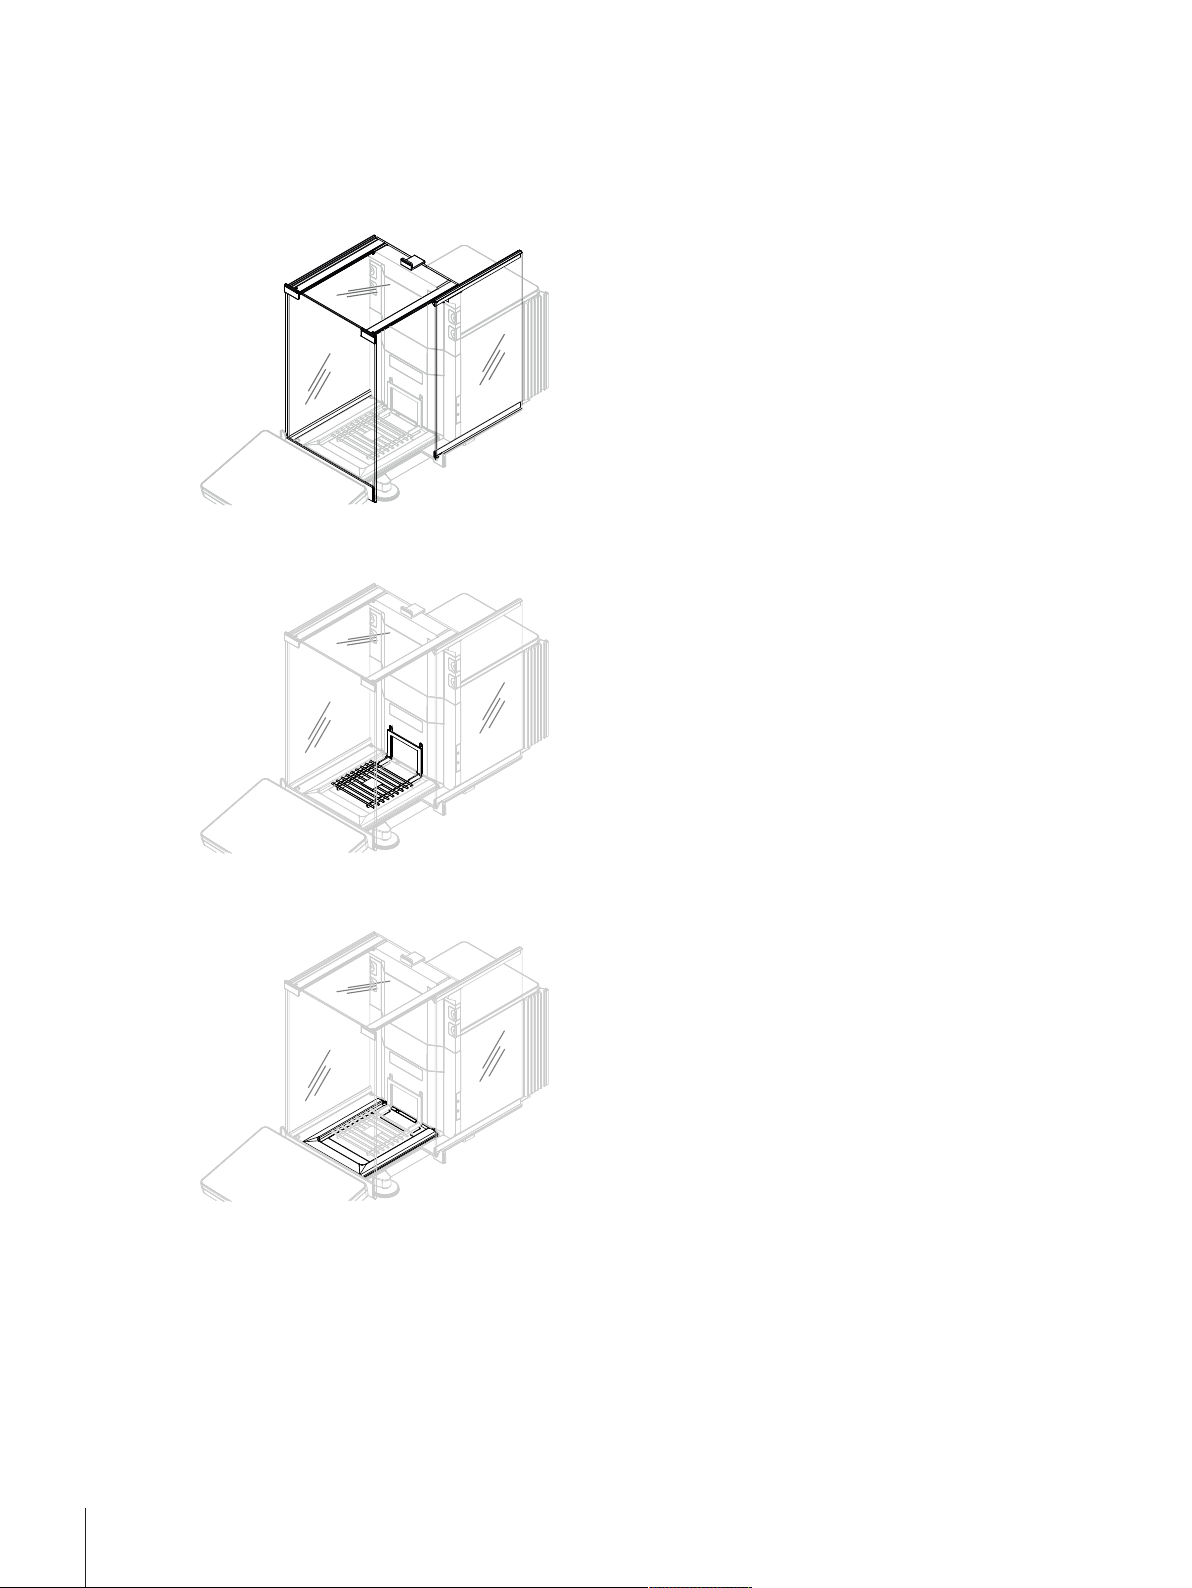
Note
Depending on the balance model, the components may look different. The procedure is always the same.
1 Insert the drip tray (1).
2 Carefully mount the weighing pan (2) onto the hooks
(3).
Installation and Putting into Operation20 Analytical Balances and Comparators
Page 23
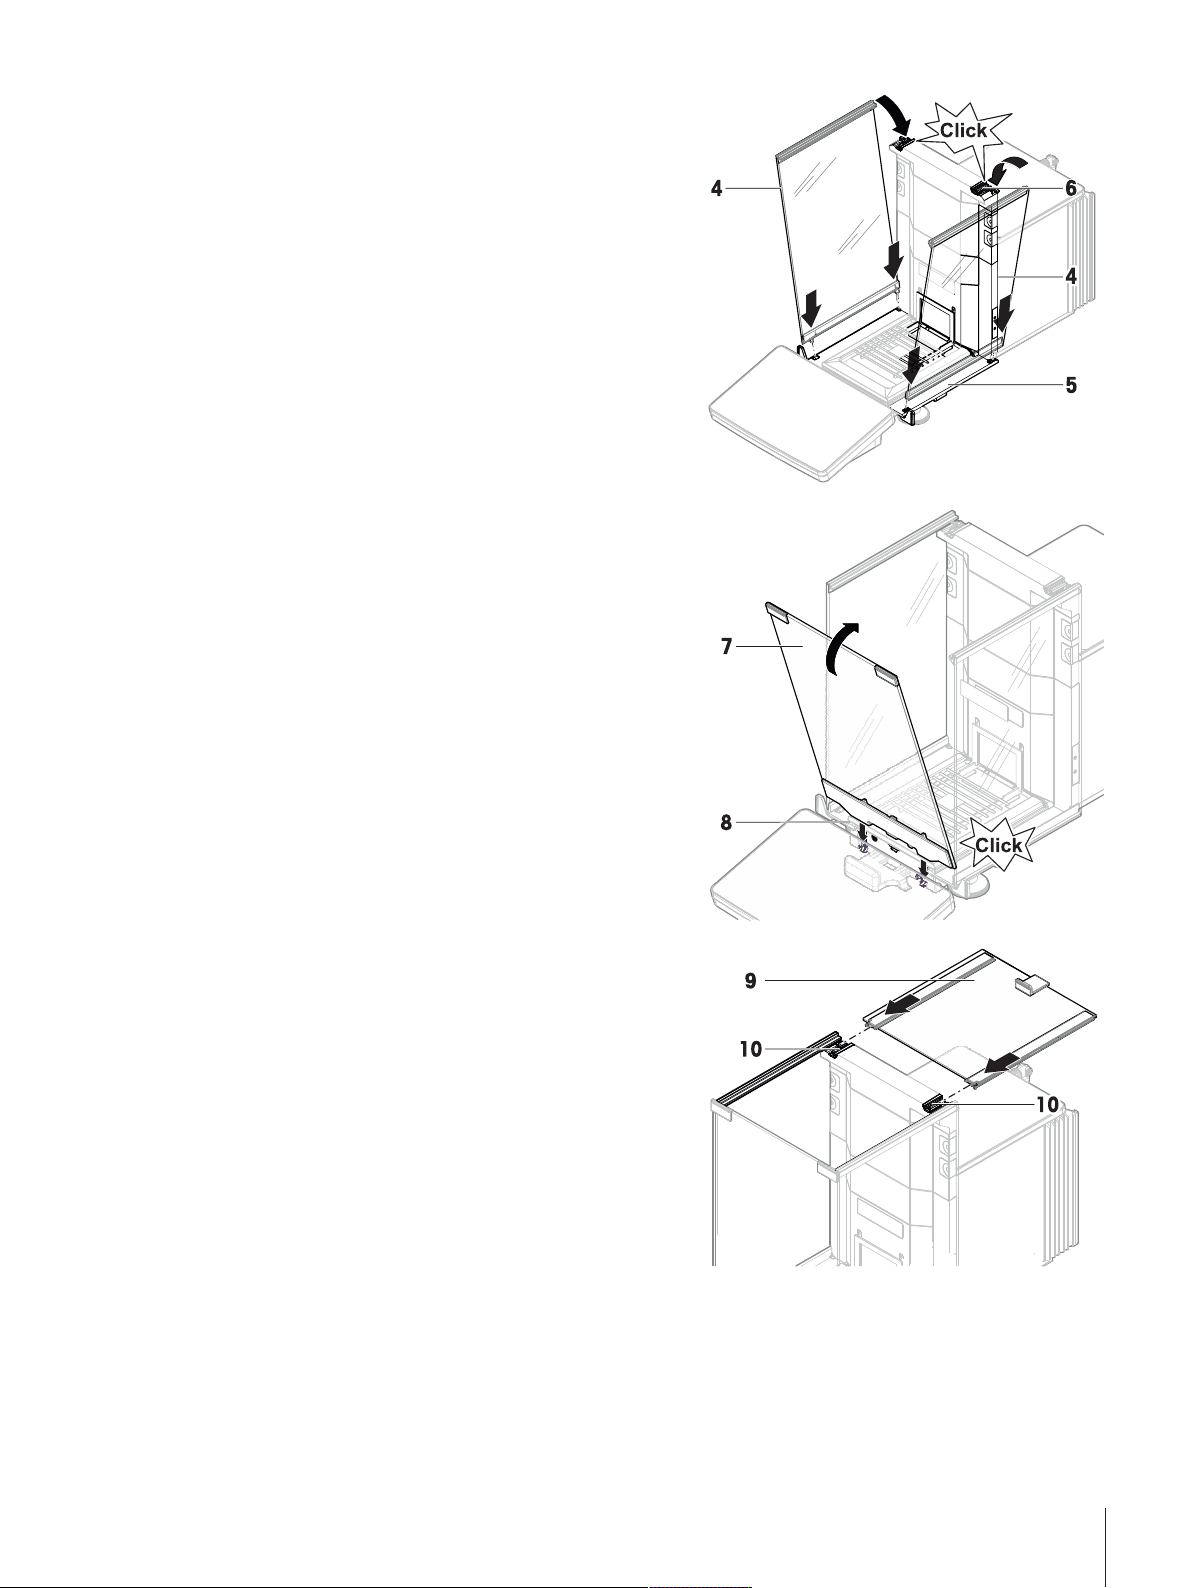
3 Place the side doors (4) into the grooves of the door
slides (5) and tilt them up until they engage. Consider
the marks on the bottom frames (L = left / R = right).
4 Tilt the side panels (4) towards the weighing platform
until they engage with the door lever (6).
5 Insert the front panel (7) into the grooves (8) and tilt it
up until it engages.
6 Fit the top door (9) into the slides (10) and push it in.
ð The balance is assembled and ready for putting into
operation.
Installation and Putting into Operation 21Analytical Balances and Comparators
Page 24
4.5 Putting into operation
4.5.1 Connecting the balance to the mains
WARNING
Death or serious injury due to electric shock
Contact with parts that carry a live current can lead to death or injury.
1 Only use the approved METTLER TOLEDO power supply cable and AC/DC adapter with a
current-limited SELV output.
2 Connect the power cable to a grounded power outlet, ensure correct polarity.
3 Keep all electrical cables and connections away from liquids and moisture.
4 Check the cables and power plug for damage and replace damaged cables and power
plugs.
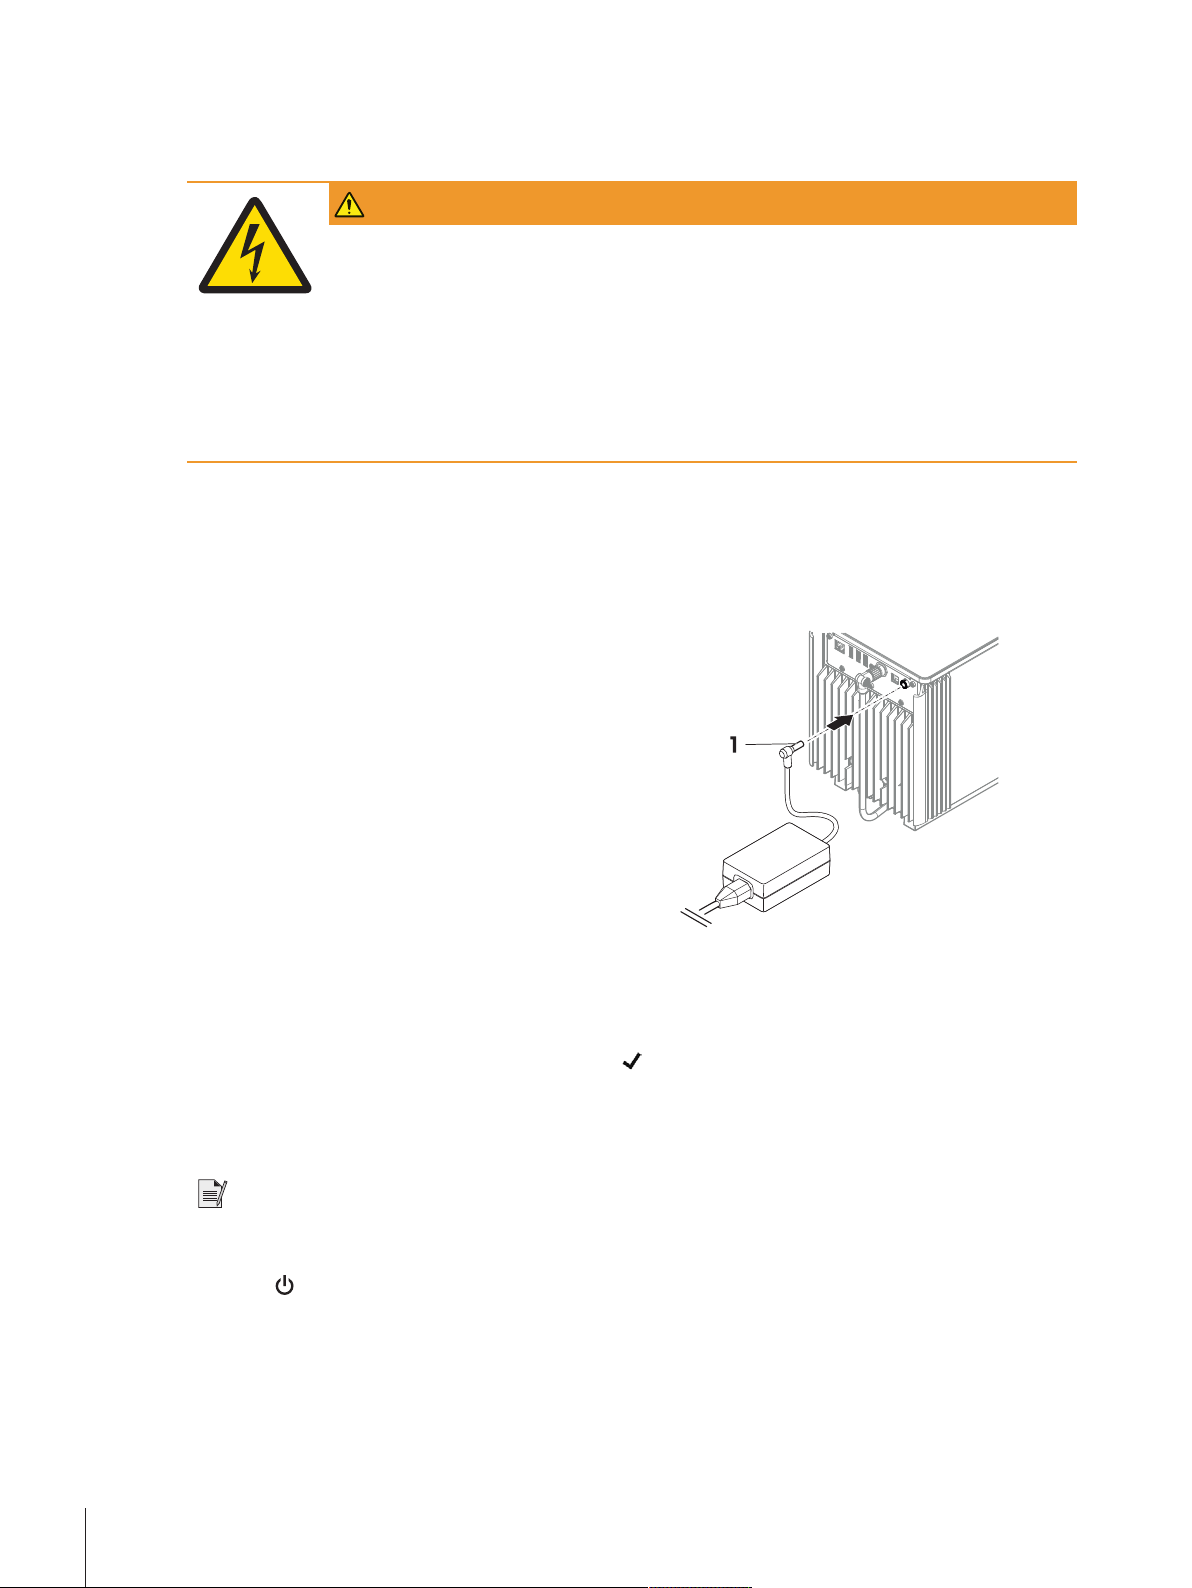
The balance is supplied with a universal AC/DC adapter or an AC/DC adapter with a country-specific power
cable.
• Insert the power cable in a grounded power outlet that is easily accessible.
• Install the cables so that they cannot be damaged or interfere with operation.
− Connect the AC/DC adapter (1) to the socket.
4.5.2 Switching on the balance
EULA (End User License Agreement)
When the balance is switched on the first time, the EULA appears on the screen. Read the conditions and tap I
accept the terms in the license agreement. and tap
Warming up
Before the balance gives reliable results, it must warm up first. This takes at least 120 minutes after connecting
the balance. When the balance is switched on from standby it is ready immediately.
Note
Do not use a multiple switched socket outlet.
The balance has warmed up.
§
− Press
ð The main weighing screen will appear.
When the balance is switched on for the first time, the main weighing screen will appear. However, it will
always start with the screen of the application last used before switching it off.
Installation and Putting into Operation22 Analytical Balances and Comparators
.
OK.
Page 25

4.5.3 Login
Note
If the user management is activated, you have to login with your user ID before performing a weighing. When
the balance starts the login dialog will open automatically.
To activate the user management or to create a new user or user groups, proceed as described in: [User
management}Page37]
1 Select a user or tap User name.
2 Tap Password.
ð The input dialog opens.
3 Enter your password and tap
4 Tap
See also
2 Logout}Page57
2 General}Page38
2 Exit / Block the balance}Page55
Login.
ð The login dialog closes and you are logged in. Your ID will be shown on the main screen.
4.5.4 Leveling the balance
Exact horizontal and stable positioning are essential for repeatable and accurate weighing results.
If the message Balance is out of level appears. Tap
screen to level the balance.
Find the leveling aid also in the menu:
Navigation:
− Turn both leveling feets (1) until the dot is in the center
of the level indicator
Balance menu > Leveling aid
OK.
. The Leveling aid opens. Follow the instructions on the
4.5.5 Performing an internal adjustment
Before performing an internal adjustment, its parameters must be defined.
1 Tap
2 Tap Start adjustment.
3 Tap
4 Tap
The Balance is now ready for use.
See also
2 Operating}Page28
2 Performing a simple weighing}Page33
More on the main Screen.
ð Internal adjustment is being executed.
ð When the adjustment has been completed, an overview of the adjustment results appears.
Print if you want to print the results.
Finish adjustment.
Installation and Putting into Operation 23Analytical Balances and Comparators
Page 26

4.6 Transporting the balance
4.6.1 Transporting the balance over short distanes
1 Switch off the balance and unplug all interface cables.
2 Hold the weighing platform with both hands and carry
the balance in horizontal position to the target location.
Consider the requirements of the location.
If you want the balance put into operation, proceed as
follows:
1 Connect in reverse order.
2 Level the balance.
3 Perform an internal adjustment.
See also
2 Performing an internal adjustment}Page23
2 Leveling the balance}Page23
2 Selecting the location}Page16
4.6.2 Transporting the balance over long distances
For transporting the balance over long distances, always using the original packaging.
See also
2 Unpacking the balance}Page16
4.6.3 Packaging and storage
Package
Store all parts of packaging in a safe place. The elements of the original packaging are developed specifically
for the balance and its components and ensure maximum protection during transportation or storage.
Storage
Only store the balance under the following conditions:
• Indoor and in the original packaging
• according to the environmental condition, see chapter "Technical data"
• When storing for longer than 6 months, the rechargeable battery may become empty (only Date and Time
get lost).
4.7 Installing devices
4.7.1 Connecting a printer via USB
Requirements:
• The USB connection cable is connected to the printer.
• The printer is connected to the mains and switched on.
• The main weighing screen is shown on the balance terminal.
NOTICE
Damage to the device due to non-observance of the printer manual.
− For all work with the printer consult and consider the original User Manual.
Installation and Putting into Operation24 Analytical Balances and Comparators
Page 27
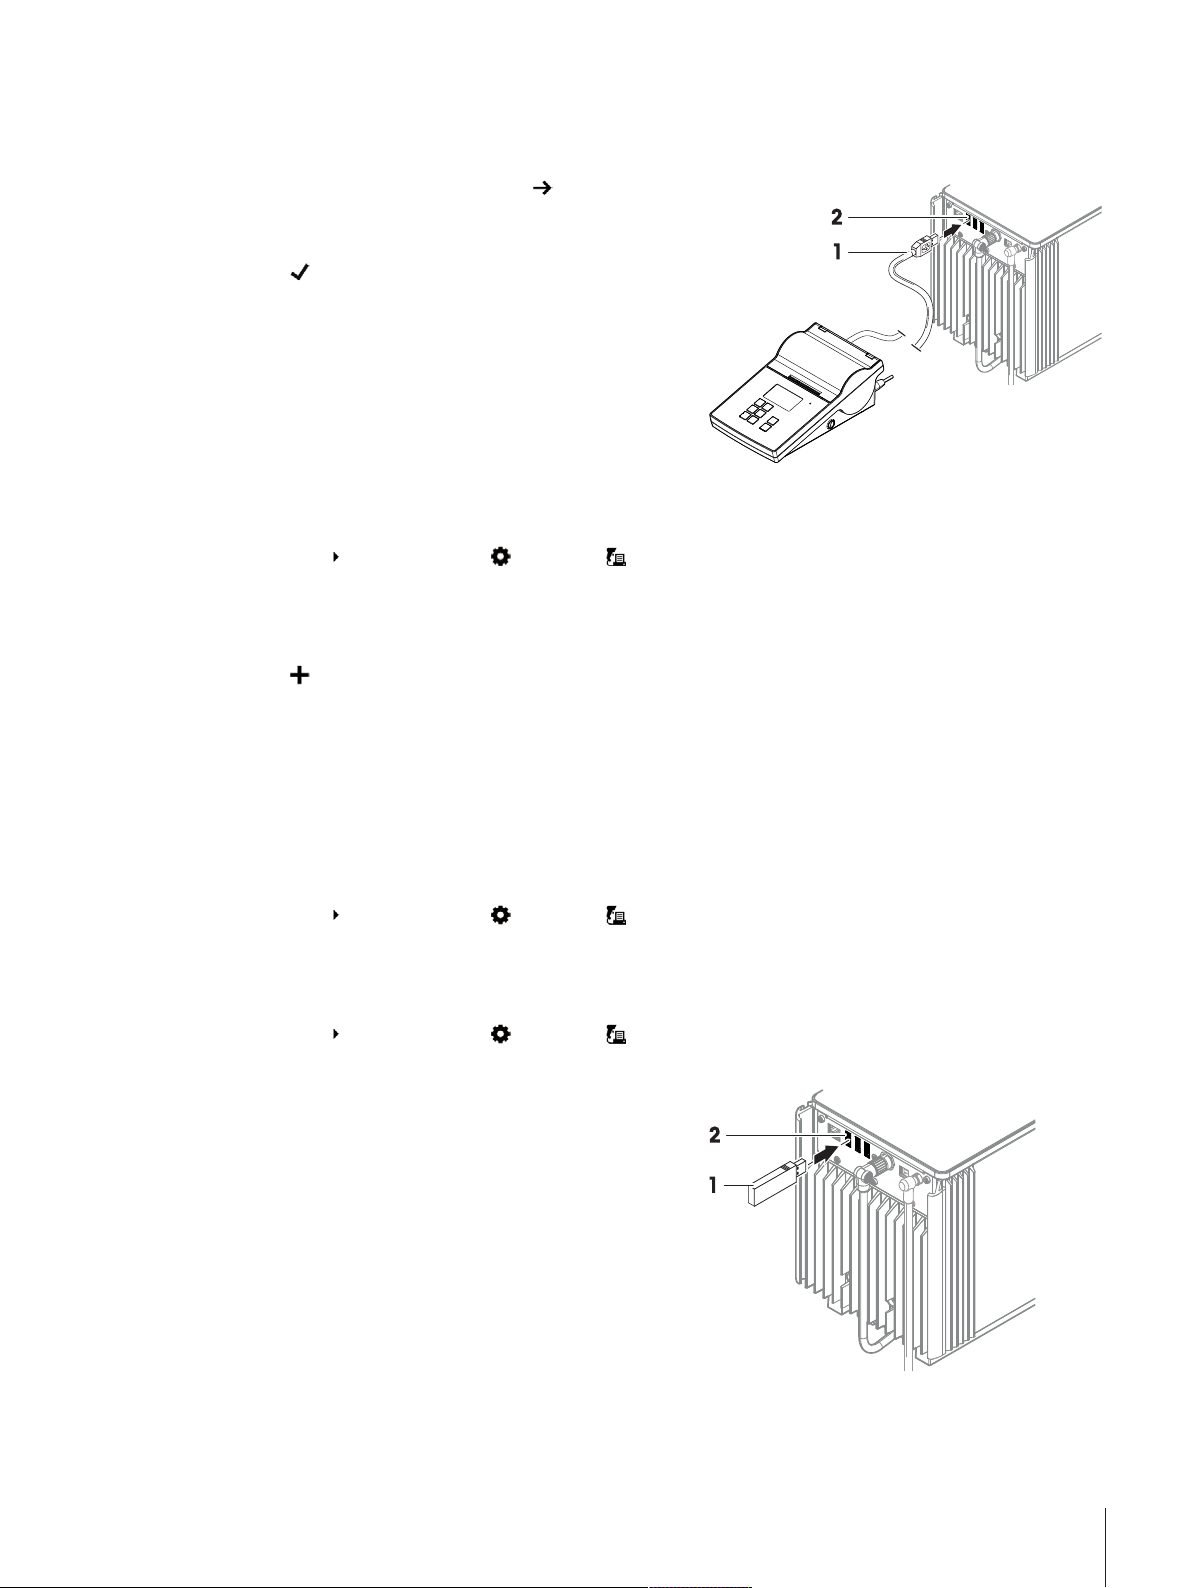
1 Connect the USB cable (1) to the USB port (2) of the balance.
ð The balance detects the printer automatically and the dialog Add device appears.
ð A message, e. g., "System has found a device of type: Printer P-XX" appears.
2 Set a name for the printer, then tap Next.
ð The message "The connection to the device is
configured and is now ready to use" appears.
3 Tap
OK to close the dialog.
ð The printer is connected and saved to the system.
ð The dialog Printer settings opens.
4 If needed, configure the printer or print a test page.
Connecting the printer via balance settings
Another way to connect a printer is through the balance settings.
Navigation:
Balance menu > Settings > Devices / Printers
Requirements:
• The USB connection cable is connected to the printer.
• The printer is connected to the mains and switched on.
1 Tap
Add device.
ð The message "Please connect the device via USB."
2 Connect the USB cable to one of the USB device ports and follow the wizard through the installation
process.
See also
2 Devices / Printer settings}Page49
4.7.1.1 Connecting a printer via bluetooth
Navigation:
Requirements:
• Bluetooth is activated in the balance settings.[Bluetooth}Page49]
• The printer is switched on.
Navigation:
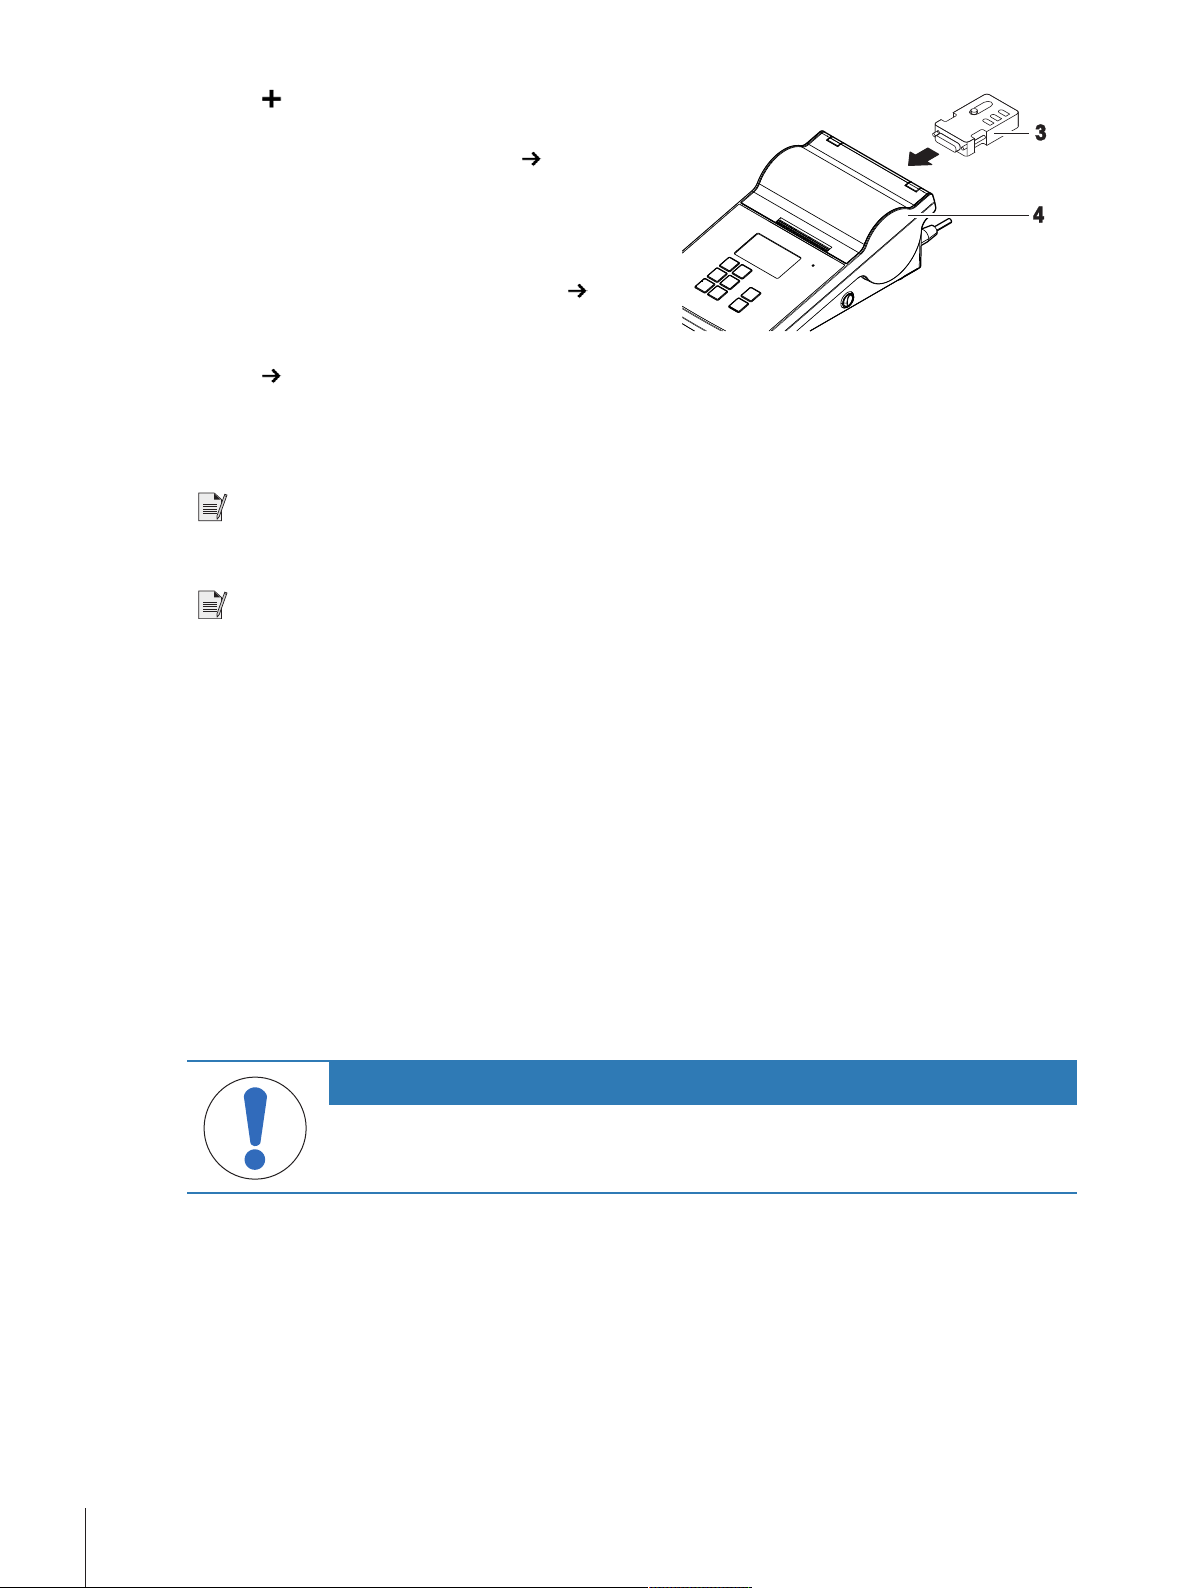
1 Connect the bluetooth USB adaptor (1) to one of the USB device ports (2) of the balance.
2 Connect the bluetooth RS adaptor (3) to the printer (4).
Balance menu > Settings > Devices / Printers
Balance menu > Settings > Devices / Printers
Installation and Putting into Operation 25Analytical Balances and Comparators
Page 28
3 Tap Add device.
ð The dialog Add device opens.
4 Select Bluetooth connection and tap
ð The dialog "seaching for devices" opens and a list
of possible bluetooth devices is displayed.
5 Check the bottom of the bluetooth RS adaptor (3) at
the printer for the MAC address (4) (Unique device
address), select this one in the list and tap
6 The dialog Authentication activated opens and the
PIN Code is displayed.
7 Tap
8 If needed, configure the printer or print a test page.
Next to confirm the bluetooth connection.
ð The dialog closes, the printer is connected to the balance via bluetooth.
ð The dialog Printer settings opens.
Next.
Next
Note
If the USB adapter is removed from the balance and plugged in again, the bluetooth connection will be detected
automatically. This may take up to 30 seconds.
Note
The balance always pairs with the bluetooth RS adaptor, but not with the printer that is attached to it. As soon
as the user "re-uses" a bluetooth RS adaptor for another printer, the user must remove the configured printer in
the balance software and add the new one.
See also
2 Bluetooth}Page49
2 Devices / Printer settings}Page49
2 Devices / Printer settings}Page49
4.7.2 Connecting USB devices
This section describes the connection of USB devices without an own power supply. For example an EasyScan
USB (RFID reader), a foot switch or an ErgoSens. The following connection procedure is the same for all USB
devices.
Requirements:
• The USB connection cable is connected to the USB device.
• The main weighing screen is shown on the balance terminal.
NOTICE
Damage to the device due to non-observance of the USB device manual.
− For all work with the USB device consult and consider the original User Manual.
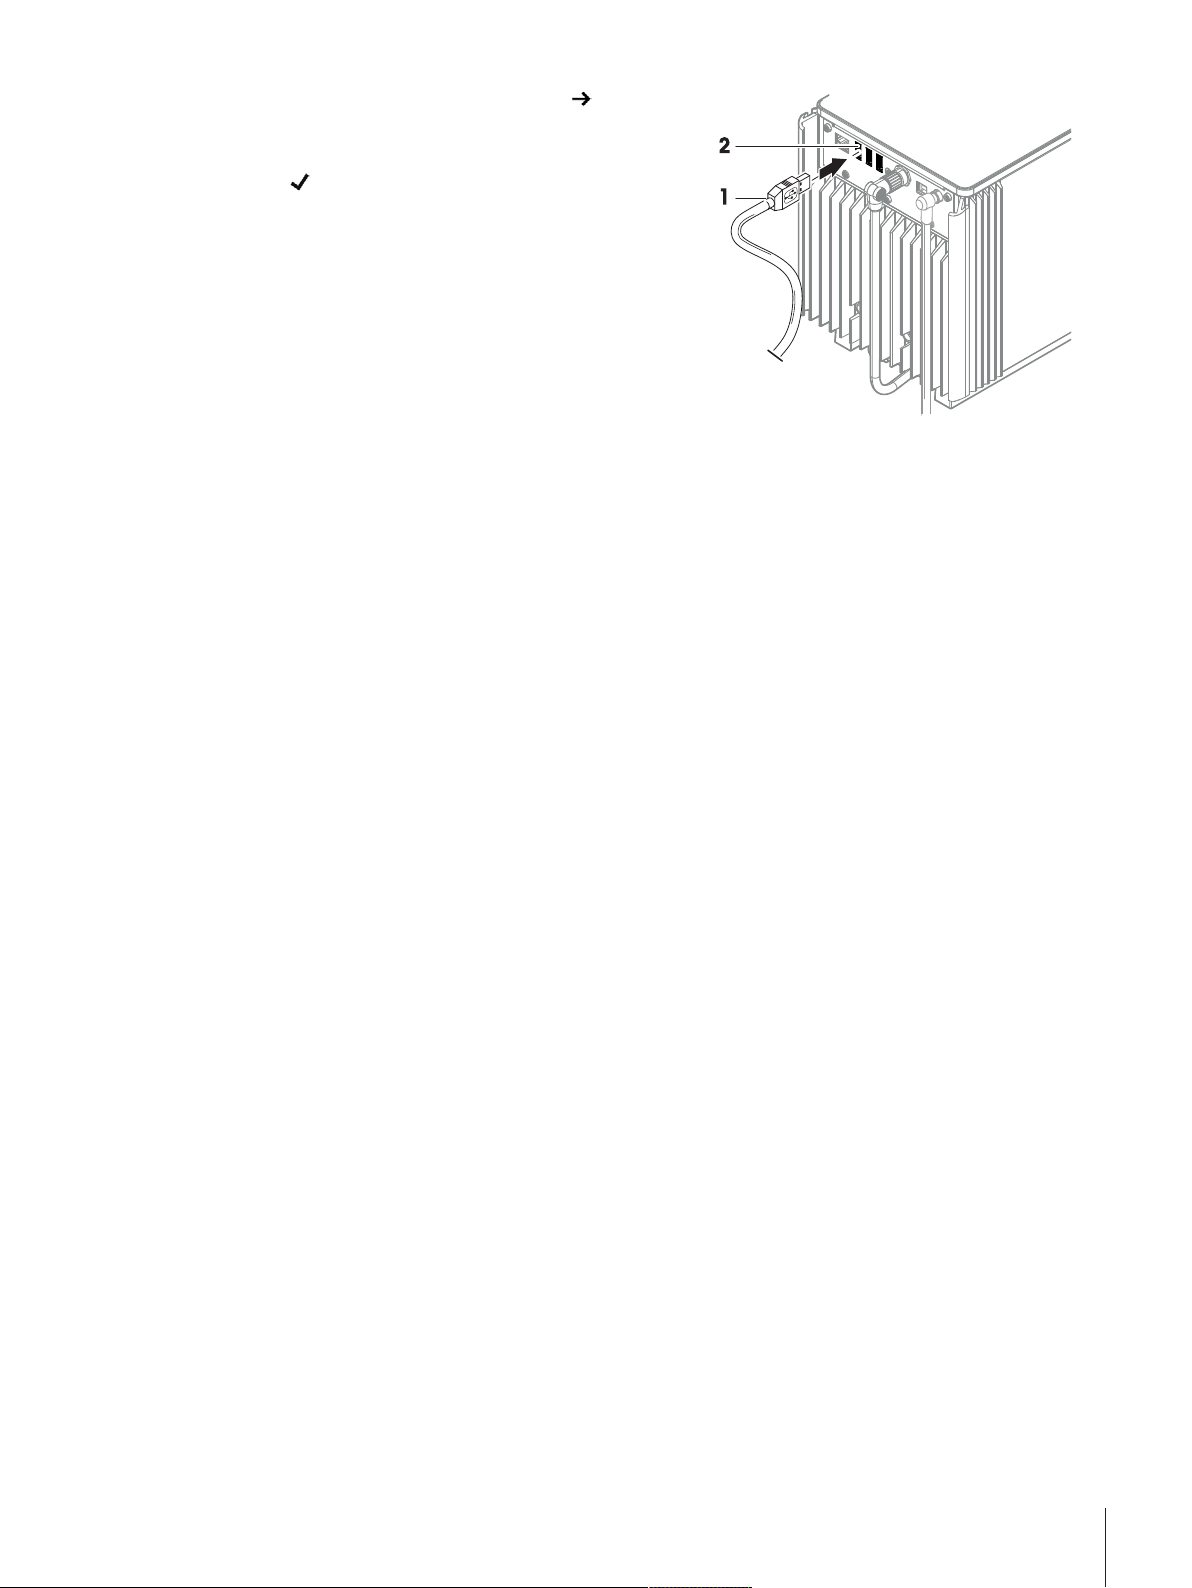
1 Connect the USB cable (1) to one of the USB device ports (2) of the balance.
ð The balance detects the USB device automatically and the dialog Add device with a message, e.g.,
"System has found a device of type: XXX" appears.
Installation and Putting into Operation26 Analytical Balances and Comparators
Page 29
2 Set a name for the USB device, then tap Next.
ð The message "The connection to the device is
configured and is now ready to use." appears.
3 Tap
OK to close the dialog.
ð The USB device is connected and saved to the
system.
For more information on using the USB device, see chapter
[Devices / Printer settings}Page49].
Installation and Putting into Operation 27Analytical Balances and Comparators
Page 30

5 Operating
General Weighing
Sample ID
Task ID
Methods
Protocol
Info
weight
Administrator
Enter here
Enter here
Cancel task
Edit
Complete
More
Add to protocol
sample 1
sample 2
sample 3
sample 4
5.1 User Interface
5.1.1 Main screen "General weighing"
Pos. Name Description
User name Shows the name of the current user.
1
Level indicator Indicates if the balance is leveled (green) or not (red).
2
Weighing value field Shows the current weighing value.
3
Info weight Shows the current weighing value in another unit.
4
5 Drawer Protocol
6 Sample status OK
7 Sample status Not
OK
8 Button Add to
protocol
Weighing action field This field contains actions referring to the current task.
9
Method information
10
area
Weighing-in aid Defines a target weight with upper und lower tolerances.
11
Weighing value area In this area the result of the current weighing process is shown.
12
13 Method name
Shows the recent weighing results.
The result fulfilled the criteria for a green status bar, e. g.:
• Balance is in level.
• Internal adjustment performed and ok.
• Weighing result within the defined tolerance range (only if tolerance defined).
Result criteria are not fulfilled, e. g., " The weighing result was out of the defined
tolerances".
Adds the result to the protocol.
Depending on the selected method the button can have different functions.
Contains information about sample, method or task IDs.
Shows the name of the current method.
Operating28 Analytical Balances and Comparators
Page 31

5.1.2 Work screen "Balance menu"
1
2
3
4
5
6
Leveling aid
History
Balance info
Settings
Balance menu
Maintenance
Complete
More
Enter here
Enter here
Solid
Methods
Protocol
Start
Blocking
Methods
Methods list
Tasks
Tests
Adjustments
Delete
Clone
Edit New
Print
Start method
Pos. Name Description
1 Leveling aid
2 History
3 Balance info
4 Settings
5 Maintenance
6 Exit / Block balance
Opens the leveling dialog.
Opens the history dialog.
Shows Balance information.
Opens the complete settings dialog.
Opens the balance maintenance dialog.
Opens the logout / block balance dialog.
5.1.3 Work screen "Methods"
Pos. Name Description
Methods list Working with Methods.
1
• General Weighing
• Interval Weighing
• Piece Counting
• Simple Formulation
• Titration
• Density Determination
The Methods can be edited, cloned, started or created. [Weighing
Methods}Page58]
Tasks A method/task can be started and then a task is associated with this method.
2
There can be up to one task for each method.
Operating 29Analytical Balances and Comparators
Page 32

Pos. Name Description
Protocol
General Weighing
Result State
Sample ID
Gross weight
Stability
Level state
MinWeigh state
Tolerance state
OK
OK
Not OK
Not OK
Test and adjustment state
No MinWeigh defined
No tolerance defined
Timestamp
06/24/2018
Cancel task Exclude result More Complete
Test Working with routine tests.
3
Adjustments Adjustments can be edited, created and started. [Adjustments}Page133]
4
5.1.4 Work screen "Protocol"
• Sensitivity tests
• Repeatability tests
• Eccentricity tests
Routine tests can be edited, started or created. [Tests}Page116]
• Internal adjustment
• External adjustment
Pos. Name Description
Result state Shows the state of the weighing process.
1
Sample ID Shows the Sample ID of the weighing.
2
Gross weight Shows the gross weight.
3
Timestamp Shows the individual timestamp of each weighing item.
4
Balance status Shows stability, level state of the balance, minimum weight, tolerance state and
5
test and adjustment state.
6 Cancel task
7 Exclude result
Cancels the current running task.
Excludes the current protocol result.
8 More Opens the dialog More.
• Change display unit
• Configure tare
• Configure zero
• Save as method with templates
Operating30 Analytical Balances and Comparators
Page 33

Pos. Name Description
9 Complete Opens the dialog Complete task.
• Print task label manually
• Print protocol manually
• Export protocol manually
5.1.5 Surface navigation of the touchscreen
NOTICE
Damage to the touch screen due to pointed or sharp objects
− Operate the touch screen with your fingers.
The surface navigation of the touch screen works like a common touchscreen.
For selecting or activating an icon or a function
− Tap it.
For scrolling a screen or a scroll bar
− Move it up/down.
For using a drawer
− Drag it.
5.1.6 Input dialog
5.1.6.1 Entering characters and numbers
Pos. Name Explanation
Input field Shows the data that has been entered.
1
Delete Deletes the character left of the current curser position. The curser can be
2
positioned by using the touchscreen.
Discard Closes the keyboard dialog.
3
Confirm Confirms the entered data.
4
Numbers and special
5
characters
Shift Switches between lower or upper case letters.
6
Menu section title Shows the title of the current setting section.
7
Switches into the special character mode.
Operating 31Analytical Balances and Comparators
Page 34

5.1.6.2 Changing date and time
Pos. Name Explanation
Pick button Increment
1
Picker field Shows the defined time or date.
2
Pick button Decrement
3
Note
The format of date and time can be defined in the settings via the options Date format and Time format.
5.1.7 System status icons
System messages can appear due to a user action, a user input or a system process. Some messages leave it
up to the user to choose upon acting, they will disappear after acknowledging. Other messages remain
persistent, so the user can defer them but eventually has to handle them. These messages can be seen in the
main status bar on the upper right-hand side of the display.
Icon Name Description
The balance is out of level. The balance must be leveled. Information about leveling the
Information Information messages appear due to user actions or system
Warning Warning messages appear due to user actions or system
balance can be found in the section [Leveling the
balance}Page23]. When the balance is leveled the symbol
appears.
processes and offer opportunities that are related to the current
action or process.
processes that could lead to a problem that can be prevented.
Error Error messages appear due to user actions or system processes
that have failed. It is mostly still possible to handle such a
problem.
5.1.8 Weighing status icons
Weighing status icons appear due to the weight value matching certain quality criteria. The information on the
status can be looked by tapping on any of the visible weighing status icons.
Icon Name Description
Stability indicator When the stability indicator appears, the balance is not stable.
Make sure that the balance is placed at an adequate location.
Information about the adequate location can be found in the
section [Selecting the location}Page16].
Net indicator Appears when the tare key has been pressed and the tare weight
has been subtracted.
Minimum weight violation The current weight value undershoots the defined minimum
weight definition. Make sure that the weight is not below the
minimum weight.
Operating32 Analytical Balances and Comparators
Page 35

Calculated value The current weight value is calculated. The symbol only appears
GWP
GWP
GWP
when a container has been used with the function Pretare.
Balance invalid The current balance configuration is invalid or quality criteria have
not been fulfilled according to the GWP approved definition.
Weight not ready The current weight measurement is not ready according to the
GWP approved definition. This can be caused by undershooting
the minimum weight, an overload or an underload.
Weight ready The current weight measurement is ready according to the GWP
approved definition. It can be added to the protocol.
5.2 Performing a simple weighing
5.2.1 Opening/closing the draft shield doors
− Open the door manually with the door handle (1) or
touch the key
The doors can be configured to open and close in different
ways. For further information see [Door
automation}Page46].
on the terminal (2).
5.2.2 Taring the balance
If a weighing container is used, the balance must be tared.
1 Clear the weighing pan.
2 Close the side door.
3 Tap
4 Open the side door.
5 Place the container (1) on the weighing pan (2).
6 Close the side door.
7 Tap
ð The balance is tared. The icon
to zero the balance.
to tare the balance.
5.2.3 Zeroing the balance
1 Open the draft shield.
2 Clear the weighing pan.
3 Close the draft shield.
4 Tap
ð The balance is zeroed.
to zero the balance.
appears.
Operating 33Analytical Balances and Comparators
Page 36

5.2.4 Inserting a weighing object
1 Place the object (1) onto the weighing pan (2), or into
the container (1).
2 Close the door manually or touch the key
terminal alternatively.
5.2.5 Performing the weighing
1 Wait until the weight value is stable.
2 Tap
ð The weight value has been transferred to the section Protocol.
Add to protocol if you want to report the weighing result.
5.2.6 Completing a weighing
on the
1 To save the weighing protocol, tap
ð The window Complete task opens.
2 Select an option to save or print the protocol.
ð The respective menu window opens.
3 Choose your saving device and tap
ð The protocol is saved/printed but deleted from the protocol screen.
Complete.
Complete
Operating34 Analytical Balances and Comparators
Page 37

5.3 Balance Menu
The Balance menu contains general settings and information.
To open the section Balance menu tap the drawer symbol
The section Balance menu is divided into the following sub-sections.
Leveling aid (see [Leveling aid}Page35] )
•
History (see [History}Page35] )
•
Balance info (see [Balance info}Page37] )
•
User management (only appears when user management is activated), (see [User
•
management}Page37])
•
Settings (see [Settings}Page42] )
Maintenance (see [Maintenance}Page53] )
•
Block balance (see [Exit / Block the balance}Page55])
•
5.3.1 Leveling aid
Exact horizontal positioning and stable installation is essential for repeatable and accurate weighing results.
With the Leveling aid the balance can be leveled.
on the left side of the screen.
Navigation:
For more information see chapter [Leveling the balance}Page23].
Note
After leveling the balance an internal adjustment must be performed.
5.3.2 History
The balance permanently records the tests and adjustments that are performed. In the section History they are
recorded.
Navigation:
The section History is divided into the following sub-sections.
•
Adjustments, see below.
Tests, see below.
•
Service, see below.
•
Changes (only appears when change history is activated), see below.
•
Adjustments
Navigation:
Note
A maximum of 500 entries can be stored in the adjustments history.
Symbol Description Procedure
Balance menu > Leveling aid
Balance menu > History
Balance menu > History > Adjustments
Filter Tap to Filter the adjustment history by a defined date range or by a user ID.
Print
Close Tap to return to the section History
Tap to print the adjustment history list.
Operating 35Analytical Balances and Comparators
Page 38

Tests
Navigation:
Balance menu > History > Tests
Note
A maximum of 500 entries can be stored in the test history.
Symbol Description Procedure
Filter Tap to Filter the test history by a defined date range or by a user ID.
Print
Close Tap to return to the section History.
Tap to print the test history list.
Service
Navigation:
Balance menu > History > Service
Note
A maximum of 500 entries can be stored in the service history.
Symbol Description Procedure
Filter Tap to Filter the service history by a defined date range or by technician.
5.3.2.1 Changes
The function Change history is an administration tool to improve the quality of the weighing process. Information such as added methods or settings changes are being listed. Tap into the list to display detailed information about the data.
Navigation:
"Changes" is deactivated in the factory settings. To activate "Changes", see [Weighing / Quality}Page43].
Note
A maximum of 5000 entries can be stored in the change history.
Symbol Description Procedure
Print
Close Tap to return to the section History.
Balance menu > History > Changes
Filter Tap to Filter the adjustment history by a defined date range or by a user ID.
Print
Tap to print the service history list.
Tap to print the adjustment history list.
Close Tap to return to the section History
Operating36 Analytical Balances and Comparators
Page 39

5.3.3 Balance info
Navigation:
The section Balance info shows numerous information about the specific balance such as:
• Identification
• Hardware
• Software
• Maintenance
Symbol Description Procedure
Balance menu > Balance info
License
agreement
Close Tap to return to the section History.
Tap to open the licence agreement.
5.3.4 User management
In the section User management, rights for users and user groups can be defined. Users can be assigned to
user groups. When the user management is active, the login dialog opens at every system start.
5.3.4.1 Activating the user management
The user management is inactivated in the factory settings. To activate the user management follow:
Navigation:
1 Tap
ð The dialog Activate user management opens.
2 Tap
ð The dialog
3 Tap New password and enter the new password.
4 Confirm the new password again and tap
ð The dialog closes.
5 Confirm the activated user management in the section General, tap
ð The User management is active. The login dialog opens at every system start.
Balance menu > Settings > General > User management.
and select Active.
Next.
Set administrator password (optional) opens.
OK.
OK
5.3.4.2 Logging in
To login:
1 Select a user and enter the password.
2 Tap
ð You are logged in and your user name is displayed on the main screen.
Login.
5.3.4.3 Logging out
To logout follow:
Navigation:
− Tap
ð You are logged out.
Balance menu > Exit/ Block balance
Logout.
5.3.4.4 Managing users and user groups
Navigation:
The section User management is divided into the following sub-sections:
Balance menu > Users
Operating 37Analytical Balances and Comparators
Page 40

General Settings for all users.
•
Users Settings for all single users.
•
Groups Settings for user groups.
•
Printing user list
An overview of all users and user groups can be printed by tapping
General
Print all.
Navigation:
Balance menu > Users > General
Parameter Description Values
Automatic logout
With the option Automatic logout activated, the balance will
Active* | Inactive
automatically log off after a predefined time.
Wait time
With the option Wait time the time until the balance automatically
logs off can be defined.
Numeric (15 minutes* |
1...60 minutes)
The option Wait time only appears when the option Automatic
logout is activated.
User proposals
The option User proposals defines if a list of users will appear on
Active* | Inactive
the login screen.
Password reset Defines if the password can be reset from the login screen. Allowed* | Not allowed
* Factory setting
User permissions
In the following the permissions for the various functions are shown. A user is always a part of a user group
and has only the permissions of the group in which he is.
Which user has which permissions can be defined or changed by authors with the appropriate permission
rights.
Permissions for quality management
Permission Content
Execute routine tests Users with this permission are authorized to execute
routine tests.
Configure routine tests Users with this permission are authorized to:
• configure routine tests
• import or export routine tests
• configure and import test weights
• configure tolerance profiles
• activate/deactivate the GWP approval mode
Execute external adjustment Users with this permission are authorized to execute
external adjustments.
View change history Users with this permission are authorized configure the
system and to view the change history.
Permissions for user management
Permission Content
Configure user management Users with this permission are authorized to:
• print or export/import user management settings
• modify user management settings
• enable or disable user management
Operating38 Analytical Balances and Comparators
Page 41

Permissions for methods
Permission Content
Configure methods Users with this permission are authorized to:
• create new methods
• edit methods
• delete methods
• lock or unlock methods
• import or export methods
Permissions for blocking or unblocking the balance
Permission Content
Block or unblock balance Users with this permission are authorized to block or
unblock the balance.
Permissions for system settings
Permission Content
Configure system Users with this permission are authorized to:
• modify system settings
• import system settings
• configure peripherals
• perform software updates
• perform application or factory settings
Permissions for service
Permission Content
execute service Users with this permission are authorized to:
• access service function
• block/unblock the balance
• view adjustment state
• generate support files
Note
All functions that not listed above are not part of any permissions and are open for any user.
Users
Navigation:
Balance menu > Users > Users
Creating a new user
1 Tap
New user in the action bar.
2 Define the values for the new user.
3 To define a user profile password, tap
Change password in the action bar.
4 Tap New password.
ð The keyboard dialogue opens.
5 Define the password.
6 Tap Confirm new password and fill in the defined password.
7 Tap
8 Tap
to close the keyboard dialogue.
OK to confirm the defined password.
ð The dialogue User name opens.
Operating 39Analytical Balances and Comparators
Page 42

9 Tap
ð The user has been created. The new user profile appears in the list.
Parameter Description Values
User name Defines the user ID.
Last name Defines the last name of the user. Text (0...22 characters)
First name Defines the first name of the user. Text (0...22 characters)
Active Activates or deactivates the current user. Active* | Inactive
Assigned groups Assigns user to user groups. List of defined groups
User language Defines the language of the user profile. Available languages
* Factory setting
OK to confirm the defined user profile.
Text (1...22 characters)
When the user profile has been defined, the value for User name
will be fixed and cannot be changed afterwards.
Groups
Navigation:
Balance menu > Users > Groups
Note
This area is only accessible for users with the appropriate rights.
Creating a new group
1 Tap
2 Define the group properties.
3 Tap
ð The group has been created, the system returns to the list of defined groups.
Parameter Description Values
Group name Defines the name of the group. Text (1 ... 22
New group.
ð The dialog opens.
OK.
characters)
General permissions
Block / unblock
balance
Configure
methods
Execute service
commands
Configure system Defines if the group is allowed to configure system settings. Active | Inactive
Configure user
management
Cancel task Defines if the group is allowed to cancel a task. Active | Inactive
Exclude /
Overwrite result
Defines if the group is allowed to block or unblock the balance. Active | Inactive
Defines if the group is allowed to configure methods. Active | Inactive
Defines if the group is allowed to perform service commands. Active | Inactive
Defines if the group is allowed to configure the user management. Active | Inactive
Defines if the group is allowed exclude or overwrite results. Active | Inactive
Quality management permissions
Start external
adjustment
Show change
history
Operating40 Analytical Balances and Comparators
Defines if the group is allowed to perform external adjustments. Active | Inactive
Defines if the group is allowed to see the option Change history.
Active | Inactive
Page 43

Configure routine
tests / GWP
Start routine tests Defines if the group is allowed to perform routine tests. Active | Inactive
Defines if the group is allowed to configure routine tests or GWP. Active | Inactive
Changing password
To change the password you have to login with you user ID.
Navigation:
1 Select your User ID.
ð The user management dialog opens.
2 Tap
ð The dialog Change password opens.
3 Enter your previous password.
4 Enter your new password and confirm your new password.
5 Tap
ð Your password is changed.
Balance menu > Users > Users
Change password in the action bar.
OK.
NOTICE
Loss of data due to missing password or ID
Protected menu areas cannot be accessed without ID or password.
− Note ID and password and keep them in a safe place.
Deleting user or user groups
Requirements for deleting:
• You logged in as administrator.
Navigation:
1 Select your User ID.
ð The user management dialog opens.
2 Tap
ð The dialog Delete user opens.
3 To delete the user tap
ð The user is deleted irreversibly.
Balance menu > Users > Users
Delete in the action bar.
OK.
5.3.4.5 Inactivating the user management
Settings > General > User management.
1 Tap
2 Tap
3 Tap New password and enter the new password.
4 Confirm the new password again and tap
5 Tap
ð The user management is inactive.
and select Inactive.
ð The dialog Deactivate user management opens.
Next.
ð The dialog
ð The dialog closes.
OK to confirm.
Set unblocking password opens.
.
5.3.4.6 Service request for resetting password or balance
When a user loses its password and cannot login, the password can be reset.
Operating 41Analytical Balances and Comparators
Page 44

In the user management settings can be activated the resetting of the password. If not, Mettler-Toledo GmbH
service technician can reset the password only through a factory reset. All data on the scale is lost.
1 In the login dialog tap
More.
ð The dialog More opens.
2 For a request, tap
Request reset password.
3 The dialog Request reset password opens.
4 Enter your user name and tap
ð The dialog
Request reset password opens with a service code (12 character string).
5 Note the service code and tap
OK.
Service request.
ð The request will be transmitted to a METTLER TOLEDO service representative.
ð You get an 8 character unblock password from a METTLER TOLEDO service representative via phone or
email.
6 Open the login dialog, select a user and enter the unblock password.
ð The balance software checks the unblocking code. If the check passes the user can enter a new
password.
Resetting the balance
If user management is active the password reset code can be used as one time login password:
1 In the login dialog tap
More.
ð The dialog More opens.
2 For a request, tap
Reset balance.
3 The dialog Reset balance opens.
4 Note the service code and tap
Service request.
ð The request will be transmitted to a METTLER TOLEDO service representative.
ð You get an unblock password from a METTLER TOLEDO service representative via phone or email.
5 Open the login dialog, select a user and enter the password reset code as password.
ð The balance software checks the unblocking code. If the check does not pass the login is denied. If the
check passes the user can enter a new password.
If user management is deactivated the password reset code can be used as one time unblock password:
1 In the login dialog tap
More.
ð The dialog More opens.
2 For a request, tap
Reset balance.
3 The dialog Reset balance opens.
4 Note the service code and tap
Service request.
ð The request will be transmitted to a METTLER TOLEDO service representative.
ð You get an unblock password from a METTLER TOLEDO service representative via phone or email.
5 Open the login dialog, select a user and enter the password reset code as unblock password.
ð The balance software checks the unblocking code. If the check passes the user is requested to enter a
new unblock password.
5.3.5 Settings
This section describes the procedure for adapting the balance to suit specific requirements. The system settings
apply to the entire weighing system and therefore to all user profiles and applications.
Navigation:
The section Settings is divided into the following sub-sections:
Balance
•
Interfaces
•
Devices / Printers
•
Operating42 Analytical Balances and Comparators
Balance menu > Settings
Page 45

LabX / Services
•
Balance settings
Navigation: Balance menu >
Settings > Balance
The section balance settings is divided into the following sub-sections:
•
Weighing / Quality
Doors
•
Date / Time / Language / Format
•
Screen / StatusLight / Sound
•
General
•
Weighing / Quality
Navigation:
Balance menu > Settings > Balance > Weighing / Quality
Parameter Description Values
Leveling warning
Defines the behaviour of the option Leveling warning.
When the option Forced leveling is selected and the balance is
out of level, a weighing value cannot be added to the protocol
Inactive | Optional
leveling* | Forced
leveling
(green button disabled).
Electrostatic
detection
Defines the condition of the environment. Standard environment* |
Unstable environment
Tolerance profiles A tolerance profile stores all the necessary balance settings
needed for a certain weighing method. It is possible to create
different tolerance profiles for different weighing methods.
This option has several sub-sections and is described later in this
chapter.
Automatic weight
value output
Defines if and in which manner (MT-SICS and / or HID) the
weighing values should be exported.
MT-SICS | HID |* Both
This option has several sub-sections and is described later in this
chapter.
GWP Approved
mode
Good Weighing Practice (GWP®) is a program started by
METTLER TOLEDO to help customers operate their weighing
Active | Inactive*
equipment in a safe and efficient way. It covers every relevant
step in the life cycle of the instrument and provides clear guidance
on how to specify, calibrate and operate weighing instruments.
The GWP Approved mode observes if the following conditions are
given:
• Use of an appropriate tolerance profile.
• FACT was successful.
• Required tests were successful.
• Setting up of enforced leveling.
• No MinWeigh violation.
If all conditions are given, the balance adds the GWP Approved
sign behind every weighing result.
The GWP Approved mode can only be enabled by a METTLER
TOLEDO service technician.
Operating 43Analytical Balances and Comparators
Page 46

Change history
Activates/Deactivates the option Change history.
The change history is used to log changes to system settings,
user management and methods as well as other settings and
configurations. The following information is stored:
• User ID and timestamp
• Object identifier
• Old values and new values of attributes
A maximum of 5000 entries can be stored in the change history.
For more information see section Change History.
Balance recalib.
reminder
Defines whether the user is reminded about the upcoming exipry
date of the calibration.
Days in advance Defines the number of days before the reminder informs about the
upcoming due date.
Action when
calib. expired
Defines the action when the calibration has expired.
Block: The balance will be blocked. In this case, the balance
cannot be used anymore until a user with the appropriate right
unblocks the balance.
Days before
blocking
Weight recalib.
reminder
Defines the number of days before the reminder informs about the
upcoming expiry date.
Defines whether the user is reminded about the upcoming expiry
date of the test weight calibration.
Service reminder Defines whether the user is reminded about the upcoming due
date of the service.
Active | Inactive*
Active* | Inactive
0...365
None* | Block
Days (30 days* |
0...400 days)
Active | Inactive*
Active | Inactive*
* Factory setting
Tolerance profiles
In this section profiles for weighing can be created. Setting and tolerances can be defined for the created profile.
Creating Tolerance profile
1 Tap
New to create a new profile.
2 Define the profile settings.
3 When all the settings have been defined, tap
OK.
ð The system returns to the profile list and the new profile appears on the list.
By tapping an existing profile, its settings can be changed, the profile can be deleted or it can be set as default
value. Several profiles can be created. A default profile must be selected.
Parameter Description Values
Name Defines the name of the profile. Text (0...22 characters)
Indicator Defines the color of the indicator icon for the tolerance profile. The
icon will appear above the weighing value unit. When a color is
selected, a description of max. 3 characters can be added.
None* I Neutral I White I
Yellow I Red I Blue I
Green | Black
Indicator text Defines the text of the indicator icon. Text (0...3 characters)
Calibration
certificate
Selects a calibration certificate. Calibration certificate |
None*
Operating44 Analytical Balances and Comparators
Page 47

Environment Defines the environmental conditions of the balance.
Very stable: For an environment that is free from any drafts and
vibrations.
Stable: For an environment that is practically free from drafts and
vibrations.
Standard: For an average working environment subject to
moderate variations in the ambient conditions.
Unstable: For an environment where the conditions are from time
to time changing.
Very unstable: For an environment where the conditions are
continuously changing.
Weighing mode Defines the weighing mode of the balance.
Universal: For all standard weighing applications.
Sensor mode: Depending on the setting of the ambient
conditions, this setting delivers a filtered weighing signal of
varying strength. The filter has a linear characteristic in relation to
time (not adaptive) and is suitable for continuous measured
value processing.
Value release Defines how fast a measured value is recognized by the balance
as stable and released.
Very fast: For very fast value release with increased repeatability.
Fast: For fast value release with increased repeatability.
Fast and reliable: For very fast value release with reliable
repeatability.
Reliable: For value release with lower but reliable repeatability.
Very reliable: For extended settling time with low repeatability.
Display
readability
Zero drift
compensation
Allowed units Defines the units that are allowed in this tolerance profile. The available values are
Determines the readability [d] of the balance display.
1d: Shows the maximum resolution
2d: Shows the final digit in increments of 2
5d: Shows the final digit in increments of 5
10d: 10x smaller resolution
100d: 100x smaller resolution
1000d: 1000x smaller resolution
The function Zero drift compensation performs ongoing
corrections of deviations from zero which may occur, for
example, as a result of small amounts of dirt on the weighing
pan.
This menu option is not available for "Approved balances", as the
settings are predefined.
Very stable| Stable|
Standard*| Unstable|
Very unstable
Universal* | Sensor
mode
Very fast | Fast* | Fast
and reliable | Reliable |
Very reliable
1d* | 2d | 5d | 10d |
100d | 1000d
Active*| Inactive
model-specific.
* Factory setting
Automatic weight value output
The balance can be connected to a PC with a USB cable. That way, weighing results can be directly transferred
into an application (e.g. Microsoft Excel).
Operating 45Analytical Balances and Comparators
Page 48

Parameter Description Values
Target Defines the way the weighing values are transferred.
HID* | MT-SICS | Both
HID (Human Interaction Device): Transfers simple character
streams (e.g. weight values) to a desktop computer without
installing additional drivers (comparable to a keyboard). The
format of a transferred weighing value can be configured.
MT-SICS: The data is transferred in MT-SICS format (METTLER
TOLEDO Standard Interface Command Set). MT-SICS operates
bidirectional, i.e. usually balance sends the confirmations to the
host and receives commands. A separate reference manual is
available for MT-SICS.
Weight field
length
Sign Defines if the weighing result is displayed with an algebraic sign.
Defines the number of digits that will be transferred into the application on the PC, e.g. into an Excel field
For all values: Each weighing result is preceded by a plus or
Numeric (1* | 0...20)
For all values | For
negative values*
minus sign.
For negative values: Only negative values are preceded by a
minus sign. Positive values are transferred without algebraic sign.
Sign position Defines if the algebraic sign is positioned at the first place of the
weight field or directly in front of the weight digits.
Decimal delimiter Defines the character used to separate the whole and fractional
Left of weight field | Left
of weight digits*
, | .*
part of a numeric value.
Net indicator In the standard output format, net weights are not specially
Active | Inactive*
marked. To place an N in front of net weights, this function can
be activated. The net symbol is left-justified in the field.
Net indicator field
length
Defines the field length of the Net indicator.
This option only appears when the option Net indicator is set to
Numeric (2*| 1 ... 2)
Active.
Unit Defines if a weighing unit is being shown in the weighing field. Active* | Inactive
Unit field length Defines the field length of the weighing unit.
Numeric (1*| 1...6)
This option only appears when the option Unit is set to Active.
Field delimiter Defines a character or sequence of characters to separate data
Outside* | TAB | , | ;
fields.
End of line
character
Defines a character or sequence of characters signifying the end
of a line.
CRLF* | CR | LF | TAB |
Outside | Enter
* Factory setting
Door automation
Navigation:
Balance menu > Settings > > Balance > Doors
Each of the following doors can be managed separately:
• Door left
• Door right
• Door top
Note
The parameters for all three doors are the same. In the following the parameter settings are described for only
one side.
Operating46 Analytical Balances and Comparators
Page 49

Door automation for the doors
Parameter Description Values
Door drive mode Defines the mode to open/close the door. Motorized* | Manual
Door opening Defines how far the door open.
The following options appears only when Motorized is selected
as the door drive mode.
Enter the value manually or capture it by tapping on
will be open with the configured value.
Door key left
Door key right
SmartSens left Defines the touchless door function of the left optical sensor. Active | Inactive*
SmartSens right Defines the touchless door function of the right optical sensor. Active | Inactive*
Devices Defines the door opening or closing via an external device, such
Automatic (Tare /
Zero / Result)
* Factory setting for the right door/ for the left door reverse
Defines the automation of the left door key on the Terminal.
Defines the automation of the right door key on the Terminal.
an ErgoSens or a footswitch.
Automatic (Tare / Zero / Result): Closes the door automatically
when taring, zeroing the balance or adding to protocol.
. The door
Numeric (1...100%)
Active | Inactive*
Active | Inactive*
Active | Inactive*
Active | Inactive*
Date, time and language adjustment
Navigation:
Parameter Description Values
Date Defines the current date. Use the pick buttons Increment/
Time Defines the current time.
Language Defines the language of the interface navigation. English| Deutsch|
Time zone Selects a time zone. see list on the screen
Date format Selects the date format. D.MMM.YYYY* | MMM D
Time format Selects the time format. 24:MM* | 12:MM |
Keyboard layout Defines the language of the keyboard layout. English| German|
Balance menu > Settings > Balance > Date / Time / Language / Format
Date
Decrement to define the date.
Time
Use the pick buttons Increment/Decrement to define the time.
Français| 日本語| 中
文| Español| Italiano|
Русский| Português|
Polski| Magyar|
Čeština
YYYY | DD.MM.YYYY |
MM/DD/YYYY | YYYYMM-DD | YYYY/MM/DD |
YYYY日M月D年
24.MM | 12.MM
French| Spanish|
Japanese| Simplified
Chinese| Russian|
Czech| Polish|
Hungarian
* Factory setting
Operating 47Analytical Balances and Comparators
Page 50

Screen, status and sound settings
Navigation:
Parameter Description Values
Screen brightness Defines the brightness of the display. 20 % | 40 % | 60 % |
Sound volume Defines the volume of the terminal sound. Inactive | 20% | 40% |
Sound on key
press
Sound on info Defines if there is a sound when an information appears on the
Sound on
warning
Sound on error Defines is there is a sound in case of an error. Active* | Inactive
StatusLight Activates/deactivates the status light.
StatusLight
brightness
* Factory setting
Balance menu > Settings > Balance > Screen / StatusLight / Sound
80 %* | 100 %
60%* | 80% | 100%
Defines if there is a sound when a key is pressed. Active* | Inactive
Active* | Inactive
screen.
Defines is there is a sound when a warning appears on the
screen.
Active (without green light): All current status of the balance are
monitored, the red/yellow lights will turn on if needed, but the
green light will stay turned off.
Defines the brightness of the activated status light.
This option appears only when the option StatusLight is set to
Active or Active (without green light).
Active* | Inactive
Active* | Active (without
green light) | Inactive
20 % | 40 % | 60 %* |
80 % | 100 %
General settings
Navigation:
Parameter Description Values
Balance ID Defines the ID of the balance. Text (0...22 characters)
Standby Activates/deactivates the automatic standby mode.
Software update
on system startup
Automatic export
directory
User
management
Wait time
Balance menu > Settings > > Balance General
Active* | Inactive
Active: The standby mode becomes active after a configurable
time period the balance was not used.
Inactive: The standby mode has to be activated manually by
tapping the ON/OFF button.
With this option activated the update of the firmware can be
performed from a USB storage device.
Defines the target directory for the automatic export. USB storage device*
Activates/Deactivates the option User management.
With the option Wait time the time until the balance automatically
logs off can be defined.
The option Wait time only appears when the option Automatic
logout is activated.
Active* | Inactive
Active | Inactive*
Numeric (15 minutes* |
1...60 minutes)
Interface settings
Navigation:
The section Interfaces has the following sub-section:
Ethernet
•
Operating48 Analytical Balances and Comparators
Balance menu > Settings > Interfaces
Page 51

Bluetooth
•
Ethernet
With the option DHCP activated, the parameters for the ethernet connection will be automatically set. With the
option Manual activated, the options for the ethernet connection must be set manually by the user.
Navigation:
Balance menu > Settings > Interfaces > Ethernet
Parameter Description Values
Host name Shows the balance host name. The host name can be defined via
Numeric (22* | 0 ... 22)
Settings > General > Balance ID.
MAC address Information on the MAC address (Media Access Control) that is
-
used to uniquely identify the balance in the network.
Network configu-
ration
DHCP: The parameters for the ethernet connection will be
automatically set.
DHCP*| Manual
Manual: The options for the ethernet connection must be set
manually by the user.
IP address If the IP is not to be automatically obtained, you can enter it here. 000.000.000.000 …
255.255.255.255
Subnet mask Defines the subnet mask that is used by the TCP/IP protocol to
determine whether a host is on the local subnet or on a remote
000.000.000.000 …
255.255.255.255
network.
DNS server
(primary)
DNS server
(secondary)
Default gateway Defines the address of the default gateway that links the host's
Defines the domain name server address of the primary server. 000.000.000.000 …
255.255.255.255
Defines the domain name server address of the secondary DNS
server.
000.000.000.000 …
255.255.255.255
000.000.000.000 …
subnet to other networks.
255.255.255.255
* Factory setting
Bluetooth
Navigation:
Balance menu > Settings > Interfaces > Bluetooth
Bluetooth identification
Parameter Description Values
Activation
With the option Bluetooth you have the possibility to commu-
Inactive* | Active
nicate with a printer via a bluetooth.
Devices / Printer settings
In this section optional external devices such as printers, barcode scanners, etc. can be added and configured.
Navigation:
The section is divided into the following sub-section:
•
Label printer
Strip printer
•
Barcode reader
•
RFID reader
•
ErgoSens
•
Foot switch
•
Balance menu > Settings > Devices / Printers
Operating 49Analytical Balances and Comparators
Page 52

Label printer
Label Printer allows the printing of weighing results on label stickers.
Navigation:
1 Tap
ð Printer type, name, status and settings are shown.
2 Tap
ð The dialog printer settings opens.
Parameter Description Values
Printer category Defines the type of the printer.
Device Allows to activate or deactivate the device. Activated* | Deactivated
* Factory setting
Balance menu > Settings > Devices / Printers > Label printer
for more information and printer settings.
Printer settings.
Label Printer allows the printing of weighing results on label
stickers.
Strip printer| Label
printer*
Printing a test page
− To print a test page, tap
Print test page
Deleting label printer
1 To delete the installed label printer from the system, tap
ð The message " Are you sure you would like to delete the selected printer?" is shown.
2 To delete, tap
ð The device is deleted.
OK. To cancel the delete dialog, tap Cancel.
Delete device.
Note
It is possible to use a label printer and a strip printer with the balance.
Strip printer
Navigation:
1 Tap
ð Printer type, name, status and settings are shown.
2 Tap
ð The dialog printer settings opens.
Parameter Description Values
Printer category Defines the type of the printer.
Device Allows to activate or inactivate the device. Activated* | Deactivated
Line end Defines the line end character for printing. The values set here
Character set Defines the communication specific character code. The values
* Factory setting
Balance menu > Settings > Devices / Printers > Strip printer
for more information and printer settings.
Printer settings
Strip printer allows the printing of weighing results on strip paper.
have to match the printer settings.
set here have to match the printer settings.
Strip printer | Label
printer*
<CR> <LF>* | <CR> |
<LF>
ANSI/WIN | IBM/DOS |
UTF8*
Printing a test page
− To print a test page, tap
Print test page
Deleting strip printer
1 To delete the installed strip printer from the system, tap
ð The message " Are you sure you would like to delete the selected printer?" is shown.
Delete device.
Operating50 Analytical Balances and Comparators
Page 53

2 To delete, tap
ð The device is deleted.
OK. To cancel the delete dialog, tap Cancel
Note
It is possible to use a strip printer and a label printer with the balance.
Barcode reader
Navigation:
1 Tap
ð Type, name and status are shown.
2 To change the name of the device, tap Name, enter the name and tap
Balance menu > Settings > Devices / Printers > Barcode reader
for more information and barcode reader settings.
Deleting barcode reader device
1 To delete the installed barcode reader from the system, tap
ð The delete reader dialog request opens.
2 To delete, tap
OK. To cancel the delete dialog, tap Cancel.
Barcode reader.
RFID Reader
Navigation:
− Tap
ð Reader type, name, status and settings are shown.
For testing the RFID reader proceed as follows.
Balance menu > Settings > Devices / Printers > RFID reader
for more information and RFID reader settings.
Testing the RFID reader
Navigation:
1 For testing the RFID reader, tap
ð The dialog Test device opens.
2 Place a RFID tag on the RFID reader.
ð If the RFID reader works correctly the message:
"The RFID reader has successfully read the RFID
tag" is shown.
ð The RFID reader has been tested.
Balance menu > Settings > Devices / Printers > RFID reader
Test device.
.
Deleting a RFID reader
1 To delete the installed RFID reader from the system, tap
ð The message "Are you sure you would like to delete the selected NFC?" is shown.
2 To delete, tap
ð The device is deleted.
OK. To cancel the delete dialog, tap Cancel.
Delete device.
Operating 51Analytical Balances and Comparators
Page 54

ErgoSens
Navigation:
1 Tap
ð Type, name and status are shown.
2 To change the name of the device, tap Name, enter the name and tap
3 To select the function of the ErgoSens, tap
Parameter Description Values
Function Defines the function of hands-free operating that can be used to
Balance menu > Settings > Devices / Printers > ErgoSens
for more information and ErgoSens settings.
.
and select an option.
execute certain weighing functions.
None* | Doors | Zero |
Tare | Add result
Deleting ErgoSens device
1 To delete the installed ErgoSens from the system, tap
ð The delete reader dialog request opens.
2 To delete, tap
OK. To cancel the delete dialog, tap Cancel.
Delete device.
Foot switch
Navigation:
1 Tap
ð Type, name and status are shown.
2 To change the name of the device, tap Name, enter the name and tap
3 To select the function of the Foot switch, tap
Parameter Description Values
Function Defines the function be used to execute certain weighing
Balance menu > Settings > Devices / Printers > Foot switch
for more information and foot switch settings.
.
and select an option.
functions.
None* | Doors | Zero |
Tare | Add result
Deleting foot switch device
1 To delete the installed foot switch from the system, tap
ð The deleting dialog request opens.
2 To delete, tap
OK. To cancel the delete dialog, tap Cancel.
Delete device.
Adding a new device
1 To add a new device, tap
ð The Add device dialog opens.
2 To add a device, connect it to the USB port.
ð If you are installing a barcode reader you can scan the barcode from the device.
3 Tap
4 Scan the barcode from the device.
5 To cancel the dialog, tap
Tools and tap Next.
ð The barcode of the device is shown.
ð The barcode is identified from the balance and the new device is connected.
Add device
Cancel.
LabX / Services settings
To enable communication between LabX and instruments, the appropriate settings in the instruments must
correspond with the settings in LabX.
LabX synchronizes the date and time on the instruments with the LabX Server each time a connection is made
and each time a task is started. When an instrument is connected, the user interface language on the
connected instrument is changed to the language currently installed on the LabX installation.
Operating52 Analytical Balances and Comparators
Page 55

Navigation:
Parameter Description Values
LabX service
MT-SICS service
Web service Allows you to define a web server to import/export data. Active| Inactive* | MC-
Printing the settings
When all the balance settings are configured, you can print the complete list to archive the information.
Navigation:
− To print the balance settings, tap
ð The complete balance settings are printed.
5.3.6 Maintenance
Balance menu > Settings > LabX / Services
Network: A network connection to LabX will be established on
startup.
Inactive: No connection to LabX will be established.
USB: A USB connection to LabX will be established on startup.
Network: A network connection to MT-SICS will be established on
startup.
Inactive: No connection to MT-SICS will be established.
USB: A USB connection to MT-SICS will be established on startup.
Balance menu > Settings
Print
Network| Inactive*|
USB
Network| Inactive*|
USB
Link
Navigation:
Balance menu > Maintenance
The section Maintenance is divided into the following sub-sections:
•
Import / Export
Format RFID
•
Software update
•
Reset
•
Service
•
Note
The option Maintenance only appears if the user has the appropriate user rights.
5.3.6.1 Import / export data
Navigation:
The import or export of data can be used to save or transfer data from one balance to another.
The following data can be imported or exported:
• Balance settings
• User management
• Methods
• Tests and weights
Balance menu > Maintenance > Import / Export
Exporting data and settings
1 Select
Export data and settings.
ð The dialog Export data and settings opens.
2 Select Export and tap
Next
ð The window Export data and settings appears.
3 Select the data type(s) you want to export.
4 Plug in the USB storage device in the USB port.
Operating 53Analytical Balances and Comparators
Page 56

5 Tap
6 Select the target USB storage device to store the data.
7 Tap
8 Tap
Export.
ð A list of available USB storage devices opens.
Next.
ð The system exports the data to the USB storage device. If the export was successful, the screen shows
with the file name and its target folder.
Close to finish the process.
Importing data and settings
With the function Import data and settings, settings from other balances can be imported to this balance. It is
also possible to re-import settings that have been exported.
1 Select
2 Plug in the USB storage device with the data to import.
3 Tap
ð A list of available USB storage devices opens.
4 Select the USB storage device with the data to import.
5 Tap
6 Select the data file you want to import.
7 Tap
8 Select the data type(s) you want to import.
When importing methods, you can select if the imported methods will replace all existing methods or if they are
additional.
− Tap
− Tap
ð The message Import of data and settings has been executed. appears. The import was successful. Tap
Import data and settings.
Next.
Next.
Next.
Import.
Next.
Close to return to the method work screen.
5.3.6.2 Formatting RFID tag
In this section the RFID tag can be read or formatted. When formatting, the data on the RFID tag will be deleted.
Navigation:
Balance menu > Maintenance > Format RFID
Formatting the RFID tag
1 Tap
2 Place the RFID tag on the RFID reader.
3 To delete the RFID tag tap
Format RFID.
ð The dialog Format RFID tag opens.
ð The dialog "Do you want to format the RFID tag and delete all data?" opens.
ð The RFID tag was formatted.
Reading the RFID tag
1 Tap
2 Place the RFID tag on the RFID reader.
3 To delete the RFID tag tap
Format RFID.
ð The dialog Format RFID tag opens.
ð The dialog "Do you want to format the RFID tag and delete all data?" opens.
ð In the dialog you can read all written data.
Format.
Format. To cancel the format dialog tap Cancel
Operating54 Analytical Balances and Comparators
Page 57

5.3.6.3 Updating the software
Navigation:
All information to perform an update is described in chapter [Update the software}Page141].
5.3.6.4 Resetting
Navigation:
The change history data and the data for test history and adjustment history will not be affected when resetting
the balance. If you want to delete these data, activate the option Also delete change, test and adjustment
history.
Resetting the balance
1 To delete the change history data and the data for test history and adjustment history, activate the option
Also delete change, test and adjustment history.
2 Tap
ð The window Reset balance opens and warns that some data will be lost by resetting the balance.
3 Tap
ð The balance software restarts in factory state.
Balance menu > Maintenance > Software update
Balance menu > Maintenance > Reset
NOTICE
Reset causes data loss
Resetting the balance will delete user application data and set the user configuration back to
factory state.
Next.
Reset balance.
5.3.6.5 Service
Navigation:
Symbol Description Procedure
Balance menu > Maintenance > Service
Show
adjustment
state
Save support
files
Import log
configuration
5.3.7 Exit / Block the balance
Navigation:
In the section Exit / Blocking the balance users can logout or block the balance.
The balance can be blocked in different ways.
Blocking
A blocking means closedown of the balance. A reason for such "full blocking" can have a serious background.
If the balance has a defect or a loss of the weighing quality, the user can block the balance completely. To
perform a blocking, see below.
Another way to blocking is a logout. A reason for such "logout" is, for example, that a task is not completed
and the current user does not want somebody else to work with the balance. This is like a notice "hands off".
To perform a logout, see below.
Balance menu > Exit/ Block balance
Tap to open information about:
- Temperature correction
- Production and user linearization
- User, production and standard calibration
Tap to save support files (all relevant information to an error) on a USB
storage device like an USB stick to send it to a METTLER TOLEDO representative.
Tap to import log configurations from a USB storage device like an USB stick
to send it to a METTLER TOLEDO representative.
Operating 55Analytical Balances and Comparators
Page 58

5.3.7.1 Logout / unblocking the balance
When the user management is active and a user logged out, the balance is blocked. The balance will be
unblocked when you log in again.
Logout / Block the balance
1 To block the balance/ logged out, tap
ð The dialog Block balance opens.
2 Tap
ð The balance is blocked and the blocking screen appears.
Block balance
Unblocking the balance
1 To unblock the balance, select your user name, enter your password and tap
2 Confirm unblocking in the next dialog. Tap
ð The balance is unblocked and the main screen appears.
5.3.7.2 Creating an unblocking password
Before blocking the balance completely, you have to create an unblocking password to withdraw the full
blocking.
NOTICE
Blocked balance due to forgotten password
A full blocked balance can not be unblocked without password.
− Note the password and keep it in a safe place.
Blocking.
Login.
Unblock balance.
Navigation: Balance menu > Settings > General
1 To create an unblocking password, tap
ð The dialog Set unblocking password opens.
2 Set a new password, confirm the new password a second time and tap
3 In the dialog
4 The unblocking password is created and saved.
General, tap OK again.
5.3.7.3 Blocking / unblocking the balance
Full blocking the balance
Before full blocking the balance you need to create an unblocking password, see above.
1 To block the balance tap
ð The dialog Block balance opens.
2 Tap
3 Enter your unlocking password and tap
ð The balance is blocked and the blocking screen opens.
to cancel the blocking procedure or tap Block balance.
ð The blocking procedure is canceled or the balance is blocked. If the balance will be full blocked the
dialog Block balance opens.
Blocking.
Unblock the balance
Note
When the user management is active, you can login with your user ID and password to unblock the balance.
1 To unblock the balance, enter your unblocking password and tap
2 Confirm unblocking in the next dialog. Tap
ð The balance is unblocked and the main screen opens.
Unblocking password in the action bar.
OK.
Block balance.
Unblock balance.
Unblock balance.
Operating56 Analytical Balances and Comparators
Page 59

5.3.7.4 Logout
− To logout, tap
ð Your logged out. The balance is blocked.
> Logout
Note
For unblocking the balance, you have to login again [Login}Page23].
Operating 57Analytical Balances and Comparators
Page 60

6 Software description
2
1
3
4
Methods
Methods list
Tasks
Tests
Adjustments
General Weighing
General Weighing
Simple formulation
Piece Counting
Interval weighing
Titration
Density determination
This balance supports the following method types:
Delete
Clone
Edit
New
Print
Start method
06/24/2018
6.1 Weighing Methods
6.1.1 Introduction
A weighing method is an application for carrying out specific weighing tasks. The balance offers the method
"General Weighing" with default parameters. You have the possibility to create a maximum of 50 methods and
edit the methods. You can use these methods for your weighing task or edit them according to your
requirements. Methods can also be deleted or cloned.
To support you while configuring new methods, a configuration wizard leads you through the whole process.
The changes performed to a method are recorded in the change history (if activated).
This chapter guides you step-by-step through the different methods. Next you will get an overview about all
possible methods, before all methods are explained separately. Every method section is composed as follows:
• 1. Method description
• 2. Creating a new method
• 3. Configure the method parameter
• 4. Perform the method
• 5. Clone the method
• 6. Delete the method
6.1.2 Methods Overview
In the section Methods list you get an overview of all possible methods. In this section new methods can be
defined, existing methods can be edited, cloned or deleted. It is also the starting point for using any method in
a weighing procedure.
Navigation:
Methods
The following methods are possible:
•
General Weighing (see section [Method General weighing}Page59])
Interval weighing (see section [Method Interval weighing}Page72])
•
Piece Counting (see section [Method Piece counting}Page77])
•
Simple formulation (see section [Method Simple formulation}Page87] )
•
Titration (see section [Method Titration}Page97] )
•
Density determination (see section [Method Density determination}Page107] )
•
Software description58 Analytical Balances and Comparators
Page 61

6.1.3 Method General weighing
Methods
Methods list
Tasks
Tests
Adjustments
Interval weighing
Piece Counting
Simple formulation
Titration
General Weighing
Delete
Clone
Edit
New
Print
06/24/2018
06/24/2018
06/24/2018
06/24/2018
06/24/2018
06/24/2018
Continue task
Density
6.1.3.1 Method description
This section describes the method General Weighing. The method General Weighing offers the basic weighing
functions (zeroing, taring, weighing). The method is used for simple weighing tasks or to perform a series of
check weighing or dosing.
This section describes how to create a new method with the method wizard, how to work with the method and
the method settings. The parameter of the weighing item (e.g. sample ID and target weight) can either be
entered manually or by using a template. Therefore two different methods exist:
• General Weighing: Select this method if you want to work without pre-defined templates.
• General Weighing with templates: Select this method if you want to use a template to define the
parameters for the weighing item. Templates are helpful to save time while weighing items with the same
parameters and to ensure the consistent use of the parameters. For further information see Using templates.
In the section Method settings the descriptions of the settings for both methods General Weighing and General
Weighing with templates can be found.
You have the possibility to start with method factory setting parameter or to create a new method with changed
method parameter.
6.1.3.2 Creating a new method for general weighing
Navigation:
1 Open the Methods section.
2 Tap
ð The method wizard opens, starting at 1. Method type.
3 Tap Method type and select the method type General Weighing or General Weighing with templates.
4 Tap
ð The method wizard opens the next creating section 2. Identification.
5 Define the Method name and Result description and tap
ð The method wizard opens the next creating section 3. Configuration.
6 Select a Tolerance profile and tap
ð The method wizard opens the next creating section 4. Save.
ð When selected General Weighing with templates the wizard opens the optional creating section 4.
Templates.
7 Select a template from the list and define Unit, a Target weight and tap
8 To set a ‒Tolerance or +Tolerance, set the tolerances tap
ð The method wizard opens the last section 5. Save.
Methods
New in the action bar.
Next.
Next.
Next.
Next.
OK.
Software description 59Analytical Balances and Comparators
Page 62

9 Tap
Edit method - {0}
General Weighing
General
ID format
Weighing item
Weighing
Automation
Print / Export
General Weighing
Method type
Method name
Comment
Lock method
General Weighing
Enter here
Close
Finish to save the new method .
ð The method has been created and appears in the list.
The newly created method can be performed, see [Performing a General Weighing}Page70]
or edited, see [Method settings}Page60].
See also
2 Performing a General Weighing}Page70
2 Method settings}Page60
6.1.3.3 Method settings
In this section, the settings of the methods General Weighing and General Weighing with templates are
described. All possible parameters are defined. It can be used to edit the settings of a newly created method or
an already existing method.
Navigation:
Methods > Methods list > General Weighing > Edit
The section General Weighing is divided into the following sub-sections:
General
•
ID format
•
Weighing item (Only available for the method General Weighing with templates)
•
Weighing item (Only available for the method General Weighing)
•
Weighing
•
Automation
•
Print / Export
•
All of these sub-sections will be described separately.
Software description60 Analytical Balances and Comparators
General settings
Note
The option Method type has been defined in the wizard and cannot be changed.
Parameter Description Values
Method name Defines the name of the method. The system copies the method
Comment The method can be described with a comment. Text (0...128
Lock method Locks the method for other users and from further editing while
name that has been defined with the function Method wizard.
Text (1...22 characters)
characters)
Active | Inactive*
running.
* Factory setting
Page 63

ID format settings
Task IDs
Parameter Description Values
Number of task
IDs
Task ID 1 Defines the value of the task ID.
Description
Default value Defines a default value for the task ID. The value of the task ID
Prefix Defines a prefix for the task ID.
For a method up to three task identifiers (task IDs) can be
defined.
If the value of the option Number of task IDs is between 1-3, the
options Task ID, Description and Prefix/Default value appear for
every single task ID.
Manual with default: The value of the task ID can be entered
manually at method execution time.
Automatic timestamp: The system provides a value created from
a prefix with the current date and time appended.
This option allows to set Manual with default or Automatic
timestamp for each task ID.
can be changed manually while executing the method.
This option only appears when the option Manual with default is
activated.
This option only appears when the option Automatic timestamp
is activated.
0 | 1* | 2 | 3
Manual with default* |
Automatic timestamp
Text (0...32 characters)
Text (0...32 characters)
Text (0...32 characters)
* Factory setting
Result IDs
Parameter Description Values
Number of result
IDs
Result ID 1 Defines the value of the result ID.
Description
Prefix Defines a prefix for the result ID.
Default value Defines a default value for the result ID. The value of the result ID
* Factory setting
Defines the number of result IDs.
If the value of the option Number of result IDs is between 1-3,
the options Result ID 1, Description and Prefix/Default value
appear for every single result ID.
Manual with default: The value of the result ID can be entered
manually at method execution time.
Automatic counter: The system provides a value created from a
prefix with an unique number (counter) appended.
Describes the option Result ID 1.
This option only appears when the option Automatic counter is
activated.
can be changed manually while executing the method.
This option only appears when the option Manual with default is
activated.
0 | 1* | 2 | 3
Manual with default* |
Automatic counter
Text (0...32 characters)
Text (0...32 characters)
Text (0...32 characters)
Weighing item setting
In this section a target weight with tolerance limits can be defined. Depending on the selected method, the
parameters for the weighing item are defined directly in the method (General Weighing) or in one or more
templates (General Weighing with templates).
Software description 61Analytical Balances and Comparators
Page 64

Initial values for weighing
Parameter Description Values
Unit Defines the unit of the primary weighing result. The available units
depend on the balance
model.
Target weight Defines the target weight. The target weight will be shown in the
weighing-in aid of the balance (SmartTrac). When a target weight
including tolerances is defined, the SmartTrac indicates if the
current display weight is in tolerance or not.
‒Tolerance Defines the lower tolerance limit.
This option only appears when the option Target weight is
activated.
+Tolerance Defines the upper tolerance limit.
This option only appears when the option Target weight is
activated.
Numeric
Numeric
Numeric
Template settings
In this section a target weight with tolerance limits can be defined. Depending on the selected method, the
parameters for the weighing item are defined directly in the method (General Weighing) or in one or more
templates (General Weighing with templates).
Note
This Option is only available for the method General Weighing with templates.
Parameter Description Values
Unit Defines the unit of the primary weighing result. The available units
depend on the balance
model.
Target weight Defines the target weight. The target weight will be shown in the
weighing-in aid of the balance (SmartTrac). When a target weight
including tolerances is defined, the SmartTrac indicates if the
current display weight is in tolerance or not.
‒Tolerance Defines the lower tolerance limit.
This option only appears when the option Target weight is
activated.
+Tolerance Defines the upper tolerance limit.
This option only appears when the option Target weight is
activated.
Numeric
Numeric
Numeric
Note
More information on using templates is available in section [Using method templates}Page115].
Weighing settings
Parameter Description Values
Show info weight With this option activated a secondary info weight appears on the
weighing screen on top of the weighing result.
Info unit Defines the unit of the info weight.
This option only appears when the option Show info weight is
activated.
* Factory setting
The weighing settings are divided in several parameter groups.
Software description62 Analytical Balances and Comparators
Active | Inactive*
The available units
depend on the balance
model.
Page 65

Custom unit
Parameter Description Values
Define custom
unit
With this option activated a specific weighing unit can be defined.
This allows calculations (e.g. surfaces or volumes) to be carried
out directly during determination of the weighing result.
The custom units are available in all menus and input fields in
which weighing units can be selected.
Active | Inactive*
Note
When the parameter Define custom unit is activated, more parameters can be defined.
Parameter Description Values
Name Defines the name of the custom unit. Text (0...6 characters)
Formula
Factor Defines the factor with which the effective weighing result (net
Display
readability
Defines how subsequently defined value for Factor is calculated.
There are 2 formulae available:
Multiplicative: Multiplies the net weight by the factor.
Divisive: The factor is divided by the net weight.
The formula can be used, for example, to simultaneously take
into account a known error factor while weighing.
weight) is calculated via the previously selected Formula.
Defines the formatting for the weighing result.
Example: A setting of “0.05” defines 2 places after the decimal
point with rounding to 5. A determined result of 123.4777 is
consequently displayed as 123.50.
This function can only be used to reduce the resolution of the
weighing result. No value must therefore be entered that exceeds
the maximum balance resolution. Values that are too small are
automatically rounded off.
Multiplicative* | Divisive
Numeric
Numeric
* Factory setting
Weighing settings
Parameter Description Values
Tolerance profile A tolerance profile stores all the necessary balance settings
needed for a certain weighing method. It is possible to create
different tolerance profiles for different weighing methods.
Weight capture
mode
Weight capture
delay
* Factory setting
Defines the behavior when the button to add the result was
tapped or the add result was triggered by the automatic weighing
result creation.
Stable: The system waits for a stable weight.
Immediate: The system doesn’t wait for a stable weight. The
system waits for the defined amount of seconds (Weight capture
delay). After the weight capture delay, the weight value from the
weight stream is captured.
Defines the time in seconds the balance waits for capturing the
weight after the button to add the result was tapped or the add
result was triggered by the automatic weighing result creation.
This option only appears when the Weight capture mode
Immediate or Dynamic is selected.
Available tolerance
profiles are modelspecific.
Stable* | Immediate
Numeric (5 seconds* |
0...60 seconds)
Software description 63Analytical Balances and Comparators
Page 66

Statistics
Parameter Description Values
Activate statistics
If Activate statistics is set to Active, the following statistics will
Active | Inactive*
be calculated:
• N: Number of items used for the statistics (with 0 decimal
places without unit)
• MIN: Minimal displayed value (decimal places and unit
according to the method setting)
• MAX: Maximum displayed value (decimal places and unit
according to the method setting)
• AVG: Displayed values are summed up and divided by the
number of values, rounded to 1 digit more than the configured
decimal places in the method settings (unit according to the
method setting)
• SD: Standard deviation rounded to 1 digit more than the
configured decimal places in the method settings (unit
according to the method setting)
• RSD: Relative standard deviation (rounded to 2 decimal
places in %)
• SUM: Sum of added measurement results
The statistical values are calculated and visualized as soon as a
result is added or updated.
* Factory setting
Electrostatic detection and ionizer
Parameter Description Values
Ionizer Defines whether the ionizer is activated/deactivated. Active | Inactive*
Detection Defines whether the electrostatic detection (StaticDetect) is
Active | Inactive*
activated/deactivated.
Threshold Defines a limit (mg) at which StaticDetect threshold failed.
If the measured approximate weighing error is <= the detection
Numeric (0.40 mg* |
0.01.....10 mg)
threshold, the StaticDetect state = OK
If the measured approximate weighing error is > the detection
threshold, the StaticDetect state = Not OK
This option only appears when the Detection is selected.
Show weighing
error
Defines whether the weighing error is displayed.
If the StaticDetect value is above the treshold, this parameter will
Active* | Inactive
display the effective approximate weighing error.
This option only appears when the Detection is selected.
* Factory setting
Software description64 Analytical Balances and Comparators
Page 67

Automation settings
Parameter Description Values
Barcode data
target
If a barcode reader is connected to the balance, this option
defines how the data is to be processed.
Keyboard Input: The data is written in the currently open input
Keyboard Input* | Target
weight value | Task ID 1
| Result ID 1
window. If no input window is open, the data is ignored.
Target weight value: The barcode data is interpreted as a value
for the target weight.
Task ID 1: The barcode data is interpreted as a value for the task
ID.
Result ID 1 The barcode data is interpreted as a value for the
result ID.
Automatic feeder support
Parameter Description Values
Automatic feeder
support
Enables or disables the automatic feeder support.
To use the automatic feeder support, the automatic feeder has to
Active | Inactive*
be connected to the balance by USB and has to be configured
correctly.
* Factory setting
Note
When the parameter Automatic feeder support is activated, additional parameters can be defined.
When this parameter is inactive, Weighing automation can be further defined.
Parameter Description Values
Number of
weighing items
Plausibility limits Defines the plausibility limit for measured values.
Defines the number of items the automatic feeder will deliver to
the balance.
The plausibility limit relates to the defined target weight.
Numeric | 20* (1...100)
Numeric (30 %* |
0...100)
Example: With a plausibility limit of 30%, all weight values that
are within ±30% of the target weight are regarded as plausible
and are transferred into the statistics. All other weight values are
being ignored and excluded from the statistics.
Discharge feeder
at the end
Discharge is used to empty the automatic feeder of all objects.
Active: The automatic feeder feeds at the configured discharge
Active | Inactive*
feed rate and stops 90 seconds after the last object has passed
the light barrier.
Inactive: No automatic emptying.
Feed rate Defines the rate by which the automatic feeder delivers the parts
to the balance. Select between the following options:
• Slow: Lowest feed rate
• Normal: Lower intermediate feed rate
• Fast: Upper intermediate feed rate
• Very fast: Highest feed rate
Slow | Normal* | Fast |
Very fast
* Factory setting
Weighing automation
Requirements to define the Weighing automation:
• The parameter for Automatic feeder support is inactive.
Software description 65Analytical Balances and Comparators
Page 68

Parameter Description Values
Automatic result Automatically generates a weighing result after a threshold is
reached.
None: No automatic result will be generated.
None | With sample
tare* | Without sample
tare
With sample tare: After a weight value that reached the threshold
is being removed from the weighing pan, the balance is being
tared.
Without sample tare: After a weight value that reached the
threshold is being removed from the weighing pan, the balance is
not being tared.
Automatic result
threshold
Defines the threshold of the option Automatic result.
This option only appears when the option Automatic result is
Numeric
activated.
Weight trigger
Defines the behaviour of the option Automatic result threshold.
Exceeding: The weighing result is generated when the weight
Exceeding* | Falling
below
exceeds the defined threshold.
Falling below: The weighing result is generated when the weight
falls below the defined threshold.
This option only appears when the option Automatic result is set
to Without sample tare.
Automatic zero
If Automatic zero is set to Active, the balance automatically
Active | Inactive*
zeros the balance when the weight falls below a predefined
threshold.
Automatic zero
threshold
Defines the threshold of the option Automatic zero.
This option only appears when the option Automatic zero is
Numeric
activated.
Pretare value Defines a weight value for the pretare function.
Numeric
Instead of entering the value, the respective tare container can be
placed on the weighing pan and the button
subsequently
pressed. The weight is directly taken over as pretare value.
This option only appears when the option Tare Mode is set to
Pretare.
Tare Mode Defines the tare mode.
None: No automatic tare.
None* | Automatic tare |
Pretare
Automatic tare: The balance stores automatically the first stable
weight as the tare weight.
Pretare: Allows you to enter manually a numerical entry of a fixed
tare weight.
* Factory setting
Print /Export
This section is divided into the following sub-sections:
• Protocol printout and data export
• Label printout for task
• Label printout for weighing item
Software description66 Analytical Balances and Comparators
Page 69

Protocol printout and data export
Parameter Description Values
Strip printer Activates/Deactivates the strip printer. The data to be transmitted
to the printer can be defined in the section Template settings.
Protocol export Activates/Deactivates the weighing data export. Active | Inactive*
Weight value Activates/Deactivates the weighing value character output over
USB.
* Factory setting
Active | Inactive*
Active | Inactive*
Protocol template for printout
This menu item can be used to define information to appear in the protocols. The extensive menu is divided into
six submenus in which options for the printout/export can be defined. Information can be enabled or disabled
by activating or deactivating the corresponding checkbox.
All available parameters can be activated or deactivated via the check boxes. To activate or inactivate all at
once, proceed as follows:
1 To deselect all check boxes at once, tap
ð All parameters are deselected.
2 To select all check boxes at once, tap
ð All parameters are selected.
Parameter Description Values
Header and
Footer
Balance information
Quality information
Task information Defines which information about the task is being printed/export. Method name | Method
Defines the header (with title, date and time) and/or footer (with
signature and end line) to be printed/exported,
Defines which information about the balance is being printed/
exported:
Defines which quality information is being printed/exported. Tolerance profile |
Deselect all
Select all
Header | Title | Date /
time | Signature |
Separating lines | Group
titles
Balance type* | Balance
ID*| Balance serial
number* | Software
version
Adjustment date / time |
Routine test name |
Routine test last
execution date | Routine
test result |GWP
Approved state |Level
state * | MinWeigh state
comment | Task IDs |
Custom unit settings |
Automatic result settings
| Count | Count|Sum |
Average | Minimum |
Maximum | Standard
deviation | Relative
standard deviation
Software description 67Analytical Balances and Comparators
Page 70

Weighing item
information
Result detail
information
* Factory setting
Defines which information about the weighing items is being
printed/exported.
Defines which information related to the result of the
measurement is being printed/exported.
Show excluded
weighing items | Result
State* | Result IDs* |
GWP Approved state |
Level state* | MinWeigh
state | Tolerance state* |
Target and tolerances
state*
Weight* | Tare weight |
Gross weight* | Info
weight* | Date / time* |
Stability*
Label printer for task
Parameter Description Values
Automatic label
printout for task
Used template Chooses the label template. Available labels
[Available labels}Page69]
* Factory setting
Activates/Deactivates the option Automatic label printout for
task.
Active | Inactive*
Field settings
The content of each label field can be defined. In the following are listed your label options.
Parameter Description Values
Field settings Defines which information appears in the label fields 1 – 8. The
number of the label fields differs depending on the selected
template.
Empty | Task ID 1 |
Printing date | Current
user | Number of
weighing items | Sum |
Minimum | Maximum |
Average | Standard
deviation | Relative
standard deviation
Barcode settings
The content of each barcode can be defined.
Parameter Description Values
2D barcode
delimiter
Barcode settings Defines which information appears in the barcode. The number of
Software description68 Analytical Balances and Comparators
The option 2D barcode delimiter appears only when the selected
template in the option Used template has a 2D code.
the barcode fields 1 – 6 differs depending on the selected
template.
The option 2D barcode delimiter appears only when the selected
template in the option Used template has a 2D code.
TAB | Form feed |
Carriage return | Space |
User defined
Empty | Task ID 1 |
Printing date | Current
user | Number of
weighing items | Sum |
Minimum | Maximum |
Average | Standard
deviation | Relative
standard deviation
Page 71

Label printout for weighing items
Parameter Description Values
Automatic label
printout for task
Used template Chooses the label template. Available labels
[Available labels}Page69]
* Factory setting
Activates/Deactivates the option Automatic label printout for
task.
Active | Inactive*
Field settings
The content of each label field can be defined.
Parameter Description Values
Field settings Defines which information appears in the label fields 1 – 8. The
number of the label fields differs depending on the selected
template.
Empty | Method name |
Task ID 1 | Printing date
| Current user | Result ID
1 | Result ID 2 | Weight |
Target weight |
+Tolerance | ‒Tolerance
|Tolerance state | Tare
weight | Result State
Barcode settings
The content of each barcode field can be defined.
Parameter Description Values
2D barcode
delimiter
Barcode settings Defines which information appears in the barcode. The number of
The option 2D barcode delimiter appears only when the selected
template in the option Used template has a 2D code.
the barcode fields 1 – 6 differs depending on the selected
template.
The option 2D barcode delimiter appears only when the selected
template in the option Used template has a 2D code.
TAB | Form feed |
Carriage return | Space |
User defined
Empty | Method name |
Task ID 1 | Printing date
| Current user | Result ID
1 | Result ID 2 | Weight |
Target weight |
+Tolerance | ‒Tolerance
|Tolerance state | Tare
weight | Result State
Available labels
The following label layouts can be selected:
5 large fields 5 small fields
10 small fields 1D barcode with 3 large fields
Software description 69Analytical Balances and Comparators
Page 72

1D barcode with 3 small fields 1D barcode with 6 small fields
2D barcode with 5 large fields 2D barcode with 5 small fields
2D barcode with 2 large fields and 6 small fields 2D barcode with 8 small fields
6.1.3.4 Performing a General Weighing
This section describes a General Weighing example step by step.
Depending on the defined settings and weighing objects the procedure can be different from this example.
1 Open the Methods section.
2 Select a method from the list or define a new method.
3 Tap
4 Press
5 Open the door and place the weighing object (1) on
6 Close the door and wait until the weight is stable.
7 Tap
8 When the weighing process is finished, tap
Start method.
ð The method work screen of the selected method appears.
to zero the balance.
the weighing pan (2).
ð The Weighing starts with Capturing weight....
Add to protocol.
ð The weighing result appears in the protocol area on
the right side of the screen.
Complete in the action bar.
ð The window Complete task opens. The task
specific information can be printed on a label
printer, the protocol can be printed manually or the
result can be exported on an external storage device.
ð The task General Weighing has been completed successfully.
Note
It is possible to exclude a weighing results from the protocol by opening the right fly-in window and tapping on
Exclude result. The window Complete task always appears after completing the task, even if the results will be
saved automatically.
Software description70 Analytical Balances and Comparators
Page 73

6.1.3.5 Cloning a method
To simplify the process to create a method, an existing method can be cloned one or several times. The cloned
method will have the same parameter values as the original one. If weighing item templates exist, those will be
cloned as well.
To clone a method proceed as follows:
1 Open the Methods section.
2 Tap the method that you want to clone.
ð The line color of the selected method becomes blue.
3 Tap
Clone.
ð A copy of the selected method appears in the list. The cloned method has the same settings as the
original method.
Note
A method can be cloned several times. The name of the cloned method is always based on its original name,
to which is appended a number.
6.1.3.6 Deleting a method
Both factory defined methods and user defined methods can be deleted if they are not needed. For this purpose
proceed as follows:
1 Open the Methods section.
2 Tap the method that you want to delete.
ð The line color of the selected method becomes blue.
3 Tap
4 Tap
ð The system returns to the method list. The method has been deleted and does not appear on the list
Delete.
ð The message Delete method and cancel tasks? appears on the screen.
OK to delete the selected method.
anymore.
Note
There is always a method activated in the background. This method can not be directly deleted. To delete the
method, another method must be started instead. Now the method is not activated anymore and can be
deleted.
Software description 71Analytical Balances and Comparators
Page 74

6.1.4 Method Interval weighing
Methods
Interval weighing
Methods list
Tasks
Tests
Adjustments
General Weighing
Piece Counting
Simple formulation
Titration
Delete
Clone
Edit
New
Print
Start method
06/24/2018
06/24/2018
06/24/2018
06/24/2018
06/24/2018
06/24/2018
Density
6.1.4.1 Method description
This section describes the method Interval weighing. With the method Interval weighing a number of
measurements and the time interval for each measurement can be defined.
6.1.4.2 Creating a new method for interval weighing
Navigation:
Methods
1 Open the Methods section.
2 Tap
New in the action bar.
ð The method wizard opens, starting at 1. Method type.
3 Tap Method type and select the method type Interval weighing.
4 Tap
Next.
ð The method wizard opens the next creating section 2. Identification.
5 Define the Method name and tap
ð The method wizard opens the next creating section 3. Configuration.
6 Select a Approximate interval, the number of Measurements, select a Tolerance profile and tap
ð The method wizard opens the next creating section 4. Weighing item.
7 Select a Unit for the weighing and tap
ð The method wizard opens the last section 5. Save.
8 Tap
Finish to save the new method .
ð The method has been created and appears in the list.
The newly created method can be performed, see [Performing a Interval Weighing}Page75]
or edited, see [Method settings}Page72].
6.1.4.3 Method settings
The section Interval weighing is divided into the following sub-sections:
Next.
Next.
Next.
Software description72 Analytical Balances and Comparators
Page 75

Navigation:
Edit method - {0}
General
Method type
Interval weighing
Interval
ID format
Weighing item
Weighing
Automation
Print / Export
Interval weighing
Method name
Comment
Lock method
Interval weighing
Enter here
Close
• General
Interval
•
ID format
•
Weighing item
•
Weighing
•
Automation
•
Print / Export
•
Methods > Methods list > Interval weighing > Edit
All of these sub-sections will be described separately.
General settings
Note
The option Method type has been defined in the wizard and cannot be changed.
Parameter Description Values
Method name Defines the name of the method. The system copies the method
Text (1...22 characters)
name that has been defined with the function Method wizard.
Comment The method can be described with a comment. Text (0...128
characters)
Lock method Locks the method for other users and from further editing while
Active | Inactive*
running.
* Factory setting
Interval
The following parameters can be defined:
Parameter Description Values
Approximate
interval
Measurements Defines the total number of measurements. Numeric (3600* |
* Factory setting
Defines the duration of a single weighing interval Numeric (1 s* |
0.5...60 s)
1...5000)
Note
The parameter Duration shows the duration of the method based on the values defined for the parameters
Approximate interval and Measurements.
Software description 73Analytical Balances and Comparators
Page 76

ID format settings
Task IDs
Parameter Description Values
Number of task
IDs
Task ID 1 Defines the value of the task ID.
Description
Default value Defines a default value for the task ID. The value of the task ID
Prefix Defines a prefix for the task ID.
For a method up to three task identifiers (task IDs) can be
defined.
If the value of the option Number of task IDs is between 1-3, the
options Task ID, Description and Prefix/Default value appear for
every single task ID.
Manual with default: The value of the task ID can be entered
manually at method execution time.
Automatic timestamp: The system provides a value created from
a prefix with the current date and time appended.
This option allows to set Manual with default or Automatic
timestamp for each task ID.
can be changed manually while executing the method.
This option only appears when the option Manual with default is
activated.
This option only appears when the option Automatic timestamp
is activated.
0 | 1* | 2 | 3
Manual with default* |
Automatic timestamp
Text (0...32 characters)
Text (0...32 characters)
Text (0...32 characters)
* Factory setting
Weighing item settings
Initial values for weighing
Parameter Description Values
Unit Defines the initial value for the weighing process. The available units
depend on the balance
model.
* Factory setting
Weighing settings
Parameter Description Values
Show info weight With this option activated a secondary info weight appears on the
weighing screen on top of the weighing result.
* Factory setting
Parameter Description Values
Info unit Defines the unit of the info weight.
This option only appears when the option Show info weight is
activated.
Active | Inactive*
The available units
depend on the balance
model.
Weighing settings
Parameter Description Values
Tolerance profile A tolerance profile stores all the necessary balance settings
needed for a certain weighing method. It is possible to create
different tolerance profiles for different weighing methods.
Available tolerance
profiles are modelspecific.
Software description74 Analytical Balances and Comparators
Page 77

Automation settings
Parameter Description Values
Barcode data
target
* Factory setting
If a barcode reader is connected to the balance, this option
defines how the data is to be processed.
Keyboard Input: The data is written in the currently open input
window. If no input window is open, the data is ignored.
Task ID 1: The received barcode data is treated as identification
text for the Task ID.
Print / Export
Automatic data output
Parameter Description Values
Protocol export Activates/Deactivates the weighing data export. Active | Inactive*
6.1.4.4 Performing a Interval Weighing
This section describes how the method Interval weighing is being used in a task example. In this example we
are weighing one single weight with a tare container.
1 Open the Methods section.
2 Select a pre-defined method from the list or define a new method.
3 Tap
4 Press
5 Open the door.
6 If a container is used, place the container on the weighing pan.
7 Press
8 Place the weighing object in the weighing container and close the door.
9 Tap
10 Wait until the process is finished.
Start method.
ð The method workscreen of the selected method appears.
to zero the balance.
to tare the balance.
ð The door closes automatically (depending on the door settings)
ð The tare-measurement starts with Taring....
ð When the taring is finished, the door opens automatically (depending on the door settings).
Start.
ð The defined method is being executed. The Protocol section shows the current counter.
ð The Protocol section opens and shows a summary of the weighing results.
Keyboard Input* | Task
ID 1
Note
The current weighing process can also be stopped by tapping
1 Tap
2 Tap Export protocol manually to export the weighing results to an external USB storage device or tap
Complete to open the Export options.
ð The dialog Complete task appears.
Complete to finish the task.
Note
After completing the task, the results will be deleted from the protocol.
6.1.4.5 Cloning a method
For cloning a method, see chapter [Cloning a method}Page71].
Stop.
Software description 75Analytical Balances and Comparators
Page 78

6.1.4.6 Deleting a Method
To deleting a method, see chapter [Deleting a method}Page71].
Software description76 Analytical Balances and Comparators
Page 79

6.1.5 Method Piece counting
Methods
Piece Counting
Methods list
Tasks
Tests
Adjustments
General Weighing
Interval weighing
Simple formulation
Titration
Delete
Clone
Edit
New
Print
Start method
06/24/2018
06/24/2018
06/24/2018
06/24/2018
06/24/2018
06/24/2018
Density
6.1.5.1 Method description
This section describes the method Piece Counting. The method Piece Counting allows you to determine the
number of pieces put on the weighing pan. It is advantageous if all pieces are of approximately equal weight,
since the unit quantity is determined on the basis of average weight.
6.1.5.2 Creating a new method for piece counting
Navigation:
Methods
1 Open the Methods section.
2 Tap
New in the action bar.
ð The method wizard opens, starting at 1. Method type.
3 Tap Method type and select the method type Piece Counting.
4 Tap
Next.
ð The method wizard opens the next creating section 2. Identification.
5 Define the Method name and Result description and tap
ð The method wizard opens the next creating section 3. Configuration.
6 Select a Tolerance profile and tap
ð The method wizard opens the next creating section 4. Weighing item.
7 Define a reference for pieces Reference PCS, a Reference average weight, Target weight and tap
Next.
ð The method wizard opens the last section 5. Save.
8 Tap
Finish to save the new method .
ð The method has been created and appears in the list.
The newly created method can be performed, see [Performing a Piece Counting}Page85]
or edited, see [Method settings}Page77].
6.1.5.3 Method settings
Next.
Next.
In this section, the settings of the method Piece Counting are being described.
Software description 77Analytical Balances and Comparators
Page 80

Navigation:
Edit method - {0}
General
Method type
Piece Counting
ID format
Weighing item
Weighing
Automation
Print / Export
Piece Counting
Method name
Comment
Lock method
Piece Counting
Enter here
Close
Methods > Methods list > Piece Counting > Edit
The section Piece Counting is divided into the following sub-sections:
General
•
ID format
•
Weighing item
•
Weighing
•
Automation
•
Print / Export
•
All of these sub-sections will be described separately.
General settings
Note
The option Piece Counting has been defined in the wizard and cannot be changed.
Parameter Description Values
Method name Defines the name of the method. The system copies the method
Text (1...22 characters)
name that has been defined with the function Method wizard.
Comment The method can be described with a comment. Text (0...128
characters)
Lock method Locks the method for other users and from further editing while
Active | Inactive*
running.
* Factory setting
ID Format settings
Task IDs
Parameter Description Values
Number of task
IDs
For a method up to three task identifiers (task IDs) can be
defined.
If the value of the option Number of task IDs is between 1-3, the
0 | 1* | 2 | 3
options Task ID, Description and Prefix/Default value appear for
Task ID 1 Defines the value of the task ID.
every single task ID.
Manual with default: The value of the task ID can be entered
Manual with default* |
Automatic timestamp
manually at method execution time.
Automatic timestamp: The system provides a value created from
a prefix with the current date and time appended.
Software description78 Analytical Balances and Comparators
Page 81

Default value Defines a default value for the task ID. The value of the task ID
can be changed manually while executing the method.
This option only appears when the option Manual with default is
activated.
* Factory setting
Text (0...32 characters)
Result IDs
Parameter Description Values
Number of result
IDs
Result ID 1 Defines the value of the result ID.
Description
Prefix Defines a prefix for the result ID.
Defines the number of result IDs.
If the value of the option Number of result IDs is between 1-3,
the options Result ID 1, Description and Prefix/Default value
appear for every single result ID.
Manual with default: The value of the result ID can be entered
manually at method execution time.
Automatic counter: The system provides a value created from a
prefix with an unique number (counter) appended.
Describes the option Result ID 1.
This option only appears when the option Automatic counter is
activated.
0 | 1* | 2 | 3
Manual with default |
Automatic counter*
Text (0...32 characters)
Text (0...32 characters)
* Factory setting
Weighing item settings
Initial values for weighing
Parameter Description Values
Reference PCS Defines a reference unit quantity. This allows you to determine the
reference unit weight with a defined, fixed number of pieces.
Reference
average weight
Target weight Defines the target weight. The target weight will be shown in the
‒Tolerance Defines the lower tolerance limit.
+Tolerance Defines the upper tolerance limit.
Defines the average weight for one piece. The average weight of
one piece serves as basis for the piece counting. During task
execution, the balance calculates the actual number of pieces on
the weighing pan based on the measured weight and the average
weight of one piece.
weighing-in aid of the balance (SmartTrac). When a target weight
including tolerances is defined, the SmartTrac indicates if the
current display weight is in tolerance or not.
This option only appears when the option Target weight is
activated.
This option only appears when the option Target weight is
activated.
Numeric (10* |
1...10000)
Numeric
Numeric
Numeric
Numeric
* Factory setting
Weighing settings
Parameter Description Values
Show info weight With this option activated a secondary info weight appears on the
weighing screen on top of the weighing result.
Active | Inactive*
Software description 79Analytical Balances and Comparators
Page 82

Info unit Defines the unit of the info weight.
This option only appears when the option Show info weight is
activated.
The available units
depend on the balance
model.
* Factory setting
Weighing settings
Parameter Description Values
Tolerance profile A tolerance profile stores all the necessary balance settings
needed for a certain weighing method. It is possible to create
different tolerance profiles for different weighing methods.
Weight capture
mode
Defines the behavior when the button to add the result was
tapped or the add result was triggered by the automatic weighing
Available tolerance
profiles are model-
specific.
Stable* | Immediate
result creation.
Stable: The system waits for a stable weight.
Immediate: The system doesn’t wait for a stable weight. The
system waits for the defined amount of seconds (Weight capture
delay). After the weight capture delay, the weight value from the
weight stream is captured.
Weight capture
delay
Defines the time in seconds the balance waits for capturing the
weight after the button to add the result was tapped or the add
Numeric (5 seconds* |
0...60 seconds)
result was triggered by the automatic weighing result creation.
This option only appears when the Weight capture mode
Immediate is selected.
* Factory setting
Statistics
Parameter Description Values
Activate statistics
If Activate statistics is set to Active, the following statistics will
Active | Inactive*
be calculated:
• N: Number of items used for the statistics (with 0 decimal
places without unit)
• MIN: Minimal displayed value (decimal places and unit
according to the method setting)
• MAX: Maximum displayed value (decimal places and unit
according to the method setting)
• AVG: Displayed values are summed up and divided by the
number of values, rounded to 1 digit more than the configured
decimal places in the method settings (unit according to the
method setting)
• SD: Standard deviation rounded to 1 digit more than the
configured decimal places in the method settings (unit
according to the method setting)
• RSD: Relative standard deviation (rounded to 2 decimal
places in %)
• SUM: Sum of added measurement results
The statistical values are calculated and visualized as soon as a
result is added or updated.
* Factory setting
Software description80 Analytical Balances and Comparators
Page 83

Automation settings
Parameter Description Values
Barcode data
target
* Factory setting
If a barcode reader is connected to the balance, this option
defines how the data is to be processed.
Keyboard Input: The data is written in the currently open input
window. If no input window is open, the data is ignored.
Target weight value: The barcode data is interpreted as a value
for the target weight.
Task ID 1: The received barcode data is treated as identification
text for the Task ID.
Result ID 1: The received barcode data is treated as identification
text for the Result ID.
Keyboard Input* | Target
weight value | Task ID 1
| Result ID 1
Weighing automation
Parameter Description Values
Automatic result Automatically generates a weighing result after a threshold is
reached.
None: No automatic result will be generated.
Without sample tare: After a weight value that reached the
threshold is being removed from the weighing pan, the balance is
not being tared.
Automatic result
threshold
Weight trigger
Automatic zero
Automatic zero
threshold
Tare Mode Defines the tare mode.
Defines the threshold of the option Automatic result.
This option only appears when the option Automatic result is
activated.
Defines the behaviour of the option Automatic result threshold.
Exceeding: The weighing result is generated when the weight
exceeds the defined threshold.
Falling below: The weighing result is generated when the weight
falls below the defined threshold.
This option only appears when the option Automatic result is set
to Without sample tare.
If Automatic zero is set to Active, the balance automatically
zeros the balance when the weight falls below a predefined
threshold.
Defines the threshold of the option Automatic zero.
This option only appears when the option Automatic zero is
activated.
None: No automatic tare.
Automatic tare: The balance stores automatically the first stable
weight as the tare weight.
Pretare: Allows you to enter manually a numerical entry of a fixed
tare weight.
None* | Without sample
tare
Numeric
Exceeding* | Falling
below
Active | Inactive*
Numeric
None* | Automatic tare |
Pretare
Software description 81Analytical Balances and Comparators
Page 84

Automatic tare
threshold
Defines the threshold of the option Tare Mode.
This value defines the minimum weight that must be applied to
the weighing pan so that it is automatically stored as the tare
weight. If the weight is below the limits, it is not automatically
transferred to the tare memory.
Instead of entering the weight, the lightest tare container can be
placed on the weighing pan and the button
pressed. The applied weight is directly taken over as a limit.
This option only appears when the option Tare Mode is set to
Automatic tare.
Pretare value Defines a weight value for the pretare function.
Instead of entering the value, the respective tare container can be
placed on the weighing pan and the button
pressed. The weight is directly taken over as pretare value.
This option only appears when the option Tare Mode is set to
Pretare.
* Factory setting
Print / Export
This section is divided into the following sub-sections:
• Protocol printout and data export
• Label printout for task
• Label printout for weighing item
Numeric
subsequently
Numeric
subsequently
Protocol printout and data export
Parameter Description Values
Strip printer Activates/Deactivates the strip printer. The data to be transmitted
Active | Inactive*
to the printer can be defined in the section Template settings.
Protocol export Activates/Deactivates the weighing data export. Active | Inactive*
Weight value Activates/Deactivates the weighing value character output over
Active | Inactive*
USB.
Protocol template for printout
This menu item can be used to define information to appear in the protocols. The extensive menu is divided into
six submenus in which options for the printout/export can be defined. Information can be enabled or disabled
by activating or deactivating the corresponding checkbox.
All available parameters can be activated or deactivated via the check boxes. To activate or inactivate all at
once, proceed as follows:
1 To deselect all check boxes at once, tap
Deselect all
ð All parameters are deselected.
2 To select all check boxes at once, tap
Select all
ð All parameters are selected.
Parameter Description Values
Header and
Footer
Defines the header (with title, date and time) and/or footer (with
signature and end line) to be printed/exported,
Header | Title | Date /
time | Signature |
Separating lines | Group
titles
Software description82 Analytical Balances and Comparators
Page 85

Balance information
Quality information
Task information Defines which information about the task is being printed/export. Method name | Method
Weighing item
information
Result detail
information
Defines which information about the balance is being printed/
exported:
Defines which quality information is being printed/exported. Tolerance profile |
Defines which information about the weighing items is being
printed/exported.
Defines which information related to the result of the
measurement is being printed/exported.
Balance type* | Balance
ID*| Balance serial
number* | Software
version
Adjustment date / time |
Routine test name |
Routine test last
execution date | Routine
test result |GWP
Approved state |Level
state * | MinWeigh state
comment | Task IDs |
Automatic result
settings| Count | Sum |
Average | Minimum |
Maximum | Standard
deviation | Relative
standard deviation | PCS
below ‒Tolerance | PCS
above +Tolerance
Show excluded
weighing items | Result
State* | Result IDs* |
GWP Approved state |
Level state* | MinWeigh
state | Tolerance state* |
Target and tolerances
state* | Reference PCS |
Reference average
weight*
Weight* | Tare weight |
Gross weight* | Info
weight* | Date / time* |
Stability*
* Factory setting
Label printer for task
Parameter Description Values
Automatic label
printout for task
Used template Chooses the label template. Available labels
[Available Labels}Page85]
Activates/Deactivates the option Automatic label printout for
task.
Active | Inactive*
Field settings
The content of each label field can be defined.
Parameter Description Values
Field settings Defines which information appears in the label fields 1 ...... 8.
The number of the label fields differs depending on the selected
template.
Empty | Method name |
Task ID | Printing date |
Current user
Software description 83Analytical Balances and Comparators
Page 86

Barcode settings
The content of each barcode can be defined. In the following are listed your barcode options.
Parameter Description Values
2D barcode
delimiter
Barcode settings Defines which information appears in the barcode. The number of
The option 2D barcode delimiter appears only when the selected
template in the option Used template has a 2D code.
the barcode fields 1 – 6 differs depending on the selected
template.
TAB | Form feed |
Carriage return | Space |
User defined
Empty | Method name |
Printing date | Current
user | Number of
weighing items | Sum |
Minimum | Maximum |
Average | Standard
deviation | Relative
standard deviation
Label printout for weighing items
The following parameters can be defined:
Parameter Description Values
Automatic label
printout for task
Used template Chooses the label template. Available labels
* Factory setting
[Available Labels}Page85]
Activates/Deactivates the option Automatic label printout for
task.
Active | Inactive*
Field settings
The content of each label field can be defined. In the following are listed your label options.
Parameter Description Values
Field settings Defines which information appears in the label fields 1 – 8. The
number of the label fields differs depending on the selected
template.
Empty | Task ID 1 |
Printing date | Current
user | Number of
weighing items | Sum |
Minimum | Maximum |
Average | Standard
deviation | Relative
standard deviation
Barcode settings
The content of each barcode can be defined.
Parameter Description Values
2D barcode
delimiter
Barcode settings Defines which information appears in the barcode. The number of
The option 2D barcode delimiter appears only when the selected
template in the option Used template has a 2D code.
the barcode fields 1 – 6 differs depending on the selected
template.
The option 2D barcode delimiter appears only when the selected
template in the option Used template has a 2D code.
TAB | Form feed |
Carriage return | Space |
User defined
Empty | Task ID 1 |
Printing date | Current
user | Number of
weighing items | Sum |
Minimum | Maximum |
Average | Standard
deviation | Relative
standard deviation
Software description84 Analytical Balances and Comparators
Page 87

Available Labels
The following label layouts can be selected:
5 large fields 5 small fields
10 small fields 1D barcode with 3 large fields
1D barcode with 3 small fields 1D barcode with 6 small fields
2D barcode with 5 large fields 2D barcode with 5 small fields
2D barcode with 2 large fields and 6 small fields 2D barcode with 8 small fields
6.1.5.4 Performing a Piece Counting
This section describes how the method Piece Counting is being used in a task example. In this example we
are weighing pieces with a tare container.
1 Open the Methods section.
2 Select a defined method from the list or define a new method.
3 Tap
Start method.
ð The method work screen of the selected method opens. The balance displays the defined target value,
the tolerance and the current average weight of one piece.
Software description 85Analytical Balances and Comparators
Page 88

4 Press to zero the balance.
or
If a container is used, place the container (1) on the
weighing pan (2) and press
balance.
ð The door closes automatically (depending on the
door settings)
ð The tare-measurement starts with Taring....
ð When the taring is finished, the door opens
automatically (depending on the door settings).
5 If not yet done, enter the average weight for one piece.
This serves as reference for the piece counting.
6 Place the pieces in the container.
7 Wait until the weight is stable.
8 Tap
9 When the weighing process is finished, tap
Add to protocol.
ð The weighing result appears in the protocol area on
the right side of the screen.
Complete.
ð The window Complete task appears. The result of
the task can be printed on a label printer, the
protocol can be printed manually or the result can
be exported on an external storage device.
ð The task Piece Counting was successfully
completed.
to tare the
Note
It is possible to exclude a weighing results from the protocol by opening the right fly-in window and tapping on
Exclude result. The window Complete task always appears after completing the task, even if the results is
saved automatically.
6.1.5.5 Cloning a method
For cloning a method, see chapter [Cloning a method}Page71].
6.1.5.6 Deleting a method
To deleting a method, see chapter [Deleting a method}Page71].
Software description86 Analytical Balances and Comparators
Page 89

6.1.6 Method Simple formulation
Methods
Simple formulation
Methods list
Tasks
Tests
Adjustments
General Weighing
Interval weighing
Piece Counting
Titration
Delete
Clone
Edit New Print
Start method
06/24/2018
06/24/2018
06/24/2018
06/24/2018
06/24/2018
06/24/2018
Density
6.1.6.1 Method description
This section describes the method Simple formulation. With the method Simple formulation the concentration
of a substance can automatically be calculated.
This section describes how to create a new method with the method wizard, how to work with the method and
the method settings. The parameter of the weighing item (e.g. sample ID and target weight) can either be
entered manually or by using a template. Therefore two different methods exist:
• Simple formulation: Select this method if you want to define the parameters for the weighing item ad-hoc
while weighing or pre-defined on a method level for all weighing items.
• Simple formulation with templates: Select this method if you want to use a template to define the
parameters for the weighing item. Templates are helpful to safe time while weighing items with the same
parameters and to ensure the consistent use of the parameters. For further information see Using templates.
In the section Method settings the settings for both methods Simple formulation and Simple formulation with
templates can be found.
6.1.6.2 Creating a new method for simple formulation
Navigation:
1 Open the Methods section.
2 Tap
ð The method wizard opens, starting at 1. Method type.
3 Tap Method type and select the method type Simple formulation or Simple formulation with templates.
4 Tap
ð The method wizard opens the next creating section 2. Identification.
5 Define the Method name and Result description and tap
ð The method wizard opens the next creating section 3. Configuration.
6 Select the options for Calculate concentration per component, Calculate amount of component and set a
value. Tolerance profile and tap
ð When selected Simple formulation with templates, the wizard opens the optional creating section 4.
Templates.
7 Select a template from the list and define Unit, set more options for Calculate target, select a Target weight
and tap
8 To set a ‒Tolerance or +Tolerance select the parameter, define the values and tap
ð The method wizard opens the last section 5. Save.
9 Tap
ð The method has been created and appears in the list.
Methods
New in the action bar.
Next.
Next.
Next.
Finish to save the new method .
Next.
OK.
Software description 87Analytical Balances and Comparators
Page 90

The newly created method can be performed, see [Performing a simple formulation}Page96]
Edit method - {0}
General
Method type
Simple formulation
Formulation
ID format
Weighing item
Weighing
Automation
Print / Export
Method name
Comment
Lock method
Simple formulation
Simple formulation
Enter here
Close
or edited, see [Method settings}Page88].
6.1.6.3 Method settings
Navigation:
Methods > Methods list > Simple formulation > Edit
The section Simple formulation is divided into the following sub-sections:
General
•
ID format
•
Weighing item
•
Weighing
•
Automation
•
Print / Export
•
All of this sub-sections will be described separately at next with all possible parameter, appendant explanation
and editable setting values.
General settings
Note
The option Method type has been defined in the wizard and cannot be changed.
Parameter Description Values
Method name Defines the name of the method. The system copies the method
Text (1...22 characters)
name that has been defined with the function Method wizard.
Comment The method can be described with a comment. Text (0...128
characters)
Lock method Locks the method for other users and from further editing while
Active | Inactive*
running.
* Factory setting
Software description88 Analytical Balances and Comparators
Page 91

Formulation settings
Parameter Description Values
Calculate target In this section the flask volume and the concentration of the target
can be defined.
Flask volume: Calculates the target weight according to the
reference flask volume and the actual flask volume.
Target concentration: Calculates the target weight according to
the desired target concentration.
This option only appears for the method Simple formulation with
templates.
Calculate concentration per
component
Calculate amount
of component
Concentration
unit
Reference flask
volume
Reference weight
(100%)
Calculates the concentration of the substance based on the
molecular weight, purity volume and dosed amount of substance,
e.g. mmol/l.
If this option is activated, the sub-options Reference weight
(100%) and Concentration unit appear in the list.
Calculates the effective amount of a component based on the
current weighing value.
Defines the concentration unit. mol/l* l mmol/l l mg/ml
Defines the volume of the reference flask. Numeric (1 ml* |
Defines the reference weight.
Instead of entering the reference weight manually, press subse-
quently the button
a reference weight.
. The applied weight is directly taken over as
None* | Flask volume |
Target concentration
Active | Inactive*
Active | Inactive*
l mg/l l µg/ml l g/ml l g/l
l %
1...999999 ml)
Depending on the
capacity of the balance.
* Factory setting
Production and expiry date
Parameter Description Values
Production date Defines the production date.
Current date: The production date is set automatically to the date
when starting the weighing task.
Manual input: The production date can be entered manually
when starting the weighing task.
Expiry date Defines the expiry date of the substance.
Period: The expiry date is set automatically when starting the
weighing task (expiry date = date when starting the weighing task
+ number of days defined in the field Period.
Manual input: The expiry date can be entered manually when
starting the weighing task.
Period Defines the period of the expiry date.
This option only appears when the option Expiry date is set to
Period.
* Factory setting
None | Current date* |
Manual input
None* | Period | Manual
input
Numeric (1 day* |
1...9999 days)
Software description 89Analytical Balances and Comparators
Page 92

ID format settings
Task IDs
Parameter Description Values
Number of task
IDs
Task ID 1 Defines the value of the task ID.
Description
Prefix Defines a prefix for the task ID.
Default value Defines a default value for the task ID. The value of the task ID
For a method up to three task identifiers (task IDs) can be
defined.
If the value of the option Number of task IDs is between 1-3, the
options Task ID, Description and Prefix/Default value appear for
every single task ID.
Manual with default: The value of the task ID can be entered
manually at method execution time.
Automatic timestamp: The system provides a value created from
a prefix with the current date and time appended.
This option allows to set Manual with default or Automatic
timestamp for each task ID.
This option only appears when the option Automatic timestamp
is activated.
can be changed manually while executing the method.
This option only appears when the option Manual with default is
activated.
0 | 1* | 2 | 3
Manual with default* |
Automatic timestamp
Text (0...32 characters)
Text (0...32 characters)
Text (0...32 characters)
* Factory setting
Result IDs
Parameter Description Values
Number of result
IDs
Result ID 1 Defines the value of the result ID.
Description
Prefix Defines a prefix for the result ID.
Default value Defines a default value for the result ID. The value of the result ID
* Factory setting
Defines the number of result IDs.
If the value of the option Number of result IDs is between 1-3,
the options Result ID 1, Description and Prefix/Default value
appear for every single result ID.
Manual with default: The value of the result ID can be entered
manually at method execution time.
Automatic counter: The system provides a value created from a
prefix with an unique number (counter) appended.
Describes the option Result ID 1.
This option only appears when the option Automatic counter is
activated.
can be changed manually while executing the method.
This option only appears when the option Manual with default is
activated.
0 | 1* | 2 | 3
Manual with default* |
Automatic counter
Text (0...32 characters)
Text (0...32 characters)
Text (0...32 characters)
Template settings
Note
Detailed information about how to create templates and the use of templates can be found in the section Using
templates.
Software description90 Analytical Balances and Comparators
Page 93

Parameter Description Values
Component ID Assigns a name to the component ID Text (0...32 characters)
Purity To define the purity of the component. Numeric
(0.001...100%)
Unit Defines the unit of the primary weighing result. The available units
depend on the balance
model.
Target weight Defines the target weight. The target weight will be shown in the
weighing-in aid of the balance (SmartTrac). When a target weight
including tolerances is defined, the SmartTrac indicates if the
current display weight is in tolerance or not.
Target concentration
‒Tolerance Defines the lower tolerance limit.
+Tolerance Defines the upper tolerance limit.
To define the concentration of the component. Numeric
This option only appears when the option Target weight is
activated.
This option only appears when the option Target weight is
activated.
Numeric
(0.001...100%)
Numeric
Numeric
Weighing item settings
In this section a target weight with tolerance limits can be defined. Depending on the selected method, the
parameters for the weighing item are defined directly in the method (Simple formulation) or in one or more
templates (Simple formulation with templates).
Initial values for weighing
Parameter Description Values
Unit Defines the unit of the primary weighing result. The available units
depend on the balance
model.
Target weight Defines the target weight. The target weight will be shown in the
weighing-in aid of the balance (SmartTrac). When a target weight
including tolerances is defined, the SmartTrac indicates if the
current display weight is in tolerance or not.
‒Tolerance Defines the lower tolerance limit.
This option only appears when the option Target weight is
activated.
+Tolerance Defines the upper tolerance limit.
This option only appears when the option Target weight is
activated.
* Factory setting
Numeric
Numeric
Numeric
Weighing setting
Parameter Description Values
Show info weight With this option activated a secondary info weight appears on the
weighing screen on top of the weighing result.
Info unit Defines the unit of the info weight.
This option only appears when the option Show info weight is
activated.
Active | Inactive*
The available units
depend on the balance
model.
* Factory setting
Software description 91Analytical Balances and Comparators
Page 94

Weighing settings
Parameter Description Values
Tolerance profile A tolerance profile stores all the necessary balance settings
needed for a certain weighing method. It is possible to create
different tolerance profiles for different weighing methods.
Available tolerance
profiles are modelspecific.
Electrostatic detection and ionizer
Parameter Description Values
Ionizer Defines whether the ionizer is activated/deactivated. Active | Inactive*
Detection Defines whether the electrostatic detection (StaticDetect) is
activated/deactivated.
Threshold Defines a limit (mg) at which StaticDetect threshold failed.
If the measured approximate weighing error is <= the detection
threshold, the StaticDetect state = OK
If the measured approximate weighing error is > the detection
threshold, the StaticDetect state = Not OK
This option only appears when the Detection is selected.
Show weighing
error
* Factory setting
Defines whether the weighing error is displayed.
If the StaticDetect value is above the treshold, this parameter will
display the effective approximate weighing error.
This option only appears when the Detection is selected.
Active | Inactive*
Numeric (0.40 mg* |
0.01.....10 mg)
Active* | Inactive
Automation setting
Parameter Description Values
Barcode data
target
* Factory setting
If a barcode reader is connected to the balance, this option
defines how the data is to be processed.
Keyboard Input: The data is written in the currently open input
window. If no input window is open, the data is ignored.
Target weight value: The barcode data is interpreted as a value
for the target weight.
Task ID 1: The received barcode data is treated as identification
text for the Task ID.
Result ID 1: The received barcode data is treated as identification
text for the Result ID.
Keyboard Input* | Target
weight value | Task ID 1
| Result ID 1
Weighing automation
Parameter Description Values
Automatic zero
Automatic zero
threshold
If Automatic zero is set to Active, the balance automatically
zeros the balance when the weight falls below a predefined
threshold.
Defines the threshold of the option Automatic zero.
This option only appears when the option Automatic zero is
activated.
Active | Inactive*
Numeric
Software description92 Analytical Balances and Comparators
Page 95

Tare Mode Defines the tare mode.
None: No automatic tare.
Automatic tare: The balance stores automatically the first stable
weight as the tare weight.
Pretare: Allows you to enter manually a numerical entry of a fixed
tare weight.
Automatic tare
threshold
Defines the threshold of the option Tare Mode.
This value defines the minimum weight that must be applied to
the weighing pan so that it is automatically stored as the tare
weight. If the weight is below the limits, it is not automatically
transferred to the tare memory.
Instead of entering the weight, the lightest tare container can be
placed on the weighing pan and the button
pressed. The applied weight is directly taken over as a limit.
This option only appears when the option Tare Mode is set to
Automatic tare.
Pretare value Defines a weight value for the pretare function.
Instead of entering the value, the respective tare container can be
placed on the weighing pan and the button
pressed. The weight is directly taken over as pretare value.
This option only appears when the option Tare Mode is set to
Pretare.
None* | Automatic tare |
Pretare
Numeric
subsequently
Numeric
subsequently
* Factory setting
Print / Export
In this section the options for printing and exporting can be defined.
This section is divided into the following sub-sections:
• Protocol printout and data export
• Label printout for task
• Label printout for weighing item
Protocol printout Protocol printout and data export
Parameter Description Values
Strip printer Activates/Deactivates the strip printer. The data to be transmitted
Active | Inactive*
to the printer can be defined in the section Template settings.
Protocol export Activates/Deactivates the weighing data export. Active | Inactive*
Weight value Activates/Deactivates the weighing value character output over
Active | Inactive*
USB.
* Factory setting
Protocol template for printout
This menu item can be used to define information to appear in the protocols. The extensive menu is divided into
six submenus in which options for the printout/export can be defined. Information can be enabled or disabled
by activating or deactivating the corresponding checkbox.
All available parameters can be activated or deactivated via the check boxes. To activate or inactivate all at
once, proceed as follows:
1 To deselect all check boxes at once, tap
Deselect all
ð All parameters are deselected.
Software description 93Analytical Balances and Comparators
Page 96

2 To select all check boxes at once, tap
ð All parameters are selected.
Parameter Description Values
Header and
Footer
Balance information
Quality information
Task information Defines which information about the task is being printed/export. Method name | Method
Weighing item
information
Result detail
information
Defines the header (with title, date and time) and/or footer (with
signature and end line) to be printed/exported,
Defines which information about the balance is being printed/
exported:
Defines which quality information is being printed/exported. Tolerance profile |
Defines which information about the weighing items is being
printed/exported.
Defines which information related to the result of the
measurement is being printed/exported.
Select all
Header | Title | Date /
time | Signature |
Separating lines | Group
titles
Balance type* | Balance
ID*| Balance serial
number* | Software
version
Adjustment date / time |
Routine test name |
Routine test last
execution date | Routine
test result |GWP
Approved state |Level
state * | MinWeigh state
comment | Task ID |
Flask volume* |
Reference weight* |
Expiry date* |
Production date*
Show excluded
weighing items | Result
State* | Result IDs* |
Molar mass | Purity |
Amount of substance* |
Concentration* | GWP
Approved state | Level
state* | MinWeigh state |
Tolerance state* | Target
and tolerances state*
Weight* | Tare weight |
Gross weight* | Info
weight* | Date / time* |
Stability*
* Factory setting
Label printer task
Parameter Description Values
Automatic label
printout for task
Used template Chooses the label template. Available labels
[Availbele Labels}Page96]
Activates/Deactivates the option Automatic label printout for
task.
Active | Inactive*
Field settings
The content of each label field can be defined.
Software description94 Analytical Balances and Comparators
Page 97

Parameter Description Values
Field settings Defines which information appears in the label fields 1 ...... 8.
The number of the label fields differs depending on the selected
template.
Empty | Method name |
Task ID | Printing date |
Current user
Barcode settings
The content of each barcode can be defined.
Parameter Description Values
2D barcode
delimiter
Barcode settings Defines which information appears in the barcode. The number of
The option 2D barcode delimiter appears only when the selected
template in the option Used template has a 2D code.
the barcode fields 1 – 6 differs depending on the selected
template.
The option 2D barcode delimiter appears only when the selected
template in the option Used template has a 2D code.
TAB | Form feed |
Carriage return | Space |
User defined
Empty | Task ID 1 |
Printing date | Current
user | Number of
weighing items | Sum |
Minimum | Maximum |
Average | Standard
deviation | Relative
standard deviation
Label printout for weighing items
Parameter Description Values
Automatic label
printout for task
Used template Chooses the label template. Available labels
Activates/Deactivates the option Automatic label printout for
task.
Active | Inactive*
* Factory setting
[Availbele Labels}Page96]
Field settings
The content of each label field can be defined.
Parameter Description Values
Field settings Defines which information appears in the label fields 1 – 8. The
number of the label fields differs depending on the selected
template.
Empty | Method name |
Task ID 1 | Printing date
| Current user | Result ID
1 | Result ID 2 | Weight |
Target weight |
+Tolerance | ‒Tolerance
|Tolerance state | Tare
weight | Result State
Barcode settings
The content of each label field can be defined. In the following are listed your label options.
Barcode settings
The content of each barcode field can be defined.
Parameter Description Values
2D barcode
delimiter
The option 2D barcode delimiter appears only when the selected
template in the option Used template has a 2D code.
TAB | Form feed |
Carriage return | Space |
User defined
Software description 95Analytical Balances and Comparators
Page 98

Parameter Description Values
Barcode settings Defines which information appears in the barcode. The number of
the barcode fields 1 – 6 differs depending on the selected
template.
The option 2D barcode delimiter appears only when the selected
template in the option Used template has a 2D code.
Empty | Method name |
Task ID 1 | Printing date
| Current user | Result ID
1 | Result ID 2 | Weight |
Target weight |
+Tolerance | ‒Tolerance
|Tolerance state | Tare
weight | Result State
Availbele Labels
The following label layouts can be selected:
5 large fields 5 small fields
10 small fields 1D barcode with 3 large fields
1D barcode with 3 small fields 1D barcode with 6 small fields
2D barcode with 5 large fields 2D barcode with 5 small fields
2D barcode with 2 large fields and 6 small fields 2D barcode with 8 small fields
6.1.6.4 Performing a simple formulation
This example describes how to perform a simple formulation with two different components. It explains the
basic functions of the method without the use of any templates. Advanced functions such as the calculation of
the concentration of a component can be defined in the method settings.
1 Open the Methods section.
2 Select a method of the type Simple formulation or define a new method.
Software description96 Analytical Balances and Comparators
Page 99

3 Tap
Methods
Titration
Methods list
Tasks
Tests
Adjustments
General Weighing
Interval weighing
Piece Counting
Simple formulation
Delete
Clone
Edit
New Print
Start method
06/24/2018
06/24/2018
06/24/2018
06/24/2018
06/24/2018
06/24/2018
Density
Start method.
ð The method work screen appears.
4 Define the target weight and the tolerance limits for the first component.
5 Select Component ID to define the first component.
6 Select Task ID to define the whole task.
7 Open the door and place the weighing object on the weighing pan carefully.
ð The measurement starts.
8 Tap
Add to protocol.
ð The weight value is being transferred to the section Protocol.
9 Open the door and replace the weighing object.
10 Define the target weight and the tolerance limits for the second component.
11 Select Component ID to define the second component.
12 Open the door and place the weighing object on the weighing pan.
13 Tap
Add to protocol.
ð The weight value is being transferred to the section Protocol.
14 Tap
Complete and select if you want to print or export the task protocol.
ð The weight task is finished and the balance returns to the method work screen.
6.1.6.5 Cloning a method
For cloning a method, see chapter [Cloning a method}Page71].
6.1.6.6 Deleting a method
To deleting a method, see chapter [Deleting a method}Page71].
6.1.7 Method Titration
6.1.7.1 Method description
The method Titration enables the interaction between the balance and the titrator via MT-SICS or RFID-tag. The
optional RFID reader enables data to be read from and written to an RFID tag. The RFID tag serves as a data
carrier between the balance and titrator. The RFID tag placed on the base of a titrating beaker easily and reliably
transfers the sample data, e.g. sample ID and weight. For available RFID reader, see chapter "Accessories".
6.1.7.2 Creating a new method for Titration
Navigation:
1 Open the Methods section.
Methods
Software description 97Analytical Balances and Comparators
Page 100

2 Tap
Edit method - {0} Titration
General
ID format
Weighing item
Weighing
Automation
Print / Export
Titration
Method type
Method name
Lock method
Comment
Titration
Titration
Enter here
Close
New in the action bar.
ð The method wizard opens, starting at 1. Method type.
3 Tap Method type and select the method type Titration.
4 Tap
Next.
ð The method wizard opens the next creating section 2. Identification.
5 Define the Method name and Result description and tap
ð The method wizard opens the next creating section 3. Configuration.
6 Select a RFID option, a Tolerance profile and tap
ð The method wizard opens the last section 4. Save.
7 Tap
Finish to save the new method .
ð The method has been created and appears in the list.
Note
The maximum text length of the Sample ID is 32 characters. If the RFID option activated, the maximum text
length of the Sample ID is 20 characters.
The newly created method can be performed, see [Performing a Piece Counting}Page85]
or can be edited, see [Method settings}Page77].
6.1.7.3 Method settings
Next.
Next.
Navigation:
The section Titration is divided into the following sub-sections:
General
•
Titration
•
ID format
•
Weighing item
•
Weighing
•
Automation
•
Print / Export
•
All of these sub-sections will be described separately.
General settings
Note
The option Method type has been defined in the wizard and cannot be changed.
Methods > Methods list > Titration > Edit
Software description98 Analytical Balances and Comparators
 Loading...