

Mettler Toledo Titration Excellence T5, Titration Excellence T7, Titration Excellence T9 User Manual
Page 1
Titration Excellence
T5/T7/T9
User Manual
Page 2

Page 3

Table of Contents
1 Introduction 3
2 Safety information 4
2.1 Definition of signal words and warning symbols ................................................. 4
2.2 Product-specific safety notes............................................................................. 4
3 Design and Function 6
3.1 Instrument ...................................................................................................... 6
3.1.1 Overview titrator................................................................................ 6
3.1.2 StatusLight ....................................................................................... 6
3.1.3 Terminal .......................................................................................... 7
3.1.4 Titrator rear panel connections............................................................ 8
3.2 User Interface .................................................................................................. 10
3.2.1 Home screen.................................................................................... 10
3.2.2 Keypads .......................................................................................... 11
3.2.3 Menu structure.................................................................................. 11
4 Installation 12
4.1 Standard equipment......................................................................................... 13
4.1.1 Scope of delivery............................................................................... 13
4.1.2 Unpack the titrator............................................................................. 15
4.1.3 Position the titrator ............................................................................ 15
4.1.4 Adjust the angle of the terminal........................................................... 16
4.1.5 Connect and disconnect the terminal ................................................... 16
4.1.6 Connect the titrator to the power supply ............................................... 16
4.1.7 Disconnect the titrator from the power supply ....................................... 17
4.1.8 Set up the titrator for a general titration................................................. 18
4.1.8.1 Attach the titration stand to the titrator ............................................. 19
4.1.8.2 Swivel the titration stand ............................................................... 19
4.1.8.3 Attaching and removing the titration vessel...................................... 20
4.1.8.4 Recommended positions for sensors, tubes and stirrers.................... 20
4.1.8.5 Connect the compact stirrer ........................................................... 20
4.1.8.6 Connect the measuring electrode ................................................... 21
4.1.8.7 Attaching the electrode arm ........................................................... 21
4.1.8.8 Insert and connect a burette .......................................................... 21
4.1.9 Connect a Rondolino TTL sample changer ........................................... 22
5 Operating the instrument 22
5.1 Start up the titrator and shut down the titrator ...................................................... 22
5.2 Running a general titration................................................................................ 23
5.2.1 Preparation ...................................................................................... 23
5.2.2 Rinsing and filling the burette ............................................................. 24
5.2.3 Calibrating and testing the sensor ....................................................... 24
5.2.3.1 Calibrate the sensor...................................................................... 24
5.2.3.2 Test the pH-sensor ....................................................................... 25
5.2.4 Determining the titer .......................................................................... 25
5.2.5 Run an EQP titration.......................................................................... 26
5.2.5.1 Prepare the sample ...................................................................... 26
5.2.5.2 Configure the method ................................................................... 26
5.2.5.3 Create an indirect shortcut............................................................. 26
5.2.5.4 Perform the analysis..................................................................... 26
5.3 Stopping Methods............................................................................................ 27
5.3.1 Suspending or stopping an ongoing analysis (GT or BI) by the user ....... 27
1Titration Excellence
Page 4

6 Transporting the titrator 28
7 Care and maintenance 28
7.1 Cleaning......................................................................................................... 28
7.2 Maintenance ................................................................................................... 29
8 Disposal 29
9 Technical data 30
9.1 Titrator............................................................................................................ 30
9.2 Terminal ......................................................................................................... 30
2 Titration Excellence
Page 5

1 Introduction
Thank you for choosing a METTLER TOLEDO Titration Excellence titrator. Titration Excellence titrators are
easy-to-operate instruments for titrations.
About this document
This document provides you with the information you need to get started with your METTLER TOLEDO titrator.
For a comprehensive description of the instrument and its functions, refer to the Operating
Instructions, supplied as PDF file on the CD.
The instructions in this document refer to titrators running firmware version 5.2.0 or higher.
If you have any additional questions, contact your authorized METTLER TOLEDO dealer or service representative.
u www.mt.com/contact
Conventions and symbols
Refers to an external document.
Note
for useful information about the product.
Elements of instructions
§
Prerequisites
1 Steps
2 ...
ð Intermediate results
ð Results
3Titration Excellence
Page 6
2 Safety information
• Read and understand the information in this User Manual before you use the instrument.
• Keep this User Manual for future reference.
• Include this User Manual if you pass on the instrument to other parties.
If the instrument is not used according to the information in the Operating Instructions or if it is modified, the
safety of the instrument may be impaired and Mettler-Toledo GmbH assumes no liability.
For a comprehensive description of the instrument and its functions, refer to the Operating
Instructions, supplied as PDF file on the CD.
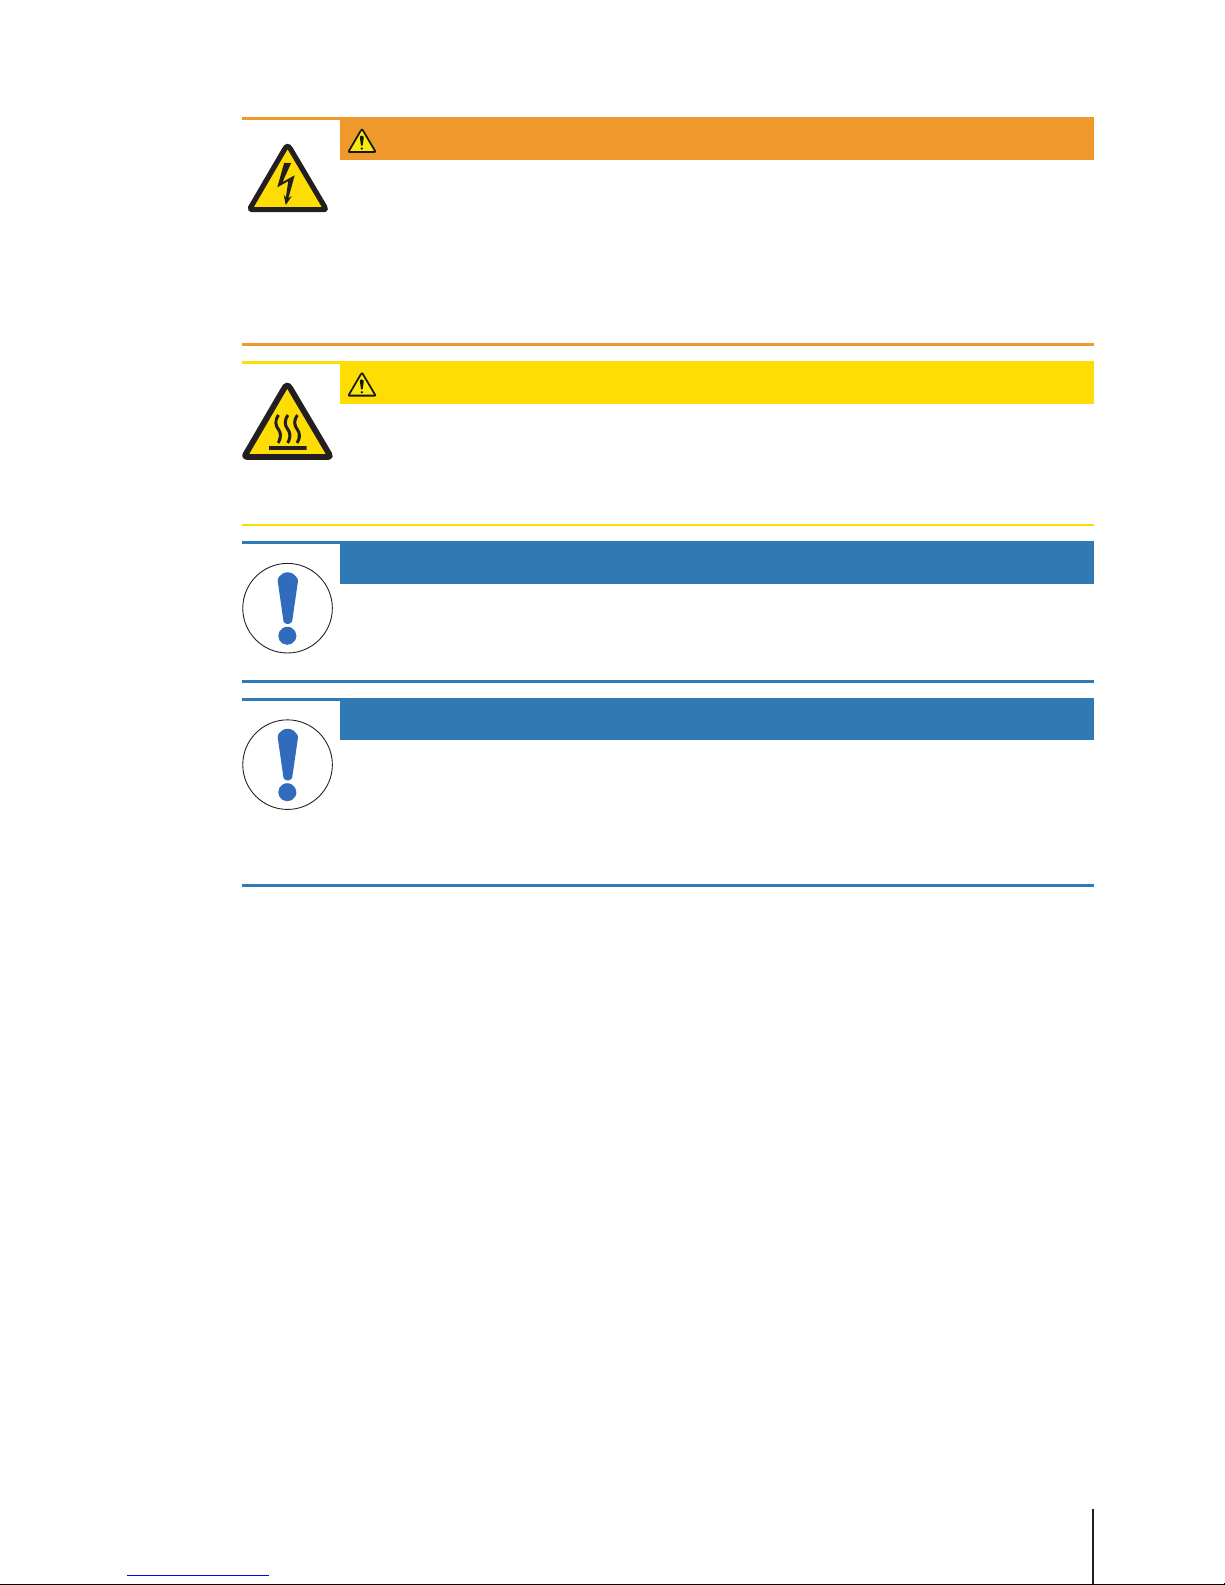
2.1 Definition of signal words and warning symbols
Safety notes are marked with signal words and warning symbols. These show safety issues and warnings.
Ignoring the safety notes may lead to personal injury, damage to the instrument, malfunctions and false
results.
Signal words
WARNING
for a hazardous situation with medium risk, possibly resulting in death or severe
injury if not avoided.
CAUTION
for a hazardous situation with low risk, resulting in minor or moderate injury if not
avoided.
NOTICE
for a hazardous situation with low risk, resulting in damage to the instrument, other
material damage, malfunctions and erroneous results, or loss of data.
Warning symbols
Electrical shock
Hot surface
2.2 Product-specific safety notes
Intended use
This instrument is designed to be used in laboratories by trained staff. The instrument is suitable for the
processing of reagents and solvents.
Any other type of use and operation beyond the limits of technical specifications without written consent from
Mettler-Toledo GmbH is considered as not intended.
This device complies with Industry Canada licence-exempt RSS standard(s) and part 15 of the FCC Rules.
Operation is subject to the following two conditions: (1) this device may not cause interference, and (2) this
device must accept any interference, including interference that may cause undesired operation of the
device. Changes or modifications not expressly approved by the party responsible for compliance could void
the user's authority to operate the equipment.
Responsibilities of the instrument owner
The instrument owner is the person that uses the instrument for commercial use or places the instrument at
the disposal of the staff. The instrument owner is responsible for product safety and the safety of staff, users
and third parties.
METTLER TOLEDO assume that the instrument owner provides the necessary protective gear, appropriate
training for the daily work and for dealing with potential hazards in their laboratory.
4 Titration Excellence
Page 7
Safety notes
WARNING
Danger of death or serious injury due to electric shock!
Contact with parts that contain a live current can lead to injury and death.
1 Only use a METTLER TOLEDO power cable and AC adapter designed for your instrument.
2 Connect the power cable to a grounded power outlet.
3 Keep all electrical cables and connections away from liquids.
4 Replace damaged power cables and AC adapters immediately.
CAUTION
Danger of burns due to hot surfaces!
Parts of the cover of the coulometer board can reach temperatures that cause injuries if
touched.
− Do not touch the place marked with the warning symbol.
NOTICE
Danger of damaging the touch screen with pointed or sharp objects!
Pressing on the touch screen with pointed or sharp objects may damage it.
− Operate the touch screen by applying gentle pressure with the pad of your finger.
NOTICE
Danger of damage to the instrument due to incorrect parts!
Using incorrect parts with the instrument can damage the Instrument or cause the instrument
to malfunction.
− Only use parts supplied with the instrument, listed accessories and spare parts from
METTLER TOLEDO.
5Titration Excellence
Page 8
3 Design and Function
3.1 Instrument
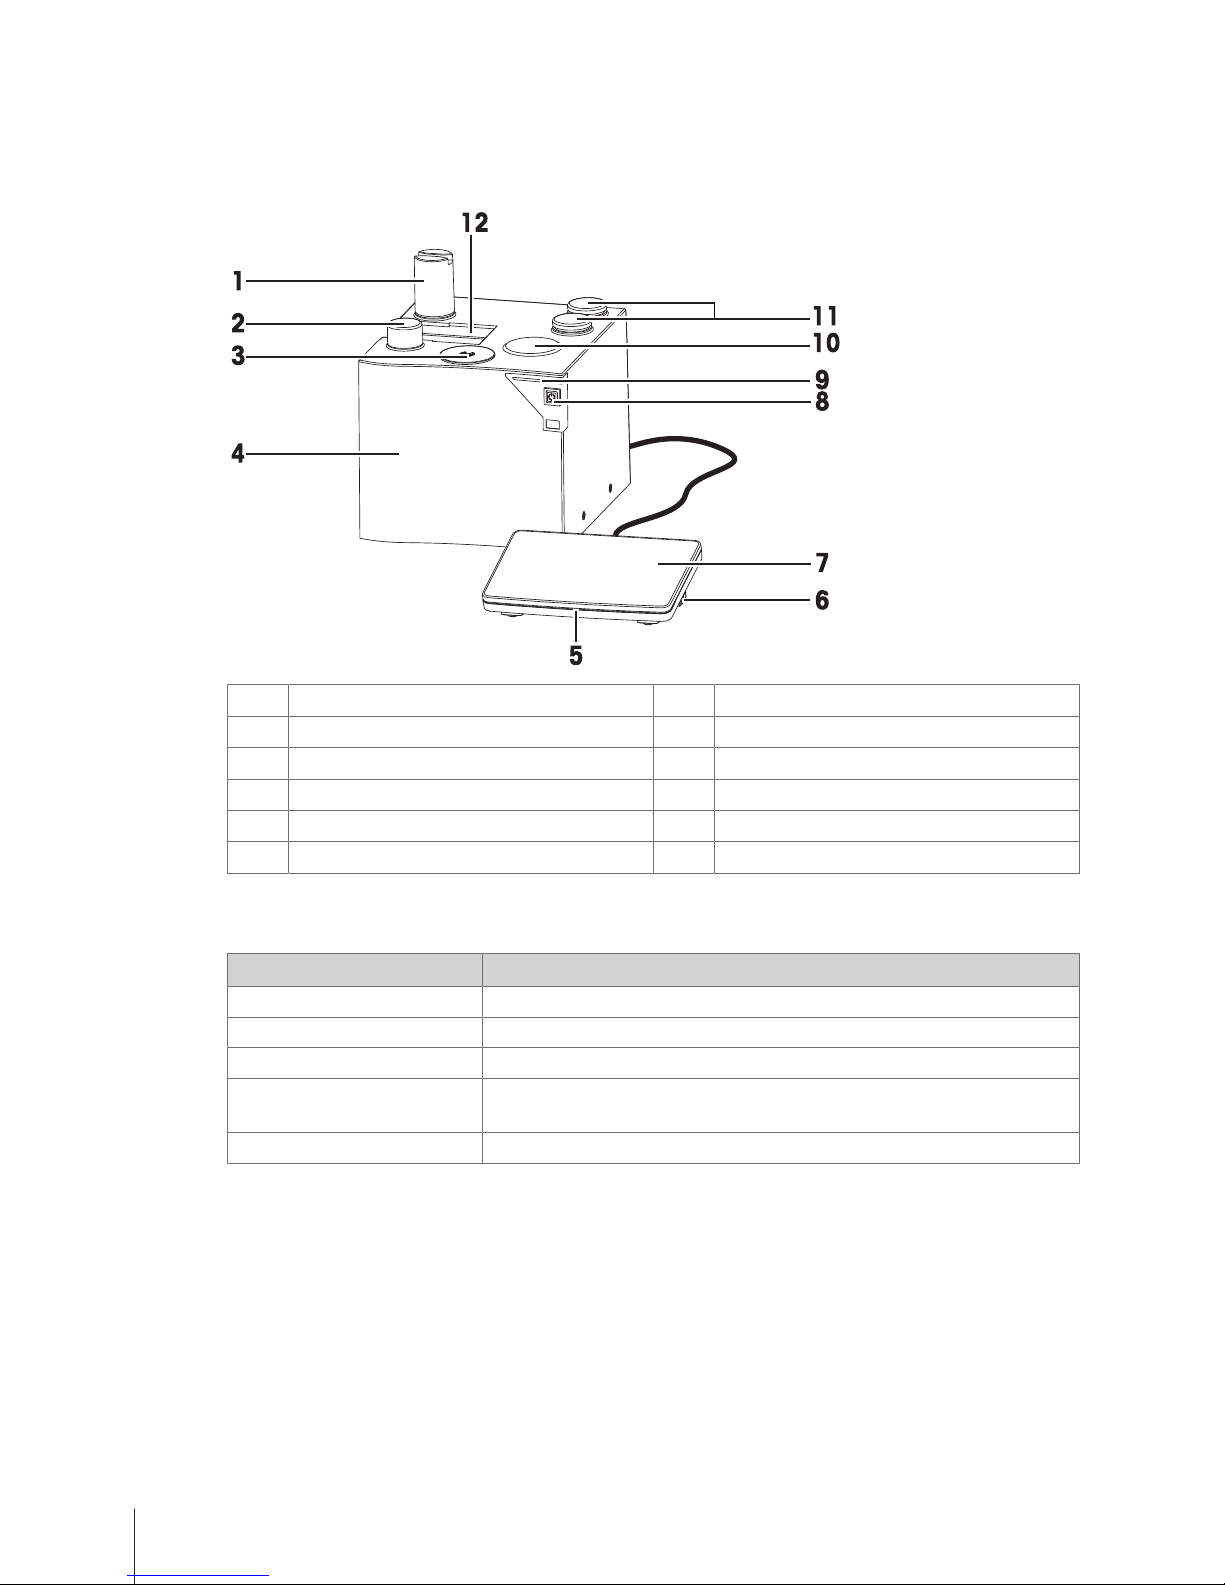
3.1.1 Overview titrator
1
Burette drive
7
Touchscreen
2
Burette arrestment knob
8
Power button
3
SmartSample reader (SmartSample™)
9
Instrument status light (StatusLight™)
4
Instrument housing
10
Internal magnetic stirrer
5
Terminal status light (StatusLight™)
11
Mounting stations for titration stand
6
USB-connection for data transfer
12
Mounting rail for burettes
3.1.2 StatusLight
The StatusLight provides information about the status of the titrator.
StatusLight Titrator status
Steady, green light The titrator is ready for operation.
Blinking green light The titrator is performing a task.
Steady, orange light The titrator waits for the user to perform an action.
Blinking, orange light The task has been interrupted, for example because a value lies outside
of its limits.
Steady,red light The titrator has an error.
6 Titration Excellence
Page 9

3.1.3 Terminal
Nr. Name Function
1
Touch screen Displays information and can be used to enter information.
2 Reset button
Ends all tasks that are currently running.
3
Home button Returns you to the home screen from any menu position.
4
StatusLight™ Provides information about the status of the titrator.
5
Info button Accesses the interactive online help for the content of the current dialog.
6
USB A USB connection for data transfer
7Titration Excellence
Page 10
3.1.4 Titrator rear panel connections
The overview includes the connections of the main board and the optional plug-in cards.
1
2
3
E
M
No. Plug-in card type Name Use Sensor/Device
E
Coulometer board
(CoulB)*
REF
Reference input to
SENSOR1
For example: DX200
SENSOR1
Sensor types: mV, pH,
ISE, phototrode
For example: DX223
PT1000
PT1000 temperature
sensor
DT1000
GENERATOR
Generator electrode Generator electrode with
diaphragma, generator
electrode without
diaphragma
Safety label for hot
surfaces
Warning that the marked
place can be hot enough
to cause burns.
–
SENSOR2
Sensor types: polarized,
mV, pH, ISE, phototrode
For example: DM143-SC
3
Free – – –
2
Conductivity board
(CB)*
SENSOR
Sensor types: mV, pH,
ISE, phototrode
For example: DGi111SC
PT1000
PT1000 temperature
sensor
DT1000
CONDCUTIVITY
Conductivity sensor,
Thermotrode
For example: InLab
®
717
COM
Balance/auxiliary device For example: XS
analytical balance
8 Titration Excellence
Page 11
No. Plug-in card type Name Use Sensor/Device
1
Analog board (AB) /
pH board**
STIRRER PUMP
Stirrer/pump For example: Compact
stirrer/DV704 titration
stand/SP280 pump/
OE06 output expander/
Y-cable
SENSOR1
Sensor types: mV, pH,
ISE, phototrode
For example: DX223
REF
Reference input to
SENSOR1
For example: DX200
PT1000
PT1000 temperature
sensor
DT1000
SENSOR2
Sensor types: polarized,
mV, pH, ISE, phototrode
For example: DM143-SC
COM
Balance/auxiliary device For example: XS
analytical balance
M
Main board (MB)
STIRRER1 PUMP1
Stirrer1/Pump1 For example: Compact
stirrer/DV704 titration
stand/SP280 pump/
OE06 output expander/
Y-cable
STIRRER2 PUMP2
Stirrer2/Pump2 For example: Compact
stirrer/DV704 titration
stand/SP280 pump/
OE06 output expander/
Y-cable
TTL-I/O
TTL input/output/
auxiliary device
For example: T-Box/
RondolinoTTL/Stromboli
COM1
Balance/auxiliary device For example: Analytical
Balance/TV6
COM2
Balance/sample
changer/auxiliary device
For example: Analytical
Balance/TV6
USB PC
PC For example: LabX
USB 1
Printer/barcode reader/
memory stick/USB hub/
autosampler
For example: InMotion
Autosampler/
InMotionKF/USB-P25
USB 2
Printer/barcode reader/
memory stick/USB hub/
autosampler
For example: InMotion
Autosampler/
InMotionKF/USB-P25
ETHERNET
Network For example: LabX
POWER SUPPLY
AC adapter AC adapter
CAN OUT
CAN connection Dosing unit
TERMINAL
Terminal Terminal
* Not part of the scope of delivery
** Not part of the scope of delivery for T5C
9Titration Excellence
Page 12

3.2 User Interface
3.2.1 Home screen
541 2 3
678
9
Home
Methods
Series
templates
Results
Setup
Manual
Tasks
StartUser dataLog out
Name Explanation
1 Shortcut area
Shows indirect and direct shortcuts for frequently used methods. Shortcuts are
saved in the user profile and can be defined, changed and deleted by the user.
2 Indirect shortcut An indirect shortcut opens the window Start analysis of the method.
3 Direct shortcut A direct shortcut starts the method without opening the window Start analysis.
4 Status bar
The status bar contains the current menu item, user name as well as date and
time.
5 Instrument status
Shows the current working status of the instrument.
Blue
No measurement running
Green
Measurement running
6 Start
Switch to direct measurement (quick start for the defined standard
measurement of this instrument).
7 User data
Opens a window with information about the currently logged in user.
8 Log out Directly log out the current user. The window Login opens after logging out.
9 Menus Methods
Create and handle methods for every measurement type.
Series templates
Open the menu for series templates for every method available on the
instrument.
Results
Display all measurement results, print out or export them. Visit detail information about every single result.
Setup
Define all system settings in this menu, e.g,, hardware settings, user
management or user preferences. These settings are usually made during
installation of the instrument.
Manual
Display the manual operations available on the instrument.
10 Titration Excellence
Page 13

3.2.2 Keypads
Alphabetic keypad Numeric keypad
Cancel
Preview
OK
Method ID
4
1
2
3
5
6
Cancel
OK
Enter auxiliary value
1
2
• Tap (1) to see how your input looks like.
• Tap (2) for capital letters.
• Tap (3) for lowercase letters.
• Tap (4) to switch to a numeric keypad and
(2) to turn back to alphanumeric.
• Tap (5) to delete all entered letters or
numbers.
• Tap (6) to delete the last entered letter or
number.
• Tap (1) to delete all entered numbers.
• Tap (2) to delete the last entered number.
3.2.3 Menu structure
Methods
The menu Methods has no submenus.
Series templates
The menu Series templates has no submenus.
Results
The menu Results has the following submenus.
• All results
• Statistics
• Samples
• Add result
• Recalculate
• Reevaluate
• Buffer
• Undo all
Setup
The menu Setup has the following submenus.
Menu level 2 Menu level 3
Chemicals Titrants
Auxiliary reagents
Calibration standards
Concentration and titer standards
Substances
11Titration Excellence
Page 14

Menu level 2 Menu level 3
User settings Language
StatusLight
Screen
Audio signal
Shortcuts
Keyboard
Values Blanks
Auxiliary values
Hardware Sensors
Pumps
Peripherals
Titration Stands
Auxiliary Instruments
Homogenizer (only T7 and T9)
Liquid Handler (only T7 and T9)
Global settings System
User management
Analysis and resources behavior
Solvent Control
Mainten. & Service MT-Service
Import / Export
Reset to factory settings
Titrator firmware history
Board firmware
Terminal
Board data
Drives
Burettes
Upgrade (only T7)
Update
Delete Mettler method template
Manual
The menu Manual has the following submenus.
• Stirrer
• Sensor
• Burette
• Pump
• Auxiliary instrument
• Sample changer
• SmartSample
4 Installation
Standard equipment for the titrator types varies. For this reason, installation steps may vary.
12 Titration Excellence
Page 15

4.1 Standard equipment
4.1.1 Scope of delivery
Titrators
Part Order number T5 T5C T7 T9
Titrator – • • • •
Analog board 51109818 • – • •
AC adapter 30298362 • • • •
Power cable (country specific) – • • • •
Terminal WVGA 7inch AnaChem – • • • •
Terminal protection Cover – • • • •
Triaxial SC LEMO cable 70cm 89601 • – • •
USB cable A-B 180cm 51191926 • – • •
Torx screwdriver 10 51191659 • • • •
Burette DV1010 10mL 51107501 • – – –
Manual titration kit
• Manual titration stand, complete
• Compact stirrer
• Propeller stirrer
• Magnetic stirrer bar
• Adapter for dispensing tube
• Electrode sleeve
• NS 7.5 stopper (3 pcs.)
• NS 14.5 stopper (4 pcs.)
• Titration vessel 100mL made
from polypropylene (2 pcs.)
51109220 • – – –
13Titration Excellence
Page 16

Part Order number T5 T5C T7 T9
CD Titration User Documentation 30297239 • • • •
User Manual – • • • •
Memo Card – • • • •
Test report – • • • •
EC declaration of conformity – • • • •
Titrator bundles
Part Order number T5 InMotion
Flex
T5 Rondolino
Titrator – • •
Analog board 51109818 • •
AC adapter 30298362 • •
Power cable (country specific) – • •
Terminal WVGA 7inch AnaChem – • •
Triaxial SC LEMO cable 70cm 89601 • •
USB cable A-B 180cm 51191926 • •
Torx screwdriver 10 51191659 • •
14 Titration Excellence
Page 17

Part Order number T5 InMotion
Flex
T5 Rondolino
Burette DV1010 10mL 51107501 • •
Sample changer Rondolino TTL 51108500 – •
Sample Changer InMotion Flex Kit
100mL
30370014 • –
Auto titration kit
• Electrode holder assembly
• Compact stirrer
• Propeller stirrer
51109221 • •
CD Titration User Documentation 30297239 • •
User Manual – • •
Memo Card – • •
Test report – • •
EC declaration of conformity – • •
4.1.2 Unpack the titrator
1 Remove the titrator (and accessories) from the protective packing material.
2 Store the packing material for later transport over long distances.
3 Check if you received all parts listed in the scope of delivery.
4 Inspect the parts visually for flaws or damage.
5 If parts are missing or damaged, report it immediately and file a freight claim if needed.
4.1.3 Position the titrator
The instrument has been developed for indoor operation in a well-ventilated area. The following site
requirements apply:
• The ambient conditions are within the limits specified in the technical data.
• No powerful vibrations
• No direct sunlight
• No corrosive gas atmosphere
• No explosive atmosphere
15Titration Excellence
Page 18

• No powerful electric or magnetic fields
4.1.4 Adjust the angle of the terminal
The angle of the terminal has twopositions.
− To increase the angle of the terminal, fold out
the two feet(1) at the underside of the terminal.
4.1.5 Connect and disconnect the terminal
Connect the terminal
§
The titrator has shut down.
1 Plug the supplied terminal cable into the socket in the back of the terminal.
2 Plug the terminal cable into the TERMINAL socket on the rear panel of the titrator.
3 Start up the titrator.
ð The titrator automatically detects the terminal and activates it.
Disconnect the terminal
§
The titrator has shut down.
1 Remove the terminal cable from the socket in the back of the terminal.
2 Remove the terminal cable from the TERMINAL socket on the rear panel of the titrator.
4.1.6 Connect the titrator to the power supply
WARNING
Danger of death or serious injury due to electric shock!
Contact with parts that contain a live current can lead to injury and death.
1 Only use a METTLER TOLEDO power cable and AC adapter designed for your instrument.
2 Connect the power cable to a grounded power outlet.
3 Keep all electrical cables and connections away from liquids.
4 Replace damaged power cables and AC adapters immediately.
16 Titration Excellence
Page 19

NOTICE
Danger of damage to the AC adapter due to overheating!
If the AC adapter is covered or in a container, it is not sufficiently cooled and overheats.
1 Do not cover the AC adapter.
2 Do not put the AC adapter in a container.
The titrator is operated using an AC adapter. The AC adapter is suitable for all supply line voltages ranging
from 100...240VAC ±10% and 50-60Hz.
1 Install the cables in such a way that they cannot be damaged or interfere with operation.
2 Insert the plug of the power cable in the socket of the AC adapter.
3 Insert the plug of the AC adapter in the POWER SUPPLY socket at the back of the titrator.
4 Insert the plug of the power cable in a grounded power outlet that is easily accessible.
4.1.7 Disconnect the titrator from the power supply
§
The titrator has shut down.
1 Pull the plug of the power cable out of the power outlet.
2 Pull the plug of the AC adapter out of the POWER SUPPLY socket at the back of the titrator.
17Titration Excellence
Page 20

4.1.8 Set up the titrator for a general titration
The illustration shows the setup of an Excellence Titrator for a general titration. For this setup you need a
titrator, and the accessories "Manual titration kit" and "Interchangeable burette set."
2
1
3
4
5
6
7
8
10
9
1
Dispensing tube
6
Burette
2
Compact stirrer
7
Titrant bottle
3
Electrode
8
Burette holder
4
Titration stand
9
Holder for dispensing tube
5
Titration vessel
10
Suction tube
18 Titration Excellence
Page 21

4.1.8.1 Attach the titration stand to the titrator
§
The spacing ring, clamping ring and threaded ring are mounted on the titration stand.
1 Remove the cover from one of the mounting holes.
2 Position the titration stand over the uncovered
mounting hole.
3 Place the screw in the hole of the titration stand and
screw it in the mounting hole.
4 Tighten the screw.
4.1.8.2 Swivel the titration stand
The titration stand can be swivelled among three predefined positions. If you use a compact stirrer, use the
titration stand in the swivelled out position.
1 Pull the titration stand upward out of the holder until
you feel resistance.
2 Swivel the titration stand to the desired position.
3 Slide the titration stand down until it rests on the
holder.
19Titration Excellence
Page 22

4.1.8.3 Attaching and removing the titration vessel
Attaching the titration vessel
§
The titration stand is swivelled out.
1 Turn the threaded ring a quarter to a half turn clockwise.
2 Guide the titration vessel upward(1) into the titration stand and
hold the titration vessel in place.
3 Tighten the threaded ring(2).
4 Check that the titration vessel is firmly attached before you let it go.
Removing the titration vessel
§
The titration stand is swivelled out.
1 Hold the titration vessel with one hand.
2 Turn the threaded ring a quarter to a half turn clockwise(1).
3 Pull the titration vessel downward(2) out of the titration stand.
4.1.8.4 Recommended positions for sensors, tubes and stirrers
1
Dispensing tube
1
2
3
4
6
7
8
5
2
Sensor
3
Sensor or rinsing unit
4
Sensor
5
Compact stirrer
6
Dispensing tube
7
Sensor
8
Dispensing tube
4.1.8.5 Connect the compact stirrer
Depending on the configuration of the titrator, three or more compact stirrers can be connected. Compact
stirrers attached directly to the titrator can be used in the manual titration stand or in connection with sample
changers. The titrator controls turning on and off and stirrer speed.
1 Shut down the titrator.
20 Titration Excellence
Page 23

2 Plug the compact stirrer into one of the STIRRER
PUMP sockets on the rear of the titrator.
3 Start up the titrator.
ð The titrator detects the connected compact stirrer.
4.1.8.6 Connect the measuring electrode
§
No task is running on the titrator
1 Insert the measuring electrode into an opening in the
titration stand.
2 Connect the triaxial cable to the SENSOR1 socket or
SENSOR2 socket of the analog board on the rear of
the titrator.
ð The titrator detects the measuring electrode.
4.1.8.7 Attaching the electrode arm
The electrode holder is used to receive an electrode in an
electrode sleeve.
1 Remove the cover from one of the mounting holes.
2 Position the electrode holder over the uncovered mounting
hole.
3 Place the screw in the hole of the electrode holder and
screw it in.
4 Tighten the screw.
4.1.8.8 Insert and connect a burette
Current generation burettes are equipped with an Smart Tag on the holder (visible by the small, black cover
plate). The Smart Tag is used for reading and writing properties such as titrate name, concentration or
usable life.
For a description of the burette, refer to the operating instructions supplied with burettes.
21Titration Excellence
Page 24

§
The burette is assembled.
§
The burette holder is mounted on the titrant bottle.
§
The piston rod(5) is in the home position.
8
6
3
4
5
7
1 2
1 Turn the arrestment knob(6) in the opposite direction
of the arrow.
2 Orient the burette so that the recesses on the driver
arm(3) are parallel to the groove(7) on the base of
the burette housing.
3 Slide the burette(8) on to the titrator either from the
left (as illustrated) or from the right(4).
4 Turn the arrestment knob(6) in the direction of the
arrow to secure the burette.
5 Place the suction tube from the titrant botttle into the
left hole(1) of the burette.
6 Place the dispensing tube into the right hole(2) of the
burette.
7 To prevents spills, place the free end of the dispensing
tube into the titration vessel, the waste bottle or
another suitable container.
4.1.9 Connect a Rondolino TTL sample changer
The Rondolino sample changer is controlled by TTL signals from the titrator.
The installation of the sample changer is described in the separate Rondolino operating
instructions.
§
The sample changer is installed and switched off.
1 Shut down the titrator.
2 Plug the cable supplied with the sample changer into
the TTL-I/O socket on the sample changer.
3 Plug the cable into the TTL-I/Osocket on the rear panel
of the titrator.
4 Start up the titrator.
5 Switch on the sample changer.
ð The titrator automatically detects the sample changer.
5 Operating the instrument
5.1 Start up the titrator and shut down the titrator
Start up the titrator
− Press the power button(2).
ð The StatusLight(1) turns green and turns off after a few seconds.
ð The titrator starts up and detects connected devices.
ð The titrator is ready for use when the StatusLight(1) is steady and green.
22 Titration Excellence
Page 25

Shut down the titrator from the touch screen
− Tap Home > Log out > Shut down.
ð The titrator stops running tasks and shuts down.
ð The AC adapter and the control circuit for the power button are energized. The rest of the titrator is no
longer energized.
Shut down the instrument using the power button
− Press the power button for less than 1s.
ð The titrator stops running tasks and shuts down.
ð The AC adapter and the control circuit for the power button are energized. The rest of the titrator is no
longer energized.
Shut down of the instrument in emergency situations
− Pull the plug of the power cable out of the power outlet.
5.2 Running a general titration
To explain the procedure for a titration method, a simple acid-base titration with a manual titration stand is
described. 5 ml of HCl solution (0.1 mol/L) is titrated with NaOH (0.1 mol/L).
Material
Sensor: DGi115-SC
Chemicals
For this titration you need the chemicals listed below.
• Approx. 5 ml of a HCl solution (0.1 mol/L)
• A titrant bottle containing a carbonate free NaOH solution (0.1 mol/L)
• 3 buffer solutions: pH 4.01, 7.00 and 9.21 from METTLER TOLEDO
• Approximately 50 mg potassium hydrogen phthalate
5.2.1 Preparation
§
The titrator is assembled, connected, and installed (see Installation).
§
A compact stirrer is placed in the appropriate opening on the titration stand and connected to the
STIRRER PUMP output of the titrator.
§
A USB printer is connected to port USB 1 or USB 2 of the titrator.
1 Tap Setup > Hardware > Titration Stands > Manual stand > Save.
2 Prepare the 10 ml burette for the sodium hydroxide.
3 To protect the NaOH solution against CO2, install a drying tube on the burette holder of the NaOH bottle.
4 Insert the burette.
ð An Info dialog appears, which allows you to initialize the burette. Burettes only have to be initialized
the first time they are used on the titrator.
5 If you use the burette for the first time on the titrator, tap Initialize.
ð The titrator initializes the burette.
6 When the burette is initialized, remove the burette from the titrator and place the burette back on the
titrator.
ð The titrator recognizes the initialized burette.
7 To create a new titrant for the burette, tap Create.
8 To assign a titrant to the burette, tap Assign .
ð The system updates the burette data and the assigned titrant appears with the suffix PnP in the
setup.
9 Attach a titration vessel to the titration stand and connect the dispensing tube for the titrant to the titration
head.
23Titration Excellence
Page 26

5.2.2 Rinsing and filling the burette
To fill the burette and tubes with titrant and remove any air bubbles from the system, rinse the burette three
times with titrant with the manual operation Rinse.
§
The titrator is prepared as described in [Preparation}Page23].
1 To ensure that the system has no leaks, check all tubes and closing points for firm seating.
2 Make sure that the free end of the dispensing tube for the titrant is placed in the titration vessel or another
container.
3 Tap Manual > Burette > Rinse.
ð The dialog Rinse opens.
4 Set Titrant to NaOH 0.1mol/L.
5 Set Cycles to "3".
6 To start the rinse procedure, tap Start.
ð The rinse procedure starts and an animation shows the progress.
7 When the rinse procedure is complete, tap OK.
ð The dialog Rinse opens.
ð The burette is filled and the tubes are free of air bubbles.
5.2.3 Calibrating and testing the sensor
The following describes how to calibrate a pH sensor or carry out a sensor test.
Preparation
1 Make sure no analysis is running on the titrator.
2 Connect the plug of the sensor (DGi115-SC) to the port "SENSOR" of the titrator.
3 Insert the sensor into the titration head.
4 Prepare three titration vessels containing buffer solutions (pH 4.01, 7.00 and 9.21).
5.2.3.1 Calibrate the sensor
1 Tap Methods > New > Standard method templates > Calibration.
ð A list of method functions appears.
2 Tap Sample (Calib).
ð The dialog Sample (Calibration) opens.
3 Make sure Sensor is set to DGi115-SC.
4 Make sure the settings for the buffer are as listed below.
Buffer 1: 4.01
Buffer 2: 7.00
Buffer 3: 9.21
5 Tap OK > Save
ð The new method is saved in the method list, with the next free ID and with the title Calibration.
6 Tap Start.
ð The dialog Start analysis opens.
7 To ensure that the system has no leaks, check all tubes and closing points for firm seating.
8 Tap Start.
ð The system asks you to attach the titration vessel with sample 1 to the titration arm.
9 Attach the titration vessel with the buffer solution with pH 4.01 to the titration arm and tap OK.
ð The measurement starts after the stirring time.
ð During the measurement the online screen displays the time, the measured value in [mV] and a
curve.
ð During the calibration, the system will output a record on the printer.
ð When the measurement is completed, the system asks you to attach the titration vessel with the next
sample to the titration arm.
24 Titration Excellence
Page 27

10 Remove the titration vessel from the titration arm.
11 Rinse the electrode with deionized water.
12 Repeat the last 3 steps for the buffer solution with pH 7.00 and the buffer solution with pH 9.21.
ð When the calibration is completed, the calibration data is automatically copied to the setup.
5.2.3.2 Test the pH-sensor
1 Tap Methods > New > Standard method templates > Sensor test.
ð A list of method functions appears.
2 Tap Sample (Calib).
ð The dialog Sample (Calibration) opens.
3 Make sure Sensor is set to DGi115-SC.
4 Make sure the settings for the buffer are as listed below.
Buffer 1: 4.01
Buffer 2: 7.00
Buffer 3: 9.21
5 Tap OK > Save
ð The new method is saved in the method list with the next free ID and with the title Sensor test.
6 Tap Start.
ð The dialog Start analysis opens.
7 To ensure that the system has no leaks, check all tubes and closing points for firm seating.
8 Tap Start.
ð The system asks you to attach the titration vessel with sample 1 to the titration arm.
9 Attach the tiration vessel with the buffer solution with pH 4.01 to the titration arm and tap OK.
ð The measurement starts after the stirring time.
ð During the measurement the online screen displays the time, measurement in [mV] and the curve.
ð During the pH-sensor test, the system will output a record on the printer.
ð When the measurement is completed, the system asks you to attach the titration vessel with the next
sample to the titration arm.
10 Remove the titration vessel from the titration arm.
11 Rinse the electrode with deionized water.
12 Repeat the last 3 steps for the buffer solution with pH 7.00 and the buffer solution with pH 9.21.
ð When the pH-sensor test is completed, the data is automatically copied to the setup.
5.2.4 Determining the titer
1 Weigh about 50 mg of potassium hydrogen phthalate and dissolve it in a titration vessel containing
deionized water.
2 Tap Methods > New > Standard method template > Titer with EQP.
ð A list of method functions appears.
3 Tap Sample (Titer).
4 Set the parameter Entry to Before and tap OK.
5 Tap Titration (EQP) > Termination.
6 Activate After number of recognized EQPs, set Number of EQPs to 1 and tap OK.
7 To exit the method function, tap OK
8 To save the new method, tap Save.
9 To ensure that the system has no leaks, check all tubes and closing points for firm seating.
10 Tap Start.
ð The Start analysis dialog opens.
11 Enter the sample size.
25Titration Excellence
Page 28

12 Tap Start.
ð The titer determination begins.
ð The titrator asks you to add sample 1/1.
13 Attach the titration vessel with potassium hydrogen phthalate solution to the titration head and tap OK.
ð The titration starts after the stirring time.
ð During the titer determination, the online screen displays the measured pH values over the titrated
volume in [mL].
ð After the titer determination is completed, the titer is copied to the setup.
14 After the titer determination is completed, rinse the sensor with deionized water.
5.2.5 Run an EQP titration
5.2.5.1 Prepare the sample
1 Fill 5 ml HCl (0.1 mol/L) into a titration vessel and dilute it with approx. 50mL deionized water.
2 Attach the titration vessel to the titration arm.
5.2.5.2 Configure the method
1 Tap Methods > New > Standard method template > EQP.
2 Tap Title.
3 Enter a title for the new method in the field Title and tap OK.
4 Tap Sample.
5 In the parameter ID 1 enter your choice of ID for the sample to be analyzed.
6 Set Entry type to Volume.
7 Set Lower limit to 6.0mL.
8 Set Upper limit to 50.0mL.
9 Set Entry to Before and tap OK.
10 Tap Titration (EQP) > Termination.
11 Activate the parameter After number of recognized EQPs, set Number of EQPs to 1 and tap OK.
12 To exit the method function, tap OK.
13 Tap Calculation R1.
14 Tap Result proposals.
15 Select the result Content with the unit mol/L.
ð The main parameters in the method function Calculation R1 are filled in automatically.
16 Set M [g/mol] to Hydrochloric acid and tap OK.
17 Tap Calculation R2.
18 Tap Delete.
19 Tap Save.
5.2.5.3 Create an indirect shortcut
1 Tap Start.
ð The Start analysis window opens.
2 Tap AddToHome.
ð The Shortcut parameters window opens.
3 Enter a name for the shortcut in Description.
4 Make sure Immediate start is deactivated.
5 Tap Save.
ð The home screen with the new shortcut opens.
5.2.5.4 Perform the analysis
1 To ensure that the system has no leaks, check all tubes and closing points for firm seating.
26 Titration Excellence
Page 29

2 Select the shortcut on the home screen.
ð The dialog Start analysis opens.
3 In the parameter Enter sample size enter the sample size.
4 Tap Start.
ð You are prompted to add the sample.
5 If the titration vessel is not attached to the titration arm, attach the titration vessel containing the HCl
solution to the titration arm and tap OK.
ð The titration starts after the pre-stirring period.
ð During the titration, the screen displays the measured pH values over the titrated volume in [mL].
ð After the titration, a record is printed.
ð All results are saved.
6 After the titration, rinse the sensor with deionized water.
7 To view the saved result, tap Home > Results.
5.3 Stopping Methods
Analyses or series of analyses that are in progress can be interrupted or terminated by the user in order to
intervene in the analysis process or by the titrator itself.
The options available in the event of an interruption of the analysis procedure are listed below.
5.3.1 Suspending or stopping an ongoing analysis (GT or BI) by the user
If you wish to make changes when an analysis or series is in progress, you can suspend the relevant
method as follows:
1 Tap Suspend(1) to suspend the current
analysis.
ð The dialog Suspending options opens.
Time remaining
Suspend
Samples
Tasks
1
Speed
Results
Stir
27Titration Excellence
Page 30

2 Tap Save series data(1) to save the current
sample series. Only the completed samples will
be saved.
ð If the maximum permitted number of series
has been reached, the series is not saved.
ð Sample data from a method that is waiting
in a queue can be saved by selecting
Suspend > Save series data.
3 Tap Skip sample(2) to skip the current sample
and continue with the next sample of the series.
ð The current sample is marked in Results as
Excl..
4 Tap Skip loop(3) to skip the loop and continue
with the next loop of the series.
ð The loop is marked in Results as Excl..
5 Tap Continue(4) to continue with the current
sample.
6 Tap Stop definitely(5) to stop the current
method.
Save series data
Continue
Stop
definitely
Tasks
1
2
3
4
Suspending options
Skip sample
Skip loop
5
Note
• If a Calib. loop is skipped, the analysis continues in accordance with the corresponding method
function Calibration.
• If required, it is possible to include a skipped sample (Excl.) into a statistic manually in the dialog
Results.
6 Transporting the titrator
If you transport the titrator over long distances, use the original packaging.
1 Empty all tubes.
2 Empty the titration vessel.
3 Shut down the titrator.
4 Unplug the titrator.
5 Remove all cable connections.
6 Remove the titration vessel from the titration stand.
7 Remove all tubes.
8 Remove all burettes.
9 Move the titrator to the new location.
7 Care and maintenance
7.1 Cleaning
Housing of the titrator
Clean the housing of the titrator using a cloth moistened with alcohol.
28 Titration Excellence
Page 31

Titration stand
1 Loosen the threaded ring(4) and remove it from the titration
stand(1).
2 Remove the clamping ring(3) and the spacing ring(2) from the
titration stand(1).
3 Clean the parts of the titration stand.
4 Place the clamping ring(3) and the spacing ring(2) in the
threaded ring(4).
5 Screw the threaded ring(4) into the titration stand.
1
2
3
4
7.2 Maintenance
Mettler Toledo recommends that a preventive maintenance and calibration certification is done at least once
a year through your local Mettler Toledo Service Organization.
NOTICE
Danger of damage to the titrator through leaking burettes!
Substances leaking out of burettes can enter the housing and damage parts of the installed
boards.
− Check the burettes for leaks and replace leaking burettes.
Daily
• Remove the burettes from the titrator.
• If you work with corrosive substances, rinse the burettes.
• If you work with corrosive substances, check the burettes for leaks and replace leaking burettes.
Weekly
• If you use the burettes daily, check the burettes for leaks and replace leaking burettes.
Before periods of inactivity
1 Rinse the burettes.
2 Empty all tubes.
3 Empty the titration vessel.
4 Shut down the titrator.
5 Unplug the titrator.
6 Remove the titration vessel from the titration stand.
7 Remove all tubes.
8 Remove all burettes.
8 Disposal
In conformance with the European Directive 2012/19/EU on Waste Electrical and
Electronic Equipment (WEEE) this device may not be disposed of in domestic waste. This
also applies to countries outside the EU, per their specific requirements.
Please dispose of this product in accordance with local regulations at the collecting point
specified for electrical and electronic equipment. If you have any questions, please
contact the responsible authority or the distributor from which you purchased this device.
Should this device be passed on to other parties (for private or professional use), the
content of this regulation must also be related.
Thank you for your contribution to environmental protection.
29Titration Excellence
Page 32

9 Technical data
9.1 Titrator
Power rating external power
supply
Input values 100...240VAC, 1.8A ±10%
Input frequency 50-60Hz
Output values 24VDC, 5A
Power rating instrument
Input values 24VDC, 3.2A
Connector type 4-pin, power Mini-DIN female
Dimensions
Width 210 mm
Depth 246 mm
Height 250 mm
Weight 4.3 kg (without plug-in cards)
Materials
Titrator housing Crastin® PBT
Titration arm Crastin® PBT
Spacing ring Crastin® PBT
Clamping ring Crastin® PBT
Threaded ring Crastin® PBT
Chassis Stainless steel
Ambient conditions
Ambient temperature +5°C…+40°C
Relative humidity Max. 80% (non-condensing) at 31°C,
linear fall to 50% at 40°C
Altitude 2000 m above sea level
Use In interior spaces
Overvoltage category II
Pollution degree 2
Contains runtime modules from decNumber, © Copyright IBM Corporation 2001, 2004. All Rights
Reserved.
Power Management
The devices have a power management system which prevents the titrator from switching off unexpectedly
in the event of a power overload. Tasks which would cause a power overload, because a number of pumps,
stirrers and burette drives are already in use, cannot be started at all. A notification brings the start attempt to
the attention of the user. It is advisable, if possible, to connect pumps and stirrers directly to sample
changers or other devices which have their own power supply, such as a TBox, instead of to the titrator
itself.
9.2 Terminal
Dimensions
Width 194mm
Depth 129.5mm
Height 56.7mm
Weight 638.4g
Materials
Top housing EN ZL-ZnAl4Cu1 (EN Zl-0410)
Lower housing Crastin SO653
Cover glas Gorilla glas
30 Titration Excellence
Page 33

Page 34

Mettler-Toledo GmbH
Im Langacher 44
8606 Greifensee, Switzerland
www.mt.com/contact
Subject to technical changes.
© Mettler-Toledo GmbH 06/2017
30297063C
For more information
www.mt.com/titration
30297063
 Loading...