

Page 1

SOLO®MAX
Automatic
Wrapper
Quick
Reference
Guide
647-2000 Series Machines
64057919
R03
Page 2

Page 3
Customer Feedback
If you have a problem with one of our products or publications, or just a suggestion on how we can serve you better, please fill out this form and send it to the
address on the opposite side of this page (U.S. postage paid), or fax it to us at
(614) 438-4355. Your feedback will help us to improve product performance,
quality, and service.
Part / Product Name: Date:
Part / Model Number:
Sold By:
Customer Name:
Address:
Phone/Fax Number:
Your Comments:
METTLER TOLEDO
1900 Polaris Parkway
Columbus, OH 43240
Page 4
BUSINESS REPLY MAIL
FIRST CLASS PERMIT NO. 414 COLUMBUS, OH
NO POSTAGE
NECESSARY IF
MAILED IN THE
UNITED STATES
POSTAGE WILL BE PAID BY ADDRESSEE
Mettler-Toledo, LLC
Retail Quality Manager - MTWT
P.O. Box 1705
Columbus, OH 43216
USA
Please seal with tape.
Fold First
Page 5

3
Contents
Operator Safety ...................................................................... 4
Important Components ........................................................... 5
Control Panel ......................................................................... 6
Startup .................................................................................. 7
Stopping the Machine ............................................................. 8
Wrapping Programs ............................................................... 9
Sealing Belt Temperature ......................................................... 10
Tray Specifications ................................................................. 11
Loading Trays ........................................................................ 12
Tray Orientation ..................................................................... 13
Film Specifications ................................................................. 14
Loading Film ......................................................................... 15
Daily Cleaning ....................................................................... 17
Weekly Cleaning .................................................................... 19
Cleaning the Package Lifter ..................................................... 21
Troubleshooting ..................................................................... 22
Operation Codes .................................................................... 24
Fault Codes ........................................................................... 25
Dimensions ........................................................................... 34
General Specifications ............................................................ 35
Page 6
4
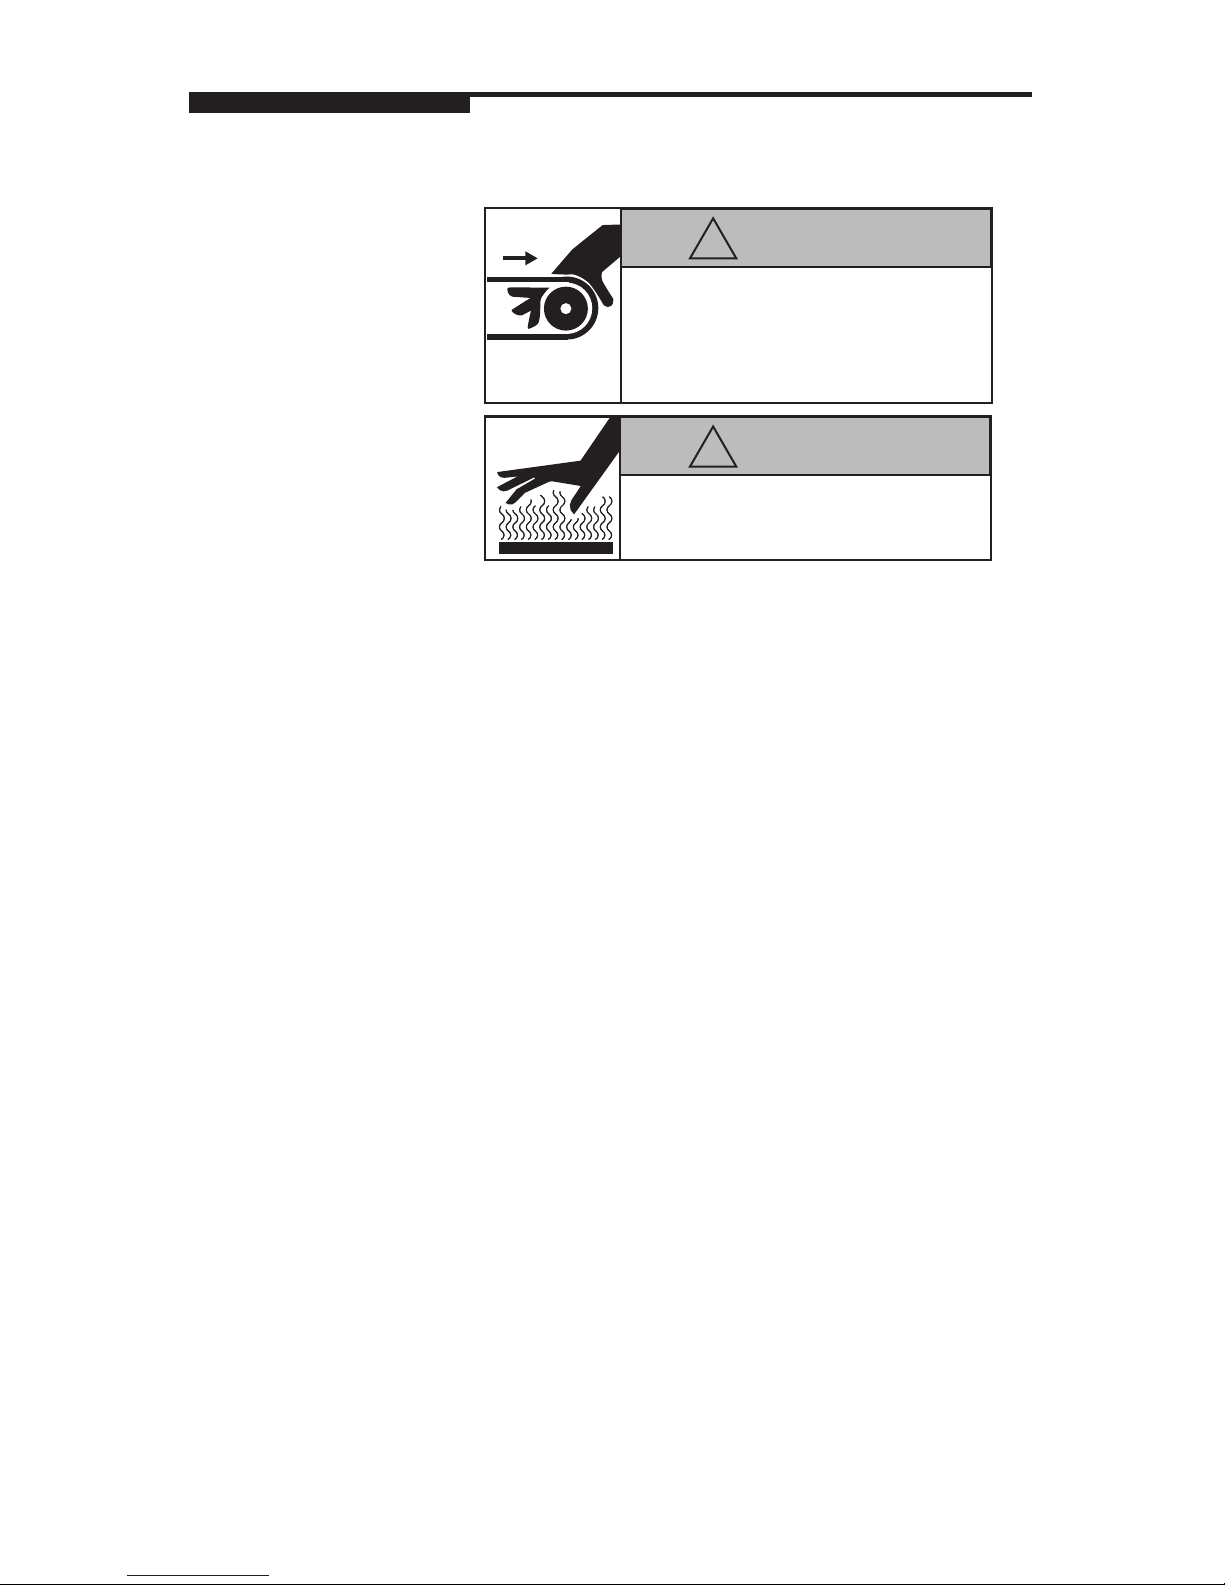
Operator Safety
CAUTION
PINCH HAZARD
Moving belts can crush and cut. Keep ngers and hands
out of belts. Keep hands out of the infeed and discharge
areas when machine is powering up or running.
Disconnect power before servicing.
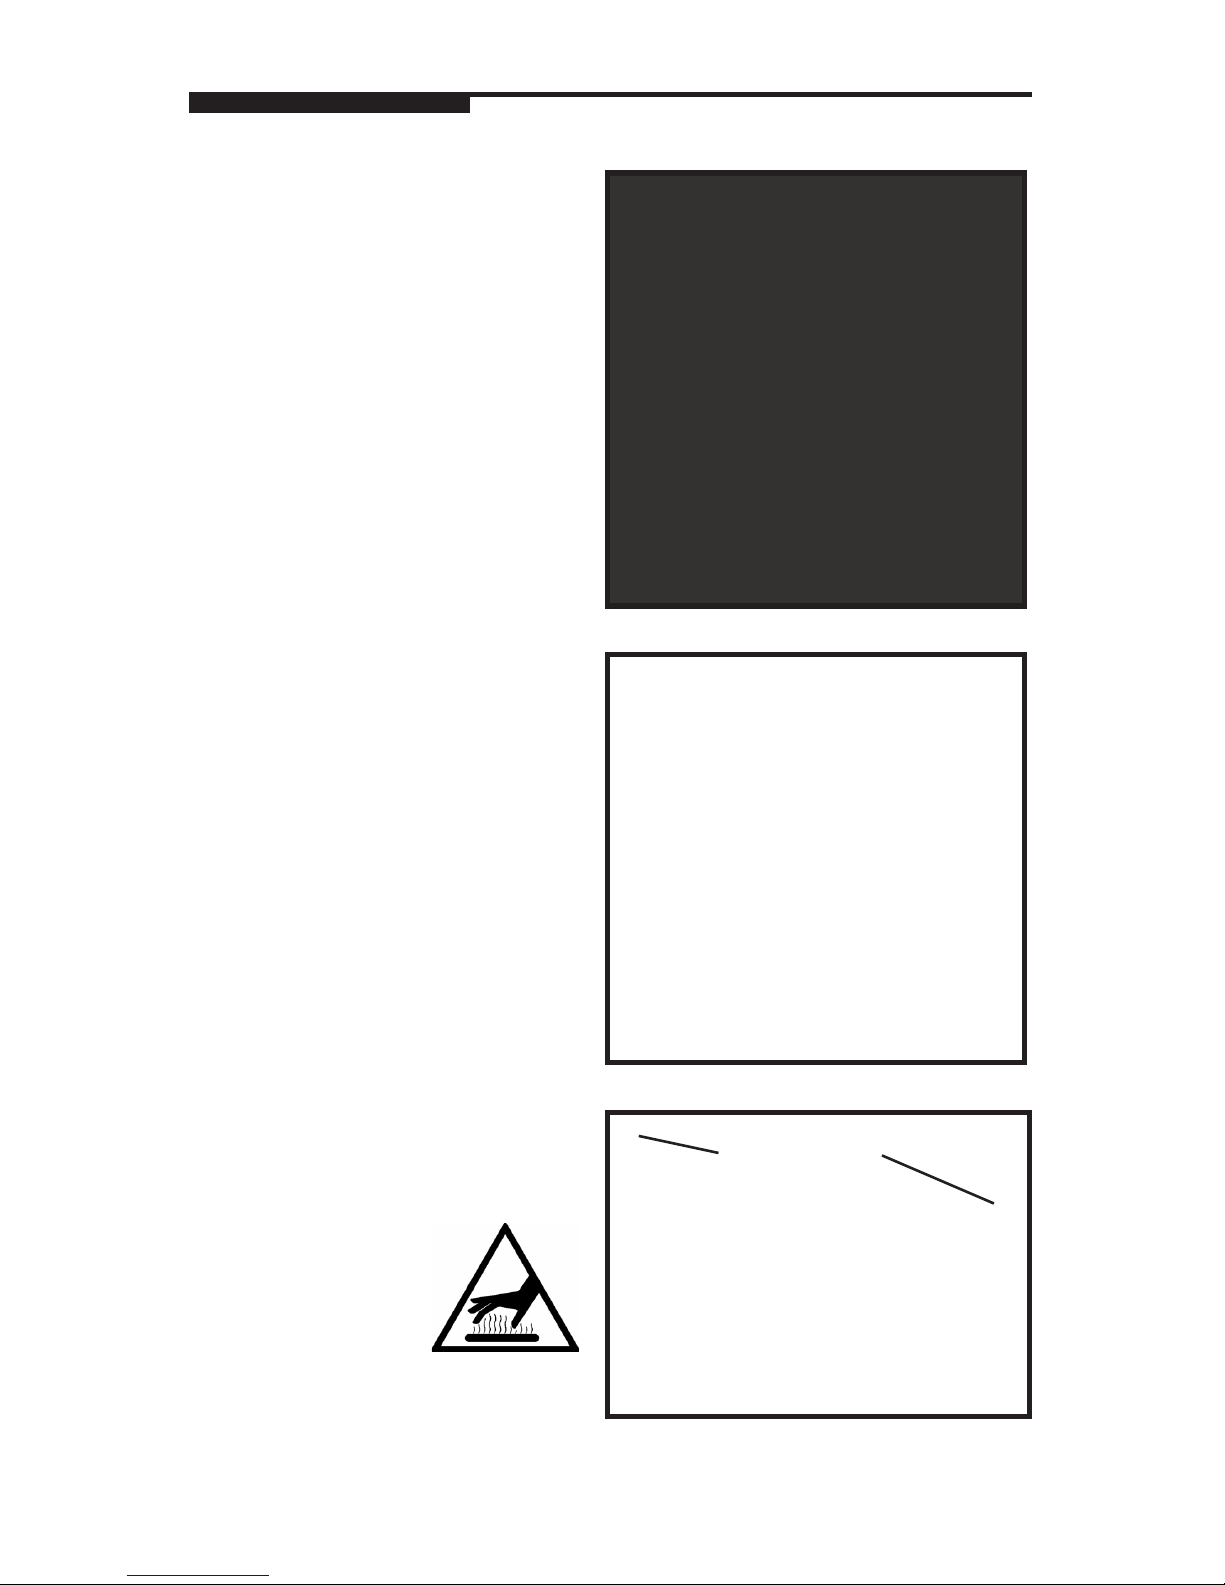
CAUTION
BURN HAZARD
Hot surface. This machine has an electrically heated
sealing belt. Allow to cool before servicing or cleaning.
!
!
Read this manual before operating or servicing this
equipment
Follow these instructions carefully.
Do not allow untrained personnel to operate, clean,
inspect, maintain, service, or tamper with this equipment.
Always disconnect this equipment from the power
source before cleaning or performing maintenance.
Observe all posted warning decals on the machine.
The machine has an electrically heated sealing belt.
Be careful when working near the belt.
Keep hands clear of the infeed entrance and the
sealing belt exit opening while the machine is
operating.
Only wrap the indicated tray sizes described in the
Tray Reference section of this manual.
Page 7
5
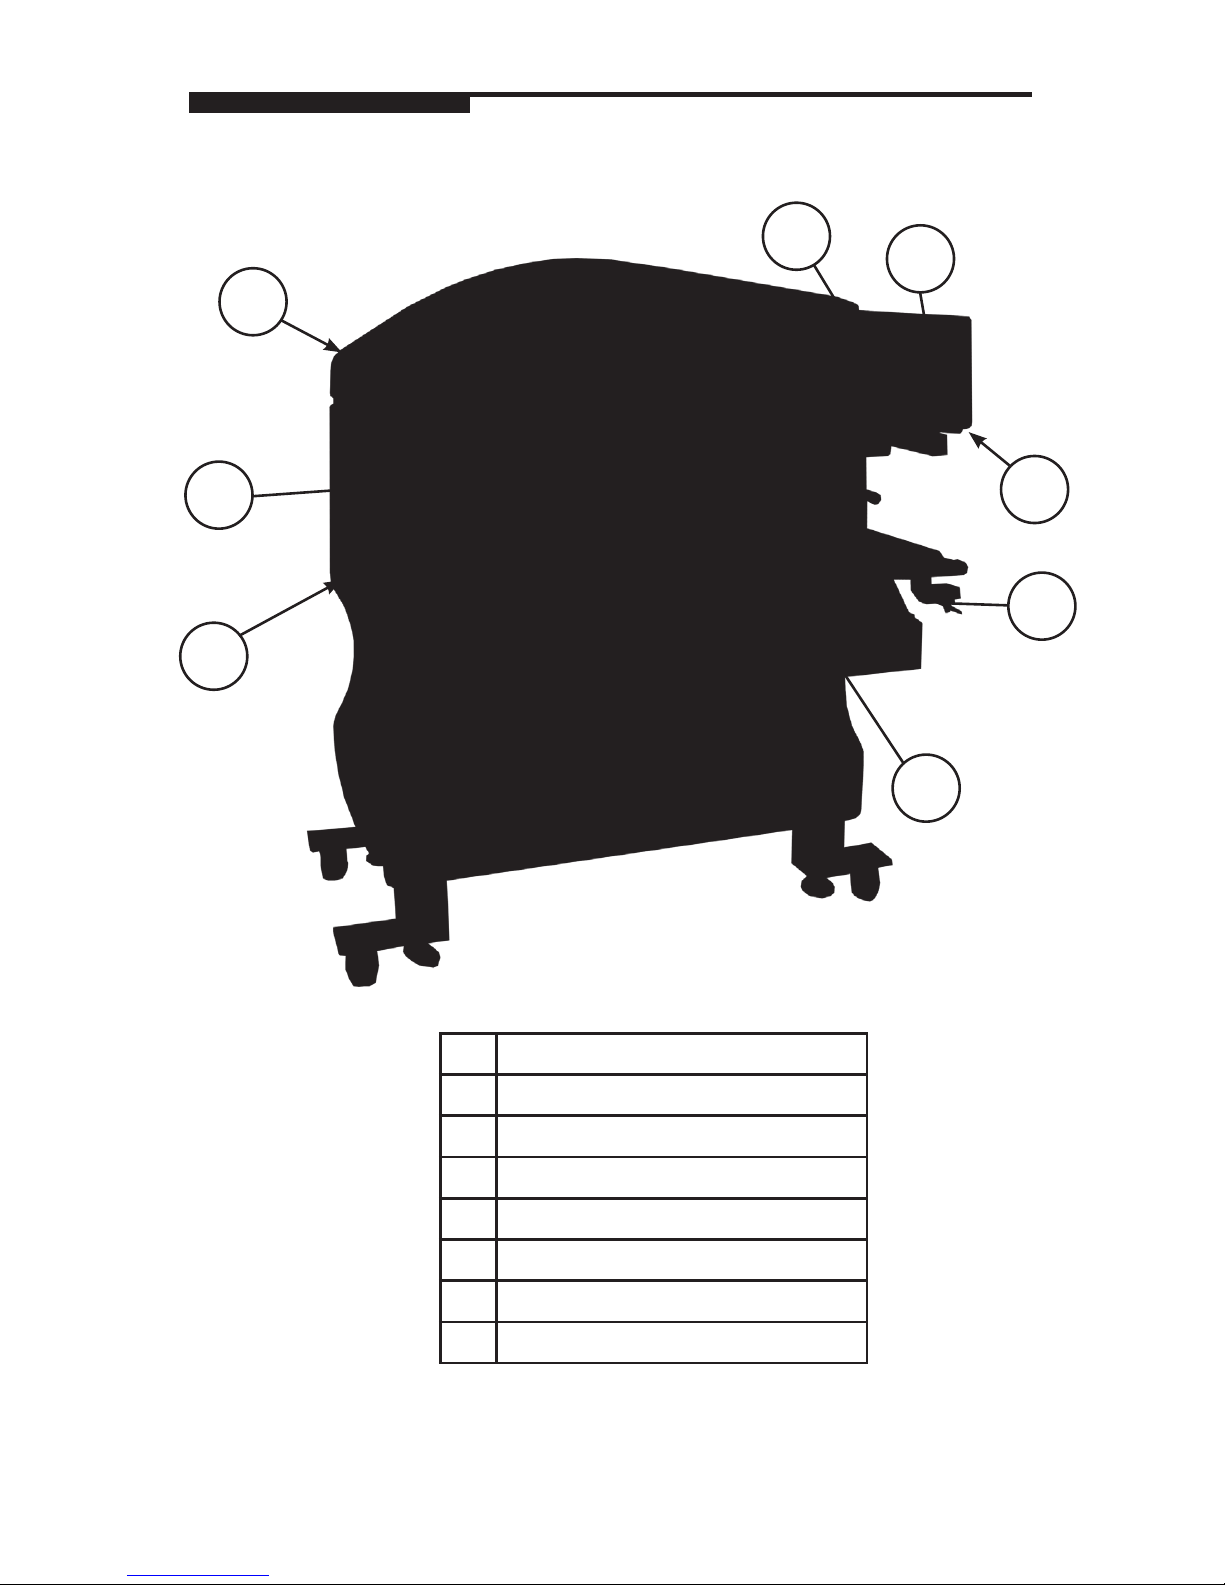
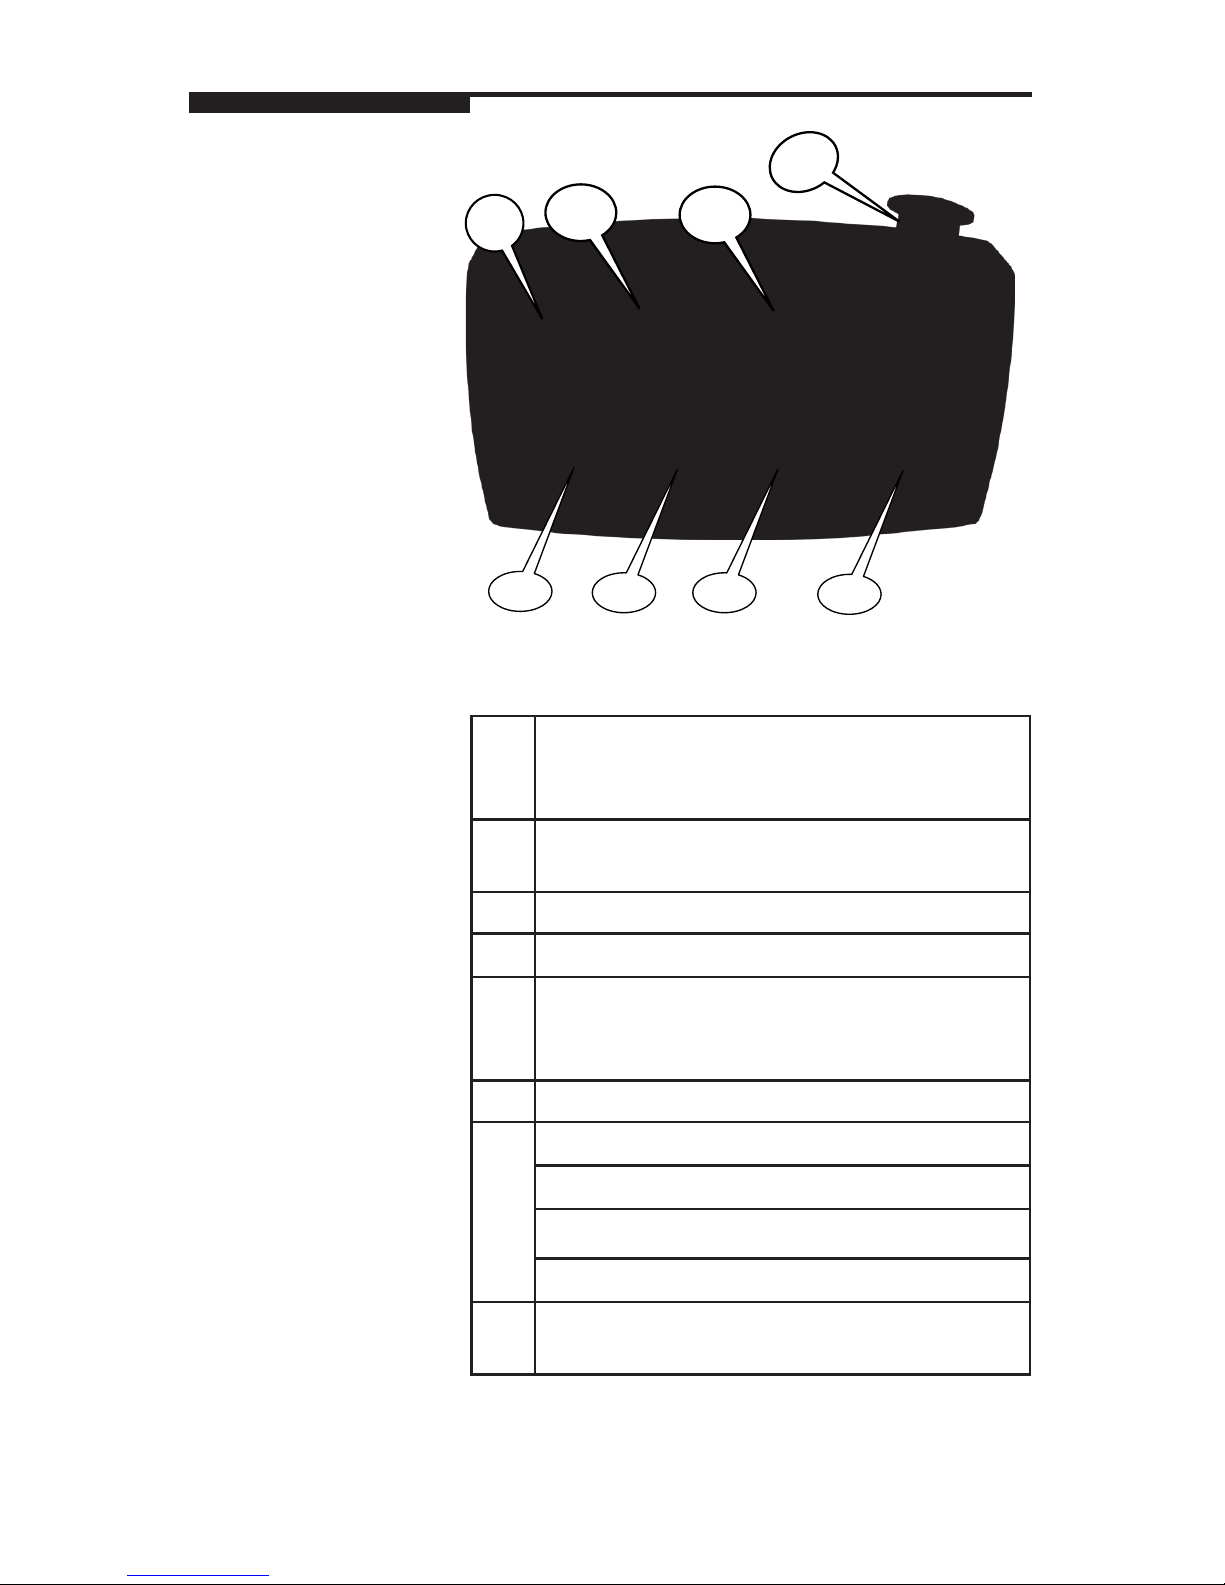
Important
Components
3
2
4
5
6
7
1
1
Side Door
2
Main Power Switch
3
Top Cover
4
Control Panel
5
Emergency Stop Pushbutton
6
Sealing Belt
7
Film Supply
8
Infeed Conveyor
8
Page 8
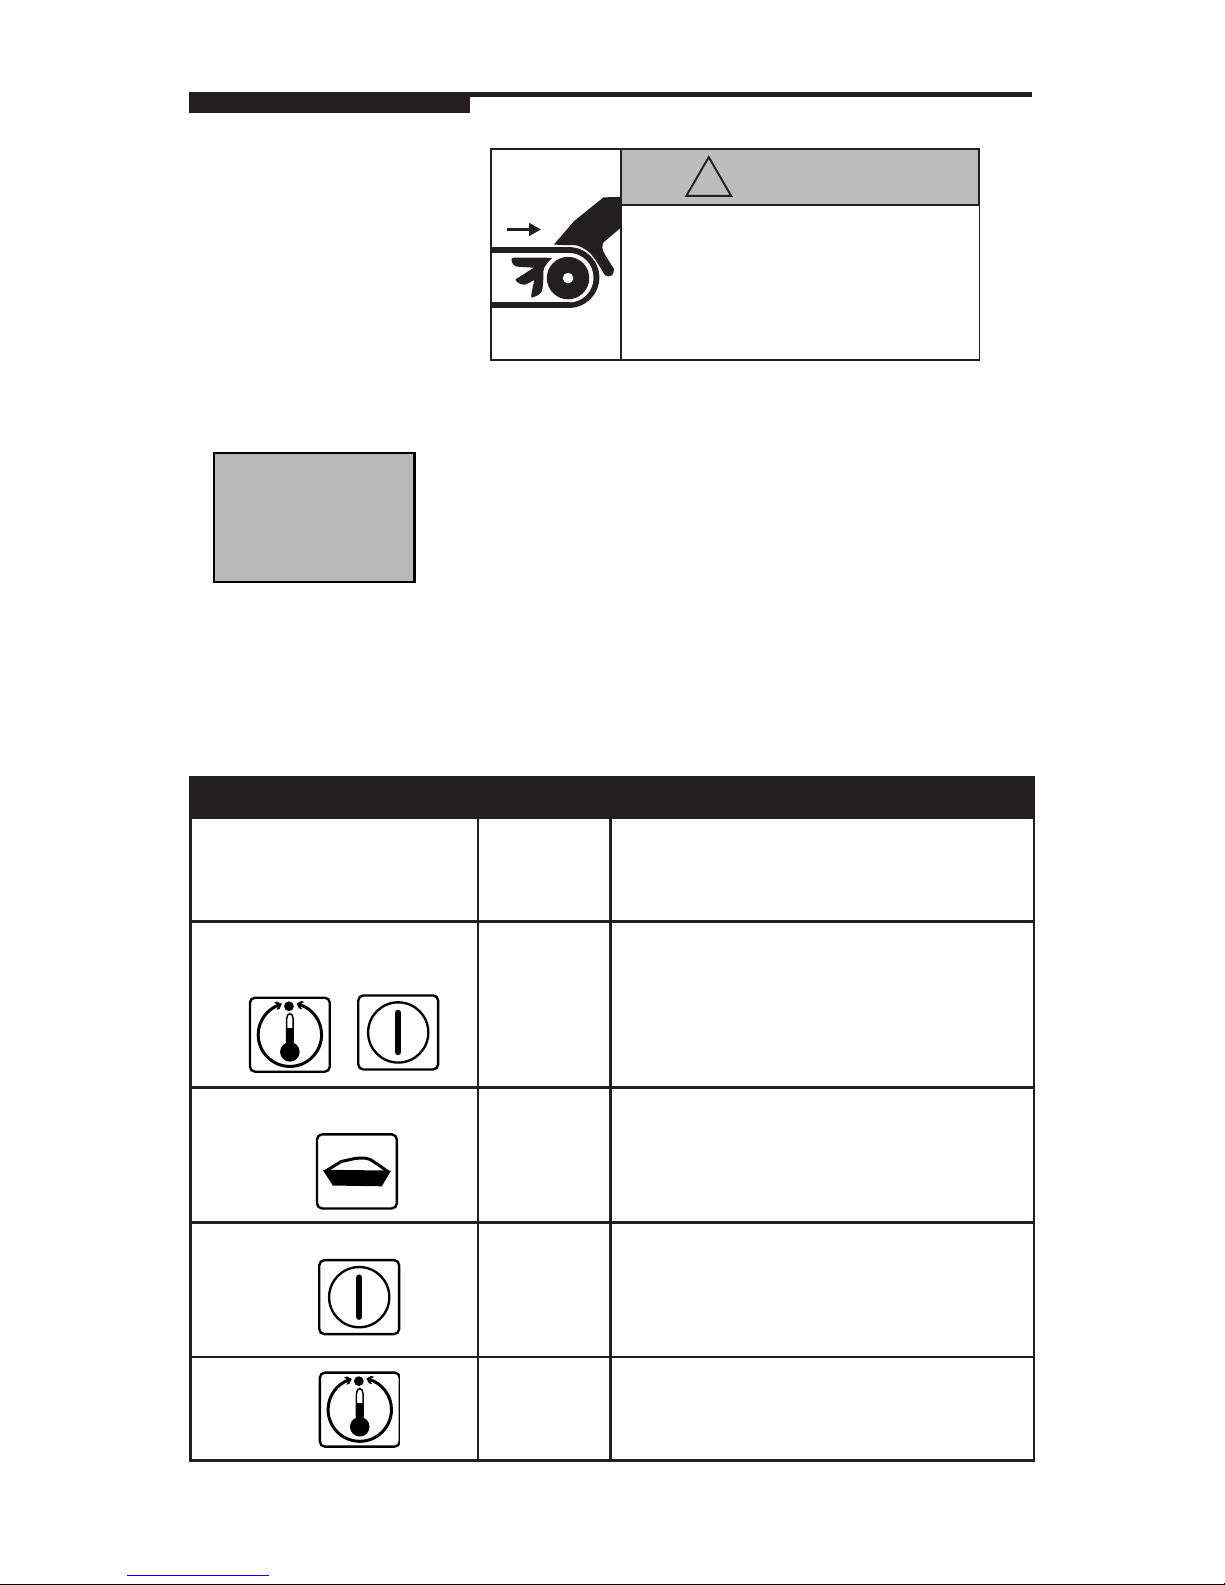
6
Control Panel
F6
F7
L
S1
F5
F4 F3
F2
a
b
c
F2
START button (machine start). S1 must be
released in order to start the machine. Also
used with F3 to set Sealing Belt Temperature.
F3
Used for Film Cutting and Sealing Belt Temperature Setup.
F4
Wrapping Program selection button.
F5 Wrapping mode (not used, Europe only).
F6
This display will show the sealing belt temperature in normal operation or status and error
codes in the event of machine malfunction.
F7
Working program display.
L
Wrapping Mode LED.
a - LED off = Wrapping Only (Normal Mode)
b - LED on = Wrapping/weighing (not used)
c - LED flashing= Weighing Only (not used)
S1
Emergency Stop Button - Press to stop machine, pull up and turn to release.
Page 9
7
Switch the machine power on by turning the main
power switch (1) to ON. Release the Stop Button on
the console by rotating and pulling the button up.
When the machine is warming up, the display will
show machine code 00 and the sealing belt temperature program will blink off and on. When the preset
sealing belt temperature has been reached, the display
will be on steady (not blinking).
When the Start Button (F2) is pressed, the machine
will perform a timing cycle. At the end of the timing
cycle, the machine is ready for use.
CAUTION
PINCH HAZARD
Moving belts can crush and cut. Keep ngers and hands
out of belts. Keep hands out of the infeed and discharge
areas when machine is powering up or running. Do not
place objects on the infeed belts. Disconnect power before
servicing .
!
Startup
OPERATION DISPLAY DESCRIPTION
Machine ready to operate F7 F6 F6 shows the sealing belt temperature
(not blinking). F7 shows the current
program, 01, 03, 05, etc.
Change sealing belt
temperature
F6 To modify the code, press and hold
both buttons F3 and F2 simultaneously
until F6 shows the required code.
Select Wrapping Program F7 Press button F4 until the display F7
shows the required wrapping program.
Machine in emergency
stop
F6 Display F6 will show the 3-digit error
code. To start again after taking care of
what caused the stop code, press the
START button F2.
Film cut Press and hold button F3 for more than
5 seconds.
1
Page 10
8
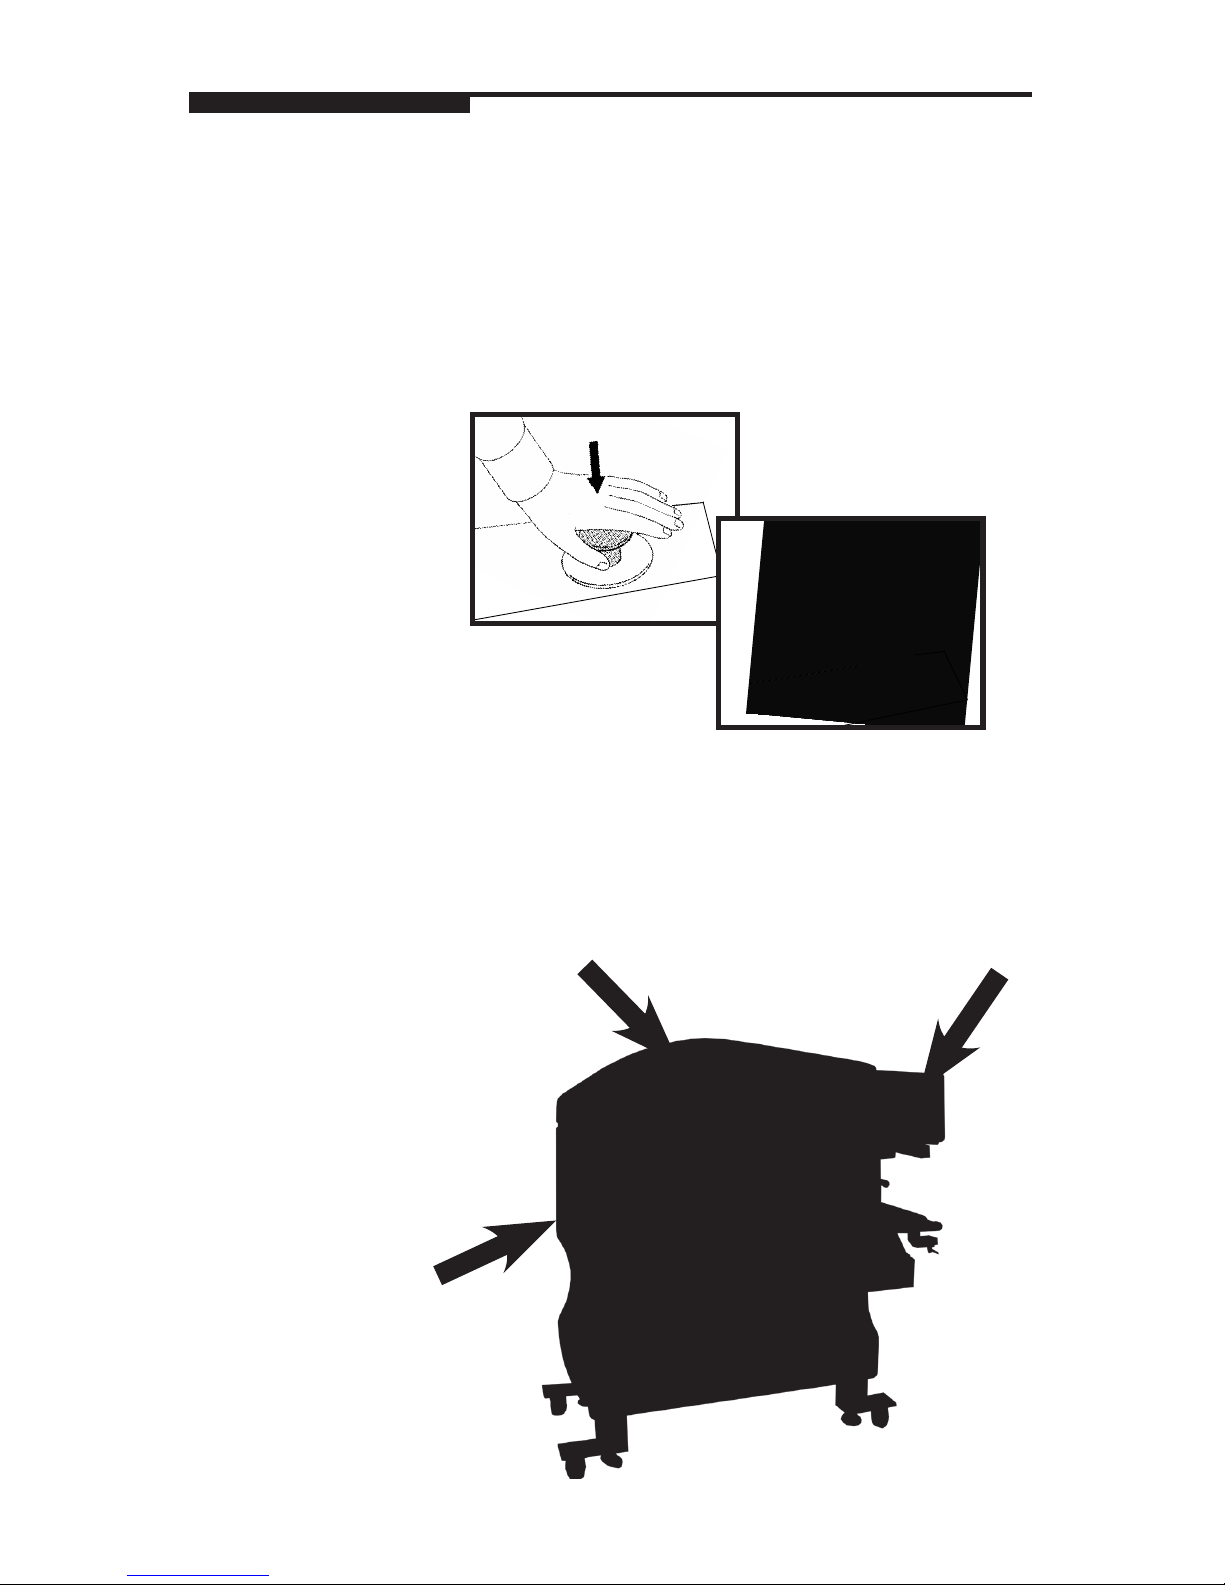
Stopping the
Machine
The SOLO® MAX is equipped with an Emergency Stop
Button located on top of the Control Panel. To stop the
machine, press the button down. To release the machine from emergency stop, turn the button and pull
up. You can then press the Start button on the Control
Panel to restart the machine.
Stop
Release
There are three ways to stop the machine:
Push Stop Button
Open Top Cover
Open Side Cover
Page 11
9
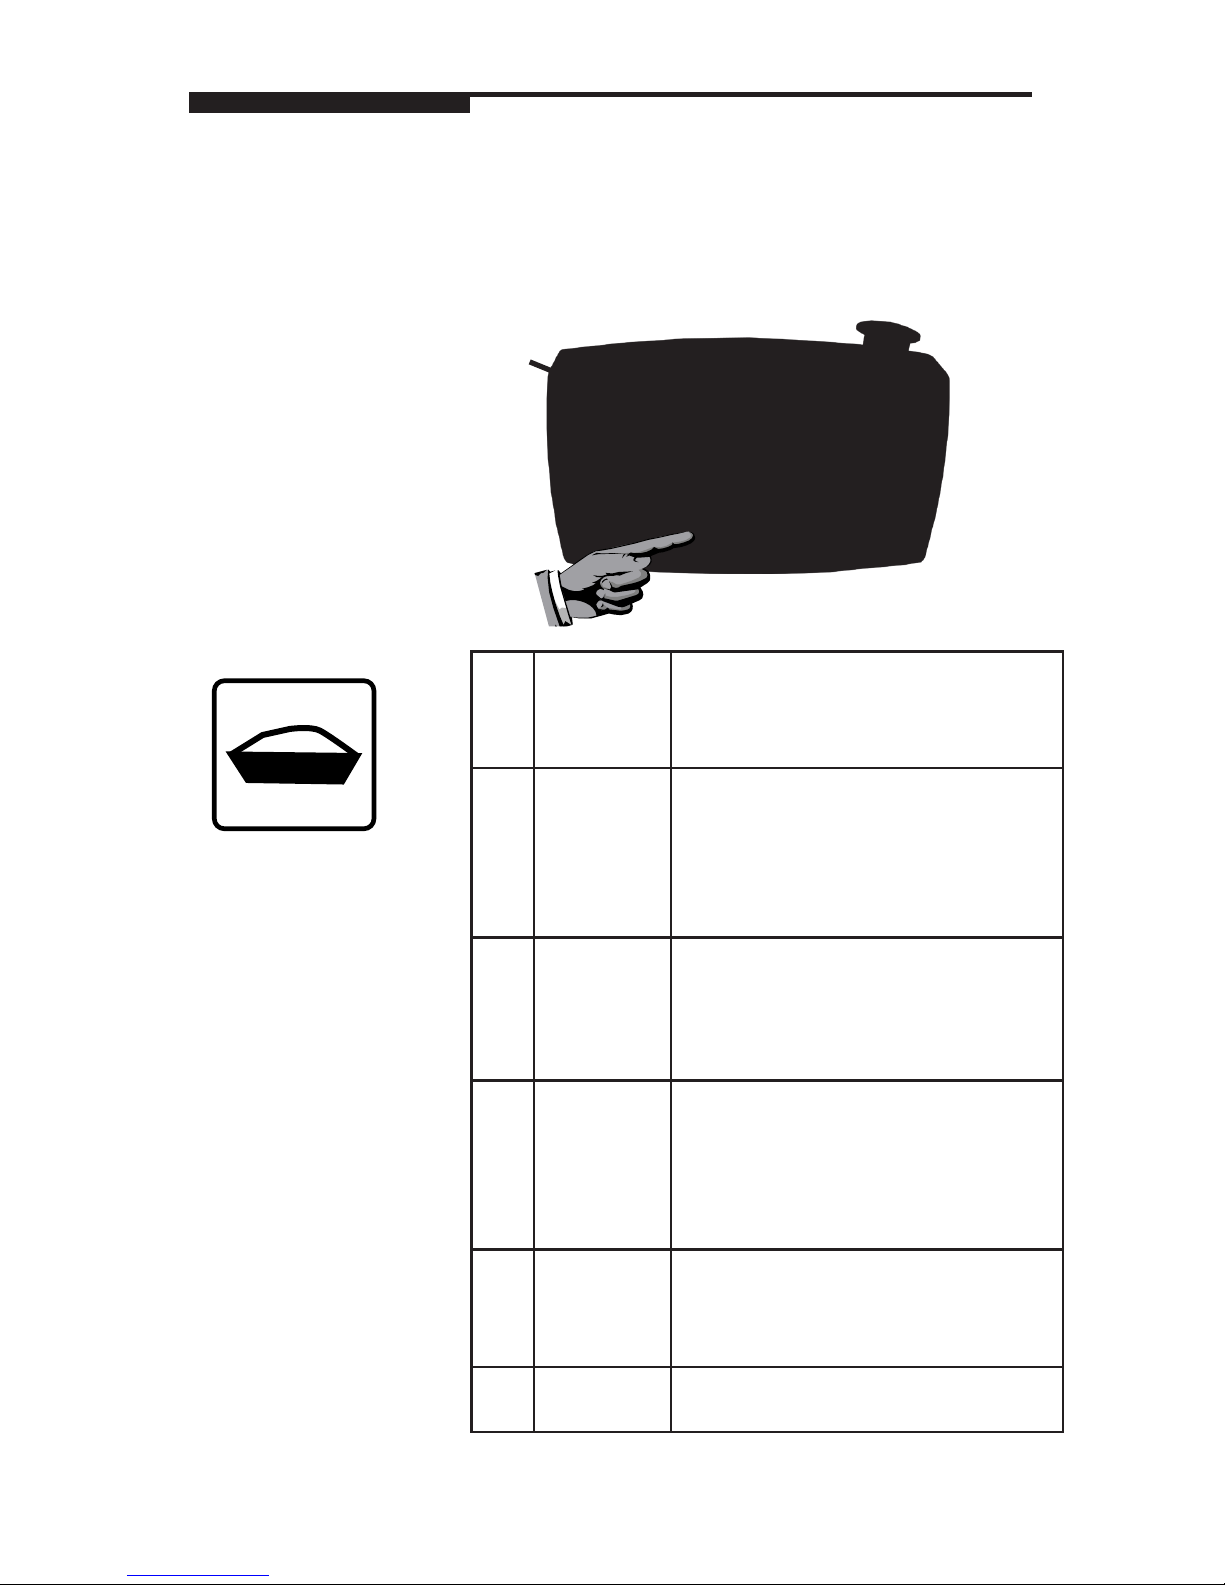
Wrapping
Programs
The Program Button (F4) is used to select the package
wrapping program. Press the button to toggle through
the selections. The program number will be shown on
the left display (F7) indicated by the package symbol.
01
Standard
Tension
Maximum
Speed
Highest tension stretch wrap at maximum speed for all small and medium
size trays with a low profile.
03
Standard
Tension
Reduced
Speed
Reduced tension stretch wrap at a
slightly reduced speed. This program
should be used when wrapping larger
higher profile trays. This program can
also be used when wrapping products
in black trays.
05
Reduced
Tension,
Standard
Speed
Reduced stretch wrap at a reduced
speed for large, high profile unstable
trays, or for delicate and / or soft packages. This program should also be
used when wrapping clear plastic trays.
07
Reduced
Tension,
Reduced
Speed
Reduced stretch wrap at a slightly
reduced speed for more reliable operation with larger, high profile unstable
trays. (Frozen fish, produce or any
product which is not stable when being
wrapped.)
09
#9 Trays
Reduced
Speed
Reduced stretch wrap at a slightly reduced speed for more reliable operation
with larger high profile 9s and 10X14
trays.
10
#10 Trays
Std Speed
Use only when wrapping low profile 10s
trays in the portrait mode.
Press to toggle
through the
programs.
F7
Page 12
10
Sealing Belt
Temperature
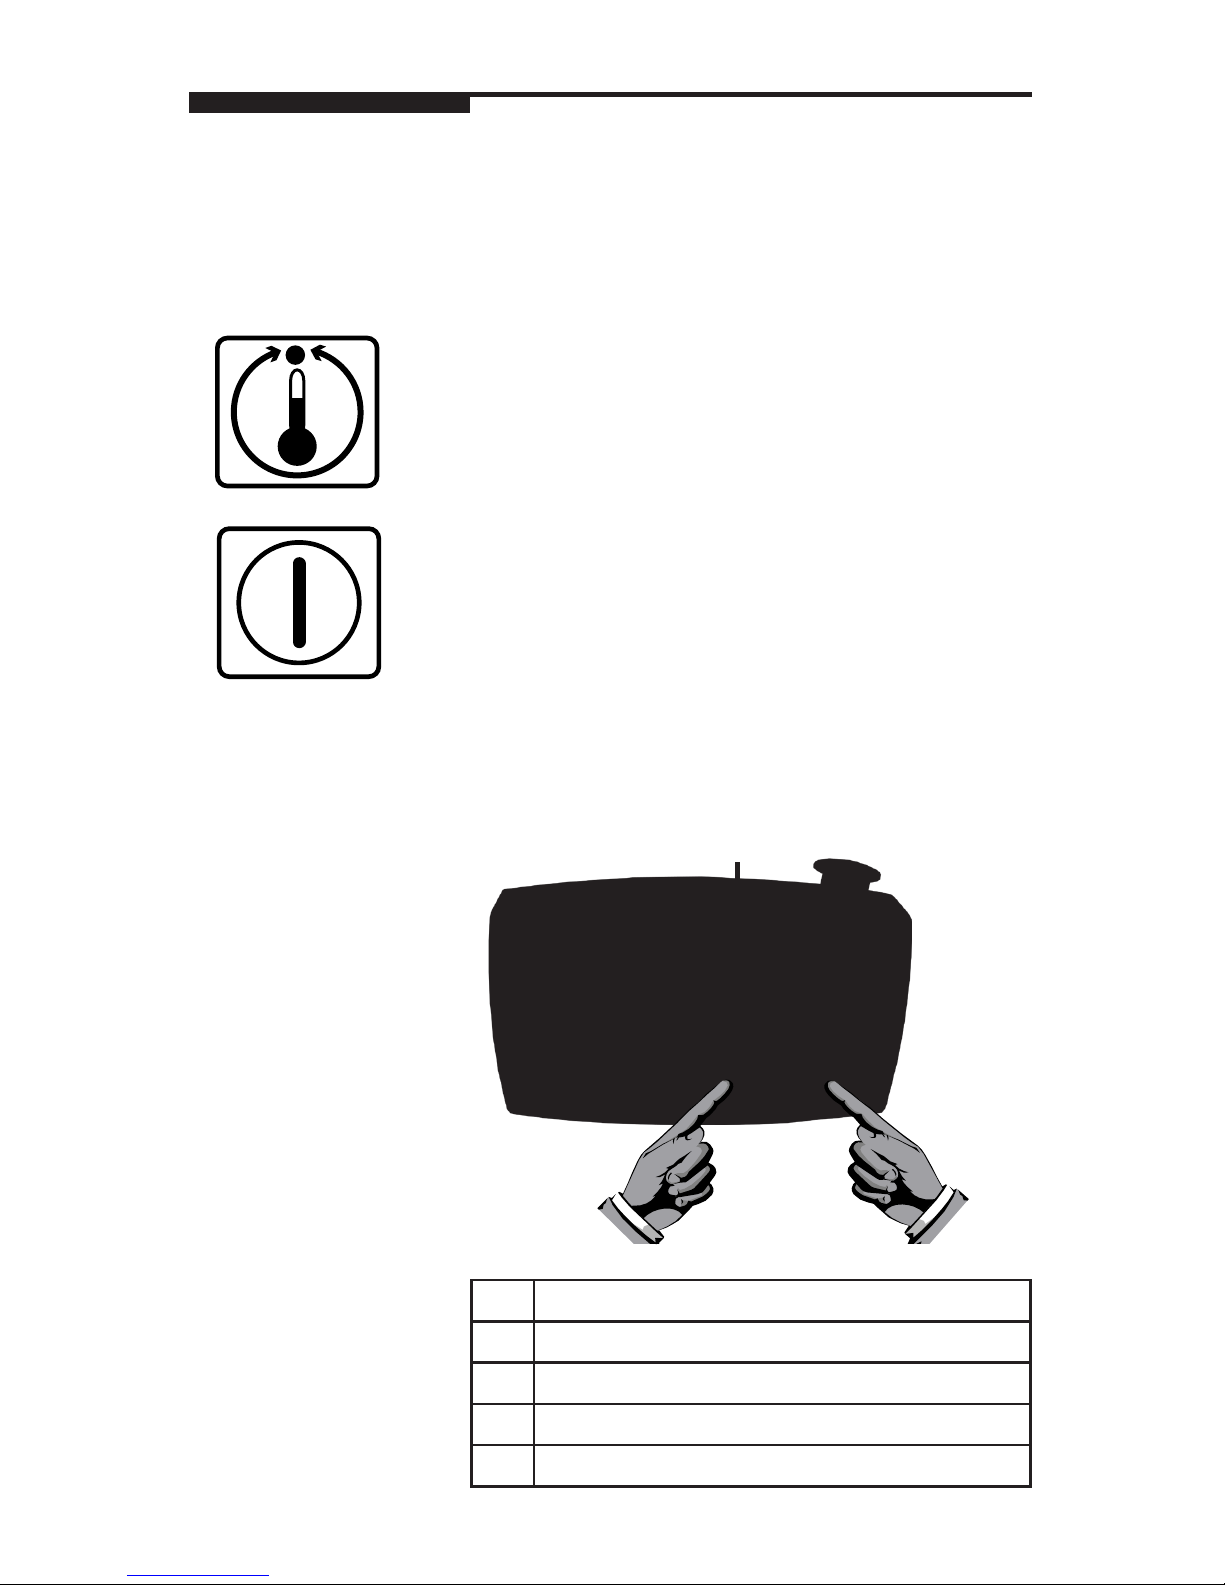
To set the Sealing Belt temperature, press and hold
both the Temperature button (F3) and the Start button
(F2). After a few seconds, the temperature display
(F6) will increment the value automatically. Release
the buttons when the desired value is displayed.
Alternately, you can release the Start button and press
to increment the value by one on each press of the
button. The temperature range in relation to the codes
is shown in the table below.
The recommended temperature range is between
20 and 21 (135°C to 138°C). In colder rooms, the
temperature may need to be set slightly higher and in
warmer rooms, the temperature may need to be set
lower.
Check the bottom of the wrapped tray after allowing at
least 30 minutes for the temperature to stabalize. If the
film is melted, reduce the temperature. If the film is not
sealed properly or if the film opens easily, increase the
temperature.
00
Heat OFF
01
78°C (172°F)
02
81°C (178°F)
..
1 unit on Display (F6) equals 3°C (5.5°F)
40
Maximum 195°C (383°F)
F6
Page 13
11
Tray
Specifications
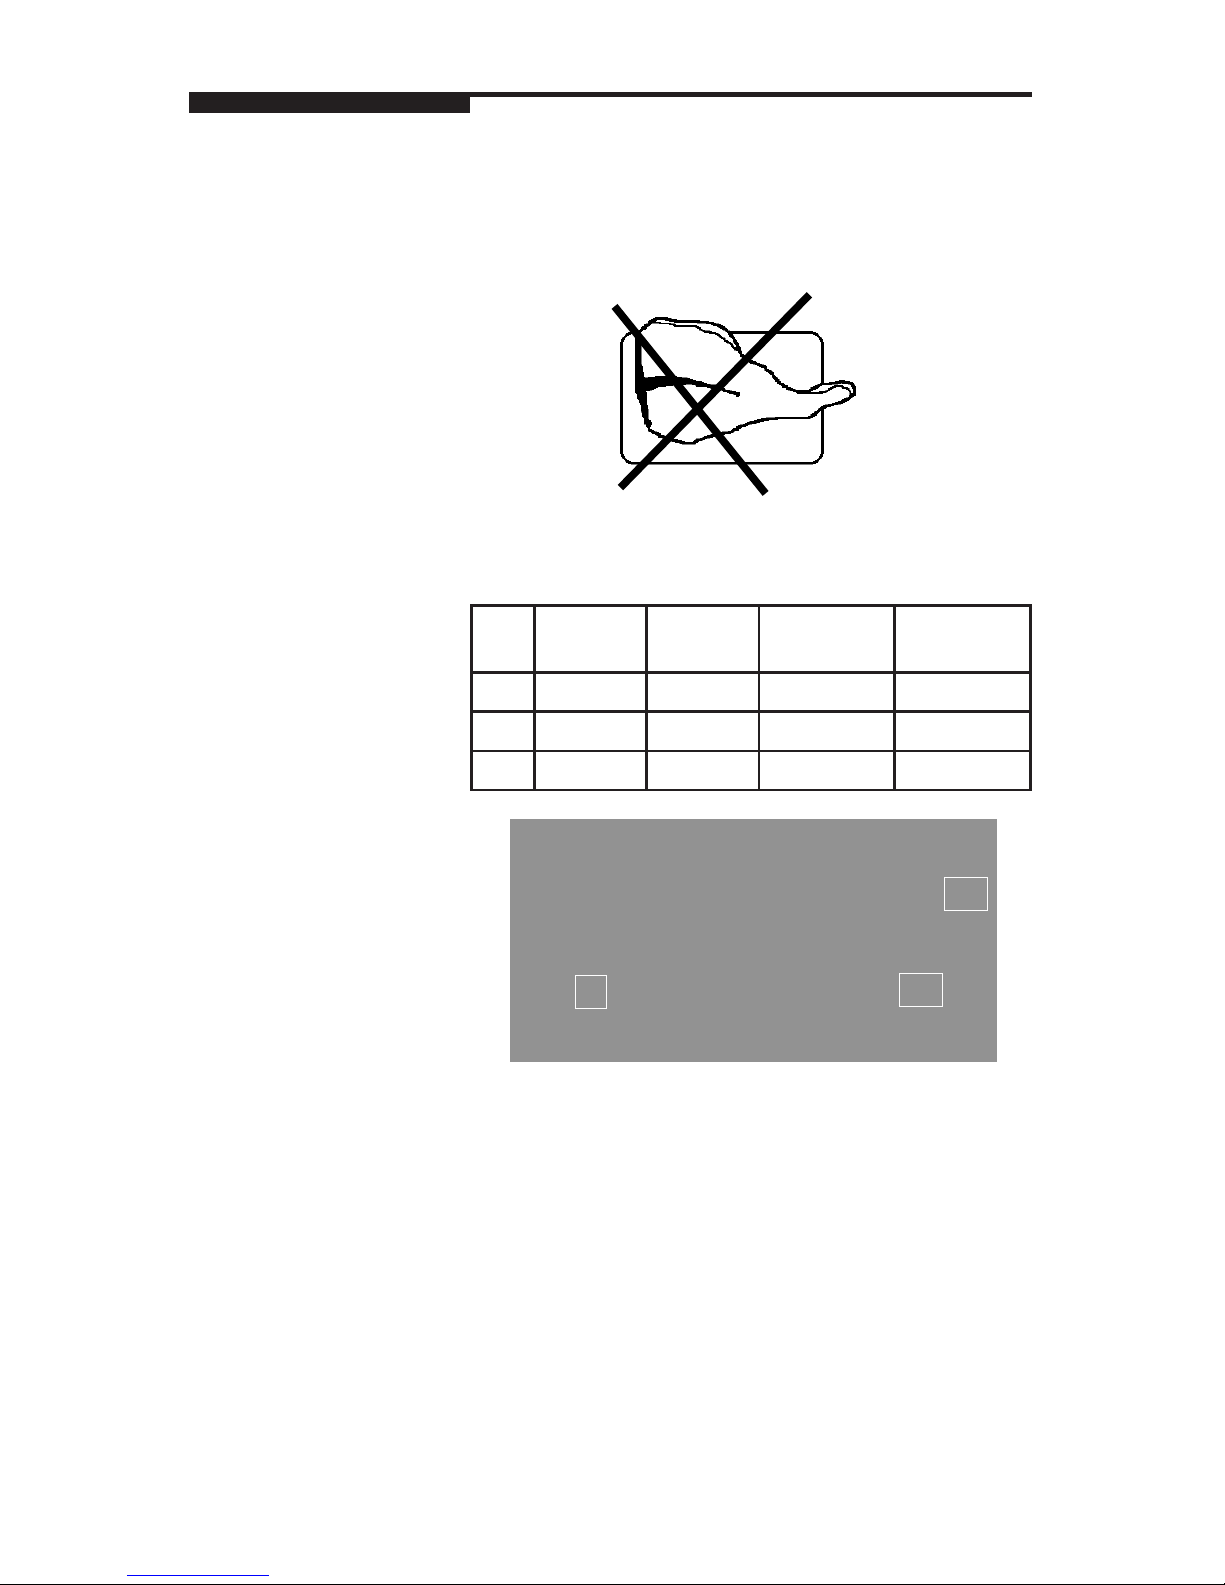
All products must be completely contained in the trays.
The trays must also be stiff enough to support the
product properly.
The tray dimensions used in the SOLO® MAX must fall
within the following limits.
Minimum
(mm)
Minimum
(Inches)
Maximum
(mm)
Maximum
(Inches)
L
180 7.1 400 15.8
W
130 5.1 260 10.3
H
20 0.8 140 5.5
L
W
H
Page 14

12
Loading Trays
The MAX detects the tray when it is placed on the infeed conveyor using a photoeye. The tray must be set
against, and aligned with, the infeed guide, as shown
below. The trays must not be spaced closer than 3 cm
(1.2 inches), shown as measurement S in the illustration below.
If the dimensions of the tray exceed the maximum
allowed by the machine, the machine will stop in
emergency mode and reject the tray.
S
Page 15
13
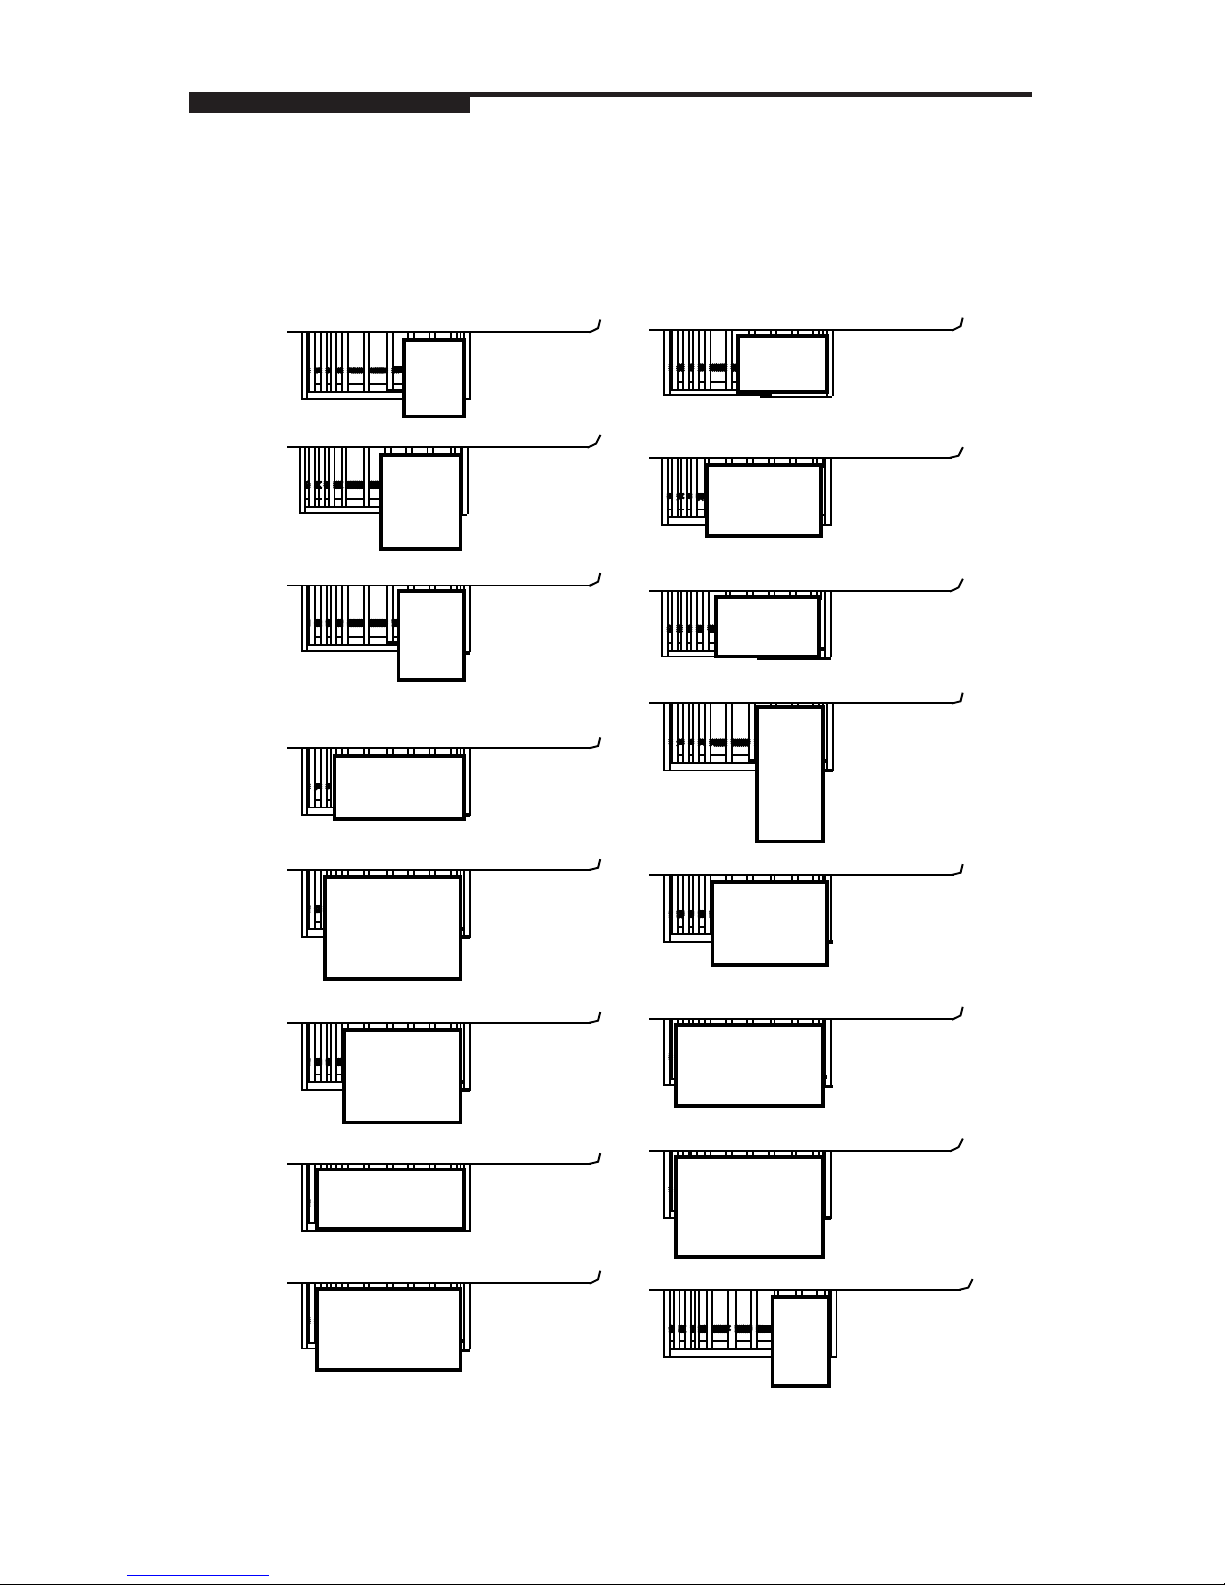
Tray Orientation
17S
2S
2S
4S
4S
20S
20S
10S
9
16S
12S
25S
7
10X14
8S
10S
If tray height is
less than 3”
If tray height is
less than 3”
If tray height is
less than 3”
If tray height is
greater than 3”
If tray height is
greater than 3”
If tray height is
greater than 3”
Use the illustrations below for the best orientation
to load the trays on the infeed.
For 10S Portrait
mode use Wrap
Program 10
Page 16
14
Film
Specifications
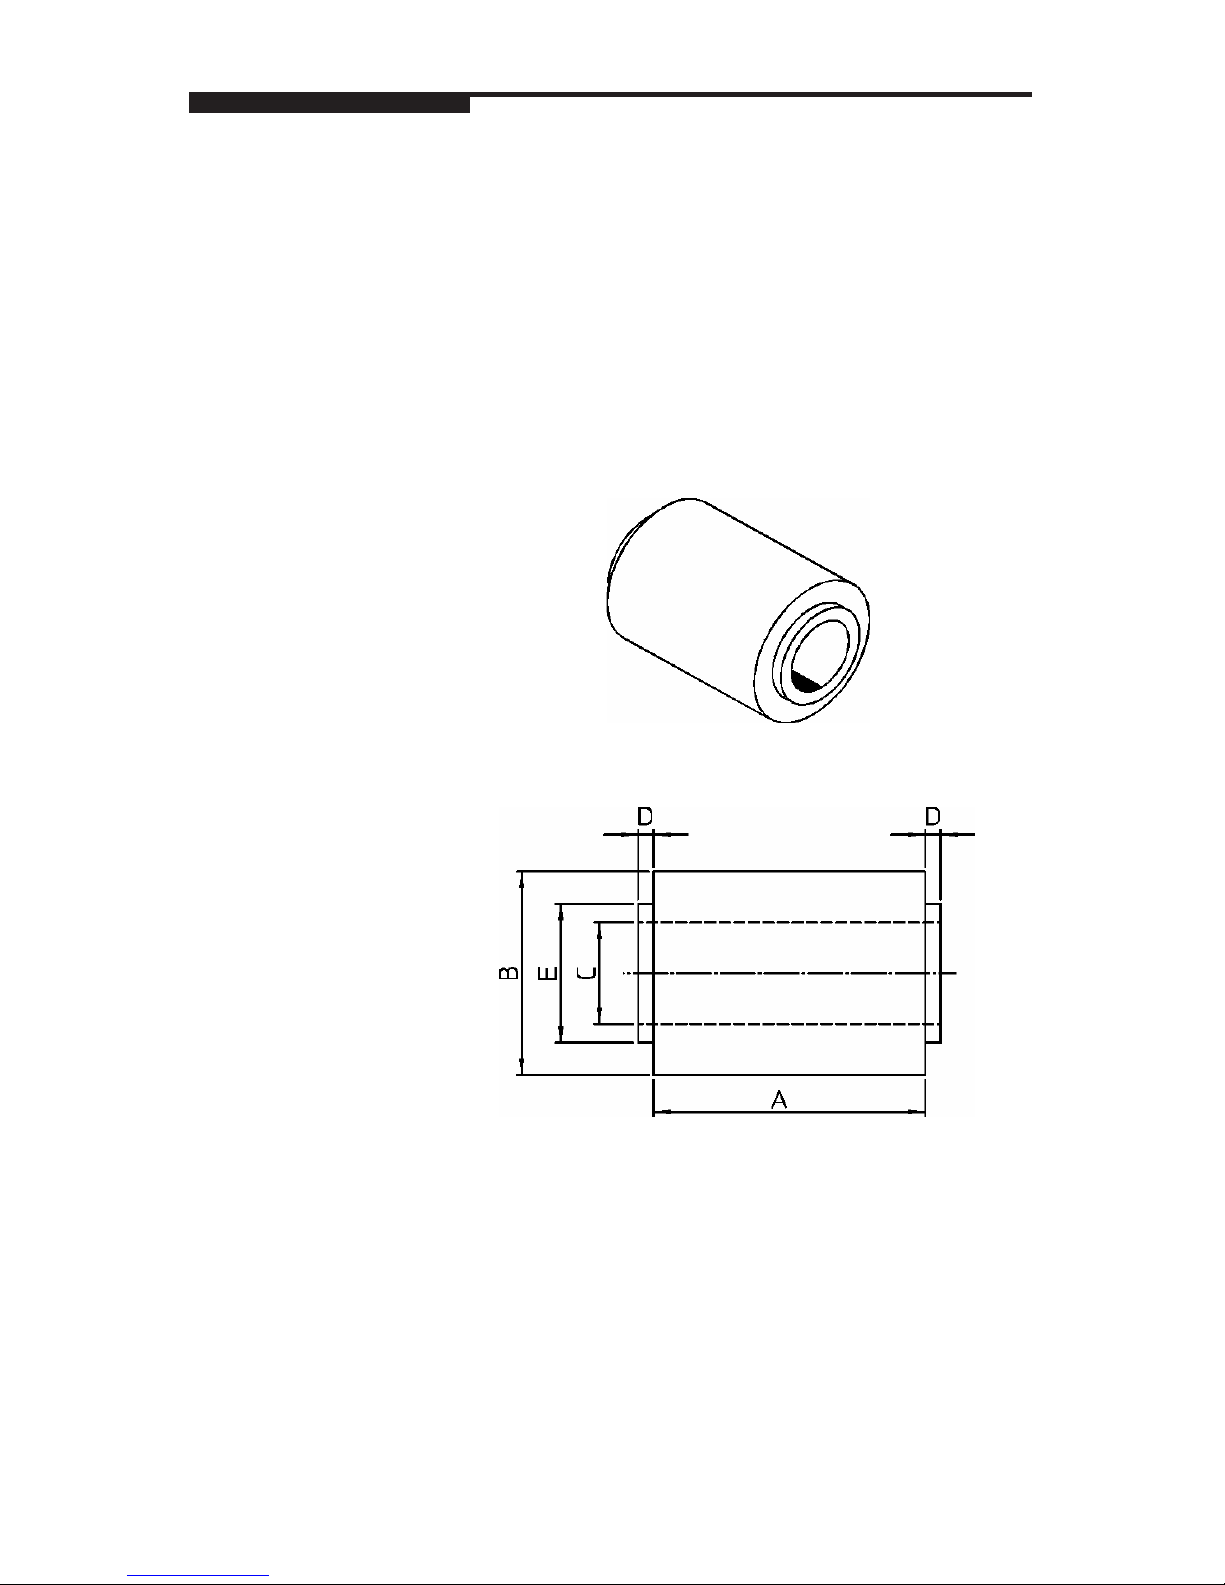
A high quality stretch film, designed to work on the
MAX wrapper is available through Mettler Toledo, Inc.
Aftermarket services. Contact your local METTLER TOLEDO® representative for more information on this film
and recommendations for other films that will work
on the MAX wrapper. The MAX uses 13” film with the
following specifications.
A = 330.2mm (13.0”)
B = Outer diameter of the reel max 220mm (8.66”)
C = Inner diameter 75mm (3”)
D = Less or equal to 16mm (0.63”)
E = Less than 92mm (3.6”)
Page 17
15
Loading Film
Press the Stop Button. Hold
film bobbin shaft and rotate
the knob (A) counterclockwise to release any empty
rolls. Slide the empty roll
out off of the shaft.
Raise the lower roller and
lock in the raised position
with hanger (D).
Insert the new film roll (B)
onto the shaft until the edge
contacts the film roll stop
(C). The film should unroll
counterclockwise from the
bottom of the roll.
Hold the film roll and rotate
the knob (A) clockwise to
tighten the film reel on the
shaft.
Open the top cover. Using
handle (H), lift the sealing
belt (I). Careful! The seal-
ing belt may be hot.
H
I
Page 18
16
Loading Film
(cont.)
Unroll the film and route the
film:
• OverRollerR1
• UnderStretcherRollerR2
• OverRollerR3
• BehindRollerR4
• OverRollerR5
• IntotheFilmFoldersR6
• Besurethefilmpullsfreely
and is not caught on any of
the film folder wheels.
• Releasehangerlock(D)
Hold the film so it will not slip back,
then using Handle (H), lower the
sealing belt (I) back down to the rest
position.
Pull the film through until it widens out
evenly on both sides.Hang on to the
film and close the top cover. Release
the Stop Button (F1). Keeping the film
slightly stretched, press and hold the
film cut button (F3) (on the control
panel) to cut the film.
For proper operation, the film must be
centered in the machine. If the film does
not track correctly, use the film tracking
adjustment knob (A1) to move the film
in the direction of the arrows shown on
the decal.
Page 19
17
Daily Cleaning
Always disconnect power
before cleaning or performing maintenance on the
machine. Turn the main
power switch to off (0).
Open the top cover. Inspect
the side clamps and
remove any film or product
from the clamps. Clean
the side clamps with a soft
cloth and hot water. Press
down on each side clamp
to open the clamp, exposing the pads. Clean each
with a soft cloth and hot
water. Dry the pads with a
soft cloth. The pads must
be dry before using the
wrapper.
Remove the film and clean
the center clamp and
pusher with a soft cloth
and hot water.
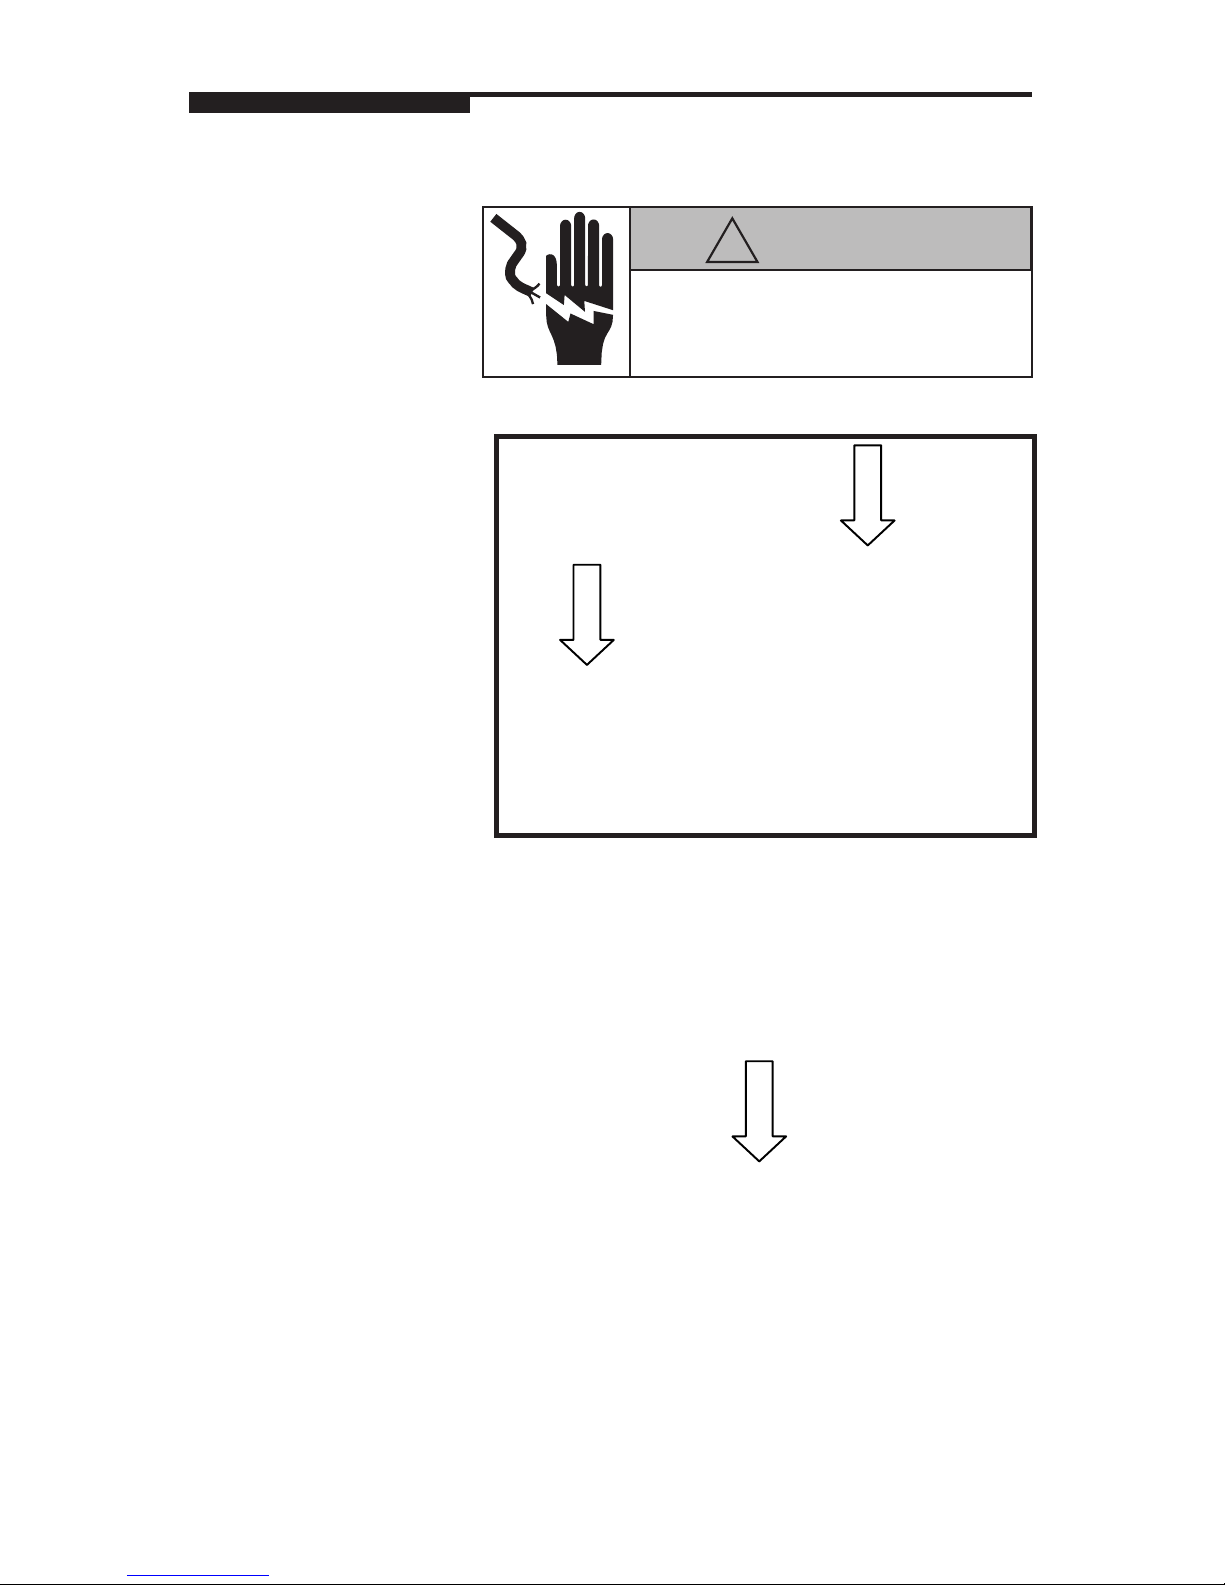
WARNING
ELECTRICAL SHOCK HAZARD
Disconnect and lock out all power to this unit before
removing or installing the fuse, cleaning, or servicing.
!
Page 20
18
Daily Cleaning
(cont.)
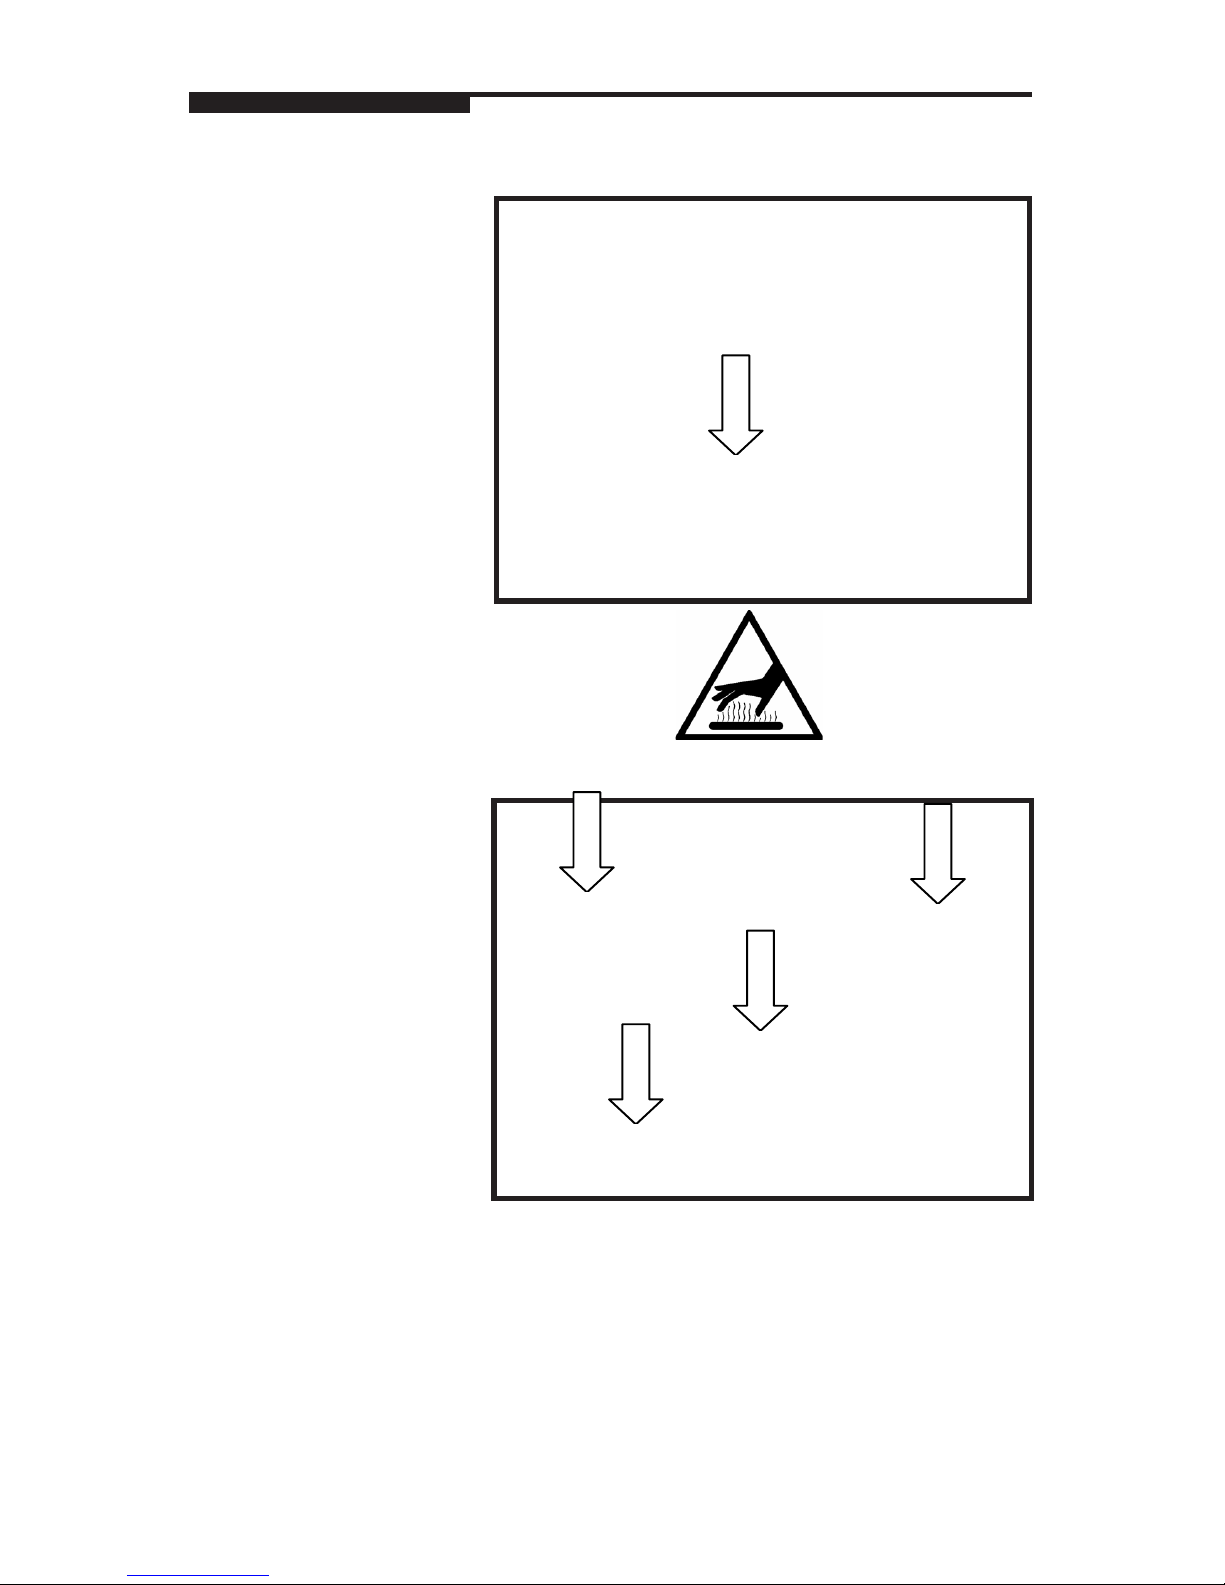
Caution: The Sealing Belt
may be hot!.
Clean the belt with a soft
cloth and hot water. Using
the lift handle, raise the
sealing belt for cleaning.
Remove any film or product from the film folders
and clean with a soft cloth
and hot water.
Using a clean soft cloth
and hot water, carefully
clean the three sets of photoeyes and the infeed belts.
Page 21
19
Weekly
Cleaning
ONCE A WEEK clean the
following areas using a
cloth dampened with hot
water on the parts detailed
in this section. Do not use
solvents or abrasives for
cleaning.
Clean the Infeed conveyor
belts and rollers.
Clean the Package lifter,
Center Clamp, Film Folders, and Film rollers.
Page 22
20
Weekly Cleaning
(Cont.)
If film is wrapped around
the first roller, use a knife
to cut the film by running it
through the provided slot.
Caution! Do not to cut into
the polished surface of the
roller. Clean the discharge
rollers on the Sealing Belt.
Clean the Side Clamps and
pads on both sides of the
machine.
Clean the photoeyes using
a soft cloth dampened in
hot water.
Clean the Sealing Belt.
Wait for the surface to cool
before cleaning
H 0
2
Agua Caliente
Hot Water
Chaude Eau
Page 23

21
Cleaning the
Package Lifter
For proper machine operation, the Package Lifter
must be kept clean. The
lifter can be cleaned from
the top of the machine, or
from the front of the machine. To clean from the
top, use this procedure.
Raise the pressure ski and
pull the lifter up. Clean
the lifter using a soft cloth
dampened with hot water
to remove any product and
dirt or grease.
Make sure the slides are
clean. If necessary, scrape
any buildup from the
slides. Use compressed air
to dry (if available).
Lower the pressure ski
before wrapping.
A
H 0
2
Agua C aliente
Hot Wat
er
Chaude Eau
A
Page 24

22
Troubleshooting
Symptom Cause Solution
Film Tearing or Film
Tracking Poorly
Bad Roll of film. Replace film with
new roll.
Trays left open, poor
overwrap, or no
overwrap
End of film roll. Replace film roll.
Film Pulling out of center
clamp.
Clean center clamp.
Film Pulling out of side
clamps.
Near end of roll change roll.
Clean side clamp
gripper pads and allow to dry.
Not picking film Sealing Belt not in correct
or closed position.
Lift and reclose Seal-
ing Belt.
Film not loaded properly. Reload Film.
Center clamp dirty. Clean center clamp
and allow to dry.
Film wrapped around
distributor film roller.
Remove any film or
debris from distribu-
tor film roller.
Short Overwrap Rollers on sealing belt
dirty.
Clean rollers on seal-
ing belt.
No Power Main switch turned OFF. Turn power switch
ON.
Circuit breaker tripped. Check store circuit
breaker, call for
service.
Inadequate wiring.
Blown Fuse.
Call for service.
Page 25

23
Troubleshooting
Symptom Cause Solution
Irregular package
wrapping.
Film roll out of position Arrange the film roll
in the correct position.
Film clamp grasp insufficient.
Check and clean
Center Clamp and
allow to dry.
Side Clamps film gripping insufficient.
Check and clean the
side clamps and allow to dry.
Film Folder dirty. Clean the Film Folder.
Film loading incorrect. Reload the film.
Package wrapping
with irregular film
tension.
Work program incorrect. Check the work
program setting.
Enter the proper work
program.
Film roll out of position. Arrange the film roll
in the correct position.
Center Clamp grasp
insufficient.
Check and clean the
film clamp.
Side clamp grasp insufficient.
Check and clean the
side clamps.
Film Folder dirty. Clean the Film Folder.
Film loading incorrect. Reload the film.
Poor package sealing.
Sealing belt temperature
incorrect
Check the tempera-
ture value.
If sealing belt is too
hot, lower the tem-
perature value.
If sealing belt is too
cold, increase the
value.
Page 26
24
Operation
Codes
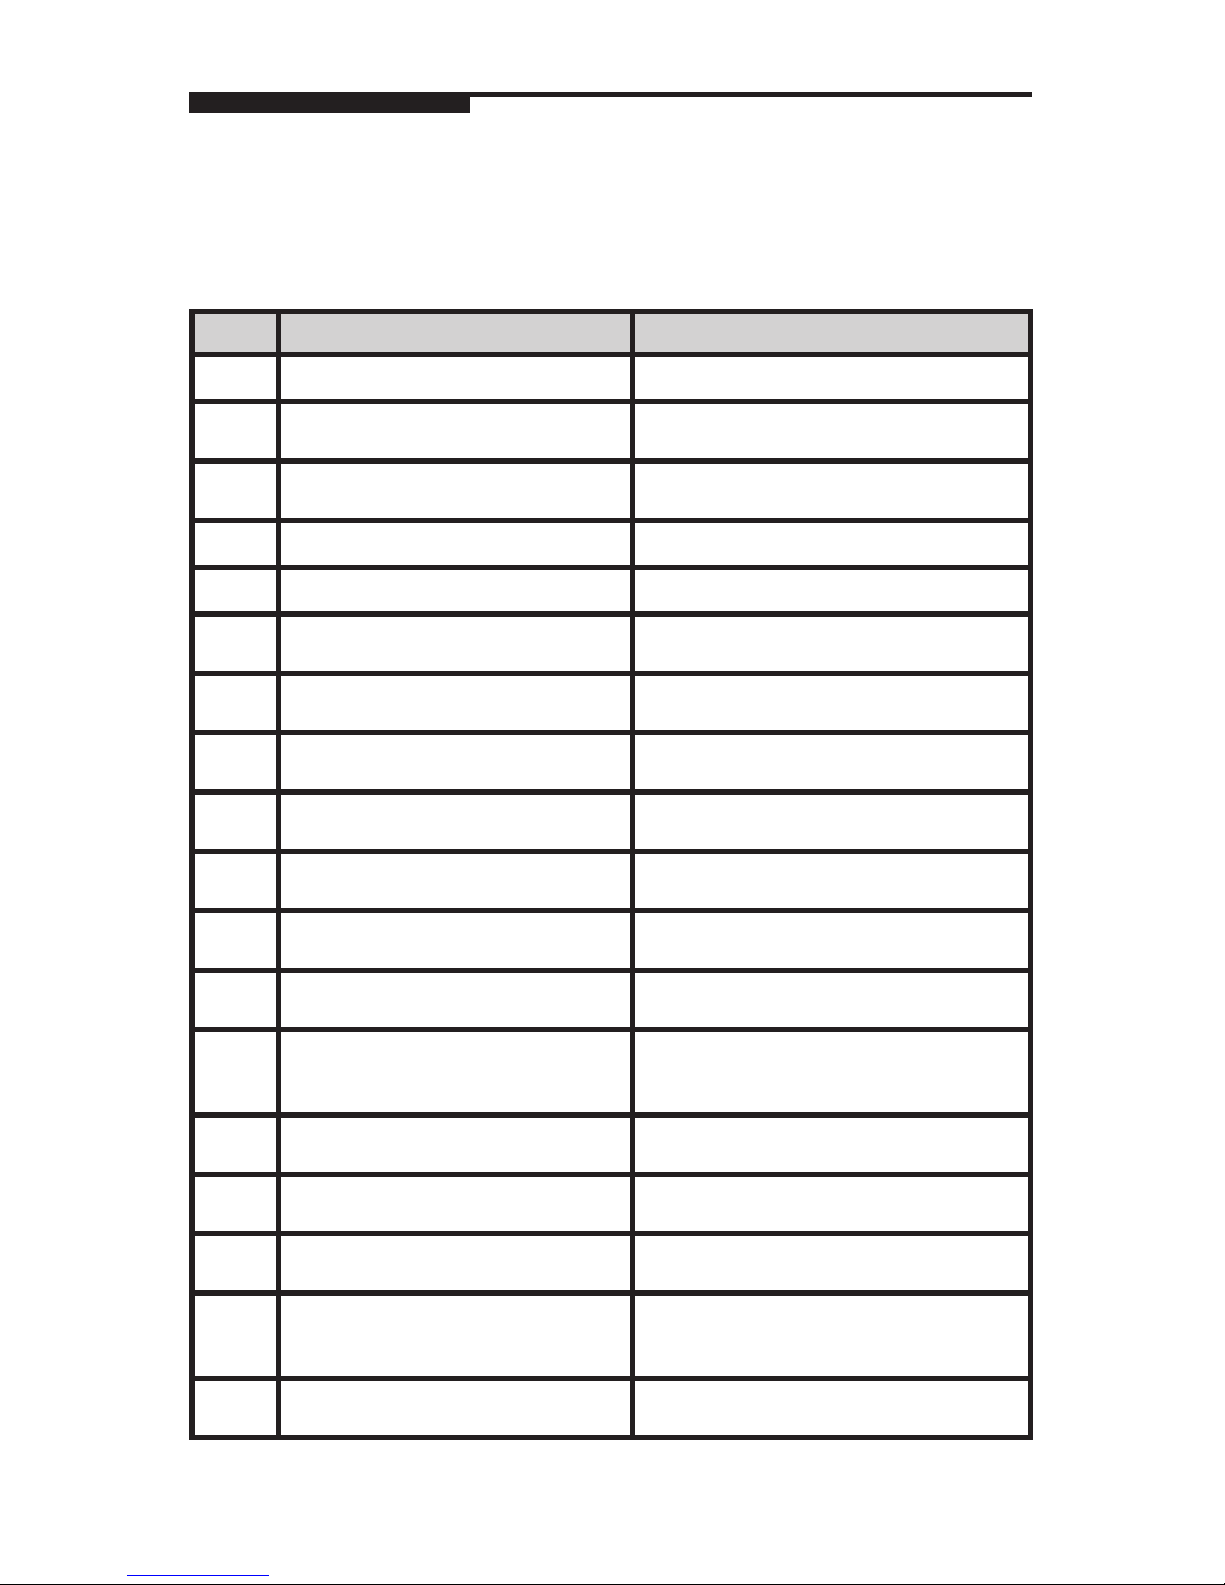
If the SOLO® MAX detects a problem, the following
message codes will blink on the console. These codes
will not stop the machine operation.
Code Problem/Cause Solution
10
Machine idle. Press START button F2 to start again.
66
Photocell in critical condition
Clean the photocells.
If the error persists, call for service.
67
Photocell is flickering.
Clean the photocells.
If the error persists, call for service.
80
Waiting for Weigh Complete Signal. If the error persists, call for service.
81
Waiting for Label Applied Signal. If the error persists, call for service.
82
One or more horizontal photocells
have been disabled.
Clean the photocells
If the error persists, call for service.
83
One or more vertical photocells
have been disabled.
Clean the photocells
If the error persists, call for service.
89
The temperature of the sealing plate
is higher that the set value.
Switch the machine off and on.
If the error persists, call for service.
90
The sealing plate thermister short
circuit.
Switch the machine off and on.
If the error persists, call for service.
91
The sealing plate thermister is not
working due to an open contact.
Switch the machine off and on.
If the error persists, call for service.
92
The sealing plate has not reached
the set value.
Switch the machine off and on.
If the error persists, call for service.
93
Heater/blower malfunctioning.
Switch the machine off and on.
If the error persists, call for service.
94
Exit full signal activated.
Check package transfer to other
machines. If the error persists, call for
service.
95
The sealing plate’s temperature
varies with respect to the set value.
Switch the machine off and on.
If the error persists, call for service.
96
The internal machine temperature
thermister is not working properly.
Switch the machine off and on.
If the error persists, call for service.
97
Machine input voltage is too low.
Switch the machine off and on.
If the error persists, call for service.
98
The machine speed has been
reduced because of defective
actuator movement (motor stalls).
Due to problems on other equipment, the
machine speed is reduced.
If the error persists, call for service.
99
One or more infeed photocells
disabled because they are blocked.
Check and clean the photocells.
If the error persists, call for service.
Page 27
25
Fault Codes
Code Problem/Cause Solution
000
End emergency / waiting for
machine start.
Press the START button F2 to start the machine
again.
001
Machine ready to wrap. Press the START button F2.
002
Reset machine’s CPU program. Press the START button F2.
Switch the machine off and on.
If the error persists, call for service.
004
Tray in machine, open cover and
remove.
Open the cover and inspect the machine.
Press the START button F2.
If the error persists, call for service.
005 RS485 serial communication error
with the expansion PCB module.
Switch the machine off and on. If the error
persists, call for service.
006
Battery operated RAM error. Switch the machine off and on. If the error
persists, call for service.
007
Battery operated RAM has lost data. Machine in operation but without data storage.
Call for service and report error.
008
Out of film. Install a new film reel.
If the error persists, call for service.
010 Key module is missing during the
machine cycle.
Switch the machine off and on. If the error
persists, call for service.
011
Emergency stop button on the
machine or on the extended infeed
is pushed.
Release the Emergency STOP push-button and
press the START button F2 to start again. If the
error persists, call for service.
012
Top cover is open. Close the top cover and press the START button
F2 to start again.
If the error persists, call for service.
013
Infeed Cover Guard Open Remove tray from machine, press F2.
014
Rear door open or stop button on
extended infeed depressed.
Close rear door or disengage Stop button on
infeed extension.
015
Infeed safety photoeye blocked. Check the photocell and clean if needed.
If the error persists, call for service.
092
Indexer wait signal time out. Press the START button F2 to start again.
If the error persists, call for service.
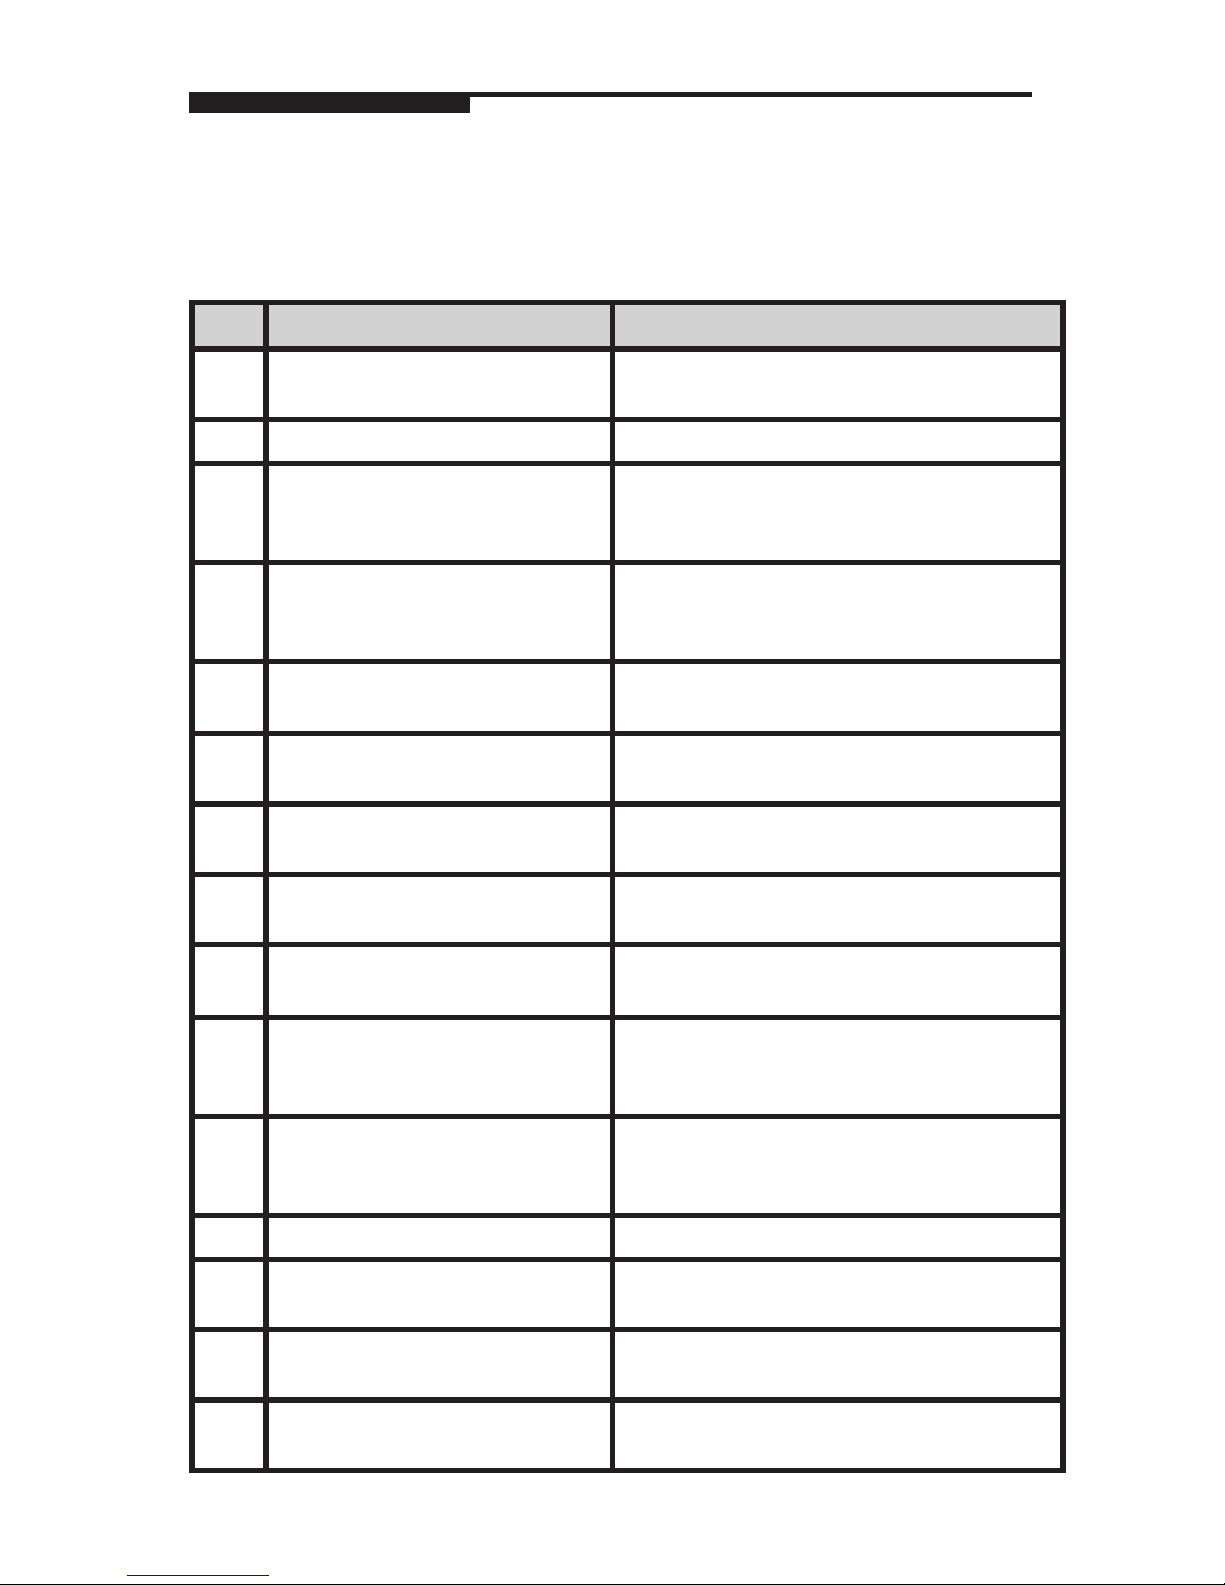
When these codes are displayed on the console, the
machine will stop. The condition must be corrected
before restarting the machine.
Page 28
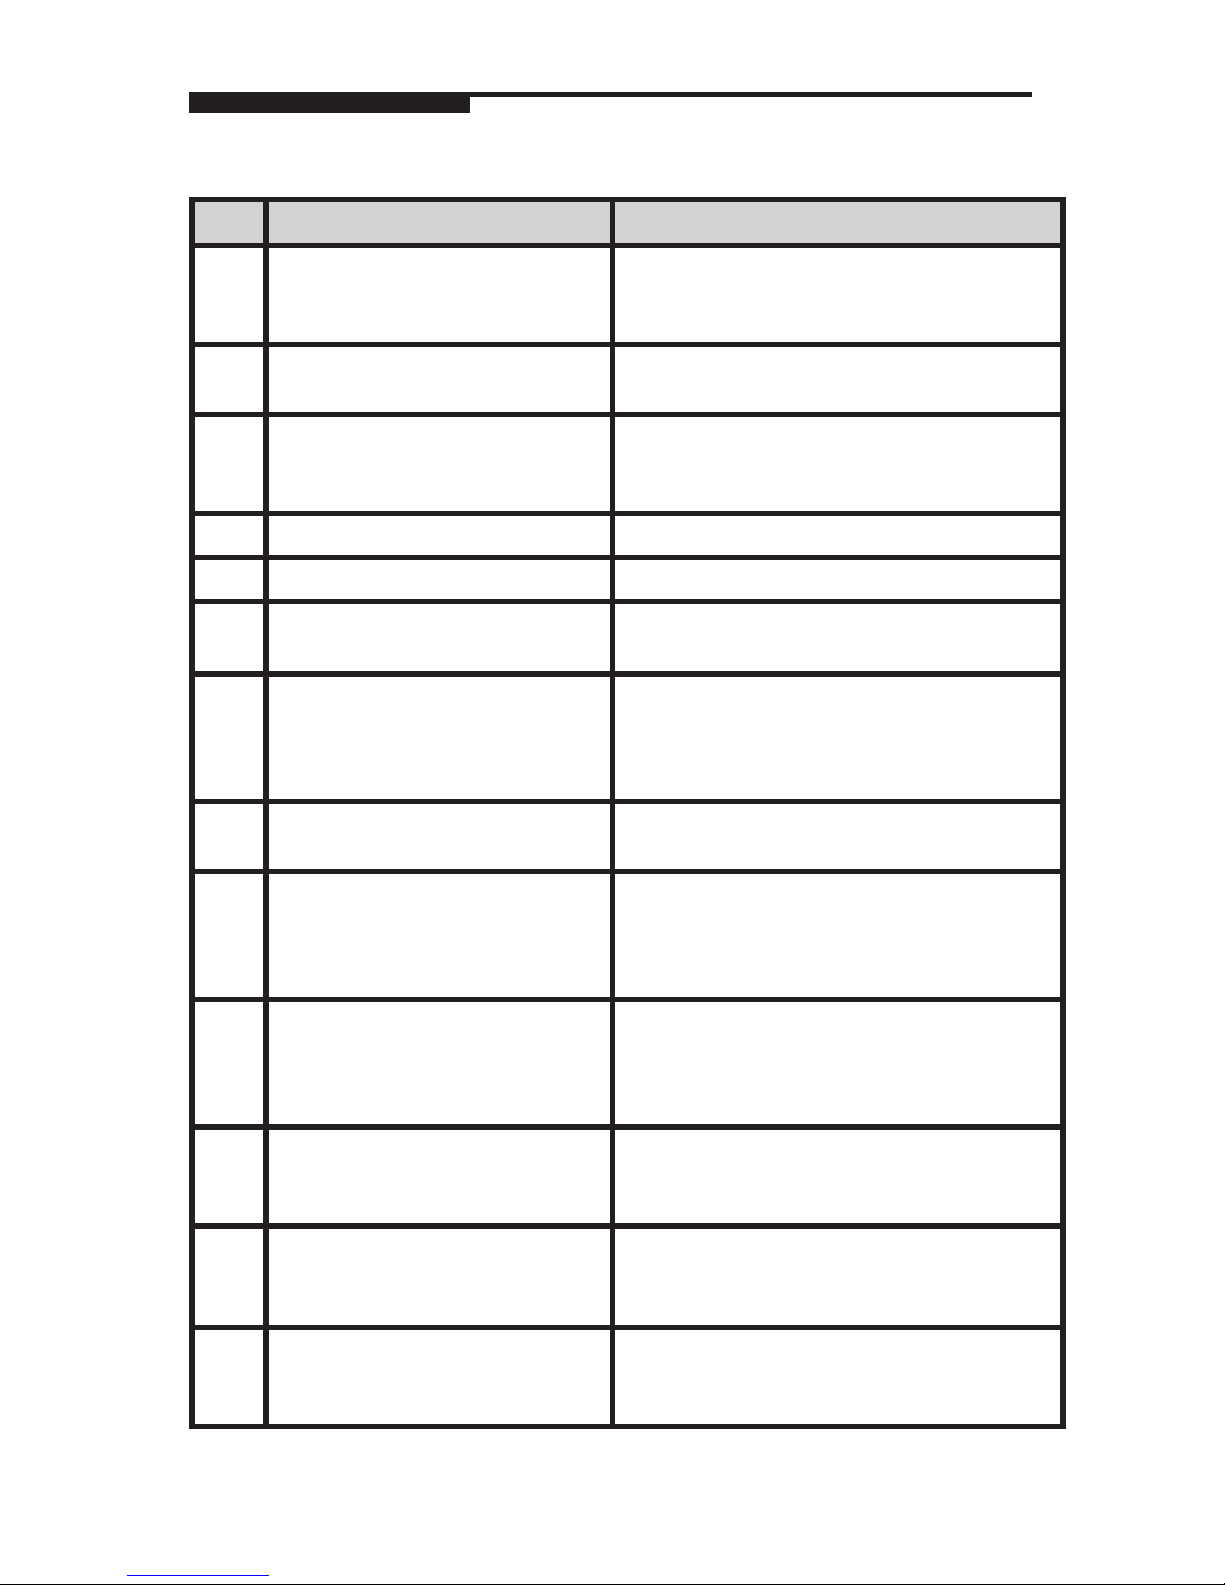
26
Code Problem/Cause Solution
093
Labeling photocell defective, or
package has not reached the
labeling photocell.
Check and clean the photocell.
If the error persists, call for service.
094
An error has occurred during the
Infeed movement.
Press the START button F2 to start again.
If the error persists, call for service.
095
The machine did not receive a
label-applied signal.
Switch the machine off and then on. Press the
START button F2.
If the error persists, call for service.
096 Incorrect movement of labeler.
097 Incorrect labeler turn sensor.
099
Program 95 has finished the set
number of cycles.
Program 95 has completed the number of
systems set without two consecutive errors.
183
No power to motors. Verify the Side
door is closed.
Check that all covers are closed and in place.
Switch the machine off and then on, then
Press the START button F2.
If the error persists, call for service.
184
Synchronous Motors have no
power.
201
The lifter has not arrived at “up”
sensor.
The lifter has not arrived at the up position.
Switch the machine off and then on. Press the
START button F2 to cycle the machine.
If the error persists, call for service.
202
The lifter has not arrived at the
“down” sensor.
The lifter has not arrived at the down position.
Switch the machine off and then on. Press the
START button F2 to cycle the machine. If the
error persists, call for service.
203
Serial communication error of lifter. Switch the machine off and then on. Press the
START button F2.
If the error persists, call for service.
204
205
206
Lifter Encoder error.
Faulty ALV Lifter Movement.
Lifter Motor short circuit
Switch the machine off and then on. Press the
START button F2.
If the error persists, call for service.
207
The temperature of the lifter servo
driver PCB is too high.
Switch the machine off and then on. Press the
START button F2.
If the error persists, call for service.
Fault Codes
Page 29
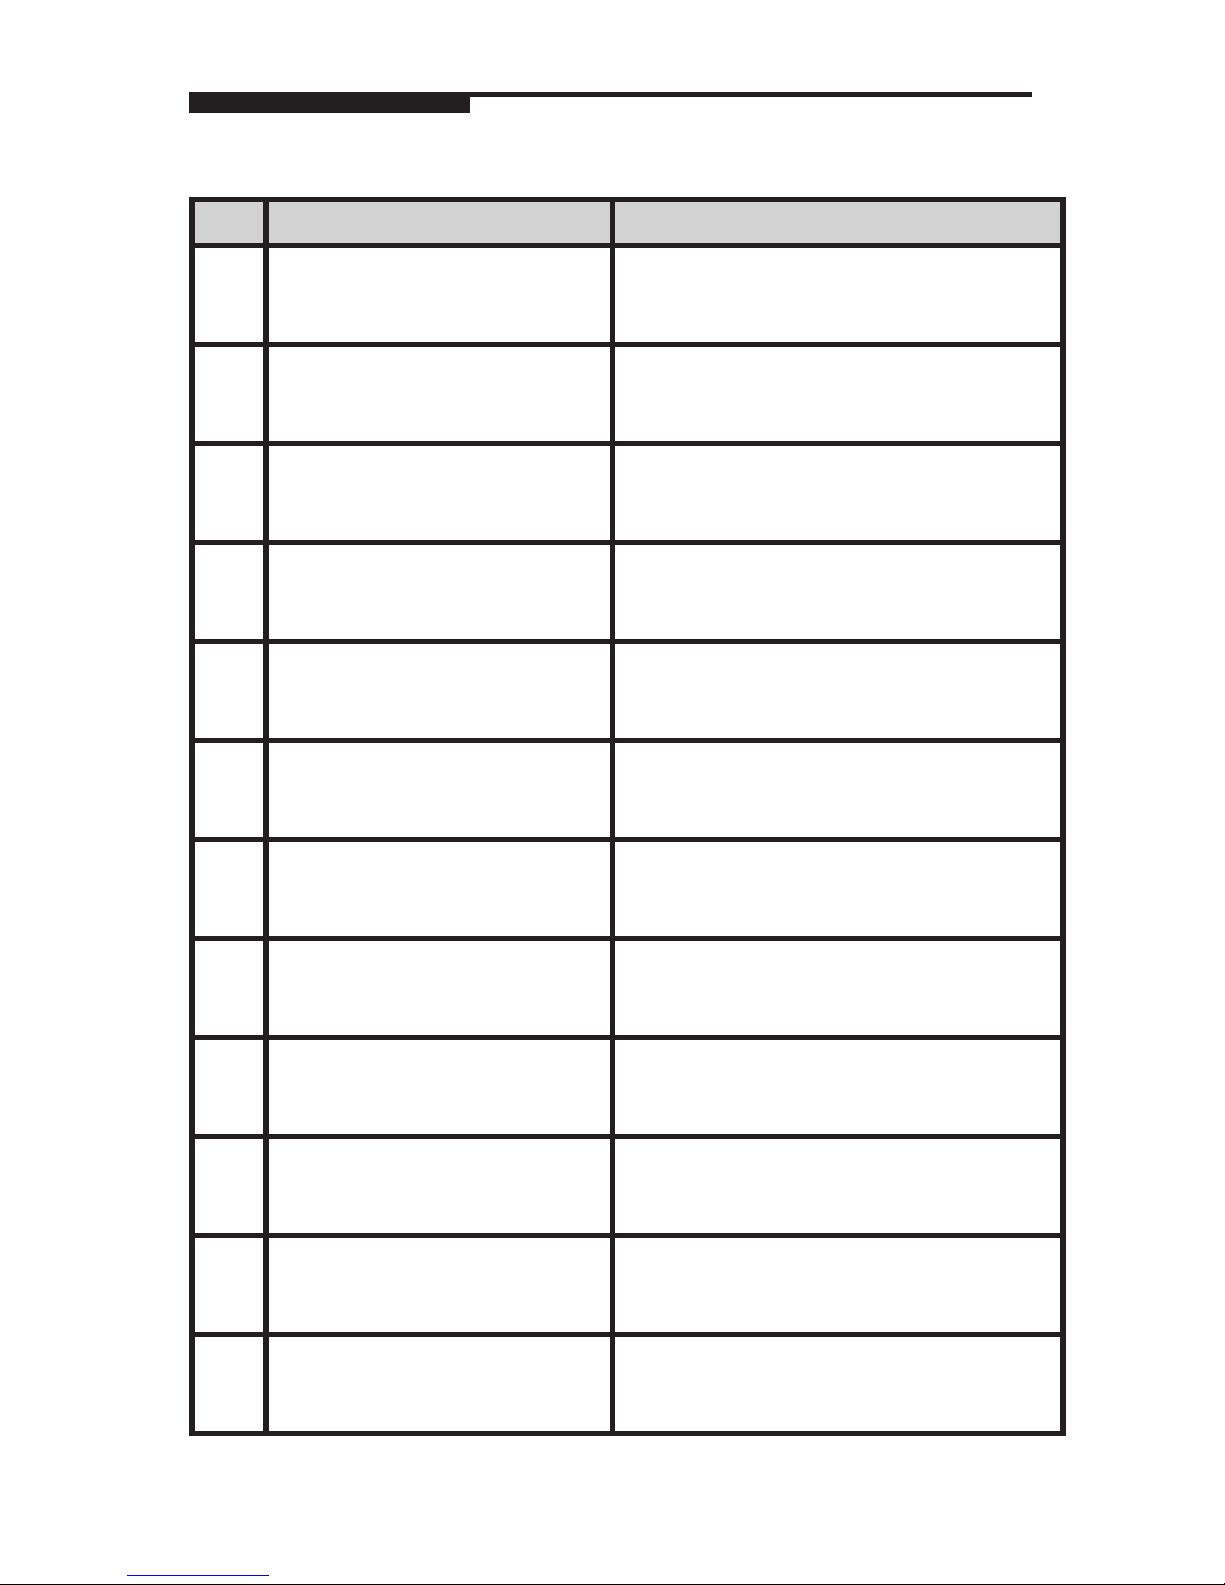
27
Code Problem/Cause Solution
208
a) Lifter movement in Delta limit
during a machine reset.
b) Multiple sensor switching.
Switch the machine off and then on. Press the
START button F2.
If the error persists, call for service.
209
Over voltage of the lifter’s driver
during a machine reset.
Switch the machine off and then on. Press the
START button F2.
If the error persists, call for service.
210
The lifter’s driver has reset during a
machine rest.
Switch the machine off and then on. Press the
START button F2.
If the error persists, call for service.
211
Lifter movement in Delta limit
during upward movement.
Switch the machine off and then on. Press the
START button F2.
If the error persists, call for service.
212
Over voltage of the lifter’s driver
during its upward movement.
Switch the machine off and then on. Press the
START button F2.
If the error persists, call for service.
213
The lifter’s driver has reset during
its upward movement.
Switch the machine off and then on. Press the
START button F2.
If the error persists, call for service.
214
Lifter movement in Delta limit
during downward movement.
Switch the machine off and then on. Press the
START button F2.
If the error persists, call for service.
215
Over voltage of the lifter’s driver
during its downward movement.
Switch the machine off and then on. Press the
START button F2.
If the error persists, call for service.
216
The lifter’s driver has reset during
its downward movement.
Switch the machine off and then on. Press the
START button F2.
If the error persists, call for service.
223
Parallel I/O error of the lifter driver. Switch the machine off and then on. Press the
START button F2.
If the error persists, call for service.
301
The center clamp did not reach the
sensor.
Switch the machine off and then on. Press the
START button F2.
If the error persists, call for service.
302
The center clamp has not left the
sensor.
Switch the machine off and then on. Press the
START button F2.
If the error persists, call for service.
Fault Codes
Page 30
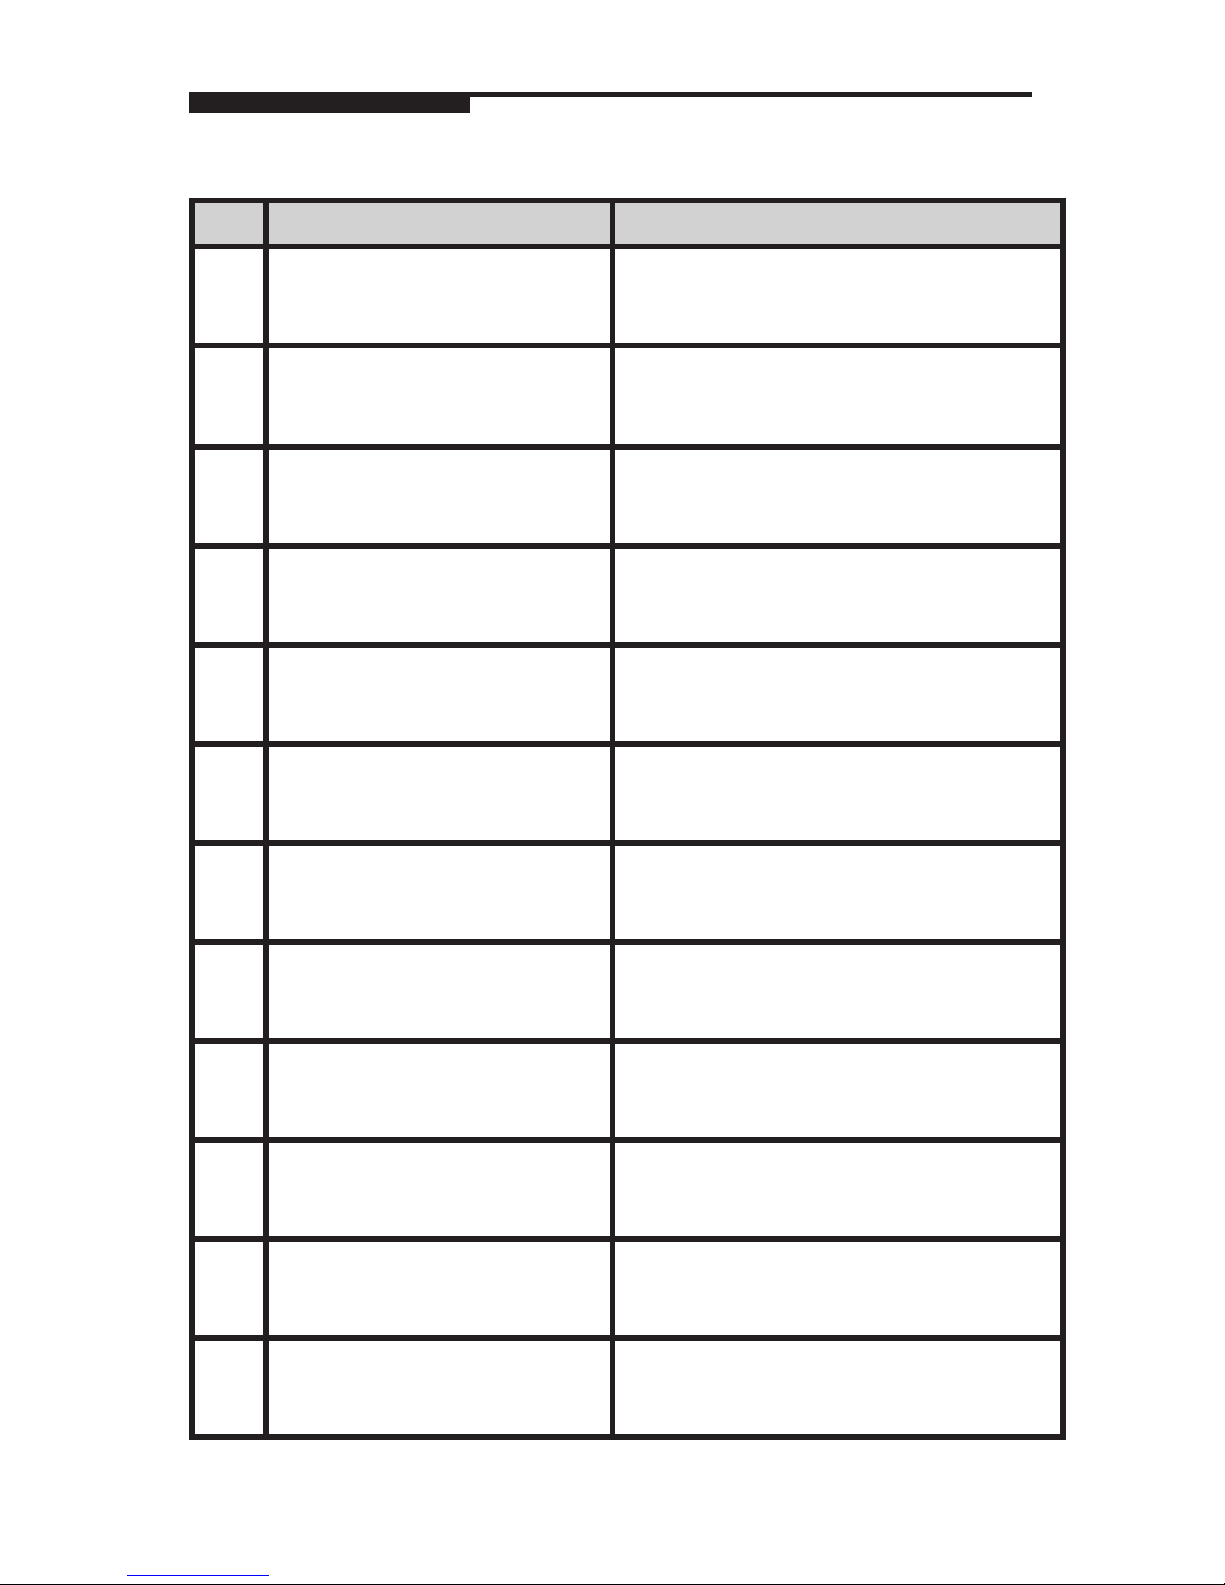
28
Code Problem/Cause Solution
303
Serial communication error of
center clamp.
Switch the machine off and then on. Press the
START button F2.
If the error persists, call for service.
304
305
306
Center Clamp Encoder error.
Faulty Cent. Clamp ALV movement.
Cent. Clamp motor short circuit.
Switch the machine off and then on. Press the
START button F2.
If the error persists, call for service.
307
The temperature of the center clamp
servo driver PCB is too high.
Switch the machine off and then on. Press the
START button F2.
If the error persists, call for service.
308
a) Center clamp movement in Delta
limit during a machine reset.
b) Multiple sensor switching.
Switch the machine off and then on. Press the
START button F2.
If the error persists, call for service.
309
Over voltage of the center clamp
driver during a machine reset.
Switch the machine off and then on. Press the
START button F2.
If the error persists, call for service.
310
The center clamp’s driver has reset
during a machine reset.
Switch the machine off and then on. Press the
START button F2.
If the error persists, call for service.
311
Center clamp movement in Delta
limit during film unwinding.
Switch the machine off and then on. Press the
START button F2.
If the error persists, call for service.
312
Over voltage of the center clamp
driver during film unwinding.
Switch the machine off and then on. Press the
START button F2.
If the error persists, call for service.
313
The center clamp’s driver has reset
during film unwinding.
Switch the machine off and then on. Press the
START button F2.
If the error persists, call for service.
314
Center clamp movement in
Delta limit during tension relief
movement.
Switch the machine off and then on. Press the
START button F2.
If the error persists, call for service.
315
Over voltage of the center clamp
driver during tension relief
movement.
Switch the machine off and then on. Press the
START button F2.
If the error persists, call for service.
316
The center clamp’s driver has reset
during tension relief movement.
Switch the machine off and then on. Press the
START button F2.
If the error persists, call for service.
Fault Codes
Page 31
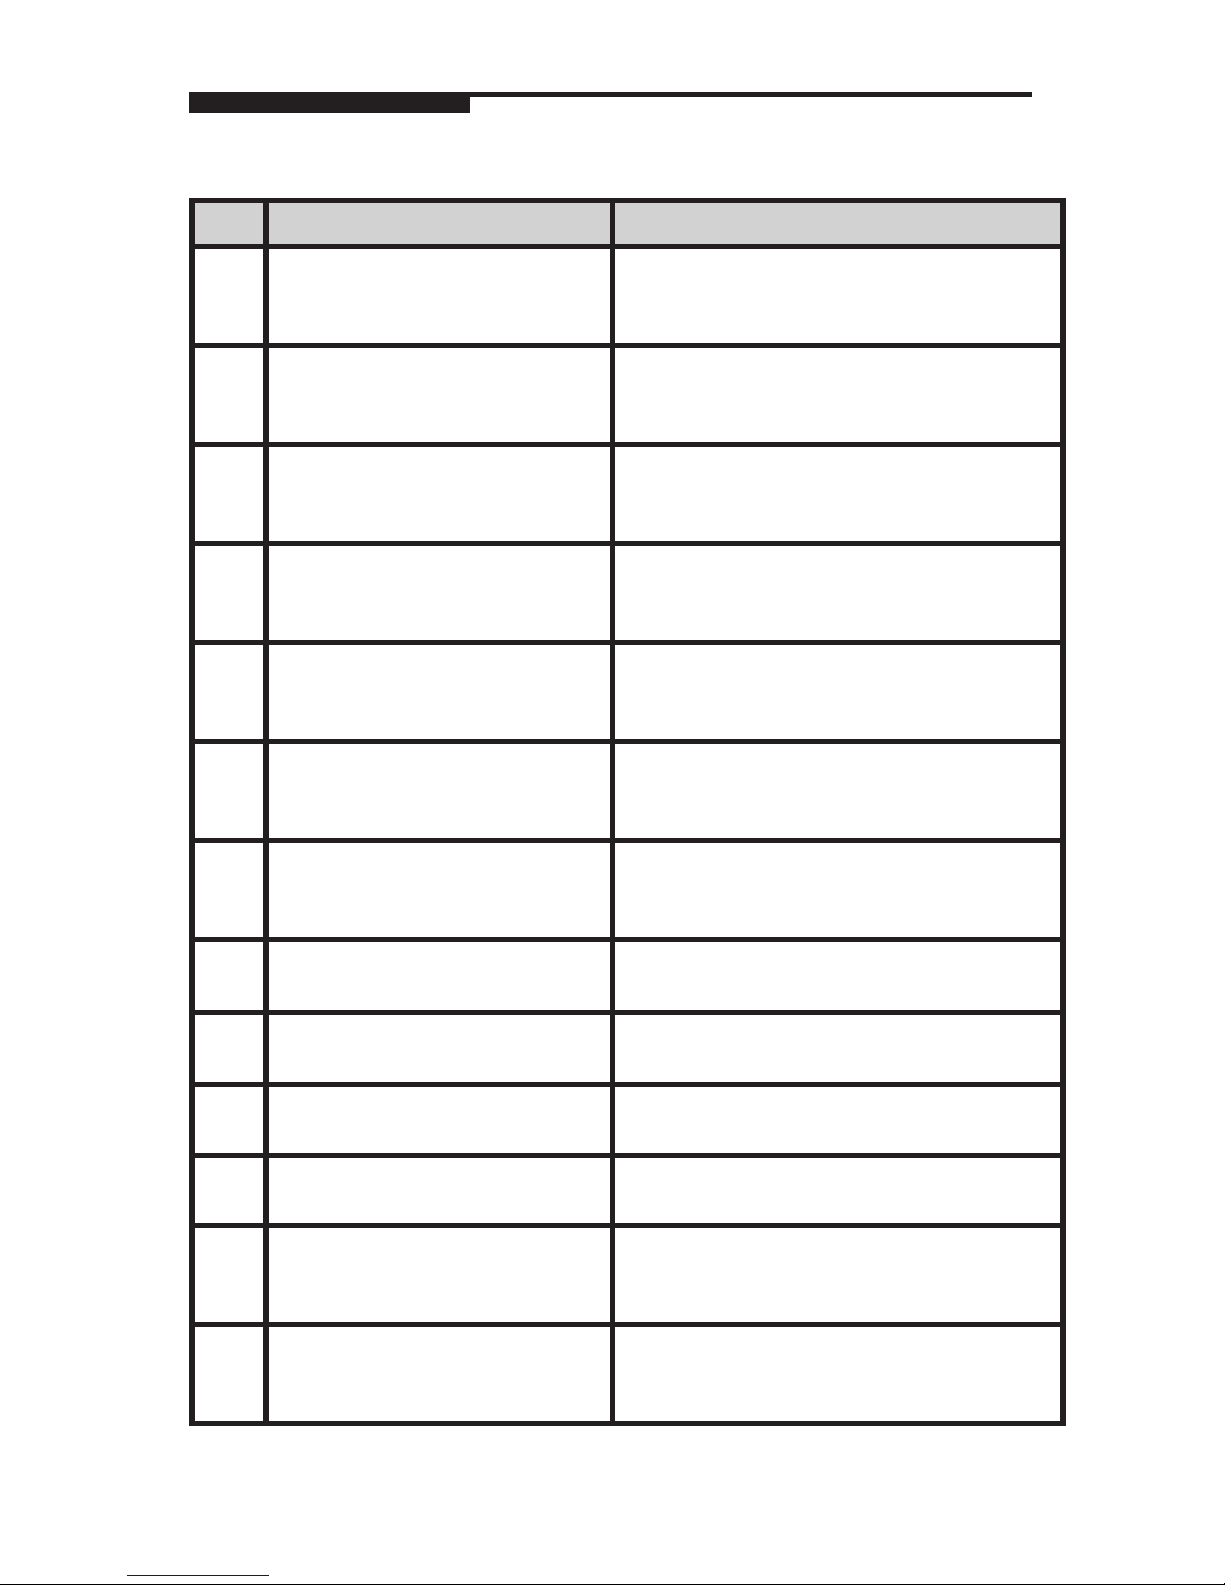
29
Code Problem/Cause Solution
317
Center clamp movement in delta
limit during film prestretch.
Switch the machine off and then on. Press the
START button F2.
If the error persists, call for service.
318
Over voltage of the center clamp
driver during film prestretch.
Switch the machine off and then on. Press the
START button F2.
If the error persists, call for service.
319
The center clamp’s driver has reset
during film prestretch.
Switch the machine off and then on. Press the
START button F2.
If the error persists, call for service.
320
Center clamp movement in delta
limit during package ejection.
Switch the machine off and then on. Press the
START button F2.
If the error persists, call for service.
321
Over voltage of the center clamp
driver during package ejection.
Switch the machine off and then on. Press the
START button F2.
If the error persists, call for service.
322
The center clamp’s driver has reset
during package ejection.
Switch the machine off and then on. Press the
START button F2.
If the error persists, call for service.
323
Parallel I/O error of the center
clamp driver.
Switch the machine off and then on. Press the
START button F2.
If the error persists, call for service.
338 Ejection photocell B1 obscured
during film unwinding.
339 Ejection photocell B1 not obscured
in tray exit phase.
401
The side-clamp opening cam has
not left the sensor.
Press the START button F2.
If the error persists, call for service.
402
The side-clamp opening cam has
not arrived at the sensor.
Press the START button F2.
If the error persists, call for service.
501
During the film cutting movement,
the cutter channel sensor was not
blocked.
Switch the machine off and then on. Press the
START button F2.
If the error persists, call for service.
502
The cutter-channel sensor was not
blocked when the channel moved
down after raising the film.
Switch the machine off and then on. Press the
START button F2.
If the error persists, call for service.
Fault Codes
Page 32
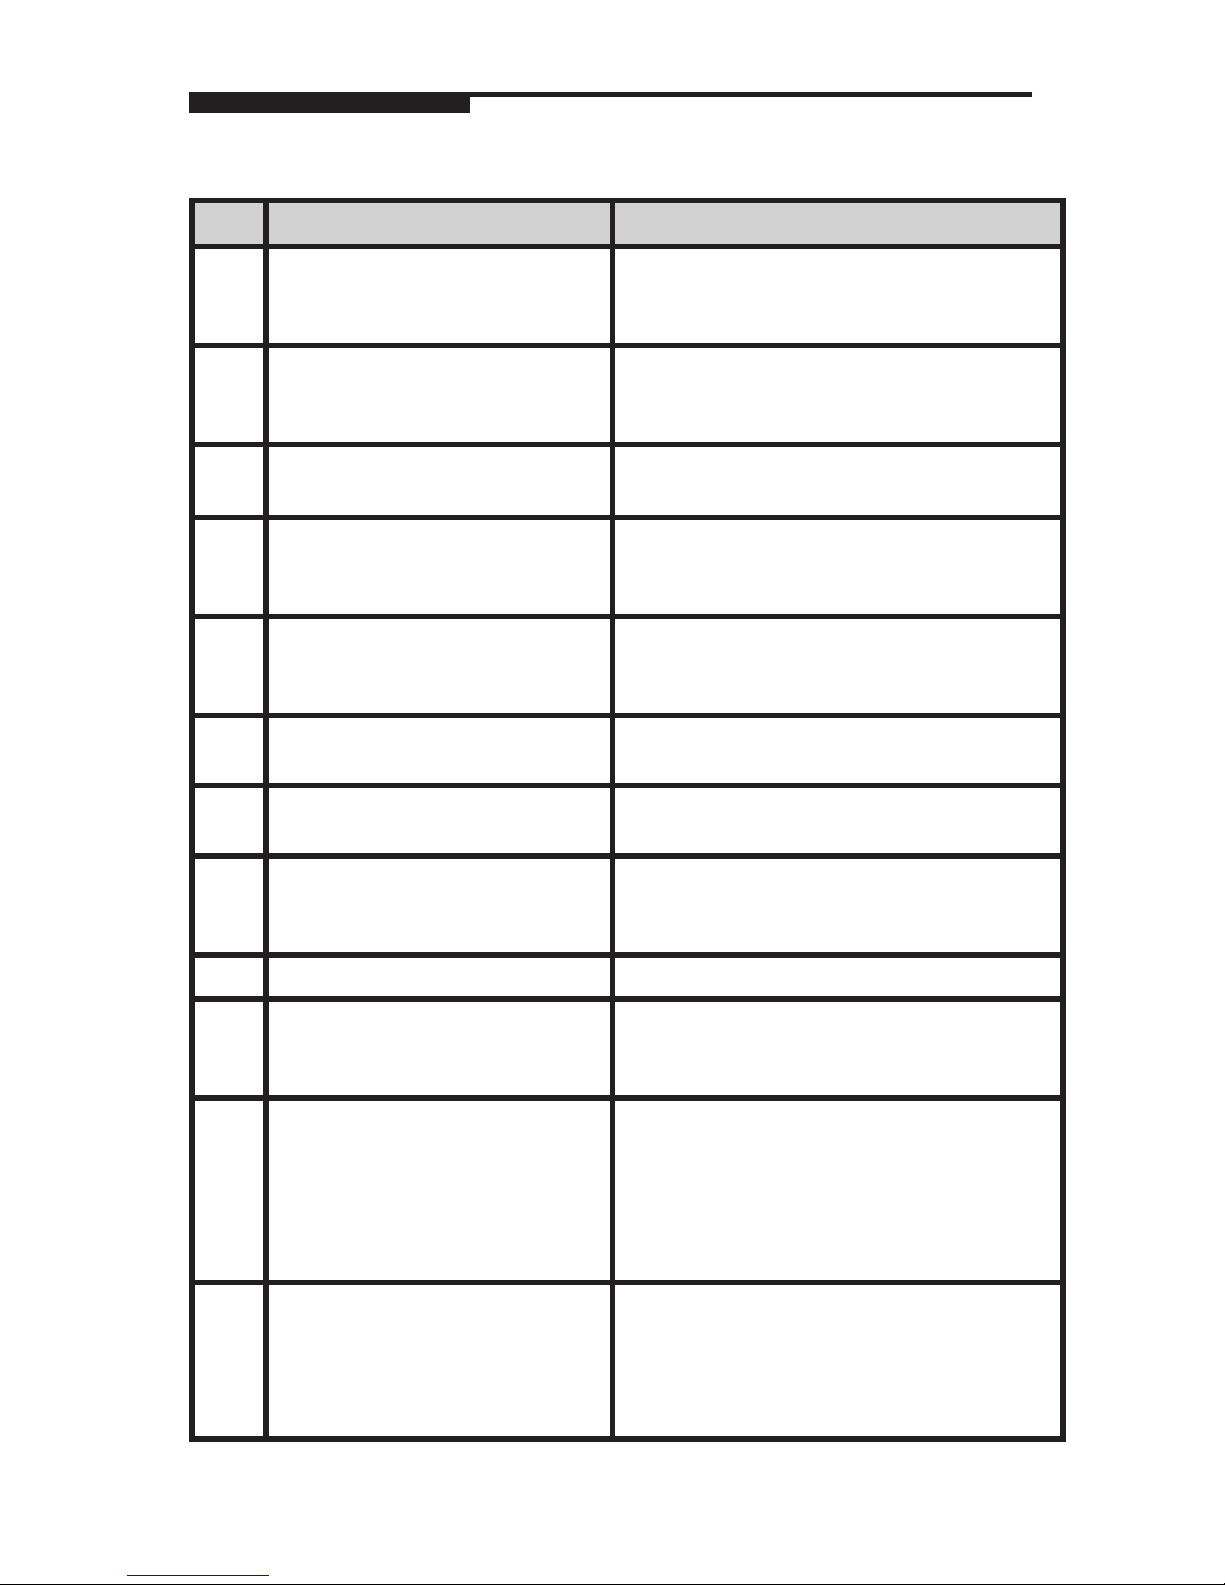
30
Code Problem/Cause Solution
503
The cutter channel has not left
the sensor during the film raise
movement.
Switch the machine off and then on. Press the
START button F2.
If the error persists, call for service.
504
The cutter channel has not left
the sensor during the film cut
movement.
Switch the machine off and then on. Press the
START button F2.
If the error persists, call for service.
600
601
Blocked or dirty Infeed Photocells. Remove any foreign matter or clean the infeed
photocells.
602
Horizontal photocells blocked and/
or dirty.
Take tray or foreign matter away and clean the
photocells.
If the error persists, call for service.
603
Vertical photocells blocked and/or
dirty.
Take tray or foreign matter away and clean the
photocells.
If the error persists, call for service.
604
The package has not reached the
lifter photocell.
Check and clean the photocells.
If the error persists, call for service.
605
Photocells reading inconsistent. Check and clean the photocells.
If the error persists, call for service.
606
Foreign object on back of lifter. Remove any foreign objects obstructing the
photoeyes across the back of the lifter. Press
Start. If the error persists, call for service.
607
Tray incorrectly centered on lifter. Remove tray, press Start button, rerun tray.
608
Tray does not block lifter centering
photocell.
Remove tray, press Start button, rerun tray.
Check for proper loading of tray and proper
tray sizes for machine.
611
612
Tray too big.
Tray is too long.
Place the tray turned by 90° on the infeed.
Check the tray sizes do not exceed 400 mm L
x 260 mm W. Refer to Tray Specifications.
Clean the photocells.
Clean infeed rollers and/or belts.
If the error persists, call for service.
621
622
Tray too short in length.
Tray too short in width.
Check the tray sizes aren’t smaller than
180 mm L x 130 mm W. Refer to Tray
Specifications. Also, check and/or clean the
following: photocells, infeed rollers and belts.
If the error persists, call for service.
Fault Codes
Page 33
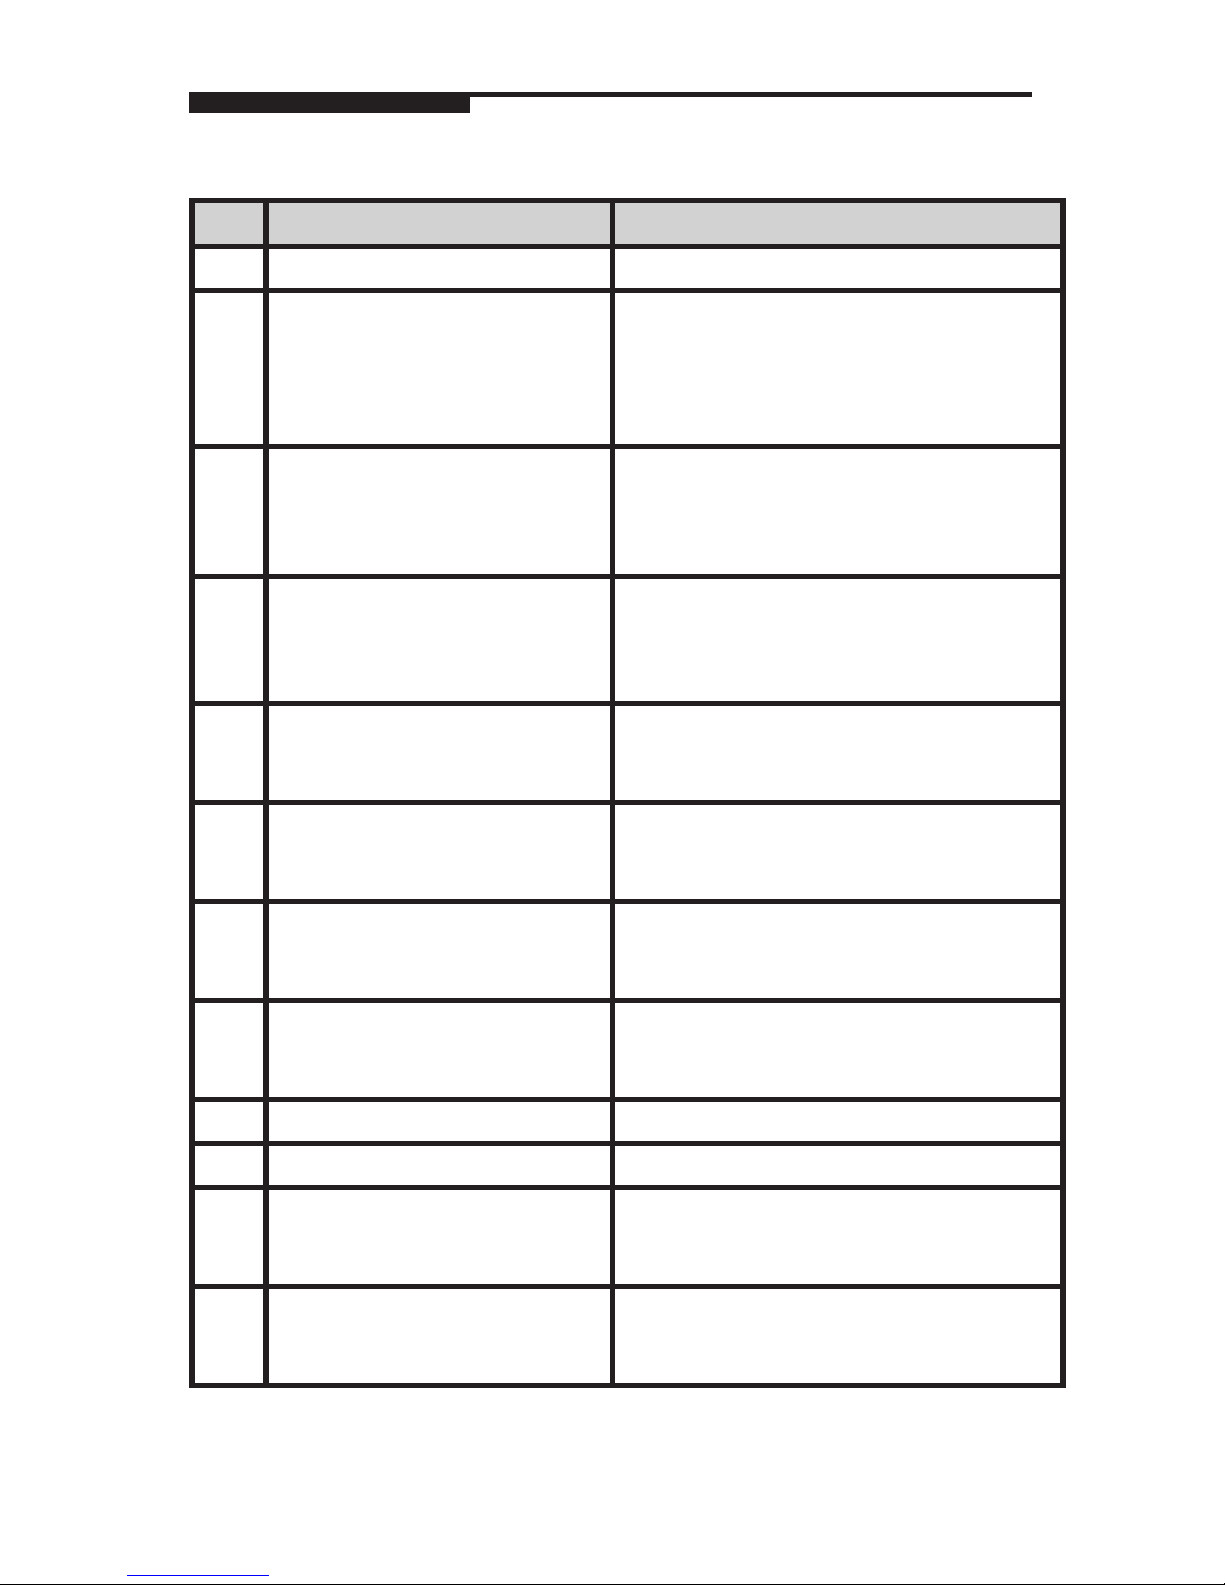
31
Code Problem/Cause Solution
623 Tray not present on infeed 2.
624
Trays too close. Place the trays on the infeed only when the
belts are stopped.
Clean the photocells.
Clean infeed rollers and/or belts.
If the error persists, call for service.
625
626
627
Incorrect movement of infeed 2.
Incorrect state of infeed 2 sensors.
Incorrect switching of sensor 3 on
infeed 2.
Check infeed 2 area for blockage.
Switch the machine off and then on. Press the
START button F2.
If the error persists, call for service.
628
Tray not aligned with the infeed
package guide.
Make sure that the tray is place near to the
infeed reference.
Clean the horizontal photocells.
If the error persists, call for service.
701
The side clamps have not reached
the sensor.
Switch the machine off and then on. Press the
START button F2.
If the error persists, call for service.
702
The side clamps have not left the
sensor.
Switch the machine off and then on. Press the
START button F2.
If the error persists, call for service.
703
Serial communication error of side
clamps.
Switch the machine off and then on. Press the
START button F2.
If the error persists, call for service.
704
Encoder error of the side clamps. Switch the machine off and then on. Press the
START button F2.
If the error persists, call for service.
705
Faulty ALV side clamp movement. Call for service.
706
Side clamp motor short circuit. Call for service.
707
The temperature of the side clamp
servo driver PCB is too high.
Switch the machine off and then on. Press the
START button F2.
If the error persists, call for service.
708
a) Side clamp movement in Delta
limit during a machine reset.
b) Multiple sensor switching.
Switch the machine off and then on. Press the
START button F2.
If the error persists, call for service.
Fault Codes
Page 34
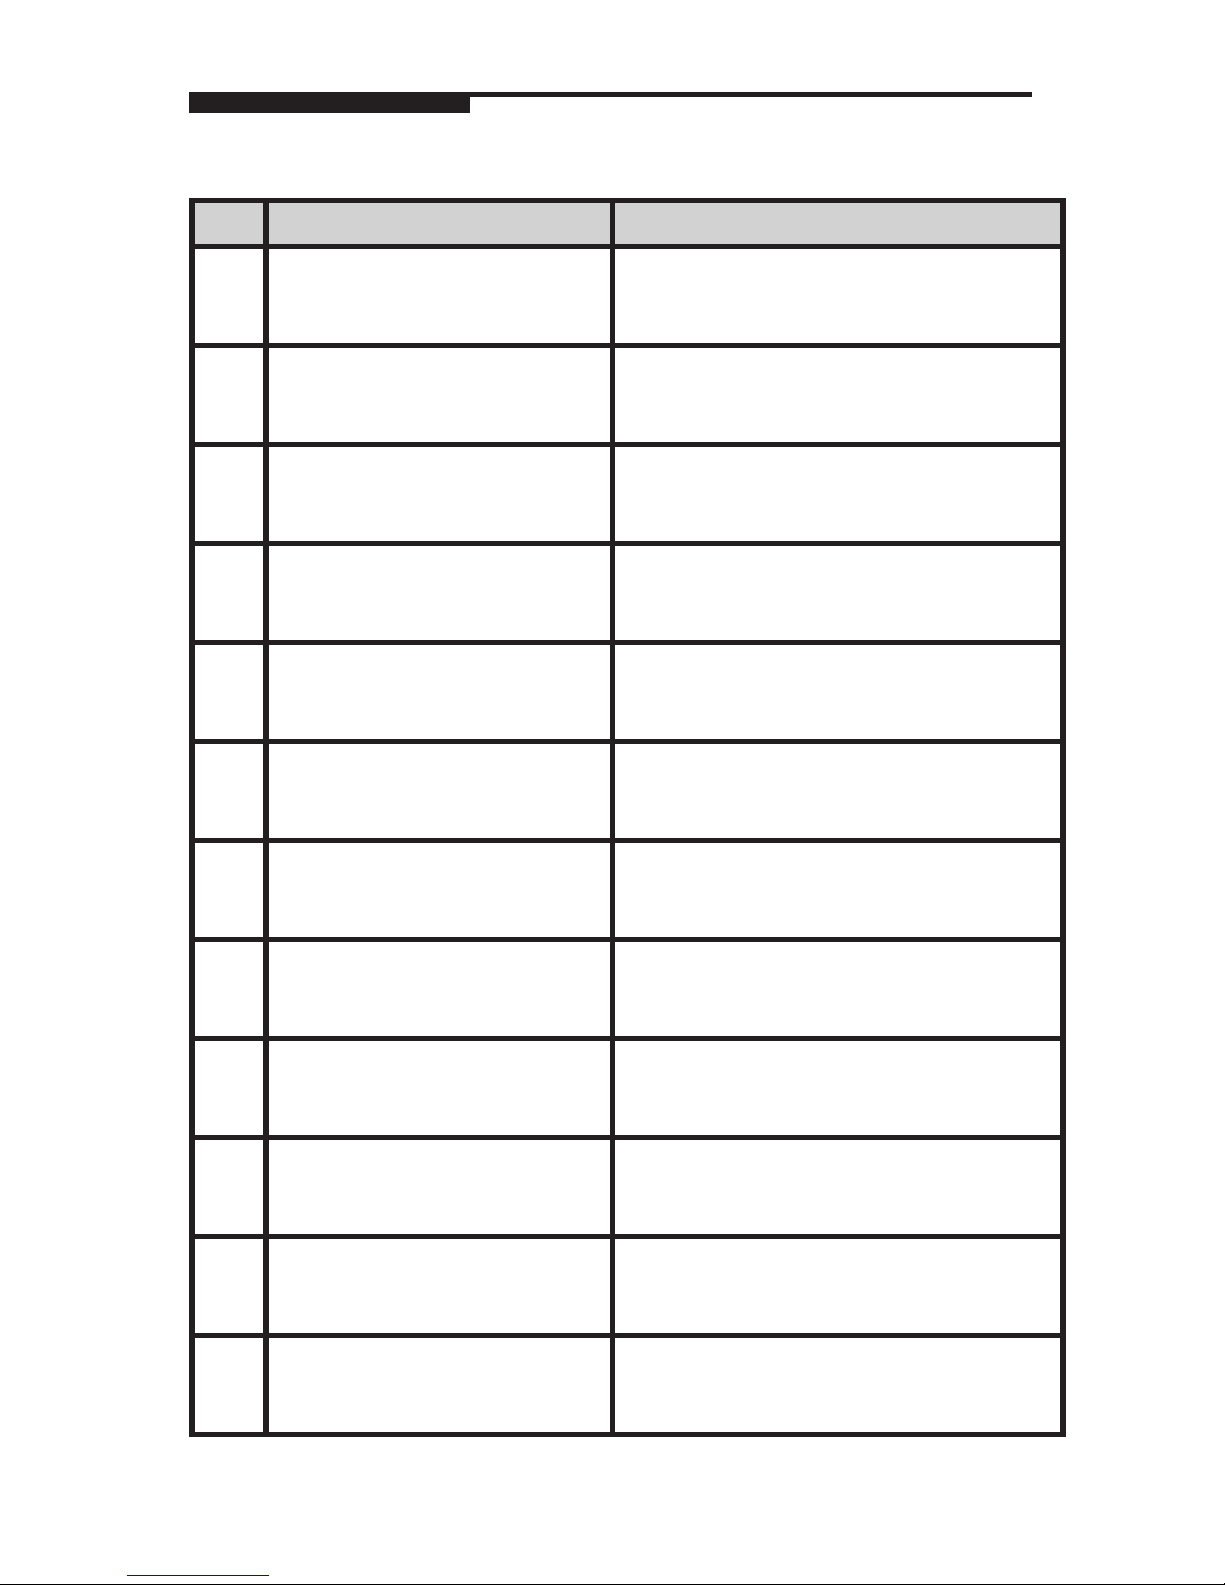
32
Code Problem/Cause Solution
709
Over voltage of the side clamp
driver during a machine reset.
Switch the machine off and then on. Press the
START button F2.
If the error persists, call for service.
710
The side clamp’s driver has reset
during a machine reset.
Switch the machine off and then on. Press the
START button F2.
If the error persists, call for service.
711
Side clamp movement in Delta limit
during film grasp movement.
Switch the machine off and then on. Press the
START button F2.
If the error persists, call for service.
712
Over voltage of the side clamp
driver during film gripping
movement.
Switch the machine off and then on. Press the
START button F2.
If the error persists, call for service.
713
The side clamp’s driver has reset
during film gripping movement.
Switch the machine off and then on. Press the
START button F2.
If the error persists, call for service.
714
Side clamp movement in Delta limit
during film stretch movement.
Switch the machine off and then on. Press the
START button F2.
If the error persists, call for service.
715
Over voltage of the side clamp
driver during film stretch
movement.
Switch the machine off and then on. Press the
START button F2.
If the error persists, call for service.
716
The side clamp’s driver has reset
during film stretch movement.
Switch the machine off and then on; press the
START button F2.
If the error persists, call for service.
717
Side clamp movement in Delta limit
during film tuck movement.
Switch the machine off and then on; press the
START button F2.
If the error persists, call for service.
718
Over voltage of the side clamp
driver during film tuck movement.
Switch the machine off and then on; press the
START button F2.
If the error persists, call for service.
719
The side clamp’s driver has reset
during film tuck movement.
Switch the machine off and then on; press the
START button F2.
If the error persists, call for service.
720
Side clamp movement in Delta limit
during outward movement.
Switch the machine off and then on; press the
START button F2.
If the error persists, call for service.
Fault Codes
Page 35
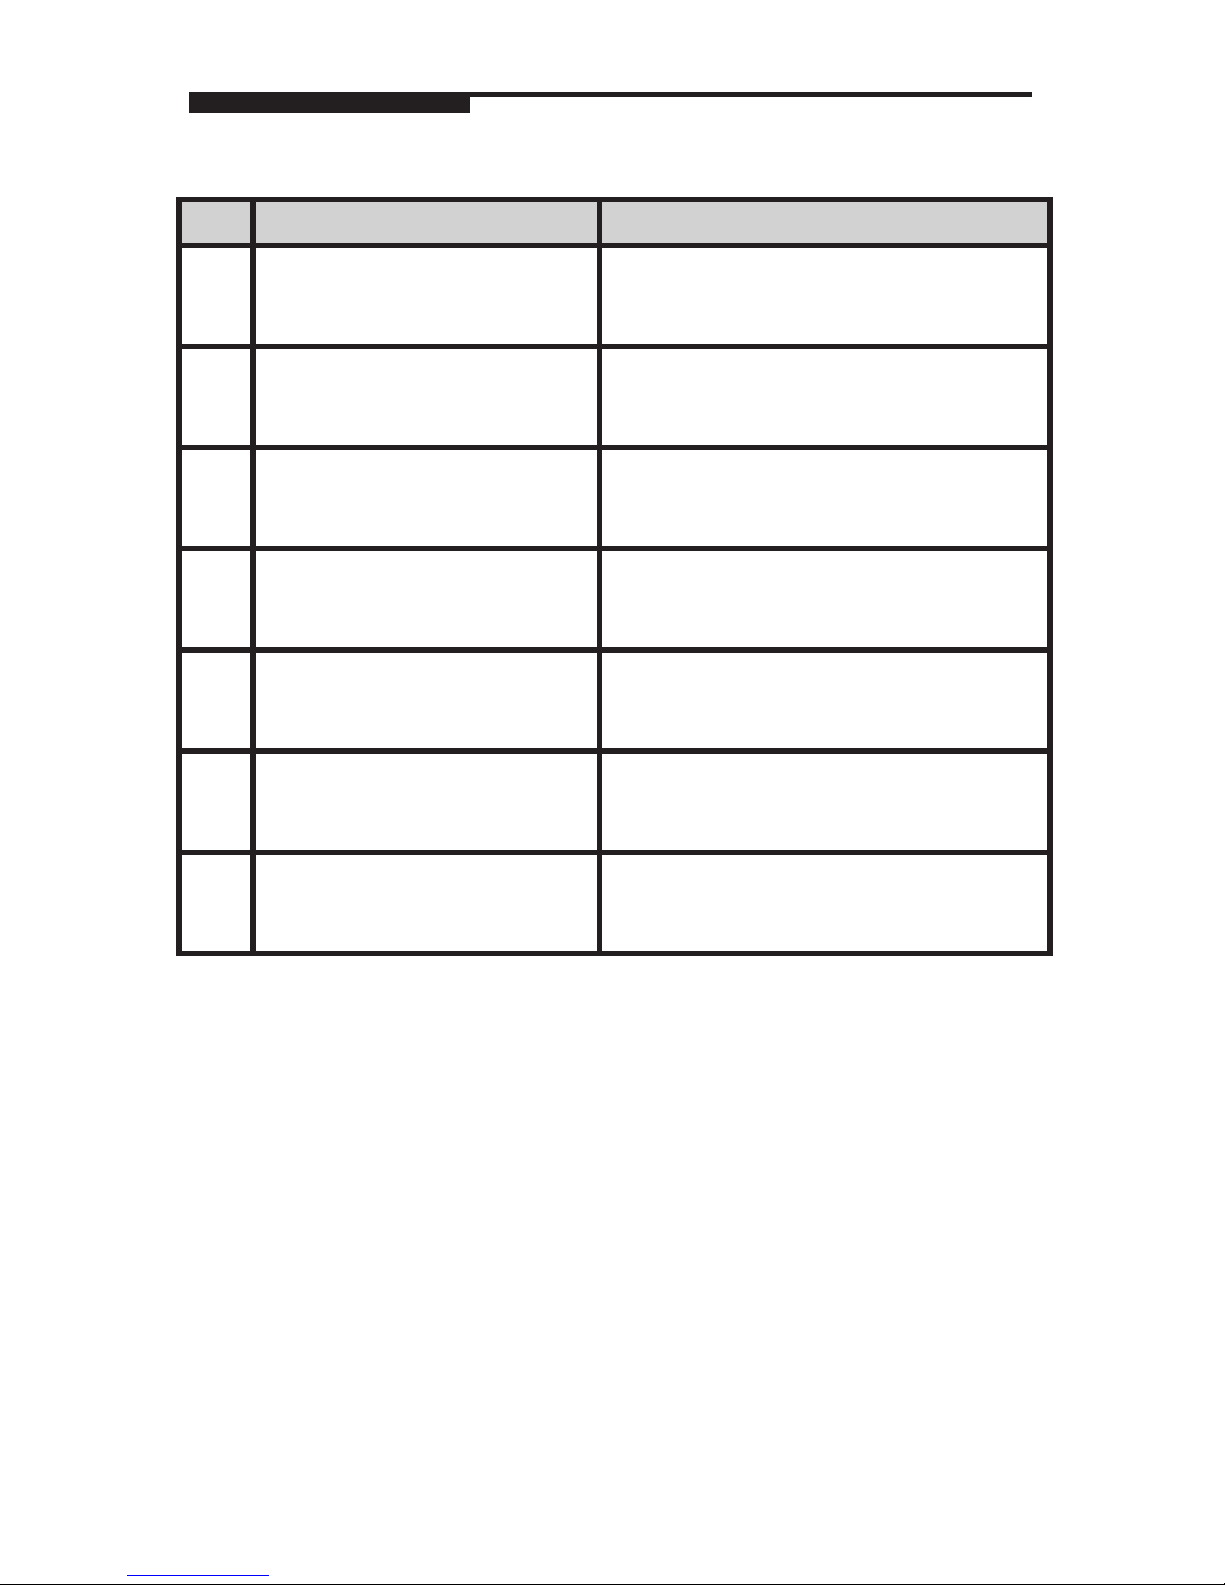
33
Code Problem/Cause Solution
721 Over voltage of the side clamp
driver during outward movement.
Switch the machine off and then on; press the
START button F2.
If the error persists, call for service.
722 The side clamp’s driver has reset
during outward movement.
Switch the machine off and then on; press the
START button F2.
If the error persists, call for service.
723 Parallel I/O error of the side clamp
driver.
Switch the machine off and then on; press the
START button F2.
If the error persists, call for service.
801 Incorrect switching of lifter control
cam sensors.
Switch the machine off and then on; press the
START button F2.
If the error persists, call for service.
802 The lifter control cam sensors did
not become blocked.
Switch the machine off and then on; press the
START button F2.
If the error persists, call for service.
803 Switching of the lifter control cam’s
sensors is out of sequence.
Switch the machine off and then on; press the
START button F2.
If the error persists, call for service.
810 Lifter Arms dropped incorrectly. Switch the machine off and then on; press the
START button F2.
If the error persists, call for service.
Fault Codes
Page 36
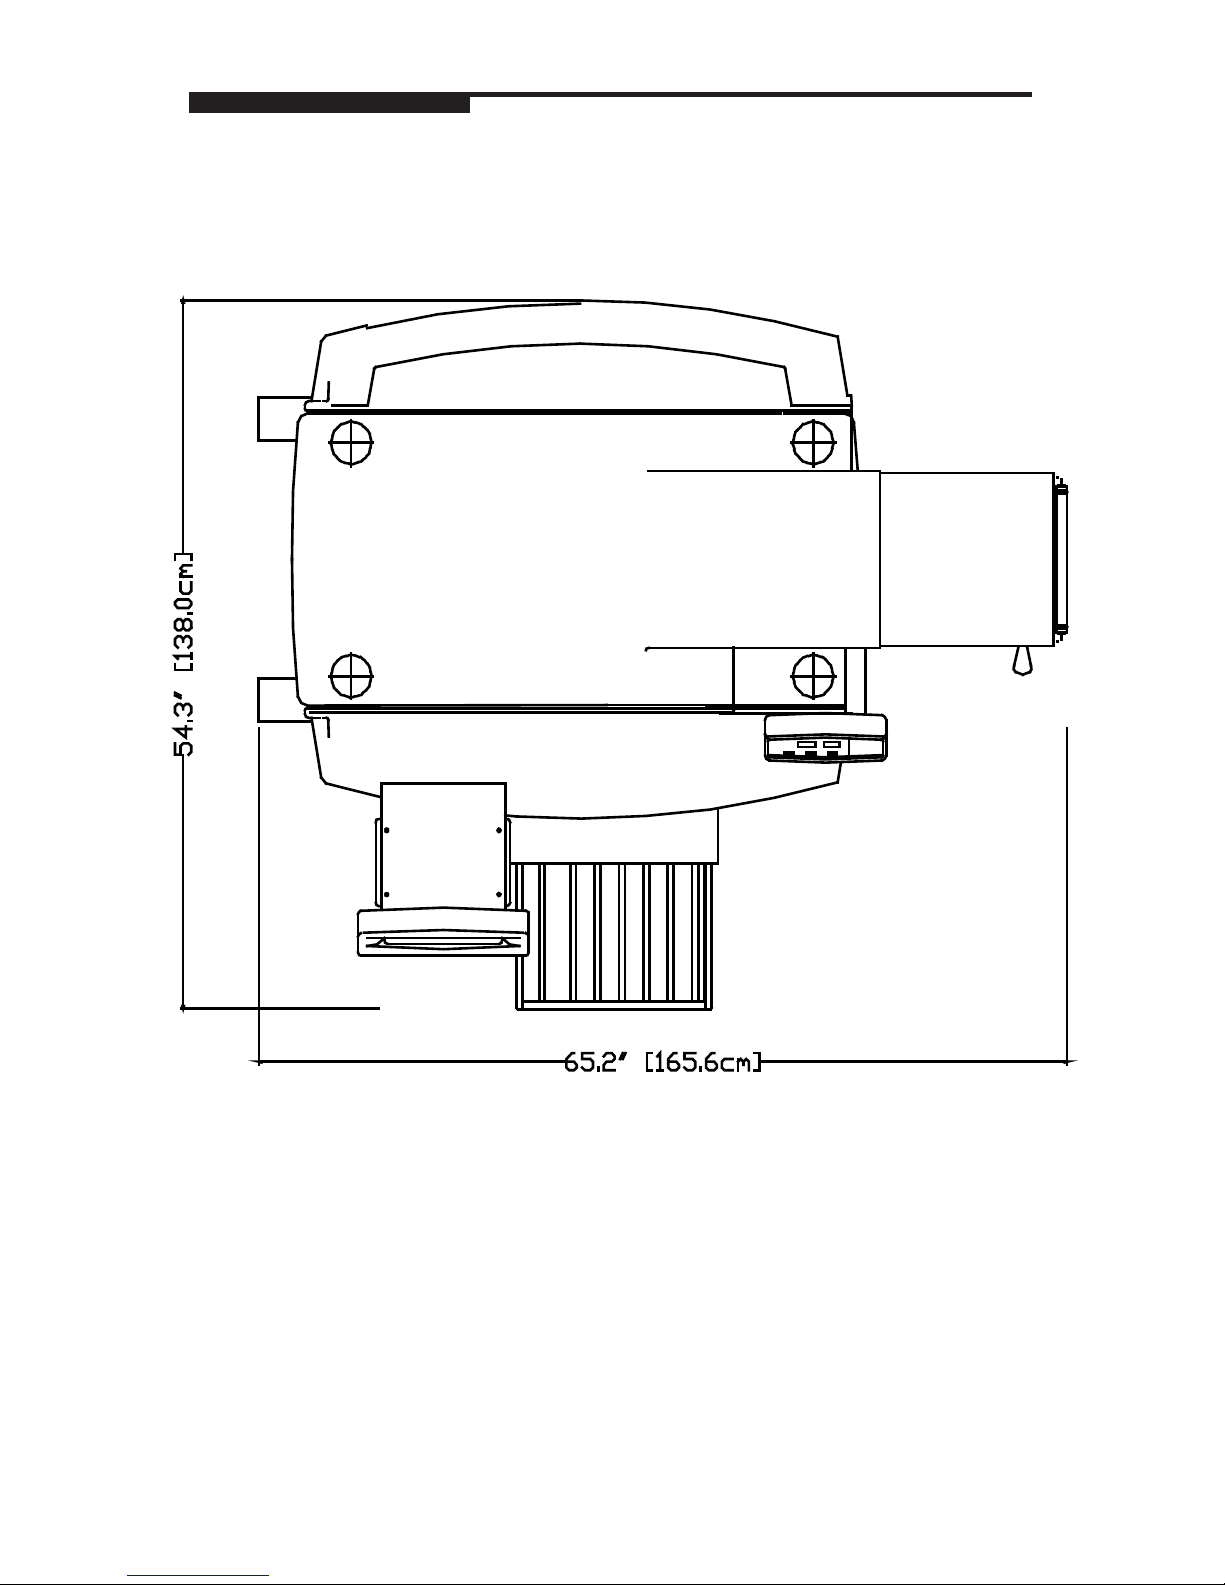
34
Dimensions
Page 37
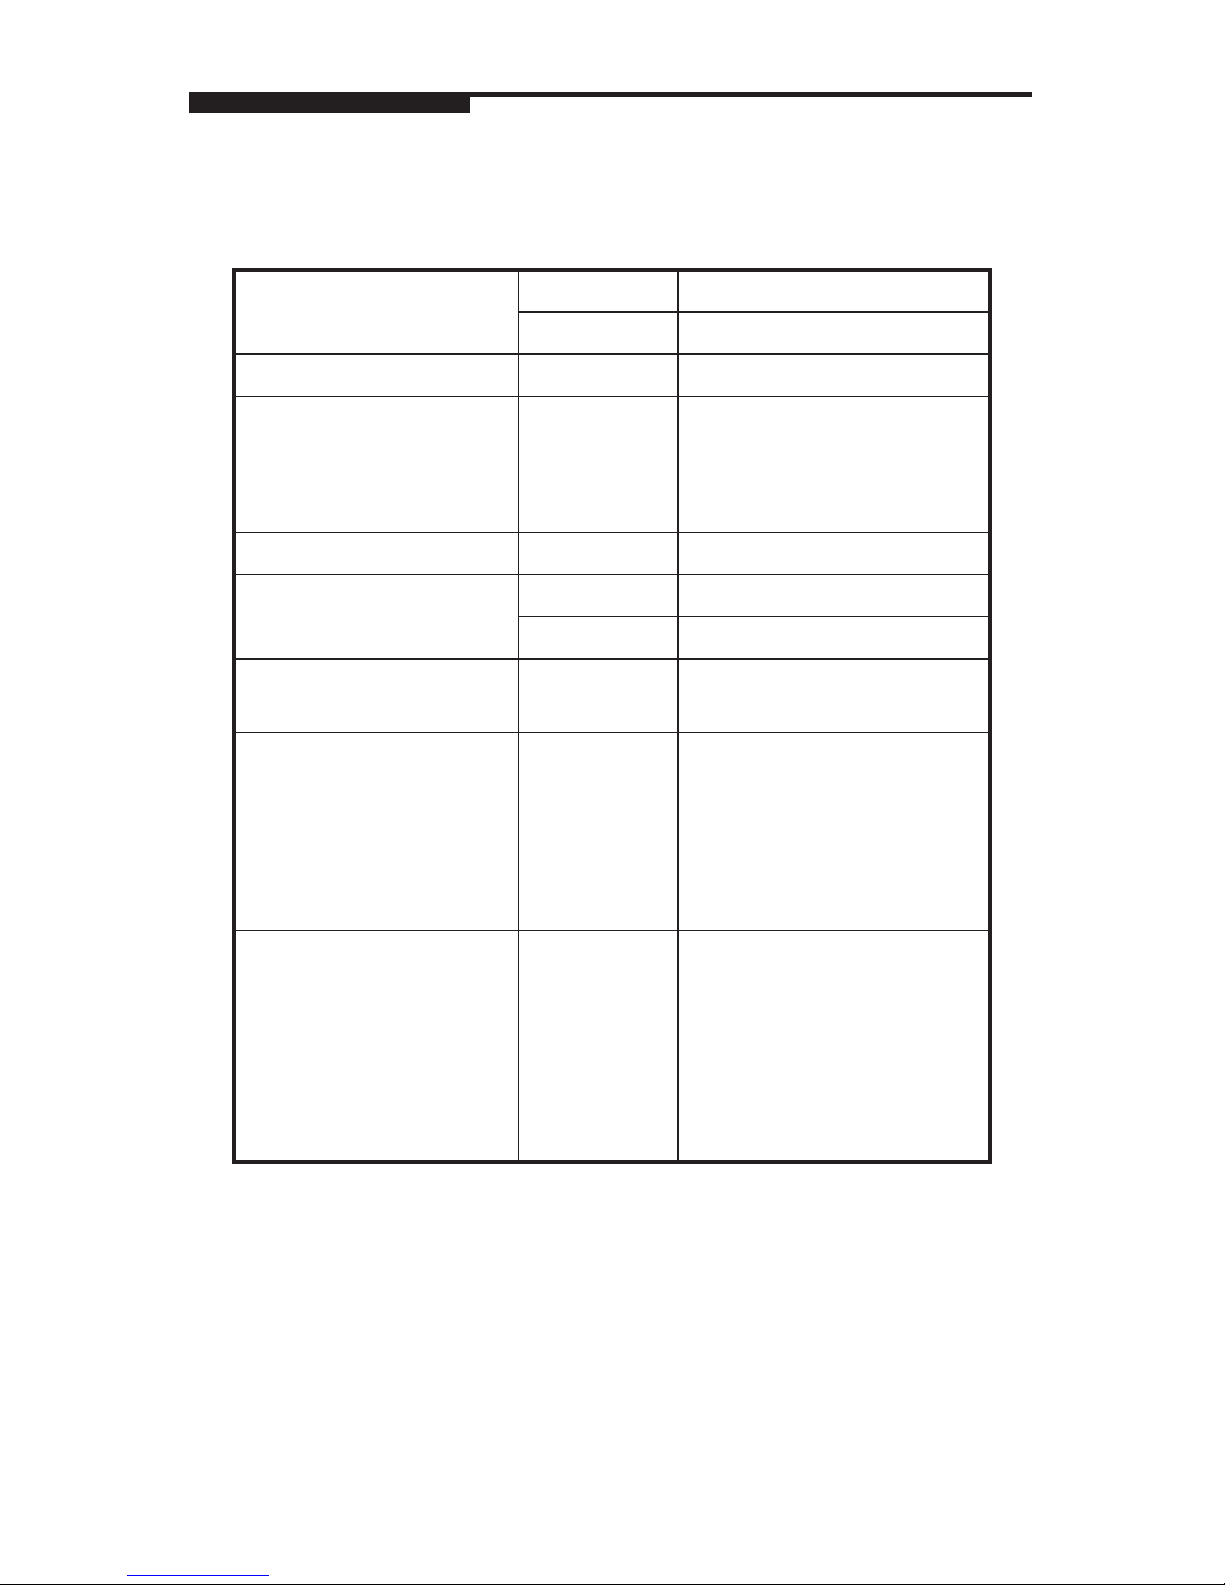
35
General
Specications
Shipping Weight kg 250
lb 551
Speed Packs/minute Up to 30
Voltage Volts 208 VAC/50-60 Hz, Single
Phase
230 VAC/50-60 Hz, Single
Phase
Power Consumption VA 3000
Recommended Operating
Temperature Range
°F +40°F to +95°F
°C +5°C to +35°C
Humidity % 5% to 95%
Non-condensing
Noise Level Specications db Equivalent continuous
weighted sound pressure
level at the workstation is
75 dB. Tests performed in
conformance with EN ISO
11202
Film Specications 13” stretch
lm
Film is available through
Mettler Toledo Aftermarket.
Contact your METTLER
TOLEDO
®
representative for
recommendations for other
lms that will work on the
wrapper.
Page 38

Page 39

Page 40

METTLER TOLEDO
1900 Polaris Parkway
Columbus, Ohio 43240
Specications subject to change without notice.
©2012 Mettler-Toledo, LLC
METTLER TOLEDO© AND SOLO© are registered
trademarks of Mettler-Toledo, LLC
Printed in USA
P/N 64057919
*64057919*
 Loading...