

Page 1
Operating Instructions
Bedienungsanleitung
Mode d'emploi
Manual de Instrucciones
Istruzioni d'uso
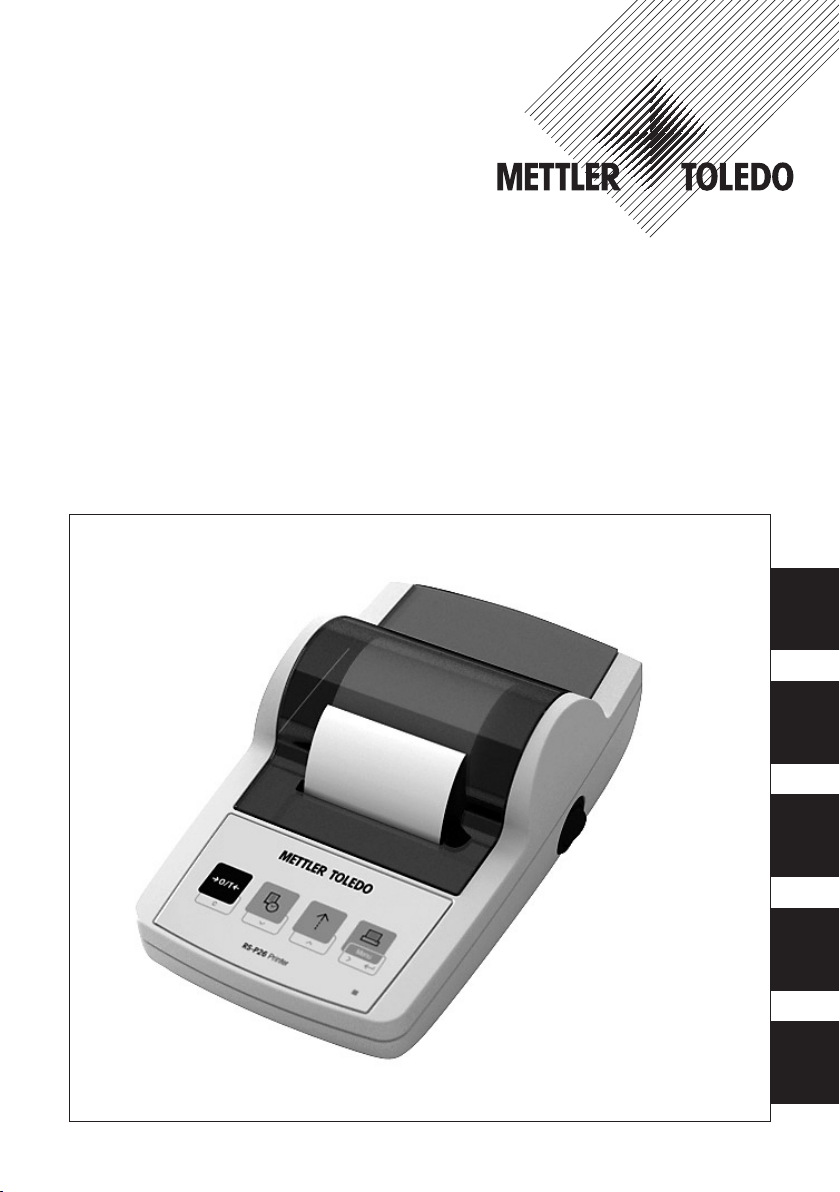
METTLER TOLEDO
RS-P26 Printer
Drucker RS-P26
Imprimante RS-P26
Impresora RS-P26
Stampante RS-P26
Page 3
English
Seite 15
Page 27
Paigna 39
Pagina 51
DeutschFrançaisEspañolItaliano
Page 2

Page 3

Contents
RS-P26 Printer
3
Overview of your RS-P26 .......................... 4
1 Introduction .......................................
1.1 Capabilities of the RS-P26 Printer ..........
1.2 Overview of functions ...........................
2 Startup procedure ..............................
2.1 Safety measures ..................................
2.2 Power supply ......................................
2.3 Switching the RS-P26 on and off ...........
2.4 Inserting paper ....................................
2.5 Connecting the RS-P26 to the balance ...
3 Keystroke functions ............................
4 Menu .................................................
5 Printer test ........................................
5
6 Maintenance ......................................
5
6.1 Changing the paper roll ......................
5
6.2 Replacing the ribbon ..........................
5
6.3 Cleaning ..........................................
5
6.4 Disposal ..........................................
6
7 Troubleshooting ...............................
6
8 Consumables and spare parts ...........
6
9 RS232C Interface .............................
6
10 Technical data RS-P26 .....................
7
11 Declaration of conformity .................
8
9
9
10
10
10
10
11
12
12
13
14
English
Page 4
Men
u
F
C
RS-P26 Printer
4
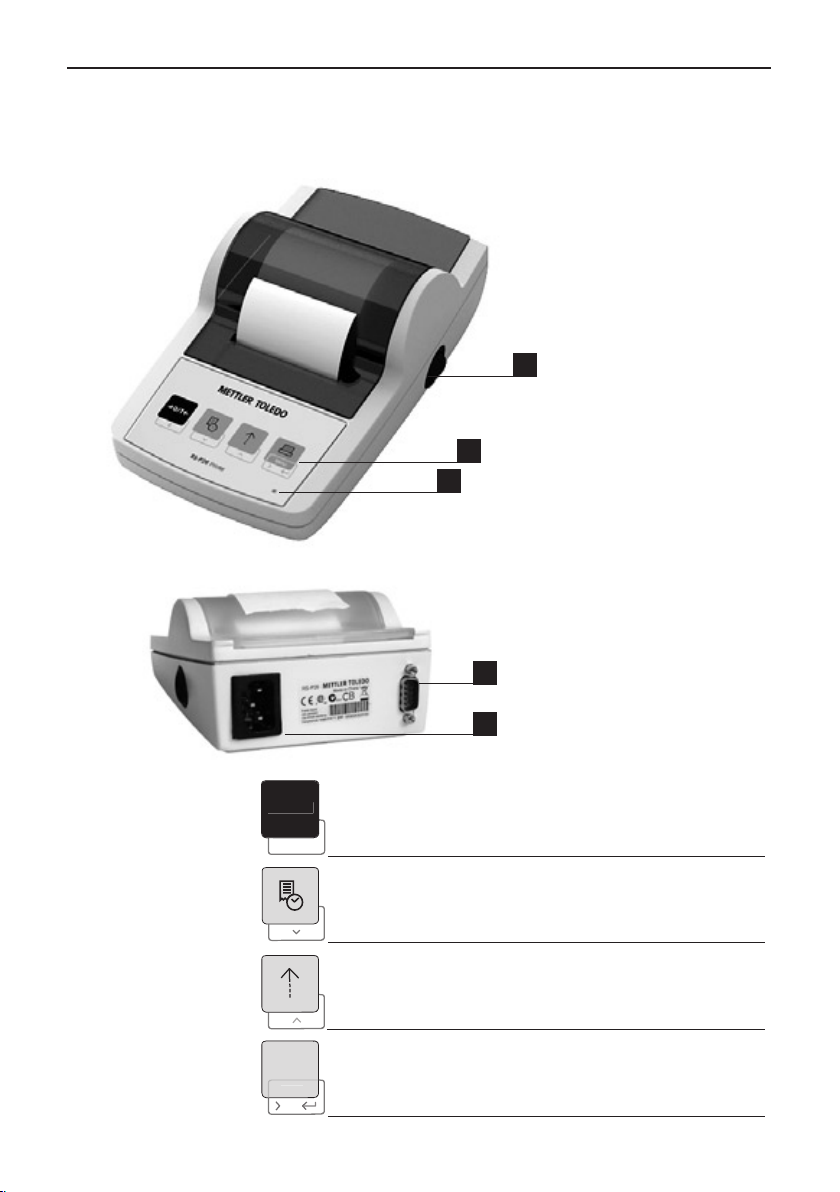
Overview of your RS-P26
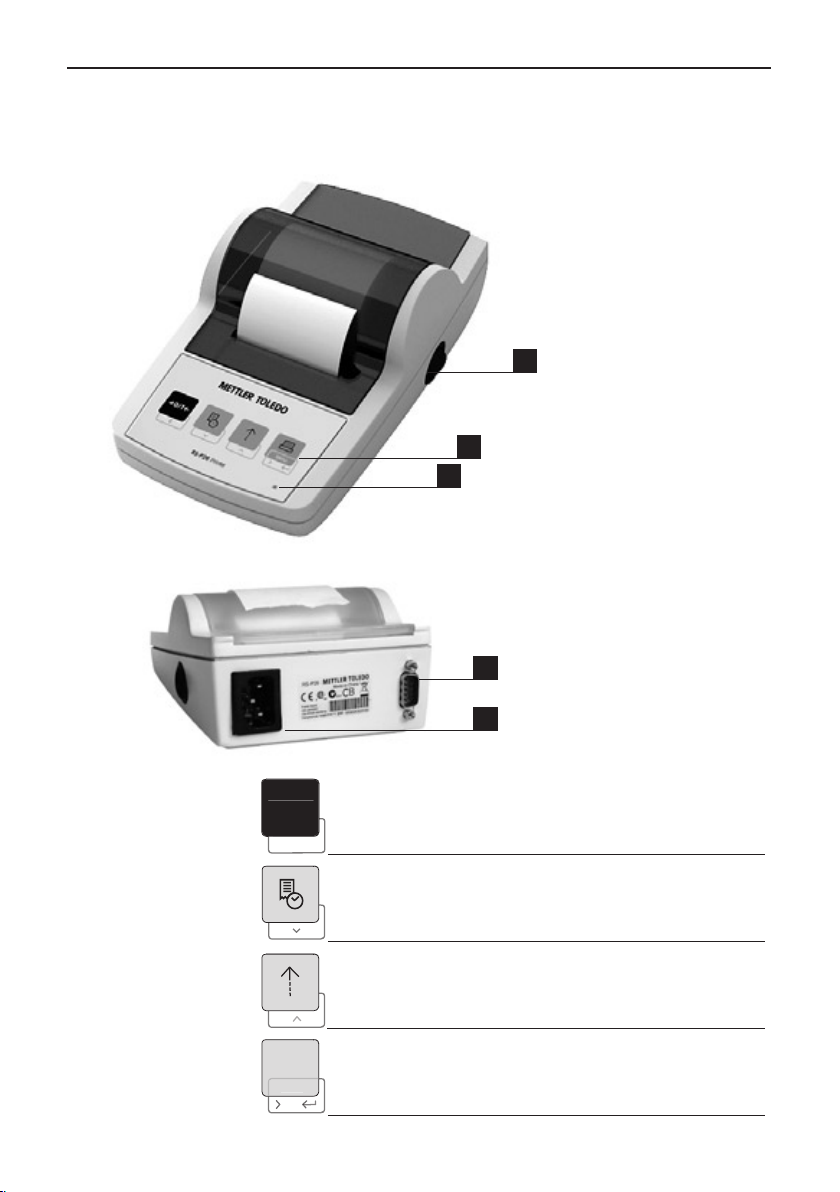
Controls:
Connections:
1
2
3
1 On/Off Switch
2 Control panel
3 Pilot lamp – status indicator
4 RS232C Interface connector
5 AC power cord connection
4
5
Functions:
• Zeroing / taring the balance
• Abort – exit
• Printout of date and time
• Scroll down menu option
• Paper feed
• Scroll up menu option
• Printing of stable weight values
• Opening the menu – select next menu option
• Save settings
Page 5
RS-P26 Printer
1 Introduction
1.1 Capabilities of the RS-P26 Printer
The RS-P26 is a simple to operate dot matrix printer for METTLER TOLEDO balances with an RS232C
interface. The printout on normal paper meets the requirements of modern quality assurance systems (GLP, GMP, ISO 9001, etc.). These norms define the principles and user requirements related
to measuring and test instruments. The RS-P26 complies with the requirements of measurement
traceability by precisely documenting the origin of data, as well as calibration procedures. It meets
the requirement of archiving measurement results by providing a thermally stable and light resistant
printout. When connected to METTLER TOLEDO balances, the RS-P26 prints all data sent by the
balance without restriction, which are not only weight values and calibration procedures, but also
the results of all applications, built into the balance.
1.2 Overview of functions
5
Printing of weight
values
Date and time Selected as an option with date and time
Zeroing/Taring of
balance
The RS-P26 prints out only the stable
weight value
in the record header (stored with battery
back-up)
Zero/Tare the connected balance at any
time.
2 Startup procedure
2.1 Safety measures
The RS-P26 has been tested for the connections and intended purposes documented in these
Operating Instructions. However, it is your responsibility to perform the necessary tests related to
the methods and purposes of its intended use. Therefore, you should observe the following safety
measures.
• The RS-P26 Printer must be used indoors only, and never in hazardous
areas.
• The electronics of the RS-P26 Printer are protected against the ingress of
splashing water and dust. However, since the printer housing is not watertight, the printer should not be used in the presence of liquids.
• Comply with cleaning instructions (see section 6.3), protect power plug
against wet conditions.
• Never open the printer housing. If you have any problems with your printer,
please contact your responsible METTLER TOLEDO service.
English
Page 6
RS-P26 Printer
6
2.2 Power supply
The power supply of the RS-P26 is integrated in the housing (100-240 V, 50-60Hz). This allows
you to connect the RS-P26 to your local line voltage.
Attention
• Connect the RS-P26 only to AC Power receptacles with a connection to
ground!
• Use an extension cable with an equipment grounding conductor!
2.3 Switching the RS-P26 on and off
Use the main switch <I/O> to power the RS-P26 on and off. As soon as the
RS-P26 is powered on the unit will start with some line feeds. The pilot lamp
will flash until a instrument is connected.
I/O
ïð
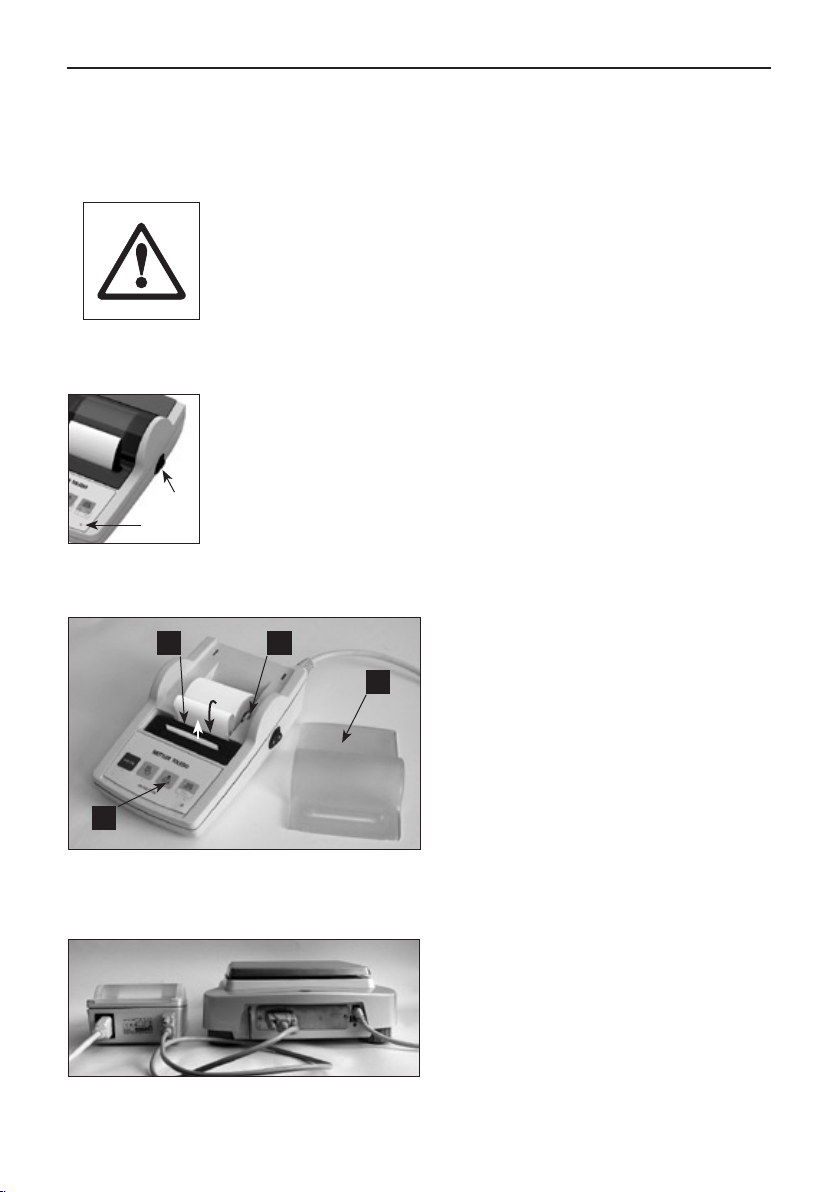
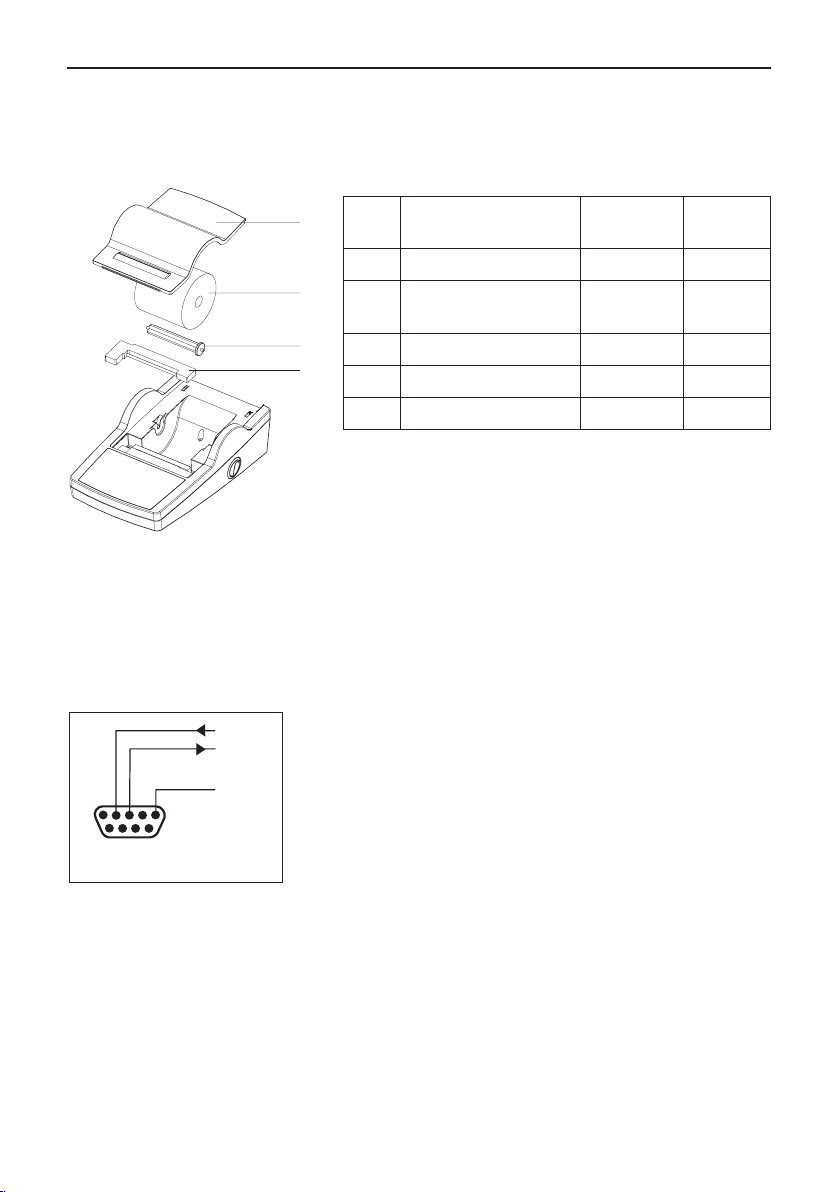
2.4 Inserting paper
• Remove paper cover (pull on the back)
23
1
4
(1)
• Insert the paper rotary axis through the
core of the paper roll (2).
• Feed paper through the slot in the printing
unit in the direction of the arrow (3).
• Press and hold until enough paper has
been fed (4).
• Lead paper through the paper cover slot
• Replace the paper cover (1).
2.5 Connecting the RS-P26 to the balance
• Attach the interconnect cable to the printer
interface of the balance and to the printer.
• Make sure that there is a match between
the communication parameters of the
balance and the printer.
• The RS-P26 is ready for use as soon the
pilot lamp stops flashing.
Page 7
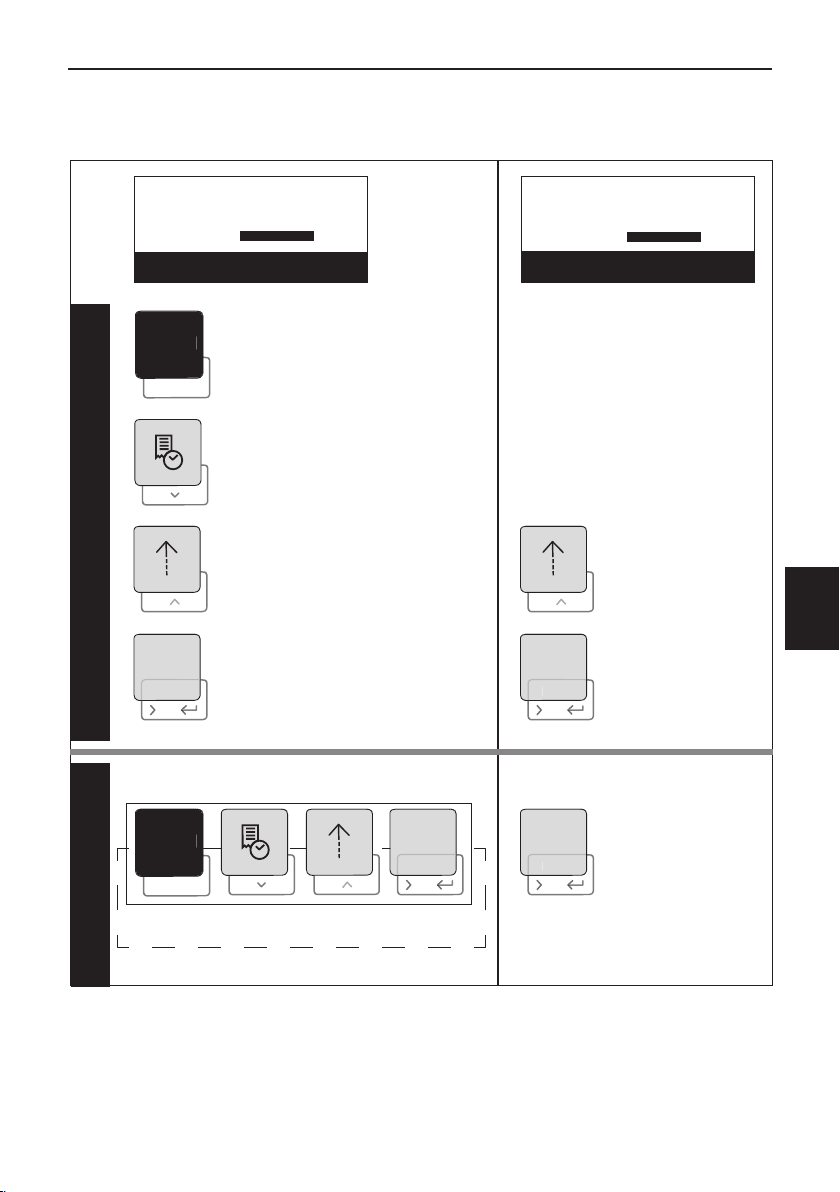
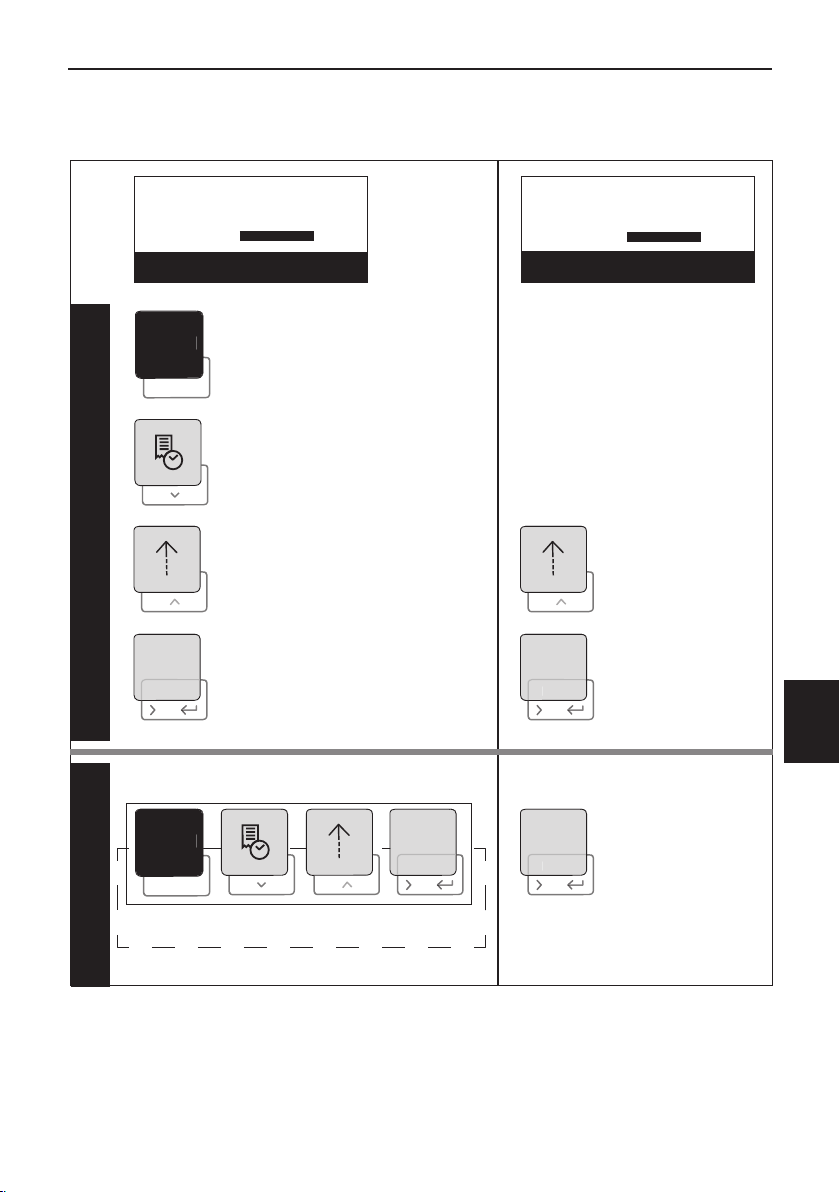
3 Keystroke functions
Men
u
F
C
C
Men
u
F
Men
u
F
Men
u
F
RS-P26 Printer
7
?
Press briefly
zero / tare the balance
print Date and Time
one line feed
print
A
Press and hold down
continuous feed
(until release)
English
open menu
store
exit down up next
Menu Level Operation Level
Page 8
Reset
Reset
No Header
Header
Date/Time
Date/Time/
Balance
24:MM:SS
Time Format
12:MM:SS
24.MM.SS
12.MM.SS
DD.MMM YYYY
Data Format
MMM DD YYYY
DD.MM.YYYY
MM/DD/YYYY
24:MM:SS
Time Format
12:MM:SS
24.MM.SS
12.MM.SS
DD.MMM YYYY
Data Format
MMM DD YYYY
DD.MM.YYYY
MM/DD/YYYY
07
Date Month
01
06
12
08
07
Date / Month
01
06
12
08
2105
2006
Date Year
2050
2007
2105
2006
Date / Year
2050
2007
14
Time Hour
00
13
23
15
14
Time / Hour
00
13
23
15
28
Time Minute
27
59
29
28
Time / Minute
27
59
29
18
Date Day
01
17
31
19
18
Date / Day
01
17
31
19
/
7 Bit Even
Bit/Parity
8 Bit No
7 Bit Odd
7 Bit Even
Bit / Parity
8 Bit No
7 Bit Odd
bd 2400
Baudrate
bd 4800
bd 9600
bd 600
bd 1200
bd 19200
bd 38400
bd 2400
Baudrate
bd 4800
bd 9600
bd 600bd 600
bd 1200
bd 19200
bd 38400bd 38400
None
Handshake
IBM/DOS
Char Set
IBM/DOS CyrillicIBM/DOS CyrillicAnsi/Win JapaneseAnsi/Win Japanese
Ansi/Win Latin 1Ansi/Win Latin 1Ansi/Win CyrillicAnsi/Win Cyrillic
ListList
Xon / Xoff
YYYY-MM-DD- -YYYY MM DD
7 Bit No
2051
00
RS-P26 Printer
8
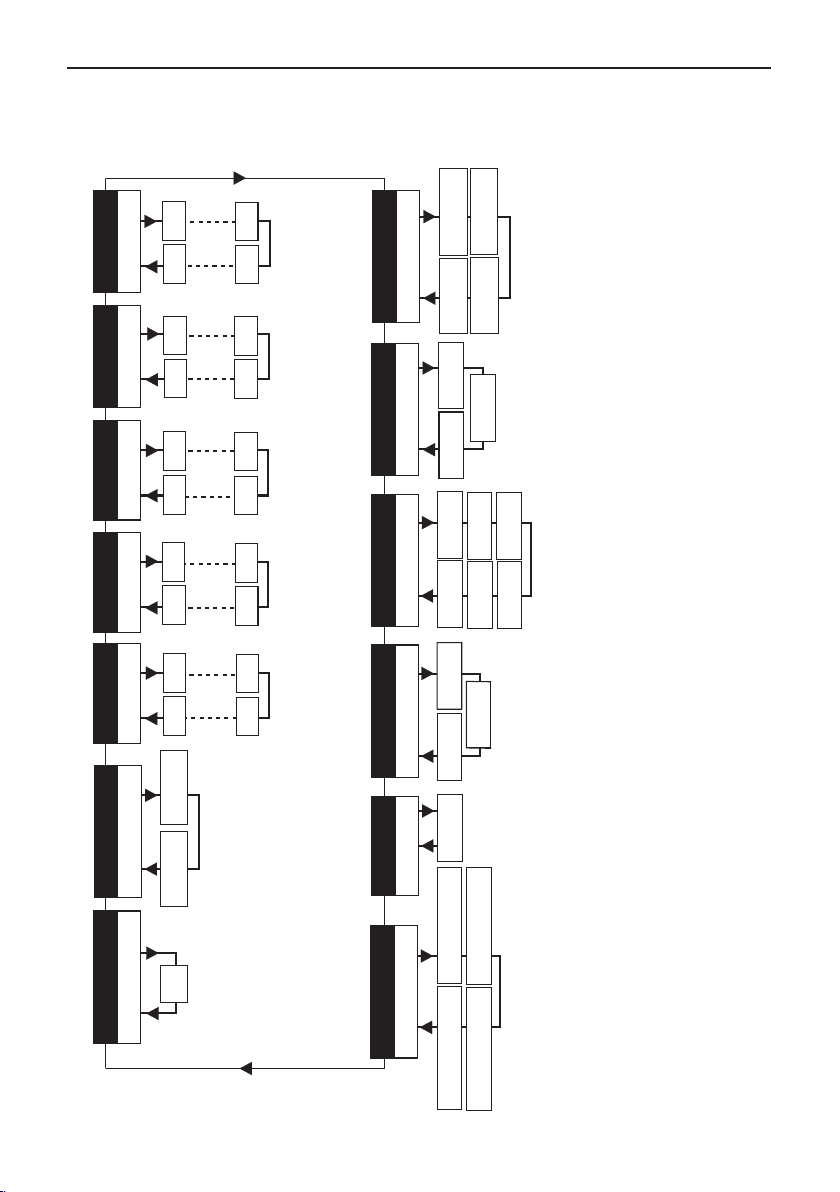
4 Menu
dOS
dOS CYr
II in LAt
II in CYr
II in JAP
balances with built-in clock
Char Set
*IBM/DOS
IBM/DOS Cyrillic
Ansi/Win Latin 1
Ansi/Win Cyrillic
bd 1200
7b-E
Bit/Parity
*7 Bit Even
1200
24áNNáSS
12áNNáSS
24.NN.SS
24:MM:SS
12:MM:SS
24.MM.SS
Ansi/Win Japanese
7b-no
8b-no
7 Bit No
8 Bit No
12.NN.SS
Baud rate
12.MM.SS
bd 38400
bd 600
38400
600
Y-NN-dd
YYYY-MM-DD
Time Format**
(built-in clock has priority)
** not applicable on
* factory settings
7b-odd
HS oFF
HS Soft
Handshake
*None
7 Bit Odd
Xon/Xoff
bd 2400
bd 4800
bd 9600
bd 19200
*2400
4800
9600
19200
YEAr2006
Date Year**
2006
Time Minute**
Nin. 28
Hour 14
28
Time Hour**
14
Date Format**
dd.NNN Y
NNN dd Y
dd.NN.Y
DD.MMM YYYY
MMM DD YYYY
DD.MM.YYYY
ê
ó
ê
ó
MM/DD/YYYY NN dd Y
rESET
LISt
no Hdr
d t Hdr
dtb Hdr
dAy 18
Nonth 07
Examples if balance display is used:
Settings
Reset
Header
List
Date Day**
18
Date/Time/Balance
Date Month**
*No Header
Date/Time
07
Page 9
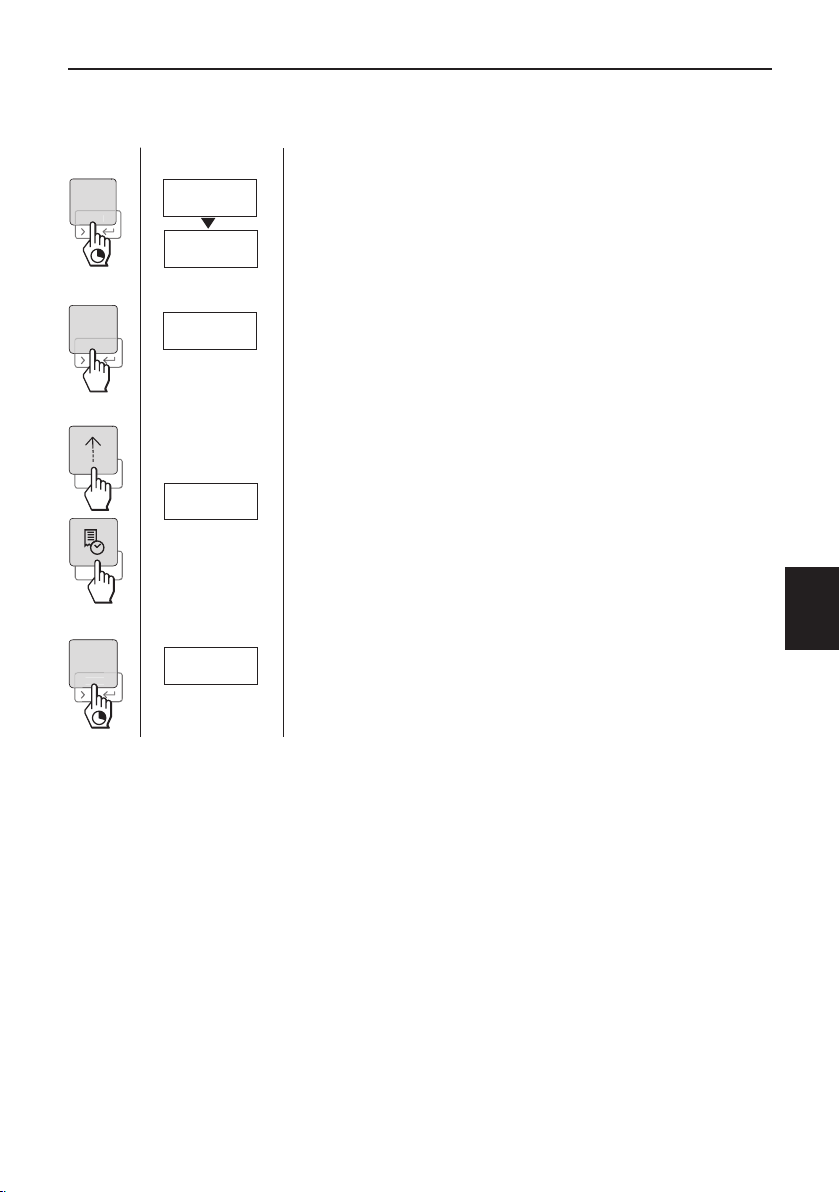
Example for setting the day:
Men
u
F
Men
u
F
Men
u
F
RS-P26 Balance Display
RS-P26 Printer
9
* NENU
* rESEt
* dAY 18
* dAY 21
* StorEd
Open the menu:
➞ Hold down the «F» key until “reset” appears.
(Print out:
--- See Balance Display ---)
➞ Select the menu option “Day” with the «F» key.
➞ Select the “Day” – scroll up with the «h» key.
– scroll down with the «
3
¿
» key.
Save the settings:
➞ Hold down the «F» key until “Stored” appears.
English
5 Printer test
The RS-P26 is equipped with a self-test that automatically prints out the character set of the printer.
(standard IBM/DOS).
Starting the test ➞ Press the key «h» and power on the RS-P26.
The printer prints out the character set
Terminating the test ➞ Power off the RS-P26
6 Maintenance
Under normal conditions the RS-P26 requires practically no maintenance. The METTLER TOLEDO
service department is available if servicing is required. Please ask your responsible METTLER
TOLEDO dealer for details.
Page 10
RS-P26 Printer
10
6.1 Changing the paper roll
Insertion of a new roll of paper is described in section 2.4. See section 8 (Consumables) for the
paper roll’s order number.
Note: You may obtain the paper rotary axis from the old paper roll.
6.2 Replacing the ribbon
2
1
34
• Remove the paper cover (1).
• Pull paper out of printing unit (2).
• To remove the ribbon cartridge, press in
direction of arrow (3).
• Insert the new ribbon, and if necessary,
take up slack with tensioning wheel (4).
See section 8 (Consumables) for the ribbon
cartridge order number.
• Insertion of a new roll of paper is described in
section 2.4.
6.3 Cleaning
Since the printer housing is made of top grade, resistant materials, all commercially available mild
cleaning agents may be used (see safety precautions in section 2.1).
6.4 Disposal
In conformance with the European Directive 2002/96/EC on Waste
Electrical and Electronic Equipment (WEEE) this device may not be
disposed of in domestic waste. This also applies to countries outside
the EU, per their specific requirements. Please dispose of this product
in accordance with local regulations at the collecting point specified
for electrical and electronic equipment.
If you have any questions, please contact the responsible authority or
the distributor from which you purchased this device.
If this device is passed on to other parties (for private or professional
use), compliance with this regulation will be required as well.
Thank you for your contribution to environmental protection.
Page 11
RS-P26 Printer
7 Troubleshooting
Problem / Message Possible cause Correction
Printout unreadable • Ribbon worn or entangled
• Service life of printing unit
at an end
Pilot lamp does not light • No power
• Power supply fault
Pilot lamp flashes
----- No Connection ----
--------Timeout --------- • Data transfer has not
------- Over Load ------- • Balance in overload range • Check the weight of sample
------ Under Load ------- • Balance in underload
-- Transmission Error -- • Balance does not under-
---- Not Executable ---- • Balance can not execute
--- Date/Time Not Set --
----- Memory Error -----
• RS232C connection
is disconnected / not
attached
• The interface parameters
do not match the balance
completed in the last 45 s
range. Weighing pan is
not in position
stand printer instruction
printer instruction
• Printer error messages • Check the balance
• Change ribbon cartridge or tense
the ribbon properly
• Please contact MEETLER TOLEDO
service
• Switch printer on
• Please contact METTLER TOLEDO
service
• Check the RS232C interconnect
cable
• Check interface parameter
settings on printer and balance
• Move balance to more stable
location
• Check the balance
• Check the balance
• Check interface parameter
settings on printer and balance
• Check the balance
• Reset the printer – set date/time
• Back-up battery depleted
Please contact METTLER TOLEDO
service
11
English
Page 12
1
2
3
4
1
5
6
9
In/Out
GND
RS232C
RS-P26 Printer
12
8 Consumables and spare parts
Pos. Item Part
number
Delivery
quantity
1 Paper cover 12120734 1 pcs
2 Paper roll
12120799 2 pcs
57.5 x ø 50 to 60 mm
3 Paper rotary axis 12120735 1 pcs
4 Ribbon cartridge, black 12120798 1 pcs
- RS9 M/F Cable, 1.5 m 12120708 1 pcs
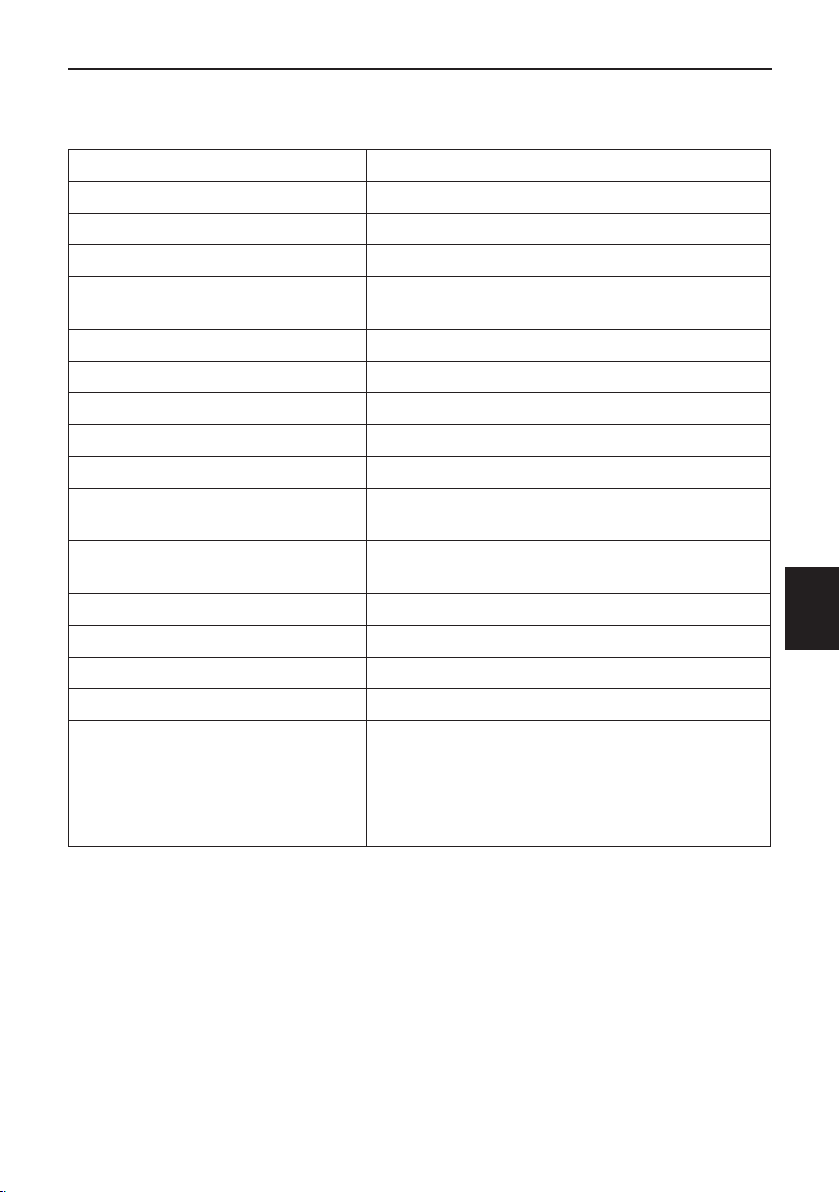
9 RS232C Interface
The RS-P26 is equipped with an RS232C interface to connect METTLER TOLEDO instruments.
•
9-pin male connector
•
Matching to other device (transmission parameters) see
section 4.
Page 13
RS-P26 Printer
10 Technical data RS-P26
Power line voltage, frequency 100 – 240 VAC, 50/60 Hz
Power consumption 150 mA (100 V), 60 mA (240 V)
Altitude up to 4000 m
Ambient temperature 0 °C – 40 °C
Relative humidity max. 80 % at 31 °C, decreasing linearly to 50 % at
40 °C, noncondensing
Overvoltage category Class II
Pollution degree 2
Printing unit Dot matrix printer 5x7, 24-character line length
Printing speed 2.3 lines per second
Ribbon cartridge Exchangeable, black
Paper roll Standard paper 57.5 mm x ø 50 to 60 mm,
integrated in housing, commercial size
Print quality Light resistant and thermally stable printing (GLP,
GMP, ISO 9001)
Interface RS232C
Printer dimensions (WxDxH) 120 mm x 203 mm x 73 mm
Packaging dimensions (WxDxH) 255 mm x 205 mm x 150 mm
Net weight 740 g (paper roll incl.)
Compatibility limits • Function Date / Time:
not applicable on balances with built-in clock
(built-in clock has priority)
• Function
not applicable on all models of balances
Zeroing / Taring:
13
English
Page 14
RS-P26 Printer
14
11 Declaration of conformity
The undersigned declare on behalf of
Mettler-Toledo AG
Im Langacher
CH-8606 Greifensee
that the Printer METTLER TOLEDO RS-P26 to which this declaration relates (serial number
specified on the product) is in compliance with the below mentioned EEC Directives (including all
amendments)
73/23/EEC Low Voltage Directive
89/336/EEC Electromagnetic compatibility
and that the following standards have been applied
IEC/EN61010-1:2001,
EN61326:1997+ A1:98+A2:01+A3:03 (class B)
EN61326:1997+ A1:98+A2:01+A3:03 (Minimal requirements)
for Canada, USA and Australia
CAN/CSA-C22.2 No.61010-1-04, UL Std. No.61010A-1, FCC, Part 15, class A,
AS/NZS CISPR 22, AS/NZS 61000.4.3
Greifensee, 01.09.2006
Mettler-Toledo AG
Laboratory & Weighing Technologies
René Lenggenhager Sascha von Wangenheim
General Manager Manager Sales & Marketing
Page 15

Inhalt
Drucker RS-P26
15
Drucker RS-P26 im Überblick .................. 16
1 Einleitung ........................................
1.1 Was kann der Drucker RS-P26 ..........
1.2 Funktionen im Überblick ....................
2 Inbetriebnahme ................................
2.1 Sicherheitshinweise ...........................
2.2 Stromversorgung ...............................
2.3 RS-P26 ein/ausschalten .....................
2.4 Papier einsetzen ................................
2.5 RS-P26 an die Waage anschliessen ....
3 Bedienung .......................................
4 Menü ...............................................
17
17
17
17
17
18
18
18
18
19
20
5 Drucker Test ....................................
6 Wartung ..........................................
6.1 Druckerpapier ersetzen .......................
6.2 Farbband ersetzen .............................
6.3 Reinigung .........................................
6.4 Entsorgung .......................................
7 Störungen ........................................
8 Verbrauchsmaterial und Ersatzteile ...
9 RS232-Schnittstelle .........................
10 Technische Daten RS-P26 .................
11 Konformitätserklärung ......................
21
21
22
22
22
22
23
24
24
25
26
Deutsch
Page 16
Men
u
F
C
Drucker RS-P26
16
Drucker RS-P26 im Überblick
Bedienelemente:
Anschlüsse:
1
2
3
1 Ein/Aus Schalter
2 Bedienungsfeld
3 Betriebs- und Statusanzeige
4 RS232C-Schnittstelle
5 Anschluss für Netzkabel
4
5
Funktionen:
• Nullstellen / tarieren der Waage
• Abbruch – Menu verlassen
• Ausdrucken von Datum und Zeit
• Menüpunkte wechseln “Abwärts”
• Papierrollen-Vorschub
• Menüpunkte wechseln “Aufwärts”
• Angezeigtes Gewicht drucken
• Menu öffnen – nächster Menüpunkt wählen
• Einstellungen speichern
Page 17
Drucker RS-P26
17
1 Einleitung
1.1 Was kann der Drucker RS-P26
Der RS-P26 ist ein einfach zu bedienender Nadeldrucker für METTLER TOLEDO Waagen mit RS232C
Schnittstelle. Der Ausdruck auf Normalpapier erfüllt die Anforderungen moderner Qualitätssicherungssysteme (GLP, GMP, ISO 9001 usw.). Diese legen unter anderem Prinzipien und Pflichten
für den Anwender von Messgeräten oder Prüfmitteln fest. Das Prinzip der Nachvollziehbarkeit
von Messungen erfüllt der RS-P26, indem er Herkunft von Daten sowie Justiervorgänge präzise
dokumentiert. Der Aufbewahrungspflicht von Messresultaten wird er gerecht durch den thermisch
beständigen sowie lichtechten Druck. Bei Anschluss an METTLER TOLEDO-Waagen druckt der
RS-P26 alle Daten, welche von der Waage kommen, also nebst Gewichtswerten und Justiervorgängen auch die Resultate aller in der Waage eingebauten Applikationen.
1.2 Funktionen im Überblick
Gewicht drucken Der RS-P26 druckt direkt das auf der
Waage angezeigte Gewicht aus.
Datum und Zeit Das Wägeresultat kann wahlweise mit
Datum und Zeit protokolliert werden. (Mit
Back-up Batterie gespeichert)
Nullstellen/Tarieren
der Waage
Nullstellen/tarieren der angeschlossenen
Waage jederzeit möglich.
2 Inbetriebnahme
2.1 Sicherheitshinweise
Der RS-P26 ist für die Anschlüsse und Bestimmungen geprüft, die in dieser Bedienungsanleitung
dokumentiert sind. Dies befreit Sie jedoch nicht von der eigenen Prüfung des von uns gelieferten
Produktes auf seine Eignung für die von Ihnen beabsichtigten Verfahren und Zwecke. Befolgen Sie
deshalb die folgenden Sicherheitsmassnahmen.
• Der RS-P26 darf nicht in explosionsgefärdeten Bereichen und nur in Innen
räumen betrieben werden.
• Die Elektronik des RS-P26 ist geschützt gegen das Eindringen von Spritzwas
ser und Staub. Das Druckergehäuse ist aber nicht dicht und sollte deshalb
nicht in Gegenwart von Flüssigkeiten benutzt werden.
• Reinigungshinweise (siehe Pkt. 6.3) beachten. Netzstecker vor Nässe schüt
zen.
• Druckergehäuse nicht öffnen. Falls Sie einmal Probleme mit Ihrem Drucker
haben, wenden Sie sich an Ihre zuständige METTLER TOLEDO Vertretung.
-
Deutsch
-
-
Page 18

Drucker RS-P26
18
2.2 Stromversorgung
Der RS-P26 verfügt über ein integriertes Schaltnetzteil (100-240 V, 50-60Hz). Somit können Sie den
RS-P26 mit dem beigelegten Netzkabel an Ihr lokales Stromnetz anschliessen
Achtung
• Schliessen Sie den RS-P26 ausschliesslich an
Schutzkontakt an!
• Verwenden Sie
nur Verlängerungskabel mit Schutzleiter!
Netzsteckdosen mit
2.3 RS-P26 ein/ausschalten
Mit dem Schalter <I/O> an der Druckerseite lässt sich der RS-P26 bequem
ein- und ausschalten. Sobald der RS-P26 eingeschaltet wird, beginnt das
Druckwerk für kurze Zeit zu laufen und die grüne Betriebsanzeige blinkt solange bis ein Gerät angeschlossen wird.
I/O
ïð
2.4 Papier einsetzen
• Papierhaube entfernen (auf der Rückseite
23
1
4
ziehen) (1).
• Papierrollen-Achse durch das Loch der
Papierrolle schieben (2).
• Papier in Pfeilrichtung in den Schlitz des
Druckwerks einführen (3).
• Druckertaste so lange gedrückt halten, bis
genügend Papier eingezogen ist (4).
• Das Papier durch den Schlitz in der
Papierhaube einführen.
• Papierhaube aufsetzen (1).
2.5 RS-P26 an die Waage anschliessen
• RS232C Anschlusskabel an der Druckerschnittstelle der Waage und am Drucker
anschliessen.
• Die Übertragungsparameter der Waage
und des Druckers müssen übereinstimmen.
• Der RS-P26 ist betriebsbereit, wenn die
grüne Betriebsanzeige konstant leuchtet.
Page 19
3 Bedienung
Men
u
F
C
C
Men
u
F
Men
u
F
Men
u
F
Drucker RS-P26
19
?
Kurz drücken
Funktionsebene
Nullstellen / Tarieren
der Waage
Datum und Zeit drucken
Zeilenvorschub
Drucken
A
Lange drücken
Papiervorschub
(solange Taste
gedrückt wird)
Menü öffnen
Deutsch
Speichern
Beenden Ab Auf Weiter
Menuebene
Page 20

Reset
Reset
No Header
Header
Date/Time
Date/Time/
Balance
24:MM:SS
Time Format
12:MM:SS
24.MM.SS
12.MM.SS
DD.MMM YYYY
Data Format
MMM DD YYYY
DD.MM.YYYY
MM/DD/YYYY
24:MM:SS
Time Format
12:MM:SS
24.MM.SS
12.MM.SS
DD.MMM YYYY
Data Format
MMM DD YYYY
DD.MM.YYYY
MM/DD/YYYY
07
Date Month
01
06
12
08
07
Date / Month
01
06
12
08
2105
2006
Date Year
2050
2007
2105
2006
Date / Year
2050
2007
14
Time Hour
00
13
23
15
14
Time / Hour
00
13
23
15
28
Time Minute
27
59
29
28
Time / Minute
27
59
29
18
Date Day
01
17
31
19
18
Date / Day
01
17
31
19
/
7 Bit Even
Bit/Parity
8 Bit No
7 Bit Odd
7 Bit Even
Bit / Parity
8 Bit No
7 Bit Odd
bd 2400
Baudrate
bd 4800
bd 9600
bd 600
bd 1200
bd 19200
bd 38400
bd 2400
Baudrate
bd 4800
bd 9600
bd 600bd 600
bd 1200
bd 19200
bd 38400bd 38400
None
Handshake
IBM/DOS
Char Set
IBM/DOS CyrillicIBM/DOS CyrillicAnsi/Win JapaneseAnsi/Win Japanese
Ansi/Win Latin 1Ansi/Win Latin 1Ansi/Win CyrillicAnsi/Win Cyrillic
ListList
Xon / Xoff
YYYY-MM-DD- -YYYY MM DD
7 Bit No
2051
00
Drucker RS-P26
20
4 Menü
dOS
dOS CYr
II in LAt
II in CYr
II in JAP
nicht anwendbar bei Waagen mit
eingebauter Uhr
(eingebaute Uhr hat vorrang)
Zeichensatz
*IBM/DOS
IBM/DOS Cyrillic
Ansi/Win Latin 1
Ansi/Win Cyrillic
Ansi/Win Japanese
* Werkseinstellung
7b-no
8b-no
7b-odd
7 Bit No
8 Bit No
7 Bit Odd
12.NN.SS
bd 2400
Baudrate
*2400
12.MM.SS
**
HS oFF
HS Soft
Handshake
*None
Xon/Xoff
bd 4800
bd 9600
bd 19200
4800
9600
19200
bd 38400
bd 600
bd 1200
38400
600
1200
Y-NN-dd
24áNNáSS
YYYY-MM-DD
Zeitformat**
24:MM:SS
7b-E
Bit/Parität
*7 Bit Even
12áNNáSS
24.NN.SS
12:MM:SS
24.MM.SS
YEAr2006
Nin. 28
Datum Jahr**
2006
Zeit Minuten**
28
Hour 14
Zeit Stunden**
14
Datumsformat**
dd.NNN Y
NNN dd Y
dd.NN.Y
DD.MMM YYYY
MMM DD YYYY
DD.MM.YYYY
ê
ó
ê
ó
MM/DD/YYYY NN dd Y
rESET
LISt
no Hdr
d t Hdr
dtb Hdr
dAy 18
Nonth 07
Darstellungbeispiele wenn die Einstellungen über die Waage erfolgen:
Settings
Reset
Header
List
*No Header
Date/Time
Date/Time/Balance
Datum Tag**
18
Datum Monat**
07
Page 21

Beispiel für das Einstellen des Tages:
Men
u
F
Men
u
F
Men
u
F
RS-P26 Waagenanzeige
Drucker RS-P26
21
* NENU
* rESEt
* dAY 18
* dAY 21
* StorEd
Open the menu:
➞ Die Taste «F» gedrückt halten bis “reset” erscheint.
(Drucker druckt:
--- See Balance Display ---)
➞ Mit der Taste «F» den Menüpunkt “Day” wählen.
➞ Den Tag “Day” wählen – aufwärts mit der «h» Taste.
– abwärts mit der «
3
» Taste.
¿
Einstellungen speichern:
➞ Die Taste «F» gedrückt halten bis “Stored” erscheint.
Deutsch
5 Drucker Test
Der RS-P26 besitzt einen Selbst-Test, der automatisch den abgespeicherten Zeichensatz ausdruckt
(Werkseinstellung IBM/DOS).
Test starten ➞ Drücken der Taste «h» und RS-P26 einschalten.
Der Drucker druckt den gespeicherten Zeichensatz aus
Test abbrechen
➞ RS-P26 ausschalten
6 Wartung
Unter normalen Betiebsbedingungen ist der RS-P26 praktisch wartungsfrei. Kommt es trotzdem zu
einem Ausfall, steht Ihnen der METTLER TOLEDO Service jederzeit zur Verfügung. Bitte erkundigen Sie
sich bei Ihrer zuständigen METTLER TOLEDO Vertretung.
Page 22

Drucker RS-P26
22
6.1 Druckerpapier ersetzen
Das Einsetzen der neuen Papierrolle ist unter Pkt. 2.4 beschrieben. Die Bestellnummer für die
Papierrolle siehe unter Pkt. 8.
Hinweis: Die Papierrollen-Achse ist immer von der alten Papierrolle auf die Neue zu
übernehmen!
6.2 Farbband ersetzen
2
1
• Papierhaube vom Drucker entfernen (1).
• Papier aus dem Druckwerk ziehen (2).
34
• Farbbandkassette entfernen durch Drücken in
Pfeilrichtung (3).
• Neues Farbband einsetzen, falls nötig mit
Spannrad spannen (4). Die Bestellnummer für
das Farbband siehe unter Pkt.8.
• Das Einsetzen der Papierrolle ist unter Pkt. 2.4
beschrieben.
6.3 Reinigung
Das Druckergehäuse ist aus hochwertigen, widerstandsfähigen Materialien hergestellt. Zur Reinigung
können deshalb handelsübliche milde Reinigungsmittel verwendet werden (siehe Sicherheitshinweise Pkt. 2.1).
6.4 Entsorgung
In Übereinstimmung mit den Anforderungen der Europäischen Richtlinie
2002/96/EG über Elektro- und Elektronik-Altgeräte (WEEE) darf dieses Gerät
nicht mit dem Hausmüll entsorgt werden. Sinngemäss gilt dies auch für Länder ausserhalb der EU entsprechend den geltenden nationalen Regelungen.
Bitte entsorgen Sie dieses Produkt gemäss den örtlichen Bestimmungen in
einer getrennten Sammlung für Elektro- und Elektronikgeräte.
Bei allfälligen Fragen wenden Sie sich bitte an die zuständige Behörde oder
den Händler, bei dem Sie dieses Gerät erworben haben.
Bei Weitergabe dieses Gerätes (z.B. für private oder gewerbliche/industrielle
Weiternutzung) ist diese Bestimmung sinngemäss weiterzugeben.
Vielen Dank für Ihren Beitrag zum Schutz der Umwelt.
Page 23

7 Störungen
Störung / Anzeige Mögliche Ursache Massnahme
Druckbild unleserlich • Farbband verbraucht oder
verwickelt
• Druckwerk-Lebensdauer
erreicht
Grüne Betriebsanzeige
leuchtet nicht
Grüne Betriebsanzeige
blinkt
----- No Connection ----
--------Timeout --------- • Datenübermittlung kann
------- Over Load ------- • Wägebereich der Waage
• Keine Netzspannung
• Netzteil defekt
• RS232C Verbindung ist
unterbrocen oder nicht
angeschlossen
• Die Übertragungsarameter
korrespondieren nicht mit
de Waage
nicht innerhalb 45 s
abgeschlossen werden
wurde überschritten
• Farbband ersetzen oder
spannen
• Bitte kontaktieren Sie den
METTLER TOLEDO Service
• Drucker einschalten
• Bitte kontaktieren Sie den
METTLER TOLEDO Service
• RS232 Kabel überprüfen ob
richtig eingesteckt
• Übertragungsparameter an
Drucker und Waage überprüfen /
einstellen
• Aufstellungsort der Waage über
prüfen, allenfalls zu unruhig
• Waage überprüfen
• Wägegut überprüfen
Drucker RS-P26
23
-
------ Under Load ------- • Waage im Unterlastbereich. Waagschale ist
nicht richtig montiert
-- Transmission Error -- • Waage versteht die Anweisung des Druckers nicht
oder kann die Anweisung
nicht übermitteln
---- Not Executable ---- • Waage versteht die
Druckerbefehle nicht
--- Date/Time Not Set --
----- Memory Error -----
• Fehlermeldungen des
Druckers
• Waage überprüfen
• Übertragungsparameter an
Drucker und Waage überprüfen
• Gerätekompatibilität überprüfen
• Waage überprüfen
• Nullstellen des Druckers – Datum
und Zeit einstellen
• Lebensdauer der Stützbatterie ist
erreicht
Bitte kontaktieren Sie den
METTLER TOLEDO Service
Deutsch
Page 24

1
2
3
4
1
5
6
9
In/Out
GND
RS232C
Drucker RS-P26
24
8 Verbrauchsmaterial und Ersatzteile
Pos. Artikel Artikel
Nummer
Lieferumfang
1 Papierhaube 12120734 1 Stück
2 Papierrolle
12120799 2 Stück
57.5 x ø 50 bis 60 mm
3 Papierrollen-Achse 12120735 1 Stück
4 Farbbandkassette,
12120798 1 Stück
schwarz
- RS9 M/W Kabel, 1.5 m 12120708 1 Stück
9 RS232-Schnittstelle
Der RS-P26 besitzt für den Anschluss von METTLER TOLEDO-Geräten eine RS232C-Schnittstelle.
•
9-poliger männlicher Stecker
•
Anpassung ans andere Gerät (Übertragungsparameter) siehe
Pkt. 4).
Page 25

Drucker RS-P26
10 Technische Daten RS-P26
Netzspannung, Frequenz 100 – 240 VAC, 50/60 Hz
Stromaufnahme 150 mA (100 V), 60 mA (240 V)
Höhe über NN bis 4000 m
Umgebungstemperatur 0 °C – 40 °C
Relative Luftfeuchtigkeit max. 80 % bei 31 °C, linear abnehmend bis 50 %
bei 40 °C, nicht betauend
Überspannungskategorie Klasse II
Verschmutzungsgrad 2
Druckwerktyp Nadel-Matrixdruckerr 5x7 Dots, 24 Zeichen pro
Zeilenlänge
Druckgeschwindigkeit 2.3 Zeilen pro Sekunde
Farbbandkassette Auswechselbar, schwarz
Papierrolle Normalpapier 57.5 mm x ø 50 bis 60 mm,
in Gehäuse integriert, handelsüblich
Druckqualität Druck lichtecht und thermisch beständig (GLP, GMP,
ISO 9001)
Datenschnittstelle RS232C
Abmessungen Drucker (BxTxH) 120 mm x 203 mm x 73 mm
Abmessungen Verpackung (BxTxH) 255 mm x 205 mm x 150 mm
Nettogewicht 740 g (inkl. Papierrolle)
Kompatibilitätseinschränkungen • Funktion Datum / Zeit:
nicht anwendbar bei Waagen mit eingebauter Uhr
(eingebaute Uhr hat vorrang)
• Funktion
nicht anwendbar bei allen Modellen
Nullstellen / Tarieren der Waage:
25
Deutsch
Page 26

Drucker RS-P26
26
11 Konformitätserklärung
Die Unterzeichnenden erklären im Namen der Firma
Mettler-Toledo AG
Im Langacher
CH-8606 Greifensee
dass der Drucker METTLER TOLEDO RS-P26 auf den sich diese Erklärung bezieht (Seriennummer
auf dem Produkt) die nachstehenden EG-Richtlinien (einschliesslich aller zutreffenden Änderungen)
erfüllen:
73/23/EEC Niederspannungsrichtlinie
89/336/EEC Elektromagnetische Verträglichkeit
und dass die nachfolgenden Normen zur Anwendung gelangt sind
IEC/EN61010-1:2001,
EN61326:1997+ A1:98+A2:01+A3:03 (Klasse B)
EN61326:1997+ A1:98+A2:01+A3:03 (Minimale Anforderungen)
für Kanada, USA und Australien
CAN/CSA-C22.2 No.61010-1-04, UL Std. No.61010A-1, FCC, Part 15, class A,
AS/NZS CISPR 22, AS/NZS 61000.4.3
Greifensee, 01.09.2006
Mettler-Toledo AG
Laboratory & Weighing Technologies
René Lenggenhager Sascha von Wangenheim
General Manager Manager Sales & Marketing
Page 27

Sommaire
Imprimante RS-P26
27
Vue d’ensemble de votre imprimante
RS-P26 ........................................... 28
1 Introduction .....................................
1.1 Fonctionnalités de l’imprimante
RS-P26 ........................................... 29
1.2 Vue d’ensemble des fonctions ............
2 Procédure de mise en service ..........
2.1 Mesures de sécurité ..........................
2.2 Alimentation électrique ......................
2.3 Marche/arrêt de l’imprimante RS-P26 .
2.4 Alimentation en papier ......................
2.5 Raccordement de l’imprimante
RS-P26 à la balance ........................ 30
3 Fonctions des touches .....................
4 Menu ..............................................
5 Test de l’imprimante .......................
6 Maintenance ...................................
29
6.1 Changement du rouleau de papier ......
6.2 Remplacement du ruban ...................
6.3 Nettoyage ........................................
29
6.4 Mise au rebut ...................................
29
7 Dépannage .....................................
29
8 Consommables et pièces de
30
30
30
31
32
rechange ........................................ 36
9 Interface RS232C ............................
10 Caractéristiques techniques de
l’imprimante RS-P26 ....................... 37
11 Déclaration de conformité ...............
33
33
34
34
34
34
35
36
38
Français
Page 28

Men
u
F
C
Imprimante RS-P26
28
Vue d’ensemble de votre imprimante RS-P26
Commandes:
2
3
1 Interrupteur marche/arrêt
2 Panneau de commande
Connecteurs:
3 Témoin lumineux – indicateur d’état
4 Connecteur RS232C
5 Connecteur d’alimentation
1
4
5
Fonctions:
• Réinitialisation / tare de la balance
• Annuler / quitter
• Impression de la date et de l’heure
• Défilement vers le bas
• Alimentation papier
• Défilement vers le haut
• Impression des mesures de poids stabilisées
• Afficher le menu - sélectionner l’option de menu
suivante
• Enregistrer les réglages
Page 29

Imprimante RS-P26
29
1 Introduction
1.1 Fonctionnalités de l’imprimante RS-P26
L’imprimante RS-P26 est une imprimante matricielle simple d’emploi pour balances METTLER
TOLEDO avec interface RS232C. L’impression obtenue sur papier ordinaire remplit les exigences
des systèmes modernes d’assurance qualité (GLP, GMP, ISO 9001, etc.). Ces exigences définissent
les définissent les principes et les devoirs de l’utilisateur d’appareils de mesure ou d’équipements
d’essai. Le principe de la traçabilité des mesures est garanti étant donné que l’imprimante RS-P26
documente de manière précise l’origine des données et le processus de calibrage. L’obligation
d’archivage des résultats de mesure est assurée grâce à une impression présentant une bonne tenue
thermique et une excellente résistance à la lumière. Lorsqu’elle est raccordée à une balance METTLER
TOLEDO, l’imprimante RS-P26 imprime toutes les données provenant de la balance; autrement dit,
en plus des valeurs de poids et des processus de calibrage, les résultats de toutes les applications
intégrées dans la balance.
1.2 Vue d’ensemble des fonctions
Impression des
mesures de poids
Date et heure Fonction d’impression en en-tête
L’imprimante RS-P26 imprime
uniquement les mesures de poids
stabilisées.
facultative (date et heure conservés en
mémoire grâce à une batterie).
Réinitialisation /
tare de la balance
À tout moment, remet à zéro et tare
la balance raccordée à l’imprimante
RS-P26.
2 Procédure de mise en service
2.1 Mesures de sécurité
L’imprimante RS-P26 a été contrôlée en vue des connexions et usages prévus, décrits dans ce mode
d’emploi. Ceci ne vous décharge cependant pas de vous assurer que le produit que nous vous livrons
est approprié aux procédés et objectifs pour lequel vous envisagez de l’utiliser. En conséquence,
respectez les consignes de sécurité suivantes.
• L’imprimante RS-P26 doit être utilisée uniquement à l’intérieur et jamais en
atmosphère explosible.
• L’électronique de l’imprimante RS-P26 est protégée contre la pénétration des
projections d’eau et de la poussière. Le boîtier de l’imprimante n’est toutefois
pas étanche et celle-ci ne devrait pas être utilisée en présence de liquides.
• Tenir compte des consignes de nettoyage (voir point 6.3). Protéger la fiche
secteur contre l’humidité.
• Ne jamais ouvrir le boîtier de l’imprimante. En cas de problème éventuel
avec votre imprimante, contactez l’agence METTLER TOLEDO compétente.
Français
Page 30

Imprimante RS-P26
30
2.2 Alimentation électrique
Le bloc d’alimentation de l’imprimante RS-P26 (100 à 240 V, 50 à 60 Hz) est intégré au boîtier.
Cela vous permet de brancher l’imprimante RS-P26 directement sur une prise électrique.
Avertissement
• Branchez l’imprimante RS-P26 uniquement sur des prises disposant
d’une mise à la terre!
• Si vous utilisez une rallonge, vérifiez qu’elle dispose également d’une
mise à la terre.
2.3 Marche/arrêt de l’imprimante RS-P26
Pour mettre en marche ou arrêter l’imprimante RS-P26, utilisez l’interrupteur
principal <I/O>. À sa mise sous tension, l’imprimante RS-P26 fait avancer
le papier de quelques lignes. Le témoin lumineux clignote jusqu’à ce qu’une
balance soit raccordée à l’imprimante.
I/O
ïð
2.4 Alimentation en papier
• Retirez le capot de protection (en le tirant
23
1
4
vers l’arrière) (1)
• Placez bien l’axe de rotation au centre du
rouleau de papier (2).
• Faites passer le papier dans la fente,
dans le sens indiqué par les flèches sur
l’illustration ci-contre. (3).
• Appuyez sur le bouton jusqu’à ce que
suffisamment de papier soit déroulé (4).
• Faites dépasser le papier du capot de
protection.
• Remettez le capot de protection en place
(1).
2.5 Raccordement de l’imprimante RS-P26 à la balance
• Branchez le câble reliant le connecteur
d’impression de la balance à celui de
l’imprimante.
• Assurez-vous que les paramètres de
communication de la balance et de
l’imprimante correspondent.
• Dès que le témoin lumineux s’arrête de
clignoter, l’imprimante RS-P26 est prête à
l’emploi.
Page 31

3 Fonctions des touches
Men
u
F
C
C
Men
u
F
Men
u
F
Men
u
F
Imprimante RS-P26
31
?
Appuyez brièvement
réinitialisation / tare de la
balance
impression de la date et de
l’heure
avance d’une ligne
impression
A
Maintenez appuyé
avance papier
continue
(jusqu’à ce que la
touche soit relâchée)
ouverture du menu
enregistrement
quitter bas haut suivant
Niveau menu Fonctionnement
Français
Page 32

Reset
Reset
No Header
Header
Date/Time
Date/Time/
Balance
24:MM:SS
Time Format
12:MM:SS
24.MM.SS
12.MM.SS
DD.MMM YYYY
Data Format
MMM DD YYYY
DD.MM.YYYY
MM/DD/YYYY
24:MM:SS
Time Format
12:MM:SS
24.MM.SS
12.MM.SS
DD.MMM YYYY
Data Format
MMM DD YYYY
DD.MM.YYYY
MM/DD/YYYY
07
Date Month
01
06
12
08
07
Date / Month
01
06
12
08
2105
2006
Date Year
2050
2007
2105
2006
Date / Year
2050
2007
14
Time Hour
00
13
23
15
14
Time / Hour
00
13
23
15
28
Time Minute
27
59
29
28
Time / Minute
27
59
29
18
Date Day
01
17
31
19
18
Date / Day
01
17
31
19
/
7 Bit Even
Bit/Parity
8 Bit No
7 Bit Odd
7 Bit Even
Bit / Parity
8 Bit No
7 Bit Odd
bd 2400
Baudrate
bd 4800
bd 9600
bd 600
bd 1200
bd 19200
bd 38400
bd 2400
Baudrate
bd 4800
bd 9600
bd 600bd 600
bd 1200
bd 19200
bd 38400bd 38400
None
Handshake
IBM/DOS
Char Set
IBM/DOS CyrillicIBM/DOS CyrillicAnsi/Win JapaneseAnsi/Win Japanese
Ansi/Win Latin 1Ansi/Win Latin 1Ansi/Win CyrillicAnsi/Win Cyrillic
ListList
Xon / Xoff
YYYY-MM-DD- -YYYY MM DD
7 Bit No
2051
00
Imprimante RS-P26
32
4 Menu
dOS
dOS CYr
II in LAt
II in CYr
II in JAP
balances avec horloge intégrée
Jeu de caractères
*IBM/DOS
IBM/DOS Cyrillic
Ansi/Win Latin 1
Ansi/Win Cyrillic
bd 1200
7b-E
Bit de parité
*Bit 7 Even
1200
24áNNáSS
12áNNáSS
24.NN.SS
12:MM:SS
24.MM.SS
24:MM:SS
Ansi/Win Japanese
7b-no
8b-no
Bit 7 No
Bit 8 No
12.NN.SS
12.MM.SS
Débit en bauds
bd 38400
bd 600
38400
600
Y-NN-dd
AAAA-MM-JJ
Format de l’heure**
(l’horloge intégrée a la priorité)
** non applicable aux
* réglages d’usine
7b-odd
HS oFF
HS Soft
Contrôle
*None
Bit 7 Odd
Xon/Xoff
bd 2400
bd 4800
bd 9600
bd 19200
4800
9600
19200
*2400
YEAr2006
Année**
2006
Nin. 28
Minutes**
28
Heure**
Hour 14
14
Format de date**
dd.NNN Y
NNN dd Y
dd.NN.Y
JJ.MMM AAAA
MMM JJ AAAA
JJ.MM.AAAA
ê
ó
ê
ó
MM/JJ/AAAA NN dd Y
rESET
LISt
no Hdr
d t Hdr
dtb Hdr
dAy 18
Month 07
List
Date/Time
Exemples d’affichage sur la balance:
Réglages
Reset
Date/Time/Balance
En-tête
*No Header
Jour**
18
Mois**
07
Page 33

Exemple de réglage du jour:
Men
u
F
Men
u
F
Men
u
F
RS-P26 Affichage de la
balance
* MENU
* rESEt
Imprimante RS-P26
Ouvrir le menu:
➞ Maintenez la touche «F» appuyée jusqu’à ce que “reset”
s’affiche.
(Message imprimé:
--- See Balance Display ---)
33
* dAY 18
➞ Appuyez sur la touche «F» pour sélectionner l’option de
menu “Day”.
* dAY 21
➞ Choisissez le jour – faites défiler vers le haut en appuyant
sur la touche «
h».
– faites défiler vers le bas en appuyant
sur la touche «
3
».
¿
Enregistrez les réglages:
* StorEd
➞ Maintenez la touche «F» appuyée jusqu’à ce que “Stored”
s’affiche.
5 Test de l’imprimante
L’imprimante RS-P26 est dotée d’un autotest qui imprime automatiquement l’ensemble de son jeu
de caractères (standard IBM/DOS).
Démarrer le test ➞ Appuyez sur la touche «h» et mettez l’imprimante RS-P26 en
marche. L’imprimante imprime le jeu de caractères.
Arrêter le test ➞ Éteignez l’imprimante RS-P26.
Français
6 Maintenance
En utilisation normale, l’imprimante RS-P26 ne nécessite presque aucune maintenance. Le service
d’assistance de METTLER TOLEDO est à votre disposition si une intervention est nécessaire. Pour de
plus amples informations, veuillez contacter votre revendeur METTLER TOLEDO.
Page 34

Imprimante RS-P26
34
6.1 Changement du rouleau de papier
La mise en place d’un nouveau rouleau de papier est décrite au point 2.4. Pour connaître les
références du rouleau de papier, reportez-vous à la point 8 (Consommables).
Remarque: Vous pouvez récupérer l’axe de rotation sur l’ancien rouleau de papier.
6.2 Remplacement du ruban
2
1
34
• Retirez le capot de protection (1).
• Sortez le rouleau de papier de l’imprimante
(2).
• Pour retirer la cartouche de ruban, appuyez
dans le sens indiqué par les flèches (3).
• Mettez en place le nouveau ruban et, si
nécessaire, relâchez la pression avec la
molette de tension (4). Pour connaître les
références de la cartouche de ruban, reportezvous à la point 8 (Consommables).
• La mise en place d’un nouveau rouleau de
papier est décrite au point 2.4.
6.3 Nettoyage
Le boîtier de l’imprimante étant de qualité supérieure et composé de matériaux résistants, tout
nettoyant ménager ordinaire est utilisable (voir les consignes de sécurité au point 2.1).
6.4 Mise au rebut
Conformément à la directive européenne WEEE 2002/96/EC relative à
la mise au rebut des équipements électriques et électroniques (DEEE),
cet appareil ne doit pas être jeté avec les déchets ménagers. Ceci est
aussi valable pour les pays en dehors de l’UE conformément aux
réglementations nationales en vigueur. Veuillez mettre au rebut cet
appareil conformément à la législation nationale dans un conteneur
séparé pour appareils électriques et électroniques.
Pour toute question, adressez-vous aux autorités compétentes ou au
revendeur auprès duquel vous avez acheté cet appareil.
Si vous cédez la propriété de cet appareil à un tiers (pour une
utilisation privée ou professionnelle), la législation en vigueur reste
applicable.
Merci pour votre contribution à la protection de l’environnement.
Page 35

Imprimante RS-P26
7 Dépannage
Panne / Message Cause possible Mesures à appliquer
Impression illisible • Ruban usagé ou emmêlé
• L’imprimante est usagée
Le témoin lumineux ne
s’allume pas
Le témoin lumineux
clignote
----- No Connection ----
--------Timeout --------- • Le transfert de données
------- Over Load ------- • Balance en surcharge • Vérifiez le poids de l’article
------ Under Load ------- • Balance en sous-charge.
-- Transmission Error -- • La balance ne comprend
---- Not Executable ---- • La balance ne comprend
--- Date/Time Not Set --
----- Memory Error -----
• Aucune alimentation
• Bloc d’alimentation
défectueux
• La connexion RS232C
est mal raccordée ou pas
raccordée du tout
• Les paramètres
de l’interface ne
correspondent pas à ceux
de la balance
n’a pas abouti sous 45 s
Le plateau n’est pas en
position
pas les instructions de
l’imprimante
pas les instructions de
l’imprimante
• Messages d’erreur de
l’imprimante
• Changez la cartouche de ruban
ou tendez correctement le ruban
• Contactez le service d’assistance
METTLER TOLEDO
• Mettez l’imprimante en marche
• Contactez le service d’assistance
METTLER TOLEDO
• Vérifiez le câble de connexion
RS232C
• Vérifiez les réglages de l’interface
sur l’imprimante et sur la balance
• Placez la balance dans un
emplacement plus stable
• Vérifiez la balance
• Vérifiez la balance
• Vérifiez les réglages de l’interface
sur l’imprimante et sur la balance
• Vérifiez la balance
• Vérifiez la balance
• Reset the printer – set date/time
• Batterie de secours épuisée
Veuillez contacter le service
d’assistance METTLER TOLEDO
35
Français
Page 36

1
2
3
4
1
5
6
9
In/Out
GND
RS232C
Imprimante RS-P26
36
8 Consommables et pièces de rechange
N° Élément Référence Qté
commande
1 Capot de protection 12120734 1 unité
2 Rouleau de papier
12120799 2 unité
57.5 x ø 50 à 60 mm
3 Axe de rotation 12120735 1 unité
4 Cartouche de ruban
12120798 1 unité
(noir)
- RS9 M/F cable, 1.5 m 12120708 1 unité
9 Interface RS232C
L’imprimante RS-P26 est équipée d’une interface RS232C permettant de la brancher sur les appareils
METTLER TOLEDO.
•
Connecteur mâle 9 broches
•
Pour l’adaptation aux paramètres de transmission de l’autre
périphérique, reportez-vous à la point 4.
Page 37

Imprimante RS-P26
10 Caractéristiques techniques de l’imprimante RS-P26
Tension et fréquence 100 – 240 VAC, 50/60 Hz
Consommation 150 mA (100 V), 60 mA (240 V)
Altitude jusqu’à 4000 m
Température de fonctionnement 0 °C à 40 °C
Humidité relative max. 80 % à 31 °C, en décroissance constante
jusqu’à 50 % à 40 °C sans condensation
Catégorie d’équipement électrique Classe II
Niveau de pollution 2
Imprimante Imprimante matricielle 5 x 7, lignes de 24 caractères
Vitesse d’impression 2.3 lignes par seconde
Cartouche de ruban Remplaçable, noire
Rouleau de papier Papier ordinaire de 57.5 mm x ø 50 à 60 mm,
placé sous le boîtier, taille légale
Qualité d’impression Bonne tenue thermique et résistante à la lumière et à
la chaleur (GLP, GMP, ISO 9001)
Interface RS232C
Dimensions de l’imprimante (LxPxH) 120 mm x 203 mm x 73 mm
Dimensions de l’emballage (LxPxH) 255 mm x 205 mm x 150 mm
Poids net 740 g (rouleau de papier inclus)
37
Restriction de compatibilité • Fonction date / heure:
non applicable aux balances avec horloge intégrée
(l’horloge intégrée a la priorité)
•
Fonction réinitialisation / tare de la balance:
non applicable à tous les modèles
Français
Page 38

Imprimante RS-P26
38
11 Déclaration de conformité
Les soussignés déclarent au nom de
Mettler-Toledo AG
Im Langacher
CH-8606 Greifensee
que l’imprimante METTLER TOLEDO RS-P26 faisant l’objet de la présente déclaration (numéro de
série indiqué sur le produit) est conforme aux directives CE citées ci-après (amendements inclus):
73/23/EEC Directive basse tension
89/336/EEC Compatibilité électromagnétique
et que les normes suivantes ont été appliquées:
IEC/EN61010-1:2001,
EN61326:1997+ A1:98+A2:01+A3:03 (classe B)
EN61326:1997+ A1:98+A2:01+A3:03 (caractéristiques minimales)
pour le Canada, les États-Unis et l’Australie
CAN/CSA-C22.2 No.61010-1-04, UL Std. No.61010A-1, FCC, Part 15, class A,
AS/NZS CISPR 22, AS/NZS 61000.4.3
Greifensee, le 01/09/2006
Mettler-Toledo AG
Laboratory & Weighing Technologies
René Lenggenhager Sascha von Wangenheim
Directeur général Directeur Ventes & Marketing
Page 39

Indice
Impresora RS-P26
39
Visión de conjunto de la RS-P26 ............40
1 Introducción ....................................
1.1 Descripción de la impresora
RS-P26 .......................................... 41
Cuadro sinóptico de las funciones ..... 41
1.2
2 Procedimiento de puesta
en marcha ...................................... 41
2.1 Indicaciones de seguridad ................
Alimentación eléctrica ...................... 42
2.2
Conexión y desconexión
2.3
de la RS-P26 .................................. 42
Inserción de papel .......................... 42
2.4
Conexión de la RS-P26 a la
2.5
balanza ......................................... 42
41
41
Funciones de tecla .......................... 43
3
4 Menú ..............................................
Prueba de impresión ....................... 45
5
6 Mantenimiento ................................
Cambio del rollo de papel ................ 46
6.1
Sustitución de la cinta de tinta .......... 46
6.2
6.3 Limpieza ........................................
6.4 Eliminación de residuos ...................
7 Averías ...........................................
Consumibles y repuestos ................. 48
8
9 Interface RS232C ............................
10 Características técnicas RS-P26 ......
11 Declaración de conformidad ............
44
45
46
46
47
48
49
50
Español
Page 40

Men
u
F
C
Impresora RS-P26
40
Visión de conjunto de la RS-P26
Controles:
Conexiones:
1
2
3
1 Interruptor principal
2 Panel de control
3 Piloto indicador de estado
4 Conexión de interface RS232C
5 Conexión de cable de red de CA
4
5
Funciones:
• Poner a cero/Tarar la balanza
• Cancelar/Salir
• Imprimir la fecha y la hora
• Bajar por la opción de menú
• Introducir papel
• Subir por la opción de menú
• Imprimir los valores ponderales estables
• Abrir el menú/Siguiente opción de menú
• Configurar la memoria
Page 41

Impresora RS-P26
41
1 Introducción
1.1 Descripción de la impresora RS-P26
La RS-P26 es una impresora de fácil manejo para balanzas METTLER TOLEDO con interface
RS232C. La impresión en papel normal cumple los requisitos de los actuales sistemas de garantía
de calidad (GLP, GMP, ISO 9001, etc.). Estos definen los principios y obligaciones del usuario de
equipos de medida o de ensayo. La impresora RS-P26 cumple con el principio de trazabilidad de
medidas, documentando con precisión el origen de los datos y los procedimientos de calibración.
También cumple con la obligación de archivar resultados de medidas mediante su impresión térmicamente estable e inalterable por la luz. Al conectarla con las balanzas, la RS-P26 imprime los
datos enviados sin restricción, los valores de peso y procedimientos de calibración, y los resultados
de todas las aplicaciones incorporadas en la balanza, como el contaje de piezas.
1.2 Cuadro sinóptico de las funciones
Impresión de valores ponderales
Fecha y hora Como opción, imprime incluyendo la
Puesta a cero/Tarado de la balanza
La RS-P26 solo imprime valores ponderales estables.
fecha y la hora en el encabezado del
informe (memorizadas con batería
tampón).
Pone a cero/Tara la balanza conectada
en cualquier momento.
2 Procedimiento de puesta en marcha
2.1 Indicaciones de seguridad
Se han comprobado las conexiones y los objetivos de la impresora RS-P26 citados en el Manual
de Instrucciones. No obstante, debe realizar sus propias pruebas del producto suministrado para
los métodos y propósitos para los que se pretende utilizarla. Tenga en cuenta estas indicaciones
de seguridad.
• Utilice la RS-P26 sólo en interiores y nunca en ambientes con riesgo de
explosión.
• El sistema electrónico de la RS-P26 está protegido contra la penetración
de polvo y salpicaduras. No obstante, como la carcasa no es estanca, la
impresora no puede utilizarse con líquidos.
• Siga las instrucciones de limpieza (consulte el apartado 6.3) y proteja la
toma de alimentación contra ambientes húmedos.
• No abra nunca la carcasa de la impresora. Si tiene algún problema, pónga
se en contacto con su distribuidor autorizado de METTLER TOLEDO.
Español
-
Page 42

Impresora RS-P26
42
2.2 Alimentación eléctrica
La fuente de alimentación de la RS-P26 está integrada en su carcasa (100-240 V, 50-60 Hz); lo
que le permite conectar la RS-P26 directamente a su red de tensión local.
Atención
• Conecte la RS-P26 sólo en enchufes de red con toma de tierra.
• Utilice sólo cables de prolongación con conductor de puesta a tierra.
2.3 Conexión y desconexión de la RS-P26
Encienda y apague la RS-P26 utilizando el interruptor principal <I/O>. Una
vez encendida la RS-P26, la unidad de impresión realizará algunos avances
de línea. El piloto parpadeará hasta que haya un equipo conectado.
I/O
ïð
2.4 Inserción de papel
• Retire la cubierta del papel (tirando de la
23
1
4
parte trasera) (1).
• Inserte el eje giratorio del papel en el rollo
de papel (2).
• Introduzca el papel por la ranura de la
unidad de impresión en el sentido de la
flecha (3).
• Pulse y mantenga hasta que se haya
introducido suficiente papel (4).
• Pase el papel
• Vuelva a colocar
por la ranura de la cubierta.
la cubierta del
papel (1).
2.5 Conexión de la RS-P26 a la balanza
• Conecte el cable de conexión al interface
de impresora de la balanza y a la impresora.
• Asegúrese de que los parámetros de
comunicación de la balanza se corresponden con los de la impresora.
• La RS-P26 estará lista para ser utilizada
en cuanto el piloto deje de parpadear.
Page 43

3 Funciones de tecla
Men
u
F
C
C
Men
u
F
Men
u
F
Men
u
F
Impresora RS-P26
43
?
Pulsando brevemente
puesta a cero/tarado de la
balanza
impresión de fecha y hora
avance de línea
impresión
A
Pulsando
y manteniendo
avance continuo
(si mantiene
pulsado)
apertura de menú
guardar
salir bajar subir siguiente
Nivel de menú Nivel operativo
Español
Page 44

Reset
Reset
No Header
Header
Date/Time
Date/Time/
Balance
24:MM:SS
Time Format
12:MM:SS
24.MM.SS
12.MM.SS
DD.MMM YYYY
Data Format
MMM DD YYYY
DD.MM.YYYY
MM/DD/YYYY
24:MM:SS
Time Format
12:MM:SS
24.MM.SS
12.MM.SS
DD.MMM YYYY
Data Format
MMM DD YYYY
DD.MM.YYYY
MM/DD/YYYY
07
Date Month
01
06
12
08
07
Date / Month
01
06
12
08
2105
2006
Date Year
2050
2007
2105
2006
Date / Year
2050
2007
14
Time Hour
00
13
23
15
14
Time / Hour
00
13
23
15
28
Time Minute
27
59
29
28
Time / Minute
27
59
29
18
Date Day
01
17
31
19
18
Date / Day
01
17
31
19
/
7 Bit Even
Bit/Parity
8 Bit No
7 Bit Odd
7 Bit Even
Bit / Parity
8 Bit No
7 Bit Odd
bd 2400
Baudrate
bd 4800
bd 9600
bd 600
bd 1200
bd 19200
bd 38400
bd 2400
Baudrate
bd 4800
bd 9600
bd 600bd 600
bd 1200
bd 19200
bd 38400bd 38400
None
Handshake
IBM/DOS
Char Set
IBM/DOS CyrillicIBM/DOS CyrillicAnsi/Win JapaneseAnsi/Win Japanese
Ansi/Win Latin 1Ansi/Win Latin 1Ansi/Win CyrillicAnsi/Win Cyrillic
ListList
Xon / Xoff
YYYY-MM-DD- -YYYY MM DD
7 Bit No
2051
00
Impresora RS-P26
44
4 Menú
dOS
dOS CYr
II in LAt
II in CYr
II in JAP
balanzas con reloj incorporado
Conjunto caracteres
*IBM/DOS
IBM/DOS Cyrillic
Ansi/Win Latin 1
Ansi/Win Cyrillic
bd 1200
7b-E
Bits/Paridad
*7 Bit Even
1200
24áNNáSS
12áNNáSS
24.NN.SS
24:MM:SS
12:MM:SS
24.MM.SS
Ansi/Win Japanese
7b-no
8b-no
7 Bit No
8 Bit No
12.NN.SS
Velocidad en baudios
12.MM.SS
bd 38400
bd 600
38400
600
Y-NN-dd
YYYY-MM-DD
Hora: formato**
(prioridad del reloj)
** no aplicable para
HS oFF
HS Soft
*None
Xon/Xoff
bd 9600
bd 19200
9600
19200
* configuración de fábrica
7b-odd
Handshake
7 Bit Odd
bd 2400
bd 4800
*2400
4800
YEAr2006
Nin. 28
Fecha: año**
2006
Hora: minuto**
28
Hour 14
Hora: hora**
14
Fecha: formato**
dd.NNN Y
NNN dd Y
dd.NN.Y
DD.MMM YYYY
MMM DD YYYY
DD.MM.YYYY
ê
ó
ê
ó
MM/DD/YYYY NN dd Y
rESET
LISt
no Hdr
d t Hdr
dtb Hdr
dAy 18
Nonth 07
Ejemplos si se utiliza la pantalla de la balanza:
Ajustes
Reset
Encabezado
List
Fecha: día**
18
Fecha: mes**
*No Header
Date/Time
Date/Time/Balance
07
Page 45

Ejemplo de configuración del día:
Men
u
F
Men
u
F
Men
u
F
RS-P26 Pantalla
de la balanza
* NENU
* rESEt
Impresora RS-P26
45
Abra el menú:
➞ Mantenga pulsada la tecla «F» hasta que aparezca “reset”
en la pantalla.
(Impresión:
--- Ver pantalla de la balanza ---)
* dAY 18
* dAY 21
➞ Seleccione la opción de menú “Day” con la tecla «F».
➞ Seleccione el día (“Day”) – suba con la tecla «h».
– baje con la tecla «
3
».
¿
Guarde los ajustes:
* StorEd
➞ Mantenga pulsada la tecla «F» hasta que
aparezca “Stored” en la pantalla.
5 Prueba de impresión
La RS-P26 está equipada con una función de autocomprobación que imprime automáticamente el
conjunto de caracteres de la impresora (IBM/DOS estándar).
Comenzar la prueba ➞ Pulse la tecla «h» y conecte la RS-P26.
Se imprimirá el conjunto de caracteres.
Terminar la prueba
➞ Desconecte la RS-P26.
Español
6 Mantenimiento
En condiciones normales, la RS-P26 no requiere prácticamente mantenimiento. En caso necesario,
el departamento de servicio técnico de METTLER TOLEDO está a su disposición. No dude en contactar con su representante de METTLER TOLEDO para obtener más detalles.
Page 46

Impresora RS-P26
46
6.1 Cambio del rollo de papel
La inserción de un nuevo rollo de papel se describe en el apartado 2.4. Encontrará el número de
pedido de rollos de papel en el apartado 8 sobre consumibles.
Nota: utilice el eje giratorio del rollo de papel sustituido.
6.2 Sustitución de la cinta de tinta
2
1
34
• Retire la cubierta del papel (1).
• Saque el papel de la unidad de impresión
tirando de él (2).
• Para quitar el cartucho de la cinta, presione
en el sentido de la flecha (3).
• Inserte la nueva cinta y, si es necesario,
ténsela girando la rueda (4). Encontrará el
número de pedido de un cartucho de cinta en
el apartado 8 sobre consumibles.
• La inserción de un nuevo rollo de papel se
describe en el apartado 2.4.
6.3 Limpieza
Puesto que la carcasa de la impresora está fabricada con materiales resistentes, de primera calidad, se puede utilizar para su limpieza cualquier producto comercial (consulte las indicaciones de
seguridad del apartado 2.1).
6.4 Eliminación de residuos
De conformidad con las exigencias de la directiva europea 2002/96 CE sobre residuos de aparatos eléctricos y electrónicos (RAEE), este equipo no puede eliminarse como basura doméstica. Esta prohibición es asimismo válida para los países
que no pertenecen a la UE cuyas normativas nacionales en vigor así lo reflejan.
Elimine este producto, según las disposiciones locales, mediante el sistema de
recogida selectiva de aparatos eléctricos y electrónicos.
Si tiene alguna pregunta al respecto, diríjase a las autoridades responsables o al
distribuidor que le proporcionó el equipo.
Si transfiere este equipo (por ejemplo, para la continuación de su uso con fines
privados, comerciales o industriales), deberá transferir con él esta disposición.
Muchas gracias por su contribución a la conservación medioambiental.
Page 47

7 Averías
Fallo / Mensaje Posible causa Solución
Impresión ilegible • La cinta de tinta está
desgastada o enredada.
• La unidad de impresión
está llegando al final de
su vida útil.
El piloto no se enciende • No hay corriente.
• Falla la fuente de alimen
tación.
El piloto parpadea
----- No Connection ----
--------Timeout --------- • La transferencia de datos
------- Over Load ------- • La balanza está pesando
• El conector RS232C no
se ha conectado o se ha
desconectado.
• Los parámetros del inter
face no se corresponden
con los de la balanza.
no se ha completado en
los últimos 45 s.
por encima de su carga
máxima.
• Cambie el cartucho de cinta o
ténsela.
• Póngase en contacto con el
servicio técnico de METTLER
TOLEDO.
• Conecte la impresora.
• Póngase en contacto con el
servicio técnico de METTLER
TOLEDO.
• Compruebe el cable de conexión
en el RS232C.
-
• Compruebe la configuración del
interface en la impresora y en la
balanza.
• Mueva la balanza a una ubicación más estable.
• Compruebe la balanza.
• Compruebe el peso de la
muestra
Impresora RS-P26
47
------ Under Load ------- • La balanza está pesando
por debajo de su carga
mínima. El plato de
pesada no está (bien)
colocado.
-- Transmission Error -- • La balanza no entiende la
instrucción de la impresora.
---- Not Executable ---- • La balanza no puede llevar a cabo la instrucción
de la impresora.
--- Date/Time Not Set --
----- Memory Error -----
• Mensajes de error de la
impresora.
• Compruebe la balanza.
• Compruebe la configuración del
interface en la impresora y en la
balanza.
• Compruebe la balanza.
• Compruebe la balanza.
• Reinicie la impresora/Configure
la fecha y la hora.
• La batería tampón está llegando
al final de su vida útil. Póngase
en contacto con el servicio técnico de METTLER TOLEDO.
Español
Page 48

1
2
3
4
1
5
6
9
In/Out
GND
RS232C
Impresora RS-P26
48
8 Consumibles y repuestos
Pos. Pieza N.º de
pedido
Cantidad
suministrada
1 Cubierta del papel 12120734 1 ud.
2 Rollo de papel 57.5 x
12120799 2 uds.
diám. 50 a 60 mm
3 Eje giratorio del papel 12120735 1 ud.
4 Cartucho de cinta,
12120798 1 ud.
tinta negra
- RS9 M/W cable, 1.5 m 12120708 1 ud.
9 Interface RS232C
La impresora RS-P26 está equipada con un interface RS232C para su conexión a equipos de
METTLER TOLEDO.
• Conector macho de 9 pines.
• Compatible con otros equipos (parámetros de transmisión)
según el apartado 4.
Page 49

Impresora RS-P26
10 Características técnicas RS-P26
Voltaje de red, frecuencia 100 – 240 VCA, 50/60 Hz
Consumo de energía 150 mA (100 V), 60 mA (240 V)
Altitud hasta 4000 m
Temperatura ambiente 0 °C – 40 °C
Humedad relativa máx. 80 % a 31 °C; decrece linealmente hasta 50 %
a 40 °C, sin condensación
Categoría de sobrevoltaje Clase II
Grado de contaminación 2
Unidad de impresión impresora matricial 5 x 7, long. línea: 24 caracteres
Velocidad de impresión 2.3 líneas por segundo
Cartucho de cinta reemplazable, tinta negra
Rollo de papel papel estándar 57.5 mm x diám. 50 a 60 mm,
integrado en la carcasa, tamaño comercial
Calidad de impresión impresión velocísima y térmicamente estable (según
buenas prácticas de laboratorio y fabricación e
ISO 9001)
Interface RS232C
Dimensiones de la impresora (LxPxA) 120 mm x 203 mm x 73 mm
Dimensiones del embalaje (LxPxA) 255 mm x 205 mm x 150 mm
Peso neto 740 g (con rollo de papel)
Limitaciónes de compatibilidad • Función para fecha y hora:
no aplicable para balanzas con reloj incorporado
(prioridad del reloj)
•
Función para puesto a cero/tarado de la balanza:
no aplicable para todos los modelos
49
Español
Page 50

Impresora RS-P26
50
11 Declaración de conformidad
Los abajo firmantes declaran en nombre de la empresa
Mettler-Toledo AG
Im Langacher
CH-8606 Greifensee
que la impresora METTLER TOLEDO RS-P26 a la que se refiere esta declaración (número de serie
especificado en el producto) cumple las siguientes directivas comunitarias (incluidas todas las
modificaciones)
73/23/EEC Directiva relativa a la baja tensión
89/336/EEC Compatibilidad electromagnética
y que se han aplicado las siguientes normas
IEC/EN61010-1:2001,
EN61326:1997+ A1:98+A2:01+A3:03 (clase B)
EN61326:1997+ A1:98+A2:01+A3:03 (requisitos mínimos)
Para Canadá, EE. UU. y Australia
CAN/CSA-C22.2 No.61010-1-04, UL Std. No.61010A-1, FCC, Part 15, class A,
AS/NZS CISPR 22, AS/NZS 61000.4.3
Greifensee, 01.09.2006
Mettler-Toledo AG
Laboratory & Weighing Technologies
René Lenggenhager Sascha von Wangenheim
General Manager Manager Sales & Marketing
Page 51

Sommario
Stampante RS-P26
51
Visione d’insieme della stampante
RS-P26 ........................................... 52
1 Introduzione ....................................
1.1 Le caratteristiche della stampante
RS-P26 ............................................ 53
Visione d’insieme delle funzioni .......... 53
1.2
2 Installazione ....................................
2.1 Misure di sicurezza ...........................
Alimentazione ................................... 54
2.2
Accensione e spegnimento
2.3
della RS-P26 .................................... 54
2.4 Inserimento della carta .......................
2.5 Connessione della R2-P26
alla bilancia ..................................... 54
Funzioni dei tasti ............................. 55
3
4 Menu ...............................................
53
53
53
54
Test della stampante ........................ 57
5
Manutenzione .................................. 57
6
Sostituzione del rullo di carta .............. 58
6.1
Sostituzione del nastro ...................... 58
6.2
6.3 Pulizia ............................................. 58
6.4 Smaltimento .....................................
7 Cause di malfunzionamento .............
Materiali e pezzi di ricambio ............ 60
8
Interfaccia RS232C ......................... 60
9
10 Dati tecnici RS-P26 ..........................
11 Dichiarazione di conformità ..............
56
58
59
61
62
Italiano
Page 52

Men
u
F
C
Stampante RS-P26
52
Visione d’insieme della stampante RS-P26
Comandi:
2
3
Collegamenti:
1
1 Interruttore On/Off
2 Pannello di controllo
3 Led di controllo – indicatore di stato
4 Connessione interfaccia RS232C
5 Connessione cavo alimentazione CA
4
5
Funzioni:
• Azzeramento / messa in tara della bilancia
• Annulla - Esci
• Stampa data/ora
• Opzione scorrimento in basso menu
• Alimentatore carta
• Opzione scorrimento in alto menu
• Stampa valori di pesata stabili
• Apertura menu – seleziona prossima opzione menu
• Impostazioni memoria
Page 53

Stampante RS-P26
53
1 Introduzione
1.1 Le caratteristiche della stampante RS-P26
La RS-P26 è una stampante a matrice di punti, semplice da collegare alle bilance METTLER TOLEDO con
interfaccia RS232C. La stampa su carta normale soddisfa i requisiti dei moderni sistemi per l'assicurazione
della qualità (GLP, GMP, ISO 9001, ecc.). Questi sistemi di qualità, tra le altre cose, definiscono i principi
e i compiti dell'utilizzatore di strumenti di misurazione, attrezzatura per test, misurazioni e ispezioni. La
RS-P26 è conforme ai principi di rintracciabilità delle misurazioni documentando con precisione i dati di
origine e le operazioni di regolazione. Adempie all'obbligo di archiviare i risultati delle misurazioni con le
sue stampe termicamente stabili e resistenti alla luce. Una volta connessa a bilance METTLER TOLEDO, la
RS-P26 stampa tutti i dati trasmessi dalla bilancia senza restrizioni, ossia non solo i valori di pesatura
e le operazioni di regolazione, ma anche i risultati di tutte le applicazioni, ad esempio il conteggio
pezzi, incorporate alla bilancia.
1.2 Visione d’insieme delle funzioni
Stampa dei
valoridi pesata
Data e ora Stampa opzionale di data e ora nella
Azzeramento/
Messain tara della
bilancia
La RS-P26 stampa solo i valori di
pesata stabili
riga di testata (memorizzata con batteria
di back up)
Azzeramento/messa in tara della
bilancia collegata, effettuabile in ogni
momento
2 Installazione
2.1 Misure di sicurezza
La RS-P26 è stata testata per le connessioni e gli scopi documentati nel presente manuale d'istruzioni
d'uso. Questo non esonera l'utente dalla responsabilità di eseguire i propri test sul prodotto da noi fornito,
per verificare la sua idoneità in relazione ai metodi e agli scopi che intende impiegare. Dovranno comunque
essere osservate le seguenti misure di sicurezza:
• La Stampante RS-P26 deve essere sempre usata al coperto e mai in aree a rischio.
• Le parti elettroniche della Stampante RS-P26 sono protette contro polvere e schizzi
d'acqua. Ciononostante, dato che la struttura della stampante non è a tenuta stagna,
la stampante non dovrebbe essere usata in presenza di liquidi.
• Seguire le istruzioni per la pulizia (vedi paragrafo 6.3), proteggere le prese
dall'umidità.
• Non aprire mai la stampante. In caso di problemi, contattare il rivenditore METTLER
TOLEDO di fiducia.
Italiano
Page 54

Stampante RS-P26
54
2.2 Alimentazione
L’alimentazione della RS-P26 è integrata nello chassis (100-240 V, 50-60Hz). Ciò consente di
collegare la RS-P26 alla tensione di alimentazione locale.
Attenzione
• Collegare la RS-P26 solo a una presa di corrente dotata di messa a terra
• Utilizzare eventuali prolunghe solo se dotate di messa a terra
2.3 Accensione e spegnimento della RS-P26
L’accensione e lo spegnimento della RS-P26 avviene tramite l’interruttore principale <I/O>. All’accensione, la stampante effettuerà qualche avanzamento
riga. Il led di controllo lampeggerà finché non verrà collegato un dispositivo.
I/O
ïð
2.4 Inserimento della carta
• Togliere il coperchio (tirando la parte
23
1
4
posteriore) (1).
• Inserire il perno rotante della carta nel
centro del rullo di carta (2).
• Inserire la carta nell’apposita apertura in
direzione della freccia (3).
• Tenere premuto fino a raggiungere la
lunghezza desiderata della carta (4).
• Infilare la carta attraverso il coperchio
• Riporre il coperchio
2.5 Connessione della R2-P26 alla bilancia
• Collegare la stampante all’interfaccia
stampante della bilancia tramite
l’apposito cavo.
• Assicurarsi che i parametri di comuni
cazione di bilancia e stampante corrispondano.
• Non appena il led di controllo passerà da
intermittente a fisso, la RS-P26 è pronta
per l’utilizzo.
-
Page 55

3 Funzioni dei tasti
Men
u
F
C
C
Men
u
F
Men
u
F
Men
u
F
Stampante RS-P26
55
?
Premere brevemente
Livello operativo
Azzeramento / messa in
tara della bilancia
Stampa data/ora
Avanza di 1 riga
Stampa
A
Premere e mantenere premuto
avanza
continuamente
(fino al rilascio
del pulsante)
apri il menu
memorizza
Esci Giù Su Avanti
Menu Level
Italiano
Page 56

Reset
Reset
No Header
Header
Date/Time
Date/Time/
Balance
24:MM:SS
Time Format
12:MM:SS
24.MM.SS
12.MM.SS
DD.MMM YYYY
Data Format
MMM DD YYYY
DD.MM.YYYY
MM/DD/YYYY
24:MM:SS
Time Format
12:MM:SS
24.MM.SS
12.MM.SS
DD.MMM YYYY
Data Format
MMM DD YYYY
DD.MM.YYYY
MM/DD/YYYY
07
Date Month
01
06
12
08
07
Date / Month
01
06
12
08
2105
2006
Date Year
2050
2007
2105
2006
Date / Year
2050
2007
14
Time Hour
00
13
23
15
14
Time / Hour
00
13
23
15
28
Time Minute
27
59
29
28
Time / Minute
27
59
29
18
Date Day
01
17
31
19
18
Date / Day
01
17
31
19
/
7 Bit Even
Bit/Parity
8 Bit No
7 Bit Odd
7 Bit Even
Bit / Parity
8 Bit No
7 Bit Odd
bd 2400
Baudrate
bd 4800
bd 9600
bd 600
bd 1200
bd 19200
bd 38400
bd 2400
Baudrate
bd 4800
bd 9600
bd 600bd 600
bd 1200
bd 19200
bd 38400bd 38400
None
Handshake
IBM/DOS
Char Set
IBM/DOS CyrillicIBM/DOS CyrillicAnsi/Win JapaneseAnsi/Win Japanese
Ansi/Win Latin 1Ansi/Win Latin 1Ansi/Win CyrillicAnsi/Win Cyrillic
ListList
Xon / Xoff
YYYY-MM-DD- -YYYY MM DD
7 Bit No
2051
00
Stampante RS-P26
56
4 Menu
dOS
dOS CYr
II in LAt
II in CYr
II in JAP
logio integrato (l’orologio integrato
Carattere
*IBM/DOS
IBM/DOS Cyrillic
Ansi/Win Latin 1
Ansi/Win Cyrillic
bd 1200
7b-E
Bit/Parità *7 Bit Even
1200
24áNNáSS
12áNNáSS
24.NN.SS
24:MM:SS
12:MM:SS
24.MM.SS
Ansi/Win Japanese
7b-no
8b-no
7 Bit No
8 Bit No
12.NN.SS
Velocità Baud *2400
12.MM.SS
bd 38400
bd 600
38400
600
Y-NN-dd
YYYY-MM-DD
Formato ora**
ha la priorità)
** non applicabile su bilance con oro-
HS oFF
HS Soft
*None
Xon/Xoff
bd 9600
bd 19200
9600
19200
* impostazioni di fabbrica
7b-odd
Handshake
7 Bit Odd
bd 4800
bd 2400
4800
YEAr2006
Anno**
2006
Nin. 28
Minuti**
28
Hour 14
Ora**
14
Formato data**
dd.NNN Y
NNN dd Y
dd.NN.Y
DD.MMM YYYY
MMM DD YYYY
DD.MM.YYYY
ê
ó
ê
ó
MM/DD/YYYY NN dd Y
rESET
LISt
no Hdr
d t Hdr
dtb Hdr
dAy 18
Nonth 07
Esempi in caso di utilizzo del display della bilancia
Impostazioni
Reset
Testata
List
Giorno**
18
Mese**
*No Header
Date/Time
Date/Time/Balance
07
Page 57

Esempio di impostazione del giorno:
Men
u
F
Men
u
F
Men
u
F
RS-P26 Display
della bilancia
* NENU
Aprire il menu:
➞ Tenere premuto il tasto «F» finché appare la scritta “reset”.
* rESEt
(Stampa:
Stampante RS-P26
57
--- See Balance Display ---)
* dAY 18
* dAY 21
➞ Selezionare l’opzione menu “Giorno” tramite il tasto «F».
➞ Selezionare il “Giorno” – scorrere in alto con il tasto «h».
– scorrere in basso con il tasto «
3
».
¿
Memorizzare le impostazioni:
➞
* StorEd
Tenere premuto il tasto «F» finché non compare il messaggio
“Stored”.
5 Test della stampante
La stampante RS-P26 è dotata di un test automatico che stampa il set di caratteri della stampante
(standard IBM/DOS).
Avviare il test ➞ Premere il tasto «h» e accendere la RS-P26. La stampante
stampa il set di caratteri
Terminare il test
➞ Spegnere la RS-P26
6 Manutenzione
In condizioni normali la RS-P26 praticamente non richiede manutenzione. Il servizio di assistenza
METTLER TOLEDO è comunque disponibile in caso di necessità. Contattare il rivenditore autorizzato
METTLER TOLEDO per informazioni.
Italiano
Page 58

Stampante RS-P26
58
6.1 Sostituzione del rullo di carta
L’inserimento di un nuovo rullo di carta è descritto alla paragrafo 2.4. Il numero d’ordine per il rullo
di carta è al paragrafo 8 materiali.
Nota: Potete utilizzare lo stesso perno rotante.
6.2 Sostituzione del nastro
2
1
• Rimuovere il coperchio (1).
• Estrarre la carta dall’unità di stampa (2).
34
• Estrarre la cartuccia a nastro, premendo in
direzione della freccia (3).
• Inserire il nuovo nastro e, se necessario,
allentarlo con la rotella di tensionamento (4).
Per il numero d’ordine della cartuccia a nastro
vedere paragrafo 8 materiali
• L’inserimento di un nuovo rullo di carta è
descritto alla paragrafo 2.4.
6.3 Pulizia
Lo chassis è realizzato in materiale resistente e di alta qualità, si possono perciò utilizzare tutti i
detergenti non aggressivi in commercio (vedi misure di paragrafo 2.1).
6.4 Smaltimento
In conformità a quanto stabilito dalla Direttiva Europea 2002/96 CE in
materia di apparecchi elettrici ed elettronici (RAEE), questo strumento
non può essere smaltito come i normali rifiuti. Tale presupposto resta
valido anche per i Paesi al di fuori dei confini della UE, conformemente
alle norme nazionali in vigore. Si prega quindi di smaltire questo
prodotto separatamente e in modo specifico secondo le disposizioni
locali relative alle apparecchiature elettriche ed elettroniche.
Per qualsiasi chiarimento, rivolgersi agli enti preposti o al rivenditore
dell‘apparecchiatura stessa.
In caso di cessione dello strumento (per es. per ulteriore utilizzo
privato o aziendale/industriale), si prega di comunicare anche questa
disposizione.
Si ringrazia per il contributo alla tutela dell‘ambiente.
Page 59

7 Cause di malfunzionamento
Stampante RS-P26
59
Malfunzionamento/
messaggio
Stampa illeggibile • Nastro usurato o inceppa-
Il led di controllo non si
accende
Il led di controllo
lampeggia
----- No Connection ----
--------Timeout --------- • Il trasferimento dati non
------- Over Load ------- • La bilancia è in sovracca-
------ Under Load ------- • La bilancia è in sottocari-
-- Transmission Error -- • La bilancia non riceve le
---- Not Executable ---- • La bilancia non esegue le
--- Date/Time Not Set --
----- Memory Error -----
Possibile causa Intervento
to
• Fine della durata dell’unità
di stampa
• Assenza di alimentazione
• Guasto all’alimentazione
• La connessione RS232C è
scollegata / non attaccata
• I parametri di interfaccia
non corrispondono a
quelli della bilancia
è stato completato negli
ultimi 45 s
rico
co. Il piatto della bilancia
non è in posizione corretta
istruzioni dalla stampante
istruzioni della stampante
• Messaggi d’errore della
stampante
• Cambiare la cartuccia a nastro o
tendere il nastro
• Contattare l’assistenza METTLER
TOLEDO
• Accendere la stampante
• Contattare l’assistenza METTLER
TOLEDO
• Controllare il cavo di collega
mento RS232C
• Controllare le impostazioni dei
parametri di interfaccia sulla
bilancia e sulla stampante
• Spostare la bilancia in una posi
zione più stabile
• Controllare la bilancia
• Controllare il peso del campione
• Controllare la bilancia
• Controllare le impostazioni dei
parametri di interfaccia sulla
stampante e sulla bilancia
• Controllare la bilancia
• Controllare la bilancia
• Resettare la stampante –
impostare data e ora
• Fine della durata della batteria di
back up. Contattare l’assistenza
METTLER TOLEDO
-
-
Italiano
Page 60

1
2
3
4
1
5
6
9
In/Out
GND
RS232C
Stampante RS-P26
60
8 Materiali e pezzi di ricambio
Pos. Articolo Codice Consegna
1 Coperchio carta 12120734 1 pz
2 Rullo di carta da
12120799 2 pz
57.5 x ø 50 a 60 mm
3 Perno rotante 12120735 1 pz
4 Cartuccia a nastro, nera 12120798 1 pz
- RS9 M/F cavo, 1.5 m 12120708 1 pz
9 Interfaccia RS232C
La RS-P26 è dotata di interfaccia RS232C per il collegamento con altri strumenti METTLER
TOLEDO.
• Connettore maschio a 9-pin
• Per la corrispondenza con altri strumenti (parametri di tras
-
missione) vedere paragrafo 4.
Page 61

Stampante RS-P26
10 Dati tecnici RS-P26
Tensione di rete, frequenza 100 – 240 VAC, 50/60 Hz
Consumo energetico 150 mA (100 V), 60 mA (240 V)
Altitudine fino a 4000 m
Temperatura ambiente 0 °C – 40 °C
Umidità relativa max. 80 % a 31 °C, decremento lineare a 50 % a
40 °C, non condensante
Categoria di sovratensione Classe II
Grado di inquinamento 2
Unità di stampa Stampante a matrice di punti 5x7, lunghezza riga 24
caratteri
Velocità di stampa 2.3 righe al secondo
Cartuccia a nastro Sostituibile, nera
Rullino carta Carta normale da 57.5 mm x ø 50 a 60 mm, incor-
porato nell’alloggiamento, dimensioni commerciali
Qualità di stampa Stampa resistente alla luce e termicamente stabile
(GLP, GMP, ISO 9001)
Interfaccia RS232C
Ingombro stampante (larg x prof x alt) 120 mm x 203 mm x 73 mm
Ingombro imballo (larg x prof x alt) 255 mm x 205 mm x 150 mm
Peso netto 740 g (rullo incl.)
Limitazione della compatibilità • Funzione per data e ora:
non applicabile su le bilance con orologio integrato
(l’orologio integrato ha la priorità)
• Funzione per azzeramento / messain tara della
bilancia:
non applicabile per tutti i modelli
61
Italiano
Page 62

Stampante RS-P26
62
11 Dichiarazione di conformità
I firmatari dichiarano, in nome della società
Mettler-Toledo AG
Im Langacher
CH-8606 Greifensee
che la stampante METTLER TOLEDO RS-P26 alle quali si riferisce la presente dichiarazione (numero di serie sul prodotto), soddisfano le seguenti direttive CEE (incluse tutte le modifiche pertinenti)
73/23/EEC Direttiva sulla bassa tensione
89/336/EEC Compatibilità elettromagnetica
e che sono applicate le seguenti norme:
IEC/EN61010-1:2001,
EN61326:1997+ A1:98+A2:01+A3:03 (classe B)
EN61326:1997+ A1:98+A2:01+A3:03 (Requisiti minimi)
Per Canada, USA e Australia
CAN/CSA-C22.2 No.61010-1-04, UL Std. No.61010A-1, FCC, Part 15, class A,
AS/NZS CISPR 22, AS/NZS 61000.4.3
Greifensee, 01.09.2006
Mettler-Toledo AG
Laboratory & Weighing Technologies
René Lenggenhager Sascha von Wangenheim
General Manager Manager Sales & Marketing
Page 63

Page 64

To protect your METTLER TOLEDO product’s future:
*11780893*
METTLER TOLEDO Service assures the quality, measuring accuracy and preservation of value of
all METTLER TOLEDO products for years to come.
Please send for full details about our attractive terms of service.
Thank you.
Für eine gute Zukunft Ihres METTLER TOLEDO-Produktes:
METTLER TOLEDO Service sichert Ihnen auf Jahre Qualität, Messgenauigkeit und Werterhaltung
der METTLER TOLEDO-Produkte.
Verlangen Sie bitte genaue Unterlagen über unser attraktives Service-Angebot.
Vielen Dank.
Pour assurer l’avenir de vos produits METTLER TOLEDO:
Le service après-vente METTLER TOLEDO vous garantit pendant des années leur qualité, leur
précision de mesure et le maintien de leur valeur.
Demandez-nous notre documentation sur les excellentes prestations proposées par le service
après-vente METTLER TOLEDO.
Merci.
Para un mejor futuro de sus productos METTLER TOLEDO:
El servicio postventa de METTLER TOLEDO garantiza durante años su calidad, su precisión metrológica y la conservación de su valor.
Pida nuestra documentación sobre las excelentes prestaciones que le ofrece el servicio postventa
de METTLER TOLEDO.
Gracias.
Per un buon futuro dei Vostri prodotti METTLER TOLEDO:
Il servizio assistenza tecnica METTLER TOLEDO Vi garantisce nel corso degli anni la loro qualità,
la loro precisione di misura e la conservazione del loro valore.
Richiedeteci subito la documentazione illustrativa del servizio altamente professionale che Vi
offriamo.
Grazie.
© Mettler-Toledo AG 2006 11780893 Printed in Switzerland 0610/2.45
Mettler-Toledo AG, Laboratory & Weighing Technologies, CH-8606 Greifensee, Switzerland
Phone +41-44-944 22 11, Fax +41-44-944 30 60, Internet: http://www.mt.com
Subject to technical changes and to the availability
of the accessories supplied with the instruments.
 Loading...